HYUNDAI MOBIS AV231JGAN CAR AVN User Manual 5
HYUNDAI MOBIS CO., LTD. CAR AVN 5
Contents
User Manual -5
6-4
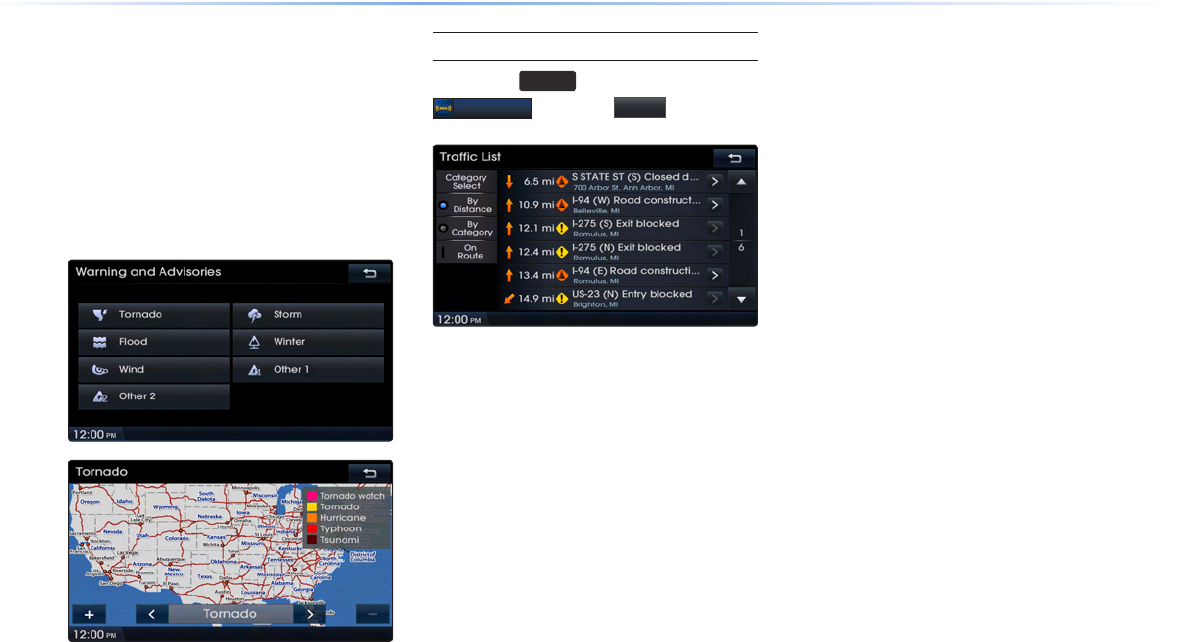
Warnings and Advisories
This service provides weather warnings and
advisories, such as Tornado, Storm, Flood,
etc. as symbols on the Navigation map.
Details can be viewed on specific regions
by using the zoom in and zoom out fea-
tures.
Trac Data Service
Press the
INFO
key ▶ Press
XM Data
▶ Press More in Traffic.
• Automatic route recalculation (guidance)
according to changes in traffic condi-
tions.
• Provides short-cuts for initially searched
routes.
• Displays increased detour distance and
estimated driving times.
• Displays icons by each traffic situation
on the map.
1. Calculation by Incorporating Actual
Road Traffic Conditions.
Incorporation of traffic information to
route calculations is a user option which
can be turned on or off by the user.
2. Displays Road Traffic Situations.
RTM (Road Traffic Message) is a fea-
ture which displays symbols of icons for
each type of road traffic condition, such
as locations under construction, acci-
dents, basic weather, and others on map
locations based on traffic information
provided by XM.
3. Avoidance of Locations Where Traffic
Situations Have Occurred.
If a traffic situation occurs somewhere
along the route, the route is recalcu-
lated to avoid such locations and an
avoidance recalculation popup will be
displayed.
XM Data
XM Data
Information l 6-3 6-3
Weather Data Service
Press the
INFO
key ▶ Press
XM Data
▶ Press More in Weather.
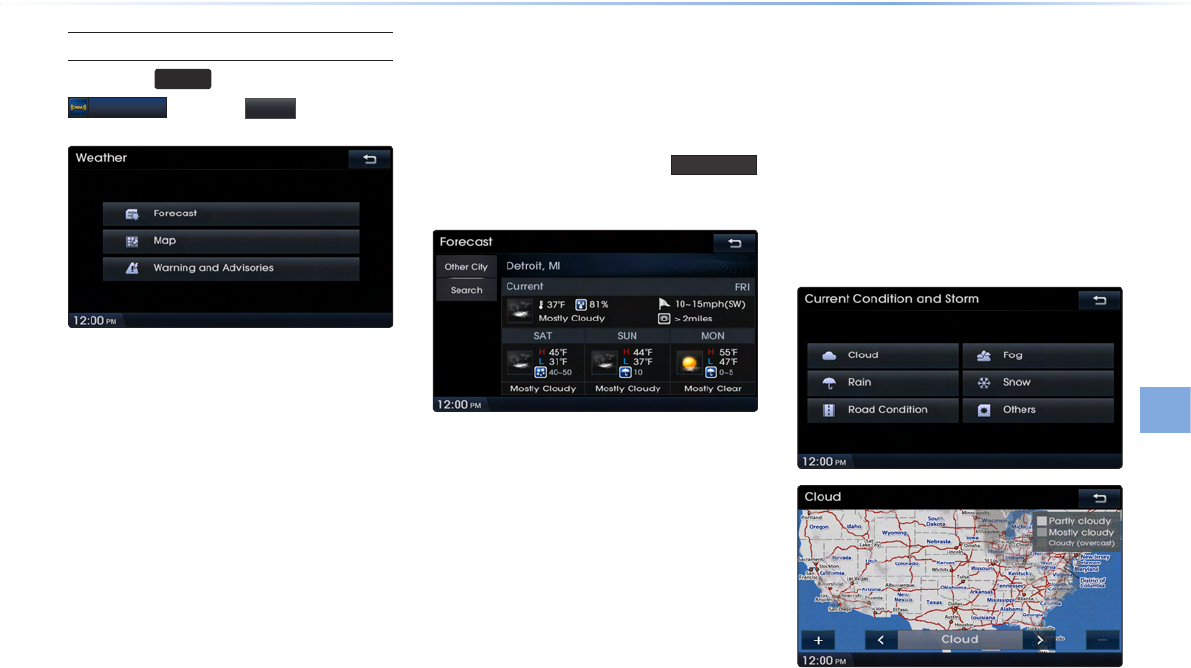
The Weather Service provides weather
information updated every 5 minutes for
your region. The Weather Service includes
Tabular Weather, Graphical Weather and
Warning and Advisories.
Forecast
This service provides current weather
information and weather forecasts for the
next three days in your region.
To change the region, press the
Other City
button and select the desired region.
Map
This service provides weather information,
such as Cloud, Fog, Rain, Snow, and Road
Conditions on the Navigation map as sym-
bols.
Details can be viewed on specific regions
by using the zoom in and zoom out fea-
tures.
XM Data
Information l 6-5 6-5
4. Displays Traffic Event List.
A list providing details on accidents and an
icon which will display the accident location
are displayed. The user can view details by
pressing on the list or move the map to the
accident location by pressing on the accident
icons.
Stocks Data Service
Press the
INFO
key ▶ Press
XM Data
▶ Press More in Stocks.
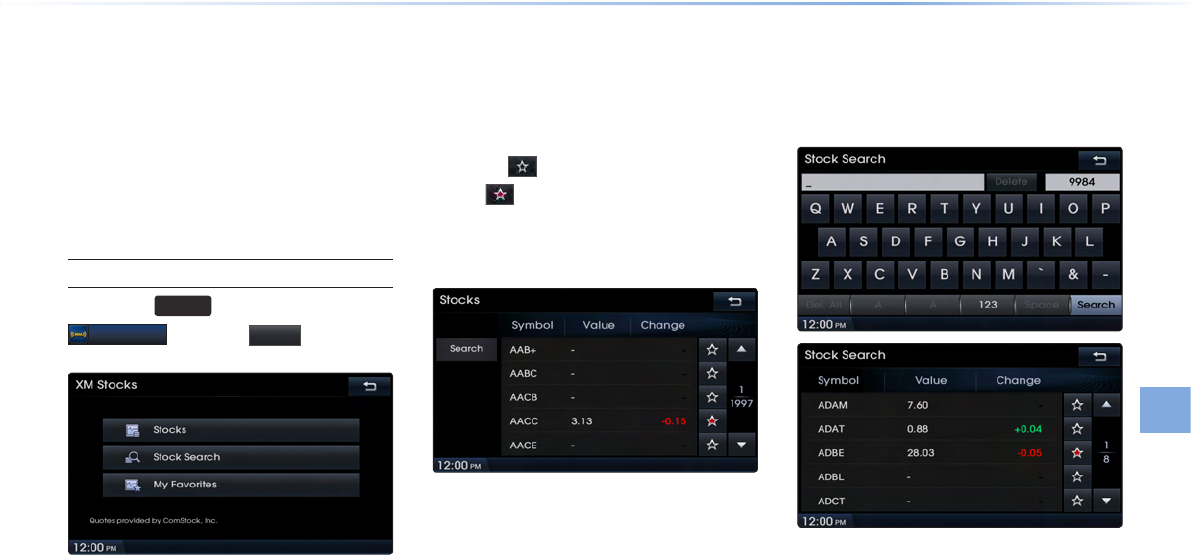
XM Stock data Service provides real-
time updated information on the NYSE,
NASDAQ, and AMEX (approximately
11,000 symbols).
Stocks
Stocks is a feature that shows the current
value and change of stocks.
For symbols which you are interested in,
press the icon to save the symbol as a
part of .
Saved symbols can be viewed from the My
Favorites button on the Stock Main screen.
Stock Search
Use the Stock Search menu to search for
specific stocks.
6-6
XM Data
My Favorites
My Favorites shows a list of stocks added
by the user.
Sports Data Service
Press the
INFO
key ▶ Press
XM Data
▶ Press More in Sports.
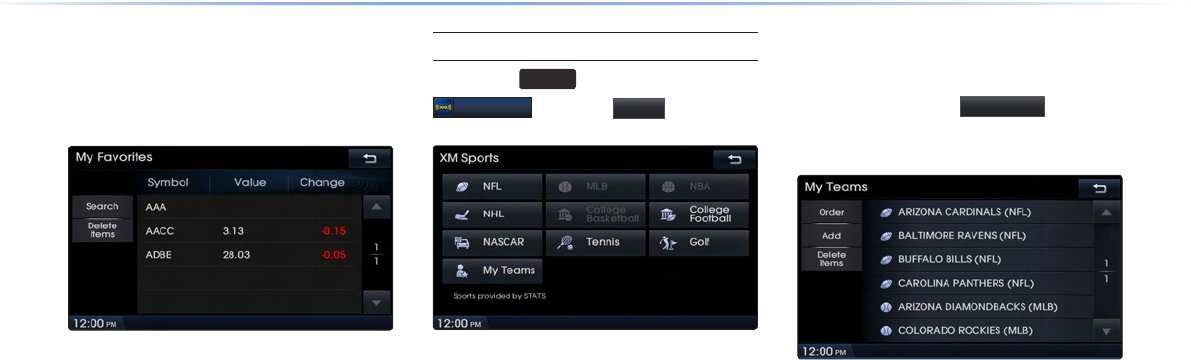
This service provides real-time updated
information on scores and schedules for
major sports, such as NFL, NBA, NCAA
Football, NCAA basketball, NHL, MLB,
NASCAR and more.
My Teams
You can save teams which you are inter-
ested in as part of My teams to easily
view related scores and schedules.
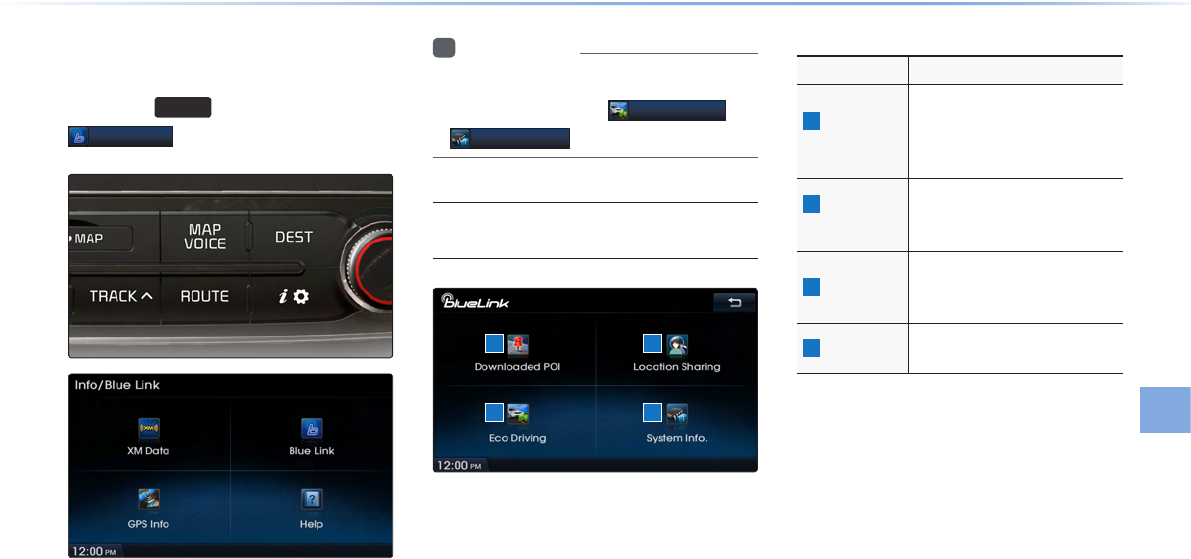
Blue Link®
Information l 6-� 6-�
Blue Link®
Press the
INFO
key ▶ Press
Blue Link
.
i
Information
•
If you have not subscribed to the Blue Link®
service, then only the
Eco Driving
and
System Info
buttons can be used
Cautions upon Using Blue Link®
Service
Name Description
1 Downloaded
POI
Check Gas Station, Restau-
rant, POI information down-
loaded from the Blue Link®
center or website
2
Location
Sharing
Check locations of location
sharing friends through the
Blue Link® center or website
3 ECO Driving
Displays car fuel economy
graphs and eco driving infor-
mation
4 System Info.
Check Blue Link® system infor-
mation and available updates
1
3 4
2
Blue Link®
6-8
Blue Link®
Blue Link® Safety and Security
Service
Auto Crash Notification
Provides immediate assistance when an
accident occurs and an airbag is deployed.
In this event, an ACN signal, contain-
ing customer and location information,
will automatically be transmitted to the
response center. Upon receipt of the sig-
nal, a response specialist will attempt to
establish voice communications with the
vehicle occupants and forward any perti-
nent information to emergency services.
SOS
Customers request emergency 911 assis-
tance by pressing the dedicated key
in the vehicle. This action transmits vehicle
information and location to specially
trained response specialists, who assist in
coordinating the dispatch of appropriate
emergency assistance to the customer.
The response specialist remains on the
line with the customer until advised assis-
tance has arrived.
Stolen Vehicle Recovery
In the event a customer’s vehicle is
reported stolen (and a stolen vehicle report
has been filed with the appropriate police
department), the response center can pro-
vide assistance to the police in an attempt
to recover the vehicle.
Vehicle Immobilization
Used with Stolen Vehicle Recovery, this
enables law enforcement to send a signal
to the vehicle which immobilizes the engine
management system, thus preventing
startup. This capability is only valid when
the ignition is off, but can be saved for
later immobilization if the vehicle is on or in
motion at the time of signal transmission.
Blue Link®
Information l 6-9 6-9
Vehicle Slowdown
Used with Stolen Vehicle Recovery, this
enables law enforcement to gradually
reduce the engine power of the vehicle,
thus slowing it down to safe levels. A warn-
ing shall be transmitted to the driver prior
to the slowdown procedure.
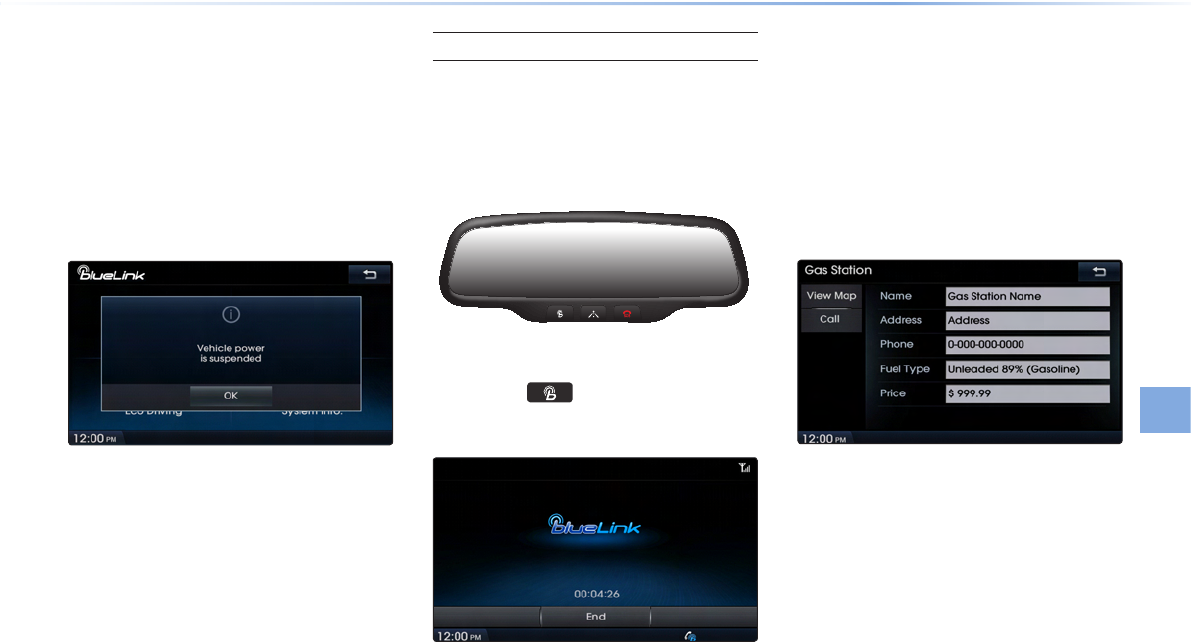
Location Information Service
Downloading POIs from the
Blue Link® Center
1.
Press the key on the Room Mirror
to connect with the Blue Link® Center.
2. Once connection is complete, request
the desired POI information through
voice recognition to the Blue Link®
Center.
3. Once the request is processed, the
requested POI information is displayed
on the screen.
6-10
Blue Link®
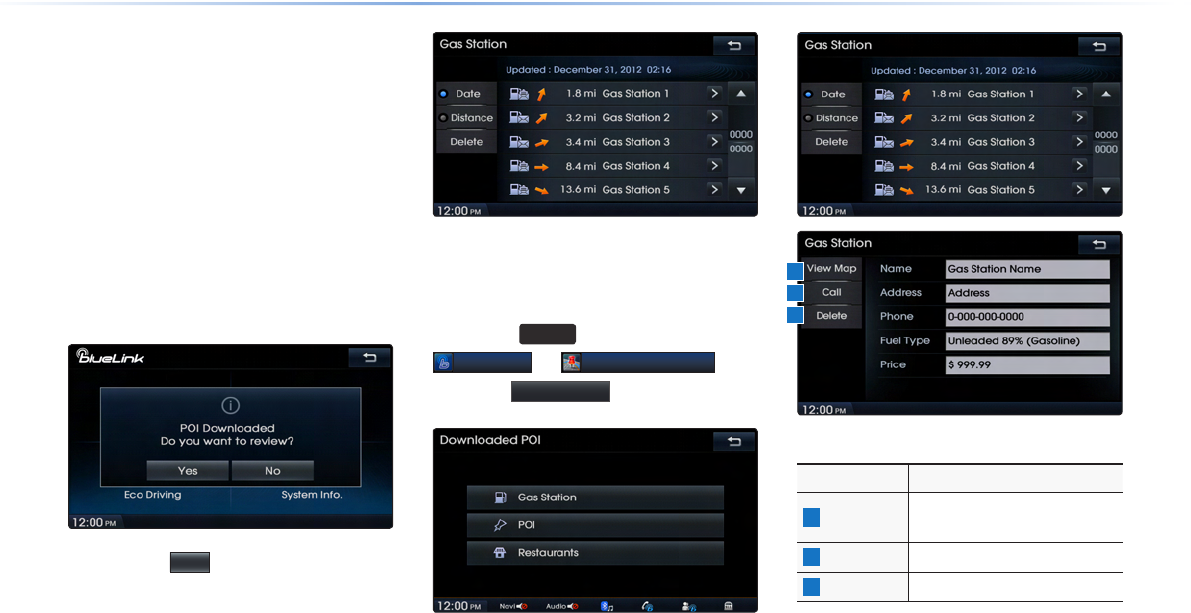
Downloading POIs through the
Owner’s Website
1. Visit the Blue Link® website
(www.MyHyundai.com) to search for
desired POI information to send to your
vehicle.
2. After transmission is complete, the fol-
lowing POI downloaded message is
displayed the next time you turn on your
vehicle.
3. Press the
Yes
button to check the list
of downloaded POIs.
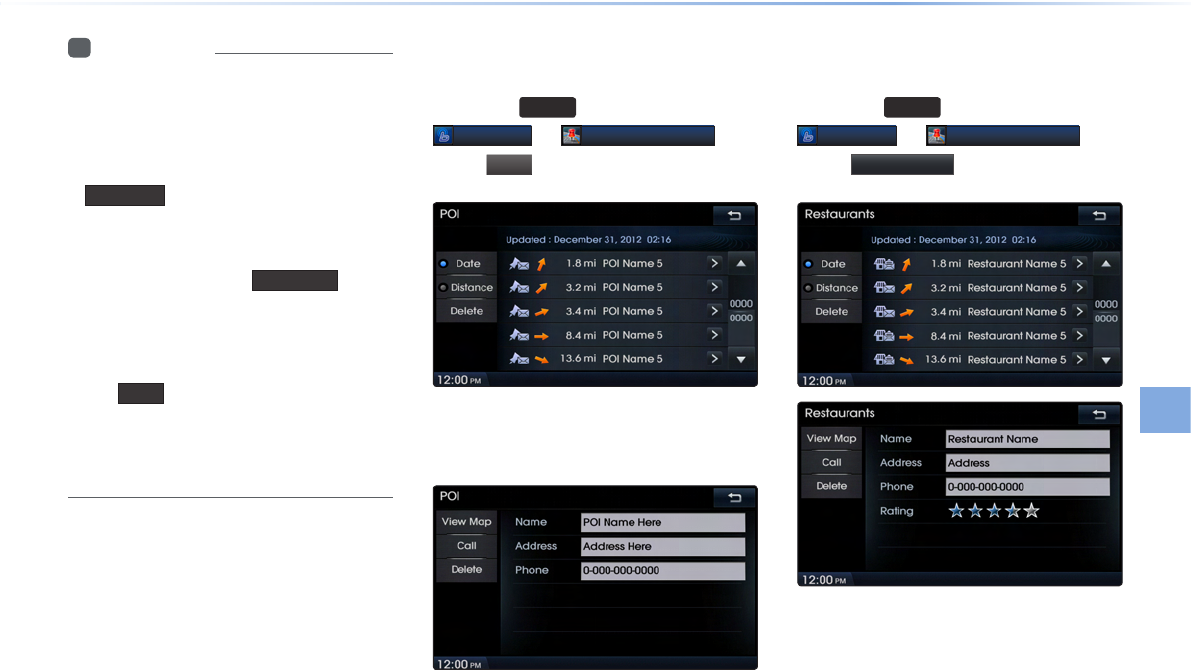
Checking Downloaded Gas Sta-
tion Information
Press the
INFO
key ▶ Press
Blue Link
▶
Downloaded POI
▶ Press Gas Station .
Name Description
1
View Map Shows location of selected
POI on the map
2
Call Makes call to the selected POI
3
Delete Deletes the selected POI
1
2
3
Blue Link®
Information l 6-11 6-11
i
Information
•
Generally, POI lists are displayed starting
with the closest distance from the cur-
rent position by dates. To display the list
by the downloaded distance, press the
Distance button.
•
If route guidance is being provided to
a destination previously set within the
Navigation, then the View Map button
cannot be used to display the map loca-
tion. Use the feature after route guidance
is complete.
•
The Call feature can be used only when
a Bluetooth® phone has been connected.
To use this feature, first check to see that
a Bluetooth® phone has been connected.
Checking Downloaded POI
Information
Press the
INFO
key ▶ Press
Blue Link
▶
Downloaded POI
▶
Press
POI
.
Select a POI on the POI list to view addi-
tional POI information.
Checking Downloaded Restau-
rant Information
Press the
INFO
key ▶ Press
Blue Link
▶
Downloaded POI
▶
Press Restaurants .
6-12
Blue Link®
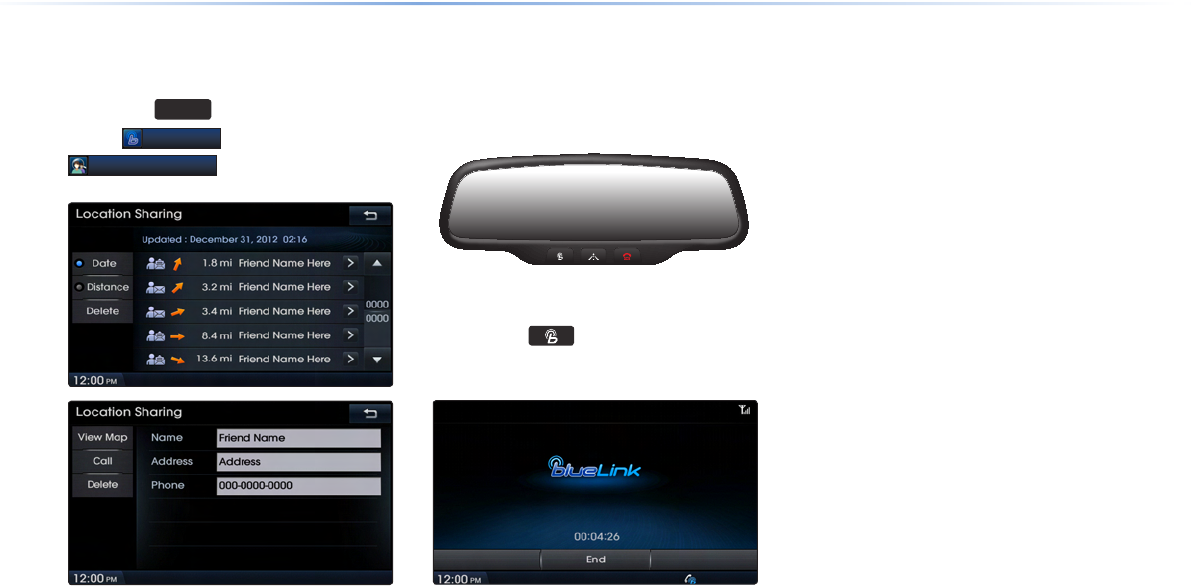
Checking Locations of Location
Sharing Friends
Press the
INFO
key ▶
Press
Blue Link
▶ Press
Location Sharing
.
Sending Your Car Position to a
Friend
1. Press the key on the Room Mirror
to connect with the Blue Link® center.
2. Once connection is complete, request
to the Blue Link® Center consultant that
your location be sent to the selected
friend.
3. Once the request is processed, your
location will be sent to the selected
friend.
Blue Link®
Information l 6-13 6-13
Car Management Information
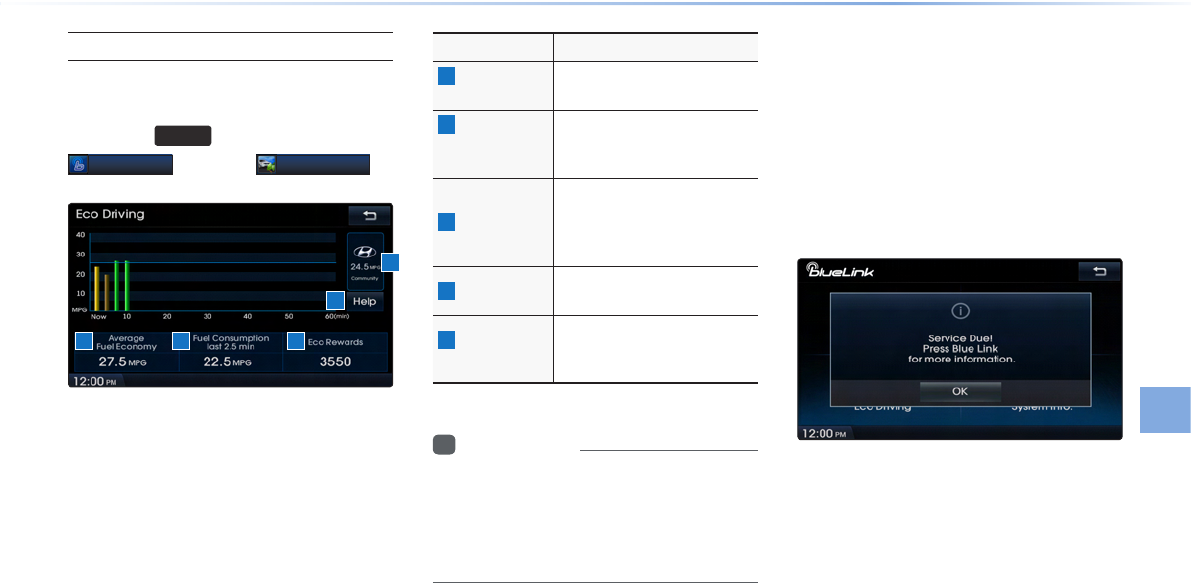
Eco Driving
Press the
INFO
key ▶ Press
Blue Link
▶ Press
Eco Driving
.
Name Description
1 Average Fuel
Economy
Displays the average fuel econ-
omy after starting the ignition
2
Fuel
Consumption
last 2.5 min
Displays the fuel economy
and consumption for the last
2.5 minutes
3
Eco Reward
Eco Rewards are acquired
when actual fuel economy is
better than the EPA or Com-
munity average
4
Help Provide additional informa-
tion on Eco Driving
5
Community
Average
Average fuel economy of
drivers who drive the same
vehicle as your vehicle
i
Information
•
The fuel economy graph changes to
green (good), yellow (average), or red
(poor) depending on the community aver-
age.
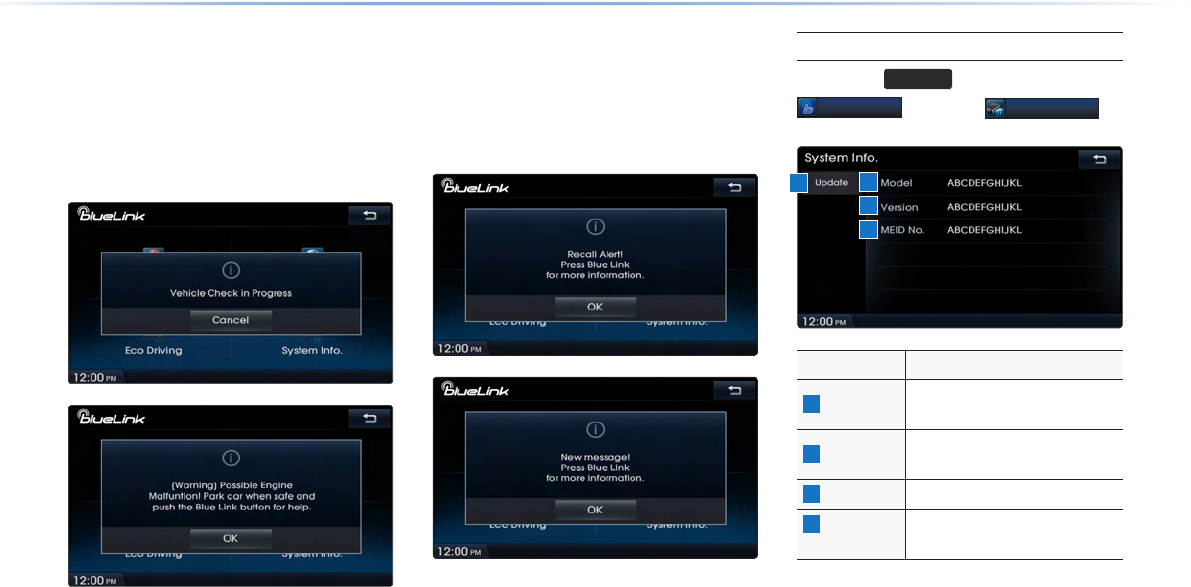
Maintenance Alert Notification
This feature displays a notice alerts when
parts are due for replacements or inspec-
tions.
Parts replacement/inspection alerts are
also provided regularly through the web-
site, emails and text messages.
1 3
4
5
2
6-14
Blue Link®
Automated DTC (Diagnostic
Trouble Code) Notification
This feature displays potential abnormali-
ties and countermeasures when potential
vehicle abnormalities are detected.
Recall and Campaign Advisor
The following message alerts are dis-
played once vehicle recall or campaign
information or received.
Blue Link® System Information
Press the
INFO
key ▶ Press
Blue Link
▶ Press
System Info
.
Name Description
1
Model Displays the vehicle Blue Link®
model name
2
Version Displays the hardware and soft-
ware Version
3
MEID NO. Blue Link® system ID number
4
Update
(USB)
Used to update the Blue Link®
system through USB
Update button will be enabled once con-
necting USB memory where the updated
Blue Link file is downloaded.
1
2
3
4

GPS Information
Information l 6-15 6-15
GPS Information
About GPS (Global Po-
sitioning System)
GPS (Global Position System) :
GPS is a system developed and operated
by the United States that determines the
user’s current position (longitude, latitude,
etc.) by using 4 or more satellites.
This system is used with related GPS infor-
mation, various sensors, road map data,
and other related information to provide
navigation services.
i
Information
•
F
or continued map updates, information-
gathering and surveys are conducted con-
tinuously to monitor road changes or new
road constructions. Nonetheless, roads,
facilities, and fares are under constant
change and it is impossible to completely
remove all errors, including road updates,
names, facilities, and fares. Please keep
this in mind when using GPS.
•
In principle, roads with widths less than
3 yards are not included within the map
data. Roads with sections with widths less
than 3 yards may be deleted in future map
data updates.
When GPS Info Cannot Be Used
GPS info may not operate under the fol-
lowing conditions :
• When buildings, tunnels, or other
obstructions block satellite signals.
• When materials are placed above the
GPS antenna and block satellite signals.
• When the satellite is not transmitting.
• When a digital cellular phone (1.5GHz)
is placed near the GPS antenna.
Errors Unavoidable Due to Sys-
tem Characteristics
• The navigation system uses GPS infor-
mation, various sensors, road map data,
and other related information to display
the current position.
• Errors may occur if the satellite is trans-
mitting inaccurate signals or only two or
less satellite signals can be received.
• Errors that occur in such conditions can-
not be corrected.
6-16
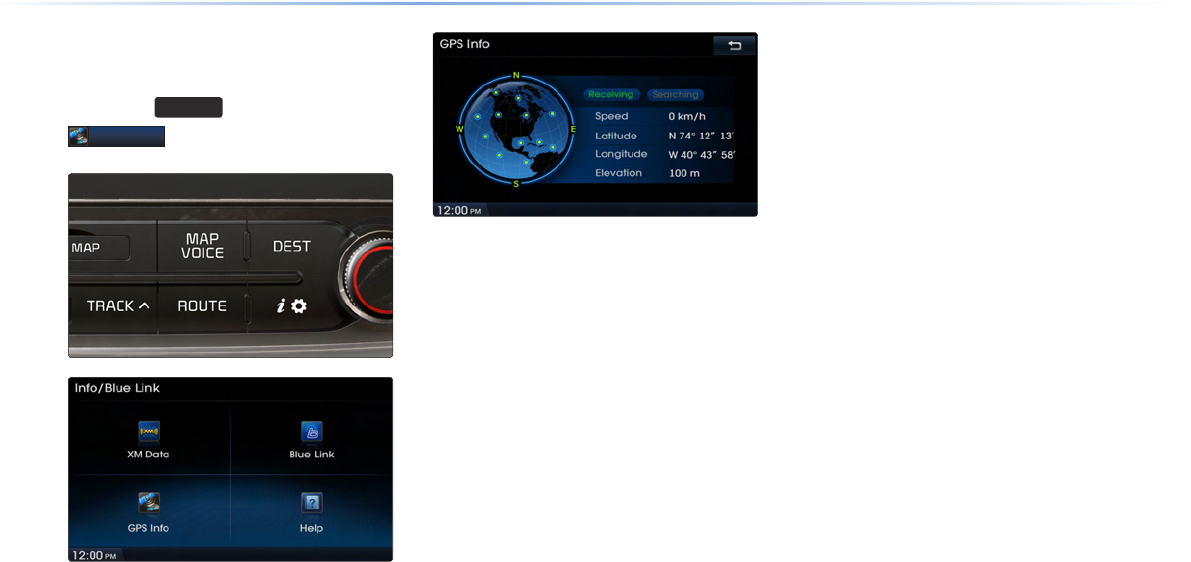
Viewing GPS Info
Press the
INFO
key ▶ Press
GPS Info
.
The GPS reception and vehicle speed
information are displayed.
GPS Information

Help
Information l 6-1� 6-1�
Viewing Help
Press the
INFO
key ▶ Press
Help
.
Help sections on the Navigation, Bluetooth®
and Voice Recognition features can be
selected and viewed.
Help

MEMO
6-18

CAR AVN SYSTEM
Other
Features
7
•
Climate Mode
•
Rear Camera
7-2
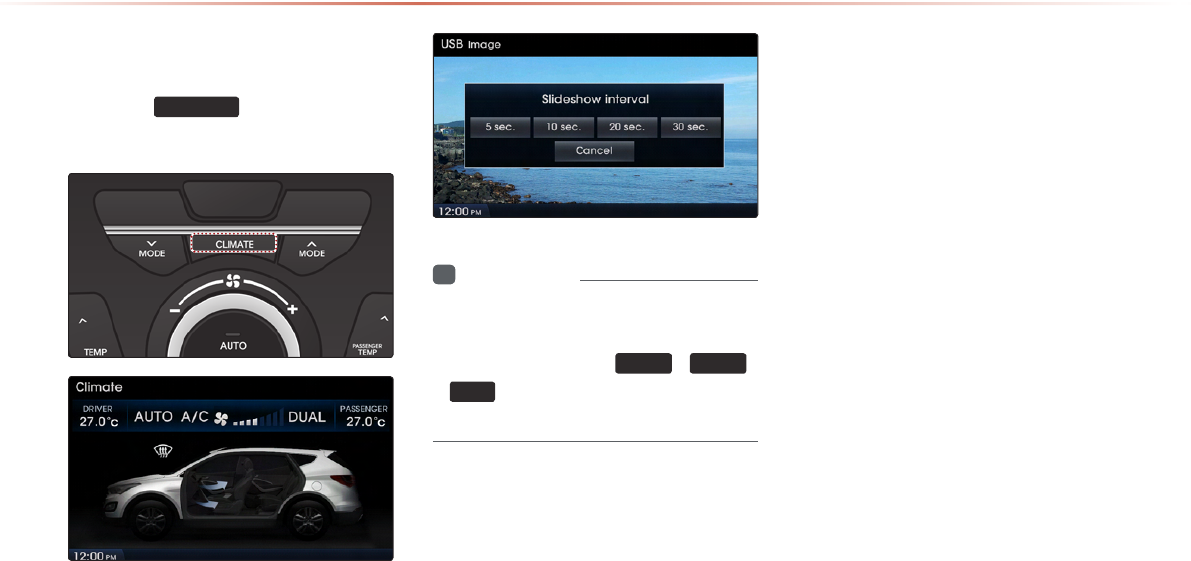
Operating Climate Mode
Press the
CLIMATE
key to display the
Climate information screen.
i
Information
•
When operating in Multimedia or
Navigation mode, pressing a Climate
related key, such as
TEMP
,
AUTO
,
A/C
will display the Climate status bar
at the top of screen.
Climate Mode
Climate Mode
Other Features l 7-� 7-�
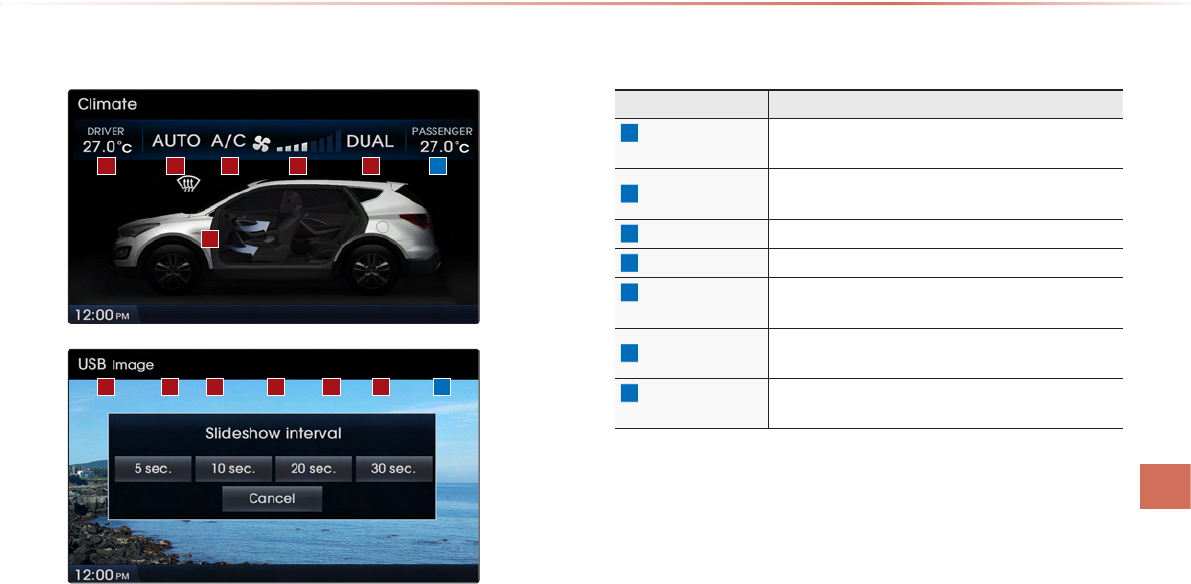
Basic Mode Screen
Name Description
1
Driver-side
Temperature Displays the driver-side temperature
2
AUTO Display Displays whether the heating/cooling auto function
is on/o
�
A/C Display Displays whether the Air-conditioner is on/o
4
Fan Level Display Displays the current fan level
5
Fan Direction
Display Displays the set fan direction
6
DUAL Display Enables the driver/passenger temperature to be set
independently
7
Passenger-side
Temperature Displays the passenger-side temperature
1
1
�
�
2
2
4
4 5
7
7
6
6
5
7-4
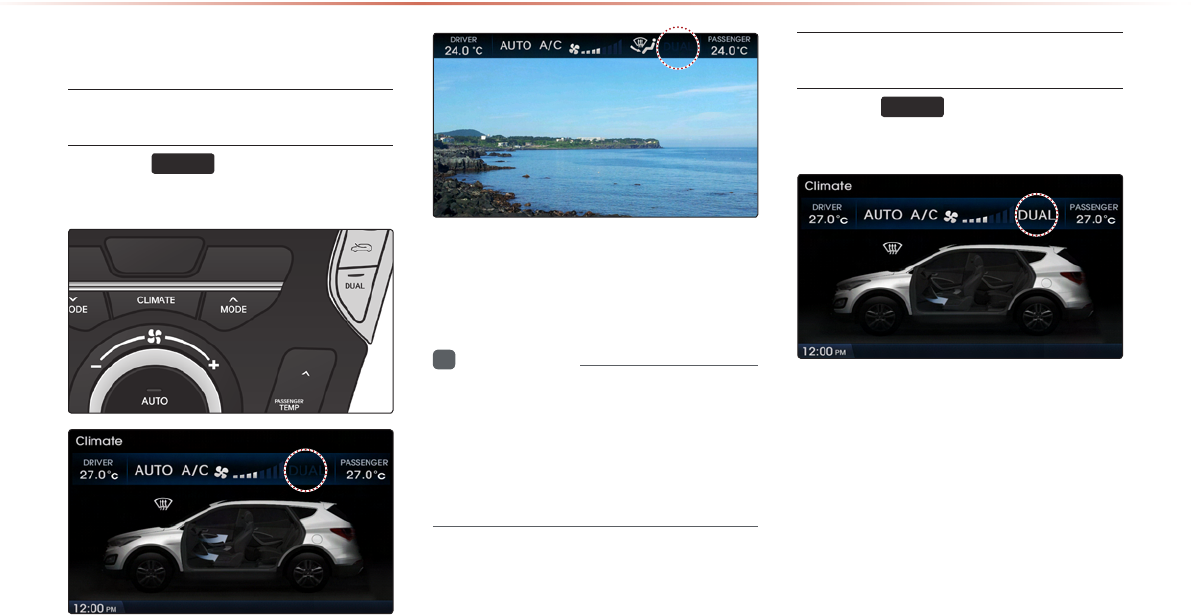
Basic Operation
Controlling Driver/Passenger
Temperature Simultaneously
Press the
DUAL
key to turn the DUAL
setting off.
When DUAL is disabled, the driver-side
and passenger-side temperatures are con-
trolled simultaneously.
i
Information
•
T
he cabin temperature can be adjusted in
0.5℃ units within a range of 6�.5℉~ 88.7℉
•
The temperature will be displayed as LOW
once it is adjusted below 6�.5℉ and HIGH
once it is adjusted above 88.7℉.
Controlling Driver/Passenger
Temperature Independently
Press the
DUAL
key to turn the DUAL
setting back on.
Climate Mode
Climate Mode
Other Features l 7-5 7-5
When DUAL has been enabled, the driver-
side and passenger-side temperatures can
be controlled independently.
i
Information
•
When setting the driver-side temperature
with DUAL on, the DUAL button will turn
OFF once the driver-side temperature is
set to LOW or HIGH.
Setting Fan Direction
Press the fan keys to change the fan direc-
tion.
i
Information
•
When setting the driver-side temperature
with DUAL on, DUAL will turn OFF once
the driver-side temperature is set to LOW
or HIGH.
7-6
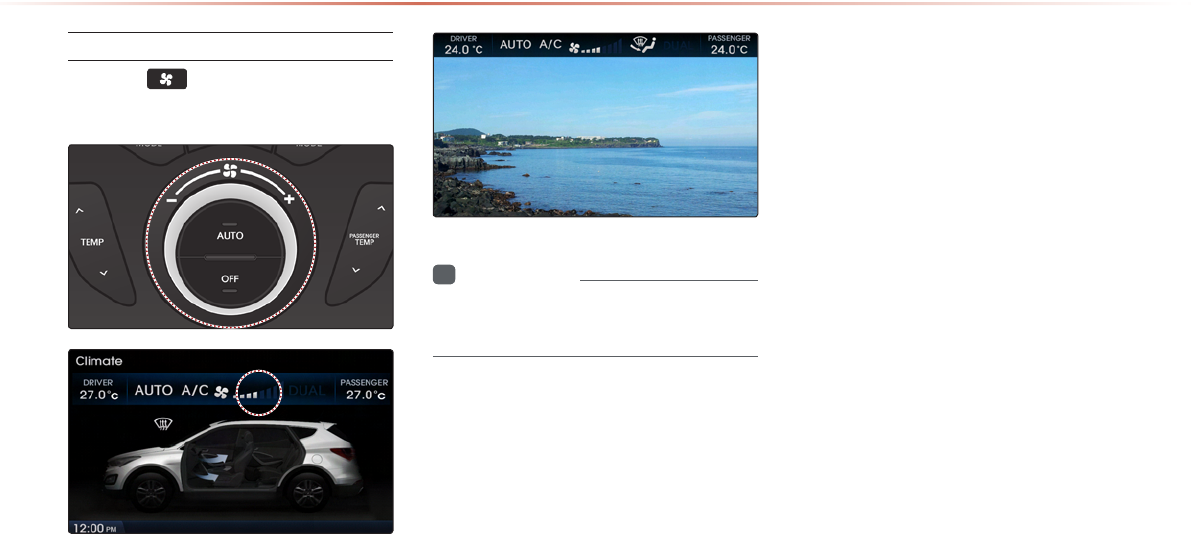
Setting Fan Level
Turn the knob to change the fan
level.
i
Information
•
If the fan level is changed while in AUTO
mode, AUTO mode will turn off.
Climate Mode
Rear Camera
Other Features l 7-7 7-7
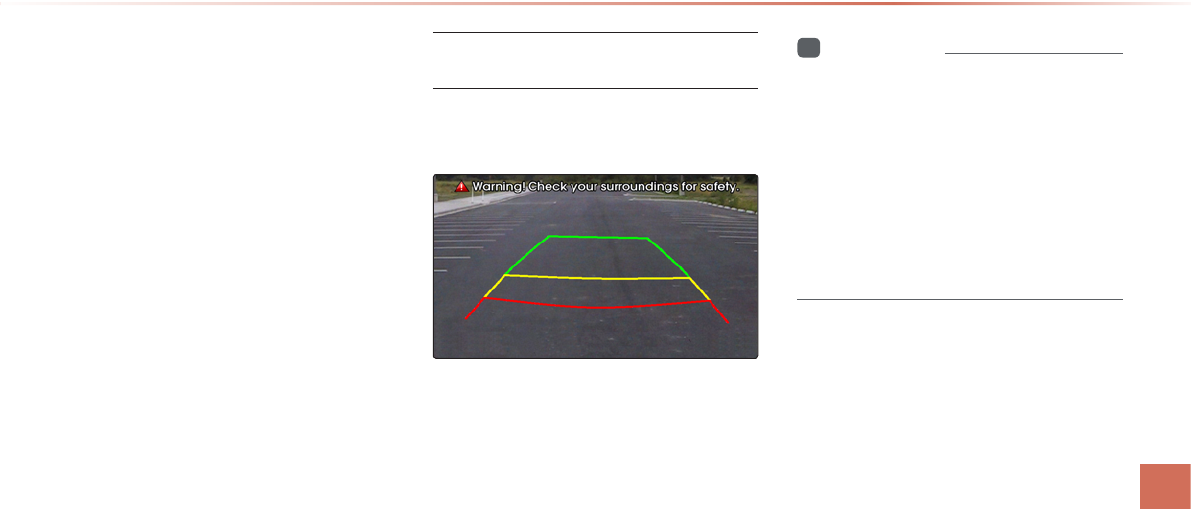
About Rear Detection
Camera
• This system has been equipped with a
rear camera for user safety by allowing a
wider rear range of vision.
• The rear camera will operate automati-
cally when the ignition KEY is turned ON
and the transmission lever is set to R.
The rear camera will automatically stop
operating when set to a different lever.
Operating sequence of the Rear
Camera
1. Position the ignition key in ACC or ON.
2. Position the transmission lever to R.
�. The rear camera mode will be displayed
on the screen.
i
Information
•
The rear camera has been equipped with
an optical lens to provide a wider range of
vision and may appear different from the
actual distance. Check the rear and left/
right firsthand for user safety.
•
The rear camera section pertains only
to customers who have purchased this
optional installation.
Rear Camera

7-8
MEMO

CAR AVN SYSTEM
•
Using Setup
Setup
8
8-2
Using Setup
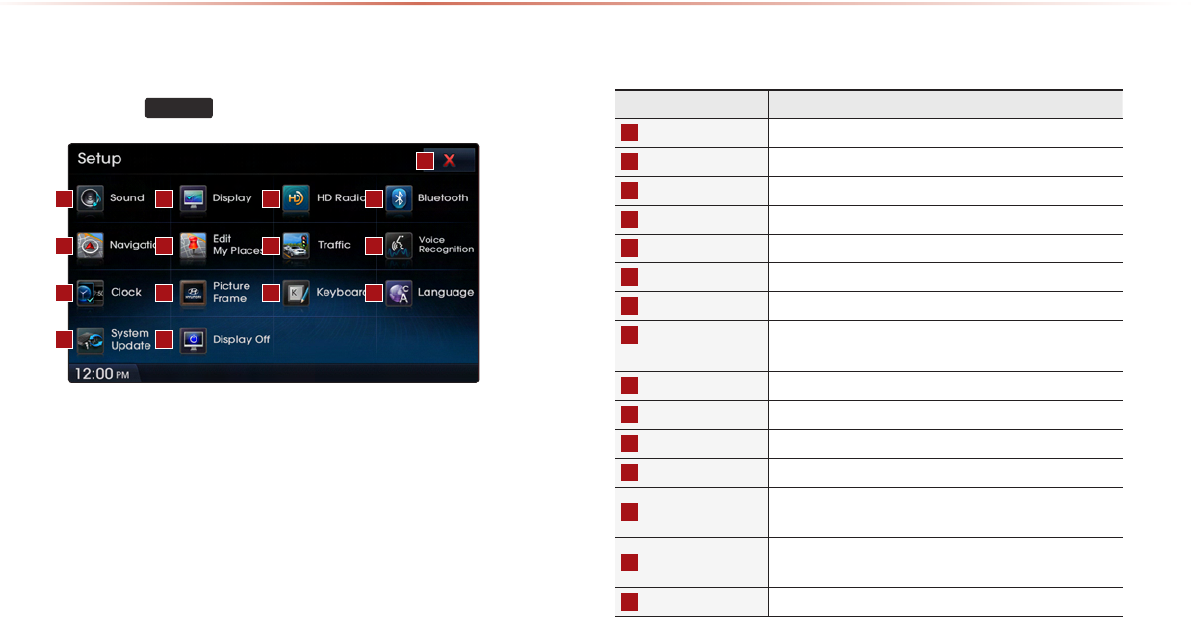
Basic Mode Screen
Press the
SETUP
key to display the Setup screen.
Name Description
1
Sound Sets sound related settings
2
Display Sets display related settings
3
HD Radio Sets HD Radio related settings
4
Bluetooth Sets Bluetooth® related settings
5
Navigation Sets various settings found within Navigation mode
6
Edit My Places Set/Edit My Places within Navigation Mode
7
Trac Sets Trac Information related settings
8
Voice
Recognition
Sets voice recognition related settings
9
Clock Sets current time and clock display
10
Picture Frame Sets screen display when device is turned o
11
Keyboard Sets the keyboard type
12
Language
Sets language for use within the system
13
System Update Checks system software version and receives up-
dates
14
Display O Turn device display on/o (The device power will not
be turned o)
15
Close Close Setup menu screen
1
5
9
13
2
6
10
14
3
7
11
4
8
12
15
Using Setup
Setup l 8-3 8-3
Starting Mode
Press the
SETUP
key to display the
Setup screen.
Within
SETUP
, you can check and change
the settings for all features found within the
Navigation system.
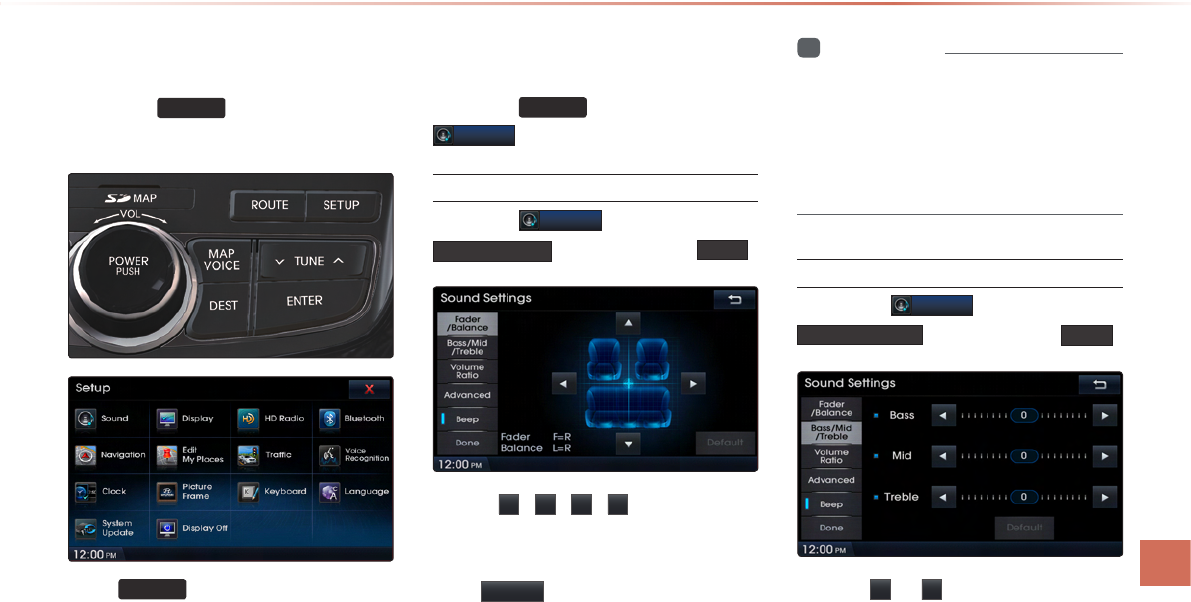
Sound
Press the
SETUP
key ▶ Press
Sound
.
Setting Balance/Fader
Press the
Sound
button ▶ Press
Fader/Balance ▶ Set and press Done
.
Use the ▲ , ▼ , ◀ , ▶ buttons to move
the cursor on the control screen to the
desired position.
Press Default to restore sound to the cen-
ter position.
i
Information
•
The Balance/Fader settings allows you to
set the sound position. For example, you
can set the sound close to the driver-seat
so that the volume is relatively lower in
the passenger or rear seats.
Setting Bass/Mid/Treble
Press the
Sound
button ▶ Press
Bass/Mid/Treble
▶ Set and press
Done
.
Use the ◀ or ▶ buttons to adjust the
Bass/Mid/Treble settings.
8-4
Using Setup
i
Information
•
Press the Default button to restore the
Bass/Mid/Treble to the center position.
Setting Volume Ratio
Press the
Sound
button ▶ Press
Volume Ratio ▶ Set and press Done
.
These options are used to set the volume
ratio by selecting from Navigation Priority/
Audio Priority/Same Ratio.
Name Description
1
Navigation
Priority
Navigation guidance is output
louder than audio Volume
2
Audio
Priority
Audio volume is output louder
than the navigation guidance
3
Same Ratio
Audio volume and navigation
guidance are output in identi-
cal volume
i
Information
•
The rear seat speaker will maintain its
audio volume regardless of which volume
ratio is selected.
Advanced
Press the
Sound
button ▶ Press
Advanced .
This is used to set the Variable-EQ (or
Surround) and Speed Dependent Volume
Control features.
1
2
3
Using Setup
Setup l 8-5 8-5
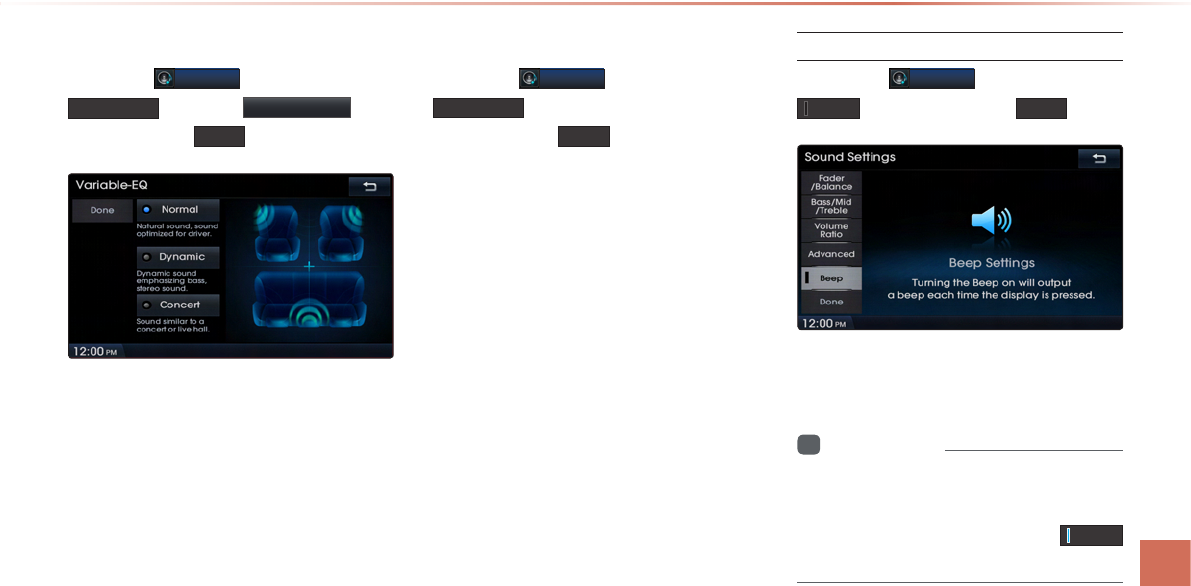
Variable-EQ
Press the
Sound
button ▶ Press
Advanced ▶ Press Variable-EQ ▶
Set and press Done .
It is possible to set the desired advanced
sound feature from the three options.
Surround
When turned on, sound with vivid, three
dimensional effects can be enjoyed.
Speed Dependent Volume Control
Press the
Sound
button ▶ Press
Advanced ▶ Turn the feature On ▶
Set and press Done .
When turned on, volume level is controlled
automatically according to the vehicle
speed.
Setting Beep
Press the
Sound
button ▶ Press
Beep ▶ Set and press Done .
Each press of this button turns the BEEP
tone on/off.
i
Information
•
When the light on the left side of the but-
ton is turned on, this indicates that the
BEEP tone is active. Press the Beep
button again to turn off the BEEP tone.
8-6
Using Setup
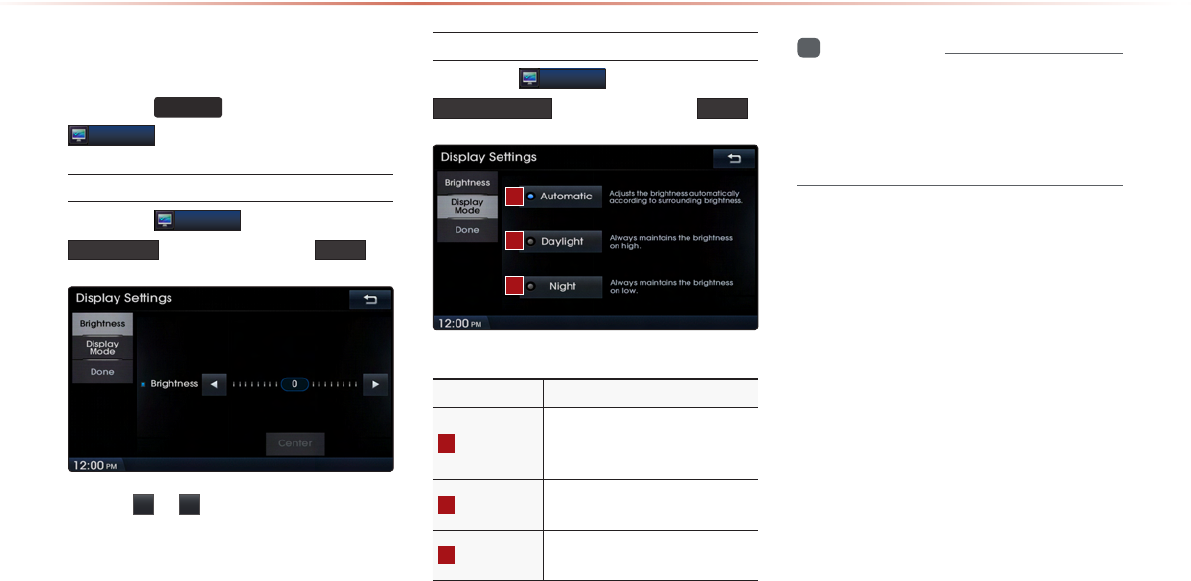
Display
Press the
SETUP
key ▶ Press
Display
.
Adjusting Brightness
Press the
Display
button ▶ Press
Brightness ▶ Set and press Done
.
Use the ◀ or ▶ buttons to adjust the dis-
play brightness.
Setting Display Mode
Press the
Display
button ▶ Press
Display Mode ▶ Set and press Done
.
Name Description
1
Automatic
Adjusts the brightness auto-
matically according to sur-
rounding brightness
2
Daylight Always maintains the bright-
ness on high
3
Night Always maintains the bright-
ness on low
i
Information
•
When set to Automatic, the screen bright-
ness and color will automatically be
adjusted according to the surrounding
brightness.
1
2
3
Using Setup
Setup l 8-7 8-7
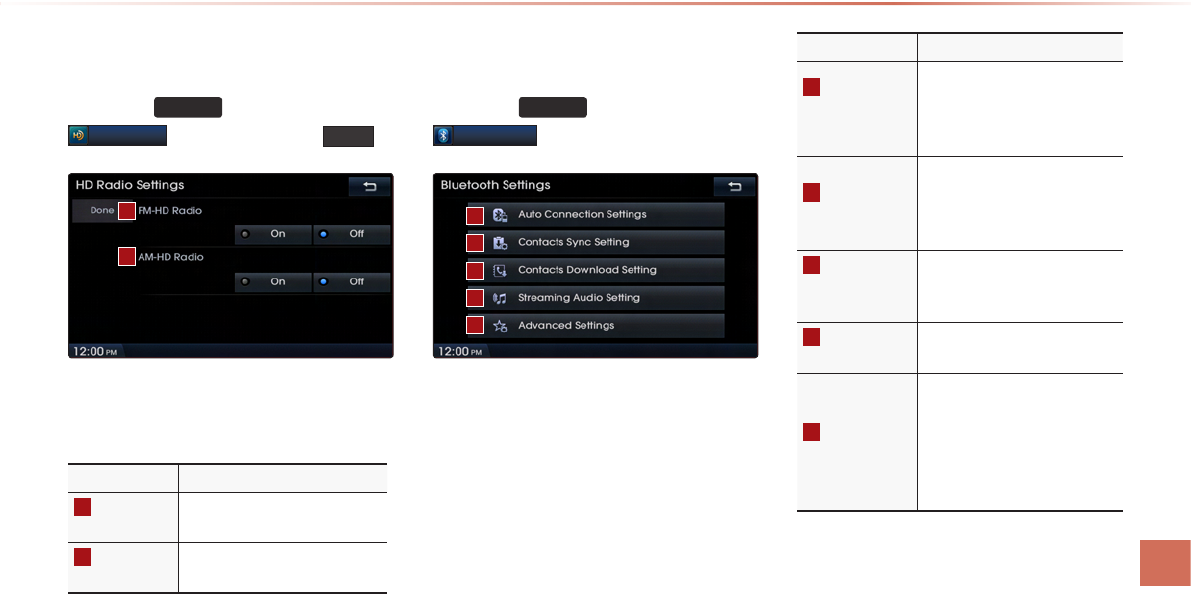
HD Radio Reception
Press the
SETUP
key ▶ Press
HD Radio
▶ Set and press Done
.
These settings are used to set whether to
turn HD Radio
reception
On/Off.
Name Description
1
FM-HD
Radio
Used to turn FM-HD Radio
reception On/O
2
AM-HD
Radio
Used to turn AM-HD Radio
reception On/O
Bluetooth
Press the
SETUP
key ▶ Press
Bluetooth
.
These menus allow you to set
Bluetooth
®
Wireless Technology related features.
Name Description
1
Auto
Connection
Settings
Sets Bluetooth® device auto
connection when car ignition
is turned on between the ve-
hicle and Bluetooth® devices
2
Contacts
Sync Setting
Automatically downloads the
mobile phone contacts and
call histories to the car upon
connecting Bluetooth® device
3
Contacts
Download
Setting
Sets which Contacts to down-
load from between Mobile or
SIM contacts
4
Streaming
Audio Setting
Sets whether to use the
streaming audio feature
5
Advanced
Settings
Sets Bluetooth® related
settings, including Change
Passkey, Change Device
Information, Delete Favorites,
Delete Call History and Re-
store Factory Settings
1
2
3
4
5
2
1
8-8
Using Setup
Auto Connection Settings
Press
Bluetooth
button ▶ Press
Auto Connections Settings ▶ Set and
press Done
.
If auto connection is turned on, a Bluetooth®
device will automatically be connected
according to the option setting when the
car ignition is turned on.
Name Description
1
Disable Auto
Connection
Disables auto connection
2
Previously
Connected
Phone
Automatically connects the pre-
viously connected Bluetooth®
device
3
User Selected
Phone
Automatically connects to the
set Bluetooth® device
4
Connect
by Priority
Automatically connects accord-
ing to the set Bluetooth® phone
priority
i
Information
•
If you press the
Setting
button next to the
User Selected Phone and
Connect by Priority o
ptions, you can
designate the phone you want to connect or
set the phone priority.
Contacts Sync Setting
Press
Bluetooth
▶ Press
Contacts Sync Setting ▶ Set and press
Done
.
This feature automatically downloads the
mobile phone contacts and call histories to
the car upon Bluetooth® connection.
If you do not wish to use Contacts Sync,
turn the feature off.
i
Information
•
This feature may not be supported in
some Bluetooth® devices.
1
2
3
4
Using Setup
Setup l 8-9 8-9
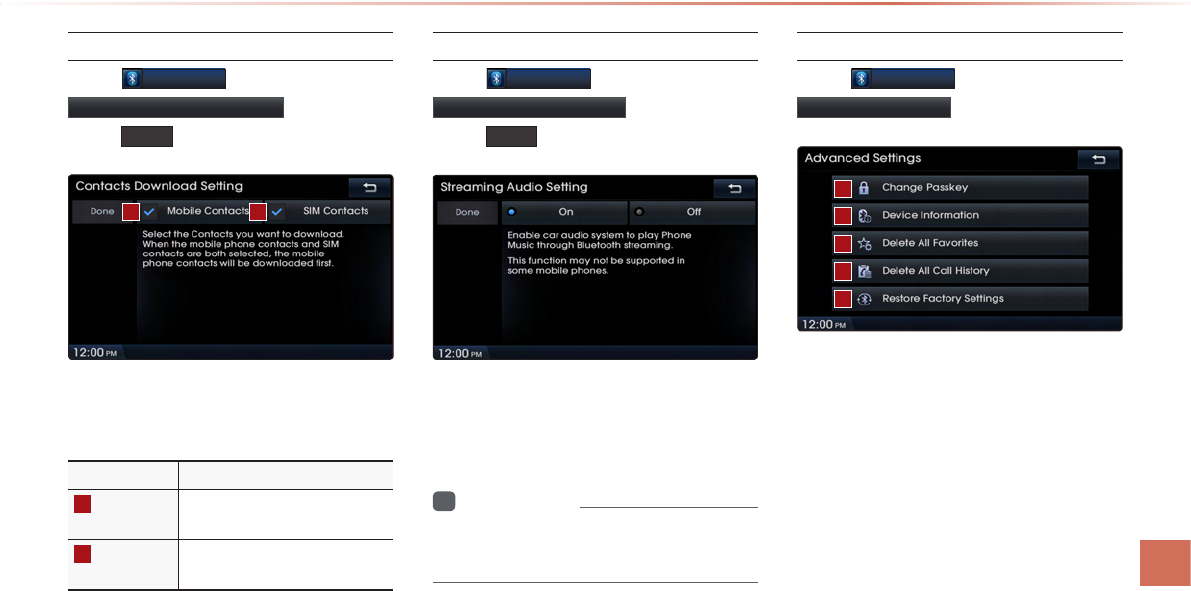
Contacts Download Setting
Press
Bluetooth
▶ Press
Contacts Download Setting ▶ Set and
press Done
.
You can select the contacts you wish to
download.
Name Description
1
Mobile
Contacts
Download contacts saved in
your mobile phone
2
SIM
Contacts
Download contacts saved in
SIM
Streaming Audio Setting
Press
Bluetooth
▶ Press
Streaming Audio Setting ▶ Set and
press Done
.
When Streaming Audio is turned On, you
can play music files saved in your Bluetooth®
device from the car.
i
Information
•
This feature may not be supported in
some Bluetooth® devices.
Advanced Settings
Press
Bluetooth
▶ Press
Advanced Settings
.
1
1
5
4
3
2
2
8-10
Using Setup
Name Description
1
Change
Passkey
Changes the passkey used to
authenticate Bluetooth® device
2
Device
Information
Searches car Bluetooth® de-
vice information and change
device name
3
Delete All
Favorites
Deletes all favorites of con-
nected Bluetooth® device
4
Delete All
Call History
Deletes all call history of con-
nected Bluetooth® device
5
Restore
Factory
Settings
Restores Bluetooth® factory
state settings
Advanced Settings allow you to control
additional
Bluetooth
®
Wireless Technology
related settings. For safety, first park the
vehicle in a safe location to operate these
features.
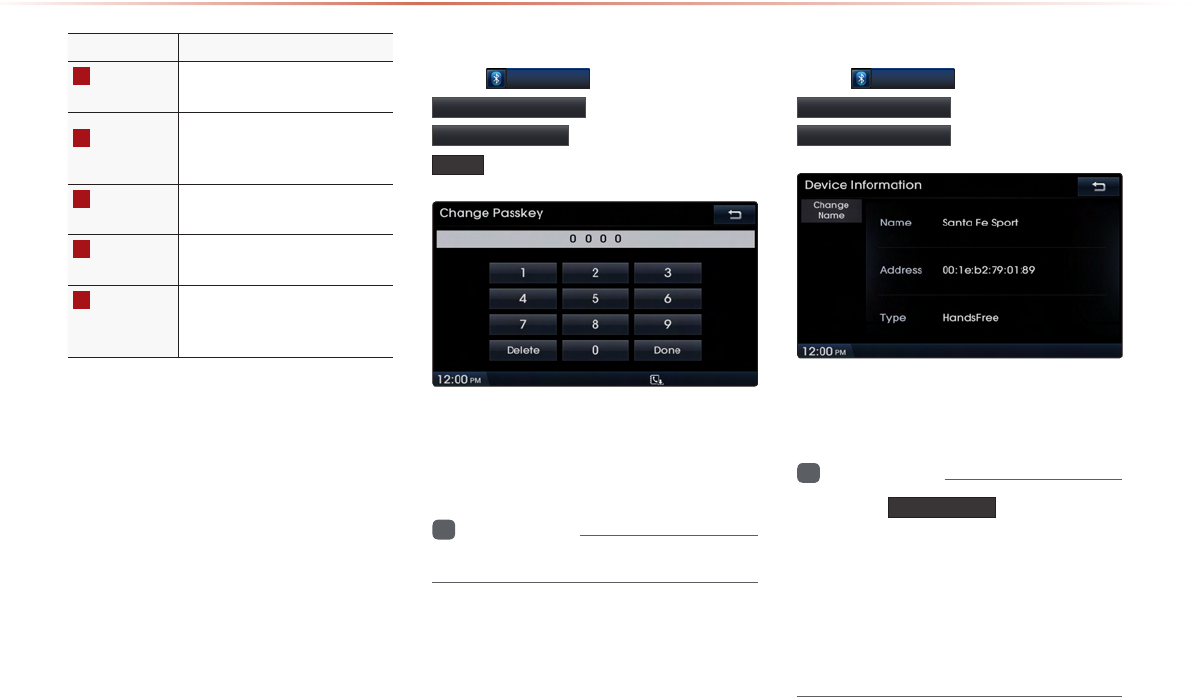
Change Passkey
Press
Bluetooth
▶ Press
Advanced Settings ▶ Press
Change Passkey ▶ Set and press
Done
.
This feature is used to change the passkey
required to connect a Bluetooth® device to
the car.
i
Information
•
The default passkey is 0000.
Device Information
Press
Bluetooth
▶ Press
Advanced Settings ▶ Press
Device Information
.
This feature allows you to check device
information.
i
Information
•
Press the
Change Name
button to change
the name of the device.
•
The default car name is set to Santa Fe
Sport.
•
The device name and address shown in
the above is only an example. Check your
device for the actual device information.
Using Setup
Setup l 8-11 8-11
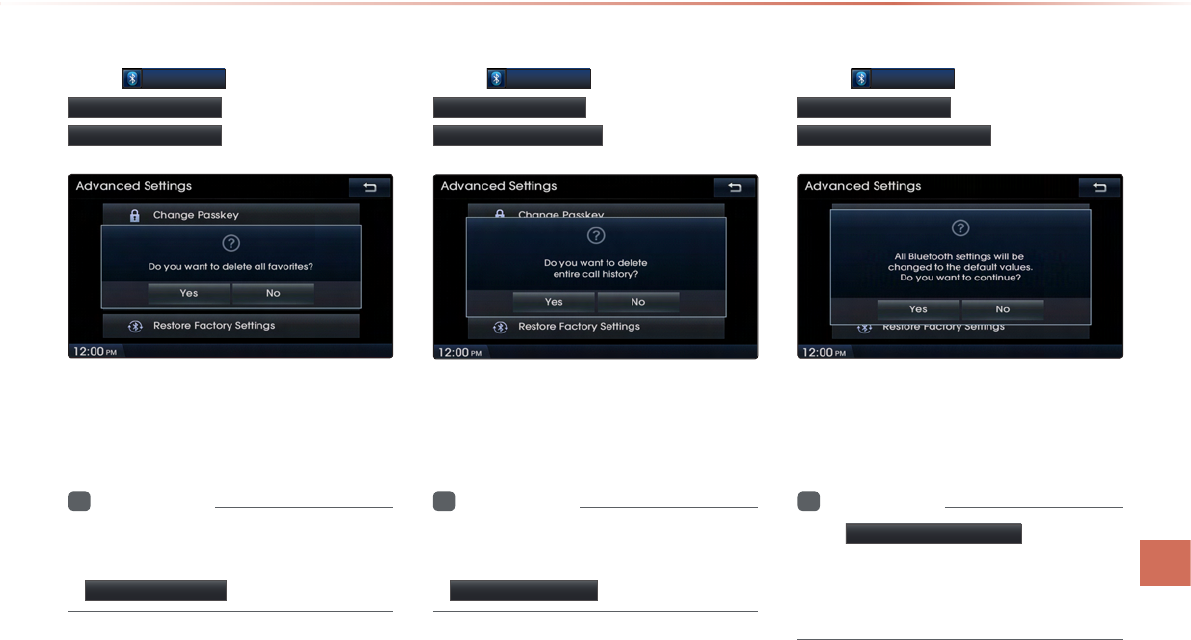
Delete All Favorites
Press
Bluetooth
▶ Press
Advanced Settings ▶ Press
Delete All Favorites
.
This feature allows you to delete all
Favorites saved in the Car Handsfree for
the currently connected
Bluetooth®
device.
i
Information
•
If there are no Favorites or a Bluetooth®
device is not connected, the
Delete All Favorites button will be disabled.
Delete All Call History
Press
Bluetooth
▶ Press
Advanced Settings ▶ Press
Delete All Call History
.
This feature allows you to delete all call
histories saved in the Car Handsfree for
the currently connected device.
i
Information
•
If there are no call histories or a Bluetooth®
device is not connected, the
Delete All Call History
button will be disabled.
Restore Factory Settings
Press
Bluetooth
▶ Press
Advanced Settings ▶ Press
Restore Factory Settings
.
Turning on this feature will erase all paired
phones and allows you to restore the fac-
tory default Bluetooth® settings.
i
Information
•
The Restore Factory Settings feature cannot
be used when a Bluetooth® device is con-
nected. To use this feature, first disconnect the
Bluetooth® device.
8-12
Using Setup
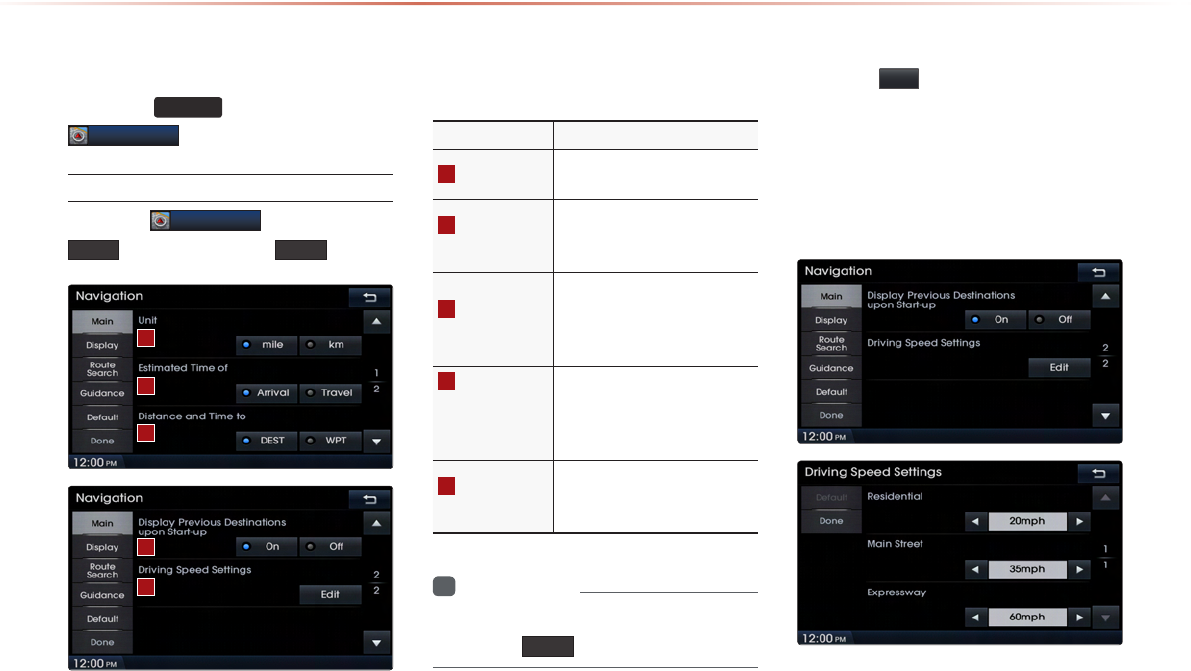
Navigation
Press the
SETUP
key▶ Press
Navigation
.
Main
Press the
Navigation
button ▶ Press
Main ▶ Set and press Done
.
This menu is used to set general naviga-
tion options.
Name Description
1
Unit Sets whether to display dis-
tance as kilometers or miles
2
Estimated
Time of
Sets whether to display esti-
mated time of arrival or travel
on the route info display screen
3
Distance
and Time to
Sets whether to display dis-
tance and time to destination
or to waypoint on the route info
display screen
4 Display
Previous
Destinations
upon Start-up
Sets whether to display the
previous destinations popup
upon starting system
5
Driving
Speed Setting
Sets basic info to calculate es-
timated arrival time to destina-
tion or waypoint
i
Information
•
When you have finished with the settings,
press the Done button to save changes.
Driving Speed Setting
Press the Edit button within the "Driving
Speed Setting" menu to set the estimated
driving speed for residential roads, main
streets, and expressways. The set driving
speed is applied to calculate the estimated
time to reach the destination or waypoint.
1
2
3
4
5
Using Setup
Setup l 8-13 8-13
The changed driving speed is used to cal-
culate the estimated time until the destina-
tion or waypoint.
Press the Default button to reset the driv-
ing speed settings.
i
Information
•
Default Driving Speed Settings for
Residential, Main Streets, and Expressways
are 20mph, 35mph, and 60mph, respec-
tively.
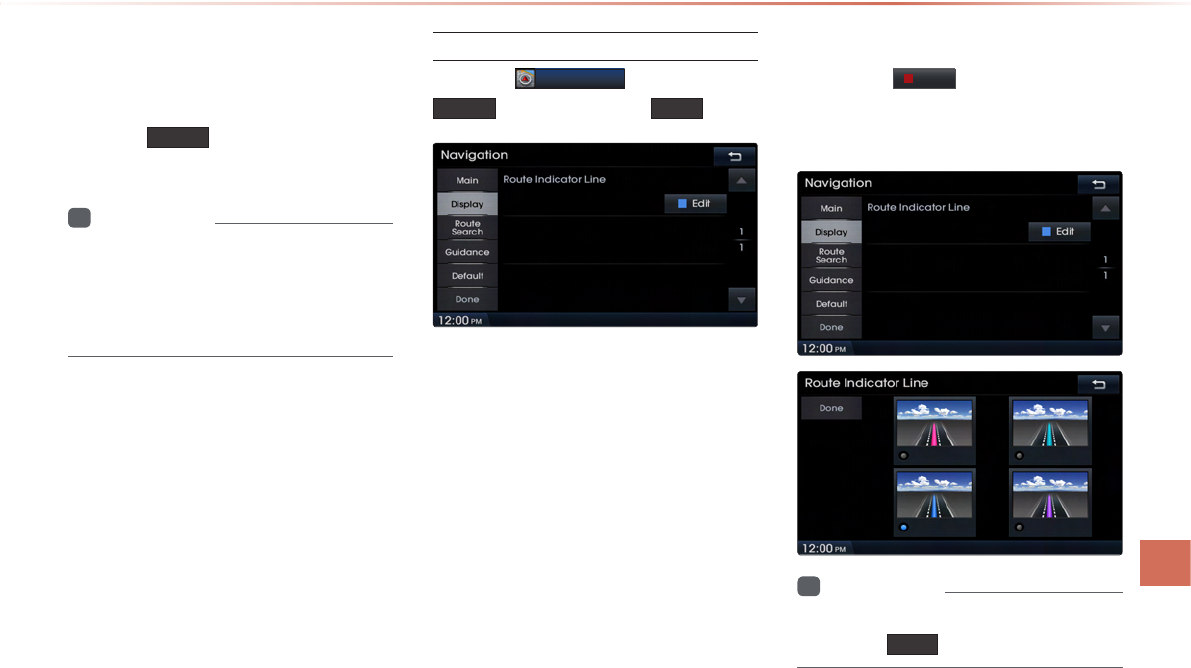
Display
Press the
Navigation
button ▶ Press
Display ▶ Set and press Done
.
This menu is used to set the color of the
Route Indicator line displayed when receiv-
ing route guidance.
Route Indicator Line
Press the Edit button within the
Route Indicator Line menu to change
the color of the route indicator line.
i
Information
•
When you have finished with the settings,
press the Done button to save changes.
8-14
Using Setup
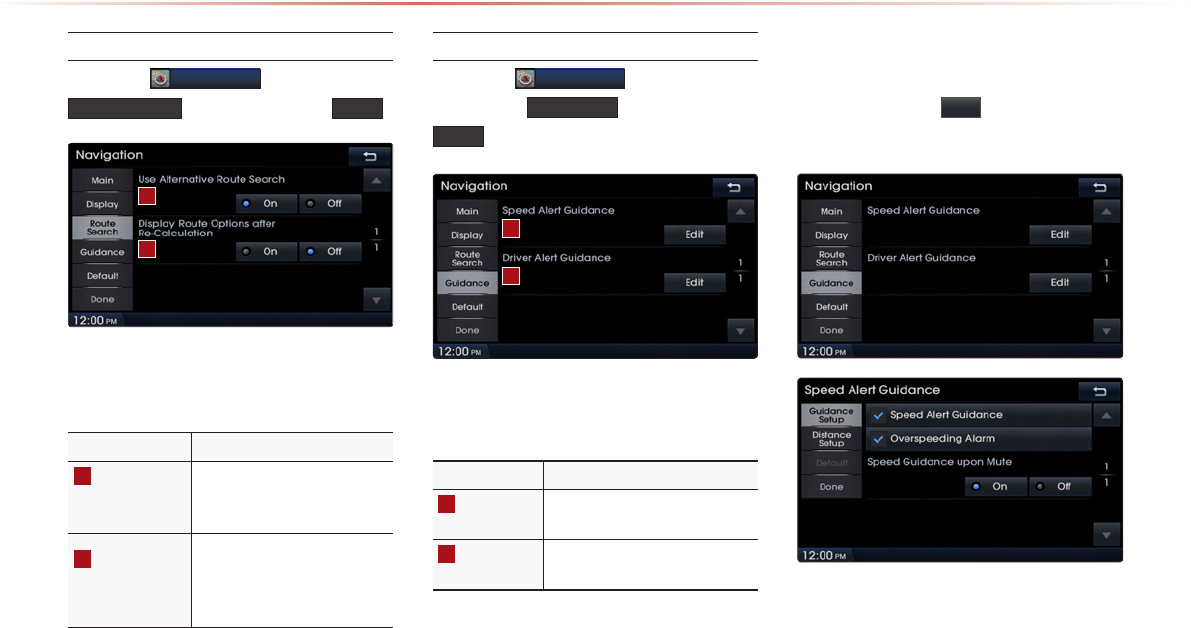
Route Search
Press the
Navigation
button ▶ Press
Route Search ▶ Set and press Done
.
This menu is used to set route search
related options.
Name Description
1
Use
Alternative
Route Search
Set whether to first display
alternative routes upon con-
ducting route search
2
Display Route
Options after
Re-Calculation
Set whether to display the
pop-up screen that allows
changes to route options
upon route recalculation
Guidance
Press the
Navigation
button ▶ Press
the desired Guidance ▶ Set and press
Done
.
This menu is used to set options on speed
alerts and driver alerts.
Name Description
1
Speed Alert
Guidance
Set options related to various
camera alerts
2
Driver Alert
Guidance
Set options related to curves,
and merges
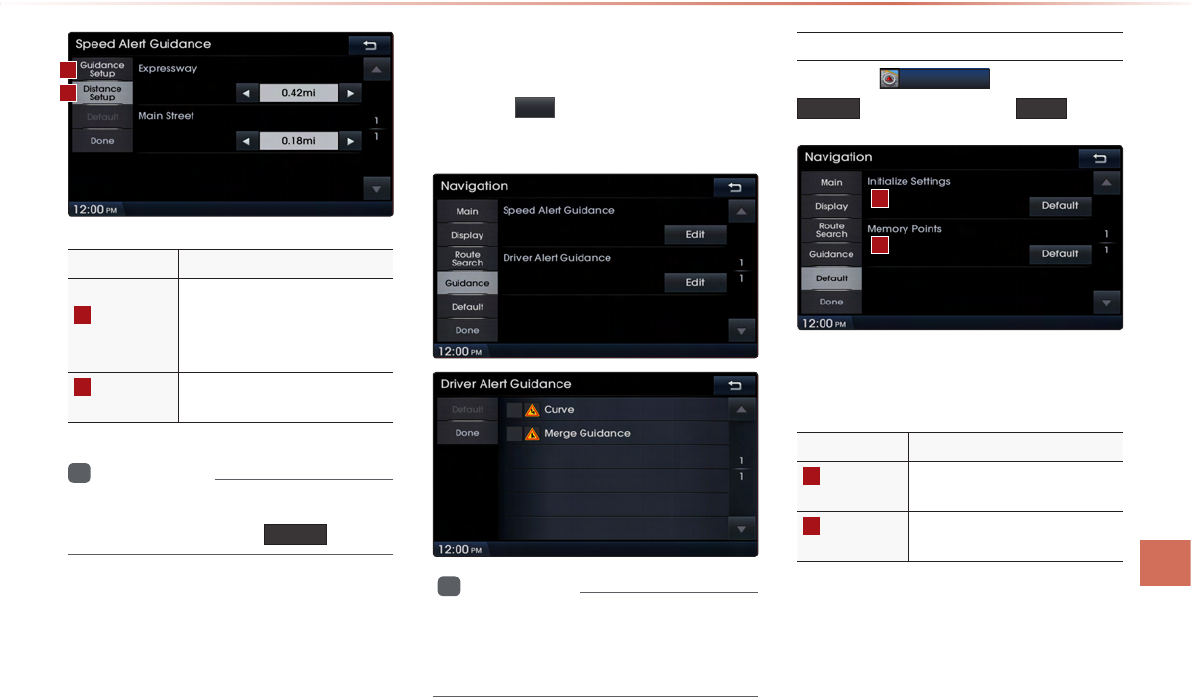
Speed Alert Guidance
To change the Speed Alert Guidance
option, press the Edit button within the
"Speed Alert Guidance" menu.
1
2
1
2
Using Setup
Setup l 8-15 8-15
Name Description
1
Guidance
Setup
Sets alarm sound for speed
alerts/overspeeding and speed
guidance when volume is
muted.
2
Distance
Setup
Sets camera guidance alarm
distance
i
Information
•
Distance can be set in 0.06mi units. To ini-
tialize settings, press the
Default
button.
Driver Alert Guidance
To set the Driver Alert Guidance, option,
press the Edit button within the "Driver
Alert Guidance" menu.
i
Information
•
Alerts pro
vided within Driver Alert Guidance
may differ depending on actual road cond
i-
tions.
Default
Press the
Navigation
button ▶ Press
Default ▶ Set and press Done
.
This menu is used to reset saved changes
and user preferences.
Name Description
1
Initialize
Settings
Resets all settings back to the
default state
2
Memory
Points
Resets all saved memory point
information
1
1
2
2
8-16
Using Setup
i
Information
•
If the settings of an option are reset, then
all settings will be restored to the default
factory state.
•
Heed caution as Home, Office and other
user locations may become deleted.
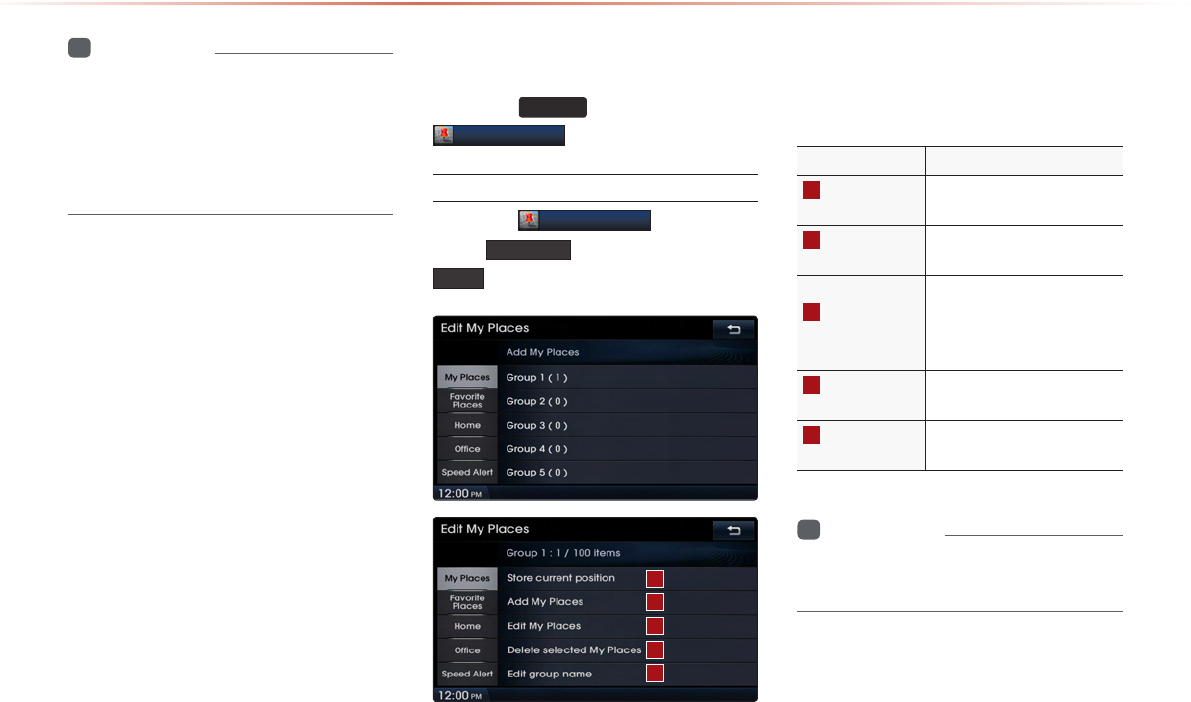
My Places
Press the
SETUP
key ▶ Press
Edit My Places
.
My Places
Press the
Edit My Places
button ▶
Press My Places ▶ Set and press
Done .
1
2
3
4
5
From the My Places list, select the desired
menu to either add, delete, or edit My
Places.
Name Description
1
Store current
position
Add the current vehicle po-
sition as a My Place
2
Add My
Places
Add a My Place by using
search functions
3
Edit My
Places
Edit information pertaining
to saved My Places, such
as name, location, and tele-
phone number
4
Delete selected
My Places
Delete one or all saved My
Places
5
Edit group
name
Edit name of corresponding
group
i
Information
•
By default, names of folders have been
set as "Group".
Using Setup
Setup l 8-17 8-17
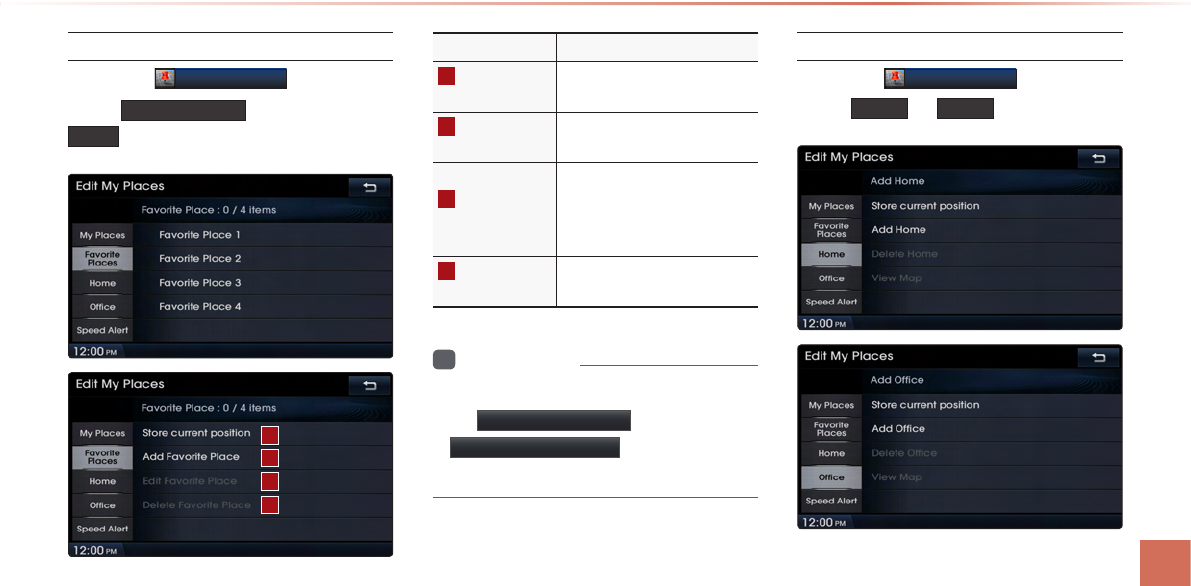
Favorite Places
Press the
Edit My Places
button ▶
Press Favorite Places ▶ Set and press
Done
.
A total of 4 Favorite Places can be saved.
Favorite Places can be selected at the
bottom of the Destination Search main
screen.
Name Description
1
Store current
position
Adds the current vehicle posi-
tion as a Favorite Place
2
Add Favorite
Place
Add a Favorite Place by using
search functions
3
Edit Favorite
Place
Edit information pertaining to
saved Favorite Places, such as
name, location, and telephone
number
4
Delete
Favorite Place
Delete one or all saved Favor-
ite Places
i
Information
•
If Favorite Places have not been added,
the
Edit Favorite Place
and
Delete Favorite Place
buttons will be
disabled.
Home and Oce
Press the
Edit My Places
button ▶
Press Home or Office
.
One Home and Office can each be saved.
The set Home and Office positions can be
selected at the bottom of the Destination
Search main screen.
1
2
3
4