HYUNDAI MOBIS AV231JGAN CAR AVN User Manual 3
HYUNDAI MOBIS CO., LTD. CAR AVN 3
Contents
user manual -3
2-54
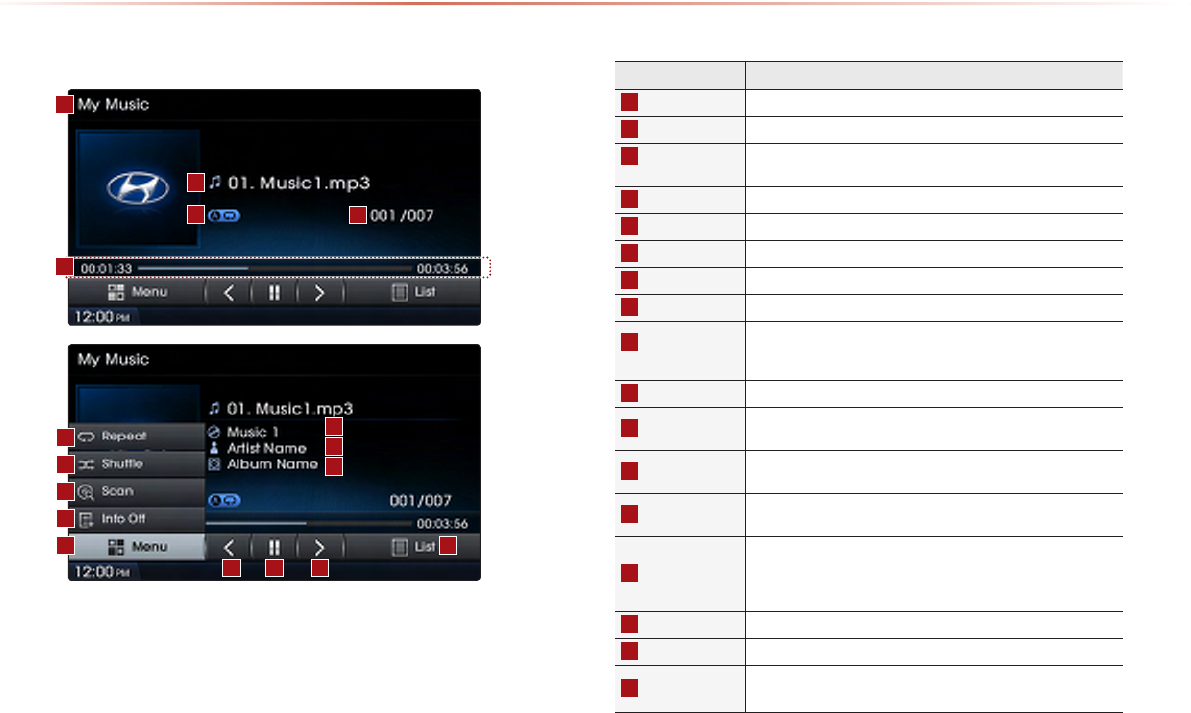
Name Description
1
Mode Displays currently operating mode
2
File Displays the name of the current le
3
Repeat/Shuffle/
Scan
From Repeat/Shuffle/Scan, displays the currently operating
function
4
File Index Shows the current le/total les within the My Music
5
Play Time Displays the current play time/total play time
6
Repeat Repeats the current le
7
Shue Plays les in random order
8
Scan Scans the beginning parts of les (approx. 10 seconds per le)
9
Info O
(Info On)
Changes the display method between Info O/Info On
• Info O : shows le name
• Info On : shows le name, title, artist, and album info
10
Menu Displays Repeat, Shue, Scan and Info On (Info O) menus
11
Title Info Displays the song title (Not displayed when information is not
available)
12
Artist Info Displays the artist information (Not displayed when information
is not available)
13
Album Info Displays the album information (Not displayed when informa-
tion is not available)
14
Previous File
• When the play time is under 2 seconds : Moves to the
previous le
• When the play time is over 2 seconds : Plays the current le
from the beginning
15
Play/Pause Plays/pauses the current le
16
Next File Moves to the next le
17
List Moves to the list screen
My Music Mode
1
2
34
10
6
7
8
9
13
15 16
17
14
12
11
5
Basic Mode Screen
My Music Mode
Audio l 2-55 2-55
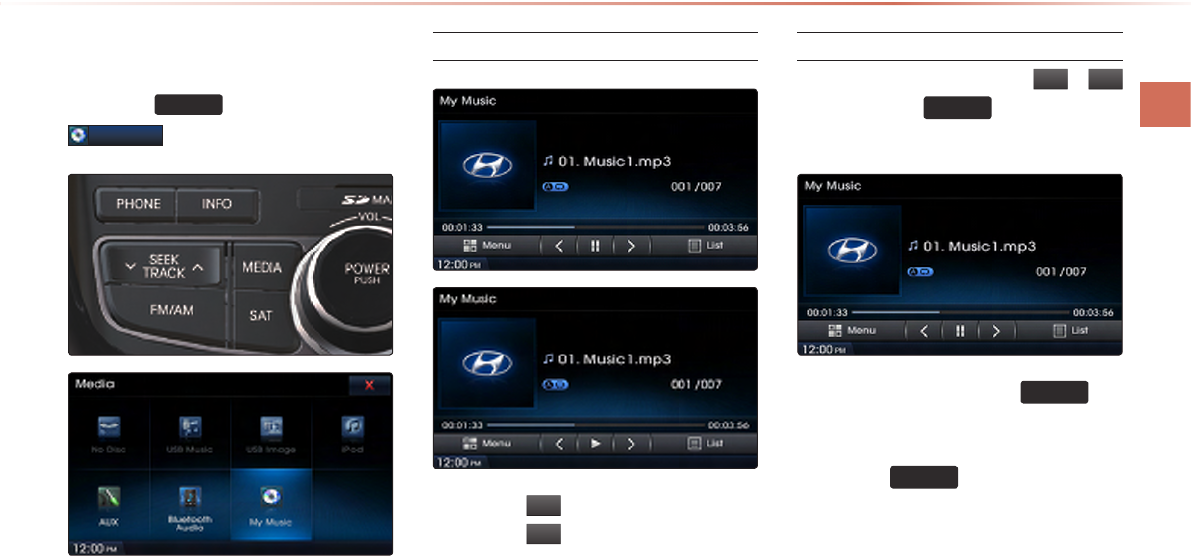
Starting Mode
Press the
MEDIA
key ▶ Press
My Music
.
Playing My Music
• Press the
▶
button to play the file.
• Press the
ll
button to pause the file.
Selecting My Music
While playing ▶ Press the
<
,
>
buttons or the
SEEK
TRACK
∧
∨
key to play the
previous/next file.
• Pressing and holding the
SEEK
TRACK
∧
∨
key
(over 0.8 seconds) will rewind or fast-
forward the current file.
• While the
SEEK
TRACK
∧
∨
key is being pressed,
the track will rewind or fast-forward at
high speeds. Once the key is released,
the Music will begin playing at normal
speed.
2-56
i
Information
•
The
<
,
>
buttons displayed on the
screen allow you to select the previous/
next file.
•
These buttons will not rewind or fast-
forward the file.
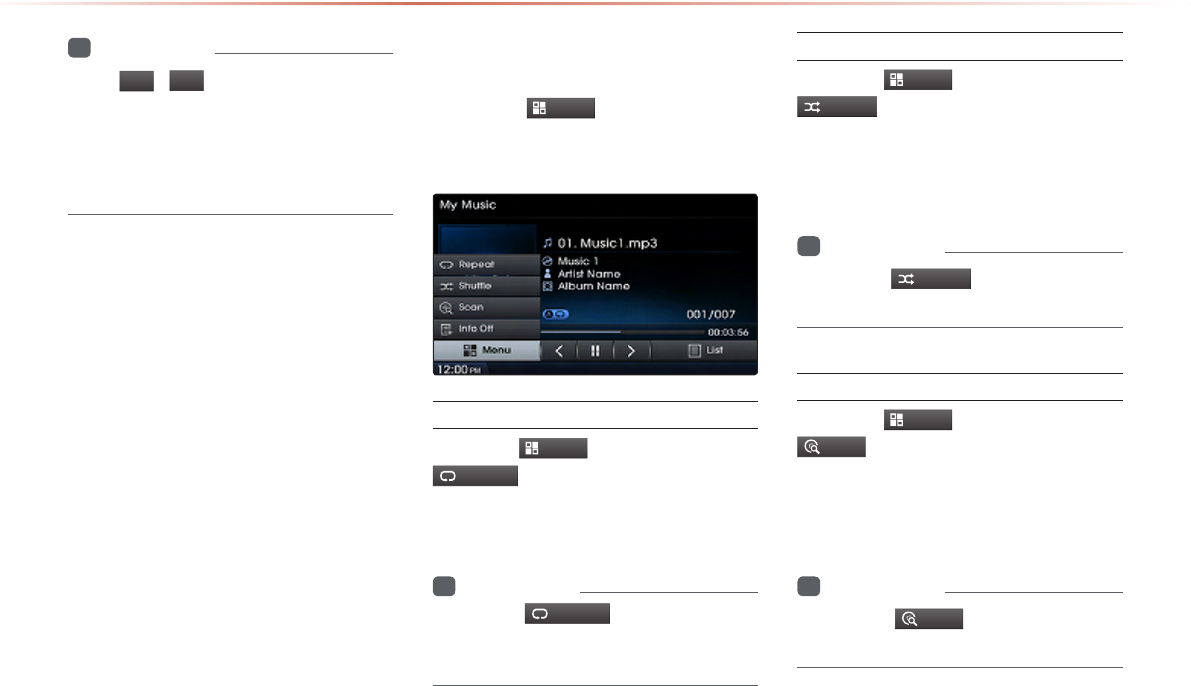
Using the Menu Buttons
Press the
Menu
button to set the
Repeat, Shuffle, Scan, Info On (Info Off)
menus.
Repeat
Press the
Menu
button ▶ Press
Repeat
.
The currently playing file is repeated.
i
Information
•
Press the
Repeat
button again to turn
off repeat. If nothing is selected, then all
files will be played in sequential order.
Shue
Press the
Menu
button ▶ Press
Shuffle
.
When turned on, files are played in ran-
dom order.
i
Information
•
Press the
Shuffle
button again to turn
the shuffle option off.
Scan
Press the
Menu
button ▶ Press
Scan
.
The beginning (approx 10 seconds) of all
files are scanned.
i
Information
•
Press the
Scan
button again to turn
the scan option off.
My Music Mode
My Music Mode
Audio l 2-57 2-57
Info On/Info O
Press the
Menu
button ▶ Press
Info On
.
The screen display can be set differently
depending on user selection.
When the title, artist, and album info are dis-
played, the button is changed to
Info Off
.
Press
Info Off
to restore the previous
information display setting.
i
Information
•
The title, artist and album info are dis-
played only when such information is
recorded within the MP3 file ID3 tag.
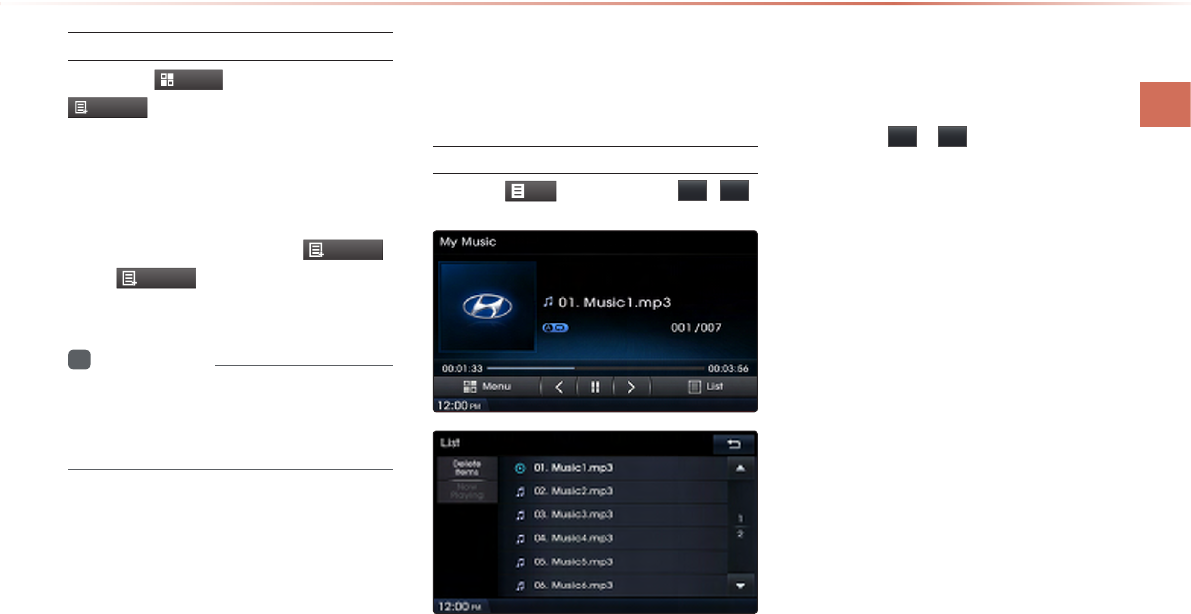
Using Menus within the
List Screen
Moving between Lists
Press the
List
button ▶ Press
▲
,
▼
.
If six (6) or more files or folders exist in
the same folder, the list will be displayed
across two or more pages.
Press the ▲ , ▼ cursor buttons to
quickly find the desired page.
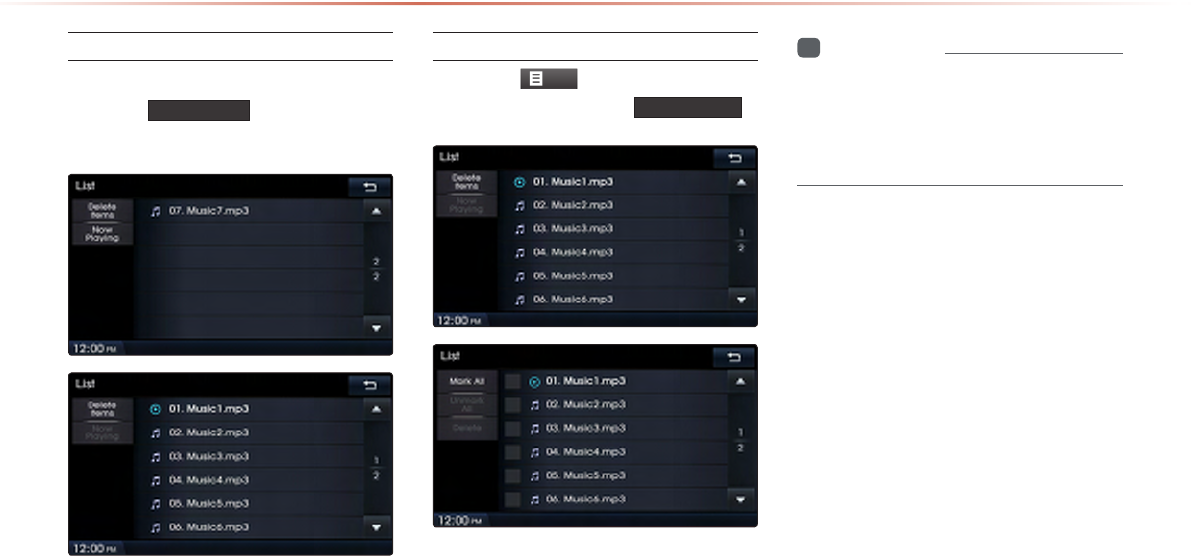
2-58
Returning to Current Location
While searching files within other folders,
press the Now Playing button to return to
the currently playing file screen.
Deleting Files
Press the
List
button ▶ Select the
files to delete ▶ Press Delete Items
.
i
Information
•
The audio system will not operate while
files are being deleted.
•
If the currently playing file is deleted, the
next file will begin playing.
My Music Mode

CAR AVN SYSTEM
•
Before Use
•
Starting Navigation
•
Using the Navigation
•
Map Logos and Landmarks
Navigation
3

3-2
Please observe and comply with local traffic rules and regulations.
For your safety, some features cannot be operated while driving
for your safety. Features that cannot be operated will be dis-
abled.
The route displayed for destination guidance is a reference and
the route guidance will take you to the vicinity of your destination
.
The highlighted route is not always; the shortest distance, the least
congested, and in some cases might, not be the fastest route.
Road, name, and POI information may not always been com-
pletely updated. Some places may not include up to date infor-
mation.
The car position mark does not always indicate your exact loca-
tion. This system uses GPS information, various sensors, and
road map data to display the current position. However, errors in
displaying your location may occur if the satellite is transmitting
inaccurate signals or two or less satellite signals are being
received. Errors that occur in such conditions cannot be corrected.
The position of the vehicle within the navigation may differ from
your actual location depending on various reasons, including
the satellite transmission state, vehicle state (driving location
and conditions), etc. Additionally, the car position mark may dif-
fer from the actual position if the map data is different from the
actual road landscape, such as changes due to the construction
of new roads. If such differences occur, driving for a short period
of time will automatically correct the position of the vehicle
through map matching or GPS information. (several minutes
may be necessary in certain cases)
Before Use
Precautions for Safe Driving
Before Use
Navigation l 3-3
Operating the Navigation
The navigation can be operated via touch. Touch the correspond-
ing button on the screen to operate.
If the button does not respond, take your finger off the screen
and try again.
When a button function is operating, the color of the selected
button will be displayed differently.
To return to the previous screen, press the button.
Press the button to cancel functions that can be operated
on the current screen.
(Some functions may not be cancelled.)
i
Information
•
Buttons that cannot be operated will be disabled.
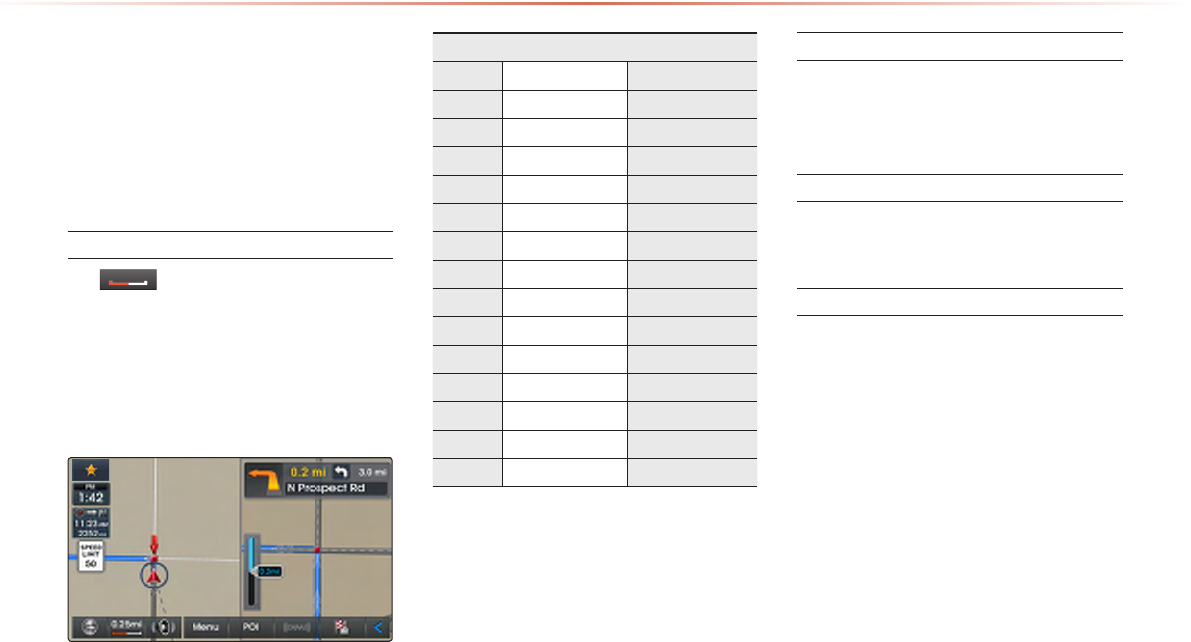
3-4
About the Map
Some roads, site names, and facility infor-
mation may have changed after map data
update and may differ with actual road
conditions.
About Map Scale
• If
PO
is displayed on the left side of
the map, this represents a map scale of
1/4 of a mile.
• For more information on Changing Map
Scale, refer to the ‘Changing Map Scale’
section.
Actual Distance
Level mi/ft km / m
1 150ft 50m
2 300ft 100 m
3 700 ft 200 m
4 0.25 mi 400 m
5 0.5 mi 800 m
6 1 mi 1.6 km
7 2 mi 3.2 km
8 4 mi 6.4 km
9 8 mi 12 km
10 16 mi 25 km
11 32 mi 50km
12 64 mi 100 km
13 130 mi 200 km
14 250 mi 400 km
About Map Icons
Icons displayed on the map may differ
from actual conditions. Multiple icons may
also be displayed as one mark.
About Map Database
Unlicensed map copying in any form, in full
or in part, is strictly prohibited.
About Map Updates
• Map updates can be downloaded
from the designated website
(http://www.mapnsoft.com) and updated
through the SD card.
• For more information, refer to the
‘System Update’ section in Setup.
Before Use
Before Use
Navigation l 3-5
About Voice Guidance
During destination guidance, voice guidance
will be provided when reaching an intersec-
tion or nearby the destination.
Voice Guidance
Voice guidance is provided in the following
instances.
Example of voice guidance during destina-
tion guidance
• In front of an intersection :
In a half mile, turn right.
After a moment, turn right
• Upon entering a toll road
You must turn right in a moment.
You are reaching an expressway.
There is a toll gate ahead.
* Please use voice guidance only as a ref-
erence to assist in your driving.
Example of voice guidance when arriving
at the destination
• In front of the destination :
You have arrived at your destina-
tion. Voice guidance will be ended.
i
Information
•
The above voice guidance examples are
normal cases. However, the actual voice
guidance may differ depending on the
road type.
•
If the car position is not accurately
measured,
then voice guidance may not be given, or
may be given later or improperly.
•
It is possible to adjust the Navigation guid-
ance volume.
Guidance when using other modes
• Voice guidance will continue even when
converting from the navigation screen to
a different mode screen.
i
Information
•
With voice guidance muted, destination
guidance will continued to be provided.

3-6
About GPS
GPS (Global Positioning System) :
GPS is a system developed and operated
by the United States which determines the
current location of the user (Longitude/
Latitude, Coordinates, etc.) by generally
using 4 or more satellites. This system is
used with related GPS information, various
sensors, road map data, and other related
information for the purposes of navigation.
For more information on GPS, refer to Part
6 ‘GPS Information’.
Before Use
Starting Navigation
Navigation l 3-7
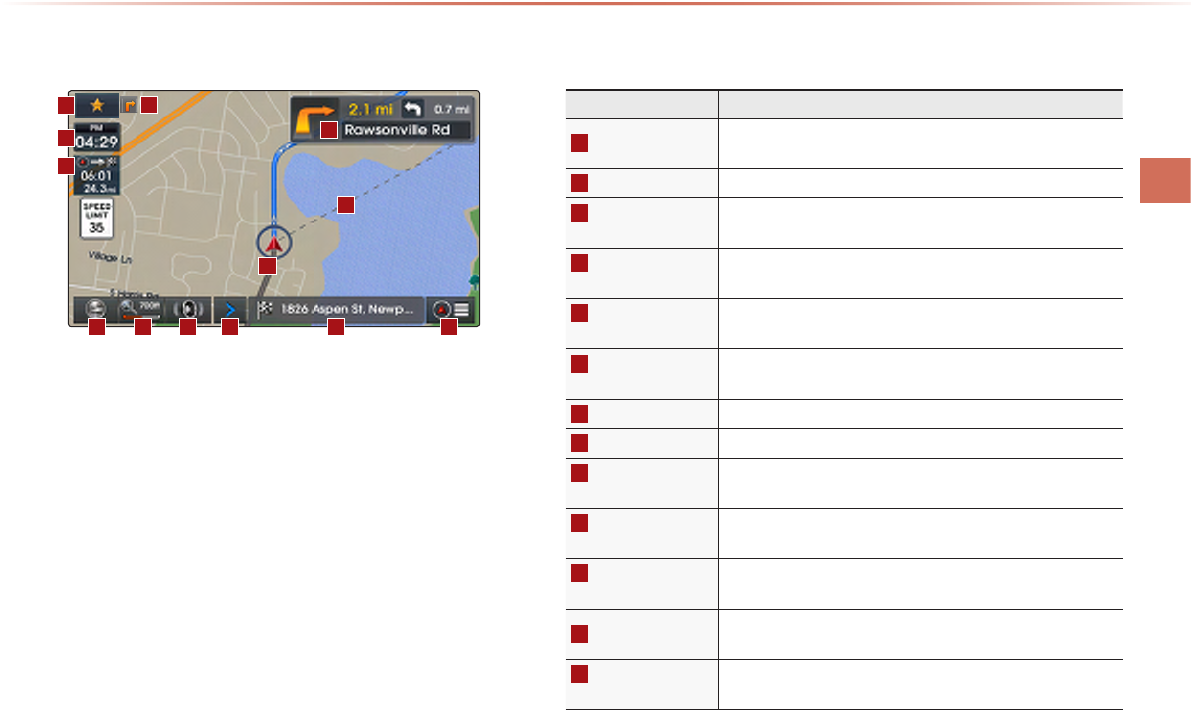
Map Screen
Starting Navigation
6
10
1 2 3 4
13
12
7
8
9
Name Description
1
Map Style Used to set either North up Always or Heading up on both
sides of split screen map
2
Map Scale Shows current map scale
3
Navigation
Guidance Volume Used to adjust navigation guidance volume
4
Function/Info
Window Shows map function buttons or current position info
5
Current Position
Info Window
Shows current road name and destination name in 5 sec-
ond intervals
6
Route Guidance
Mode
Switches route guidance mode between preliminary guid-
ance mode, Highway mode, and Turn by turn mode
7
Quick Menu Allows users to easily and quickly access desired menus
8
Current Time Shows the time
9
ETA/Remaining
Time
Shows the ETA (Estimated time of arrival), remaining time
and distance from current position to the destination
10
Preliminary
Guidance
Provides distance, direction guidance at turn points and di-
rections within the set route
11
Destination
Direction
Shows straight line distance to destination from current car
position mark
12
Lane Info Shows recommended lanes for use by considering upcom-
ing intersections and expected routes
13
Car Position
Mark Displays current car position
5
11
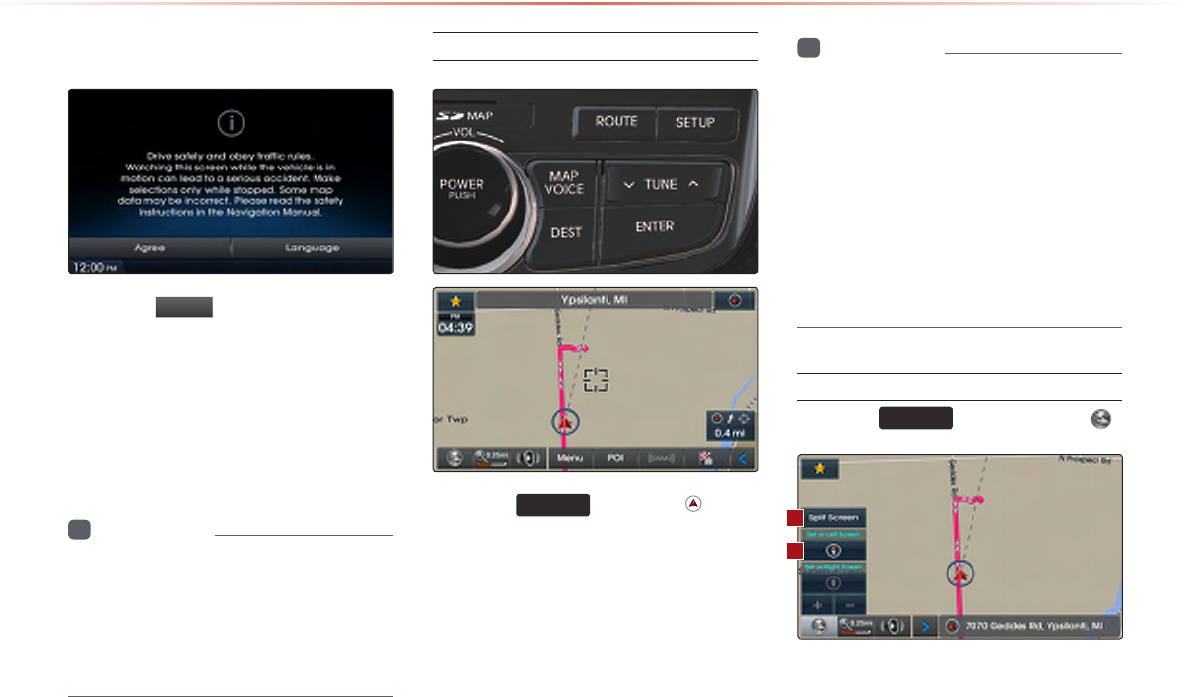
3-8
Initial Screen
Press the
Agree
button to display the
most recently used mode.
If Audio mode is used with the navigation
turned on, navigation guidance will be
provided in the background. If you turn the
ignition on, then the most recently played
mode will restart.
i
Information
•
Once the vehicle ignition is turned on, the
User Warning screen will always be displayed.
Make sure to carefully read the warning page
as it contains important information related to
system operations while driving.
Current Position
Press the
MAP
VOICE
key or the button
displayed at the upper right side in some
map conditions to display the map of the
current position and the neighboring area.
i
Information
•
When riding in a new car or after replacing
the battery terminal, the car position mark
may at first appear at a different location.
•
Even if the car position mark on the map
is different, map matching and GPS
coordinates are utilized to automatically
update the current position. It may take
up to several minutes to find your current
position.
Map Display Settings
Press the
MAP
VOICE
key▶ Press the .
Starting Navigation
1
2
Starting Navigation
Navigation l 3-9
This button is used to set map screen
related options, such as Split screen,
Heading-Up/North Up, and Left/Right
screen display.
Name Description
1
Split Screen/
Single Screen
Select between Split Screen
or Single Screen Map
2
Heading-Up/
North-Up
Display Map in Vehicle Trav-
eling Direction (Heading-Up)
or North-Up direction
i
Information
•
The Heading-Up/North-Up, 2D, and map
scale adjustments can be used when
using Split Screen map.
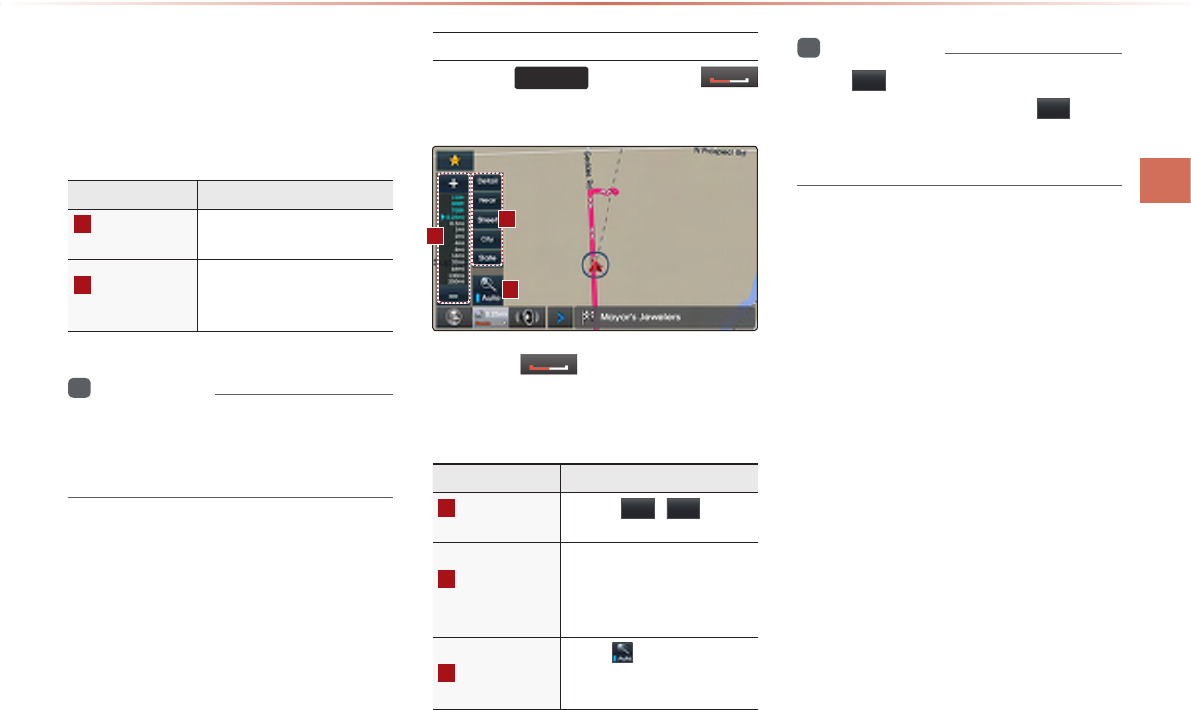
Changing Map Scale
Press the
MAP
VOICE
key ▶ Press
PO
▶ Set the desired map scale.
Press the
PO
button to display the
map scale menu and change the map to
the desired scale.
Name Description
1
Adjust Map
Scale
Use the
+
/
-
buttons
to display the scale bar
2
Administrative
District Scale
Shows map scales in cate-
gories of Detail (300ft), Near
(0.25mi), Street (1mi), City
(4mi), State (16mi)
3
Auto Scale
When is enabled, map
scale automatically adjusts
according to driving situation
i
Information
•
The - will be disabled when set to
max scale (1/250mi) and the + button
will be disabled when set to min scale
(1/150ft).
3
1
2
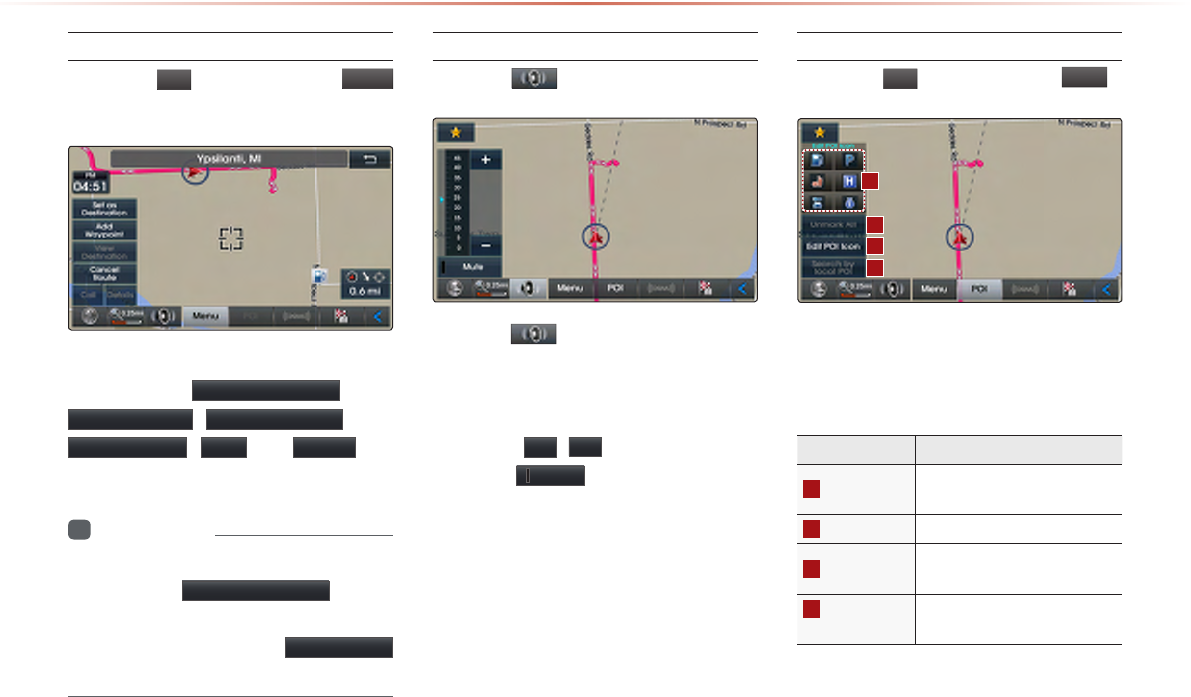
3-10
Map Menu
Press the
>
button ▶ Press
Menu
button.
Features frequently used within the map
screen, such as Set as Destination ,
Add Waypoint , View Destination ,
Cancel Route , Call , and Details are
displayed.
i
Information
•
If the screen is scrolled, then the top menu is
changed to the
Set as Destination
button.
•
If you have already set a destination, then the
top button will change to the
Recalculate
button.
Adjusting Navigation Volume
Press the button ▶ Adjust volume.
Press the button. The volume menu
is displayed and allows you to adjust the
navigation voice guidance volume.
The volume can be adjusted from 0~45
through the +
/
- button.
Press the
Mute button to turn off the
sound.
POI Display
Press the
>
button ▶ Press
POI
.
When POI menus are displayed, pressing
one of the 6 POI icon buttons will display
the corresponding POI icons.
Name Description
1
POI Icon Shows/hides corresponding
POIs
2
Unmark All Unmarks selected POI Icons
3
Edit POI Icon Edit the 6 POI icons shown
within the menu
4
Search by
Local POI Searches selected POI
Starting Navigation
1
2
3
4
Starting Navigation
Navigation l 3-11
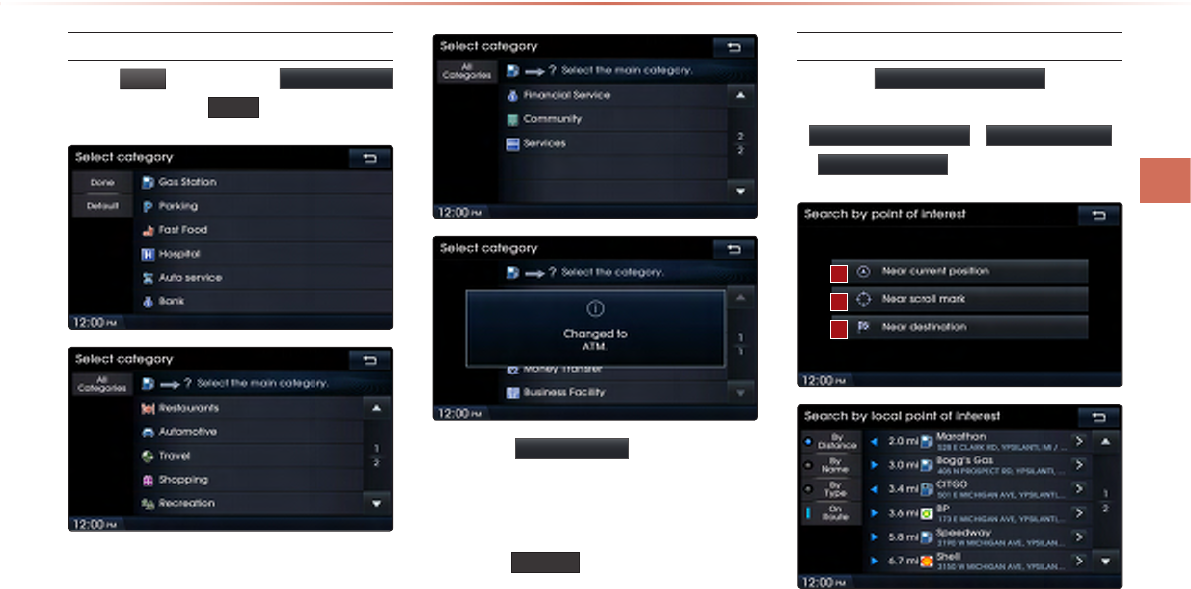
Editing POI Icons
Press
POI
▶ Press the Edit POI Icon
button ▶ Press Done .
Press the Edit POI Icon button to select
the desired facility from the various facility
types.
Up to six favorite facilities can be set.
Press the Default button to reset the dis-
played POI icons.
Initially, Gas Station, Parking, Fast Food,
Hospital, Auto Service, and Bank are set
as default.
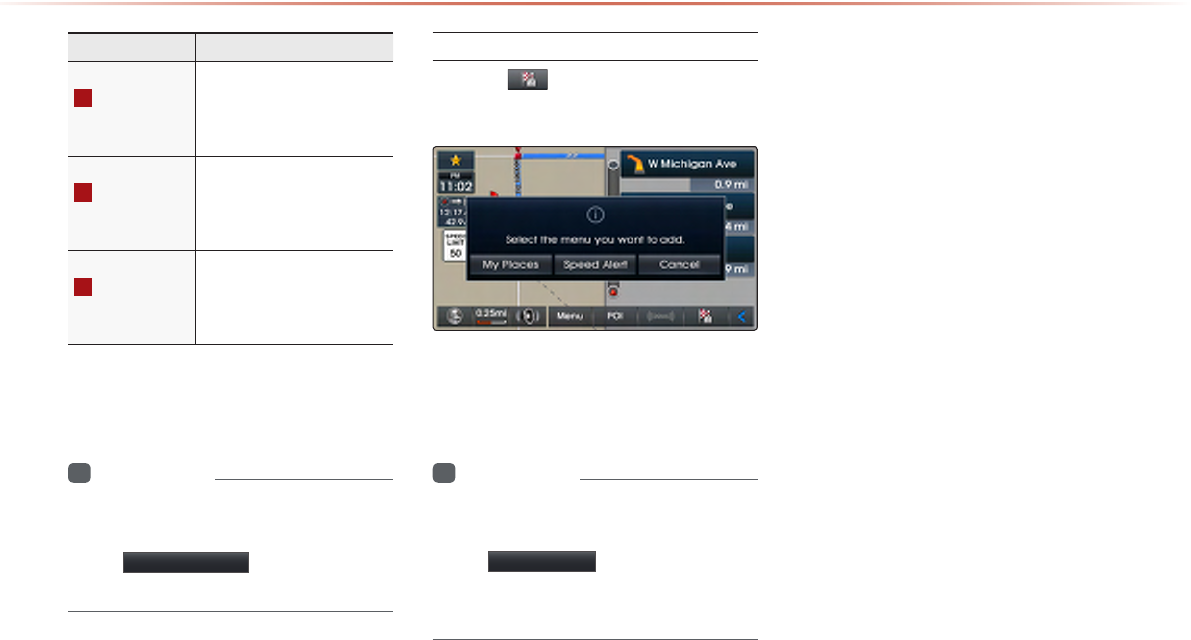
Searching POIs
Press the
Search by local POI
button
▶
Press the search criteria
(
Near current position
,
Near scroll mark
,
or
Near destination
).
1
2
3
3-12
Name Description
1
Near Current
Position
Within the ‘Search by POI’
menu, searches facilities
based on the current ve-
hicle position
2
Near Scroll
Mark
Within the ‘Search by POI’
menu, searches facili-
ties based on the current
scrolled position
3
Near
Destination
Within the ‘Search by POI’
menu, searches facilities
based on the location of
the destination
The POI mark is displayed according to
the selected criteria.
i
Information
•
When searching POIs, you can only
search POIs within selected categories.
•
The
Near scroll mark
menu is enabled
only when the map has been scrolled.
Adding a My Place
Press the button ▶ Press the desired
group.
This feature is used to save the current
position or the scrolled position as a My
Place or Speed Alert.
i
Information
•
My Places are saved without distinction
for the driving or scrolled state.
•
The Speed Alert button is displayed
when a point is saved with the speed limit
of the road while driving on the road.
Starting Navigation
Using the Navigation
Navigation l 3-13
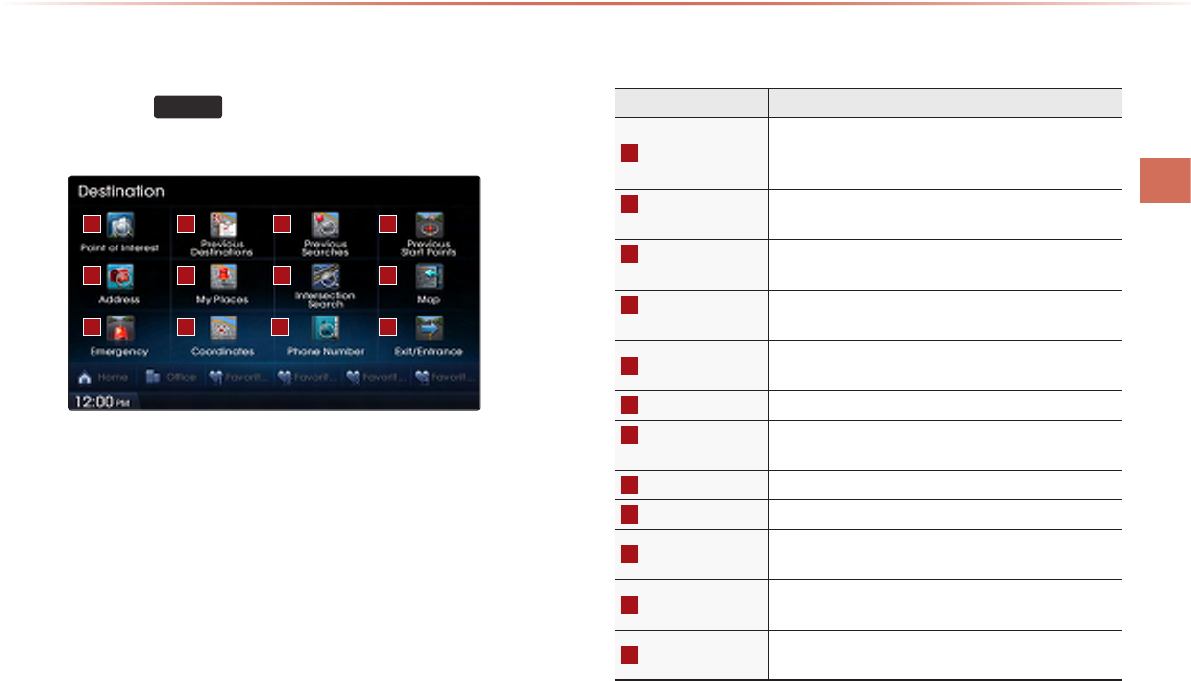
Destination Search
Using the Navigation
3 41 2
5
9 10 11
6 7 8
12
Name Description
1
Point of Interest
Used to search for neighboring POIs near current
position/near scroll position/near destination/near
city center
2
Previous
Destinations Used for route guidance to recently set destinations
3
Previous
Searches
Used for route guidance to recently searched loca-
tions
4
Previous Start
Points Used for route guidance to recent start positions
5
Address Used to search destinations by selecting specific
states/cities/roads
6
My Places Displays list of saved My Places
7
Intersection
Search
Used to search destinations by selecting street inter-
sections
8
Map Moves to the map screen
9
Emergency Used to make emergency related searches
10
Coordinates Used to search destinations by entering the Lat/
Long coordinates
11
Phone Number
Used to search destinations by entering POI phone
numbers
12
Exit/Entrance
Used to search destinations by searching for ex-
pressway exits/entrances
Press the
DEST
key to display the Destination
Search menu screen.
The Destination Search screen includes various
search menus as well as shortcuts to Favorites that
provide maximum convenience in searching for desti-
nations.
3-14
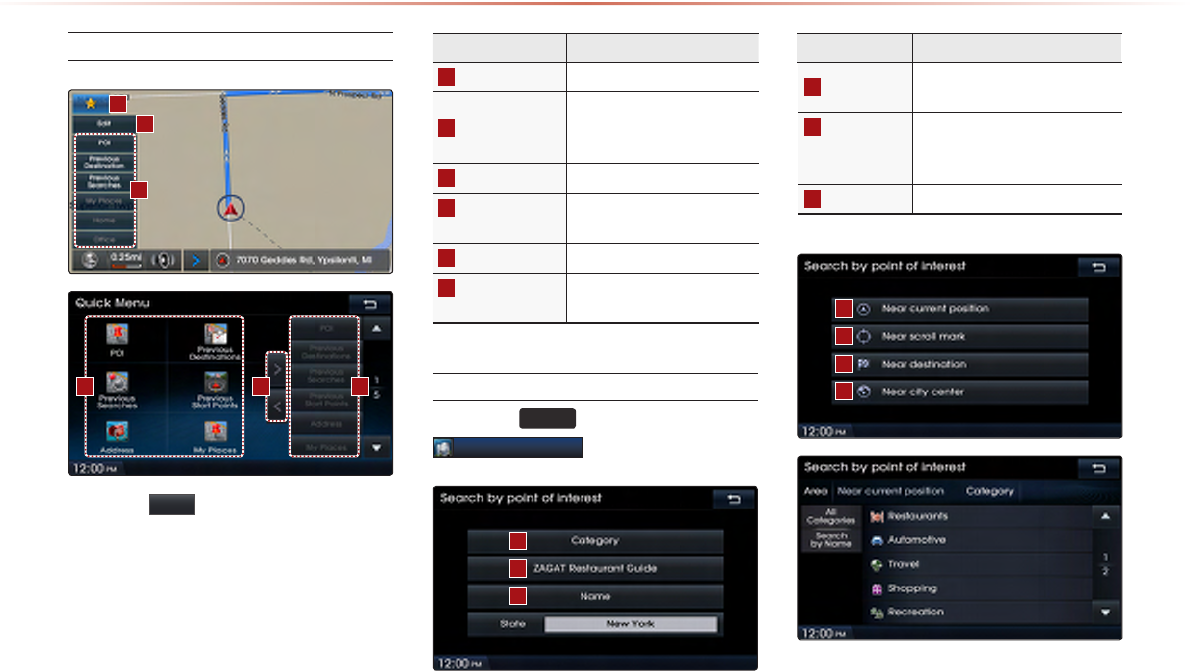
Using the Navigation
Quick Menu
Press the ★ button on the left side of
the map screen to display the Quick Menu.
Name Description
1 Quick Menu (★)
Display/hide Quick Menus
2
Quick Menu Bar
Menus added to the Quick
Menu (possible to set up to
6 menus)
3
Edit Add/Delete Quick Menus
4
Current Quick
Menus
Shows list of current Quick
Menus
5
Add/Remove
Add or remove Quick Menus
6
Quick Menu
Categories
List of categories that can
be added to Quick Menus
Point of Interest (POI) Search
Press the
DEST
key ▶ Press
Point of Interest
.
Name Description
1
Category Search for POIs by selecting
through POI categories
2
ZAGAT
Restaurant
Guide
Search for ZAGAT restaurant
guide POIs from among POIs
within the vicinity
3
Name Search POIs by name
1
4 6
3
5
1
2
3
1
2
3
4
2
Using the Navigation
Navigation l 3-15
POI Search is a feature that allows you to
search for POIs that are near your current
position, near a scroll mark, near the destina-
tion, or near the city center.
Categories are sub-categorized and the
selected area and category are displayed at
the top of the screen for user convenience.
Name Description
1
Near Current
Position
Searches POIs based on the
current vehicle position
2
Near Scroll
Mark
Searches POIs based on the
current map scroll position
3
Near
Destination
Searches POIs nearby the
set destination (feature is dis-
abled when a destination has
not been set)
4
Near City
Center
Searches POIs nearby a se-
lected area
i
Information
•
The searched location may not be the
exact location of a specific destination,
but displays a representative position of a
POI address.
•
The ZAGAT Restaurant guide list is a rat-
ing system categorized into 0~9 Poor to
fair, 10~15 Fair to good , 16~19 Good to
very good , 20~25 Very good to excellent,
26~30 Extraordinary to perfection.
•
Each category is sorted starting with high-
est ratings down to the lowest ratings.
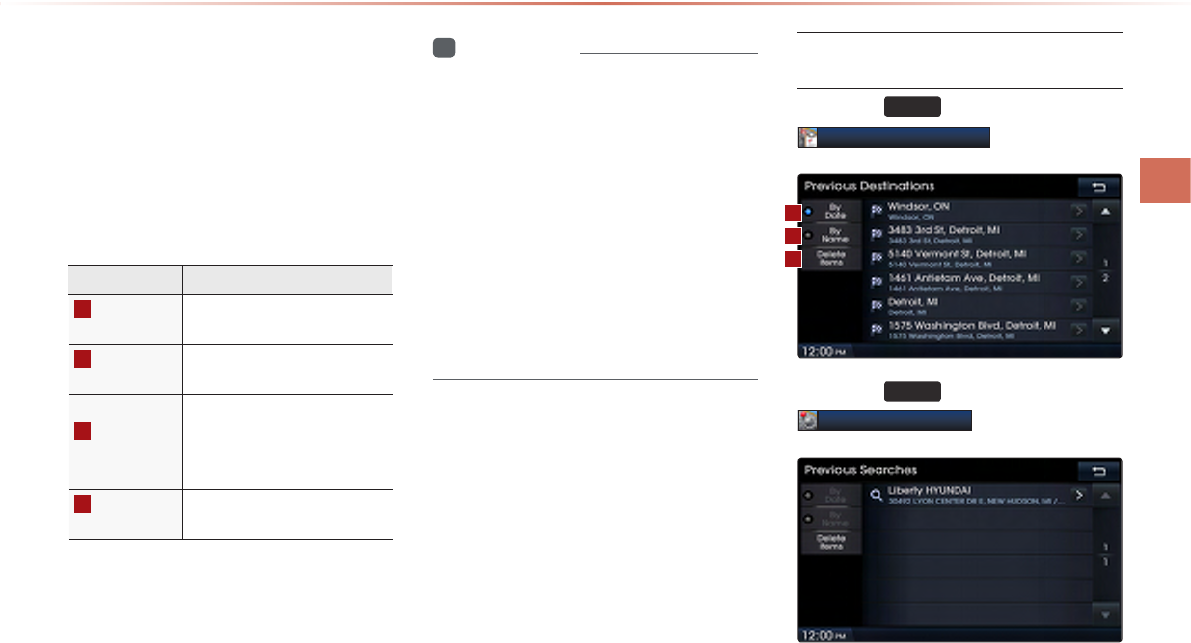
Previous Destinations, Previous
Searches, and Previous Start Points
Press the
DEST
key ▶ Press
Previous Destinations
.
Press the
DEST
key ▶ Press
Previous Searches
.
1
2
3
3-16
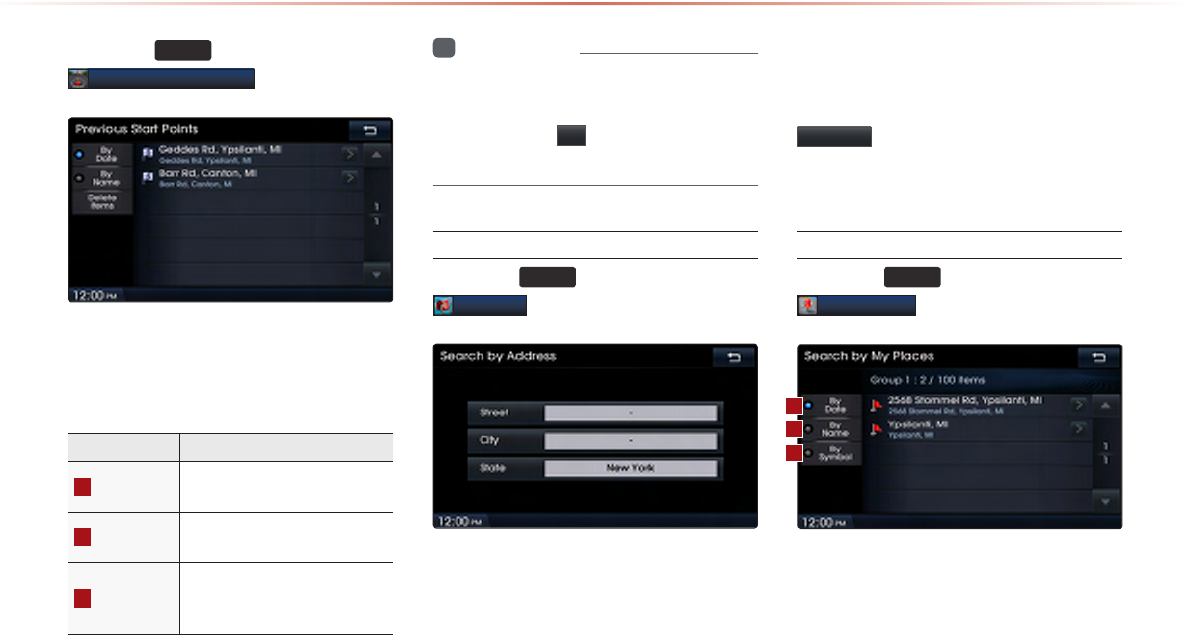
Using the Navigation
Press the
DEST
key ▶ Press
Previous Start Points
.
These search features allow you to search
previous routes, previous searches and
start points.
Name Description
1
By Date Sorts POIs and locations by
added date
2
By Name Sorts POIs and locations by
name
3
Delete Items
From various entries, items
can be selected and deleted
all at once
i
Information
•
If the POI or region name is too long and
cannot be displayed within one screen,
pressing the
>
button will move the
name to the left to display the full name.
Address
Press the
DEST
key ▶ Press
Address
.
T
his search feature is used to search des-
tinations by addresses through state, city,
and street.
Enter the name of the Street, City and
State corresponding to the desired destina-
tion. Once search is complete, press the
Search
button to select the desired loca-
tion from the list.
My Places
Press the
DEST
key ▶ Press
My places
.
This search feature is used to search des-
tinations by selecting previously saved My
Places to set as destinations. My Places
can be placed in groups, and group names
can be edited within Setup.
1
2
3
Using the Navigation
Navigation l 3-17
Name Description
1
By Date Sort POIs and locations by date
2
By Name
Sort POIs and locations by
name
3
By Symbol Sort POIs and locations by sym-
bol
i
Information
•
If the POI or region name is too long and
cannot be displayed within one screen,
pressing the > button will move the
name to the left.
•
It is possible to save up to 100 My Places
per Group.
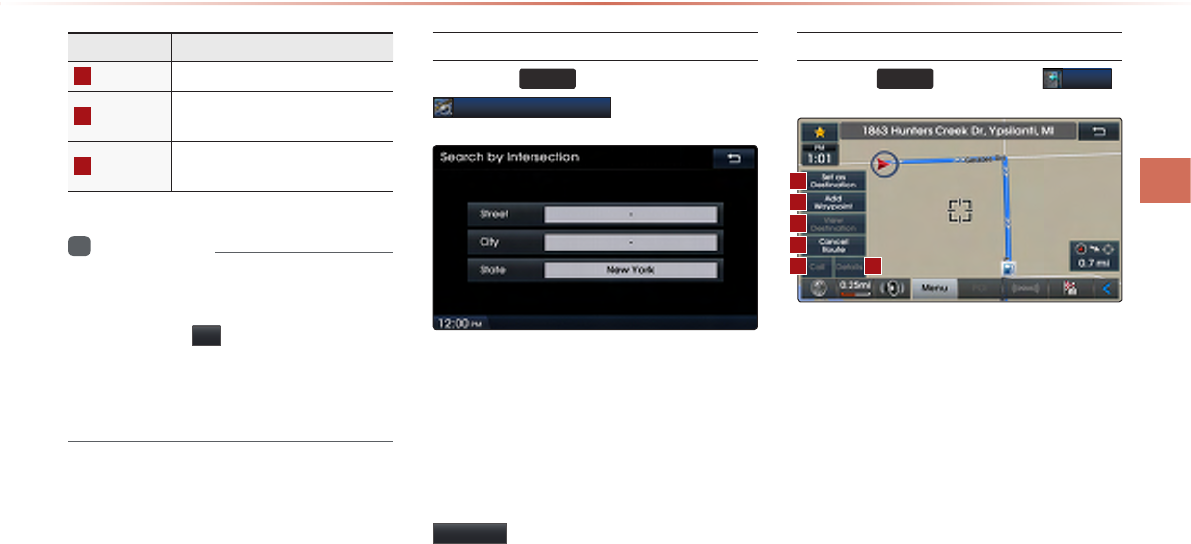
Intersection Search
Press the
DEST
key ▶ Press
Intersection Search
.
This search feature is used to search des-
tinations by street intersections throughout
the map.
Enter the name of the Street, City and
State corresponding to the desired desti-
nation. Once search is complete, press the
Search button to select the desired loca-
tion from the list.
Map
Press the
DEST
key ▶ Press
Map
.
The map screen can be scrolled to display
other positions where you can set destinations.
1
2
3
4
5 6
3-18
Using the Navigation
Name Description
1
Set as
Destination
Sets the POI or region where
the cursor is positioned as the
new destination
2
Add
Waypoint
Sets the POI or region where the
cursor is positioned as a waypoint
3
View
Destination
Displays information for the set
destination
4
Cancel
Route Cancels the currently set route
5
Call Calls the selected POI facility
6
Details
Displays details for the selected
POI facility with ZAGAT informa-
tion
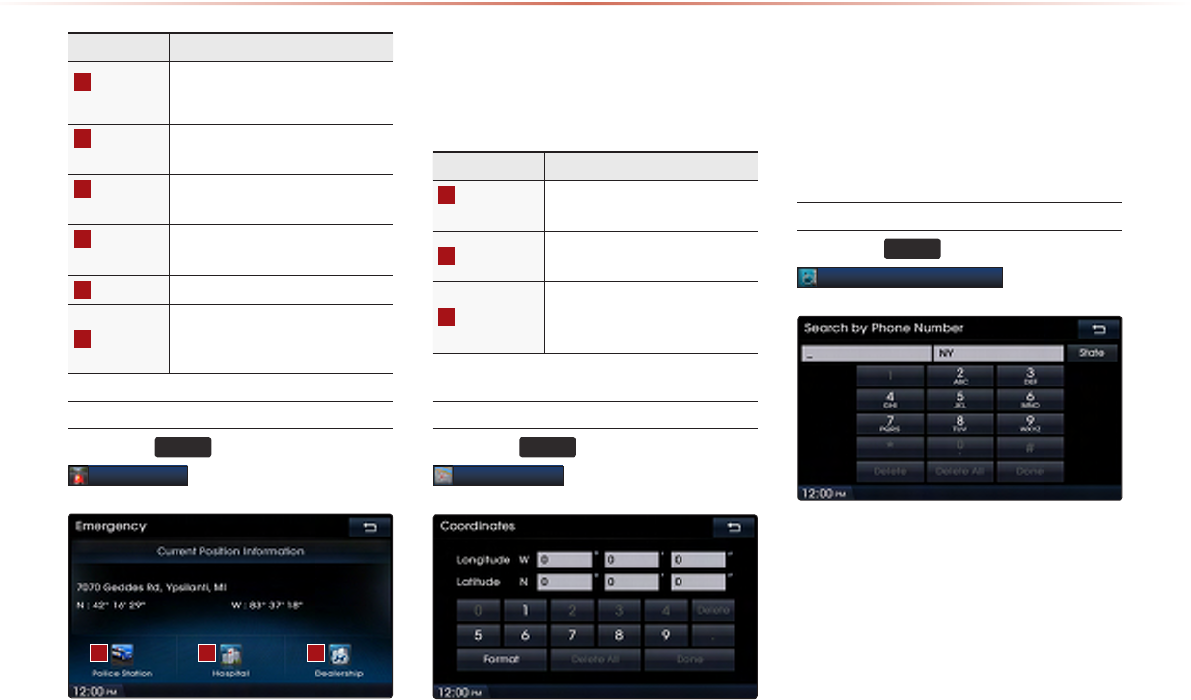
Emergency
Press the
DEST
key ▶ Press
Emergency
.
This search feature is used to search for
police stations, hospitals, and dealerships
in emergency situations.
Name Description
1
Police
Station
Displays list of Police Stations
closest to the current position
2
Hospital Displays list of Hospitals clos-
est to the current position
3
Dealership
Displays list of Hyundai Motor
Dealerships closest to the cur-
rent position
Coordinates
Press the
DEST
key ▶ Press
Coordinates
.
This search feature is used to search desti-
nations by entering coordinates. Two coor-
dinate entry formats are supported. Select
the desired format upon starting search.
Phone Number Search
Press the
DEST
key ▶ Press
Phone Number Search
.
This search feature is used to search the
locations of POIs by entering the phone
number of the desired POI destination.
• Area codes must be entered to complete
the search.
1 2 3
Using the Navigation
Navigation l 3-19
i
Information
•
The phone number and location may
differ for some POIs. In addition, the fol-
lowing types of facilities may be more
frequently located in other locations.
•
Locations of department stores, muse-
ums, and amusement parks may some-
what differ from the set destination.
Check the exact address when trying to
reach such destinations.
•
Within general information newspapers,
there are cases when phone numbers of
concert halls actually list the numbers of
management companies. In such cases,
destination searches will be made to the
management companies.
•
The telephone number and addresses
may change at any time.
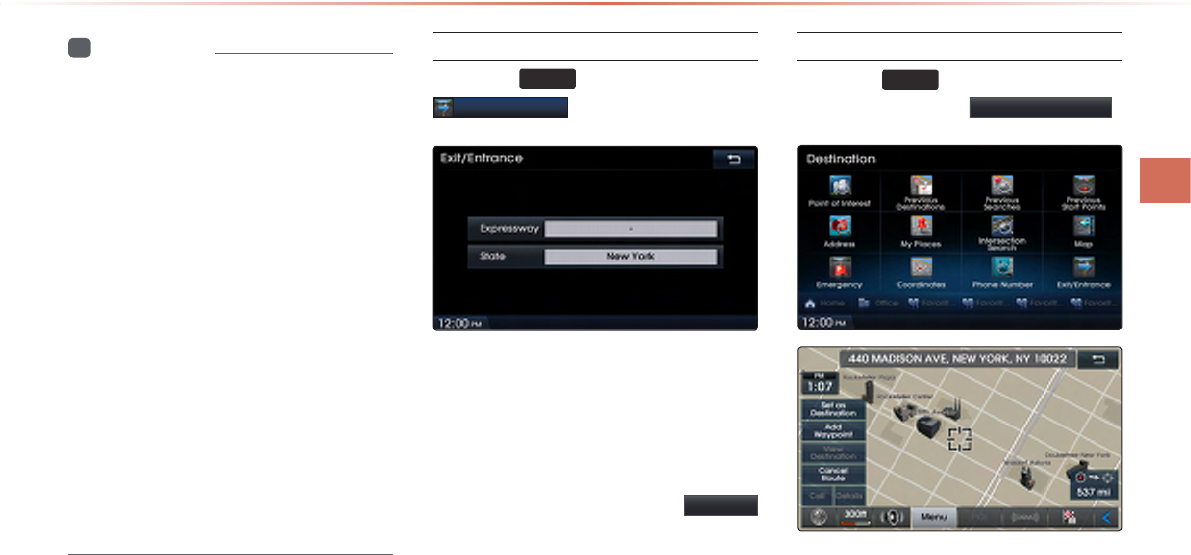
Exit/Entrance
Press the
DEST
key ▶ Press
Exit/Entrance
.
This search feature is used to search
destinations by entering the Exits and
Entrances of corresponding expressways.
Enter the name of the Freeway corre-
sponding to the desired destination. Once
search is complete, press the Search
button to select the desired location from
the list.
Setting a Destination
Press the
DEST
key ▶ Search for the
Destination ▶ Press
Set as Destination
.
3-20
Using the Navigation
(Alternative Route)
(Route Overview)
• To conduct a destination search through
the desired search method, select the
desired destination from the list. (For
more information on destination search
methods, refer to the ‘Destination
Search’ section.)
• After verifying the location of the
searched destination, press the
Set as Destination button to calcu-
late the route. The Route Overview or
Alternative Route screen will be the dis-
played.
• Press the Add Waypoint button to add
a waypoint destination.
• Within the Route Overview or Alternative
Route screen, press the
MAP
VOICE
key
or the Start Guidance button to start
route guidance.
i
Information
•
If you press the
Set as Destination
button
while a previous destination has already
been set, the pop-up ‘Do you want to
change the destination?’ will be displayed.
•
If you press Yes , then the previous des-
tination is deleted and the new destination
will be set. Pressing the Add Waypoint
button will add a waypoint destination.
One Touch Scroll Setting
The destination can be set to the current
map display.
• Within the map screen, touching a position
on the map will move the map to the center
of the selected position and display the
scroll mark.
• Press the
Menu
button to set the selected
position as a waypoint or destination.
Using the Navigation
Navigation l 3-21
Route Calculation
• Once you have set a destination, calcu-
late the route. The route overview and
route option menus will be displayed.
• After checking the Route Overview, press
the
MAP
VOICE
key or the
Start Guidance
button or just drive for over 3 mph or for
approximately 5 seconds to start guid-
ance.
i
Information
•
To learn more about ‘Alternative Route’,
‘Route Overview’, or ‘Detailed Route
Settings’ refer to the ‘Route Menu’ section.
Demo
After a route has been calculated, press
the Demo button to begin simulated
driving of the calculated route.
• Within the Route Overview screen, press
the Demo button.
• During Demo, press the
MAP
VOICE
key
to end the demo and display the current
map position. If you start driving while
viewing the route demo, demo will end
and route guidance will start.
i
Information
•
Demo will not operate after starting route
guidance. To use the Demo feature, use
after route calculation but prior to starting
route guidance.
•
During Demo the “Fast/Normal/Auto”
menus are displayed and it is possible to
adjust the demo speed.
3-22
Using the Navigation
Add Waypoint
After searching for waypoints, press the
Add Waypoint button to add the way-
point to the current route.
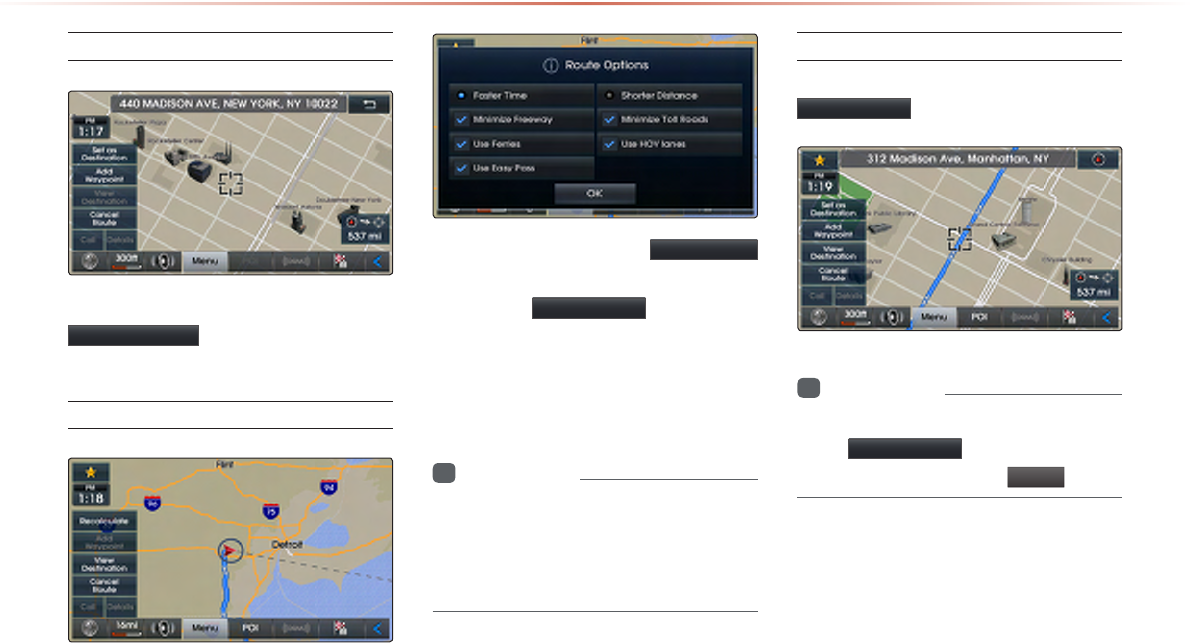
Route Recalculation
Once a route has been set, the
Recalculate
button is displayed at the top of the menus.
Pressing the Recalculate button will dis-
play a pop-up that allows you to change route
options. Once the settings are changed,
the route is recalculated by reflecting the
changes.
i
Information
•
For more information on Faster Time,
Shorter Distance, and other route calcula-
tion options, refer to the route calculation
section.
Cancel Route
In the Map menu screen, press the
Cancel Route button.
i
Information
•
You can cancel the route by pressing
the
Cancel Route
button that is dis-
played after pressing the
Menu
button.
Using the Navigation
Navigation l 3-23
Route Guidance
Preliminary guidance, highway mode, turn
list guidance, and other guidance screens
are displayed according to the current road
condition.
Within the guidance map screen, if the cur-
rent position is on route, then intersection
guidance will be provided once you are
nearby an intersection.
Also, the intersection zoom screen is dis-
played when nearby an intersection.
i
Information
•
Within all guidance mode screens, press-
ing the button at the bottom right side of
the screen will change the route guidance
mode.
•
Each time the button is pressed, the guid-
ance mode will change in order of prelimi-
nary guidance → turn list → highway guid-
ance mode. (The icon within the button
indicates the mode that will be displayed
upon next press.)
•
Highway and intersection zoom guidance
are displayed during guidance at corre-
sponding roads.
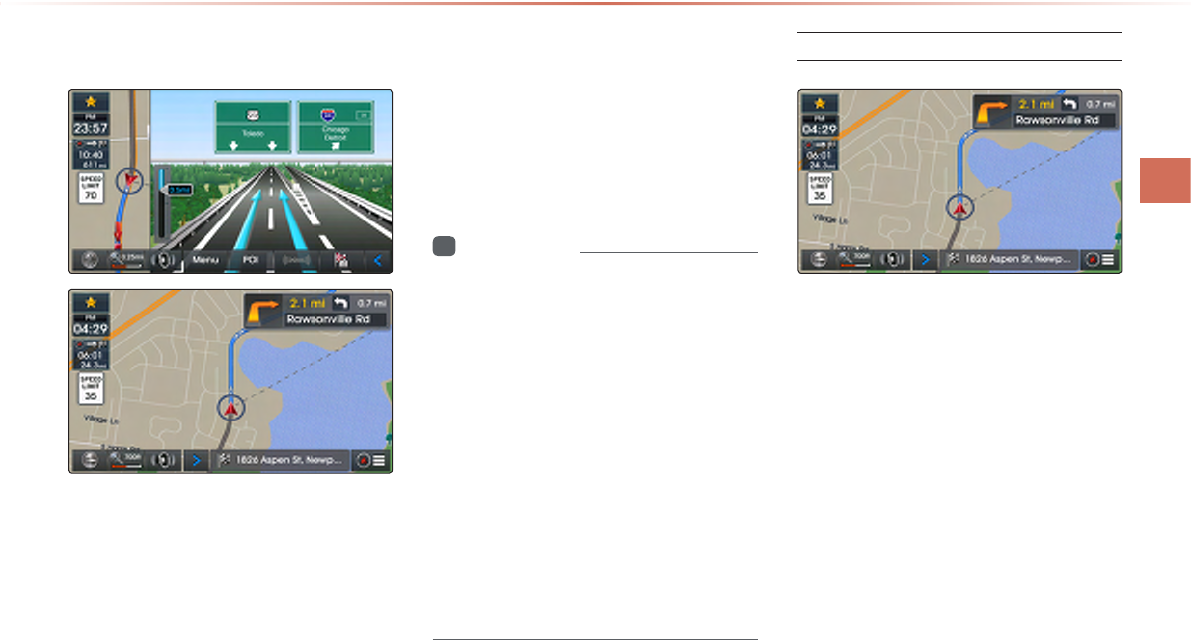
Preliminary Guidance Mode
At the top right side of the screen, the next/
after next turn info, remaining distance,
direction, and other information are dis-
played.
3-24
Using the Navigation
Intersection Zoom Mode
This mode provides detailed guidance
nearby intersections before the next turn.
This mode is displayed starting from 300m
before the intersection.
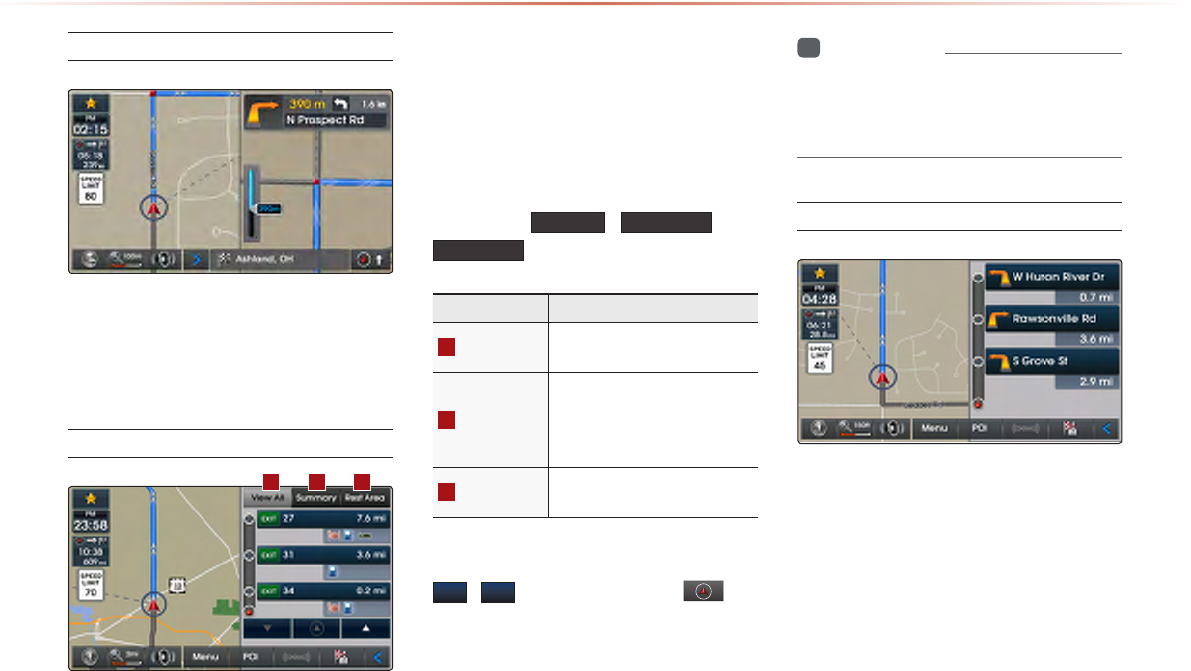
Highway Mode
Upon entering a highway during route guid-
ance, the highway mode will automatically
be displayed. This mode is displayed when
driving on a highway and mainly displays
highway related POIs.
You can check information for various POIs
by using the
View All
,
Summary , and
Rest Area buttons.
Name Description
1
View All Guidance for all POIs on the
highway
2
Summary
Shows list of turn points and
other directional route
guidance while driving within
highway
3
Rest Area Guidance for only the rest ar-
eas on the highway
When scrolling through POIs by using the
▼
,
▲
buttons, pressing the
but-
ton will select the POI closest to the cur-
rent position.
i
Information
•
When there are more than four POI marks
that can be listed, some POIs may be
omitted and not displayed.
Turn List Mode
Turn List Mode shows turn information on
the current route.
123
Using the Navigation
Navigation l 3-25
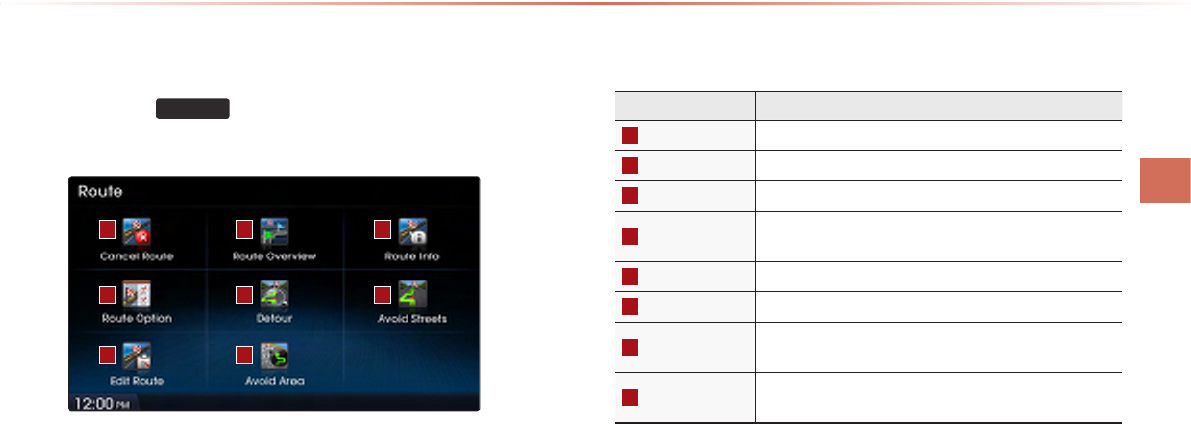
Route Menu
Press the
ROUTE
key to use, edit, or optimize
various route options.
Name Description
1
Cancel Route Cancels the currently set route
2
Route Overview Shows the route overview to the set destination
3
Route Info Shows detailed info for the current route
4
Route Option Route calculation settings with various options for cal-
culating a route
5
Detour Used to select and edit detour road/streets
6
Avoid Streets Used to edit the route by avoiding streets
7
Edit Route Used to add/delete/change the order of destinations/
waypoints
8
Avoid Area
Used to edit route by adding Avoid Areas/Editing Avoid
Areas and Deleting Avoid Areas
1
4
7
2
5
8
3
6
3-26
Using the Navigation
Cancel Route
Press the
ROUTE
key
▶ Press
Cancel Route
.
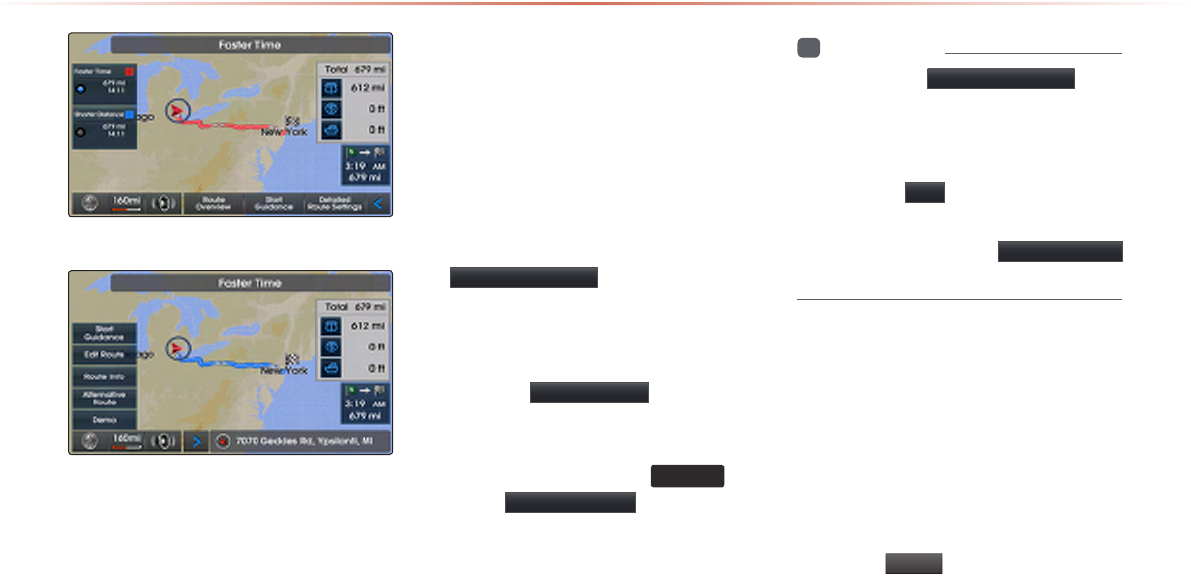
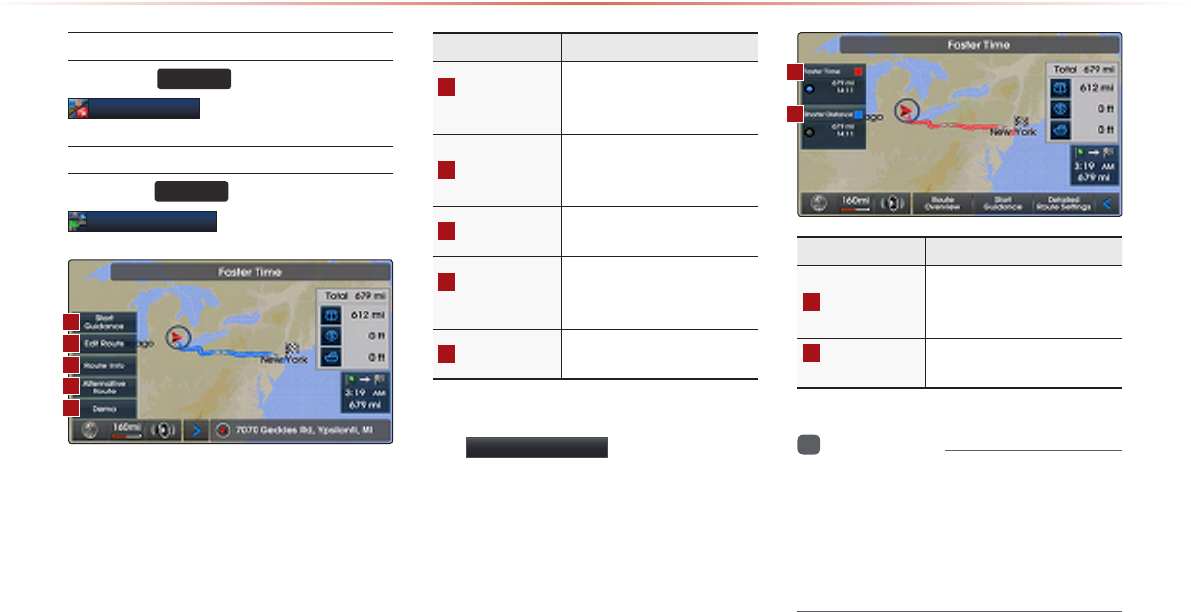
Route Overview
Press the
ROUTE
key ▶ Press
Route Overview
.
Name Description
1
Start
Guidance
Starts guidance to the set
Route/Displays the current
vehicle position
2
Edit Route
Used to add/delete/change
order of destinations/ way-
points
3
Route Info Shows route info to the set
destination
4
Alternative
Route
Displays various alternative
route options for route cal-
culation
5
Demo
Starts demo to the set desti-
nation
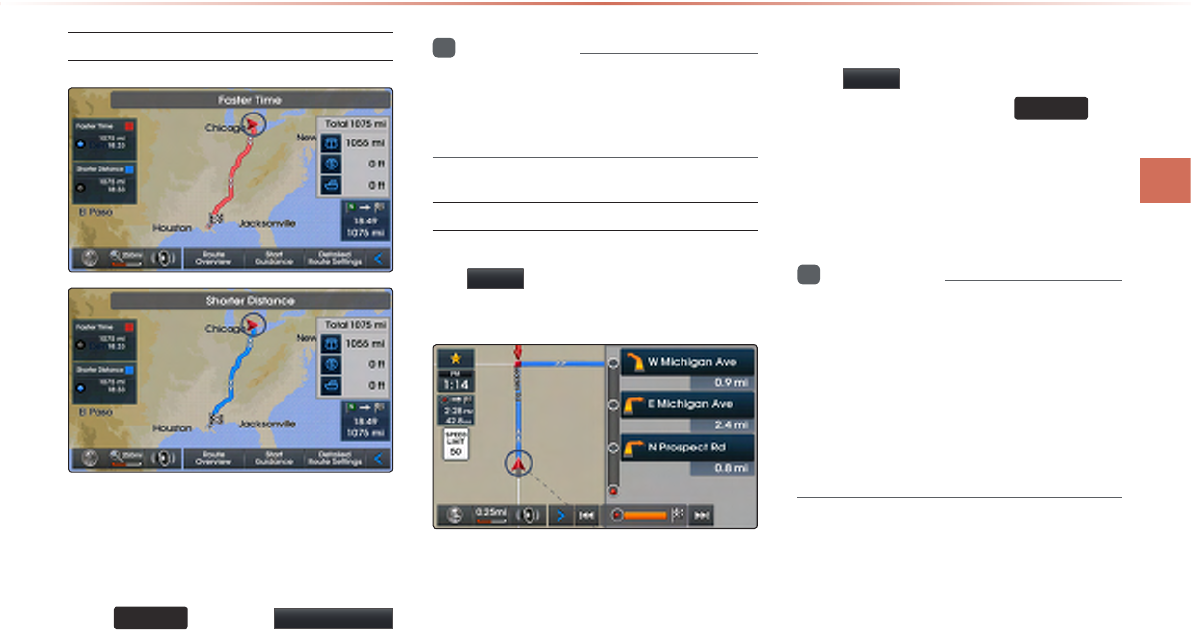
Within the Route Overview screen, press
the
Alternative Route
button to display
other potential routes to the set destination.
From the alternative route options, select
the desired route.
Name Description
1
Faster Time
Faster time route that re-
flects distance and traffic
conditions
2
Shorter
Distance
The shortest distance from
start point to the destination
i
Information
•
Even if the “Use Alternative Route Search”
option is turned on, the Route Overview
screen (not the Alternative Route screen)
when calculating routes that include way-
points.
1
2
1
3
2
4
5
Using the Navigation
Navigation l 3-27
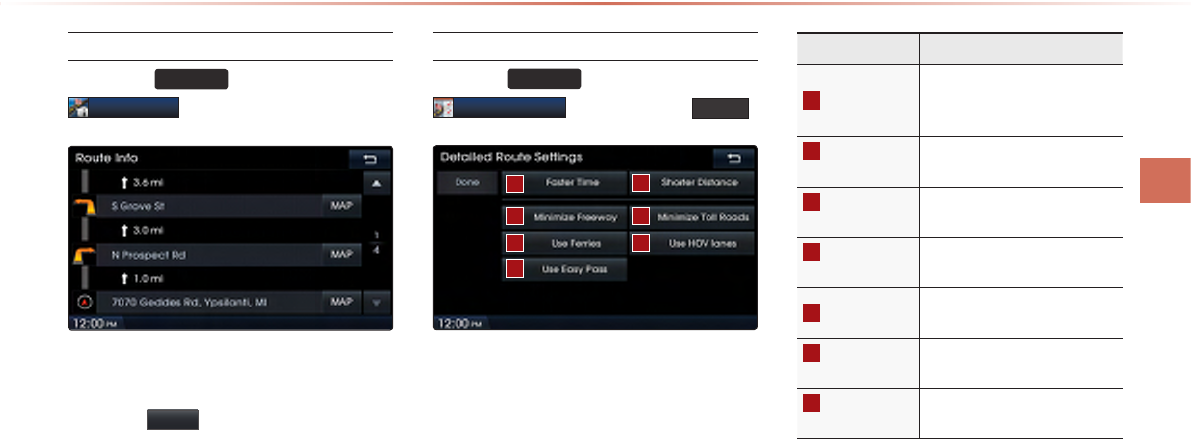
Route Info
Press the
ROUTE
key ▶ Press
Route Info
.
The turn points and distance information
by
key roads within the set route are displayed.
Press the MAP button next to each road
name to display the map position for the
corresponding location.
Route Option
Press the
ROUTE
key ▶ Press
Route Option
▶ Set and press
Done
.
1
3
5
2
4
7
6
Route Options refer to conditions used to
calculate the route to the destination. The
route is automatically recalculated if the
route options and detailed route settings
are changed.
Name Description
1
Faster Time
Faster time route that reects
distance and traffic condi-
tions
2
Shorter Dis-
tance
The shortest distance from
start point to the destination
3
Minimize
Freeway
Route calculation with mini-
mal use of highway
4
Minimize Toll
Roads
Route calculation with mini-
mal use of toll roads
5
Use Ferries Route calculation by includ-
ing use of ferries
6
Use HOV
Lanes
Route calculation by includ-
ing use of HOV lanes
7
Use Easy
Pass
Route calculation by includ-
ing use of Easy Pass
3-28
Using the Navigation
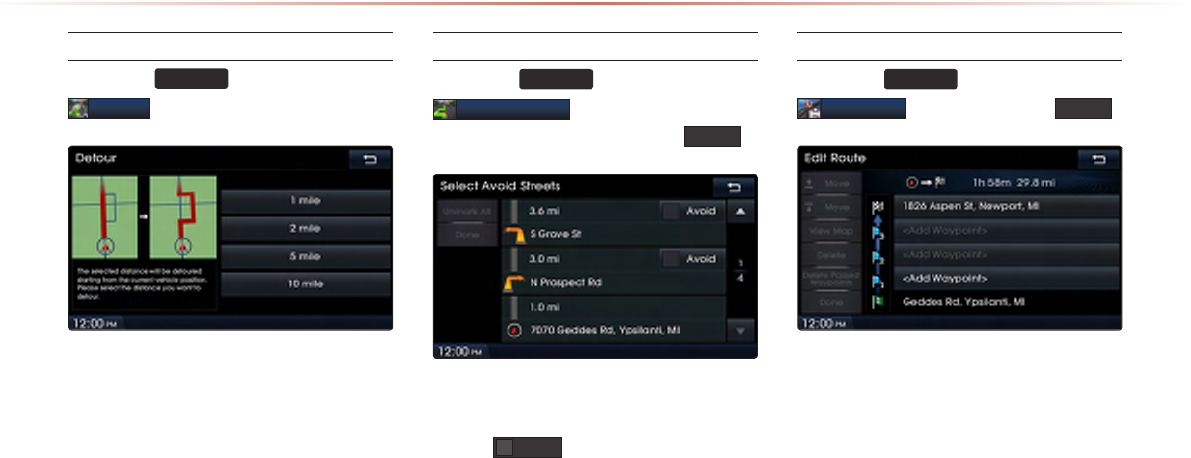
Detour
Press the
ROUTE
key ▶ Press
Detour
.
The Detour menu is used to redefine the
route by setting a detour to a certain dis-
tance from the current position.
Avoid Streets
Press the
ROUTE
key ▶ Press
Avoid Streets
▶ Select the streets
you want to avoid and press Done .
This feature is used to select specific
streets to avoid within the current route.
Select Avoid to avoid the particular
streets in the route overview that are
desired to be avoided.
Edit Route
Press the
ROUTE
key ▶ Press
Edit Route
▶ Set and press Done .
The Edit Route menu displays the start
point, waypoints, and the destination in list
format and is used to edit corresponding
positions or the order of destinations within
the route.
Using the Navigation
Navigation l 3-29
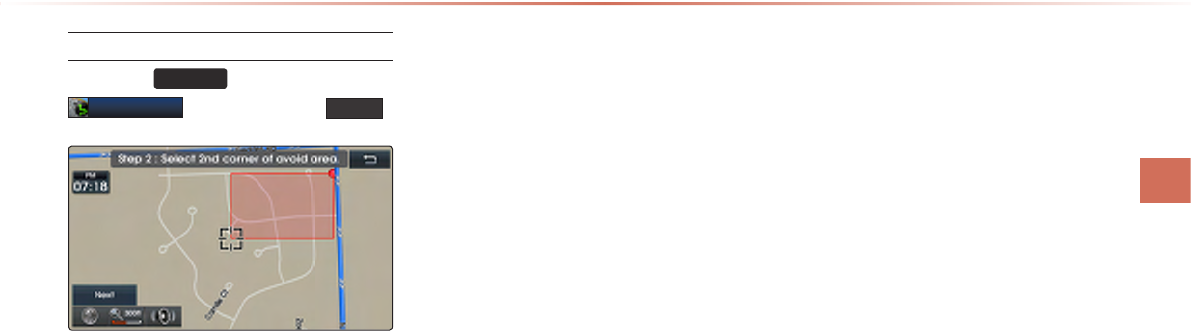
Avoid Area
Press the
ROUTE
key ▶Press
Avoid Area
▶ Set and press Done .
This feature is used by creating a rectangle
over the area to avoid.
An area set as an avoid area is excluded
from the calculated route. If a route had
been calculated prior to creating an avoid
area, the route will automatically be recal-
culated.
The screen will prompt to select the first
corner of the square of the avoid area, fol-
lowed by the second corner.
3-30
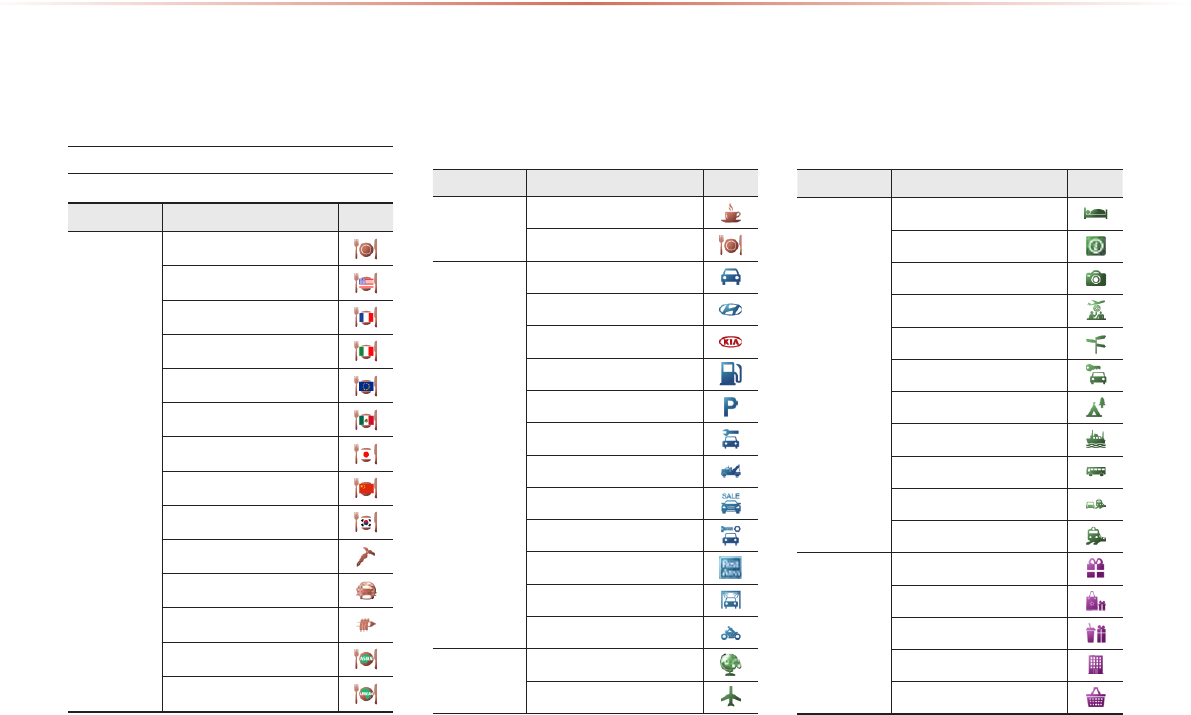
These are landmark and logo icons that display facilities within 2D map mode. The size of the
symbol may be displayed differently according to the map scale. Symbols may change without
prior notice during map updates. Symbols shown within the manual represent a portion of all
symbols and shou as a reference.
Logo/Landmarks
Map Logos and Landmarks
Category Sub-category Icon
Restaurant
Restaurant
American
French
Italian
Continental
Mexican
Japanese
Chinese
Korean
Vegetarian Food
Seafood
Latin American
Asian
African
Category Sub-category Icon
Restaurant Coee Shop
Others
Automotive
Automotive
Hyundai Dealership
KIA Dealership
Gas Station
Parking
Auto service
Road Assistance
Automobile Dealership
Auto Parts
Rest Area
Car Wash
Motorcycle Dealership
Travel Travel
Airport
Category Sub-category Icon
Travel
Hotel
Tourist Information
Tourist Attraction
Travel Agent
City Center
Rental Car Agency
Campground
Ferry Terminal
Bus Station
Local Transit
Train Station
Shopping
Shopping
Department Store
Convenience Store
Shopping Center
Grocery Store
LOGO
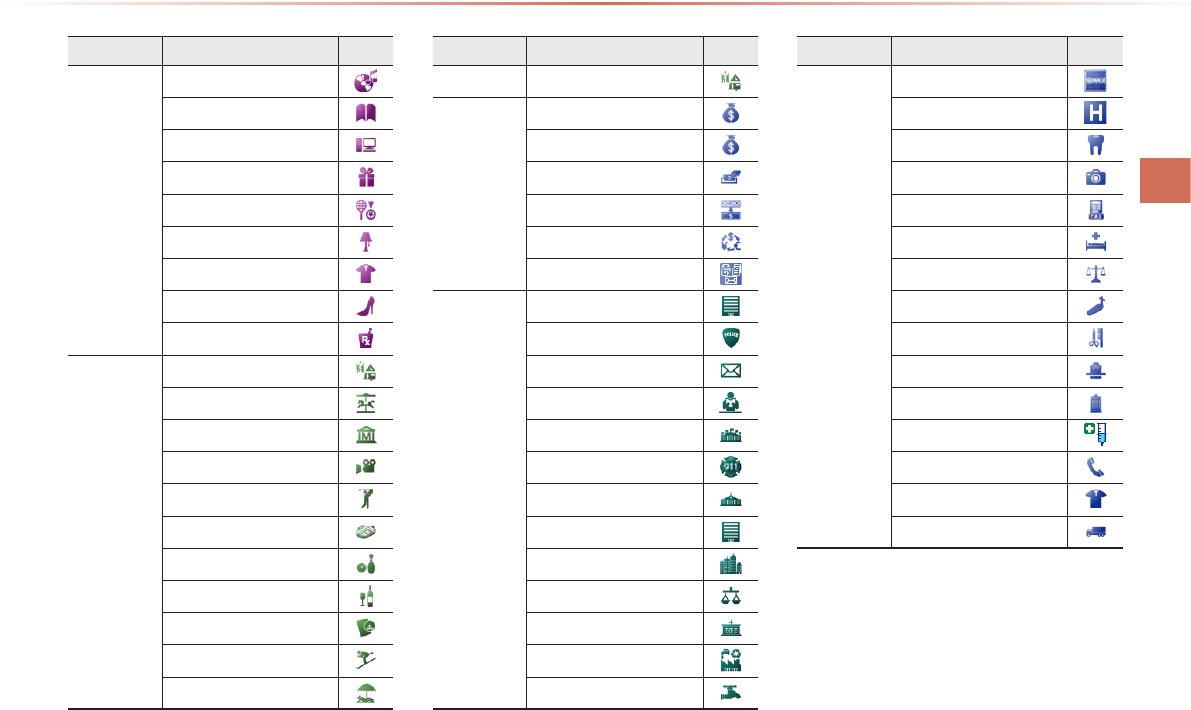
Map Logos and Landmarks
Navigation l 3-31
Category Sub-category Icon
Shopping
Music Store
Bookstore
Electronics
Gifts
Sporting Goods
Home Specialty Store
Clothing
Shoe Store
Pharmacy
Recreation
Recreation
Amusement Park
Museum
Cinema
Golf Course
Sports Complex
Sports Activities
Winery
Video & Game Rental
Ski Resort
Recreation Area
Category Sub-category Icon
Recreation Other Recreation
Financial
Service
Financial Service
Bank
ATM
Check Cashing Service
Money Transfer
Business Facility
Community
Community
Police Station
Post Oce
Library
School
Fire Department
Convention Center
City Hall
Civic Center
Court House
Government Oces
Waste & Sanitary
Utilities
Category Sub-category Icon
Services
Services
Hospital
Dentist
Photography
Tax Service
Medical Service
Attorney
Funeral Home
Hair & Beauty
Cleaning & Laundry
Social Service
Physician
Communication
Tailor & Alteration
Mover
3-32
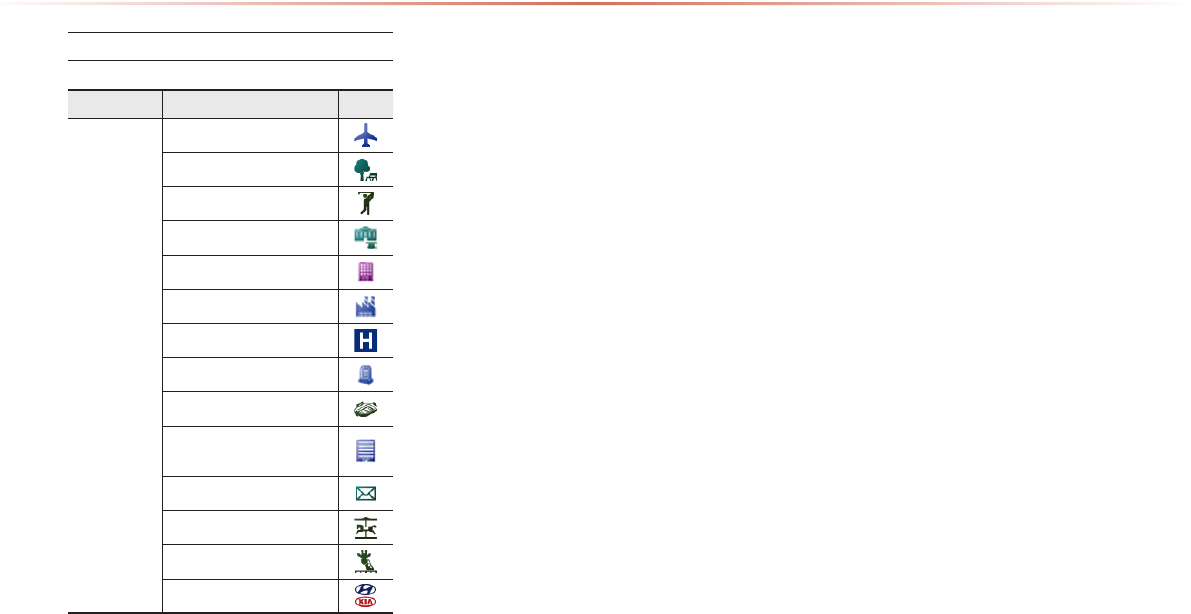
2D Landmarks
Map Logos and Landmarks
Category Sub-category Icon
Airport
Park
Golf course
University
SHOPPING CENTER
Industrial Complex
Hospital
Cemetery
Sports Complex
Emergency Service
Building
Post Oce Building
Amusement park
Animal Park
HATCH

CAR AVN SYSTEM
Bluetooth®
Handsfree
4
•
Before Use
•
Basic Mode Screen
•
Using
Bluetooth®
Wireless Technology
4-2
Before Using the Bluetooth® Handsfree
What is
Bluetooth
®
Wireless Technology?
Bluetooth
®
Wireless Technology refers to a short-distance wire-
less networking technology which uses a 2.45GHz frequency to
connect various devices within a certain distance.
Supported within PCs, external devices, Bluetooth
®
phones,
PDAs, various electronic devices, and automotive environ-
ments,
Bluetooth
®
Wireless Technology to be transmitted at
high speeds without having to use a connector cable.
Bluetooth
®
Handsfree refers to a device which allows the user to
conveniently make phone calls with Bluetooth
®
mobile phones
through the Navigation system.
The Bluetooth
®
Handsfree feature may not be supported in
some mobile phones. For more information on mobile phone
compatibility, visit the Hyundai Motor website.
(http://www.hyundaiusa.com)
Precautions for Safe Driving
Bluetooth® Handsfree is a feature that enables drivers to practice
safe driving. Connecting the head unit with a Bluetooth® phone
allows the user to conveniently make calls, receive calls, and man-
age the phone book. Before using
Bluetooth
®
Wireless Technology,
carefully read the contents of this user’s manual.
Excessive use or operations while driving may lead to negligent
driving practices and be the cause of accidents. Do not operate
the device excessively while driving.
Viewing the screen for prolonged periods of time is dangerous
and may lead to accidents. When driving, view the screen only
for short periods of time.
Before Use
Bluetooth® Handsfree l 4-� 4-�
Before Use
CAUTIONS upon Connecting
Bluetooth® Phone
Before connecting the head unit with the mobile phone, check to
see that the mobile phone supports Bluetooth® features.
Even if the phone supports
Bluetooth
®
Wireless Technology, the
phone will not be found during device searches if the phone has
been set to hidden state or the Bluetooth® power is turned off.
Disable the hidden state or turn on the Bluetooth® power prior to
searching/connecting with the head unit.
If Auto Connection is used, the Bluetooth® phone is automatically
connected when the ignition is turned on, making it unnecessary to
have to connect the phone with the head unit every time.
If you do not want automatic connection with your Bluetooth® de-
vice, turn the Bluetooth® feature off of the Bluetooth® device.
To set Auto Connection, go to
SETUP
▶
Bluetooth
▶
Auto Connections Settings .
The car name can be set at
SETUP
▶
Bluetooth
▶
Advanced Settings
▶
Device Information .
The passkey needed to connect the mobile phone can be verified/
changed at
SETUP
▶
Bluetooth
▶
Advanced Settings
▶
Change Passkey .
If the Bluetooth® audio does not play, go to
SETUP
▶
Bluetooth
▶
Streaming Audio Setting
If the feature is set to
Off , turn On and try again.
Park the vehicle when connecting the head unit with the mobile phone.
Bluetooth®
connection may become intermittently disconnected in
some mobile phones. Follow these steps to try again.
1. Turn the Bluetooth
®
function within the mobile phone OFF/ON and try
again.
2. Turn the mobile phone power OFF/ON and try again.
�. Completely remove the mobile phone battery, reboot, and then again.
4. Reboot the Audio Navigation System and try again.
5. Delete all paired devices, pair and try again.
The handsfree call volume and quality may differ depending on
the mobile phone.
Pairing Bluetooth® devices and use of other Bluetooth® features
are not supported when the vehicle is in motion. For safety, please
first park your vehicle.
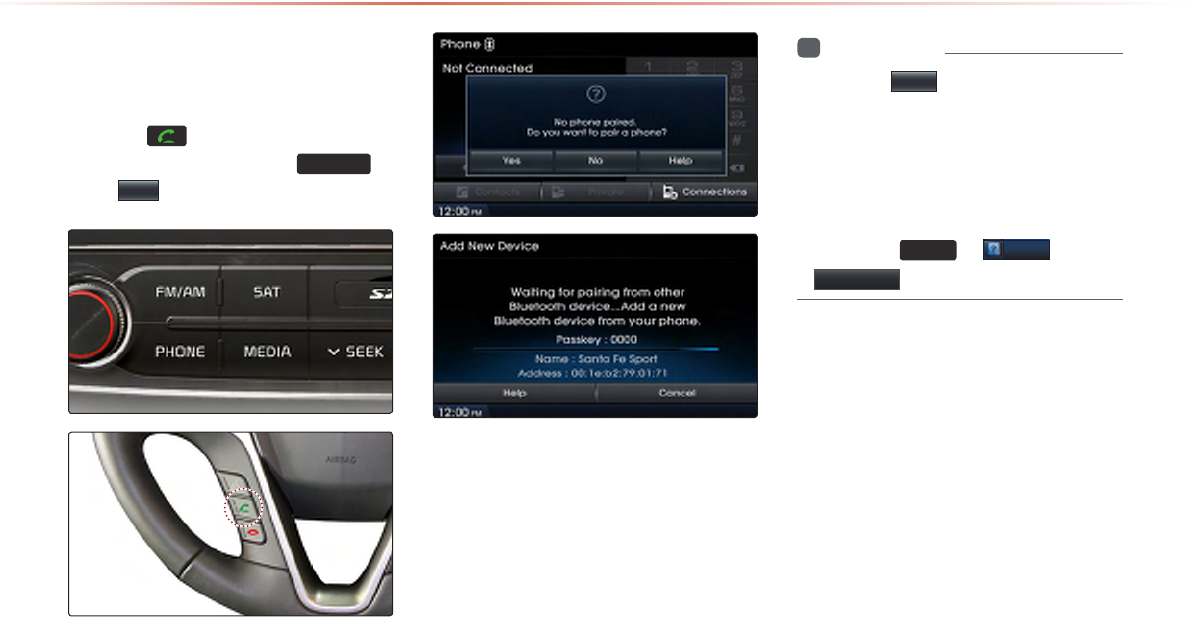
4-4
Basic Mode Screen
When no Phones Have
Been Paired
Press the key on the steering wheel
remote controller or press the
PHONE
▶
Press
Yes
.
i
Information
•
Press the
Help
button within the pop-up
to view the help section with informa-
tion related to pairing and connecting
Bluetooth® devices and using Handsfree
related features.
•
The same Help section can be viewed
by going to
INFO
▶
Help
▶
Bluetooth .