HYUNDAI MOBIS AV231JGAN CAR AVN User Manual 2
HYUNDAI MOBIS CO., LTD. CAR AVN 2
Contents
User manual -2
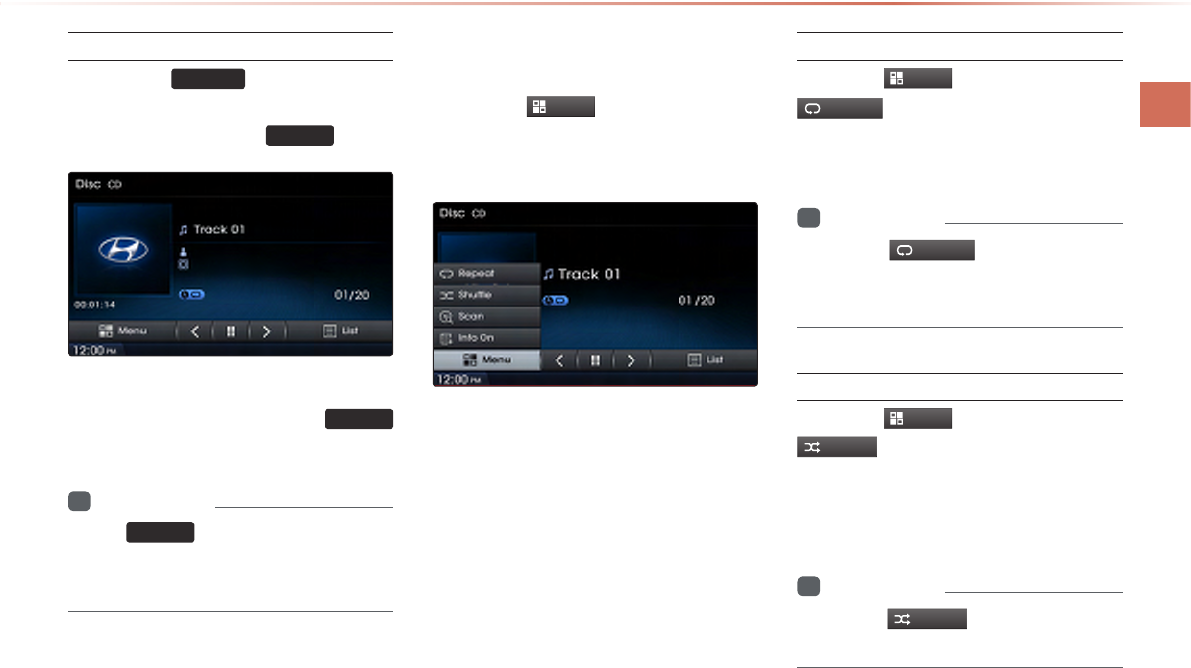
CD Mode
Audio l 2-21 2-21
Searching CD Tracks
Press the
TUNE
∧
∨
key ▶ Search
tracks ▶ Once the desired track name
is displayed, press the
ENTER
key.
When searching tracks, the track number
is displayed in blue. Pressing the
ENTER
key will play the corresponding track.
i
Information
•
If the
ENTER
key is not pressed within 5
seconds of searching tracks, the track info
for the current track is restored.
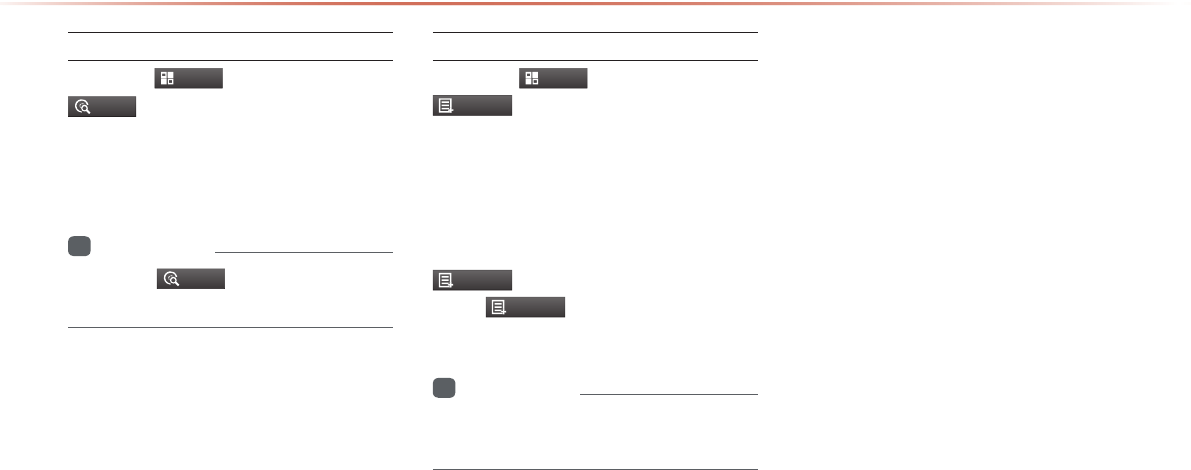
Using the Menu Buttons
Press the
Menu
button to set the
repeat, shuffle, scan and Info On/Info
Off menus.
Repeat
Press the
Menu
button ▶ Press
Repeat
.
The current track is repeated.
i
Information
•
Press the
Repeat
button again to turn
off repeat. If nothing is selected, then all
tracks will be played in sequential order.
Shue
Press the
Menu
button ▶ Press
Shuffle
.
Tracks within the disc are played in ran-
dom order.
i
Information
•
Press the
Shuffle
button again to turn
the shuffle option off.
2-22
Scan
Press the
Menu
button ▶ Press
Scan
.
The beginning (approx. 10 seconds) of all
tracks within the CD are scanned.
i
Information
•
Press the
Scan
button again to turn the
scan option off.
Info On/Info O
Press the
Menu
button ▶ Press
Info On
.
The amount of information displayed on
the screen can be selected. When the
title, artist, and album info are displayed,
the button will automatically change to
Info Off
.
Press
Info Off
to restore the previous
information display setting.
i
Information
•
Artist/album info is supported within Text
CDs.
CD Mode
MP3 CD Mode
Audio l 2-23 2-23
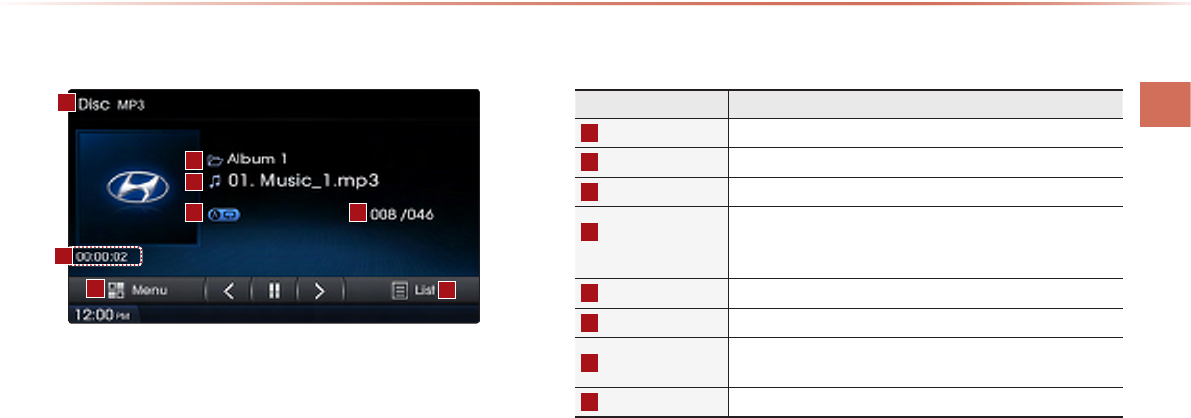
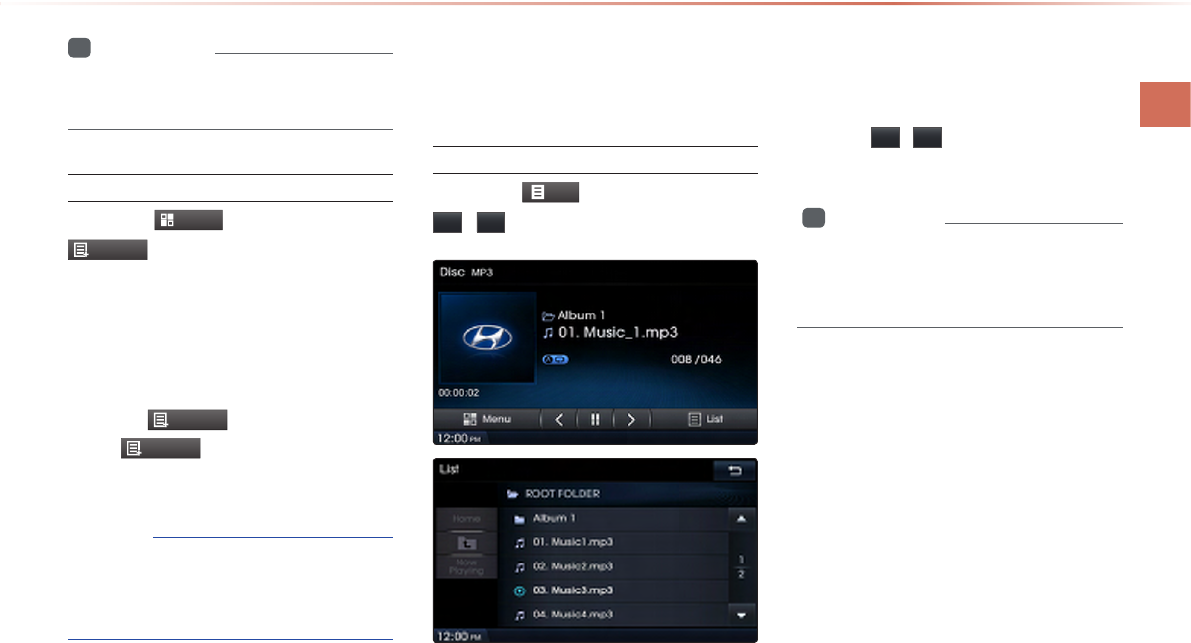
Basic Mode Screen
MP3 CD Mode
Name Description
1
Mode Displays currently operating mode
2
Folder Name Displays folder name for current le
3
File Name Displays the name of the current le
4
Repeat/Shue/
Scan
From Repeat All/Repeat One Song/Repeat Folder/Shue
Folder/Shue All/Folder Scan/Scan All, displays the cur-
rently operating function
5
File Index Shows the current MP3 le/total number of MP3 les
6
Play Time Displays the current play time
7
Menu Displays Copy, Repeat, Shuffle, Scan and Info On (Info
O) menus
8
List Moves to the list screen
1
7
4 5
8
3
2
6
2-24
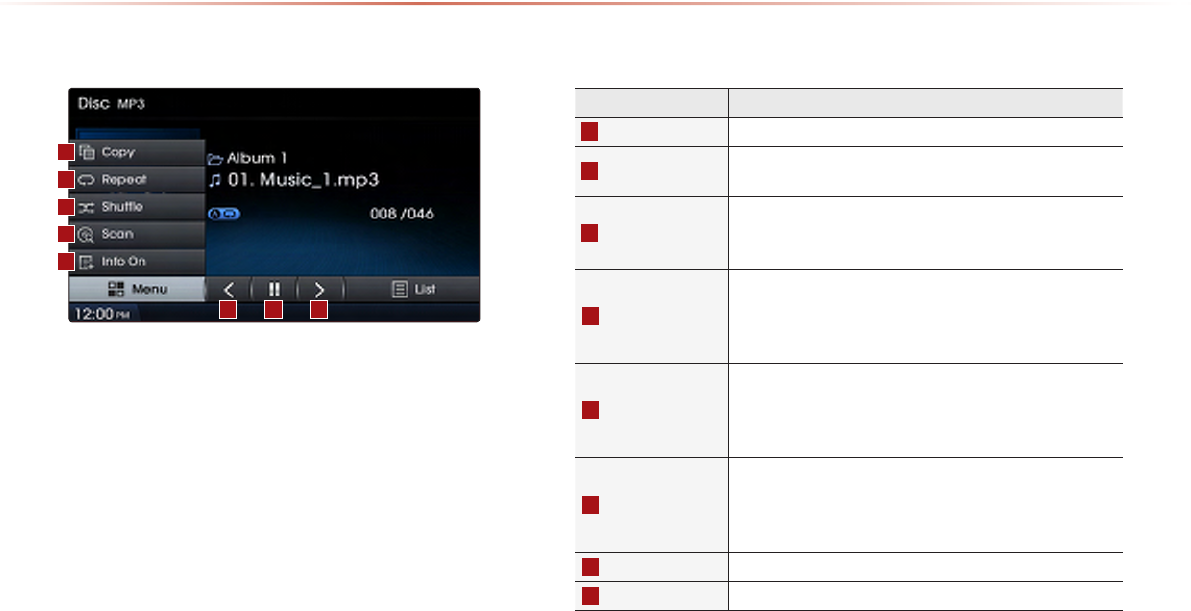
MP3 CD Mode
Name Description
9
Copy Copies the currently playing le into My Music
10
Repeat Repeats the current le (each time the button is pressed,
changes in order of Repeat Once → Repeat Folder → Off)
11
Shue
Plays files in random order (each time the button is
pressed, changes option in order of Shufe Folder →
Shufe All → Off)
12
Scan
Scans the beginning parts of MP3 les (approx. 10 sec-
onds per le)
(Each time the button is pressed, changes option in order
of Folder Scan → Scan All → Off)
13
Info O (Info On)
Changes the display method between Info O/Info On
• Info O : shows folder name/le name
• Info On : shows folder name, le name, title, artist, and
album info
14
Previous le
• When the play time is under 2 seconds : Moves to the
previous le
• When the play time is over 2 seconds : Plays the
current le from the beginning
15
Play/Pause Plays/pauses the current le
16
Next le Moves to the next le
Basic Mode Screen
9
10
11
12
13
15 1614
MP3 CD Mode
Audio l 2-25 2-25
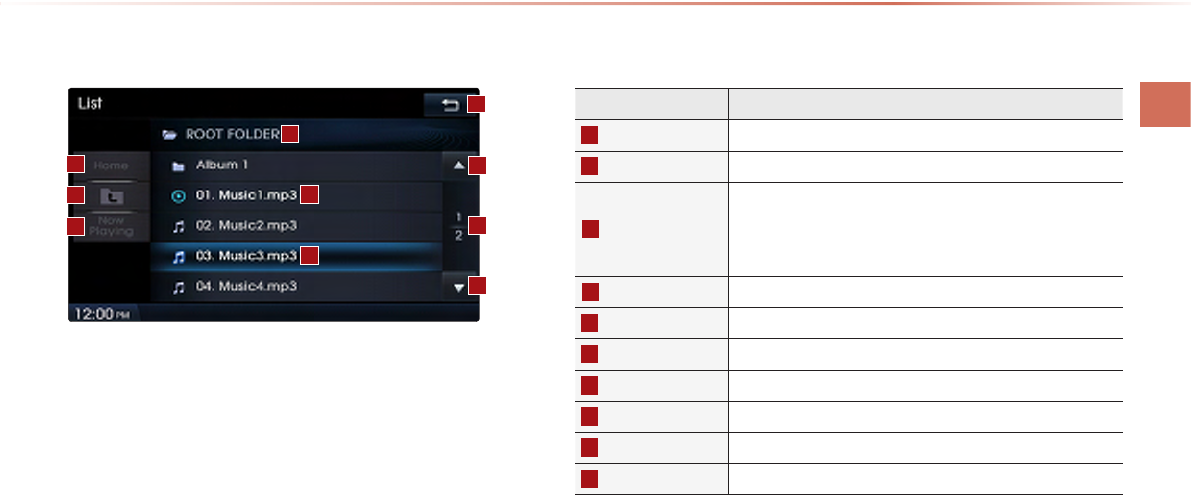
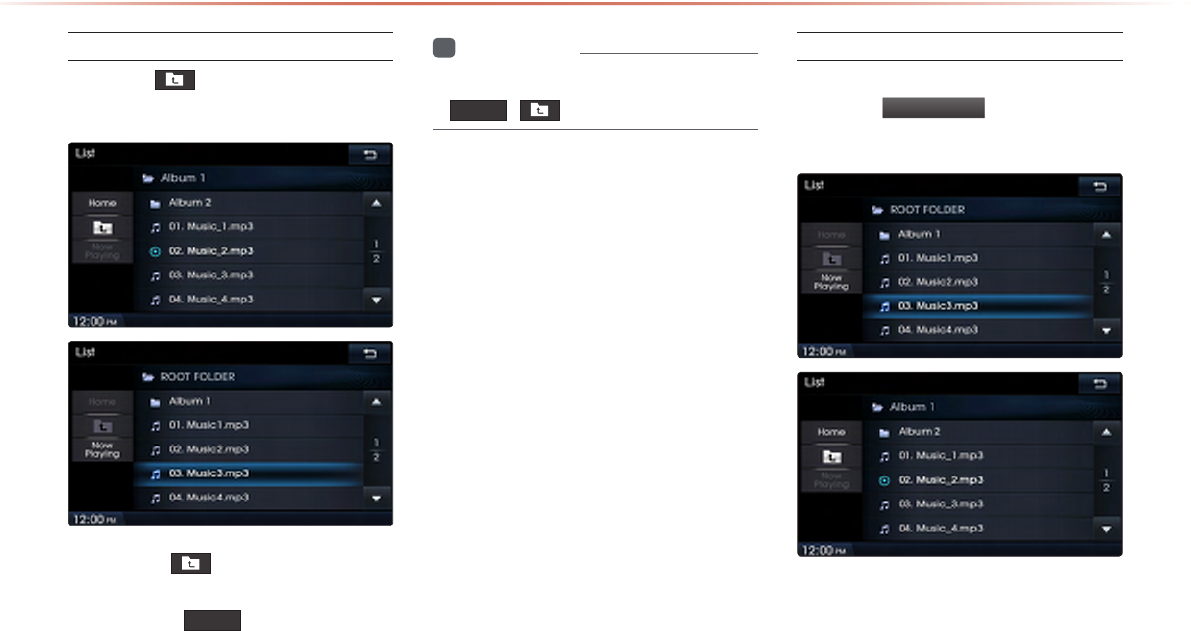
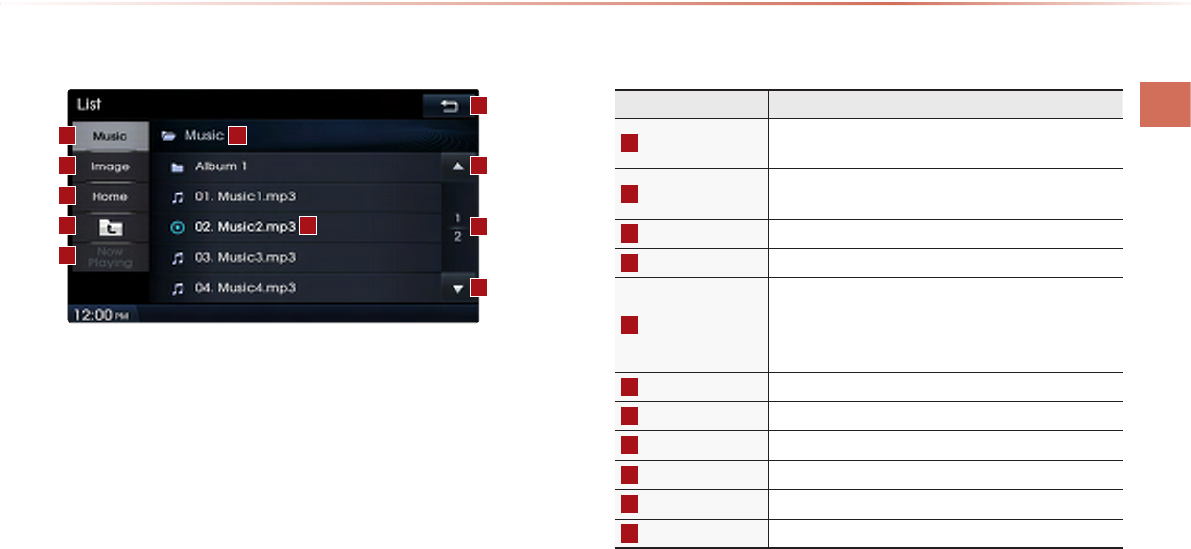
List Menu Screen
Name Description
1
Home Folder Moves to home folder
2
Parent Folder Moves to the parent folder
3
Now Playing
When moving to a dierent list screen, moves to the list
page where the current le is located
(Becomes disabled when the current list includes the current
le)
4
Folder Name Folder name of current list
5
Current Song Shows current playing le name
6
List Focus Creates focus upon operating Tune
7
Back button Converts to basic mode screen
8
Previous list Moves to the previous list
9
List page Shows current le list page/total number of pages
10
Next list Moves to the next list
4
1
2
3
6
9
8
7
5
10
2-26
MP3 CD Mode
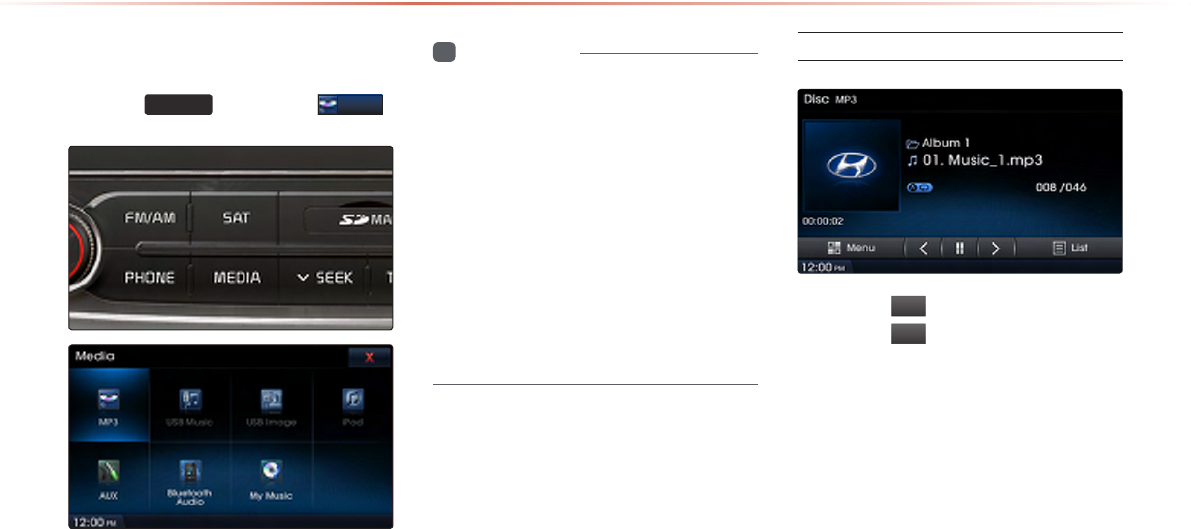
Starting Mode
Press the
MEDIA
key ▶ Press
MP3
.
i
Information
•
MP3 mode automatically starts when an
MP3 disc is inserted.
•
If there are numerous songs and folders
within the disc, reading time could take
more than 10 seconds and the list may
not be displayed or song searches may
not operate. Once loading is complete, try
again.
•
Only genuine audio CDs are supported.
•
Other discs may result in recognition fail-
ure. (e.g. copy CD-R, CDs with labels)
Playing MP3
• Press the
▶
button to play the file.
• Press the
ll
button to pause the file.
MP3 CD Mode
Audio l 2-27 2-27
Selecting MP3 les
Selecting from the Mode Screen
• Press the
SEEK
TRACK
∧
∨
key to select the pre-
vious or next file.
• Pressing and holding the
SEEK
TRACK
∧
∨
key
will rewind or fast-forward the current file.
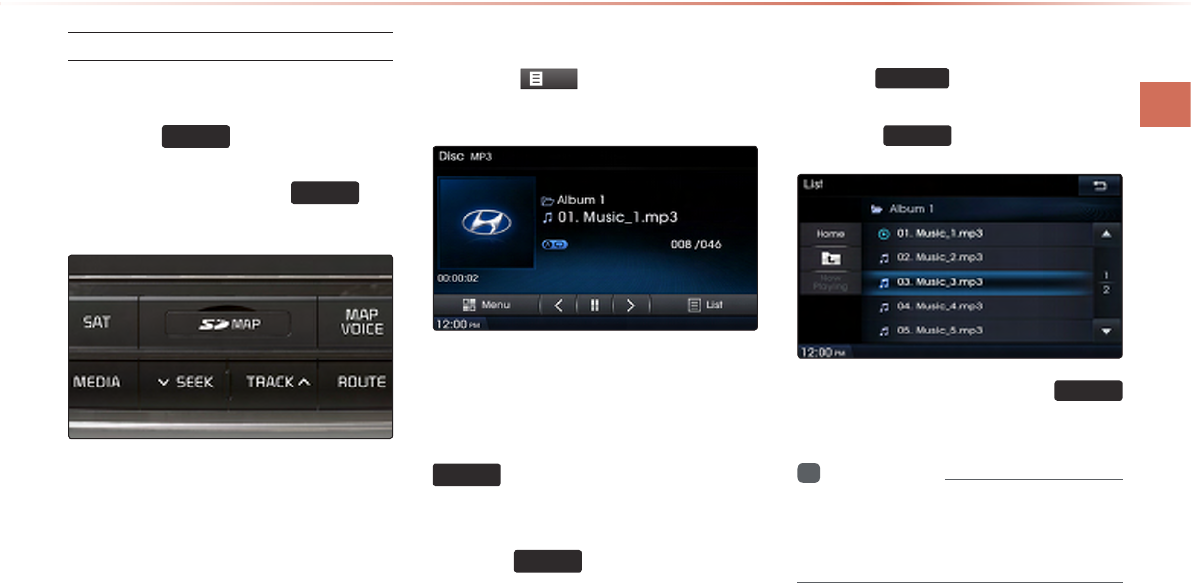
Using Menus within List Screen
Press the
List
button ▶ Select the
file from the list.
Fast-forwarding or Rewinding MP3
Files
While playing ▶Press and hold the
SEEK
TRACK
∧
∨
key. (over 0.8 seconds)
This will rewind or fast-forward the file.
While the
SEEK
TRACK
∧
∨
key is being pressed,
the file will rewind or fast-forward at 20x
speed.
Once released, the file will begin playing at
normal speed.
Searching MP3 Files
Press the
TUNE
∧
∨
key ▶ Search files ▶
Once the desired file name is displayed,
press the
ENTER
key.
When searching files, pressing the
ENTER
key will play the file highlighted in blue.
i
Information
•
If there are no operations within 5 sec-
onds, info on the current song will be re-
displayed.
2-28
MP3 CD Mode
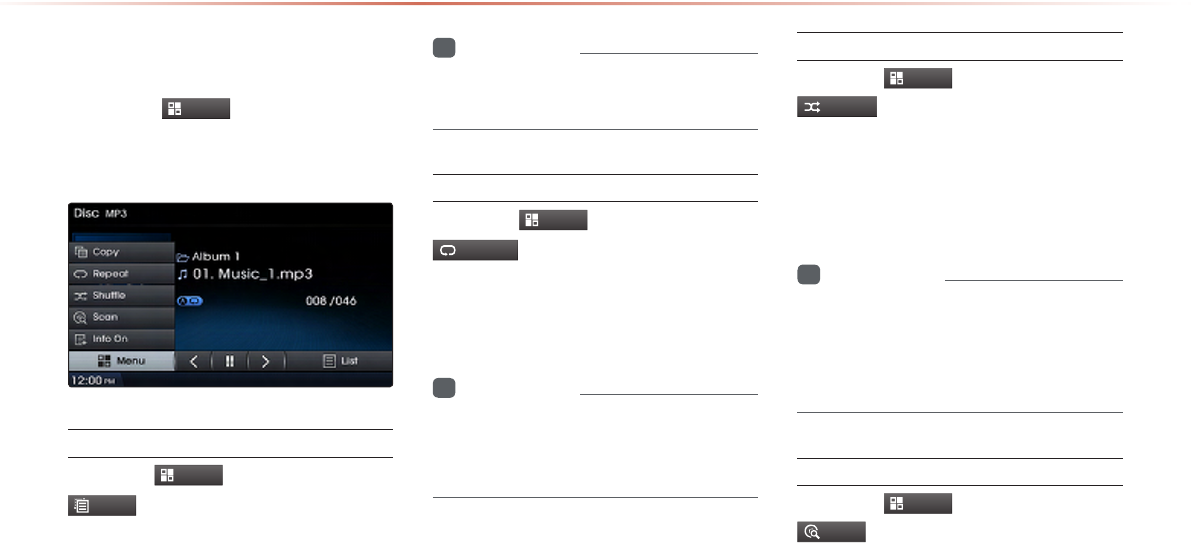
Using the Menu Buttons
Press the
Menu
button to set the
copy, repeat, shuffle, scan, and Info On/
Off options.
Copy
Press the
Menu
button ▶ Press
Copy
.
The currently playing file is copied and
saved in My Music.
i
Information
•
Copied and saved files can be played
within My Music mode.
Repeat
Press the
Menu
button ▶ Press
Repeat
.
Each time the button is pressed, the option
is changed from Repeat Once → Off.
i
Information
•
Repeat Once : repeats the current file.
•
Repeat Folder : repeats all files in current
folder.
Shue
Press the
Menu
button ▶ Press
Shuffle
.
Each time the button is pressed, the option
is changed from Shuffle Folder → Shuffle
All →Off.
i
Information
•
Shuffle Folder : plays files in current folder
in random order.
•
Shuffle All : plays all files in DISC in ran-
dom order.
Scan
Press the
Menu
button ▶ Press
Scan
.
Each time the button is pressed, the option
is changed from Folder Scan →Scan All
→ Off.
MP3 CD Mode
Audio l 2-29 2-29
i
Information
•
Folder Scan : scans files in current folder.
•
Scan All : scans all files in the disc.
Info On/Info O
Press the
Menu
button ▶ Press
Info On
.
The amount of information displayed on
the screen can be changed.
When the title, artist, and album info are
displayed, the button will automatically
change to
Info Off
.
Press
Info Off
to restore the previous
information display setting.
NOTICE
•
The title, artist and album info are dis-
played only when such information is
recorded within the MP3 file ID3 tag.
Using Menus within the
List Screen
Moving between Lists
Press the
List
button ▶ Press the
▲ , ▼ buttons.
If five (5) or more files or folders exist in the
same folder, the list will be displayed across
two or more pages.
Press the
▲
,
▼
cursor buttons to quickly
find the desired page.
i
Information
•
A lag may occur in displaying the previ-
ous/next list page depending on the file
name or file size.
2-30
MP3 CD Mode
Moving between Folders
Press the button ▶ Select folder
from the folder list.
Pressing the button will move to the
folder one level above the current folder.
Pressing the Home button folder will
move to the root folder.
i
Information
•
If there are no more parent folders, both
Home , buttons will be disabled.
Returning to Current Location
While searching files within other folders,
press the
Now Playing
button to return
to the currently playing file screen.
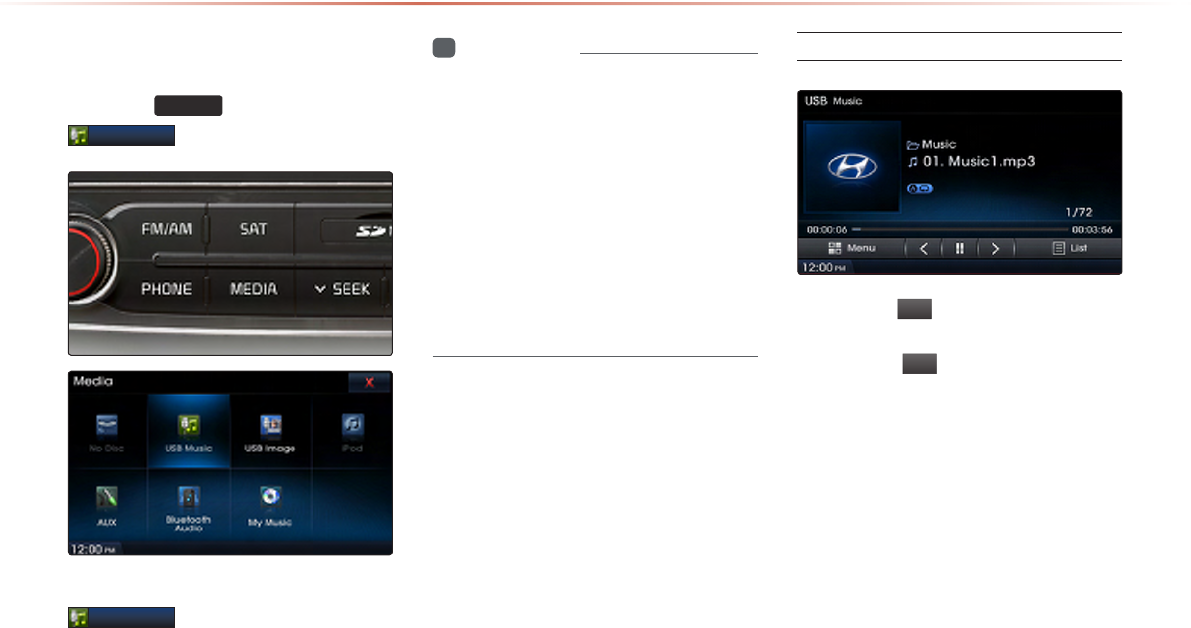
USB Mode
Audio l 2-31 2-31
USB Mode
About USB
Before Playing a USB MP3
Connect the USB device after turning on the engine. The USB
device may become damaged if it is already connected when the
ignition is turned on.
Files that are not standard format music/image files will not be
played.
For MP3/WMA files, only music files with compression rates between
8Kbps ~ 320Kbps can be played.
Heed caution to static electricity when connecting/disconnecting ex-
ternal USB devices.
Encoded MP3 Players will not be recognized when connected as an
external device.
When connecting an external USB device, the device may not prop-
erly recognize the USB is in some states.
Only products formatted with byte/sectors under 64Kbyte will be rec-
ognized.
This device recognizes USB devices formatted in FAT 12/16/32 file
formats. This device does not recognize files in NTFS file format.
Some USB devices may not be supported due to compatibility is-
sues.
Take caution so that the USB connector does not come in contact
with body parts or objects.
Repeated connecting/disconnecting of USB devices within short peri-
ods of time may result in product malfunction.
Make sure to connect/disconnect external USB devices with the au-
dio power turned off.
The amount of time required to recognize the external USB device
may differ depending on the type, size, or file formats stored on the
USB. Such differences in required time are not indications of mal-
function.
The use of USB devices for purposes other than playing music and
image files is prohibited.
Do not use the USB I/F to charge batteries or USB accessories that
generate heat. Such acts may lead to worsened performance or
damage to the device.
2-32
USB Mode
The device may not recognize the USB device if separately pur-
chased USB hubs and extension cables are being used. Connect the
USB directly with the multimedia terminal of the vehicle.
When using mass storage USB devices with separate logical drives,
only files saved to the root drive can be played.
When application programs are installed to specific USBs, files may
not properly play.
The device may not operate normally if MP3 Players, cellular phones,
digital cameras, or other electronic devices (USB devices not recog-
nized as portable disk drives) are connected with the device.
Charging through the USB may not work for some mobile devices.
The device may not support normal operation when using a USB
memory type besides Metal Cover Type USB Memory.
The device may not support normal operation when using formats
such as HDD Type, CF, or SD Memory.
Upon playing iPods, please use a dedicated iPod car cable.
Normal operations cannot be guaranteed when other cables are be-
ing used.
The device will not support files locked by DRM. (Digital Rights
Management)
USB memory sticks used by connecting an Adaptor (SD Type or CF
Type) may not be properly recognized.
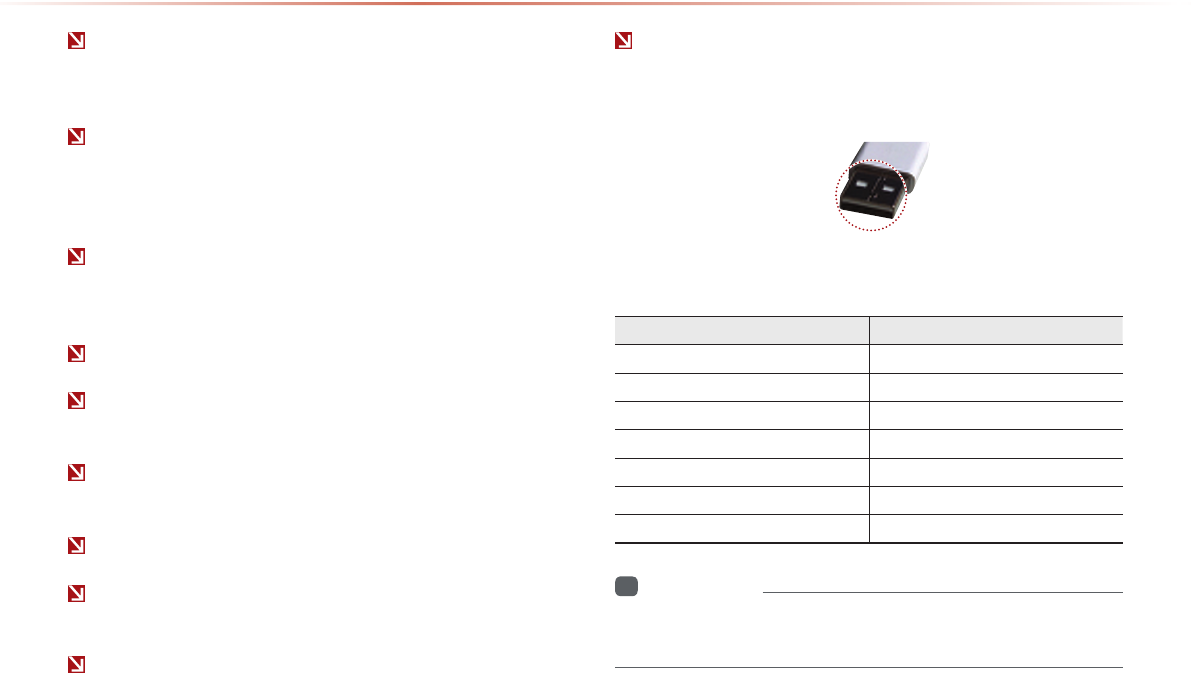
Only use Plug type connector products, as shown in the figure below.
Product Name Manufacturer
XTICK LG
BMK BMK Technology
SKY-DRV Sky Digital
TRANSCEND JetFlash Transcend
Sandisk Cruzer SanDisk
Micro ZyRUS ZyRUS
NEXTIK Digiworks
i
Information
•
Problems that occur through use of USB devices not listed within
the above table are not covered by the product warranty.
Plug Type Connector
USB Mode
Audio l 2-33 2-33
USB MP3 Information and Precautions
Name Description
MP3 File
Specication Specication : MPEG1 AUDIO LAYER 3
Recommended
Bit Rates and Sam-
pling Frequency
Acceptable sampling frequency : 32, 44.1, 48 (KHz)
Acceptable bit rate : 32, 40, 48, 56, 64, 80, 96, 112,
128, 160, 192, 224, 256, 320 (Kbps)
96, 128, 192 Kbps xed bit rate/44.1KHz
ID3 Tag Supports ID3v1.0 and ID3v1.1, ID3v2.2, ID3v2.3,
ID3v2.4 ID3 tags
Detailed
Specications
Maximum directory layers : 20 layers
Maximum length of folder name/le namev : 255Bytes
Supported characters for folder name/file name : Al-
phanumeric characters, Korean standard character set
2,350 characters, Simplied Chinese 4888 characters
Maximum number of folders which can be stored
onto one USB : 2000 folders (including ROOT)
Maximum number of les which can be stored onto
one USB : 8000
i
Information
•
The sound quality of MP3 files that use bitrates exceeding 192
Kbps cannot be guaranteed. When using files without fixed bit
rates, some features (FF/REW features) may not properly operate.
2-34
USB Mode
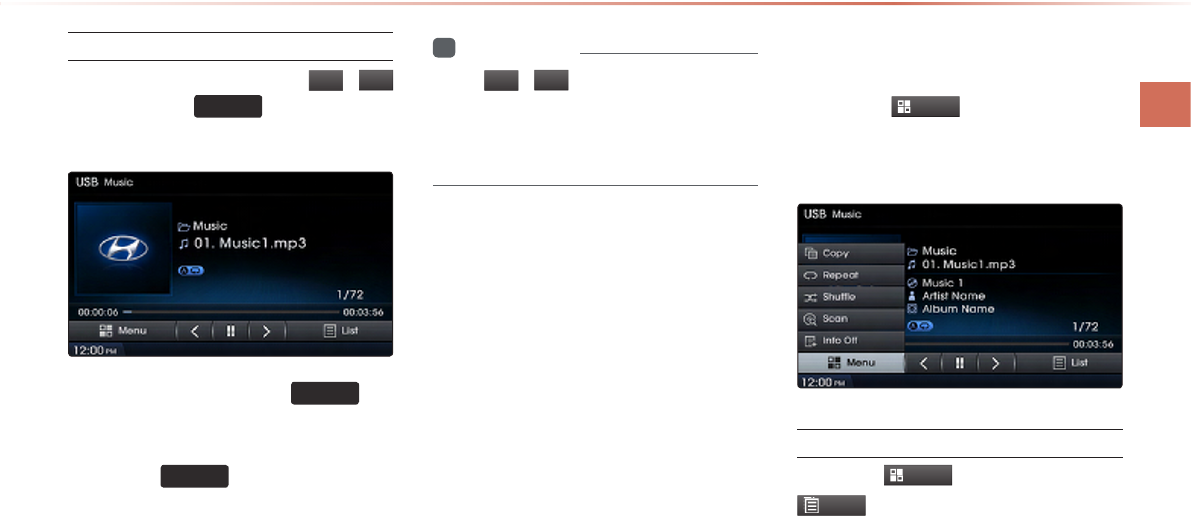
Basic Mode Screen
USB Music Mode
Name Description
1
Mode Displays currently operating mode
2
Folder Name Displays the name of the current folder
3
File Name Displays the name of the current le
4
Repeat/Shue/
Scan
From Repeat All/Repeat One Song/Repeat Folder/
Shue Folder/Shue All/Folder Scan/Scan All, dis-
plays the currently operating function
5
Play Time Displays the current play time/total play time
6
File Index Shows the current le/total les within the USB
7
Menu Displays Copy, Repeat, Shue, Scan and Info On
(Info O) menus
8
List Moves to the list screen
1
7 8
6
5
4
3
2
USB Mode
Audio l 2-35 2-35
Name Description
9
Copy Copies the currently playing le into My Music
10
Repeat
Repeats the current file (Each time the button is
pressed, changes in order of Repeat Once → Re-
peat Folder → O)
11
Shue
Plays les in random order (Each time the button is
pressed, changes option in order of Shufe Folder
→ Shufe All → Off)
12
Scan
• Scans the beginning parts of USB les (approx. 10
seconds per le)
• Each time the button is pressed, changes option
in order of Folder Scan → Scan All → Off
13
Info O (Info On)
• Info O : shows folder name/le name
• Info On : shows folder name, file name, title,
artist, and album info
14
Previous File
• When the play time is under 2 seconds : Moves
to the previous le
• When the play time is over 2 seconds : Plays the
current le from the beginning
15
Play/Pause Plays/pauses the current le
16
Next File Moves to the next le
9
10
11
12
13
15 1614
2-36
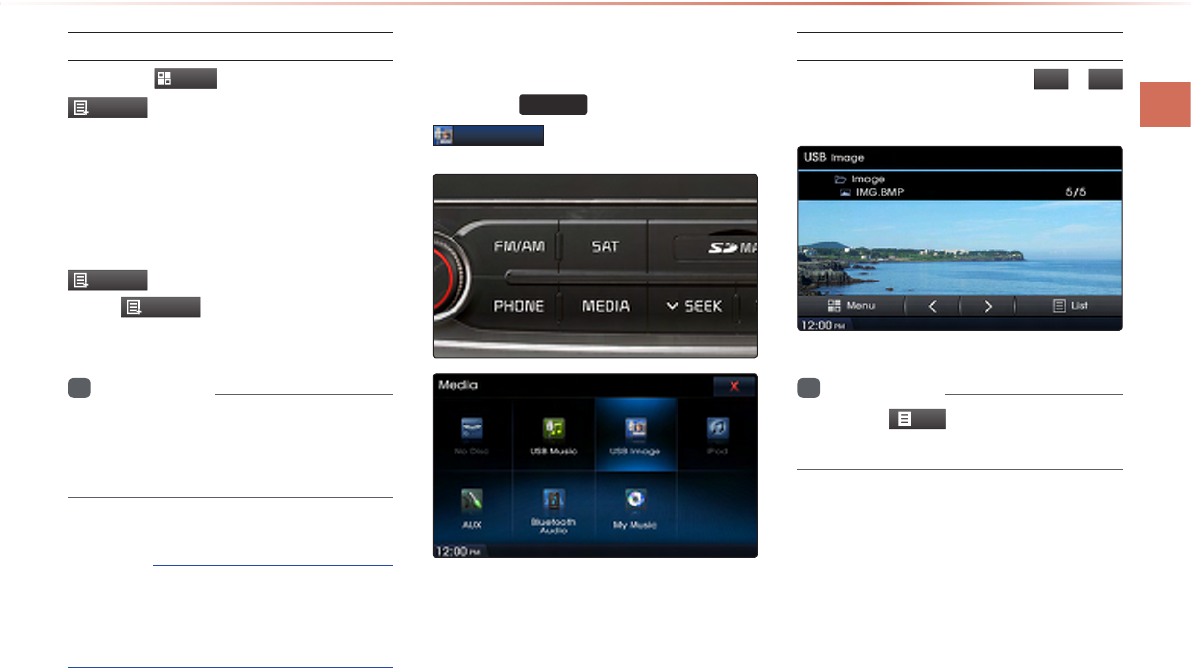
USB Mode
USB Image Mode
Name Description
1
Mode Displays currently operating mode
2
Folder Name Displays folder name where image is located
3
File Name Name of image le
4
File Index Shows the current image le/total image les within
the USB
5
Menu
Displays Slideshow, Rotate Image, Adjust Image
Size, Save Image, and Info menus (Press the button
again to hide the buttons)
6
Previous Image Shows previous image
7
Next Image Shows next image
8
List Moves to the list screen
9
Slideshow View images as slideshow in 5, 10, 20, 30 second
intervals
10
Rotate Image Rotate image in clockwise direction
11 Adjust Image Size
Enlarge/reduce (zoom-in/zoom-out) image size
12
Save Image Add image as frame screen displayed when the sys-
tem power is turned o
13
Info Shows the le name, resolution and le type of cur-
rent image
1
4
8
76
5
2
3
9
10
11
12
13
USB Mode
Audio l 2-37 2-37
Menu List Screen
Name Description
1
Music Shows the Music list (Disabled when Music list does
not exist)
2
Image Shows the Image list (Disabled when Image list does
not exist)
3
Home Folder Moves to home folder
4
Parent Folder Moves to the parent folder
5 Now Playing
When moving to a different list screen, moves
to the list page where the current file is located
(Becomes disabled when the current list includes the
current le)
6
Folder Name Folder name of current list
7
Current Song Shows current playing le name
8
Back Button Converts to basic mode screen
9
Previous List Moves to the previous list
10
List Page Shows current le list page/total number of pages
11
Next List Moves to the next list
1 6
710
9
8
11
2
3
4
5
2-38
USB Mode
Starting USB Music Mode
Press the
MEDIA
key ▶ Press
USB Music
.
If the USB is not connected, then the
USB Music
button will be disabled.
i
Information
•
Once a USB is connected, USB Music
mode will operate automatically.
•
If a previously played USB is recon-
nected, then the song after the most
recently played song is played. However,
if a different USB is connected or the file
information within the USB was changed,
then the USB file order information is
deleted and will start playing from the first
song within the USB.
Playing USB Music
• Press the
▶
button to play the USB
Music.
• Press the
ll
button to pause USB
Music.
USB Mode
Audio l 2-39 2-39
Searching USB Music Files
While Playing ▶ Press the
<
,
>
buttons or the
SEEK
TRACK
∧
∨
key to play the
previous/next file.
• Pressing and holding the
SEEK
TRACK
∧
∨
key
(over 0.8 seconds) will rewind or fast-
forward the current file.
• While the
SEEK
TRACK
∧
∨
key is being pressed,
the track will rewind or fast-forward at
high speeds. Once the key is released,
the USB Music will begin playing at nor-
mal speed.
i
Information
•
The
<
,
>
buttons displayed on the
screen allow you to select the previous/
next file. These buttons will not rewind or
fast-forward the file.
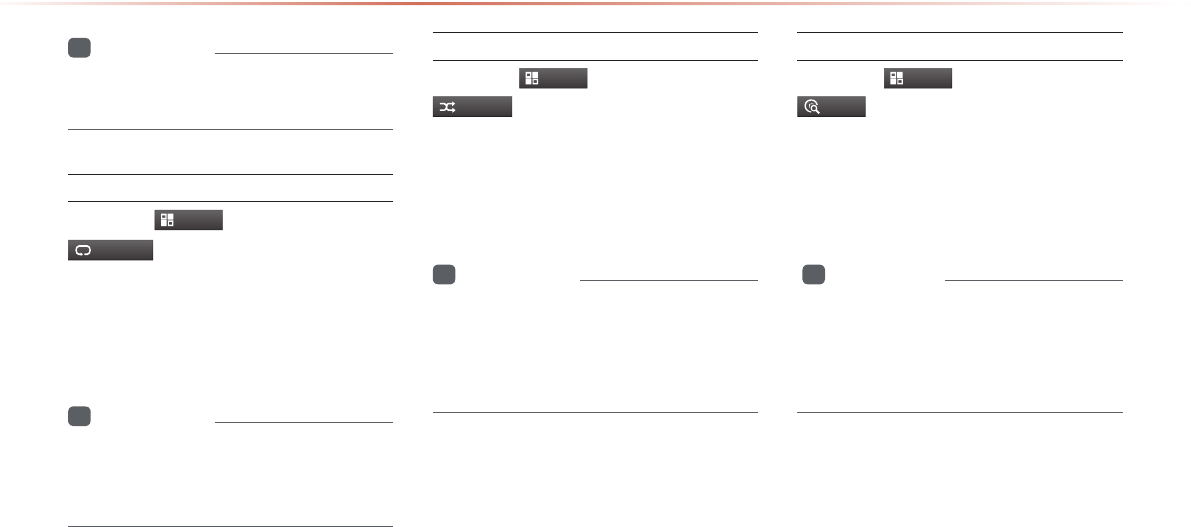
Using the Menu Buttons
Press the
Menu
button to set the
Copy, Repeat, Shuffle, Scan, Info On
(Info Off) menus.
Copy
Press the
Menu
button ▶ Press
Copy
.
The currently playing file is copied and
saved in My Music.
2-40
USB Mode
i
Information
•
Copied and saved files can be played
within My Music mode.
Repeat
Press the
Menu
button ▶ Press
Repeat
.
Each time the button is pressed, the option
is changed from Repeat Once → Repeat
Folder → Off.
i
Information
•
Repeat Once : Repeats the current file.
•
Repeat Folder : Repeats all files in current
folder.
Shue
Press the
Menu
button ▶ Press
Shuffle
.
Each time the button is pressed, the option
is changed from Shuffle Folder → Shuffle
All →Off.
i
Information
•
Shuffle Folder : Plays files within the cur-
rent folder in random order.
•
Shuffle All : Plays files within the USB in
random order.
Scan
Press the
Menu
button ▶ Press
Scan
.
Each time the button is pressed, the option
is changed from Folder Scan →Scan All
→ Off.
i
Information
•
Folder Scan : Searches files within the
current folder.
•
Scan All : Scans files within the USB in
random order.
USB Mode
Audio l 2-41 2-41
Info On/Info O
Press the
Menu
button ▶ Press
Info On
.
The screen display can be set differently
depending on user selection.
When the title, artist, and album info
are displayed, the button is changed to
Info Off
.
Press
Info Off
to restore the previous
information display setting.
i
Information
•
The title, artist, and album info are dis-
played only when such information is
recorded within the MP3 file ID3 tag.
NOTICE
•
The title, artist and album info are dis-
played only when such information is
recorded within the MP3 file ID3 tag.
Starting USB Image Mode
Press the
MEDIA
key ▶ Press
USB Image
.
Searching USB Image Files
While playing ▶ Press the
<
,
>
buttons to view the previous/next image.
i
Information
•
Press the
List
button to view the list of
USB images.
2-42
USB Mode
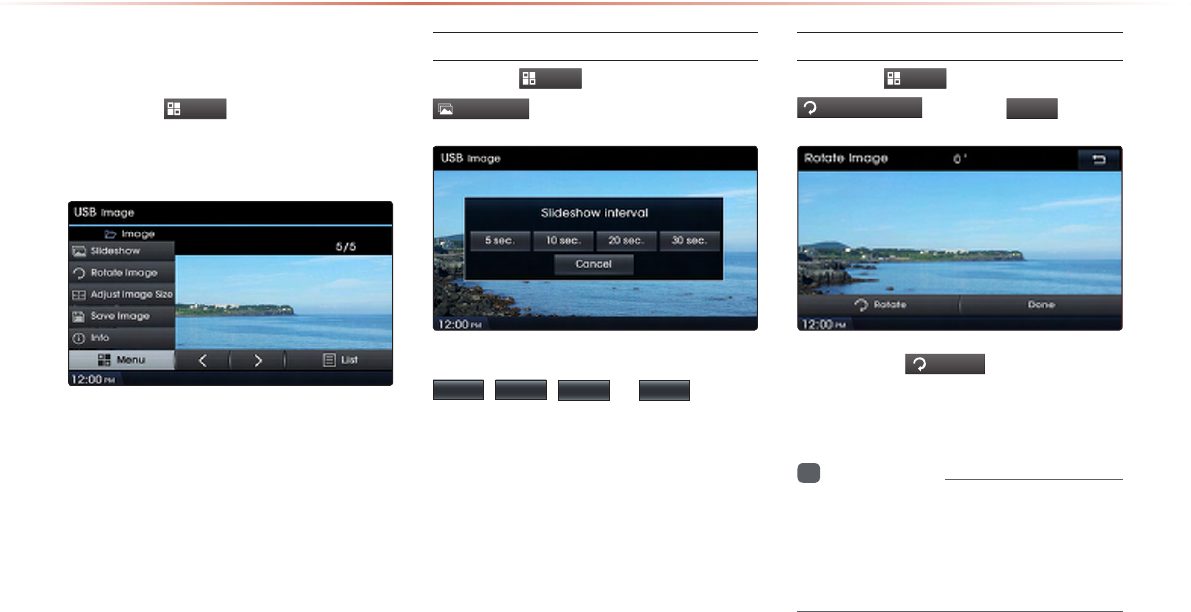
Using the Menu Buttons
Press the
Menu
button to set the
Slideshow, Rotate Image, Adjust Image
Size, Save Image and Info menus.
Slideshow Interval
Press the
Menu
button ▶ Press
Slideshow
.
Image slideshow intervals can be set at
5sec
,
10sec
,
20sec
, or
30sec
intervals.
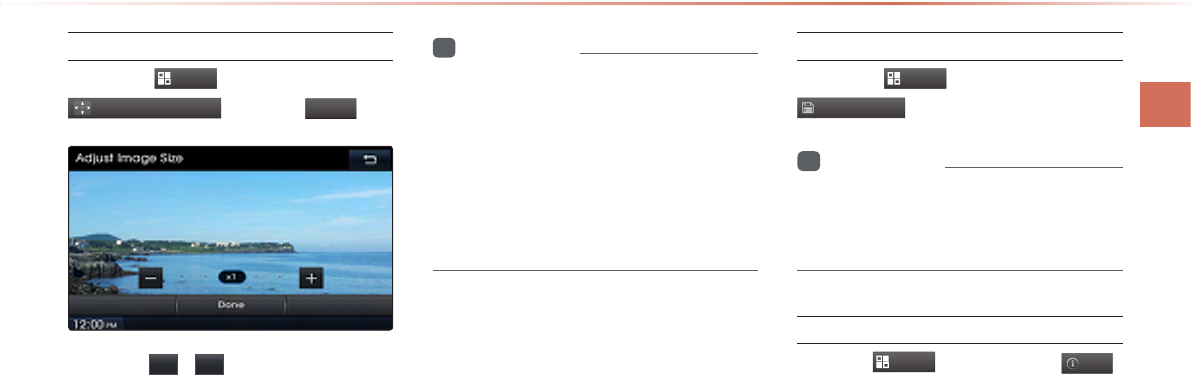
Rotating Image
Press the
Menu
button ▶ Press
Rotate Image
▶ Press
Done
.
Each time the
Rotate
button is pressed,
the image is rotated from 0˚ → 90˚ → 180˚
→270˚ degrees.
i
Information
•
Rotated images are not saved.
•
The image will be restored to its original
position when returning to it after viewing
a different image.
USB Mode
Audio l 2-43 2-43
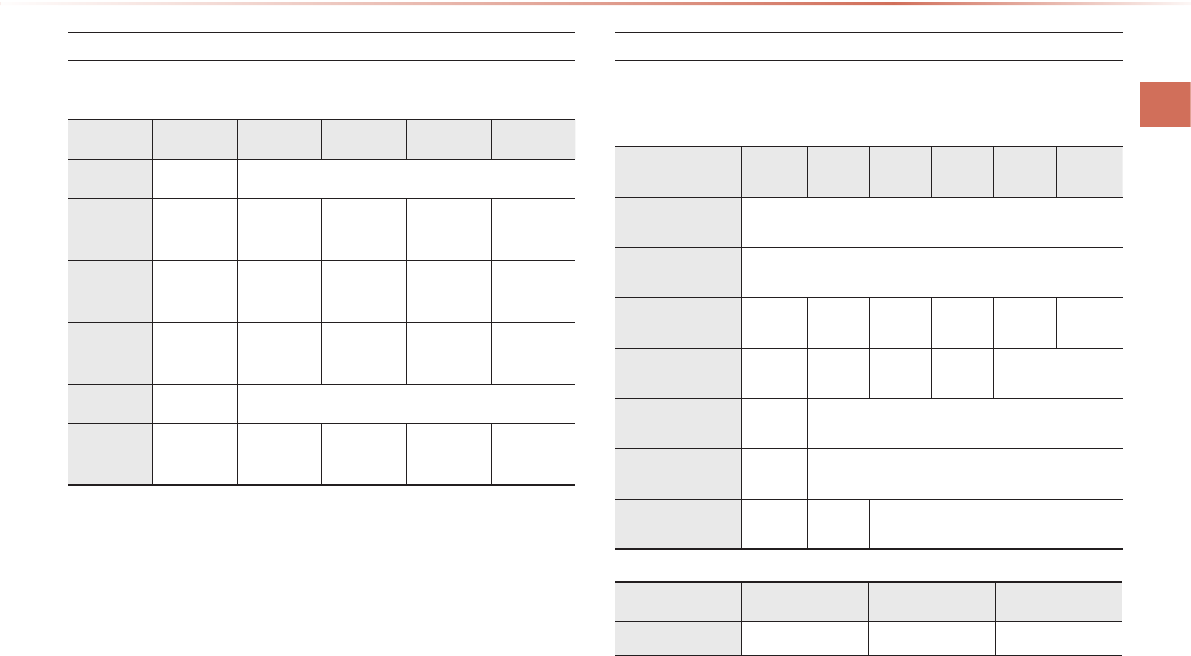
Adjusting Image Size
Press the
Menu
button ▶ Press
Adjust Image Size
▶ Press
Done
.
Press the - , + buttons to enlarge or
reduce the image size. The scale can be
changed to x1/4, x1/2, x1, x2, x4.
i
Information
•
Enlarged or reduced images are not
saved. The image will restore its original
size when returning to it after viewing a
different image.
•
If the image cannot be fully displayed on
the screen, touch the image to move the
screen.
Saving Image
Press the
Menu
button ▶ Press
Save Image
.
i
Information
•
For details on using the picture frame,
refer to the Picture Frame Settings within
Setup.
Viewing Info
Press the
Menu
button ▶ Press
Info
.
This menu is used to check image informa-
tion, such as the image resolution and file
type.

2-44
iPod Mode
Using iPod Devices
iPod® is a registered trademark of Apple Inc.
iPod mode will not operate if the connected iPod cannot be recognized
due to operation of unsupported versions that do not support related
protocols, iPod abnormalities, or iPod device defects. Some iPods with
unsupported communication protocols may not properly operate with
the Navigation system.
For fifth generation iPod Nano devices, the iPod may not be recog-
nized when the battery level is low. Please charge the iPod for use.
Search/play orders shown within the iPod device may differ with the
orders shown within the Navigation system.
If the iPod malfunctions due to an iPod device defect, reset the iPod
and try again. (To learn more, refer to your iPod manual)
For some iPod Touch and iPhone devices, connecting Bluetooth®
while the iPod is operating may result in discontinued iPod sound.
When such devices with Bluetooth® support are connected, this prob-
lem occurs as the sound source is changed from the Dock Connector
(USB connector cable) to Bluebird. (Bluetooth® Module)
To listen to the iPod sound, reconnect the USB cable or exit then re-
enter iPod mode.
In order to use the iPod while operating the keys, you must use a dedi-
cated iPod cable. (the cable that is supplied when purchasing iPod/
iPhone products)
※During ACC ON state, connecting the iPod through the iPod cable
(The cable that is supplied when purchasing iPod/iPhone product.)
will charge the iPod through the head unit.
※ The use of genuine iPod cables supplied by Apple is recom-
mended. (The use of other products may result in noise
or abnormal operation.)
When connecting with the iPod cable, make sure to fully insert the jack
to prevent communication interference. If the iPod is connected to the
vehicle while it is playing, a high pitch tone may sound for about 1~2
seconds immediately after connection. If possible, connect the iPod to
the vehicle with the iPod stopped/paused.
Within iPhones, streaming audio and iPod control may occasionally
conflict. If problems persist, remove the iPhone and connect again.
Some iPod versions may not sync with the system. In such cases, the
system may not properly restore the previously operated mode. (For
iPads, battery charging is not supported.)
Applications that are not exclusively used as iPod Applications
within iPhone/iPod Touch devices are not supported.
iPod Mode
Audio l 2-45 2-45
Steps upon Initial Connection
Search Steps may differ depending on the type of iPod device.
Supported iPod Devices
• Operation is supported and Apple Inc. certified : ○
• Operation is supported but uncertified :△
1 Step 2 Step 3 Step 4 Step 5 Step
Play List Play List Play List name (category is same as iPod)
Artist Artist Artist Album
Name
Song
Name
Album Album Album
Name
Song
Name
Genre Genre Genre
Name
Artist
Name
Album
Name
Song
Name
Song Song Song Name
Composer Composer Composer
Name
Album
Name
Song
Name
Device/
Generation
1st 2st 3st 4st 5st 6st
iPod Mini Not Supported
iPod Shue Not Supported
iPod Nano ○ ○ ○ ○ ○ ○
iPod Touch ○ ○ ○ ○ Not Released
iPod Classic ○Not Released
iPod With video ○Not Released
iPad △ △ Not Released
Device/Type 3GS 4G 4S
iPhone ○ ○ △

2-46
iPod Mode
Basic Mode Screen
Name Description
1
Mode Displays currently operating mode
2
Title Displays name of current title
3
Artist Info Artist name
4
Album Info Album name
5
Repeat/Shue From Repeat Once/Shue Category/Shue Random,
displays the currently operating function
6
File Index Shows the current le/total les within the iPod
7
Play Time Displays the current play time/total play time
8
Repeat Repeats the currently playing le
9
Shue
Plays les in random order (each time the button is
pressed, changes option in order of Shufe Category
→ Shufe Album → Off)
10
Info O
(Info on)
Changes the display method between Info O/Info On
• Info O : Shows title, artist, and album Info
• Info On : Shows title, artist, album, genre, and
composer info
11
Menu Displays Repeat, Shue, and Info On (Info O) menus
12
Previous File Moves to the previous le
13
Play/Pause Plays/pauses the current le
14
Next File Moves to the next le
15
List Moves to the list screen
1
11
8
9
10
15
12 13 14
4
5 6
3
2
7
iPod Mode
Audio l 2-47 2-47
Starting Mode
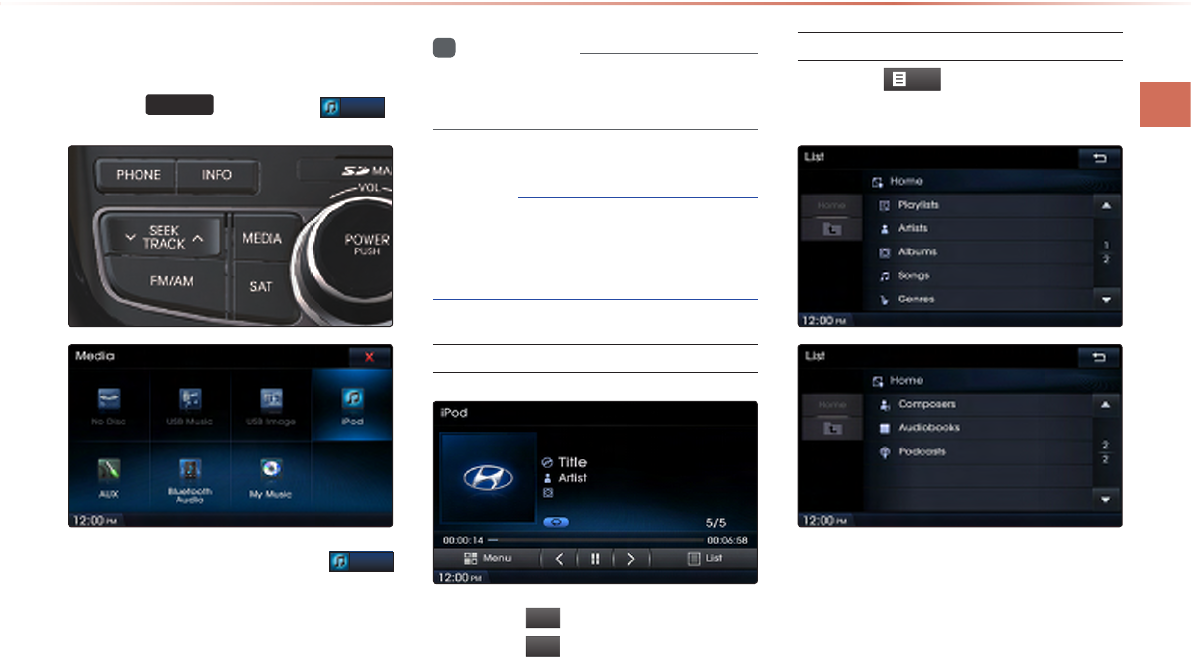
Press the MEDIA key ▶ Press
iPod
.
If the iPod is not connected, then the
iPod
button will be disabled.
i
Information
•
Once an iPod is connected, iPod mode
will operate automatically.
NOTICE
•
Some iPods with unsupported communi-
cation protocols may not properly operate
with the Audio system.
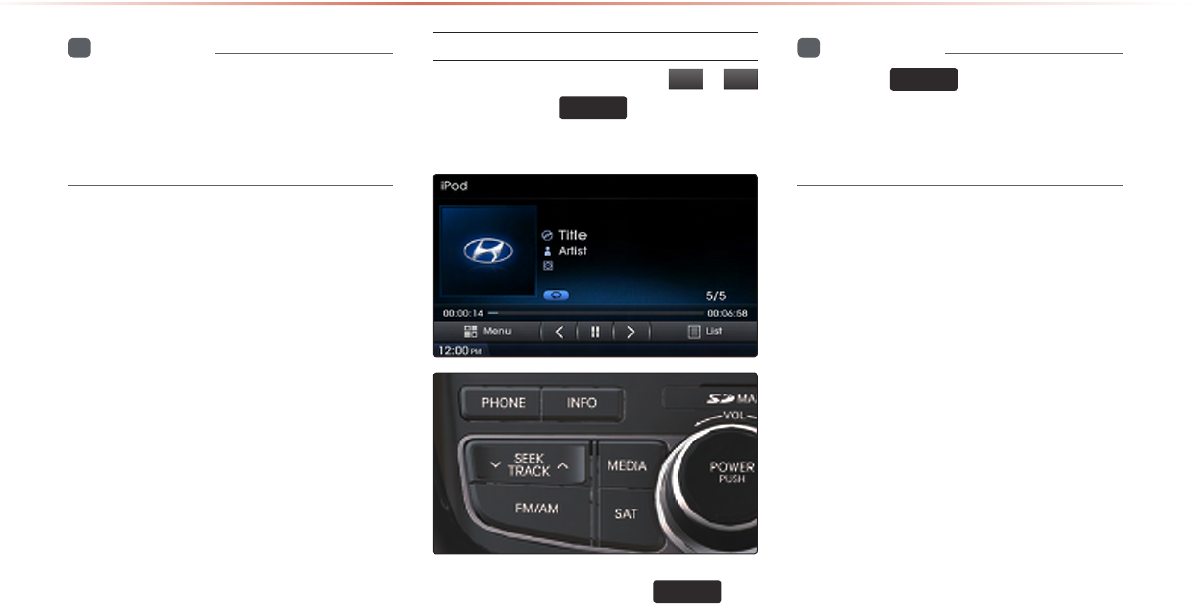
Playing iPod
• Press the
▶
button to play the iPod.
• Press the
ll
button to pause the iPod.
Searching iPod
Press the
List
button to display the
initial iPod list screen.
When searching an iPod, it is possible
to search by Playlists, Artists, Albums,
Songs, Genres, Composers, Audiobooks,
and Podcasts.
2-48
iPod Mode
i
Information
•
If the search mode is accessed while
playing a song, the most recent searched
step will be displayed. The search steps
upon initial connection are listed below.
Selecting iPod Files
While playing ▶ Press the
<
,
>
buttons or the
SEEK
TRACK
∧
∨
key to play the
previous/next file.
Pressing and holding the
SEEK
TRACK
∧
∨
key
(over 0.8 seconds) will rewind or fast-
forward the current song.
i
Information
•
While the
SEEK
TRACK
∧
∨
key is being pressed,
the track will rewind or fast-forward at high
speeds. Once the key is released, the
Music will begin playing at normal speed.
iPod Mode
Audio l 2-49 2-49
Searching iPod Files
Press the
TUNE
∧
∨
key ▶ Search files
▶
Once the desired file name is displayed,
press the
ENTER
key.
When searching files, the file number is
displayed in blue. Pressing the
ENTER
key will play the corresponding file.
i
Information
•
If there are no operations within 5 sec-
onds, info on the current song will be re-
displayed.
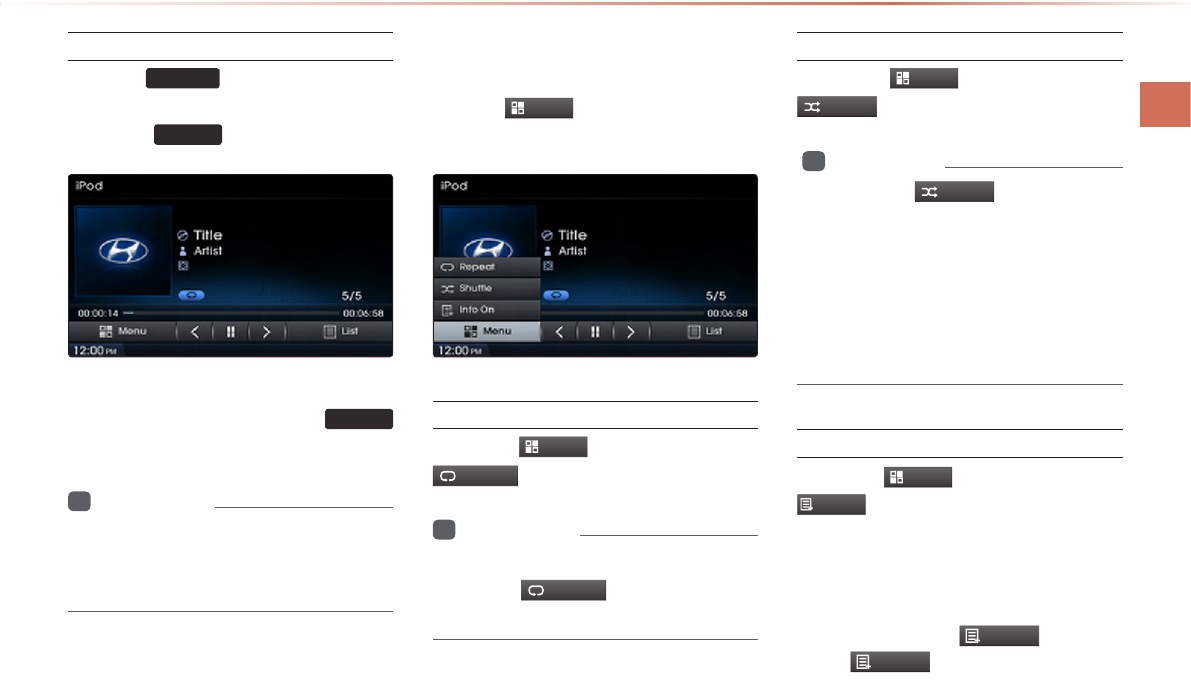
Using the Menu Buttons
Press the
Menu
button to set the Repeat,
Shuffle, and Info On (Info Off) menus.
Repeat
Press the
Menu
button ▶ Press
Repeat
.
i
Information
•
The currently playing file is repeated.
•
Press the
Repeat
button again to turn
off repeat.
Shue
Press the
Menu
button ▶ Press
Shuffle
.
i
Information
•
Each time the
Shuffle
button is pressed,
the option is changed from Shuffle Category
→ Shuffle Album → Off.
•
Shuffle Category : Plays files within the cur-
rent category in random order.
•
Shuffle Album : Plays files within the current
category in random order.
Info On/Info O
Press the
Menu
button ▶ Press
Info On
.
The screen display can be set differently
depending on user selection.
When the title, artist, and album info are
displayed, the button
Info Off
.
Press
Info Off
to restore the previous
display setting.
2-50
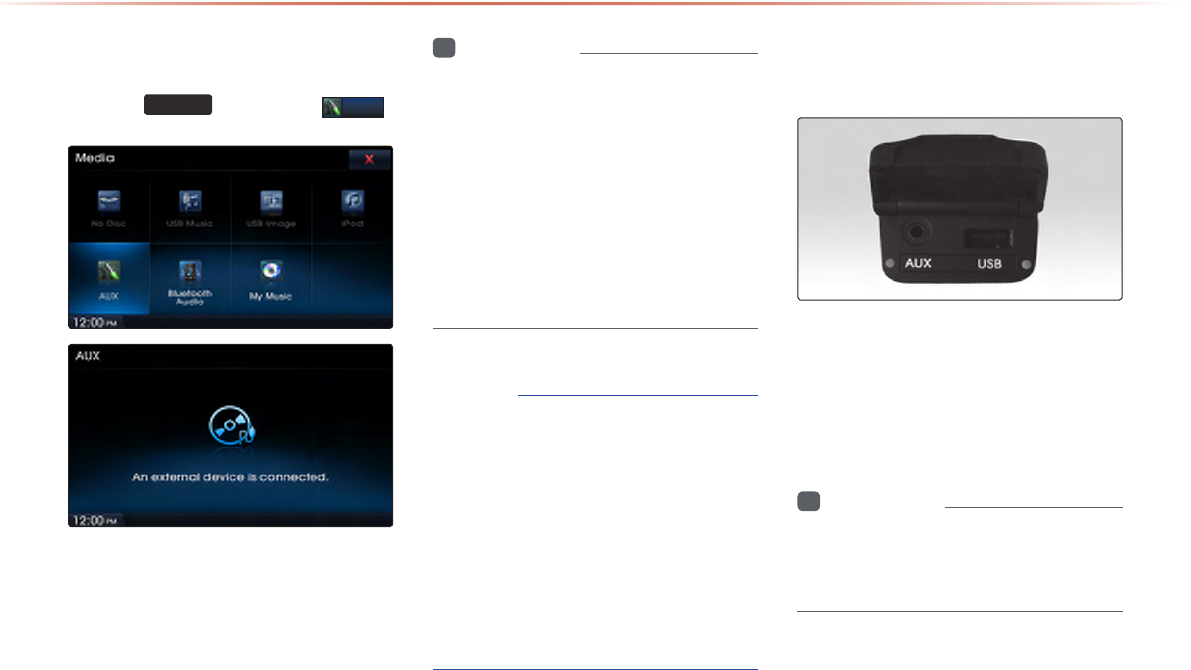
Starting Mode
Press the MEDIA key ▶ Press
AUX
.
i
Information
•
If an external device connector is con-
nected with the AUX terminal, then AUX
mode will automatically operate. Once the
connector is disconnected, the previous
mode will be restored.
•
AUX mode can be used only when an
external audio player (camcorder, car
VCR, etc.) has been connected.
•
The AUX volume can also be controlled
separately through the connected device.
NOTICE
•
If only cable connected to the AUX with-
out an external device, the mode changed
to AUX, but noise may occur. When an
external device is not being used, remove
the connector jack.
•
When the external device power is con-
nected to the power jack, playing the
external device may output noise. In such
cases, disconnect the power connection
before use.
Connecting an
External Device
External AUDIO players can be played
through a dedicated cable. The position of
the AUX jack is at the top of the gear box
located between the driver and passenger
seats.
i
Information
•
The color saturation option is not sup-
ported when using the PAL color system
within this device.
AUX Mode
Bluetooth® Audio Mode
Audio l 2-51 2-51
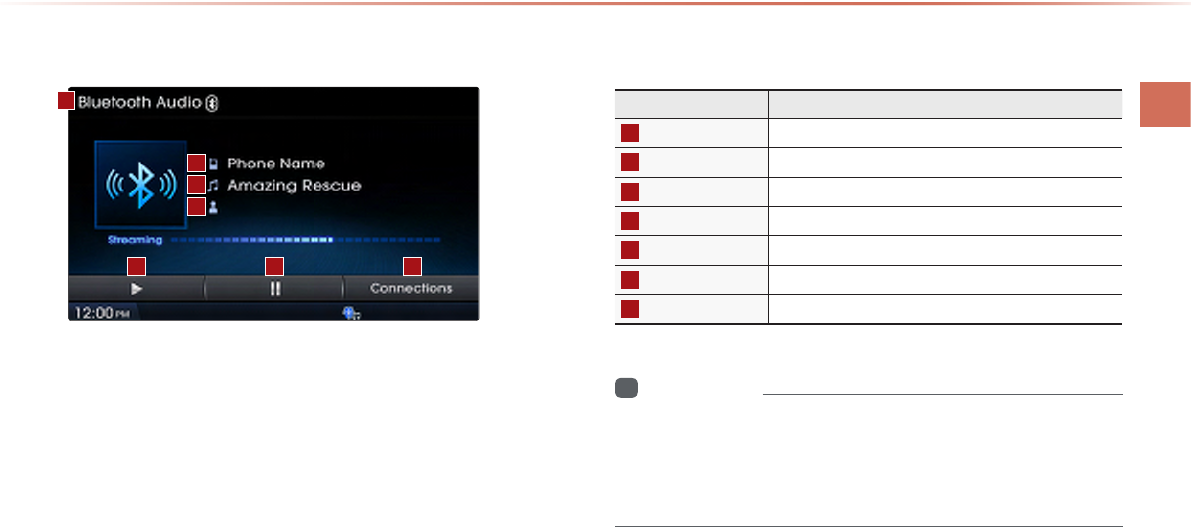
Basic Mode Screen
i
Information
•
The title/artist info may not be supported in some mobile phones.
When it is not supported, a symbol will be displayed.
•
The play/pause feature may operate differently depending on the
mobile phone.
1
2
3
4
5 6 7
Name Description
1
Mode Displays currently playing mode
2
Phone Name Displays name of connected phone
3
Title Name of current song
4
Artist Info Name of current artist
5
Play Plays Bluetooth® Audio
6
Pause Pauses Bluetooth® Audio
7
Connections Displays the Connections screen
Bluetooth® Audio Mode
2-52
Using
Bluetooth® Audio
Mode
Bluetooth® Audio Mode can be used
only when a Bluetooth® Audio Mode
phone has been connected.
While Bluetooth® Audio Mode is play-
ing, if the Bluetooth® phone is con-
nected, then the music will also stop.
Bluetooth® streaming audio may not be
supported with some mobile phones.
Starting Mode
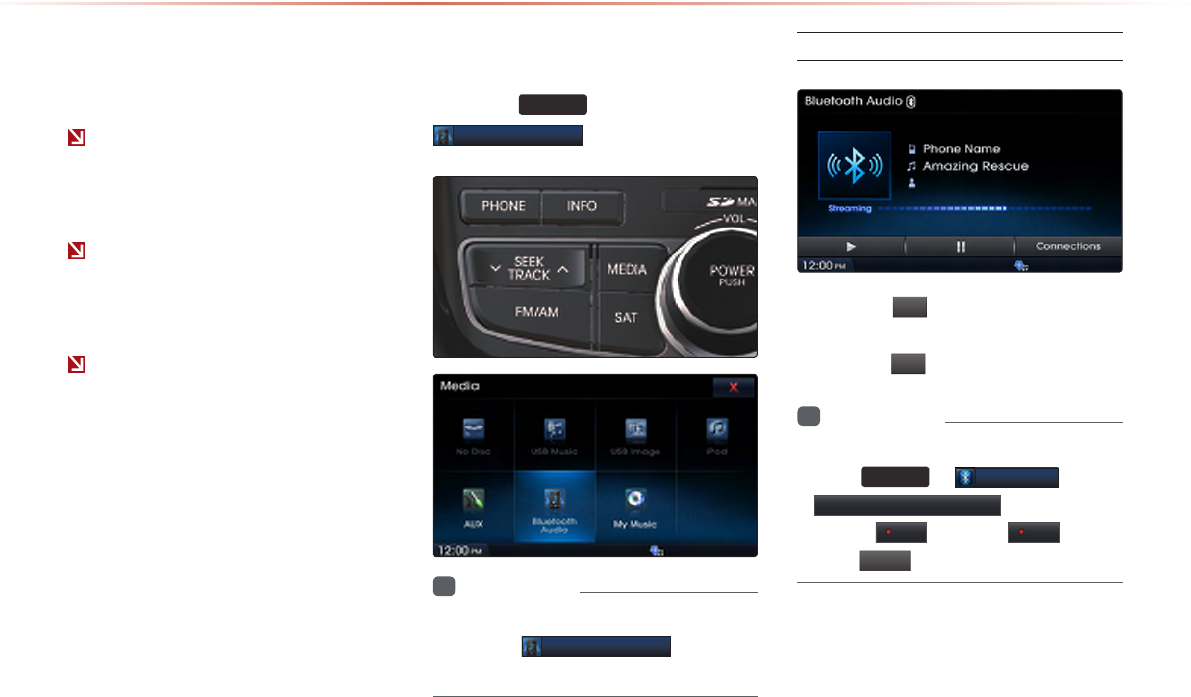
Press the
MEDIA
key ▶ Press
Bluetooth Audio
.
i
Information
•
If the Bluetooth® device is not connected,
then the
Bluetooth Audio
button will
be disabled.
Playing Bluetooth® Audio
• Press the
▶
button to play files saved
within the Bluetooth® phone.
• Press the
ll
button to pause the file.
i
Information
•
If the Bluetooth® audio does not play,
Press
SETUP
▶
Bluetooth
▶
Streaming Audio Setting ▶ If the option
is set to Off change to On and
press
Done
and try again.
Bluetooth® Audio Mode
Bluetooth® Audio Mode
Audio l 2-53 2-53
Selecting Bluetooth® Audio Files
While playing ▶ Press the
SEEK
TRACK
∧
∨
key
▶ Selects the previous/next file.
i
Information
•
The title/artist info may not be supported
in some mobile phones. When it is not
supported, only the symbol will be dis-
played.
•
The play/pause feature may operate dif-
ferently depending on the mobile phone.
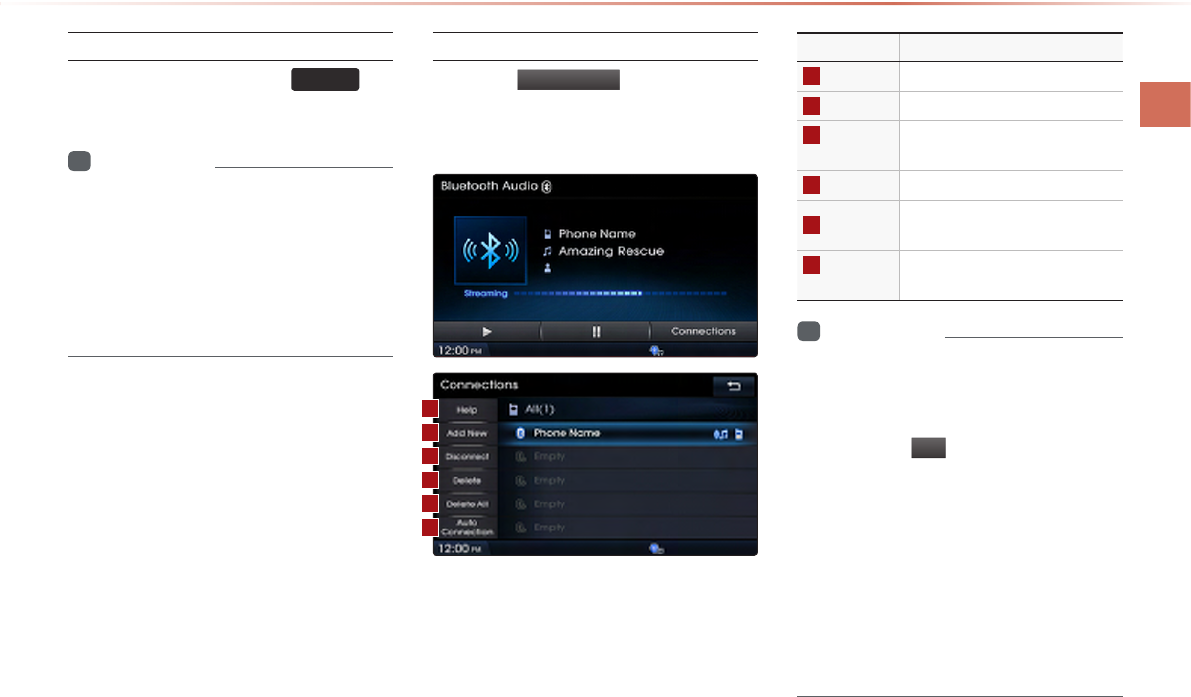
Setting Connection
Press the
Connections
button to add a
new Bluetooth® phone, connect/disconnect,
delete, delete all, or view the Help section.
Name Description
1
Help Displays Bluetooth® Help screen
2
Add New Pair a new Bluetooth® device
3
Connect/
Disconnect
Connect or disconnect a Bluetooth®
device
4
Delete Delete a paired Bluetooth® device
5
Delete All Delete all paired Bluetooth® de-
vices
6
Auto
Connection
Set Bluetooth® phone Auto Con-
nection upon starting car ignition
i
Information
•
If music is not yet playing from your
mobile device after converting to stream-
ing audio (Bluetooth® Audio) mode,
pressing the
▶
button once may begin
playing the music. Check to see whether
music is playing from the Bluetooth®
device after converting to streaming audio
mode. The Streaming audio feature may
not be supported in some mobile phones.
•
For more information on mobile phone com-
patibility, visit the Hyundai Motor Company
website (http://www.hyundaiusa.com).
1
3
4
5
6
2