HYUNDAI MOBIS AV231JGAN CAR AVN User Manual 1
HYUNDAI MOBIS CO., LTD. CAR AVN 1
Contents
User manual -1
DIGITAL NAVIGATION SYSTEM l OWNER'S MANUAL
DIGITAL NAVIGATION SYSTEM
OWNER'S MANUAL

Read the following safety cautions for
your safety.
Please read the following safety matters for your safety. This
User's Manual describes circumstances that may inflict injury
onto drivers and others with the following notations (Warning,
Caution, Information, Notice).
Before using the product, read the contents of this user's
manual carefully and use this product safely.
※ The design and specification of this product may change without
prior notification for product improvement.
Safety Warnings
Failure to observe the safety instructions within this category could
result in serious injury or death.
Safety Cautions
Failure to observe the safety instructions within this category could
result in accident related injuries or damage to the vehicle.
Notations used within this User's
Manual
CAUTION
• Information on matters that could potentially lead to injury or vehi-
cle damage/malfunction
• Information that could lead to higher user safety
i
Information
•
Information and tips that provides additional user convenience in
using the product
NOTICE
•
Information on specific features that facilitate proper product use and
functional understanding
•
Information on terminology used within this manual

2
Warnings and Cautions
Safety Warnings
...................................
1-2
Safety Cautions
....................................
1-3
Key Product Features
Key Product Features
..........................
1-4
Component Names and Functions
Head Unit
.............................................
1-6
Steering Wheel Remote Controller
......
1-8
Climate System
..................................
1-10
Room Mirror
........................................
1-11
Starting the System for the First Time
Turning the System On/Off
................
1-12
Turning the System On
......................
1-12
Turning the System Off
.......................
1-12
Resetting the System
.........................
1-13
Battery Warning Message
.................
1-13
FM/AM Mode
Basic Mode Screen (HD Radio reception OFF)
..
2-2
Basic Mode Screen (HD Radio reception ON)
2-3
Starting Mode
.....................................
2-4
Using SEEK
........................................
2-4
Using TUNE
........................................
2-4
Selecting Presets
.................................
2-4
Saving Radio Frequency
.....................
2-5
Saving Manually
..................................
2-5
Saving Automatically
............................
2-5
Scanning Radio Frequency
................
2-5
Using the Menu Buttons
......................
2-6
Preset Scan
.........................................
2-6
Text On/Text Off
..................................
2-6
HD Radio Mode
About HD RadioTM Technology
............
2-7
Starting Mode
.......................................
2-7
Operating HD Radio Mode
..................
2-7
Selecting a Frequency
..........................
2-7
Using TUNE
........................................
2-8
Selecting through Preset
......................
2-8
Song-Tagging
......................................
2-8
HD Radio Digital Broadcast On/Off
....
2-9
XM Mode
Basic Mode Screen
............................
2-10
Starting Mode
.....................................
2-11
Using SEEK
......................................
2-11
Using TUNE
......................................
2-11
Selecting Presets
...............................
2-11
Selecting through Channel/Category List..2-12
Saving XM Channels
..........................
2-12
Saving Manually
................................
2-12
Using the Menu Buttons
.....................
2-12
Search
..............................................
2-13
Preset Scan
.......................................
2-13
Scan
.................................................
2-13
Disc
About Disc
.........................................
2-14
Precautions upon Handling Discs
........
2-14
Supported Disc Formats
.....................
2-15
Table of Contents
1 Basic 2 Audio

Table of Contents l 3
Disc/Content Format Compatibility
......
2-15
Before Playing an MP3 Disc
...............
2-17
CD Mode
Basic Mode Screen
............................
2-19
Starting Mode
....................................
2-20
Playing a CD
.....................................
2-20
Fast-forwarding or Rewinding CDTracks..2-20
Searching CD Tracks
.........................
2-21
Using the Menu Buttons
.....................
2-21
Repeat
..............................................
2-21
Shuffle
...............................................
2-21
Scan
.................................................
2-22
Info On/Info Off
..................................
2-22
MP3 CD Mode
Basic Mode Screen
.........................
2-23
List Menu Screen
.............................
2-25
Starting Mode
...................................
2-26
Playing MP3
......................................
2-26
Selecting MP3 files
.............................
2-27
Using the Menu Buttons
....................
2-28
Copy
.................................................
2-28
Repeat
..............................................
2-28
Shuffle
...............................................
2-28
Scan
.................................................
2-28
Info On/Info Off
..................................
2-29
Using Menus within the List Screen
.
2-29
Moving between Lists
........................
2-29
Moving between Folders
....................
2-30
Returning to Current Location
............
2-30
USB Mode
About USB
..........................................
2-31
Before Playing a USB MP3
.................
2-31
USB MP3 Information and Precautions... 2-33
Basic Mode Screen
..........................
2-34
USB Music Mode
...............................
2-34
USB Image Mode
..............................
2-36
Menu List Screen
..............................
2-37
Starting USB Music Mode
................
2-38
Playing USB Music
............................
2-38
Searching USB Music Files
................
2-39
Using the Menu Buttons
....................
2-39
Copy
.................................................
2-39
Repeat
..............................................
2-40
Shuffle
...............................................
2-40
Scan
.................................................
2-40
Info On/Info Off
..................................
2-41
Starting USB Image Mode
.................
2-41
Searching USB Image Files
................
2-41
Using the Menu Buttons
....................
2-42
Slideshow Interval
..............................
2-42
Rotating Image
..................................
2-42
Adjusting Image Size
.........................
2-43
Saving Image
....................................
2-43
Viewing Info
.......................................
2-43
iPod Mode
Using iPod Devices
...........................
2-44
Steps upon Initial Connection
.............
2-45
Supported iPod Devices
.....................
2-45
Basic Mode Screen
...........................
2-46
Starting Mode
....................................
2-47
Playing iPod
......................................
2-47
Searching iPod
.................................
2-47
Selecting iPod File
.............................
2-48
Searching iPod Files
..........................
2-49
Using the Menu Buttons
....................
2-49

4
Repeat
..............................................
2-49
Shuffle
...............................................
2-49
Info On/Info Off
..................................
2-49
AUX Mode
Starting Mode
....................................
2-50
Connecting an External Device
........
2-50
Bluetooth® Audio Mode
Basic Mode Screen
............................
2-51
Using
Bluetooth® Audio Mode
...........
2-52
Starting Mode
....................................
2-52
Playing Bluetooth® Audio
....................
2-52
Selecting Bluetooth® Audio Files
.........
2-53
Setting Connection
.............................
2-53
My Music Mode
Basic Mode Screen
...........................
2-54
Starting Mode
....................................
2-55
Playing My Music
...............................
2-55
Selecting My Music
............................
2-55
Using the Menu Buttons
....................
2-56
Repeat
..............................................
2-56
Shuffle
...............................................
2-56
Scan
.................................................
2-56
Info On/Info Off
..................................
2-57
Using Menus within the List Screen
.
2-57
Moving between Lists
.........................
2-57
Returning to Current Location
.............
2-58
Deleting Files
.....................................
2-58
Before Use
Precautions for Safe Driving
..............
3-2
Operating the Navigation
....................
3-3
About the Map
.....................................
3-4
About Map Scale
.................................
3-4
About Map Icons
..................................
3-4
About Map Database
...........................
3-4
About Map Updates
.............................
3-4
About Voice Guidance
........................
3-5
Voice Guidance
...................................
3-5
About GPS
...........................................
3-6
Starting Navigation
Map Screen
..........................................
3-7
Initial Screen
........................................
3-8
Current Position
...................................
3-8
Map Display Settings
...........................
3-8
Changing Map Scale
............................
3-9
Map Menu
.........................................
3-10
Adjusting Navigation Volume
..............
3-10
POI Display
.......................................
3-10
Editing POI Icons
...............................
3-11
Searching POIs
.................................
3-11
Adding a My Place
.............................
3-12
Using the Navigation
Destination Search
............................
3-13
Quick Menu
.......................................
3-14
Point of Interest (POI) Search
.............
3-14
Previous Destination, Previous Searches,
and Previous Start Point
.....................
3-15
Address
.............................................
3-16
My Places
.........................................
3-16
Intersection Search
............................
3-17
Map
..................................................
3-17
3 Navigation
Table of Contents

Table of Contents l 5
Emergency
........................................
3-18
Coordinates
.......................................
3-18
Phone Number Search
.......................
3-18
Exit/Entrance
.....................................
3-19
Setting a Destination
..........................
3-19
Route Calculation
...............................
3-21
Demo
...............................................
3-21
Add Waypoint
....................................
3-22
Route Recalculation
...........................
3-22
Cancel Route
.....................................
3-22
Route Guidance
................................
3-23
Preliminary Guidance Mode
................
3-23
Intersection Zoom Mode
.....................
3-24
Highway Mode
...................................
3-24
Turn List Mode
...................................
3-24
Route Menu
......................................
3-25
Cancel Route
.....................................
3-26
Route Overview
.................................
3-26
Route Info
.........................................
3-27
Route Option
.....................................
3-27
Detour
...............................................
3-28
Avoid Streets
.....................................
3-28
Edit Route
.........................................
3-28
Avoid Area
.........................................
3-29
Map Logos and Landmarks
Logo/Landmarks
................................
3-30
Logo
.................................................
3-30
2D Landmarks
...................................
3-32
Before Use
Before Using the Bluetooth® Handsfree..4-2
What is
Bluetooth
®
Wireless Technology?. 4-2
Precautions for Safe Driving
...............
4-2
CAUTIONS upon Connecting Bluetooth®
Phone
...................................................
4-3
Basic Mode Screen
When no Phones Have Been Paired
.
4-4
Pairing from the Bluetooth® Device
........
4-5
When a Phone is Already Paired
.......
4-5
When Pairing Additional Device
............
4-6
When There is a Connected Device
...
4-7
Using
Bluetooth®
Wireless Technology
During a Call
........................................
4-8
Status Bar Icons
..................................
4-8
Making/Answering Calls
......................
4-9
Calling by Dialing a Number
.................
4-9
Making a Call from Speed Dial
..............
4-9
Calling through Redial
........................
4-10
Making a Call from Call History
...........
4-10
Answering a Call
................................
4-11
Rejecting a Call
..................................
4-11
Operating Menus during a Call
..........
4-12
Switching Call to Bluetooth® Phone
.....
4-12
Switching Call to the Handsfree
..........
4-12
Ending a Call
.....................................
4-13
Switching to Call Waiting
....................
4-13
Setting Mic Volume
............................
4-14
Adjusting the Ring/Call Volume
...........
4-14
Contacts
..............................................
4-15
Mobile Contacts Screen Configuration
.
4-16
Downloading Mobile Phone Contacts
..
4-17
Checking Mobile Contacts Details
.......
4-18
Adding as a Favorite
..........................
4-18
Favorites
.............................................
4-19
4 Bluetooth® Handsfree

6
Calling Favorites
................................
4-19
Selecting/Deleting Favorites
...............
4-19
Searching Contacts
............................
4-20
Call History
.........................................
4-21
Entering Call History Screen
...............
4-21
Call History Screen Configuration
........
4-21
Downloading Call History
....................
4-22
Viewing Call History Information
..........
4-22
Setting Bluetooth® Connection
.........
4-23
Connections Menu
.............................
4-23
Connecting a Device
..........................
4-23
Pairing a New Device
.........................
4-24
Disconnecting a Device
......................
4-25
Deleting a Device
...............................
4-25
Setting Auto Connection
.....................
4-26
Starting Voice Recognition
Starting Voice Recognition
..................
5-2
Starting Voice Recognition
...................
5-2
Skipping Prompt Messages
..................
5-2
Re-starting Voice Recognition
...............
5-3
Ending Voice Recognition
...................
5-3
Using Voice Recognition
.....................
5-4
Adjusting Voice Recognition Volume
.
5-4
Illustration on Using Voice Recognition
(Setting Home as the Destination)
......
5-5
Voice Command Lists
Voice Command List
..........................
5-6
Help Command List
.............................
5-6
Audio System Command List
..............
5-7
FM/AM Radio
......................................
5-7
XM Radio
............................................
5-8
CD(Audio Type)
...................................
5-9
CD(MP3 Type)
....................................
5-9
USB Music
........................................
5-10
USB Image
........................................
5-10
iPod
..................................................
5-11
My Music
...........................................
5-11
Others
...............................................
5-12
Phone Command List
........................
5-12
Navigation Command List
..................
5-13
Destination
........................................
5-13
Map
..................................................
5-14
POI Category List
...............................
5-15
XM Data
About XM Data
....................................
6-2
About XM Data Service
........................
6-2
Weather Data Service
..........................
6-3
Traffic Data Service
..............................
6-4
Stocks Data Service
.............................
6-5
Sports Data Service
.............................
6-6
Blue Link®
Blue Link®
..............................................
6-7
Cautions upon Using Blue Link® Service... 6-7
Blue Link® Safety and Security Service..... 6-8
Stolen Vehicle Recovery
......................
6-8
Location Information Service
.................
6-9
Car Management Information
.............
6-13
Blue Link® System Information
............
6-14
GPS Information
About GPS (Global Positioning System).. 6-15
5 Voice Recognition
6 Information
Table of Contents

Table of Contents l 7
When GPS Info Cannot Be Used
........
6-15
Errors Unavoidable Due to System
Characteristics
...................................
6-15
Viewing GPS Info
...............................
6-16
Help
Viewing Help
.......................................
6-17
Climate Mode
Operating Climate Mode
......................
7-2
Basic Mode Screen
..............................
7-3
Basic Operation
....................................
7-4
Controlling Driver/Passenger Temperature
Simultaneously
....................................
7-4
Controlling Driver/Passenger Temperature
Independently
......................................
7-4
Controlling Driver/Passenger Temperature
Setting Fan Direction
............................
7-5
Setting Fan Level
.................................
7-6
Rear Camera
About Rear Detection Camera
............
7-7
Operating sequence of the Rear Camera.. 7-7
Using Setup
Basic Mode Screen
.............................
8-2
Starting Mode
......................................
8-3
Sound
...................................................
8-3
Setting Balance/Fader
..........................
8-3
Setting Bass/Mid/Treble
.......................
8-3
Setting Volume Ratio
...........................
8-4
Advanced
............................................
8-4
Setting Beep
........................................
8-5
Display
.................................................
8-6
Adjusting Screen
..................................
8-6
Setting Display Mode
...........................
8-6
HD Radio
..............................................
8-7
Bluetooth
...............................................
8-7
Auto Connection Settings
.....................
8-8
Contacts Sync Setting
..........................
8-8
Contacts Download Setting
...................
8-9
Streaming Audio Setting
.......................
8-9
Advanced Settings
...............................
8-9
Navigation
...........................................
8-12
Main
..................................................
8-12
Display
..............................................
8-13
Route Search
....................................
8-14
Guidance
...........................................
8-14
Default
..............................................
8-15
My Places
...........................................
8-16
My Places
.........................................
8-16
Favorite Places
..................................
8-17
Home and Office
................................
8-17
Speed Alerts
......................................
8-18
Traffic Setup
.......................................
8-18
Voice Recognition Settings
................
8-19
Clock Settings
.....................................
8-19
Time
.................................................
8-19
View
..................................................
8-20
Picture Frame
....................................
8-20
Keyboard
...........................................
8-21
Language
...........................................
8-22
System Update
..................................
8-22
Display Off
.........................................
8-23
7 Other Features
8 Setup

8
Appendix
Product Specification
..........................
9-2
Before Thinking There is a Product Defect.. 9-4
Before Thinking the Product Has
Malfunctioned
......................................
9-5
Troubleshooting
...................................
9-6
FAQ
......................................................
9-8
About sPairing Mobile Phones
..............
9-8
About Making/Answering Phone Calls
...
9-9
About
Bluetooth
®
Wireless Technology/
Head Unit Use Environment
.................
9-9
9 Appendix
Table of Contents

Table of Contents l 9
CAUTIONSuponUsingSDCards
EjectingandInsertingSDCards
• Ejecting and inserting SD cards while the Navigation system is operating may result in
SD Card or System errors. To eject or insert the SD card, first turn off the Navigation
system and the vehicle ignition.
• Eject/insert SD cards only to update the navigation system with a new version.
※ When an SD Card with the new version is inserted, then system update will
occur automatically
UsageofSDCards
• The SD Card is formatted to include only MAP and new system update files.
• The SD Card cannot be used to save and play Music.
• Do not add, delete, or format files within the SD Card.

iPod®
iPod® is a registered trademark of Apple Inc.
Bluetooth
®
Wireless Technology
The
Bluetooth
®
Wireless Technology word mark and logos are registered
trademarks owned by
Bluetooth
®
Wireless Technology SIG, Inc. and any
use of such marks by Hyundai is under license.
A
Bluetooth
®
Wireless Technology enabled cell phone is required to use
Bluetooth
®
Wireless Technology.
Bluetooth
®
Wireless Technology phone
compatibility can be checked by visiting www.hyundaiusa.com and under
the SERVICE & PARTS–BLUETOOTH COMPATIBILITY menu.
• Areas that can be checked –9 areas, such as Pairing, Connection,
Handsfree Calling, Streaming, etc.
HD Radio™ Technology
HD Radio Technology manufactured under license from iBiquity
Digital Corporation. U.S. and Foreign Patents.
HD Radio™ and the HD, HD Radio, and "Arc" logos are proprietary
trademarks of iBiquity Digital Corp.

CAR AVN SYSTEM
•
Warnings and Cautions
•
Key Product Features
•
Component Names and Functions
•
Starting the System for the First Time
Basic
1

1-2
Safety Warnings
Even when receiving route guidance from the Navigation system,
please abide by actual traffic and road regulations. Following only
the Navigation route guidance may lead to violations of actual traffic
and road regulations and lead to traffic accidents.
Do not stare at the screen while driving. Staring at the screen for
prolonged periods of time could lead to traffic accidents.
Do not operate the Navigation system while driving, such as entering
POIs or conducting route searches. Such acts could lead to accidents,
fire, or electric shock. Park the vehicle before operating the device.
Do not disassemble, assemble, or modify the Navigation system.
Such acts could result in accidents, fire, or electric shock.
Heed caution not to spill water or introduce foreign objects into the
device. Such acts could lead to smoke, fire, or product malfunction.
Please refrain from use if the screen is blank or no sound can be
heard as these signs may indicate product malfunction. Continued
use in such conditions could lead to accidents (fires, electric
shock) or product malfunctions.
Do not touch the antenna during thunder or lightening as such
acts may lead to lightning induced electric shock.
Do not stop or park in parking-restricted areas to operate the prod-
uct. Such acts could lead to traffic accidents.
For most Audio and multimedia modes, the display will not operate
when the vehicle is in motion. For your safety, first park the vehicle
to watch or view the screen. (The screen will operate when the park-
ing brake is set to ON for manual transmission vehicles and when
set to P or Parking Brake On state for auto transmission vehicles.)
Warnings and Cautions

Warnings and Cautions
Basic l 1-3
Safety Cautions
Pay attention to traffic conditions while driving.
In some instances, the navigation may provide guidance through re-
stricted areas.
Operating the device while driving could lead to accidents due to a
lack of attention to external surroundings. First park the vehicle before
operating the device. In addition, the touch screen may not work for
some functions when the vehicle is in motion. The touch screen fea-
ture will be supported once the vehicle has stopped.
Adjust the volume to levels that allow the driver to hear sounds
from outside of the vehicle. Driving in a state where external
sounds cannot be heard may lead to accidents.
Pay attention to the volume setting when turning the device on. A
sudden output of extreme volume upon turning the device on
could lead to hearing impairment. (Adjust the volume to a suitable
levels before turning off the device.)
If you want to change the position of device installation, please in-
quire with your place of purchase or service maintenance center.
Technical expertise is required to install or disassemble the device.
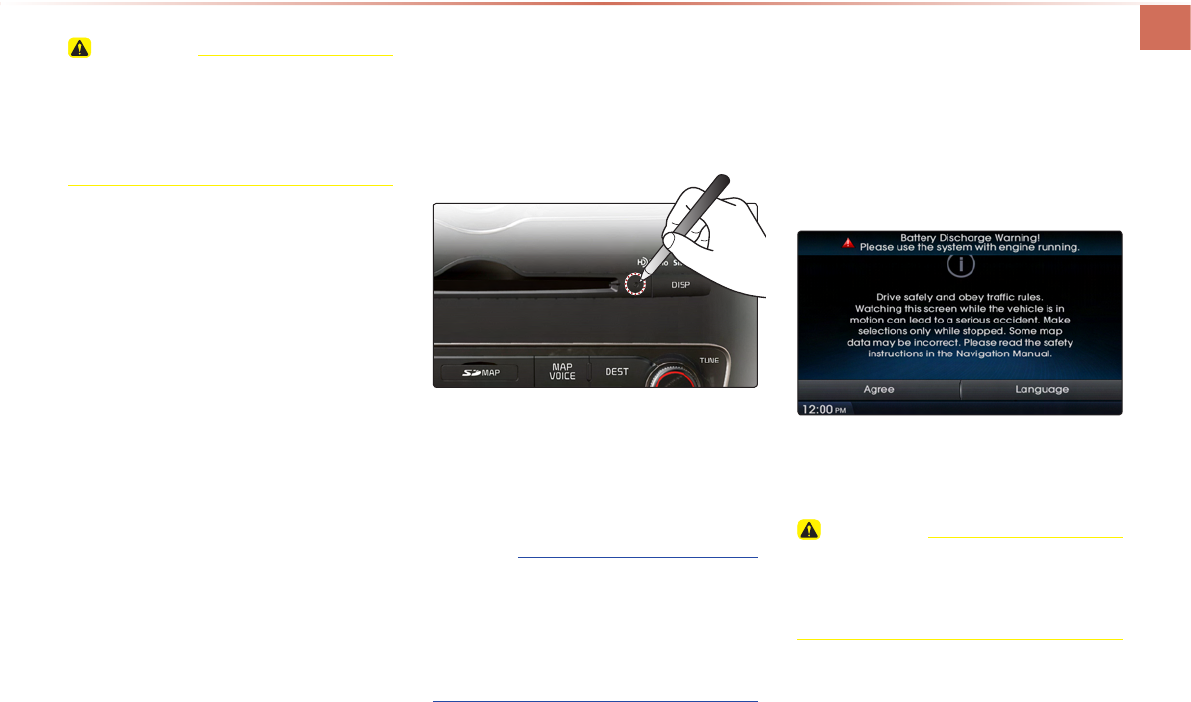
Turn on the car ignition before using this device. Do not operate
the Navigation system for long periods of time with the ignition
turned off as such operations may lead to battery discharge.
Upon using the Navigation system for more than 10 minutes with
the car engine turned off, the following warning will be displayed.
After 10 minutes, the warning will be displayed for 5 seconds every
1 minute.
Do not subject the device to severe shock or impact. Direct pres-
sure onto the front side of the monitor may cause damage to the
LCD or touch screen.
When cleaning the device, make sure to turn off the device and
use a dry and smooth cloth.
Never use tough materials, chemical cloths, or solvents(alcohol,
benzene, thinners, etc.) as such materials may damage the de-
vice panel or cause color/quality deterioration.
When experiencing product malfunctions, inquire with your place
of purchase or service maintenance center.

1-4
This device is an Audio Navigation system equipped with a multifunctional disc player that supports Radio (FM1, FM2, AM), HD Radio technol-
ogy, Audio CD, MP3, USB, iPod, and Audio, Aux, and My Music features. The WIDE VGA LCD provides a high quality resolution while the
powerful and rich sound system adds to the driving enjoyment.
Display
Wide TFT-LCD Display
• Provides high quality sound and video through a Wide TFT-LCD Display using an LED Back Light
• Touch screen for maximum user convenience
Radio
Digital Tuner Feature
• Digital Tuner using PPL method that supports memory of 6 broadcast stations for each AM, FM1, and FM2 modes
Integrated Antenna (RADIO+NAVI)
• Outstanding reception via integrated antenna with high sensitivity
Radio broadcast station name
• Displays broadcast station names for key locations
HD Radio/Satellite Radio feature
• Supports HD Radio reception and Satellite Radio (XM)
Multimedia
Player
Support for various Media Formats
• Support for various media formats, including Radio, audio MP3 CD, USB, iPod and AUX
• Supports USB, iPod, and Bluetooth® Audio Streaming modes
My Music
• Supports copying of music stored within USB or iPod devices into My Music (internal memory) mode
USB Image
• Copy to view and save images saved in USB devices
Key Product Features

Key Product Features
Basic l 1-5
Navigation
Voice Guidance
• Voice route guidance to safely and conveniently reach set destinations
• Various map scales that enables drivers to accurately view map and surrounding areas
Automatic Correction for Current Location
• Automatically corrects current position using map matching and GPS information
Blue Link®
Sync with Blue Link® Center
• Synchronization with the Blue Link® Center to provide various types of information
Vehicle Diagnostics/Maintenance
• Supports Vehicle Theft Protection, Parts Diagnostics and Recall Information
Eco Driving and Fuel Economy Management
• Supports Economic driving practices by providing driver/community fuel economy information and Eco Rewards
Miscellaneous
Bluetooth®
Wireless Technology
• Convenient use of Bluetooth® Handsfree by using buttons within the steering wheel remote controller
Digital Screen Control Features
• Easy control of features through touch screen options
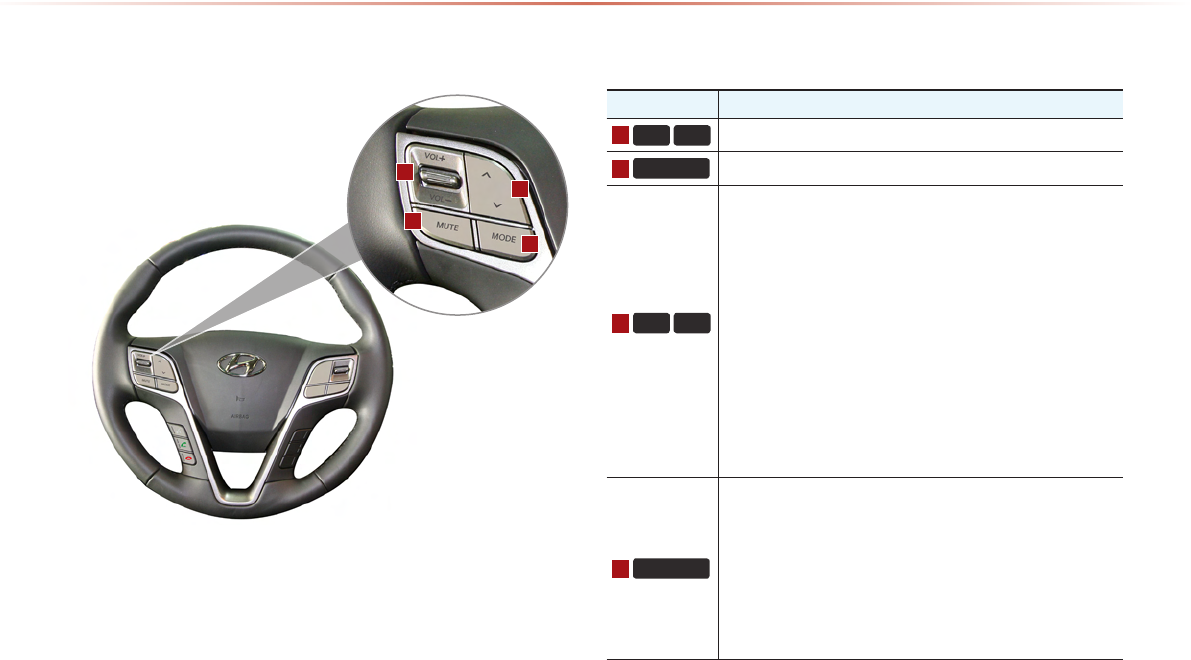
Steering Wheel Remote Controller
• Control over audio features, voice recognition and Bluetooth® through the steering wheel remote controller for maximum
convenience
1-6
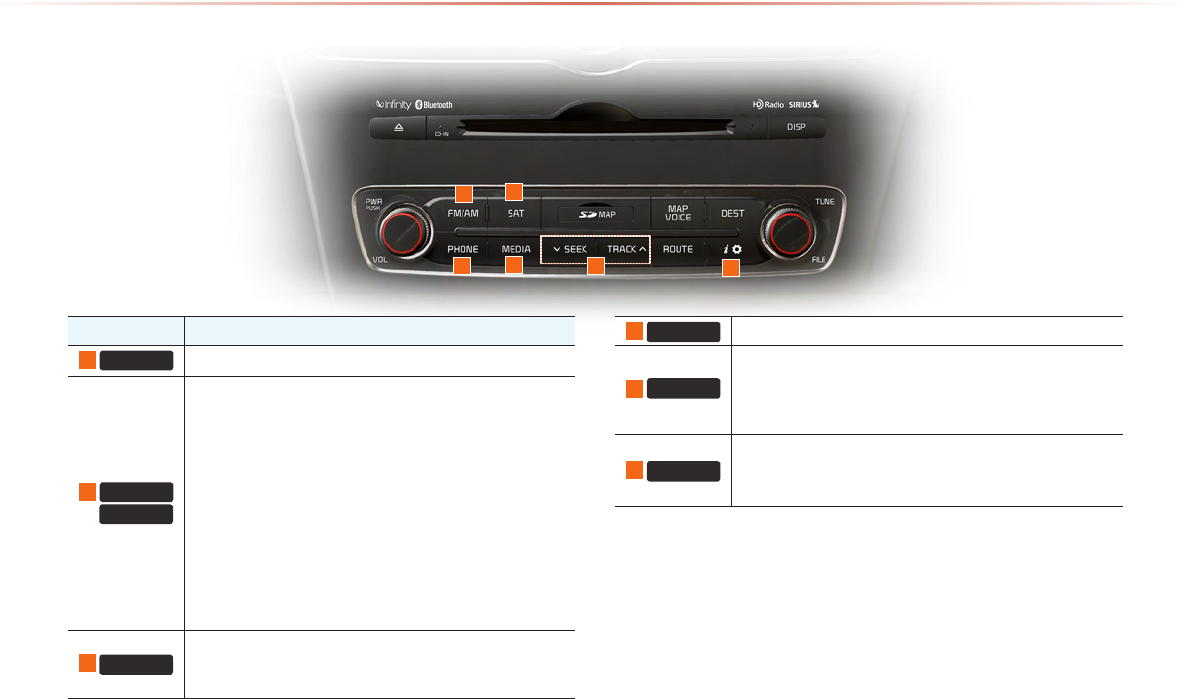
Component Names and Functions
Name Description
1
PHONE Takes user to home phone screen
2
∨
SEEK
TRACK
∨
When key is pressed shortly. (under 0.8 seconds)
• In FM/AM mode, plays previous/next frequency
• In XM mode, plays the previous/next channel
• In CD/MP3/USB/iPod/My Music modes, changes the
track, le or chapter
When key is pressed and held. (over 0.8 seconds)
• In FM/AM mode, continuously changes the frequency
until the key is released and plays the current frequency
• In XM mode, continuously changes the channel until the
key is released and plays the current channel
• In CD/MP3/USB/iPod/My Music modes, rewinds or fast-
forwards the track or le
3
FM/AM
• Converts to FM/AM mode
• Each time the key is pressed, the mode is changed in
order of FM1 → FM2 → AM → FM1
4
INFO Displays the Info mode screen
5
MEDIA
• Displays CD, MP3, USB, iPod, AUX, Bluetooth® Audio
Streaming, My Music modes
• If the media is not connected or a disc is not inserted,
corresponding modes will be disabled
6
SAT
Converts to XM mode
• Each time the key is pressed, the mode is changed in
order of XM1 → XM2 → XM3 → XM1
14
36
52
Head Unit
Component Names and Functions
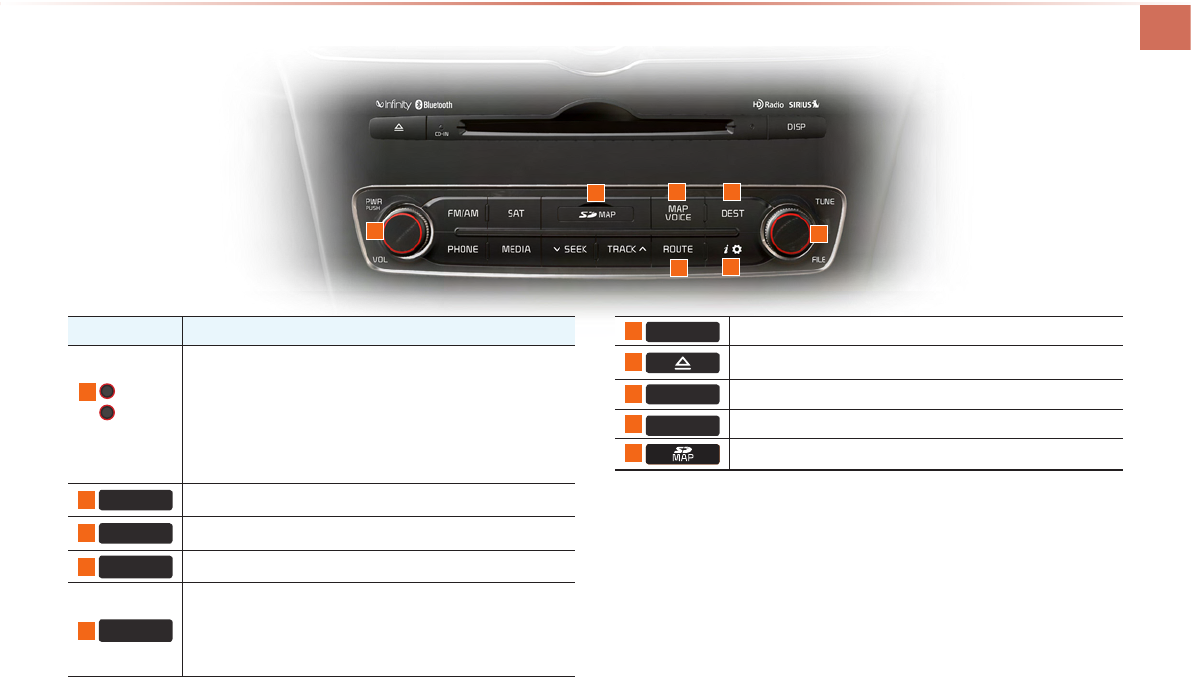
Basic l 1-7
Name Description
7
PWR key
VOL Knob
• When power is o, press to turn power on
• When power is on, press and hold (over 0.8 seconds)
to turn power o
• When power is on, press shortly (under 0.8 seconds) to
turn Audio o
• Turn left/right to control volume
8
ROUTE Displays Route menu screen
9
SETUP Displays the Setup mode
10
MAP
VOICE Displays the map for the current position
11
TUNE
• In FM/AM mode, changes the frequency
• In XM mode, changes the channel
• In CD, MP3, USB, iPod, My Music modes, changes the
track, le or chapter
12
DEST Displays the Destination setup menu
13
Press to insert or eject disc
14
DISP
Converts to DISP mode
15
RESET Resets and restarts the system
16
SD Card insert slot
89
11
16 12
7
10
1-8
Component Names and Functions
Steering Wheel Remote Controller
Name Description
1
VOL+
VOL-
Controls the volume
2
MUTE Mutes the sound
3
Λ
V
When keys are pressed shortly. (under 0.8 seconds)
• In FM/AM mode, searches broadcast frequencies saved
to Presets
• In XM modes, searches broadcast channels saved to
Presets
• In CD/MP/USB/iPod/My Music modes, changes the
track, le or chapter
When keys are pressed and held. (over 0.8 seconds)
• In FM/AM mode, automatically searches broadcast
frequencies and channels
• In XM modes, automatically searches broadcast channels
• In CD/MP3/USB/iPod/My Music modes, rewinds or fast
forwards the track or le
4
MODE
• Each time this key is pressed, the mode is changed in
order of FM1 → FM2 → AM → XM1 → XM2 → XM3 →
USB or iPod → AUX → Bluetooth® Audio → My Music
• If the media is not connected or a disc is not inserted,
corresponding modes will be disabled
• Press and hold the key (over 0.8 seconds) to turn the
Audio system on/o
• When power is o, press the key to turn power back on
1
2
3
4
Component Names and Functions
Basic l 1-9
Name Description
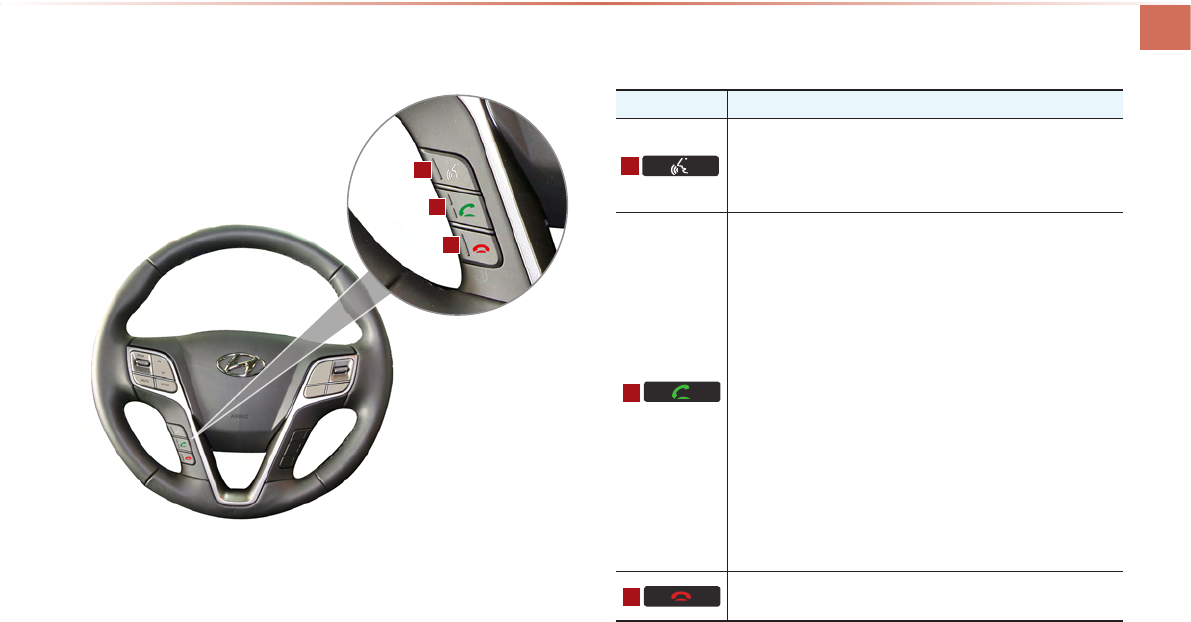
5
When pressed shortly. (under 0.8 seconds)
• Activates voice recognition
When pressed and held. (over 0.8 seconds)
• Ends voice recognition
6
When pressed shortly. (under 1.2 seconds)
• When pressed in the phone screen, displays call history
screen
• When pressed in the dial screen, makes a call
• When pressed in the incoming call screen, answers the
call
• When pressed during call waiting, switches to waiting
call (Call Waiting)
When pressed and held. (over 1.2 seconds)
• When pressed in the Bluetooth® Handsfree wait mode,
redials the last call
• When pressed during a Bluetooth® Handsfree call,
switches call back to mobile phone (Private)
• When pressed while calling on the mobile phone,
switches call back to Bluetooth® Handsfree (Operates
only when Bluetooth® Handsfree is connected)
7
When pressed during a call, ends the phone call
When pressed in the incoming call screen, rejects the call
5
6
7

1-10
Component Names and Functions
Climate System
Name Description
1
MODE Sets the fan direction
2
CLIMATE Displays the climate info screen
3
Removes humidity and frost by blowing fan towards the
front window
4
The side mirror and rear window defroster is turned on/o
5
A/C Turns the air conditioner on/o
6
TEMP Controls the driver-side temperature
7
Switches the air intake mode to recirculation
8
Switches the air intake mode to outside air
9
DUAL
Turns DUAL mode on/o
Upon turning on DUAL, the driver-side and passenger-side
temperature can be operated independently
10
Passenger
Temp Controls the passenger-side temperature
11
AUTO Operates auto temperature mode to maintain cabin tem-
perature at suitable levels relative to outside temperature
12
OFF Turns the climate system o
13
Sets the fan level
1
2
11
12
10
73
4
5
8
9
6
1
13
Component Names and Functions
Basic l 1-11
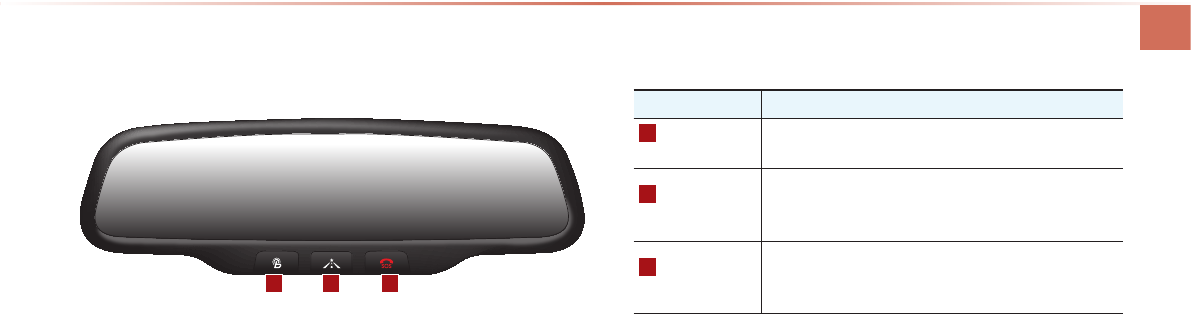
Room Mirror
Name Description
1
Blue Link®
Center
Connects to the Blue Link® Center to speak with con-
sultants When pressed again during call, ends call
2
Blue Link® for
POI
After connecting to the Blue Link® Center, used to
request POI information through voice recognition
When pressed again during call, ends call
3
Blue Link® for
SOS
• When an unforeseen emergency occurs, used to
make call and request Blue Link® SOS service
• When pressed again during call, ends call
1 32
1-12
Turning the System On/Off
Turning the System On
If the engine start button is pressed without
pressing the brakes, then the ACC and
system will turn on.
Once the system is turned on, the booting
process will start and the safety warning
page is displayed.
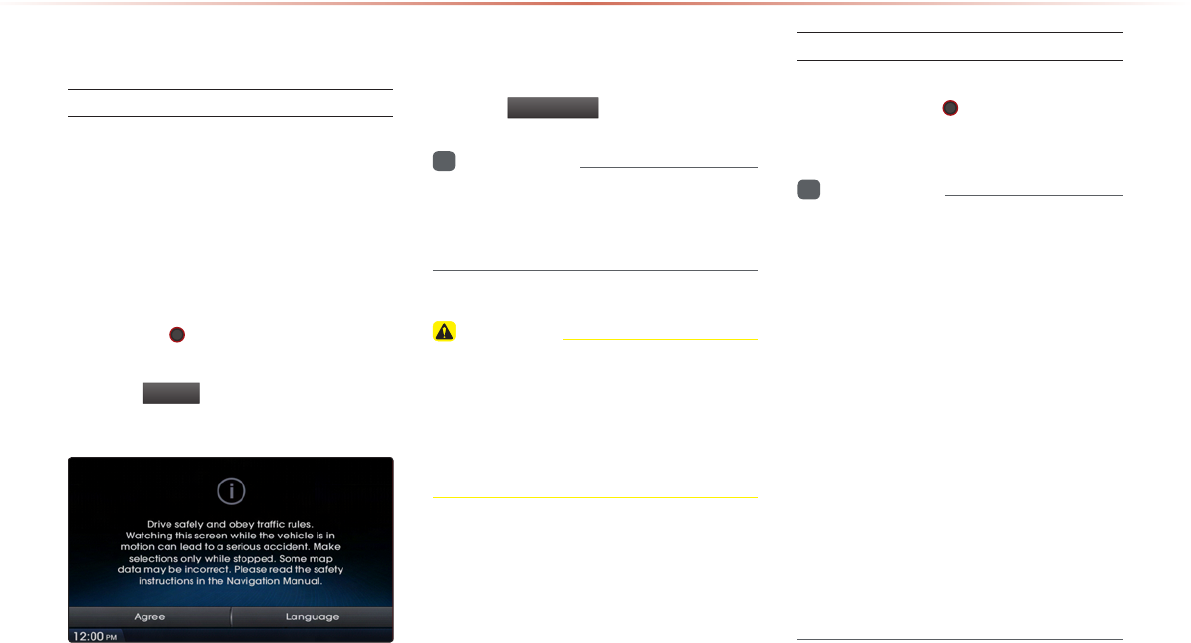
Pressing the PWR key on the head unit
will display the safety warning page.
Press the
Agree
button to display the most
recent mode.
To change the system language between
Korean, English, Français, and Español
press the
Language
button.
i
Information
•
No operations are supported while the sys-
tem is booting. Some time may be required
until all features are ready for use.
CAUTION
• The safety warning page is displayed
every time the ignition is turned on. The
displayed warnings are related to saftey,
please closely read and comply with the
safety warnings.
Turning the System O
Press the engine start button again or
press and hold the PWR key on the sys-
tem to turn the system off.
i
Information
•
If the system is turned off while the
Handsfree is being used, then the call will
automatically switch back to the mobile
phone.
•
ADM (Accessory Delay Mode) refers to
a state in which the navigation system
will remain turned on for continued use
up to a certain amount of time even if the
vehicle ignition is set to ACC OFF state.
•
The navigation system will automatically
turn off if more than 3 minutes has passed
in ACC OFF state or the driver-side door
is opened.
•
While ADM is operating, it is possible to
manually turn off the system power.
Starting the System for the First Time
Starting the System for the First Time
Basic l 1-13
CAUTION
• Pay attention to the volume setting when
turning the device on. Adjust the volume
to a suitable levels before turning off the
device.
Resetting the System
This feature is used to reset the system in
the occurrence of an unforeseen error or
problem.
Press and hold the RESET key. (about 1
second)
(The use of a clip or pin is recommended
when resetting the system.)
NOTICE
•
Upon resetting the system, saved data
and settings information (radio frequen-
cies, volume and display settings) will be
restored back to the default factory state.
Such are not indications of malfunctions.
Battery Warning Message
Use the system only when the engine is
running. If the system is turned on with the
engine off, then the following warning will
be displayed.
This message will automatically disappear
once the engine is turned on.
CAUTION
• Using the system for prolonged periods
of time without the engine running may
result in battery discharge.

MEMO
1-14

CAR AVN SYSTEM
•
FM/AM Mode
•
HD Radio Mode
•
XM Mode
•
About DISC
•
CD Mode
•
MP3 CD Mode
•
USB Mode
•
iPod Mode
•
AUX Mode
•
Bluetooth® Audio Mode
•
My Music Mode
Audio
2
2-2
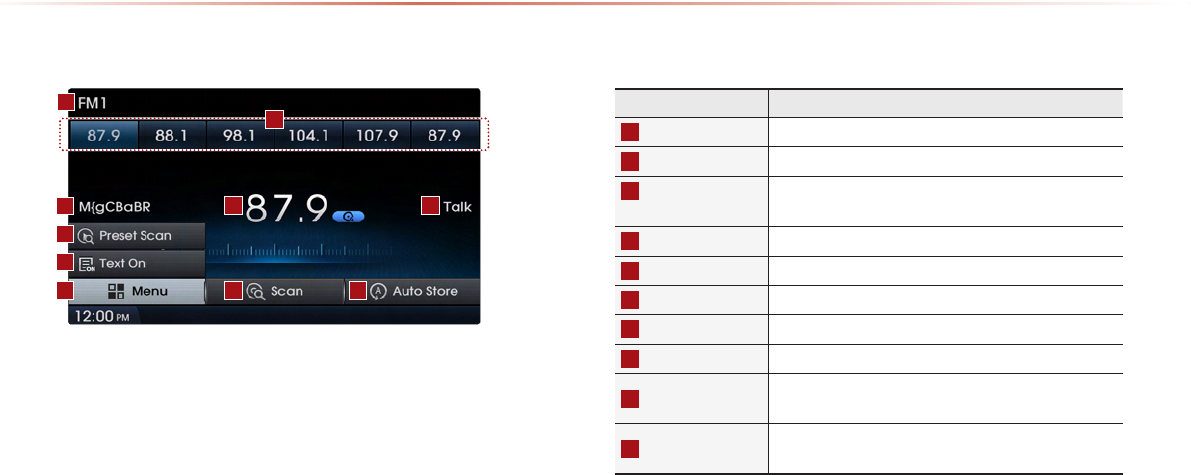
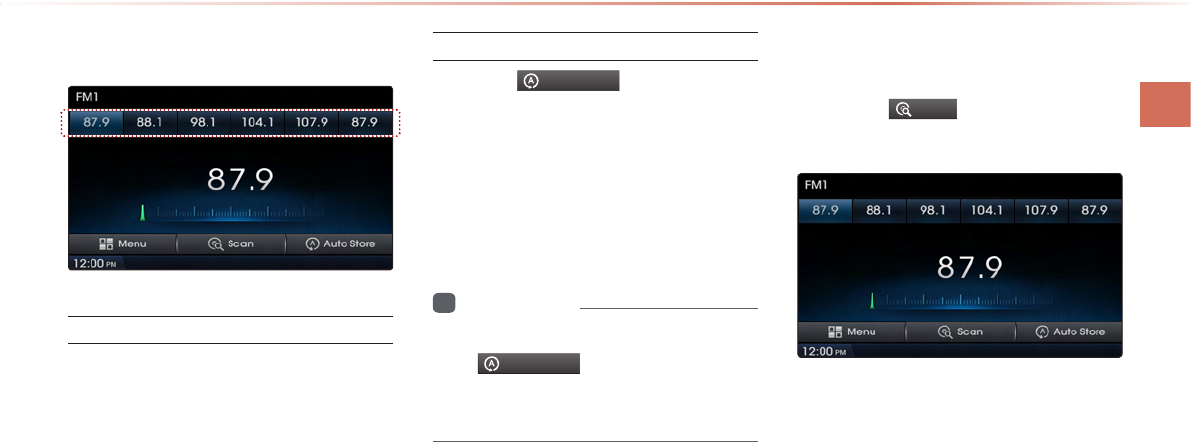
Basic Mode Screen (HD Radio reception OFF)
1
10
7
6
2
54
3
98
Name Description
1
Mode Display Displays currently operating mode
2
Preset Shows saved presets for user selection
3
Broadcast
Station Name Displays the current broadcast station name
4
Frequency Displays the current frequency
5
Genre Display Displays the current genre
6
Preset Scan Plays preset frequencies for 5 seconds each
7
Text On (Text O) Turns the Radio Text information on and o
8
Menu Displays Preset Scan and Text On (Text O) menus
9
Scan Plays frequencies with superior reception for 5 sec-
onds each
10
Auto Store Saves frequencies with superior reception to Preset
buttons
FM/AM Mode
FM/AM Mode
Audio l 2-3 2-3
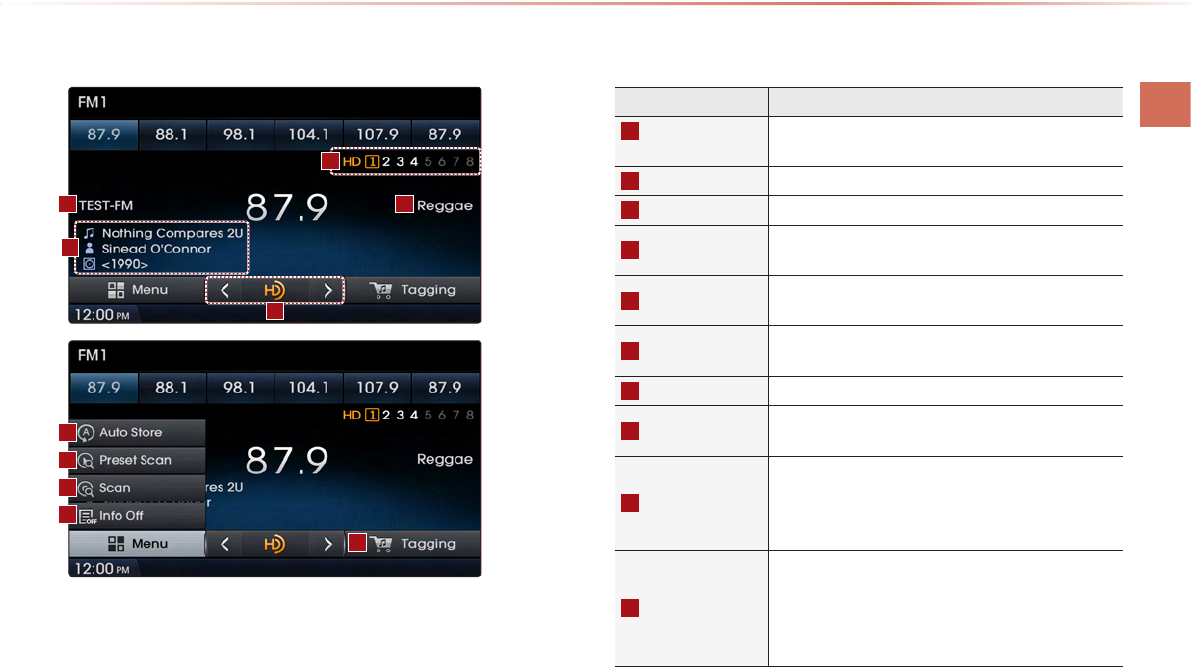
Basic Mode Screen (HD Radio reception ON)
9
7
6
8
10
Name Description
1
HD Radio
Reception Displays main HD Radio channels
2
Broadcast Station Displays the current broadcast station
3
Genre Displays the current broadcast genre
4
Broadcast Info Displays detailed information about the current
broadcast
5
Selection buttons Used to select the previous/next HD Radio broad-
cast channel
6
Auto Store Saves frequencies with superior reception to Preset
buttons
7
Preset Scan Plays preset frequencies for 5 seconds each
8
Scan Plays frequencies with superior reception for 5 sec-
onds each
9
Info On (Info O)
• When pressed, shows detailed information about
the current broadcast
• When pressed again, detailed information is
turned o
10
Tagging
• Used to save song information for the currently
playing broadcast
• Upon connecting an iPod, song information is
transferred to the iPod and can be downloaded
through iTunes
23
5
1
4
2-4
Starting Mode
Press the
FM/AM
key to change the
mode in order of FM1 → FM2 → AM.
When the power is OFF, pressing the
FM/AM
key will turn the power on and
play a radio broadcast.
Using SEEK
Press the
SEEK
TRACK
∧
∨
key to automatically
search for frequencies.
• Shortly press the key (under 0.8 seconds) :
Plays previous/next frequency.
• Press and hold the key (over 0.8 seconds) :
Changes the frequency while pressed and
receives the next frequency upon release.
Using TUNE
Press the
TUNE
∧
∨
key to manually
select the frequency.
• FM1/FM2 : Increases/decreases by 200kHz
• AM : Increases/decreases by 10kHz
Selecting Presets
From the 6 presets, select the frequency
you want to listen to.
i
Information
•
You can save up to 6 preset channels each
for FM1, FM2 and AM.
FM/AM Mode
FM/AM Mode
Audio l 2-5 2-5
Saving Radio Frequency
Saving Manually
After selecting frequency ▶ Press and
hold (over 0.8 seconds) the preset button.
A 'beep' will sound and the frequency is
saved to the selected preset button.
Saving Automatically
Press the
Auto Store
to automatically
save receivable frequencies to Preset
buttons.
A total of 18 frequencies with six preset
frequencies each for FM1/FM2/AM modes
can be saved.
i
Information
•
While Auto Store is operating, pressing
the
Auto Store
button again will cancel
the function and play the previous fre-
quency.
Scanning Radio Frequency
Press the
Scan
button to scan all
radio frequencies.
Starting from the current frequency, fre-
quencies with superior reception are
scanned for 5 seconds and the previous
frequency is restored.
2-6
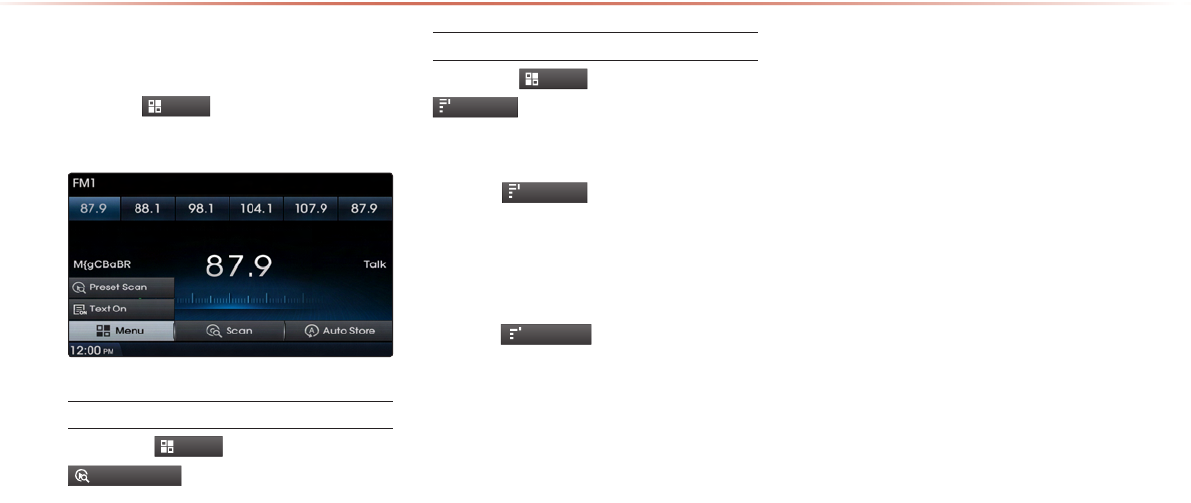
Using the Menu Buttons
Press the
Menu
button to use the Preset
Scan menu.
Preset Scan
Press the
Menu
button ▶ Press
Preset Scan
.
Frequencies saved to the 6 preset buttons
are each played for 5 seconds and the
previous frequency is restored.
Text On/Text O
Press the
Menu
button ▶ Press
ON
Text On
.
The Text feature is turned on/off.
• If the
ON
Text On
button is displayed
(Text off state), information will not be
displayed even if there is information
being transmitted from the broadcast
station.
• If the
Off
Text Off
button is displayed
(Text on state), then broadcast informa-
tion will be displayed. Information may
not be displayed if there is no informa-
tion being transmitted from the broad-
cast station.
FM/AM Mode
HD Radio Mode
Audio l 2-7 2-7
About HD RadioTM Technology
Starting Mode
Press the
FM/AM
key to turn on Radio
mode.
If an HD Radio broadcast is received, the
radio mode will switch from analog broad-
cast to HD Radio broadcast.
i
Information
•
The HD Radio screen is displayed only
when a HD Radio broadcast is being
received.
•
To ensure HD Radio stations are received,
turn the feature on at
SETUP
key ▶
HD Radio
.
Operating HD Radio Mode
Selecting a Frequency
As HD Radio reception is included within
Radio mode, the methods of moving
between channels, saving presets, search-
ing, or methods of searching frequencies
are identical. However, while the HD Radio
related icon display will become active
when within regions where an HD Radio
signal can be received.
HD Radio Mode
Program Service Data :
Contributes to the superior user
experience of HD Radio Technology. Presents
song name, artist, station IDs, HD2/HD3 Channel
Guide, and other relevant data streams.
Adjacent traditional main stations
are extra local FM channels.
Theses HD2/HD3 Channels provide new, original
music as well as deep cuts into traditional genre.
Digital, CD-quality sound. HD
Radio Technology enables local
radio stations to broadcast a clean digital signal. AM
sounds like today’s FM and FM sounds like a CD.
2-8
Using TUNE
Press the
TUNE
∧
∨
key to manually
select the frequency.
Selecting through Preset
From the 6 presets, select the HD Radio
broadcast you want to listen to.
i
Information
•
For HD Radio broadcast channels with-
out sub channels, sub channels will be
skipped and only main channels will be
received.
Song-Tagging
The song tagging feature provides a way
to capture broadcasted song informa-
tion from the radio for future purchase in
iTunes.
Upon connection of an Apple audio play-
back device , the "tagged songs" will be
transferred to your iTunes account in your
Tagged songs folder.
i
Information
•
Up to 50 songs can be saved if an iPod
device is not connected.
•
Song data can be transferred to an iPod
only if there is available space within the
device.
HD Radio Mode
HD Radio Mode
Audio l 2-9 2-9
HD Radio Digital
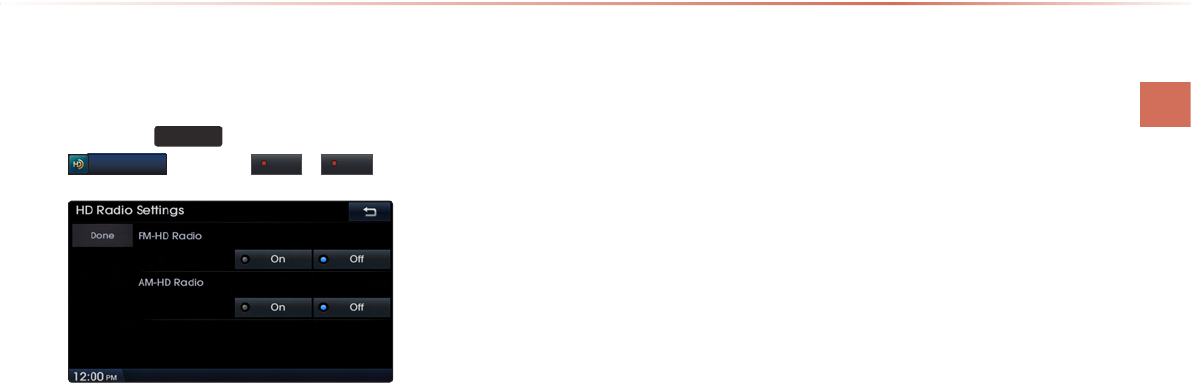
Broadcast On/Off
Press the
SETUP
key ▶ Press the ▶
HD Radio
▶ Press On / Off .
HD Radio Broadcasts can be turned On
and Off for HD Radio FM and AM mode.
2-10
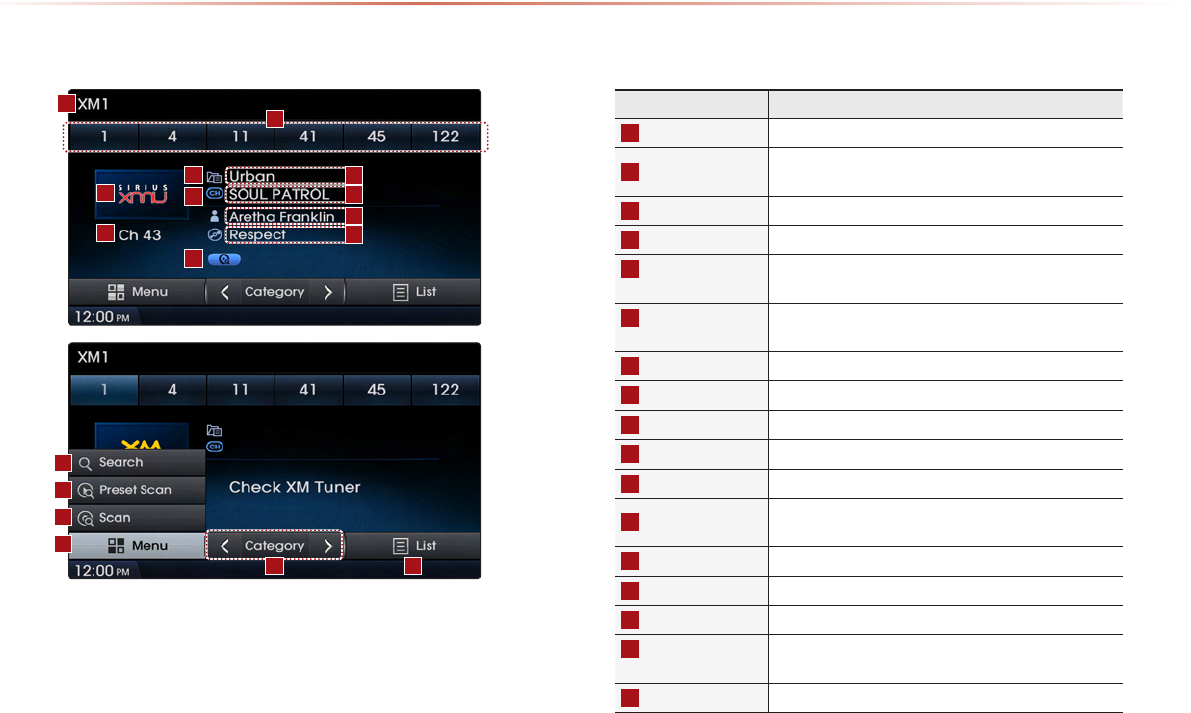
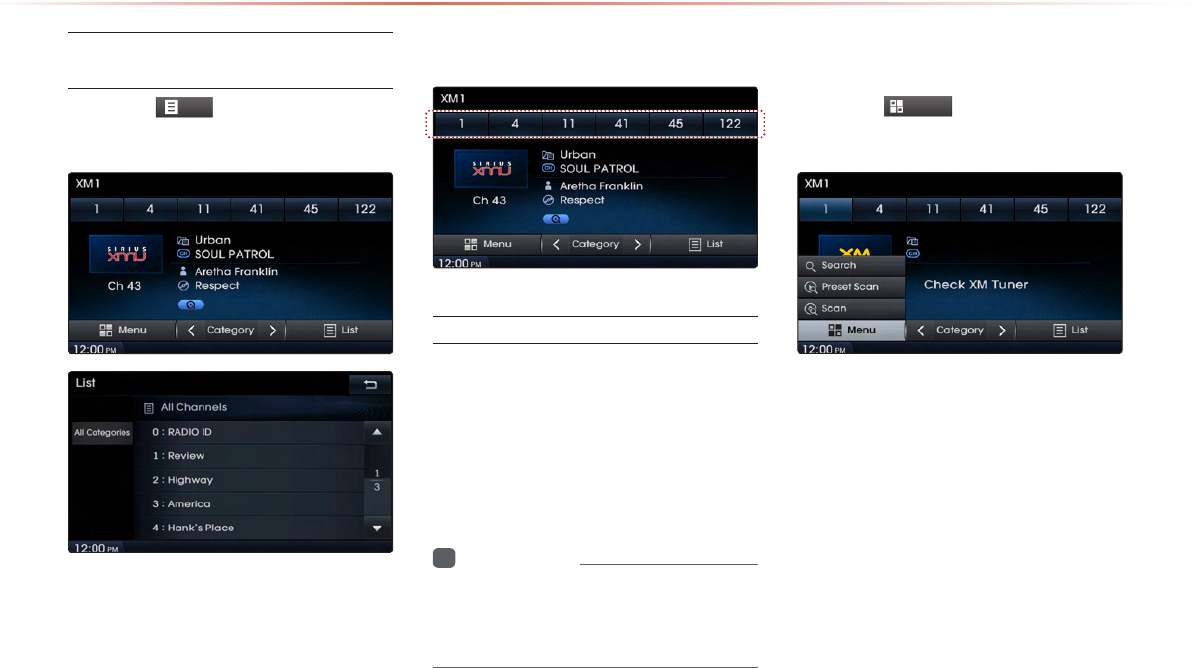
XM Mode
Name Description
1
Mode Display Displays currently operating mode
2
Preset The desired frequency can be saved as a preset
and selected
3
Channel Logo Display the channel logo
4
Channel Number Displays the current channel number
5
Category mode
indicator
Displays the category mode in blue
6
Channel mode
indicator
Displays the channel mode in blue
7
Setting Display
Displays the indicator if Scan/Preset Scan is operating
8
Category name
Displays the category name
9
Channel name
Displays the channel
10
Artist name
Displays the artist name
11
Title name
Displays the title name
12
Search Used to search for channels by entering channel
numbers
13
Preset Scan Plays preset frequencies for 5 seconds each
14
Scan Plays all receivable channels for 5 seconds each
15
Menu Displays Search, Preset Scan and Scan menus
16
Category
Selection Buttons Used to select the previous/next channel
17
List Displays XM Radio Categories/Channel Lists
Basic Mode Screen
15
4
3
1
2
5
6
7
12
13
14
16 17
8
10
9
11
XM Mode
Audio l 2-11 2-11
Starting Mode
Press the
SAT
key to change the
mode in order of XM1 → XM2 → XM3.
When the power is OFF, pressing the
SAT
key will turn the power on and
play an XM Radio broadcast.
Using SEEK
Press the
SEEK
TRACK
∧
∨
key on the control
panel for under 0.8 seconds.
The previous or next channel will be
selected.
i
Information
•
Within category mode, channels within
the current category will be played.
•
Within channel mode, all channels in all
categories will be played.
•
If no operation for 5 seconds during cat-
egory mode, it goes back to the channel
mode automatically.
Using TUNE
Press the
TUNE
∧
∨
key to display the
previous or next channel information.
After a brief moment, the selected channel
will be displayed.
Selecting Presets
From the 6 presets, select the channel you
want to listen to.
2-12
Selecting through Channel/Cat-
egory List
Press the
List
button ▶ Select the
desired category and channel.
Select the desired category and the channel.
Once selected, the previous screen will
be restored and the selected channel will
begin playing.
Saving XM Channels
Saving Manually
After selecting channel ▶ Press and hold
(over 0.8 seconds) the preset button.
A confirmation 'beep' will be heard and the
channel will be saved to the selected pre-
set button.
i
Information
•
Six preset frequencies each for XM1/
XM2/XM3 modes can be stored using the
above instructions.
Using the Menu Buttons
Press the
Menu
button to use the
Search, Preset Scan, and Scan menus.
XM Mode
XM Mode
Audio l 2-13 2-13
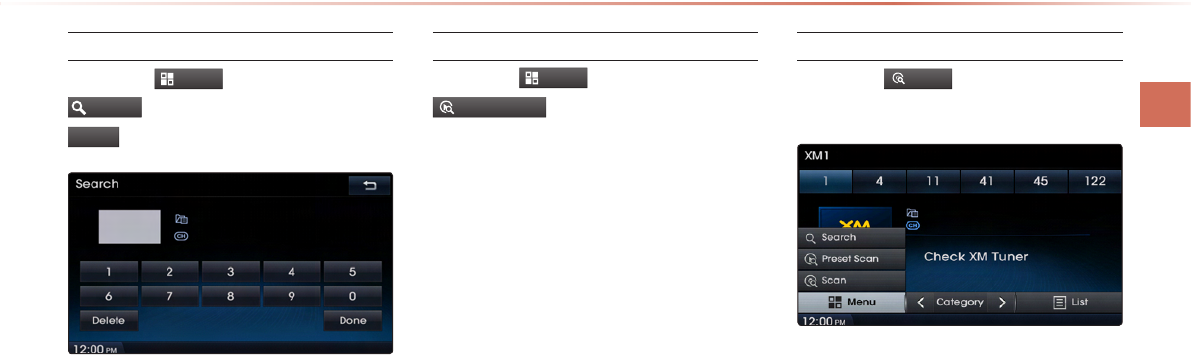
Search
Press the
Menu
button ▶ Press
Search
▶ Enter numbers and press
Done
.
Enter the number of the channel you want
to receive.
Preset Scan
Press the
Menu
button ▶ Press
Preset Scan
.
Channels saved to the 6 preset buttons
are each played for 5 seconds and then
the previous channel is restored.
Scan
Press the
Scan
button to scan all
channels.
Starting from the current channel, chan-
nels with superior reception are scanned
for 5 seconds and the previous channel is
restored once scanning is complete.

2-14
Disc
About Disc
Precautions upon Handling Discs
After using a disc, put the disc back in its original case to prevent
disc scratches.
Do not use abnormally shaped discs (8cm, heart-shaped, octa-
gon-shaped) as such discs could lead to malfunctions.
Do not clean discs with chemical solutions, such as record sprays,
antistatic sprays, antistatic liquids, benzene, or thinners.
Do not expose the disc to direct sunlight or high temperatures for
prolonged periods of time. Such exposure may lead to disc defor-
mation.
Upon playing a disc contaminated by dirt or other substances, the
sound quality may deteriorate and result in skipping sounds.
Writing on either side of the disc could result in damage to disc
surfaces.
Clean fingerprints and dust off the disc surface (coated side) with
a soft cloth.
Copy-protected CDs, such as S-type CDs, may not properly oper-
ate in the device. DATA CDs cannot be played. (However, such
discs may still abnormally operate.)
Do not disassemble the device. Contact a designated service cen-
ter in case of malfunction. (Complete after service assistance will
not be provided if the user disassembles the device.)
Do not use water to clean the device. Exposure to water could
lead to product malfunction.
Do not to introduce foreign substances into the disc insert/eject
slot. Introducing foreign substances could damage the device inte-
rior.
The device may fail to properly operate in extremely hot or cold
temperatures. (The operating temperature range is : 14˚F ~ 150˚F)
Steam can become condensed on the fiber-optic lens due to rain,
wet conditions, or upon operating the heating system. In such
cases, discs may not be properly recognized. Remove the disc
and wait until the moisture dries.
Skipping may occur during audio play when driving on bumpy
roads for prolonged periods of time or upon severe shock to the
vehicle. In case of severe shock, audio may not properly play.

Disc
Audio l 2-15 2-15
Supported Disc Formats
This device supports the following disc for-
mats.
Disc Type
Disc Type Disc Format Device Support
CD
3inch (8cm)
5inch (12cm)
CD
CD-R
CD-RW
Multisession-CD
X
○
○
○ (Read Only)
○ (Read Only)
○ (Read Only)
SACD
SACD
(Single, SACD layer)
SACD (Hybrid)
X
X
(Only CD layer)
Disc Format
Disc Type Disc Format Device Support
CD
CD-DA
MP3
WMA
MPEG4 AAC
DTS-CD
CD-ROM
CD-G
CD-EXTRA
CD-TEXT
○
○
○
X
○
○
X
○
○
Disc/Content Format Compatibility
By Format according to Disc Type
Disc Type Disc Format Device Support
CD LPCM
○
MP3
MPEG1, Layer3
MPEG2, Layer3
MPEG2.5
○
○
○
WMA Ver9
○
Ordinary Disc Compatibility
This device has been designed/ manufac-
tured to be compatible with software bear-
ing the following logo marks.
• CD-R/RW discs (Audio CD) created
with CD recording devices or PCs may
not properly operate in the device.
This is a result of various causes, includ-
ing disc format, recording method, and
contamination to the disc or lens.
DVD-Video Audio-CD Video-CD

2-16
CD-R/RW Compatibility
• This device supports CD-R, CD-RW,
and MP3 discs burned in Audio CD for-
mats.
• The recording of CD-R and CD-RW
discs with this device is not supported.
• CD-R/RW discs recorded as audio CDs
that were not finalized are not supported
by this device.
PC-created Disc Compatibility
• When burning a disc on a PC, the disc
may not operate in this device depend-
ing on the software settings. In such
cases, inquire with the software manu-
facturer.
• Additional information regarding compat-
ibility is displayed on the CD-R/RW soft-
ware disc box.
• DVD-R/W discs are not compatible with
this device.
Cautions upon Writing CDs
• When a multi-session disc is being
recorded, make sure to close the ses-
sion before recording.
• If MP3/WMA file extensions are changed,
such could result in malfunctions.
• In the case of MP3/WMA, write using
only English. (Other languages are not
supported)
• Unauthorized use of copy-protected
music files is prohibited by law.
• Prolonged use of CD-R/CD-RW prod-
ucts that do not satisfy related specifica-
tions may result in product malfunction.
• When writing CDs, low-speed writing is
recommended.
Compressed Audio Compatibility
• Physical formats of CD : Model 1, Model
2 XA format 1.
• This device supports audio file compressed
through MPEG-1 audio stream layer 3
(MP3) using 8kbps ~ 320kbps. (CBR or
VBR)
• For stable operation, the use of files
in 95kbps~192kbps bit rate range and
44.1kHz SAMPLING frequency is rec-
ommended.
• This device supports WMA audio files
using 20kbps ~ 320kbps. (CBR or VBR)
• Variable bit rate files may operate, but
the play time information may not be
properly displayed.
• This device only supports tracks with file
extension of ".mp3" or ".wma".
• This device does not support multises-
sion discs.
• This device supports only 8 layer folders.
Disc

Disc
Audio l 2-17 2-17
• This device supports MP3 ID3 tag ver-
sions of Ver. 1.0, Ver. 1.1, Ver. 2.2, Ver.
2.3, Ver. 2.4. When using discs with
other versions, the ID3 info will not be
displayed.
• Although this device has been desig-
nated to be compatible with various bit
rates, playing low bit rate MP3 tracks
may result in low quality sound.
Before Playing an MP3 Disc
Supported MP3 File Specification
• Acceptable standard: MPEG1 Audio
Layer 3.
• Acceptable sampling frequency :
8, 11.025, 12, 16, 22.05, 24, 32, 44.1,
48(KHz).
• Acceptable bit rate : 8 ~ 320 (Kbps).
Recommended Bit Rates and Fre-
quency
• Sampling frequency : 96 ~ 192 Kbps
fixed bit rate/4.1kHz.
NOTICE
•
Supported ID3 tags : ID3v1.0, ID3v1.1,
ID3v1.2, ID3v2.2, ID3v2.3, ID3v2.4.
•
Supported MP3 Media : CD-ROM.
•
Supported media formats : ISO9660
LEVEL1 and LEVEL2.
Detailed Specification
• Maximum directory layers : 8 layers.
• Maximum folder length : 64 bytes, file
name length: 64 bytes.
• Supported characters for folder name/ file
name: Alphanumeric characters, Korean
standard character set 2350 characters,
Simplified Chinese 4888 characters.
• Maximum number of folders per disc :
256 folders. (including ROOT)
• Maximum number of files per disc : 512
files.
Precautions upon Burning MP3 Files
• The use of ISO 9660 LEVEL 2 JOLIET
format is recommended.
• Up to 32 characters in Korean/Chinese
are supported for file names and up to
20 characters in Korean/Chinese are
supported for folder names.
• The use of CDs exceeding 700MB may
result in faulty disc recognition or errors
upon play.
2-18
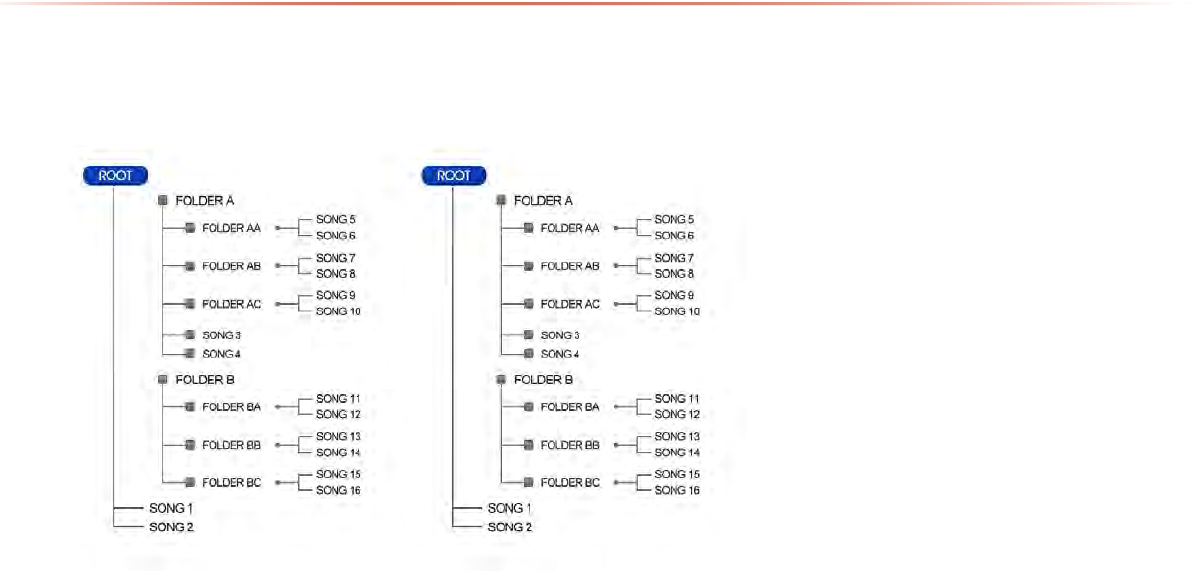
MP3 File Structure
Recognition occurs through the same folder structure used within the disc.
Folder structure as saved in CD-ROM Folder structure as saved in the system
Disc
CD Mode
Audio l 2-19 2-19
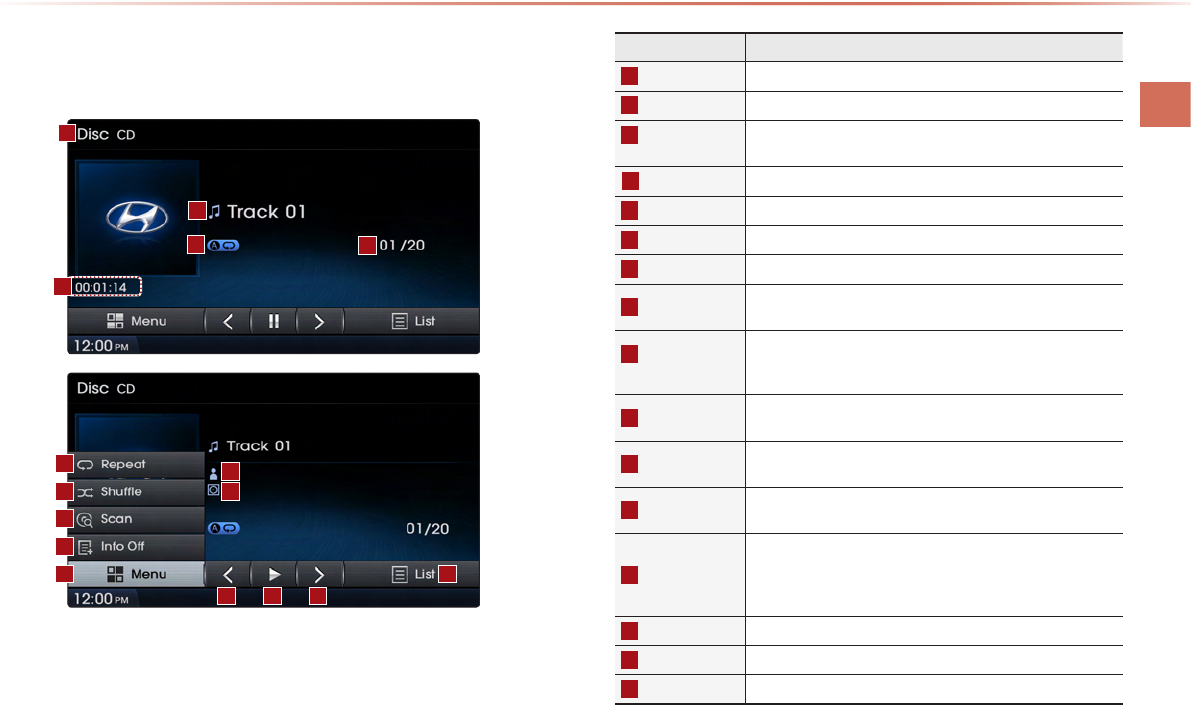
CD Mode
Basic Mode Screen
Name description
1
Mode Displays currently operating mode
2
Track Track number of current song
3
Repeat/
Shue/Scan
From Repeat/Shue/Scan, displays the currently oper-
ating function
4
Track Index Shows the current track/total tracks
5
Play Time Displays the current play time
6
Repeat Repeats the current track
7
Shue Plays disc tracks in random order
8
Scan Scans the beginning parts of disc tracks (approx. 10
seconds per track)
9
Info O
(Info On)
• Info Off : shows only track info
• Info On : shows track info, artist and album info
※ Empty when there is no corresponding information
10
Menu
Displays Repeat, Shue, Scan, and Info On (Info O)
menus
11
Artist Info Displays artist info for current song (Will not be dis-
played if the information does not exist)
12
Album Info Displays album info for current song (Will not be dis-
played if the information does not exist)
13
Previous Track
• When the play time is under 2 seconds : Moves to
the previous track
• When the play time is over 2 seconds : Plays the
current song from the beginning
14
Play/Pause Plays/pauses the current track
15
Next Track Moves to the next track
16
List Moves to the track list screen
1
2
3
10
4
611
712
8
9
1413 15
16
5
2-20
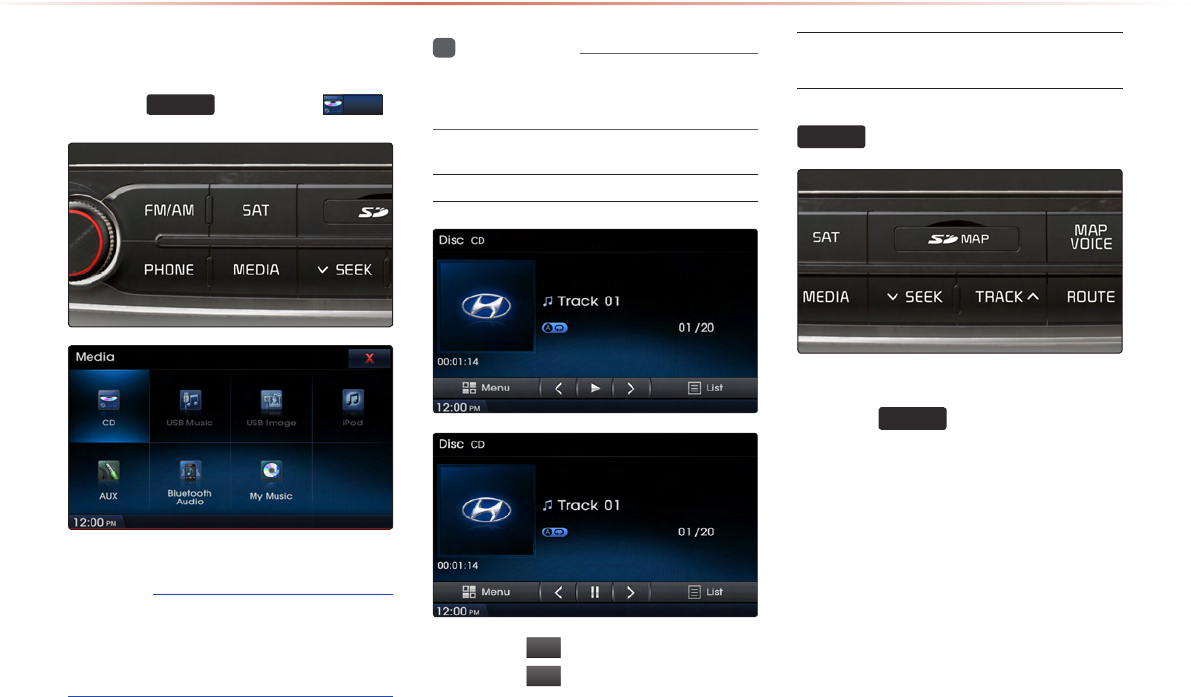
Starting Mode
Press the
MEDIA
key ▶ Press
CD
.
NOTICE
•
Only genuine audio CDs are supported.
Other discs may result in recognition fail-
ure. (e.g. copy CD-R, CDs with labels)
i
Information
•
CD mode will automatically start once a
CD is inserted.
Playing a CD
• Press the
▶
button to play the track.
• Press the
ll
button to pause the track.
Fast-forwarding or Rewinding
CD Tracks
While playing ▶ Press and hold the
SEEK
TRACK
∧
∨
key. (over 0.8 seconds)
This will rewind or fast-forward the track.
While the
SEEK
TRACK
∧
∨
key is being pressed,
the track will rewind or fast-forward at 20x
speed.
Once released, the track will begin playing
at normal speed.
CD Mode