Hanwha Techwin PRO815 Digital Camera User Manual H1 en c v03
Samsung Techwin Co Ltd Digital Camera H1 en c v03
Contents
Users Manual 1 of 7
ENGLISH
User’s Manual
Thank you for buying a Samsung Camera.
This manual will guide you through using the camera, including capturing images,
downloading images and using the application software.
Please read this manual carefully before using your new camera.

《2》
■Use this camera in the following order
Insert the
USB cable
Set up the
camera driver
Before connecting the camera to a PC, via the
USB cable, you will need to set up the camera
driver. Install the camera driver that is contained in
Application software CD-ROM. (p.96)
Take a picture. (p.20)
Insert the supplied USB cable into the PC’s USB
port and the camera’s USB connection terminal.
(p.102)
Check the camera’s power. If the power is turned
off, press the camera button to turn it on. (p.31)
Take a picture
Check the
camera’s power
Check
[Removable Disk]
Open Window’s EXPLORER and search for
[Removable Disk]. (p.103)
●If you use a card reader to copy the images on the memory card to your PC, the images
could be damaged. When transferring the images taken with the camera to your PC, be sure
to use the supplied USB cable to connect the camera to your PC. Please note that the
manufacturer holds no responsibility for loss or damage of images on the memory card due
to the use of a card reader.
Instructions

《3》
Contents
READY
●Getting to know your camera 5
●Danger 6
●Warning 6
●Caution 7
●An FCC warning 7
●System chart 8
●Identification of features 10
■Front & Top 10
■Back & Bottom 10
■Bottom/ 5-function button 11
■Cradle 11
■Self-timer lamp 12
■Camera Status Lamp 12
■Mode icon 12
●Connecting to a Power Source 13
■Using the SAC-41 14
■Using the battery 18
■Removing the battery 18
●Instructions on how to use the
memory card 19
●Inserting the memory card 21
●Removing the memory card 21
●
When Using the Camera for the First Time
22
●LCD monitor indicator 23
●Changing the recording mode 24
■Selecting the [Mode] menu 24
■How to use the Auto mode 26
■How to use the Movie clip mode 26
■Recording the movie clip without voice 27
■Using Successive Recording 27
■How to use the Manual mode 27
■How to use the Scene modes 28
■How to use the VOICE RECORDING
mode 29
■How to use the SF mode 29
●Things to Watch Out for When Taking
Pictures 30
●Using the camera buttons to adjust the
camera 31
■POWER button 31
■SHUTTER button 31
●ZOOM W/T button 31
●
Voice recording/ Voice memo/ UP button
34
●Macro/ Down button 35
●Focus lock 36
●Flash/ Left button 37
●Self-timer/ Right button 39
●MENU/ OK button 40
●M (Mode) button 40
●SF button 42
●+/- button 43
●Using the LCD monitor to adjust the camera
settings 47
●How to use the menu 49
●Mode 49
●Mode Set 50
●Size 51
●Quality / Frame rate 52
●Metering 53
●Continuous shot 53
●Sharpness 54
●OSD information 54
●Effect 55
●Special Effect 56
●Special Effect : Preset focus frames 56
●Special Effect : Composite shooting 58
●Special Effect : Photo Frame 60
●Movie Clip frame stabiliser 61
●Starting play mode 62
■Playing back a still image 62
RECORDING
PLAY

《4》
Contents
■Playing back a movie clip 63
■
How to capture the movie clip
63
■On camera movie trimming 64
■Playing back a recorded voice 65
●LCD monitor indicator 66
●Using the camera buttons to adjust the
camera 67
■Play mode button 67
●Thumbnail/ Enlargement button 68
●Voice memo/ Up button 69
●Play & Pause/ Down button 70
●Delete button 71
●Left / Right / Menu / OK button 72
●Album button 73
●Setting up the play back function using the
LCD monitor 76
●Starting the slide show 79
●Protecting images 81
●Deleting images 82
●Resize 83
●Effect 84
●Rotating an image 85
●DPOF 85
●DPOF : Standard 86
●DPOF : Index 86
●DPOF : Print size 87
●Copy To Card 88
●PictBridge 89
●PictBridge : Picture Selection 90
●PictBridge : Print Setting 91
●PictBridge : Printing 92
●PictBridge : RESET 93
●Setup menu 94
●File name 95
●Auto power off 96
●Language 97
●Formatting a memory card 97
●Setting up the Date/ Time/ Date type 98
●Imprinting the recording date 98
●Sound 99
●Connecting an External Device (USB) 99
●Auto Focus lamp 100
●LCD brightness 100
●Selecting Video out type 101
●Quick view 103
●Initialisation 103
●Setting up the Mycam menu 104
●Start up image 104
●Start up sound 105
●Shutter sound 105
●Important notes 106
●Warning indicator 108
●Before contacting a service centre 109
●Specifications 112
●Software Notes 114
●System Requirements 114
●About the software 115
●Setting up the application software 117
●Starting PC mode 127
●Removing the USB Driver for Windows
98SE 130
●Removable Disk 131
●Removing the removable disk 132
●Setting up the USB Driver for MAC 133
●Using the USB Driver for MAC 133
●Digimax Viewer 2.1 134
●Digimax Reader 135
●Using PhotoImpression 137
●FAQ 139
SETUP
SOFTWARE

《5》
Thank you for buying a Samsung Digital Camera.
●Prior to using this camera, please read the user manual thoroughly.
●When you require After Sales service, please bring the camera and the cause of the camera
malfunction (such as battery, Memory card etc.) to the A/S centre.
●Please check that the camera is operating properly prior to when you intend to use it
(e.g. for a trip or an important event) to avoid disappointment. Samsung camera takes no
responsibility for any loss or damages that may result from camera malfunction.
●Keep the manual in a safe place.
Microsoft, Windows and Windows logo are registered trademarks of Microsoft Corporation
incorporated in the United States and/or other countries.
CompactFlash logo is registered trademarks of SanDisk Corporation.
All brand and product names appearing in this manual are registered trademarks of their
respective companies.
Getting to know your camera
DANGER
DANGER indicates an imminently hazardous situation which, if not avoided,
will result in death or serious injury.
WARNING
WARNING indicates a potentially hazardous situation, which, if not avoided,
could result in death or serious injury.
CAUTION
CAUTION indicates a potentially hazardous situation, which, if not avoided,
may result in a minor or moderate injury.
Correct Disposal of This Product (Waste Electrical & Electronic Equipment)
(Applicable in the European Union and other European countries with separate
collection systems) This marking shown on the product or its literature, indicates that
it should not be disposed with other household wastes at the end of its working life.
To prevent possible harm to the environment or human health from uncontrolled
waste disposal, please separate this from other types of wastes and recycle it responsibly to
promote the sustainable reuse of material resources. Household users should contact either the
retailer where they purchased this product, or their local government office, for details of where
and how they can take this item for environmentally safe recycling. Business users should
contact their supplier and check the terms and conditions of the purchase contract.
This product should not be mixed with other commercial wastes for disposal.
This manual contains instructions on using this camera that will help you to use this
camera safely and correctly. This will help prevent danger and injury to others.

NOTE: This equipment has been tested and found to comply with the limits
for a Class B digital device, pursuant to part 15 of the FCC Rules. These
limits are designed to provide reasonable protection against harmful
interference in a residential installation.
This equipment generates, uses and can radiate radio frequency energy and,
if not installed and used in accordance with the instructions, may cause
harmful interference to radio communications. However, there is no
guarantee that interference will not occur in a particular installation. If this
equipment does cause harmful interference to radio or television reception,
which can be determined by turning the equipment off and on, the user is
encouraged to try to correct the interference by one or more of the following
measures:
- Reorient or relocate the receiving antenna.
- Increase the separation between the equipment and receiver.
- Connect the equipment into an outlet on a circuit different from that to
which the receiver is connected.
- Consult the dealer or an experienced radio/TV technician for help.
CAUTION : Changes or modifications not expressly approved by the party
responsible for compliance could void the user’s authority to operate the
equipment.
Information to the user

《6》
■Do not attempt to modify this camera in any way. This may result in fire, injury, electric shock
or severe damage to you or your camera. Internal inspection, maintenance and repairs
should be carried out by your dealer or Samsung Camera Service centre.
■Please do not use this product in close proximity to flammable or explosive gases, as this
could increase the risk of explosion.
■Should any form of liquid or a foreign object enter the camera, do not use it. Switch off the
camera, and then disconnect the power source (batteries or AC Power Adapter). You must
contact your dealer or Samsung Camera Service centre. Do not continue to use the camera
as this may cause a fire or electric shock.
■Do not insert or drop metallic or inflammable foreign objects into the camera through access
points e.g. the memory card slot and battery chamber. This may cause a fire or electric
shock.
■Do not operate this camera with wet hands. This could pose a risk of electric shock.
■Do not use the flash in close proximity to people or animals. Positioning the flash too close to
your subject’s eyes, may cause eyesight damage.
■When taking photographs, never point the lens of the camera directly into very strong light.
This may result in permanent damage to your eyesight.
■For safety reasons keep this product and accessories out of reach of children or animals to
prevent accidents e.g.:
•Swallowing batteries or small camera accessories. If an accident should occur, please
consult a doctor immediately.
•There is the possibility of injury from the camera’s moving parts.
■Batteries and camera may become hot during prolonged use and it may result in camera
malfunction. Should this be the case, allow the camera to sit idle for a few minutes to allow it
time to cool.
■Do not recharge non rechargeable batteries. This may cause an explosion.
■Do not leave this camera in places subject to extremely high temperatures, such as a sealed
vehicle, direct sunlight or other places of extreme variances in temperature. Exposure to
extreme temperatures may adversely affect the camera’s internal components and could
cause a fire.
■When in use, do not cover the camera or AC Power Adapter. This may cause heat to build up
and distort the camera body or cause a fire. Always use the camera and its accessories in a
well-ventilated area.
Warning
Danger

《7》
■Leaking, overheating, or burst batteries could result in fire or injury.
•Use batteries with the correct specification for the camera.
•Do not short circuit, heat or dispose of batteries in fire.
•Do not insert the batteries with the reverse polarities.
■Remove the batteries when not planning to use the camera for a long period of time.
Batteries may leak corrosive electrolyte and permanently damage the camera's components.
■Do not fire the flash while it is in contact with hands or objects. Do not touch the flash after
using it continuously. It may cause burns.
■Do not move the camera while it is switched on, if you are using the AC Power Adapter.
After use, always switch off the camera before unplugging the adapter from the wall socket.
Then make sure that any connector cords or cables to other devices are disconnected before
moving the camera. Failure to do so may damage the cords or cables and cause a fire or
electric shock.
■The Lens is attached to the camera body. Do not drop or press the lens by force. It may
cause a camera malfunction.
■Do not pull the lens by hand or do not rotate the zoom ring quickly. It may cause a camera
malfunction. Please be careful when using the lens.
Caution
《8》
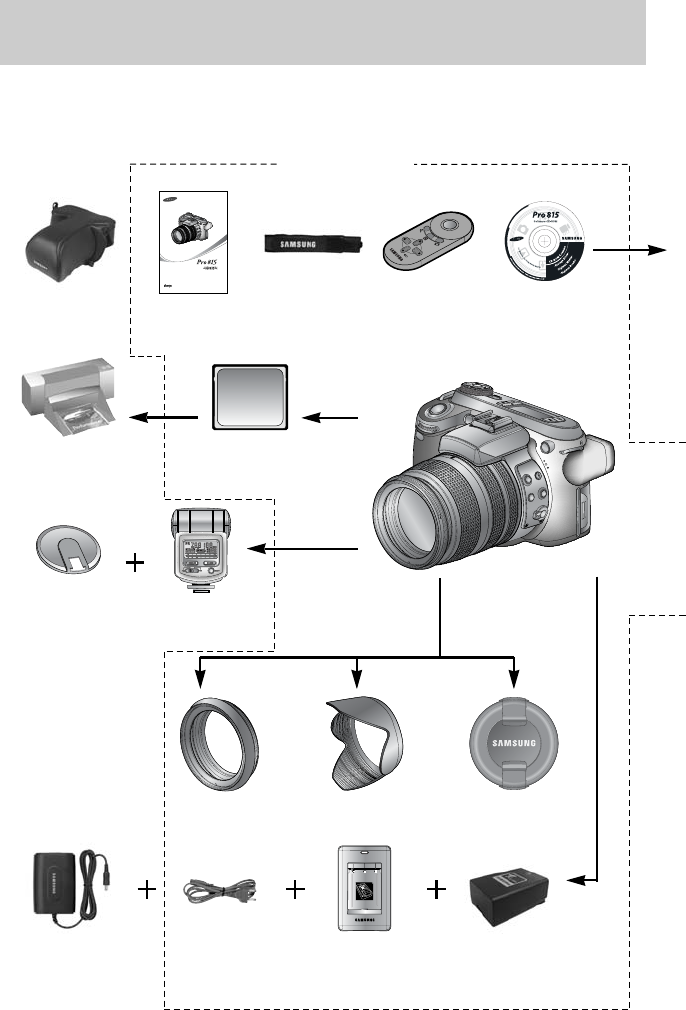
Please check that you have the correct contents before using this product. To buy the optional
equipment, contact your nearest Samsung dealer or Samsung service centre.
CF (CompactFlash) card
(p.00)
DPOF compatible
printer(see p.00)
Exclusive
bounce flash
Flash plate
Camera case User manual,
Warranty card
Camera strap
Remote controller
Software (p.00)
AC cordAC adapter Battery charger
Rechargeable battery
(SLB-1974)
Lens adapter Lens hood Lens cap
System chart
< Included items >
《9》
PictBridge compatible
printer(see p.00)
Computer (p.00)
External monitor
Yellow cable - Video,
White/Red colour - Stereo
voice (see p.83)
USB cable AV cable
For Windows
•
PC with processor better than Pentium II 450MHz
(Pentium 700MHz or better is recommended)
•Windows 98/ 98SE/ 2000/ ME/ XP
•Minimum 64MB RAM (XP : 128MB)
•200MB of available hard-disk space (Over
1GB is recommended)
•USB port
•CD-ROM drive
•1024x768 pixels, 16-bit colour display
compatible monitor (24-bit colour display
recommended)
•DirectX 9.0 or later
For Macintosh
•Power Mac G3 or later
•Mac OS 10.0 or later
•Minimum 64MB RAM
•110MB of available hard-disk space
•USB port
•CD-ROM drive
System Requirements
System chart
《10》
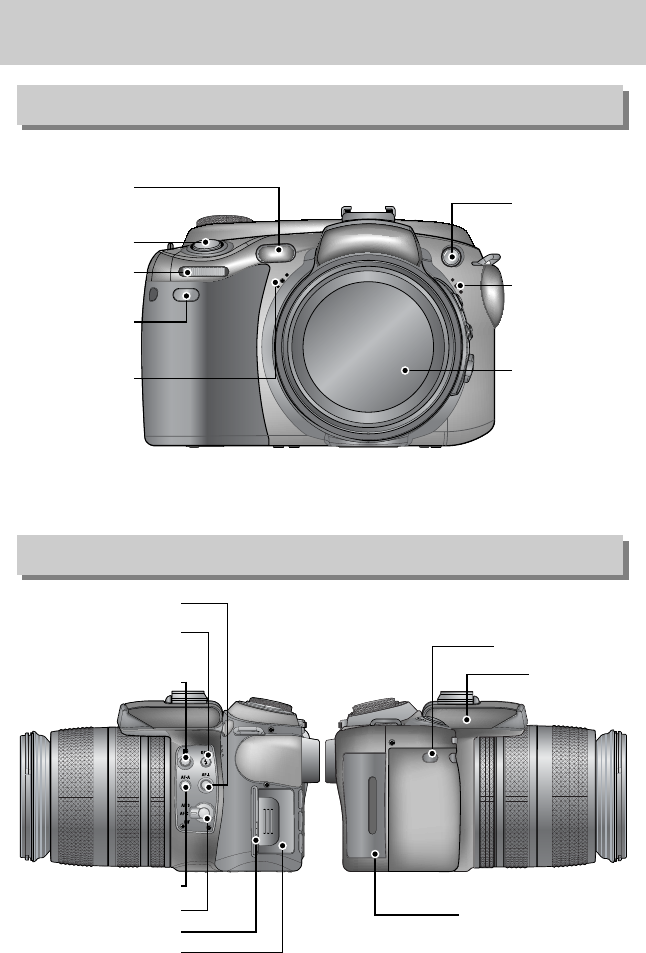
Front
Side (Left/ Right)
Side (Left) Side (Right)
AF passive sensor
High Speed shutter (HS) button
Remote control sensor
Flash
Focus area selection (AF-A) button
Focus mode selection button
Speaker
Connector cover
Memory card slot cover
Pop-up flash (OPEN) button/
Flash compensation button
AF loc (AF-L) button
Remote control
sensor
Microphone
Shutter button
Front Jog dial
(JOG 1)
Self-timer lamp &
Auto Focus lamp
Microphone
Lens
Identification of features
《11》
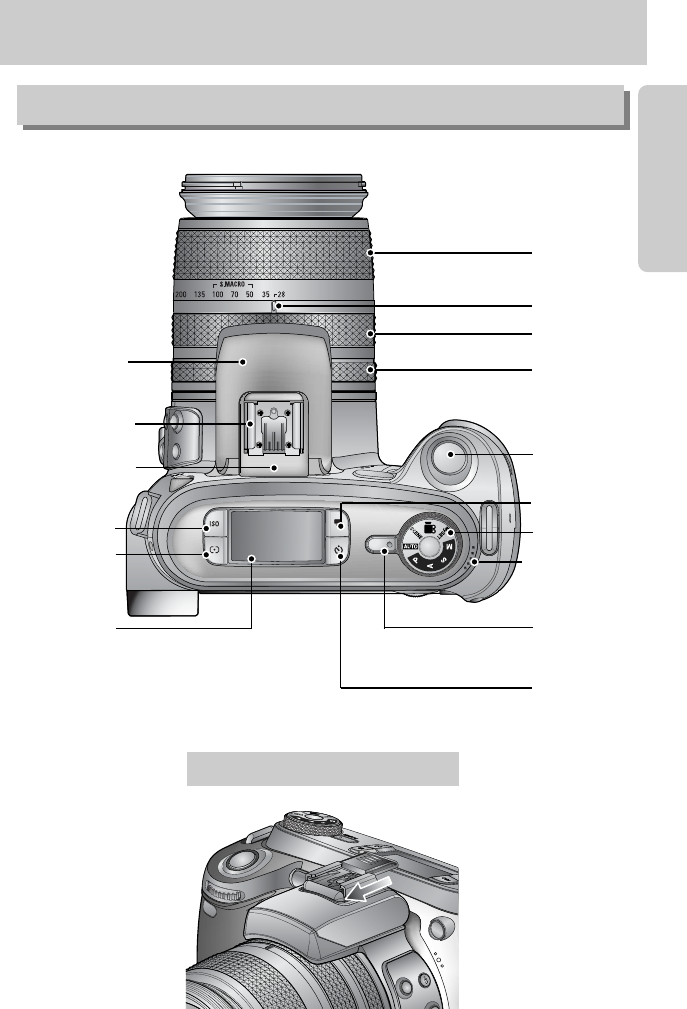
Top
Drive button
Self-timer
button
Power button/
Power lamp
Top LCD
ISO button
Metering button
Hot shoe
Flash status lamp
Mode dial
Speaker
Shutter button
EVC (Exposure Value
Compensation) ring
Focus ring
Zoom ring
Zoom scale indicator
Flash
Hot shoe cap
Identification of features