Hisense Electric LCDC0008 Part15 Subpart B-LCD TV User Manual

Hisense Electric Co., Ltd. Part15 Subpart B-LCD TV

W9HLCDC0008_User Manual 3_Rev.1

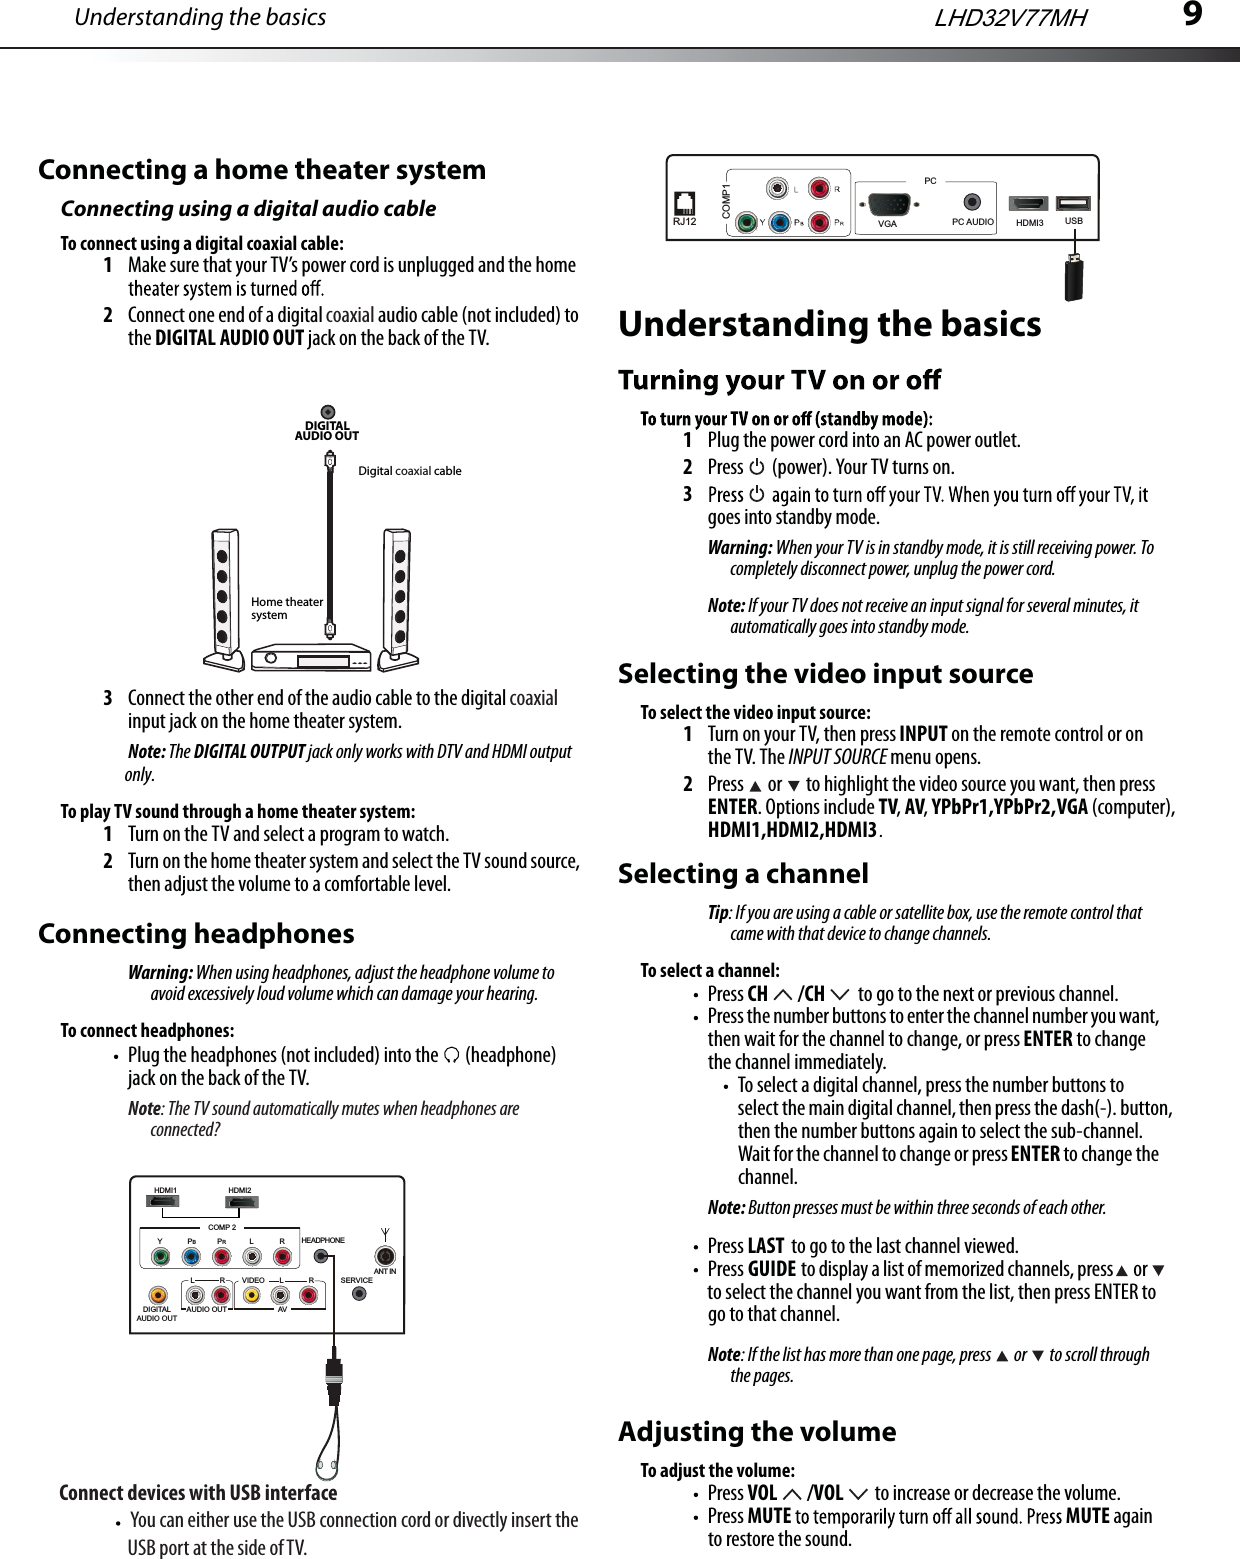
9Connecting a home theater systemConnecting using a digital audio cableTo connect using a digital coaxial cable:1Make sure that your TV’s power cord is unplugged and the home 2Connect one end of a digital coaxial audio cable (not included) to the DIGITAL AUDIO OUT jack on the back of the TV.3Connect the other end of the audio cable to the digital coaxial input jack on the home theater system.Note: The DIGITAL OUTPUT jack only works with DTV and HDMI output To play TV sound through a home theater system:1Turn on the TV and select a program to watch.2Turn on the home theater system and select the TV sound source, then adjust the volume to a comfortable level.Connecting headphonesWarning: When using headphones, adjust the headphone volume to avoid excessively loud volume which can damage your hearing.To connect headphones:Plug the headphones (not included) into the   (headphone) jack on the back of the TV.Note: The TV sound automatically mutes when headphones are connected?DIGITAL AUDIO OUT Home theater systemDigital coaxial cableUnderstanding the basics1Plug the power cord into an AC power outlet.2Press   (power). Your TV turns on.3goes into standby mode.Warning: When your TV is in standby mode, it is still receiving power. To completely disconnect power, unplug the power cord.Note: If your TV does not receive an input signal for several minutes, it automatically goes into standby mode.Understanding the basicsSelecting the video input sourceTo select the video input source:1Turn on your TV, then press INPUT on the remote control or on the TV. The INPUT SOURCE menu opens.2Press   or   to highlight the video source you want, then press ENTER. Options include TV, AV, YPbPr1,YPbPr2, VGA (computer), HDMI1,HDMI2,HDMI3. Selecting a channelTip: If you are using a cable or satellite box, use the remote control that came with that device to change channels. To select a channel:Press CH  /CH  to go to the next or previous channel.Press the number buttons to enter the channel number you want, then wait for the channel to change, or press ENTER to change the channel immediately.To select a digital channel, press the number buttons to select the main digital channel, then press the dash(-). button, then the number buttons again to select the sub-channel. Wait for the channel to change or press ENTER to change the channel.Note: Button presses must be within three seconds of each other.Press LAST  to go to the last channel viewed.Press GUIDE  to display a list of memorized channels, press  or  to select the channel you want from the list, then press ENTER to go to that channel.Note: If the list has more than one page, press   or   to scroll through the pages.Adjusting the volumeTo adjust the volume:Press VOL  /VOL  to increase or decrease the volume.Press MUTE MUTE again to restore the sound.only.LHD32V77MHHDMI2COMP 2HEADPHONEAUDIO OUTVIDEO L RL RAVDIGITALAUDIO OUTY PBPRL RHDMI1SERVICEANT INConnect devices with USB interface                    You can either use the USB connection cord or divectly insert the                    USB port at the side of TV.HDMI3COMP1PC AUDIORJ12PCUSBVGA
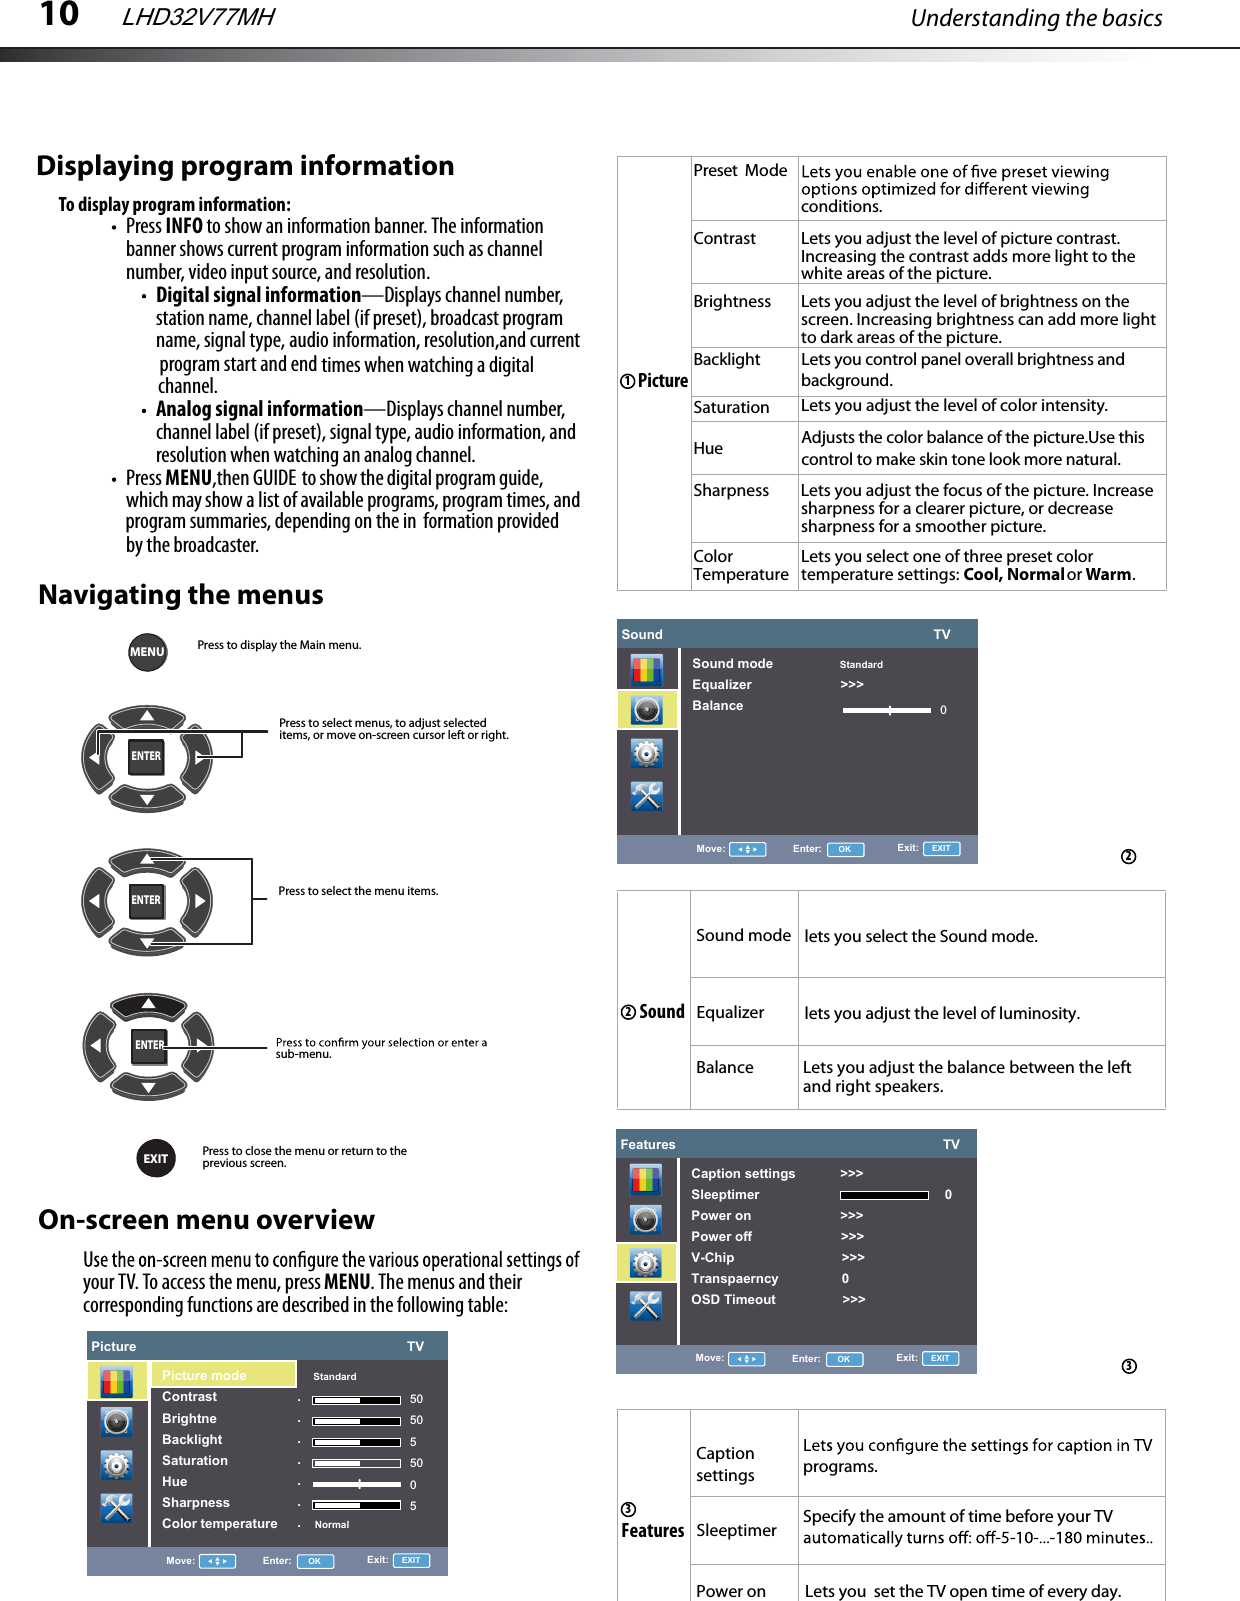
10 Understanding the basicsNavigating the menusOn-screen menu overviewyour TV. To access the menu, press MENU. The menus and their corresponding functions are described in the following table:PictureBrightness Lets you adjust the level of brightness on the screen. Increasing brightness can add more light to dark areas of the picture.Contrast Lets you adjust the level of picture contrast. Increasing the contrast adds more light to the white areas of the picture.Saturation Lets you adjust the level of color intensity.Sharpness Lets you adjust the focus of the picture. Increase sharpness for a clearer picture, or decrease sharpness for a smoother picture.Backlight  Lets you control panel overall brightness and background.Color TemperatureLets you select one of three preset color temperature settings: Cool, Normalor Warm.ENTERMENUEXITENTERENTERPress to display the Main menu.Press to select menus, to adjust selected items, or move on-screen cursor left or right.Press to select the menu items.sub-menu.Press to close the menu or return to the previous screen.Displaying program informationTo display program information:Press INFO to show an information banner. The information banner shows current program information such as channel number, video input source, and resolution.Digital signal information—Displays channel number, station name, channel label (if preset), broadcast program name, signal type, audio information, resolution,and current  program start and end times when watching a digital Analog signal information—Displays channel number, channel label (if preset), signal type, audio information, and resolution when watching an analog channel.Press MENU,then GUIDE  to show the digital program guide, which may show a list of available programs, program times, and program summaries, depending on the in formation provided by the broadcaster.channel.Preset  Modeconditions.12SoundSound mode2Balance Lets you adjust the balance between the left and right speakers.3LHD32V77MHPicture                                                                         TV.......Picture mode                  StandardContrastBrightneBacklightSaturationHueSharpnessColor temperature          Normal505055005Move: Enter:      OK Exit:     EXITHueSound                                                                         TVSound mode                  StandardEqualizer                        >>>Balance 0Move: Enter:      OK Exit:     EXITFeatures                                                                        TVCaption settings            >>>Sleeptimer                                                  0Power on                        >>>Power off                        >>>V-Chip                             >>>Transpaerncy                 0OSD Timeout                  >>>Move: Enter:      OK Exit:     EXITEqualizerFeaturesCaption settings3Power onSleeptimerAdjusts the color balance of the picture.Use this control to make skin tone look more natural. lets you select the Sound mode.lets you adjust the level of luminosity.programs.Specify the amount of time before your TV Lets you  set the TV open time of every day.
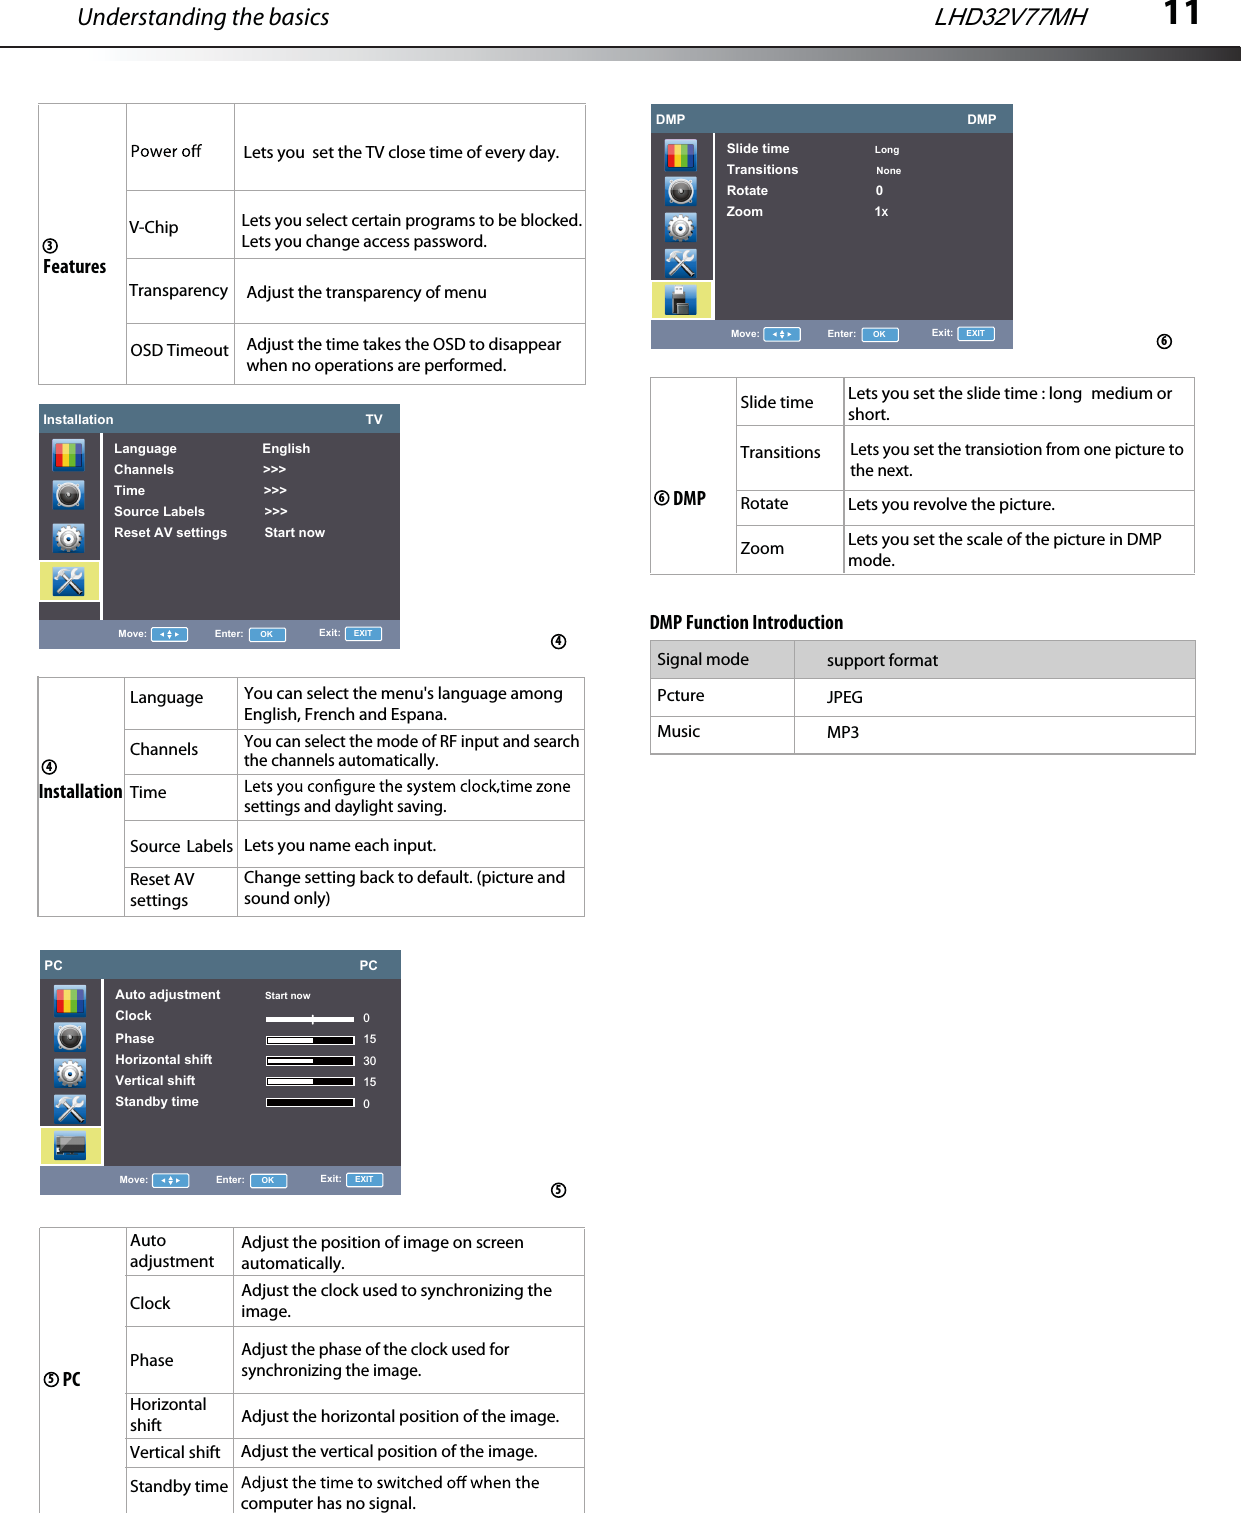
11Understanding the basicsInstallation44PC55TimeSource  LabelsReset AVsettingsAutoadjustmentClockPhaseHorizontal shiftVertical shiftStandby time LanguageLHD32V77MHFeatures3OSD TimeoutInstallation                                                                    TVLanguage                       EnglishChannels                        >>>Time                                >>>Source Labels                >>>Reset AV settings          Start nowMove: Enter:      OK Exit:     EXITChannelsPC                                                                                PCAuto adjustment            Start nowClockPhaseHorizontal shiftVertical shiftStandby time01530150Move: Enter:      OK Exit:     EXITDMP                                                                            DMPSlide time                       LongTransitions                     NoneRotate                             0Zoom                              1XMove: Enter:      OK Exit:     EXITDMP6Slide timeTransitionsRotateZoom6Lets you  set the TV close time of every day.Adjust the transparency of menuYou can select the menu's language among English, French and Espana.settings and daylight saving.Adjust the clock used to synchronizing the image.Lets you set the slide time : long medium orshort.Adjust the time takes the OSD to disappear when no operations are performed.Lets you select certain programs to be blocked.Lets you change access password.Lets you set the scale of the picture in DMP mode.  You can select the mode of RF input and searchthe channels automatically.Lets you name each input.Change setting back to default. (picture andsound only)Adjust the position of image on screen automatically.Adjust the phase of the clock used for synchronizing the image.Adjust the horizontal position of the image. Adjust the vertical position of the image. computer has no signal.Lets you revolve the picture.V-ChipLets you set the transiotion from one picture tothe next.Signal modeDMP Function IntroductionPctureMusicsupport formatJPEGMP3Transparency,
12Adjusting the pictureTo adjust the picture:1Press MENU. The Main menu opens.2Press ENTER or  . The Picture  menu opens.3Press     or     to highlight an option, then press                  or      to accessthe option, and press      or      to adjust the option. You can select:Picture Mode—Selects the picture mode. You can select: Vivid (a bright and vivid picture) Standard (a standard picture): You can also press PICTURE on the remote control to select the Backlight                         –Adjust backlight to suit light conditions in the room.    Under low room illumination, the use of lower backlight settings    is recommended for reduced power consumption and extended     life of the flat panel of your television. Saturation– Adjusts the intensity of the colours.Sharpness–Lets you increase the sharpness level for clearer images or decrease the sharpness level for smoother images.Color temperature –Lets you change the color temperature. You can select the color temperature from three options: Cool,  Normal  or Warm.4Press  MENU to return to the previous menu, or press EXIT  to close the menu.Choosing the display format (aspect ratio)To choose the display format:1Press ASPECT on the remote control repeatedly to cycle through the available display formats. Options include:Normal —Selects the 4:3 aspect ratio to show a picture with black bar on both right and left hand side.Zoom1 —Enlarges the picture but may crop the top and bottom of picture. And has less black bar on right and left Full Screen—Shows a full-screen picture.Panorama —Stretches the picture at the edges, butmaintains a good aspect ratio at the center  of the screen.Adjusting the soundTo adjust the sound:1Press MENU. The Main menu opens.2Press   or   to highlight Audio, then press ENTER or  . The Audio menu opens.3Equalize4Press  MENU to return to the previous menu, or press EXIT  to close the menu. Selecting the audio modeTo select the audio mode:Press SOUND on the remote control one or more times to cycle through the available sound modes. Options include: StandarderutciP erutciP  picture mode.–Lets you increase or decrease the contrast of the picture. Increase the contrast to adjust the white areas of the picture or decrease the contrast to adjust the black areas of the picture.Contrast–Lets you increase or decrease the brightness of the picture. Increasing the brightness can add more light to dark areas of the picture, while decreasing the brightness can add more darkness to light areas of the picture.BrightnessNoteENTERPress     or     to highlight an option, then press                  or      to accessthe option, and press      or      to adjust the option. You can select:ENTERBalance—Adjusts the balance between the left and right audio channels.than Normal aspect mode.Note:  In analog TV mode, allows you to select all aspect modes.In digital TV mode, allows you to select Normal mode and full- screen mode. Zoom and panorama modes are not available. (for normal programs).Music (for music programs).Clear Voice (for music programs).Custiom (for a customized sound mode).Adjusting picture and soundLHD32V77MHPicture                                                                         TV.......Picture mode                  StandardContrastBrightnessBacklightSaturationHueSharpnessColor temperature          Normal505055005Move: Enter:      OK Exit:     EXITGame(a finely detailed picture) ciema(the brightness rightness is decreaced) power saver(decrease the backlight for to save energy) Hue– change the picture quality when there is a NTSC signal at AV source. Sound                                                                         TVSound mode                  StandardEqualizer                        >>>Balance 0Move: Enter:      OK Exit:     EXIT                              — Press [ / ] to select between 4 different pre-adjusted sound modes:Custom,Standard,music,and Clear voice. The User mode preserves your preferred sound settings after using the Equalizer available under the Sound submenu.Sound Mode                       —Set the users' mode of sound, press [ /  ]  button    to select the sound component of 120HZ, 500HZ, 1.5K, 5K, and 10K.   Press [▲/▼]  button to weaken or enlarge the sound to the    proper value.The sound Equalizer can also be easily configured for most frequent situations by pressing the [SOUND] button on your remote controller. Preset settings are provided for User, Music, Standard and Speech conditions. Standard mode delivers a flat frequency response, which preserves the natural characteristics of  the original sound. In Music mode the extremes of low and high frequencies are accentuated to enhance musical instrument reproduction. The opposite effect is  accomplished in Speech mode where very low and high frequencies are attenuated to improve the reproduction and intelligibility of the human voice.In TV mode, you can adjust:In TV mode, you can adjust:Zoom2 —Enlarges the picture but may crop the top and bottom of picture. And no black bar on right and left.

Navigation menu