Hyundai IBT HQP50AH000 50” PDP Monitor User Manual 1
Hyundai IBT Corp. 50” PDP Monitor 1
UserManual.wiki
>
Hyundai IBT
>
HQP50AH000 User Manual
>
Users Manual 1 of 3
Contents
1.
Users Manual 1 of 3
2.
Users Manual 2 of 3
3.
Users Manual 3 of 3
Users Manual 1 of 3
Navigation menu
Upload a User Manual
Namespaces
Wiki Guide
HTML
PDF
Info
Views
User Manual
Discussion / Help
Navigation

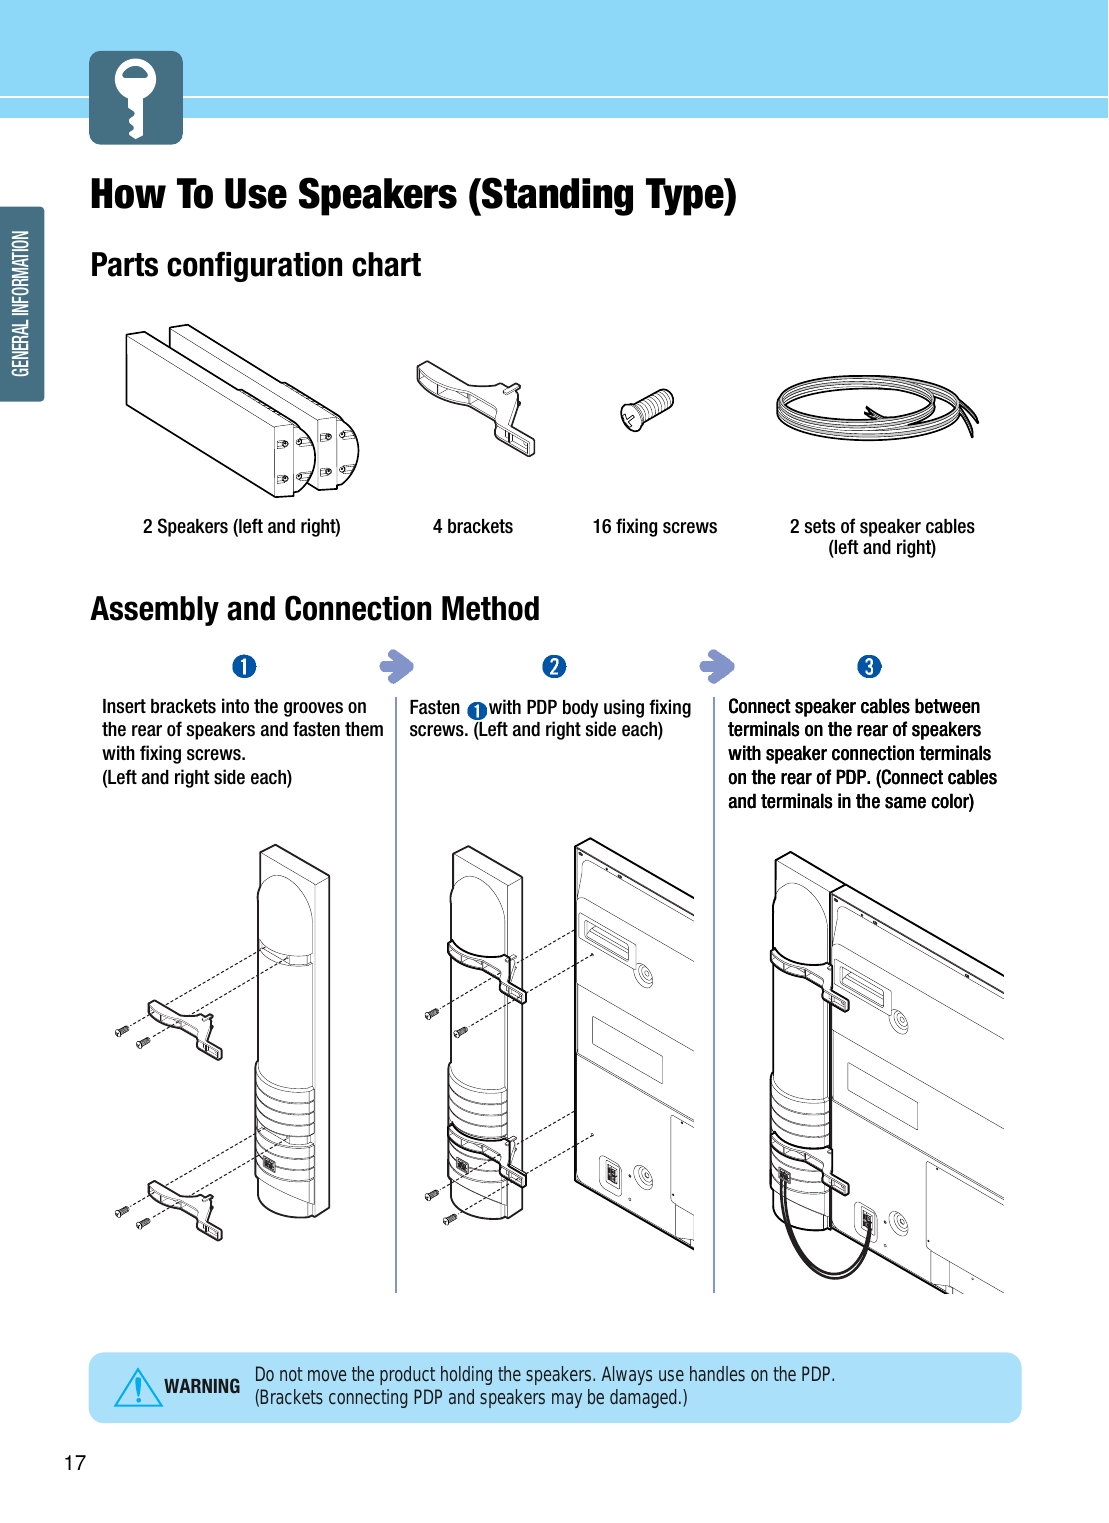
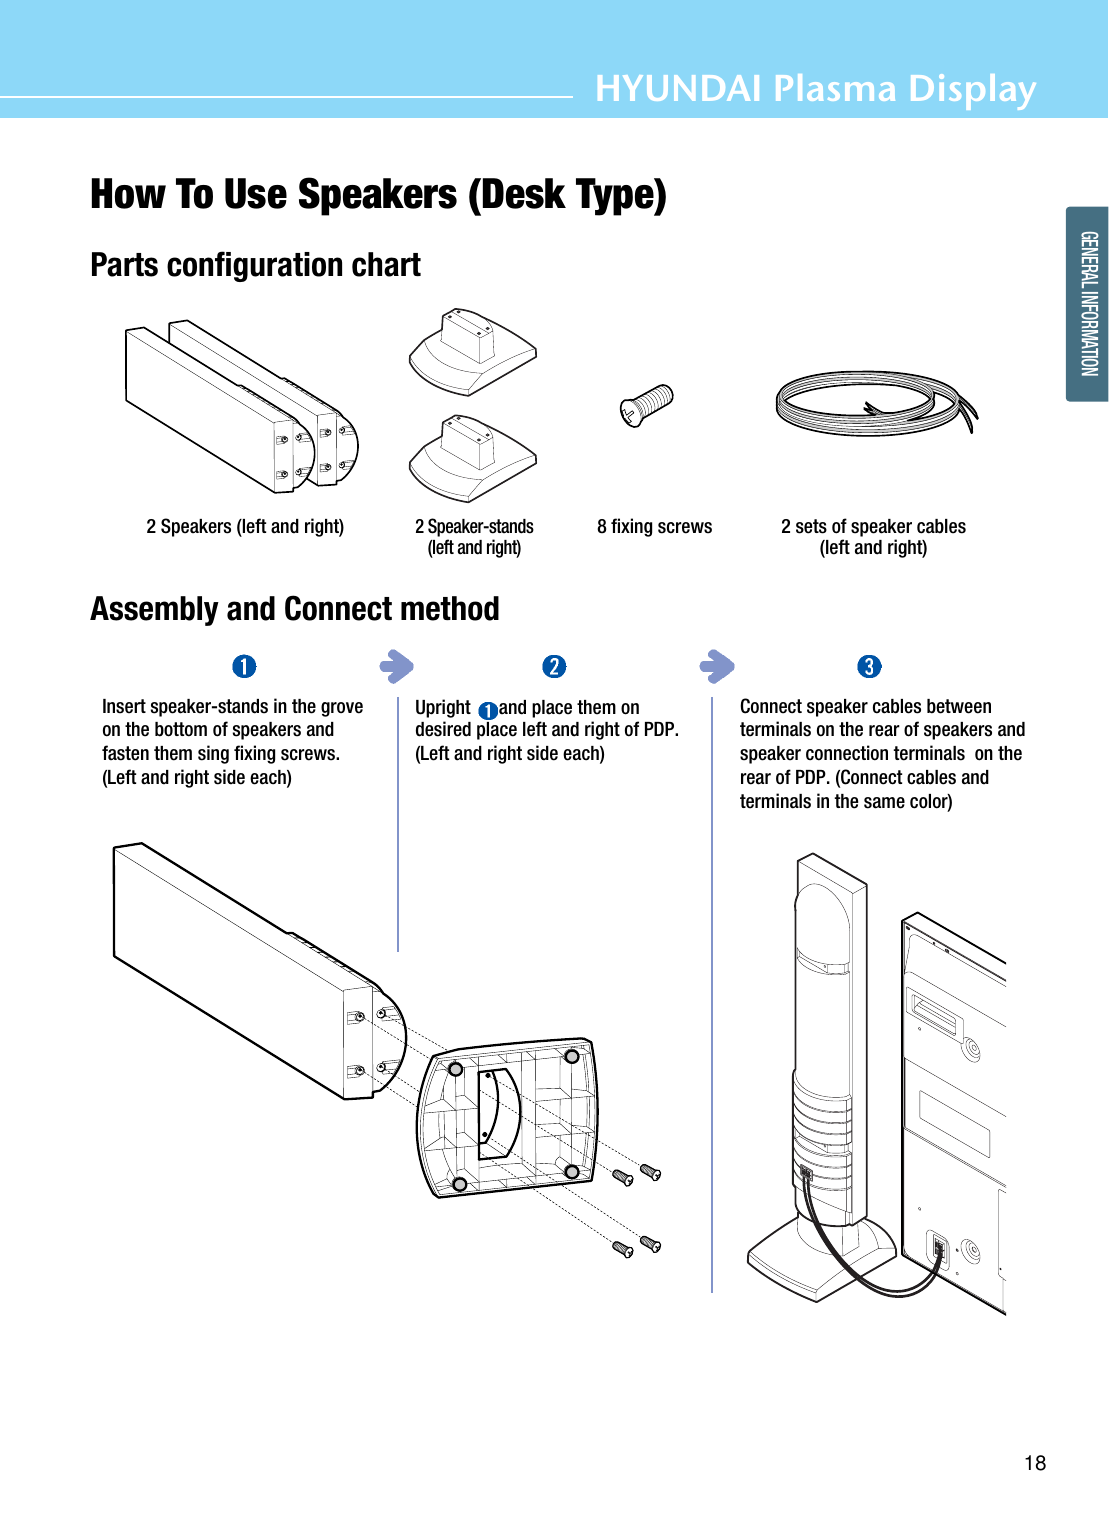
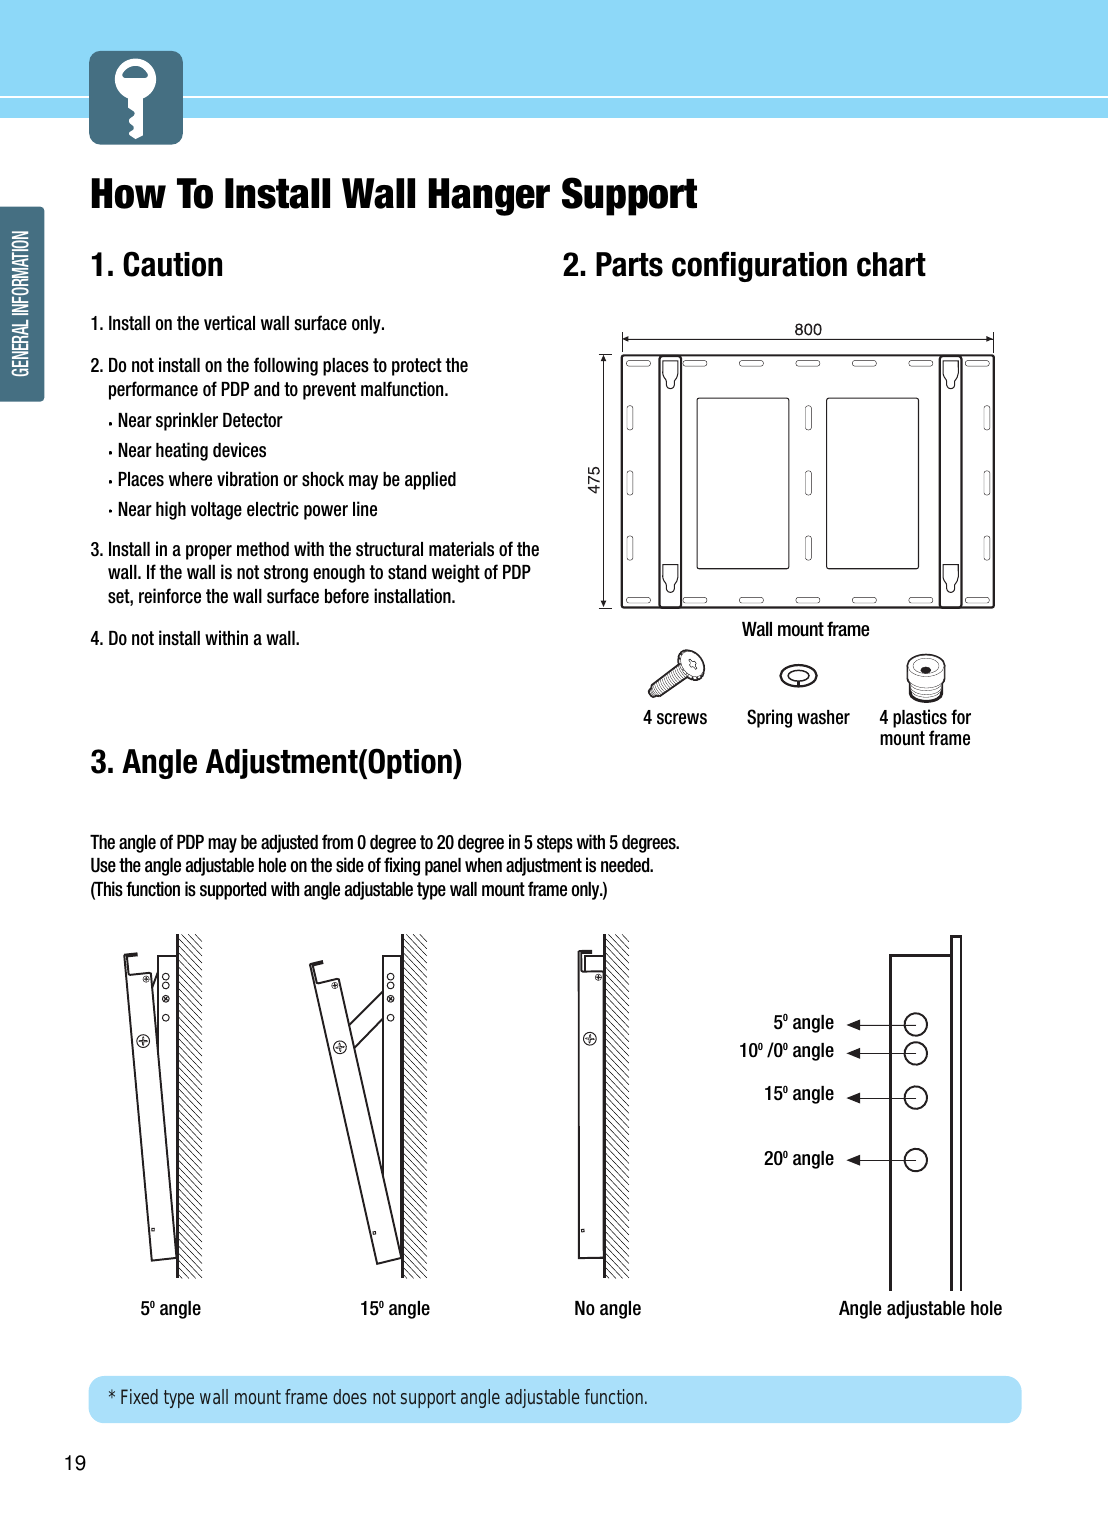
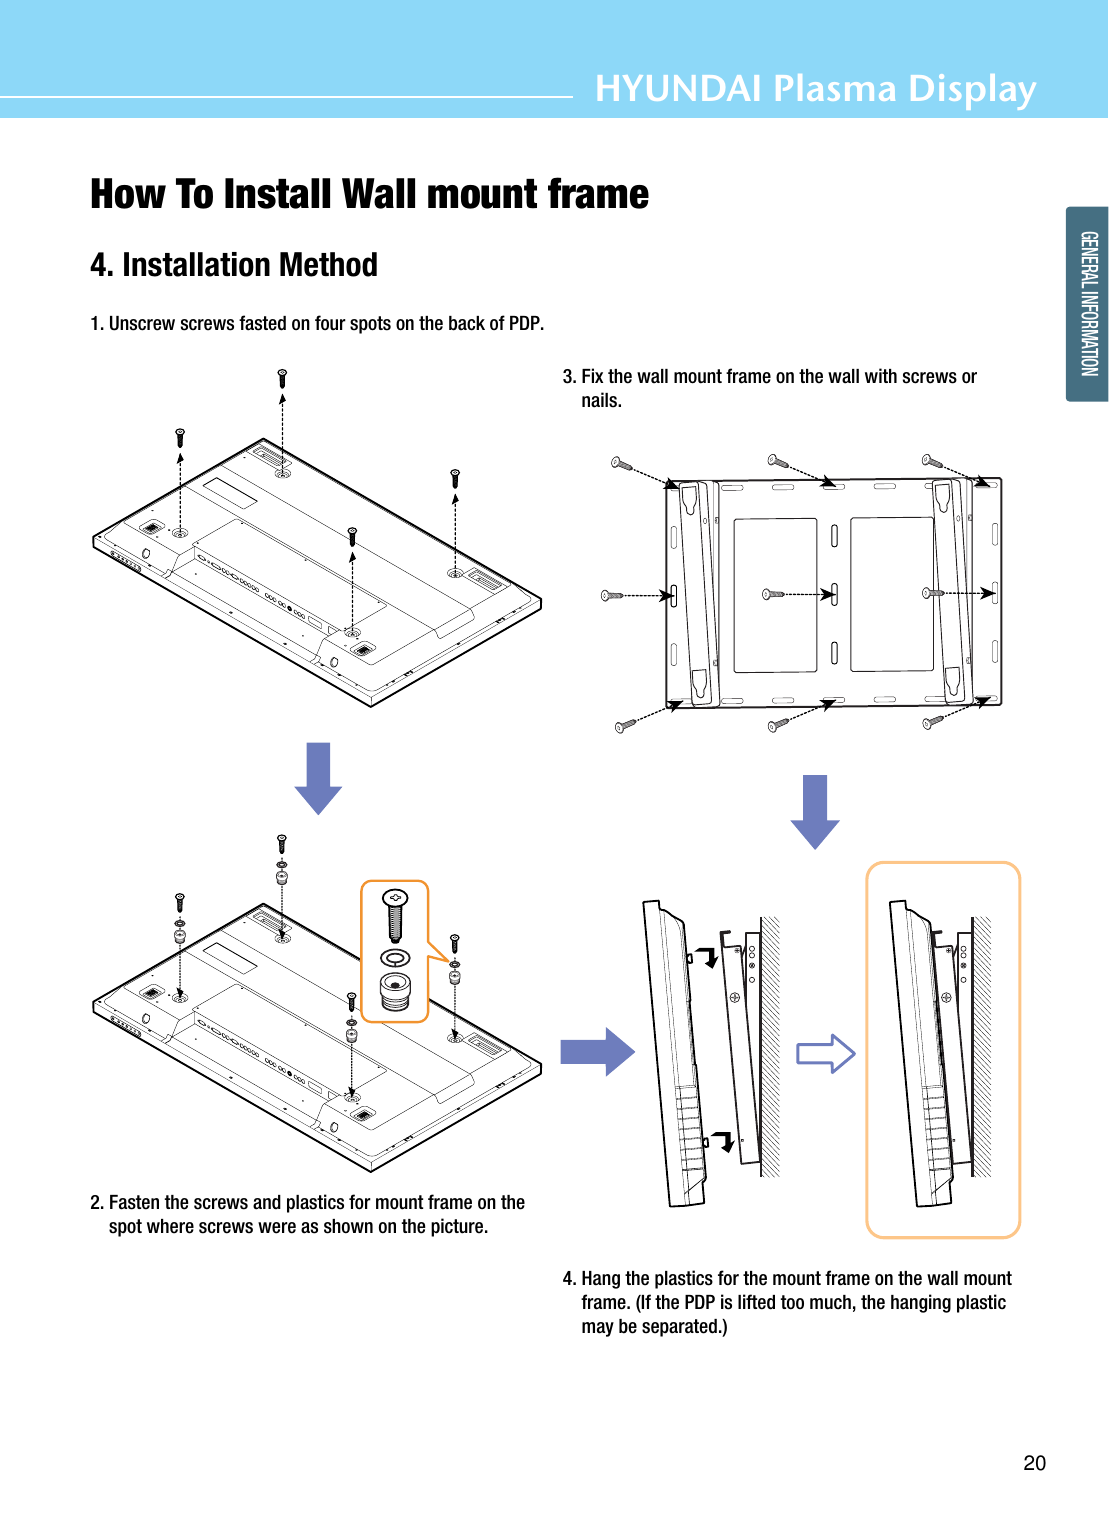
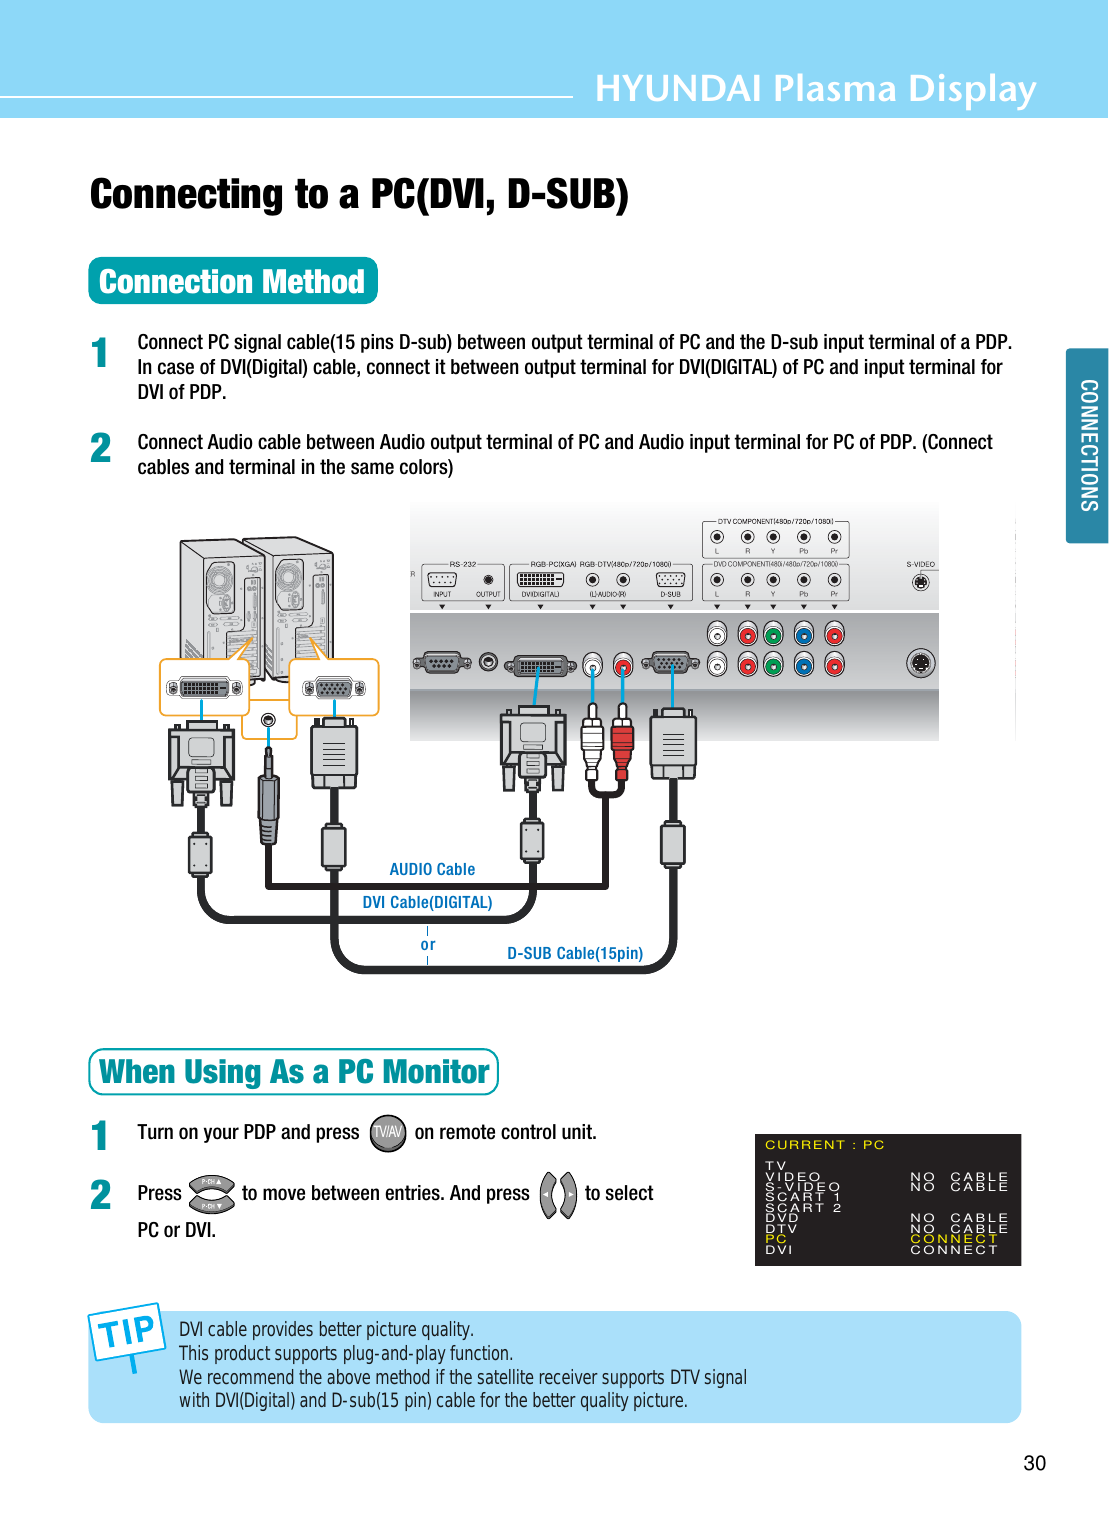
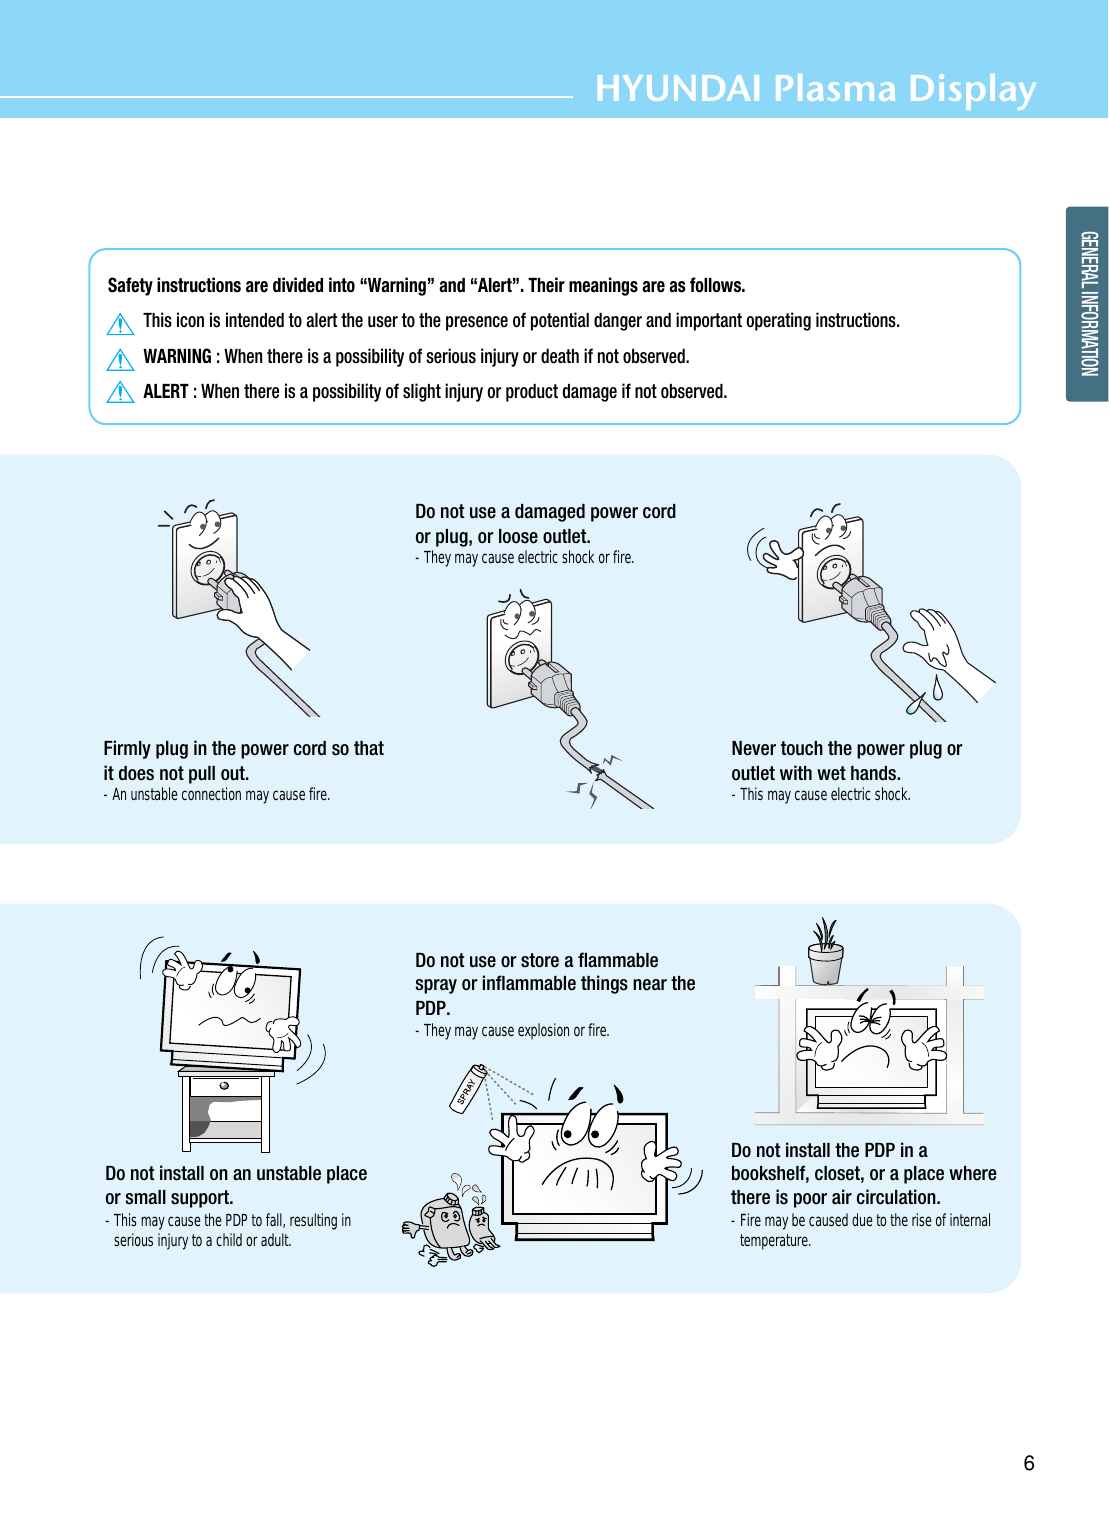
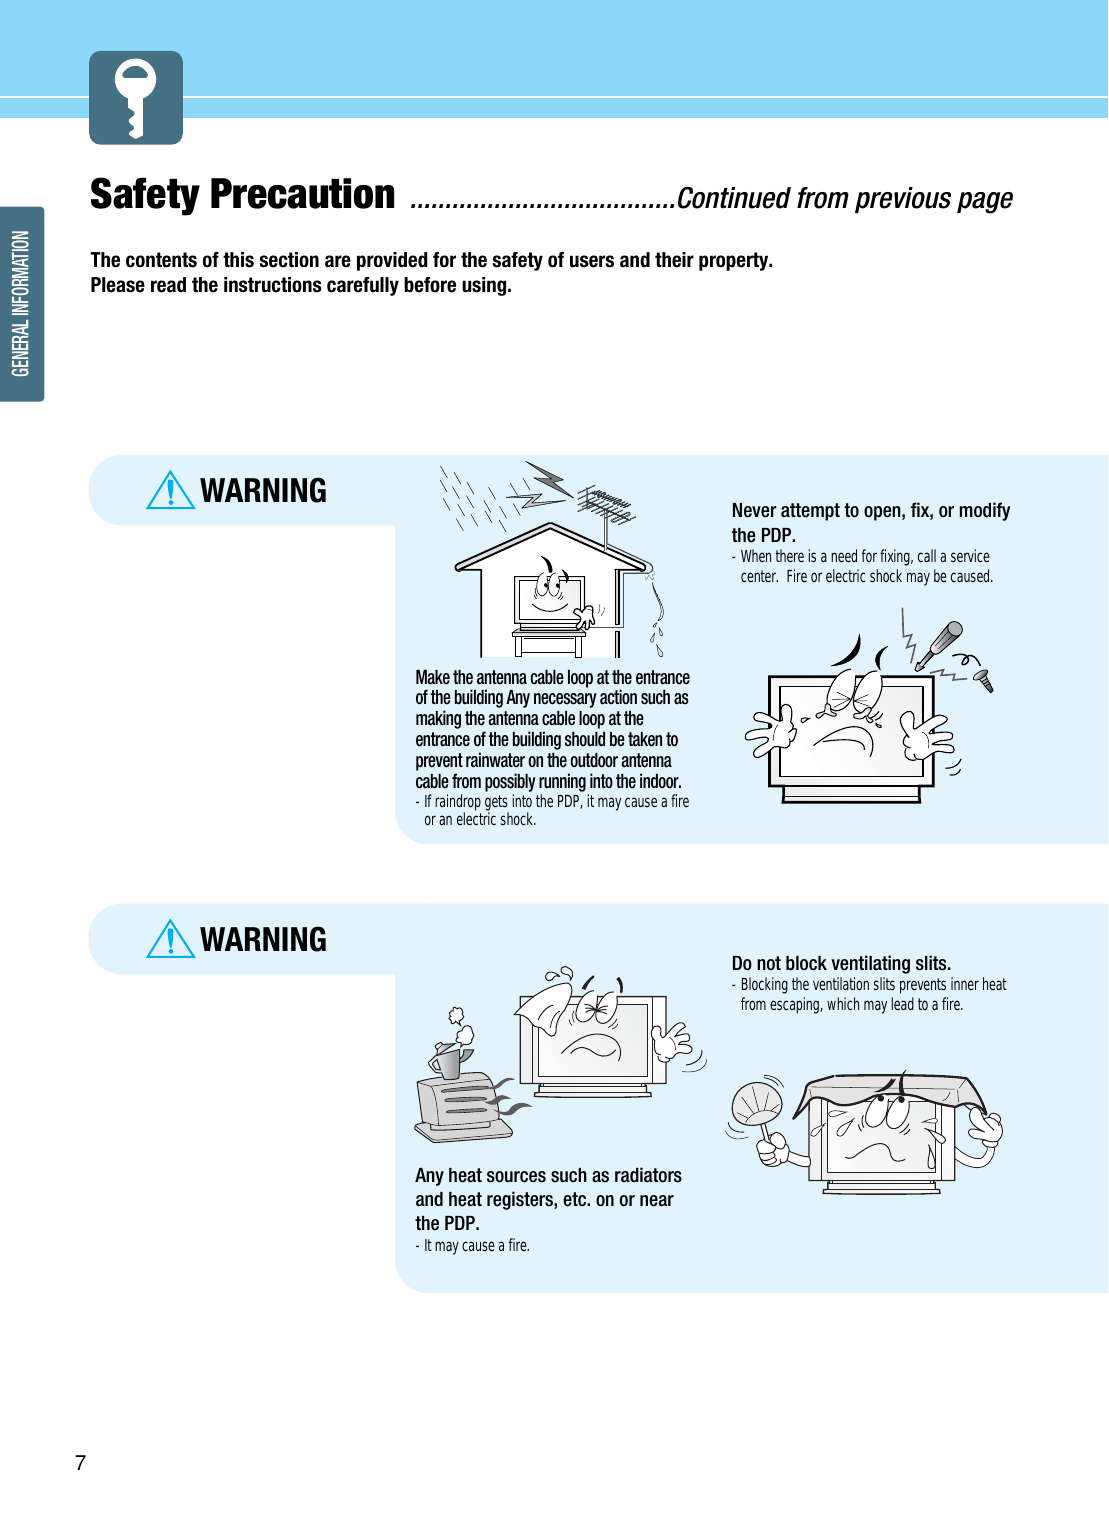
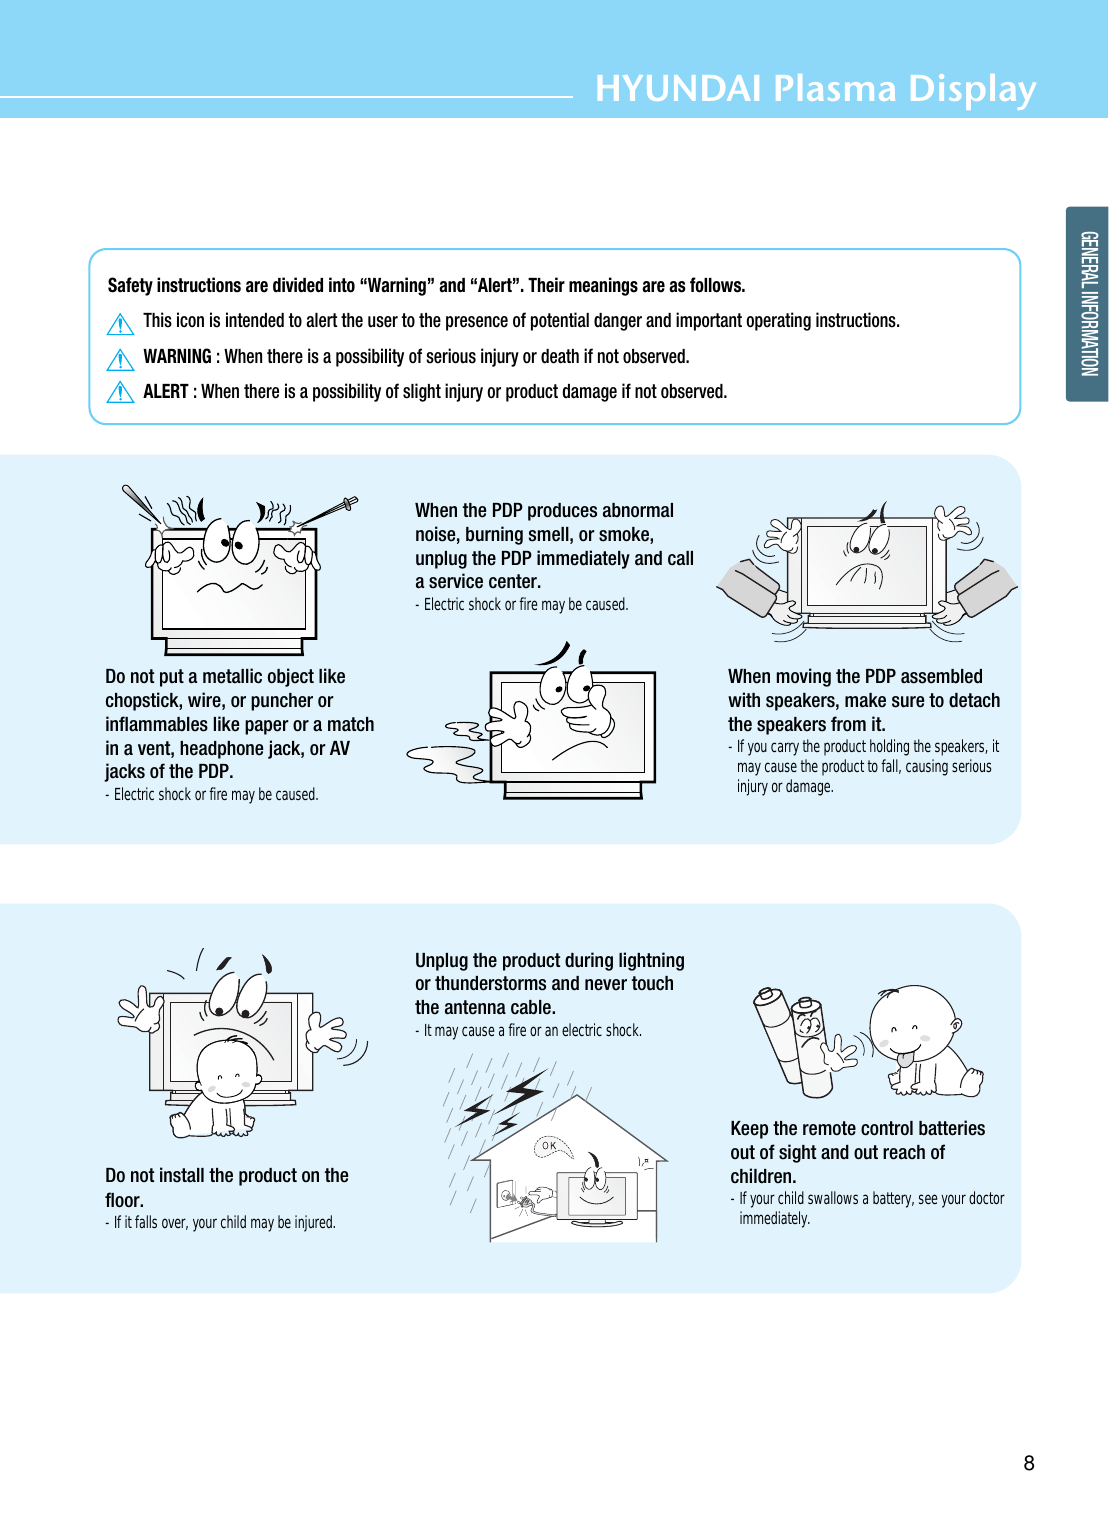
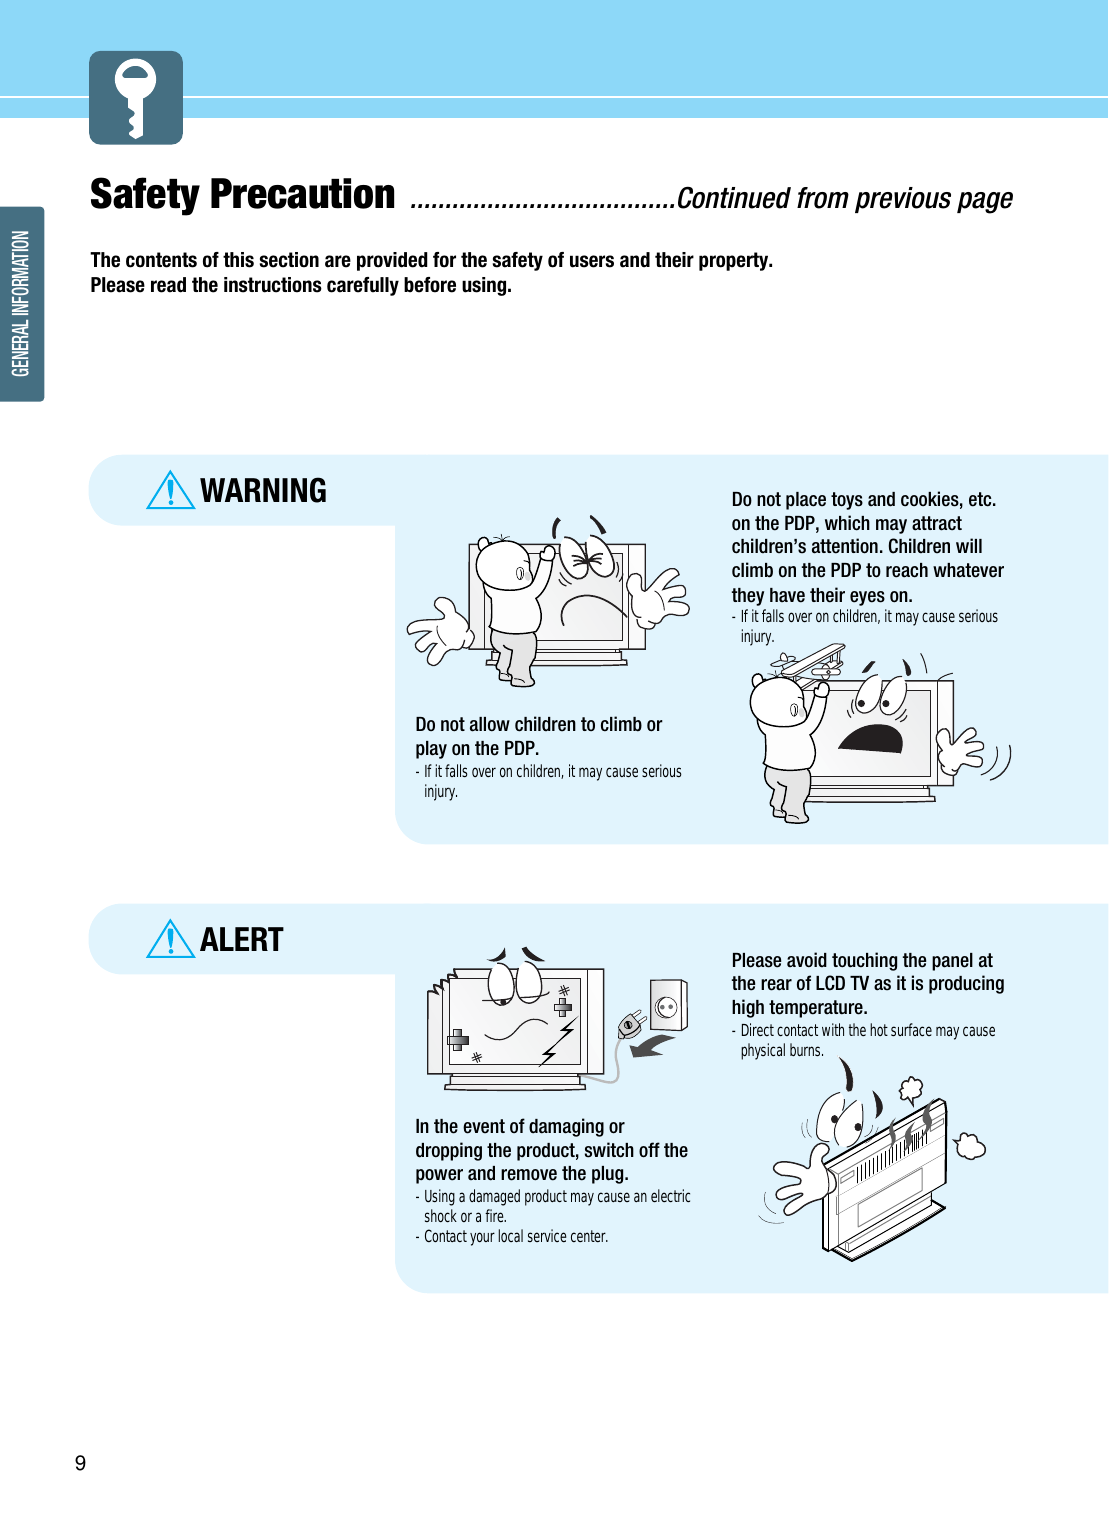
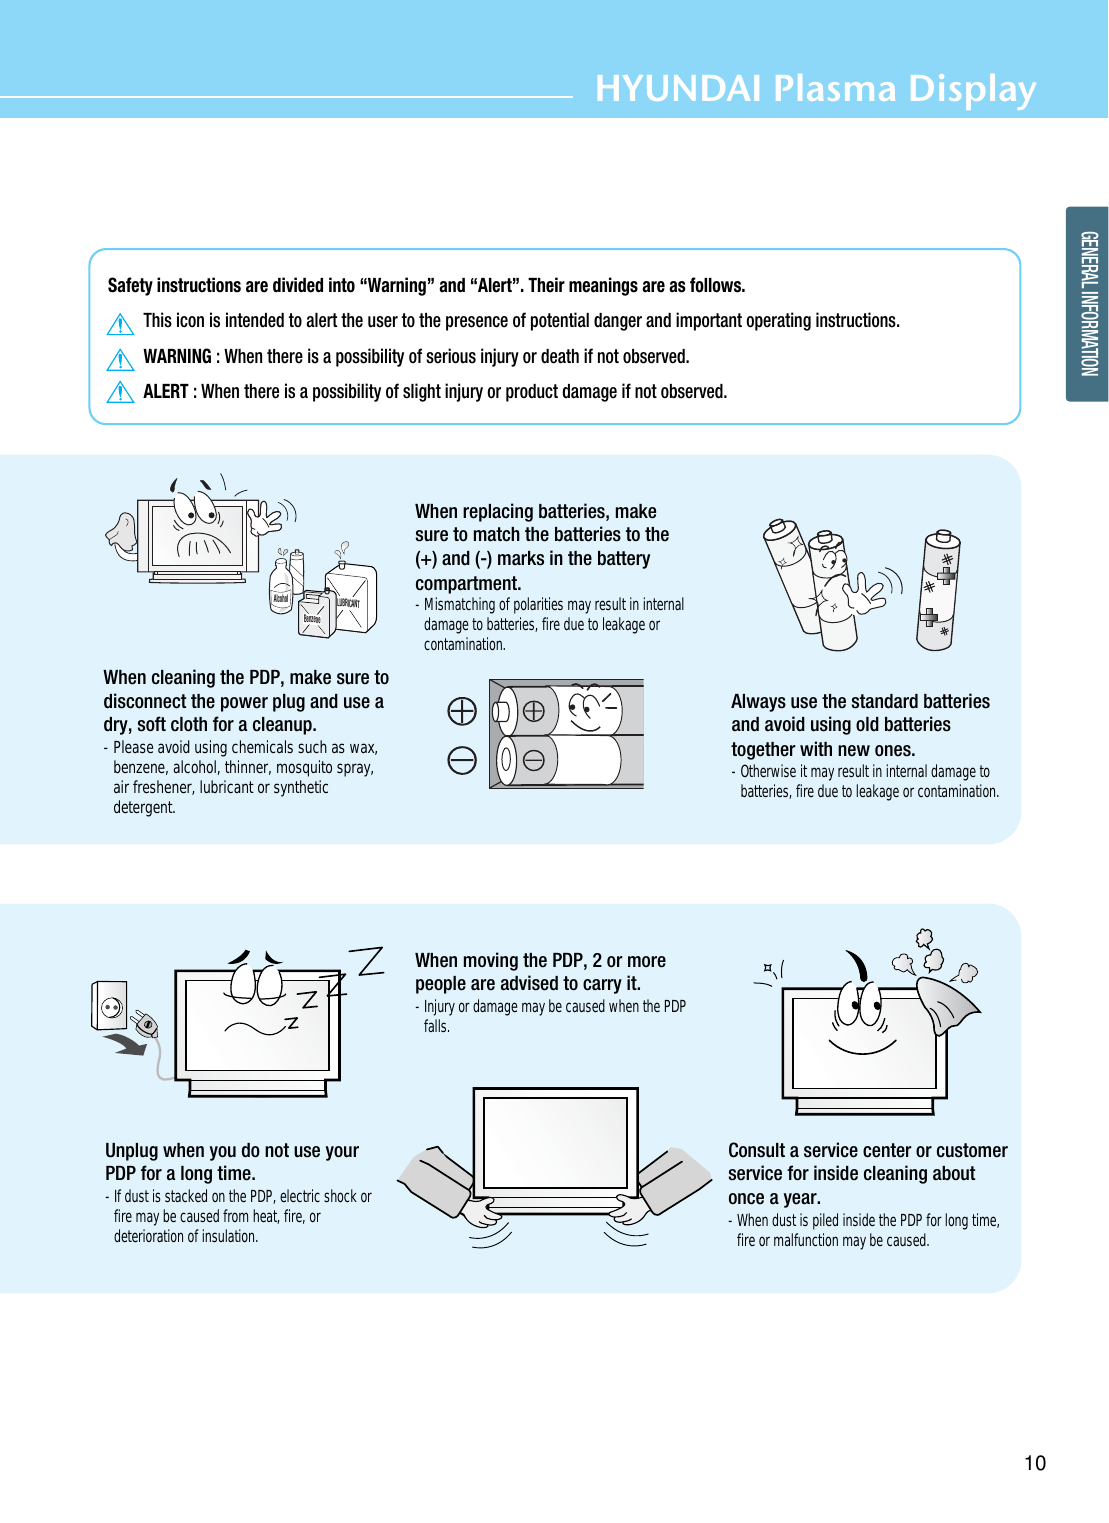
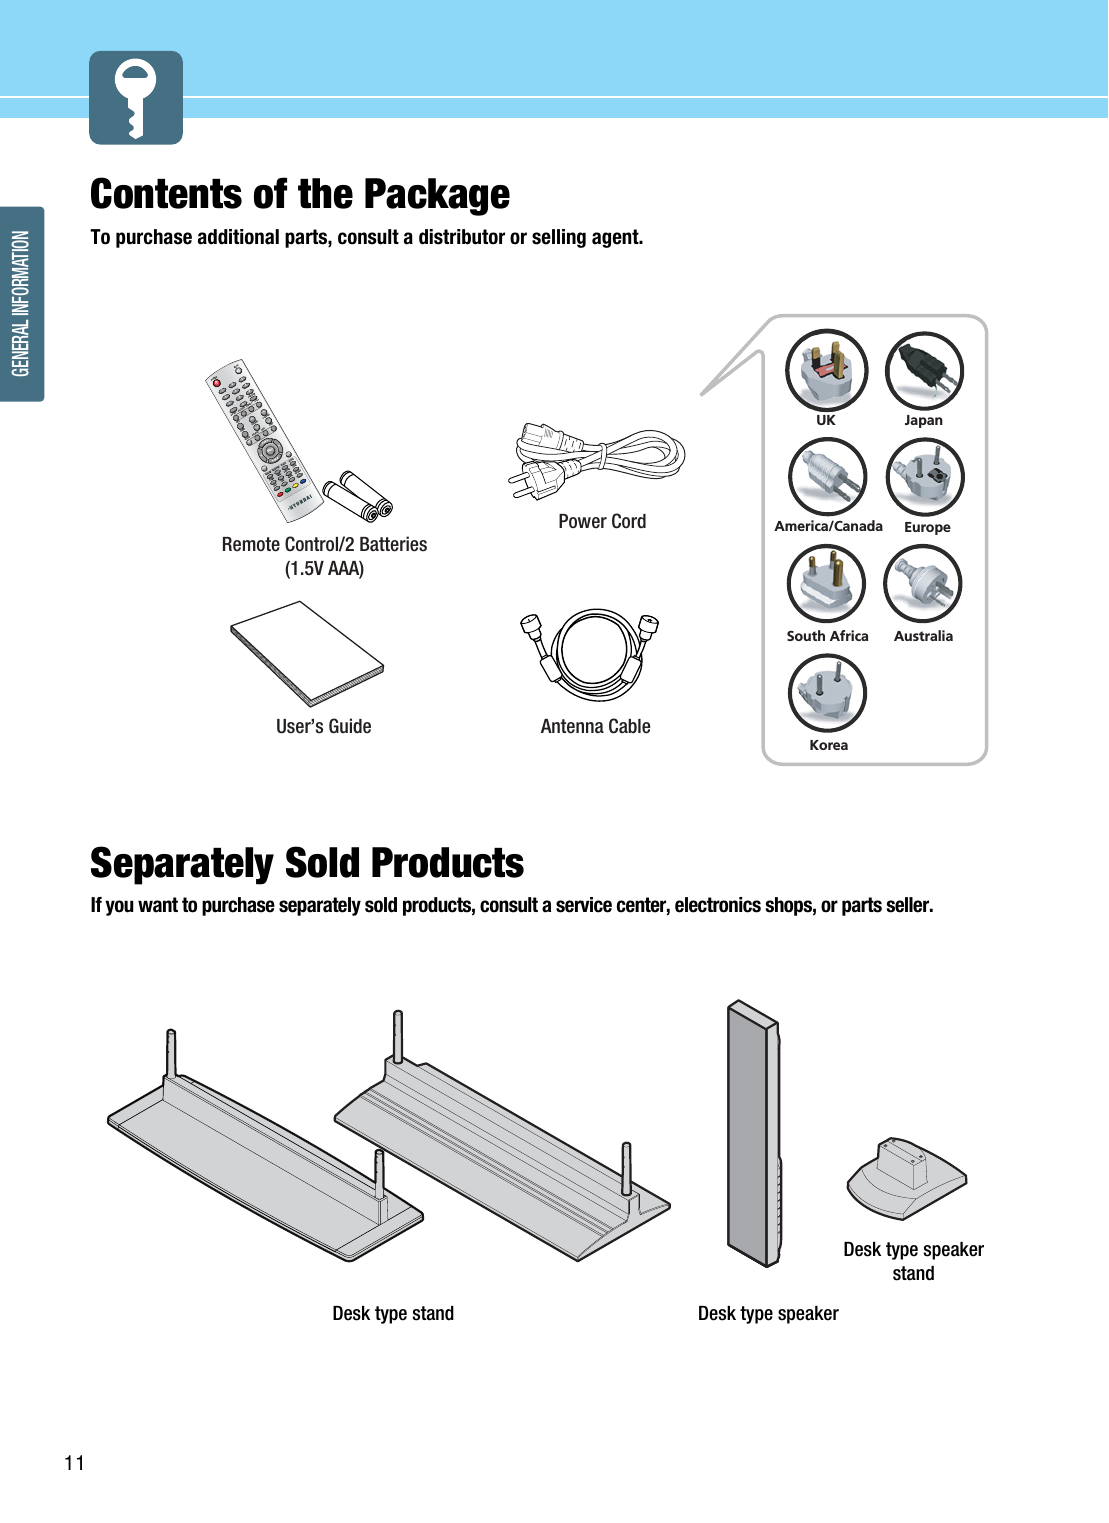
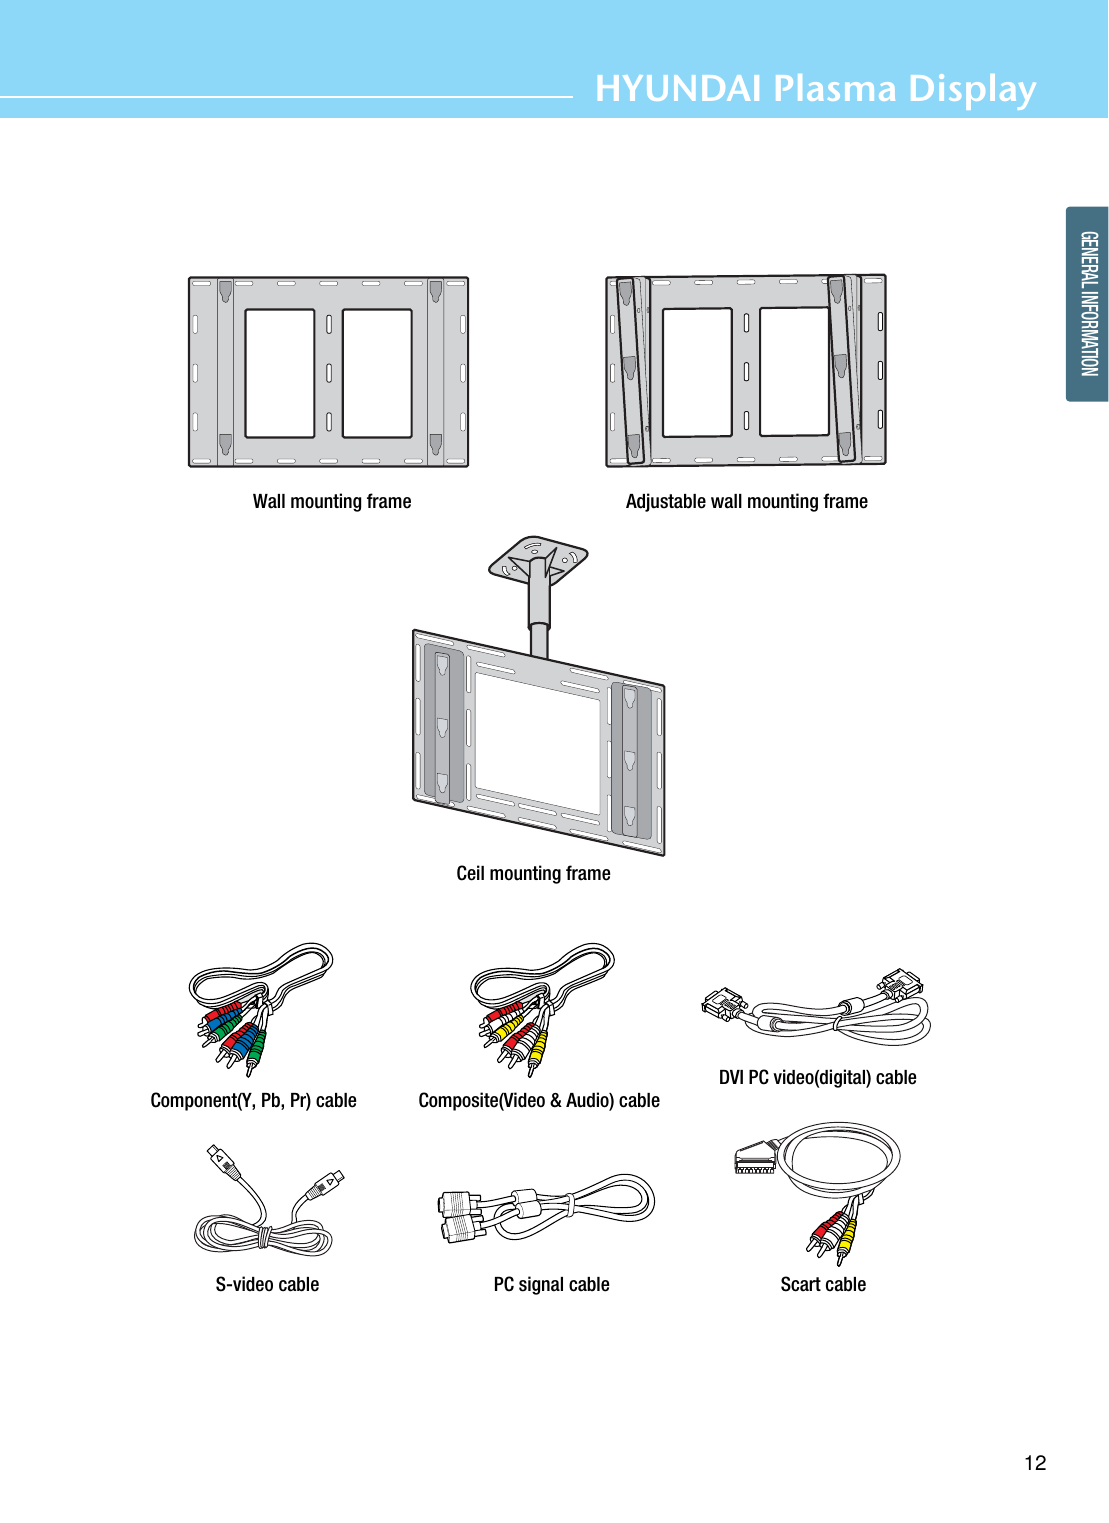
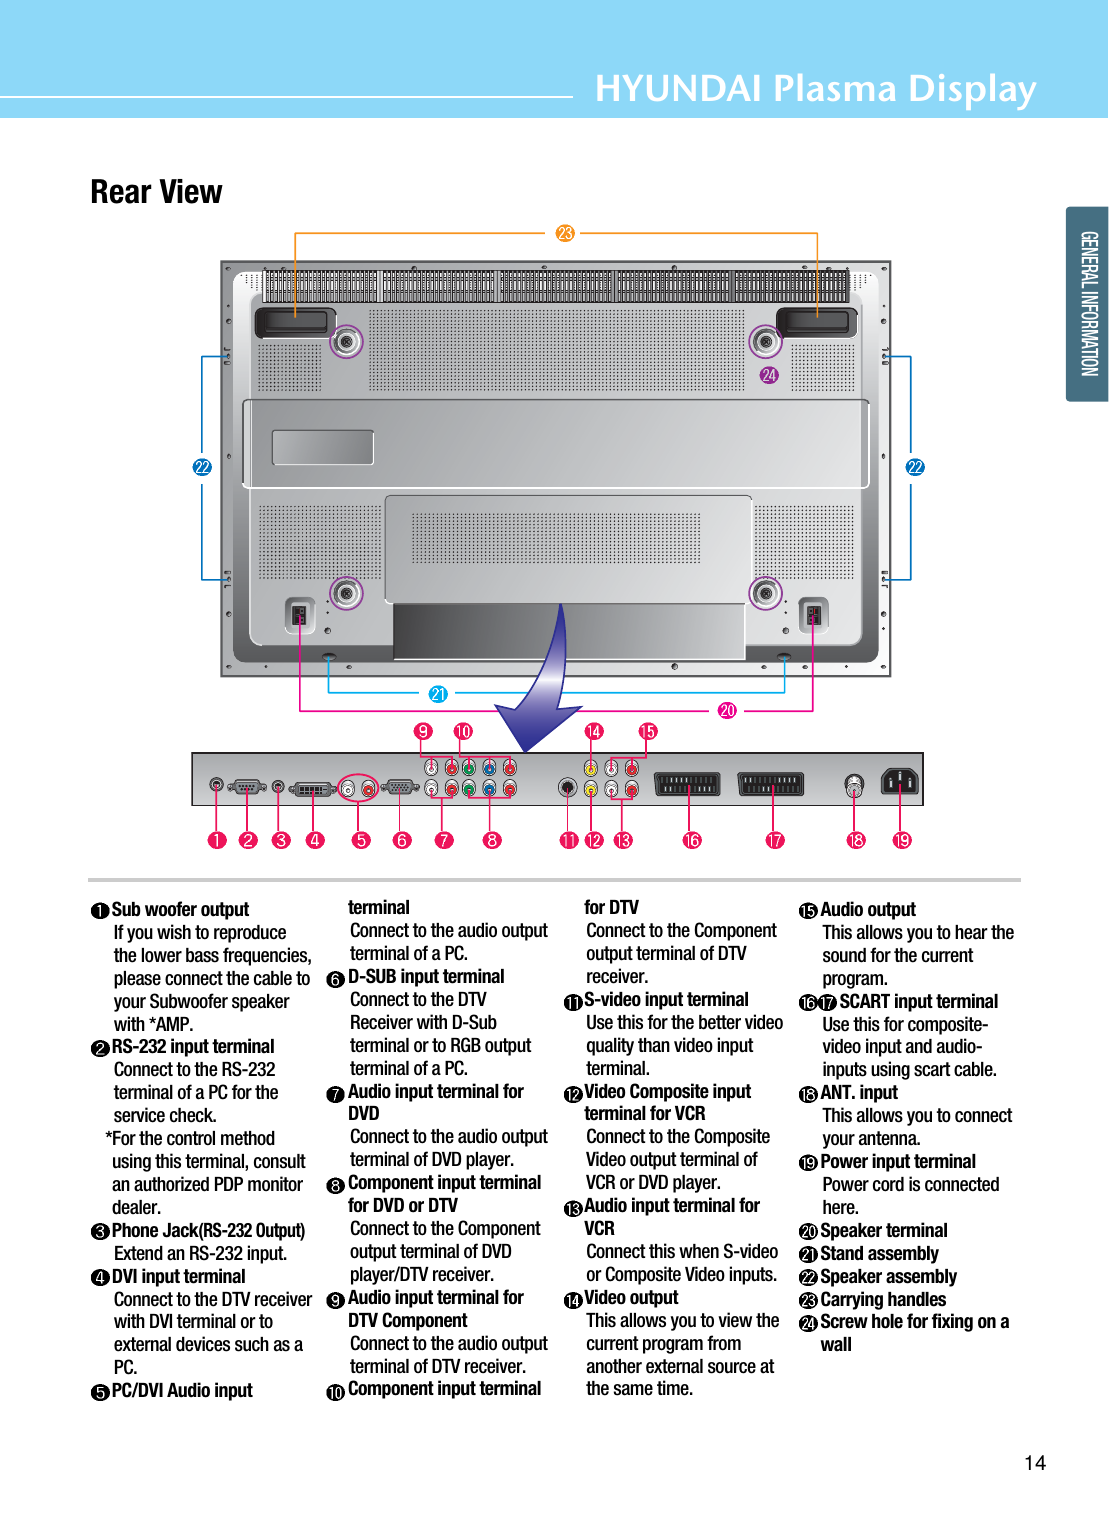
![HYUNDAI Plasma DisplayTable of ContentsGeneral InformationImportant Tips ......................................................................3Image Sticking Precaution ....................................................4Safety Precaution .................................................................5Contents of the Package .....................................................11Separately Sold Products ....................................................11Parts Names and Functions ................................................13Remote Control ...................................................................15How To Use Speakers (Standing Type) ...............................17How To Use Speakers (Desk Type) ......................................18How To Install Wall Hanger Support ....................................19How To Install Wall mount frame ........................................20How To Install Wall Hanger Support ....................................21Connections Connecting VHF and UHF Antenna........................................23Connecting Cable TV ...........................................................23Before connecting the video/audio connections toexternal devices ................................................................25Connecting a VCR, Cable/Satellite Receiver .........................26Connecting a DVD Player ....................................................27Connecting a DTV(Digital Broadcast) Receiver .....................28Playing Back a Tape Recorded On a Camcorder ..................29Connecting to a PC(DVI, D-SUB) .........................................30Resolutions Supported in PC ...............................................31Scart Connection to the External Input ................................32Picture SetupHow to Select the Picture Mode ..........................................35How to Set the Desired Picture ...........................................36How to Set Blue Screen ......................................................37How to Set Film Mode .........................................................38How to Select a Color Temperature .....................................39How to Set PIP [Mode] ........................................................40How to Set Multi-Screen [Input Source/Position/Size] .........41How to Set Noise Reduction ................................................44Supported PIP Table ...........................................................45Sound SetupHow to Select the Audio Mode ............................................47How to Set the Desired Audio .............................................48How to Select AVL ..............................................................49How to Select SRS WOW(Surround) ....................................50How to Select MTS(Multi-Channel Sound) ...........................51How to Set the Output of Subwoofer ...................................52Channel SetupMemorizing the Channels ...................................................55Fine Tuning Channel Reception ...........................................56Storing Channels Manually .................................................57Using the LNA(Low-Noise-Amplifier) Feature ......................58Function SetupHow to Select the Aspect Ratio ...........................................61Displaying Information ........................................................63How to Set Key-Lock ..........................................................64Using the Pixel Shift / Full White / Wiper Function ...............65How to Freeze Picture .........................................................66How to Set DPMS ...............................................................67Choosing the Your Languages .............................................68How to Set Image Adjust in PC Mode ..................................69Viewing Closed Captions .....................................................71Using the V-Chip .................................................................73Clock SetupHow to Set Clock ................................................................77How to Set On Time ............................................................78How to Set Off Time ............................................................80How to Set Sleep Time .......................................................82AppendixGlossary ............................................................................ 91Troubleshooting ................................................................. 93Care and Cleaning ............................................................. 95Product Specifications ....................................................... 96](https://usermanual.wiki/Hyundai-IBT/HQP50AH000.Users-Manual-1-of-3/User-Guide-458196-Page-8.png)
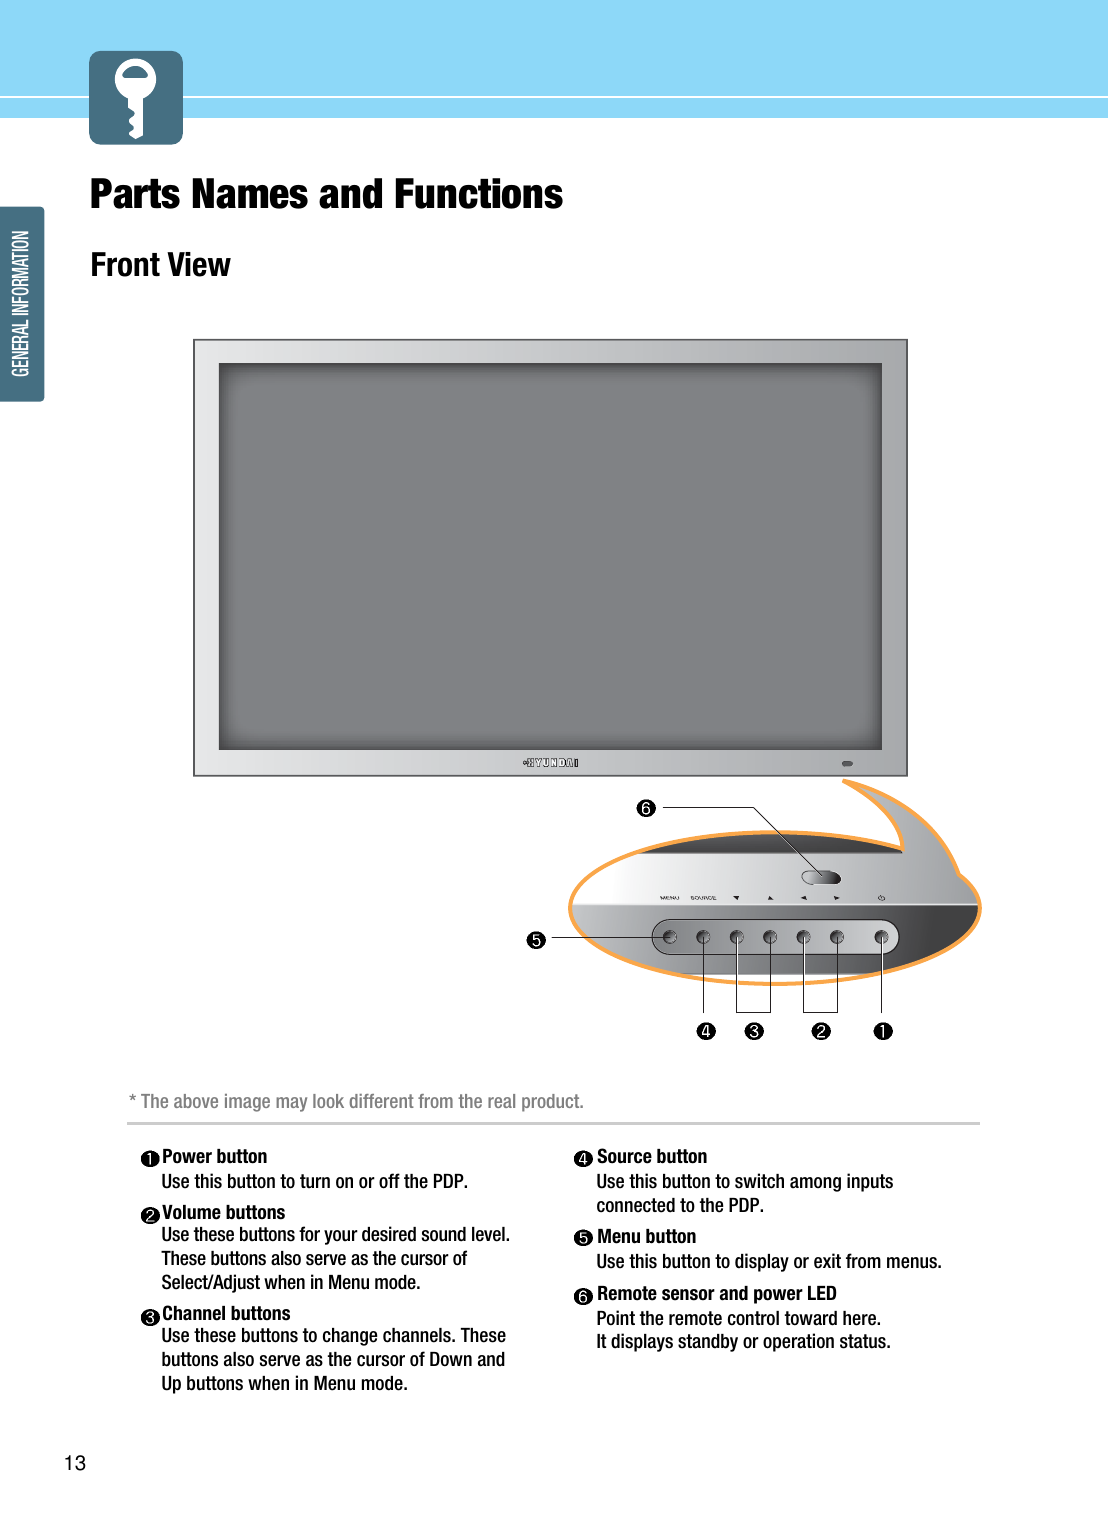
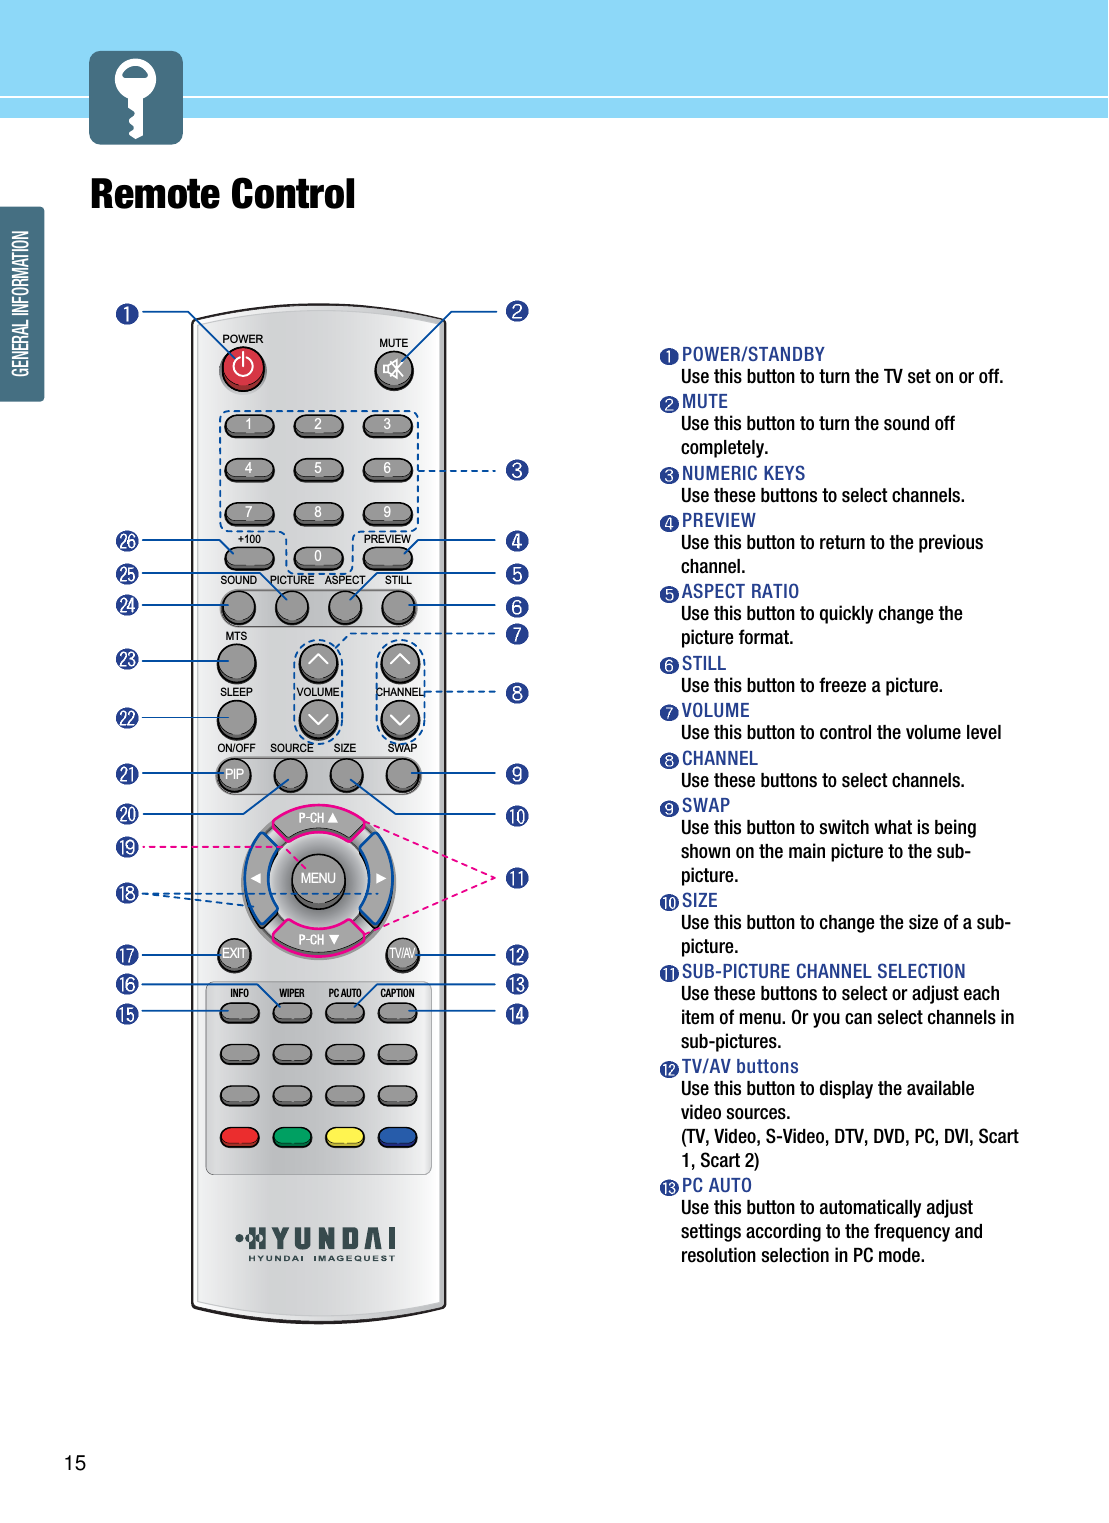
![HYUNDAI Plasma Display16GENERAL INFORMATIONHow to Insert Batteries in Remote Control *Battery type : 1.5V/UM-3(AA/R06)CAPTIONUse this button to displays the closed captions that arebroadcasted with certain TV shows.INFORMATIONUse this button to display picture mode, resolution orvarious program information.WIPERUse this button to prevent any possible ghosts. Whitebar will pass through the TV screen to prevent ghosts.EXITUse this button to exit from a menu.SELECT/ADJUSTSelect or adjust each item of menu.MENUUse this button to adjust screen, audio, channel,function, time, etc.SOURCE [MULTI SCREEN]Use this button to select input signals for sub-pictures.PIP (PICTURE IN PICTURE) ON/OFFUse this button to watch more than one picture at once.SLEEPUse this button to allow your TV to turn offautomatically at designated time.MTSUse this button to display types of audio signalscurrently aired on TV. Or you can use this button toswitch to other Sound Mode available.SOUNDUse this button to select the status of sound. PICTUREUse this button to select the status of picture.+100 KEYUse this button to select the channel above 100Press and hold ∆part and pushto open cover.123Insert batteries with properpolarities of + and - .Use the remote control with coverclosed.](https://usermanual.wiki/Hyundai-IBT/HQP50AH000.Users-Manual-1-of-3/User-Guide-458196-Page-20.png)