JADAK a business unit of Novanta MERCURY6E-M RFID Module User Manual revised
Trimble Navigation Limited RFID Module revised
Contents
User manual revised

Juno T41/5
User Manual

i
1 WELCOME
ThankyouforpurchasingaJunoT41/5ruggedhandheldcomputer!This
usermanualwillhelpyouconfigureanduseyourdevice.
1.1 IMPORTANT INFORMATION FOR USING THE USER
MANUAL
This user manual has been prepared to guide you through the
configuration and operation of your device, which includes:
1. Initial configuration of the device
2. Operating basics
3. Navigating the operating system and software
4. Securing your device
Please read this user manual carefully before using your device for
the first time. In particular, read the Important Safety Information and
all of Chapter 1 before using your device.
This user manual describes features and functionality that may not
be present on your particular device, as features vary by model.
1.2 DOCUMENT CONVENTIONS
It is important to understand the typographical conventions used in
this user manual. The formatting of the text identifies special
information:
1. CAPITAL—indicatesthehardwareitemsonthedevice.Example:press
thePOWERbutton.
2. Bold—indicatestheitemsdisplayedonthescreen,includingicons,
tiles,buttons,headings,fieldnamesandoptions.
Example:taptheE‐mailicon.

ii
3. Italic—indicatesthenameofascreen/windowasshownintheupper
leftcornerofthedisplay.
Example:theSettingsscreen.
4. >—describesaprocedureoranavigationpath.
5. Example:Tap>Settings>System>SystemInformation>
Wirelessisequivalentto:
1.Tapthe(Start)iconorpressthe(Start)button
2.TaptheSettingsicon
3.TaptheSystemicon
4.TaptheSystemInformationicon
5.OntheSystemInformationscreen,slideleftorrightuntilthe
Wirelesstabisdisplayed.Youcanalsotapthe<or>inthehorizontal
scrollbartoactivatedifferenttabsintheSystemInformationscreen.
1.3 TERMS
The following terms are used throughout this user manual to
describe user actions.
1. Press—pressandquicklyreleaseahardwarebutton.
2. Tap—touchandquicklyreleaseanitemdisplayedonthescreen.
3. Select—tapaniteminalistortapacommandfromamenu.
4. Drag—tapandholdontheitemandthenmoveittothetarget
positionwithoutreleasingyourfingertip.
5. Slide—touchanddragtotheleft/right/up/downtomovetothenext
itemonthelist.
1.4 IMPORTANT SAFETY INFORMATION
• THE DEVICE BATTERY IS PARTIALLY CHARGED WHEN
SHIPPED NEW FROM THE FACTORY.
• BEFORE INSERTING OR REMOVING A SIM CARD, THE
PHONE MODULE MUST BE POWERED OFF. To do this,
press and hold the POWER button for two seconds to
iii
display the Power Menu, then tap Enable Airplane mode.
Alternatively, use the Wireless Manager to disable only the
Phone module.
• DO NOT OPERATE THE DEVICE WITHOUT THE CARD
SLOT COVER PROPERLY INSTALLED.
• IN MANY COUNTRIES YOU ARE REQUIRED BY LAW TO
TURN OFF YOUR PHONE WHEN YOU FLY. THE MOST
SECURE METHOD TO ACCOMPLISH THIS IS TO ENABLE
AIRPLANE MODE. To do this, press and hold the POWER
button for two seconds to display the Power Menu, then tap
Enable Airplane mode.
WARNING: TURNING OFF YOUR DEVICE DOES NOT
TURN OFF THE PHONE; YOU MUST USE AIRPLANE MODE.
• YOUR WARRANTY IS INVALIDATED IF YOU OPEN OR
TAMPER WITH THE OUTER CASING OF THE DEVICE.
Unapproved modifications or operations beyond or in
conflict with these instructions for use may void
authorization by the authorities to operate the equipment.
• ONLYAPPROVEDACCESSORIESMAYBEUSEDWITHTHISEQUIPMENT.
INGENERAL,ALLCABLESMUSTBEHIGHQUALITY,SHIELDED,
CORRECTLYTERMINATEDANDNORMALLYRESTRICTEDTOTWO
METERSINLENGTH.THEPOWERSUPPLYAPPROVEDFORTHIS
PRODUCTEMPLOYSSPECIALPROVISIONSTOAVOIDRADIO
INTERFERENCEANDSHOULDNOTBEALTEREDORSUBSTITUTED.

iv
1.5 DISCLAIMERS
The manufacturer operates a policy of ongoing product development.
The manufacturer reserves the right to make changes and
improvements to any of the hardware and software products
described in this document without prior notice.
The screenshots and other presentations shown in this user manual
may differ from the actual screens and presentations generated by
the actual product. The manufacturer does not warrant that this
document is error-free.
Not all models are available in all regions of the world. Depending on
the specific model purchased, the color and look of your device and
accessories may not exactly match the graphics shown in this
document. Not all models contain all of the hardware features and
software applications described in this user manual.
All such differences are minor and the actual product will deliver the
described functionality as presented in this User Manual in all
material respects, subject to limitations of the particular model
operated by the user.
1.6 LIMITED WARRANTY & LIABILITY LIMITATIONS
This unit and battery are limited warranted against defects in
materials and workmanship for twelve (12) months from the original
date of purchase. All accessories and peripherals are limited
warranted against defects in materials and workmanship for twelve
(12) months from the original date of purchase. If notice is received
of such defects during the limited warranty period, the proven
defective product(s) will either be repaired or replaced, at the
manufacturer’s option. Replacement products may be either new or
like new.
The manufacturer does not warrant that the operation of the
products will be uninterrupted or error free. If the product is not,
within a reasonable time, repaired or replaced to a condition as
limited warranted, the customer will be entitled to a refund of the
purchase price upon prompt return of the product.
Limited warranty does not apply to defects resulting from (a)

v
improper or inadequate maintenance or calibration, (b) software,
interfacing, parts, or supplies not supplied by manufacturer, (c)
unauthorized modification, or misuse, (d) operation in conditions
outside of the published environmental specifications for the product,
or (e) physical damage due to external causes, including accident,
abuse, misuse or problems with electrical power. Water damage
caused by improper installation of the accessories and service parts
is not covered by warranty. Removal of or tampering with the back
case voids the limited warranty. There are important seals that will
be compromised and the device will no longer be water resistant
(IP65(grey units)) or waterproof (IP68(yellow units)).
To the extent allowed by local law, the above limited warranties are
exclusive and no other warranty or condition, whether written or oral,
is expressed or implied, specifically disclaiming any implied
warranties or conditions of merchantability, satisfactory quality, and
fitness for a particular purpose.
To the extent allowed by local law, the remedies in this limited
warranty statement are the customer’s sole and exclusive
remedies. Except as indicated above, in no event will the
manufacturer or its suppliers be liable for loss of data or for
direct, special, incidental, consequential (including lost profit or
data), or other damage, whether based in contract, tort, or
otherwise.
1.7 STANDARD WARRANTY ADDENDUM
Trimble Navigation Limited
935 Stewart Drive
Sunnyvale, California 94085
United States of America
Notice to Australian Purchasers
The Australian Consumer Law
Our goods come with guarantees that cannot be excluded under the
Australian Consumer Law. You are entitled to a replacement or

vi
refund for a major failure and for compensation for any other
reasonably foreseeable loss or damage. You are also entitled to
have the goods repaired or replaced if the goods fail to be of
acceptable quality and the failure does not amount to a major failure.
Trimble's warranty, as set out in the user manual accompanying this
statement, or as described in the warranty card accompanying the
Product you purchased, is in addition to any mandatory rights and
remedies that you may have under the Australian Consumer Law.
1.8 COPYRIGHT
All brand and product names are trademarks or registered
trademarks of their respective companies.
Revision:2.0
(05/2013)

vii
2 CONTENTS
WELCOME...............................................................................................................................................
IMPORTANT INFORMATION FOR USING THE USER MANUAL...................................................................................
DOCUMENT CONVENTIONS.................................................................................................................................
TERMSII
IMPORTANT SAFETY INFORMATION......................................................................................................................
DISCLAIMERS......................................................................................................................................................
LIMITED WARRANTY & LIABILITY LIMITATIONS....................................................................................................
STANDARD WARRANTY ADDENDUM....................................................................................................................
COPYRIGHTVI
CONTENTS..............................................................................................................................................
CHAPTER 1 GETTING STARTED.........................................................................................................
1.1 DEVICE COMPONENTS..................................................................................................................................
1.2 INSERTING A STORAGE CARD AND A SIM CARD.............................................................................................
1.3 CHARGING THE BATTERY..............................................................................................................................
1.4 TURNING YOUR DEVICE ON AND CHOOSING YOUR LANGUAGE.......................................................................
CHAPTER 2 OPERATING BASICS.......................................................................................................
2.1 HOME SCREEN.............................................................................................................................................
2.2 START SCREEN.............................................................................................................................................
2.3 TITLE BAR.....................................................................................................................................................
2.3.1 Title bar status indicators...................................................................................................
2.4 TILE BAR.......................................................................................................................................................
2.5 POWER MENU...............................................................................................................................................
2.6 SECURING YOUR DEVICE..............................................................................................................................
Lock the keypad............................................................................................................................
Lock your device...........................................................................................................................
2.7 CONFIGURING THE ONSCREEN KEYBOARD..................................................................................................
2.8 PERFORM A CLEAN BOOT / FACTORY RESET...............................................................................................
2.9 ABSOLUTE POWER OFF MODE.....................................................................................................................
CHAPTER 3 MANAGING AND CARING FOR YOUR DEVICE...........................................................
3.1 CHANGING BASIC SETTINGS.........................................................................................................................
Personalizing the Home screen..................................................................................................
Setting the date, time, and alarms.............................................................................................
Setting regional options...............................................................................................................
3.2 CUSTOMIZING SOUNDS AND NOTIFICATIONS.................................................................................................
Specifying the sound for an event..............................................................................................
Setting the ring tone for incoming calls.....................................................................................
Copying a sound to your device.................................................................................................
3.3 MANAGING BATTERY POWER AND DATA STORAGE.........................................................................................
Battery Life....................................................................................................................................
Changing the power management settings..............................................................................
Managing low battery...................................................................................................................
Checking the phone memory......................................................................................................

viii
3.4 WORKING WITH FILES...................................................................................................................................
Copying files to your computer...................................................................................................
Using File Explorer.......................................................................................................................
3.5 ADDING AND REMOVING PROGRAMS.............................................................................................................
Installing a program from your computer..................................................................................
Removing a program....................................................................................................................
3.6 USING TASK MANAGER................................................................................................................................
3.7 CHECKING THE DEVICE SYSTEM INFORMATION............................................................................................
3.8 CARING FOR YOUR DEVICE..........................................................................................................................
3.9 SAFE USE OF YOUR DEVICE.........................................................................................................................
CHAPTER 4 CONNECTING TO A PC AND SYNCHRONIZING INFORMATION...............................
4.1 SETTING UP WINDOWS MOBILE® DEVICE CENTER......................................................................................
Using Windows Mobile Device Center......................................................................................
4.2 SETTING UP ACTIVESYNC®..........................................................................................................................
Setting up synchronization in ActiveSync..................................................................................
4.3 SYNCHRONIZING WITH YOUR COMPUTER......................................................................................................
Starting and stopping synchronization.......................................................................................
Selecting information to synchronize.........................................................................................
Troubleshooting sync connection problems.............................................................................
CHAPTER 5 USING THE PHONE..........................................................................................................
5.1 MAKING A CALL.............................................................................................................................................
Making a call from the Phone screen........................................................................................
Making a call from Contacts........................................................................................................
Making a call from Call History...................................................................................................
Making an international call.........................................................................................................
Making an emergency call...........................................................................................................
5.2 RECEIVING AND ENDING A CALL....................................................................................................................
Ending a call..................................................................................................................................
5.3 SPEED DIAL..................................................................................................................................................
Using speed dial...........................................................................................................................
5.4 WORKING WITH WWAN (MOBILE DATA SERVICE).........................................................................................
5.5 WORKING WITH CELLSTART.........................................................................................................................
Removing cellular data settings..................................................................................................
5.6 CUSTOMIZING YOUR PHONE.........................................................................................................................
5.7 BROWSING THE INTERNET............................................................................................................................
Internet Sharing............................................................................................................................
5.8 SMS MESSAGES..........................................................................................................................................
5.9 SENDING AND RECEIVING E-MAIL..................................................................................................................
CHAPTER 6 USING ADDITIONAL HARDWARE FEATURES............................................................
6.1 FLASHLIGHT.................................................................................................................................................
6.2 ASSIGNING BUTTONS (HARDWARE BUTTONS)..............................................................................................
6.3 COMPASS CALIBRATION...............................................................................................................................
6.4 WORKING WITH BLUETOOTH........................................................................................................................
6.5 WORKING WITH WI-FI..................................................................................................................................
Using the Summit Utilities...........................................................................................................
Accessing the Summit Client Utility...........................................................................................
Main Window.................................................................................................................................

ix
Profile Window..............................................................................................................................
Status Window..............................................................................................................................
Diags Window...............................................................................................................................
Global Window..............................................................................................................................
6.6 WORKING WITH THE CAMERA.......................................................................................................................
User Interface................................................................................................................................
Thumbnail Window.......................................................................................................................
Capturing Images.........................................................................................................................
Capturing Videos..........................................................................................................................
Closing application.......................................................................................................................
IMAGE CAMERA APPLICATION FEATURES............................................................................................................
Image Delete and Switch to Camera in Image review mode.................................................
VIDEO CAMERA APPLICATION FEATURES............................................................................................................
6.7 WORKING WITH GPS...................................................................................................................................
GPS settings:................................................................................................................................
Exiting GPS applications.............................................................................................................
6.8 SATVIEWER..................................................................................................................................................
6.9 BATTERY LOGGER........................................................................................................................................
6.10 RFID TAG READING (FOR RFID VERSION ONLY).......................................................................................
APPENDIX A: REGULATORY COMPLIANCE......................................................................................
U.S.A. - FCC STATEMENT.................................................................................................................................
EXPOSURE TO RADIO FREQUENCY (RF) SIGNALS.............................................................................................
TELECOMMUNICATIONS & INTERNET ASSOCIATION (TIA) INFORMATION.............................................................
CANADA COMPLIANCE, INDUSTRIE CANADA (IC)................................................................................................
ROHS STATEMENT.............................................................................................................................................
EUROPEAN CONFORMITY STATEMENT................................................................................................................
EUROPE75
ENVIRONMENTAL HAZARDS................................................................................................................................
TOXIC AND HAZARDOUS SUBSTANCES AND ELEMENTS......................................................................................
TAIWAN78
1
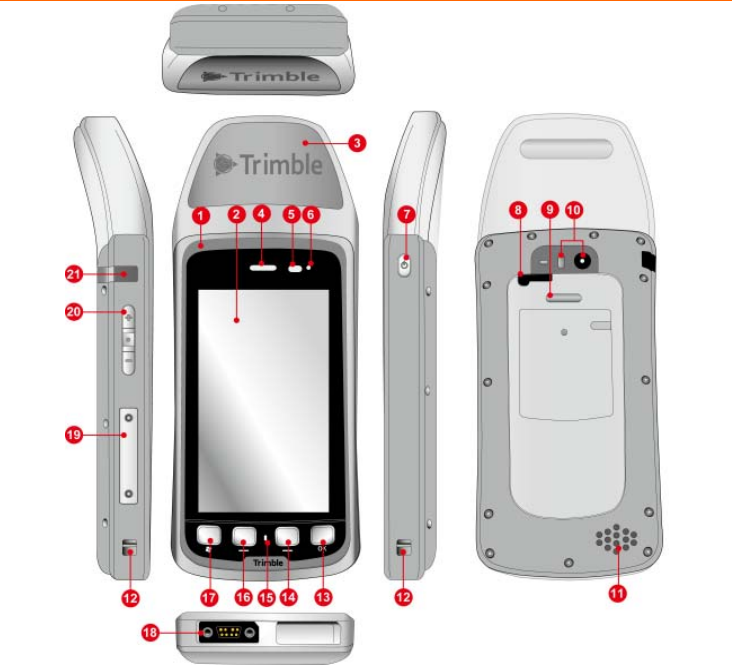
3 CHAPTER 1 GETTING STARTED
3.1 1.1 DEVICE COMPONENTS
GPS Model
2
GPS + RFID Model
1. Color Band
The color band surrounding the screen is yellow or grey, and
indicates IP65(grey units) or IP68(yellow units), respectively.
2. Touchscreen
The capacitive touchscreen enables handwriting, drawing and
making selections with your finger. An optional T41/5 Capacitive

3
Stylus, sold separately, is available.
The touchscreen is on a rugged Gorilla® Glass panel, and to
prevent cosmetic scratches, a screen protector is recommended.
Follow the instruction below to apply the Screen Protector.
3. Expanded feature location
Combo of Imager and/or enhanced GPS.
4. Phone Receiver (Ear)
When using the optional phone, place the receiver to your ear to
hear the other participant(s) to the phone call.
5. Light Sensor
The Light Sensor detects ambient light in your environment. If the
Backlight control is configured to use the Light Sensor, the screen
brightness dims in a dark environment and brightens in a lighted
environment.
6. Notification LED
One tri-color LED (Red/Amber/Green) indicator is provided for
user notifications. These include battery status and other
operating system (OS) notifications. This indicator is capable of
operating even when the device is in Shutdown mode.
The LED status behavior is as follows:
Color Pattern Condition Notes
Red Solid Low battery Connect device
to charger before
pressing
POWER.
Red Blinking Low battery
and OS
notification
Amber Solid Charging
Amber Blinking Charging and
OS notification

4
Color Pattern Condition Notes
Amber Blinking
OS
notification,
medium
battery charge
Green Solid Fully charged
Green Blinking Fully charged
and OS
notification
<Off> n/a Battery not
low, no OS
notification
7. POWER button
When the device is on, press and release to suspend or
resume the device.
Press and hold for 2 seconds to open the Power Menu.
Press and hold for 6 to 8 seconds to force the device to
Reset.
8. MCX port
The MCX port enables connecting an optional External GPS
Antenna to provide improved GPS signal reception when
operating the Juno T41/5 inside a vehicle or in other situations
where the sky visibility is limited.
9. Accessory Latch
The accessory latch is designed to lock the connection of
Extended Battery Pack.
10. Camera and Flash
The camera takes pictures and records videos.
The flash assists the camera in low-light conditions.
11. Speaker
Listen to audio media or a phone call from here.

5
12. Wris
t
Wrist
acco
m
13. OK b
u
Pres
s
equiv
a
14. RIGH
Pres
s
15. Micr
o
Spea
k
16. LEF
T
Pres
s
17. b
u
Pres
s
Hom
e
18. T41/
5
Conn
e
charg
lapto
p
Two
o
Cabl
e
19. micr
o
Use t
h
A
mic
A
SI
M
the d
e
text
m
(Cont
servi
c
20.
V
OL
U
Pres
s
devic
e
Pres
s
optio
n
Strap tie poi
n
strap tie point
s
m
modate left-
a
u
tton
s
to confirm yo
u
a
lent to tappin
g
T button (
)
s
to activate th
e
o
phone
k
here when t
a
T
button ( )
s
to activate th
e
u
tton
s
to access the
e
screen.
5
Custom Por
t
e
ct the T41/5
C
e the device o
r
p
computer.
o
ptional acces
s
e
and the T41/
5
o
SD storage c
h
e SD/SIM Ca
r
roSD storage
c
M
card provide
s
e
vice to place
a
m
essages and
t
act a GSM cel
l
c
es and a SIM
U
ME control a
s
the + / - butto
e
.
s
the ACTION
b
n
.
n
t
s
are provide o
a
nd right-hand
e
u
r selection. P
r
g
the X tile or
O
)
e
associated til
e
a
lking during a
e
associated til
e
Start screen.
P
t
C
ustom USB
C
r
connect to th
e
s
ories are avai
l
5
9-Pin Serial
C
ard and SIM
c
r
d Access Tool
c
ard provides
a
s
access to a
G
a
nd receive ph
t
o connect to
3
l
ular service p
r
card.)
nd ACTION b
u
n to increase/
d
b
utton (betwee
n both sides o
f
e
d users.
r
essing this bu
t
OK
tile on the
T
e
(if any) on th
phone call.
e
(if any) on th
P
ress again to
C
lient cable to t
e
device from
a
l
able, the T41/
5
C
able.
c
ard slots
to loosen the
a
dditional file s
G
SM cellular n
e
one calls, sen
d
3
.75G mobile d
a
r
ovider in your
u
ttons
d
ecrease the v
o
n the + / - butt
o
f
the device to
t
ton is typically
T
ile bar.
e Tile bar.
e Tile bar.
access the
his port to
a
desktop or
5
USB Host
protective cov
e
torage.
e
twork, enablin
d
and receive
a
ta services.
area to obtain
o
lume for your
o
ns) to select
a
e
r.
g
a
n
6
21. Headphone or Headset connector
Connect a 3.5 mm stereo headphone to listen to audio media or
use the hands-free kit.
Connect a 3.5 mm stereo headset to listen to audio media and to
use the phone in hands-free mode.
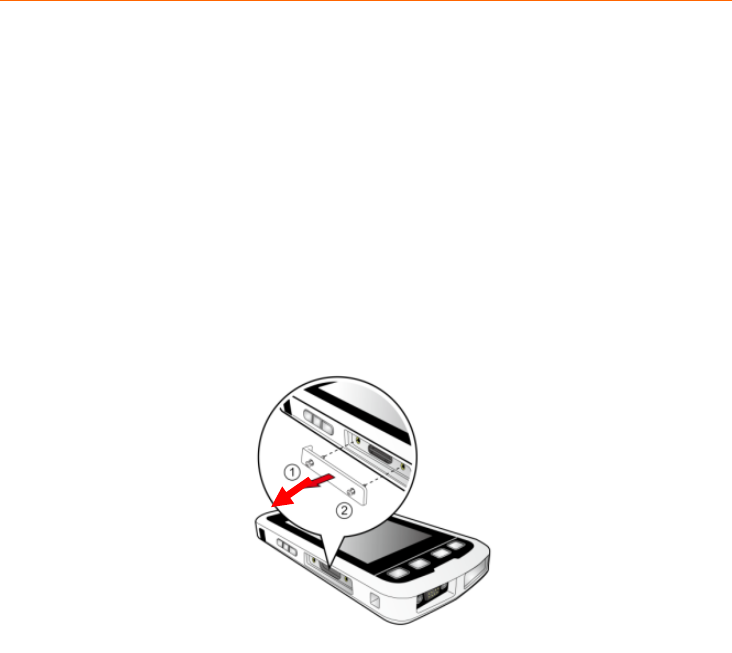
3.2 1.2 INSERTING A STORAGE CARD AND A SIM CARD
ToinstallamicroSDstoragecardandaSIMcardinyourdevice,youneed
toremovethecoverontheleftsideusingtheSD/SIMCardAccessTool
includedwiththedeviceaccessories.
NOTE:Thedevicesupportsupto32GBSDHCmicroSDstoragecards.SDXC
cardsarenotsupported.
WARNING:InsertorremoveaSIMcardONLYwhenthePhonemoduleis
completelyoff.
WARNING:OnlyinsertaSIMcardondeviceswithPhone/WWAN
capability.
1. Removethecoverontheleftsideofthedevicebyunscrewingthe
screws.
2. FollowtheillustrationbelowtoinsertthestoragecardandtheSIM
card:
To insert the SIM card: push the card into the slot with its
metal contacts facing the back of your device.
To insert the storage card: hold the card by the edges and
gently insert it into the slot with the label facing the front of
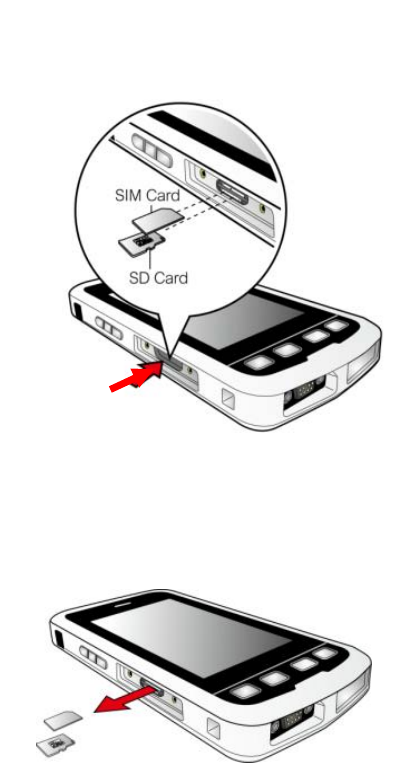
7
your device. Do not apply pressure to the center of the
storage card while inserting the card.
3. Toremoveacard,pushthecardtoreleasefromtheslot.
NOTE: Make sure you have saved any data in open programs
before removing the storage card.
WARNING: Only remove a SIM card when the device is in Shutdown
mode, Absolute Power Off mode, Airplane mode or when the Phone
module is off.
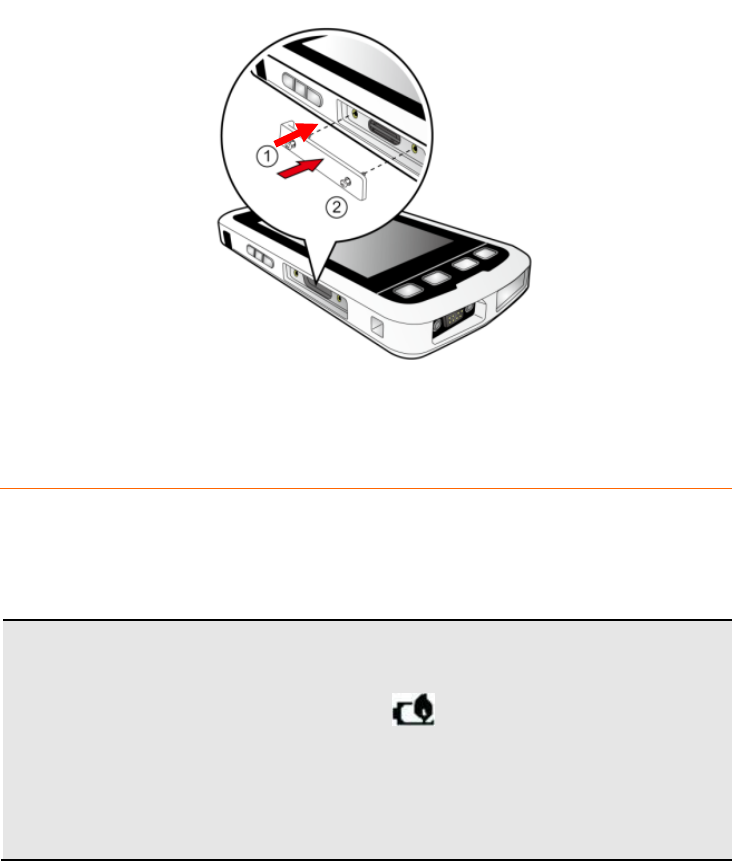
8
4. Replacethecoverandthensecureitwiththescrews.
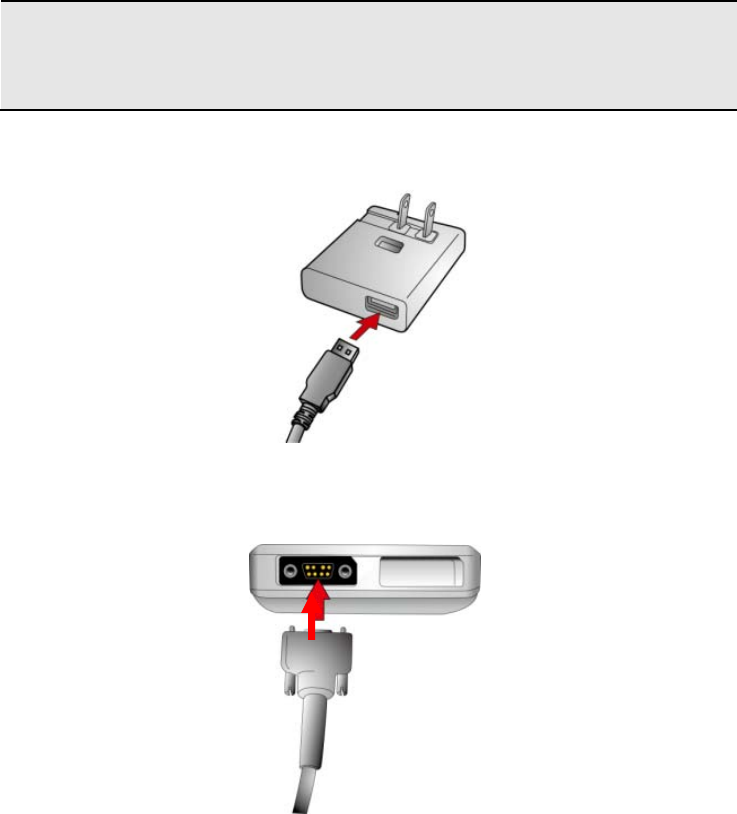
3.3 1.3 CHARGING THE BATTERY
IMPORTANT:BeforeusingtheJunoT41/5forthefirsttime,chargethe
deviceforatleast4hours.ThenotificationLEDwillturngreenwhenfully
charged.
CAUTION: Avoid Extreme Heat
• The battery is designed to stop operating at or above 149
°F (65 °C). If this status icon appears, the battery has
overheated to 140 °F (60 °C) or more.
• If the battery temperature exceeds 158 °F (70 °C), the
battery will be disabled and the device must be sent to an
Authorized Service Provider to have the battery replaced.
9
Operating Temperature Range: -22 °F to 140 °F (-30 °C to 60 °C)
Storage Temperature Range: -40 °F to 158 °F (-40 °C to 70 °C)
CAUTION: Do not exceed specified storage temperature.
1. ConnecttheUSBendoftheT41/5CustomUSBClientcabletotheAC
charger.
2. ConnectthecustomendoftheT41/5CustomUSBClientcabletothe
connectoronthebottomfaceofyourdevice.
10
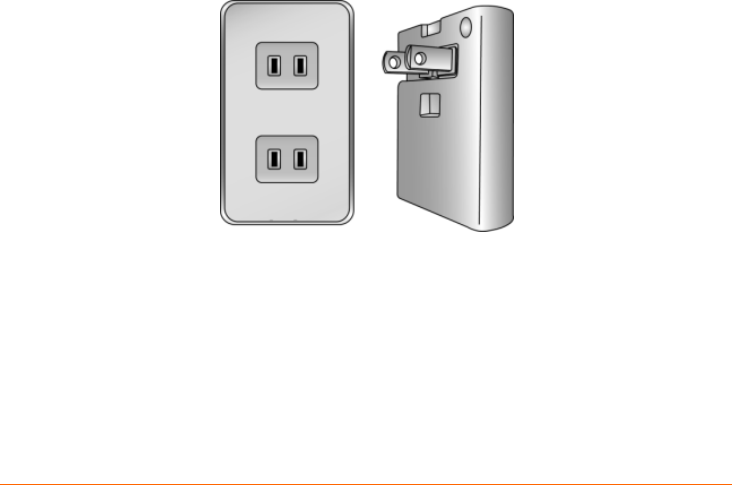
3. PlugtheACchargerintoawalloutlet.Ifneeded,attachaplug
converterontotheACcharger.
Tipsforextendingthebatterylife:
SeeChapter3.3fortipsonextendingbatterylife.
3.4 1.4 TURNING YOUR DEVICE ON AND CHOOSING YOUR
LANGUAGE
WARNING!BEFORETURNINGTHEDEVICEON,THEDEVICEMUSTBE
PLUGGEDINTOANEXTERNALPOWERSOURCE.COMPLETEALLSTEPS
IN1.3CHARGINGTHEBATTERY.
1. Onceyoubegintochargeyourdevice,thedeviceturnson
automatically.
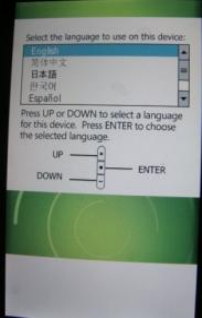
11
2. TheWelcomeWizardwillleadyouthroughthesetupprocess.
3. Selectyourpreferredlanguagebyusingthe+or‐(shownasUPor
DOWNontheWizard)buttonsontheleftsideofthedevice,then
presstheACTION(shownasENTERontheWizard)buttontochoose
thelanguage(thetouchscreenisnotenabledintheWizard).
4. Usethe+buttontohighlighttheboxnexttoYes,Iwanttouse
<language>asthelanguageonthedevice.
a. PresstheACTION(ENTER)buttontocheckthebox.
b. Pressthe‐(DOWN)button2timestohighlighttheNext>box.
c. PresstheACTION(ENTER)buttontoselectNext>.
Waitwhileyourdeviceisbeingconfiguredforthelanguageyou
selected.
WARNING:Theonlywaytochangethelanguageyouhaveselectedis
tore‐installthefirmwareusingtheFirmwareupdateutility.
NOTE:OnlyMicrosoftapplicationsandmessageswillbetranslated
intolanguagesotherthanEnglish.Allothererrormessages,
notificationsandotherapplicationsmayappearinEnglish.
5. TapthescreentosetupyourdevicewithaSecurityPIN(optional).
6. SeeChapter3forinstructionsonsettingthedateandtimeonyour
device.
12
4 CHAPTER 2 OPERATING BASICS
4.1 2.1 HOME SCREEN
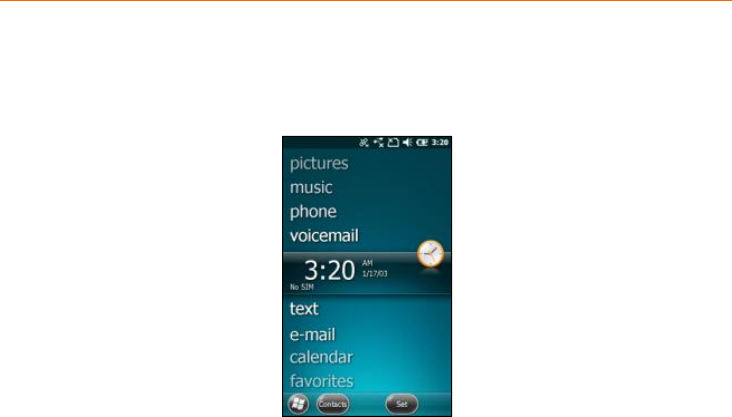
TheHomeScreenisaneasywaytolaunchcommonactivities,suchas
usingthephone,checkingtextmessagesorcheckinge‐mail.Youcanview
high‐levelinformationataglance,withnotificationsforLiveservices,
e‐mail,voicemail,SMS/MMSandmore.
TonavigatetheHomescreen,touchandslideyourfingertipupordown
onthescreen;ordragthehighlightbartothedesireditemonthescreen.
TheprogramsprovidedontheHomescreeninclude:
• pictures: Select your photos from this menu.
• music: Select your music from this menu.
• phone: If your device has the phone feature, select this item to
use the phone.
• voicemail: If your device has the phone feature, select this item
to access your voicemail.
• time: Select your time zone, set the time and date and set
alarms.
• text: If your device has the phone feature, select this item to
compose and read text messages.

13
• e-mail: Select this item to read and compose e-mail.
• calendar: Select this item to manage appointments.
• favorites: Select this item to use Internet Explorer Mobile.
YoucanchangetotheclassicWindowsMobileTodayscreenbytapping
>Settings>Home.
1. OntheAppearancetab,changethethemetoClassicBlue.
2. OntheItemstab,uncheckWindowsDefaultandselecttheitemsthat
youwouldliketoappearontheHomescreen.
JunoT41/5
UserManual
14
4.2 2.2 START SCREEN
PressthebuttontoaccesstheStartscreenwhereyoucaneasily
accessthesoftwareinstalledonyourdevice.Slideyourfingertipup/down
ontheStartscreentobrowsemoreitemsandthenaccessanitemby
tappingontheitem.
4.3 2.3 TITLE BAR
InWindowsEmbeddedHandheld,thetitlebarislocatedatthetopofthe
screenanditistouchable.Tapanywhereonthetitlebartorevealalistof
verticaliconslots,representingdifferentcategoriesoficons.Tapanicon
togetadditionalnotificationorstatusinformation.Thetitlebaralso
providesaccesstotheMagnifytool,providingacloserlookatthedataon
thescreen.SimplytaptheMagnifyiconontherightendofthetitlebarto
endmagnifymode.
TheStart,OK,andClose(X)iconshavebeenmovedfromtheTitlebarto
theTilebartoimproveconsistency.Now,allnavigationcontrols—Start,
OKandClose—areinoneplace.
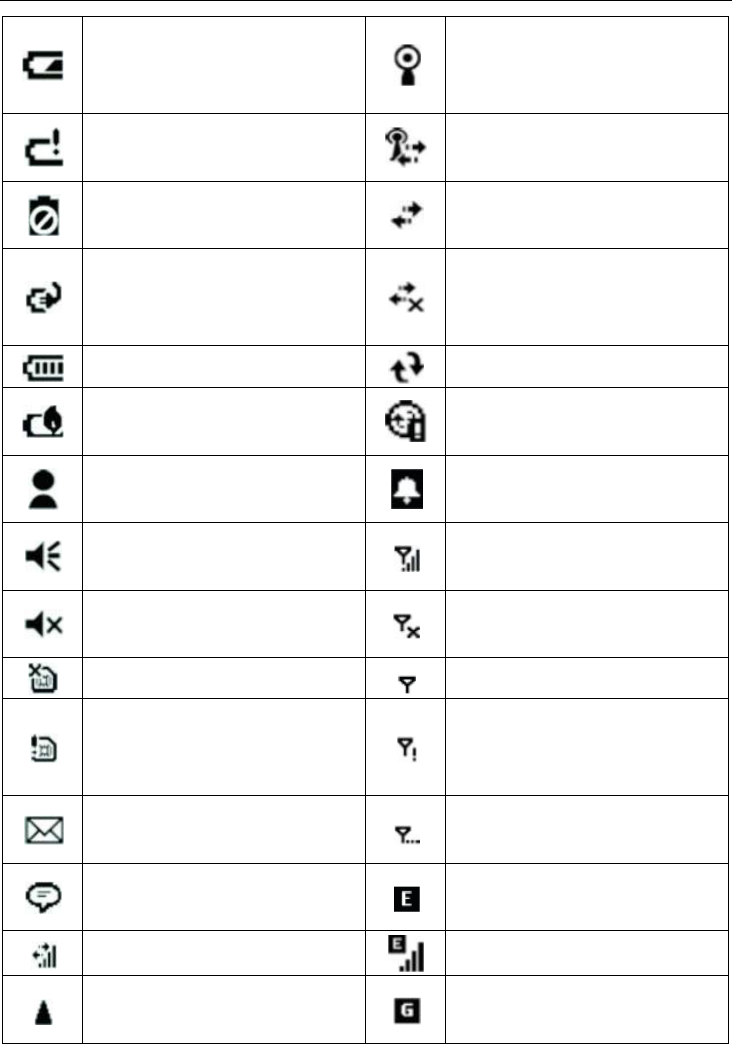
4.4 2.3.1 TITLE BAR STATUS INDICATORS
ThefollowingtablelistscommonstatusindicatorsseenintheTitlebar.
IconDescriptionIconDescription
JunoT41/5
UserManual
15
Batterypowerislow
Othernetworksare
detected.Taptoaccessan
availablenetwork
Batterypowerisverylow
Wirelessnetwork
connected
Batterycommunication
error
Activeconnection,butnot
currentlysynchronizing
Batterycharging
Inactiveconnectionto
computerorwireless
network
Batterylevel Synchronizing
Batteryoutoftemperature
rangeWARNING
Synchronizingerror
Instantmessagesreceived
Pendingalarm
Speakerison
Phoneisturnedonand
signalstrength
Speakerisoff(orinmute
position)
Phoneisturnedoff.Toturn
iton,tapthisicon
SIMcardmissingNosignal
FaultySIMcard
Noservice.Phone
connectionunavailableor
networkerror.
E‐mailhasbeenreceived
Lostsignal.Thedeviceis
searchingforasignal.
Taptoviewmore
notifications
EDGEnetworkisavailable
DatacallisinprogressEDGEnetworkconnected
Roamingmode
GPRSnetworkavailable

JunoT41/5
UserManual
16
3GconnectedGPRSnetworkconnected
Airplanemodeenabled.
Thedeviceradiosareall
off.
HSDPAnetworkavailable
GPSreceiverisoff.
GPSreceiverison.
Vibratemodeison
JunoT41/5
UserManual
17
4.5 2.4 TILE BAR
TheTilebarislocatedatthebottomofthescreenandtheinformation
displayedthereismoreuniformthanonearlierversionsofWindows®
Mobileoperatingsystems.TheTilebarusestouchabletiles,andthese
tilescanbeactivatedbypressingthecorrespondingbuttonsonfront
keypadofyourdevice.
Touchabletilescanbetextstringsoricons,dependingonthescreen,and
theyareatfixedpositionsontheTilebar.Forexample,theStarticonis
alwaysinthefarleftposition,andtheOKorCloseiconisalwaysonthefar
right.IftheTilebarhasaKeyboardicon,itisalwaysinthethird,orcenter
position;ifithasadditionalmenuorfeatureaccessicons,theywillbeon
eithersideoftheKeyboardicon.
Thebuttonsonthebezelbelowthescreencorrespondtothetouchable
tilesontheTilebar.Pressabuttontoactivatetheassociatedtile.
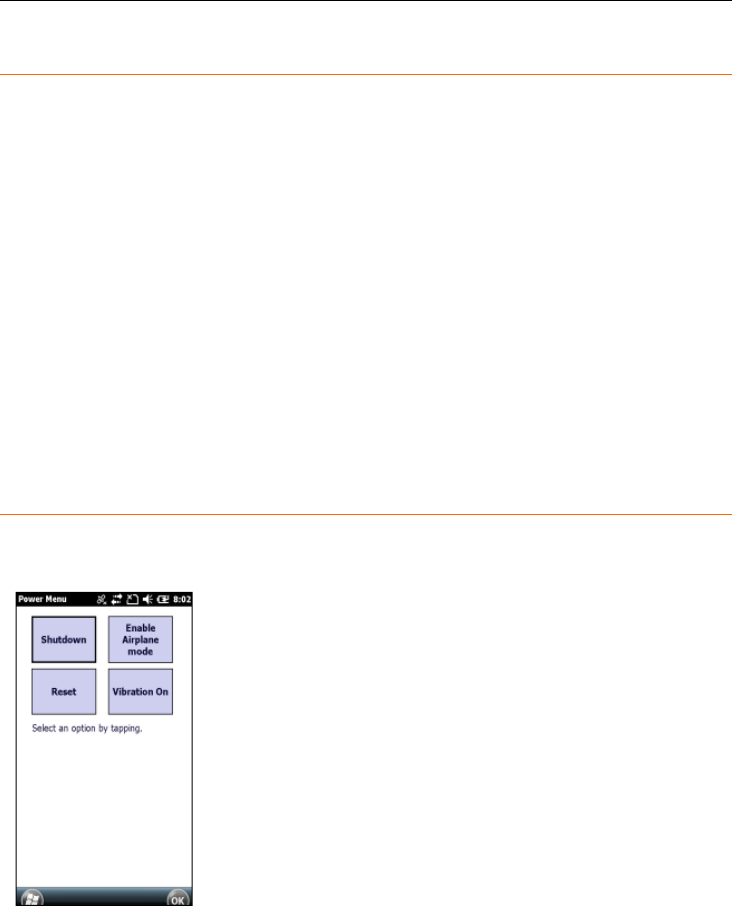
4.6 2.5 POWER MENU
PressandholdthePOWERbuttonforabout3secondsuntilthePower
Menuappears.TapanoptionorOKtoexit.
• Shutdown: Turn off the device.
• Enable Airplane mode: Enable the
Airplane mode for the device.
• Disable Airplane mode: Disable the
Airplane mode for the device.
• Reset: Restart the device.
• Vibration On: Enable the Vibration
mode for the device.
NOTE: If the Power Menu does not appear
when the POWER button is held down,
and/or if you continue to hold down the
POWER button for at least 7 seconds, the
device will perform a hardware reset. It may
take a few seconds for the device to start
JunoT41/5
UserManual
18
after the POWER button has been released.
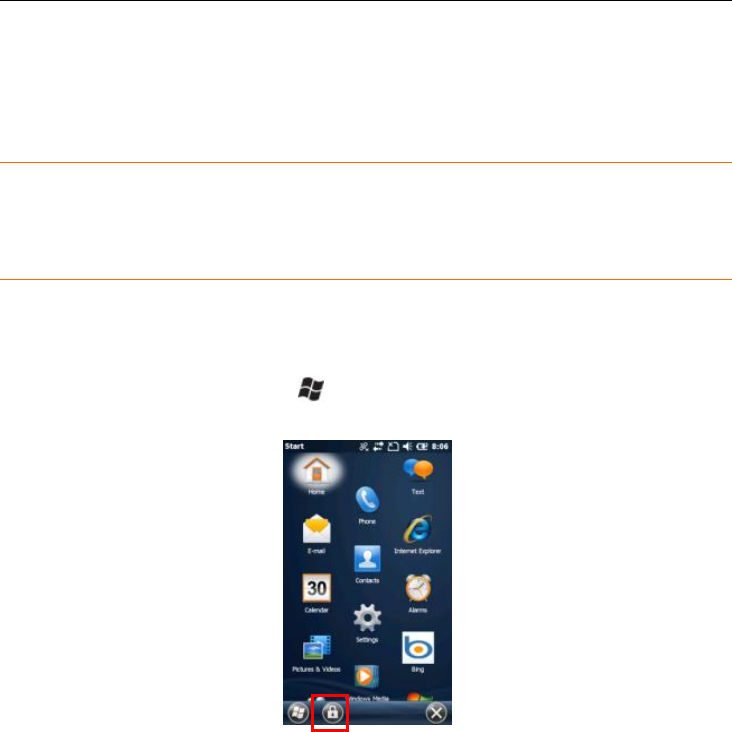
4.7
4.8 2.6 SECURING YOUR DEVICE
Youcancustomizethelevelofsecurityyouwanttohaveonyourdeviceby
lockingthekeypadortheentiredevice.
4.9 LOCK THE KEYPAD
Thekeypadlockturnsoffthekeypadfunctionality.Thisisahelpfulfeature
if,forexample,yourdeviceisturnedoffandinyourpocket,andyouwant
topreventaccidentalbuttonpressesfromactivatingthedevice.
Tolockthekeypad,pressthebuttontoaccesstheStartscreen,then
presstheLEFTbuttonortapthepadlocktileontheTilebar.
JunoT41/5
UserManual
19
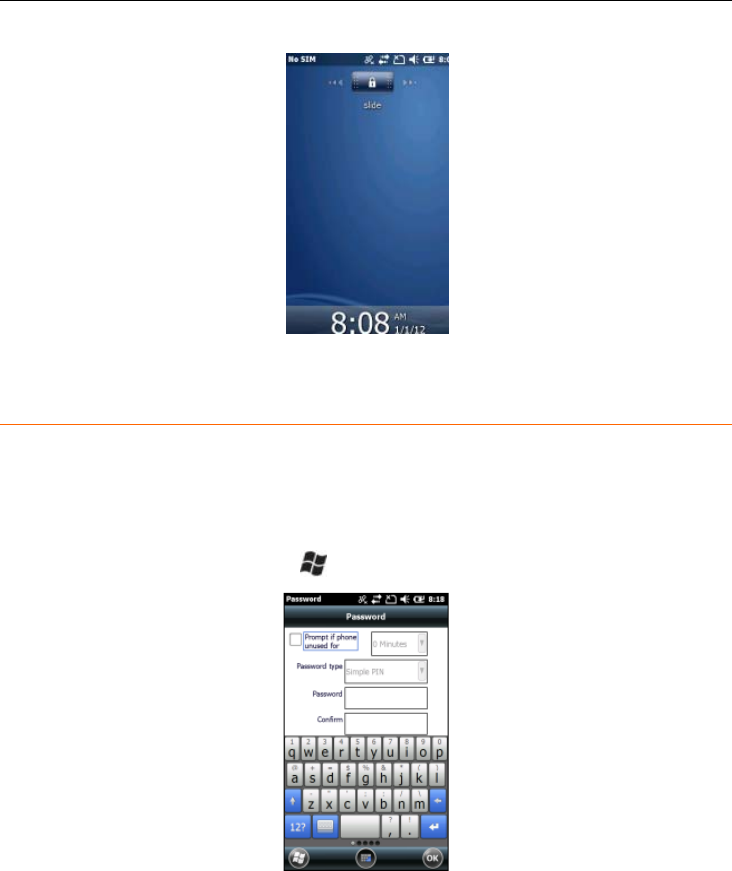
Youwillthenseethefollowingscreen:
Tounlockthekeypad,slidethelocksymbol.
4.10 LOCK YOUR DEVICE
Lockingyourdevicepreventsaccesstopersonaldata.Whenyouenable
thisfeature,yourdevicewillautomaticallylockafteraspecifiedtimeof
inactivity.Ascreenwillbedisplayedrequiringyourdevicelockpassword
beforeaccessisgranted.
ToaccesstheLockmenu,tap>Settings>Lock
WARNING:BECERTAINTOREMEMBERTHEPASSWORD.
Theonlywaytorecoverfromaforgottenpasswordistoperforma
CleanBoot.However,youwillLOSEallapplicationsoftware,licenses,
settingsanddataonyourdevice.ForinstructionsonhowtoPerforma
CleanBoot,seebelow..
JunoT41/5
UserManual
20
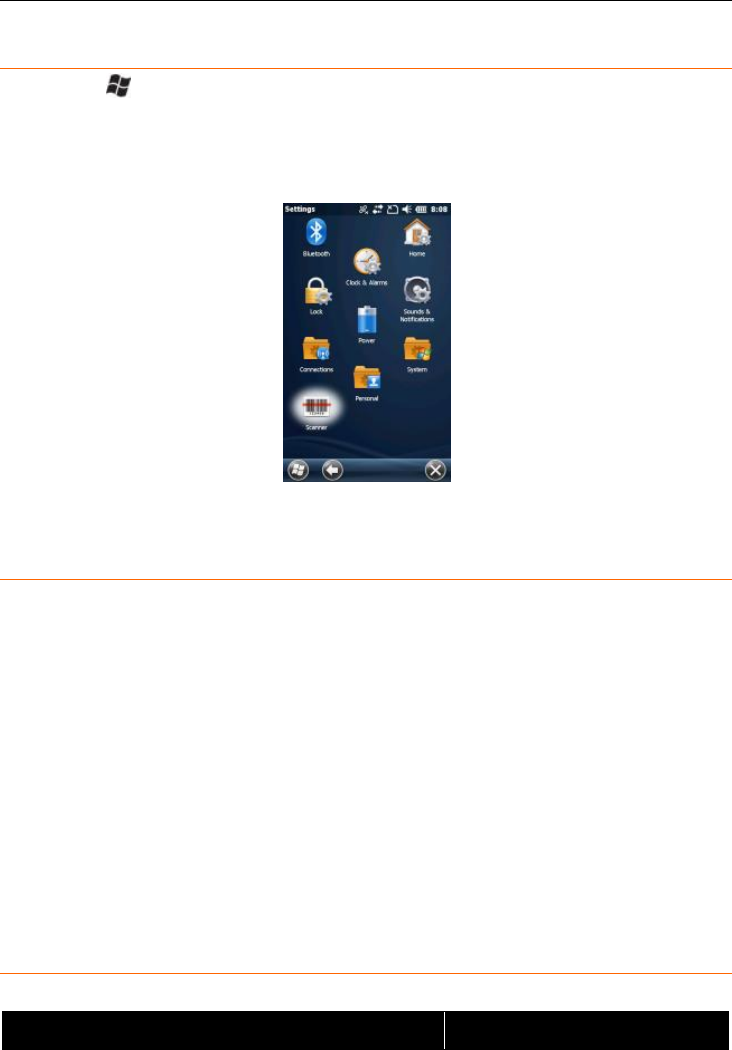
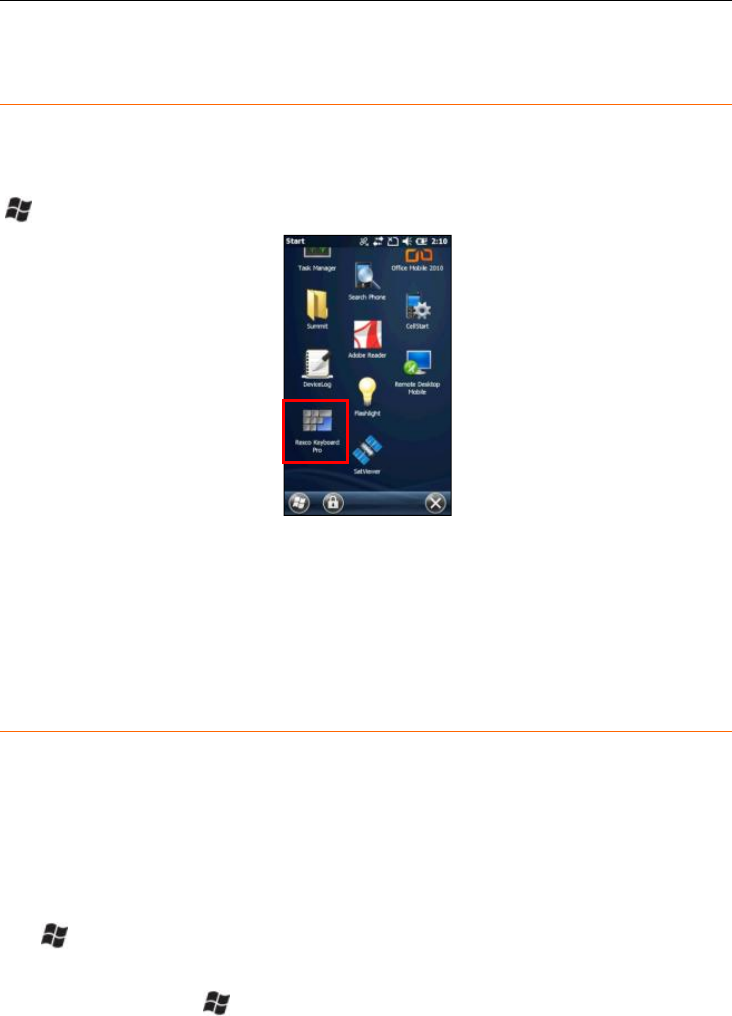
4.11 2.7 CONFIGURING THE ONSCREEN KEYBOARD
TheSoftInputPanel(alsocalledS.I.P.)isaspecialon‐screenkeyboardfor
deviceswhichdonothavestandardkeyboards.TheJunoT41/5includesa
customS.I.P.applicationcalledRescoKeyboardPro.Toconfigureit,tap
>RescoKeyboardPro.
RescoKeyboardProallowsyoutocustomizeyourdeviceforfastinsertion
offrequentlyusedphrases,andtocustomizevariousfeaturesincluding
hapticoraudiofeedback,basicoradvancedgesturesandmore.Resco
KeyboardProsupports39languages.
4.12 2.8 PERFORM A CLEAN BOOT / FACTORY RESET
WARNING: Application software installed by the customer and some
licenses, settings and user data will be cleared if this function is
performed!
1. PressandholdthePOWERbuttontodisplaythePowerMenu.
2. TapReset.
3. Whenyouseethescreengoescompletelyblack,pressandholdthe
button.
4. WhenyouseetheJunoT41/5screen,presstheRIGHTbuttonwhile
stillholdingthebutton.Letgoofbothbuttons.
5. PresstheACTIONbuttonontheleftsideofthedevicetoclearthe

JunoT41/5
UserManual
21
persis
t
booti
n
4.13 2.
TheJuno
T
enterthe
SHUTDO
W
than20u
A
Theprim
a
batteryw
h
customer.
powered
d
puttingth
thanawe
NOTE:Th
e
Toactivat
e
1. Disco
n
2. Press
a
3. TapR
e
4. When
appea
().
5. Ames
6. Thed
e
7. Pleas
e
powe
r
t
entstore.Pres
s
n
gnormally.
9 ABSOLUT
E
T
41/5features
a
absolutelowes
t
W
Npowerstate.
A
.
a
rypurposefor
t
h
iletheproduc
t
Asecondaryp
u
d
ownbeforeshi
eproductinto
s
ek.
e
solemethodf
o
e
theAbsolute
P
n
necttheT41/5
a
ndholdtheP
O
e
set.Thescreen
itcomesoutof
ring,pressand
h
sagewillappea
r
e
viceisnowin
A
e
notethatthe
d
r
backonfromt
h
s
anyotherbutt
o
E
POWER O
F
a
batterycut‐off
t
powermodep
o
Inthismode,t
h
t
hismodeisto
p
t
isbetweenthe
u
rposeistoens
u
ppingtheprod
u
s
torageforane
x
o
rexitingthism
P
owerOffmode
,
USBClientcabl
e
O
WERbuttonto
d
willgoblackas
reset,indicate
d
h
oldtheLEFTb
u
r
:“Pleaseremo
v
A
bsolutePower
O
d
evicewillneed
h
ismode.
o
ntocancelan
d
F
F MODE
modethatena
b
o
ssible,evenlo
w
h
edrawonthe
b
p
rolongtheshel
f
productionfac
t
u
rethedeviceis
u
ctviaairfreigh
t
x
tendedperiod,
odeistocharg
e
,
followthesest
e
,ifconnected.
d
isplaythePow
e
theunitgoest
h
d
bytheJunoT4
1
u
tton()and
t
v
eAC.Systemis
O
ffmode.
tobereconnec
t
d
continue
b
lesthedevice
t
w
erthanthe
b
atteryisless
f
lifeofthe
t
oryandthe
completely
t
,orwhen
typicallylonger
e
thebattery.
eps:
e
rMenu.
h
roughreset.
1
/5splashscre
e
t
heRIGHTbutt
o
turningoff”
t
edtoACto
t
o
e
n
o
n

JunoT41/5
UserManual
22
5 CHAPTER 3 MANAGING AND
CARING FOR YOUR DEVICE
5.1 3.1 CHANGING BASIC SETTINGS
5.2 PERSONALIZING THE HOME SCREEN
TheHomescreenisthestartingplaceformostofthetasksyouperform
onyourdeviceandgivesyouaccesstoallthefeaturesandsoftware
programsofyourdevice.
1. Tap>Settings>Home>Appearance.
2. Selecttheavailableoptionfromthelist.
3. Whendone,tapOK.
4. TosetapictureastheHomescreenbackground:
a. SelecttheUsethispictureasthebackgroundoption.
b. TapBrowsetoselectthepictureyouwanttouse.
c. Whendone,tapOK.
5.3 SETTING THE DATE, TIME, AND ALARMS
1. Tap>Settings>Clock&Alarms>Time.
2. SettheTimezone,Date,andTime.
3. Whendone,tapOK.
4. Tosetanalarm:
a. OntheClock&Alarmsscreen,gototheAlarmstab.
b. TaponthealarmitemtodisplaytheAlarmSettingsscreen,
allowingyoutochangetheAlarmsettings.TapOKtosavethe
settings.
c. Tapthecheckboxoneachavailablealarmitemtoenableor
disablethealarm.
d. Whenyouenableanalarm,anAlarmiconappearsonthe
Homescreen.

JunoT41/5
UserManual
23
e. YoumayalsoneedtochecktheSoundalarmsevenwhenthe
deviceissettosilentorvibratecheckbox.
5.4 SETTING REGIONAL OPTIONS
Yourdevicecomeswiththeregionalsettingsthatareappropriateforyour
locale.
1. OntheHomescreen,tap>Settings>System>RegionalSettings.
2. OntheRegionalSettingsscreen,selecttheRegiontabandthenselect
yourpreferredlanguagefromthelist.
3. Ifdesired,youcanspecifythelocale,dateandtimestyle,aswellas
numberandcurrencyformattingoptionsapplicabletoyourregion.
4. Whendone,tapOK.
5.5 3.2 CUSTOMIZING SOUNDS AND NOTIFICATIONS
Youcanchoosehowtobenotifiedforincomingcalls,reminders,new
messages,alarms,andmore.
5.6 SPECIFYING THE SOUND FOR AN EVENT
1. OntheHomescreen,tap>Settings>Sounds&Notifications.
2. FromtheSoundstab,selectthedesiredsoundforeachevent.
3. Whendone,tapOK.
5.7 SETTING THE RING TONE FOR INCOMING CALLS
1. OntheHomescreen,tap>Settings>Sounds&Notifications.
2. FromtheNotificationstab,selectaringtoneintheRingtonelist.
3. Whendone,tapOK.
NOTE:IfyouselectVibrate,thesoundmutesandthephonewillvibrate
whenyoureceiveacall.TheVibratestatusiconappearsinthetitlebar.
5.8 COPYING A SOUND TO YOUR DEVICE
Youcanusea.wav,.mid,.wma,or.mp3audiofileonyourdeviceasaring
tone,notification,orreminder.

JunoT41/5
UserManual
24
1. ConnectthedevicetoyourPCusingtheT41/5CustomUSBClient
cable.
2. OnyourPC,copythesoundfileyouwant.
3. Explorethephone’scontents:
In Windows Mobile Device Center on your PC, tap File
Management > Browse the contents of your device.
In ActiveSync on your PC, tap Explore and double-tap My
Windows Mobile-Based Device.
4. Navigatetoyourdevice’sApplicationData>Soundsfolderandthen
pastetheaudiofile.
5.9 3.3 MANAGING BATTERY POWER AND DATA STORAGE
5.10 BATTERY LIFE
TheLithium‐ionpolymerbatterylifeisdependentupontheapplication
andoperatingenvironment.Forexample,estimatedbatterylifeforanew
batteryisapproximately12hourswiththedeviceturnedonbutidle,
backlightat15%andallradiosandcompassoff.
Tipsforextendingthebatterylife:
‐ Displaybacklight:Tap>Settings>System>Backlighttominimize
theamountoftimethebacklightstaysonanddimittoonlyasbrightas
requiredtoviewthedisplay.
Alternatively,verifythatthebacklightbrightnessisauto‐adjustingbased
ontheLightSensor,bytapping>Settings>System>Backlight>
BrightnessandcheckingtheboxforUseLightSensortoadjustthe
brightness.
‐ Wi‐Fi,Bluetoothandcamera:Turnoffwhennotneeded.
‐ WWAN:Turnthephoneoffwhennotinuse.
‐ GPS:EnsurethattheGPS‐awareapplicationsthatcommunicatewiththe
GPSareclosedwhennotinuse.
‐ Flashlight:Usetheflashlightonlywhenneeded.
‐ Coldtemperatures:Keepthedeviceasclosetoroomambient
temperature(77°For25°C)aspossible.Iffeasible,keepitinsideyour

JunoT41/5
UserManual
25
coatoravehiclewhennotinuse.
‐ Autofeatures:Tap>Settings>Power>Advanced.Specifyyour
devicetoturnoffinashorttimeifnotinuse.Tap>Settings>
Bluetooth>WakeSettings.TurnoffAllowBluetoothactivitytoturn
thedeviceon.Bluetoothcouldturnonyourdevice,transferdataand
drainthebattery.
‐ CPU:ApplicationsrequiringsignificantcomputationsbytheCPUmay
havesomeimpactonbatterylife,butthisistypicallylesssignificant
thanmanagingthehardwarefeatures.
5.11 CHANGING THE POWER MANAGEMENT SETTINGS
YoucanusePowerManagementtocheckthebattery,andconfigure
settingsthatprolongbatterylife.
1. Tap>Settings>Power.
2. OnthePowerscreen,youcan:
Select the Battery tab to check the amount of battery life
remaining.
Select the Advanced tab to change the screen power
settings.
3. Tooptimizebatteryusage,youcanadjustthebacklightsettings:
Tap > Settings > System > Backlight.
From the Brightness tab, adjust the proper backlight level
and enable the Light Sensor to automatically adjust the
backlight brightness.
4. FromtheBatteryPowertabandExternalPowertab,setthebacklight
offsettings
5. Whendone,tapOK.
5.12 MANAGING LOW BATTERY
Whenthelow‐batterywarningappears,dothefollowing:
1. Immediatelysaveyourcurrentdata.Allofyourdataisstoredin

JunoT41/5
UserManual
26
non‐volatilepersistentstoragememory.Losingpowerwillnotimpact
saveddataorconfigurationsotherthanthereal‐timeclock.Aswith
anycomputersystem,werecommendthatyouregularlybackupyour
datatoremovablemediaortoaPC.
2. SynchronizewithyourPCorusetheACadaptertochargethebattery.
3. Turnoffyourdevicewhileitischarging,especiallyifitischargingfrom
thePCUSBpowerandnotfromtheACadapterpower.TurnonJuno
T41/5onlywhenyouneedtouseit,untilthebatteryisrecharged.
5.13 CHECKING THE PHONE MEMORY
1. Tap>Settings>System>Memory.
2. FromtheMaintabandStorageCardtab,checktheavailablememory
andtheavailablestorageonyourdevice.

JunoT41/5
UserManual
27
5.14 3.4 WORKING WITH FILES
Youcancopyfilesbetweenyourdeviceandcomputer,orcopyfilestoa
storagecardinstalledonyourdevice.Youcanalsoefficientlymanageyour
filesandfoldersusingFileExplorer.
5.15 COPYING FILES TO YOUR COMPUTER
1. ConnectyourdevicetoyourPC.
2. Dooneofthefollowing,asappropriatetoyourPC:
In Windows Mobile Device Center on your PC, tap File
Management > Browse the contents of your device.
In ActiveSync on your PC, tap Explore. This opens the
Mobile Device folder for your device.
3. BrowseyourdeviceforfilesthatyouwanttocopytoyourPC.
4. Selectandcopythefiles[Ctrl+C]andthenpastethem[Ctrl+V]tothe
destinationfolderinthePC.
5.16 USING FILE EXPLORER
FileExplorerprovidesmanyeasy‐to‐usefeaturesforfileandfolder
management.FileExplorerletsyoubrowseandmanagethecontentsof
yourdevice.
1. Tap>FileExplorer.TherootfolderonthedeviceisnamedMy
Device,andcontainsthefollowingfolders:MyDocuments,Program
Files,Windows,andmore.
2. Tapafolderorfiletoopenit.
3. Toreturntoanupperlevelfolder,tapUp.
4. Tocopyfilestoastoragecard:
a. Verifythestoragecardisproperlyinstalledonyourdevice.
b. OntheFileExplorerscreen,navigatetotheappropriatefolder.
c. Selectthefileyouwanttocopy,andthentapMenu>Edit>
Copy.
d. TapMenu>StorageCard.
e. TapMenu>Edit>Paste.

JunoT41/5
UserManual
28
NOTE:UnlikeWindows®PC’s,WindowsEmbeddedHandhelddoesnot
featureaRecycleBin.Onceafileisdeleted,itcannotberecovered.
5.17 3.5 ADDING AND REMOVING PROGRAMS
Beforeyoupurchaseadditionalprogramsforyourdevice,makesurethat
theyarecompatiblewiththeWindowsEmbeddedHandheldoperating
system.Also,beforeyoulaunchtheprograminstaller,checkfirstwhether
theinstallercandirectlyrunonWindowsEmbeddedHandheldorneeds
toberunonaWindowsPC.
Followthesetupinstructionsthatcamewithyoursoftware.Ifprompted,
performaresettocompletetheinstallation.
Installingaprogramdirectlyonyourdevice
1. Iftheinstallationfileisa.cabfile,downloadthefiledirectlytoyour
device,ordownloadittoyourPCandcopyittoyourdevice.
2. Onyourdevice,tap>FileExplorerandnavigatetothe
installationfile.
3. Tapthefiletostarttheinstallationprocess.
4. Choosewhethertoinstalltheprogramintothemainmemoryoryour
storagecard,ifyouhavethestoragecardinsertedonyourdevice.
5. Waitfortheinstallationtocomplete.
5.18 INSTALLING A PROGRAM FROM YOUR COMPUTER
1. Iftheinstallerisan.exefilesuchasSetup.exe,mostlikely,theinstaller
needstoberunonaWindowsPC.Downloadorcopyittoyour
computer.
2. ConnectyourdevicetoyourcomputerusingtheUSBcable,andthen
double‐clicktheinstallationfileonyourcomputertostartthe
installationprocess.
3. Followtheon‐screeninstructionsonyourcomputerandyourdevice
tocompletetheinstallation.
5.19 REMOVING A PROGRAM
1. Tap>Settings>System>RemovePrograms.
2. ScrolltotheprogramtoremoveandthentapRemove.

JunoT41/5
UserManual
29
5.20 3.6 USING TASK MANAGER
TaskManagerallowsyoutovieworstoptheprogramscurrentlyrunning
onyourdevice.
1. Tap>TaskManager.
2. OntheTaskManagerscreen,selectaprogramonthelistandthentap
EndTask.
3. Tostopallrunningprograms,tapMenu>EndAllTasks.
4. TapMenutoopenamenuwhereyoucanchangetheview,sorting
order,refreshthescreen,andmore.
5.21 3.7 CHECKING THE DEVICE SYSTEM INFORMATION
Tap>Settings>System>SystemInformation.Firmwareversion,
serialnumber,processorspeed,RAMandFlashsize,wireless
configurations,batteryandcardportinformationcanbefoundhere.
5.22 3.8 CARING FOR YOUR DEVICE
Cleaningthedevice
Useasoft,dampenedclothwitheitherwateroradilutedmilddetergent.
Ifamilddetergentisused,ensureallsoapresidueisremoved.Donotuse
anychemicalcleanersanddonotputthedeviceinthedishwasher.
Careofthetouchscreen
Useonlyyourfinger,theT41/5stylusorotherstylusdevicesspecifically
designedforusewithcapacitivetouchscreens.
Theuseofballpointpens,nailsorothersharpobjectstooperatethe
touchscreenwillscratchand/ordamagethedevice.Keepthetouchscreen
cleanbygentlywipingthedisplay,usingasoft,dampenedclothwith
eithercleanwaterorglasscleaner.Useascreenprotectoratalltimes,and
changethescreenprotectoraccordingtomanufacturer

JunoT41/5
UserManual
30
recommendations.
Donotuseabrasivecleanersdirectlyonthedisplay.Doingsomayvoid
yourwarranty.Usethescreenprotectorsincludedwiththedevicetokeep
thetouchscreencleanandprotected,followingtheinstructionsprovided
onthescreenprotectorpackage.
Mechanicalshock
Thedeviceisdesignedtoresistdamagefordropsupto4ft(1.22meters).
However,youshouldprotectthedisplayfromimpact,pressure,or
abrasivesubstancesthatcanscratchitorcrackit.Thedeviceshouldnot
bedroppedunnecessarily.
Environmentalconsiderations
Thedevice’sruggeddesignallowsyoutorunyourdeviceinharshoutdoor
environments.Herearesomeconsiderationsthatwillhelpyougetthe
mostoutofyourdevicewhenworkinginverywet,hotorcoldconditions.
Water:ThisdeviceisdesignedtoIP65(greyunits)orIP68(yellowunits).
IPx5isdefinedasresistanttodrivingrainandwaterspray.IPx8is
definedasresistanttosubmersioninwaterupto1meterdeepforupto2
hours.
WARNING:Removalofthebackcasescrewscouldcauseleakageandwill
voidyourwarranty.
NOTE:Althoughanoptionalaccessoryfortheportcoverisavailableand
theaudiojackhasaprotectivecover,thesearenotrequiredtomaintain
thesealagainstwater.Thecoversareintendedtokeepmud,sandand
othermaterialsfromblockingtheseports.
Temperaturerange:Theoperationaltemperaturerangeisfrom‐22°Fto
+144°F(‐30°Cto+60°C).Althoughthedeviceisdesignedtoberugged,
donotleaveitindirectsunlightinexcessiveheatorinavehicleinthe
sunlightforextendedperiodsastheinternaltemperaturemayexceedthe
operatingorstoragetemperaturelimits.
Batteriesperformbestatroomtemperature.Thebatteryhasastable
capacityastemperaturesrise;however,thecolderthetemperature,the
greaterthereductioninavailablebatterycapacity.Underverycold

JunoT41/5
UserManual
31
conditions(‐4°F/‐20°Candbelow),thebatterycapacityisnoticeably
reduced.Toimprovethebatteryperformanceinverycoldconditions,
considerincreasingtheloadonthebattery,suchasbyadjustingthe
backlighttofullbrightness.Increasingthebatteryloadcausesthebattery
togenerateheat,thuswarmingthebatteryandimprovingthe
performance.Therearelimitstohowhardtopushthebatterybeforeyou
reducetherun‐timeinsteadofincreasingit.
5.23 3.9 SAFE USE OF YOUR DEVICE
Repair:Donotattempttodismantlethedeviceforrepair.Thereareno
user‐serviceablepartsinside.Forservice,usethecontactdetailslistedon
thecoverofthismanualorcontactyourlocaldealer.
Batterysafety:Lithium‐ionpolymerbatteriesareclassifiedbytheU.S.
FederalGovernmentasnon‐hazardouswasteandaresafefordisposalin
thenormalmunicipalwastestreamexceptwhereprohibitedbylocalor
regionalregulations.Thesebatteriescontainrecyclablematerialsandare
acceptedforrecycling.
NOTE:Intheeventofabatteryfailure,returnthedevicetoTrimbleoran
AuthorizedServiceProvidertohavethebatteryreplaced.Trimble
disposesusedbatteriesinaccordancewithlocalregulations.
1. Donotdisassembleoropen,crush,bendordeform,puncture,or
shredthebatteryassembly.Therearenouser‐serviceablepartsinthe
batteryassembly.
2. Donotusebatteryifplasticcaseiscracked,compromisedor
punctured.
3. Donotattempttoseparatethebatteryfromthedevice.
4. Donotmodifyorremanufacture,attempttoinsertforeignobjectsinto
thebattery,immerseorexposetowaterorotherliquids.
5. Donotexposetofire,explosion,orotherhazard.Donotexposeto
temperaturesabove+158°F(+70°C).Thebatteryisdesignedtostop
functioningifitreachesanunsafetemperature.
6. Onlyuseachargingsystemthathasbeenqualifiedforusewiththe

JunoT41/5
UserManual
32
device.
7. Intheeventofabatteryleak,donotallowtheliquidtocomein
contactwiththeskinoreyes.Ifcontacthasbeenmade,flushthe
affectedareawithwaterandseekmedicaladvice.
Powersupplysafety:UseonlyACandvehicleadaptersintendedforthe
device.Otherexternalpowersourcesmaydamageyourproductandvoid
thewarranty.CertificationofthisClassIIIproductisonlyvalidwiththe
powersupply–PSA10F‐050Q.
Ensure the input voltage on the power supply matches the
voltage in your location. Ensure the power supply has prongs
compatible with your outlets.
The power supply is designed for indoor use only. Avoid using
the power supply in wet areas.
Unplug the power supply from power when not connected to
the device.
Do not create a short circuit in the power output connector.

JunoT41/5
UserManual
33
6 CHAPTER 4 CONNECTING TO A PC
AND SYNCHRONIZING
INFORMATION
Youcantakeinformationfromyourcomputerwhereveryougoby
synchronizingthemtoyourdevice.Thefollowingtypesofinformationcan
besynchronized:
Microsoft Outlook® information, which includes Outlook e-mail,
contacts, calendar, tasks, and notes
Notes, which are created using Microsoft® Office OneNote®
2007
Media, such as pictures, music and video
Favorites, which are the bookmarked links to your favorite
web sites
Files, such as documents and other files
Beforeyoucansynchronize,youwillfirstneedtoinstallandsetupeither
ActiveSyncorWindowsMobileDeviceCenteronyourcomputer.
Afterinstallingthesynchronizationsoftwareonyourcomputer,connect
thephonetoyourcomputerusingtheT41/5USBClientcable.Upon
connectingtheclientcabletoyourdeviceandyourcomputer,chooseto
startthesynchronizationprocess.
ActiveSyncorWindowsMobileDeviceCenteronlysynchronizesdataon
yourcomputerandphone.Ifyouhaveinstalledastoragecardandyou
wanttobackupfilesfromthestoragecard,useWindowsExploreronyour
computertocopyfilesfromthestoragecardtoyourcomputer.
Ifyouaresendingyourdevicetoyourlocaldealerorservicecenterfor
repairorahardreset,datafromyourdevicewillbelost.Itis
recommendedthatyousyncyourdevicetoyourcomputertobackup
yourfiles.Tobackupfilesfromthestoragecardtoyourcomputer,use
WindowsExplorertocopyfilesfromthestoragecardtothecomputer.

JunoT41/5
UserManual
34
6.1 4.1 SETTING UP WINDOWS MOBILE® DEVICE CENTER
MicrosoftWindowsMobile®DeviceCenteristhereplacementfor
Microsoft®ActiveSync®onWindowsVista®andnewer.Someversionsof
WindowsVista®comewithWindowsMobileDeviceCenteralready
installed.IfWindowsMobileDeviceCenterisnotavailableonyour
WindowsVista®,youcandownloaditfromtheMicrosoftwebsite.Goto
http://www.microsoft.comandsearchforWindowsMobileDeviceCenter.
WhenyouconnectyourdevicetoyourcomputerandstartWindows
MobileDeviceCenterforthefirsttime,youareaskedtocreateaWindows
Mobilepartnershipwithyourdevice.Tocreateapartnership:
1. ConnectyourdevicetoyourPC.WindowsMobileDeviceCenter
configuresitselfandthenopens.
2. YouaregiventheoptiontoRegisterOnline,RemindmeLater,or
Don’tRegister.
3. OntheWindowsMobileDeviceHomescreen,clickSetupyourdevice.
NOTE:ChooseConnectwithoutsettingupyourdeviceifyouonlywantto
transfermediafiles,checkforupdates,andexploreyourdevicebutnot
syncOutlookinformation.
1. Selecttheinformationtypesthatyouwanttosynchronizethenclick
Next.
2. EnteranameforyourdeviceandclickSetUp.
Whenyoufinishthewizard,WindowsMobileDeviceCentersynchronizes
yourdeviceautomatically.NoticethatOutlooke‐mailmessagesandother
informationwillappearonyourdeviceaftersynchronization.
6.2 USING WINDOWS MOBILE DEVICE CENTER
ToopenWindowsMobileDeviceCenter,click>AllPrograms>
WindowsMobileDeviceCenteronyourWindowsVistaornewer
computer.

JunoT41/5
UserManual
35
OnWindowsMobileDeviceCenter,youcandothefollowing:
Click Mobile Device Settings to change synchronization
settings.
When you click Pictures > Music and Video > <XX> new
pictures/video clips are available for import, a wizard
guides you to tag and transfer photos from your device to the
Photo Gallery on your computer.
Click Pictures > Music and Video > Add media to your
device from Windows Media Player to synchronize music and
video files using Windows Media® Player.
Click File Management > Browse the contents of your
device to view documents and files on your device.
NOTE:SeeWindowsMobileDeviceCenterHelpformoreinformation.
6.3 4.2 SETTING UP ACTIVESYNC®
OnaWindows®XPcomputer,youneedtouseMicrosoftActiveSync®4.5or
later.Ifyoudonothavethissoftwareonyourcomputer,youcan
downloaditfromtheMicrosoftwebsite.Gotohttp://www.microsoft.comand
searchforActiveSync.
6.4 SETTING UP SYNCHRONIZATION IN ACTIVESYNC
1. Connectyourdevicetoyourcomputer.TheSynchronizationSetup
Wizardautomaticallystartsandguidesyoutocreateasynchronization
partnership.ClickNexttoproceed.
2. Tosynchronizeyourdevicewithyourcomputer,cleartheSynchronize
directlywithaserverrunningMicrosoftExchangecheckbox,andthen
clickNext.
3. Selecttheinformationtypesthatyouwanttosynchronize,thenclick
Next.
4. SelectorcleartheAllowwirelessdataconnectionscheckbox
accordingtoyourpreference.
5. ClickFinish.

JunoT41/5
UserManual
36
Whenyoufinishthewizard,ActiveSyncsynchronizesyourdevice
automatically.NoticethatOutlooke‐mailmessagesandotherinformation
appearonyourdeviceaftersynchronization.
6.5 4.3 SYNCHRONIZING WITH YOUR COMPUTER
ConnectyourdevicetoyourPCtosynchronizetheinformationbetween
yourdeviceandPC.Whileyourdeviceisconnected,ActiveSync(or
WindowsMobileDeviceCenteronyourPC)synchronizeseverytimeyou
makeachangeoneitherthePCoryourdevice.
6.6 STARTING AND STOPPING SYNCHRONIZATION
Youcanmanuallysynchronizeeitherfromyourdeviceorcomputer.
Fromyourdevice:
1. Click > ActiveSync, and then click Sync.
2. To end synchronization before it completes, click Stop.
TIP:Todeleteapartnershipwithonecomputercompletely,disconnect
yourdevicefromthatcomputerfirst.InActiveSynconyourdevice,tap
Menu>Options,selectthecomputername,thentapMenu>Delete.
FromWindowsMobileDeviceCenter:
1. Click > All Programs > Windows Mobile Device Center.
2. Click at the lower left of the Windows Mobile Device
Center.
3. To end synchronization before it completes, click .
FromActiveSynconyourcomputer:
Whenyouconnectyourdevicetoyourcomputer,ActiveSync
automaticallyopensonyourcomputerandsynchronizes.
1. To manually start synchronization, click .
2. To end synchronization before it completes, click .
6.7 SELECTING INFORMATION TO SYNCHRONIZE

JunoT41/5
UserManual
37
Youcanchangetheinformationtypesandtheamountofinformationto
synchronizeforeachtypeeitheronyourdeviceoryourcomputer.Follow
thestepsbelowtochangesynchronizationsettingsonyourdevice.
Beforechangingsynchronizationsettingsonyourdevice,disconnectit
fromyourcomputer.
NOTE:ItisnotpossibletosetActiveSyncOptionsifyourdevicehasnot
yetsynchronizedwithyourPC.
1. In ActiveSync on your device, tap Menu > Options.
2. Select the check box for any items you want to synchronize.
If you cannot select a check box, you might have to clear the
check box for the same information type elsewhere in the
list.
3. To change synchronization settings for an information type,
for instance, E-mail, select it and tap Settings.
4. You can then set the download size limit, specify the time
period of information to download, and more.
SomeinformationtypessuchasFavorites,FilesandMediacannotbe
selectedinActiveSyncOptionsonyourdevice.Youcanonlyselectorclear
theseitemsfromyourcomputer’sWindowsMobileDeviceCenteror
ActiveSync.
AcomputercanhavesyncpartnershipswithmanydifferentWindows
Mobilepoweredphones,butaphonecanhavesyncpartnershipswithat
mosttwocomputers.Toensurethatyourdevicewillsynchronizeproperly
withbothcomputers,setupthesecondcomputerusingthesame
synchronizationsettingsyouusedonthefirstcomputer.
Outlooke‐mailcanbesynchronizedwithonlyonecomputer.
6.8 TROUBLESHOOTING SYNC CONNECTION PROBLEMS
Insomecases,whenthecomputerconnectstotheInternetoralocal
network,itmaydisconnecttheconnectionwithyourdeviceinfavorofthe
Internetornetworkconnection.
Ifthishappens,onthedevice,click>Settings>Connections>USBto

JunoT41/5
UserManual
38
PC,thencleartheEnableadvancednetworkfunctionalitycheckbox.
JunoT41/5
UserManual
39
7 CHAPTER 5 USING THE PHONE
NOTE:NotallJunoT41/5modelsfeatureaGSMphoneandWWAN
feature.ThissectionappliestotheT41/5Xmodelsonly.Donotplacea
SIMcardinT41/5CorT41/5Mmodels.
Beforeusingthephonefeature,purchaseaGSMcellularvoiceordata
planfromaGSMcellularserviceprovider.
YoucanusePhonetomakephonecalls,setupspeeddials,keeptrackof
calls,andsendSMSmessagesjustlikethestandardfeaturesofamobile
phone.Also,thereareseveraldialingfeaturesuniquetoyourdevice.For
example,youcantakenoteswhiletalking,dialdirectlyfromContactsand
easilytransfercontactsbetweenyourSIMcardandthestorageofyour
device.
ThePhonescreenletsyouopen,call,orfindacontact,orsaveanew
numberinContacts.ToopenthePhonescreen,tapthephoneoptionon
theHomescreen,ortap>Phone.
7.1 5.1 MAKING A CALL
YoucanmakecallsfromthePhonescreen,fromContactsscreen,from
SpeedDialandfromCallHistory.
7.2 MAKING A CALL FROM THE PHONE SCREEN
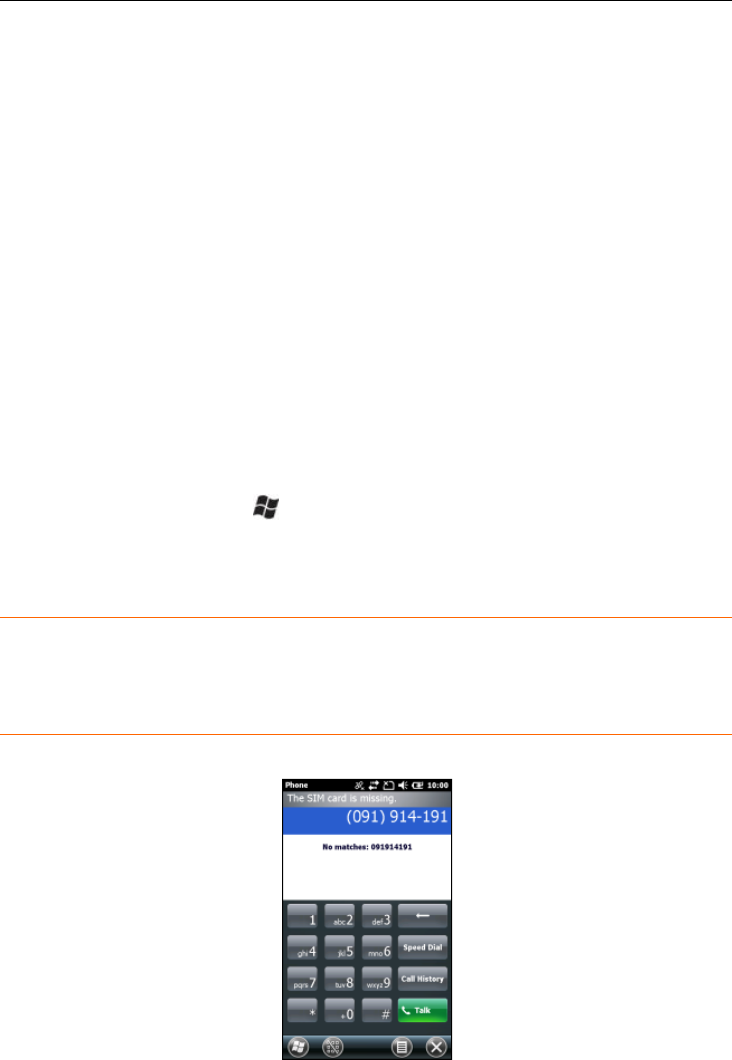
1. OpenthePhonescreen.
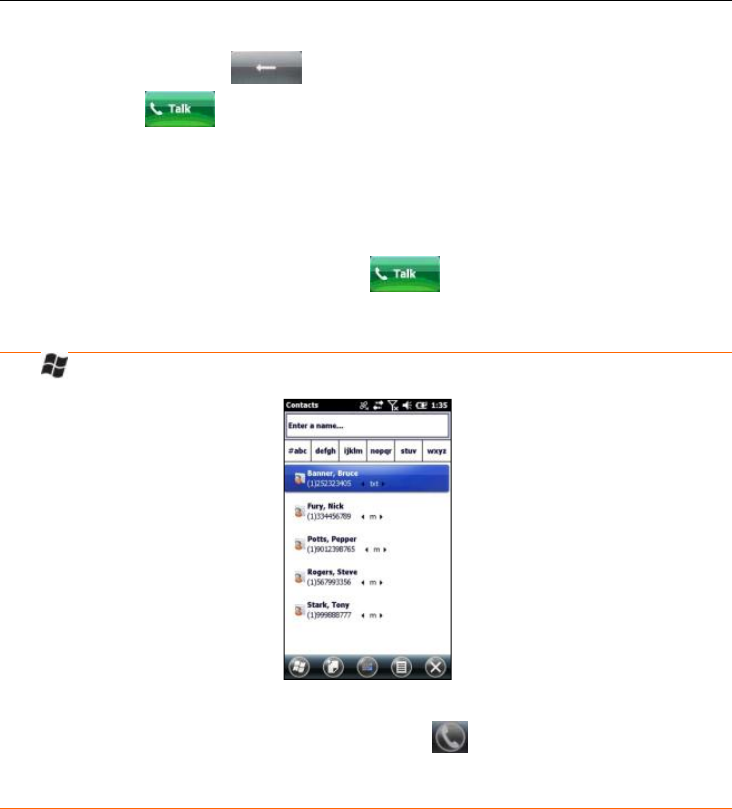
JunoT41/5
UserManual
40
2. Enterthephonenumberbytappingnumericbuttonsonthescreen.
3. TaptheBackicon()ifyouneedtodeleteanumber.
4. TapTalk()tobeginthecall.
TIP:Whenyoutapakeyontheon‐screenkeypad,alistofnamesand
numbersisdisplayedasyourdevicesearchesContacts,CallHistory,and
SpeedDialtofindamatchingnameornumber.Thenextkeyyoutap
continuestonarrowthesearch.Whenyouseethenameoftheperson
youwanttocall,tapitandtapTalk().
7.3 MAKING A CALL FROM CONTACTS
1. >Contacts.
2. Selectthedesiredcontact.
3. Selectthenumbertocall,andthentap.
7.4 MAKING A CALL FROM CALL HISTORY
1. OpentheCallHistoryscreen(fromthephonescreen).
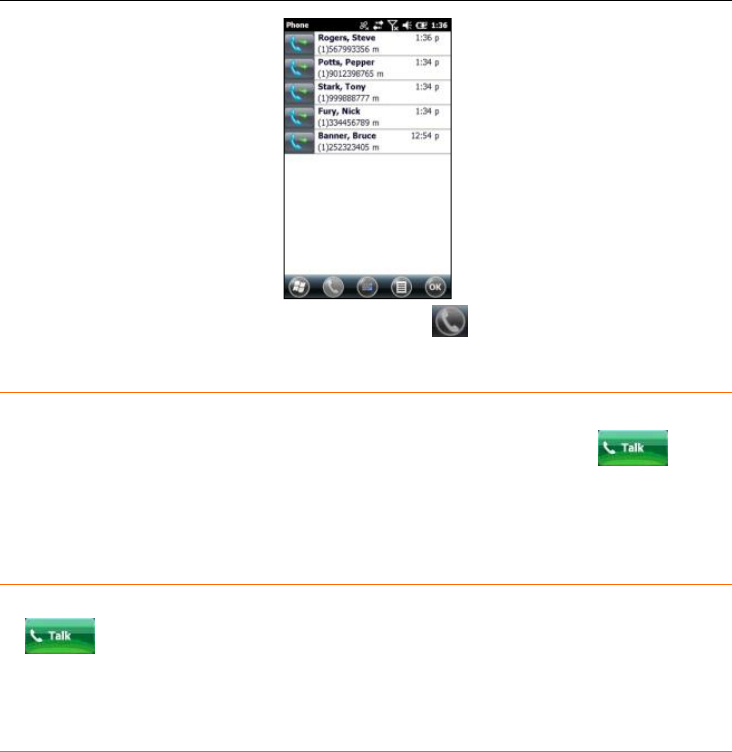
JunoT41/5
UserManual
41
2. Selectthenumbertocall,andthentap.
7.5 MAKING AN INTERNATIONAL CALL
Tapandholdthe0(Zero)keyonthekeypaduntil“+”symbolappears.
Enterthefullphonenumberyouwanttodial,andtapTalk().
Thefullphonenumberincludesthecountrycode,areacode(withoutthe
leadingzero,ifany),andphonenumber.
7.6 MAKING AN EMERGENCY CALL
EntertheemergencynumberforyourlocaleandthentaptheTalk
().
7.7 5.2 RECEIVING AND ENDING A CALL
Whenyoureceiveaphonecall,anincomingcallmessageappearsonthe
screenandyouaregiventheoptiontoanswerorignoreit.

JunoT41/5
UserManual
42
To answer the call, tap
To reject the call, tap
TIP:Toadjustthein‐callvolume,presstheVOLUME+/-buttonon
theleftsideofthedevice.
7.8 ENDING A CALL
Whenacallisinprogress,taptheEndbuttontohangup.
7.9 5.3 SPEED DIAL
Youcancreatespeeddialentriesforfrequently‐callednumberssoyoucan
dialanumberbytappingasinglekey.
7.10 USING SPEED DIAL
1. Tap>Contacts.
2. Selectacontacttoviewthecontactdetails.
3. SelectthedesiredphonenumberandtapMenu()>Addto
SpeedDial.
4. SpecifytheName,Number,andLocationassignmentoftheSpeed
Dialentry.
5. Whendone,tapOK.
NOTE:Thefirstspeeddiallocationisgenerallyreservedforyour
voicemail.SpeedDialusesthenextavailablelocationbydefault.Ifyou
wanttoplaceanumberinalocationthatisalreadyused,thenew
numberreplacestheexistingnumber.

JunoT41/5
UserManual
43
6. Ifyouhaveassignedaspeeddial(forexample,thenumber2key)toa
contactinSpeedDial,youcansimplytapandholdthe2keytodialthe
contact’snumber.
7.11 5.4 WORKING WITH WWAN (MOBILE DATA
SERVICE)
AfterpurchasingadataconnectionplanfromyourlocalGSMcellular
provider,youcancommunicatefromfieldtooffice,sende‐mailmessages
andsendtextmessages.
YouwillneedaSIMcardfromyourprovider,andyoushouldinstallitper
theinstructioninchapter1.2InsertingthestoragecardandtheSIMcard.
NOTE:Whenbrowsingtheinternetusingthecellularconnection,you
mustturnofftheWi‐Fi(802.11)orthedevicewilldefaulttotheWi‐Fito
browse.
CAUTION:
DO NOT use your device while driving a moving vehicle.
When you are on an airplane, in a medical facility or at other
facilities where wireless communication devices are not
allowed, access the Power Menu to Enable Airplane mode.
Simply pressing the POWER button off to put the device in
Sleep mode does not turn off these communication radios.
7.12 5.5 WORKING WITH CELLSTART
FollowtheinstructionsbelowtouseCellStarttoconfigurethecellular
dataconnection.
1. Tap>CellStart.(YoumayneedtotapOKtoagreetothetermsto
opentheprogram.)UnderAvailableSettings,tapthe[+]byyour
countrytoexpandcarriers.
2. Tapthe[+]bythecarrieryouhavesignedupwithandhighlightTypical
andtapNew.(Ifusingmultipleconfigurationsettings,youcantapon
theprimarysettingandtapDefault.)
3. Ensurethephoneisturnedon.Tap>Settings>Connections>
WirelessManager>Phone.

JunoT41/5
UserManual
44
4. Testthesettingsbytapping>InternetExplorerandthenbrowse
toawebpage.Thephonewillautomaticallyopenadataconnection
whenyoutrytoopenawebpage.
5. Ifthephonewillnotconnect,tryothersettingsbeforecallingthe
carriertechnicalsupport.
6. Youcanalsomanuallychangemodemsettingsbytapping>
Settings>Connections>Connections.
7. NOTE:Onceconnected,G(GPRS)orE(EDGE‐afasterformofGPRS)
orH(HSDPA)willautomaticallyappearinthenotificationbar
dependingonthenetworkcapabilitiesinthatarea;someservice
providersmayonlyprovideGPRS.
7.13 REMOVING CELLULAR DATA SETTINGS
1. Tap>CellStart.
2. TapRefreshtoseethecurrentlistofconfigurations.
3. Selecttheconfigureddatasettingyouwishtoremove.
4. TapRemoveandOK.
NOTE:Afterremovingadefaultconfiguration,thetopsettingwillbecome
thenewdefault.
Toaccessthedetailedsettingsforeachconfiguration,tapMenu>Open
ConnectionsApplettochangethemodemconnections.
7.14 5.6 CUSTOMIZING YOUR PHONE
Tap>Settings>Personal>Phone.TheSIMcardmustbeinstalled
andthephoneturnedontoviewthesettings.
Sounds:Taptomakechanges.
Phone Number: The SIM card phone number is displayed.
Ring type, Ring tone and Keypad sounds: Choose the
sounds you want for text messaging notifications.
Security:APINcanbesetorchangedtoblockunauthorizedaccessto
yourphoneconnection.
Services:SettingscanbechangedforCallBarring,CallerID,Call
Forwarding,CallWaiting,FixedDialingandVoicemailandTextMessages.

JunoT41/5
UserManual
45
Network:Findandsetyourpreferrednetworks.
Version:ViewtheRIL,MUX,RHAandAUDversions,aswellasthe
Manufacturer,ModelandRevisionnumberoftheWWANmodule.
Info:InformationaboutyourphonehardwareIDnumber,currentsignal
strength,celltowerIDnumberandmore.
IMEI: The unique number that identifies the phone module
that is embedded in the device. (If you purchase a SIM card
separately, the phone service provider may want your IMEI
number. It is located on this screen.
IMSI and ICCID: Unique numbers embedded on the SIM
card.
Signal Strength, Cell ID, Location Code and Network
Code are also listed under the info tab.
Band:LeaveallthesettingsselectedunlessyouareinstructedbyTechnical
Supporttomakeanadjustment.
7.15 5.7 BROWSING THE INTERNET
Tap>InternetExplorer,andentertheaddressofawebsite.
7.16 INTERNET SHARING
TheInternetservicefromyourdevicecanbesharedwithacomputer.Tap
>InternetSharing.YoucanconnecteitherthroughUSBorBluetooth.
7.17 5.8 SMS MESSAGES
YoucansendaSMS(shortmessageservice)inmuchthesamewayasa
typicalmobiletelephone.EachSMStextmessagecancontainamaximum
of160charactersorless,dependingonyourserviceprovider.
TosendamessagefromtheHomescreen,taptext>Compose.
TosendamessagefromtheStartscreen,tapText>Menu>New.
7.18 5.9 SENDING AND RECEIVING E-MAIL
E‐mailsetup:Tap>E‐mail>SetupE‐mail.Followinstructionstoset
uptheemailservice.YoucansynchronizewithaPOPMailserver,orwitha
MicrosoftExchange®server.

JunoT41/5
UserManual
46
Sendingandreceivingmessages:Tap>E‐mailandselectanemail
account.TapNewtocomposeamessageandtapSend.Inputthecontact
information.Dependingonyouraccountsettings,yourdevicewillcheck
fornewe‐mailperiodically.Youcanforceadownloadofnewmessages,by
tappingMenu>Send/Receive.

JunoT41/5
UserManual
47
8 CHAPTER 6 USING ADDITIONAL
HARDWARE FEATURES
8.1 6.1 FLASHLIGHT
ThedualLEDsforthecameraflashcanalsobeusedasaflashlight.Tap
>FlashlighttotoggletheFlashlightonandoff.
8.2 6.2 ASSIGNING BUTTONS (HARDWARE BUTTONS)
Tap>Settings>Personal>Buttons.UnderProgramButtons,your
favoriteprogramscanbeassignedtoseveralofthedevicebuttons.Thelist
ofassignablebuttonsisshownonthelefthandsidewiththeprogramthat
isassignedbydefaultontheright.Toreassignabutton,selectthebutton
insection1andchangetothedesiredprogramoractionfromthe
pull‐downlistinsection2.
YoucancustomizethewayyourUp/Downcontrolrepeatsbychangingthe
settingsundertheUp/DownControltab.
CAUTION:Assigningabuttontoactivateaprogrammaydisabletheuseof
thatbuttonforspecificusesinotherprograms.Forexample,ifthe
ACTIONbuttonisassignedtoopenaspecificprogram,itwillnolonger
triggerthecameraapplicationtocaptureanimage.
8.3 6.3 COMPASS CALIBRATION
Tore‐calibratethecompass,tap>Settings>System>Compass
Calibration.Followtheinstructionsonthescreen.
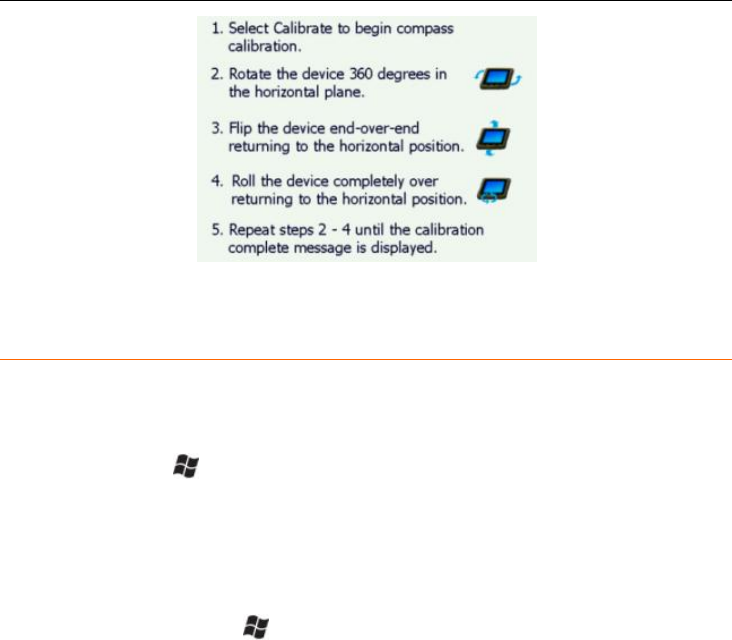
JunoT41/5
UserManual
48
8.4 6.4 WORKING WITH BLUETOOTH
Ifyourdevicecomeswithbuilt‐inBluetoothcapability,youcanwirelessly
transmitdatatoandfromyourdevicebyconnectingtoavailable
Bluetoothenableddevices.TofindoutifyouhaveBluetoothinstalledin
yourdevice,tap>Settings>System>SystemInformation>
Wireless.
Bluetoothcapabilityisashort‐rangewirelesscommunicationtechnology
thatexchangesinformation(beam)overadistanceofupto30feet(10
meters)withoutrequiringaphysicalconnection.
Bluetoothsettings:tap>Settings>Bluetooth.
Mode:ToenableBluetooth,selectthecheckboxTurnonBluetooth.If
youwantotherBluetoothdevicestofindyourdevice,alsocheckthe
Makethisdevicevisibletootherdevicescheckbox.
Devices:TapAddnewdevicetosearchforotherBluetoothdevices.For
enhancedsecurity,usepasscodes.
COMPorts:AvailableonlyforBluetooth‐connecteddevicesthatsupport
serial(COM)connections.
WakeSettings:AllowBluetoothactivitytoturnthedeviceon.Whenthis
checkboxisselected,anotherBluetoothdevicecansenddataandyour
devicewillturnonandreplyifnecessary,butonlyifBluetoothisenabled.
NOTE:Itisrecommendedthatyourdevicebeconfiguredtoautomatically
turnoffwhennotinuse.Otherwise,anotherBluetoothdevicecouldturn
onyourdevice,transferdataandifJunoT41/5doesnotturnoffagain,

JunoT41/5
UserManual
49
drainthebattery.
ReceivingBeams:Toallowthedevicetoreceiveincomingbeams,tap
>Settings>Connections>BeamtoopentheBeamscreen.Checkthe
ReceiveallincomingbeamscheckboxandtapOK.
CreatingaBluetoothPartnership:Bluetoothpartnershipsarerequiredfor
connectionstosomePC’s,printers,andheadphones.
ConfiguringBluetoothconnectionsvarydependinguponhoweach
Bluetoothdeviceworks.Refertoalldevicedocumentation.
1. Tap>Settings>Bluetooth>Mode.Ensurethatbothdevices
haveBluetoothturnedonintheModearea,arevisibleandwithin
closerange.
2. TapDevices>Addnewdevice…Waitafewmomentswhileyour
devicesearchesforBluetoothdevices.
3. TapthenameoftheotherBluetoothdeviceandtapNext.For
enhancedsecurity,usepasscodes.Enterthesamepasscodeonthe
otherdevice.
4. UnderAdvanced,youcanchangethenameoftheotherdeviceand
addadditionalservices,ifavailable.TapSave.
CreatingaBluetoothconnectionwithaPC:
1. EnsurethatyourPChasconnectivitysoftwareinstalledandhas
Bluetoothhardware.
2. SetupapartnershipbetweenyourdeviceandthePC.RefertoyourPC
documentationforinstructions.
3. Onceshown,selectthePCfromtheDevicelistandtapNext.
4. Enterthepasscode,ifnecessaryandtapNext.
5. ConfirmthatActiveSyncserviceisavailableandplaceacheckinthe
checkboxandtapFinish.
6. Tap>ActiveSync>Menu>ConnectviaBluetooth.
Bluetooth‐enabledheadphone:YoucanuseBluetoothstereo
headphones(A2DP)oraBluetoothheadset(HFP/HSP).AnyBluetooth
audiodevicesupportingtheA2DP,HFP,orHSPprofilesshouldbe
compatible.ManyBluetoothheadphonesdonotrequireapasscodeto

JunoT41/5
UserManual
50
pairwithyourdevice.
TroubleshootingBluetoothconnectionproblems:Ifyourdevicecannot
findanotherBluetoothdevice,confirmthatthedeviceiswithinrange
(lessthan30feet/10meters)andnolargeobjectsobstructthepathof
otherBluetooth‐enableddevices.Confirmthatthedeviceisturnedonand
hasbeenconfiguredtobediscoverable.
8.5 6.5 WORKING WITH WI-FI
Ifyourdevicecomeswithbuilt‐inWi‐Ficapability,youcanwirelessly
transmitdatatoandfromyourdevicebyconnectingtoavailableaccess
pointsorhotspots.TofindoutifyouhaveWi‐Fiinstalledinyourdevice,
tap>Settings>System>SystemInformation>Wireless.
TheWi‐Fiisoffbydefault;howevertheon/offstatewillpersistaftera
reset.ToturntheWi‐Fionoroff,dooneofthefollowingprocedures:
Touch the Title bar, tap the Connectivity icon and tap
Wireless Manager to open the Wireless Manager screen,
and tap Wi-Fi.
Tap > Settings > Connections > Wireless Manager and
tap Wi-Fi.
OncetheWi‐Fiisturnedon,itdetectsthewirelessnetworksinthevicinity
andgivesyoutheoptiontoconnecttoone.TurnWi‐Fioffwhennotinuse
tosavebatterypowerandpossiblyspeedupotherprocesses.
1. Wi‐Fibydefaultisoff.TapWi‐FiontheWirelessManagerscreento
enableWi‐Fiasnecessary.
2. Afterafewseconds,aMultipleNetworksDetectedorNetwork
Detectedpop‐upwindowappears.
3. TapthenetworktoconnecttoandtapOK.
4. Ifthenetworkrequiresauthentication,theNetworkLogOndialogwill
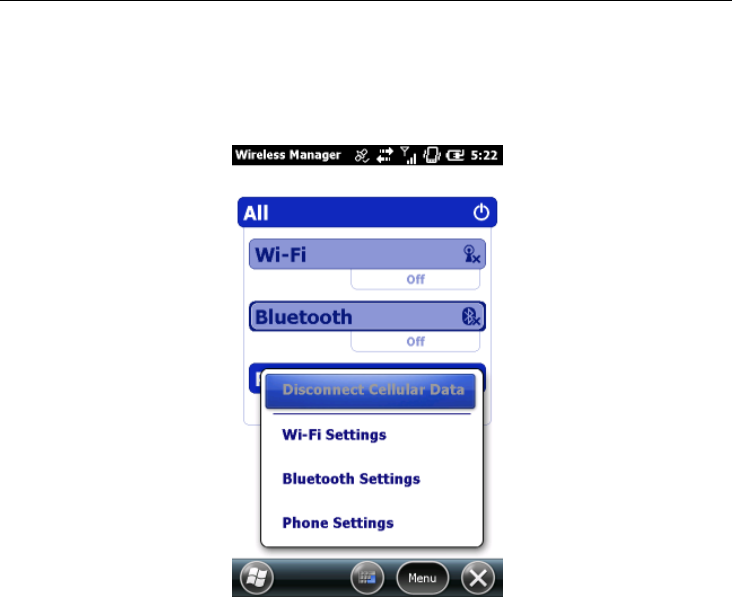
JunoT41/5
UserManual
51
open.Fornetworksthatrequirenetworkkeys,enterthenetworkkey
intothedialogboxandtapConnecttobeginusingthenetwork.
5. UnderNetworkAdapterstab,changescanbemadetowhatyour
networkcardconnectstoandtomodifyadaptersettings.
ToupdateWi‐Ficonnectionsettings:
1. OntheWirelessManagerscreen,tapMenu>Wi‐FiSettings.
2. Tapthenameofthenetworktoupdatethesettingsfor.
3. TheConfigureWirelessNetworkwizardappears.Updatesettingsand
tapNextasneededtoprogressthroughthewizard.
4. TapFinishtoclosethewizardandsavethesettings.
NOTE:IfyourdeviceisconnectedtoaPCthatisconnectedtotheInternet,
thedevicewillusethePC’sInternetconnectionandWi‐Fiwillnotappear
ontheWirelessManagerscreen.Youmayallowthesimultaneoususeof
thePCandtheWi‐Fimodulebydoingoneofthefollowing:
In the ActiveSync software on your PC, select File >
Connection Settings and check the Allow wireless
connection on the device when connected to the desktop

JunoT41/5
UserManual
52
checkbox.
In Windows Mobile Device Center software on your PC, click
Mobile Device Settings > Connection Settings and check
the Allow data connections on device when connected to
PC checkbox.
UsingActiveSyncviaWi‐Fi
ExchangeActiveSync,acomponentofExchangeServer,facilitatesdata
synchronizationbetweenyourdeviceandanExchangeserver.This
synchronizationcanoccuroveranetworkconnection,allowingyouto
updatecalendars,contacts,tasksandtheInboxonyourdevicewithout
directlyconnectingtoaPC.TheservermustberunningExchangeServer
2003SP2orlater.
TouseExchangeActiveSync,confirmwithyoursystemadministratorthat
anExchangeServerisavailable.Theadministratorwillprovideyouwitha
loginname,password,servername,anddomainname.Toconfigure
ExchangeActiveSynconyourdevice:
1. Tap>ActiveSync>Menu>AddServerSource.
2. EnteryouremailaddressandtapNext.
3. EntertheUsername,PasswordandDomainandtapNext.
4. TheAutomaticConfigurationdialogwillappearwhilethedevice
attemptstoconnecttoExchangeServer.Ifthesystemencounters
difficulty,followthedirectionsofthedialogsthatappear,suchasthe
EditServerSettingsdialog.
5. ChoosethedatatypesyouwanttosynchronizeandtapFinish.Enter
theserveraddressandconfirmwithyouradministratorwhetherthe
Exchangeserverrequiresanencrypted(SSL)connection.TapNext.
TroubleshootingWi‐Ficonnectionproblems:Ifthedeviceseemstobe
connectedtothenetwork,butyouarehavingdifficultyusingthenetwork
connection,tap>Settings>Connections>Wi‐Fi.TheNetworkCards
windowwillopenandallowyoutoconfirmthattheconnectionis
appropriatelyconfiguredaseitheraWorkorInternetconnection.Ifyou
areunabletoconnecttoanetwork,tryconnectingtoanothernetwork
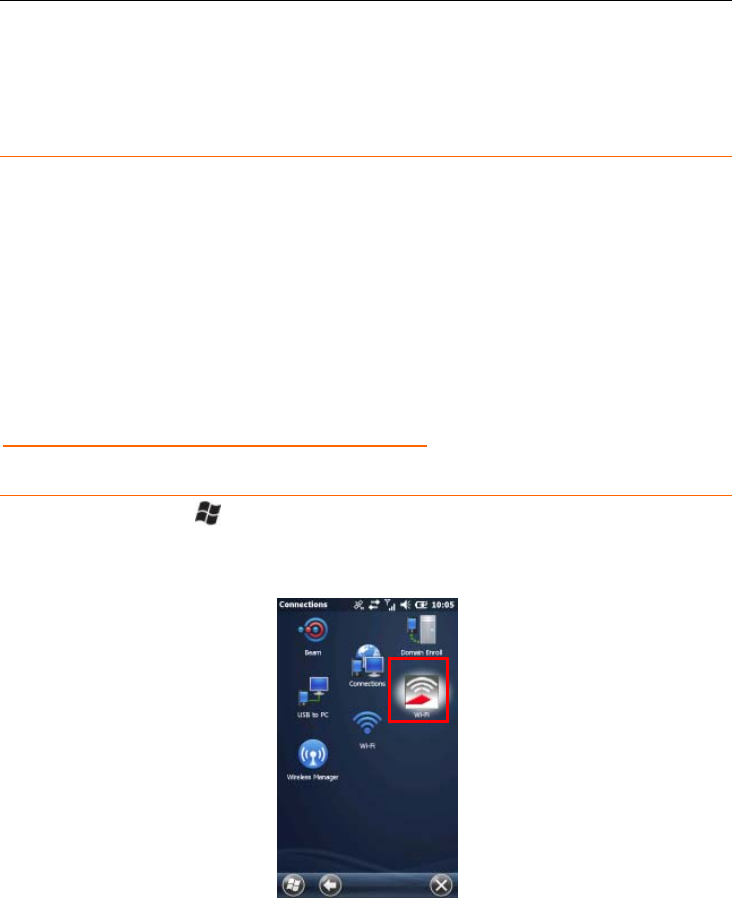
JunoT41/5
UserManual
53
withoutanysecurity,suchasaWi‐Fihotspot,todetermineiftheissueis
thehardwareorthenetwork.
8.6 USING THE SUMMIT UTILITIES
TheJunoT41/5softwareincludesaWi‐Ficonnectionmanagementand
monitoringutilitycalledtheSummitClientUtility(SCU).SCUallowsyouto
viewallradioandsecuritysettings,andstatus;andenablesyouto
troubleshootconnectivityissues.
TheSCUsoftwareisusefulforestablishingnetworkconnectionson
networksthatrequiremorecomplexsettingsthantheConfigureWireless
NetworkwizardprovidedintheWindowsEmbeddedHandheldoperating
system.
FormoreinformationhowtousetheSCU,pleasevisit:
http://www.summitdata.com/documentation.htmlandclickontheUser’sGuide.
8.7 ACCESSING THE SUMMIT CLIENT UTILITY
ToaccessSCU,tap>Settings>Connections>Wi‐Fi.TheSummit
ClientUtilitywindowappears.
NOTE:TherearetwoiconslabeledWi‐Fi.
SCUhasfivetabswhichmaybeaccessedfromthetopofthescreen:
Main
Profile
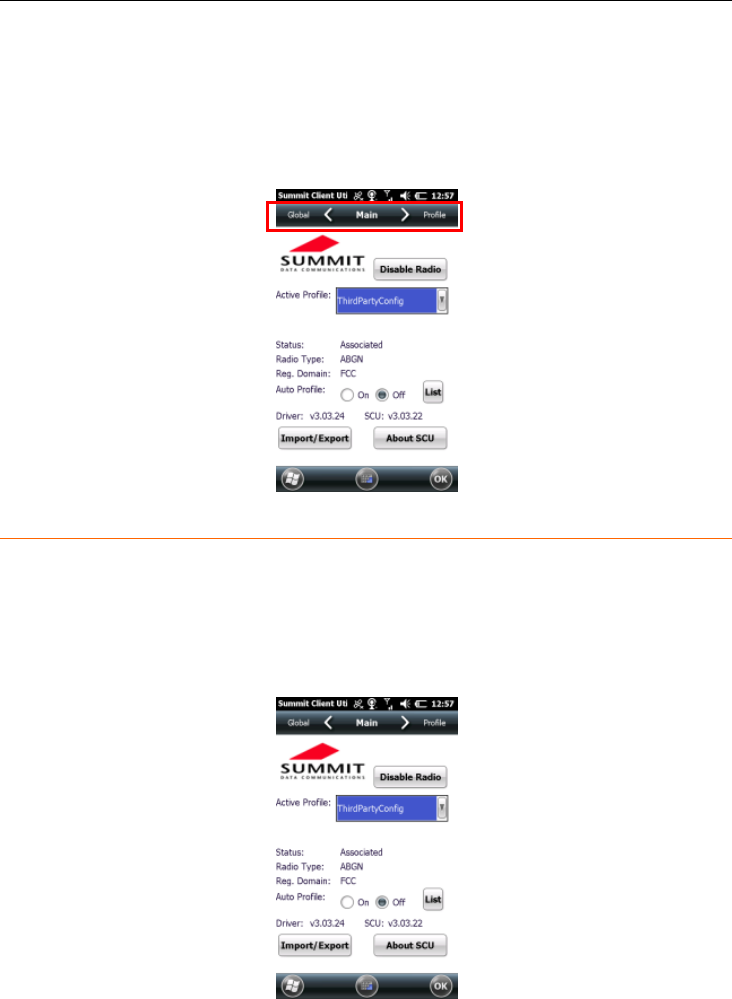
JunoT41/5
UserManual
54
Status
Diags (for troubleshooting)
Global
Toviewatab,tapthetabbaratthetopofthescreen,orslideyourfinger
leftorrighttoviewthenexttab.
8.8 MAIN WINDOW
TheMainwindowprovidesanoverviewofthecurrentwirelessnetwork
connectionconfiguration(ActiveProfile),asnapshotofconnection
information,andadditionalinformationregardingSCU(AboutSCU).You
canalsoimportandexportsettingsconfigurations,whichisusefulifyou
havemultipledevicestoconfiguretoaccessyourlocalnetworks.

JunoT41/5
UserManual
55
8.9 PROFILE WINDOW
Profilesettingsareradioandsecuritysettingsthatarestoredforeach
configurationprofile.TapNewtocreateanewProfileandenterinthe
necessaryconnectionsettingsforaWi‐Finetworkaccesspoint.Scroll
downtofindtheCommitbuttontosavechangestotheProfile.
8.10 STATUS WINDOW
TheStatuswindowprovidesstatusinformationontheradioconnection
betweentheclientdeviceandtheassociatedaccesspoint.
8.11 DIAGS WINDOW
TheDiagswindowenablesyoutotroubleshootconnectionissueswith
SCU.
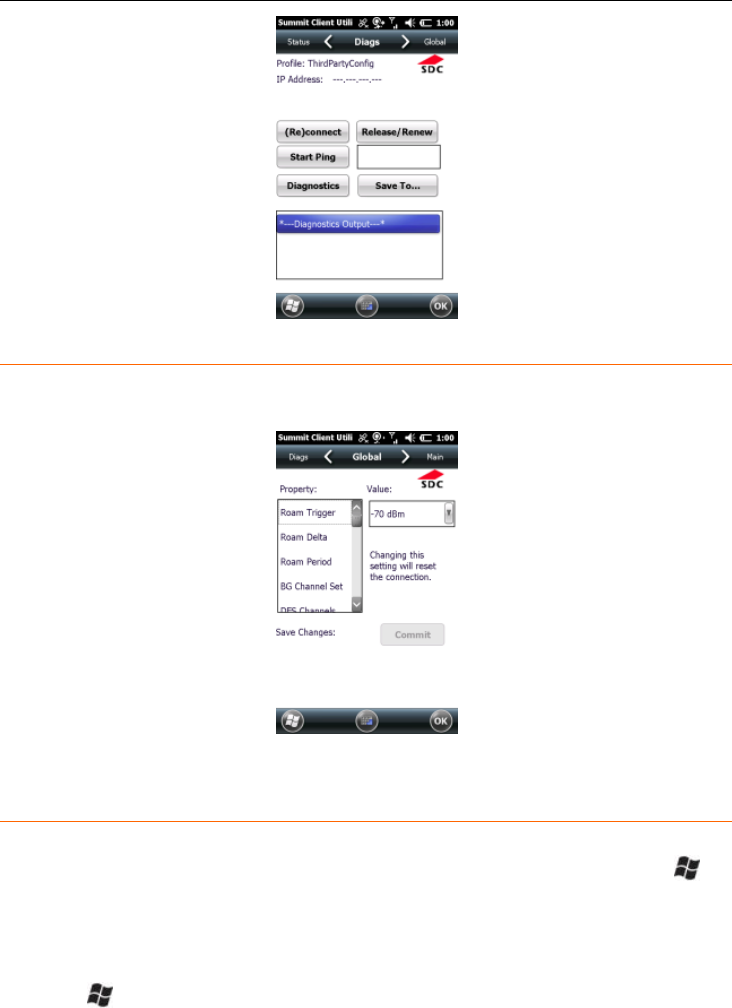
JunoT41/5
UserManual
56
8.12 GLOBAL WINDOW
Globalsettingsincluderadioandsecuritysettingsthatapplytoallprofiles
andsettingsmanagedbySCU.
8.13 6.6 WORKING WITH THE CAMERA
Ifyourdevicecomeswiththebuilt‐incamera,youcancapturephotosand
videos.Tofindoutifyouhaveacamerainstalledinyourdevice,tap>
Pictures&Videos.IfyouseetheCameraicon,yourdevicehasthecamera
feature.
Tocapturepicturesandvideos,openthecameraapplication:
1. Tap>Pictures&Videos.
2. TaptheCameraiconortheCameratile,orpresstheLEFTbuttonto
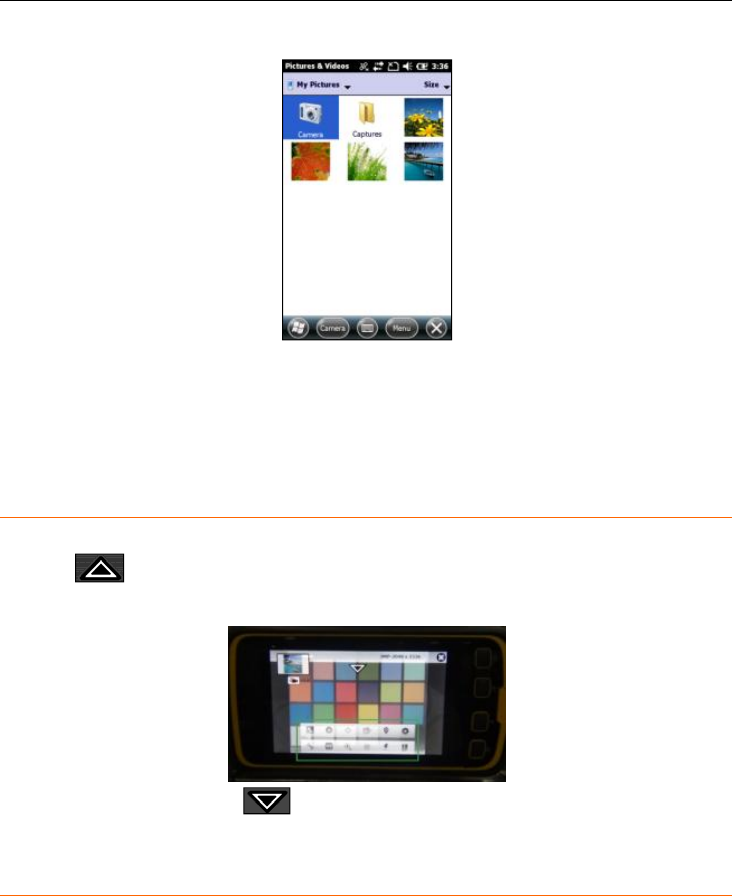
JunoT41/5
UserManual
57
activatetheCameratile.
Thecameraapplicationstartsandsoondisplaysacamerapreviewonthe
entiredisplayscreen.ThecamerawillbeineitherinPortraitorLandscape
modeasperthecamerasettingsoraccordingtothedeviceorientation.
TheTitlebarandTilebarwillnotbevisible.
8.14 USER INTERFACE
OncetheCameraiconistapped,thepreviewscreenshows.Tapontheup
arrow()todisplaythepop‐upmenusystemandtoaccessvarious
camerafeaturesandsettings.
Taponthedownarrow()toexitthemenus.
8.15 THUMBNAIL WINDOW
Athumbnailimageisshownontopofthepreviewscreen.Thisisthemost
recentimagecapturedusingthecameraapplication.Taponthethumbnail
toreturntoMicrosoftPictures&Videoswindowanddisplayathumbnail
previewofsavedimageandvideofiles.
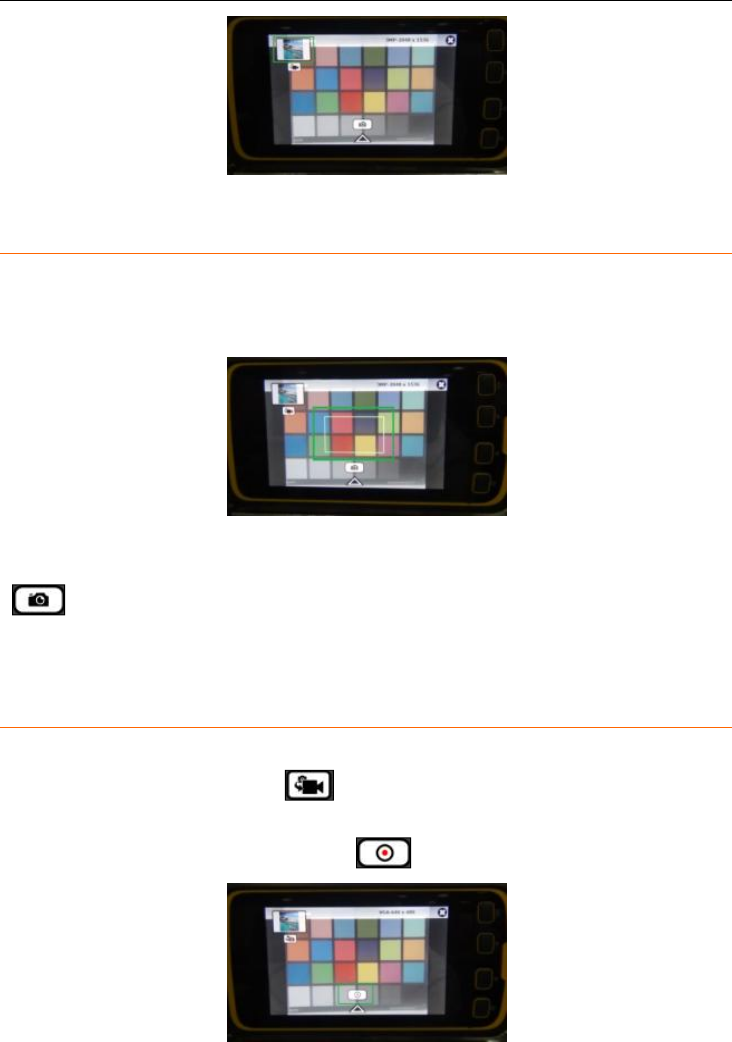
JunoT41/5
UserManual
58
8.16 CAPTURING IMAGES
Ifpreviewnotfocused,aquickdouble‐taponthepreviewscreenfocuses
theimage(iffocusisenabledinsettingsmenu).Focussuccessisindicated
byagreenboxdisplayedatcenterofthescreen.
TheimagecanbecapturedafterthisbytappingontheCameraicon
()whentheuserinterfaceisviewableontheimagepreview.Youcan
alsousetheACTIONbuttontotriggertheimagecapture.
Capturedimagesaresavedwiththefileextensionof.JPG.
8.17 CAPTURING VIDEOS
The camera application will switch from image mode to video mode
by tapping the video icon ( ) below the thumbnail window. In
video mode, the similar icon is used to switch to Image mode.
Atapofthecapture/recordbutton()willstartcapturingthevideo.
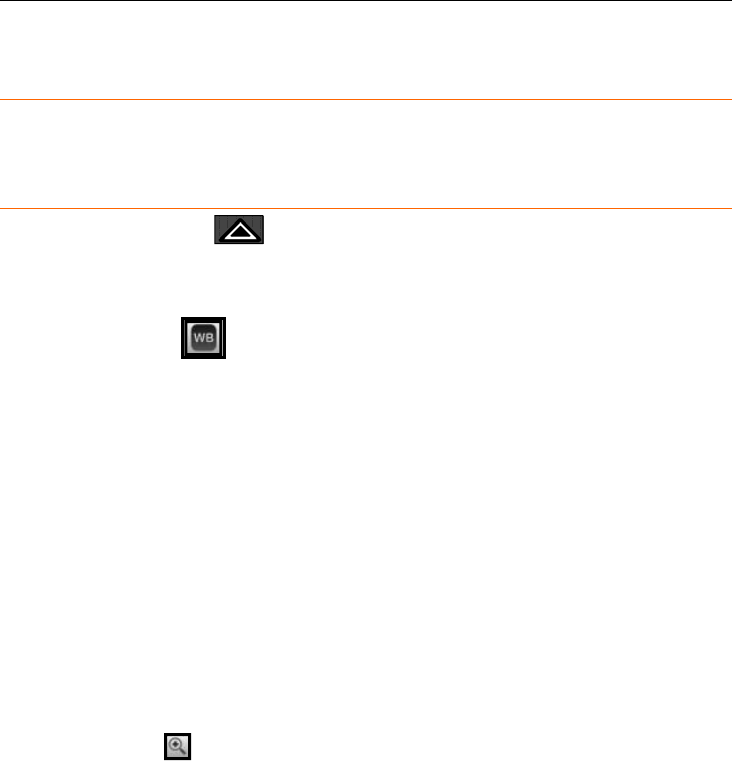
JunoT41/5
UserManual
59
Capturedvideofilesaresavedwiththefileextensionof.WMV.
8.18 CLOSING APPLICATION
Toclosethecameraapplication,tapontheclose(X)markatthetopright
corneroftheprevieworpresstheOKbutton.
8.19 IMAGE CAMERA APPLICATION FEATURES
Tapontheuparrow()todisplaythepop‐upmenusystemtoaccess
variousfeaturesandsettings.Thefeaturesandsettingsaredescribed
below.
White Balance ( )
AtapontheWhiteBalanceicon,displaysthefollowingoptions.
Auto: Select this option to adjust the White Balance
automatically while taking pictures and videos in different
lighting conditions.
Sunny: Select this option when taking pictures and videos in
full sunlight.
Incandescent: Select this option when taking pictures and
videos in places lit with Incandescent lighting.
Fluorescent: Select this option when taking pictures and
videos in places lit with Fluorescent lighting.
Selectionofanyoptionappliesthatsettingtocamerapreviewandto
imagescaptured.
Zoom Levels ( )
AtapontheZoomicondisplaysthelevelsofdigitalzoomsupportedby
cameraapplication.
1.0x [Minimum Zoom]
1.5x
2.0x
2.5x
3.0x
3.5x
4.0x [Maximum Zoom]
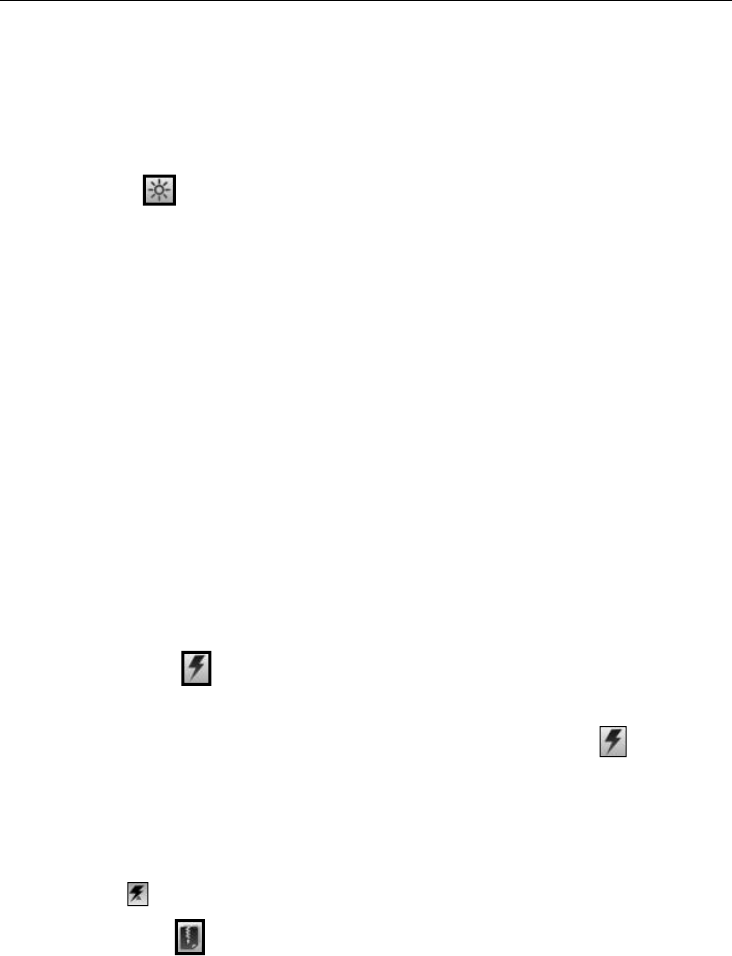
JunoT41/5
UserManual
60
Selectionofanyoptionappliesthatsettingtocamerapreviewandto
imagescaptured.
NOTE:TheImageTaggingofdate‐timeandGPSontheimageisnot
compatiblewithaDigitalZoomsettingotherthan1.0x.TheEXIFtagging
isnotaffectedbyDigitalZoom.
Brightness ( )
AtapontheBrightnessiconenablesadjustmentoftheBrightnessoffset.
+3 [Maximum Brightness]
+2
+1
0 [Normal Brightness]
-1
-2
-3 [Minimum Brightness]
Selectionofanyoptionappliesthatsettingtocamerapreviewandto
imagescaptured.IncreasetheBrightnessifthesubjectisunderexposed,
ordecreasetheBrightnessifthesubjectisoverexposed.Acommon
situationrequiringadjustmenttoBrightnessiscapturingascenewith
highcontrastcausedbydirectexposureoflightsourcesorareasof
shadingorshadows.
Flash Settings ( )
AtapontheFlashSettingsicondisplaysthefollowingoptions.
On: Selection of this option enable the flash icon ( ) on the
screen and dual LEDs will flash while capturing images.
Off: Selection of this option disables the LED flash.
Auto: Selection of this option enable the LEDs to flash if
needed to illuminate the scenes with low-light. The auto flash
icon ( ) will display on the screen.
Image Quality ( )
AtapontheImageQualityicondisplaysthefollowingoptions.
Economy: Select this option should save the captured image
with low quality (high compression).
JunoT41/5
UserManual
61
Normal: Select this option should save the captured image
with medium quality (medium compression).
Fine: Select this option should save the captured image with
good quality (low compression).
Super Fine: Select this option should save the captured
image with very good quality (very low compression).
Images will be stored with the selected quality and the file size of
the image increases as quality increases.
Camera Settings ( )
AtapontheSettingsicondisplaysthesubmenuwhichhasStill
Resolution,StorageSelection,Focus,ImageReview,ImageTaggingand
ApplicationSettings.Thesesubmenuoptionsareexplainedinfurther
detailbelow.
Still Resolution
The still image resolution displays on the top right corner of the
preview window when the camera user interface is visible.
Two aspect ratios are available on the Juno T41/5:
4:3
5:3
4:3 ( )
The4:3imageresolutionsavailableare:
1.3MP - 1280x960
3MP - 2048x1536
5MP - 2560x1920
8MP - 3264x2448
Selectthedesiredimageresolution.
5:3 ( )
The5:3imageresolutionsavailableare:
WVGA - 800x480
WXGA - 1280x768
2.4MP - 2000x1200

JunoT41/5
UserManual
62
3.9MP - 2560x1536
6MP - 3264x1960
Selectthedesiredimageresolution.
Storage Select ( )
TapontheStorageSelecticontodisplaythefollowingoptions:
Main Memory: Save images to the on-board storage.
SD Card: Save the images to the microSD card. This item is
not selectable if no microSD card is installed.
Focus ( )
TapontheFocusicontodisplaythefollowingoptions.
Enable: This enables the Auto Focus feature, which is
activated with double-tap on the image preview.
Disable: This disables the Auto Focus feature.
Image Review ( )
AtapontheImageReviewiconwilldisplaythefollowingoptions.
2 Seconds: The captured image is displayed for 2 seconds.
3 Seconds: The captured image is displayed for 3 seconds.
User Prompted: The captured image is displayed until the
user indicates to delete or save the image. See below for
further information.
Off: The captured image is not displayed. This mode is useful
for capturing images as quickly as possible.
Image Tagging ( )
Imagetaggingisthecaptureofdate,timeandlocationdataonyour
images.ThedatamaybestoredintheEXIFdataorboththeEXIFdataand
onthevisibleimage.
AtapontheImageTaggingiconwilldisplaythefollowingsubmenuand
options.
Date
DateSource:
DeviceDate‐Time:Fetchthedate‐timefromthedevicereal‐time

JunoT41/5
UserManual
63
clock.
GPSDate‐Time:FetchthecurrentGPSdate‐time.
NOTE:IfthecurrentGPStimeisnotavailable(duetolackofGPS
signal),theDeviceDate‐Timeisused.
StampSettings:
EXIF:Storethedate‐timeinformationasEXIFdata.
EXIF&Stamp:Storethedate‐timeinformationasEXIFdataand
embeddedonthevisibleimage.
Off:Donotstoredate‐timeinformation.
GPS
Format:
Deg/Min/Sec:FormatinDegrees,Minutes,Seconds.
DecimalDegree:FormatinDegreeswithdecimalprecision.
StampSettings:
EXIF:StorethelocationinformationasEXIFdata.
EXIF&Stamp:StorethelocationinformationasEXIFdataand
embeddedonthevisibleimage.
Off:Donotstoredate‐timeinformation.
APP Settings ( )
TapontheAPPSettingsicontodisplayasubmenuwiththeoptions
describedbelow.
UI Orientation
RotationonTilt:Enabletheautomaticrotationofthecamerauser
interfacebasedondeviceorientation/tilt.
FixedLandscape:Lockthecameraapplicationinlandscapemode.
FixedPortrait:Lockthecameraapplicationinportraitmode.
NOTE:Thisoptiononlyappliestotheimagecaptureanddoesnot
applytovideocapture,whichisonlyavailableinfixedlandscape
mode.
Sounds
Enable:Thisoptionenablesthebeepsoundwhilefocusingand
clicksoundforcapturingtheimages.

JunoT41/5
UserManual
64
Disable:Thisoptiondisablesthesoundwhilefocusingand
capturingtheimages.
Modify Prefix
SelecttheModifyPrefixoptiontodisplaytheprefixwindowenabling
youtoedittheprefixofImageandVideofiles.Bydefault,Imagefiles
appendwithprefixIMGandvideofilesappendwithVID.
Thefileissavedwithanamethatisautogeneratedwiththeprefix
followedbyafourdigitnumber.Thenumberissequential.
8.20 IMAGE DELETE AND SWITCH TO CAMERA IN IMAGE REVIEW
MODE
WhentheImageReviewmodeisUserPrompted,thecameraapplication
willdisplaythecaptureimageandshowtwoicons.
• DELETE ( )
Tapthedeleteicontodeletetheimagefromthestorage.
• CAMERA ( )
Tapthecameraicontosavetheimageandreturntoimagepreview
mode.
8.21 VIDEO CAMERA APPLICATION FEATURES
Tapontheuparrow()todisplaythepop‐upmenusystemtoaccess
variousfeaturesandsettings.Thefeaturesandsettingsaredescribed
below.
Manyofthesettingsforimagecapturearethesameforvideocapture,
andtheseincludeWhiteBalance,BrightnessandFocus.Settingsunique
tovideorecordingareasfollows:
• Audio settings ( )
Tap the Audio Settings icon to display the following
options:
Enable:AudiocapturefromtheMICROPHONEisenabledwhile
recording.
Disable:ThevideothatisrecordeddoesNOTincludeanysound
fromtheMICROPHONE.
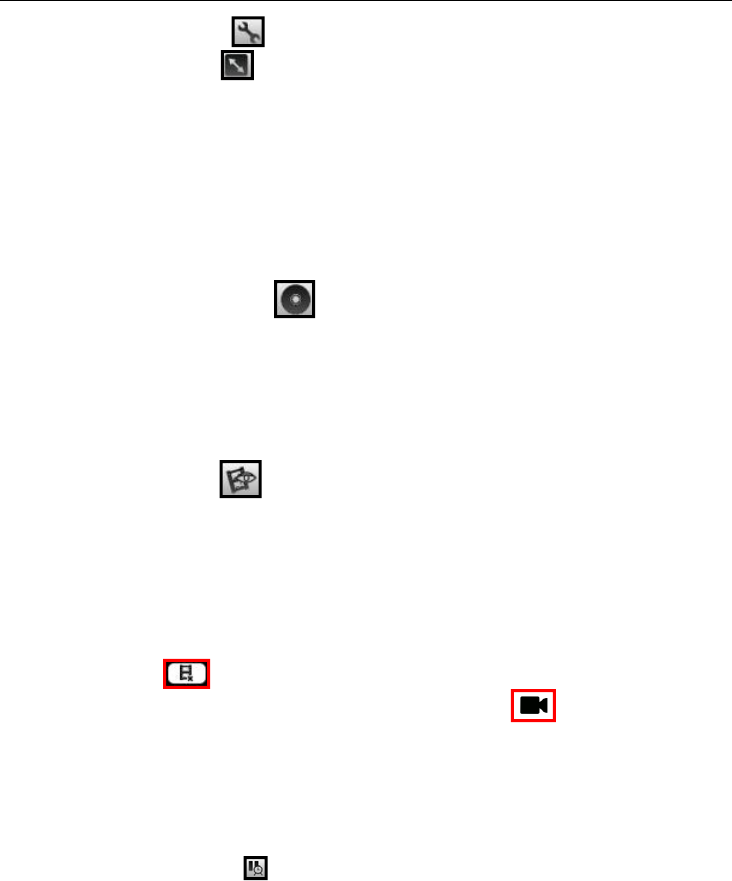
JunoT41/5
UserManual
65
• Video Settings ( )
Resolution ( )
TaptheVideoResolutionicontodisplaythefollowingoptions:
QVGA‐320x240
VGA‐640x480
WVGA‐800x480
Selectionofanyoptionappliesthatsettingtocamerapreview
andtovideoscaptured.
Storage Select ()
TaptheStorageSelecticontodisplaythefollowingoptions:
MainMemory:Savevideostotheon‐boardstorage.
SDCard:SavethevideostothemicroSDcard.Thisitemisnot
selectableifnomicroSDcardisinstalled.
• Video Review ( )
TaptheVideoReviewicontodisplaythefollowingoptions:
On:Ifselected,thevideoreviewmodeisenabled.Aftervideo
capturingiscompleted,videoreviewwindowenablestheuserto
reviewthecapturevideobyplayingitback.Also,DELETEand
VIDEOiconsareenabledinthereviewwindow.Ataponthe
Delete()icon,willdeletethevideofileandreturntothe
videopreviewwindow.AtapontheVideo()iconwillsave
thevideofileandreturntothevideopreviewwindow.
Off:Ifselected,thevideoreviewfeatureisdisabled.The
applicationwillreturntothepreviewwindowaftercapturingthe
videoandstoringthevideofile.
• Pause Time-out ( )
TapthePauseTime‐outicontodisplaythefollowingoptions:
10seconds
20seconds
60seconds
Disable

JunoT41/5
UserManual
66
SelectanoptiontospecifythetimeoutdurationofthePAUSE
featurewhilerecording.
WhilerecordinghastheoptiontobeSTOPPED(andsaved)or
beingPAUSEDandcontinued.Ifpaused,thevideorecording
pausesfortheselectedtime‐out.Thenthepauseiconchangesto
arecordicon,enablingtheusertoresumerecording.TheStop
iconendstherecordingandsavesthevideofile.

JunoT41/5
UserManual
67
8.22 6.7 WORKING WITH GPS
Tap>Settings>System>SystemInformation>Wirelesstoseeif
yourdevicehasGPSinstalled.COM2isthededicatedhardwareportfor
thebuilt‐inGPS(COM1isdedicatedtotheexternal9‐pin).
TheGPSiscompatiblewithapplicationsthataccepttheNMEAposition
informationusingadefaultbaudrateof38400.
8.23 GPS SETTINGS:
IfyouareusingonlyoneGPS‐awareapplication,thesesettingsdonot
needtobechanged.However,tousemultipleGPS‐awareapplications,tap
>Settings>System>GPSandselectthefollowingtabs:
Access: The GPS Intermediate Driver (GPSID) allows
multiple applications to access the GPS receiver. If the check
box is unchecked, the GPSID is disabled.
Hardware: COM2 is the hardware port dedicated for the
built-in GPS. Verify that COM2 is selected. The internal GPS
communicates at 38400 baud by default. If it has been
modified by a third-party program, adjust to match the
receiver baud rate.
Programs: Programs that use GPS need to know which COM
port to use to access GPS data. When using more than one
GPS-aware application, the same GPSID port must be used
in each application. Ensure that the COM port on the
GPS-aware application(s) is set to the same GPSID port as
shown in the Programs tab of the GPS applet. The program
port must be a different port than the hardware port. By
default, the GPS program port is COM3 and should not be
modified unless directed by Technical Support.
NOTE:SomeGPS‐awareapplicationsmaynotcommunicateoverGPS
programports.
8.24 EXITING GPS APPLICATIONS
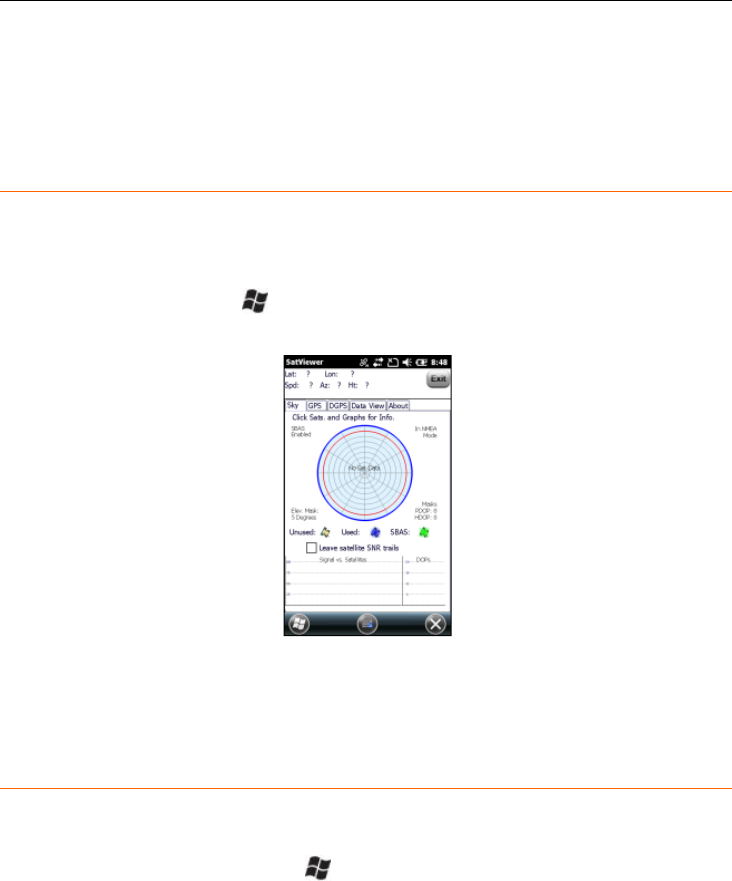
JunoT41/5
UserManual
68
AnytimeyouexitaGPSapplication(suchasSatViewer)itisadvisableto
closetheportgracefully,e.g.tapDisconnectfromGPSandthenexitthe
application.Failuretodosomayleavetheportopenandhinderthenext
GPSoperation.
8.25 6.8 SATVIEWER
SatViewerprovidesinformationsuchasyourcurrentlongitude,latitude,
elevation,howmanyGPSsatellitesarevisibleandthequalityofthe
computedcoordinates.
ToopenSatViewer,tap>SatViewer.TobeginmonitoringGPS
satellites,taptheGPStabandtheConnecttoGPSbutton.
NOTE:ExternalGPSreceivers,BluetoothGPSreceiversorotherexternal
GPSdevicesarenotsupportedandmaynotworkcorrectlywith
SatViewer.
8.26 6.9 BATTERY LOGGER
Thebatteryloggerisusefulformonitoringbatteryperformanceunder
certainuserscenariosortocheckifthebatteryhasaperformanceissue.
ToruntheBatteryLogger,tap>FileExplorer.IntheWindowsfolder,
findbatlogandtapittostarttheprogram.TapFile>StartBatteryLogging.
Thesoftwarewillpromptyoutospecifywheretologthedatafile.
Theprogramanalyzesandlogsthefollowinginformationaboutthe
battery:
‐ Chargecyclesbegunand%capacityatinitiation
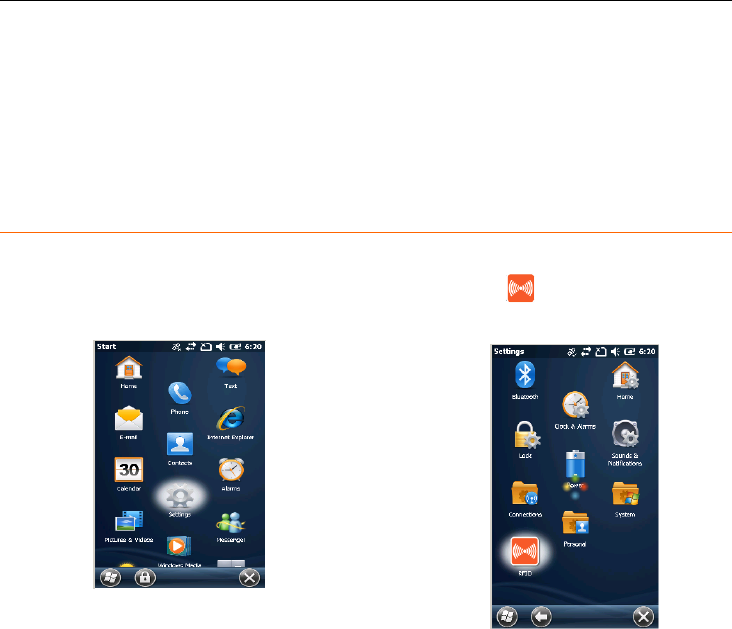
JunoT41/5
UserManual
69
‐ Chargecyclesfullycompleted
‐ Abortedchargecyclesand%capacityattermination
‐ Providenotificationwhenthenumberofchargecyclesreaches90%
ofthemax
8.27 6.10 RFID TAG READING (FOR RFID VERSION
ONLY)
1.Onthedesktop,tapSettingsicon.
2.TapRFID icon.
3.TapReadRFIDtagsbutton.
4.TapStartReadingbutton.
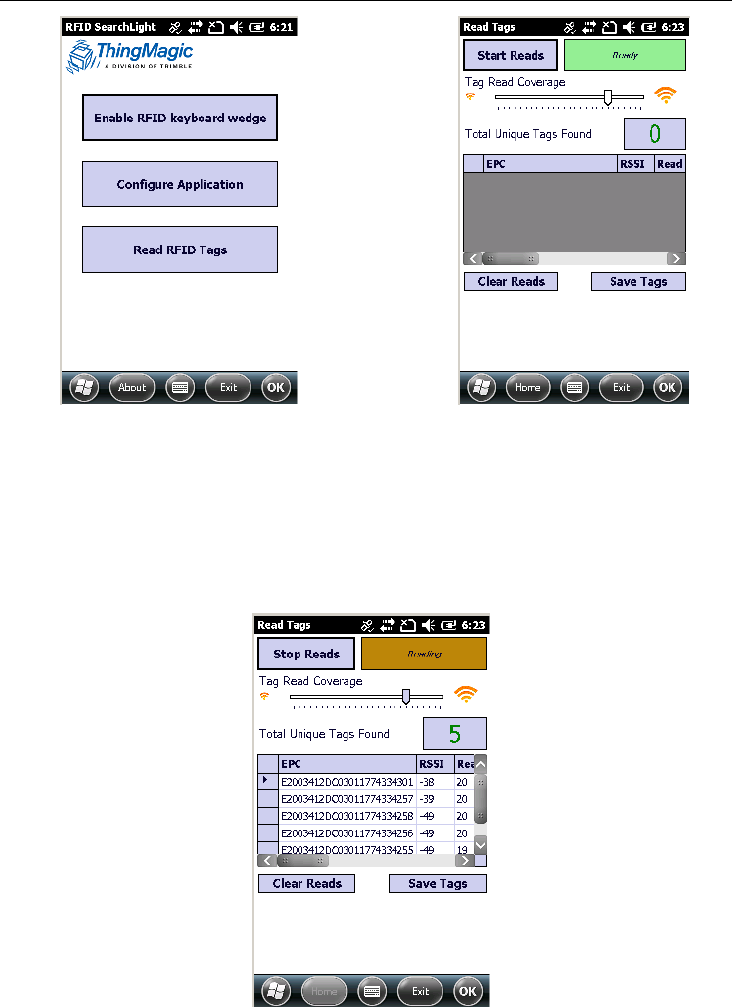
JunoT41/5
UserManual
70
5.AllRFIDtagfoundwillbelisted.Youcancanceltheprocedureby
clickingStopReads.
6.Tosaveallreadingresults:
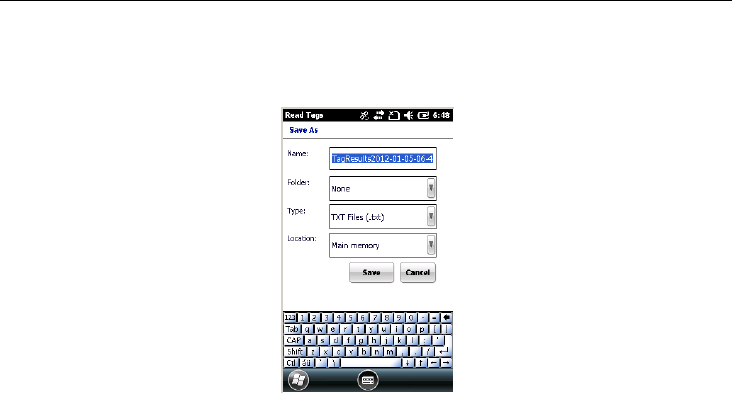
JunoT41/5
UserManual
71
a.TapSaveTags.
b.EnterallinformationintofieldsunderSaveasdialogueboxas
necessaryandtapSavebutton.

JunoT41/5
UserManual
72
9 APPENDIX A: REGULATORY
COMPLIANCE
9.1 U.S.A. - FCC STATEMENT
Thisequipmenthasbeentestedandfoundtocomplywiththelimitsfora
ClassBdigitaldevice,pursuanttopart15oftheFCCrules.Theselimitsare
designedtoprovidereasonableprotectionagainstharmfulinterferencein
aresidentialinstallation.Thisequipmentgenerates,usesandcanradiate
radiofrequencyenergyand,ifnotinstalledandusedinaccordancewith
theinstructions,maycauseharmfulinterferencetoradiocommunications.
However,thereisnoguaranteethatinterferencewillnotoccurina
particularinstallation.Ifthisequipmentdoescauseharmfulinterference
toradioortelevisionreception,whichcanbedeterminedbyturningthe
equipmentoffandon,theuserisencouragedtotrytocorrectthe
interferencebyoneormoreofthefollowingmeasures:
–Reorientorrelocatethereceivingantenna.
–Increasetheseparationbetweentheequipmentandreceiver.
–Connecttheequipmentintoanoutletonacircuitdifferentfromthatto
whichthereceiverisconnected.
–Consultthedealeroranexperiencedradio/TVtechnicianforhelp.
9.2 EXPOSURE TO RADIO FREQUENCY (RF) SIGNALS
Yourdevicecontainsaradiotransmitterandreceiver.Theradiatedoutput
powerisfarbelowtheinternationalradiofrequencyexposurelimits.
Theselimitsarepartofcomprehensiveguidelinesandestablishpermitted
levelsofRFenergyforthegeneralpopulation.Theguidelinesarebasedon
thesafetystandardspreviouslysetbyinternationalstandardsbodies:
• American National Standards Institute (ANSI) IEEE.
C95.1-1992.
• National Council on Radiation Protection and Measurement
(NCRP). Report 86. 1986.
• Int’l Commission on Non-Ionizing Radiation Protection

JunoT41/5
UserManual
73
(ICNIRP) 1996.
• Ministry of Health (Canada), Safety Code 6. The standards
include a substantial safety margin designed to assure the
safety of all persons, regardless of age and health.
SAR:1.064w/kg
Useofunauthorizedormodifiedantennasmayimpaircallqualityand
damagethephone,causinglossofperformance.Toassureoptimalphone
performanceandensurehumanexposuretoRFenergyiswithinthe
guidelinessetforthintherelevantstandards;alwaysuseyourdeviceonly
initsnormal‐useposition.
AvoidingcontactwiththeantennaareawhenthephoneisINUSE
optimizestheantennaperformance.
9.3 TELECOMMUNICATIONS & INTERNET ASSOCIATION (TIA)
INFORMATION
HearingAids:Somedigitalwirelessphonesmayinterferewithsome
hearingaids.Intheeventofsuchinterference,youmaywanttoconsult
yourwirelessserviceprovider,orcallcustomerservicetodiscuss
alternatives.
PacemakersandOtherMedicalDevices:TheHealthIndustry
ManufacturersAssociationrecommendsaminimumseparationofsix
inchesbemaintainedbetweenahandheldwirelessphoneanda
pacemakertoavoidpotentialinterferencewiththepacemaker.These
recommendationsareconsistentwiththeindependentresearchbyand
recommendationsofWirelessTechnologyResearch.Personswith
pacemakersshouldusetheearoppositethepacemakertominimizethe
potentialforinterference.Personswithpacemakersshouldexercisegreat
cautionifusingahands‐freedevicesuchasaheadset,asthesepersons
maybeatgreaterriskofthedevicenotmaintainingtherecommended
minimumsixinchesofseparationfromthepacemaker.Ifyouhaveany
reasontosuspectthatinterferenceistakingplace,turnthephoneOFF
immediately.
Ifyouuseanyotherpersonalmedicaldevice,consultthemanufacturerof
yourdevicetodetermineiftheyareadequatelyshieldedfromexternalRF

JunoT41/5
UserManual
74
energy.Yourphysicianmaybeabletoassistyouinobtainingthis
information.
TurnthephoneOFFinhealthcarefacilitieswhenanyregulationsposted
intheseareasinstructyoutodoso.Hospitalsorhealthcarefacilitiesmay
beusingequipmentthatcouldbesensitivetoexternalRFenergy.
9.4 CANADA COMPLIANCE, INDUSTRIE CANADA (IC)
ThisClassBdigitalapparatuscomplieswithCanadianCAN
ICES‐3(B)/NMB‐3(B).
CetappareilnumériquedeclasseBestconformeàlanormeNMB‐3.
ThisdevicecomplieswithIndustryCanadalicence‐exemptRSS
standard(s).Operationissubjecttothefollowingtwoconditions:(1)this
devicemaynotcauseinterference,and(2)thisdevicemustacceptany
interference,includinginterferencethatmaycauseundesiredoperationof
thedevice.
CetappareilestconformeavecIndustrieCanadaRSSstandardexempts
delicence(s).Sonfonctionnementestsoumisauxdeuxconditions
suivantes:
(1)cetappareilnepeutpasprovoquerd'interférenceset
(2)cetappareildoitacceptertouteinterférence,ycomprislesinterférences
pouvantentraînerunmauvaisfonctionnementdelaappareil.
RFRadiationExposureStatement:
Forbodywornoperation,thisphonehasbeentestedandmeetsRF
exposurerequirementswhenusedwithanaccessorythatcontainsno
metalandthatpositionsthehandsetaminimumof1.5cmfromthebody.
Thisphoneencloseshigh‐powerRFIDmodule,andbeenSARtested,
complyingwithRFexposurerequirements.
UseofotheraccessoriesmaynotensurecompliancewithRFexposure
guidelines.
Déclarationdel'expositionauxradiationsRF:
Pourlefonctionnementducorps,cetéléphoneaététestéetrépondaux
directivesd'expositionRFlorsqu'ilestutiliséavecunaccessoirequine
contientpasdemétaletquiplacelecombinéd'unminimumde1.5cmdu
corps.
Utilisationd'autresaccessoirespeutnepasassurerlerespectdes

JunoT41/5
UserManual
75
directivesd'expositionRF.
Thisdevicecomplieswithpart15oftheFCCRules.Operationissubjectto
thefollowingtwoconditions:
1)thisdevicemaynotcauseinterferenceand
2)thisdevicemustacceptanyinterference,includinginterferencethat
maycauseundesiredoperationofthedevice.
RFexposure
ThisdevicewastestedaccordingtoFCCSARprocedure,andwastested
15mmawayfromtheBody.
Thisphoneencloseshigh‐powerRFIDmodule,andbeenSARtested,
complyingwithRFexposurerequirements.
9.5 ROHS STATEMENT
ThisdeviceconformstoRoHS(ReductionOfHazardous
Sub‐stances)EuropeanUnionregulationsthatset
maximumconcentrationlimitsonhazardousmaterials
usedinelectricalandelectronicequipment.
CAUTION:RISKOFEXPLOSIONIFBATTERYISDISPOSEDOFINCORRECTLY.
DISPOSEOFTHEDEVICEANDTHEBATTERYACCORDINGTO
INSTRUCTIONSFORELECTRONICWASTE.
9.6 EUROPEAN CONFORMITY STATEMENT
DeclarationofConformitywithRegardtotheR&TTE1999/5/ECandEMC
89/336/EECdirectives.
9.7 EUROPE
AccordingtoISO/IECGuide22andEN45014

JunoT41/5
UserManual
76
Manufacturer’sName:TrimbleNavigationLimited.
Manufacturer’sAddress:POBox947,Corvallis,OR97339USA
Declares,underoursoleresponsibility,thattheproduct:
ProductName:RuggedHandheldComputer(JUNO/T41/5)
ModelNumber:JUNO/T41/5‐BWCRF;JUNO/T41/5‐BWCRFG
RegulatoryName:JUNO/T41/5‐BWCRF;JUNO/T41/5‐BWCRFG
ProductOptions:ALL
ConformstothefollowingProductSpecifications:
EN300328:V1.7.1:2006
EN301489‐1:V1.9.2:2011
EN301489‐3:V1.4.1:2002
EN301489‐7V1.3.1:2011
EN301489‐17:V2.2.1:2012
EN301489‐24V1.5.1:2010
EN301511:V9.0.2:2003
EN301908‐1&2:V4.2.1:2010
EN55022:2010/AC:2011
EN55024:2010
CISPR22:2005,AmendmentsA1:2005,
A2:2006
R&TTEDirective1999/5/EC
CFR47,Part15,SubpartB
EN302208‐2:V1.4.1:2011
EN
61000‐3‐2:2006+A1:200
9
+A2:2009
EN61000‐3‐3:2008
EN61000‐4‐2:2009
EN
61000‐4‐3:2006+A1:200
8
+A2:2010
EN61000‐4‐4:2012
EN61000‐4‐5:2006
EN61000‐4‐6:2009
EN61000‐4‐11:2004
EN60950‐1:2006+A11:
2009+A1:2010+A12:201
1
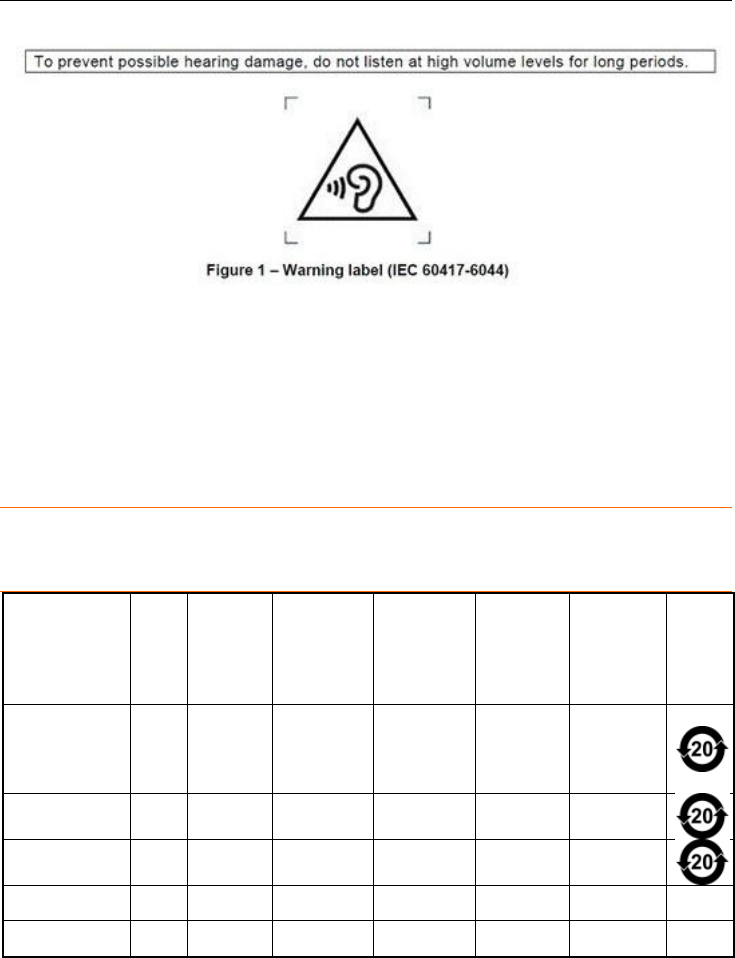
JunoT41/5
UserManual
77
ExposuretoLoudAudio:
ImporterofRecord:TrimbleEuropeanRegionalFulfillmentCenter,
LogisticsManager,Meerheide45,5521DZEersel,
Netherlands.
9.8 ENVIRONMENTAL HAZARDS
TheproductcomplieswithinternationalRoHSregulations.
9.9 TOXIC AND HAZARDOUS SUBSTANCES AND ELEMENTS
PartNameLead
(Pb)
Mercury
(Hg)
Cadmium
(Cd)
Hexavalent
Chromium
(Cr6+)
Poly‐bromi
nated
biphenyls
(PBB)
Poly‐bromi
nated
diphenyl
ethers
(PBDE)
Printed
Circuit
Assemblies
XOOOOO
DisplayXOOOOO
KeypadXOOOOO
HousingOOOOOO
HardwareOOOOOO
ProductPerioddoesnotincludetheseitems

JunoT41/5
UserManual
78
BatteryXOOOOO
Power
supplyXOOOOO
CableOOOOOO
ManualOOOOOO
HandstrapOOOOOO
Styluspkg.OOOOOO
Companion
CDOOOOOO
10
11
12
12.1 TAIWAN
低功率電波輻射性電機管理辦法
第十二條: 經型式認證合格之低功率射頻電機,非經許可,公司、商
號或使用者均不得擅自變更頻率、加大功率或變更原設計之特性及功
能。
第十四條: 低功率射頻電機之使用不得影響飛航安全及干擾合法通信;
經發現有干擾現象時,應立即停用,並改善至無干擾時方得繼續使用。
低功率射頻電機需忍受合法通信或工業、科學及醫療用電波輻射性電
機設備之干擾。
SAR標準值 2.0W/Kg,送測產品實測值為 1.064w/Kg

JunoT41/5
UserManual
79
12.2