LG Electronics USA L05A 850/ 1900 GSM/ GPRS/ EDGE and 850 WCDMA USB Dongle User Manual L05A Manual E
LG Electronics USA 850/ 1900 GSM/ GPRS/ EDGE and 850 WCDMA USB Dongle L05A Manual E
Contents
- 1. Users Manual 1
- 2. Users Manual 2
- 3. Revised Users Manual
- 4. Users Manual
Users Manual 2


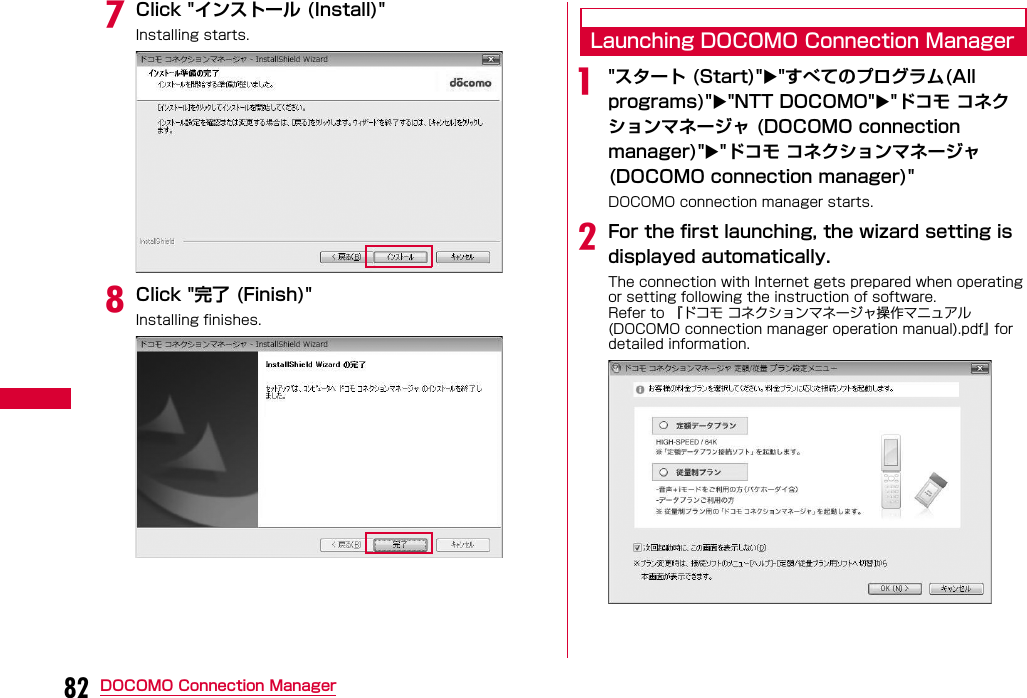


![112 Overseas UseInternational Roaming Service (WORLD WING)WORLD WING is DOCOMO's international roaming service that provides telephone and other types of communication services overseas out of the service area of FOMA network, using affiliated overseas network.•The following 3 types of communication are included in overseas network.■3G networkA third generation mobile communication network complying with 3GPP Global standards. (3rd Generation Partnership Project)※※ The local satandardization organization established for the development of common technical specifications related to 3rd Generation Mobile Communication Systems (IMT-2000)■GSM (Global System for Mobile Communication) networkThe second generation mobile communication network in a digital communication system that is most widely used around the world.■GPRS (3General Packet Radio Service) networkGPRS is the 2.5 generation mobile communication system that enables high speed packet communication using GSM.•It is available to use 3G network or GSM/GPRS network service within service area. For countries/areas support 3G850MHz/GSM850MHz, it is also available to use.•Before using the FOMA terminal overseas, refer to the followings.- "Mobile Phone User's Guide [International Services]"- DOCOMO "International Service Web site"Services Available OverseasAvailable communication services may vary depending on the overseas carrier or network.Available Communication Services※ Sending and receiving SMS may be available in overseas.Please understand that communication fee is countedwhen sending SMS.※ Packet communication is not available for GSM networkcommunication type.Service DescriptionData Communication Available for data communication using packets communication.Note•For details on available communication services while using international roaming, refer to Mobile Phone User's Guide [International Services] or visit DOCOMO "International Service Web site".•Voice call or video telephony features are not supported by L-05A.](https://usermanual.wiki/LG-Electronics-USA/L05A.Users-Manual-2/User-Guide-1100757-Page-45.png)
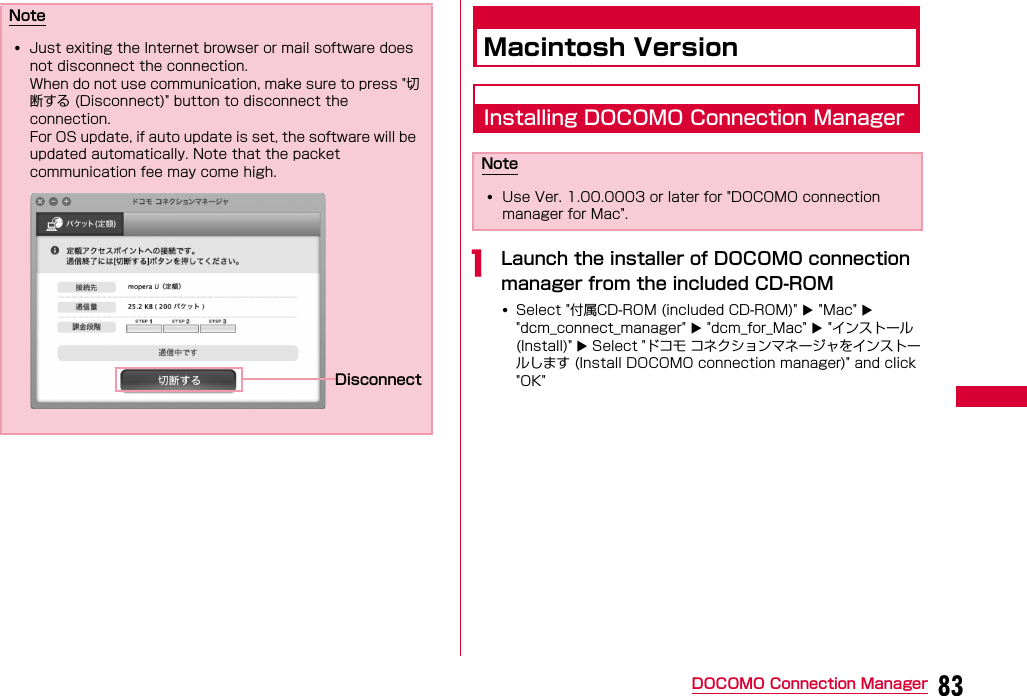
![113Overseas UseBefore Using OverseasSTEP1:Before Leaving JapanSTEP2:While OverseasSTEP3:After Coming Back to JapanBefore Leaving JapanBefore using the FOMA terminal overseas, refer to the followings.•"Mobile Phone User's Guide [International Services]"•"Mobile Phone User's Guide [Network Services]"•DOCOMO "International Service Web site"■ Subscription•If you subscribed to the FOMA service after September 1, 2005, no separate subscription is required to use ″WORLD WING″. If you subscribed to the FOMA service on or before August 31, 2005 and have not subscribed to ″WORLD WING″, a separate subscription is required to use it.•A FOMA card (green/White) made available for WORLD WING must be inserted in the FOMA terminal.■ Power source and voltage in the country or region of stay•Countries and regions may have different power sources, voltages or power outlet shapes. Check these in the instruction manual for your PC or web sites of the PC manufacturer in advance.■ Network setup•You can change network setup from overseas.→P116■ Internet access•For overseas access points or settings for using the Internet overseas, contact your Internet service provider.•If you subscribe to mopera U, visit the mopera U web site.http://www.mopera.net/ (Japanese only)While Overseas■ Switching networksSearching for and connecting to an access point are performed automatically by default. No special settings are required.■ Main screen display areaThe name of the connected carrier can be viewed in the display area of the Main screen.→P116Inquries overseasIf your FOMA card (green/white) is lost or stolen overseas, contact DOCOMO immediately and temporarily suspend your subscription. For inquiry information, see "docomo Information Center" on the back of this manual. Call or data communication charge will still on you after the terminal was lost or stolen.Note•You can manually switch networks if you want to connect to a particular network. See procedure 3 of "ネットワークを設定する (Configuring Networks)" (P116)差替え予定](https://usermanual.wiki/LG-Electronics-USA/L05A.Users-Manual-2/User-Guide-1100757-Page-46.png)
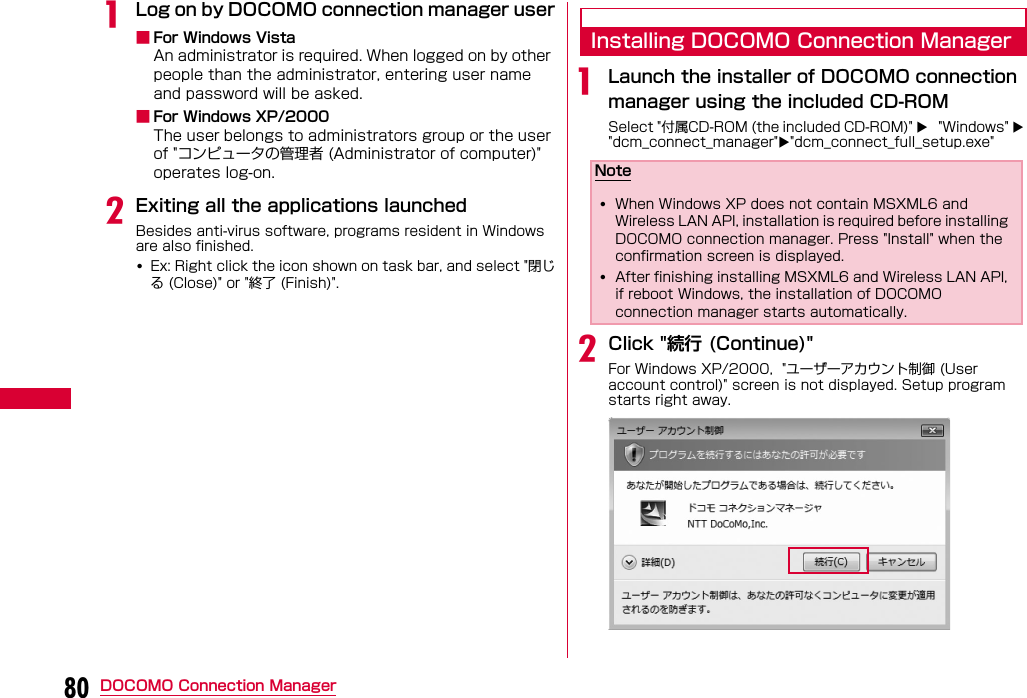
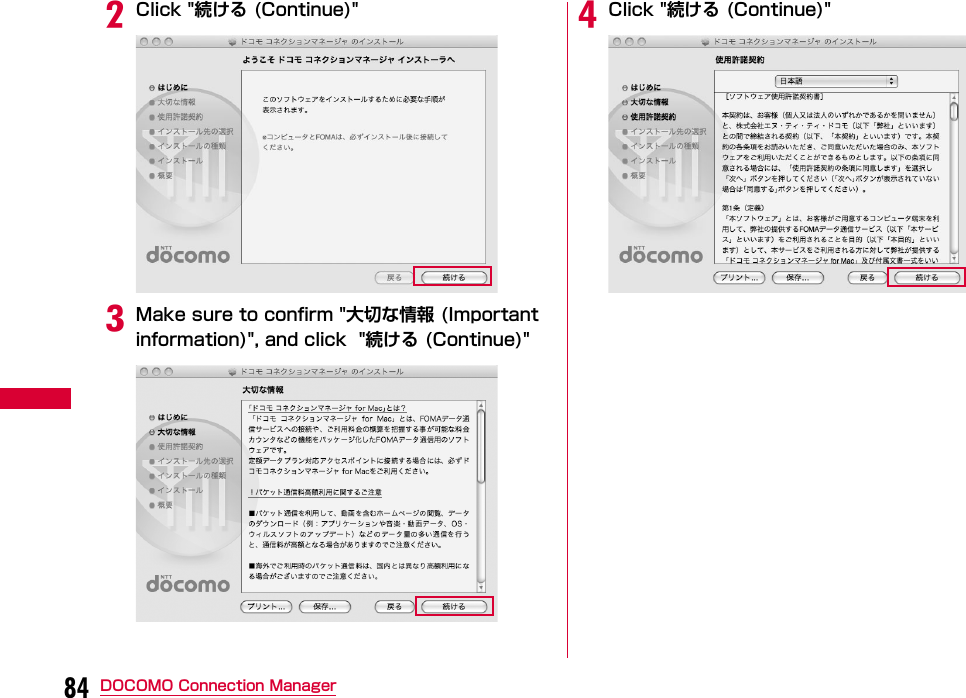
![114 Overseas Use■ Country Codes for Major Countries※ For country code or detailed information, refer to "MobilePhone User's Guide [International Services]" or DOCOMO"International Service Web site".■ International Access Codes for Major Countries (Table 1)※ For codes of other countries or details, visit DOCOMO "International Service Web site".Area Code Area CodeU.S.A 1 Germany 49 U.K. 44 Turkey 90 Italy 39 Japan 81 India 91 New Caledonia 687 Indonesia 62 New Zealand 64 Egypt 20 Norway 47 Australia 61 Hungary 36 Austria 43 Fiji 679 Netherlands 31 Philippines 63 Canada 1 Finland 358 Korea 82 France 33 Greece 30 Brazil 55 Singapore 65 Vietnam 84 Switzerland 41 Peru 51 Sweden 46 Belgium 32 Spain 34 Hong Kong 852 Thailand 66 Macau 853 Taiwan 886 Malaysia 60 Tahiti 689 Maldives 960 Czech 420 Russia 7 China 86Area Code Area CodeIreland 00 Germany 00 U.S.A. 011 Turkey 00 U.A.E. 00 New Zealand 00 U.K. 00 Norway 00 Italy 00 Hungary 00 India 00 Philippines 00 Indonesia 001 Finland 00 Australia 0011 France 00 Netherlands 00 Brazil 0021 Canada 011 0014 Korea 001 Vietnam 00 Greece 00 Belgium 00 Singapore 001 Poland 00 Switzerland 00 Portugal 00 Sweden 00 Hong Kong 001 Spain 00 Macau 00 Thailand 001 Malaysia 00 Taiwan 002 Monaco 00 Czech 00 Luxembourg 00 China 00 Russia 810 Denmark 00](https://usermanual.wiki/LG-Electronics-USA/L05A.Users-Manual-2/User-Guide-1100757-Page-47.png)

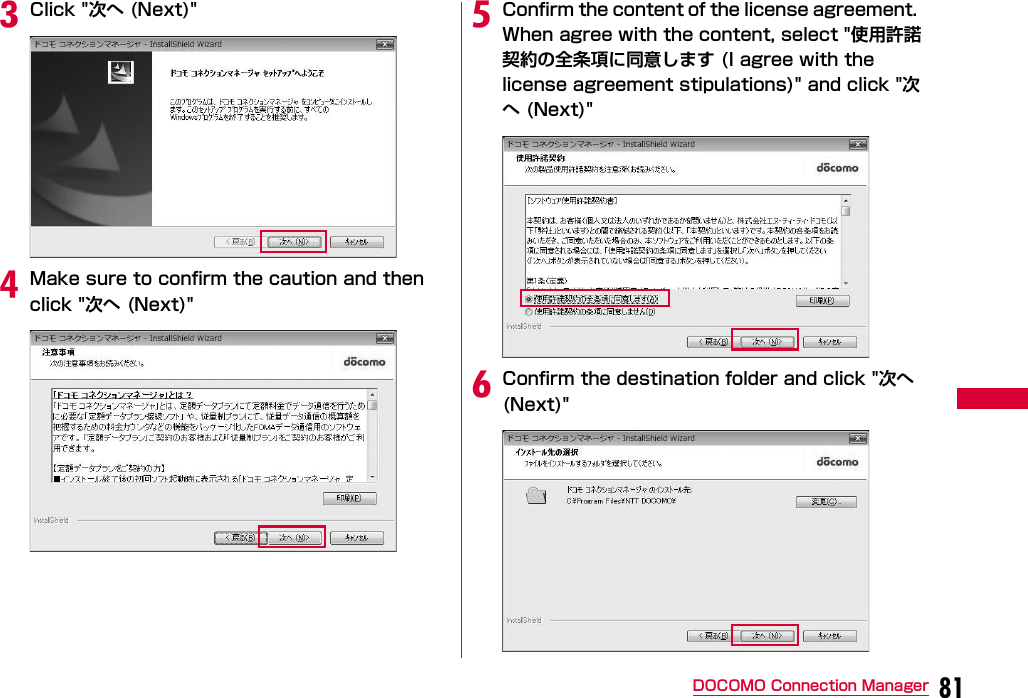
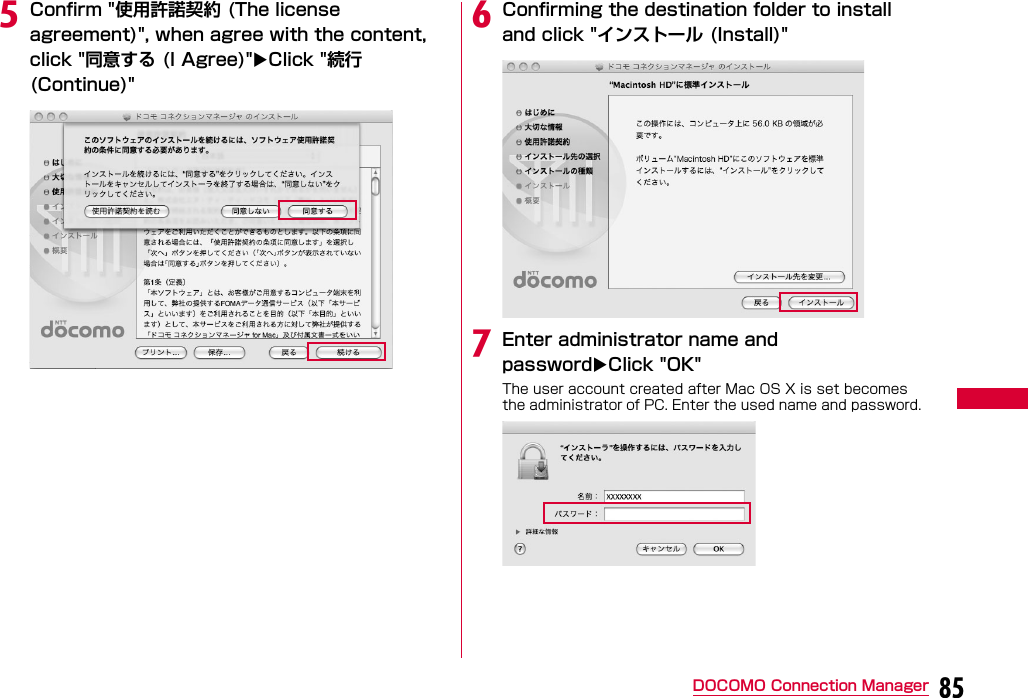
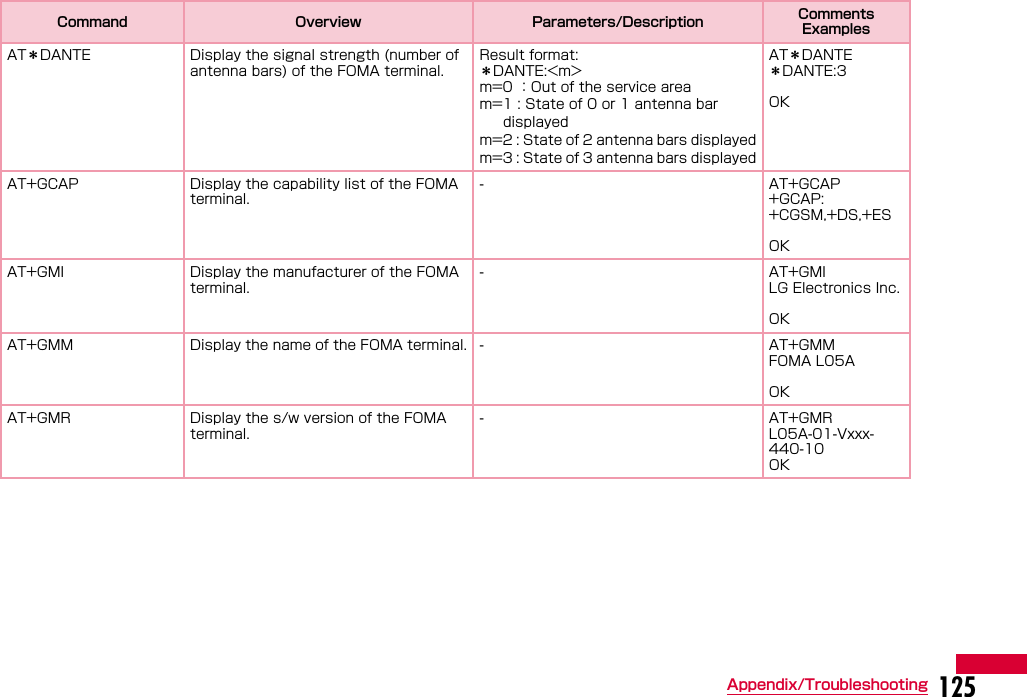
![121Appendix/TroubleshootingAT Command ListThe following AT commands can be used on the ″L-05A″modem port.•[&F]:A command to initialize settings used as AT&F command.•[?][=?]:The current settings appear when adding″?″at the end of the command, and the effective range of the current settings appears when adding″=?″at the end of the command. Command Overview Parameters/Description Comments ExamplesAT&C<n> Select the operating conditions of the circuit CD for DTEn=0: Always keeps CD singal ONn=1 (default): CD changes depending on the other party's modem status.AT&C1 OK AT&F<n> Reset the FOMA terminal AT command set values to factory defaults If executed during a communication, the line is disconnected.Only n=0 can be set (Skippable) -AT+CGDCONT [?] [=?] Set APN when sending Packet communication.Refer to P128 Refer to P128AT+CGEQMIN [?] [=?] Register criteria value for determining if QoS (Quality of Service) sent from network when PPP Packet communication is established, is acceptable or not.Refer to P128 Refer to P128AT+CGEQREQ [?] [=?] Set QoS(Quality of Service) to request for the network when PPP Packet communication is established.Refer to P128 Refer to P128AT+CGMR Display the version of the AT+CGMR FOMA terminal.- AT+CGMR 1234567890123456OK](https://usermanual.wiki/LG-Electronics-USA/L05A.Users-Manual-2/User-Guide-1100757-Page-54.png)
![122 Appendix/TroubleshootingAT+CGREG=<n> [&F][?] [=?] Set whether to be notified of the network registration status.<n> n=0(default): Do not note.n=1: Notify when outside and inside the service area is changed.Execute「AT+CGREG?」then appears as 「+CGREG:<n>,<state>」<state> 0:Not registered1:Registered Home Network4: Unknown5: Registered (while roaming)AT+CGREG?+CGREG: 0,1OKAT+CGREG=?+CGREG: (0-2)OKAT+CGSN Display the serial number of the FOMA terminal.- AT+CGSN 12345678901 2345 OK AT+CMEE=<n> [&F][?] [=?] Set the error report form of the FOMA terminal.n=0: Display「ERROR」n=1: Display in the form of 「+CMEE ERROR: xxxx」(where xxxx are numbers)n=2(default): Display in the form of「+CMEE ERROR: xxxx」(where xxxx are text)※ If using ATZ or AT&F command to default, "0" is setup. Note that when connecting L-05A to power, the value of ATZ or AT&F command differs.AT+CMEE=0 OK AT+CMEE?+CMEE: 0OK AT+CMEE=?+CMEE: (0, 1, 2)OK Command Overview Parameters/Description Comments Examples](https://usermanual.wiki/LG-Electronics-USA/L05A.Users-Manual-2/User-Guide-1100757-Page-55.png)
![123Appendix/TroubleshootingAT+ CNUM Display the own number of the FOMA terminalExecuting「AT+CNUM」displays in the form of「+CNUM: <number>, <type>」number: phone numbertype=129: Excluding the international access code+type=145: Including the international access code+AT+CNUM +CNUM:,″09080189242″,129 OK AT+COPS=〔<mode>〔,<format>〔,<oper>〔,<stat>〕〕〕〕[?] [=?]Select and set carrier's name/Plmn Number.<mode>0:Auto (Searching network automatically and then change communication service)1:Manual(to connect <oper> communication service)2:Disconnection communication service※Not supported3:Mapping don't excute.4:Auto manual(In case, to disconnect <oper>communication service that excute automatically)※Not supported<format>2:Fixed number<oper> represents country code(MCC) plus network code(MNC).“ 44010”is displayed for MCC=440 and MNC=10AT+COPS?+COPS: 0,0,””,2OKAT+COPS=?+COPS:(2,””,””,”44010”,2),(3,””,””,”44020”,2),,(0,1,2,3,4),(0,1,2) OKCommand Overview Parameters/Description Comments Examples](https://usermanual.wiki/LG-Electronics-USA/L05A.Users-Manual-2/User-Guide-1100757-Page-56.png)
![124 Appendix/TroubleshootingAT+CPAS [=?] Display FOMA terminal state Displays in the form of「+CPAS : <n>」. n=0: Available to set AT commands.n=3: Available and receivingn=4: Available and receivingAT+CPAS +CPAS:0 OK AT+CPAS=? +CPAS :(0,3,4)OK AT+CPIN=″PIN″/ AT+CPIN=″PUK″ ″PIN″ [?] Command to enter the PIN code or unblocking PIN code for FOMA card.Enter the PIN1 code for ″PIN″, and enter unblocking PIN code for ″PUK″.Executing「AT+CPIN?」displays「+CPIN: <n>」.n=READY: Authenticatedn=SIM PIN: Waiting for entryn=SIM PUK: Waiting forunblocking PIN1 code entryn=ERROR: Locked(+CPIN:SIM PIN status) AT+CPIN=″1234″ OK(+CPIN:SIM PUK status) AT+CPIN=″ 12345678″,″1234″OKAT+CUSD[&F]Inquire the change or setting contents of Internet configuration related to the extra service.Form : AT+CUSD=<n>,"<str>"[,0]n=0 : middle result Do not send <m>[<str>,<dcs>] (default)n=1 : middle result Send <m>[<str>,<dcs>] Middle result : m=0 : setting finishes m=1 : information requirement from network exists.str :0∼9、#、*のみ使用可能。 <str>は""で囲むAT+CUSD=0,"xxxxxxxxx"OKAT+CUSD=1,"*148*1*0000#",0+CUSD:0,"148*7#",0OKAT+CUSD=?+CUSD: 0OKAT+CUSD=?+CUSD:(0-2)OKCommand Overview Parameters/Description Comments Examples](https://usermanual.wiki/LG-Electronics-USA/L05A.Users-Manual-2/User-Guide-1100757-Page-57.png)
![126 Appendix/TroubleshootingAT+IFC=<n>,<m> [&F][?] [=?] Set the local flow control method between the PC and the FOMA terminal.n : DCE by DTE controln=0 : No flow control.n=1 : Perform XON/XOFF control.n=2 (default): Perform RS/CS (RTS/CTS) flow control.m : DTE by DCE control.m=0 : Perform No flow control.m=1: XON/XOFF control.m=2(default) : Perform RS/CS (RTS/CTS) flow controlAT+IFC=2, 2OK AT+IFC? +IFC: 2,2OK AT+WS46=<n> [&F][?] [=?] Set the wireless network to be used by the FOMA terminal when dialing.12: GSM22: 3G (WCDMA)25: GSM+3G (WCDMA)AT+WS46? 25 OK A/ Retry a command just before performing is not needed after entering command.A/OK ATD Sending packet Sending packet:ATD*99***<cid># <cid>1∼10: + Display the APN that configured +CGDCONT ATD*99***3# CONNECT 7200000 ATE<n> [&F] Set whether to echo back the text sent from a PC.n=0 : Not echo back.n=1(default) : Echo back.ATE1 OKATI<n> Display the recognition code n=0 : Display [NTT DOCOMO] n=1 : Display the name of the FOMA terminal(Same as +GMM)n=2 : Display the FOMA terminal version(same as +GMR)n=3 : Display OKn=4 : Display the details of communication functions of the FOMA terminal.ATIONTT DoCoMo OK Command Overview Parameters/Description Comments Examples](https://usermanual.wiki/LG-Electronics-USA/L05A.Users-Manual-2/User-Guide-1100757-Page-59.png)
![127Appendix/TroubleshootingATS3=<n> [&F] [?] Set the return character (CR) to recognize the end of AT command text string.n=13(default) : only n=13 can be specified.ATS3=13 OK ATS4=<n> [&F] [?] Set the line feed (LF) character. It is positioned next to the return character (CR) if displaying the result code in alphanumeric characters.Only n=10 (default) can be specified. ATS4=10 OK ATS5=<n> [&F] [?] Set the back space (BS) character to delete the last character in the input buffer while AT commands are entered.Only n=8 (default) can be specified. ATS5=8 OK ATV<n> [&F] Set the display method of the result code.n=0 :Display in numeric characters. n=1(default): Display in text.ATV1 OK ATZ Reset the settings on the FOMA terminal with the nonvolatile memory contents. If performed during a communication, the line is disconnected.-ATZ OK Command Overview Parameters/Description Comments Examples](https://usermanual.wiki/LG-Electronics-USA/L05A.Users-Manual-2/User-Guide-1100757-Page-60.png)
![128 Appendix/TroubleshootingSupplementary Explanation of AT Commands■ Command name:+CGDCONT•OverviewSet APN when sending packet connection.•Form+CGDCONT=[<cid>[,″<PDP type>″[,″<APN>″]]]•Parameter descriptionsSet the destination (APN) when sending packets. See the following examples for command operations.<cid>※1:1∼10<PDP type>※2:PPP or IP<APN>※3:Optional※1 <cid> is the number used to control the destination (APN) for the packet communication to be registered in FOMA terminal. 1 to 10 can be registered. The default value of <cid>=1 is 「mopera.ne.jp」 and <cid>=3 is 「mopera.net」. Set cid to 2 or a number between 4 and 10.※2 <PDP type> is a protocol for packet communication.※3 <APN> is optional string that indicates each destination.•Command examplesCommand to register an APN with the name of abc (When PDP type is PPP, cid is 3)AT+CGDCONT=2,″IP″,″abc″OK•Operations without a parameterAT+CGDCONT=:Clear all the settings of <cid>.However, the setting of <cid>=1 or <cid>=3 is reset to the value when purchasing.AT+CGDCONT?:Display the current settings.■ Command name: +CGEQMIN=[Parameter]•OverviewRegister the threshold to accept the QoS (Quality of Service) sent from the network when packet communication is established.•Format+CGEQMIN=<cid>[,,<Maximum bitrateUL>[,<Maximum bitrate DL>]]]•Parameter description<cid>※1:1∼10<Maximum bitrate UL>※2:None (default)<Maximum bitrate DL>※2:None (default)※1 <cid> is a number used to manage the access point (APN) for the packet communication registered in the FOMA terminal. ※2 <Maximum bitrate UL> and <Maximum bitrate DL>indicate the minimum communication speed [kbps] of upload and download traffic respectively between the FOMA terminal and the base station. If these are set to None (default), all speeds are permissible. Be aware that a packet communication may not be established because any other speed than this is not permissible.•Command examples(1) Command to permit all speeds for both upload and download (When cid=2)AT+CGEQMIN=2OK(2) Command to permit only 5,700kbps for upload and 7,232kbps for download (When cid=2)AT+CGEQMIN=2,,5700,7232OK(3) Command to permit 5,700kbps for upload and all speeds for download (When cid=2)AT+CGEQMIN=2,,5700OK](https://usermanual.wiki/LG-Electronics-USA/L05A.Users-Manual-2/User-Guide-1100757-Page-61.png)
![129Appendix/Troubleshooting(4) Command to permit all speeds for upload and only 7,232kbps for download (When cid=4)AT+CGEQMIN=4,,,7232OK•Operations without a parameterAT+CGEQMIN=:Reset all <cid> to their defaults.AT+CGEQMIN=<cid>:Reset the specified <cid> to its default.■ Command name: +CGEQREQ=[Parameter]•OverviewSet the QoS (Quality of Service) requested to the network when packet communication is dialed.•Format+CGEQREQ=[<cid>[,,<Maximum bitrate UL>[,<Maximum bitrate DL>]]]•Parameter description<cid>※1:1∼10<Maximum bitrate UL>※2:None (default)<Maximum bitrate DL>※2:None (default)※1 <cid> is a number used to manage the access point (APN) for the packet communication registered in the FOMA terminal. ※2 <Maximum bitrate UL> and <Maximum bitrate DL>indicate the minimum communication speed [kbps] of upload and download traffic respectively between the FOMA terminal and the base station. If these are set to None (default), all speeds are permissible. Be aware that a packet communication may not be established because any other speed than this is not permissible.•Command exampleCommand to require 5,700kbps for upload and 7,232kbps for download (When cid=2)AT+CGEQREQ=2,2,5700,7232OK•Operations without a parameterAT+CGEQREQ=:Reset all <cid> to their defaultsAT+CGEQREQ=<cid>:Set the specified <cid> as default.Result Codes■ List of result codesNote•This command, (+CGDCONT, +CGEQMIN, + CGEQREQ) is not reset by [&F] and [Z], either.Numeric display Text display Description0 OK Operation performed properly1 CONNECT Connected to other party3 NO CARRIER Line disconnected4 ERROR Unable to accept command](https://usermanual.wiki/LG-Electronics-USA/L05A.Users-Manual-2/User-Guide-1100757-Page-62.png)
![131Appendix/Troubleshooting■ Communication problems■ Problems with AT Commands■ Other problemsSymptom CheckCommunications are not possibleVerify that signals are received in the service area.In the setting of Send Caller ID does not conform to the provider's instructions, communication may not be performed.→P74, P90 Check if you set the FOMA Card Setting to ″PIN1 unblocking″.→P69If set to (PIN1 Lock), launch the L-05A connection software, then change FOMA card setting to ″PIN1 unblocking″.→P71 Check the property settings of the modem and the registration of the destination (APN)Symptom Check[ERROR] appears when a command is enteredVerify that you entered a correct ATcommand.Check the properties of the terminal software to see whether a device other than the FOMA terminal is selected[OK] does not appear after an AT command is entered. Check the L-05A Communication Configuration Files (Drivers) have been installed and functioned properly.Verify that the commands start with "AT" or "at".Symptom CheckThe terminal stopped working suddenly Verify that the FOMA CARD is properly inserted to FOMA terminal.→P19Your PC operating environments may have changed because a new peripheral or software was installed. Make a confirmation with manufacturer or maker of accessory or software.The FOMA terminal is not detected if it is inserted into a USB port while installing the L-05A Communication Configuration Files (Drivers).Please confirm the followings.•Whether the PC or OS you are using is in the latest condition?(If required, apply revision program of OS or a maker.)•Whether the FOMA terminal recognizes normally when other USB devices are inserted into the USB port?•Whether the FOMA terminal operates normally when being inserted into another PC?•Whether the FOMA terminal operates normally when being reset to its default?※:For inquiries related to OS or PC, contact Microsoft or PC manufactures.Internet connection speed decreased significantlyInserting FOMA terminal directly to a PC may result in deterioration of performance depending on the type of PC, specification and degree of electromagnetic interference.Deterioration of performance may occur to the service areas where W-CDMA/HSDPA/GSM network are unstable. In this case, move to other area and try to connect again.](https://usermanual.wiki/LG-Electronics-USA/L05A.Users-Manual-2/User-Guide-1100757-Page-64.png)