LG Electronics USA L06A PCS GSM Phone User Manual L 03A English Cover 1 0
LG Electronics USA PCS GSM Phone L 03A English Cover 1 0
UserManual.wiki
>
LG Electronics USA
>
L06A User Manual
>
Users Manual 2
Contents
1.
Users Manual 1
2.
Users Manual 2
3.
Users Manual 3
4.
Users Manual 4
Users Manual 2
Navigation menu
Upload a User Manual
Namespaces
Wiki Guide
HTML
PDF
Info
Views
User Manual
Discussion / Help
Navigation
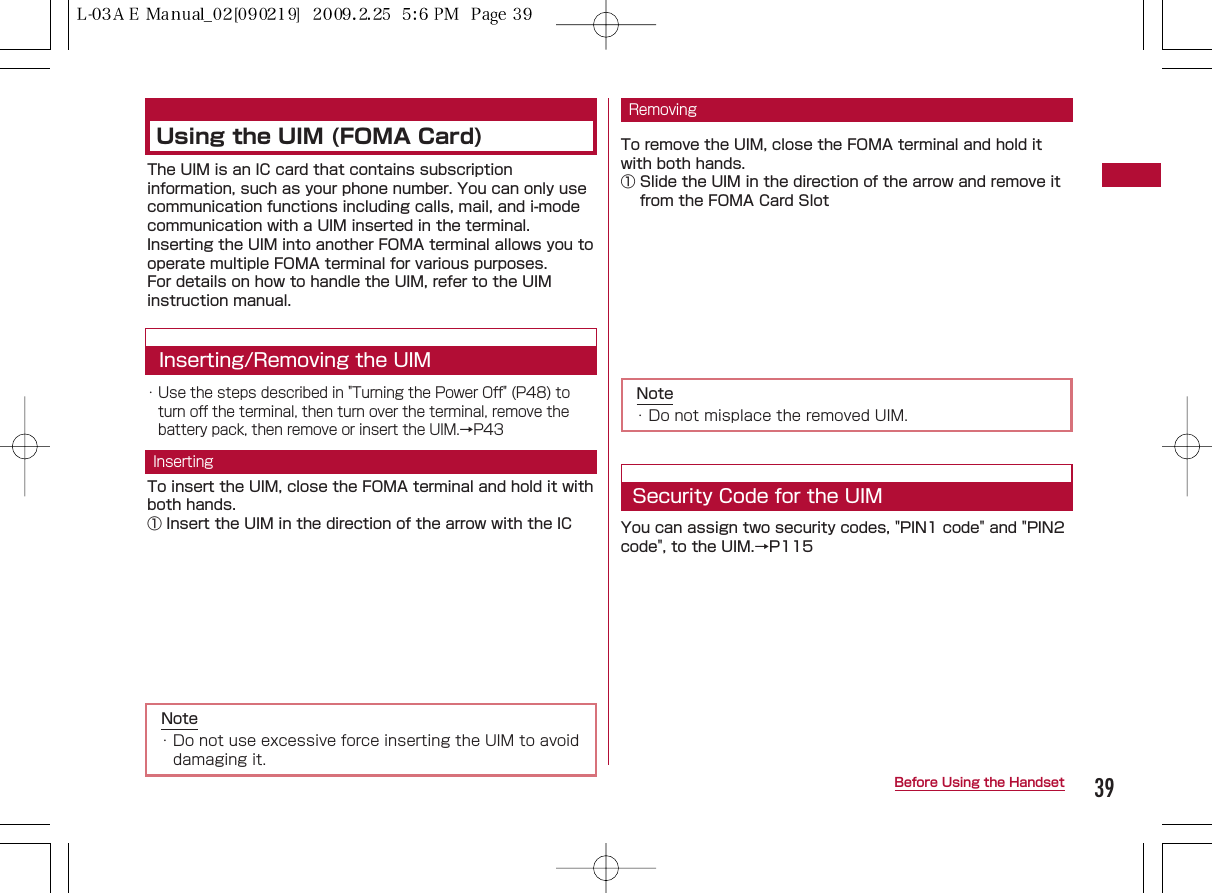
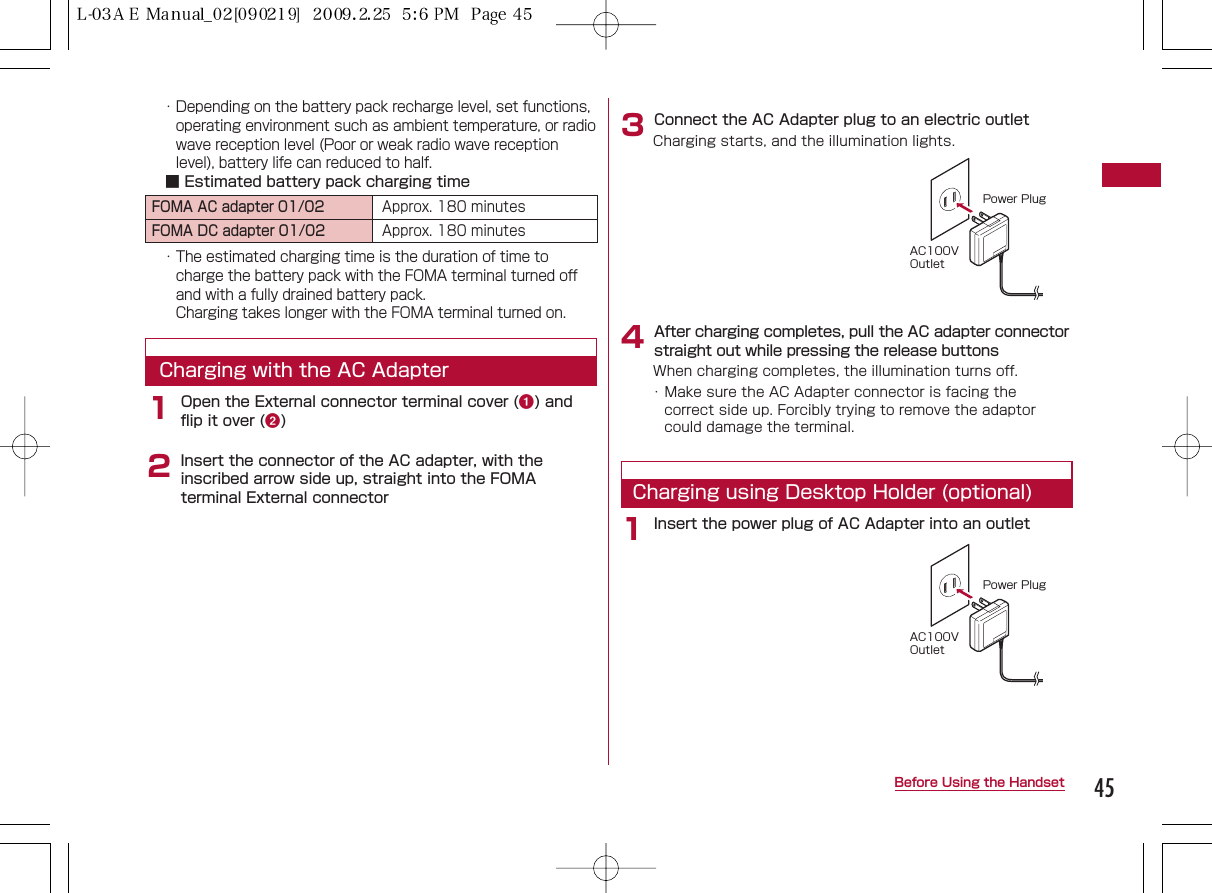
![Items displayed on the sub menu may vary depending onthe settings or registered items of the FOMA terminal.[Scroll]Set the number of lines scrolled after pressing H on a site, Scre]"1 line"/"3 lines"/"5 lines"/"Page"[Message list]Configure Message R/F list screen display.1 Line:Display only the subject in one line.2 Line:Display the subject and received date and time in twolines.1Menu item name. Press H/ F/ Eto move the cursor to theitem and press C[Select] to select.2Functional description of the item.3Operational description of the item. Perform this step afterselecting a 1.4Item names, function description of items, and operationdescription of items after items are selected.■ Description of steps starting from other than theStandby displayAt the beginning of the description, the status of the terminalor the screen to open such as "Ringing" or "List screen" is written.■ Omitting C[Select] in selection operationAs shown in 3in "Example of Operations" (P37), to explain astep to select an icon or a function from a list, operationalsteps such as pressing C[Select] are omitted.Similarly, to explain steps to enter a password or fix enteredcharacters, the operations for fixing such as C[OK] areomitted.■ Omitting Cwhen carrying out a function to make into The instruction beginning with "Place check marks" meansthat you have to enable the checkbox by pressing Cto turn to shown beside the desired item.38 Before Using the HandsetNotation Rules4Note・ If multiple sub menus such as the redial list screenand the redial detail screen are collectively described,some menu items that do not actually appear may beincluded (depending on the settings or screens).Sub Menu Example123](https://usermanual.wiki/LG-Electronics-USA/L06A.Users-Manual-2/User-Guide-1109033-Page-1.png)

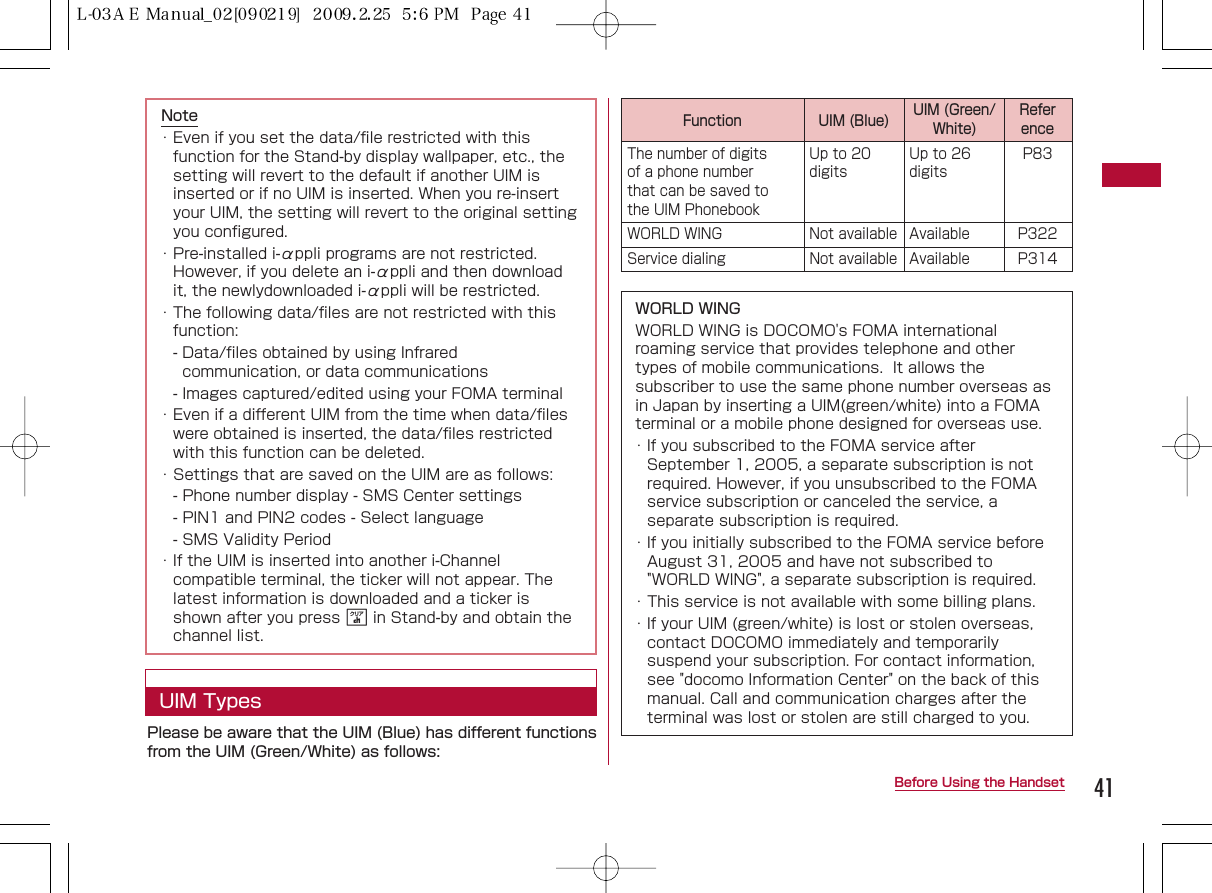

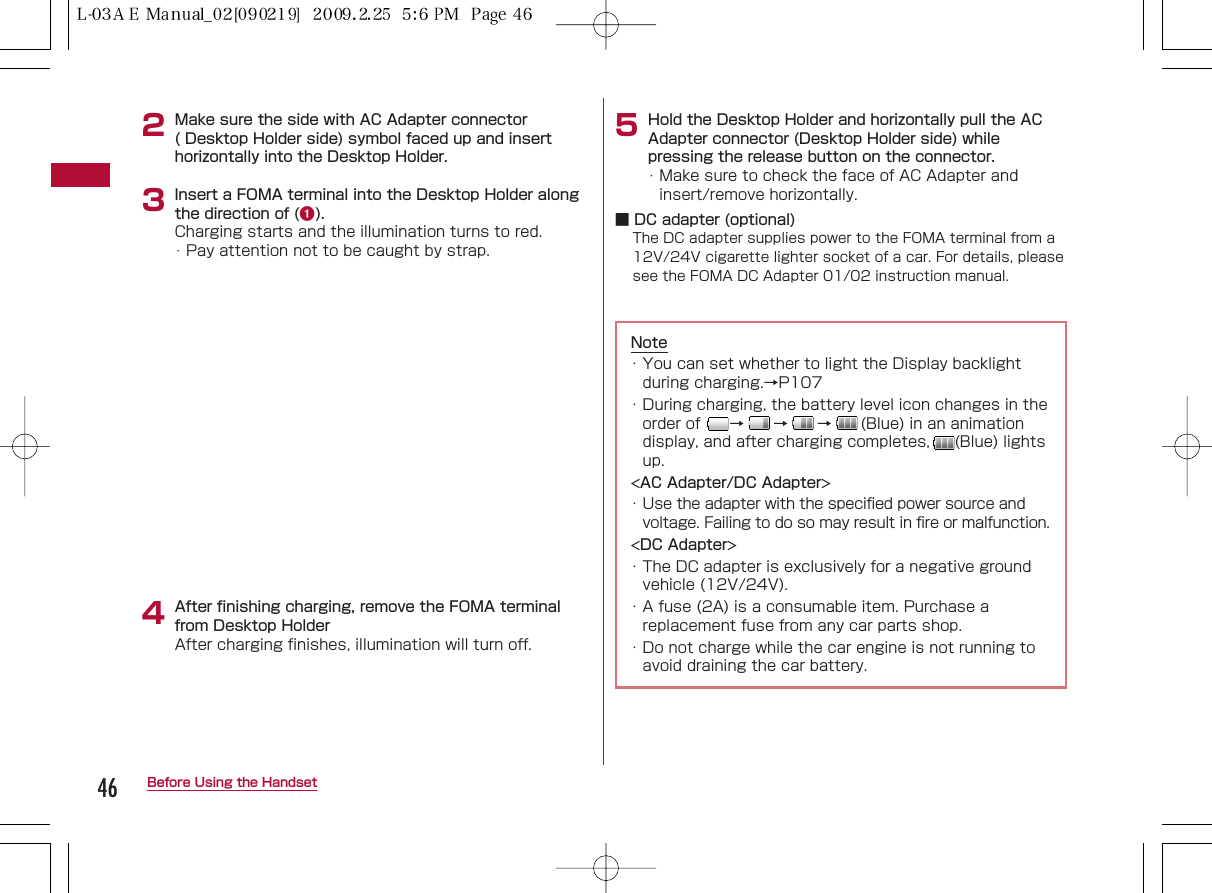
![47Before Using the HandsetAn icon indicating the approximate battery level isdisplayed at the top of the screen.(Blue): The battery is full.(Blue): The battery is getting low.(Red): The battery is almost completelyexhausted. Charge the battery.(Red): The battery is almost completelyexhausted. The terminal will turnitself off in a moment. Charge thebattery.The approximate battery level can be checked throughdisplay and sounds1M[Menu] ] (Settings) ]"Others" ]"Battery level"A warning appears, and a tone indicatingthe remaining power sounds. The imageof the battery level disappears inapproximately 3 seconds.Three beeps : The battery is full.Two beeps : The battery is getting low.One beep : The battery is almostcompletely exhaused. Charge the battery.Checking the Battery LevelBattery LevelNote・ When an icon indicating battery level is (Red) or(Red), the camera and infrared communication areunavailable.・ When the color of the icon that indicates battery levelis other than (Blue) and the Music player is started,the warning screen indicating the low battery levelappears. (This may not appear when the battery levelis Blue).Checking Battery Level with the Sound andDisplayNote・ When "Keypad tone" is set to "Silent" or "Mannermode" is activated, you will not hear the beep.When the battery pack is running outA warning message indicating that thebattery level is low and the battery needsto be charged appears, and the beep tone sounds. (Depending on the settings, the tone may not sound.) The (Red) at the top thescreen blinks. After a little while, the terminal turns itselfoff automatically.](https://usermanual.wiki/LG-Electronics-USA/L06A.Users-Manual-2/User-Guide-1109033-Page-10.png)
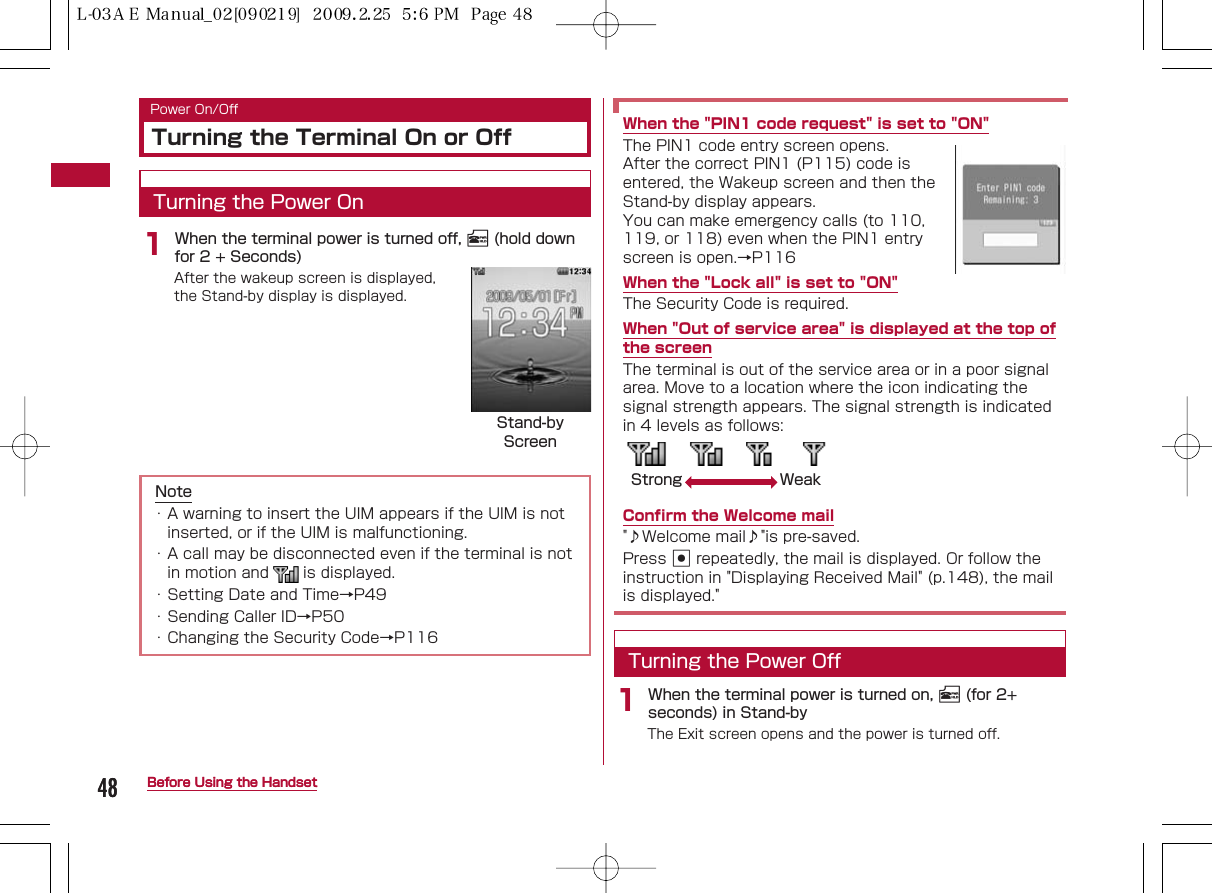
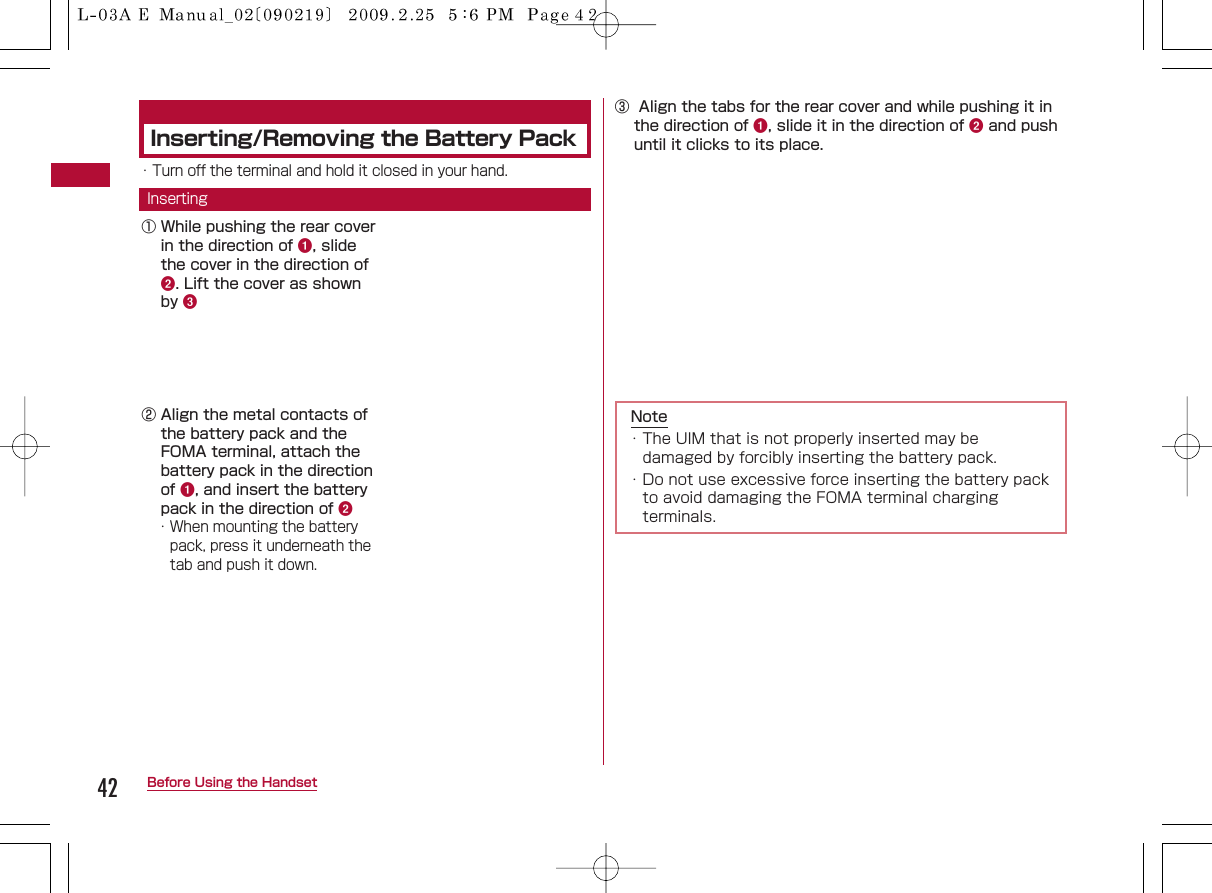
![49Before Using the HandsetYou can set to update the time automatically. The Localtime zone, Daylight Saving and Date&Time can also be set.1M[Menu] ] (Settings) ]"Date&Time" ]"Set Date&Time"2Perform the following operations[Auto time adjust]Set whether to update the time on the FOMA terminal based onthe time information from the network.ON : The date and time are updated automatically.OFF : Auto update will not be performed.[Local time zone]*Set the time zone for the current date and time. For selecting acountry or city from the country/city name list by pressing C[List], press M[Prev.] or I[Next] to switch the list by page.[Daylight saving]*Set whether to use Daylight savings time.[Set date/time]*You can manually set the date and time. To set the date, use Jto move the cursor to the place tochange the date and enter the date with the dial keys (to set thedate on the calendar screen, press C [Select] in the date entryfield ). Operations on the calendar screen→P271To set the time, use Jto move the cursor to the value tochange, enter the time with dial keys, and switch between "AM"and "PM" with C(pressing Cin the time entry field opens thetime settings screen on which you can enter a time using dialkeys and H).・ Depending on the settings in "Date&Time format" (P111), thedisplay format or order of the date and time may differ.・ You can set the value between 1980/01/01 and2099/12/31.* Available when "Auto time adjust" set to "OFF".3I[Done]Setting the Date and TimeSet date&timeDate and TimeSettingsScreenNote<Auto time set Settings>・ Time will be updated when turning the power on. Turnthe power on again if the time is not updated.・ Time may not be updated depending on the signalstrength.・ When using the FOMA terminal overseas, the time ortime zone may not be updated or displayed dependingon the network service in use. set the local time onthe World Clock.→P282・ Time is not updated when an i-αppli is running or theUIM is not inserted.・ An error of a few seconds may occur.](https://usermanual.wiki/LG-Electronics-USA/L06A.Users-Manual-2/User-Guide-1109033-Page-12.png)
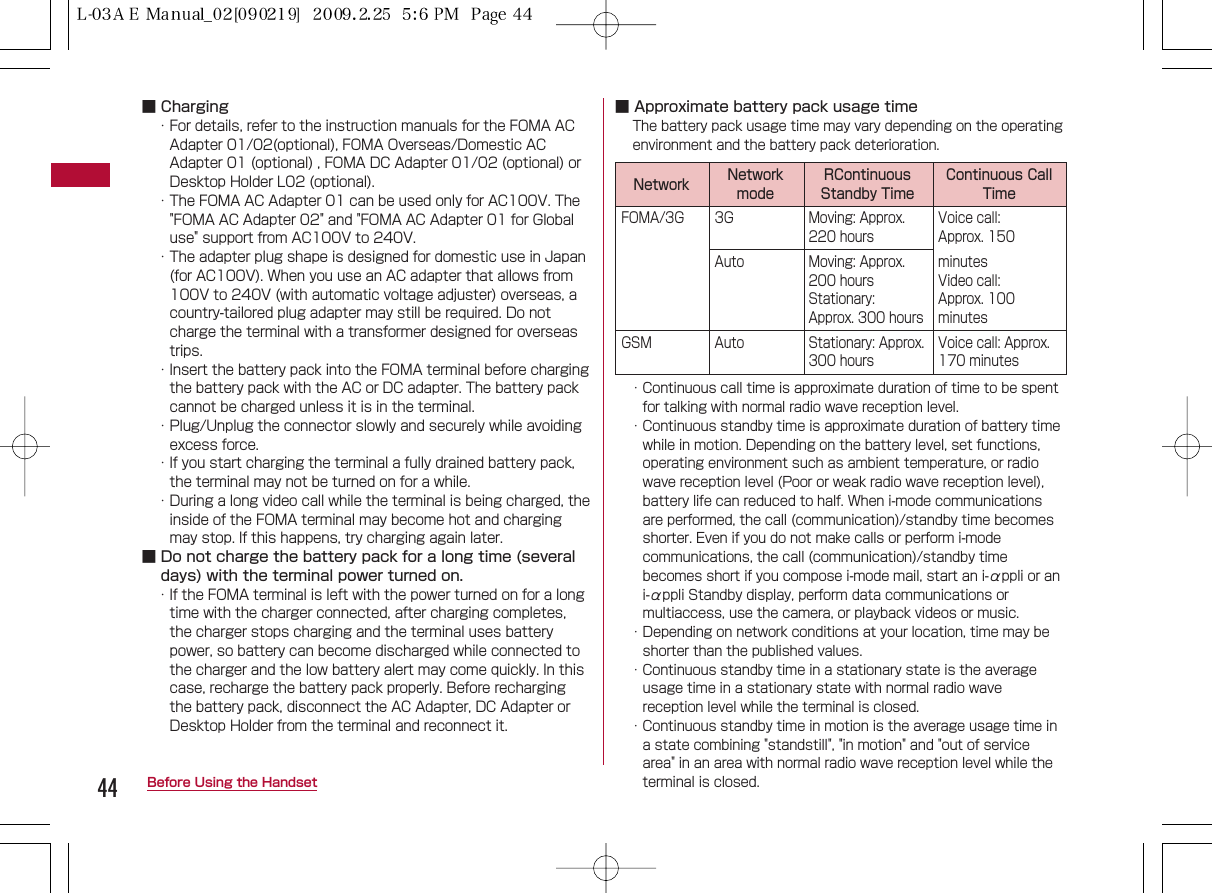
![50 Before Using the HandsetYou can set to show/hide your Caller ID to the network inadvance.・ Your Caller ID (phone number) is valuable information. Becautious about sending your Caller ID・ Caller ID notification cannot be set when "Out of service area" isdisplayed.1M[Menu] ] (Service) ]"Caller ID notification"2Perform the following operation[Activate/Deactivate]Set to show/hide the Caller ID.[Check setting]Check the status of the current setting.You can view your own phone number (My Number) savedin the UIM.1M[Menu] ](Own number)■To view the saved detailedinformationPressing C[Detail] and entering thesecurity code on the own numberscreen open the own number detailscreen. You can also save itemsother than the own number. → P279・ If you have saved a phone number other than your own number, mail address, or URL, you can make a call, create i-mode Mail, or connect to a site by moving the cursor to the item and pressing I.Sending the Caller IDCaller ID notificationViewing Your Own NumberOwn numberNote・ Your Caller ID is displayed only if the other party'sphone is capable of displaying it.・ You can set the Caller ID notification for each dialedcall. → P61Own numberscreen](https://usermanual.wiki/LG-Electronics-USA/L06A.Users-Manual-2/User-Guide-1109033-Page-13.png)
![52 Voice/Video callsVideo callsThe Videophone call can be used with a mobile phone thatsupports DOCOMO's Videophone call service.・ DOCOMO's Video call service complies with "ISO 3GPP*1standardized 3G-324M*2". DOCOMO's Video calls cannotconnect with handsets that support a different form of Videocall.*1 3GPP (3rd Generation Partnership Project) is the localstandardization organization established for thedevelopment of common technical specifications related to3rd Generation Mobile Communication Systems (IMT- 2000).*2 3G-324M is the international standard of 3rd GenerationMobile Video Phone.・ 64K (64kbps) and 32K (32kbps) are the two types ofcommunication speed when making a video call. Video calls arenot available by 32K for this FOMA terminal.・ This FOMA terminal does not support remote monitoring.Components of Video call Screen1Main windowThe other party's imageappears by default.2Sub windowYour image appears by default.3Call durationDisplayed in the format of Minutes: Seconds.4Settings icons/ Zoom Adjustment→P56/ Handsfree ON/OFF State Display→P53/ Picture mode (Camera image/Substitute image) →P561Enter a phone number・ Up to 80 digits can be entered.However, up to 32 digits can bedisplayed.・ Enter a number from "0" to "99" to viewthe Phonebook entry of thecorresponding memory number. Also,entering a number with 3 digits or more finds phone numbers containing the number from the Phonebook.→P93・ Start from the area code even for a local call.・ C [Save]: Add a new or extra phone number to thePhonebook.→P85・ I [Mail]: Create i-mode mail to the phone number that youentered.→P1311234Phone numberentry screenMaking Voice/Video callsBecause this FOMA terminal does not have an inside camera, sothe images sending to the others will be the pictures or imagescaptured by the out side camera.](https://usermanual.wiki/LG-Electronics-USA/L06A.Users-Manual-2/User-Guide-1109033-Page-15.png)
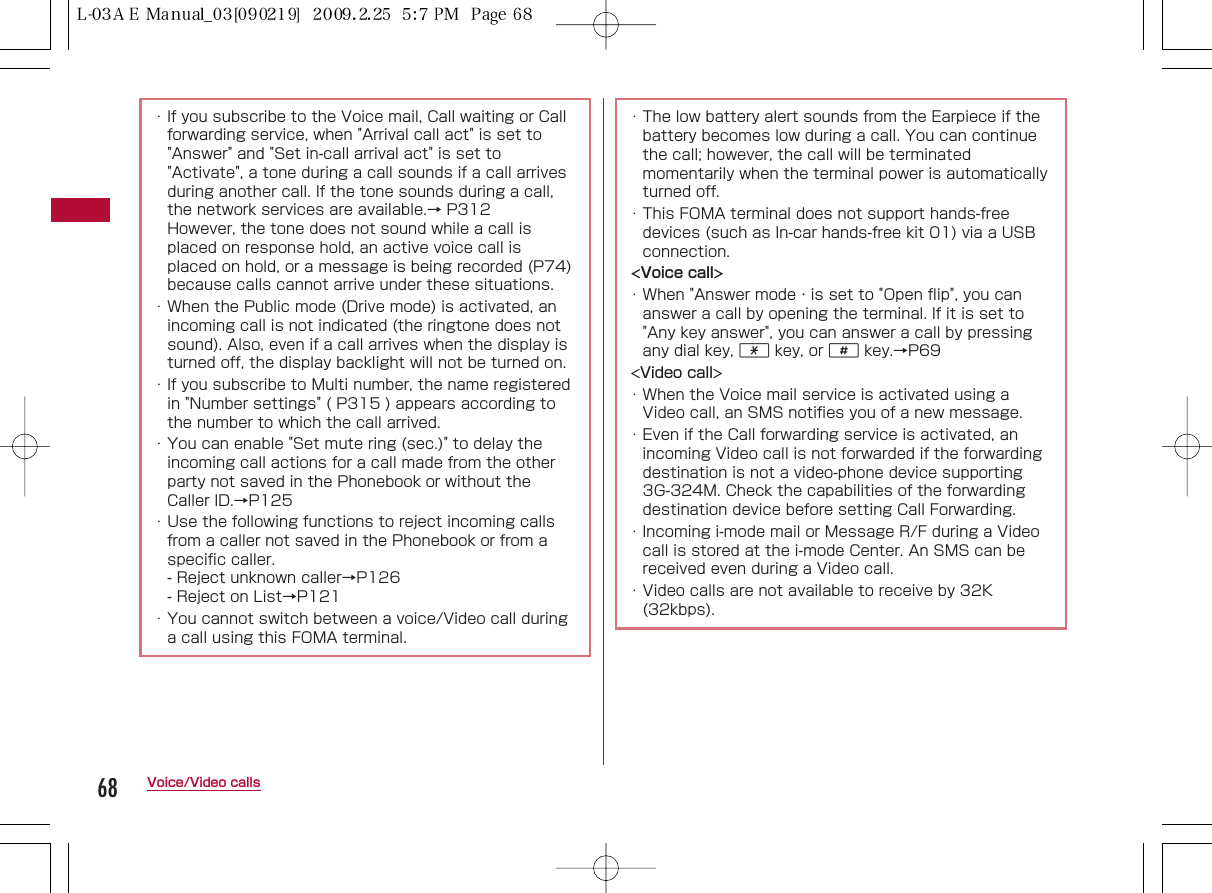
![2 To make a voice call ATo make a Video callM [Menu] ]"Video phone call"A ringback tonesounds from theearpiece, and the"Calling..." dialingscreen is displayeduntil the other partyanswers the call.・ C [Spk on/Spk off]:Toggle Hands-freeON or OFF.・ Pressing a dial key/*/#during a call allows you tosend touch-tone signals.■During a voice callDuring a voice call, screen will display setting status withicons.・ / : Hand free call ON / OFF・ / : Mute enable / Mute disable → P55・ to : Receive call volume → P70■During a Video call・ I [Substitute image/Camera image]: Switch the imageto send between the alternate image and the cameraimage.3To terminate the call P53Voice/Video callsVoice call screen Video call screenNote・ If you hear the voice guidance for a Caller ID Request,make the call again sending Caller ID.・ You cannot switch between a voice/Video call duringa call using this FOMA terminal.・ Closing the FOMA terminal during a call terminatesthe call when the "Close setting" is set to "End thecall", and holds the call when it is set to "On hold".However, if the flat-plug earphone/microphone(optional) is connected, closing the FOMA terminalwill not terminate the call or place the call on hold.・ The low battery alert sounds from the Earpiece if thebattery becomes low during a call. You can continuethe call; however, the call will be terminatedmomentarily when the terminal power is automaticallyturned off.・ This FOMA terminal does not support hands-freedevices (such as In-car hands-free kit 01) via a USBconnection.<Video calls>・ A call cannot be connected if you make a Video callto a phone without Video call capabilities, or if theother party's terminal is out of service area or turnedoff. If you make a Video call to a phone that doesn'tsupport Video calls, and you have set "Auto redial asvoice" to "ON", the call will be disconnected before theconnection is established, and the terminalautomatically redials the number as a voice call.However, if the other party uses an ISDN 64kconnection, or a video phone that does not supportthe 3G-324M standard (as of March 2009), or youdialed a wrong number, the above action may not betaken. Communication charges may apply.](https://usermanual.wiki/LG-Electronics-USA/L06A.Users-Manual-2/User-Guide-1109033-Page-16.png)
![54 Voice/Video callsMessage DescriptionThe phone number is not valid.Busy The other party is on a call (this messagemay appear when the other party's terminalis performing packet communicationdepending on the terminal).The other party is in packetcommunication.The other party's terminal is either out ofthe service area or turned off.The Caller ID was not sent (when the call ismade to the number for Visualnet , etc.).The call is being forwarded.The Call forwarding service is activated,and the forwarding destination does notsupport Video calls.Your usage fees have exceeded the limit ofyour plan (Type limit or Family wide limit).The Video call was not dialed from theofficial i-mode site Information Provider(when the call is made to V-live).Set the "Caller ID notification" to "Notify"and redial. ・ This message may appear for otherreasons, as well.Check number,then redial.Busy with packettransmissionOut of servicearea/power offSet caller ID toONYour call is being forwardedRedial using voice callUpper limit hasbeen exceeded.Connection failedPlease make yourcall from the i-mode web pageConnection failedTo correct an entered phone numberTo delete an entered digit, use L ] Kto move thecursor to the right of the digit and press Q.To add a digit, use L ] Kto move the cursor to theposition and enter the digit with a dial key.Screen Display during DialingThe other party's name is displayed if the other party'sphone number is saved in the Phonebook.If a Video call could not be madeThe following messages appear if a Video call could notbe made (depending on the other party's mobile phonemodel or subscribed network services, the displayedmessages may not describe the actual situation).<Video calls>・ If you make a Video call to an emergency numbersuch as "110", "119" or "118", a voice call will bemade automatically.・ Incoming i-mode mail or Message R/F during a Videocall is stored at the i-mode Center. An SMS can bereceived even during a Video call.・ There is a digital call charge for sending theSubstitute Image.](https://usermanual.wiki/LG-Electronics-USA/L06A.Users-Manual-2/User-Guide-1109033-Page-17.png)
![55Voice/Video calls1Phone number entry screen (P52)] M [Menu] ] Perform the followingoperations[Video phone call]Make a Video call.[Caller ID]Set whether the other party receives your Caller ID when youmake a call.→P61[Int. call]After selecting the country code to make a call, "009130010"(WORLD CALL) and the country code will be inserted at thebeginning of the phone number.→P62[Select prefix]Add the prefix number at the beginning of the entered phonenumber. You can add a prefix number only one time.→P63[Multi number]If you subscribe to Multi number, select the number to use whenmaking a call.→P315[Compose mail]Create new i-mode mail to the entered phone number.→P131[Add to phonebook]Add an entry to the Phonebook.→P84[Search phonebook]Search the Phonebook entry with the number already entered →P871Voice call screen (P53) ] M [Menu] ] Perform the following operations[New call]*1Place the active call on hold, and dial another party.[End active call]Disconnect the call.[Hold]Place the active call on hold. To cancel, press Aor C[Release].[Mute]Enable or disable to mute your voice on the other party's terminal.[Send my info.]Create i-mode mail with own number entered in the messagetext. →P131[Search phonebook]*2Search for a Phonebook entry.→P87*1 This is not available if you do not subscribe to the Call Waitingservice.*2 This is not available if you make a call using Redial orReceived calls, or the Phonebook is accessed. To use thisfunction, terminate applicable applications from the task listscreen.→P264Sub Menu on the Phone Number Entry Screen Voice Call Screen Sub Menu](https://usermanual.wiki/LG-Electronics-USA/L06A.Users-Manual-2/User-Guide-1109033-Page-18.png)
![56 Voice/Video calls1Video call screen (P53) ] M [Menu] ] Perform the following operations[End call]Disconnect the call.[Hold]Place the active call on hold. To cancel, press C [Camera] or I[Alternate image].[Camera image/Substitute image]Switch the image to send between the alternate image and thecamera image.[Camera set]Configure the camera for Video calls. Press Jto select an icon.After setting, press M [Close].Zoom :Zoom the camera image (x1 / x2).Brightness : Adjust the brightness of the camera image (High / Standard /Low).Night mode : Set this when using the camera in a dark place,etc.[Videophone set]You can set the display and lighting for Video calls. After setting,press I [Done].Display settingsOther-Me : Display the other party's image on the mainwindow and your image on the sub window.Me-Other : Display your image on the main window and theother party's image on the sub window.Other only : Display only the other party's image.Me only : Display only your image.LightAlways on : Always stays on during a call.Terminal setting : In accord with the "Backlight" settings. →P107[Screen size]Set the display size of the main window.[Visual preference]Set the image quality sent to the other party.Prefer img qual :Set priority to the image quality. This optionis effective when there is little movement.Normal : Set the sent video quality and motion tostandard.Prefer motion spd : Set priority to motion for sent images. Thisoption is effective when there is a lot ofmovement.[Search phonebook]*Search for a Phonebook entry. →P87[Own number]Display your phone number (Own number).* This is not available if you make a call using Redial or Receivedcalls, or the Phonebook is accessed. To use this function,terminate applicable applications from the task list screen.→P264Sub Menu During a Video call](https://usermanual.wiki/LG-Electronics-USA/L06A.Users-Manual-2/User-Guide-1109033-Page-19.png)
![Redial and the Received call logs can be used to makephone calls. Also, the Recent calls (sent and received) canbe used to make calls.RedialCalling the Same Party AgainRedial maintains a list of the last 30 voice or Video calls.The phone number and the calling date and time are storedin the call logs.・ If more than 30 calls are made, the most recent 30 calls areretained1Stand-by display ] R1The name saved in thePhonebookIf the caller's name is notsaved in Phonebook, thephone number will bedisplayed.2Outgoing phone call typeDialing a voice call Dialing a Video call3The other party's phonenumberIf the caller's phone numberis not saved in the Phonebook, "Unregistered" will be displayed.4Dialing an international callCalling overseas from JapanCalling from overseas during international roamingMaking an international call from overseas duringinternational roaming5Which number of Multi Number is used for dialing*/ / Basic number/Additional number 1/Additionalnumber 2* Appears if you subscribe to the Multi number service.6Call date and time2Move the cursor to the number to redial ] C1Outgoing phone call type2The name saved in thePhonebookIf the number is not savedin the Phonebook,"Unregistered" is displayed.3The other party's phonenumber4"Caller ID" setting whendialingAppears when you make a call with the Caller ID (P55) set to "Notify".5Which number of Multi Number is used for dialing*The number of Multi number used to dial is displayed asthe name registered in "Number setting" (P315).* : Appears if you subscribe to the Multi number service.6Call date and time7Call duration8Outgoing international callCalling overseas from JapanCalling from overseas during international roamingMaking an international call from overseas duringinternational roaming3 To make a voice call ATo make a Video callM [Menu] ]"Video phone call"57Voice/Video calls12456Redial list screenUsing Redial/Received Call LogsRedial detailscreen123675843](https://usermanual.wiki/LG-Electronics-USA/L06A.Users-Manual-2/User-Guide-1109033-Page-20.png)
![1The Redial list screen (P57)/Redial detail screen (P57)] M [Menu] ] Perform the following operations[Video phone call]Make a Video call.[Compose mail]Create i-mode mail to the phone number on the Redial screen. →P131[Add to phonebook]Add a number to a Phonebook entry from the redial list.→P84[Customize call]You can change the phone number of the redial list (P57) andmake a call to the number.[Change list]*Switch logs to display.Recent call :Display the recent call list screen.→P61Recent mail :Display the recent mail list screen.→P161Received Calls :Display the received call log list screen.→P59Received Mail :Display the received mail log list screen.→P161Sent Mail :Display the sent mail log list screen.→P161[Delete]Delete the selected/displayed redial entry.[Delete all]*Delete all redial entries.* Not displayed on the Detail screen.58 Voice/Video callsNote・ You can make a voice call by selecting an entry onthe Dialed Calls list screen and pressing A. You canalso make a Video call if you select M[Menu] ] "Video phone call". ・ If the same phone number is saved repeatedly in thePhonebook, the name found first in the Readingsearch is displayed.・ A call dialed with "184" or "186" will be recorded as adifferent Redial entry.・ Press I [Mail] on the Redial list screen / Redialdetail screen, to create i-mode mail to the phonenumber on the selected Redial entry.Redial List Screen / Redial Detail Screen Sub Menu](https://usermanual.wiki/LG-Electronics-USA/L06A.Users-Manual-2/User-Guide-1109033-Page-21.png)
![59Voice/Video callsReceived CallsThe Received call log maintains a list of the last 30incoming calls and Video calls. Phone numbers andreceived dates/times are stored in a call log.・ If there have been more than 30 calls received, the most recent30 calls are retained.1Stand-by display ] L1The caller's name saved inthe PhonebookIf the caller's name is notsaved, the phone numberwill be displayed. If the callerdid not send the Caller ID,the reason for No Caller IDis displayed.2Incoming phone call type/ Answered /Missedvoice call (includingRejected calls)/ Answered /Missed Video call (including Rejectedcalls)3The other party's phone number4Incoming international callIncoming international call from overseasCalling from overseas during international roaming Incoming international call from overseas duringinternational roaming5Which number of Multi Number is used for dialing*The number of Multi number to which the call arrived isdisplayed as the name registered in "Number settings".* : Appears if you subscribe to the Multi number service.6Received Date and Time2Move the cursor to a log entry ] R [View]1The name saved in thePhonebookIf the phone number is notin the Phonebook,"Unregistered" is displayed,and if the Caller ID was notreceived, "User unset" isdisplayed.2 Incoming phone call type/ Answered/Missed voice call (including Rejected calls)/ Answered/Missed videophone call (including Rejected calls)3The other party's phone number4Incoming international callIncoming international call from overseasCalling from overseas during international roamingIncoming international call from overseas duringinternational roaming5Which number of Multi Number is used for dialing*The number of Multi number to which the call arrived isdisplayed as the name registered in "Number settings"(P315).* : Appears if you subscribe to the Multi number service.6Received Date and Time3 To make a voice call ATo make a Video callM [Menu] ]"Video phone call"Received callslist screenUsing the Received Call Log124563Redial detailscreen1235647](https://usermanual.wiki/LG-Electronics-USA/L06A.Users-Manual-2/User-Guide-1109033-Page-22.png)
![60 Voice/Video calls1The Received call list screen (P59)/Received call detailscreen (P59) ] M [Menu] ] Performs the following operations[Video phone call]Make a Video call.[Compose mail]Create i-mode mail to the phone number on the Received callsscreen.→P131[Add to phonebook]Add a number to the phonebook from the Received calls.→P84[Customize call]You can change the phone number of the Received calls list(P57) and make a call to the number.[Change list]*Switch logs to display.Recent call :Display the recent mail list screen.→P61Recent mail :Display the recent call list screen.→P161Received Mail :Display the received mail log list screen.→P57Redial :Display the redial list screen→P161Sent Mail :Display the sent mail log list screen.→P161[Delete]Delete the selected/displayed Received calls entry.[Delete all]*Delete all Received Calls entries.* Not displayed on the Detail screen.Note・ You can make a voice call by selecting an entry onthe Received calls detail screen and pressing A.You can also make a Video call by selecting M[Menu] ] "Video phone call". ・ The reason for no Caller ID is displayed in the logentry of the call without Caller ID.→P124・ If the same phone number is saved repeatedly in thePhonebook, the name found first in the Readingsearch is displayed.・ The phone number dialed to make a dial-in call may bedisplayed differently from the actual number in thereceived call log entry.・ Press I [Mail] on the Received call list/detailscreen, to create i-mode mail to the phone number inthe selected received call log entry.Sub Menu of the Received Calls List/Detail Screen](https://usermanual.wiki/LG-Electronics-USA/L06A.Users-Manual-2/User-Guide-1109033-Page-23.png)
![61Voice/Video callsUp to 60 incoming and outgoing calls can be recorded in"Recent call log".・ If there have been more than 60 calls recorded, the mostrecent 60 calls are retained1Stand-by display ] AFor subsequent steps and the description of screencomponents, see "Redial" (P57) and "Received calls" (P59)sections.There are 2 ways to show/hide the Caller ID for each call:adding "184"/"186", or using the sub menu on the Phonenumber entry screen.1Enter "184" (Do not notify)/"186" (Notify) ] Enter the phone number2 To make a voice call ATo make a Video callM [Menu] ]"Video call"Example: Using the Sub menu of the Phone number entry screen1Enter the phone number ] M [Menu] ] "Caller ID" ]"Not notify"/"Notify"/"Cancel"2 To make a voice call ATo make a Video callM [Menu] ]"Video phone call"Using the Recent CallsRecent callsNote・ The sub menu of the Recent call list screen/detailscreen is the same as the one of the Redial andReceived call list screen/detail screen.→P58、P60Showing/Hiding Caller ID for Each Call184/186Showing/Hiding the Caller ID by Adding184/186Showing/Hiding the Caller ID Using the SubNote・ You can set to show/hide the Caller ID to the networkin advance. →P312](https://usermanual.wiki/LG-Electronics-USA/L06A.Users-Manual-2/User-Guide-1109033-Page-24.png)
![62 Voice/Video callsEnter "P" and a number after the phone number and make avoice call to send a push signal (DTMF) for the numberafter "P". This is useful when you use, for example, onlineticket reservation or balance inquiry services.・ The signal may not be received depending on the device on thereceiving side.1Enter the phone number ] Press * 3 times andenter "P" ] Enter the number to send ] AAfter the call is connected, the number after "P" is displayed.The displayed number is send by pressing A.WORLD CALL is an international calling service availableon DOCOMO mobile phones.FOMA service subscribers are also signed up for WORLDCALL at the time of initial subscription (except subscribersexplicitly declining this service).・ This service is available in approximately 240 countries andregions around the world.・ Charges for "WORLD CALL" are added to the monthly FOMAservice call charges.・ No initial fee and no fixed monthly charges apply.・ This service is not available with some billing plans.・ Even if the Caller ID notification is set, the Caller ID may not benotified or phone number is not displayed correctly, dependingon the telecommunication carrier. In this case, you cannotmake a call using the Received calls.・ For details on WORLD CALL, contact the "docomo InformationCenter" shown at the back of this manual.・ When using international carriers other than DOCOMO, pleasecontact the carrier directly.・ Setting Country code: Up to 50 Country codes necessary tomake an international call can be saved.・ Setting International prefix dial: Up to 1 numbers (prefixes) tobe added to the beginning of the phone number. ・ Making an international call (including to Japan) selectingregistered Country code :Register frequently used countrynames and country codes in the "Country code list" in"International call" to make a call quickly.Enter the number in the following order.1"010-Country code- Area Code (City Code) - Phone Number"Sending Touch-tone SignalsPauseMaking International CallsWORLD CALLIf an overseas party uses the terminal having video callfunction of telecommunication carrier supporting videocalls of FOMA overseas, you can make an InternationalVideo call to that party by pressing M[Menu] ]Select"Video phone call" after the following dialing procedures.・ For information on the countries where connectioncan be made and telecommunications carriers, visitthe DOCOMO website.・ The other party's image displayed on the FOMAterminal may blur, and the call may not be connecteddepending on the other party's terminal.Enter the Phone Number and Make anInternational Call](https://usermanual.wiki/LG-Electronics-USA/L06A.Users-Manual-2/User-Guide-1109033-Page-25.png)
![・ If the Area Code (City Code) starts with "", remove "0". (In afew countries, like Italy, "0" must not be removed.).・ An international call can be made by entering "009130-010-Country code - Area code (City code) - other party'sphone number.2 A■To make an international Video callM [Menu] and then select ]"Video phone call"Enter "+" at the beginning of a phone number and dial toreplace "+" with an international access codeautomatically.・ The WORLD CALL (009130010) is set to be addedautomatically by default.→P631Press 0(for 1+ seconds) to enter "+" ]Enter"Country Code - Area Code (City Code) - Phone Number"・ You can also press *twice to input "+".・ If the Area Code (City Code) starts with "", remove "0". (In afew countries, like Italy, "0" must not be removed.) 2 AInternational call:Make a call afterconverting "+" into an internationalaccess code.Original number:Make a call withoutconverting "+" into an internationalaccess code.Cancel:Cancel dialing.■To make an international Video callM [Menu] and then select ]"Video phone call"3Select a dialing methodYou can select an international access code from the submenu and add it to the phone number.1Enter "Country code - Area code (City code) - otherparty's phone number"・ If the Area Code (City Code) starts with "0", remove "0". (In a few countries, like Italy, "0" must not be removed).2M [Menu] ] "Select prefix" ] Select an internationalaccess codeThe selected international access code is inserted at thebeginning of the entered phone number.3 A■To make an international Video callM [Menu] and then select ]"Video phone call"63Voice/Video callsMaking an International Call Using "+"Dialed callconfirmationscreenNote・ This option is available only inside the FOMA networkservice area.・ If the phone number starts with "+81", "+" will not beconverted into the International Access Code.Making an International Call AddingInternational Access CodeNote・ By default, WORLD CALL (009130010) is registeredto "Prefix1". →P65](https://usermanual.wiki/LG-Electronics-USA/L06A.Users-Manual-2/User-Guide-1109033-Page-26.png)
![64 Voice/Video callsThe International Call settings can be changed.・ Even if the Caller ID notification is set, the Caller ID maynot be notified or phone number is not displayed correctly,depending on the telecommunication carrier. In this case,you cannot make a call using the Received calls.You can set whether to add an international access codeautomatically instead of "+" when you make a call byentering "+" at the beginning of the phone number.1M [Menu] ] (Settings) ] "International dial" ] "Auto assist setting" ] "Auto"/"OFF "Auto:Convert "+" automatically to the number specified inthe IDD prefix setting.None:"+" will not be coverted.When "Auto assist setting" is set to "Auto", specify theinternational access code to be added automatically.1M [Menu] ] (Settings) ] "International dial" ] "IDD prefix setting"2Perform the following operation[IDD prefix name]Enter the International Dial name used in the Auto AssistSettings.[IDD prefix code]Enters the International Dial number used in the Auto AssistSettings.3I [Done]Set whether to automatically replace leading "0", ifentered, of a phone number with "+ Country code" duringinternational roaming. Also, you can specify the Countrycode to be added automatically.1M [Menu] ] (Settings) ]"International dial" ]"Auto international dial" ]Performthe following operations[Auto international dial]Set whether to add a Country code automatically.[Target country]Set a Country code to add.2I [Done]Making an International Call EasilySetting to Add the International Access CodeAutomatically <Auto assist setting>Setting International Access Codes <International Prefix Settings>Setting Auto Assist of Country Code <Auto international dial>](https://usermanual.wiki/LG-Electronics-USA/L06A.Users-Manual-2/User-Guide-1109033-Page-27.png)
![65Voice/Video callsRegistering a Country Code <Country code list>Up to 50 Country codes necessary to make aninternational call can be saved.1M [Menu] ] (Settings) ]"International dial" ]"Country code list"2M [Menu] ] Perform the following operations・ C [Edit]: Edit the selected county code.[Country]Register a name of the Country code. Up to 7 full-pitch or 14halfpitch characters can be entered.[Country code]5 Up to 5 digits can be entered.3I [Done]1"Country code list" screen (P65) ] M [Menu] ] Perform the following operations[Add new]Go to Step 2 (P65) in "Registering Country Codes "<CountryCode>" here.".[Edit]Edit the selected country code. Go to Step 2 (P65) in"Registering Country Codes "<Country Code>" here.".[Delete]Delete the selected country code.[Delete all]Delete all country codes.Up to 3 numbers (prefixes) to be added to the beginning ofthe phone number such as an international access code,"184", or "186 can be saved.1M [Menu] ] (Settings) ] "Call/VT/Dialing" ] "Prefix dial"Setting the Prefix to be Addedto a Phone NumberPrefix dialCountry code listscreenSub menu of the "Country code list" screenNote<Edit>・ You can edit the pre-installed country codes.<Delete>・ You cannot delete the country code that is set to beadded automatically in "Auto international dial" (P64).](https://usermanual.wiki/LG-Electronics-USA/L06A.Users-Manual-2/User-Guide-1109033-Page-28.png)
![2Select a Prefix entry field ] Enter the Number ] I [Done]・ Up to ten digits can be entered as a prefix.You can set whether digits after ":" in a phone numberwith a ":" are identified as a sub-address. A sub-address isused to access a specific device connected to an ISDNline or to select contents on "V live".1M [Menu] ] (Settings) ] "Call/VT/Dialing" ] "Sub-address setting" ] "ON"/"OFF"ON :Identify the address after ":" as a sub-address.OFF:The address after ":" will not be identified as asubaddress.You can set an alarm that keeps sounding until a voice orVideo call is reconnected when the call was disconnecteddue to weak signals.1M [Menu] ] (Settings) ] "Call/VT/Dialing" ] "Callfeature" ] "Reconnect alarm" ] Select an AlarmAlarm off :Set not to sound an alarm.Low alarm :Set to Low alarm.High alarm:Set to High alarm.Noise Reduction suppresses background noises. The otherparty can hear your voice clearer even in a noisy place.66 Voice/Video callsNote・ Do not add Pauses and the such to the prefix. If theyare present, the call can not be connected.Making a Call by Specifying aSub AddressSub AddressNote・ ":" is not identified as a delimiter of a sub-address if:- ":" is entered at the beginning of the phone number.- A specific number such as "184" or "186" is enteredat the beginning of the phone number and ":" isentered right after it.Reconnecting automatically when acall is disconnectedReconnect AlarmNote・ Duration for the reconnection is available variesdepending on the usage and the signal strength.・ If the signal suddenly worsens, the call may bedisconnected without the alarm sounding.・ The billed airtime will continue during thereconnection attempt.・ If the call is disconnected, the other party will hearnothing.Clarifying Your Voice in NoisyLocationsNoise Reduction](https://usermanual.wiki/LG-Electronics-USA/L06A.Users-Manual-2/User-Guide-1109033-Page-29.png)
![67Voice/Video calls1M [Menu] ] (Settings) ] "Call/VT/Dialing" ] "Callfeature" ] "Noise reduction" ] "ON"/"OFF"ON :Activate Noise Reduction.OFF:Deactivate Noise Reduction.1An incoming callarrivesThe ring tone sounds.・ P:Place the call onresponse hold. →P70■During a voice call・ I [Silent]: Stop thering tone or vibration.Pressing I [Reject]again rejects thecall.*:When "Manner mode" is activated or "Incoming call vol."in "Original manner mode" is set to "Silent", press I[Reject] to reject an incoming call.■When a Video call is arriving・ C [Image]: Answer the call using the substitute image.2 AAnswer the call.・ C[Spk on/Spk off]: Toggle Hands-free ON or OFF.・ Pressing a dial key/*/#during a call allows you tosend touch-tone signals.■During a Video call・ I[Substitute image/Camera image]: Switch the imageto send between the alternate image and the cameraimage.3To terminate the call, PReceiving Voice/Video callsIncoming videocall screenIncoming voicecall screenWhen the caller sent the Caller IDWhen the caller is registered in the Phonebook, thephone number and registered name appear.When the caller did not send the Caller IDThe reason for no Caller ID is displayed instead of aphone number.→P124Note・ The incoming call actions such as a ring tone orvibration vary depending on the settings in "Profile" orthe settings saved in the Phonebook.→P80, P98,P100・ When "Manner mode" is activated, the ringtone doesnot sound. However, if "Original manner mode" isactivated, the ring tone may sound depending on thesettings.→P102・ Closing the FOMA terminal during a call terminatesthe call when the "Close setting" is set to "End thecall", and holds the call when it is set to "On Hold".However, if the flat-plug headphone/microphone(optional) is connected, closing the FOMA terminalwill not terminate the call or place the call on hold.](https://usermanual.wiki/LG-Electronics-USA/L06A.Users-Manual-2/User-Guide-1109033-Page-30.png)
![69Voice/Video callsSetting How to AnswerIncoming Voice CallsAnswer mode1Incoming call screen (P67) ] M [Menu] ] Perform the following operations[Voice mail]*1Connect the incoming call to the Voice mail service center.[Call rejection]Reject an incoming call and hang up.[Call forwarding]*2Transfer an incoming call to a specified number.*1 This is not available unless you subscribe to the Voice mailservice.*2 This is not available unless you subscribed to the Callforwarding service or you have specified a forwarding number.You can set to answer an incoming voice call by openingthe FOMA terminal (Open flip) or pressing a dial key (Anykey answer) in addition to A.1M [Menu] ] (Settings) ] "Call/VT/Dialing" ]"Incoming call " ] "Answer mode"2Perform the following operation[Open flip]You can answer a call by opening the FOMA terminal.[Any key answer]You can answer a call by pressing a dial key, *, #in additionto A.[SEND key only]You can answer a call by pressing A.Incoming Call Screen Sub Menu](https://usermanual.wiki/LG-Electronics-USA/L06A.Users-Manual-2/User-Guide-1109033-Page-32.png)
![Ending or Holding Calls byClosing the FOMA TerminalClose settings1M [Menu] ] (Settings) ] "Call/VT/ Dialing" ] "Callfeature" ] "Close setting" ] Select conditions whenthe terminal is closedEnd the call :End the call.On Hold :Place the active call on hold.Mute :The call continues, however, your voicecannot be heard by the other party.The Receiver volume can be adjusted in 7 levels from 1 to7.1Incoming call screen (P53) ] F/E・ F: Increase the volume.・ E: Decreases the volume.The ring volume can be adjusted in 8 levels from 0 to 7.1Incoming call volume (P67) ] F/EPress each of F/Echanges the volume.・ If no action is taken for approximately 2 seconds, thesound volume adjustment screen closes automatically andthe volume is set.1Incoming call screen (P67) ] PThe tone set in the "On hold tone" (P71) is played. Theimage set in the "Response holdimage" (P76) appearsfor Video calls.70 Voice/Video callsVideo call holdscreenVoice call holdscreenAdjusting the Volume during a CallReceiver volumeNote・ The adjusted Receiver volume will be retained afterthe call.・ "Receiver volume" in "Volume" (P100) is alsochanged.Adjusting the Ring VolumeIncoming call volumeNote・ This is not available when Manner mode is activated.・ "Incoming call" in "Volume" (P99) is also changed.Placing a Call on Hold When YouCannot Answer a Call ImmediatelyOn hold](https://usermanual.wiki/LG-Electronics-USA/L06A.Users-Manual-2/User-Guide-1109033-Page-33.png)
![2When you can resume the call Aor C[Release]・ You can also cancel the hold on a Video call by pressingC[Camera]. If you press I [Substitute Image] to cancel thehold, the alternate image will be sent to the other party.■To terminate a voice call/Video callPress P.You can select to play one of the 3 on-hold-tones(guidance) to the callerwhen you place the call on responsehold.1M [Menu] ] (Settings) ] "Call/VT/Dialing" ]"Incoming call" ] "On hold tone" ] "Hold tone 1"/"Hold tone 2"/"Hold tone 3"・ I [Play]: Play back the hold tone.You can select one of the 3 on-hold-tones to play for thecaller on hold.1M [Menu] ] (Settings) ] "Call/VT/Dialing" ] "Call feature" ] "Holding tone" ] "Hold tone 1"/"Hold tone 2"/"Hold tone 3"・ I [Play]: Play back the hold tone.Public mode (Drive mode) is an automatic response serviceto assist in observing manners in public locations. WhenPublic mode (Drive mode) is activated, a voice guidance isplayed to the caller indicating that you are driving or at aplace where you cannot talk (such as on a train, bus, or in amovie theater) and cannot answer the call, and the call isdisconnected.・ You can set or cancel Public mode (Drive mode) only inStandby (even when "Out of service area" is displayed).・ This option is not available during data communication.・ Voice mail service (*1), Call forwarding service (*1), and CallerID request service (*2) take priority over Public mode.*1 Voice calls with the ring time set to other than "0 Sec." theservice is activated after the guidance for Public mode.*2 If the other party sends the Caller ID, Public mode isactivated.・ Public mode is not activated for calls you reject using Nuisancecall blocking service.1The Stand-by display ]* more than 1 secondWhen a call arrives, a voice guidance is played in Japanesesaying that "The person you are calling is currently driving orin the area where mobile phones should not be used. Pleasecall again later" is played.71Voice/Video callsNote・ The other party is charged even during a hold.・ If you subscribe to the Voice mail service/Callforwarding service, you can connect the incoming callto the Voicemail service center/forward the incomingcall to the specified phone number.→P306, P309Setting the "On Hold Tone"On hold toneSetting the Holding ToneHolding toneUsing Public Mode (Drive Mode)Public Mode (Drive Mode)](https://usermanual.wiki/LG-Electronics-USA/L06A.Users-Manual-2/User-Guide-1109033-Page-34.png)
![72 Voice/Video callsPublic mode (Power Off) is an automatic response serviceto assist in observing manners in public locations. WhenPublic mode (Power Off) is set, when a call arrives whilethe power is turned off, a voice guidance is played to thecaller indicating that you are at a place where the terminalmust be turned off (such as in hospitals, in aircraft, or nearpriority seats on a train) and cannot answer the call, andthe call is disconnected.1Enter ":25251" ] APublic mode (Power Off) is activated (there is no change forthe Stand-by display). After Public mode (Power Off) is set, when a call arrives whilethe power is turned off, "The person you are calling iscurrently in the area where mobile phone use is prohibitedand cannot answer the call. Please call again later" is played.When Public mode (Drive mode) is activatedEven when a call arrives to your terminal, the ringtonedoes not sound. appears on the Stand-by display, andthe call is recorded in the Received call log.A voice guidance indicating that you are driving or youare at a location where you cannot use the terminal isplayed to the caller, and the call is disconnected.To deactivate Public mode (Drive mode)Press *(for 1+ seconds) in Stand-by.Note・ appears at the top of the screen when Publicmode (Drive mode) is activated.・ Even when Public mode (Drive mode) is activated, youcan make calls as usual.・ If Manner mode is activated concurrently, Publicmode (Drive mode) settings take precedence.・ Tones other than from operations (ring tones oralarms, etc.) do not sound when Public mode (Drivemode) is activated.・ If "Alarm", "Schedule", or "To do" alarm reaches thespecified time while Public mode (Drive mode) isactivated, the alarm tone does not sound and thealarm screen and illumination does not appear. Thealarm setting remains and the icon on the Stand-bydisplay is still displayed. P267・ Even if mail arrives when Public mode (Drive mode) isactivated, incoming mail actions such as soundingthe ring tone, or vibrating the FOMA terminal will nottake place.Using Public Mode (Power Off)Public Mode (Power OFF)After activating Public mode (Power Off)Public mode (Power Off) is activated until it isdeactivated by dialing ":25250". Turning the power ondoes not deactivate the mode. Public mode (Power Off)voice guidance is played even when you are out ofservice area or in a place with weak signals. A voiceguidance indicating that you are at a location where youmust turn the terminal off is played to the caller, and thecall is disconnected.To deactivate Public mode (Power Off)Enter ":25250" and press A.To confirm the setting of Public mode (Power OFF)Enter ":25259" and press A.](https://usermanual.wiki/LG-Electronics-USA/L06A.Users-Manual-2/User-Guide-1109033-Page-35.png)
![If you could not answer a call, the Missed call notificationscreen opens on the Stand-by display. The Received callslist screen can be accessed from the icon, allowing you tocheck the caller.1An incoming call terminatesThe Missed call icon appears on the Stand-by display. The number of the icon represents number of missed calls.2C]Kto select The Received call list screen (P59) appears.When Record message is activated, if you cannot answer avoice call, the voice guidance is played and the caller'smessage is recorded.・ Up to 5 messages can be recorded with up to 15 seconds permessage.・ Record message does not start when a Video call arrives. TheFOMA terminal answers the call normally.1M [Menu] ] (LifeKit) ]"Record message" ]"Record msg. settings"2Perform the following operation・ C [List]: List of items is displayed.[Activate record msg.]When activate Record message, set to "ON".[To answer]*Enter the time after a call arrives and before Record messagestarts between 0 and 120 seconds.73Voice/Video callsChecking Missed CallsMissed CallStand-byMissed call icon(The number indicatesthe number of calls).Note・ After the Received call list screen opens, willdisappear. You can also select and hold Qfor 1+seconds to clear the icon.Recording a Voice Message from aCaller When You Cannot Answer aCallRecord MessageSetting the Record Message](https://usermanual.wiki/LG-Electronics-USA/L06A.Users-Manual-2/User-Guide-1109033-Page-36.png)
![[Answer message]*Select an answer message.・ I You can listen to the response message.*Available when "Activate record msg." is set to "ON".3I [Done] When a voice call arrived, the caller's voice is recorded.■To talk with the caller while the response message isplayed or a message is being recordedPress A.■To play a recorded messageIn Stand-by, press C[OK]] Jand then select (numberis number of items) or press Ufor 1+ seconds. The RecordMessage list screen (P75) is displayed.・ will disappear after the recorded message is deleted.74 Voice/Video callsNote・ appears at the top of the screen when the RecordMessage is activated.<Response Time>・ If the set Response time is longer than the setringing time for the Voice mail service/Call forwardingservice, a network service takes precedence.・ If the response time is set shorter than the set "Setmute ring (sec.)" (P125), Record message startswithout ringing.When a Call Arrives with Record Message ActivatedA call is arrivingThe set time has elapsedRecordedA new Record message iconappears (the number indicatesthe number of calls)The Stand-bydisplay opensPlaying a responsemessageRecording amessage](https://usermanual.wiki/LG-Electronics-USA/L06A.Users-Manual-2/User-Guide-1109033-Page-37.png)
![75Voice/Video calls1M [Menu] ] (LifeKit)]"Record message" ]"Record msg. list"・ I [Delete]: The selected recordedmessage is deleted.■To delete all recorded messages M[Menu] on the Record Message listscreen ] Select "Delete all".2Move the cursor to the recorded message ] C [Play]The recorded message is played.・ C [Stop]:Stop the message.・ Q:Return to the Record Message list screen.Even if Record Massage is disabled, you can record thecaller's message with easy operation.1Incoming Call Screen (P67) ] Efor 1+ secondsCaller's message will be recorded after streaming aguidance.1M [Menu] ] (Settings) ] "Call/VT/Dialing" ] "Videophone" ] "Substitute image" ] "Default"/"Select image"] I [Done]・ When "Select image" is selected, press D]C[List] inthe "Select file" field and then select from the imagessaved in "My picture" in "Data box".→P239Note・ When "圏外" is displayed, the terminal is turned off, or"Public mode (Drive mode)" is activated, messagescannot be recorded.・ If a call arrives when the Additional guidance is beingplayed or when a message is being recorded inRecord message, the call is rejected.Playing/Deleting Messages in RecordMessageRecord messagelist screenRecording a Message from a CallerIf You Cannot Answer the Call WhileRingingQuick Record MessageNote・ If 5 messages are already recorded, "RecordMessage" will not start and you cannot record thecaller's message.Setting the Image to Send to theOther PartySetting the Substitute ImageSubstitute image](https://usermanual.wiki/LG-Electronics-USA/L06A.Users-Manual-2/User-Guide-1109033-Page-38.png)
![1M [Menu] ] (Settings) ] "Call/VT/Dialing" ]"Video Phone" ]"Response hold image" ]"Default"/"Select image" ]I [Done]・ When "Select image" is selected, press D ]C[List] in the"Select file" field and then select from the images saved in"My picture" in "Data box".→P2391M [Menu] ] (Settings) ] "Call/VT/Dialing" ] "Video phone" ] "Holding image" ] "Default"/"Select image" ] I[Done]・ When "Select image" is selected, press D ]C[List] in the"Select file" field and then select from the images saved in"My picture" in "Data box".→P2391M [Menu] ] (Settings) ]"Call/VT/Dialing" ] "Video phone" ] "Videophone set"2Perform the following operation・ C [List]: List of items is displayed.[Display setting]Set whether the image is displayed on the main window or subwindow for Video calls.Other-Me :The other party's image is displayed on the mainwindow, and your image on the sub window.Me-Other :Your image is displayed on the main window, and theother party's image on the sub window.Other only:Display only the other party's image.Me only :Display only your image.[Send camera image]Set whether your camera image is sent to the other party. When "OFF" is set, the other party receives the substitute image.[Screen size]Set the display size of the main window.[Visual preference]Set the image quality sent to the other party.Prefer motion spd:The image is sent with maximized imagequality. This option is effective when there islittle movement.Normal :Set the sent video quality and motion tostandard.Prefer img qual :Set priority to motion for sent images. This option is effective when there is a lot ofmovement.76 Voice/Video callsSetting the Response Hold ImageResponse hold imageSetting the Response Hold ImageResponse hold imageSetting the Holding ImageHolding imageChanging the Video call SettingsVideo phone settings](https://usermanual.wiki/LG-Electronics-USA/L06A.Users-Manual-2/User-Guide-1109033-Page-39.png)
![77Voice/Video calls[Light]Set the talking screen's backlight level.Always on :Always stays on during a call.Terminal setting :In accord with the "Backlight" settings.→P107[Auto redial as voice]You can set whether to automatically redial after switching to avoice call if the terminal of the other party does not support videocalls.[Hand-free switch]Set whether to use Hands-free during a Video call.3I [Done]](https://usermanual.wiki/LG-Electronics-USA/L06A.Users-Manual-2/User-Guide-1109033-Page-40.png)

![There are two Phonebooks: one is saved on the FOMAterminal (Phone) and the other is saved on the UIM. The following can be saved/set for each Phonebook.* Depending on the saved contents, 1000 entries may notbe saved.Note that the service counter such as a docomo shopmay not be able to copy Phonebook data from your existingFOMA terminal to the new one, depending on thespecifications.1The Stand-by display ]D(for 1+seconds)2Perform the following operations[ Save to]Select the saving location. This section explains the case where"Terminal" is specified as the saving destination. When "UIM" isspecified as the saving destination, the Add to UIM Phonebookscreen is displayed. →P83[ Memory No.]The smallest un-assigned number is allocated to a new recordautomatically. You can still re-allocate it to your favorite numberfrom 000 to 999 manually.[ Name]Up to 16 full-pitch or 32 half-pitch characters can be entered.Enter using Kanji, Hiragana, Pictographs, symbols, alphanumericcharacters, or Katakana.80 PhonebookAdd to Phonebookscreen (FOMAterminal)Phonebook on the FOMA TerminalFOMA terminalPhonebook UIM PhonebookItemUp to 1000 entries*15331 group1Secret code, Ringtone, Mail tone, etc.Name(Reading)PhoneNumberMail AddressGroupImageOther settingitemsUp to 50 11111 groupNot availableNot availableNumber ofEntriesEntryDetailsNote・ If you insert your UIM into another FOMA terminal,your Phonebook data is available on it.Saving to the FOMA TerminalPhonebook](https://usermanual.wiki/LG-Electronics-USA/L06A.Users-Manual-2/User-Guide-1109033-Page-43.png)
![[ Reading]Enter or edit when necessary.Up to 32 half-pitch characters canbe entered. Enter using Katakana, alphanumeric characters, orsymbols.[ Phone number]Up to 26 digits can be entered.] Enter the phone number ]Select an icon・ You can select "International dial", "Select prefix" or "Cancel" bypressing M[Menu] on the Phone number entry screen. PressI[Cancel] to cancel the entry.[ Mail address]Up to 50 half-pitch characters can be entered. Enter usingalphanumeric characters or symbols.] Enter the mail address ]Select an icon[ Secret code]*1Enter the security code, and set the secret code. ] Enter the Terminal security code ] Select an icon for thephone number/mail address ] Enter the secret code[ (Select a group)]You can select from among 31 types of groups, from "No groupand from "グループ1 (Group1)" to "グループ30 (Group 30)". Groupscan be used for the Group search (P87)[ Image]*2 *3Select an image, or i-motion movie to be displayed whensending/receiving calls or when checking a Phonebook entry.Character : Set the Character image. Press Hto selecta category (hair, face, top, bottom,accessories, and scenery), and press Jtoselect an item from the selected category.After the selection, press C[Done].My picture : Select from images saved in "My picture" inthe "Data box".→P239i-motion : Select a video/i-motion movie saved in "i-motion" in the "Data box".→P249 Take picture : Start the camera, and set the captured stillimage.→P200Terminal setting : In accord with the "Call display" settings.→P105[ Ringtone]*2 *3Select a ring tone for incoming voice/video calls from the callersaved in the Phonebook.Music : Select a Chaku-Uta-Full®song saved in"Music" in the "Data box". →P217Go to Step 3 (P214) in "Setting a Chaku-Uta-Full®Song as a Ring Tone".Melody : Select from melodies saved in "Melody" inthe "Data box".→P254i-motion : Select a video/i-motion movie saved in "i-motion" in the "Data box".→P249Terminal setting :In accord with the "Select ring tone" setting.→ P98[ Mail ringtone]Select a ring tone to be played for incoming mail from the sendersaved in the Phonebook.・ Available set items are the same as for Ringtone.[ URL]Up to 256 half-pitch characters can be entered.[ Zip code]Up to 7 half-pitch characters can be entered.81Phonebook](https://usermanual.wiki/LG-Electronics-USA/L06A.Users-Manual-2/User-Guide-1109033-Page-44.png)
![[ Home address]Up to 100 full-pitch or 200 half-pitch characters can be entered.Enter using Kanji, Hiragana, Pictographs, symbols, alphanumericcharacters, or Katakana.[ Company name]Up to 50 full-pitch or 100 half-pitch characters can be entered.Enter using Kanji, Hiragana, Pictographs, symbols, alphanumericcharacters, or Katakana.[ Job title]Up to 50 full-pitch or 100 half-pitch characters can be entered.Enter using Kanji, Hiragana, Pictographs, symbols, alphanumericcharacters, or Katakana.[ Co. zip code]Up to 7 half-pitch characters can be entered.[ Co. address]Up to 100 full-pitch or 200 half-pitch characters can be entered.Enter using Kanji, Hiragana, Pictographs, symbols, alphanumericcharacters, or Katakana.[ Memo]Up to 100 full-pitch or 200 half-pitch characters can be entered.Enter using Kanji, Hiragana, Pictographs, symbols, alphanumericcharacters, or Katakana.[ (Birthday)]Enter the birthday[ Substitute image]Set the substitute image for a video call.Data box : Select from images saved in "My picture" inthe "Data box".→P239Terminal setting : In accord with the "Call display" settings. →P105[ (Secret)]This option appears when Secret mode (P121) is set to "On". Set this option to "ON" if you want to save the createdPhonebook entry as secret data.*1 For details about the Secret code, refer to "Mobile PhoneUser's Guide [i-mode] FOMA version".*2 If you select "Terminal setting" either for "Select ring tone"(P95) or "Call display"(P105) and you specify a movie/i-motion movie with video/audio as the ring tone or calldisplay for a specific caller, this option will be overridden andthe movie/i-motion will be invoked and played when a call fromthat caller arrives.*3 If you specify a movie/i-motion movie with video/audio for"Display setting", the same file will be set for "Call display"automatically, and vice versa.3I[Done]82 PhonebookNote<Secret code>・ If you add a new mail address defined as "Phone number+ secret code@docomo.ne.jp" to the Phonebook, you maynot send mail or reply to that contact. Save the mailaddress in the format "Phone number@docomo.ne.jp"first, then insert the Secret code.<Image>・ Up to 100K Image can be set.](https://usermanual.wiki/LG-Electronics-USA/L06A.Users-Manual-2/User-Guide-1109033-Page-45.png)
![1"Add to phonebook" screen (P80) ] (Save to) field ]"UIM"2Perform the following operations [ (Save to)]Select the saving location. When "Terminal" is specified as thesaving destination, the FOMA terminal (Phone) phonebook entryscreen is displayed.→P83[ Name]Up to 10 full-pitch or 21 half-pitch characters can be entered.Enter using Kanji, Hiragana, symbols, alphanumeric characters, orKatakana.[ Reading]Enter or edit when necessary. Up to 12 full-pitch or 25 half-pitchcharacters can be entered. Enter using full-pitch katakana,halfpitch alphanumeric characters, or half-pitch symbols.[ Phone number]For a green or white UIM, up to 26 digits can be entered. For ablue UIM, up to 20 digits can be entered.・ You can select "International dial", "Select prefix" or "Cancel" bypressing M[Menu] on the Phone number entry screen. PressI[Cancel] to cancel the entry.[ Mail address]Up to 50 half-pitch characters can be entered. Enter usingalphanumeric characters or symbols.[ (Select a group)]You can select from among 11 types of groups, from "No group"and from "グループ1 (Group1)" to "グループ10 (Group 10)". Groupscan be used for the Group search (P91)3I[Done]83Phonebook<Secret>・ When the Secret mode setting (P121) is set to"Secret data only mode", the Phonebook entry issaved as secret data.・ The secret entry is displayed only when the "Secretmode" is set to "ON" or "Secret data only mode".・ Secret entries cannot be saved in the UIM Phonebook.・ The names saved in the secret entries are shown inthe Redial log, history, or mail list/detail screen onlywhen the "Secret mode" is set to "ON" or "Secret dataonly mode". The phone numbers and mail addressesare shown when the "Secret mode" is set to "OFF".・ When the "Secret mode" is set to "OFF", the name,image, melody saved to the secret contact will not beused when you receive a call or mail from the contact.Saving to the UIM PhonebookAdd to PhonebookScreen (UIM)](https://usermanual.wiki/LG-Electronics-USA/L06A.Users-Manual-2/User-Guide-1109033-Page-46.png)
![84 PhonebookYou can save entries to the Phonebook from the list ordetail screen of the call history, mail, or SMS that containsa phone number, mail address, or URL. Also, you can save aphone number currently being entered/displayed on thephone number entry screen or web site, etc.1Open the screen containing items to save■To save phone numbers using Dialed calls list screen(P57), Dialed calls detail screen (P57), Received calls listscreen (P59), or Received calls detail screen (P59):M[Menu] ]Select "Add to phonebook".・ To save phone numbers from the "Dialed calls" or"Received calls" list screen, select the target numberfrom the history first. ・ If the phone number is already saved in the Phonebook,the "Add to phonebook" can not be selected.■To save phone numbers from the Phone number entryscreen・ Press C[Save].■To save a sender or recipient mail addressPress M[Menu] in the Mail detail screen ]Select"Store" ] "Store address".・ If there are several mail addresses, select the one tosave first.■To save items using other screensMove the cursor to select an item or phone number on thescreen andpress M[Menu] ]Add to phonebook" ]Select "Add toregistration".2Perform the following operations[New registration]Add a new entry to the Phonebook. Go to Step 3.・ The Add to phonebook screen opens with the new entry alreadyentered.[Add registration]Select a Phonebook entry to which an item is added. PressM[Menu] on the Phonebook entry screen to change thePhonebook search method.→P87] Select a Phonebook entry to which the item is to be added・ The Add to phonebook screen with an item already added isdisplayed.・ When you add an item to a Phonebook entry on the UIM, theAdd to phonebook screen opens with the overwritten contactinformation.3Modify/save the Phonebook entry ]I[Done]・ For steps to register, see Step 2 in "Saving to the FOMATerminal Phonebook" (P80).Saving Contacts to the Phonebookfrom Received or Dialed CallsNote・ If you attempt to input a string longer than themaximum number of characters allowed, a warningscreen notifying of the problem is displayed. Then,the truncated string will be shown on the Add tophonebook screen.](https://usermanual.wiki/LG-Electronics-USA/L06A.Users-Manual-2/User-Guide-1109033-Page-47.png)
![You can group the contacts in the FOMA terminalPhonebook or UIM Phonebook. Up to 31 groups can besaved in the FOMA terminal Phonebook, and up to 11groups can be saved in the UIM Phonebook (including "Nogroup"). ・ "No group" cannot be edited.・ Only a category name and members can be saved/edited in theUIM Phonebook.1M[Menu] ](Phonebook&Logs) ]"Searchphonebook" ]"Group search" ]Move the cursor to thetarget group ]I[Set]・ I[FOMA card/Phone] : Switch betweenthe terminal and the UIM group settings.・ J: Display the settings of the selectedgroup.・ For the operations on the screen (Grouplist screen) that opens for "Groupsearch", see Step 2 in "SearchingPhonebook" (P87)2C[Set]3Perform the following operations[ (Group name)]Up to 10 full-pitch or 21 half-pitch characters can be entered.Enter using Kanji, Hiragana, pictographs, symbols, or Katakana.[ Ringtone]*1 *2Set the ring tone for a call.Music : Select a Chaku-Uta-Full®song saved in"Music" in the "Data box". →P217Go to Step 3 (P214) in Setting a Chaku-Uta-Full®Song as a Ring Tone.Melody : Select from melodies saved in "Melody" in the"Data box".→P254i-motion : Select from videos/i-motion movies saved in"imotion" in the "Data box".→P249Terminal setting : In accord with the "Select ringtone" setting.→P98[ Mail ringtone]Set the ring tone for incoming mail.・ Available set items are the same as for " Ringtone".[ Image]*1 *2Add an image to a group.My picture : Select from images saved in "My picture" inthe "Data box". →P239i-motion : Select from videos/i-motion movies saved in"imotion" in the "Data box". →P249Take picture : Start the camera, and set the captured stillimage. →P200Terminal setting : In accord with the "Call display" settings. →P10585PhonebookSaving/Editing a Group NameGroup settingslist screenGroup settingsscreen](https://usermanual.wiki/LG-Electronics-USA/L06A.Users-Manual-2/User-Guide-1109033-Page-48.png)
![[ Accept/Reject]Set to accept/reject calls by groups. ] Enter the Terminal security code ]"Not set"/"Reject call"/"Accept call"*1 If you select "Display setting" either for "Select ring tone"(P98) or "Call display" (P105) and you choose movie/i-motion with video/audio as the ring tone or call display for aspecific caller, this option will be overridden and the movie/i-motion will be invoked and played when a call from that callerarrives.*2 If you specify a movie/i-motion movie with video/audio as thering tone for "Display setting", the same file will be set for"Call display" automatically, and vice versa.4I[Done]1Group setting list screen (P85) ]M[Menu] ]Performthe following operations[Reset]Reset the selected group settings. The group name is restoredto its default.[Move]Change the display position of the selected group.] Locate the new display position ]C[OK][Set]Edit the selected group settings. →P85[Reset all]Reset all group settings and group order.・ To search Phonebook entries set as secret, set the "Secretmode" to "ON" in advance.→P121You can quickly make a call after invoking the Phonebook.1Stand-by display ] D・ The entries found by the default search method appear inthe Phonebook entry list screen.→P9486 PhonebookNote<Accept/Reject call>・ The setting in "Accept/Reject call" (P91) in thePhonebook takes precedence.Sub Menu on the Group Setting List ScreenMaking a Call from the PhonebookSearch phonebookCalling after Invoking the PhonebookPhonebookContact list screen(Example: Whensearching a data)](https://usermanual.wiki/LG-Electronics-USA/L06A.Users-Manual-2/User-Guide-1109033-Page-49.png)
![2Select a Phonebook entryThe Phonebook detail screen opens with the phone numberdisplayed.■When multiple phone numbers are saved in thePhonebook entryPress Hto select the number to dial.・ Press Ato display the saved number in the Phonenumber selection screen. Use Hto move the cursor tothe phone number ]C[Select] to make a call.3I[Send]・ You can also make a call by pressing C[Display] ]C[Send] after you highlight the desired phone number on thePhonebook detail screen.■To make a video callSelect M[Menu] ]"Call function" ]"Video phone call".You can use various ways to search a Phonebook entry.1M[Menu] ](Phonebook&Logs) ]"Searchphonebook"・ I[Default]: Thehighlighted search methodis set as the searchmethod of the Phonebooklist screen that openswhen you press DinStand-by. is displayed tothe default search method.2Perform the following operations[Show all data]Display all Phonebook entries for readings starting with (あ line toわ line) line and "others" (for readings other than the JapaneseKana syllables).・ Press Jto switch the reading line.・ You can switch the displayed line by pressing the keys 1to0, *(あ line to わ line, and others) corresponding toreading lines.[Group search]Phonebook entries are searched/displayed per group (Group listscreen). Switch between FOMA terminal (Phone) Phonebook andUIM Phonebook with J. Select a group with H]C[Select] todisplay Phonebook entries saved in the group.・ In the group list screen, you can perform the followingoperations.- Scroll the screen by page using F/E.- You can move the cursor by entering a group number (1 to31) with dial keys.87PhonebookSearch PhonebookscreenThe defaultsearchmethod isindicatedNote・ If the "Secret mode" is set to "Secret data only mode"(P121), only Phonebook entries set as Secret (P82)can be searched/displayed.Searching Phonebook](https://usermanual.wiki/LG-Electronics-USA/L06A.Users-Manual-2/User-Guide-1109033-Page-50.png)
![88 PhonebookSub Menu on the Group List Screen[Reading search]Enter a part of the contact name "reading", and search allPhonebook entries. Up to 32 half-pitch characters can beentered for a reading.・ All Phonebook entries are displayed when a reading is notentered.・ You can search readings using other than the leadingcharacter.[Memory No. search]All Phonebook entries in the FOMA terminal (phone) are displayedevery 50 entries.・ Press Jto switch to the display by memory number.・ The UIM Phonebook can not be displayed.・ Phonebook entries can also be displayed by entering memorynumbers with dial keys.[Phone No. search]Enter a part of a saved phone number to search all Phonebookentries. Up to 26 digits can be entered for a phone number.・ All Phonebook entries are displayed when a phone number isnot entered.・ You can search phone numbers using other than the leadingdigits.[Domain search]Display Phonebook entries with mail addresses saved, perdomain name.・ Press Jto switch the target domain.・ Register a domain to be searched in advance. →P941"Search phonebook" screen (P87) ]"Group search" ] M[Menu] ]Perform the following operations.[View UIM/View phone]Switch between the UIM Phonebook and FOMA terminal (Phone)Phonebook group search screens and display them.[Set]The Group setting screen (P85) is displayed.[Select]Select the highlighted group.1Stand-by display ]D1Saving locations for PhonebookentriesSave in the FOMA terminal(Phone) Phonebook(An iconassigned to "Phone Number 1"is displayed).Save in the UIM Phonebook2Phonebook entry image displayWhen an image is assigned tothe phonebook entry, it isdisplayed on the screen.Viewing Phonebook EntriesPhonebook listscreen12](https://usermanual.wiki/LG-Electronics-USA/L06A.Users-Manual-2/User-Guide-1109033-Page-51.png)
![2Select a Phonebook entry・ When an image is assigned to thephonebook entry, it is displayed on thescreen.・ The same icon as on the Add toPhonebook screen is displayed for eachitem. →P801Phonebook list screen (P88) ]M[Menu] ]Performthe following operations[Mail/URL]Create mail or access a URL.Compose mail : Create i-mode mail addressed to the mailaddress or phone number in the selectedPhonebook entry →P131Attach to mail :Create i-mode mail with the selectedPhonebook entry attached. →P131Compose SMS : Create an SMS message addressed to thephone number in the selected Phonebookentry.→P168Connect to URL : Connect to the URL saved in the currentlyselected Phonebook entry.[Call function]Select the calling method. If multiple phone numbers are saved,after selecting the calling method, further select the numberfrom the Phone number selection screen.Video phone call : Make a video call.Customize call : Make a call after changing the registeredphone number.Int. Call(Japan) : When you make a call from overseas to aphone number in Japan saved in thephonebook, the Country Code for Japan "+81"is added automatically at the beginning of thephone number. ・ If the phone number has a leading "0", it isautomatically deleted.89PhonebookSearch Phonebookdetail screenOperations on the Phonebook list screenSelect a Phonebook entry with a phone number and amail address saved, and press Ato make a call or pressI[Mail] to create mail. If multiple phone numbers or mailaddresses are registered, the Phone number or mailaddress selection screen opens.Operations on the Phonebook detail screenAfter selecting a saved phone number, mail address, orURL, the following items appear at the lower right softkey. You can perform the following operations bypressing I.Send : Make a voice call to the selected phonenumber.Mail : Create a message using the selected phonenumber/ mail address. →P131Connect : Connect to the site of the selected URL.Sub Menu in the Phonebook List Screen](https://usermanual.wiki/LG-Electronics-USA/L06A.Users-Manual-2/User-Guide-1109033-Page-52.png)
![[Add new]Create a new Phonebook entry. →P80[Edit]Edit the selected Phonebook entry. →P91[Copy]Copy the selected Phonebook entry.to the UIM*1 : Copy the selected Phonebook entry to the UIM.to the phone*2 : Copy the selected Phonebook entry to theterminal.[Delete]Delete saved data from the Phonebook.Focused data : Delete the selected Phonebook entry.all in phone :Delete all Phonebook data on the terminal.all in UIM :Delete all Phonebook data saved on the UIM.[Multiple choice]Select multiple Phonebook entries to copy or delete. After youselect the storage location to save multiple phonebook entriesfrom "Phone"/"UIM" (FOMA terminal (Phone) Phonebook/UIMPhonebook), perform the following operations.] Place check marks next to the entries to select ]M[Menu]Copy to UIM*1 : Copy the selected Phonebook entries to theUIM.Copy to phone*2 :Copy the selected Phonebook entries to theterminal.Delete :Delete the selected Phonebook entries.Mark/Unmark :Delete or unmark all entries saved in thePhonebook.[Search by]Re-search the Phonebook by another search method. →P87[Send Ir data]Send a Phonebook entry to an external device using infraredtransmission. →P259Focused data : Send the selected Phonebook entry.all in phone :Send all data saved in the terminal Phonebook.all in UIM :Send all data saved in the UIM Phonebook.[Create domain list]*3Create a list of domains to be searched using "Domain search". → P94*1 This appears for the FOMA terminal Phonebook.*2 This appears for UIM Phonebook.*3 This appears only for the Domain search.1Phonebook detail screen (P88) ]M[Menu] ]Performthe following operations:[Mail/URL]Create mail or access a URL.Compose mail : Create i-mode mail addressed to the mailaddress or phone number saved in thedisplayed Phonebook entry. →P131Attach to mail :Create i-mode mail with the displayedPhonebook entry attached. →P131Compose SMS :Create an SMS addressed to the phonenumber in the displayed Phonebook entry. →P168Connect to URL :Access the URL saved in the selectedPhonebook entry.90 PhonebookSub Menu in the Phonebook Detail Screen](https://usermanual.wiki/LG-Electronics-USA/L06A.Users-Manual-2/User-Guide-1109033-Page-53.png)
![[Call function]Select the calling method.Video phone call : Make a video call.Customize call : Make a call after changing the registeredphone number.Int. call (Japan) : When you make a call from overseas to aphone number in Japan saved in thephonebook, the Country Code for Japan "+81"is added automatically at the beginning of thephone number. ・ If the phone number has a leading "0", it isautomatically deleted.[Edit]Edit the displayed Phonebook entry. →P91[Copy]Copy item : Select and copy from the contents of thedisplayed Phonebook entry.to the UIM*1 : Copy the displayed Phonebook entry to theUIM.to the phone*2 : Copy the displayed Phonebook entry to theterminal.[Delete]Delete the displayed Phonebook entry.[Send Ir data]Send the displayed Phonebook entry using infrared transmission.→P259[Accept/Reject call]Set to accept or reject calls per phone number in theFOMA terminal Phonebook. ・ Selecting is available when the cursor has been moved to aphone numbers.・ A phone number saved in the "Reject on List" (P123) cannot beset to "Accept call".] Enter the security code ]"Not set"/"Reject call"/"Accept call"*1 This appears for the terminal Phonebook.*2 This appears for the UIM phonebook.1Phonebook detail screen (P88) ]M[Menu] ][Edit] ]Edit the entryUse the same steps in "Saving to the FOMA TerminalPhonebook" (P80) or "Saving to the UIM Phonebook" (P83)to edit the entry.■To save a Phonebook entry to another memory numberA new memory number is added if the existing memorynumber is changed and saved. The original Phonebookentry is left intact.(Enter memory number) ]Enter any un-assignedmemory number (000-999)2Press I[Done] when finished editing ]"Yes"91PhonebookEditing a Phonebook Entry](https://usermanual.wiki/LG-Electronics-USA/L06A.Users-Manual-2/User-Guide-1109033-Page-54.png)
![92 PhonebookDeleting Phonebook entriesDeleting One or All EntriesExample: To delete a Phonebook entry from the Phonebookentry list screen1Move the cursor to the Phonebook entry on thePhonebook entry list screen (P88) ]M[Menu]]"Delete" ]Select a deleting methodFocused data : Delete the selected Phonebook entry.all in phone :Delete all Phonebook entries saved on theFOMA terminal. The security code is requiredto delete.all in UIM :Delete all Phonebook entries saved on theUIM. The security code is required to delete.2"Yes"The selected/displayed Phonebook entry will be deleted.■To delete a Phonebook entry from the Phonebook detailscreenYou can delete only one Phonebook entry at a time fromthe Phonebook detail screen.Phonebook detail screen (P88) ]M[Menu] ]"Delete"]"Yes"・ If either of the terminal (Phone) Phonebook or UIM Phonebookis displayed, Phonebook entries will be deleted from thedisplayed (active) Phonebook.1Phonebook list screen (P88) ]M[Menu] ][Multiple choice] ]"Phone"/"UIM"2Place check marks next to the entries to delete ]M[Menu] ]"Delete"・ After placing check marks next to all unnecessary entries,select "Delete".3"Yes"The selected Phonebook entries will be deleted.Selecting and Deleting Multiple PhonebookEntries](https://usermanual.wiki/LG-Electronics-USA/L06A.Users-Manual-2/User-Guide-1109033-Page-55.png)
![You can check the available space in the terminal/UIMPhonebook.1M[Menu] ](Phonebook&Logs) ]"No. ofPhonebook"・ "Secret entry" is displayed when the "Secret mode" is set to"On" or "Secret data only mode".You can specify Phonebook entries or images to beinvoked from the Stand-by display.1M[Menu] ](Phonebook&Logs) ]"Phonebook settings"2Perform the following operations:[Default mode]Set the search method to be invoked when accessing thePhonebook list screen directly from the Stand-by display.[Create domain list]Create a list of domains to be searched using the Domain search.Select an unfilled column in the list and enter a domain name.] Enter a domain name ]C[Set][Display image]Set whether to display the image assigned to the Phonebookentry.[93PhonebookChecking the Phonebook Capacityand UtilizationNumber of saved Phonebook entriesPhonebook Settings To edit the domain nameSelect the domain you want to edit from the list ]C[Select] ]Edit the domain name.You cannot edit "@docomo.ne.jp" in the domain list.To delete the entered domain nameSelect the domain you want to delete from the list ]M[Menu] ]Select "Delete".](https://usermanual.wiki/LG-Electronics-USA/L06A.Users-Manual-2/User-Guide-1109033-Page-56.png)
![In Stand-by, you can enter a 1- or 2-digit memory numberwith dial keys from "0" to "99" to make a call to the phonenumber saved in the corresponding FOMA terminalPhonebook entry. If you enter a 3 or more digits, the phonenumbers saved in the FOMA terminal Phonebook whichcontain the number sequence you entered are displayed onthe screen.Example: To access a Phonebook entry by entering amemory number1Enter a 1- or 2-digit number ] A■If you enter 3 or more digitsThe phone numbers saved in the Phonebook containingthe entered number sequence will be displayed. D]Press Hto select a phone number and press A.・ M[Menu]: Display the sub menu of the Phone numberentry screen. →P55・ I [Mail] :If you enter a 1- or 2-digit number, i-mode mailwith the address found in the Phonebook entry alreadyentered will be created. If you enter 3 or more digits, an i-mode mail can be created to an address containing theentered number sequence. → P131・ H: When you enter a 1- or 2-digit number, thePhonebook entries assigned to the previous andsubsequent memory numbers will be displayed. If youenter 3 or more digits, select a phone number to call.・ J: If the entered number has 2 or fewer digits, you canselect phone numbers saved in the accessedPhonebook entry.94 PhonebookMaking a Call with the LeastNumber of ButtonsDialing Quick SearchThe content ofthe Phonebookentry of theentered phonenumber or thecorrespondingmemorynumber isdisplayed.Note・ When "Dialing Quick Search" in the "Dialing" is set to"OFF", this function does not work. →P106・ This function does not work when you enter a 2-digitnumber which begins with "0" such as "01" because itis not recognized as a memory number.・ This function does not work for the UIM phonebook.](https://usermanual.wiki/LG-Electronics-USA/L06A.Users-Manual-2/User-Guide-1109033-Page-57.png)
![1M[Menu] ](Phonebook&Logs) ][Call/Mail history]]Select the log to be displayedReceived calls :Show logs for received voice/video calls. →P59Redial : Show redial logs for voice/video calls.→P57Received mails :Show received mail logs.→P161Sent mails :Show the Sent mail logs.→P16195PhonebookDisplaying the Call/Mail HistoryNote・ Received mails can be accessed from the Stand-bydisplay by pressing L.・ Redial can be accessed from the Stand-by display bypressing R.](https://usermanual.wiki/LG-Electronics-USA/L06A.Users-Manual-2/User-Guide-1109033-Page-58.png)

![You can change the ring tone for voice/video calls, mail,etc.・ In addition to the pre-installed ring tones and melodies, i-motionmovies, melodies and Chaku-Uta®songs, Chaku-Uta-Full®songsdownloaded from i-mode sites or websites can be set as ringtones.1M[Menu] ](Settings) ]"Sounds&Vibration" ]"Select ring tone"2Perform the following operations:・ C[List]: The ring tone settings screen of the selecteditem opens.[Voice call]Select the ring tone for a voice call.Music : Select from Chaku-Uta-Full®songs saved in "Music" inthe "Data box". →P217Go to Step 3 (P214) in Setting a Chaku-Uta-Full®Song as a Ring Tone.i-motion : Select from videos/i-motion movies saved in"imotion" in the "Data box".→P249Melody : Select from melodies saved in "Melody" in the "Databox".→P254[Video call]Select the ring tone for a video call.・ Available set items are the same as for voice call.[Mail]Select the ring tone for mail.・ Available set items are the same as for voice call.[Message R]Select the ring tone for a Message R.・ Available set items are the same as for voice call.[Message F]Select the ring tone for a Message F.・ Available set items are the same as for voice call.[SMS]Select the ring tone for SMS.・ Available set items are the same as for voice call.3I[Done]98 Sound/Screen/Light SettingsChanging the Ring toneSelect ring toneNote・ The name of a ring tone is its file name.・ The following file formats can be set for a ring tone(however, some files such as restricted files or filesincluding only movies or sounds may not be set).SMF, MFi, MP4 (Mobile MP4), and AMR・ When a video/i-motion movie is set as a ring tone(Chakumotion), the "Call display" (P105) will bechanged accordingly.・ Audio only videos/i-motion movies can be set for"Mail", "Message F", "Message R" and "SMS" ringtones.・ When a video/i-motion movie with graphics is set as aring tone, the incoming display will be automaticallyreset to the default if you change the ring tone to avideo/i-motion movie without graphics.・ Graphic only videos/i-motion movies cannot be set asa ring tone.](https://usermanual.wiki/LG-Electronics-USA/L06A.Users-Manual-2/User-Guide-1109033-Page-61.png)
![01 ブギ・ウギ 11 Alarm01 23 Power On02 ゴーゴーカート 12 Alarm02 24 Power Off03 ハワイアンドリーム04 再会 15 Message01 27 Ring0305 ウェイティング 16 Message02 28 Ring0406 彼女について 17 Message03 29 Ring05 07 桜 18 Message04 30 Ring0608 蝶 19 Message05 31 Ring0709 あなたとともに 20 Message0610 ピアサー・デュ・アモーレ1M[Menu] ](Settings) ]"Sounds&Vibration" ]"Volume"2Perform the following operations・ J: Adjust the sound volume of the selected item. When the volume level is set to the lowest, "Silent" isdisplayed and the tone does not sound. Every time thevolume is adjusted, the tone for the item sounds* in thenew volume (Except "Receiver volume").* : The default tone sounds for the item with imotion orChaku-Uta-Full®set as the ring tone. However, if youselect a Chaku-Uta-Full®in "Full song ring tone", theChaku-Uta-Full®will be used as the ring tone.・ C[Select]: Volume setting screen of the selected item isdisplayed.[Incoming call]*Adjust the ring tone volume for a voice/video call.[Mail/Message/SMS]*Adjust the ring tone volume for Mail/Message R/F.[Alarm/Schedule]*Adjust the alarm tone volume for Alarm/Schedule.[Keypad tone]Adjust the volume of the keypad sound.[Flip tone]Adjust the volume of a sound when the FOMA terminal isopened/closed.[Menu effect]Adjust the main menu operation sound volume.99Sound/Screen/Light SettingsList of the Pre-installed Ring tones13 Alarm03 25 Ring0114 Alarm04 26 Ring0221 Message0722 Message08Setting the Volume of Ring Tone, Alarm, etc.Volume](https://usermanual.wiki/LG-Electronics-USA/L06A.Users-Manual-2/User-Guide-1109033-Page-62.png)
![100 Sound/Screen/Light Settings[Power On/Off]Adjust the volume of the sound when the terminal is turnedon/off.[Popup tone]Adjust the volume of the sound when the popup window isdisplayed.[Receiver volume]Adjust the earpiece volume. It cannot be muted.* Maximize the volume to display "Step" and to increase thesound volume progressively.3I[Done]You can set the terminal to vibrate when a call or mailarrives or at a Schedule alarm time.1M[Menu] ](Settings) ]"Sounds&Vibration" ]"Vibrator"2Perform the following operations:・ J: Set the vibration pattern of the selected item. Everytime the vibration pattern is changed, the terminal vibratesin the new pattern.・ C[List]: Vibration pattern setting screen of the selecteditem is displayed.[Incoming call]Set the vibration pattern for an incoming voice/video call.[Mail/Message/SMS]Sets the vibration pattern for incoming mail/Message R/F.[Alram/Schedule]Set the vibration pattern for the Alarm/Schedule alert.3I[Done]Notifying of Incoming Calls/Mail orAlarm Time with VibrationVibrationNote・ Adjust the receiver volume while making a call.→P70](https://usermanual.wiki/LG-Electronics-USA/L06A.Users-Manual-2/User-Guide-1109033-Page-63.png)
![You can set the sound effects when a key is pressed or afunction is performed.1M[Menu] ](Settings) ]"Sounds&Vibration" ]"Select effect tone"2Perform the following operations:・ C[List]: List of the options for the selected item isdisplayed.[Dial sound]*Select the effect sound when a dial key,* key, or # key is pressedon the Stand-by screen or the Phone number entry screen (P52).If set to "Japanese", "English", or "Korean", the numbers enteredwith dial keys will be read aloud.[Flip tone]*Select the effect sound when the FOMA terminal is opened/closed.[Menu effect]*Select the effect sound when a main menu item is selected.[Power On]Select the effect sound when the terminal is turned on.Music : Select from Chaku-Uta-Full®songs saved in "Music"in the "Data box" →P217Go to Step 3 (P214) in Setting a Chaku-Uta-Full®Song as a Ring Tone.i-motion : Select from videos/i-motion movies saved in"imotion" in the "Data box".→P249・ Graphics only videos/i-motion movies cannot beset.Melody : Select from melodies saved in "Melody" in the "Databox".→P254[Power off]Select the effect sound when the terminal is turned off.・ Available set items are the same as for Power on.[Low battery alert]Set whether to sound an alarm when the battery level is low.* Press M[Play] on the Sound effect select screen to soundthe effect tone selected by pressing J. Press M[Mute] tonot sound the tone. You can also check the effect sound bypressing I[Play] and Hon the Sound effect list screen.However, you can not check the effect sound when setting to"Silent" in "Volume".3I[Done]101Sound/Screen/Light SettingsSelect effecttone screenSetting the Sound When a Key isPressedSelect effect tone](https://usermanual.wiki/LG-Electronics-USA/L06A.Users-Manual-2/User-Guide-1109033-Page-64.png)
![The FOMA terminal uses this function to sound an alarmtone during a voice or videophone call warning you that thesignal quality is deteriorating and the call is likely to bedisconnected.・ If the signal rapidly deteriorates, the call may be disconnectedwithout warning.1M[Menu] ](Settings) ]"Call/VT/Dialing" ]"Call feature" ]"Quality alarm" ]"Alarm off"/"Low alarm"/"High alarm"You can set how many times or for how long the ring tonesounds when mail arrives.1M[Menu] ](Settings) ] "Sounds&Vibration" ]"Mail ring duration"2Perform the following operations:・ C[List]: List of items is displayed.[Mail ring]OFF : Set not to sound a ring tone.1 cycle :Ring once (maximum 30 seconds) with the lengthsetting of music or melody that is set as a ring tone.Select time: Set the duration of the ring tone. ]D]Enter ringtime between 1-30 seconds in the ring time field3I[Done]Turn off the tones that sound from the terminal so as notto disturb others.1#(1+ seconds)102 Sound/Screen/Light SettingsNotifying of a Call AlmostDisconnected with Alarm SoundQuality alarmSetting Ring Time Duration forIncoming MailMail ring durationMuting Terminal TonesManner ModeTo cancel Manner ModePress #(for 1+ seconds) in Stand-by.Note・ There are 2 types of Manner Mode: "General manner"and "Original manner mode".→P102・ appears at the top of the screen when MannerMode is activated.・ A notification screen appears when you attempt toplay a melody, video, or i-motion movie, when MannerMode is activated.・ Even when Manner Mode is activated, the camerashutter tone sounds.・ While "Manner mode" is active, incomingvoice/videophone call, mail/message, andalarm/schedule alert are notified with vibration. Thevibration pattern follows "Vibrator" settings (if "OFF" isset, "Pattern 1" is applied).](https://usermanual.wiki/LG-Electronics-USA/L06A.Users-Manual-2/User-Guide-1109033-Page-65.png)
![Selects the action of Manner Mode from "General manner"and "Original manner mode".The setting of the set Manner mode can be changed forthe Original manner mode.Example: To change the settings of the Original mannermode1M[Menu] ](Settings) ] "Sounds&Vibration" ]"Manner mode set" ]Move the cursor to the "Originalmanner" ]I[Edit]■To select the Manner mode type"General manner"/"Original manner" ] Press C. The Manner mode setting will terminate.2Perform the following operations:・ J: Select the vibration pattern or volume of the selecteditem. When the volume level is the lowest, "Silent" isdisplayed and the tone sound not sound.・ C[List]: Vibration patterns and volume setting screen ofthe selected item is displayed.[Incoming call vib.]Set the vibration pattern for an incoming voice/video call.[Mail/SMS vib.]*Sets the vibration pattern for incoming mail/Message R/F.・ Available set items are the same as for incoming call vib.[Alarm/Schedule vib.]*Set the vibration pattern for the Alarm/Schedule alert.・ Available set items are the same as for incoming call vib.[Incoming call vol.]*Adjust the ring tone volume for an incoming voice/video call.[Mail/SMS vol.]*Adjust the ring tone volume for incoming mail/Message R/F.[Alarm/Schedule vol.]*Adjust the alarm tone volume for Alarm/Schedule.[Effect/Popup tone]Adjust the effect sound or volume when the popup is displayed.[Low battery alert]Set whether to sound an alarm when the battery level is low.*When the volume level is set to the highest, (Step up) isdisplayed to increase the sound progressively.3I[Done]Set the items (Wallpaper, Clock, Calendar, Schedule) to beshown on the Stand-by display.1M[Menu] ](Settings) ]"Display" ]"Stand-byDisplay"103Sound/Screen/Light SettingsChanging Manner ModeManner mode setChanging the Appearance of Stand-by DisplayStand-by displayStand-by display](https://usermanual.wiki/LG-Electronics-USA/L06A.Users-Manual-2/User-Guide-1109033-Page-66.png)
![2Perform the following operations:・ C[List]: List of the options for the selected item isdisplayed.・ M[Preview]: The selected preview screen is displayed.[Wallpaper]Set an image to be displayed as the Wallpaper.Image : Select from images saved in "My picture" in the"Data box".→P239i-motion : Select from videos/i-motion movies saved in"imotion" in the "Data box".→P249] D ]in the image name field, C[List] ]Select an image[Display items]Set the display of the Clock or Calendar on the Stand-by display.Do not show : The Clock and the Calendar will not bedisplayed.Clock : The Clock will be displayed.Calendar*1 : The Calendar will be displayed.Calendar+Schedule*1: Display a calendar and schedule events fortoday.[Clock type]*2Set the display of the Clock.Small digital : Reduce the display size of the digital clock.Large digital : Enlarge the digital clock to fit to the screen.Analog : Set to display the analog clock on the screen.Dual clock : Display the time/date of two countries orregions, and cities on the Stand-by display.Select the city, area, or country for the clockdisplayed on the bottom using the "Secondcity".[2-nd city]*3Set the city for the second clock.] C[List] ]Do not show Select a city by using J*1 This cannot be selected if a Flash movie is set as Wallpaper.*2 This appears when "Clock" is selected in "Display items".*3 This appearswhen "Dual clock" is selected in "Clock type".3I[Done]104 Sound/Screen/Light SettingsNote・ Some data may not be set for the Stand-by display.・ The video/i-motion movie or Flash movie set as theWallpaper starts when the FOMA terminal is openedand stops when the terminal is closed. You can usePto start or stop.・ Web To function is not available from a video/i-motionmovie set as the Wallpaper.・ When the stand-by screen is displayed, Flash imageor GIF animation, such as clock, will stop playingafter a certain time.<Display items>・ If "Clock" is selected, "Clock type" will be set to "DualClock" automatically when the time zone option in"Auto time set" (P49) or "Local time zone"(P49) is setto other than GMT+9:00・(not in Japan)<Clock type>・ You can only select "Dual Clock" when the time zoneoption in "Auto time set" (P49) or "Local timezone"(P49) is set to other than GMT+9:00・(not inJapan).](https://usermanual.wiki/LG-Electronics-USA/L06A.Users-Manual-2/User-Guide-1109033-Page-67.png)
![Set an image shown on the screen when a call arrives.1M[Menu] ](Settings) ]"Display" ]"Call display".2Perform the following operations:・ C[List]: List of the options for the selected item isdisplayed.・ M[Preview]: The selected preview screen is displayed.[Incoming voice call]Set an image shown on the screen when a voice call arrives.Image : Select from images saved in "My picture" in the"Data box".→P239i-motion : Select from videos/i-motion movies saved in"imotion" in the "Data box".→P249] D]on the image name field, C[List] ]Select an image[Incoming video call]Set an image to be displayed on the incoming voice call screen.・ Set items and operations are the same as in "Incoming voicecall".3I[Done]105Sound/Screen/Light SettingsSetting the Image for IncomingCallsCall display・ After you set this option, the following screen will bedisplayed after you press C in Stand-by and highlightthe clock ]C[OK].- Small digital, Large digital, Analog, Alarm list screen(P267) will be displayed.- "Dual Clock"The "Time and Date settings" screen (P49) openswhen you select the Home clock located in theupper part of the screen, and the "Stand-by display"screen opens when you select the Sub clocklocated on the lower part of the screen.<Calendar type>・ After this option is set, Stand-by screen ]C]alendar display ]C[OK] to display the Calendarscreen of the schedule (P271).・ After this option is set, Stand-by screen ]C]chedule display ]C[OK] to display the Schedulelist screen (P272). The Calendar screen of theschedule also displays from the Stand-by screenusing the same way of setting to [Calender].Note・ An audio only video/i-motion movie cannot be set asthe Call display.・ When a movie/i-motion movie with sound is set forthe Call display, the "Select ring tone" (P98) will beset to the same video/imotion movie.・ If you use a video/i-motion movie with sounds as acaller's image and you change it to a video/i-motionmovie without sounds, the ring tone settings arerestored to the default automatically.](https://usermanual.wiki/LG-Electronics-USA/L06A.Users-Manual-2/User-Guide-1109033-Page-68.png)
![Set the screen displayed when numbers are entered inStand-by.1M[Menu] ](Settings) ]"Display" ]"Dialing"2Perform the following operations:・ C[List]: List of the options for the selected item isdisplayed.[Motion dialing]Set the display method of the entered numbers.Digital : Display numbers in a digital design.Painting : Display numbers in a painting design.OFF : Display numbers with decoration set to OFF.[Dialing quick search]Set whether to search a Phonebook entry when thecorresponding number for the entry is entered with 1 digit or 2digits.[Dialing font color]Set the font color of the number entered when "Motion dialing" isset to "OFF".3I[Done]Set the Wake-up screen that opens when you turn theterminal power on.1M[Menu] ](Settings) ]"Display" ]"Wake-updisplay"2Perform the following operations:・ C[List]: List of items is displayed.・ M[Preview]: The selected image is shown.[Wake-up display]Set an image shown on the screen when the terminal is starting.Image : Select from images saved in "My picture" in the"Data box". →P239i-motion : Select from videos/i-motion movies saved in"imotion" in the "Data box". →P249] D]on the image name field, C[List] ]Select an image3I[Done]106 Sound/Screen/Light SettingsSetting the Display of the DialingScreenDialingSetting a Wake-up DisplayWake-up displayNote・ Flash movies cannot be set as the wake up screen.](https://usermanual.wiki/LG-Electronics-USA/L06A.Users-Manual-2/User-Guide-1109033-Page-69.png)
![Sound/Screen/Light Settings 107When a call with Caller ID from the caller saved in thePhonebook arrives, the image set in the Phonebook will bedisplayed.1M[Menu] ](Settings) ]"Call/VT/Dialing" ]"Incoming call" ]"Display phonebook image" ]"ON"/"OFF"You can change the design of the clock shown on the subdisplay.1M[Menu] ] (Settings) ]"Display" ]"Sub displayclock" ]Select a clockYou can set the main display backlight (Backlight).1M[Menu] ] (Settings) ]"Display" ]"Backlight"2Perform the following operations:・ C[List]: List of the options for the selected item isdisplayed.[Display duration]Set the Display backlight duration of the main display between10-180 seconds.[Display brightness]Set the backlight level of the main display.[AC connected]Set the lighting when the AC charger is connected.Display setting : In accord with the setting in "Display duration"and "Display brightness".Always on : Light is always on.3I[Done]Displaying an Image Saved in aPhonebook Entry on the IncomingCall ScreenDisplay phonebook imageNote・ The priority order for images displayed on an incomingcall is as follows:1Image set to a Phonebook entry 2Image set to a Group in the Phonebook 3Image set for the Call displaySetting the Clock on the SubDisplaySub display clockSetting the Back Light of the MainDisplayBacklight](https://usermanual.wiki/LG-Electronics-USA/L06A.Users-Manual-2/User-Guide-1109033-Page-70.png)
![Set the backlight brightness of the main display to thelowest level in the power saving mode.1M[Menu] ] (Settings) ]"Others" ]"Power savermode" ]"ON"/"OFF"You can select a combination of screen colors and a menuformat.1M[Menu] ] (Settings) ]"Display" ]"Color theme"]"Illumination dot"/ "Sparkling wine"Illumination dot:Display the menu options as a list of iconswith the black-based color scheme.Sparkling wine :Display the menu in a list with bright wine-red color scheme.You can set whether to display the guidance for the iconselected on the Main Menu.1Select M[Menu] ](Settings) ]"Display" ]"Menusettings" ]"Menu guidance" ]"ON"/"OFF"You can change the display format of the Main menu. Also,you can save up to two combinations of Main menu icons.Example: Changing the combination of Main menu icons1Select M[Menu] ](Settings) ]"Display" ]"Menusettings" ]"Menu customization" ]"Customize1"/"Customize 2"Select a name of the combination of iconsfrom "Customize1" or "Customixe2".・ To open a preview screen of the mainmenu, move the cursor to an item tochange and press M[Preview] on the"Menu customization" screen.108 Sound/Screen/Light SettingsUsing the Power Saving Mode forthe Main DisplayPower saver modeSetting a Theme for Display ColorsColor themeChanging the Appearance of MainMenuMenu settingsDisplaying Guidance for the Main MenuMenu guidanceChanging the Display Format of the MainMenu CustomizationCustomizationScreen](https://usermanual.wiki/LG-Electronics-USA/L06A.Users-Manual-2/User-Guide-1109033-Page-71.png)
![109Sound/Screen/Light Settings■When you do not wish to change the combination of iconsSelect "Color theme setting". The main menu display willbe in accord with the "Color Theme setting". Menucustomization terminates.2Move cursor to an icon to change ]C[Change] ]Select a new icon ]I[Done] ]"Yes"Select an icon from images saved in "My picture" in the "Databox".■To cancel changing of the iconsSelect "No" on the confirmation screen for saving.When purchasing, a menu is set to "Simple Menu" thatcontains only In Simple Menu, the font size for Phonebookentries and mail message text will be enlarged.Simplemenu can switch with Normal menu. 1Press the M[Menu] button in Stand-by.Simple menu appears.2Press I[Settings]3Press Hto move the cursor over "Off", and press C[Select]The menu is switched to the normal menu.To initialize the main menu to the default settingsOn the customization screen you want torestore M[Menu] ]"Restore to default" ]Select "Yes"Note・ JPEG or GIF images in 80x70 pixels or smaller canbe used as icons for customization. The first framewill be displayed when you use an animation GIF asmenu icon.To restore the Simple menuSelect M[Menu] ]I[Settings] ]"ON"Note・ The Simple menu offers larger fonts for menu items,Phonebook entries, Redial/Received calls, Sent mail/Received mail, mail list/detail screen, i-mode, andcharacters being entered.・ The font size cannot be changed.・ To use a menu option not displayed in the Simplemenu, select "Normal menu". The default main menuappears temporarily.Switching to Normal MenuNormal MenuSwitching from Simple Menu to Normal Menu](https://usermanual.wiki/LG-Electronics-USA/L06A.Users-Manual-2/User-Guide-1109033-Page-72.png)
![You can set the incoming or alarm illumination to ON orOFF, or set a combination of illumination colors for eachitem.1M[Menu] ] (Settings) ]"Display" ]"Lighting LED"2Perform the following operations:・ C[List]: List of the options for the selected item isdisplayed.[Lighting]Set whether to light/blink the illumination light.[Incoming voice call]*Set an illumination pattern/color for an incoming voice call.[Incoming video call]*Set illumination pattern/color for an incoming video call.[New mail]*Set illumination pattern/color for incoming mail.[New message R]*Set illumination pattern/color for an incoming Message R.[New message F]*Set illumination pattern/color for an incoming Message F.[New SMS]*Set illumination pattern/color for an incoming SMS.[New Voice mail]*Set illumination pattern/color to indicate that a new message isrecorded at the Voice mail center.・ To light the illumination when a new message is beingrecorded, select "Tone/Vibration message notification" (P306)]"Yes".[New Record message]*Set illumination patter/color to indicate that a new message isrecorded in Record message.[Playing music]*Set illumination pattern/color when music is played.[Alarm]*Set illumination pattern/color when an alarm is activated.[Schedule/To do list]*Set illumination pattern/color for the set time of a Scheduleevent/To do list task.[During call]*Set illumination pattern/color during a call.[Missed call]*Set whether to light the illumination if you missed a call.[Unread message]*Set whether to light the illumination when there is an unreadmessage.* Available when "Lighting LED" is set to "ON"3I[Done]110 Sound/Screen/Light SettingsSetting Incoming Lighting/ BlinkingColors or PatternsLighting LEDNote・ A color cannot be selected for Pattern 5 - 7.・ The illuminations for "Missed call" and "Unreadmessage" light/blink up to 6 hours, and otherilluminations light/blink up to 30 seconds.](https://usermanual.wiki/LG-Electronics-USA/L06A.Users-Manual-2/User-Guide-1109033-Page-73.png)
![111Sound/Screen/Light SettingsYou can change the font size for menu items, Phonebookentries, Redial/Received calls, Sent mail/Received mail,mail list/detail screen, i-mode, and characters beingentered.1M[Menu] ] (Settings) ]"Display" ]"Font size"]"Normal"/"Large"/"User set"Normal :The standard font size is used for all items.Large : The larger font size is used for all items.User set:You can set a font size for each item.]D]Select an item ]Change the font size2I[Done]You can set the display format for date/time.1M[Menu] ] (Settings) ]"Date&Time" ]"Date&Time format"2Perform the following operations:・ C[List]: List of the options for the selected item isdisplayed.[Date format]Set the display format for the date.] "DD/MM/YYYY"/"MM/DD/YYYY"/"YYYY/MM/DD"[Time format]Set the display format for the time.] "12-hour"/"24-hour"3I[Done]Changing the Font SizeFont sizeNote・ When "Simple menu" is set to "On", the font sizecannot be changed.・ "Small" can be selected for "Mail" and "i-mode" (thesame font size as in Mail settings and i-modesettings will be used).Setting the Time FormatDate&Time formatNote・ yyyy=year, mm=month, and dd=day in the display.](https://usermanual.wiki/LG-Electronics-USA/L06A.Users-Manual-2/User-Guide-1109033-Page-74.png)
![112 Sound/Screen/Light SettingsSwitching the Display Language toEnglishSelect languageYou can switch the language of the displayed on the FOMAterminal between Japanese and English.1M[Menu] ] (Settings) ]"Others" ]"バイリンガル" ]"日本語"/"English"Note・ When set to English, "Select language" is displayedas "バイリンガル (Bilingual)"・ The setting of this function is recorded on the UIM. Ifanother UIM is inserted into the phone, the setting onanother UIM has priority.](https://usermanual.wiki/LG-Electronics-USA/L06A.Users-Manual-2/User-Guide-1109033-Page-75.png)
![114 Security SettingsPasswordsSome functions of the FOMA terminal require a password.In addition to the Security Code, there are the networksecurity code and the i-mode Password. These passwordshelp you utilize your terminal.・ Entered security code, network security code, and i-modepassword are displayed as "*".The Security Code is set to "0000" bydefault, however, you can change the codeyourself.→P116If the Security Code entry screen opens,enter the 4-8 digit Security Code and pressC[OK].The Network security code is a 4-digit number to be usedfor confirming subscriber's identity at an acceptance oforder at a docomo shop, docomo Information Center, or "お客様サポート(User support)" and accessing networkservices. You can set any number at subscription, and canchange the number yourself. If you have "docomo ID/ Password" for "My docomo" whichis a total support site for a PC, you can change theNetwork security code from a PC. From i-mode, you canchange the Network security code by accessing "お客様サポート(user support)" then "各種設定(確認・変更・利用)(Settings (Confirmation・change・use))".・ For "My docomo" and "お客様サポート(User support)", see theback of this manual.Security CodeEntry ScreenWarning about Passwords・Avoid setting a password using your birthday, a part ofyour phone number, your address or room number,1111 or 1234, that can be easily guessed by others.Be sure to write down the set passwords and storethem in a separate location.・Do not reveal your passwords to others. DOCOMO isnot responsible for damage caused by misuse of yoursecurity codes by others.・If you forget your passwords, you need to bring an ID(driver's license, etc.), the terminal and the UIM to aservice counter such as a docomo shop. For details,contact a "docomo Information Center" on the back ofthis manual.Security CodeNetwork Security Code](https://usermanual.wiki/LG-Electronics-USA/L06A.Users-Manual-2/User-Guide-1109033-Page-77.png)
![The 4-digit "i-mode password" is required to add/removefrom my menu, or change message service, fee based i-mode services or cancellation. (Some other informationservice providers may set passwords for their sites) The i-mode password is set to "0000" by default, however, youcan change it at any time. Access "iMenu" ]"ENGLISH" ]"Options" ]"Change i-mode Password" if you are using i-mode.You can assign PIN1 and PIN2 codes tothe UIM. These codes are set to "0000" by default, however, you can change themyourself.→P117 The PIN1 code is a 4- to 8-digit number(code) required to identify the user everytime the UIM is inserted into the terminalor the terminal power is turned on in orderto prevent unauthorized use. The PIN1code entry is required to make or receivecalls, and operate the terminal. The PIN2code is a 4- to 8-digit number used toreset outgoing call charges, incoming callcharges (if any) and the total of both, to reset total callcharges.If the PIN/PIN2 code entry screen opens, enter the 4- to 8-digit PIN/PIN2 codes and press C[OK].・ Use the PIN1 and PIN2 codes you set previously if youpurchase a new terminal but keep the same UIM.The PIN Unblock Code is an 8-digit number used to unblockthe PIN1 or PIN2. →P116You cannot change it.・ If you fail to enter the correct PIN Unblock code 10 times in arow, the UIM will be completely locked.115Security Settingsi-mode PasswordPIN1/PIN2 codesPIN1 codeentry screen(Example: forPIN1 code)PIN Unblock CodeDefine new PIN1/PIN2 codesFailed 10 times in a rowPassedFailed 3 times in a rowInput PIN unlock codeContact docomo shop servicecounterInput PIN 1codeInput PIN 2code](https://usermanual.wiki/LG-Electronics-USA/L06A.Users-Manual-2/User-Guide-1109033-Page-78.png)
![116 Security SettingsChanging the Security CodeChange Security codeSetting the PIN codesPIN codeThe security code can be changed.1 M[Menu] ](Settings) ]"Lock/ Security" ]"Change Security code"2 Enter the current security codeThe Change Security code screen opens.3 Enter a new security code4 Enter the Security code you entered in Step 3 again.PIN1 code requestSet the FOMA Terminal so that it displays PIN1 Code entryscreen and cannot be used without entering the PIN1 codeat startup.1 M[Menu] ](Settings) ]"Lock/ Security" ]"PINcode" ]Enter the security code ]"PIN1 code request"]"ON"/ "OFF" ]Enter PIN1 codeChangePIN1/PIN2 code・ Set "PIN1 code request" to "ON" before changing the PIN1code.1 M[Menu] ](Settings) ]"Lock/ Security" ]"PIN code" ]Enter the Terminal2 "Change PIN1 code"/"Change PIN2 code" ]Enter thecurrent PIN1/PIN2 codeThe new PIN/PIN2 code entry screen opens.3 Enter the new PIN1/PIN2 code (4- to 8-digit)The new PIN/PIN2 code re-entry screen opens.4 Re-enter the PIN1/PIN2 code entered in Step 3Requiring the PIN1 Code when the Terminalis TurnedMaking emergency calls (to 110, 119 or 118) whenthe PIN1 entry Screen is OpenYou can make emergency calls (to 110, 119 or 118)even when the PIN1 code entry screen is open after theterminal is turned on.]I[Emergency] ]Move the cursor to the emergencynumber ]C [OK]/A.Changing PIN1/PIN2 Code](https://usermanual.wiki/LG-Electronics-USA/L06A.Users-Manual-2/User-Guide-1109033-Page-79.png)
![If you enter an incorrect PIN1/PIN2 code three times in arow and the PIN lock screen opens, enter the PIN unblockcode to cancel the lock.・ You need to set a new PIN 1/PIN2 code after unblocking thePIN code.1 PIN Lock screen ]Enter the PIN Unblock code (8 digits)The new PIN1/PIN2 code entry screen opens.2 Enter the new PIN1/PIN2 (4- to 8-digit)The re-entry screen for confirmation opens.3 Re-enter the PIN1/PIN2 code entered in Step 2117Security SettingsUnblocking a Blocked PIN Lock FunctionsLockFunctionLock allCall/Mail lockSelf modeData accesslock Display call/mail logs Secret mode DescriptionLock the terminal to preventunauthorized use.To prevent unauthorized use of theFOMA terminal, you can disable makingcalls, entering an address with dialkeys, answering calls, or displaying mail.You can disable all network functions,such as making/receiving calls, using i-mode, or sending/receiving mail.You can specify certain functions tolock. You can hide Redial, Received calls,Sent mail log, and Received mail log.You can keep someone from displayingthe Phonebook entries, Scheduleevents, or To Do tasks set as secretdata.ReferenceP117P118P119P119P121P121](https://usermanual.wiki/LG-Electronics-USA/L06A.Users-Manual-2/User-Guide-1109033-Page-80.png)
![118 Security SettingsLocking the Terminal to PreventUse by OthersLock allCalling Emergency Numbers (110, 119, or 118) During Lock allEmergency numbers (110, 119, and 118) can be calledduring Lock all.] I[Emergency] ] Move the cursor to the emergencynumber ] C[OK]/A.To Cancel Lock allEnter the security code. If an incorrect security code isentered 5 times, the terminal automatically turns itselfoff.You can lock the terminal to prevent anyone from using it.・ When Lock all is activated, the only operations you can performare turning power On/Off, making emergency calls, answeringIncoming voice/video calls, and canceling Lock all.1 M[Menu] ](Settings) ] "Lock/ Security" ] "Lock"] "Lock all" ] Enter the security code ] "Yes"/"No"Call/Mail lockYou can disable making calls, entering an address with dialkeys, answering calls, or displaying mail.1 M[Menu] ](Settings) ] "Lock/ Security" ] "Lock" ] "Call/Mail Lock" ] Enter the security code2 Perform the following operations:・ C[List]: List of items is displayed.[Call/Mail Lock set]Set whether to activate the Call/Mail Lock. [Dialing call lock]*Disable the following operations.・ Making calls entering numbers with dial keys・ Making calls using Received calls or mail history・ Making calls to a phone number in the redial list (while allowingcalls to a number saved in the Phonebook or an emergencynumber such as "110", "119", or "118")・ Saving, editing, or deleting Phonebook entries (includingsending or receiving via infrared communication)Disabling Making/Receiving CallsDisabling Outgoing or IncomingCommunications](https://usermanual.wiki/LG-Electronics-USA/L06A.Users-Manual-2/User-Guide-1109033-Page-81.png)
![[Send mail lock]*Disable the following operations.・ Entering a mail address with dial keys・ Sending mail to an address in the redial or received call log(while allowing mail to an address saved in the Phonebook)・ Performing data communications connecting to a PC, etc.・ Saving, editing, or deleting Phonebook entries (includingsending or receiving via infrared communication)[Incoming call lock]*Disable incoming calls. While activated, a missed call icon will notbe displayed and the Received call log cannot be viewed.[Received mail display lock]*Prevent to display sent/received Message R/F. While activated,an icon indicating incoming mail will not be displayed, and mail inthe FOMA terminal and received mail log can not be viewed.* Available when "Call/Mail lock" is set to "ON".3 I[Done]Self modeYou can disable all network functions, such as making/receiving calls, using i-mode, or sending/receiving mail.Infrared data communication is also not available.1 M[Menu] ](Settings) ]"Call/VT/ Dialing" ]"Selfmode" ]"ON"/"OFF" ]"Yes"You can lock specified functions and require the securitycode to use the terminal, or restrict the use of theterminal.1 M[Menu] ](Settings) ]"Lock/ Security" ] "Lock" ] "Data access lock" ] Enter the securitycode2 Perform the following operations:・ C[List]: List of items is displayed.119Security SettingsStopping All Incoming/Outgoing CallsNote・ Self mode is deactivated if you call an emergencynumber (110, 119, or 118).・ When Self mode is activated, callers will hear amessage indicating that the terminal is off or out ofservice area.・ The Voice mail service and the Call forwarding servicestill work in Self mode.・ All mail, Message R/F and SMS received while in Selfmode will be stored at the i-mode center and the SMScenter (respectively). To receive them, deactivateSelf mode, and check new messages/SMS.Disabling Phonebook or ScheduleViewingData access lock](https://usermanual.wiki/LG-Electronics-USA/L06A.Users-Manual-2/User-Guide-1109033-Page-82.png)
![[Data access Lock set]Set whether to activate the Data access lock. After setting the Data access lock, the security code is requiredto use the selected functions.[Phonebook]*The Phonebook can not be used until the Security code isentered.・ In the Redial list or logs, the phone number or mail address sentby the caller/sender will be displayed instead of the namesaved in the Phonebook.・ Receiving Phonebook entries using infrared communicationbecomes unavailable.[Data box]*The files in the Data box can not be used until the Security codeis entered.・ Receiving data such as images or melodies to be saved in theData box using infrared communication becomes unavailable.[Record message]*The Record message can not be used until the Security code isentered.・ If the Record message is set to "ON" and locked, is notdisplayed on the Stand-by screen even when a message isrecorded.[Schedule]*The Schedule function can not be used until the Security code isentered.・ An alarm set for a Schedule event will not sound.・ Receiving schedule events using infrared communicationbecomes unavailable.[i-mode]*i-mode can not be used until the Security code is entered.・ i-mode connections such as "Web to" other than from the i-modemenu screen become unavailable.・ i-Channel tickers will not be displayed.・ Software will not be updated.・ Receiving Bookmarks using infrared communication becomesunavailable.[i-αppli]*i-αppli can not be used until the Security code is entered.・ Receiving i-αppli using infrared communication becomesunavailable.* Available when "Data access Lock set" is set to "ON".3 I[Done]120 Security SettingsNote・ In the following situations, you can access thefunctions by entering the security code.- To access a function from the Main menu or Custommenu- press a button assigned for accessing the functionin Stand-by- To access the function from the New task screen(P263) or Task List screen(P264)](https://usermanual.wiki/LG-Electronics-USA/L06A.Users-Manual-2/User-Guide-1109033-Page-83.png)
![You can disable display of redial, received call, sent mail,and received mail logs.1 M[Menu] ](Settings) ]"Lock/ Security" ]"Display call/mail logs" ] Enter the security code2 Perform the following operations:The items set to "OFF" will not be displayed.・ C[List]: List of items is displayed.[Redial logs]Set whether to display the redial list.[Received call logs]Set whether to display Received calls.[Sent mail logs]Set whether to display the sent mail log.[Received mail logs]Set whether to display Received mail.3 I[Done]You can set whether to display a secret Phonebook entry/Schedule event.1 M[Menu] ](Settings) ]"Lock/ Security" ] "Secret mode" ] Enter the security code ] Select aSecret mode settingOFF:Display only data other than secret data.Secret mode:Display secret and general data.Secret data only mode:Display only secret data.You can reject calls from the specific parties stored in thelist.・ This function is available only when the caller sends Caller ID.・ It is recommended that you set the Caller ID requestconcurrently.121Security SettingsSetting Redial/Received Call LogDisplayDisplay call/mail logsDisplaying Secret DataSecret modeNote・ If "Received call logs" is set to "OFF", recordedmessages in Record message cannot be played.Rejecting Calls from a SpecificNumberReject on List](https://usermanual.wiki/LG-Electronics-USA/L06A.Users-Manual-2/User-Guide-1109033-Page-84.png)
![You can register up to 20 phone numbers to be rejected.1 M[Menu] ](Settings) ]"Call/VT/ Dialing" ]"Incoming call" ]"Accept/Reject call" ]Enter thesecurity code ]"Accept/ Reject set" ]Move to thecursor to "Reject on list" ]I[List] ]I[Add]2 Perform the following operations:[Reject types]Select actions for rejected calls.・ C[List]: List of items is displayed.Silent:Receive a call without the ring tone. will be displayedon the list.Disconnect call:Incoming call actions will not take place. willbe displayed on the list.[Reject number]Specify the phone number to reject.・ M[Search]: Search and set a phone number from thePhonebook. The name saved in the Phonebook is displayed onthe list.・ C[Select]: Enter and set a phone number. The entered phonenumber is displayed on the list.3 I[Done]122 Security SettingsSaving a Phone Number to RejectReject on ListscreenNote・ If the reject on list is not empty, save a new phonenumber by pressing ] M[Menu] ]"Add new".To delete a saved phone numberSelect the number to delete from the Reject on listscreen ]M[Menu] ]"Delete"/"Delete all" ]"Yes"To edit a saved phone numberSelect a phone number to edit on the Reject on listscreen ]M[Menu] ]Select "Edit"](https://usermanual.wiki/LG-Electronics-USA/L06A.Users-Manual-2/User-Guide-1109033-Page-85.png)
![1 M[Menu] ] (Settings) ]"Call/VT/Dialing" ]"Incoming call" ]"Accept/Reject call" ]Enter thesecurity code ]"Accept/Reject set" ]"Reject on list"■To ReleaseSelect "Accept" on the "Accept/Reject call" screen.You can mute the ring tone for all incoming calls ordisconnect calls before incoming call actions take place.1 M[Menu] ](Settings) ]"Call/VT/ Dialing" ]"Incoming call" ]"Accept/Reject call" ]Enter thesecurity code ]"Accept/ Reject set" ]"Reject allcalls" ]"Silent"/ Disconnect call"Silent:Receive all calls with the muted ring tone.Disconnect call:Incoming call actions for all incomingcalls will not take place.■To ReleaseSelect "Accept" on the "Accept/Reject call" screen.123Security SettingsSetting the Reject on ListNote・ When the Reject call list is activated, and a call froma party registered in the Reject call list arrives,appears on the Stand-by display and the call isrecorded in the Received call log as a missed call.The other party hears a busy signal.・ i-mode mail or SMS messages are receivedregardless of rejection settings.Rejecting All Incoming CallsReject all callsNote・ When a call arrives when "Disconnect call" is set, thecall is not indicated, appears on the Stand-by display(with the number of the calls), and the call isrecorded in the Received call log as a missed call.The other party hears a busy signal.・ i-mode mail or SMS messages are receivedregardless of rejection settings.](https://usermanual.wiki/LG-Electronics-USA/L06A.Users-Manual-2/User-Guide-1109033-Page-86.png)
![124 Security SettingsYou can set whether to accept or reject calls withoutCaller ID per reason for no Caller ID.1 M[Menu] ](Settings) ]"Call/VT/ Dialing" ]"Incoming call " ]"Anonymous caller" ]Enter thesecurity code2 Perform the following operations:・ C[List]: List of items is displayed.[User unset]Set options for calls without Caller ID because the caller chosenot to send Caller ID.Disable :Cancel the setting.Reject call :Reject a call.Silent alert :Receive a call without the ring tone. You canselect an image saved in "My picture" in the"Data box" for the Incoming call screen.→P239]D]field]"Image"/"i-motion"]Select the ImageAlert setting :You can select a file from the "Data box" forthe Incoming call screen or the ring tone.Incoming call screen:]D]Select field]"Image"/"i-motion" ]Select a file Ring tone:]D]Select field]"Music"/"i-motion"/"Melody"]Select a ringtone・ Go to Step 3 in "Setting a Chaku-Uta-Full songas a Ring tone" (P214) if you select "Music".[Pay phone]Set an option for calls made from payphones.・ Set items and operations are the same as in "User unset".[Not support]Set an option for calls made from overseas or from a fixed linephone via forwarding services, from which Caller ID cannot besent. (Caller ID may be sent depending on the carrier.)・ Go to Step 3 in "Setting a Chaku-Uta FullR Song as a RingTone" (P215) if selected a Chaku-Uta FullR song saved in"MUSIC".3 I[Done]Setting Actions When Calls Arrivefrom Unknown CallersAnonymous caller](https://usermanual.wiki/LG-Electronics-USA/L06A.Users-Manual-2/User-Guide-1109033-Page-87.png)
![125Security SettingsYou can set the terminal not to ring when a call arrivesfrom a caller not saved in the Phonebook or without CallerID. This prevents nuisance calls such as "one ring calls"that are disconnected after a short ringing time.1 M[Menu] ] (Settings) ]"Sounds&Vibration" ]"Set mute ring (sec.)"2 Perform the following operations:・ C[List]: List of items is displayed.[Set mute ring time]Set whether to activate Set mute ring time. When set to "ON",the following items can be selected.[Mute time]*You can set the mute time from when a call arrives until theringing action starts between 1 and 99 seconds.[Missed call logs]*Set whether to show the Received call logs for the call that wasterminated within the time specified in "Mute time".* Available when "Set mute ring time" is set to "ON".3 I[Done]Security SettingsNote・ When User unset is activated, if a call without CallerID set to be rejected arrives, the call will not beindicated, is displayed on the Stand-by screen, andthe call is recorded in Received call log as a missedcall. The other party hears a busy signal. Calls arerejected even when the Voice mail or Call forwardingservice is activated. However, if Ringing Time is setto 0 second or the FOMA terminal is out of servicearea or turned off, network services start.・ i-mode mail or SMS messages are receivedregardless of rejection settings.・ If you specify a movie/i-motion movie with video/audioas the ring tone or call display in "Select ring tone"(P98) or "Call display"(P105), this option will beoverridden and the movie/i-motion will be invoked andplayed when a call from that caller arrives in spite ofthe following selecting.- If you select to "Silent alert"- If you select "Display setting" either for "Select ringtone" or "Call display".・ If you specify a movie/i-motion movie with video/audioas the ring tone for "Display setting", the same file willbe set for "Call display" automatically, and vice versa.<User unset>・ If the Caller ID Request service is activated, it takesprecedence over the settings of "Anonymous caller".The caller hears a message requesting Caller ID.Muting Ring tones for UnknownCallersSet mute ring (seconds)](https://usermanual.wiki/LG-Electronics-USA/L06A.Users-Manual-2/User-Guide-1109033-Page-88.png)
![You can set to reject calls from callers not saved in thePhonebook.・ This function is available only when the caller sends Caller ID.・ It is recommended that you set the Caller ID request and"Anonymous caller" concurrently.1 M[Menu] ](Settings) ]"Call/VT/ Dialing" ]"Incoming call" ]"Accept/Reject call" ]Enter thesecurity code ]"Reject unknown" ]"ON"/"OFF"126 Security SettingsNote・ When a relevant caller calls while this function isactivated, incoming call actions, such as soundingthe ring tone, will not take place for the set time;however, the Incoming call screen opens.・ This option works even when Secret mode is setenabled and a call from a caller whose Phonebookentry is set as secret arrives.<Set mute ring (seconds)>・ If the Ring Delay is set longer than the response timeof the Voice mail/Call forwarding service, networkservices start without the ringing action.・ If the Ring Delay is set longer than the response timeof "Record message", the Record Message startswithout the ringing action.・ You cannot activate "Set mute ring (sec.)" when"Reject unknown" is set to "ON".Rejecting Calls from an UnknownCallerReject unknown callerNote・ The terminal does not start incoming call actions fora rejected incoming call, however, the call is recordedin the Received call log. The other party hears a busysignal.・ Calls are rejected even when the Voice mail or Callforwarding service is activated. However, if theringing time is set to 0 second, network servicesstart.・ i-mode mail or SMS messages are receivedregardless of rejection settings.・ When "Set mute ring (sec.)" is set to "On", or when"Data access lock" is set to "On" and a check mark isplaced next to "Phonebook", you cannot activate"Reject unknown".](https://usermanual.wiki/LG-Electronics-USA/L06A.Users-Manual-2/User-Guide-1109033-Page-89.png)
![127Security SettingsYou can restore the settings of various functions to thedefaults.・ For functions that can be restored to the defaults, seethe "Menu List" (P346).1 M [Menu]](Settings) ]"Others"]"Reset/ Clear"]"Reset settings"]"Yes" ] Enter the security code.You can delete the saved data.1 M [Menu]](Settings) ]"Others"]"Reset/ Clear"]"Clear memory"2 Place check marks next to the items to be deleted ]I [Done] ]"Yes" ]Enter the security codePre-installed data : Delete default data in the "Databox".User Data : Delete all data other than defaultdata in the "Data box".PIM data : Delete data in the "Phonebook" and"Stationery".Restoring Various FunctionSettings to Their DefaultsReset/ClearNote・ Perform "Reset settings" only when the battery levelis sufficient to complete the task.・ While resetting, applications/communications are notavailableDeleting All Saved Data at OnceClearing MemoryNote・ The total call duration and total call cost will not bedeleted.・ Protected data is also deleted.・ Data saved in the UIM will not be deleted.・ The mail "♪Welcome Mail♪"will not be deleted.<User Data>・ After deleting the user data, the ticker of the i- Channel will not appear. When the information isautomatically updated, or you download the latest information by pressing Qthe ticker reappears automatically.<Pre-installed data>・ Some files that are used for default settings will notbe deleted.・ Usage of WOW LGIf the registered data when purchasing of i-αppli,Deco-mail pictures, Decomail pictographs, Wallpaper(Stand-by display), Frames, Stamps, or Melodies isdeleted, download the deleted data from "WOW LG".*"i menu"]"メニューリスト"]"ケータイ電話メーカー"]"WOW.LG"*Fees for packet communication will be charged.](https://usermanual.wiki/LG-Electronics-USA/L06A.Users-Manual-2/User-Guide-1109033-Page-90.png)
![128 Security SettingsIn addition to the security functions described in thischapter, the following functions and services are available.Please use them for your convenienceOther "Security Settings"Function name/Service nameNuisance call blockingserviceCaller ID request serviceSoftware updateReceive option"i-mode Disaster MessageBoard" ServiceSpam Mail Prevention(Reject mail with URLs)(Reject/Receive MailSettings)(Kantan Mail Settings)(Reject mass i-mode MailSenders)(Reject SMS)(Reject Unsolicited Ad Mail)(Confirm Settings)PurposeTo reject "nuisance call"To reject a call from acaller without Caller IDTo update software onthe FOMA terminal whennecessaryTo accept onlynecessary mails whenreceiving a large amountof i-mode mailsReferenceP311P312P385P142Function name/Service nameSuspending/reopening mailfunctionsLimiting mail sizeKeitai-osagashi Serviceimadoko-searchPurpose ReferenceNote・ The priority when setting to prevent nuisance call atthe same time is "Nuisance call blocking service" →"Reject on List/Anonymous caller".see "Mobile Phone User's Guide[i-mode] FOMA version".see "Mobile Phone User's Guide[i-mode] FOMA version".](https://usermanual.wiki/LG-Electronics-USA/L06A.Users-Manual-2/User-Guide-1109033-Page-91.png)
![Upon subscription to i-mode, you can send and receiveemail via the Internet, as well as between i-mode terminal.In addition to the message text, a total of 2MB in 10 files(JPEG, etc.) can be attached. Also, i-mode mail can bedecorated by changing the font color, size, or backgroundcolor of the message text. In addition, you can insert Deco-mail pictographs from the many pre-installed onesthat can be inserted in the same manner as Pictographs,to easily create and send expressive mail.・ For details about i-mode mail, refer to "Mobile Phone User'sGuide [i-mode] FOMA version".1 The Stand-by display ]g]Perform the followingoperations:[Inbox]Display the received mail folder list screen.→P148[Outbox]Display the sent mail folder list screen.→P149[Unsent message]Display the unsent maillist screen.→P149[Compose message]Create new i-mode mail.→P131[Check new messages]Receive i-mode mail stored in the i-mode Center by checking newmessages.→P144[Receive option]You can check subjects of i-mode mail stored in the i-modeCenter, and select mail to be received, or deleted withoutreception from the i-mode Center.→P142[SMS]Compose new SMS, or receive SMS stored in the SMS Center bychecking new SMS. →P168、P170[Template]Display a list of saved templates. →P138[Mail setting]Set mail functions. →P162130 MailWhat is i-mode Mail?Displaying the Mail MenuMail Menui-mode menuscreen](https://usermanual.wiki/LG-Electronics-USA/L06A.Users-Manual-2/User-Guide-1109033-Page-93.png)
![1 The Stand-by display ]g ]"Compose message"2 Select (Receiver) field ]"Direct input" ]Enter theaddress・ Up to 50 half-pitch characters can be entered.・ The address can be selected from Sent mail logs, orReceived mail logs or Phonebook→P1323 (Select (Subject) field ]Enter the subject・ Up to 15 full-pitch or 30 half-pitch characters can beentered.4 (Select (Message text) field ]Enter the message・ Up to 5000 full-pitch or 10000halfpitch characters can be entered. 5 I[Send]131MailCompose i-modemail screenReceiverSubjectMessageThe total number of bytes ofcharacters and decoration inthe message textCreating and Sending i-mode MailCreating and sending i-mode mailMessage textentry screenNote・ To decorate mail →P134・ To send with attachments →P139・ You can insert a line feed in the message text. The line feed is counted as 1 full-pitch character.・ A space is counted as 1 half-pitch character when press R.・ Characters may not be sent correctly to the receiver dependingon the signal strength.・ Entire words of Subject may not be received depending on themodel or type of mobile of receiver.・ Half-pitch katakana and pictographs (E-Moji) except for mailexchanged between i-mode terminal may not be displayedcorrectly.・ The secret code is added automatically when mail whose addressis set with the secret code is sent. However, the address of thesent mail does not display the added secret code.・ Even if i-mode mail is sent successfully, an error message"Transmission failed" may appear depending on the signalstrength.・ If you use Deco-mail pictographs in mail, the mail is automaticallysent as Deco-mail.・ If you send a mail with emotional pictographs to the other carrier'smobile phone, they will be automatically replaced with the similarpictographs that the carrier/mobile phone supports. However,they may not be displayed properly depending on the mobilephone type or its functions.・ i-mode mail that is successfully sent will be saved in the Outbox. Ifthe total number or total size of the stored sent mail exceeds thelimit, the oldest messages will be overwritten first. Protect sentmessages that you want to keep.](https://usermanual.wiki/LG-Electronics-USA/L06A.Users-Manual-2/User-Guide-1109033-Page-94.png)
![1 i-mode mail creation screen(P131) ]M[Menu] ]Perform the following operations:[Send]Send mail.[Preview]Display a preview of the mail to be sent.[Save]Save mail that is being created or edited as unsent mail.[Add address]Send mail to several addresses Up to five addresses can beadded.Sent address:Select an address from the Sent mail logs.Rcv. address:Select an address from the Received mail logs.Open phonebook:Select an address from the phonebook.Direct input:Enter the receiver address directly.[Delete address]Delete a selected receiver address.[Cng. rcv. type]Change to To:Change the selected receiver to To. The mailaddress entered in the To field will be shown to the recipient.Change to Cc:Change the selected receiver to Cc. You canspecify additional addresses to send a copy of the same mail toother recipients in addition to the direct recipients. The mailaddress entered in the Cc field will be shown to other recipients.・ The mail address may not be displayed depending on therecipient's terminal, device or mail software.Change to Bcc:Change the selected receiver to Bcc. You canspecify addresses of recipients of the copy, however, the identitywill not be shown to other recipients. The mail addresses enteredin the Bcc field will not be shown to other recipients.[Attach file]Add a new attached file / View/play or delete the attached file.→P140[Template]Load template:Open a template to create Deco-mail.→P137Save template:Save the current Deco-mail as a template.[Activate camera]Photo mode:Capture and attach a still image.]Take a still picture ]C[OK]Video mode:Capture and attach a video.]Take a video ]C[OK][Header/Sign.]Attach header:Attach the set header.Attach Signature:Attach the set signature.[Delete body]Delete the message text.[Delete mail]Delete mail that is being composed.132 Maili-mode Mail Creation Screen Sub MenuNote<Add address>・ When selecting a Phonebook entry with multiple mailaddresses saved, you need to further specify whichaddresses are to be added for recipients.<Cng. rcv. type>・ This option is not available when no address isentered.<Template>・ If the message text is already entered, a confirmationscreen whether to delete the text opens. To load thetemplate, select "Yes".](https://usermanual.wiki/LG-Electronics-USA/L06A.Users-Manual-2/User-Guide-1109033-Page-95.png)
![1 Message text entry screen(P131) ]M[Menu] ]Perform the following operations:[Decorate mail]Open the palette to select the decoration to Deco-mail(Decoration).→P135[Range choice]Specify the range of text to decorate. Go to Step 2 in "ChangingDecoration"(P137). ・ This option cannot be selected when no text has been enteredin the message.[Common phrases]Enter or edit Common phrases.→P297[Edit character]Select a character/decoration in the body and copy/cut/paste.Undo the last entry or pasting of characters.→P301[Edit dictionary]Edit a dictionary stored in the FOMA terminal.→P302[Quote]Quote the contents of a phonebook entry.→P296[Input setting]Configure the character entry.→P296[Special input]Enter a space, line feed, or Kuten code.→P297[Header/Sign.]Attach aheader:Attach the set header.Attach asignature.:Attach the set signature.[Jump]Top:Move to the top of the displayed message text.Bottom:Move to the bottom of the displayed message text.[Property]Display detailed information about the attached file.[Preview]Open the preview screen of the message text.133MailMessage Text Entry Screen Sub Menu](https://usermanual.wiki/LG-Electronics-USA/L06A.Users-Manual-2/User-Guide-1109033-Page-96.png)
![134 MailYou can create your own designed mail by addingdecorations such as changing font size, font color orbackground color, or inserting images while editing an i-mode mail message.・ Deco-mail up to 100KB can be sent.・ Up to 20 images within 90KB can be inserted.・ When a Deco-mail non-compatible terminal receives a Deco-mail, the mail contains a URL to browse or the messagewith only text will be shown in some Deco-mail incompatibleterminals.・ If insert the Pictographs (E-Moji) into text, it will change intoDeco-mail.1 The Stand-by display ]g ]"Compose message"2 Enter the receiver and subject ・ Entering the receiver and subject →Steps 2 and 3 in"Creating and Sending i-mode Mail" (P131)3 Select (Message text) field ]M[Menu] ]"Decorate mail"4 Use the palette to decorate the message text■To select a decoration before entering charactersFor operations, see "Decorating the Text" (P135).■To decorate entered charactersFor operations, see "Changing Decoration" (P137).5 I[Body]■To view the Deco-mail messageM[Menu]]Select "Preview".6 C[Set] ]I[Send]The set decoration appearsat the cursor positionMessage textentry screenPalette displayscreenNote・ If you exchange Deco-mail with non Deco-mail i-modeterminal, the decorations may not be displayedcorrectly .・ After decorated text is deleted, the decoration codesmay remain and this may result in a reduction in thenumber of characters available to enter to the text.Cancel any decoration before deleting the text. Whenyou delete the text by pressing Qfor 1+ seconds,the text including any decoration will be deleted.・ If a template contains an image that cannot be sentby mail, the image may be deleted.Creating and Sending Deco-mailDeco-mail](https://usermanual.wiki/LG-Electronics-USA/L06A.Users-Manual-2/User-Guide-1109033-Page-97.png)
![1 Message text entry screen (P131) ]M[Menu] ]"Decorate mail" ]Perform the following operations:・ I[Body]: Switch from palette functions to characterentry.[ (Edit decoration)]Specify the range of text to decorate.→P137・ This option cannot be selected when no text has been enteredin the message.[ (Cancel decoration)]Delete decoration in the line at the cursor.[ (Undo)]Restore a set decoration to the previous state.[ (Font size)]Set a font size.[ (Font color)]Set the color for characters.]Select a color ]Enter text[ (Background color)]Set a background color of the message text.[ (Blink)]Make characters blink.・ To finish entering characters that blink, select (Blink :End).[ (Ticker)]Set a ticker to the text.・ Characters entered between and appear as a ticker.・ To finish entering characters to be the ticker, select (Ticker : End).[ (Swing)]Set the text to swing.・ Characters entered between and swing.・ To finish entering characters to swing, select (Swing :End).[ (Word alignment)]Set a position to enter characters or insert an image.](Left)/ (Center)/ (Right)[ (Insert line)]Insert a line in message text.[ (Insert image)]Databox:Insert an image saved in "My picture" to the messageltext. ]Move the cursor to the folder ]C[Open] ]Select animage.Still image photo graphy:Capture and insert a still image.]Take a still picture ]C[OK]135MailDecorating the Text](https://usermanual.wiki/LG-Electronics-USA/L06A.Users-Manual-2/User-Guide-1109033-Page-98.png)
![[ (Copy)]Specify the range and copy text, an image, or a line.]Use Kto select the start point ]Use Kto select the endpoint[ (Cut)]Specify the range and cut text, an image, or a line.]Use Kto select the start point ]Use Kto select the endpoint[ (Paste)]Paste the copied or cut data after the cursor.[ (Copy decoration)]Copy all decorations set to the line at the cursor.[ (Paste decoration)]After copying decorations using "Copy Decoration", you canpaste them in the line at the cursor.[ (Reset all settings)]Delete all set decorations.136 MailNote<Copy/Cut>・ When characters with "Ticker" or "Swing" set areselected and copied or cut, "Ticker" or "Swing" will nottake effect.<Font size>・ The size of Deco-mail pictographs cannot bechanged.<Font color>・ Pictographs (E-Moji) are also displayed in thespecified color. To restore the default color, select "(Default)" from the color palette.<Blink>・ When characters set to blink are displayed on thepreview screen or the Compose message screen, thecharacters stop blinking after a certain period of time.<Insert image>・ Up to 90KB or 20 images can be inserted. Thenumber of available attachments may be reduceddepending on the file size. If the maximum number ofimages or size is exceeded, a warning messageappears.・ By default, images are saved in the "Decomail picture"and "Decomail pictograph" folders.・ If the same image is inserted more than once, it isconsidered that one image is inserted.](https://usermanual.wiki/LG-Electronics-USA/L06A.Users-Manual-2/User-Guide-1109033-Page-99.png)
![137Mail1 Mail Message text entry screen(P131) ]M[Menu] ]"Decorate mail" ]Select (Edit decoration)2 Use Kto specify the start point・ I[SelAll]: Select the entire message.3 Use Kto select the end point ]Select Decoration・ Operate Decoration→P135Templates are form data for Deco-mail with decorationssuch as the font size and image insertion already set. Inaddition to the pre-installed templates, you can usetemplates downloaded from sites.1 i-mode mail screen(P131)]M[Menu]]"Template"]"Load template"]"Yes"・ If the mail has message text entered, the entered textwill be deleted and the template will be loaded.2 Select a template]C[Select]The selected template is inserted in the message text.・ Selecting a template then pressing Jallows you toselect the template while viewing.・ You can edit the message text after inserting a template.Changing Decoration Creating Deco-mail Using aTemplateTemplate](https://usermanual.wiki/LG-Electronics-USA/L06A.Users-Manual-2/User-Guide-1109033-Page-100.png)
![138 MailCreate user-defined templates. Created templates aresaved in the "Template" of Mail menu.1 The Stand-by display ]g]"Template"]M[Menu]]"New template"2 Creating Templates・ Decorating operations→P1353 After creating a Template]C[Set]]C[Select]]Edit the title]I[Done]You can edit user-defined templates.1 The Stand-by display ]g ]"Template"2 Select a Template]C[Edit]]Edit the template・ Decorating operations→P1353 After editing the template]C[Select]]"Overwritesave"/"New save"Save:Save the edited template over the source template.New save:Save the edited template as a new template.]C[Select]]Edit the title4 I[Done] Creating a New TemplateNote・ Undecorated text cannot be saved as a template.Template listscreenEditing Templates](https://usermanual.wiki/LG-Electronics-USA/L06A.Users-Manual-2/User-Guide-1109033-Page-101.png)
![1 Template list screen (P138)]Move the cursor to atemplate]M[Menu]]Perform the followingoperations:[New template]Create a new template.→P138[Edit template]Edit the selected template.→P138[Edit title]Edit the title of the selected template.[Info]Display the selected template's properties.[Sort]Display the properties of the selected template.[Delete]Delete one:Delete the selected template.Del. selected:Select and delete templates.]Place check marks next the templates todelete ]I[Done] ]"Yes"・ Press M[Menu] and select "Select all" or "Release all".Delete all:Delete all templates.]Enter the security code ]"Yes"[Memory status]Display the number of saved templates.You can send i-mode mail with images or melodiesattached.・ Up to 2MB or 10 files can be attached. The number of availableattachments may be reduced depending on the file size.・ The following file types can be attached:- Images (JPEG, GIF)- Videos/i-motion movies- Melodies- Phonebook entries- Schedule events- To Do- Bookmarks・ A file prohibited to be attached to mail or to be output from theFOMA terminal cannot be attached.1 i-mode mail creation screen(P131)]M[Menu]]"Attach file"]Perform the following operations:139MailTemplate list screen sub menuAttaching a FileAttach file](https://usermanual.wiki/LG-Electronics-USA/L06A.Users-Manual-2/User-Guide-1109033-Page-102.png)
![[Attach file]Image:Select from images saved in "My picture" of the "Databox".]Move the cursor to the folder ]C[Open] ]Select an imageMovie:Select from videos/i-motion movies saved in "imotion" ofthe "Data box".]Move the cursor to folder ]C[Open] ]Select a movieMelody:Select from melodies saved in "Melody" of the "Databox".]Move the cursor to folder ]C[Open] ]Select a melodyPhonebook:Select a Phonebook entry.Calendar:Select a schedule event saved in the FOMA Terminal.]Select a date ]Select the Schedule eventTo Do:Select a To Do task saved in the FOMA TerminalBookmark:Select from bookmarks saved in "Bookmark" of "i-mode".]Move the cursor to the folder ]C[Open] ]Select a bookmark2 Select a receiver address and send the message For further operations, see [Creating and Sending i-mode Mail] (P131)1 Compose message screen (P131) ]Select a desiredattachment field with a file attached ]Perform thefollowing operations)[Add attach]Add an attach file.→P140[Del. attach]Delete the selected attachment.[Play/disp file]Play or display the attached file.140 MailNote・ Attached GIF images and melodies cannot bereceived with an i-mode terminal using the movaservice.・ A video/i-motion movie over 2MB cannot be attached.Reduce the size under "Clipping" to the available sizebefore attaching it. →P253・ Depending on the recipient terminal, a video may bedisplayed coarsely or as sequential still images. It isrecommended that you use the following settings tocapture a movie if you send it to the terminal modelswhich are not corresponding to 2M bite terminalmodels. Size restriction: 500KB, Select Size: QCIF(176×144), Quality: Super fine・ Some i-motion movies may not be attached.Playing/Displaying/Deleting an Attached File](https://usermanual.wiki/LG-Electronics-USA/L06A.Users-Manual-2/User-Guide-1109033-Page-103.png)
![141MailWhen the FOMA terminal is in the service area, i-mode mailis automatically sent from the i-mode Center.1 After the i-mode mail is received, appears at thetop of the screenWhen the reception is completed, theReception result screen opens. ・ The previous screen returns if nooperation is performed for approximately30 seconds.・ Selecting "Mail" opens the Inbox listscreen.・ Until the Detail screen of received i-modemail is opened, appears at the top ofthe screen and (the number indicatesthe number of messages) appears onthe Stand-by screen.When i-mode Mail is ReceivedAutomatic Reception of MailReceptionresult ScreenNote・ When new i-mode mail is delivered, other i-mode mailand/ or Message R/F stored in the i-mode Center arereceived at the same time.・ When Receive option for i-mode mail has been set,sent i-mode mail is stored in the i-mode Center. Youcan check the subject of i-mode mail stored in thecenter before selecting and receiving the mail. →P142・ If mail is received from a terminal that is capable ofsetting To, Cc, or Bcc, you can check how the mailwas addressed to you using the FOMA terminal. →P151・ Melodies, videos and still images can be received asattachments to i-mode mail. Incompatible files may beautomatically deleted at the i-mode Center. If anattached file is deleted, "Del. attach" is added isinserted to the message text.・ Files attached to a mail cannot be saved in the FOMAterminal when the FOMA terminal does not supportthe file type but can be forwarded.・ Up to 100KB of i-mode mail including attachmentscan be automatically downloaded. Attachments over100KB can be manually downloaded from the i-modecenter.→P146 ・ You can set whether to receive attached melodies orimages under "Receive attach file".→P162・ If the size of a received mail exceeds the number ofcharacters set under "iMenu"]"English" ]"Options"]"Mail Settings"]"Limit Mail Size", you can select and download the attached file or thedata whose name appears in the message text.→P146・ If the total number or total size of the received mail (i-mode mail and SMS) stored in the FOMA terminalexceeds the limit, the oldest read messages will beoverwritten first. Protect the received messages youwant to keep.・ Incoming mail is saved at the i-mode Center when:- Power is off - A video call in progress- Self mode is activated - The terminal is out of service area- The "Receive option set" is set to "ON"- The Inbox is full with protected or unread mail](https://usermanual.wiki/LG-Electronics-USA/L06A.Users-Manual-2/User-Guide-1109033-Page-104.png)
![・ When mail is kept at the i-mode Center, orappears. When the terminal power is off or theterminal is out of service area, these icons may notbe displayed even there is i-mode mail at the i-modeCenter.・ If multiple i-mode mail messages or Message R/F arereceived concurrently, the ring tone set to the i-modemail or Message R/F received the last sounds.1 After the i-mode mail is received, appears at the top ofthe screen ]"Mail"]Select a folder2 Select mail to be displayedYou can check the subject of i-mode mail stored in the i-mode Center, and select mail to be received or deleted atthe i-mode Center before downloading all new messages.To use the Receive option, set "Receive option" to "ON" inadvance.Set "Receive option" to "ON" to receive selected i-modemail.1 The Stand-by display ]g]"Receive option"]C[Select]]select "ON"]I[Done]After this option is set, i-mode mail will not be receivedautomatically.142 MailDisplaying New i-mode MailReceived mailNote・ Images attached to i-mode mail may not be properlydisplayed.・ Incompatible attachments cannot be saved to the"Data box", however, they can be forwarded.・ The following shows the available file type ofdisplay/playback/save when attached in i-mode mail.- Images available to use as a Deco-mail pictogram- Movie/i-motion- Melody- Schedule- To Do- BookmarkSelecting and Receiving i-mode MailReceive optionSetting the Receive option](https://usermanual.wiki/LG-Electronics-USA/L06A.Users-Manual-2/User-Guide-1109033-Page-105.png)
![1 The Notification of received mailscreen opensPress C[Select] or Q/Pto close thenotification screen.After "Receive option" is set to "ON", perform the followingsteps to select and receive i-mode mail:1 The Stand-by display ]g ]"Receive option"For subsequent steps, see "Mobile Phone User's Guide [i-mode] FOMA version".■ Icons displayed on the Receive option screen indicatingattachments143MailNote・ Set "Receive option" to "OFF" in "Receive option set"(P162).Note・ or indicating the incoming i-mode mail will notbe displayed, and the mail ring tone will not sound.・ The i-Channel ticker stops while the Notification ofreceived mail screen is displayed.If i-mode mail arrives when the Receiveoption is setSetting the Receive Option for i-mode MailNotification ofreceived mailscreenIcon File typeAn image is attached.An i-motion movie is attached.A melody is attached.Another type of file is attached.Note・ Even when "Receive option set" is set to "ON", allmessages will be received when "Check newmessages" is used. If you do not want to receive mail,delete "Mail" from the items to be checked.→P162・ Receive option can also be performed from "iMenu".Select "iMenu"]"メニューリスト(Menu List)"]"メール選択受信 (Receive Option)".](https://usermanual.wiki/LG-Electronics-USA/L06A.Users-Manual-2/User-Guide-1109033-Page-106.png)
![i-mode mail that could not be received because the FOMAterminal was out of service area or from other reasons arestored in the i-mode Center. You can receive stored i-modemail by checking to the i-mode Center.・ appears at the top of the screen when mail is kept at the i-mode Center.・ You can select items to check (mail or Message R/F) under"Check new messages" (P162).・ You cannot check new messages while out of the service area.1 Stand-by display]g(for 1+ seconds)When checking is completed, the check result screenopens.You can reply to the sender of i-mode mail. Replying can bemade by entering new text or quoting the text of received i-mode mail.1 Received mail detail screen(P148)]M[Menu]]"Reply"]"Reply"/ "Reply quoted"・ You can reply to mail also by pressing I[Reply] on theReceived mail detail screen.・ If the mail is sent to multiple receivers, you can select"Reply all" or "Rep. quoted all".2 Enter the subject and the message text・ "Re:" is added to the subject.・ When replying by quoting, ">" is added at the beginning ofthe quoted message.・ Editing the subject and message.(P131).3 I[Send]144 MailChecking for New i-mode MailCheck new messageNote・ Even when i-mode mail is kept at the i-mode Center,may not appear on the screen if mail arrived while theFOMA terminal power was turned off.Replying to i-mode MailReplying to i-mode MailNote・ After exceeding the storage capacity of Outbox, areply cannot be created. Delete mail saved in Outboxbefore replying.・ The reply to received Deco-mail with quotation hasoriginal decoration and images entered in themessage text. However, restricted images will not beentered.](https://usermanual.wiki/LG-Electronics-USA/L06A.Users-Manual-2/User-Guide-1109033-Page-107.png)
![You can forward received i-mode mail to another receiver.1 Received mail detail screen (P148)]M[Menu]]"Forward"2 Enter the receiver・ "Fw:" is added to the subject.・ Editing the receiver and message text (P131).3 I[Send]You can save mail addresses/phone numbers from mail tothe Phonebook.1 Received mail detail screen (P148)]Move the cursorto the addresses/number to save]M[Menu]]"Store"]"Add to ph.book"2 "Yes"Go to Step 2 in "Saving Contacts to the Phonebook fromReceived or Dialed Calls" (P85).1 Received mail detail screen(P148)]M[Menu]]Select "Store"]"Store address"If there are multiple recipients/senders, further select theaddresses/phone numbers to register.Go to Step 2 in "Saving Contacts to the Phonebook fromReceived or Dialed Calls" (P85).145MailForwarding i-mode Mail to AnotherReceiverForwarding i-mode MailNote・ When a file that is prohibited from beingattached/distributed from the FOMA terminal isattached/pasted to an i-mode mail to be forwarded,the file will be deleted.・ After the storage capacity of the Outbox is exceeded,you cannot forward the mail. Delete mail saved in theOutbox before forwarding.・ The forwarded Deco-mail has original decoration andimages entered in the message text. However,restricted images will not be entered.Registering Mail Addresses/ PhoneNumbers to the PhonebookTo register an address/phone number from the message textTo save a receiver, sender address, or phone number](https://usermanual.wiki/LG-Electronics-USA/L06A.Users-Manual-2/User-Guide-1109033-Page-108.png)
![You can play or save an image, melody, video or i-motionmovie attached or pasted to i-mode mail.When the size of a received message includingattachments exceeds 100 KB, you will need to downloadthe attachments from the i-mode Center.・ All the attached files selected are downloaded regardless ofthe setting of "Receive attach file" option in "Mail setting" of"Communication".・ Expired files cannot be downloaded.1 Received mail detail screen (P148)]Select a filename1 Received mail detail screen (P148) ]Move the cursorto the attached file・ C[Select]: Display/Play the selected attachment.2 M[Menu] ]"Attach file" ]Perform the followingoperations:[Save]Save the selected attachment.・ Obtained images will be saved in "i-mode" folder in "My picture"of the "Data box". (If the image can be used as a Deco-mailpictograph, it will be saved in "Deco-mail pictogram" folder.)・ Movies/i-motion movies will be saved in the "i-mode" folder in"imotion" of the "Data box".・ Melodies will be saved in the "i-mode" folder in "Melody" of the"Data box".・ Phonebook entries will be saved to the Phonebook in the FOMAterminal.・ Schedule events will be saved to Schedule in the FOMAterminal.・ To Do tasks will be saved to the To do list in the FOMAterminal.・ Bookmarks will be saved in "Bookmark" in the "i-mode" folder.・ Attached files other than the above cannot be saved.[View/Play]Play/Display the selected attachment.[Delete]Delete the selected attachment.146 MailPlaying/Saving an Attached Filefrom i-mode MailRetrieve Selected Attached FileNote・ If the available space of the Inbox is smaller than thefile size, the attachment cannot be retrieved.Displaying/Playing/Saving//Deleting anAttached File](https://usermanual.wiki/LG-Electronics-USA/L06A.Users-Manual-2/User-Guide-1109033-Page-109.png)
![1 Received mail detail screen (P148) ]M[Menu] ]"Inline image"2 Select an image ]Perform the following operations:[Save inline img]Save the selected image in the "i-mode" folder in "My picture" ofthe "Data box".[Prop inline img]Display detailed information about the selected image.147MailNote・ Large i-mode mail may be rejected by the i-modeCenter, and an error message may be returned to thesource address.・ i-mode mail that is 100KB (with attachmentsincluded) or smaller can be automatically downloaded.Attachments larger than 100KB can be manuallydownloaded from the i-mode center.・ Set a size limit for i-mode mail messages in advance.・ An image that is larger than the screen is reducedand displayed.・ Some images, videos/i-motion movies may not bedisplayed or played.・ When "Melody auto play" is set to "ON", an attachedmelody is played automatically when you open areceived i-mode mail.・ Software that supports i-motion mail is required toplay it on a PC.Saving Attached Images](https://usermanual.wiki/LG-Electronics-USA/L06A.Users-Manual-2/User-Guide-1109033-Page-110.png)