LG Electronics USA L06A PCS GSM Phone User Manual L 03A English Cover 1 0
LG Electronics USA PCS GSM Phone L 03A English Cover 1 0
UserManual.wiki
>
LG Electronics USA
>
L06A User Manual
>
Users Manual 4
Contents
1.
Users Manual 1
2.
Users Manual 2
3.
Users Manual 3
4.
Users Manual 4
Users Manual 4
Navigation menu
Upload a User Manual
Namespaces
Wiki Guide
HTML
PDF
Info
Views
User Manual
Discussion / Help
Navigation
!["i-αppli" is software for i-mode compatible mobile phones.Downloading various software from i-mode sites allowsupdating stock price or weather information automatically,playing games without connecting to a network, or usingthe FOMA terminal more conveniently.・ Packet communication charges apply.・ When using overseas, packet communication charges differfrom domestic charges. →P322・ For details about i-αppli, refer to the "Mobile Phone User'sGuide [i-mode] FOMA version".Downloading i-αppli from a SiteYou can download an i-αppli from a site and save it to theFOMA terminal. ・ Up to 500KB of an application can be downloaded.・ Up to100 downloaded applications can be saved. This numbermay be reduced by the software data size.1 From the currently accessed site ]Select a program・ I[Cancel]:Cancel downloading. ■When "Display SW info" is set to "Display"Software information is displayed. C[OK] ]"Yes" todownload the program.2 After the download is completed ]"Yes"The downloaded software starts.・ Depending on the software, after the software isdownloaded, a screen where you set operating conditionmay be displayed. The settings can be changed from"Software set" later. → P226222 i-αppliNote・ At the start of downloading, a confirmation screenmay appear notifying you that the application will use"the phoneinformation data (stored data and serialnumber of your mobile phone/UIM)". Press "Yes" tostart downloading. Select I[Detail] to check thedetails of the phone information to be used. In thiscase, the "serial number of your mobile phone/UIM" issent to the IP (Information Provider) over the Internet,and it could be intercepted by a third party. However,this action does not reveal your phone number, postaladdress, age, or gender to the IP or others.・ If you attempt to re-download software that hasalready been downloaded with a different UIM, aconfirmation asking whether to overwrite appears.Select "Yes" to overwrite.・ If the maximum number of software programs whichcan be saved is exceeded or if there is not enoughmemory space, a confirmation for deletion of another i-αppli appears. If there is not enough free memoryspace, you can select i-αppli to delete, checking therequired memory space to store the new application.Select "Yes" to delete ]Place check marks next to i-αppli to delete ]I[Delete]. ]Select "Yes" todelete the marked software and to start the download.・ If the download of software fails due to weak signalreception, the software cannot be saved.・ Even if the download of software fails due to weaksignal reception after old software was deleted toincrease the available space on the terminal, the oldsoftware cannot be restored.・ Some software that starts immediately after beingdownloaded cannot be saved.What is an i-αppli?Downloading i-αppli from a Site](https://usermanual.wiki/LG-Electronics-USA/L06A.Users-Manual-4/User-Guide-1109039-Page-2.png)
![223Note the followings if you download a mail-connectedi-αppli.・ If you download a mail-connected i-αppli, a folder specific to themail-connected i-αppli is created in Inbox and Outbox. A reatedfolder takes the downloaded mail-connected i-αppli name and itis unchangeable.・ Up to 17 (100 including all other i-αpplis) mail-connected i-αpplis can be saved.・ If you attempt to download a mail-connected i-αppli, which willuse an existing folder for a mail-connected i-αppli saved in theFOMA terminal, the attempt will be denied.・ If there is only a folder for a mail-connected i-αppli left in theFOMA terminal, you can download a mail-connected i-αppliwhich uses that folder. If the folder is not used, you can deleteit and create a new folder. A mail-connected i-αppli will not bedownloaded if you do not create a folder for it.・ You cannot delete a folder if a mail-connected i-αppli that usesthat folder still exists in the FOMA terminal. If you delete foldersthat no mail-connected i-αppli uses, folders created in bothInbox and Outbox are deleted at once.・ If you delete folders that no mail-connected i-αppli uses, youcan choose whether to delete all folders automatically createdat once. You cannot delete folders, however, if they have any protectedmessages in them.Display Software infoWhat is an i-αppli?Set whether to display software information beforedownloading the software.1 M[Menu] ]"iαppli" ]"iαppli settings" ]"Display SWinfo" ]"Display"/"Not display"1 The Stand-by display ]I(for 1+ seconds)■ Icons on the Software List screeni-αppliDownloading a Mail-Connected i-αppliView i-αppli Information at download timeStarting an i-αppliIcon DescriptionStandard i-αpplii-αppli DXAuto-start set i-αpplii-αppli downloaded from an SSL siteSoftware listscreen](https://usermanual.wiki/LG-Electronics-USA/L06A.Users-Manual-4/User-Guide-1109039-Page-3.png)
![2 Select software・ If "Network set" of "Software set" is set to "Confirm everysession", a confirmation whether to allow thecommunication appears. Select"Yes"/"No" ■To exit an i-αppliP] Select "Yes".224 i-αppliTo start software from other softwareSome software can start a specified i-αppli withoutreturning to the Software list screen. ・ If the software to be started is not saved in the FOMAterminal, you need to download it.・ If the software to be started is not specified, select a softwarefollowing the instruction on the screen.If a security error occursIf you attempt to perform operations that are notpermitted for the software, a security error is indicatedand the error is recorded in "Security error history". → P234If a problem occurs with the softwareIf a problem occurs with the software, you can check thecontents using the Trace info. → P234To i-αppli creatorsIf software does not behave as expected while beingcreated, you may want to refer to the Trace info.Note・ Some software performs communication whilerunning. You can change the settings in "Networkset" of "Software set" to not automatically performcommunication.→P225・ If there is an incoming voice or video call when thesoftware is running, you can answer the call pausingthe software. After the call is terminated, theprevious screen returns.・ Even when the software is running, you can receivemail or Message R/F. The software keeps running,and , , appears at the top of the screen. Toview the received mail or Message R/F, terminate thesoftware.・ Images used by an i-αppli* or data you enter may beautomatically sent to a server via the Internet. * Images used by the i-αppli include: images capturedwith Camera that is started from a Camera-linked(linkage) application, images obtained using infraredcommunication function of the i-αppli, imagesdownloaded from a site or web site, and imagesobtained from the Data box by the i-αppli.・ You cannot start software downloaded using adifferent UIM.・ Depending on i-αppli, the tone may not sound.・ Depending on the software, an IP (InformationProvider) can access programs saved on yourterminal and directly disable their use. In this case,the software cannot be run or updated, however, itcan still be deleted, or the software information canstill be shown. To use the software again, signals toenable the software must be sent. Contact your IP.・ Depending on the software, the IP may send data toa program saved on your terminal.・ In the event that the IP disables/re-enables thesoftware or sends data, your terminal performscommunication and blinks. Packet communicationcharges do not apply in this case.](https://usermanual.wiki/LG-Electronics-USA/L06A.Users-Manual-4/User-Guide-1109039-Page-4.png)
![225i-αppli1 Software list screen (P217) ]Move the cursor tosoftware ]M[Menu] ]Perform the following operations:[Set iαppli TO]Set conditions to start the selected software.→ P233[Auto start time]Set whether to start the selected software automatically, andset the date and time to start if the auto start is specified. → P233[Software set]Set the selected software.→P225[Software info]Display the selected software information such as a name andversion of the i-αppli . The displayed items differ depending onthe software.[Upgrade]Upgrade the selected software.[Delete]Delete software.→ P235Set operating conditions for each software program. You can set an application to perform communicationsautomatically while it is running or decide separatelywhether to allow it to browse icon information, Phonebook,etc.・ Some items may not be changed depending on the software.1 Software list screen(P223) ]Move cursor to the program]M[Menu] ][Software set] ]Perform the followingoperations:[Network set]Set whether to allow communications while software is running.[Icon info]Set whether to permit the use of icons for i-mode mail, MessageR/F, in/out of service area, battery level, or Manner Mode whenthe software starts.[View P.book/call records]Set whether to allow software to browse the Phonebook and callhistory when the software is started.[Change ring tone/image]Set whether to allow software to automatically change an imageor melody set for a ring tone or the Stand-by display when thesoftware is startedSoftware List Screen Sub MenuNote<Upgrade>・ During an update, a confirmation may appearnotifying you of the use of terminal data (stored dataor serial number of the terminal/UIM)". Select "Yes" tostart downloading. Select I[Detail] to check thedetails of the terminal data to be used. In this case,the "serial number of your mobile phone/UIM" is sentto the IP (Information Provider) over the Internet, andit could be intercepted by a third party. However, thisaction does not reveal your phone number, postaladdress, age, or gender to the IP or others.Setting i-αppli Operating Conditions](https://usermanual.wiki/LG-Electronics-USA/L06A.Users-Manual-4/User-Guide-1109039-Page-5.png)
![226 i-αppliThe software you deleted after purchasing is available todownload from "WOW LG" of i Menu site. →P128Various games to train the brain are available. You can playgame by selecting either right brain or left brain or measurethe abilities.1 Software list screen (P223) ]"脳オン" ]CThe menu screen opens.2 Perform the following operations:・ Push I [終了(Exit)] to exit.[ゲームスタート (Start the game)]Start the game.・ For each game, use Hto select an item.左脳(Left brain) : You can select out of 4 games to buff up theleft brain ]Move the cursor to the game toplay ]C]Move the cursor to the level withwhich you want to play ]C右脳(Right brain) : You can select out of 4 games to buff up theright brain..]Move the cursor to the game toplay ]C]Move the cursor to the level withwhich you want to play ]C試験 (Test) : Measure the left-brain/right-brain skills.]Move the cursor to the game to play ]C]Move the cursor to the level with which youwant to play ]CNote・ Depending on the settings, the software may notconnect to the network or icon information (unreadmessages or battery level, etc. will not be sent).<Network Set>・ When this is set to "No", the software may not start,or realtime information may not be provided.・ When this is set to "Yes", the software automaticallyconnects to the network. While connected, packetcommunication charges apply.<Icon info>・ When set to "Yes", information about the status ofthe terminal as indicated by the presence of icons forunread mail, messages, battery level, Manner Mode,inside the service area, and outside the service areamay be sent to Information Providers (IP) via theInternet in the same manner as the "serial number ofyour mobile phone/UIM" is sent. The icon informationmay be intercepted by a third party. Software thatneeds Icon data may not function if this is set to "No".Pre-installed i-αppli脳オン](https://usermanual.wiki/LG-Electronics-USA/L06A.Users-Manual-4/User-Guide-1109039-Page-6.png)
![227i-αppli[環境設定 (Environment settings)]Adjust sound in 8 levels or reset the history and score of game.・ Push I[戻る(Back)] to back to menu screen.[ヘルプ (Help)]Display the description of the game and how to play it.・ Push I [戻る(Back)] to back to menu screen.[ゲーム成績 (Game result)]Shows recorded game results by graphs or numeric values.・ Push I [戻る(Back)] to back to menu screen.[終了 (Exit)]Exit the game.■ Operations during the gameEnter a number from 1 - 9 in an empty cell. However, thesame number cannot be entered more than once for eachvertical or horizontal row, or for a block of 3x3 cells framedwith a thick line. 1 Software list screen (P223) ]"Sudoku Puzzle"The menu screen opens after the game title screen.2 Perform the following operations:[ゲームスタート (Start the game)]Start the game. Select a level.[ランキング (Ranking)]Open the list of high scores.[オプション (Options)]Set whether to sound the tone or display hints.・ Selecting "リセット (Reset)" restores the settings and the highscore entries to their defaults.[ヘルプ (Help)]Display the description and rules for the game.[終了 (Exit)]Terminate the i-αppli.* Press I[メニュー (Menu)] to return to the menu screen.Key Description1∼9Select an answer.M[OK] /[確認 (Check)] Select an item.I[ポーズ (Pause)] Suspend the game. You can selectfrom "ゲームを続ける (Resume)"/"終了(Exit)".I[戻る (Back)] Close the paused screen.Move the cursor toselect an item.Sudoku Puzzle](https://usermanual.wiki/LG-Electronics-USA/L06A.Users-Manual-4/User-Guide-1109039-Page-7.png)
![■ Operations during the gameThis is a puzzle in which you try to erase 3 or moreadjacent same type of monsters at once. The game endswhen all the monsters are erased.Think carefully about the order of the monsters to delete. If there are any remaining monsters at the end, you willlose.1 Software list screen (P223) ]"Halloween Fever"The menu screen opens.2 Perform the following operations:・ Press I[終了(Exit)] to exit.[スタート (Start)]Start the game.[ステージ (Stage)]Press Jto select the finished stage.[ヘルプ (Help)]Display the description and how to play the game.[サウンドオン(Sound on)/サウンドオフ(Sound off)]Ctoggles the sound effects on or off.■ Operations during the gameHalloween FeverElapsed timeKey DescriptionKMove the cursorM[消す(Erase)] Delete the entered numberIPause the game. You can select from[ポーズ (Pause)] "セーブ (Save)", "ニューゲーム (Start a newgame)", "リスタート (Restart)", and "終了(Exit)" Only one session can be saved.1∼9 Enter a numberC]J]C228 i-αppliMove the cursorand selectKey DescriptionKMove the cursorCSelectI[メニュー (Menu)] Selecting "はい (Yes)" ends the game,and the menu screen opens.*Restart the game.#Return to the previous screen.](https://usermanual.wiki/LG-Electronics-USA/L06A.Users-Manual-4/User-Guide-1109039-Page-8.png)
![This is a chess game in which you try to surround theplaymate's chess pieces on every side with your pieces,and the playmate's chess pieces will become to yours. Theone who has more chess pieces at the end of game will bethe winner.1 Software list screen (P223)]"Battle Reversi"The game title list screen appears.2 Press any buttonThe menu screen appears.3 Perform the following operationsPress I[終了(Exit)] to exit.[シングルモード(Single mode)]A mode to play with a pretend playmate.The game starts after you selected your character, your chesspieces color (white or black) and playmate's character.・ Press I[もどる(back)] to go back to menu screen beforegame starts.[バトルモード(Battle mode)]A mode to play with your friend with your cellphone.The game starts after you selected your character, your chesspieces color (white or black) and playmate's character.・ Press I[もどる(back)] to go back to menu screen beforegame starts.[データボックス(Data box)]Display every game's result (scores in win, draw or loss games,etc.).Press M[キャラクター(Character)] to show your signed upcharacter.・ Press I[もどる(back)] to go back to menu screen.[環境設定(Environment settings)]Set or reset time limit or sound.・ Press I[もどる(back)] to go back to menu screen.[キーマップ(Key map)]Display buttons description that using in this game.・ Press I[もどる(back)] to go back to menu screen.[ヘルプ(Help)]Display game content and operations.・ Press I[もどる(back)] to go back to menu screen.■ Operations during the game229i-αppliBattle ReversiSelect where to putyour chess piece withcursor](https://usermanual.wiki/LG-Electronics-USA/L06A.Users-Manual-4/User-Guide-1109039-Page-9.png)
![230 i-αppliTry to throw a higher card than the previous player. Playersare ranked in the order of ascending priorities who finishedcards earlier.1 Soft List Display (P223)]" 超富豪 "Menu is displayed.2 Next・ Press M [終了(end)] to end this game.[PRACTICE GAME]One game COM competition mode.[RANKING GAME]5 games COM competition mode.[CONTINUE]Restart the game was paused. Choose the game if game datawas saved.[RANKING GAME]More detail rules, and sound ON/OFF can be set.■ Game OperationUse cursor to choosethe thrown cardKey DescriptionJ /4/6Move cursorU /2Choose a cardD /8Cancel the card chosenC /5Throw the card chosenM [タイトル(Title)] Press "Yes" to end the game and showtitle screen. Press "End" to end thegame.I [開始(Start)] Start a gameI [パス(Pass)] Pass*Switch between sound ON and soundOFFK / 2 / 8 / 4/6C/5I[ポーズ(pause)]Move the cursorSelect itemsSelecting "はい(Yes)" ends the gameand show result screen. Selecting I[終了(end)] to end the game.Key Description超富豪](https://usermanual.wiki/LG-Electronics-USA/L06A.Users-Manual-4/User-Guide-1109039-Page-10.png)
![Enjoy mahjong with the pretend playmates.1 Soft List Display (P223)]" GravityArrow "Menu is displayed.2 Next・ Press M[終了(End)] to end this game[GAME START]Start the game.[SOUND ON/SOUND OFF]Press C to switch the Sound ON/OFF■ Game Operation231i-αppliGravityArrowKey DescriptionK /2/8/ Move the ball4/6C /5Switch the ballM [中断(Pause)]/ Pause/Restart[再開(Restart)]I [タイトル(Title)] Press "Yes" to end the game and showtitle screen. Press "End" to end thegame.*Switch between sound ON and soundOFFThe scores now](https://usermanual.wiki/LG-Electronics-USA/L06A.Users-Manual-4/User-Guide-1109039-Page-11.png)
![Enjoy mahjong with the pretend playmates.1 Soft List Display (P223)]" 麻雀 "Menu is displayed.2 Next・ Press M[終了(End)] to end this game[GAME START]Start the game.[SOUND ON/SOUND OFF]Press C to switch the Sound ON/OFF■ Game Operation・ The screen image only provides an example. It may differ from actual one.FOMA環境通信確認アプリ(FOMA Communication EnvironmentCheck Application) is an application to confirm if the FOMAterminal is in a FOMA HIGH-SPEED Area.・ When using FOMA環境通信確認アプリ (FOMA CommunicationEnvironment Check Application), please agree with the "Usageand Warning" section.・ When confirming the Communication Environment, thediagnostic result may differ, depending on the CommunicationEnvironment (weather, radio wave, network, etc.), even if youuse the FOMA terminal at same place, same time (sometimes"Out of service area" may be displayed).・ Using other functions while using this application may causean application error.232 i-αppliChoose the tile withcursor Key DescriptionJ /4/6Move cursorC /5Decide the tile will be thrownM [得点(Score)] Show scoreI [タイトル(Title)] Press "Yes" to end the game and showtitle screen. Press "End" to end thegame.*Switch between sound ON and soundOFFFOMA環境通信確認アプリ(FOMA CommunicationEnvironment Check Application)麻雀Only displayed at [ポン]/[チー]](https://usermanual.wiki/LG-Electronics-USA/L06A.Users-Manual-4/User-Guide-1109039-Page-12.png)
![233i-αppliSet whether to start software from a site, mail, or viainfrared communication.1 Software list screen(P223)]Move the cursor tosoftware ]M[Menu] ]"Set iαppli to" ]Place checkmarks next to software to be startedSite i-αppli to:Start the software from a site.Mail i-αppli to:Start the software from mail.Ir i-αppli to:Start the software via infrared communication.2 I[Done]・ Date and Time need to be set in advance to start an i-αppliautomatically.→ P48Auto Start You can set whether to start i-αppli automatically.1 M[Menu] ]"iαppli" ]"iαppli settings" ]"Auto start set"]"ON"/"OFF"Auto Start TimeSet the date and time when the software starts automatically.This option can be set for to up to 3 software programs.1 Software list screen(P223) ]Move the cursor to thesoftware ]M[Menu] ]"Auto start time" ]Perform thefollowing operations:[Time interval set]Applications will be started automatically with set intervals.[Start time set]Place check marks when you want to set the time when the i-αppliautomatically start. [Time]*Set the time and date for auto-start. To set the date, use Jto move the cursor to the place tochange the date and enter the date with the dial keys (to set thedate on the calendar screen, press C[Select] in the date entryfield ). Operations on the calendar screen → P271 To set the time, use Jto move the cursor to the value tochange, enter the time with dial keys, (pressing C[Select] inthe time entry field opens the time settings screen on which youcan enter a time using dial keys and H).・ Depending on the settings in "Date&Time format" (P52), thedisplay format or order of the date and time may differ.[Repeat]*Select a repeating pattern for auto-start.1 Time: The software starts automatically only once at the setdate and time.Setting Start Date/TimeStart an i-αppli from a Site or Maili-αppli To FunctionAutomatically Starting i-αppliAuto start setSetting to Automatically Start i-αppli](https://usermanual.wiki/LG-Electronics-USA/L06A.Users-Manual-4/User-Guide-1109039-Page-13.png)
![234 i-αppliDaily:The software starts automatically at the set time everyday.Weekly:The software starts automatically at the set time onthe specified days of the week every week. → Placecheck marks next to the days to auto-start every week* Can be set by marking "Start time set"2 I[Done]1 M[Menu] ][iαppli] ][iαppli info] ]Perform thefollowing operations:[Security error history]Display a log of errors of software that was terminated due to asecurity errors.・ I[Delete]: Delete the selected error history entry.[Auto start info]You can check whether software automatically started. You canview the information and the latest date and time when softwarestarted for up to 3 software programs set to start automatically.Start ○: The software automatically started successfully Start ×: The software failed to start automatically Start −: The software has not started because the set time hasnot arrived[Trace info]Display trace information for the software.・ I[Delete]: Delete trace information for the software.Viewing Various InformationNote・ History or information which is not traced will not beshown.Note・ The software will not automatically start when:- The FOMA terminal power is turned off- A call or communication is in progress- Another function is running- "Lock all" is set (even from the security code entryscreen)- An "i-αppli" in "Data access lock" currently is "ON"(even from the security code entry screen)- The Auto-start time is the same as the scheduledtime for software update, an alarm, Schedule event,or To Do alarm- The i-αppli was downloaded using another UIM- The i-αppli has "Network set" to "Confirm everysession"- The same i-αppli has a set intervals to start within10 minutes・ Software will not start at the set time if othersoftware is running at that time. Also, the softwaremay not start while other functions are running.・ If auto starts fails, appears on the Stand-bydisplay. Selecting the icon displays the Auto startinfo (P234). disappears after the Auto start info isviewed.i-αppli information](https://usermanual.wiki/LG-Electronics-USA/L06A.Users-Manual-4/User-Guide-1109039-Page-14.png)
![235i-αppli1 Software list screen(P223) ]Move the cursor to software]M[Menu] ][Delete] ]Perform the followingoperations:This item:You can delete the selected software.Selected items:Select and delete items.]Place check marks next to the software to bedeleted]I[Delete]]"Yes"All items:Delete all software.]Enter the security code]"Yes"Some i-αppli use terminal functions and connect to sites.・ You need to download i-αppli that support the function inadvance.・ For some i-αppli, operations may be different, or functions maynot be available.・ When the camera is started by an i-αppli, capturedimages will not be saved in "My picture" in the "Data box",however, they are saved and used as a component of thei-αppli.1 Capture an image with the camera using an i-αppli1 Perform infrared communication using an i-αppliUsing the Camera from an i-αppliUsing Infrared Communication from an i-αppliNote・ You may not be able to exchange data with somedevices even if they have the infrared capability.・ You can also start an i-αppli by receiving i-αppliactivation data via infrared communication.・ When infrared communication is in progress, anyconnection with sites or reception of Mail will becancelled.Note・ When "Auto start time" is set, a confirmation fordisabling the option appears. Select "Yes" to disable.Using Various i-αppli FunctionsDeleting i-αppli](https://usermanual.wiki/LG-Electronics-USA/L06A.Users-Manual-4/User-Guide-1109039-Page-15.png)

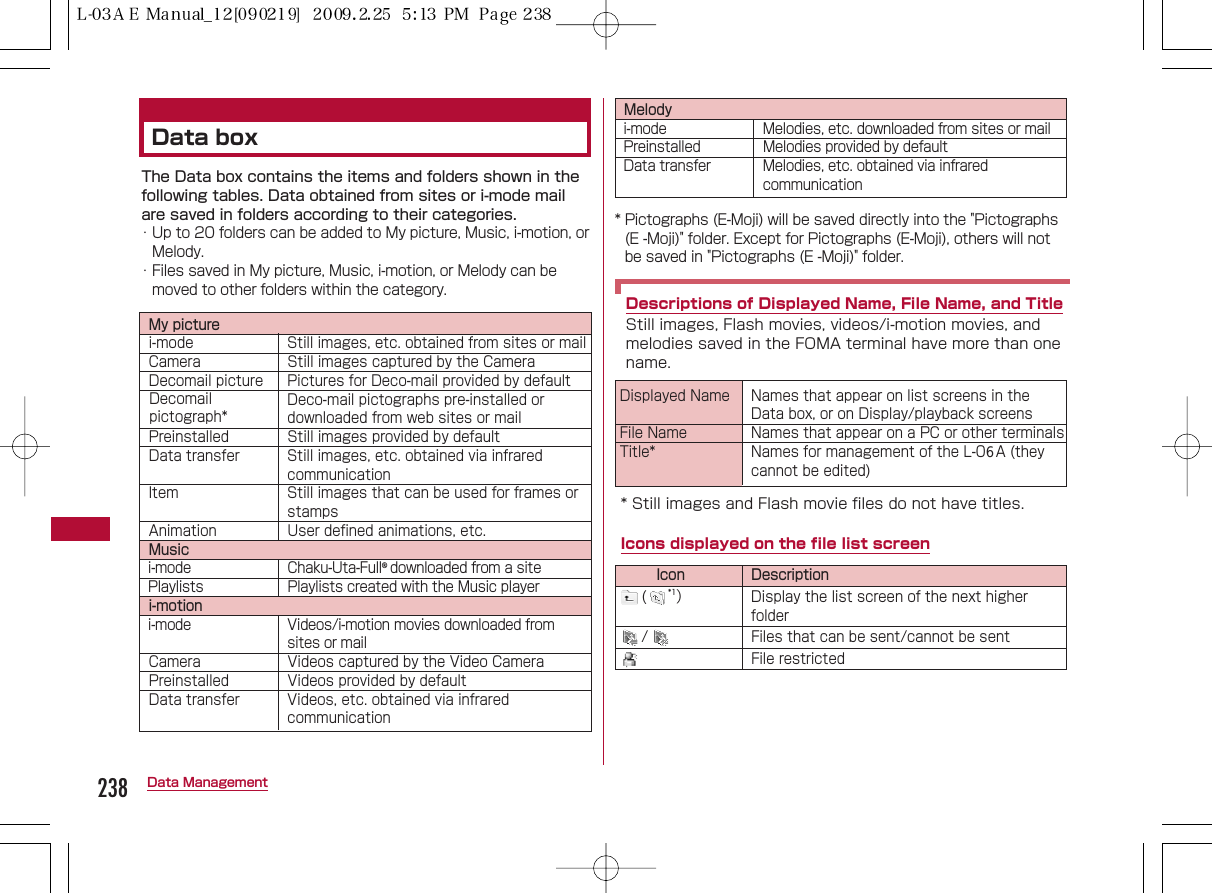
![File Format* JPEG, GIF Pixels JPEG: Up to 1200 x 1600 pixels ProgressiveJPEG, GIF: Up to 800x600 pixelsFile Size Up to 2MBFile Extension jpg, gif*1 Appears in a list view.*2 Icons that appear on the screen vary depending onthe type of the list screen.You can display still images you have captured, or obtainedfrom sites or i-mode mail.■Available File Formats* Even if a file is in a compatible file format, it may not bedisplayed depending on the file.1 M[Menu] ](Data box)]"My picture"・ I[Switch]: Switch between list andpicture display.2 Move the cursor to a folder ]C[Open]・ I[Mail]: Display the Compose messagescreen with the selected file attached.・ Icons displayed on the list screen→ P2381Display name of the selected file2Type of the selected file239Data ManagementIcon DescriptionFile with UIM restriction activatedA file prohibited to be redistributedFile type (JPEG/GIF/MP4 (file extension: mp4)/MP4 (file extension: 3gp)/SMF/MFi/Others(unsupported files))*2 / / / / //Displaying ImagesPicture viewerMy PictureScreenStill image filelist screen21](https://usermanual.wiki/LG-Electronics-USA/L06A.Users-Manual-4/User-Guide-1109039-Page-19.png)
![240 Data Management3 Move the cursor to a file ]C[View]1Sequential number/number of saved filesDisplay the sequential number of the current file and thetotal number of saved files in the folder.2Display name of the file■Available File Formats1 My Picture screen(P239)]Move the cursor to a folder]M[Menu] ]Perform the following operations:[Rename]Change the name of the selected folder. Up to 30 full-pitch orhalf-pitch characters can be entered.[New folder]Create a folder.・ You cannot create a sub folder in a user-defined folder.[Delete]Delete the selected folder.[List view/Grid view]Switch how to display folders.[Sort]You can sort folders by setting a condition.[Memory Info.]Display the status of storage space of the "Data box".[Folder property]Display the name of the selected folder and the number of files inthe folder.Key DescriptionJDisplay the previous/next fileC[Full]Display a full image, hiding the Softkeys/return to the original display sizeI[Mail] Send the displayed image by mail → P131Note・ An i-mode mail with the selected image attached canbe created by pressing I[Mail] on the still image filelist screen.・ Some images not captured with L-06A may not bedisplayed on the Still image file list screen.Sub Menu on the My Pictures ScreenStill image filelist screen21](https://usermanual.wiki/LG-Electronics-USA/L06A.Users-Manual-4/User-Guide-1109039-Page-20.png)
![1 Still image file screen (P239) ]Move the cursor to a file ]M[Menu] ]Perform the following operations:[Files]View:Display the selected file.Edit:Edit the selected file.→ P244Move:Move the selected file to another folder.]Select a destination folder ]I[Move]Copy:Copy the selected file to another folder.]Select a destination folder ]I[Copy]Delete:Delete the selected file.Delete all:Delete all files in the folder.]"Yes" ]Enter the security codeRename:Change the display name of the selected file.[Multiple choice]Select and delete files.]Place check marks next to files to delete]I[Delete]]"Yes"・ You can move/copy multiple files by performing the followingsteps:]Place check marks next to files to move/copy]M[Menu]]"Move"/"Copy" ]Select the destination folder]I[Copy]/[Move]・ You can also select "Delete", "Mark", "Mark all", "Unmark", or"Unmark all" by pressing M[Menu].[File property]Display the file name, size and type, etc. of the selected file. → P243[Send via]*Mail:Create i-mode mail with the selected file attached. Go to Step 2 in "Creating and Sending i-mode Mail" (P131).IrDA:Send a file using Infrared communication.[Set as]Set the selected file as the Stand-by display or Call displayStand-by display:Set as the Stand-by display.Voice call display:Set as a Voice call display.Video call display:Set as a Video call display.Wake-up display:Set as the Wake-up display.[List view]Switch the display format of files.[Sort]Sort files by specifying a condition.[Memory info.]Display the status of storage space of the "Data box".[New folder]This item is not available.* This is not available for Flash files.1 Still image display screen(P240)]M[Menu] ]Perform the following operations:[Edit image]*Edit the displayed file.→ P244[Delete]Delete the displayed file.[Edit title]Edit the name of the displayed file.241Data ManagementSub Menu on the Still Image File List ScreenSub Menu on the Still Image Display Screen](https://usermanual.wiki/LG-Electronics-USA/L06A.Users-Manual-4/User-Guide-1109039-Page-21.png)
![242 Data Management[File property]Display the file name, size and type, etc. of the displayed file.→ P243[Send via]*Mail:Create i-mode mail with the selected file attached. Go toStep 2 in "Creating and Sending i-mode Mail" (P131).IrDA:Send a file using Infrared communication.[Full screen]View the image in Full screen. (In Full screen view, the followingoperations are available.)・ C/Q: Restore the full image to the original display.・ J: Display the next/previous image.[Zoom]Display an enlarged image.・ M[+]: Enlarge the image・ I[-]: Restore the previous zoom ratio・ K: Move the display position・ The entire image and the displayed area appear at the lowerright of the screen.[Set as]Set the displayed file as the Stand-by display or Call display.Stand-by display:Set as the Stand-by display.Voice call display:Set as a Voice call display.Video call display:Set as a Video call display.Wake-up display:Set as the Wake-up display.[View settings]Set the display method of an image, a zoom ratio, or intervalbetween animation frames. → P243* This is not available for Flash files.You can view Flash movies downloaded from a site, etc.■Available File Formats* Even a file in a compatible file format may not save/playdepending on the file.1 M[Menu] ](Data box) ]"My picture"2 Move the cursor to a folder ]C[Open]3 Move the cursor to a file ]C[View]1Sequential number/number of saved filesDisplay the sequential number of the current file and thetotal number of saved files in the folder.2Display name of the fileViewing Flash MoviesFile Format* FlashFile Size Up to 100KBFile Extension swfFlash movieplayback screen21](https://usermanual.wiki/LG-Electronics-USA/L06A.Users-Manual-4/User-Guide-1109039-Page-22.png)
![243Data Management■Key operations on the Flash movie playback screen1 Flash playback screen(P242)]M[Menu]・ The sub menu on the Flash playback screen is thesame as the "Sub Menu on the Still Image DisplayScreen" (P241). However, "Edit image" and "Send via"are not available.1 Still image list screen (P239)/Still image display screen(P240)/Flash playback screen (P242) ]M[Menu] ]"File property"・ I[Edit]: Edit properties.■Information displayed on the File property screen* This is not displayed for a Flash file.Set the display method of an image, a zoom ratio, orinterval between animation frames.1 Still image display screen (P240)/Flash playback screen(P242)/Animation list screen (P247) ]M[Menu] ]"View settings" ]Perform the following operations:[View type]Normal:Display the image in its original size.Fit to screen:Display the image enlarged to fit the screen.[Zoom type]Normal:Zoom in on an image enlarged to fit the screen.Same magnification:Zoom in on an image displayed in itsoriginal size.[Animation interval]Set the interval between animation frames.2 I[Done]Key DescriptionJDisplay the previous/next fileC[Full]Display a full image, hiding the Soft keys/return to the original display sizeI[Retry] Play the Flash movie from the beginningF/EEnlarge the image/return to the previousratioH Move the display position when the image isenlarged・The entire image and the displayed areaappear at the edge of the screen.Sub Menu on the Flash Playback ScreenViewing Image InformationItem DescriptionFile nameDisplay the file nameFile sizeDisplay the file sizeFile type*Display the file formatDate & Time(Saved)Display the saved date and timeDisplay size* Display the resolutionFile restriction Display whether the file is restrictedSource Display the sourceSetting the View of a Still Image](https://usermanual.wiki/LG-Electronics-USA/L06A.Users-Manual-4/User-Guide-1109039-Page-23.png)
![244 Data ManagementYou can restrict files. The recipient cannot send or forwarda restricted file received by mail.1 Select a file to restrict ]M[Menu] ]"File property"The File property screen opens.2 Move the cursor to the "File restriction" field ]I[Edit] ]"File Restricted"You can edit still images. The edited still image is saved inthe same folder as the source file.・ Only JPEG files can be edited. However, it may not be possibleto edit some files.・ Editing a still image repeatedly may reduce the image quality orincrease the file size.1 Still image display screen (P240) ]M[Menu] ]"Edit image"2 M[Menu] ]Perform the following operations:[Save]Save the edited still image. Go to Step 5.[Rotate]Left:Rotate the image 90 degrees counterclockwise.Right:Rotate the image 90 degrees clockwise.180:Rotate the image 180 degrees.[Mirror]Left/Right:Flip the image horizontally.Up/Down:Flip the image vertically.[Resize]You can change the image size.→ P245[Crop]You can cut out a part of an image.→ P246[Insert]You can add a frame, stamp, or text.Frame:Add a frame to an image.]Select a folder ]Select a frame・ After selecting a frame, you can select "Change frame"or "Rotate" by pressing M[Menu].Stamp:Add a stamp to an image.→ P246Text:You can add text to an image.→ P246Note・ This option cannot be changed for a file downloadedfrom a site.Editing Still ImagesEdit Still ImagesStill image editscreenRestricting Files](https://usermanual.wiki/LG-Electronics-USA/L06A.Users-Manual-4/User-Guide-1109039-Page-24.png)
![245Data Management[Retouch]Change the brightness, contrast, or color tone of an image.] Use Jto switch to the item to retouch ] C[Select]・ Adjust the item with J.・ If selecting "Auto level" or "Auto enhance", the image isadjusted automatically.・ If selecting "Color adjust" or "Level adjust", adjust each colorwith K.・ Pressing M[List] also enables you to select the item toretouch.[Effect]Set special effects to an image.]Use Jto switch to the item to set ]C [Select]・ Depending on items, adjust with J.・ If selecting "Rotation" or "Spotlight", adjust each item with K.・ Pressing M[List] also enables you to select the item to set.[Send via mail]Create i-mode mail with the edited image attached.[Undo]Cancel the performed operation and restore the previous state.3 C[OK]■ To cancel editingPress I[Cancel].4 C[Save]■ To restore to the previous statePress I[Undo].5 "New file"■ To overwrite the original fileSelect "Original file".1 Still image edit screen (P244)]M[Menu]]"Resize"2 Select an image size3 C[OK]・ Go to Step 4 (P244) in "Editing Still Images".Note<Frames>・ Frames are in four sizes: CIF (352x288), QVGA(240x320), QCIF (176x144), and Sub-QCIF (128x96).・ You can only select a frame of the same size as thesource image.<Retouch>・ A source image larger than 640 x 480 pixels cannotbe retouched.<Effect>・ An effect cannot be added to a source image largerthan 640 x 480 pixels or with either side smallerthan 8 pixels.Changing the Image SizeNote・ An image cannot be resized when the vertical orhorizontal size of the source image is smaller than 8pixels.・ If a size with different proportions than the source isselected, the original proportions will be retained forthe resized image.](https://usermanual.wiki/LG-Electronics-USA/L06A.Users-Manual-4/User-Guide-1109039-Page-25.png)
![246 Data Management1 Still image edit screen (P244)]M[Menu]]"Crop"2 Select a cropping size]Use K to move the frame to thearea to be cropped]C [Select]■ When "User define" is selectedUse Kto move the cursor to a start point]C[Select]]K to move the cursor to an end point ]C[Select] toset the area to crop.3 C[OK]・ Go to Step 4 (P244) in "Editing Still Images".1 Still image edit screen (P244)]M[Menu]]"Insert"]"Stamp"2 Select a folder ]Select a stamp ]K to move the stampto the position ]C[OK]■ To add another stampPress M [Menu] ]"Change stamp" ]select a folder ]select a stamp ]Kto move the stamp to the position ]C [OK].■ To rotate the stampM[Menu] ]Select from "Rotate" ]"Left"/"Right"and"180".3 I[Done]・ Go to Step 4 (P244) in "Editing Still Images".You can add text to an image. You can also change thefont color or size, rotate the text, or paste speech bubbles.1 Still image edit screen (P244)]M[Menu]]"Insert"]"Text"2 Enter the text to paste3 M[Menu]]Modify text[Edit text]Change the pasted text.[Font size]Specify the font size.[Font color]Change the pasted text color.Cropping an ImageNote・ An image cannot be resized when the vertical orhorizontal size of the source image is smaller than 8pixels.Adding a StampNote・ A Stamp cannot be added to a source image largerthan 640 x 480 pixels or with either side smallerthan 24 pixels.Pasting Characters](https://usermanual.wiki/LG-Electronics-USA/L06A.Users-Manual-4/User-Guide-1109039-Page-26.png)
![247Data Management[Rotate]Rotate the text.[Comic]Add a speech bubble.4 Use K to specify the location5 I[Done]・ Go to Step 4 (P244) in "Editing Still Images".You can create an animation with up to 20 frames usingsaved still images.・ Up to 30 animations can be created.・ Up to 640 x 480 pixels of still images can be used forcreating the animation.1 M[Menu]](Data box)]"My picture"]"Animation"2 I[New]]Enter a display name of the file3 C[Add] ]Move the cursor to a folder ]C[Open]]Select an imageSelecting an image displays the registered image file name.■ To delete an added imageMove the cursor to an image to delete and Press M[Delete].4 Repeat Step 3 to save images ]I[Done]Note・ Text cannot be added to an image when the verticalor horizontal size of the source image is smaller than24 pixels or when the source image size is largerthan 640x480.Creating AnimationsAnimationAnimation listscreen](https://usermanual.wiki/LG-Electronics-USA/L06A.Users-Manual-4/User-Guide-1109039-Page-27.png)
![248 Data Management1 Animation list screen(P247)]Move the cursor to ananimation]C[View]■Key operations while viewing animationYou can perform the following operations from theselection screen to save images:・ I[View]:The selected image is displayed.1 From a screen where an image is selected (P247)]M[Menu]]perform the following operations:[Select]Add the selected image file to the animation.[View]Display the selected file.[File property]Display the file name, size and type, etc. of the selected file. → P243[List view/Grid view]Switch the display format of files.[Sort]Sort files by specifying a condition. [Memory info.]Display the status of storage space of the "Data box".[New folder]The item not available to use.1 Animation list screen (P247)]Move the cursor to ananimation]M[Menu]]Perform the following operations:[Add images]Add images to the selected animation.[Delete]Delete the selected animation.[Edit title]Edit the display name of the selected animation. Up to 30 full-pitch or half-pitch characters can be entered.Viewing AnimationAnimationdisplay screenImage File Selection Screen Sub MenuSub Menu on the Animation List ScreenKey DescriptionJPlay the previous/next animationC[Full]Display a fit-to-screen animation, hiding theSoft keys/return to the original display size](https://usermanual.wiki/LG-Electronics-USA/L06A.Users-Manual-4/User-Guide-1109039-Page-28.png)
![249Data Management[Set as stand-by]Set the selected animation as the Stand-by display.[View settings]Set the display method of an image, a zoom ratio, or intervalbetween animation frames.→ P2431 Animation display screen(P248)]M[Menu]]Performthe following operations:[Delete]Delete the selected animation.[Edit title]Change the display name of the displayed animation. Up to 30full-pitch or half-pitch characters can be entered.[Full screen]View the animation in Full screen. (In Full screen view, thefollowing operations are available.)・ C/Q: Restore the full image to the original display.・ J: Display the next/previous animation.[Set as stand-by]Set the selected animation as the Stand-by display.[View settings]Set the display method of an image, a zoom ratio, or intervalbetween animation frames.→ P243You can play video clips you have captured, or i-motionmovies obtained from sites or i-mode mail.■Available File Formats* Even a file in a compatible file format may not playdepending on the file.1 M[Menu]] (Data box)]"i-motion"・ I[Switch]: Switch between list andpicture display.Animation Display Screen Sub MenuPlaying Videos/i-motion MoviesVideo/i-motion PlayerFile Format* MP4 (Mobile MP4)Encoding Method MP4 fileGraphics: MPEG-4 and H.263Audio: AMR and AACFile Extension mp4 and 3gpi-motion movie](https://usermanual.wiki/LG-Electronics-USA/L06A.Users-Manual-4/User-Guide-1109039-Page-29.png)
![250 Data Management2 Move the cursor to a folder]C [Open]・ I[Mail]: Display the Compose messagescreen with the selected file attached.・ Icons displayed on the list screen →P2383 Move the cursor to a file]C [Play]1Display the name of a file2Playback progress barShows the playback elapsed time.3Volume4Control KeysIndicates available navigation keys.5Elapsed time/total time■Key operations on the i-motion playback screenWhen Link is Set in The TickerAfter i-motion playback ends, a confirmation screenopens asking whether to use Phone To/AV PhoneTo/Web To/Mail To. To use the function, select an item.Note・ Some files may not be played and rewound duringplayback.・ When you fast forward or rewind an i-motion movieduring playback, the i-motion movie is paused.Key DescriptionCPause/PlayIStopJPlay the previous/next fileL(Hold down)While being pressed, rewinds themovie/soundR(Hold down)While being pressed, fast forwards themovie/soundF/E HAdjust the volumei-motion File listscreeni-motion movieplayback screen23451](https://usermanual.wiki/LG-Electronics-USA/L06A.Users-Manual-4/User-Guide-1109039-Page-30.png)
![251Data Management1 i-motion screen (P249) ]Move the cursor to a folder]M[Menu]・ The sub menu of the i-motion screen is the same as the"sub menu on the My Picture Screen" (P240).1 i-motion file list screen (P250) ]Move the cursor to a file]M[Menu] ]Perform the following operations:[Files]Play:Play the selected file.Move:Move the selected file to another folder.]Select the destination folder ]I [Move]Copy:Copy the selected file to another folder.Select the destination folder I[Copy] Delete:Delete the selected files.Delete all:Delete all files in the folder.]"Yes" ]Enter the security codeRename:Change the display name of the selected file.Reset name:Reset the display name of the selected file to itsdefault name.[Multiple choice]Select and delete files.]Place check marks next to files to delete ]I [Delete] ]"Yes"・ You can move/copy multiple files by performing the followingsteps:]Place check marks next to files to move/copy ]M [Menu]]"Move"/"Copy" ]Select the destination folder ]I [Copy]/[Move]・ You can also select "Delete", "Mark", "Mark all", "Unmark", or"Unmark all" by pressing M [Menu].[File property]Display the file name, size and type, etc. of the selected file. → P253[Send via]Mail:Create i-mode mail with the selected file attached. Go toStep 2 in "Creating and Sending i-mode Mail" (P131).IrDA:Send a file using Infrared communication.[Set as tone]Set the selected file as a ring tone, etc.Voice ringtone:Set as a ring tone for a voice call.Video ringtone:Set as a ring tone for a video call.Mail tone:Set as a ring tone for mail.Message R tone:Set as a ring tone for Message R.Message F tone:Set as a ring tone for Message F.SMS:Set as a ring tone for SMS.Alarm tone:Set as an alarm tone.[Set as display]Set the selected file as the Stand-by display or Call displayStand-by display:Set as the Stand-by display.Voice call display:Set as a Voice call display.Video call display:Set as a Video call display.Wake-up display:Set as the Wake-up display.[List view/Grid view]Switch the display format of files.[Sort]Sort files by specifying a condition.[Memory info.]Display the status of storage space of the "Data box".[New folder]This item is not available.Sub Menu on the i-motion ScreenSub Menu on the i-motion File List Screen](https://usermanual.wiki/LG-Electronics-USA/L06A.Users-Manual-4/User-Guide-1109039-Page-31.png)
![252 Data Management1 i-motion playback screen(P250)]M[Menu] ]Performthe following operations:[Play]Play an i-motion movie.[Send via mail]Create i-mode mail with the selected file attached. Go to Step 2in "Creating and Sending i-mode Mail" (P131).[Set as tone]Set the file in playback as a ring tone.Voice ringtone:Set as a ring tone for a voice call.Video ringtone:Set as a ring tone for a video call.Mail tone:Set as a ring tone for mail.Message R tone:Set as a ring tone for Message R.Message F tone:Set as a ring tone for Message F.SMS:Set as a ring tone for SMS.Alarm tone:Set as an alarm tone.[Set as display]Set the selected file as the Stand-by display or Call displayStand-by display:Set as the Stand-by display.Voice call display:Set as a Voice call display.Video call display:Set as a Video call display.Wake-up display:Set as the Wake-up display.[Expand]Display a fit-to-screen video/i-motion movie, hiding Soft keys, etc.・ Press Qto restore its original display size.[Mute/Unlock mute]Mute or un-mute the sound.[Edit]Edit the video/i-motion in playback.→ P253[File property]Display the file name, size and type, etc. of the file in playback. →P253Sub Menu on the i-motion Playback ScreenNote・ While the sub menu is accessed, the video/i-motionmovie in playback is paused.<Set as/Set as display>・ Videos/i-motion movies, that were sent to a PC oranother FOMA terminal via Infrared communication orDOCOMO Keitai datalink and sent back to the FOMAterminal, cannot be set as Chaku-motion or anincoming call screen.](https://usermanual.wiki/LG-Electronics-USA/L06A.Users-Manual-4/User-Guide-1109039-Page-32.png)
![253Data Management1 i-motion file list screen (P250)/i-motion playback screen(P250)]M[Menu]]"File property"・ I[Edit]: Edit properties.■Information displayed on the File detail screenYou can edit videos/i-motion movies. The editedvideo/imotion movie will be saved in the same folder as thesource file.・ The preinstalled files cannot be edited.・ Some files may not be edited.・ The Ticker displayed on i-motion movies cannot be edited.You can extract a still image from a video/i-motion movie. The extracted image is saved under the "Camera" folder in"My picture" in "Data box".1 i-motion playback screen (P250)]Display the image to beextracted as a still image・ Operations during i-motion playback ]P2502 M[Menu]]"Edit"]"Capture"You can extract a part of a video/i-motion movie.The trimmed movie/i-motion will be saved in the foldersaving the file of original edition.Viewing Video/i-motion Movie InformationItem DescriptionFile nameDisplay the file nameFile sizeDisplay the file sizeFile typeDisplay the file formatDate & Time(Saved)Display the saved date and timePlay time Display the file playback durationDisplay size Display the resolutionAudio Display the sound formatFile restriction Display whether the file is restricted→P244Ringtone Display whether the file can be set as a ringtoneReceive display Display whether the file can be set as theStand-by display or Call displayTitle Display the default title of the fileCreator Display creator informationCopyright Display copyright informationDescription Display the file descriptionSource Display the sourceEditing Videos/i-motion MoviesEdit Videos/i-motion MoviesExtracting a Frame of a Video as a Still(Capture)Extracting a Video (Trimming)](https://usermanual.wiki/LG-Electronics-USA/L06A.Users-Manual-4/User-Guide-1109039-Page-33.png)
![254 Data Management1 i-motion playback screen (P250) ]M[Menu] ]"Edit"]"Clipping"]Perform the following operations:[500KB]Extract the video beyond the starting point to 500KB or smallerand save it.[2MB]Extract the video beyond the start point to 2MB or smaller andsave it.[Bound]Crop and save the video from the selected starting point to aselected ending point.]PressCto play a video/i-motion ]At the start point toclipM[Start] ]At the end point to clipM[End]You can play pre-installed melodies or melodiesdownloaded from sites.■Available File Formats* Even a file in a compatible file format may not playdepending on the file.1 M[Menu]](Data box)]"Melody"2 Move the cursor to a folder]C[Open]・ Icons displayed on the list screen →P2383 Move the cursor to a file]C[Play]・ I[Mail]: Display the Compose messagescreen with the selected file attached.Playing MelodiesMelody playerFile Format* SMF and MFiFile Extension mid and mldMelody screenMelody file listscreenMelody playbackScreen23451](https://usermanual.wiki/LG-Electronics-USA/L06A.Users-Manual-4/User-Guide-1109039-Page-34.png)
![255Data Management1Display the name of a file 2Playback progress barShows the playback elapsed time3Volume4Control KeysAvailable navigation keys are shown.5Elapsed time/total time■Key operations on the Melody playback screen1 Melody screen (P254)]Move the cursor to a folder]M[Menu]・ The sub menu of the Melody screen is the same as the"Sub Menu on the My Picture Screen" (P240). However,"List display・picture display" is not displayed.1 Melody file list screen (P254)]Move the cursor to a file]M[Menu]]Perform the following operations:[Files]Play:Play the selected file.Move:Move the selected file to another folder.]Select the destination folder ]I [Move]Copy:Copy the selected file to another folder.]Select the destination folder I [Copy]Delete the selected file.Delete:Delete the selected files.Delete all:Delete all files in the folder.]Yes ]Enter the security codeRename:Change the display name of the selected file.Reset name:Reset the display name of the selected file to itsdefault name.[Multiple choice]Select and delete files.]Place check marks next to files to delete ]I [Delete] ]"Yes"・ You can move/copy multiple files by performing the followingsteps:]Place check marks next to files to move/copy ]M [Menu]]"Move"/"Copy" ]Select the destination folder ]I [Copy]/[Move]・ You can also select "Delete", "Mark", "Mark all", "Unmark", or"Unmark all" by pressing M [Menu].[File property]Display the name, size and type, etc. of the selected melody. → P257[Send via]Mail:Create i-mode mail with the selected melody attached. Go to Step 2 in "Creating and Sending i-mode Mail" (P131).IrDA:Send a file using Infrared communication.Key DescriptionCPause/PlayJPlay the previous/next fileF/E HAdjust the volumeSub Menu on the Melody ScreenSub Menu on the Melody File List Screen](https://usermanual.wiki/LG-Electronics-USA/L06A.Users-Manual-4/User-Guide-1109039-Page-35.png)
![256 Data Management[Set as]Set the selected file as a ring tone, etc.Voice ringtone:Set as a ring tone for a voice call.Video ringtone:Set as a ring tone for a video call.Mail tone:Set as a ring tone for mail.Message R tone:Set as a ring tone for Message R.Message F tone:Set as a ring tone for Message F.SMS:Set as a ring tone for SMS.Alarm tone:Set as an alarm tone.[Sort]Sort files by specifying a condition.[Memory info.]Display the status of storage space of the "Data box".[New folder]This option is not available.1 Melody playback screen (P254)]M[Menu] ]Performthe following operations:[Send via mail]Create i-mode mail with the melody in playback attached. Go toStep 2 in "Creating and Sending i-mode Mail" (P131).[Set as]Set the file in playback as a ring tone.Voice ringtone:Set as a ring tone for a voice call.Video ringtone:Set as a ring tone for a video call.Mail tone:Set as a ring tone for mail.Message R tone:Set as a ring tone for Message R.Message F tone:Set as a ring tone for Message F.SMS:Set as a ring tone for SMS.Alarm tone:Set as an alarm tone.[Mute]Mute or un-mute the sound.[File property]Display the file name, size and type, etc. of the melody inplayback.→ P257Sub Menu on the Melody Playback ScreenNote・ While the sub menu is accessed, the melody playbackis paused.](https://usermanual.wiki/LG-Electronics-USA/L06A.Users-Manual-4/User-Guide-1109039-Page-36.png)
![257Data Management1 Melody file list screen (P254)/Melody playback screen(P254)]M[Menu]]"File property"・ I[Edit]: Edit properties.■Available File FormatsYou can exchange Phonebook entries, Schedule events orBookmarks with a device equipped with infraredcommunication capabilities.■Available Data for Transfer*1 Received To Do tasks with the alarm set prior to the set timemay not be correctly saved.*2 Up to 2 MB of data per file can be sent or received.*3 Up to 100 KB of data per file can be sent or received.*4 Received Bookmarks may not be filtered depending on theother party's terminal model.Viewing Melody InformationItem DescriptionFile nameDisplay the file nameFile sizeDisplay the file sizeFile typeDisplay the file formatDate & Time(Saved)Display the saved date and timePlay time Display the file playback durationDisplay size Display the resolutionAudio Display the sound formatFile restriction Display whether the file is restricted→ P244Ringtone Display whether the file can be set as a ringtoneTitle Display the default title of the fileSource Display the sourceUsing Infrared CommunicationIrDAData typePhonebook entries ○○○○See P80(Personal info)Schedule ○○○○Up to 200eventsTo Do*1 ○○○○Up to 50Received mail ○○○○Up to 1000Sent mail ○○○○Up to 500Unsent mail ○○○○Image files*2 ○×○×Up to 1000Videos*2 ○×○×Up to 1000Melodies*3 ○×○×Up to 1000Bookmarks*4 ○○○○Up to 100Memo ○○○○Up to 50Number of piecesto be storedReceivingcapabilitySendingcapabilityOneitemOneitemAllitemsAllitems](https://usermanual.wiki/LG-Electronics-USA/L06A.Users-Manual-4/User-Guide-1109039-Page-37.png)
![259Data Management・ When a message text contains pictographs (E-Moji) orsymbols, they may not be displayed correctly on arecipient terminal or PC that is not capable of displayingthem.・ Depending the type of the receiving device, all subjectsof mail may not be received.・ Infrared communication is not available when Lock all,Data access lock is set, or when Self mode is activated.・ Large size mail may not be sent correctly.・ Only downloaded attachments are forwarded when mail isforwarded.・ Set the receiving device to infrared receiving mode beforesending data.Example: Sending one Phonebook entry1 Stand-by display]DMove the cursor to a Phonebook &Logs entry]M[Menu] ]"Send Ir data"]"Focused data"]Yes"1 M[Menu] ](LifeKit) ]"Receive Ir data" ]"Receive"]"Yes"2 Perform infrared transmission operations on the sendingdeviceStart infrared communication.3 "Yes"You can exchange all data in a batch with a PC or anotherFOMA terminal.・ To exchange all data, a session code is used to identifythe sender and receiver correctly. The session code isany 4- digit number and should be entered both in thesending and receiving devices before sending/receivingdata.・ Set the receiving device to the infrared receiving modebefore sending data.Example: Sending all Phonebook entries on the FOMA terminal1 Stand-by display]D]M[Menu] ]"Send Ir data"]"allin phone"Exchanging Data One Piece at a TimeSend IrDA/Receive Ir DataSending Data One Piece at a TimeNote・ A warning appears if the destination cannot be found.Verify the distance and angle with the other party.Receiving Data One Piece at a TimeReceiving or Sending All DataSend All via IrDA/Receive All IrDASending All Data](https://usermanual.wiki/LG-Electronics-USA/L06A.Users-Manual-4/User-Guide-1109039-Page-39.png)
![260 Data Management・ If a Phonebook entry has an image set, a warningindicating that it may take a while to send is displayed.Select "Yes" to send.2 Enter the security code]Enter the session code]"Yes"Start infrared communication.・ Receiving all data overwrites the data on the FOMAterminal and deletes all saved data including protectedmail. Verify that important data has been savedelsewhere before sending or receiving all data.1 M[Menu] ](LifeKit) ]"Receive Ir data" ]"Receive all"]"Yes"2 Enter the Security code ]Enter the session code3 Perform infrared transmission operations on the sendingdeviceStart infrared communication.4 "Yes"Note・ A warning appears if the destination cannot be found.Verify the distance and angle with the other party.・ Files in "My picture", "i-motion" and "Melody" cannot besent as a batch (one file can be sent at a time).Receiving All Data](https://usermanual.wiki/LG-Electronics-USA/L06A.Users-Manual-4/User-Guide-1109039-Page-40.png)
![262 Convenient FunctionsMulti-accessMulti-access is a function that allows the use of three lines(voice call, packet communication, and SMS) concurrently.By invoking the New task (P263) screen, a voice call canbe made during packet communication such as i-mode.Example: Making a voice call during i-mode operation1 i-mode screen(P175)] N(1+seconds) ]"Dialing"Main menu appears.2 Enter a phone number ] AA voice call can be received during packet communicationsuch as i-mode.Example: Receiving a voice call during i-mode operation1 A call arrivesThe Incoming call screen opens.2 ADuring a voice call, you can perform operations such assending/receiving mail or connecting to i-mode.Communication Type Available LinesVoice call 1 linePacket communication including i-mode, 1 line i-αppli, i-mode mail, and PC connectionsSMS 1 lineMulti-AccessNote・ Combinations of Lines.・ During Multi-access, communication charges applyfor each connected line.・ During a video call, Multi-access is disabled exceptfor incoming SMS.Making a Voice Call during PacketCommunicationNote・ To return to the i-mode screen from the Voice callscreen press N and select "i-mode".Note・ To return to the i-mode screen from the Voice callscreen press Nand select "i-mode".Receiving a Voice Call during PacketCommunicationUsing Other Communications during aVoice Call](https://usermanual.wiki/LG-Electronics-USA/L06A.Users-Manual-4/User-Guide-1109039-Page-42.png)
![2631 Voice call screen ] N(1+ seconds)]"Mail"2 Create and send mailAn icon (P35) to notify of incoming mailappears at the top of the screen. 1 Voice call screen ] N(1+ seconds)]"i-mode" ]"iMenu"This FOMA terminal provides multitasking that allows youto start and operate multiple applications concurrently.To launch a new function while another function is running,open the New task screen (Task manager).1 While using an application]N(for 1+seconds)・ Unavailable functions are grayed out.2 Select an application to start・ Available applications vary depending on the currentlyrunning application and its operating status.[ Dialing]The Phone number entry screen opens.→P52[ Mail]The Mail menu screen opens.→P130[ i-mode]The i-mode menu screen opens.→P174Convenient FunctionsVoice callscreenSending MailNote・ Creating and sending mail →P131、P168Note・ To return to the Voice call screen, press P] Select"Yes"Receiving MailConnecting to i-modeMultitaskingMultitaskingTask managerLaunching a New FunctionNew taskScreen](https://usermanual.wiki/LG-Electronics-USA/L06A.Users-Manual-4/User-Guide-1109039-Page-43.png)
![264 Convenient Functions[iαppli]The Software list screen opens.→P223[ Search phonebook]The Search phonebook screen opens.→P87[ Photo-mode]The Still image capture screen opens.→P200[ Schedule]The Month view calendar screen opens.→P269[ To do list]The To do list screen opens.→P273[ Memo]The Memo list screen opens.→P287[ Calculator]The Calculator screen opens.→P286[ Own number]The Own number screen opens.→P50To switch or view applications, open the Task list screen.1 While using an application]NSelect New task on the Task list screento open the New task screen that allowsyou to launch another application.2 Use Kto select an applicationThe screen for the selected application will be displayed.Close the currently displayed application and open thepreviously displayed application.1 While using an application]Q/P・ To close an application, make it current application first.・ Repeat these steps to close other applications.Note・ Combinations of Applications →P359Switching/Viewing ApplicationsTask listScreenTerminating an ApplicationThe running applicationsare listed](https://usermanual.wiki/LG-Electronics-USA/L06A.Users-Manual-4/User-Guide-1109039-Page-44.png)
![A phone number and a mail address can be assigned toh/j /k One Touch Keys. You can view thephone number and the mail address with a singlekeystroke.A frequently used function can be assigned to la Onetouch hot key. You can access the function with a singlekeystroke.1 M[Menu]](LifeKit)]"One Touch Key"・ I[Delete]: Delete the content of the selected key.2 Move the cursor to the number of a One Touch Key (1-3) ]C[Register]]Perform the following operations・ If you select an already used number, press C[Change].[Search phonebook ]Set up a number using a Phonebook entry.・ When selecting a Phonebook entry with multiple mail addressessaved, you need to further specify which addresses are to beregistered to the key.[Direct input]Enter a name, phone number, and mail address.]Select a field ]Enter the Name/Phone number/Mail address]I [Done][Cancel]Cancel registering.265Convenient FunctionsUsing One Touch KeyOne Touch KeyRegistering a Phone Number and MailAddress to a One Touch Key Note<Register direct>・ A phone number and a mail address assigned to Onetouch hot keys is not saved in the Phonebook.](https://usermanual.wiki/LG-Electronics-USA/L06A.Users-Manual-4/User-Guide-1109039-Page-45.png)
![266 Convenient Functions1 One Touch Key list screen (P265) ]M [Menu] ]Perform the following operations[Copy from Phonebook]Set up a number using a Phonebook entry.Selected slot: Register the Phonebook entry of the Memorynumber from 000 to 002 based on the selectedOne Touch Key number (1-3).All (1-3) : Register the Phonebook entries of the Memorynumbers from 000 to 002 to One Touch Keyh/j/k.[Register direct input]Enter a name, phone number, and mail address for the selectedOne Touch Key.]Select a field ]Enter the Name/Phone number/Mail address] I [Done][Delete]Delete the content of the selected One Touch Key.1 Stand-by screen h/j/kThe content of the One Touch Key appears.2Aor C [Call]gor I [Mail]M [Menu]]Perform the following operations:[Video call]Make a video call.[Compose mail]Compose i-mode mail.→P131[Compose SMS]Compose an SMS message.→P168[Change]Change the contents of the One Touch Key.[Int. call (Japan)]When you make a call from overseas to a phone number in Japansaved in the Phonebook, the Country code for Japan "+81" isadded automatically at the beginning of the phone number.・ If the phone number has a leading "0", it is automatically deleted.Using sub menuTo compose mailTo make a callMaking a Call/Composing Mail Using OneTouch KeyNote<Register direct>・ A phone number and a mail address assigned to Onetouch keys is not saved in the Phonebook.Sub Menu on the One Touch Key List Screen](https://usermanual.wiki/LG-Electronics-USA/L06A.Users-Manual-4/User-Guide-1109039-Page-46.png)
![267Convenient Functions1 M[Menu] ](LifeKit) ]"One Touch Key" ]Move thecursor to "My One Touch Key" ]C[Register]A list of functions that can be assigned to One Touch Keyappears.2 Select an item ]Select a function1 Stand-by display ]lThe FOMA terminal can be used as an alarm clock. Up to10 alarms can be registered.1 M[Menu]](Stationery)]"Alarm"・ Press I to set the selected alarm"On"/ "Off".■Icons displayed on the Alarm list screenAssigning a Frequently Used Function toOne TouchAccessing a Function Using a One TouchKeyNote・ You can also select a function to access from MyOne Touch key menu that appears when l ispressed for 1+ seconds in Stand-by (items in Mymenu cannot be changed).Sounding an Alarm at Set TimesAlarmAlarm listscreenIcon DescriptionAlarm set to "ON".Alarm with "Set repeat" set.Note・ You can also make a call by pressing h/j/kfor 1+ seconds in Stand-by. During Internationalroaming, a message appears and you can select"International call", "Normal call", or "Cancel".](https://usermanual.wiki/LG-Electronics-USA/L06A.Users-Manual-4/User-Guide-1109039-Page-47.png)
![2 Move the cursor to an alarm to be edited ]C[Edit]3 Perform the following operations:・ C[List]: List of the options for the selected item is displayed.[ (ON/OFF list)]Set whether to enable the alarm.[(Set time)]Set the time for the alarm to sound.[ (Set repeat)]Select a repetition type.・ If you select "Daily except holiday", the alarm does not sound onSundays and holidays set in "Set holiday" (P272).If "Weekdays" is selected, perform the following steps to specifythe days of the week for the alarm to start:]D]C[List] on "Su Mo Tu We Th Fr Sa" field ]Place checkmarks next to days of the week ]I [Done][ (Alarm tone)]Select an alarm tone.Music :Select from Chaku-Uta-Full®songs saved in "Music"in the "Data box.→P217 Go to Step 3 (P214) in "Setting a Chaku-Uta-Full®Song as a Ring Tone".i-motion :Select from videos/i-motion movies saved in"imotion" in the "Data box".→P249Melody :Select from melodies saved in "Melody" in the "Databox".→P254[ (Memo)]Up to 7 full-pitch or 15 half-pitch characters can be entered. Theentered text is displayed on the Alarm screen after the alarmstarts.[ (Turbo alarm)]Set whether to enable the Turbo Alarm that increases its volumelevels up to the maximum volume and vibrates the terminal.[ (Snooze)]Select an interval between snooze tones. To deactivate Snooze,select "OFF".4 I[Done]1 Alarm list screen (P267)]M[Menu]]Perform the following operations[Edit]Edit the selected alarm.→P267[Turn On/Turn Off]Set the selected alarm "ON"/"OFF".[Multiple choice]Select alarms and set whether to enable the alarms.]Place check marks next to the alarms ]M[Menu] ]"On"/"Off"・ You can also select "Mark/Unmark" ]"Mark all", "Mark" *,"Unmark" *, or "Unmark all" by pressing M[Menu].*: Either one appears depending on the alarm status.268 Convenient FunctionsSub Menu on the Alarm List Screen](https://usermanual.wiki/LG-Electronics-USA/L06A.Users-Manual-4/User-Guide-1109039-Page-48.png)
![269Convenient FunctionsYou can save a schedule event such as a meeting orappointment. Up to 200 Schedule events and up to 100holidays can be saved.1 M[Menu]](Stationery)]"Schedule"]Move thecursor to the day to be saved in Schedule ] I [New]] Perform the following operations・ C[List]: List of the options for the selected item isdisplayed.・ When the cursor is in the time setting field, you can stopcreating a schedule event by selecting M[Cancel] ]"Yes".When the alarms for "Alarm" and "Schedule"/"To Do"reach the specified timeThe following actions are performed by function.AlarmThe alarm screen appears, the alarm tone sounds andthe illumination lights.・ To stop the alarm, press C[OFF]. Unless you stop thealarm, the alarm tone repetitively rings 12 times at 5minute intervals, then stops.・ You can press I[Snooze] to temporarily stop thealarm with its (Snooze) activated. When the snoozeinterval time is up, the alarm starts ringing again.・ While the alarm tone is ringing with (snooze setting)activated, the alarm counter will be reset right after youpress I[Snooze], then the alarm will starts ringingover from scratch.Schedule eventsThe schedule alarm screen appears, the alarm tonesounds and the illumination lights.・ To stop the alarm, press C[OK] and then C[OFF] onthe Schedule detail screen.・ To sound the alarm tone again, select I[Snooze] ]Select a snooze interval.・ If the alarm for Schedule is not stopped, the alarm tonesounds again in about 5 minutes regardless of the setting of the snooze interval time.To DoThe To Do alarm screen appears, the alarm tone soundsand the illumination lights.・ To stop the alarm, press C[OK] and then C[OFF] onthe To Do detail screen.When the alarm for Alarm, Schedule and To Do are set tothe same time The priority order for the alarm is Alarm →Schedule alarm→To Do alarm.When Public mode (Drive mode) is setAlarm will not sound.・ Alarm will be notified at the set time after the followingday.・ Alarm for a Schedule event/To do task will not benotified afterward and remains on the Stand-bydisplay. To delete the icon, delete the relevant Scheduleevent/To do task or change alarm setting to "No alarm".Managing Schedule EventsSchedule eventsRegistering Schedule Events](https://usermanual.wiki/LG-Electronics-USA/L06A.Users-Manual-4/User-Guide-1109039-Page-49.png)
![[ (Start Date)]Specify the date to start the Schedule event. To enter a date,use Jto move the cursor to the position and enter a numberwith dial keys. Press C[List] to select the day from a calendar.[ (End Date)]Specify the date to complete the Schedule event. To enter adate, use Jto move the cursor to the position and enter anumber with dial keys. Press C [List] to select the day from acalendar.・ The end date cannot be set earlier than the start date.[ (Set time)]Specify the times to start/end the Schedule event.All day : Save the schedule event for a whole day withoutspecifying time.Set time : After setting, use Dto move the cursor and enterthe start and end time of the schedule event. Use Jto move the cursor to the position and enterthe time with dial keys and switch between "AM" and"PM" with C(pressing Cin the time field opens theTime settings screen that allows you to enter timewith dial keys and H). ・ The end time cannot be set earlier than the starttime.・ Depending on the settings in "Date&Time format"(P111), the display format or order of the date andtime may differ.[ (Category)]Select a category for the Schedule event. Icons vary dependingon the selected category.[ (Subject)]Up to 200 full-pitch or 400 half-pitch characters can be entered.Up to 2 subjects are displayed at the bottom of the Monthly viewscreen.A subject is required to register a Schedule event.The summary is displayed on the Alarm screen that opens whenalarm starts.[ (Summary)]Up to 20 full-pitch or 40 half-pitch characters can be entered.[ (Set alarm)]Set whether to be notified with an alarm tone of the set startingdate and time.If you select other than "No alarm", perform the following steps toselect the alarm tone.]D] C[Select] on field ]Select a type of the alarm toneMusic : Select from Chaku-Uta-Full®songs saved in "Music" inthe "Data box.→P217 Go to Step 3 (P214) in "Setting Chaku-Uta-Full®as aRing tone".i-motion : Select from videos/i-motion movies saved in "imotion"in the "Data box".→P249Melody : Select from melodies saved in "Melody" in the "Databox".→P254[ (Set repeat)]You can set a schedule event to recur periodically. Select "Once"not to repeat. If "Weekdays" is selected, perform the followingsteps to specify the day of the week:]D]C[List] on "Su Mo Tu We Th Fr Sa" field ]Placecheck marks next to days of the week ]I [Done][ (Secret)]This option appears when Secret mode (P121) is set to "ON".Set this option to "ON" if you save the created schedule event assecret data.2 I [Done]270 Convenient Functions](https://usermanual.wiki/LG-Electronics-USA/L06A.Users-Manual-4/User-Guide-1109039-Page-50.png)
![271Convenient FunctionsYou can view settings of a schedule event from theCalendar screen.1 M[Menu]](Stationery)]"Schedule"1The day when a schedule event is set2A schedule event saved for the highlighted dayUp to 2 events will be displayed. Schedule events thathave passed their start times will not be displayed.・ 1/3: Switch the view to yearly.・ 7/9/F/E: Switch the view to monthly.・ 5:Return to the current date.・ On the Monthly view, blue indicates Saturdays, and red indicates Sundays and holidays.・ You can switch between the Monthly and Weekly view of theCalendar screen.→P2722 Select a day to view・ J: Switch to the previous/next day.1Date2Icon indicating a "Category"3Start time-End time, Subject4Icon indicating a schedule event set for other than JapantimeAppears if the schedule event's "Local time zone" (P48) is setto other than "GMT+9:00" (outside of Japan).5Alarm iconAppears when the alarm is set to sound.Note<Secret>・ When the "Secret mode" (P123) is set to "Secret onlymode", the Schedule entry is saved as secret data.・ The secret Schedule is displayed when the "Secretmode" is set to "On" or "Secret only mode".・ At the set time of a secret Schedule event while the"Secret mode" is set to "OFF", the alarm tone sounds,however, the description of the event will not appear,and "Secret" appears on the notification screen.Viewing Schedule EventsCalendarscreen12Schedule listscreen12345](https://usermanual.wiki/LG-Electronics-USA/L06A.Users-Manual-4/User-Guide-1109039-Page-51.png)
![3 Select the event to viewThe Schedule detail screen opens.1 Month view screen (P271)/Week view screen (P272)]M [Menu] ]Perform the following operations:[Add new]Register a new Schedule event.→P269[Set holiday]Set or release a selected day as a holiday.To set a day as a holiday, select "Set holiday" ]select an optionfrom the following ]enter a "Holiday name" ]I[Done].On the day : Set the highlighted day as a holiday.Weekly : Set the day of the week of the highlighted dayas a weekly holiday.Monthly : Set the date of the highlighted day as amonthly holiday.Annually : Set the date of the highlighted day as anannual holiday.Duration(2-31): Set a period from 2 to 31 days as holidaysfrom the highlighted day. Enter the number ofdays in the "Duration (2-31)" field.・ To cancel holidays, select "Clear holiday" ]"Yes". Select "Yes"on the Confirmation of deletion of repeat screen for a holidayset as "Weekly", "Monthly", "Annually", or "Duration (2-31)".[Week view/Month view]Switch the view by week or by month.→P271[Go to date]The Calendar for the specified day appears. Use Jto move thecursor to the position in the "Go to date" field, and enter the dateand time with dial keys.[Delete]Register a new Schedule event.→P269Previous entries : Delete all events scheduled prior to today.All entries : Delete all Schedule events.272 Convenient FunctionsSub Menu on the Calendar ViewSwitching the Calendar ViewThe Calendar screen can be viewed on monthly basis orweekly basis. Perform the following steps to switch views temporarily.]On the Calendar screen M[Menu] ]"Weekly view" /"Monthly view"Perform the following steps to switch default.]In calender screen M[Menu]]"Settings" ]defaultview field C[List] ]"Monthly view"/"Weekly view"・Use Hto scroll the screen to view the hidden hoursWeekly viewAn "All day" scheduleevent is set for the daySet time for the schedule eventNote・ National Holidays are based on "国民の祝日に関する法律及び老人福祉法の一部を改正する法律(平成17年法律第43号までのもの (law relating to national holidays and old-age persons' welfare, as amended (Law No. 43,2005))". Spring Equinox Day and Autumnal EquinoxDay are released in an official gazette on February 1and may not be exact (as of March, 2009).](https://usermanual.wiki/LG-Electronics-USA/L06A.Users-Manual-4/User-Guide-1109039-Page-52.png)
![273Convenient Functions[Send all via IrDA]Send all Schedule events via IrDA.→P259[Memory info.]Schedule events and holidays status will be displayed.・ If "Secret mode" is set to "ON" or "Secret data only mode", thenumber of pieces of secret data is shown in "Secret".[Reset holiday]Restores the default holiday set in "Set holiday".[Settings]Configure how the Calendar screen will be displayed.Default view : Configure the display format of theCalendar screen when launching Schedule. Monthly view type : Select a starting day of the week fromSunday or Monday.Weekly start time : Configure the starting time displayed in theWeek view.1 Schedule list screen (P271)/Detail screen ]M[Menu] ]Perform the following operations:[Add new]Register a new Schedule event.→P269[Send via]*1Send the selected schedule events as an i-mode mailattachment or via Infrared communication.[Edit]*1Edit the selected Schedule event.→P269[Multiple choice]*2You can select and delete scheduled events set to the selectedday.]Place check marks next to the schedule events to delete]I [Delete] ]"Yes"・ You can select "Mark all" or "Unmark all" from "Delete" or "Mark/Unmark" by pressing M[Menu].[Go to date]*2The Calendar for the specified day appears. Use Jto move thecursor to the position in the "Enter date you want to go to" field,and enter the date and time with dial keys.[Delete]Delete the selected schedule event and holiday.*1 Not available when you are using the default or "Set holiday"configuration.*2 Not displayed on the Schedule detail screen.Up to 50 To Do tasks can be entered.Sub Menu on the Schedule List Screen/Detail ScreenManaging To Do TasksTo Do listRegistering To Do Tasks](https://usermanual.wiki/LG-Electronics-USA/L06A.Users-Manual-4/User-Guide-1109039-Page-53.png)
![274 Convenient Functions1 M[Menu]](Stationery)]"To do list"] I [New] ] Perform the following operations:・ C [List]: List of the options for theselected item is displayed.・ When the cursor is in the due datesetting field, you can stop creating aTo Do task by selecting M[Cancel] ]"Yes".[ (Category)]Select the category of the To Do task. Icons vary depending onthe selected category.[ (Subject)]Up to 200 full-pitch or 400 half-pitch characters can beentered. The subject is displayed on the To Do listscreen. A Subject is required to register a To Do task.The summary is displayed on the Alarm screen that opens whenthe alarm starts.[ (Summary)]Up to 20 full-pitch or 40 half-pitch characters can be entered.[ (Due date)]Set the due date of the To Do task. To set the date, use Jtomove the cursor to the place to change the date and enter thedate with the dial keys (to set the date on the calendar screen,press C [Select] in the date entry field ). Operations on thecalendar screen→P271 To set the time, use Jto move the cursor to the value tochange, enter the time with dial keys, and switch between "AM"and "PM" with C (pressing Cin the time entry field opens thetime settings screen on which you can enter a time using dialkeys and H).・ Depending on the settings in "Date&Time format", the displayorder or format for the date and time may differ.→P111[ (Priority)]Select a priority of the To Do.task Icons vary depending on theselected priority.[ (Status)]Select a status of the To Do task. Icons vary depending on theselected status.・ When "Completed" is selected, the due date and the subject willbe crossed out, and the task appears after To Do tasks withstatus other than "Completed" on the To Do list screen.[ (Set alarm)]Set whether to be notified with an alarm tone at the set due dateand time.If you select other than "No alarm", perform the following steps toselect the alarm tone.D ]C[Select] on field ]Select a type of the alarmtoneMusic : Select from Chaku-Uta-Full®songs saved in "Music" inthe "Data box". →P217 Go to Step 3 (P214) in "Setting a Chaku-Uta-Full®Song as a Ring Tone".i-motion : Select from videos/i-motion movies saved in "imotion"in the "Data box". →P249Melody : Select from melodies saved in "Melody" in the "Databox". →P2542 I [Done]New MemoCreation Screen](https://usermanual.wiki/LG-Electronics-USA/L06A.Users-Manual-4/User-Guide-1109039-Page-54.png)
![275Convenient FunctionsYou can list and view registered To Do tasks.1 M[Menu]](Stationery)]"To Do list"・ Saved To Do tasks are listed in the order of HighlowNoPriority. When two or more To Do tasks have the same levelof Priority, the task with earlier due date is listed first. When To Do tasks have same due date, the one withearliest registered date is listed first.・ For To Do tasks with "Status" set to "Completed", the duedate and the subject are crossed out and the task appearsafter To Do tasks with status other than "Completed".1Icon indicating a "Status"2Due date and subject3Priority/ / "High"/"Low"/"No priority"4To Do task with the alarm set5Icon indicating a To Do task set for other than Japan timeAppears if this To Do task was registered while the terminal"Local time zone" (P49) is set to other than "GMT+9:00".2 Select a To Do task to viewThe To Do detail screen opens.1 To do list screen (P275) or To Do detail screen ] M[Menu] ] Perform the following operations:[Add new]Create a new To Do entry.→P274[Send via]Send the selected To Do tasks as i-mode mail attachment or viaInfrared communication.[Edit]Edit the selected To Do task.→P274[Change status]Change the "Status" of the selected To Do task.→P274[Multiple choice]*You can select and delete To do tasks.]Place check marks next to To do tasks to delete ]I[delete] ]"Yes"・ You can also select "Mark all" or "Unmark all" from "Mark/Unmark" by pressing M[Menu].[Delete]Delete the selected To Do task.[View calendar]Display the current date of the calendar.* This does not appear on the To Do detail screen.Viewing To Do TasksTo Do List ScreenSub Menu on the To Do List/Detail Screen13452](https://usermanual.wiki/LG-Electronics-USA/L06A.Users-Manual-4/User-Guide-1109039-Page-55.png)
![276 Convenient FunctionsManaging AnniversariesRemembering datesDate CounterRegistrationScreenChecking the Number of Days RemainingUsing the Date CounterDate counterRegistering in Date CounterYou can display the number of days until an importantevent on the Stand-by screen or find the number of daysquickly by using the Date counter and Date search.Up to 30 important events can be tracked for remainingdays.1 M[Menu]] (Stationery)]"Remembering dates" ]"Date counter" ] I[Add] ]Performs the following operations:[ (Date)]Specify the date of an event. To enter a date, use Jto movethe cursor to the position and enter a number with dial keys.[ Memo]Up to 40 full-pitch or 80 half-pitch characters can be entered.The memo is displayed on the Date counter list screen. Youcannot save events to the Date Counter without a memo.[ (Category)]Select the event category. Icons vary depending on the selectedcategory. Press C[List] to select a category and icon from theIcon list screen.2 I[Done]You can find the number of days remaining until the savedevent.1 M[Menu]](Stationery)]"Remembering dates" ]"Date counter" 1Counter displayDisplay with - : Show the elapsed days from the set dateto today.Display with + : Show the remaining days from today tothe set date.2Icon to display on the Stand-by displayAn event that is to be displayed on the Stand-by screen.Date CounterList Screen12](https://usermanual.wiki/LG-Electronics-USA/L06A.Users-Manual-4/User-Guide-1109039-Page-56.png)
![277Convenient Functions2 Select an event to find the daysThe Event detail screen opens. 1 Date counter list (P276)/detail screen ] M [Menu] ]Perform the following operations:[Add new]Save a new event.→P276[Edit]Edit the selected event.→P276[Display day on stand-by screen/Cancel displaying]*Specify whether to show the Date counter for the selected eventon the Stand-by display.[Multiple Choice]*You can select and delete events.]Place check marks next to events to delete]I[delete]]"Yes"・ You can also select "Mark"*, "Mark all"*, "Unmark"*, "Unmark all"*from "Delete" or "Mark/Unmark" by pressing M[Menu]. * Items displayed vary depending on the status of an event.[Delete]Delete the selected event.* This does not appear the Detail screen.You can find the date when the designated days passedafter the starting date. For example, you can easily find thedate 100 days after today. You can check out the date upto 9999 days after today.To display the remaining days on the Stand-by displayYou can select one of the registeredevents and show the days remaininguntil that event on the Stand-by display.Perform the following steps from the"Date counter" screen to display theremaining days:]Move the cursor to the event ]M[Menu] ]"Display on stand-by screen"Sub Menu on the Date Counter List/Detail ScreenCategory andremaining days for an eventUsing Date Search](https://usermanual.wiki/LG-Electronics-USA/L06A.Users-Manual-4/User-Guide-1109039-Page-57.png)
![278 Convenient Functions1 M[Menu]](Stationery)]"Remembering dates" ]"Date search"]Perform the following operations:・ I [Reset]: Reset the set value.[From]Specify the date to start searching. Use Jand dial keys toenter the date.[After]Enter the number of days after the starting date using dial key.For example, to find the date 100 days after "From", enter"100".[Result]Show the date when the designated days passed.You can quickly access frequently used functions bysaving them to the Custom menu.You can save up to 10 frequently used functions to theCustom menu. You can also change the default functions.Example: To register a function to an unused custom menunumber [Menu 8]1 M[Menu] (for 1+ seconds) ]Move the cursor to"Menu 8" ] I [Add]The "Add new" screen opens.■To change the assigned functionSelect the function ]Press I [Edit]2 Select a functionThe selected function will be registered to the Custommenu number. ・ A currently registered function cannot be registered again.1 The Stand-by screen ] M[Menu] (for 1+ seconds)・ You can also perform the following steps: M[Menu] ] I[Custom]2 Select a function to accessQuick Access to Frequently UsedFunctionsCustom MenuCreating the Custom MenuUsing the Custom MenuCustom menuscreen](https://usermanual.wiki/LG-Electronics-USA/L06A.Users-Manual-4/User-Guide-1109039-Page-58.png)
![279Convenient Functions1 Custom menu screen (P278) ] M [Menu] ] Performthe following operations:[Add new]*1Select and register a function selected from the list.→P278[Open]*2Start the selected function.[Edit]*2Change the registered function.[Delete]*2Delete the selected function.[Delete all]Delete all registered functions.*1 This appears when an unused menu number is selected. *2 This appears when a registered function is selected.You can store your personal information in the FOMA terminal.1 M [Menu] ](Own number)] C [Detail] ] Enterthe security codeThe Own number detail screen opens.2 M [Menu]]"Edit"The Edit own number screen opens.3 Enter the information] I [Done]For steps to register, see Step 2 in "Saving FOMA TerminalPhonebook (Phone) Contacts" (P80). You cannot setsecret data.・ The pre-installed own number cannot be changed or deleted.1 Own number detail screen ]M[Menu]]Perform thefollowing operations:[Mail/URL]Create mail using the saved mail address, or connect to a site tothe saved URL.Compose mail : Create i-mode mail addressed to other thanown number or own mail address.Attach to mail : Create i-mode mail with Own numberinformation attached.Compose SMS : Create an SMS message addressed to otherthan own number.Connect to URL : Connect to the saved URL.Sub Menu on the Custom Menu ScreenRegistering Your Name and ImageOwn numberNote・ If you change a mail address using i-mode, theaddress saved to this function will not be updatedautomatically.Sub Menu on the Own Number Detail Screen](https://usermanual.wiki/LG-Electronics-USA/L06A.Users-Manual-4/User-Guide-1109039-Page-59.png)
![[Edit]You can edit items on the Own number detail screen.→P279[Send Ir data]Send the information on the Own number detail screen viainfrared communication.→P260[Copy item]You can copy the contents of saved items on the Own numberdetail screen.[Customize call]Change the saved number other than own number, and make acall to the new number. Use C [Save] to save the phone numberto the Phonebook.[Reset]Delete all registered personal information.You can check the last and accumulated call duration andcosts of voice and video calls.・ Voice call duration and digital communication duration (videocall duration) are displayed for Call duration. Call durationincludes both incoming and outgoing calls.・ Call cost includes only outgoing calls. However, calls made totoll free numbers or the information number (104) have "0 YEN"or "** YEN" displayed.・ Call costs are stored in the UIM. When a different UIM is used,the stored call costs appear (storing started in December,2004).・ The displayed call duration and call cost can be reset.・ The displayed call duration and cost are approximate valuesand may be different from actual ones. Note that call cost doesnot include the consumption tax.You can check the duration of the previous and accumulatedduration of voice and video calls.1 M[Menu]](Phonebook & Logs) ]"Call duration"[Last voice Call]Display the duration of the latest voice call.[Last video Call]Display the duration of the latest video call.Checking Call Duration/Call CostNote・ The call duration/cost for i-mode communication andpacket communication is not included. For checking i-mode usage charges, refer to "Mobile Phone User'sGuide [i-mode] FOMA version".Call durationChecking Call Duration280 Convenient Functions](https://usermanual.wiki/LG-Electronics-USA/L06A.Users-Manual-4/User-Guide-1109039-Page-60.png)
![281Convenient Functions[Total voice Call]Display the total duration of voice calls from the last reset untilnow.[Total video Call]Display the total duration of video calls from the last reset untilnow.Call cost includes only outgoing calls.1 M[Menu]](Phonebook & Logs) ]"Call costs"]Check call costs[Last voice call cost]Display the previous voice call cost.[Last video call cost]Display the previous video call cost.[Total calls cost]Display the total cost of calls from the last reset until now.[Reset date & time]Display the last reset date and time.1 M [Menu]](Phonebook & Logs) ]"Call costs"]Check call costs2 I [Reset] ] Enter the PIN2 code ] "Yes"Set the limit of total call cost as threshold so that you willbe notified when the cost reached the limit.1 M [Menu] ](Phonebook & Logs) ]"Call costs" ]"Setcall cost limit"2 Enter the security code ] Perform the following operations:Note・ The displayed Call duration returns to 0 (zero)seconds and starts counting when the durationexceeds 99hours, 59minutes and 59seconds.・ The ringing and dialing durations are not counted.To reset individual items for "Call duration" settingsMove the cursor to the item to reset ]I [Reset] ]Enterthe security code ] Select "Yes".To reset all items for "Call duration" settingsYou can reset all items at one time.]M [Menu] ]"Reset all" ]Enter the security code ]"Yes"Call costsChecking Call CostsNote・ International call costs of WORLD CALL are counted.Call costs to use other international telephoneservices are not counted.Resetting Total Call CostsSetting a Call Cost LimitSet call cost limit](https://usermanual.wiki/LG-Electronics-USA/L06A.Users-Manual-4/User-Guide-1109039-Page-61.png)
![[Set limit]Set whether to limit total call costs.[Call cost limit]Set the limit of the total call cost.[Notification]Select how to indicate that the total call cost has reached itslimit.OFF : You will not be notified.Sound+Icon : You will be notified with the call cost icon + thecall cost tone.Icon : You will be notified with the call cost icon.You can view the date and time in major cities around theworld stored in the FOMA terminal.1 M [Menu]](Stationery) ] "World time"・ C[Change]: Change the selected city. The World time setting screen opens.1Home iconIndicates the city set as Home. * The home city set in the World time is linked with thecity set in "Local time zone" in "Set Date&Time"(P48).Changing the city in one setting changes the other cityautomatically. Therefore, you cannot change the Homecity if "Auto time set" in "Set Date&Time" is set to "ON".2The currently specified city and time2 I [Add]・ C[List]: Open the list of cities and select a city.Press M[Prev.] or I[Next] to switch the city name list by page.1The currently selected city name, date, and time2Date and time of Home (own country)282 Convenient FunctionsIf the limit is exceededThe call cost icon appears on the Stand-by display.When you set "Set call cost limit" to "Sound+Icon", thecall cost tone sounds after the call that reached thelimit.To hide the Call cost icon]M [Menu] ](Phonebook & Logs) ] "Call costs" ]"Delete call cost icon"Using the World TimeWorld timeWorld time listscreen12World timesetting screen12](https://usermanual.wiki/LG-Electronics-USA/L06A.Users-Manual-4/User-Guide-1109039-Page-62.png)
![283Convenient Functions3 Press Jto select a city to addThe selected city is added to the World time list screen.1 World time list screen (P282) ] M [Menu] ] Performthe following operations:[Change home City]*1Change the city set as Home.[Change City]*2Change the selected city.[Daylight Saving]*1Set whether to use Daylight savings time.[Analog Clock On/Analog Clock Off]Set whether to display the analog clock on the World time listscreen.[Delete]*2Delete the selected city.[Delete all]*2Delete all cities except the Home city.*1 This option is not available when "Auto time set" is set to"ON".*2 This option is not displayed when the home city is selected.You can use the FOMA terminal as a stopwatch.1 M [Menu]](LifeKit)]"Stopwatch"・ C[Start]/[Stop] : Start or stop counting.・ I [Reset]: Reset the counted result.・ I[Lap]: Displayed during the counting Each press ofthis key displays the lap time at that moment at the bottom of the screen.You can convert the units for measuring currency, area,length, weight, temperature, volume, or speed.This option is useful in occasions such as exchanging from yento dollars.Sub Menu of the World Time List ScreenUsing the StopwatchStopwatchUsing the Unit ConverterUnit converterConverting Currency Units](https://usermanual.wiki/LG-Electronics-USA/L06A.Users-Manual-4/User-Guide-1109039-Page-63.png)
![284 Convenient FunctionsBefore converting, set the exchange rate.1 M [Menu]](Stationery)]"Unit converter" ]"Currency"2 Select the currency unit field] M [Rate]・ "YEN", "USD", "Euro", and "Currency 1-3" are registered by default.3 Perform the following operations:[(Currency name field)]Press C[Select] to change the currency. Up to 10 full-pitch or20 half-pitch characters can be entered.・ "YEN" in the top row cannot be changed.[(Exchange rate field)]Set the exchange rate. Up to 10 digits (including the decimalpoint) can be entered. Up to 2 digits can be entered after thedecimal point. For example, to exchange between US dollars andyen (example: one US dollar is 120 yen), set 120 to "YEN" and 1to "USD".・ M[.]/#: Enter the decimal point.・ Q : Delete from the last entered digit.4 I [Done]Convert the one currency to another based on the rates set forthose 2 currencies.1 Select two currencies from the Currency unit field inthe Currency exchange screen (P284)・ C[List]: The Currency list screen opens.2 Enter the amount in the value entry field of the sourcecurrencyThe converted amount will be displayed in the other valueentry field. You can enter/convert in either value entry field.・ Up to 10 digits (including the decimal point) can beentered. However, if the converted value exceeds 14digits (including the decimal point) or 2,147,483,647, nomore digits can be entered.・ If the currency in the Currency unit field is changed afterthe amount was entered, the new amount will bedisplayed in the lower value entry field using the amountin the upper value entry field as the source.Setting the Exchange RateCurrencyexchange screenConvert CurrenciesCurrency unit fieldValue entry field](https://usermanual.wiki/LG-Electronics-USA/L06A.Users-Manual-4/User-Guide-1109039-Page-64.png)
![285Convenient Functions・ #:Enter the decimal point.・ Q: Delete from the last entered digit.・ I[Reset]: Delete all entered numbers.Convert one defined area unit to another type of defined areaunit.1 M [Menu]](Stationery)]"Unit converter" ]"Surface"2 Select a unit in the Surface unit field (two places)・ C[Unit]: The unit list screen opens.3 Enter the value in the value entry field of the sourcesurfaceThe converted value will be displayed in the other valueentry field. You can enter/convert in either value entry field.・ The description of the values is the same as for theCurrency conversion screen.→P284You can convert temperature between Fahrenheit (°F) andcentigrade (℃).1 M [Menu]](Stationery)]"Unit converter" ]"Temperature" ] Enter the temperature either in"Celsius" or "Fahrenheit"The converted temperature will be displayed in the othervalue entry field. You can enter/convert in either valueentry field.・ From -40 to 309, or up to 10 digits (including-(minus)and the decimal point) can be entered.・ M[-]: Enter - (minus) before the value.・ #:Enter the decimal point.・ Q : Delete from the last entered digit.・ I [Reset]: Delete all entered numbers.1 M [Menu]](Stationery)]"Unit converter" ]"Length"/"Weight"/ "Temperature"/"Volume"/"Velocity"Perform the same subsequent steps as in "Converting AreaUnits" (P285).Converting Area UnitsConverting Temperature UnitsConverting Length, Weight, Volume, andSpeed](https://usermanual.wiki/LG-Electronics-USA/L06A.Users-Manual-4/User-Guide-1109039-Page-65.png)
![286 Convenient FunctionsYou can use the Calculator to perform arithmetic operations,and calculations with functions.1 M [Menu]](Stationery)]"Calculator"1Arithmetic operation (+, −, ×, ÷(/), =):Use K, C.2KeyboardUse *, or #.2 Calculating・ *:Enter the decimal point.・ #: Enter ( ) parentheses.・ Q : Delete from the last entered digit.・ I [AC]: Clear all entered numbers and calculated results.1 Calculator screen (P286) ]M [Func.] ]Perform thefollowing operations:[+/−]Switch the sign (+/-) of the entered number.[sin]Perform the trigonometric function.[cos]Perform the trigonometric function.[tan]Perform the trigonometric function.[log]Calculate the logarithm of a number.[ln]Calculate the natural logarithm of a number.Calculate the natural logarithm of the specified positive value(logarithm with the base of e).[exp]Calculate the value of a number raised to an exponential level.Using the CalculatorCalculatorSub Menu on the Calculator ScreenCalculator12](https://usermanual.wiki/LG-Electronics-USA/L06A.Users-Manual-4/User-Guide-1109039-Page-66.png)
![287Convenient Functions[sqrt]Calculate the square root of a number.[deg]Set the unit of angle to "degree".[rad]Set the unit of angle to "radian". Radian expresses an angle using the constant number π(180degrees equal πradians).One radian (360 degrees/2π is approximately 57.29578degrees; One degree (2π/360 degrees) is approximately0.01745 radian (where π=3.141592653).Create and save a memo. Up to 50 memos can be saved.1 M [Menu]](Stationery)]"Memo"] I [New] ]Perform the following operations:・ C [List]: List of items opens.[ (Category)]Select a type (category) of Memo. Icons vary depending on theselected category.[ (Subject)]Enter a memo. Up to 50 full-pitch or 100 half-pitch characterscan be entered. A blank memo cannot be saved.2 I [Done]You can list and view saved memos.1 M [Menu]](Stationery)]"Memo"2 Select a memo to viewThe Memo detail screen opens.・ C [Edit]: The new memo creation screen opens.・ I [Mail]: The Compose message screen with the contents of "Category" and "Memo" already inserted in themessage text opens.Using MemosMemoCreating MemosMemo ListscreenViewing Modifying a Memo](https://usermanual.wiki/LG-Electronics-USA/L06A.Users-Manual-4/User-Guide-1109039-Page-67.png)
![288 Convenient Functions1 Memo list screen (P287)/Detail screen ]M[Menu]]Perform the following operations:[Add new]Save a new memo.→P287[Send via]Send the selected memo as an i-mode mail attachment or viaInfrared communication. You can also send all memos via Infraredcommunication.[Edit]Edit the selected memo.→P287[Delete]Delete the selected memo.[Multiple choice]*Select and delete memos.]Place check marks next to memos to delete ] I[delete] ]"Yes"・ You can also select "Mark all" or "Release all" from "Mark/Unmark" by pressing M[Menu].* This is not displayed on the Detail screen.You can connect a flat-plug earphone/microphone with switch(optional) to the FOMA terminal to make and receive calls.Specify the phone number to call using a memory numberof the Phonebook in the FOMA terminal while connectingthe flat-plug earphone/microphone with switch.・ The phone number saved as "Phone number 1" in theterminal Phonebook will be specified.1 M [Menu]](Settings)]"Call/VT/ Dialing" ]"Earphone" ] Perform the following operations:[Switch call]Selecting "ON" allows you to make calls by pressing the switch ofthe flat-plug earphone/microphone with switch.Sub Menu on the Memo List Screen/Memo Detail ScreenTalking Using the Flat-plugEarphone/microphone with SwitchConfiguring Switch Actions](https://usermanual.wiki/LG-Electronics-USA/L06A.Users-Manual-4/User-Guide-1109039-Page-68.png)
![289Convenient Functions[Memory number]*Enter the memory number of the Phonebook.This option can be selected from the Phonebook search screenby pressing C [Search].* Set "Switch call" to "ON" to make this setting available.2 I [Done]Press the switch of the flat-plug earphone/microphone withswitch to make a voice call to the number assigned to thememory number of the Phonebook set under the Earphonesetting (P288).1 Press the switch of the Flat-plug Earphone/Microphone with Switch once2 To end the call, press the switch of the flatplugearphone/microphone with switch for 1+ seconds.1 A call arrives ] Press the switch of the flatplug earphone/microphone with switchAnswer the call.・ When a video call arrives, the camera image is sent tothe other party.■To reject incoming calls without answering Press the switch of the flat-plug earphone/ microphonewith switch for 2+ seconds.2 To end the call, press the switch of the flatplug earphone/microphone with switch for 1+ seconds.If you subscribe to the Call waiting service and activatedthe service, when a voice call arrives during another voicecall, you can answer the second call by pressing the switchof the flat-plug earphone/microphone with switch.1 A call arrives ] Press the switch of the flat-plug earphone/microphone with switchThe active voice call is placed on hold and you can answerthe incoming call. The connecting 3-way screen opens.■To reject incoming calls without answeringPress the switch of the flat-plug earphone/ microphonewith switch for 2+ seconds.■To activate the held call during the 3-way connectionPress the switch of the flat-plug earphone/ microphonewith switch for 2+ seconds.2 To end the call, press P・ While the Connecting 3-way screen is displayed, you cannot terminate the call by pressing the switch of theflat-plug earphone/microphone with switch.Answering a Call during a CallNote・ When using the flat-plug earphone/microphone withswitch, a call will not be terminated or placed on holdif the terminal is closed during the call regardless of"Close setting" (P70).Making a Call Using the SwitchReceiving a Call Using the Switch](https://usermanual.wiki/LG-Electronics-USA/L06A.Users-Manual-4/User-Guide-1109039-Page-69.png)
![290 Convenient FunctionsYou can set to answer a call automatically when the flatplugearphone/microphone option with switch is connected after theset ring time has elapsed.1 M [Menu]](Settings)]"Call/VT/Dialing" ]"Incoming call"]"Auto answer"]Perform the followingoperations:[Auto answering]Selecting "ON" allows you to answer calls automatically using theflat-plug earphone/microphone with switch.[Delayed time]*Enter the time until the call is automatically received.* Set "Auto answering" to "ON" to make this setting available.2 I [Done]Set whether to sound a tone each hour, on the hour.1 M [Menu]](Settings) ]"Date&Time" ] "Hourindication" ] Perform the following operations:[Set sound]Specify the tone.・ Press C[List] to open the Set sound list screen.・ Press Jto sound the selected tone. From the list screen,press I[Play] ]Hto sound the tone. However, if 「Popupdisplay」 in 「Volume Setting」 is set to 「mute」, Set sound willnot be confirmed.[Time]Set the time to sound the tone.Use Jto move the cursor to the position and enter the timewith dial keys, and switch between "AM" and "PM" with C(pressing C in the time field opens the Time settings screenthat allows you to enter time with dial keys and H).・ Depending on the settings in "Date&Time format", the displayorder or format for the date and time may differ.→P1112 I [Done]Automatically Answering a CallConnecting the Flat-plugEarphone/microphone with SwitchAuto AnswerNote・ If you set Auto Answer ring time (duration) to earliertime than the start of the Voice mail or Callforwarding service, or Record message, this functiontakes precedence.Chiming the HourHour indicationNote・ The indication volume sounded when confirmingsettings and notifying every hour follows"Alarm/Schedule".→P99](https://usermanual.wiki/LG-Electronics-USA/L06A.Users-Manual-4/User-Guide-1109039-Page-70.png)
![291Convenient FunctionsYou can check used and free space of the FOMA terminal memory.・ The space used in the FOMA terminal includes thefiles/data for the following functions- Data box (My Picture, i-motion, Melody, and Music)- Phonebook - Schedule - Holiday- Memo - To Do - Date counter1 M [Menu]](Settings) ]"Others" ]"Memory status"2 Select a memory to viewDatabox memory :Display the amount of data saved inthe "Data box".Personal info. :Display the amount of data saved inthe Phonebook, Schedule, Holiday,Memo, To do, and Date counter.UIM memory :Display the amount of data saved onthe UIM.Checking Memory UsageMemory status](https://usermanual.wiki/LG-Electronics-USA/L06A.Users-Manual-4/User-Guide-1109039-Page-71.png)


![Character InputVarious operations require entering characters, such asregistering to the Phonebook or creating mail. Learn howto enter characters to fully use the FOMA terminal.Character input screenThe Character input screen shows the current input modeand operation guide.1Available number of charactersIndicates number of bytes or number of characters that canbe input further.2Operation guide fieldShows switching among pictographs, symbols, andemoticons, and switching between full- and half-pitchcharacters.3Input mode fieldShows the input mode.Switch input modes for entering various types ofcharacters. In some input modes, you can switch betweenfull and half-pitch characters.・ Depending on the input screen, it may not be possible toswitch input modes.1 Character input screen (P294) ]I[Mode]2 I[Change]/ J]C[Select]Each press of I[Change] or Jswitches the inputmode.Pressing Hbefore [Select] switches between fulland half-pitch (excluding Hiragana or Kanji input mode).・ After switching the input mode, you can enter charactersin the selected input mode without pressing C[Select].漢 (kanji):Hiragana or Kanji character input modeカ (katakana):Katakana character input modea/A*(ab/AB*) :Alphabetic character input mode1 (12):Numeric input mode*: Press M[Upper] to change to upper case.294 Character EntrySwitching Input ModesSwitchinginput modesCharacterInput screen123](https://usermanual.wiki/LG-Electronics-USA/L06A.Users-Manual-4/User-Guide-1109039-Page-74.png)
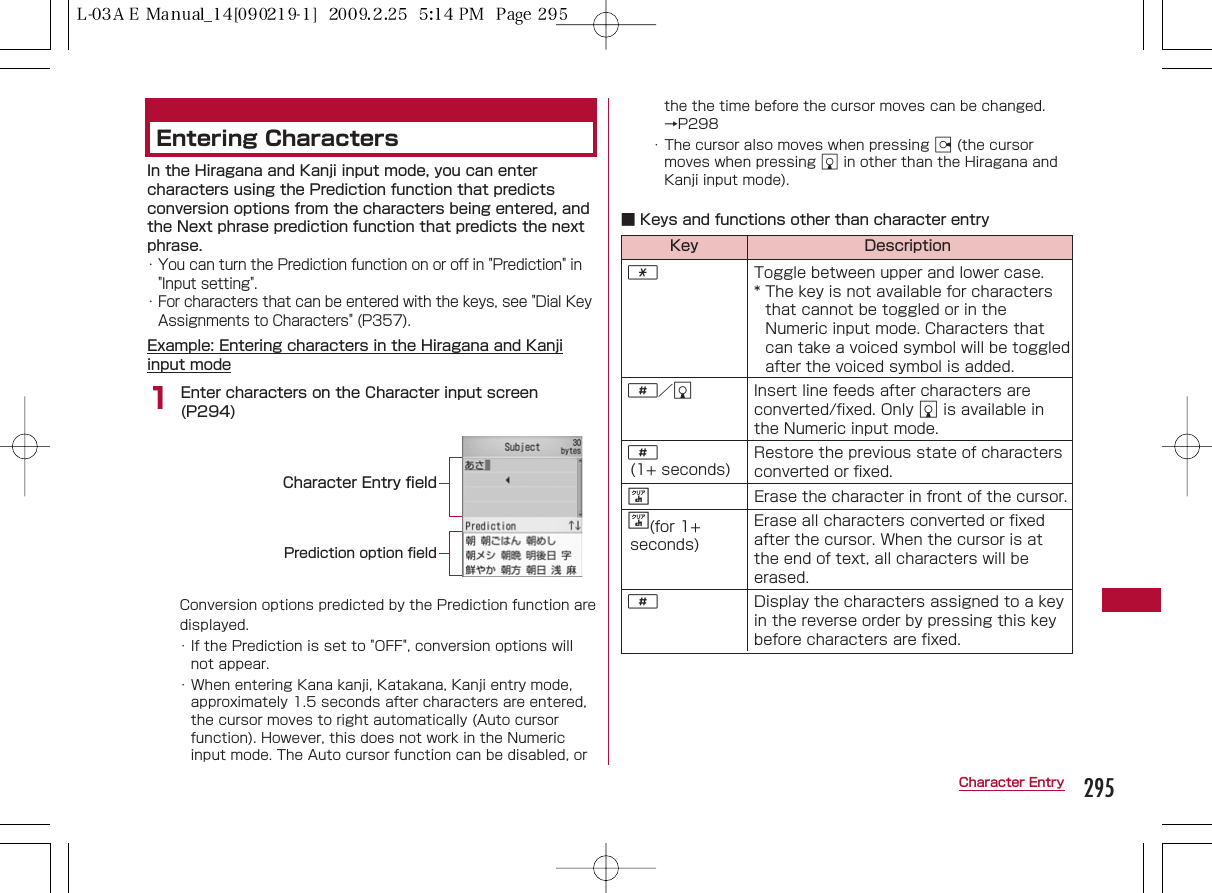
![2 Use Hto move the cursor to the conversion optionfield・ C[Set]: Fix the entered characters. In the Hiragana andKanji input mode, press this key to fix the characterswithout converting them.・ M[KanaA1]: Display conversion options combined withKatakana and alphanumeric characters.・I[Conv.]: Display conversion options without using thePrediction function. Press when there is no conversionoption you want to enter at the prediction option field.3 Move the cursor to the characters to convert ]C[Select]The entered characters are fixed. Conversion optionspredicted by the Next phrase prediction function appear inthe display area. If desired characters are displayed,perform Step 2 to 3 to select and enter the characters.・ Press Qto cancel conversion and to resume enteringcharacters.Converting Characters without the Prediction FunctionPerform the following steps if desired characters are notshown as conversion options or if Prediction is set to "OFF":① Enter characters on the Character input screen (P294)・ After entering characters, if the cursor is in the Predictedconversion option area, press Qto move the cursor tothe character input area.②I[Conv.]Conversion options for the highlighted area will be displayed.・ To change the highlighted area, use Jto move the cursor.③ Use Hto move the cursor to the conversion optiondisplay area④ Move the cursor to the characters to convert ]C[Select]The entered characters are fixed. As each phrase isconverted, the next phrase will be highlighted.・ Displayed items vary depending on the options or enteredcharacters on the Character input screen.1 Character input screen (P294)]M[Menu]]Performthe following operations:[Common phrases]Select and enter a saved common phrase.Input :Select and enter a saved common phrase.Edit :You can create and save a common phrase, or edit asaved common phrase.→P299[Edit character]Copy or cut characters specifying a range and paste.→P301[Edit dictionary]Register a word.→P302[Quote]Phonebook :Quote an entry to the Phonebook.Own number :Quote your phone number. The security codeis required to quote.[Input setting]Full/Half :Switch between full-/half-pitch input mode.Upper/Lower :Switch between upper/lower case input modein the Alphabetic mode296 Character EntrySub Menu on the Character Input Screen](https://usermanual.wiki/LG-Electronics-USA/L06A.Users-Manual-4/User-Guide-1109039-Page-76.png)
![297Character EntryNote・ Common phrases can be edited/registered.→P299Pictograph listScreenPrediction :Activate or deactivate the prediction function.→ P298Auto cursor :Set whether to automatically fix the enteredcharacters and move the cursor.→P299[Special input]Space : Enter a space before the cursor.Changing line : Enter a linefeed before the cursor.Kuten Code : Enter a character using its Kuten code.→P301Pictograph : Select and enter a pictograph from a list.*Full symbol : Select and enter a full-pitch symbol from alist. *Half symbol :Select and enter a half-pitch symbol from alist. *Emoticon : Select and enter an emoticon from a list. *[Cancel]Erase all entered characters.*: Use Ato switch the input screen.→P297Entering Common PhrasesYou can enter text using common phrases saved in theFOMA terminal.・ By default, "Original-1" and "Original-2" are empty.1 Character input screen (P294)]M[Menu]]"Commonphrases"]"Input"The list of Common phrase category screen opens.2 Select a type ]Select a common phraseThe common phrase is entered.Entering Pictographs/Symbols/EmoticonsYou can switch the input modes of pictographs/symbols/emoticons using A.・ Depending on the current input screen, these characters maynot be entered or modes may not be switched.1 Character input screen (P294) ]AEach press of Aswitches the input mode, and the list screen opens.絵:Pictograph input mode記:Full-pitch symbol input modeキゴウ : Half-pitch symbol input mode顔:Emoticon input mode2 Move the cursor to the pictograph/symbol/emoticon]C[Select]The selected character will be entered.](https://usermanual.wiki/LG-Electronics-USA/L06A.Users-Manual-4/User-Guide-1109039-Page-77.png)
![298 Character Entry■ Available Keys on the List Screen and Their Functions■Entering Pictographs/Symbols/EmoticonsConsecutivelyCharacters of each input mode can be consecutivelyentered.]Each input mode screenI[Cont.] ]Selectcharacters consecutively ]II [Set]Configure various settings related to character input.Set whether to enable the Prediction function that displaysconversion options matching with the beginning of thecharacters being entered, or the Next phrase predictionfunction that displays the predicted next phrase, in theHiragana and Kanji input mode.1 Character input screen (P294)]M[Menu] ]"Inputsetting" ]"Prediction" ]"ON"/"OFF"Character EntryKey Description#/EDisplay list screens in the order of thescreen numbers.*/FDisplay list screens in the reverse orderof the screen numbers.1/2/3Move the cursor to the left/center/rightof the top row on the Pictograph/symbollist screen.4/5/6Move the cursor to the left/center/rightof the middle row on the Pictograph/symbol list screen.7/8/9Move the cursor to the left/center/rightof the bottom row on the Pictograph/symbol list screen.0Switch between "Pictograph1" and"Pictograph2" "Pictograph D (DecomailPictures)" on the Pictograph list screen.Editing Emoticons①M[Menu] ](Settings) ]"Others" ]"Characterinput" ]"Edit emoticon" The Edit emoticon screen opens.② Select a category ]Select an emoticon to edit ]I[Edit] The Character input screen opens with the selectedemoticon entered.③ Change the Emoticon ]C[Set] The new emoticon is saved overwriting the existing one.Note・ Depending on the current input screen, thesecharacters may not be entered or modes may not beswitched.Configuring Character InputSettingsInput SettingSet Prediction](https://usermanual.wiki/LG-Electronics-USA/L06A.Users-Manual-4/User-Guide-1109039-Page-78.png)
![299Character EntryYou can configure the input method so that cursor movesto a new position for the next input automatically after aset time so that another character can be entered with thesame key.1 Character input screen (P294)]M[Menu] ]"Inputsetting" ]"Auto cursor" ]Select the speedOFF :Characters are not automatically fixed.Slow :Characters are fixed approximately two secondsafter being entered.Normal :Characters are fixed approximately 1.5 secondsafter being entered.Fast :Characters are fixed approximately 1 secondsafter being entered.Register frequently used greetings or phrases as commonphrases to enter them quickly.Newly defined common phrases can be saved in "Original-1" or "Original-2". Up to 10 common phrases can be saved.1 Character input screen (P294)]M[Menu]]"Commonphrases"]"Edit"The common phrase types are listed.2 "Original-1"/"Original-2" ]Move the cursor to a phrasetype for adding a phrase ]I[Edit]Up to 64 full-pitch or 128 half-pitchcharacters can be entered.Character EntryNote・ You can also set the Prediction input by performingthe following steps: M [Menu] ] (Settings) ]"Others" ]"Characterinput"]"Prediction input"]"On"/"Off"Fixing Entered Characters AutomaticallyModifying / RegisteringCommon PhrasesEditRegistering Common PhrasesEdit commonphrase ListscreenEdit commonPhrase screen](https://usermanual.wiki/LG-Electronics-USA/L06A.Users-Manual-4/User-Guide-1109039-Page-79.png)
![300 Character EntryCharacter Entry3 Enter text to register ]C[Set]The common phrase is registered.You can edit a pre-installed common phrase.1 Character input screen (P294)]M[Menu] ]"Commonphrases"]"Edit"]Select a common phrase type2 Move the cursor to a phrase ]C[Edit]The Common phrase edit screen opens with the selectedcommon phrase entered.・ Press C [Select] to open the full screen with thecommon phrase entered.3 Edit the common phrase ]C[Set]The common phrase is registered.1 The Edit common phrase screen (P299) ]M[Menu]]Perform the following operations:[Reset all]Restore all common phrases to their defaults.[Cancel]Terminate editing a common phrase.1 Common phrase list screen (P300) /Display all screen(P299)]M [Menu] ]Perform the following operations:[Delete 1 item]Delete the selected common phrase.[Reset 1 item] *1Restore the selected common phrase to its default.[Category reset] *2Restore all common phrases in the category to their defaults.[Cancel]Terminate editing a common phrase.Editing Pre-installed Common PhrasesSub Menu on the Common Phrase List/Display"Greeting"Common PhraseList ScreenNote・ You can also edit common phrases saved in a user-defined folder.・ You can also perform the following steps to save oredit a common phrase. M[Menu] ] (Settings) ]"Others" ]"Characterinput" ]"Edit common phrase"Common Phrase Edit Screen Sub Menu](https://usermanual.wiki/LG-Electronics-USA/L06A.Users-Manual-4/User-Guide-1109039-Page-80.png)
![301Character Entry*1 A common phrase whose type is "Original-1" or "Original-2"cannot be selected. *2 Not displayed in the sub menu for "Display all" screen.You can copy/cut characters and paste them to otherlocations or on other screens. Copied/cut characters canbe pasted any number of times until the FOMA terminal isturned off or another copy/cut is performed.1 Character input screen (P294) ]M[Menu] ]"Editcharacter" ]"Copy"/"Cut"2 Use Kto move the cursor to the starting point ]C[Select]3 Use Kto move the cursor to the ending point]C[Select]4 Open the character input destination screen ]UseKto move the cursor to the position to paste5 M[Menu] ]"Edit character" ]"Paste" ]"Yes"・ To undo a cut or paste operation, select M[Menu] ]"Edit character" ]"Undo"You can enter a 4-digit Kuten Code to enter a letter,numeric character, or symbol, etc.・ For the "Kuten Code List", refer to the "Kuten Code List" on thecontained in the bundeled CD-ROM in PDF format.Character EntryCopying/Cutting and PastingCharactersNote・ If copied or cut text contains more characters thanthe allowable number of characters, the excesscharacters are truncated when pasted.・ Characters can be pasted only if copied or cut textcan be entered in the destination text. For example,Hiragana or Kanji characters cannot be pasted in themail address field (half-pitch alphanumericcharacters).・ Line feeds in a copied text string are replaced withhalfpitch spaces if the text is pasted to an inputscreen that does not allow linefeeds.・ When pasting in the Deco-mail message aftercopying or cutting, the decoration information willalso be pasted (except for some decorationinformation).Using the Kuten Code to EnterCharactersKuten Code Input](https://usermanual.wiki/LG-Electronics-USA/L06A.Users-Manual-4/User-Guide-1109039-Page-81.png)
![302 Character EntryCharacter Entry1 Character input screen (P294) ]M[Menu] ]"Specialinput" ]"Kuten code"2 Enter the Kuten code (4-digit number) for thecharacter ]C[Select]The associated character is entered.・ If you proceed to press [Cont.], you can enter consecutivecharacters using Kuten codes.・ You can also select characters by moving the cursor withK.You can register up to 100 words not listed as conversionoptions, or words with difficult readings, along with thereadings. Registered words will be displayed as conversionoptions when the readings are entered.1 Character input screen (P294) ]M[Menu] ]"Edit dictionary"・ To view registered words, select adictionary and press C.2 I[Add] ]Select or save thefollowing item[Reading]Enter the reading that is used to find the registered word. Up to14 full-pitch Hiragana characters only can be entered.・ Spare cannot be entered.[Word]Enter the word to register. Up to 14 full-pitch or 28 half-pitchcharacters can be entered. On the Character input screen, afterthe characters of a "Reading" are entered, the registered wordappears as a conversion option.・ Linefeed cannot be entered.3 I[Store]The word is registered to the dictionary.You can delete one word or all words registered using "Editdictionary".Registering Frequently UsedWordsEdit dictionaryNote・ You can also perform the following steps to register aword. M[Menu] ](Settings) ]"Others" ]"Characterinput" ]"Edit dictionary"Kuten Codeinput screenDeleting Words](https://usermanual.wiki/LG-Electronics-USA/L06A.Users-Manual-4/User-Guide-1109039-Page-82.png)
![303Character EntryExample: Deleting one word1 Move the cursor to the word to delete on the Storedword list screen (P302)2 M[Menu] ]"Delete 1 item" ]"Yes"The selected word will be deleted.■To delete all wordsSelect M[Menu] ]"Delete all" ]"Yes" on the Storedword list screen.Restore the learned data concerning character entrysaved in the FOMA terminal to its default.1 M[Menu] ](Settings) ]"Others" ]"Characterinput" ]"Reset learnt info" ]"Yes"/"No"You can enable dictionaries downloaded from i-mode sites,etc. and use them for character conversion. Up to fivedictionaries can be enabled.・ Up to 10 dictionaries can be stored in the FOMA terminal.1 M[Menu] ](Settings) ]"Others" ]"Characterinput" ]"Download dictionary"2 Place check marks next to dictionaries to enable ]C[Enable]Each checked dictionary is enabled.■To disable a dictionarySelect an enabled dictionary and press C[Disable].1 Downloaded dictionary screen (P303) ]M[Menu] ]Perform the following operations:・ I[View]: Display details of the dictionary.[Delete]Delete the selected dictionary.[Delete all]Delete all listed dictionaries.Learned Dataconverted by selecting from conversion options, orcharacters fixed by pressing Cwithout conversion. Thenext time you enter the same first character, the learnedword appears as the first conversion option.Using Downloaded DictionariesDownload DictionariesDownloadedDictionaryscreenSub Menu on the Downloaded Dictionary ScreenInitializing Learned DataReset learnt info](https://usermanual.wiki/LG-Electronics-USA/L06A.Users-Manual-4/User-Guide-1109039-Page-83.png)

![Network ServicesThe following DOCOMO network services are available for theFOMA terminal.Voice Mail Service・・・・・・・・・・・・・・・・・・・・・・ Voice mail 306Call Waiting ・・・・・・・・・・・・・・・・・・・・・・・・・・・ Call waiting 307Call Forwarding Service ・・・・・・・・・・・Call forwarding 309Nuisance Call Blocking Service・・・・・・・・・・・・・・・・・・・・・・・・・・・・Nuisance Call Blocking 311Caller ID Notification Service・・・・・・・・・・・・・・・・・・・・・・・・・・・・・・Caller ID notification 312Caller ID Request ・・・・・・・・・・・・・・・ Caller ID request 312Set In-call Arrival Act ・・・・・・・ Set in-call arrival act 312Selecting Actions to an Incoming Call during a Call ・・・・・・・・・・・・・・・・・・・・・・・・・・・・・・・・・・・・ Arrival call act 313Dual Network Service ・・・・・・・・・・・・・・ Dual Network 313English Guidance ・・・・・・・・・・・・・・・・ English guidance 314Service Numbers Available・・・・・・ Service numbers 314Setting Remote Control ・・・・・・・・・・ Remote Control 315Multi Number ・・・・・・・・・・・・・・・・・・・・・・・・ Multi number 315OFFICEED ・・・・・・・・・・・・・・・・・・・・・・・・・・・・・・・・・・・・・・・・・ 317Registering and Using a New Service・・・・・・・・・・Additional Services (USSD Registration) 317Registering Additional Guidance・・・・・・・・・・・・・・・・・・・・・・・・・・・・・・・・・・・Additional guide 318305Network Services AvailableService name MonthlychargeSubscriptionVoice MailServiceCall WaitingServiceCall ForwardingServiceNuisance callBlockingServiceCaller IDNotificationServiceCaller ID DisplayRequest ServiceRequiredRequiredRequiredNotrequiredNotrequiredNotrequiredChargedChargedFreeFreeFreeFree*Public Mode P71, P72・ You cannot use network services while you are out of service area or wherethere is no signal reception.・ For subscription or inquirios, contact the "docomo Information Center" listedon the back of this manual.・ "OFFICEED" is a fee-based service requiring a separate subscription. For details, see the web page "NTT DOCOMO Business Online"(http://www.docomo.biz/d/212/).(Japanese only)・ This manual contaios an overview of network services available throughoperation of FOMA terminal menus. For details, see "Mobil Phone User's Guide[Network Services].Service name MonthlychargeSubscriptionDual NetworkServiceEnglishAnnouncementServiceMultiNumberPublic mode(Drive mode)*Public mode(Power off)*RequiredNotrequiredRequiredNotrequiredNotrequiredChargedFreeChargedFreeFreeOFFICEEDRequired Charged](https://usermanual.wiki/LG-Electronics-USA/L06A.Users-Manual-4/User-Guide-1109039-Page-85.png)
![306 Network ServicesWhen your terminal is out of the service area or turned off,or you cannot answer a call, this service automaticallyresponds to incoming voice/video calls and recordsmessages.・ Up to 3 minutes can be recorded per voice message, andmessages can be recorded for up to 20 voice calls and 20video calls. Messages are retained at the center for up to 72hours.・ When a message is recorded, (with the number of receivedmessages) appears on the Stand-by display. However, if a videomessage is recorded, does not appear on the Standbydisplay but an Incoming mail information(SMS) notifies you ofthe messages.・ When Record Message (P73) is activated concurrently, to usethe Voice mail service first, set the ringing time of the Voicemail service shorter than the Response Time of RecordMessage.・ If you do not answer an incoming voice or video call when theVoice mail service is activated, the call is recorded as a"Missed Call" in Received Calls and appears (with thenumber of the missed calls).Step 1 : Activate the Voice Mail ServiceStep 2 : A call arrives*Step 3 : Caller records a messageStep 4 : Play the message* When you are in a hurry, you may want to record a messagewithout listening to the Response Greeting of the Voice mailservice. In this case, you can immediately start recording amessage by pressing "#".1 M[Menu] ](Service) ] "Voice mail" ]Performthe following operations:[Activate]Activate the Voice mail service.[Set ring time]Set time before connecting to the Voice mail service center aftera call arrives.]"Yes"] Enter a ring timeVoice Mail ServiceVoice mailBasic Flow of Voice Mail ServiceNote・ In Step 2, if you are in service area and the FOMAterminal is turned on, a ring tone sounds until the setring time elapses. When an incoming call is notanswered while a ring tone is sounding, the call isconnected to the Voice mail service center. The ringtime can be changed.・ In Step 3, when a message is recorded, appears (thenumber is the number of recorded messages) on theStand-by display, and calls are recorded in Receivedcalls as missed calls. However, if you set "Set ringtime" to 0, missed calls will not be recorded inReceived calls.・ Even when the Voice mail service is deactivated, youcan forward an incoming voice call to the Voice mailcenter manually using the sub menu.→P69・ To change the settings to connect video calls to theVoice mail center, make a voice call to "1412".Using the Voice Mail Service](https://usermanual.wiki/LG-Electronics-USA/L06A.Users-Manual-4/User-Guide-1109039-Page-86.png)
![307Network Services[Deactivate]Deactivate the Voice mail service.[Check setting]Check the current settings of the Voice mail service.Press M[Menu] to activate/deactivate the Voice mail service,or set a ring time.[Play messages]Make a call to the Voice mail service center and play therecorded voice mail message.[Voice mail setting]Make a call to the Voice mail service center, and change thesettings according to the voice guidance.[Check messages]Check whether there are new messages.[Notify missed call]An SMS will be sent to notify you of missed calls when callsarrived while the terminal is turned off or out of service area, afterthe terminal is turned on or in service area.Activate : Activate the Notify missed call service.call notificationDeactivate : Deactivate the Notify missed call service.Check setting : Check the status of the Notify missed callsetting.[Del. Voicemail icon]Hide displayed in the icon display area.[Tone/Vibration message notification]Set whether to notify you of a new recorded message withillumination and a ring tone.When a call arrives during another call, a call terminationduring a call tone sounds. You can place the active call onhold and answer the other call. You can also place theactive call on hold to make another call.・ To use the "Call waiting" service, set "In-call arrival act"(P312) to "Answer" in advance. If this option is setotherwise, an incoming voice call during another voice callcannot be answered even if the "Call waiting" service isactivated.・ The Call waiting service is not available when:- Dialing a number or ringing the other party- A voice call arrives during a video call- A video call arrives during a voice call1 M[Menu] ](Service)]"Call waiting"]Perform thefollowing operations:Call WaitingCall waitingUsing Call WaitingNote・ Even when you activate "SMS一括拒否 (Reject AllSMS)", the notification will be received.](https://usermanual.wiki/LG-Electronics-USA/L06A.Users-Manual-4/User-Guide-1109039-Page-87.png)
![308 Network Services[Activate]Activate the "Call waiting" service.[Deactivate]Deactivate the "Call waiting" service.[Check setting]Check whether the Call waiting service is activated ordeactivated.When a call arrives during a voice call, the call terminationtone during a call sounds from the earpiece, and theIncoming call screen opens.1 A call arrives]AThe active voice call is placed on hold, and you can answerthe incoming voice call. A message "Connecting 3-way"appears on the 3-way connection screen.・ I[Switch]: Each press this key toggles between theactive call and the held call.・ C[Spk on/Spk off]: Toggle Hands-free between On and Off.・ P: End the active call.You can make a new voice call placing the active voice callon hold.1 Voice call screen (P53)]C OK ]M[Menu] ]"Newcall" ]Enter a phone number ]AThe new call becomes active, the previous call is placed onhold, and the connecting 3-way screen opens.・ To switch to a held call, press C OK ]M [Menu] ][Switch].・ To end the held call, switch to the call by performing theabove steps and press P.Answer an incoming voice call after terminating the activevoice call. You can answer the call even when the Callwaiting service is activated.1 A call arrives]C OK ]M[Menu]]"End active call "The Voice call termination screen opens, and the Incomingvoice call screen for the incoming call opens.■to answer the call after terminating the held callC OK ]M[Menu] ]"End the call" ]"End held call・ When connecting 3-way, The held call is terminated, andyou answer the incoming call.2 AAnswering a Call Placing the Active Call onHoldMaking a Call Placing the Active Call onHoldAnswering an Incoming Call Terminatingthe ActiveNote・ If you deactivate Call waiting, you cannot answer acall even when you hear in-call arrival tone during acall with "Set in-call arrival act" activated.](https://usermanual.wiki/LG-Electronics-USA/L06A.Users-Manual-4/User-Guide-1109039-Page-88.png)
![309Network ServicesSub Menu of the Incoming Call Screen during a Call Screen1 When a call arrives during a call, press C OK ]M[Menu] ]perform the following operations:[Voice mail]*1Connect the incoming call to the Voice mail service center.[Call rejection]Reject an incoming call and hang up.[Call forwarding] *2Forward an incoming call to the specified number.[End active call]Terminate the active call. A call is arriving.[Mute]Mute or un-mute the active call.*1 This is not available unless you subscribe to the Voice mailservice.*2 This is not available unless you subscribe to the Callforwarding service and you have specified a forwardingnumber.1 The 3-way connecting screen C OK ]M[Menu] ]Perform the following operations:[Switch]Switch between the active call and held call.[End call]Select and terminate a call.End active call :Terminate the active call. The held callautomatically becomes active.End held call : Terminate all calls.End all calls[Mute]Mute or un-mute the active call.[Send my info.]Create i-mode mail with own number entered in the messagetext. →P131[Search phonebook] *Search for a Phonebook entry.→P87* This cannot be used when the Phonebook is accessed. To usethis function, terminate applicable functions from the task listscreen. → P264When your terminal is out of service area or switched off, ora call was not answered within the set ring time, thisservice forwards the voice/video call.・ Video calls are forwarded only to a video call capabledestination complying with 3G-324M.・ The subscriber to the Call forwarding service is changed forforwarding a call to a destination.・ This service is not available with some billing plans.・ When Record message (P73) is activated concurrently, to usethe Call forwarding service first, set the ring time of the Callforwarding service shorter than the Ring time of Recordmessage.・ If an incoming voice or video call is not answered when the Callforwarding service is activated, the call is recorded as a Missedcall in Received calls and appears (the number is thenumber of missed calls).Sub Menu on the 3-way Connecting ScreenCall Forwarding ServiceCall forwarding](https://usermanual.wiki/LG-Electronics-USA/L06A.Users-Manual-4/User-Guide-1109039-Page-89.png)
![310 Network ServicesStep 1 : Register the phone number of the forwardingdestinationStep 2 : Activate the "Call forwarding" ServiceStep 3 : A call arrivesStep 4 : Forward the call to the destination1 M[Menu] ](Service) ]"Call forwarding" ]Performthe following operations:[Activate]Activate the "Call forwarding" service.Register the : Register the phone number of theforwarding numberforwarding destination. Press M[Search]to find the number from the Phonebook.Set ring time :Set the duration from when a call arrivesuntil the call is forwarded.[Deactivate]Deactivate the Call forwarding service.[Register the forwarding number]Register the phone number of the forwarding destination. PressM[Search] to find the number from the Phonebook.・ Press I[Done], a confirmation appears. Selecting "Yes"changes the forwarding destination number and activates theCall forwarding service.[Setting if forwarding number busy]Set whether to connect to the Voice mail service center whenthe forwarding destination is busy.[Check setting]Check the current setting of the Call forwarding service.・ This cannot be operated from a menu.・ For details, refer to "Mobile Phone User's Guide [Networkservices]".1 Enter "1429" ]AFollow the voice guidance.Basic Flow of the "Call forwarding" ServiceNote・ In Step 3, when you are in a service area and theterminal is turned on, a ring tone sounds until the setRing time elapses. If an incoming call is not answeredwhile a ring tone is sounding, it is forwarded to theforwarding destination. The ring time can be changed.・ In Step 4, when the call is forwarded, the call isrecorded as a Missed call in Received calls. However,if you set the ring time to zero, missed calls will notbe recorded in Received calls.・ Even when the "Call forwarding" service isdeactivated, an incoming call can be forwarded to aforwarding destination manually from the sub menu.→P76・ You cannot answer a call if you do not subscribe tothe Call waiting service even if you hear a calltermination tone during a call.Using the Call Forwarding ServiceEnable or Disable Forwarding Guidance](https://usermanual.wiki/LG-Electronics-USA/L06A.Users-Manual-4/User-Guide-1109039-Page-90.png)
![311Network ServicesThis service rejects incoming nuisance calls. After a phonenumber is registered to be rejected, all incoming calls fromthat number will be automatically rejected, and the voiceguidance is played to the caller.・ Up to 30 phone numbers can be registered.・ Even when a call arrives from the phone number to be rejected,the ring tone does not sound. Also, the call is not recorded inReceived calls.1 M[Menu] ] (Service) ]"Nuisance call blocking" ]Perform the following operations:[Register nuisance caller]Register the phone number of the last incoming call youanswered to set to reject calls from the number.[Register selected number]Set to reject the phone number you selected.[Delete all entries]Delete all phone numbers registered as nuisance callers.[Delete last entry]The last registered phone number is deleted.Repeat the samesteps to delete a phone number from the last saved number, oneat a time.[Check the number of entries]Check the number of the rejected callers.Nuisance Call Blocking ServiceNuisance Call Blocking](https://usermanual.wiki/LG-Electronics-USA/L06A.Users-Manual-4/User-Guide-1109039-Page-91.png)
![You can notify the other party of your caller ID (phonenumber) when you call. Your Caller ID will be displayed onthe other party's phone if the phone is a digital phone andcapable of displaying Caller ID.・ Your Caller ID is valuable information. Be cautious aboutsending your Caller ID.1 M[Menu] ] (Service) ]"Caller ID notification" ]Perform the following operations:[Activate/Deactivate]Set whether to send or hide your Caller ID to the other party. Thenetwork security code is required to configure the setting.[Check setting]Check the current status of the Caller ID notification service.This service responds a voice/video call without Caller ID,plays a voice guidance requesting the caller send Caller ID,and terminates the call automatically.・ Calls that did not arrive due to the Caller ID request service arenot recorded in Received calls, and the Missed Call notificationscreen does not appear.1 M[Menu] ] (Service) ]"Caller ID request" ]Perform the following operations:[Activate]Activate the caller ID request.[Deactivate]Deactivate the caller ID request.[Check setting]Check the current status of Caller ID request.Activate or deactivate incoming call actions set in "Arrivalcall act" Also, you can check the current settings.1 M[Menu] ] (Service) ]"Set in-call arrival act" ]Perform the following operations:[Activate]Activate the actions set in "Arrival call act"[Deactivate]Deactivate the actions set in "Arrival call act"[Check setting]Check the current setting of "in-call arrival act".312 Network ServicesCaller ID Notification ServiceCaller ID notificationCaller ID RequestCaller ID requestNote・ This service is applicable only to calls with "Userunset" set as a reason for hiding Caller ID.Set In-call Arrival ActSet in-call arrival act](https://usermanual.wiki/LG-Electronics-USA/L06A.Users-Manual-4/User-Guide-1109039-Page-92.png)
![You can set how to respond to an incoming voice/videocall during a call when you subscribe to the Voice mail, Callwaiting, and Call forwarding services.・ You cannot respond to an incoming call during a call if you donot subscribe to the Voice mail, Call waiting, and Callforwarding services.・ Activate "Set in-call arrival act." to use Arrival call act.1 M[Menu] ](Service) ]"Arrival call act" ]Performthe following operations:AnswerCalls are received. Incoming call actionwill follow the settings of the Voice mail,Call waiting, and Call forwarding serviceswhen they are activated.Voice mailThe Voice mail service answers a call.Calls are connected to the Voice mailservice even when Call waiting isactivated.Call forwardingForward a call to the registered phonenumber. Calls are forwarded even whenthe Voice mail or Call waiting isactivated.Call rejectionCalls are rejected..This service allows you to use the mova service with yourFOMA terminal phone number. You can switch betweenFOMA and mova depending on the service area.・ You cannot use the FOMA service and mova serviceconcurrently.・ Switch the services using the Dual Network service when theterminal is not accessing a network.1 M[Menu] ] (Service) ]"Others" ]"Dual network"]Perform the following operations:[Dual network switching]Switch mova to FOMA to make the FOMA terminal available.[Check setting]Check the current status of the setting.313Network ServicesSelecting Actions to an IncomingCall during a CallArrival call actDual Network ServiceDual NetworkNote・ When switching from FOMA to mova, operate from amova terminal.<Dual network switching>・ Switching the network during communication forciblyterminates the connection.Note・ Incoming voice or videophone calls are recorded inReceived calls regardless of the arrival all act setting.](https://usermanual.wiki/LG-Electronics-USA/L06A.Users-Manual-4/User-Guide-1109039-Page-93.png)
![314 Network ServicesThe voice guidance played when a network service suchas the Voice mail service is activated or when the terminalis out of service area can be played in English.■ Incoming calls (Guidance to the caller)■ Outgoing calls (Guidance to you)・ When the caller is using this service at the same time, thecaller's settings for making calls have precedence over thereceiver's settings for receiving calls. Therefore, match thecaller's settings for making calls and the receiver's settings forreceiving calls.For example, if receiver's language is set toJapanese+English, English guidance is not played unlesscaller's language is set to English.1 M[Menu] ](Service) ]"Others" ]"Englishguidance" ]Perform the following operations:[Guidance setting]Configure the guidance settings.Outgoing+Incoming call:Set guidance languages for incoming andoutgoing calls. Select the language after youselect "Yes".Outgoing call:Set a guidance language for outgoing calls.Select the language after you select "Yes".Incoming call:Set a guidance language for incoming calls.Select the language after you select "Yes".[Check guidance setting]Check the current setting of Guidance Setting.You can make a call to a docomo Information CenterorContacts for Repairs.・ Depending on your UIM, the items displayed may differ or someitems may not be displayed.1 M[Menu] ](Service) ]"Others" ]"Servicenumbers" ]Perform the following operations:[ドコモ故障問合せ]Call inquiries when malfunction happens.[ドコモ総合案内・受付]Call for overall instruction or information.English GuidanceEnglish guidanceService Numbers AvailableService numbersLanguage DescriptionJapanese The Japanese guidance is played.The English guidance will follow theJapanese guidance.The Japanese guidance will follow theEnglish guidance.Language DescriptionJapanese The Japanese guidance is played.English The English guidance is played.Japanese+EnglishEnglish+Japanese](https://usermanual.wiki/LG-Electronics-USA/L06A.Users-Manual-4/User-Guide-1109039-Page-94.png)
![315Network ServicesYou can set so that a landline phone or pay phone with thetouch tone system or a DOCOMO terminal can be used tooperate the Voice mail or Call forwarding service.・ To use the Voice mail or Call forwarding service overseas,Remote control must be activated before leaving Japan.1 M[Menu] ](Service) ]"Others" ]"Remotecontrol" ]Perform the following operations:[Activate]Activate Remote control.[Deactivate]Deactivate Remote control.[Check setting]Check the status of the remote control setting.This service allows you to use up to 2 extra phonenumbers, Additional number 1 and Additional number 2, asyour FOMA terminal phone number in addition to the basicsubscription phone number.・ On the Dialing/Incoming screen, names corresponding to Multinumber (Basic number/Additional number1/Additionalnumber2) appear.・ When you dial from Dialed calls or Received calls, the Multinumber dialed from/received to is displayed, and this number isused to dial.You can register or set a name, a number, and a ring tonefor additional numbers.1 M[Menu] ] (Service) ]"Others" ]"Multi number"]"Number setting" ]Perform the following operations:[Basic number: Name]Enter a name for the Basic number.[Phone number]Display your phone number (Basic number).[Additional no1: Name]Enter a name of additional number 1.[Phone number]Enter a phone number of additional number 1.[Additional no2: Name]Enter a name of additional number 2.Setting Remote ControlRemote ControlMulti NumberMulti numberNumbersetting screenRegistering Additional Number(s)Number Settings](https://usermanual.wiki/LG-Electronics-USA/L06A.Users-Manual-4/User-Guide-1109039-Page-95.png)
![[Phone number]Enter a phone number of additional number 2.2 I[Done]You can set a registered additional number as the defaultnumber used for making calls.1 M[Menu] ] (Service) ]"Others" ]"Multi number"]"Set multi number" ]"Basic number"/"Additionalnumber1"/"Additional number2" ]"Yes"1 M[Menu] ] (Service) ]"Others" ]"Multi number"]"Check setting" ] "Yes"1 Enter a phone number2 M[Menu] ]"Multi number" ]Select a name of theadditional number3 A1 M[Menu] ] (Service) ]"Others" ]"Multi number"]"Ring tone & image setting" ]Select an additionalnumber ]Perform the following operations:・ C[List]: List of items opens.[Individual setting]Select whether to set the ring tone or image.316 Network ServicesSetting the Primary NumberChecking the Primary Number SettingsSelecting Caller ID for Each CallSetting Ring Tone and ImageAdditional](https://usermanual.wiki/LG-Electronics-USA/L06A.Users-Manual-4/User-Guide-1109039-Page-96.png)
![317Network Services[Ring alert]Set the ring tone.Music :Press Dto move the cursor to the field below, andselect from Chaku-Uta-Full®songs saved in "Melody"in the "Data box".→P217 Go to Step 3 (P214) in "Setting a Chaku-Uta-Full®Song as a Ring tone".i-motion : Press Dto move the cursor to the field below, andselect from videos/i-mode movies saved in "imotion"in the "Data box".→P249Melody :Press Dto move the cursor to the field below, andselect from melodies saved in "Melody" in the "Databox".→P254OFF :No ring tone is set.[incoming image]Set an image to be shown on the incoming call screen.Image :Select from images saved in "My picture" in the "Databox".→P239i-motion :Select from videos/i-motion movies saved in "imotion"in the "Data box".→P2492 I[Done]"OFFICEED" is an internal voice call service with fixedcharges offered for an in-building mobile communicationsystem IMCS. It requires a separate subscription. For details, see the web page "docomo Business Online"(http://www.docomo.biz/html/product/officeed/?DCMB_AREA=03&path=212) (Japanese only).When DOCOMO offers a new network service, you can addthe service into the menu. Up to 10 new network servicescan be registered.Register a service name and "Special number"/"Servicenumber (USSD)" given by DOCOMO.・ Service number (USSD) is a code to be sent to Service Center.Registering and Using a NewServiceAdditional Services (USSD Registration)Adding ServicesNote・ If you specify a video/i-motion with video/audio for"Select ring tone" (P98) or "Call display"(P105), andyou select "Terminal setting" for either "Ring alert" or"Incoming image", this option will be overridden andthe movie/imotion will be played when an applicablevoice/video call arrives.OFFICEED](https://usermanual.wiki/LG-Electronics-USA/L06A.Users-Manual-4/User-Guide-1109039-Page-97.png)
![318 Network Services1 M[Menu] ] (Service) ]"Others" ]"Additionalservice" ]Move the cursor to "Not recorded" ]I[Edit] ]Perform the following operations:[USSD code]Register the Service number (USSD).[Service name]Enter a service name.2 C[OK]1 M[Menu] ] (Service) ]"Others" ]"Additionalservice" ]M[Menu] ]Perform the followingoperations:[Edit]Modify the selected service.[Select]*1Perform the selected service.[Delete]*1Delete the selected service.[Delete all]*2Delete all added services.*1 This appears only when the recorded item is selected.*2 This option appears only when more than one item isregistered.1 M[Menu] ] (Service) ]"Others" ]"Additionalservice" ]Select a serviceConnect to Service Center.Up to 10 response messages, that correspond to a servicecode (USSD) returned from the service center whenadditional services connect to the center using the USSD,can be saved.1 M[Menu] ] (Service) ]"Others" ]"Additionalguide" ]Move the cursor to "Not recorded" ]I[Edit]]Perform the following operations:Performing Added ServicesRegistering Additional GuidanceAdditional guideAdditionalguidance EditscreenAdditionalservices EditscreenSub Menu on Additional Service List Screen](https://usermanual.wiki/LG-Electronics-USA/L06A.Users-Manual-4/User-Guide-1109039-Page-98.png)
![319Network Services[USSD code]Register Service number (USSD).[Reply message]Register an Additional guidance name.2 C[OK]1 M[Menu] ] (Service) ]"Others" ]"Additionalguide" ]M[Menu] ]Perform the following operations:[Edit]Modify the selected guidance.[Delete]*1Delete the selected/displayed guidance.[Delete all]*2Delete all guidance.*1 This appears only when the recorded item is selected.*2 This option appears only when more than one item isregistered.Sub Menu on the Additional Guidance List Screen](https://usermanual.wiki/LG-Electronics-USA/L06A.Users-Manual-4/User-Guide-1109039-Page-99.png)
![322 Overseas UseInternational roaming (WORLD WING) is a service thatallows to talk or make communications over an affiliatedoverseas carrier's network using the same phone numberas that used domestically.For details of the services available during internationalroaming, refer to the "Mobile Phone User's Guide[International Services]". Also, in DOCOMO "Internationalservice website", you can see the latest information oninternational services and download the latest issue of the"Mobile Phone User's Guide [International Services]".If you subscribed to the FOMA service after September 1,2005, a separate subscription is not required.・ If you subscribed to the FOMA service after September 1,2005, a separate subscription is not required. However, if youunsubscribed to the FOMA service subscription or canceled theservice, a separate subscription is required.・ If you initially subscribed to the FOMA service before August31, 2005 and have not subscribed to "WORLD WING", aseparate subscription is required.Before use the FOMA terminal overseas, please view thefollowings for reference.・ "Mobile Phone User's Guide [International Services]"・ "Mobile Phone User's Guide [Network Services]"Communication services available vary depending on theoverseas carrier and/or network used. For details ofcommunication services available in international roaming,refer to the "Mobile Phone User's Guide [InternationalServices]" or DOCOMO website.Overview of InternationalRoaming (WORLD WING)Subscribing to WORLD WINGServices Available OverseasCommunication Services AvailableService DescriptionVoice call Using the same phone number as thatused in Japan, you can make/receivecalls in another country and makeinternational calls to a third country.Video Calls You can make or receive an internationalvideo call with a user using the terminalsupporting video calls of an overseasspecific 3G carrier or a FOMA terminaluser in Japan.You can use i-mode to acquireinformation from Japan and the countryyou where you are.Using the same mail address as thatused in Japan, you can send/receive i-mode mail.You can download informationperiodically as in Japan.*3 You can alsopress the i-Channel assigned key toopen a channel list and downloaddetailed information.*4i-mode*1i-mode maili-Channel*2](https://usermanual.wiki/LG-Electronics-USA/L06A.Users-Manual-4/User-Guide-1109039-Page-102.png)
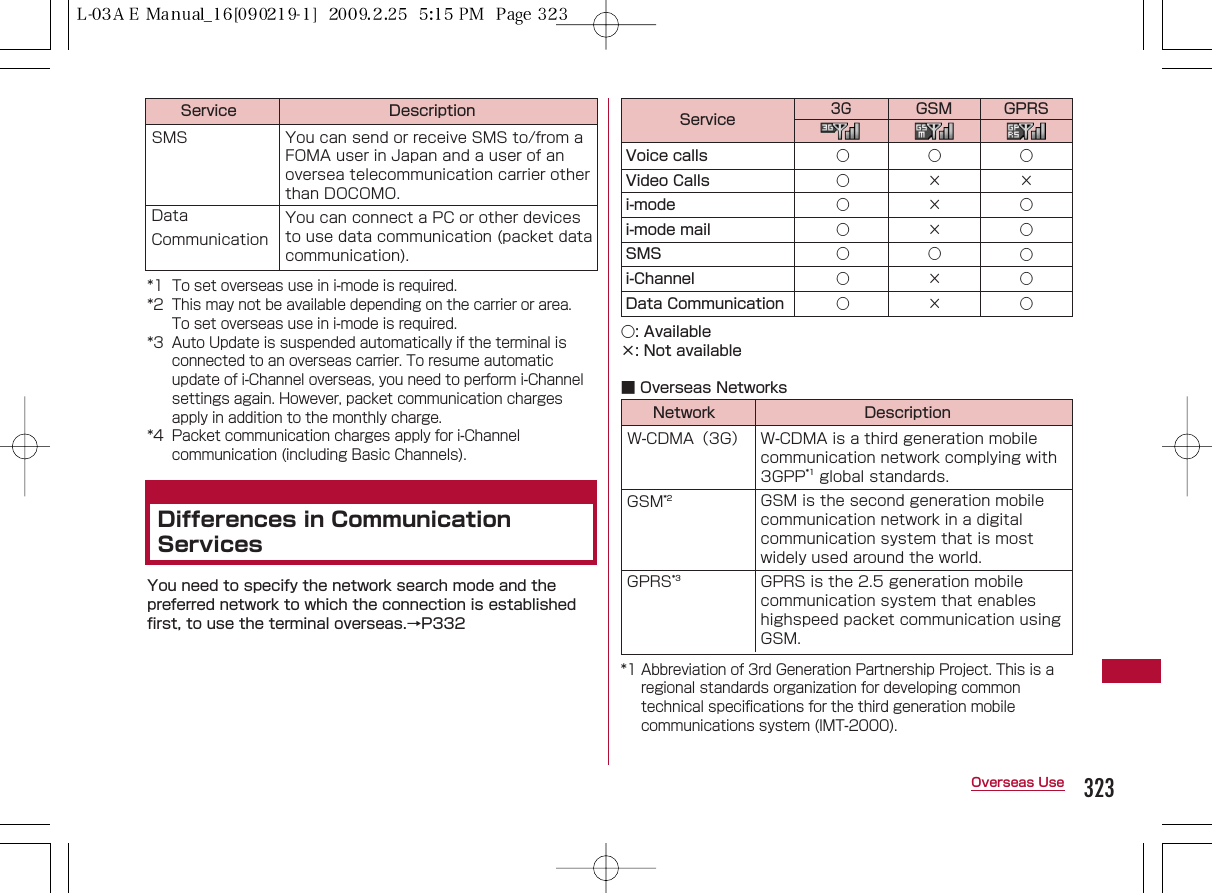
![324 Overseas Use*2 Abbreviation of Global System for Mobile Communications.This is the second generation mobile communication networkin a digital communication system that is most widely usedaround the world.*3 Abbreviation of General Packet Radio Service. This serviceoffers enhanced data communication such as packetcommunication by increasing the speed of GSM.STEP1 : Preparation before departureSTEP2 : Using overseasSTEP3 : Setting after returning to Japan■ SubscriptionIf you have not subscribed to WORLD WING (P322),subscribe to the service.・ Install a UIM supporting WORLD WING. (Green/White).■ Communication services, etc. in countries and regionsFor information such as countries, areas, ortelecommunication carriers available, visit DOCOMO"International service website".→P332■ Charging・ Cautions When Handling the AC Adapter →P21・ Charging Using the AC Adapter →P43、P45■ Using i-modeYou have to configure "International Settings" in advance. Select"i Menu" ]select "English " ]"Options" ]"International Settings"]i-mode Settings" to open the setup screen. i-mode setting canbe done in this screen.For detailed information refer to "Mobile Phone User's Guide [i-mode] FOMA version"■ Setting network servicesYou can activate or deactivate the subscribed networkservices overseas. The following network services can beaccessed:・ Caller ID notification service*1 *2・ Voice mail service*1 *3・ Call forwarding service*1 *3・ Caller ID request service*1・ Call waiting service*1・ English guidance*1・ Nuisance call blocking service*1・ Roaming guidance*1・ Call barring*1 This may not be activated in some service areas.*2 Caller ID may not be sent correctly or not be sent at all.*3 To operate overseas, you need to activate the "Remotecontrol" (P315, P336) before leaving Japan.■ Convenient functions and services available overseasChecking before Using OverseasPreparation before DepartureDescriptionThe other party is notified with a voiceguidance that the terminal is ininternational roaming.Reject reception during internationalroaming.You can view the date and time in twocountries or regions, and citiessimultaneously.You can convert currencies by settingan exchange rate.Functions and servicesRoamingguidance[international]Call barringDual clockdisplayUnit converter](https://usermanual.wiki/LG-Electronics-USA/L06A.Users-Manual-4/User-Guide-1109039-Page-104.png)
![325Overseas Use■ Recommended Guide Books in addition to This Manual■ Billing of chargesOverseas charges are billed with your monthly charge. Note that they may appear on a billing invoice of the nextmonth or later due to the situation of the operator of yourcountry of stay. Also note that the billing invoice for chargesin the same charging period may be sent to you in a differentmonth.■ Network switching"Network search mode" is set to "Auto" by default. When youuse the FOMA terminal in Japan or during connecting to 3Gnetwork, it is recommended to switch "Network mode" to"WCDMA only" to reduce the consumption of the battery pack.→P332・ To switch networks manually P332■ Main DisplayThe network name does not appearwhen the terminal is connected tothe FOMA network in Japan.・To display network name whenroaming→P3331Icons indicating the connected networkConnected to a FOMA network in JapanConnected to a 3G network overseasConnected to a GSM network overseasConnected to a GPRS network overseas2Connected network nameTitle DescriptionThis book describes how to use i-modeand i-mode mail overseas and their fees,etc.This book describes details about theinternational roaming service includingcontents of the service, usage fees, andprecautions.This book describes contents, settings,precautions and such of networkservices.Note・ This manual contains a quick manual for "OverseasUse" that can be used conveniently for referencingoperations. Use the quick manual as a referencewhen using the FOMA terminal overseas.Overseas Use12Mobile PhoneUser's Guide [i-mode] FOMAversionMobile PhoneUser's Guide[InternationalServices]Mobile PhoneUser's Guide[Network Services]Note・ If Auto time adjust is set to "ON", when receiving theinformation related to time difference from networktelecommunication carrier overseas, FOMA terminal willadjust the time automatically. The time adjusted will bedifferent depending on telecommunication carriers.・ Time may not be adjusted automatically. For this situation,adjust time manually.→P49](https://usermanual.wiki/LG-Electronics-USA/L06A.Users-Manual-4/User-Guide-1109039-Page-105.png)
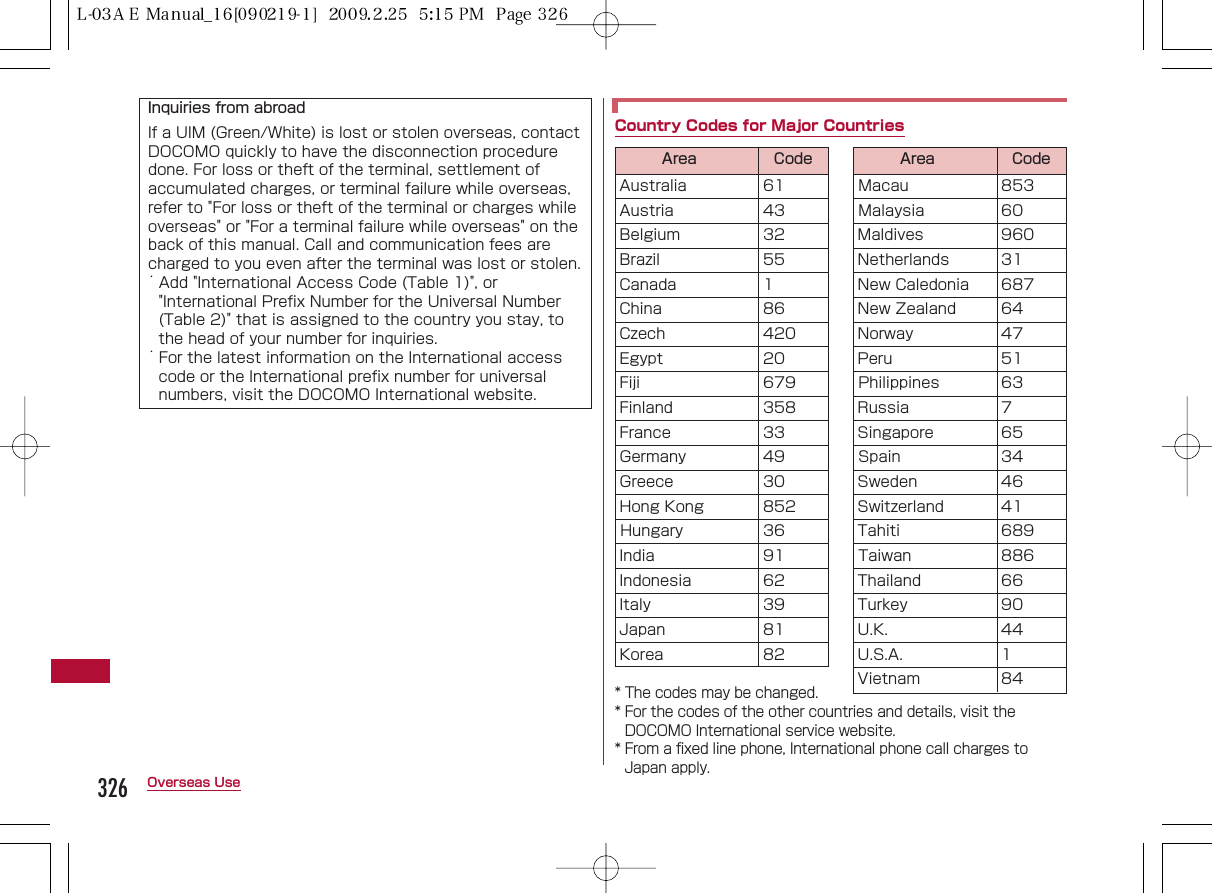
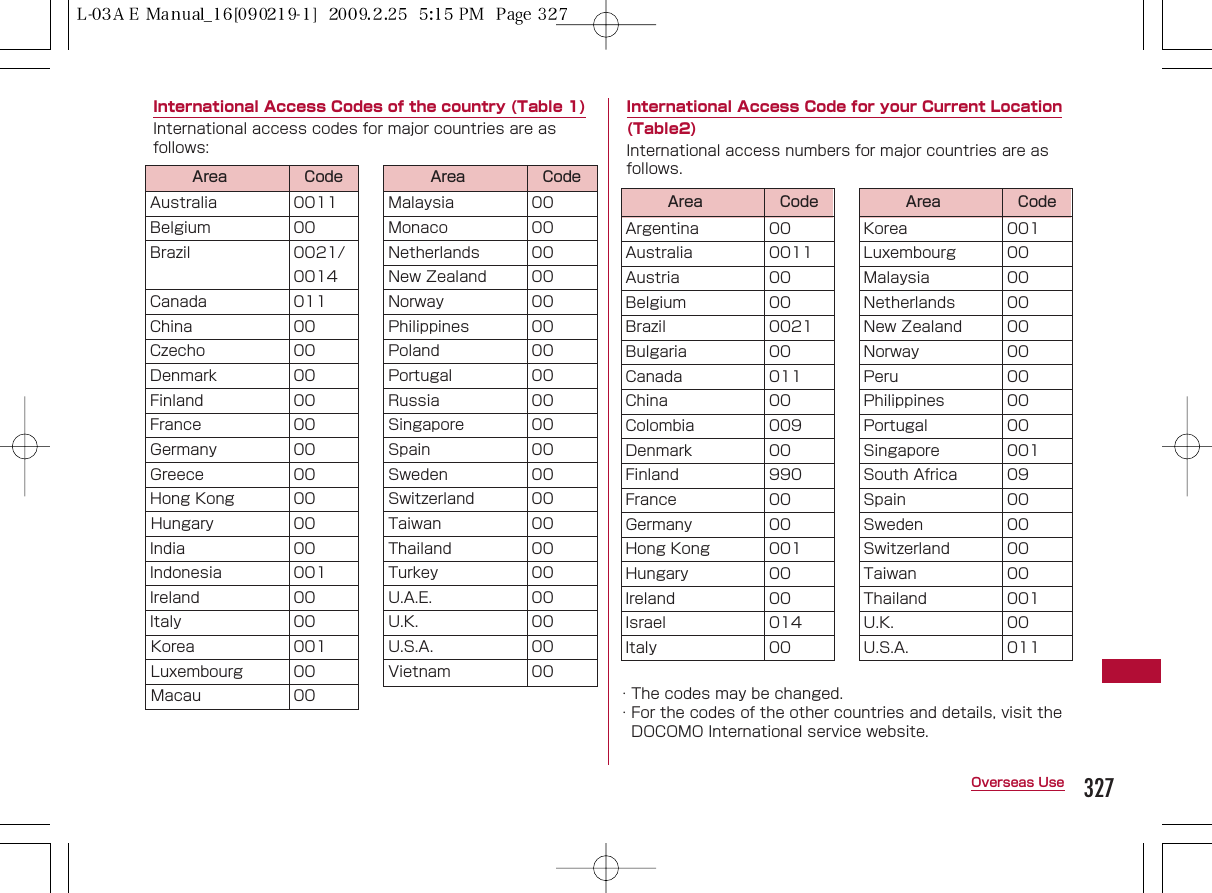
![329Overseas UseMake a call prefixing "+" and a country code to the otherparty's phone number.・ Press 0for 1+ seconds to enter "+".・ To call an overseas WORLD-WING user, dial "81" as the countrycode of Japan.1 0(for 1+ seconds) ]Enter "Country Code - AreaCode (City Code) - Phone Number"・ When making a call to a fixed phone in Japan fromabroad, enter "81" as the country code.・ If the Area Code (City Code) starts with "0" remove "0". (Ina few countries, like Italy, "0" must be removed.)・ When making a call to a mobile phone or PHS in Japan,omit the leading "0" as well.・ Country code →P326, 327, 3282 A■To make a video callM[Menu] ]Select "Video phone call"If a call is made using an entry in Redial or Received callsor the Phonebook in which a phone number with a leading"0" is recorded/registered, the leading "0" is automaticallyreplaced with "+ Country code (+81)".・ Your terminal is configured to enter "+81" (country code ofJapan) automatically by default.→P641 Display an entry in history/Phonebook■Using Redial logsOpen the Redial screen (P57) or the Dialed calls detailscreen (P57).■Using Received call logOpen the Received call log screen (P59) or theReceived call detail screen (P59).■Using PhonebookOpen the Phonebook list screen (P88) or thePhonebook detail screen (P89).2 Select an entry in the history or Phonebook ]A■When two or more phone numbers are saved in thePhonebook entry on the Phonebook list screenPress Hto select the number to dial.■When two or more phone numbers are saved in thePhonebook entry on the Phonebook detail screenPress Hto display the phone number to call, andpress I[Send].Making an International Call (Including toJapan)Making a Call Easily to Japan](https://usermanual.wiki/LG-Electronics-USA/L06A.Users-Manual-4/User-Guide-1109039-Page-109.png)
![3 A・ The Dialing confirmation screen shows a phone numberprefixed with "+ Country code".■To make a video callM[Menu] ]Select "Video phone call"4 "International call"Original number without changing: The leading "0" will notbe replaced with"+Country code".Cancel :Dialing will be canceled.Register frequently used country names and country codesin the "Country code list" in "International call" to make acall quickly.1 Enter "Area code - other party's phone number"2 M[Menu] ]"Int. call"The Select country screen opens.3 Select a country codeThe "+ Country code" is added at the beginning of thephone number.・ When the entered phone number starts with "0", it isreplaced with "+ Country code".4 A■To make a video callM[Menu] ]Select "Video phone call"Make a call by dialing the other party's phone number fromthe area code (city code).・ If you make a call to an overseas WORLD WING user, make aninternational call using the same steps in "Making anInternational Call (Including to Japan)" (P329) even if you andthe other party are in the same country or region.・ When "Auto international dial" is set to "ON", the Dialingconfirmation screen opens if a call is made to a phone numberwhose area code (city code) starts with "0" from an entry in thePhonebook or Dialed/Redialed calls list. In this case, select"Original No" to make a call.330 Overseas UseMaking an International Call (Including to Japan) SelectingRegistered Country CodeNote・ This function is available only out of the FOMAnetwork service area (during international roaming).Note・ By default, 22 country codes are stored in the Selectcountry screen. Country codes can be added.→P65・ Available operations on the Country code selectionscreen (P65) are the same as on the Country codelist screen.Making a Domestic Call](https://usermanual.wiki/LG-Electronics-USA/L06A.Users-Manual-4/User-Guide-1109039-Page-110.png)
![1 A call arrivesThe ring tone sounds.・ I [Silent] : Stop the ring tone・ P:Place the call on response hold.→P702 AAnswer the call.■Receiving video calls by still imagePress A■Receiving video calls by imagePress C [image]3 To end the call P331Overseas UseReceiving Calls OverseasWhen you and the other party are using atelecommunication carrier that handles FOMA video calls,international video calls are available by pressing M[Menu] ]Select "Video phone call" after the internationalcall dialing procedure.・For information such as countries or telecommunicationcarriers available, visit the DOCOMO International servicewebsite.・Depending on the terminal of the other party of aninternational video call, the video streaming may fail, orthe connection may not be established.Note・ When a call arrived during international roaming, thecall will be forwarded from Japan to other countries.For caller communication fee to Japan will becharged, while for receiver fee will be chargedincluding the international forward fee.Making calls to your FOMA terminal from JapanYou can receive calls to your phone number in Japan.Receiving a call to your FOMA terminal from anoverseas callerYou can receive a call via Japan regardless of where youare. Similarly to making an international call to Japan, youcan be called using the following steps.Make a call by entering "International Access Code*1-81*2‐ your phone number excluding leading the "0"*3"*1 When dialing to a mobile phone, you may be able todial by entering "+" instead of the International AccessCode.*2 Enter the country code of Japan.*3 Enter "90-XXXX-XXXX" when the number starts with"090" or "80-XXXX-XXXX" when it starts with "080".](https://usermanual.wiki/LG-Electronics-USA/L06A.Users-Manual-4/User-Guide-1109039-Page-111.png)
![332 Overseas UseSelect a search mode to find available networks when thenetwork is switched overseas.・ "Network search mode" is set to "Auto" by default. When youuse the FOMA terminal in Japan or during connecting to 3Gnetwork, it is recommended to switch "Network mode" to"WCDMA only" to reduce the consumption of the battery pack.1 M[Menu] ] (Settings) ]"International roaming" ]"Network" ]Perform the following operations:[Network search mode]Auto:Automatically search and set the network.Manual:The Network search screen appears. Select and set anetwork from the list. ]"Yes" ]Select a network ・ Available networks are followed by the circular mark.Network re-search:Search for networks using the samemethod (Auto/ Manual) as the previoussearch.[Network mode]Specify the network to search for.・ Check available communication systems in the country of usebefore specifying a network.→P324Auto : Search for all available networks regardless oftheir communication systems.WCDMA only : Search only for WCDMA networks.GSM only : Search only for GSM networks.[Preferred NW lists]You can prioritize networks to be searched or set.→P333[Operator name display]Set whether to show the network name that is currentlyconnected on the Stand-by display. →P333[Host selection]Specify a host other than i-mode.→P191[SMS center]Set the SMS center address.→P172Setting Telecommunication CarrierSearch ModeNetwork Search Mode/Network ModeNote・ After coming back to Japan, if the icon indicating thenetwork status remains out of the service area, set"Network mode" to "Auto" or "WCMDA only" and"Network search mode" to "Auto".<Network search mode>・ Searching for networks may take a long time.・ When this option is set to "Auto", networks will besearched automatically when the terminal power isturned on or the terminal moves out of the servicearea.](https://usermanual.wiki/LG-Electronics-USA/L06A.Users-Manual-4/User-Guide-1109039-Page-112.png)
![333Overseas UseYou can register up to 20 networks to be searched or setby priority.1 M[Menu]] (Settings)]"Internationalroaming"]"Network"]"Preferred NW lists"The preferred network list screen opens.・ If networks have been alreadyregistered, the network names appearin order of priority.・ C[Change]: Replace the selectednetwork with another network.2 I[Add] ]Perform the following operations:[UPLMN manual select]Add a network to the Preferred list by entering MCC (countrycode) and MNC (network code).]Enter an MCC and MNC ]I[Done] ]"Yes"[UPLMN select by list]Select and add a network from the default network list.]Select a network ]"Yes"・ I[Country]: Select a country name to specify an availablenetwork in the country from the list.[Set VPLMN to UPLMN]Add the network currently connected.1 Preferred NW lists screen (P333)]M[Menu] ]Perform the following operations:[Add new]Search and add a newly found network to the selectednetwork. Go to Step 2 in "Setting Preferred Networks" (P333).[Change]Replace the selected network with another network. Go to Step2 in "Setting Preferred Networks" (P333).[Delete]Delete the selected network.[Move up]*Move the selected network up one in the list.[Move down]*Move the selected network down one in the list.* This may not appear depending on the current position in thelist.Specify whether to show the network name currentlyconnected on the Stand-by display.1 M[Menu] ] (Settings) ]"International roaming" ]"Network" ]"Operator name display" ]"ON"/"OFF" ]"Yes"Setting PreferredTelecommunication CarrierPreferred NW listsSub menu of the Preferred NW lists screenNote・ Depending on the signal strength, a network that isnot registered may be connected.・ The settings of this function are saved on the UIM.Displaying the Network Name whileRoamingOperator name display](https://usermanual.wiki/LG-Electronics-USA/L06A.Users-Manual-4/User-Guide-1109039-Page-113.png)
![334 Overseas UseBefore leaving Japan, you can set to play a voice promptindicating that you are overseas.・ Setting must be done while in Japan.・ The service may not be operable when "圏外" is displayed.1 M[Menu] ](Service) ]"Others" ]"Roamingguidance setting" ]Perform the following operations:[Activate]Activate the roaming guidance.[Deactivate]Deactivate the roaming guidance.[Check setting]Activate the roaming guidance.2 "Yes"You can set so that all incoming calls, mail, etc, are allrestricted during roaming. You can also set to restrict onlyincoming video calls.1 M[Menu] ] (Settings) ]"International roaming" ]"Call barring" ]Perform the following operations:[Activate -roam]Start call barring.]Select from the following options ]Enter the Networksecurity code ]"Yes"Barring all incoming calls : Restrict all incoming calls.Data calls barring : Restrict only incoming video calls.(Only inside the 3G network servicearea).[Deactivate - roam]]Enter the Network security code ]"Yes"[Check setting - roam]Check the current status of the setting.Activating the Roaming GuidanceRoaming guidance settingNote・ When deactivating the guidance, a call tone set bythe overseas carrier sounds.・ Even if you activated this option, a voice guidance ina foreign language may be played due to theoverseas carrier's services.Setting to Accept No IncomingCalls during RoamingCall barringNote・ This may not be set depending on internationalcarriers.](https://usermanual.wiki/LG-Electronics-USA/L06A.Users-Manual-4/User-Guide-1109039-Page-114.png)
![335Overseas UseYou can use network services of the Voice mail service,Call Forwarding service, and Roaming guidance overseas.・ To use Voice mail (int.) or Call forwarding service (Int.),subscription to Voice mail or Call forwarding service is required.・ To use the network service overseas, activate Remote Controlbeforehand. → P315・ International call charges to Japan apply.・ The services may not be operable in some countries.・ Some overseas carriers may not offer this option.You can activate/deactivate the Voice mail serviceoverseas. You can also play recorded messages or changethe settings following a voice guidance.・ The service may not be operable when "圏外" is displayed.1 M[Menu] ](Settings) ]"International roaming" ]"Voice mail (Int.)" ]Perform the following operations:[Activate]Activate the Voice mail service.[Deactivate]Deactivate the Voice mail service.[Play messages]Play a Voice mail message.[Voice mail setting]Change the settings following a voice guidance.[Set ring time]Set time before connecting to the Voice mail service center aftera call arrives.2 "Yes"3 Operate according to the voice guidanceUsing Network Servicesduring RoamingOperating the Voice Mail Service OverseasVoice Mail (International)Note・ To use the Voice mail service outside the servicearea at your overseas location, you need to turn offthe terminal where signals can be received inadvance.](https://usermanual.wiki/LG-Electronics-USA/L06A.Users-Manual-4/User-Guide-1109039-Page-115.png)
![336 Overseas UseYou can activate/deactivate the Call forwarding serviceoverseas.・ The service may not be operable when "圏外" is displayed.1 M[Menu] ] (Settings) ]"International roaming" ]"Call forwarding (Int.)" ]Perform the followingoperations:[Activate]Activate the Call forwarding service.[Deactivate]Deactivate the Call forwarding service.[Call forwarding settings]Check the current status of the setting.2 "Yes"3 Operate according to the voice guidanceYou can activate/deactivate the Roaming guidanceoverseas.・ The service may not be operable when "圏外" is displayed.1 M[Menu] ](Settings) ]"International roaming" ]"Roaming guide (Int.)"2 "Yes"3 Operate according to the voice guidanceYou can activate/deactivate the Remote access overseas.・ The service may not be operable when "圏外" is displayed.1 M[Menu] ](Settings) ]"International roaming" ]"Remote access setting(Int.)"2 "Yes"3 Operate according to the voice guidanceCall Forwarding (International)Operating the Call Forwarding ServiceOverseasRoaming Guide (International)Note・ To use this service outside the service area at youroverseas location, you need to turn off the terminalwhere signals can be received in advance.Operating the Roaming Guidance OverseasSetting the Remote Access OverseasRemote Access Setting (International)](https://usermanual.wiki/LG-Electronics-USA/L06A.Users-Manual-4/User-Guide-1109039-Page-116.png)
![337Overseas UseYou can activate/deactivate the Caller ID request serviceoverseas.・ The service may not be operable when "圏外" is displayed.Even if "Caller ID request service" is activated, an incoming callmay be displayed as "Not Support" overseas.1 M[Menu] ](Settings) ]"International roaming" ]"Caller ID request (Int.)"2 "Yes"3 Operate according to the voice guidanceOperating the Caller ID Request ServiceOverseasCaller ID request (International)](https://usermanual.wiki/LG-Electronics-USA/L06A.Users-Manual-4/User-Guide-1109039-Page-117.png)

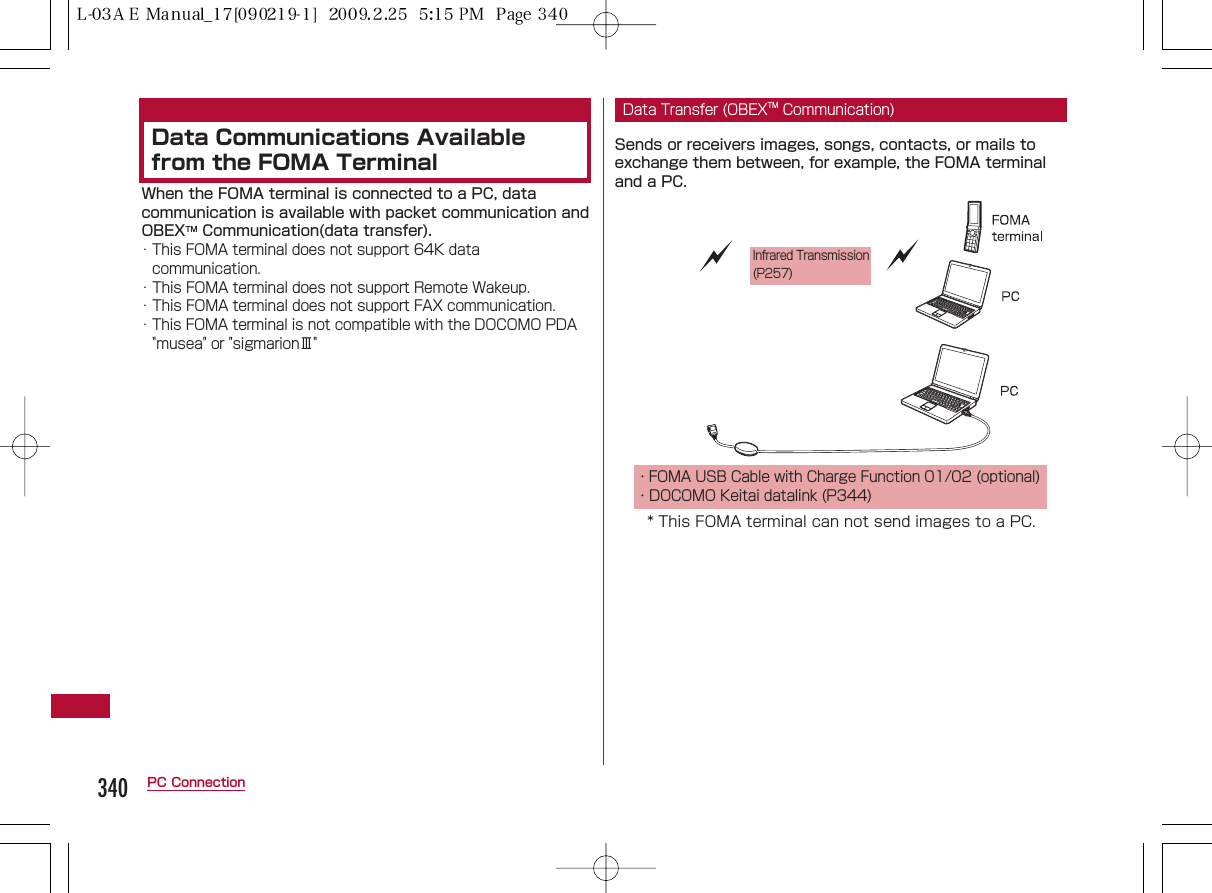
![The following operating environment is required for a PC touse data communication:*1 DOCOMO does not guarantee proper operation if you upgradeyour OS.*2 The operating environment of DOCOMO Connection Manageris Windows 2000 SP4 or later, or Windows XP SP2 or later.For detailed operating environment, check DOCOMO website.*3 Required memory or hard disk space may vary depending onthe PC system configuration.*However, USB2.0 HIGHSPEED does not support.*4 DOCOMO Connection Manager requires 15MB or more.To use data communications, the following devices andsoftware are required in addition to the FOMA terminal anda PC:・ FOMA USB Cable with Charge Function 01/02 (optional) orFOMA USB Cable (optional)・ CD-ROM for FOMA L-06A (bundled)Item RequirementsPC Main Unit ・ PC-AT compatible machine with a CD-ROM drive ・ USB port (in accord with UniversalSerial Bus Specification Rev1.1/2.0)** However, this FOMA terminal doesnot support "USB2.0 High-Speed".・ Display resolution of 800x600 pixels,High Color (65,536 colors) or higherrecommendedOS*1*2 ・ Windows Vista, Windows XP, orWindows 2000 (Japanese versions)・ Windows Vista: 512M bytes or more・ Windows XP: 128M bytes or more*2・ Windows 2000: 64M bytes or more*2・ Available space of 5M bytes or more*2342 PC ConnectionBefore UsingOperating EnvironmentRequiredMemory*3Hard Disk Space *3*4The following warning screen may appear when youinsert the bundled CD in a PC. This warning isdisplayed according to the security settings of theInternet Explorer. There is no problem with using thesoftware.Click [はい (Yes)].Required DevicesNote・ Purchase the exclusive FOMA Cable with ChargeFunction 01/02 or FOMA USB Cable. A generic USBcable for PC cannot be used because it does not fitthe FOMA USB connector.・ The terminal may not work properly with a USB HUB.](https://usermanual.wiki/LG-Electronics-USA/L06A.Users-Manual-4/User-Guide-1109039-Page-122.png)

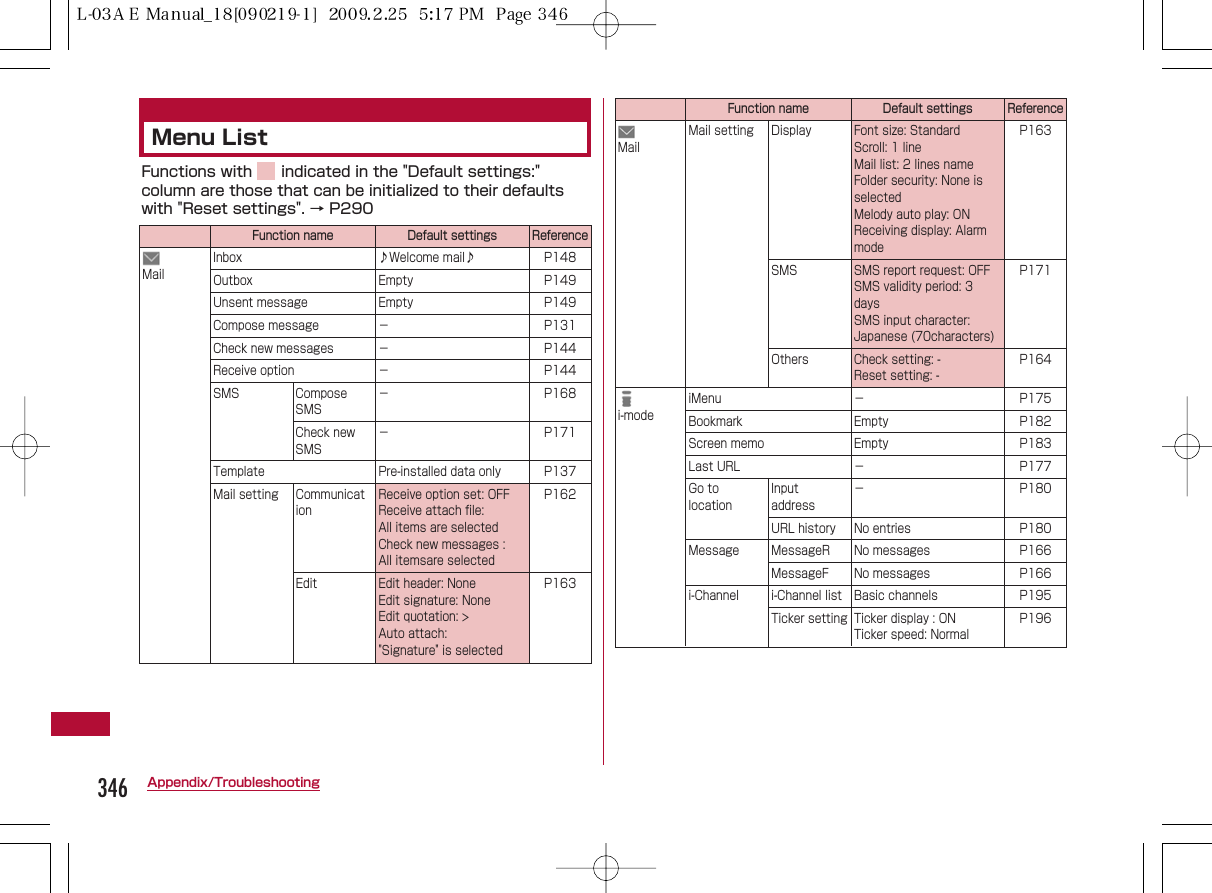
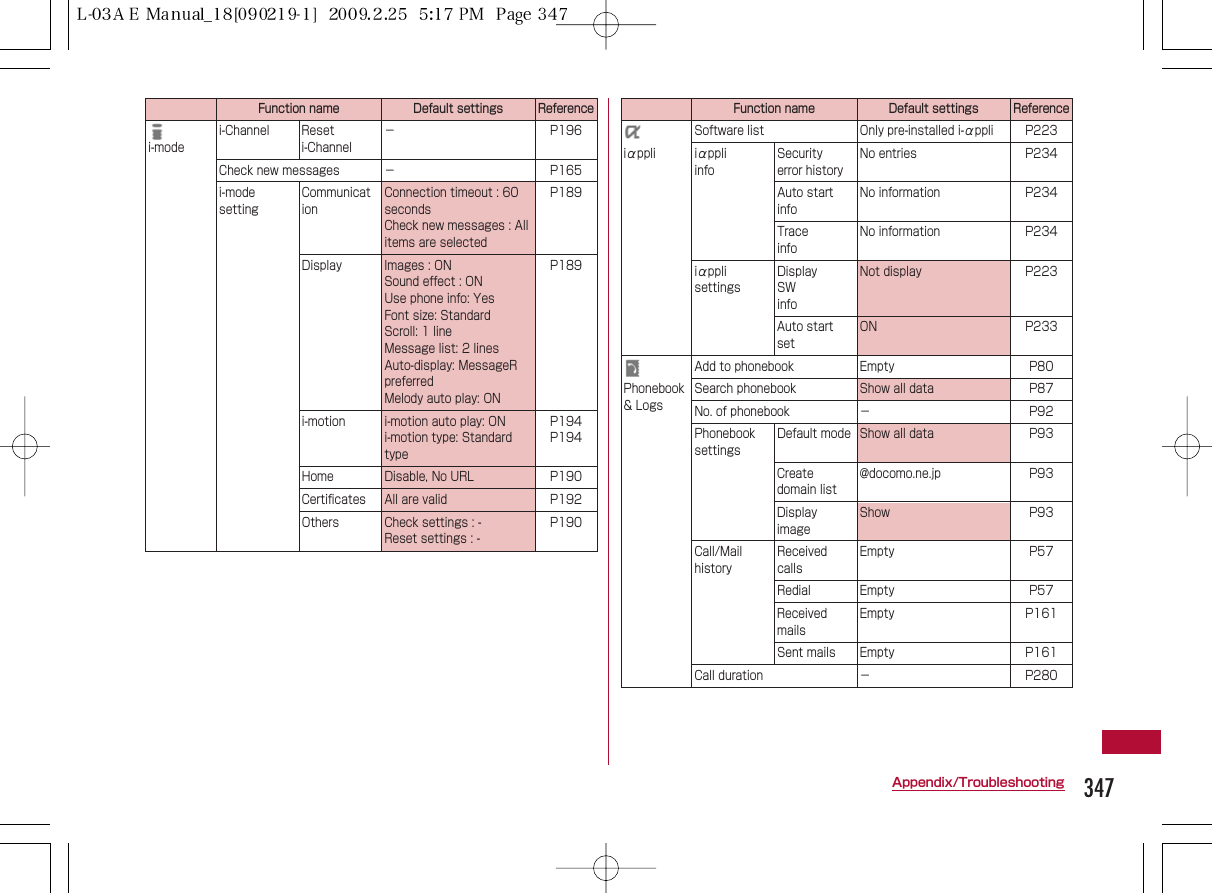
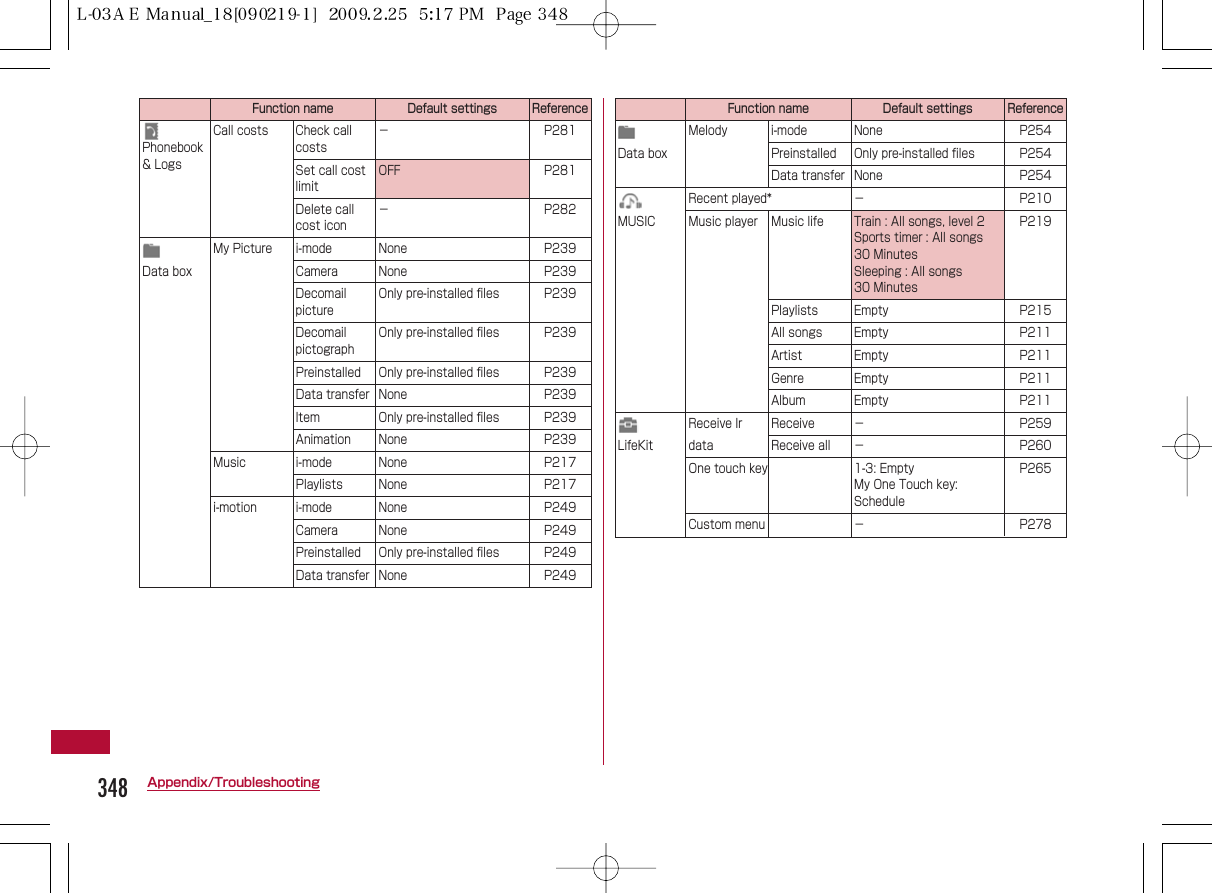
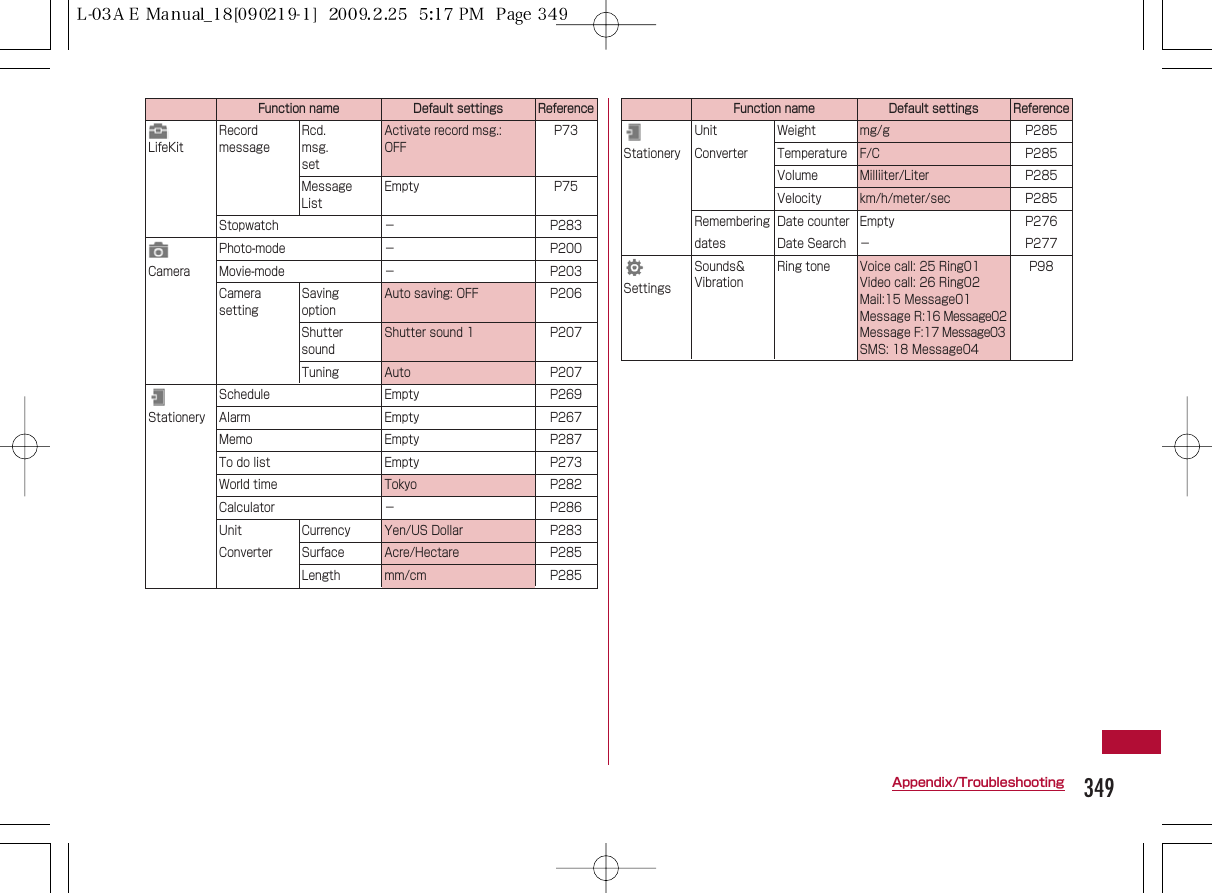
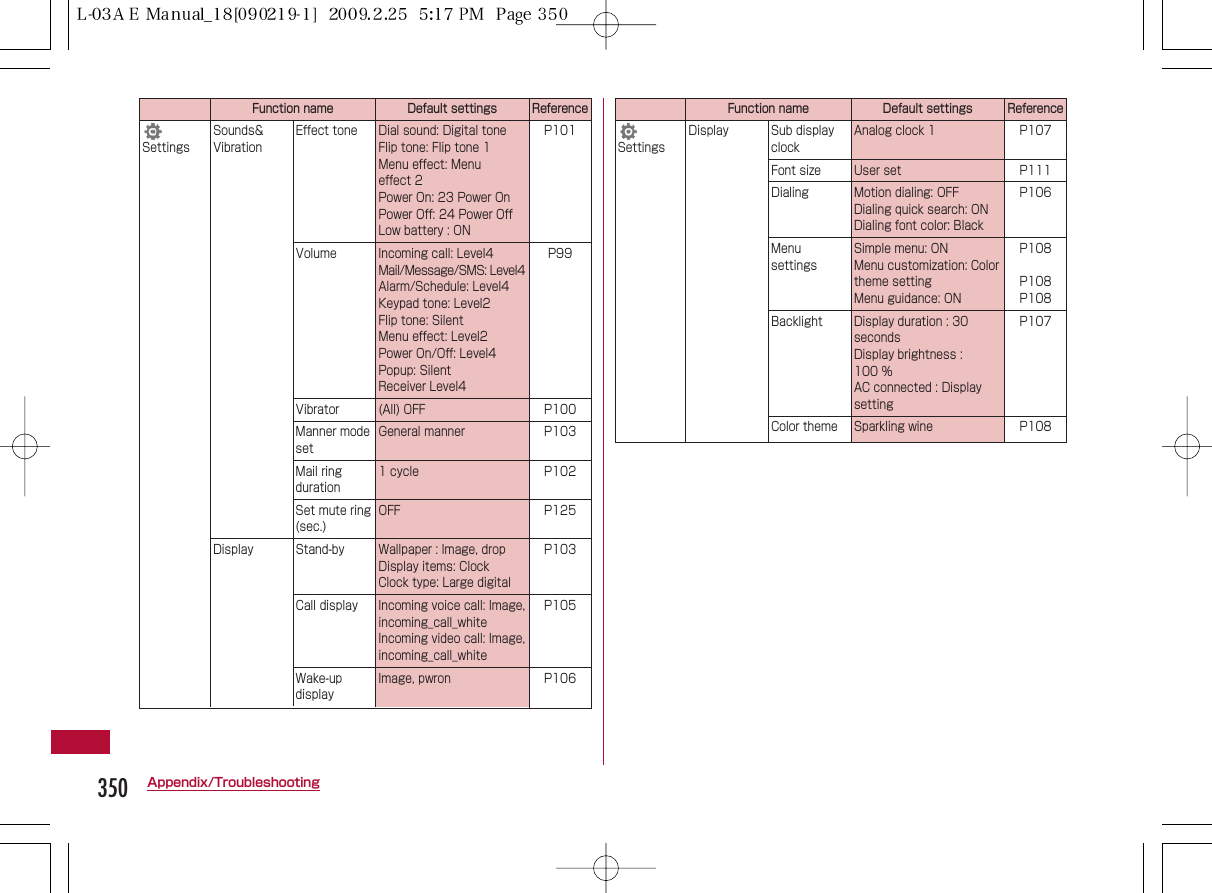
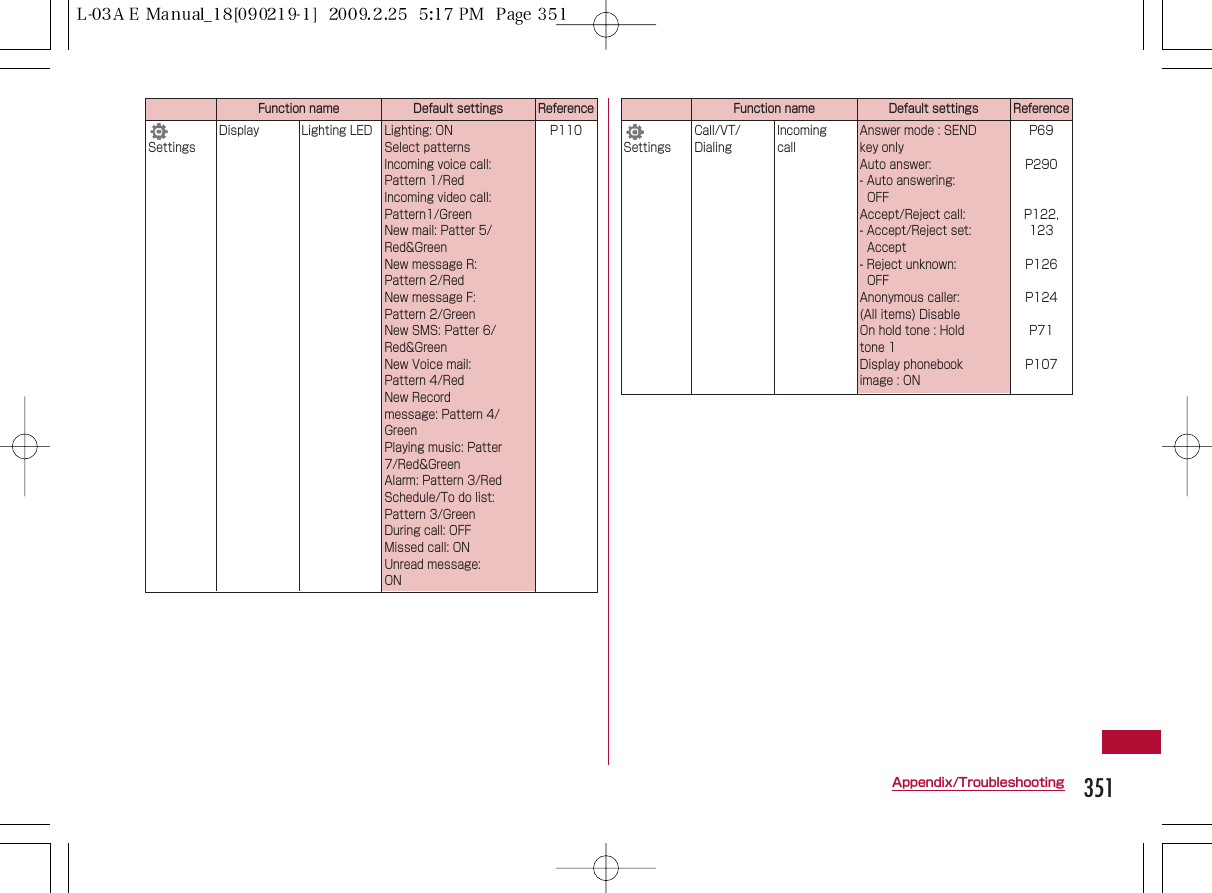

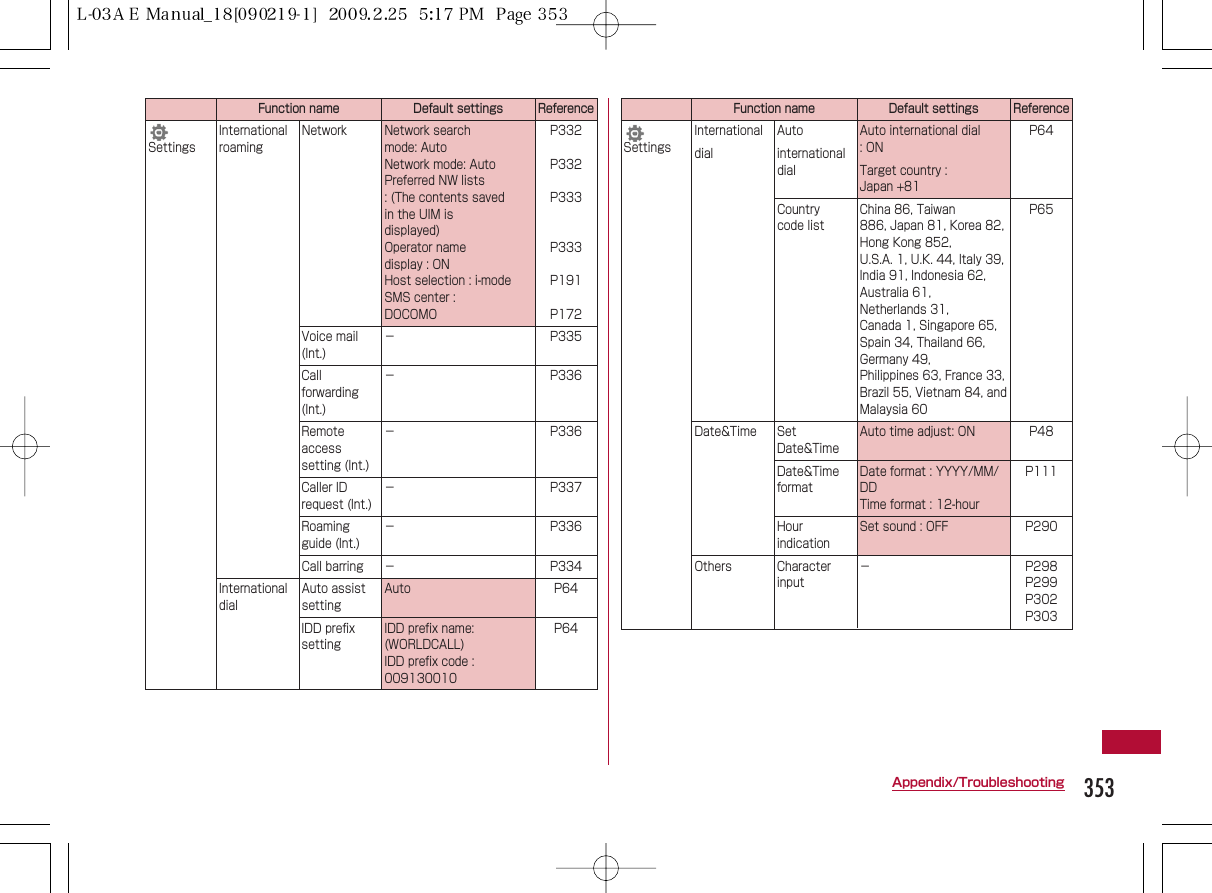
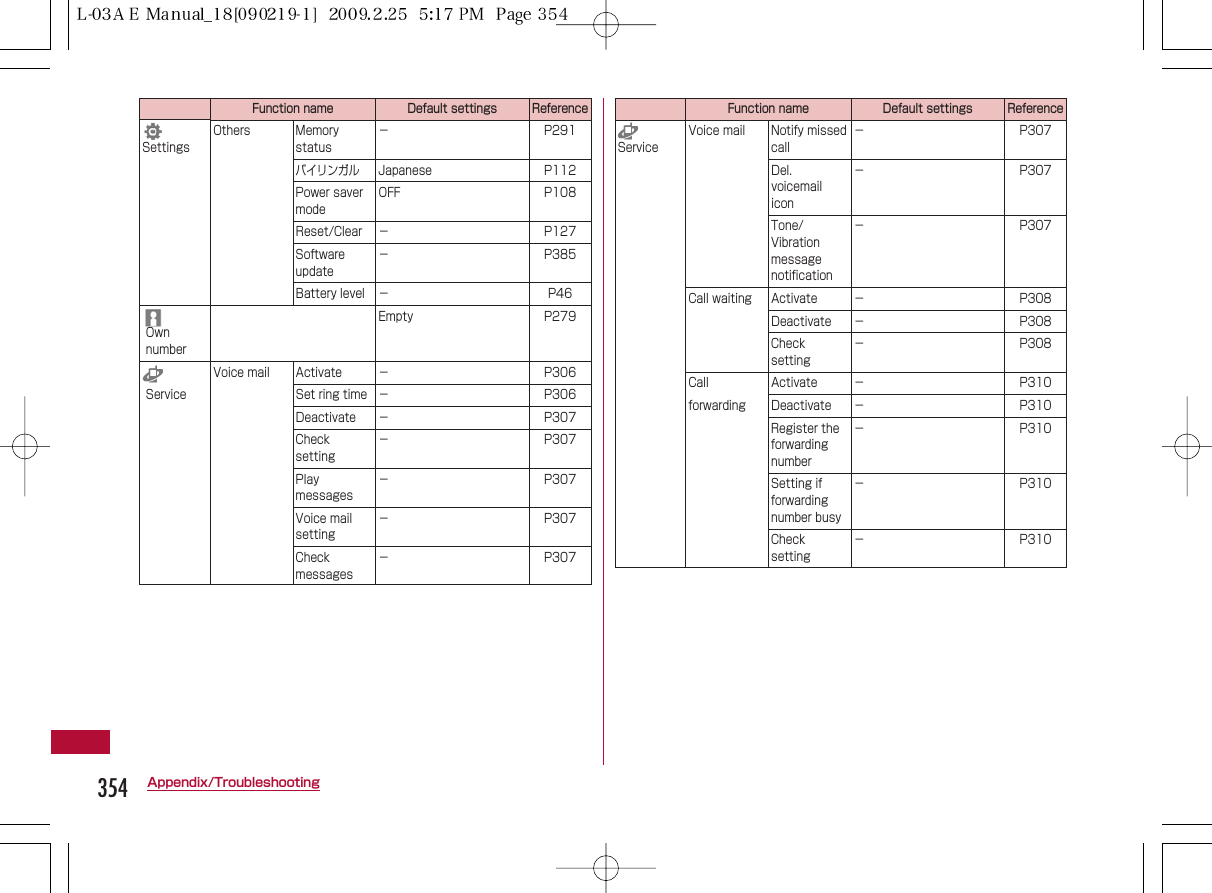
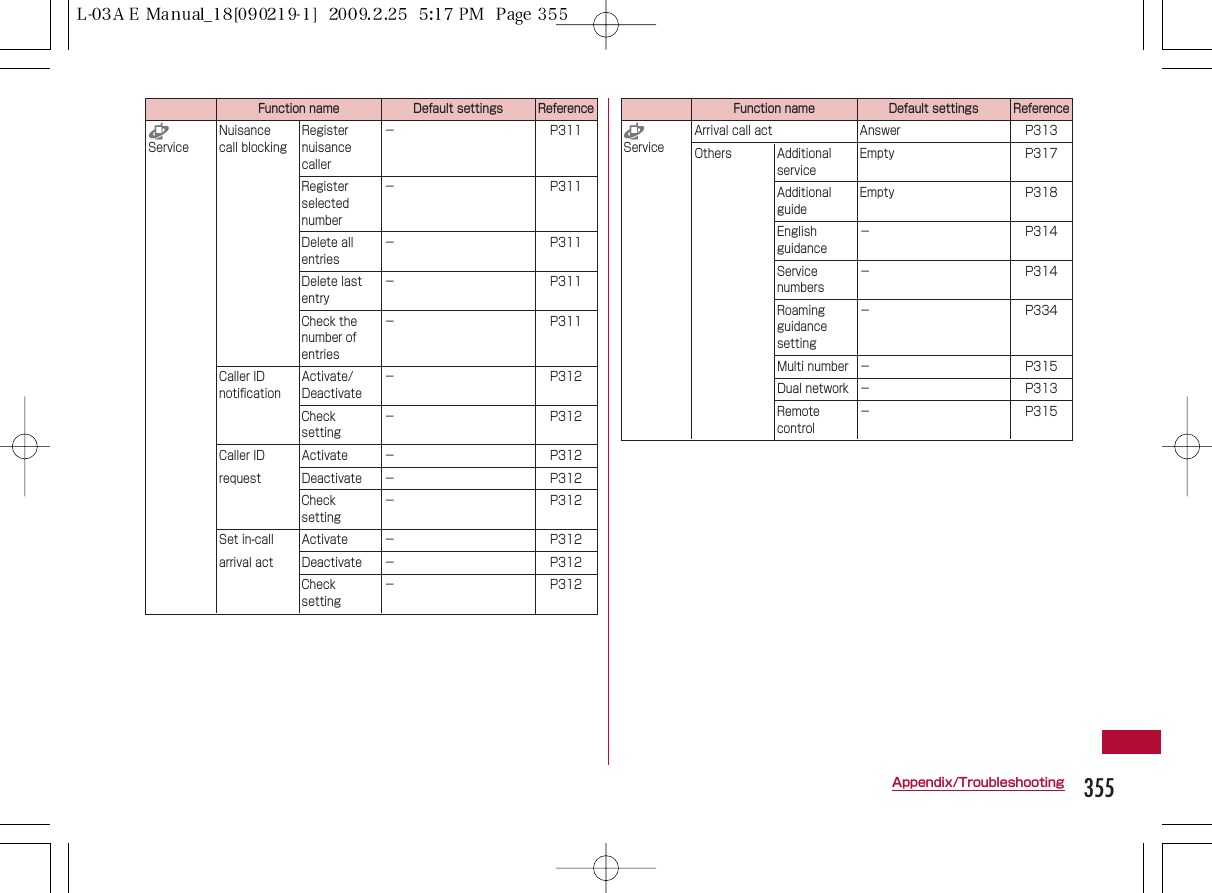
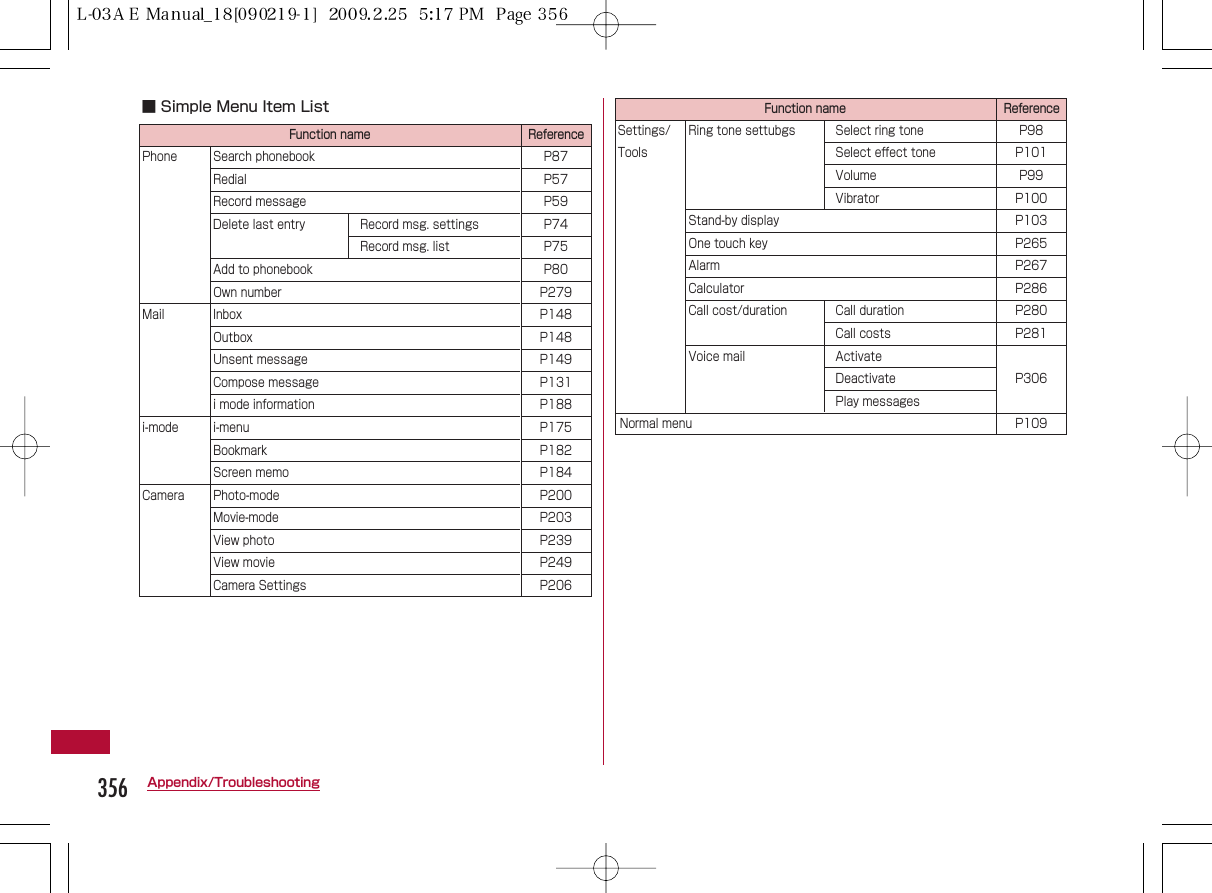

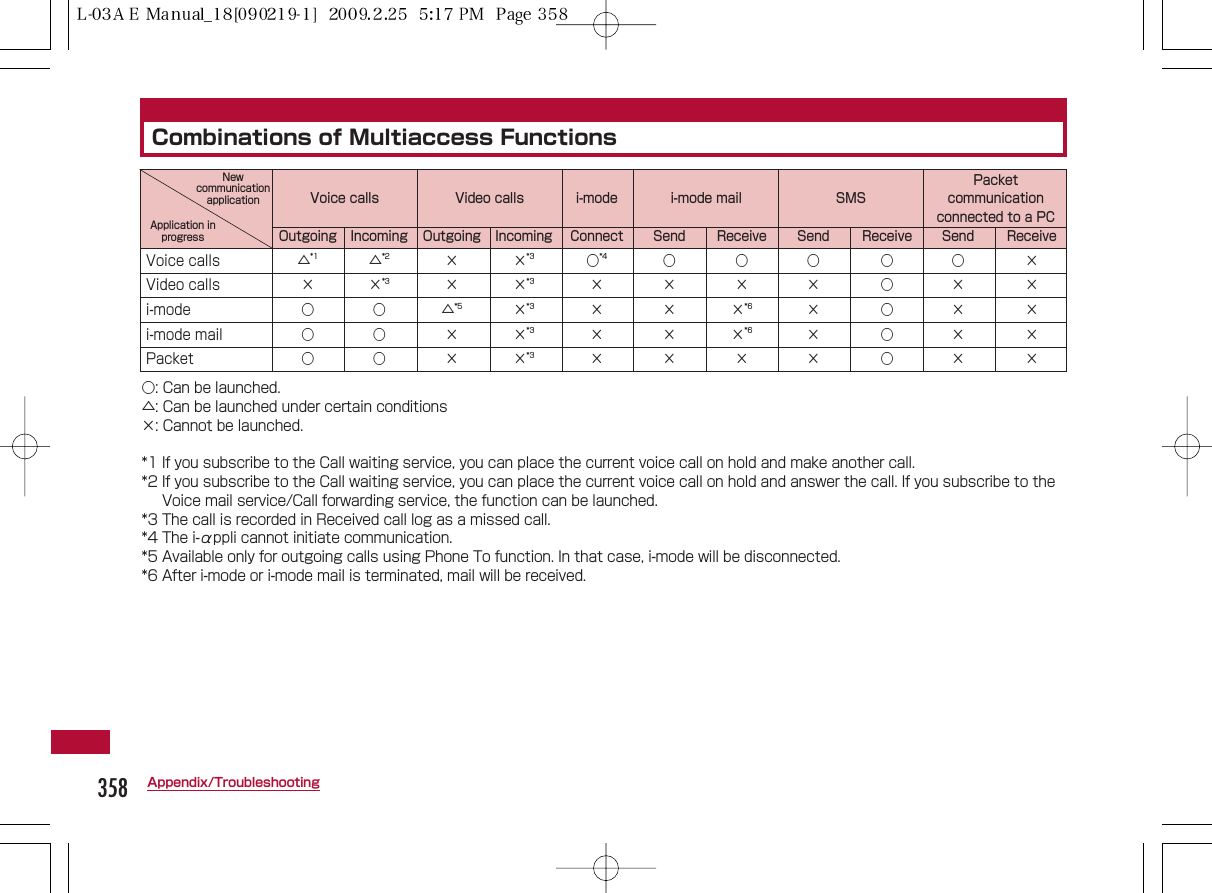
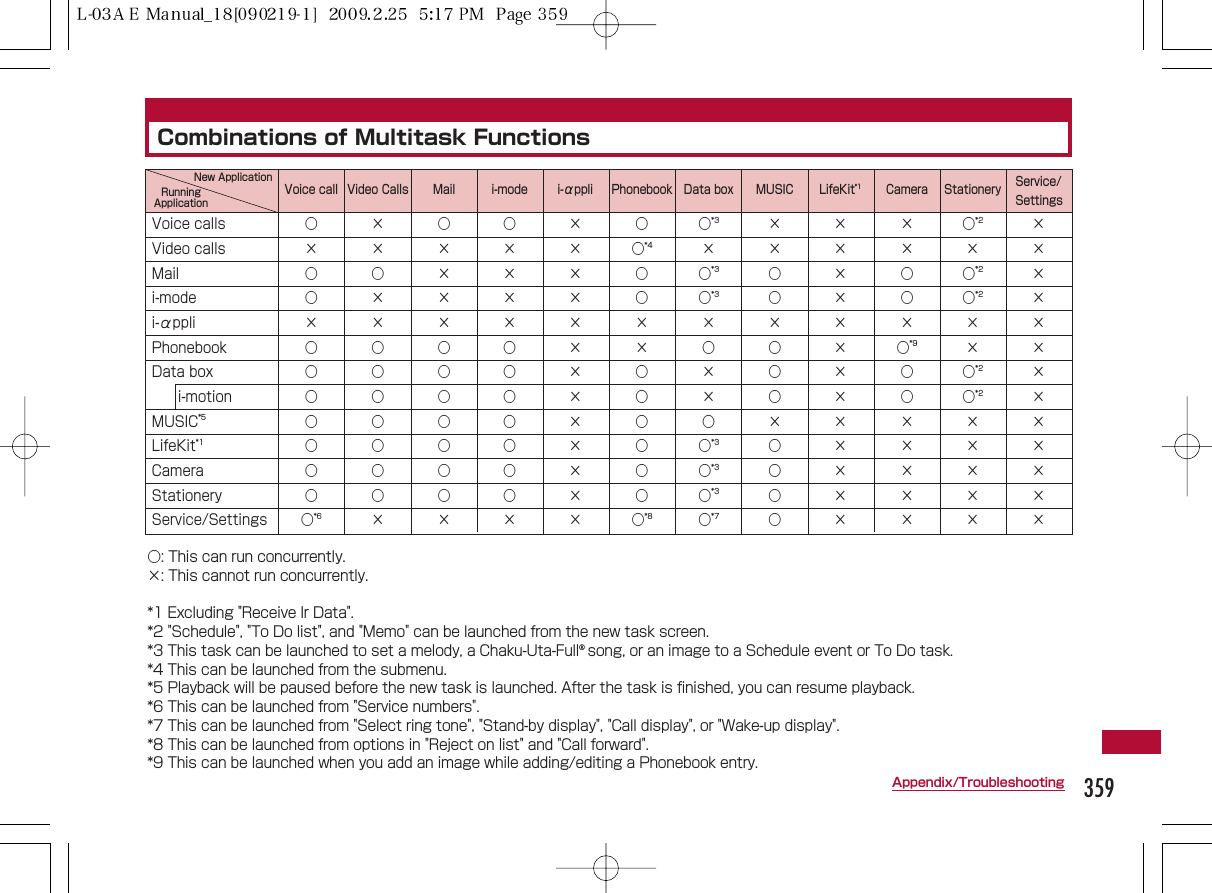
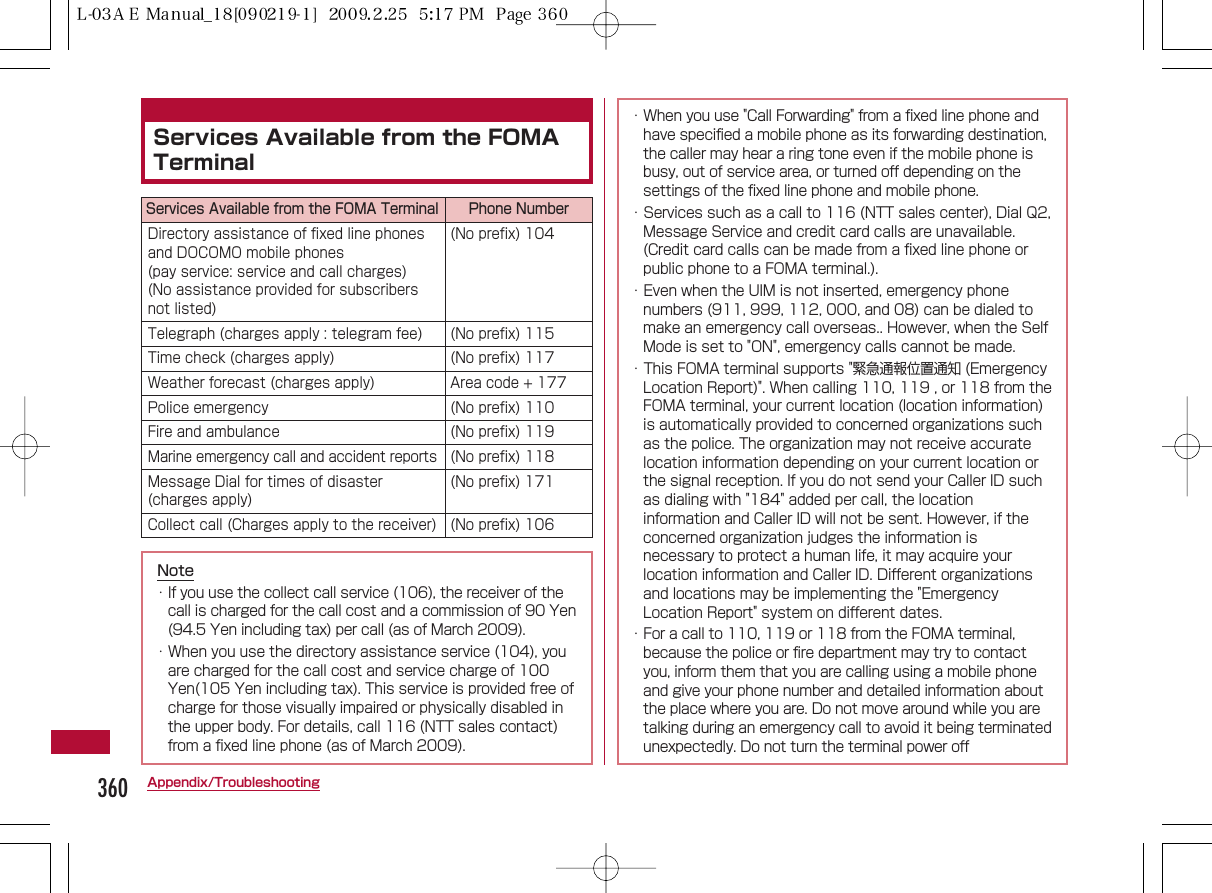
![363Appendix/TroubleshootingSymptomThe FOMA terminal powers off andpowers on automatically.No operation is performed even if a keyis pressedDisplay reaction is slow after a key ispressedFOMA card cannot be recognizedA call cannot be made even if the dialbutton/ key is pressedThe ring tone do not soundCall is not available( the icon indicatingthe network status is still shown as outof service area even the FOMA terminalis removed to service area, or callcannot be made or received even in thelocation with good signal reception)Display is not bright enoughCheck・ If the connector terminals become dirty, the contact may become loose, and the FOMAterminal power may be turned off. Wipe the connector terminals with a clean dry cloth orcotton swab. →P20・ Is Lock all set? →P117・ Display reaction may be slow if a lot of data is saved in FOMA terminal. →P389・ Does FOMA card is inserted correctly? →P39・ Is Lock all set? →P118・ Is Self mode set? →P119・ Is Silent set at Volume settings' Incoming call volume? →P99・ Is Public mode, Manner mode, Self mode or Privacy mode set? →P71, P103, P119・ Check these settings : Accept/Reject call settings, Anonymous caller settings, Set mutering time, and Reject unknown. →P122. P123. P124. P125・ Is the response time of the Voice mail/Call forwarding service set at 0 second? →P71・ Is "To answer" time of "Record message" set at 0 second? →P73・ Have you sent the auto answer time to "O second"? →P286・ Turn off and turn it back on, or reset battery and FOMA card →P39, P42, P48・ Even [in service area], [Display the signal strength: State of 3 antenna bars displayed],depending on the signal, call is not available sometimes. Please move to the other placeand try again →P48・ Is "Accept/Reject call set? →P118・ Calls and messages will be difficult to make and send out in the crowd. The message[Please wait] will be displayed and accompany with a sound like the ring tone. Please moveto the other place or try again later. →P73・ Is Display off time settings set? →P108・ Adjust the Backlight Display brightness. →P107・ Is "Power saver mode" set to "ON"? →P108](https://usermanual.wiki/LG-Electronics-USA/L06A.Users-Manual-4/User-Guide-1109039-Page-143.png)
![364 Appendix/TroubleshootingSymptomThe other party's voice is too low or tooloud during a callImages or melodies set for somefunctions do not work, and defaultsettings are usedA message is not automaticallyreceivedi-mode, i-mode mail, i-αppli and i-Channel cannot be connectedi-mode mark does not disappear andkeeps blinking continuouslyStill images or movies look blurredData cannot be transferred[X] mark appears when trying to displaythe image, playing for demonstration orpreviewImage cannot be display as theattachment file is deletedA phone number is dialed, but a busytone sounds and the call cannot beconnectedThe icon indicating the network statusremains out of service area and "Out ofservice area" is displayedCheck・ Did you change the "Volume" setting?・ Is the same UIM inserted that was installed when images or melodies were obtained?→P40・ If you have set "Revive option setting" to "ON", set it to "OFF".・ Is "Host selection" set to something other than "i-mode"? →P191・ If you had started using the FOMA terminal before you subscribed to i-mode, turn the FOMAterminal off and then turn it back on.・ If i-mode access breaks down between or after i-mode(center) information or sending/receiving mail, i-mode mark keeps blinking. i- mode is stopped automatically if there is nodata being transferred. And i-mode also can be stopped by pressing power button. →P174・ Change to close-up mode for close-up shooting. →P205・ Check camera lens is dirty or have mist or not. →P198・ Is a USB HUB being used? The FOMA terminal may not work properly with a USB HUB. →P361・ [X] mark may appear when the image data is corrupted. →P190・ Check the [Attachment File Settings]. →P139・ Check the [Limit Mail Size Settings]. For the detail, see "Mobile Phone User's Guide [i-mode] FOMA version". →P147・ Did you enter the city code? →P52・ Is the phone out of service area? →P47・ Are you out of service area, or in the location with week/poor signal reception? →P48](https://usermanual.wiki/LG-Electronics-USA/L06A.Users-Manual-4/User-Guide-1109039-Page-144.png)
![365Appendix/Troubleshooting■ When overseasSymptomThe Terminal security code entryscreen appears on the Stand-by displayA different ring tone sounds for incoming mailAccumulated call costs are notcounted"Please wait." or "No lines/ channels areavailable" is displayed."Time out." appears and i-mode mail andSMS cannot be sentCheck・ Is Lock all set? →P117・ Is the sender saved in the Phonebook with a different ring tone? →P81・ Is the sender saved in the Phonebook under a group with a different ring tone assigned?→P85・ Have you exceeded the call charge limit? Reset the accumulated call costs to restartcounting. →P281・ Audio line/packet communication facility failed, or audio line/packet communication networkis extremely busy. Try again later. →P334SymptomThe icon indicating the network statusremains as out of service area, and theinternational roaming service is notavailableA voice call or videophone call cannotbe receivedCheck・ Are you out of the international roaming service area, or in a location with weak signalreception?・ Check whether you are in an available service area and whether you are using an internationalcarrier listed in the "Mobile Phone User's Guide [International Services]" or at the DOCOMOInternational service website.・ Launch "NW search mode" to search for a compatible operator. →P332・ Switch 3G/GSM to [Automatic] status or an available network. And please turn off the FOMAterminal then turn it back if [Automatic] status is selected in Japan. →P332・ Is "Bar incoming when roam" set to "Active"? →P334・ The videophone is not available during GSM/GPRS network. →P323](https://usermanual.wiki/LG-Electronics-USA/L06A.Users-Manual-4/User-Guide-1109039-Page-145.png)
![366 Appendix/TroubleshootingSymptomA voice call or videophone call cannotbe received suddenly even it wasavailableThe other party's caller ID is notnotified. The notified caller ID is not theother party's. The FOMA terminal doesnot perform operations usingphonebook data or Valller IDNotification.Videophones, i-mode mail, SMS, andpacket communication are not availableCalls or mail cannot be receivedAfter returning to Japan, the networkstatus icon still shows out of serviceareaCheck・ Please check the accumulative amount at docomo Information Center. Before start usingthe international roaming service (WORLD WING), setting an end service approximateamount is required. Service is stopped when the amount exceed the end service approximateamount. Settle the bill can start to use this service again. →P322・ Check Internet settings. Application of some special networks may not be available ifInternet is set as [automatic]. Change the set to [manual] and fit the networkenvironment(3G or GSM). →P332・ If the used network or operator does not notify the caller ID, the caller ID does not appear onthe FOMA terminal screen even when the caller ID is notified. Depending on the usednetwork or operator, the notified caller ID may be different from the other party's. →P62・ Check whether you are in an available service area and whether you are using aninternational carrier listed in the "Mobile Phone User's Guide [International Services]" or atthe DOCOMO International service website →P322・ Switch to an available network. →P332・ Is "Call barring" activated? →P334・ Is "Network search mode" set to "Manual" ?→P332](https://usermanual.wiki/LG-Electronics-USA/L06A.Users-Manual-4/User-Guide-1109039-Page-146.png)
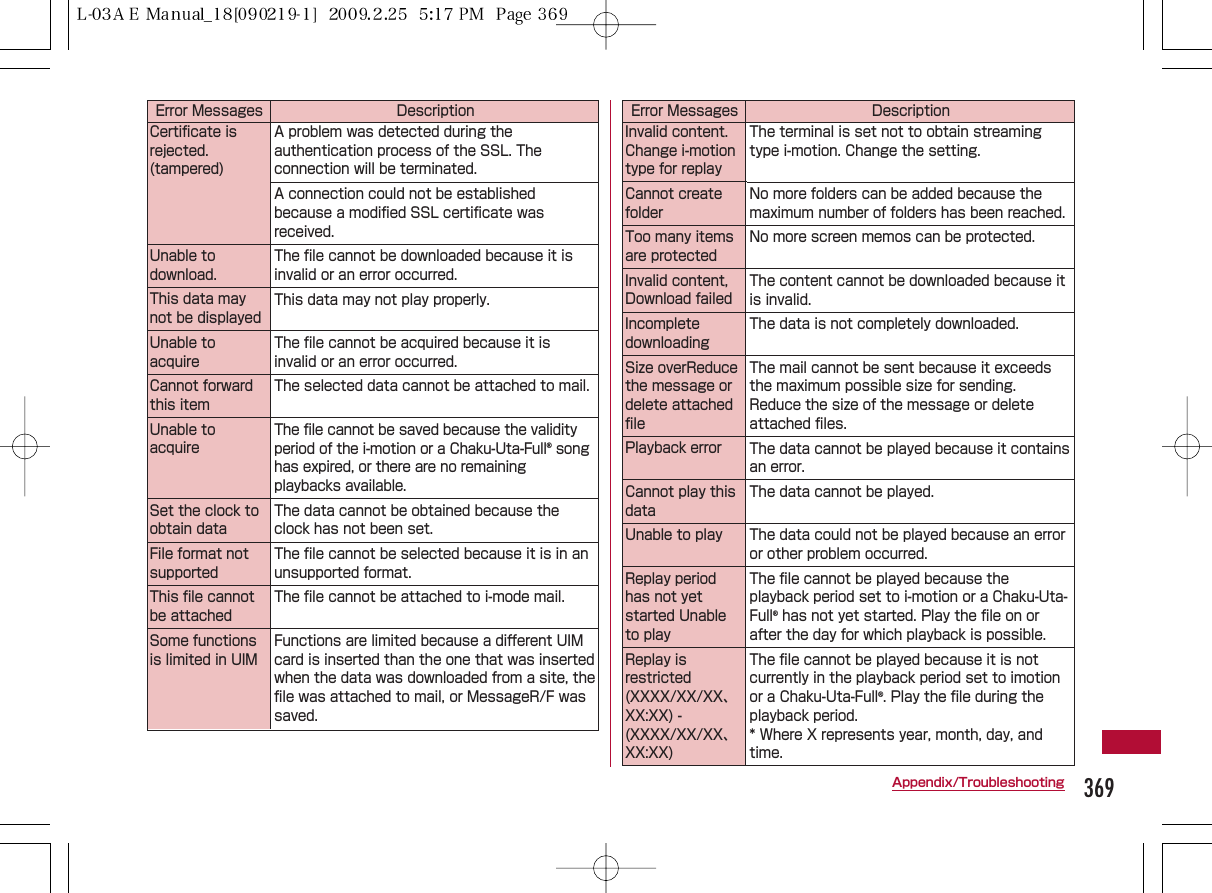
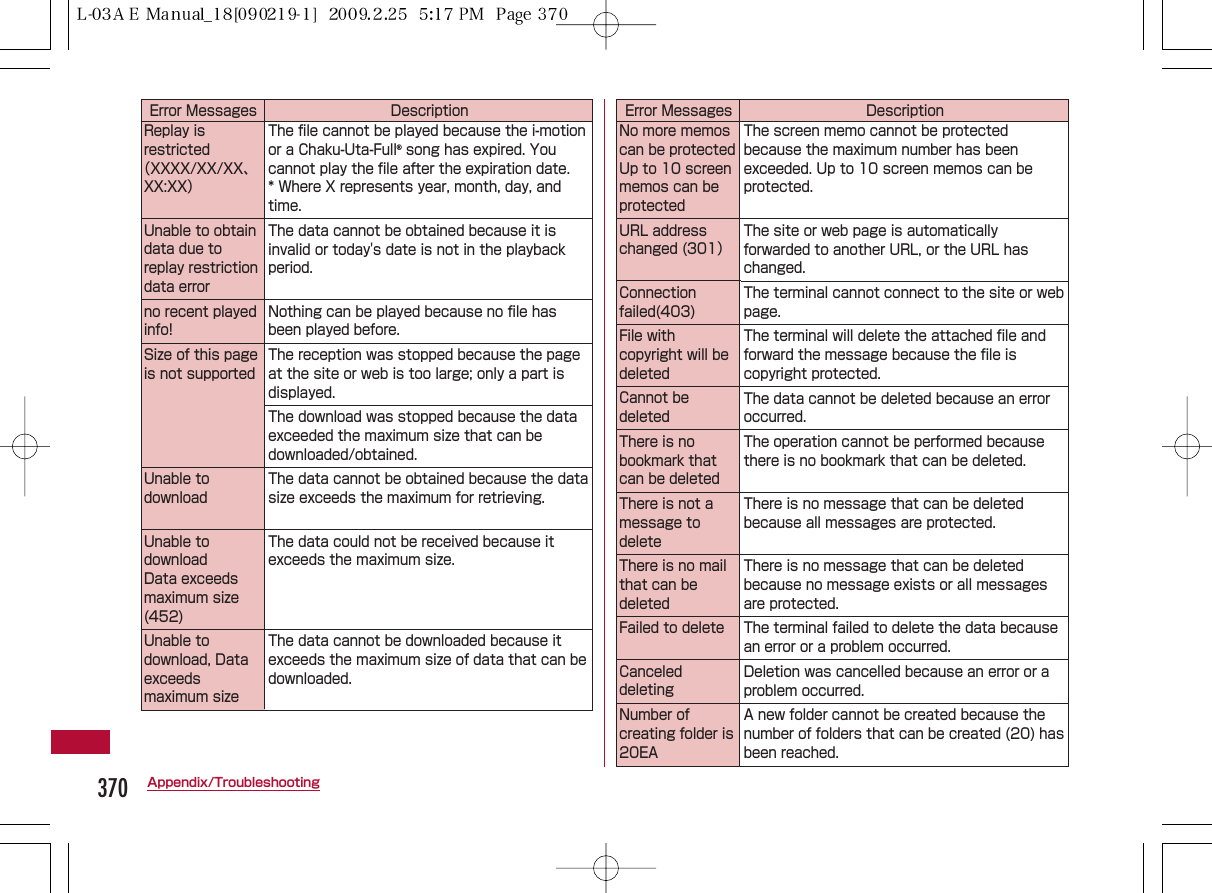


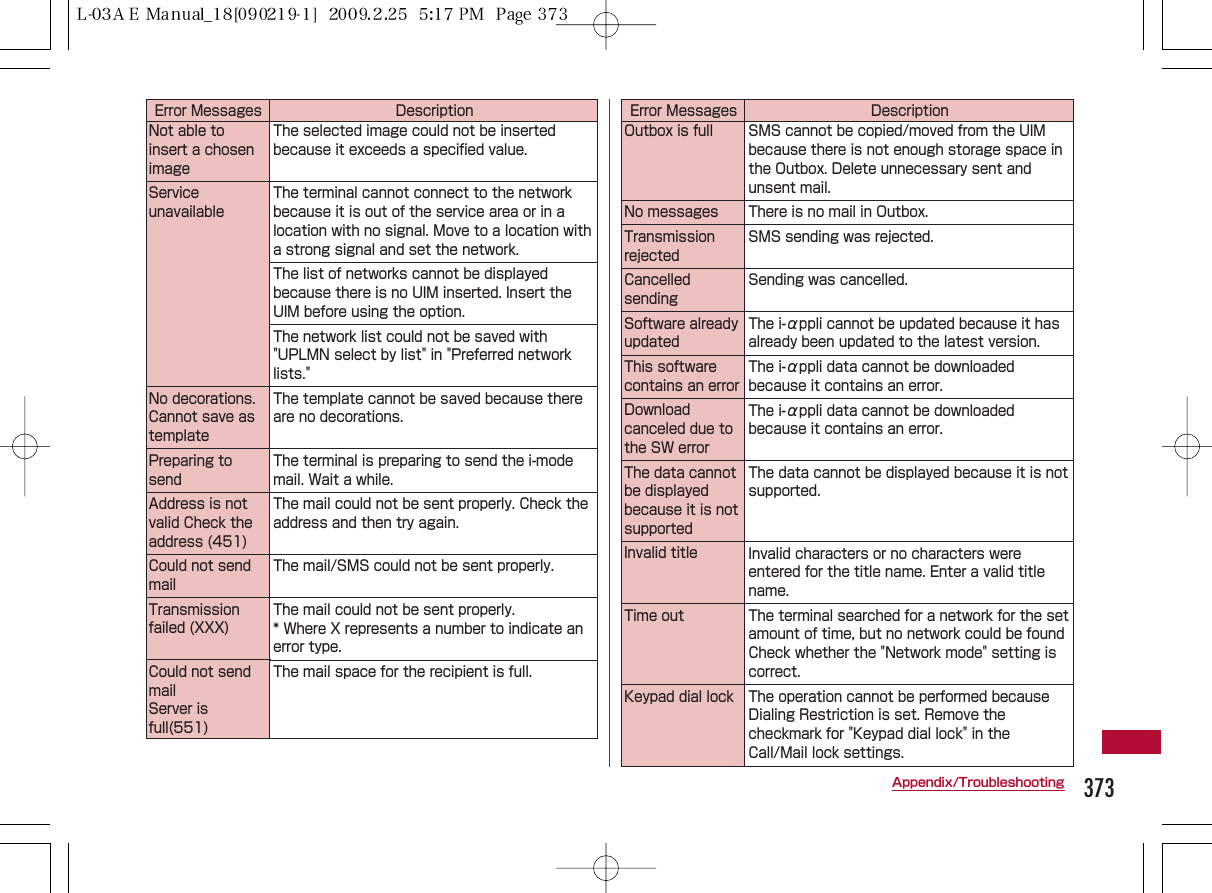
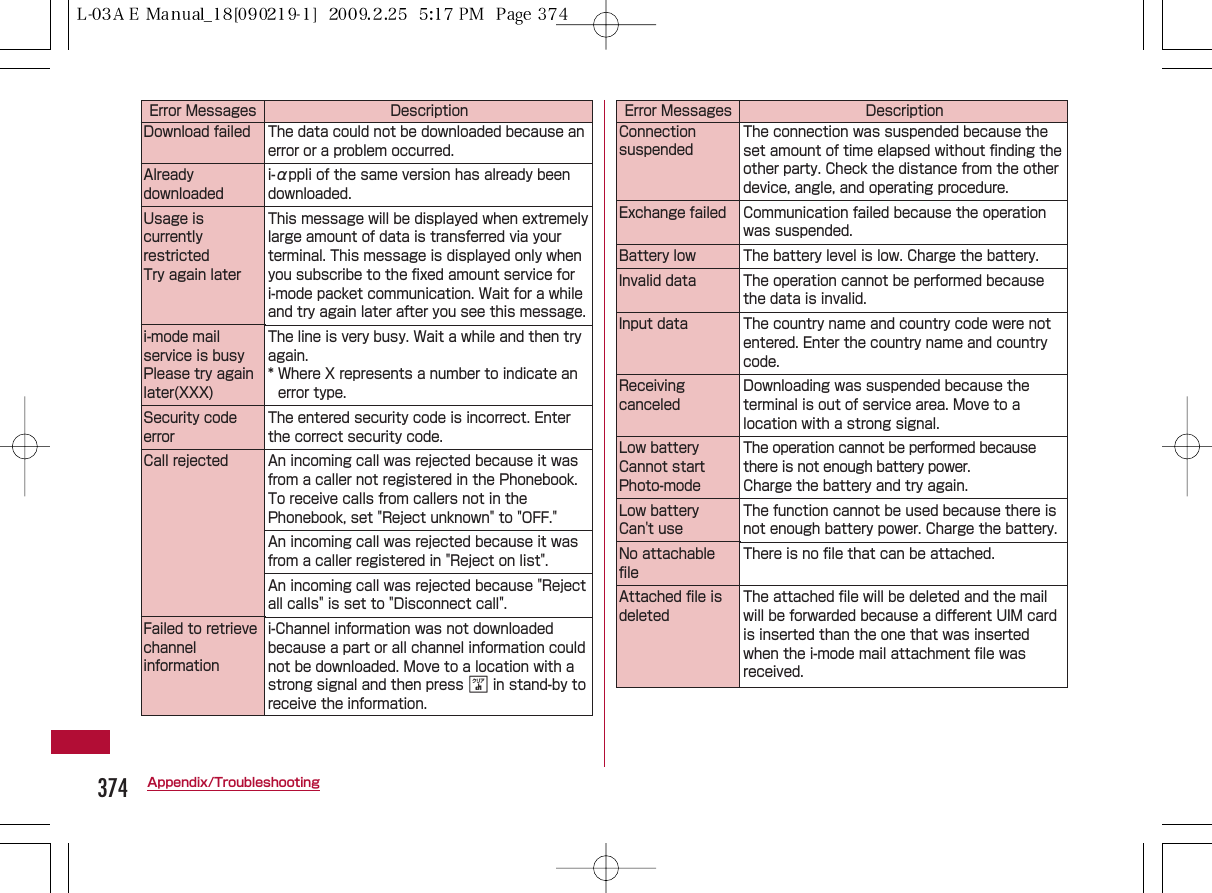
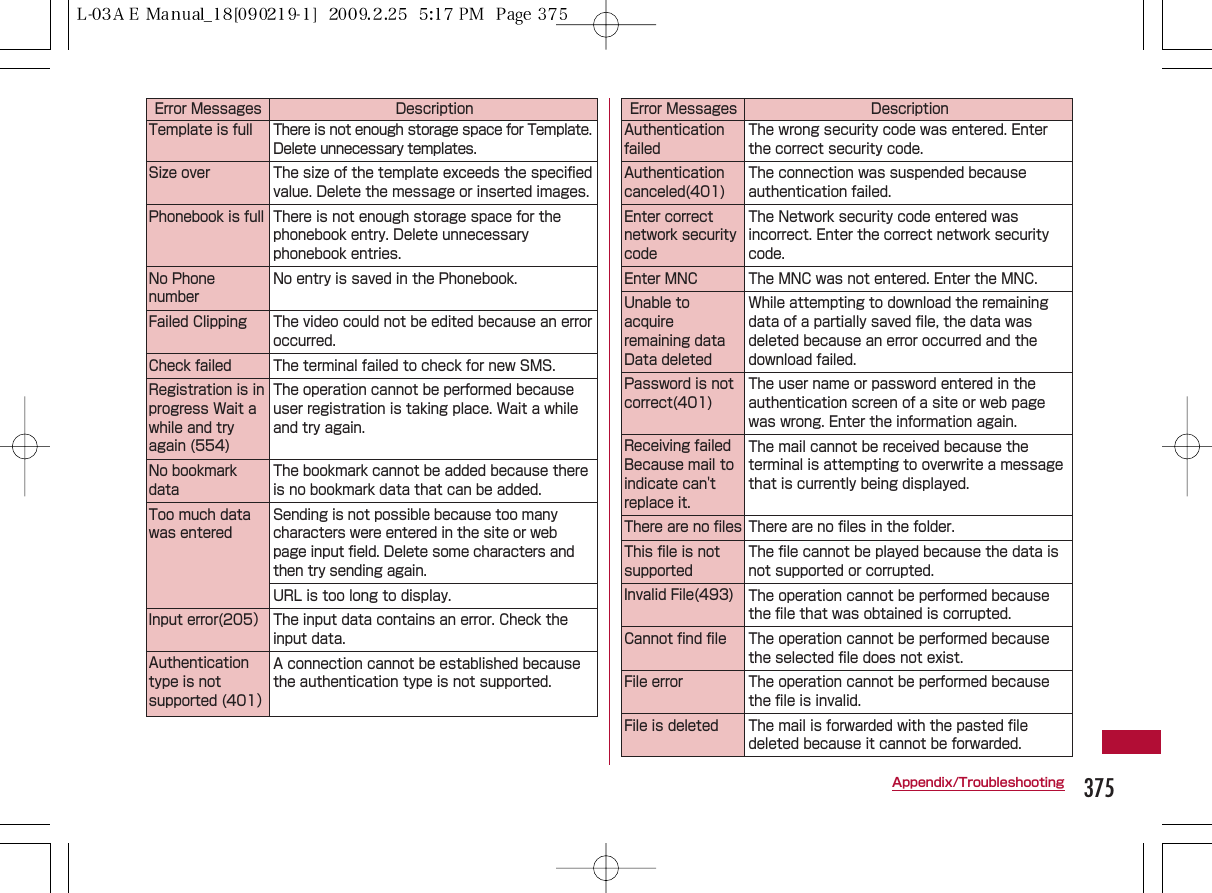
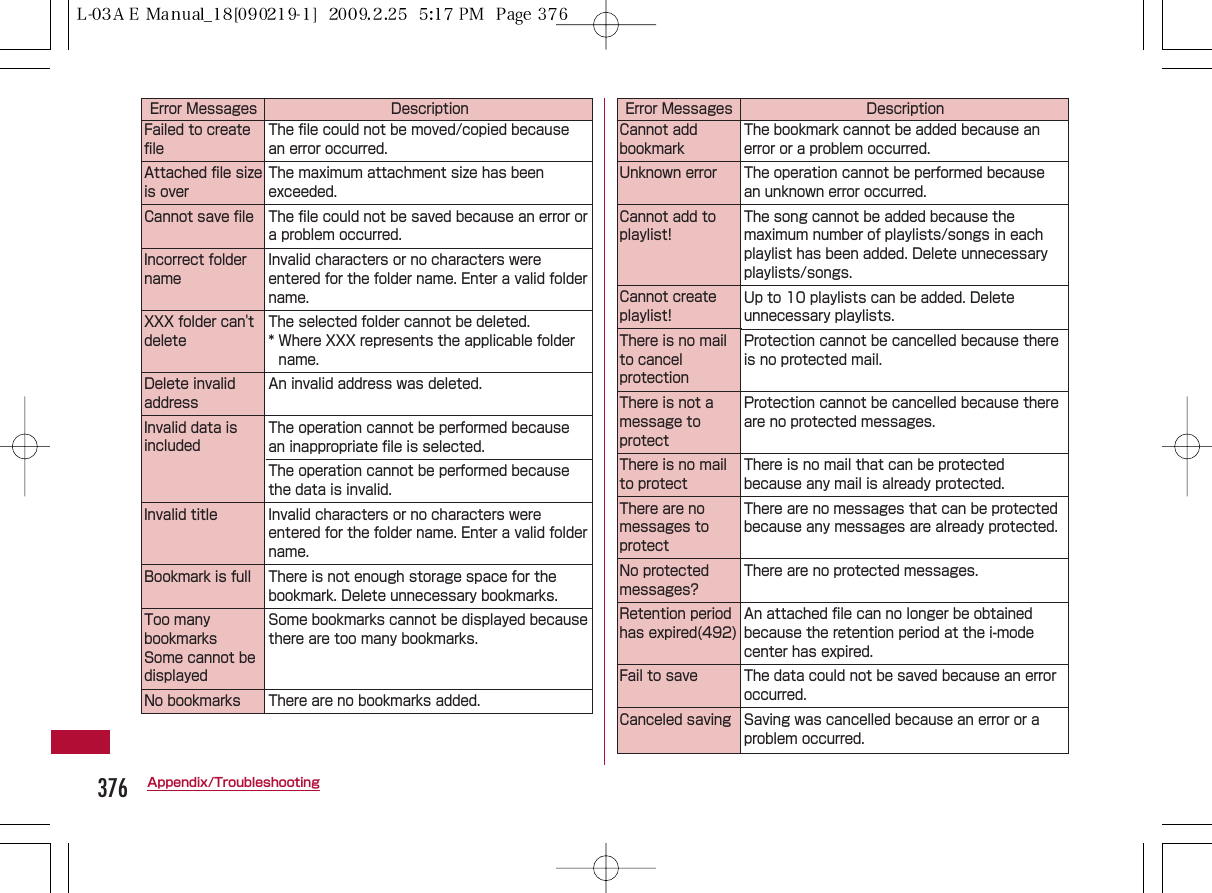
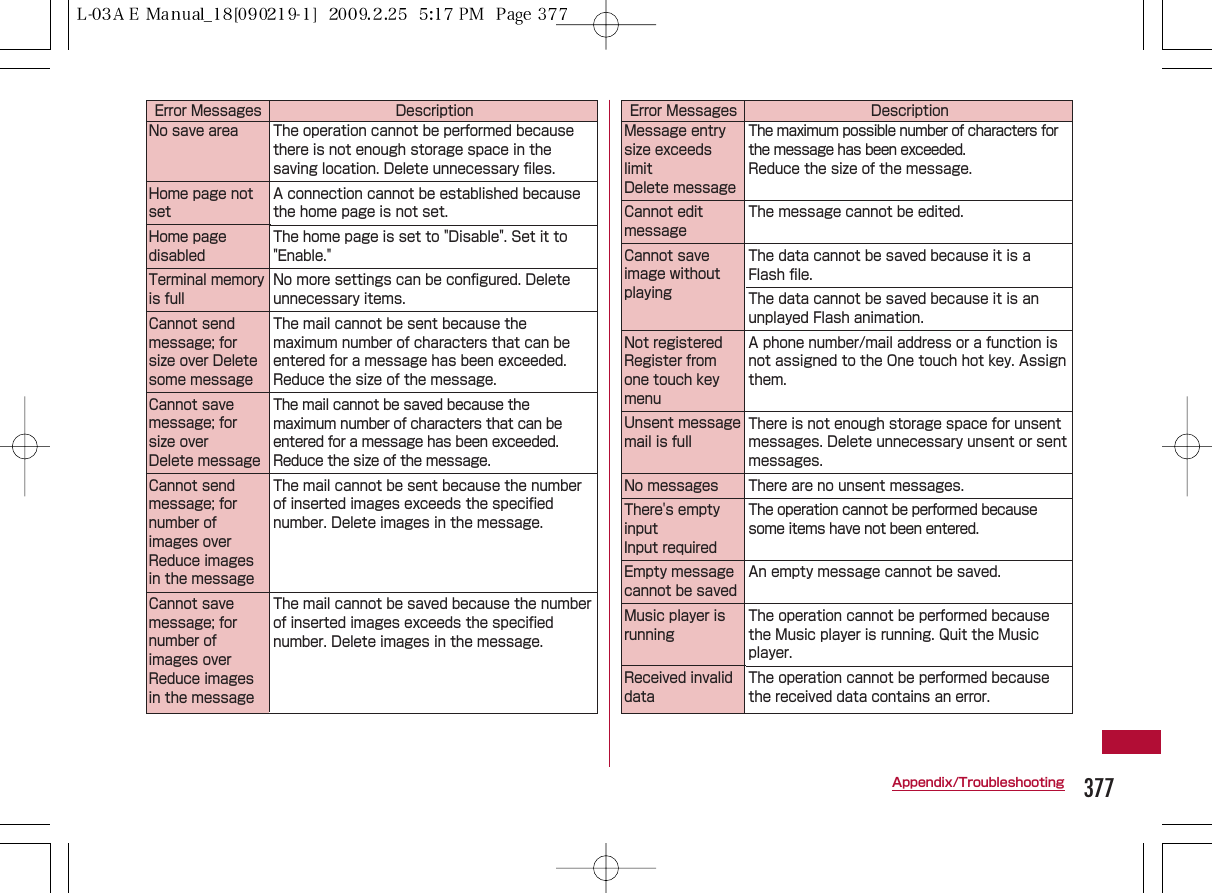
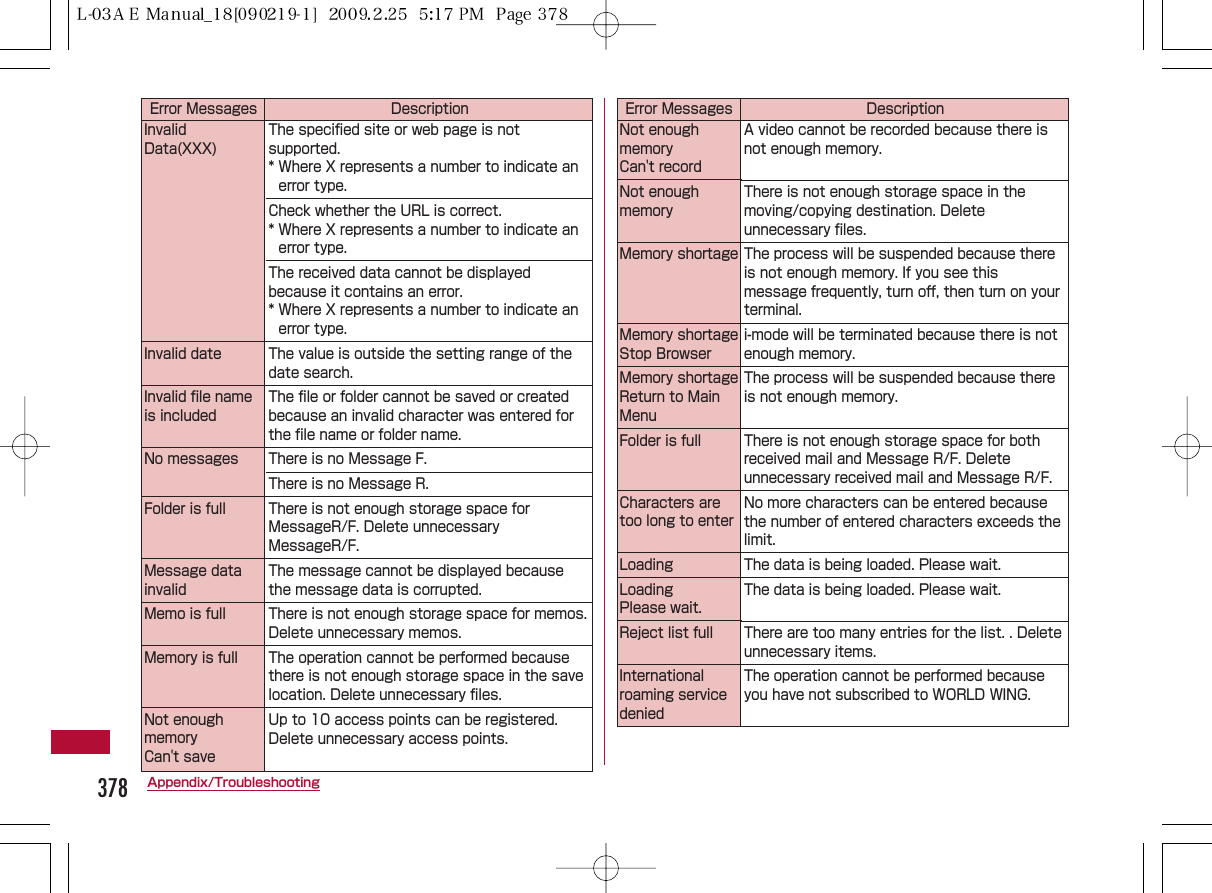
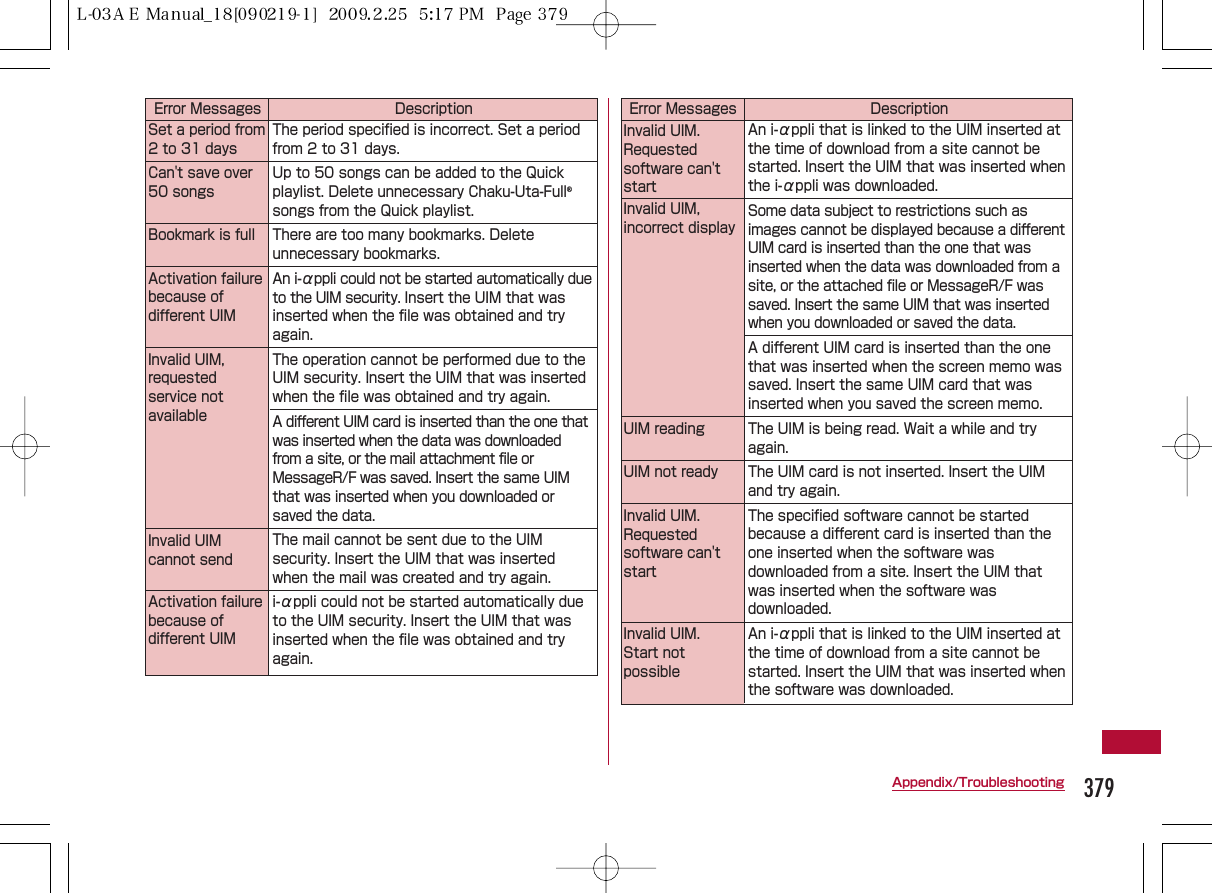
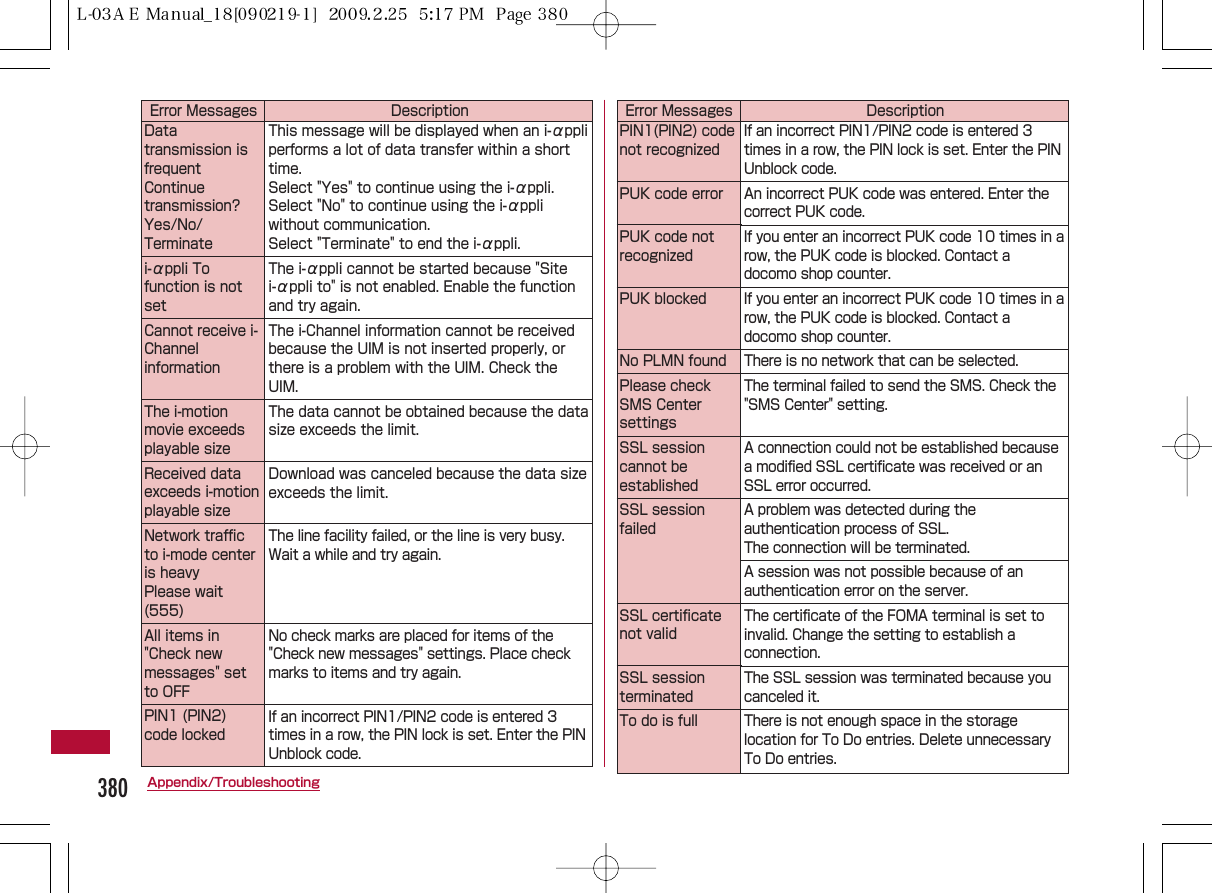
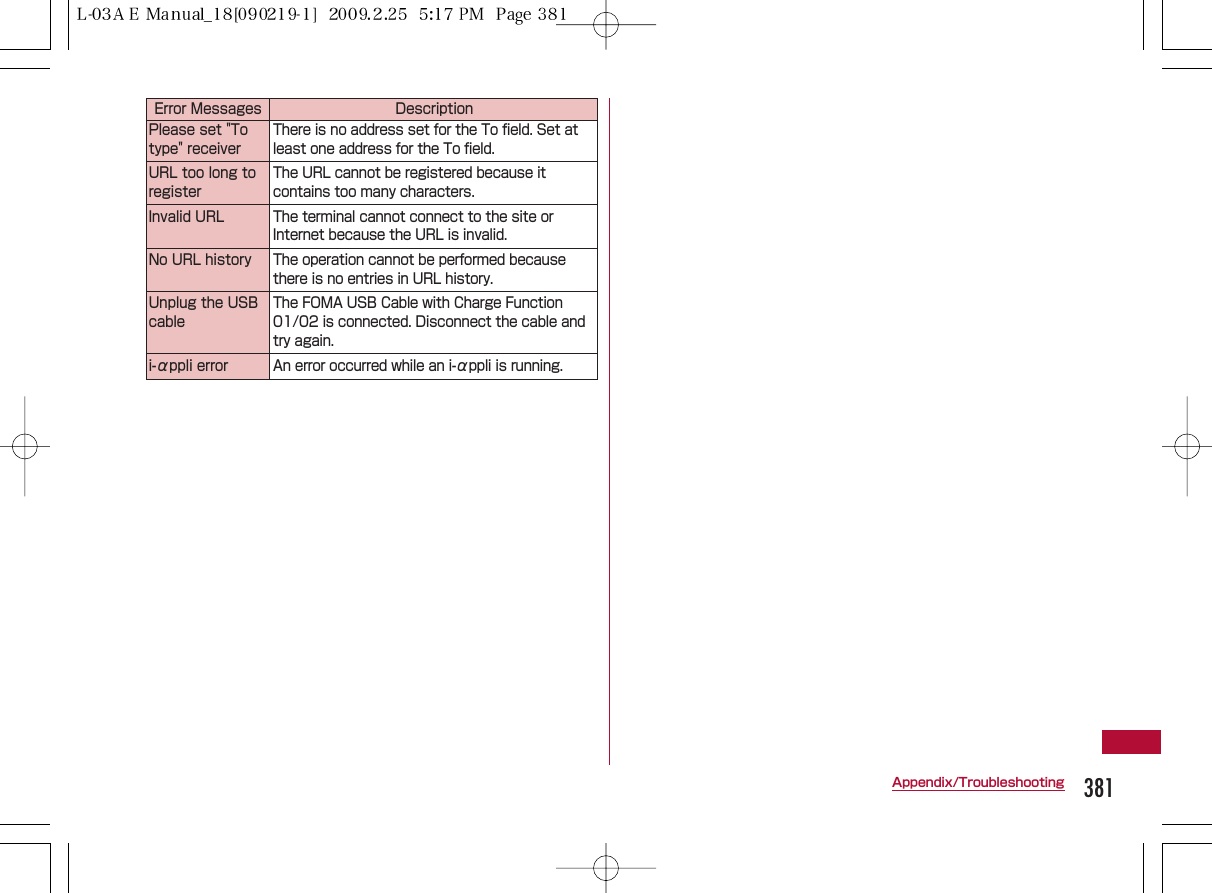
![384 Appendix/TroubleshootingYou can check whether your FOMA terminal is properlysending/receiving mail, downloading images or melodiesyourself.・ Access method to "iモード故障診断(i-mode malfunctiondiagnosis site)"i-mode site: iMenu ]お知らせ(Information) ]サービス・機能(Service/Function) ]iモード(i-mode) ]iモード故障診断(i-modemalfunction diagnosis site)i-mode Malfunction Diagnosis SiteTest menulist screenTop screen]Note・ Packet communication charges free for the i-mode malfunction diagnosis.* Charges apply when accessing from overseas.・ Test items will differ depending on the FOMA terminalmodel. Test items may change.・ Before diagnosing operations for each test item byperforming the test, read the warnings on the sitecarefully.・ When accessing the i-mode malfunction diagnosissite, and performing the sending mail test,information unique to your FOMA terminal (such as amodel name and mail address) is automatically sentto the server (i-mode malfunction diagnosis server)..The information sent is used only for i-modemalfunction diagnosis.・ After the diagnosis, if you think that the terminal ismalfunctioning, call "Contact for Repairs" as listed onthe back of the manual.](https://usermanual.wiki/LG-Electronics-USA/L06A.Users-Manual-4/User-Guide-1109039-Page-164.png)
![・ It is recommended that you update software* in a locationwith strong signal reception with three antenna barsdisplayed in stationary state. * If the signal becomes weak during software download, ordownload is suspended, retry software update in a locationwith strong signal reception.・ When your software is up to date, a message indicatingthat "No update required Use it as usual" appears when youcheck availability of software update.・ After software is updated, an icon indicating the i-modeCenter storage status disappears. When mail is deliveredduring software update with "Receive option" set to "ON", ascreen indicating that there is mail may not appear aftersoftware update.・ When software is updated, information unique to yourterminal (such as a terminal model and the serial number) isautomatically sent to the server (software update servermanaged by DOCOMO). DOCOMO does not use the sentinformation for other purposes than Software update.・ If software update fails, a message indicating "Rewritingfailed" appears. All operations become unavailable. In thiscase, bring your FOMA terminal to a DOCOMO servicecenter.・ It is not available to use during overseas.Check whether the FOMA terminal software update isnecessary.1 M[Menu]] (Setting) ]"Other" ]"Software update" ・ When software update has been reserved already,Reservation note screen will be displayed.2 Check the contents on the confirmation screen andpress "OK"]"OK"]"YES"・ The communication starts to check whether softwareupdate is necessary. If update is necessary, "Update isnecessary" will be displayed. You can choose either"Update immediately" or "Reserve"・ When software update is not necessary, "Update is notnecessary" will appear. Use it as usual.386 Appendix/TroubleshootingStarting Software UpdateNote・ Software update confirmation screen will be displayedeven in default setting, software is available toupdate.](https://usermanual.wiki/LG-Electronics-USA/L06A.Users-Manual-4/User-Guide-1109039-Page-166.png)
![1 On the software update confirmation screen, select"Update now" ]"OK" on the download start screen.・ Download starts, and when the download is completed,the confirmation screen for software rewriting isdisplayed.2 "OK"・ The rewriting starts,automatically and the softwareupdate confirmation screen appears after completion.・ All operations will be disabled during rewriting.And it cannot be disconnected during updating.3 "OK"Updating Software ImmediatelyNote・ If disconnected during download, the downloadeddata will be deleted.・ As soon as download starts, the update will beconducted whether or not select menu.387Appendix/Troubleshooting](https://usermanual.wiki/LG-Electronics-USA/L06A.Users-Manual-4/User-Guide-1109039-Page-167.png)