LG Electronics USA L06A PCS GSM Phone User Manual L 03A English Cover 1 0
LG Electronics USA PCS GSM Phone L 03A English Cover 1 0
UserManual.wiki
>
LG Electronics USA
>
L06A User Manual
>
Users Manual 3
Contents
1.
Users Manual 1
2.
Users Manual 2
3.
Users Manual 3
4.
Users Manual 4
Users Manual 3
Navigation menu
Upload a User Manual
Namespaces
Wiki Guide
HTML
PDF
Info
Views
User Manual
Discussion / Help
Navigation
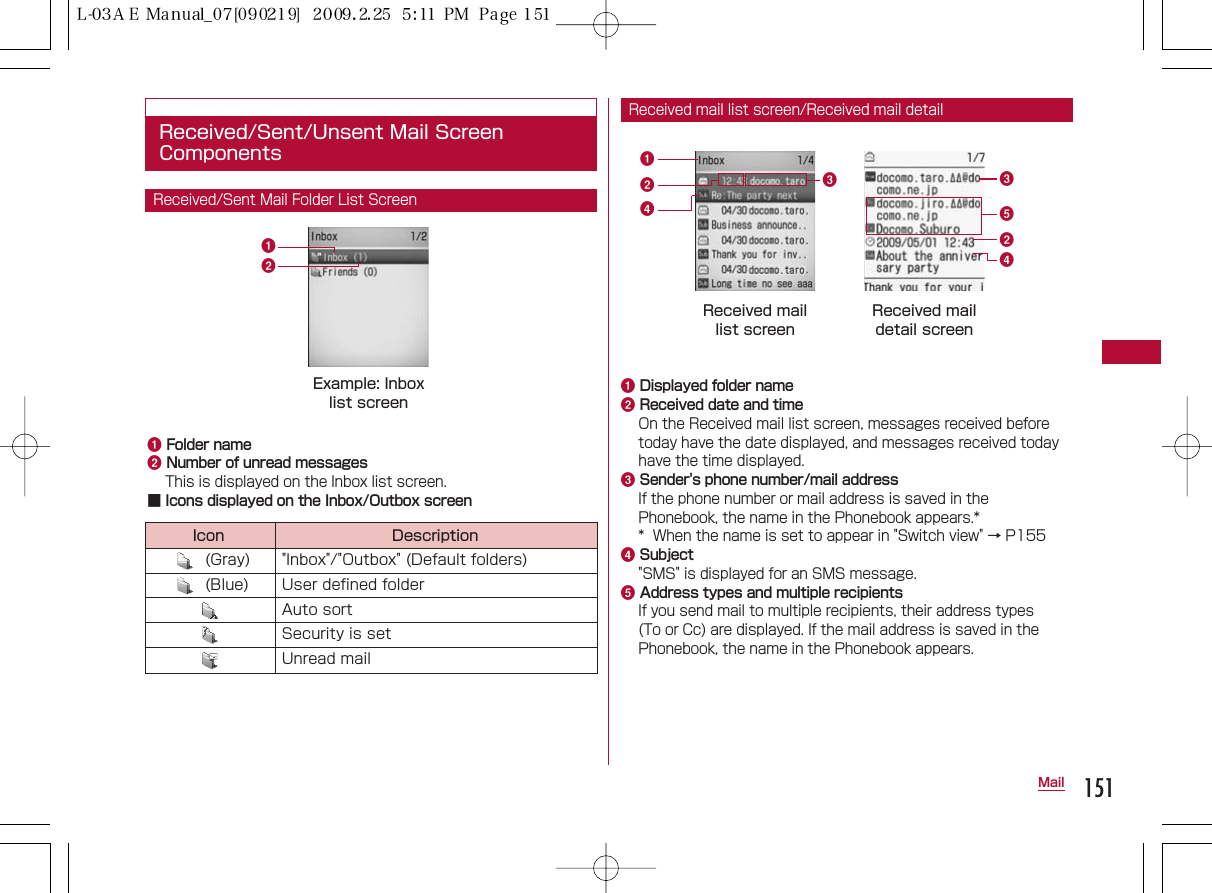
![148 Mail・ To display contents of a folder with security set, enter theTerminal Security code.・ Up to 1000 incoming i-mode mail and SMS messages can besaved in the Inbox. However, the savable number depends onthe amount of the data.・ By default, "♪Welcome mail♪" mail is saved. This mail does notinclude any charge.・It is not possible to send e-mail back to "♪Welcome mail♪".1 The Stand-by display ]g ]"Inbox"2 Select a folder・ I[Reply]: Reply to the sender and/ormultiple recipients. →P1443 Select a message・ J:Open the previous or next mail.・ I[Reply]: Reply to the sender and/ormultiple recipients. →P144Displaying Mail in Inbox/ Outbox orUnsent MessagesInbox/Outbox/Unsent messageDisplaying Received MailInbox listscreenReceived maillist screenReceived mail](https://usermanual.wiki/LG-Electronics-USA/L06A.Users-Manual-3/User-Guide-1109034-Page-1.png)
![・ Up to 500 i-mode mail, SMS, and unsent messages can besaved in the Outbox. However, the savable number depends onthe amount of the data.1 The Stand-by display ]g]"Outbox"2 Select a folder3 Select a message・ J:Open the previous or next mail.・ I[ReEdit]: Open the Composemessage or SMS screen.→P131, P168・ Messages saved as Unsent message are included in themaximum number of savable messages in the Outbox.1 The Stand-by display ]g]"Unsent message"・ I[Delete]: Delete i-mode mail or SMS.2 Select a messageThe Compose i-mode mail or SMS screen opens dependingon the type of the selected mail, and the unsent mail canbe edited.149MailOutbox listscreenSent maildetails screenUnsentmessagescreenSent mail listscreenDisplaying Sent MailDisplaying Unsent Messages](https://usermanual.wiki/LG-Electronics-USA/L06A.Users-Manual-3/User-Guide-1109034-Page-2.png)
![150 MailSet conditions for automatically saving mail in specifiedfolders.・ This option is not available with the default "Inbox" and "Outbox".1 Received mail folder list screen(P148)/Sent mail folderlist screen (P149) ]Move a cursor to a folder ]M[Menu] ]"Auto sort"・ I[Phonebook]: Select and set sort to mail addressesfrom the Phonebook.2 M[Menu] ]Perform the following operations:[Address]Set mail address as a sorting condition. You can specify morethan one mail address.Sent address:Select an address from the sent mail logs.Rcv. address:Select an address from the received mail logs.Open phonebook:Select and set sort to addresses from thePhonebook.Direct address:Directly enter and set a mail address.[Subject]Set a mail subject as a condition.[Reply invalid]*Route messages with Reply impossible to the selected folder.[Switch view]Select a view to display the condition of "Auto sort" setting.Name:Display the name saved in the Phonebook.Address:Display the mail address.[Release]Select a view to display the condition of "Auto sort" setting.Release one:Delete the selected Auto sort condition.Release sel:Select and delete the auto-sort condition.]Place check marks next to the conditions to be deleted ]I"Done" ]"Yes"・ Press M[Menu] to select "Mark all", "Unmark all", or "Switchview"Release all:Delete all conditions set to the selected folder.* This icon is not displayed for the sent mail.Sorting Sent/Received Mail Automaticallyto FoldersNote・ You cannot set multiple conditions such as"Address", "Subject", and "Reply impossible" to thesame folder concurrently.・ The same sorting conditions as ones set to anotherfolder cannot be set.・ If set to sorting mail address, set domain name(including after @). For example, when set fromOutbox address list or Inbox address list, if receivingor sending mail using only the phone number, thedomain name is not included. For this condition,sorting will not be recognized.Auto sort](https://usermanual.wiki/LG-Electronics-USA/L06A.Users-Manual-3/User-Guide-1109034-Page-3.png)
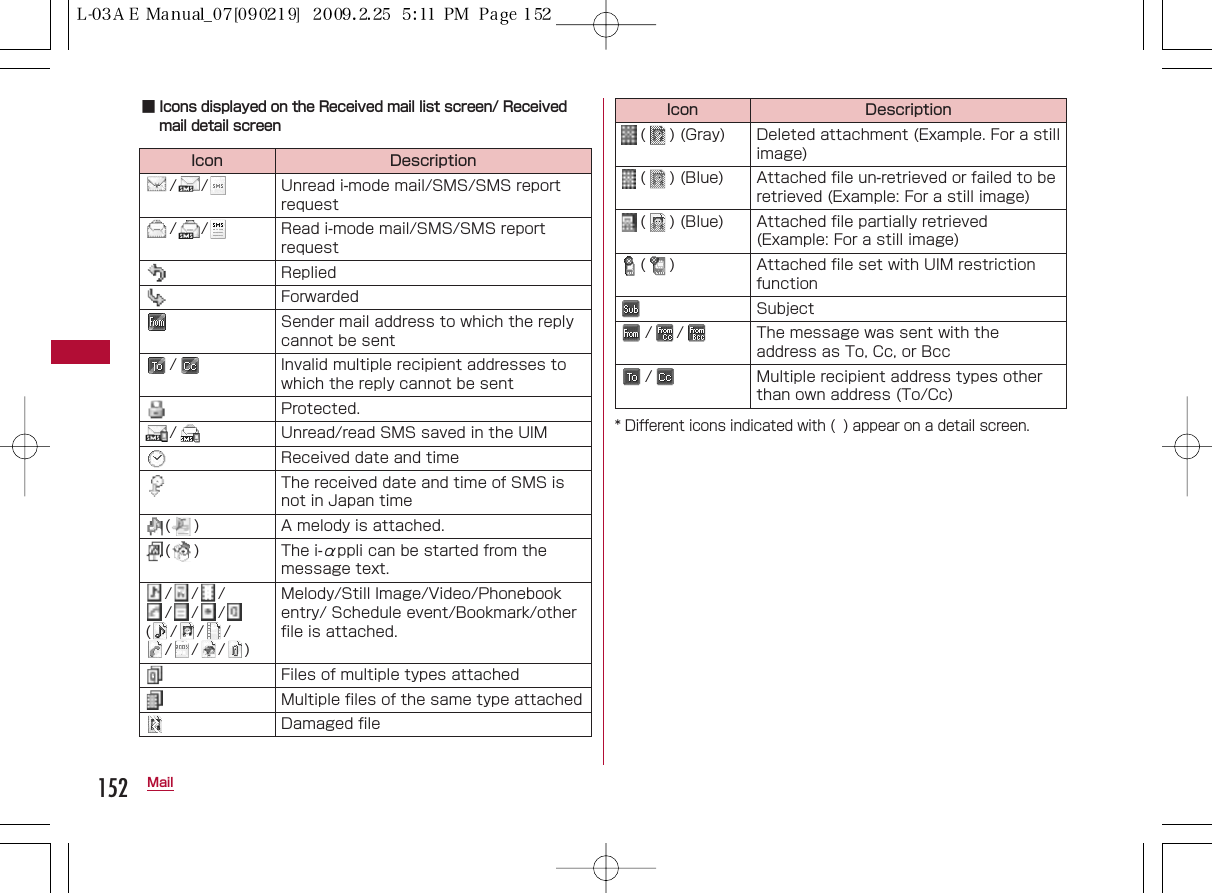
![1Saved date and timeMessages saved before today have the date displayed, andmessages saved today have the time displayed.2Subject"SMS" is displayed for an SMS message.3Recipient phone number/mail addressIf the phone number or mail address is saved in thePhonebook, the name in the Phonebook appears.** : When the name is set to appear in "Switch view"→P160■ Icons displayed on the Unsent mail list screen* Other than the above, same icons as for sent mail are used.1 Inbox list screen(P148)/Outbox list screen (P149) ]M[Menu] ]Perform following operations:[Manage folders]Create folder:Create a folder.Rename folder:Change the name of the selected folder.Sort folder:Select the display position of the folders and sortfolders.Fold. security:Set or release security to the selected folder.]Enter the security code ]"Yes"[Delete]Delete one:Delete the selected folder.]Enter the security code ]"Yes"Del. all read*:Delete all read messages in Inbox.]Enter the security code ]"Yes"Delete all:Deletes all messages in Inbox/Outbox.]Enter the security code ]"Yes"[Auto sort]Set conditions for mail to be saved automatically in specifiedfolders. →P150[Send all Ir data]Send all mail in Inbox/Outbox via infrared.→P259]Enter the security code ]Enter the password ]"Yes"[Memory status]Display number of messages in Inbox/Outbox.[Open folder]Display contents of the selected folder.* This item is not displayed for sent mail.154 MailUnsent mail list screenUnsent maillist screenIcon DescriptionUnsent i-mode mailUnsent SMSReceived Mail Folder/Sent Mail Folder List Screen Sub Menu132](https://usermanual.wiki/LG-Electronics-USA/L06A.Users-Manual-3/User-Guide-1109034-Page-7.png)
![155Mail1 Received mail list screen (P148) ]Move the cursor tomail ]M[Menu] ]Perform the following operations:[Move]Move this:Move the displayed mail to another folder.Move selected:Select mail and move them to another folder.]Place check marks next to the messages to move ]I[Done]]Select a destination folder・ Press M[Menu] to select "Mark all", "Unmark all", or "Switchview"Move all:Move all mail in the folder to another folder.[Delete]Delete one:Delete the selected message.Del. selected:Delete selected message.]Place check marks next to the messages to be deleted ]I[Done] ]"Yes"・ Press M[Menu] to select "Mark all", "Unmark all", or "Switchview"Del all read:Deletes all read messages in the folder.]Enter the security code ]"Yes"Delete all:Delete all mail in the folder.]Enter the security code ]"Yes"SMS rmv. in fd.:Delete all SMS reports in the folder.]Enter the security code ]"Yes"Note<Manage folders>・ If I[Add] is pressed on the Inbox/Outbox list screen,a folder can be added.<Rename folder/Sort folders/Delete one/Auto sort>・ This option is not available for the default "Inbox" and"Outbox" folders.<Delete>・ A folder containing protected mail cannot be deleted.・ Protected mail or SMS saved in the UIM are notdeleted.・ If "Delete one" is selected for a folder with unreadmail, a confirmation for deletion appears. Select "Yes"to delete.Received Mail List Screen Sub Menu](https://usermanual.wiki/LG-Electronics-USA/L06A.Users-Manual-3/User-Guide-1109034-Page-8.png)
![156 Mail[Display settings]Switch view:Set the mail display method.Sort:Set conditions to rearrange the messages.[Filter]Display messages that meet certain conditions.Address:Display only mail from a specific address]Select an item ]Select/input the addressSubject:Display mail with a specific subject.Unread:Display only unread mail.Read:Display only read mail.Protected:Display only protected mail.Not protected:Display only unprotected mail.Image:Display only mail with an image attached.i-motion:Display only mail with an i-motion movie attached.Melody: Display only the mail with melody attached.Mail: Display only i-mode mail.SMS: Display only SMS/ SMS arrivalAll: Display all the mails in folder.[Read all]Mark all mail in the folder as read.[Protect on/off]Mark all mail in the folder as read.One on/off:Protect or unprotect the selected mail.Select on/off:Select and protect or unprotect mail.]Place check marks next to the messages to be protected ]I[Done] ]"Yes"・ Press M[Menu] to select "Mark all", "Unmark all", or "Switchview"Protect all:Protect all mail in the folder.Unprotect all:Unprotect all mail in the folder.[Ir exchange]Send:Send selected mail via Infrared.Send all:Send all mail in the folder via infrared.→P259]Enter the security code ]Enter the password ]"Yes"[UIM]Copy to UIM:Copy the selected SMS to the UIM.Move to UIM:Move the selected SMS to the UIM.Copy from UIM: Copy the selected SMS to the terminal.Move from UIM:Move the selected SMS to the terminal.[Memory status]Display the number of messages in Inbox.Note<Delete>・ If there are unread messages, a confirmation fordeletion appears. Select "Yes" to delete.<Filter>・ Addresses matched completely and subjectsmatched even partially are displayed.](https://usermanual.wiki/LG-Electronics-USA/L06A.Users-Manual-3/User-Guide-1109034-Page-9.png)
![1 Received mail detail screen (P148)]M[Menu]]Perform the following operations:[Reply]Reply to the displayed mail.→P144[Forward]Forward the displayed mail.→P145[Move]Move the displayed mail to another folder.[Delete]Delete the displayed mail.[Protect on/off]Protect or unprotect the displayed mail.[Store]Save phone numbers or email addresses from the displayed mailto the Phonebook. →P145[Attach file]Save, play/view, or delete files attached to the displayed mail.→ P146[Inline image]Save images contained in the displayed mail or view detailedinformation.→P147[Display settings]Scroll:Set the number of lines scrolled when His pressed onthe mail display screen.Font size:Set a font size for the message text on the Messagedisplay screen.[Copy]Copy contents of the displayed mail.Body:Select and copy contents of text.→P301Subject:Copy the subject.Sender:Copy the destination. If there are multiple addresses,select an address from the Mail address list screen.[Save template]Save Deco-mail as a template.]C[Select] ]Edit the title ]I[Done][Export]Ir exchange:Send the displayed mail via IrDA.UIM:Copy or move the displayed SMS to the UIM, or copy ormove the selected SMS from the UIM to the terminal.157MailReceived Mail Detail Screen Sub MenuNote<Protect>・ Up to 1000 messages can be protected.<Delete>・ Protected mail cannot be deleted.](https://usermanual.wiki/LG-Electronics-USA/L06A.Users-Manual-3/User-Guide-1109034-Page-10.png)
![158 Mail1 Sent mail list screen (P149)]Move the cursor to mail]M[Menu]]Perform the following operations:[Edit]Edit and send sent mail.→P131, P170[Move]Move this:Move the displayed mail to another folder.Move selected:Select mail and move them to another folder.]Place check marks next to the messages to move ]I[Done]]Select a destination folder・ Press M[Menu] to select "Mark all", "Unmark all", or "Switchview"Move all:Move all mail in the folder to another folder.[Delete]Delete one:Delete the selected message.Del. selected:Select and delete messages.]Place check marks next to the messages to be deleted ]I[Done] ]"Yes"・ Press M[Menu] to select "Mark all", "Unmark all", or "Switchview"Delete all:Delete all mail in the folder.]Enter the security code ]"Yes"[Display settings]Switch view:Set the mail display method.Sort:Set conditions to rearrange the messages.[Filter]Display messages that meet certain conditions.Address:Display only mail sent to a specific address.]Select an item ]Select/input the addressSubject:Display only mail with a specific subject.Protected:Display only protected mail.Not protected:Display only unprotected mail.Image:Display only mail with an image attached.i-motion:Display only mail with an i-motion movie attached.Melody:Display only mail with a melody attached.Mail: Display only i-mode mail.SMS: Display only SMS/SMS arrivalAll: Display all the mails in folder.Sent Mail List Screen Sub Menu](https://usermanual.wiki/LG-Electronics-USA/L06A.Users-Manual-3/User-Guide-1109034-Page-11.png)
![[Protect on/off]One on/off:Protect or unprotect the selected mail.Select on/off:Select and protect or unprotect mail.]Place check marks next to the messages to be protected ]I[Done] ]"Yes"・ Press M[Menu] to select "Mark all", "Unmark all", or "Switchview"Protect all:Protect all mail in the folder.Unprotect all:Unprotect all mail in the folder.[Ir exchange]Send:Send selected mail via Infrared.Send all:Send all mail in the folder via infrared.→P259]Enter the security code ]Enter the password ]"Yes"[UIM]Copy to UIM:Copy the selected SMS to the UIM.Move to UIM:Move the selected SMS to the UIM.Copy from UIM: Copy the selected SMS to the terminal.Move from UIM:Move the selected SMS to the terminal.[Memory status]Display the number of messages in Outbox.1 Sent mail details screen (P149) ]M[Menu] ]Perform the following operations:[Edit]Edit and send sent mail.→P131、P170[Move]Move the displayed mail to another folder.[Delete]Delete the displayed mail.[Protect on/off]Protect or unprotect the displayed mail.[Store]Save phone numbers or email addresses in the displayed mail tothe Phonebook. →P145[Attach file]Save, play/view, or delete files attached to the displayed mail.→P146[Inline image]Save images contained in the displayed mail or view detailedinformation.→P147159MailNote<Filter>・ Addresses matched completely and subjectsmatched even partially are displayed.Sent Mail Details Screen Sub Menu](https://usermanual.wiki/LG-Electronics-USA/L06A.Users-Manual-3/User-Guide-1109034-Page-12.png)
![160 Mail[Display settings]Scroll:Sets the number of lines scrolled when His pressed onthe mail Display Screen.Font size:Set a font size for the message text on the Messagedisplay screen.[Copy]Copy contents of the displayed mail.Body:Select and copy contents of text.→P301Subject:Copy the subject.Sender:Copy the destination. If there are multiple recipients,select addresses to copy.[Save template]Save Deco-mail as a template.]C[Select] ]Edit the title ]I[Done][Export]Ir exchange:Send the displayed mail via IrDA.UIM:Copy or move the displayed SMS to the UIM, or copy ormove the selected SMS from the UIM to the terminal.1 Unsent mail list screen (P149)]Move the cursor tomail]M[Menu]]Perform the following operations:[Delete]Delete one:Delete the selected message.Del. selected:Select and delete messages.]Place check marks next to the messages to be deleted ]I[Done] ]"Yes"・ Press M[Menu] to select "Mark all", "Unmark all", or "Switchview"Delete all:Delete all unsent messages.]Enter the security code ]"Yes"[Display settings]Switch View:Set the mail display method.Sort:Set conditions to rearrange the messages.[Filter]Display messages that meet certain conditions.Address:Display only mail sent to a specific address.]Select an item ]Select/input the addressSubject:Display only mail with a specific subject.Image:Display only mail with an image attached.i-motion:Display only mail with an i-motion movie attached.Melody:Display only mail with a melody attached.Mail:Display only i-mode mail.SMS:Display only SMS.All: Display all the mails in folder.[Ir exchange]Send:Send selected mail via Infrared.Send all:Send all unsent messages via infrared. →P259]Enter the security code ]Enter the password ]"Yes"[Memory status]Display number of unsent messages.Note<Protect>・ Up to 500 messages can be protected.<Delete>・ Protected mail cannot be deleted.Unsent Mail List Screen Sub Menu](https://usermanual.wiki/LG-Electronics-USA/L06A.Users-Manual-3/User-Guide-1109034-Page-13.png)
![Sent mail logs. Also, up to 60 entries of sent/received mailwill be saved in "Recent mail". These logs can be used tocompose mail, and save addresses to the phonebook.・ If the maximum number of recordable entries has beenexceeded, the oldest entries will be overwritten first.Example: When displaying the received mail logs1 The Stand-by display ]L(Hold for 1 seconds)■To display Sent mails logsThe Stand-by display ]R(for 1seconds)■To display recent mailThe Stand-by display ]A(for 1seconds) 2 Select an entry in the log・ I[Mail]: Create mail to the receiver or sender of theselected entry.1The name saved in the Phonebook2Other party's mail address3Receive/Sent date & time■ Icons displayed on the received mail log/send log/RecentMails* The received/sent date and time is shown in the local time.161MailUsing Mail LogsReceived Mails/Sent Mails/Recent MailsExample:Received MailHistory ListScreenExample:Received MailHistory ListScreen123Icon DescriptionReceived mailSent mailReceived SMSSent SMSMail and SMS that were Received/Sentwhile Roaming*](https://usermanual.wiki/LG-Electronics-USA/L06A.Users-Manual-3/User-Guide-1109034-Page-14.png)
![1 Press Hto move the cursor to the received/sent log]M[Menu] ]Perform the following operations:[Video phone call]Make a video call to the selected log entry.[Compose mail]Create mail to the address or sender of the selected log entry.Go to Step 3 in "Creating and Sending i-mode Mail" (P131).[Add to phonebook]Save the mail address of the selected log entry to thephonebook. Go to Step 2 in "Saving Contacts to the Phonebookfrom Received or Dialed Calls" (P85). ・ Save only unsaved mail addresses.[Customize call]Edit the phone number of the selected log entry and dial. [Change list]*Recent call:Display all incoming and outgoing call log entries.Recent mail:Display all incoming and outgoing mail log entries.Received calls:Display Received calls.Received Mail:Display received mail log entries.Redial:Display phone redial log entries.Sent Mail:Display Sent mail log entries.・ The item for the currently displayed log is not shown.[Delete]Delete the selected log entry.[Delete all]*Delete all entries from the mail logs.* This option does not appear on the Received mail logs/Sentmail logs/Recent mail detail screen.Auto sort1 The Stand-by display ] g]"Mail setting"]"Communication"]Perform the following operations:[Receive option set]To enable/disable the Receive option (P142), set whether toreceive i-mode mail automatically.On:Mail will not be received automatically.Off:Mail will be automatically received.iI[Done][Receive attach file]Specify attached files to be retrieved when i-mode mail isreceived.]Place check marks next to items to be downloaded ]I[Done][Check new messages]Specify request items when using "Check new messages". ]Place check marks next to the items to check ]I[Done]162 MailReceived Mail Log/Sent Mail Log/Recent Mail Sub MenuSetting FOMA Terminal MailFunctions SettingsMail settingConfiguring Network Settings](https://usermanual.wiki/LG-Electronics-USA/L06A.Users-Manual-3/User-Guide-1109034-Page-15.png)
![Edit1 The Stand-by display ] g]"Mail setting"]"Edit"]Perform the following operations:[Edit header]Set a header to be inserted to i-mode mail text.]C[Edit] ]Enter a header[Edit signature]Set a signature to be inserted to i-mode mail text.]C[Edit] ]Enter a signature[Edit quotation]Set a symbol indicating quotation from received mail used forreplying by quoting.]C[Select] ]Enter a quotation symbol ]I[Done][Auto attach]Set whether to automatically attach a header or signature whencomposing i-mode mail.]Place check marks next to items to be attached ]I[Done]Display1 The Stand-by display ] g]"Mail setting"]"Display" ]Perform the following operations:[Font size]Set a font size for text on the Mail detail screen.[Scroll]Set the number of lines scrolled when His pressed on the Maildetail screen or the Preview screen[Mail list]Set how to display mail on the Mail list screen.[Folder security]Set security for Inbox/Outbox and Unsent message in the Mailmenu. To display security-enabled mail, the security code mustbe entered.]Enter the security code ]Place check marks next to items toenable ]I[Done][Melody auto play]Set whether to automatically play attached or pasted melodieson the Mail display screen.[Receiving display]Set whether to notify with a ring tone or Receive results screenwhen i-mode mail or Message R/F is received while operating theFOMA terminal (displaying other than Stand-by display).Alarm mode:Open the Received results screen.Operation mode:FOMA terminal operations will take precedencewithout the Received result screen being displayed.163MailNote<Receive option set>・ When this option is set to "ON", i-mode mail cannot bereceived automatically. Incoming i-mode mail is keptat the i-mode Center, and the Receive notify screen(P143) appears.<Attach File>・ If the attached file set not to be received arrives, thefile name is contained in the message text. You canselect and receive attachments. →P146Editing Header/Signature/QuotationConfiguring Display Settings](https://usermanual.wiki/LG-Electronics-USA/L06A.Users-Manual-3/User-Guide-1109034-Page-16.png)
![164 MailOthers1 The Stand-by display ] g ]"Mail setting"]"Others"]Perform the following operations:[Check setting]Confirm the contents set in "Mail setting".[Reset setting]Reset the contents set in "Mail setting" to the default.]Enter the security code ]"Yes"When the terminal is in the service area, Messages R/F aresent automatically from the i-mode Center. WhenMessages R/F arrives, the display, ring tone or vibrationnotifies you of new messages.・ Up to 100 each MessageR or MessageF can besaved.However, the number of savable messages variesdepending on the message size.When Message R/F arrives, the newest message appearsautomatically.・ "Message auto-display" can be configured to allow the detailscreen to automatically open after a Message R/F arrives. → P1651 Automatically Receiving a Message R/F When itArrives・ After Message R/F is received, the reception result isdisplayed.・ The previous screen returns if no operation is performedfor approximately 30 seconds.Configuring Other SettingsNote<Reset Settings>・ The header and signature will be reset.Note<Receiving display>・ Even if 「Alarm mode」 is being set, depending on thefunction which is being used, the result of receivingmessage will not be displayed.When Receiving Messages R/FReceive MessageViewing New Message R/F](https://usermanual.wiki/LG-Electronics-USA/L06A.Users-Manual-3/User-Guide-1109034-Page-17.png)
![Auto-display MessageSet how to automatically display Message R/F.1 The Stand-by display ] I ]"i-mode setting"]"Display"]"Auto-display"]Perform the following operations:Message R preferred:If a Message R and F are receivedsimultaneously, MessageR is automatically shown.Message R Only:Only MessageR is automaticallydisplayed.Message F preferred:If a Message R and F are receivedsimultaneously, MessageF is automatically shown.Message F Only:Only Message F is automaticallydisplayed. Auto-display off:Messages are not displayedautomatically.Melody Auto PlaySet how to automatically display Message R/F.Set whether to automatically play a melody when MessageR/F is displayed. 1 The Stand-by display ] I ]"i-mode setting"]"Display"]"Melody auto play"]"ON"/"OFF"Message R/F that were not received because the terminalwas out of service area are stored at the i-mode Center,and , or will appear at the top on the screen.Checking new messages downloads the stored MessagesR/F.・ You cannot check new messages when the terminal is out ofservice area.・ Item to check ( i-mode mail or Messages R/F) in "Check newmessages" (P162).1 g(for 1+ seconds) in Stand-byWhen checking is completed, the Reception result screenopens.2 "Message R"/"Message F"165MailDisplaying Messages R/F AutomaticallyPlaying a Melody Automatically WhenMessage R/F is DisplayedChecking for New Messages R/FCheck new messageNote・ Incoming Message R/F is saved at the i-mode Centerwhen:- Power is off - A video call in progress- Self mode is activated - The terminal is out ofservice area- The FOMA Terminal MessageR/F mailbox is full](https://usermanual.wiki/LG-Electronics-USA/L06A.Users-Manual-3/User-Guide-1109034-Page-18.png)
![When Messages R/F arrive from the i-mode Center, , appears at the top of the screen.1 The Stand-by display ] I]"Message"]"Message R"/"Message F"1Received date and time2Subject2 Select a Message R/F・ I[Delete]: Delete the selected Message R/F1Received date and time2Subject■ Icons displayed on the Message R/F list/detail screen* Different icons indicated with ( ) appear on a detail screen.166 MailIcon/// /( ) (Gray)( ) (Blue)( ) (Blue)( )DescriptionUnread Messages R/FRead Messages R/F Protected.Received date and timeA melody/still image/video is attached.Multiple files are attached.Damaged attachment or attachmentthat failed to be downloadedDeleted attachment (Example. For a stillimage)Attachment that is not downloaded(Example: For a still image)Attached file partially retrieved(Example: For a still image)Attachment with UIM security functionactivatedSubjectViewing New Message R/FMessage R/MessageFExample:Message RScreenExample:MessageRScreen1212](https://usermanual.wiki/LG-Electronics-USA/L06A.Users-Manual-3/User-Guide-1109034-Page-19.png)
![167Mail1 MessageR/F List screen (P166)]Move the cursor toa message]M[Menu]]Perform the followingoperations:[Delete]Delete one:Delete the selected Message R/F.Delete selected:Select and delete Message R/F.]Place check marks next to the Messages R/F to delete ]I[Done] ]"Yes"・ Press M[Menu] to select "Mark all", "Unmark all", or "Switchview"Del all read:Delete all read Messages R/F.]Enter the security code ]"Yes"Delete all:Delete all Message R/F.]Enter the security code ]"Yes"[Display settings]Switch View:Set the display method of the Message R/F listscreen.1 lines:Display only the subject in one line.2 lines:Display the subject and received date and time in twolines.Sort:Rearrange Message R/F by the set conditions.[Filter]Display only the Message R/F that meet certain conditions.Subject:Display only the Message R/F with a specific subject.Unread:Display only the unread Message R/F.Read:Display only the read Message R/F.Protected:Display only the protected Message R/F.Not protected:Display only the unprotected Message R/F.Image:Display only the Message R/F with attachments.Melody:Display only the Message R/F with a melody attached.All:Display all Message R/F.[Read all]Mark all Message R/F to "read".[Protect on/off]One on/off:Protect or unprotect the selected Message R/F.Select on/off:Select and protect/unprotect Messages R/F.]Place check marks next to the Messages R/F to delete ]I[Done] ]"Yes" ・ Press M[Menu] to select "Mark all", "Release all", or "Switchview"Protect all:Protect all Messages R/F.Unprotect all:Unprotect all Messages R/F.[Memory status]Display the number of Messages R/F.Messages R/F List Screen Sub MenuNote<Delete>・ If there are unread Messages R/F, a confirmation fordeletion appears. Select "Yes" to delete.](https://usermanual.wiki/LG-Electronics-USA/L06A.Users-Manual-3/User-Guide-1109034-Page-20.png)
![168 MailMessages R/F Detail Screen Sub Menu1 MessageR/F detail screen(P166)]M[Menu]]Perform the following operations:[Delete]Delete the displayed Message R/F.[Protect on/off]Protect or unprotect the displayed Message R/F.[Add to ph.book]Save the mail address or phone number contained in themessage text of the displayed Message R/F to the phonebook.]Select the address to save to the phonebook ]"Yes" Go toStep 2 in "Saving Contacts to the Phonebook from Received orDialed Calls" (P85).[Attach file]Save/play/display an attachment of the currently displayedMessage R/F. Perform the following steps to save attachments.]Select the attachment ]"Save" ]"Yes" Perform the followingsteps to play/display the attachment.[Inline image]Save an image inserted in the currently displayed Message R/F.]Select the image ]"Save" ]"Yes"・ To view information about the selected image, select "Fileproperty".[Background Image]Save the background image used in the displayed Message R/F.]"Save" ]"Yes"・ To view information about the image, select "File property"[Display settings]This option is not available.・ You can send and receive SMS to/from parties of overseascarriers other than DOCOMO. Visit DOCOMO website forcountries and overseas carriers available.1 The Stand-by display ] g]"SMS"]"Compose SMS"Note<Protect>・ Up to 100 each Message R/F can be protected.<Delete>・ Protected messages cannot be deleted.Creating and Sending SMSSMS Compose/SendCompose SMSScreen](https://usermanual.wiki/LG-Electronics-USA/L06A.Users-Manual-3/User-Guide-1109034-Page-21.png)
![169Mail2 Select (Receiver) field]"Direct input"]Enter thephone number・ Up to 21 digits (including "+" can be entered.・ You can select "Int. call", "Select prefix" or "Cancel" bypressing M[Menu] on the Phone number entry screen.Press I[Cancel] to cancel the entry.・ The address can be selected from the Phonebook, Sentmail logs and Received mail logs.→P1693 Select (Body) field]Enter the message text・ The number of characters which can be entered differsdepending on the settings in "SMS input character".→P1724 I[Send]Note・ For a destination of an overseas carrier other thanDOCOMO, enter in the order of "+" (Press 0for 1+seconds), "Country Code" and "other party's mobilephone number". For the mobile phone number, skip theleading "0", if any. Numbers may be entered in theorder of "010", "Country Code" and the "other party'smobile phone number" (to reply to overseas SMSreceived, enter "010").・ Characters may not be sent correctly to the otherparty depending on the signal strength.・ When you send an SMS to a receiver who uses aforeign carrier and some of the characters you sendare not supported by the carrier, those charactersmay not be displayed correctly.・ Even if you set "Activate/Deactivate" to "Not notify",your Caller ID is sent to the other party.・ You cannot reply to SMS sent with Unknown ID orfrom a public phone.・ When sending mail, the excluding "Pictographs" , will be changed to half byte space.](https://usermanual.wiki/LG-Electronics-USA/L06A.Users-Manual-3/User-Guide-1109034-Page-22.png)
![170 Mail1 Create SMS screen (P168) ]M[Menu]]Perform thefollowing operations:[Send]Send SMS.[Save]Save SMS being created or edited as Unsent mail.[Add address]Sent address:Select an address from the Sent mail logs.Rcv. address:Select an address from the Received mail logs.Open phonebook:Select an address from the phonebook.Direct input:Enter the receiver address directly.[Report request]Set whether to request an SMS delivery notification when SMS isdelivered.→P170[Validity period]Set the duration a sent SMS can be kept undelivered at the SMScenter.→P172[Delete body]Delete the message text.[Delete SMS]Delete the SMS being composed.When the FOMA terminal is in the service area, SMS isautomatically received.・ Up to 1000 received SMS messages including i-mode mail canbe saved. However, the savable number depends on theamount of the data.1 When SMS is received appears at the top of thescreenWhen the reception is completed, theReception result screen opens.・ The previous screen returns if nooperation is performed for approximately30 seconds.・ Selecting "SMS" opens the Inbox listscreen.・ Until the Detail screen of received SMSopens, appears at the top of thescreen and (the number indicates thenumber of messages) appears on the Stand-by screen.Create SMS Screen Sub MenuAutomatically Receiving SMS(Short Message Service) MessagesReceive SMSReceptionresult screen](https://usermanual.wiki/LG-Electronics-USA/L06A.Users-Manual-3/User-Guide-1109034-Page-23.png)
![1 Received result screen (P170) ]"SMS" ]Select afolder2 Select the SMS to displaySMS that could not be received because the terminal wasout of service area (or for other reasons) are stored in theSMS Center. You can receive stored SMS by checking theSMS Center.・ You cannot check new messages while out of the service area.1 The Stand-by display ]g]"SMS" ]"Check new SMS"When the reception is completed, the Reception resultscreen opens.Set whether to request an SMS delivery report after theSMS is delivered. If this option is set to "ON", an SMSreport request indicating that the SMS has been deliveredto the receiver will be sent to you.1 The Stand-by display ]g]"Mail setting" ]"SMS" ]"SMS report request" ]"ON"/"OFF"171MailViewing New SMSReceived MailDetails screenChecking for SMS (Short MessageService) MessagesCheck new SMSConfiguring SMS SettingsSMS SettingsSMS ReportNote・ An SMS report will show the sent time and thenumber of the receiver.](https://usermanual.wiki/LG-Electronics-USA/L06A.Users-Manual-3/User-Guide-1109034-Page-24.png)
![172 MailSMS Validity PeriodSet the length of period that a sent SMS will be kept at theSMS center delivered because the recipient terminal is outof service area, etc.・ If "0 day" is selected, sending the SMS message is retried aftera while, then the message is deleted from the SMS center.1 The Stand-by display ] g]"Mail setting" ]"SMS" ]"SMS Validity Period" ]Select a periodSet the maximum number of characters that can beentered in an SMS message text.1 The Stand-by display ] g]"Mail setting" ]"SMS" ]"SMS Validity Period" ]Select a periodJapanese (70 characters):Set the maximum number ofcharacters to 70.English (160 characters):Set the maximum number ofcharacters to 160. Japanese may not be entered.You can specify the SMS center.1 M[Menu] ](Settings) ]"International roaming" ]"Network" ]"SMS center" ]Perform the followingoperations:[SMSC]DOCOMO:Set DOCOMO as the SMS center.Others:Set a carrier other than DOCOMO as the SMS center.[Address]When "Others" is selected for "SMS center", enter the connectionaddress of the SMS center.[Type of number]Set when "Others" is selected for "SMS center".unknown:If you do not know whether the SMS center phonenumber is for international calls, select this option.international:If the SMS center phone number is forinternational calls, select this option.2 I[Done]SMS input characterSMS Center* You usually do not need to change this setting.](https://usermanual.wiki/LG-Electronics-USA/L06A.Users-Manual-3/User-Guide-1109034-Page-25.png)
![174 i-mode/i-motion/i-Channeli-modei-mode is a service that allows the display of an i-modesupporting FOMA terminal (i-mode terminal) to be used withonline services such as site access, Internet access, or i-mode mail.・ i-mode is a fee-based service requiring a separate subscription.・ For details about i-mode, refer to "Mobile Phone User's Guide [i-mode] FOMA version".i-mode MenuDisplaying the i-mode MenuYou can use i-mode functions from the i-mode Menu.1 The Stand-by display ]I]Perform the followingoperations:[iMenu]Connect to the i-mode Center.→P175[Bookmark]Open the Bookmark folder list screen.→P182[Screen memo]Open the Screen memo list screen.→P184[Last URL]Open the last viewed i-mode site or web site.→P177[Go to location]Enter a URL to connect to the Internet.→P180[Message]Display a list of Message R/F.→P166i-mode menuscreenBefore Using i-mode・ Contents of sites and web sites are generallyprotected by copyright law. Data, such as text orimages you download to the i-mode terminal fromsites or web sites, can be used only for personalentertainment, but cannot be used, in whole or in part,as it is or after modification, for sale or redistribution,without the consent of the copyright holders.・ If you insert another UIM or turn the terminal power onwithout the UIM, depending on the model of theterminal, still images, videos, melodies, mailattachments (still images, videos or melodies), screenmemos, or Messages R/F cannot be viewed or played.・ When a file with UIM restrictions is set as the Stand-by display or ring tone, the setting will revert to itsdefault if a different UIM is inserted or the terminalpower is turned on without a UIM.](https://usermanual.wiki/LG-Electronics-USA/L06A.Users-Manual-3/User-Guide-1109034-Page-27.png)
![[i-Channel]Open the i-channel menu screen.→P196[Check new messages]Check whether i-mode mail or Message R/F is stored at the i-mode Center.→P165[i-mode setting]Configure the terminal i-mode functions.→P189Accessing SitesYou can use various services offered by IP (InformationProviders).・ Services vary depending on the Information Provider. Somesites require a separate subscription.1 i-mode menu screen(P174) ]"iMenu" ]"メニューリスト/検索(Menu list/Search)"appears at the top of the screen during i-modecommunication.・ Press I[Stop] to cancel a page download.2 Select an item (link)・ I[Bookmark]: Save the URL of the current page as aBookmark.・ P: Exit i-mode. Select "Yes".1 From the currently accessed site ]M[Menu] ]Perform the following operations:175i-mode/i-motion/i-ChannelC[Select]Note・ When a number appears in front of a linked item,press the corresponding Dial Key to access the site.It may not be possible to connect to some sites.・ Some sites may require the "serial number of yourmobile phone/UIM" to be sent in order to gain access.The "serial number of your mobile phone/UIM" is sentto the Information Provider (IP) so that the IP canrecognize you and provide customized information.The serial number is also used to judge whether thecontents that the IP provides can be used on yourmobile phone. The "serial number of your mobilephone/UIM card" is sent via the Internet to the IP andit may be seen by a third party. This action does notreveal your postal address, age, or sex to theInformation Provider.・ When information about the music played by yourmobile phone is required from the website, aconfirmation screen for sending music informationappears. When "Yes" is selected, the information(title, artist name, play date/time) of the music playedby your mobile phone is sent. The music informationto be sent is used by the IP (Information Provider) toprovide you with customized information, etc.Site Display Screen Sub Menu](https://usermanual.wiki/LG-Electronics-USA/L06A.Users-Manual-3/User-Guide-1109034-Page-28.png)
![176 i-mode/i-motion/i-Channel[Bookmark]Save:Save the URL of the current site as a Bookmark. Go toStep 2 in "Saving in Bookmarks" (P181).List:Open the Bookmark folder list screen.→P182Save:Save the current page as a Screen memo.→P181List:Open the Screen memo list screen.→P182[Save image]Save images contained in the current page.→P186[Show properties]Show URL:Display the URL of the current page.Page properties: Display the URL and title of the current page. Certificates:If the current page is an SSL page, the SSLcertificate is displayed.[Go to location]Input address:You can access a web site by entering its URL.Go to Step 2 (P180) in "Opening Web Site".URL history:You can visit a web site by selecting an entry inthe URL history. Go to Step 2 in "Using the URL History" (P181).[Home]Connect to the URL set as "Home".[Reload]If the site is updated, the updated page opens.[Compose message]Create i-mode mail with the URL of the open page pasted in themessage text. Go to Step 2 in "Creating and Sending i-modeMail" (P131). Select from the following options when a linkeditem is selected.This page:Attach the URL of the current page.Link page:Attach the URL of the link.[Change char code]If characters are not displayed correctly, change the characterencoding.[Add to phonebook]Save a phone number or mail address on the web page to thePhonebook.→P179[Retry]Play an animation/Flash movie contained in the current pagefrom the beginning.[Settings]Image display:Set whether to display images contained on thecurrent page.Sound effect: Set whether to play sound effects in the Flashmovie contained on the current page.i-motion type: Specify the i-motion type to download. →P194Note<Change character encoding>・ If characters are not displayed correctly, repeat thesteps. However, after the character code is changed4 times, the default character encoding returns.・ Characters may not be displayed correctly even afterrepeatedly changing the encoding.・ The new character encoding is valid only for the opensite.<Image display>・ Images may not be displayed correctly even if set to"Display". In this case, appears.](https://usermanual.wiki/LG-Electronics-USA/L06A.Users-Manual-3/User-Guide-1109034-Page-29.png)
![177i-mode/i-motion/i-ChannelTo download an SSL pageThe screen to the right opens when youaccess an SSL site. After the download iscompleted, the SSL page opens and appears on the top of the screen.To return to a normal siteThe screen to the right opens when you returnto a non-SSL site. Select "Yes" to return to anormal site, and disappears.Note・ If the SSL Certificate has already expired or the sitedoes not support SSL, a warning indicating that thissite may not be secure may appear. To connect,select "Yes". However, your personal information(credit card number or contact address) may not besent safely.Last URLOpen the Most Recently Accessed Web PageAfter i-mode is terminated, the URL of the last open pageis saved in "Last URL". You can re-connect to the mostrecently accessed page using Last URL.1 i-mode menu screen (P174) ]"Last URL" ]C[Connect]Operations on i-mode/Web SitesThis section describes basic operations on i-mode/Websites (pages).Going Back to the Previous Page/GoingThe FOMA terminal temporarily saves the displayed sitedata in a Cache.Data saved to the cache can be displayed, withoutrevisiting the site, by pressing J.・ However, the site will be reloaded if the data is larger than thecache size, or if the site requires the latest information alwaysbe loaded.・ Entered characters or settings at the site will not be stored inthe cache.](https://usermanual.wiki/LG-Electronics-USA/L06A.Users-Manual-3/User-Guide-1109034-Page-30.png)
![・ Terminating i-mode deletes data from the cache.Example: Pages are displayed in the order of Screen"A" → "B" → "C" → "B" → "D"If opening the pages in the order "A" → "B" → "C", then returningto "B", and opening "D", "C" is deleted from the cache. PressingJdisplays "B" ⇔ "D".Selecting Links or ItemsYou may need to perform operations using the followingitems while connected to i-mode. For details, refer to"Mobile Phone User's Guide [i-mode] FOMA version". 178 i-mode/i-motion/i-ChannelName Display DetailsexampleRadio button You can select only1 item.Check box You can selectmultiple items.Text box You can enter text.Select a text box toopen the text entryscreen.Pull down menu Select an item froma list of options.Click pull downmenus to displaythe items.(Not selected) (Selected)(Not selected)(Selected)Note<Text Box>・ You can enter a Phonebook entry or your own numbersaved in the FOMA terminal into a text box byperforming the following steps: M[Menu] ]"Quote" ]"Phonebook"/"Own number"Note・ Page navigation may differ when a Flash movie is displayed.…Paging orderLLL…Reverse paging order starting from screen "D"Selecting Links or Items](https://usermanual.wiki/LG-Electronics-USA/L06A.Users-Manual-3/User-Guide-1109034-Page-31.png)
![179i-mode/i-motion/i-ChannelThe FOMA terminal supports Flash, an animationtechnology using images and sounds. You can accesssites that provide various kinds of animations using theterminal. You can also download a Flash file and set it forthe Stand-by display.You can save a phone number or mail address displayed ata site to the Phonebook.1 From the currently accessed site ]Move the cursor toa phone number/mail address ]M[Menu] ]"Add toph.book" ]"Yes"Go to Step 2 in "Saving Contacts to the Phonebook fromReceived or Dialed Calls" (P85).Frequently accessed sites can be saved in My Menu forquick connection.・ Up to 45 entries can be saved in My Menu.・ Some sites cannot be saved in My Menu.1 Display a site to save ]Select "マイメニュー登録(Storein My Menu)"・ Item names may vary depending on the site.2 Select i-mode password text box ]Enter the i-modepassword ]"OK"・ The entered i-mode password is masked by asterisks ":".・ i-mode password→P180Displaying Flash MoviesNote・ Even if a Flash file is displayed, the animation maynot work correctly.・ Some Flash files use data about your FOMA terminal.To allow Flash files to use the data, set "Use phoneinfo" to "Yes".・ If the Flash movie contains audio, it will be played inthe volume set from the Flash playback screen(P242). To turn off sound effects, set "Sound effect"to "OFF".→P189・ If you play a Flash file with vibration set, the terminalvibrates regardless of the "Sounds&Vibration" (P100)settings on the terminal.・ Flash movies are not displayed if "Images" is set to"OFF". →P190・ Flash movies may appear differently depending on thelocation they are saved, the Data box, or Screenmemo.・ Flash sound effects are not played if they are set tothe Stand-by display / Call Display.Adding a Mail Address/Phone Number toPhonebookSaving Entries in My MenuMy MenuNote・ When you subscribe to a fee-based site in "メニューリスト (Menu list)", the site is added to My Menuautomatically.](https://usermanual.wiki/LG-Electronics-USA/L06A.Users-Manual-3/User-Guide-1109034-Page-32.png)
![180 i-mode/i-motion/i-Channel1 i-mode menu screen (P174) ]"iMenu" ]"EnglishiMenu" ]"My Menu" ]Select the site to access"i-mode Password" (4 digit) is required to subscribe to andunsubscribe from message services or fee-based i-modesites, or configure mail settings. The password is set to"0000" by default. Change it to a number of your ownchoice. Do not reveal your i-mode password to others.1 i-mode menu screen(P174) ]"iMenu" ]"English ]"Options" ]"Change i-mode Password"2 Select the "Current Password" text box ]Enter the i-mode password (4 digits)3 Select "New Password" text box ]Enter a new i-modepassword (4 digits)4 Select the "New Password (Confirmation)" text box ]Enter the new i-mode password (4 digits)5 "Select"You can view a web site by entering its URL. A URLconsists of half-pitch alphanumeric characters andsymbols.1 i-mode menu screen (P174) ]"Go to location"2 "Input address" ]Enter the URL ]C[Set]・ Up to 256 half-pitch characters can be entered.Up to 10 previously entered URLs are stored in the URLHistory. You can access a web site by using the URLhistory.1 i-mode menu screen (P174) ]"Goto location" ]"URL history"Accessing a Site from My MenuChanging the i-mode PasswordChange i-mode PasswordOpening a Web SiteInternet AccessNote・ If you forget the i-mode password, you need to bring apicture ID such as your driver's license to a servicecounter such as a docomo shop to have the i-modepassword reset to "0000".Note・ Web sites that do not support i-mode may not bedisplayed correctly.・ When the same URL as a history entry is accessed,the old URL is overwritten and the entry is shown asthe latest URL in the history.Using the URL HistoryURL historylist screen](https://usermanual.wiki/LG-Electronics-USA/L06A.Users-Manual-3/User-Guide-1109034-Page-33.png)
![2 Select the URL to access1 URL history list screen (P180) ]Move the cursor to aURL history entry ]M[Menu] ]Perform the followingoperations:[Connect]Connect to the selected entry in the URL history.[Edit URL]Edit and connect to the URL of the selected history entry.]Edit URL]C[Set][Delete]Delete one:Delete the selected URL history entry.Del. selected:Select and delete an entry in the URL history.]Place check marks next to the URL history entries to delete]I[Done]]"Yes" ・ Press M[Menu] and select "Mark all" or "Unmark all"Delete all:Delete entire URL history.]Enter the security code]"Yes"[Compose message]Create i-mode mail with the URL of the selected history entryalready pasted in the message text. Go to Step 2 in "Creatingand Sending i-mode Mail" (P131).Save frequently accessed sites or web sites in Bookmarksto display the page quickly.・ Up to 100 URLs can be saved in the Bookmarks folder.1 From the currently accessed site ]I[BK.mark]2 Edit the title ]I[Done] ]Select a destination folder・ If there is already the same URL saved, a confirmationscreen to overwrite appears. Select "Yes".181i-mode/i-motion/i-ChannelNote・ If more than 10 URLs are saved in the history, theoldest URL will be overwritten first.・ The URL visited will be re-displayed at the top of theURL history.URL History List Screen Sub MenuNote・ Up to 256 half-pitch characters can be entered for aURL saved as a Bookmark.・ Up to 12 full-pitch or 24 half-pitch characters can besaved for a Bookmark title.・ If the maximum number of Bookmarks has beensaved, a confirmation screen appears. Select "Yes" ]Select a folder ]Select Bookmark to delete ]Selecta destination folder.Saving and Quickly Displaying aSite/HomepageBookmarksSaving in Bookmarks](https://usermanual.wiki/LG-Electronics-USA/L06A.Users-Manual-3/User-Guide-1109034-Page-34.png)
![182 i-mode/i-motion/i-Channel1 i-mode menu screen (P174) ]"Bookmark"・ I[Add]: You can add a folder. Up to 16 full-pitch or 32 half-pitchcharacters can be entered for afolder name.■ Icons displayed on the Bookmark folder list screen2 Select a Folder 3 Select the Bookmark URL to access・ I[URL]: Display the URL.1 Bookmark list screen (P181) ]Move the cursor tofolder ]M[Menu] ]Perform the followingoperations:[Manage folder]Create folder:You can add a folder. Up to 16 full-pitch or 32half-pitch characters can be entered for a folder name.Rename folder:Edit the selected folder name.Sort folder:Sort the selected folders.[Delete]Delete one:Delete the selected folder.]Enter the security code ]"Yes"Delete all:Delete all Bookmarks.]Enter the security code ]"Yes"[Send all Ir data]Send all bookmarks via Infrared.(P259)]Enter the security code ]Enter the password ]"Yes"[Memory status]Display the number of saved bookmarks.Accessing Web Sites from BookmarksIcon Description(Gray) "Bookmark" (pre-installed folder)(Blue) User defined folderBookmark listscreenBookmarkFolder ListBookmark Folder List Screen Sub MenuNote<Rename folder/Sort folder/Delete 1 folder>・ The pre-installed "Bookmark" folder cannot berenamed, moved, or deleted.<Delete one>・ If there is a bookmark in the folder, a confirmationappears. Select "Yes" to delete.](https://usermanual.wiki/LG-Electronics-USA/L06A.Users-Manual-3/User-Guide-1109034-Page-35.png)
![1 Bookmark list screen (P181) ]Move the cursor to abookmark ]Select the bookmark ]M[Menu] ]Perform the following operations:[Connect]Connect to the selected bookmark site.[Edit title]Edit the title or URL of the selected Bookmark.]Edit the title or URL ]I[Done][Move]Move this:Move the selected bookmarks to another folder.Move selected:Select and move a bookmark.]Place check marks next to the bookmarks tomove]I[Done]]Select a destination folder]Press M[Menu] and select "Mark all" or "Unmark all"Move all:Move all bookmarks in the folder to another folder.[Delete]Delete one:Delete the selected bookmark. Del. selected:Select and delete bookmarks.]Place check marks next to the bookmarks to delete ]I[Done] ]"Yes"・ Press M[Menu] and select "Mark all" or "Unmark all".Delete all:Delete all bookmarks.]Enter the security code ]"Yes"[URL]Display the URL of the selected Bookmark.[Copy URL]Copy the URL of the selected Bookmark.[Compose message]Create i-mode mail with the selected bookmark attached. Go toStep 2 in "Creating and Sending i-mode Mail" (P131).[Ir exchange]Send:Send the selected bookmark via Infrared.Send all:Send all bookmarks in the folder via infrared.(P259)]Enter the security code ]Enter the password ]"Yes"[Memory status]Display the number of saved bookmarks.You can save the currently open page as a screen memo.Saved Screen memo pages can be opened withoutconnecting to i-mode.・ Up to 50 Screen memos can be saved. However, fewer pagescan be saved if the saved pages are long.・ Up to 100 Kbytes per page can be saved.1 From the currently accessed site ]M[Menu]]"Screen memo" ]"Save" ]"Yes"183i-mode/i-motion/i-ChannelBookmark Folder List Screen Sub MenuSave Site ContentsScreen MemoSaving Screen MemosNote・ If the maximum number of Screen memos havealready been saved, a prompt appears to ask whetheryou want to select and delete a memo. To select,choose "Yes" ]and select a Screen memo to delete.](https://usermanual.wiki/LG-Electronics-USA/L06A.Users-Manual-3/User-Guide-1109034-Page-36.png)
![184 i-mode/i-motion/i-Channel1 i-mode menu screen (P174) ]"Screen memo"2 Select the Screen memo to viewThe Screen memo detail screen is displayed.・ I[URL]: Display the URL.1 Screen memo list screen(P184)]Move the cursor toa Screen memo]M[Menu]]Perform the followingoperations[Display]View the selected Screen memo.[Edit title]Edit the title of the selected Screen memo. Up to 12 full-pitch or24 half-pitch characters can be entered for a title.[Delete]Delete one:Delete the selected Screen memo.Del. selected:Select and delete a Screen memo.]Place check marks next to the Screen memos to delete ]I[Done] ]"Yes"・ Press M[Menu] and select "Select all" or "Release all".Delete all:Delete all bookmarks.]Enter the security code ]"Yes"[URL]Display the URL of the selected Screen memo.[Protect on/off]One on/off:Disable/Enable the protection for the selectedScreen memo.Select on/off:Select a Screen memo and protect or unprotectit.]Place check marks next to the Screen memos to protect ]I[Done]]"Yes"・ Press M[Menu] and select "Select all" or "Release all".Unprotect all:Unprotect all Screen memos.]Enter the security code ]"Yes"[Memory status]Display the number of Screen memosViewing Screen MemosScreen memolist screenNote・ The information saved in a Screen memo is from thetime it was saved. The memo may not contain thelatest information.Screen Memo List Screen Sub Menu](https://usermanual.wiki/LG-Electronics-USA/L06A.Users-Manual-3/User-Guide-1109034-Page-37.png)
![1 Screen memo details screen]M[Menu]]Performthe following operations[Save image]Save an image contained in the Screen memo. Go to Step 2 in"Saving Images from a Site or Screen memo" (P186).[Show properties]URL:Display the URL of the displayed Screen memo.Page properties:Display the URL and the title of the displayedScreen memo.Certificates:If the displayed Screen memo is an SSL page, theSSL certificate is displayed.[Add to Phonebook]Save a phone number or mail address on the web page to thePhonebook.→P179[Retry]Play a Flash movie or an animation contained in the Screenmemo from the beginning.[Sound effect]Set whether to play sound effects of the Flash movie containedin the displayed Screen memo.On:The Flash movie sound effects will be played.Off:The Flash movie sound effects will not be played.[Edit title]Edit the title of the displayed Screen memo. Up to 12 full-pitch or24 half-pitch characters can be entered for a title.[Delete]Delete the Screen memo that is currently displayed.[Protect on/off]Protect or unprotect the displayed Screen memo.185i-mode/i-motion/i-ChannelScreen Memo Detail Screen's Sub MenuNote<Delete>・ Protected Screen memos cannot be deleted.Unprotect them before deleting.<Protect on/off>・ Up to 10 Screen memos can be protected. Thenumber of Screen memos that can be protected mayvary depending on the data size.](https://usermanual.wiki/LG-Electronics-USA/L06A.Users-Manual-3/User-Guide-1109034-Page-38.png)
![You can download files or data such as images or melodiesfrom sites and save them to the FOMA terminal.You can save images contained in the displayed site orScreen memo to the terminal.・ Obtained images will be saved in the "i-mode" folder in "MyPicture" of the "Data box".・ The format types of image file available to save are JPEG andGIF of up to 100Kbytes size.Example: To save the image displayed on a web page1 From the currently accessed site ]M[Menu] ]"Saveimage"2 "Select image" ]Select an image■To save the background image from a siteSelect "Save background".3 "Yes"186 i-mode/i-motion/i-ChannelA savable image has a dotted border.Note・ Images cannot be saved if "Images" is set to "OFF".・ Each image file name must be unique in the samefolder.・ Some images saved on the FOMA terminal may notproperly display even if they are displayed on the site.・ Some obtained images may not be displayed correctly.・ Image files in JPEG, GIF, or Progressive JPEG*formats cannot be displayed after they are saved ifthe size (pixels) exceeds the following. However, theycan be output to external devices such as beingattached to mail.- JPEG image files that exceed 1600x1200 pixels- GIF or Progressive JPEG image files that exceed800x600 pixels* Progressive JPEG is an image format that is used inthe Internet. The image looks coarse at the beginningof the download and the image sharpness improvesas the download progresses.Downloading Data from SitesSaving Images from a Site or Screen MemoSave image](https://usermanual.wiki/LG-Electronics-USA/L06A.Users-Manual-3/User-Guide-1109034-Page-39.png)
![187i-mode/i-motion/i-Channel・ Downloaded melodies will be saved in the "i-mode" folder in"Melody" of the "Data box".1 From the currently accessed site ]Select a melodyAfter the download completes, a confirmation appears.2 "Save"Play:Play the downloaded melody.File property:Display information about the downloadedmelody.Back:Return to the site without saving the melody.You can download templates for Deco-mail.・ Downloaded templates are saved in the "Template" (P138) ofthe Mail menu.1 From the currently accessed site ]Select a templateAfter the download completes, a confirmation appears.2 "Save"Preview:Display the downloaded template.File property:Display information about the downloadedtemplate.Compose mail:Use a downloaded template to createDeco-mail.Back:Return to the site without saving the template.3 I[Done]・ To rename and save a file, select C[Edit] ]Rename thefile ]Press I[Done].・ Downloaded dictionaries will be saved in "Download Dictionary"(P303).・ Up to 10 dictionaries can be saved. However, no more than fivedictionaries are available at one time.1 From the currently accessed site ]Select a dictionaryAfter the download completes, a confirmation appears.Note・ Download may not be possible depending on the site.・ Each melody file name must be unique in the samefolder.・ Some downloaded melodies may not be played correctly.・ Some downloaded melodies may have a section to beplayed already specified. These melodies will beplayed entirely in the playback, however, when themelody is set for a ring tone, only the specified part isplayed.Downloading Melodies from Sitesi-melodyDownloading Templates from a SiteDownload TemplatesDownloading Dictionaries from a SiteDownload Dictionaries](https://usermanual.wiki/LG-Electronics-USA/L06A.Users-Manual-3/User-Guide-1109034-Page-40.png)
![188 i-mode/i-motion/i-Channel2 "Save"View:Display information about the downloaded dictionary.Back:Return to the site without saving the dictionary.3 Select a saving destination・ If you are only using four or fewer dictionaries, aconfirmation whether to enable the downloaded dictionaryappears. Select "Yes" to enable it.When a phone number, mail address or URL is highlightedon a web page or in mail, you can use it to easily make acall, send i-mode mail or access the web site. ・ Phone To, AV Phone To, Mail To, or Web To function in mailsent from a PC may not be available.Make a voice call (Phone To)/video call (AV Phone To) tothe highlighted phone number at a site or in mail.1 Select a phone number ]Perform the followingoperationsMake Call:Make a voice call.Video phone:Make a video call.Copy:Copy the selected phone number.Add to phonebook:Add the selected phone number to thePhonebook.Go to Step 2 in "Saving Contacts to the Phonebook fromReceived or Dialed Calls" (P84).You can send mail to an Email address highlighted on asite page or in mail.1 Select a mail address・ Go to Step 3 in "Creating and Sending i-mode Mail"(P131).Access a URL highlighted on a site page or in mail.1 Select a URL・ When you access a URL shown in mail, pressC[Connect] after Step1.Using the Phone To/Mail To/Web To/i-αppli To FunctionsPhone To/Mail To/Web To/i-αppli To functionNote・ Using Downloaded Dictionaries→P303Note・ The Phone To/AV Phone To function may not beavailable depending on the site.Phone To/AV Phone To FunctionMail To FunctionWeb To FunctionNote・ The Mail To function may not be available dependingon the site.](https://usermanual.wiki/LG-Electronics-USA/L06A.Users-Manual-3/User-Guide-1109034-Page-41.png)
![You can start i-αppli from a URL highlighted on a site or ini-mode mail.・ If a check mark is not placed next to "Site i-αppli to"(P233) or"Mail i-αppli to" in "Set i-αppli to", the i-αppli will not start.1 Select i-αppli information ]"Yes"Set the functions for i-mode or Message R/F.Network1 i-mode menu screen (P174) ]"i-mode setting" ]"Communication" ]Perform the following operations:[Connection timeout]Set the time until the connection is automatically terminated ifno response was returned due to network traffic.→P191[Check new messages]Specify request items when using "Check new messages".]Place check marks next to the items to check ]I[Done]Display1 i-mode menu screen (P174) ]"i-mode setting" ]"Display" ]Perform the following operations[Images]Set whether to display images or Flash movies contained on sitepages or Screen memos.[Sound effect]Set whether to play sound effects of Flash movies contained onsites or Screen memos.[Use phone info]When a Flash image is displayed on a site or in a Screen memo,information saved on the terminal may be required. Set whetherto use the information from the phone in this case.[Font size]Set the font size for sites, Screen memos, or message text inMessage R/F.189i-mode/i-motion/i-Channeli-αppli To FunctionNote・ The Web To function may not be available dependingon the site.・ How a URL is displayed may vary depending on thesite.・ The Web To function may be available using ahighlighted item other than a URL.Note・ Some i-αppli, that immediately start directly from thesite using the i-αppli To function, may not be saved.Configuring i-mode Settingsi-mode settingConfiguring Network SettingsConfiguring Display Settings](https://usermanual.wiki/LG-Electronics-USA/L06A.Users-Manual-3/User-Guide-1109034-Page-42.png)
![190 i-mode/i-motion/i-Channel[Scroll]Set the number of lines scrolled with each Hpress on sites,Screen memos, or Message R/F.[Message list]Set the display method of the Message R/F list screen.1 line:Display only the subject in one line.2 lines:Display the subject and received date and time in twolines.[Auto-display]Set how Messages R/F are displayed automatically.→P165[Melody auto play]Set whether to automatically play a melody when a Message R/ F is displayed.→P165HomeTo set the home URL, select "Home" from the site displayscreen sub menu.1 i-mode menu screen (P174) ]"i-mode setting" ]"Home"2 Select "Enable" ]Select the "http" field ]Enter theURL ]I[Done]Others1 i-mode menu screen (P174) ]"i-mode setting" ]"Others" ]Perform the following operations:[Check settings]Check the options set in "i-mode setting".[Reset settings]Reset the options set in "i-mode setting" to the default.]Enter the security code]"Yes"Note<Images>・ Images may not be displayed correctly even when"Images" is set to "ON". In this case, appears.<Sound effect>・ Even if "Sound effect" is set to "ON", some soundeffects may not sound depending on the Flash movie.<Use phone info.>・ When this option is set to "Yes", the battery level,signal strength, Date & Time, Ring Volume,Language, and terminal model information may besent to the IP (Information Provider) via the Internet,and a third party may intercept the information.Configuring the Home SettingConfiguring Other SettingsNote・ If "Home" is set to "Disable", even selecting "Home"does not open the specified page. The URL entered inthe "http://" field will remain intact.](https://usermanual.wiki/LG-Electronics-USA/L06A.Users-Manual-3/User-Guide-1109034-Page-43.png)
![Connection timeoutSet the time until the connection is automaticallyterminated if no response was returned due to networktraffic.1 i-mode menu screen (P174) ]"i-mode setting" ]"Communication" ]"Connection timeout" ]"60seconds"/"90 seconds"/"Unlimited"・ If "Unlimited" is selected, the connection will not beautomatically terminated.Host SelectionSet an APN (Access Point Name) when you use servicesother than i-mode (DOCOMO). i-mode and i-mode mailbecome unavailable when you connect to an APN otherthan DOCOMO.1 M[Menu] ](Settings) ]"International roaming" ]"Network" ]"Host selection"2 I[Add] ]Enter the security code ]Perform the following operations:[Host name]Enter the host name within 15 full-pitch or 30 half-pitchcharacters.[Host number]Enter the number of the access point within 99 half-pitchalphanumeric characters.[Host address]Enter the host address within 30 half-pitch alphanumericcharacters.[Host address 2]Enter the host address for i-channel within 30 half-pitchalphanumeric characters.3 I[Done]1 Host selection screen(P191)]Select the accesspoint to change191i-mode/i-motion/i-ChannelSetting the Connection TimeoutChanging the Access Point from i-modeNote・ Even if this option is set to "Unlimited", theconnection attempt may be terminated because ofthe signal strength.* If you use the i-mode service of DOCOMO, do notchange the access point.Adding Access PointsChanging the Access PointHost selectionscreen](https://usermanual.wiki/LG-Electronics-USA/L06A.Users-Manual-3/User-Guide-1109034-Page-44.png)
![1 Host selection screen (P191) ]Move the cursor to anaccess point ]M[Menu] ]Perform the followingoperations:・ This option is not available while "i-mode" is selected.[Add new]Add a new access point.→P191[Edit]Edit the access point settings.]Enter the security code ]Edit the settings ]I[Done][Delete]Delete the selected access point. ]"Yes" ]Enter the security code[View]Display the selected access point settings. ・ C[Edit]: Edit the access point settings.You can view an SSL Certificate, or set a certificate validor invalid.1 i-mode menu screen (P174) ]"i-modesetting" ]"Certificates"・ C[Select]: Display the contents of theselected certificate.■ Icons displayed on the Certificate list screen2 Move the cursor to a certificate ]I[Invalid] / [Valid]1 Certificate list screen (P192) ]Move the cursor to acertificate ]M[Menu] ]Perform the followingoperations:[Certificate Info]Display detailed information about the selected certificate.[Valid/Invalid]Set the selected certificate to valid or invalid.192 i-mode/i-motion/i-ChannelHost Selection Screen Sub MenuNote・ Pake-Hodai/Pake-Hodai Full/Pake-Hodai Double is notapplied to packet communication with an APN otherthan "i-mode".・ When an access point is changed, the i-Channelticker does not appear. When the information isupdated or you download the latest information bypressing Q in Standby, the ticker will appearautomatically.・ If the current access point is deleted, "i-mode" will beset as the default host.Manipulating SSL CertificatesSSL Certificate InfoCertificate List Screen Sub MenuCertificate listscreenIcon DescriptionValid certificateInvalid certificate](https://usermanual.wiki/LG-Electronics-USA/L06A.Users-Manual-3/User-Guide-1109034-Page-45.png)
![i-motion movies are videos with graphics and audio. Theycan be obtained from i-motion sites, played, saved, and setas the Stand-by display or a ring tone, etc.There are 2 types of i-motion movies.■ Standard typeThere are 2 formats of the Standard type.1The format in which an i-motion movie can be played afterdownload (Up to 500KB)2The format in which an i-motion movie can be played duringthe download (Up to 500KB)・ Some standard type i-motion movies cannot be saved.■ Std/Streaming typesYou can play this type of i-mode movie while it is beingdownloading. Up to 2MB of i-motion movie can be played. Thedata will be deleted after playback. It cannot be saved on theFOMA terminal.Up to 1000 i-motion movies can be saved. However, thesavable number depends on the amount of the data.・ Downloaded i-motion movies are saved in the "i-mode" folder in"i-motion" of the "Data box".1 From the currently accessed site ]Select an imotionmovie・ When "i-motion auto play" is set to "ON", an i-motion movieis played automatically after being downloaded.Operations during Playback→P250■Std/Streaming-Type i-motion movies・ The Playback confirmation screen opens. Select "Yes"to play the i-motion movie while it is being downloaded.・ When "i-motion type" is set to "Standard type", youcannot play the i-motion movie during the download.Switch the type to "Std/Streaming", and download theimotion movie again.→P1942 After the downloadQ]"Save"Play:Play a downloaded i-motion movie.File property:Display detailed information about thedownloaded i-motion movie.Back:Return to the Site display screen without saving thei-motion movie.193i-mode/i-motion/i-ChannelCertificates used for SSL communicationThese certificates are issued by an authenticationcompany, and are saved on the terminal by default.i-motioni-motion TypesNote・ i-motion movies that can be downloaded and playedare in the MP4 (Mobile MP4) format. i-motion moviesin the ASF format cannot be downloaded or played.Downloading i-motion Movies fromSitesi-motion Download](https://usermanual.wiki/LG-Electronics-USA/L06A.Users-Manual-3/User-Guide-1109034-Page-46.png)
![194 i-mode/i-motion/i-ChannelWhen a ticker is set in an i-motion movie, the ticker isdisplayed during playback. If a phone number, a mailaddress, or an URL is included in the ticker, you can usePhone To, AV Phone To, Mail To, or Web To functions afterthe ticker is finished.1 After an i-motion playback is finished ]Select an itemi-motion Auto PlaySet whether to play an i-motion movie automatically whenit is downloaded from a site or mail.1 i-mode menu screen (P174) ]"i-mode setting" ]"i-motion" ]"i-motion auto play" ]"ON"/"OFF"i-motion typeSet the type of the new i-motion movie to download from asite.1 i-mode menu screen (P174) ]"i-mode setting" ]"i-motion" ]"i-motion type" ]Select the typeStandard type:Only standard-type i-motion movies will bedownloaded.Std / Streaming:The standard or streaming type i-motionmovies will be downloaded.Note・ Depending on the connected site or i-motion movie,some i-motion movies may not be downloaded, orplayed during the download.・ If you play a movie while downloading it, the moviemay stop playing or the picture may become distorteddue to signal strength.・ Each i-motion file name must be unique in the samefolder.・ Some i-motion movies cannot be saved on the FOMAterminal.・ Some i-motion movies have playback restrictions.appears for an i-motion movie with fixed number ofplays set. appears for the i-motion movie with theplayback expiration or playback restrictions set.Expired i-motion movies cannot be played.・ Some downloaded i-motion movies may not playcorrectly.When a Link is Set in TickerSetting Whether to Play an i-motion MovieAutomaticallySetting Whether to Play an i-motion MovieAutomaticallySetting Whether to Play an i-motion MovieAutomaticallySpecifying a Type of i-motion Movie toDownloadNote・ Even if this option is set to "OFF", streaming-type i-motions will be automatically played.](https://usermanual.wiki/LG-Electronics-USA/L06A.Users-Manual-3/User-Guide-1109034-Page-47.png)
![195i-mode/i-motion/i-Channeli-Channel is a service through which provides informationsuch as news or weather forecasts to i-Channel compatibleterminal. (Only Japanese)The latest updated information receives automatically thatis displayed in a ticker on the Stand-by display. Press Qto open the channel list with the updated information.Moreover, you can obtain useful information by selectingfavorite channels from the channel list. The view of i-Channel list→P195・ i-Channel is a fee-based service requiring a separatesubscription (an i-mode contract is necessary for thissubscription).There are 2 types of i-channel "Basic channels" provided byDOCOMO and "Favorite channels" provided by IP(Information Service Provider). "Basic channels" areprovided by DOCOMO. They are saved by default andimmediately become available upon subscription to i-Channel. Packet communication charges do not apply toautomatic update of information delivered to "Basicchannels". "Favorite channels" are provided by an IP(Information Provider) other than DOCOMO and areavailable when you register your favorite channels. The i-Channel service fee does not include Packetcommunication charges for automatic update ofinformation delivered to "Favorite channels". However,"Basic channels" and "Favorite channels" require packetcommunication charges for viewing detailed informationfrom a channel list, in addition to the i-Channel service fee.The i-Channel service charge does not include the packetcommunication charges for auto-updating the "Basicchannels" information that is delivered during InternationalRoaming.・ For details about i-Channel, refer to "Mobile Phone User's Guide[i-mode] FOMA version".If you subscribed to i-Channel, information appears in aticker on the Stand-by Display as the information isreceived.・ To display the ticker automatically , set "Ticker display" to "ON".→P196・ When Public mode (Drive mode) is set, the ticker will not bedisplayed.1 Stand-by display ]Q2 Select a channelThe site is connected and detail information appears.・ L:The Channel list screen returns.Note・ To download streaming type i-motion movies, "Std/Streaming" must be set.i-ChannelDisplaying the i-ChannelsQTickerTickerChannel list](https://usermanual.wiki/LG-Electronics-USA/L06A.Users-Manual-3/User-Guide-1109034-Page-48.png)
![You can set whether to display the ticker on the Stand-by displayor to set the ticker display speed. All i-channel information on theFOMA terminal can be deleted.1 I]"i-Channel" ]Perform the following operations:[i-Channel list]Open the Channel list screen.[Ticker setting]Ticker display:Set whether to display a Ticker on the Stand-bydisplay. Ticker speed:Set the ticker display rate.[Reset i-Channel]Delete the i-Channel data downloaded in FOMA terminal to resetTicker Display to its default status when purchasing.Note・ While information is being received, blinks.・ Even when the information arrives, a ring tone doesnot sound nor does the terminal vibrate. Theillumination does not light/blink either.・ Information may not be received when the terminalpower is turned off, while the terminal is out ofservice area, or when the signal reception is weak.Press Qin Stand-by to receive information. Then theobtained information will be displayed automatically inthe ticker on the Stand-by display. Also, informationmay not be received if the default settings are kept.In this case, hold down Q. The information will bereceived and it will be displayed in the ticker on theStand-by display automatically.・ In some conditions, information may be received onlywhen a channel list is displayed.・ If you change the access point in "Host selection" of"i-mode setting", the access point of i-Channel is alsochanged. (Normally, you do not need to change thesettings).・ The ticker will not appear after i-Channel is canceled.・ When an i-motion movie is set to the Standby display,the ticker will not appear during playback.・ There may be a warning of failure to acquire channelinformation if:- the i-Channel access point has been changed- The UIM has been replacedConfiguring i-Channel Settingsi-Channel SettingNote<Ticker display>・ If you cancel the i-mode service before canceling i-channel, the "Ticker display" setting remains.196 i-mode/i-motion/i-Channel](https://usermanual.wiki/LG-Electronics-USA/L06A.Users-Manual-3/User-Guide-1109034-Page-49.png)

![200 Camera* The video file name does not contain the capture time inseconds.・ Captured still images are stored in the "Camera" folder under"My Picture" in the "Data box" on the FOMA terminal.1 Stand-by display] G■ Key operations on the still image capture screen*If a still image is already saved in "Camera" folder in "Mypicture", the still image list screen in "Camera" isdisplayed.Still Image File Movie FileFile Format JPEG MP4(Mobile MP4)ResolutionEncoding − Video: MPEG-4Format Voice: AMRFile .jpg .3gpExtensi onFile Name The year, month, date, hour and minute of the time ofcapture will be added automatically. Example: If taken at 10:10:10 seconds on 2009/05/1Photo-mode: "P2009_0501_101010"Movie-mode: "V2009_0501_1010_0"*Maximum Approx.1600Kbytes Approx. 80MbytesFile SizeSave Format of Still Images or MoviesQCIF (176x144)Sub-QCIF (128x96)UXGA (1200×1600)SXGA (960×1280) VGA (640×480) CIF (352×288)Wallpaper (240x320)QCIF (176x144) Sub-QCIF (128x96)Phonebook (120x160)Menu-icon (80x70) Capturing Still ImagesPhoto-modeStill imagecapture screenKey DescriptionC[Take] ShutterHZoomJ Brightness controlsM[Menu] Display sub menuI[ ] Display "My picture" folder list screen*Q[Cancel] Exit Photo-mode](https://usermanual.wiki/LG-Electronics-USA/L06A.Users-Manual-3/User-Guide-1109034-Page-53.png)
![201Camera2 Frame the shot ]C[Take]After an image is captured, the Confirm save screenopens, and you can select whether to save the image.3 C[Save] ]Select the saving destination folder ]C[OK]The confirmation save screen isappeared, press C[OK] to save thecaptured image and the still imagecaptured screen returns.■To cancel saving Press I[Cancel].・ Press I[Mail] on the Confirm savescreen to create i-mode mail withthe captured still image attached.1 Still image capture screen(P200)] M [Menu] ]Perform the following operations[ Camera-mode]Change modes[ Shoot with frame]Add a frame to the subject when capturing an image.Off : No frame is attached.Choose frame : Select a frame from "My picture".[ Continuous mode]Capture continuous (sequential) images when the shutter ispressed.Up to 6 continuous images smaller than CIF 352×288 pixels, orup to 4 images of CIF 352×288 pixels.Off : No continuous capturing.Auto : Take continuous pictures by pressing the shutteronce. Images are captured with approx. 0.7 secondintervals.Manual : Take continuous pictures by repeatedly pressing theshutter.For images captured with "Continuous mode"You can select, delete, or display images to save on theConfirm save screen.・ To save selected images, select images to save andpress C[Save] or M[Menu] ]"Save selected". The"Specify saving destination" screen opens.・ To save all captured images, press M[Menu] ]"Saveall". The Specify saving destination screen opens.・ To send selected images via mail, select images to sendand press M[Menu] ]"Send via mail".・ To delete selected images, select images to delete andpress M[Menu] ]"Delete".・ To display only the selected images, press I[View].When "Auto saving" (P206) is set to "ON"If you press C[Take], a still image is captured andautomatically saved in the destination specified under"Auto saving" (P206).Confirm saveNote・ Even when Manner mode is activated, the shuttertone sounds when capturing.・ When a still image is being displayed, the illuminationkeeps red. While taking the video, the illuminationblinks.Still Image Capture Screen sub menu](https://usermanual.wiki/LG-Electronics-USA/L06A.Users-Manual-3/User-Guide-1109034-Page-54.png)
![[ Night mode]Activate when capturing images in dark places.[ Effect]Add an effect when capturing images.[ White balance]Set hue/tint for the image. When set according to the capturingconditions, a naturally colored image can be produced.[ Auto timer]Set the number of seconds from the time the shutter is presseduntil the picture is taken.[ Select size]Set the image size to take.[ Quality]Select the image quality of still images.1 Confirm Save screen (P200)]M[Menu] ]Perform thefollowing operations:[New picture]Return to the still image capture screen.[Send via mail]Create i-mode mail with the captured image attached.→P131[Edit image]Edit the captured still image.→P244[Delete]Cancel save and delete the still image.[Set as wallpaper]Set the captured image as the Stand-by display wallpaper.202 CameraNote・ If the "Select size" is set to "UXGA (1200x1600),SXGA (960x1280)", the zoom feature cannot beused.<Continuous mode>・ When "Continuous mode" is set, the picture size isreduced to "CIF (352x288) " if the "Select size" is setlarger than "CIF (352x288)".・ When "Continuous mode" is set, the "Auto timer" isdisabled.Confirm Save Screen sub menu](https://usermanual.wiki/LG-Electronics-USA/L06A.Users-Manual-3/User-Guide-1109034-Page-55.png)
![203Camera・ Captured still images are stored in the "Camera" folder under"My Picture" in the "Data box" on the FOMA terminal.1 Stand-by display]G(For 1+ seconds)■ Key operations on the Movie capture screen*1 This is available during a movie capture.*2 If a still image is already saved in "Camera" folder in "i-motion",the video list screen in "Camera" is displayed.2 Frame the shot]CStart capturing a movie.3 To stop capturing ]C After a movie is captured, the Confirm save screenopens, and you can select whether to save the video.・ From the Confirm save screen, select M[Menu] ]"Play" to play the video.4 C [Save] ]Select a destination folder ]C[OK]Press C[OK] to save the capturedvideo. After that, the Movie capturescreen appears.■To cancel saving Press I[Cancel]・ Press I[Mail] on the Confirm savescreen to create i-mode mail withthe captured video attached.Capturing MoviesMovie-modeMovie capturescreenKey DescriptionCStart capturing/End capturingHZoom*1J Brightness controls*1M[Menu] Display sub menuI[ ] Display "i-motion" folder list screen*2Q[Cancel] Exit Movie-modeConfirm savescreenWhen "Auto saving" (P206) is set to "ON"C[Start capturing] Capturing ends, and the capturedvideo automatically will be saved in the destinationspecified under "Auto saving" (P206). The Confirm savescreen opens and the Movie capture screen returns.Note・ Even when Manner mode is activated, the shuttertone sounds when capturing starts and ends.・ When movie capture screen is being displayed, theillumination keeps red. While capturing movie, theillumination blinks.・ Video capturing will be terminated when it is interrupted by a call. After the call is terminated, theConfirm save screen appears.](https://usermanual.wiki/LG-Electronics-USA/L06A.Users-Manual-3/User-Guide-1109034-Page-56.png)
![1 Movie capture screen (P203) ]M [Menu]]Performthe following operations:[ Camera-mode]Change modes[ Size restriction]Limit the file size of a captured movie.[ Night mode]Activate when capturing images in dark places.[ Effect]Add an effect when capturing images.[ White balance]Set hue/tint for the image. When set according to the capturingconditions, a naturally colored image can be produced.[ Select size]Set the image size to take.[ Quality]Set the image quality of movies.[ Type]Set whether graphics or sounds are to be included in movies.[ Common mode]Movies captured when "Common mode" is activated can beplayed regardless of the type or model of the FOMA terminal.1 Confirm Save screen (P203)]M[Menu] ]Perform thefollowing operations:[New movie]Return to the Movie capture screen.[Send via mail]Create i-mode mail with the captured movie attached.→P131[Delete]Cancel saving the movie and delete it.[Set as wallpaper]Set as the Stand-by display wallpaper.204 CameraMovie Capture Screen Sub MenuNote・ When "Common mode" is set to "ON", "Quality" is notavailable.Confirm Save Screen sub menu](https://usermanual.wiki/LG-Electronics-USA/L06A.Users-Manual-3/User-Guide-1109034-Page-57.png)
![Set the image zoom magnification. Available maximum magnifications are as follows:Set the Camera functions according to the capturing conditions The maximum zoom of each image size is shownbelow.1 Still image capture screen (P200) / movie capturescreen (P203) ]Use Hto set zoomAdjust the brightness (exposure) of the image.The brightness can be set from -2 to +2.1 Still image capture screen (P200) / movie capturescreen (P203) ]J Select brightness (exposure) ofthe image205CameraChanging the Capture SettingsUsing ZoomAdjusting BrightnessZoom Settings(Example: Still imagecapture screen)ZoomBrightnessDisplay brightness(Example: Still imagecapture screen)Camera mode Image size ZoomMaximum magnificationSXGA (1280x960) − −SXGA (1280x960) − −VGA (640x480) Approx.1.8CIF (352x288) Approx.2.1Wallpaper (240x320) Approx.2.2Photo mode QCIF (176x144) 10steps Approx.2.7Sub-QCIF (128x96)For the Phonebook Approx.2.8(120x160)Menu-icon (80x70) Approx.3.4Movie mode QCIF (176x144) 10steps Approx.2.1Sub-QCIF (128x96) Approx.2.3](https://usermanual.wiki/LG-Electronics-USA/L06A.Users-Manual-3/User-Guide-1109034-Page-58.png)
![Set the number of seconds from the time the shutter ispressed until an image is captured.・ The Auto Timer is not available for movie capturing.1 Still image capture screen (P200)]M[Menu]][Auto timer]2 "None"/"3sec"/"5sec"/"10sec"(the number represents the number of seconds) appears at the top of the screen.3 C [Take]Auto timer starts. An image is captured after the setnumber of seconds automatically. After the shutter button is pressed, Illumination flashesbefore the image is captured.Set whether to save the captured still image/movieautomatically.1 M [Menu] ](Camera) ]"Camera settings"]"Saving option"]Perform the following operations:・ C [List]: List of items is displayed.[Auto saving]Set whether to save the captured image automatically.[Save picture to]*Specify the saving destination for a still image.[Save movie to]*Specify the saving destination for a movie.* This appears when "Auto saving" is set to "On".2 I [Done]206 CameraSetting the Auto Timer Changing the Camera SettingsCamera SettingsSaving Option](https://usermanual.wiki/LG-Electronics-USA/L06A.Users-Manual-3/User-Guide-1109034-Page-59.png)
![207Camera1 M [Menu] ](Camera) ]"Camera settings"]"Shutter sound"]Select a shutter toneSelecting an item plays the sound.The flicker on the screen under a fluorescent light, etc. maybe reduced.1 M [Menu] ](Camera) ]"Camera settings"]"Flicker tuning" ]Select the tuning methodAuto : Suppress the flicker automatically.50Hz: Select this option in the location where thefrequency of the power is 50Hz.60Hz: Select this option in the location where thefrequency of the power is 60Hz.Setting the Shutter SoundTuning Flicker](https://usermanual.wiki/LG-Electronics-USA/L06A.Users-Manual-3/User-Guide-1109034-Page-60.png)

![210 MusicPlaying MusicYou can play music with the FOMA terminal in one of thefollowing 2 ways:・ Playing music with the Music player Play a Chaku-Uta-Full®song downloaded from a site.・ Playing an i-motion movie Play an audio only i-motion moviedownloaded using i-mode and saved in the Data box. →P249Saving a Chaku-Uta-Full®songDownloading a Chaku-Uta-Full®song・ Up to 1000 Chaku-Uta Full®songs of up to 5MB eachcan be saved.・ Downloaded Chaku-Uta-Full®songs will be saved in the "i-mode" folder or "Music" in the "Data box".1 Access a site that provides Chaku-Uta- Full®songs ]Select a Chaku-Uta-Full®song to downloadAfter the download completes, a confirmation appears.2 "Save" ]Select save locationPlay : Play the downloaded Chaku-Uta-Full®song.File property : Display information about the downloadedChaku-Uta-Full®songBack : Return to the Web site without saving the Chaku-Uta-Full®song.Playing a Chaku-Uta-Full®SongYou can play a Chaku-Uta-Full®song saved in the FOMAterminal.■ Available Chaku-Uta-Full®File Format1 M[Menu] ](MUSIC)]"Music player"]Perform thefollowing operations:Note・ Each Chaku-Uta-Full®song name must be unique inthe same folder.File Format MP4Bit rateMPEG-4 AAC: 8-128 Kbps HE-AAC: 8-128 Kbps Enhanced aacPlus: 16-48 kbpsThe number of Approx. 1000 songssongs that can be savedThe number of Up to 10playlists that can be createdMUSIC screen](https://usermanual.wiki/LG-Electronics-USA/L06A.Users-Manual-3/User-Guide-1109034-Page-63.png)
![211[Music life]Play Chaku-Uta-Full®songs suitable for special occasions orcircumstances.→P219[Playlists]Display, create, or play a Playlist.→P215[All songs]Up to 50 songs saved in the FOMA terminal will be displayed.→P211[Artist]Sort and display Chaku-Uta-Full®songs in the "All songs" folderby artist.[Genre]Sort and display Chaku-Uta-Full®songs in the "All songs" folderby genre.[Album]Sort and display Chaku-Uta-Full®songs in the "All songs" folderby album.You can continuously play all songs saved in the FOMAterminal, or only songs specified by artist name, genre, oralbum title.Example: To play music in "All songs"1 Music Player screen (P210)]"Allsongs"2 Move the cursor to a Chaku-Uta-Full®song ]C"Play"Chaku-Uta-Full®songs will be played in the order ofappearance starting from the selected Chaku-Uta-Full®song.Music Note・ To play the last played song, in Stand-by select M[Menu]](MUSIC) ]"Recent played" ・ Sorting conditions for Artists, Genre and Album is inaccordance with the detailed information about aChaku-Uta-Full®song.・ When you enjoy the programs overseas, the actualexpiration date may be earlier or later than the datedisplayed for the program.Chaku-Uta-Full®Music player screen3126754Continuously Playing Chaku-Uta-Full®Songs](https://usermanual.wiki/LG-Electronics-USA/L06A.Users-Manual-3/User-Guide-1109034-Page-64.png)
![1Album title, artist name and song title2Playback progress bar/Elapsed time/Total timeThe bar shows the playback elapsed time.3Volume4Shuffle settingThis appears when "Shuffle ON" is selected5Repeat settingCurrent songAll songs6Jacket image/Stand-by image/Lyrics7Playback status■ Key operations on the Music player screen1 Chaku-Uta-Full®list screen (P211) ]Move the cursorto a Chaku-Uta-Full®song]M[Menu] ]Perform thefollowing operations:・ C[Play] : Play from the selected Chaku-Uta-Full®song.・ I [Playlist]: Add the selected Chaku-Uta-Full®song to aplaylist.→P217[Play]Play from the selected Chaku-Uta-Full®songs.[Add to playlist]Add the selected Chaku-Uta-Full®song to a playlist.→P217[Multiple choice]Select and play multiple Chaku-Uta-Full®songs Operationsduring playback are the same as for a Playlist.→P215 ]Place check marks next to Chaku-Uta-Full®songs to play]I[Play] ・ Press M[Menu] to select "Play", "Add to playlist", or "Mark/Unmark". Selecting "Add to playlist" allows you to add Chaku-Uta-Full®songs with check marks to a playlist.212 MusicSub Menu on the Chaku-Uta-Full®List ScreenKey DescriptionCPause/PlayC(for1+seconds) Cue the songup to the beginning, thenpauseH F /EAdjust the volumeL /RCue the song up to the beginning or playthe previous/Play the next songL/R(Hold down) Rewind/fast forward while being pressed#Switch the Shuffle setting*Switch the Repeat setting1-5Change the screen design7/9Display the previous/next image8Switch Jacket image/Lyrics/HideI[List] Open the Chaku-Uta-Full®list screenis displayed at the right side of thesong title while list screen is displayed.PQuit the Music playerNote・ The music continues even if you close the FOMAterminal when the Music player screen is open.・ Playback is paused for the following occasions. Theplayback will resume automatically after the operationcompletes.- When a voice or video call arrives- When i-mode mail or SMS is received- When an alarm sounds・ Sound effects such as the key tone do not soundduring Chaku-Uta-Full®playback.](https://usermanual.wiki/LG-Electronics-USA/L06A.Users-Manual-3/User-Guide-1109034-Page-65.png)
![213Music [Search]*Specify "Title", "Artist", "Album", "Genre", or "Year" to search for aChaku-Uta-Full®song.]Select an item]Enter the item]I[Search]・ All Chaku-Uta-Full®songs that match all specified conditionsare displayed.[Sort]Set conditions to rearrange Chaku-Uta-Full®songs. [File property]Display or edit the information of the selected Chaku-Uta-Full®song. ]Select an item ]I[Edit] ]Edit the item・ Some items cannot be edited.* This will not appear on the Chaku-Uta-Full®list screen inArtists/Genre/Album.1 Music player screen (P211)]M[Menu]]Perform thefollowing operations: [Go to MUSIC]Open the MUSIC screen while a Chaku-Uta-Full®song is beingplayed.→P210[List]Open the Chaku-Uta-Full®list screen.→P211[File property]Display the information of the Chaku-Uta-Full®song in playback.[Shuffle ON/ShuffleOFF]Enable or disable shuffle play.[Set repeat]None: Playback is not repeated.Current song:The Chaku-Uta-Full®song in playback is repeated.Play all: Play all Chaku-Uta-Full®songs on the Chaku-Uta-Full®list screen repeatedly.[Jacket image]Display or save the Jacket image to the Data box. →P214[Lyric]Display or save the Lyrics to the Data box. →P214[Set as tone]Set the Chaku-Uta-Full®song in playback as a ring tone. →P214[Player skin]Change the appearance of the Music player screen.[Connect to URL]Access the site if the Chaku-Uta-Full®song in playback containsa URL.Sub Menu on the Music Player Screen](https://usermanual.wiki/LG-Electronics-USA/L06A.Users-Manual-3/User-Guide-1109034-Page-66.png)
![1 Music player screen (P211)] M [Menu]]"Set as tone"2 Select a ring tone typeVoice ringtone :Set as a ring tone for a voice call.Video ringtone :Set as a ring tone for a video call.Mail tone :Set as a ring tone for i-mode mail.Message R tone :Set as a ring tone for Message R.Message F tone :Set as a ring tone for Message F.SMS :Set as a ring tone for SMS.Alarm tone :Set as an alarm tone.3 Select a range to set as the ring tone[Full song ring tone]Set the entire Chaku-Uta-Full®song in playback as a ring tone.[Point ring tone]If the Chaku-Uta-Full®song in the playback has already a rangespecified, this option can be selected.[Free point ring tone]Specify and set starting and ending points as a range for the ringtone.]Use Jto find a start point]M[Start]]J UseJto find an endpoint]M [Done]Viewing Images or Lyrics Contained in aChaku-Uta-Full®SongYou can view and save Jacket images, Stand-by images, orLyrics contained in a Chaku-Uta-Full®song.1 Music player screen (P211)]M[Menu] ]"Jacketimage"/"Lyric"]Perform the following operations:[Next image]View the next image or lyrics.[Previous image]View the previous image or lyrics.[Full view]View an image or lyrics to fit the screen.[Display ON / OFF]Show/hide the image or lyrics.[Save in databox]Save the displayed image or lyrics to "i-mode" in "My Picture" inthe "Data box".214 MusicNote・ To select a Chaku-Uta-Full®song as Alarm, setting theChaku-Uta Full®wanted to "ON" in advance is required.・ If selecting "Alarm tone", further select which alarm.・ Some Chaku-Uta-Full®songs cannot be set as a ringtone.Setting a Chaku-Uta-Full®song as a Ring](https://usermanual.wiki/LG-Electronics-USA/L06A.Users-Manual-3/User-Guide-1109034-Page-67.png)
![215Music Using PlaylistYou can specify the order in which to play Chaku-Uta-Full®songs in a Playlist. You can play any songs in the order ofyour choice from all songs saved in the FOMA terminal.Setting a Chaku-Uta-Full®song as a RingUp to 10 Playlists and up to 50 Chaku-Uta-Full®songs perPlaylist can be saved.1 Music player screen (P210)]"Playlists"2 I [New] ]Enter a Playlist nameUp to 30 full-pitch or half-pitch characters can be entered.3 Place check marks next to Chaku-Uta-Full®songs toadd]I[Done]・ M[Menu]: You can select "File property", "Mark all","Unmark all", or "Sort".1 Playlist screen (P215) ]Select aPlaylist2 Move the cursor to a Chaku-Uta-Full®song ]C"Play"Chaku-Uta-Full®songs will be played in the order of appearancestarting from the selected Chaku-Uta-Full®song.1 Playlist screen (P215)]Move the cursor to aPlaylist]M[Menu]]Perform the following operations:[Play]Play the selected Playlist.[New playlist]Create a Playlist.→P215[Rename]Change the Playlist name.[Copy playlist]Copy the selected Playlist and create a new Playlist. ]"OK" ] Enter a new playlist nameCharging with the AC AdapterSub Menu on the Playlist List ScreenPlaylist screenList screen forChaku-Uta Fullin Playlists](https://usermanual.wiki/LG-Electronics-USA/L06A.Users-Manual-3/User-Guide-1109034-Page-68.png)
![216 Music[Delete playlist]Delete the selected Playlist.[Multiple choice]Select and delete Playlists.]Place check marks next to Playlists todelete]I[Delete]]"Yes"・ Press M[Menu] to select "Delete" or "Mark/Unmark".1 Playlist Chaku-Uta-Full®list screen (P215) ]Move thecursor to a Chaku-Uta-Full®song]M[Menu]]Perform the following operations:・ I[Add]: Add the displayed Chaku-Uta-Full®song to aplaylist.[Play]Play from the selected Chaku-Uta-Full®songs.[Add songs]Add the displayed Chaku-Uta-Full®song to a playlist.]Place check marks next to Chaku-Uta-Full®songs to add ]I[Done]・ You can select "File property", "Mark all", "Unmark all", or "Sort"using M[Menu].[Move]Change the order of the selected Chaku-Uta-Full®songs.[Delete from list]Delete the selected Chaku-Uta-Full®song from the playlist.[Multiple choice]Select and play multiple Chaku-Uta-Full®songs operations duringplayback are the same as for a Playlist.→P215]Place check marks next to Chaku-Uta-Full®songs to play ]I [Play]・ Press M[Menu] to select "Play", "Delete from list", or "Mark/Unmark".[Search]Specify "Title", "Artist", "Album", "Genre", or "Year" to search for aChaku-Uta-Full®song.]Move the cursor to an item ]Enter the item]I[Search]・ All Chaku-Uta-Full®songs that match all specified conditionsare displayed.・ Press M[Menu] to select "Play", "Add to playlist", "Save","Multiple choice", "Sort" or "File property". Selecting "Save"deletes Chaku-Uta-Full®that were not found from the Playlist.[Sort]Rearrange Chaku-Uta-Full®songs based on the sort.[File property]Display or edit the information of the selected Chaku-Uta-Full®song.]Move the cursor to an item ]I[Edit] ]Edit the item・ Some items cannot be edited.Note<Rename/Delete playlist>・ These options are not available for "All songs" and"Quick playlist".<Copy playlist>・ This option is not available for "All songs".Sub Menu on the Playlist Chaku-Uta-Full®List Screen](https://usermanual.wiki/LG-Electronics-USA/L06A.Users-Manual-3/User-Guide-1109034-Page-69.png)
![217Music 1 Music player screen (P210)]"All songs"2 Move the cursor to a Chaku-Uta-Full®song toadd]I[Playlist]]Select a PlaylistThe Chaku-Uta-Full®song is added to the selected Playlist.・ I[New]: Create a new Playlist with the selected Chaku-Uta-Full®song.■To add multiple Chaku-Uta-Full®songsM[Menu]]"Multiple choice"]Place check marks nextto Chaku-Uta-Full®songs to save]M[Menu]]Select"Add to Playlist".Press Afor 1+ seconds on the Chaku-Uta-Full®listscreen (P211) to save the selected Chaku-Uta-Full®songto the "Quick playlist". This option is useful to collect yourfavorite Chaku-Uta-Full®songs.To play the saved Chaku-Uta-Full®song, select the "Quickplaylist" on the Playlist screen.Chaku-Uta-Full®songs are saved in the "Music" folder inthe Data box.Delete or move a Chaku-Uta-Full®song from the Data box.1 M[Menu]](Data box)]"Music"Performing these steps may start playing an availableChaku-Uta-Full®song. In this case, press Q.・ I [Switch]: Switch between list and picture display.2 Move the cursor to a folder ]C[Open] ]Move thecursor to a Chaku-Uta-Full®song ] M[Menu] ]Perform the following operations:■Managing Playlists"Playlist" ] Move the cursor to a playlist ]M [Menu]Refer to "Sub Menu on the Playlist List Screen"(P285) for information on the sub menu items.[Files]Play : Play the selected Chaku-Uta-Full®song.Move : Move the selected Chaku-Uta-Full®song toanother folder.]Select the destination folder]I [Move]Copy : Copy the selected Chaku-Uta-Full®song toanother folder.]Select the destination folder]I [Copy]Delete : Delete the selected Chaku-Uta-Full®song.Delete all : Delete all Chaku-Uta-Full®songs in the folder.Rename : Change the display name of the selected Chaku-Uta-Full®song.Reset name : Reset the display name of the selected file to itsdefault name.[Multiple choice]Select and delete multiple Chaku-Uta-Full®songs]Place check marks next to songs to delete]I[Delete]]"Yes"Adding a Chaku-Uta-Full®Song to theQuick PlaylistManaging Folders, Playlists,and Chaku-Uta-Full®SongsAdding a Chaku-Uta-Full®Song to a Playlist](https://usermanual.wiki/LG-Electronics-USA/L06A.Users-Manual-3/User-Guide-1109034-Page-70.png)
![218 Music・ You can move/copy multiple Chaku-Uta-Full®songs byperforming the following steps:] Place check marks next to Chaku-Uta-Full®songs to moveor copy]M[Menu] ]"Move"/"Copy" ] Enter the securitycode ] Select the destination folder ] I "Move"/"Copy"・ Press M[Menu] to select from "Mark", "Mark all", "Unmark",and "Unmark all".[File property]Display or edit the information of the selected Chaku-Uta-Full®song.]Move the cursor to the item ]I [Edit] ]Edit the item・ Some items cannot be edited.・ Move the cursor to an edited item and press M[Restore todefault] →OK to undo editing.[Send via・compose mail]This option is not available.[Set as]Set the selected Chaku-Uta-Full®song as a ring tone.→P214[List view/Grid view]Switch between list and picture display.[Sort]Set conditions to rearrange Chaku-Uta-Full®songs.[Memory info.]Display the status of storage space of the "Data box".[New folder]Create a new folder.Note・ When the "Playlist" folder is open, press I[New] tocreate a new Playlist.→P215・ If a Chaku-Uta-Full®song saved in a Playlist is deleted,the Chaku-Uta-Full®song will be removed from thePlaylist.Icon Description( in blue)/ Play count is limited but still playable/ ( in orange) Reached the limit and not playable( in blue)/ Not expired (Playable)/( in orange) Expired (Not playable)File with UIM restriction function activatedIcons appear for Chaku-Uta-Full®songs in the "Data](https://usermanual.wiki/LG-Electronics-USA/L06A.Users-Manual-3/User-Guide-1109034-Page-71.png)
![219Music Sub Menu while a Folder Selected1 Move the cursor to the certificate]M [Menu] ]Performs the following operations:[Rename]Edit a folder name[New folder]Create a new folder.[Delete]Delete the selected folder.[List view/Grid view]Switch between list and picture display.[Sort]Set conditions to rearrange Chaku-Uta-Full®songs in a folder.[Memory Info]Display the status of storage space of the "Data box".[Folder property]The folder size, the number of files in the folder, and the numberof folders in the folder are displayed.You can play Chaku-Uta-Full®songs suitable for use whencommuting, playing sports, or going to bed.1 "Music player" screen (P210) ]"Music life"]Performthe following operations:[Train]Vocal sound is emphasized so that lyrics can be clearly heardeven in a low volume when you commute.Playlist : Select from "All songs", "Quick playlist" or yourplaylist.・ C[List] : List Playlists.Vocal : Place emphasis on vocal sounds.[Sports timer]Songs are played for a set period. You can use this option as atimer when you want to run for a certain time. The selectedPlaylist is repeatedly played for the specified time period.Playlist : Select from "All songs", "Quick playlist" or yourplaylist. ・ C[List] : List Playlists.Playing time: Enter the playback time. 1Up to 1200 minutescan be entered.Note・ The "Playlist" folder cannot be renamed or deleted.<New folder>・ You cannot create a sub folder in a user-defined folder.Playing Chaku-Uta-Full®SongsSuitable for Special ListeningCircumstancesMusic life](https://usermanual.wiki/LG-Electronics-USA/L06A.Users-Manual-3/User-Guide-1109034-Page-72.png)
![[Sleeping]You can set an off timer to stop the playback automatically whenlying in bed listening to music. The volume is gradually reducedfor about five minutes, and fades out about 50 seconds beforestopping the playback. The selected Playlist is repeatedly playedfor the specified time period.Playlist : Select "All songs", "Quick playlist" or your playlist.・ C[List] : List songs from the Playlist.Playing time:Enter a value of minutes until the playbackstops.1Up to 1200 minutes can be entered.2 I[Play]220 Music](https://usermanual.wiki/LG-Electronics-USA/L06A.Users-Manual-3/User-Guide-1109034-Page-73.png)