Leica Biosystems Nussloch SPECTRACV01 HistoCore SPECTRA CV User Manual Leica SPECTRA CV Instructions for Use V1 2 RevA
Leica Biosystems Nussloch GmbH HistoCore SPECTRA CV Leica SPECTRA CV Instructions for Use V1 2 RevA
Contents
User Manual V1.2 Part 2
35
HistoCore SPECTRA CV
Installation and Instrument Setup 4
1
2
Fig. 15
4.6.2 Inserting the mounting medium bottle and prime bottle
1. Open the hood.
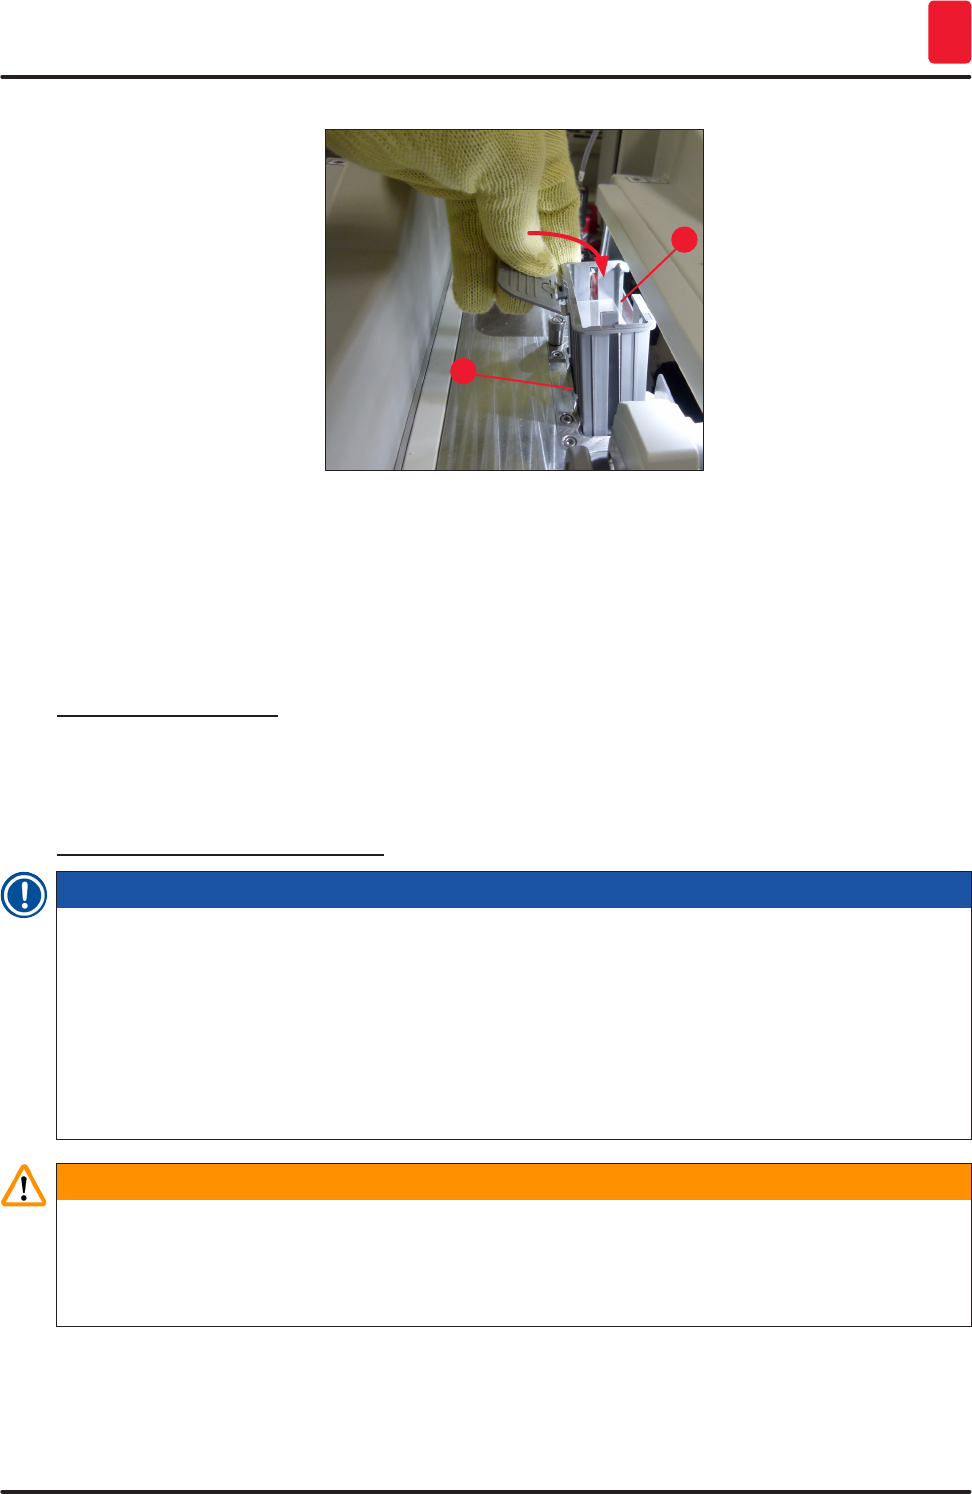
2. Grasp the bottle sledge on the handle (→ Fig. 17-1) and move it all the way forward.
Inserting the prime bottle
» Insert the prime bottle (→ Fig. 17-2) into the position provided for it (→ Fig. 4-11) in the bottle
sledge.
Inserting the mounting medium bottle
Note
• Before the insertion of a mounting medium bottle in the instrument, the expiration date
(imprint on the packaging and on the bottle label (→ Fig. 16-3)) is to be checked. If the expiration
date has been reached or exceeded, the mounting medium may no longer be used. Expired
mounting medium is to be disposed of in accordance with the applicable on-site lab guidelines.
• Opened mounting medium has a storage life of 14 days, within which it must be spent.
We recommend making a note of the use-date on the bottle label.
• Only original mounting medium that has been validated by Leica may be used
(→ P. 160 – Consumables) in order to prevent instrument faults.
Warning
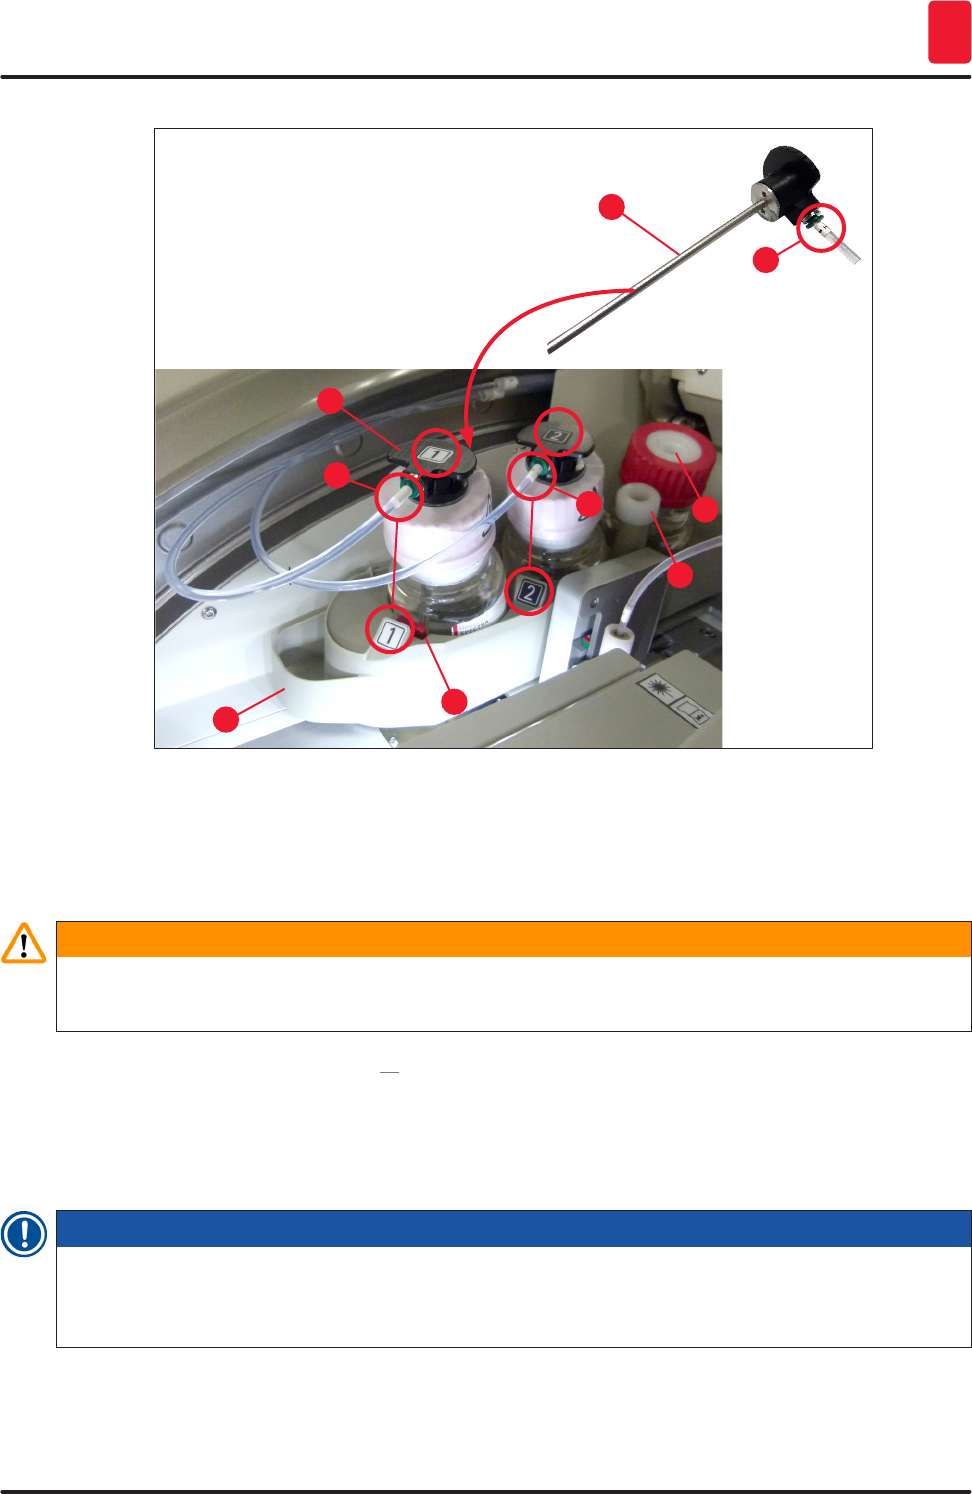
Ensure the correct assignment of the cannulas (→ Fig. 17-4) to the respective mounting medium
bottles to prevent instrument faults. The cannula with the mark 1 is to be inserted into the mounting
medium bottle in position 1 and the cannula with the mark 2 into the mounting medium bottle in
position 2 of the bottle sledge (→ Fig. 17-3).
36 Version 1.2, Revision A
Installation and Instrument Setup
4
Note
The insertion of a mounting medium bottle in the coverslip line L1 is described below. The same
procedures also apply for the coverslip line L2.
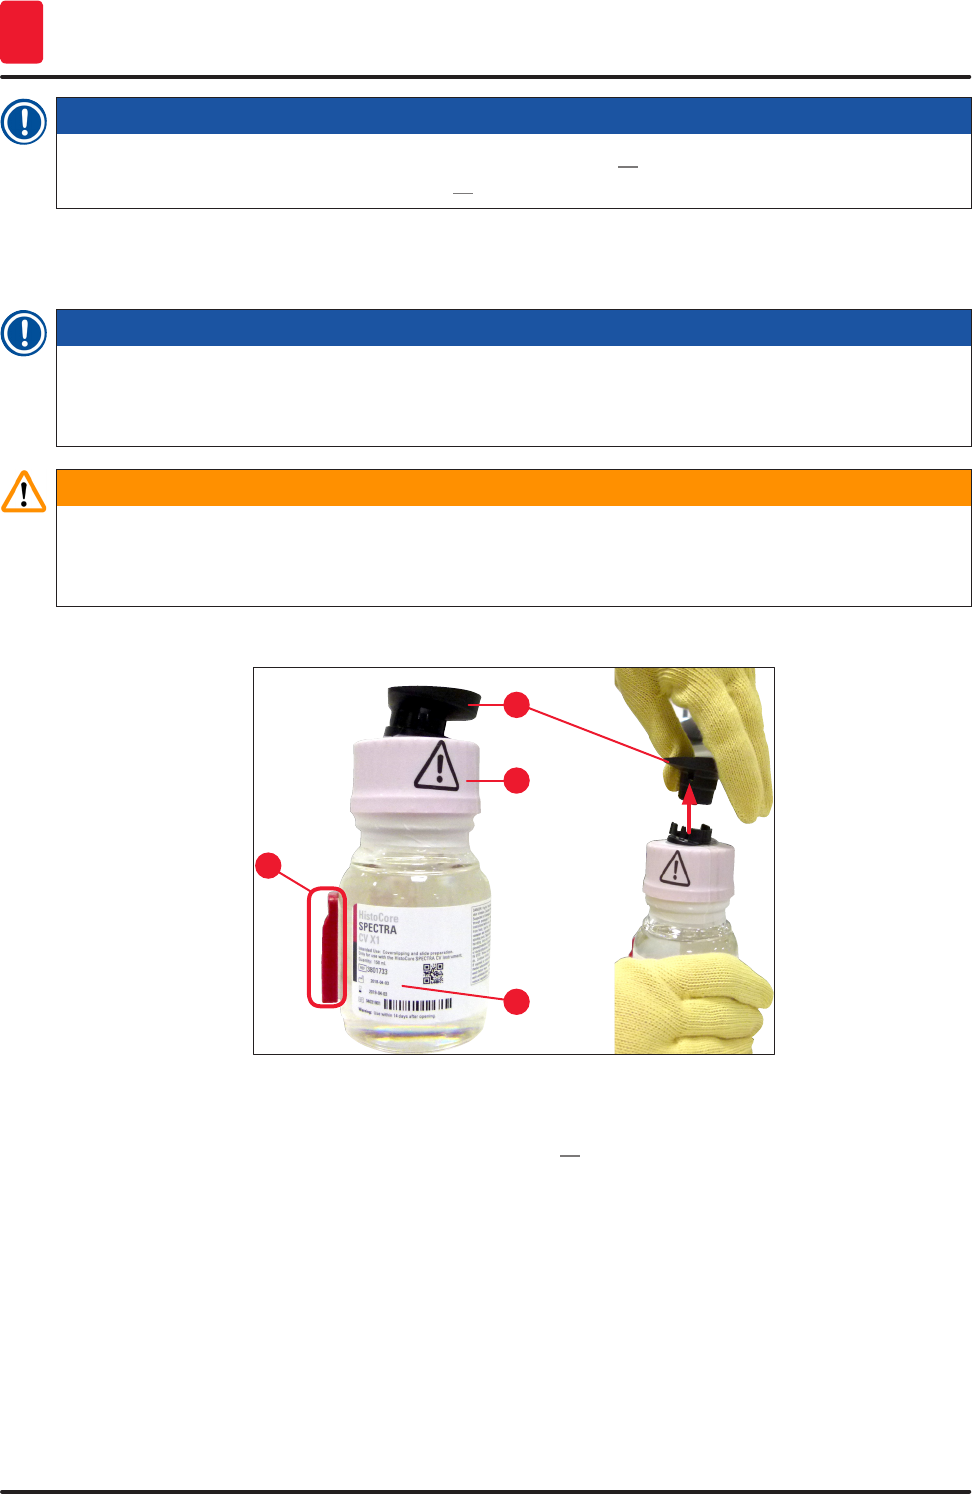
1. Take the mounting medium bottle (→ Fig. 16) out of the packaging and remove the black
plastic cap (→ Fig. 16-1).
Note
Do not dispose of the black cover cap. If a non-empty bottle of mounting medium is taken out of the
instrument (e.g. in the event of transport), it can be closed up again using the black plastic cap and
retained. However, while doing so, the expiration date of the opened bottle must be observed.
Warning
• Do not remove the white plastic seal (→ Fig. 16-2). It must remain on the bottle.
• Before the initial insertion of the cannulas, check whether the caps on the ends of the cannulas
have been removed.
1
2
3
4
Fig. 16
2. Insert the mounting medium bottle into the recess L1 and make sure that the RFID chip
(→ Fig. 16-4) is seated in the notch of the recess (→ Fig. 17-5).
37
HistoCore SPECTRA CV
Installation and Instrument Setup 4
1
2
4
4
3
3
3
6
5
Fig. 17
3. Carefully insert the cannula (→ Fig. 17-4) with the label 1 into the opening of the mounting
medium bottle until it clicks into place. This process involves puncturing the white protective
membrane.
Warning
Puncturing the white protective membrane briefly requires an increase in force. Therefore, proceed
carefully to avoid slipping from your hand.
4. Repeat the process for bottle L2.
5. Slide the bottle sledge (→ Fig. 17-1) back until you feel it click into place.
6. Close the hood.
7. The mounting medium bottles that are inserted are detected by the instrument software and
the Module Status (→ Fig. 23) is updated.
Note
The software identifies the insertion of the new bottles and informs the user that an Extended Prime
is necessary for both coverslip lines (→ P. 126 – 7.3.2 Extended Prime). Only afterwards is the
instrument ready to start.
38 Version 1.2, Revision A
Installation and Instrument Setup
4
4.6.3 Prepare the reagent vessel, fill it and insert it into the load drawer
To ensure that everything runs smoothly in the instrument, observe the following notes and proceed as
follows.
Attaching the reagent vessel handle:
» Check whether the reagent vessel handle is correctly attached to the reagent vessel. If this is
not the case, fasten the handle according to (→ Fig. 18).
Fig. 18
1
2
Correct filling of reagent vessels:
Note
• The reagent vessel must be filled with a reagent which is both compatible with the
HistoCore SPECTRA ST and with the mounting medium used (→ P. 33 – 4.6 Refilling
consumables).
• Reagent vessels must always be filled outside the instrument.
• Make sure that the reagent vessel handle is not bent. During the removal of the reagent vessel, if
the handle is bent out of shape, it may become unfixed from the reagent vessel and the reagent
that is filled could be spilled.
Warning
The safety notes for reagent handling must be observed!
39
HistoCore SPECTRA CV
Installation and Instrument Setup 4
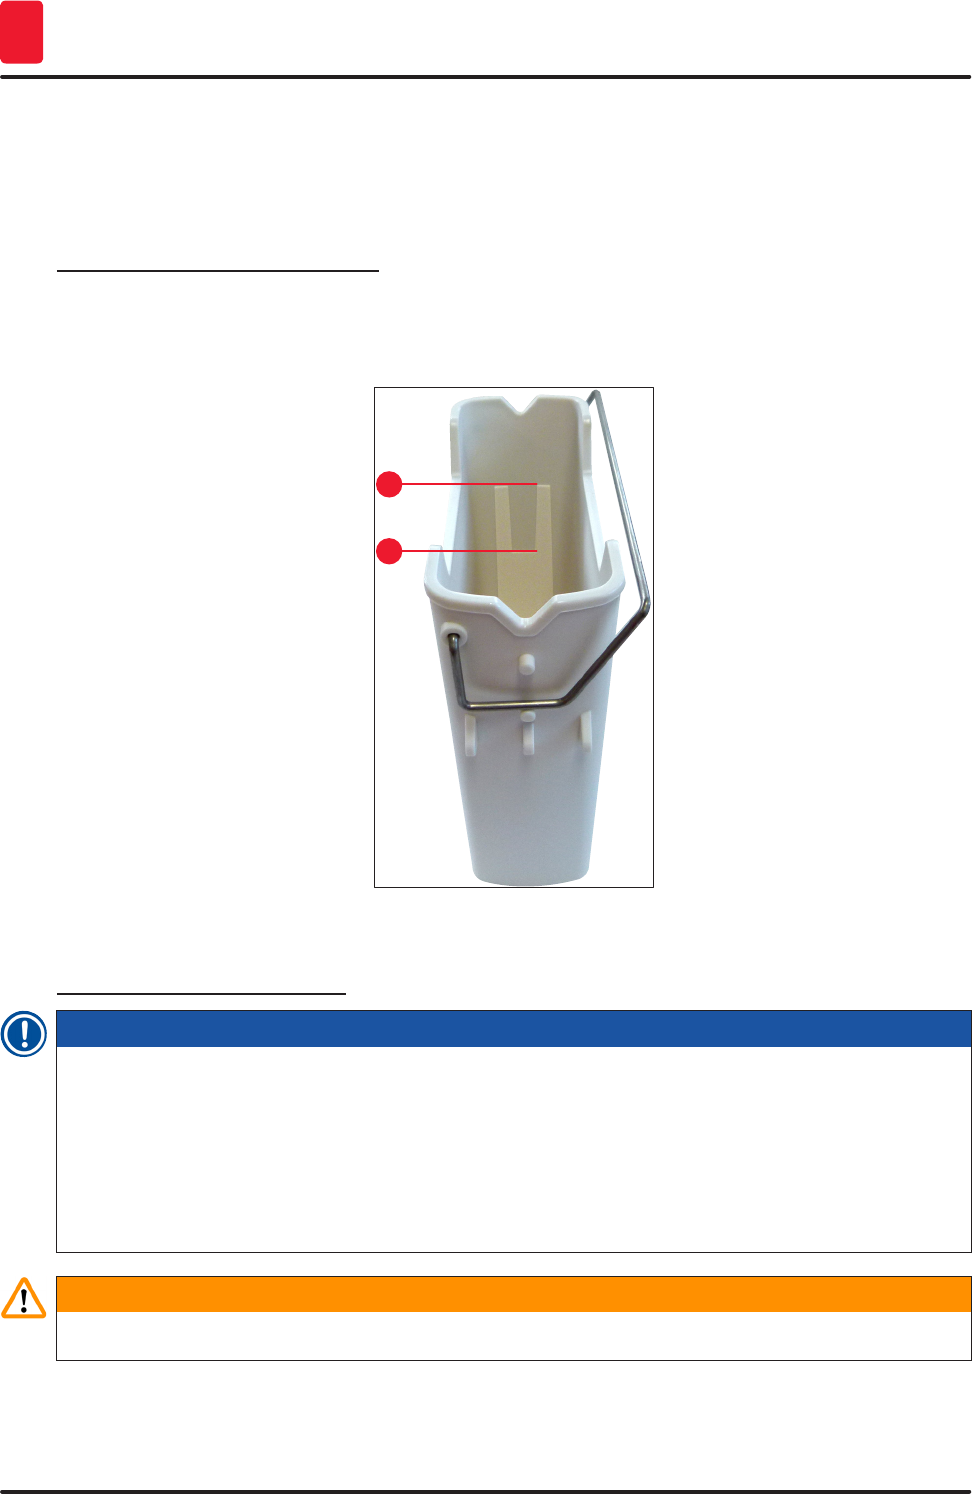
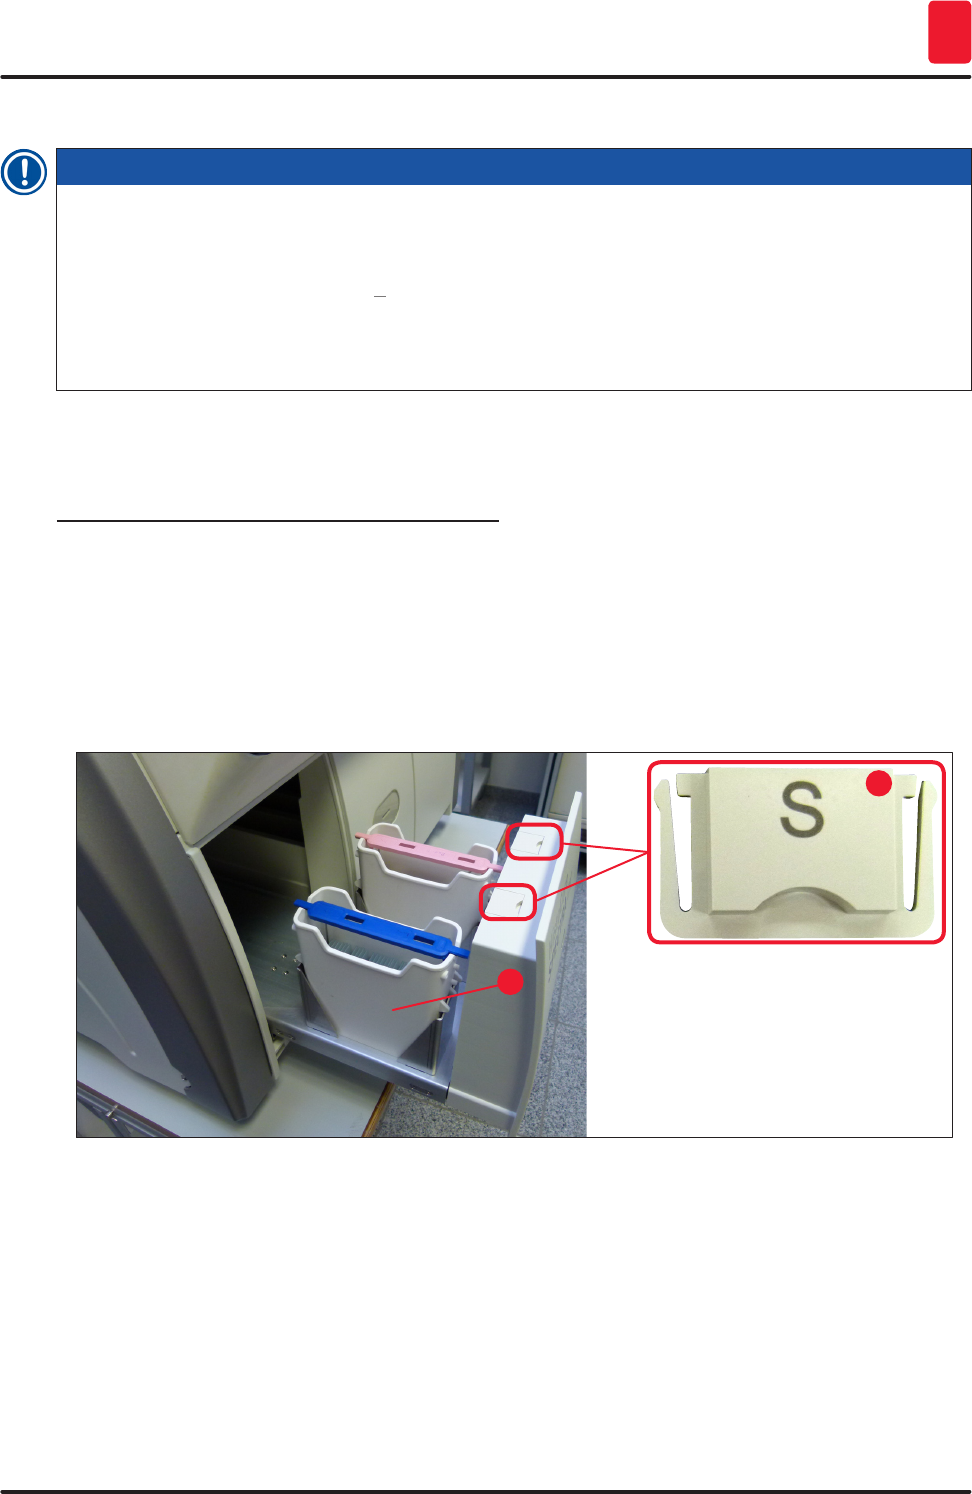
Correct fill level of the reagent vessels
Note
• When filling the reagent vessels, observe the fill level marks inside the reagent vessels.
• Use the label covers contained in the (→ P. 19 – 3.1 Standard delivery – packing list) to label the
reagent vessels in the load drawers.
• The label covers with the letter S printed on them (→ Fig. 19-2) indicate to the user that the
reagent vessel has been filled with a solvent.
• Use the non-labeled covers only in cases where the reagent vessels are empty (e.g. after shutting
down the instrument).
A sufficient fill level is ensured if the level of the reagents is between the maximum (→ Fig. 18-1) and
the minimum (→ Fig. 18-2) fill level mark.
Inserting the reagent vessels into the load drawer:
1. To insert the reagent vessels, press the drawer button for the load drawer (→ Fig. 2-4).
2. The load drawer opens.
3. Remove the reagent vessel and fill it with a HistoCore SPECTRA ST compatible solvent outside
the instrument in accordance with the safety instructions.
4. Then insert the filled vessel back into the load drawer (→ Fig. 19-1).
5. Close the load drawer by pressing the drawer button again.
Fig. 19
1
2
40 Version 1.2, Revision A
Operation
5
5. Operation
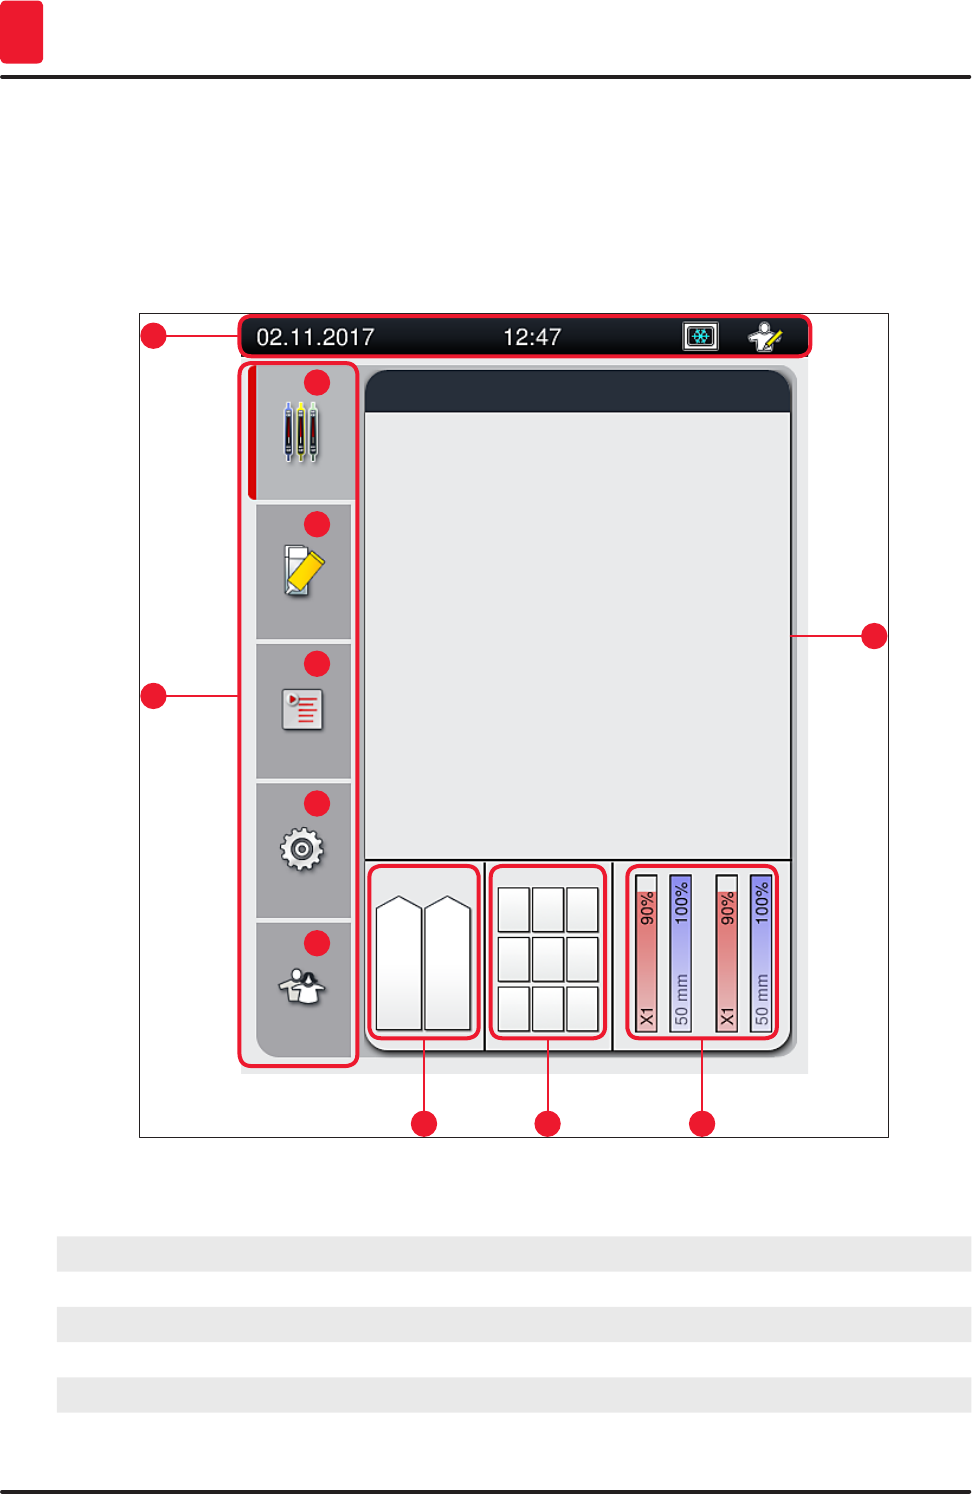
5.1 User interface – overview
The HistoCore SPECTRA CV is programmed and operated using a color touchscreen. If there is no
processing in progress, the screen displays the following main window (→ Fig. 20) after switching on.
1
5
2
34
6
7
8
9
10
11
Fig. 20
1Status bar 7Process status display menu
2Process status display 8Module status menu
3Consumables status display 9Parameter sets menu
4Load drawer status display 10 Settings menu
5Unload drawer status display 11 User Settings menu
6Main menu (→ P. 46 – 5.6 Main menu overview)

41
HistoCore SPECTRA CV
Operation 5
5.1.1 Grayed out function keys
Note
No changes can be carried out in the settings during processing or while there are racks in the
instrument (load drawer, unload drawer, oven, coverslip line). Corresponding function keys are
grayed out and therefore deactivated.
However, at all times it is possible to:
• Refill consumables (mounting medium, coverglass)
• Run the cleaning programs Quick Prime, Extended Prime and Clean the Hose System,
• Switch from Standard User Mode to the Supervisor Mode.
42 Version 1.2, Revision A
Operation
5
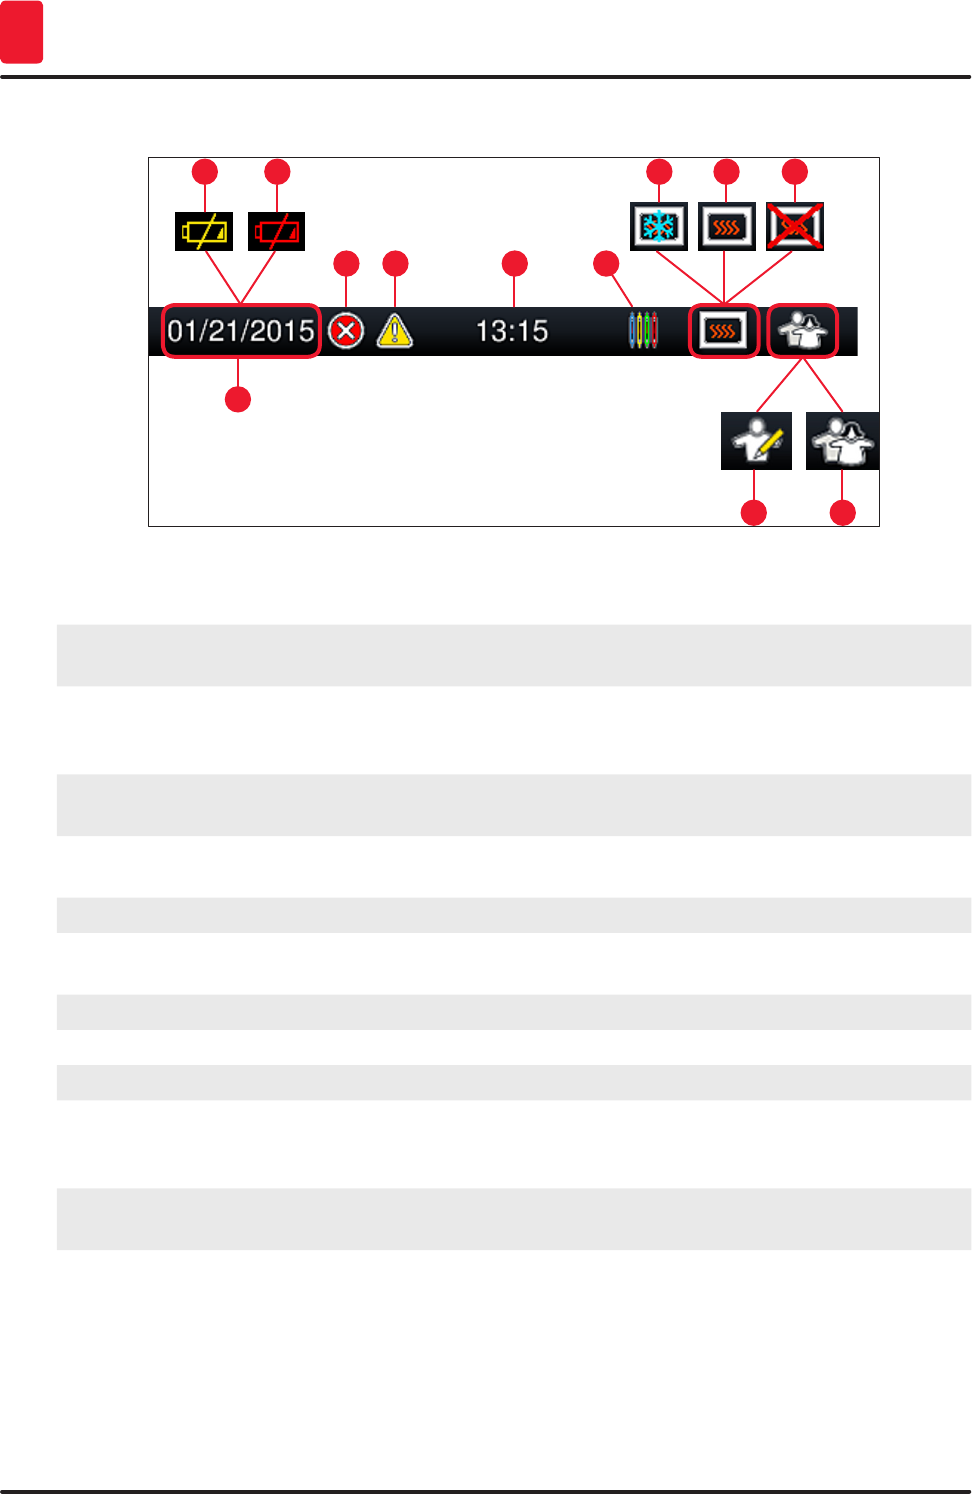
5.2 Elements of the status display
1
102
6
11
3
7
12
4
8
5
9
Fig. 21
1Current date
2If the remaining service life for the battery is about 3 months or less, this symbol appears on the
status bar instead of the date. A notification is sent to the user at the same time.
3If the service life of the battery has expired, this symbol appears on the status bar instead of the
date. A notification that the battery needs to be replaced by a Leica service technician is sent to
the user at the same time.
4If alarms and error messages are displayed during operation, this alarm symbol appears.
Pressing this symbol allows the last 20 active messages to be viewed again.
5If warnings and notes are displayed during operation, this notification symbol appears. Pressing
this symbol allows the last 20 active messages to be viewed again.
6Local time
7The Process symbol indicates that processing is currently active and that a rack may still be in
the unload drawer or a rack from the HistoCore SPECTRA ST is expected.
8This symbol displays that the oven is active and is in the heating phase.
9This symbol displays that the oven is active and is ready to operate.
10 This symbol displays that the oven has been deactivated.
11 The operation of the instrument in Supervisor Mode is displayed by this symbol. This mode
provides additional operation and adjustment options for trained staff. Access to this mode is
password-protected.
12 This User symbol displays that the instrument is in user mode, which permits a simplified
instrument operation without password.
43
HistoCore SPECTRA CV
Operation 5
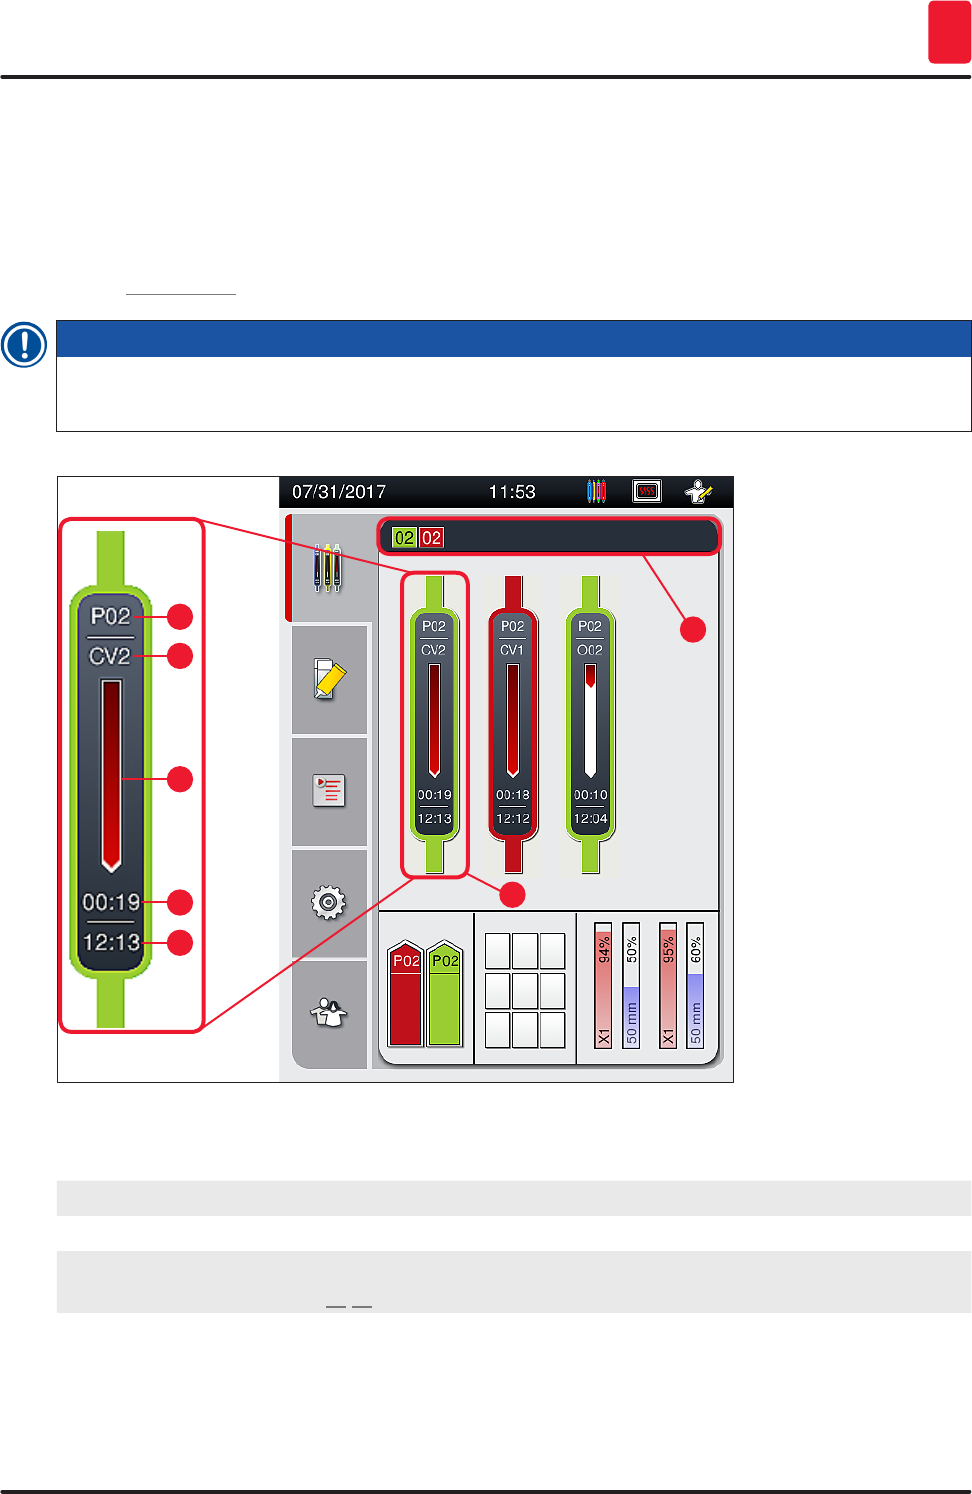
5.3 Process status display
• In the Process status display (→ Fig. 20-2), all racks in the process (→ Fig. 22-2) are displayed in
color of the respective rack handle.
• The status bar (→ Fig. 22-1) for the main window lists the parameter sets that can currently be
started with the number and color assigned to the rack handles. These symbols are also visible if the
daily Quick Prime (→ P. 125 – 7.3.1 Quick Prime) has not yet been carried out.
Note
Each ongoing processing is illustrated by a rack handle symbol. It is shown in the same color as the
actual rack handle. Various information is displayed on the handle symbol (→ Fig. 22).
1
62
7
3
4
5
Fig. 22
1Parameter sets that can be started 5Progress display of processing
2Racks in the process 6Estimated remaining time (hh:mm)
3Parameter set number 7Time at end of process
4Current position of the rack in the instrument:
CV1/CV2 = coverslip line L1/L2, RED = rotator, O01/O02 = oven position 1/2
44 Version 1.2, Revision A
Operation
5
5.4 Consumables Management System (CMS)
Note
To call up this menu, press the Module Status menu (→ Fig. 20-8) button.
The HistoCore SPECTRA CV has a Consumables Management System (CMS) that automatically
monitors various levels and notifies the user of the following details:
• Mounting medium designation (→ Fig. 23-1)
• Remaining number of slides (→ Fig. 23-2)
• Coverglass length (→ Fig. 23-3)
• Remaining number of coverglass (→ Fig. 23-4)
• The percentage display (→ Fig. 23-5) (→ Fig. 23-6) displays the consumption status of the
mounting medium and the coverglasses in the respective left or right coverslip line. The colored
portion of the bar lowers accordingly as usage continues.
1
6
2
3
4
5
Fig. 23
45
HistoCore SPECTRA CV
Operation 5
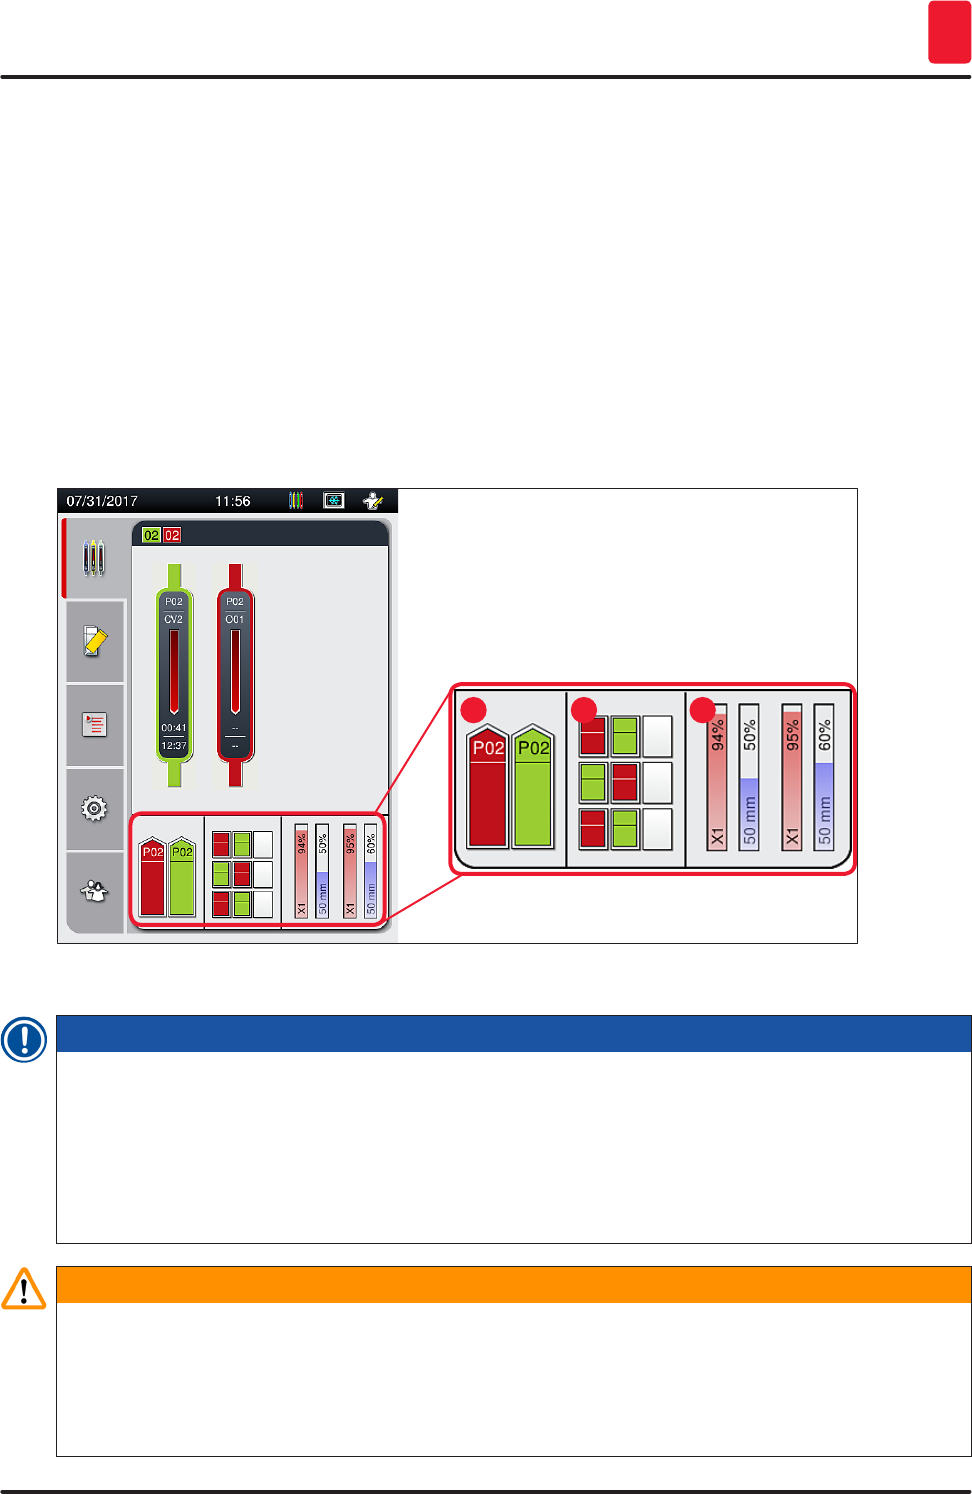
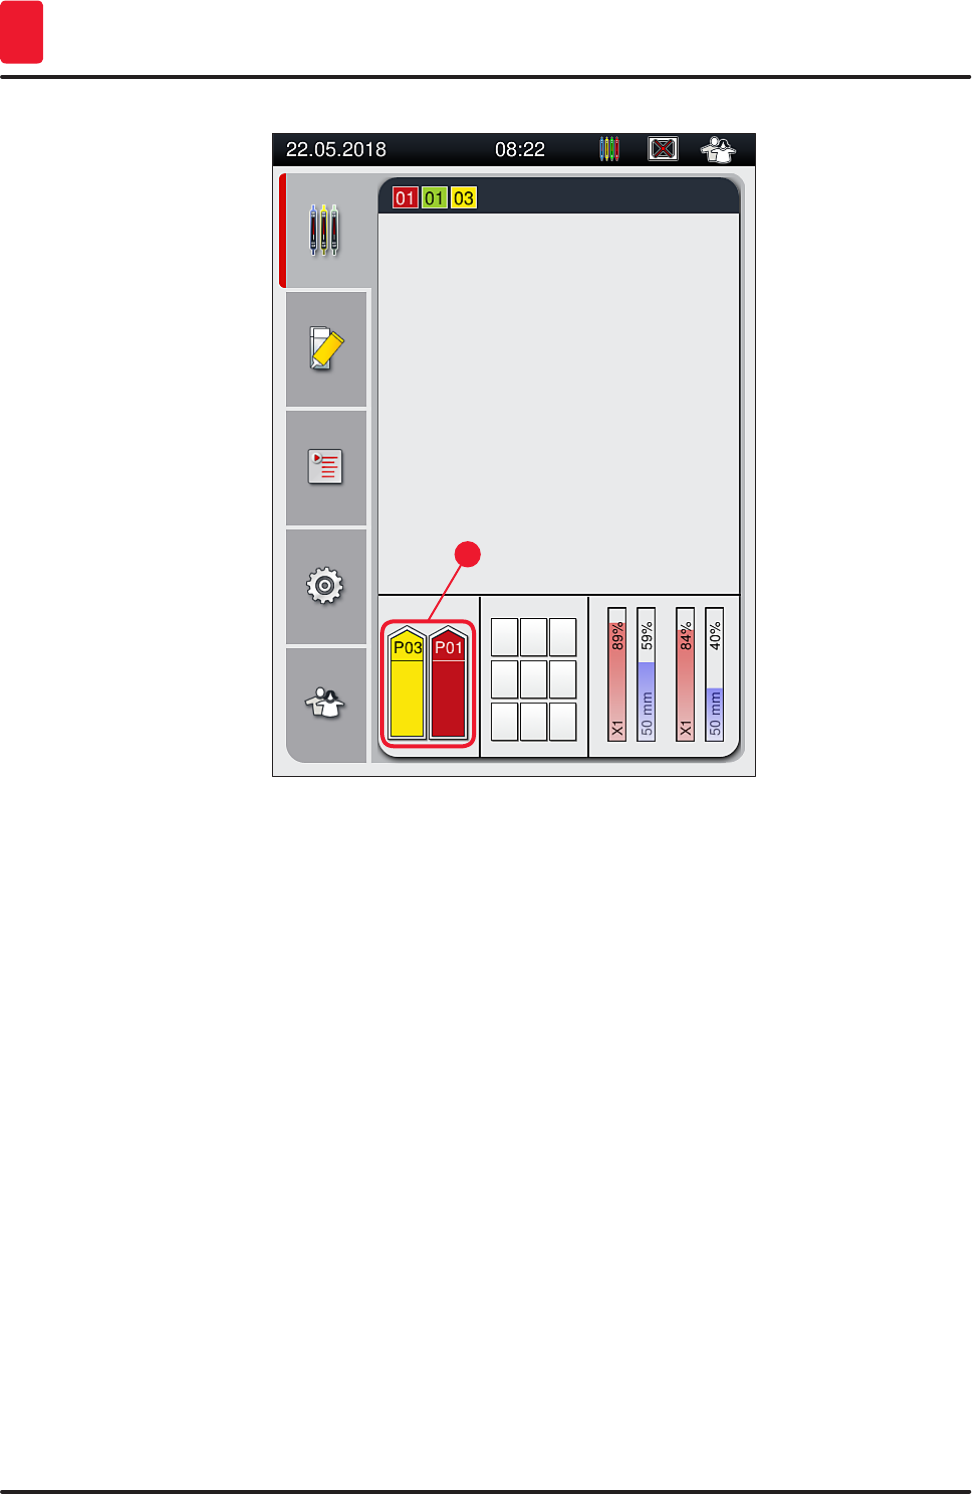
5.5 Displaying the drawers
The lower area of the main window (→ Fig. 24) shows the status of the load drawer, the unload drawer
and the consumables (coverglass and mounting medium).
• The stations depicted by a directional arrow in the instrument (→ Fig. 24-1) symbolize the load
drawer.
• The center area (→ Fig. 24-2) displays the assigned and available positions in the unload drawer.
• The right-hand area (→ Fig. 24-3) shows the state of the filled consumables (coverglass and
mounting medium).
• After closing the load drawers, the instrument automatically detects any inserted or removed racks.
• The racks in both drawers are shown on the screen with the respective rack handle color
(→ Fig. 24-1) (→ Fig. 24-2). Available positions are displayed as empty.
1 2 3
Fig. 24
Note
The drawers can be opened when the drawer buttons (→ Fig. 2-4) and (→ Fig. 2-5) light up green.
A drawer button is illuminated in red and cannot be opened in the following cases:
• If there is a rack used by the instrument in the input or unload drawer,
• If a rack is to be transferred from the HistoCore SPECTRA ST to the HistoCore SPECTRA CV,
• If a rack is being turned in the rotator
• If a rack is being inserted into the rack elevator or removed from the rack elevator.
Warning
For manual loading of the HistoCore SPECTRA CV in workstation mode, the user is responsible
for ensuring racks would be suitable for being transferred from the HistoCore SPECTRA ST to
the HistoCore SPECTRA CV at the same time. The end times of the HistoCore SPECTRA ST have
to be taken into account before loading manually since otherwise there can be delays in the
HistoCore SPECTRA ST that can affect the staining result.
46 Version 1.2, Revision A
Operation
5
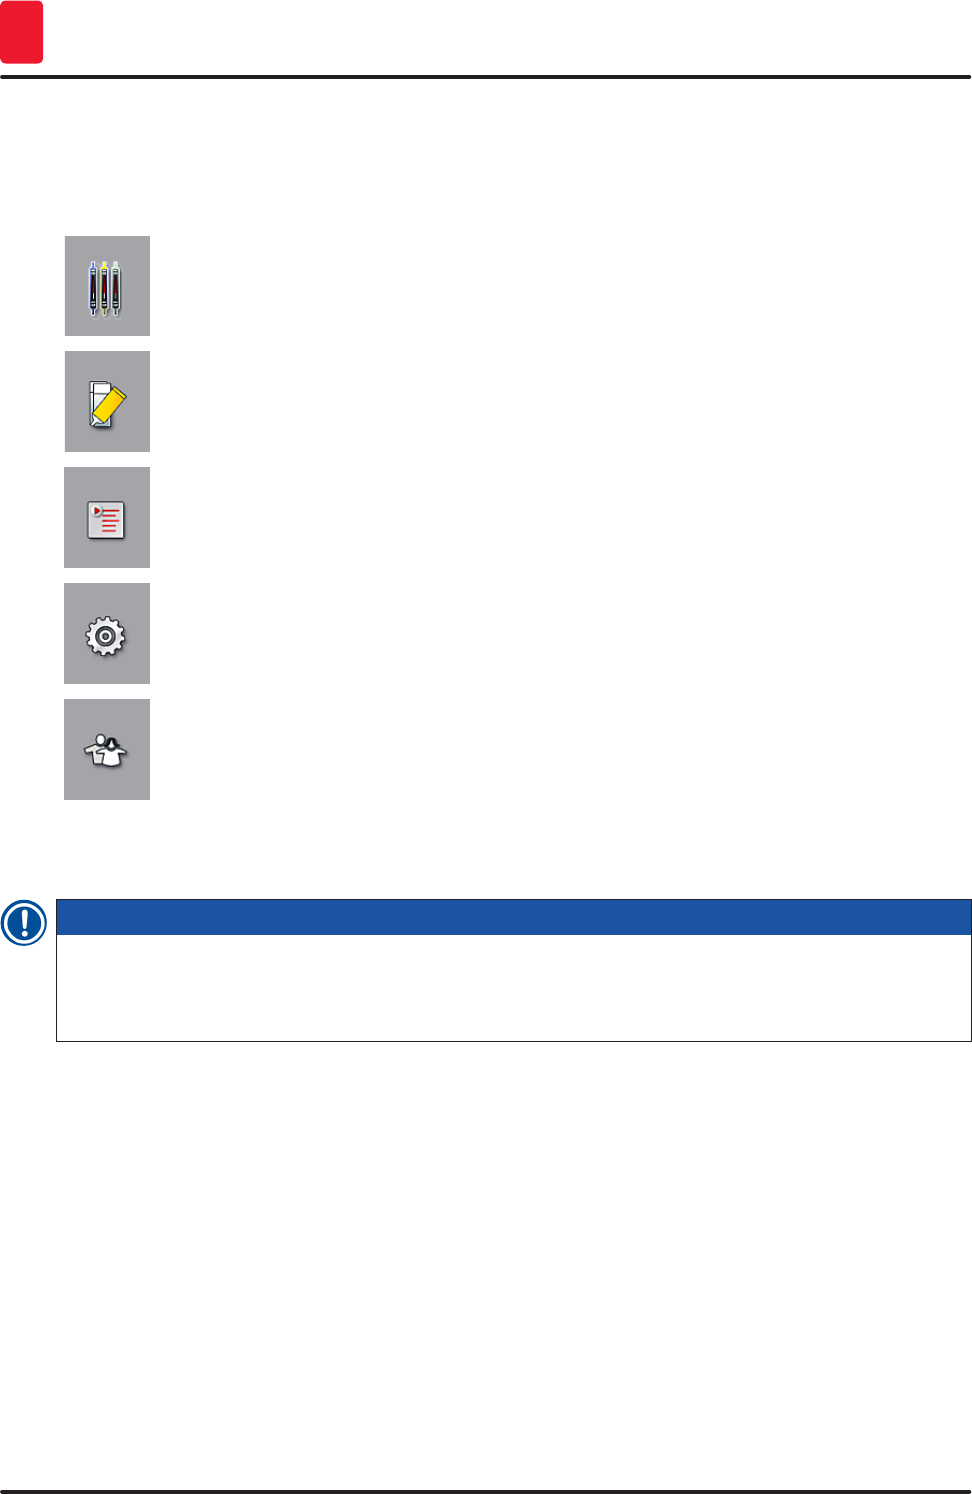
5.6 Main menu overview
The Main menu (→ Fig. 20-6) is located on the left side of the display, which is divided as described
below. This menu is visible in all submenus and allows switching to another submenu at any time.
The Process Status Display (→ Fig. 20-7) displays the current status of all racks in
process. Here, the respective handle of the rack is displayed in representational form
with the respective color.
This display shows the standard display.
The Module Status (→ Fig. 20-8) displays an overview of the consumables filled for the
respective coverslip line (mounting medium and coverglasses) and enables access to
the cleaning and priming options menu for the two coverslip lines.
The Parameter sets (→ Fig. 20-9) menu item is used to create and manage parameter
sets.
Basic settings can be configured in the Settings (→ Fig. 20-10) menu. The language
version, date and time and other parameters can be adapted to local requirements here.
The oven can be switched on or shut down.
In the User Settings (→ Fig. 20-11) menu, a custom password can be set up to prevent
modifications to the programs and reagent lists by unauthorized persons (Supervisor
Mode). However, the instrument can be used without a password in the standard User
Mode.
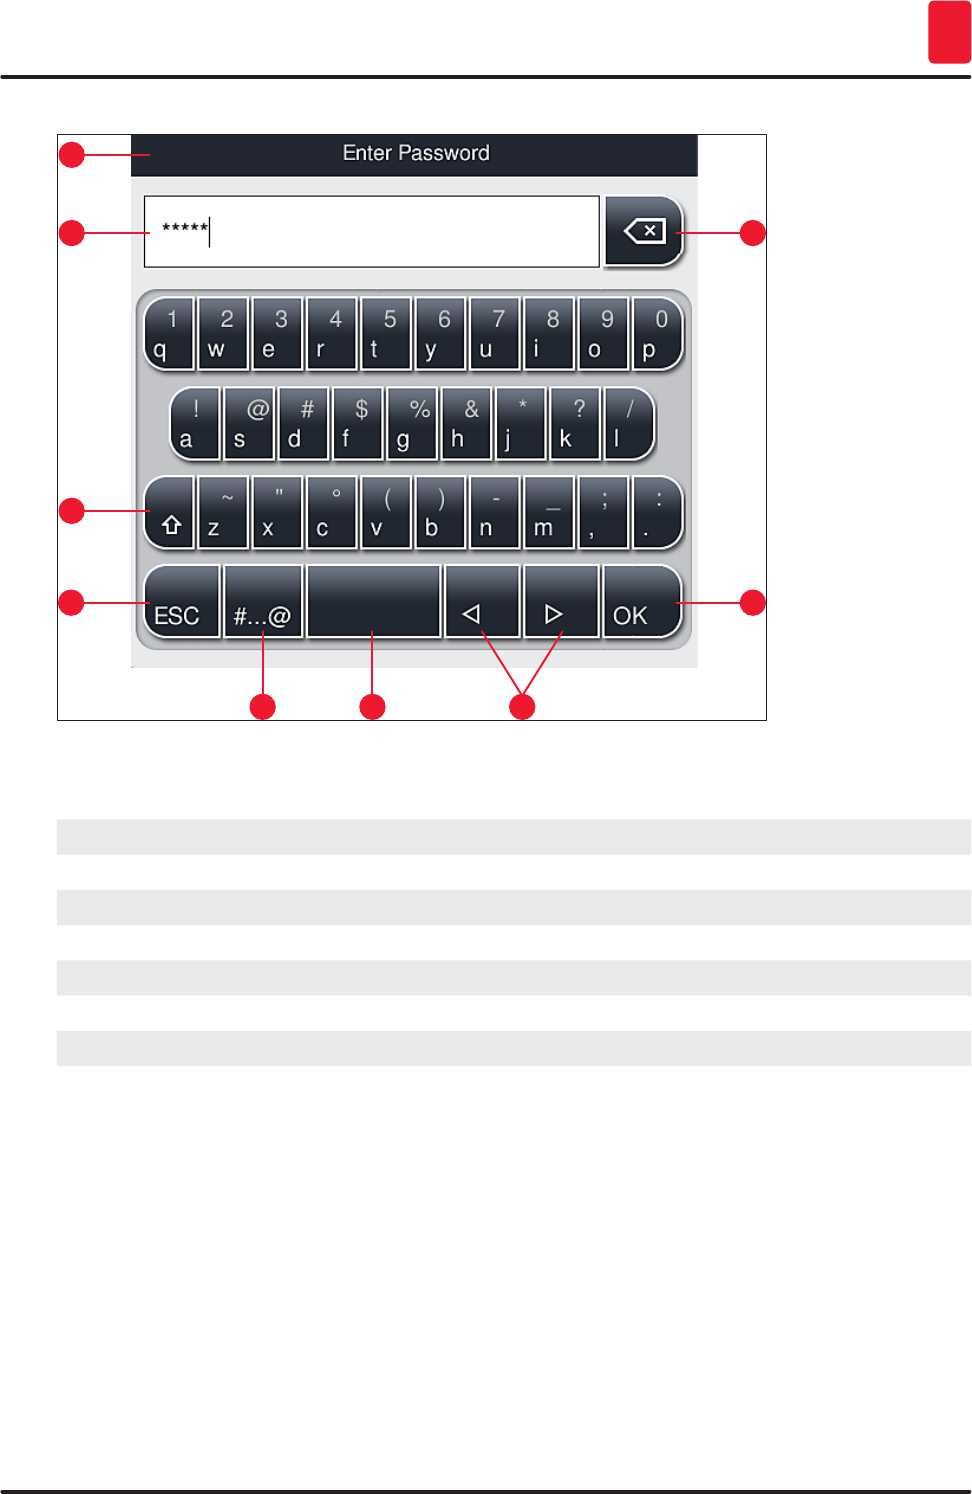
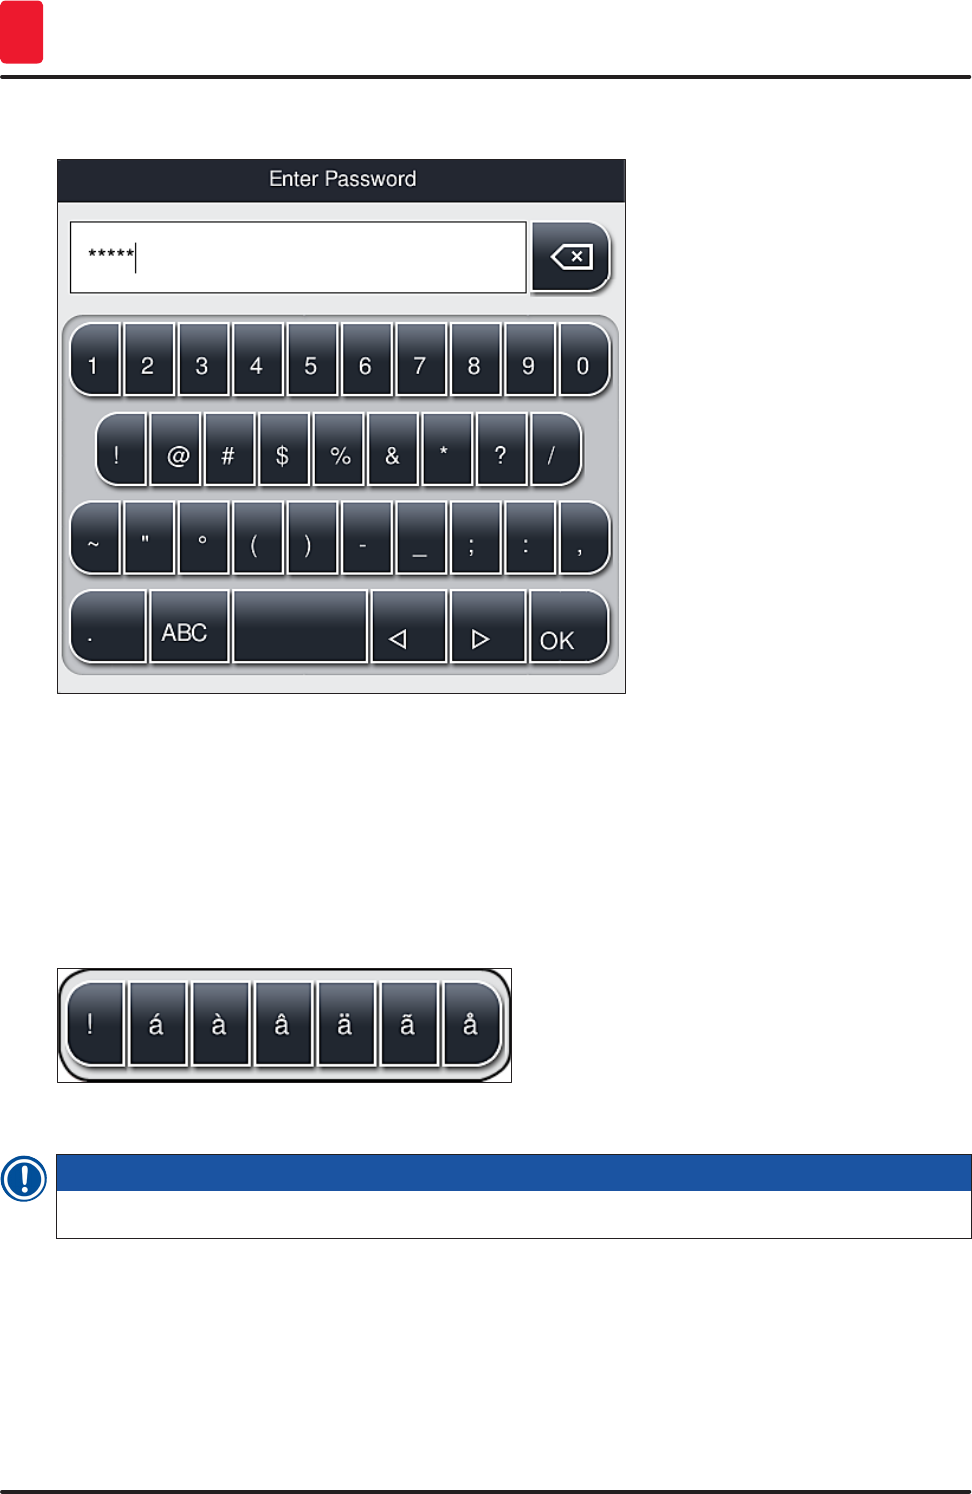
5.6.1 Entry keyboard
Note
A keyboard appears (→ Fig. 25) for required entries (creating or entering a password). It is operated
using the touchscreen.
Note that the keyboard display depends on the configured language.
47
HistoCore SPECTRA CV
Operation 5
1
6
2
7
3
8 4
5
9
Fig. 25
1Title bar
2Input field
3Delete the most recently entered character
4Confirmation
5Move cursor to left or right
6Space key
7Special character shift button (→ Fig. 26)
8Cancel (entries are not saved!)
9Upper and lowercase (pushing the button twice activates caps lock, indicated by the button
turning red. Pressing again re-activates lowercase.)
48 Version 1.2, Revision A
Operation
5
Special character keyboard
Fig. 26
Other special characters
1. To enter a special character or umlaut, etc. not included in the special character keyboard
(→ Fig. 26), hold the corresponding normal button on the keyboard.
2. Example: Holding the standard "a" button brings up other selection options (→ Fig. 27).
3. Select the required character from the new single-line keyboard by pressing it.
Fig. 27
Note
Number of characters for passwords: min. 4 to max. 16 characters.
49
HistoCore SPECTRA CV
Operation 5
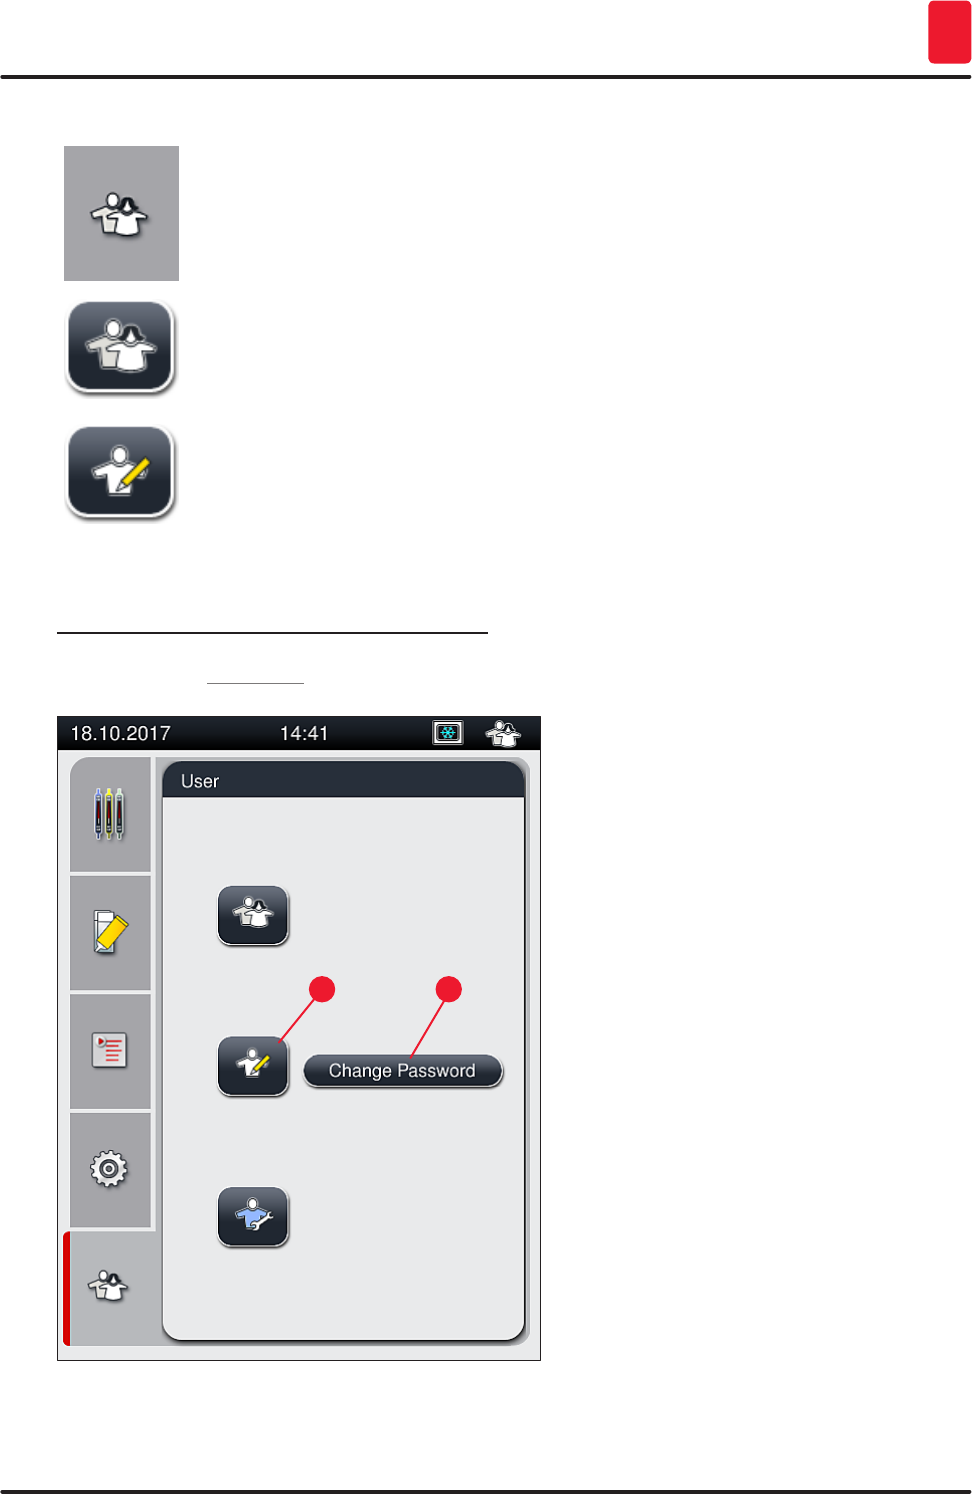
5.7 User settings
This menu can be used to configure the appropriate access level. A distinction is
made between the following:
• Standard user
• Supervisor (password-protected)
• Service technician (password-protected)
Standard user:
The standard user does not need a password and can use the completely configured
instrument for all routine applications. It is not possible for this user group to modify
programs and settings.
Supervisor:
The supervisor has the same access options as the standard user, but when the
instrument is in sleep mode, they can also create, edit and delete parameter sets,
change settings and perform the instrument setup functions. Therefore, supervisor
access is password-protected.
To activate supervisor mode, proceed as follows:
1. Press the Supervisor button (→ Fig. 28-1).
1 2
Fig. 28

50 Version 1.2, Revision A
Operation
5
2. A keyboard (→ Fig. 29) is then displayed which can be used to enter the password.
Fig. 29
1
3. The entry is finished by confirming with OK (→ Fig. 29-1) and the entered password is checked
for validity.
The current user status is displayed with the respective symbol in the status bar (→ Fig. 21) on
the top right.
Note
The password configured at the factory should be changed during the initial setup.
To change the supervisor password, proceed as follows:
1. To change the password, press the Change Password button (→ Fig. 28-2) and enter the old
password.
2. Then, enter the new password twice using the keyboard and confirm with OK.
Note
A password must have at least 4 characters and may have up to 16 characters.
Service technician:
The service technician can access system files and carry out basic settings and
tests.
51
HistoCore SPECTRA CV
Operation 5
Note
Access to this service area of the software is only possible for technicians trained by Leica and
certified for this instrument type.
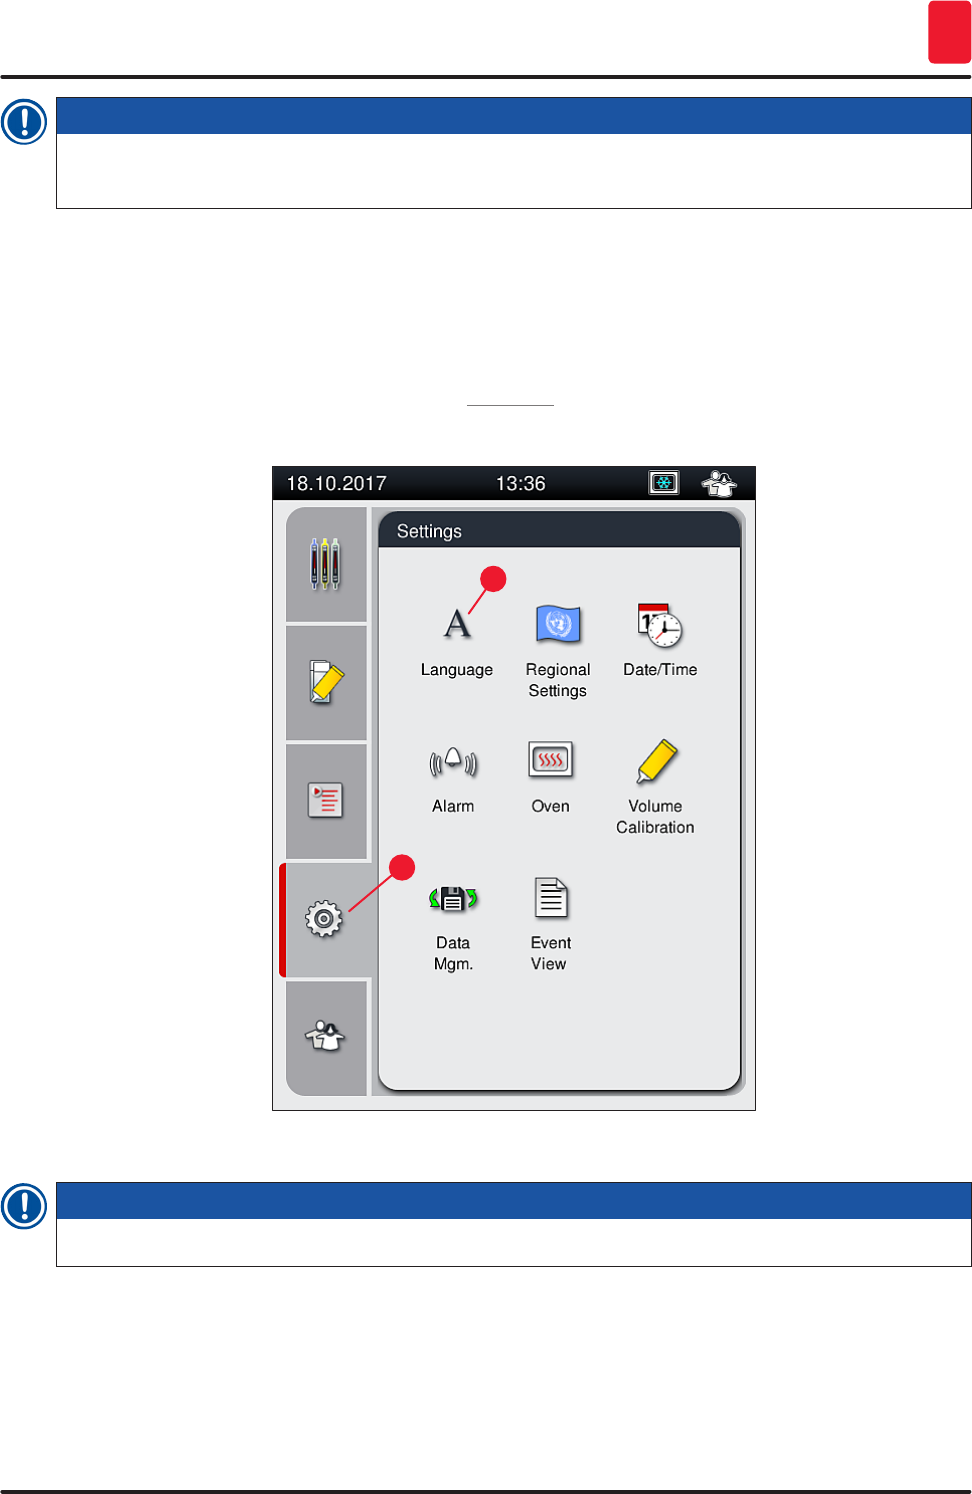
5.8 Basic settings
The Settings (→ Fig. 30-1) menu is opened by pressing the gear symbol (→ Fig. 30). Basic instrument
and software settings can be configured in this menu.
• Touching one of the displayed symbols, e.g. Language (→ Fig. 30-2), opens the corresponding
submenu.
1
2
Fig. 30
Note
The individual submenus are described in the following chapters.
52 Version 1.2, Revision A
Operation
5
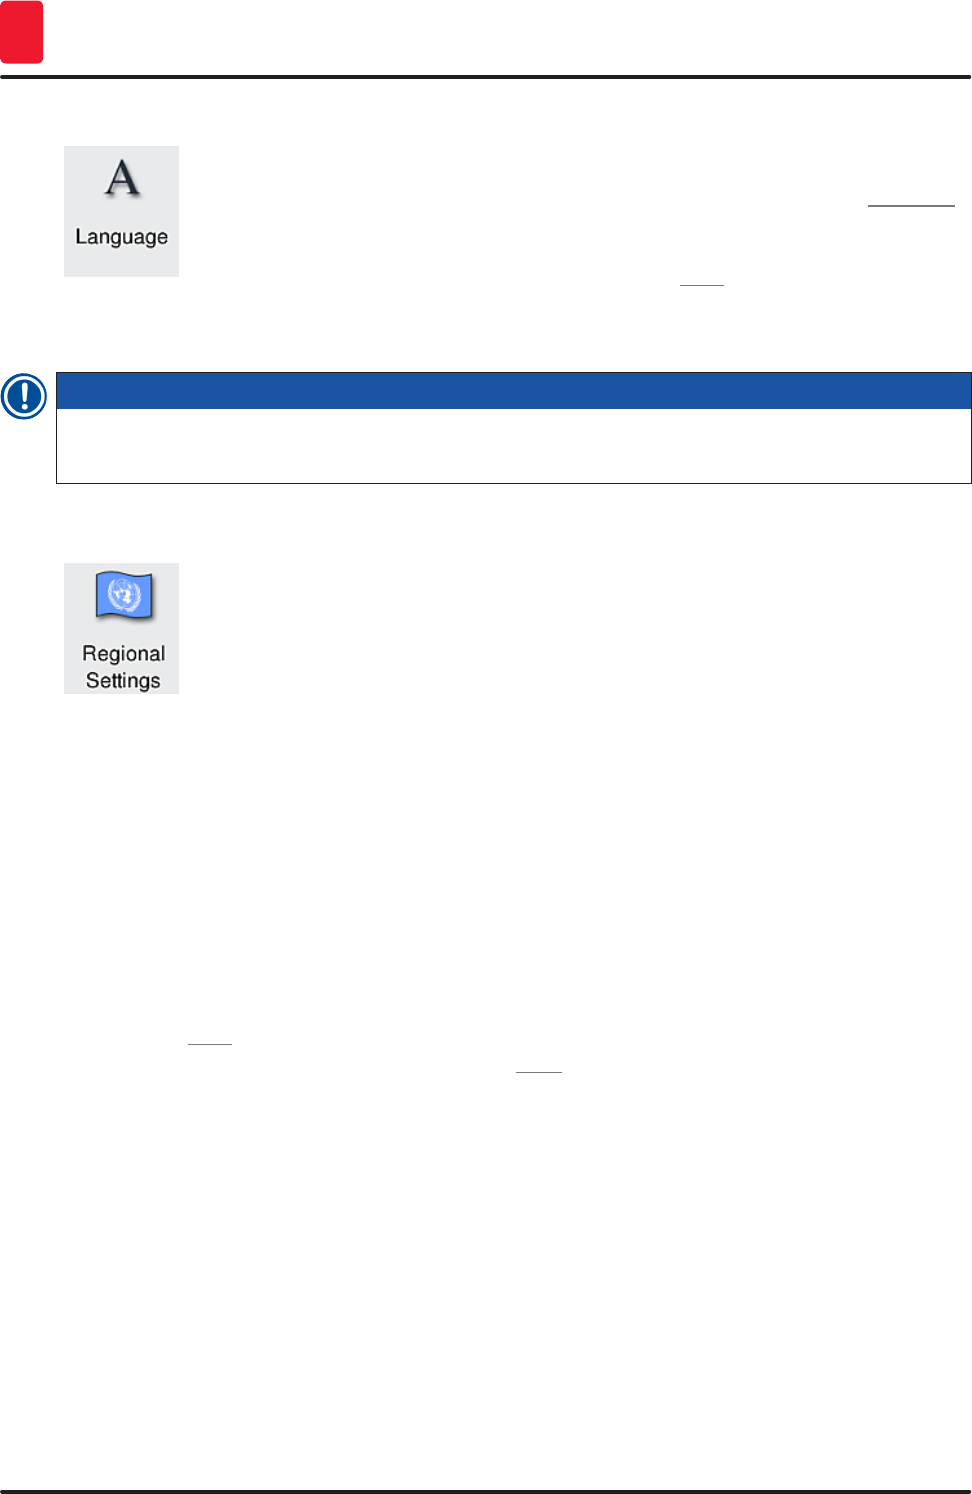
5.8.1 Language settings
Required access level: Standard user, supervisor
• The language selection menu is displayed by pushing the symbol for the Language
(→ Fig. 30-2). This menu contains an overview of all languages installed in the
instrument and allows the desired display language to be selected.
• Select the desired language and confirm by hitting Save.
• The screen display and all information messages and labels are displayed
immediately in the currently configured language.
Note
A supervisor or Leica service technician can add other languages (if available) by using Import
(→ P. 62 – 5.8.7 Data management).
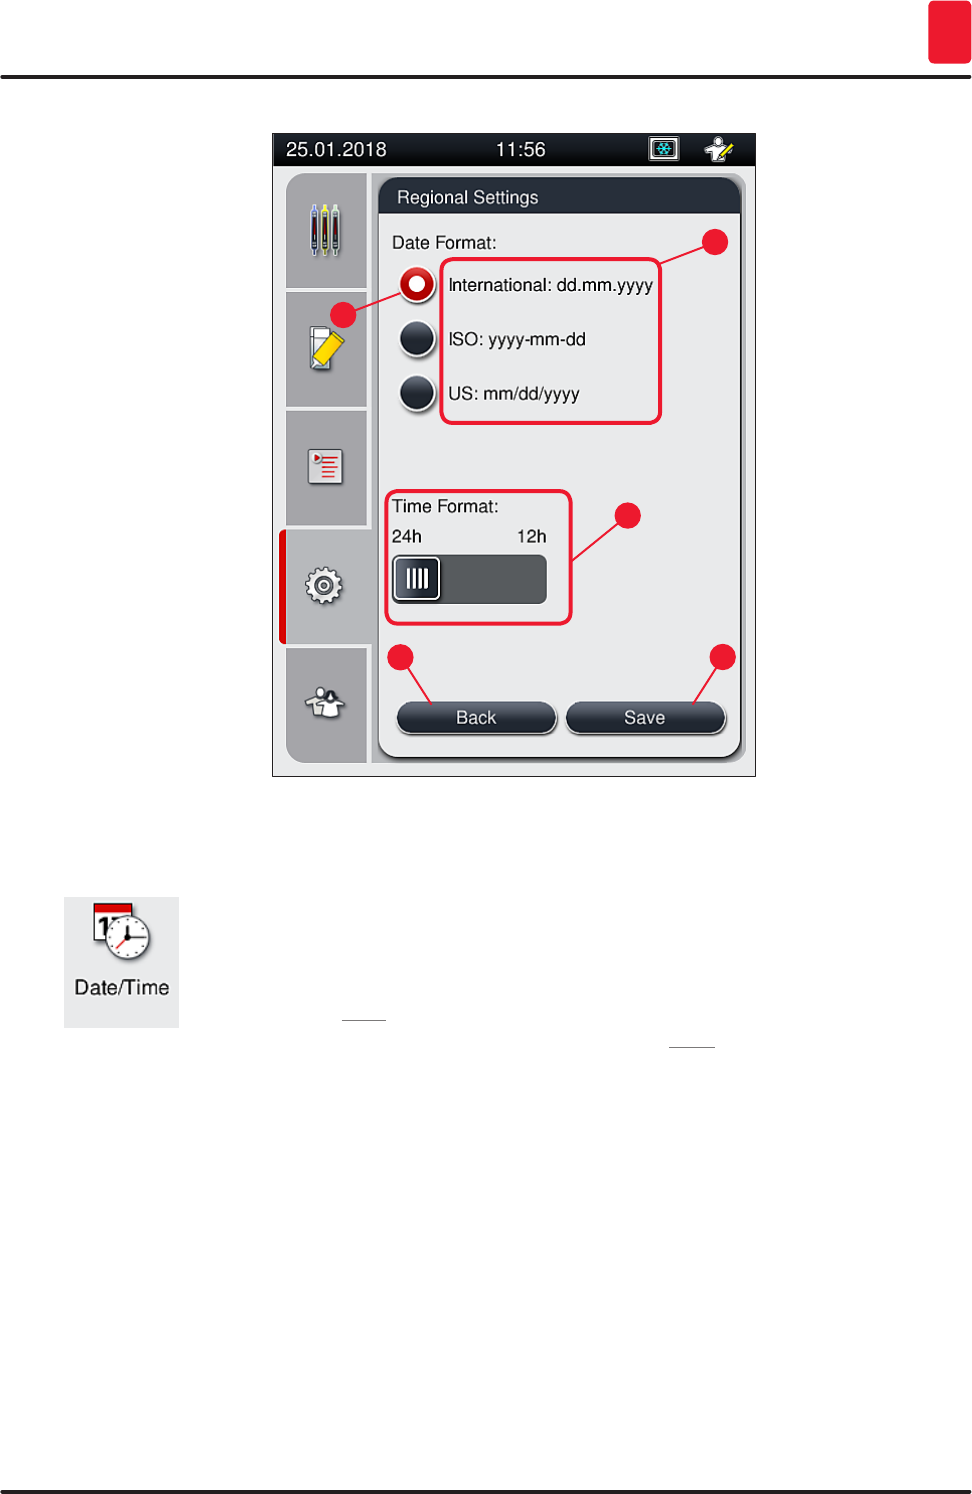
5.8.2 Regional settings
Required access level: Standard user, supervisor
Basic format settings can be carried out in this menu.
Date format:
• Configure the date display (→ Fig. 31-1) to international, ISO or US format by pressing the
corresponding radio button (→ Fig. 31-2).
• The activated setting is labeled by a red border (→ Fig. 31-2).
Time format:
• The time display can be changed from a 24-hour display to a 12-hour display (a.m. = morning/p.m. =
afternoon) using the slider (→ Fig. 31-3).
• Pushing the Save (→ Fig. 31-5) button saves the settings.
• If you do not want to apply the settings, press the Back (→ Fig. 31-4) button to return to the previous
menu.
53
HistoCore SPECTRA CV
Operation 5
1
2
3
45
Fig. 31
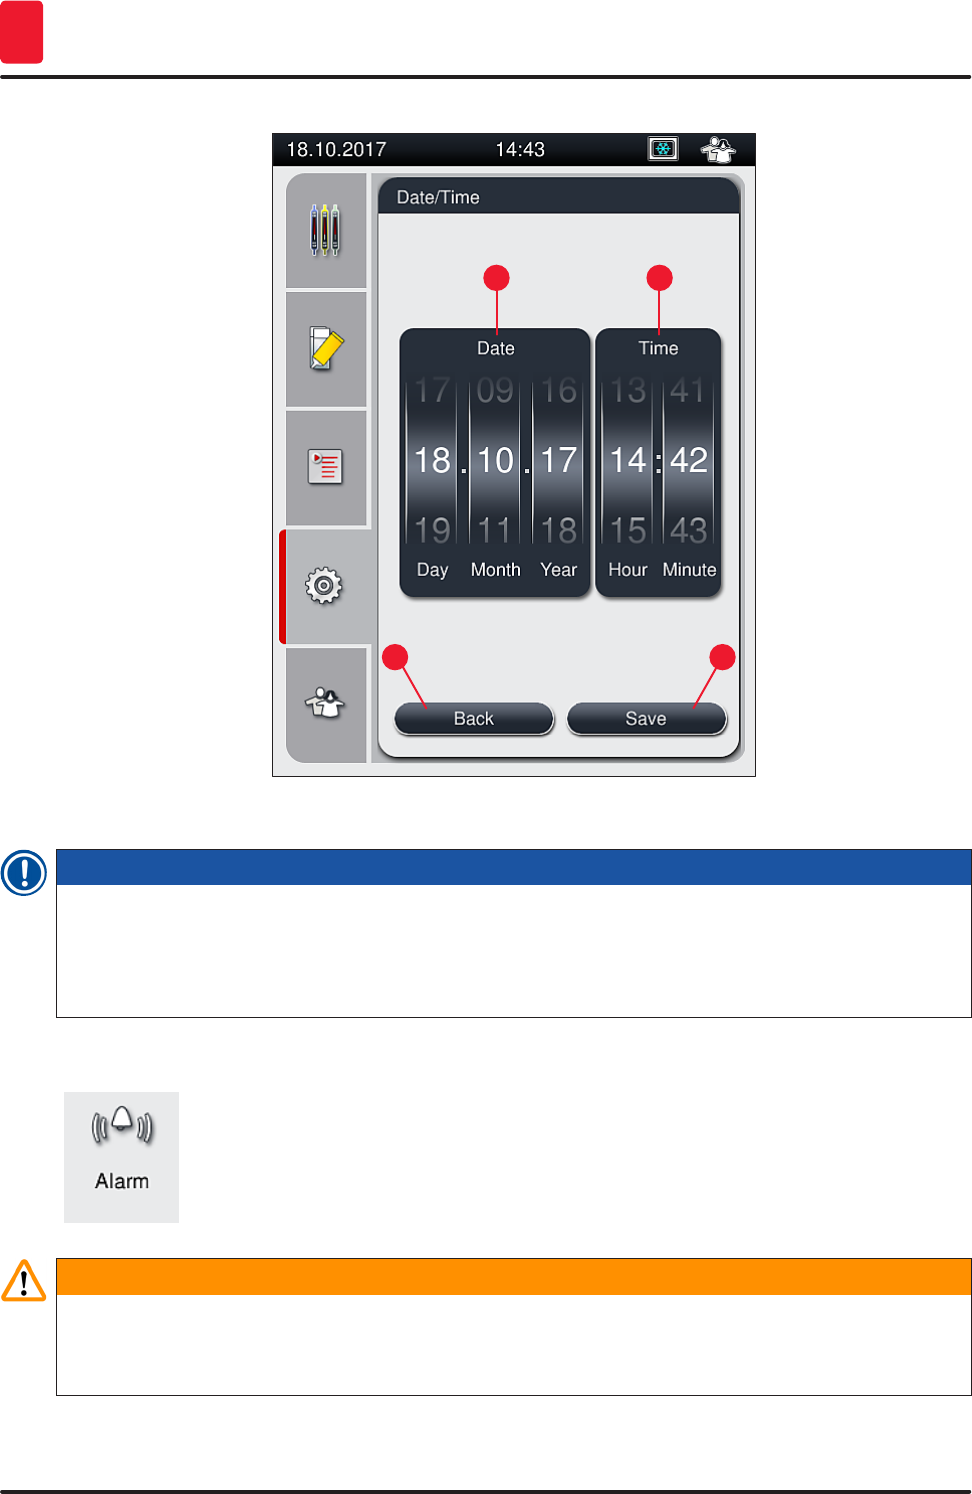
5.8.3 Date and time
Required access level: Standard user, supervisor
The current date (→ Fig. 32-1) and local time (→ Fig. 32-2) can be configured in this
menu by rotating the individual rollers.
• Pushing the Save (→ Fig. 32-4) button saves the settings.
• If you do not want to apply the settings, press the Back (→ Fig. 32-3) button to
return to the previous menu.
54 Version 1.2, Revision A
Operation
5
1 2
3 4
Fig. 32
Note
In the 12-hour display, a.m. (morning) and p.m. (evening) are displayed under the hour digits to enable
a correct setting.
The time and date settings cannot deviate more than 24 hours from the system time configured at the
factory.
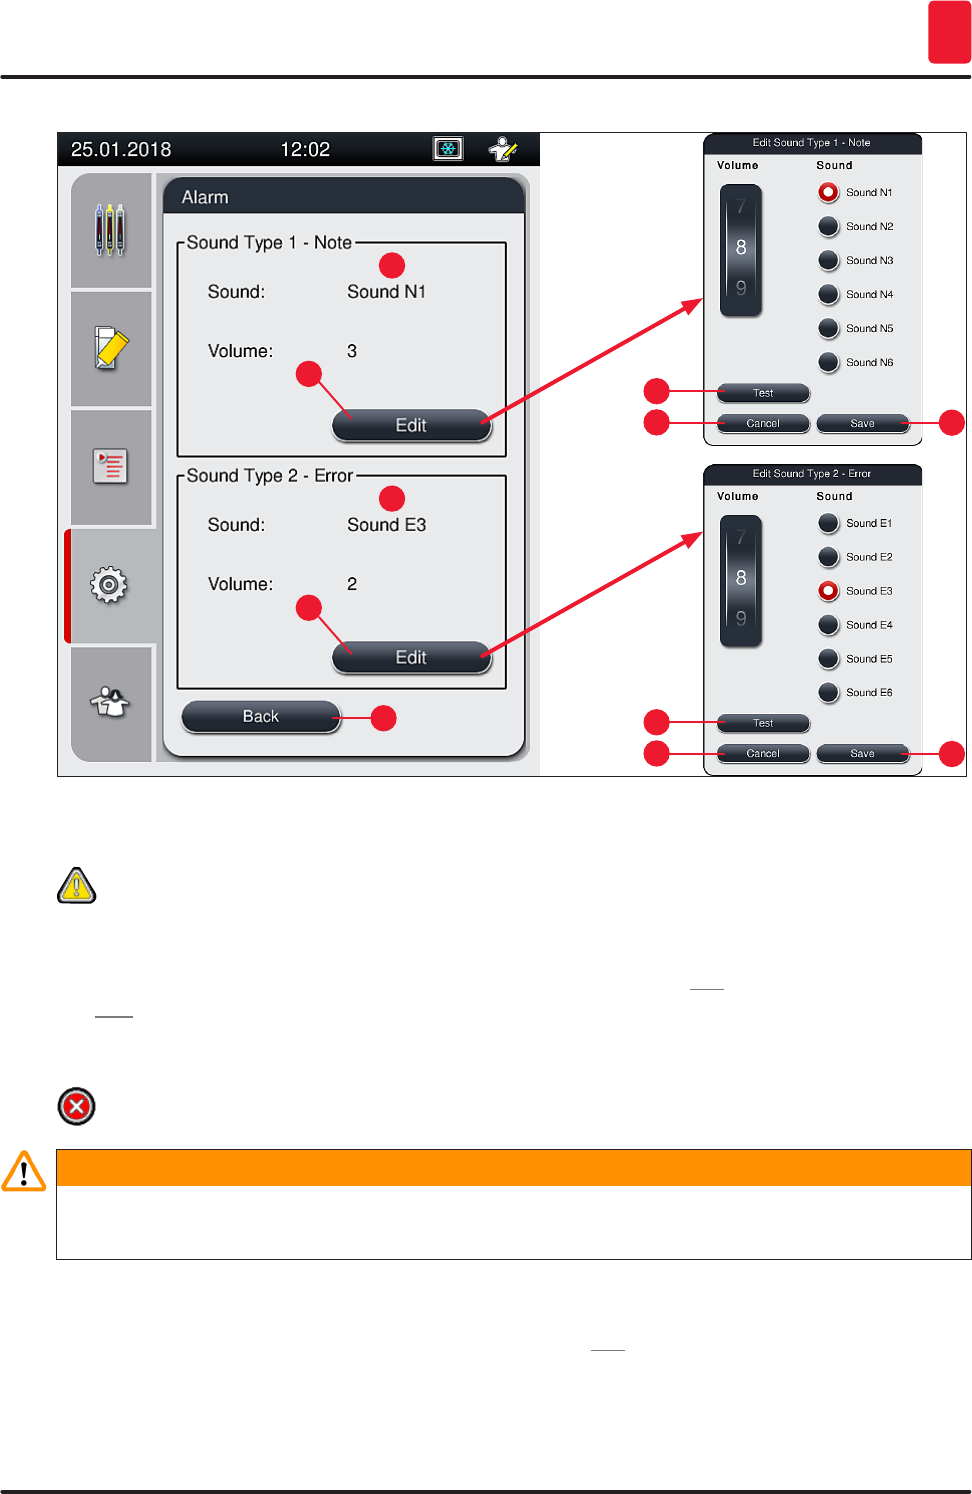
5.8.4 Menu for alarm sounds – Error and signal sounds
Required access level: Standard user, supervisor
In this menu, audible note and error signals can be selected, the volume can be
configured and functionality can be tested.
The current setting for alarm and error sounds is displayed after calling up the menu.
Warning
After starting the instrument, an error sound is played. If this does not occur, the instrument may not
be operated. This protects the specimens and the user. In this case, contact the responsible Leica
service organization.
55
HistoCore SPECTRA CV
Operation 5
1
2
3
4
5
5
7
76
6
8
Fig. 33
Sound Type 1 - Note (→ Fig. 33-1)
Signal sounds are issued if warning messages or notifications are displayed on the screen.
You can select from a list of 6 sounds. To change the settings, press the Edit (→ Fig. 33-3) button.
The Test (→ Fig. 33-5) button can be used to listen to the respective sound. The volume can be
adjusted incrementally by turning the roller (0 to 9).
Sound Type 2 - Error (→ Fig. 33-2)
Warning
The user must stay within earshot during the operation in order to react immediately during
instrument malfunctions.
Error sounds are issued if an error message is displayed on the screen. This requires immediate
intervention from the user. To change the settings, press the Edit (→ Fig. 33-4) button.
56 Version 1.2, Revision A
Operation
5
• The volume setting for error sounds is adjusted using the Volume roller. Six different sounds are
available for the alarm types. The Test (→ Fig. 33-5) button can be used to listen to the respective
sound.
• The volume can be adjusted incrementally by turning the roller.
Note
The acoustic error sounds cannot be disabled. The minimum configurable value for the volume is 2.
The maximum value is 9.
• Pushing the Save (→ Fig. 33-6) button saves the settings. The Cancel (→ Fig. 33-7) button is used to
close the selection window without applying the settings.
• Press the Back (→ Fig. 33-8) button to return to the Settings menu.
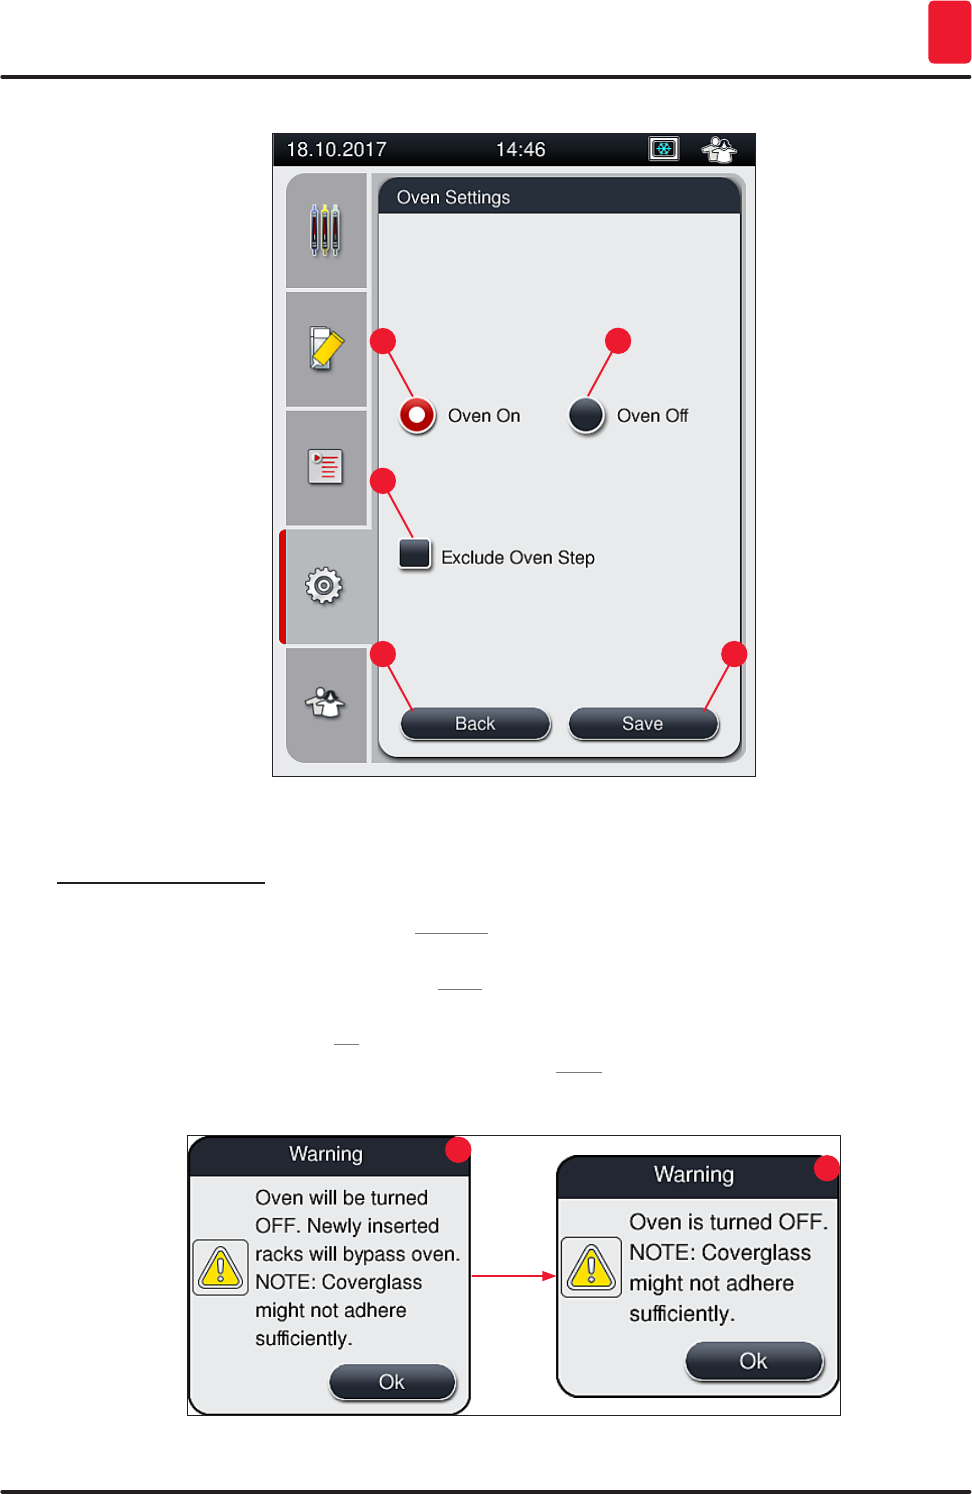
5.8.5 Oven settings
Required access level: Standard user, supervisor
The operating mode of the oven can be configured in the menu for oven settings
(→ Fig. 34). The current oven settings are displayed after calling up the menu.
Note
• When starting the instrument, the oven is normally enabled and the Exclude Oven Step
(→ Fig. 34-3) is disabled.
• The oven heats up to approx. 35 °C. As soon as a rack has been coverslipped, the oven continues
heating up to approx. 40 °C. The symbol in the status bar changes from the status "heating up"
(→ Fig. 21-8) to the status "ready to operate" (→ Fig. 21-9).
• The oven dries the cover slipped slides after completed processing for approx. 5 minutes. After
the oven step has ended, the mounting medium is not completely dry. Treat the slides carefully
during the removal from the rack to avoid a sliding of the coverglass.
• The temperature setting of the oven (maximum 40 °C) and the dwell time of the finished
coverslipped slides are both configured at the factory and cannot be changed by the user.
• It can take up to 4 minutes for the oven to heat up!
57
HistoCore SPECTRA CV
Operation 5
54
3
2
1
Fig. 34
Shutting down the oven
1. To shut down the oven, press the Oven off (→ Fig. 34-2) button.
2. If the oven is shut down, this is indicated by the button (→ Fig. 34-2) being colored red/white.
3. Apply the shutdown by pressing the Save (→ Fig. 34-5) button.
4. Observe both of the following information messages (→ Fig. 35-1) and (→ Fig. 35-2) and
acknowledge each with Ok.
5. If you do not want to apply the settings, press the Back (→ Fig. 34-4) button to return to the
previous menu without saving the changes.
Fig. 35
12
58 Version 1.2, Revision A
Operation
5
Note
• If the oven is shut down, the slides are no longer transported to the oven after coverslipping;
instead, they are deposited directly into the unload drawer.
• Processing is shortened by about 5 minutes.
Warning
If you shut down the oven, it is shut down immediately after pressing the Save button. Racks used
earlier, and thus still in the process, go through the oven step in a slowly cooling oven. This can result
in less effective drying and requires greater care when removing the slides from the rack.
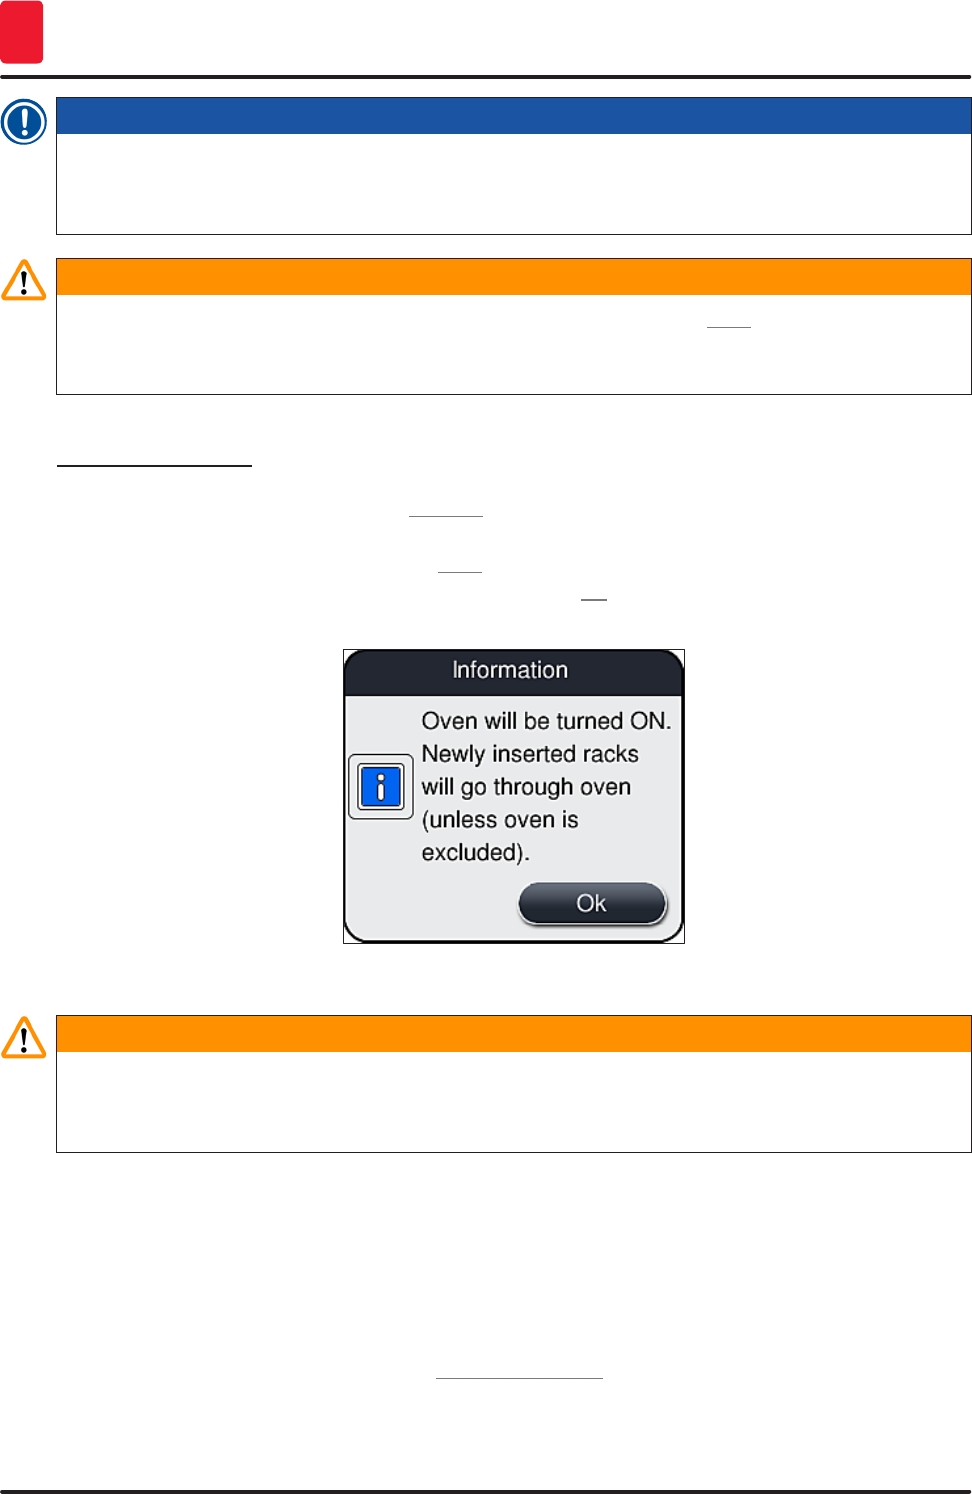
Switching on the oven
1. To switch on the oven, press the Oven On (→ Fig. 34-1) button.
2. If the oven is enabled, this is indicated by the button (→ Fig. 34-1) being colored red/white.
3. Apply the activation by pressing the Save (→ Fig. 34-5) button and note the subsequent
information message (→ Fig. 36) and confirm it with OK.
Fig. 36
Warning
After switching the oven back on, keep in mind that the oven takes up to 4 minutes to heat up. This
can result in less effective drying for the initial racks and requires greater care when removing the
slides from the rack.
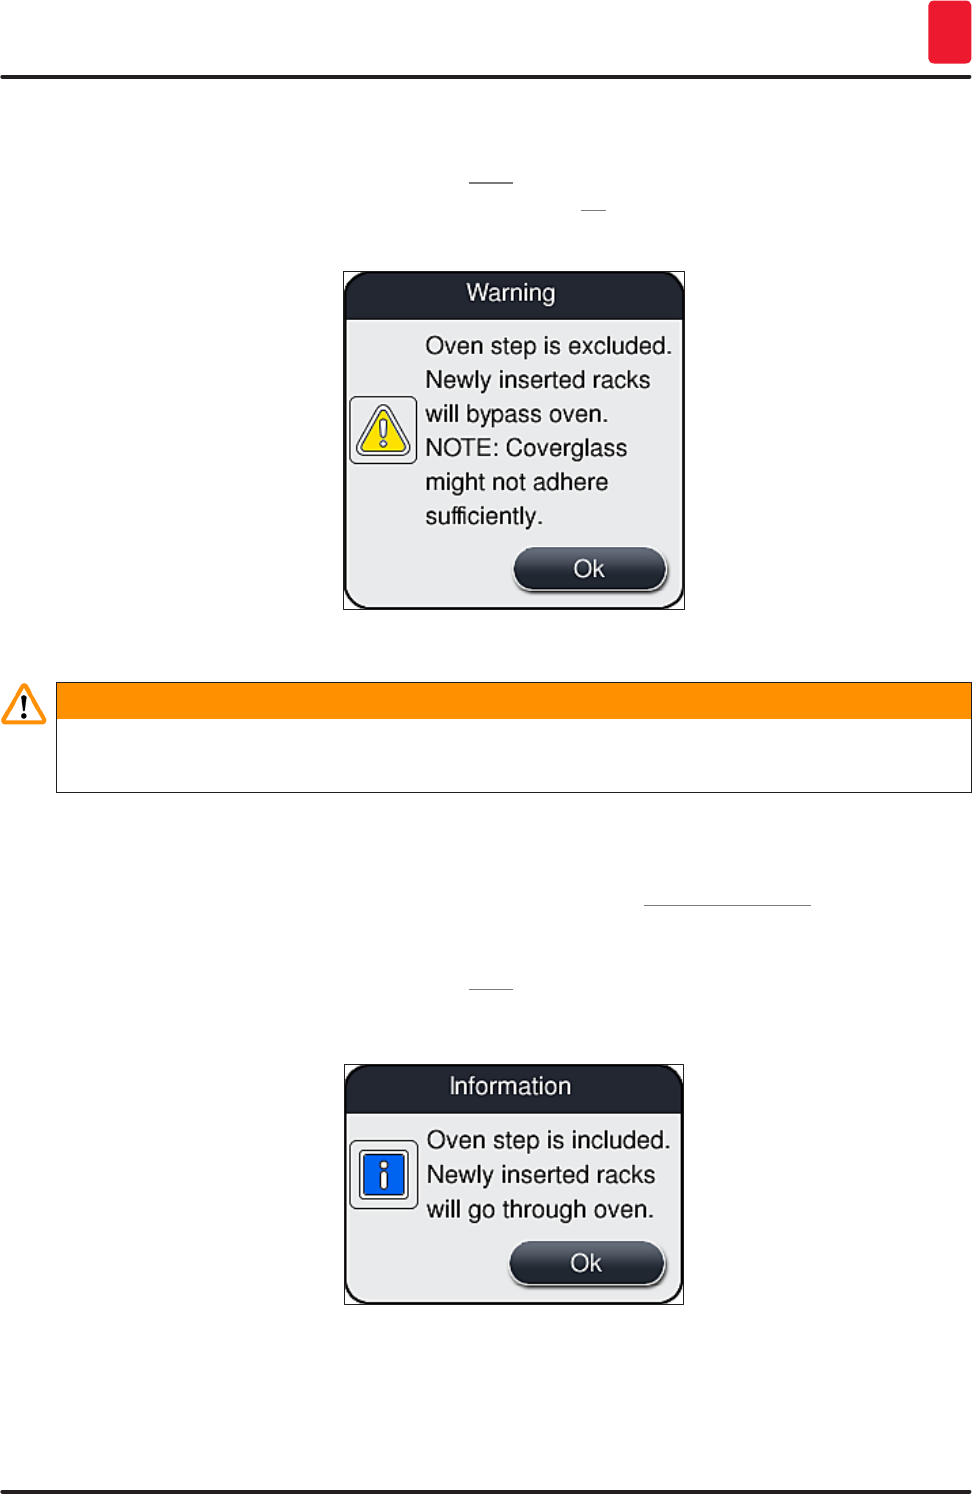
Excluding the oven step
LThe oven step at the end of processing can be disabled if necessary. In this case, the oven
remains switched on and can be made available immediately again if necessary by reactivating
the oven step. The heating phase is omitted.
1. To exclude the oven step, press the Exclude Oven Step (→ Fig. 34-3) button.
59
HistoCore SPECTRA CV
Operation 5
2. If the oven step is excluded, this is indicated by the button (→ Fig. 34-3) being colored red with
an X.
3. Apply the configuration by pressing the Save (→ Fig. 34-5) button and note the subsequent
information message (→ Fig. 37) and confirm it with Ok.
Fig. 37
Warning
Excluding the oven step leads to less effective drying and requires greater care when removing
slides from the rack.
Including the oven step in the processing
1. To enable the oven step at the end of processing, press the Exclude Oven Step (→ Fig. 34-3)
button.
2. If the oven step is enabled, no check mark in the (→ Fig. 34-3) button is displayed.
3. Apply the configuration by pressing the Save (→ Fig. 34-5) button and note the subsequent
information message (→ Fig. 38) and confirm it with Ok.
Fig. 38
60 Version 1.2, Revision A
Operation
5
Note
• The function is valid only for racks inserted into the instrument after the Save button was pressed.
• The overall processing is extended by the duration of the oven step (approx. 5 min.).
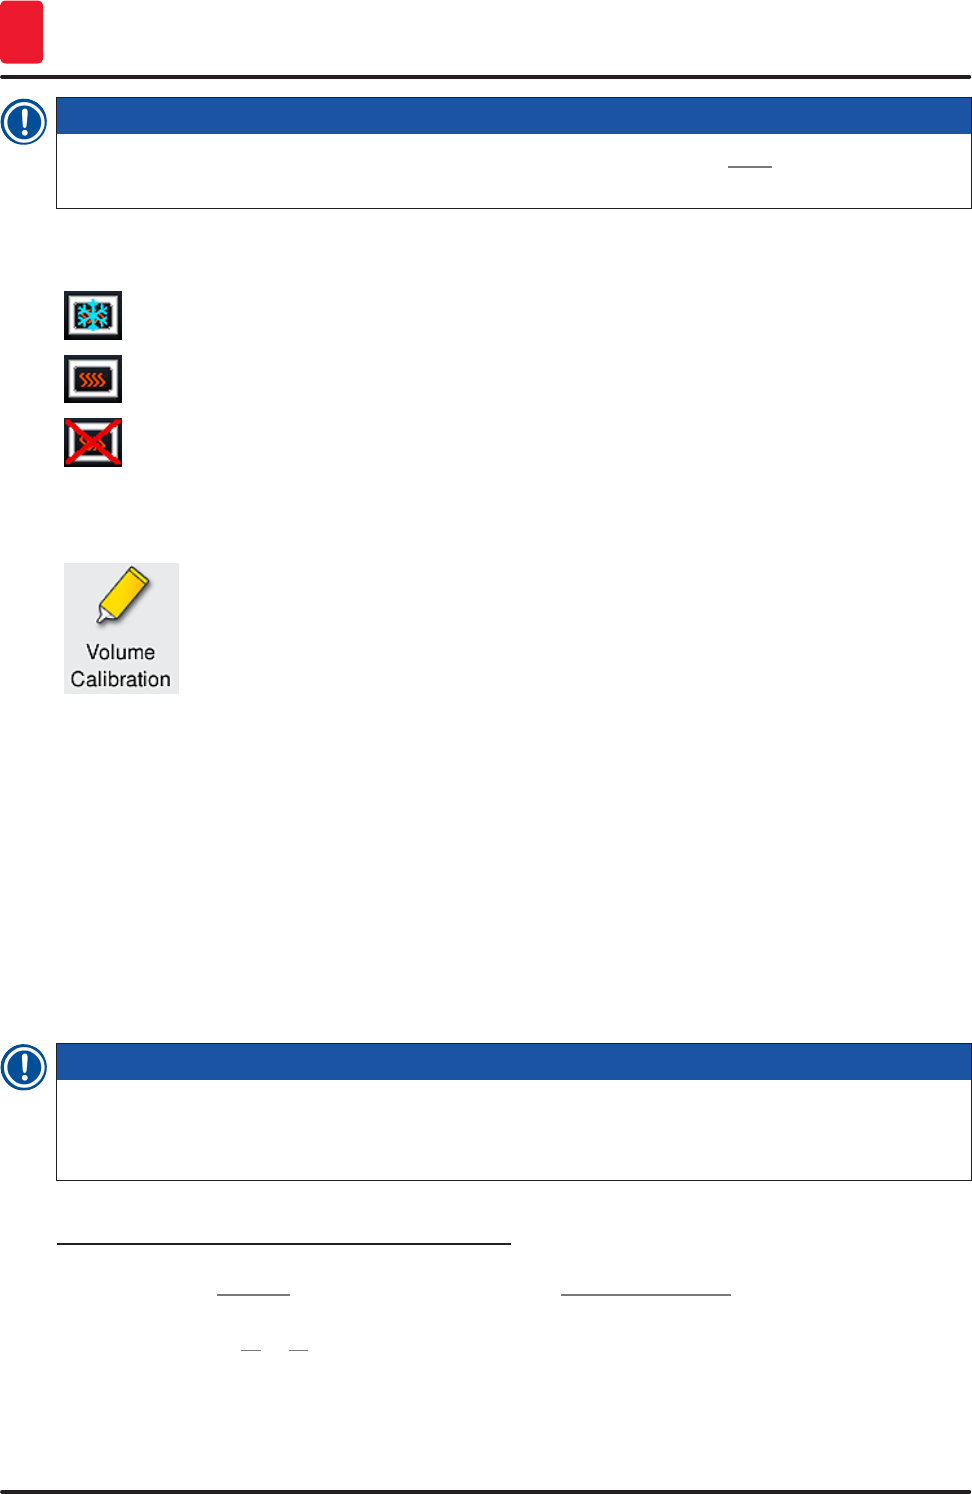
The respective status of the oven is displayed in the status bar (→ Fig. 21):
The oven is in the heating phase
The oven is enabled and ready to operate
The oven is disabled
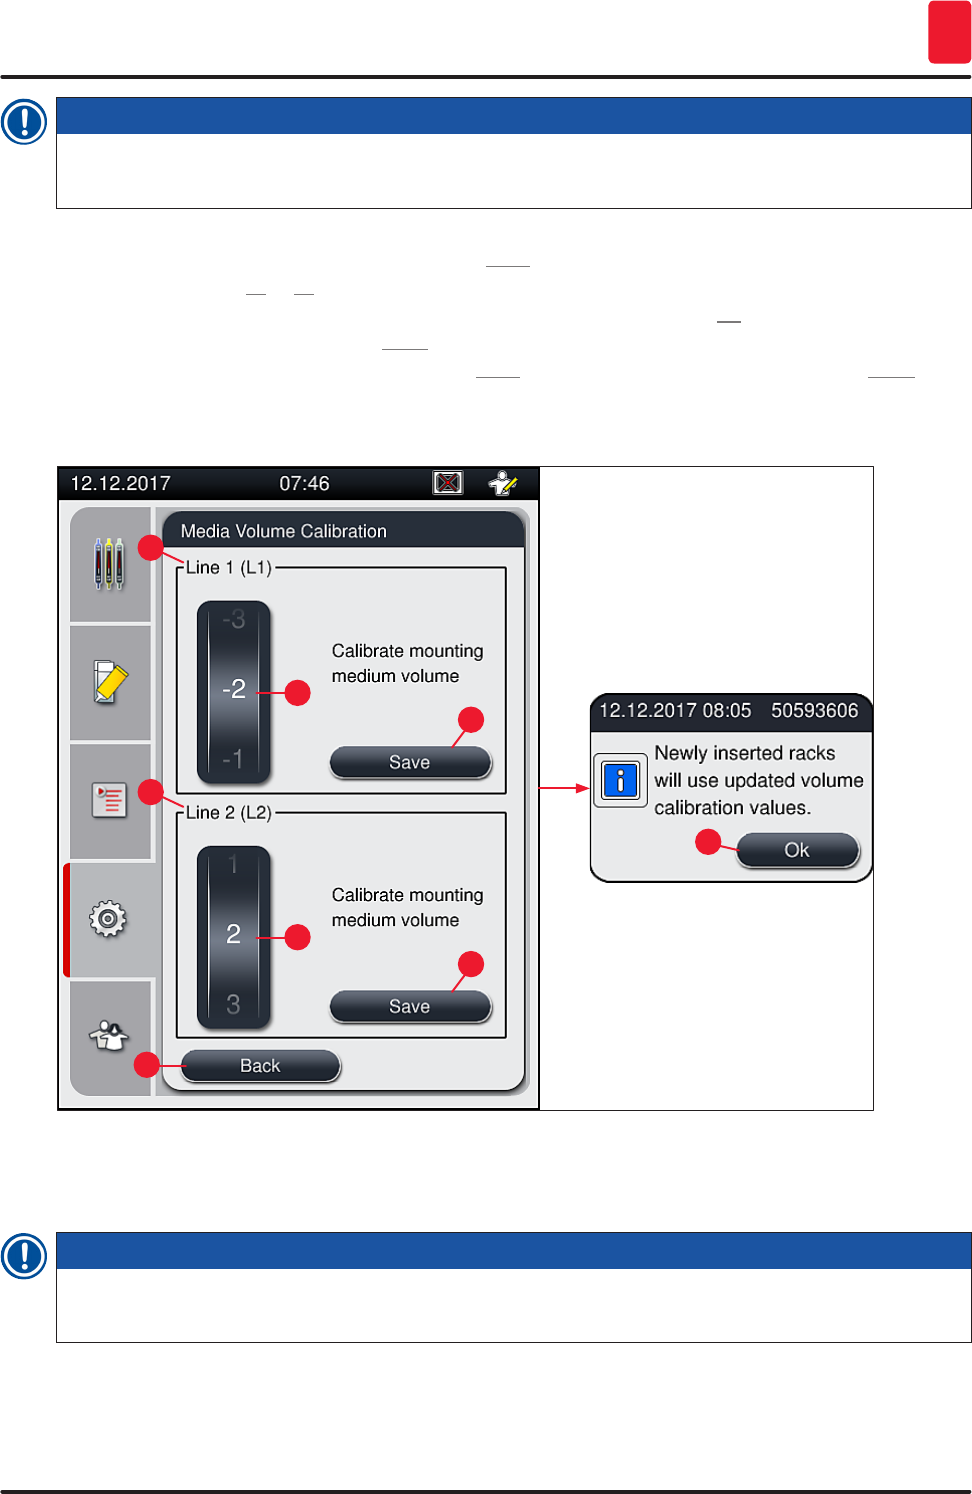
5.8.6 Volume calibration
Required access level: Supervisor
The application quantity of the mounting medium on the slide can be adapted to
changes in ambient conditions by the Supervisor using the Volume Calibration
menu.
The properties of the mounting medium that is used can be changed depending on the ambient
conditions. For example, the viscosity changes due to temperature differences. If the mounting medium
is stored at a cool temperature and deployed in a cool state in the instrument for use, the viscosity is
"tougher" (i.e. more viscous) than with a mounting medium which has already adapted to the ambient
temperature. The viscosity has a direct influence on the application quantity of the mounting medium on
the slide.
If the application quantity differs during coverslipping so significantly that the user fears a loss of
quality, the application quantity can be adjusted separately for both coverslip lines by means of the
Volume Calibration menu. The application quantity configured in the parameter sets can remain
unchanged.
Note
To adjust the application quantity, the password-protected Supervisor Mode is necessary.
Furthermore, the adjustment is only possible if no processing is running and there are no longer any
racks in the instrument.
Adjusting the application quantity by the Supervisor
1. Call up the Settings menu (→ Fig. 30-1) and press Volume calibration.
2. You can adjust the application quantity by turning the corresponding roller (→ Fig. 39-2) for
coverslip line L1 or L2 (→ Fig. 39-1).
61
HistoCore SPECTRA CV
Operation 5
Note
Negative values (-1 through -5) reduce the application quantity for the selected coverslip line
incrementally, while positive values (1 through 5) increase the application quantity incrementally.
3. To apply the configured values, press the Save (→ Fig. 39-3) button for the respective
coverslip line, L1 or L2.
4. Note the subsequent information message and acknowledge it with Ok (→ Fig. 39-4).
5. Exit the menu by pressing the Back (→ Fig. 39-5).
6. To discard the settings, do not press the Save (→ Fig. 39-3) button, but instead press Back
(→ Fig. 39-5) and exit the menu without saving.
1
1
2
2
5
3
3
4
Fig. 39
Volume calibration during installation is done by a Leica service technician
Note
The pumps built into the coverslip lines have different flow rates due to the design. During the initial
installation of the HistoCore SPECTRA CV, both pumps are matched by means of this menu.
62 Version 1.2, Revision A
Operation
5
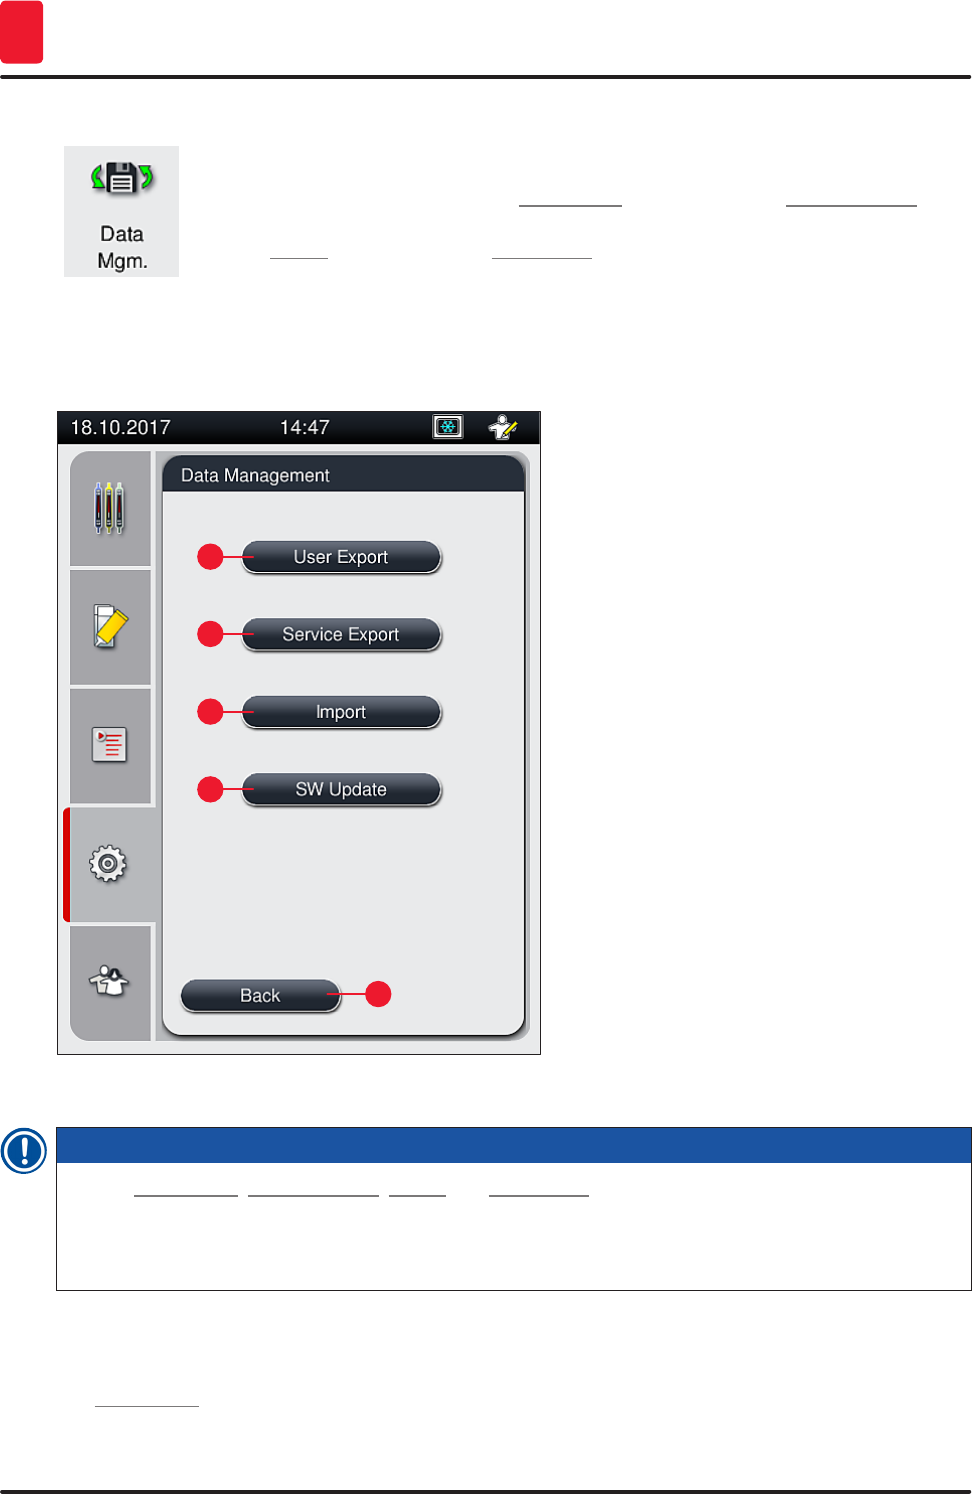
5.8.7 Data management
Required access level: Standard user, supervisor
• Standard users can execute the User Export (→ Fig. 40-1) and Service Export
(→ Fig. 40-2) functions.
• The Import (→ Fig. 40-3) and SW Update (→ Fig. 40-4) functions can only be used
by the Supervisor.
The event logs (log files) can be exported in this menu. A USB memory stick
connected to the USB port on the front side of the instrument (→ Fig. 2-7) is required
for all exports and imports.
1
2
3
4
5
Fig. 40
Note
• The User Export, Service Export, Import and SW Update functions can only be carried out if the
instrument is in sleep mode and there are no longer any racks in the instrument. Furthermore, the
load and unload drawers must be closed.
• The USB memory stick used must be formatted as FAT32.
User export (→ Fig. 40-1)
The User Export function is used to save information on a connected USB memory stick (→ Fig. 2-7):
63
HistoCore SPECTRA CV
Operation 5
• A zip file with the event logs of the last 30 working days and CMS information in CSV format.
• An encrypted lpkg file that contains all user-defined parameter sets and the consumables list.
Note
The encrypted lpkg file cannot be opened and viewed by the user.
1. After pressing the User Export button, the data is exported to the connected USB memory
stick.
2. The information message User data is being exported... is displayed for the duration of the
data export.
The information message Export successful indicates to the user that the data transfer is
finished and the USB memory stick can be removed safely. Press the OK button to close the
message.
Note
If the message Export failed is displayed, an error occurred (e.g. the USB memory stick was removed
too soon). In this case, the export process must be carried out again.
Service export (→ Fig. 40-2)
The Service Export function is used to save a lpkg file on a connected USB memory stick (→ Fig. 2-7).
The encrypted lpkg file contains a predefined number of event logs as well as the following:
• CMS information
• User-defined parameter sets
• Consumables data
• Additional service-relevant data
Note
The data is stored in encrypted form and can only be decrypted by a Leica service technician.
• After pressing the Service export button, a selection menu appears in which the user can select the
desired number of data records to be exported (5, 10, 15 or 30 days).
• Press Ok to confirm the selection.
• The information message Service data is being exported... is displayed for the duration of the data
export.
64 Version 1.2, Revision A
Operation
5
• The information message Export successful indicates to the user that the data transfer is finished
and the USB memory stick can be removed safely.
• If the message Export failed is displayed, an error occurred (e.g. the USB memory stick was removed
too soon). In this case, the export process must be carried out again.
Import (→ Fig. 40-3)
Note
The password-protected Supervisor Mode is required for importing.
LThe function enables the import of language packages from a connected USB memory stick.
1. To do this, insert the USB memory stick into one of the USB ports on the front side of the
instrument.
2. Then, select the Import function. The data is scanned.
SW update (→ Fig. 40-4)
Software updates can be run by a Supervisor or by a Leica-authorized service technician.
Note
Lab-specific settings are not deleted when updating the software for the HistoCore SPECTRA CV.
5.8.8 Event view
Required access level: Standard user, supervisor
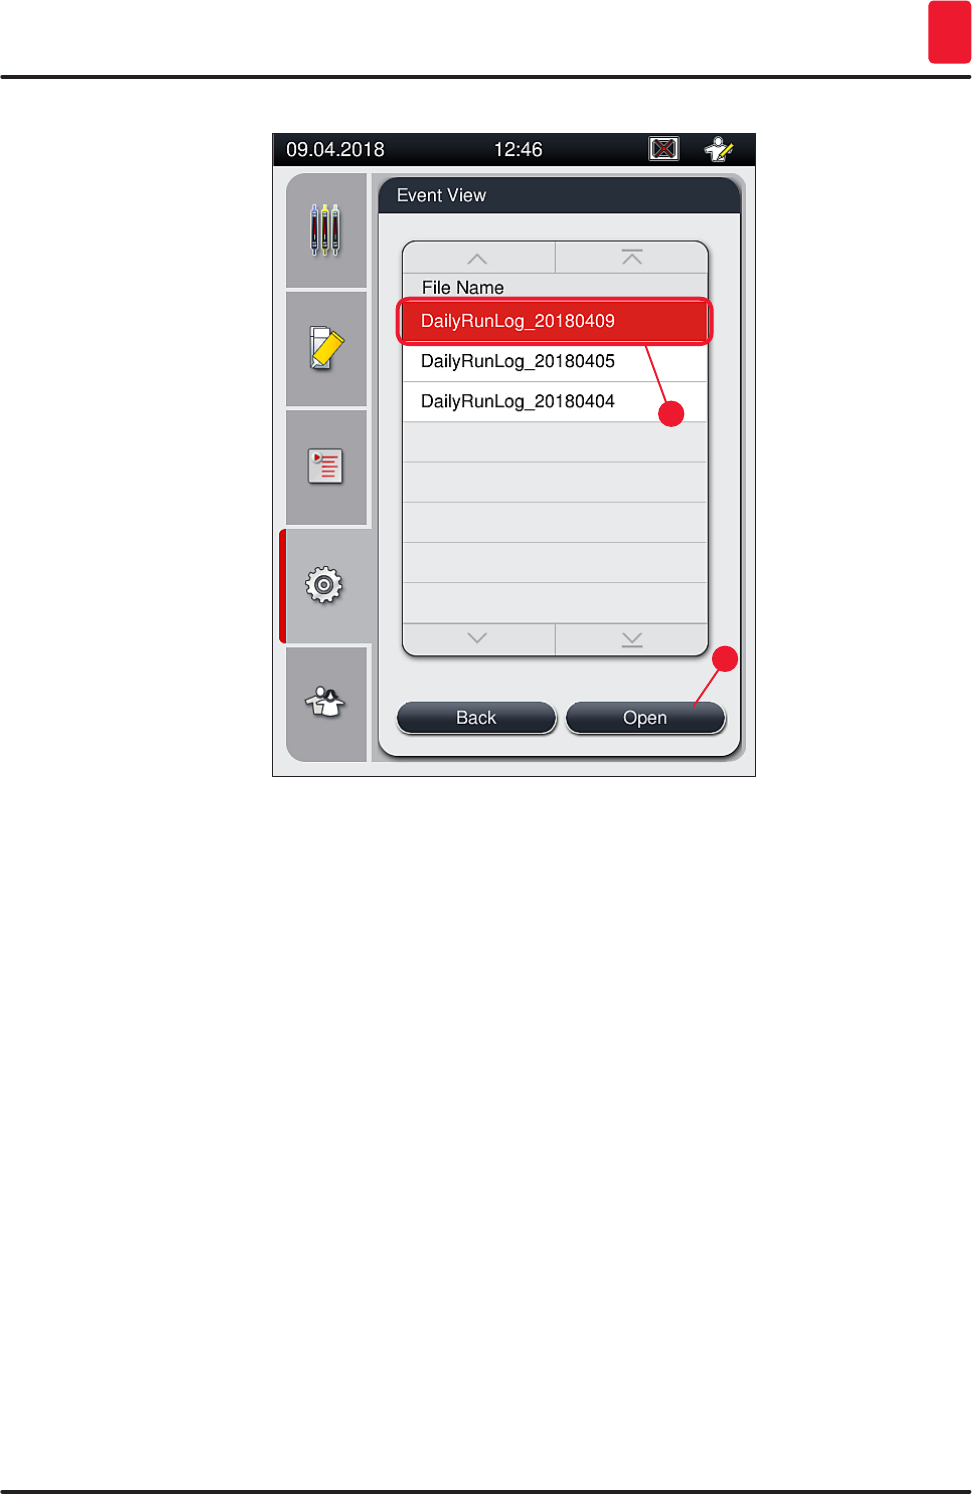
A separate log file is created for each day that the instrument was switched on. This
file can be called up by selecting the DailyRunLog file in the Event view (→ Fig. 41).
In the event viewer, an event log (→ Fig. 41) can be selected from a list of available logs (→ Fig. 41-1)
and called up by pressing the Open (→ Fig. 41-2) button.
65
HistoCore SPECTRA CV
Operation 5
1
2
Fig. 41
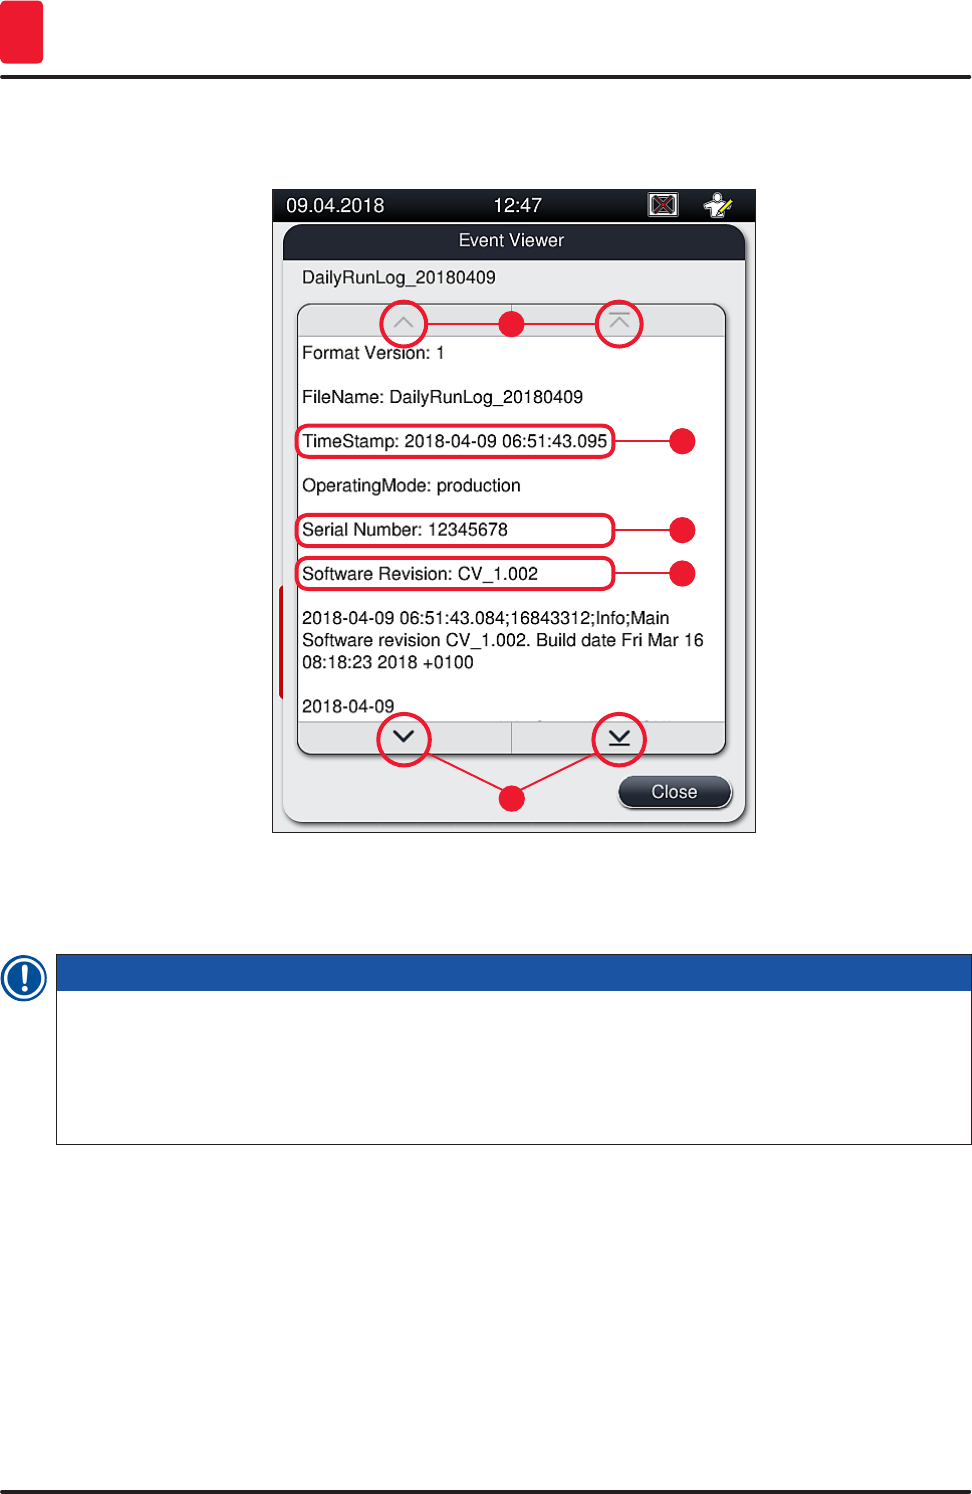
• All event entries begin with the Timestamp (→ Fig. 42-1), a date and time when the entry was
created.
• The title bars of the event viewer also indicate the serial number (→ Fig. 42-2) and the currently
installed software version (→ Fig. 42-3) of HistoCore SPECTRA CV.
• You can scroll up and down in the list and the log file using the arrow buttons (→ Fig. 42-4).
• Pressing the left button allows you to scroll through the event viewer page by page.
66 Version 1.2, Revision A
Operation
5
• Pressing the right button takes you to the beginning or the end of the event viewer.
1
2
3
4
4
Fig. 42
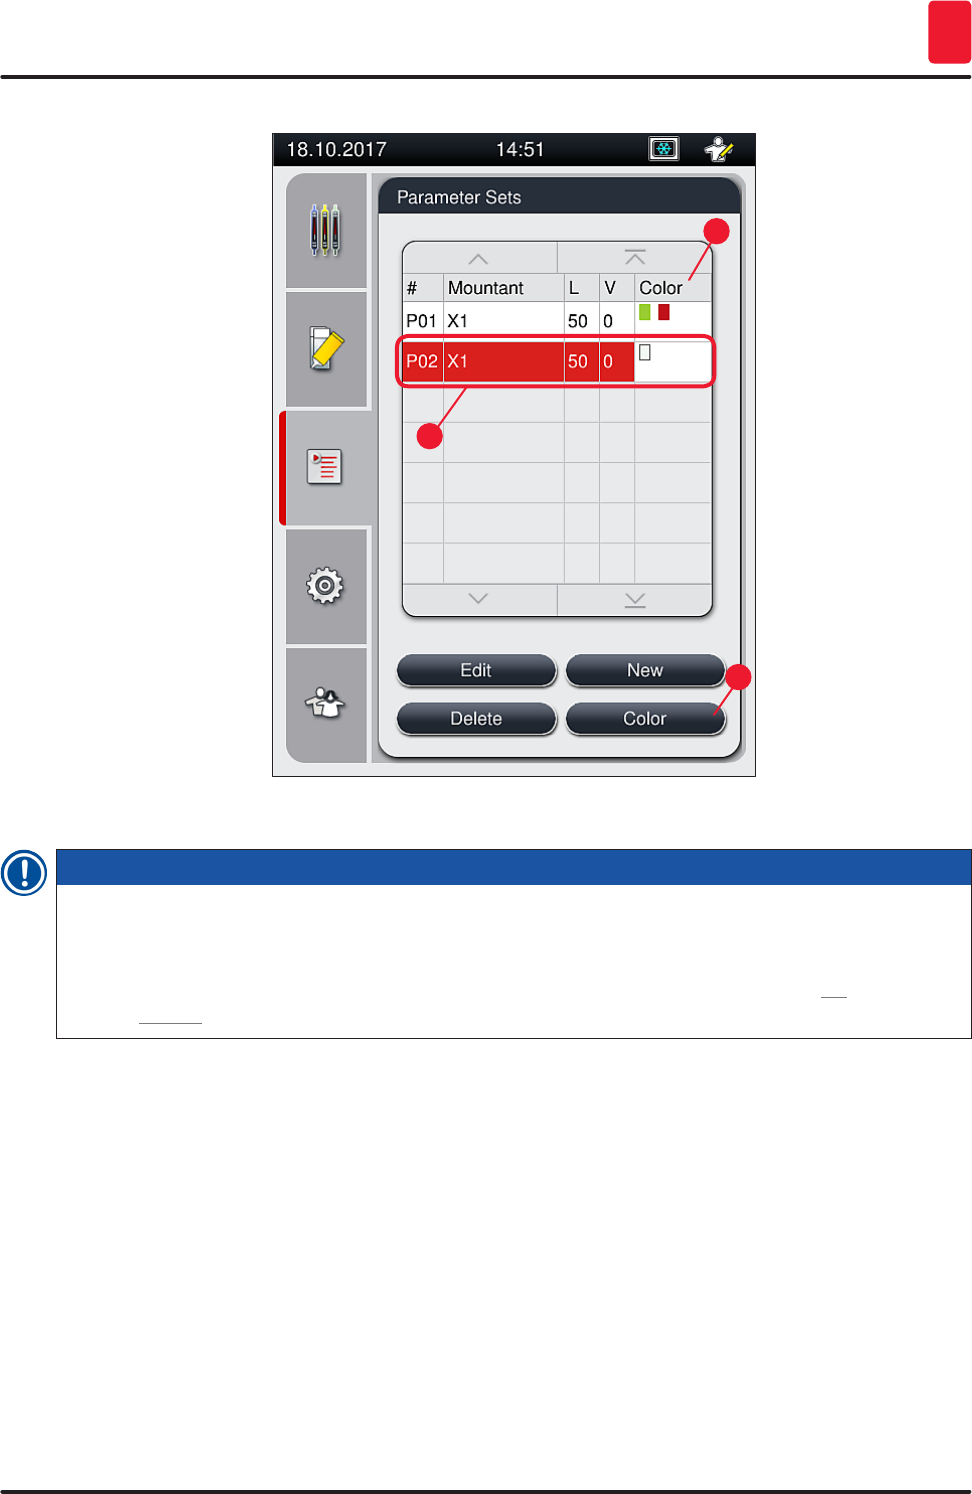
5.9 Parameter settings
Note
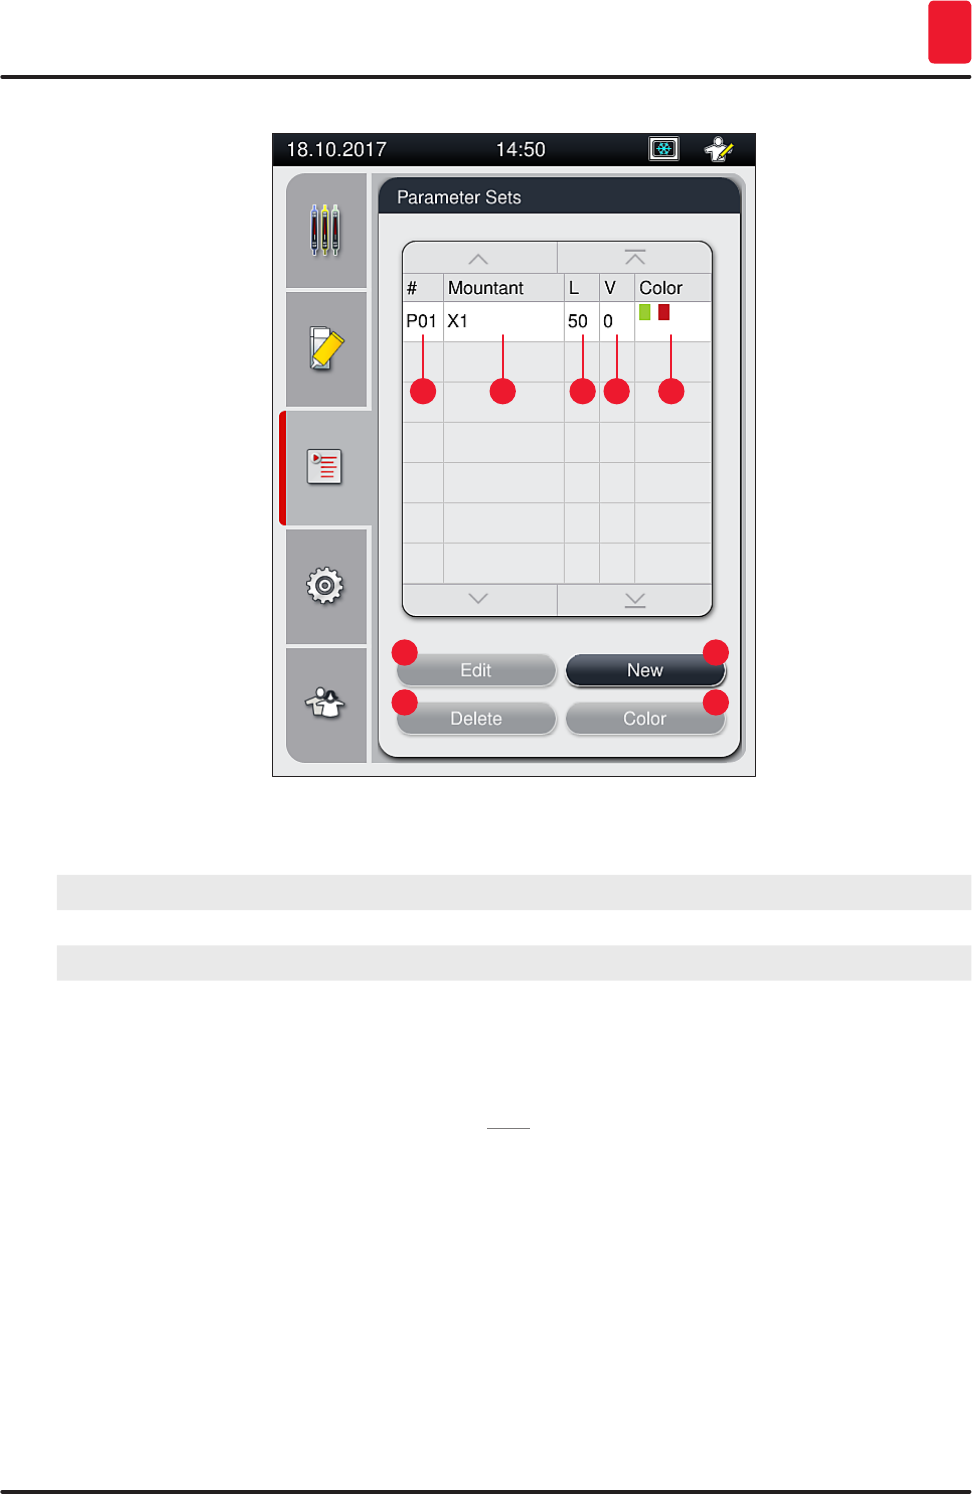
• The parameter set menu (→ Fig. 43) lets the user create new parameter sets, modify existing
ones or assign a rack handle color to a parameter set. Creating or modifying a parameter set
requires having the Supervisor user status and is only possible if there is no rack in the instrument
and the instrument is idle.
• The User status only allows one parameter set to be displayed.
67
HistoCore SPECTRA CV
Operation 5
1
2
7
8 9
3 4 5 6
Fig. 43
1Create a new parameter set 6Assigned rack handle color(s)
2Parameter set number 7Editing a parameter set
3Mounting medium used 8Deleting a parameter set
4Coverglass length 9Assigning colors to a parameter set
5Application volume
5.9.1 Creating a new parameter set
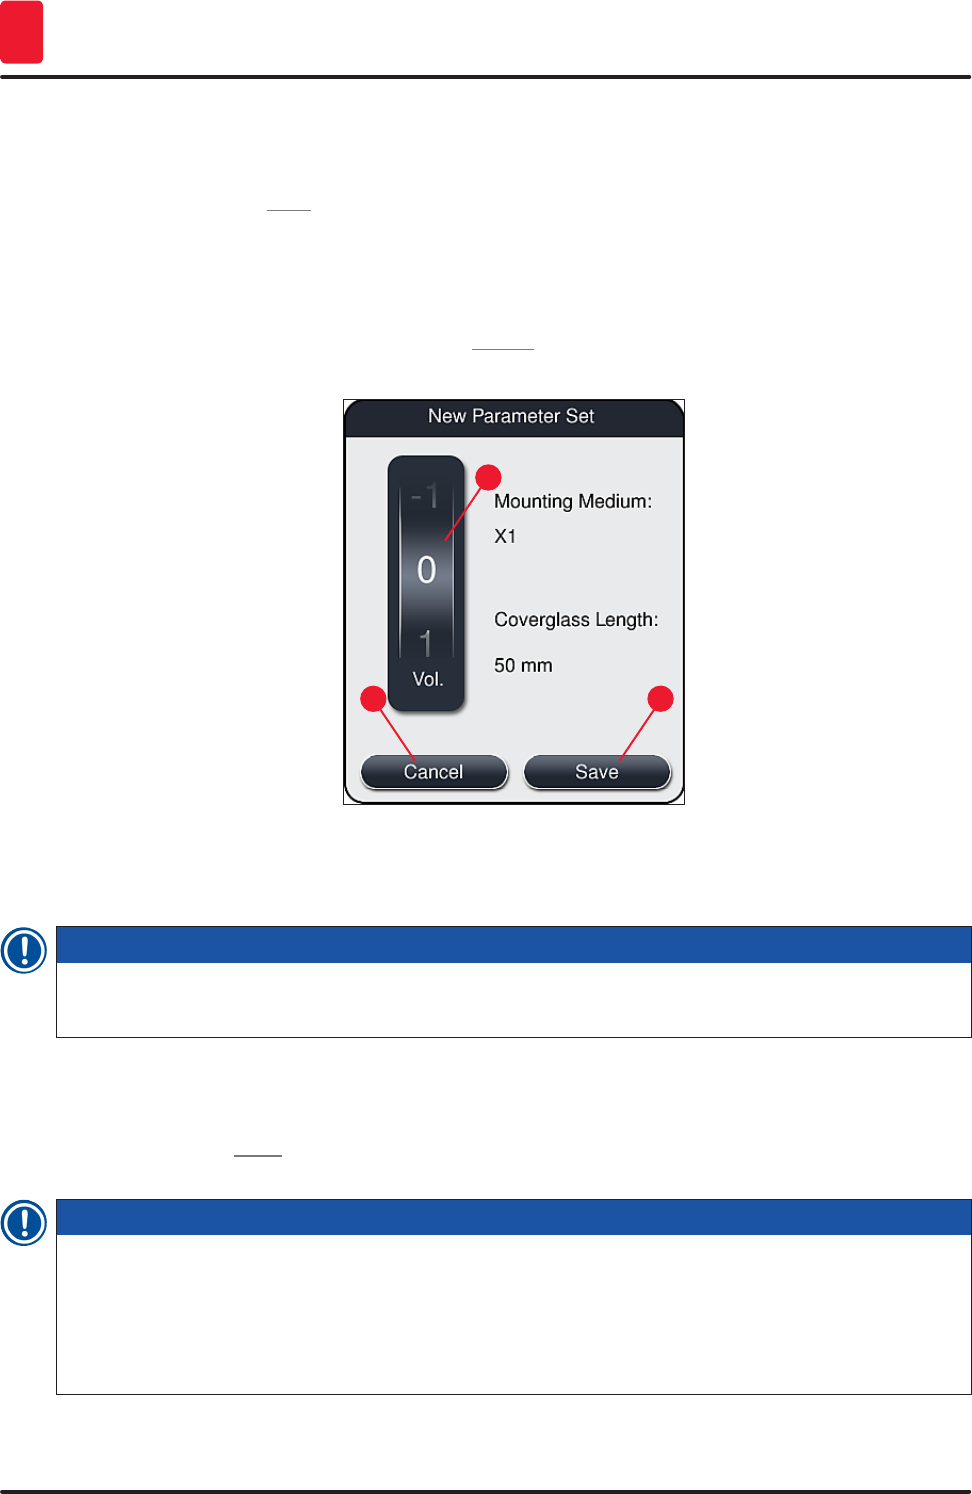
1. To create a new parameter set, press the New button (→ Fig. 43-1) in the parameter set menu.
68 Version 1.2, Revision A
Operation
5
2. In the following open menu, an incremental adjustment of the application volume (max. 5/min.
-5) can take place (→ P. 72 – 5.9.5 Adjustment of the application volume). For this purpose
set the desired volume by turning the roller (→ Fig. 44-1).
3. Finally press the Save button (→ Fig. 44-2).
The newly created parameter set is now saved and can be selected in the parameter set menu
(→ Fig. 43).
LTo discard the parameter set, press the Cancel (→ Fig. 44-3) button.
1
2
3
Fig. 44
5.9.2 Assigning a parameter set to a rack handle color
Note
One or more rack handle color(s) can be assigned to each parameter set. For this purpose the
Supervisor user status is required.
1. In the parameter set menu (→ Fig. 45), tap on the corresponding entry to select the parameter
set to which a rack handle color is to be assigned (→ Fig. 45-1).
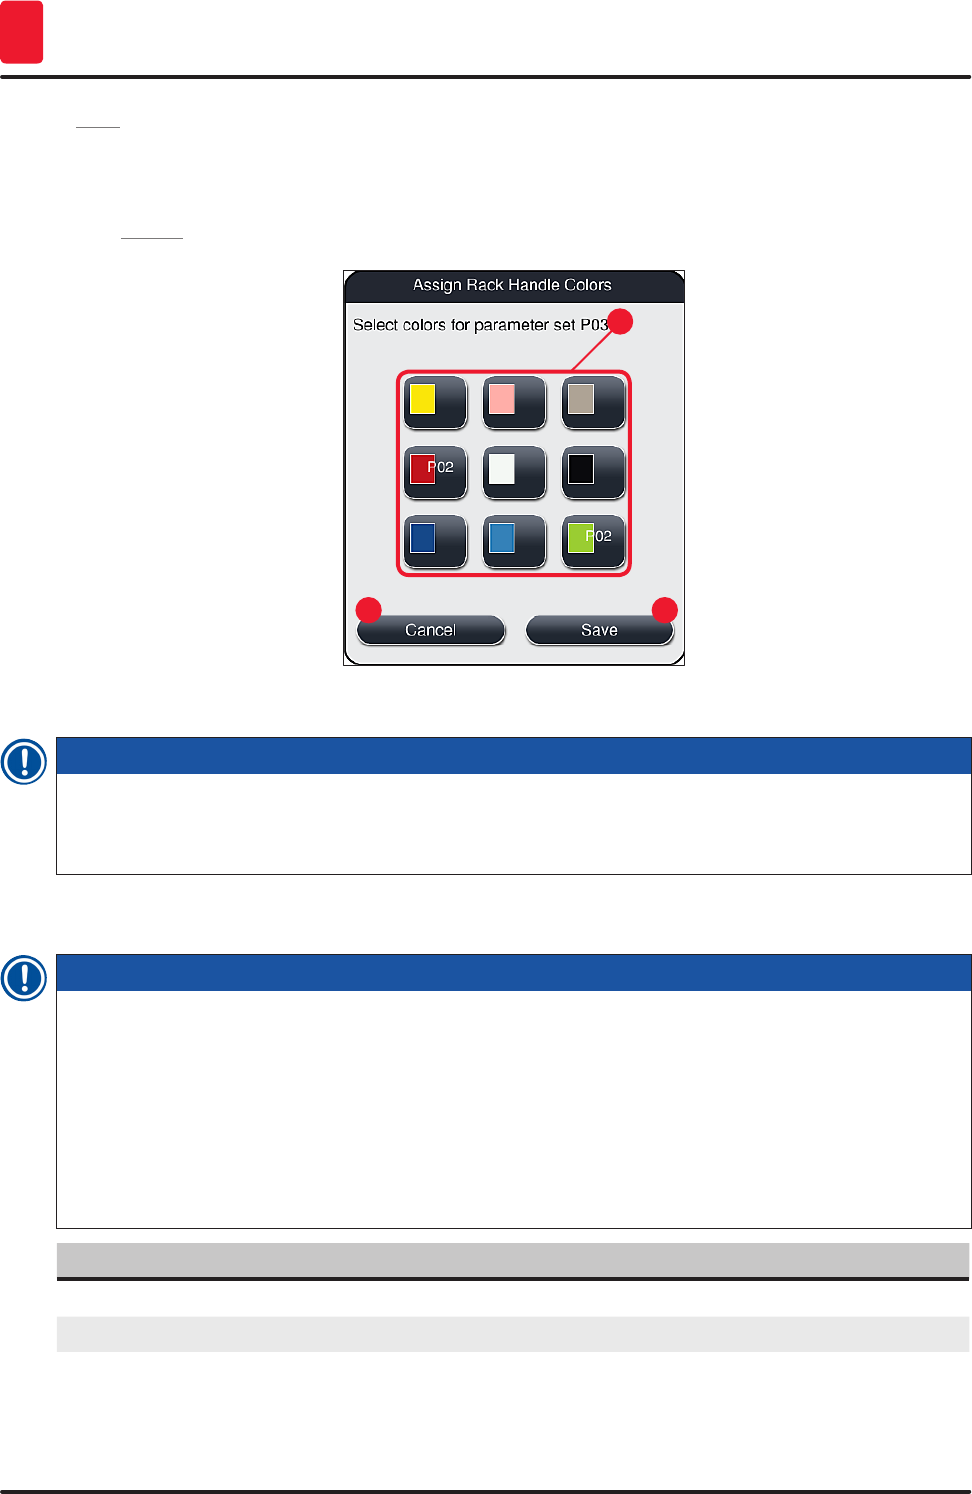
2. Pressing the Color (→ Fig. 45-2) button displays a selection field (→ Fig. 46), that allows the
assignment of the rack handle color to the selected parameter set.
Note
The following must be taken into account when creating a parameter set when the workstation is
working:
• If slides in HistoCore SPECTRA ST are processed with a program, which was allocated a specific
color (for example green), the user has to pay attention that the same color is assigned to the
suitable parameter set in HistoCore SPECTRA CV which was created and is bootable.
69
HistoCore SPECTRA CV
Operation 5
1
2
3
Fig. 45
Note
• All available colors are displayed in Figure (→ Fig. 46). If an abbreviation is entered in the color
field, this color has already been assigned to a parameter set.
• If an already assigned color is selected, a dialog box appears with a confirmation prompt
indicating that the existing assignment will be undone. This can be confirmed with OK or canceled
with Cancel.
3. In the overview (→ Fig. 46-1), select a color that has not been assigned previously.
70 Version 1.2, Revision A
Operation
5
4. Save (→ Fig. 46-2) is used to assign the color and close the dialog.
The selected color is now displayed in the parameter set list.
LCancel (→ Fig. 46-3) is used to close the dialog without applying the changes.
23
1
Fig. 46
Note
The color white is a wildcard color. When inserting a rack with a white handle, a selection window
opens that has to be used to assign a unique parameter set to the white handle. Assigning the color
white to a parameter set removes all colors previously assigned to that parameter set.
5.9.3 Properties of the mounting medium
Note
Leica provides validated mounting media for the HistoCore SPECTRA CV. This offers the user the
following advantages:
• Easy handling and non-contact filling and/or changing of the mounting medium
• Low defect rate
• Closed system
• Fully automated importing of relevant data (designation, LOT numbers, number of possible
coverslipping operations remaining) into CMS,
• Graphical fill level display and monitoring.
Designation Viscosity Drying time Based on...
X1* Low Approx. 24 hours Xylene, Toluene
*Ordering information: (→ P. 160 – Consumables)
71
HistoCore SPECTRA CV
Operation 5
Note
• Please observe the procedure when filling the mounting medium for the first time (→ P. 33 – 4.6
Refilling consumables).
• Changing the mounting medium is described in (→ P. 79 – 6.3.1 Changing the mounting medium
bottle).
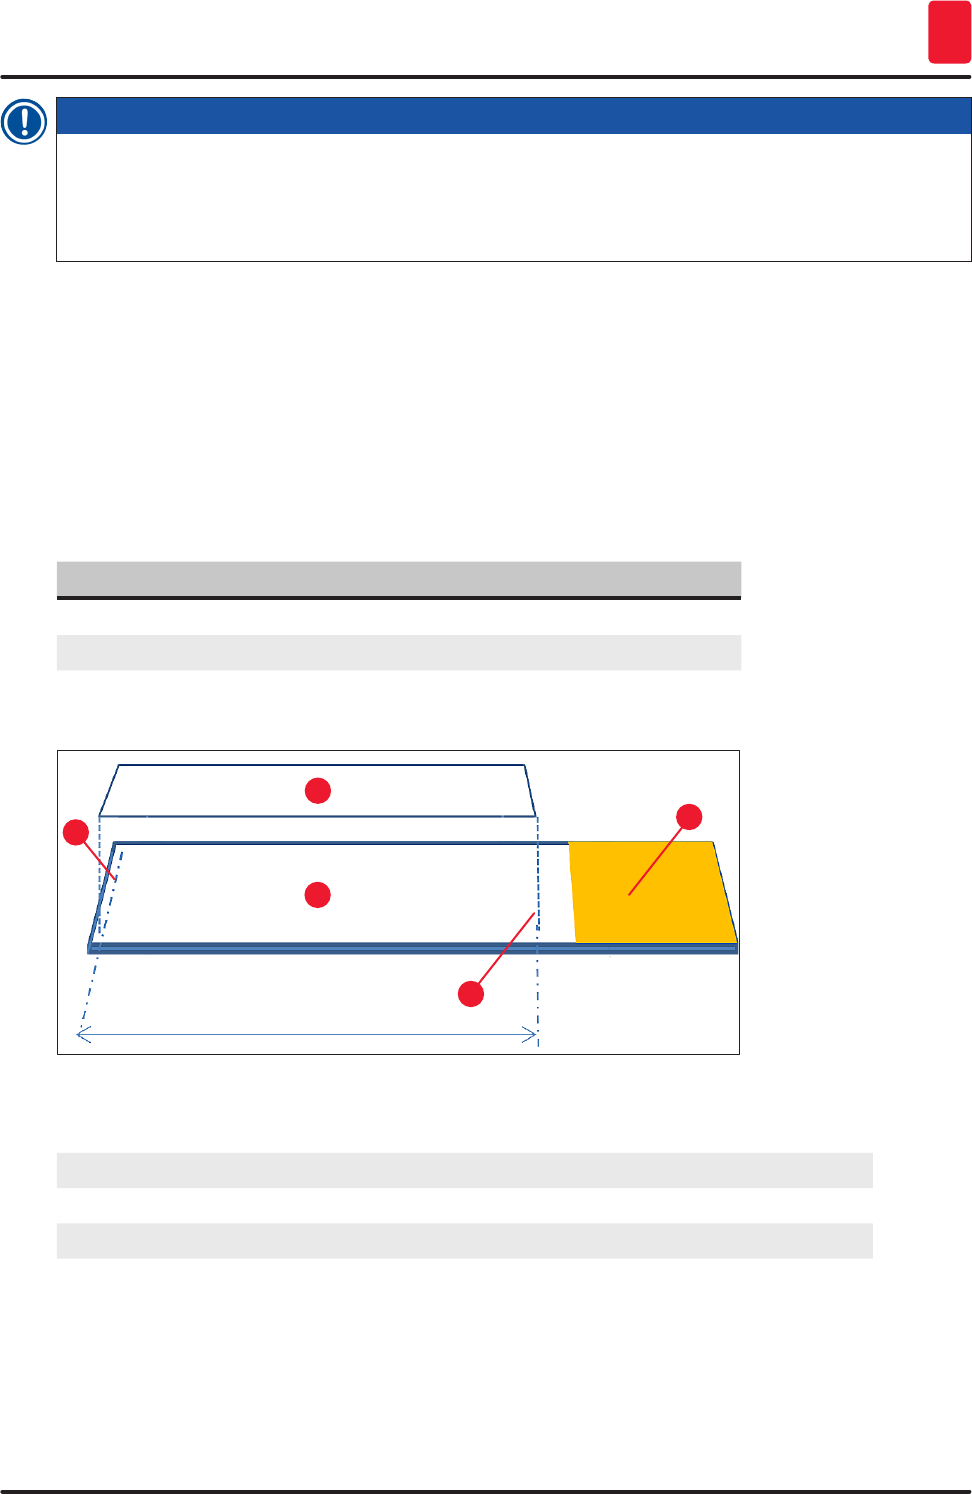
5.9.4 Properties of the coverglass
Leica offers coverglass for the HistoCore SPECTRA CV, validated and manufactured in accordance with
the ISO Standard 8255-1, 2011 (→ P. 20 – 3.2 Technical data).
The Consumables Management System (CMS) automatically detects refilling and shows the current
level of the coverglasses at all times.
Only Leica coverglass* can be used in the HistoCore SPECTRA CV:
Length in mm Width in mm Thickness
50 24 #1
*Ordering information: (→ P. 160 – Consumables)
1
2
3
4
5
Fig. 47
1Coverglass size: 50 mm
2Slides
3Edge position of the coverglass on the slide (approx. 5 mm spacing)
4Position on the slide, coverglass size of 50 mm
5Label field of the slide
72 Version 1.2, Revision A
Operation
5
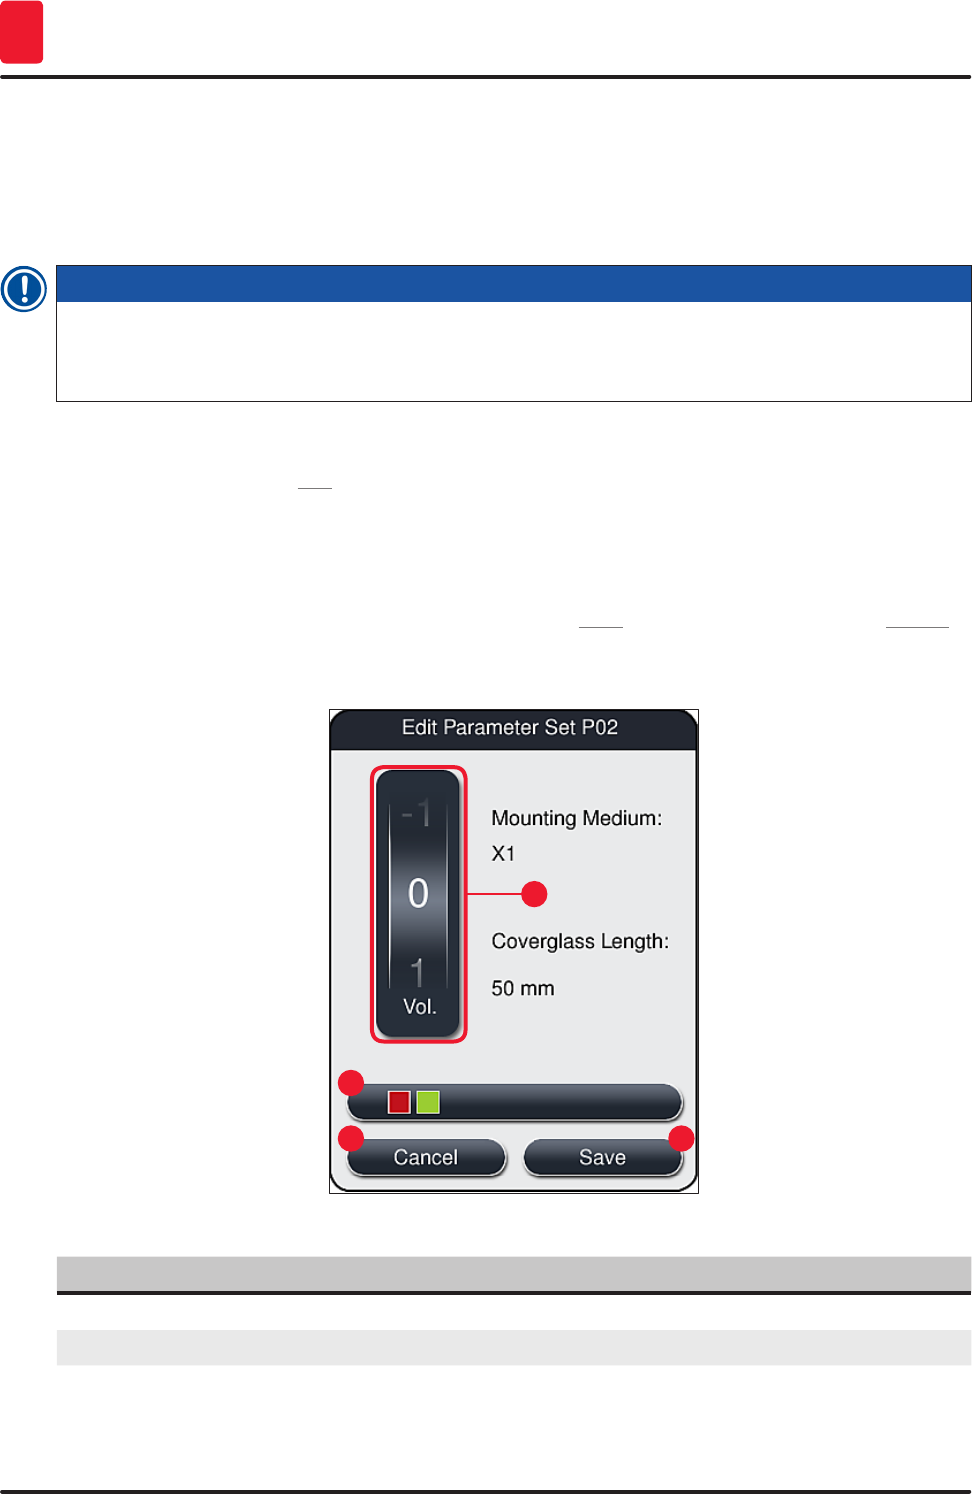
5.9.5 Adjustment of the application volume
The HistoCore SPECTRA CV has a volume setting for the application volume of the mounting medium
that is set by default and validated by Leica. The default values are defined as 0 (=default) in the setting
for the parameter set (→ Fig. 48-1). These settings can be used immediately.
Note
Leica recommends checking the 0 value under the given conditions and requirements (e.g. specimen
size, specimen type and specimen thickness, temperature and humidity) in the lab and adjusting it
where appropriate.
1. To adjust the application volume, select the corresponding parameter set in the Parameter sets
menu and press the Edit button (→ Fig. 43-7).
2. In the following menu (→ Fig. 48) the application volume can be lowered or increased by
turning the roller (→ Fig. 48-1).
3. The menu also offers the option of changing an assigned color (→ Fig. 48-2) or to assign a new
color (→ P. 68 – 5.9.2 Assigning a parameter set to a rack handle color).
4. Apply the settings you have entered by pressing the Save button (→ Fig. 48-3) or press Cancel
(→ Fig. 48-4) to return to the Parameter sets menu without saving.
1
34
2
Fig. 48
Set value Significance
Default value 0 Apply the Leica-validated quantity of mounting medium to the slide.
Positive values 1 to 5 More mounting medium is applied incrementally to the slide.
Negative values -1 to -5 Less mounting medium is applied incrementally to the slide.

73
HistoCore SPECTRA CV
Operation 5
Warning
Changes to the mounting medium application quantity should only be made with extreme caution to
prevent negative effects on the coverslipping result.
5.10 Reagent vessels in the load drawer
Warning
• It is absolutely necessary to ensure that the reagent filled in the reagent vessel is compatible with
the mounting medium!
• The user must monitor the levels of the reagent vessels to ensure they are sufficient.
• If the instrument is to be in a non-running state for a moderate period of time or if the
HistoCore SPECTRA CV is not to be used for a long period of time (longer than 5 days), cover or
drain the reagent vessels in the load drawer in order to prevent evaporation of the filled reagent
and to prevent the formation of vapors.
• If the HistoCore SPECTRA CV is used in conjunction with the HistoCore SPECTRA ST
as a workstation, the user must ensure that the last stations in the staining program of
the HistoCore SPECTRA ST are filled with the same reagent as the load stations of the
HistoCore SPECTRA CV.
• Racks newly inserted into the load drawer are detected after closing the load drawer and indicated
using the colors (→ Fig. 49-1).
74 Version 1.2, Revision A
Operation
5
1
Fig. 49
• At the same time, the instrument checks whether the parameter set assigned to the rack handle color
matches the mounting medium and coverslip size present in the coverslip line.
• If this is not the case, a message prompts the user to take the rack back out of the load drawer and to
place it in the other reagent vessel in the load drawer.
• The instrument detects if a rack with a rack handle that has an unassigned color is inserted in
either of the two reagent vessels. The user is prompted to take the rack back out and to create a
corresponding parameter set (→ P. 67 – 5.9.1 Creating a new parameter set) or to assign the color
to an appropriate existing parameter set (→ P. 68 – 5.9.2 Assigning a parameter set to a rack
handle color).
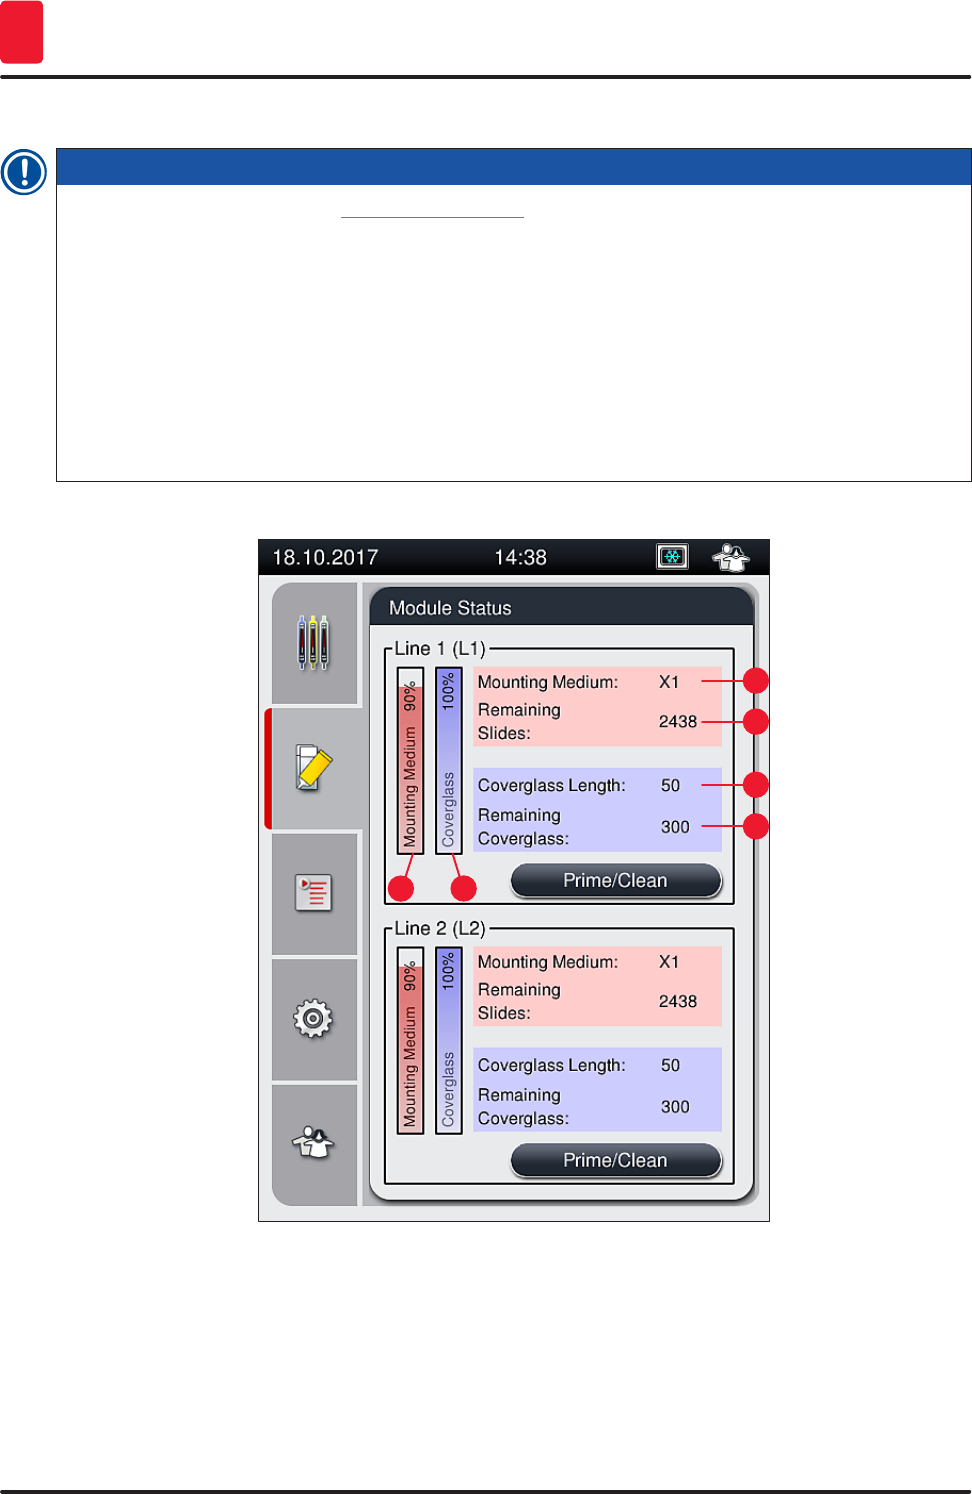
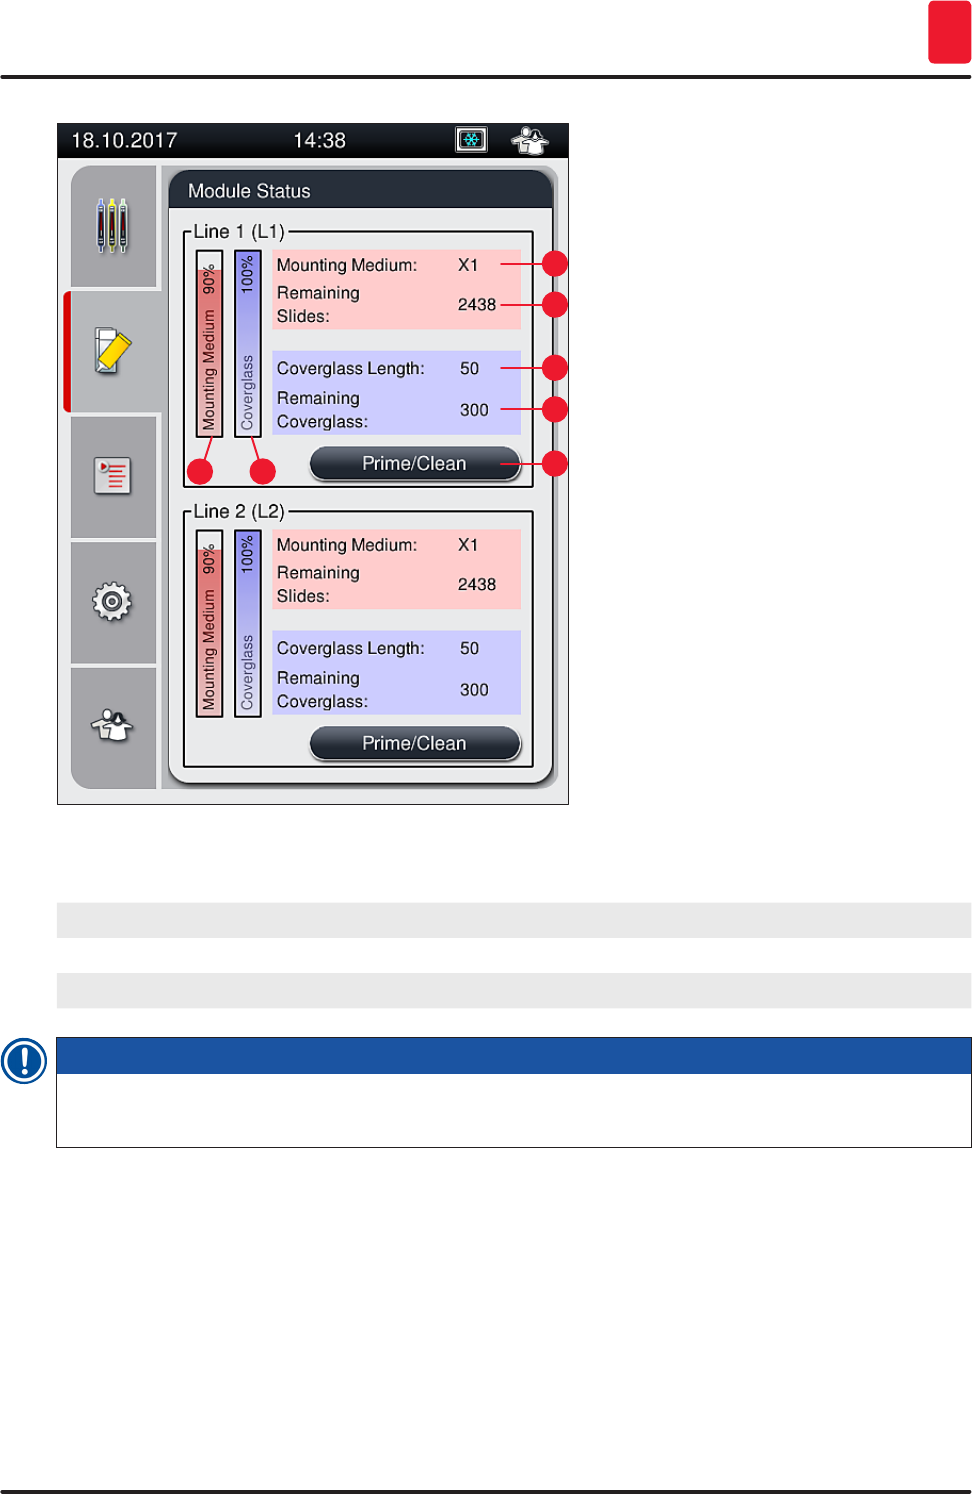
5.11 Module status
• The menu Module Status (→ Fig. 50) provides the user in HistoCore SPECTRA CV an overview of the
used consumables (mounting media (→ Fig. 50-1) and coverglass (→ Fig. 50-3)) and their current
fill levels (→ Fig. 50-5) (→ Fig. 50-6) and remaining amounts (→ Fig. 50-2) (→ Fig. 50-4) for both
coverslip lines.
• The user has access to various cleaning options for the hose system through the Prime/Clean
submenu (→ Fig. 50-7).
75
HistoCore SPECTRA CV
Operation 5
1
6
2
3
4
7
5
Fig. 50
1Mounting medium designation 5Remaining amount of mounting medium in %
2Remaining number of slides 6Remaining amount of coverglasses in %
3Coverglass length 7Prime/Clean submenu
4Remaining number of coverglass
Note
For more information about the Prime/Clean submenu and using the individual priming and cleaning
options: (→ P. 122 – 7.3 Preparing the hose system for priming and cleaning).