Leica Biosystems Nussloch SPECTRACV01 HistoCore SPECTRA CV User Manual Leica SPECTRA CV Instructions for Use V1 2 RevA
Leica Biosystems Nussloch GmbH HistoCore SPECTRA CV Leica SPECTRA CV Instructions for Use V1 2 RevA
Contents
User Manual V1.2 Part 5
119
HistoCore SPECTRA CV
Cleaning and Maintenance 7
Note
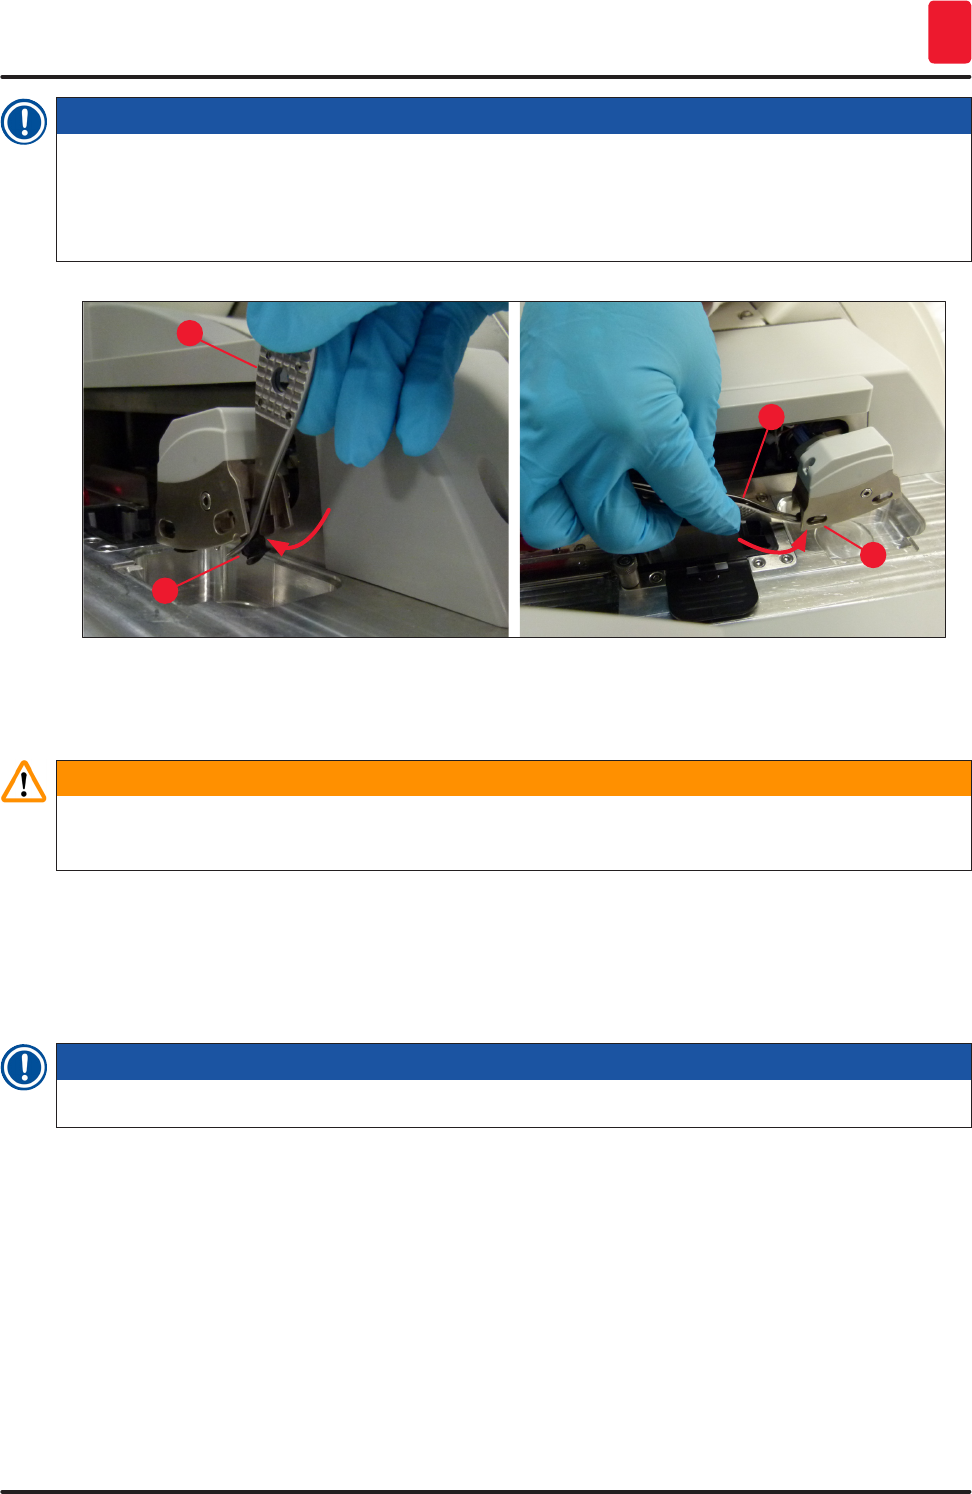
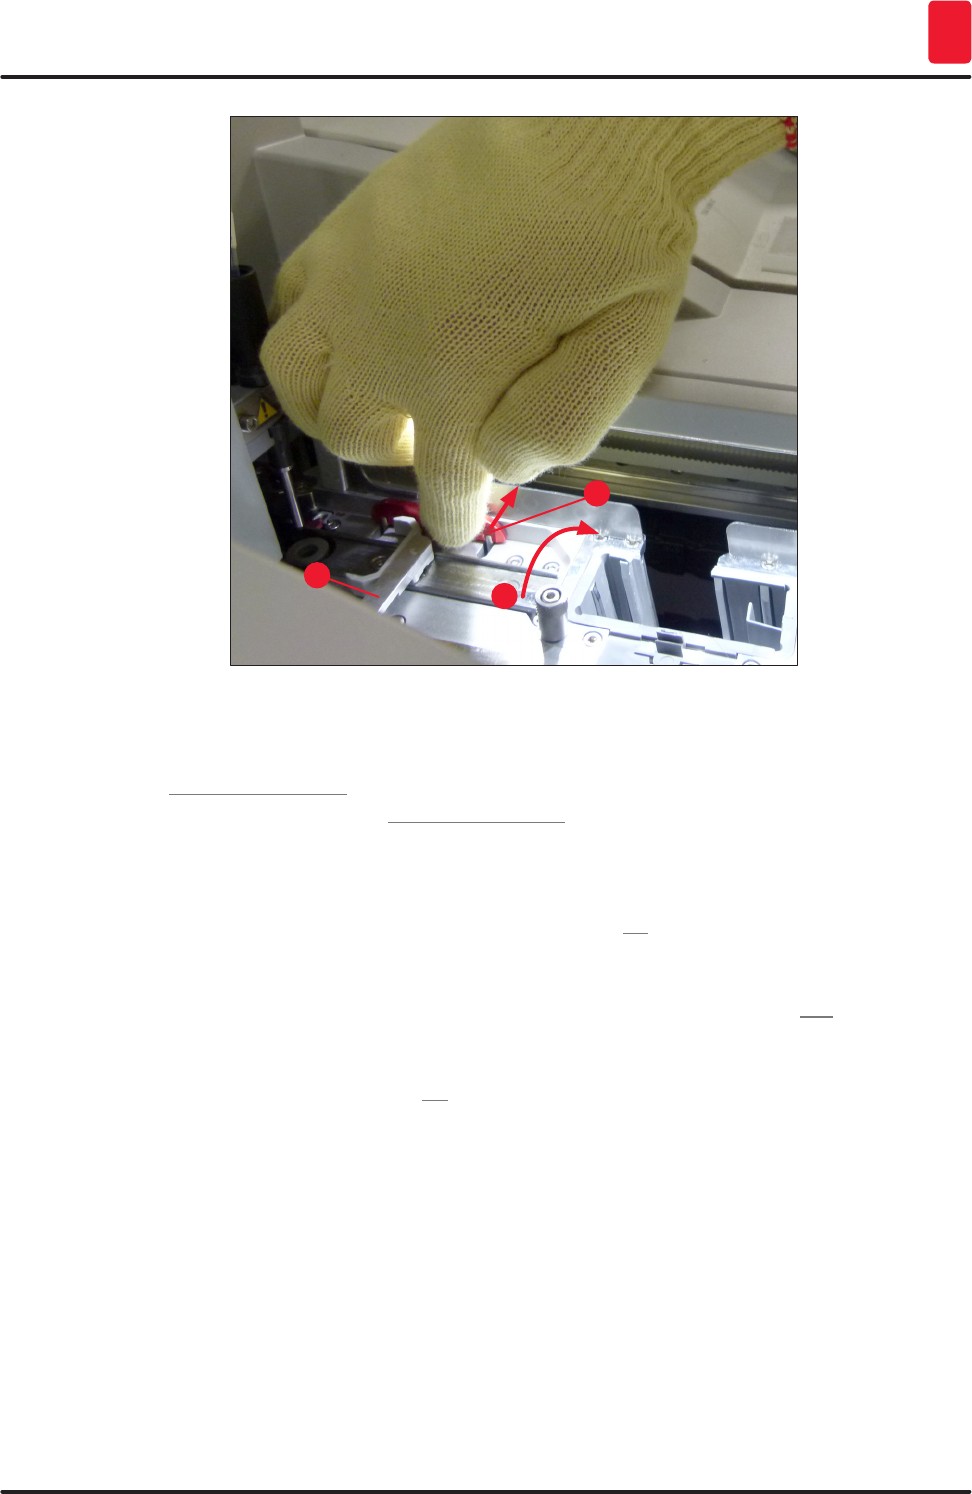
• Carefully attach the suction cups with a bent tweezers to avoid damage to the new suction cups.
• Make sure that the suction cups fit correctly. It could be impossible to attach the coverglasses if
are not deposited properly.
• We recommend having a rack filled with empty slides coverslipped for a function check.
2
1
1
3
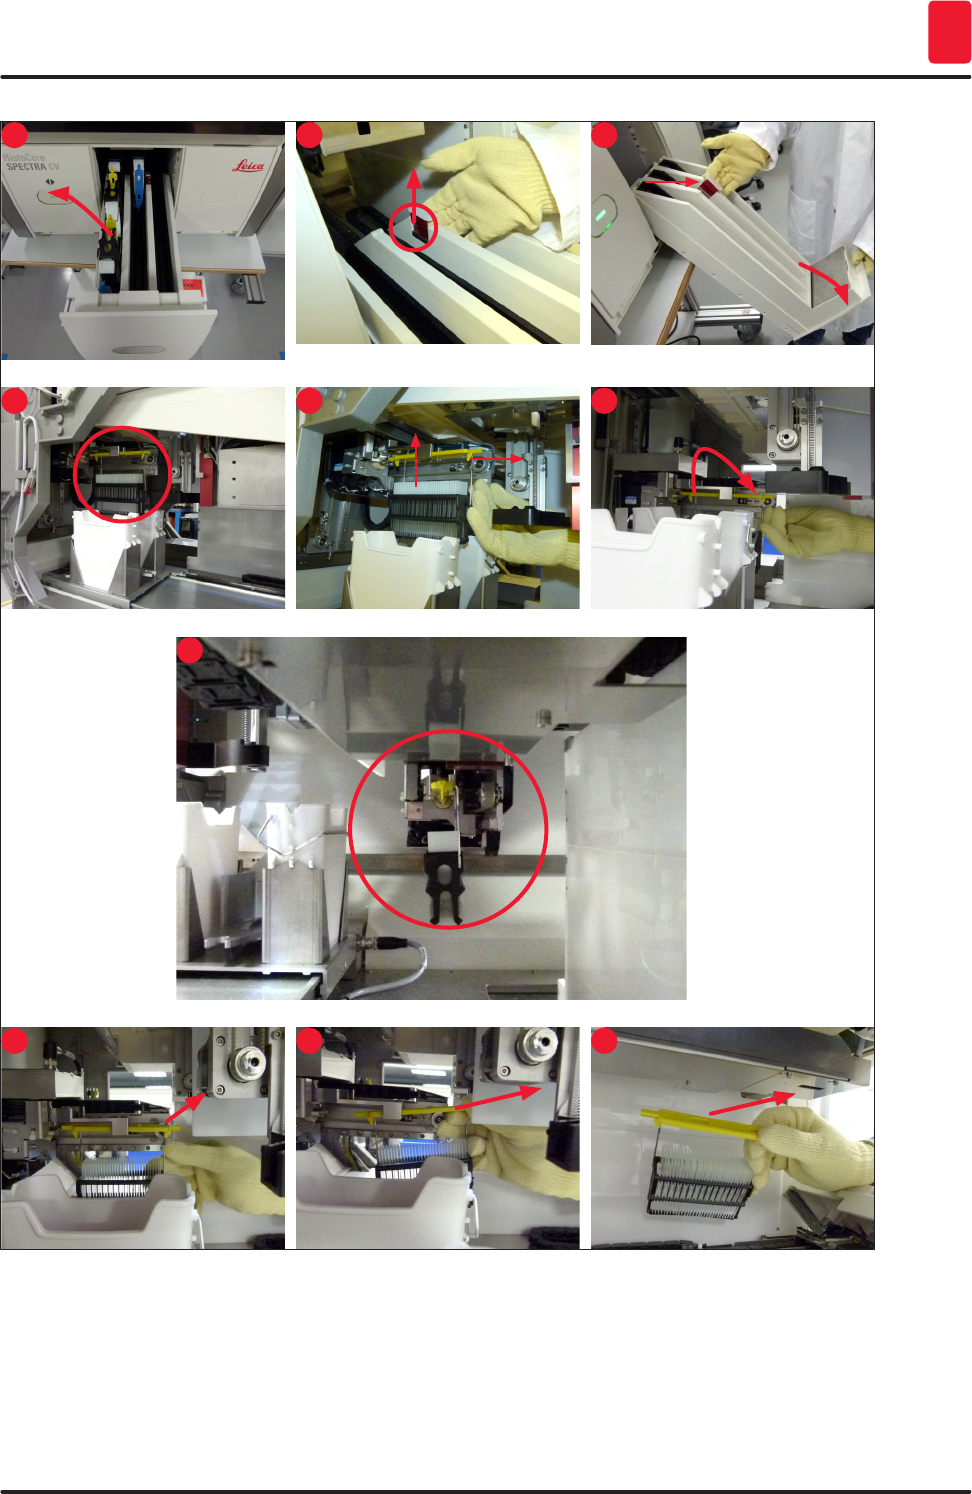
Fig. 93
7.2.12 Cleaning the waste tray
Warning
Wear cut-resistant safety gloves (→ P. 19 – 3.1 Standard delivery – packing list) for emptying the
waste tray!
For handling, removing and re-inserting the waste tray, see (→ P. 87 – 6.3.4 Emptying the waste tray).
» Soak a lint-free cloth with a compatible solvent and remove any mounting medium residue that
may be present.
Note
Dispose of glass shards, splinters and dust in accordance with laboratory specifications.
7.2.13 Cleaning the reagent vessels
1. Remove the reagent vessels individually from the load drawer by the handle. Ensure that the
handle is in the correct position (→ P. 38 – 4.6.3 Prepare the reagent vessel, fill it and insert it
into the load drawer) to prevent spilling the reagent.
2. Dispose of filled reagents in accordance with the local laboratory specifications.
3. All reagent vessels can be cleaned in a dishwasher at a maximum temperature of 65 °C using
a standard, commercially available detergent for lab dishwashers. The handles can remain
attached to the various vessels when doing so.
120 Version 1.2, Revision A
Cleaning and Maintenance
7
Warning
• Reagent vessels are to be pre-cleaned manually before cleaning in a dishwasher. Any staining
residue that may be present is to be removed to the greatest extent possible to prevent
discoloration of the remaining reagent vessels in the dishwasher.
• Never clean plastic reagent vessels at temperatures higher than 65 °C since this can deform
reagent vessels!
7.2.14 Rack and handle
LThe racks are to be checked regularly for mounting medium residue and other possible
contamination.
1. The colored handle must be removed from the rack for cleaning.
2. To remove small amounts of residual mountant, soak a lint-free cloth with a compatible solvent
and clean the racks.
3. For stubborn dirt, you can place the racks in a compatible solvent bath for up to 1–2 hours to
remove dried out residual mountant.
4. The solvent can then be washed off with alcohol.
Completely rinse the racks with clean water and then dry them.
LA dishwasher can also be used for the cleaning process. The maximum temperature of 65 °C
must be observed.
Note
The maximum exposure time in a solvent bath is 1–2 hours. Completely prime the racks with water,
then dry them. If an external drying furnace is used for drying, the temperature must not exceed 70 °C.
Warning
• The racks and handles may not remain in the solvent for a long time frame (e.g. several hours or
overnight), because this can lead to deformation!
• It is essential to ensure that the solvent being used is compatible with the mounting medium.
Xylene-based mounting media can be removed using a xylene bath.

121
HistoCore SPECTRA CV
Cleaning and Maintenance 7
7.2.15 Changing the active carbon filter
Note
The active carbon filter installed in the instrument helps reduce the amount of reagent vapors in the
exhaust air. The life cycle of the filter can fluctuate strongly depending on intensity of use and the
reagent configuration of the instrument. Therefore, replace the active carbon filter regularly (every
2-3 months) and dispose of it properly in accordance with the laboratory regulations applicable in the
country of use.
1. The user can access the activated carbon filter (→ Fig. 94-1) from the front of the instrument
by opening the upper cover (→ Fig. 94-2).
2. The activated carbon filter can be accessed without any tools and can be removed by pulling
on the pull tab.
3. Write the insertion date on the white adhesive label on the front side of the activated carbon
filter (→ Fig. 94-3).
4. Insert the new activated carbon filter in such a way that the pull tab is visible and reachable
even after it is completely pushed in.
5. The active carbon filter must be pushed in until you feel it make contact with the rear panel of
the instrument.
6. Close the cover (→ Fig. 94-2) again.
1
1
2
3
Fig. 94
7.2.16 Cleaning reagent vessels in the load drawer
• Open the load drawer and individually remove the reagent vessels by the handle. Ensure that the
handle is in the correct position (→ P. 38 – 4.6.3 Prepare the reagent vessel, fill it and insert it into
the load drawer) to prevent spilling the reagent.
• Dispose of reagents in accordance with the local laboratory specifications.
• All reagent vessels can be cleaned in a dishwasher at a maximum temperature of 65 °C using a
standard, commercially available detergent for lab dishwashers. The handles can remain attached to
the reagent vessels during this process.

122 Version 1.2, Revision A
Cleaning and Maintenance
7
Warning
• Never clean reagent vessels at temperatures higher than 65 °C since this can deform reagent
vessels!
7.3 Preparing the hose system for priming and cleaning
Note
• The user must flush the hose system during daily instrument setup and when inserting a new
mounting medium bottle. This ensures that the needle allows material through and the internal
hose system is free of air bubbles.
• During a scheduled, prolonged break in instrument use (more than 5 days), the user must carry out
a complete cleaning of the hose system (→ P. 127 – 7.3.3 Cleaning the hose system) to prevent
damage to the system.
• The second line of processing is also interrupted during the priming process or during the
cleaning process. slides could dry out on that line. For this reason, Leica recommends priming or
cleaning only if all racks have been removed from the instrument and with the instrument in sleep
mode.
Priming preparation
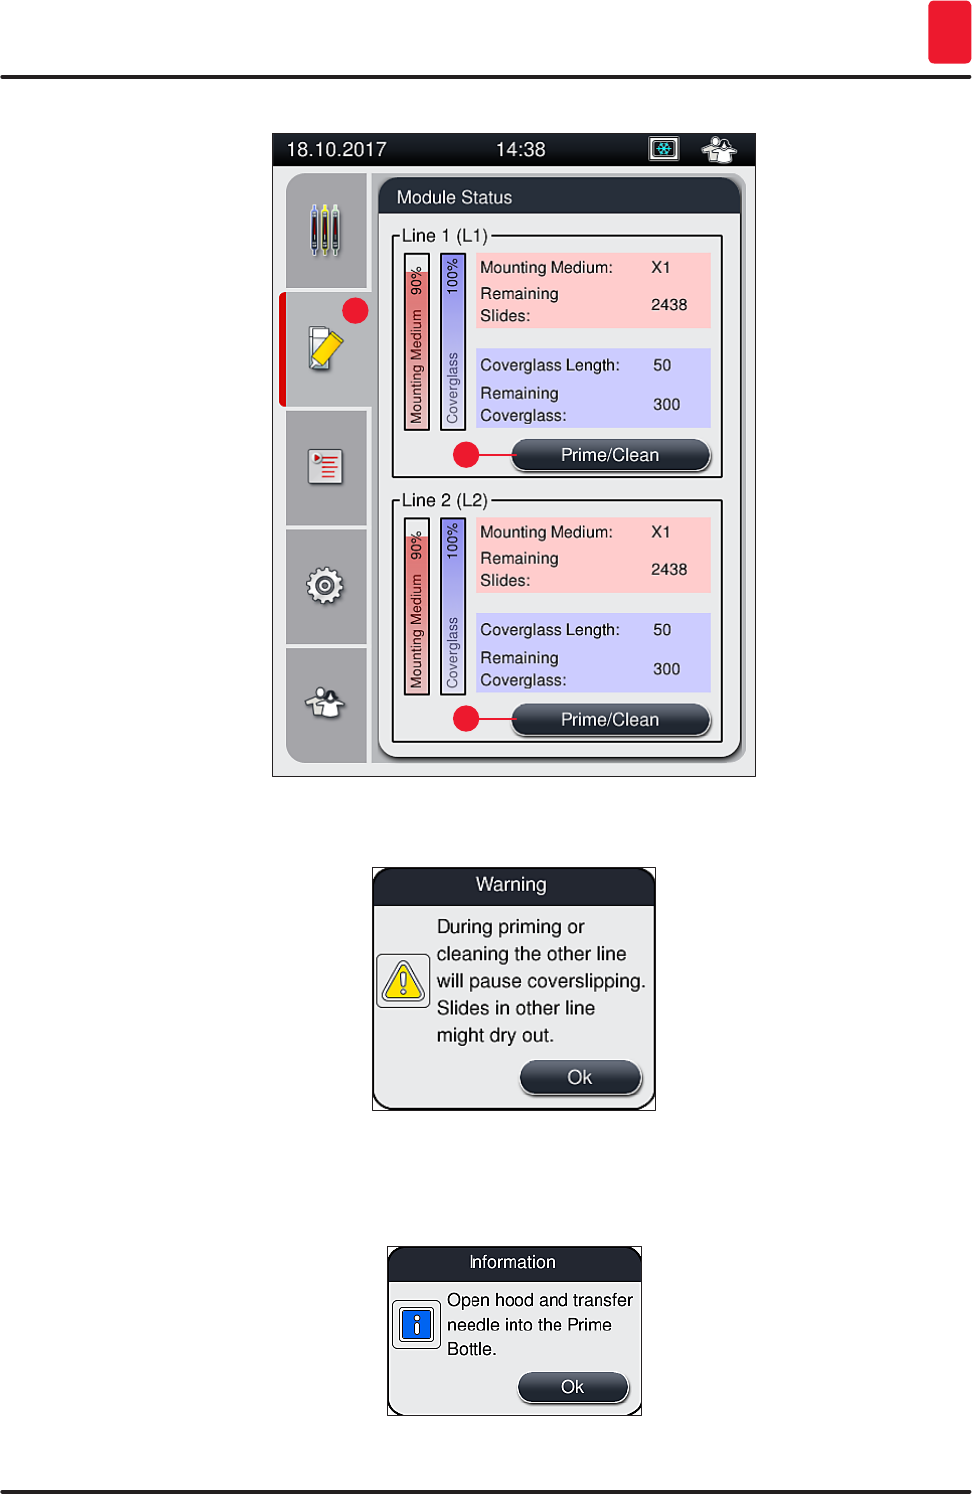
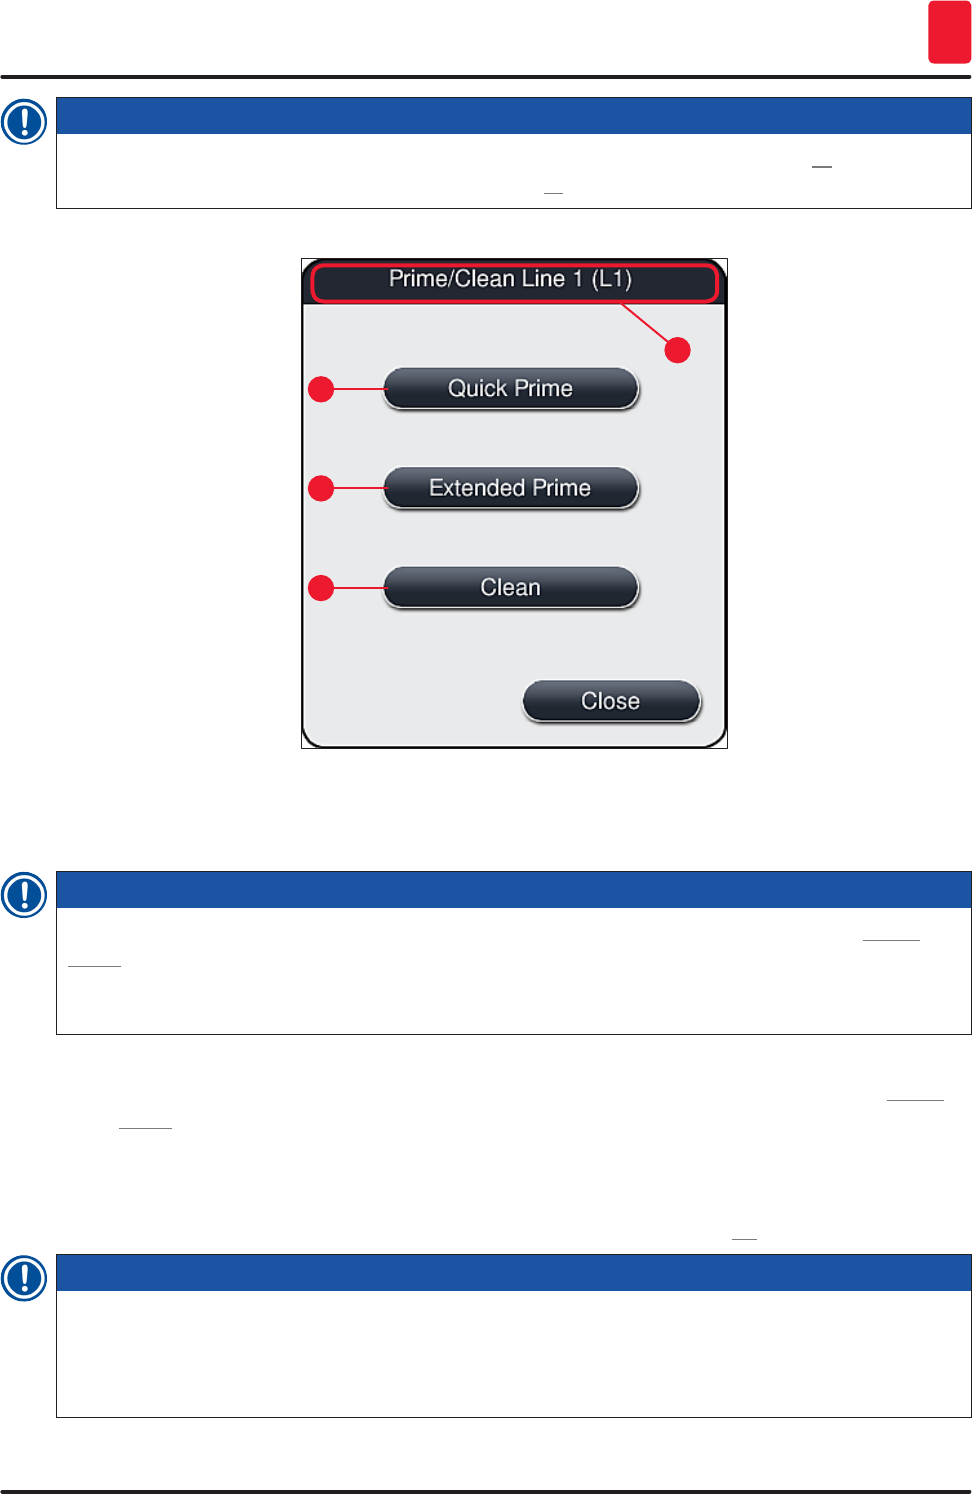
1. To get to the menu, press the Module Status (→ Fig. 95-1) button in the main menu.
2. Following this, press the Prime/Clean button of the respective left (→ Fig. 95-2) or right
(→ Fig. 95-3) coverslip line and acknowledge the warning message with Ok (→ Fig. 96).
123
HistoCore SPECTRA CV
Cleaning and Maintenance 7
1
3
2
Fig. 95
Fig. 96
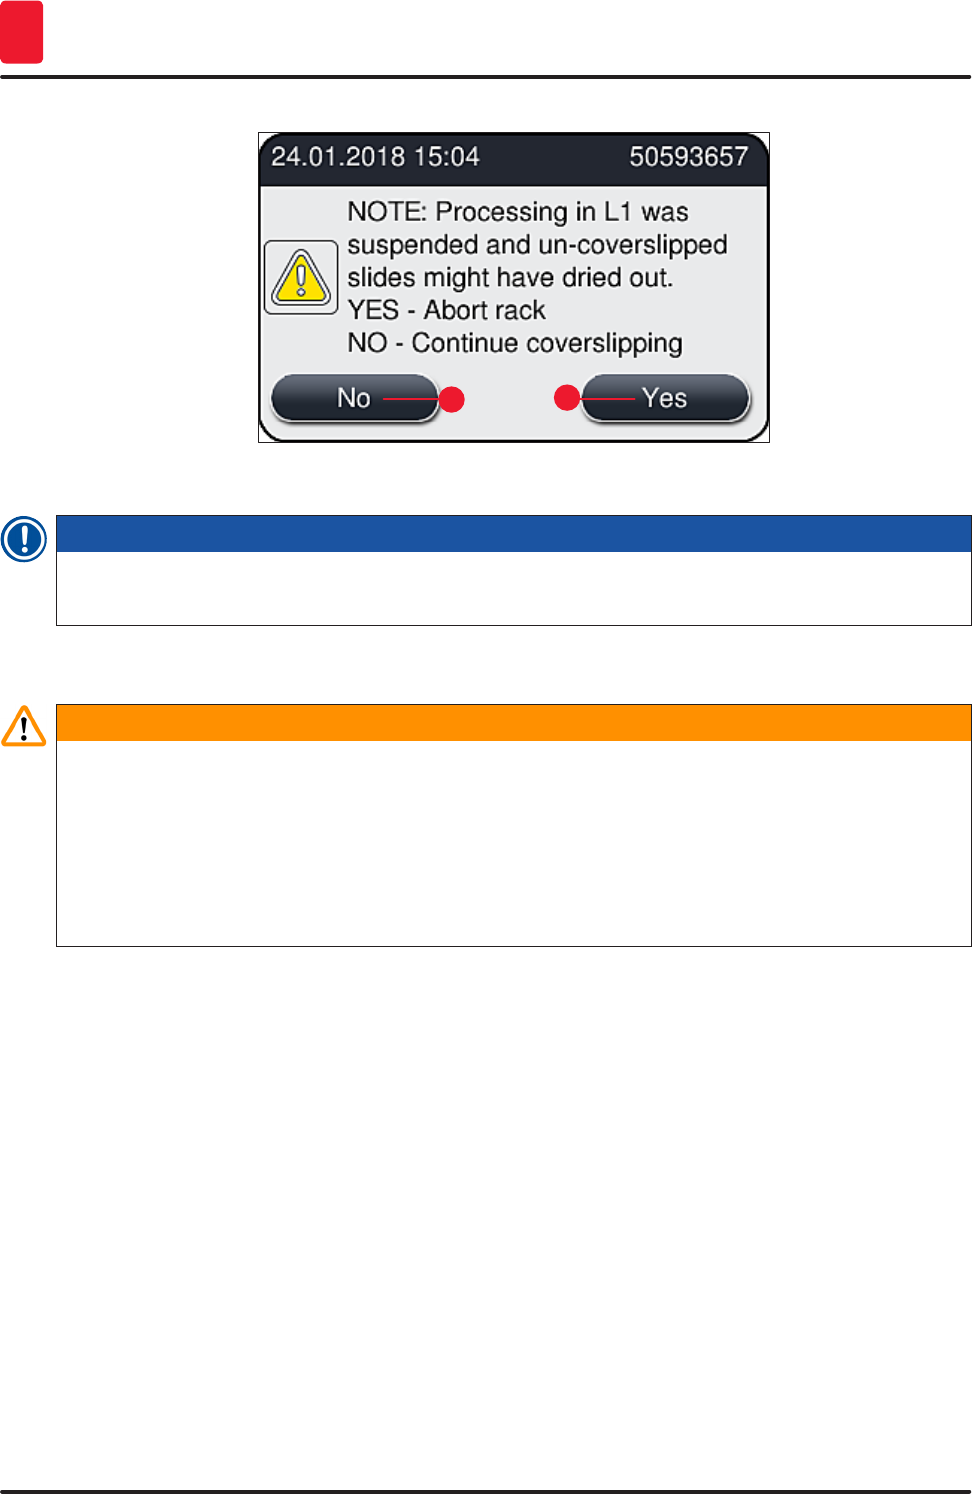
3. Observe the following information message (→ Fig. 97).
Fig. 97
124 Version 1.2, Revision A
Cleaning and Maintenance
7
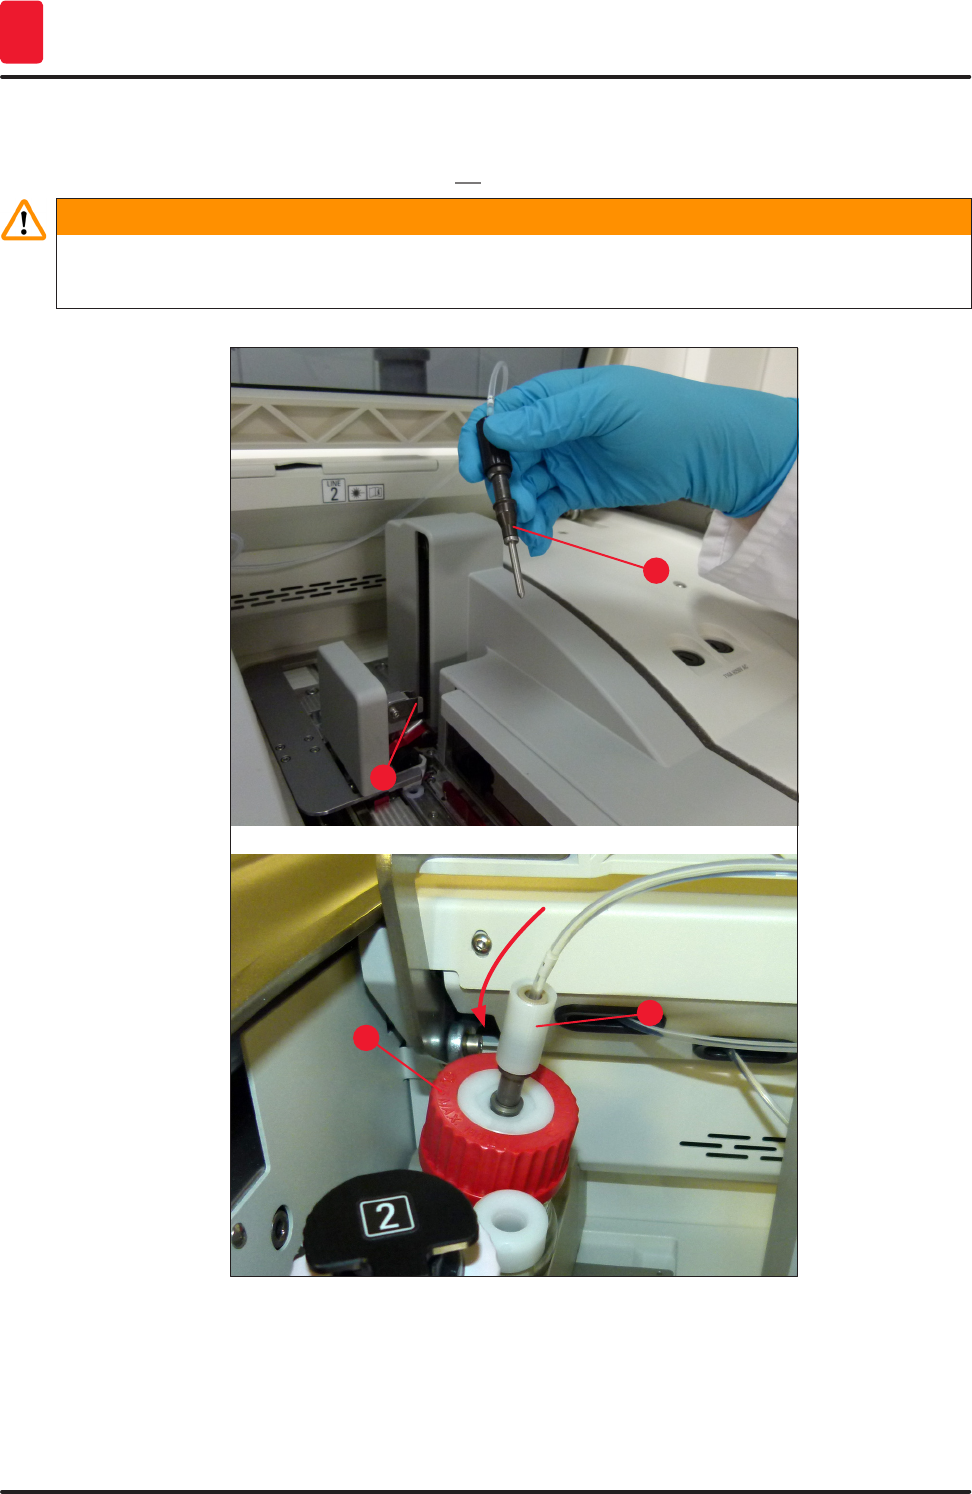
4. Open the instrument hood and remove the needle (→ Fig. 98-1) from the holder (→ Fig. 98-2).
5. Stick the needle unit (→ Fig. 98-1) in the prime bottle (→ Fig. 98-3) and acknowledge the
information message (→ Fig. 97) with OK.
Warning
Do not close the hood while the needle is inserted in the prime bottle in order to avoid kinking the
hose or bending the needle.
Fig. 98
1
2
1
3
In the following menu (→ Fig. 99), three different priming/cleaning programs are available.
125
HistoCore SPECTRA CV
Cleaning and Maintenance 7
Note
The individual rinsing programs are clarified in the following, using the coverslip line L1 (→ Fig. 99-1).
The same procedures also apply for the coverslip line L2.
2
3
4
1
Fig. 99
7.3.1 Quick Prime
Note
At the start of operation, the user is prompted after starting the instrument to carry out the Quick
Prime (→ Fig. 99-2) rinsing program. This step is necessary to ensure the flow rate of the mounting
medium through the needle system. The respective coverslip line is ready to operate only after Quick
Prime.
1. After the steps under (→ P. 122 – Priming preparation) have been completed, press the Quick
Prime (→ Fig. 99-2) button.
2. Priming lasts approx. 35 seconds and uses approx. 2 ml of mounting medium. This quantity is
taken into account by the CMS.
3. After the rinsing process has been completed, reinsert the needle unit into the holder
(→ Fig. 88) and confirm the corresponding information message with OK.
Note
The needle has a notch (→ Fig. 88-3) that fits exactly in the holder. The Attention symbol
(→ Fig. 88-4) on the holder (→ Fig. 88-2) indicates to the user that utmost care is required when
inserting the needle into the holder. The needle must be inserted straight and all the way in order to
make sure that no negative impact on the samples arises during processing.
126 Version 1.2, Revision A
Cleaning and Maintenance
7
4. Repeat steps 1-3 for the second coverslip line (L2).
5. Finally, close the hood.
After checking the fill level, the instrument is ready to operate and can begin processing.
7.3.2 Extended Prime
Note
• The Extended Prime (→ Fig. 99-3) rinsing program must be carried out after each time a mounting
medium bottle is replaced (→ P. 79 – 6.3.1 Changing the mounting medium bottle) for the
respective coverslip line L1 or L2.
• During an Extended Prime process, mounting medium is pumped through the entire hose system
to ensure that no air remains in the hose system as a result of the replacement.
• After the replacement of the mounting medium bottle, the Quick Prime (→ Fig. 99-2) and Clean
(→ Fig. 99-4) buttons are inactive (grayed out).
1. To change the mounting medium bottle, proceed the same way as in (→ P. 79 – 6.3.1
Changing the mounting medium bottle) and close the hood.
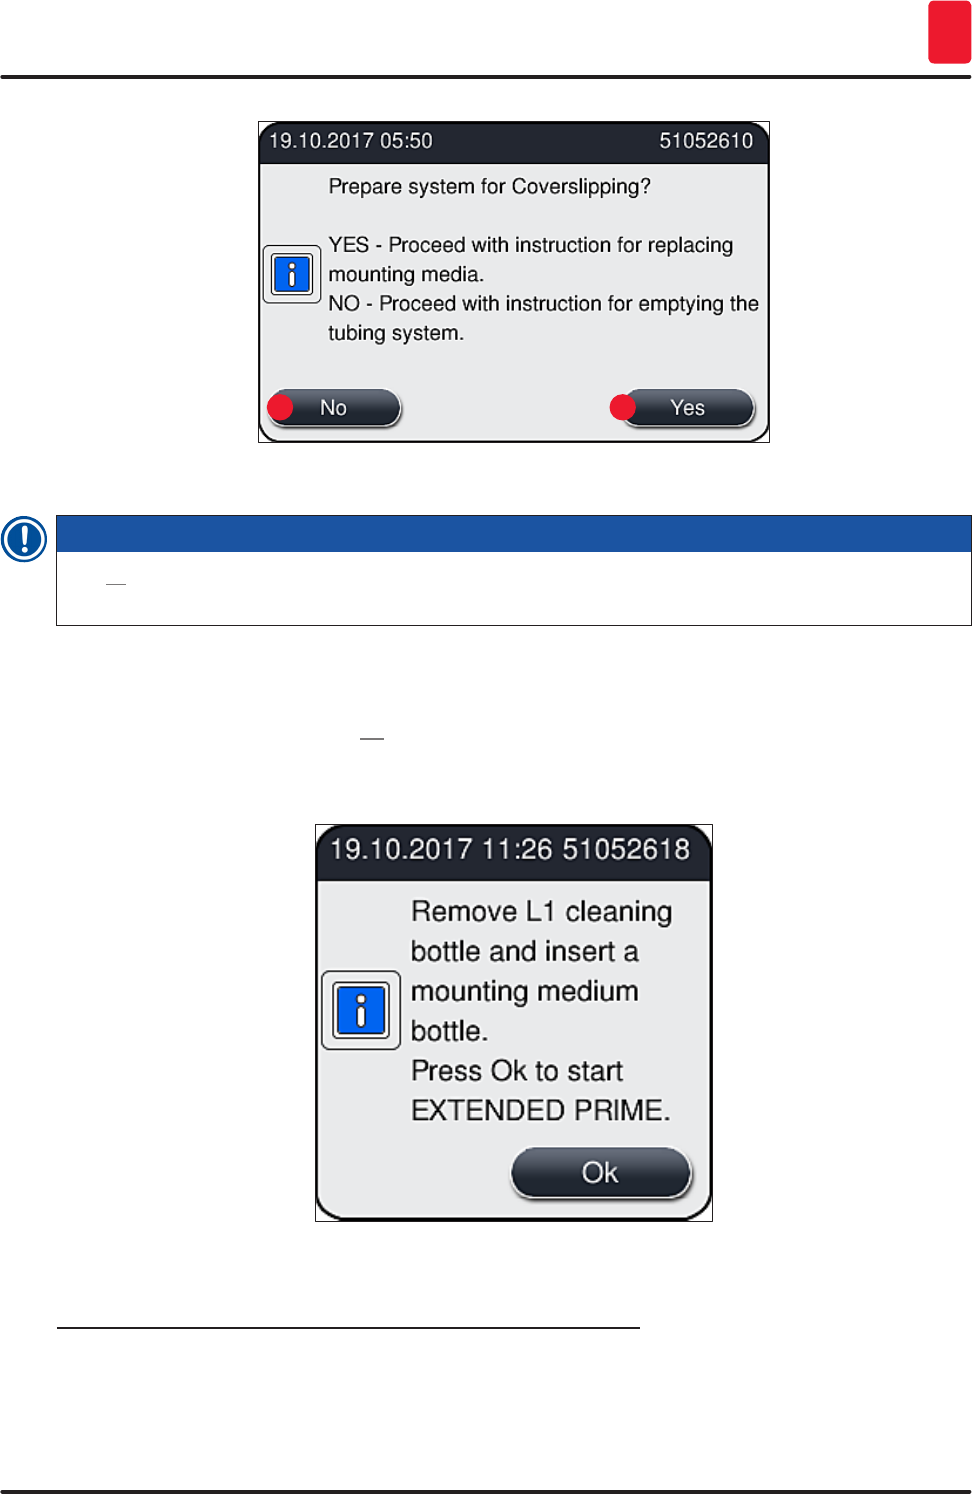
2. Take note of the information message that follows (→ Fig. 100) and acknowledge with the Ok
button.
Fig. 100
3. After the steps under (→ P. 122 – Priming preparation) have been completed, press the
Extended Prime (→ Fig. 99-3) button.
4. The priming lasts approx. 3 minutes and 30 seconds and uses approx. 14 ml mounting medium.
This quantity is taken into account by the CMS.
5. After the rinsing process has been completed, reinsert the needle unit into the holder and
confirm the corresponding information message with OK.
127
HistoCore SPECTRA CV
Cleaning and Maintenance 7
Note
The needle has a notch (→ Fig. 88-3) that fits exactly in the holder. The Attention symbol
(→ Fig. 88-4) on the holder (→ Fig. 88-2) indicates to the user that utmost care is required when
inserting the needle into the holder. The needle must be inserted straight and all the way in order to
make sure that no negative impact on the samples arises during processing.
6. Finally, close the hood.
7.3.3 Cleaning the hose system
Note
The Clean (→ Fig. 99-4) function is required if the HistoCore SPECTRA CV is to be prepared for
transport or to be left idle for a prolonged time frame (longer than 5 days). The mounting medium in
the hose system is washed out using a cleaning solution. This process requires a minimum of 125 ml
cleaning solution (xylene). The safety notes for safe reagent handling (→ P. 16 – Warnings –
Handling reagents) must be observed!
The cleaning using the coverslip line L1 (→ Fig. 99-1) is clarified in the following. The same
procedures also apply for the coverslip line L2.
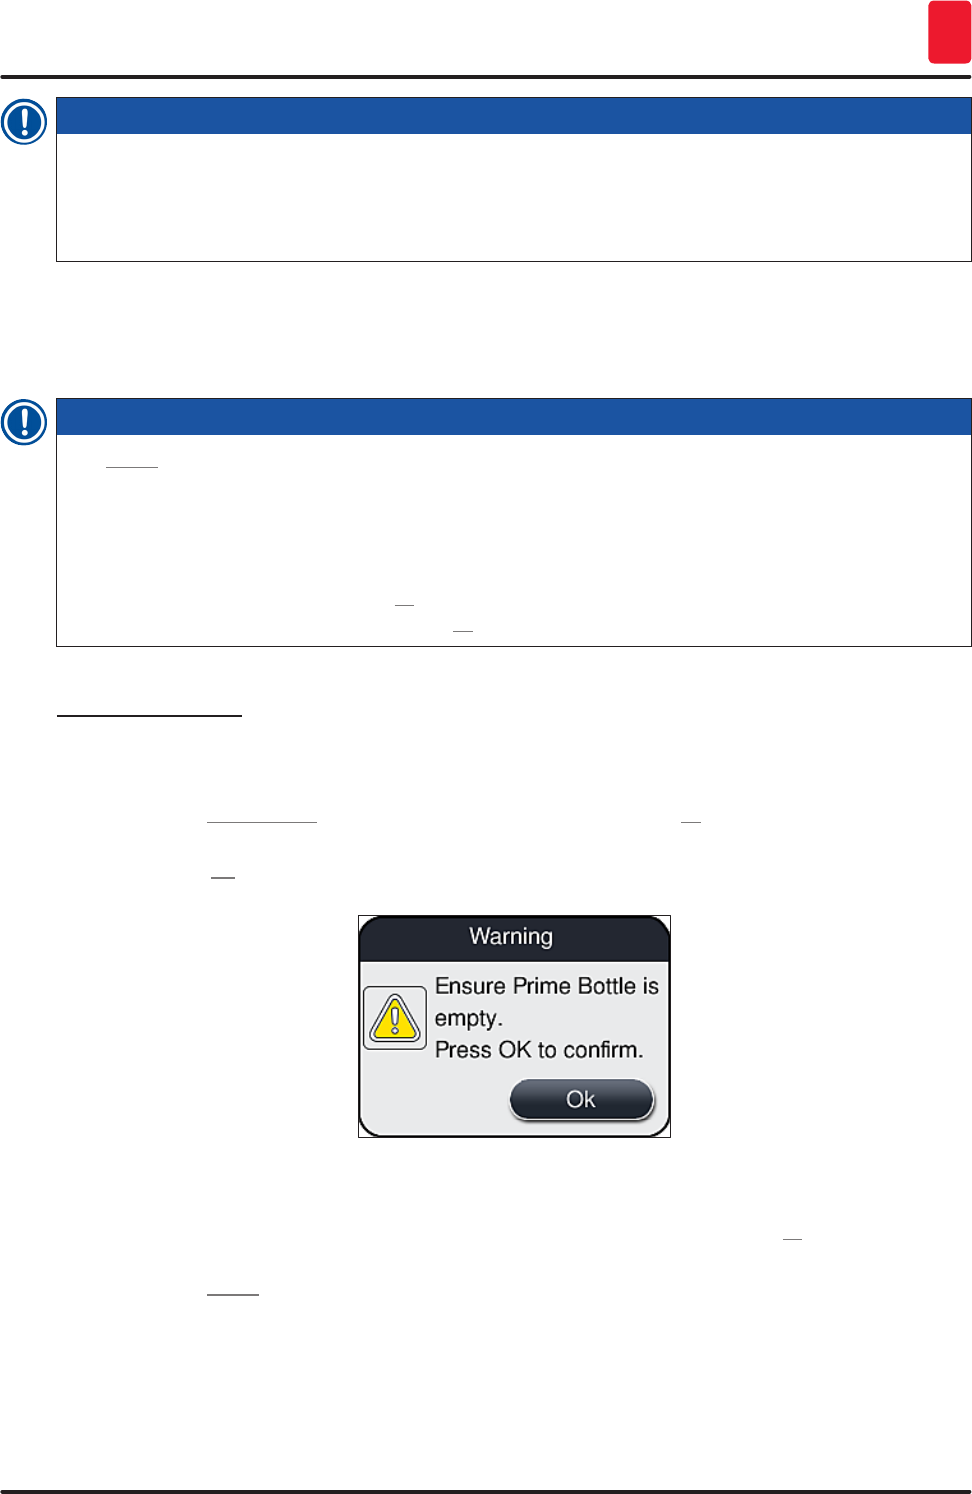
Cleaning preparation
1. Drain prime bottle and reinsert it.
2. Change in the Module Status (→ Fig. 95-1) menu.
3. Press the Prime/Clean (→ Fig. 95-2) button of the coverslip line L1.
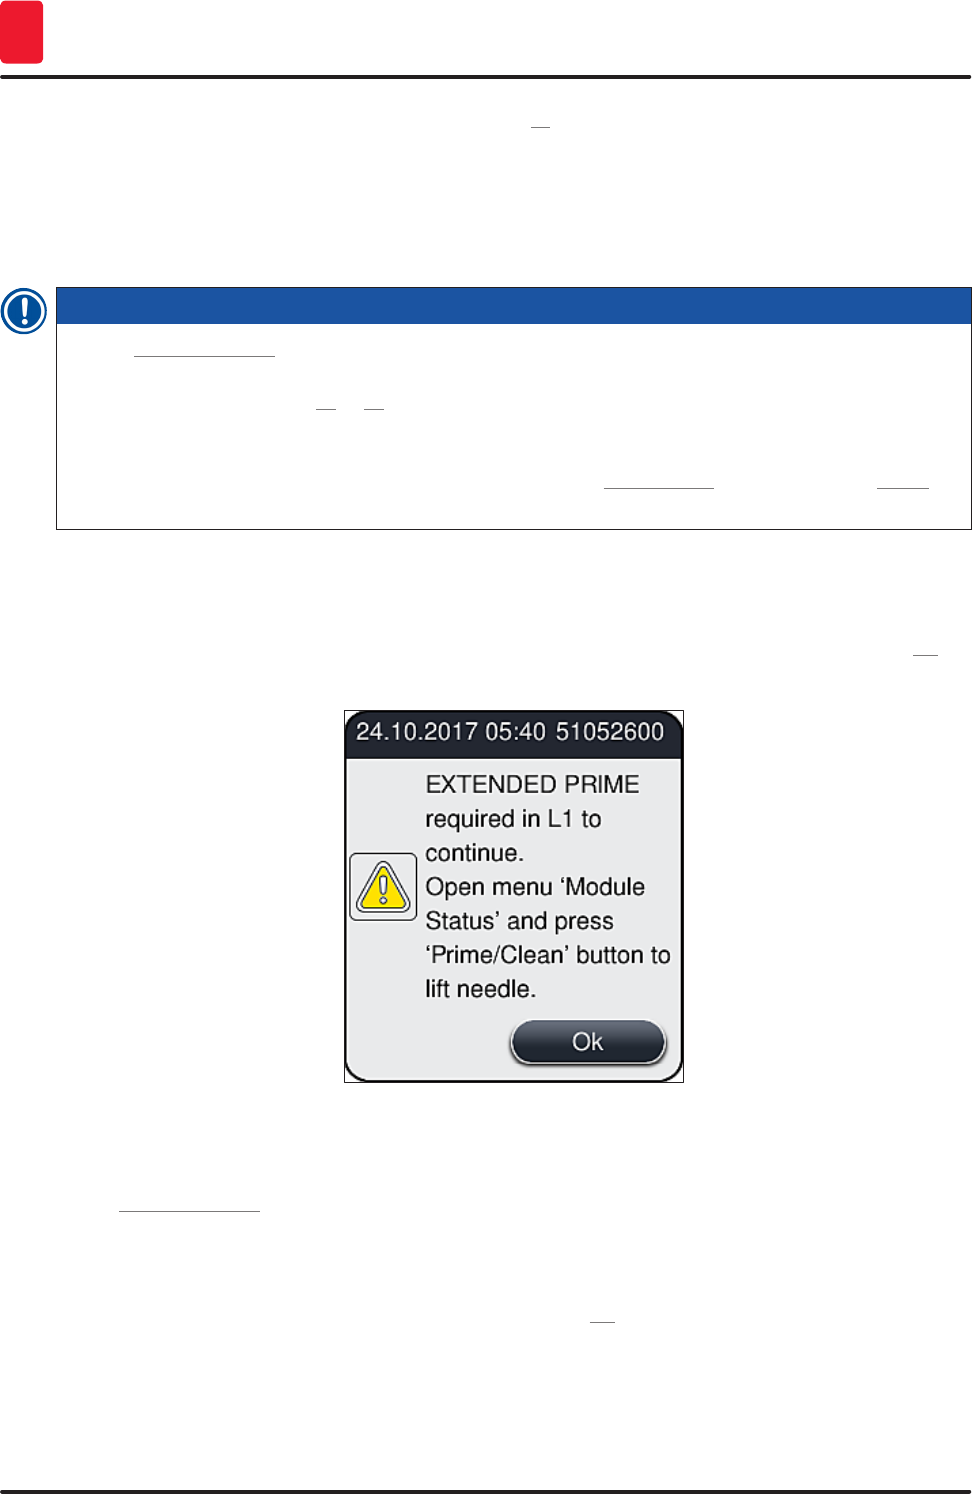
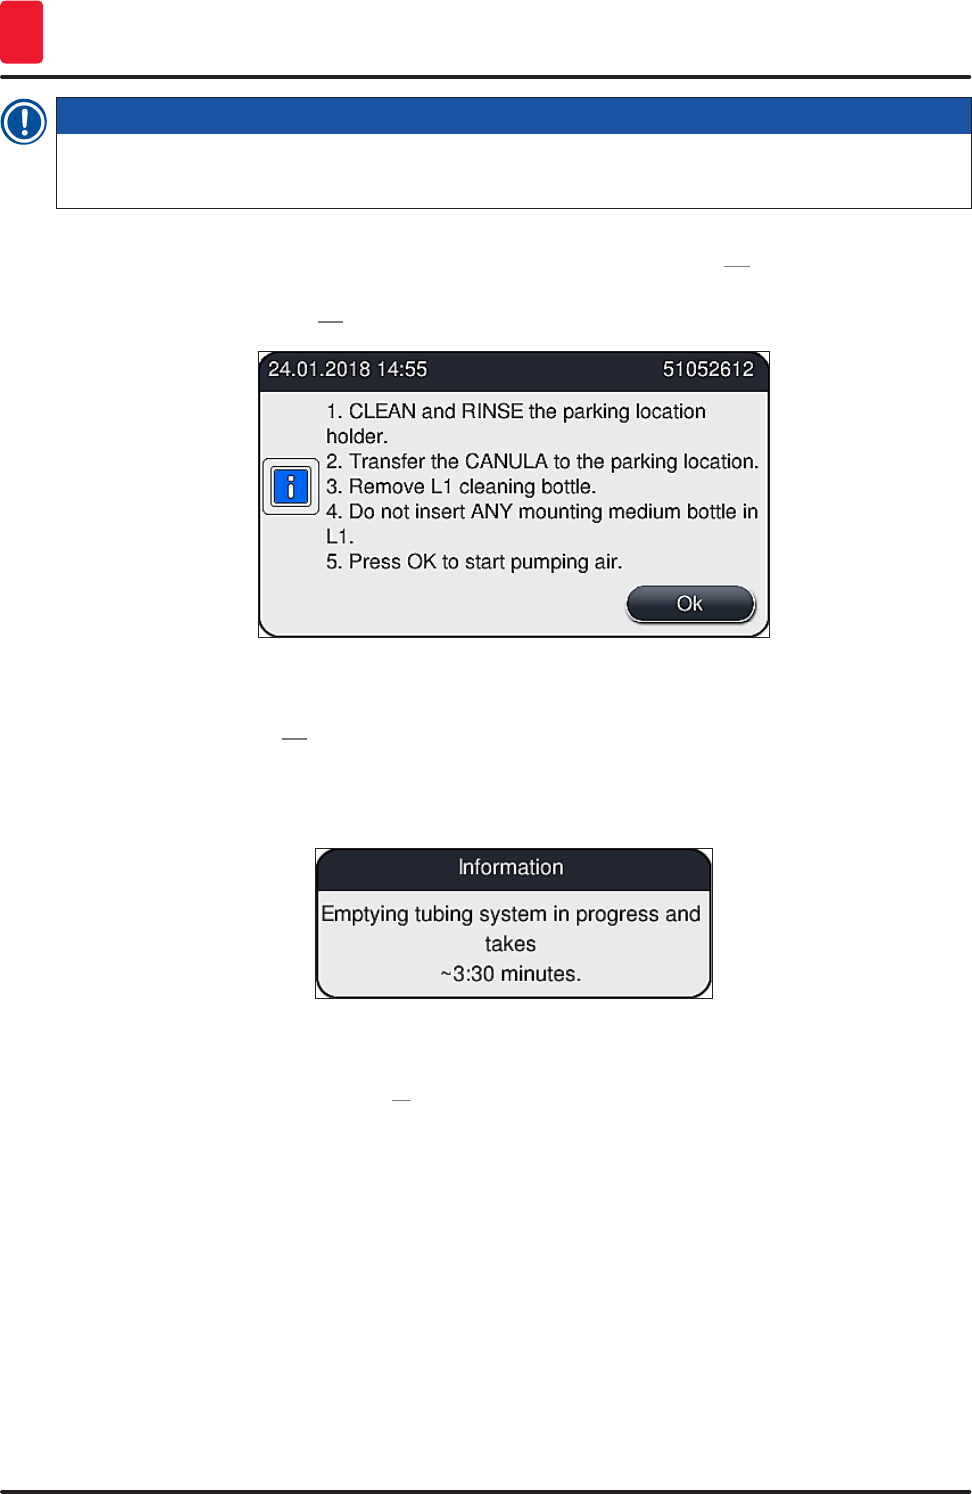
4. Note the following information messages (→ Fig. 96), (→ Fig. 97) and (→ Fig. 101) and confirm
each with Ok.
Fig. 101
5. Remove the cannula from the mounting medium bottle for the coverslip line L1 and place in the
parking location (→ Fig. 60-3).
6. Press the Clean (→ Fig. 99-4) button.
7. Take the mounting medium bottle out of the bottle sledge, close and store safely.
128 Version 1.2, Revision A
Cleaning and Maintenance
7
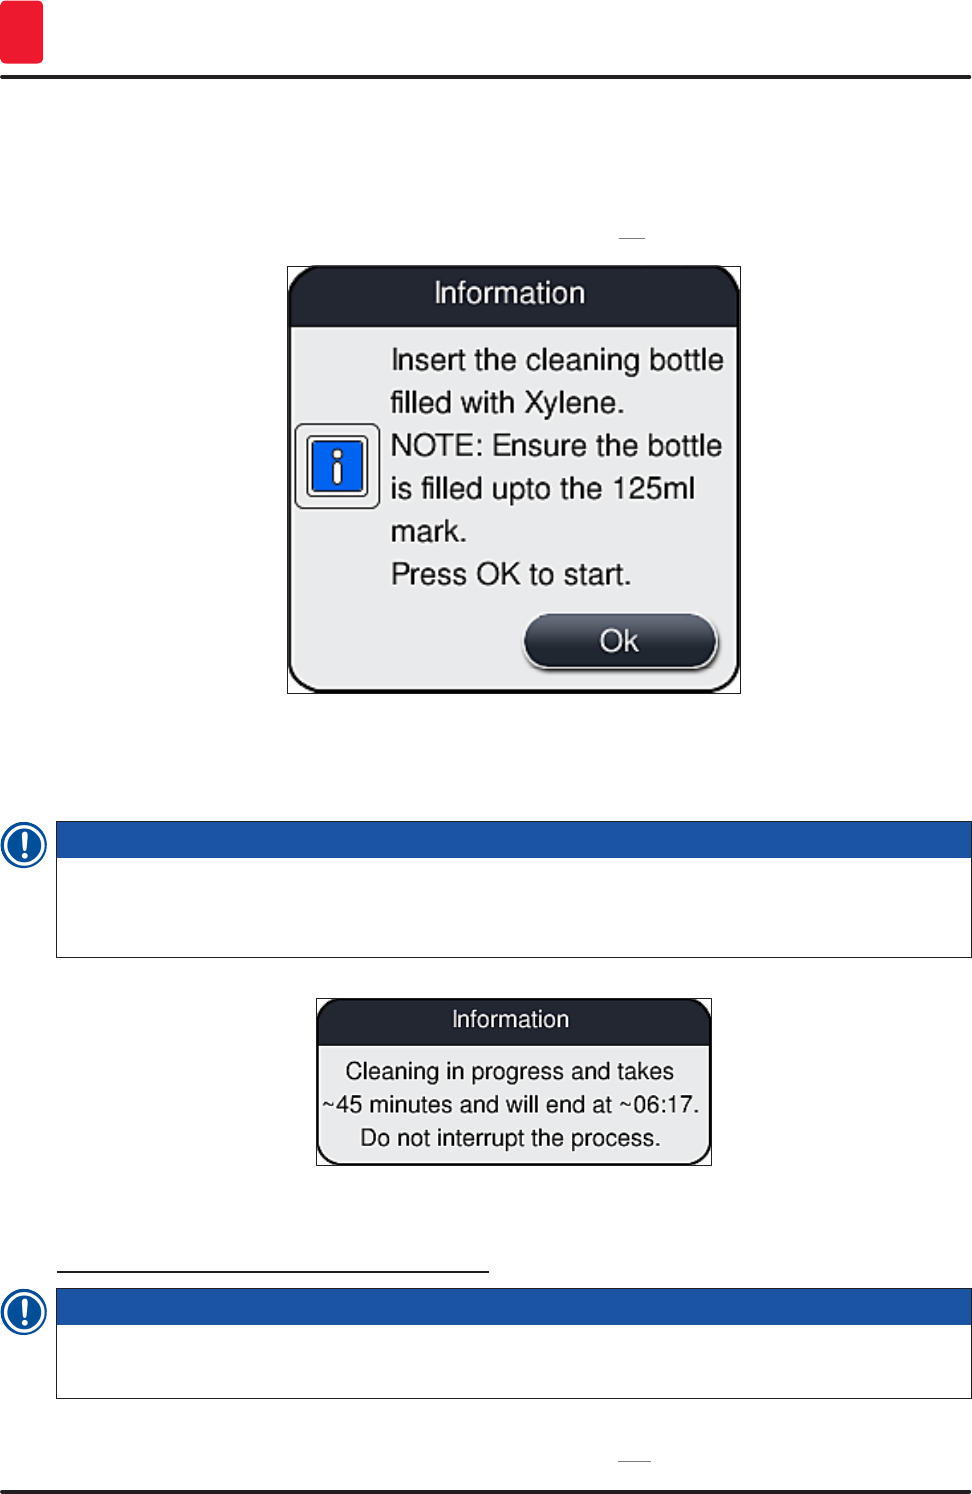
8. Fill the bottle for cleaning solution (→ P. 19 – 3.1 Standard delivery – packing list) with at
least 125 ml of cleaning solution (xylene) while it is outside the instrument and place it in the
position of the mounting medium bottle in the bottle sledge.
9. Take the cannula out of the parking location and insert it into the cleaning bottle.
10. Then confirm the information message (→ Fig. 102) with OK.
Fig. 102
The cleaning process begins.
Note
The cleaning process lasts approx. 45 minutes. The information message (→ Fig. 103) is displayed on
the display while the cleaning process is running. It disappears as soon as the cleaning process is
concluded.
Fig. 103
Cleaning process finished, continuing processing
Note
After the cleaning process has been completed, the user is asked if a new bottle of mounting medium
is to be used to continue with the coverslipping (→ Fig. 104).
LIf you want to continue with the coverslipping, press the Yes (→ Fig. 104-1) button.
129
HistoCore SPECTRA CV
Cleaning and Maintenance 7
2 1
Fig. 104
Note
The L1 coverslip line must be prepared for processing again by extended priming (→ P. 126 – 7.3.2
Extended Prime).
» Following this, the user is prompted to remove the cleaning bottle from the instrument and to
insert a new bottle with mounting medium. After the insertion, acknowledge the information
message (→ Fig. 105) with Ok. Dispose of the contents of the cleaning bottle in accordance with
laboratory regulations.
Fig. 105
Cleaning process finished and preparation for transport or storage
1. After the cleaning process has been completed, remove the prime bottle from the instrument
and dispose of the contents according to laboratory specifications.
2. Insert the empty prime bottle back into the instrument again.
130 Version 1.2, Revision A
Cleaning and Maintenance
7
Note
After the cleaning process has been completed, the user is asked if a new bottle of mounting medium
is to be used to continue with the coverslipping (→ Fig. 104).
3. If the instrument is to be prepared for transport or storage, press the No (→ Fig. 104-2) button.
4. Take note of the next information message (→ Fig. 106), which contains instructions, and
acknowledge with the Ok button.
Fig. 106
5. After pressing the OK button, the instrument immediately begins pumping air through the hose
system.
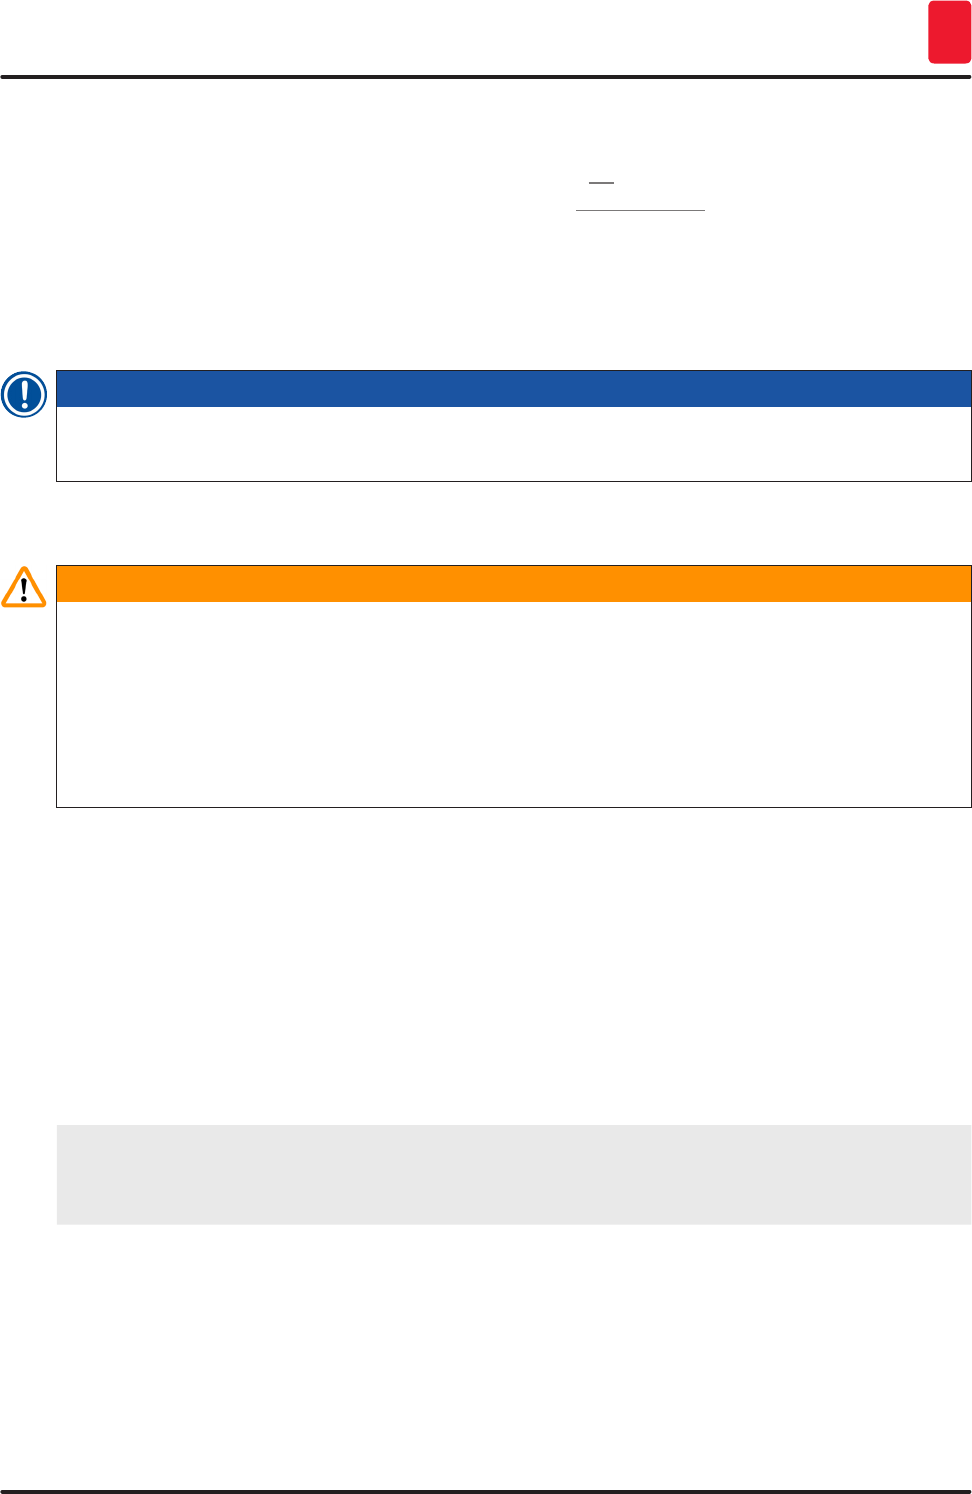
6. On the screen, an information message (→ Fig. 107) appears informing the user about the
duration. This message disappears as soon as air pumping has been completed.
Fig. 107
7. Repeat the procedure with the L2 coverslip line.
8. After the air pumping has been completed for both coverslip lines, remove the remaining
coverglass cartridges and needle cleaning containers and close the instrument hood.
131
HistoCore SPECTRA CV
Cleaning and Maintenance 7
9. The instrument software identifies that no mounting medium bottles, coverglass cartridges and
needle cleaning containers are inserted, and indicates this to the user through error messages
for each coverslip line. Confirm these messages with OK.
10. Finally, shut down the instrument, switch it off at the power switch and disconnect it from the
power grid.
The instrument is now ready for transport or for storage.
7.3.4 Recommissioning after transport or storage
Note
For recommissioning after a transport or after long-term storage, proceed as described in
(→ P. 25 – 4. Installation and Instrument Setup) and (→ P. 76 – 6. Daily Instrument Setup).
7.4 Recommended cleaning and maintenance intervals
Warning
• It is mandatory to observe and carry out the following cleaning and maintenance intervals and
cleaning tasks.
• In case of non-compliance with the maintenance intervals, the proper function of the
HistoCore SPECTRA CV by Leica Biosystems GmbH cannot be guaranteed.
• The instrument should be inspected once per year by a qualified service technician authorized by
Leica.
• Always wear suitable protective clothing (lab coat, cut-resistant gloves, safety goggles).
To ensure trouble-free operation of the instrument over a long period of time, it is strongly
recommended that you conclude a maintenance contract after the warranty period has elapsed.
For more information, contact the relevant customer service organization.
7.4.1 Daily cleaning and maintenance
A Coverglass cartridge:
• Check the coverglass cartridge for broken glass (→ P. 83 – 6.3.3 Checking and
replacing the coverglass cartridge) and clean if necessary.
• Check that the coverglass is seated correctly in the coverglass cartridge (→ P. 83 –
6.3.3 Checking and replacing the coverglass cartridge).
B Waste tray:
• Check the waste tray for broken glass (→ P. 87 – 6.3.4 Emptying the waste tray) and
drain if necessary.
C Pick&Place module:
• Check the skids, suction cups and coverglass sensor pin for residual mountant and
broken glass (→ P. 88 – 6.3.5 Inspect Pick&Place module) and clean if necessary
(→ P. 118 – 7.2.10 Cleaning the Pick&Place module).
• Replace deformed and/or damaged suction cups (→ P. 118 – 7.2.11 Exchange suction
cups).

132 Version 1.2, Revision A
Cleaning and Maintenance
7
D Alignment pins:
• Check for residual mountant and clean if necessary (→ Fig. 4-12).
E Coverslip lines L1 and L2:
• Check for surface-dried residual mountant and clean if necessary.
F Reagent vessels in the load drawer:
• Replace the reagent in the reagent vessel (→ P. 33 – 4.6 Refilling consumables).
G Unload drawer:
• Check if there are still racks in the unload drawer and remove (→ P. 111 – 7.2.4 Interior
cleaning).
H Surfaces of the instrument:
• Check surfaces of the instrument for residual reagent in the area of the load drawer
and clean if necessary. For this purpose, commercial household cleaner can be used
(→ P. 109 – 7.2.1 Exterior surfaces, varnished surfaces, instrument hood).
I Prime bottle:
• Check the fill level of the prime bottle and dispose of the contents in accordance with
the laboratory specification if necessary.
J Shifter and shifter tongue:
• Check the shifter and shifter tongue (→ Fig. 4-14) for contamination and dried out
mounting medium. Soak a lint-free cloth with a compatible solvent and remove any
mounting medium residue that may be present.

133
HistoCore SPECTRA CV
Cleaning and Maintenance 7
7.4.2 Weekly cleaning and maintenance
A Needle cleaning container:
• Drain the needle cleaning container, clean and refill with solvent (→ P. 114 – 7.2.8
Filling and changing the needle cleaning container).
B Reagent vessels in the load drawer:
• Drain reagent vessels and clean at a maximum of 65 °C using a lab rinsing machine
(→ P. 119 – 7.2.13 Cleaning the reagent vessels).
• Then, refill the reagent vessels and re-insert into the load drawer (→ P. 38 – 4.6.3
Prepare the reagent vessel, fill it and insert it into the load drawer).
C Needle:
• Check the needle for surface-dried residual mountant and clean it with a compatible
solvent if necessary (→ P. 113 – 7.2.7 Cleaning the needle).
D Touchscreen:
• Check for dirt and clean if necessary. For this purpose, commercial household cleaner
can be used (→ P. 110 – 7.2.2 TFT touchscreen).
E Racks:
• For small amounts of dirt: Clean the racks with a lint-free cloth soaked in solvent
(→ P. 120 – 7.2.14 Rack and handle).
• In case of heavier soiling: Immerse the rack in a compatible solvent for a maximum of
1–2 hours in order to remove dried residual mountant.
• Clean the rack in the dishwasher at 65 °C.
F Workstation:
• Check the transfer station in the HistoCore SPECTRA ST. For additional information, refer
to the Instructions for Use of the HistoCore SPECTRA ST.
G• Check the drawer inserts for broken glass and clean if necessary (→ P. 111 – 7.2.4
Interior cleaning).
Warning
Never place reagent vessels, racks and rack handles in a solvent for a prolonged period (e.g.
overnight) because this can cause deformation and trouble-free operation can no longer be ensured.

134 Version 1.2, Revision A
Cleaning and Maintenance
7
7.4.3 Quarterly cleaning and maintenance
A Changing the active carbon filter:
• Replace the active carbon filter (→ P. 121 – 7.2.15 Changing the active carbon filter).
7.4.4 Cleaning and maintenance as necessary
Warning
• Attention: Wear cut-resistant gloves (→ P. 19 – 3.1 Standard delivery – packing list)!
• Clean the interior of the instrument in the event of broken glass.
• A lint-free cloth moistened with compatible solvent can be used to clean off any adhesive residue.
You can use the brush included in the delivery package to brush any glass shards and splinters
free of adhesive residue toward the drawer outlet and then use a commercially available vacuum
cleaner to carefully clean them up.
A• Make sure the instrument is idle (→ P. 77 – 6.2 Switching on and shutting down the
instrument):
• Cover reagent vessels
• Ensure there is enough solvent in the needle cleaning container to prevent the needle
from drying out (→ P. 82 – 6.3.2 Monitoring and refilling of the needle cleaning
container).
B• Prime the hose system with solvent (→ P. 127 – 7.3.3 Cleaning the hose system).
C Pick&Place module:
• Replace the suction cups if they have severe deformation or are very dirty (→ P. 118 –
7.2.11 Exchange suction cups).
D• Cleaning the interior of the instrument (→ P. 111 – 7.2.4 Interior cleaning).

135
HistoCore SPECTRA CV
Malfunctions and Troubleshooting 8
8. Malfunctions and Troubleshooting
8.1 Troubleshooting
Problem/malfunction Possible cause Correction
Black screen • Software crash • Remove all racks from the
instrument and restart the
instrument.
• Power failure • See (→ P. 139 – 8.2 Power failure
scenario and instrument failure)
Needle cleaning container
cannot be removed using
the knurled screw
• Needle cleaning container is
stuck due to mounting medium
residue in the holder.
• Remove the needle cleaning unit
and immerse it in xylene until
the needle cleaning container
has loosened and can be taken
out (→ P. 115 – 7.2.9 Removing
the complete unit of the needle
cleaning container).
Consumables cannot be
scanned
• RFID chip is dirty • Carefully remove any
contamination from the RFID chip
and re-scan the consumables by
closing the hood.
• RFID chip is defective • Try again with new consumables.
• There may be an instrument
defect present if the problem
persists. Please contact
Leica Service.
Load/unload drawer is
sticking
• Possible contamination in or on
the respective drawer
• Carefully remove any
contamination (mounting
medium residue, glass shards
and splinters) (→ P. 109 – 7.1
Important notes about cleaning
this instrument), remove all racks
from the instrument and restart
the instrument.
Transport arm reports
an error
• Malfunction in the instrument • Follow the instructions in
(→ P. 141 – 8.3 Manual
removal of a rack in the event of
instrument malfunctions) and pull
the transport arm to the unload
drawer. Remove the rack from the
transport arm.

136 Version 1.2, Revision A
Malfunctions and Troubleshooting
8
Problem/malfunction Possible cause Correction
Intact coverglass
is conveyed into
the waste tray.
• Coverglass sensor pin
contaminated.
• Check the coverglass sensor pin
for dirt; if necessary, clean it with
a lint-free cloth soaked in xylene
(→ P. 118 – 7.2.10 Cleaning the
Pick&Place module).
Air bubbles between the
specimen and coverglass
• Needle partially stuck/blocked • Remove any stuck mounting
medium and perform a Quick
Prime (→ P. 125 – 7.3.1 Quick
Prime). If the problem persists,
carry out a complete cleaning of
the hose system (→ P. 127 – 7.3.3
Cleaning the hose system).
• A reagent not compatible with
the mounting medium has been
filled in the reagent vessel in the
load drawer.
• Leica recommends the use of
xylene for the reagent vessels in
the load drawer.
• Ensure that a solvent compatible
with the Leica mounting medium
(such as xylene) is being used
both in the reagent vessel in the
HistoCore SPECTRA CV load
drawer and in the last steps of the
preceding staining process in the
HistoCore SPECTRA ST.
• Dispose of non-compatible
reagent in accordance with the
applicable local regulations, clean
the reagent vessel and fill it with
xylene outside the instrument.
Finally, set the reagent vessels
back in the load drawer.
• The needle is bent. • Notify Leica Service and replace
the bent needle with a new one.
• The specimens were not kept
sufficiently moist
• Check the fill level of the reagent
vessels in the load drawer
(→ P. 39 – Correct fill level of
the reagent vessels) and refill
reagent if necessary (→ P. 16 –
Warnings – Handling reagents).

137
HistoCore SPECTRA CV
Malfunctions and Troubleshooting 8
Problem/malfunction Possible cause Correction
• The coverslipping operation has
been interrupted by the user and
resumed.
• Problem should no longer occur
for the next rack. In general, the
coverslipping operation should not
be interrupted to perform tasks
such as refilling consumables.
• Leaks in the mountant hose
system.
• Remove mounting medium bottle,
check that the cannula fits
correctly and ensure that you can
feel it click in place.
Insufficient mounting
medium is applied to the
slides
• Quantity of mounting medium is
set too low.
• Adjust the application quantity
of the mounting medium in the
parameter set (→ P. 72 – 5.9.5
Adjustment of the application
volume) or change it using the
Volume calibration (→ P. 60 –
5.8.6 Volume calibration) menu.
Too much mounting
medium is dispensed
on the slides, or there is
excess mounting medium
on the coverglass
• Quantity of mounting medium is
set too high.
• Adjust the application quantity
of the mounting medium in the
parameter set (→ P. 72 – 5.9.5
Adjustment of the application
volume) or change it using the
Volume calibration (→ P. 60 –
5.8.6 Volume calibration) menu.
• Mounting medium residue on
the shifter or the shifter tongue
(also below the shifter tongue).
• Check the shifter and shifter
tongue (also below the shifter
tongue) for contamination, clean
with a lint-free moistened in
xylene if appropriate
During application of the
mounting medium, the
specimen on the slide was
damaged
• Needle height not set correctly. • Do not begin any further
coverslipping operations in the
respective coverslip line and
notify Leica Service. The needle
height can be changed and
calibrated only by Leica Service.

138 Version 1.2, Revision A
Malfunctions and Troubleshooting
8
Problem/malfunction Possible cause Correction
The Pick&Place module
allows coverglass to fall
• Dirty or deformed suction cups • Check the suction cups on
the Pick&Place module for
contamination and deformation
(→ P. 118 – 7.2.10 Cleaning the
Pick&Place module). Clean the
suction cups or replace them
with new ones (→ P. 118 – 7.2.11
Exchange suction cups).
• Additionally, observe the
procedure in (→ P. 144 – 8.3.1
Malfunction at the coverglass
receptacle).
• coverglass in the magazine have
been moistened and can no
longer be removed individually.
• Remove the cover slip magazine
and replace it with a new one
(→ P. 83 – 6.3.3 Checking
and replacing the coverglass
cartridge).
Drying out of the needle • Malfunction in a coverslip
line, the needle could not be
moved to the needle cleaning
container.
• Remove the needle from the
needle holder and set it in the
needle cleaning container.
The fill level indicated in
the Module Status for the
mounting medium bottle is
too low
• Quick or extended priming has
failed multiple times.
• Upon each priming attempt, the
instrument software takes the
amount necessary for priming
from the fill level of the mounting
medium bottle.
• Change the mounting medium
bottle.
• Check the needle's ability to allow
material to flow and, if necessary,
place it in a solvent for a longer
period of time. If the needle
remains clogged for a prolonged
period, arrange for a Leica service
technician to replace the needle
unit.
Error message "L1/L2
mounting medium not
detected"
• Bottle sledge (→ Fig. 17-1) not
inserted until it clicks in place.
• Slide the bottle sledge
(→ Fig. 17-1) back until you feel it
click into place.
Error message "Unload
drawer malfunction" after
the transport of a rack into
the unload drawer
• RFID chip in the rack handle is
defective.
• Observe the message and remove
all racks from the unload drawer.
Disengage the defective rack
handle from the rack (→ P. 91 –
Detach the handle from the rack.)
and dispose of it in accordance
with applicable local laboratory
regulations.

139
HistoCore SPECTRA CV
Malfunctions and Troubleshooting 8
8.2 Power failure scenario and instrument failure
Warning
In the event of a software crash or an instrument malfunction, a previously defined audible
warning signal will sound. In this case, the user has to remove all racks from both instruments,
HistoCore SPECTRA CV and HistoCore SPECTRA ST, as well as restart the instruments afterwards.
Note
• In the event of a prolonged power failure (> 3 sec.), the internal battery ensures that the
HistoCore SPECTRA CV is shut down in a controlled manner and any negative impact on the
specimens is avoided.
• The fully charged internal battery can bridge two successive power failures (> 3 sec.). After
two successive power failures and once the power supply has been re-established, the internal
battery is recharged when the instrument is started up. The user is notified of the charging
process by a note on the screen. The instrument is not ready for use again until after charging.
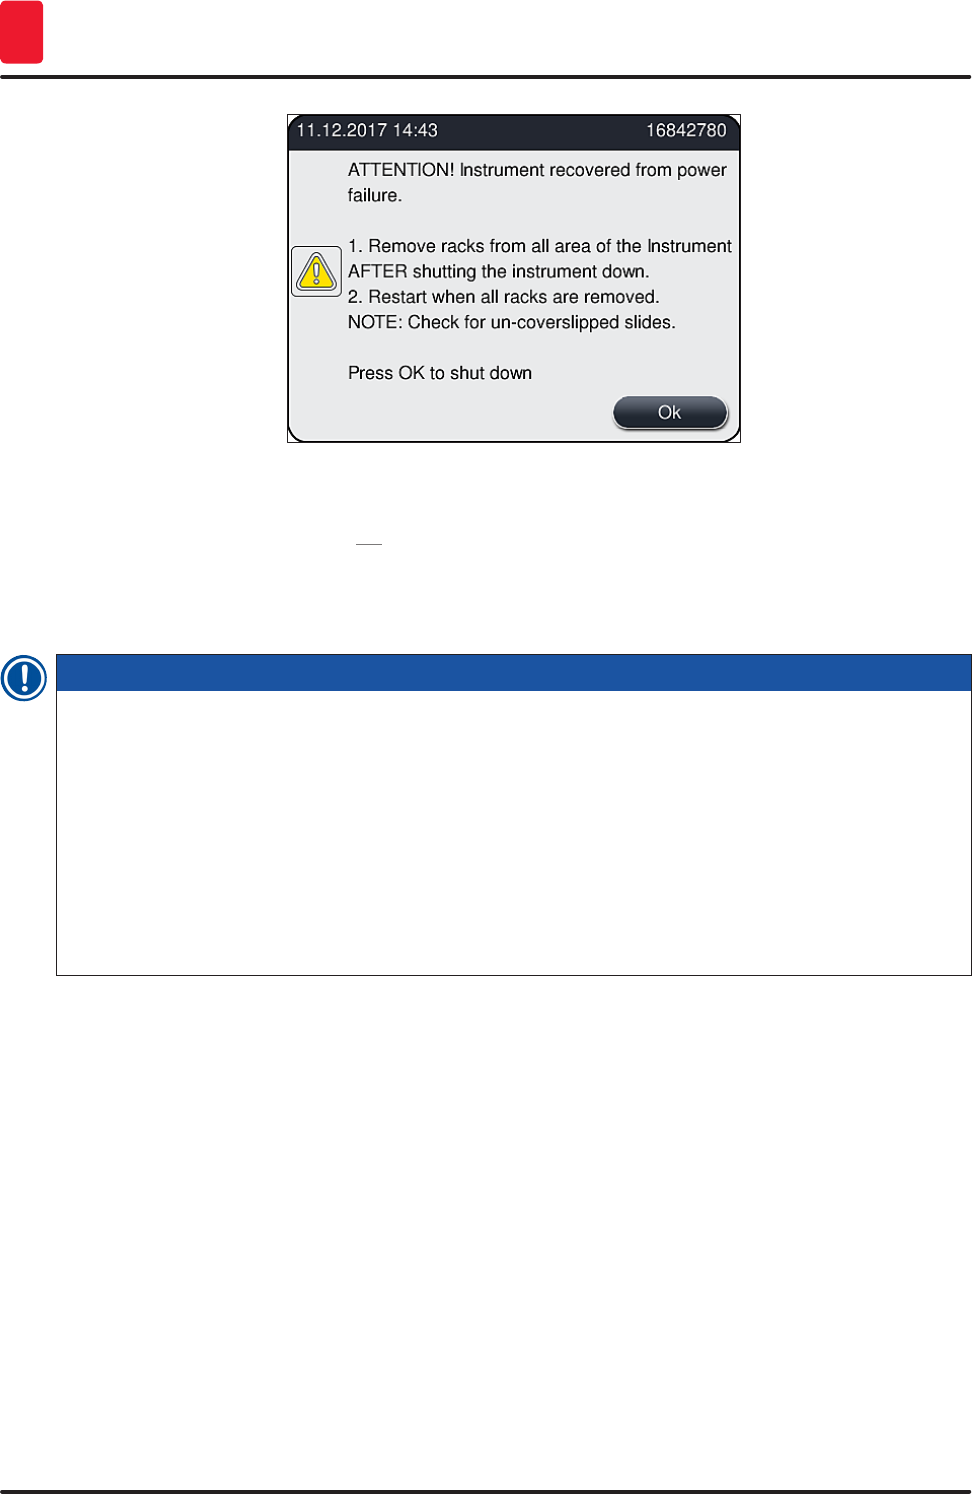
• After the power supply has been restored, the instrument automatic performs a restart. The user
is notified of the power failure by an information message (→ Fig. 108) on the screen, and the
event is entered into the event log.
• An external UPS (uninterruptible power supply) ensures a long-term bypass, depending on the
specifications of the connected UPS (→ P. 27 – 4.2.2 Using an external uninterruptible power
supply (UPS)).
In case of a power failure, the instrument carries out the following steps regardless of whether just one
or both coverslip lines are in use:
1. The software shuts the screen down.
2. The slides currently being processed in the coverslip lines L1 and L2 are still completely
covered and pushed back into the rack.
3. The rack in the coverslip line L2 is transported by the gripper arm into the unload drawer. After
this, the gripper arm moves into the secure position behind the oven.
4. The rack remains in the elevator in the coverslip line L1.
5. The instrument is then shut down by the software in a controlled manner
(→ P. 31 – 4.5 Switching on and shutting down the instrument).
LAfter power supply has been restored, the instrument restarts automatically. An audible warning
signal sounds and a warning message is displayed on the display (→ Fig. 108).
140 Version 1.2, Revision A
Malfunctions and Troubleshooting
8
Fig. 108
6. Confirm this message with OK, whereupon the instrument shuts down in a controlled manner.
Then follow the instructions in the information message (→ Fig. 108) and remove the slides from the
instrument.
Note
• After the restart of the instrument, the oven is shut down, and the user must reactivate it in
the Oven Settings menu (→ P. 56 – 5.8.5 Oven settings). The user is notified by a information
message upon the setting of a rack.
• For a safe and easy removal of the racks from the instrument, the instrument must be shut down.
Following shutting down, the user can, for example, easily move the transport arm in order to
carry out the necessary steps for removing the racks.
• Check the removed racks for un-coverslipped slides and coverslip those slides manually. In
doing so, observe the sequence in which the individual slides are processed in the coverslipping
process (→ P. 96 – 6.6 Starting the coverslipping operation) and (→ Fig. 75).
• The following chapters shall be observed for removal of the rack remaining in the instrument.
141
HistoCore SPECTRA CV
Malfunctions and Troubleshooting 8
Position See
Load drawer (→ P. 141 – 8.3 Manual removal of a rack in the event of instrument
malfunctions)
Rotator (→ P. 151 – 8.3.5 Removal of the rack from the rotator)
Elevator (→ P. 146 – 8.3.2 Removing a rack from the elevator of the coverslip line)
Gripper arm (→ P. 141 – 8.3 Manual removal of a rack in the event of instrument
malfunctions)
Oven (→ 8.3.4 Removing the rack from the oven or from behind the oven)
Unload drawer (→ P. 141 – 8.3 Manual removal of a rack in the event of instrument
malfunctions)
8.3 Manual removal of a rack in the event of instrument malfunctions
Warning
• Risk of injury! Always wear personal protective clothing (lab coat, cut-resistant gloves, safety
goggles)!
• We recommend calling in a second person for support.
• The instrument software provides instructions on the screen. Compliance with these is mandatory.
• If a manual removal of a rack from the right-side L2 coverslip line is necessary, the transport of
racks in and out of the oven is interrupted for safety reasons. racks may remain in the oven for
longer than 5 minutes as a result.
Note
In the event of instrument malfunctions requiring the user to remove a rack from inside the instrument
manually, note that the instrument software cannot precisely locate a rack inside the instrument and
therefore only gives general instructions regarding manual removal. If the user can readily identify
the rack to be removed upon looking inside the instrument, the user can carefully remove it without
following the instruction on screen if there is no risk of damage to the specimens or the instrument
from doing so.
Manual removal of a rack from the interior of the instrument:
1. Open the load drawer.
2. Open the unload drawer and remove all racks contained (→ Fig. 109-1).
3. Pull the red retaining lever upwards (→ Fig. 109-2). Pull out the drawer entirely and lower it
into the rescue position (→ Fig. 109-3).
4. Locate rack by looking through the shaft of the unload drawer. (→ Fig. 109-4).
5. Insert your hand into the shaft and try carefully to feel around for the rack.
142 Version 1.2, Revision A
Malfunctions and Troubleshooting
8
Warning
• There can still be un-coverslipped slides in the racks. Proceed with utmost caution and care.
• If the elevator interferes with the removal of a rack, then the user must manually lift the elevator
upward (→ P. 146 – 8.3.2 Removing a rack from the elevator of the coverslip line).
6. Lift the gripper with the rack to the very top if necessary and push/pull the gripper arm to the
center of the instrument (→ Fig. 109-5).
7. Carefully lower the gripper with rack downwards (→ Fig. 109-6).
8. The rack is now in a position (→ Fig. 109-7) that facilitates secure removal.
9. With one hand, secure the gripper so it does not fall down and grasp the front part of the rack
with the other hand.
10. Lightly lift the front of the rack to release it from the gripper (→ Fig. 109-8).
11. Finally, hold the rack upwards in a tilted fashion (→ Fig. 109-9) and pull it forwards out of the
gripper (→ Fig. 109-10).
12. Place the gripper in the secure position behind the oven.
13. Close the unload drawer and acknowledge the information message that follows with Ok.
14. Afterwards, the instrument is re-initialized.
15. A Quick Prime (→ P. 125 – 7.3.1 Quick Prime) must always be performed after initializing.
Note
Place the extracted rack outside of the instrument and secure the slide against drying out.
143
HistoCore SPECTRA CV
Malfunctions and Troubleshooting 8
1 2 3
4 5 6
7
8 9 10
Fig. 109
144 Version 1.2, Revision A
Malfunctions and Troubleshooting
8
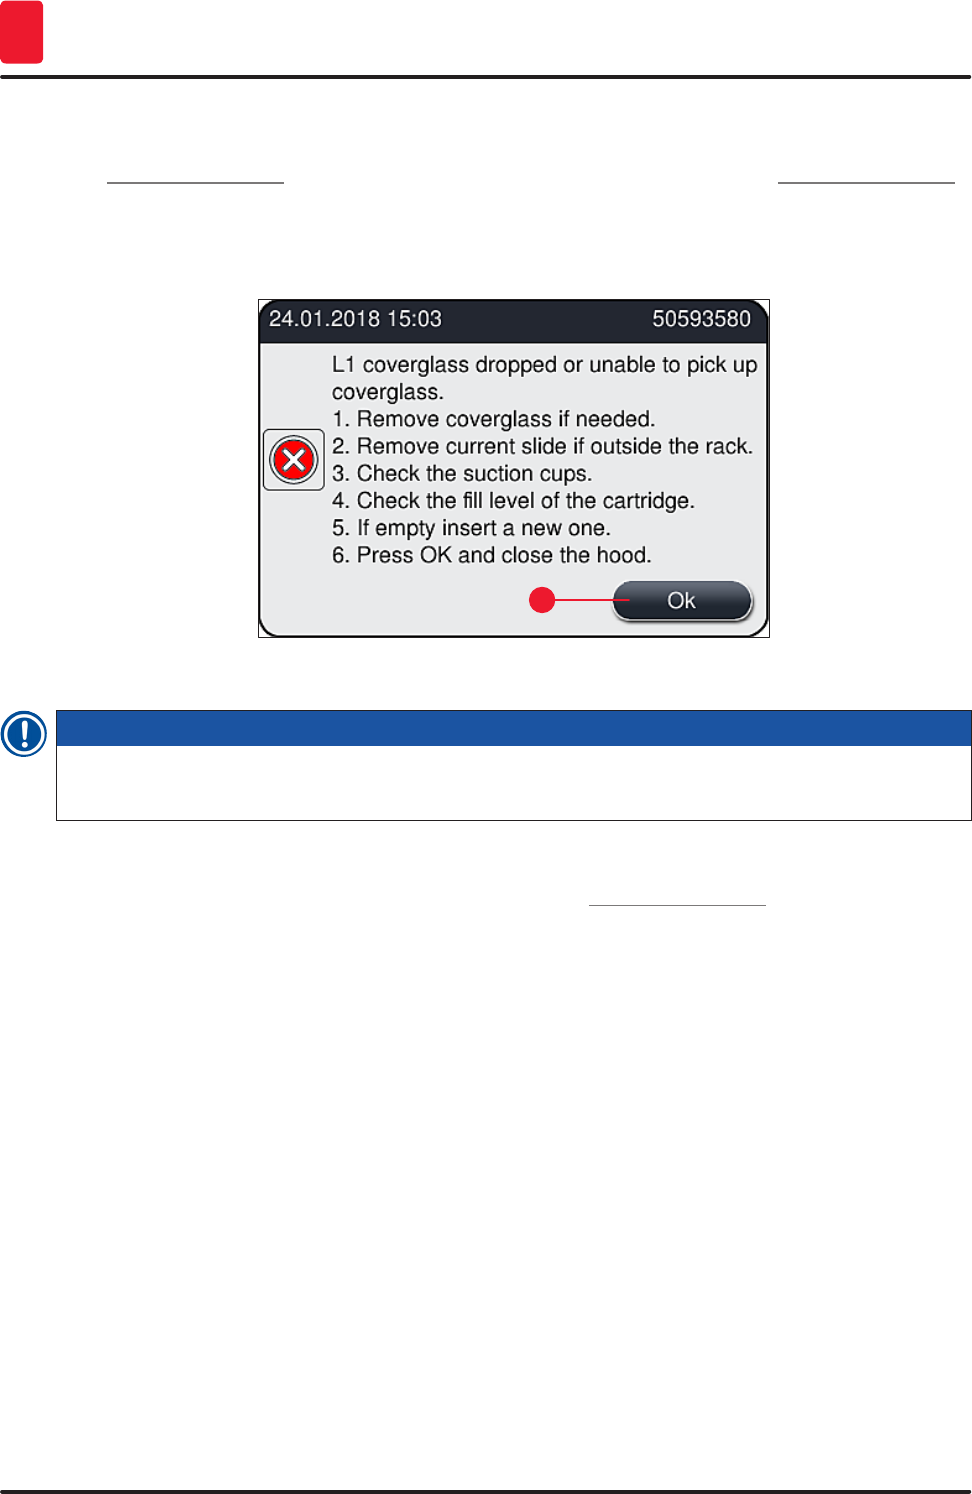
8.3.1 Malfunction at the coverglass receptacle
If the Pick&Place module loses a coverglass during transport to the slide or if the Pick&Place module
cannot remove a coverglass from the coverglass cartridge after 3 attempts, the user is notified of this
through an error message (→ Fig. 110).
1
Fig. 110
Note
Processing in the respective coverslip line is interrupted in order to prevent damage to the
specimens. Specimens may become dried out during the interruption.
LIf this message (→ Fig. 110) is displayed, the user must first check whether a coverglass has
been lost during transport to the slide or whether the Pick&Place module was unable to take a
coverglass from the coverglass cartridge.
1. To do this, start by opening the hood of the instrument and checking whether or not a
coverglass has been lost while being transported to the slide.
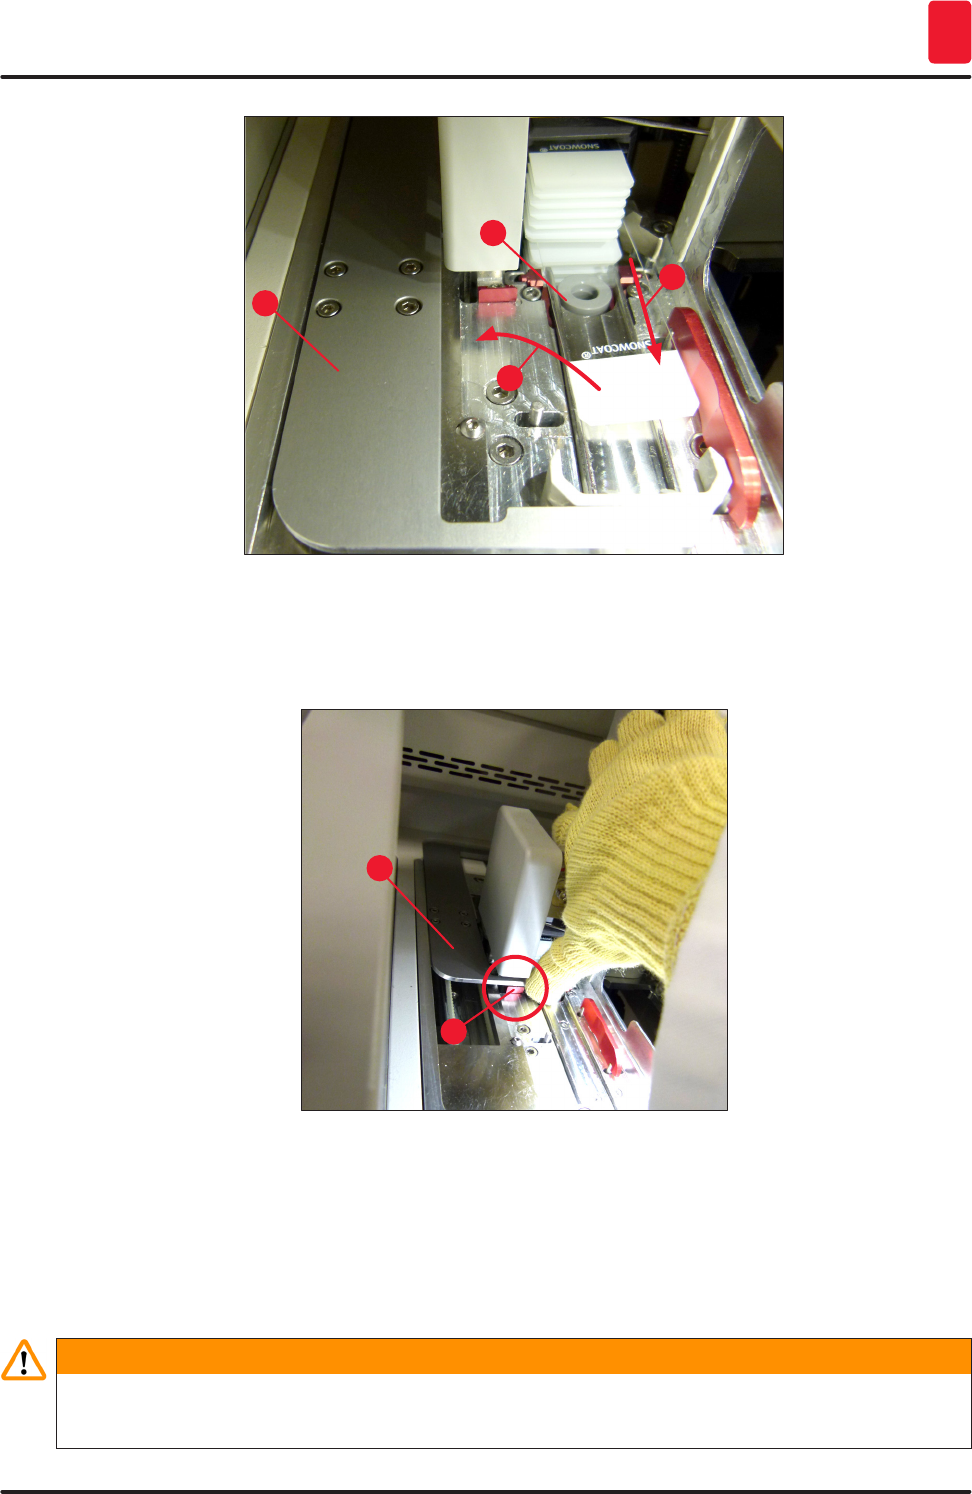
2. To remove the slide, press the red bar to the far right (→ Fig. 111-1) and hold it in this position.
3. Make sure that the shifter (→ Fig. 111-2) does not obstruct the safe removal of the slide. Move
the shifter all the way forward or back if necessary.
4. Carefully remove the slide that has not yet been coverslipped from the instrument
(→ Fig. 111-3) and store it safely outside the instrument. After correcting the malfunction, the
slide can be coverslipped manually.
145
HistoCore SPECTRA CV
Malfunctions and Troubleshooting 8
1
2
3
Fig. 111
5. Check the coverslip line for broken glass and clean if necessary.
6. If the Pick&Place module was unable to remove a coverglass from the coverglass cartridge,
check the suction cups on the Pick&Place module for contamination or damage and, if
necessary, clean or replace the suction cups with two new ones.
7. Then check the fill level of the coverglass cartridge as well. If there is no longer enough
coverglass present, insert a new coverglass cartridge.
8. If the steps listed above have been carried out, press the OK button and close the hood.
9. The instrument software performs a fill level scan. The user receives an information message
when the check is finished (→ Fig. 112).
10. If the processing was interrupted for too long, it can be canceled by pressing Yes
(→ Fig. 112-1). The rack in question is transported to the unload drawer and can be removed
by the user there.
11. To continue processing, press the No (→ Fig. 112-2) button. Processing is continued as
normal.
146 Version 1.2, Revision A
Malfunctions and Troubleshooting
8
21
Fig. 112
Note
If the error cannot be remedied by the user using the specified procedure, notify a Leica service
technician and remove the coverslip line in question from service for the time being.
8.3.2 Removing a rack from the elevator of the coverslip line
Warning
• If, during operation, a malfunction occurs in one of the two coverslip lines, the user will receive
information messages from the instrument, which will provide the user with instructions for
the potentially necessary removal of a rack from the elevator. Compliance with the information
messages is mandatory.
• Risk of injury! Always wear personal protective clothing (lab coat, cut-resistant gloves, safety
goggles)!
• Specimens may become dried out during the interruption.
1. Open the hood.
2. Take the needle of the respective coverslip line from its holder laterally and insert it into the
parking location.
3. Ensure that the Pick&Place module is located above the waste tray. If this is not the case,
carefully push the Pick&Place module manually over the waste tray.
4. Check the respective coverslip line for possible locks and remove it carefully.
5. If a slide has canted in the coverslip line (→ Fig. 113-1), push the shifter (→ Fig. 113-2)
forwards. To do so, press the red bar to the far right (→ Fig. 111-1) and hold it in this position.
Then carefully pull the canted slide forwards (→ Fig. 113-3), remove it from the instrument
(→ Fig. 113-4) and coverslip it manually.
147
HistoCore SPECTRA CV
Malfunctions and Troubleshooting 8
1
2
3
4
Fig. 113
6. Align the shifter (→ Fig. 114-1) with the red barrier (→ Fig. 114-2). This ensures that user can
move the elevator upwards manually.
1
2
Fig. 114
7. Close the hood.
8. The instrument now attempts to move the rack to the uppermost position.
9. Reopen the hood and check whether the rack is in the upper position.
10. If this is not the case, the user can pull the elevator upwards manually. To do so, grasp the red
lever (→ Fig. 115-1) and carefully pull the elevator with the rack upwards.
Warning
While exercising caution, pull the elevator upwards slowly and without jerky movements.
Pay attention to protruding or interfering slides and push them carefully back into the rack.