MEILOON SSC4TV51 Audio Entertainment Console User Manual part1
Meiloon Industrial Co., Ltd. Audio Entertainment Console part1
MEILOON >
Contents
- 1. user manual part1
- 2. user manual part2
- 3. user manual part3
- 4. user manual part4
- 5. user manual part5
- 6. user manual part 6
- 7. user manual part 7
- 8. user manual part 8
- 9. user manual-Part1
- 10. user manual-Part2
- 11. user manual-Part3
- 12. user manual-Part4
- 13. user manual-Part5
- 14. user manual-Part6
- 15. user manual-Part7
- 16. user manual-Part8
user manual part1
This symbol found on the apparatus indicates hazards
arising from dangerous voltages.
This symbol found on the apparatus indicates the user
should read all safety statements found in the user
manual.
1. Read these instructions.
2. Keep these instructions.
3. Heed all warnings.
4. Follow all instructions.
5. Do not use this apparatus near water.
6. Clean only with dry cloth.
7. Do not block any ventilation openings. Install in accordance with
the manufacturer’s instructions.
8. Do not install near any heat sources such as radiators, heat
registers, stoves, or other apparatus (including ampliers)
that produce heat.
9. Do not defeat the safety purpose of the polarized or grounding-
type plug. A polarized plug has two blades with one wider than
the other. A grounding-type plug has two blades and a third
grounding prong. The wide blade or the third prong is provided
for your safety. If the provided plug does not t into your outlet,
consult an electrician for replacement of the obsolete outlet.
10. Protect the power cord from being walked on or pinched
particularly at plugs, convenience receptacles, and the point
where they exit from the apparatus.
IMPORTANT SAFETY INSTRUCTIONS
Manufactured under license from Dolby Laboratories.
Dolby and the double-D symbol are trademarks of Dolby Laboratories.
This equipment may only be used indoors in FR.
This equipment may only be used in one’s own premises in IT.
This equipment is for private use only in LU
Operation is not allowed within a radius of 20 km from the centre
of Ny-Ålesund in NO.
Hereby, AudioXperts, Inc. 505 Paradise Rd. Ste. 397, Swampscott,
MA 01907 USA, declares that this 4TV 2112 is in compliance with the
essential requirements and other relevant provisions of Directive
1999/5/EC. A copy of the Declaration of Conformity (DOC) may be
obtained from:
Mark Nazar
AudioXperts,Inc.
505 Paradise Rd. Ste. 397
Swampscott, MA 01907
USA
AT CZ FI IS LT PT SE FR
BE DK DE IE MT SK CH IT
EE GR LV NL SI TR LU CY
HU PL ES GB NO
RLAN - Radio Local Area Network Equipment
This class B digital apparatus complies with Canadian ICES-003.
Cet appareil numérique de classe B est conforme á la norme
NMB-003 du Canada.
Note: This equipment has been tested and found to comply with
the limits for a Class B digital device, pursuant to part 15 of the FCC
Rules. These limits are designed to provide reasonable protection
against harmful interference in a residential installation. This equip-
ment generates, uses, and can radiate radio frequency energy and,
if not installed and used in accordance with the instructions, may
cause harmful interference to radio communications. However,
there is no guarantee that interference will not occur in a particular
installation. If this equipment does cause harmful interference to
radio or television reception, which can be determined by turning the
equipment off and on, the user is encouraged to try to correct the
interference by one or more of the following measures:
• Reorient or relocate the receiving antenna.
• Increase the separation between the equipment and receiver.
• Connect the equipment into an outlet on a circuit different from that
to which the receiver is connected.
• Consult the dealer or an experienced radio/TV technician for help.
Caution: Unauthorized changes or modications to the receiver
could void the users authority to operate the equipment.
This symbol found on the apparatus indicates double
insulation
Warning!
To reduce the risk of re or electrical shock, do not
expose this apparatus to rain or moisture.
11. Only use attachments/accessories specied by the manufacturer.
12. Unplug this apparatus during lightning storms or when unused
for long periods of time.
13. Refer all servicing to qualied service personnel. Servicing is
required when the apparatus has been damaged in any way, such
as power-supply cord or plug is damaged, liquid has been spilled
or objects have fallen into the apparatus, the apparatus has been
exposed to rain or moisture, does not operate normally, or has
been dropped.
14. Maintain a minimum distance of 2” (50mm) around the front, rear,
and sides of the apparatus for sufcient ventilation. The ventilation
should not be impeded by covering the ventilation openings or
placing on or around the apparatus items such as newspapers,
table-cloths, curtains, etc.
15. No open ame sources, such as lighted candles, should be placed
on the apparatus.
15. The apparatus shall not be exposed to dripping or splashing.
No objects lled with liquids, such as vases, shall be placed on
the apparatus.
17. Either the power inlet connector on the rear of the apparatus
or the power plug at the wall must remain accessible, to be able to
disconnect power from the apparatus.
18. To completely disconnect this apparatus from the AC Mains,
disconnect the power supply cord plug from the AC receptacle.
American Users: Canadian Users:
European Users:
E nglish
Designed and Engineered by
US E R MANUAL
5122
1
2
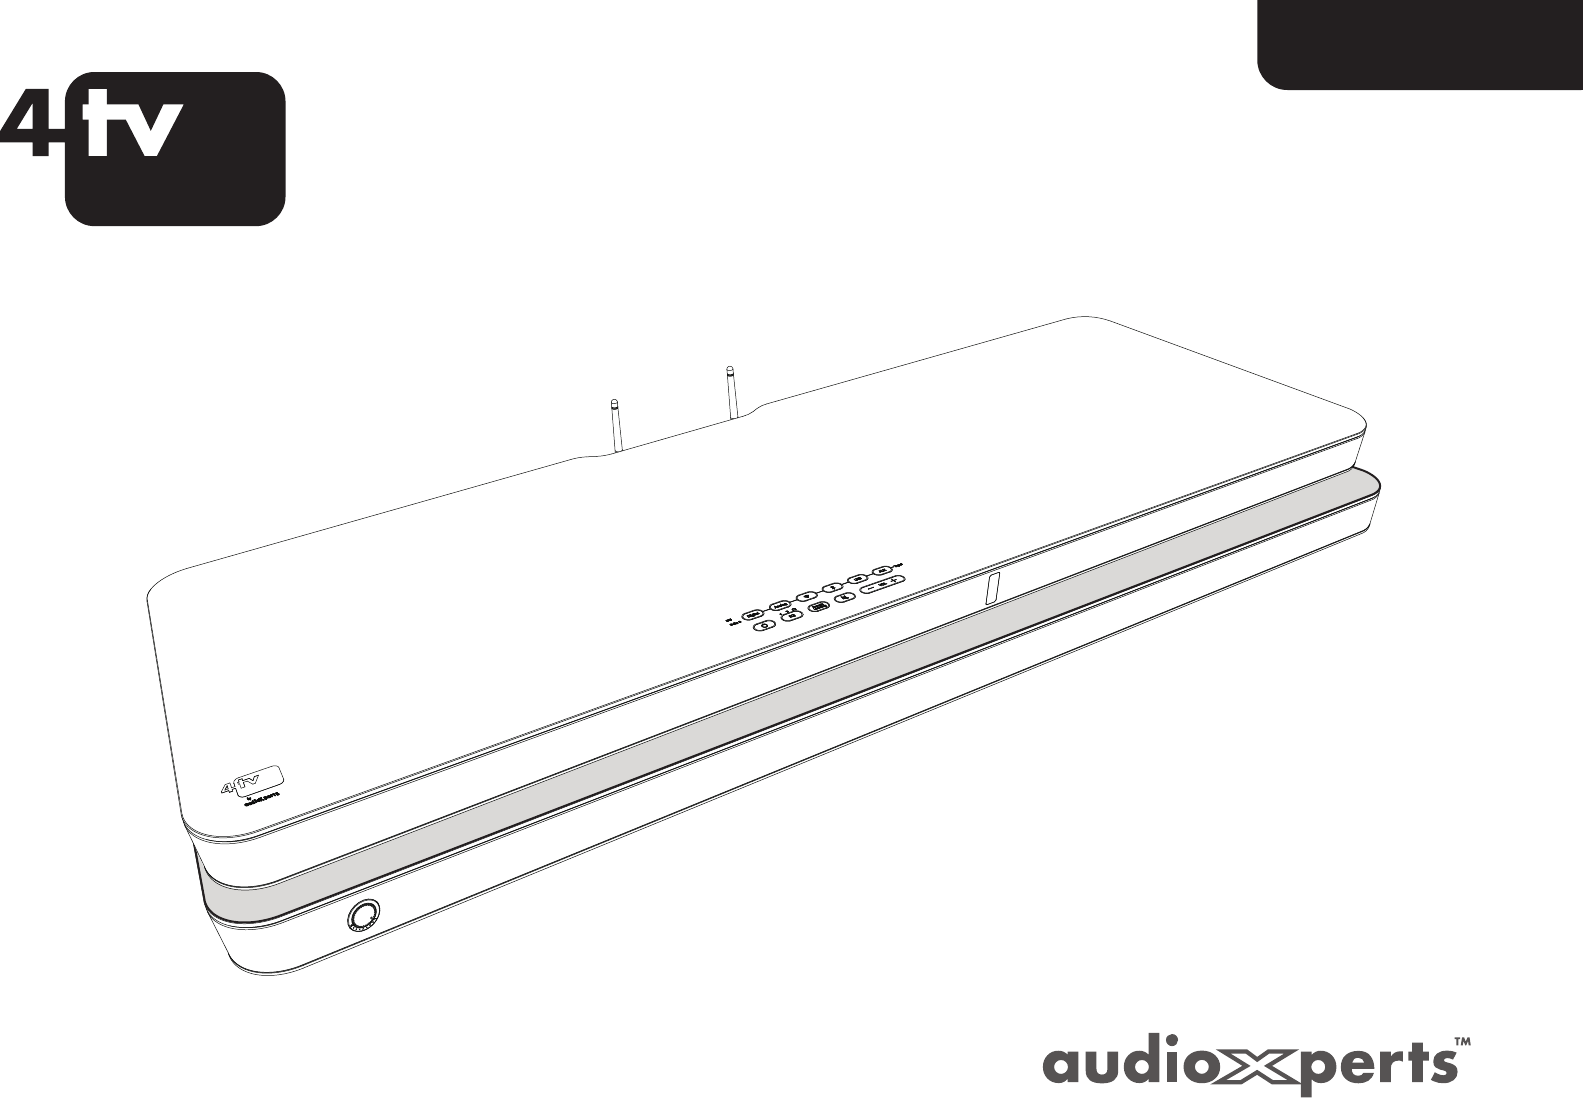
Congratulations!
Thank you for selecting the 4TV 5122 Audio Entertainment
System by AudioXperts. This owner’s manual provides you with
important information on setting up and enjoying your new music
and surround sound system.
Please keep this manual and all packaging materials stored in a
dry place in case you need access to them at a later date.
Key Features:
• Smoked glass and aluminum enclosures.
• Convenient top-mounted touch sensitive controls.
• Dolby Digital and DTS decoding.
• Music, Movie, and Enhanced-Dialogue listening modes.
• Bluetooth® with CSR® aptX® codec for crystal clear, full
bandwidth wireless music streaming.
• LevelCorrect provides listeners with consistent level
while watching TV
• Instant connection for Apple® AirPort Express
• Apple® audio USB input*
• Learns your TV’s remote control.
• Wireless Subwoofer (shown with included feet)
• Console Weight with Swivel Base: 68lbs (30kg)
• Subwoofer Weight with Swivel Base: 69lbs (31kg)
Technical Specications
• 800 W peak/500 W RMS Total System Power
• Three 1” (25mm) fabric dome tweeters for left/center/right
• Six patent-pending H.A.R.T. drivers for left/center/right
• Four patent-pending H.A.R.T. drivers for dipole surround
• Eight 4.5” (114mm) SSHO woofers for powerful
subwoofer performance
• Inputs: Digital Optical (2), COAX (1), Analog RCA (1),1/8”
(3.5mm) Mini-Stereo (1), USB Audio (1)
• Console Dimensions (H x W x D): 2” x 50-1/2” x 17-1/4”
(51 x1283 x 438mm)
• Console Dimensions with Swivel Base (H x W x D): 2-1/4” x
50-1/2” x 17-1/4” (57 x1283 x 438mm)
• Subwoofer Dimensions (H x W x D): 2-1/4” x 50-1/2” x 17-
1/4” (51 x1022 x 438mm)
3
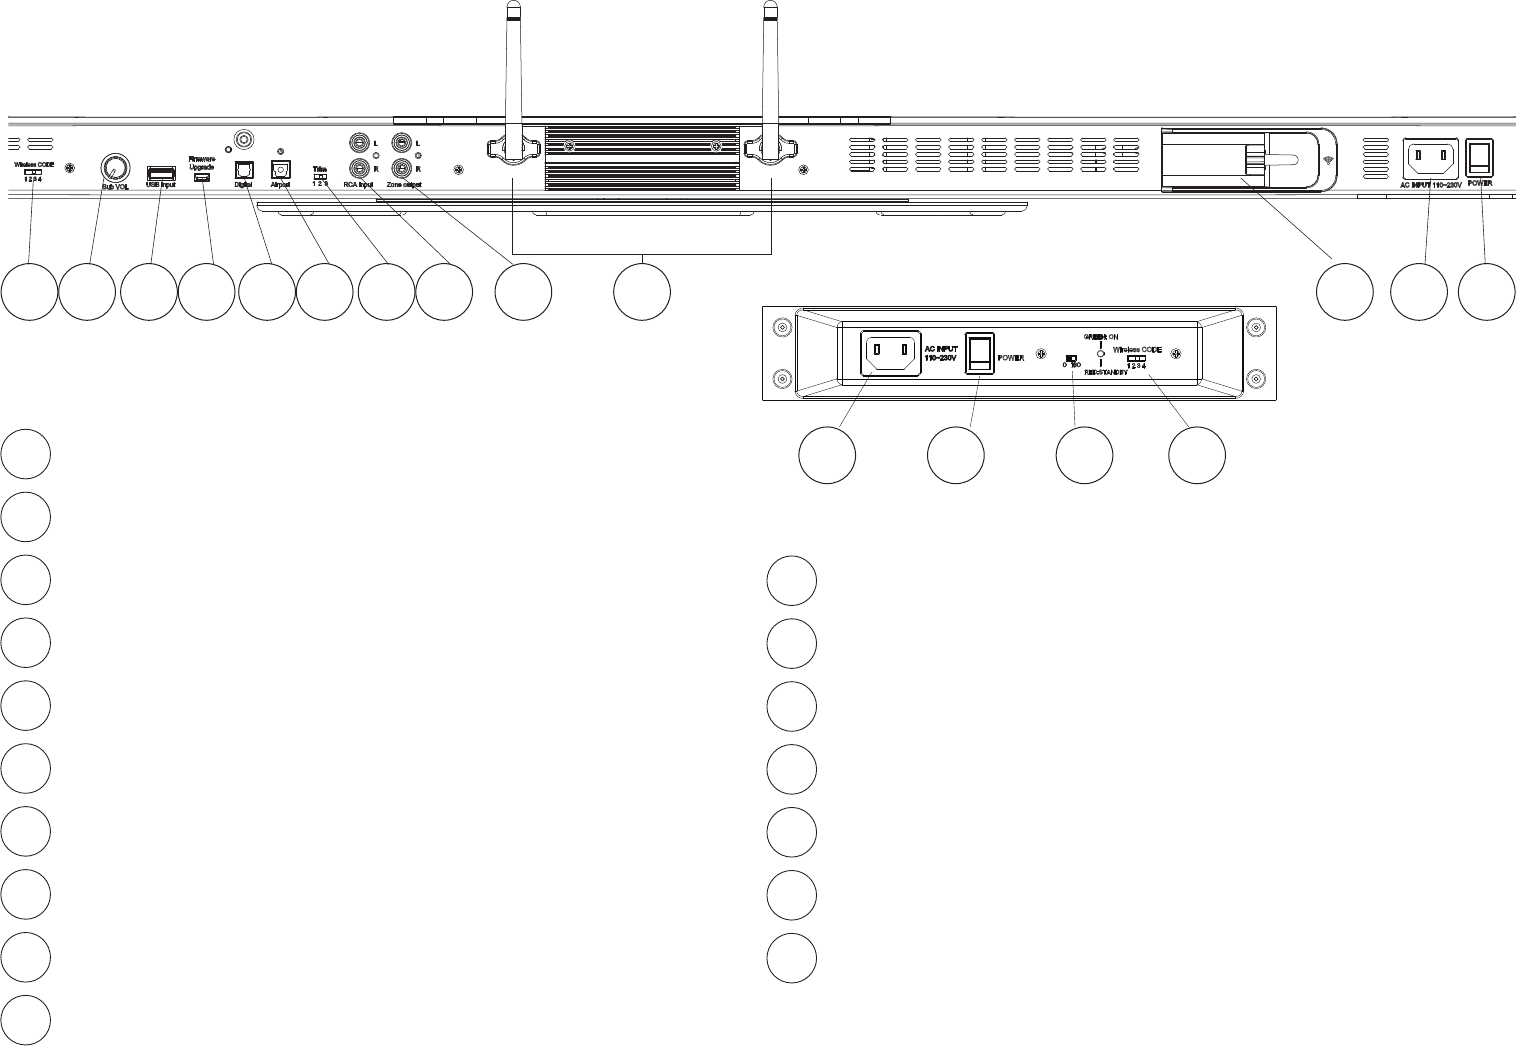
Rear Connection Panel
Wireless CODE - Set to same channel as Sub
Sub Volume - Control subwoofer volume level.
iPod/iPhone/iPad (USB) – Connection of compatible Apple devices.
Firmware – Software upgrades.
Digital - Digital optical and COAX cable input connections
Airport – Audio connection for AirPort Express.
Trim – Adjusts input signal level.
RCA Input – Analog RCA cable input connection.
Zone Output – Audio output for 2nd zone.
Antenna 1 – Antenna for Bluetooth wireless.
Antenna 2 – Antenna for Wireless Sub.
5122 Sub
1
1
2345678910 11 12 13
7
6
5
4
3
2
10
9
8
AirPort Express Connector – Power connection for
the AirPort Express.
AC Input – Connect to wall outlet.
Power Switch – Main system power on and off.
AC Input - Connect to wall outlet
Power Switch - Power on and off
Phase Switch - 0 or 180 degrees
Wireless CODE - Set to same channel as Console
15
14
13
12
11
17
16
5122 Console
14 15 16 17
4
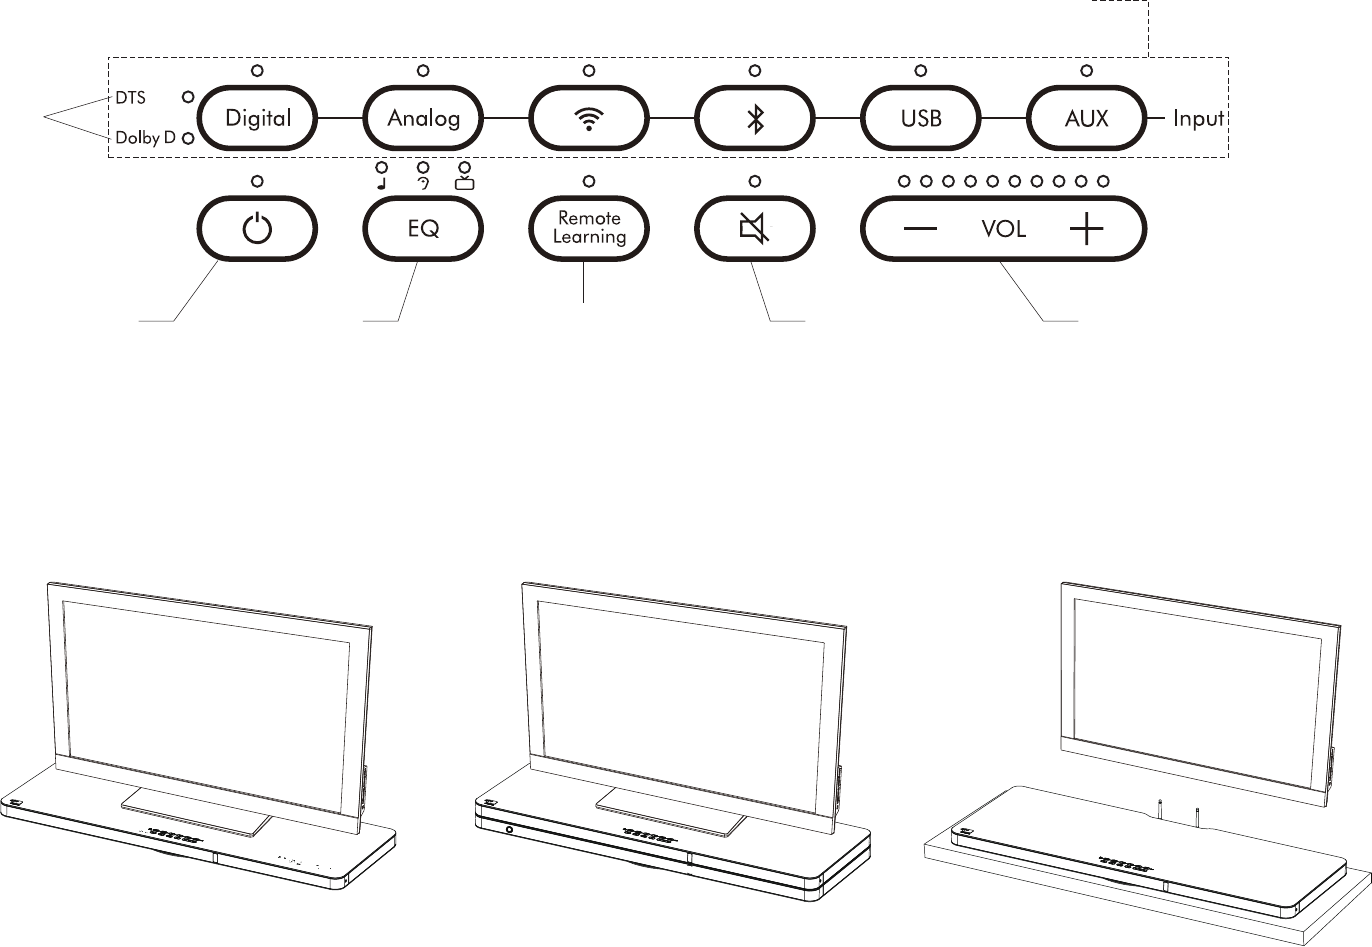
Control Panel
Digital
Format
Selection
Input selection
Power / Standby Power / StandbyMuteEQ Selection
Music
Dialogue
Movies
Remote Learning
Programming
Find a Location
The 4TV Audio Entertainment Console is designed to be placed under your TV or on a shelf below a wall-mounted TV.
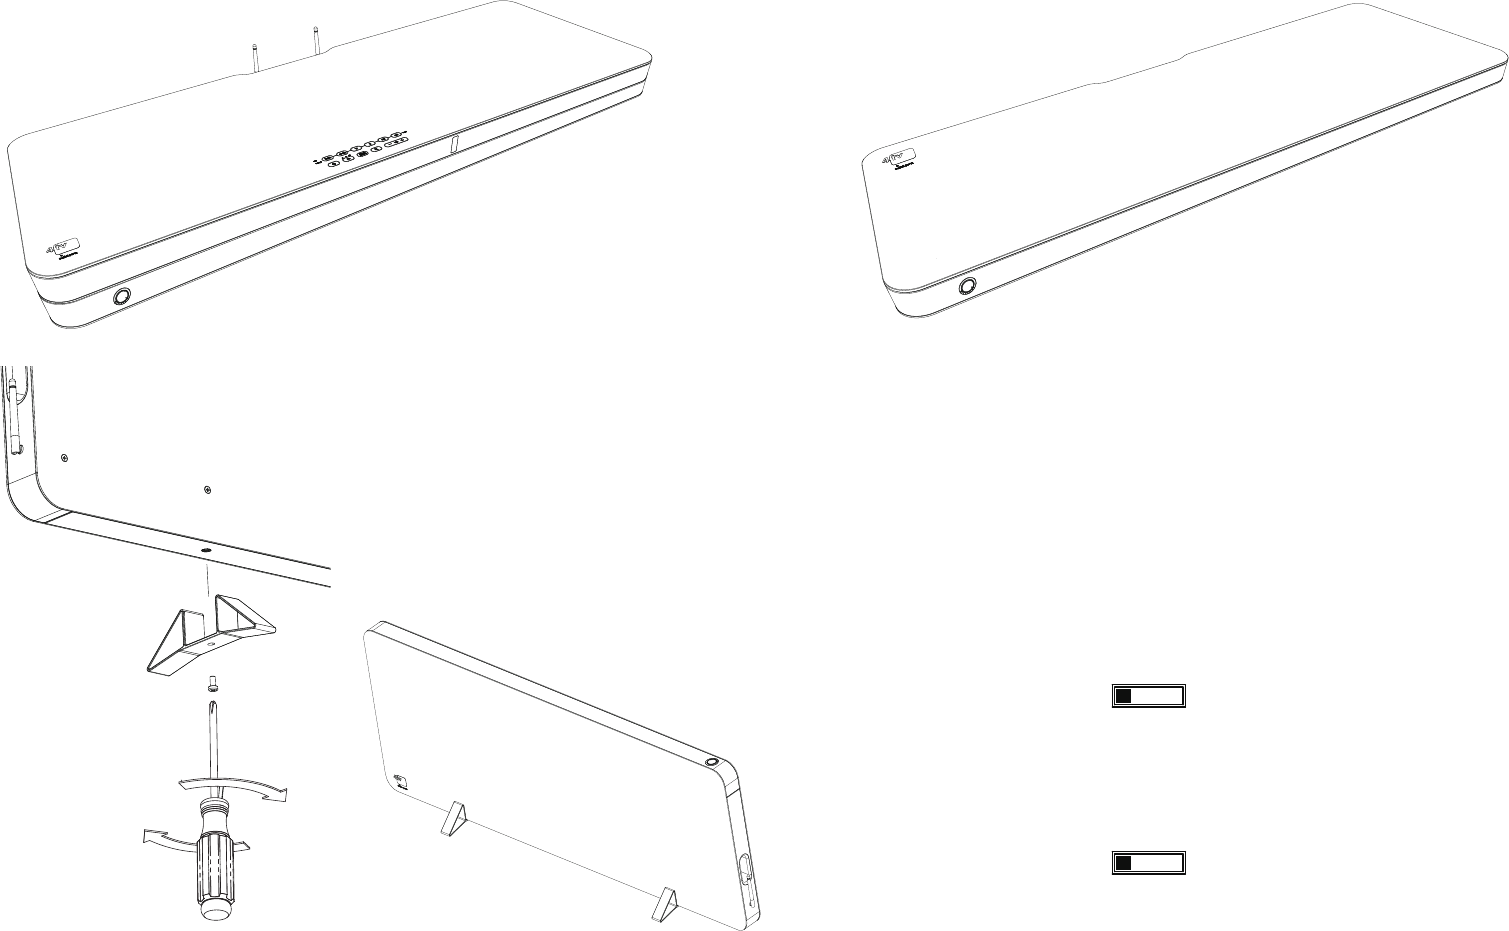
For vertical positioning, attached the
included feet to the subwoofer as shown.
A single screw conveniently fastens
each foot.
Once the feet are attached, the sub can be
placed against a wall or even hidden away
behind a couch.
.
Find a location for the Wireless Subwoofer
In the horizontal position, the wireless subwoofer can be placed directly under the 5122 console or positioned under a couch or other furniture.
Set the Wireless Subwoofer Channel
Set the Wireless Channel Switch on the console and the
subwoofer to the same number. If you receive any interfer-
ence or connection is not made, try setting both units to an
alternate number.
Wireless CODE
1234
Wireless CODE
1234
Console
Sub
5
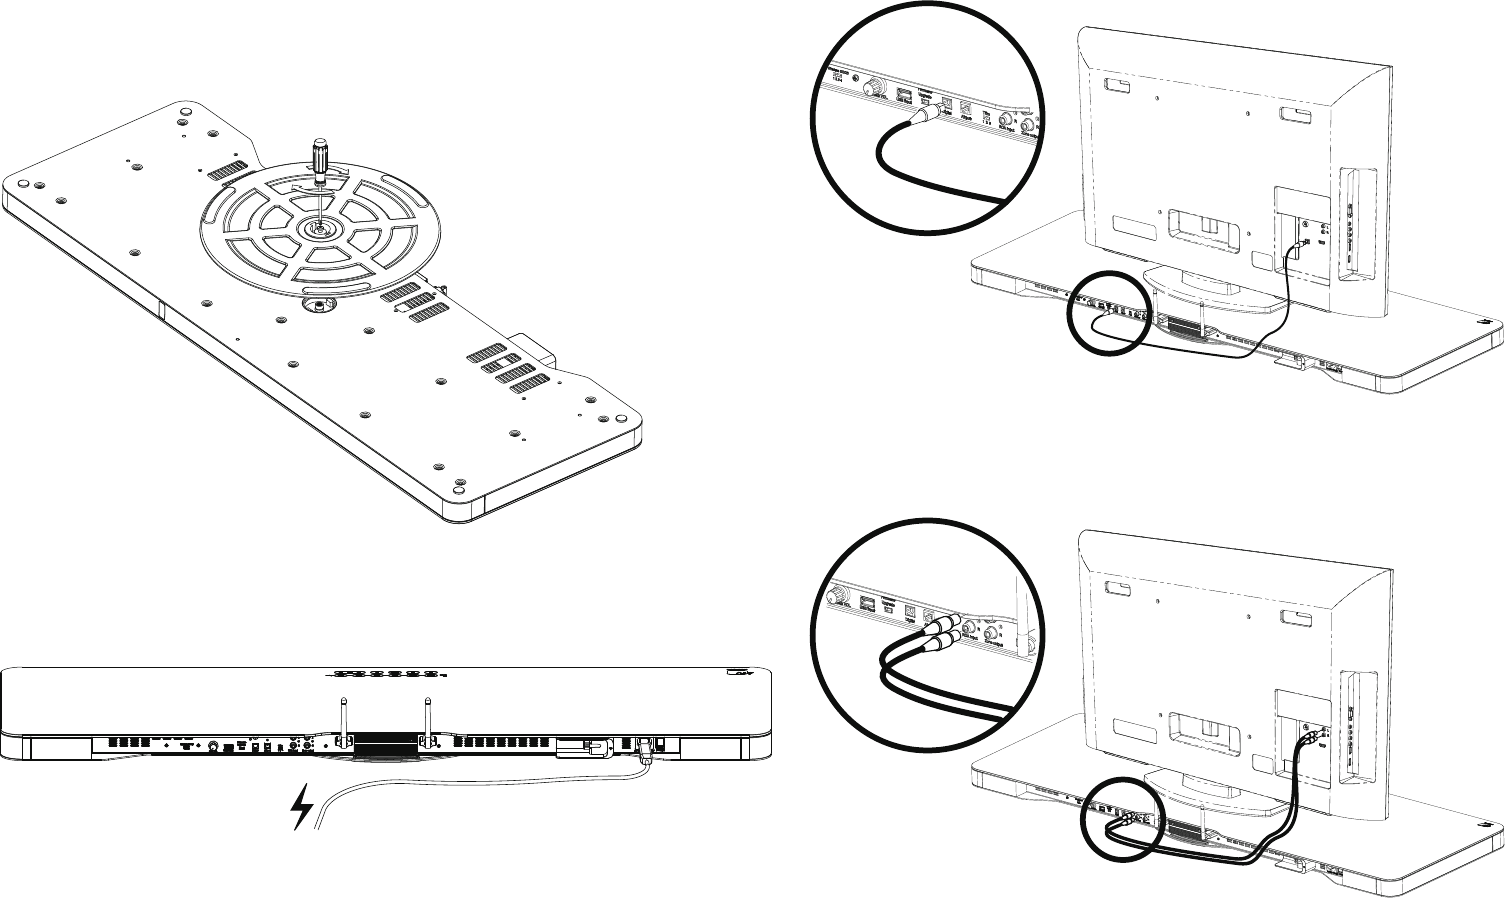
Attach Swivel Base
The included swivel base allows you to angle the 4TV console to
your listening area. If desired, attach the swivel base with the
supplied screw on the bottom of the 4TV console using a Phillips
head screwdriver as shown.
Make your Connections
Power
Connect the included power cord to a nearby power outlet on console
and wireless subwoofer.
Audio
Best Connection: Digital Optical
Good Connection: Analog RCA Connectors
6
Once wire connections are complete, press the Digital or Analog
button on the 4TV control panel to select the correct input.
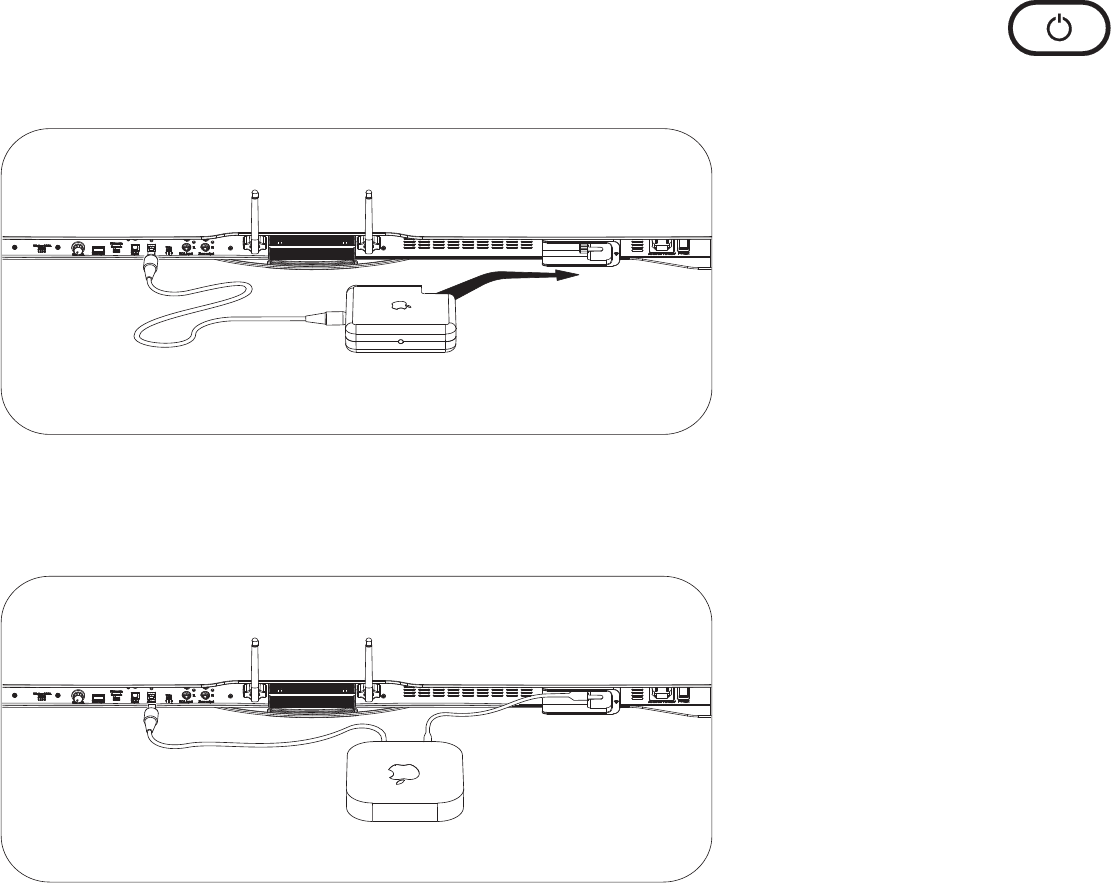
Apple Airport Express (old & new versions)
To connect an original Airport Express to the 4TV, simply slide it
into the Power Port as shown.
To connect the new Airport Express to the 4TV, use the included
power adapter cable as shown.
Once power connection is complete, connect your digital optical
audio cable from the Airport Express to the digital optical input
labeled “Airport”.
Turn on the Console
When the console Power Switch on the rear panel is rst turned
on, press the Power button on the 4TV control panel to turn the
console on. The Power button light will go from red to blue and
the blue control panel status lights will illuminate as well.
After playing the unit, all the LEDs will go out. If no audio signal is
introduced for 10 minutes, the unit goes into a low power sleep
state and the LED comes back on a solid red.
To turn the console on from a solid red state, approach the front
of the console and it will activate the proximity sensor. The solid
red LED will change to slowly blinking red.
Now the Power button can be used to turn on the console. A
remote control may be used to turn the console on at any time.
7
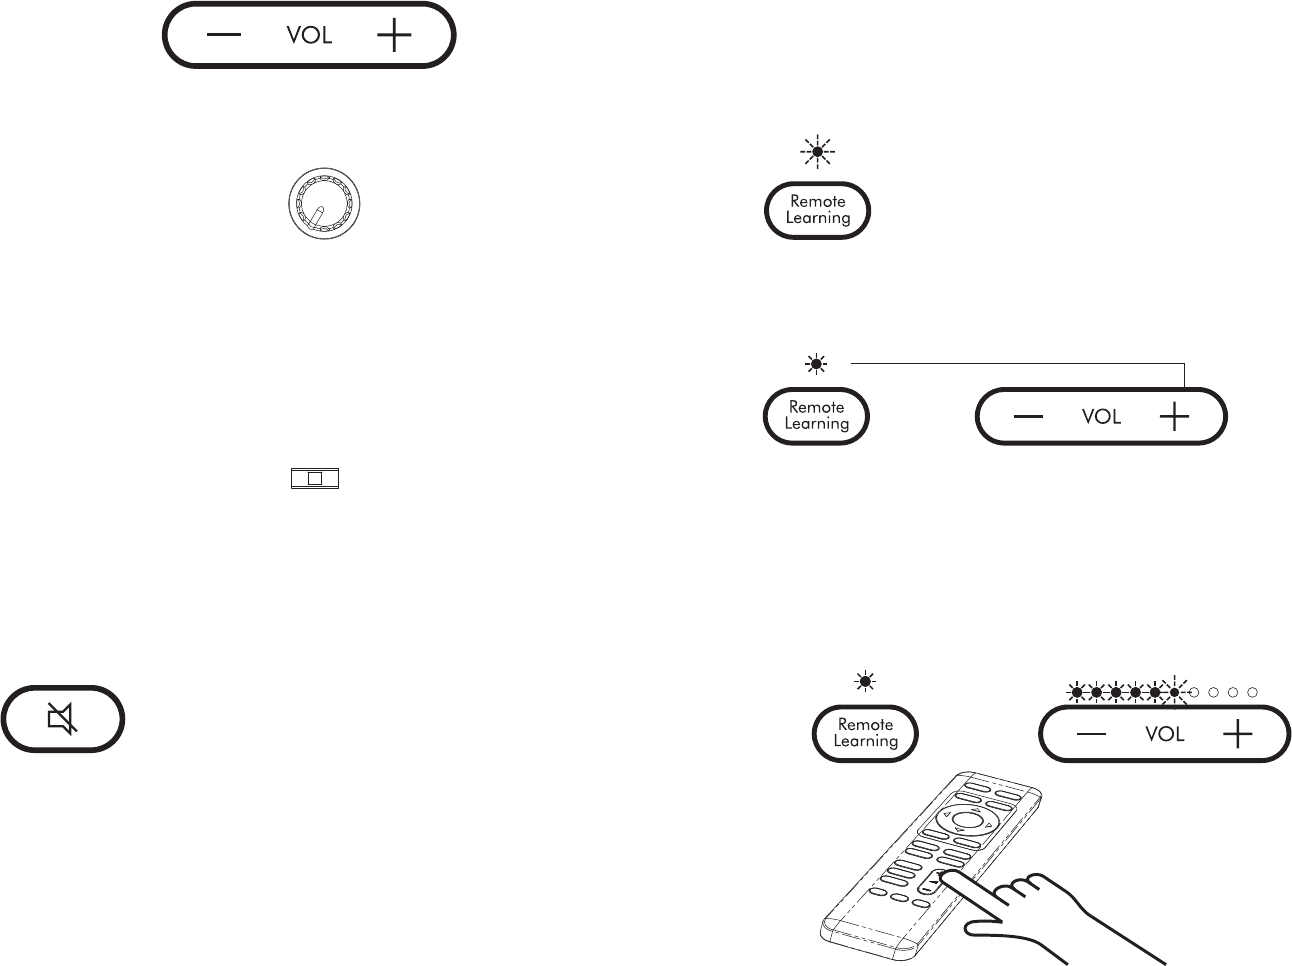
Setting Volume Level
Press the Volume - button to lower the system volume. Press the
Volume + button to make the system volume louder.
Adjusting the Subwoofer Volume
The subwoofer volume level is best set up by turning the volume
control on the subwoofer to about 3/4 full, then adjust with the
console’s rear mounted subwoofer volume knob to the amount of
bass you desire. Bass output may vary due to room environment
and location of the 4TV.
Setting the Trim Switch (Optional)
Use the rear mounted trim switch to adjust the level of input from
your TV or other audio device. Some TVs or devices may have a
weak output signal or the signal strength may be too strong and
can create noise. There are 3 positions on the switch to allow you
to adjust to the optimal setting.
Mute
To mute the system volume, press the “Mute” button on the control
panel.
Program your Remote Control (Program Volume +)
Step 1. Press the Remote Learning button on the 4TV control
panel. The Remote Learning light will turn on and ash.
Step 2. Press the Volume + button on the 4TV control panel to be
learned. The Remote Learning and Volume + buttons will light.
Step 3. While pointing your TV or Cable/Sat remote control to
the 4TV, press the Volume + button on the remote control 4 times
to be learned. The Remote Learning light and the Volume + light
on the 4TV will blink 4 times and then turn off to conrm.
Note: If Remote Learning is not conrmed, lights will blink alternating several times.
8
Trim
1 2 3
Sub VOL
Sub VOL
Trim
1 2 3
Trim
1 2 3
Sub VOL
Trim
1 2 3
Sub VOL
Repeat Steps 1 to 3 to program other remote control functions.
(i.e. Volume Down, Power, and Mute)
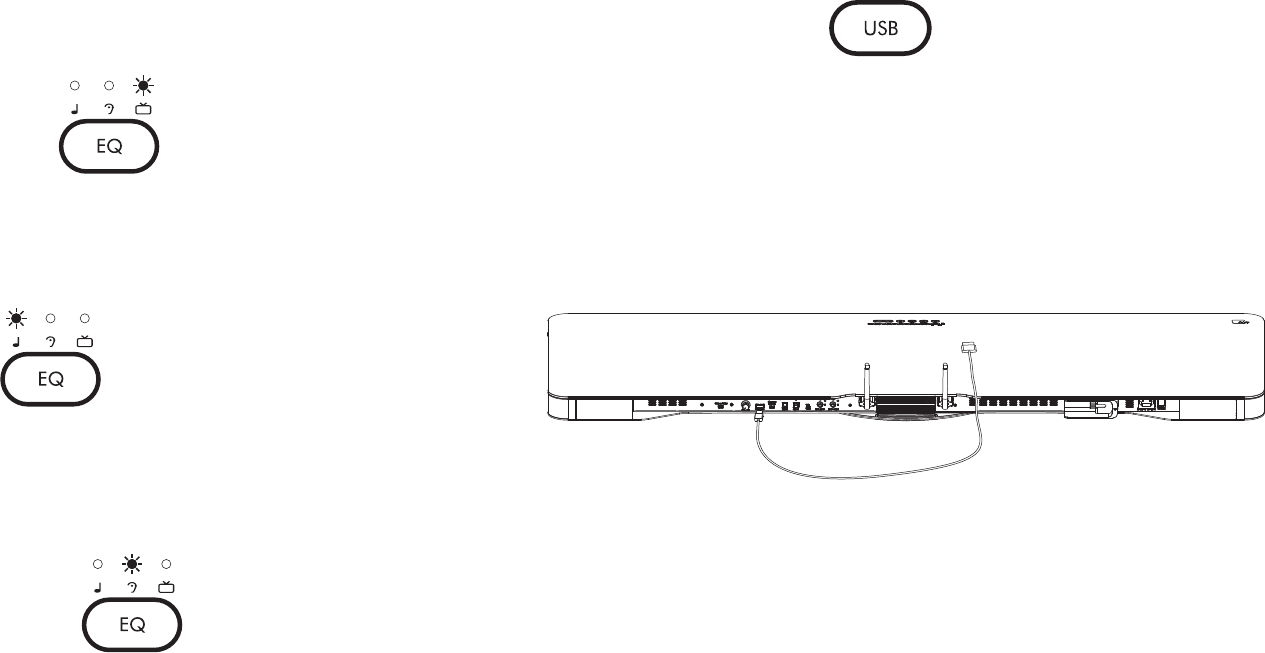
Watching TV or Movies
The 4TV features a Movie Mode for full surround sound
reproduction. To engage the Movie Mode, simply press EQ button
on the control panel until the blue light is over the “TV” icon
Listening to Music
The 4TV features a dedicated music listening mode for true stereo
audio reproduction. To engage the Music Mode, simply press
EQ button on the control panel until the blue light is over the
“Note” icon
Enhanced Dialogue Mode
The 4TV features an Enhanced Dialogue Mode for enhanced
dialogue perception of movie and television sound. To engage the
Enhanced Dialogue Mode, simply press EQ button on the control
panel until the blue light is over the “Ear ” icon.
iPod/iPhone/iPad (USB)
Connect a compatible iPod, iPhone, or iPad to the USB input on
the back input panel of the 4TV. To select this input press the USB
button on the control panel.
Play music on your iPod, iPhone, or iPad.
The USB connector is compatible with the following Apple
products:
Made for:
iPod touch (4th generation)
iPod touch (3rd generation)
iPod touch (2nd generation)
iPod touch (1st generation)
iPod nano (6th generation)
iPhone 4S
iPhone 4
iPhone 3GS
iPhone 3G
iPad (3rd generation)
iPad 2
iPad 8
9