Motorola Solutions 89FT5815 iDEN i88s, i58sr User Manual i58sr
Motorola Solutions, Inc. iDEN i88s, i58sr i58sr
Contents
- 1. Users Manual
- 2. Ex8 User Manual 1 of 2 i58sr
- 3. Ex8 User Manual 2of 2 i58sr
- 4. Ex8 User Manual i88s
- 5. MANUAL 2
- 6. users manual
Ex8 User Manual 1 of 2 i58sr

Motorola
iDEN®
Digital Multi-Service Data-Capable Phone
i58sr Phone User’s Guide
FIRST DRAFT
@NTN9865A@
NTN0000-O

www.motorola.com/iden

FIRST DRAFT 1
Table of Contents
Introduction .......................................................................................... 7
Driving Safety Tips .........................................................................................9
Getting Started.................................................................................... 11
i58sr Phone Features .....................................................................................12
Battery ...........................................................................................................12
Turning Your i58sr Phone On/Off ...............................................................16
Enabling Security ..........................................................................................17
Security Features of the i58sr Phone.............................................................18
Status of Your i58sr Phone ...........................................................................29
My Information .............................................................................................30
Using T9 Text Input ......................................................................................31
Display Essentials ............................................................................... 37
Display Screen Elements...............................................................................37
Navigating Menus and Lists..........................................................................41
Main Menu Options.......................................................................................41
Phonebook ........................................................................................... 45
Accessing Phonebook with an i2000, i2000plus, or GSM Phone.................46
Phonebook Entries and Speed Dial Numbers................................................46
Phonebook Icons ...........................................................................................46
VoiceRecord ..................................................................................................47
Accessing Your Phonebook ..........................................................................48
About Phonebook Entries..............................................................................48
Pause Digit Entry...........................................................................................57
Plus Dialing ...................................................................................................58
Digital Cellular.................................................................................... 59
Making Phone Calls ......................................................................................59

www.motorola.com/iden
2 FIRST DRAFT
Emergency Calling ........................................................................................64
Receiving a Phone Call .................................................................................64
Ending a Phone Call ......................................................................................64
Recent Calls...................................................................................................65
Missed Calls ..................................................................................................69
Call Timers ....................................................................................................69
Call Waiting ..................................................................................................70
Call Hold .......................................................................................................71
Three-Way Calling ........................................................................................72
Call Forwarding.............................................................................................73
Messages .............................................................................................. 79
Message Center .............................................................................................79
Voice Mail .....................................................................................................80
Using Voice Mail ..........................................................................................81
Text and Numeric Messaging........................................................................82
Net Alert ........................................................................................................84
Using Your Phone as a Modem.....................................................................85
Private Calls ........................................................................................ 87
Private Call ....................................................................................................87
Call Alerts......................................................................................................90
Group Call .....................................................................................................94
Datebook.............................................................................................. 99
Datebook Icons............................................................................................100
Viewing Your Datebook .............................................................................100
About Datebook Events...............................................................................102
Adding New Events.....................................................................................103
Editing Events .............................................................................................107
Deleting Events ...........................................................................................107
Datebook Event Reminders.........................................................................108
Customizing Datebook Set Up ....................................................................108

FIRST DRAFT 3
Memo ................................................................................................. 111
Adding a New Memo ..................................................................................111
Viewing a Memo .........................................................................................111
Editing a Memo ...........................................................................................112
Deleting a Memo .........................................................................................112
Java .................................................................................................... 113
Installing Java Applications ........................................................................114
Running Java Applications..........................................................................114
Downloading Java Applications..................................................................115
Java Memory ...............................................................................................115
Deinstalling Java Applications ....................................................................116
Voice Record* ................................................................................... 117
About Voice Record ....................................................................................117
Accessing Voice Record .............................................................................117
Recording a Voice Record ..........................................................................118
Playing a Voice Record ...............................................................................118
Adding to a Voice Record ...........................................................................118
Labeling a Voice Record .............................................................................118
Deleting Voice Record ................................................................................120
Locking/Unlocking a Voice Record............................................................120
Voice Record Memory ................................................................................121
Customizing the i58sr Phone ........................................................... 123
Settings Menu..............................................................................................123
Shortcuts......................................................................................................145
Accessories......................................................................................... 149
Carrying Solutions.......................................................................................149
Batteries.......................................................................................................151
Travel Chargers ...........................................................................................152
Data Accessories .........................................................................................154

www.motorola.com/iden
4 FIRST DRAFT
Other Important Information ......................................................... 159
Understanding Status Messages ..................................................................159
Safety and General Information ..................................................... 161
RF Operational Characteristics ...................................................................161
Portable Radio Product Operation and EME Exposure ..............................161
Electro Magnetic Interference/Compatibility..............................................164
Medical Devices ..........................................................................................164
Operational Warnings..................................................................................166
Operational Cautions ...................................................................................167
Accessory Safety Information .....................................................................169
Limited Warranty Motorola Communication Products...............................171
Limited Warranty Motorola Communication Products (International) ......175
Patent and Trademark Information..............................................................179
Index .................................................................................................. 181

FIRST DRAFT 5
IMPORTANT!
Read “Safety and General Information” on page 171
before using your i58sr phone.

www.motorola.com/iden
6 FIRST DRAFT
DECLARATION OF CONFORMITY
Per FCC CFR 47 Part 2 Section 2.1077(a)
Responsible Party Name: Motorola, Inc.
Address: 8000 West Sunrise Boulevard, Plantation, FL 33328 USA
Phone Number: 1 (800) 453-0920
Hereby declares that the product:
Product Name: i58sr
Model Number: H58XAH6RR7AN
Conforms to the following regulations:
FCC Part 15, subpart B, section 15.107(a), 15.107(d) and section 15.109(a)
Class B Digital Device
Date: July 1, 2002
Note: This equipment has been tested and found to comply with the limits for a Class B digital
device, pursuant to part 15 of the FCC Rules. These limits are designed to provide reasonable
protection against harmful interference in a residential installation. This equipment generates,
uses and can radiate radio frequency energy and, if not installed and used in accordance with the
instructions, may cause harmful interference to radio communications. However, there is no
guarantee that interference will not occur in a particular installation.
If this equipment does cause harmful interference to radio or television reception, which can be
determined by turning the equipment off and on, the user is encouraged to try to correct the
interference by one or more of the following measures:
--Reorient or relocate the receiving antenna.
--Increase the separation between the equipment and receiver.
--Connect the equipment into an outlet on a circuit different from that to which the receiver is
connected
--Consult the dealer or an experienced radio/TV technician for help.

FIRST DRAFT 7
Introduction
ongratulations on purchasing your Motorola iDEN i58sr
multi-service, data-capable, digital, portable phone. Your i58sr
phone offers:
•Phonebook — Your consolidated Phonebook holds up to 250 entries and
allows you to store multiple contact numbers for each person, offering you
various ways to communicate with your business and personal contacts.
•SIM Card — Your phone’s SIM card holds all entries stored in your
Phonebook. In addition, you have a PIN (Personal Identification Number)
to keep your information safe and secure.
•Datebook — Schedule and keep track of appointments using your phone’s
Datebook feature.
•Messages — The Message Center allows you to manage and access your
Voice Mail, Text Messages and Net Alert all from the same inbox.
•Private and Group Calls — You can use your phone as a two-way radio
to communicate directly with business and personal contacts in your iDEN
service area.
•Fax and Data Transfer — for circuit data faxes and file transfers.
•J2METM — With the JavaTM applications feature, you can choose from the
many Java programs. Either download Java applications directly from the
Internet, or try one of the pre-loaded applications.
•Customization — Use the Settings, Shortcuts and, optional features* to
customize your i58sr phone to meet your individual needs.
•Speakerphone* — You can enjoy hands-free communication at the touch
of a button. And Speakerphone is especially great for conference calls.
•Voice Activated Dialing* — Your i58sr phone offers state-of-the-art
Voice Activated Dialing.
*Optional Feature — Please consult your provider for availability of purchase.
For more information on these and other features of the i58sr phone, review this
User’s Guide. There is a Table of Contents in the front of the guide and an Index
in the back of the guide to assist you in finding the specific information you
want.
NOTE: Some features of your i58sr phone are available only in the
iDEN service area, and are indicated as such in this guide.
C

www.motorola.com/iden
8 FIRST DRAFT
NOTE: This guide describes the features of the i58sr phone as they
were set up by Motorola. However, your carrier or your
organization may have changed or added features. For more
information, check with your carrier or your organization.

Driving Safety Tips
FIRST DRAFT 9
Driving Safety Tips
“Safety is your most important call!”
Your Motorola wireless telephone gives you the powerful ability to
communicate by voice — almost anywhere, anytime, wherever wireless phone
service is available and safe conditions allow. But an important responsibility
accompanies that benefits of wireless phones, one that every user must uphold.
When driving a car, driving is your first responsibility. If you find it necessary to
use your wireless phone while behind the wheel of a car, practice good common
sense and remember the following tips:
1. Get to know your Motorola wireless phone and its features such as speed
dial and redial. If available, these features help you to place your call
without taking your attention off the road.
2. When available, use a hands-free device. If possible, add an additional
layer of convenience to your wireless phone with one of the many
Motorola Original hands-free accessories available today.
3. Position your wireless phone within easy reach. Be able to access your
wireless phone without removing your eyes from the road. If you receive
an incoming call at an inconvenient time, if possible, let your voice mail
answer it for you.
4. Let the person you are speaking with know you are driving; if necessary,
suspend the call in heavy traffic or hazardous weather conditions. Rain,
sleet, snow, ice, and even heavy traffic can be hazardous.
5. If you receive an incoming call at an inconvenient time do not take notes or
look up phone numbers while driving. Jotting down a “to do” list or going
through your address book takes attention away from your primary
responsibility — driving safely.
6. Dial sensibly and assess the traffic; if possible, place calls when you are not
moving or before pulling into traffic. Try to plan calls when your car will
be stationary. If you need to make a call while moving, dial only a few
numbers, check the road and your mirrors, then continue.
7. Do not engage in stressful or emotional conversations that may be
distracting. Make people you are talking with aware you are driving and

www.motorola.com/iden
10 FIRST DRAFT
suspend conversations which have the potential to divert your attention
away from the road.
8. Use your wireless phone to call for help. Dial 9-1-1 or other local
emergency number in the case of fire, traffic accident or medical
emergencies.1
9. Use your wireless phone to help others in emergencies. If you see an auto
accident, crime in progress or other serious emergency where lives are in
danger, call 9-1-1 or other local emergency number, as you would want
others to do for you.
10. Call roadside assistance or a special non-emergency wireless assistance
number when necessary. If you see a broken-down vehicle posing no
serious hazard, a broken traffic signal, a minor traffic accident where no
one appears injured, or a vehicle you know to be stolen, call roadside
assistance or other special non-emergency wireless number.1
1. Wherever wireless phone service is available.
FIRST DRAFT 11
Getting Started
This section includes:
i58sr Phone Features Page 12
Battery Page 13
Turning Your i58sr Phone On/Off Page 16
Enabling Security Page 17
Receiving Over-the-Air Programming Page 17
Security Features of the i58sr Phone Page 18
Status of Your i58sr Phone Page 29
My Information Page 30
Using T9 Text Input Page 31
www.motorola.com/iden
12 FIRST DRAFT
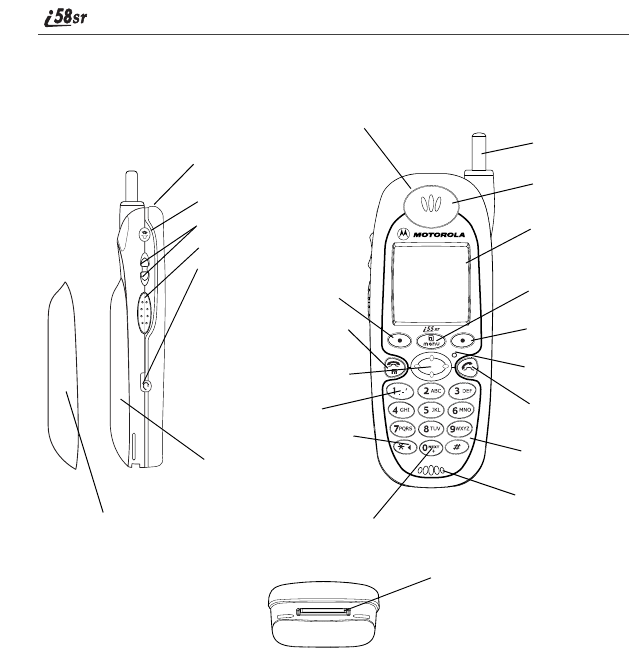
i58sr Phone Features
Antenna
Earpiece
Display
Menu Key
Option Key
Photosensor
Send Key
AlphaNumeric
Keypad
Microphone
Option Key
4-Way Navigation Key
End/Home Key
Punctuation Key
Headset Jack
Back Key/Pause Dialing
Next Word Key/International
Plus Dialing
Accessory Connector
Speaker Key
Volume Control Buttons
Push-To-Talk Button (PTT)
Power Button/Status Light
End/Home Key
SIDE VIEW
FRONT VIEW
BOTTOM VIEW
Overmolded Battery
Cover for High
Performance
Battery
Rubber Overmold
Overmolded Battery Cover
for Maximum Capacity
Battery
Battery
FIRST DRAFT 13
Battery
Your i58sr phone comes with a Lithium Ion battery. After attaching the battery,
you must charge it before you use it for the first time. See “Charging Lithium
Ion Batteries” on page 161 for the charging times for your phone’s battery. The
first time you charge your phone’s battery, charge for 30 minutes more than the
time shown on page 161. After the initial charging, the battery can be charged in
the time shown on page 161.
Remove the battery from the protective plastic safety tray provided in the
original packaging. When the battery is not attached to the phone store it in the
original tray.
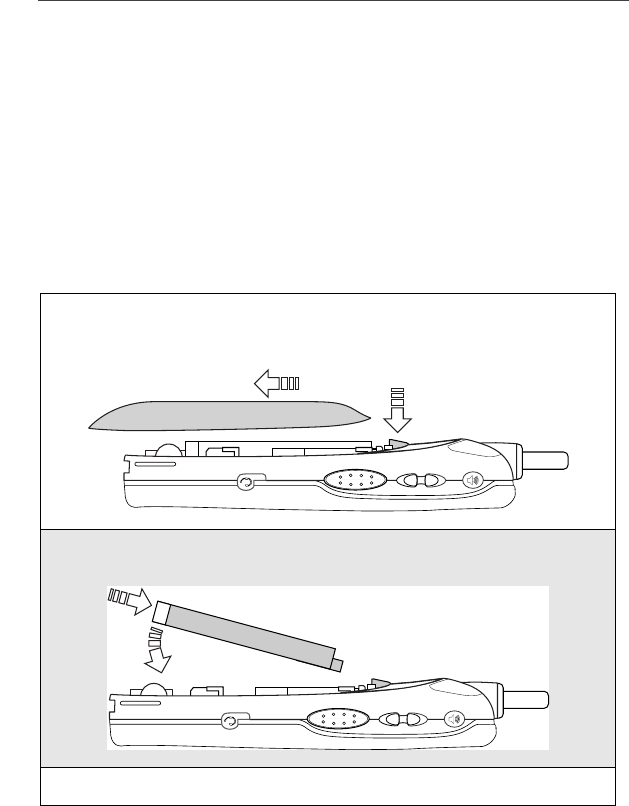
Attaching the Battery
1
Remove the battery cover located on the back of the phone by pressing
the battery cover release button and sliding the battery cover away from
the antenna.
2
Insert the top of the battery into the battery area. Press down on the
bottom of the battery to secure it.
3
Replace the battery cover and push forward until you hear a click.
www.motorola.com/iden
14 FIRST DRAFT
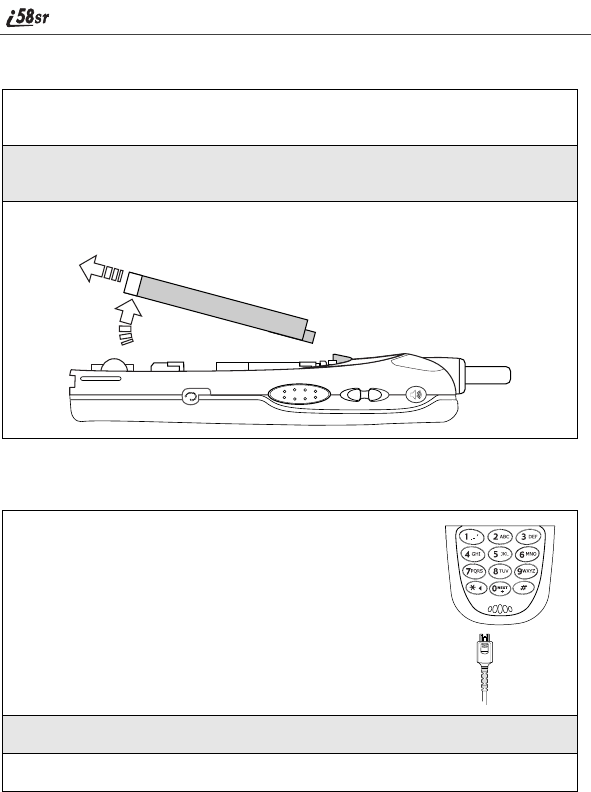
Detaching the Battery
Charging the Battery
Your phone’s screen backlight will remain lit while the battery is charging.
1
Ensure that the phone is powered off before attempting to detach the
battery.
2
Press the battery cover release button and slide the battery cover away
from the antenna.
3
Remove the battery by pushing the battery toward the antenna and
lifting it out of the phone.
1
With your phone’s keypad facing up, plug the
charger’s accessory connector into the left side of
the accessory connector on the bottom of the phone.
2
If the charger has folding electrical prongs, flip open the prongs.
3
Plug the charger into an electrical outlet.

Battery
FIRST DRAFT 15
Battery Charging Status
The battery strength indicator icon found on your phone’s display screen shows
the charge amount remaining in the battery.
When Using Phone
A short, chirp-like sound indicates a low battery. The icon flashes to indicate
that you have approximately five minutes of talk time remaining.
When Charging Battery
Icon
Display abcd
Battery
Strength
Low
Battery
11% to
40%
41% to
70%
Fully
Charged
Icon
Display efgd
1 flashing bar 1 flashing bar,
1 continuous bar
1 flashing bar,
2 continuous bars
3 continuous bars
Battery
Strength
Low
Battery
31% to
60%
61% to
90%
Fully
Charged
www.motorola.com/iden
16 FIRST DRAFT
Turning Your i58sr Phone On/Off
To power the phone on:
To power the phone off:
1
For optimal signal strength, extend the antenna.
2
Press and hold p at the top of the phone until the status light glows red
and a tone briefly sounds.
3
When the Enter SIM PIN Code screen displays, enter your SIM PIN.
(For more information see “SIM Card Personal Identification Number
(PIN)” on page 18.)
NOTE: The default SIM card PIN is 0000. It is recommended that you
change your PIN to prevent fraudulent use of the SIM card
(see “Changing the PIN” on page 20).
4
Press B under OK.
As your phone connects to the network,
you will see a welcome message and a
connecting message. When the Ready
screen appears on the display, you are
ready to use your i58sr phone!
1
Press and hold p on the top of the phone until you see the message
Powering Off.
2
Push down the antenna.
A
Enabling Security
FIRST DRAFT 17
Enabling Security
To utilize browser functionality from your service provider, you must enable
security the first time you power on your phone or within 20 days of first
activation of your phone.
Receiving Over-the-Air Programming
If you have been set up to receive Over-the-Air Programming by your service
provider, you will receive your Private ID and Talkgroup lists for Private Call
use, and your Personal Telephone Number via a Net Alert message.
In order to receive your programming, you must have enabled security. Within
24 hours of enabling security, you will receive a Net Alert message containing
your lists.
To accept your phone programming:
1
When you power on your phone for the
first time, after the Ready screen appears,
you will be prompted to select OK to
update your browser info.
NOTE: If you press A under LATER,
you will be prompted to enable
security each time you power on
your phone until you press A
under OK. It is recommended
that you do not choose LATER.
2
Press A under OK.
3
You are prompted to enable security. Press A under YES. A series of
screens display. If you subscribe to your service provider plan, your
home page displays.
4
Press e to return to the Ready screen.
1
You will receive a Net Alert with the message New Browser Message –
Receive Programming Info.
2
Press A under GOTO.
a
www.motorola.com/iden
18 FIRST DRAFT
Security Features of the i58sr Phone
The i58sr phone comes with two levels of security protection:
• SIM Card
• Keypad Lock
Your phone comes with a built-in level of security protection through the use of
the SIM (Subscriber Identity Module) card. The SIM card stores all your
Phonebook information. Since this information is stored on the SIM card, not in
your phone itself, you can remove the information by removing the SIM card.
The SIM card is located in the SIM Card Holder on the back of the phone,
underneath the battery. You can verify that the SIM card is in place by removing
the battery and viewing the SIM card through the SIM card cover.
See “Removing/Inserting the SIM Card” on page 23 for information on locating
the SIM card. If there is no SIM card in your phone, notify your sales
representative.
NOTE: Except for making emergency calls, your phone will not
function without the SIM card.
SIM Card Personal Identification Number (PIN)
To prevent unauthorized use of your phone, your SIM card is protected by a
PIN. Each time the phone is powered on, you must enter your PIN. You can
change or disable your PIN if desired.
NOTE: Disabling your PIN enables anyone to use your phone. If you
disable your PIN, you must still keep the SIM card in the phone
to make calls.
3
You are prompted to accept changes to your phonebook. Press A
under OK.
4
A confirmation screen displays. Press A under OK.
5
You are prompted again to accept changes to your phonebook. Press A
under OK.
6
A confirmation screen displays. Press A under OK.
7
Press e to return to the idle screen.
Security Features of the i58sr Phone
FIRST DRAFT 19
Entering the SIM PIN
Depending on your Service Provider, your phone
may or may not require you to enter a SIM PIN
when you first use your phone.
If your phone is required to enter a PIN, your
default SIM card PIN is 0000. It is recommended
that you change your PIN to prevent fraudulent
use of the SIM card (see “Changing the PIN” on
page 20).
If you enter an incorrect PIN, the message SIM PIN incorrect: Try again
appears on your phone’s screen. After three consecutive incorrect attempts, the
SIM card is blocked. The phone does not allow you to attempt to enter your PIN
again, even after powering the phone off and back on. If this happens, see
“Unblocking the SIM PIN” on page 21.
IMPORTANT: Incorrectly entering your PIN three times
causes the SIM card to be blocked. To
unblock your SIM card, you must contact
your service provider. For more information,
see “Unblocking the PIN” on page 21
1
From the Enter SIM PIN screen, enter your four- to eight-digit PIN.
An asterisk appears for each character entered.
NOTE: Other than emergency dialing, you will be unable to use any
of the phone functions, including receiving phone calls, until
you enter the PIN.
2
Press B under OK.
P
www.motorola.com/iden
20 FIRST DRAFT
Changing the PIN
1
At the Ready screen, press m and then
press R to scroll to Settings.
2
Press B under SELECT. The Settings screen displays.
3
Press R to scroll to Security. Press B
under SELECT to access the Security
screen.
4
At the Security screen, press R to scroll to New Passwords. Press B
under SELECT to access the New Passwords screen.
5
At the New Passwords screen, press R to scroll to SIM PIN and press
B under SELECT.
6
At the Enter Old SIM PIN Code screen, enter the current SIM PIN
and press B under OK.
7
At the Enter New SIM PIN Code screen, enter the new 4- to 8-digit
SIM PIN and press B under OK.
8
At the Re-enter New SIM PIN Code screen, re-enter the new SIM PIN
to confirm, and press B under OK.
B
C
Security Features of the i58sr Phone
FIRST DRAFT 21
Unblocking the SIM PIN
If you forget your PIN and unsuccessfully enter it three times, access to your
phone will be blocked.
NOTE: Before you begin, obtain the PIN Unblocking Key (PUK) code
from your service provider, then read and understand the PIN
unblocking sequence. In entering the key press sequence, each
key press must occur within 5 seconds of the prior key press.
To unblock the PIN:
IMPORTANT: If you unsuccessfully enter the PUK code
ten times, the SIM card is permanently
blocked and must be replaced. If this
happens, all data will be lost. You will get a
message to contact your service
provider.Call Nextel Customer Care for
assistance. If the SIM card is blocked, the
i58sr phone only allows outgoing
Emergency calls.
1
Press **05s.
2
Enter the PUK code.
3
Press s.
4
Enter a new 4- to 8-digit SIM PIN and press s.
5
Re-enter your SIM PIN and press s.
If you entered the codes properly, the SIM Unlocked screen displays.

www.motorola.com/iden
22 FIRST DRAFT
Disabling/Enabling the PIN Requirement
When the PIN requirement is enabled, you are
prompted to enter your PIN each time you turn
on your phone. Until a valid PIN is entered, you
can use the phone only to make emergency calls.
After the PIN is accepted, the phone registers on
the network and the Ready screen displays.
When the PIN requirement is disabled, the phone
can be used without entering a PIN.
NOTE: If you disable the PIN requirement,
you remove protection of personal
data on your SIM card. Anyone
can then use your phone and
access your personal data.
1
At the Ready screen, press mand then
press R to scroll to Settings.
2
Press B under SELECT. The Settings screen displays.
P
B
Security Features of the i58sr Phone
FIRST DRAFT 23
Removing/Inserting the SIM Card
NOTE: To avoid loss or damage, do not remove your SIM card unless
absolutely necessary.
3
Press R to scroll to Security. Press B
under SELECT to access the Security
screen.
4
At the Security screen, press R to scroll to SIM PIN. Press B under
SELECT to access the SIM PIN screen.
5
Press R to scroll to On or Off. On enables the SIM PIN requirement;
Off disables the SIM PIN requirement. Press B under SELECT.
6
At the Verify SIM PIN Code screen, enter the current SIM PIN and
press B under OK.
IMPORTANT: If you remove your SIM card and insert
another SIM card into your phone, the
following information is erased when you
use the phone with the new SIM card:
Datebook events, the Recent Call list, Voice
Record, voice names for Phonebook entries
and shortcuts, call forwarding settings, call
filtering settings in styles, Net Alert alerts,
and information stored in memo.
C
www.motorola.com/iden
24 FIRST DRAFT
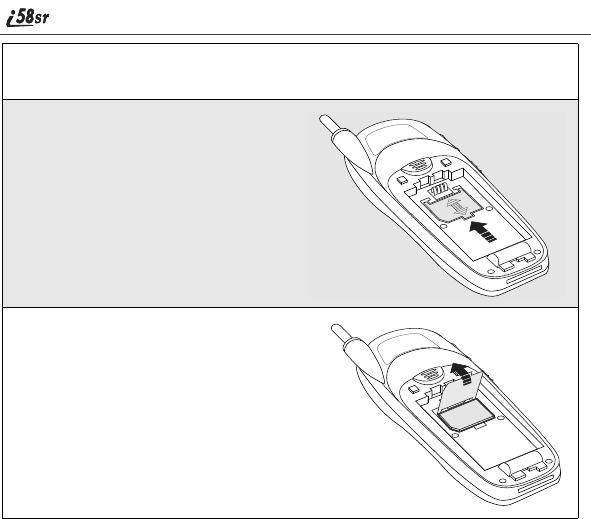
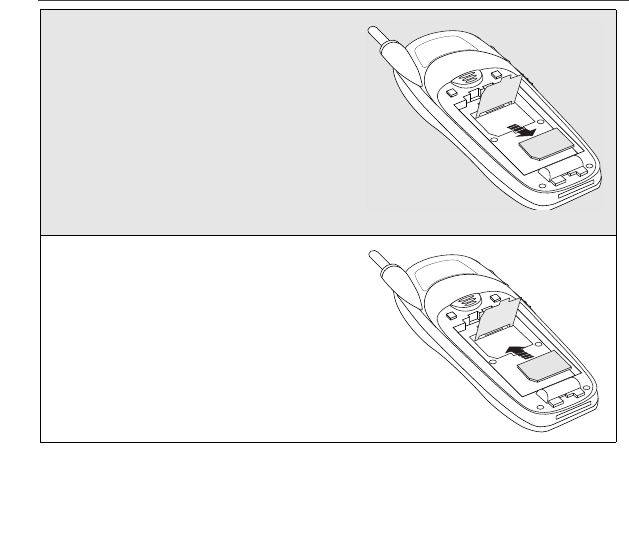
1
With phone powered off, remove the battery cover and battery. See
“Detaching the Battery” on page 14.
2
With the antenna facing away
from you, and the back of the
phone exposed and facing up,
locate the SIM cover and gently
push it forward.
3
Lift the SIM cover up.
000800137866150
Security Features of the i58sr Phone
FIRST DRAFT 25
Keypad Lock
The i58sr phone includes a Keypad Lock feature that enables you to quickly
lock the phone’s keypad to avoid inadvertently pressing keys or placing calls.
Once Keypad Lock is activated, you can only perform the following tasks:
• Turn your phone on and off
• Unlock the keypad
• Receive incoming calls, messages, and alerts.
NOTE: Emergency calls cannot be placed while Keypad Lock is
activated.
Before locking your phone’s keypad, you may want to read this entire section to
learn how to respond to incoming calls, messages, and alerts.
4
To remove the SIM card, very
carefully lift it out of its holder. Do
not touch the gold-colored areas of
the SIM card.
NOTE: Protect the SIM card as you
would any delicate object.
When the SIM card is not in
the phone, you should
store it in something
protective, such as a
mailing envelope.
5
To insert the SIM card, very
carefully place it in its holder with
the gold contact side facing down
and the cut corner on the card
properly aligned with the cut corner
of the holder.
Close the SIM card cover and slide
it down until you hear a click.
000800137866150
000800137866150

www.motorola.com/iden
26 FIRST DRAFT
Activating Keypad Lock
Whenever a key is pressed while in Keypad Lock mode, the unlock instructions
display briefly.
Receiving Incoming Calls
When you receive an incoming phone call (see “Receiving a Phone Call” on
page 64), Keypad Lock is temporarily disabled.
From the Ready screen, press m then
*. The message Keypad Locked
displays on your phone.
1
Press B under YES or press s to answer the call.
Or,
Press A under NO or press e to send the call to Voice Mail and
reactivate Keypad Lock.
2
When you end the call, the Recent Calls list appears. Press e to
reactivate Keypad Lock and return to the Ready screen.
D

Security Features of the i58sr Phone
FIRST DRAFT 27
Receiving Private Calls
When you receive an incoming Private call, Talkgroup call, or call alert (see
“Private Call” on page 91), Keypad Lock is temporarily disabled.
Receiving New Voice Mail
When you receive new Voice Mail (see “Voice Mail” on page 84), Keypad
Lock is temporarily disabled.
1
Press and hold the Push-To-Talk (PTT) button on the side of the phone.
Begin talking after the phone emits a chirping sound. Release the PTT
button to listen.
2
When you end the call, the Recent Calls list appears. Press e to
reactivate Keypad Lock and return to the Ready screen.
1
When New Voice Mail Message displays, press A under EXIT to
return to the Ready screen and reactivate Keypad Lock.
Or,
Press B under CALL to access Voice Mail.
2
Once you have finished, press e to exit Voice Mail. The Recent Calls
list displays. Press e to reactivate Keypad Lock and return to the
Ready screen.

www.motorola.com/iden
28 FIRST DRAFT
Receiving New Text Messages
When you receive new Text Messages (see “Text and Numeric Messaging” on
page 86), Keypad Lock is temporarily disabled.
Receiving New Net Alert
When you receive new Net Alert, Keypad Lock is temporarily disabled.
1
When New Text Message displays, press A under EXIT to return to
the Ready screen and reactivate Keypad Lock.
Or,
Press B under READ to read the message. Press B under SAVE or
DELETE.
2
Once you have finished, press A under EXIT to reactivate Keypad
Lock return to the Ready screen.
1
When New Browser Message displays, press A under EXIT to return
to the Ready screen and reactivate Keypad Lock.
Or,
Press B under GOTO. Press A under View. Press A under OK or
Reply.
2
Once you have finished, press e until you reactivate Keypad Lock
return to the Ready screen.
Status of Your i58sr Phone
FIRST DRAFT 29
Deactivating Keypad Lock
Status of Your i58sr Phone
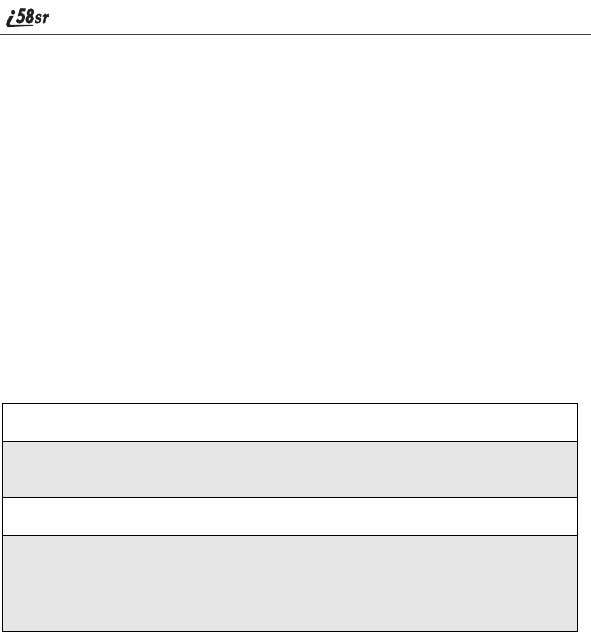
Your i58sr phone has a status light that displays around the power button. The
status light indicates the status of your connection.
From the Ready screen, press m then
*. The message Keypad Unlocked
displays briefly.
Status Light
Indicator
i58sr Phone Status
Flashing Red Signing on to the network. Please wait.
Solid Red No service or out of coverage area.
Flashing
Green
In service/Ready to use.
Solid Green In use.
E
www.motorola.com/iden
30 FIRST DRAFT
My Information
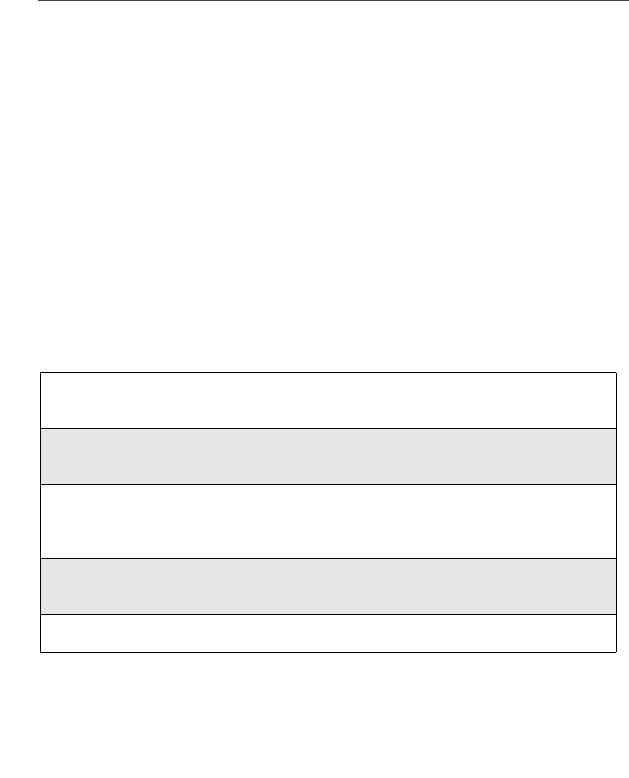
You can select My Info from the main menu to display or edit the following:
• Name — enter your name in this field.
• Private ID — your Private ID is displayed in this field. Your Private ID is
the number that others use to contact you using Private calls.
• Phone Numbers of Lines 1 and 2 — your phone’s numbers are displayed in
these fields. You can edit the phone numbers displayed on the My
Information screen, but this does not change your phone numbers.
• Carrier IP — This field displays your phone’s carrier assigned IP address.
• IP Addresses — these fields display the IP addresses you use to access the
Internet with your phone.
• Circuit Data Number (Ckt) — your circuit data number is in this field.
Viewing/Editing My Information
1
From the Ready screen, press m.
2
Press R to scroll to My Info. Press B under SELECT. The My
Information screen displays.
3
Use S to scroll through the fields.
4
To edit the displayed information, press B under CHANGE. Edit
information as desired, and press B under OK to save the changes.
To return to the Ready screen, press A under EXIT.
Using T9 Text Input
FIRST DRAFT 31
Using T9 Text Input
Your i58sr phone has embedded software, called T9® Text Input, that makes
typing on a phone keypad much like typing on a computer keyboard: it
eliminates the traditional “multi-tap” method of text entry. As you type, you
press only one key per letter. T9 Text Input matches your keystrokes to words in
its linguistic database of approximately 60,000 words and proper names. You
may also store additional words you frequently use in your own user database,
which is incorporated into the T9 database.
T9 Text Input is available when you are typing information into your
Phonebook and Datebook.
T9 Text Input Entry Modes
Four text entry modes are available in T9 Text Input: Alpha, Word, Symbols,
and Numeric. When you are using T9 Text Input, an icon in the top right corner
of your phone’s display screen (next to the battery strength indicator icon)
indicates the T9 Text Input entry mode you are using:
Choosing a Text Entry Mode
When you are using Phonebook or Datebook, you select your text entry mode
from a menu available whenever the phone is displaying a screen that requires
you to enter text (for example, the Name screen or Title screen).
Icon T9 Entry Mode
Name
Used For...
wAlpha Standard “multi-tap” keypad
text entry.
#Word Entering words and
punctuation with one key-
press per character.
!Symbols Entering punctuation and
symbols such as “@” or “?”.
,Numeric Entering keypad numbers.
www.motorola.com/iden
32 FIRST DRAFT
To choose a text entry mode:
Using Alpha Mode
To enter text while in Alpha text entry mode to enter letters, numbers, and
symbols:
• Press any button on the alphanumeric keypad to enter the letters, numbers,
and symbols on that key.
• Type a letter then press Q to activate Caps Lock or type a letter then press
R to deactivate Caps Lock.
• Pause briefly to leave the currently displayed character in place and move
on to the next place in the text entry field.
•Press P to create a space in the text entry field.
•Press A under DELETE to delete one character. Press and hold A under
DELETE to delete an entire entry.
Using Word Mode
In Word mode, T9 Text Input analyzes the letters on the keypad button you
press and arranges them to create words. As you type, T9 Text Input matches
your keystrokes to words in its database and will display the most commonly
used matching word.
1
From any screen that requires text input, press m to access the Entry
Method menu.
A check mark appears next to the current text entry mode. When you
access a screen that requires text input, the default text entry mode is
Alpha.
2
Press S to highlight the T9 Text Input text entry mode you want to use.
3
Press B under SELECT.
The phone returns to the text entry screen. The text entry mode you
selected is now active.

Using T9 Text Input
FIRST DRAFT 33
Special Key Functions
Some of your phone’s keys assume different functions while in T9 Text Input
Word mode.
Backspace and Erase
Press A under DELETE once to backspace or to erase a single character. Press
and hold A under DELETE to erase the entire text entry field.
Space
Press R once to accept a word and insert a space when entering text.
Next Word in Database
Press 0 to display more words in the database that match the keystroke
sequence you entered.
Shift and Caps Lock
Press # to make the next letter typed uppercase (Shift), to make all subsequent
letters types uppercase (Caps Lock), or to go back to lowercase letters.
These icons appear in the top row of your display screen:
•$ for Shift to uppercase
•x for Caps Lock
When neither of these icons appear, letters typed are lowercase.
NOTE: T9 Text Input automatically makes the first letter of a sentence
uppercase.
Punctuation
In Word mode, T9 Text Input uses Smart Punctuation to quickly apply basic
rules of grammar to insert the correct punctuation within a word and at the end
of a sentence.
Press 1 to insert punctuation. One of eight basic punctuation symbols will be
inserted (. , - ’ @ : ? ;).
Press 0 to change the inserted punctuation symbol to another of the eight basic
punctuation symbols.
Press R to accept the punctuation and continue typing.
NOTE: Additional punctuation symbols are available in Symbols mode.
www.motorola.com/iden
34 FIRST DRAFT
Enter a Word
To enter a word using Word mode:
Adding Words to the User Database
To add words to the T9 database:
NOTE: You cannot store alphanumeric combinations, such as Y2K.
1
Choose Word as your text entry mode.
2
Type a word by using one key-press per desired letter.
For example, to type “test” press 8378.
The displayed word may change as you type it. Do not try to correct the
word as you go. Type to the end of the word before editing.
3
If the word that appears is not the desired word, press 0 to change the
word on the display to the next most likely word in the database.
Repeat until the desired word appears.
If the desired word does not appear, you can add it to the database of
words using the instructions in “Adding Words to the User Database”
on page 34.
1
Change from Word text entry mode to Alpha text entry mode.
2
Type the word using Alpha text entry mode.
3
Return to Word text entry mode.
4
Press R to add a space.
The word you typed in Alpha text entry mode is now in the database.
Using T9 Text Input
FIRST DRAFT 35
Choosing a Language
To change the language of the database T9 Text Input chooses common words
from:
Using Numeric Mode
To use Numeric text entry mode, choose Numeric as your text entry mode and
press the number buttons on your keypad to enter numbers.
Using Symbols Mode
To use Symbols text entry mode:
1
From any screen that requires text input, press m to access the Entry
Method menu.
2
Press S to scroll to Languages.
3
Press B under SELECT.
4
Press S to scroll to the language of the database you want T9 Text
Input text use.
5
Press B under SELECT.
1
Choose Symbols as your text entry mode.
A row of 32 symbols appears along the bottom of your phone’s display
screen, just above the display option and menu icon. (Press T to view
the complete row.)
2
Press T to highlight the symbol you want to enter into the text entry
field.
3
Press B under SELECT to enter the symbol.

www.motorola.com/iden
36 FIRST DRAFT
FIRST DRAFT 37
Display Essentials
Your i58sr phone’s display screen tells you what you need to know as you use
your phone.
This section includes:
Display Screen Elements
Any time your phone is powered on, the display screen provides you with
information and options.
The Ready Screen
The Ready screen displays any time the
phone is powered on, but not engaged in
some activity.
The Ready screen consist of elements
common to many of the screens your
phone displays:
• status icons
• text display area
• menu icon
• display options
USER TIP:You can always access the Ready screen by pressing e.
Status Icons
Status icons provide you with information about your phone and its functions.
These icons are context sensitive; meaning, the icons that appear depend on the
task you are performing.
Display Screen Elements Page 37
Navigating Menus and Lists Page 41
Main Menu Options Page 42
Status
icon
rows
Text
display
area
Menu
icon
Display
options
Status
icon
rows
Text
display
area
Menu
icon
Display
options
Status
icon
rows
Text
display
area
Menu
icon
Display
options
Status
icon
rows
Text
display
area
Menu
icon
Display
options
Status
icon
rows
Text
display
area
Menu
icon
Display
options
A
Status
icon
rows
Text
display
area
Menu
icon
Display
options
www.motorola.com/iden
38 FIRST DRAFT
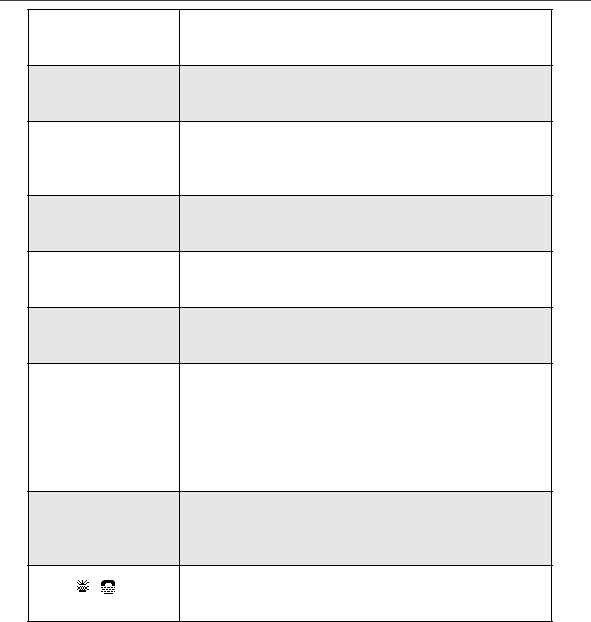
Status icons appear in the two rows at the top of the display screen. Some appear
at all times. Others appear only when your phone is engaged in certain activities
or when you have activated certain features.
Icon Indicates...
abcd
efgd
Battery Strength icons — remaining
battery charge. More bars on the battery
indicate a greater charge. See the table on
page 15 for detailed information about the
meaning of each battery strength icon.
opqr
s
Signal Strength icons — strength of the
network signal. More bars next to the
antenna indicate a stronger signal.
01 Active Line icons — currently active
phone line; 0 indicates Line 1 is active; 1
indicates Line 2 is active.
GHI
JKL Call Forward icons — phone is set to
forward calls. See “Call Forwarding” on
page 73 for more information.
cPhone In Use — phone is connected on an
active call.
hPrivate In Use — number being called is a
Private ID.
%Talkgroup In Use — phone is active on a
talkgroup call.
YPacket Data Ready — phone is ready to
receive data through a data cable.
ZPacket Data Activity — phone is
transmitting data.
]Mobile IP — phone is ready to access the
Internet.
Display Screen Elements
FIRST DRAFT 39
The icon of the main menu feature currently in use always appears in the top left
of the status icon rows. For a list of the main menu icons, see “Main Menu
Options” on page 42.
{Secure Data — phone is accessing the
Internet using a secure connection.
}Non-secure Data — phone is accessing
the Internet using a non-secure connection.
lRoaming — phone is searching for
network connections outside your local
area.
.Text Message — you have one or more
Text Messages or Net Alert messages.
yVoice Mail — you have one or more Voice
Mail messages.
BFaxMail — you have one or more FaxMail
messages.
-[\ Ring/Vibe icons — you have customized
the way in which the phone is set to notify
you when you receive calls and other types
of messages. See “Ring Style and
Notification Type” on page 135 for more
information.
w#,!
$x
T9 Text Input icons — you are using T9
Text Input to enter text. See “Using T9 Text
Input” on page 31 for more information.
TTY— your phone supports TTY devices
and communications

www.motorola.com/iden
40 FIRST DRAFT
Text Display Area
On the Ready screen, the text displayed in this area is determined by your
wireless communications provider. When you access other screens, this area
displays menu options, messages, names, phone numbers, and other
information.
The number of lines of text displayed in the text display area depends on which
display view is selected — Standard view, Compressed view, or Zoom view.
(For more information, see “Setting Text Display” on page 145.) In Standard
view, five lines of text are displayed.
NOTE: Standard view is the default display setting. Unless otherwise
noted, illustrations in this User’s Guide depict Standard view.
Menu Icon
This menu icon S appears on any screen from which a menu can be accessed.
To access a menu, press the menu key on your keypad. This key has the menu
icon printed on it.
Menus are context sensitive. The menu that appears depends on the screen you
access it from and the items on the menu apply to the task you are currently
performing.
Pressing the menu key from the Ready screen accesses the main menu.
Display Options
Two display options appear at the bottom of most screens. These options enable
you to perform a wide variety of actions, including changing, saving and
viewing information, running programs, and canceling previous actions. You
activate a display option by pressing the option key below it.
The Ready screen display options provide quick access to two main menu
features. By default, the Phonebook (PHBK) and Messages (MESG) display
options appear on the Ready screen. You can control which display options
appear on the Ready screen using the phone’s Personalize feature in the Settings
menu (see “Changing Ready Screen Options” on page 140).
The display options on screens other than the Ready screen cannot be
customized.

Navigating Menus and Lists
FIRST DRAFT 41
Navigating Menus and Lists
The i58sr phone is menu driven. By navigating menus, you access submenus
which lead to all of the functions and features that are built into your phone. Use
the menus to store calls, manage your Phonebook and Datebook, change your
phone settings, browse the Internet, and more.
Some features include lists of names, numbers, or other information. These list
items can be accessed the same way menu options are.
To access the items in a menu or list, scroll through using the four-way
navigation key near the center of your keypad. Scroll down by pressing the
lower portion of the navigation key R. Scroll up by pressing the upper portion
of the navigation key Q. Holding down the appropriate part of the navigation
key speeds up scrolling. If you continue scrolling after you have reached the
bottom or top of a menu or list, you “wrap-around” to the opposite end.
If more items appear in a menu or list than can be displayed in the text area, a
down arrow or up arrow appears in the left side of the screen indicating that
more options may be accessed by scrolling up or down.
Down arrow Up arrow
BS
www.motorola.com/iden
42 FIRST DRAFT
Main Menu Options
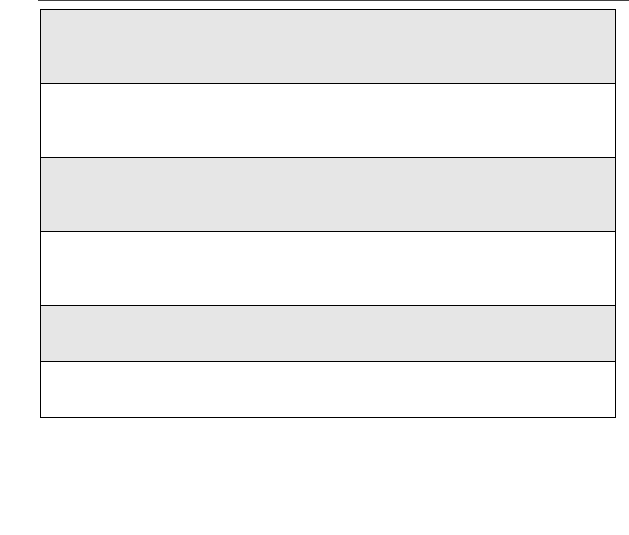
By default, the main menu options appear in the order determined by your
service provider. You can change the order in which they appear by using the
Personalize feature (see “Reordering Main Menu” on page 140).
To access the main menu, press m from the Ready screen:
Menu Item Use to ...
Net Browse the Web.
F Java Run pre-installed and download custom
Java applications on your phone.
m Settings Customize your phone: Ring/Vibe, In Call
Setup, Security, Personalize, Initial Setup,
Phone Setup, Voice Volume, and Talkgroup
Settings.
( VoiceRecord* Record personal messages or the incoming
portion of phone calls to play back at a later
time.
b Phonebook Store and retrieve a list of stored entries for
calling, editing, viewing and deleting.
R Messages Receive, store, access and manage Voice
Mail, FaxMail, Text Messages, and Net
Alert.
; Call Forward Settings for forwarding calls in various
situations.
= Datebook Schedule and organize events, by the day
or the month, such as appointments and
meetings.
O Memo Input and store numbers to access later.
z Call Timers Display the duration of phone calls, private
or group calls, circuit data use, and
Kilobytes sent and received.
Main Menu Options
FIRST DRAFT 43
*Optional feature. Please consult your service provider for availability of purchase.
To choose the highlighted Main Menu selection, press B under SELECT. To
exit the Main Menu (and return to the Ready screen), press A under EXIT or
press e.
j Recent Calls Access a list of the last 20 sent, received, or
missed calls. Calls can be made from this
list.
n Shortcuts Associate a menu option with a number on
the alphanumeric keypad for quick and
easy access.
U My Info View the name, Private ID, phone numbers
for lines 1 and 2, IP address, and circuit
data number of your phone.
v Styles* Create or edit a group of settings and save
them as one for use in different
environments.
: Call Alert Store received call alerts to respond to at
your convenience.
[icon pending] GPS Find your phone’s exact geographical
location.

www.motorola.com/iden
44 FIRST DRAFT
FIRST DRAFT 45
Phonebook
The Phonebook allows you to store up to 250 frequently used names and
numbers.
When you store information in your Phonebook, it is saved on your SIM card. If
you move your SIM card to another SIM-based Motorola iDEN phone, you can
access information in your Phonebook from that phone.
NOTE: If you use a different SIM card in your phone, some information
stored in the phone will be lost. See “Removing/Inserting the
SIM Card” on page 24.
This section includes:
*Optional feature. Please consult your service provider for availability of purchase.
Accessing Phonebook with an i2000, i2000plus, or
GSM Phone
Page 46
Phonebook Entries and Speed Dial Numbers Page 46
Phonebook Icons Page 46
Vo i c e Na m e s * Page 47
Accessing Your Phonebook Page 48
About Phonebook Entries Page 48
Viewing Phonebook Entries Page 49
Sorting Phonebook Entries Page 49
Adding Phonebook Entries Page 51
Editing Phonebook Entries Page 56
Deleting Phonebook Entries Page 57
Pause Digit Entry Page 57
Plus Dialing Page 58
www.motorola.com/iden
46 FIRST DRAFT
Accessing Phonebook with an i2000, i2000plus,
or GSM Phone
If you plan to use the information stored in your Phonebook with an i2000,
i2000plus, or any other GSM phone, you must purchase CompanionPro. Go to
www.motorola.com\iden or your service provider’s web site for more
information.
You can use CompanionPro to make the Phonebook information saved to your
i58sr phone’s SIM card accessible in this type of phone.
Phonebook Entries and Speed Dial Numbers
Your Phonebook can store multiple phone numbers to a single name. For
example, you can enter someone’s name into your Phonebook once and then
assign that person’s home, office, mobile phone and fax numbers to the name.
Each number stored in your Phonebook is automatically assigned a Speed Dial
number that corresponds to its location in your Phonebook. Each phone number
uses one Speed Dial location, even if it is assigned to the same name as other
phone numbers. The phone number stored in location 1 is assigned Speed Dial
number 1, the phone number stored in location 2 is assigned Speed Dial number
2, and so forth, to location 250.
Phonebook Icons
Icons that appear to the right of entries in your Phonebook convey information
about those entries.
When you enter a phone number in your Phonebook, you can designate the
phone number’s type using any of the following icons:
WMobile
hPrivate
qWork
QMain
LHome
bPager
Voice Names*
FIRST DRAFT 47
NOTE: The Mobile icon automatically appears to the right of the first
phone number assigned to a name unless you choose another
icon.
For more information on entering phone numbers into your Phonebook, see
“Adding Phonebook Entries” on page 51.
The “picker” arrows appearing around the phone number type icon indicates
multiple phone numbers stored under one name:
The Voice Name* icon appearing to the left of one of the phone number type
icons indicates that a voice name is associated with the Phonebook entry:
*Optional feature. Please consult your service provider for availability of purchase.
Voice Names*
*Optional feature. Please consult your service provider for availability of purchase.
A voice name is an audio recording you make by speaking into your i58sr phone
that you assign to a number in your Phonebook. You can then dial the number
by speaking the words you recorded into the phone. See step 6 of “Adding
Phonebook Entries” on page 51 for more information on creating a voice name.
KFax
nTalkgroup
iP IP (Internet
Protocol
Address)
ZOther
ef pickers
pVoice Name
www.motorola.com/iden
48 FIRST DRAFT
Accessing Your Phonebook
If PHBK is one of your display options:
If PHBK is not one of your display options:
USER TIP:You can also access the Phonebook by pressing m while
your phone is in a phone call or private call.
This brings you to the Phonebook screen. From this screen, you can view, sort,
add, edit, and delete Phonebook entries, check Phonebook capacity, or make
calls.
About Phonebook Entries
Each Phonebook entry may contain the following information:
• The name associated with the entry. Typically, this is the name of the
person whose number you are storing in the Phonebook.
• The type of number to be stored: Mobile, Private, Work, Main, Home,
Pager, Fax, Other, or Talkgroup. If you don’t choose a type, the number is
assigned type Mobile, unless a Mobile number has already been assigned
to the name.
• The phone number to be stored. Every Phonebook entry must contain a
phone number. This number may be any type of phone number, Private ID,
or Talkgroup number.
• A Speed Dial number. You may accept the default Speed Dial number or
assign a different one.
• A voice name audio recording for voice-activated dialing. (This is an
optional feature. Contact your carrier for further details.)
From the Ready screen, press B under PHBK.
1
From the Ready screen, press m.
2
Press R to scroll to Phonebook.
3
Press B under SELECT.

About Phonebook Entries
FIRST DRAFT 49
Viewing Phonebook Entries
Names with more than one number assigned to them appear with ef
surrounding the icon to the right of the name. For example, if you had stored a
home and work number for Joe Smith, the entry for Joe Smith’s home phone
number would look like this:
Joe Smith eLf
When the name is highlighted, press T to scroll to the icons representing each
of the numbers assigned to that name.
To view any of the phone numbers assigned to a name:
Sorting Phonebook Entries
You can sort your Phonebook entries by:
• Name — the name you entered for the entry.
• Speed No. — the Speed Dial location of the entry.
• Voice Name* — all entries with voice names appear at the top of the list.
NOTE: Private calls cannot be made from the Phonebook when sorted
by Speed Dial location.
*Optional feature. Please consult your service provider for availability of purchase.
1
From the Phonebook screen, press S to scroll to the name associated
with the phone number you want to see.
2
Press T to view the icons representing the phone numbers assigned to
that name.
3
When the icon representing the number you want to view is displayed,
press B under VIEW.
If there is a Private ID or a Talkgroup number stored for the person,
press m. Then press R to scroll to View and press B under
SELECT.
4
Press S to view the other numbers stored for this name.
www.motorola.com/iden
50 FIRST DRAFT
To sort your Phonebook list:
Checking Phonebook Capacity
Your Phonebook can store up to 250 numbers of any kind. To see how many
entries are stored in your Phonebook:
1
From the Main Screen screen, press m
and scroll down R to view the
Phonebook Menu screen.
2
Press R to scroll to Sort By.
3
Press B under SELECT.
4
Press R to scroll to the desired sorting method: Name, Speed #, or
Voice N ame*
*.Optional feature. Please consult your service provider for availability of purchase.
5
Press B under SELECT.
1
From the Phonebook screen, Press m to view the Phonebook Menu
screen.
2
Press R to scroll to Capacity.
3
Press B under SELECT.
The Capacity screen shows how many storage spaces in you
Phonebook are in use and how many are empty.
}

About Phonebook Entries
FIRST DRAFT 51
Adding Phonebook Entries
Using the following instructions, you will enter the information in the order the
items appear on the Phonebook Entry Details screen. However, you can enter
this information in any order by pressing S to scroll through the items on the
Entry Details screen.
You can leave any item blank or unchanged by pressing S to scroll past it on
the Entry Details screen. Only a phone number is required for a valid
Phonebook entry.
After you have entered a phone number and any other information you wish to
include, you can press A under DONE to save the Phonebook entry.
To cancel a Phonebook entry at any time, press e to return to the Ready screen.
To add a Phonebook entry:
1
Access the Entry Details screen:
From the Main Screen screen, press m.
Then press R to scroll to Phonebook.
Press B under SELECT
To add a [New Entry], press B under
SELECT.
2
If you want to assign a name to your
Phonebook entry:
With the Name field highlighted, press
B under CHANGE.
From the Name screen, enter the name
using the alphanumeric keypad.
See “Using T9 Text Input” on page 31 for
information about entering text into this
field.
When you are finished, press B under OK.
The Entry Details screen returns with the Type field highlighted.
H
I

www.motorola.com/iden
52 FIRST DRAFT
3
If you want to assign a phone number type
other than Mobile to your Phonebook
entry:
With the Type field highlighted, press B
under CHANGE.
From the Type Editor screen, press R to
scroll to the type of phone number you
want to assign to the Phonebook entry.
Press B under SELECT.
The Entry Details screen returns with the # field highlighted.
4
Assign a phone number to your
Phonebook entry:
With the # field highlighted, press B
under CHANGE.
Type the number using the alphanumeric
keypad. For phone numbers, use the
10-digit format.
To delete a digit, press A under
DELETE.
See “Pause Digit Entry” on page 57 and “Plus Dialing” on page 58 for
information on using these features when storing phone numbers in you
Phonebook.
NOTE: The number can be up to 20 characters long.
When you are finished, press B under OK.
The Entry Details screen returns with the Speed # field highlighted.
J
K

About Phonebook Entries
FIRST DRAFT 53
5
The default Speed Dial number assigned
to the Phonebook entry is displayed in the
Speed # field. This is always the next
available Speed Dial location.
If you want to assign the phone number to
a different Speed Dial location:
With the Speed # field highlighted, press
B under CHANGE.
Press A under DELETE to delete the
current Speed Dial number.
Type the new Speed Dial number using the alphanumeric keypad.
When you are finished, press B under OK.
6
If you want to assign a voice name* to the
number:
*Optional feature. Please consult your service
provider for availability of purchase.
With the Voice N ame field highlighted,
press B under RECORD.
As directed by the screen prompts, say and
repeat the name you want to assign to the
number. Speak clearly into the
microphone.
An ) icon appears in the Voice Na me field indicating that the voice
name has been recorded.
USER TIP: For best results, record in a quiet environment.
L
M

www.motorola.com/iden
54 FIRST DRAFT
Storing Phone Numbers and Private IDs Quickly
Your phone gives you two ways to store phone numbers quickly: from the
Ready screen and from the Recent Calls list.
To store a number from the Ready screen:
7
If you want to store more phone numbers to
the name associated with this Phonebook
entry:
Press R to scroll to MORE at the bottom
of the Entry Details screen and then press
B under SELECT.
A new Type field appears for the additional
number.
Enter the information for the additional
phone number using step 3 through step 7.
NOTE: Each name in your Phonebook may have up to seven phone
numbers one Private ID associated with it.
8
When you have entered all the information
you wanted in this Phonebook entry, press
A under DONE.
1
From the Ready screen, use the alphanumeric keypad to enter the
number you want to store.
2
Press m to access the Dialing Menu screen.
U
N
About Phonebook Entries
FIRST DRAFT 55
To store a number from the Recent Calls list:
3
With Store Number highlighted, press B under SELECT.
This displays the Store To screen.
4
To store to a new entry, press
B
under SELECT. The Entry Details
screen will display with the number entered in the field.
Or,
To store to an existing entry, press
S
to scroll the list of names in your
Phonebook. Or press the first letter of the entry to jump to the entry.
Once the desired entry is highlighted, press
B
under SELECT. The
Phonebook information for that entry displays with the number entered
in the # field.
5
From the Entry Details screen, press
S
to scroll to the first Type
field.
6
From the Type Editor screen, press
S
to scroll to the selection that
you want to assign to the phone number. Press
B
under SELECT.
7
If you want to add more information to the Phonebook entry, follow the
applicable instructions in “Adding Phonebook Entries” on page 51.
8
Press
A
under DONE.
1
From the Recent Calls screen, press
R
to scroll to the 10-digit
telephone number you want to store.
2
Press
B
under STORE. This displays the Store To screen with [New
Entry] highlighted.
www.motorola.com/iden
56 FIRST DRAFT
To store a Private ID from the Recent Calls list:
Follow steps 3-6 in “To store a number from the Recent Calls list” (listed on the
previous page).
Editing Phonebook Entries
3
To store a new entry, press
B
under SELECT. The Entry Details
screen displays with the number entered in the # field and the Type field
highlighted.
Or,
To store to an existing entry, press
S
to scroll the list of names in your
Phonebook. Or press the first letter of the entry to jump to the entry.
Once the desired entry is highlighted, press
B
under SELECT. The
Phonebook information for that entry displays with the number entered
in the # field and the Type field highlighted.
4
Press B under CHANGE. Press
R
to scroll to the type of number
you want to assign to the Phonebook entry. Press
B
under SELECT.
5
If you want to add more information to the Phonebook entry, follow the
applicable instructions in “Adding Phonebook Entries” on page 51.
6
Press
A
under DONE.
1
Press
R
to scroll to the Private ID number you want to store. Note:
The Store option for Private ID numbers (e.g., 123*123*1234), will not
display in the Recent Calls list.
2
With the Private ID highlighted, press
m
to access the Rec. Calls
Menu. Press
R
to scroll to Store. Press
A
under SELECT. This
displays the Store To screen with [New Entry] highlighted.
1
From the Phonebook screen, press R to scroll to the entry you want to
edit.
2
Press m to view the Phonebook Menu.
Pause Digit Entry
FIRST DRAFT 57
Deleting Phonebook Entries
Pause Digit Entry
When storing a number, you can program your phone so that it will not only dial
a number but also pause before entering another series of numbers such as a
personal identification number (PIN) or password. This feature is particularly
useful for accessing automated services such as voice mail and banking systems
from your i58sr phone.
Here’s how it works. Let’s say you have a company voice mail account that you
frequently check while traveling. And, to access that account you must do the
following:
• Dial your work number;
• Press # while the voice mail greeting is being played; and
• Enter your PIN to access your messages.
3
Press R to scroll to Edit.
4
Press B under SELECT. The Entry Details screen displays.
5
Follow the applicable instructions in “Adding Phonebook Entries” on
page 51 to edit the various fields.
1
From the Phonebook screen, press R to scroll to the entry you want to
delete.
2
Press m to view the Phonebook Menu.
3
Press R to scroll to Delete Contact or Delete Number.
Delete Contact deletes the name and all numbers associated with that
name.
Delete Number deletes the number associated with the icon that is
currently displayed in the Phonebook list for the name. The name and
all the other numbers will remain.
4
Press B under SELECT. A warning screen displays requiring you to
confirm the deletion.
www.motorola.com/iden
58 FIRST DRAFT
You can program your phone to enter all of the above information for you. All
you have to do is separate each entry with a pause. If you were to program your
phone to automatically input the above information, the stored data would look
like this 17035551234P#P1234. In this example, the first eleven digits represent
the number that must be dialed to access your voice mail. The P represents a 3
second pause. The # interrupts your greeting. The second P represents another 3
second pause. The last four digits represent your PIN.
You can use this feature not only to enter PINs and passwords but also to have
the phone automatically select menu options (i.e., press 1 to hear messages).
To create a three-second pause follow the steps below:
NOTE: You can enter up to 20 characters in a single entry, stored or
dialed.
NOTE: If you use a system that will not let you enter an option until the
automated message has played in its entirety, you can program
your phone to pause for more than 3 seconds. For example,
performing the above step twice will program two pauses and
cause your phone to wait 6 seconds before entering the next set
of numbers.
Plus Dialing
This feature enables you to place an international call from most countries —
without entering the local international access code. Use Plus Dialing for all
Phonebook entries if you plan to travel outside the United States. Begin by
following the instructions for “Adding Phonebook Entries” on page 51. Before
you type the phone number to be stored:
Press and hold * for two seconds. The pause symbol (P) will appear
on the display screen.
1
Press and hold 0 for two seconds. A “0” appears, then changes to a
“+”.
NOTE: The network translates the “+” into the appropriate
international access code needed to place the call.
2
Enter the country code, city code, or area code, and phone number.
3
Follow the rest of the instructions for “Adding Phonebook Entries” on
page 51.

FIRST DRAFT 59
Digital Cellular
The i58sr phone enables you to make and receive domestic and international
phone calls, make emergency calls, and be notified of a missed call.
This section includes:
*Optional feature. Please consult your service provider for availability of purchase.
Making Phone Calls
Your i58sr phone provides the following features for making phone calls:
• Direct Dial
• Phonebook
• Recent Calls
• Speed Dial
• Turbo Dial®
• Last Number Redial
• TTY— your phone supports TTY devices and communications.
Making Phone Calls Page 59
Emergency Calling Page 64
Receiving a Phone Call Page 64
Ending a Phone Call Page 64
Recent Calls Page 65
Call Waiting Page 70
Hands Free SpeakerPhone* Page 68
Call Timers Page 70
Call Hold Page 71
Three-Way Calling Page 72
Call Forwarding Page 73
www.motorola.com/iden
60 FIRST DRAFT
Using Direct Dial
NOTE: See “Plus Dialing” on page 58 for information on making
international calls.
If you make a mistake:
• To clear one digit, press A under DELETE.
• To clear all digits, press and hold A under DELETE.
• To cancel, press e.
Making Calls from the Phonebook
After you have entered phone numbers into your Phonebook, you can use these
numbers to make phone calls. For information on entering numbers into your
Phonebook, see “Adding Phonebook Entries” on page 51.
To make calls from the Phonebook:
1
From the Ready screen, use the keypad to enter the number you want to
call.
2
Press s to place the call.
3
Press e to end the call.
1
From the Ready screen, if PHBK is one of your display options, press
A under PHBK.
Or,
From the Ready screen, press m, then press R to scroll to
Phonebook. Press B under SELECT.
2
Press R to scroll through the names in your Phonebook.
Or,
Use the alphanumeric keypad to enter the first letter of the name and
press R to scroll through the names beginning with that letter.
Stop when the name of the person you want to call is highlighted.

Making Phone Calls
FIRST DRAFT 61
Making Calls from the Recent Calls List
Your phone stores the numbers of the last 20 calls you received or sent in the
Recent Calls list.
3
If more than one number is stored for the person you want to call, ef
appears around the icon to the right of the person’s name.
Press T to scroll through the icons representing the numbers stored for
that person.
Or,
Press B under VIEW to view all the numbers stored for this person.
Then press R to scroll to the number you want to call.
Or,
If there is a Private ID or a Talkgroup number stored for this person,
press m. When the Phonebook Menu appears, press R to scroll to
View and press B under SELECT. Then press R to scroll to the
number you want to call.
For more information on assigning multiple numbers to one person, see
“Adding Phonebook Entries” on page 51.
4
Press s to place the call.
5
Press e to end the call.
1
From the Ready screen, press R.
Or,
From the Ready screen, press S to Recent Calls is not the first item
on the list, press S to scroll to it. Press B under SELECT.
2
Press S to scroll the list received or sent recent calls until you reach
the desired call.
www.motorola.com/iden
62 FIRST DRAFT
Using Speed Dial
Each phone number stored in your Phonebook is assigned a Speed Dial number.
You can use the Speed Dial number to quickly place a call.
Using Turbo Dial
Turbo Dial allows you to call the numbers in your Phonebook associated with
Speed Dial numbers 1 through 9 by pressing and holding the corresponding
numeric key on the keypad.
NOTE: Turbo Dial cannot be accessed while the browser is active, nor
while Keypad Lock or SIM Lock is active.
3
To view additional information about the call:
Press B under VIEW.
Or,
Press m to access the Rec. Calls Menu. Then press R to scroll to
View and press B under SELECT.
4
Press s to place the call.
5
Press e to end the call.
1
From the Ready screen, enter the Speed Dial number assigned to the
phone number you want to call.
2
Press #.
3
Press s to place the call.
4
Press e to end the call.
Press and hold a number (keys 1 through 9).
Making Phone Calls
FIRST DRAFT 63
Last Number Redial
Making TTY Calls
NOTE: This feature may not be offered by
your service provider.
You can use your phone to make calls using a
TTY device.
When you make a TTY call, the call begins in the
TTY mode you last selected. You can change the
TTY mode during a call. For more information on
choosing a TTY mode, see “Setting TTY Mode”
on page 146.
To make a call using a TTY device:
Placing International Phone Calls
When making an international call, you can either enter the international access
code directly (011 in the United States) or use Plus Dialing.
You can make international calls from your Phonebook if you have stored the
numbers with Plus Dialing. See “Adding Phonebook Entries” on page 51 and
“Plus Dialing” on page 58 for more information.
NOTE: Your service default is “International Calls Restricted.”
Therefore, you must call Customer Care to obtain international
dialing access.
Press and hold s to redial the last number you called.
1
Connect one end of a 2.5mm cable into the jack on the phone. (To locate
the jack, see page 12.) Connect the other end of the cord into your TTY
device.
2
Enter the phone number you wish to call and press.
Q
www.motorola.com/iden
64 FIRST DRAFT
To make an international call using Plus Dialing:
Emergency Calling
Your phone supports emergency calling. Emergency calls can be made even
when the SIM card is blocked or not in the phone.
To place a call in an emergency, dial 911s. You will be connected to the
nearest emergency dispatch center. If you are on an active call, you must end it
before calling 911.
NOTE: If you have enabled the Keypad Lock feature, you must unlock
the phone’s keypad before any call can be made, including 911
emergency calls.
Receiving a Phone Call
Ending a Phone Call
1
Press and hold 0 for two seconds. A “0” appears, then changes to a
“+”.
NOTE: The network translates the “+” into the appropriate
international access code needed to place the call.
2
Enter the country code, city code, or area code, and phone number.
3
Press s to place the call.
4
Press e to end the call.
Incoming calls are indicated by a ring, vibration or backlight
illumination. Press s or any key on the keypad or press B under YES
to answer the call.
Press e to hang up.

Recent Calls
FIRST DRAFT 65
Recent Calls
The Recent Calls feature stores the phone numbers of the 20 most recent calls
you have made and received, including private and talkgroup calls. You can
access Recent Calls to:
• view your recent calls
• store numbers to the Phonebook
• delete recent calls
• call numbers on the Recent Calls list
NOTE: The Recent Calls list displays briefly after you end a call.
Viewing Recent Calls
To view your Recent Calls list:
If the number of the recent call is stored in your Phonebook, the name associated
with the phone number appears on the Recent Calls list.
For private calls, Talkgroup calls, and numbers stored in your Phonebook, an
icon appears to the right of the name of number indicating the Phonebook type
of the number used in the call. See “Phonebook Icons” on page 46 for more
information about Phonebook types.
For phone calls, an icon appears to the left of the name or number indicating the
type of call:
•N indicates an incoming call
•a indicates an outgoing call
•V indicates a missed call. (Missed calls appear on your Recent Calls list
only if you have Caller ID.)
1
From the Ready screen, press R.
Or,
From the Ready screen, press S to scroll to Recent Calls. Press B
under SELECT.
2
Press S to scroll the list of recent calls.
www.motorola.com/iden
66 FIRST DRAFT
For private calls, an icon appears to the left of the name or number indicating the
type of call:
•h indicates a Private Call
•% indicates a Group Call
Getting Detailed Information About Recent Calls
To get more information about a recent call:
The screen that appears displays information such as the name associated with
the phone number of the recent call, the phone number, the date, time, and
duration of the call.
Storing a Recent Call Number to the Phonebook
To store a number from the Recent Calls list to the Phonebook:
1
From the Recent Calls screen, press S to scroll to the call you want
more information on.
2
Press B under VIEW.
Or,
Press m to access the Rec. Calls Menu. Then press R to scroll to
View and press B under SELECT.
1
From the Recent Calls screen, press S to scroll to the number you
want to store.
2
Press B under STORE.
This displays the Phonebook Entry Details screen with the # field filled
in with the number of the recent call.
3
If you want to add more information to the Phonebook entry, follow
applicable the instructions in “Adding Phonebook Entries” on page 51.
Recent Calls
FIRST DRAFT 67
Calling From the Recent Calls List
See “Making Calls from the Recent Calls List” on page 61.
Deleting Recent Calls
To delete a recent call:
To delete all calls on the Recent Calls list:
Accessing Voice Record* From Recent Calls
You can access the Voice Record feature from Recent Calls and use it to record
spoken messages that you can listen to later
*Optional feature. Please consult your service provider for availability of purchase..
1
From the Recent Calls screen, press S to scroll to the call you want to
delete.
2
Press m to access the Rec. Calls Menu.
3
Press R to scroll to Delete.
4
Press B under SELECT.
5
Press A under YES to confirm the deletion.
1
From the Recent Calls screen, press m to access the Rec. Calls
Menu.
2
Press R to scroll to Delete All.
3
Press B under SELECT.
4
Press A under YES to confirm the deletion.
1
From the Recent Calls screen, press m to access the Rec. Calls
Menu.
www.motorola.com/iden
68 FIRST DRAFT
Hands-Free Speakerphone*
This feature provides the convenience of a hands-free solution, allowing you to
hold impromptu meetings and place safer phone calls. The speakerphone option
(SPEAKER) is available whenever you are on an active phone.
*Optional feature. Please consult your service provider for availability of purchase.
NOTE: During speakerphone operation, you may either speak or listen,
but you cannot do both at the same time.
To turn the speakerphone on:
While speakerphone is on, Spkrphone On appears in the text display area.
To turn the speakerphone off:
Mute
Use the Mute feature to listen to incoming audio without allowing sound from
your phone’s microphone to be transmitted over the phone line.
To turn mute on:
While mute is on, UNMUTE appears as a display option.
To turn mute off:
2
Press S to scroll to New Voice Record.
3
Press B under SELECT.
While on an active call, press B under SPEAKER.
Press B under SPEAKER.
Press B under MUTE.
Press B under UNMUTE.

Missed Calls
FIRST DRAFT 69
Missed Calls
Missed calls are shown on the display screen with the missed call icon V.
Call Timers
Call Timers measure the duration of your phone calls, Private or Group calls,
and circuit data use, as well as the number of Kilobytes sent and received by
your phone.
The Call Timers menu displays the following options:
•Last Call — displays the duration of your most recent phone call.
•Phone Reset — keeps a running total of your phone call minutes, until you
reset it.
•Phone Lifetime — displays the total minutes of all your phone calls.
•Prvt/Grp Reset — keeps a running total of all of your Private and Group
call minutes, until you reset it.
•Prvt/Grp Lifetime — displays the total minutes of all your Private and
Groups calls.
•Circuit Reset — keeps a running total of all of your circuit data use, until
you reset it.
•Circuit Lifetime — displays the total minutes of all of your circuit data
use.
•Kbytes Reset — keeps a running total of the number of Kilobytes sent and
received by your phone, until you reset it.
To view the Call Timers menu:
To view or reset a Call Timers option:
1
From the Ready screen, press m.
2
Press R to scroll to Call Timers.
3
Press B under SELECT.
1
From the Call Timers menu, press S to scroll to the Call Timers
option you want to view or reset.
www.motorola.com/iden
70 FIRST DRAFT
NOTE: The values displayed by Call Timers are not intended for billing
purposes. Call timers are estimates only.
Call Waiting
Call Waiting allows you to receive a second call while you are talking on the
phone. You can switch between calls so you never have to miss a call. By
default, Call Waiting is always on unless you turn it off for a specific call.
If you’re on a call and you receive a second call,
you will:
• Hear a tone; and
• See a message on your display informing
you of another incoming call.
Accepting Calls
2
Press B under SELECT.
3
If the feature does not include an option to reset or you do not wish to
reset the option, press A under DONE when you are finished viewing.
To reset a feature, press B under RESET. When the confirmation
screen appears, press A under YES to confirm the reset.
Press B under YES. The first call is placed on hold.
To end the active call and accept the second call, press e.
e
Call Hold
FIRST DRAFT 71
Switching Between Calls
When you accept a second call while you are talking on the phone, your display
shows the name or number of each call. An icon appears to the left of each name
or number indicating that the call on hold V or active D.
Declining Calls
Ending the Active Call
Turning Off Call Waiting
If you do not want to be interrupted during a call, you can turn Call Waiting off
prior to making/receiving a call.
Call Hold
When you are on an active call, you can place the call on hold and make a
second call.
Press B under SWITCH to switch between calls.
Press A under NO. If you subscribe to Voice Mail, the call will be
forwarded to your Voice Mail box.
Press e.
1
From the Ready screen, press m. Press R to scroll to Settings, and
press B under SELECT.
2
Press R to scroll to In Call Setup and press B under SELECT.
3
Press R to scroll to Call Waiting and press B under CHANGE.
4
Press R to scroll to Off and press B under SELECT.
Call Waiting is now disabled for the next call. It will automatically reset
to On when you hang up.
www.motorola.com/iden
72 FIRST DRAFT
To place an active call on hold:
To place a second call while the first call is on hold:
To toggle between the two calls:
To end the active call:
Three-Way Calling
Using Three-Way Calling, you can combine two ongoing phone calls into one
conversation. While on an active call, you can make a second call and combine
the two calls. When you place or receive a phone call, the 3-WAY option
appears in the bottom right-hand corner of the display screen.
1
Press m to access the Calls Menu.
2
Press R to scroll to Hold.
3
Press B under SELECT.
4
If you have not placed a second call, you can resume this call by
pressing B under RESUME.
Enter the second phone number you want to call and press s to place
the second call.
Or, access the number from your Phonebook:
Press m and then press R to scroll to Phonebook.
Press B under SELECT.
To place the call, see “Making Calls from the Phonebook” on page 60.
Press B under SWITCH.
Press e. The call on hold becomes active.
Call Forwarding
FIRST DRAFT 73
To make a three-way call:
Call Forwarding
Call Forwarding forwards calls to the number you designate. The following Call
Forwarding options are available:
•Off — No calls are forwarded.
•All Calls — When this option is turned on, all calls will be sent
automatically to a number you specify.
•Detailed — Choosing this option enables you to forward calls you missed to
different numbers, or to Voice Mail, depending on why you missed each call:
•Busy — your phone is engaged in other activities.
•No Answer — you do not answer. The phone will ring 4 times before
forwarding the call.
•Unreachable — your phone is out of coverage or powered off.
1
Place or receive a phone call.
2
While in a call, press mto access Call Menu.
3
Press R to scroll to 3-WAY.
4
Press B under SELECT. The first call will be placed on hold.
5
Enter the second phone number you want to call and press s to place
the second call.
Or, access the number from your Phonebook:
Press m and then press R to scroll to Phonebook.
Press B under SELECT.
To place the call, see “Making Calls from the Phonebook” on page 60.
6
After you reach the second individual, press m.
7
Press R to scroll to 3-WAY.
8
Press B under SELECT. Both calls will appear on your display.
www.motorola.com/iden
74 FIRST DRAFT
NOTE: For you to receive Voice Mail messages, the All Calls option
must be set to Off and the Detailed options must be set to your
Voice Mail access number. Your Voice Mail access number is
the first six digits of your 10-digit phone number followed by
6245. This is the default setting.
You can forward Line 1 and Line 2 independently.
When your phone is set to forward all calls, one of the following icons appears
on the top row of your display screen to indicate the call forwarding option you
have chosen:
NOTE: Call Forwarding must be set to Detailed with the Voice Mail
access number to receive Voice Mail messages. This is the
default setting.
Turning On Call Forwarding
Icon Indicates...
GLine 1 is active; calls from Line 1 are being
forwarded.
HLine 1 is active; calls from Line 2 are being
forwarded.
ILine 1 is active; calls from Line 1 and Line
2 are being forwarded.
JLine 2 is active; calls from Line 1 are being
forwarded.
KLine 1 is active; calls from Line 2 are being
forwarded.
LLine 2 is active; calls from Line 1 and Line
2 are being forwarded.
1
Press m then press R to scroll to Call Forward.
2
Press B under SELECT.
Call Forwarding
FIRST DRAFT 75
Your calls will now be forwarded to the number that you selected.
Turning Off Call Forwarding
3
At the Call Forward screen, the Forward field is highlighted. Press
B under CHANGE.
4
Press S to scroll to All Calls.
5
Press B under SELECT.
6
Press R to scroll to the To field and press B under CHANGE.
7
To activate a call forwarding number:
If you have never used Call Forwarding before, the Forward screen
appears. To enter a call forwarding number, type the number on your
phone’s keypad or press B under SEARCH to select from numbers
stored in your phone. Press B under OK.
Or,
If you have used Call Forwarding before, the call forwarding number
you last used is displayed. Press B under CHANGE to access the
Forward screen.
To forward your calls to this number, press B under OK.
To forward your calls to a different number, press and hold A under
DELETE to erase the displayed number. Type the new number on your
phone’s keypad or press B under SEARCH to select from numbers
stored in your phone. Press B under OK.
1
Press m then press R to scroll to Call Forward.
2
Press B under SELECT.
The Call Forward screen displays with the Forward field highlighted.

www.motorola.com/iden
76 FIRST DRAFT
You will now receive all calls on your phone. When you are unavailable, your
calls will be forwarded according to your Detailed call forwarding settings. By
default, the Detailed option is set to forward your calls to Voice Mail.
Setting Call Forwarding to Voice Mail
In most cases, turning off Call Forwarding restores your ability to receive Voice
Mail messages when you are unavailable (see “Turning Off Call Forwarding”
on page 77). If you have completed those steps but are still not able to receive
Voice Mail messages, you can reset Call Forwarding to Voice Mail.
For you to receive Voice Mail messages, Call Forwarding must be set to
Detailed with your Voice Mail access number:
3
Press R to scroll to the To field and press B under CHANGE.
4
Press S to scroll to Off and press B
under SELECT.
1
Press m then press R to scroll to Call Forward.
2
Press B under SELECT.
The Call Forward screen displays with the Forward field set to
Detailed.
3
Press R to scroll to the If Busy field and press B under CHANGE.
4
The call forwarding number you last used is displayed. Press B under
CHANGE. If this is your Voice Mail access number (the first six digits
of your 10-digit phone number followed by 6245), go to step 7.
5
Press and hold A under DELETE to erase the displayed number.
{

Call Forwarding
FIRST DRAFT 77
6
Enter your Voice Mail access number.
Your Voice Mail access number is the first six digits of your 10-digit
phone number, followed by 6245. (For example 7035556245.)
7
Press B under OK.
8
Repeat step 3 through step 7 for the If No Answer field and the If
Unreachable field.
9
When finished, press A under EXIT.

www.motorola.com/iden
78 FIRST DRAFT
FIRST DRAFT 83
Messages
The main topics covered in this section are listed below:
Message Center
The Message Center enables you to access all messaging services through one
screen.
To access the Message Center:
If MESG is one of your display options:
If MESG is not one of your display options:
The Message Center screen displays the number of messages you have in each
message service — Voice Mail (Voice Mail), Text Msgs (Text and Numeric
Messages), and Net Alert.
Message Center Page 83
Vo i c e Ma i l Page 84
Text and Numeric Messaging Page 86
Net Alert Page 88
Using Your Phone as a Modem Page 89
From the Ready screen, press B under MESG.
1
From the Ready screen, press m.
2
Press R to scroll to Messages.
3
Press B under SELECT.

www.motorola.com/iden
84 FIRST DRAFT
To access any message service:
Voice Mail
New Message Indicators
When you receive a new message:
•New Voice Mail Message will display on the screen.
• Your phone will alert you every 30 seconds until you press B under
CALL or A under EXIT. (If you are on a call, your phone will alert you
once during the call.)
Transferring Calls to Voice Mail
1
From the Message Center screen, press R to scroll to the message
service you want to access.
2
Press B under the display option on the right. This option varies
depending on the message service selected.
Press A under NO while your phone is ringing to transfer incoming
calls directly to Voice Mail.
f

Using Voice Mail
FIRST DRAFT 85
Using Voice Mail
Logging Into Voice Mail
1
From the Ready screen, press B under
MESG to open up the Message Center
screen.
2
Voice Mail should be highlighted to
indicate that it is selected. If it isn’t
highlighted, press S to scroll to the
Voicemail field.
The number of new messages and the total
number of messages are displayed.
3
Press B under CALL to log into your Carrier’s Voice Mail System.
Calling displays as you are connected to the network.
A
g

www.motorola.com/iden
86 FIRST DRAFT
Text and Numeric Messaging
With Text and Numeric Messaging, your phone will:
• Allow numeric messages up to 20 characters in length and text (alpha)
messages up to 140 characters in length.
• Accept your messages even if you are unavailable, if your phone is turned
off, or if you are busy on another call.
• Alert you of a new text or numeric message, even if you are on another call.
• Store a message if you are making a Private or Group call and deliver it
upon completion of the call.
• Store the message if you are outside of the coverage area and deliver it as
soon as you are back in a coverage area.
• Attempt continuous delivery of messages until successful, for up to 7 days.
With Text and Numeric Messaging, your phone will:
• Refer to text and numeric messages as Text Messages.
• Stamp the message with the time and date the message was left.
• Store up to 16 messages at a time, that will remain until you delete them.
NOTE: “Mail Waiting, Memory Full” displays when 16 message
registers are full. (Messages must be erased before you can
receive others.)
• Allow for “Auto Call Back” of a phone number that is included within a
message, by pressing s. If the message contains two phone numbers, Auto
Call Back will dial the last number.

Text and Numeric Messaging
FIRST DRAFT 87
New Messages Indicators
When you receive a new message:
•New Text Message will display on the screen.
• Your phone will alert you every 30 seconds until you press B under
READ or A under EXIT. (If you are on a call, your phone will alert you
once during the call.)
Accessing New Messages
When you receive a message, you can view it immediately or later:
View a Message Immediately
Viewing a Message Later
1
Press B under READ. The message displays.
2
If the message fills more than one screen, use S to scroll through the
rest of the message.
3
Press A under SAVE to save the message.
Or,
Press B under DELETE to delete the message.
Press A under EXIT. The . icon will appear on the second line of the
Ready screen to remind you that you have a stored message.
i
www.motorola.com/iden
88 FIRST DRAFT
Viewing Stored Messages
Net Alert
With Net Alert, you can send text and numeric messages in any of three ways:
• from your i58sr Phone
• from a web site provided by your service provider
• from any email application
When you receive a new message:
• Words will display on your phone’s display screen indicating that you have
a Net Alert message. (The exact words displayed are determined by your
service provider.)
• Your phone will alert you every 30 seconds until your press B to access
the message or press A to exit the screen.
If you choose to exit the screen and view the message later, the . icon will
appear on the second line of the Ready screen to remind you that you have a
stored message.
You can view new or stored Net Alert messages at any time by access the
Message Center. For more information, see “Message Center” on page 83.
1
In the Message Center screen, press S to scroll down to Text Msgs.
The number of new messages and the total number of messages are
displayed.
2
Press B under SELECT. The Text Msg Inbox screen appears.
3
Press S to scroll to the message you want to read and press B under
READ.
4
If the message fills more than one screen, use S to scroll through the
rest of the message.
5
Press A under SAVE to save the message.
Or,
Press B under DELETE to delete the message.

Using Your Phone as a Modem
FIRST DRAFT 89
Using Your Phone as a Modem
NOTE: Some features may be network dependent or subscription only,
and may not be available in all areas. Contact your service
provider for more information.
You can use your i58sr phone as a modem for data transfer from your laptop,
handheld device, or desktop computer. This is particularly useful when there is
no wired phone line (wall jack) available.
You simply attach a data cable (available separately) to your phone and your
computer. From that point, your phone is your modem. This allows you to send
or receive time-critical information such as email, a field service report, or files.
In addition, you can also send or receive faxes.
This type of wireless connection uses one of two types of data connection:
circuit-switched data and packet data.
• Circuit-switched data is typically used for sending and receiving faxes and
for transferring large files.
• Packet data is used for small file transfers such as email.
To use these services, you must install the iDEN Wireless Data Services
software (available separately). For more information on setting up your
computer and your i58sr phone for Packet and Circuit Data calls, see the
Wireless Data Services User’s Guide and contact your carrier.
TTY Users
You can use your phone and computer in TTY mode. Your computer
screen and keyboard replace the standard TTY device. For more
information, please see the Wireless Data Services User’s Guide.

www.motorola.com/iden
90 FIRST DRAFT
FIRST DRAFT 91
Private Calls
The main topics covered in this section are listed below:
Private Call
There are two ways to reach an individual using Private calls. You can enter the
person’s Private ID number then press the Push-To-Talk (PTT) button. Or, you
can store the person’s name and Private ID number, then recall the number from
your Phonebook. Whether you dial the person’s Private ID directly or store it in
your Phonebook, you must have the individual’s Private ID to use Private calls.
To learn how to store names and numbers, see “Phonebook” on page 45.
USER TIP:To find out your own Private ID number, see “My
Information” on page 30.
Making a Private Call from the Keypad
Making a Private Call from the Phonebook
If you have stored a person’s Private ID in your Phonebook, you can use your
Phonebook to make a Private call to that person:
Private Call Page 91
Call Alerts Page 93
Group Call Page 98
1
Enter the Private ID of the person you are trying to call.
2
Press and hold the PTT button on the side of the phone. Begin talking
after the phone emits a chirping sound.
3
Release the PTT button to listen.
1
From the Ready screen, press m.
2
Press R to scroll to the Phonebook. Press B under SELECT.
www.motorola.com/iden
92 FIRST DRAFT
Making a Private Call from the Recent Call List
Receiving a Private Call
When you receive a Private call, your phone emits a chirping sound and Private
in Use appears on the screen. The Private ID or the name of the caller (if stored
in your Phonebook) displays. Press and hold the PTT button to talk and release
it to listen.
Storing Private IDs
For information store Private ID numbers to your Phonebook, see “Adding
Phonebook Entries” on page 51.
3
From the Phonebook screen, press S to scroll through the names until
the desired name is highlighted.
If more than one number is stored for an entry, press T until
idisplays.
4
Press and hold the PTT button on the side of the phone. Begin talking
after the phone emits a chirping sound.
5
Release the PTT button to listen.
1
From the Ready screen, press m.
2
Press R to scroll to the Recent Calls. Press B under SELECT.
3
From the Recent Calls screen, press S to scroll through the names and
numbers until the desired name or Private ID number is highlighted.
If more than one number is stored for an entry, press T until
idisplays.
4
Press and hold the PTT button on the side of the phone. Begin talking
after the phone emits a chirping sound.
5
Release the PTT button to listen.
Call Alerts
FIRST DRAFT 93
For information on how to quickly store Private ID numbers, see “Storing Phone
Numbers and Private IDs Quickly” on page 54.
Making Calls Using Voice-Activated Dialing
If you have recorded a voice name for a Private ID in your Phonebook, Adding
Phonebook Entries (see Page 48), you can use this voice name to call the
number
USER TIP:If you have difficulty making phone calls using a voice
name, try assigning a longer voice name to the number. For
example, if the voice name “Joe” fails to place a call to Joe
Smith’s number, try assigning the voice name “Joe Smith”
to the number.
Call Alerts
You can send a call alert, which lets recipients know that you would like to talk
with them. When you send an alert, the recipient will receive a series of beeps
and your name or Private ID will appear on the display.
1
From the Ready screen, press m.
2
Press R to scroll to the Recent Calls. Press B under SELECT.
3
From the Recent Calls screen, press S to scroll through the names and
numbers until the desired name or Private ID number is highlighted.
4
Press and hold the PTT button on the side of the phone. Begin talking
after the phone emits a chirping sound.
5
Release the PTT button to listen.
1
From the Ready screen, press and hold t on the side of your phone
until the Say Name Now screen appears.
2
Speaking into the microphone, say the voice name assigned to the
Private ID you want to call.
3
Your phone will play the name back to you. Press the PTT button.
www.motorola.com/iden
94 FIRST DRAFT
Placing a Call Alert from the Keypad
Placing a Call Alert from the Phonebook
1
Enter the Private ID of the person you want to call.
2
Press B under ALERT. The Ready to Alert screen displays.
3
Press and hold the PTT button until Alert Successful displays. The alert
sounds intermittently until the user of the phone answers, queues, or
clears the alert.
1
From the Ready screen, press m.
2
Press R to scroll down to Phonebook. Press B under SELECT.
3
From the Phonebook screen, press S to scroll to the Phonebook entry
for the person you want to alert.
If more than one number is stored for an entry, press T until
idisplays.
4
Press B under ALERT. The Ready to
Alert screen appears.
5
Press and hold the PTT button until Alert Successful displays. The alert
sounds intermittently until the user of the phone answers, queues, or
clears the alert.
V

Call Alerts
FIRST DRAFT 95
Ready to Alert Screen
Ready to Alert is used to confirm your request for the alert and to prompt you
to push the PTT button:
• If you press the PTT button, the call alert is sent, and the phone displays the
Recent Calls screen.
• For call alerts placed from the keypad, pressing A under CANCEL causes
the phone to return to the Dial screen with the previously entered number
displayed.
• For call alerts placed from the Phonebook, pressing A under CANCEL
causes the phone to return to the Phonebook screen.
• If you do nothing, the phone will revert to the Ready screen.
Receiving Call Alerts
When you receive a call alert, your phone emits a chirp and displays the name or
number of the caller. You can answer, queue, or clear the call alert:
• To answer a call alert, press the PTT button.
• To queue a call alert, press B under QUEUE.
• To clear the call alert, press A under CLEAR.
Call Alert Queue
Call alert queuing enables you to save call alerts in a list, or queue. To store a
call alert in the call alert queue, press B under QUEUE when you have
received an incoming call alert.
Accessing the Call Alert Queue
1
From the Ready screen, press m.
2
Press R to scroll to Call Alert.
3
Press B under SELECT. The Call Alert Queue screen displays.
www.motorola.com/iden
96 FIRST DRAFT
Viewing Call Alert Date and Time
To find out the date and time a call alert was received:
Sorting Call Alerts
To sort your call alerts by the order they were received:
1
From the Call Alert Queue screen, press S to scroll to the desired call
alert.
2
Press m to access Call Alert Menu.
3
Press R to scroll to View.
4
Press B under SELECT.
1
From the Call Alert Queue screen, press m to access Call Alert
Menu.
2
Press S to scroll to Sort By.
3
Press B under SELECT.
4
Press S to scroll to First on Top or Last on Top.
5
Press B under SELECT.
Call Alerts
FIRST DRAFT 97
Responding to a Call Alert From the Queue
Deleting a Call Alert From the Queue
To delete a call alert from the queue:
To delete all call alerts from the queue:
1
From the Call Alert Queue screen, press S to scroll to the call alert
you want to respond to. You can respond by sending a call alert or
placing a Private call.
2
To send a call alert, press B under ALERT and then press the PTT
button.
Or,
To place a Private call, press the PTT button.
The call alert will be removed from the queue.
1
From the Call Alert Queue screen, press S to scroll to the entry you
want to delete.
2
Press m to access Call Alert Menu.
3
Press R to scroll to Delete.
4
Press B to SELECT.
5
When the confirmation screen appears, press B under YES to delete
all call alerts.
1
From the Call Alert Queue screen, press m to access Call Alert
Menu.
2
Press R to scroll to Delete All.
www.motorola.com/iden
98 FIRST DRAFT
Group Call
In a Group call, you can communicate instantly with a group of people that you
have previously set up as a Talkgroup. Your sales representative must set up
your Talkgroups by providing you with a Talkgroup number for each
Talkgroup. After you have the number, you can assign each Talkgroup number a
name and store it in your phone (see “Naming a Talkgroup” on page 98).
Talkgroups appear on your display as numbers or programmed names such as
SALES TEAM or Talkgrp 5. Your phone can store up to 30 Talkgroups. You
can initiate or participate in Group calls for Talkgroups that have been created
for you and that are stored in your Phonebook.
Naming a Talkgroup
3
Press B to SELECT.
4
When the confirmation screen appears, press B under YES to delete
the entry.
1
From the Ready screen, press m.
2
Press R to scroll to Phonebook.
3
Press B under SELECT.
4
Press S to scroll to New Entry.
5
Press B under SELECT. The Entry Details screen displays.
6
Enter the information as you would any other Phonebook entry. (See
“Adding Phonebook Entries” on page 51.) When you get to Type, make
sure that you select Talkgroup.
7
Enter the Talkgroup name or number.
8
When you have completed the Entry Details, press A under DONE.
Group Call
FIRST DRAFT 99
Making a Group Call from the Keypad
Making a Group Call from the Phonebook
Making a Group Call from the Recent Calls List
Receiving a Group Call
When you receive an incoming Group call, your phone emits a chirp.
To respond to a Group call:
1
Press # and then enter the Talkgroup number of the group that you
want to call.
2
Press and hold the PTT button on the side of the phone or press B
under ALERT, and speak. The phones of individuals in the Talkgroup
will emit a chirping sound to alert them that someone is calling.
3
Release the PTT button to listen.
1
From the Phonebook screen, press R to scroll to the name of the
Talkgroup you want to call.
2
Press and hold the PTT button on the side of the phone or press B
under ALERT, and speak. The phones of the people in the Talkgroup
will emit a chirping sound to alert them that someone is calling.
3
Release the PTT button to listen.
1
From the Recent Calls screen, press R to scroll to the name of the
Talkgroup you want to call.
2
Press and hold the PTT button on the side of the phone or press B
under ALERT, and speak. The phones of individuals in the Talkgroup
will emit a chirping sound to alert them that someone is calling.
3
Release the PTT button to listen.
www.motorola.com/iden
100 FIRST DRAFT
Joining a Talkgroup
To receive Group calls from a Talkgroup, you must first join the Talkgroup.
You may only belong to one Talkgroup at a time. When you join a new
Talkgroup, you no longer belong to your previous Talkgroup.
To join an ongoing Talkgroup:
Group-Silent Programming
Group-Silent programming enables you to silence incoming Group alerts and
communication.
Turning Group-Silent On or Off
1
Wait for the caller to finish speaking.
2
Press and hold the PTT button to talk. Release the PTT button to listen.
1
Using the keypad, press # then enter the Talkgroup number.
Or,
From the Phonebook screen, press R to scroll to the name of the
Talkgroup you want to call.
Or,
If the Talkgroup you want to join is on your Recent Call list, go to the
Recent Call screen and press R to scroll to the name of the Talkgroup
you want to call.
2
Press B under JOIN.
1
From the Ready screen, press m.
2
Press R to scroll to Settings. Press B under SELECT.
3
Press R to scroll to Tkgrp Settings. Press B under SELECT.

Group Call
FIRST DRAFT 101
4
With the Silent field highlighted, press B under CHANGE.
5
Press S to scroll to On or Off.
6
Press B under SELECT.

www.motorola.com/iden
102 FIRST DRAFT