Nikon 3142EB Digital Camera with 802.11b/g Transmitter User Manual 2 of 8
Nikon Corporation Digital Camera with 802.11b/g Transmitter 2 of 8
Nikon >
Contents
User Manual 2 of 8
21
Basic Photography and Playback
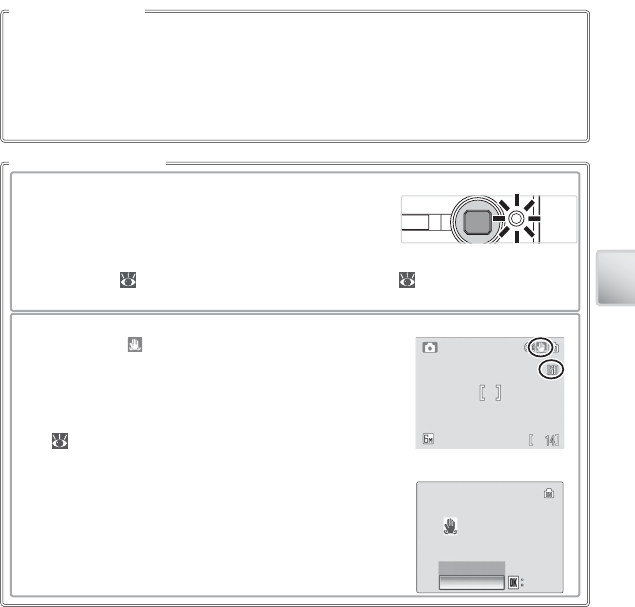
The camera uses advanced red-eye reduction. Low-intensity light pulses cause the sub-
ject’s pupils to contract before the fl ash fi res. If the camera still detects red-eye, it will pro-
cess the image to further its eff ects (“In-Camera Red-eye Fix”; note that this may slightly
increase the time needed to record the picture). This mode is not recommended where
a quick shutter response is required; if the desired results are not achieved, try again at a
diff erent fl ash setting.
Red-eye Reduction
When Lighting Is Poor
ቢ The AF-assist illuminator may light
If lighting is poor, the AF-assist illuminator may light to as-
sist the focus operation when the shutter-release button is
pressed halfway. The illuminator has a maximum range of
about 1.9 m/6 ft. 3 in. (W) to 1.1 m/3 ft. 7 in. (T). The AF-assist illuminator is not available
in some modes ( 84) and can also be turned off manually ( 75), although in this case
the camera may not focus when lighting is poor.
ባ A blur warning may be displayed
If the fl ash is off , a icon will be displayed to warn that pic-
tures may be blurred as a result of slow shutter speeds. If
an ISO icon is displayed, sensitivity has been raised to com-
pensate for poor lighting and pictures may be aff ected by
“noise” in the form of randomly-spaced, brightly-colored
dots ( 65). The camera may process pictures to reduce
noise, doubling recording times.
If the warning at right is displayed after a picture is taken,
the picture may be blurred. Select No to exit without re-
cording the picture. If no operations are performed for
about twenty seconds, the picture will be recorded auto-
matically.
PICTURE IS BLURRED.PICTURE IS BLURRED.
SAVE PICTURE?SAVE PICTURE?
PICTURE IS BLURRED.
SAVE PICTURE?
ConfirmConfirmConfirm
NoNo
Yes
No
22
Basic Photography and Playback
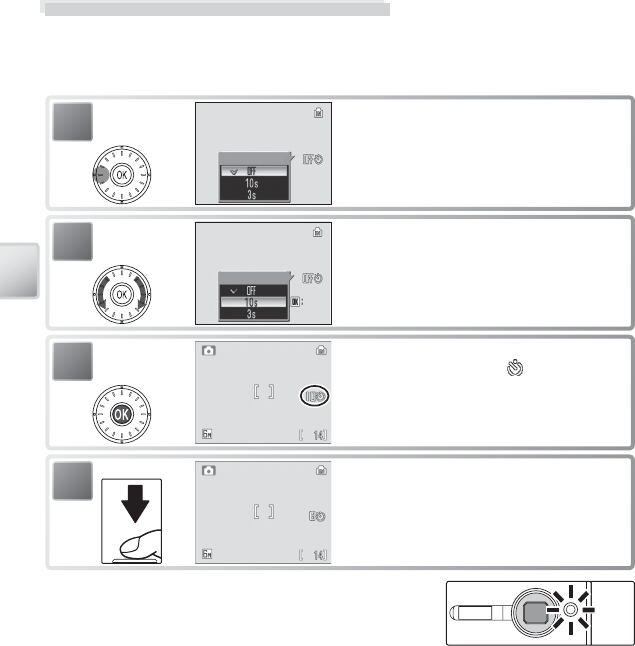
Taking Pictures with the Self-Timer
The camera is equipped with a ten- and three-second timers for self-portraits and
to reduce blur. When using the self-timer, mount the camera on a tripod (recom-
mended) or rest it on a fl at, level surface.
1
Self-timer
Display self-timer menu.
2
Self-timer
Confirm
Confirm
Confirm
Highlight option.
3 s: Use to reduce blur.
10 s: Use for self-portraits.
3Make selection (to exit without setting
timer, wait fi ve seconds). icon appears in
display.
The self-timer lamp will blink until one second before
the picture is taken, staying lit during the fi nal second
to warn that the shutter is about to be released.
4Frame picture and start timer; display in
monitor shows seconds remaining before
shutter is released. To stop timer before pic-
ture is taken, press shutter-release button
again.
23
Basic Photography and Playback
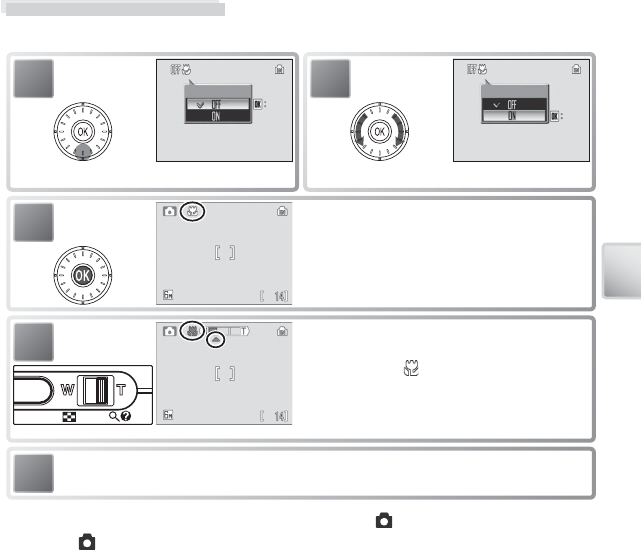
Macro Close-up Mode
Macro close-up mode is used for taking shots of objects as close as 4 cm (1.6 in.).
Focus and shoot. Note that fl ash may be unable to light entire subject at dis-
tances of less than 30 cm (1 ft.); if fl ash fi res, play picture back and check results.
5
3Make selection (to exit without changing
mode, wait fi ve seconds). Selection is shown
by icon in display.
2
Macro close-up
Confirm
Confirm
Confirm
Highlight ON.
1
Macro close-up
Confirm
Confirm
Confirm
Display macro close-up menu.
4Frame picture. Minimum focus distance var-
ies with zoom position; if zoom is adjusted to
▲ position and icon turns green, camera
can focus at distance of 4 cm (1.6 in.). Camera
focuses continuously until shutter-release
button is pressed halfway to lock focus.
The macro close-up mode option last selected for (auto) mode is restored the
next time mode is selected.
24
Basic Photography and Playback
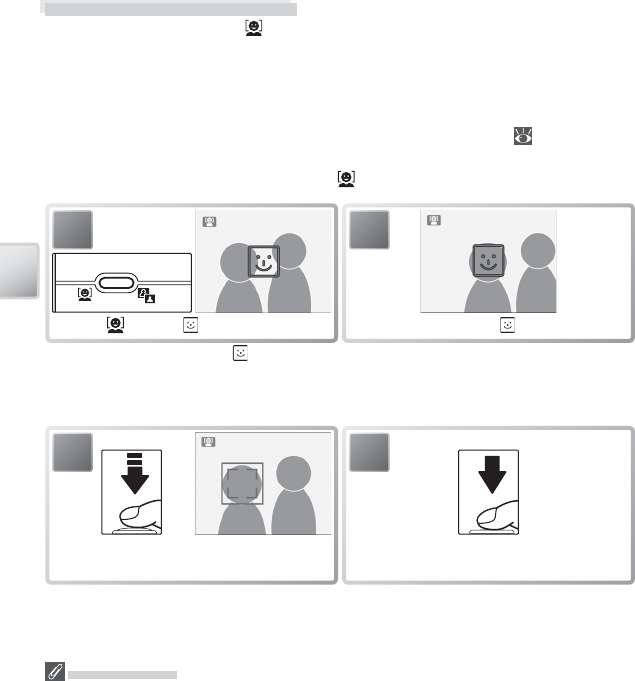
Face-Priority AF
The camera’s ability to detect faces depends on a variety of factors, including whether or not
the subject is facing the camera. The camera may be unable to detect faces that are hidden
by sunglasses or other obstructions or that take up too much or too little of the frame. If no
face is detected when the shutter-release button is pressed halfway, the camera will focus on
the center of the frame.
The camera will focus continuously until a face detected. If the double border fl ashes yellow
when the shutter-release button is pressed halfway, the camera is unable to focus; release the
button and try again.
2
Frame picture using icon as guide. *
1
Press button. icon is displayed.
* When camera detects face, will change to double yellow border. If camera detects mul-
tiple faces, it will focus on closest subject; other subjects are indicated by single border. If
camera can no longer detect subject (for example, because subject has looked away from
camera), borders will no longer be displayed; return to Step 2.
3
Set focus and exposure.
Double border turns green.
4
Take picture.
One-Touch Portrait Mode
For portrait shots, press the button when the camera is in shooting mode. This
will automatically activate the following features:
• Portrait: Background details are softened, allowing the portrait subject to stand
out clearly.
• Face-priority AF: The camera automatically detects and focuses on faces.
• Advanced red-eye reduction: Reduces “red-eye” caused by the fl ash ( 21).
Macro close-up is not available in one touch portrait mode. To return to the previ-
ously selected shooting mode, press the button again.
25
Basic Photography and Playback
The One-Touch Portrait Menu
Pressing the button in one-touch portrait mode displays the one-touch portrait
menu. With the exception of exposure compensation, the options chosen in this
menu are restored the next time one-touch portrait mode is selected.
Option Description
SET-UP Display setup menu ( 70)
Image mode Choose image size and quality ( 61).
Exp. +/–
Alter exposure from the value selected by the camera. Choose from
values between –2.0 EV and +2.0 EV. Negative values produce darker
pictures, positive values brighter pictures.
Portrait eff ect Choose from Normal, Brighter (reduces vividness of skin tones), and
Softer (soft eff ect).
26
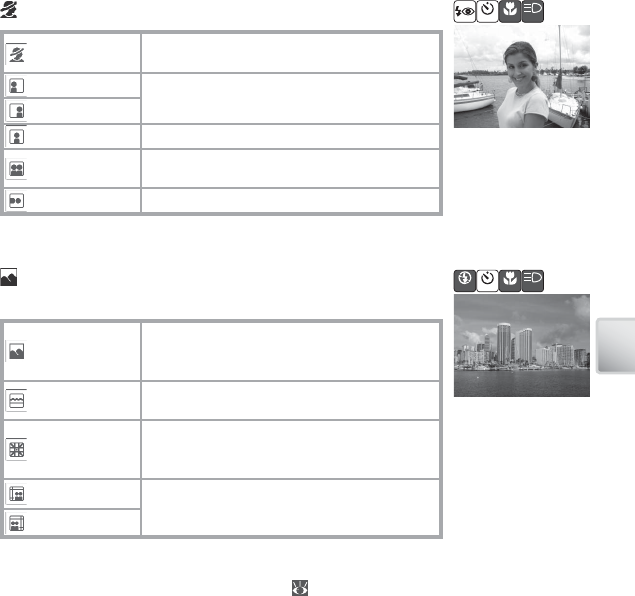
Scene and Scene Assist Modes
Scene and Scene Assist Modes
The camera off ers a choice of eleven “scene” and four “assist” options. Camera set-
tings are automatically optimized for the selected subject type.
Scene mode: The following scenes are available.
Copy
Back Light
Panorama Assist
Night Landscape
Close Up
Museum
Fireworks Show
Party/Indoor
Beach/Snow
Sunset
Dusk/Dawn
Scene assist modes: These scenes off er framing assist to help compose shots.
Mode Description
Portrait For portraits.
Landscape For landscapes.
Mode Description
Sports For moving subjects.
Night Portrait For portraits taken against
a night backdrop.
1
Display shooting mode menu.
2
Highlight .
4
Display scene menu.
3
Select and exit to last selected scene.
5
Highlight scene. *
6
Select and exit to selected scene.
* Select to display setup menu ( 70), to display image-mode menu ( 61), to
adjust exposure compensation ( 31).
Scene Mode
To take pictures in scene mode, select shooting mode and follow these steps:
27
Scene and Scene Assist Modes
7Take pictures.
The following scenes are available:
Party/Indoor
Party/Indoor
OFF OFF AUTO
Use for shots that include details of the background, or to capture the
eff ects of candlelight and other indoor background lighting.
Beach/Snow
Beach/Snow
AUTO OFF OFF AUTO
Captures the brightness of such subjects as snowfi elds, beaches, or
sunlit expanses of water.
Sunset
Sunset
OFF OFF OFF OFF
Preserves the deep hues seen in sunsets and sunrises.
The icons to the right of the scene name indicate (in order from left to right) the default
fl ash ( 20), self-timer ( 22), macro close-up ( 23), focus (see below), and AF-assist
( 21) settings for that scene. White squares ( ) indicate settings that can be changed,
solid squares ( ) settings that are fi xed at the values shown. Default values for the current
scene are restored when the camera is turned off or another scene or shooting mode is
selected. Focus is shown as follows:
Camera focuses on subject in center of frame
Camera focuses at infi nity. Focus indicator is always displayed in green when shut-
ter-release button is pressed halfway; note, however, that foreground objects may not
always be in focus.
The following icons indicate the precautions that may be needed to avoid blur:
Hold camera steady Use tripod
A icon indicates that pictures may be processed to reduce noise, resulting in increased
recording times.
Setting Icons
28
Scene and Scene Assist Modes
Dusk/Dawn
Dusk/Dawn
OFF OFF OFF OFF
Preserves the colors seen in the weak natural light before sunrise or
after sunset.
Night Landscape
Night Landscape
OFF OFF OFF OFF
Slow shutter speeds are used to produce stunning night landscapes.
Close Up
Close Up
AUTO OFF ON AUTO
Use to photograph fl owers, insects, and other small objects at rang-
es as close as 4 cm (1.6 in.), with the background artistically blurred.
Camera zooms to macro close-up position. Macro close-up icon ( )
turns green, indicating that camera can focus as close as 4 cm (1.6 in.)
to lens. Camera focuses continuously until shutter-release button is
pressed halfway to lock focus.
Museum
Museum
OFF OFF ON OFF
Use indoors where fl ash photography is prohibited (for example, in
museums and art galleries) or in other settings in which you do not
want to use the fl ash. BSS ( 65) turns on automatically.
Fireworks Show
Fireworks Show
OFF OFF OFF OFF
Slow shutter speeds are used to capture the expanding burst of light
from a fi rework.
Copy
Copy
OFF OFF ON AUTO
Provides clear pictures of text or drawings on a white board or in
printed matter such as a business card. Use macro close-up ( 23)
to focus at short ranges. Colored text and drawings may not show
up well.
Back Light
Back Light
OFF OFF AUTO
Use when light is coming from behind a portrait subject, throwing
their features into shadow. The fl ash fi res automatically to “fi ll in” (il-
luminate) shadows.
29
Scene and Scene Assist Modes
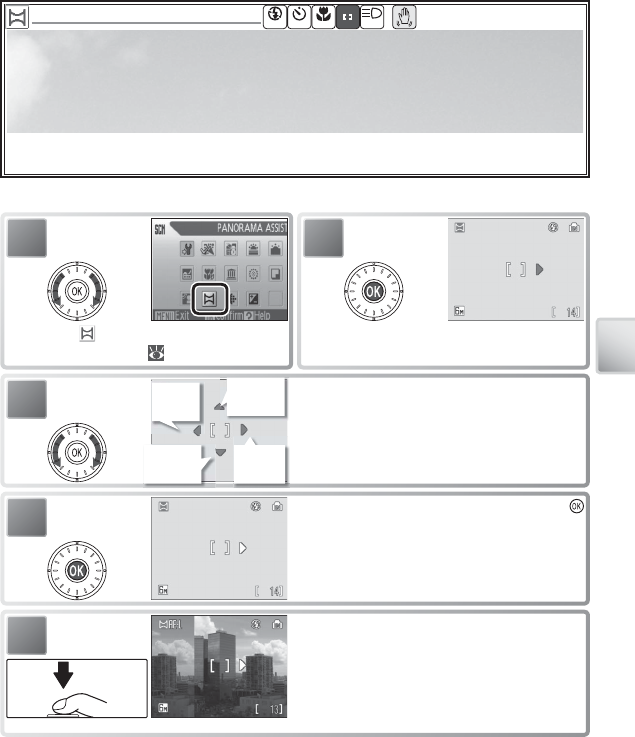
Panorama Assist
Panorama Assist
OFF OFF OFF AUTO
Use when taking a series of pictures that will later be joined together in PictureProject to
form a panorama.
Taking Pictures for a Panorama
1
Highlight (Panorama assist) in scene
menu ( 26).
2
Default pan direction displayed.
3Select how pictures will be joined together
in completed panorama. This is the direc-
tion in which camera will be panned after
each shot.
Top to
bottom
Right
to left
Left to
right
Bottom
to top
4Make selection (to return to step 3, press
button again). Pan direction displayed in
white.
5Take fi rst shot. About 1
/
3 of picture is super-
imposed on view through lens (if pan direc-
tion is left to right, picture will appear on side
of monitor). AE-L icon is displayed to show
that white balance and exposure settings for
this picture apply to all shots in series.
30
Scene and Scene Assist Modes
6
Compose next shot to overlap with previ-
ous picture.
7
Take next shot. Repeat steps 6–7 until all
shots in series have been taken.
8End series. Shooting will also end if a new
mode is selected or camera enters standby
mode ( 14).
The camera focuses on the subject in the center of the frame. Use a tripod for bet-
ter results.
Panorama Assist
Flash mode ( 20), macro close-up ( 23), and self-timer ( 22) can not be adjusted after
the fi rst picture is taken. Pictures can not be deleted or zoom or image mode ( 61) adjusted
until shooting is complete. See page 89 for information on how panoramas are stored.
31
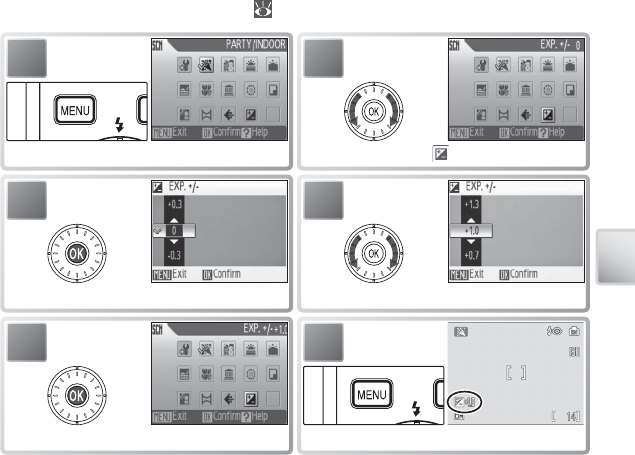
Scene and Scene Assist Modes
Using Exposure Compensation in Scene Mode
Exposure compensation is used to alter exposure from the value selected by the
camera. Choose from values between –2.0 EV and +2.0 EV. Negative values pro-
duce darker pictures, positive values brighter pictures. To choose a value for expo-
sure compensation, select a scene ( 27–29) and follow the steps below.
1
Display scene menu.
2
Highlight (Exp. +/–).
3
Display exposure compensation menu.
4
Choose value for exposure compensation.
5
Select and exit to scene menu.
6
Return to previously-selected scene.
Exposure compensation for the current scene will be reset to 0 when the camera is
turned off or another scene or shooting mode is selected.
32
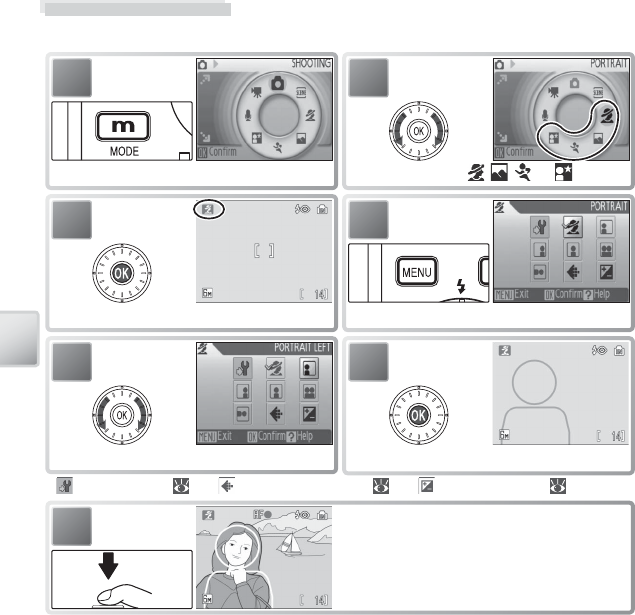
Scene and Scene Assist Modes
Scene Assist Mode
Compose pictures with the help of framing guides displayed in the monitor.
5
Highlight composition type. *
6
Select and return to shooting mode.
1
Display shooting mode menu.
2
Highlight , , , or .
3
Select and exit to selected mode.
7Take pictures. If framing guides are dis-
played, position subject in guides before
shooting.
* : camera setup ( 70); : select image-mode ( 61); : adjust exposure ( 31)
4
Display framing assist menu.
33
Scene and Scene Assist Modes
Portrait Assist: Use for smooth, natural-looking portraits.
PORTRAIT No guides are displayed. Camera sets focus
and exposure for subject in center focus area.
Portrait Left Compose shot with subject in left or right half
of frame. †
Portrait Right
Portrait Close-up Compose shot with face in top half of frame. †
Portrait Couple Compose shot with two subjects side-by-
side. †
Portrait Figure Compose shot in “tall” orientation. †
* AF-assist available in PORTRAIT mode.
† Camera sets focus and exposure for subject in framing guides.
Landscape Assist: Use for vivid landscapes or portraits that
feature a landmark in the background.
LANDSCAPE
No guides are displayed. Use to focus on dis-
tant objects through foreground objects such
as windows or a screen of branches. †
Scenic View Compose shot with sky in top third of frame.
Match skyline with wavy yellow guide. †
Architecture
Photograph buildings. Framing grid helps
keep verticals and horizontals aligned with the
frame. †
Group Right Compose shots with landmark to left or right
of portrait subjects. Camera sets focus and ex-
posure for portrait subjects.
Group Left
* In Group Right and Group Left modes, fl ash mode is automatically set to AUTO; other
modes can be selected.
† Camera focuses at infi nity. Focus indicator ( 16) is always displayed in green when shut-
ter-release button is pressed halfway; note, however, that foreground objects may not al-
ways be in focus.
OFF OFF OFF
OFF OFF OFF OFF
*
*
34
Scene and Scene Assist Modes
SPORTS
While shutter-release button is held down, camera shoots about 2.2 frames
per second (fps) until icon is displayed. Camera focuses continuously
even when shutter-release button is not pressed.
Sport
Spectator
As above, except that camera focuses at about 4.5 m/15 ft. (6 m/20 ft. at maxi-
mum zoom) to infi nity for improved shutter response.
Sport
Composite
Each time shutter-release button is pressed, camera takes
16 shots in about 2 seconds and arranges them in single
picture (1,600 × 1,200 pixels) in size. Camera focuses
continuously even when shutter-release button is not
pressed.
Night Portrait Assist: Use for a natural balance between the
main subject and background lighting in portraits shot at
night. This mode off ers the same assist options as portrait as-
sist mode. To prevent blurring, mount the camera on a tripod
or rest it on a fl at, stable surface.
Sports Assist: Capture motion in a series of high-speed shots.
No framing guides are displayed. Focus, exposure, and white
balance for all pictures are determined by the fi rst shot in each
series.
OFF OFF OFF OFF
OFF OFF OFF
*
35
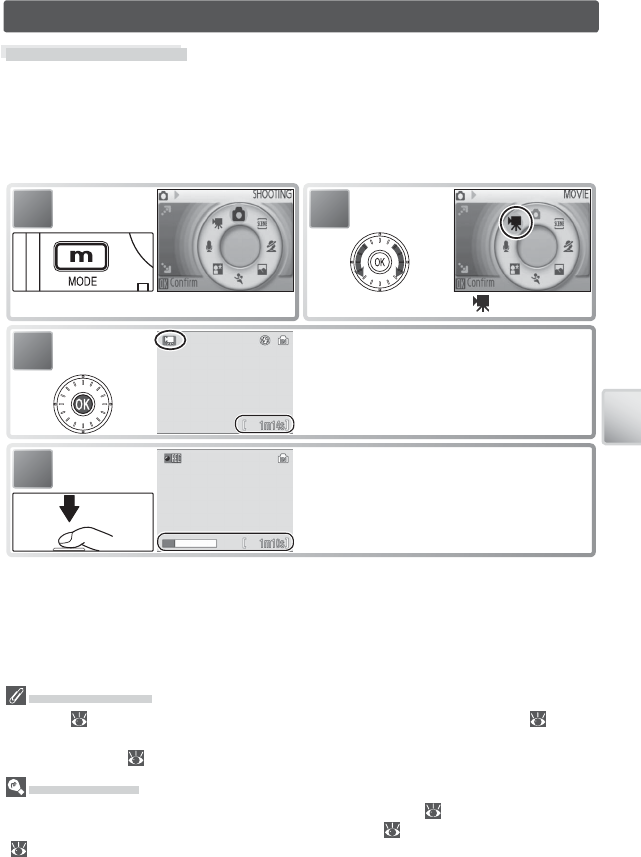
Movies
Movies
Recording Movies
To shoot movies with sound recorded via the built-in microphone, select shooting
mode and follow the steps below (no sound is recorded for time-lapse movies).
Movies recorded to internal memory at the default setting of Small Size 320 can
be up to 1 minute 14 seconds long; a 256 MB memory card can hold up to 14 min-
utes 30 seconds.
1
Display shooting mode menu.
2
Highlight .
4Press shutter-release button all the way
down to start recording. Progress bar shows
amount of memory remaining. Press shut-
ter-release button all the way down a sec-
ond time to end recording.
3Select and exit to movie mode. Exposure
count display shows maximum total length
of movie that can be recorded.
Recording Movies
The fl ash ( 20) turns off in all modes except Time-lapse movie. The self-timer ( 22) can
not be used. Optical zoom can not be adjusted during recording; digital zoom is available to
a maximum of 2 × ( 15).
More on Movies
See the Appendix for information on how movie fi les are stored ( 89), the maximum total
length of movie that can be recorded at diff erent settings ( 88), and movie menu defaults
( 87).
36
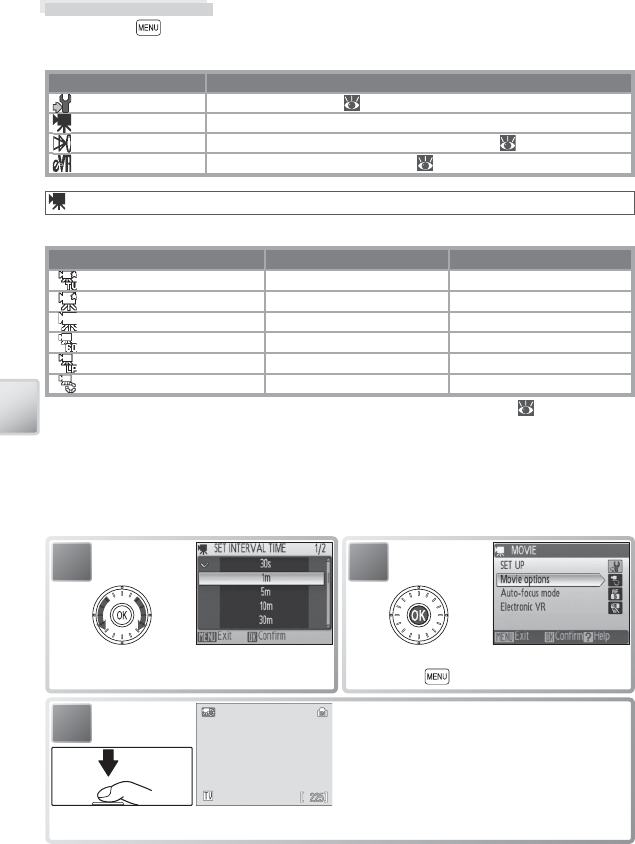
Movies
3Press shutter-release button all the way
down to start recording. Camera will take
pictures at specifi ed interval until shutter-
release button is pressed again, memory
is full, or 1800 frames have been recorded.
Monitor turns off and indicator lamp blinks
green between shots.
1
Choose interval between shots.
2
Select and exit to movie options menu.
Press button to exit menu.
The Movie Menu
Pressing the button in movie mode displays the movie menu. Options chosen
in this menu are restored the next time movie mode is selected.
Option Description
SET-UP Display setup menu ( 70).
Movie Options Choose type of movie that will be recorded (see below).
Auto-focus Mode Choose how camera focuses in movie mode ( 37).
Electronic VR Reduce eff ects of camera shake ( 37).
Movie Options
The following options are available:
Option Size (pixels) Frames per second
TV movie 640★640 × 480 30
Small Size 320★320 × 240 30
Small Size 320 320 × 240 15
Pictmotion 320 * 320 × 240 15
Smaller Size 160 160 × 120 15
Time-lapse movie★640 × 480 30
* Maximum length is 60 s, making movie suitable for use with Pictmotion ( 48).
Time-Lapse Movie: Record fl owers opening or butterfl ies emerging from cocoons.
The camera takes up to 1800 stills at specifi ed intervals and joins them into a silent
movie up to sixty seconds long. Charge the battery before shooting begins.
Selecting Time-lapse movie★ displays the menu shown in Step 1, below.
37
Movies
Auto-focus Mode
Choose how the camera focuses in movie mode.
Option Description
Single AF
Camera focuses when shutter-release button is pressed halfway and
locks at this position during shooting, preventing sound of camera
focusing from interfering with recording.
Continuous AF Camera constantly adjusts focus, even when shutter-release button
is not pressed.
Electronic VR
Choose On to reduce the eff ects of camera shake in all movie modes except Time-
lapse movie. An electronic VR indicator is displayed in the monitor when elec-
tronic VR is on ( 6–7).
38
Movies
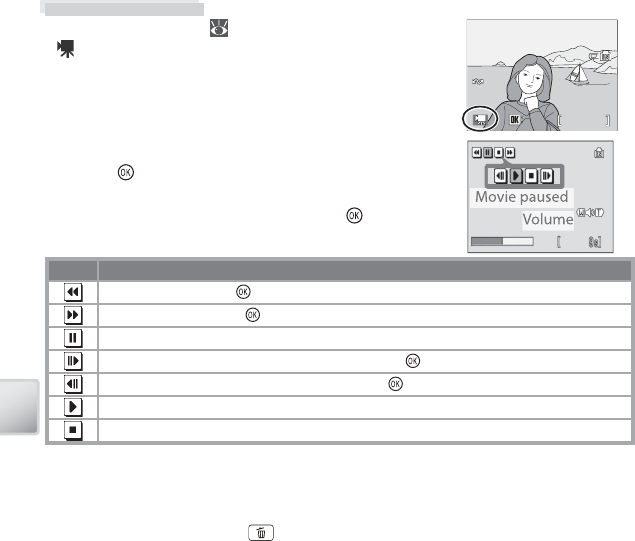
To play a movie, display it in full-frame playback and
press the button. Playback controls appear at the
top of the display; press the rotary multi selector left or
right to highlight a control, then press the button to
perform the selected operation.
Control Description
Movie rewinds while button is pressed.
Movie advances while button is pressed.
Pause playback. Rotate rotary multi selector for single-frame advance or rewind.
Go ahead one frame. Advance continues while button is pressed.
Go back one frame. Rewind continues while button is pressed.
Resume playback.
End movie and return to full-frame playback.
Volume is displayed when the zoom control is pressed. Select W to lower volume,
T to increase. Rotate the rotary multi selector to fast forward or rewind while the
movie is playing. To delete a movie, display it in full-frame playback or select it in the
thumbnail list and press the button. A confi rmation dialog will be displayed.
15.05.2006
15.05.2006
15.05.2006
10:20
10:20
10:20
100NIKON
100NIKON
100NIKON
0001.MOV
0001.MOV
0001.MOV
1m
14s
14s
1m14s
Start
Start
Start
Movie Playback
In full-frame playback ( 41), movies are indicated by
a icon.
39
Voice Recordings
Voice Recordings
Audio voice recordings can be recorded over the built-in microphone and played
back over the built-in speaker.
Making a Voice Recording
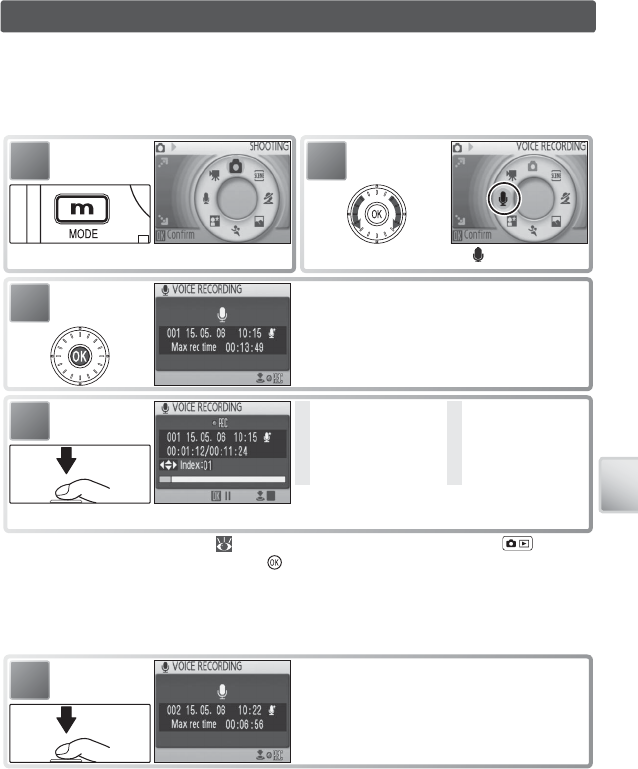
To make a voice recording, select shooting mode and follow these steps:
1
Display shooting mode menu.
2
Highlight .
3Select and exit to voice recording mode.
Display shows length of recording that can
be made.
* Camera enters stand-by mode ( 14) and indicator lamp turns green. Press to reacti-
vate display. To pause recording, press button; self-timer and indicator lamps will blink.
Press again to resume.
† To create index, press rotary multi selector up, down, left, or right during recording. Camera
can skip to any index during playback. Start of recording is index number 01; other numbers
are assigned in ascending order, to maximum of 98.
4
Press shutter-release button all the way down to start recording. *
1 Recording indicator
2 File number
3 Length of recording
4 Date of recording
5 Time remaining
6 Index number †
7 Progress indicator
5Press shutter-release button all the way
down a second time to end recording. Re-
cording will end automatically after fi ve
hours or when no more memory is avail-
able.
1
1
2
2
3
3
7
7
6
6
5
5
4
4

40
Voice Recordings
The Voice Recording Menu
Pressing the button in voice recording mode displays the following options.
The option selected for Sound quality is restored the next time voice recording
mode is selected.
Option Description
SET-UP Display setup menu ( 70).
Sound quality Select High for high quality, Normal for reduced fi le size.
Voice Recordings
PictureProject can not be used to transfer or play voice recordings. Select Interface > Mass
storage for USB, copy the fi les manually, and then play them back using QuickTime or any
other WAV-compatible audio player. Note that index points created with the camera can not
be used when voice recordings are played back on another device.
The COOLPIX S6 may be unable play or copy sound fi les created with other devices. See the
Appendix for information on how voice recordings are stored ( 89) and on the maximum
total length of voice recording that can be stored ( 88).