Nikon 3142EB Digital Camera with 802.11b/g Transmitter User Manual 6 of 8
Nikon Corporation Digital Camera with 802.11b/g Transmitter 6 of 8
Nikon >
Contents
User Manual 6 of 8
51
Viewing Pictures on the Camera
* Place hand behind speaker
for better sound.
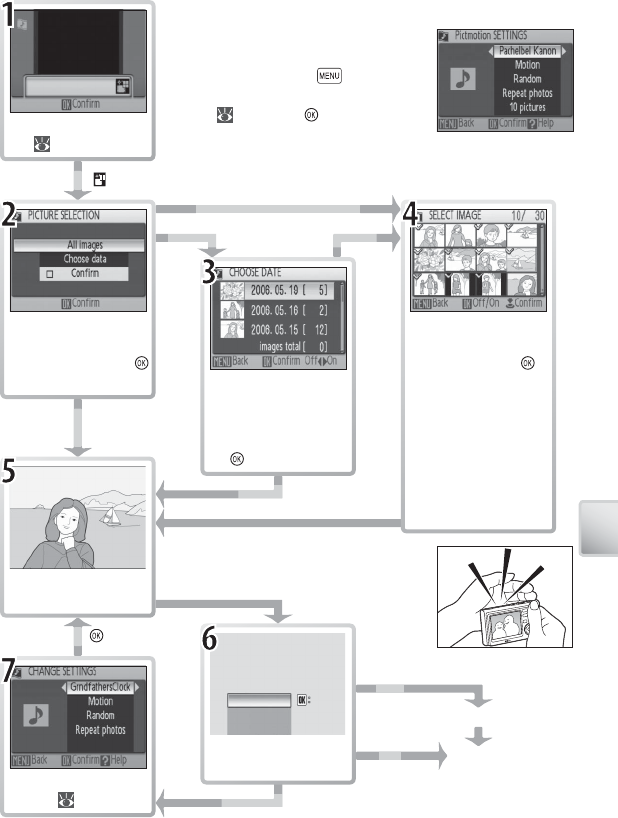
To create a custom Pictmotion movie:
To select pictures
for movie, highlight
Confi rm and press
to turn check box on.
Display options
( 48, Step 3).
Select
All images (Confi rm on)
Rotate rotary multi
selector to highlight
date, press left or
right to select. Press
when done.
Rotate rotary multi
selector to highlight
pictures; press
to select (up to 30).
Press zoom control to
T to view highlighted
picture full, frame;
select W to return to
thumbnail display.
Press shutter button
when done.
Confi rm off
All images
(Confi rm off )
View
Pictmotion. *
Choose date
Adjust settings
( 50).
Confi rm on
Save Pictmotion?
Save Pictmotion?
Save Pictmotion?
Yes
No
No
Change settings
Change settings
Confirm
Confirm
Confirm
Change settings
No
Confi rmation dialog
displayed.
Change settings
Save Pictmotion
Return to
Step 1
No
Yes
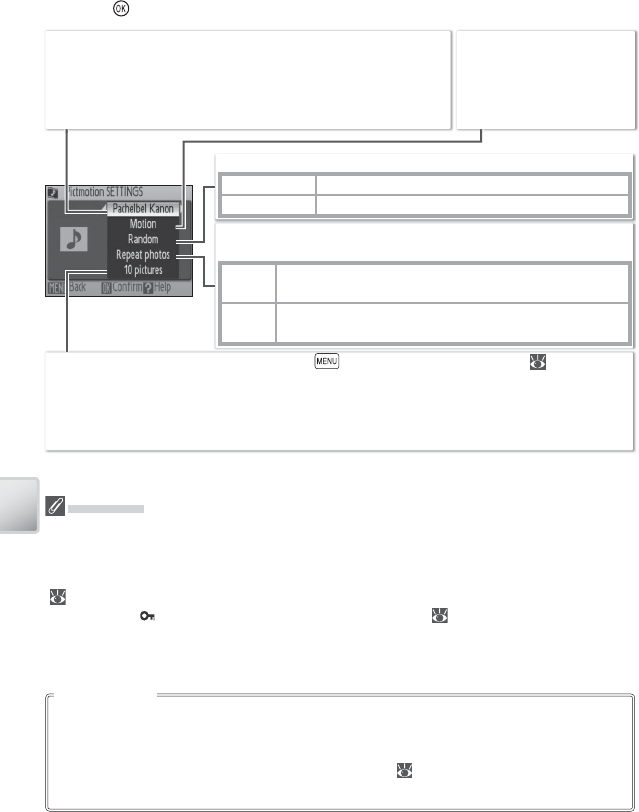
To choose style, background music,
playback order, and number of slides
for new movie, press button and
make selections in Pictmotion settings
dialog ( 50). Press when done.
Press
52
Viewing Pictures on the Camera
Other Options (Steps 1 and 7 on Page 49)
Rotate the rotary multi selector to highlight options, press left or right to change.
Press the button to exit when done.
Playback order: Choose order of pictures in movie.
Random Play pictures in random order.
Play in order Play pictures in order recorded.
Fit to length: Choose whether to play background track once or re-
peat track until all pictures have been displayed at least once.
Repeat
audio
Repeat background track until all pictures have been
played at least once (some pictures may be repeated).
Repeat
photos
Play background track once, repeating or omitting pic-
tures as necessary.
Auto select: This option is only available if button is pressed in Step 1 ( 49). Choose
from 10, 20, 30 or No auto select. This will be number of slides in slide show if Confi rm is
not selected in Step 2. If Confi rm is selected in Step 2, specifi ed number of images will be
selected in Step 4, starting with most recent picture. Follow instructions in Step 4 to change
selection.
The supplied PictureProject software can be used to copy up to three three-minute cus-
tom sound tracks to a memory card and to copy Pictmotion movies to the computer
(Windows only). Before copying sound tracks to the computer, set the Interface > USB
option in the camera setup menu to Mass Storage ( 76). See the PictureProject refer-
ence manual (on CD) for details.
PictureProject
Pictmotion
If the current memory card holds twenty Pictmotion movies, no additional movies can be
created until an existing movie has been deleted.
The pictures in a Pictmotion movie are automatically protected when the movie is saved
( 68). Protection is not removed when the Pictmotion is deleted. Protected pictures are
marked with a icon in full-frame and thumbnail playback ( 6–7).
Pictmotion supports both still pictures and movie fi les; note, however, that in the case of mov-
ies only a small portion selected from the fi rst sixty seconds of each movie will be included.
Style: Choose from Motion,
Moody, Pro-Slow, Pro-
Fast, and Classic. Press
zoom control to T to pre-
view selected style.
Music: Choose from Pachelbel’s Canon, Scarborough Fair, Pomp
and Circumstance March, Turkish March, and Grandfather’s
Clock; press zoom control to T to preview selected track (pre-
installed tracks only). Up to three custom tracks can be added
using PictureProject (Windows only; see below).
53
Viewing Pictures on the Camera
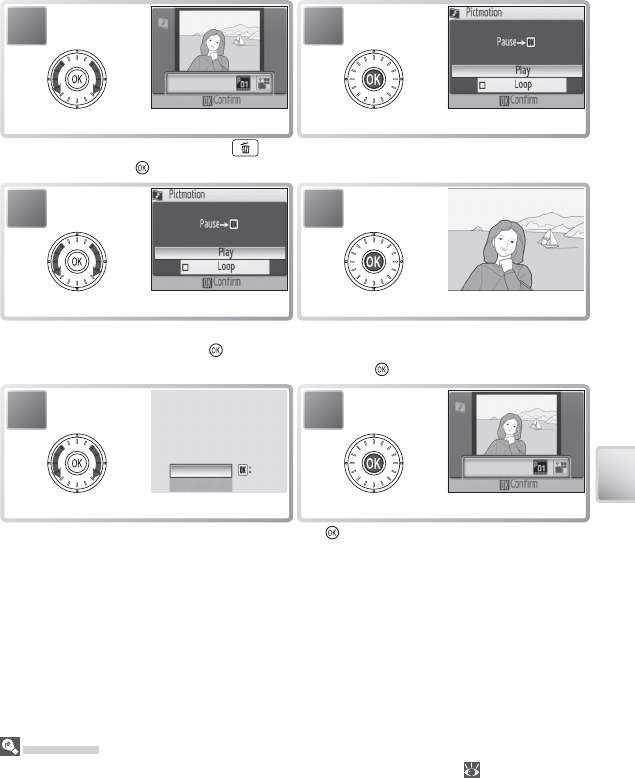
Viewing Pictmotion Movies
To view Pictmotion movies, display the Pictmotion menu as described in Steps 1–3
on page 48 and follow the steps below.
Pictmotion
See the Appendix for information on how Pictmotion movies are stored ( 89).
1
Highlight movie. *
2
Display Pictmotion playback screen.
3
Highlight Play. †
4
View movie. ‡
5
Confirm
Confirm
Confirm
End
Restart
Restart
Restart
Highlight End. **
6
Exit to movie list.
* To delete highlighted movie, press button. Confi rmation dialog will be displayed; high-
light Yes and press .
† If Loop option is selected, movie will repeat automatically. To select or deselect Loop op-
tion, highlight Loop and press .
‡ Zoom control controls volume. To pause playback, press .
** To resume playback, highlight Restart and press .
54
Connecting to Televisions, Computers, and Printers
Connecting to Televisions, Computers, and Printers
By connecting the camera to another device using the supplied A/V or USB cables,
you can:
• View pictures on TV and record movies to video (see below)
• Copy pictures to a computer for storage and editing ( 52–54)
• Print pictures on a home printer ( 55) or order prints from photofi nisher
Pictures can also be transmitted to a computer or printed over a wireless LAN (
00–00). Before connecting the camera to another device, it may be necessary to
change the Interface settings in the setup menu ( 54, 76). To prevent the cam-
era from turning off unexpectedly during connection, use fully charged batteries or
the supplied AC adapter.
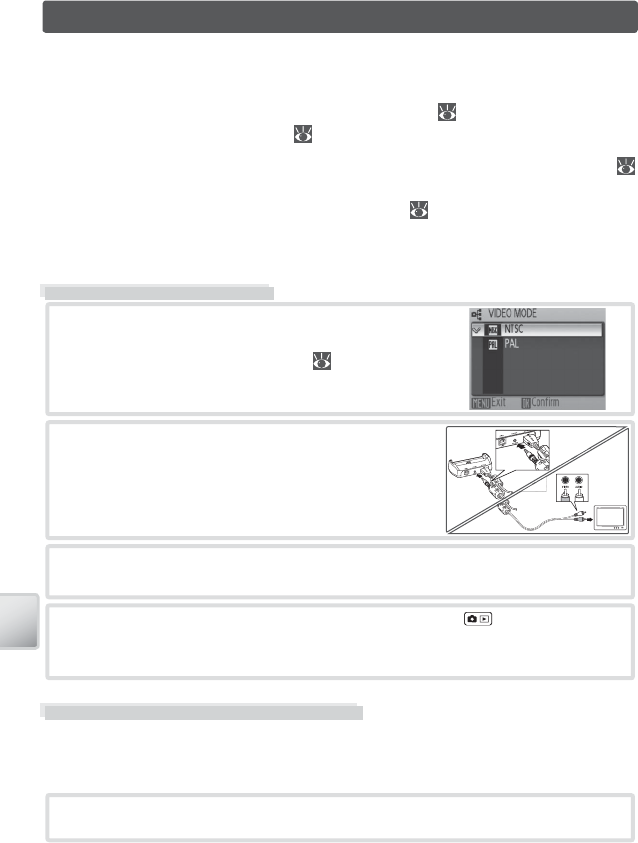
Viewing Pictures on TV
1 Check that the option selected for Inter-
face > Video mode matches the device to which
the camera will be connected ( 76), and then
turn the camera off .
4 Place the camera in the COOL-STATION and press the button for about a
second to turn the camera on. The camera monitor will remain off and the
television will show the image normally shown in the monitor.
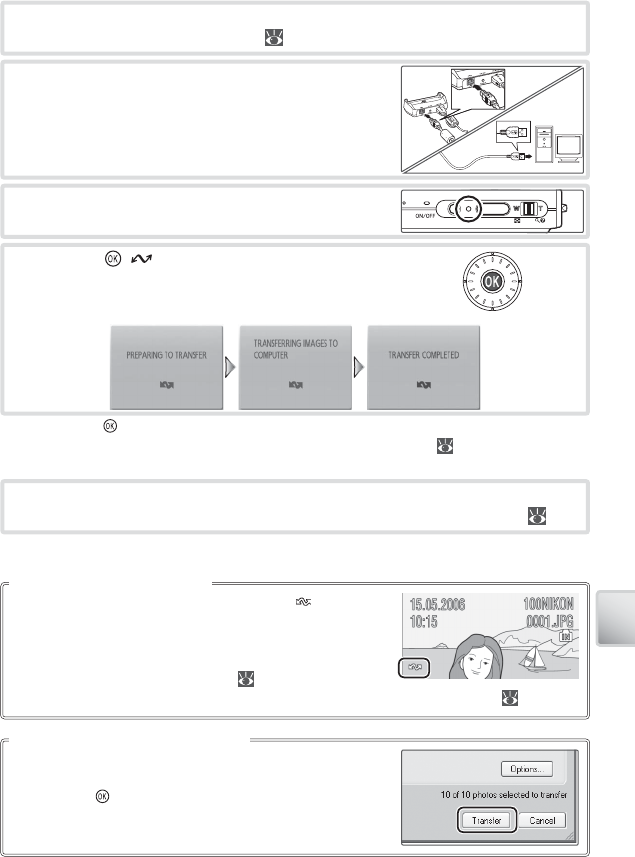
Viewing Pictures on a Computer
Before pictures can be transferred (copied) to a computer via USB, PictureProject
must be installed. For more information on installing and using PictureProject, see
reference CD and Quick Start Guide. To transfer pictures to a computer:
1 Start a computer to which PictureProject has been installed.
2 Connect the COOL-STATION to the TV using the
supplied A/V cable. Connect the black plug to the
COOL-STATION, the yellow plug to the video-in
jack on the TV, and the white plug to the audio-in
jack.
3 Tune the television to the video channel. If in doubt, consult the documenta-
tion for the TV.
55
Connecting to Televisions, Computers, and Printers
2 Choose an Interface > USB option as described in “Choosing a USB Option
for Connection to a Computer” ( 54) and then turn the camera off .
To copy both marked and unmarked pictures to the com-
puter, click the PictureProject Transfer button instead of
pressing the button in Step 5. See the Quick Start Guide
or PictureProject reference manual (on CD) for details.
The PictureProject Transfer Button
Pictures marked for transfer are shown by a icon during
playback. By default, all pictures are automatically marked
for transfer. Two options control transfer marking:
• Interface > Auto transfer (setup menu): Choose On to
mark all new pictures for transfer ( 76).
• Transfer marking (playback menu): Change marking for existing pictures ( 68).
Marking Pictures for Transfer
4 Place the camera in the COOL-STATION and turn it
on.
5 Press the ( ) button * to copy all marked pic-
tures to the computer. The following messages
will be displayed:
6 The pictures will be displayed in PictureProject when transfer is complete.
Disconnect the camera as described in “Disconnecting the Camera” ( 54).
3 Connect COOL-STATION to the computer using
the supplied USB cable.
* Note that the button can not be used to transfer pictures from internal memory when
Mass Storage is selected for USB or if the memory card is locked ( 13). Transfer pictures
using the PictureProject Transfer button (see below).
56
Connecting to Televisions, Computers, and Printers
Choosing a USB Option for Connection to a Computer
If PTP is selected for USB, turn the camera off and disconnect the USB cable.
If Mass Storage is selected for USB, remove the camera from the system as described be-
low before turning the camera off and disconnecting the USB cable.
• Windows XP Home Edition/Windows XP Professional: Click the
“Safely Remove Hardware” icon ( ) in the taskbar and se-
lect Safely remove USB Mass Storage Device.
• Windows 2000 Professional: Click the “Unplug or Eject Hard-
ware” icon ( ) in the taskbar and select Stop USB Mass
Storage Device.
• Windows Millennium Edition (Me): Click the “Unplug or Eject
Hardware” icon ( ) in the taskbar and select Stop USB
Disk.
• Windows 98 Second Edition (SE): In My Computer, right click
on the removable disk corresponding to the camera and
select Eject.
Disconnecting the Camera
• Macintosh: Drag the untitled camera volume (“NO NAME”)
into the Trash.
Consult the following table when choosing a USB option
for connection to a computer ( 52). The default option
is PTP. For more information on menu operations, see
“Using Menus” ( 17).
Computer operating system
Pictures transferred using:
Camera button * PictureProject button
Windows XP Home Edition
Windows XP Professional Choose Mass Storage or PTP.
Windows 2000 Professional
Windows Millennium Edition (Me)
Windows 98 Second Edition (SE)
Choose Mass Storage. †
Mac OS X 10.1.5 or later Choose PTP. Choose Mass Storage or PTP.
* Can not be used to transfer pictures from internal memory when Mass Storage is se-
lected for USB or if memory card is locked ( 13). Use PictureProject Transfer button.
† Do NOT select PTP. If PTP is selected when the camera is connected, wait until the Win-
dows hardware wizard is displayed, then click Cancel and disconnect the camera. Select
Mass Storage in the camera USB menu before reconnecting the camera.
57
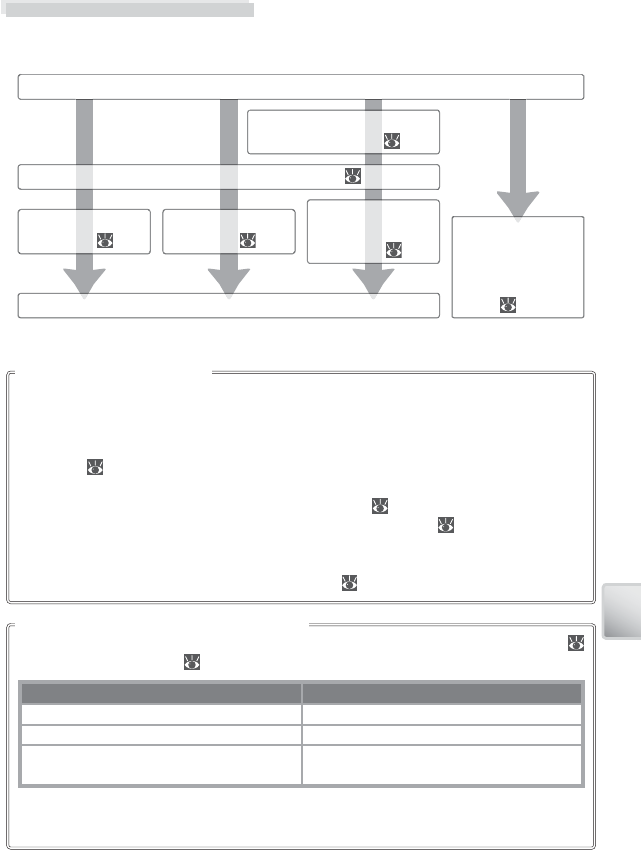
Connecting to Televisions, Computers, and Printers
Pictures can also be printed by:
• Inserting a memory card in the printer: If the printer is equipped with a card slot, a memory
card can be inserted in the printer and pictures printed directly from the card. If the
printer supports DPOF, the camera Print set option can be used to select pictures for
printing ( 59). See the printer manual for details.
• Taking memory cards to a digital print service: If the service supports DPOF, the camera Print
set option can be used to select pictures for printing ( 59).
• Transferring pictures to a computer: Once transferred to a computer ( 52–53), pictures can
be printed using imaging software. See the application and printer manuals for details.
• Sending pictures to a printer over a wireless network: Pictures can be transmitted to a printer
connected to a computer on a wireless network ( 00–00).
Other Ways to Print Pictures
Two options are available for printing the date of recording on pictures: Date imprint (
74) and Print set > Date ( 59).
Date imprint Print set > Date
Must be set before picture is taken Set after picture is taken
Date permanently imprinted on picture Date stored separately
Date appears whenever picture is printed Date only appears when picture is printed
on DPOF-compatible printer
The date only appears once; Print set > Date can not be used to print two dates on pic-
tures with a date imprint.
Printing the Date of Recording on Pictures
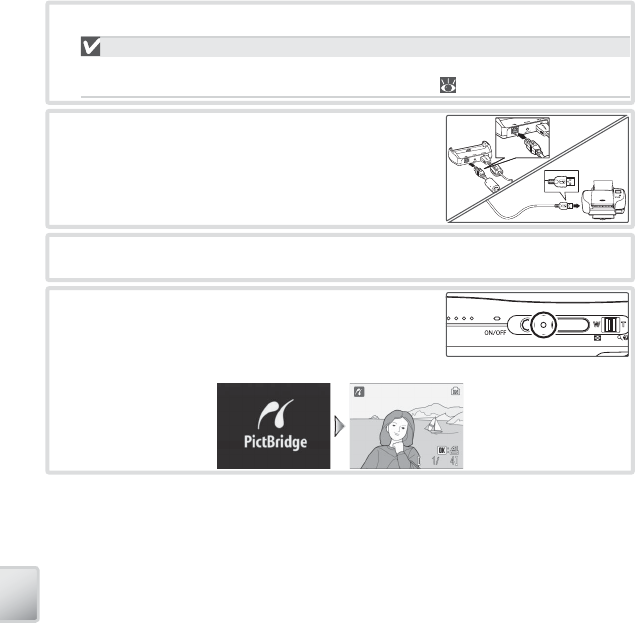
Printing Pictures Via USB
Users of PictBridge- or ImageLink-compatible printers can connect the camera di-
rectly to the printer and print pictures without using a computer.
Take photographs
Connect USB cable to PictBridge printer ( 56)
Use Print set to select pic-
tures for printing ( 59)
Print pictures one
at a time ( 57)
Print multiple
pictures ( 58)
Print current print
order (DPOF
printing; 58)
Disconnect USB cable
Place camera in
ImageLink printer
dock and print pic-
tures from printer
( 60)
58
Connecting to Televisions, Computers, and Printers
4 Place the camera in the COOL-STATION and turn it
on. A PictBridge start-up screen will be displayed.
The camera will then enter full-frame playback
with the PictBridge logo displayed in the moni-
tor.
Connecting the Printer
3 Turn the printer on.
2 Connect COOL-STATION to the printer using the
supplied USB cable.
1 Turn the camera off .
USB
PTP (the default option) must be selected for Interface > USB in the camera setup
menu before the camera can be connected to a printer ( 76).
59
Connecting to Televisions, Computers, and Printers
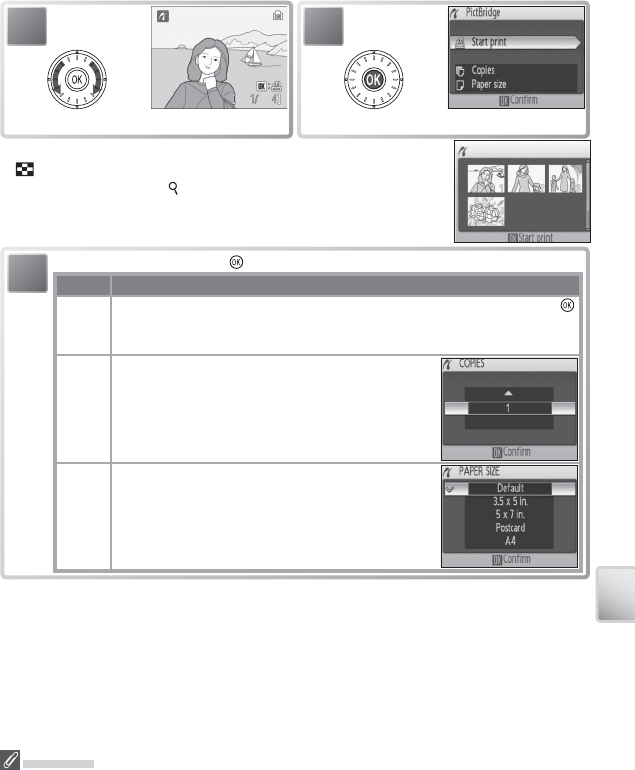
Printing Pictures One at a Time
Highlight option and press :
Option Description
Start
print
Start printing. To cancel before all copies have been printed, press .
Camera returns to PictBridge playback display when printing is complete;
repeat from Step 1 to print additional pictures.
Copies Choose number of copies (up to 9).
Paper
size
Choose from Default (the default page size for
the current printer), 3.5 x 5 in., 5 x 7 in., Postcard,
100x150mm, 4 x 6 in., 8 x 10 in., Letter, A4, and
A3. Only sizes supported by the current printer
will be displayed.
3
* To choose picture from thumbnail list, press zoom control to W
() and use rotary multi selector to highlight desired picture, or
press zoom control to T ( ) to exit to full-frame playback.
Paper Size
Paper size can not be selected from the camera if the printer does not support the page sizes
used by the camera or the printer automatically selects the page size. Use the printer to select
page size.
1
Select picture. *
2
Display print options.
60
Connecting to Televisions, Computers, and Printers
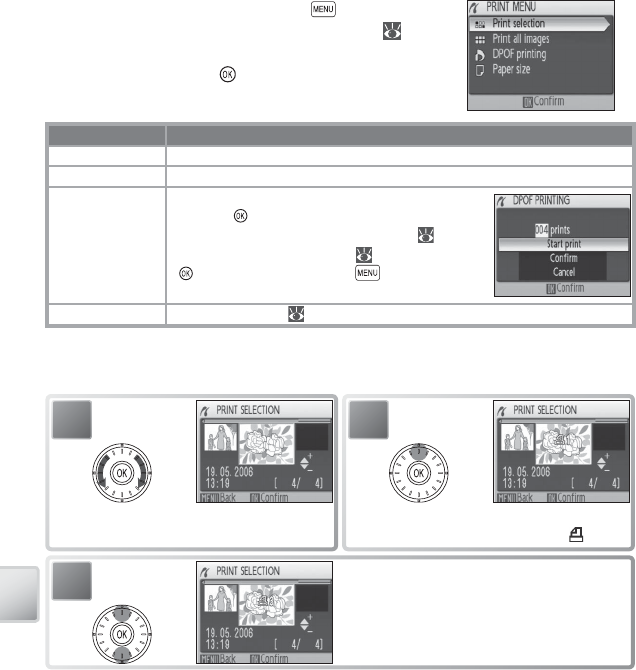
Printing Multiple Pictures
To print multiple pictures, press the button while
the PictBridge playback screen is displayed ( 56).
The menu shown at right will be displayed; highlight
an option and press the button.
Option Description
Print selection Print selected pictures (see below).
Print all images Print one copy of all images.
DPOF printing
Menu shown at right displayed. Highlight option
and press :
• Start print: Print current print order ( 59).
• Confi rm: View print order ( 59, Step 4). Press
to start printing, or press to exit.
• Cancel: Exit without printing.
Paper size Choose page size ( 57, Step 3).
Printing Selected Pictures
Choosing Print selection displays the menu shown in Step 1.
1
Scroll through pictures. Current picture
shown at center of display.
2
Select picture and set number of prints to
1. Selected pictures marked by icon.
3Choose number of prints (up to 9). To de-
select picture, press rotary multi selector
down when number of prints is 1. Repeat
steps 1–3 to select additional pictures.