Nikon 3142EB Digital Camera with 802.11b/g Transmitter User Manual 7 of 8
Nikon Corporation Digital Camera with 802.11b/g Transmitter 7 of 8
Nikon >
Contents
User Manual 7 of 8
61
Connecting to Televisions, Computers, and Printers
* Press again to cancel before printing is complete.
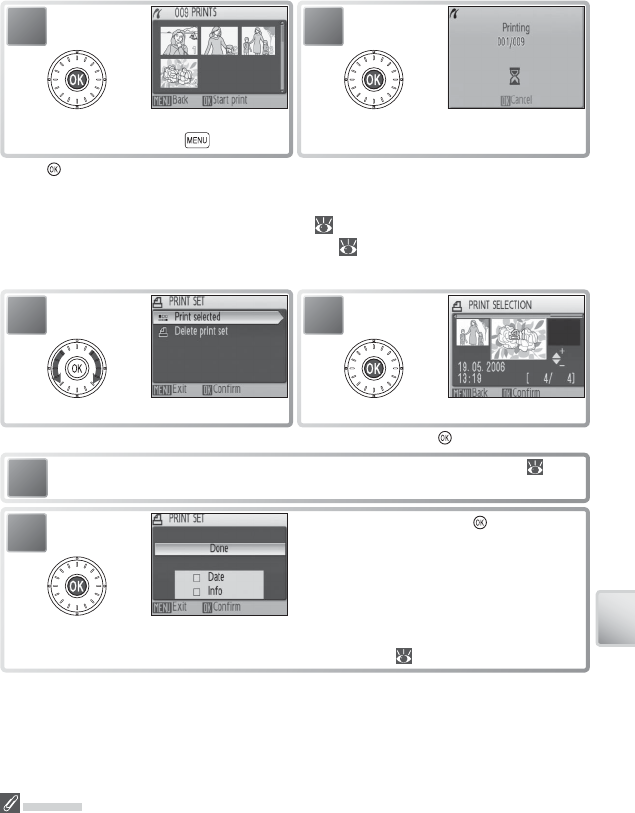
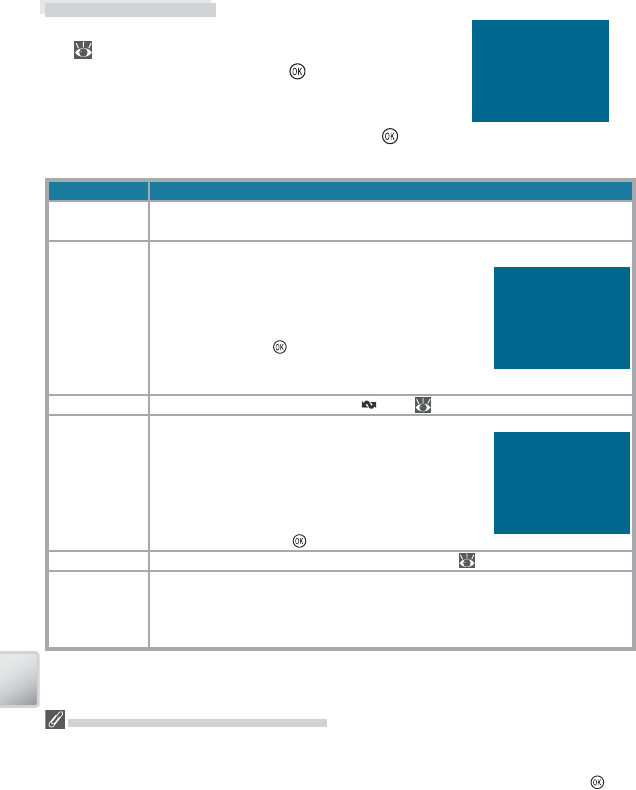
Creating a DPOF Print Order: Print Set
The Print set option in the playback menu ( 67) is used to create digital “print or-
ders” for printing on DPOF-compatible devices ( 86). Selecting Print set displays
the menu shown in Step 1.
Select pictures as described in Steps 1–3 of “Printing Selected Pictures” ( 58).
3
* To delete current print order, highlight Delete Print Set and press .
Print Set
Date and Info are reset each time the menu shown Step 4 is displayed. Info is not printed
when the camera is connected directly to the printer.
4
Confi rm selection (to return to step 1 and
change selection, press button).
5
Start printing. PictBridge menu is dis-
played when printing is complete. *
1
Highlight Print Selected.
2
Display selection dialog.
4Highlight option and press :
• Date: Print date of recording on all pictures
in print order.
• Info: Print shutter speed and aperture on
all pictures in print order.
• Done: Complete print order and exit. Pic-
tures in print order are shown by icon dur-
ing playback ( 6–7).
62
Connecting to Televisions, Computers, and Printers
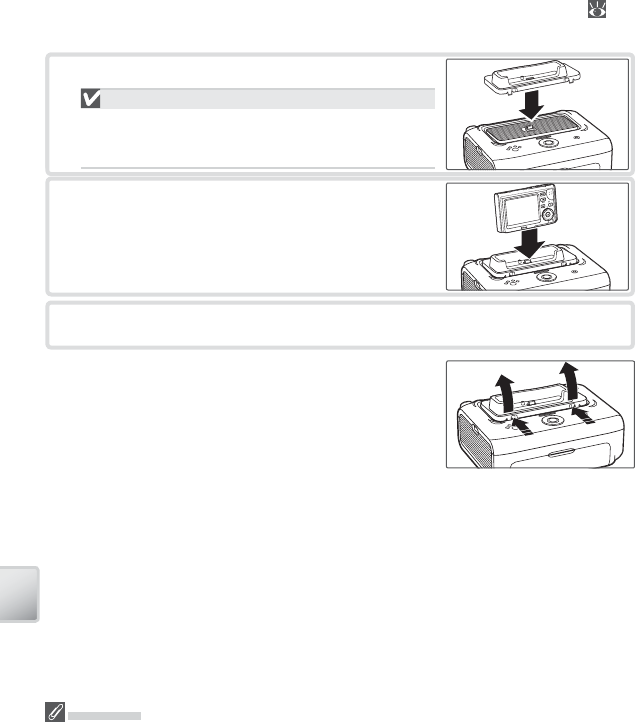
ImageLink
Use the supplied PV-10 dock insert to print pictures on an ImageLink printer ( 86).
See the printer manual for details.
1 Attach the supplied printer insert to the printer.
1 Attach the dock insert to the printer.
USB
PTP (the default option) must be selected for Inter-
face > USB in the camera setup menu before the cam-
era can be connected to a printer.
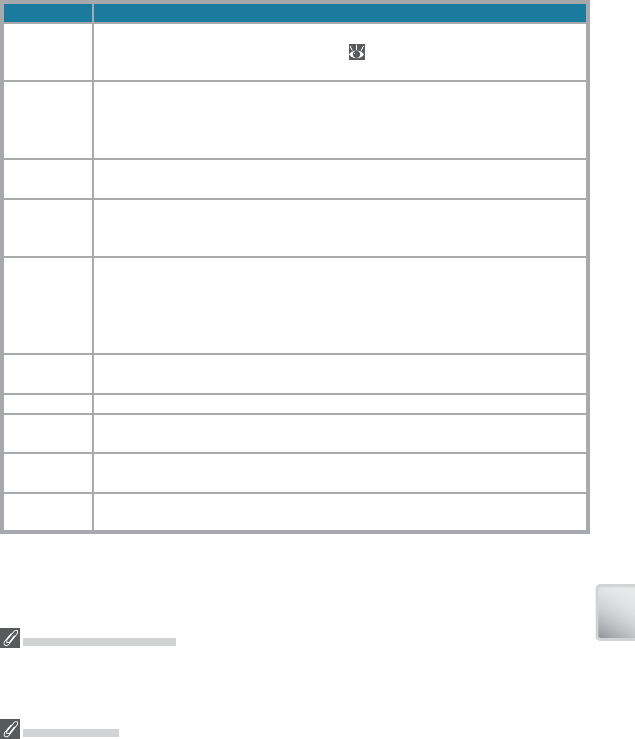
2 Turn the camera off and attach it to the dock in-
sert. The camera will turn on automatically.
3 Print pictures as described in the printer manual.
To remove the dock insert, place your thumbs where
indicated, press, and lift.
ImageLink
The monitor will turn off automatically if no operations are performed for about one minute
while the camera is connected to an ImageLink printer. If no operations are performed for
another seven minutes, the camera will turn off .
If the printer does not support the language selected in the camera setup menu, menus will
be displayed in English.
63
Wireless Transfer and Printing
Wireless transfer is available with computers running Windows XP Home Edition/
Windows XP Professional Service Pack 1 or later (Service Pack 2 or later recom-
mended) or Mac OS X version 10.3 or later. To confi gure the camera for use with
the wireless network, you will also need the Wireless Camera Setup Utility, which is
installed with Picture Project; see the Quick Start Guide and the PictureProject Refer-
ence Manual (on CD) for installation instructions.
Wireless Transfer and Printing
Using the camera’s built-in IEEE 802.11b/g wireless transmitter, you can:
• Transmit pictures to a computer for storage and editing ( 00–00)
• Save pictures directly to the computer hard disk as they are taken ( 00)
• Print pictures on a printer connected to a wireless network ( 00)
To prevent the camera from turning off unexpectedly during transmission, use the
supplied AC adapter.
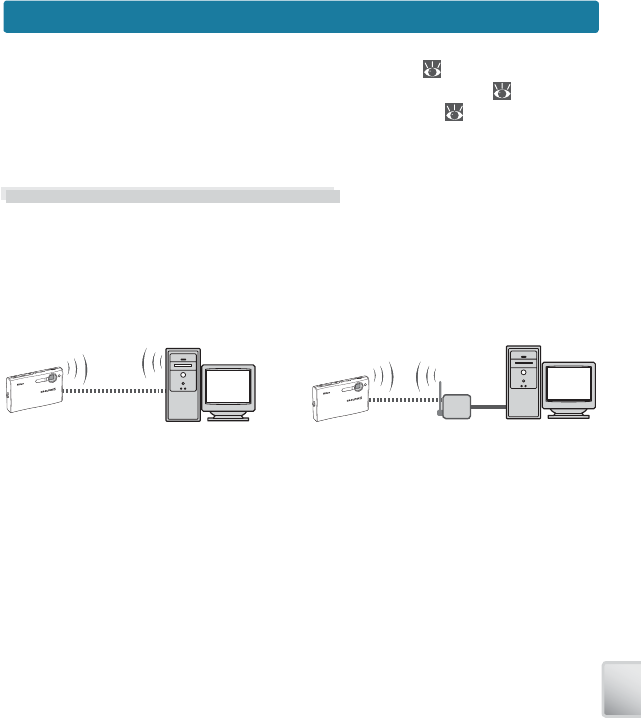
Connecting to a Wireless Network
Wireless transfer and printing requires a wireless local-area network (LAN) compat-
ible with the IEEE 802.11b/g standard. The network can consist of the camera in
peer-to-peer communication with a single computer equipped with a wireless LAN
adapter (ad-hoc mode) or of a camera connected to a wireless network via a wire-
less LAN access point (infrastructure mode).
Ad-hoc (peer-to-peer) network Infrastructure network
Wireless LAN
access point
Computer with
wireless LAN adapter
64
Wireless Transfer and Printing
Confi guring the Camera for Connection
Before the camera can be used as part of a wireless network, network settings must
be copied to the camera using the Wireless Camera Setup Utility. Follow the steps
below to prepare the camera for connection to the computer.
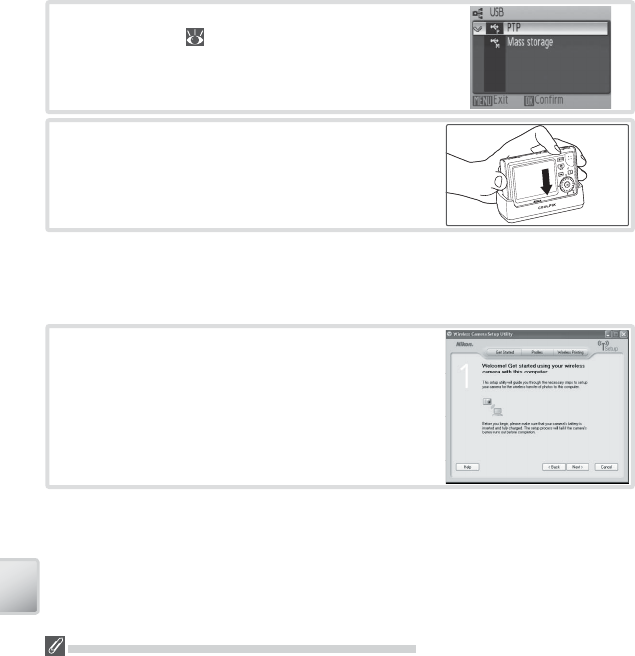
1 Set the Interface > USB option in the setup
menu to PTP ( 00) and turn the camera off .
2 Place the camera in the COOL-STATION.
See pages 00–00 for information on using the Wireless Camera Setup Utility for
Windows. Instructions for Macintosh users may be found on pages 00–00.
Windows
If the Wireless Camera Setup Utility Is Not Installed
If the Wireless Camera Setup Utility is not already installed, insert the yellow installer CD sup-
plied with the camera in a CD-ROM drive and start the installer as described in the Quick Start
Guide. In the “Install Center” window, click Wireless Camera Setup Utility. The Wireless
Camera Setup Utility will start automatically when installation is complete. The “Profi les” and
“Wireless Printing” tabs are not available during the initial installation run.
1 Turn the computer on and select All Pro-
grams > Nikon > Wireless Camera Setup
Utility from the Start menu. The dialog shown
at right will be displayed; click Next.
65
Wireless Transfer and Printing
2 Confi rm that the computer is equipped for wire-
less LAN and click Next.
3 Follow the on-screen instructions to describe your
wireless LAN setup. The Wireless Camera Setup
Utility will determine the information required to
confi gure the camera based on the type of wire-
less device used and whether the network is infra-
structure or ad-hoc.
4 The dialog shown at right will be displayed. Con-
nect the COOL-STATION to the computer using
the supplied USB cable. Place the camera in the
COOL-STATION and turn the camera on, then click
Next to proceed to the next step.
5 Enter a profi le name and choose the icon that
will appear in the camera profi le list ( 00). Click
Next to proceed. Depending on the options se-
lected in Step 3, the dialog shown in Step 6 may
be displayed. If it is not displayed, proceed to Step
8.

66
Wireless Transfer and Printing
6 Enter wireless network settings ( 00). Do not
edit fi elds that are completed automatically (de-
pending on the options selected in Step 3, it may
only be necessary to provide a security key). Click
Next to proceed. If the dialog shown in Step 7 is
not displayed, proceed to Step 8.
7 Enter TCP/IP settings ( 00) and click Next.
8 If desired, select the printer that will be used for
wireless printing with this profi le ( 00) and enter
an appropriate name. Click Next to proceed.
9 Click Finish, then turn the camera off and discon-
nect the COOL-STATION.

67
Wireless Transfer and Printing
Macintosh
1 Open the “Applications : Nikon Software : Wireless
Camera Setup Utility” folder and double-click
the Wireless Camera Setup Utility icon.
The dialog shown at right will be displayed; click
Next.
2 Confi rm that the computer is equipped for wire-
less LAN and click Next.
3 Follow the on-screen instructions to describe your
wireless LAN setup. The Wireless Camera Setup
Utility will determine the information required to
confi gure the camera based on the type of wire-
less device used and whether the network is infra-
structure or ad-hoc.
4 The dialog shown at right will be displayed. Con-
nect the COOL-STATION to the computer using
the supplied USB cable. Place the camera in the
COOL-STATION and turn the camera on, then click
Next to proceed to the next step.

68
Wireless Transfer and Printing
5 Enter a profi le name and choose the icon that
will appear in the camera profi le list ( 00). Click
Next to proceed.
6 Enter wireless network settings ( 00). Do not
edit fi elds that are completed automatically.
7 Enter TCP/IP settings ( 00) and click Next.
8 If desired, select the printer that will be used for
wireless printing with this profi le ( 00) and enter
an appropriate name. Click Next to proceed.
9 Click Finish, then turn the camera off and discon-
nect the COOL-STATION.
69
Wireless Transfer and Printing
Wireless Network Settings (Windows and Macintosh)
The Wireless Camera Setup Utility may require information on some or all of the
following wireless network settings:
Item Description
Network name
(SSID)
(required)
The name of the wireless network. Note that the camera will connect only
to the device selected in the profi le list ( 00), even if another network exists
with the same SS-ID.
Type
(required)
• Ad-hoc: The network is ad-hoc if it consists of the camera and a computer
with a built-in wireless or a wireless LAN adapter.
• Infrastructure: Infrastructure networks include a wireless access point con-
nected to a local-area network.
Channel The channel used by the computer for peer-to-peer wireless communication
(ad-hoc networks only).
Authentication
The type of authentication used by the computer or access point. The cam-
era supports WP-PSK (infrastructure mode only), open system, and shared key
authentication.
Data
encryption
The type of encryption (if any) used on the network. Depending on the au-
thentication used, the camera supports the following types of encryption:
• Open system: none, WEP
• Shared key: WEP
• WP-PSK: TKIP
Key type If the network uses WEP encryption, note whether the key is base 16 or
ASCII.
Network key If the network uses TKIP or WEP encryption, note the network key.
Key index In infrastructure networks that use WEP encryption, note the access point key
index. The default index is 1.
Address type
(required)
Note whether the network is confi gured to supply IP address automatically
or manually.
IP address If the network is confi gured for manual IP addresses, note the IP address that
will be assigned to the camera.
MAC Address Filtering
If the wireless network uses MAC address fi ltering, you will need to supply the fi lter with the
camera’s MAC address. Choose Firmware version from the camera setup menu and note
the camera MAC address.
Port Numbers
The camera uses UDP port 5353 and TCP port 15740. If you are using a fi rewall, you will need
to confi gure it to leave these ports open.
70
Wireless Transfer and Printing
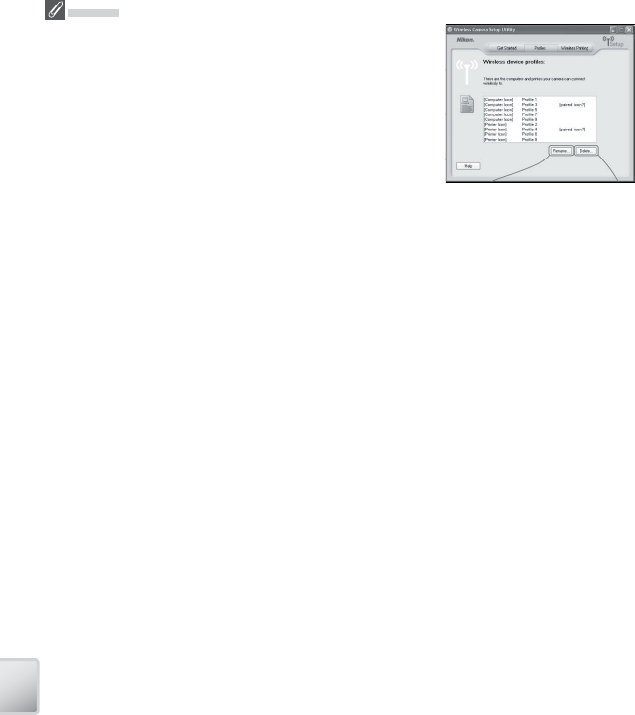
Profi les
A separate profi le must be created for each network to which
the camera is connected. In addition, the Wireless Camera
Setup Utility must be installed on any computer to which pic-
tures are transferred. The camera can store up to nine profi les
for diff erent computers or printers; before additional profi les
can be created, existing profi les must be deleted. To view
existing profi les, connect the camera and start the Wireless
Camera Setup Utility as described on the preceding pages,
and then select the “Profi les” tab. Profi les selected in the “Pro-
fi les” tab can be edited, renamed, or deleted using the De-
tails, Rename, and Delete buttons.
71
Wireless Transfer and Printing
Connecting to the Network
After creating a network profi le, you can connect to the network by selecting the
profi le from a list. Turn the camera on, select shooting mode, and follow the steps
below:
* To view settings for the selected profi le, press the zoom control to T ( ). If you are unable
to connect, check these settings to make sure they match those used on the network. If
the last session with the selected device did not terminate normally, the camera will briefl y
display a message stating that the session is now complete.
@ Mode
While the camera is in @ (wireless) mode, data transmission will continue after the camera
monitor turns off to save power (auto power off ; 00). Video output ( 00) is suspended
while the camera is in wireless mode.
“Resume Interrupted Transfer”
If data transfer is interrupted due to signal loss or loss of power, the camera will display the
message “Resume interrupted transfer?” the next time wireless mode is selected. Select Ye s
to resume transfer, No to exit to the profi le list.
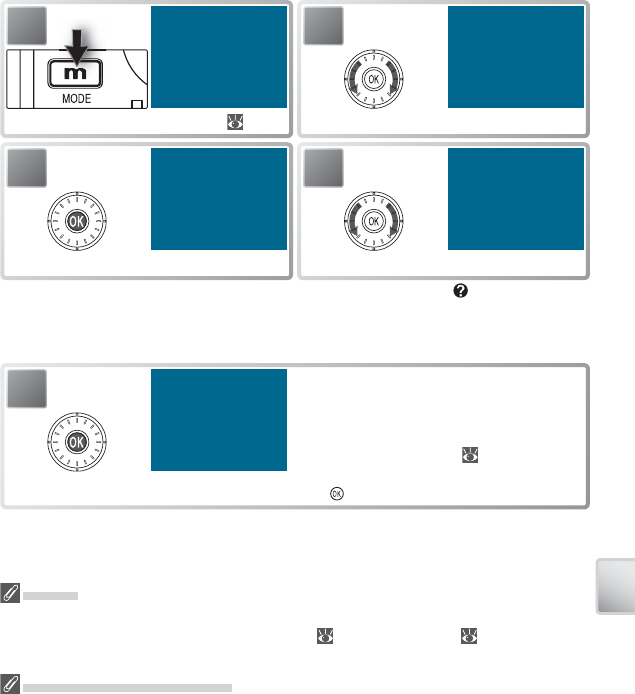
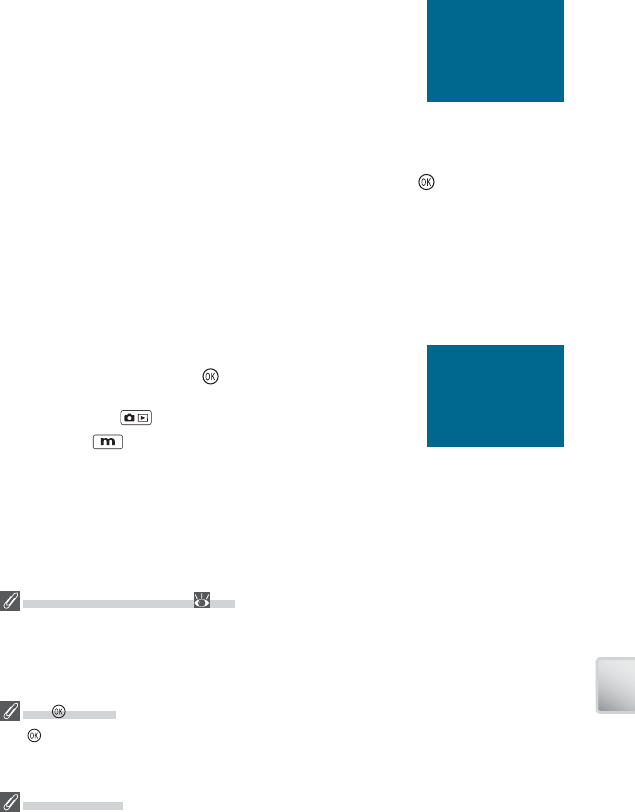
1
Display shooting mode menu ( 00).
2
Highlight @.
3
Display profi le list.
4
Highlight profi le. *
5Select profi le. If network profi le is selected,
wireless transfer menu shown at left will be
displayed when connection is established.
If printer profi le is selected, wireless printer
menu will be displayed ( 00). To exit to
profi le list before connection is established,
press again.
72
Wireless Transfer and Printing
Wireless Transfer
When a network profi le is selected from the profi le
list ( 00), the menu shown at right will be displayed.
Highlight an option and press the button. The mes-
sage “Connecting to (profi le name)” will be displayed
while the camera connects. To exit to the profi le list
before a connection is established, press the but-
ton.
Item Description
Easy Transfer Transfer all new pictures. Pictures that have already been transferred will not
be transferred again.
Shooting Date
Transfer all pictures taken on selected date(s). Once
connection has been established, list of dates will be
displayed with number of pictures taken on each
date. Rotate rotary multi selector to highlight date,
press to right to select. Selected dates are marked
with @ icon. Press to transfer pictures on selected
dates. Press rotary multi selector to left to exit with-
out transferring pictures.
Marked Images Transfer all pictures marked with icon ( 00).
Selected Images
Transfer selected pictures. Once connection has
been established, dialog shown at right will be dis-
played. Rotate rotary multi selector left or right to
scroll through pictures, press up to select picture at
center of display for transfer. Selected pictures are
marked with @ icon (to deselect, press rotary multi
selector down). Press to begin transfer.
Shoot & Transfer Transfer pictures to computer as they are taken ( 00).
PC Mode
Camera will display “Connected to (profi le name).” If PictureProject is in-
stalled on destination computer, PictureProject Transfer will start. Click the
Picture Project Transfer button to transfer pictures. If PictureProject is not
installed, pictures can be copied to computer by drag and drop.
Unable to Connect/Connection Failed
If the camera is unable to connect or data transfer can not be established, an error message
will be displayed. After ensuring that the wireless LAN adapter or access point is on and that
network settings match those in the selected profi le, select Try Again and press the but-
ton. Note that depending on the type of error, the Try Again option may not be available.
To connect using a diff erent profi le, select Choose Profi le and select the profi le from the
profi le list.
73
Wireless Transfer and Printing
During transfer, the camera will display the dialog
shown at right, showing signal strength, the number
of pictures transferred, the total number of pictures,
and the transfer rate. Signal strength is indicated by
the antenna icon at the top of the dialog, varying from
“strong” (fi ve bars) to “no signal” (antenna icon turns
red). The signal can be improved by ensuring a clear line of sight between the
camera antenna and the wireless LAN adapter or access point. To cancel transfer
before the current picture has been transmitted, press the button.
If PictureProject is installed on the destination computer, pictures will automati-
cally be displayed in PictureProject after transfer. Pictures are saved to the direc-
tory selected in the PictureProject “Transfer Options” dialog. If PictureProject is not
installed, pictures will be saved to the “PictureProject” folder in “My Pictures” (Win-
dows) or “Pictures” (Macintosh), and the destination directory will be displayed in
Windows Explorer (Windows) or the Finder (Macintosh).
When transfer is complete, the message shown at right
will be displayed. Press the button to return to the
profi le list. To exit wireless transfer mode, turn the cam-
era off , press the button to exit to shooting mode,
or press the button and select another playback
mode.
The Wireless Status LED ( 00)
The camera wireless status LED shows data transfer status as follows:
• LED blinks: Camera searching for connection or in power-saving mode
• LED on: Connection established or data transfer in progress
• LED off : Not connected
The Button
The button can not be used to transfer pictures when the camera is in wireless mode. Use
the options in the wireless transfer menu or the PictureProject Transfer button to transfer
pictures.
Memory Cards
Pictures can not be transferred when a locked (write-protected) memory card is inserted in
the camera. Unlock the card before insertion.
74
Wireless Transfer and Printing
Saving Pictures Directly to the Computer: Shoot & Transfer
In Shoot & Transfer mode, the camera monitor will display the view through
the lens. Pictures can be taken as though the camera were in (auto) mode (
00–00). All pictures shot in Shoot & Transfer mode are transferred directly to the
computer as they are taken. To exit, press the rotary multi selector.
Note that because the rotary multi selector can not be used in Shoot & Transfer
mode, camera settings must be adjusted before wireless mode is selected. The ad-
ditional processing for advanced red-eye reduction is not performed ( 00).
Pressing the button in Shoot & Transfer mode displays the following op-
tions:
Item Description
Confi rm Transfer Select On to display confi rmation message before picture is transferred.
Save Images Select On to save a copy of each picture taken to internal memory or the
camera memory card.
Image Mode Choose an image mode ( 00).
Wireless Printing
If a printer profi le is selected from the profi le list (
00), the camera will display the message “Connected to
printer” followed by the wireless printing menu shown
at right. Print pictures as described on pages 00–00.
Note that pictures can not be printed if the printer is
off .
The PD-10 Wireless Printer Adapter
The PD-10 wireless printer adapter (available separately) can be connected to any printer with
a type A (fl at) USB connector, allowing direct wireless printing even when the printer is not
connected to a network. To print pictures using the PD-10, press the camera button when
the profi le list is displayed ( 00). For more information, consult the instructions provided
with the PD-10.
75
The Shooting Menu
Menu Guide
This section describes the menus available for shooting, playback, and camera set-
up. See page 17 for information on using the menus.
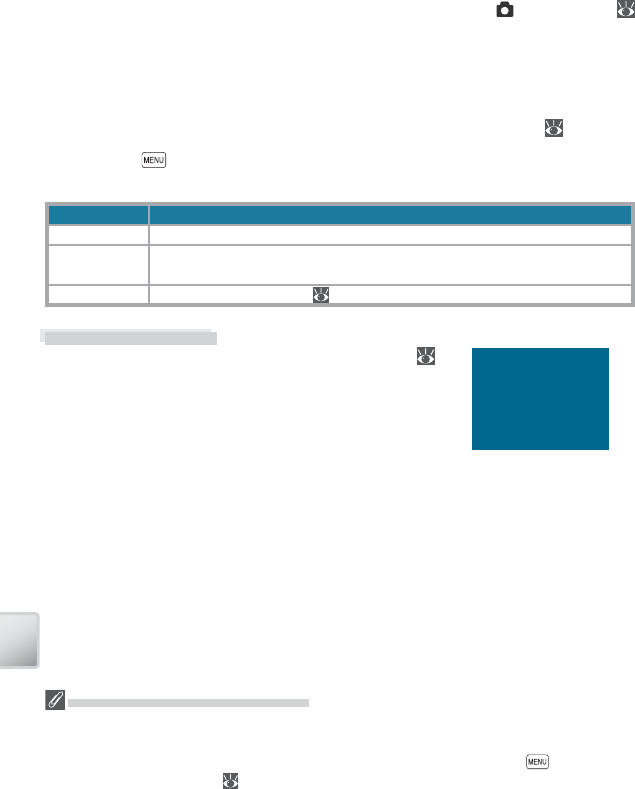
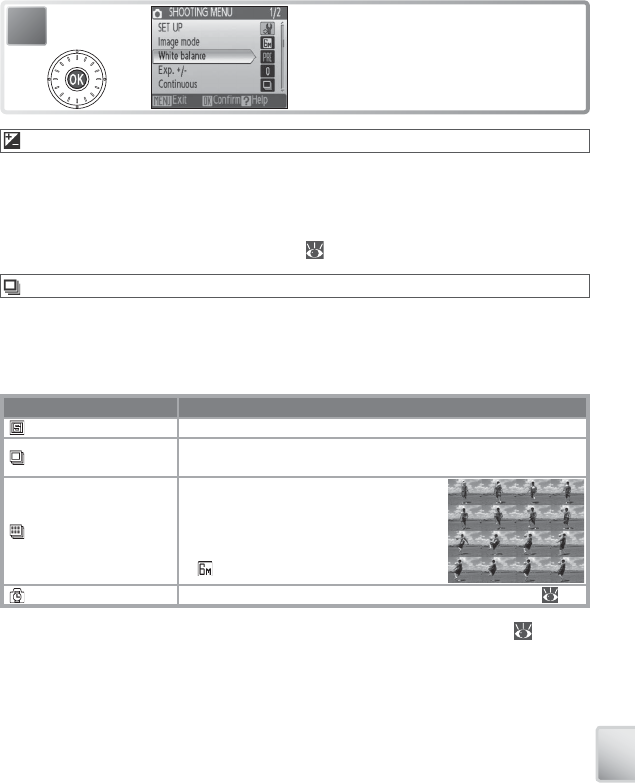
Shooting Options: The Shooting Menu
To display the shooting menu, select mode ( 18) and press the button.
With the exception of Image mode, the following options are available only in
mode. Unless Reset all ( 76) is used to reset settings to their default values (
87), settings in this menu will be restored the next time mode is selected.
Option Description
SET-UP Display the setup menu. 70
Image mode Choose image size and quality. 61
White balance * Match white balance to the light source. 62
Exp. +/– Adjust exposure for very bright or very dark subjects. 63
Continuous * Take pictures one at a time or in a sequence. 63
BSS * Use BSS to choose the sharpest picture. 65
ISO Sensitivity Control camera’s sensitivity to light. 65
Color options * Control color. 66
AF-area mode Choose where the camera focuses. 66
* See the Appendix for information on restrictions that may apply to these settings ( 88).
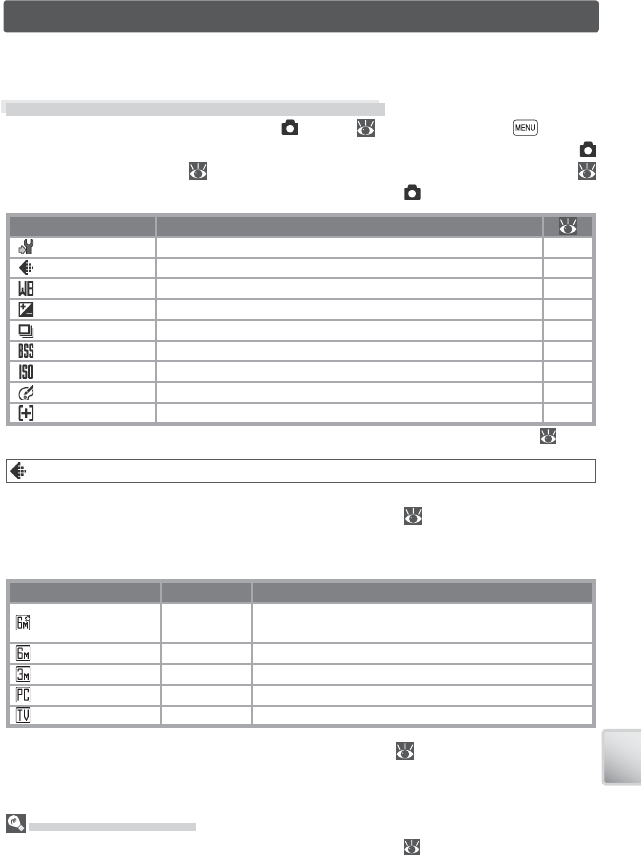
Image Mode
Pictures taken with a digital camera are recorded as image fi les. The size of the fi les,
and with it the number of images that can be recorded ( 88), depends on the size
and quality of the images (image mode). Before shooting, choose an image mode
according to how you plan to use the picture.
Option Size (pixels) Description
High (2816★)2,816 × 2,112 Pictures are compressed less than Normal, produc-
ing higher quality images.
Normal (2816) 2,816 × 2,112 Best choice in most situations.
Normal (2048) 2,048 × 1,536 Smaller size allows more pictures to be stored.
PC screen (1024) 1,024 × 768 Suited to computer display.
TV screen (640) 640 × 480 Suited to e-mail or television viewing.
The current setting is shown by an icon in the display ( 6–7).
Shooting Menu Settings
See the Appendix for information on shooting menu defaults ( 87).
76
The Shooting Menu
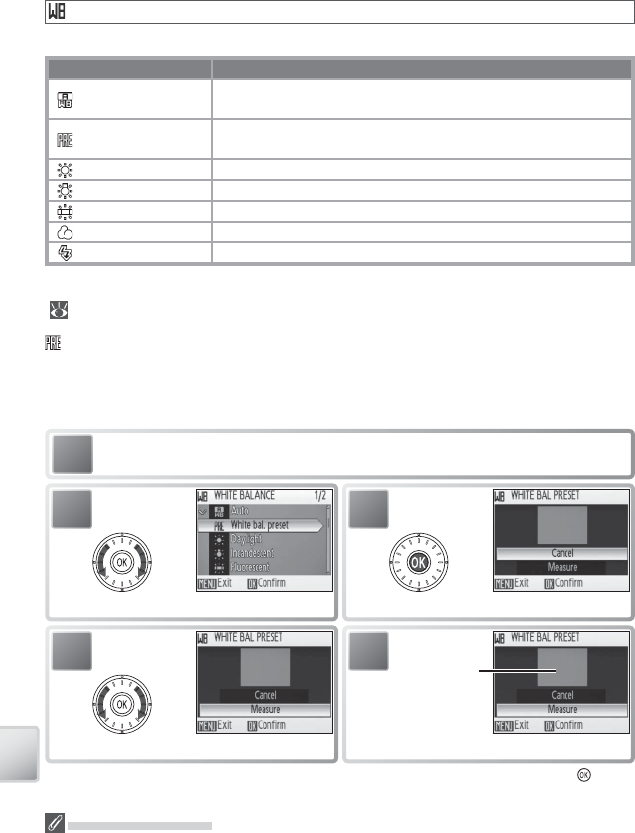
White Balance
Process pictures to produce natural colors under diff erent types of light.
Option Description
Auto White balance automatically adjusted to suit lighting conditions.
Best choice in most situations.
White bal. preset Neutral-colored object used as reference to set white balance un-
der unusual lighting conditions (see below).
Daylight White balance adjusted for direct sunlight.
Incandescent Use under incandescent lighting.
Fluorescent Use under most types of fl uorescent lighting.
Cloudy Use when taking pictures under overcast skies.
Flash Use with the fl ash.
At settings other than Auto, the current setting is shown by an icon in the display
( 6–7).
Preset White Balance
Preset white balance is used with mixed lighting or to compensate for light sources
with a strong color cast (for example, to make pictures taken under a lamp with a
red shade look as though they had been taken under white light).
Place white or gray reference object under lighting that will be used during
shooting.
1
2
Highlight White bal. preset.
3
Camera zooms in.
* To restore most recent value for preset white balance, highlight Cancel and press .
4
Highlight Measure. *
5
Frame reference object.
Frame
reference
object here
Preset White Balance
Preset white balance can not be measured with the fl ash.
77
The Shooting Menu
6Preset white balance set to new value.
Exp. +/–
Exposure compensation is used to alter exposure from the value selected by the
camera. Choose from values between –2.0 EV and +2.0 EV in increments of
/
EV.
Negative values produce darker pictures, positive values brighter pictures. The ef-
fects can be previewed in the display; at settings other than zero, the current value
for exposure compensation is also shown ( 6–7).
Continuous
Capture a fl eeting expression on a portrait subject, photograph a subject that is
moving unpredictably, or capture motion in a series of pictures. At settings of Con-
tinuous and Multi-shot 16, the fl ash turns off and focus, exposure, and white
balance are fi xed at the values for the fi rst picture in each series.
Option Description
Single One shot is taken each time shutter-release button is pressed.
Continuous While shutter-release button is pressed, camera takes pictures at
up to 2.2 frames per second (fps).
Multi-shot 16
Each time shutter-release button is
pressed, camera takes 16 shots at about
2 fps and arranges them in a single pic-
ture as shown at right. Image mode set
to Normal (2816).
Intvl timer shooting Camera takes pictures automatically at specifi ed interval ( 64).
Except at Single, the current setting is shown by an icon in the display ( 6–7).
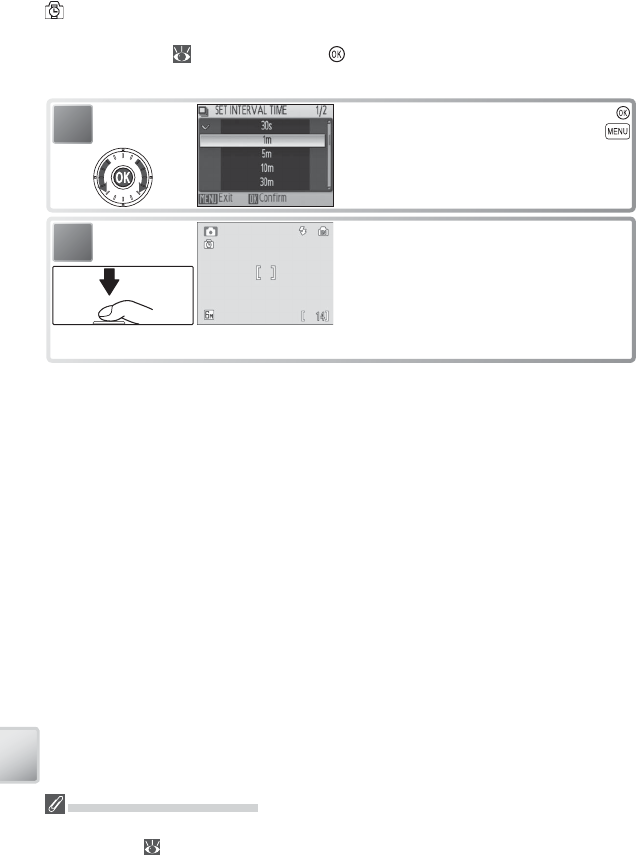
78
The Shooting Menu
1Choose interval between shots. Press
button to make selection, then press
button to return to shooting mode.
2Press shutter-release button all the way
down to start recording. Camera will take
pictures at specifi ed interval until shutter-
release button is pressed again, memory
is full, or 1800 frames have been recorded.
Monitor turns off and indicator lamp blinks
green between shots.
Interval Timer Photography
To display the interval timer menu, highlight Intvl timer shooting in the CON
TINUOUS menu ( 63) and press the button. To prevent unexpected loss of
power, charge the battery before shooting begins.
Interval Timer Photography
See the Appendix for more information on how pictures taken with interval timer photogra-
phy are stored ( 89).
79
The Shooting Menu
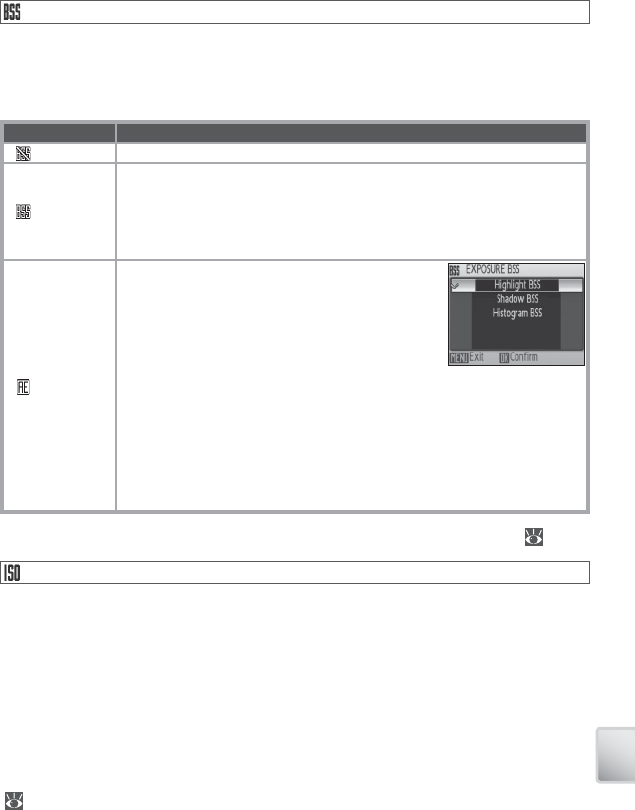
Best Shot Selector (BSS)
BSS is recommended for situations in which inadvertent camera movement can
produce blurred pictures, or when parts of the image are prone to under- or over-
exposure. It may not produce the desired results if the subject moves or the com-
position is changed while the shutter-release button is fully pressed.
Option Description
Off BSS off .
On
Camera takes shots while shutter-release button is pressed, to a maximum
of ten. These images are then compared and sharpest picture (picture
with highest level of detail) is saved. Flash turns off automatically and
focus, exposure, and white balance for all photos are determined by fi rst
picture in each series.
Exposure
BSS
Selecting this option displays sub-menu shown at
right. Choose from:
• Highlight BSS: picture with smallest area of over-
exposure is selected.
• Shadow BSS: picture with smallest area of un-
derexposure is selected.
• Histogram BSS: of pictures with least under- and over-exposure, cam-
era chooses picture with overall exposure closest to optimum.
Camera takes fi ve shots each time shutter-release button is pressed, but
only picture that best meets selected criterion is saved. Flash turns off
automatically and focus and white balance for all photos are determined
by fi rst picture in each series. Recommended for high-contrast subjects,
when it is diffi cult to set exposure correctly.
At settings other than Off , the current BSS setting appears in the display ( 6–7).
ISO Sensitivity
ISO sensitivity is a measure of how quickly the camera reacts to light. The higher
the sensitivity, the less light needed to make an exposure. Much as fi lm with a high
ISO rating tends to produce “grainy” images, high sensitivities may however be as-
sociated with “noise”—randomly spaced, brightly colored pixels concentrated in
dark parts of the image. Choose from values between ISO 50 and 400 equivalent.
Auto is equivalent to ISO 50 under normal conditions; when lighting is poor and
the fl ash is off , the camera compensates by raising ISO sensitivity to a maximum of
ISO 200 equivalent.
The current ISO sensitivity is displayed in the monitor at settings other than Auto
( 6–7). If Auto is selected, an ISO icon will be displayed when sensitivity is raised
above ISO 50 equivalent.
80
The Shooting Menu
Color Options
Make colors more vivid or record pictures in monochrome.
Option Description
Standard color Natural color.
Vivid color Vivid, “photoprint” colors.
Black-and-white Take pictures in black-and-white.
Sepia Record pictures in sepia.
Cyanotype Take pictures in blue-tinted monochrome.
The eff ects of the selected option can be previewed in the monitor. At settings
other than Standard color, the current setting is also indicated by an icon in the
display ( 6–7).
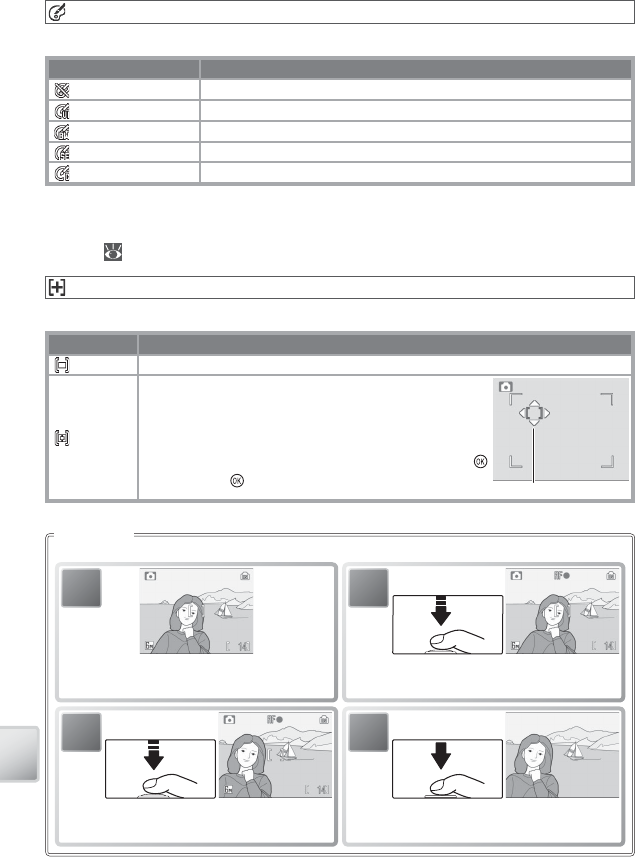
AF-Area Mode
Choose where the camera focuses.
Option Description
Center Camera focuses on subject at center of frame.
Manual
Press rotary multi selector up, down, left, or right to se-
lect from 99 focus areas in large frame shown at right.
Pictures can be taken while focus area selection screen
is displayed. To end focus area selection and adjust
fl ash, macro close-up, and self-timer settings, press
button. Press button again to change selection. Focus area
To focus on off -center subjects when Center is selected for AF-area mode:
Focus Lock
1
Position subject in center of frame.
2
Press shutter-release button halfway and
check focus.
3
Recompose picture with shutter-release
button pressed halfway.
4
Take picture.
81
The Playback Menu
Playback Options: The Playback Menu
To display the playback menu, press the button to select playback mode (
19) and press the button. See page 17 for more on using the menus.
Option Description
SET-UP Display the setup menu. 70
Print set Select pictures for printing. 59
Slide show View pictures in an automatic slide show. 68
Delete * Delete all or selected pictures. 68
Protect * Protect selected pictures from accidental deletion. 68
Transfer marking * Change transfer marking for existing pictures. 68
Small pic. Create a small copy of the current picture. 69
Copy * Copy fi les between memory card and internal memory. 69
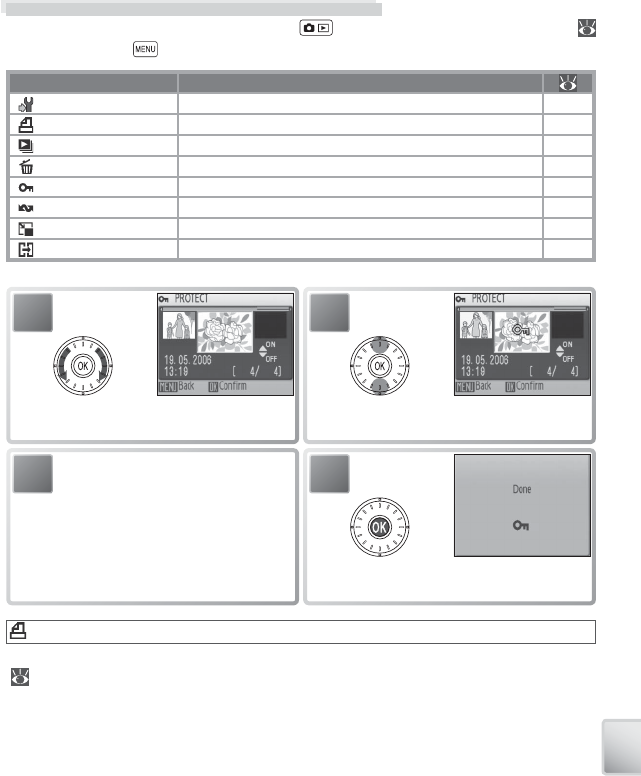
* To select multiple pictures for deletion, protection, transfer, or copying:
3Repeat steps 1–2 to select addi-
tional pictures. To deselect picture,
highlight and press rotary multi se-
lector down.
2
Select current picture. Selection shown
by icon.
1
Scroll through pictures. Current picture
shown at center of display.
4
Complete operation. Confi rmation
message may be displayed.
Print Set
Create digital “print orders” for PictBridge printers and devices that support DPOF
( 59).
82
The Playback Menu
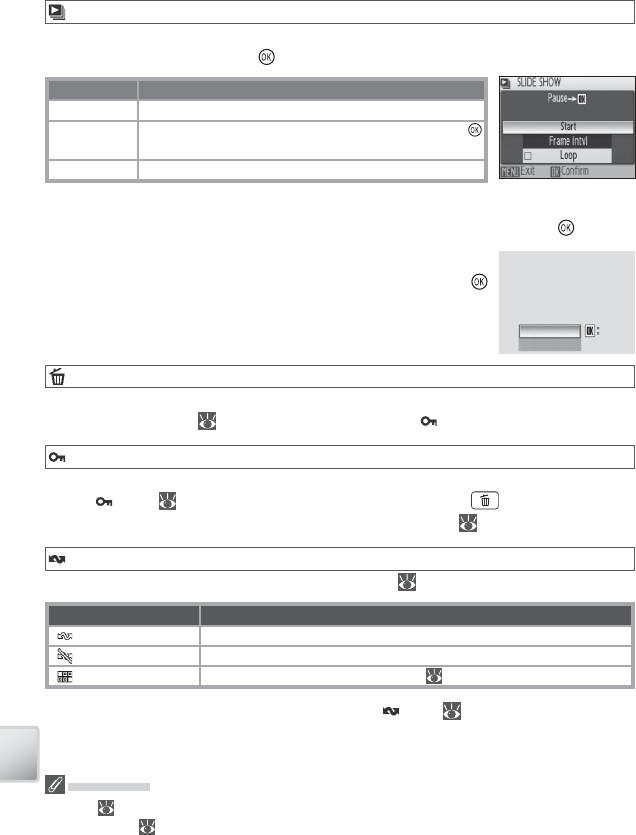
Slide Show
Selecting Slide show displays the following options. Rotate the rotary multi selec-
tor to highlight and press the button to select.
Option Description
Frame intvl Choose length of time each slide will be displayed.
Loop If this option is checked, slide show will repeat until
button is pressed.
Start Start slide show.
While the slide show is in progress, rotate the rotary multi selector clockwise to skip
ahead, counter-clockwise to rewind. To pause the slide show, press the button.
When the slide show ends or is paused, the menu shown at
right will be displayed. Highlight Restart and press the
button to restart the show, or select End to end the show and
return to the playback menu.
Pause
Pause
Pause
Confirm
Confirm
Confirm
End
Restart
Restart
Restart
Slide Shows
Movies ( 37) appear as still images showing the movie’s fi rst frame. The camera will turn off
automatically ( 75) if no operations are performed for 30 minutes during the show, even if
Loop is selected.
Delete
Choose Erase all images to delete all pictures, Erase selected image(s) to select
pictures for deletion ( 67). Pictures marked with a icon will not be deleted.
Protect
Protect selected pictures from accidental deletion. Protected pictures are marked
with a icon ( 6–7) and can not be deleted using the button or Delete.
Note, however, that formatting will delete protected fi les ( 76).
Transfer Marking
Mark existing pictures for transfer to a computer ( 53).
Option Description
All on Mark all images for transfer.
All off Remove transfer marking from all images.
Select image(s) Mark selected pictures for transfer ( 67).
Pictures selected for transfer are identifi ed by a icon ( 6–7).
83
The Playback Menu
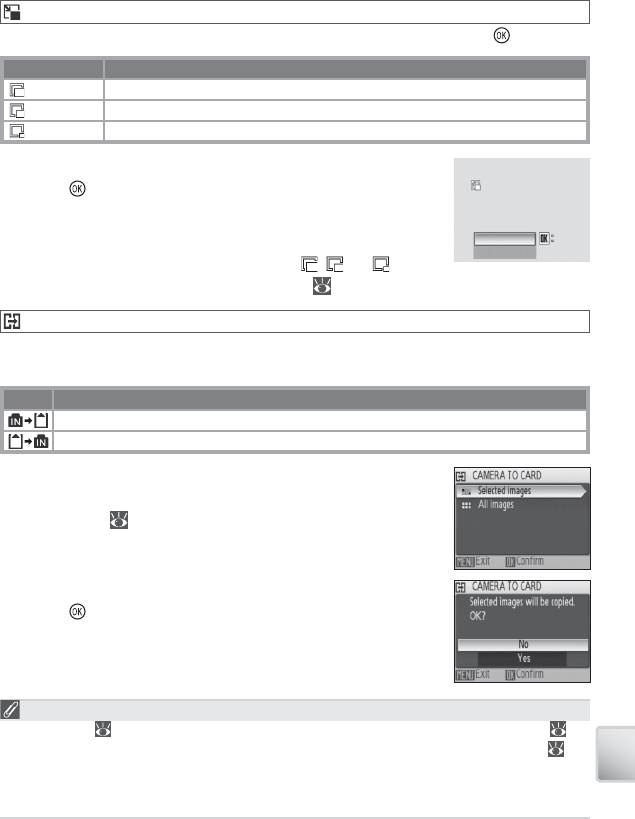
Small Pic.
Create a small copy of the current picture. Highlight a size and press .
Option Description
640 × 480 Suited to television playback.
320 × 240 Suited to display on web pages.
160 × 120 Suitable for e-mail.
A confi rmation dialog will be displayed. Highlight Yes and
press the button to create a copy at the chosen size.
Small copies are stored as JPEG fi les with a compression ratio
of 1 :16 (see page 89 for more information). During playback,
copies are indicated by a gray border; a , , or icon is
displayed when they are viewed full-frame ( 6–7).
Copy
Copy pictures between internal memory and a memory card. This option is only
available when a memory card is inserted.
Option Description
Copy pictures from internal memory to memory card.
Copy pictures from memory card to internal memory.
Selecting either of the above options displays the menu shown
at right. Choose Selected images to select the pictures that
will be copied ( 67) or All images to copy all pictures.
Create small picture file?
Create small picture file?
Create small picture file?
Confirm
Confirm
Confirm
No
Yes
Yes
Yes
A confi rmation dialog will be displayed. Highlight Yes and
press the button to copy the images.
Copy
Voice memos ( 44) will be copied with the associated picture, but voice recordings ( 38)
will not. See “Copying Voice Recordings” for information on copying voice recordings ( 40).
The camera may be unable to copy pictures that were created with another make of camera
or that have been modifi ed on a computer. See page 89 for more information on how copies
are stored.
84
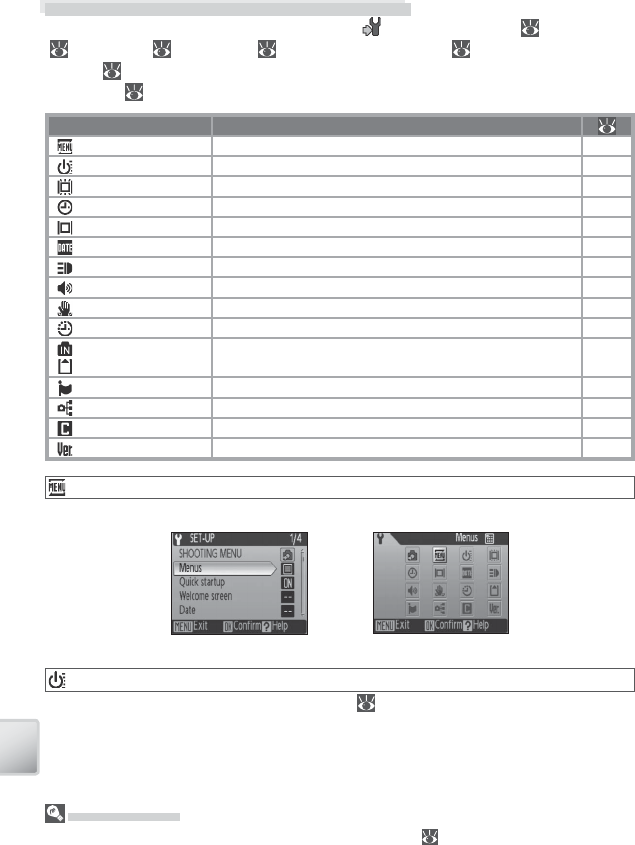
The Setup Menu
Basic Camera Setup: The Setup Menu
To display the setup menu, select SET-UP or from the shooting ( 61), playback
( 67), scene ( 26), movie ( 36), one-touch portrait ( 25), or voice recording
menus ( 39). See page 17 for more on using the menus. Settings remain in eff ect
until reset ( 76).
Option Description
Menus Choose how menus are displayed. 70
Quick startup Enable or disable welcome screen and start-up sound. 70
Welcome screen Select screen displayed when camera is turned on. 71
Date Set clock and choose home and destination time zones. 71
Monitor settings Adjust monitor brightness and choose display style. 73
Date imprint Imprint date or birthday counter on pictures. 74
AF assist Enable or disable AF assist illumination. 75
Sound settings Adjust sound and volume settings. 75
Blur warning Turn blur warning on or off .75
Auto off Choose when monitor will turn off to save power. 75
Format memory /
Format card Format internal memory or memory card. 76
Language Choose language for camera menus and messages. 76
Interface Adjust settings for connection to television or computer. 76
Reset all Restore camera settings to default values. 76
Firmware version Display camera fi rmware version. 76
Menus
Choose how menus are displayed.
Default Settings
See the Appendix for information on setup menu defaults ( 87).
Quick Startup
Choose On to disable the welcome screen ( 71) and start-up sound. The camera
will be ready for shooting as soon as it is turned on.
Text Icon
85
The Setup Menu
The Clock Battery
The clock battery charges when the main battery is installed or an AC adapter is connected,
and can provide several days of backup power after about 10 hours of charging.
Welcome Screen
Choose the welcome screen displayed when the camera is turned on. This option
is only available when Off is selected for Quick Startup.
Option Description
Nikon COOLPIX logo displayed at start-up.
Animation Animation displayed at start-up.
Select an
image
Select picture from internal memory or memory card. Copy of selected image
is created for use in welcome screen and remains when original is deleted or
memory card is removed.
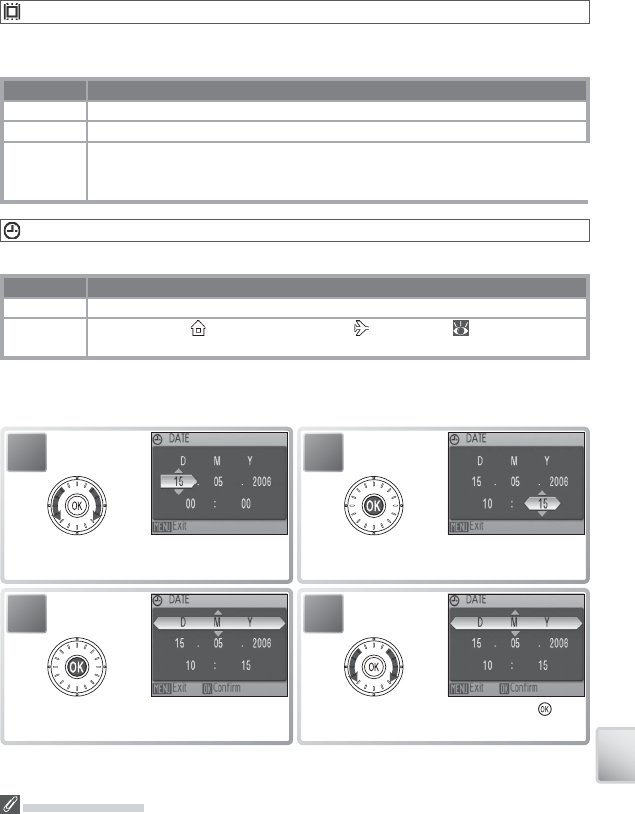
Date
Set the camera clock and choose home and travel destination time zones.
Option Description
Date Set camera clock to current date and time (see below).
Time zone Choose home ( ) or travel destination ( ) time zone ( 90); turn daylight
saving time on or off .
Selecting Date displays the menu shown in Step 1. Follow the steps below to set
the camera clock to the current date and time.
2
Select Month. Repeat steps 1–2 to edit
Month, Year, hour, and minute.
1
Edit Day (order of Day, Month,
and Year may diff er).
4
Choose date display order. Press to
return to setup menu.
3
Select D M Y.