Nokia of America ONEBTS-23 AWS DIGITAL HOST WIRELESS BASE STATION User Manual USERS MANUAL 4
Alcatel-Lucent USA Inc. AWS DIGITAL HOST WIRELESS BASE STATION USERS MANUAL 4
Contents
- 1. USERS MANUAL 1
- 2. USERS MANUAL 2
- 3. USERS MANUAL 3
- 4. USERS MANUAL 4
USERS MANUAL 4
...................................................................................................................................................................................................
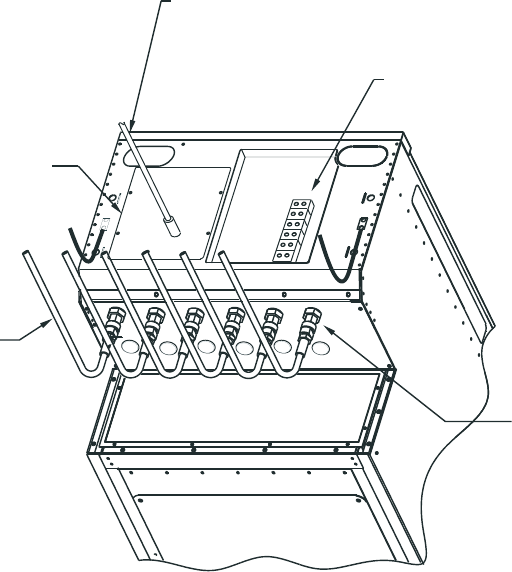
5Repeat Steps 1 through 4 for all RF antenna jumper cables.
HATCHPLATE
GPS ANTENNA
JUMPER CABLE
(PRIMARY CABINET
ONLY)
DC TERMINAL BLOCKS
RF ANTENNA
JUMPER CABLE
(TYP)
7/16 DIN-TYPE
MALE CONNECTOR
(TYP)
FRONT
REAR
RIGHT ANGLE RF ANTENNA CONNECTORS MAY BE USED AT
THE CABINET CONNECTIONS.
Finishing the installation
Install RF antenna jumper cables (indoor)
....................................................................................................................................................................................................................................
401-703-444
Issue 4, November 2007 Alcatel-Lucent - Proprietary
See notice on first page 8-7
END OF STEPS
...................................................................................................................................................................................................
Route and connect indoor RF antenna jumper cables to customer provided DAS
Use the following procedure to route and connect the RF antenna jumper cables to the
antenna cables at the DAS.
...................................................................................................................................................................................................
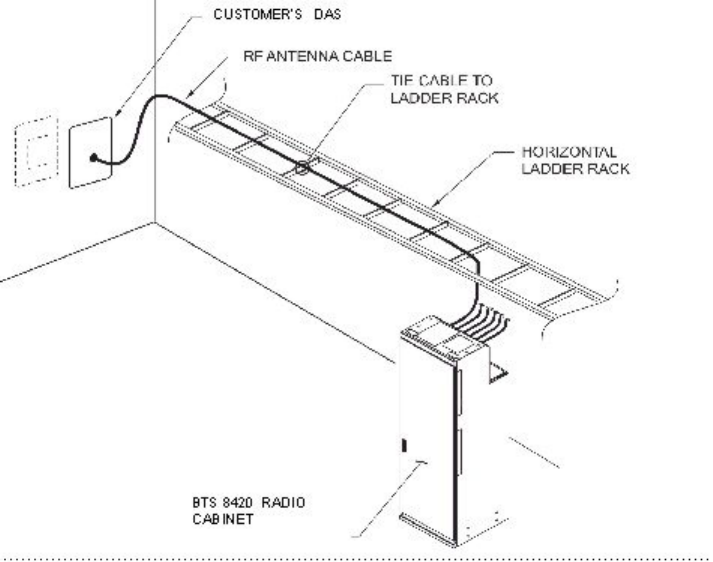
1Route the RF antenna jumper cable from the radio cabinet, via the ladder rack, to the
customer provided DAS. Refer to the figure below. (This figure applies to both the
BTS 8420 and AWS 8420 radio cabinets.)
Important! When performing the next step, secure the cable to the ladder rack
using standard procedures, including the use of cable ties.
...................................................................................................................................................................................................
2Tie the RF antenna jumper cables to the ladder rack.
Important! Skip the next two steps if the RF antenna jumper cable is already
terminated at the hatchplate end.
...................................................................................................................................................................................................
3Cut the cable to the correct length -- allowing adequate slack.
Important! If the cable marking is cut off, re-mark the RF antenna jumper cable
after cutting.
Finishing the installation
Install RF antenna jumper cables (indoor)
....................................................................................................................................................................................................................................
8-8 Alcatel-Lucent - Proprietary
See notice on first page 401-703-444
Issue 4, November 2007
...................................................................................................................................................................................................
4Terminate the end of the cable, using the supplied connector. Use the appropriate
stripping tool part number provided in Chapter 3.
...................................................................................................................................................................................................
5Connect the RF antenna jumper cable to the applicable RF antenna connection. Refer
to the figure below.
Important! Before system operation, the RF antenna jumper cables must be tested,
and the power output of the amplifiers adjusted. Those tasks are a part of system
test and integration.
...................................................................................................................................................................................................
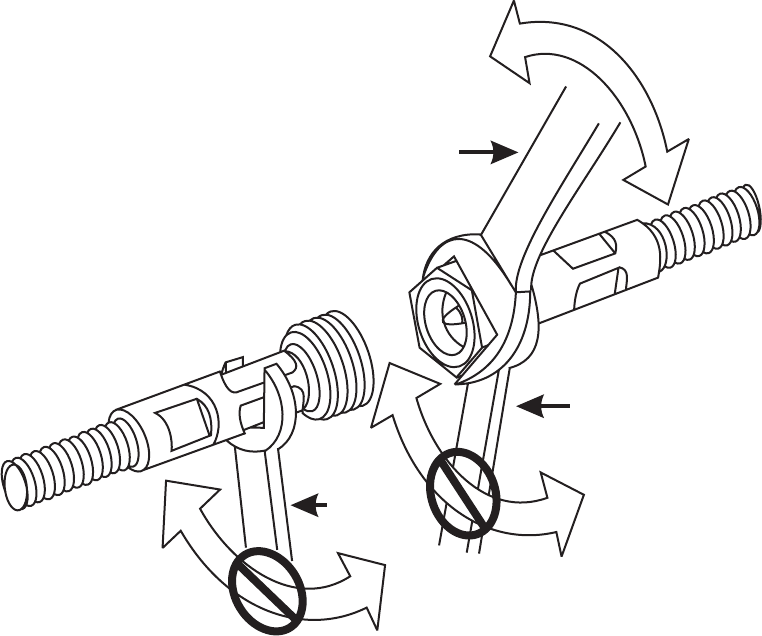
6Torque the RF antenna jumper cable connections at the antenna connection to 25 Nm
(221 in-lb), using the method shown in the figure below.
Important! When connecting/disconnecting a Alcatel-Lucent RF coaxial jumper
cable assembly to/from any 7-16 DIN female receptacle connector at the antenna, it
is highly recommended that the cable assembly be connected/disconnected as
shown in the figure below. Please note that the mating receptacle connector
32mm
22mm
221 - 250 lb-IN
25 - 30 N-m
22mm
Finishing the installation
Install RF antenna jumper cables (indoor)
....................................................................................................................................................................................................................................
401-703-444
Issue 4, November 2007 Alcatel-Lucent - Proprietary
See notice on first page 8-9
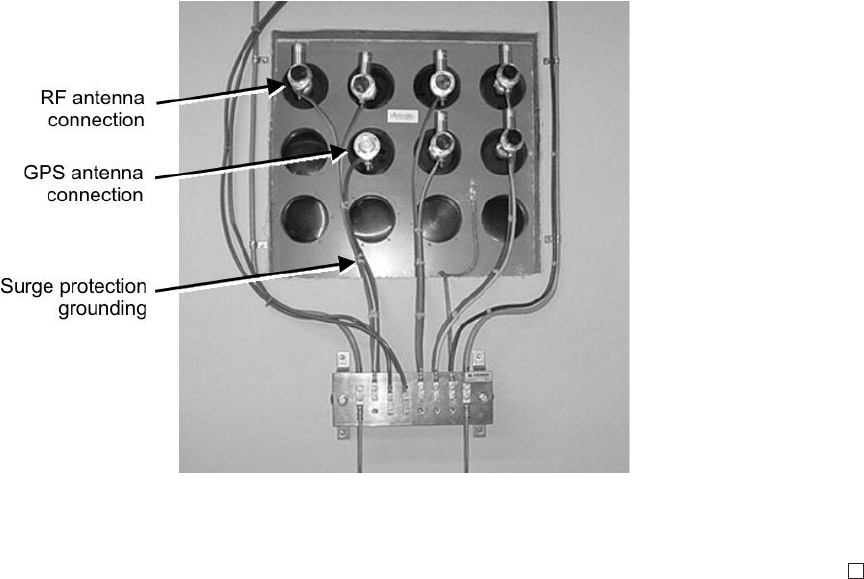
requires a wrench for support to hold it in place. Wrenches for
connecting/disconnecting the mating RF coaxial jumper cable’s 7-16 DIN male
plug, which is equipped with a rotating coupling nut, are required.
...................................................................................................................................................................................................
7Repeat Steps 1 through 6 for all RF antenna jumper cables.
END OF STEPS
...................................................................................................................................................................................................
Finishing the installation
Install RF antenna jumper cables (indoor)
....................................................................................................................................................................................................................................
8-10 Alcatel-Lucent - Proprietary
See notice on first page 401-703-444
Issue 4, November 2007

Finish installation of indoor BTS 8420/AWS 8420
radio cabinet
Overview
...................................................................................................................................................................................................................................
Purpose
This section provides information for finishing the installation of the indoor BTS
8420/AWS 8420 radio cabinet.
Contents
Final indoor BTS 8420/AWS 8420 radio cabinet installation procedures 8-12
Finishing the installation
...................................................................................................................................................................................................................................
401-703-444
Issue 4, November 2007 Alcatel-Lucent - Proprietary
See notice on first page 8-11

Final indoor BTS 8420/AWS 8420 radio cabinet installation
procedures
...................................................................................................................................................................................................................................
Overview
This procedure module describes the tasks that must be completed to finish the
installation of the indoor BTS 8420/AWS 8420 radio cabinet.
System test
Following installation of the indoor BTS 8420/AWS 8420 radio cabinet, the system
should be tested before being put into operation. System test procedures are not
covered in this installation document. Information concerning system test and
integration is contained in CDMA Modcell and Base Station Integration Engineering
Handbook (IEH 238).
Replace or close all access panels
Use the following procedure to replace or close all access panels and doors.
...................................................................................................................................................................................................
1Make sure the T1/E1 lines and alarm cable connectors are securely connected at the
BTS 8420/AWS 8420 radio cabinet.
...................................................................................................................................................................................................
2Check the BTS 8420/AWS 8420 radio cabinet for tools, materials, and parts. Remove
any tools, materials, and parts from the BTS 8420 radio cabinet.
...................................................................................................................................................................................................
3Close the front door on the BTS 8420/AWS 8420 radio cabinet.
END OF STEPS
...................................................................................................................................................................................................
Finishing the installation
...................................................................................................................................................................................................................................
8-12 Alcatel-Lucent - Proprietary
See notice on first page 401-703-444
Issue 4, November 2007

Appendix A: Installing 3GP24i power
cabinet, if applicable
Overview
...................................................................................................................................................................................................................................
Purpose
The purpose of this appendix is to provide installation instructions when installing a
3GP24i power cabinet with the indoor BTS 8420 radio cabinet. (Power Alarm
connections were already covered in Chapter 6). Component installation in the 3GP24i
power cabinet is also covered. Instructions are also provided for the installation and
connection of first and second EZBFi battery frames to the 3GP24i power cabinet.
Note that battery installation in a EZBFi battery module is referenced to Chapter 8
where the procedures are supplied.
Contents
Safety precautions and wiring overview A-2
Safety precautions A-3
Power wiring overview A-4
How to make 3GP24i power cabinet DC and AC connections A-5
Access to the 3GP24i power cabinet A-6
Pre-installation instructions A-9
How to install DC power cables A-12
How to install the AC utility power cables A-20
How to install 3GP24i power cabinet components A-28
How to install the rectifiers in the 3GP24i power cabinet A-29
How to install the DC circuit breakers in the 3GP24i power cabinet A-32
Prepare to install batteries in the 3GP24i power cabinet A-35
How to install batteries in the 3GP24i power cabinet A-40
...................................................................................................................................................................................................................................
401-703-444
Issue 4, November 2007 Alcatel-Lucent - Proprietary
See notice on first page A-1

Safety precautions and wiring overview
Overview
...................................................................................................................................................................................................................................
Purpose
The overall safety precautions that must be observed during the installation of the
3GP24i power cabinet with BTS 8420/AWS 8420 cabinets are provided here.
Contents
Safety precautions A-3
Power wiring overview A-4
Installing 3GP24i power cabinet, if applicable
...................................................................................................................................................................................................................................
A-2 Alcatel-Lucent - Proprietary
See notice on first page 401-703-444
Issue 4, November 2007

Safety precautions
...................................................................................................................................................................................................................................
The following safety precautions should be read and understood before starting the
installation of power cables.
WARNING
Electrical Energy Hazard
Failure to follow the order of the installation procedure (as written) can result in an
energized AC or DC circuit, which creates an electrical shock hazard.
Follow these rules:
1. Perform installation steps in the order provided.
2. Do not connect AC power until instructed to do so.
3. When installing battery modules, do not connect battery disconnect cables on the
battery retaining brackets until instructed to do so.
4. When installing battery modules, do not connect DC cables until instructed to do
so.
5. Observe and strictly follow all additional safety precautions.
6. When completing electrical connections, always use tools that are properly
insulated.
CAUTION
Damage to electronic components
Handling of plug-in modules without the use of an ESD wrist strap can result in
damage to electronic circuits.
Always wear a properly grounded ESD strap and follow ESD procedures when
handling any electronic components.
Installing 3GP24i power cabinet, if applicable
...................................................................................................................................................................................................................................
401-703-444
Issue 4, November 2007 Alcatel-Lucent - Proprietary
See notice on first page A-3
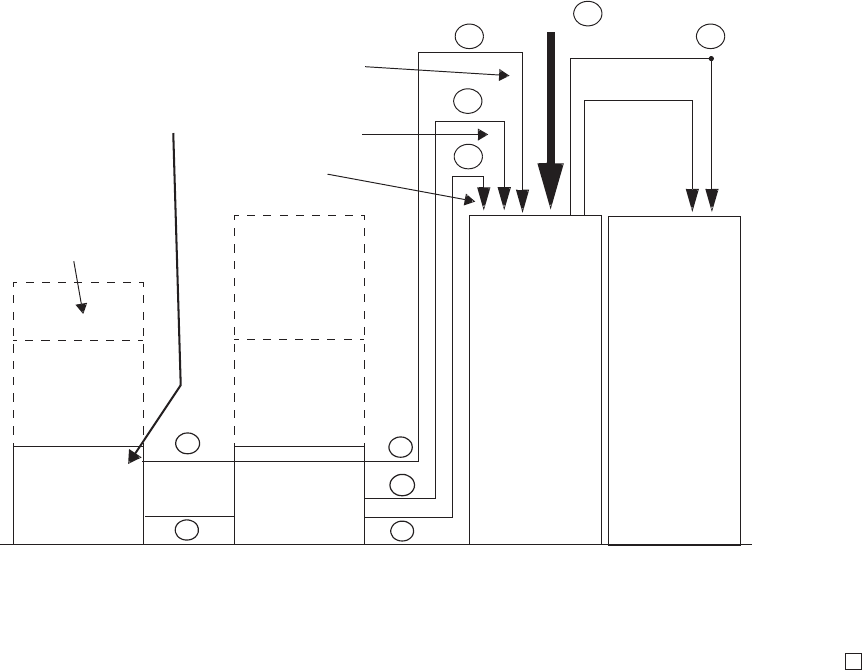
Power wiring overview
...................................................................................................................................................................................................................................
This chapter provides instructions for the power interconnections between the 3GP24i
power cabinet and the BTS 8420/AWS 8420 radio cabinet, as well as the connections
from EZBFi battery frames to the 3GP24i power cabinet. Also included are AC utility
connection to the 3GP24i power cabinet. Refer to the figure below for a key to the
following numbered list.
1. DC cable connections between the power cabinet and BTS 8420/AWS 8420 radio
cabinet
2. AC utility connection to the 3GP24i power cabinet
3. DC cable connections between the first EZBFi battery base module and the power
cabinet
4. Fuse alarm cable connections between the first battery base module and the power
cabinet and the two base modules
5. Thermal probe cable connections between the battery base modules and the power
cabinet
6. DC cable connections between the first EZBFi battery base module and the second
EZBFi battery base module.
BTS
8420
RADIO
CABINET
AC
DC
DC
POWER
ALARMS*
ALARM
3GP24i
POWER
CABINET
THERMAL
PROBE
CABLES
SECOND
BATTERY
BASE
MODULE
FIRST
BATTERY
BASE
MODULE
ADD-ON
BATTERY
MODULE
ADD-ON
BATTERY
MODULE
ADD-ON
BATTERY
MODULE
SINGLE
SHELF
ADD-ON
BATTERY
MODULE
ADD-ON
BATTERY
MODULE AS
SECONDBASE
MODULE
1
* Power alarm connections to the BTS 8420 radio cabinet were covered in Chapter 5.
2
5
4
3
5
4
36
5
Installing 3GP24i power cabinet, if applicable
...................................................................................................................................................................................................................................
A-4 Alcatel-Lucent - Proprietary
See notice on first page 401-703-444
Issue 4, November 2007

How to make 3GP24i power cabinet DC and AC
connections
Overview
...................................................................................................................................................................................................................................
Purpose
This section describes the procedures for installing DC power cables to/from the
3GP24i power cabinet when installing it with an indoor BTS 8420/AWS 8420 radio
cabinet. Also included are instructions for making AC utility power connections to the
3GP24i power cabinet.
Note that grounding cables were installed in Chapter 4 after placement and anchoring
of the 3GP24i power cabinet.
Contents
Access to the 3GP24i power cabinet A-6
Pre-installation instructions A-9
How to install DC power cables A-12
How to install the AC utility power cables A-20
Installing 3GP24i power cabinet, if applicable
...................................................................................................................................................................................................................................
401-703-444
Issue 4, November 2007 Alcatel-Lucent - Proprietary
See notice on first page A-5
Access to the 3GP24i power cabinet
...................................................................................................................................................................................................................................
Overview
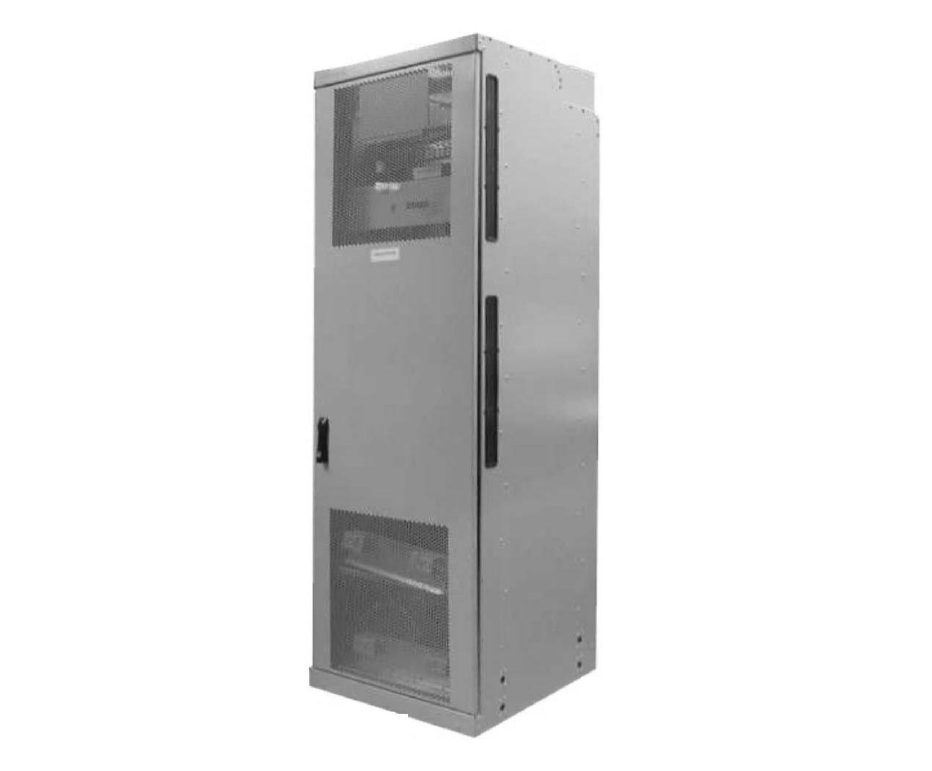
This procedure module provides instructions for access into the 3GP24i power cabinet.
Description of 3GP24i power cabinet door
The door is secured with a single latch on the left side. The door is right-hinged and
will swing open to the right.
Open front door of the 3GP24i power cabinet
To open the front door of the 3GP24i power cabinet: unlock the latch, pull out the
latch, and turn the latch to the right.
Installing 3GP24i power cabinet, if applicable
...................................................................................................................................................................................................................................
A-6 Alcatel-Lucent - Proprietary
See notice on first page 401-703-444
Issue 4, November 2007
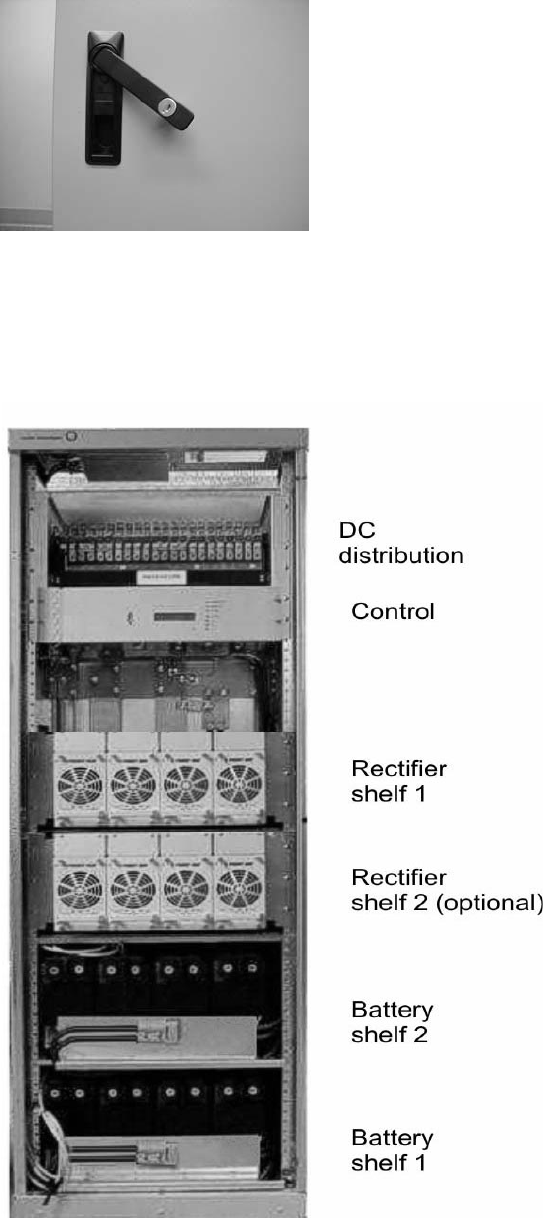
Inside view of the 3GP24i power cabinet
The figure below shows the 3GP24i power cabinet with the door open.
Installing 3GP24i power cabinet, if applicable
Access to the 3GP24i power cabinet
....................................................................................................................................................................................................................................
401-703-444
Issue 4, November 2007 Alcatel-Lucent - Proprietary
See notice on first page A-7

Installing 3GP24i power cabinet, if applicable
Access to the 3GP24i power cabinet
....................................................................................................................................................................................................................................
A-8 Alcatel-Lucent - Proprietary
See notice on first page 401-703-444
Issue 4, November 2007
Pre-installation instructions
...................................................................................................................................................................................................................................
Wiring overview
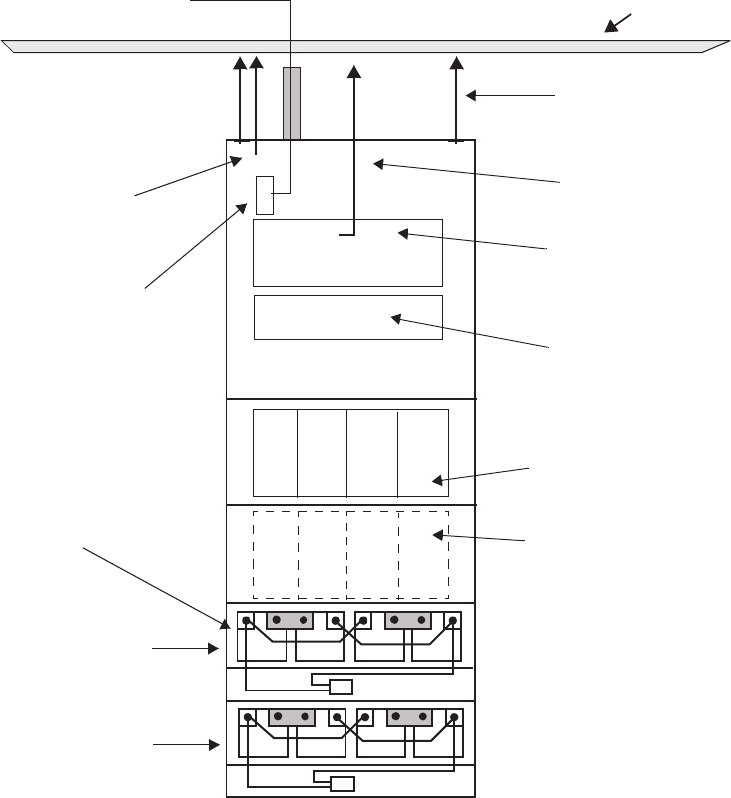
AC utility power input enters the 3GP24i power cabinet at the top of the unit. AC is
connected to the AC distribution panel. DC load output and return wiring enters the
3GP24i power cabinet through the top and is attached to the DC distribution panel. An
alarm cable is preinstalled in the 3GP24i power cabinet. This cable exits through the
top of the 3GP24i power cabinet and is connected to the BTS 8420/AWS 8420 radio
cabinet (refer to Chapter 5). Refer to the figure below for an overview illustration of
the wiring.
(-) (+)
~
5768
1324
ALARM CABLE TO
PRIMARY
CABINET
FRAME GROUND
(1 of 2)
DC DISTRIBUTION
RECTIFIER
SHELF 1
RECTIFIER
SHELF 2 (OPTIONAL)
THERMAL
PROBE
LOCATION
(1 of 1
per shelf)
AC INPUT VIA
1-1/2 INCH CONDUIT OVERHEAD LADDER RACK
BATTERY SHELF 2
BATTERY SHELF 1
CONTROL
DC OUTPUT
CABLES
(-) (+)
AC DISTRIBUTION
Installing 3GP24i power cabinet, if applicable
...................................................................................................................................................................................................................................
401-703-444
Issue 4, November 2007 Alcatel-Lucent - Proprietary
See notice on first page A-9

DC feeders and connection interface
Each BTS 8420/AWS 8420 radio cabinet requires three DC feeds. Refer to the table on
the next page for more details on BTS 8420 radio cabinet DC feeders.
Alternate wire gauges may be used for the DC feeders, but shall be sized to limit the
round trip voltage drop between the power system output terminals and the BTS
8420/AWS 8420 radio cabinet input terminals to less than one volt (for +24 VDC
systems). A current level equal to 80% of the circuit breaker current rating specified
shall be used for this calculation. The wire used for the DC feeders shall be rated for
the environmental condition in which it is used. The circuit breaker characteristics shall
be equivalent to Airpax Inc. model LEL/LML, circuit breakers with Type 51, DC trip
delay curve characteristics.
The DC terminal block is located on top of the BTS 8420/AWS 8420 radio cabinet.
(See figure on the next page).
Alcatel-Lucent Recommends Class B stranded wire to interface with the DC strip and
poke (Phoenix) terminal block. Strip 1-inch of insulation from each DC cable and
properly insert into strip and poke terminal block (avoid crimping into the cable
insulation). Torque the nut on top of terminal block to 6 Nm (53 in-lb).
The DC terminal connections may be damaged if the hardware is tightened more than
15 Nm (132 in-lb).
If Class I or finer stranded wire is used, a ferrule must be crimped to the wire before
inserting into the strip and poke terminal block to avoid fraying, otherwise it may
cause a short circuit and damage the connector. The installation DC feeders shall not
be performed in extremely cold temperature (-15 degrees C/-5 degrees F or less).
DC feeders and the connection interface for the BTS 8420/AWS 8420 radio
cabinet
BTS
8420/AWS
8420 radio
cabinet
Feeders #1, #2, #3 Maximum wire size at DC
terminal block
Circuit
breaker
(AMPS)
Wire size
(AWG)
Max.
Length
(Feet)
+24 VDC 150 1/0 40 50 mm2 (1/0 AWG)
Installing 3GP24i power cabinet, if applicable
Pre-installation instructions
....................................................................................................................................................................................................................................
A-10 Alcatel-Lucent - Proprietary
See notice on first page 401-703-444
Issue 4, November 2007
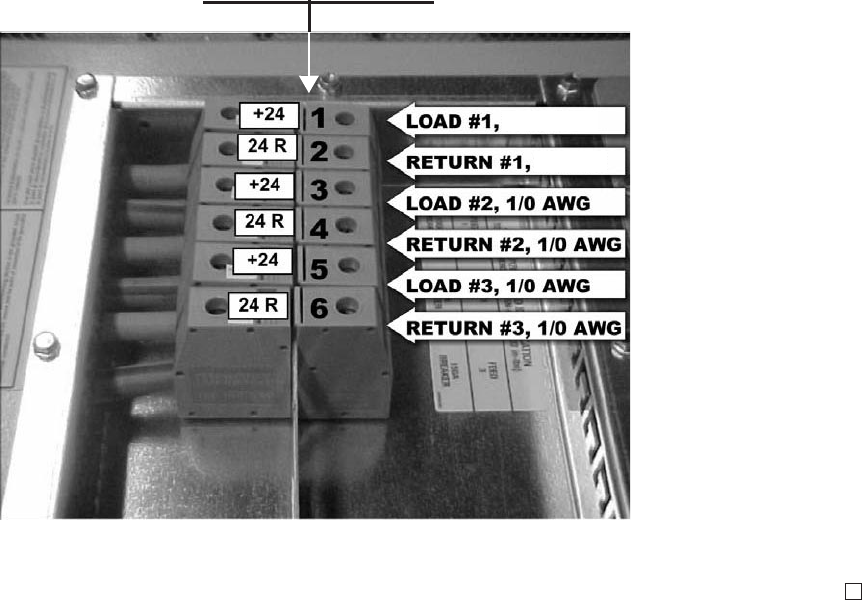
BTS 8420/AWS 8420 radio cabinet DC power terminal block (front view)
POSITION NUMBER
1/0 AWG
1/0 AWG
Installing 3GP24i power cabinet, if applicable
Pre-installation instructions
....................................................................................................................................................................................................................................
401-703-444
Issue 4, November 2007 Alcatel-Lucent - Proprietary
See notice on first page A-11

How to install DC power cables
...................................................................................................................................................................................................................................
Overview
This procedure module provides instructions for the installation of DC power cables
(feed and return) from the 3GP24i power cabinet to the BTS 8420/AWS 8420 radio
cabinet.
Step-by-step instructions are provided for the following tasks:
“Label, layout, and route DC cables to 3GP24i power cabinet” (p. A-12)
“Connect the BTS 8420/AWS 8420 radio cabinet DC cables at the 3GP24i power
cabinet” (p. A-14)
“Connect the DC power cables to the BTS 8420/AWS 8420 radio cabinet” (p. A-17)
Description of DC power cable routing and connections
This procedure module provides instructions for the preparation, routing, and
connection of DC power cables (load and return) at the 3GP24i power cabinet.
The indoor BTS 8420/AWS 8420 radio cabinet requires six #1/0 AWG, DC power
cables: three red load cables (+) and three grey return cables (-). These cables are
provided in kits.
The load cables (red) will be connected to the DC distribution bus in the 3GP24i
power cabinet.
The return cables (grey) will be connected to the DC load return bus in the 3GP24i
power cabinet.
At the BTS 8420 radio cabinet, the DC cables will be connected to the DC terminal
block on top of the cabinet.
Label, layout, and route DC cables to 3GP24i power cabinet
Use the following procedure to label, layout and route the DC cables to the 3GP24i
power cabinet.
...................................................................................................................................................................................................
1Label both ends of each +24 VDC (red) cable with a permanent marker or a wire tag
as follows:
•#1/0 AWG: Label L1
•#1/0 AWG: Label L2
•#1/0 AWG: Label L3
Installing 3GP24i power cabinet, if applicable
...................................................................................................................................................................................................................................
A-12 Alcatel-Lucent - Proprietary
See notice on first page 401-703-444
Issue 4, November 2007
...................................................................................................................................................................................................
2Label both ends of each 24 VDC return (grey) cable with a permanent marker or a
wire tag as follows.
•#1/0 AWG: Label L1
•#1/0 AWG: Label L2
•#1/0 AWG: Label L3
...................................................................................................................................................................................................
3Layout the DC cables via the ladder rack or cable support frame, from the power
cabinet to the DC terminal block on the top of the BTS 8420/AWS 8420 radio cabinet.
Refer to the figure below.
...................................................................................................................................................................................................
4Route the ends of the +24 VDC cables to the top of the 3GP24i power cabinet and
through the appropriate opening shown in the figure below.
...................................................................................................................................................................................................
5Route the ends of the return cables into the top of the 3GP24i power cabinet through
the specified opening shown in the figure below.
G-2 POSITION
4.0B 850 DUAL BAND OR 4.0B PCS AUX GROWTH
Installing 3GP24i power cabinet, if applicable
How to install DC power cables
....................................................................................................................................................................................................................................
401-703-444
Issue 4, November 2007 Alcatel-Lucent - Proprietary
See notice on first page A-13

...................................................................................................................................................................................................
6At the power cabinet, strip 19 mm (3/4 inches) of insulation from the end of each of
the cables.
Connect the BTS 8420/AWS 8420 radio cabinet DC cables at the 3GP24i power cabinet
Perform the following steps to connect the BTS 8420/AWS 8420 radio cabinet DC
cables at the 3GP24i power cabinet.
...................................................................................................................................................................................................
1Refer to the figure in the next step. Using a flat head screwdriver, connect each +24
VDC (red) cable to the appropriate terminal on the DC distribution panel, as follows:
•L1 (#1/0 AWG) to position 5
•L2 (#1/0 AWG) to position 6
•L3 (#1/0 AWG) to position 7/8
Torque each connection to 6 Nm (53 in-lb).
...................................................................................................................................................................................................
2Locate the return terminals on the return (upper) bus, shown in the figure below. Each
terminal is situated directly above and behind the corresponding +24 VDC (red) cable,
which was attached in the previous step.
TOP VIEW
FRONT OF CABINET
EZBFi BATTERY LEFT EZBFi BATTERY RIGHT
BTS 8420 RADIO CABINET
RETURN
BTS 8420 RADIO CABINET +24V
Installing 3GP24i power cabinet, if applicable
How to install DC power cables
....................................................................................................................................................................................................................................
A-14 Alcatel-Lucent - Proprietary
See notice on first page 401-703-444
Issue 4, November 2007
END OF STEPS
...................................................................................................................................................................................................
...................................................................................................................................................................................................
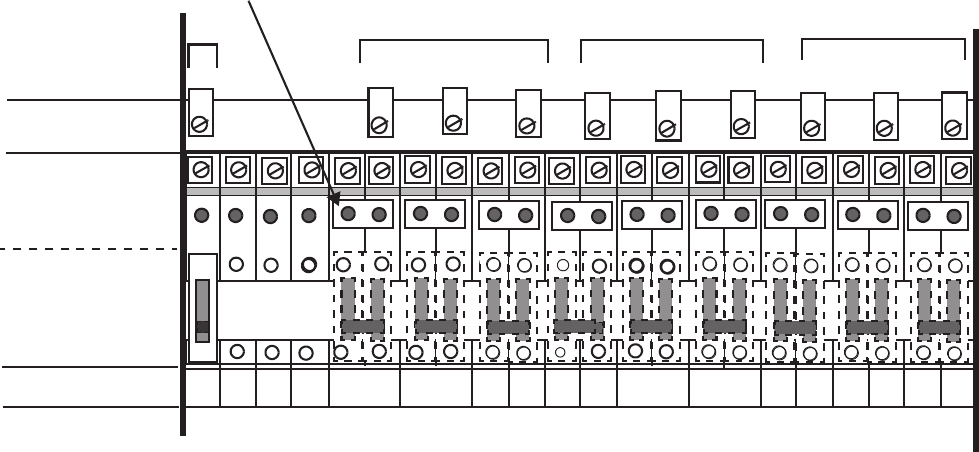
3Using a flat head screwdriver, connect each of the three return (grey) cables to the
appropriate terminal on the return (upper) bus, directly above and behind each
corresponding +24 VDC (red) cable. Torque each connection to 6 Nm (53 in-lb). Note
that this figure is only an example.
12345678910 11 12 13 14 15 16 17 18
RETURN BUS
CONNECTIONS
*PRIMARY CABINET G-1 CABINET **
CIRCUIT
BREAKER
POSITIONS
+24VDC BUS
CONNECTIONS
LOCATION #
* POWER CABINET CONTROLLER CONNECTION AND CIRCUIT BREAKER: INSTALLED AT FACTORY
** G-1 = PCS DUAL BAND OR PCS AUX
** G-2 = PCS AUX OR 850 DUAL BAND
ADDITIONAL
STRAPS MAY BE
REQUIRED
G-2 CABINET ***
Installing 3GP24i power cabinet, if applicable
How to install DC power cables
....................................................................................................................................................................................................................................
401-703-444
Issue 4, November 2007 Alcatel-Lucent - Proprietary
See notice on first page A-15
...................................................................................................................................................................................................
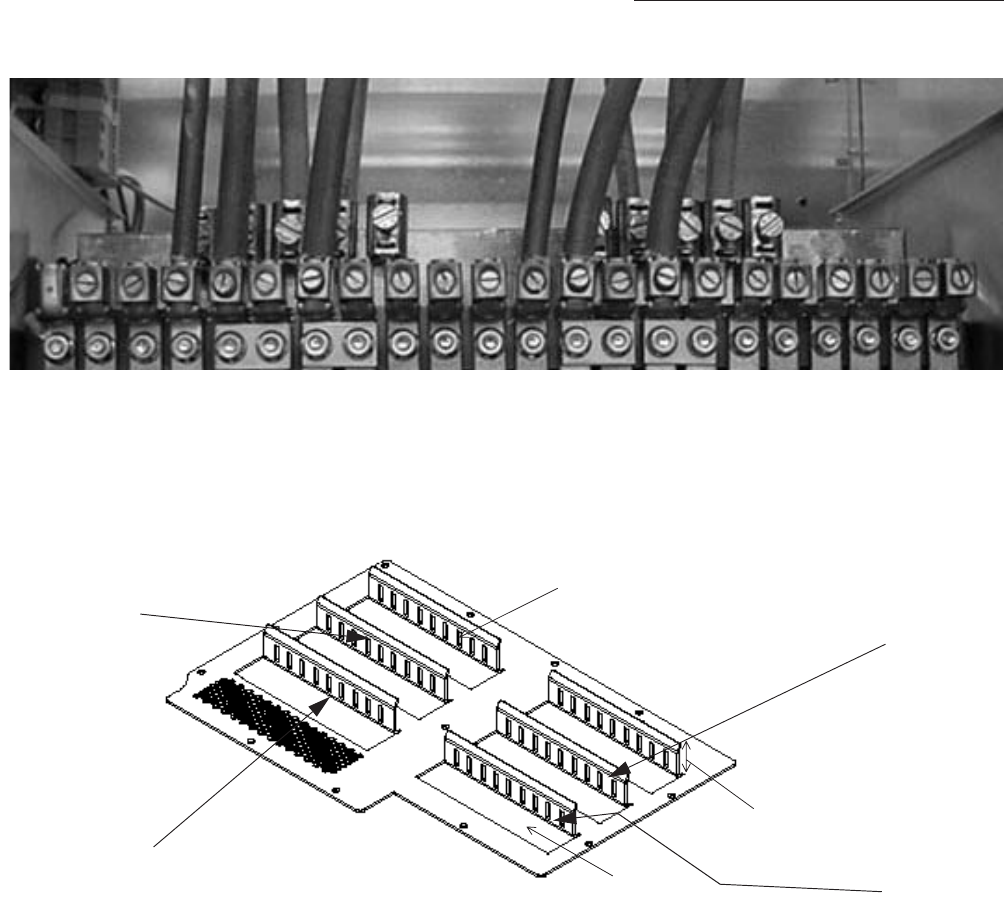
4Attach the DC cables to the applicable cable tie slot on the top of the 3GP24i power
cabinet with lacing cord or wire ties. Refer to the figure below.
.
Cable tie slots
DC Cable interface cutouts
25mm max
Tie primary
cabinet
return
cables here
Tie primary
cabinet
+24VDC
cables here
Tie G-1 and
G-2 cabinet
+24VDC
cables here
Tie G-1 and
G-2 cabinet
return cables
here
Installing 3GP24i power cabinet, if applicable
How to install DC power cables
....................................................................................................................................................................................................................................
A-16 Alcatel-Lucent - Proprietary
See notice on first page 401-703-444
Issue 4, November 2007
END OF STEPS
...................................................................................................................................................................................................
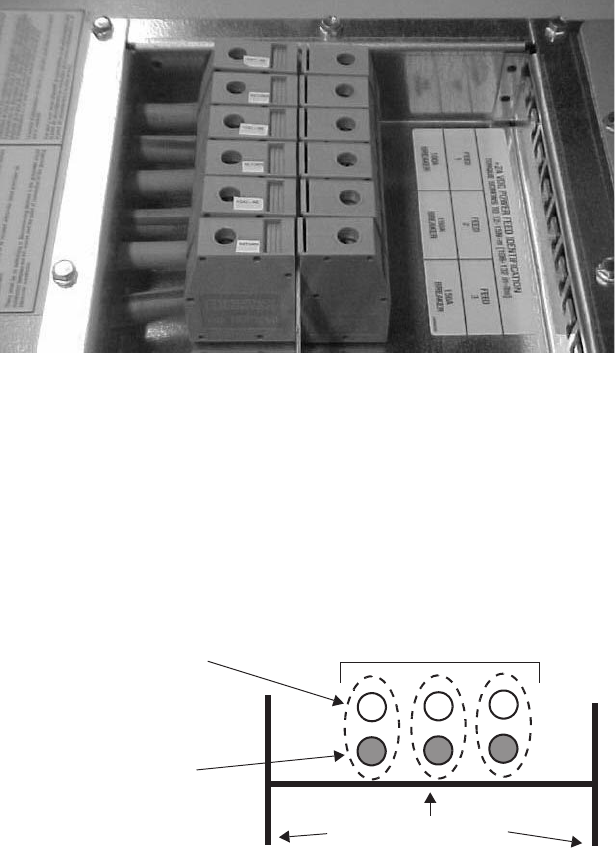
Connect the DC power cables to the BTS 8420/AWS 8420 radio cabinet
Use the following procedure to connect the DC power cables to the BTS 8420/AWS
8420 radio cabinet.
...................................................................................................................................................................................................
1Route all DC power cables from the 3GP24i power cabinet, via the ladder rack, or
cable support frame, to the DC terminal block on the top of the BTS 8420/AWS 8420
radio cabinet.
...................................................................................................................................................................................................
2Route and secure the cables to the ladder rack, as shown in the figure below
(preferred). Attach the cables to the ladder rack or cable support frame using standard
procedures, including the use of cable ties or lacing cord. Refer to the figure below.
Important! When performing the next step, the cable markings (or wire tags) may
be cut off when the excess cable is removed. Re-mark or tag each cable
immediately after cutting.
3 PAIRS PER
CABINET
(3 PAIR 1/0 AWG)
+24 VDC
24-VDC RETURN
LADDER RACK
Installing 3GP24i power cabinet, if applicable
How to install DC power cables
....................................................................................................................................................................................................................................
401-703-444
Issue 4, November 2007 Alcatel-Lucent - Proprietary
See notice on first page A-17
...................................................................................................................................................................................................
3Cut each cable to the correct length (allow adequate slack).
Important! If not installing a BTS 8420/AWS 8420 radio cabinet, skip the next
step.
...................................................................................................................................................................................................
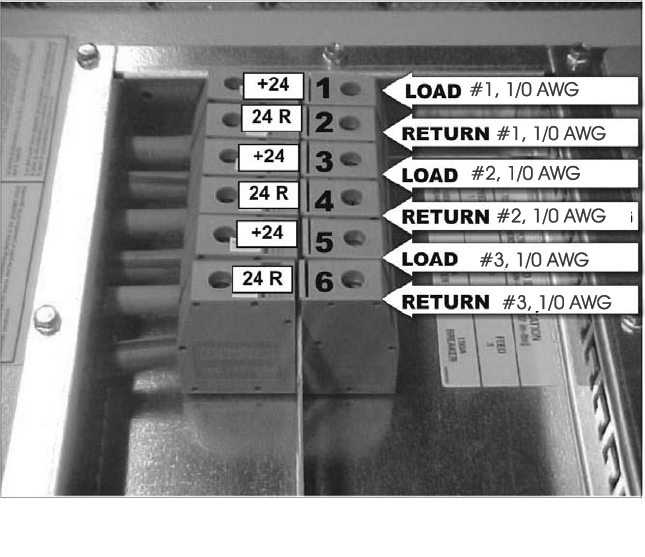
4At the BTS 8420/AWS 8420 radio cabinet, strip 1 inch (25 mm) of insulation from
each feed and return cable and connect it to the appropriate terminal on the DC
terminal block. Torque each connection to 6 Nm (53 in-lb). Connect the red DC cables
(+24 VDC) and the DC return cables (24 VDC return) to the DC power terminal block
as follows:
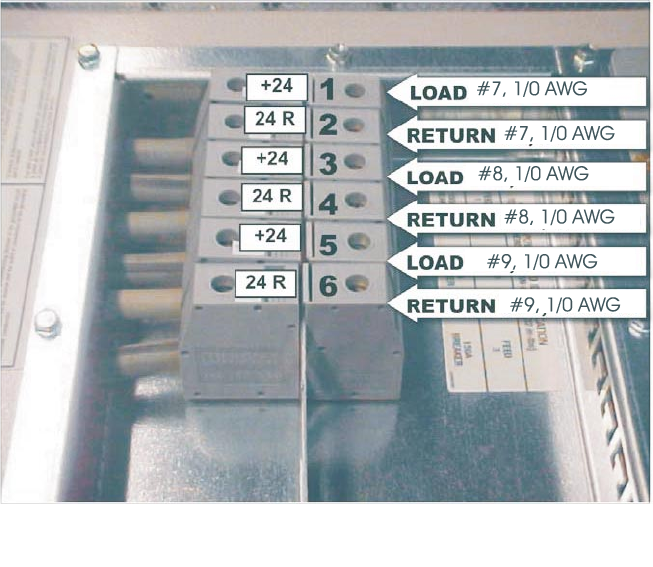
•L1 #1/0 AWG RED (+24 VDC) to position 1
•L1 #1/0 AWG GREY (24 VDC Return) to position 2
•L2 #1/0 AWG RED (+24 VDC) to position 3
•L2 #1/0 AWG GREY (24 VDC Return) to position 4
•L3 #1/0 AWG RED (+24 VDC) to position 5
•L3 #1/0 AWG GREY (24 VDC Return) to position 6.
4.0B 850 OR 4.0B PCS PRIMARY CABINET
Installing 3GP24i power cabinet, if applicable
How to install DC power cables
....................................................................................................................................................................................................................................
A-18 Alcatel-Lucent - Proprietary
See notice on first page 401-703-444
Issue 4, November 2007

END OF STEPS
...................................................................................................................................................................................................
Installing 3GP24i power cabinet, if applicable
How to install DC power cables
....................................................................................................................................................................................................................................
401-703-444
Issue 4, November 2007 Alcatel-Lucent - Proprietary
See notice on first page A-19

How to install the AC utility power cables
...................................................................................................................................................................................................................................
Overview
Important! If installing the BTS 8420 radio cabinet, the AC utility cables have
already been connected to the 3GP24i power cabinet at the time of the installation
of the primary cabinet. In this case, if also installing a battery module, skip to
“How to install the first EZBFi battery base module” in the EZBFi Modular
Battery Installation Manual for +24V and -48V, 401-703-507. Otherwise, skip to
Chapter 6 to continue the installation. If utilizing non-Alcatel-Lucent power, skip to
Appendix A.
This procedure module provides instructions for the connection of the AC utility power
cable to the 3GP24i power cabinet. Since this procedure may be performed by a
licensed electrician (depending upon local regulations), these steps are supplied for
reference only.
Important! If the AC utility connections are to be performed by a licensed
electrician, this activity must be coordinated with the work of the 3GP24i power
cabinet installers in order to avoid unnecessary delays.
Step-by-step instructions are provided for the following tasks:
“Connect the 1.5 inch AC conduit at the top of the 3GP24i power cabinet” (p. A-22)
“Route and connect the AC wires in the 3GP24i power cabinet” (p. A-24)
Before you begin
The AC cable should be installed from the service panel to the area of the power
cabinet as part of site preparation. If this has not been done, contact your supervisor
and the customer contact.
Verify that the circuit breakers for the AC feeder wires are off, locked out, and tagged.
Verify that the GPS antenna, power cabinet, primary cabinet, and associated equipment
have been properly grounded.
Safety precautions
Observe the following safety precautions
Installing 3GP24i power cabinet, if applicable
...................................................................................................................................................................................................................................
A-20 Alcatel-Lucent - Proprietary
See notice on first page 401-703-444
Issue 4, November 2007

DANGER
Electrical Energy Hazard
Electrical circuits can become energized, resulting in an electrical shock hazard.
Follow these rules:
1. Ensure that the circuit breaker for each AC input is turned OFF and tagged out.
2. Follow the procedures in the order provided. Always install earth ground
connection before connecting AC power to the 3GP24i power cabinet.
CAUTION
Equipment Damage / Inspection Failure
Damage to equipment, safety hazards, or failure to pass inspection can occur if all
applicable codes and regulations are not followed.
Follow all local codes and practices when performing the steps to connect AC to the
3GP24i power cabinet.
Description of AC utility power connections
The 3GP24i power cabinet is equipped with one standard rectifier shelf. An optional
second rectifier shelf may be added. Each shelf can support up to four rectifiers. The
3GP24i power cabinet accepts a 1-1/2 inch conduit (flexible or rigid per local code) for
the AC power supply wires. The AC wires enter through the top of the 3GP24i cabinet.
Refer to the figure The 3GP24i power cabinet is equipped with an AC terminal block
at the top interior left side of the cabinet for connecting the AC wires to power up to
eight rectifiers in the cabinet. Refer to the figure. The AC wires are connected as
shown in the figure. The customer provides the AC service and the conduit as part of
site preparation.
Before you begin
The AC cable should be installed from the service panel to the area of the power
cabinet as part of site preparation. If this has not been done, contact your supervisor
and the customer contact.
Verify that the circuit breakers for the AC feeder wires are off, locked out, and tagged.
Verify that the GPS antenna, power cabinet, primary cabinet, and associated equipment
have been properly grounded.
Installing 3GP24i power cabinet, if applicable
How to install the AC utility power cables
....................................................................................................................................................................................................................................
401-703-444
Issue 4, November 2007 Alcatel-Lucent - Proprietary
See notice on first page A-21
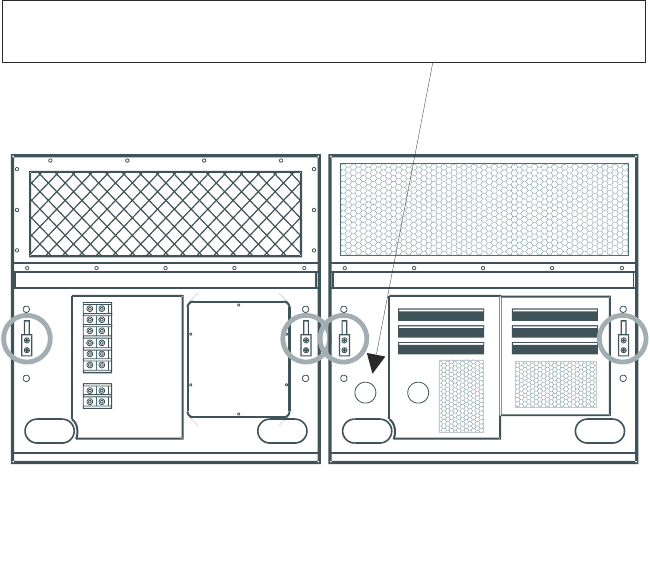
Connect the 1.5 inch AC conduit at the top of the 3GP24i power cabinet
Use the following procedure to connect the 1.5 inch AC conduit at the top of the
cabinet.
...................................................................................................................................................................................................
1Locate the AC access opening on the top of the 3GP24i power cabinet. Refer to the
figure below. The circles represent the attachment location of the cabinet ground
cables, which were attached in Chapter 4.
...................................................................................................................................................................................................
2Locate the AC conduit, which is provided by the customer.
...................................................................................................................................................................................................
3Verify that the main panel breaker(s) that supply AC power are OFF.
...................................................................................................................................................................................................
4Thread the AC wires through the conduit and into the top of the power cabinet through
the access opening. Refer to the figure below.
...................................................................................................................................................................................................
5Attach the AC cable conduit to the top of the power cabinet at the access opening.
Refer to the figure below.
Top View
4.0B Primary cabinet without
integrated power
3GP24i Power Cabinet
REAR
1.95-INCH AC ACCESS OPENING FOR AC WIRE FEED CONDUIT
ATTACHMENT
BTS 8420 Radiocabinet without
integrated power 3GP24i Power Cabinet
Installing 3GP24i power cabinet, if applicable
How to install the AC utility power cables
....................................................................................................................................................................................................................................
A-22 Alcatel-Lucent - Proprietary
See notice on first page 401-703-444
Issue 4, November 2007
Installing 3GP24i power cabinet, if applicable
How to install the AC utility power cables
....................................................................................................................................................................................................................................
401-703-444
Issue 4, November 2007 Alcatel-Lucent - Proprietary
See notice on first page A-23
END OF STEPS
...................................................................................................................................................................................................
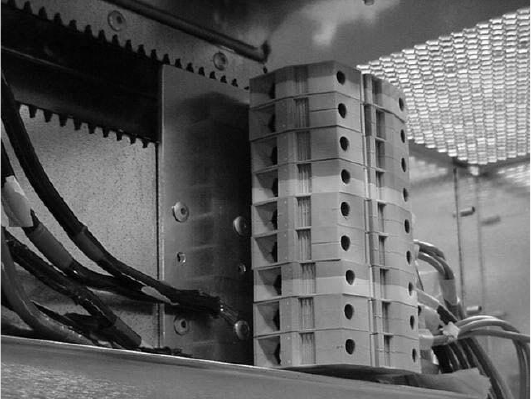
Route and connect the AC wires in the 3GP24i power cabinet
Use the following procedure to route and connect the AC wires in the power cabinet.
...................................................................................................................................................................................................
1Verify that the main panel breaker(s) that supply AC power are OFF.
...................................................................................................................................................................................................
2Clearly label (tag out) the circuit breaker panel, stating that installers are working on
the AC cabling.
...................................................................................................................................................................................................
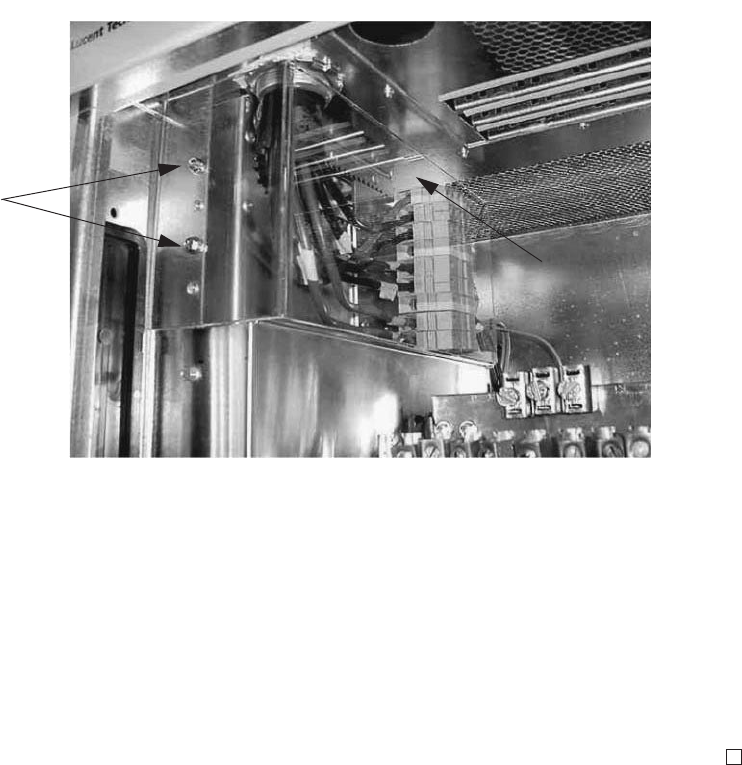
3Remove the plastic cover protecting AC terminal block by loosening two screws, then
lifting cover away from inner frame. Refer to the figure
...................................................................................................................................................................................................
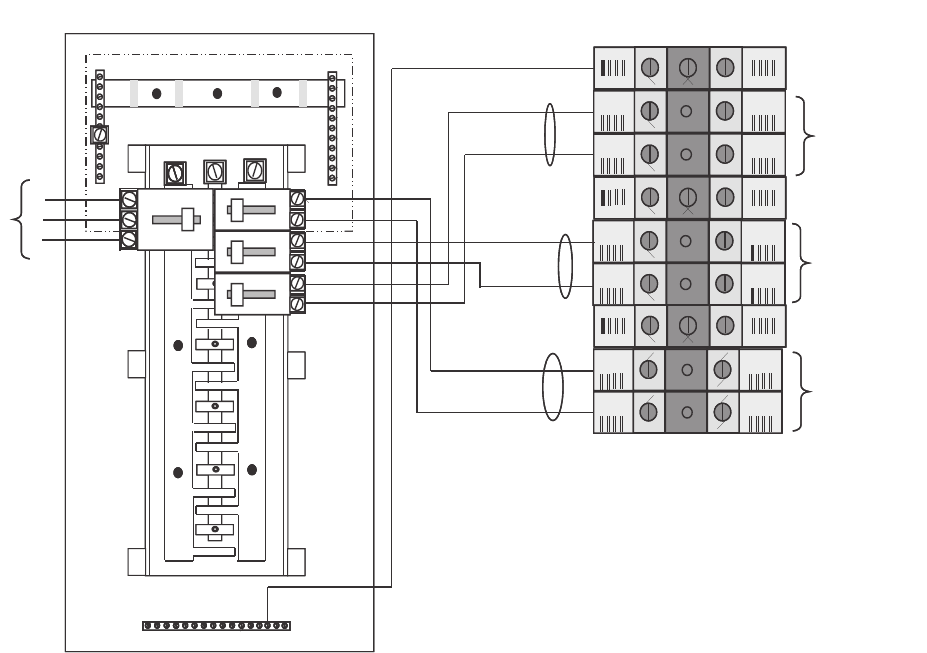
4Route the six (three pairs) of AC wires and the grounding wire from the access
opening, inside the top of the 3GP24i power cabinet, to the AC terminal block. Refer
to the figure below.
...................................................................................................................................................................................................
5Position the AC wires at the AC terminal block and cut them to length.
...................................................................................................................................................................................................
6Strip approximately 19 mm (3/4 inches) of insulation from the end of each wire.
...................................................................................................................................................................................................
7Observe the AC wiring diagram below.
Installing 3GP24i power cabinet, if applicable
How to install the AC utility power cables
....................................................................................................................................................................................................................................
A-24 Alcatel-Lucent - Proprietary
See notice on first page 401-703-444
Issue 4, November 2007
...................................................................................................................................................................................................
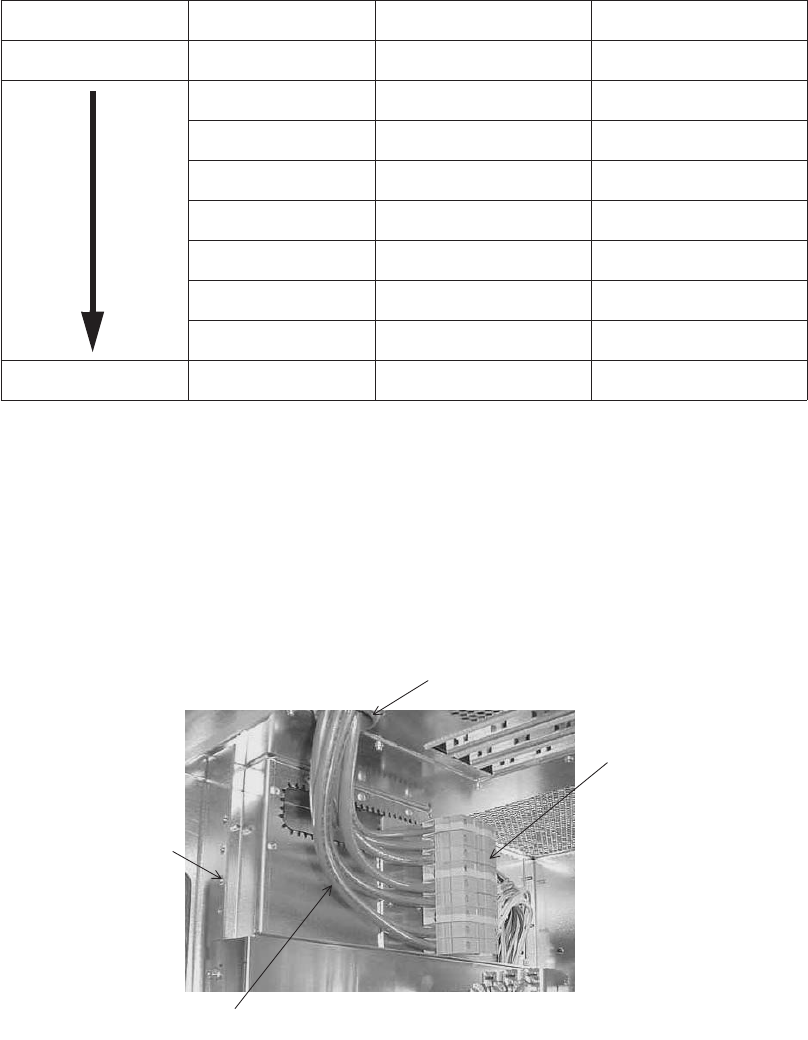
8Connect the AC wires as shown in the figure and the table below.
The location, color, function, and size of each wire in the AC input cable in a single
phase configuration is shown in the table below.
Rectifiers 1, 4 & 7
Rectifier 2, 5 & 8
Rectifier 3 & 6
Service Entrance Panel
808080
Ground
Line2
Circuit 2
Circuit 3
Circuit 1
Line1
Line2
L1 L2 L3
100
Line1
Line1
A
Top of Cabinet
A
A
B
B
B
C
C
C
Line2
Rectifiers 1, 4 & 7
Rectifier 2, 5 & 8
Rectifier 3 & 6
Service Entrance Panel
808080808080
Ground
Line2
Circuit 2
Circuit 3
Circuit 1
Line1
Line2
L1 L2 L3
100100
Line1
Line1
A
Top of Cabinet
A
A
B
B
B
C
C
C
Line2
208VAC
3Phase
Installing 3GP24i power cabinet, if applicable
How to install the AC utility power cables
....................................................................................................................................................................................................................................
401-703-444
Issue 4, November 2007 Alcatel-Lucent - Proprietary
See notice on first page A-25
* No connection
...................................................................................................................................................................................................
9Insert each wire into the appropriate terminal. Then, torque each terminal to 4 Nm (35
in-lb.). Refer to the completed connection below.
...................................................................................................................................................................................................
10 Install the plastic cover and secure to cabinet inner frame using two screws. Refer to
the figure below.
Location Color Function Wire size
Top Green/Yellow Ground 6 AWG
Red/Black Line2 4 AWG
Red/Black Line 1 4 AWG
*
Red/Black Line2 4 AWG
Red/Black Line 1 4 AWG
*
Red/Black Line2 4 AWG
Bottom Red/Black Line 1 4 AWG
AC input terminals
AC input conduit fitting
on top of cabinet
AC input cables
Secure protective cover
to mounting rail
Installing 3GP24i power cabinet, if applicable
How to install the AC utility power cables
....................................................................................................................................................................................................................................
A-26 Alcatel-Lucent - Proprietary
See notice on first page 401-703-444
Issue 4, November 2007
...................................................................................................................................................................................................
11 At the AC main distribution panel, check the label for each breaker. If they are not
correct, relabel them corresponding to each circuits.
Important! Do not turn on AC power at this time.
END OF STEPS
...................................................................................................................................................................................................
Plastic cover
Two screws
Installing 3GP24i power cabinet, if applicable
How to install the AC utility power cables
....................................................................................................................................................................................................................................
401-703-444
Issue 4, November 2007 Alcatel-Lucent - Proprietary
See notice on first page A-27

How to install 3GP24i power cabinet components
Overview
...................................................................................................................................................................................................................................
Purpose
Instructions for the installation of rectifiers, circuit breakers, and batteries in the
3GP24i power cabinet are provided here.
Contents
How to install the rectifiers in the 3GP24i power cabinet A-29
How to install the DC circuit breakers in the 3GP24i power cabinet A-32
Prepare to install batteries in the 3GP24i power cabinet A-35
How to install batteries in the 3GP24i power cabinet A-40
Installing 3GP24i power cabinet, if applicable
...................................................................................................................................................................................................................................
A-28 Alcatel-Lucent - Proprietary
See notice on first page 401-703-444
Issue 4, November 2007
How to install the rectifiers in the 3GP24i power cabinet
...................................................................................................................................................................................................................................
Overview
This procedure module provides information and instructions for the installation of the
rectifiers.
This section contains the following information and instructions.
“Description of rectifiers and shelves” (p. A-29)
“Install the rectifiers” (p. A-30)
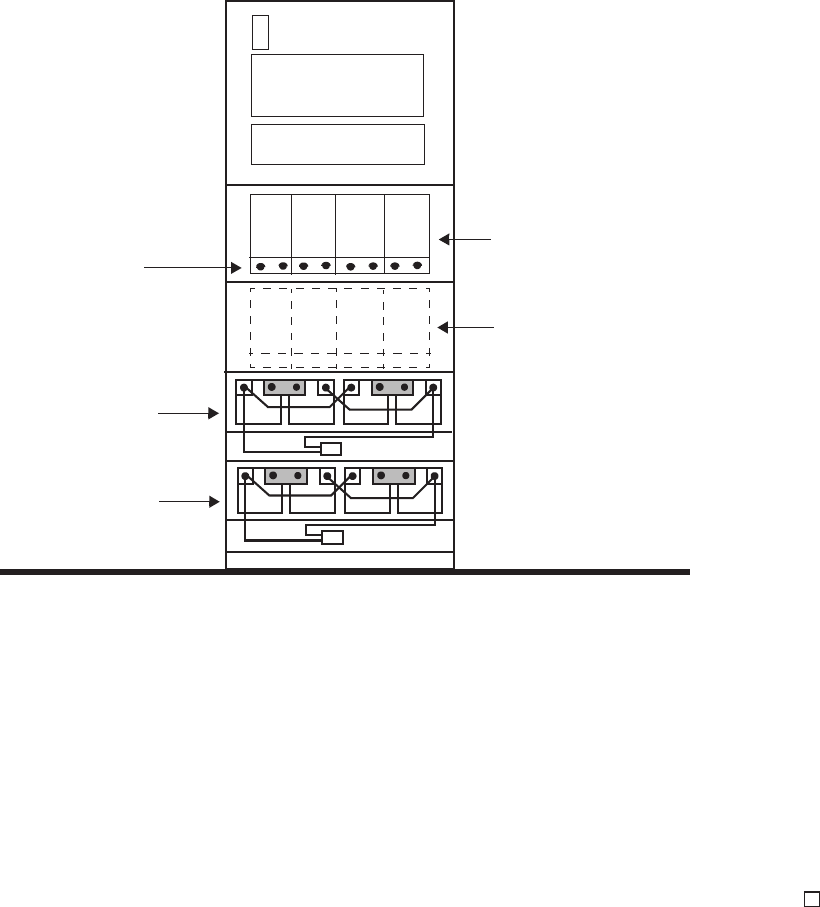
Description of rectifiers and shelves
The rectifiers are shipped separately from the 3GP24i power cabinet for installation at
the site. Each rectifier is keyed to prevent installation of the wrong type of rectifier.
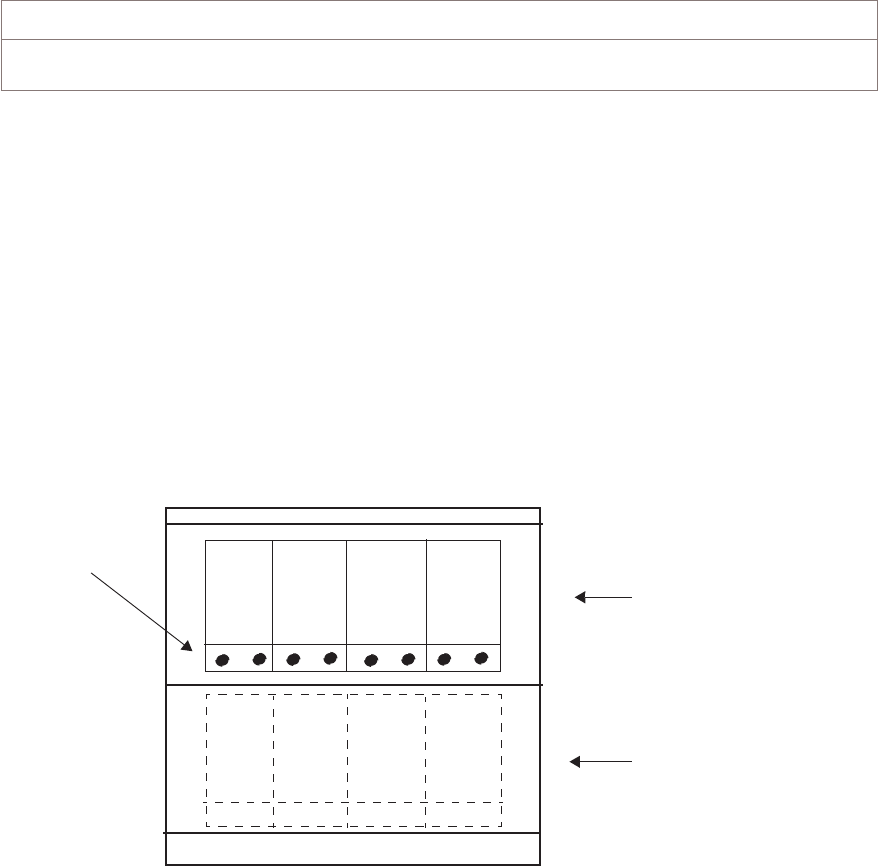
The 3GP24i power cabinet is equipped with one rectifier shelf. An optional second
rectifier shelf can be added. Each shelf can support up to four KS24637 rectifiers, but
must be installed in the order shown in the figure below
The 3GP24i power cabinet may be equipped with two rectifier shelves. which support
up to four rectifiers each. The rectifiers must be installed in the order shown in the
figure below
Note that the fifth rectifier requires the second rectifier shelf option
5768
1324
RECTIFIER
SHELF 1
RECTIFIER
SHELF 2 (OPTIONAL)
MOUNTING
SCREWS (2 per
RECTIFIER)
Installing 3GP24i power cabinet, if applicable
...................................................................................................................................................................................................................................
401-703-444
Issue 4, November 2007 Alcatel-Lucent - Proprietary
See notice on first page A-29
Preventing Equipment damage
CAUTION
Electrostatically Sensitive Components!
Semiconductor elements can be damaged by static discharges.
The following rules must be complied with when handling any module containing
semiconductor components:
•Wear conductive or antistatic working clothes (e.g., coat made of 100% cotton.
•Wear grounded ESD wrist strap.
•Wear shoes with conductive soles on a conductive floor surface or conductive work
mat.
•Leave the modules in their original packaging until ready for use.
•Make sure there is no difference in potential between yourself, the workplace, and
the package before removing, unpacking, or packing a module.
•Hold the module only by the grip without touching the connection pins, tracks, or
components.
•Place modules removed from the equipment on a conductive surface.
•Test or handle the module only with grounded tools on grounded equipment.
•Handle defective modules exactly like new ones to avoid causing further damage.
Install the rectifiers
Use the following procedure to install the rectifiers.
...................................................................................................................................................................................................
1Obtain the required rectifiers. Obtain the required rectifiers. Rectifier information (the
required number for various loads) can be obtained from the ERD
(ERD_0102_0004__PWR). The ERD can be accessed from the Customer Information
Center at http//www.cic.lucent.com.
Important! Install rectifiers from left to right on the top shelf (Shelf 1). Shelf 1
should be populated with four rectifiers before adding Shelf 2. Refer to the figure
below.
...................................................................................................................................................................................................
2Install each rectifier on the appropriate shelf, and in the correct position. Refer to the
figure below.
Installing 3GP24i power cabinet, if applicable
How to install the rectifiers in the 3GP24i power cabinet
....................................................................................................................................................................................................................................
A-30 Alcatel-Lucent - Proprietary
See notice on first page 401-703-444
Issue 4, November 2007
...................................................................................................................................................................................................
3Slide the rectifier inward until it stops. Secure with the two mounting screws at the
bottom.
...................................................................................................................................................................................................
4Skip to “How to install the DC circuit breakers in the 3GP24i power cabinet”
(p. A-32) to continue the installation.
END OF STEPS
...................................................................................................................................................................................................
(-) (+)
5768
13 24
DC DIST.
RECTIFIER
SHELF 1
RECTIFIER
SHELF 2
(OPTIONAL -
REQUIRED ABOVE
FOUR RECTIFIERS)
BATTERY SHELF 2
BATTERY SHELF 1
CONTROL
(-) (+)
MOUNTING
SCREWS
(2 per RECTIFIER)
Installing 3GP24i power cabinet, if applicable
How to install the rectifiers in the 3GP24i power cabinet
....................................................................................................................................................................................................................................
401-703-444
Issue 4, November 2007 Alcatel-Lucent - Proprietary
See notice on first page A-31
How to install the DC circuit breakers in the 3GP24i power
cabinet
...................................................................................................................................................................................................................................
Overview
This procedure module provides instructions for the installation of the DC circuit
breakers.
Before you begin
Here is some useful work preparation information.
Parts and/or kits needed
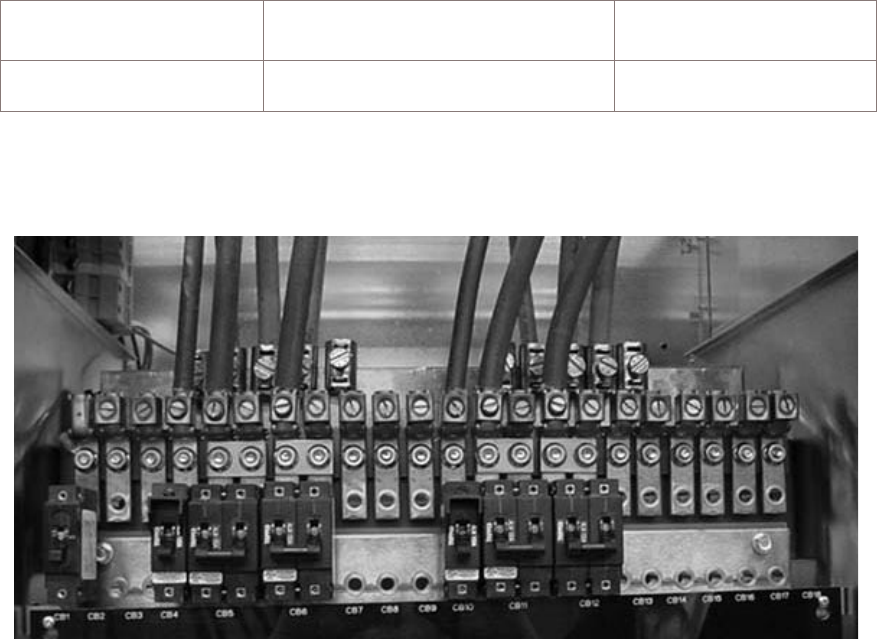
The following circuit breakers are required for the installation of the BTS 8420 radio
cabinet. These circuit breakers are installed on the DC distribution panel.
Step-by-step instructions are provided for the following tasks:
CELL TYPE CIRCUIT BREAKER TYPE CIRCUIT BREAKER
QUANTITY
BTS 8420 LMLK DC (150-A) 3
These breakers will be installed into the DC distribution panel, as shown in the
example figure below. Note that this figure is only an example.
Installing 3GP24i power cabinet, if applicable
...................................................................................................................................................................................................................................
A-32 Alcatel-Lucent - Proprietary
See notice on first page 401-703-444
Issue 4, November 2007
Install DC circuit breakers in the 3GP24i power cabinet
Use the following procedure to install the DC circuit breakers in the 3GP24i power
cabinet.
...................................................................................................................................................................................................
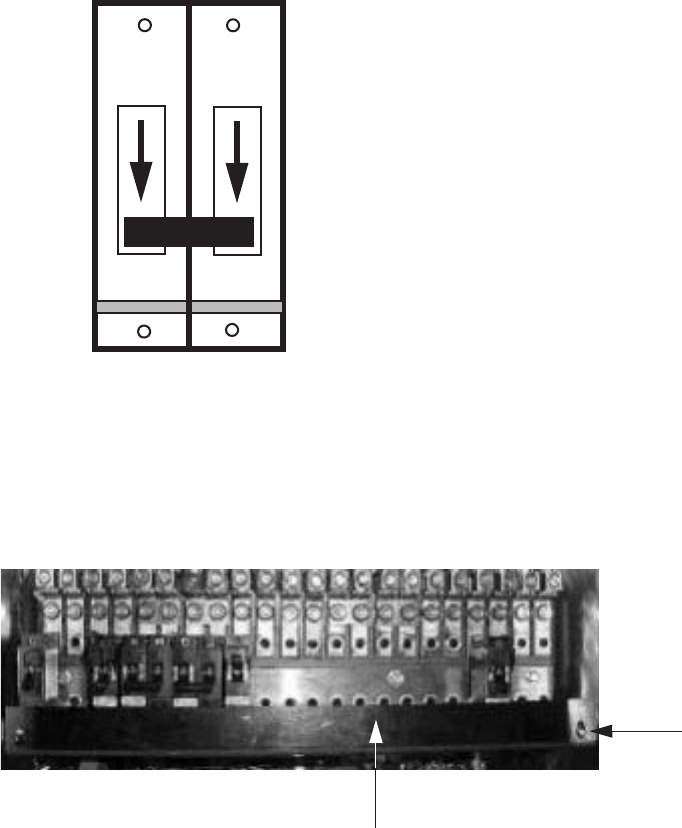
1Turn all breakers that are being installed to the OFF position. See the figure below.
...................................................................................................................................................................................................
2Remove the plastic circuit breaker bar by loosening the two screws and the lifting bar
up and out as shown in the example figure below.
Important! If installing circuit breakers for a cabinet in addition to the primary
cabinet, skip the next step.
LEFT
BOTTOM
TOP
RIGHT
OFF
ON
OFF
ON
150-A
plastic circuit breaker panel
screw
(1 of 2)
Installing 3GP24i power cabinet, if applicable
How to install the DC circuit breakers in the 3GP24i
power cabinet
....................................................................................................................................................................................................................................
401-703-444
Issue 4, November 2007 Alcatel-Lucent - Proprietary
See notice on first page A-33
...................................................................................................................................................................................................
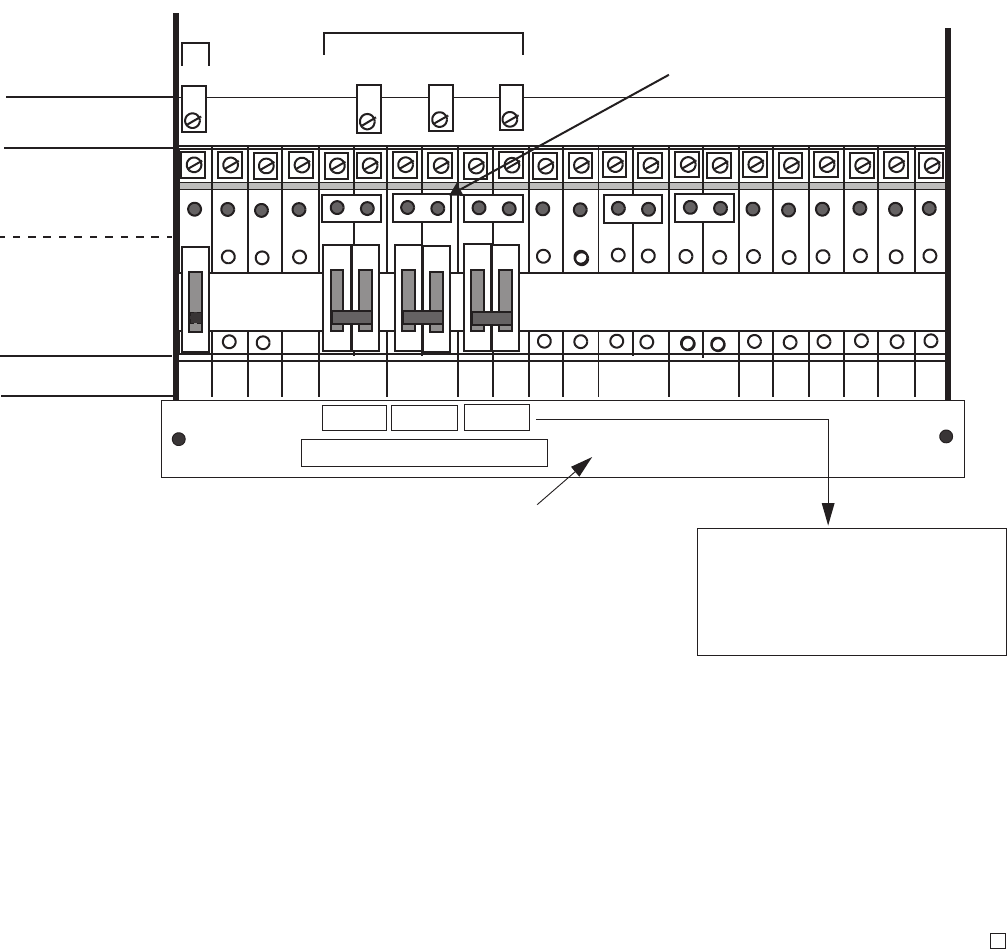
3Plug the breakers into the following positions on the DC distribution panel. See the
figure below.
•150-A (two-position) into position 5
•150-A (two-position) into position 6
•150-A (two-position) into position 7/8.
...................................................................................................................................................................................................
4Replace the plastic circuit breaker panel, and complete and attach the supplied circuit
breaker labels to the front. Label as shown in the figure above.
Important! If installing circuit breakers for a cabinet in the G-2 position (third
cabinet), skip the next step.
END OF STEPS
...................................................................................................................................................................................................
12345678910 11 12 13 14 15 16 17 18
RETURN BUS
CONNECTIONS
*
CIRCUIT
BREAKERS
POSITIONS
+24VDC BUS
CONNECTIONS
LOCATION #
A. Label " Filters and Radio
Shelves "
B. Label "Amplifiers Group 1"
C. Label "Amplifiers Group 2"
PRIMARY CABINET
AB
PLASTIC CIRCUIT
BREAKER PANEL
PRIMARY CABINET
*POWER CABINET CONTROLLER CONNECTION AND CIRCUIT BREAKER: INSTALLED AT FACTORY
C
ADDITIONAL
STRAPS MAY BE
REQUIRED
Installing 3GP24i power cabinet, if applicable
How to install the DC circuit breakers in the 3GP24i
power cabinet
....................................................................................................................................................................................................................................
A-34 Alcatel-Lucent - Proprietary
See notice on first page 401-703-444
Issue 4, November 2007
Prepare to install batteries in the 3GP24i power cabinet
...................................................................................................................................................................................................................................
Perform the following steps in preparation for installation of the batteries in the
3GP24i power cabinet.
“Battery safety and precautions” (p. A-35)
“Description of battery compartment” (p. A-36)
“Description of typical batteries” (p. A-37)
Battery safety and precautions
Your understanding of the following information is important to ensure a proper and
safe installation of the batteries.
CAUTION
To batteries in this product can present a risk of high short circuit and
fire. The following precautions should be observed when working on
batteries:
•Remove watches, rings, or other metal objects
•Use insulated tools
•Wear rubber gloves and boots
•Disconnect charging source prior to connecting or disconnecting battery terminals
DANGER
Injury to Personnel - Chemical Burns
The batteries contain electrolyte (sulfuric acid and water), which can generate
hydrogen gas, even under open circuit conditions. Extreme caution must be taken when
handling batteries. Carefully follow all applicable procedures.
WARNING
Injury to Personnel
Lifting of the batteries by one person can result in a serious injury. Always use two
people (or use a lifting device) to handle the batteries.
Installing 3GP24i power cabinet, if applicable
...................................................................................................................................................................................................................................
401-703-444
Issue 4, November 2007 Alcatel-Lucent - Proprietary
See notice on first page A-35

WARNING
High Energy hazard
The following procedures are the safest method to install and connect the batteries. If
these procedures are not followed in the exact sequence listed, a serious electrical
energy hazard will result. Ensure that loose cables cannot cause a short circuit. Since
the batteries are charged, do not touch battery terminals or cross terminals with metal
objects. Do not remove the insulated cover from the battery terminals until you are
preparing to complete each connection.
CAUTION
To reduce the risk of fire or injury to persons, read and follow
these instructions:
•Use only batteries approved for use with this product. Refer to “Approved
batteries” (p. A-38) for 3GP24i approved batteries and “Approved batteries”
(p. A-38) for EZBFi approved batteries
•Do not dispose of the batteries in a fire. The cell may explode. Check with local
codes for possible disposal instructions
•Do not open or mutilate the batteries. Released electrolyte is corrosive and may
cause damage to the eye and skin. It may be toxic if swallowed
•Exercise care in handling batteries in order not to short the battery with conductive
materials such as rings, bracelets, and keys. The battery or conductor may
overheat and cause burns
•Do not mix old and new batteries in this product.
Description of battery compartment
Two shelves are provided for batteries. The bottom shelf (Shelf 1) is populated first.
Each shelf can contain four batteries, for a total of eight batteries. During installation,
two 12 V batteries are connected together in a pair to form a 24 V string, two strings
per shelf, for a maximum of four strings per cabinet.
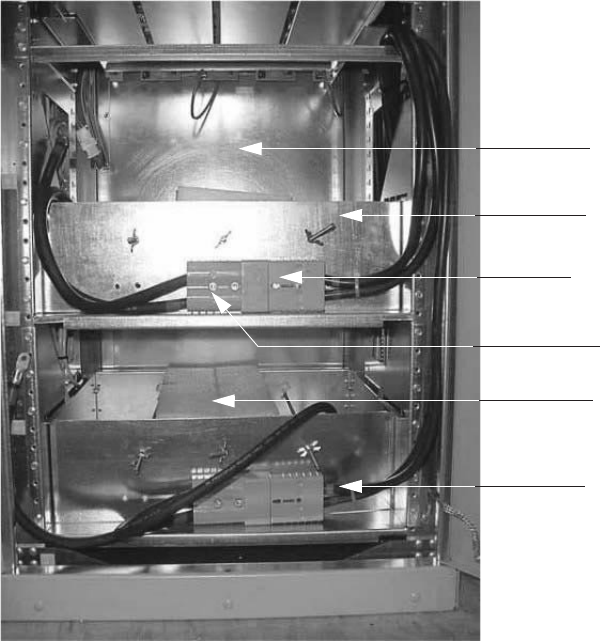
A disconnect connector is provided for each battery shelf. Battery side disconnect
cables are pre-installed on the battery retaining bracket on the front of each shelf. The
bus side battery disconnect cable assembly (which is not attached to the retaining
bracket) is pre-installed from the bus bars and plugs in to the battery side disconnect
cable connector on the retaining bracket to form the battery disconnect, as shown in
the figure below.
A thermal probe cable is pre-connected and coiled along the cabinet inner wall. Battery
heater thermostats are present for each battery shelf.
Installing 3GP24i power cabinet, if applicable
Prepare to install batteries in the 3GP24i power cabinet
....................................................................................................................................................................................................................................
A-36 Alcatel-Lucent - Proprietary
See notice on first page 401-703-444
Issue 4, November 2007
Description of typical batteries
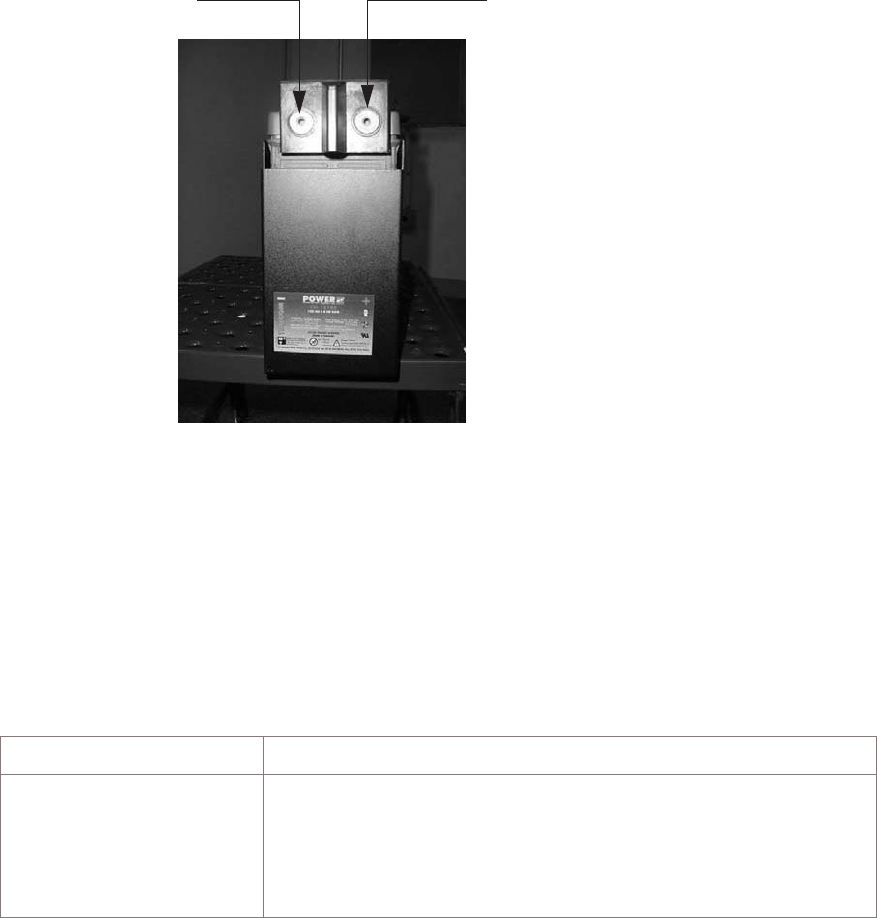
The L1-type batteries are shown as an example in this manual. The battery terminals
are located on the front end of the battery. Positive and negative terminals are clearly
labeled ″+″and ″-″. Dual strap handles are permanently attached to the battery along
its top. An example Power CLS-12100 L1 battery is shown in the figure below.
Battery Shelf 2
Battery Shelf 1
Bus side battery
Battery side disconnect
Battery retaining
bracket, Shelf 1
Battery retaining
bracket, Shelf 2
disconnect cable
cable
Installing 3GP24i power cabinet, if applicable
Prepare to install batteries in the 3GP24i power cabinet
....................................................................................................................................................................................................................................
401-703-444
Issue 4, November 2007 Alcatel-Lucent - Proprietary
See notice on first page A-37
Important! An insulated cover is factory-installed over the terminals on the
batteries to prevent an inadvertent electrical short during battery installation. Do not
remove this cover until you are preparing to complete the battery connection.
Important!
Approved batteries
You will need the following recommended materials or equivalent.
Qty: Name
As required per site
specification
Power CSL-12100 L1-type batteries with interconnection
bus bars
Marathon GNB M12V100FT L1-type batteries with
interconnecting bus bars and spacers (One per battery)
Review the battery cabling plan
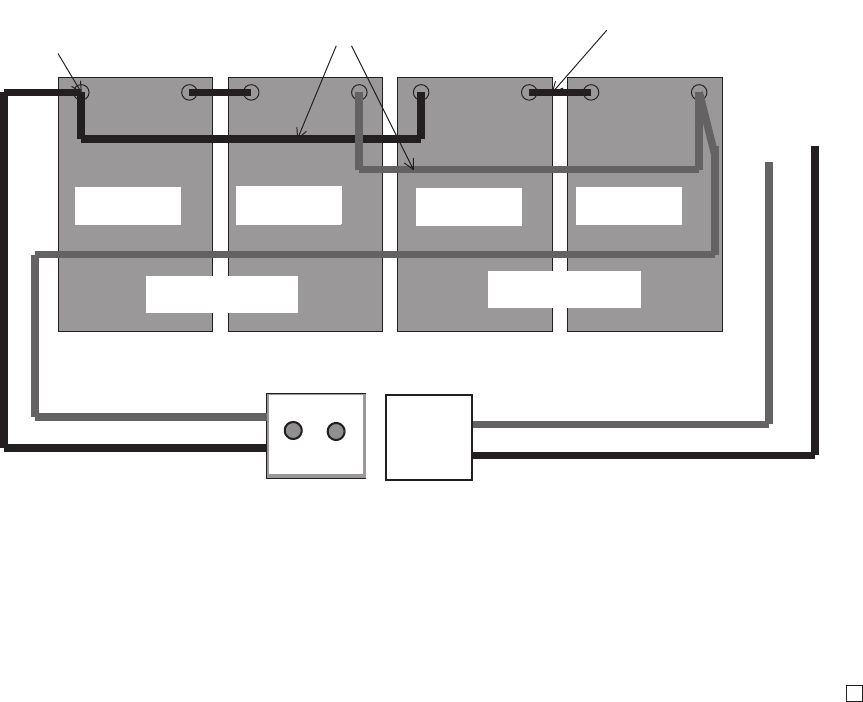
Prior to battery installation, refer to the figure below to review the battery cabling plan.
Negative battery Positive battery
terminal
Installing 3GP24i power cabinet, if applicable
Prepare to install batteries in the 3GP24i power cabinet
....................................................................................................................................................................................................................................
A-38 Alcatel-Lucent - Proprietary
See notice on first page 401-703-444
Issue 4, November 2007
Bat 1
-+
Bat 1
-+
Bat 2
-+
Bat 2
-+
Bat 3
-+
Bat 3
-+
Bat 4
-+
Bat 4
-+
350A
Anderson
350A
Anderson
To bus
1/0 AWG Cable
Cable 2
#2 AWG Cables
2x Bus jumper supplied w/ battery
1/0 AWG Cable 1/0 AWG Cable
1/0 AWG Cable
All cable can be same color jacket.Use labels on field-terminated ends.
Anderson connected to bat should be secured to battery retainer in front.
Batteries come equipped with 6mm hardware. Lug cables accordingly.
Cabinet ships loose #2AWG cable jumpers and pre-terminated Andersons.
6mm studs
Stationary
half
Floating
half
Bat 1 Bat 2
STRING 1 STRING 2
Bat 1 Bat 2
Battery jumper cables
BUS SIDE
DISCONNECT
CABLE
BATTERY SIDE
DISCONNECT
CABLE
Installing 3GP24i power cabinet, if applicable
Prepare to install batteries in the 3GP24i power cabinet
....................................................................................................................................................................................................................................
401-703-444
Issue 4, November 2007 Alcatel-Lucent - Proprietary
See notice on first page A-39

How to install batteries in the 3GP24i power cabinet
...................................................................................................................................................................................................................................
Overview
This procedure module provides instructions for the installation and connection of the
batteries.
Step-by-step instructions are provided for the following tasks:
“Prepare the batteries for installation” (p. A-40)
“Review the battery cabling plan” (p. A-38)
“Place batteries on a shelf” (p. A-40)
“Connect the battery cables to all battery strings” (p. A-43)
“Attach interconnecting bus bars to all battery strings” (p. A-45)
“Complete the installation of batteries” (p. A-47)
Prepare the batteries for installation
Follow all appropriate standard practices for the storage and handling of batteries, and
complete the warranty procedures and the following steps.
...................................................................................................................................................................................................
1Check battery initial voltages and record.
...................................................................................................................................................................................................
2Record all battery date codes.
Place batteries on a shelf
CAUTION
Electrical energy hazard
Battery cable lugs are not insulated and can cause a short circuit or injury. Ensure
that loose cables cannot cause a short circuit.
Installing 3GP24i power cabinet, if applicable
...................................................................................................................................................................................................................................
A-40 Alcatel-Lucent - Proprietary
See notice on first page 401-703-444
Issue 4, November 2007
END OF STEPS
...................................................................................................................................................................................................
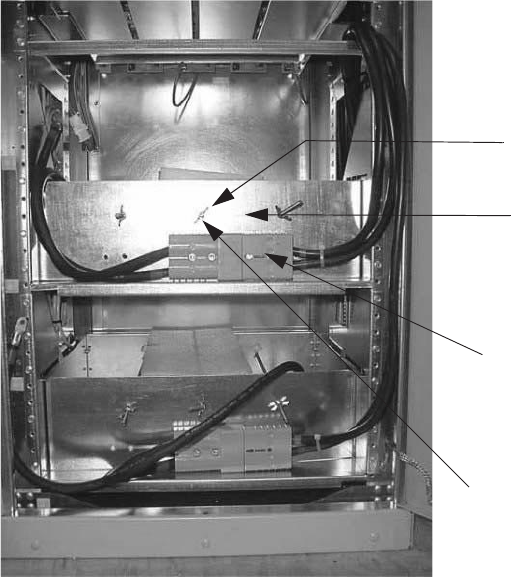
Use the following procedure to place batteries on a shelf, starting with Shelf 1
(bottom).
...................................................................................................................................................................................................
1If connected, unplug the bus side disconnect cable connector from the battery side
disconnect cable connector attached to the Shelf 1 (bottom) battery retaining bracket.
Refer to the figure below (top shelf identified).
...................................................................................................................................................................................................
2Remove the wing nut from the threaded rod on the front of the battery retaining
bracket and carefully remove bracket and attached battery side disconnect cable
assembly from battery shelf. Refer to the figure above and the figure below.
Important! The thermal probe is coiled along left inner frame of the cabinet.
Ensure that the probe is up against the inner frame so as to prevent the cable from
being pinched during battery installation. Make sure to pull the rear battery handle
strap towards the front and away from rear wall. This will prevent the strap from
becoming an obstruction during battery placement.
...................................................................................................................................................................................................
3Ensure that the battery shelf is free of any obstruction that may hinder battery
placement.
Flatwasher, lockwasher, wingnut
Threaded rod
Battery retaining bracket
Bus side battery disconnect
cable connector
Installing 3GP24i power cabinet, if applicable
How to install batteries in the 3GP24i power cabinet
....................................................................................................................................................................................................................................
401-703-444
Issue 4, November 2007 Alcatel-Lucent - Proprietary
See notice on first page A-41
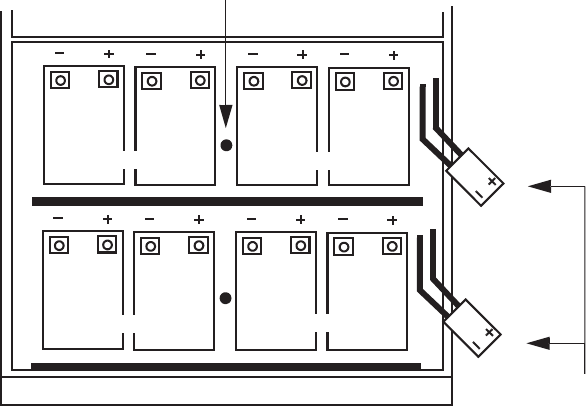
...................................................................................................................................................................................................
4Lift and place each battery of the four batteries on the bottom battery shelf, with the
battery terminals facing the front of the battery compartment. Ensure that the threaded
rod is between the two battery pairs, and can be placed in a straight position in
preparation for battery retaining bracket reinstallation. Refer to the figure below.
...................................................................................................................................................................................................
5Place battery retainer bracket at the bottom of each shelf, and pass the threaded rod
through the center hole. Secure the threaded rod to the bracket using the flat washer,
lock washer, and wing nut, as shown in the figure below.
SHELF 1
SHELF 2
BUS SIDE
BATTERY
DISCONNECT
CABLES
THREADED RODS
STRING 2
STRING 1
STRING 1 STRING 2
12
1212
12
Installing 3GP24i power cabinet, if applicable
How to install batteries in the 3GP24i power cabinet
....................................................................................................................................................................................................................................
A-42 Alcatel-Lucent - Proprietary
See notice on first page 401-703-444
Issue 4, November 2007
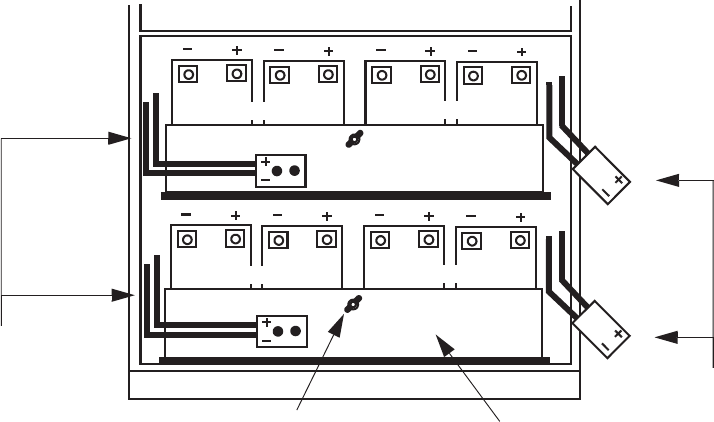
...................................................................................................................................................................................................
6Repeat the previous steps for Shelf 2, if required.
Connect the battery cables to all battery strings
Perform the following steps to connect the battery cables to all battery strings. Route
all cables downward from their battery connections.
...................................................................................................................................................................................................
1Remove the attaching hardware from the positive (+) terminals of String 2, Battery 2,
and String 1, Battery 2 (shown shaded in the figure below).
Important! If installing Marathon GNB M12V100FT L1-type batteries install the
supplied spacer before making the battery cable connections in the next three steps.
...................................................................................................................................................................................................
2Using antioxidant compound, connect the positive (+) battery jumper cable to the
positive (+) terminal of String 1, Battery 2, using the previously removed attaching
hardware. Refer to the figure below.
...................................................................................................................................................................................................
3Place the other end of the positive (+) battery jumper cable on the positive (+)
terminal on of String 2, Battery 2. Do not attach it at this time. Refer to the figure
below.
SHELF 1
SHELF 2
BATTERY RETAINING
BRACKET (1 of 2)
BUS SIDE
BATTERY
DISCONNECT
CABLES
THREADER ROD AND
WINGNUT (1 of 2)
BATTERY SIDE
DICCONNECT
CABLES
1212
STRING 2
STRING 1
STRING 2
STRING 1
1212
Installing 3GP24i power cabinet, if applicable
How to install batteries in the 3GP24i power cabinet
....................................................................................................................................................................................................................................
401-703-444
Issue 4, November 2007 Alcatel-Lucent - Proprietary
See notice on first page A-43
END OF STEPS
...................................................................................................................................................................................................
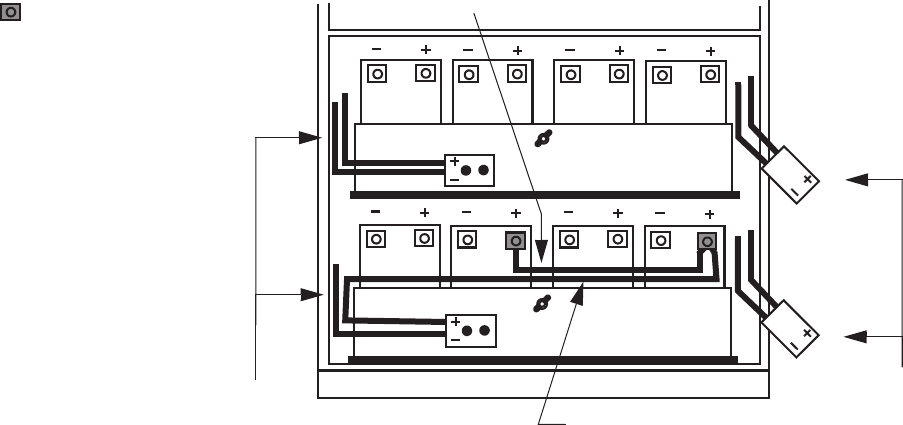
...................................................................................................................................................................................................
4Place the positive (+) battery side disconnect cable on the positive (+) terminal of
String 2, Battery 2. Attach the two cables using the previously removed attaching
hardware.
...................................................................................................................................................................................................
5Remove the attaching hardware from the negative (-) terminal of String 2, Battery 1,
and String 1, Battery 1 (shown shaded in the figure below).
Important! If installing Marathon GNB M12V100FT L1-type batteries, install the
supplied spacer before making the battery cable connections in the next three steps.
...................................................................................................................................................................................................
6Using antioxidant compound, connect the negative (-) battery jumper cable to the
negative (-) terminal of String 2, Battery 1, using the previously removed attaching
hardware.
...................................................................................................................................................................................................
7Place the other end of the negative (-) battery jumper cable on the negative (-)
terminal of String 1, Battery 1. Do not attach it at this time.
...................................................................................................................................................................................................
8Place the negative (-) battery side disconnect cable on the negative (-) terminal on
String 1, Battery 1. Attach the two cables using the previously removed attaching
hardware. Refer to the figure below.
POSITIVE (+) BATTERY JUMPER CABLE
POSITIVE (+) BATTERY
SIDE CABLE
SHELF 1
SHELF 2
BUS SIDE
BATTERY
DISCONNECT
CABLES
BATTERY SIDE
DISCONNECT CABLES
STRING 2
STRING 1
1212
STRING 2
STRING 1
1212
Marathon GNB
M12V100FT L1-type
batteries require a spacer in
the shaded locations before
connection of the battery
cable(s).
Installing 3GP24i power cabinet, if applicable
How to install batteries in the 3GP24i power cabinet
....................................................................................................................................................................................................................................
A-44 Alcatel-Lucent - Proprietary
See notice on first page 401-703-444
Issue 4, November 2007
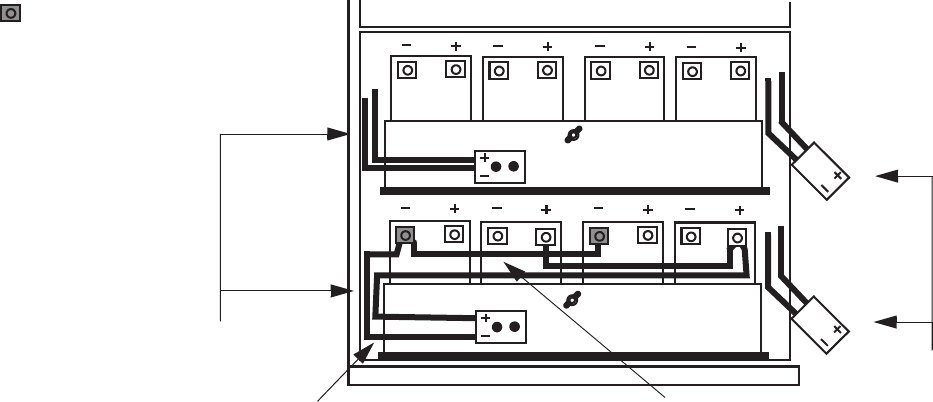
...................................................................................................................................................................................................
9Torque all battery connections using the torque value provided on the battery label. Do
not use the torque specifications provided in Chapter 3. Then, repeat Steps 1 through 9
for the remaining battery shelf, if applicable.
Attach interconnecting bus bars to all battery strings
Perform the following steps to connect the interconnecting bus bars to all battery
strings.
...................................................................................................................................................................................................
1Starting with String 2 on the right side of Shelf 1, remove the attaching hardware from
the positive (+) terminal of Battery 1 and the negative (-) terminal of Battery 2. Refer
to the figure.
...................................................................................................................................................................................................
2Remove the interconnecting bus bar from the kit that is provided with each pair of
batteries and polish the bus bar.
...................................................................................................................................................................................................
3Apply antioxidant compound to the interconnecting bus bar.
...................................................................................................................................................................................................
4Apply antioxidant compound to the positive (+) terminal of Battery 1 and the negative
(-) terminal of Battery 2 of String 2.
NEGATIVE (-) BATTERY JUMPER CABLE
NEGATIVE (-) BATTERY SIDE CABLE
SHELF 1
SHELF 2
BUS SIDE
DISCONNECT
CABLES
BATTERY SIDE
DISCONNECT
CABLES
STRING 2
STRING 1
1212
STRING 2
STRING 1
1212
Marathon GNB
M12V100FT L1-type
batteries require a spacer in
the shaded locations before
connection of the battery
cable(s).
Installing 3GP24i power cabinet, if applicable
How to install batteries in the 3GP24i power cabinet
....................................................................................................................................................................................................................................
401-703-444
Issue 4, November 2007 Alcatel-Lucent - Proprietary
See notice on first page A-45
END OF STEPS
...................................................................................................................................................................................................
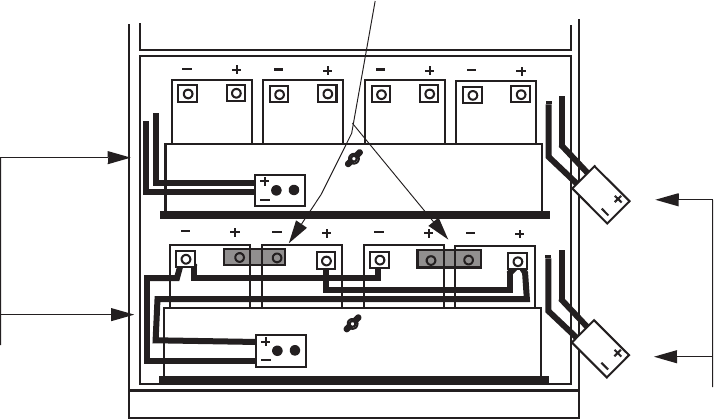
...................................................................................................................................................................................................
5On String 2, place the interconnecting bus bar between the positive terminal of the
left-hand battery (#1) and the negative terminal of the right-hand battery (#2).
...................................................................................................................................................................................................
6Connect the interconnecting bus bar using the previously removed attaching hardware.
Refer to the figure below.
...................................................................................................................................................................................................
7Torque all battery connections using the torque value provided on the battery label. Do
not use the torque specifications provided in Chapter 3.
...................................................................................................................................................................................................
8Repeat Steps 1 through 7 for the remaining battery strings.
INTERCONNECTING
BUS BARS
SHELF 1
SHELF 2
BUS SIDE
BATTERY CABLES
BATTERY SIDE
BATTERY CABLES
1212
1212
STRING 2
STRING 1
STRING 2
STRING 1
Installing 3GP24i power cabinet, if applicable
How to install batteries in the 3GP24i power cabinet
....................................................................................................................................................................................................................................
A-46 Alcatel-Lucent - Proprietary
See notice on first page 401-703-444
Issue 4, November 2007
END OF STEPS
...................................................................................................................................................................................................
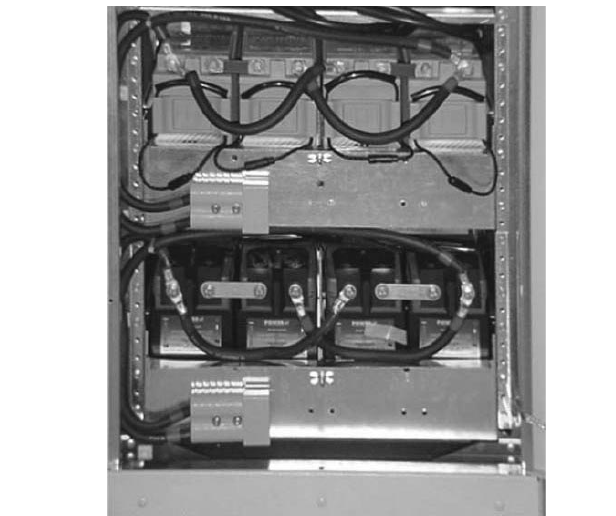
Complete the installation of batteries
CAUTION
Polarity hazard
When completing the installation of the batteries, carefully check the completed wiring
against the wiring diagram on the following page to prevent an electrical hazard.
Use the following procedure to complete the installation of batteries.
...................................................................................................................................................................................................
1Important! Do not connect the bus side battery disconnect cable connector until
the wiring has been checked and AC power has been applied to the power cabinet.
Dress and tie-wrap any remaining loose cables.
Important! The figure above shows the battery cabling plan. The battery string
pairs are connected in series; the positive (+) terminal of the left-hand battery is
connected to the negative (-) terminal on the adjacent right-hand battery. The two
strings are connected in parallel via the negative and positive battery jumper cables.
...................................................................................................................................................................................................
2Check the completed installation against the wiring diagram below.
Installing 3GP24i power cabinet, if applicable
How to install batteries in the 3GP24i power cabinet
....................................................................................................................................................................................................................................
401-703-444
Issue 4, November 2007 Alcatel-Lucent - Proprietary
See notice on first page A-47
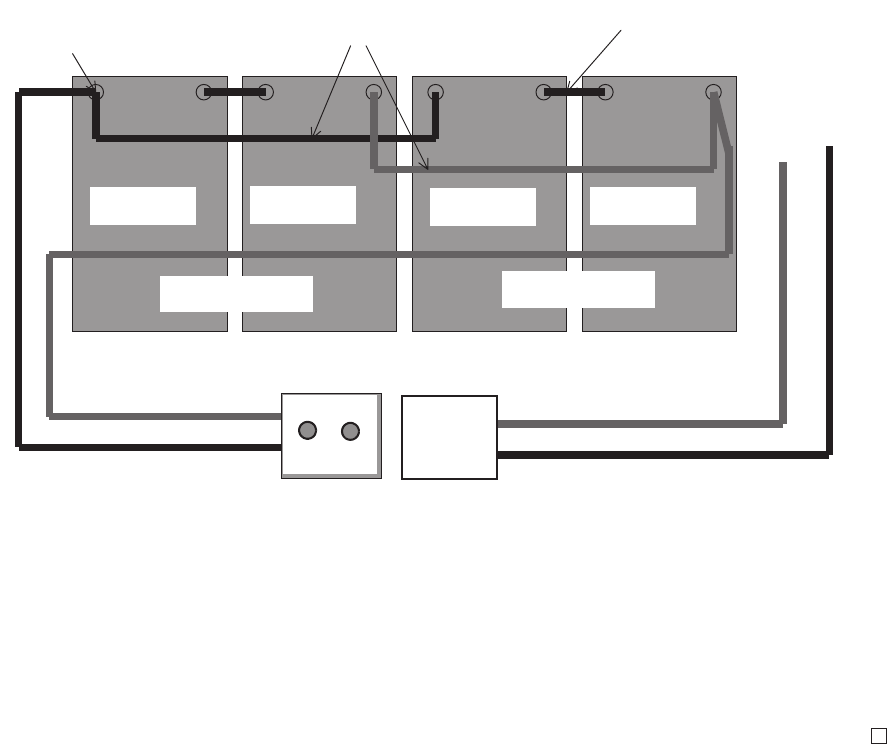
END OF STEPS
...................................................................................................................................................................................................
Bat 1
-+
Bat 1
-+
Bat 2
-+
Bat 2
-+
Bat 3
-+
Bat 3
-+
Bat 4
-+
Bat 4
-+
350A
Anderson
350A
Anderson
To bus
1/0 AWG Cable
Cable 2
#2 AWG Cables
2x Bus jumper supplied w/ battery
1/0 AWG Cable 1/0 AWG Cable
1/0 AWG Cable
All cable can be same color jacket.Use labels on field-terminated ends.
Anderson connected to bat should be secured to battery retainer in front.
Batteries come equipped with 6mm hardware. Lug cables accordingly.
Cabinet ships loose #2AWG cable jumpers and pre-terminated Andersons.
6mm studs
Stationary
half
Floating
half
Bat 1 Bat 2
STRING 1 STRING 2
Bat 1 Bat 2
Battery jumper cables
BATTERY SIDE
DISCONNECT CABLE BUS SIDE
DISCONNECT CABLE
Installing 3GP24i power cabinet, if applicable
How to install batteries in the 3GP24i power cabinet
....................................................................................................................................................................................................................................
A-48 Alcatel-Lucent - Proprietary
See notice on first page 401-703-444
Issue 4, November 2007

Appendix B: Post-installation
checklist by cabinet and frame
Overview
...................................................................................................................................................................................................................................
Purpose
The following post-installation checklists may be used by all installers to record
completion of individual installation requirements. To use the checklists, make a copy
of each page, as applicable, for each installation. Chapter or other document references
are given in the event that a particular requirement needs review. Note that the
checklists are followed by an “Installation Punchlist Sheet.” For instructions on how to
use the checklists and the Installation Punchlist Sheet, refer to “Instructions for use of
the checklists and punchlist” (p. B-2) .
Contents
Instructions for use of the checklists and punchlist B-2
IN1: BTS 8420/AWS 8420 radio cabinet B-3
IN2: 3GP24i power cabinet B-5
IN-3: Installation Punchlist Sheet B-6
...................................................................................................................................................................................................................................
401-703-444
Issue 4, November 2007 Alcatel-Lucent - Proprietary
See notice on first page B-1

Instructions for use of the checklists and punchlist
...................................................................................................................................................................................................................................
Perform the following steps to use the checklists and punchlist.
...................................................................................................................................................................................................
1Make copies of sheets IN-1 through IN-3, as applicable to the specific installation.
...................................................................................................................................................................................................
2Fill out the IN-1 and IN-2 sheets, according to the following instructions.
1. For each checklist sheet, fill in the cabinet serial number.
2. For each item, check the “Yes,” “No,” or “N/A” column, as applicable.
Important! Observe that the right-hand column labeled “Ch. Ref.” lists the specific
chapter for each installation procedure, and if applicable, “Doc. 401-200-115” for
grounding specifications or “Doc. 401-703-443” for site preparation.
...................................................................................................................................................................................................
3Make multiple copies of sheet IN-3, as needed.
...................................................................................................................................................................................................
4Fill out sheet(s) IN-3, the “Installation Punchlist,” using the “No” column entries from
sheets IN-1 and IN-2, and add comments for each.
...................................................................................................................................................................................................
5Retain the completed sheets.
END OF STEPS
...................................................................................................................................................................................................
Post-installation checklist by cabinet and frame
...................................................................................................................................................................................................................................
B-2 Alcatel-Lucent - Proprietary
See notice on first page 401-703-444
Issue 4, November 2007

IN1: BTS 8420/AWS 8420 radio cabinet
...................................................................................................................................................................................................................................
Overview
The table below lists the post-installation requirements for the Flexent®radio cabinets.
It also provides columns for indicating compliance or non-compliance (Yes or No), and
a column to indicate “not applicable” (N/A). The Chapter Reference (Ch. Ref.) column
provides the specific chapter for each installation procedure, and if applicable, “Doc.
401-200-115” for grounding specifications or “Doc. 401-703-443” for site preparation.
BTS 8420 radio cabinet Serial Number:
AWS 8420 radio cabinet Serial Number:
Item/Description Yes No N/A Ch. Ref.
1. Is the cabinet secured to a substructure per earthquake
zoning requirements?
2
2. Is the cabinet properly grounded? 2
3. Have all cables been properly installed? 3/4
4. Are all covers and screws tightened? 2-7
5. Are all RF cable connections torqued to the appropriate
value?
3/7
6. Are all DC cable connections torqued to the appropriate
value?
4/5
7. Have all external alarms been connected to the punchdown
block?
3
8. Have all Power Alarms been connected to the punchdown
block?
3
9. Have facilities twisted pairs been connected to the
punchdown block?
3
10. Are shorting plugs present for all applicable alarm and
TELCO signals?
3
11. Is a surge protector present, connected and torqued
correctly for each antenna (including GPS)?
Doc.
401-703-415
/3/7
12. Is the equipment properly frame-grounded per
Alcatel-Lucent document 401-200-115 specifications?
Please note conductor(s) quantity, size & type:
Doc.
401-200-115
Post-installation checklist by cabinet and frame
...................................................................................................................................................................................................................................
401-703-444
Issue 4, November 2007 Alcatel-Lucent - Proprietary
See notice on first page B-3

Item/Description Yes No N/A Ch. Ref.
13. Are all DC circuit breakers for installed equipment in the
ON position?
5
14. Have all doors, covers, panels, etc. been properly installed
on cabinets?
7
15. Are all panel/door latches in the locked position? 7
16. Are the battery temperature compensation probes
connected?
5
17. Has proper spacing around the cabinet been provided per
Alcatel-Lucent Site Preparation documentation?
Doc.
401-703-443
18. Are all rectifiers properly seated in each shelf? 5
19. Are all battery, AC, and DC cable connections properly
torqued?
4/5
20. Have battery retaining brackets been properly installed? 5
21. Are all in-use AC circuit breakers in the ON position?
[Note: Leave unused circuit breaker(s) in the OFF
position.]
5
22. Are battery quick disconnects properly mated (or battery
disconnect circuit breakers ON) for strings in use?
5
23. Has required battery information been recorded and
provided to the customer?
5
Post-installation checklist by cabinet and frame
IN1: BTS 8420/AWS 8420 radio cabinet
...................................................................................................................................................................................................................................
B-4 Alcatel-Lucent - Proprietary
See notice on first page 401-703-444
Issue 4, November 2007

IN2: 3GP24i power cabinet
...................................................................................................................................................................................................................................
Overview
The table below lists the post-installation requirements for the 3GP24i power cabinet.
It also provides columns for indicating compliance or non-compliance (Yes or No), and
a column to indicate “not applicable” (N/A). The Chapter Reference (Ch. Ref.) column
provides the specific chapter for each installation procedure, and if applicable, “Doc.
401-200-115” for grounding specifications or “Doc. 401-703-443” for site preparation.
3GP24i Power Cabinet Serial Number:
Item/Description Yes No N/A Ch. Ref.
1. Is the frame properly secured to a substructure per
earthquake zoning requirements?
2
2. Is a battery temperature compensation probe(s) properly
connected?
4
3. Is the equipment properly frame-grounded per
Alcatel-Lucent document 401-200-115 specifications?
Please note conductor(s) quantity, size & type:
Doc.
401-200-115
4. Has proper spacing around the frame been provided per
Alcatel-Lucent Site Preparation documentation?.
Doc.
401-703-443
5. Are all rectifiers properly seated? 5
6. Are all battery, AC, and DC cable connections properly
torqued?
4/5
7. Are all DC circuit breakers in the ON position? 5
8. Have battery retaining brackets been properly installed? 5
9. Is the power frame negative return bus connected to the
main ground bus? Please note size & type:
4
10. Are battery disconnect switches in the ON position? 5
11. Are all circuit breakers in the ON position? 5
Post-installation checklist by cabinet and frame
...................................................................................................................................................................................................................................
401-703-444
Issue 4, November 2007 Alcatel-Lucent - Proprietary
See notice on first page B-5

IN-3: Installation Punchlist Sheet
...................................................................................................................................................................................................................................
Severity Column Definitions:
1. Equipment installation is not complete and may void the warranty, potentially cause
personal injury or prevent RF optimization from occurring.
2. Equipment installation is not complete. RF optimization can occur but items must
be rectified prior to handoff to customer or service turn-up so that the warranty is
not voided.
3. RF optimization, handoff to customer or service turn-up can occur, but not per
Alcatel-Lucent recommendations.
Check list
Sheet
Number
Item
#Comment/Description Severity
(1/2/3) Corrective
Action
Required
(Y/N) Comp.
Date
Inspection Checklist Completion Sign-off:
Inspector’s Name: Inspector’s
Function:
Inspector’s
Signature:
Date:
Post-installation checklist by cabinet and frame
...................................................................................................................................................................................................................................
B-6 Alcatel-Lucent - Proprietary
See notice on first page 401-703-444
Issue 4, November 2007

Appendix C: Product Conformance
Statements
Overview
...................................................................................................................................................................................................................................
Purpose
This appendix presents the product conformance statements that apply to the BTS 8420
and AWS 8420 radio cabinet equipment.
In regions such as North America, the statements that are required are determined
primarily by national or multinational regulations. However, in some regions, contract
terms determine which statements are required.
Contents
FCC and Industry Canada (IC) conformance statements C-2
Antenna exposure statements C-5
UL and UL Canada conformance statements C-6
Eco-environmental statements C-7
...................................................................................................................................................................................................................................
401-703-444
Issue 4, November 2007 Alcatel-Lucent - Proprietary
See notice on first page C-1
FCC and Industry Canada (IC) conformance statements
...................................................................................................................................................................................................................................
Introduction
The statements that follow are the FCC conformance statements that apply to the
CDMA BTS 8420 and AWS 8420 radio cabinet product bearing the FCC and/or IC
markings.
Important! Changes or modifications not expressly approved by Alcatel-Lucent,
Inc. could void the users authority to operate the equipment.
FCC Part 1
Pursuant to 47 CFR Part 1, Subpart I, all installations must be evaluated for
requirements contained in Table 1, “Limits for maximum permissible exposure,” in
section 1.1310.
FCC Part 2
This device complies with Part 2, Subpart J - Equipment Authorization Procedures of
the FCC rules.
FCC Part 15
This device complies with Part 15 of the FCC Rules. Operation is subject to the
following two conditions:
1. This device may not cause harmful interference.
2. This device must accept any interference received, including interference that may
cause undesired operation.
FCC part 15 class B
This equipment has been tested and found to comply with the limits for a Class B
digital device, pursuant to Part 15 of the FCC Rules. These limits are designed to
provide reasonable protection against harmful interference in a residential installation.
This equipment generates, uses and can radiate radio frequency energy and, if not
installed and used in accordance with the instructions, may cause harmful interference
to radio communications. However, there is no guarantee that interference will not
occur in a particular installation.
If this equipment does cause harmful interference to radio or television reception,
which can be determined by turning the equipment off and on, the user is encouraged
to try to correct the interference by one or more of the following measures:
•Reorient or relocate the receiving antenna.
•Increase the separation between the equipment and receiver.
Product Conformance Statements
...................................................................................................................................................................................................................................
C-2 Alcatel-Lucent - Proprietary
See notice on first page 401-703-444
Issue 4, November 2007
•Connect the equipment into an outlet on a circuit different from that to which the
receiver is connected.
•Consult the dealer or an experienced radio/TV technician for help.
FCC Part 22
This device complies with Part 22, Subpart - of the FCC rules for cellular products.
FCC Part 24
This device complies with Part 24, Subpart E – Broadband PCS, of the FCC rules.
FCC Part 27
This equipment complies with Part 27 – Miscellaneous Wireless Communication
Services.
FCC Part 68
This equipment complies with Part 68 of the FCC rules and the requirements adopted
by the ACTA. On the cabinet assembly of this equipment is a label that contains,
among other information, a product identifier in the format of AAAEQ##TXXXX. If
requested, this number must be provided to the telephone company.
The T1 network interface on this equipment is hardwired to a punch down block,
which meets the FCC specifications.
The Facility Interface Code for this equipment is 04DU9-1SN. The Service Order Code
for this equipment is 6.0N. These two numbers are required when the customer orders
service from the telephone company.
A plug and jack used to connect this equipment to the premises wiring and telephone
network must comply with the applicable FCC Part 68 rules and requirements adopted
by the ACTA. A compliant telephone cord and modular plug is provided with this
product. It is designed to connect to a compatible modular jack that is also compliant.
See installation instructions for details.
The REN is used to determine the number of devices that may be connected to a
telephone line. Excessive RENs on a telephone line may result in the devices not
ringing in response to an incoming call. In most but not all areas, the sum of RENs
should not exceed five (5.0). To be certain of the number of devices that may be
connected a line, as determined by the total RENs, contact the local telephone
company. For product approved after July 23, 2001, the REN for this product is part of
the product identifier that has the format US:AAAEQ##TXXXX. The digits
represented by ## are the RENs without a decimal point (e.g., 02 is a REN of 0.3). For
earlier product, the REN is shown separately on the label.
There is no need of any ringer equivalence number for this equipment.
Product Conformance Statements
FCC and Industry Canada (IC) conformance statements
...................................................................................................................................................................................................................................
401-703-444
Issue 4, November 2007 Alcatel-Lucent - Proprietary
See notice on first page C-3

If this equipment causes harm to the telephone network, the telephone company will
notify you in advance that temporary discontinuance of service may be required.
However, if advance notice is not practical, the telephone company will notify the
customer as soon as possible. Also, you will be advised of your right to file a
complaint with the FCC if you believe it is necessary.
The telephone company may make changes in its facilities, equipment, operations, or
procedures that could affect the operation of the equipment. If this happens, the
telephone company will provide advance notice in order for you to make necessary
modifications to maintain uninterrupted service.
If the equipment is causing harm to the telephone network, the telephone company
may request that you disconnect the equipment until the problem is resolved. If trouble
is experienced with this equipment repair or warranty information may be obtained by
contacting:
Technical Support Services
Alcatel-Lucent
Within the United States: 866 582 3688, prompt 1.
Industry Canada conformance statements
IC RSS 132: Cellular Telephones Employing New Technologies Operating in the
Bands 824-849 MHz and 869-894 MHz
IC RSS 133: PCS radio standards specifications
The term “IC:” before the certification/registration number only signifies that the
Industry Canada technical specifications were met.
ICES-003: Interference-causing equipment standard digital apparatus
This Class A digital apparatus complies with Canadian ICES-003.
Cet apperiel numérique de la classe A est conforme à norme NMB-003 du Canada.
IC CS-03: Specifications for Terminal Equipment, Terminal Systems, Network
Protection Devices, Connection Arrangements and Hearing Aids Compatibility
This product meets the applicable Industry Canada technical specifications.
IC CS-02: Specification for Terminal Equipment, Terminal Systems, Network
Protection Devices, Connection Arrangement
This equipment meets the applicable Industry Canada Terminal Equipment Technical
Specifications. This is confirmed by the registration number. The abbreviation, IC,
before the registration number signifies that registration was performed based on a
Declaration of Conformity indicating that Industry Canada technical specifications were
met. It does not imply that Industry Canada approved the equipment.
Product Conformance Statements
FCC and Industry Canada (IC) conformance statements
...................................................................................................................................................................................................................................
C-4 Alcatel-Lucent - Proprietary
See notice on first page 401-703-444
Issue 4, November 2007

Antenna exposure statements
...................................................................................................................................................................................................................................
Overview
The following is the antenna exposure statement for the equipment.
Antenna exposure statement
Antenna installations for the equipment shall be performed in accordance with all
applicable manufacturer’s recommendations, and national laws and regulations. To
ensure correct antenna installation, the antenna installer shall perform all necessary
calculations and/or field measurements to evaluate compliance with applicable national
laws or regulations regarding exposure to electromagnetic fields. The supplier of radio
equipment, the supplier of antenna equipment, and the integrator and builder of the site
must provide sufficient information so that the limits of the exclusion zones can be
determined. Information on Alcatel-Lucent-supplied equipment for the determination of
RF safety compliance distances and exclusion zones is available from customer
representatives. Information on the methodology and results of the compliance
evaluation shall be available for inspection by officials of the governing authorities.
Product Conformance Statements
...................................................................................................................................................................................................................................
401-703-444
Issue 4, November 2007 Alcatel-Lucent - Proprietary
See notice on first page C-5

UL and UL Canada conformance statements
...................................................................................................................................................................................................................................
Overview
The statements that follow are the Underwriters Laboratories (UL) and UL Canada
conformance statements that apply to the CDMA BTS 8420 and AWS 8420 radio
cabinet product.
UL listed
This equipment is UL Listed, Information Technology Equipment.
The UL Listing applies to both the United States and Canada and is marked on the
equipment main nameplate label. Should the local Authority Having Jurisdiction (AHJ)
require prior or additional verification of this listing, a Product Certificate of
Compliance from Underwriters Laboratories can be obtained by contacting the
Business/Product Unit Applicant for the product, as follows:
Technical Support Services
Alcatel-Lucent
Within the United States: 1 866 582 3688, prompt 1
Any modifications to this equipment are not permitted without review and official
authorization from the specific Certification Body. Modifications or changes authorized
by official CN/CNN are assumed to have received prior approval from this Lab.
Additional information
For equipment designed for indoor applications only:
This equipment is intended for installation in restricted access locations where access is
controlled or where access can only be gained by service personnel with a key or tool.
Access to this equipment is restricted to qualified service personnel only.
Reference
The hazard statement severities are defined in Chapter 2, “Safety”.
Product Conformance Statements
...................................................................................................................................................................................................................................
C-6 Alcatel-Lucent - Proprietary
See notice on first page 401-703-444
Issue 4, November 2007
Eco-environmental statements
...................................................................................................................................................................................................................................
Overview
The statements that follow are the eco-environmental statements that apply to the
CDMA BTS 8420 and AWS 8420 radio cabinet product.
Packaging Collection and Recovery Requirements
Countries, States, Localities, or other jurisdictions may require that systems be
established for the return and/or collection of packaging waste from the consumer,
other final user, or from the waste stream. Additionally, reuse, recovery and/or
recycling targets for the return and/or collection of the packaging waste may be
established.
For more information regarding the requirements for the collection and recovery of
Packaging and Packaging Waste within specific jurisdictions, please contact the
Alcatel-Lucent’ Field Services/Installation - Environmental Health and Safety
Organization.
For installations not performed by Alcatel-Lucent, please contact the Alcatel-Lucent
Customer Support Center at:
Technical Support Services
Alcatel-Lucent
Within the United States: 866 582 3688, prompt 1
From all other countries: +1 630 224 4672, prompt 2
Recycling, take-back, and disposal of product
Electronic products bearing or referencing the symbol shown below when put on the
market within the European Union, shall be collected and treated at the end of their
useful life, in compliance with applicable European Union and local legislation. They
shall not be disposed of as part of unsorted municipal waste. Due to materials that may
be contained in the product, such as heavy metals or batteries, the environment and
human health may be negatively impacted as a result of inappropriate disposal
Product Conformance Statements
...................................................................................................................................................................................................................................
401-703-444
Issue 4, November 2007 Alcatel-Lucent - Proprietary
See notice on first page C-7

Note: In the European Union, a solid bar under the crossed-out wheeled bin indicates
that the product was put on the market after 13 August 2005.
Moreover, in compliance with legal requirements, where applicable, Alcatel-Lucent will
offer to provide for the collection and treatment of waste from Alcatel-Lucent products,
or from products displaced by Alcatel-Lucent offers, in accordance with applicable
legislation.
For information regarding take-back of equipment by Alcatel-Lucent, or for more
information regarding the requirements for recycling/disposal of product, please contact
your Alcatel-Lucent Account Manager or Alcatel-Lucent Takeback Support at:
takeback@lucent.com
Material Content Compliance
For product placed on the market in the European Union, the following applies:
European Union (EU) Directive 2002/95/EC, “Restriction of the use of certain
Hazardous Substances” (RoHS), restricts the use of lead, mercury, cadmium,
hexavalent chromium, and certain flame retardants in electrical and electronic
equipment. This Directive applies to electrical and electronic products placed on the
EU market from 1 July 2006, with various exemptions, including an exemption for
lead solder in network infrastructure equipment. Alcatel-Lucent products shipped to the
EU after 1 July 2006 will comply with the RoHS Directive.
The following notification applies to Alcatel-Lucent products distributed for sale, resale
or use into the United States:
This product, part, or both may include a lithium-manganese dioxide battery, which
contains very small amounts of a perchlorate substance. Special handling may apply.
For California:
Perchlorate Material - special handling may apply.
Product Conformance Statements
Eco-environmental statements
...................................................................................................................................................................................................................................
C-8 Alcatel-Lucent - Proprietary
See notice on first page 401-703-444
Issue 4, November 2007

See http://www.dtsc.ca.gov/hazardouswaste/perchlorate/
Product Conformance Statements
Eco-environmental statements
...................................................................................................................................................................................................................................
401-703-444
Issue 4, November 2007 Alcatel-Lucent - Proprietary
See notice on first page C-9
Glossary
....................................................................................................................................................................................................................................
Symbols
-48 VDC
DC connection block for 48 volt power source (see VDC).
....................................................................................................................................................................................................................................
Numerics
12IR125
Battery designed to withstand the rigors of harsh environments and uncontrolled
temperatures.
24 VDC
DC connection block for 24 volt power source (see VDC).
850 CDMA
CDMA technology in the cellular frequency band (824-894 MHz).
....................................................................................................................................................................................................................................
A AC (Alternating Current)
Continuously variable current, rising to a maximum in one direction, falling to zero, then
reversing direction and repeating the cycle in the other direction.
AC convenience outlet
BTS 8420/AWS 8420 radio cabinet sites must be equipped with at least two duplex
outlets for installation and maintenance procedures. The outlets are required to power
test equipment and installation tools.
AC distribution panel
Module equipped with various circuit breakers and fuses which provides AC power to
various equipment.
....................................................................................................................................................................................................................................
401-703-444
Issue 4, November 2007 Alcatel-Lucent - Proprietary
See notice on first page GL-1
Ambient temperature
The temperature of air or other media in a designated area, particularly the area
surrounding the equipment.
Anchor
Device that is buried in the ground and fastened to the cabinet for stability.
ANSI (American National Standards Institute)
The U.S. standards organization that establishes procedures for the development and
coordination of voluntary American standards.
Antenna
An elevated device for radiating or receiving radio waves. It changes electrical currents
into electromagnetic waves, and vice versa.
AWG (American Wire Gauge )
American wire gauge standard. American standard for classifying wire diameter.
AWS (Advanced Wireless Services)
....................................................................................................................................................................................................................................
B Backup
Facility used to replace an element which has failed.
Boom line
Rope extended from a derrick or other lifting device used for lifting a cabinet.
Boot
Weather-resistant connection for GPS and RF jumper cables.
BTS 8420/AWS 8420 radio cabinet
Provides radio access interfaces and radio resources management functions, as well as
call handling with the 5ESS®Switch at cellular and PCS frequencies.
Bus bar
One or more conductors that serve as a common connection for a group of related
devices.
....................................................................................................................................................................................................................................
C C-tap
Clamp used to connect a power lead to a main power conductor without breaking and
terminating the conductor.
CDMA (Code Division Multiple Access)
Assigns each active call a unique pseudonoise code that is used by the system to
distinguish that call from all other calls that occupy the same CDMA carrier band.
CDMA uses spread-spectrum digital modulation techniques.
Glossary
...................................................................................................................................................................................................................................
GL-2 Alcatel-Lucent - Proprietary
See notice on first page 401-703-444
Issue 4, November 2007
Cell
A geographical area, usually depicted as hexagon-shaped, that is served by a cellular
system. Cellular technology is based on the premise that a group of radio frequencies
used within one cell can be used again in distant cells.
Cell site
An installation located within a cell that houses the equipment needed to set up and
complete calls on cellular telephones; for example, FM radio transmitter and receiver
equipment, antennas and computers.
Circuit
1. The complete path between two terminals over which one-way or two-way
communications may be provided. 2. An electronic path between two or more points,
capable of providing a number of channels. 3. A number of conductors connected
together for the purpose of carrying an electrical current. 4. An electronic closed-loop
path among two or more points used for signal transfer. 5. A number of electrical
components, such as resistors, inductances, capacitors, transistors, and power sources
connected together in one or more closed loops.
CLGC
Closed Loop Gain Control.
CO (Central Office)
Grounding cable that is connected to the facility ground bus bar on the power frame.
Cord grip seal assembly
EMI/RF1 liquid-tight fitting for T1/E1, User Alarms, and Power Alarm cables.
....................................................................................................................................................................................................................................
D DAS
Distributed Antenna System. The point to which GPS and RF jumper cables are
connected. This is not Alcatel-Lucent equipment. It is provided by the customer.
DC (Direct Current)
Current flow in one direction.
DC distribution panel
Module equipped with various circuit breakers and/or fuses to provide DC current to
load.
Digital Only version
Version of BTS 8420/AWS 8420 radio cabinet, which contains only the Digital Shelf.
DIN (Deutsches Institute für Normung)
Germany’s standards-setting organization.
Glossary
...................................................................................................................................................................................................................................
401-703-444
Issue 4, November 2007 Alcatel-Lucent - Proprietary
See notice on first page GL-3
Drip loop
A cable which has been curved with the arc facing the ground to prevent water from
flowing to the connectors at either end of the cable. When it rains, the water drips from
the lowest point of the curve towards the ground.
Dual Band
A dual band cabinet is a growth cabinet in which one or more of the carriers are of a
different band than the carriers in the primary cabinet.
....................................................................................................................................................................................................................................
EE1
A four-wire voice and data trunking facility that carries 30 duplex channels in 64-kbps
time slices. E1 facilities are standard for digital telecommunications in all continents
except for North America.
Earthquake zone
Seismic ratings ranging from zone 1 (relatively low central office operational shock and
vibration levels) to the most severe zone 4 levels. Equipment must be able to withstand
earthquake zone requirements under both operational and non-operational conditions.
ED (Equipment Drawings)
Provides cabinet layout, dimensions, and installation requirements.
EMI (Electromagnetic Interference)
Any electromagnetic disturbance that interrupts, obstructs, or otherwise degrades or
limits the effective performance of electronics or electrical equipment (see RFI).
ESD (Electrostatic Discharge)
External User Alarms
Alarms generated external at the BTS 8420 radio cabinet but routed to the punchdown
block(s) for reporting purposes.
....................................................................................................................................................................................................................................
F Facility Interface Panel
Pull-down component on BTS 8420 radio cabinet where the punchdown terminal block
is located for terminating T1/E1, User Alarm, and power system alarms.
Feed
To supply a signal to the input of a system, subsystem, equipment or component, such as
a transmission line or antenna.
Filter
A frequency selective network that transmits/receives signals of desired frequencies
while greatly attenuating all other frequencies.
Glossary
...................................................................................................................................................................................................................................
GL-4 Alcatel-Lucent - Proprietary
See notice on first page 401-703-444
Issue 4, November 2007
Filtered Version
Version of BTS 8420 radio cabinet, which contains the Digital Shelf and filters.
Fish tape
Narrow, springy steel tape designed for pushing through short lengths of ducting in order
to pull cables in from the far end.
Flexent
®
Registered trademark of Alcatel-Lucent.
....................................................................................................................................................................................................................................
G GND (Ground)
See Ground.
GPS (Global Positioning System)
A system of 24 satellites that provide, among other things, extremely accurate timing
information to CDMA-equipped cell sites.
Ground
A conducting connection between equipment or an electrical circuit and earth, or other
conductive body that is used in place of the earth.
Grounding Electrode System
The conductive objects that are intentionally bonded to furnish connection to earth (e.g.
buried ring ground with ground rods, electrically continuous buried metallic water pipe,
electrolytic ground electrode, etc.).
....................................................................................................................................................................................................................................
I IDC (Insulation Displacement Connector)
Block which provides electrical protection and/or termination location inside the BTS
8420 radio cabinet.
Interconnect
Linkage used to join two or more communications units or equipment.
IPM
Integrated Power Module. Converts AC input line voltage to +24 VDC for the equipment
inside the BTS 8420 radio cabinet.
....................................................................................................................................................................................................................................
J Jumper
Connections between terminal blocks on the two sides of a distribution frame.
Junction box
Steel box inside equipment where low-voltage power cable joints are made.
Glossary
...................................................................................................................................................................................................................................
401-703-444
Issue 4, November 2007 Alcatel-Lucent - Proprietary
See notice on first page GL-5
....................................................................................................................................................................................................................................
K Knockout
Discs partially punched out on the side or base of a terminal or junction box to the
appropriate size for feeding cable into the box.
kW (Kilowatts)
....................................................................................................................................................................................................................................
L Landline
A telephone accessed by landline media.
LB (Left Body)
Lifting eyes
Bolts located on the top of the cabinet for connecting slings to lift the cabinet.
Line side
Portion of a device that is connected to an external facility that provides power from a
power source.
Load side
Portion of a device that is connected to an external facility that is using the power from
a power source.
Low Power Version
Version of BTS 8420 radio cabinet, which contains the Digital Shelf, filters, and
amplifiers. Also, AWS 8420 radio cabinet in the present release.
Lugs
A tag or projecting terminal onto which a wire may be connected by crimping or
soldering.
....................................................................................................................................................................................................................................
M MGB (Main Bus Bar)
A copper bus bar used to provide the electrical interface for connection of the isolated
ground plane to the integrated ground system.
Mobile Switching Center
See MSC.
Multiplexer
Equipment that provides a means of transmitting two or more signals over the same
transmission path.
....................................................................................................................................................................................................................................
N NEC (National Electrical Code)
Standard that governs the use of electrical wire, cable, and fixtures, and electrical and
Glossary
...................................................................................................................................................................................................................................
GL-6 Alcatel-Lucent - Proprietary
See notice on first page 401-703-444
Issue 4, November 2007
optical communication cable installed in buildings.
Network Interface
The demarcation between the LEC infrastructure and the Customer Premises Equipment
(CPE). Equipment located at this point is intended to allow the LEC to determine
whether transmission problems are within the network itself or the CPE.
Neutral ground
An intentional ground applied to a neutral conductor or neutral point of a circuit,
equipment, or system.
NFPA (National Fire Prevention Association)
Standards and code writing organization made up of volunteer industrial and institutional
subject-matter-expert committees.
Nm (Newton Meter)
....................................................................................................................................................................................................................................
O OA&M (Operation, Administration, and Maintenance)
Generic name given to functions such as technical interfaces, diagnostics, service
measurements, and status reports.
OMP (Operation Management Platform)
This component provides a centralized point of access for wireless systems’ operation
and maintenance. The OMP provides a dedicated processor from which system operators
can perform multiple operation, administration, and maintenance (OA&M) tasks
simultaneously.
Open circuit
A path that contains an infinite impedance, and is available for use.
....................................................................................................................................................................................................................................
P Paired cable
Cable made up of one or more separately insulated twisted-wire pairs, none of which is
arranged with another to form quads.
Panelboard
A flat board consisting of buses and automatic over-current devices with or without
switches, for the control of electrical circuits. The panelboard is designed to be placed in
a cabinet with only front access.
PCB (Power Circuit Breaker)
The primary switch used to apply and remove power from equipment. Used on AC
circuits rated in excess of 1500 V.
PCS (Personal Communications Services)
Services for digital RF equipment operating in the 2 GHz spectrum.
Glossary
...................................................................................................................................................................................................................................
401-703-444
Issue 4, November 2007 Alcatel-Lucent - Proprietary
See notice on first page GL-7
Pigtail
A short length of electrical conductor permanently affixed to a component, used to
connect the component to another.
Positive terminal
The terminal from which conventional current leaves the battery.
Punchdown terminal block
Used for terminating T1/E1, User Alarms, and power cables. The block is located
external to the indoor BTS 8420 radio cabinet.
....................................................................................................................................................................................................................................
R Rectifiers
Device for converting alternating current (AC) into direct current (DC).
Return
A return path for current.
RF (Radio Frequency)
The electromagnetic wave used for, among other things, cellular voice and data
communications.
RFI (Radio Frequency Interference)
See EMI.
RTV
Silicone used for sealing or potting compound.
....................................................................................................................................................................................................................................
S Shield
A housing, screen, sheath, or cover that substantially reduces the coupling of electric,
magnetic, or electromagnetic fields into or out of circuits or transmission lines.
Short circuit
A direct low-resistance connection between conductors not normally in contact with each
other.
STBY (Standby)
System operations pertaining to a power saving condition or status of operation of
equipment that is ready for use, but not in use.
String
A series of elements considered as a whole.
Surge protector
Protective device used to limit surge voltages by discharging or bypassing any unwanted
surge current that may enter a building or equipment.
Glossary
...................................................................................................................................................................................................................................
GL-8 Alcatel-Lucent - Proprietary
See notice on first page 401-703-444
Issue 4, November 2007
System test
Test performed after installation and power-up of the cabinets, and after GPS antenna
jumper cable is connected. The RF jumper cable is not connected during testing.
....................................................................................................................................................................................................................................
TT1
A four-wire voice and data trunking facility that carries 24 duplex channels over 56-kbps
time slots.
Tagged out
TELCO (Telephone Company)
Terminal
A device capable of sending, and/or receiving information over a communications
channel.
Thermal Probe
Device used for sensing the temperature of an object or air.
TIP N TELL
Indicator on cabinet’s package that indicates if the cabinet was mishandled or tipped
during shipment.
Torque
Moment of force acting on a body and tending to produce rotation about an axis.
Twisted-pair cable
See Paired cable.
....................................................................................................................................................................................................................................
U UL (Underwriters Laboratories)
Laboratories that test materials and equipment against predetermined performance
standards.
Upgrade
To improve service by offering better facilities.
....................................................................................................................................................................................................................................
V VDC (Volts direct current)
....................................................................................................................................................................................................................................
W Weatherproof
Designed to be used outdoors under any number of specified climatic conditions.
Glossary
...................................................................................................................................................................................................................................
401-703-444
Issue 4, November 2007 Alcatel-Lucent - Proprietary
See notice on first page GL-9
....................................................................................................................................................................................................................................
Z Zero Clearance Installation
Cabinets are placed in close proximity to a wall or other structure, and the available
space behind the cabinet does not permit the installer to access the rear cabinet
mounting brackets.
Glossary
...................................................................................................................................................................................................................................
GL-10 Alcatel-Lucent - Proprietary
See notice on first page 401-703-444
Issue 4, November 2007
Index
Numerics
3GP24i power cabinet
connect 1.5 inch AC
conduit, A-21
connect BTS 8420 DC
cables, A-14
3GP24i power cabinet door
description, A-6
3GP24i power cabinet
inside view, A-7
install DC circuit breakers,
A-32
label, layout and route,
A-12
open front door, A-6
route and connect AC wires,
A-24
.............................................................
Aabout this information product
reason for reissue, ix
related training, xii
systems supported, x
AC input power requirements
for BTS 8420/AWS 8420 with
integrated power, 1-36
AC power for BTS 8420/AWS
8420 with integrated power,
1-36
AC utility power connections
description of, 6-8
AC wires in Integrated Power
Module
route and connect, 6-11
access panels
replace or close, 8-12
all versions of BTS 8420
except Digital Only version
with two Digital Shelves and
AWS 8420
connect User Alarm cables
to Z-IDC punchdown
blocks, 5-45
anchor and torque requirements
for radio cabinet, 4-18
anchor holes
mark and drill, 4-9
anchor specifications, 4-7
antenna exposure statement,
C-5
attach grounding cables to BTS
842/AWS 8420 with
integrated power, 4-25
attach grounding cables to BTS
8420/AWS 8420 without
integrated power, 4-23
attach interconnecting bus bars
to all battery strings, A-45
AWG conversion table, x
AWS 8420
hardware components, 1-23
.............................................................
Bbackup power options, 1-39
batteries
complete installation, A-47
battery backup, 1-39
battery frame modules, 1-40
battery strings
attach interconnecting bus
bars to all, A-45
connect battery cables, A-43
battery, rectifier, pallet
weights, 1-19
BTS 8420
connect DC power cables,
A-17
Digital Only version, 1-11
Digital Only version with
two Digital Shelves, 1-13
filtered version, 1-8
BTS 8420 Digital Only version
with two Digital Shelves
connect twisted-wire pairs
in T1/E1 cables to
appropriate Z-IDC
punchdown blocks, 5-29
....................................................................................................................................................................................................................................
401-703-444
Issue 4, November 2007 Alcatel-Lucent - Proprietary
See notice on first page IN-1
BTS 8420/AWS 8420
connect RF antenna jumper
cables, 8-5
connect T1/E1 cables, 5-16
dimensions, 1-20
BTS 8420/AWS 8420 with and
without integrated power
site configurations, 1-34
BTS 8420/AWS 8420 with
integrated power, 1-26
AC input power
requirements, 1-36
AC power, 1-36
attach grounding cables,
4-25
connect User Alarm cables,
5-40
connecting GPS antenna
jumper cable, 5-3
I/O cable termination points,
1-29
BTS 8420/AWS 8420 without
integrated power
attach grounding cables,
4-23
cable interfaces, 1-26
connect User Alarm cables,
5-43
connecting GPS antenna
jumper cable, 5-5
DC input power, 1-37
I/O cable termination points,
1-27
BTS 8420/AWS 8420 without
integrated power, external top
view, 1-26
BTS 8420/AWS 8420, battery
frame, power shelf, mounting
plate
weights and dimensions,
1-18
.............................................................
Ccabinet weights and
dimensions, 1-18
cable interfaces on BTS
8420/AWS 8420 without
integrated power, 1-26
capabilities
product, 1-5
checklists and punchlist
instructions for use, B-2
clearances, 4-3
complete installation of
batteries, A-47
configurations
[product, 1-5
conformance statements
antenna exposure, C-5
eco-environmental, C-7
FCC, C-2
IC, C-2
UL, C-6
UL Canada, C-6
Connect 1 inch AC flexible
metallic conduit to Integrated
Power Module on top of BTS
8420/AWS 8420, 6-8
connect 1.5 inch AC conduit on
top of 3GP24i power cabinet,
A-21
connect battery cables to all
battery strings, A-43
connect BTS 8420 DC cables at
3GP24i power cabinet, A-14
connect DC power cables to
BTS 8420, A-17
connect GPS antenna jumper
cable to GPS surge protector
at customer’s DAS, 5-7
connect RF antenna jumper
cables to BTS 8420/AWS
8420, 8-5
connect T1/E1 cables to BTS
8420/AWS 8420, 5-16
connect twisted-wire pairs in
T1/E1 cables to appropriate
Z-IDC punchdown blocks, for
BTS 8420 Digital Only
version with two Digital
Shelves, 5-29
connect twisted-wire pairs in
T1/E1 cables to appropriate
Z-IDC punchdown blocks, for
the AWS 8420 and all
versions of BTS 8420 except
the Digital Only version with
two Digital Shelves, 5-23
connect User Alarm cables to
BTS 8420/AWS 8420 with
integrated power, 5-40
connect User Alarm cables to
BTS 8420/AWS 8420 without
integrated power, 5-43
connect User Alarm cables to
Z-IDC punchdown blocks, for
all versions of BTS 8420
except Digital Only version
with two Digital Shelves and
AWS 8420, 5-45
connect User Alarm cables to
Z-IDC punchdown blocks, for
Digital Only version with two
Digital Shelves, 5-52
connecting GPS antenna jumper
cable to BTS 8420/AWS 8420
with integrated power, 5-3
Index
...................................................................................................................................................................................................................................
IN-2 Alcatel-Lucent - Proprietary
See notice on first page 401-703-444
Issue 4, November 2007
connecting GPS antenna jumper
cable to BTS 8420/AWS 8420
without integrated power, 5-5
connections
RF antenna jumper cable,
1-31
customer-supplied power wiring
overview, 6-6
.............................................................
DDC feeder and connection
interface, A-9
DC input power for BTS
8420/AWS 8420 without
integrated power, 1-37
DC power cable routing and
connections, A-12
definitions, 1-3
derrick, 4-14,4-15
description
physical, 1-7
description of 3GP24i power
cabinet door, A-6
Description of AC utility power
connections, 6-8
description of GPS antenna
cable, 5-2
description of rectifiers and
shelves, A-29
details
installation, 1-3
Digital Only version
hardware components, 1-23
Digital Only version of BTS
8420, 1-11
Digital Only version of BTS
8420 with two Digital
Shelves, 1-13
Digital Only version with two
Digital Shelves
connect User Alarm cables
to Z-IDC punchdown
blocks, 5-52
hardware components, 1-23
dimensions of BTS 8420/AWS
8420, 1-20
dimensions of EZBFi, 1-21
documentation
how to order, xiii
.............................................................
Eeco-environmental statements,
C-7
electrical connections
generic torque
specifications, 3-7
external top view
BTS 8420/AWS 8420
without integrated power,
1-26
eyebolts
See: lifting eyebolts
EZBFi
dimensions, 1-21
EZBFi battery frame, 1-39
EZBFi battery frames
first and second, 1-39
.............................................................
FFCC conformance statements,
C-2
Filtered version
hardware components, 1-23
filtered version of BTS 8420,
1-8
for AWS 8420 and all versions
of BTS 8420 except Digital
Only version with two Digital
Shelves
connect twisted-wire pairs
in T1/E1 cables to
appropriate Z-IDC
punchdown blocks, 5-23
forklift, 4-14
front anchoring bolts or anchor
assemblies
install, 4-21
.............................................................
Ggeneral description, 1-5
generic torque specifications
for electrical connections, 3-7
GPS antenna cable
description, 5-2
GPS surge protector at
customer’s DAS
connect GPS antenna
jumper cable, 5-7
.............................................................
Hhardware components inside
AWS 8420, 1-23
hardware components inside
Digital Only version, 1-23
hardware components inside
Digital Only version with two
Digital Shelves, 1-23
hardware components inside
Filtered version, 1-23
hardware components inside
Low Power version, 1-23
.............................................................
II/O cable termination points on
BTS 8420/AWS 8420 with
integrated power, 1-29
Index
...................................................................................................................................................................................................................................
401-703-444
Issue 4, November 2007 Alcatel-Lucent - Proprietary
See notice on first page IN-3
I/O cable termination points on
BTS 8420/AWS 8420 without
integrated power, 1-27
IC conformance statements, C-2
indoor RF antenna jumper
cables to customer provided
DAS
route and connect, 8-8
inside view of 3GP24i power
cabinet, A-7
install DC circuit breakers in
3GP24i power cabinet, A-32
install front anchoring bolts or
anchor assemblies, 4-21
install rectifiers, A-30
installation details, 1-3
instructions for use of
checklists and punchlist, B-2
integrated power
BTS 8420/AWS 8420, 1-26
Integrated Power Module
rectifier modules, 1-35
Integrated Power Module on
top of BTS 8420/AWS 8420
connect 1 inch AC flexible
metallic conduit, 6-8
.............................................................
Llabel, layout and route DC
cables to 3GP24i power
cabinet, A-12
Layout of Z-IDC punchdown
blocks, 5-12
layouts, 4-4
lifting cabinets, 4-14
derrick, 4-14,4-15
forklift, 4-14
lifting eyebolts, 4-15
lifting eyebolts, 4-15
low power version
hardware components, 1-23
.............................................................
Mmark and drill anchor holes,
4-9
mechanical connections
torque requirements, 3-7
mounting plate and torque rear
anchors
place and level, 4-10
move/lift cabinet into position
on mounting plate, 4-19
.............................................................
Nneeded supplies, 3-5
.............................................................
Oopen front door of 3GP24i
power cabinet, A-6
Overview wiring block diagram
for T1/E1 lines, external User
Alarms, Z-IDC punchdown
blocks, 5-11
.............................................................
Pparts and/or kits needed, 3-5,
A-32
physical description, 1-7
physical installation process
chart, 3-9
physical installation process
table, 3-9
place and level mounting plate
and torque rear anchors, 4-10
place batteries on a shelf, A-40
planning guidelines, 4-3
position BTS 8420/AWS 8420
mounting plate for anchor
hole marking, 4-8
power connections, 6-1
power options, 1-38
backup, 1-39
process chart
physical installation, 3-9
process table
physical installation, 3-9
product capabilities, 1-5
product configurations, 1-5
.............................................................
Rreason for reissue, ix
rectifier modules inside
Integrated Power Module,
1-35
rectifiers
install, A-30
rectifiers and shelves
description, A-29
reference documents, 3-2,4-3
related training, xii
replace or close all access
panels, 8-12
RF antenna jumper cable
connections, 1-31
route and connect AC wires in
3GP24i power cabinet, A-24
route and connect AC wires in
Integrated Power Module,
6-11
route and connect RF antenna
jumper cables to customer
provided DAS, 8-8
.............................................................
Ssafety
general precautions for
installation procedures, 2-4
labels on the cabinet, 2-10
specific hazards, 2-6
Index
...................................................................................................................................................................................................................................
IN-4 Alcatel-Lucent - Proprietary
See notice on first page 401-703-444
Issue 4, November 2007
site configurations for BTS
8420/AWS 8420 with and
without integrated power, 1-34
site preparation
verify, 3-11
statements
structure of hazard, 2-2
structure of hazard statements,
2-2
system test, 8-12
systems supported, x
.............................................................
Tterminal blocks
torque requirements, 3-8
tools, 3-3
torque requirements, 3-7
torque requirements for
mechanical connections, 3-7
torque requirements for
terminal blocks, 3-8
transporting cabinets
See: lifting cabinets
.............................................................
UUL Canada conformance
statements, C-6
UL conformance statements,
C-6
.............................................................
Vverify site preparation, 3-11
.............................................................
Wweights and dimensions
cabinet, 1-18
weights and dimensions of BTS
8420/AWS 8420, battery
frame, power shelf, mounting
plate, 1-18
weights of battery, rectifier,
pallet, 1-19
wire cross-sectional area table,
x
wire size table, x
wiring block diagram
T1/E1 lines, external User
Alarms, A-IDC punchdown
blocks, 5-11
wiring overview
3GP24i, A-9
customer-supplied power,
6-6
.............................................................
ZZ-IDC punchdown blocks
layout of, 5-12
Index
...................................................................................................................................................................................................................................
401-703-444
Issue 4, November 2007 Alcatel-Lucent - Proprietary
See notice on first page IN-5