Novatel Wireless NRM-EU860D Dual Band Licensed Modular Transmitter User Manual book
Novatel Wireless, Inc. Dual Band Licensed Modular Transmitter book
Contents
- 1. Part 1
- 2. Part 2
- 3. Manual 1
- 4. Manual 2
- 5. Manual 3
- 6. Manual 4
- 7. User Manual 1
- 8. User Manual 2
- 9. User Manual M1210
- 10. User Manual D430
- 11. User Manual D420
- 12. User Manual Corsica
- 13. User Manual Sapporo
- 14. User Manual Vostro 1
- 15. User Manual Vostro 2
- 16. Users Manual Vostro 3
- 17. Users Manual Vostro 4
- 18. User Manual 3
- 19. User Manual 4
- 20. User Manual Gilligan
Users Manual Vostro 3

Troubleshooting 101
3
When the DELL logo appears, press <F12> immediately.
NOTE: Keyboard failure may result when a key on the keyboard is held down
for extended periods of time. To avoid possible keyboard failure, press and
release <F12> in even intervals until the boot device menu appears.
4
At the boot device menu, use the up- and down-arrow keys to highlight
CD/DVD/CD-RW
, and then press <Enter>.
NOTE: The Quickboot feature changes the boot sequence for the current
boot only. Upon restart, the computer boots according to the boot sequence
specified in system setup.
5
Select the
Boot from CD-ROM
option from the menu that appears, and
then press <Enter>.
6
Type
1
to start the Drivers and Utilities menu, and then press <Enter>.
7
Select
Run the 32 Bit Dell Diagnostics
from the numbered list. If multiple
versions are listed, select the version appropriate for your computer.
8
At the Dell Diagnostics
Main Menu
, select the test you want to run.
NOTE: Write down any error codes and problem descriptions exactly as they
appear and follow the instructions on the screen.
9
After all tests have completed, close the test window to return to the Dell
Diagnostics
Main Menu
.
10
Remove your Drivers and Utilities media, then close the
Main Menu
window to exit the Dell Diagnostics and restart the computer.
Dell Diagnostics Main Menu
After the Dell Diagnostics loads and the Main Menu screen appears, click the
button for the option you want.
NOTE: It is recommended that you select Test System to run a complete test
on your computer.
Option Function
Test Memory Run the stand-alone memory test
Test System Run System Diagnostics
Exit Exit the Diagnostics

102 Troubleshooting
After you have selected the Test System option from the main menu, the
following menu appears.
NOTE: It is recommended that you select Extended Test from the menu
below to run a more thorough check of the devices in the computer.
For any problem encountered during a test, a message appears with an error
code and a description of the problem. Write down the error code and
problem description exactly as it appears and follow the instructions on the
screen. If you cannot resolve the problem, contact Dell (see "Contacting Dell"
on page 177).
NOTE: The Service Tag for your computer is located at the top of each test screen.
When contacting Dell support, have your Service Tag ready.
Option Function
Express Test Performs a quick test of system
devices. The test typically takes 10 to
20 minutes and requires no interaction
on your part. Run Express Test first to
increase the possibility of tracing the
problem quickly.
Extended Test Performs a thorough check of system
devices. The test typically takes an
hour or more and periodically requires
your input to answer specific
questions.
Custom Test Tests a specific device in the system
and can be used to customize the tests
you want to run.
Symptom Tree Lists a number of common symptoms and
allows you to select a test based on the
symptom of the problem you are having.

Troubleshooting 103
The following tabs provide additional information for tests run from the
Custom Test or Symptom Tree option:
Dell Support Utility
The Dell Support Utility is customized for your computing environment.
This utility provides self-support information, software updates, and health
scans for your computer. Use this utility to do the following:
• Check your computing environment
• View the Dell Support Utility settings
• Access the help file for the Dell Support Utility
• View frequently asked questions
Tab Function
Results Displays the results of the test and any
error conditions encountered.
Errors Displays error conditions encountered,
error codes, and the problem
description.
Help Describes the test and any requirements
for running the test.
Configuration Displays your hardware configuration
for the selected device.
The Dell Diagnostics obtains
configuration information for all
devices from system setup, memory, and
various internal tests, and it displays
the information in the device list in
the left pane of the screen. The device
list may not display the names of all
the components installed on your
computer or all devices attached to
your computer.
Parameters Allows you to customize the test by
changing the test settings.
104 Troubleshooting
• Learn more about the Dell Support Utility
• Turn the Dell Support Utility off
For more information about the Dell Support Utility, click the question mark
(?) at the top of the Dell Support window.
To access the Dell Support Utility:
• Click the Dell Support icon in the notification area.
NOTE: The icon functions vary when clicking, double-clicking, or right-
clicking.
Or
• Click the
Start
→
All Programs
→
Dell Support
→
Dell Support
Settings
. Ensure that the
Show icon on the taskbar
option is checked.
NOTE: If the Dell Support Utility is not available from the Start menu, go to
support.dell.com and download the software.
Drive Problems
CAUTION: Before you begin any of the procedures in this section, follow the
safety instructions in the Product Information Guide.
Fill out the "Diagnostics Checklist" on page 176 as you complete these
checks.
ENSURE THAT MICROSOFT® WINDOWS®RECOGNIZES THE DRIVE —
• Click
Start
→
Computer
.
If the drive is not listed, perform a full scan with your antivirus software to
check for and remove viruses. Viruses can sometimes prevent Windows from
recognizing the drive.
TEST THE DRIVE —
• Insert another floppy disk, CD, or DVD to eliminate the possibility that
the original media is defective.
• Insert a bootable floppy disk and restart the computer.
CLEAN THE DRIVE OR DISK —See "Cleaning Your Computer" on page 192.

Troubleshooting 105
ENSURE THAT THE CD OR DVD MEDIA IS SNAPPED ONTO THE SPINDLE
CHECK THE CABLE CONNECTIONS
CHECK FOR HARDWARE INCOMPATIBILITIES —See "Troubleshooting Software
and Hardware Problems" on page 130.
RUN THE DELL DIAGNOSTICS —See "Dell Diagnostics" on page 99.
Optical drive problems
NOTE: High-speed optical drive vibration is normal and may cause noise, which
does not indicate a defect in the drive or the media.
NOTE: Because of different regions worldwide and different disc formats, not all
DVD titles work in all DVD drives.
Problems writing to a CD-RW or DVD+/-RW drive
CLOSE OTHER PROGRAMS —CD-RW or DVD+/-RW drives must receive a
steady stream of data when writing. If the stream is interrupted, an error
occurs. Try closing all programs before you write to the drive.
TURN OFF SLEEP STATE IN WINDOWS BEFORE WRITING TO A CD/DVD DISC —
See "Using the Sleep Power State" on page 51 for information on Sleep state.
CHANGE THE WRITE SPEED TO A SLOWER RATE —See the help files for your CD
or DVD creation software.
The drive tray cannot eject
1
Ensure that the computer is shut down.
2
Straighten a paper clip and insert one end into the eject hole at the front
of the drive, then push firmly until the tray is partially ejected.
3
Gently pull out the tray until it stops.
The drive makes an unfamiliar scraping or grinding sound
• Ensure that the sound is not caused by the program that is running.
• Ensure that the disc is inserted properly.

106 Troubleshooting
Hard drive problems
ALLOW THE COMPUTER TO COOL BEFORE TURNING IT ON —A hot hard drive may
prevent the operating system from starting. Try allowing the computer to
return to room temperature before turning it on.
RUN CHECK DISK —
1
Click
Start
→
Computer
.
2
Right-click
Local Disk (C:)
.
3
Click
Properties
→
Tools
→
Check Now
.
NOTE: The User Account Control window may appear. If you are an
administrator on the computer, click Continue; otherwise, contact your
administrator to continue the desired action.
4
Click to check
Scan for and attempt recovery of bad sectors
, and then click
Start
.
E-Mail, Modem, and Internet Problems
CAUTION: Before you begin any of the procedures in this section, follow the
safety instructions in the Product Information Guide.
NOTE: Connect the modem to an analog telephone jack only. The modem does not
operate while it is connected to a digital telephone network.
CHECK THE MICROSOFT OUTLOOK® EXPRESS SECURITY SETTINGS —If you
cannot open your e-mail attachments:
1
In Outlook Express, click
Tools
, click
Options
, and then click
Security
.
2
Click
Do not allow attachments
to remove the checkmark.
CHECK THE TELEPHONE LINE CONNECTION
CHECK THE TELEPHONE JACK
CONNECT THE MODEM DIRECTLY TO THE TELEPHONE WALL JACK
USE A DIFFERENT TELEPHONE LINE
• Verify that the telephone line is connected to the jack on the modem (the
jack has either a green label or a connector-shaped icon next to it).
• Ensure that you hear a click when you insert the telephone line connector
into the modem.

Troubleshooting 107
• Disconnect the telephone line from the modem and connect it to a
telephone, then listen for a dial tone.
• If you have other telephone devices sharing the line, such as an answering
machine, fax machine, surge protector, or line splitter, then bypass them
and connect the modem directly to the telephone wall jack. If you are
using a line that is 3 m (10 ft) or more in length, try a shorter one.
RUN THE MODEM HELPER DIAGNOSTICS —Click the Start → Programs→
Modem Diagnostic Tool→ Modem Diagnostic Tool. Follow the instructions
on the screen to identify and resolve modem problems (Modem Helper is not
available on certain computers).
VERIFY THAT THE MODEM IS COMMUNICATING WITH WINDOWS —
1
Click the
Start ,
and then click
Control Panel
.
2
Click
Hardware and Sound
.
3
Click
Phone and Modem Options
.
4
Click the
Modems
tab.
5
Click the COM port for your modem.
6
Click
Properties
, click the
Diagnostics
tab, and then click
Query Modem
to verify that the modem is communicating with Windows.
If all commands receive responses, the modem is operating properly.
ENSURE THAT YOU ARE CONNECTED TO THE INTERNET —Ensure that you have
subscribed to an Internet service provider. With the Outlook Express e-mail
program open, click File. If Work Offline has a checkmark next to it, click the
checkmark to remove it, and then connect to the Internet. For help, contact
your Internet service provider.
SCAN THE COMPUTER FOR SPYWARE —If you are experiencing slow computer
performance, you frequently receive pop-up advertisements, or you are having
problems connecting to the Internet, your computer might be infected with
spyware. Use an anti-virus program that includes anti-spyware protection
(your program may require an upgrade) to scan the computer and remove
spyware. For more information, go to support.dell.com and search for the
keyword spyware.

108 Troubleshooting
Error Messages
Fill out the "Diagnostics Checklist" on page 176 as you complete these
checks.
CAUTION: Before you begin any of the procedures in this section, follow the
safety instructions in the Product Information Guide.
If the message is not listed, see the documentation for the operating system
or the program that was running when the message appeared.
AUXILIARY DEVICE FAILURE —The touch pad or external mouse may be faulty.
For an external mouse, check the cable connection. Enable the Pointing
Device option in the system setup program (see "Using the System Setup
Program" on page 189). If the problem persists, contact Dell (see "Contacting
Dell" on page 177).
BAD COMMAND OR FILE NAME —Ensure that you have spelled the command
correctly, put spaces in the proper place, and used the correct pathname.
CACHE DISABLED DUE TO FAILURE —The primary cache internal to the
microprocessor has failed. Contact Dell (see "Contacting Dell" on page 177).
CD DRIVE CONTROLLER FAILURE —The CD drive does not respond to
commands from the computer (see "Drive Problems" on page 104).
DATA ERROR —The hard drive cannot read the data (see "Drive Problems" on
page 104).
DECREASING AVAILABLE MEMORY —One or more memory modules may be
faulty or improperly seated. Reinstall the memory modules and, if necessary,
replace them (see "Memory" on page 146).
DISK C: FAILED INITIALIZATION —The hard drive failed initialization. Run the
hard drive tests in the Dell Diagnostics (see "Dell Diagnostics" on page 99).
DRIVE NOT READY —The operation requires a hard drive in the bay before it
can continue. Install a hard drive in the hard drive bay (see "Hard Drive" on
page 139).
ERROR READING PCMCIA CARD —The computer cannot identify the
ExpressCard. Reinsert the card or try another card (see "Using ExpressCards"
on page 77).

Troubleshooting 109
EXTENDED MEMORY SIZE HAS CHANGED —The amount of memory recorded in
NVRAM does not match the memory installed in the computer. Restart the
computer. If the error appears again, contact Dell (see "Contacting Dell" on
page 177).
THE FILE BEING COPIED IS TOO LARGE FOR THE DESTINATION DRIVE —The file
that you are trying to copy is too large to fit on the disk, or the disk is full. Try
copying the file to a different disk or use a larger capacity disk.
AFILENAME CANNOT CONTAIN ANY OF THE FOLLOWING CHARACTERS: \ / : * ? “ <
> | — Do not use these characters in filenames.
GATE A20 FAILURE —A memory module may be loose. Reinstall the memory
modules and, if necessary, replace them (see "Memory" on page 146).
GENERAL FAILURE —The operating system is unable to carry out the
command. The message is usually followed by specific information—for
example, Printer out of paper. Take the appropriate action.
HARD-DISK DRIVE CONFIGURATION ERROR —The computer cannot identify the
drive type. Shut down the computer, remove the hard drive (see "Hard Drive"
on page 139), and boot the computer from a CD. Then, shut down the
computer, reinstall the hard drive, and restart the computer. Run the Hard
Disk Drive tests in the Dell Diagnostics (see "Dell Diagnostics" on page 99).
HARD-DISK DRIVE CONTROLLER FAILURE 0—The hard drive does not respond
to commands from the computer. Shut down the computer, remove the hard
drive (see "Hard Drive" on page 139), and boot the computer from a CD.
Then, shut down the computer, reinstall the hard drive, and restart the
computer. If the problem persists, try another drive. Run the Hard Disk Drive
tests in the Dell Diagnostics (see "Dell Diagnostics" on page 99).
HARD-DISK DRIVE FAILURE —The hard drive does not respond to commands
from the computer. Shut down the computer, remove the hard drive (see
"Hard Drive" on page 139), and boot the computer from a CD. Then, shut
down the computer, reinstall the hard drive, and restart the computer. If the
problem persists, try another drive. Run the Hard Disk Drive tests in the Dell
Diagnostics (see "Dell Diagnostics" on page 99).
HARD-DISK DRIVE READ FAILURE —The hard drive may be defective. Shut
down the computer, remove the hard drive (see "Hard Drive" on page 139),
and boot the computer from a CD. Then, shut down the computer, reinstall
the hard drive, and restart the computer. If the problem persists, try another
drive. Run the Hard Disk Drive tests in the Dell Diagnostics (see "Dell
Diagnostics" on page 99).

110 Troubleshooting
INSERT BOOTABLE MEDIA —The operating system is trying to boot to
nonbootable media, such as a floppy disk or CD. Insert bootable media.
INVALID CONFIGURATION INFORMATION-PLEASE RUN SYSTEM SETUP
PROGRAM —The system configuration information does not match the
hardware configuration. The message is most likely to occur after a memory
module is installed. Correct the appropriate options in the system setup
program (see "Using the System Setup Program" on page 189).
KEYBOARD CLOCK LINE FAILURE —For external keyboards, check the cable
connection. Run the Keyboard Controller test in the Dell Diagnostics (see
"Dell Diagnostics" on page 99).
KEYBOARD CONTROLLER FAILURE —For external keyboards, check the cable
connection. Restart the computer, and avoid touching the keyboard or the
mouse during the boot routine. Run the Keyboard Controller test in the Dell
Diagnostics (see "Dell Diagnostics" on page 99).
KEYBOARD DATA LINE FAILURE —For external keyboards, check the cable
connection. Run the Keyboard Controller test in the Dell Diagnostics (see
"Dell Diagnostics" on page 99).
KEYBOARD STUCK KEY FAILURE —For external keyboards or keypads, check the
cable connection. Restart the computer, and avoid touching the keyboard or
keys during the boot routine. Run the Stuck Key test in the Dell Diagnostics
(see "Dell Diagnostics" on page 99).
LICENSED CONTENT IS NOT ACCESSIBLE IN MEDIADIRECT —Dell MediaDirect™
cannot verify the Digital Rights Management (DRM) restrictions on the file,
so the file cannot be played (see "Dell MediaDirect problems" on page 116).
MEMORY ADDRESS LINE FAILURE AT ADDRESS,READ VALUE EXPECTING VALUE —
A memory module may be faulty or improperly seated. Reinstall the memory
modules and, if necessary, replace them (see "Memory" on page 146).
MEMORY ALLOCATION ERROR —The software you are attempting to run is
conflicting with the operating system, another program, or a utility. Shut
down the computer, wait 30 seconds, and then restart it. Try to run the
program again. If the error message still appears, see the software
documentation.
MEMORY DATA LINE FAILURE AT ADDRESS,READ VALUE EXPECTING VALUE —A
memory module may be faulty or improperly seated. Reinstall the memory
modules and, if necessary, replace them (see "Memory" on page 146).

Troubleshooting 111
MEMORY DOUBLE WORD LOGIC FAILURE AT ADDRESS,READ VALUE EXPECTING
VALUE —A memory module may be faulty or improperly seated. Reinstall the
memory modules and, if necessary, replace them (see "Memory" on page 146).
MEMORY ODD/EVEN LOGIC FAILURE AT ADDRESS,READ VALUE EXPECTING
VALUE —A memory module may be faulty or improperly seated. Reinstall the
memory modules and, if necessary, replace them (see "Memory" on page 146).
MEMORY WRITE/READ FAILURE AT ADDRESS,READ VALUE EXPECTING VALUE —A
memory module may be faulty or improperly seated. Reinstall the memory
modules and, if necessary, replace them (see "Memory" on page 146).
NO BOOT DEVICE AVAILABLE —The computer cannot find the hard drive. If
the hard drive is your boot device, ensure that the drive is installed, properly
seated, and partitioned as a boot device.
NO BOOT SECTOR ON HARD DRIVE —The operating system may be corrupted.
Contact Dell (see "Contacting Dell" on page 177).
NO TIMER TICK INTERRUPT —A chip on the system board may be
malfunctioning. Run the System Set tests in the Dell Diagnostics (see "Dell
Diagnostics" on page 99).
NOT ENOUGH MEMORY OR RESOURCES. EXIT SOME PROGRAMS AND TRY AGAIN —
You have too many programs open. Close all windows and open the program
that you want to use.
OPERATING SYSTEM NOT FOUND —Reinstall the hard drive (see "Hard Drive"
on page 139). If the problem persists, contact Dell (see "Contacting Dell" on
page 177).
OPTIONAL ROM BAD CHECKSUM —The optional ROM has failed. Contact
Dell (see "Contacting Dell" on page 177).
AREQUIRED .DLL FILE WAS NOT FOUND —The program that you are trying to
open is missing an essential file. Remove and then reinstall the program.
1
Click
Start →
Control Panel
.
2
Under
Programs
, click
Uninstall a Program
.
3
Select the program you want to remove.
4
Click
Uninstall
and follow the prompts on the screen.
5
See the program documentation for installation instructions.

112 Troubleshooting
SECTOR NOT FOUND —The operating system cannot locate a sector on the
hard drive. You may have a defective sector or corrupted FAT on the hard
drive. Run the Windows error-checking utility to check the file structure on
the hard drive. See Windows Help and Support for instructions (click
Start
→Help and Support). If a large number of sectors are defective, back up
the data (if possible), and then reformat the hard drive.
SEEK ERROR —The operating system cannot find a specific track on the hard
drive.
SHUTDOWN FAILURE —A chip on the system board may be malfunctioning.
Run the System Set tests in the Dell Diagnostics (see "Dell Diagnostics" on
page 99).
TIME-OF-DAY CLOCK LOST POWER —System configuration settings are
corrupted. Connect your computer to an electrical outlet to charge the
battery. If the problem persists, try to restore the data by entering the system
setup program, then immediately exit the program (see "Using the System
Setup Program" on page 189). If the message reappears, contact Dell (see
"Contacting Dell" on page 177).
TIME-OF-DAY CLOCK STOPPED —The reserve battery that supports the system
configuration settings may require recharging. Connect your computer to an
electrical outlet to charge the battery. If the problem persists, contact Dell
(see "Contacting Dell" on page 177).
TIME-OF-DAY NOT SET-PLEASE RUN THE SYS T E M SETUP PROGRAM —The time
or date stored in the system setup program does not match the system clock.
Correct the settings for the Date and Time options (see "Using the System
Setup Program" on page 189).
TIMER CHIP COUNTER 2 FAILED —A chip on the system board may be
malfunctioning. Run the System Set tests in the Dell Diagnostics (see "Dell
Diagnostics" on page 99).
UNEXPECTED INTERRUPT IN PROTECTED MODE —The keyboard controller may
be malfunctioning, or a memory module may be loose. Run the System
Memory tests and the Keyboard Controller test in the Dell Diagnostics (see
"Dell Diagnostics" on page 99).
X:\ IS NOT ACCESSIBLE. THE DEVICE IS NOT READY —Insert a disk into the
drive and try again.
Troubleshooting 113
WARNING: BATTERY IS CRITICALLY LOW —The battery is running out of
charge. Replace the battery, or connect the computer to an electrical outlet;
otherwise, activate hibernate mode or shut down the computer.
ExpressCard Problems
CAUTION: Before you begin any of the procedures in this section, follow the
safety instructions in the Product Information Guide.
CHECK THE EXPRESSCARD —Ensure that the ExpressCard is properly inserted
into the connector.
CHECK THAT THE CARD IS RECOGNIZED BY WINDOWS —Double-click the Safely
Remove Hardware icon in the Windows taskbar. Some cards do not support
this feature. If the card supports this Windows feature, the card will be listed.
IF YOU HAVE PROBLEMS WITH A DELL-PROVIDED EXPRESSCARD —Contact Dell
(see "Contacting Dell" on page 177). Also, for Mobile Broadband (WWAN)
ExpressCards, see "Mobile Broadband (Wireless Wide Area Network
[WWAN])" on page 119.
IF YOU HAVE PROBLEMS WITH AN EXPRESSCARD NOT PROVIDED BY DELL —
Contact the ExpressCard manufacturer.
IEEE 1394 Device Problems
CAUTION: Before you begin any of the procedures in this section, follow the
safety instructions in the Product Information Guide.
ENSURE THAT THE IEEE 1394 DEVICE IS RECOGNIZED BY WINDOWS —
1
Click
Start
→
Control Panel
→
System and Maintenance
→
Device
Manager
.
NOTE: The User Account Control window may appear. If you are an
administrator on the computer, click Continue; otherwise, contact your
administrator to continue the desired action.
If your IEEE 1394 device is listed, Windows recognizes the device.
IF YOU HAVE PROBLEMS WITH A DELL-PROVIDED IEEE 1394 DEVICE —Contact
Dell (see "Contacting Dell" on page 177).

114 Troubleshooting
IF YOU HAVE PROBLEMS WITH AN IEEE 1394 DEVICE NOT PROVIDED BY DELL —
Contact the IEEE 1394 device manufacturer.
Ensure that the IEEE 1394 device is properly inserted into the connector.
Keyboard Problems
CAUTION: Before you begin any of the procedures in this section, follow the
safety instructions in the Product Information Guide.
Fill out the "Diagnostics Checklist" on page 176 as you perform the various
checks.
NOTE: Use the integrated keyboard when running the Dell Diagnostics or the
system setup program. When you attach an external keyboard, the integrated
keyboard remains fully functional.
External Keyboard problems
NOTE: When you attach an external keyboard, the integrated keyboard remains
fully functional.
CHECK THE KEYBOARD CABLE —Shut down the computer, disconnect the
keyboard cable and check it for damage, then firmly reconnect the cable.
If you are using a keyboard extension cable, disconnect it and connect the
keyboard directly to the computer.
CHECK THE EXTERNAL KEYBOARD —
1
Shut down the computer, wait 1 minute, and then turn it on again.
2
Verify that the numbers, capitals, and scroll lock lights on the keyboard
blink during the boot routine.
3
From the Windows desktop, click
Start
→
All Programs
→
Accessories
→
Notepad
.
4
Type some characters on the external keyboard and verify that they appear
on the display.
If you cannot verify these steps, you may have a defective external
keyboard.

Troubleshooting 115
TO VERIFY THAT THE PROBLEM IS WITH THE EXTERNAL KEYBOARD,CHECK THE
INTEGRATED KEYBOARD —
1
Shut down the computer.
2
Disconnect the external keyboard.
3
Turn on the computer.
4
From the Windows desktop, click
Start
→
All Programs
→
Accessories
→
Notepad
.
5
Type some characters on the internal keyboard and verify that they appear
on the display.
If the characters appear now, but did not with the external keyboard, you
may have a defective external keyboard. Contact Dell
(see "Contacting
Dell
" on page 177
).
RUN THE KEYBOARD DIAGNOSTICS TESTS —Run the PC-AT Compatible
Keyboards tests in the Dell Diagnostics (see "Dell Diagnostics" on page 99). If
the tests indicate a defective external keyboard, contact Dell (see "Contacting
Dell" on page 177).
Unexpected characters
DISABLE THE NUMERIC KEYPAD —Press <Num Lk> to disable the numeric
keypad if numbers are displayed instead of letters. Verify that the numbers
lock light is not lit.
Lockups and Software Problems
CAUTION: Before you begin any of the procedures in this section, follow the
safety instructions in the Product Information Guide.
The computer does not start
CHECK THE AC ADAPTER —Ensure that the AC adapter is firmly connected to
the computer and to the electrical outlet.
The computer stops responding
NOTICE: You might lose data if you are unable to perform an operating system
shutdown.

116 Troubleshooting
TURN THE COMPUTER OFF —If you are unable to get a response by pressing a
key on your keyboard or moving your mouse, press and hold the power button
for at least 8 to 10 seconds until the computer turns off, then restart your
computer.
A program stops responding or crashes repeatedly
END THE PROGRAM —
1
Press <Crtl><Shift><Esc> simultaneously.
2
Click the
Applications
tab and select the program that is no longer
responding.
3
Click
End Task
.
NOTE: The chkdsk program may run when you restart the computer. Follow the
instructions on the screen.
CHECK THE SOFTWARE DOCUMENTATION —If necessary, uninstall and then
reinstall the program. Software usually includes installation instructions in its
documentation or on a floppy disk or CD.
A program is designed for an earlier Microsoft®Windows® operating
system
RUN THE PROGRAM COMPATIBILITY WIZARD —Program compatibility is a
mode in Windows that lets you run programs written for earlier versions of
Windows. For more information, sea
rch for the keyword program compatibility
wizard in Windows Help and Support.
A solid blue screen appears
TURN THE COMPUTER OFF —If you are unable to get a response by pressing a
key on your keyboard or moving your mouse, press and hold the power button
for at least 8 to 10 seconds until the computer turns off, then restart your
computer.
Dell MediaDirect problems
CHECK THE DELL MEDIADIRECT HELP FILE FOR INFORMATION —Use the Help
menu to access Dell MediaDirect Help.

Troubleshooting 117
TO PLAY MOVIES WITH DELL MEDIADIRECT,YOU MUST HAVE A DVD DRIVE AND
THE DELL DVD PLAYER —If you purchased a DVD drive with your computer,
this software should already be installed.
VIDEO QUALITY PROBLEMS —Turn off the Use Hardware Acceleration option.
This feature takes advantage of the special processing in some graphics cards
to reduce processor requirements when playing DVDs and certain types of
video files.
CANNOT PLAY SOME MEDIA FILES —Because Dell MediaDirect provides access
to media files outside the Windows operating system environment, access to
licensed content is restricted. Licensed content is digital content that has
Digital Rights Management (DRM) applied to it. The Dell MediaDirect
environment cannot verify the DRM restrictions, so the licensed files cannot
be played. Licensed music and video files have a lock icon next to them. You
can access licensed files in the Windows operating system environment.
ADJUSTING THE COLOR SETTINGS FOR MOVIES THAT CONTAIN SCENES THAT ARE
TOO DARK OR TOO BRIGHT —Click EagleVision to use a video enhancement
technology that detects video content and dynamically adjusts the
brightness/contrast/saturation ratios.
NOTICE: You cannot reinstall the Dell MediaDirect feature if you voluntarily
reformat the hard drive. Contact Dell for assistance (see "Contacting Dell" on
page 177).
Other software problems
CHECK THE SOFTWARE DOCUMENTATION OR CONTACT THE SOFTWARE
MANUFACTURER FOR TROUBLESHOOTING INFORMATION —
• Ensure that the program is compatible with the operating system installed
on your computer.
• Ensure that your computer meets the minimum hardware requirements
needed to run the software. See the software documentation for
information.
• Ensure that the program is installed and configured properly.
• Verify that the device drivers do not conflict with the program.
• If necessary, uninstall and then reinstall the program.

118 Troubleshooting
BACK UP YOUR FILES IMMEDIATELY
USE A VIRUS-SCANNING PROGRAM TO CHECK THE HARD DRIVE,FLOPPY DISKS,OR
CDS
SAVE AND CLOSE ANY OPEN FILES OR PROGRAMS AND SHUT DOWN YOUR
COMPUTER THROUGH THE START MENU
SCAN THE COMPUTER FOR SPYWARE —If you are experiencing slow computer
performance, you frequently receive pop-up advertisements, or you are having
problems connecting to the Internet, your computer might be infected with
spyware. Use an anti-virus program that includes anti-spyware protection
(your program may require an upgrade) to scan the computer and remove
spyware. For more information, go to support.dell.com and search for the
keyword spyware.
RUN THE DELL DIAGNOSTICS —If all tests run successfully, the error condition
is related to a software problem (see "Dell Diagnostics" on page 99).
Memory Problems
Fill out the "Diagnostics Checklist" on page 176 as you complete these
checks.
CAUTION: Before you begin any of the procedures in this section, follow the
safety instructions in the Product Information Guide.
IF YOU RECEIVE AN INSUFFICIENT MEMORY MESSAGE —
• Save and close any open files and exit any open programs you are not using
to see if that resolves the problem.
• See the software documentation for minimum memory requirements. If
necessary, install additional memory
(see "Memory
" on page 146
)
.
• Reseat the memory modules to ensure that your computer is successfully
communicating with the memory
(see "Memory
" on page 146
)
.
• Run the Dell Diagnostics
(see "Dell Diagnostics
" on page 99
)
.
IF YOU EXPERIENCE OTHER MEMORY PROBLEMS —
• Reseat the memory modules to ensure that your computer is successfully
communicating with the memory
(see "Memory
" on page 146
)
.
• Ensure that you are following the memory installation guidelines
(see
"Memory
" on page 146
)
.
• Run the Dell Diagnostics
(see "Dell Diagnostics
" on page 99
)
.
Troubleshooting 119
Network Problems
Fill out the "Diagnostics Checklist" on page 176 as you complete these
checks.
CAUTION: Before you begin any of the procedures in this section, follow the
safety instructions in the Product Information Guide.
CHECK THE NETWORK CABLE CONNECTOR —Ensure that the network cable is
firmly inserted into both the network connector on the back of the computer
and the network jack.
CHECK THE NETWORK LIGHTS ON THE NETWORK CONNECTOR —No light
indicates that no network communication exists. Replace the network cable.
RESTART THE COMPUTER AND LOG ON TO THE NETWORK AGAIN
CHECK YOUR NETWORK SETTINGS —Contact your network administrator or
the person who set up your network to verify that your network settings are
correct and that the network is functioning.
Mobile Broadband (Wireless Wide Area Network [WWAN])
NOTE: The Dell Mobile Broadband Card Utility user’s guide and the Mobile
Broadband ExpressCard user’s guide are available through Windows Help and
Support (click Start →Help and Support). You can also download the Dell
Mobile Broadband Card Utility user’s guide from support.dell.com.
NOTE: The icon appears in the notification area if the computer has a Dell
WWAN device installed. Double-click the icon to launch the utility.
ACTIVATE THE MOBILE BROADBAND EXPRESSCARD —You must activate the
Mobile Broadband ExpressCard before you can connect to the network.
Position the mouse over the icon in the notification area to verify the
status of the connection. If the card is not activated, follow the card
activation instructions located within the Dell Mobile Broadband Card
Utility. To access the utility, double-click the icon located in the taskbar,
at the lower-right corner of your screen. If your ExpressCard is not a Dell-
branded card, see the manufacturer’s instructions for your card.
CHECK NETWORK CONNECTION STATUS IN THE DELL MOBILE BROADBAND CARD
UTILITY —Double-click the icon to launch the Dell Mobile Broadband
Card Utility. Check the status in the main window:
•
No card detected
— Restart the computer, and launch the
Dell Mobile
Broadband Card Utility
again.

120 Troubleshooting
•
Check your WWAN service
— Contact your cellular service provider to
verify your plan coverage and supported services.
Power Problems
Fill out the "Diagnostics Checklist" on page 176 as you complete these
checks.
CAUTION: Before you begin any of the procedures in this section, follow the
safety instructions in the Product Information Guide.
CHECK THE POWER LIGHT —When the power light is lit or blinking, the
computer has power. If the power light is blinking, the computer is in Sleep
state—press the power button to exit Sleep state. If the light is off, press the
power button to turn on the computer.
NOTE: For information on Sleep power state, see "Using the Sleep Power State" on
page 51.
CHARGE THE BATTERY —The battery charge may be depleted.
1
Reinstall the battery.
2
Use the AC adapter to connect the computer to an electrical outlet.
3
Turn on the computer.
NOTE: Battery operating time (the time the battery can hold a charge) decreases
over time. Depending on how often the battery is used and the conditions under
which it is used, you may need to purchase a new battery during the life of your
computer.
CHECK THE BATTERY STATUS LIGHT —If the battery status light flashes amber
or is a steady amber, the battery charge is low or depleted. Connect the
computer to an electrical outlet.
If the battery status light flashes blue and amber, the battery is too hot to
charge. Shut down the computer, disconnect the computer from the electrical
outlet, and then let the battery and computer cool to room temperature.
If the battery status light rapidly flashes amber, the battery may be defective.
Contact Dell (see "Contacting Dell" on page 177).
CHECK THE BATTERY TEMPERATURE —If the battery temperature is below 0°C
(32°F), the computer will not start.
TEST THE ELECTRICAL OUTLET —Ensure that the electrical outlet is working by
testing it with another device, such as a lamp.

Troubleshooting 121
CHECK THE AC ADAPTER —Check the AC adapter cable connections. If the
AC adapter has a light, ensure that the light is on.
CONNECT THE COMPUTER DIRECTLY TO AN ELECTRICAL OUTLET —Bypass power
protection devices, power strips, and extension cables to verify that the
computer turns on.
ELIMINATE POSSIBLE INTERFERENCE —Turn off nearby fans, fluorescent lights,
halogen lamps, or other appliances.
ADJUST THE POWER PROPERTIES —See "Configuring Power Management
Settings" on page 50.
RESEAT THE MEMORY MODULES —If the computer power light turns on, but
the display remains blank, reinstall the memory modules (see "Memory" on
page 146).
Printer Problems
Fill out the "Diagnostics Checklist" on page 176 as you complete these
checks.
CAUTION: Before you begin any of the procedures in this section, follow the
safety instructions in the Product Information Guide.
NOTE: If you need technical assistance for your printer, contact the printer’s
manufacturer.
CHECK THE PRINTER DOCUMENTATION —See the printer documentation for
setup and troubleshooting information.
ENSURE THAT THE PRINTER IS TURNED ON
CHECK THE PRINTER CABLE CONNECTIONS —
• See the printer documentation for cable connection information.
• Ensure that the printer cables are securely connected to the printer and
the computer.
TEST THE ELECTRICAL OUTLET —Ensure that the electrical outlet is working by
testing it with another device, such as a lamp.
VERIFY THAT THE PRINTER IS RECOGNIZED BY WINDOWS —
1
Click
Start
→
Control Panel
→
Hardware and Sound
→
Printers
.
2
Right-click the printer icon.

122 Troubleshooting
3
Click
Properties
, and then click the
Ports
tab. For a parallel printer, ensure
that the
Print to the following port(s):
setting is
LPT1 (Printer Port)
. For a
USB printer, ensure that the
Print to the following port(s):
setting is
USB
.
REINSTALL THE PRINTER DRIVER —See the printer documentation for
instructions.
Scanner Problems
CAUTION: Before you begin any of the procedures in this section, follow the
safety instructions in the Product Information Guide.
NOTE: If you need technical assistance for your scanner, contact the scanner’s
manufacturer.
CHECK THE SCANNER DOCUMENTATION —See the scanner documentation for
setup and troubleshooting information.
UNLOCK THE SCANNER —Ensure that your scanner is unlocked.
RESTART THE COMPUTER AND TRY THE SCANNER AGAIN
CHECK THE CABLE CONNECTIONS —
• See the scanner documentation for cable connection information.
• Ensure that the scanner cables are securely connected to the scanner and
the computer.
VERIFY THAT THE SCANNER IS RECOGNIZED BY MICROSOFT WINDOWS —
Click Start →Control Panel→Hardware and Sound→Scanners and
Cameras. If your scanner is listed, Windows recognizes the scanner.
REINSTALL THE SCANNER DRIVER —See the scanner documentation for
instructions.
Sound and Speaker Problems
Fill out the "Diagnostics Checklist" on page 176 as you complete these
checks.
CAUTION: Before you begin any of the procedures in this section, follow the
safety instructions in the Product Information Guide.

Troubleshooting 123
No sound from integrated speakers
ADJUST THE WINDOWS VOLUME CONTROL —Double-click the speaker icon in
the lower-right corner of your screen. Ensure that the volume is turned up and
that the sound is not muted. Adjust the volume, bass, or treble controls to
eliminate distortion.
ADJUST THE VOLUME USING KEYBOARD SHORTCUTS —Press <Fn><End> to
disable (mute) or re-enable the integrated speakers.
REINSTALL THE SOUND (AUDIO)DRIVER —See "Reinstalling Drivers and
Utilities" on page 127.
No sound from external speakers
ENSURE THAT THE SUBWOOFER AND THE SPEAKERS ARE TURNED ON —See the
setup diagram supplied with the speakers. If your speakers have volume
controls, adjust the volume, bass, or treble to eliminate distortion.
ADJUST THE WINDOWS VOLUME CONTROL —Click or double-click the speaker
icon in the lower-right corner of your screen. Ensure that the volume is turned
up and that the sound is not muted.
DISCONNECT HEADPHONES FROM THE HEADPHONE CONNECTOR —Sound from
the speakers is automatically disabled when headphones are connected to the
headphone connector.
TEST THE ELECTRICAL OUTLET —Ensure that the electrical outlet is working by
testing it with another device, such as a lamp.
ELIMINATE POSSIBLE INTERFERENCE —Turn off nearby fans, fluorescent lights,
or halogen lamps to check for interference.
REINSTALL THE AUDIO DRIVER —See "Reinstalling Drivers and Utilities" on
page 127.
RUN THE DELL DIAGNOSTICS —See "Dell Diagnostics" on page 99.
NOTE: The volume control in some MP3 players overrides the Windows volume
setting. If you have been listening to MP3 songs, ensure that you did not turn the
player volume down or off.
No sound from headphones
CHECK THE HEADPHONE CABLE CONNECTION —Ensure that the headphone
cable is securely inserted into the headphone connector (see "audio
connectors" on page 26).

124 Troubleshooting
ADJUST THE WINDOWS VOLUME CONTROL —Click or double-click the speaker
icon in the lower-right corner of your screen. Ensure that the volume is turned
up and that the sound is not muted.
Touch Pad or Mouse Problems
CHECK THE TOUCH PAD SETTINGS —
1
Click
Start
→
Control Panel
→
Hardware and Sound
→
Mouse
.
2
Adjust the settings, as needed.
CHECK THE MOUSE CABLE —Shut down the computer, disconnect the mouse
cable and check it for damage, then firmly reconnect the cable.
If you are using a mouse extension cable, disconnect it and connect the
mouse directly to the computer.
TO VERIFY THAT THE PROBLEM IS WITH THE MOUSE,CHECK THE TOUCH PAD —
1
Shut down the computer.
2
Disconnect the mouse.
3
Turn on the computer.
4
At the Windows desktop, use the touch pad to move the cursor around,
select an icon, and open it.
If the touch pad operates correctly, the mouse may be defective.
CHECK THE SYSTEM SETUP PROGRAM SETTINGS —Verify that the system setup
program lists the correct device for the pointing device option (the computer
automatically recognizes a USB mouse without making any setting
adjustments).
TEST THE MOUSE CONTROLLER —To test the mouse controller (which affects
pointer movement) and the operation of the touch pad or mouse buttons,
run the Mouse test in the Pointing Devices test group in the "Dell
Diagnostics" on page 99.
REINSTALL THE TOUCH PAD DRIVER —See "Reinstalling Drivers and Utilities"
on page 127.

Troubleshooting 125
Video and Display Problems
Fill out the "Diagnostics Checklist" on page 176 as you complete these
checks.
CAUTION: Before you begin any of the procedures in this section, follow the
safety instructions in the Product Information Guide.
If the display is blank
NOTE: If you are using a program that requires a higher resolution than your
computer supports, it is recommended that you attach an external monitor to your
computer.
CHECK THE BATTERY —If you are using a battery to power your computer, the
battery charge may be depleted. Connect the computer to an electrical outlet
using the AC adapter, and then turn on the computer.
TEST THE ELECTRICAL OUTLET —Ensure that the electrical outlet is working by
testing it with another device, such as a lamp.
CHECK THE AC ADAPTER —Check the AC adapter cable connections. If the
AC adapter has a light, ensure that the light is on.
CONNECT THE COMPUTER DIRECTLY TO AN ELECTRICAL OUTLET —Bypass power
protection devices, power strips, and extension cables to verify that the
computer turns on.
ADJUST THE POWER PROPERTIES —Search for the keyword sleep in Windows
Help and Support.
SWITCH THE VIDEO IMAGE —If your computer is attached to an external
monitor, press <Fn><F8> to switch the video image to the display.
If the display is difficult to read
ADJUST THE BRIGHTNESS —Press <Fn> and the up- or down-arrow key.
MOVE THE EXTERNAL SUBWOOFER AWAY FROM THE COMPUTER OR MONITOR —If
your external speaker system includes a subwoofer, ensure that the subwoofer
is at least 60 cm (2 ft) away from the computer or external monitor.
ELIMINATE POSSIBLE INTERFERENCE —Turn off nearby fans, fluorescent lights,
halogen lamps, or other appliances.
ROTATE THE COMPUTER TO FACE A DIFFERENT DIRECTION —Eliminate sunlight
glare, which can cause poor picture quality.

126 Troubleshooting
ADJUST THE WINDOWS DISPLAY SETTINGS —
1
Click
Start
→
Control Panel
→
Appearance and Personalization
→
Personalization
→
Display Settings
.
2
Click the area you want to change or click the
Display
icon.
Try different settings for
Resolution
and
Colors
.
RUN THE VIDEO DIAGNOSTICS TESTS —If no error message appears and you
still have a display problem, but the display is not completely blank, run the
Video device group in the "Dell Diagnostics" on page 99, then contact Dell
(see "Contacting Dell" on page 177).
SEE "ERROR MESSAGES"—If an error message appears, see "Error Messages"
on page 108.
If only part of the display is readable
CONNECT AN EXTERNAL MONITOR —
1
Shut down your computer and connect an external monitor to the
computer.
2
Turn on the computer and the monitor, and then adjust the monitor
brightness and contrast controls.
If the external monitor works, the computer display or video controller
may be defective. Contact Dell (
see "Contacting Dell
" on page 177
).
Drivers
What Is a Driver?
A driver is a program that controls a device such as a printer, mouse, or
keyboard. All devices require a driver program.
A driver acts like a translator between the device and any other programs that
use the device. Each device has its own set of specialized commands that only
its driver recognizes.
Dell ships your computer to you with required drivers already installed—no
further installation or configuration is needed.
NOTICE: Your Drivers and Utilities media may contain drivers for operating systems
that are not on your computer. Ensure that you are installing software appropriate
for your operating system.

Troubleshooting 127
Many drivers, such as the keyboard driver, come with your Microsoft®
Windows® operating system. You may need to install drivers if you:
• Upgrade your operating system.
• Reinstall your operating system.
• Connect or install a new device.
Identifying Drivers
If you experience a problem with any device, identify whether the driver is the
source of your problem and, if necessary, update the driver.
1
Click
Start
, and then right-click
Computer
.
2
Click
Properties
, and then click
Device Manager
.
NOTE: The User Account Control window may appear. If you are an
administrator on the computer, click Continue; otherwise, contact your
administrator to continue.
Scroll down the list of devices and check for an exclamation point (a circle with
a [
!]
) next to the device name
. If an exclamation point is next to the device
name, you may need to reinstall the driver or install a new driver (see
"Reinstalling Drivers and Utilities" on page 127).
Reinstalling Drivers and Utilities
NOTICE: The Dell Support website at support.dell.com and your Drivers and
Utilities media provide approved drivers for Dell computers. If you install drivers
obtained from other sources, your computer might not work correctly.
Using Windows Device Driver Rollback
If a problem occurs on your computer after you install or update a driver, use
Windows Device Driver Rollback to replace the driver with the previously
installed version.
1
Click
Start
, and then right-click
Computer
.
2
Click
Properties
, and then click
Device Manager
.
NOTE: The User Account Control window may appear. If you are an
administrator on the computer, click Continue; otherwise, contact your
administrator to enter the Device Manager.

128 Troubleshooting
3
Right-click the device for which the new driver was installed and click
Properties
.
4
Click the
Drivers
tab, and then click
Roll Back Driver
.
If Device Driver Rollback does not resolve the problem, use System Restore
(see "Restoring Your Operating System" on page 130) to return your computer
to the operating state that existed before you installed the new driver.
Using the Drivers and Utilities Media
If using Device Driver Rollback or System Restore (see "Restoring Your
Operating System" on page 130) does not resolve the problem, reinstall the
driver from your Drivers and Utilities media.
1
With the Windows desktop displayed, insert your
Drivers and Utilities
media
.
If this is your first time to use your
Drivers and Utilities media
, continue
to step 2. If not, proceed to step 5.
2
When the
Drivers and Utilities
installation program starts, follow the
prompts on the screen.
NOTE: In most cases, the Drivers and Utilities program starts running
automatically. If it does not, start Windows Explorer, click your media drive
directory to display the media contents, and then double-click the autorcd.exe
file.
3
When the
InstallShield Wizard Complete
window appears, remove the
Drivers and Utilities disc
and click
Finish
to restart the computer.
4
When you see the Windows desktop, reinsert the
Drivers and Utilities
disc
.
5
At the
Welcome Dell System Owner
screen, click
Next
.
NOTE: The Drivers and Utilities program displays drivers only for hardware
that came installed in your computer. If you installed additional hardware, the
drivers for the new hardware might not be displayed. If those drivers are not
displayed, exit the Drivers and Utilities program. For drivers information, see
the documentation that came with the device.
A message stating that the
Drivers and Utilities program
is detecting
hardware in your computer appears.

Troubleshooting 129
The drivers that are used by your computer are automatically displayed in
the
My Drivers—The ResourceCD has identified these components in
your system
window.
6
Click the driver that you want to reinstall and follow the instructions on
the screen.
If a particular driver is not listed, then that driver is not required by your
operating system.
Manually Reinstalling Drivers
NOTE: If your computer has a Consumer IR port and you are reinstalling a
Consumer IR driver, you must first enable the Consumer IR port in the system setup
program (see "Using the System Setup Program" on page 189) before continuing
with the driver installation (see "Reinstalling Drivers and Utilities" on page 127). For
information about components installed on your computer, see "Determining Your
Computer’s Configuration" on page 19.
1
After extracting the driver files to your hard drive, as described in the
previous section, click
Start ,
and then right-click
Computer
.
2
Click
Properties
, and then click
Device Manager
.
3
Double-click the type of device for which you are installing the driver (for
example,
Modems
or
Infrared devices
).
4
Double-click the name of the device for which you are installing the driver.
5
Click
Driver
tab, and then click
Update Driver
.
6
Click
Install from a list or specific location (Advanced)
, and then click
Next
.
7
Click
Browse
and browse to the location to which you previously copied
the driver files.
8
When the name of the appropriate driver appears, click
Next
.
9
Click
Finish
, and then restart your computer.

130 Troubleshooting
Troubleshooting Software and Hardware
Problems
If a device is either not detected during the operating system setup or is
detected but incorrectly configured, use
Windows Vista Help and Support
to
resolve the incompatibility:
1
Click
Start
→
Help and Support
.
2
Type
hardware troubleshooter
in the search field, then press
<Enter>.
3
In the search results, select the option that best describes the problem and
follow the remaining troubleshooting steps.
Restoring Your Operating System
You can restore your operating system in the following ways:
• Microsoft Windows Vista System Restore returns your computer to an
earlier operating state without affecting data files. Use System Restore as
the first solution for restoring your operating system and preserving data
files. For instructions, see "Using Microsoft Windows System Restore" on
page 131.
• Dell PC Restore by Symantec restores your hard drive to the operating
state it was in when you purchased the computer. Dell PC Restore
permanently deletes all data on the hard drive and removes any
applications installed after you received the computer. Use PC Restore
only if System Restore did not resolve your operating system problem. For
instructions, see "Using Dell PC Restore by Symantec" on page 131.
• If you received Operating System media with your computer, you can use
it to restore your operating system. However, using the Operating System
media also deletes all data on the hard drive. Use the media only if System
Restore did not resolve your operating system problem. For instructions,
see "Using the Operating System Media" on page 134.

Troubleshooting 131
Using Microsoft Windows System Restore
The Windows operating system provides System Restore to allow you to
return your computer to an earlier operating state (without affecting data
files) if changes to the hardware, software, or other system settings have left
the computer in an undesirable operating state. Any changes that System
Restore makes to your computer are completely reversible.
NOTICE: Make regular backups of your data files. System Restore does not
monitor your data files or recover them.
NOTE: The procedures in this document were written for the Windows default
view, so they may not apply if you set your Dell computer to the Windows Classic
view.
1
Click
Start
→
Help and Support
.
2
Type
System Restore
in the search field, then press <Enter>.
NOTE: The User Account Control window may appear. If you are an
administrator on the computer, click Continue; otherwise, contact your
administrator to continue the desired action.
3
Click
Next
and follow the remaining prompts on the screen.
In the event that System Restore did not resolve the issue, you may undo the
last system restore.
Undoing the Last System Restore
NOTICE: Before you undo the last system restore, save and close all open files and
exit any open programs. Do not alter, open, or delete any files or programs until the
system restoration is complete.
1
Click
Start
→
Help and Support
.
2
Type
System Restore
in the search field and press <Enter>.
3
Click
Undo my last restoration
, and then click
Next
.
Using Dell PC Restore by Symantec
NOTICE: Using Dell PC Restore permanently deletes all data on the hard drive and
removes any application programs or drivers installed after you received your
computer. If possible, back up the data before using PC Restore. Use PC Restore
only if System Restore (see "Using Microsoft Windows System Restore" on
page 131) did not resolve your operating system problem.

132 Troubleshooting
NOTE: Dell PC Restore by Symantec may not be available in certain countries or on
certain computers.
Use Dell PC Restore by Symantec only as the last method to restore your
operating system. PC Restore restores your hard drive to the operating state it
was in when you purchased the computer. Any programs or files added since
you received your computer—including data files—are permanently deleted
from the hard drive. Data files include documents, spreadsheets, e-mail
messages, digital photos, music files, etc. If possible, back up all data before
using PC Restore.
To use PC Restore:
1
Turn on the computer.
During the boot process, a blue bar with
www.dell.com
appears at the top
of the screen.
2
Immediately upon seeing the blue bar, press <Ctrl><F11>.
If you do not press <Ctrl><F11> in time, let the computer finish
starting, and then restart the computer and try again.
NOTICE: If you do not want to proceed with PC Restore, click Reboot in the
following step.
3
On the next screen that appears, click
Restore
.
4
Click
Confirm
.
The restore process takes approximately 6–10 minutes to complete.
5
When prompted, click
Finish
to reboot the computer.
NOTE: Do not manually shut down the computer. Click Finish and let the
computer completely reboot.
6
When prompted, click
Yes
.
The computer restarts. Because the computer is restored to its original
operating state, the screens that appear, such as the End User License
Agreement, are the same ones that appeared the first time the computer
was turned on.
7
Click
Next
.
The
System Restore
screen appears and the computer restarts.
8
After the computer restarts, click
OK
.

Troubleshooting 133
Removing Dell PC Restore
NOTICE: Removing Dell PC Restore from the hard drive permanently deletes the PC
Restore utility from your computer. After you have removed Dell PC Restore, you will
not be able to use it to restore your computer’s operating system.
Dell PC Restore enables you to restore your hard drive to the operating state
it was in when you purchased your computer. It is recommended that you do
not remove PC Restore from your computer, even to gain additional hard-
drive space. If you remove PC Restore from the hard drive, you cannot recall
it, and you will be unable to use PC Restore to return your computer’s
operating system to its original state.
To remove PC Restore:
1
Log on to the computer as a local administrator.
2
In Windows Explorer, go to
c:\dell\utilities\DSR
.
3
Double-click the filename
DSRIRRemv2.exe
.
NOTE: If you do not log on as a local administrator, a message appears
stating that you must log on as administrator. Click Quit, and then log on as a
local administrator.
NOTE: If the partition for PC Restore does not exist on your computer’s hard
drive, a message appears stating that the partition was not found. Click Quit;
there is no partition to delete.
4
Click
OK
to remove the PC Restore partition on the hard drive.
5
Click
Yes
to confirm.
The PC Restore partition is deleted and the newly available disk space is
added to the free space allocation on the hard drive.
6
Right-click
Local Disk (C:)
in Windows Explorer, click
Properties
, and
verify that the additional disk space is available as indicated by the
increased value for
Free Space
.
7
Click
Finish
to close the
PC Restore Removal
window.
8
Restart the computer.

134 Troubleshooting
Using the Operating System Media
Before You Begin
If you are considering reinstalling the Windows operating system to correct a
problem with a newly installed driver, first try using Windows Device Driver
Rollback (see "Using Windows Device Driver Rollback" on page 127). If
Device Driver Rollback does not resolve the problem, then use System
Restore to return your operating system to the operating state it was in before
you installed the new device driver (see "Using Microsoft Windows System
Restore" on page 131).
NOTICE: Before performing the installation, back up all data files on your primary
hard drive. For conventional hard drive configurations, the primary hard drive is the
first drive detected by the computer.
To reinstall Windows, you need the following items:
•Dell Operating System media
•Dell Drivers and Utilities media
NOTE: Your Drivers and Utilities media contains drivers that were installed during
assembly of the computer. Use your Drivers and Utilities media to load any required
drivers, including the drivers required if your computer has a RAID controller.
Reinstalling Windows
The reinstallation process can take 1 to 2 hours to complete. After you
reinstall the operating system, you must also reinstall the device drivers, virus
protection program, and other software.
NOTICE: The Operating System media provides options for reinstalling Windows.
The options can overwrite files and possibly affect programs that are installed on
your hard drive. Therefore, do not reinstall Windows unless a Dell technical support
representative instructs you to do so.
1
Save and close any open files and exit any open programs.
2
Insert the Operating System media.
3
Click
Exit
if the
Install Windows
message appears.

Troubleshooting 135
4
Restart the computer.
When the DELL logo appears, press <F12> immediately.
NOTE: If you wait too long and the operating system logo appears, continue
to wait until you see the Microsoft Windows desktop, then shut down your
computer and try again.
NOTE: The next steps change the boot sequence for one time only. On the
next start-up, the computer boots according to the devices specified in the
system setup program.
5
When the boot device list appears, highlight
CD/DVD/CD-RW Drive
,
and then press <Enter>.
6
Press any key to
Boot from CD-ROM
.
7
Follow the instructions on the screen to complete the installation.

136 Troubleshooting

Adding and Replacing Parts 137
Adding and Replacing Parts
Before You Begin
This chapter provides procedures for removing and installing the components
in your computer. Unless otherwise noted, each procedure assumes that the
following conditions exist:
• You have performed the steps in "Turning Off Your Computer" on page 137
and "Before Working Inside Your Computer" on page 138.
• You have read the safety information in your Dell Product Information
Guide.
• A component can be replaced—or if purchased separately—installed by
performing the removal procedure in reverse order.
Recommended Tools
The procedures in this document may require the following tools:
• Small flat-blade screwdriver
• Phillips screwdriver
• Small plastic scribe
• Flash BIOS update (see the Dell Support website at
support.dell.com
)
Turning Off Your Computer
NOTICE: To avoid losing data, save and close any open files and exit any open
programs before you turn off your computer.
1
Save and close any open files and exit any open programs.
2
Click
Start
, click the arrow
,
and then click
Shut Down
.
The computer turns off after the operating system shutdown process
finishes.

138 Adding and Replacing Parts
3
Ensure that the computer and any attached devices are turned off. If your
computer and attached devices did not automatically turn off when you
shut down your operating system, press and hold the power button for at
least 8 to 10 seconds until the computer turns off.
Before Working Inside Your Computer
Use the following safety guidelines to help protect your computer from
potential damage and to help ensure your own personal safety.
CAUTION: Before you begin any of the procedures in this section, follow the
safety instructions in the Product Information Guide.
CAUTION: Handle components and cards with care. Do not touch the components
or contacts on a card. Hold a card by its edges or by its metal mounting bracket.
Hold a component such as a processor by its edges, not by its pins.
NOTICE: Only a certified service technician should perform repairs on your
computer. Damage due to servicing that is not authorized by Dell is not covered by
your warranty.
NOTICE: When you disconnect a cable, pull on its connector or on its strain-relief
loop, not on the cable itself. Some cables have a connector with locking tabs; if you
are disconnecting this type of cable, press in on the locking tabs before you
disconnect the cable. As you pull connectors apart, keep them evenly aligned to
avoid bending any connector pins. Also, before you connect a cable, ensure that
both connectors are correctly oriented and aligned.
NOTICE: To avoid electrostatic discharge, ground yourself by using a wrist
grounding strap or by periodically touching an unpainted metal surface (such as a
connector on the back of the computer).
NOTICE: To help prevent damage to the computer, perform the following steps
before you begin working inside the computer.
1
Ensure that the work surface is flat and clean to prevent the computer
cover from being scratched.
2
Turn off your computer (see "Turning Off Your Computer" on page 137).
NOTICE: To disconnect a network cable, first unplug the cable from your computer,
and then unplug it from the network wall jack.
3
Disconnect any telephone or network cables from the computer.
4
Disconnect your computer and all attached devices from their electrical
outlets.
Adding and Replacing Parts 139
NOTICE: To help prevent damage to the system board, you must remove the battery
from the battery bay before you service the computer.
NOTE: To avoid damage to the computer, use only the battery designed for this
particular Dell computer. Do not use batteries designed for other Dell computers.
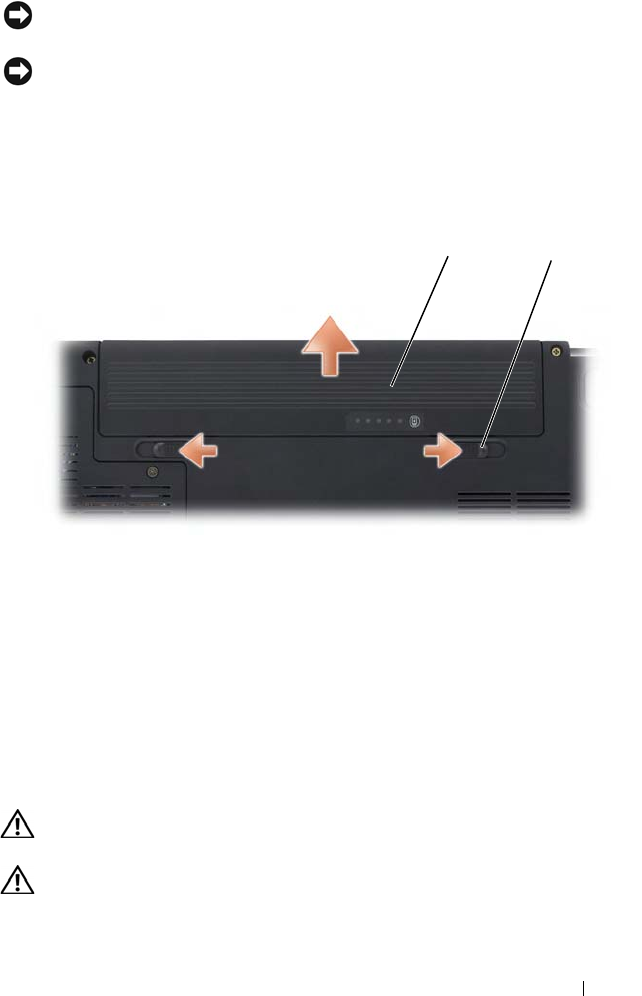
5
Turn the computer over.
6
Slide and click the battery release latches.
7
Slide the battery out of the battery bay.
8
Turn the computer top-side up, open the display, and press the power
button to ground the system board.
9
Remove any installed cards from the ExpressCard slot (see "Removing an
ExpressCard or Blank" on page 79) and the 8-in-1 memory card reader (see
"Removing a Memory Card or Blank" on page 82).
Hard Drive
CAUTION: If you remove the hard drive from the computer when the drive is hot,
do not touch the metal housing of the hard drive.
CAUTION: Before you begin any of the procedures in this section, follow the
safety instructions in the Product Information Guide.
1 battery 2 battery release latch (2)
2
1
140 Adding and Replacing Parts
NOTICE: To prevent data loss, turn off your computer (see "Turning Off Your
Computer" on page 137) before removing the hard drive. Do not remove the hard
drive while the computer is on or in Sleep state.
NOTICE: Hard drives are extremely fragile. Exercise care when handling the hard
drive.
NOTE: Dell does not guarantee compatibility or provide support for hard drives
from sources other than Dell.
NOTE: If you are installing a hard drive from a source other than Dell, you need to
install an operating system, drivers, and utilities on the new hard drive (see
"Restoring Your Operating System" on page 130 and "Reinstalling Drivers and
Utilities" on page 127).
Removing the Hard Drive
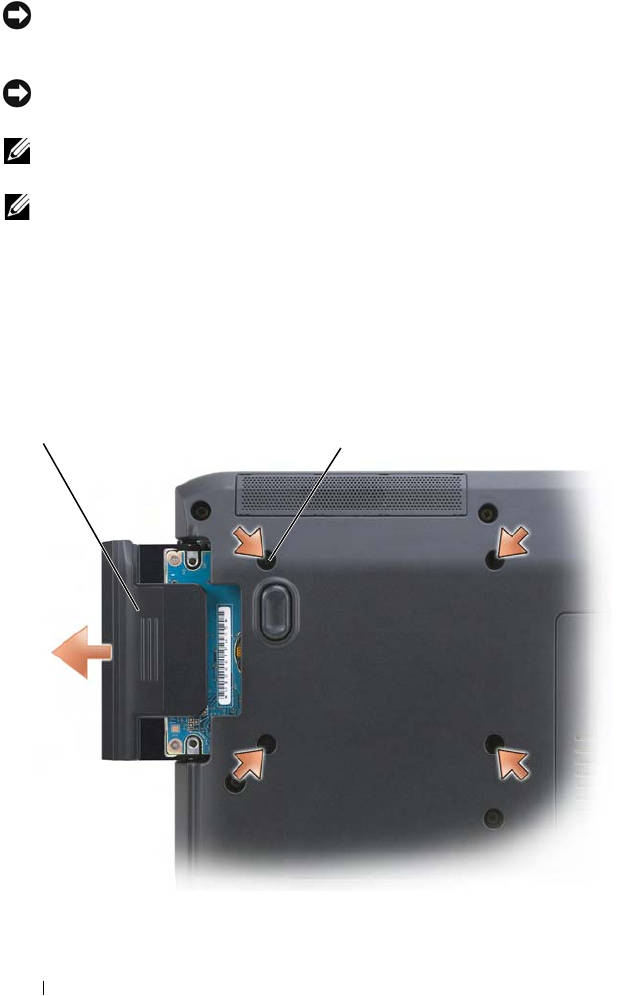
1
Follow the procedures in "Before You Begin" on page 137.
2
Turn the computer over and remove the hard drive screws.
1 hard drive 2 screws (4)
2
1
Adding and Replacing Parts 141
NOTICE: When the hard drive is not in the computer, store it in protective antistatic
packaging (see "Protecting Against Electrostatic Discharge" in the Product
Information Guide).
3
Slide the hard drive out of the computer.
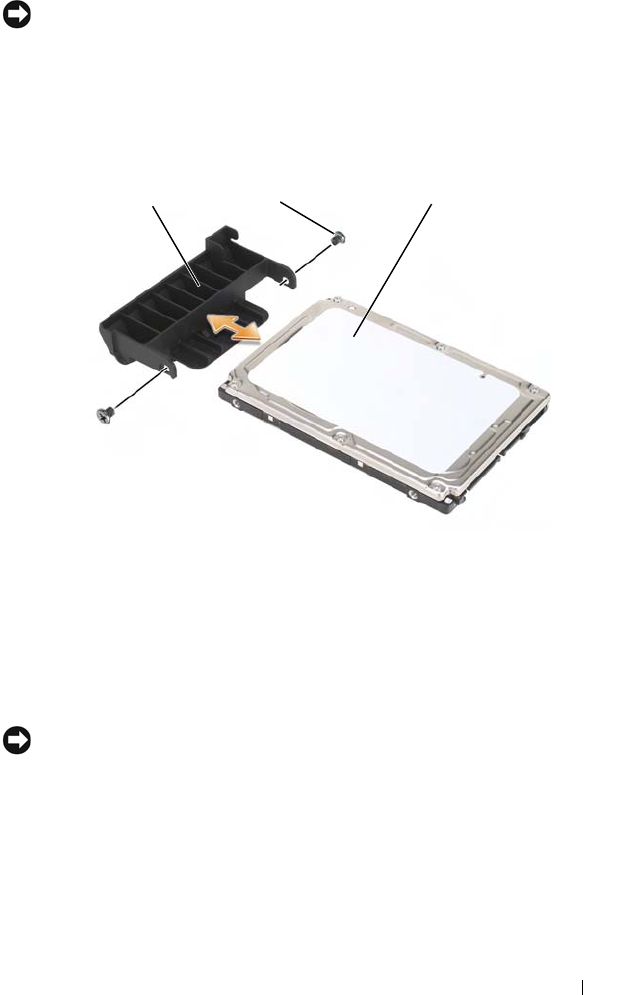
4
Remove the two screws from the sides of the hard drive bezel and pull the
bezel off the hard drive.
Replacing the Hard Drive
1
Remove the new drive from its packaging.
Save the original packaging for storing or shipping the hard drive.
NOTICE: Use firm and even pressure to slide the drive into place. If you use
excessive force, you may damage the connector.
2
Slide the hard drive bezel that you took off the old hard drive onto the new
hard drive, and fasten the two screws on the sides of the bezel.
3
Slide the hard drive into the bay until it is fully seated.
4
Replace and tighten the screws.
1 hard drive bezel 2 screws (2) on sides of hard drive bezel
3 hard drive
31 2
142 Adding and Replacing Parts
5
Install the operating system for your computer, as needed (see "Restoring
Your Operating System" on page 130).
6
Install the drivers and utilities for your computer, as needed (see
"Reinstalling Drivers and Utilities" on page 127).
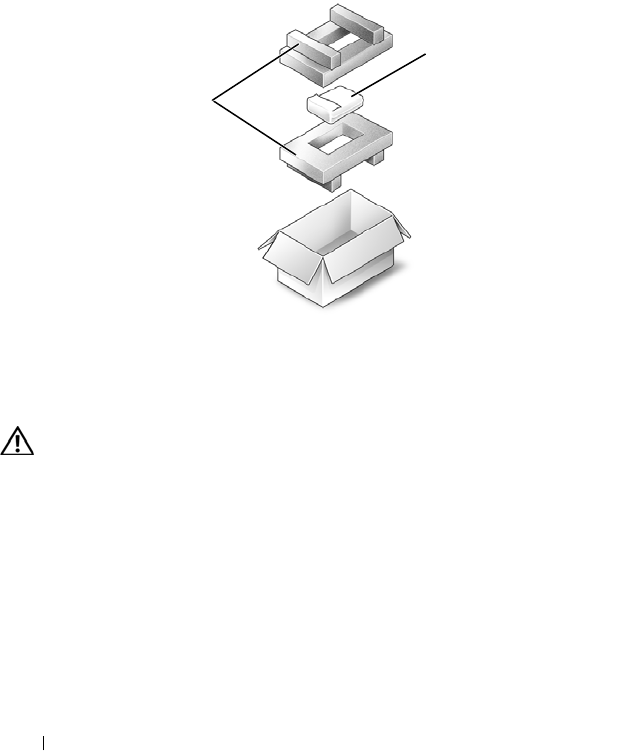
Returning a Hard Drive to Dell
Return your old hard drive to Dell in its original, or comparable, foam
packaging. Otherwise, the hard drive may be damaged in transit.
Optical Drive
CAUTION: Before you begin any of the procedures in this section, follow the
safety instructions in the Product Information Guide.
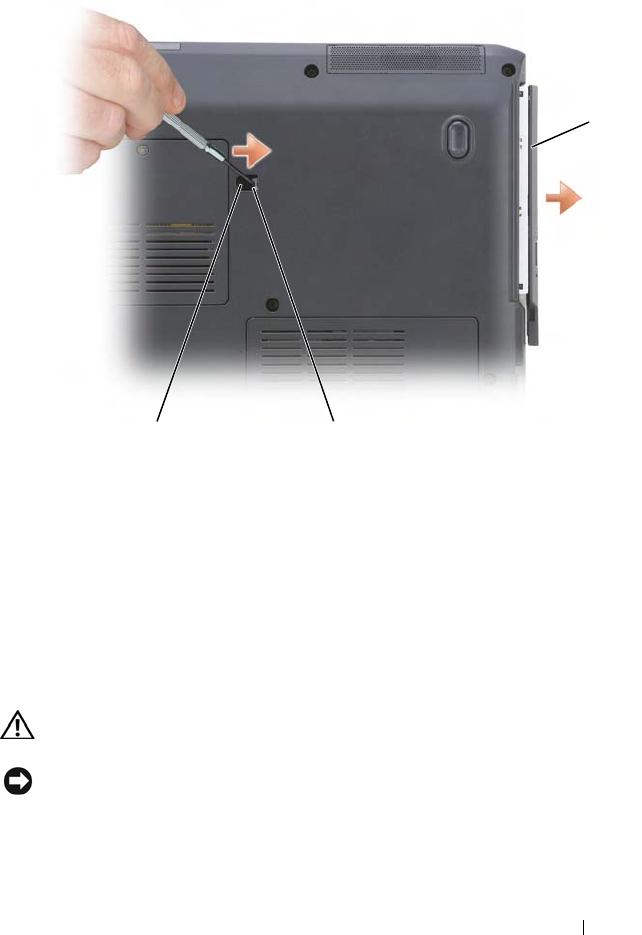
Removing the Optical Drive
1
Follow the procedures in "Before You Begin" on page 137.
2
Turn the computer over.
3
Remove the locking screw from the optical drive.
4
Using a plastic scribe, push the notch to release the optical drive from the
bay.
1 foam packaging 2 hard drive
2
1
Adding and Replacing Parts 143
5
Slide the optical drive out of the bay.
Replacing the Optical Drive
1
Slide the optical drive into the bay.
2
Replace and tighten the locking screw.
Hinge Cover
CAUTION: Before you begin any of the procedures in this section, follow the
safety instructions in the Product Information Guide.
NOTICE: To avoid electrostatic discharge, ground yourself by using a wrist
grounding strap or by periodically touching an unpainted metal surface (such as a
connector on the back of the computer).
1 optical drive 2 notch
3 locking screw
2
1
3

144 Adding and Replacing Parts
NOTICE: To help prevent damage to the system board, you must remove the battery
from the battery bay before you begin working inside the computer.
Removing the Hinge Cover
1
Follow the procedures in "Before You Begin" on page 137.
2
Open the display as far as it will open.
NOTICE: To avoid damage to the hinge cover, do not lift the cover on both sides
simultaneously.
3
Insert a plastic scribe into the indent to lift the hinge cover on the right
side.
4
Ease the hinge cover up, moving from right to left, and remove it.
Replacing the Hinge Cover
1
Insert the left edge of the hinge cover.
1 hinge cover 2 scribe
1
2

Adding and Replacing Parts 145
2
Press from left to right until the cover snaps into place.
Keyboard
For more information about the keyboard, see "Using the Keyboard and
Touchpad" on page 41.
CAUTION: Before you begin any of the procedures in this section, follow the
safety instructions in the Product Information Guide.
NOTICE: To avoid electrostatic discharge, ground yourself by using a wrist
grounding strap or by periodically touching an unpainted metal surface (such as a
connector on the back of the computer).
NOTICE: To help prevent damage to the system board, you must remove the battery
from the battery bay before you begin working inside the computer.
Removing the Keyboard
1
Follow the procedures in "Before You Begin" on page 137.
2
Remove the hinge cover (see "Hinge Cover" on page 143).
3
Remove the two screws at the top of the keyboard.
NOTICE: The key caps on the keyboard are fragile, easily dislodged, and time-
consuming to replace. Be careful when removing and handling the keyboard.
4
Lift the keyboard and hold it up and slightly forward to access to the
keyboard connector.
5
To disconnect the keyboard cable from the keyboard connector on the
system board, rotate the cable release lever toward the front of the
computer.
6
Slide the keyboard cable out of the keyboard connector on the DIMM A
memory module cover.
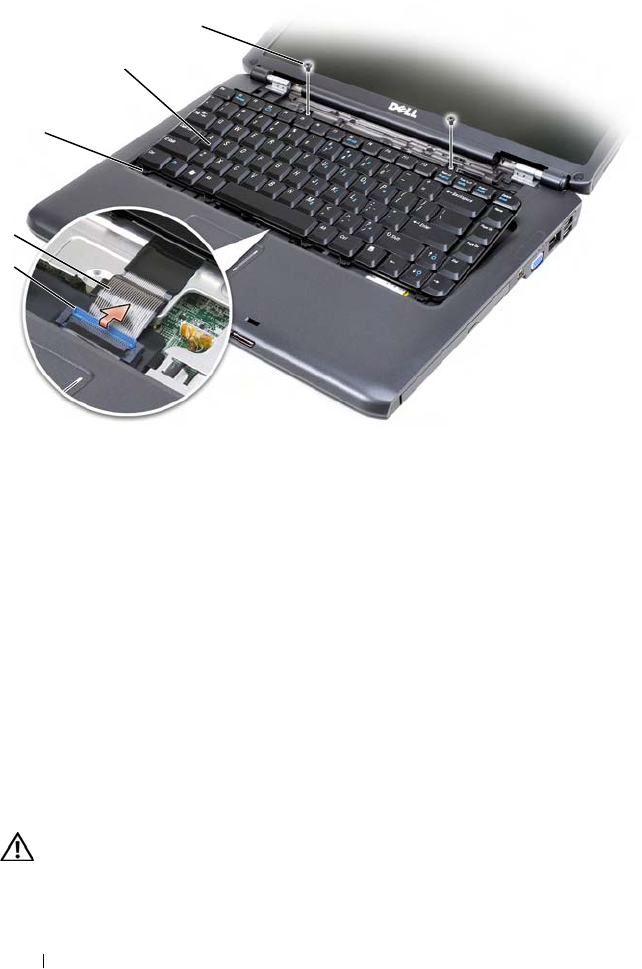
146 Adding and Replacing Parts
Replacing the Keyboard
1
Slide the keyboard cable into the keyboard connector on the DIMM A
memory module cover.
2
Rotate the cable release lever to secure the cable.
3
Hook the tabs along the front edge of the keyboard into the palmrest.
4
Press on the right edge near the top to snap the keyboard into place.
5
Replace the two screws on the top of the keyboard.
Memory
CAUTION: Before you begin any of the procedures in this section, follow the
safety instructions in the Product Information Guide.
1 screws (2) 2 keyboard
3 tabs (5) 4 keyboard cable
5 cable release lever
1
2
4
5
3

Adding and Replacing Parts 147
You can increase your computer memory by installing memory modules on
the system board. See "Specifications" on page 179 for information on the
memory supported by your computer. Install only memory modules that are
intended for your computer.
NOTE: Memory modules purchased from Dell are covered under your computer
warranty.
Your computer has two user-accessible SODIMM sockets, one accessed from
beneath the keyboard (DIMM A), and the other accessed from the bottom of
the computer (DIMM B).
NOTICE: If your computer has only one memory module, install the memory module
in the connector labeled “DIMMA.”
NOTICE: If you need to install memory modules in two connectors, install a
memory module in the connector labeled “DIMMA” before you install a module in
the connector labeled “DIMMB.”
Removing the DIMM A Memory Module
NOTICE: To avoid electrostatic discharge, ground yourself by using a wrist
grounding strap or by periodically touching an unpainted metal surface (such as a
connector on the back of the computer).
The DIMM A memory module is located under the keyboard.
1
Follow the procedures in "Before You Begin" on page 137.
2
Remove the hinge cover (see "Hinge Cover" on page 143).
3
Remove the keyboard (see "Keyboard" on page 145).
NOTE: It is not necessary to disconnect the keyboard cable from the memory
module cover.
4
Lift the memory module cover but do not remove it.
NOTICE: To prevent damage to the memory module connector, do not use tools to
spread the memory module securing clips.
5
Use your fingertips to carefully spread apart the securing clips on each end
of the memory module connector until the module pops up.
6
Remove the module from the connector.
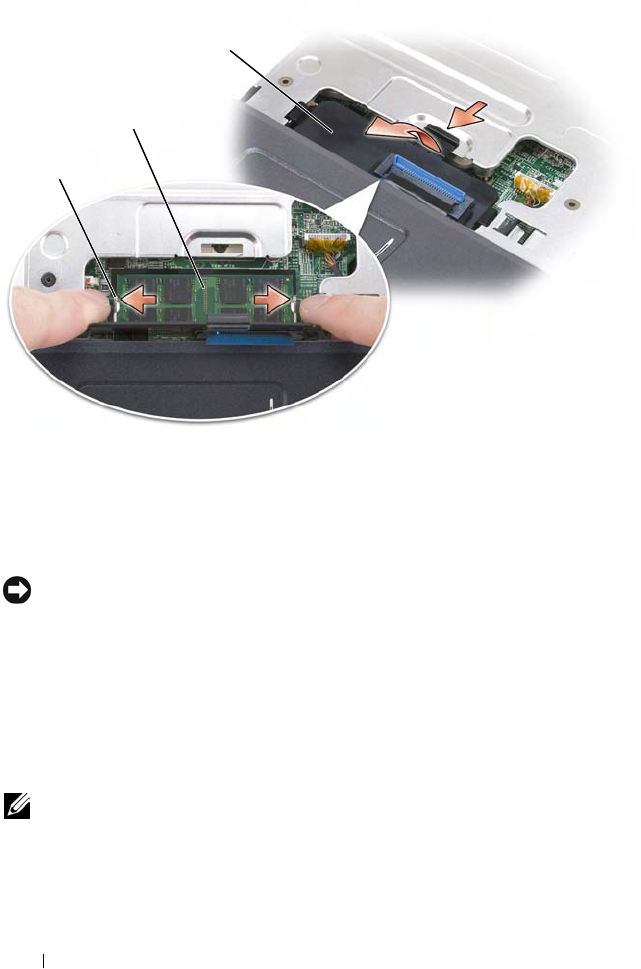
148 Adding and Replacing Parts
Replacing the DIMM A Memory Module
NOTICE: To avoid electrostatic discharge, ground yourself by using a wrist
grounding strap or by periodically touching an unpainted metal surface (such as a
connector on the back of the computer).
1
Align the notch in the module edge connector with the tab in the
connector slot.
2
Slide the module firmly into the slot at a 45-degree angle, and rotate the
module down until it clicks into place. If you do not feel the click, remove
the module and reinstall it.
NOTE: If the memory module is not installed properly, the computer may not boot.
No error message indicates this failure.
1 memory module cover 2 memory module (DIMM A)
3 securing clips (2)
1
2
3
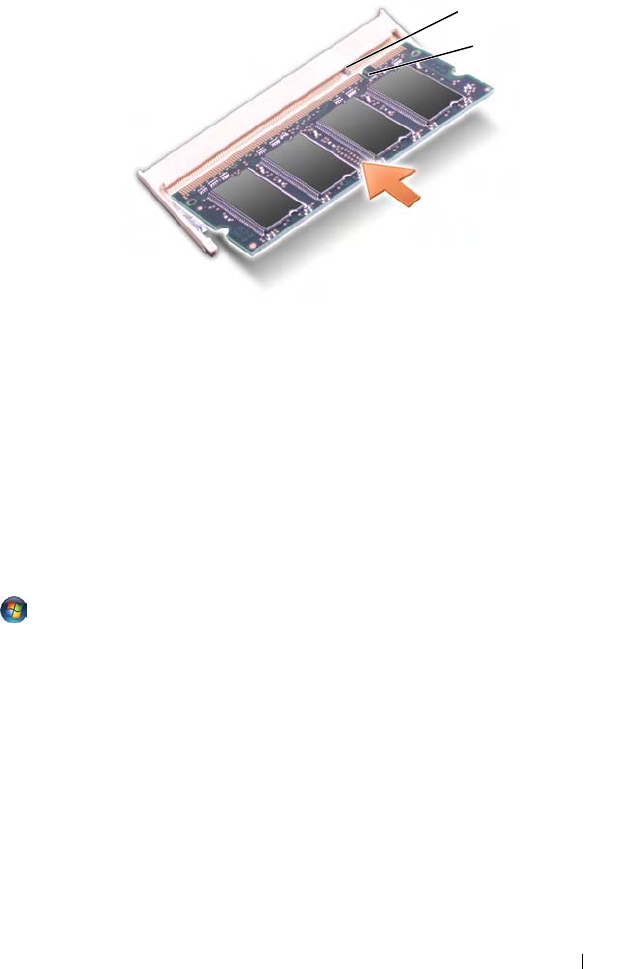
Adding and Replacing Parts 149
3
Replace the memory module cover.
4
Replace the keyboard and hinge cover.
5
Insert the battery into the battery bay, or connect the AC adapter to your
computer and an electrical outlet.
6
Turn on the computer.
As the computer boots, it detects the additional memory and automatically
updates the system configuration information.
To confirm the amount of memory installed in the computer, click Start
→
Help and Support
→
Dell System Information.
Removing the DIMM B Memory Module
The DIMM B memory module is located under the memory module cover on
the bottom of the computer.
1
Follow the procedures in "Before You Begin" on page 137.
2
Turn the computer upside-down, loosen the captive screw on the memory
module cover (see "Bottom View" on page 31), and remove the cover.
1 tab 2 notch
1
2
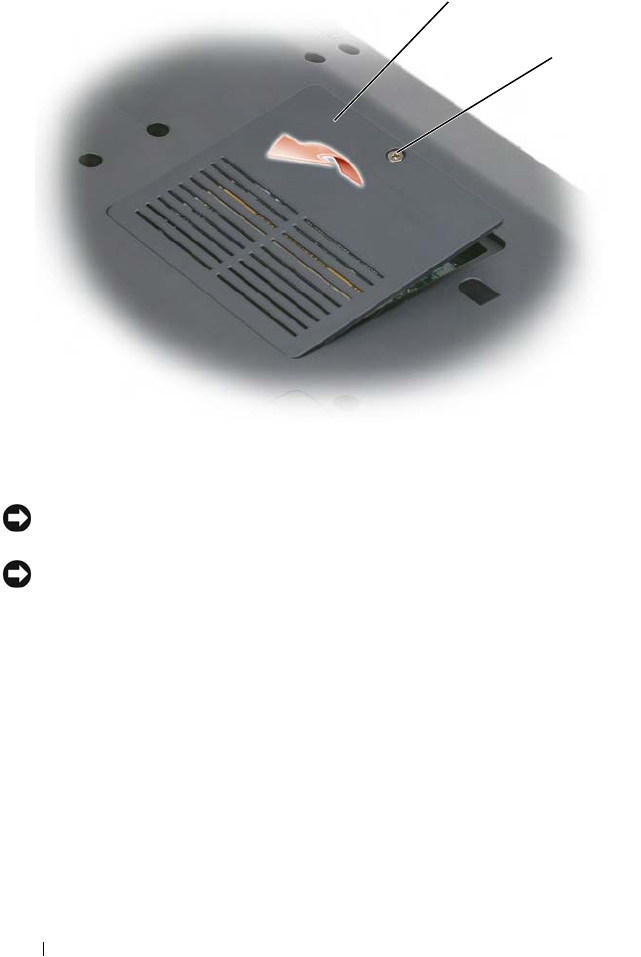
150 Adding and Replacing Parts
NOTICE: To prevent damage to the memory module connector, do not use tools to
spread the memory module securing clips.
NOTICE: To avoid electrostatic discharge, ground yourself by using a wrist
grounding strap or by periodically touching an unpainted metal surface (such as a
connector on the back of the computer).
3
Use your fingertips to carefully spread apart the securing clips on each end
of the memory module connector until the module pops up.
4
Remove the module from the connector.
1 memory module/coin-cell battery
compartment
2 captive screw
1
2