Realtek Semiconductor RTL8192EEBT 802.11b/g/n RTL8192EE Combo module User Manual
Realtek Semiconductor Corp. 802.11b/g/n RTL8192EE Combo module
Contents
User Manual
Lenovo(Japan), Ltd., Date: April 17, 2013
Document Number: UY152-0007-01-71
User’s Manual
The attachment is the user’s manual for the specific Lenovo host PC device in this application that
consists of the following two sections.
The regulatory notice concerning the FCC Part 2 /15B /15C and IC RSS-102/210, ICES-003 for the
applying WLAN transmitter device (FCC ID: TX2RTL8192EEBT,
IC: 6317A-RTL8192EEBT).
1. The electronic user’s guidance referred to in the above regulatory notices, which are displayed on
the LCD screen of the host PC device.
1. Regulatory notice for WLAN / Bluetooth transmitter devices

ThinkPadRegulatoryNotice
Aboutthismanual
ThismanualcontainsregulatoryinformationforthefollowingThinkPadproducts:
•ThinkPad11e
•ThinkPadYoga11e
Readfirst—regulatoryinformation
Readthisdocumentbeforeusingyourcomputer.Thiscomputercomplieswith
theradiofrequencyandsafetystandardsofanycountryorregioninwhichithas
beenapprovedforwirelessuse.Installanduseyourcomputeraccordingtothe
followinginstructions.
ThelatestRegulatoryNoticehasbeenuploadedontheWebsite.Torefertoit,go
tohttp://www.lenovo.com/think/support,andthenclickGuides&Manuals.
Veuillezlireleprésentdocumentavantd'utiliservotreordinateur.Cetordinateur
estconformeauxnormesdefréquenceradioetdesécuritédetouslespaysou
régionsdanslesquelssonutilisationsansfilaétéhomologuée.Installezetutilisez
l'ordinateurenrespectantlesinstructionsquisuivent.
LaversionlaplusrécentedelaNoticerelativeàlaréglementationaétéchargée
surlesiteWeb.Pourlaconsulter,http://www.lenovo.com/think/support,puis
surGuides&Manuals.
USA—FederalCommunicationsCommission(FCC)
I.Approvedwirelessdevices
ThissectionpresentstheFCCIDandmodelnumberofeachwirelessdevice.
i)UserinstallablewirelessLANandBluetoothcombocard
FCCID:PD97260NGU(Model:7260NGWAN)
FCCID:TX2RTL8192EEBT(Model:RTL8192EEBT)
1

Notes:
•Either7260NGWANorRTL8192EEBTisinstalledintothecomputer.
•ThewirelessLANandtheBluetoothfeaturesoperateatdifferentfrequencies
exclusively,andtransmitradiofrequenciessimultaneously.
•ThewirelessLANcardsmarketedintheUSAandCanadadonotsupportor
functionintheextendedchannels(12ch,13ch).
II.UserinstallablewirelessLANandBluetoothcombocard
i)UseofthewirelessLANandBluetoothcombocard
IfnointegratedwirelessLANandBluetoothcombocardhasbeenpreinstalledin
yourcomputer,youcaninstallone,providedbyLenovo®asanoption.Plugthe
wirelessLANcardintothewirelessLANcardslot.Fortheinstallationprocedure,
see“Replacingthewireless-LANcard”inUserGuide.
Attention:Thecomputercontainsanauthenticationmechanism.Ifyouinstall
anunauthorizedwirelesscommunicationcardthatisnotapprovedforusein
yourcomputer,thecomputerwillnotstart,butonlydisplaysanerrormessage
andemitsaudiblebeeps.
ii)FCCIDlocation
ThereisnoFCCIDforthewirelessLANcardshownontheenclosureofyour
computer.InsteadyouwillfindanindicatorpointingtothelocationoftheFCC
IDonthebottomofyourcomputer.TheFCCIDisaffixedontheapproved
cardinstalledinthewirelessLANcardslot,andtheFCCIDisvisiblepriorto
installation.ForthelocationoftheFCCIDindicatorandtheslot,see“FCCIDand
ICCertificationnumberlabel”inUserGuide.
iii)FCCRFExposurecompliance
TheradiatedoutputpowerofthewirelessLANcardauthorizedtouseforyour
computerisfarbelowtheFCCradiofrequencyexposurelimits.Nevertheless,it
shallbeusedinsuchamannerthatthepotentialforhumancontactduringnormal
operationisminimizedasfollows:
2

CAUTION:
ForThinkPad11e:
TocomplywithFCCRFexposurecompliancerequirements,aseparation
distanceofatleast20cm(8inches)mustbemaintainedbetweenthe
antennasconnectedtothewirelesscardsandallpersons.Ifthisdistance
cannotbemaintainedwhilethecomputerlidisclosed,youmustselectfirst
selectsleepasthepowermodepriortoclosingthedisplaylid.
ForThinkPadYoga11e:
TheradiatedenergyfromtheantennasconformstotheFCClimitoftheSAR
(SpecificAbsorptionRate)requirementregarding47CFRPart2Section
1093,whenthecomputeroperatesintheconventionalsetting.TheSAR
isdeterminedtomeasureatthehighestpowerlevelineachfrequency
band.TheThinkPadYoga11ehasbeentestedandfoundtomeettheFCC
RFexposureguidelines.
ThetransmissionantennasforthewirelessLANcardarelocatedintheLCDcover.
See“LocatingtheUltraConnectwirelessantennas”inUserGuide.
iv)RadioFrequencyinterferencerequirements
EachdevicehasbeentestedandfoundtocomplywiththelimitsforaClassB
digitaldevicepursuanttoFCCPart15SubpartB.Referto“Electronicemission
notices”onpage7.
WhenyouuseawirelessLANcardinthe802.11a/ntransmissionmode,note
thefollowing:
•Eachdeviceisrestrictedtoindooruseduetoitsoperationinthe5150to5250
MHzfrequencyrange.FCCrequirestheseproductstobeusedindoorsfor
thefrequencyrange5150to5250MHztoreducethepotentialforharmful
interferencetoco-channelMobileSatellitesystems.
•Highpowerradarsareallocatedasprimaryusersofthe5250to5350MHzand
5650to5850MHzbands.Theseradarstationscancauseinterferencewith
and/ordamagethisdevice.
Canada—IndustryCanada(IC)
ICCertificationnumber
I.Approvedwirelessdevices
ThissectionpresentstheICCertificationandmodelnumberofeachwireless
device.
3

i)UserinstallablewirelessLANandBluetoothcombocard
IC:1000M-7260NG(Model:7260NGWAN)
IC:6317A-RTL8192EEBT(Model:RTL8192EENF[NGFF])
Notes:
•Either7260NGWANorRTL8192EEBTisinstalledintothecomputer.
•ThewirelessLANcardmarketedintheUSAandCanadadoesnotsupportor
functionintheextendedchannels(12ch,13ch).
II.UserinstallablewirelessLANandBluetoothcombocard
ThereisnocertificationnumberofIndustryCanadaforthewirelesscommunication
cardshownontheenclosureofyourcomputer.Insteadyouwillfindanindicator
pointingtothelocationoftheICCertificationnumberonthebottomofyour
computer.TheICcertificationnumberisaffixedontheapprovedcardinstalled
inthecorrespondingslot,andtheICCertificationnumberisvisiblepriorto
installation.ForthelocationoftheICCertificationnumberindicatorandtheslot,
see“FCCIDandICCertificationnumberinformation”inUserGuide.
Attention:Thecomputercontainsanauthenticationmechanism.Youcaninstall
orremoveeachwirelesscardbyyourself.Ifyouinstallanunauthorizedwireless
cardthatisnotapprovedforuseinthecomputer,thecomputerwillnotstart,but
onlydisplaysanerrormessageandemitsaudiblebeeps.
V.Lowpowerlicense-exemptradiocommunicationdevices
(RSS-210)
Operationissubjecttothefollowingtwoconditions:
1.Thisdevicemaynotcauseinterference,and
2.Thisdevicemustacceptanyinterference,includinginterferencethatmay
causeundesiredoperationofthedevice.
Thetransmitterdeviceshavebeendesignedtooperatewiththeantennas
integratedinthecomputer,andhavingamaximumgainofwithin3dBi.
Themaximumantennagainpermittedfordevicesinthe5250-5350MHz,
5470-5725MHz,and5725-5825MHzbandscomplieswiththee.i.r.p.limitin
sectionA9.2ofRSS-210.
WhenyouuseawirelessLANcardinthe802.11a/ntransmissionmode:
•Thedevicesfortheband5150–5250MHzareonlyforindoorusagetoreduce
potentialforharmfulinterferencetoco-channelMobileSatellitesystems.
•Highpowerradarsareallocatedasprimaryusers(meaningtheyhavepriority)
of5250–5350MHzand5650–5850MHzandtheseradarscouldcause
4

interferenceand/ordamagetoLELAN(Licence-ExemptLocalAreaNetwork)
devices.
VI.ExposureofhumanstoRFfields(RSS-102)
ThecomputersemploylowgainintegralantennasthatdonotemitRFfieldin
excessofHealthCanadalimitsforthegeneralpopulation;consultSafetyCode6,
obtainablefromHealthCanada’sWebsiteathttp://www.hc-sc.gc.ca/.
Theradiatedenergyfromtheantennasconnectedtothewirelesscardsconforms
totheIClimitoftheRFexposurerequirementregardingICRSS-102,Issue2
clause4.2.
Numérod’homologationIC
I.Périphériquessansfilhomologués
Cettesectionprésentelenumérod’homologationICetlenumérodemodèlede
chaquepériphériquesansfil.
i)Cartesansfilinstallableparl’utilisateur
IC:1000M-7260NG(Model:7260NGWAN)
IC:6317A-RTL8192EEBT(Model:RTL8192EENF[NGFF])
Remarques:
•LesfonctionsderéseaulocalsansfiletBluetoothsontopérationnellesà
desfréquencesdifférentesexclusivementetémettentdesfréquencesradio
simultanément.
•LescartesderéseaulocalsansfilcommercialiséesauxEtats-Unisetau
Canadaneprennentpasenchargelescanauxétendus(12ch,13ch)etne
fonctionnentdoncpassurdetelscanaux.
II.Cartesansfilinstallableparl’utilisateur
LenumérodecertificationIC(IndustrieCanada)pourlacartedecommunication
sansfilnefigurepassurleboîtierdevotreordinateur.Enrevanche,sousvotre
ordinateur,voustrouverezuneindicationvousprécisantl'emplacementdu
numérodecertificationIC.LenumérodecertificationICfiguresurlacarte
homologuéeinstalléedanslelogementcorrespondantetestvisibleavant
l’installation.Pourconnaîtrel’emplacementdunumérodecertificationICetdu
logement,reportez-vousàlasection«Etiquetted’identificationFCCetdunuméro
decertificationIC»duGuided’utilisation.
5

Attention:L’ordinateurcontientunmécanismed'authentification.Vouspouvez
installeroudésinstallertoutdispositifsansfil.Sivousinstallezunecartesansfil
quin’estpashomologuéedansvotreordinateur,l’ordinateurnedémarrerapas
maisafficheraunmessaged’erreuretgénéreradesbipssonores.
V.Remarquerelativeauxappareilsdecommunicationradiode
faiblepuissancesanslicence(CNR-210)
Lefonctionnementdecetyped’appareilestsoumisauxdeuxconditions
suivantes:
1.Cetappareilnedoitpasperturberlescommunicationsradio,et
2.Cetappareildoitsupportertouteperturbation,ycomprislesperturbations
quipourraientprovoquersondysfonctionnement.
Lespériphériquesd’émissionsontconçuspourfonctionneravecdesantennes
intégréesàl’ordinateuretayantungainmaximaldemoinsde3dBi.
Legaind’antennemaximalpourlespériphériquesdanslesbandesdefréquence
5250-5350MHz,5470-5725MHz,et5725-5825MHzestconformeàlalimite
p.i.r.eénoncéedanslasectionA9.2delaCNR-210.
Lorsquevousutilisezlacartepourréseaulocalsansfilenmodedetransmission
802.11a/n:
•Toutappareildestinéàlabande5150-5250MHzdevraêtreexclusivement
utiliséenintérieurafinderéduirelesrisquesdeperturbations
électromagnétiquesgênantessurlessystèmesdesatellitemobiledansun
mêmecanal.
•Lesradarsàfortepuissancesontdésignéscommelesutilisateursprincipaux
(c’est-à-direqu'ilssontprioritaires)desbandes5250-5350MHzet5650-5850
MHz.Ilspeuventprovoquerdesperturbationsélectromagnétiquessurles
appareilsdetypeLELAN(réseaudecommunicationlocalsanslicence)ou
lesendommager.
VI.Expositiondesêtreshumainsauxchampsradioélectriques
(RF)(CNR-102)
L’ordinateurutilisedesantennesintégralesàfaiblegainquin’émettentpasun
champélectromagnétiquesupérieurauxnormesimposéesparleMinistéredela
santécanadienpourlapopulation.ConsultezleSafetyCode6surlesiteWebdu
Ministéredelasantécanadienàl'adressehttp://www.hc-sc.gc.ca/.
L’énergieémiseparlesantennesreliéesauxadaptateurssansfilrespectelalimite
d’expositionauxradiofréquencestellequedéfinieparIndustrieCanadadans
laclause4.2dudocumentCNR-102.
6

Electronicemissionnotices
FederalCommunicationsCommission(FCC)Declarationof
Conformity
•Model:7260NGWAN
•Model:RTL8192EEBT
ThisequipmenthasbeentestedandfoundtocomplywiththelimitsforaClassB
digitaldevice,pursuanttoPart15oftheFCCRules.Theselimitsaredesigned
toprovidereasonableprotectionagainstharmfulinterferenceinaresidential
installation.Thisequipmentgenerates,uses,andcanradiateradiofrequency
energyand,ifnotinstalledandusedinaccordancewiththeinstructions,may
causeharmfulinterferencetoradiocommunications.However,thereisno
guaranteethatinterferencewillnotoccurinaparticularinstallation.Ifthis
equipmentdoescauseharmfulinterferencetoradioortelevisionreception,which
canbedeterminedbyturningtheequipmentoffandon,theuserisencouragedto
trytocorrecttheinterferencebyoneormoreofthefollowingmeasures:
•Reorientorrelocatethereceivingantenna.
•Increasetheseparationbetweentheequipmentandreceiver.
•Connecttheequipmentintoanoutletonacircuitdifferentfromthattowhich
thereceiverisconnected.
•Consultanauthorizeddealerorservicerepresentativeforhelp.
Lenovoisnotresponsibleforanyradioortelevisioninterferencecausedby
unauthorizedchangesormodificationstothisequipment.Unauthorizedchange
ormodificationscouldavoidtheuser’sauthoritytooperatetheequipment.
ThisdevicecomplieswithPart15oftheFCCRules.Operationissubjecttothe
followingtwoconditions:(1)thisdevicemaynotcauseharmfulinterference,
and(2)thisdevicemustacceptanyinterferencereceived,includinginterference
thatmaycauseundesiredoperation.
ResponsibleParty:
Lenovo(UnitedStates)Incorporated
1009ThinkPlace-BuildingOne
Morrisville,NC27560
Telephone:1-919-294-5900
IndustryCanadaClassBEmissionComplianceStatement
ThisClassBdigitalapparatuscomplieswithCanadianICES-003.
7

Avisdeconformitéàlaréglementationd’IndustrieCanada
CetappareilnumériquedelaclasseBestconformeàlanormeNMB-003du
Canada.
Usageenvironmentandyourhealth
Wirelessfeature(suchaswirelessWAN,wirelessLAN,andBluetoothandsoon)
emitsradiofrequencyelectromagneticenergylikeotherradiodevices.However,
thelevelofenergyemittedisfarmuchlessthantheelectromagneticenergy
emittedbywirelessdeviceslikeforexamplemobilephones.
Duetothefactthatwirelessfeatureoperateswithintheguidelinesfoundinradio
frequencysafetystandardsandrecommendations,Lenovobelievesthewireless
featureissafeforusebyconsumers.Thesestandardsandrecommendations
reflecttheconsensusofthescientificcommunityandresultfromdeliberations
ofpanelsandcommitteesofscientistswhocontinuallyreviewandinterpretthe
extensiveresearchliterature.
Insomesituationorenvironment,theuseofwirelessfeaturemightberestricted
bytheproprietorofthebuildingorresponsiblerepresentativesoftheorganization.
Thesesituationsandareasmayforexampleinclude:
•Usingthewirelessfeatureonboardofairplanes,inhospitalsornearpetrol
stations,blastingareas(withelectro-explosivedevices),medicalimplantsor
body-wornelectronicmedicaldevices,suchaspacemakers.
•Inanyotherenvironmentwheretheriskofinterferencetootherdevicesor
servicesisperceivedoridentifiedasharmful.
Ifyouareuncertainofthepolicythatappliesontheuseofwirelessdevicesina
specificorganization(suchasairportorhospital),youareencouragedtoaskfor
authorizationtousewirelessfeaturepriortoturningonthetablet.
8

Trademarks
ThefollowingtermsaretrademarksofLenovointheUnitedStates,other
countries,orboth:
Lenovo
ThinkPad
UltraConnect
Othercompany,product,andservicenamesmaybetrademarksorservicemarks
ofothers.
9

FirstEdition(May2014)
©CopyrightLenovo2014.
LIMITEDANDRESTRICTEDRIGHTSNOTICE:Ifdataorsoftwareisdelivered
pursuantaGeneralServicesAdministration“GSA”contract,use,reproduction,or
disclosureissubjecttorestrictionssetforthinContractNo.GS-35F-05925.
PrintedinChina
(1P)P/N:SP40F29946
*1PSP40F29946*
2. The electronic user’s guidance

UserGuide
ThinkPad11eandThinkPadYoga11e

Note:Beforeusingthisinformationandtheproductitsupports,besuretoreadandunderstandthefollowing:
•Safety,Warranty,andSetupGuide
•RegulatoryNotice
•“Importantsafetyinformation”onpagevi
•AppendixE“Notices”onpage141
ThelatestSafety,Warranty,andSetupGuideandtheRegulatoryNoticeareavailableontheLenovoSupport
Websiteat:
http://www.lenovo.com/UserManuals
SecondEdition(May2014)
©CopyrightLenovo2014.
LIMITEDANDRESTRICTEDRIGHTSNOTICE:IfdataorsoftwareisdeliveredpursuantaGeneralServicesAdministration
“GSA”contract,use,reproduction,ordisclosureissubjecttorestrictionssetforthinContractNo.GS-35F-05925.

Contents
Readthisfirst..............v
Importantsafetyinformation..........vi
Conditionsthatrequireimmediateaction..vii
Serviceandupgrades..........vii
Powercordsandpoweradapters.....viii
Extensioncordsandrelateddevices.....ix
Plugsandoutlets.............ix
Powersupplystatement..........ix
Externaldevices.............x
Generalbatterynotice...........x
Lithiumcoin-cellbatterynotice.......x
Noticeforbuilt-inrechargeablebatteries....xi
Heatandproductventilation........xi
Electricalcurrentsafetyinformation....xii
Liquidcrystaldisplay(LCD)notice.....xii
Usingheadphonesorearphones......xiii
Additionalsafetyinformation.......xiii
Chapter1.Productoverview......1
Locatingcomputercontrols,connectors,and
indicators..................1
Frontview................1
Right-sideview..............3
Left-sideview..............5
Rearview................7
Statusindicators.............7
Locatingimportantproductinformation......9
Machinetypeandmodellabel........9
FCCIDandICCertificationnumber
information..............10
GenuineMicrosoftlabel.........10
Features.................11
Specifications...............12
Lenovoprograms.............13
AccessingLenovoprogramsontheWindows
7operatingsystem...........13
AccessingLenovoprogramsontheWindows
8.1operatingsystem..........15
Lenovoprogramsoverview........15
Chapter2.Usingyourcomputer...19
Registeringyourcomputer..........19
Specialkeys...............19
Usingthetouchpad............21
UsingtheThinkPadYoga11eindifferentmodes.21
Rotatingthecomputerdisplay.......22
Notebookmode............22
Standmode..............23
Tabletmode..............24
Tentmode..............25
Usingthetabletbuttons.........26
Usingthemulti-touchscreen.......27
Powermanagement............31
Usingtheacpoweradapter........31
Checkingthebatterystatus........31
Chargingthebattery..........32
Managingthebatterypower.......32
Power-savingmodes..........32
Maximizingthebatterylife........33
Connectingtothenetwork..........34
Ethernetconnections..........34
Wirelessconnections..........34
Presentationsandmultimedia.........36
Changingdisplaysettings........36
Usinganexternalmonitor........36
Usingaprojector............38
Usingdualdisplays...........38
Usingaudiofeatures............39
Usingthecamera.............39
Usingaflashmediacard...........40
Installingaflashmediacard.......40
Removingaflashmediacard.......41
Frequentlyaskedquestions.........41
Chapter3.Youandyourcomputer..45
Accessibilityandcomfort..........45
Ergonomicinformation..........45
Comfort...............46
Accessibilityinformation.........46
Travelingwithyourcomputer.........50
Traveltips...............50
Travelaccessories...........50
Chapter4.Security..........51
Attachingamechanicallock.........51
Usingpasswords..............51
Typingpasswords...........51
Power-onpassword...........51
Supervisorpassword..........52
Harddiskpasswords..........54
Harddisksecurity.............55
Noticeondeletingdatafromyourharddiskdrive
orsolid-statedrive.............56
Usingfirewalls...............57
©CopyrightLenovo2014i

Protectingdataagainstviruses........57
Chapter5.Advancedconfiguration..59
Installinganewoperatingsystem.......59
InstallingtheWindows7operatingsystem..59
InstallingtheWindows8.1operatingsystem.60
Installingdevicedrivers...........61
UsingtheThinkPadSetupprogram......61
Mainmenu..............62
Configmenu..............62
Date/Timemenu............65
Securitymenu.............65
Startupmenu.............69
Restartmenu.............71
UpdatingtheUEFIBIOS.........71
Usingsystemmanagement..........71
Settingmanagementfeatures.......72
Chapter6.Preventingproblems...75
Generaltipsforpreventingproblems......75
Makingsuredevicedriversarecurrent.....76
Takingcareofyourcomputer.........77
Cleaningthecoverofyourcomputer....78
Chapter7.Troubleshooting
problems...............81
Diagnosingproblems............81
Troubleshooting..............81
Computerstopsresponding.......81
Spillsonthekeyboard..........82
Errormessages............82
Errorswithoutmessages.........83
Beeperrors..............84
Memorymoduleproblems........85
Networkingproblems..........85
Keyboardproblems...........87
Problemswiththedisplayandmultimedia
devices................87
Batteryandpowerproblems.......92
Problemswithdrivesandotherstorage
devices................94
Asoftwareproblem...........95
AUSBproblem............95
Chapter8.Recoveryinformation...97
RecoveryinformationfortheWindows7operating
system..................97
Creatingandusingrecoverymedia.....97
Performingbackupandrecoveryoperations.98
UsingtheRescueandRecoveryworkspace.99
Creatingandusingarescuemedium....100
Reinstallingpreinstalledapplicationsand
devicedrivers.............101
Solvingrecoveryproblems........102
RecoveryinformationfortheWindows8.1
operatingsystem..............102
Refreshingyourcomputer........102
Resettingyourcomputertothefactorydefault
settings................102
Usingtheadvancedstartupoptions....103
RecoveringyouroperatingsystemifWindows
8.1failstostart.............103
Creatingandusingrecoverymedia.....103
Chapter9.Replacingdevices....105
Staticelectricityprevention..........105
Disablingthebuilt-inbatteries.........105
Replacingthememorymodule........106
Replacingthewireless-LANcard.......108
Replacingthecoin-cellbattery........111
Replacingtheharddiskdriveorsolid-state
drive...................113
Replacingthekeyboard...........117
Chapter10.Gettingsupport....123
BeforeyoucontactLenovo..........123
Gettinghelpandservice...........123
Usingdiagnosticprograms........124
LenovoSupportWebsite.........124
CallingLenovo.............124
FindingThinkPadoptions........125
Purchasingadditionalservices........125
AppendixA.Regulatory
information.............127
Wirelessrelatedinformation.........127
LocatingtheUltraConnectwireless
antennas...............128
Locatingwirelessregulatorynotices....128
Exportclassificationnotice..........129
Electronicemissionnotices..........129
FederalCommunicationsCommission
DeclarationofConformity........129
IndustryCanadaClassBemissioncompliance
statement...............129
EuropeanUnion-Compliancetothe
ElectromagneticCompatibilityDirective...129
GermanClassBcompliancestatement...130
KoreaClassBcompliancestatement....130
JapanVCCIClassBcompliancestatement..131
Japancompliancestatementforproducts
whichconnecttothepowermainswith
ratedcurrentlessthanorequalto20Aper
phase................131
iiUserGuide

Lenovoproductserviceinformationfor
Taiwan................131
Eurasiancompliancemark..........131
Brazilregulatorynotice...........131
Mexicoregulatorynotice...........131
AppendixB.WEEEandrecycling
information.............133
ImportantWEEEinformation.........133
RecyclinginformationforChina........133
RecyclinginformationforJapan........133
BatteryrecyclinginformationforBrazil.....134
BatteryrecyclinginformationforTaiwan.....134
BatteryrecyclinginformationfortheEuropean
Union..................135
BatteryrecyclinginformationfortheUnitedStates
andCanada................135
AppendixC.RestrictionofHazardous
SubstancesDirective(RoHS)....137
EuropeanUnionRoHS...........137
ChinaRoHS................137
IndiaRoHS................137
TurkishRoHS...............137
UkraineRoHS...............138
AppendixD.ENERGYSTARmodel
information.............139
AppendixE.Notices.........141
Trademarks................142
©CopyrightLenovo2014iii

ivUserGuide
Readthisfirst
Besuretofollowtheimportanttipsgivenheretogetthemostuseandenjoymentoutofyourcomputer.
Failuretodosomightleadtodiscomfortorinjury,orcauseyourcomputertofail.
Protectyourselffromtheheatthatyourcomputergenerates.
Whenyourcomputeristurnedonorthebatteryischarging,thebase,thepalm
rest,andsomeotherpartsmaybecomehot.Thetemperaturetheyreach
dependsontheamountofsystemactivityandthelevelofchargeinthebattery.
Extendedcontactwithyourbody,eventhroughclothing,couldcause
discomfortorevenaskinburn.
•Avoidkeepingyourhands,yourlap,oranyotherpartofyourbodyin
contactwithahotsectionofthecomputerforanyextendedtime.
•Periodicallytakehandsfromusingthekeyboardbyliftingyourhandsfrom
thepalmrest.
Protectyourselffromtheheatgeneratedbytheacpoweradapter.
Whentheacpoweradapterisconnectedtoanelectricaloutletandyour
computer,itgeneratesheat.
Extendedcontactwithyourbody,eventhroughclothing,maycauseaskin
burn.
•Donotplacetheacpoweradapterincontactwithanypartofyourbody
whileitisinuse.
•Neveruseittowarmyourbody.
Preventyourcomputerfromgettingwet.
Toavoidspillsandthedangerofelectricalshock,keepliquidsawayfromyour
computer.
Protectthecablesfrombeingdamaged.
Applyingstrongforcetocablesmaydamageorbreakthem.
Routecommunicationlines,orthecablesofanacpoweradapter,amouse,a
keyboard,aprinter,oranyotherelectronicdevice,sothattheycannotbewalked
on,trippedover,pinchedbyyourcomputerorotherobjects,orinanyway
subjectedtotreatmentthatcouldinterferewiththeoperationofyourcomputer.
©CopyrightLenovo2014v

Protectyourcomputeranddatawhenmovingit.
Beforemovingacomputerequippedwithaharddiskdriveorsolid-statedrive,
dooneofthefollowing:
•Turnitoff.
•Putitinsleepmode.
•Putitinhibernationmode.
Thiswillhelptopreventdamagetothecomputer,andpossiblelossofdata.
Handleyourcomputergently.
Donotdrop,bump,scratch,twist,hit,vibrate,push,orplaceheavyobjectson
yourcomputer,display,orexternaldevices.
Carryyourcomputercarefully.
•Useaqualitycarryingcasethatprovidesadequatecushioningandprotection.
•Donotpackyourcomputerinatightlypackedsuitcaseorbag.
•Beforeputtingyourcomputerinacarryingcase,makesurethatitisoff,insleep
mode,orinhibernationmode.Donotputacomputerinacarryingcasewhileit
isturnedon.
Importantsafetyinformation
Note:Readtheimportantsafetyinformationfirst.
Thisinformationcanhelpyousafelyuseyournotebookcomputer.Followandretainallinformationincluded
withyourcomputer.Theinformationinthisdocumentdoesnotalterthetermsofyourpurchaseagreement
ortheLenovo®LimitedWarranty.Formoreinformation,see“WarrantyInformation”intheSafety,Warranty,
andSetupGuidethatcomeswithyourcomputer.
Customersafetyisimportant.Ourproductsaredevelopedtobesafeandeffective.However,personal
computersareelectronicdevices.Powercords,poweradapters,andotherfeaturescancreatepotential
safetyrisksthatcanresultinphysicalinjuryorpropertydamage,especiallyifmisused.Toreducethese
risks,followtheinstructionsincludedwithyourproduct,observeallwarningsontheproductandinthe
operatinginstructions,andreviewtheinformationincludedinthisdocumentcarefully.Bycarefullyfollowing
theinformationcontainedinthisdocumentandprovidedwithyourproduct,youcanhelpprotectyourself
fromhazardsandcreateasafercomputerworkenvironment.
Note:Thisinformationincludesreferencestopoweradaptersandbatteries.Inadditiontonotebook
computers,someproducts(suchasspeakersandmonitors)shipwithexternalpoweradapters.Ifyouhave
suchaproduct,thisinformationappliestoyourproduct.Inaddition,computerproductscontainacoin-sized
internalbatterythatprovidespowertothesystemclockevenwhenthecomputerisunplugged,sothe
batterysafetyinformationappliestoallcomputerproducts.
viUserGuide

Conditionsthatrequireimmediateaction
Productscanbecomedamagedduetomisuseorneglect.Someproductdamageisseriousenough
thattheproductshouldnotbeusedagainuntilithasbeeninspectedand,ifnecessary,repairedby
anauthorizedservicer.
Aswithanyelectronicdevice,paycloseattentiontotheproductwhenitisturnedon.Onveryrare
occasions,youmightnoticeanodororseeapuffofsmokeorsparksventfromyourproduct.Oryou
mighthearsoundslikepopping,crackingorhissing.Theseconditionsmightmerelymeanthatan
internalelectroniccomponenthasfailedinasafeandcontrolledmanner.Or,theymightindicate
apotentialsafetyissue.However,donottakerisksorattempttodiagnosethesituationyourself.
ContacttheCustomerSupportCenterforfurtherguidance.ForalistofServiceandSupportphone
numbers,seethefollowingWebsite:
http://www.lenovo.com/support/phone
Frequentlyinspectyourcomputeranditscomponentsfordamageorwearorsignsofdanger.
Ifyouhaveanyquestionabouttheconditionofacomponent,donotusetheproduct.Contact
theCustomerSupportCenterortheproductmanufacturerforinstructionsonhowtoinspectthe
productandhaveitrepaired,ifnecessary.
Intheunlikelyeventthatyounoticeanyofthefollowingconditions,orifyouhaveanysafety
concernswithyourproduct,stopusingtheproductandunplugitfromthepowersourceand
telecommunicationlinesuntilyoucanspeaktotheCustomerSupportCenterforfurtherguidance.
•Powercords,plugs,poweradapters,extensioncords,surgeprotectors,orpowersuppliesthatare
cracked,broken,ordamaged.
•Signsofoverheating,smoke,sparks,orfire.
•Damagetoabattery(suchascracks,dents,orcreases),dischargefromabattery,orabuildupofforeign
substancesonthebattery.
•Acracking,hissingorpoppingsound,orstrongodorthatcomesfromtheproduct.
•Signsthatliquidhasbeenspilledoranobjecthasfallenontothecomputerproduct,thepowercordor
poweradapter.
•Thecomputerproduct,powercord,orpoweradapterhasbeenexposedtowater.
•Theproducthasbeendroppedordamagedinanyway.
•Theproductdoesnotoperatenormallywhenyoufollowtheoperatinginstructions.
Note:Ifyounoticetheseconditionswithaproduct(suchasanextensioncord)thatisnotmanufacturedfor
orbyLenovo,stopusingthatproductuntilyoucancontacttheproductmanufacturerforfurtherinstructions,
oruntilyougetasuitablereplacement.
Serviceandupgrades
DonotattempttoserviceaproductyourselfunlessinstructedtodosobytheCustomerSupportCenteror
yourdocumentation.OnlyuseaServiceProviderwhoisapprovedtorepairyourparticularproduct.
Note:Somecomputerpartscanbeupgradedorreplacedbythecustomer.Upgradestypicallyare
referredtoasoptions.ReplacementpartsapprovedforcustomerinstallationarereferredtoasCustomer
ReplaceableUnits,orCRUs.Lenovoprovidesdocumentationwithinstructionswhenitisappropriatefor
customerstoinstalloptionsorreplaceCRUs.Youmustcloselyfollowallinstructionswheninstallingor
replacingparts.Beforeyouremovethecoversfromaproductequippedwithapowercord,alwaysmake
surethatthepoweristurnedoffandthattheproductisunpluggedfromanypowersource.Ifyouhave
anyquestionsorconcerns,contacttheCustomerSupportCenter.
Althoughtherearenomovingpartsinyourcomputerafterthepowercordhasbeendisconnected,the
followingwarningsarerequiredforyoursafety.
©CopyrightLenovo2014vii

CAUTION:
Hazardousmovingparts.Keepfingersandotherbodypartsaway.
CAUTION:
BeforereplacinganyCRUs,turnoffthecomputerandwaitthreetofiveminutestoletthecomputer
coolbeforeopeningthecover.
Powercordsandpoweradapters
DANGER
Useonlythepowercordsandpoweradapterssuppliedbytheproductmanufacturer.
Thepowercordsshallbesafetyapproved.ForGermany,itshallbeH05VV-F,3G,0.75mm2,or
better.Forothercountries,thesuitabletypesshallbeusedaccordingly.
Neverwrapapowercordaroundapoweradapterorotherobject.Doingsocanstressthecordin
waysthatcancausethecordtofray,crack,orcrimp.Thiscanpresentasafetyhazard.
Alwaysroutepowercordssothattheywillnotbewalkedon,trippedover,orpinchedbyobjects.
Protectpowercordsandpoweradaptersfromliquids.Forinstance,donotleaveyourpowercord
orpoweradapternearsinks,tubs,toilets,oronfloorsthatarecleanedwithliquidcleansers.
Liquidscancauseashortcircuit,particularlyifthepowercordorpoweradapterhasbeenstressed
bymisuse.Liquidsalsocancausegradualcorrosionofpowercordterminalsand/ortheconnector
terminalsonapoweradapter,whichcaneventuallyresultinoverheating.
Ensurethatallpowercordconnectorsaresecurelyandcompletelypluggedintoreceptacles.
Donotuseanypoweradapterthatshowscorrosionattheacinputpinsorshowssignsof
overheating(suchasdeformedplastic)attheacinputpinsoranywhereonthepoweradapter.
Donotuseanypowercordswheretheelectricalcontactsoneitherendshowsignsofcorrosionor
overheatingorwherethepowercordappearstohavebeendamagedinanyway.
Topreventpossibleoverheating,donotcoverthepoweradapterwithclothingorotherobjects
whenthepoweradapterispluggedintoanelectricaloutlet.
viiiUserGuide

Extensioncordsandrelateddevices
Ensurethatextensioncords,surgeprotectors,uninterruptiblepowersupplies,andpowerstripsthatyouuse
areratedtohandletheelectricalrequirementsoftheproduct.Neveroverloadthesedevices.Ifpowerstrips
areused,theloadshouldnotexceedthepowerstripinputrating.Consultanelectricianformoreinformation
ifyouhavequestionsaboutpowerloads,powerrequirements,andinputratings.
Plugsandoutlets
DANGER
Ifareceptacle(poweroutlet)thatyouintendtousewithyourcomputerequipmentappearstobe
damagedorcorroded,donotusetheoutletuntilitisreplacedbyaqualifiedelectrician.
Donotbendormodifytheplug.Iftheplugisdamaged,contactthemanufacturertoobtain
areplacement.
Donotshareanelectricaloutletwithotherhomeorcommercialappliancesthatdrawlargeamounts
ofelectricity;otherwise,unstablevoltagemightdamageyourcomputer,data,orattacheddevices.
Someproductsareequippedwithathree-prongedplug.Thisplugfitsonlyintoagrounded
electricaloutlet.Thisisasafetyfeature.Donotdefeatthissafetyfeaturebytryingtoinsertitinto
anon-groundedoutlet.Ifyoucannotinserttheplugintotheoutlet,contactanelectricianforan
approvedoutletadapterortoreplacetheoutletwithonethatenablesthissafetyfeature.Never
overloadanelectricaloutlet.Theoverallsystemloadshouldnotexceed80percentofthebranch
circuitrating.Consultanelectricianformoreinformationifyouhavequestionsaboutpowerloads
andbranchcircuitratings.
Besurethatthepoweroutletyouareusingisproperlywired,easilyaccessible,andlocatedclose
totheequipment.Donotfullyextendpowercordsinawaythatwillstressthecords.
Besurethatthepoweroutletprovidesthecorrectvoltageandcurrentfortheproductyouare
installing.
Carefullyconnectanddisconnecttheequipmentfromtheelectricaloutlet.
Powersupplystatement
DANGER
Neverremovethecoveronapowersupplyoranypartthathasthefollowinglabelattached.
Hazardousvoltage,current,andenergylevelsarepresentinsideanycomponentthathasthislabel
attached.Therearenoserviceablepartsinsidethesecomponents.Ifyoususpectaproblemwith
oneoftheseparts,contactaservicetechnician.
©CopyrightLenovo2014ix

Externaldevices
CAUTION:
DonotconnectordisconnectanyexternaldevicecablesotherthanUSBand1394cableswhilethe
computerpowerison;otherwise,youmightdamageyourcomputer.Toavoidpossibledamageto
attacheddevices,waitatleastfivesecondsafterthecomputerisshutdowntodisconnectexternal
devices.
Generalbatterynotice
DANGER
PersonalcomputersmanufacturedbyLenovocontainacoin-cellbatterytoprovidepowerto
thesystemclock.Inaddition,manymobileproducts,suchasnotebookcomputers,utilizea
rechargeablebatterypacktoprovidesystempowerwheninportablemode.Batteriessuppliedby
Lenovoforusewithyourproducthavebeentestedforcompatibilityandshouldonlybereplaced
withapprovedparts.
Neverattempttoopenorserviceanybattery.Donotcrush,puncture,orincineratebatteriesor
shortcircuitthemetalcontacts.Donotexposethebatterytowaterorotherliquids.Onlyrecharge
thebatterypackstrictlyaccordingtoinstructionsincludedintheproductdocumentation.
Batteryabuseormishandlingcancausethebatterytooverheat,whichcancausegassesorflame
to“vent”fromthebatterypackorcoincell.Ifyourbatteryisdamaged,orifyounoticeany
dischargefromyourbatteryorthebuildupofforeignmaterialsonthebatteryleads,stopusingthe
batteryandobtainareplacementfromthebatterymanufacturer.
Batteriescandegradewhentheyareleftunusedforlongperiodsoftime.Forsomerechargeable
batteries(particularlyLithiumIonbatteries),leavingabatteryunusedinadischargedstatecould
increasetheriskofabatteryshortcircuit,whichcouldshortenthelifeofthebatteryandalsocan
poseasafetyhazard.DonotletrechargeableLithium-Ionbatteriescompletelydischargeorstore
thesebatteriesinadischargedstate.
Lithiumcoin-cellbatterynotice
DANGER
Dangerofexplosionifbatteryisincorrectlyreplaced.
Whenreplacingthelithiumcoin-cellbattery,useonlythesameoranequivalenttypethatis
recommendedbythemanufacturer.Thebatterycontainslithiumandcanexplodeifnotproperly
used,handled,ordisposedof.
Donot:
•Throworimmerseintowater
•Heattomorethan100°C(212°F)
•Repairordisassemble
Disposeofthebatteryasrequiredbylocalordinancesorregulations.
ThefollowingstatementappliestousersinthestateofCalifornia,U.S.A.
CaliforniaPerchlorateInformation:
xUserGuide

Productscontainingmanganesedioxidelithiumcoin-cellbatteriesmaycontainperchlorate.
PerchlorateMaterial-specialhandlingmayapply,See
www.dtsc.ca.gov/hazardouswaste/perchlorate
Noticeforbuilt-inrechargeablebatteries
DANGER
Donotattempttoreplacetheinternalrechargeableorlithiumcoin-cellbatteries.ContactLenovo
Supportforfactoryreplacement.
Heatandproductventilation
DANGER
Computers,acpoweradapters,andmanyaccessoriescangenerateheatwhenturnedonandwhen
batteriesarecharging.Notebookcomputerscangenerateasignificantamountofheatduetotheir
compactsize.Alwaysfollowthesebasicprecautions:
•Whenyourcomputeristurnedonorthebatteryischarging,thebase,thepalmrest,andsome
otherpartsmaybecomehot.Avoidkeepingyourhands,yourlap,oranyotherpartofyour
bodyincontactwithahotsectionofthecomputerforanyextendedlengthoftime.Whenyou
usethekeyboard,avoidkeepingyourpalmsonthepalmrestforaprolongedperiodoftime.
Yourcomputergeneratessomeheatduringnormaloperation.Theamountofheatdependson
theamountofsystemactivityandthebatterychargelevel.Extendedcontactwithyourbody,
eventhroughclothing,couldcausediscomfortorevenaskinburn.Periodicallytakebreaks
fromusingthekeyboardbyliftingyourhandsfromthepalmrest;andbecarefulnottouse
thekeyboardforanyextendedlengthoftime.
•Donotoperateyourcomputerorchargethebatterynearflammablematerialsorinexplosive
environments.
•Ventilationslots,fansand/orheatsinksareprovidedwiththeproductforsafety,comfort,and
reliableoperation.Thesefeaturesmightinadvertentlybecomeblockedbyplacingtheproducton
abed,sofa,carpet,orotherflexiblesurface.Neverblock,cover,ordisablethesefeatures.
•Whentheacpoweradapterisconnectedtoanelectricaloutletandyourcomputer,itgenerates
heat.Donotplacetheadapterincontactwithanypartofyourbodywhileusingit.Neverusethe
acpoweradaptertowarmyourbody.Extendedcontactwithyourbody,eventhroughclothing,
maycauseaskinburn.
Foryoursafety,alwaysfollowthesebasicprecautionswithyourcomputer:
•Keepthecoverclosedwheneverthecomputerispluggedin.
•Regularlyinspecttheoutsideofthecomputerfordustaccumulation.
•Removedustfromventsandanyperforationsinthebezel.Morefrequentcleaningsmightbe
requiredforcomputersindustyorhigh-trafficareas.
•Donotrestrictorblockanyventilationopenings.
•Donotoperateyourcomputerinsidefurniture,asthismightincreasetheriskofoverheating.
•Airflowtemperaturesintothecomputershouldnotexceed35°C(95°F).
©CopyrightLenovo2014xi

Electricalcurrentsafetyinformation
DANGER
Electriccurrentfrompower,telephone,andcommunicationcablesishazardous.
Toavoidashockhazard:
•Donotuseyourcomputerduringalightningstorm.
•Donotconnectordisconnectanycablesorperforminstallation,maintenance,orreconfiguration
ofthisproductduringanelectricalstorm.
•Connectallpowercordstoaproperlywiredandgroundedelectricaloutlet.
•Connecttoproperlywiredoutletsanyequipmentthatwillbeattachedtothisproduct.
•Wheneverpossible,useonehandonlytoconnectordisconnectsignalcables.
•Neverturnonanyequipmentwhenthereisevidenceoffire,water,orstructuraldamage.
•Disconnecttheattachedpowercordsandallthecablesbeforeyouopenthedevicecovers,
unlessinstructedotherwiseintheinstallationandconfigurationprocedures.
•Donotuseyourcomputeruntilallinternalpartsenclosuresarefastenedintoplace.Neveruse
thecomputerwheninternalpartsandcircuitsareexposed.
DANGER
Connectanddisconnectcablesasdescribedinthefollowingprocedureswheninstalling,moving,
oropeningcoversonthisproductorattacheddevices.
Toconnect:
1.TurneverythingOFF.
2.First,attachallcablestodevices.
3.Attachsignalcablestoconnectors.
4.Attachpowercordstooutlets.
5.TurndevicesON.
Todisconnect:
1.TurneverythingOFF.
2.First,removepowercordsfromoutlets.
3.Removesignalcablesfromconnectors.
4.Removeallcablesfromdevices.
Thepowercordmustbedisconnectedfromthewalloutletorreceptaclebeforeinstallingallother
electricalcablesconnectedtothecomputer.
Thepowercordmaybereconnectedtothewalloutletorreceptacleonlyafterallotherelectrical
cableshavebeenconnectedtothecomputer.
Liquidcrystaldisplay(LCD)notice
CAUTION:
Theliquidcrystaldisplay(LCD)ismadeofglass,androughhandlingordroppingthecomputercan
causetheLCDtobreak.IftheLCDbreaksandtheinternalfluidgetsintoyoureyesoronyour
hands,immediatelywashtheaffectedareaswithwaterforatleast15minutes;ifanysymptomsare
presentafterwashing,getmedicalcare.
Note:Forproductswithmercury-containingfluorescentlamps(forexample,non-LED),thefluorescentlamp
intheLiquidcrystaldisplay(LCD)containsmercury;disposeofaccordingtolocal,state,orfederallaws.
xiiUserGuide

Usingheadphonesorearphones
CAUTION:
Excessivesoundpressurefromearphonesandheadphonescancausehearingloss.Adjustmentof
theequalizertomaximumincreasestheearphoneandheadphoneoutputvoltageandthesound
pressurelevel.Therefore,toprotectyourhearing,adjusttheequalizertoanappropriatelevel.
Excessiveuseofheadphonesorearphonesforalongperiodoftimeathighvolumecanbedangerousifthe
outputoftheheadphoneorearphoneconnectorsdonotcomplywithspecificationsofEN50332-2.The
headphoneoutputconnectorofyourcomputercomplieswithEN50332-2Subclause7.Thisspecification
limitsthecomputer’smaximumwidebandtrueRMSoutputvoltageto150mV.Tohelpprotectagainst
hearingloss,ensurethattheheadphonesorearphonesyouusealsocomplywithEN50332-2(Clause7
limits)forawidebandcharacteristicvoltageof75mV.UsingheadphonesthatdonotcomplywithEN
50332-2canbedangerousduetoexcessivesoundpressurelevels.
IfyourLenovocomputercamewithheadphonesorearphonesinthepackage,asaset,thecombinationof
theheadphonesorearphonesandthecomputeralreadycomplieswiththespecificationsofEN50332-1.
Ifdifferentheadphonesorearphonesareused,ensurethattheycomplywithEN50332-1(Clause6.5
LimitationValues).UsingheadphonesthatdonotcomplywithEN50332-1canbedangerousdueto
excessivesoundpressurelevels.
Additionalsafetyinformation
Plasticbagnotice
DANGER
Plasticbagscanbedangerous.Keepplasticbagsawayfrombabiesandchildrentoavoiddanger
ofsuffocation.
PolyvinylChloride(PVC)cableandcordnotice
Manypersonalcomputerproductsandaccessoriescontaincords,cablesorwires,suchaspowercordsor
cordstoconnecttheaccessorytoapersonalcomputer.Ifthisproducthassuchacord,cableorwire,then
thefollowingwarningapplies:
WARNING:Handlingthecordonthisproductorcordsassociatedwithaccessoriessoldwiththisproduct
willexposeyoutolead,achemicalknowntotheStateofCaliforniatocausecancer,andbirthdefectsor
otherreproductiveharm.Washhandsafterhandling.
©CopyrightLenovo2014xiii

xivUserGuide

Chapter1.Productoverview
Thischapterprovidesinformationaboutthelocationsofconnectors,locationsofimportantproductlabels,
computerfeatures,specifications,andpreinstalledprograms.
Thischaptercontainsthefollowingtopics:
•“Locatingcomputercontrols,connectors,andindicators”onpage1
•“Locatingimportantproductinformation”onpage9
•“Features”onpage11
•“Specifications”onpage12
•“Lenovoprograms”onpage13
Locatingcomputercontrols,connectors,andindicators
Thistopicintroducesthecomputerhardwarefeaturestogiveyouthebasicinformationthatyouneed
tostartusingthecomputer.
Frontview
ThinkPad11efrontview
1Microphone
2Camera-in-useindicator
3Camera 4Speakers
5System-statusindicator
6Touchpad
1Microphone
Themicrophonecapturessoundandvoicewhenusedwithaprogramcapableofhandlingaudio.
©CopyrightLenovo20141
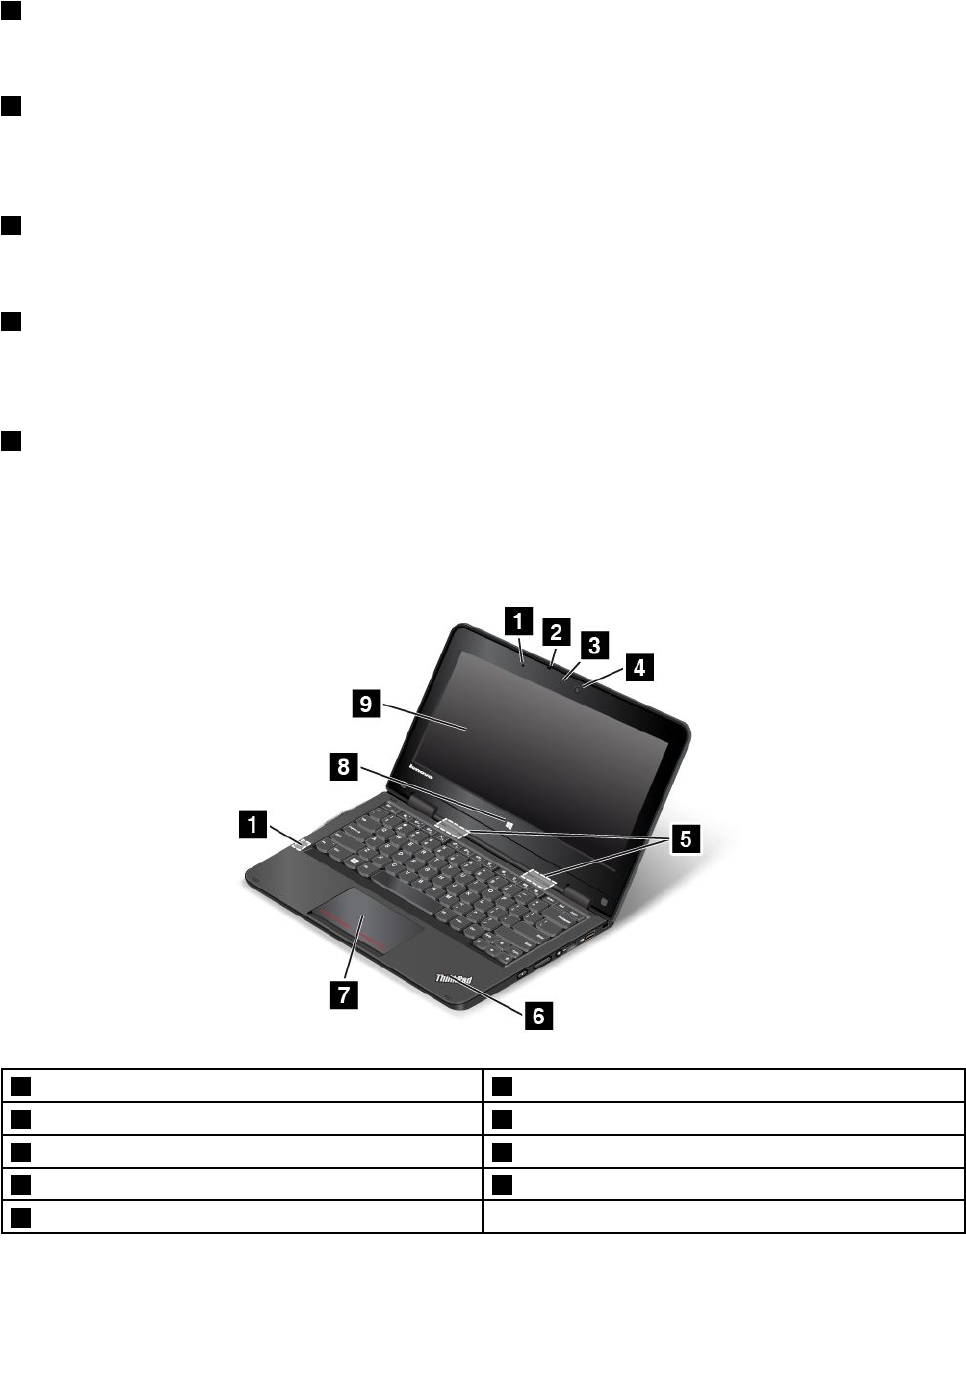
2Camera-in-useindicator
Whenthecameraisstarted,thecamera-in-useindicatorturnsoningreen.
3Camera
Usethecameratotakepicturesorholdavideoconference.Formoreinformation,see“Usingthecamera”
onpage39.
4Speakers
Yourcomputerisequippedwithapairofstereospeakers.
5System-statusindicator
TheilluminateddotintheThinkPad®logoonthepalmrestfunctionsasasystem-statusindicator.For
moreinformation,see“Statusindicators”onpage7.
6Touchpad
Yourcomputerisequippedwithatouchpadunderthebottomedgeofthekeyboard.Thetouchpad
enablesyoutomovethepointer,withouttheuseofaconventionalmouse.Formoreinformation,see“Using
thetouchpad”onpage21.
ThinkPadYoga11efrontview
1Proximitysensor 2Microphone
3Camera-in-useindicator 4Camera
5Speakers 6System-statusindicator
7Touchpad 8Windowsbutton
9Multi-touchscreen
2UserGuide

1Proximitysensor
Theproximitysensorisdesignedtoworkwhenyourcomputerisintabletmode.Iftheproximitysensor
detectsyourhandsnearby,theActiveProtectionSystem™programwillbedisabledautomatically.Afteryour
handsleavethedetectingareaoftheproximitysensor,theActiveProtectionSystemwillbere-enabled.
2Microphone
Themicrophonecapturessoundandvoicewhenusedwithaprogramcapableofhandlingaudio.
3Camera-in-useindicator
Whenthecameraisstarted,thecamera-in-useindicatorturnsoningreen.
4Camera
Usethecameratotakepicturesorholdavideoconference.Formoreinformation,see“Usingthecamera”
onpage39.
5Speakers
Yourcomputerisequippedwithapairofstereospeakers.
6System-statusindicator
TheilluminateddotintheThinkPadlogoonthepalmrestfunctionsasasystem-statusindicator.For
moreinformation,see“Statusindicators”onpage7.
7Touchpad
Yourcomputerisequippedwithatouchpadunderthebottomedgeofthekeyboard.Thetouchpad
enablesyoutomovethepointer,withouttheuseofaconventionalmouse.Formoreinformation,see“Using
thetouchpad”onpage21.
8Windowsbutton
PresstheWindowsbuttontoswitchbetweenthecurrentworkspaceandtheStartscreen;orpressthe
Windowsbuttontowakeupthecomputerfromsleepmode.
9Multi-touchscreen
Yourcomputercomeswithamulti-touchscreen.Formoreinformation,see“Usingthemulti-touchscreen”
onpage27.
Right-sideview
Note:Yourcomputermightlookslightlydifferentfromtheillustrationinthistopic.
Chapter1.Productoverview3
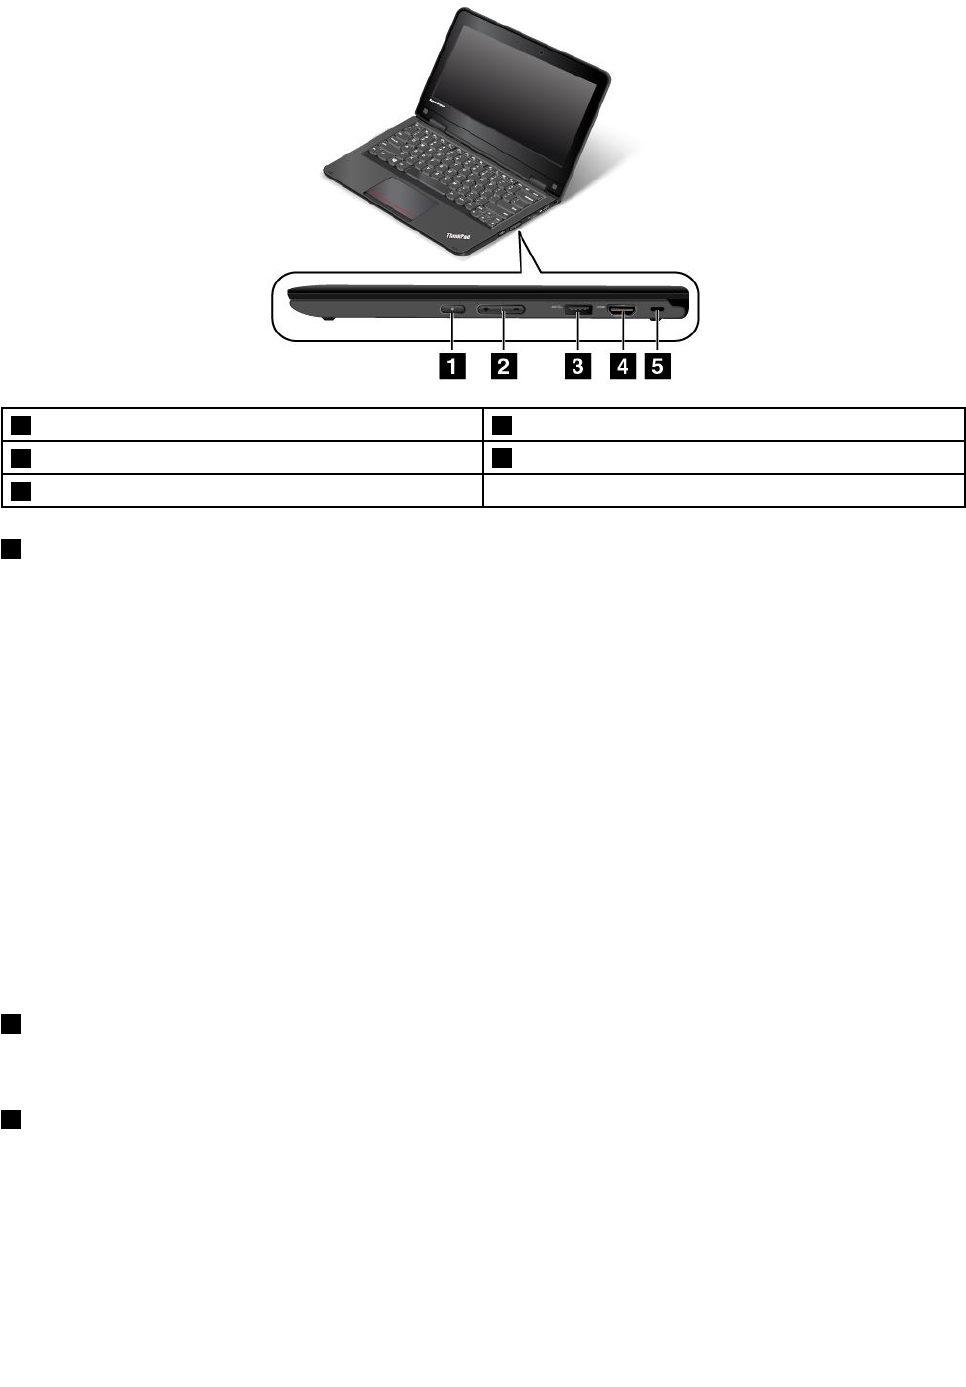
1Powerbutton 2Volume-controlbuttons
3USB3.0connector
4HDMI™connector
5Security-lockslot
1Powerbutton
Usethepowerbuttontoturnonthecomputer.
Toturnoffthecomputer,usetheStartmenushutdownoptionontheMicrosoft®Windows®7operating
system.FortheMicrosoftWindows8.1operatingsystem,movethepointertothetop-rightorbottom-right
cornerofthescreentodisplaythecharms.ThenclickSettings➙Power➙Shutdown.
Ifthecomputerstopsrespondingandyoucannotturnitoff,pressandholdthepowerbuttonforfour
secondsormoretoresetthecomputer.
Youalsocanprogramthepowerbuttonsothatyoucanturnoffthecomputerorputthecomputerintosleep
orhibernationmodebypressingthepowerbutton.Toachievethis,dothefollowing:
•ForWindows7:StartthePowerManagerprogramandthenclickthePowerPlantab.IntheEventsarea,
selecttheactionthatyouwantthepowerbuttontoperform.ForinstructionsonhowtostartthePower
Managerprogram,see“AccessingLenovoprogramsontheWindows7operatingsystem”onpage13.
•ForWindows8.1:Gotothedesktopandright-clickthebattery-statusiconintheWindowsnotification
area,andthenclickPoweroptions➙Choosewhatthepowerbuttondoes.
2Volume-controlbuttons
Usethevolume-controlbuttonstoadjustthevolume.
3USB3.0connector
TheUniversalSerialBus(USB)3.0connectorisusedforconnectingdevicescompatiblewithaUSB
interface,suchasaUSBprinteroradigitalcamera.
Attention:WhenyouconnectaUSBcabletothisconnector,ensurethattheUSBmarkisfacingupward.
Otherwisetheconnectormightgetdamaged.
4UserGuide
4HDMIconnector
YourcomputerhasaHigh-DefinitionMultimediaInterface(HDMI)connector.Thisconnectorcanconnecta
compatibledigitalaudiodeviceorvideomonitor,suchasahigh-definitiontelevision(HDTV).Youalsocan
connectyourcomputertoacompatiblevideographicsarray(VGA)videodevice,suchasaVGAmonitor,by
usinganHDMI-to-VGAmonitorcable.
5Security-lockslot
Toprotectyourcomputerfromtheft,youcanpurchaseasecuritycablelockthatfitsthesecurity-lock
slottolockthecomputertoastationaryobject.
Note:Youareresponsibleforevaluating,selecting,andimplementingthelockingdeviceandsecurity
feature.Lenovomakesnocomments,judgments,orwarrantiesaboutthefunction,quality,orperformance
ofthelockingdeviceandsecurityfeature.
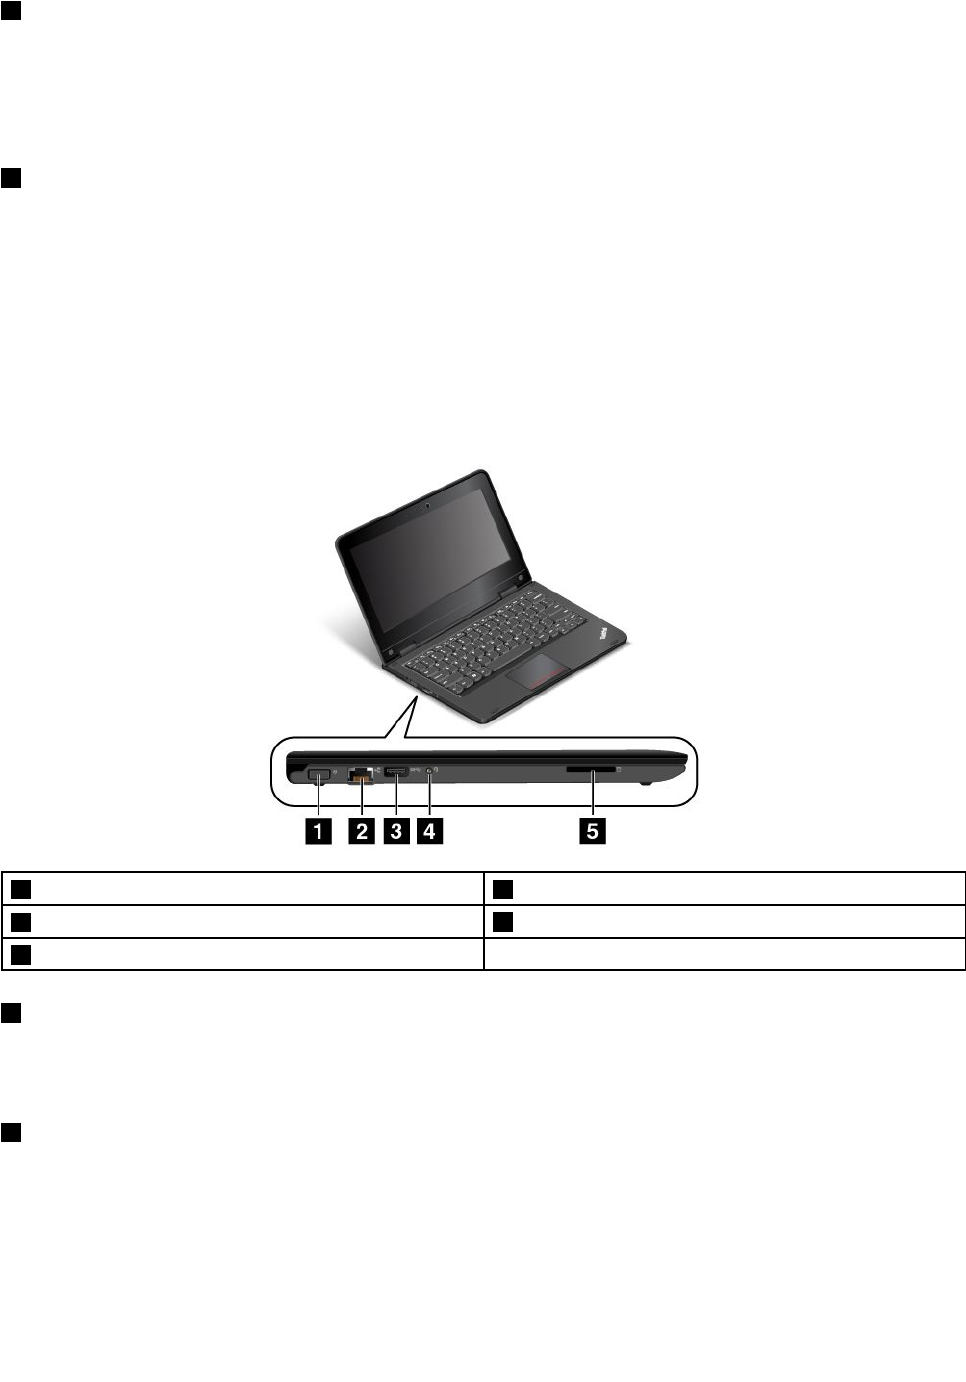
Left-sideview
Note:Yourcomputermightlookslightlydifferentfromtheillustrationinthistopic.
1Powerconnector 2Ethernetconnector
3Always-onUSBconnector(USB2.0connector)
4Audioconnector
5Mediacardslot
1Powerconnector
Connecttheacpoweradaptertothepowerconnectortoprovideacpowertothecomputerandcharge
thebattery.
2Ethernetconnector
Connectthecomputertoalocalareanetwork(LAN)withtheEthernetconnector.
Chapter1.Productoverview5

DANGER
Toavoidtheriskofelectricalshock,donotconnectthetelephonecabletotheEthernetconnector.
YoucanonlyconnectanEthernetcabletothisconnector.
TheEthernetconnectorhastwoindicatorsthatshowthestatusofthenetworkconnection.Whentheleft
indicatorissolidgreen,itindicatesthatthecomputerconnectstoaLANandasessionwiththenetworkis
available.Whentherightindicatorblinksinyellow,itindicatesthatdataisbeingtransmitted.
Note:Ifyouattachthecomputertoadockingstationorportreplicator,usetheEthernetconnectoronthe
dockingstationorportreplicatortoconnecttoaLAN,nottheoneonthecomputer.
3Always-onUSBconnector(USB2.0connector)
Bydefault,theAlways-onUSBconnectorenablesyoutochargesomemobiledigitaldevicesand
smartphoneswhenyourcomputerisinthefollowingsituations:
•Thecomputerisonorinsleepmode.
•Thecomputerisinhibernationmodeoristurnedoff,butconnectedtoacpower.
Ifyouwanttochargethesedeviceswhenyourcomputerisinhibernationmodeoristurnedoff,andthe
computerisnotconnectedtoacpower,dothefollowing:
•ForWindows7
1.StartthePowerManagerprogramandclicktheGlobalPowerSettingstab.Forinstructionsonhow
tostartthePowerManagerprogram,see“AccessingLenovoprogramsontheWindows7operating
system”onpage13.
2.SelectbothEnableAlwaysOnUSBandEnableevenwhenthecomputerisoff.
3.ClickOK.
•ForWindows8.1
1.PresstheWindowskeytogototheStartscreen.
2.ClickLenovoSettings➙Power.
3.IntheEnableAlwaysOnUSBarea,slidethecontroltotherighttoenabletheAlways-onUSB
connector.Then,selectEnableevenwhenthecomputerisoff.
4.ClickOK.
4Audioconnector
Connectheadphonesoraheadsetthathasa3.5-mm(0.14-inch),4-poleplugtotheaudioconnectorto
listentothesoundfromthecomputer.
Note:Ifyouareusingaheadsetwithafunctionswitch,theaudioconnectormightnotfullysupportthe
functionswitch.
5Mediacardslot
Yourcomputerhasamediacardslot.Insertyourflashmediacardintothisslottoreadthedataonthecard.
Formoreinformationaboutthesupportedcards,see“Usingaflashmediacard”onpage40.
6UserGuide

Rearview
1Fanlouvers
Thefanlouversandinternalfanenableairtocirculateinthecomputer,whichinturnensurespropercooling,
especiallythecoolingofthemicroprocessor.
Notes:
•Toensureproperairflow,donotplaceanyobstaclesinfrontofthefanlouvers.
•Thefanlouversofyourcomputermightgettoohotwhenthecomputerisrunningheavytasks.Whenyou
areusingorcarryingthecomputer,takecaretoavoiddirectcontacttothefanlouvers.
Statusindicators
Thestatusindicatorsshowthecurrentstatusofyourcomputer.
Note:Yourcomputermightlookslightlydifferentfromtheillustrationsinthistopic.
Chapter1.Productoverview7
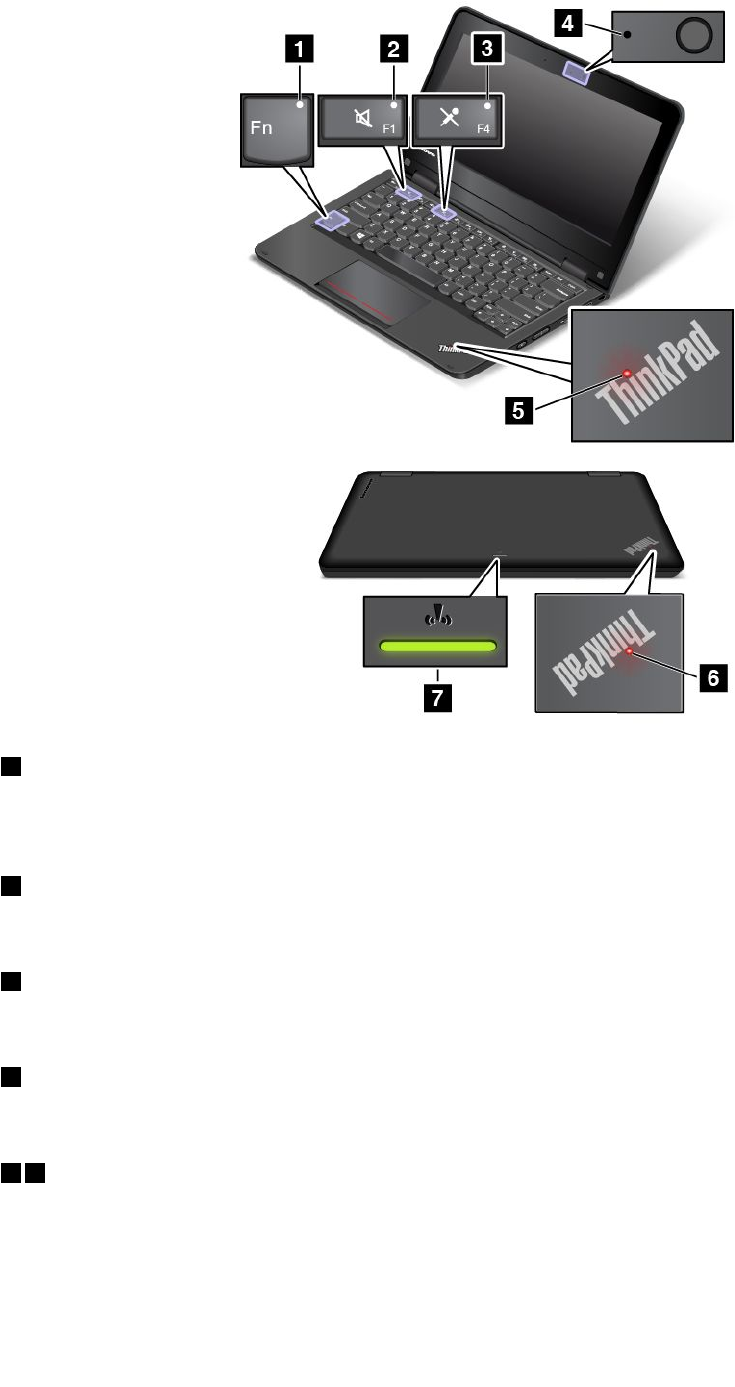
1FnLockindicator
TheFnLockindicatorshowsthestatusofFnLockfunction.Formoreinformation,see“Specialkeys”
onpage19.
2Speaker-muteindicator
Whenthespeaker-muteindicatorison,thespeakersaremuted.
3Microphone-muteindicator
Whenthemicrophone-muteindicatorison,themicrophoneismuted.
4Camera-in-useindicator
Whenthecameraisstarted,thecamera-in-useindicatorturnsoningreen.
5 6 System-statusindicators
TherearetwoThinkPadlogosonyourcomputer,oneonthepalmrestandtheotherontheouterlid.
TheilluminateddotineachThinkPadlogoworksasasystem-statusindicatorandhelpsyouidentifythe
statusofyourcomputer.
•Solidon:Thecomputerison(innormaluse).
8UserGuide
•Blinksfast:Thecomputerisenteringhibernationmode.
•Blinksslowly:Thecomputerisinsleepmode.
•Blinksforthreetimes:Thecomputerisinitiallyconnectedtopower.
•Off:Thecomputerisofforinhibernationmode.
7Wireless-statusindicator
Thewireless-statusindicatorislocatedontheouterlidofthecomputerandithelpsyouidentifythewireless
statusofyourcomputer.
•Solidgreen:Thewirelessfeaturesofthecomputerareon.
•Off:Thewirelessfeaturesofthecomputerareoff.
Locatingimportantproductinformation
Thissectionprovidesinformationtohelpyoulocatethemachinetypeandmodellabel,FCCIDandIC
Certificationnumberlabel,andtheGenuineMicrosoftlabel.
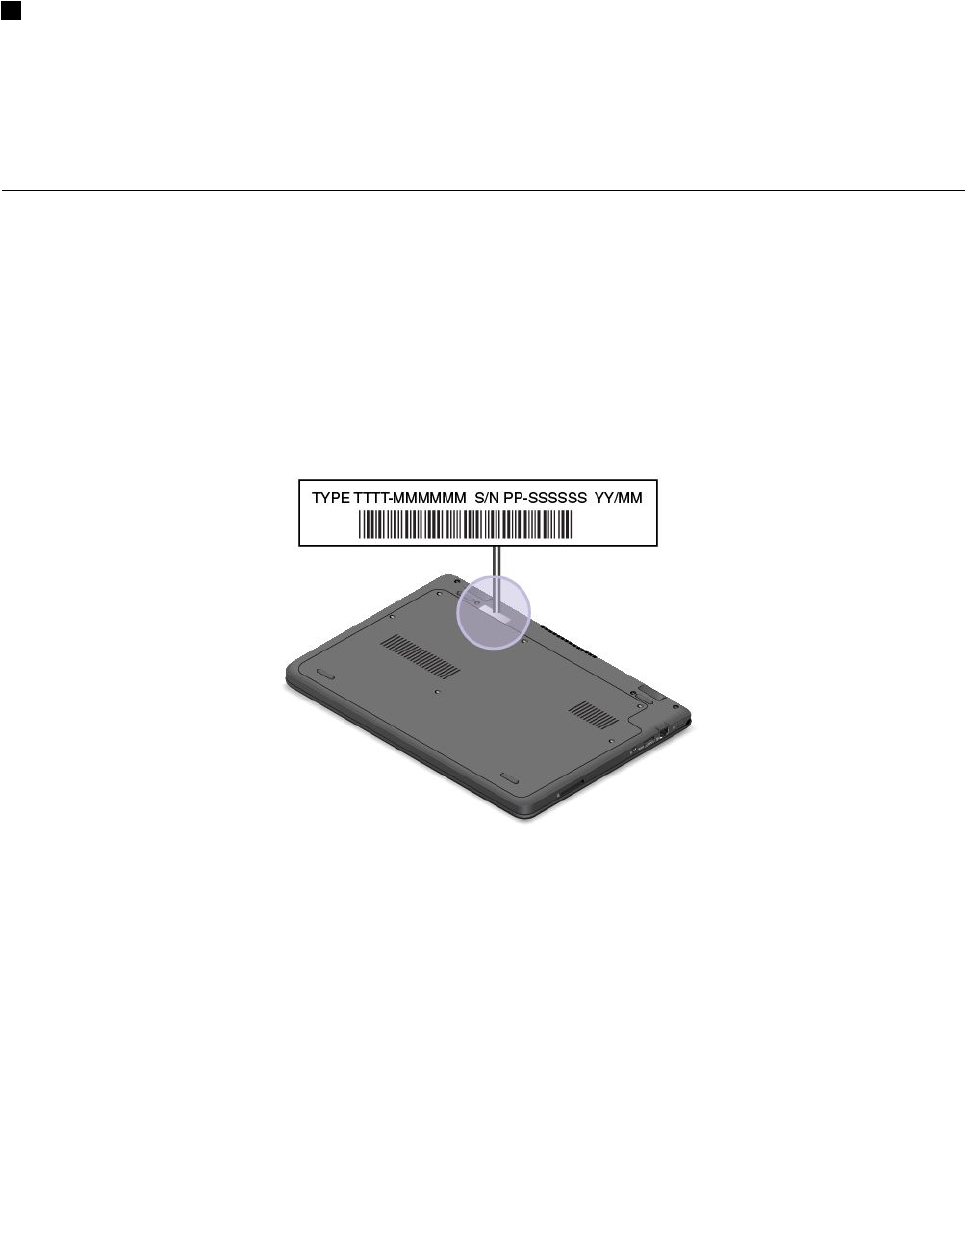
Machinetypeandmodellabel
Themachinetypeandmodellabelidentifiesyourcomputer.WhenyoucontactLenovoforhelp,themachine
typeandmodelinformationhelpssupporttechnicianstoidentifyyourcomputerandprovidefasterservice.
Thefollowingillustrationshowsthelocationofthemachinetypeandmodelofyourcomputer.
Chapter1.Productoverview9
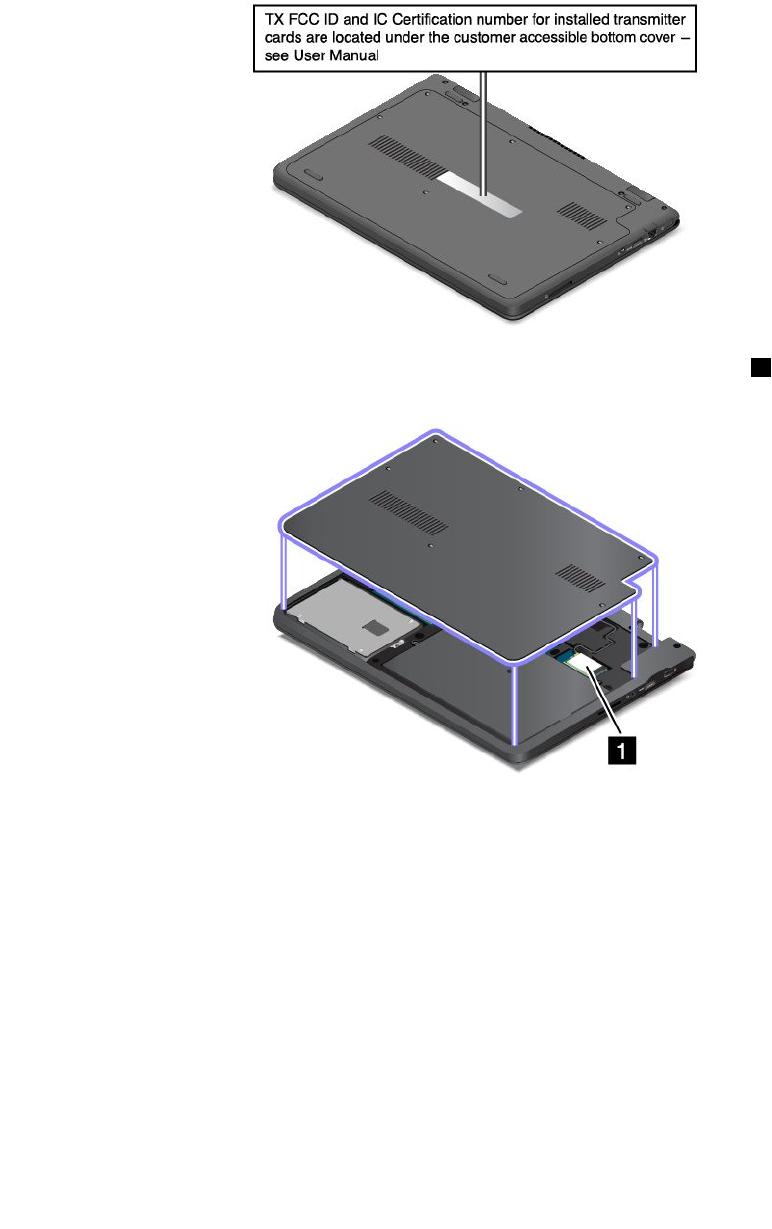
FCCIDandICCertificationnumberinformation
TheFCCIDandICCertificationnumberfortheinstalledwirelesscommunicationcardsarenotshownonthe
enclosureofyourcomputer.However,Lenovoprovidesinformationonthebackcoverassemblyofyour
computerasshowntoinstructyouhowtolocatetheFCCIDandICCertificationnumberinsideyour
computer.
TheFCCIDandICCertificationnumberlabelsareaffixedonthewirelessLANcard 1installedinyour
computer.
Note:UseonlyLenovo-authorizedwirelesscommunicationcardsforthecomputer.Ifyouinstallan
unauthorizedwirelesscommunicationcardthatisnotapprovedforuseinyourcomputer,anerrormessage
willbedisplayedandthecomputerwillbeepwhenyouturnonthecomputer.
GenuineMicrosoftlabel
TheGenuineMicrosoftlabelisprovidedonmodelsthatarelicensedtouseaWindows8.1operatingsystem.
TheversionoftheWindows8.1operatingsystemisprintedonthelabel.Lenovocomputersthatarelicensed
forusewithaWindows8.1operatingsystemareshippedwiththeWindows8.1licensekeydigitallyencoded
intothecomputerhardware.Dependingonthecomputermodel,theGenuineMicrosoftlabelcanbeonthe
computercover,underthebattery,oronthepoweradapter.
FormoreinformationabouttheGenuineMicrosoftlabel,goto:
http://www.microsoft.com/en-us/howtotell/Hardware.aspx
10UserGuide

ThefollowingillustrationshowsthelocationoftheGenuineMicrosoftlabelonthebackcoverofthecomputer.
Features
Thistopicprovidesgeneralinformationaboutthecomputerfeaturesforvariousmodels.Dependingonyour
specificmodel,somefeaturesmightvaryorunavailable.
Microprocessor
Toviewthemicroprocessorinformationofyourcomputer,dothefollowing:
•ForWindows7:ClickStart,right-clickComputer,andthenclickProperties.
•ForWindows8.1:Gotothedesktopandmovethepointertothetop-rightorbottom-rightcornerofthe
screentodisplaythecharms.ThenclickSettings➙PCinfo.
Memory
Doubledatarate3lowvoltagesmalloutlinedualin-linememorymodules(DDR3LVSODIMM)
Thememorycapacityvariesdependingonyourcomputermodel.Toviewthememoryinformationof
yourcomputer,dothefollowing:
•ForWindows7:ClickStart,right-clickComputer,andthenclickProperties.
•ForWindows8.1:Gotothedesktopandmovethepointertothetop-rightorbottom-rightcornerofthe
screentodisplaythecharms.ThenclickSettings➙PCinfo.
Battery
Toviewthebatteryinformationofyourcomputer,dothefollowing:
•ForWindows7:StartthePowerManagerprogram,andthenclicktheBatterytab.Forinstructionson
howtostartthePowerManagerprogram,see“AccessingLenovoprogramsontheWindows7operating
system”onpage13.
•ForWindows8.1:StarttheLenovoSettingsprogramandclickPower.Forinstructionsonhowtostart
theLenovoSettingsprogram,see“AccessingLenovoprogramsontheWindows8.1operatingsystem”
onpage15.
Storagedevice
•2.5-inchformfactor,7-mmheightharddiskdrive
•2.5-inchformfactor,7-mmheightsolid-statedrive
Chapter1.Productoverview11

Display
•Size:11.6inches(294.64mm)
•Resolution:
–LCD:Upto1366x768
–Externalmonitor:Upto1920x1080(HDMI)
•Colordisplaywiththethin-filmtransistor(TFT)technology
•Brightnesscontrol
•Integratedcamera
Powersource(acpoweradapter)
•Sine-waveinputat50–60Hz
•Inputratingoftheacpoweradapter:100–240Vac,50–60Hz
Keyboard
•6-rowkeyboard
•Fnkey
•Touchpad
Interface
•Oneaudioconnector
•OneHDMIconnector
•OneUSB3.0connector
•OneAlways-onUSBconnector
•OneRJ45Ethernetconnector
•One4-in-1digitalmedia-card-readerslot
Wirelessfeatures
•IntegratedwirelessLAN
•IntegratedBluetooth
FeaturesforThinkPadYoga11eonly:
•Accellerometer
•Digitalcompass
•Gyrometer
•Multi-touchscreen
•Proximitysensor
•Windowsbutton
Specifications
Thistopicliststhephysicalspecificationsforyourcomputer.
12UserGuide

Dimensions
•Width:300mm(11.81inches)
•Depth:216mm(8.50inches)
•Height:
–ThinkPad11e:22.30mm(0.88inch)
–ThinkPadYoga11e:22.90mm(0.90inch)
Weight
•ThinkPad11e:1.49kg(3.28lb)
•ThinkPadYoga11e:1.59kg(3.50lb)
Environment
•Maximumaltitudewithoutpressurization:3048m(10000ft)
•Temperature
–Ataltitudesupto2438m(8000ft)
–Operating:From5.0°C(41°F)to35.0°C(95°F)
–Storage:From5.0°C(41°F)to43.0°C(109°F)
–Ataltitudesabove2438m(8000ft)
–Maximumtemperaturewhenoperatingundertheunpressurizedcondition:31.3°C(88°F)
Note:Whenyouchargethebattery,thebatterytemperaturemustbeatleast10°C(50°F).
•Relativehumidity:
–Operating:From8%to80%
–Storage:From5%to95%
Heatoutput
•45W(154Btu/hr)maximum
Attention:
•Keepyourcomputerawayfromelectricalappliancessuchasanairconditioner,anelectricfan,a
microwaveoven,andaradio.Thestrongmagneticfieldsgeneratedbytheseappliancescandamagethe
motoranddataontheharddiskdrive.
•Donotplaceanybeveragesontopoforbesidethecomputerorotherattacheddevices.Ifliquidisspilled
onorinthecomputeroranattacheddevice,ashortcircuitorotherdamagemightoccur.
•Donoteatorsmokeoveryourkeyboard.Particlesthatfallintoyourkeyboardcancausedamage.
Lenovoprograms
YourcomputercomeswithLenovoprogramstohelpyouworkmoreeasilyandsecurely.Theavailable
programsmightvarydependingonthepreinstalledWindowsoperatingsystem.
TolearnmoreabouttheprogramsandothercomputingsolutionsofferedbyLenovo,goto
http://www.lenovo.com/support.
AccessingLenovoprogramsontheWindows7operatingsystem
OntheWindows7operatingsystem,youcanaccessLenovoprogramsfromeithertheLenovo
ThinkVantage®ToolsprogramorfromControlPanel.
Chapter1.Productoverview13

AccessingLenovoprogramsfromtheLenovoThinkVantageT oolsprogram
ToaccessLenovoprogramsfromtheLenovoThinkVantageToolsprogram,clickStart➙AllPrograms➙
LenovoThinkVantageTools.Thendouble-clickaprogramicontoaccesstheprogram.
Note:IfaprogramiconisdimmedinthenavigationwindowoftheLenovoThinkVantageToolsprogram,it
indicatesthatyouneedtomanuallyinstalltheprogram.Tomanuallyinstalltheprogram,double-clickthe
programicon.Then,followtheinstructionsonthescreen.Whentheinstallationprocesscompletes,the
programiconwillbeactivated.
Thefollowingtableliststheprogramsandthecorrespondingiconnamesonthenavigationwindowofthe
LenovoThinkVantageToolsprogram.
Note:Dependingonyourcomputermodel,someoftheprogramsmightnotbeavailable.
Table1.ProgramsintheLenovoThinkVantageToolsprogram
ProgramIconname
AccessConnections™InternetConnection
ActiveProtectionSystemAirbagProtection
ClientSecuritySolutionEnhancedSecurity
CommunicationsUtilityWebConferencing
LenovoQuickCastLenovoQuickCast
LenovoQuickControlLenovoQuickControl
LenovoSolutionCenterSystemHealthandDiagnostics
PasswordManagerPasswordVault
PowerManagerPowerControls
RecoveryMediaFactoryRecoveryDisks
RescueandRecovery®EnhancedBackupandRestore
SystemUpdateUpdateandDrivers
AccessingLenovoprogramsfromControlPanel
ToaccessLenovoprogramsfromControlPanel,clickStart➙ControlPanel.Thendependingonthe
programyouwanttoaccess,clickthecorrespondingsectionandthenclickthecorrespondinggreentext.
Note:IfyoucannotfindtheprogramyouneedinControlPanel,openthenavigationwindowoftheLenovo
ThinkVantageToolsprogramanddouble-clickthecorrespondingdimmedicontoinstalltheprogramyou
need.Then,followtheinstructionsonthescreen.Whentheinstallationprocesscompletes,theprogram
iconwillbeactivated,andyoucanfindtheprograminControlPanel.
ThefollowingtableliststheprogramsandthecorrespondingsectionsandgreentextsinControlPanel.
Notes:
•Dependingonyourcomputermodel,someoftheprogramsmightnotbeavailable.
•TheLenovoQuickCastprogramandtheLenovoQuickControlprogramarenotlistedinControlPanel.
UsetheLenovoThinkVantageToolsprogramtoaccessthem.
14UserGuide

Table2.ProgramsinControlPanel
ProgramControlPanelsectionGreentextinControlPanel
AccessConnectionsNetworkandInternetLenovo-InternetConnection
ActiveProtectionSystemSystemandSecurity
HardwareandSound
Lenovo-AirbagProtection
ClientSecuritySolutionSystemandSecurityLenovo-EnhancedSecurity
CommunicationsUtilityHardwareandSoundLenovo-WebConferencing
LenovoSolutionCenterSystemandSecurityLenovo-SystemHealthandDiagnostics
MessageCenterPlusProgramsMessagesfromLenovo
PasswordManagerSystemandSecurity
UserAccountsandFamilySafety
Lenovo-PasswordVault
PowerManagerHardwareandSound
SystemandSecurity
Lenovo-PowerControls
RecoveryMediaSystemandSecurityLenovo-FactoryRecoveryDisks
RescueandRecoverySystemandSecurityLenovo-EnhancedBackupandRestore
SystemUpdateSystemandSecurityLenovo-UpdateandDrivers
AccessingLenovoprogramsontheWindows8.1operatingsystem
IfyourcomputerispreinstalledwiththeWindows8.1operatingsystem,toaccessLenovoprograms,press
theWindowskeytogototheStartscreenandthenclickaLenovoprogramtolaunchit.
Ifyoucannotfindtheprogramyouneed,movethepointertothetop-rightorbottom-rightcornerofthe
screentodisplaythecharms.ThenclicktheSearchcharmtosearchforthedesiredprogram.
YourcomputersupportsthefollowingLenovoprograms:
•ActiveProtectionSystem
•LenovoCloudStorage
•LenovoCompanion
•LenovoQuickCast
•LenovoQuickControl
•LenovoSettings
•LenovoSolutionCenter
•LenovoSupport
•LenovoTools
•PasswordManager
•SystemUpdate
Notes:
•Dependingonyourcomputermodel,someoftheprogramsmightnotbeavailable.
•ThePasswordManagerprogramisnotpreinstalledonyourWindows8.1computers.Youcandownloadit
fromtheLenovoSupportWebsitehttp://www.lenovo.com/support.
Lenovoprogramsoverview
ThistopicprovidesinformationaboutsomeLenovoprograms.
Chapter1.Productoverview15

Note:Dependingonyourcomputermodel,someoftheprogramsmightnotbeavailable.
•AccessConnections(Windows7)
TheAccessConnectionsprogramisaconnectivityassistantprogramforcreatingandmanaginglocation
profiles.EachlocationprofilestoresallthenetworkandInternetconfigurationsettingsneededfor
connectingtoanetworkinfrastructurefromaspecificlocationsuchasahomeoranoffice.
Byswitchingbetweenlocationprofilesasyoumoveyourcomputerfromplacetoplace,youcanquickly
andeasilyconnecttoanetworkwithnoneedtomanuallyreconfigureyoursettingsandrestartthe
computereachtime.
•ClientSecuritySolution(Windows7)
TheClientSecuritySolutionprogramprotectsyourcomputerbysecuringclientdataanddeflecting
securitybreachattempts.Italsocanhelpmanageyourpasswords,recoveraforgottenpassword,
monitorsecuritysettingsonyourcomputer,andsuggesthowtoenhancethecomputersecurity.
•LenovoThinkVantageTools(Windows7)
TheLenovoThinkVantageToolsprogramhelpsyouworkmoreeasilyandsecurelybyprovidingeasy
accesstovariousprogram,suchasLenovoSolutionCenter,SystemUpdate,andsoon.
•MessageCenterPlus(Windows7)
TheMessageCenterPlusprogramautomaticallydisplaysmessagestoinformyouaboutimportantnotices
fromLenovo,suchasalertsonsystemupdatesandalertsonconditionsthatrequireyourattention.
•PowerManager(Windows7)
ThePowerManagerprogramprovidesconvenient,flexible,andcompletepowermanagementforthe
computer.Itenablesyoutoadjustyourcomputerpowersettingstoachievethebestbalancebetween
performanceandpowersaving.
•RecoveryMedia(Windows7)
TheRecoveryMediaprogramenablesyoutorestorethecontentsoftheharddiskdriveorsolid-state
drivetothefactorydefaultsettings.
•RescueandRecovery(Windows7)
TheRescueandRecoveryprogramisaone-buttonrecoveryandrestoresolution.Itincludesasetof
self-recoverytoolstohelpyoudiagnosecomputerproblems,gethelp,andrecoverfromsystemcrashes,
evenifyoucannotstarttheWindowsoperatingsystem.
•LenovoCloudStorage(Windows8.1)
TheLenovoCloudStorageprogramenablesyoutouploadandstoreyourlocalfilesonaremoteLenovo
server,andenablesyoutoviewanddownloadthestoredfilesatanytime.
•LenovoCompanion(Windows8.1)
ThroughtheLenovoCompanionprogram,youcangettheinformationabouttheaccessoriesforyour
computer,viewblogsandarticlesaboutyourcomputer,andcheckforotherrecommendedprograms.
•LenovoSettings(Windows8.1)
TheLenovoSettingsprogramenablesyoutoenhanceyourcomputingexperiencebyturningyour
computerintoaportablehotspot,configuringcameraandaudiosettings,optimizingyourpowersettings,
andcreatingandmanagingmultiplenetworkprofiles.
•LenovoSupport(Windows8.1)
TheLenovoSupportprogramenablesyoutoregisteryourcomputerwithLenovo,checkthecomputer
healthconditionandbatterystatus,downloadandviewusermanuals,getthewarrantyinformationof
yourcomputer,andexplorehelpandsupportinformation.
•LenovoTools(Windows8.1)
TheLenovoToolsprogramhelpsyouworkmoreeasilyandsecurelybyprovidingeasyaccesstovarious
program,suchasLenovoSolutionCenter,SystemUpdate,andsoon.
16UserGuide

•ActiveProtectionSystem(Windows7andWindows8.1)
TheActiveProtectionSystemprogramprotectsyourharddiskdrivewhentheshocksensorinsideyour
computerdetectsaconditionthatcoulddamagethedrive,suchassystemtilt,excessivevibration,or
shock.Theharddiskdriveislessvulnerabletodamagewhenitisnotoperating.Thisisbecausewhen
theharddiskdriveisnotoperating,thesystemstopsitfromspinning,andmightalsomovetheread
andwriteheadsofthedrivetoareasthatdonotcontaindata.Assoonastheshocksensorsenses
thattheenvironmentisstableagain(minimalchangeinsystemtilt,vibration,orshock),itturnsonthe
harddiskdrive.
•LenovoQuickCast(Windows7andWindows8.1)
TheLenovoQuickCastprogramenablesyoutosharefiles,videos,pictures,computerdesktop,and
uniformresourcelocator(URLs)betweentwodevices.
•LenovoQuickControl(Windows7andWindows8.1)
TheLenovoQuickControlprogramenablesyoutocontrolyourcomputerremotelythroughyour
smartphone,suchascontrollingthepointer,enteringtext,controllingmoviesandmusic,andgiving
presentations.
•LenovoSolutionCenter(Windows7andWindows8.1)
TheLenovoSolutionCenterprogramenablesyoutotroubleshootandresolvecomputerproblems.It
combinesdiagnostictests,systeminformationcollection,securitystatus,andsupportinformation,along
withhintsandtipsforoptimalsystemperformance.
•PasswordManager(Windows7andWindows8.1)
ThePasswordManagerprogramautomaticallycapturesandfillsinauthenticationinformationfor
WindowsprogramsandWebsites.
•SystemUpdate(Windows7andWindows8.1)
TheSystemUpdateprogramenablesyoutokeepthesoftwareonthecomputerup-to-dateby
downloadingandinstallingsoftwarepackages,includingThinkVantageprograms,devicedrivers,Unified
ExtensibleFirmwareInterface(UEFI)basicinput/outputsystem(BIOS)updates,andotherthird-party
programs.
Chapter1.Productoverview17

18UserGuide

Chapter2.Usingyourcomputer
Thischapterprovidesinformationonusingsomeofthecomputercomponents.
Tocreateamorecomfortableconditionforyouruseofthecomputer,seeChapter3“Youandyour
computer”onpage45first.
Thischaptercontainsthefollowingtopics:
•“Registeringyourcomputer”onpage19
•“Specialkeys”onpage19
•“Usingthetouchpad”onpage21
•“UsingtheThinkPadYoga11eindifferentmodes”onpage21
•“Powermanagement”onpage31
•“Connectingtothenetwork”onpage34
•“Presentationsandmultimedia”onpage36
•“Usingaudiofeatures”onpage39
•“Usingthecamera”onpage39
•“Usingaflashmediacard”onpage40
•“Frequentlyaskedquestions”onpage41
Registeringyourcomputer
Whenyouregisteryourcomputer,informationisenteredintoadatabase,whichenablesLenovotocontact
youincaseofarecallorothersevereproblem.Inaddition,somelocationsofferextendedprivilegesand
servicestoregisteredusers.
WhenyouregisteryourcomputerwithLenovo,youalsowillreceivethefollowingbenefits:
•QuickerservicewhenyoucallLenovoforhelp
•Automaticnotificationoffreesoftwareandspecialpromotionaloffers
ToregisteryourcomputerwithLenovo,gotohttp://www.lenovo.com/register.Then,followtheinstructions
onthescreen.
Note:IfyouareusingtheWindows7operatingsystem,youalsocanregisteryourcomputerthroughthe
preinstalledLenovoProductRegistrationprogram.Theprogramlaunchesautomaticallyafteryouconnect
thecomputertotheInternetandyouhaveusedthecomputerforaperiodoftime.Then,followthe
instructionsonthescreentoregisteryourcomputer.
Specialkeys
Yourcomputerkeyboardfeaturesseveralspecialkeystohelpyouworkmoreeasilyandeffectively.
Thefollowingillustrationshowsthelocationsofthespecialkeys.
Note:Yourcomputermightlookslightlydifferentfromtheillustrationsinthistopic.
©CopyrightLenovo201419
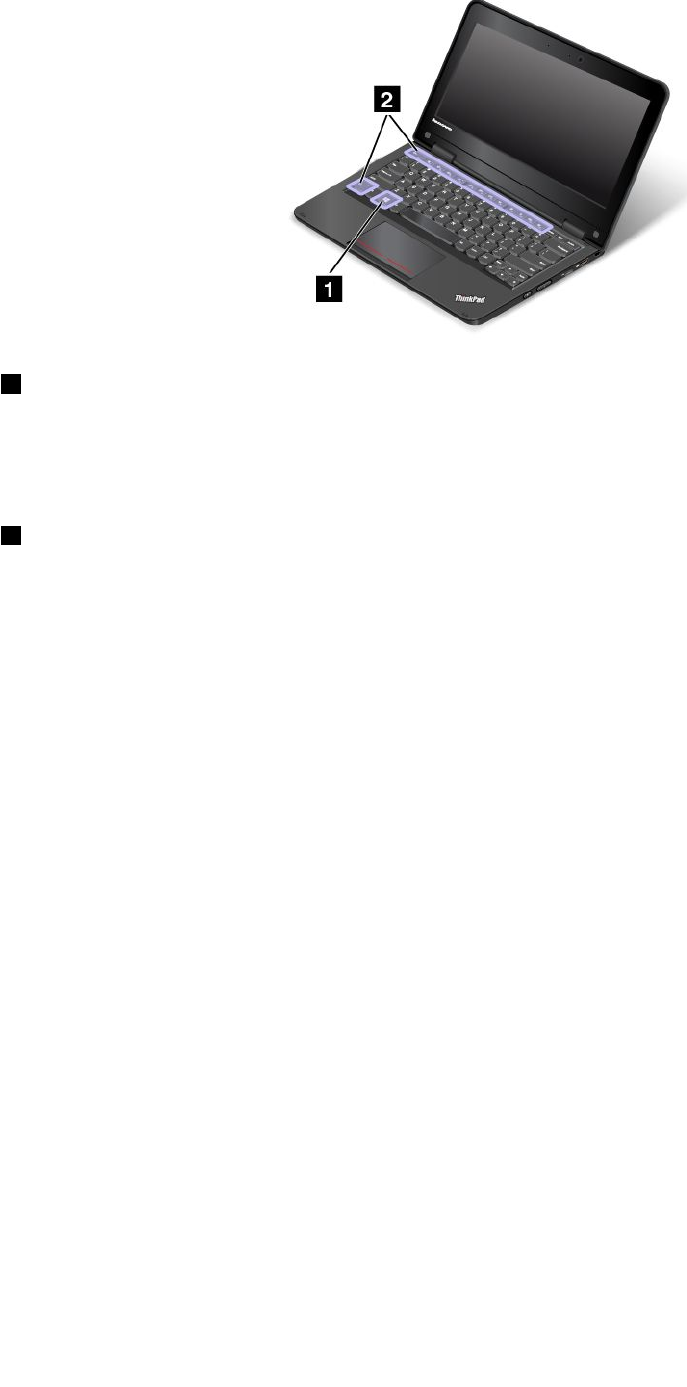
1Windowskey
PresstheWindowskeytoswitchbetweenthecurrentworkspaceandtheStartscreen.
ForinformationaboutusingtheWindowskeywithotherkeys,refertothehelpinformationsystemofthe
Windowsoperatingsystem.
2Functionkeys
•Fn+Esc:PressFn+EsctoenableordisabletheFnLockfunction.
WhentheFnLockfunctionisdisabled:Toinitiatethespecialfunctionofeachkey,pressthe
correspondingfunctionkeydirectly.ToinputF1-F12,presstheFnkeyandthecorrespondingfunctionkey.
WhentheFnLockfunctionisenabled:ToinputF1-F12,pressthecorrespondingfunctionkeydirectly.
Toinitiatethespecialfunctionofeachkey,presstheFnkeyandthecorrespondingfunctionkey.
•F1:Mutesorunmutesthespeakers.
•F2:Decreasesthespeakervolume.
•F3:Increasesthespeakervolume.
•F4:Mutesorunmutesthemicrophone.
Note:Ifyoumutethemicrophoneandturnoffyourcomputer,themicrophonewillremainmutedwhen
youturnonyourcomputeragain.Tounmutethemicrophone,pressF4.
•F5:Darkensthedisplay.
•F6:Brightensthedisplay.
YoucantemporarilychangethecomputerdisplaybrightnessbypressingF5orF6.Tochangethedefault
brightnesslevel,right-clickthebattery-statusiconintheWindowsnotificationarea.ThenclickAdjust
screenbrightnessandmakechangesasdesired.
•F7:Switchesthedisplayoutputlocationbetweenthecomputerdisplayandanexternalmonitor.
Note:YoualsocanpressWindows+Ptoswitchbetweenthecomputerdisplayandanexternalmonitor.
•F8:Enablesordisablesthewirelessnetworkingfeatures.Formoreinformationaboutthewireless
features,referto“Wirelessconnections”onpage34.
•F9:
ForWindows7:OpensControlPanel.
ForWindows8.1:OpenstheSettingscharm.
20UserGuide
•F10:
ForWindows7:OpensWindowsSearch.
ForWindows8.1:OpenstheSearchcharm.
•F11:Viewstheprogramsthatyouhaveopened.
•F12:
ForWindows7:OpensComputer.
ForWindows8.1:Viewalltheprograms.
•Fn+4:Putsyourcomputerintosleepmode.Toreturntonormaloperation,presstheFnkeyonly.
•Fn+B:HasthesamefunctionastheBreakkey.
•Fn+P:HasthesamefunctionasthePausekey.
•Fn+S:HasthesamefunctionastheSysRqkey.
•Fn+K:HasthesamefunctionastheScrLKkey.
•Fn+End:HasthesamefunctionastheInsertkey.
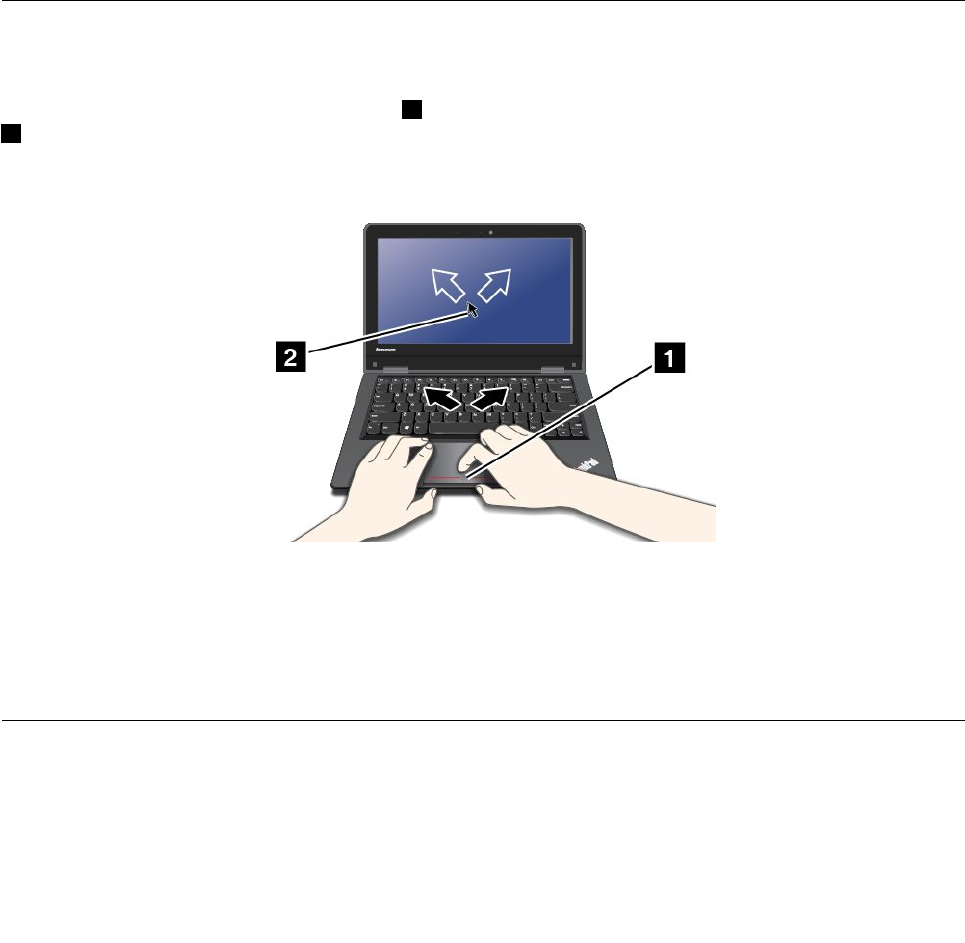
Usingthetouchpad
Note:Yourcomputermightlookslightlydifferentfromtheillustrationsinthistopic.
Yourcomputerisequippedwithatouchpad 1underthebottomedgeofthekeyboard.Tomovethepointer
2onthescreen,slideyourfingertipoverthetouchpadinthedirectioninwhichyouwantthepointerto
move.Theleftandrightbottomofthetouchpadworkasclickbuttons.Thefunctionscorrespondtothose
oftheleftandrightmousebuttonsonaconventionalmouse.
Customizingthetouchpad
Tocustomizethetouchpad,dothefollowing:
1.GotoControlPanelandclickHardwareandSound➙Mouse➙ThinkPad.
2.Followtheinstructionsonthescreen.
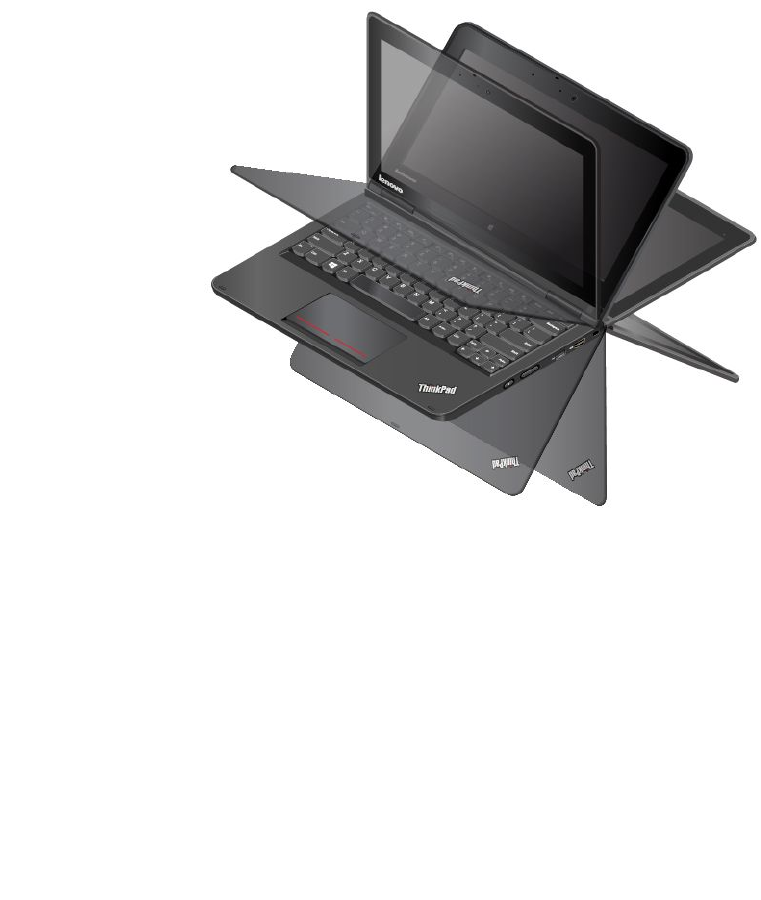
UsingtheThinkPadYoga11eindifferentmodes
TheThinkPadYoga11ecomputerfeaturesdifferentmodesandprovidessometabletfeaturestohelp
youworkmoreflexiblyandconveniently.
Chapter2.Usingyourcomputer21
Thissectioncontainsthefollowingtopics:
•“Rotatingthecomputerdisplay”onpage22
•“Notebookmode”onpage22
•“Standmode”onpage23
•“Tabletmode”onpage24
•“Tentmode”onpage25
•“Usingthetabletbuttons”onpage26
•“Usingthemulti-touchscreen”onpage27
Rotatingthecomputerdisplay
YoucanopenthecomputerdisplayofyourThinkPadYoga11ecomputertoanyanglewithinarangeofupto
360degreesasshowninthefollowingillustration.
Attention:Donotrotatethecomputerdisplaywithtoomuchforce,otherwisethecomputerdisplay
orhingesmightgetdamaged.Donotapplytoomuchforcetotheupper-rightorupper-leftcornerof
thecomputerdisplay.
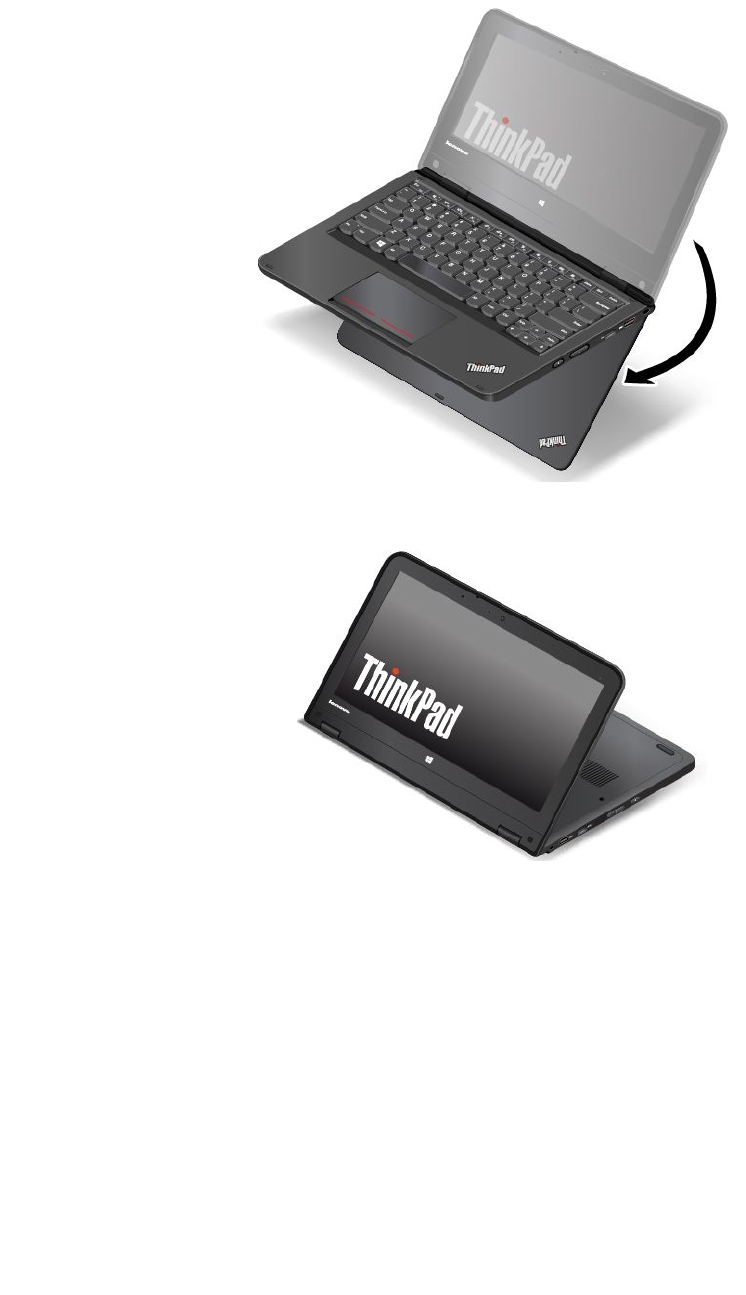
Notebookmode
YoucanusetheThinkPadYoga11ecomputerinnotebookmodeinscenariosthatrequireusingakeyboard
andamouse,suchaseditingdocumentsandwritinge-mails.
Attention:Donotrotatethecomputerdisplaywithtoomuchforce,otherwisethecomputerdisplay
orhingesmightgetdamaged.Donotapplytoomuchforcetotheupper-rightorupper-leftcornerof
thecomputerdisplay.
22UserGuide

Openthecomputerdisplayslowlytoanyanglewithinarangeoflessthan190degreesasshowninthe
followingillustration.Yourcomputerisnowinnotebookmode.
Note:ThedegreesreferstotheangledegreesbetweentheLCDandthekeyboard.
Innotebookmode,thekeyboardandthetouchpadareenabled.Youalsocancontrolsomefunctionsof
yourcomputerthroughthetabletbuttonsandthemulti-touchscreen,withouttheuseofthekeyboard
andthetouchpad.Formoreinformation,referto“Usingthetabletbuttons”onpage26and“Usingthe
multi-touchscreen”onpage27.
Standmode
YoucanusetheThinkPadYoga11ecomputerinstandmodeinscenariosthatrequirelimitedinteractionwith
thescreen,suchasviewingphotosandplayingvideos.
Attention:Donotrotatethecomputerdisplaywithtoomuchforce,otherwisethecomputerdisplay
orhingesmightgetdamaged.Donotapplytoomuchforcetotheupper-rightorupper-leftcornerof
thecomputerdisplay.
Ifyourcomputerisinnotebookmode,dothefollowingtoturnthecomputerfromnotebookmodeinto
standmode:
Chapter2.Usingyourcomputer23
1.Slowlyrotatethecomputerdisplayclockwisetoanyanglewithinarangeof190degreesto359degrees.
Note:ThedegreesreferstotheangledegreesbetweentheLCDandthekeyboard.
2.Positionyourcomputerasshown.Yourcomputerisnowinstandmode.
Instandmode,thekeyboardandthetouchpadareautomaticallydisabled.However,youcancontrol
somefunctionsofyourcomputerthroughthetabletbuttonsandthemulti-touchscreen,withouttheuse
ofthekeyboardandthetouchpad.Formoreinformation,referto“Usingthetabletbuttons”onpage26
and“Usingthemulti-touchscreen”onpage27.
Tabletmode
YoucanusetheThinkPadYoga11ecomputerintabletmodeinscenariosthatrequirefrequentinteraction
withthescreen,suchasbrowsingtheWebsite.
Attention:Donotrotatethecomputerdisplaywithtoomuchforce,otherwisethecomputerdisplay
orhingesmightgetdamaged.Donotapplytoomuchforcetotheupper-rightorupper-leftcornerof
thecomputerdisplay.
Ifyourcomputerisinstandmode,dothefollowingtoturnthecomputerfromstandmodeintotabletmode:
24UserGuide
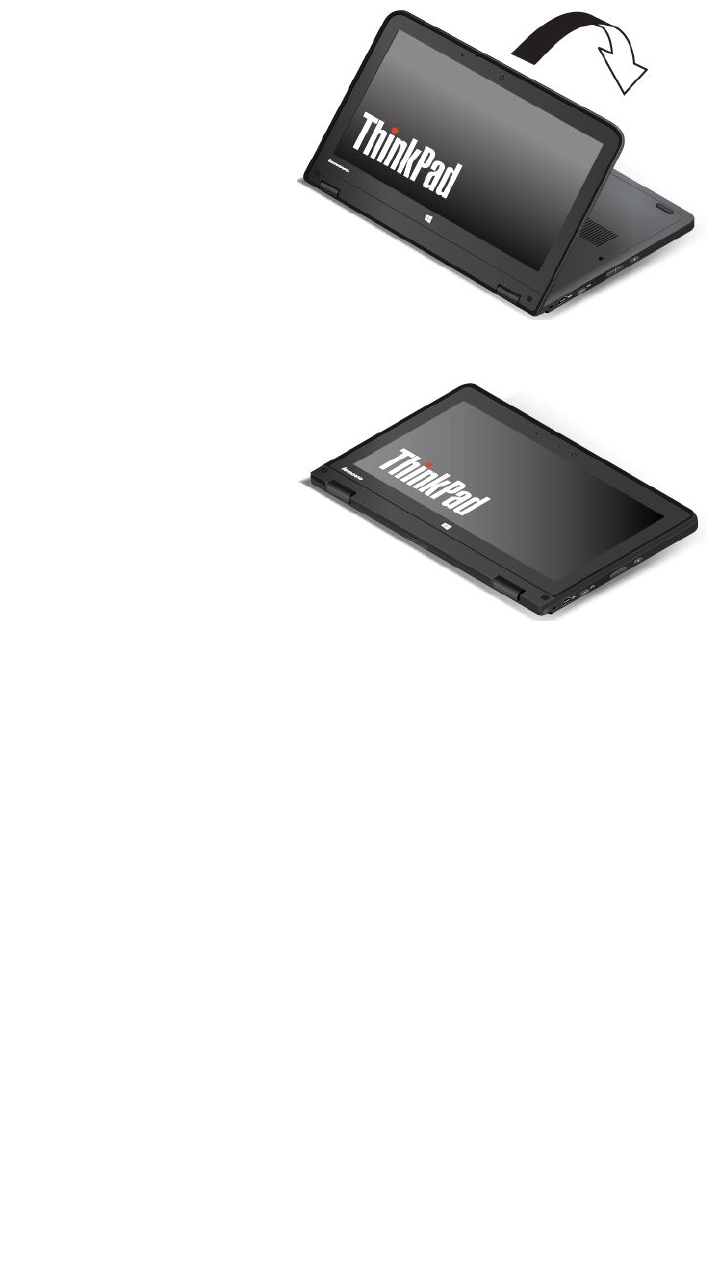
1.Positionyourcomputerasshownandslowlyrotatethecomputerdisplayclockwisetotheangle
of360degrees.
Note:ThedegreesreferstotheangledegreesbetweentheLCDandthekeyboard.
2.Positionyourcomputerasshown.Yourcomputerisnowintabletmode.
Intabletmode,thekeyboardandthetouchpadareautomaticallydisabled.However,youcancontrol
somefunctionsofyourcomputerthroughthetabletbuttonsandthemulti-touchscreen,withouttheuse
ofthekeyboardandthetouchpad.Formoreinformation,referto“Usingthetabletbuttons”onpage26
and“Usingthemulti-touchscreen”onpage27.
Tentmode
YoucanusetheThinkPadYoga11ecomputerintentmodeinscenariosthatrequirelimitedinteractionwith
thescreen,suchasviewingphotosandmakingapresentation.
Attention:Donotrotatethecomputerdisplaywithtoomuchforce,otherwisethecomputerdisplay
orhingesmightgetdamaged.Donotapplytoomuchforcetotheupper-rightorupper-leftcornerof
thecomputerdisplay.
Ifyourcomputerisintabletmode,dothefollowingtoturnthecomputerfromtabletmodeintotentmode:
Chapter2.Usingyourcomputer25
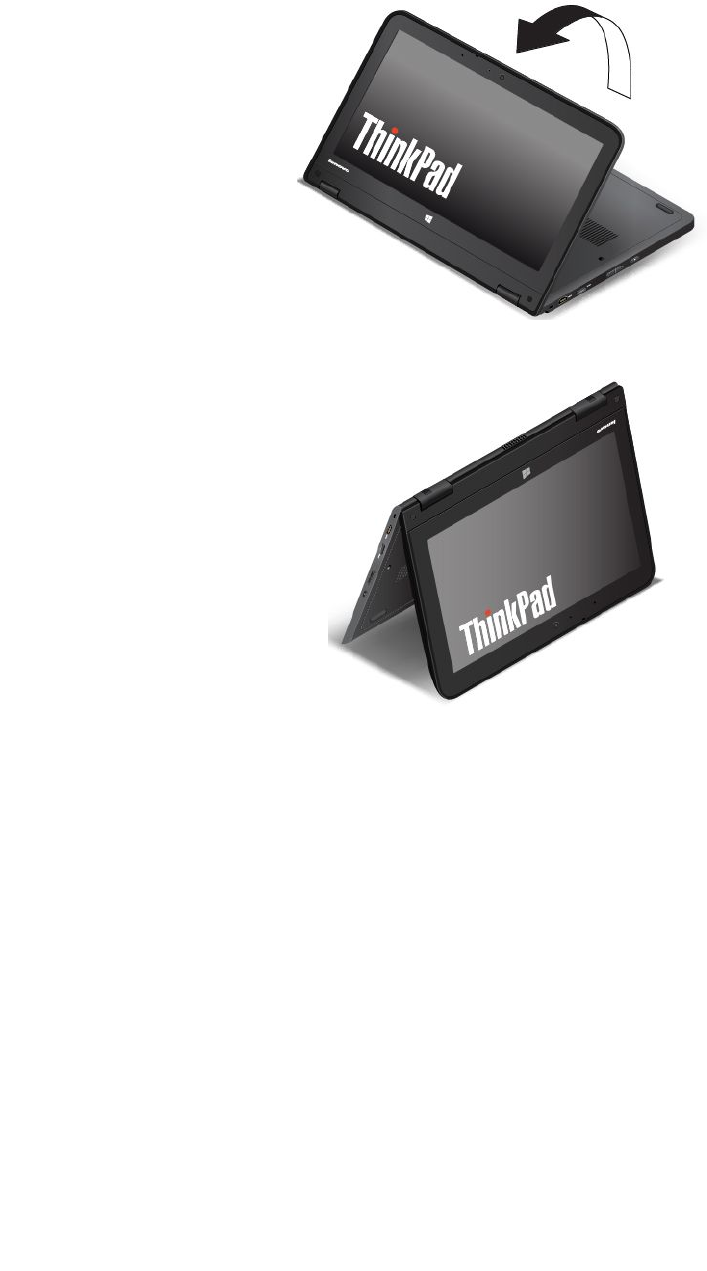
1.Slowlyrotateyourcomputerdisplayanticlockwisetoanyanglewithinarangeof190degreesto359
degrees.
Note:ThedegreesreferstotheangledegreesbetweentheLCDandthekeyboard.
2.Positionyourcomputerasshown.Yourcomputerisnowintentmode.
Intentmode,thekeyboardandthetouchpadareautomaticallydisabled.However,youcancontrolsome
functionsofyourcomputerthroughthetabletbuttonsandthemulti-touchscreen,withouttheuseofthe
keyboardandthetouchpad.Formoreinformation,referto“Usingthetabletbuttons”onpage26and
“Usingthemulti-touchscreen”onpage27.
Usingthetabletbuttons
TheThinkPadYoga11ecomputerisequippedwithtabletbuttonsasshowninthefollowingillustration.You
cancontrolsomefunctionsofyourcomputerthroughthetabletbuttons,withouttheuseofthekeyboard.
26UserGuide
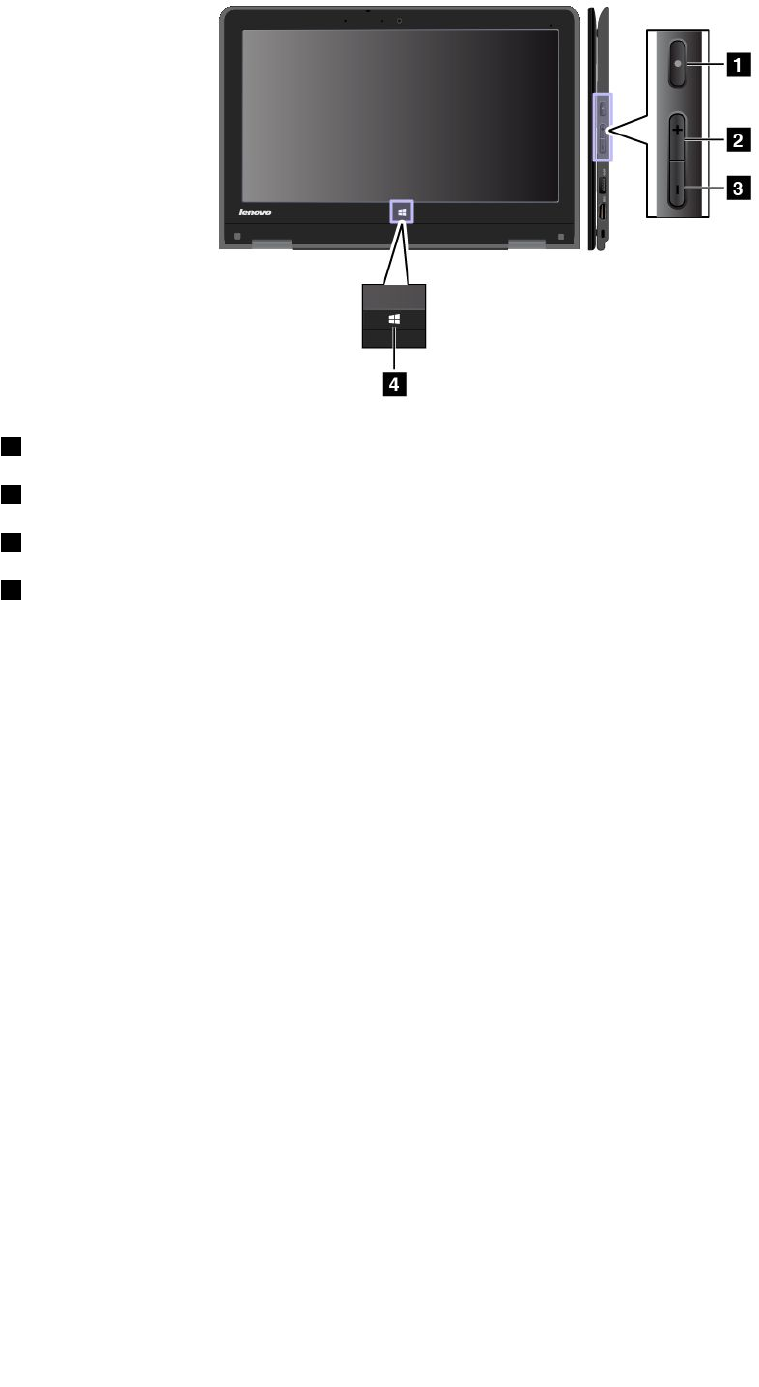
1Powerbutton:Pressthepowerbuttontoturnonthecomputer.
2Speakervolume-upbutton:Pressthespeakervolume-upbuttontoincreasethespeakervolume.
3Speakervolume-downbutton:Pressthespeakervolume-downbuttontodecreasethespeakervolume.
4Windowsbutton:PresstheWindowsbuttontoswitchbetweenthecurrentworkspaceandtheStart
screen;ortowakeupthecomputerfromsleepmode.
Usingthemulti-touchscreen
TheThinkPadYoga11ecomputerisequippedwithamulti-touchscreen,whichenablesyoutoperform
someactionswithouttheuseofthetouchpadoraconventionalmouse.
TouchgesturesandmouseactionsfortheWindows8.1operatingsystem
Thefollowingtablelistssometouchgesturesandthecorrespondingmouseactionsthatareapplicable
totheWindows8.1operatingsystem.
Note:Yourcomputerscreenmightlookdifferentfromthefollowingillustrations.
Chapter2.Usingyourcomputer27
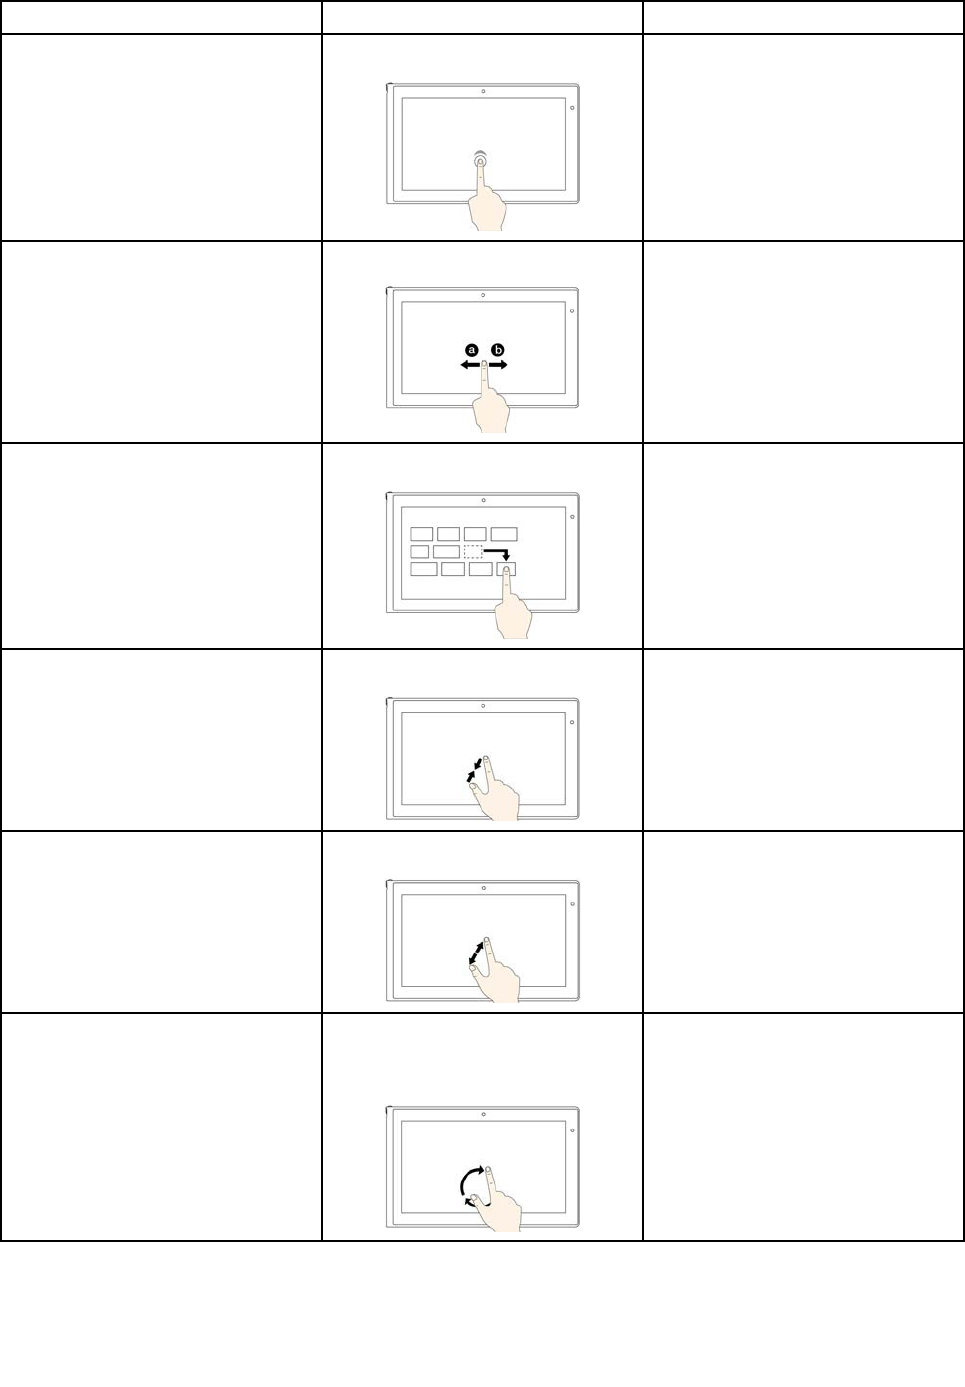
TasksTouchgestures(touchmodelsonly)Mouseactions
Startanapplicationorperforman
actiononastartedapplication,
suchasCopy,Save,andDelete,
dependingontheapplication.
Tap.
Click.
Scrollthroughitems,suchaslists,
pages,andphotos.
Slide. Scrollthemousewheel,movethe
scrollbar,orclickthescrollarrow.
Moveanobject.Draganitemtothedesiredlocation.
Click,hold,anddraganitem.
Zoomout.Movetwofingersclosertogether.
PresstheCtrlkeywhilescrollingthe
mousewheelbackward.
Zoomin.Movetwofingersfartherapart.
PresstheCtrlkeywhilescrollingthe
mousewheelforward.
Rotateanitem.Puttwoormorefingersonan
item,andthenrotateyourfingers
(supportedonlyonsomemodels).
Iftheapplicationsupportsrotation,
clicktherotationicon.
28UserGuide
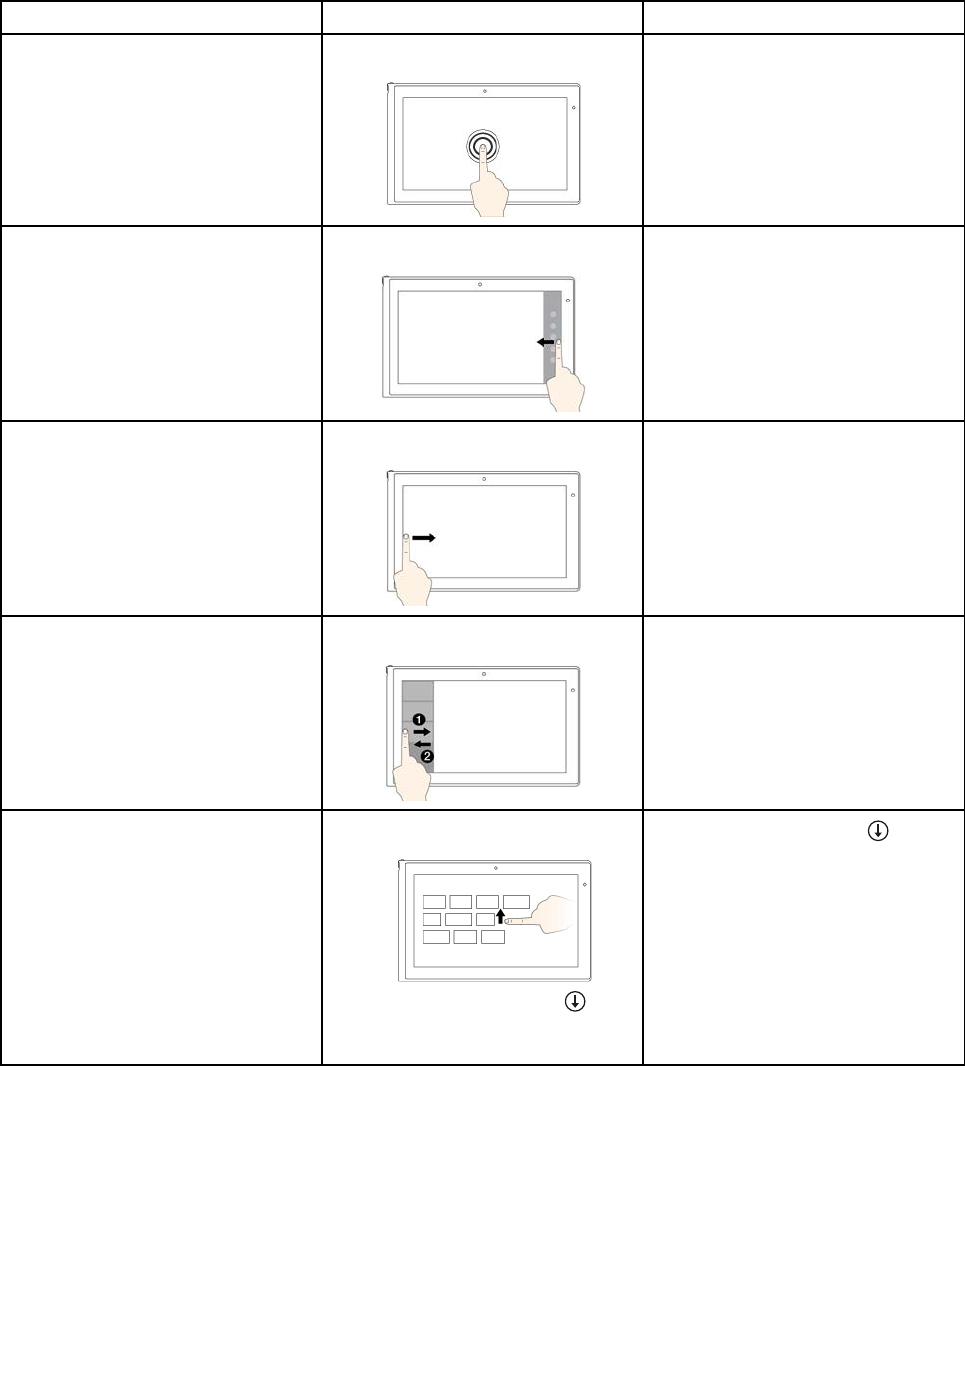
TasksTouchgestures(touchmodelsonly)Mouseactions
Openamenuwithmultipleoptions.Tapandhold.
Double-click.
Displaythecharmsthatcontain
systemcommands,suchasStart,
Settings,Search,Share,and
Devices.
Swipeinfromtherightedge.
Movethepointertothebottom-right
ortop-rightcornerofyourscreen.
Cyclethroughandswitchtostarted
applications.
Swipeinfromtheleftedge.
Movethepointertothetop-leftcorner
ofyourscreen,andthenclick.Keep
clickingtocyclethroughthestarted
applications.
Viewtherecentlyusedapplications
orselectanactiveapplicationfrom
thelist.
Swipeinandoutontheleftedge.
Movethepointertothetop-leftcorner
ofthescreen,andthenmovethe
pointerdownwardalongtheleftedge.
Tomakeaselection,clickthedesired
application.
ViewallapplicationsontheStart
screen.
•Swipeuptothetopedge.
•Tapthedownwardarrow
locatednearthebottom-leftcorner
oftheStartscreen.
Clickthedownwardarrow
located
nearthebottom-leftcornerofthe
Startscreen.
Chapter2.Usingyourcomputer29
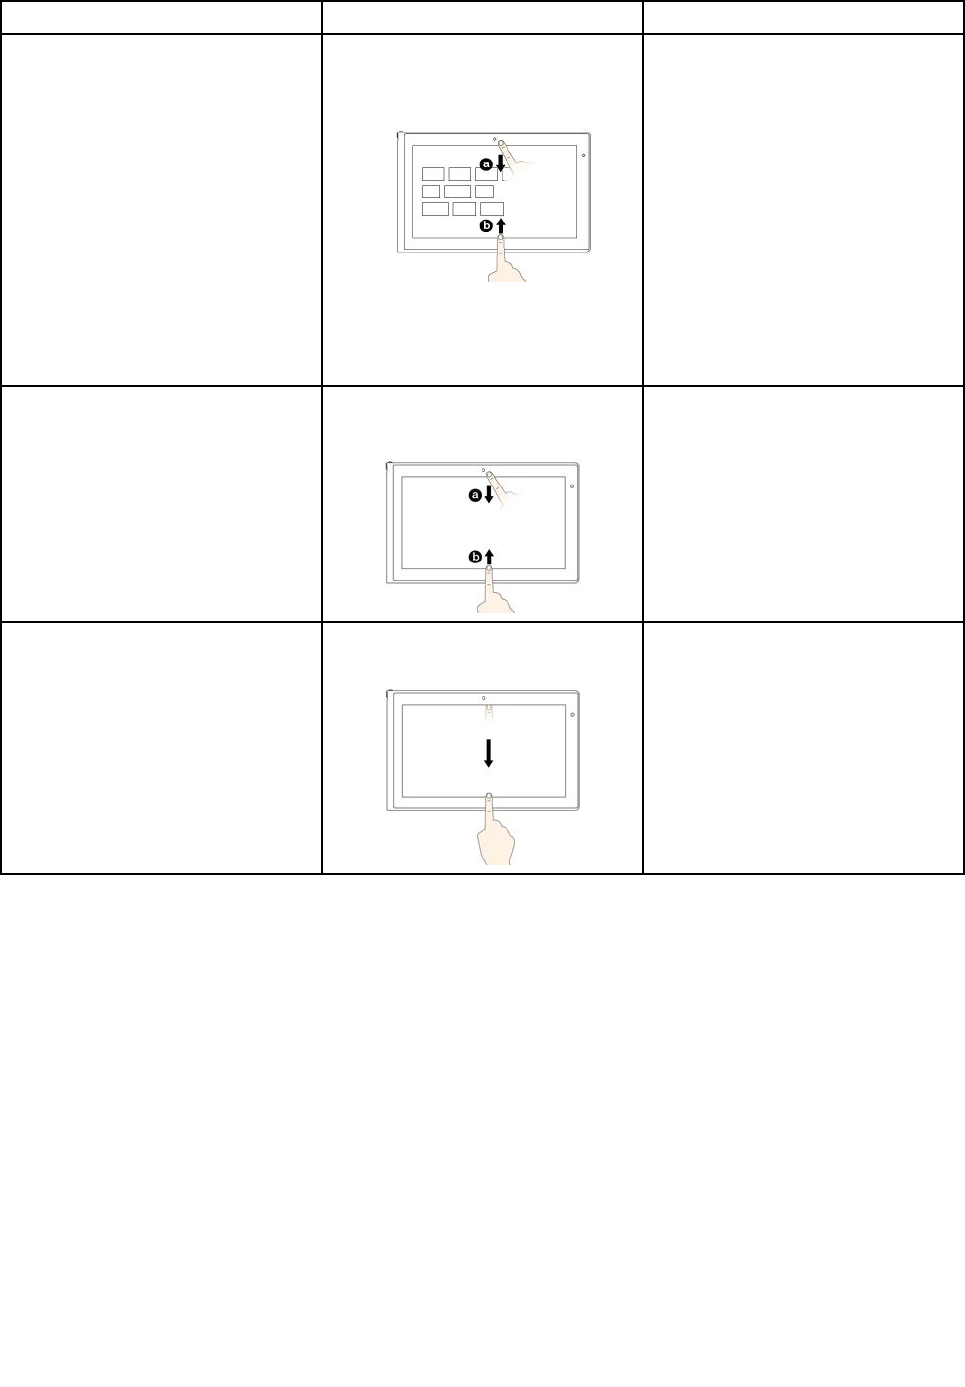
TasksTouchgestures(touchmodelsonly)Mouseactions
CustomizetilesontheStartscreen,
oruninstallanapplication.
•Swipeinfromthetoporbottom
edge.
TapCustomize,andthentapthe
desiredicon.
•Pressandholdthedesiredicon.
•Right-clickablankareaonthe
Startscreen,clickCustomize,and
thenclickthedesiredicon.
•Right-clickthedesiredicon.
Viewtheapplicationcommandson
astartedapplication,suchasCopy,
Save,andDelete,dependingonthe
application.
Swipeinfromthetoporbottomedge.
Right-clickastartedapplication.
Closethecurrentapplication.Swipeinfromthetopedgetothe
bottom.
Movethepointertothetopedgeof
thescreen,clickandholdtheleft
buttononyourmouse,thenmovethe
pointertothebottomofthescreen.
Releasetheleftbuttonwhenyou
reachthebottomofthescreen.
Tipsforusingthemulti-touchscreen
•Themulti-touchscreenisaglasspanelcoveredwithaplasticfilm.Donotapplypressureorplaceany
metallicobjectonthescreen,whichmightdamagethetouchpanelorcauseittomalfunction.
•Donotusefingernails,glovedfingers,orinanimateobjectsforinputonthescreen.
•Regularlycalibratetheaccuracyofthefingerinputtoavoidadiscrepancy.
Tipsforcleaningthemulti-touchscreen
•Turnoffthecomputerbeforecleaningthemulti-touchscreen.
•Useadry,soft,andlint-freeclothorapieceofabsorbentcottontoremovefingerprintsordustfromthe
multi-touchscreen.Donotapplysolventstothecloth.
•Gentlywipethescreenusingatop-downmotion.Donotapplyanypressureonthescreen.
30UserGuide

Powermanagement
Thepowertorunyourcomputercomeseitherfromtheacpowerprovidedbytheacpoweradapterofyour
computer,orfromthelithium-ion(Li-ion)batteryprovidedwithyourcomputer.Whileyouuseacpower,the
batterychargesautomatically.
Whenyouuseyourcomputerawayfromelectricaloutlets,youdependonbatterypowertokeepyour
computerrunning.Differentcomputercomponentsconsumepoweratdifferentrates.Themoreyouusethe
power-intensivecomponents,thefasteryouconsumebatterypower.
Usingtheacpoweradapter
Theacpoweradapterthatcomeswithyourcomputerhastwobasiccomponents:
•Thetransformerpackthatconvertsacpowerforusewiththecomputer.
•Thepowercordthatconnectstotheacoutletandtothetransformerpack.
Attention:Usinganimproperpowercordcouldseverelydamageyourcomputer.
Connectingtheacpoweradapter
Toconnecttheacpoweradapter,dothefollowing:
Note:Ensurethatyouperformtheactionsintheorderinwhichtheyarelisted.
1.Connectthepowercordtothetransformerpack.
2.Connecttheacpoweradaptertothepowerconnectorofthecomputer.
3.Connectthepowercordtoanelectricaloutlet.
Tipsforusingtheacpoweradapter
•Whentheacpoweradapterisnotinuse,disconnectitfromtheelectricaloutlet.
•Donotbindthepowercordtightlyaroundthetransformerpackwhenthepowercordisconnectedto
thetransformerpack.
•Ifthebattery-statusiconintheWindowsnotificationareashowsthatthebatterypowerremainingislow,
youcanchargethebatterywhentheacpoweradapterisconnectedtothecomputer.
Note:Beforeyouchargethebattery,makesurethatthebatterytemperatureisatleast10°C(50°F).
Checkingthebatterystatus
Thebattery-statusiconintheWindowsnotificationareashowsthepercentageofbatterypowerremaining.
Therateatwhichyouusebatterypowerdetermineshowlongyoucanusethebatteryofyourcomputer
betweencharges.Becauseeachcomputeruserhasdifferenthabitsandneeds,itisdifficulttopredicthow
longabatterychargewilllast.Therearetwomainfactors:
•Howmuchenergyisstoredinthebatterywhenyoubegintowork.
•Thewayyouuseyourcomputer.Forexample:
–Howoftenyouaccesstheharddiskdriveorsolid-statedrive.
–Howbrightyoumakethecomputerdisplay.
–Howoftenyouusethewirelessfeatures.
Tocheckfordetailedbatterystatusinformation,dothefollowing:
Chapter2.Usingyourcomputer31

•ForWindows7:StartthePowerManagerprogramandclicktheBatterytab.Forinstructionsonhow
tostartthePowerManagerprogram,see“AccessingLenovoprogramsontheWindows7operating
system”onpage13.
•ForWindows8.1:StarttheLenovoSettingsprogramandclickPower.Forinstructionsonhowtostart
theLenovoSettingsprogram,see“AccessingLenovoprogramsontheWindows8.1operatingsystem”
onpage15.
EnablingthebatteryalarmontheWindows7operatingsystem
FortheWindows7operatingsystem,youcanprogramyourcomputersothatwhenthebatterypowerfalls
belowacertainlevel,threeeventsoccur:analarmisinitiated,amessageisdisplayed,andtheLCDturnsoff.
Toenablethebatteryalarm,dothefollowing:
1.StartthePowerManagerprogramandthenclicktheGlobalPowerSettingstab.Forinstructions
onhowtostartthePowerManagerprogram,see“AccessingLenovoprogramsontheWindows7
operatingsystem”onpage13.
2.IntheAlarmsarea,setthepowerlevelpercentageandtheactionintheLowbatteryalarmsectionand
Criticallylowbatteryalarmsection.
Note:Ifyourcomputerenterssleeporhibernationmodewhenthebatterypowerislow,butthealarm
messagehasnotyetbeendisplayed,themessagewillbedisplayedwhenthecomputerresumes.Toreturn
tonormaloperation,whenthemessageisdisplayed,clickOK.
Chargingthebattery
Itisrecommendedthatyouchargethebatterywhenthebatterypowerremainingislow.Forexample:
•Whenyoufindthatthepercentageoftheremainingpowerislow.
•Whenthepoweralarmalertsyou.
Ifanacoutletisconvenient,connecttheacpoweradaptertothecomputerandtheacoutlet.Dependingon
thebatterysizeandthephysicalenvironment,thebatterywillbefullychargedinaboutthreetosixhours.
Thebattery-statusiconhelpsyouidentifythatthebatteryischarging,andthatthebatteryisfullycharged.
Note:Tomaximizethelifeofthebattery,thecomputerdoesnotstartrechargingthebatteryiftheremaining
powerisgreaterthan95%.
Managingthebatterypower
Toachievethebestbalancebetweenperformanceandpowersaving,adjustyourpowerplansettings.
Toaccesspowerplansettings,dothefollowing:
•ForWindows7:StartthePowerManagerprogramandthenclickthePowerPlantab.Forinstructionson
howtostartthePowerManagerprogram,see“AccessingLenovoprogramsontheWindows7operating
system”onpage13.
•ForWindows8.1:Right-clickthebattery-statusiconintheWindowsnotificationareaandclickPower
Options.ThenclickChangeplansettingsnexttoyourpowerplan.
Formoreinformation,refertothehelpinformationsystemoftheprogram.
Power-savingmodes
Thereareseveralpower-savingmodesthatyoucanuseatanytimetoconservepower.Thissection
introduceseachmodeandgivestipsontheeffectiveuseofthebatterypower.
32UserGuide

•Screen-blankmode(forWindows7only)
Thecomputerdisplayrequiresconsiderablebatterypower.Toturnoffthepowertothedisplayandmake
thecomputerenterscreen-blankmode,right-clickthebatterygaugeiconintheWindowsnotification
areaandthenselectPoweroffdisplay.
•Sleepmode
Insleepmode,yourworkissavedtomemory,andthentheharddiskdriveorsolid-statedriveand
thecomputerdisplayareturnedoff.Whenyourcomputerresumestonormaloperation,yourworkis
restoredwithinseconds.
Toputyourcomputerintosleepmode,dothefollowing:
–ForWindows7:ClicktheStartmenushutdownoptionandthenselectSleep.
–ForWindows8.1:Movethepointertothetop-rightorbottom-rightcornerofthescreentodisplaythe
charms.ThenclickSettings➙Power➙Sleep.
•Hibernationmode
Byusingthismode,youcanturnoffyourcomputercompletelywithoutsavingfilesorexitingfromany
programsthatarerunning.Whenthecomputerentershibernationmode,allopenprograms,folders,and
filesaresavedtotheharddiskdriveorsolid-statedrive,andthenthecomputerturnsoff.
Toputthecomputerintohibernationmode,changeyourpowerplansettingsbydoingthefollowing:
–ForWindows7:ClicktheStartmenushutdownoptionandthenselectHibernate.
–ForWindows8.1:Gotothedesktop.Right-clickthebattery-statusiconintheWindowsnotification
areaandclickPowerOptions.ThenclickChangeplansettingsthatisnexttoyourpowerplan,
andthenfollowtheinstructionsonthescreen.
Ifyouputyourcomputerintohibernationmodewiththewake-upfunctiondisabled,thecomputerdoes
notconsumeanypower.Thewake-upfunctionisdisabledbydefault.Ifyouputyourcomputerinto
hibernationmodewiththewake-upfunctionenabled,thecomputerconsumesasmallamountofpower.
Toenablethewake-upfunction,dothefollowing:
1.GotoControlPanelandclickSystemandSecurity➙AdministrativeT ools.
2.Double-clickTaskScheduler.Ifyouarepromptedforanadministratorpasswordorconfirmation,
typethepasswordorprovideconfirmation.
3.Fromtheleftpane,selectthetaskfolderforwhichyouwanttoenablethewake-upfunction.The
scheduledtasksaredisplayed.
4.Clickascheduledtask,andthenclicktheConditionstab.
5.InthePowerarea,selectWakethecomputertorunthistask.
•Wirelessoff
Whenyouarenotusingthewirelessfeatures,suchasBluetoothorwirelessLAN,turnthemoff.This
helpsconservepower.Toturnoffthewirelessfeatures,pressF8.
Maximizingthebatterylife
Tomaximizethelifeofthebattery,dothefollowing:
•Usethebatteryuntilthechargeiscompletelydepleted.
•Rechargethebatterycompletelybeforeusingit.Youcanseewhetherthebatteryisfullychargedfromthe
battery-statusiconintheWindowsnotificationarea.
•Takeconsiderationofusingpower-savingmodes,suchassleepmodeandhibernationmode.
Chapter2.Usingyourcomputer33

Connectingtothenetwork
YourcomputerhasoneormorenetworkcardsthatenableyoutoconnectyourcomputertotheInternet
andothernetworkconnections.
Ethernetconnections
Youcanconnecttoyourlocalnetworkorabroadbandconnectionbyusingthebuilt-inEthernetfeature
ofyourcomputer.
DANGER
YourcomputerhasanEthernetconnector.Toavoidtheriskofelectricalshock,donotconnect
thetelephonecabletotheEthernetconnector.
Wirelessconnections
Wirelessconnectionisthetransferofdatawithouttheuseofcablesbutbymeansofradiowavesonly.
Attention:
•Ifyouwanttousethewirelessfeaturesonanairplane,checkthewirelessserviceswiththeairlinebefore
boardingtheairplane.
•Iftherearerestrictionsontheuseofcomputerwirelessfeaturesonanairplane,disablethewireless
featuresofyourcomputerbeforeboarding.
Dependingonthewirelessdevicesinstalledonyourcomputer,youmightbeabletousethefollowing
wirelessnetworks:
•WirelessLANconnection
•Bluetoothconnection
UsingthewirelessLANconnection
AwirelessLANcoversarelativelysmallgeographicarea,suchasanofficebuildingorahouse.Devices
basedonthe802.11standardscanconnecttothistypeofnetwork.
Yourcomputercomeswithabuilt-inwirelessnetworkcardandaconfigurationutilitytohelpyouestablish
wirelessconnectionsandmonitortheconnectionstatus.Thisenablesyoutostayconnectedtoyournetwork
whileyouareattheoffice,inameetingroom,orathome,withnoneedforawiredconnection.
ToestablishawirelessLANconnection,dothefollowing:
ForWindows7:
1.PressF8andfollowtheinstructionsonthescreentoenablethewirelessfeature.
2.Clickthewireless-network-connection-statusiconintheWindowsnotificationarea.Alistofavailable
wirelessnetworksisdisplayed.
3.Double-clickanetworktoconnecttoit.Providerequiredinformationifneeded.
ForWindows8.1
1.Gotothedesktopandclickthewireless-network-connection-statusiconintheWindowsnotification
area.Alistofavailablewirelessnetworksisdisplayed.
34UserGuide

Note:Todisplaythelist,ensurethatairplanemode(flightmode)issettooff.
2.Double-clickanetworktoconnecttoit.Providerequiredinformationifneeded.
Ifyouneedtoconnecttodifferentwirelessnetworksindifferentlocations,usethefollowingsoftwareto
managemultiplenetworkprofilessothatthecomputerautomaticallyconnectstoanavailablenetworkwhen
thelocationchanges:
•ForWindows7:UsetheAccessConnectionsprogram.Formoreinformation,see“AccessingLenovo
programsontheWindows7operatingsystem”onpage13.
•ForWindows8.1:StarttheLenovoSettingsprogramandclickLocationAwareness.Formore
information,see“AccessingLenovoprogramsontheWindows8.1operatingsystem”onpage15.
TipsforusingthewirelessLANfeature
Toachievethebestconnection,usethefollowingguidelines:
•PlaceyourcomputersothatthereareasfewobstaclesaspossiblebetweenthewirelessLANaccess
pointandthecomputer.
•Openyourcomputerlidtoanangleofslightlymorethan90degrees.
•Ifyouusethewirelessfeature(the802.11standard)ofyourcomputersimultaneouslywithaBluetooth
option,thedatatransmissionspeedcanbedelayedandtheperformanceofthewirelessfeaturecanbe
degraded.
CheckingthewirelessLANconnectionstatus
YoucancheckthewirelessLANconnectionstatusthroughthewireless-network-connection-statusiconin
theWindowsnotificationarea.Themorebarsencompassed,thebetterthesignalis.
FortheWindows7operatingsystem,youalsocanchecktheAccessConnectionsgauge,theAccess
Connectionsstatusicon,ortheAccessConnectionswireless-statusiconintheWindowsnotificationarea.
AccessConnectionsgauge:
•
Powertothewirelessradioisoffornosignal.
•Powertothewirelessradioison.Thesignalstrengthofthewirelessconnectionispoor.To
improvesignalstrength,moveyourcomputerclosertothewirelessaccesspoint.
•Powertothewirelessradioison.Thesignalstrengthofthewirelessconnection
ismarginal.
•Powertothewirelessradioison.Thesignalstrengthofthewirelessconnection
isexcellent.
AccessConnectionsstatusicon:
•Nolocationprofileisactiveornoneexists.
•Currentlocationprofileisdisconnected.
•Currentlocationprofileisconnected.
AccessConnectionswireless-statusicon:
•Powertothewirelessradioisoff.
•Powertothewirelessradioison.Noassociation.
•Powertothewirelessradioison.Nosignal.
Chapter2.Usingyourcomputer35

• Powertothewirelessradioison.Thesignalstrengthofthewirelessconnectionispoor.Toimprove
signalstrength,moveyourcomputerclosertothewirelessaccesspoint.
•Powertothewirelessradioison.Thesignalstrengthofthewirelessconnectionismarginal.
•Powertothewirelessradioison.Thesignalstrengthofthewirelessconnectionisexcellent.
UsingtheBluetoothconnection
Bluetoothcanconnectdevicesashortdistancefromoneanother,andiscommonlyusedforconnecting
peripheraldevicestoacomputer,transferringdatabetweenhand-helddevicesandapersonalcomputer,or
remotelycontrollingandcommunicatingwithdevicessuchasmobilephones.
Dependingonthemodel,yourcomputermightsupporttheBluetoothfeature.Totransferdatathrough
theBluetoothfeature,dothefollowing:
1.EnsurethattheBluetoothfeatureisenabled.IfyouareusingtheWindows8.1operatingsystem,the
integratedBluetoothfeatureisenabledbydefault.IfyouareusingtheWindows7operatingsystem,to
enabletheBluetoothfeature,pressF8andthenfollowtheinstructionsonthescreen.
2.Right-clickthedatathatyouwanttosend.
3.SelectSendT o➙BluetoothDevices.
4.SelectaBluetoothdevice,andthenfollowtheinstructionsonthescreen.
Note:Ifyouusethewirelessfeature(the802.11standards)ofyourcomputersimultaneouslywitha
Bluetoothoption,thedatatransmissionspeedcanbedelayedandtheperformanceofthewirelessfeature
canbedegraded.
Formoreinformation,refertotheWindowshelpinformationsystemandtheBluetoothhelpinformation
system.
Presentationsandmultimedia
Youcanconnectyourcomputertoaprojectortogivepresentationsoryoucanconnectyourcomputer
toanexternalmonitortoexpandyourworkspace.
Changingdisplaysettings
Youcanchangethedisplaysettings,suchasthedisplayresolution,fontsize,andsoon.
Tochangethedisplaysettings,dothefollowing:
1.GotoControlPanelandclickAppearanceandPersonalization.
2.ClickDisplayforfurtherconfiguration.
3.ClickApply.Thechangewilltakeeffectafteryoulogoff.
Usinganexternalmonitor
Note:Whenyouconnectanexternalmonitor,avideointerfacecablewithaferritecoreisrequired.
Yourcomputercansupportamaximumvideoresolutionofupto2560x1600(withanexternalmonitor
connectedtotheHDMIconnector),providedthattheexternalmonitoralsosupportsthatresolution.For
moreinformationabouttheexternalmonitor,refertothemanualsprovidedwiththeexternalmonitor.
Youcansetanyresolutionforeitherthecomputerdisplayortheexternalmonitor.Whenyouusebothatthe
sametime,theresolutionofbothisthesame.Ifyousetahigherresolutionforthecomputerdisplay,youcan
seeonlypartofthescreenatatime.Youcanseeotherpartsbymovingtheimagewiththepointingdevice.
36UserGuide

Youcanmovethedisplayoutputtothecomputerdisplay,theexternalmonitor,orbothintheDisplay
Settingswindow.
Connectinganexternalmonitor
Toconnectanexternalmonitor,dothefollowing:
1.Connecttheexternalmonitortothemonitorconnectorofyourcomputer.
2.Connecttheexternalmonitortoanelectricaloutlet.
3.Turnontheexternalmonitor.
4.ChangethedisplayoutputlocationbypressingF7.Thisenablesyoutoswitchbetweenviewingoutput
ontheexternalmonitor,thecomputermonitor,andbothmonitors.
Note:Ifyourcomputercannotdetecttheexternalmonitor,right-clickonthedesktop,thenselectScreen
resolution.ClicktheDetectbutton.
Settingtheexternalmonitortype
Aftertheexternalmonitorisconnectedtoyourcomputer,youcansettheexternalmonitortype.
Tosettheexternalmonitortype,dothefollowing:
1.Right-clickonthedesktop,andclickScreenresolution.
Note:Ifyourcomputercannotdetecttheexternalmonitor,clicktheDetectbutton.
2.SelecttheexternalmonitorandthensetthescreenresolutionasdesiredintheResolutionarea.
3.ClickAdvancedSettings.
4.ClicktheMonitortab.Checkthemonitorinformationtoensurethatthemonitortypeiscorrect.Ifitis,
clickOKtoclosethewindow;otherwiseproceedwiththefollowingsteps.
Note:Ifmorethantwomonitortypesaredisplayed,selectGenericPnPMonitororGenericNon-PnP
Monitor.
5.ClickProperties.Ifyouarepromptedforanadministratorpasswordorconfirmation,typethepassword
orprovideconfirmation.
6.ClicktheDrivertab.ThenclickUpdateDriver.
7.ClickBrowsemycomputerfordriversoftware,andthenclickLetmepickfromalistofdevice
driversonmycomputer.
8.CleartheShowcompatiblehardwarecheckbox.
9.Selectthecorrectmanufacturerandmodelfortheexternalmonitor.Ifyoucannotfindyourmonitoron
thelist,stoptheinstallationofthisdriverandusethedrivershippedwithyourmonitor.
10.Afterupdatingthedriver,clickClose.
Changingthecolorsettings
Tochangethecolorsettings,dothefollowing:
ForWindows7:
1.Right-clickonthedesktop,andclickScreenresolution.
2.ClickAdvancedSettings,selecttheMonitortab,thensetthecolorfromtheColorsdrop-downlistbox.
3.ClickOK.
ForWindows8.1:
1.Right-clickonthedesktop,andclickScreenresolution.
Chapter2.Usingyourcomputer37

2.ClickAdvancedSettings,andthenclicktheColorManagementtab.
3.ClickColorManagement,andthenclicktheAdvancedtab.
4.Changethecolorsettingsasyoudesired,andthenclickClose.
Considerationsforconnectinganexternalmonitor
•Wheninstallinganoperatingsystem,youmustinstallthedisplaydriverforyourmonitorthatisprovided
withthecomputer,andthemonitorINFfilethatisprovidedwiththeexternalmonitor.
•Ifyousetaresolutionhigherthantheresolutionyouareusingonthecomputermonitor,andusean
externalmonitorthatdoesnotsupportthatresolution,takeadvantageofthevirtualscreenfunction,which
enablesyoutodisplayonlyapartofthehigh-resolutionscreenimageyourcomputerproduces.Youcan
seeotherpartsoftheimagebymovingthescreenwiththepointingdevice.
•Iftheexternalmonitoryouareusingisoutdated,theresolutionandtherefreshratemightbelimited.
Usingaprojector
Tomakepresentations,youcanconnectaprojectortoyourcomputerthroughtheHDMIconnectoronyour
computerbyusinganHDMI-to-VGAmonitorcable.
Note:Itmighttakeseveralsecondsbeforetheprojectordisplaystheimage.Ifyoudonotseeyourdesktop
displayedafter60seconds,pressF7toswitchamongdifferentdisplayoutputlocations.
Yourprojectormighthaveoneormoreaudio-inputconnectors.Toprojectsound,youneedtoconnectthe
audioconnectoronyourcomputertotheseconnectors,usinganaudiocable(commerciallyavailable).
Usingdualdisplays
ThissectionintroducestheDuplicateandExtenddesktopfunctionsthatenableyoutodisplayoutputon
boththecomputerdisplayandanexternalmonitor.
UsingtheDuplicateorExtenddesktopfunction
WiththeDuplicatedesktopfunction,youcandisplaythesameoutputonboththecomputerdisplayand
anexternaldisplay.YoualsocandisplaydifferentdesktopimagesoneachmonitorwiththeExtend
desktopfunction.
YoucanusetheDuplicateorExtenddesktopfunctionwithoutchanginganysettings.Ifthefunctiondoes
notwork,refertothefollowingtopiconhowtoenabletheDuplicateorExtenddesktopfunction.
EnablingtheDuplicateorExtenddesktopfunction
ToenabletheDuplicateorExtenddesktopfunction,dothefollowing:
1.Connecttheexternalmonitortoyourcomputer;thenconnectthemonitortoanelectricaloutlet.
2.Turnontheexternalmonitor.
3.PressF7,thenselectDuplicateorExtend.
Tochangetheresolutionforeachmonitor,dothefollowing:
1.Right-clickonthedesktop,andclickScreenresolution.
2.ClicktheMonitor-1icon,whichisfortheprimarydisplay(thecomputerdisplaybydefault).
3.Settheresolutionfortheprimarydisplay.
4.ClicktheMonitor-2icon,whichisforthesecondarydisplay(theexternaldisplaybydefault).
5.Settheresolutionforthesecondarydisplay.
6.ClickAdvancedsettingsandsetupthecolorqualityontheMonitortab.
38UserGuide

7.ClickOKtoapplythechanges.
ConsiderationsforusingtheExtenddesktopfunction
•IfyouwanttoshowDOSfull-screenwhileinExtenddesktopmode,onlytheprimarydisplayshows
DOS;theotherdisplayisblackedout.
•IfyourcomputerhastheIntel®graphicscard,youcandesignatetheprimarydisplaybydoingthe
following:
1.Right-clickonthedesktopandselectScreenresolution.
2.ClickthedesireddisplayimageandselectMakethismymaindisplay.
3.ClickOK.
•WhenanapplicationusingDirectDraworDirect3Disrunninginfull-screenmode,onlytheprimarydisplay
showstheoutput.
•YoucannotusethedisplayswitchingfunctionwhenyouareinExtenddesktopmode.
Usingaudiofeatures
Yourcomputerisequippedwiththefollowingitems:
•Microphone
•Speakers
•Audioconnector,3.5mm(0.14inch)indiameter
Yourcomputeralsohasanaudiochipthatenablesyoutoenjoyvariousmultimediaaudiofeatures:
•CompliantwithIntelHighDefinitionAudio
•Playbackofmusicalinstrumentdigitalinterface(MIDI)andmovingpictureexpertsgroupaudiolayer-3
(MP3)files
•Recordingandplaybackofpulse-codemodulation(PCM)andwaveformaudiofileformat(WAV)files
•Recordingfromvarioussoundsources,suchasaheadsetattached
Thefollowingtableshowswhichfunctionsoftheaudiodevicesattachedtotheconnectorsonyour
computeraresupported.
Table3.Audiofeaturelist
ConnectorHeadsetwitha3.5mm
(0.14-inch),4-poleplug
ConventionalheadphoneConventionalmicrophone
AudioconnectorHeadphoneand
microphonefunctions
supported
Headphonefunction
supported
Notsupported
Toconfigurethemicrophoneforoptimalsoundrecording,usetheDolbyAdvancedAudiov2program.To
starttheprogram,gotoControlPanelandclickHardwareandSound.ThenclicktheiconoftheDolby
AdvancedAudiov2program.
Usingthecamera
Yourcomputerhasanintegratedcamera.Youcanusethecameratopreviewyourvideoimageandtakea
snapshotofyourcurrentimage.
Tostartthecamera,dothefollowing:
Chapter2.Usingyourcomputer39

•ForWindows7:StarttheCommunicationsUtilityprogram.
•ForWindows8.1:ClickCamerafromtheStartscreen.
Whenthecameraisstarted,thecamera-in-useindicatorturnsoningreen.
Youalsocanusethecamerawithotherprogramsthatprovidefeaturessuchasphotographing,video
capturing,andvideoconferencing.Tousethecamerawithotherprograms,startoneoftheprograms
andstartthephotographing,videocapturing,orvideoconferencingfunction.Then,thecamerastarts
automaticallyandthecamera-in-useindicatorturnsoningreen.Formoreinformationaboutusingthe
camerawithaprogram,refertothehelpinformationsystemoftheprogram.
Configuringcamerasettings
Youcanconfigurethecamerasettingstomeetyourneeds,suchasadjustingthequalityofthevideooutput.
Toconfigurethecamerasettings,dothefollowing:
•ForWindows7:StarttheCommunicationsUtilityprogram.ClicktheManageSettingsbuttonand
configurethecamerasettingsasdesired.
•ForWindows8.1,dooneofthefollowing:
–Configurethecamerasettingsdirectlyfromtheprogramthatisusingthecamera.Fordetails,seethe
helpinformationsystemoftheprogram.
–ClickLenovoSettingsfromtheStartscreen.ThenclickCamera.Followtheinstructionsonthe
screentoconfigurethecamerasettingsasdesired.
Usingaflashmediacard
Yourcomputerhasamediacardreaderslot,anditsupportsthefollowingtypesofcards:
•MultiMediaCard(MMC)module
•SecureDigital(SD)card
•SecureDigitaleXtended-Capacity(SDXC)card
•SecureDigitalHigh-Capacity(SDHC)card
Note:YourcomputerdoesnotsupporttheCPRMfeaturefortheSDcard.
Attention:Whiletransferringdatatoorfromaflashmediacard,suchasanSDcard,donotputyour
computerintosleeporhibernationmodebeforethedatatransfercompletes;otherwise,yourdatacould
becomedamaged.
Installingaflashmediacard
Attention:Beforeyoustartinstallingacard,touchametaltableoragroundedmetalobject.Thisaction
reducesanystaticelectricityfromyourbody.Staticelectricitycoulddamagethecard.
Toinstallaflashmediacard,dothefollowing:
1.Locatethemediacardslotonyourcomputer.See“Left-sideview”onpage5.
2.Ensurethatthemetalcontactsofthecardarefacingdownandpointingtowardthemediacardslot.
3.Pressthecardfirmlyintothemediacardslot.
Iftheplug-and-playfeatureisnotenabledfortheinstalledflashmediacard,dothefollowingtoenable
thefeature:
1.GotoControlPanel.
40UserGuide

2.ClickHardwareandSound.
3.ClickDeviceManager.Ifyouarepromptedforanadministratorpasswordorconfirmation,typethe
passwordorprovideconfirmation.
4.FromtheActionmenu,selectAddlegacyhardware.TheAddHardwareWizardstarts.
5.Followtheinstructionsonthescreen.
Removingaflashmediacard
Attention:
•Beforeremovingacard,stopthecardfirst.Otherwise,dataonthecardmightgetdamagedorlost.
•Donotremoveacardwhilethecomputerisinsleepmodeorhibernationmode.Otherwise,thesystem
mightnotrespondwhenyoutrytoresumeoperation.
Toremoveaflashmediacard,dothefollowing:
1.ClickthetriangulariconintheWindowsnotificationareatoshowhiddenicons.Then,right-clickthe
SafelyRemoveHardwareandEjectMediaicon.
2.Selecttheitemyouwanttoremovetostopthecard.
3.Pressthecardtoejectitfromyourcomputer.
4.Removethecardandstoreitsafelyforfutureuse.
Note:IfyoudonotremovethecardfromyourcomputerafteryouejectthecardfromtheWindows
operatingsystem,thecardcannolongerbeaccessed.Toaccessthecard,youmustremoveitonce,
theninsertitagain.
Frequentlyaskedquestions
Thefollowingareafewtipsthatwillhelpyouoptimizetheuseofyourcomputer.
Toensurethatyoureceivethebestperformancefromyourcomputer,gotothefollowingWebpage
tofindinformationsuchasaidsfortroubleshootingandanswerstofrequentlyaskedquestions:
http://www.lenovo.com/support/faq
CanIgetmyuserguideinanotherlanguage?
•Todownloadtheuserguideinanotherlanguage,goto:http://www.lenovo.com/support.Thenfollow
theinstructionsonthescreen.
WherecanIfindhelpabouttheWindowsoperatingsystem?
TheWindowsHelpandSupportinformationsystemprovidesyouwithdetailedinformationaboutusingthe
Windowsoperatingsystemtohelpyougetthemostofyourcomputer.ToaccesstheWindowsHelpand
Supportinformationsystem,dooneofthefollowing:
•OntheWindows7operatingsystem,clickStart➙HelpandSupport.
•OntheWindows8.1operatingsystem,moveyourpointertothetop-rightorbottom-rightcornerofthe
screentodisplaythecharms.ThenclickSettings➙Help.Additionally,theWindows8.1operating
systemprovidesaHelp+TipsapplicationthatyoucanstartfromtheStartscreenorAppsscreen.
CanIchangetheWindows8.1startupbehaviortoopeneitherthedesktoportheStartscreen?
OntheWindows8.1operatingsystem,youcansetthecomputertoopeneitherthedesktoportheStart
screenbydefault.Tosetthedefaultstartupscreen,dothefollowing:
Chapter2.Usingyourcomputer41

1.Onthedesktop,moveyourpointertothetaskbaratthebottomofthescreenandright-clickonthe
taskbar.
2.ClickProperties.TheTaskbarandNavigationpropertieswindowisdisplayed.
3.OntheNavigationtab,locatetheStartscreensection,andthendooneofthefollowing:
•Tosetthedesktopasyourdefaultstartupscreen,selectWhenIsigninorcloseallappsona
screen,gotothedesktopinsteadofStartsoacheckisvisible.
•TosettheStartscreenasyourdefaultstartupscreen,removethecheckfromtheWhenIsigninor
closeallappsonthescreen,gotodesktopinsteadofStartcheckbox.
4.ClickOKtosavethesetting.
Howtousethebatterypowermoreeffectively?
•Toconservepower,ortosuspendoperationwithoutexitingprogramsorsavingfiles,see“Power-saving
modes”onpage32.
•Toachievethebestbalancebetweenperformanceandpowersaving,changepowerplansettings.
Concernedaboutsecurityorneedtosecurelydisposeofdatastoredonyourharddiskdriveor
solid-statedrive?
•StudyChapter4“Security”onpage51tofindouthowyoucanprotectyourcomputerfromtheftand
unauthorizeduse.
•UsethePasswordManagerprogramtoprotectthedatastoredonyourcomputer.Fordetails,seethe
helpinformationsystemoftheprogram.
•Beforeyoudisposeofthedataontheharddiskdriveorsolid-statedrive,besuretoread“Noticeon
deletingdatafromyourharddiskdriveorsolid-statedrive”onpage56.
Isgettingconnectedindifferentlocationsachallenge?
•Totroubleshootawirelessnetworkingissue,goto:
http://www.lenovo.com/support/faq
•TakeadvantageofthenetworkingfeaturesprovidedbytheAccessConnectionsprogram(onthe
Windows7operatingsystem)orLocationAwarenessintheLenovoSettingsprogram(ontheWindows
8.1operatingsystem).
•Tolearnmoreaboutusingthewirelessfeaturesofyourcomputer,referto“Wirelessconnections”on
page34.
•Totravelmoreconfidently,besuretocheckthetipsin“Travelingwithyourcomputer”onpage50.
•PressF8toenableordisablethewirelessfeatures.
Needtogivepresentationsorattachanexternalmonitoroften?
•Ensurethatyoufollowtheprocedurefor“Usinganexternalmonitor”onpage36.
•WiththeExtenddesktopfunction,youcandisplayoutputonboththecomputerdisplayandanexternal
monitor.
Ihavebeenusingyourcomputerforsometimealready,anditisgettingslower?
•Follow“Generaltipsforpreventingproblems”onpage75.
•Youcandiagnoseproblemsyourselfbyusingthepreinstalleddiagnosticsoftware.
•CheckforrecoverysolutionsinChapter8“Recoveryinformation”onpage97.
Printthefollowingsectionsandkeepthemwithyourcomputerincaseyouareunabletoaccessthisonline
userguidewhennecessary.
42UserGuide


44UserGuide
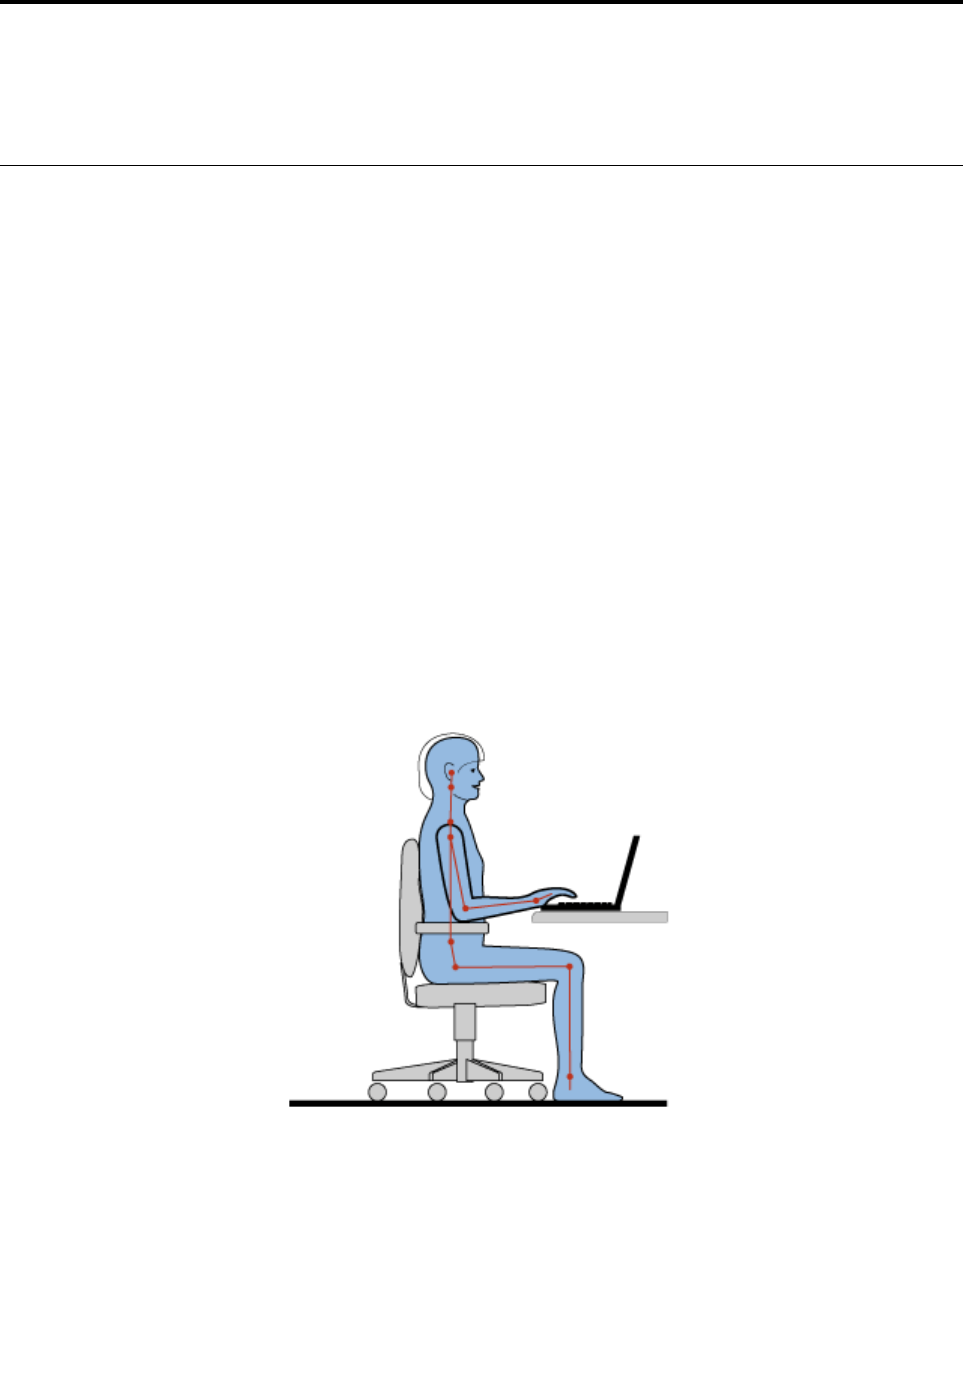
Chapter3.Youandyourcomputer
Thischapterprovidesinformationaboutaccessibility,comfort,andtravelingwithyourcomputer.
Accessibilityandcomfort
Goodergonomicpracticeisimportanttogetthemostfromyourpersonalcomputerandtoavoiddiscomfort.
Arrangeyourworkplaceandtheequipmentyouusetosuityourindividualneedsandthekindofwork
thatyouperform.Inaddition,usehealthyworkhabitstomaximizeyourperformanceandcomfortwhile
usingyourcomputer.
Thefollowingtopicsprovideinformationaboutarrangingyourworkarea,settingupyourcomputer
equipment,andestablishinghealthyworkhabits.
Lenovoiscommittedtoprovidingthelatestinformationandtechnologytoourcustomerswithdisabilities.
Refertotheaccessibilityinformationthatoutlinesoureffortsinthisarea.See“Accessibilityinformation”
onpage46.
Ergonomicinformation
Workinginthevirtualofficemightmeanadaptingtofrequentchangesinyourenvironment.Forexample,
adaptingtothesurroundinglightingsources,properseating,andtheplacementofyourcomputerhardware,
canhelpyouimproveyourperformanceandachievegreatercomfort.
Thefollowingexampleshowssomeoneinaconventionalsetting.Evenwhennotinsuchasetting,youcan
followmanyofthesetips.Developgoodhabits,andtheywillserveyouwell.
Generalposture:Makeminormodificationsinyourworkingposturetodetertheonsetofdiscomfort
causedbylongperiodsofworkinginthesameposition.Frequent,shortbreaksfromyourworkalsohelp
topreventminordiscomfortassociatedwithyourworkingposture.
Display:Positionthedisplaytomaintainacomfortableviewingdistanceof510-760mm(20-30inches).
Avoidglareorreflectionsonthedisplayfromoverheadlightingoroutsidesourcesoflight.Keepthedisplay
screencleanandsetthebrightnesstolevelsthatenableyoutoseethescreenclearly.
©CopyrightLenovo201445

Headposition:Keepyourheadandneckinacomfortableandneutral(vertical,orupright)position.
Chair:Useachairthatgivesyougoodbacksupportandseatheightadjustment.Usechairadjustmentsto
bestsuityourdesiredposture.
Armandhandposition:Keepyourforearms,wrists,andhandsinarelaxedandneutral(horizontal)position.
Typewithasofttouchwithoutpoundingthekeys.
Legposition:Keepyourthighsparalleltothefloorandyourfeetflatonthefloororonafootrest.
Whatifyouaretraveling?
Itmightnotbepossibletoobservethebestergonomicpracticeswhenyouareusingyourcomputer
whileonthemoveorinacasualsetting.Regardlessofthesetting,trytoobserveasmanyofthetipsas
possible.Sittingproperlyandusingadequatelighting,forexample,willhelpyoumaintaindesirablelevels
ofcomfortandperformance.
Questionsaboutvision?
ThevisualdisplayscreensofThinkPadnotebookcomputersaredesignedtomeetthehigheststandards
andtoprovideyouwithclear,crispimagesandlarge,brightdisplaysthatareeasytosee,yeteasyonthe
eyes.Ofcourse,anyconcentratedandsustainedvisualactivitycanbetiring.Ifyouhavequestionsoneye
fatigueorvisualdiscomfort,consultavision-carespecialistforadvice.
Comfort
Observethefollowingguidelinestoachievegreatercomfortandimproveperformance.
Activesittingandrestbreaks:Thelongeryousitandworkwithyourcomputer,themoreimportantitisto
observeyourworkingposture.Follow“Ergonomicinformation”onpage45andpractice“activesitting”to
avoiddiscomfortassociatedwithyourworkingpostures.Makingminorvoluntaryposturalchangesand
takingshortfrequentworkbreaksarethekeyingredientsforhealthycomputing.Yourcomputerislightand
mobile;youcaneasilyrepositionyourworkingsurfacetoaccommodatemanyposturemodifications.
Workareasetupoptions:Familiarizeyourselfwithallofyourofficefurnituresothatyouknowhowtoadjust
yourworksurface,seat,andotherworktoolstoaccommodateyourpreferencesforcomfort.Ifyourwork
areaisnotinanofficesetting,besuretotakespecialnoteofemployingactivesittingandtakingwork
breaks.ManyThinkPadproductsolutionsareavailabletohelpyoumodifyandexpandyourcomputerto
bestsuityourneeds.Youcanfindsomeoftheseoptionsathttp://www.lenovo.com/essentials.Exploreyour
optionsfordockingsolutionsandexternalproductsthatprovidetheadjustabilityandfeaturesthatyouwant.
Accessibilityinformation
Lenovoiscommittedtoprovidingpeoplewithdisabilitiesgreateraccesstoinformationandtechnology.
Sometechnologiesarealreadyprovidedinyouroperatingsystem.Otherscanbepurchasedthrough
vendors.
UsersalsocanusetheEaseofAccessCenterprovidedintheWindowsoperatingsystemtoconfiguretheir
computerstosuittheirphysicalandcognitiveneeds.TheEaseofAccessCenterisacentrallocation
thatyoucanusetoconfiguretheaccessibilitysettingsandprogramsavailableintheMicrosoftWindows
operatingsystem.TousetheEaseofAccessCenter,openControlPanelandclickEaseofAccess
➙EaseofAccessCenter.
Thefollowinginformationprovideswaystohelpuserswhohavehearing,vision,andmobilitylimitationsget
themostoutoftheircomputerexperience.
46UserGuide

On-screennotification
On-screennotificationhelpshearing-impairedpeoplebeawareofthestatusoftheircomputer.On-screen
notificationreplacessoundswithvisualcuesortextcaptionstoindicatethatactivityishappeningonthe
computer.Asaresult,systemalertsarenoticeableevenwhentheyarenotheard.Forexample,whenyou
selectoneobjectwithyourkeyboard,theobjectishighlighted.Whenyoumovethepointertooneobject
withyourmouse,theintroductorytextoftheobjectisdisplayed.
Touseon-screennotification,openControlPanel,clickEaseofAccess➙EaseofAccessCenter,and
thenclickUsetextorvisualalternativeforsounds.
Audionotification
Audionotificationhelpsvisuallyimpairedpeopleorpeoplewithweaksightbeawareofthestatusoftheir
computer.
Touseaudionotification,openControlPanel,clickEaseofAccess➙EaseofAccessCenter➙Usethe
computerwithoutadisplay,andthenselectTurnonAudioDescription.
Narrator
Narratorisascreenreaderthatreadswhatisdisplayedonthescreenaloudanddescribeseventslike
errormessages.
ToopenNarrator,dothefollowing:
•ForWindows7:ClicktheStartbutton.Then,typeNarratorintothesearchfield.Inthelistofresults,
clickNarrator.
•ForWindows8.1:Moveyourpointertothetop-rightorbottom-rightcornerofthescreentodisplaythe
charmsandclickSearch.Then,typeNarratorintothesearchfield.Inthelistofresults,clickNarrator.
FormoreinformationabouthowtouseandconfigureNarrator,seetheWindowsHelpandSupport
informationsystem.
Screen-readertechnologies
Screen-readertechnologiesareprimarilyfocusedonsoftwareprograminterfaces,helpinformationsystems,
andavarietyofonlinedocuments.Foradditionalinformationaboutscreenreaders,seethefollowing:
•UsingPDFswithscreenreaders:
http://www.adobe.com/accessibility.html?promoid=DJGVE
•UsingtheJAWSscreenreader:
http://www.freedomscientific.com/jaws-hq.asp
•UsingtheNVDAscreenreader:
http://www.nvaccess.org/
SpeechRecognition
SpeechRecognitionenablesyoutocontrolyourcomputerbyvoice.
Usingonlyyourvoice,youcanstartprograms,openmenus,clickbuttonsandotherobjectsonthescreen,
dictatetextintodocuments,andwriteandsende-mails.Everythingyoudowiththekeyboardandmouse
canbedonewithonlyyourvoice.
ToopenSpeechRecognition,dothefollowing:
•ForWindows7:ClicktheStartbutton.Then,typeSpeechRecognitionintothesearchfield.Inthelist
ofresults,clickSpeechRecognition.
Chapter3.Youandyourcomputer47

•ForWindows8.1:Moveyourpointertothetop-rightorbottom-rightcornerofthescreentodisplaythe
charmsandclickSearch.Then,typeSpeechRecognitionintothesearchfield.Inthelistofresults,
clickSpeechRecognition.
FormoreinformationabouthowtouseandconfigureSpeechRecognition,seetheWindowsHelpand
Supportinformationsystem.
Customizabletextsize
Dependingonyourpreference,youcanchangeonlythetextsizeinsteadofchangingthesizeofeverything
onthedesktop.Tochangethetextsize,openControlPanelandclickAppearancesandPersonalization➙
Display.Then,gotoChangeonlythetextsizeandsetatextsizethatmeetsyourneeds.
Magnifier
YourcomputerisequippedwiththeMicrosoftMagnifiertohelpvisuallyimpairedpeopleusethecomputer
morecomfortably.Magnifierisausefulutilitythatenlargespartorallofyourscreensothatyoucanseethe
wordsandimagesbetter.MagnifierispartoftheEaseofAccessCenter.
ToopenMagnifier,dothefollowing:
•ForWindows7:ClicktheStartbutton,clickAllPrograms➙Accessories➙EaseofAccess,and
thenclickMagnifier.
•ForWindows8.1:Moveyourpointertothetop-rightorbottom-rightcornerofthescreentodisplaythe
charmsandclickSearch.Then,typeMagnierintothesearchfield.Inthelistofresults,clickMagnifier.
FormoreinformationabouthowtouseandconfigureMagnifier,seetheWindowsHelpandSupport
informationsystem.
Note:Fortouch-screencomputermodels,youalsocanzoominandzoomoutbyusingtouchgestures
insteadofthekeyboard.See“Zoom”onpage48.
Zoom
Youcanusethezoomfeaturetoenlargeorreducethesizeoftext,pictures,maps,orotherobjects.
•Fromthekeyboard:
–Zoomin:PresstheWindowslogokey+theplus-signkey(+)toenlargethesizeoftext,pictures,
maps,orotherobjects.
–Zoomout:PresstheWindowslogokey+theminus-sign(-)keytoreducethesizeoftext,pictures,
maps,orotherobjects.
•Fromthetouchscreen:
–Zoomin:Movetwofingersfartherapartonthetouchscreentoenlargethesizeoftext,pictures,
maps,orotherobjects.
–Zoomout:Movetwofingersclosertogetheronthetouchscreentoreducethesizeoftext,pictures,
maps,orotherobjects.
Screenresolution
Youcanmakeyourdocumentseasiertoreadbyadjustingthescreenresolutionofyourcomputer.Toadjust
thescreenresolution,rightclickanywhereonthedesktop,clickScreenresolution,andthenadjustthe
settingsasyouprefer.
Note:Settingtoolowofaresolutionmightpreventsomeitemsfromfittingonthescreen.
Foralternativesonincreasingthesizeoftextandotherobjects,seethefollowing:
48UserGuide

•“Customizabletextsize”onpage48
•“Magnifier”onpage48
•“Zoom”onpage48
EaseofAccesskeyboardshortcuts
Keyboardshortcutsarecombinationsoftwoormorekeysthatyoucanusetoperformataskthatwould
typicallyrequireamouseorotherpointingdevices.Keyboardshortcutsprovideaneasieralternativeto
interactwithyourcomputerasyouworkwiththeWindowsoperatingsystemandmostapplications.
Thefollowingtablecontainskeyboardshortcutsthatcanhelpmakeyourcomputereasiertouse.
KeyboardshortcutFunction
Windowslogokey+UOpentheEaseofAccessCenter
RightShiftforeightsecondsTurnFilterKeysonoroff
ShiftfivetimesTurnStickyKeysonoroff
NumLockforfivesecondsTurnToggleKeysonoroff
LeftAlt+LeftShift+NumLockTurnMouseKeysonoroff
LeftAlt+LeftShift+PrtScn(orPrtSc)TurnHighContrastonoroff
Formoreinformation,gotohttp://windows.microsoft.com/,andthentypeanyofthefollowingkeywordsfor
searching:keyboardshortcuts,accesskeys,keycombinations,shortcutkeys.
On-ScreenKeyboard
Ifyouprefertotypeorenterdataintoyourcomputerwithoutusingaphysicalkeyboard,youcanuse
On-ScreenKeyboard.On-ScreenKeyboarddisplaysavisualkeyboardwithallthestandardkeys.Youcan
selectkeysusingthemouseoranotherpointingdevice,oryoucantaptoselectthekeysifyourcomputer
supportsmulti-touchscreen.
ToopenOn-ScreenKeyboard,dothefollowing:
•ForWindows7:ClicktheStartbutton.Then,typeOn-ScreenKeyboardintothesearchfield.Inthelistof
results,clickOn-ScreenKeyboard.
•ForWindows8.1:Moveyourpointertothetop-rightorbottom-rightcornerofthescreentodisplaythe
charmsandclickSearch.Then,typeOn-ScreenKeyboardintothesearchfield.Inthelistofresults,
clickOn-ScreenKeyboard.
FormoreinformationabouthowtouseandconfigureOn-ScreenKeyboard,seetheWindowsHelpand
Supportinformationsystem.
Personalizedkeyboard
Thetactilebumpsonthekeyboardprovideareferencepointfromwhichyoucaneasilylocateallkeyson
thekeyboardwithoutvisualassistance.
Toadjustyourkeyboardsettings,openControlPanel,clickEaseofAccess➙EaseofAccessCenter,
andthenclickMakethekeyboardeasiertouse.
Industry-standardconnectors
Yourcomputerprovidesindustry-standardconnectorsthatenableyoutoconnectassistivedevices,
ifneeded.
Chapter3.Youandyourcomputer49

Formoreinformationonthelocationandfunctionofeachconnector,see“Locatingcomputercontrols,
connectors,andindicators”onpage1.
Documentationinaccessibleformats
Lenovoprovideselectronicdocumentationinaccessibleformats.Lenovoelectronicdocumentation,suchas
properlytaggedPDFfilesorHyperTextMarkupLanguage(HTML)files,isdevelopedtoensurethatvisually
impaireduserscanreadthedocumentationthroughascreenreader.Eachimageinthedocumentationalso
includesadequatealternativetexttoexplaintheimagesothatvisuallyimpaireduserscanunderstandthe
imagewhentheyuseascreenreader.
Travelingwithyourcomputer
Thistopicprovidesinformationtohelpyouworkwithyourcomputerwhenyouaretraveling.
Traveltips
Usethefollowingtraveltipstotravelmoreconfidentlyandefficientlywithyourcomputer.
•Althoughitissafetoallowyourcomputertogothroughthex-raymachinesatairportsecuritystations,it
isimportanttokeepyoureyesonthecomputeratalltimestopreventtheft.
•Considerbringinganelectricaladapterforuseinanairplaneorautomobile.
•Ifyoucarryanacpoweradapter,detachtheaccordfromittoavoiddamagingthecord.
Traveltipsonairplanes
Ifyoucarryyourcomputerintoanairplane,takenoteofthefollowingtips:
•Ifyouintendtouseyourcomputerorwirelessservices(suchasInternetandBluetooth),checkwiththe
airlineforrestrictionsandavailabilityofservicesbeforeboardingtheairplane.Iftherearerestrictions
ontheuseofcomputerswithwirelessfeaturesontheairplane,youmustabidebythoserestrictions.If
necessary,disablewirelessfeaturesbeforeboarding.
•Becarefulabouttheseatinfrontofyouonairplanes.Angleyourcomputerdisplaysothatitdoesnotget
caughtwhenthepersoninfrontofyouleansback.
•Whentakingoff,remembertoturnoffyourcomputerorputitintohibernationmode.
Travelaccessories
Thefollowingisachecklistofitemstoconsiderpackingwhenyouaregoingtotravel:
•ThinkPadacpoweradapter
•Externalmouse,ifyouareaccustomedtousingone
•Ethernetcable
•Externalstoragedevice
•HDMIcable
•HDMI-to-VGAmonitorcable
•Aqualitycarryingcasethatprovidesadequatecushionandprotection
Ifyouaretravelingtoanothercountry,youmightwanttoconsideranacpoweradapterforthecountryto
whichyouaretraveling.
Topurchasetravelaccessories,gotohttp://www.lenovo.com/essentials.
50UserGuide

Chapter4.Security
Thischapterprovidesinformationabouthowtoprotectyourcomputerfromtheftandunauthorizeduse.
•“Attachingamechanicallock”onpage51
•“Usingpasswords”onpage51
•“Harddisksecurity”onpage55
•“Noticeondeletingdatafromyourharddiskdriveorsolid-statedrive”onpage56
•“Usingfirewalls”onpage57
•“Protectingdataagainstviruses”onpage57
Attachingamechanicallock
Youcanattachamechanicallocktoyourcomputertohelppreventitfrombeingremovedwithoutyour
permission.
Attachamechanicallocktothesecurity-lockslotofthecomputer;thensecurethechainonthelocktoa
stationaryobject.Refertotheinstructionsshippedwiththemechanicallock.
Note:Youareresponsibleforevaluating,selecting,andimplementingthelockingdevicesandsecurity
features.Lenovomakesnocomments,judgments,orwarrantiesaboutthefunction,quality,orperformance
oflockingdevicesandsecurityfeatures.
Usingpasswords
Youcanhelppreventyourcomputerfromunauthorizedusebyusingpasswords.Onceyousetapassword,
apromptisdisplayedonthescreeneachtimeyouturnonthecomputer.Enteryourpasswordattheprompt.
Youcannotusethecomputerunlessyouenterthevalidpassword.
Ifyouhavesetapower-onpassword,asupervisorpassword,oraharddiskpassword,itunlocks
automaticallywhenthecomputerresumesfromsleepmode.
Note:IfaWindowspasswordhasbeenset,youwillbepromptedtoenterit.
Typingpasswords
Whenthisiconisdisplayed,typeapower-onpasswordorasupervisorpassword.
Whenthisiconisdisplayed,typeauserharddiskpassword.Ifyouwanttotypeamasterharddisk
password,PressF1.Whentheiconchangesto
,typethemasterharddiskpassword.
Note:Toreturntotheicon,pressF1again.
Power-onpassword
Youcansetapower-onpasswordtohelpprotectyourcomputeragainstunauthorizedaccess.
©CopyrightLenovo201451

Ifyousetapower-onpassword,thepasswordpromptisdisplayedonthescreenwheneveryouturnonthe
computer.Youmustenterthecorrectpasswordtostartusingthecomputer.
Setting,changing,orremovingapower-onpassword
Beforeyoustart,printtheseinstructions.
Toset,change,orremoveapower-onpassword,dothefollowing:
1.Turnoffyourcomputer.Waitforaboutfiveseconds,andthenturnonthecomputeragain.
2.Whenthelogoscreenisdisplayed,pressF1tostarttheThinkPadSetupprogram.
3.SelectSecurity➙Password➙Power-onPasswordbyusingthearrowkeys.
4.Dependingonyourneed,dooneofthefollowing:
•Tosetapassword,dothefollowing:
a.IntheEnterNewPasswordfield,typeadesiredpasswordandpressEnter.
b.IntheConfirmNewPasswordfield,retypethepasswordandpressEnter.
•Tochangeapassword,dothefollowing:
a.IntheEnterCurrentPasswordfield,typethecurrentpower-onpasswordandpressEnter.
b.IntheEnterNewPasswordfield,typethenewpower-onpasswordandpressEnter;thenretype
thepasswordintheConfirmNewPasswordfieldandPressEnter.
•Toremoveapassword,dothefollowing:
a.IntheEnterCurrentPasswordfield,typethecurrentpower-onpasswordandpressEnter.
b.LeavetheEnterNewPasswordandConfirmNewPasswordfieldsblank.PressEntertwice.
5.ASetupNoticewindowisdisplayed.PressEntertocontinue.
6.PressF10.ASetupConfirmationwindowisdisplayed.SelectYestosavetheconfigurationchanges
andexit.
Note:Youmightwanttorecordyourpasswordandstoreitinasafeplace.Otherwise,ifyouforgetthe
password,youhavetotakeyourcomputertoaLenovoreselleroramarketingrepresentativetohave
thepasswordcanceled.
Supervisorpassword
ThesupervisorpasswordprotectsthesysteminformationstoredintheThinkPadSetupprogram.Ifyouhave
setasupervisorpassword,noonecanchangetheconfigurationofthecomputerwithoutthepassword.It
providesthefollowingsecurityfeatures:
•Ifonlyasupervisorpasswordisset,apasswordpromptisdisplayedwhenyoutrytostarttheThinkPad
Setupprogram.UnauthorizeduserscannotaccesstheThinkPadSetupprogramwithoutthepassword.
•Thesystemadministratorcanusethesupervisorpasswordtoaccessacomputereveniftheuserofthat
computerhassetapower-onpassword.Thesupervisorpasswordoverridesthepower-onpassword.
•Ifbothasupervisorpasswordandapower-onpasswordareset,youcandothefollowingonlyifyou
havethesupervisorpassword:
–Changingordeletingthepower-onpassword
–Changingordeletingthesupervisorpassword
–Changingdateandtime
–Changingthesettingforthesecuritychip
–Specifyingtheminimumlengthforpower-onpasswordandharddiskpassword
52UserGuide

–Enablingordisablingthefollowingfeatures:
–BootDeviceListF12Option
–BootOrderLock
–FlashBIOSUpdatingbyEnd-Users
–Internalnetworkdevice
–Internalwirelessdevice
–InternalBluetoothdevice
–InternalNetworkOptionROM
–LockUEFIBIOSSettings
–Passwordatunattendedboot
–Securitymode
–WakeonLAN
Notes:
•ThesystemadministratorcansetthesamesupervisorpasswordonmanyThinkPadnotebookcomputers
tomakeadministrationeasier.
•WhenLockUEFIBIOSSettingsoptionisenabled,allBIOSsettingscannotbechanged.Tochange
thesettings,asupervisorpasswordisrequired.
Setting,changing,orremovingasupervisorpassword
Beforeyoustart,printtheseinstructions.
Onlyasystemadministratorcanset,change,orremoveasupervisorpassword.Toset,change,orremovea
supervisorpassword,dothefollowing:
1.Turnoffyourcomputer.Waitforaboutfiveseconds,andthenturnonthecomputeragain.
2.Whenthelogoscreenisdisplayed,pressF1tostarttheThinkPadSetupprogram.
3.SelectSecurity➙Password➙SupervisorPasswordbyusingthearrowkeys.
4.Dependingonyourneeds,dooneofthefollowing:
•Tosetapassword,dothefollowing:
a.IntheEnterNewPasswordfield,typeadesiredpasswordandpressEnter.
b.IntheConfirmNewPasswordfield,retypethepasswordandpressEnter.
•Tochangeapassword,dothefollowing:
a.IntheEnterCurrentPasswordfield,typethecurrentsupervisorpasswordandpressEnter.
b.IntheEnterNewPasswordfield,typethenewsupervisorpasswordandpressEnter;thenretype
thepasswordintheConfirmNewPasswordfieldandpressEnter.
•Toremoveapassword,dothefollowing:
a.IntheEnterCurrentPasswordfield,typethecurrentsupervisorpasswordandpressEnter.
b.LeavetheEnterNewPasswordandConfirmNewPasswordfieldsblank.PressEntertwice.
5.ASetupNoticewindowisdisplayed.PressEntertocontinue.
6.PressF10.ASetupConfirmationwindowisdisplayed.SelectYestosavetheconfigurationchanges
andexit.
Note:Youmightwanttorecordyourpasswordandstoreitinasafeplace.Thenexttimeyoustartthe
ThinkPadSetupprogram,youwillbepromptedtotypeyoursupervisorpasswordtoproceed.Ifyouforget
Chapter4.Security53

yoursupervisorpassword,Lenovocannotresetyourpassword.YoumusttakeyourcomputertoaLenovo
reselleroraLenovomarketingrepresentativetohavethesystemboardreplaced.Proofofpurchaseis
required,andafeewillbechargedforpartsandservice.
Harddiskpasswords
Thefollowingtwotypesofharddiskpasswordscanhelpprotecttheinformationstoredontheharddisk
driveorsolid-statedrive:
•Userharddiskpassword
Ifauserharddiskpasswordhasbeenset,butnomasterharddiskpasswordhasbeen,theuser
mustentertheuserharddiskpasswordtoaccessfilesandapplicationsontheharddiskdriveorthe
solid-statedrive.
•Masterharddiskpassword
Themasterharddiskpasswordalsorequiresauserharddiskpassword.Themasterharddiskpassword
isusuallysetandusedbyasystemadministrator.Itenablestheadministratortoaccessanyharddisk
driveorsolid-statedriveinasystemlikeamasterkey.Theadministratorsetsthemasterpassword;then
assignsauserpasswordforeachcomputerinthenetwork.Theusercanthenchangetheuserpassword
asdesired,buttheadministratorstillcangetaccessbyusingthemasterpassword.
Whenamasterharddiskpasswordisset,onlytheadministratorcanremovetheuserharddiskpassword.
Settingaharddiskpassword
Beforeyoustart,printtheseinstructions.
Tosetaharddiskpassword,dothefollowing:
1.Turnoffyourcomputer.Waitforaboutfiveseconds,andthenturnonthecomputeragain.
2.Whenthelogoscreenisdisplayed,pressF1tostarttheThinkPadSetupprogram.
3.SelectSecurity➙Password➙Harddisk1Passwordbyusingthearrowkeys.
4.Apasswordwindowisdisplayed.YouarepromptedtoselectUserorUser+Master.SelectUserif
youwanttosetonlyoneharddiskpassword.SelectUser+Masterifyouwanttosetauserharddisk
passwordandamasterharddiskpassword,forexampleifyouareanadministratororasupervisor.
•IfyouselectUser,dothefollowing:
a.Whenawindowfortypingthenewpasswordopens,typeyournewpasswordintheEnterNew
PasswordfieldandpressEnter.
b.IntheConfirmNewPasswordfield,retypethepasswordyoujustenteredandpressEnter.
•IfyouselectUser+Master,dothefollowing:
a.First,setauserharddiskpassword.Whenamessagewindowpromptsyoutosettheuserhard
diskpassword,pressEntertocontinue.TypeyournewuserharddiskpasswordintheEnter
NewPasswordfieldandpressEnter.RetypethepasswordintheConfirmNewPassword
fieldandpressEnter.
b.Then,setamasterharddiskpassword.Whenamessagewindowpromptsyoutosetthemaster
harddiskpassword.PressEntertocontinue.Typeyournewmasterharddiskpasswordinthe
EnterNewPasswordfieldandpressEnter.RetypethepasswordintheConfirmNewPassword
fieldandpressEnter.
5.ASetupNoticewindowisdisplayed.PressEntertocontinue.
6.PressF10.ASetupConfirmationwindowisdisplayed.SelectYestosavetheconfigurationchanges
andexit.
Thenexttimeyouturnonyourcomputer,typetheuserormasterharddiskpasswordtostartyourcomputer
andaccesstheoperatingsystem.
54UserGuide

Changingorremovingaharddiskpassword
Tochangeorremovetheharddiskpassword,dothefollowing:
•IfyouareinUser+Masterharddiskmode,youcanselecteitherUserHDPorMasterHDPtochange
thepassword,dependingonyourneeds.
–IfyouselectUserHDPmode,followthefollowingstepstochangetheuserharddiskpassword:
1.TypethecurrentuserharddiskpasswordintheEnterCurrentPasswordfieldandpressEnter.
2.TypethenewpasswordintheEnterNewPasswordfieldandpressEnter;thenretypethe
passwordintheConfirmNewPasswordfieldandpressEnter.
3.ASetupNoticewindowisdisplayed.PressEnteragaintocontinue.Theuserharddiskpassword
ischanged.
Note:TheharddiskpasswordcannotberemovedinUserHDPmode.
–IfyouselectMasterHDPmode,followthefollowingstepstochangethemasterharddiskpassword:
1.TypethecurrentmasterharddiskpasswordintheEnterCurrentPasswordfieldandpressEnter.
2.TypethenewmasterharddiskpasswordintheEnterNewPasswordfieldandpressEnter;then
retypethenewpasswordyoujustenteredintheConfirmNewPasswordfieldandpressEnter.
3.ASetupNoticewindowisdisplayed.PressEntertocontinue.Themasterharddiskpasswordis
changed.
Note:IfyouleavetheEnterNewPasswordandConfirmNewPasswordfieldsblankandpressEnter
twice,boththeuserandmasterharddiskpasswordsareremoved.
•IfyouareinUserharddiskmode,followthefollowingstepstochangetheuserharddiskpassword:
1.Followsteps1through6in“Settingaharddiskpassword”onpage54,typingyourpasswordto
starttheThinkPadSetupprogram.
2.TypethecurrentuserharddiskpasswordintheEnterCurrentPasswordfieldandpressEnter.
3.TypethenewpasswordintheEnterNewPasswordfieldandpressEnter;thenretypethenew
passwordintheConfirmNewPasswordfieldandpressEnter.
4.ASetupNoticewindowisdisplayed.PressEnteragaintocontinue.Theuserharddiskpasswordis
changed.
Note:IfyouleavetheEnterNewPasswordandConfirmNewPasswordfieldsblankandpressEnter
twice,theuserharddiskpasswordisremoved.
Tipsforusingtheharddiskpasswords
•YoucansettheminimumlengthofaharddiskpasswordthroughtheSecuritymenu.
•Ifyousetaharddiskpasswordofoversevencharacters,theharddiskdriveorsolid-statedrivecanbe
usedonlywithacomputerthatcanrecognizeaharddiskpasswordofoversevencharacters.Ifyouthen
installtheharddiskdriveorsolid-statedriveinacomputerthatcannotrecognizeaharddiskpassword
thatcontainsmorethansevencharacters,youcannotaccessthedrive.
•Recordyourpasswordandstoreitinasafeplace.Ifyouforgettheuserharddiskpassword,orboth
userandmasterharddiskpasswords,Lenovocannotresetyourpasswordsorrecoverdatafromthe
harddiskdriveorsolid-statedrive.YoumusttakeyourcomputertoaLenovoreselleroramarketing
representativetohavetheharddiskdriveorsolid-statedrivereplaced.Proofofpurchaseisrequired,
andafeewillbechargedforpartsandservice.
Harddisksecurity
Toprotectpasswordsfromunauthorizedsecurityattacks,refertothefollowingtipstomaximizesecurity:
Chapter4.Security55

•Setapower-onpasswordaswellasaharddiskpasswordforyourinternalharddiskdriveorsolid-state
drive.Refertotheproceduresin“Power-onpassword”onpage51and“Harddiskpasswords”onpage
54.Forsecurity,alongerpasswordisrecommended.
•IfaDiskEncryptionharddiskdriveoranEncryptionsolid-statedriveisinstalledinyourcomputer,besure
toprotectthecontentsofyourcomputermemoryfromunauthorizedaccessesbyuseofdriveencryption
software,suchasMicrosoftWindowsBitLocker®DriveEncryption,whichissupportedintheUltimateand
EnterpriseeditionsoftheWindows7operatingsystemandProfessionalandEnterpriseeditionsofthe
Windows8.1operatingsystem.Referto“UsingWindowsBitLockerDriveEncryption”onpage56.
•Beforeyoudisposeof,sell,orhandoveryourcomputer,besuretodeletedatastoredonit.Formore
information,referto“Noticeondeletingdatafromyourharddiskdriveorsolid-statedrive”onpage56.
Note:Theharddiskdriveorsolid-statedrivebuiltintoyourcomputercanbeprotectedbyUEFIBIOS.
UsingWindowsBitLockerDriveEncryption
Tohelpprotectyourcomputeragainstunauthorizedaccess,usethedriveencryptionsoftware,suchas
WindowsBitLockerDriveEncryption.
WindowsBitLockerDriveEncryptionisanintegralsecurityfeatureofWindows7andWindows8.1operating
systems.ItissupportedintheUltimateandEnterpriseeditionsoftheWindows7andProfessionaland
EnterpriseeditionsoftheWindows8.1operatingsystem.Itcanhelpyouprotecttheoperatingsystemand
datastoredonyourcomputer,evenifyourcomputerislostorstolen.BitLockerworksbyencryptingalluser
andsystemfiles,includingtheswapandhibernationfiles.
BitLockerprovidesenhancedprotectionforyourdataandtoensureearlybootcomponentintegrity.
TochecktheBitLockerstatus,gotoControlPanel,andclickSystemandSecurity➙BitLock
erDrive
Encryption.
FormoreinformationaboutWindowsBitLockerDriveEncryption,seethehelpinformationsystemofthe
Windowsoperatingsystem,orsearchfor“MicrosoftWindowsBitLockerDriveEncryptionStep-by-Step
Guide”ontheMicrosoftWebsite.
DiskEncryptionharddiskdriveandEncryptionsolid-statedrive
SomemodelscontaintheDiskEncryptionharddiskdriveorEncryptionsolid-statedrive.Thisfeaturehelps
toprotectyourcomputeragainstsecurityattacksonmedia,NANDflashordevicecontrollersbyuseof
ahardwareencryptionchip.Fortheefficientuseoftheencryptionfeature,besuretosetaharddisk
passwordfortheinternalstoragedevice.
Noticeondeletingdatafromyourharddiskdriveorsolid-statedrive
Someofthedatastoredontheharddiskdriveorsolid-statedrivemightbesensitive.Handingyour
computerovertosomeoneelsewithoutdeletingtheloadedsoftware,suchasoperatingsystemsand
applicationsoftware,mightevenviolatelicenseagreements.Besuretodeletedatastoredontheharddisk
driveorsolid-statedrivebeforeyoudisposeof,sell,orhandoveryourcomputer.
Youcanusethefollowingmethodstodeletedatafromtheharddiskdriveorsolid-statedrive:
•MovethedatatotheRecycleBin,andthenemptytheRecycleBin.
•Deletethedata.
•Formatyourharddiskdriveorsolid-statedrive,usingthesoftwareforinitializingit.
•UsetherecoveryprogramprovidedbyLenovotobringtheharddiskdriveorsolid-statedrivebackto
thefactorydefaultsettings.
56UserGuide

Theseoperations,however,onlychangethefilelocationofthedata;theydonotdeletethedataitself.In
otherwords,thedataretrievalprocessingisdisabledunderanoperatingsystemsuchasWindows.The
dataisstillthere,eventhoughitseemstobelost.Thus,itissometimespossibletoreadthedatabyuseof
specialsoftwarefordatarecovery.Thereisariskthatpeopleofbadfaithmightreadandmisusethecritical
dataonharddiskdrivesorsolid-statedrivesforunexpectedpurposes.
Topreventleakageofdata,itisimportantthatyoudeleteallthedatafromtheharddiskdriveorsolid-state
drivewhenyoudisposeof,sell,orhandoveryourcomputer.Youcandestroythedataphysicallyby
smashingtheharddiskdrivewithahammer,ormagneticallybymeansofstrongmagneticpower,thus
makingthedataunreadable.Butitisrecommendedthatyouusethesoftware(payware)orservice(pay
service)developedforthatpurpose.Theprocessmighttakeseveralhours.
Fordisposingofdataonthesolid-statedrive,LenovoprovidestheDriveEraseUtilityforResettingthe
CryptographicKeyandErasingtheSolidStateDrivetool.Fordisposingofdataontheharddiskdrive,
LenovoprovidestheSecureDataDisposal™tool.
IfaDiskEncryptionharddiskdriveoranEncryptionsolid-statedriveissupportedandinstalledinyour
computer,youcanlogicallydisposeofallthedataonthedriveinashorttimebyerasingthecryptographic
key.Thedataencryptedwiththeoldkeyisnotphysicallyerasedbutremainsonthedrive;however,itcannot
bedecryptedwithouttheoldkey.ThisfeatureisalsoavailablewiththeDriveEraseUtilityforResetting
theCryptographicKeyandErasingtheSolidStateDrivetool.Gotohttp://www.lenovo.com/supportto
downloadthesetools.
Usingfirewalls
Ifyoursystemispreinstalledwithafirewallprogram,itprotectsagainstcomputerInternetsecuritythreats,
unauthorizedaccesses,intrusions,andInternetattacks.Italsoprotectsyourprivacy.
Formoreinformationabouthowtousethefirewallprogram,refertothehelpinformationsystemthat
comeswiththeprogram.
Protectingdataagainstviruses
Yourcomputerispreinstalledwithanantivirusprogramsoyoucandetectandeliminateviruses.The
antivirusprogramisdesignedtohelpyoudetectandeliminateviruses.
Lenovoprovidesafullversionofantivirussoftwareonyourcomputerwithafree30-daysubscription.After
30days,youmustrenewthelicensetocontinuereceivingtheantivirussoftwareupdates.
Formoreinformationabouthowtouseyourantivirussoftware,refertothehelpinformationsystemof
yourantivirussoftware.
Chapter4.Security57

58UserGuide

Chapter5.Advancedconfiguration
Thischapterprovidesthefollowinginformationtohelpyouconfigurethecomputer:
•“Installinganewoperatingsystem”onpage59
•“Installingdevicedrivers”onpage61
•“UsingtheThinkPadSetupprogram”onpage61
•“Usingsystemmanagement”onpage71
Installinganewoperatingsystem
Insomesituations,youmightneedtoinstallanewoperatingsystem.Thistopicprovidesinstructionson
howtoinstallanewoperatingsystem.
InstallingtheWindows7operatingsystem
Beforeyoustart,printtheseinstructions.
Attention:Theprocessofinstallinganewoperatingsystemdeletesallthedataonyourharddiskdriveor
solid-statedrive,includingthedatathatwerestoredinahiddenfolder.
ToinstalltheWindows7operatingsystem,dothefollowing:
1.CopyallthesubdirectoriesandfilesintheC:\SWTOOLSdirectorytoaremovablestoragedevice.
•ThesupplementfilesfortheWindows7operatingsystemareintheC:\SWTOOLS\OSFIXESdirectory.
•ThedevicedriversareintheC:\SWTOOLS\DRIVERSdirectory.
•ThepreinstalledprogramsareintheC:\SWTOOLS\APPSdirectory.
2.StarttheThinkPadSetupprogram.See“UsingtheThinkPadSetupprogram”onpage61.
3.SelectStartup➙UEFI/LegacyBoot.Thendooneofthefollowing:
•ToinstalltheWindows7(32-bit)operatingsystem,selectLegacyOnlyorBoth.
•ToinstalltheWindows7(64-bit)operatingsysteminLegacymode,selectLegacyOnly.
•ToinstalltheWindows7(64-bit)operatingsysteminUEFImode,selectUEFIOnly.
4.PresstheF10keytoexittheThinkPadSetupprogram.
5.InserttheWindows7operatingsysteminstallationDVDintotheexternalopticaldrive,andrestartthe
computer.
6.RestoretheC:\SWTOOLSdirectorythatyoubackedupbeforeinstallingtheWindows7operatingsystem.
7.Installthedevicedrivers.See“Installingdevicedrivers”onpage61.
8.InstalltheWindows7fixmodules.YoucanfindtheWindows7fixmodulesintheC:\SWTOOLS\OSFIXES\
directory.Formoreinformation,gototheMicrosoftKnowledgeBasehomepageat:
http://support.microsoft.com/
9.Installtheregistrypatches,forexampletheEnablingWakeonLANfromStandbyforENERGYSTAR
patch.Todownloadandinstalltheregistrypatches,gototheLenovoSupportWebsiteat:
http://www.lenovo.com/support
Note:Afterinstallingtheoperatingsystem,donotchangetheinitialUEFI/LegacyBootsettinginthe
ThinkPadSetupprogram.Otherwisetheoperatingsystemwillnotstartcorrectly.
©CopyrightLenovo201459

WhenyouinstalltheWindows7operatingsystem,youmightneedoneofthefollowingcountryorregion
codes:
CountryorregionCodeCountryorregionCode
ChinaSCDenmarkDK
FinlandFIFranceFR
GermanyGRItalyIT
JapanJPNetherlandsNL
NorwayNOSpainSP
SwedenSVTaiwanandHongKongTC
UnitedStatesUS
InstallingtheWindows8.1operatingsystem
Beforeyoustart,printtheseinstructions.
Attention:Theprocessofinstallinganewoperatingsystemdeletesallthedataonyourharddiskdriveor
solid-statedrive,includingthedatathatwerestoredinahiddenfolder.
ToinstalltheWindows8.1operatingsystem,dothefollowing:
1.StarttheThinkPadSetupprogram.See“UsingtheThinkPadSetupprogram”onpage61.
2.SelectStartup➙BoottodisplaytheBootPriorityOrdersubmenu.
3.SelectthedrivethatcontainstheWindows8.1operatingsysteminstallationprogram,forexample
USBHDD.
4.PressF10keytoexittheThinkPadSetupprogram.
5.ConnectthedrivethatcontainstheWindows8.1operatingsysteminstallationprogramtothecomputer,
andrestartthecomputer.
6.InstalltheWindows8.1fixmodules.GototheMicrosoftKnowledgeBasehomepageat
http://support.microsoft.com/.Typethenumberofthefixmoduleinthesearchfield,thenclickSearch.
7.Installtheregistrypatches,forexampletheEnablingWakeonLANfromStandbyforENERGYSTAR
patch.Todownloadandinstalltheregistrypatches,gototheLenovoSupportWebsiteat:
http://www.lenovo.com/support
8.Installdevicedrivers.See“Installingdevicedrivers”onpage61.
Note:Afterinstallingtheoperatingsystem,donotchangetheinitialUEFI/LegacyBootsettinginthe
ThinkPadSetupprogram.Otherwise,theoperatingsystemwillnotstartcorrectly.
WhenyouinstalltheWindows8.1operatingsystem,youmightneedoneofthefollowingcountryorregion
codes:
CountryorregionCodeCountryorregionCode
ChinaSCDenmarkDK
FinlandFIFranceFR
GermanyGRItalyIT
JapanJPNetherlandsNL
NorwayNOSpainSP
60UserGuide

CountryorregionCodeCountryorregionCode
SwedenSVTaiwanandHongKongTC
UnitedStatesUS
Installingdevicedrivers
Devicedriveristheprogramthatoperatesaparticularhardwaredeviceofthecomputer.Ifadevicedoes
notperformwelloryouinstallanewdevice,youneedtoupdateorinstallthecorrespondingdevicedriver.
Forexample,ifyouusetheWindows7operatingsystem,tousetheUSB3.0connector,youneedto
downloadandinstalltheUSB3.0driver.
Todownloadthelatestdevicedrivers,dothefollowing:
1.Gotohttp://www.lenovo.com/ThinkPadDrivers.
2.Selectyourproductnametoviewallthedevicedriversforyourcomputer.
3.Selectthedevicedriversyouthatyouneed,andfollowtheinstructionsonthescreen.
Attention:DonotdownloadthedevicedriversfromtheWindowsUpdateWeb.Alwaysdownloadthedevice
driverfrom:
http://www.lenovo.com/ThinkPadDrivers
IfyouusetheWindows7operatingsystem,youalsocanfindthedevicedriversintheC:\SWTOOLS\DRIVERS
directoryonyourharddiskdriveorsolid-statedrive.Formoreinformation,see“Reinstallingpreinstalled
applicationsanddevicedrivers”onpage101.
UsingtheThinkPadSetupprogram
TheThinkPadSetupprogramenablesyoutoselectvarioussetupconfigurationsforyourcomputerthrough
configuringtheBIOS.
ToconfiguretheBIOSofyourcomputer,dothefollowing:
1.Turnonthecomputer.Whenthelogoscreenisdisplayed,pressF1.TheThinkPadSetupprogramstarts.
Note:Ifyouarerequiredtoenterthesupervisorpassword,enterthecorrectpassword.Youalsocan
pressEntertoskipthepasswordpromptandstarttheThinkPadSetupprogram.Ifyoudonotenterthe
password,youcannotchangetheconfigurationsthatareprotectedbythesupervisorpassword.For
moreinformation,referto“Usingpasswords”onpage51.
2.Usethearrowkeystoselectatab;orusethearrowkeystolocateanitemandpressEntertoselectit.
Thenasubmenuisdisplayed.
Note:Somemenuitemsaredisplayedonlyifthecomputersupportsthecorrespondingfeatures.
3.Setthevalueofanitembydoingoneofthefollowing:
•PresstheF6keytochangetoahighervalue.
•PresstheF5keytochangetoalowervalue.
Note:Defaultvaluesareinboldface.
4.Tochangeotherconfigurations,presstheEsckeytoexitthesubmenuandreturntotheparentmenu.
5.Whenyoucompletetheconfiguration,presstheF10keytosaveandexit.Youalsocanselectthe
RestarttabintheThinkPadSetupmenu,andrestartyourcomputerwithoneoftheprovidedoptions.
Note:YoucanpresstheF9keytorestoretothedefaultsettings.
Chapter5.Advancedconfiguration61

Mainmenu
WhenyouentertheThinkPadSetupprogram,youwillfirstseetheMainmenuasfollows:
•UEFIBIOSVersion
•UEFIBIOSDate
•EmbeddedControllerVersion
•TXEFirmwareVersion
•MachineTypeModel
•System-unitserialnumber
•Systemboardserialnumber
•AssetTag
•CPUType
•CPUSpeed
•Installedmemory
•UUID
•MACaddress(InternalLAN)
•PreinstalledOSlicense
•UEFISecureBoot
Configmenu
Tochangetheconfigurationofyourcomputer,selecttheConfigtabfromtheThinkPadSetupmenu.
ThefollowingtableliststheConfigmenuitems.Defaultvaluesareinboldface.
Attention:Thedefaultconfigurationsarealreadyoptimizedforyou.Improperchangeoftheconfigurations
mightcauseunexpectedresults.
Table4.Configmenuitems
MenuitemSubmenuitemValueComments
WakeOnLAN•Disabled
•ACOnly
•ACandBattery
Enablethecomputerto
poweronwhentheEthernet
controllerreceivesamagic
packet(aspecialnetwork
message).
IfyouselectACOnly,Wake
onLANisenabledonly
whentheacpoweradapter
isattached.
IfyouselectACand
Battery,WakeonLANis
enabledwithanypower
sources.
Notes:
•Themagicpackettype
WakeonLANrequiresac
power.
Network
62UserGuide

Table4.Configmenuitems(continued)
MenuitemSubmenuitemValueComments
•TheWakeonLAN
functiondoesnot
workwhenaharddisk
passwordisset.
EthernetLANOptionROM
(forLegacyOnlyboot
modeorBothwithLegacy
first)
•Disabled
•Enabled
LoadtheEthernetLAN
OptionROMtoenable
startupfromanintegrated
networkdevice.
UEFIIPv4NetworkStack
(forUEFIOnlybootmode
orBothwithUEFIfirst)
•Disabled
•Enabled
EnableordisableInternet
ProtocolVersion4(IPv4)
networkstackfortheUEFI
environment.
UEFIIPv6NetworkStack
(forUEFIOnlybootmode
orBothwithUEFIfirst)
•Disabled
•Enabled
EnableordisableInternet
ProtocolVersion6(IPv6)
networkstackfortheUEFI
environment.
UEFIPXEBootPriority
(forBothwithUEFIfirst
bootmode,andIPv6
andIPv4stacksareboth
enabled.)
•IPv6First
•IPv4First
Selectnetworkstack
priorityforUEFIpreboot
executeenvironment(PXE)
boot.
USBUEFIBIOSSupport•Disabled
•Enabled
Enablesordisablesboot
supportforUSBstorage
devices.
AlwaysOnUSB•Disabled
•Enabled
IfyouselectEnabled,the
externalUSBdevicescan
bechargedthroughthe
Always-onUSBconnector
evenwhenthecomputeris
inlow-powermode(sleep,
hibernate,orpower-off).
-ChargeinBattery
Operation
•Disabled
•Enabled
IfyouselectEnabled,the
externalUSBdevicescan
bechargedthroughUSB
connectorsevenwhen
systemishibernateor
power-offandinbattery
operation.
USB
USB3.0Mode•Disabled
•Enabled
SettheUSB3.0controller
modefortheconnectors
sharedbetweenUSB2.0
andUSB3.0controllers.
IfyouselectEnabled,it
enablesUSB3.0mode
andallowsUSB3.0tobe
supportedintheoperating
system.
IfyouselectDisabled,it
disablesandhidestheUSB
3.0controller,andtheUSB
Chapter5.Advancedconfiguration63

Table4.Configmenuitems(continued)
MenuitemSubmenuitemValueComments
3.0connectorwillworkasa
USB2.0connector.
Keyboard/MouseFnandCtrlKeyswap•Disabled
•Enabled
IfyouselectEnabled,the
FnkeyworksastheCtrl
key,andtheCtrlkeyworks
astheFnkey.
Note:EvenwhenEnabled
isselected,youneedto
presstheFnkeytoresume
thecomputerfromsleep
modetonormaloperation.
DisplayBootDisplayDevice•ThinkPadLCD
•HDMI
Selectthedisplaydevice
thatistobeactivatedat
boottime.Thisselection
iseffectiveforboottime,
passwordprompt,and
ThinkPadSetup.
HDMIistheHDMI
connectoronyour
computer.
IntelSpeedStep®
technology
(IntelSpeedStepmounted
modelsonly)
•Disabled
•Enabled
ModeforAC
•MaximumPerformance
•BatteryOptimized
ModeforBattery
•MaximumPerformance
•BatteryOptimized
SelectthemodeofIntel
SpeedSteptechnologyat
runtime.
MaximumPerformance:
Alwayshighestspeed
BatteryOptimized:Always
lowestspeed
Disabled:Noruntime
support,lowestspeed
CPUPowerManagement•Disabled
•Enabled
Enableordisablethe
power-savingfeaturethat
stopsthemicroprocessor
clockautomaticallywhen
therearenocomputer
activities.Normally,itisnot
necessarytochangethe
setting.
Power
DisableBuilt-inBattery•Yes
•No
Temporarilydisablebattery
forservicingthecomputer.
Afterselectingthisitem,
thecomputerwillbe
automaticallypoweredoff.
Thecomputeristhenready
tobeserviced.
Note:Thebatterywillbe
automaticallyre-enabled
whentheacpoweradapter
isreconnectedtothe
computer.
64UserGuide

Table4.Configmenuitems(continued)
MenuitemSubmenuitemValueComments
PasswordBeep•Disabled
•Enabled
Enablethisoptiontohave
abeepsoundwhenthe
computeriswaitingfor
apower-on,harddisk,
orsupervisorpassword.
Differentbeepswillsound
whentheenteredpassword
matchesordoesnotmatch
theconfiguredpassword.
BeepandAlarm
KeyboardBeep•Disabled
•Enabled
Enablesordisablesthe
keyboardbeepwhen
unmanageablekey
combinationsarepressed.
Date/Timemenu
Tochangethedateortimeofyourcomputer,selecttheDate/TimetabfromtheThinkPadSetupmenu.
Thendothefollowing:
1.UsethearrowkeystoselectSystemDateorSyst emTime.
2.Typeadateortime.
Securitymenu
Tochangethesecuritysettingsofyourcomputer,selecttheSecuritytabfromtheThinkPadSetupmenu.
ThefollowingtableliststheSecuritymenuitems.Defaultvaluesareinboldface.
Attention:Thedefaultconfigurationsarealreadyoptimizedforyou.Improperchangeoftheconfigurations
mightcauseunexpectedresults.
Table5.Securitymenuitems
MenuitemSubmenuitemValueComments
SupervisorPassword•Disabled
•Enabled
Referto“Supervisor
password”onpage52.
LockUEFIBIOSSettings•Disabled
•Enabled
Enableordisablethe
functionthatprotects
itemsintheThinkPad
Setupprogramfrom
beingchangedbyauser
whodoesnothavethe
supervisorpassword.
Bydefault,thisissetto
Disabled.Ifyousetthe
supervisorpasswordand
enablethisfunction,no
onebutyoucanchange
itemsintheThinkPadSetup
program.
Passwordatunattended
boot
•Disabled
•Enabled
Ifyouselectandenable
Passwordatunattended
boot,apasswordprompt
isdisplayedwhenthe
computeristurnedon,
Password
Chapter5.Advancedconfiguration65

Table5.Securitymenuitems(continued)
MenuitemSubmenuitemValueComments
fromeitherapower-off
stateorhibernationstate,
byanunattendedevent
suchasaWakeonLAN
attempt.Ifyouselect
Disabled,nopassword
promptisdisplayed;the
computergoesaheadand
loadstheoperatingsystem.
Topreventunauthorized
access,settheuser
authenticationonthe
operatingsystem.
Passwordatrestart•Disabled
•Enabled
Ifyouselectandenable
Passwordatrestart,
apasswordpromptis
displayedwhenyourestart
thecomputer.Ifyouselect
Disabled,nopassword
promptisdisplayed;the
computergoesaheadand
loadstheoperatingsystem.
Topreventunauthorized
access,settheuser
authenticationonthe
operatingsystem.
SetMinimumLength•Disabled
•xcharacters
(4≤x≤12)
Specifyaminimumlength
forthepower-onpassword
andharddiskpassword.
Ifyousetthesupervisor
passwordandspecify
aminimumlengthfor
passwords,noonebutyou
canchangethelength.
Power-OnPassword•Disabled
•Enabled
Referto“Power-on
password”onpage51.
HardDisk1Password•Disabled
•Enabled
Referto“Harddisk
passwords”onpage
54.
FlashBIOSUpdatingby
End-Users
•Disabled
•Enabled
IfyouselectEnabled,
alluserscanupdatethe
UEFIBIOS.Ifyouselect
Disabled,onlytheperson
whoknowsthesupervisor
passwordcanupdatethe
UEFIBIOS.
UEFIBIOSUpdateOption
SecureRollBackPrevention•Disabled
•Enabled
IfyouselectDisabled,
youcanflashtoanearlier
versionoftheUEFIBIOS.
IfyouselectEnabled,you
cannotflashtoanearlier
versionoftheUEFIBIOS.
66UserGuide

Table5.Securitymenuitems(continued)
MenuitemSubmenuitemValueComments
Note:Thisitemissetas
Disabledbydefaultwhen
theOSOptimizedDefaults
ontheRestartmenuisset
asDisabled.Thisitemis
setasEnabledbydefault
whentheOSOptimized
DefaultsissetasEnabled.
MemoryProtectionExecutionPrevention•Disabled
•Enabled
Somecomputerviruses
andwormscausememory
bufferstooverflow.By
selectingEnabled,you
canprotectyourcomputer
againstattacksbysuch
virusesandworms.Ifafter
choosingEnabledyoufind
thataprogramdoesnotrun
correctly,selectDisabled
andresetthesetting.
IntelVirtualization
Technology
•Disabled
•Enabled
IfyouselectEnabled,a
VirtualMachineMonitor
(VMM)canutilizethe
additionalhardware
capabilitiesprovided
byIntelVirtualization
Technology.
Virtualization
IntelVT-dFeature•Disabled
•Enabled
IntelVT-dstandsforIntel
VirtualizationTechnology
forDirectedI/O.When
enabled,aVMMcanutilize
theplatforminfrastructure
forI/Ovirtualization.
EthernetLAN•Disabled
•Enabled
IfyouselectEnabled,
youcanuseEthernetLAN
devices.
WirelessLAN•Disabled
•Enabled
IfyouselectEnabled,
youcanusewirelessLAN
devices.
Bluetooth•Disabled
•Enabled
IfyouselectEnabled,you
canuseBluetoothdevices.
USBPort•Disabled
•Enabled
IfyouselectEnabled,you
canuseUSBconnectors.
MemoryCardSlot•Disabled
•Enabled
IfyouselectEnabled,you
canusethememorycard
slot.
IntegratedCamera•Disabled
•Enabled
IfyouselectEnabled,you
canusetheintegrated
camera.
I/OPortAccess
Chapter5.Advancedconfiguration67

Table5.Securitymenuitems(continued)
MenuitemSubmenuitemValueComments
Microphone•Disabled
•Enabled
IfyouselectEnabled,you
canusethemicrophones
(internal,external,or
line-in).
Anti-TheftComputrace•Enabled
•Disabled
•PermanentlyDisabled
Enablesordisablesthe
UEFIBIOSinterfaceto
activatethecomputrace
module.Computraceisan
optionalmonitoringservice
fromAbsoluteSoftware.
Note:Ifyousetthe
computracemodule
activationtoPermanently
Disabled,youwillbe
unabletoenablethis
settingagain.
SecureBoot•Disabled
•Enabled
EnableordisabletheUEFI
SecureBootfeature.
SelectEnabletoprevent
unauthorizedoperating
systemsfromrunningat
boottime.SelectDisabled
toallowanyoperating
systemstorunatboottime.
IfyouenabletheSecure
Boot,thefollowingitem
settingsontheStartup
menualsowillchange
automatically:
1.TheUEFI/Legacy
Bootsettingwill
changetoUEFIOnly.
2.TheCSMSupport
settingwillchangeto
No.
Note:Thisitemissetas
Disabledbydefaultwhen
theOSOptimizedDefaults
ontheRestartmenuisset
asDisabled.Thisitemis
setasEnabledbydefault
whentheOSOptimized
DefaultsissetasEnabled.
PlatformMode•UserMode
•SetupMode
Specifythesystem
operatingmode.
SecureBootMode•StandardMode
•CustomMode
SpecifytheSecureBoot
mode.
ResettoSetupModeThisoptionisusedtoclear
thecurrentplatformkey
andputthecomputerinto
SecureBoot
68UserGuide

Table5.Securitymenuitems(continued)
MenuitemSubmenuitemValueComments
SetupMode.Youcan
installyourownplatform
keyandcustomizethe
SecureBootsignature
databasesinSetupMode.
SecureBootmodewillbe
settoCustomMode.
RestoreFactoryKeysThisoptionisusedto
restoreallkeysand
certificatesinSecure
Bootdatabasestofactory
defaultsettings.Any
customizedSecureBoot
settingswillbeerased,
andthedefaultplatform
keywillbere-established
alongwiththeoriginal
signaturedatabases
includingcertificatefor
Windows8.1.
Startupmenu
Tochangethestartupsettingsofyourcomputer,selecttheStartuptabfromtheThinkPadSetupmenu.
Attention:
•Afteryouchangethestartupsequence,ensurethatyouselectacorrectdeviceduringacopy,asave,ora
formatoperation.Otherwiseyourdatamightbeerasedoroverwritten.
•IfyouareusingtheBitLockerdriveencryption,youshouldnotchangethestartupsequence.BitLocker
driveencryptionlocksthecomputerfromstartingoncedetectsthechangeofstartupsequence.
Tochangethestartupsequencetemporarilysothatthecomputerstartsfromadesireddrive,dothefollowing:
1.Turnoffthecomputer.
2.Turnonthecomputer.Whenthelogoscreenisdisplayed,presstheF12key.
3.Selectthedeviceyouwantthecomputertostartfrom.
Note:TheBootmenuwillbedisplayedifthecomputercannotstartfromanydevicesortheoperating
systemcannotbefound.
ThefollowingtableliststheStartupmenuitems.Defaultvaluesareinboldface.
Note:Someitemsaredisplayedonthemenuonlyifthecomputersupportsthecorrespondingfeatures.
Chapter5.Advancedconfiguration69

Table6.Startupmenuitems
MenuitemValueComments
Boot•USBCD
•USBFDD
•ATAHDD0
•USBHDD
•PCILAN-xxxxxxxxxx
•PCILAN
Selectthebootdevicewhenyou
pressthepowerbuttontoturnonthe
computer.
NetworkBoot•USBCD
•USBFDD
•ATAHDD0
•USBHDD
•PCILAN
Selectthebootdevicewhenthe
computerwakesfromLAN.If
PCILANisenabled,anetwork
administratorcanturnonallofthe
computersinaLANremotelybyuse
ofnetworkmanagementsoftware.
UEFI/LegacyBoot•Both
–UEFI/LegacyBootPriority
–UEFIFirst
–LegacyFirst
•UEFIOnly
•LegacyOnly
CSMSupport(forUEFIOnly)
•Y es
•No
Selectsystembootcapability.
•Both:Selectpriorityofboot
optionsbetweenUEFIandLegacy.
•UEFIOnly:Thesystemwillstart
fromtheUEFI-enabledoperating
system.
•LegacyOnly:Thesystemwillstart
fromanyoperatingsystemother
thantheUEFI-enabledone.
Note:IfyouselectUEFIOnly,the
computercannotstartfromthe
bootabledevicesthatdonothavethe
UEFIenabledoperatingsystem.
CompatibilitySupportModule(CSM)
isrequiredforstartingthelegacy
operatingsystem.IfyouselectUEFI
Only,CSMSupportisselectable.
ForBothorLegacyOnlymode,CSM
Supportisnotselectable.
BootMode•Quick
•Diagnostics
ScreenduringthePOST:
•Quick:TheThinkPadlogoscreen
isdisplayed.
•Diagnostics:Textmessagesare
displayed.
Note:Youalsocanenterthe
DiagnosticmodebypressingEsc
duringthePOST.
OptionKeyDisplay•Disabled
•Enabled
IfyouselectDisabled,themessage
“Tointerruptnormalstartup,press
Enter.”willnotbedisplayedduring
thePOST.
70UserGuide

Table6.Startupmenuitems(continued)
MenuitemValueComments
BootDeviceListF12Option•Disabled
•Enabled
IfyouselectEnabled,theF12key
isrecognizedandtheBootMenu
windowisdisplayed.
BootOrderLock•Disabled
•Enabled
IfyouselectEnabled,theboot
priorityorderislockedforyourfuture
use.
Restartmenu
ToexittheThinkPadSetupprogramandrestartthecomputer,selectRestartfromtheThinkPadSetupmenu.
Thefollowingsubmenuitemsaredisplayed:
•ExitSavingChanges:Savethechangesandrestartthecomputer.
•ExitDiscardingChanges:Discardthechangesandrestartthecomputer.
•LoadSetupDefaults:Restoretothefactorydefaultsettings.
Note:EnableOSOptimizedDefaultstomeetMicrosoftWindows8.1certificationrequirement.When
youchangethissetting,someothersettingsarechangedautomatically,suchasCSMSupport,
UEFI/LegacyBoot,SecureBoot,andSecureRollBackPrevention.
•DiscardChanges:Discardthechanges.
•SaveChanges:Savethechanges.
UpdatingtheUEFIBIOS
TheUEFIBIOSisthefirstprogramthatthecomputerrunswhenthecomputeristurnedon.TheUEFIBIOS
initializesthehardwarecomponents,andloadstheoperatingsystemandotherprograms.
YoucanupdatetheUEFIBIOSbystartingyourcomputerfromaflashupdateopticaldiscoraflashupdate
programrunningintheWindowsenvironment.Whenyouinstallanewprogram,adevicedriver,orhardware,
youmightbeinformedtoupdatetheUEFIBIOS.
ForinstructionsonhowtoupdatetheUEFIBIOS,goto:
http://www.lenovo.com/ThinkPadDrivers
Usingsystemmanagement
Thistopicisprimarilyintendedforthenetworkadministrators.
Yourcomputerisdesignedformanageability,sothatyoucanredirectmoreresourcestobettermeet
yourbusinessobjectives.
Thismanageability,knownasTotalCostofOwnership(TCO),enablesyoutoremotelyoperateclient
computersinthesamewayasyouoperateyourowncomputer,suchasturningonaclientcomputer,
formattingharddiskdriveorsolid-statedrive,andinstallingaprogram.
Oncethecomputerisconfiguredandoperational,youcanmanageitbyusingthesoftwareandthe
manageabilityfeaturesthatarealreadyintegratedintotheclientcomputerandthenetwork.
Chapter5.Advancedconfiguration71

DesktopManagementInterface
TheUEFIBIOSofyourcomputersupportsaninterfacecalledSystemManagementBIOS(SMBIOS)
ReferenceSpecification,version2.6.1.SMBIOSprovidesinformationaboutthehardwarecomponentsof
yourcomputer.ItistheresponsibilityoftheUEFIBIOStoprovideinformationaboutitselfandthedeviceson
thesystemboard.ThisspecificationdocumentsthestandardsforgettingaccesstothisBIOSinformation.
PrebooteXecutionEnvironment
ThePrebooteXecutionEnvironment(PXE)technologymakesthecomputermoremanageablebyenabling
thecomputertostartfromaserver.YourcomputersupportsthepersonalcomputerfunctionsthatPXE
requires.Forexample,withtheappropriateLANcard,yourcomputercanbestartedfromthePXEserver.
Note:TheRemoteInitialProgramLoad(RIPLorRPL)functioncannotbeusedwithyourcomputer.
WakeonLAN
ThenetworkadministratorcanturnonacomputerfromamanagementconsolebyusingtheWakeon
LANfeature.
WhentheWakeonLANfeatureisenabled,manyoperations,suchasdatatransfer,softwareupdates,and
FlashupdatesoftheUEFIBIOS,canbedoneremotelywithoutremoteattendance.Theupdatingprocess
canperformafternormalworkinghoursandonweekends,sothattheusersarenotinterruptedduringwork,
andtheLANtrafficiskepttoaminimum.Itsavestimeandincreasesproductivity.
Note:IfthecomputeristurnedonthroughWakeonLAN,thecomputerstartsfollowtheNetworkBoot
sequence.
AssetIDEEPROM
TheAssetIDEEPROMcontainsinformationaboutthecomputerconfigurationandtheserialnumbersof
thekeycomponents.Italsoincludesanumberofblankfieldswhereyoucanrecordinformationabout
theendusersinyournetwork.
Settingmanagementfeatures
Toenableanetworkadministratortoremotelycontrolyourcomputer,setthefollowingsystem-management
featuresintheThinkPadSetupprogram:
•WakeonLAN
•NetworkBootsequence
•Flashupdate
Note:Ifasupervisorpasswordhasbeenset,youwillberequiredtoenterthesupervisorpasswordwhen
youstarttheThinkPadSetupprogram.
EnablingordisablingtheWakeonLANfeature
WhentheWakeonLANfeatureisenabledandthecomputerisconnectedtoaLAN,thenetworkadministrator
canstartthecomputerremotelyfromamanagementconsole,usingaremotenetwork-managementprogram.
ToenableordisabletheWakeonLANfeature,dothefollowing:
1.StarttheThinkPadSetupprogram.See“UsingtheThinkPadSetupprogram”onpage61.
2.SelectConfig➙Network.TheNetworksubmenuisdisplayed.
3.SelectacorrespondingoptionfortheWakeonLANfeature.
4.PresstheF10keytosaveandexit.
72UserGuide

DefiningaNetworkBootsequence
WhenthecomputerwakesonLAN,thecomputerbootsfromthedeviceasspecifiedontheNetworkBoot
menu,andthenfollowthebootorderlistontheBootmenu.
TodefineaNetworkBootsequence,dothefollowing:
1.StarttheThinkPadSetupprogram.See“UsingtheThinkPadSetupprogram”onpage61.
2.SelectStartup➙NetworkBoot.Thebootdevicelistisdisplayed.
3.Selectabootdevicetomakeitasthetopbootpriority.
4.PresstheF10keytosaveandexit.
Note:YoucanpresstheF9keytorestoretothefactorydefaultsettings.
Checkingtherequirementsforflashupdates
Anetworkadministratorcanupdatetheprogramsonyourcomputerfromamanagementconsole,ifthe
followingrequirementsaremet:
•ThecomputermustbestartedoverLAN.
•ThecomputermustbeengagedinthePXE.
•Anetwork-managementprogrammustbeinstalledonthecomputerofthenetworkadministrator.
Chapter5.Advancedconfiguration73

74UserGuide

Chapter6.Preventingproblems
AnimportantpartofowningaThinkPadnotebookcomputerismaintenance.Withpropercare,you
canavoidcommonproblems.Thischapterprovidesinformationthatcanhelpyoukeepyourcomputer
runningsmoothly.
•“Generaltipsforpreventingproblems”onpage75
•“Makingsuredevicedriversarecurrent”onpage76
•“Takingcareofyourcomputer”onpage77
Generaltipsforpreventingproblems
Thistopicprovidesthefollowingtipstohelpyoupreventcomputingproblems:
•Checkthecapacityofyourharddiskdriveorsolid-statedrivefromtimetotime.Iftheharddiskdriveor
solid-statedrivegetstoofull,theWindowsoperatingsystemwillslowdownandmightproduceerrors.
Tochecktheharddiskdriveorsolid-statedrivecapacity,dothefollowing:
–Windows7:ClickStart➙Computer.
–Windows8.1:OpentheFileExplorerandclickComputer.
•Emptyyourrecyclebinonaregularbasis.
•Usediskdefragmenttoolregularlyonyourharddiskdriveorsolid-statedrivetoimprovedataseek
andreadtimes.
•Tofreeupdiskspace,uninstallunusedapplicationprograms.
Note:Youalsomightwanttolookforprogramduplicationoroverlappingversions.
•CleanoutyourInbox,Sent,andTrashfoldersfromyoure-mailclientprogram.
•Backupyourdataatleastonceaweek.Ifcriticaldataispresent,itisagoodideatoperformadaily
backupoperation.Lenovohasmanybackupoptionsavailableforyourcomputer.Rewritableoptical
drivesareavailableformostmachinesandareeasilyinstalled.
•Schedulesystemrestoreoperationstotakeasystemsnapshotperiodically.Formoreinformationabout
systemrestore,seeChapter8“Recoveryinformation”onpage97.
•UpdatedevicedriversandtheUEFIBIOSwhenneeded.
•Profileyourmachineathttp://www.lenovo.com/supporttokeepuptodatewithcurrentdriversand
revisions.
•Keepuptodatefordevicedriversonothernon-Lenovohardware.Youmightwanttoreadthedevice
driverinformationreleasenotespriortoupdatingforcompatibilityorknownissues.
•Keepalogbook.Entriesmightincludemajorhardwareorsoftwarechanges,driverupdates,minorissues
youhaveexperienced,andhowyouresolvedtheminorissues.
•Ifyoueverneedtorunarecoveryonyourcomputertoreturnthepreinstalledcontentsontothemachine,
thefollowingtipsmighthelpalongtheway:
–Removeallexternaldevicessuchastheprinter,keyboard,andsoon.
–Makesurethatyourbatteryischargedandyourcomputerhastheacpowerconnected.
–AccessThinkPadSetupandloadthedefaultsettings.
–Restartthecomputerandstarttherecoveryoperation.
–Ifyourcomputerusesdiscsastherecoverymedia,donotremovethediscfromthedriveuntil
promptedtodoso.
©CopyrightLenovo201475

•Forsuspectedharddiskdriveorsolid-statedriveissues,referto“Diagnosingproblems”onpage81and
runadiagnostictestforthedrivebeforeyoucalltheCustomerSupportCenter.Ifyourcomputerdoesnot
startup,downloadthefilestocreateabootableself-testmediumfromhttp://www.lenovo.com/hddtest.
Runthetestandrecordanymessagesorerrorcodes.Ifthetestreturnsanyfailingerrorcodesor
messages,calltheCustomerSupportCenterwiththecodesormessagesandthecomputerinfrontof
you.Atechnicianwillassistyoufurther.
•Ifrequired,youcanfindthecontactinformationabouttheCustomerSupportCenterforyourcountry
orregionathttp://www.lenovo.com/support/phone.WhencallingtheCustomerSupportCenter,make
surethatyouhaveyourmachinemodeltype,serialnumber,andthecomputerinfrontofyou.Also,ifthe
computerisproducingerrorcodes,itishelpfultohavetheerrorscreenonorthemessageswrittendown.
Makingsuredevicedriversarecurrent
Devicedriversareprogramsthatcontaininstructionsfortheoperatingsystemabouthowtooperateor
“drive”acertainpieceofhardware.Eachhardwarecomponentonyourcomputerhasitsownspecificdriver.
Ifyouaddanewcomponent,theoperatingsystemneedstobeinstructedonhowtooperatethatpiece
ofhardware.Afteryouinstallthedriver,theoperatingsystemcanrecognizethehardwarecomponent
andunderstandhowtouseit.
Note:Becausedriversareprograms,likeanyotherfileonyourcomputer,theyaresusceptibletocorruption
andmightnotperformcorrectlyifcorruptionoccurs.
Itisnotalwaysnecessarytodownloadthelatestdrivers.However,youshoulddownloadthelatestdriverfor
acomponentifyounoticepoorperformancefromthatcomponentorifyouaddanewcomponent.This
mighteliminatethedriverasthepotentialcauseoftheproblem.
GettingthelatestdriversfromtheWebsite
YoucandownloadandinstallupdateddevicedriversfromtheLenovoWebsitebydoingthefollowing:
1.Gotohttp://www.lenovo.com/ThinkPadDrivers.
2.Selecttheentryforyourcomputerandthenfollowtheinstructionsonthescreentodownloadand
installnecessarysoftware.
GettingthelatestdriversusingSystemUpdate
TheS
ystemUpdateprogramhelpsyoukeepthesoftwareonyourcomputerup-to-date.Updatepackages
arestoredonLenovoserversandcanbedownloadedfromtheLenovoSupportWebsite.Updatepackages
cancontainapplications,devicedrivers,UEFIBIOSflashes,orsoftwareupdates.WhentheSystemUpdate
programconnectstotheLenovoSupportWebsite,theSystemUpdateprogramautomaticallyrecognizes
themachinetypeandmodelofyourcomputer,theinstalledoperatingsystem,andthelanguageofthe
operatingsystemtodeterminewhatupdatesareavailableforyourcomputer.TheSystemUpdateprogram
thendisplaysalistofupdatepackagesandcategorizeseachupdateascritical,recommended,oroptionalto
helpyouunderstandtheimportance.Youhavecompletecontrolofwhichupdatestodownloadandinstall.
Afteryouselecttheupdatepackagesyouwant,theSystemUpdateprogramautomaticallydownloadsand
installstheupdateswithoutanyfurtherinterventionfromyou.
TheSystemUpdateprogramispreinstalledonyourcomputerandisreadytorun.Theonlyprerequisiteis
anactiveInternetconnection.Youcanstarttheprogrammanually,oryoucanusetheschedulefeature
toenabletheprogramtosearchforupdatesautomaticallyatspecifiedintervals.Youalsocanpredefine
scheduledupdatestosearchbyseverity(criticalupdates,criticalandrecommendedupdates,orallupdates)
sothelistyouchoosefromcontainsonlythoseupdatetypesthatareofinteresttoyou.
FormoreinformationabouthowtouseSystemUpdate,refertothehelpinformationsystemoftheprogram.
76UserGuide

Takingcareofyourcomputer
Althoughyourcomputerisdesignedtofunctionreliablyinnormalworkenvironments,youneedtouse
commonsenseinhandlingit.Byfollowingtheimportanttipsinthistopic,youwillgetthemostuseand
enjoymentoutofyourcomputer.
Becarefulaboutwhereandhowyouwork
•Storepackingmaterialssafelyoutofthereachofchildrentopreventtheriskofsuffocationfromplastic
bags.
•Keepyourcomputerawayfrommagnets,activatedcellularphones,electricalappliances,orspeakers
(morethan13cmor5inches).
•Avoidsubjectingyourcomputertoextremetemperatures(below5°C/41°Forabove35°C/95°F).
•Someappliances,suchascertainportabledesktopfansorairpurifiers,canproducenegativeions.Ifa
computerisclosetosuchanappliance,andisexposedforanextendedtimetoaircontainingnegative
ions,itmightbecomeelectrostaticallycharged.Suchachargemightbedischargedthroughyourhands
whenyoutouchthekeyboardorotherpartsofthecomputer,orthroughconnectorsonI/Odevices
connectedtothecomputer.Eventhoughthiskindofelectrostaticdischarge(ESD)istheoppositeofa
dischargefromyourbodyorclothingtothecomputer,itposesthesameriskofacomputermalfunction.
Yourcomputerisdesignedandmanufacturedtominimizeanyeffectsofelectrostaticcharge.Anelectrostatic
chargeaboveacertainlimit,however,canincreasetheriskofESD.Therefore,whenusingthecomputer
closetoanappliancethatcanproducenegativeions,givespecialattentiontothefollowing:
•Avoiddirectlyexposingyourcomputertotheairfromanappliancethatcanproducenegativeions.
•Keepyourcomputerandperipheralsasfaraspossiblefromsuchanappliance.
•Whereverpossible,groundyourcomputertofacilitatesafeelectrostaticdischarge.
Note:Notallsuchappliancescauseasignificantelectrostaticcharge.
Begentlewithyourcomputer
•Avoidplacinganyobjects(includingpaper)betweenthedisplayandthekeyboardorthepalmrest.
•Donotturnyourcomputeroverwhiletheacpoweradapterisconnected.Thiscouldbreaktheadapter
plug.
Carryyourcomputerproperly
•Beforemovingyourcomputer,besuretoremoveanymedia,turnoffattacheddevices,anddisconnect
cordsandcables.
•Whenpickingupyouropencomputer,holditbythebottom.Donotpickuporholdyourcomputerby
thedisplay.
Handlestoragemediaanddrivesproperly
•Wheninstallingtheharddiskdriveorsolid-statedrive,followtheinstructionsshippedwithyourhardware,
andapplypressureonlywhereneededonthedevice.
•Turnoffyourcomputerifyouarereplacingtheharddiskdriveorthesolid-statedrive.
•Afteryoureplacetheharddiskdriveorsolid-statedrive,reattachthecoverofthedriveslot.
•Storeyourexternalandremovableharddiskdriveoropticaldrivesintheappropriatecontainersor
packagingwhentheyarenotbeingused.
•Beforeyouinstallanyofthefollowingdevices,touchametaltableoragroundedmetalobject.Thisaction
reducesanystaticelectricityfromyourbody.Thestaticelectricitycoulddamagethedevice.
Chapter6.Preventingproblems77

–Memorymodule
–Memorycard,suchasanSDcard,SDHCcard,SDXCcard,andaMultiMediaCard
Note:Notalllisteddevicesareincludedinyourcomputer.
•Whiletransferringdatatoorfromaflashmediacard,suchasanSDcard,donotputyourcomputer
intosleeporhibernationmodebeforethedatatransferiscomplete.Todosomightcausedamageto
yourdata.
Takecarewhensettingpasswords
•Rememberyourpasswords.Ifyouforgetasupervisororharddiskpassword,Lenovowillnotresetit,and
youmighthavetoreplaceyoursystemboard,orharddiskdrive,orsolid-statedrive.
Registeryourcomputer
•RegisteryourThinkPadcomputerwithLenovoathttp://www.lenovo.com/register.Formoreinformation,
see“Registeringyourcomputer”onpage19.
Besurenottomodifyyourcomputer
•OnlyanauthorizedThinkPadrepairtechnicianshoulddisassembleandrepairyourcomputer.
Cleaningthecoverofyourcomputer
Occasionallycleanyourcomputerbydoingthefollowing:
1.Prepareamixtureofagentlekitchen-usedetergent.Thedetergentmustnotcontainabrasivepowderor
strongchemicalssuchasacidoralkaline.Usefivepartswatertoonepartdetergent.
2.Absorbthediluteddetergentintoasponge.
3.Squeezeexcessliquidfromthesponge.
4.Wipethecoverwiththesponge,usingacircularmotionandtakingcarenottoletanyexcessliquiddrip.
5.Wipethesurfacetoremovethedetergent.
6.Rinsethespongewithcleanrunningwater.
7.Wipethecoverwiththecleansponge.
8.Wipethesurfaceagainwithadry,soft,lint-freecloth.
9.Waitforthesurfacetodrycompletelyandremoveanyfibersfromthecloth.
Cleaningyourcomputerkeyboard
Tocleanthecomputerkeyboard,dothefollowing:
1.Applysomeisopropylrubbingalcoholtoasoft,dust-freecloth.
Note:Avoidsprayingcleanerdirectlyontothekeyboard.
2.Wipeeachkeytopsurfacewiththecloth.Wipethekeysonebyone;ifyouwipeseveralkeysatatime,
theclothmighthookontoanadjacentkeyandpossiblydamageit.Makesurethatnoliquiddripsonto
orbetweenthekeys.
3.Allowtodry.
4.Toremoveanycrumbsordustfrombeneaththekeys,youcanuseacamerablowerwithabrush
orcoolairfromahairdryer.
Cleaningyourcomputerdisplay
Tocleanthecomputerdisplay,dothefollowing:
78UserGuide

1.Gentlywipethedisplaywithadry,soft,lint-freecloth.Ifyouseeascratchlikemarkonyourdisplay,it
mightbeastaintransferredfromthekeyboardwhenthecoverwaspressedfromtheoutside.
2.Wipeordustthestaingentlywithasoft,drycloth.
3.Ifthestainremains,moistenasoft,lint-freeclothwithwaterora50-50mixtureofisopropylalcoholand
waterthatdoesnotcontainimpurities.
Note:Avoidsprayingcleanerdirectlyontothekeyboard.
4.Wringoutasmuchoftheliquidasyoucan.
5.Wipethedisplayagain;donotletanyliquiddripintothecomputer.
6.Besuretodrythedisplaybeforeclosingit.
Chapter6.Preventingproblems79

80UserGuide

Chapter7.Troubleshootingproblems
Thischapterprovidesinformationonwhattodoifyouexperienceaproblemwithyourcomputer.
Thischaptercontainsthefollowingtopics:
•“Diagnosingproblems”onpage81
•“Troubleshooting”onpage81
Diagnosingproblems
Ifyouexperienceproblemswithyourcomputer,usetheLenovoSolutionCenterprogramasastarting
pointforsolvingthem.
TheLenovoSolutionCenterprogramenablesyoutotroubleshootandresolvecomputerproblems.It
combinesdiagnostictests,systeminformationcollection,securitystatus,andsupportinformation,along
withhintsandtipsforoptimalsystemperformance.
Notes:
•TheLenovoSolutionCenterprogramalsoisavailablefordownloadedat:
http://www.lenovo.com/diags
•IfyouareusingotherWindowsoperatingsystemratherthanWindows7orWindows8.1,youcanfindthe
latestinformationaboutdiagnosticsforyourcomputerat:
http://www.lenovo.com/diagnose
IfyourcomputerisinstalledwiththeWindows7operatingsystem,whenyouaresettingupyourcomputer,
theLenovoSolutionCenterprogrampromptsyoutocreaterecoverymedia.Youcanusetherecoverymedia
torestoretheharddiskdriveorsolid-statedrivetothefactorydefaultstate.Formoreinformation,see
“Creatingandusingrecoverymedia”onpage97.
ToruntheLenovoSolutionCenterprogram,see“Lenovoprograms”onpage13.
Foradditionalinformation,refertotheLenovoSolutionCenterhelpsystem.
Note:IfyouareunabletoisolateandrepairtheproblemyourselfafterrunningtheLenovoSolutionCenter
program,saveandprintthelogfilescreatedbytheprogram.Youwillneedthelogfileswhenyouspeaktoa
Lenovotechnicalsupportrepresentative.
Troubleshooting
Ifyourcomputerhasanerror,ittypicallydisplaysamessageoranerrorcode,ormakesabeepwhen
youturniton.Whenyouexperienceaproblem,refertothecorrespondingsectionsinthistopictotryto
solvetheproblembyyourself.
Computerstopsresponding
Printtheseinstructionsnowandkeepitwithyourcomputerforreferencelater.
Ifyourcomputeriscompletelyunresponsive(youcannotusethetouchpadorthekeyboard),dothefollowing:
1.Pressandholdthepowerbuttonuntilthecomputerturnsoff.Afterthecomputeristurnedoff,restart
thecomputerbypressingthepowerbutton.Ifthecomputerdoesnotturnon,continuewithstep2.
©CopyrightLenovo201481

2.Whilethecomputerisoff,removetheacpoweradapterfromthecomputer.Holddownthepower
buttonfor10seconds.Connecttheacpoweradapter.Ifthecomputerdoesnotturnbackon,continue
withstep3.
3.Whilethecomputerisoff,removetheacpoweradapterfromthecomputer.Removeallexternaldevices
thatareattachedtoyourcomputer(keyboard,mouse,printer,scanner,andsoon).Repeatstep2.
Ifstep2isunsuccessful,continuewithstep4.
Note:Thefollowingstepsinvolveremovingstaticsensitivecomponentsfromyourcomputer.Make
surethatyouareproperlygroundedandremoveallsourcesofpowerattachedtothecomputer.If
youareuncomfortableorunsureaboutremovingcomponents,pleasecalltheCustomerSupport
Centerforassistance.
4.Whilethecomputerisoff,removeallsourcesofpowerandexternalhardware.Removeanynon-original
memorymoduleaddedtoyourcomputer.Afterremovingtheextramemorymoduleandreseatingthe
originalmemorymodule,repeatstep2.Ifthecomputerstilldoesnotturnon,consulttheusermanual
forothercustomer-replaceablecomponentsthatareattachedtoyourcomputer.
Ifthecomputerstilldoesnotstartup,calltheCustomerSupportCenterandaCustomerSupportSpecialist
willassistyou.
Spillsonthekeyboard
Withamobilecomputer,thereareincreasedchancesofspillingliquidsonthekeyboard.Becausemost
liquidsconductelectricity,liquidspilledonthekeyboardcouldcreatenumerousshortcircuits,potentially
causingirreparabledamagetoyourcomputer.
Ifyouspillsomethingonyourcomputer:
Attention:Ensurethatnoliquidcreatesashortcircuitbetweenyouandtheacpoweradapter(ifinuse).
Althoughyoumightlosesomedataorworkbyturningoffthecomputerimmediately,leavingthecomputer
onmightmakeyourcomputerunusable.
1.Carefullydisconnecttheacpoweradapterimmediately.
2.Turnoffthecomputerimmediately.Themorequicklyyoustopthecurrentfrompassingthroughthe
computer,themorelikelyyouwillreducedamagefromshortcircuits.
3.Waituntilyouarecertainthatalltheliquidisdrybeforeturningonyourcomputer.
Errormessages
•Message:0177:BadSVPdata,stopPOSTtask.
Solution:ChecksumofthesupervisorpasswordintheEEPROMisnotcorrect.Thesystemboard
shouldbereplaced.Havethecomputerserviced.
•Message:0183:BadCRCofSecuritySettingsinEFIVariable.EnterThinkPadSetup.
Solution:ChecksumoftheSecuritysettingsintheEFIVariableisnotcorrect.EnterThinkPadSetup
tocheckthesecuritysettings,PressF10andthenpressEntertorestartthesystem.Ifyoustillhavea
problem,havethecomputerserviced.
•Message:0187:EAIAdataaccesserror
Solution:TheaccesstoEEPROMisfailed.Havethecomputerserviced.
•Message:0188:InvalidRFIDSerializationInformationArea
Solution:TheEEPROMchecksumisnotcorrect(block#0and1).Thesystemboardshouldbereplaced,
andtheboxserialnumberneedstobereinstalled.Havethecomputerserviced.
82UserGuide

•Message:0189:InvalidRFIDconfigurationinformationarea
Solution:TheEEPROMchecksumisnotcorrect(block#4and5).Thesystemboardshouldbereplace,
andtheUUIDneedstobereinstalled.Havethecomputerserviced.
•Message:0190:Criticallow-batteryerror
Solution:Thecomputerturnsoffbecausethebatteryislow.Connecttheacpoweradaptertothe
computerandchargethebattery.
•Message:0191:SystemSecurity-Invalidremotechangerequested
Solution:Thesystemconfigurationchangehasfailed.Confirmtheoperationandtryagain.Toclearthe
error,enterThinkPadSetup.
•Message:0199:SystemSecurity-Securitypasswordretrycountexceeded.
Solution:Thismessageisdisplayedifyouenterawrongsupervisorpasswordmorethanthreetimes.
Confirmthesupervisorpasswordandtryagain.Tocleartheerror,enterThinkPadSetup.
•Message:1802:Unauthorizednetworkcardispluggedin-Poweroffandremovethenetworkcard.
Solution:Thewirelessnetworkcardisnotsupportedonthiscomputer.Removeit.
•Message:2100:DetectionerroronHDD0(MainHDD)
Solution:Theharddiskdriveorsolid-statedriveisnotworking.Havetheharddiskdriveorsolid-state
driveserviced.
•Message:2110:ReaderroronHDD0(MainHDD)
Solution:Theharddiskdriveorsolid-statedriveisnotworking.Havetheharddiskdriveorsolid-state
driveserviced.
•Message:2200:MachineTypeandSerialNumberareinvalid.
Solution:MachineTypeandSerialNumberareinvalid.Havethecomputerserviced.
•Message:2201:MachineUUIDisinvalid.
Solution:MachineUUIDisinvalid.Havethecomputerserviced.
•Message:Fanerror
Solution:Coolingfanhasfailed.Shutdownthecomputerimmediatelyandhavethecomputerserviced.
•Message:Thermalsensingerror
Solution:Thethermalsensorhasaproblem.Shutdownthecomputerimmediatelyandhavethe
computerserviced.
Errorswithoutmessages
•Problem:MyscreenkeepsblankingwhenIdonotwantitto.
Solution:
–IfyourcomputerispreinstalledwiththeWindows7operatingsystem,youcandisableanysystem
timers,suchastheLCDturn-offtimerortheblanktimerbydoingthefollowing:
1.StartthePowerManagerprogram.
2.ClickthePowerplantab,andthenselectMaximumPerformancefromthepredefinedpower
plans.
Chapter7.Troubleshootingproblems83

–IfyourcomputerispreinstalledwiththeWindows8.1operatingsystem,doingthefollowing:
1.Gothedesktopandclickthebattery-statusiconintheWindowsnotificationarea.
2.ClickPowerOptions➙Showadditionalplans➙Highperformance.
•Problem:WhenIturnonthecomputer,nothingisdisplayedonthescreenandthecomputerdoesnot
beepwhilestartingup.
Note:Ifyouarenotsurewhetheryouheardanybeeps,turnoffthecomputerbypressingandholdingthe
powerbuttonforfoursecondsormore.Thenturnonthecomputerandlistenagain.
Solution:Ensurethat:
–Theacpoweradapterisconnectedtothecomputerandthepowercordisconnectedtoaworking
electricaloutlet.
–Thecomputeristurnedon.(Pressthepowerbuttonagainforconfirmation.)
–Thebrightnesslevelofthescreenisappropriatelyset.
Ifapower-onpasswordisset,pressanykeytodisplaythepromptforthepower-onpasswordand
thentypethecorrectpasswordandpressEnter.
Iftheseitemsarecorrectlyset,andthescreenremainsblank,havethecomputerserviced.
•Problem:WhenIturnonthecomputer,onlyawhitepointerisdisplayedonablankscreen.
Solution:Ifyouhavemodifiedapartitiononyourharddiskdriveorsolid-statedrivebyusingpartition
software,informationaboutthatpartition,orthemasterbootrecordmighthavebeendestroyed.
Dothefollowingtotrytosolvetheproblem:
1.Turnoffthecomputer,andthenturnitonagain.
2.Ifyoustillseeonlythepointeronthescreen,dothefollowing:
–Ifyouhaveusedthepartitionsoftware,examinethepartitionontheharddiskdriveorsolid-state
drivebyusingthesoftware,andrecoverthepartitionifrequired.
–Usetherecoverysolutionstorestorethesystemtothefactorydefaultstate.
Iftheproblempersists,havethecomputerserviced.
•Problem:Myscreengoesblankwhilethecomputerison.
Solution:Yourscreensaverorpowermanagementmighthavebeenenabled.Doeitherofthefollowing:
–Touchthetouchpadorpressakeytoexitthescreensaver.
–Pressthepowerbuttontoresumethecomputerfromsleeporhibernation.
Beeperrors
Thefollowingtabledescribesthecommonbeeperrorsandcorrespondingsolutions.
Table7.Beeperrors
ProblemSolution
Oneshortbeep,pause,threeshortbeeps,pause,three
moreshortbeeps,andoneshortbeep
Havethecomputerserviced.
OnelongandtwoshortbeepsThevideofunctionhasaproblem.Havethecomputer
serviced.
84UserGuide

Table7.Beeperrors(continued)
ProblemSolution
FourcyclesoffourshortbeepsShutdownthecomputerimmediatelyandhavethe
computerserviced.
FiveshortbeepsThesystemboardhasaproblem.Havethecomputer
serviced.
Memorymoduleproblems
Printtheseinstructionsnowandkeepitwithyourcomputerforreferencelater.
Ifyourmemorymoduleisnotoperatingproperly,checkthefollowingitems:
1.Verifythatthememorymoduleisinstalledandseatedcorrectlyinyourcomputer.
Itmightbenecessarytoremovealladdedmemorymodulestotestthecomputerwithonlythe
factory-installedmemorymodules,andthenreinstallthememorymoduleoneatatimetoensure
aproperconnection.
2.Checkforerrormessagesduringstartup.
Followtheappropriatecorrectiveactionsforpower-onself-test(POST)errormessages.
3.VerifythatthelatestUEFIBIOSforyourmodelhasbeeninstalled.
4.Verifythatthepropermemoryconfigurationandcompatibilityincludingthemaximummemorysize
andthememoryspeed.
5.Rundiagnosticprograms.See“Diagnosingproblems”onpage81.
Networkingproblems
Thefollowingarethemostcommonnetworkingproblems.
Ethernetproblems
•Problem:Thecomputercannotconnecttothenetwork.
Solution:Ensurethat:
–Thecableisinstalledcorrectly.
ThenetworkcablemustbesecurelyconnectedbothtotheEthernetconnectorofyourcomputerand
totheRJ45connectorofthehub.Themaximumallowabledistancefromthecomputertohubis
100meters.Ifthecableisconnectedandthedistanceiswithinacceptablelimitsbuttheproblem
persists,tryadifferentcable.
–Youareusingthecorrectdevicedriver.Toinstallthecorrectdriver,dothefollowing:
1.GotoControlPanelandclickHardwareandSound➙DeviceManager.Ifyouarepromptedfor
anadministratorpasswordorconfirmation,typethepasswordorprovideconfirmation.
2.Iftheexclamationmark!isdisplayednexttotheadapternameunderNetworkadapters,you
mightnotbeusingthecorrectdriverorthedrivermighthavebeendisabled.Toupdatethedriver,
right-clickthehighlightedadapter.
3.ClickUpdateDriverSoftware,andthenfollowtheinstructionsonthescreen.
–Theswitchportandtheadapterhavethesameduplexsetting.
Ifyouconfiguredtheadapterforfullduplex,makesurethattheswitchportalsoisconfiguredforfull
duplex.Settingwrongduplexmodecandegradeperformance,causedataloss,orresultinlost
connections.
–Youhaveinstalledallnetworkingsoftwarethatisnecessaryforyournetworkenvironment.
Chapter7.Troubleshootingproblems85

CheckwithyourLANadministratorforthenecessarynetworkingsoftware.
•Problem:Theadapterstopsworkingfornoapparentreason.
Solution:Thenetworkdriverfilesmightbecorruptormissing.Updatethedriverbyreferringtothe
previoussolutionfortheproceduretomakesurethatthecorrectdevicedriverisinstalled.
•Problem:MycomputerisaGigabitEthernetmodelandIuseaspeedof1000Mbps,buttheconnection
failsorerrorsoccur.
Solution:
–UseCategory5wiringandmakesurethatthenetworkcableissecurelyconnected.
–Connecttoa1000BASE-Thub/switch(not1000BASE-X).
•Problem:TheWakeonLANfeatureisnotworking.
Solution:EnsurethatWakeonLANisenabledinThinkPadSetup.Ifitis,checkwithyourLAN
administratorforthenecessarysettings.
•Problem:MycomputerisaGigabitEthernetmodel,butthecomputercannotconnecttothenetworkat
1000Mbps.Instead,itconnectsat100Mbps.
Solution:
–Tryanothercable.
–Makesurethatthelinkpartnerissettoauto-negotiate.
–Makesurethattheswitchis802.3ab-compliant(gigabitovercopper).
AwirelessLANproblem
Problem:Icannotconnecttothenetworkusingthebuilt-inwirelessnetworkcard.
Solution:Makesurethat:
•YourwirelessLANdriveristhelatestversion.
•Yourcomputeriswithinrangeofawirelessaccesspoint.
•Thewirelessradioisenabled.
Note:IfyouareusingtheWindows7operatingsystem,clickShowhiddeniconsonthetaskbar.The
AccessConnectionsiconisdisplayed.Formoreinformationabouttheicon,refertotheAccessConnections
helpinformationsystem.
FortheWindows7operatingsystem,checktheNetworkName(SSID)andyourencryptioninformation.Use
theAccessConnectionsprogramtoverifythiscase-sensitiveinformation.
Bluetoothproblems
Note:CheckyourconnectionanytimeandmakesurethatnootherBluetooth-enableddeviceissearchingfor
thedevicetowhichyouwanttoconnect.SimultaneoussearchingisnotallowedintheBluetoothconnection.
•Problem:SounddoesnotcomefromtheBluetoothheadset/headphonebutcomesfromthelocal
speakereventhoughtheBluetoothheadset/headphoneisconnectedusingaHeadsetprofileorAVprofile.
Solution:Dothefollowing:
1.Exittheprogramthatusesthesounddevice(forexample,WindowsMedia®Player).
2.GotoControlPanelandclickHardwareandSound➙Sound➙Playback.
3.IfyouareusingaHeadsetprofile,selectBluetoothHands-freeAudioandclicktheSetDefault
button.IfyouareusinganAVprofile,selectStereoAudioandclicktheSetDefaultbutton.
86UserGuide

4.ClickOKtoclosetheSoundwindow.
•Problem:PIMitemssentfromtheWindows7operatingsystemscannotbereceivedcorrectlyintothe
addressbookofanyotherBluetooth-enableddevice.
Solution:TheWindows7operatingsystemsendsPIMitemsinXMLformat,butmostBluetooth-enabled
deviceshandlePIMitemsinvCardformat.IfanotherBluetooth-enableddevicecanreceiveafilethrough
Bluetooth,aPIMitemsentfromtheWindows7mightbesavedasafilewiththeextension.contact.
Keyboardproblems
•Problem:Allorsomekeysonthekeyboarddonotwork.
Solution:Ifanexternalnumerickeypadisconnected:
1.Turnoffthecomputer.
2.Removetheexternalnumerickeypad.
3.Turnonthecomputerandtryusingthekeyboardagain.
Ifthekeyboardproblemisresolved,carefullyreconnecttheexternalnumerickeypad.Makesurethatyou
haveseatedtheconnectorscorrectly.
Iftheproblempersists,makesurethatthecorrectdevicedriverisinstalledbydoingthefollowing:
1.GotoControlPanel.ChangetheviewofControlPanelfromCategorytoLargeiconsorSmallicons.
2.ClickKeyboard.
3.SelecttheHardwaretab.IntheDevicePropertiespane,makesurethatyouseethismessage:
DeviceStatus:Thisdeviceisworkingproperly.
Ifkeysonthekeyboardstilldonotwork,havethecomputerserviced.
•Problem:Anumberisdisplayedwhenyoutypealetter.
Solution:Thenumericlockfunctionison.Todisableit,pressShift+ScrLkorFn+NmLk.
•Problem:Allorsomekeysontheexternalnumerickeypaddonotwork.
Solution:Makesurethattheexternalnumerickeypadiscorrectlyconnectedtothecomputer.
Problemswiththedisplayandmultimediadevices
Thistopicincludesthemostcommonproblemswithdisplaysandmultimediadevices,includingthe
computerdisplay,theexternalmonitor,andtheaudiodevices.
Computerscreenproblems
•Problem:Thescreenisblank.
Solution:Dothefollowing:
–PressF7tobringuptheimage.
–Ifyouareusingtheacpoweradapter,orusingthebatteryandbattery-statusiconshowsthatthe
batteryisnotdepleted,pressF6tomakethescreenbrighter.
–Ifyourcomputerisinsleepmode,pressFntoresumefromthesleepmode.
–Iftheproblempersists,followthesolutionforthefollowingproblem.
•Problem:Thescreenisunreadableordistorted.
Solution:Makesurethat:
–Thedisplaydevicedriverisinstalledcorrectly.
–Thescreenresolutionandcolorqualityarecorrectlyset.
Chapter7.Troubleshootingproblems87

–Themonitortypeiscorrect.
Tocheckthesesettings,dothefollowing:
1.Right-clickanywhereonthedesktop,andclickPersonalize.
2.ClickDisplayattheleft.
3.SelectChangedisplaysettings.Checkwhetherthescreenresolutioniscorrectlyset.
4.ClickAdvancedSettings.
5.ClicktheAdaptertab.Ensurethatthecorrectdevicedrivernameisshownintheadapterinformation
window.
Note:Thedevicedrivernamedependsonthevideochipthathasbeeninstalledonyourcomputer.
6.ClickthePropertiesbutton.Ifyouarepromptedforanadministratorpasswordorconfirmation,type
thepasswordorprovideconfirmation.ChecktheDevicestatusboxandmakesurethatthedevice
isworkingcorrectly.Ifnot,clicktheTroubleshootbuttonandfollowtheinstructionsonthescreen.
7.ClicktheMonitortab.Checkwhetherthecolorqualityiscorrectlyset,andmakesurethattheother
informationalsoiscorrect.
8.ClickthePropertiesbutton.Ifyouarepromptedforanadministratorpasswordorconfirmation,type
thepasswordorprovideconfirmation.ChecktheDevicestatusboxandmakesurethatthedevice
isworkingcorrectly.Ifnot,clicktheTroubleshootbuttonandfollowtheinstructionsonthescreen.
•Problem:Incorrectcharactersaredisplayedonthescreen.
Solution:Ensurethatyouinstalltheoperatingsystemorprogramcorrectly.Iftheyareinstalledand
configuredcorrectly,havethecomputerserviced.
•Problem:Thescreenstaysonevenafteryouturnoffyourcomputer.
Solution:Pressandholdthepowerbuttonforfoursecondsormoretoturnoffyourcomputer;then
turnitonagain.
•Problem:Missing,discolored,orbrightdotsappearonthescreeneverytimeyouturnonyourcomputer.
Solution:ThisisanintrinsiccharacteristicoftheTFTtechnology.Yourcomputerdisplaycontainsmultiple
TFTs.Asmallnumberofmissing,discolored,orbrightdotsonthescreenmightexistallthetime.
Externalmonitorproblems
•Problem:Theexternalmonitorisblank.
Solution:Tobringuptheimage,pressF7andselectthedesiredmonitor.Iftheproblempersists,do
thefollowing:
1.Connecttheexternalmonitortoanothercomputertomakesurethatitworks.
2.Reconnecttheexternalmonitortoyourcomputer.
3.Refertothemanualshippedwiththeexternalmonitortochecktheresolutionsandrefreshratesthat
aresupported.
–Iftheexternalmonitorsupportsthesameresolutionasthecomputerdisplayorahigherresolution,
viewoutputontheexternalmonitororonboththeexternalmonitorandthecomputerdisplay.
–Iftheexternalmonitorsupportsalowerresolutionthanthecomputerdisplay,viewoutputonthe
externalmonitoronly.(Ifyouviewoutputonboththecomputerdisplayandtheexternalmonitor,
theexternalmonitorscreenwillbeblankordistorted.)
•Problem:Youcannotsetahigherresolutionthanthepresentoneonyourexternalmonitor.
Solution:Ensurethatthemonitorinformationiscorrect.Dothefollowing:
1.Right-clickanywhereonthedesktop,andclickScreenresolution.
88UserGuide

Note:Ifyourcomputercannotdetecttheexternalmonitor,clicktheDetectbutton.
2.Clicktheiconforthedesiredmonitor(theMonitor-2iconisfortheexternalmonitor).
3.ClickAdvancedSettings.
4.ClicktheAdaptertab.Makesurethatthecorrectdevicedrivernameisshownintheadapter
informationwindow.
Note:Thedevicedrivernamedependsonthevideochipthathasbeeninstalledonyourcomputer.
5.ClickOK.
Iftheinformationisincorrect,reinstallthedevicedriver.
–Checkthemonitortypeand,ifnecessary,updatethedriverbydoingthefollowing:
1.Connecttheexternalmonitortothemonitorconnector,andthenconnectthemonitortoan
electricaloutlet.
2.Turnontheexternalmonitorandthecomputer.
3.Right-clickonthedesktop,andclickScreenresolution.
Note:Ifyourcomputercannotdetecttheexternalmonitor,clicktheDetectbutton.
4.Clicktheiconforthedesiredmonitor(theMonitor-2iconisfortheexternalmonitor).
5.ClickAdvancedSettings.
6.ClicktheMonitortab.Checkthemonitorinformationwindowtomakesurethatthemonitortype
iscorrect.Ifitis,clickOKtoclosethewindow;otherwisedothefollowing.
7.Ifmorethanonemonitortypeisdisplayed,selectGenericPnPMonitororGenericNon-PnP
Monitor.
8.ClickProperties.Ifyouarepromptedforanadministratorpasswordorconfirmation,typethe
passwordorprovideconfirmation.
9.ClicktheDrivertab.
10.ClickUpdateDriver.
11.ClickBrowsemycomputerfordriversoftware,andthenclickLetmepickfromalistof
devicedriversonmycomputer.
12.CleartheShowcompatiblehardwarecheckbox.
13.Selectyourmonitormanufacturerandmodel.
14.Afterupdatingthedriver,clickClose.
15.SetResolution.
Note:Tochangethecolorsettings,selecttheMonitortab,thensetColors.
16.ClickOK.
•Problem:Thescreenisunreadableordistorted.
Solution:Makesurethat:
–Themonitorinformationiscorrectandtheappropriatemonitortypeisselected.Refertothesolutionto
thepreviousproblem.
–Makesurethatanappropriaterefreshrateisselectedbydoingthefollowing:
1.Connecttheexternalmonitortothemonitorconnector,andthenconnectthemonitortoan
electricaloutlet.
2.Turnontheexternalmonitorandthecomputer.
3.Right-clickonthedesktop,andclickScreenresolution.
Chapter7.Troubleshootingproblems89

Note:Ifyourcomputercannotdetecttheexternalmonitor,clicktheDetectbutton.
4.Clicktheiconforthedesiredmonitor(theMonitor-2iconisfortheexternalmonitor).
5.ClickAdvancedSettings.
6.ClicktheMonitortab.
7.Selectthecorrectscreenrefreshrate.
•Problem:Wrongcharactersaredisplayedonthescreen.
Solution:Ensurethatyoufollowthecorrectprocedurewheninstallingtheoperatingsystemorprogram.
Ifyoudid,havetheexternalmonitorserviced.
•Problem:TheExtenddesktopfunctiondoesnotwork.
Solution:EnabletheExtenddesktopfunctionbydoingthefollowing:
1.Connecttheexternalmonitortothemonitorconnector,andthenconnectthemonitortoanelectrical
outlet.
2.Turnontheexternalmonitorandthecomputer.
3.Right-clickonthedesktop,andclickScreenresolution.
4.ClicktheMonitor-2icon.
5.SelectExtendthesedisplaysformultipledisplays.
6.ClicktheMonitor-1icon(fortheprimarydisplay,thecomputerdisplay).
7.Settheresolutionfortheprimarydisplay.
8.ClicktheMonitor-2icon(fortheexternalmonitor).
9.Setthescreenresolutionforthesecondarydisplay.
10.Settherelativepositionofeachmonitorbydraggingitsicon.Youcansetthemonitorsinanyrelative
position,buttheiconsmusttoucheachother.
11.ClickOKtoapplythechanges.
Note:Tochangethecolorsettings,right-clickonthedesktop,andclickScreenresolution.Click
AdvancedSettings,selecttheMonitortab,thensetColors.
•Problem:IfyouusetheExtenddesktopfunction,youcannotsetahigherresolutionorhigherrefresh
rateonthesecondarydisplay.
Solution:Changetheresolutionandthecolordepthtolowersettingsfortheprimarydisplay.Referto
thesolutiontothepreviousproblem.
•Problem:Displayswitchingdoesnotwork.
Solution:IfyouusetheExtenddesktopfunction,disableit,andchangethedisplayoutputlocation.If
aDVDmovieoravideoclipisplaying,stoptheplayback,closetheprogram,andthenchangethe
displayoutputlocation.
•Problem:Thescreenpositionontheexternalmonitorisincorrectwhenthatmonitorissetforahigh
resolution.
Solution:Sometimes,whenyouuseahighresolutionsuchas1600x1200,theimageisshiftedtoleftor
rightonthescreen.Tocorrectthis,firstmakesurethatyourexternalmonitorsupportsthedisplaymode
(theresolutionandtherefreshrate)thatyouhaveset.Ifitdoesnot,setadisplaymodethatthemonitor
supports.Ifitdoessupportthedisplaymodeyouhaveset,gotothesetupmenuforthemonitoritself
andadjustthesettingsthere.Usuallytheexternalmonitorhasbuttonsforaccesstothesetupmenu.For
details,seethedocumentationthatcomeswiththemonitor.
90UserGuide

Audioproblems
•Problem:WaveorMIDIsounddoesnotplaycorrectly.
Solution:Makesurethatthebuilt-inaudiodeviceisconfiguredcorrectly.
1.GotoControlPanelandclickHardwareandSound.
2.ClickDeviceManager.Ifyouarepromptedforanadministratorpasswordorconfirmation,typethe
passwordorprovideconfirmation.
3.Double-clickSound,videoandgamecontrollers.MakesurethattheDolbyAdvancedAudio
v2driverisenabledandconfiguredcorrectly.
•Problem:Recordingsmadeusingthemicrophoneinputarenotloudenough.
Solution:MakesurethattheMicrophoneBoostfunctionisturnedonandsetbydoingthefollowing:
1.GotoControlPanelandclickHardwareandSound➙Sound.
2.ClicktheRecordingtabintheSoundwindow.
3.SelectMicrophone,andclickthePropertiesbutton.
4.ClicktheLevelstab,andmovetheMicrophoneBoostsliderupwards.
5.ClickOK.
Note:Fordetailsaboutcontrollingvolume,refertoyourWindowsonlinehelp.
•Problem:Avolumeorbalanceslidercannotbemoved.
Solution:Theslidermightbegrayedout.Thismeansthatitspositionisfixedbythehardwareand
cannotbechanged.
•Problem:Thevolumeslidersdonotstayinplacewhensomeaudioprogramsareused.
Solution:Itisnormalforthesliderstochangepositionwhencertainsoundprogramsareused.The
programsareawareofthesettingsintheVolumeMixerwindowandareallowedtochangethesettings
themselves.AnexampleistheWindowsMediaPlayer.Usuallytheapplicationhasslidersavailableto
controlthesoundfromwithintheprogram.
•Problem:Thebalanceslidercannotcompletelymuteonechannel.
Solution:Thecontrolisdesignedtocompensateforminordifferencesinbalanceanddoesnot
completelymuteeitherchannel.
•Problem:ThereisnovolumecontrolforMIDIsoundintheVolumeMixerwindow.
Solution:Usethehardwarevolumecontrol.Thisisbecausethebuilt-insynthesizersoftwaredoes
notsupportthecontrol.
•Problem:ThesoundcannotbeturnedoffevenifyousettheMastervolumecontrolatminimum.
Solution:YoustillcanhearsomesoundeventhoughyouhavesettheMastervolumecontrolatminimum.
Toturnoffthesoundcompletely,gototheMastervolumecontrolandselectMutespeakers.
•Problem:Whenyouconnectaheadphonetoyourcomputerwhileplayingsound,aspeakerdoesnot
producesound.
Solution:Oncetheheadphoneisattached,thestreamingisautomaticallyredirectedtoit.Ifyouwant
tolistentosoundfromthespeakersagain,besuretosetthosespeakersasthedefaultdevice.The
procedureisasfollows:
1.GotoControlPanel.ChangetheviewofControlPanelfromCategorytoLargeiconsorSmallicons.
2.ClickSmartAudio.TheSmartAudiowindowopens.
Chapter7.Troubleshootingproblems91

3.Lookattheplaybackdevices.Ifyouhaveattachedaheadphone,theheadphonewillbeautomatically
setasthedefaultdevice,andtheiconforthatheadphonewillbechecked.
4.Tosetadifferentdeviceasthedefault,double-clicktheiconforthosespeakers.Thaticonwill
nowhaveacheckmark.
5.PlayanysoundbyuseofamusicprogramsuchasWindowsMediaPlayer.Makesurethatsound
comesfromthespeakers.
Fordetails,refertothehelpinformationsystemforSmartAudio.
Batteryandpowerproblems
Thistopiccontainsinstructionsontroubleshootingbatteryandpowerproblems.
Batteryproblems
•Problem:Thebuilt-inbatterycannotbefullychargedinthestandardchargetimewhenthecomputeris
poweredoff.
Solution:Thebatterymightbeover-discharged.Dothefollowing:
1.Turnoffthecomputer.
2.Connecttheacpoweradaptertothecomputerandletitcharge.
Ifthebuilt-inbatterycannotbefullychargedin24hours,haveyourcomputerserviced.
•Problem:Yourcomputershutsdownbeforethebattery-statusindicatorshowsempty,oryourcomputer
operatesafterthebattery-statusindicatorshowsempty.
Solution:Dischargeandrechargethebuilt-inbattery.
•Problem:Theoperatingtimeforafullychargedbuilt-inbatteryisshort.
Solution:Dischargeandrechargethebuilt-inbattery.Ifyourbatteryoperatingtimeisstillshort,have
yourcomputerserviced.
•Problem:Thecomputerdoesnotoperatewithafullychargedbuilt-inbattery.
Solution:Thesurgeprotectorinthebuilt-inbatterymightbeactive.Turnoffthecomputerforoneminute
toresettheprotector;thenturnonthecomputeragain.
•Problem:Thebuilt-inbatterycannotbecharged.
Youcannotchargethebatterywhenitistoohot.Turnoffthecomputerandallowittocooltoroom
temperature.Afterthecomputercools,rechargethebattery.Ifthebatterystillcannotbecharged,
haveyourcomputerserviced.
Powerproblems
Printtheseinstructionsnowandkeepitwithyourcomputerforreferencelater.
Ifyourcomputerisgettingnopoweratall,checkthefollowingitems:
1.Checkallpowerconnections.Removeanypowerstripsandsurgeprotectorstoconnecttheacpower
adapterdirectlytotheacpoweroutlet.
2.Inspecttheacpoweradapter.Checkforanyphysicaldamage,andmakesurethatthepowercableis
firmlyattachedtotheadapterbrickandthecomputer.
3.Verifytheacpowersourceisworkingbyattachinganotherdevicetotheoutlet.
4.Removealldevicesandthentestforsystempowerwithminimaldevicesattached.
92UserGuide

Ifyourcomputerdoesnotrunonbatterypower,checkthefollowingitems:
1.Ifthebatteryrunsoutofpower,attachacpoweradaptertorechargethebattery.
2.Ifthebatteryischargedbutthecomputerdoesnotrun,callLenovoCustomerServiceCentertohave
yourcomputerserviced.
Anacpoweradapterproblem
Problem:Theacpoweradapterisconnectedtothecomputerandtheworkingelectricaloutlet,butthe
poweradapter(powerplug)iconisnotdisplayedintheWindowsnotificationarea.
Solution:Dothefollowing:
1.Makesurethattheconnectionoftheacpoweradapteriscorrect.Forinstructionsonconnectingtheac
poweradapter,seeSafety,Warranty,andSetupGuidethatcomeswithyourcomputer.
2.Iftheconnectionoftheacpoweradapteriscorrect,turnoffthecomputer,thendisconnecttheac
poweradapter.
3.Reconnecttheacpoweradapter,thenturnonthecomputer.
4.IfthepoweradaptericonstillisnotdisplayedintheWindowsnotificationarea,havetheacpower
adapterandyourcomputerserviced.
Note:IfyouareusingtheWindows7operatingsystem,todisplaythepoweradapter(powerplug)icon,click
ShowhiddeniconsintheWindowsnotificationarea.
Apowerbuttonproblem
Problem:Thesystemdoesnotrespond,andyoucannotturnoffthecomputer.
Solution:Turnoffthecomputerbypressingandholdingthepowerbuttonforfoursecondsormore.Ifthe
systemisstillnotreset,removetheacpoweradapter.
Bootproblems
Printtheseinstructionsnowandkeepthemwithyourcomputerforreferencelater.
Ifyoureceiveanerrormessagebeforetheoperatingsystemloads,followtheappropriatecorrectiveactions
forPOSTerrormessages.
Ifyoureceiveanerrormessagewhiletheoperatingsystemisloadingthedesktopconfigurationafterthe
POSTiscompleted,checkthefollowingitems:
1.GototheLenovoSupportWebsiteathttp://www.lenovo.com/supportandsearchfortheerrormessage.
2.GototheMicrosoftKnowledgeBasehomepageathttp://support.microsoft.com/andsearchforthe
errormessage.
Sleepandhibernationproblems
•Problem:Thecomputerenterssleepmodeunexpectedly.
Solution:Ifthemicroprocessoroverheats,thecomputerautomaticallyenterssleepmodetoallowthe
computertocoolandtoprotectthemicroprocessorandotherinternalcomponents.Checkthesettings
forsleepmode.
•Problem:ThecomputerenterssleepmodeimmediatelyafterthePOST.
Solution:Makesurethat:
–Thebatteryischarged.
–Theoperatingtemperatureiswithintheacceptablerange.Referto“Specifications”onpage12.
Chapter7.Troubleshootingproblems93

Ifthebatteryischargedandthetemperatureiswithinrange,havethecomputerserviced.
•Problem:Acriticallow-batteryerroroccurs,andthecomputerimmediatelyturnsoff.
Solution:Thebatterypowerisgettinglow.Connecttheacpoweradaptertothecomputerandtoan
electricaloutlet.
•Problem:ThecomputerdisplayremainsblankafteryoupressFntoreturnfromsleepmode.
Solution:Checkwhetheranexternalmonitorwasdisconnectedorturnedoffwhilethecomputerwas
insleepmode.Ifyoudisconnectedorturnedofftheexternalmonitor,connectitorturnitonbefore
resumingthecomputerfromthesleepmode.Whenresumingthecomputerfromthesleepmode
withoutattachingtheexternalmonitororturningiton,andthecomputerdisplayremainsblank,press
F7tobringupthecomputerdisplay.
Notes:
–IfyouareusingF7toapplyapresentationscheme,youwillneedtopressF7atleastthreetimesin
threesecondstobringupthecomputerdisplay.
–IfyourcomputerisaWindows7model,itdoesnotsupportthepresentationscheme.
•Problem:Thecomputerdoesnotreturnfromsleepmode,andthecomputerdoesnotwork.
Solution:Ifthecomputerdoesnotreturnfromsleepmode,itmighthaveenteredsleeporhibernation
modeautomaticallybecausethebatteryisdepleted.Checkthesystem-statusindicator(illuminated
ThinkPadlogo).
–Ifthesystem-statusindicator(illuminatedThinkPadlogo)blinksslowly,yourcomputerisinsleepmode.
Connecttheacpoweradaptertothecomputer;thenpressFn.
–Ifthesystem-statusindicator(illuminatedThinkPadlogo)isoff,yourcomputerisinpower-offstateor
inhibernationmode.Connecttheacpoweradaptertothecomputer;thenpressthepowerbutton
toresumeoperation.
Ifthesystemstilldoesnotreturnfromsleepmode,yoursystemmightstoprespondingandyoumightnot
beabletoturnoffthecomputer.Inthiscase,youneedtoresetthecomputer.Ifyouhavenotsaved
yourdata,itmightbelost.Toresetthecomputer,pressandholdthepowerbuttonforfoursecondsor
more.Ifthesystemisstillnotreset,removetheacpoweradapter.
•Problem:Yourcomputerdoesnotentersleeporhibernationmode.
Solution:Checkwhetheranyoptionhasbeenselectedtodisableyourcomputerfromenteringsleep
orhibernationmode.
Ifyourcomputertriestoentersleepmodebuttherequestisrejected,thedeviceattachedtotheUSB
connectormighthavebeendisabled.Ifthisoccurs,doahot-unplug-and-plugoperationfortheUSB
device.
•Problem:Thebatterydischargesslightlywhilethecomputerisinhibernationmode.
Solution:Ifthewake-upfunctionisenabled,thecomputerconsumesasmallamountofpower.Thisis
notadefect.Fordetails,referto“Power-savingmodes”onpage32.
Problemswithdrivesandotherstoragedevices
Thissectionincludesharddiskdriveproblemsandasolid-statedriveproblem.
Harddiskdriveproblems
•Problem:Theharddiskdrivemakesarattlingnoiseintermittently.
Solution:Therattlingnoisemightbeheard:
94UserGuide

–Whentheharddiskdrivebeginsorfinishesgettingaccesstodata.
–Whenyoucarrytheharddiskdrive.
–Whenyoucarryyourcomputer.
Thisisanormalcharacteristicofaharddiskdriveandisnotadefect.
•Problem:Theharddiskdrivedoesnotwork.
Solution:OntheStartupmenuofThinkPadSetup,makesurethattheharddiskdriveisontheBoot
priorityorderlist.IfitisontheExcludedfrombootorderlist,itisdisabled.Selecttheentryforitonthe
listandpresstheShift+1key.ThismovestheentrytotheBootpriorityorderlist.
•Problem:Aftersettingaharddiskpasswordontheharddiskdriveofthecomputer,youmovedthedrive
toanothercomputer.Nowyoucannotunlocktheharddiskpassword.
Solution:Yourcomputersupportsanenhancedpasswordalgorithm.Computersolderthanyoursmight
notsupportsuchasecurityfunction.
Asolid-statedriveproblem
Problem:WhenyoucompressfilesorfoldersbyuseofthedatacompressionfunctioninWindows,and
thendecompressthem,theprocessofwritingtoorreadingfromthefilesorfoldersisslow.
Solution:ApplythediskdefragmentationtoolinWindowsforfasteraccesstothedata.
Asoftwareproblem
Problem:Anapplicationdoesnotruncorrectly.
Solution:Ensurethattheproblemisnotbeingcausedbytheapplication.
Checkthatyourcomputerhastheminimumrequiredmemorytoruntheapplication.Refertothemanuals
suppliedwiththeapplication.
Checkthefollowing:
•Theapplicationisdesignedtooperatewithyouroperatingsystem.
•Otherapplicationsruncorrectlyonyourcomputer.
•Thenecessarydevicedriversareinstalled.
•Theapplicationworkswhenitisrunonsomeothercomputer.
Ifanerrormessageisdisplayedwhileyouareusingtheapplication,refertothemanualssuppliedwiththe
application.
Iftheapplicationstilldoesnotruncorrectly,contactyourplaceofpurchaseoraservicerepresentative
forhelp.
AUSBproblem
Problem:AdeviceconnectedtotheUSBconnectordoesnotwork.
Solution:OpentheDeviceManagerwindow.MakesurethattheUSBdevicesetupiscorrect,andthatthe
assignmentofcomputerresourceandtheinstallationofthedevicedriverarecorrect.ToopentheDevice
Managerwindow,gotoControlPanelandclickHardwareandSound➙DeviceManager.Ifyouare
promptedforanadministratorpasswordorconfirmation,typethepasswordorprovideconfirmation.
Referto“Diagnosingproblems”onpage81andrunadiagnostictestoftheUSBconnector.
Chapter7.Troubleshootingproblems95

96UserGuide

Chapter8.Recoveryinformation
ThischapterprovidesinformationabouttherecoverysolutionsprovidedbyLenovo.
•“RecoveryinformationfortheWindows7operatingsystem”onpage97
•“RecoveryinformationfortheWindows8.1operatingsystem”onpage102
RecoveryinformationfortheWindows7operatingsystem
ThissectionprovidesinformationabouttherecoverysolutionsprovidedbyLenovoontheWindows7
operatingsystem.
Notes:
•Thereareavarietyofmethodstochoosefromwhenconsideringhowtorecoverintheeventofasoftware-
orhardware-relatedproblem.Somemethodsvarydependingonthetypeofyouroperatingsystem.
•Theproductontherecoverymediamightbeusedonlyforthefollowingpurposes:
–Restoretheproductpreinstalledonyourcomputer
–Reinstalltheproduct
–ModifytheproductusingtheAdditionalFiles
Topreventpotentialperformancerisksorunexpectedbehaviorthatmightbecausedbythenewharddisk
drivetechnology,itisrecommendedthatyouuseoneofthefollowingsoftwareprogramsforbackup:
•ThinkVantageRescueandRecoveryversion4.3orlater
•SymantecNortonGhostversion15orlater
TostarttheSymantecNortonGhostprogram,dothefollowing:
1.ClickStart➙Run.TheRunwindowopens.
2.Typecmdinthefield.ThenclickOK.
3.Typeghost-align=1mbandpressEnter.
•AcronisTrueImage2010orlater
•ParagonBackup&Recovery10Suiteorlater,ParagonBackup&Recovery10Homeorlater
Creatingandusingrecoverymedia
Youcanuserecoverymediatorestoretheharddiskdriveorsolid-statedrivetothefactorydefaultsettings.
Recoverymediaareusefulifyoutransferthecomputertoanotherarea,sellthecomputer,recyclethe
computer,orputthecomputerinanoperationalstateafterallothermethodsofrecoveryhavefailed.Asa
precautionarymeasure,itisimportanttocreaterecoverymediaasearlyaspossible.
Note:Therecoveryoperationsyoucanperformusingrecoverymediavarydependingontheoperating
systemfromwhichtherecoverymediawerecreated.Therecoverymediamightcontainabootmedium
andadatamedium.YourMicrosoftWindowslicensepermitsyoutocreateonlyonedatamedium,soitis
importantthatyoustoretherecoverymediainasafeplaceafteryouhavemadethem.
Creatingrecoverymedia
Thissectionprovidesinstructionsonhowtocreaterecoverymedia.
Note:YoucancreaterecoverymediausingdiscsorexternalUSBstoragedevices.
©CopyrightLenovo201497

Tocreaterecoverymedia,clickStart➙AllPrograms➙LenovoThinkVantageTools➙FactoryRecovery
Disks.Then,followtheinstructionsonthescreen.
Usingrecoverymedia
Youcanuserecoverymediatorestorethecomputertothefactorydefaultsettingsonly.Youcanuse
recoverymediatoputthecomputerinanoperationalstateafterallothermethodsofrecoveryhavefailed.
Attention:Whenyouuserecoverymediatorestorethecomputertothefactorydefaultsettings,allthefiles
currentlyontheharddiskdriveorsolid-statedrivewillbedeletedandreplacedbythefactorydefaultsettings.
Touserecoverymedia,dothefollowing:
1.Dependingonthetypeofyourrecoverymedia,connectthebootmedium(memorykeyorotherUSB
storagedevice)tothecomputer,orinsertthebootdiscintoanexternalopticaldrive.
2.RepeatedlypressandreleasetheF12keywhenturningonthecomputer.WhentheBootMenuwindow
opens,releasetheF12key.
3.SelectthedesiredstartupdeviceandpressEnter.Therestoreprocessbegins.
4.Followtheinstructionsonthescreentocompletetheoperation.
Notes:
1.Afterrestoringyourcomputertothefactorydefaultsettings,youmighthavetoreinstalldevicedrivers
forsomedevices.See“Reinstallingpreinstalledapplicationsanddevicedrivers”onpage101.
2.SomecomputerscomewithMicrosoftOfficeorMicrosoftWorkspreinstalled.Ifyouneedtorecover
orreinstallyourMicrosoftOfficeorMicrosoftWorksapplications,youmustusetheMicrosoftOffice
CDorMicrosoftWorksCD.ThesediscsareprovidedonlywithcomputerspreinstalledwithMicrosoft
OfficeorMicrosoftWorks.
Performingbackupandrecoveryoperations
TheRescueandRecoveryprogramenablesyoutobackupallyourharddiskdriveorsolid-statedrive
contentsincludingtheoperatingsystem,datafiles,softwareprograms,andpersonalsettings.Youcan
designatewheretheRescueandRecoveryprogramstoresthebackup:
•Inaprotectedareaofyourharddiskdriveorsolid-statedrive
•OnanattachedexternalUSBharddiskdrive
•Onanetworkdrive
•Onrecordablediscs(arecordableopticaldriveisrequiredforthisoption)
Afteryouhavebackedupthecontentsontheharddiskdriveorsolid-statedrive,youcanrestorethe
completecontentsoftheharddiskdriveorsolid-statedrive,restoreonlytheselectedfiles,orrestoreonly
theWindowsoperatingsystemandapplications.
Performingabackupoperation
ThissectionprovidesinstructionsonhowtoperformabackupoperationusingtheRescueandRecovery
program.
1.Fromthedesktop,clickStart➙AllPrograms➙LenovoThinkVantageTools➙EnhancedBackup
andRestore.TheRescueandRecoveryprogramstarts.
2.IntheRescueandRecoverymainwindow,clicktheLaunchadvancedRescueandRecoveryarrow.
3.ClickBackupyourharddriveandselectbackupoperationoptions.Then,followtheinstructionson
thescreentocompletethebackupoperation.
98UserGuide

Performingarecoveryoperation
ThissectionprovidesinstructionsonhowtoperformarecoveryoperationusingtheRescueandRecovery
program.
1.Fromthedesktop,clickStart➙AllPrograms➙LenovoThinkVantageTools➙EnhancedBackup
andRestore.TheRescueandRecoveryprogramstarts.
2.IntheRescueandRecoveryprogrammainwindow,clicktheLaunchadvancedRescueandRecovery
arrow.
3.ClicktheRestoreyoursystemfromabackupicon.
4.Followtheinstructionsonthescreentocompletetherecoveryoperation.
FormoreinformationaboutperformingarecoveryoperationfromtheRescueandRecoveryworkspace,see
“UsingtheRescueandRecoveryworkspace”onpage99.
UsingtheRescueandRecoveryworkspace
TheRescueandRecoveryworkspaceresidesinaprotected,hiddenareaofyourharddiskdriveor
solid-statedrivethatoperatesindependentlyfromtheWindowsoperatingsystem.Thisenablesyouto
performrecoveryoperationsevenifyoucannotstarttheWindowsoperatingsystem.Youcanperformthe
followingrecoveryoperationsfromtheRescueandRecoveryworkspace:
•Rescuefilesfromyourharddiskdriveorsolid-statedrive,orfromabackup
TheRescueandRecoveryworkspaceenablesyoutolocatefilesonyourharddiskdriveorsolid-state
driveandtransferthemtoanetworkdriveorotherrecordablemedia,suchasaUSBdeviceoradisc.
Thissolutionisavailableevenifyoudidnotbackupyourfilesorifchangesweremadetothefilessince
yourlastbackupoperation.YoualsocanrescueindividualfilesfromaRescueandRecoverybackup
locatedonyourlocalharddiskdriveorsolid-statedrive,aUSBdevice,oranetworkdrive.
•Restoreyourharddiskdriveorsolid-statedrivefromaRescueandRecoverybackup
Ifyouhavebackedupyourharddiskdriveorsolid-statedriveusingtheRescueandRecoveryprogram,
youcanrestoretheharddiskdriveorsolid-statedrivefromaRescueandRecoverybackup,evenif
youcannotstarttheWindowsoperatingsystem.
•Restoreyourharddiskdriveorsolid-statedrivetothefactorydefaultsettings
TheRescueandRecoveryworkspaceenablesyoutorestorethecompletecontentsofyourharddisk
driveorsolid-statedrivetothefactorydefaultsettings.Ifyouhavemultiplepartitionsonyourharddisk
driveorsolid-statedrive,youhavetheoptiontorestorethefactorydefaultsettingstotheC:partitionand
leavetheotherpartitionsintact.BecausetheRescueandRecoveryworkspaceoperatesindependently
fromtheWindowsoperatingsystem,youcanrestorethefactorydefaultsettingsevenifyoucannot
starttheWindowsoperatingsystem.
Attention:Ifyourestoretheharddiskdriveorsolid-statedrivefromaRescueandRecoverybackupor
restoretheharddiskdriveorsolid-statedrivetothefactorydefaultsettings,allfilesontheprimaryhard
diskdriveorsolid-statedrivepartition(usuallydriveC:)willbedeletedintherecoveryprocess.Ifpossible,
makecopiesofimportantfiles.IfyouareunabletostarttheWindowsoperatingsystem,youcanusethe
rescuefilesfeatureoftheRescueandRecoveryworkspacetocopyfilesfromyourharddiskdriveor
solid-statedrivetoothermedia.
TostarttheRescueandRecoveryworkspace,dothefollowing:
1.Turnoffyourcomputer.
2.RepeatedlypressandreleasetheF11keywhenturningonthecomputer.Whenyouhearbeepsor
seealogoscreen,releasetheF11key.
3.IfyouhavesetaRescueandRecoverypassword,typeyourpasswordwhenprompted.TheRescue
andRecoveryworkspaceopensafterashortdelay.
Chapter8.Recoveryinformation99

Note:IftheRescueandRecoveryworkspacefailstoopen,see“Solvingrecoveryproblems”on
page102.
4.Dooneofthefollowing:
•Torescuefilesfromyourharddiskdriveorsolid-statedrive,orfromabackup,clickRescuefilesand
followtheinstructionsonthescreen.
•Torestoreyourharddiskdriveorsolid-statedrivefromaRescueandRecoverybackuportorestore
yourharddiskdriveorsolid-statedrivetothefactorydefaultsettings,clickRestoreyoursystem
andfollowtheinstructionsonthescreen.
FormoreinformationaboutthefeaturesoftheRescueandRecoveryworkspace,clickHelp.
Notes:
1.Afterrestoringyourharddiskdriveorsolid-statedrivetothefactorydefaultsettings,youmighthave
toreinstalldevicedriversforsomedevices.See“Reinstallingpreinstalledapplicationsanddevice
drivers”onpage101.
2.SomecomputerscomewithMicrosoftOfficeorMicrosoftWorkspreinstalled.Ifyouneedtorecover
orreinstallyourMicrosoftOfficeorMicrosoftWorksapplications,youmustusetheMicrosoftOffice
CDorMicrosoftWorksCD.ThesediscsareprovidedonlywithcomputerspreinstalledwithMicrosoft
OfficeorMicrosoftWorks.
Creatingandusingarescuemedium
Witharescuemedium,suchasadiscoraUSBharddiskdrive,youcanrecoverthecomputerfromfailures
thatpreventyoufromgainingaccesstotheRescueandRecoveryworkspaceonyourharddiskdriveor
solid-statedrive.
Notes:
1.Therecoveryoperationsyoucanperformusingarescuemediumvarydependingontheoperating
system.
2.Therescuedisccanbestartedinalltypesofexternalopticaldrives.
Creatingarescuemedium
Tocreatearescuemedium,dothefollowing:
1.Fromthedesktop,clickStart➙AllPrograms➙LenovoThinkVantageTools➙EnhancedBackup
andRestore.TheRescueandRecoveryprogramstarts.
2.IntheRescueandRecoverymainwindow,clicktheLaunchadvancedRescueandRecoveryarrow.
3.ClicktheCreateRescueMediaicon.TheCreateRescueandRecoveryMediawindowopens.
4.IntheRescueMediaarea,selectthetypeoftherescuemediumyouwanttocreate.Youcancreatea
rescuemediumusingadiscoraUSBharddiskdrive.
5.ClickOKandfollowtheinstructionsonthescreentocreatearescuemedium.
Usingarescuemedium
Thissectionprovidesinstructionsonhowtousetherescuemediumyouhavecreated.
•Ifyouhavecreatedarescuemediumusingadisc,usethefollowinginstructionstousetherescuemedium:
1.Turnoffyourcomputer.
2.RepeatedlypressandreleasetheF12keywhenturningonthecomputer.WhentheBootMenu
windowopens,releasetheF12key.
3.IntheBootMenuwindow,selectthedesiredopticaldriveasthefirstbootdevice.Then,insertthe
rescuediscintotheexternalopticaldriveandpressEnter.Therescuemediumstarts.
100UserGuide

•IfyouhavecreatedarescuemediumusingaUSBharddiskdrive,usethefollowinginstructionsto
usetherescuemedium:
1.AttachtheUSBharddiskdrivetooneoftheUSBconnectorsonyourcomputer.
2.RepeatedlypressandreleasetheF12keywhenturningonthecomputer.WhentheBootMenu
windowopens,releasetheF12key.
3.IntheBootMenuwindow,selecttheUSBharddiskdriveasthefirstbootdeviceandpressEnter.
Therescuemediumstarts.
Whentherescuemediumstarts,theRescueandRecoveryworkspaceopens.Thehelpinformationfor
eachfeatureisavailablefromtheRescueandRecoveryworkspace.Followtheinstructionstocomplete
therecoveryprocess.
Reinstallingpreinstalledapplicationsanddevicedrivers
Yourcomputerhasprovisionsthatenableyoutoreinstalldesiredfactory-installedapplicationsanddevice
drivers.
Reinstallingpreinstalledprograms
Toreinstallselectedapplications,dothefollowing:
1.Turnonyourcomputer.
2.GototheC:\SWTOOLSdirectory.
3.OpentheAPPSfolder.Thefoldercontainsseveralsubfoldersnamedforthevariouspreinstalled
applications.
4.Openthesubfolderfortheapplicationyouwanttoreinstall.
5.Double-clickSetup,andthenfollowtheon-screenstepstoreinstalltheapplication.
Reinstallingpreinstalleddevicedrivers
Attention:Whenyoureinstalldevicedrivers,youarechangingthecurrentconfigurationofyourcomputer.
Reinstalldevicedriversonlywhenitisnecessarytocorrectaproblemwithyourcomputer.
Toreinstalladevicedriverforafactory-installeddevice,dothefollowing:
1.Turnonyourcomputer.
2.GototheC:\SWTOOLSdirectory.
3.OpentheDRIVERSfolder.Thefoldercontainsseveralsubfoldersnamedforthevariousdevices
installedinyourcomputer(forexample,AUDIOandVIDEO).
4.Openthesubfolderforthedevice.
5.Reinstallthedevicedriverbyoneofthefollowingmethods:
•Inthesubfolderforthedevice,lookforatextfile(afilewiththeextension.txt).Thetextfilecontains
informationonhowtoreinstallthatdevicedriver.
•Ifthesubfolderforthedevicecontainsafileofsetupinformation(afilewiththeextension.inf),you
canusetheAddNewHardwareprogram(intheWindowsControlPanel)toreinstallthedevicedriver.
Notalldevicedriverscanbereinstalledbyuseofthisprogram.IntheAddNewHardwareprogram,
whenpromptedforthedevicedriveryouwanttoinstall,clickHaveDiskandBrowse.Thenselect
thedevicedriverfilefromthedevicesubfolder.
•Inthesubfolderforthedevice,lookfortheexecutablefile(afilewiththeextension.exe).Double-click
thefile,andfollowtheinstructionsonthescreen.
Chapter8.Recoveryinformation101

Attention:Ifyouneedupdateddevicedriversforyourcomputer,donotdownloadthemfromtheWindows
UpdateWebsite.ObtainthemfromLenovo.Formoreinformation,see“Makingsuredevicedriversare
current”onpage76.
Solvingrecoveryproblems
IfyouareunabletoaccesstheRescueandRecoveryworkspaceortheWindowsenvironment,doone
ofthefollowing:
•UsearescuemediumtostarttheRescueandRecoveryworkspace.See“Creatingandusingarescue
medium”onpage100.
•Userecoverymediaifallothermethodsofrecoveryhavefailedandyouneedtorestoretheharddiskdrive
orsolid-statedrivetothefactorydefaultsettings.See“Creatingandusingrecoverymedia”onpage97.
Note:IfyouareunabletoaccesstheRescueandRecoveryworkspaceortheWindowsenvironmentfrom
arescuemediumorrecoverymedia,youmightnothavetherescuedevice(aninternalharddiskdriveor
solid-statedrive,adisc,aUSBharddiskdrive,orotherexternaldevices)setasthefirstbootdeviceinthe
startupdevicesequence.Youmustfirstmakesurethatyourrescuedeviceissetasthefirstbootdevicein
thestartupdevicesequenceintheThinkPadSetupprogram.Fordetailedinformationonhowtotemporarily
orpermanentlychangethestartupdevicesequence,see“Startupmenu”onpage69.
Itisimportanttocreatearescuemediumandasetofrecoverymediaasearlyaspossibleandstorethem
inasafeplaceforfutureuse.
RecoveryinformationfortheWindows8.1operatingsystem
ThissectionprovidesinformationabouttherecoverysolutionsfortheWindows8.1operatingsystem.
AWindowsrecoveryimageispreinstalledintherecoverypartitiononyourcomputer.TheWindowsrecovery
imageenablesyoutorefreshyourcomputer,orresetyourcomputertothefactorydefaultsettings.
YoucancreaterecoverymediaasbackupsorreplacementfortheWindowsrecoveryimage.Withthe
recoverymedia,youcantroubleshootandfixtheproblemsonyourcomputerevenifyoucannotstartthe
Windows8.1operatingsystem.Itisrecommendedthatyoucreaterecoverymediaasearlyaspossible.For
moreinformation,see“Creatingandusingrecoverymedia”onpage103.
Refreshingyourcomputer
Ifyourcomputerdoesnotperformwellandtheproblemmightbecausedbyarecentlyinstalledprogram,
youcanrefreshyourcomputerwithoutlosingyourpersonalfilesorchangingyoursettings.
Attention:Ifyourefreshyourcomputer,theprogramsthatcamewithyourcomputerandtheprogramsthat
youinstalledfromWindowsStorewillbereinstalled,butallotherprogramswillberemoved.
Torefreshyourcomputer,dothefollowing:
1.Moveyourpointertothetop-rightorbottom-rightcornerofthescreentodisplaythecharms.Click
Settings➙ChangePCsettings➙Updateandrecovery➙Recovery.
2.IntheRefreshyourPCwithoutaffectingyourfilessection,clickGetstarted.
3.Followtheinstructionsonthescreentorefreshyourcomputer.
Resettingyourcomputertothefactorydefaultsettings
Ifyouwanttorecycleyourcomputerorjuststartover,youcanresetyourcomputertothefactorydefault
settings.Resettingthecomputerwillreinstalltheoperatingsystem,reinstallalltheprogramsthatcamewith
yourcomputer,andresetallthesettingstothefactorydefaultsettings.
102UserGuide

Attention:Ifyouresetthecomputertothefactorydefaultsettings,allyourpersonalfilesandsettingswillbe
deleted.Toavoiddataloss,makeabackupcopyofallthedatathatyouwanttokeep.
Toresetyourcomputertothefactorydefaultsettings,dothefollowing:
1.Moveyourpointertothetop-rightorbottom-rightcornerofthescreentodisplaythecharms.Click
Settings➙ChangePCsettings➙Updateandrecovery➙Recovery.
2.IntheRemoveeverythingandreinstallWindowssection,clickGetstarted.ThenclickNextto
confirmtheoperation.
3.Dependingonyourneeds,dooneofthefollowing:
•Toperformaquickformat,clickJustremovemyfilestostarttheprocess.Theprocesswilltake
severalminutes.
•Toperformacompleteformat,clickFullycleanthedrivetostarttheprocess.Theprocesswill
takeseveralhours.
4.Followtheinstructionsonthescreentoresetyourcomputertothefactorydefaultsettings.
Usingtheadvancedstartupoptions
Withtheadvancedstartupoptions,youcanchangethefirmwaresettingsofthecomputer,changethe
startupsettingsoftheWindowsoperatingsystem,startthecomputerfromanexternaldevice,orrestorethe
Windowsoperatingsystemfromasystemimage.
Tousetheadvancedstartupoptions,dothefollowing:
1.Moveyourpointertothetop-rightorbottom-rightcornerofthescreentodisplaythecharms.Click
Settings➙ChangePCsettings➙Updateandrecovery➙Recovery.
2.IntheAdvancedstartupsection,clickRestartnow➙Troubleshoot➙Advancedoptions.
3.Selectadesiredstartupoption,thenfollowtheinstructionsonthescreen.
RecoveringyouroperatingsystemifWindows8.1failstostart
TheWindowsrecoveryenvironmentonyourcomputeriscapableofoperatingindependentlyfromthe
Windows8.1operatingsystem.Thisenablesyoutorecoverorrepairtheoperatingsystemevenifthe
Windows8.1operatingsystemfailstostart.
Aftertwoconsecutivefailedbootattempts,theWindowsrecoveryenvironmentstartsautomatically.Then
youcanchooserepairandrecoveryoptionsbyfollowingtheinstructionsonthescreen.
Note:Ensurethatyourcomputerisconnectedtoacpowerduringtherecoveryprocess.
Creatingandusingrecoverymedia
YoucancreaterecoverymediaasbackupsfortheWindowsrecoveryenvironmentandtheWindows
recoveryimage.Ifyoucannotstartthecomputer,youcanuserecoverymediatotroubleshootandfixthe
problemsonyourcomputer.
Itisrecommendedthatyoucreaterecoverymediaasearlyaspossible.Onceyoucreaterecoverymedia,
keeptheminasafeplaceanddonotusethemtostoreotherdata.
Creatingrecoverymedia
Tocreaterecoverymedia,youneedaUSBdrivewithatleast8GBofstorage.TherequiredUSBcapacity
dependsonthesizeoftherecoveryimage.
Chapter8.Recoveryinformation103

Attention:CreatingrecoverymediawilldeleteanythingstoredontheUSBdrive.Toavoiddataloss,makea
backupcopyofallthedatathatyouwanttokeep.
Tocreaterecoverymedia,dothefollowing:
Note:Ensurethatyourcomputerisconnectedtoacpower.
1.Moveyourpointertothetop-rightorbottom-rightcornerofthescreentodisplaythecharms,and
clickSearch.
2.TyperecoveryintheSearchfieldandclicktheSearchbutton.ThenclickCreatearecoverydrive.
3.ClickY esintheUserAccountControlwindowtoallowtheRecoveryMediaCreatorprogramtostart.
4.SelecttheCopytherecoverypartitionfromthePCtotherecoverydrive.option.ThenclickNext.
Important:IfyoucleartheCopytherecoverypartitionfromthePCtotherecoverydrive.option,
youwillcreaterecoverymediawithouttherecoverypartitioncontent.Youstillcanstartthecomputer
fromtherecoverymedia,butyoumightbeunabletorecoveryourcomputeriftherecoverypartitionon
yourcomputerisdamaged.
5.ConnectaproperUSBdrivethenclickNext.
6.ClickCreateintheRecoveryDrivewindow.Thecreationoftherecoverymediastarts.
7.Whenthecreationoftherecoverymediafinishes,dooneofthefollowing:
•Tokeeptherecoverypartitiononyourcomputer,clickFinish.
•Todeletetherecoverypartitiononyourcomputer,clickDeletetherecoverypartition.
Attention:Ifyoudeletetherecoverypartitiononyourcomputer,dokeeptherecoverymediaina
safeplace.TheWindowsrecoveryimagewillnotbestoredinyourcomputeranymore,andyouwill
needtherecoverymediatorefreshorresetyourcomputer.
8.RemovetheUSBdrive.Therecoverymediaarecreatedsuccessfully.
Usingrecoverymedia
Ifyoucannotstartyourcomputer,orifyoucannotstarttheWindowsrecoveryimageonyourcomputer,use
recoverymediatorecoveryourcomputer.
Touserecoverymedia,dothefollowing:
Note:Ensurethatyourcomputerisconnectedtoacpower.
1.Turnonorrestartthecomputer.BeforetheWindowsoperatingsystemstarts,repeatedlypresstheF12
key.TheBootMenuwindowopens.
2.Selecttherecoverydriveasthebootdevice.
3.Selectapreferredlanguageandthenselectapreferredkeyboardlayout.
4.ClickTroubleshoottodisplaytheoptionalrecoverysolutions.
5.Selectacorrespondingrecoverysolutionaccordingtoyoursituation.Forexample,selectResetyour
PCifyouwanttoresetyourcomputertothefactorydefaultsettings.
FormoreinformationabouttherecoverysolutionsprovidedbytheWindows8.1operatingsystem,goto:
http://go.microsoft.com/fwlink/?LinkID=263800
104UserGuide

Chapter9.Replacingdevices
Thischaptercontainsthefollowingitems:
•“Staticelectricityprevention”onpage105
•“Disablingthebuilt-inbatteries”onpage105
•“Replacingthememorymodule”onpage106
•“Replacingthecoin-cellbattery”onpage111
•“Replacingthewireless-LANcard”onpage108
•“Replacingtheharddiskdriveorsolid-statedrive”onpage113
•“Replacingthekeyboard”onpage117
Staticelectricityprevention
Staticelectricity,althoughharmlesstoyou,canseriouslydamagecomputercomponentsandoptions.
Improperhandlingofstatic-sensitivepartscancausedamagetothepart.Whenyouunpackanoptionor
aCRU,donotopenthestatic-protectivepackagecontainingthepartuntiltheinstructionsdirectyou
toinstallit.
WhenyouhandleoptionsorCRUs,orperformanyworkinsidethecomputer,takethefollowingprecautions
toavoidstatic-electricitydamage:
•Limityourmovement.Movementcancausestaticelectricitytobuilduparoundyou.
•Alwayshandlecomponentscarefully.Handleadapters,memorymodules,andothercircuitboardsbythe
edges.Nevertouchexposedcircuitry.
•Preventothersfromtouchingcomponents.
•Whenyouinstallastatic-sensitiveoptionorCRU,touchthestatic-protectivepackagecontainingthe
parttoametalexpansion-slotcoverorotherunpaintedmetalsurfaceonthecomputerforatleasttwo
seconds.Thisreducesstaticelectricityfromthepackageandyourbody.
•Whenpossible,removethestatic-sensitivepartfromthestatic-protectivepackagingandinstallthepart
withoutsettingitdown.Whenthisisnotpossible,placethestatic-protectivepackagingonasmooth,
levelsurfaceandplacethepartonit.
•Donotplacethepartonthecomputercoverorothermetalsurface.
Disablingthebuilt-inbatteries
Beforereplacinganydevices,ensurethatyouhavedisabledthebuilt-inbatteriesbydoingthefollowing:
1.Disconnecttheacpoweradapterandallcablesfromthecomputer.
2.Restartthecomputer.PressF1toenterThinkPadSetupwhenthelogoscreenappears.
3.SelectConfig➙Power.Thesubmenuisdisplayed.
4.SelectDisableBuilt-inBattery.
5.ClickYesintheSetupWarningwindow.Thenthecomputerturnsoffandthebuilt-inbatteriesare
disabled.Waitforafewminutestoletthecomputercool.
Note:Thebuilt-inbatterieswillbeautomaticallyenabledagainwhentheacpoweradapterisconnected
tothecomputer.
©CopyrightLenovo2014105
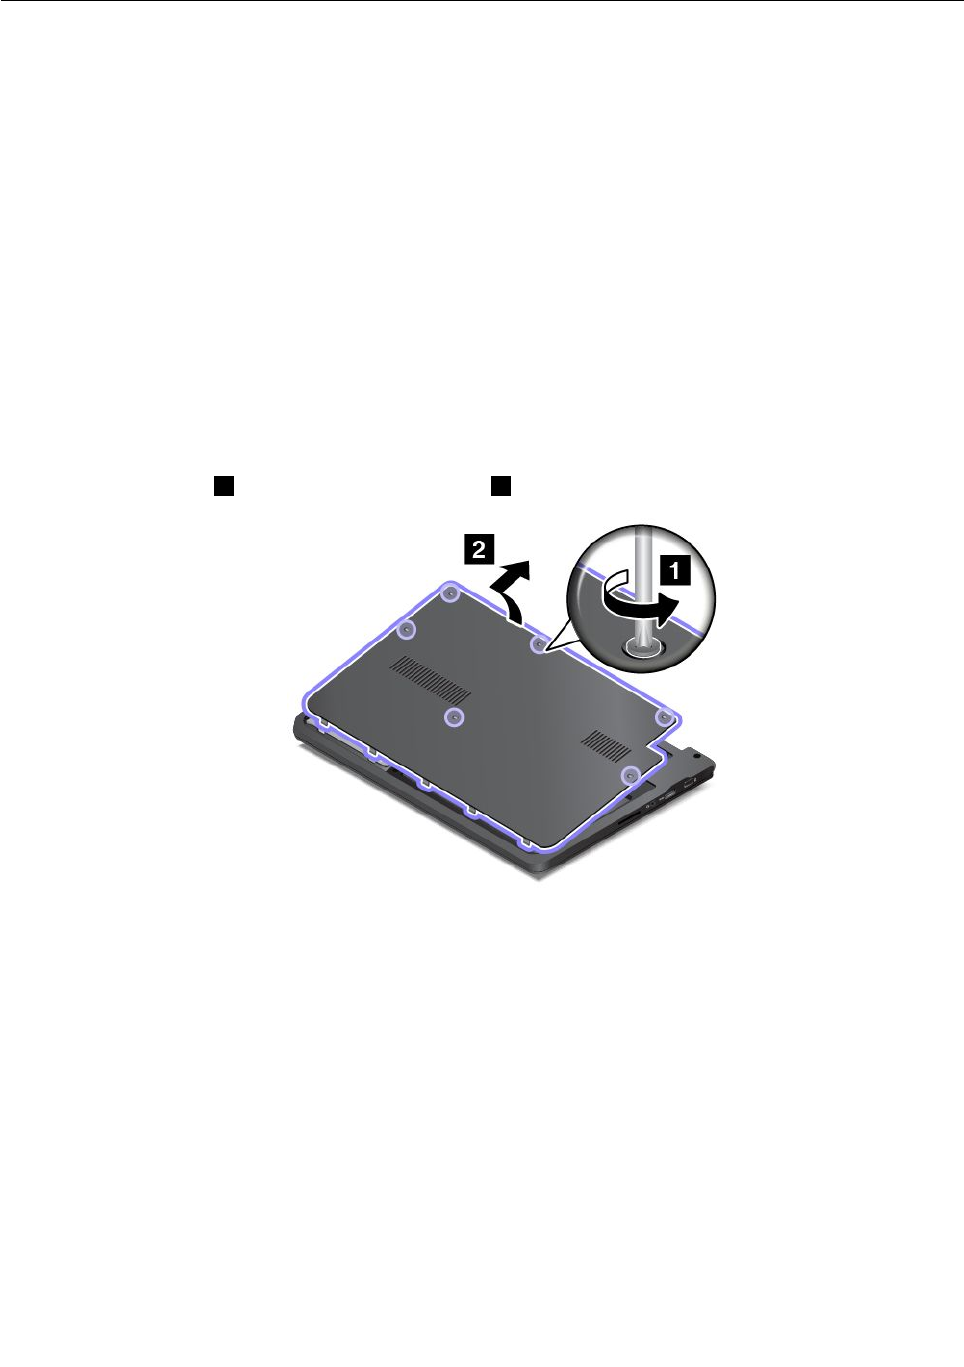
Replacingthememorymodule
Beforeyoustart,printtheseinstructions.
Increasingmemorycapacityisaneffectivewaytomakeprogramsrunfaster.Toreplacethememory
module,readthefollowingprerequisites,andthentheinstructions.
Whenreplacingamemorymodule,besuretofollowtheprecautions.
Note:Theoperatingspeedofthememorymodulehasdependencyonthesystemconfiguration.Insome
conditions,thememorymoduleinyourcomputermightnotbeabletooperateatthemaximumspeed.
Attention:Beforeyoustartinstallingamemorymodule,touchametaltableoragroundedmetalobject.This
actionreducesanystaticelectricityfromyourbody.Thestaticelectricitycoulddamagethememorymodule.
Toreplaceamemorymodule,dothefollowing:
1.Turnoffthecomputer;thendisconnecttheacpoweradapterandallcablesfromthecomputer.Wait
threetofiveminutestoletthecomputercool.
2.Closethecomputerdisplay,andturnitover.
3.Loosenthescrews
1,andthenremovethecover 2.
106UserGuide
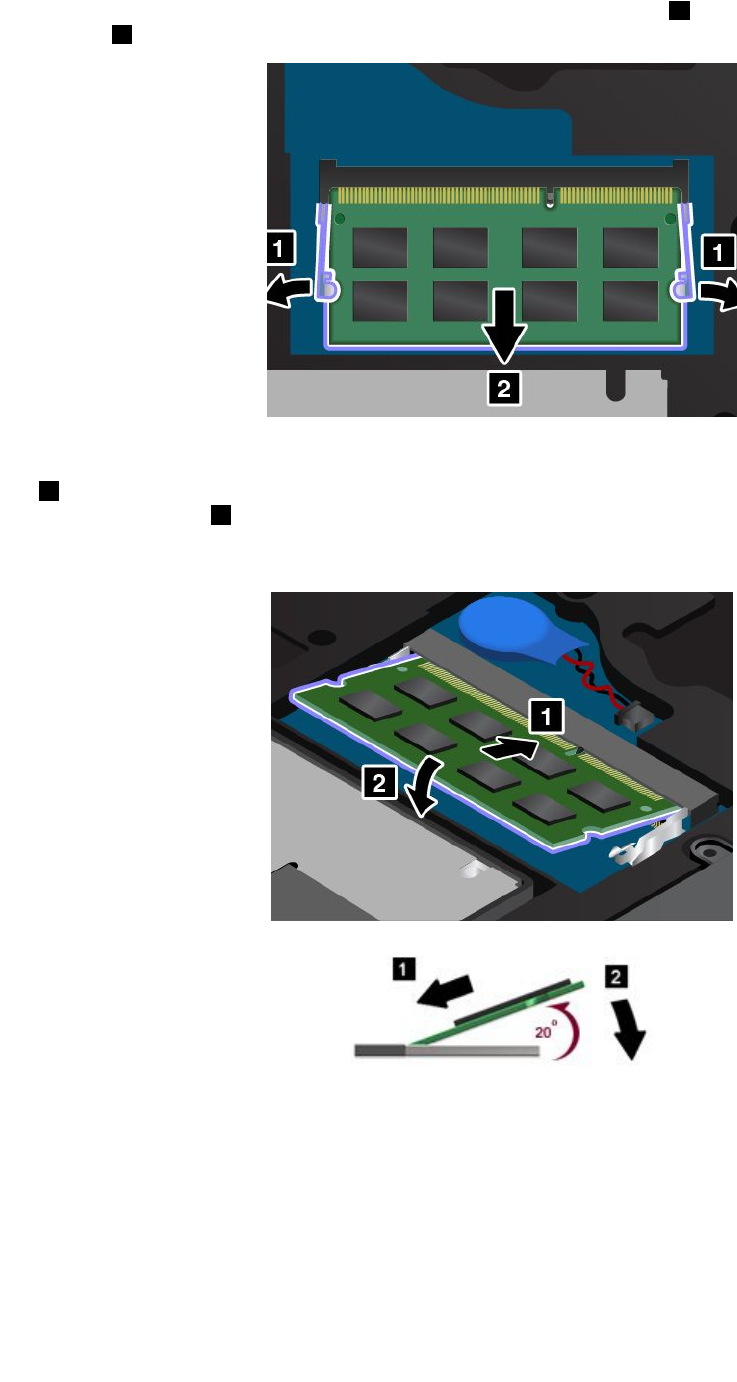
4.Pressoutonthelatchesonbothedgesofthesocketatthesametime 1,andthenremovethememory
module2tomakeroomforthenewone.
5.Findthenotchonthecontactedgesideofthememorymoduleyouareinstalling.Withthenotched
endofthememorymoduletowardthecontactedgesideofthesocket,insertthememorymodule
1intothesocketatanangleofabout20degrees;thenpivotthememorymoduledownwarduntil
itsnapsintoplace
2.
Attention:Toavoiddamagingthememorymodule,donottouchitscontactedge.
Chapter9.Replacingdevices107
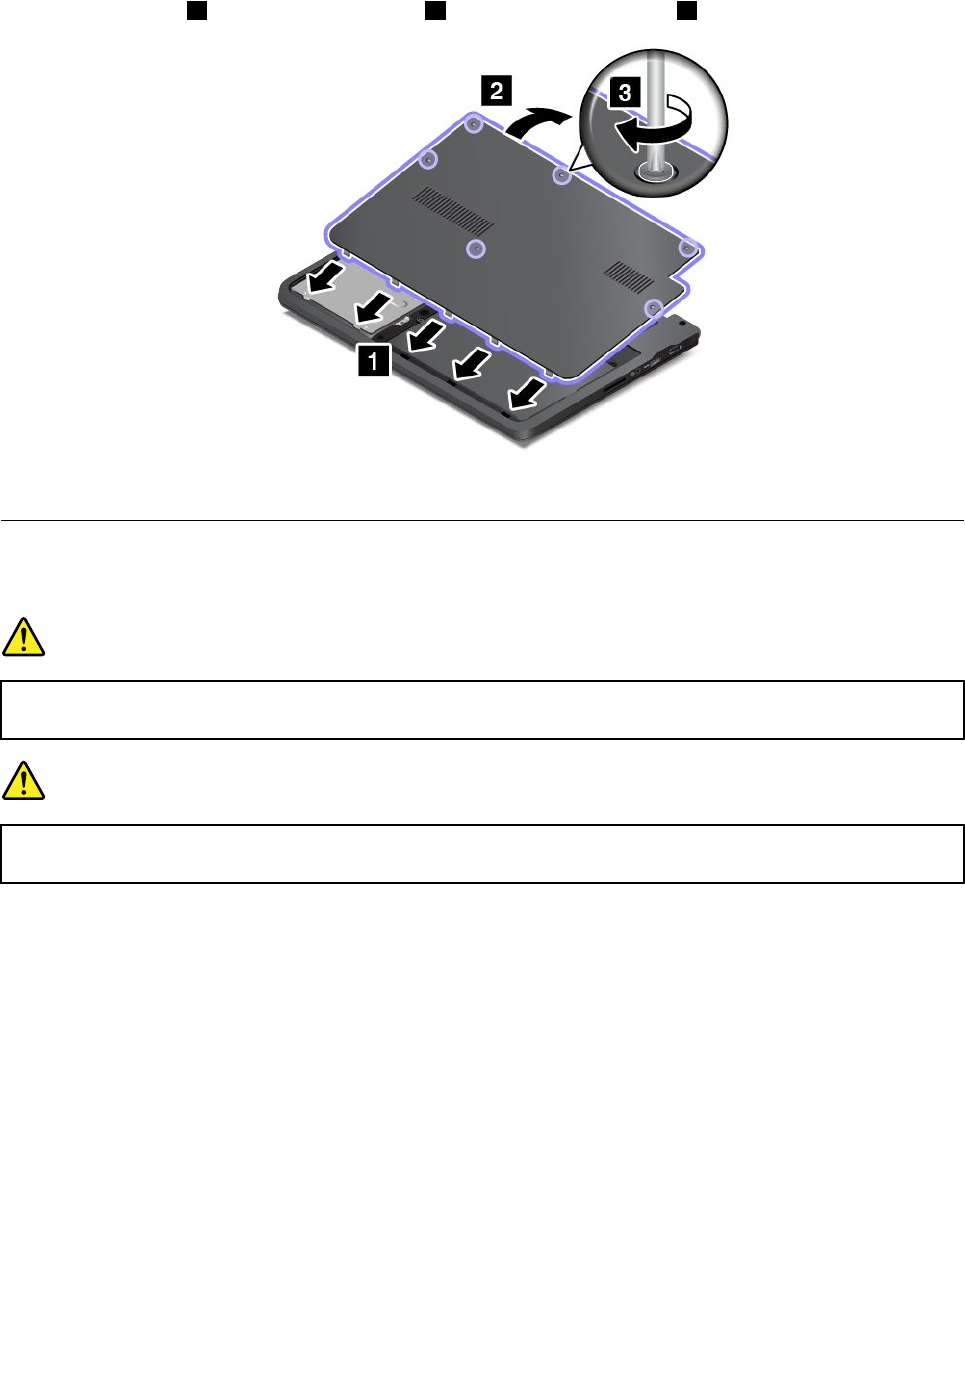
6.Installthecover 1andpivotitdownwards 2.Thentightenthescrews 3.
7.Turnthecomputeroveragain.Connecttheacpoweradapterandallcables.
Replacingthewireless-LANcard
Beforeyoustart,printtheseinstructions.
DANGER
Duringelectricalstorms,donotconnectthecabletoordisconnectitfromthetelephoneoutlet
onthewall.
DANGER
Electriccurrentfrompower,telephone,andcommunicationcablesishazardous.Toavoidshock
hazard,disconnectthecablesbeforeopeningthecoverofthisslot.
Attention:Beforeyoustartinstallingawireless-LANcard,touchametaltableoragroundedmetalobject.
Thisactionreducesanystaticelectricityfromyourbody.Thestaticelectricitycoulddamagethecard.
Toreplacethewireless-LANcard,dothefollowing:
1.Turnoffthecomputer;thendisconnecttheacpoweradapterandallcablesfromthecomputer.Wait
threetofiveminutestoletthecomputercool.
2.Closethecomputerdisplay,andturnthecomputerover.
108UserGuide
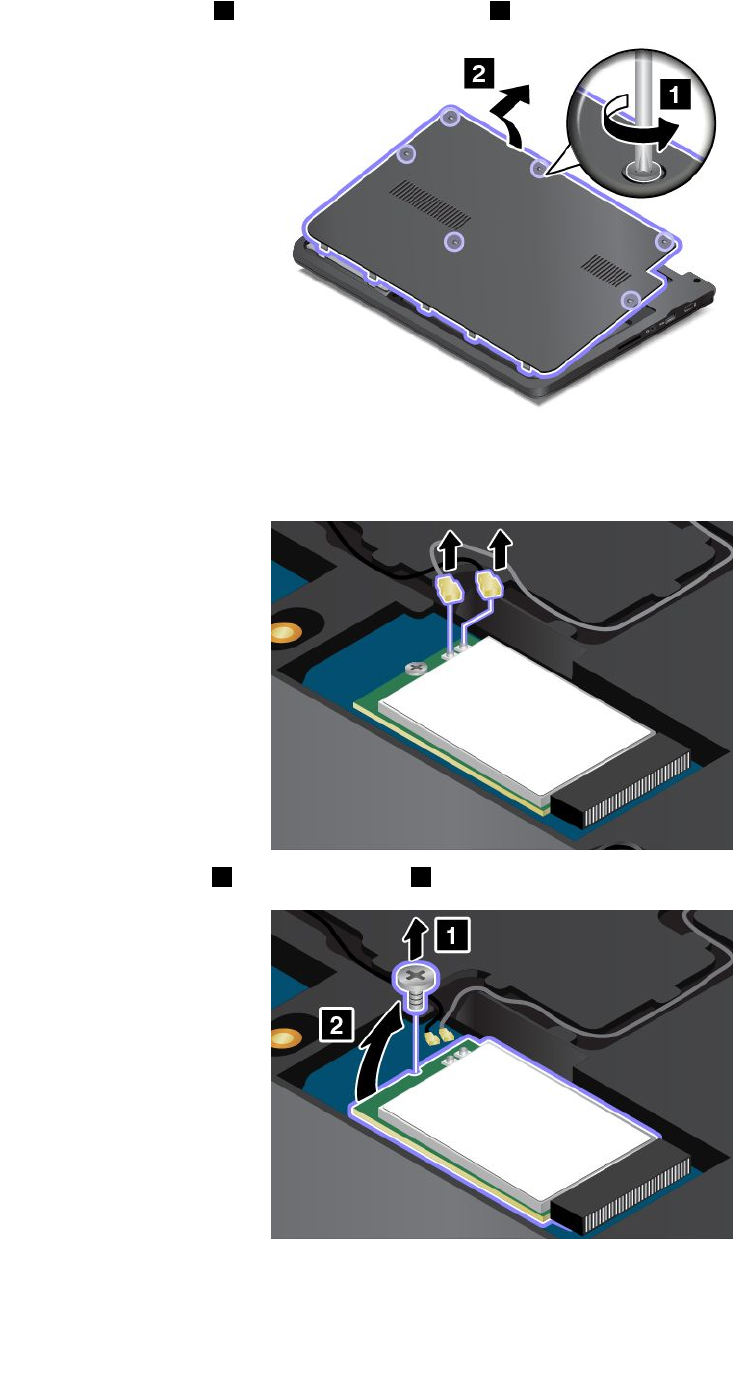
3.Loosenthescrews 1,andthenremovethecover 2.
4.Ifatoolforremovingconnectorsisincludedinthepackagewiththenewcard,useittodisconnectthe
cablesfromthecard.Ifnosuchtoolisincluded,disconnectthecablesbypickinguptheconnectors
withyourfingersandgentlyunpluggingthem.
5.Removethescrew 1.Thecardpopsup 2.
6.Removethecard.
Chapter9.Replacingdevices109
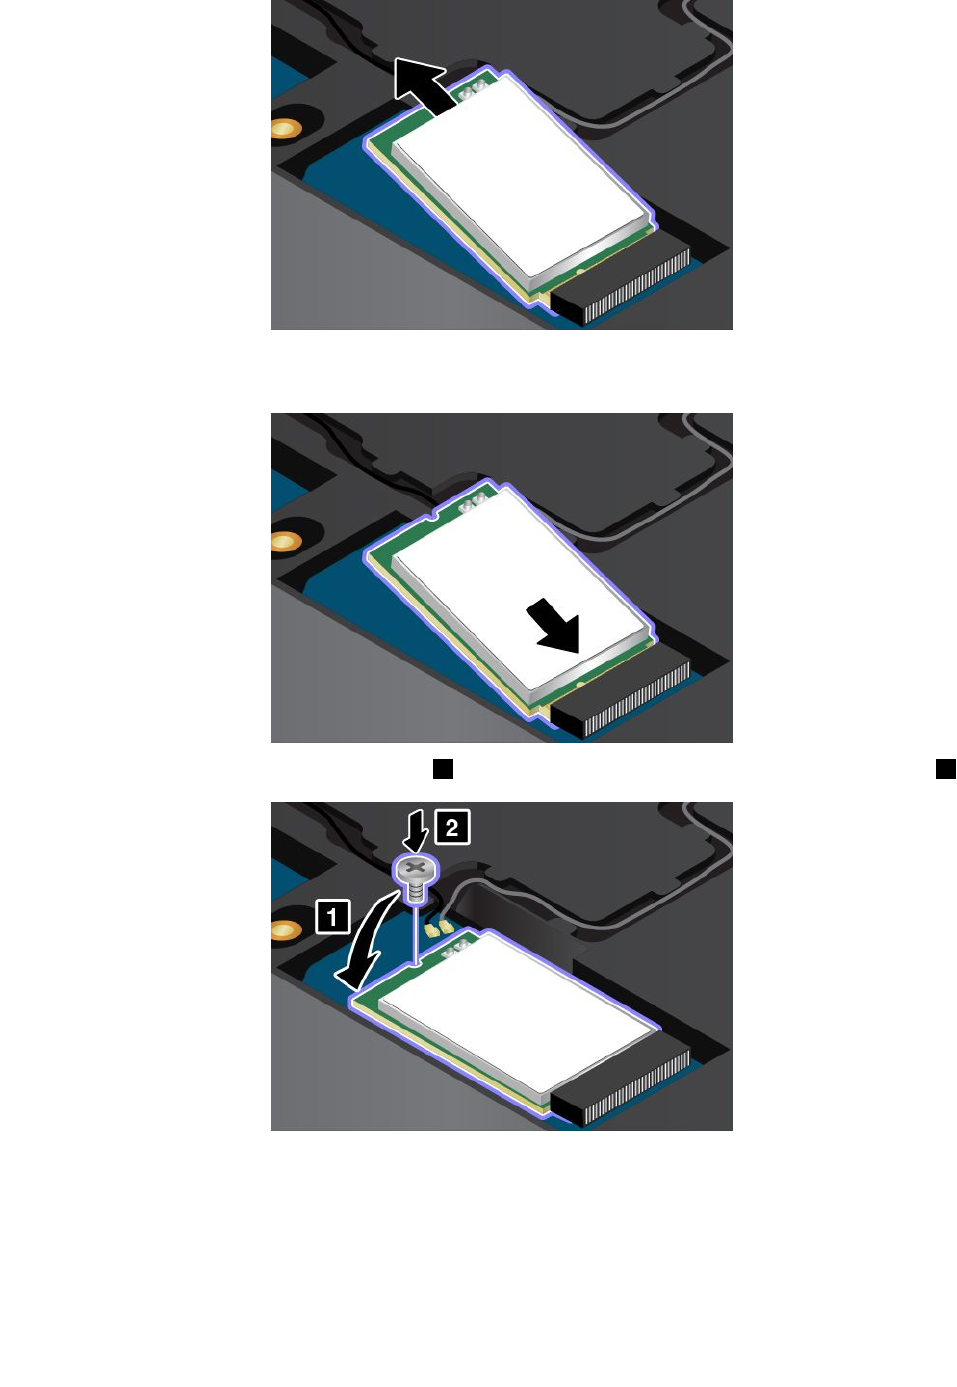
7.Alignthenotchededgeofthenewwireless-LANcardwiththekeyintheslot.Thencarefullyinsertthe
cardintotheslotatanangleofabout20degrees.
8.Pivotthenewwireless-LANcarddownward 1,andtheninstallthescrewtosecurethecardinplace 2.
110UserGuide
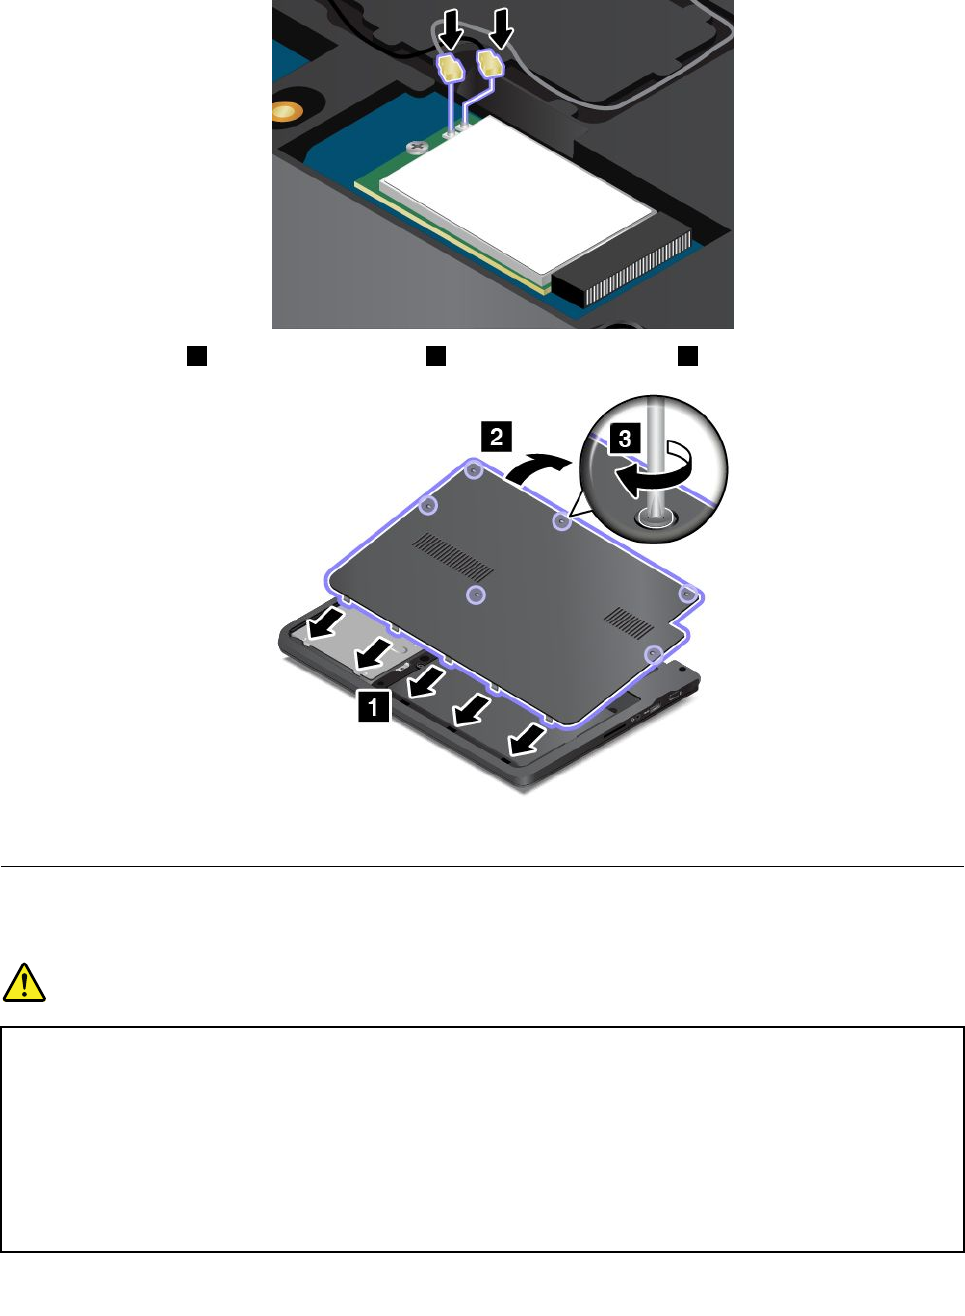
9.Connecttheantennacablestothenewcard.Besuretoattachthegraycabletotheconnectormarked
“MAIN”onthecard,andattachtheblackcabletotheconnectormarked“AUX”.
10.Installthecover 1andpivotitdownwards 2.Thentightenthescrews 3.
11.Turnthecomputeroveragain.Connecttheacpoweradapterandallcables.
Replacingthecoin-cellbattery
Beforeyoustart,printtheseinstructions.
DANGER
Ifthecoin-cellbatteryisincorrectlyreplaced,thereisdangerofanexplosion.Thecoin-cellbattery
containsasmallamountofharmfulsubstances.Toavoidpossibleinjury:
•ReplaceonlywithabatteryofthetyperecommendedbyLenovo.
•Keepthebatterypackawayfromfire.
•Donotexposeittoexcessiveheat.
•Donotexposeittowaterorrain.
•Donotshort-circuitit.
Chapter9.Replacingdevices111
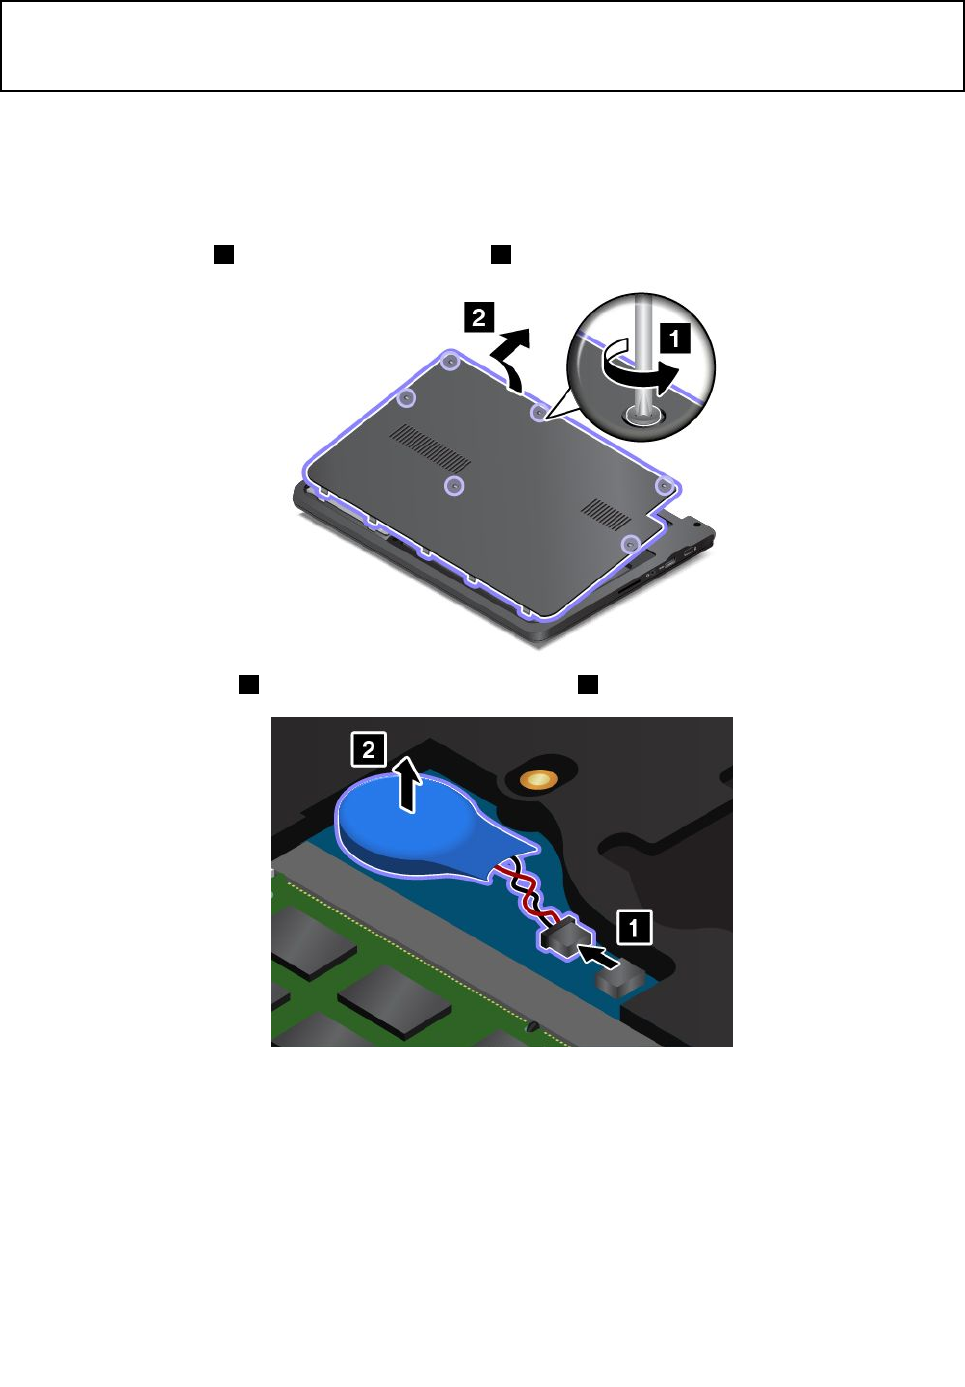
•Donotdrop,crush,puncture,orsubjecttostrongforces.Batteryabuseormishandlingcan
causethebatterytooverheat,whichcancausegassesorflameto“vent”fromthebattery
packorcoincell.
Toremovethecoin-cellbattery,dothefollowing:
1.Turnoffthecomputer;thendisconnecttheacpoweradapterandallcablesfromthecomputer.Wait
threetofiveminutestoletthecomputercool.
2.Closethecomputerdisplay,andturnthecomputerover.
3.Loosenthescrews
1,andthenremovethecover 2.
4.Detachtheconnector 1.Thenremovethecoin-cellbattery 2.
Toinstallthebackupbattery,dothefollowing:
112UserGuide
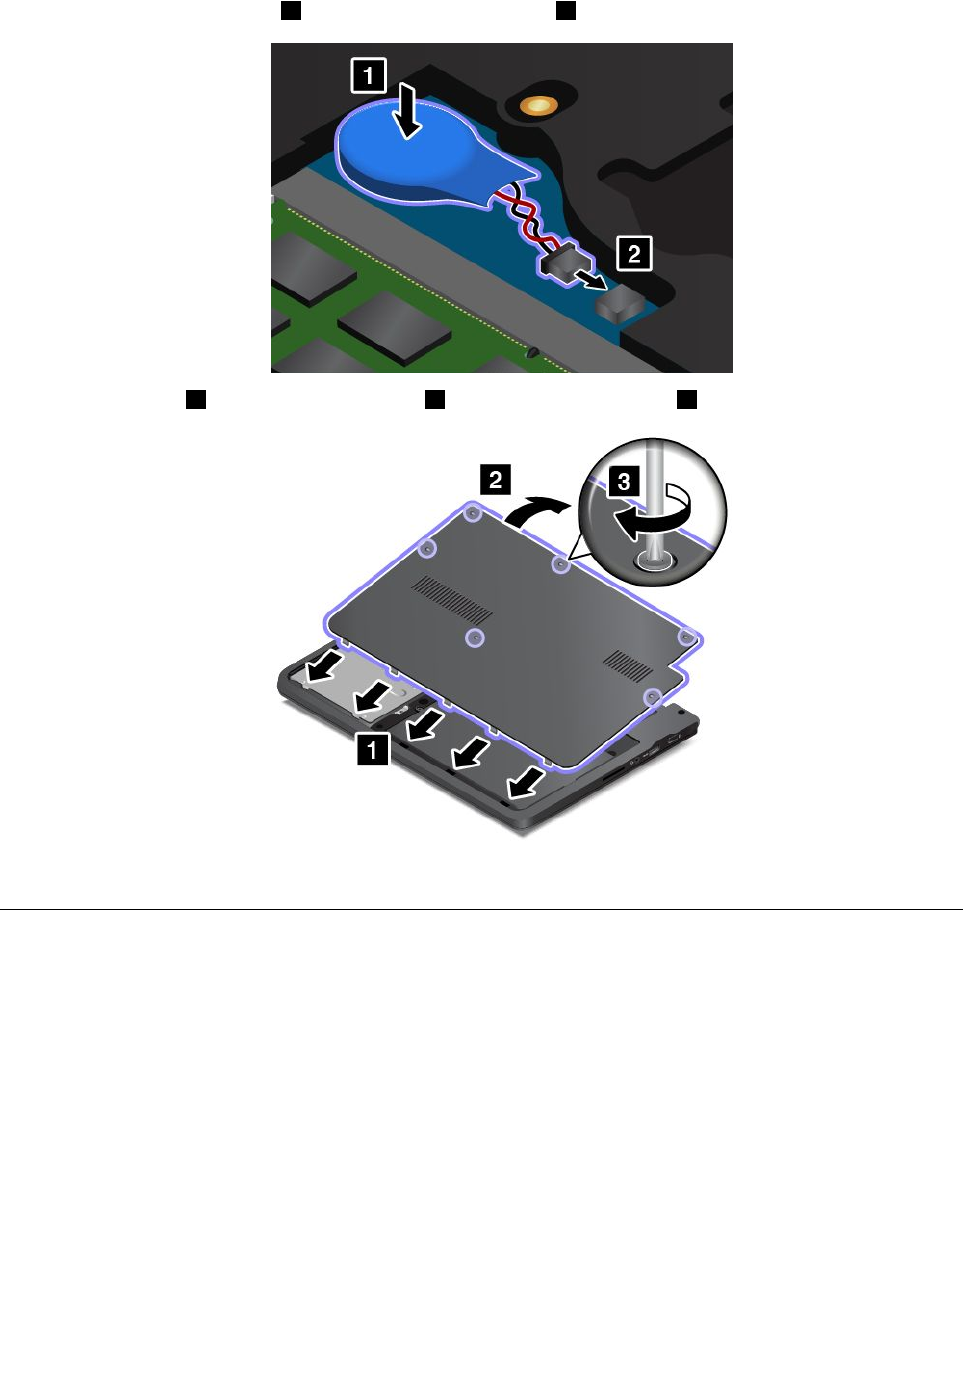
1.Installthecoin-cellbattery 1.Thenattachtheconnector 2.
2.Installthecover 1andpivotitdownwards 2.Thentightenthescrews 3.
3.Turnthecomputeroveragain.Connecttheacpoweradapterandallcables.
Replacingtheharddiskdriveorsolid-statedrive
Beforeyoustart,printtheseinstructions.
Attention:Theharddiskdriveorsolid-statedriveisverysensitive.Incorrecthandlingcancausedamage
andpermanentlossofdata.Observethefollowingguidelines:
•Replacetheharddiskdriveorsolid-statedriveonlyifyouupgradeitorhaveitrepaired.Theconnectors
andslotoftheharddiskdriveorsolid-statedrivearenotdesignedforfrequentchanges,ordrive
swapping.
•Donotdropthedriveorsubjectittophysicalshocks.Putthedriveonamaterial,suchassoftcloth,that
absorbsanyphysicalshocks.
•Donotapplypressuretothecoverofthedrive.
•Donottouchtheconnector.
•Beforeremovingtheharddiskdriveorsolid-statedrive,makeabackupcopyofalltheinformation
onit,andthenturnthecomputeroff.
Chapter9.Replacingdevices113
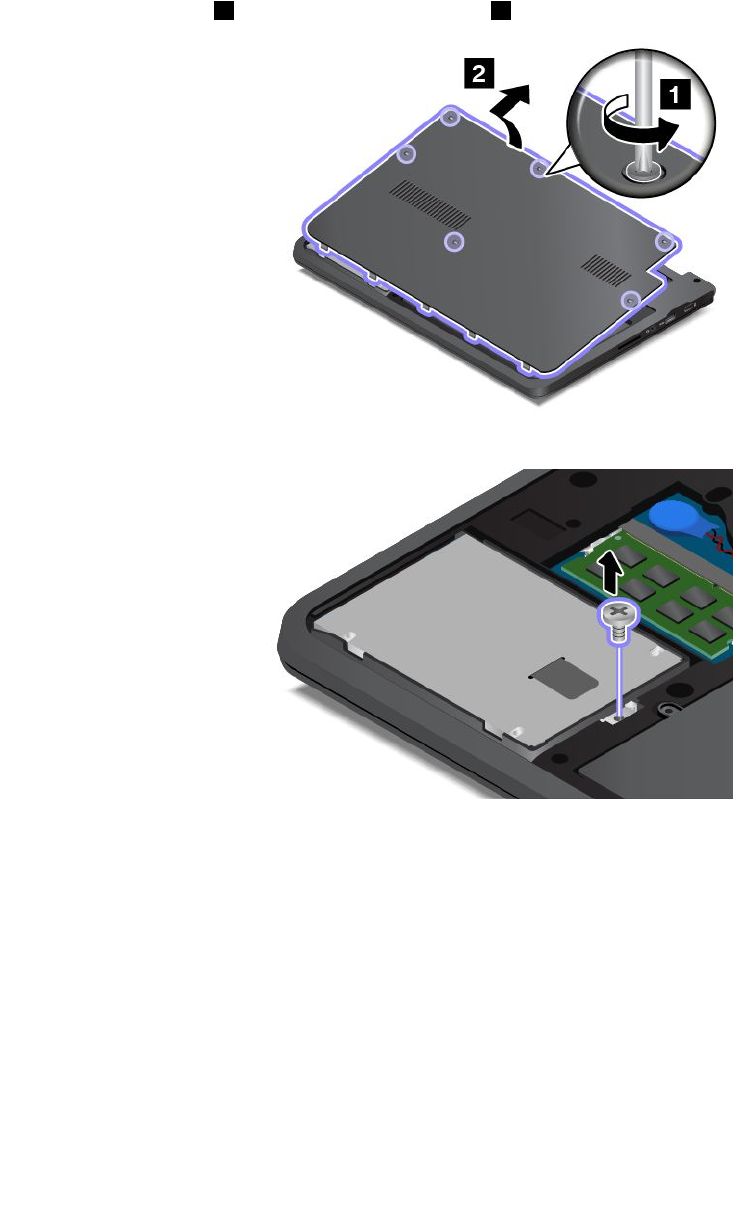
•Neverremovethedrivewhilethecomputerisoperating,insleepmode,orinhibernationmode.
Toreplacetheharddiskdriveorsolid-statedrive,dothefollowing:
1.Turnoffthecomputer;thendisconnecttheacpoweradapterandallcablesfromthecomputer.Wait
threetofiveminutestoletthecomputercool.
2.Closethecomputerdisplay,andturnitover.
3.Loosenthescrews
1,andthenremovethecover 2.
4.Removethescrewthatsecurestheharddiskdriveorsolid-statedrive.
114UserGuide
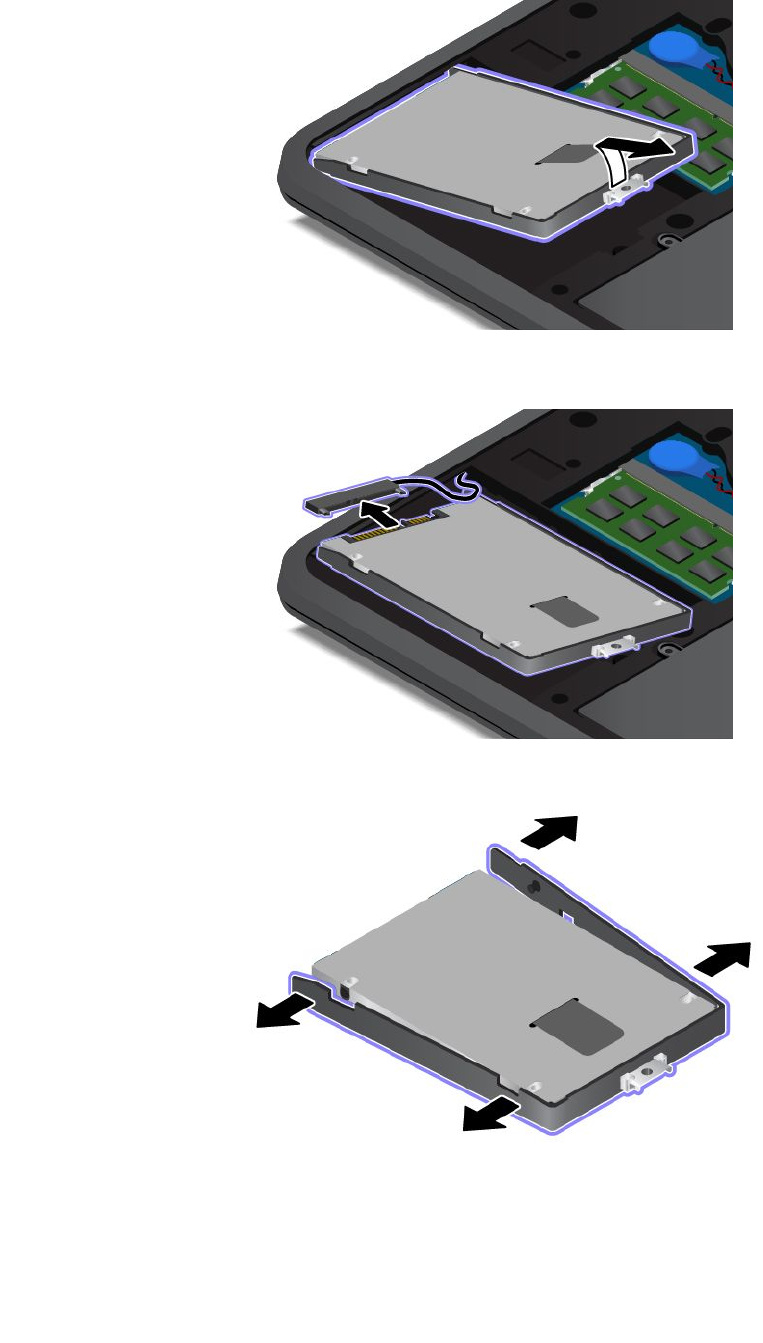
5.Taketheblacktabandlifttheharddiskdriveorsolid-statedrive.
6.Gentlytaketheharddiskdriveorsolid-statedriveoutofthedrivebaytorevealthedrivecable.Then
disconnectthecablefromtheharddiskdriveorsolid-statedrive.
7.Detachthebracketfromtheharddiskdriveorsolid-statedrive.
8.Attachthebrackettothenewharddiskdriveorsolid-statedrive.
Chapter9.Replacingdevices115
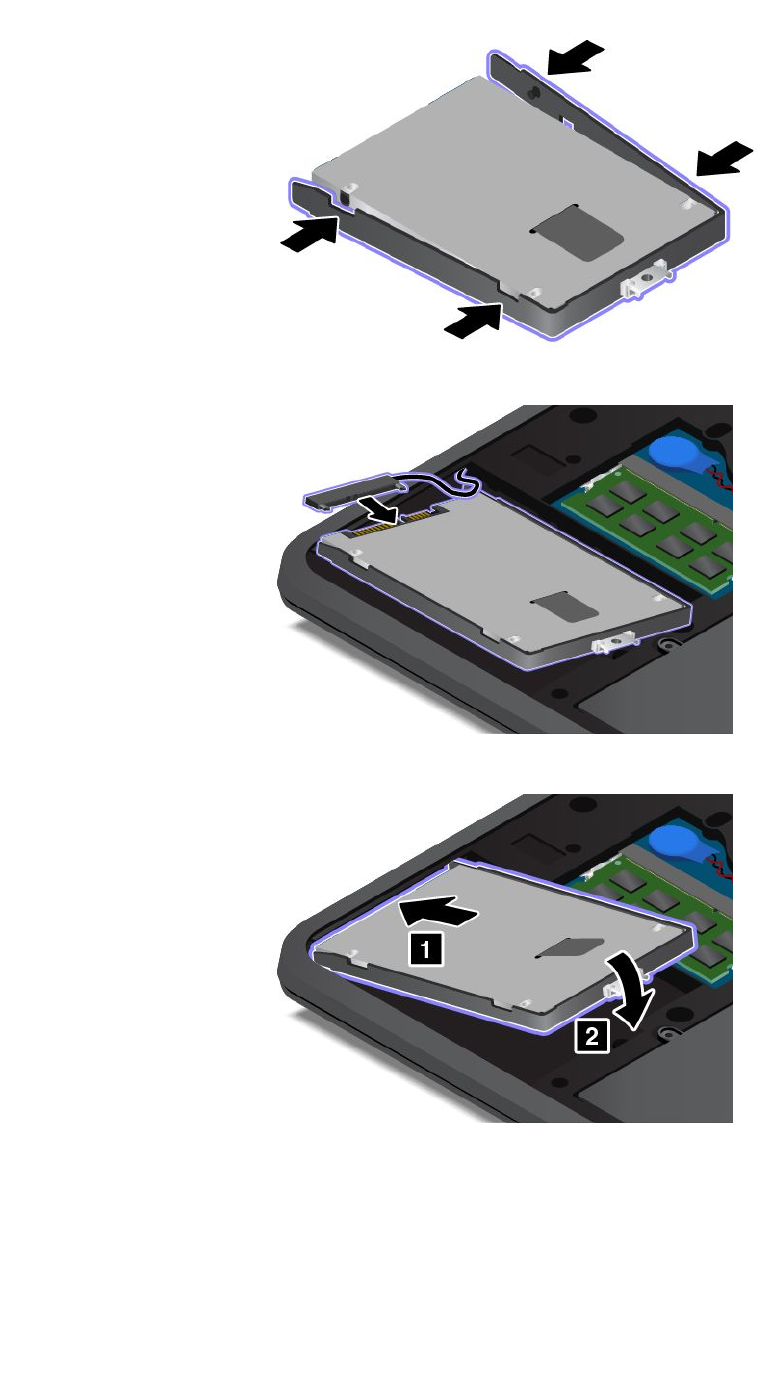
9.Connectthedrivecabletotheharddiskdriveorsolid-statedrive.
10.Placethenewharddiskdriveorsolid-statedriveintotheharddiskdriveorsolid-statedrivebay.
116UserGuide
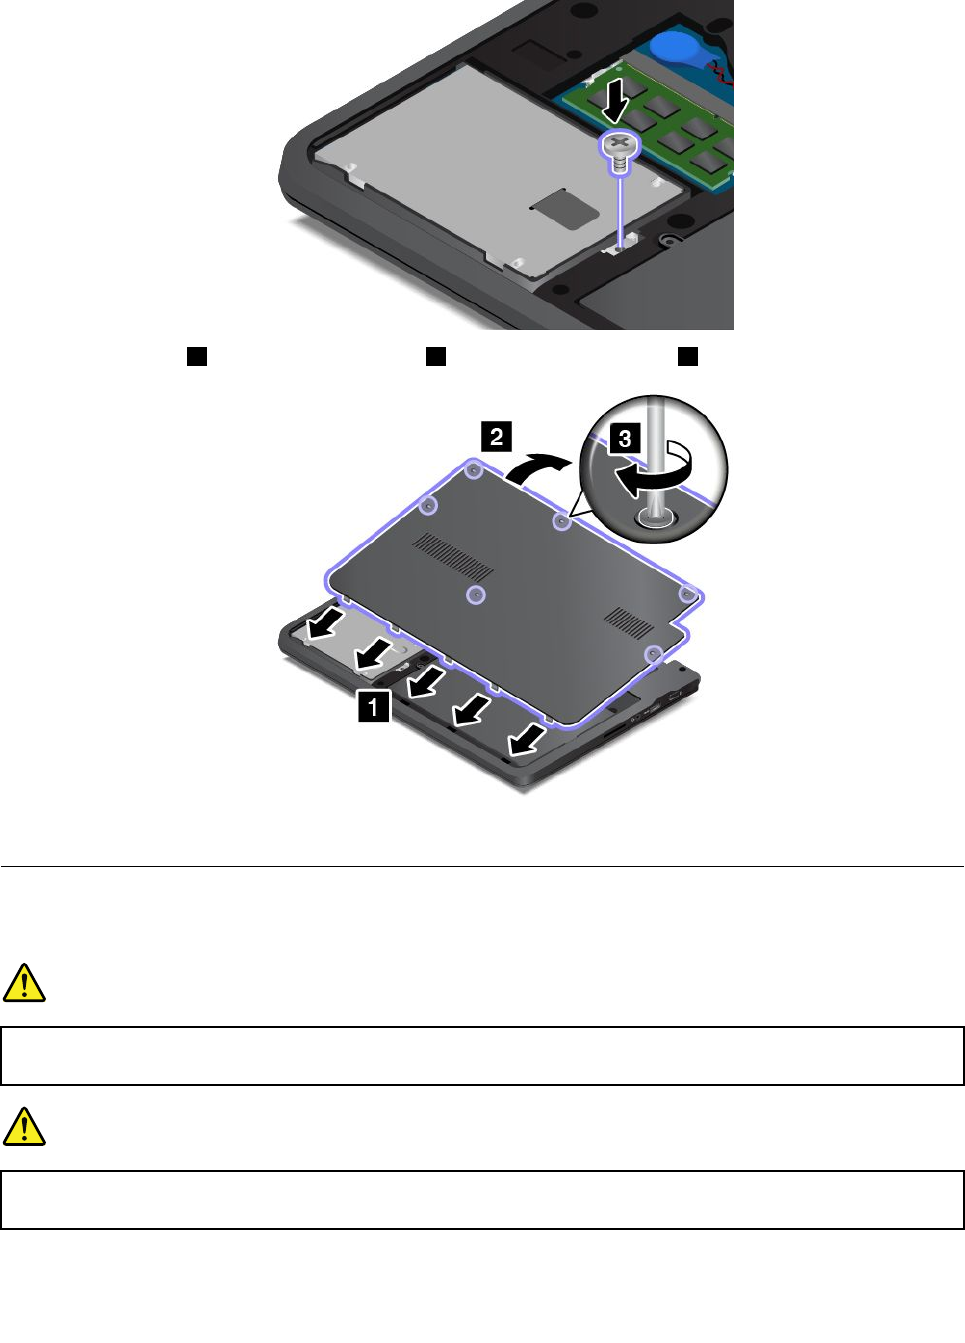
11.Reinstallthescrewtosecuretheharddiskdriveorsolid-statedrive.
12.Installthecover 1andpivotitdownwards 2.Thentightenthescrews 3.
13.Turnthecomputeroveragain.Connecttheacpoweradapterandallcables.
Replacingthekeyboard
Beforeyoustart,printtheseinstructions.
DANGER
Duringelectricalstorms,donotconnectthecabletoordisconnectitfromthetelephoneoutlet
onthewall.
DANGER
Electriccurrentfrompower,telephone,andcommunicationcablesishazardous.Toavoidshock
hazard,disconnectthecablesbeforeopeningthecoverofthisslot.
Chapter9.Replacingdevices117
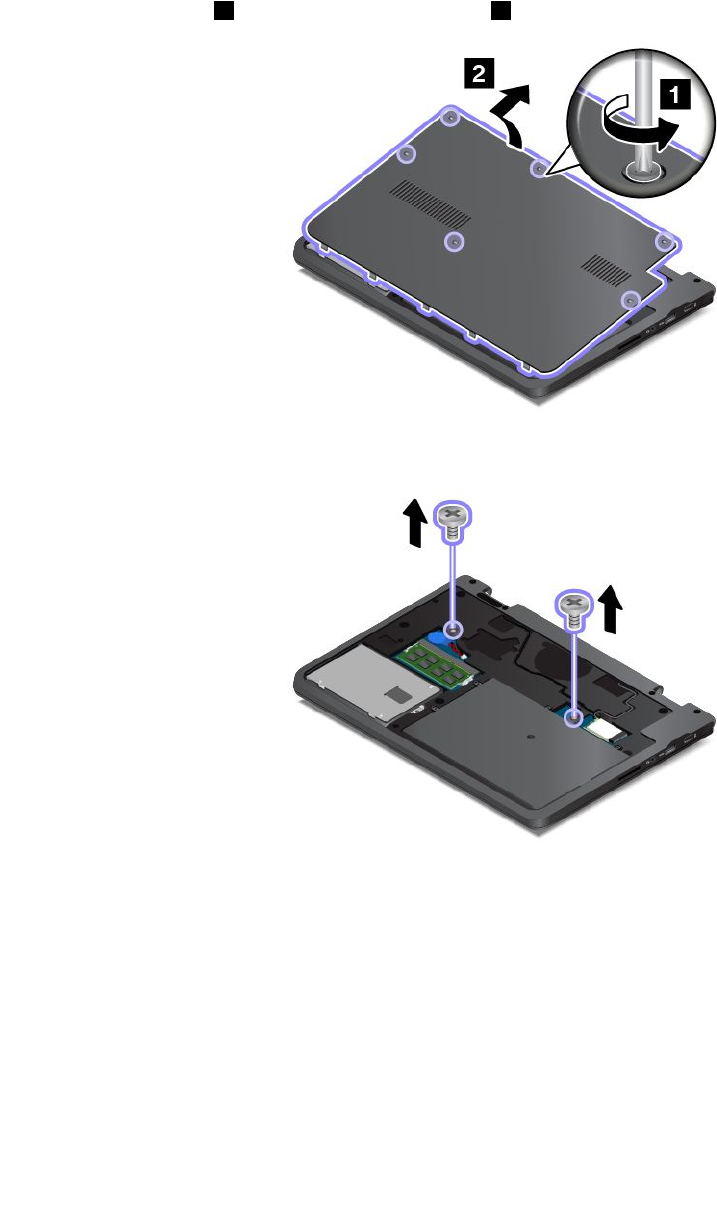
Removingthekeyboard
Toremovethekeyboard,dothefollowing:
1.Turnoffthecomputer;thendisconnecttheacpoweradapterandallcablesfromthecomputer.Wait
threetofiveminutestoletthecomputercool.
2.Closethecomputerdisplay,andturnitover.
3.Loosenthescrews
1,andthenremovethecover 2.
4.Removethescrewsthatsecurethekeyboard.
5.Turnthecomputeroverandopenthedisplay.
118UserGuide
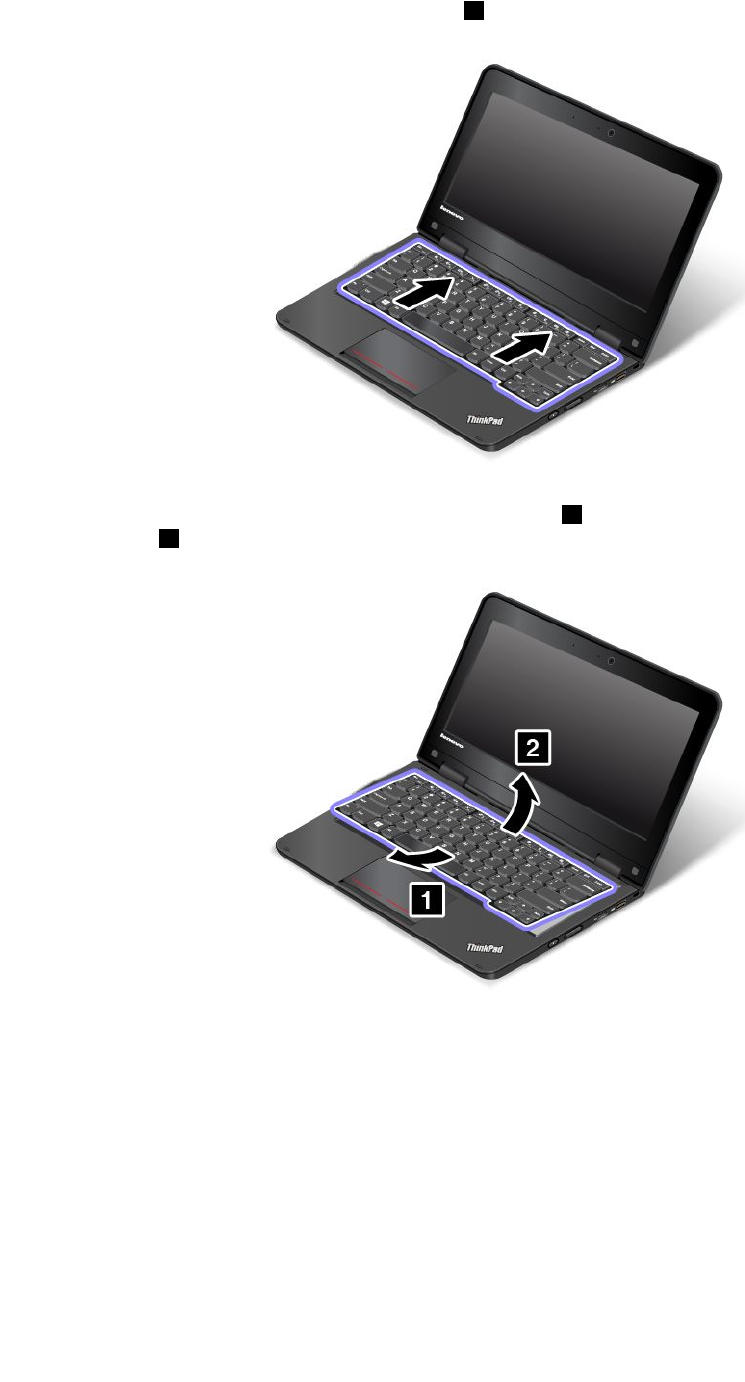

8.Detachtheconnectorandremovethekeyboard.
Installingthekeyboard
Toinstallthekeyboard,dothefollowing:
1.Attachthecable,andthenturnoverthekeyboard.
120UserGuide
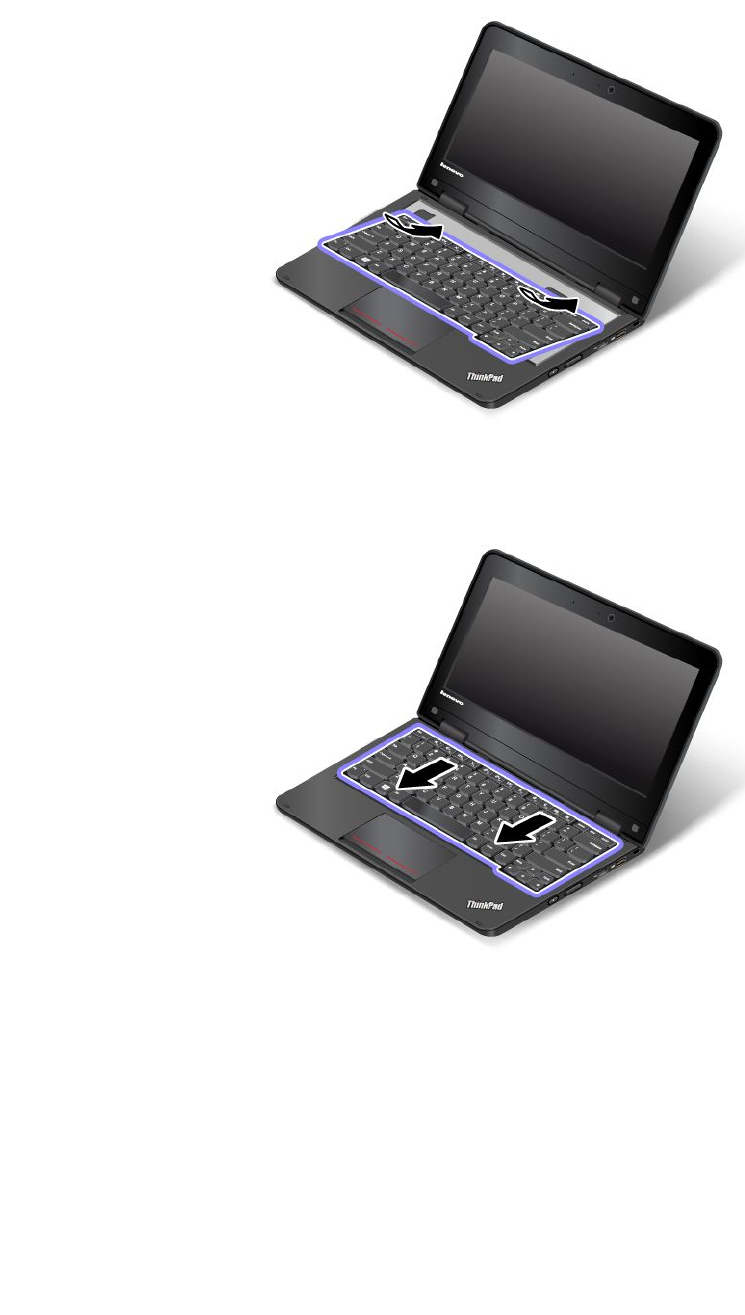
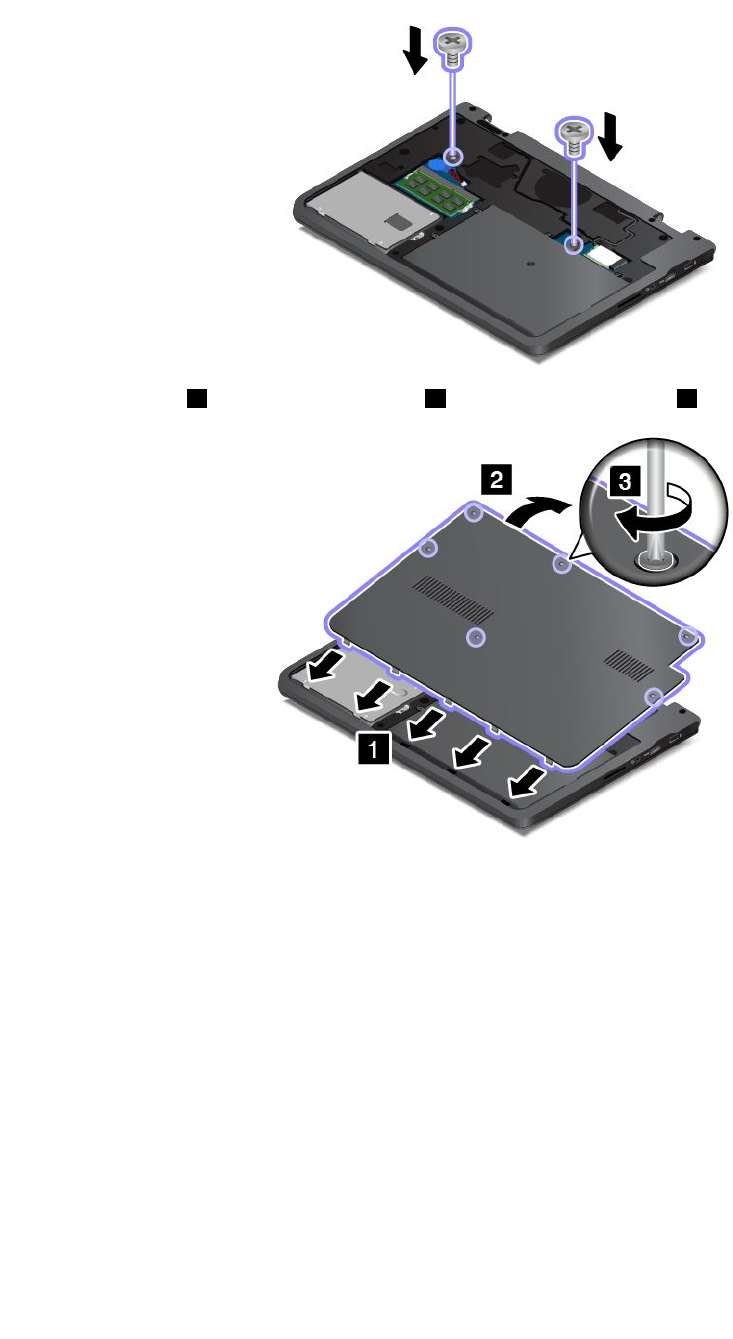
4.Closethedisplayandturnthecomputerover.Thenreinstallthescrews.
5.Installthecover 1andpivotitdownwards 2.Thentightenthescrews 3.
6.Turnthecomputeroveragain.Connecttheacpoweradapterandallcables.
122UserGuide

Chapter10.Gettingsupport
ThischapterprovidesinformationaboutgettinghelpandsupportfromLenovo.
•“BeforeyoucontactLenovo”onpage123
•“Gettinghelpandservice”onpage123
•“Purchasingadditionalservices”onpage125
BeforeyoucontactLenovo
Often,youcansolveyourcomputerproblemsbyreferringtotheinformationintheexplanationsoferror
codes,runningdiagnosticprograms,orbyconsultingtheLenovoWebsite.
Registeringyourcomputer
RegisteryourcomputerwithLenovoathttp://www.lenovo.com/register.Formoreinformation,see
“Registeringyourcomputer”onpage19.
Downloadingsystemupdates
Downloadingupdatedsoftwaremightresolveproblemsyouexperiencewithyourcomputer.
Todownloadupdatedsoftware,gotothefollowingWebsiteandfollowtheinstructionsonthescreen:
http://www.lenovo.com/support
Recordinginformation
BeforeyoutalktoaLenovorepresentative,recordthefollowingimportantinformationaboutyourcomputer.
Recordingproblemsymptomsanddetails
Collecttheanswerstothequestionsbelowbeforeyoucallforhelp.Then,youwillbeabletogethelp
asquicklyaspossible.
•Whatistheproblem?Isitcontinuousorintermittent?
•Isthereanerrormessage?Whatistheerrorcode,ifany?
•Whatoperatingsystemareyouusing?Whichversion?
•Whichsoftwareprogramswererunningatthetimeoftheproblem?
•Cantheproblembereproduced?Ifso,how?
Recordingsysteminformation
Theserialnumberlabelisonthebottomofyourcomputer.Recordthemachinetypeandtheserialnumber.
•WhatisthenameofyourLenovoproduct?
•Whatisthemachinetype?
•Whatistheserialnumber?
Gettinghelpandservice
Ifyouneedhelp,service,technicalassistance,orjustwantmoreinformationaboutLenovoproducts,you
willfindawidevarietyofsourcesavailablefromLenovotoassistyou.Thissectioncontainsinformation
©CopyrightLenovo2014123

aboutwheretogoforadditionalinformationaboutLenovoandourproducts,whattodoifyouexperiencea
problemwithyourcomputer,andwhomtocallforserviceshoulditbenecessary.
Informationaboutyourcomputerandpreinstalledsoftware,ifany,isavailableinthedocumentationthat
comeswithyourcomputer.Thatdocumentationincludesprintedbooks,onlinebooks,readmefiles,and
helpfiles.Inaddition,informationaboutLenovoproductsisavailableontheWorldWideWeb.
MicrosoftServicePacksarethelatestsoftwaresourceforWindowsproductupdates.Theyareavailable
throughWebdownload(connectionchargesmightapply)orthroughdisc.Formorespecificinformationand
links,gotohttp://www.microsoft.com.Lenovoofferstechnicalassistancewithinstallationof,orquestions
relatedto,ServicePacksforyourLenovo-preloadedMicrosoftWindowsproduct.Forinformation,contact
theCustomerSupportCenter.
Usingdiagnosticprograms
Manycomputerproblemscanbesolvedwithoutoutsideassistance.Ifyouexperienceaproblemwithyour
computer,thefirstplacetostartisthetroubleshootinginformationofyourcomputerdocumentation.Ifyou
suspectasoftwareproblem,seethedocumentation,includingreadmefilesandhelpinformationsystems,
thatcomeswiththeoperatingsystemorprogram.
ThinkPadnotebookcomputerscomewithasetofdiagnosticprogramsthatyoucanusetohelpyouidentify
hardwareproblems.See“Diagnosingproblems”onpage81forinstructionsonusingthediagnostic
programs.
Thetroubleshootinginformationorthediagnosticprogramsmighttellyouthatyouneedadditionalor
updateddevicedriversorothersoftware.Youcangetthelatesttechnicalinformationanddownloaddevice
driversandupdatesfromtheLenovoWebsiteathttp://www.lenovo.com/support.
LenovoSupportWebsite
TechnicalsupportinformationisavailableontheLenovoSupportWebsiteat:
http://www.lenovo.com/support
ThisWebsiteisupdatedwiththelatestsupportinformationsuchasthefollowing:
•Driversandsoftware
•Diagnosticsolutions
•Productandservicewarranty
•Productandpartsdetails
•Userguidesandmanuals
•Knowledgebaseandfrequentlyaskedquestions
CallingLenovo
Ifyouhavetriedtocorrecttheproblemyourselfandstillneedhelp,duringthewarrantyperiod,youcan
gethelpandinformationbytelephonethroughtheCustomerSupportCenter.Thefollowingservicesare
availableduringthewarrantyperiod:
•Problemdetermination-Trainedpersonnelareavailabletoassistyouwithdeterminingifyouhavea
hardwareproblemanddecidingwhatactionisnecessarytofixtheproblem.
•Lenovohardwarerepair-IftheproblemisdeterminedtobecausedbyLenovohardwareunderwarranty,
trainedservicepersonnelareavailabletoprovidetheapplicablelevelofservice.
124UserGuide

•Engineeringchangemanagement-Occasionally,theremightbechangesthatarerequiredafteraproduct
hasbeensold.Lenovooryourreseller,ifauthorizedbyLenovo,willmakeselectedEngineeringChanges
(ECs)thatapplytoyourhardwareavailable.
Thefollowingitemsarenotcovered:
•ReplacementoruseofpartsnotmanufacturedfororbyLenovoornon-warrantedparts
Note:Allwarrantedpartscontaina7-characteridentificationintheformatFRUXXXXXXX.
•Identificationofsoftwareproblemsources
•ConfigurationofUEFIBIOSaspartofaninstallationorupgrade
•Changes,modifications,orupgradestodevicedrivers
•Installationandmaintenanceofnetworkoperatingsystems(NOS)
•Installationandmaintenanceofprograms
ForthetermsandconditionsoftheLenovoLimitedWarrantythatappliestoyourLenovohardwareproduct,
see“Warrantyinformation”intheSafety,Warranty,andSetupGuidethatcomeswithyourcomputer.
Ifpossible,benearyourcomputerwhenyoumakeyourcallincasethetechnicalassistancerepresentative
needstohelpyouresolveacomputerproblem.Ensurethatyouhavedownloadedthemostcurrentdrivers
andsystemupdates,rundiagnostics,andrecordedinformationbeforeyoucall.Whencallingfortechnical
assistance,havethefollowinginformationavailable:
•Machinetypeandmodel
•Serialnumbersofyourcomputer,monitor,andothercomponents,oryourproofofpurchase
•Descriptionoftheproblem
•Exactwordingofanyerrormessages
•Hardwareandsoftwareconfigurationinformationforyoursystem
Telephonenumbers
ForalistoftheLenovoSupportphonenumbersforyourcountryorregion,goto
http://www.lenovo.com/support/phoneorrefertotheSafety,Warranty,andSetupGuidethatcomeswith
yourcomputer.
Note:Phonenumbersaresubjecttochangewithoutnotice.Thelatestphonenumbersareavailableat
http://www.lenovo.com/support/phone.Ifthenumberforyourcountryorregionisnotprovided,contact
yourLenovoresellerorLenovomarketingrepresentative.
FindingThinkPadoptions
Ifyouwanttoexpandthecapabilitiesofyourcomputer,Lenovohasanumberofhardwareaccessories
andupgradestomeetyourneeds.Optionsincludememorymodules,storagedevices,networkcards,port
replicatorsordockingstations,batteries,poweradapters,printers,scanners,keyboards,mice,andmore.
YoucanshopatLenovo24hoursaday,7daysaweekdirectlyovertheWorldWideWeb.Allyouneedisan
Internetconnectionandacreditcard.
ToshopatLenovo,goto:
http://www.lenovo.com/essentials
Purchasingadditionalservices
Duringandafterthewarrantyperiod,youcanpurchaseadditionalservices,suchassupportforLenovo
andnon-Lenovohardware,operatingsystems,andapplicationprograms;networksetupandconfiguration
Chapter10.Gettingsupport125


AppendixA.Regulatoryinformation
Wirelessrelatedinformation
Wirelessinteroperability
TheWirelessLANPCIExpressMiniCardisdesignedtobeinteroperablewithanywirelessLANproducts
thatarebasedonDSSS,CCK,and/orOFDMradiotechnology,andarecompliantto:
•The802.11b/gStandard,802.11a/b/gor802.11nonWirelessLANs,asdefinedandapprovedby
theInstituteofElectricalandElectronicsEngineers.
•TheWiFicertificationasdefinedbytheWi-FiAlliance.
ABluetoothdeviceisdesignedtobeinteroperablewithanyBluetoothproductsthatarecompliantto
BluetoothSpecificationasdefinedbytheBluetoothSIG.Thefollowingprofilesaresupported
byBluetoothdevices:
•AudioGateway
•AV
•BasicImage
•Dial-upNetworking
•FileTransfer
•GenericAccess
•ServiceDiscovery
•SerialPort
•LANAccessusingPPP
•PersonalAreaNetwork
•GenericObjectExchange
•GenericObjectPush
•Synchronization
•Headset
•Printer
•HumanInterfaceDevices(Keyboard/Mouse)
•Handsfree
•PBAP(fortheWindows7operatingsystemonly)
•VDP-SyncProfile(fortheWindows7operatingsystemonly)
Usageenvironmentandyourhealth
Integratedwirelesscardsemitradiofrequencyelectromagneticenergylikeotherradiodevices.However,the
levelofenergyemittedisfarmuchlessthantheelectromagneticenergyemittedbywirelessdeviceslike
forexamplemobilephones.
Duetothefactthatintegratedwirelesscardsoperatewithintheguidelinesfoundinradiofrequencysafety
standardsandrecommendations,Lenovobelievestheyaresafeforusebyconsumers.Thesestandardsand
©CopyrightLenovo2014127
4.0

recommendationsreflecttheconsensusofthescientificcommunityandresultfromdeliberationsofpanels
andcommitteesofscientistswhocontinuallyreviewandinterprettheextensiveresearchliterature.
Insomesituationorenvironment,theuseofintegratedwirelesscardsmightberestrictedbytheproprietor
ofthebuildingorresponsiblerepresentativesoftheorganization.Thesesituationsandareasmightfor
exampleinclude:
•Usingtheintegratedwirelesscardsonboardofairplanes,inhospitalsornearpetrolstations,blasting
areas(withelectro-explosivedevices),medicalimplantsorbody-wornelectronicmedicaldevices,such
aspacemakers.
•Inanyotherenvironmentwheretheriskofinterferencetootherdevicesorservicesisperceivedor
identifiedasharmful.
Ifyouareuncertainofthepolicythatappliestotheuseofwirelessdevicesinaspecificorganization(suchas
airportorhospital),youareencouragedtoaskforauthorizationtouseintegratedwirelesscardspriorto
turningonthecomputer.
LocatingtheUltraConnectwirelessantennas
ThinkPadnotebookcomputersfeatureanUltraConnect™wirelessantennasystembuiltintothedisplayfor
optimalreception,whichenablesyoutoestablishwirelesscommunicationswhereveryouare.
Note:Yourcomputermightlookslightlydifferentfromtheillustrationinthistopic.
1Wireless-LANantenna(main)
2Wireless-LANantenna(auxiliary)
Locatingwirelessregulatorynotices
Formoreinformationaboutthewirelessregulatorynotices,refertotheRegulatoryNoticeshippedwithyour
computer.
IfyourcomputerisshippedwithouttheRegulatoryNotice,youcanfinditontheWebsiteat:
http://www.lenovo.com/UserManuals
128UserGuide

Exportclassificationnotice
ThisproductissubjecttotheUnitedStatesExportAdministrationRegulations(EAR)andhasanExport
ClassificationControlNumber(ECCN)of4A994.b.Itcanbere-exportedexcepttoanyoftheembargoed
countriesintheEARE1countrylist.
Electronicemissionnotices
ThefollowinginformationreferstotheThinkPad11eandThinkPadYoga11ecomputers,machinetypes
20D9and20DA.
FederalCommunicationsCommissionDeclarationofConformity
ThisequipmenthasbeentestedandfoundtocomplywiththelimitsforaClassBdigitaldevice,pursuant
toPart15oftheFCCRules.Theselimitsaredesignedtoprovidereasonableprotectionagainstharmful
interferenceinaresidentialinstallation.Thisequipmentgenerates,uses,andcanradiateradiofrequency
energyand,ifnotinstalledandusedinaccordancewiththeinstructions,maycauseharmfulinterference
toradiocommunications.However,thereisnoguaranteethatinterferencewillnotoccurinaparticular
installation.Ifthisequipmentdoescauseharmfulinterferencetoradioortelevisionreception,whichcanbe
determinedbyturningtheequipmentoffandon,theuserisencouragedtotrytocorrecttheinterferenceby
oneormoreofthefollowingmeasures:
•Reorientorrelocatethereceivingantenna.
•Increasetheseparationbetweentheequipmentandreceiver.
•Connecttheequipmentintoanoutletonacircuitdifferentfromthattowhichthereceiverisconnected.
•Consultanauthorizeddealerorservicerepresentativeforhelp.
Lenovoisnotresponsibleforanyradioortelevisioninterferencecausedbyusingotherthanspecifiedor
recommendedcablesandconnectorsorbyunauthorizedchangesormodificationstothisequipment.
Unauthorizedchangesormodificationscouldvoidtheuser'sauthoritytooperatetheequipment.
ThisdevicecomplieswithPart15oftheFCCRules.Operationissubjecttothefollowingtwoconditions:(1)
thisdevicemaynotcauseharmfulinterference,and(2)thisdevicemustacceptanyinterferencereceived,
includinginterferencethatmaycauseundesiredoperation.
ResponsibleParty:
Lenovo(UnitedStates)Incorporated
1009ThinkPlace-BuildingOne
Morrisville,NC27560
PhoneNumber:919-294-5900
IndustryCanadaClassBemissioncompliancestatement
ThisClassBdigitalapparatuscomplieswithCanadianICES-003.
CetappareilnumériquedelaclasseBestconformeàlanormeNMB-003duCanada.
EuropeanUnion-CompliancetotheElectromagneticCompatibility
Directive
ThisproductisinconformitywiththeprotectionrequirementsofEUCouncilDirective2004/108/EConthe
approximationofthelawsoftheMemberStatesrelatingtoelectromagneticcompatibility.Lenovocannot
AppendixA.Regulatoryinformation129

acceptresponsibilityforanyfailuretosatisfytheprotectionrequirementsresultingfromanon-recommended
modificationoftheproduct,includingtheinstallationofoptioncardsfromothermanufacturers.
ThisproducthasbeentestedandfoundtocomplywiththelimitsforClassBInformationTechnology
EquipmentaccordingtoEuropeanStandardEN55022.ThelimitsforClassBequipmentwerederived
fortypicalresidentialenvironmentstoprovidereasonableprotectionagainstinterferencewithlicensed
communicationdevices.
EUcontact:Lenovo,Einsteinova21,85101Bratislava,Slovakia
GermanClassBcompliancestatement
DeutschsprachigerEUHinweis:
HinweisfürGerätederKlasseBEU-RichtliniezurElektromagnetischenVerträglichkeit
DiesesProduktentsprichtdenSchutzanforderungenderEU-Richtlinie2004/108/EG(früher89/336/EWG)zur
AngleichungderRechtsvorschriftenüberdieelektromagnetischeVerträglichkeitindenEU-Mitgliedsstaaten
undhältdieGrenzwertederEN55022KlasseBein.
Umdiesessicherzustellen,sinddieGerätewieindenHandbüchernbeschriebenzuinstallierenundzu
betreiben.DesWeiterendürfenauchnurvonderLenovoempfohleneKabelangeschlossenwerden.
LenovoübernimmtkeineVerantwortungfürdieEinhaltungderSchutzanforderungen,wenndasProdukt
ohneZustimmungderLenovoverändertbzw.wennErweiterungskomponentenvonFremdherstellernohne
EmpfehlungderLenovogesteckt/eingebautwerden.
Deutschland:
EinhaltungdesGesetzesüberdieelektromagnetischeVerträglichkeitvonBetriebsmitteln
DiesesProduktentsprichtdem„GesetzüberdieelektromagnetischeVerträglichkeitvonBetriebsmitteln“
EMVG(früher„GesetzüberdieelektromagnetischeVerträglichkeitvonGeräten“).DiesistdieUmsetzungder
EU-Richtlinie2004/108/EG(früher89/336/EWG)inderBundesrepublikDeutschland.
ZulassungsbescheinigunglautdemDeutschenGesetzüberdieelektromagnetischeVerträglichkeit
vonBetriebsmitteln,EMVGvom20.Juli2007(früherGesetzüberdieelektromagnetische
VerträglichkeitvonGeräten),bzw.derEMVEGRichtlinie2004/108/EC(früher89/336/EWG),für
GerätederKlasseB.
DiesesGerätistberechtigt,inÜbereinstimmungmitdemDeutschenEMVGdasEG-Konformitätszeichen
-CE-zuführen.VerantwortlichfürdieKonformitätserklärungnachParagraf5desEMVGistdieLenovo
(Deutschland)GmbH,Gropiusplatz10,D-70563Stuttgart.
InformationeninHinsichtEMVGParagraf4Abs.(1)4:
DasGeräterfülltdieSchutzanforderungennachEN55024undEN55022KlasseB.
KoreaClassBcompliancestatement
130UserGuide

JapanVCCIClassBcompliancestatement
Japancompliancestatementforproductswhichconnecttothepower
mainswithratedcurrentlessthanorequalto20Aperphase
LenovoproductserviceinformationforTaiwan
Eurasiancompliancemark
Модели,относящиесякнастоящейсерии(семейству)продуктовивпервыевыпущенныевобращение
до14февраля2013года,сертифицированыпотребованиямСистемысертификацииГОСТРи/или
потребованиямединойсистемысертификацииТаможенногоСоюза,действовавшимвмомент
сертификации,имаркируютсязнакомсоответствияГОСТР .
Модели,относящиесякнастоящейсерии(семейству)продуктовивпервыевыпущенныевобращение
после14февраля2013года,сертифицированывединойсистемесертификацииТаможенногоСоюза
насоответствиетребованиямприменимыхТехническихРегламентовимаркируютсязнакомEAC.
Brazilregulatorynotice
Ouvirsonscommaisde85decibéisporlongosperíodospodeprovocardanosaosistemaauditivo.
Mexicoregulatorynotice
Advertencia:EnMexicolaoperacióndeesteequipoestásujetaalassiguientesdoscondiciones:(1)es
posiblequeesteequipoodispositivonocauseinterferenciaperjudicialy(2)esteequipoodispositivodebe
aceptarcualquierinterferencia,incluyendolaquepuedacausarsuoperaciónnodeseada.
AppendixA.Regulatoryinformation131

132UserGuide
AppendixB.WEEEandrecyclinginformation
Lenovoencouragesownersofinformationtechnology(IT)equipmenttoresponsiblyrecycletheirequipment
whenitisnolongerneeded.Lenovooffersavarietyofprogramsandservicestoassistequipmentownersin
recyclingtheirITproducts.ForinformationonrecyclingLenovoproducts,goto:
http://www.lenovo.com/recycling
ImportantWEEEinformation
TheWEEEmarkingonLenovoproductsappliestocountrieswithWEEEande-wasteregulations(forexample,
EuropeanDirective2002/96/EC,IndiaE-WasteManagement&HandlingRules,2011).Appliancesare
labeledinaccordancewithlocalregulationsconcerningwasteelectricalandelectronicequipment(WEEE).
Theseregulationsdeterminetheframeworkforthereturnandrecyclingofusedappliancesasapplicable
withineachgeography.Thislabelisappliedtovariousproductstoindicatethattheproductisnottobe
thrownaway,butratherputintheestablishedcollectionsystemsforreclaimingtheseendoflifeproducts.
Usersofelectricalandelectronicequipment(EEE)withtheWEEEmarkingmustnotdisposeofendoflife
EEEasunsortedmunicipalwaste,butusethecollectionframeworkavailabletothemforthereturn,recycle,
andrecoveryofWEEEandtominimizeanypotentialeffectsofEEEontheenvironmentandhumanhealth
duetothepresenceofhazardoussubstances.ForadditionalWEEEinformationgoto:
http://www.lenovo.com/recycling
RecyclinginformationforChina
http://support.lenovo.com.cn/activity/551.htm
RecyclinginformationforJapan
CollectingandrecyclingadisusedLenovocomputerormonitor
IfyouareacompanyemployeeandneedtodisposeofaLenovocomputerormonitorthatistheproperty
ofthecompany,youmustdosoinaccordancewiththeLawforPromotionofEffectiveUtilizationof
Resources.Computersandmonitorsarecategorizedasindustrialwasteandshouldbeproperlydisposed
ofbyanindustrialwastedisposalcontractorcertifiedbyalocalgovernment.InaccordancewiththeLaw
forPromotionofEffectiveUtilizationofResources,LenovoJapanprovides,throughitsPCCollectingand
RecyclingServices,forthecollecting,reuse,andrecyclingofdisusedcomputersandmonitors.Fordetails,
visittheLenovoWebsiteathttp://www.lenovo.com/recycling/japan.
©CopyrightLenovo2014133

PursuanttotheLawforPromotionofEffectiveUtilizationofResources,thecollectingandrecyclingof
home-usedcomputersandmonitorsbythemanufacturerwasbegunonOctober1,2003.Thisservice
isprovidedfreeofchargeforhome-usedcomputerssoldafterOctober1,2003.Fordetails,goto
http://www.lenovo.com/recycling/japan.
DisposingofLenovocomputercomponents
SomeLenovocomputerproductssoldinJapanmayhavecomponentsthatcontainheavymetalsorother
environmentalsensitivesubstances.Toproperlydisposeofdisusedcomponents,suchasaprintedcircuit
boardordrive,usethemethodsdescribedaboveforcollectingandrecyclingadisusedcomputerormonitor.
DisposingofdisusedlithiumbatteriesfromLenovocomputers
Abutton-shapedlithiumbatteryisinstalledinsideyourLenovocomputertoprovidepowertothecomputer
clockwhilethecomputerisoffordisconnectedfromthemainpowersource.Ifyouneedtoreplaceitwitha
newone,contactyourplaceofpurchaseorcontactLenovoforservice.Ifyouneedtodisposeofadisused
lithiumbattery,insulateitwithvinyltape,contactyourplaceofpurchaseoranindustrial-waste-disposal
operator,andfollowtheirinstructions.
Disposalofalithiumbatterymustcomplywithlocalordinancesandregulations.
DisposingofadisusedbatterypackfromLenovonotebookcomputers
YourLenovonotebookcomputerhasalithiumionbatterypackoranickelmetalhydridebatterypack.Ifyou
areacompanyemployeewhousesaLenovonotebookcomputerandneedtodisposeofabatterypack,
contacttheproperpersoninLenovosales,service,ormarketing,andfollowthatperson'sinstructions.You
alsocanrefertotheinstructionsathttp://www.lenovo.com/jp/ja/environment/recycle/battery/.
IfyouuseaLenovonotebookcomputerathomeandneedtodisposeofabatterypack,you
mustcomplywithlocalordinancesandregulations.Youalsocanrefertotheinstructionsat
http://www.lenovo.com/jp/ja/environment/recycle/battery/.
BatteryrecyclinginformationforBrazil
DeclaraçõesdeReciclagemnoBrasil
DescartedeumProdutoLenovoForadeUso
Equipamentoselétricoseeletrônicosnãodevemserdescartadosemlixocomum,masenviadosàpontosde
coleta,autorizadospelofabricantedoprodutoparaquesejamencaminhadoseprocessadosporempresas
especializadasnomanuseioderesíduosindustriais,devidamentecertificadaspelosorgãosambientais,de
acordocomalegislaçãolocal.
ALenovopossuiumcanalespecíficoparaauxiliá-lonodescartedessesprodutos.Casovocêpossua
umprodutoLenovoemsituaçãodedescarte,ligueparaonossoSACouencaminheume-mailpara:
reciclar@lenovo.com,informandoomodelo,númerodesérieecidade,afimdeenviarmosasinstruções
paraocorretodescartedoseuprodutoLenovo.
BatteryrecyclinginformationforTaiwan
134UserGuide

BatteryrecyclinginformationfortheEuropeanUnion
Notice:ThismarkappliesonlytocountrieswithintheEuropeanUnion(EU).
BatteriesorpackagingforbatteriesarelabeledinaccordancewithEuropeanDirective2006/66/EC
concerningbatteriesandaccumulatorsandwastebatteriesandaccumulators.TheDirectivedeterminesthe
frameworkforthereturnandrecyclingofusedbatteriesandaccumulatorsasapplicablethroughoutthe
EuropeanUnion.Thislabelisappliedtovariousbatteriestoindicatethatthebatteryisnottobethrown
away,butratherreclaimeduponendoflifeperthisDirective.
InaccordancewiththeEuropeanDirective2006/66/EC,batteriesandaccumulatorsarelabeledtoindicate
thattheyaretobecollectedseparatelyandrecycledatendoflife.Thelabelonthebatterymayalso
includeachemicalsymbolforthemetalconcernedinthebattery(Pbforlead,Hgformercury,andCdfor
cadmium).Usersofbatteriesandaccumulatorsmustnotdisposeofbatteriesandaccumulatorsasunsorted
municipalwaste,butusethecollectionframeworkavailabletocustomersforthereturn,recycling,and
treatmentofbatteriesandaccumulators.Customerparticipationisimportanttominimizeanypotential
effectsofbatteriesandaccumulatorsontheenvironmentandhumanhealthduetothepotentialpresenceof
hazardoussubstances.Forpropercollectionandtreatment,goto:
http://www.lenovo.com/lenovo/environment
BatteryrecyclinginformationfortheUnitedStatesandCanada
AppendixB.WEEEandrecyclinginformation135

136UserGuide
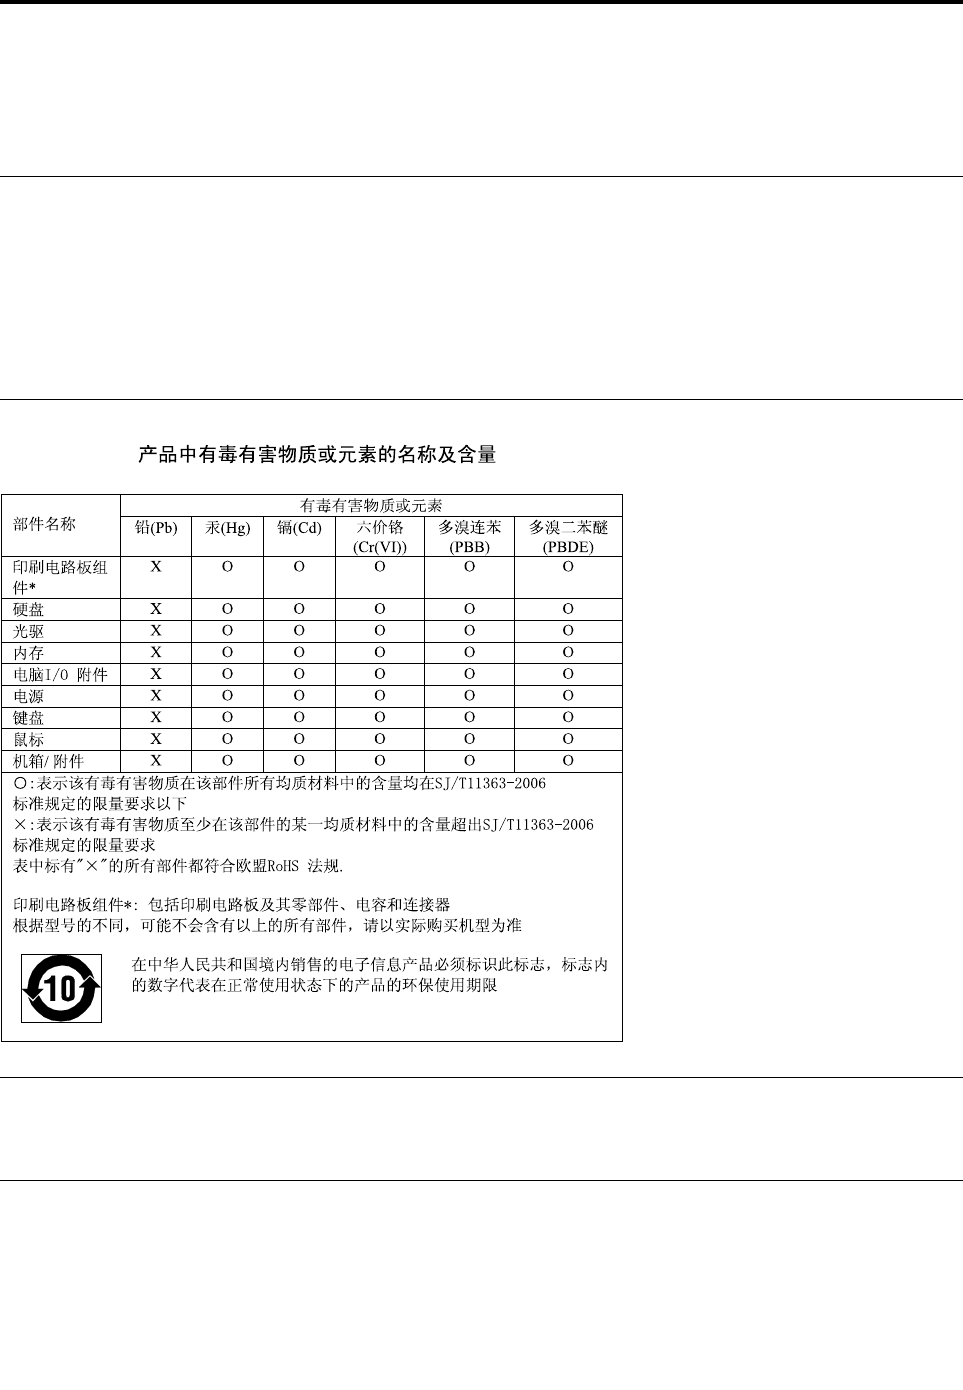
AppendixC.RestrictionofHazardousSubstancesDirective
(RoHS)
EuropeanUnionRoHS
LenovoproductssoldintheEuropeanUnion,onorafter3January2013meettherequirementsofDirective
2011/65/EUontherestrictionoftheuseofcertainhazardoussubstancesinelectricalandelectronic
equipment(“RoHSrecast”or“RoHS2”).
FormoreinformationaboutLenovoprogressonRoHS,goto:
http://www.lenovo.com/social_responsibility/us/en/RoHS_Communication.pdf
ChinaRoHS
IndiaRoHS
RoHScompliantasperE-Waste(Management&Handling)Rules,2011.
TurkishRoHS
TheLenovoproductmeetstherequirementsoftheRepublicofTurkeyDirectiveontheRestrictionoftheUse
ofCertainHazardousSubstancesinElectricalandElectronicEquipment(EEE).
©CopyrightLenovo2014137

UkraineRoHS
138UserGuide

AppendixD.ENERGYSTARmodelinformation
ENERGYSTAR®isajointprogramoftheU.S.EnvironmentalProtectionAgencyandtheU.S.Department
ofEnergyaimedatsavingmoneyandprotectingtheenvironmentthroughenergyefficientproductsand
practices.
LenovoisproudtoofferourcustomersproductswiththeENERGYSTARqualifieddesignation.Lenovo
computersofthefollowingmachinetypes,iftheENERGYSTARmarkisaffixed,havebeendesignedand
testedtoconformtotheENERGYSTARprogramrequirementsforcomputers.
20D9and20DA
ByusingENERGYSTARqualifiedproductsandtakingadvantageofthepower-managementfeatures
ofyourcomputer,youcanhelpreducetheconsumptionofelectricity.Reducedelectricalconsumption
cancontributetopotentialfinancialsavings,acleanerenvironment,andthereductionofgreenhousegas
emissions.
FormoreinformationaboutENERGYSTAR,goto:
http://www.energystar.gov
Lenovoencouragesyoutomakeefficientuseofenergyanintegralpartofyourday-to-dayoperations.To
helpinthisendeavor,Lenovohaspresetthefollowingpower-managementfeaturestotakeeffectwhenyour
computerhasbeeninactiveforaspecifiedlengthoftime:
Powerplan:EnergySaver(settingswhenpluggedintoacpower)
•Turnoffthedisplay:After10minutes
•Putthecomputerintosleep:After20minutes
•Advancedpowersettings:
–Turnoffharddisks:After15minutes
–Hibernate:Never
Toawakenyourcomputerfromsleepmode,presstheFnkeyonyourkeyboard.Formoreinformationabout
thesesettings,seetheWindowsHelpandSupportinformationonyourcomputer.
TheWakeonLANfunctionisenabledwhenyourLenovocomputerisshippedfromthefactory,andthe
settingremainsvalidevenwhenthecomputerisinsleepmode.IfyoudonotneedtohaveWakeonLAN
enabledwhilethecomputerisinsleepmode,youcanreducethepowerconsumptionandprolongthetime
insleepmode,bydisablingthesettingofWakeonLANforsleepmode.
TodisablethesettingofWakeonLANforsleepmode,dothefollowing:
1.GotoControlPanel.
2.ClickHardwareandSound➙DeviceManager.
©CopyrightLenovo2014139

3.IntheDeviceManagerwindow,expandNetworkadapters.
4.Right-clickyournetworkadapterdevice,andclickProperties.
5.ClickthePowerManagementtab.
6.CleartheAllowthisdevicetowakethecomputercheckbox.
7.ClickOK.
140UserGuide

AppendixE.Notices
Lenovomaynotoffertheproducts,services,orfeaturesdiscussedinthisdocumentinallcountries.Consult
yourlocalLenovorepresentativeforinformationontheproductsandservicescurrentlyavailableinyour
area.AnyreferencetoaLenovoproduct,program,orserviceisnotintendedtostateorimplythatonlythat
Lenovoproduct,program,orservicemaybeused.Anyfunctionallyequivalentproduct,program,orservice
thatdoesnotinfringeanyLenovointellectualpropertyrightmaybeusedinstead.However,itistheuser's
responsibilitytoevaluateandverifytheoperationofanyotherproduct,program,orservice.
Lenovomayhavepatentsorpendingpatentapplicationscoveringsubjectmatterdescribedinthis
document.Thefurnishingofthisdocumentdoesnotgiveyouanylicensetothesepatents.Youcansend
licenseinquiries,inwriting,to:
Lenovo(UnitedStates),Inc.
1009ThinkPlace-BuildingOne
Morrisville,NC27560
U.S.A.
Attention:LenovoDirectorofLicensing
LENOVOPROVIDESTHISPUBLICATION“ASIS”WITHOUTWARRANTYOFANYKIND,EITHEREXPRESS
ORIMPLIED,INCLUDING,BUTNOTLIMITEDTO,THEIMPLIEDWARRANTIESOFNON-INFRINGEMENT,
MERCHANTABILITYORFITNESSFORAPARTICULARPURPOSE.Somejurisdictionsdonotallow
disclaimerofexpressorimpliedwarrantiesincertaintransactions,therefore,thisstatementmaynotapply
toyou.
Thisinformationcouldincludetechnicalinaccuraciesortypographicalerrors.Changesareperiodically
madetotheinformationherein;thesechangeswillbeincorporatedinneweditionsofthepublication.
Lenovomaymakeimprovementsand/orchangesintheproduct(s)and/ortheprogram(s)describedinthis
publicationatanytimewithoutnotice.
Theproductsdescribedinthisdocumentarenotintendedforuseinimplantationorotherlifesupport
applicationswheremalfunctionmayresultininjuryordeathtopersons.Theinformationcontainedinthis
documentdoesnotaffectorchangeLenovoproductspecificationsorwarranties.Nothinginthisdocument
shalloperateasanexpressorimpliedlicenseorindemnityundertheintellectualpropertyrightsofLenovo
orthirdparties.Allinformationcontainedinthisdocumentwasobtainedinspecificenvironmentsandis
presentedasanillustration.Theresultobtainedinotheroperatingenvironmentsmayvary.
Lenovomayuseordistributeanyoftheinformationyousupplyinanywayitbelievesappropriatewithout
incurringanyobligationtoyou.
Anyreferencesinthispublicationtonon-LenovoWebsitesareprovidedforconvenienceonlyanddonotin
anymannerserveasanendorsementofthoseWebsites.ThematerialsatthoseWebsitesarenotpartof
thematerialsforthisLenovoproduct,anduseofthoseWebsitesisatyourownrisk.
Anyperformancedatacontainedhereinwasdeterminedinacontrolledenvironment.Therefore,theresult
obtainedinotheroperatingenvironmentsmayvarysignificantly.Somemeasurementsmayhavebeen
madeondevelopment-levelsystemsandthereisnoguaranteethatthesemeasurementswillbethesame
ongenerallyavailablesystems.Furthermore,somemeasurementsmayhavebeenestimatedthrough
extrapolation.Actualresultsmayvary.Usersofthisdocumentshouldverifytheapplicabledatafortheir
specificenvironment.
©CopyrightLenovo2014141

Trademarks
ThefollowingtermsaretrademarksofLenovointheUnitedStates,othercountries,orboth:
AccessConnections
ActiveProtectionSystem
Lenovo
RescueandRecovery
SecureDataDisposal
ThinkPad
ThinkVantage
UltraConnect
BitLocker,Microsoft,Windows,andWindowsMediaaretrademarksoftheMicrosoftgroupofcompanies.
IntelandIntelSpeedSteparetrademarksorregisteredtrademarksofIntelCorporationoritssubsidiariesin
theUnitedStatesandothercountries.
ThetermsHDMIandHDMIHigh-DefinitionMultimediaInterfacearetrademarksorregisteredtrademarksof
HDMILicensingLLCintheUnitedStatesandothercountries.
Othercompany,product,andservicenamesmaybetrademarksorservicemarksofothers.
142UserGuide