Samsung Electronics Co CLP415NW Laser Multi-funtion Printer User Manual Rousseau Klimt english1
Samsung Electronics Co Ltd Laser Multi-funtion Printer Rousseau Klimt english1
Contents
- 1. Users Manual 1
- 2. Users Manual 2
- 3. Users Manual 3
- 4. Users Manual 4
- 5. Users Manual 5
Users Manual 3
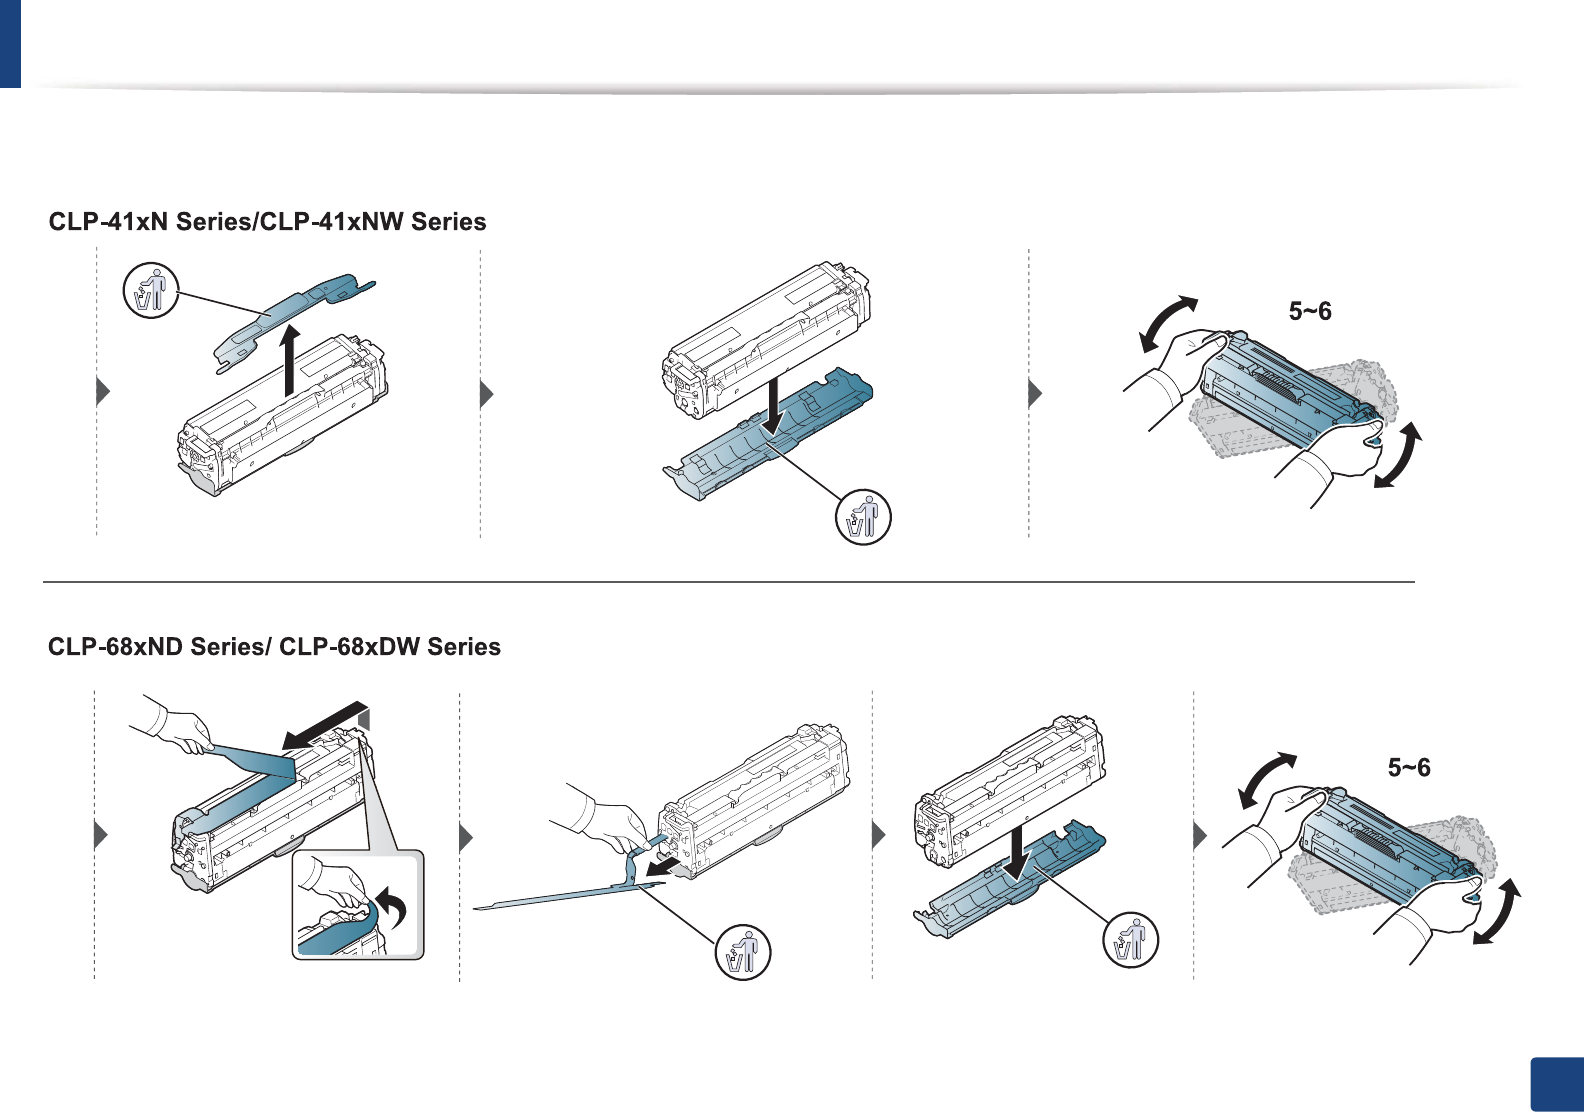
Replacing the toner cartridge
66
3. Maintenance
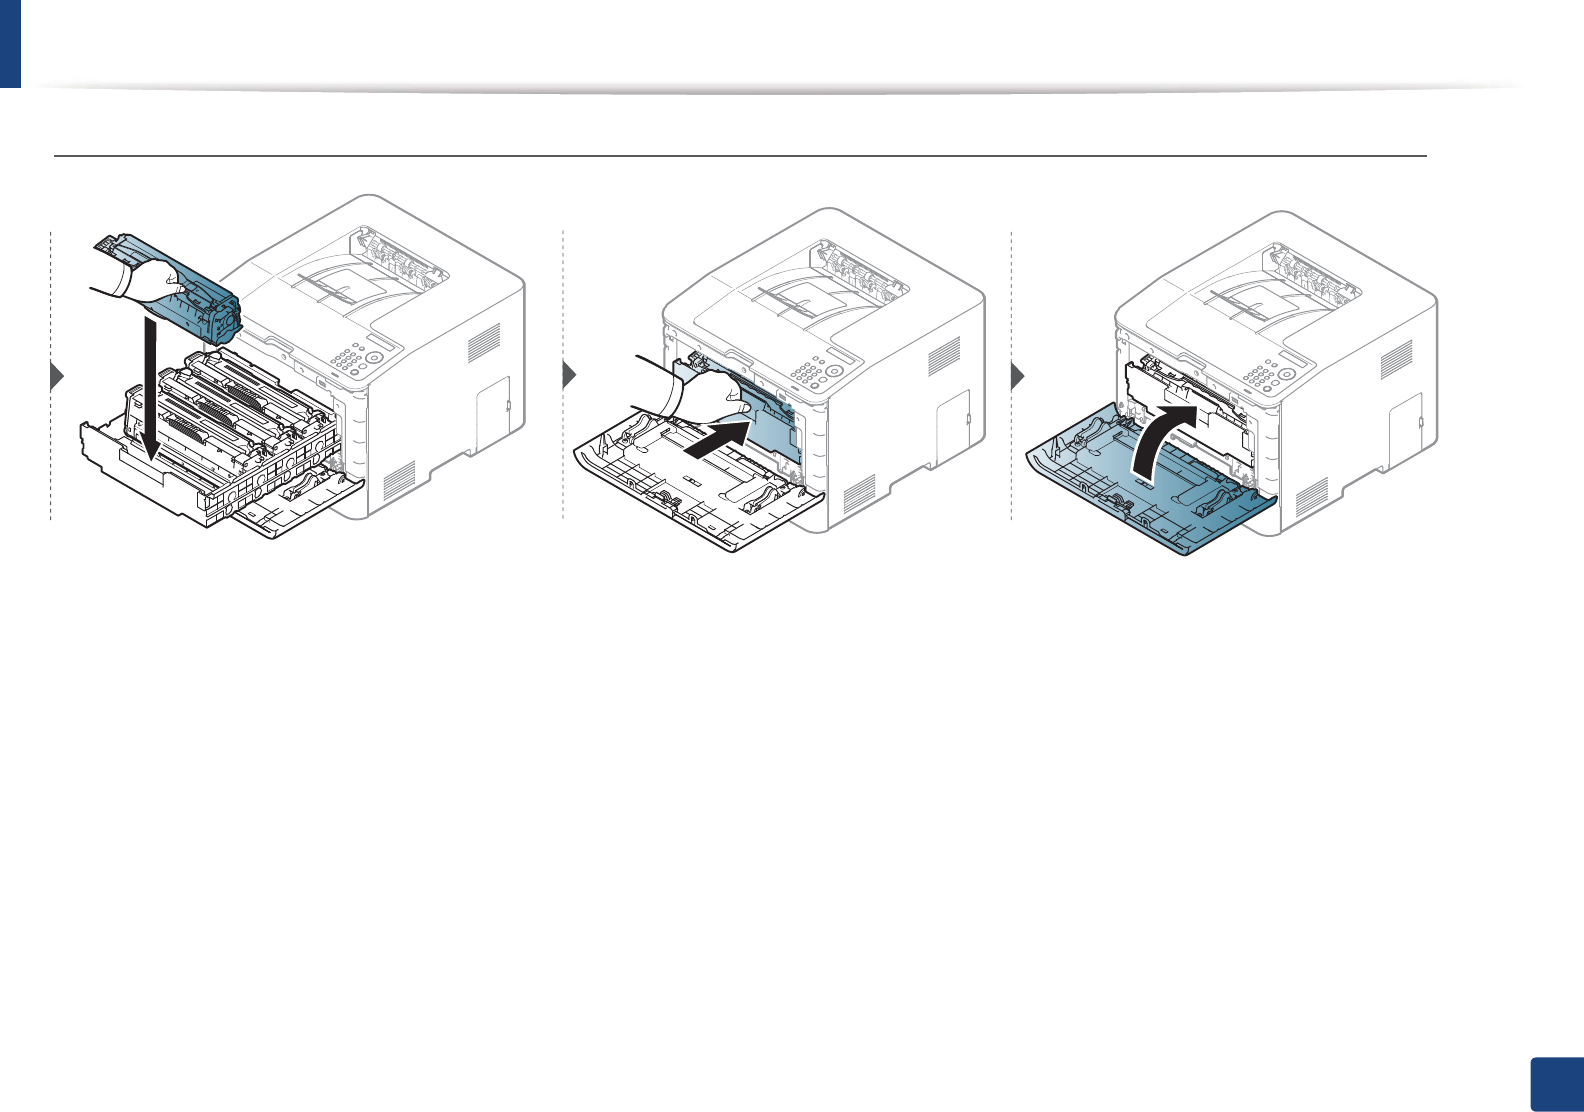
Replacing the toner cartridge
67
3. Maintenance
68
3. Maintenance
Replacing the waste toner container
When the life span of the waste toner container has expired, waste toner container-related message appears on the screen display of the control panel, indicating
the waste toner container needs to be replaced. Check the waste toner container for your machine (see "Available consumables" on page 56). For information about
installing the waste toner container, refer to the waste toner container installation guide included on the package.
• Toner particles can be released inside the machine but it does not mean the machine is damaged. Contact a service representative when print quality problems
occur.
• When you pull out the waste toner container out of the machine, move the container carefully not to drop it from your hands.
• Make sure that you lay the waste toner container on a flat surface so that the toner does not spill.
Do not tilt or turn over the container.

69
3. Maintenance
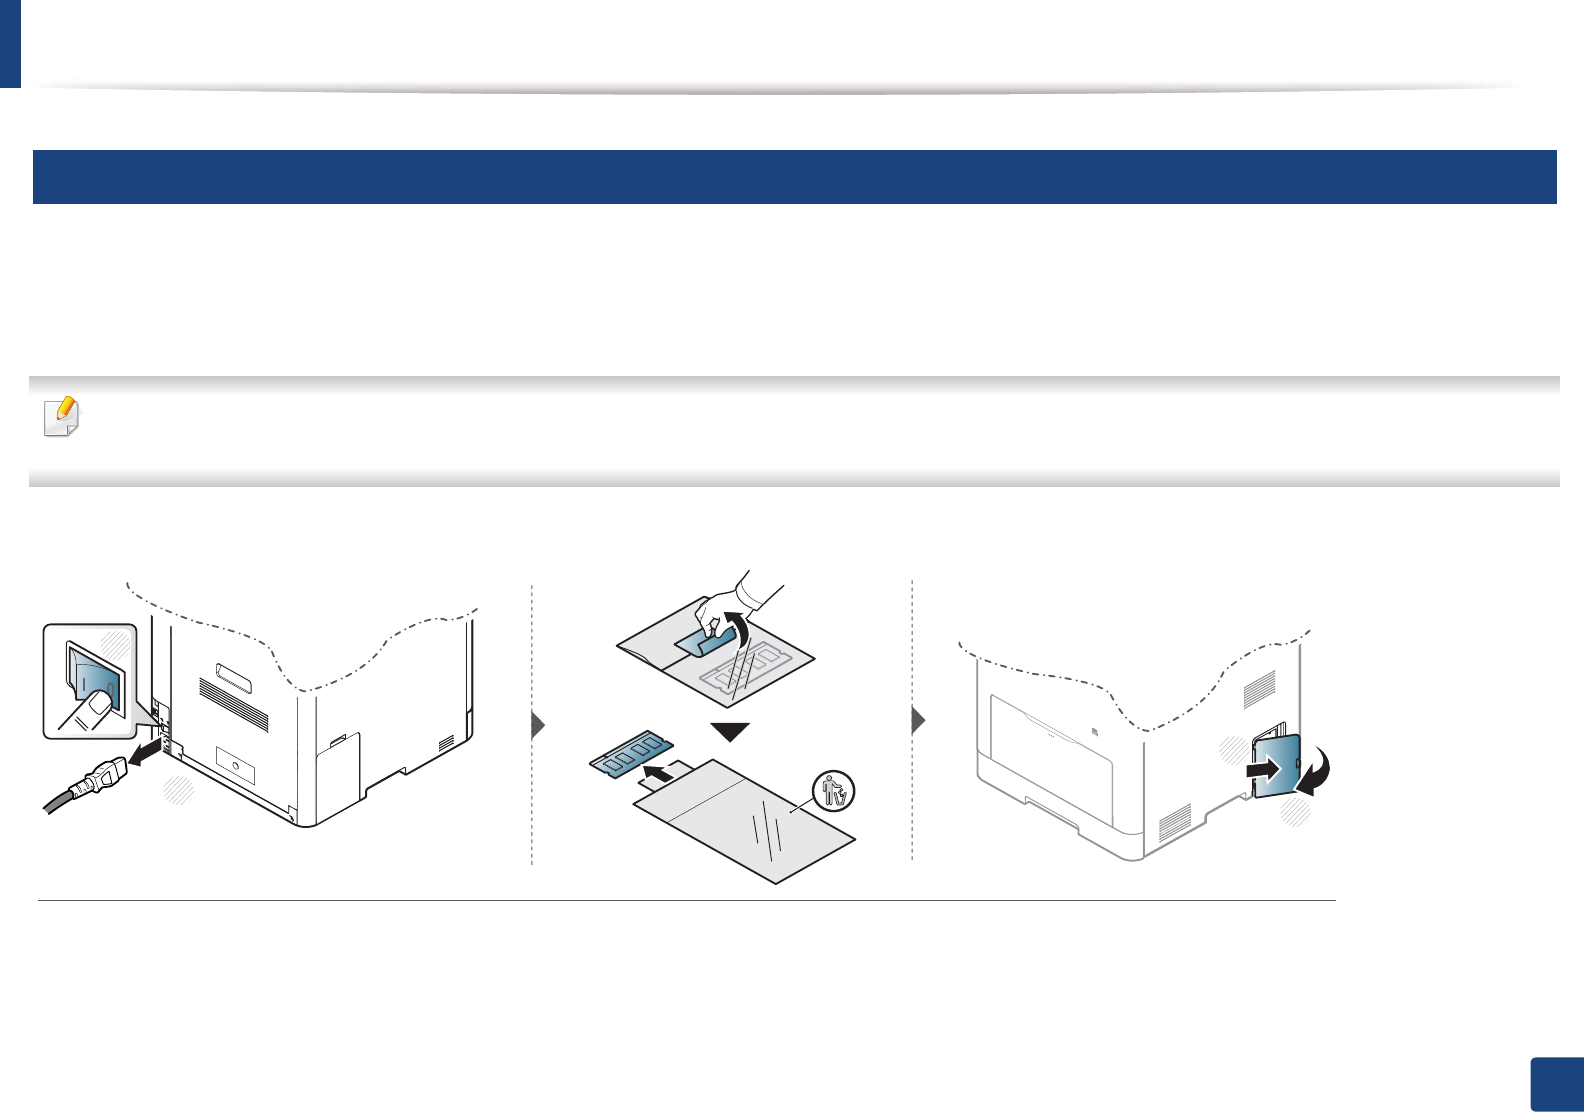
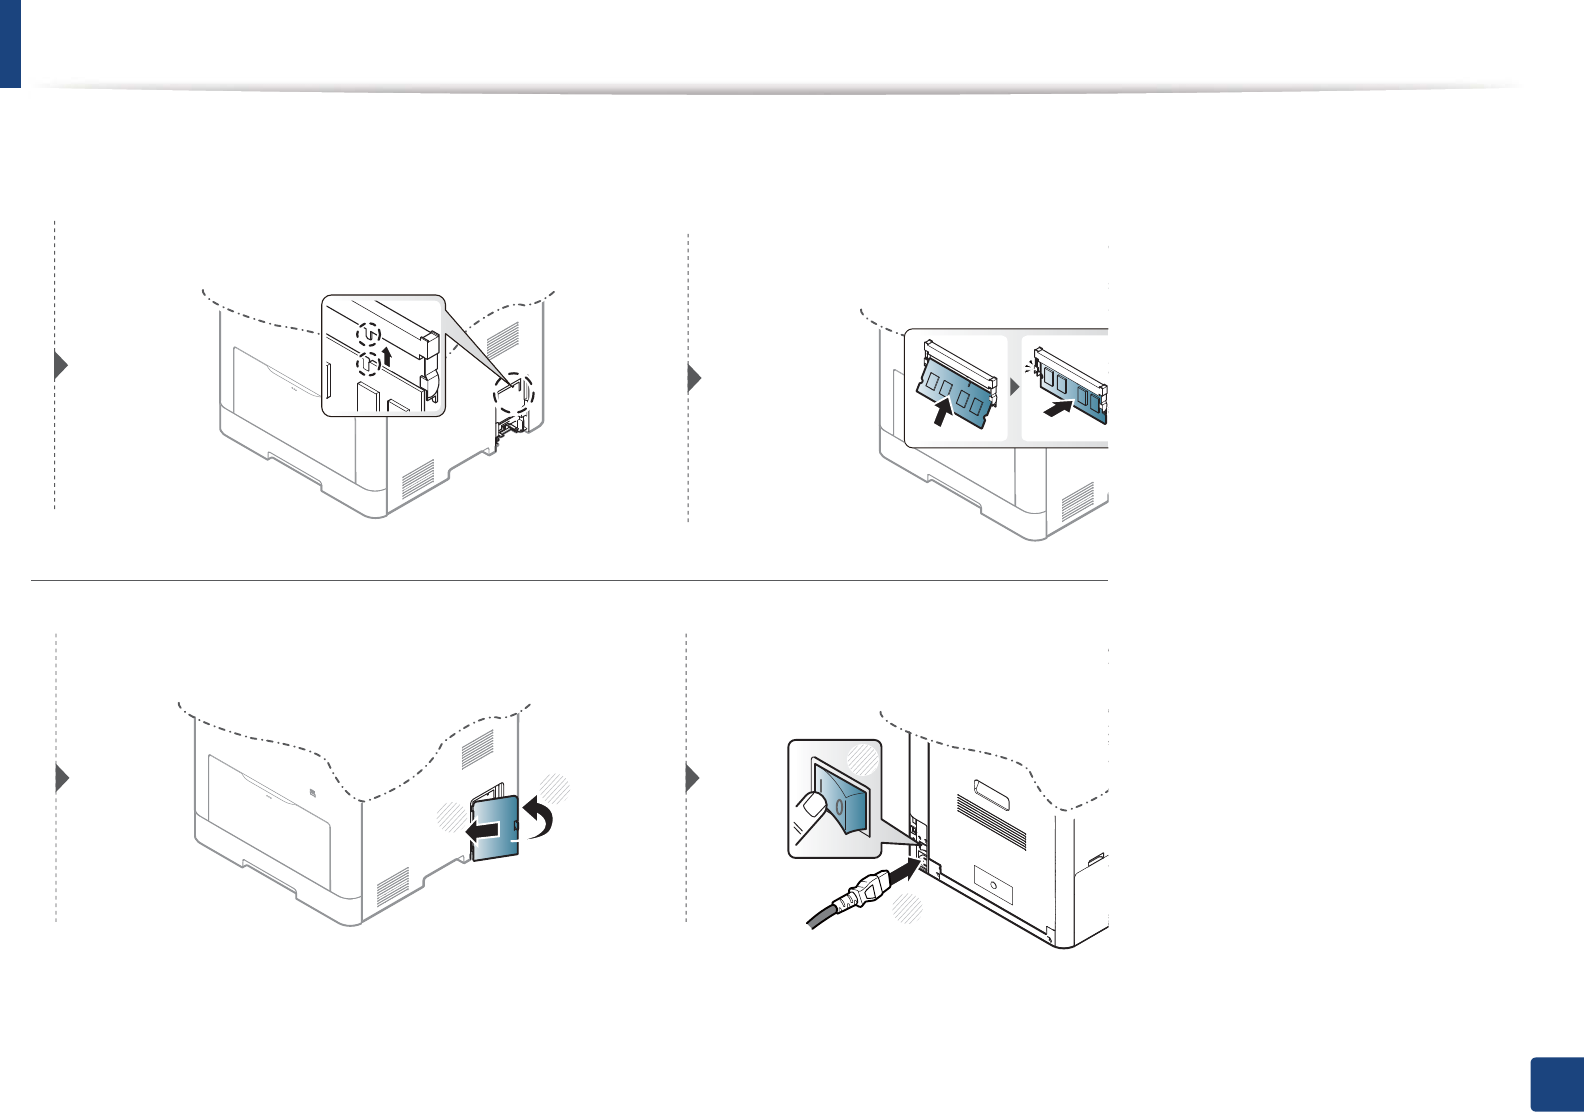
Installing accessories
4
Precautions
• Disconnect the power cord
Never remove the control board cover while the power is turned on.
To avoid the possibility of an electrical shock, always disconnect the power
cord when installing or removing ANY internal or external accessories.
• Discharge static electricity
The control board and internal accessories (network interface card or
memory module) are sensitive to static electricity. Before installing or
removing any internal accessories, discharge static electricity from your
body by touching something metal, such as the metal back plate on any
device plugged into a grounded power source. If you walk around before
finishing the installation, repeat this procedure to discharge any static
electricity again.
When installing accessories, the battery inside the machine is a service
component. Do not change it by yourself. There is a risk of an explosion if
battery is replaced by an incorrect type. Dispose used batteries according to
the instructions.
5
Setting Device Options
When you install the optional devices such as optional tray, memory, etc, this
machine automatically detects and sets the optional devices. If you cannot use
the optional devices you installed in this driver, you need to set the optional
devices in Device Options.
1Click the Windows Start menu.
2 For Windows 2000, select Settings > Printers.
• For Windows XP/2003, select Printers and Faxes.
• For Windows 2008/Vista, select Control Panel > Hardware and
Sound > Printers.
• For Windows 7, select Control Panel > Hardware and Sound >
Devices and Printers.
• For Windows Server 2008 R2, select Control Panel > Hardware >
Devices and Printers.
3 Right-click your machine.
4 For Windows XP/2003/2008/Vista, press Properties.
For Windows 7 and Windows Server 2008 R2, from context menus, select
the Printer properties.
Installing accessories
70
3. Maintenance
If Printer properties item has ൘ mark, you can select other printer drivers
connected with selected printer.
5 Select Device Options.
The Properties window may differ depending on the driver or operating
system you are using.
6 Select the appropriate option.
Some menus may not appear in the display depending on options or
models. If so, it is not applicable to your machine.
•Tray Options: Select the optional tray you installed. You can select
the tray.
•Storage Options: Select the optional memory you installed. If this
feature is checked, you can select the Print Mode in printer driver
("Using optional device features" on page 221).
•Printer Configuration: Select the printer language (SPL/PCL 6) for
the print job.
•Administrator Settings: You can select the Printer Status and EMF
Spooling.
•Admin Job Accounting: Allows you to associate user and account
identification information with each document you print.
-User permission: If you check this option, only users with user
permission can start a print job.
-Group permission: If you check this option, only groups with
group permission can start a print job.
• If you want to encrypt job accounting password, check Job Accounting
Password Encryption.
• Administrators can enable job accounting and configure permissions in
the control panel or SyncThru™ Web Service.
•Custom Paper Size Settings: You can specify custom paper size.
7 Click OK until you exit the Properties or Printer properties window.
Installing accessories
71
3. Maintenance
6
Upgrading a memory module
Your machine has a dual in-line memory module (DIMM). Use this memory module slot to install additional memory. We recommend the use of only genuine
Samsung DIMM's. You may void your warranty if it is determined that your machine problem is being caused by third party DIMM's.
The order information is provided for optional accessories (see "Available accessories" on page 58).
After installing the optional memory, you can use the advanced printing features, such as proofing a job and specifying of printing a secure print job in the printer
properties window. You can controll the active job queue and file policy in Job Manage menu (see "Using optional device features" on page 221).
1
2
1
2
Installing accessories
72
3. Maintenance
1
2
1
2
73
3. Maintenance
Monitoring the supplies life
If you experience frequent paper jams or printing problems, check the number of pages the machine has printed or scanned. Replace the corresponding parts, if
necessary.
It may be necessary to press OK to navigate to lower-level menus for some models.
1Select (Menu) > System Setup > Maintenance > Supplies Life on the control panel.
2 Select the option you want and press OK.
3 Press (Cancel) to return to ready mode.
74
3. Maintenance
Setting the toner low alert
If the amount of toner in the cartridge is low, a message or LED informing the user to change the toner cartridge appears. You can set the option for whether or not
this message or LED appears.
You can set the machine’s settings by using the Device Settings in 6DPVXQJ(DV\3ULQWHU0DQDJHUprogram.
• For Windows and Macintosh users, you set from Samsung Easy Printer Manager! (Switch to advanced mode)!Device Settings, see "Device Settings"
on page 234.
1Select (Menu) > System Setup > Maintenance > TonerLow Alert on the control panel.
2 Select the option you want.
3 Press OK to save the selection.
75
3. Maintenance
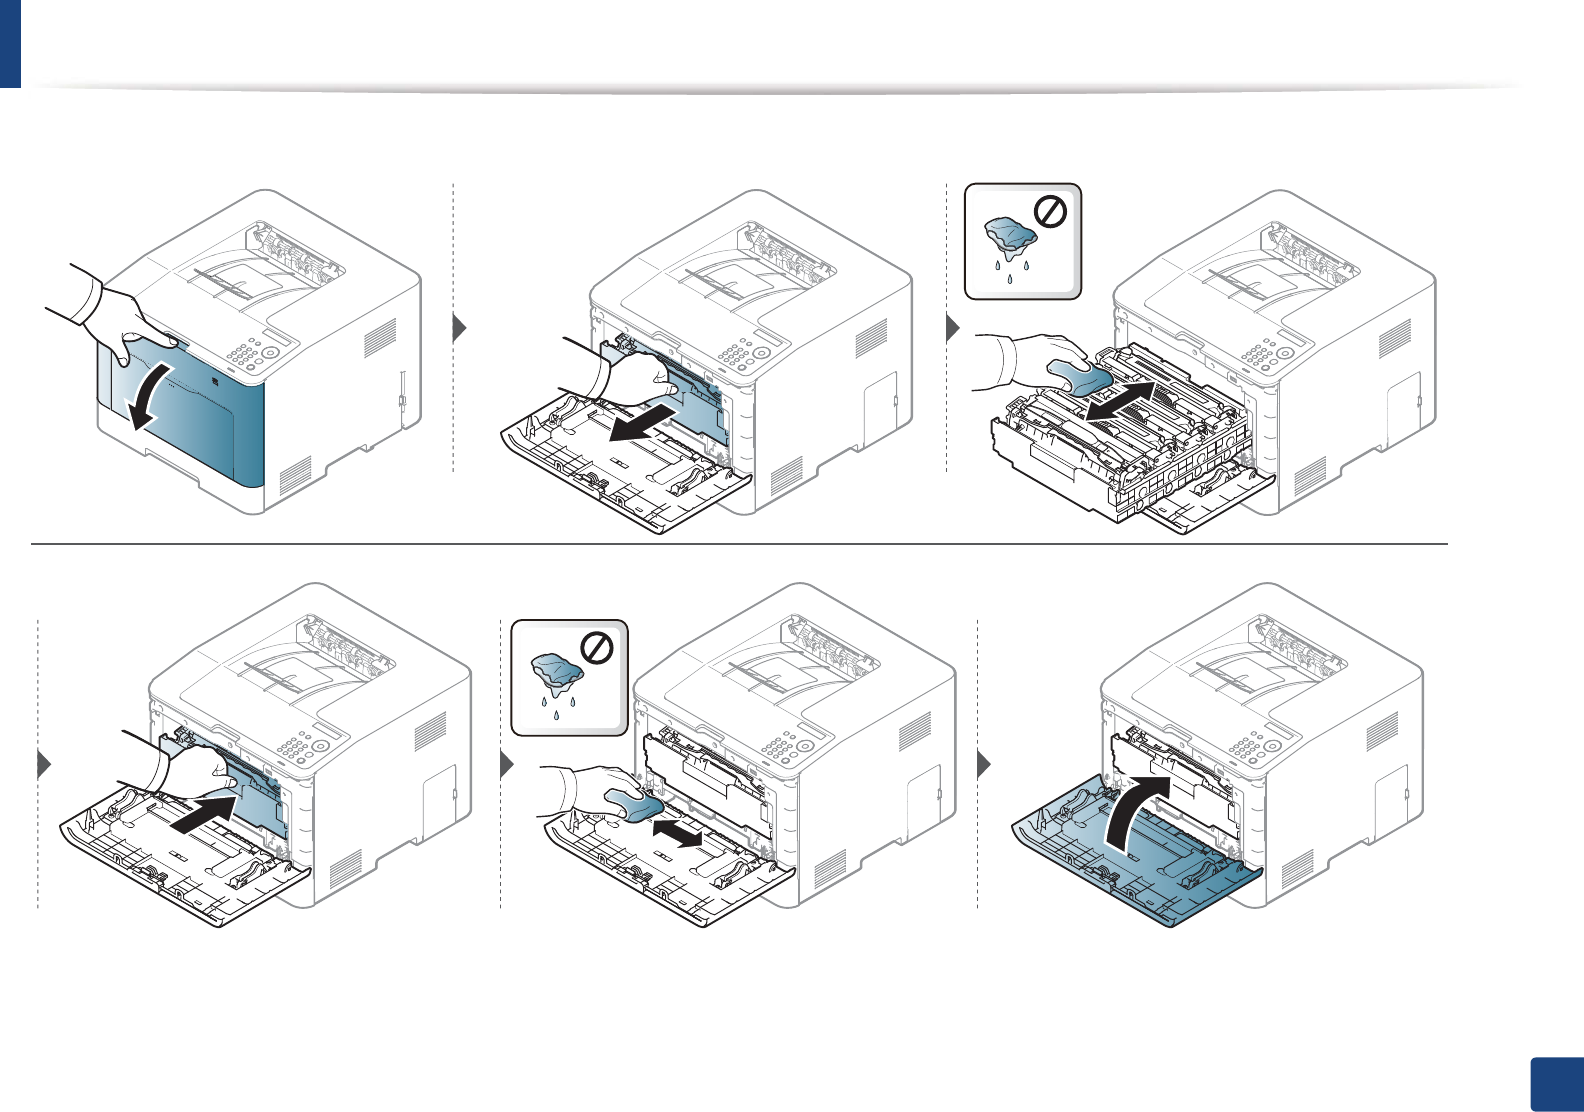
Cleaning the machine
If printing quality problems occur or if you use your machine in a dusty environment, you need to clean your machine regularly to keep it in the best printing
condition and use your machine longer.
• Cleaning the cabinet of the machine with cleaning materials containing large amounts of alcohol, solvents, or other strong substances can discolor or distort the
cabinet.
• If your machine or the surrounding area is contaminated with toner, we recommend you use a cloth or tissue dampened with water to clean it. If you use a vacuum
cleaner, toner blows in the air and might be harmful to you.
7
Cleaning the outside
Clean the machine cabinet with a soft, lint-free cloth. Dampen the cloth slightly with water, but be careful not to let any water drip onto or into the machine.
Cleaning the machine
76
3. Maintenance
8
Cleaning the inside
During the printing process, paper, toner, and dust particles can accumulate inside the machine. This buildup can cause print quality problems, such as toner specks
or smearing. Cleaning the inside of the machine clears and reduces these problems.
• To prevent damage to the toner cartridge, do not expose it to light for more than a few minutes. Cover it with a piece of paper, if necessary.
• Do not touch the green area of the toner cartridge. Use the handle on the cartridge to avoid touching this area.
• Use a dry lint free cloth when cleaning the inside of the machine, be careful not to damage the transfer roller or any other inside parts. Do not use solvents such
as benzene or thinner. Printing quality problems can occur and cause damage to the machine.
• Use a dry lint-free cloth to clean the machine.
• Turn the machine off and unplug the power cord. Wait for the machine to cool down. If your machine has a power switch, turn the power switch off before
cleaning the machine.
• Illustrations on this user’s guide may differ from your machine depending on its options or models. Check your machine type (see "Front view" on page 17).
Cleaning the machine
77
3. Maintenance
Cleaning the machine
78
3. Maintenance
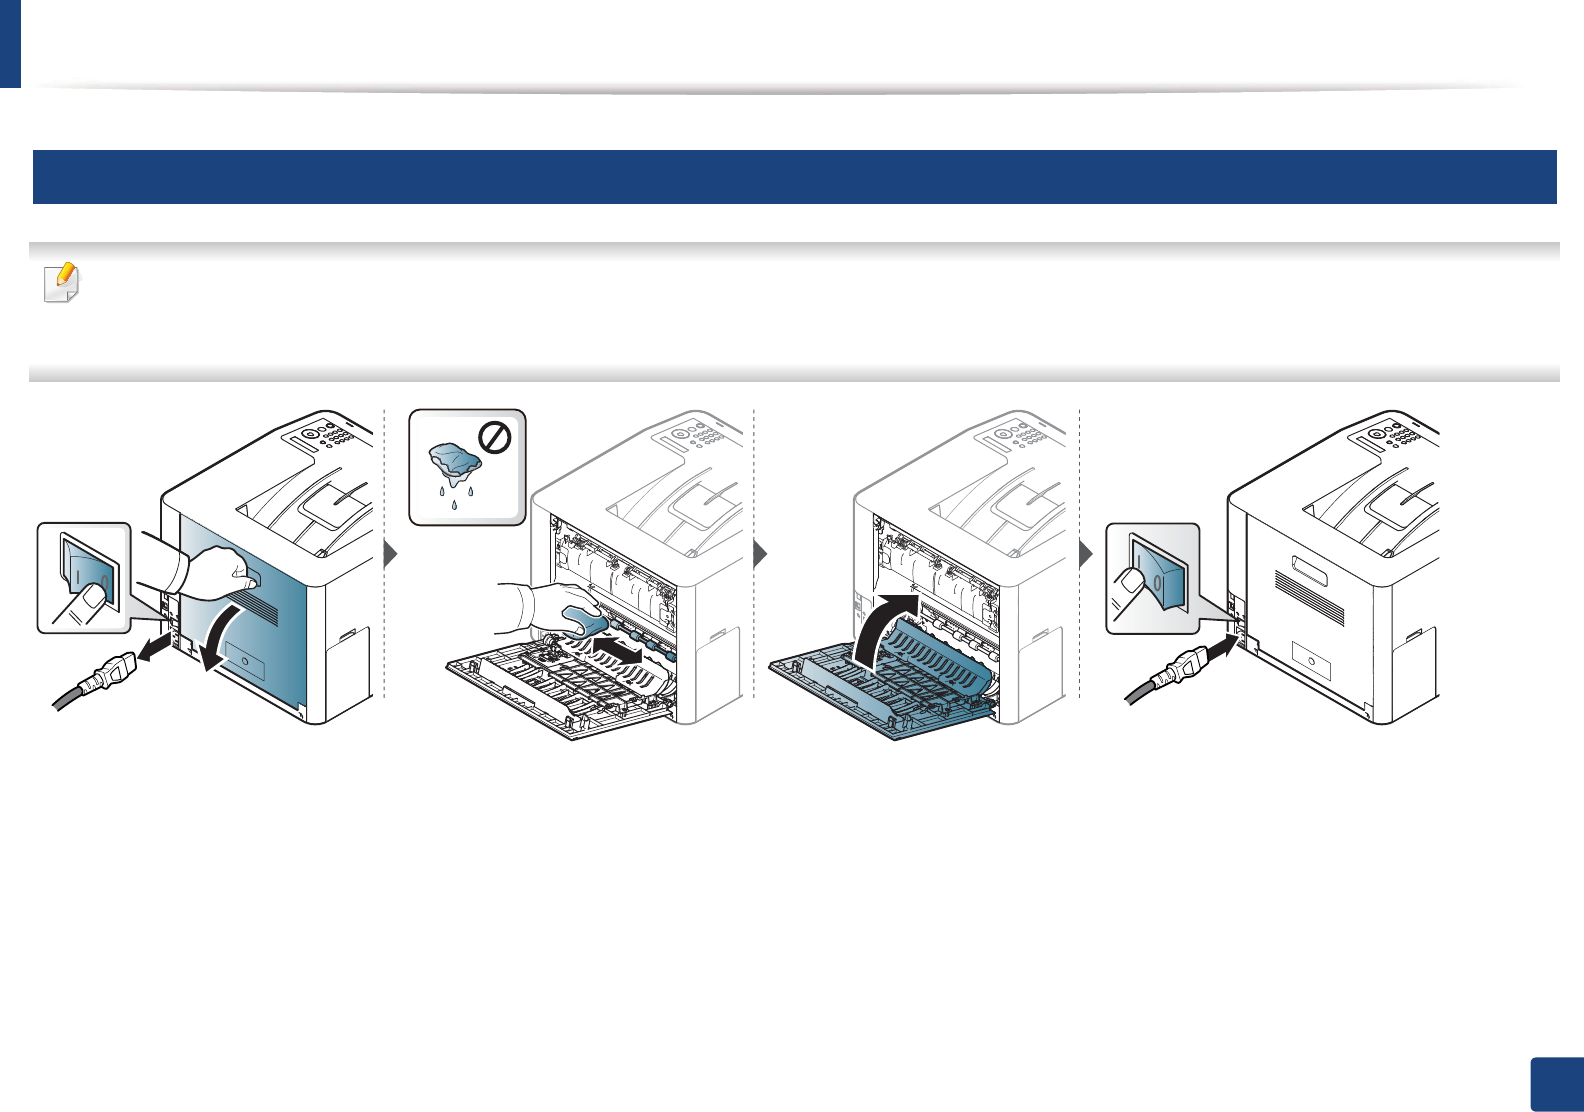
9
Cleaning the pickup roller
• Turn the machine off and unplug the power cord. Wait for the machine to cool down. If your machine has a power switch, turn the power switch off before
cleaning the machine.
• Illustrations on this user’s guide may differ from your machine depending on its options or models. Check your machine type (see "Front view" on page 17).

79
3. Maintenance
Tips for moving & storing your machine
• When moving the machine, do not tilt or turn it upside down. Otherwise, the inside of the machine may be contaminated by toner, which can cause damage to
the machine or reduce print quality.
• When moving the machine, make sure at least two people are holding the machine securely.
4. Troubleshooting
This chapter gives helpful information for what to do if you encounter an error.
• Tips for avoiding paper jams 81
• Clearing paper jams 82
• Understanding the status LED 94
• Understanding display messages 96
This chapter gives helpful information for what to do if you encounter an error. If your machine
has a display screen, check the message on the display screen first to solve the error.
If you cannot find a solution to your problem in this chapter, refer to the Troubleshooting
chapter in the Advanced Guide (see "Troubleshooting" on page 241).
If you cannot find a solution in the User's Guide or the problem persists, call for service.

81
4. Troubleshooting
Tips for avoiding paper jams
By selecting the correct media s, most paper jams can be avoided. To avoid paper jams, refer to the following guidelines:
• Ensure that the adjustable guides are positioned correctly (see "Tray overview" on page 32).
• Do not remove paper from the tray while your machine is printing.
• Flex, fan, and straighten paper before loading.
• Do not use creased, damp, or highly curled paper.
• Do not mix papers in a tray.
• Use only recommended print media (see "Print media specifications" on page 105).
82
4. Troubleshooting
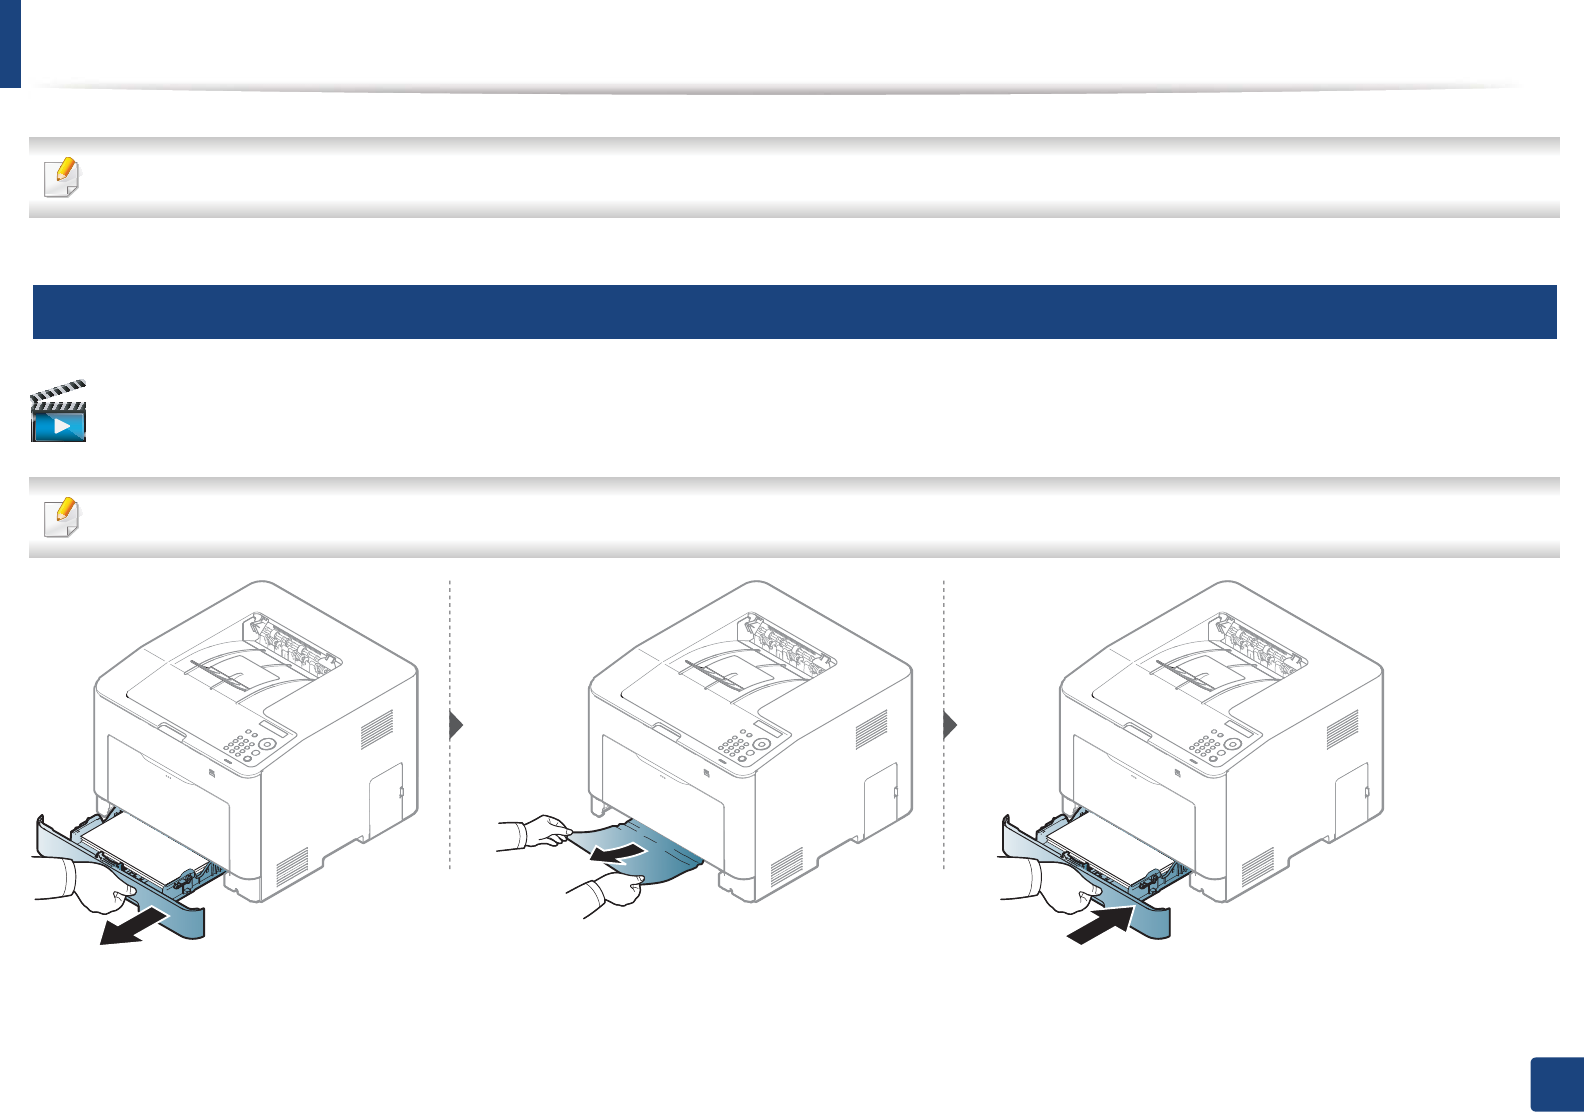
Clearing paper jams
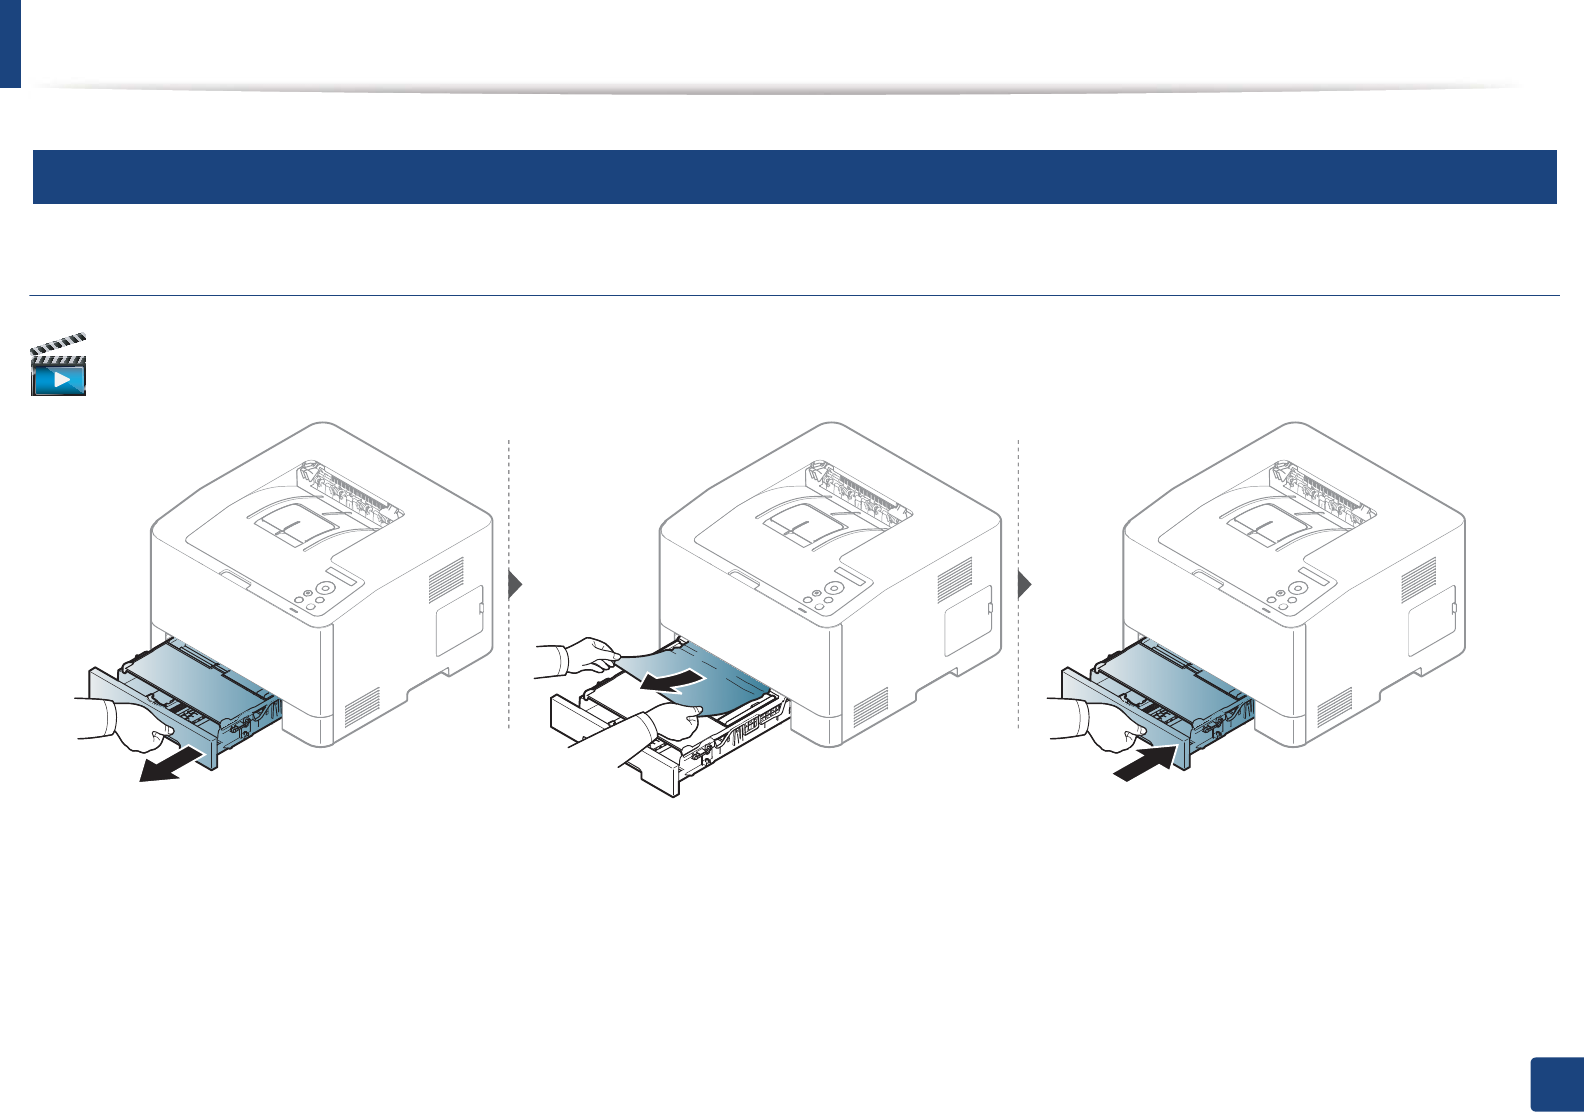
To avoid tearing the paper, pull the jammed paper out slowly and gently.
1
In tray 1
Click this link to open an animation about clearing a jam.
Illustrations on this user’s guide may differ from your machine depending on its options or models. Check your machine type (see "Front view" on page 17).
Clearing paper jams
83
4. Troubleshooting
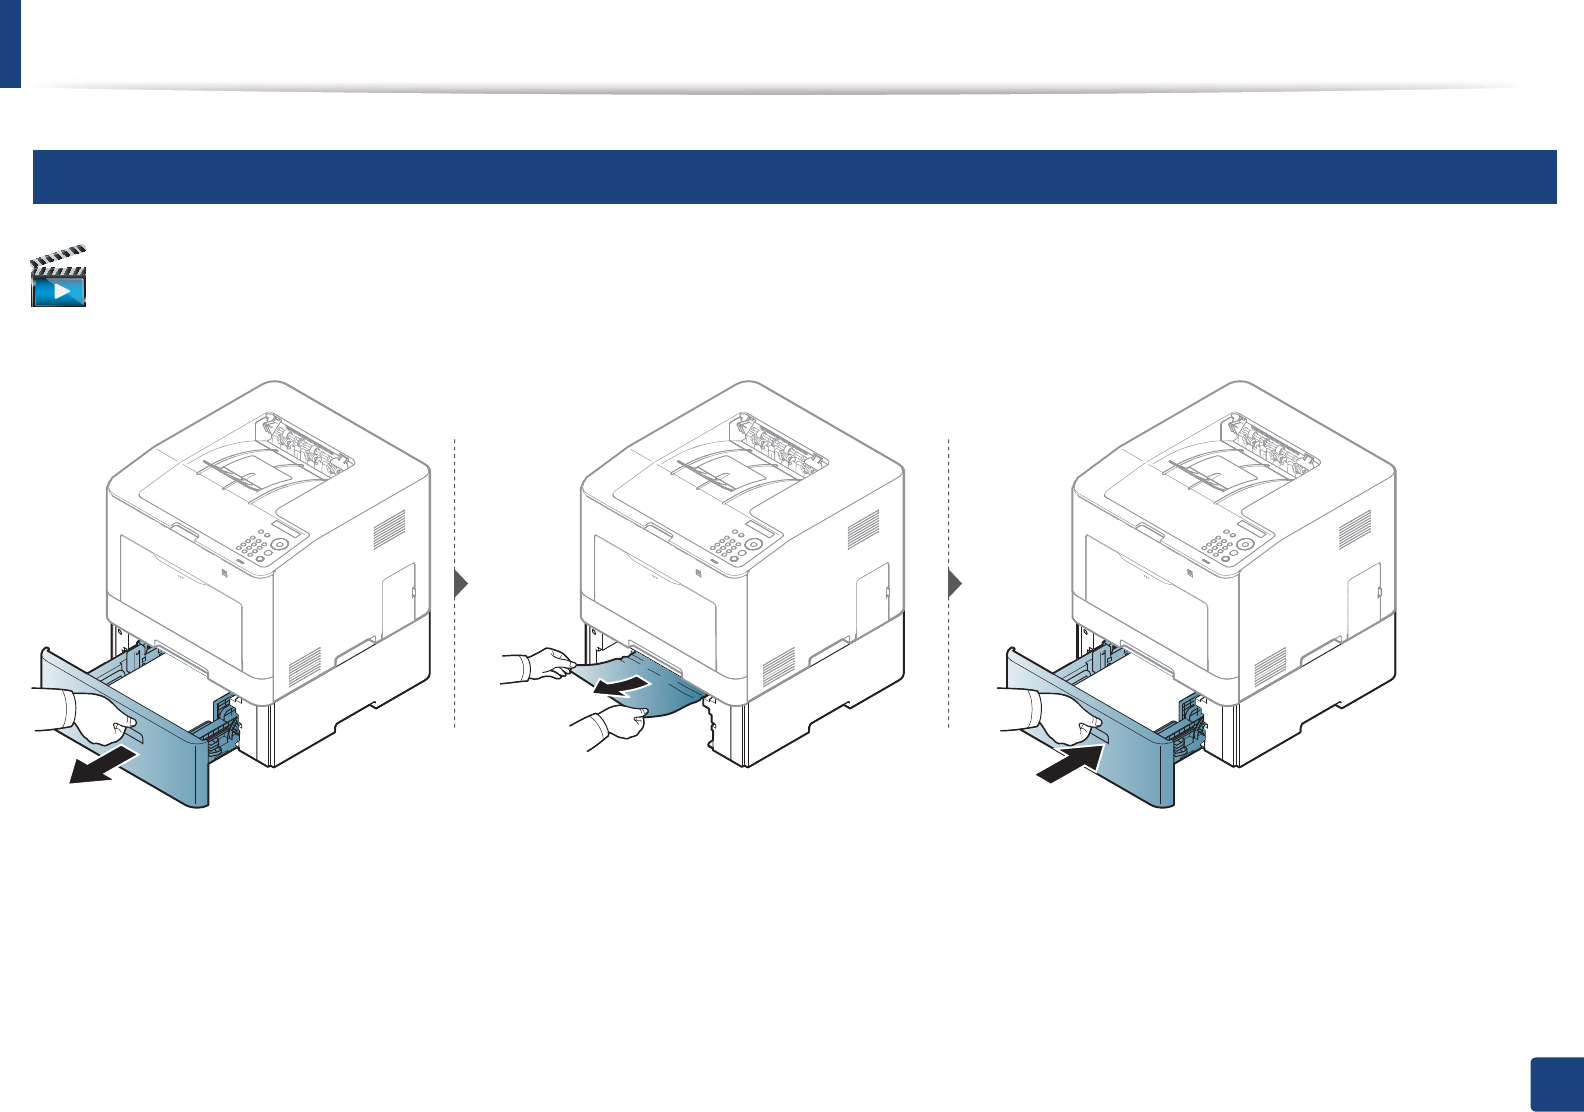
2
In optional tray (CLP-68xND Series/CLP-68xDW Series only)
Click this link to open an animation about clearing a jam.
Clearing paper jams
84
4. Troubleshooting
If you do not see the paper in this area, stop and go to next step:
Clearing paper jams
85
4. Troubleshooting
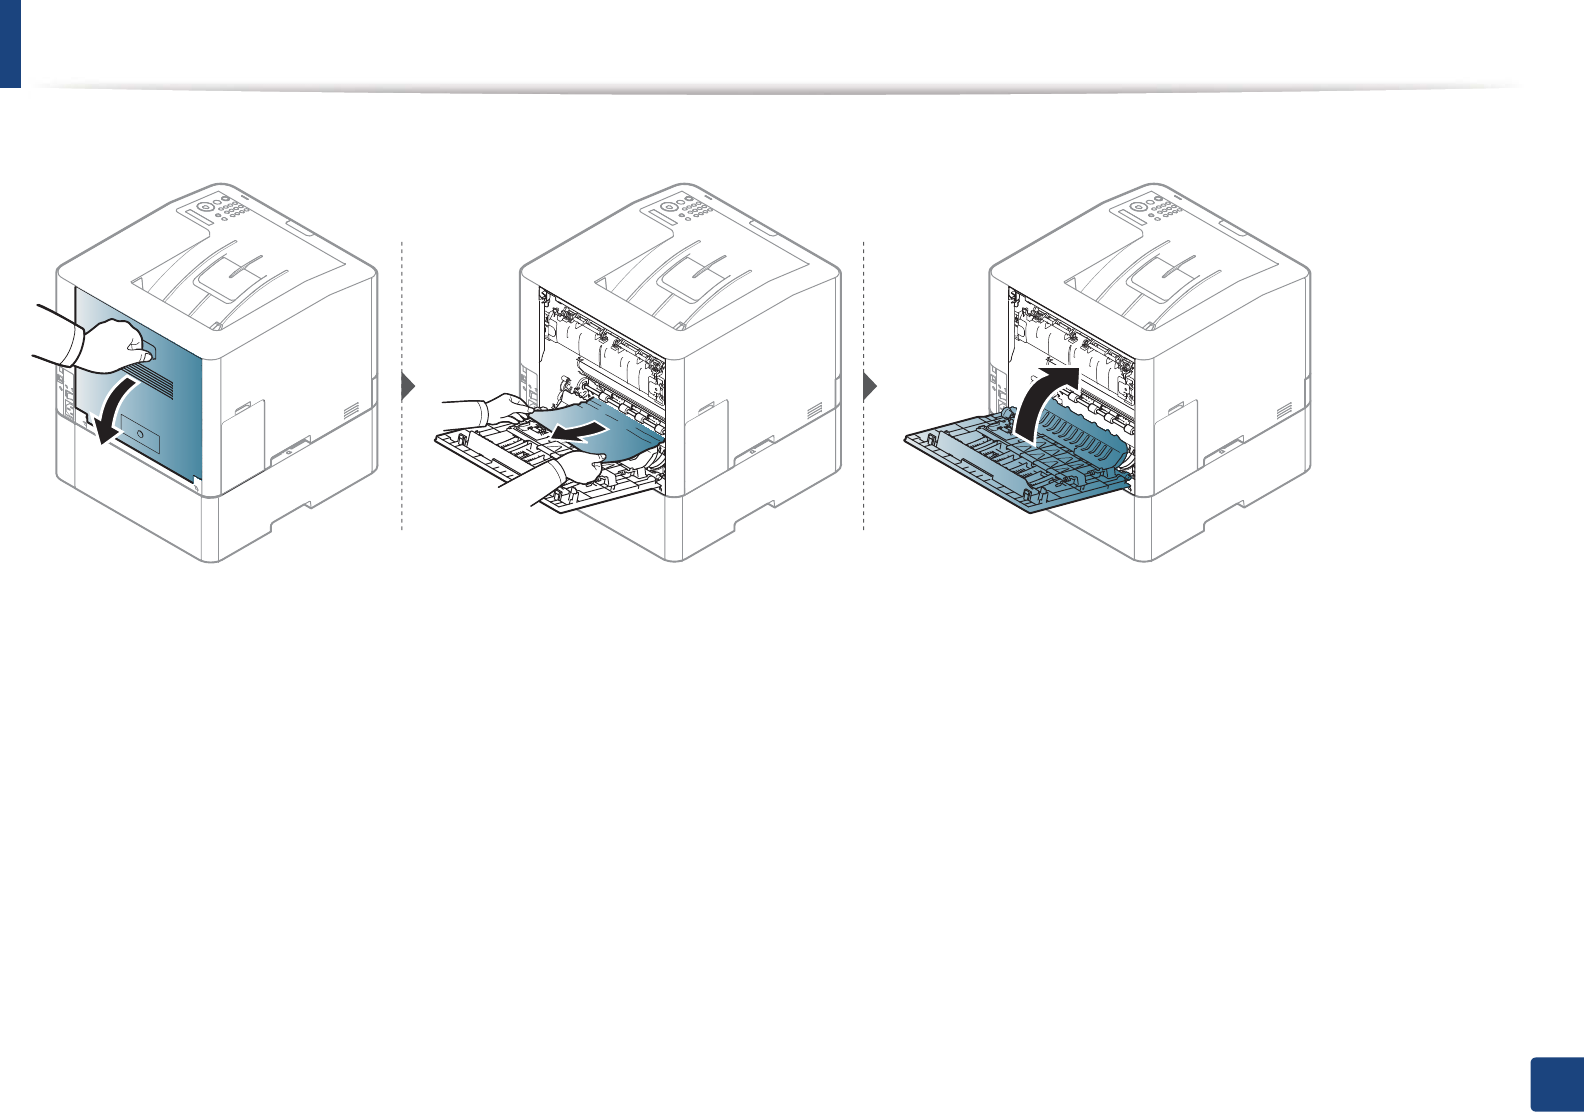
3
In the manual feeder
V
multi-purpose tray
CLP-41xN Series/CLP-41xNW Series
Click this link to open an animation about clearing a jam.