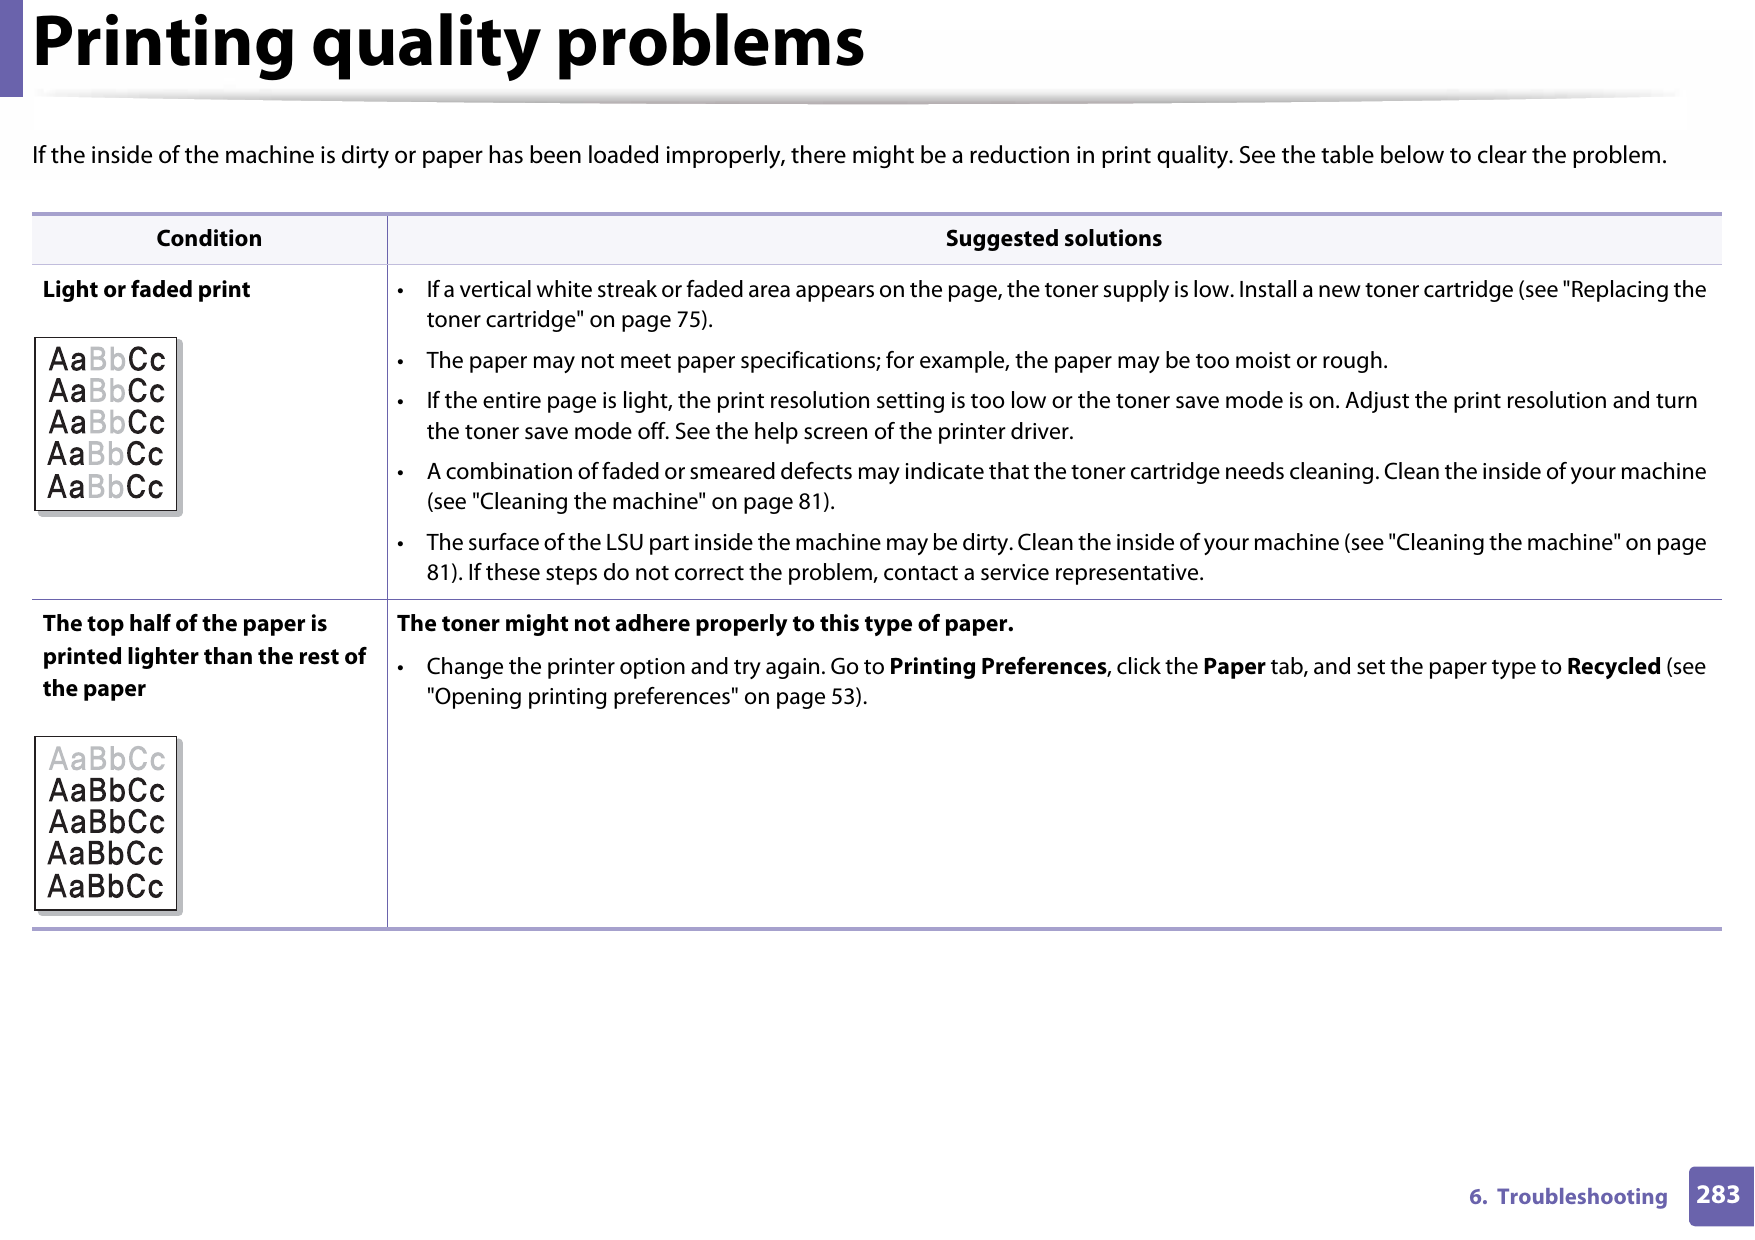
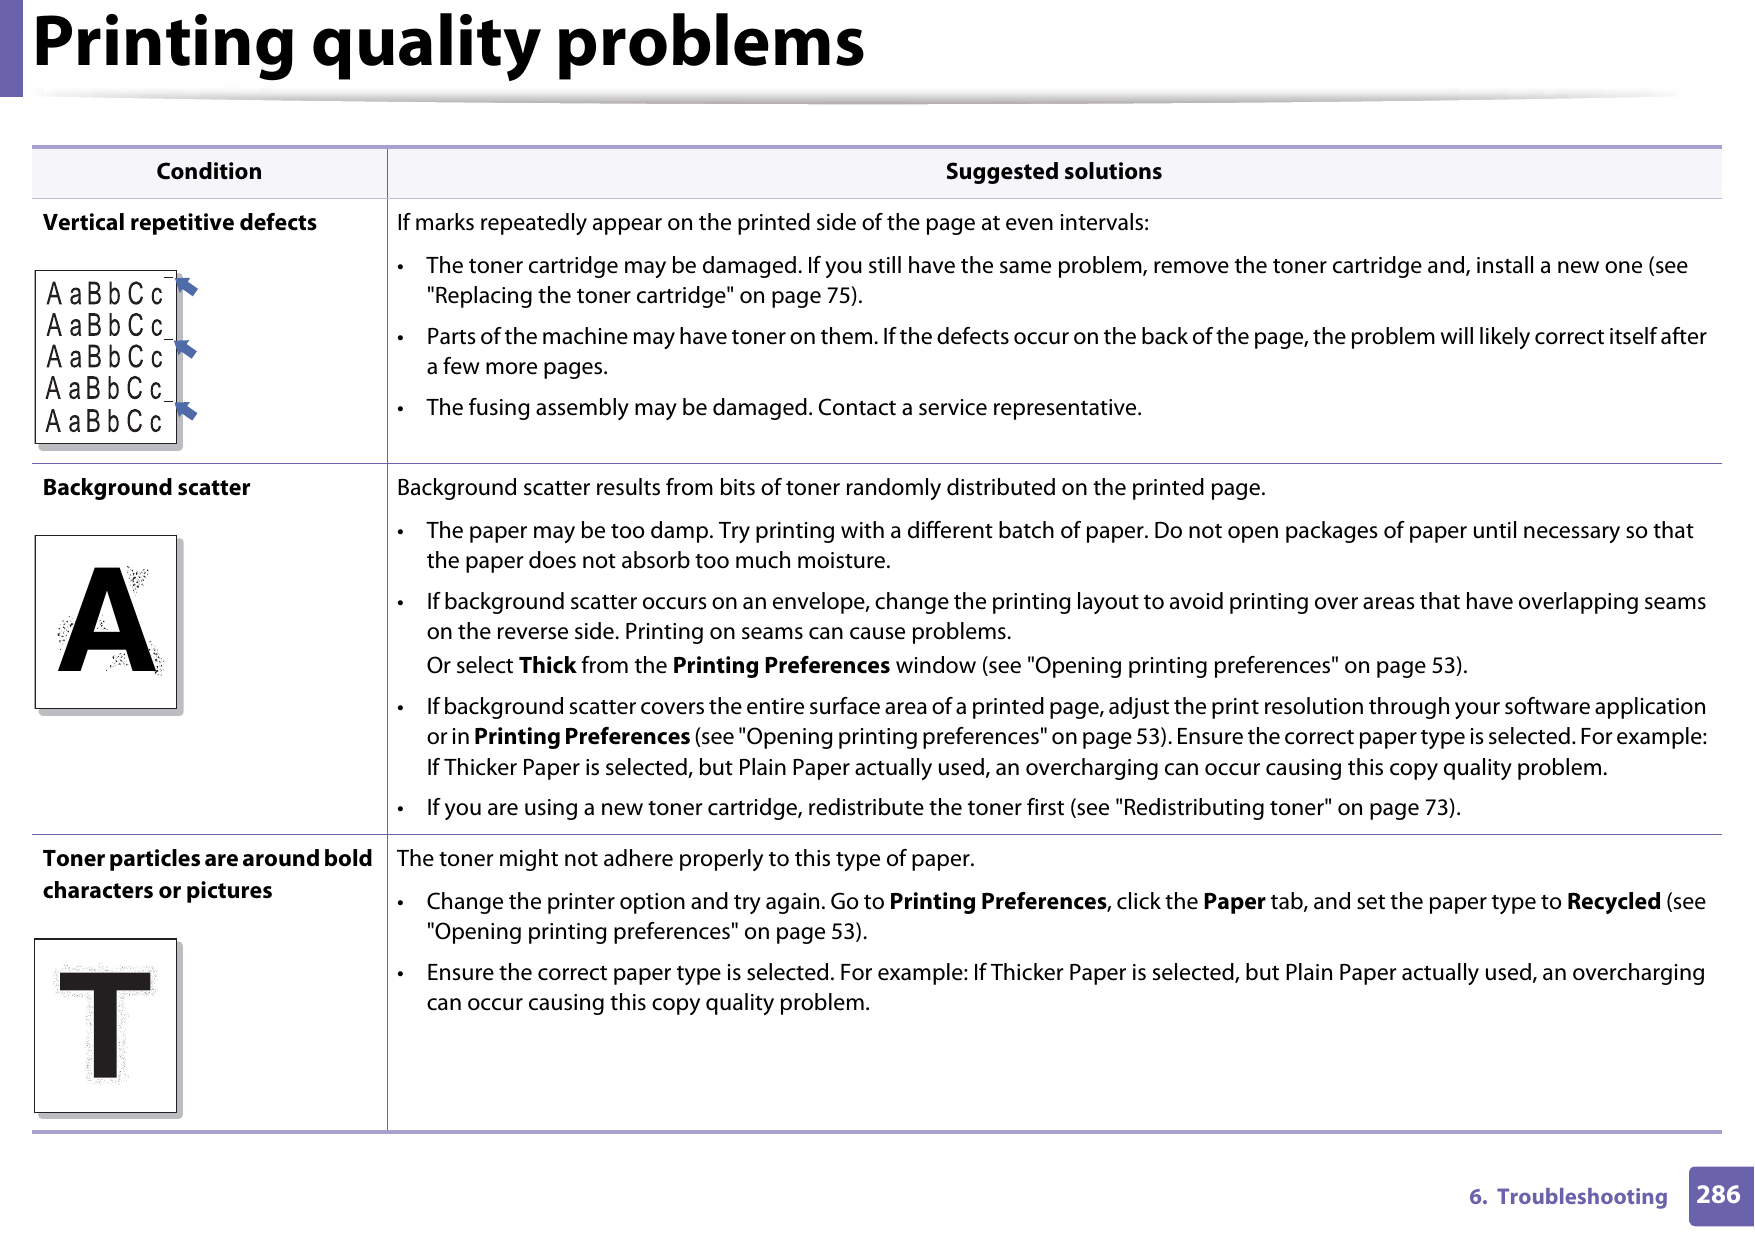
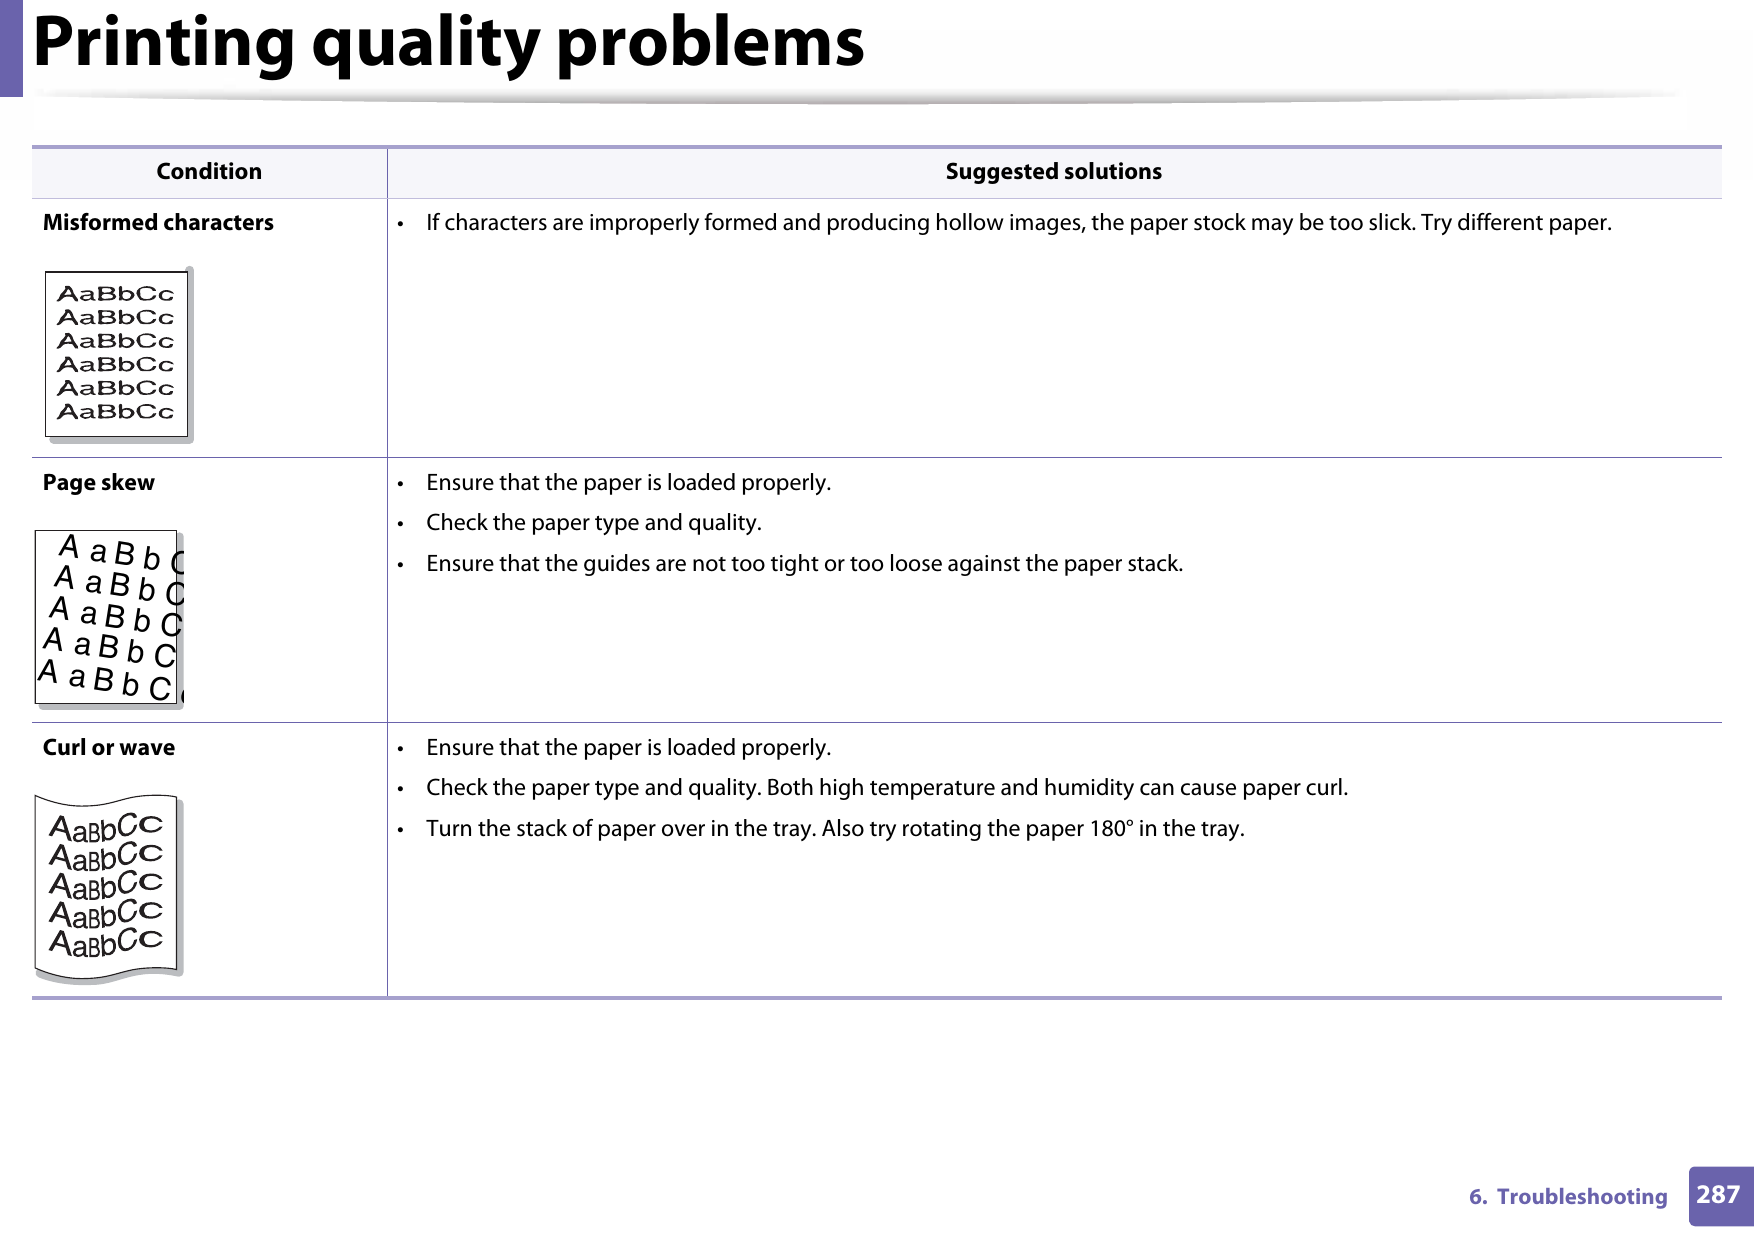
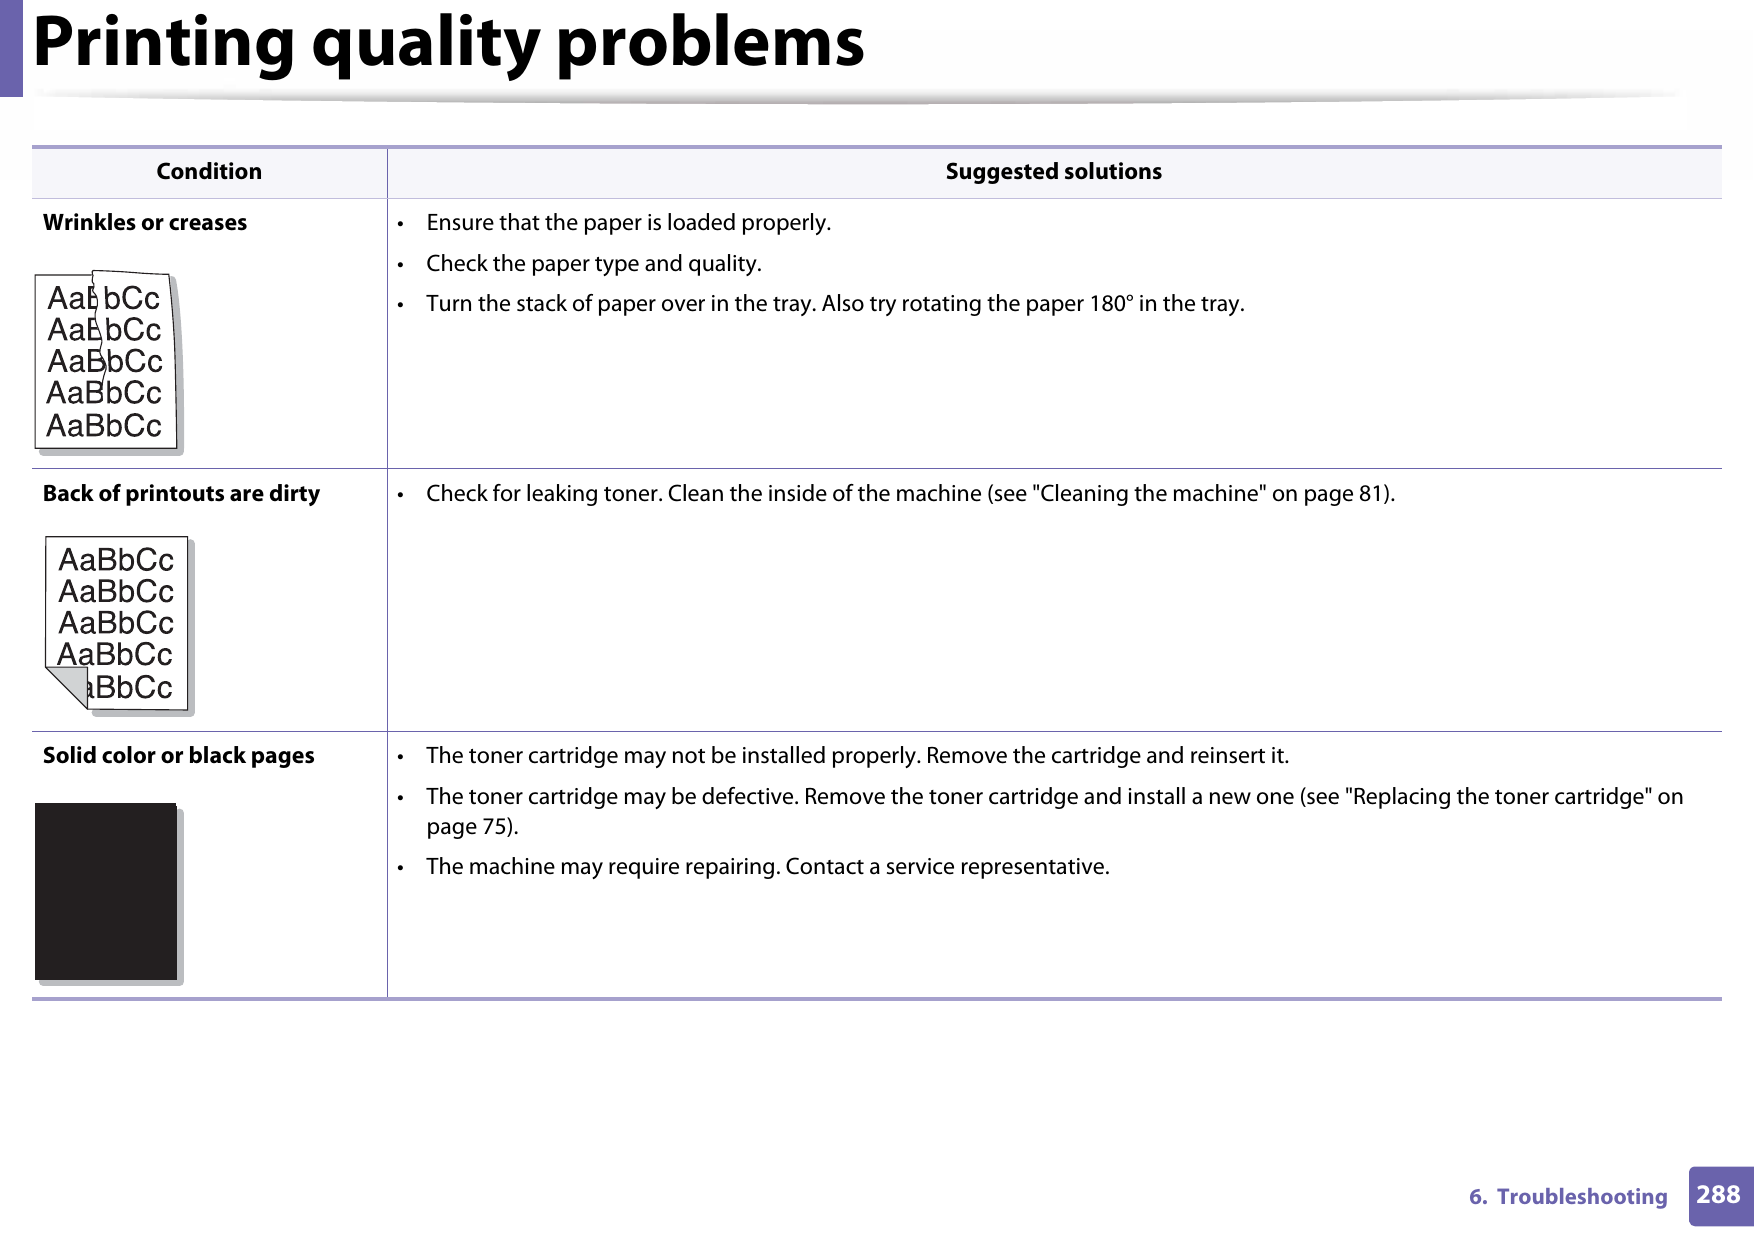
Samsung Electronics Co SLM3065FW Multi Function Printer User Manual
Samsung Electronics Co Ltd Multi Function Printer
UserManual.wiki
>
Samsung Electronics Co
>
SLM3065FW User Manual
>
Users Manual Part 11
Contents
1.
Users Manual Part 1
2.
Users Manual Part 2
3.
Users Manual Part 3
4.
Users Manual Part 4
5.
Users Manual Part 5
6.
Users Manual Part 6
7.
Users Manual Part 7
8.
Users Manual Part 8
9.
Users Manual Part 9
10.
Users Manual Part 10
11.
Users Manual Part 11
12.
Users Manual Part 12
13.
Users Manual Part 13
Users Manual Part 11
Navigation menu
Upload a User Manual
Namespaces
Wiki Guide
HTML
PDF
Info
Views
User Manual
Discussion / Help
Navigation


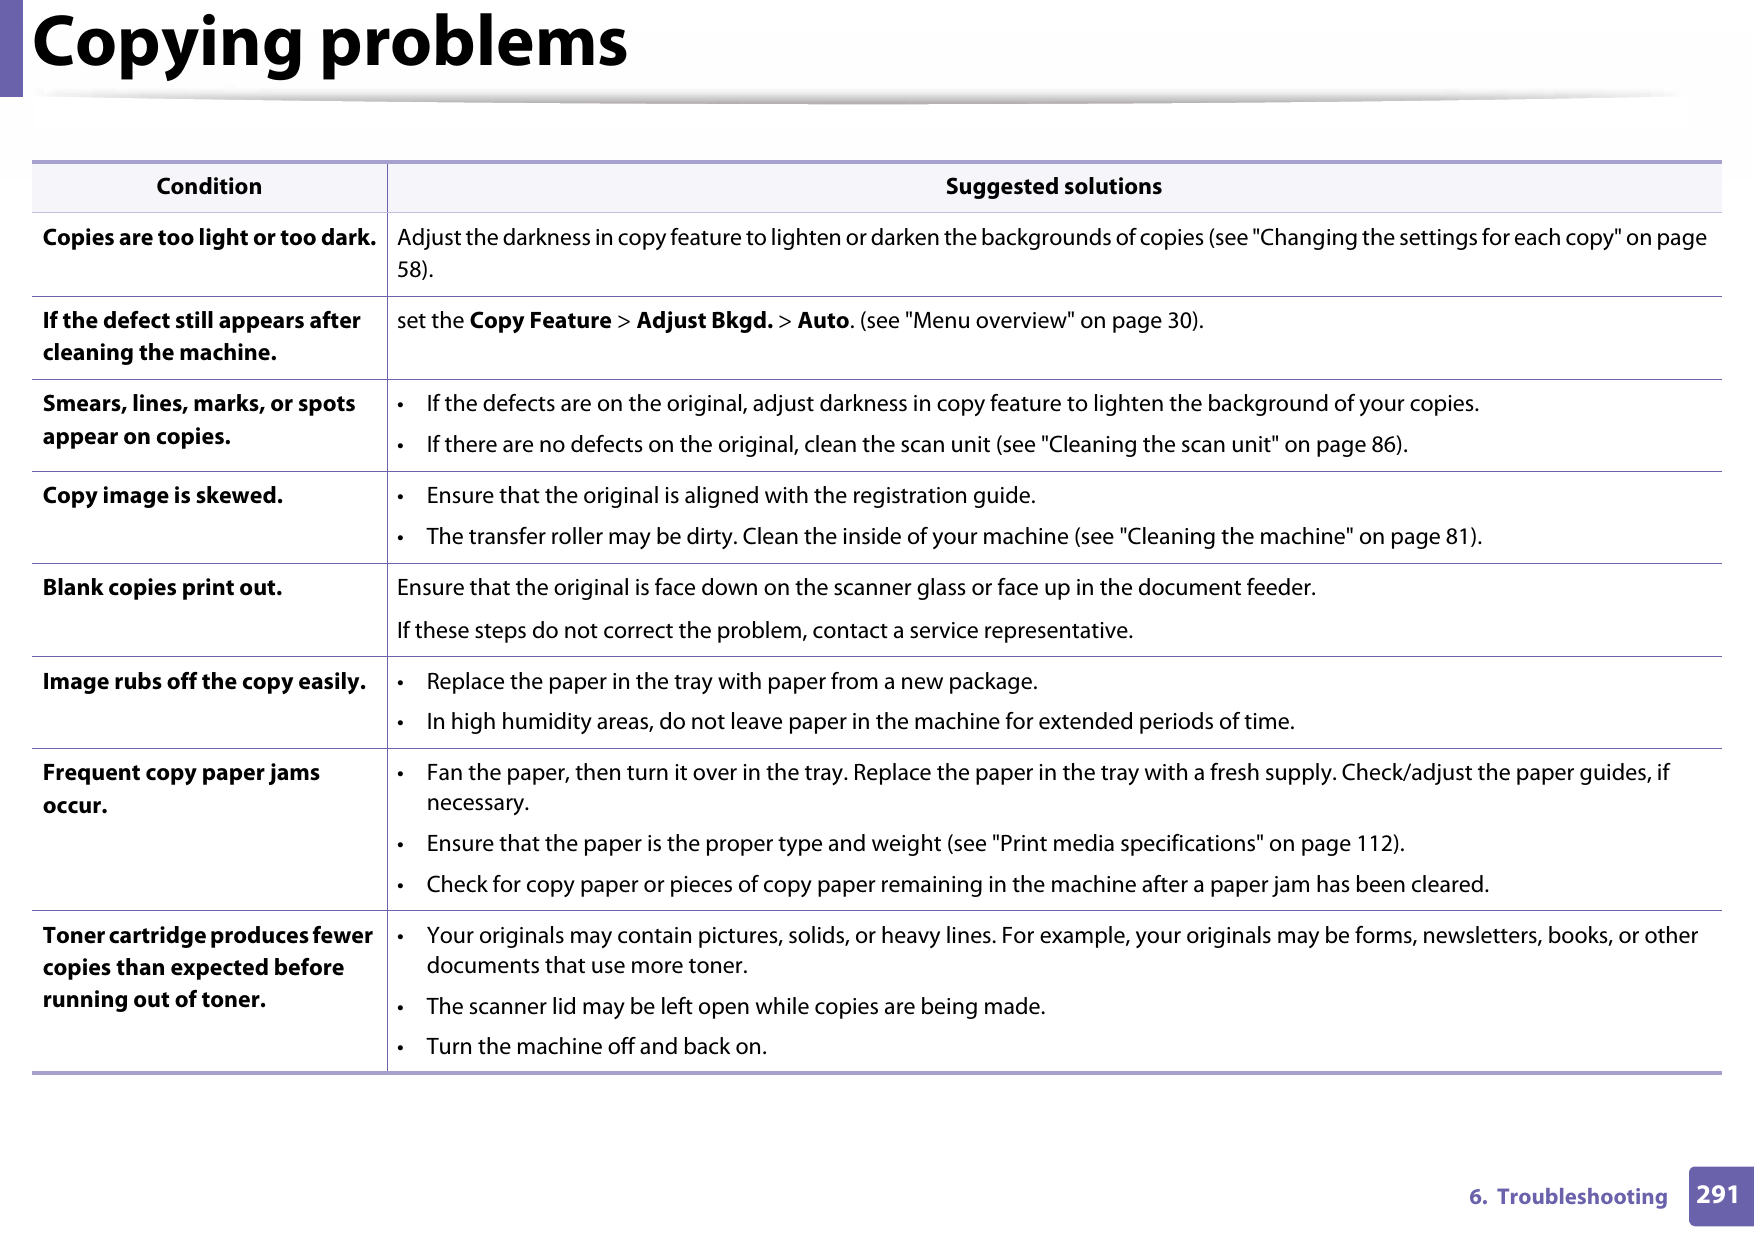
![299 Contact SAMSUNG worldwideContact SAMSUNG worldwideIf you have any comments or questions regarding Samsung products, contact the Samsung customer care center.Country/Region Customer Care Center WebSiteALGERIA 021 36 11 00 www.samsung.com/n_africa/supportARGENTINE 0800-333-3733 www.samsung.com/ar/supportARMENIA 0-800-05-555 www.samsung.com/supportAUSTRALIA 1300 362 603 www.samsung.com/au/supportAUSTRIA 0800 - SAMSUNG (0800 - 7267864)www.samsung.com/at/supportAZERBAIJAN 0-88-555-55-55 www.samsung.com/supportBAHRAIN8000-GSAM (8000-4726) www.samsung.com/ae/support (English)www.samsung.com/ae_ar/support (Arabic)BELARUS 810-800-500-55-500 www.samsung.com/supportBANGLADESH 09612300300 www.samsung.com/in/supportBELGIUM02-201-24-18 www.samsung.com/be/support (Dutch)www.samsung.com/be_fr/support (French)BOLIVIA 800-10-7260[HHP] 4828210www.samsung.com/cl/supportBOSNIA 051 331 999 www.samsung.com/supportBOTSWANA 8007260000 www.samsung.com/supportBRAZIL0800-124-421 (Demais cidades e regiões)4004-0000 (Capitais e grandes centros)www.samsung.com/br/supportBULGARIA 800 111 31 , Безплатна телефонна линияwww.samsung.com/bg/supportBURUNDI 200 www.samsung.com/supportCAMEROON 7095- 0077 www.samsung.com/africa_fr/supportCountry/Region Customer Care Center WebSite](https://usermanual.wiki/Samsung-Electronics-Co/SLM3065FW.Users-Manual-Part-11/User-Guide-2775403-Page-49.png)
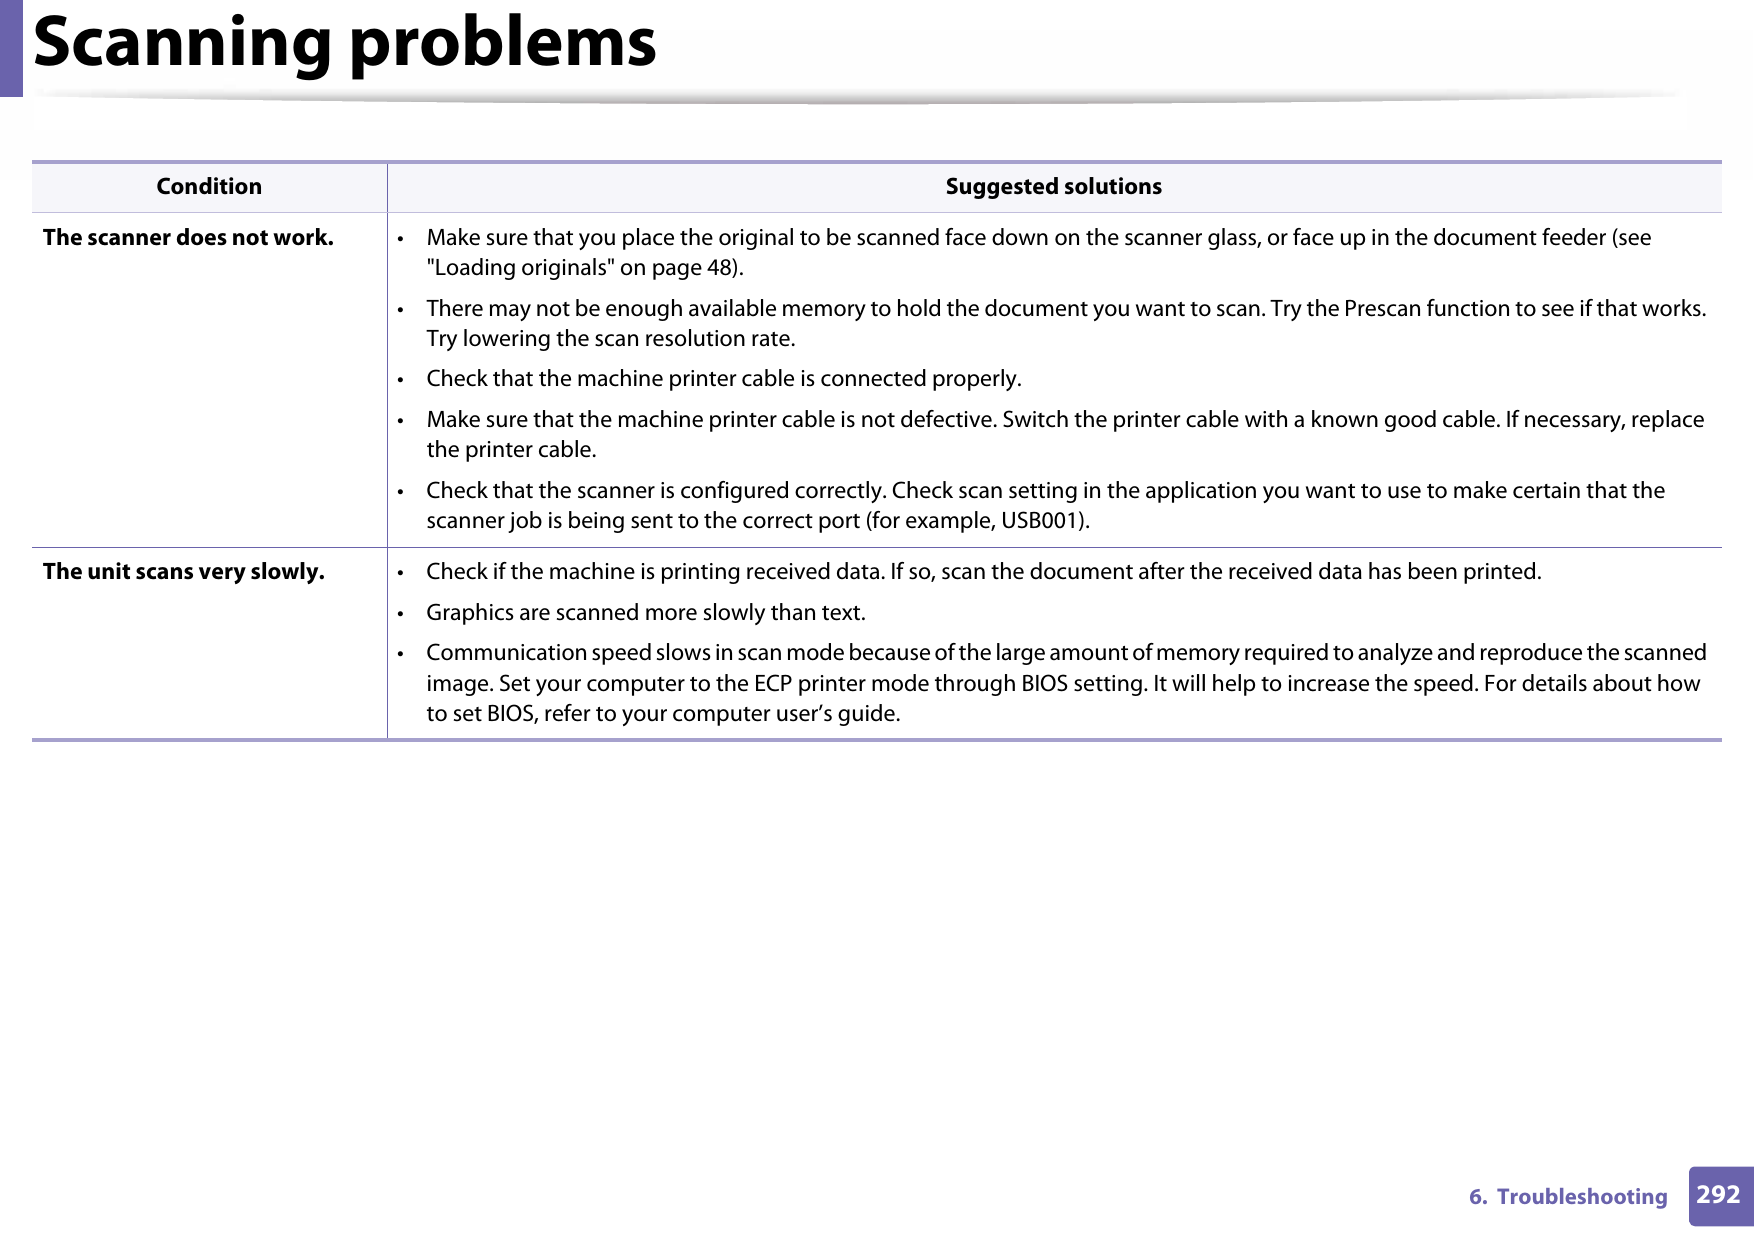
![Contact SAMSUNG worldwide300 Contact SAMSUNG worldwideCANADA1-800-SAMSUNG (726-7864) www.samsung.com/ca/support(English)www.samsung.com/ca_fr/support (French)CHILE 800-SAMSUNG (726-7864)[HHP] 02-24828200www.samsung.com/cl/supportCHINA 400-810-5858 www.samsung.com/cn/supportCOLOMBIABogotá 600 12 72Gratis desde cualquier parte del país 01 8000 112 112 ó desde su celular #SAM(726)www.samsung.com/co/supportCOSTA RICA0-800-507-7267 00-800-1-SAMSUNG (726-7864)www.samsung.com/latin/support (Spanish)www.samsung.com/latin_en/support (English)CROATIA 072 726 786 www.samsung.com/hr/supportCote D’ Ivoire 8000 0077 www.samsung.com/africa_fr/supportCountry/Region Customer Care Center WebSiteCYPRUS 8009 4000 only from landline, toll freewww.samsung.com/gr/supportCZECH 800-SAMSUNG (800-726786) www.samsung.com/cz/supportDENMARK 70 70 19 70 www.samsung.com/dk/supportDOMINICA1-800-751-2676 www.samsung.com/latin/support (Spanish)www.samsung.com/latin_en/support (English)DRC 499999 www.samsung.com/supportECUADOR1-800-10-726701-800-SAMSUNG (72-6786)www.samsung.com/latin/support (Spanish)www.samsung.com/latin_en/support(English)EGYPT 08000-72678616580www.samsung.com/eg/supportCountry/Region Customer Care Center WebSite](https://usermanual.wiki/Samsung-Electronics-Co/SLM3065FW.Users-Manual-Part-11/User-Guide-2775403-Page-50.png)