Samsung Electronics Co SLM4530NX Printer User Manual english
Samsung Electronics Co Ltd Printer english
UserManual.wiki
>
Samsung Electronics Co
>
SLM4530NX User Manual
>
User Manual Part 2
Contents
1.
User Manual Part 2
2.
User Manual Part 3
3.
User Manual Part 4
4.
User Manual Part 1
User Manual Part 2
Navigation menu
Upload a User Manual
Namespaces
Wiki Guide
HTML
PDF
Info
Views
User Manual
Discussion / Help
Navigation

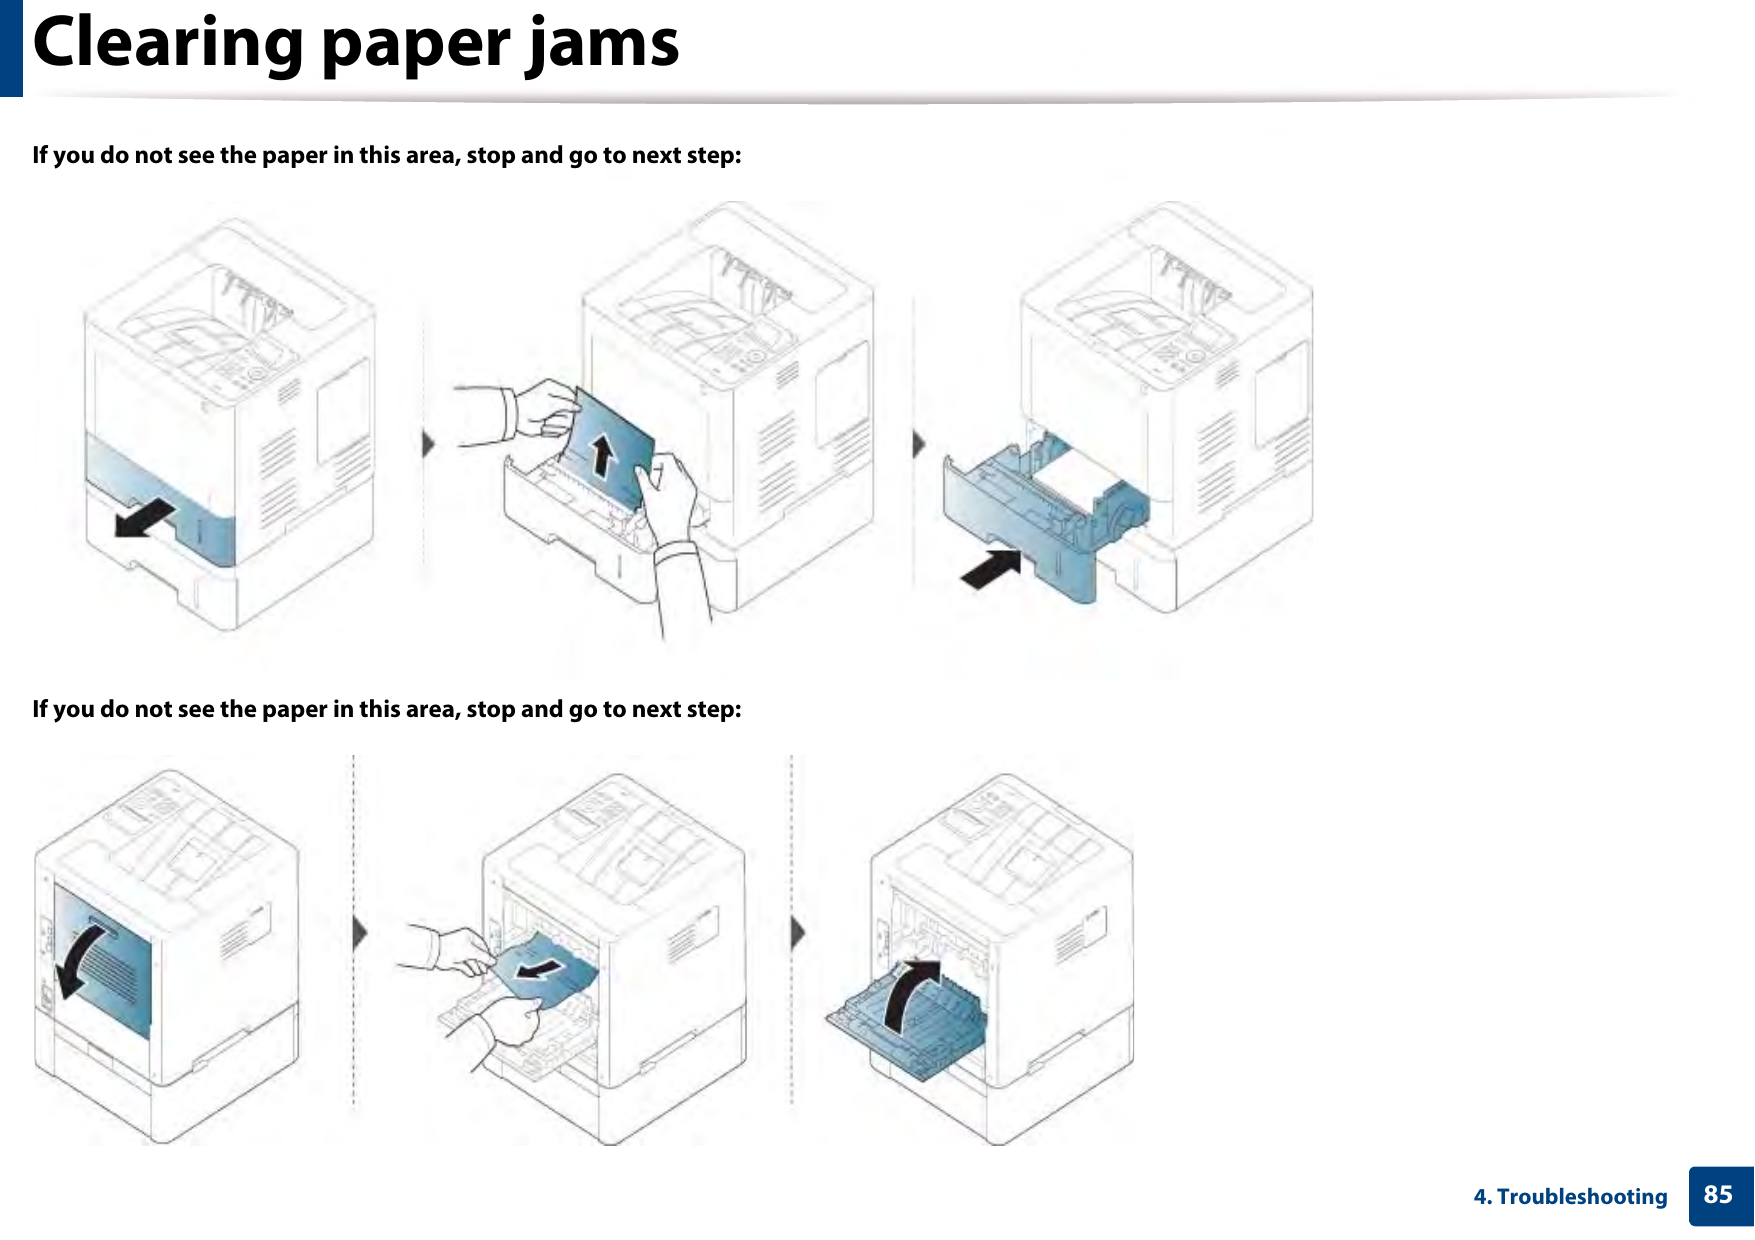
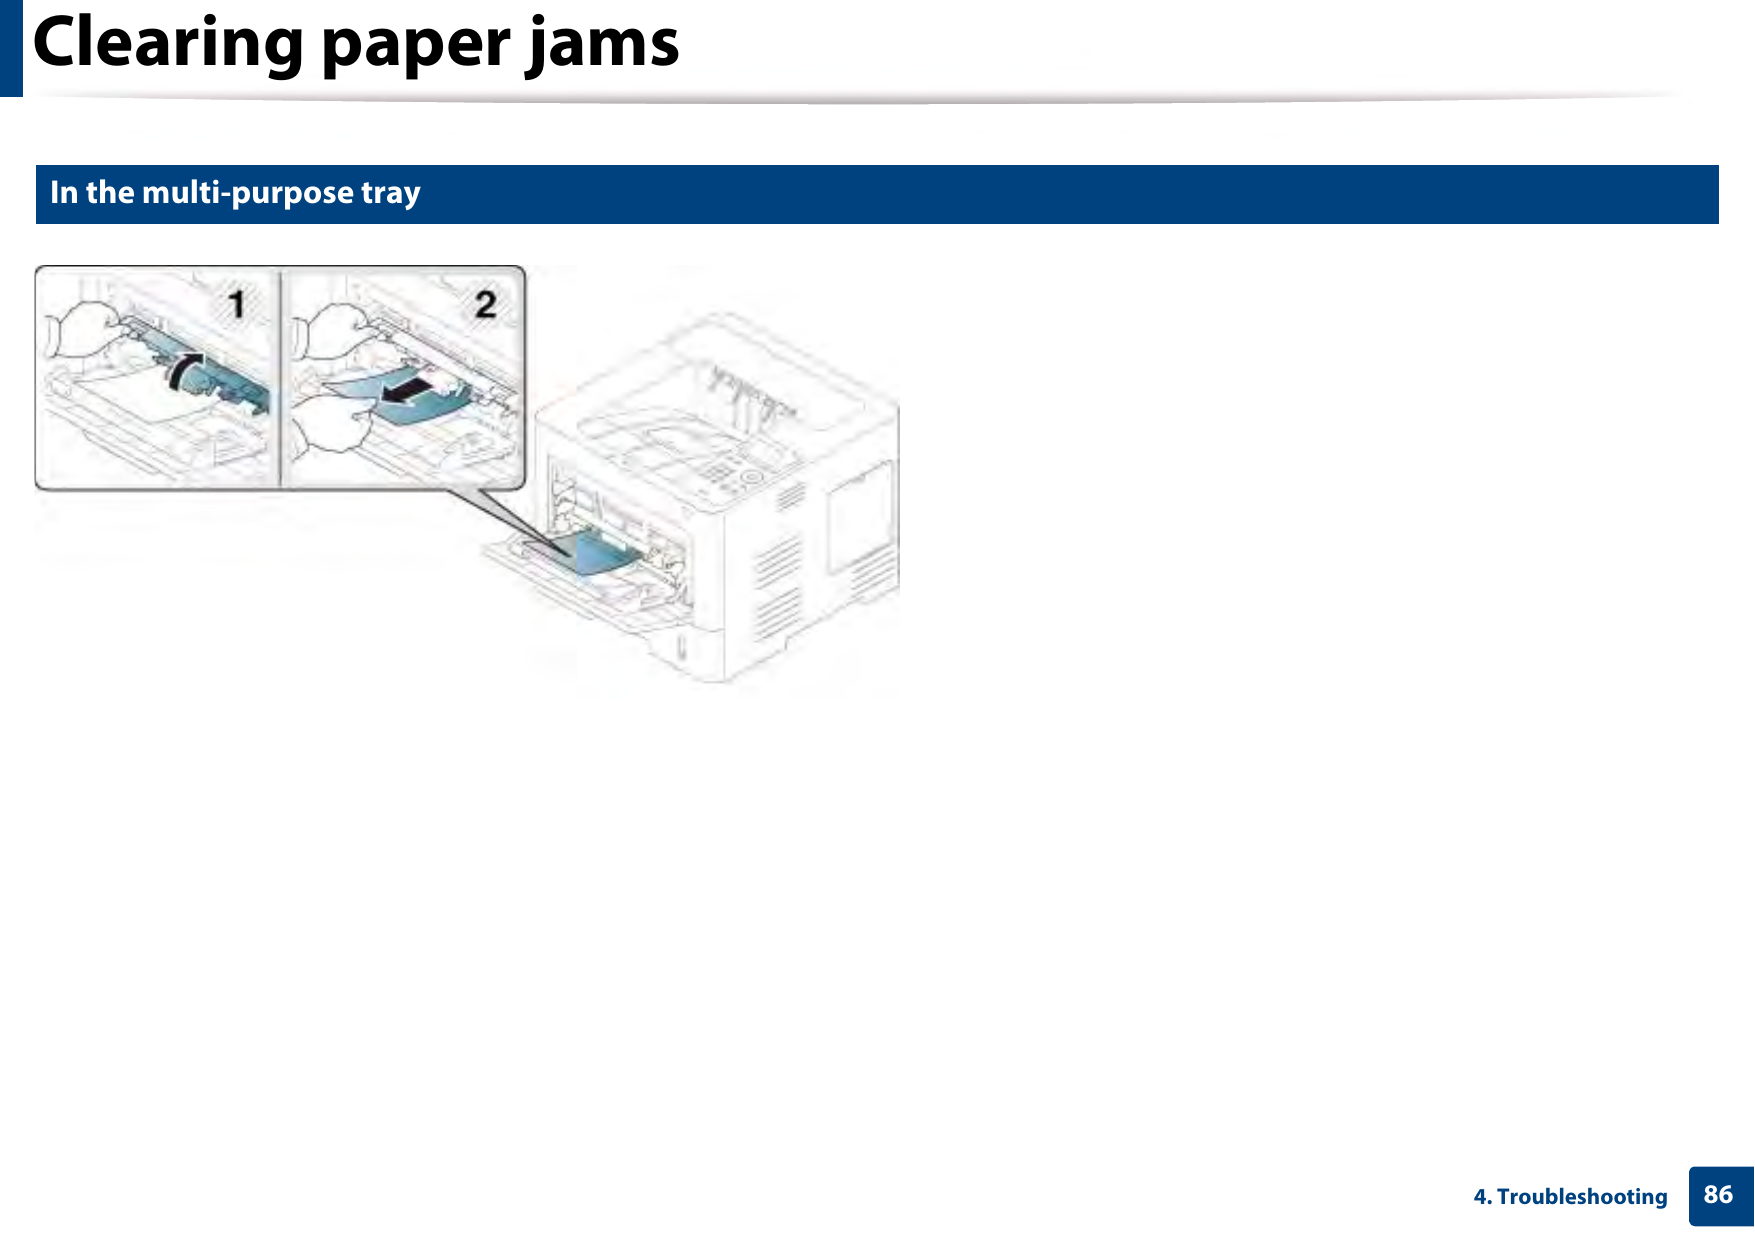
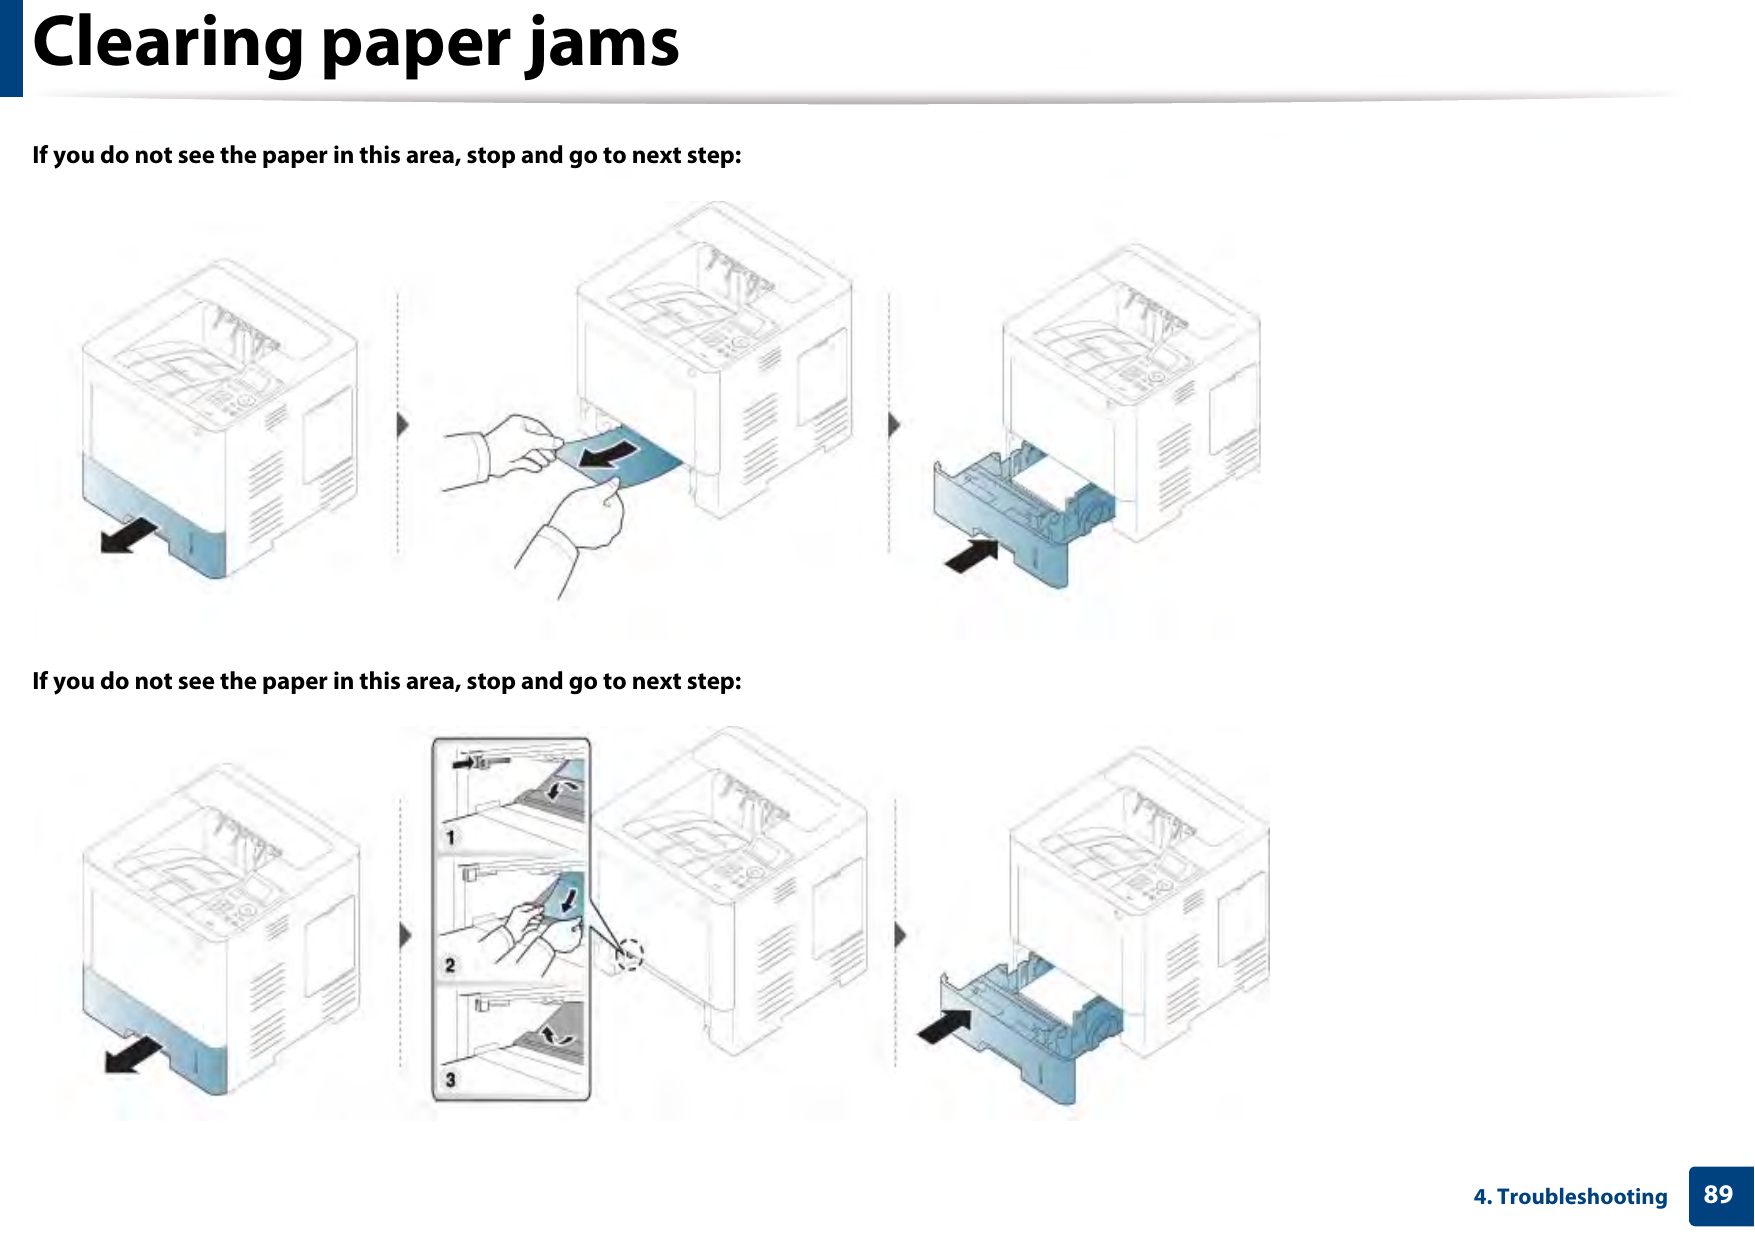
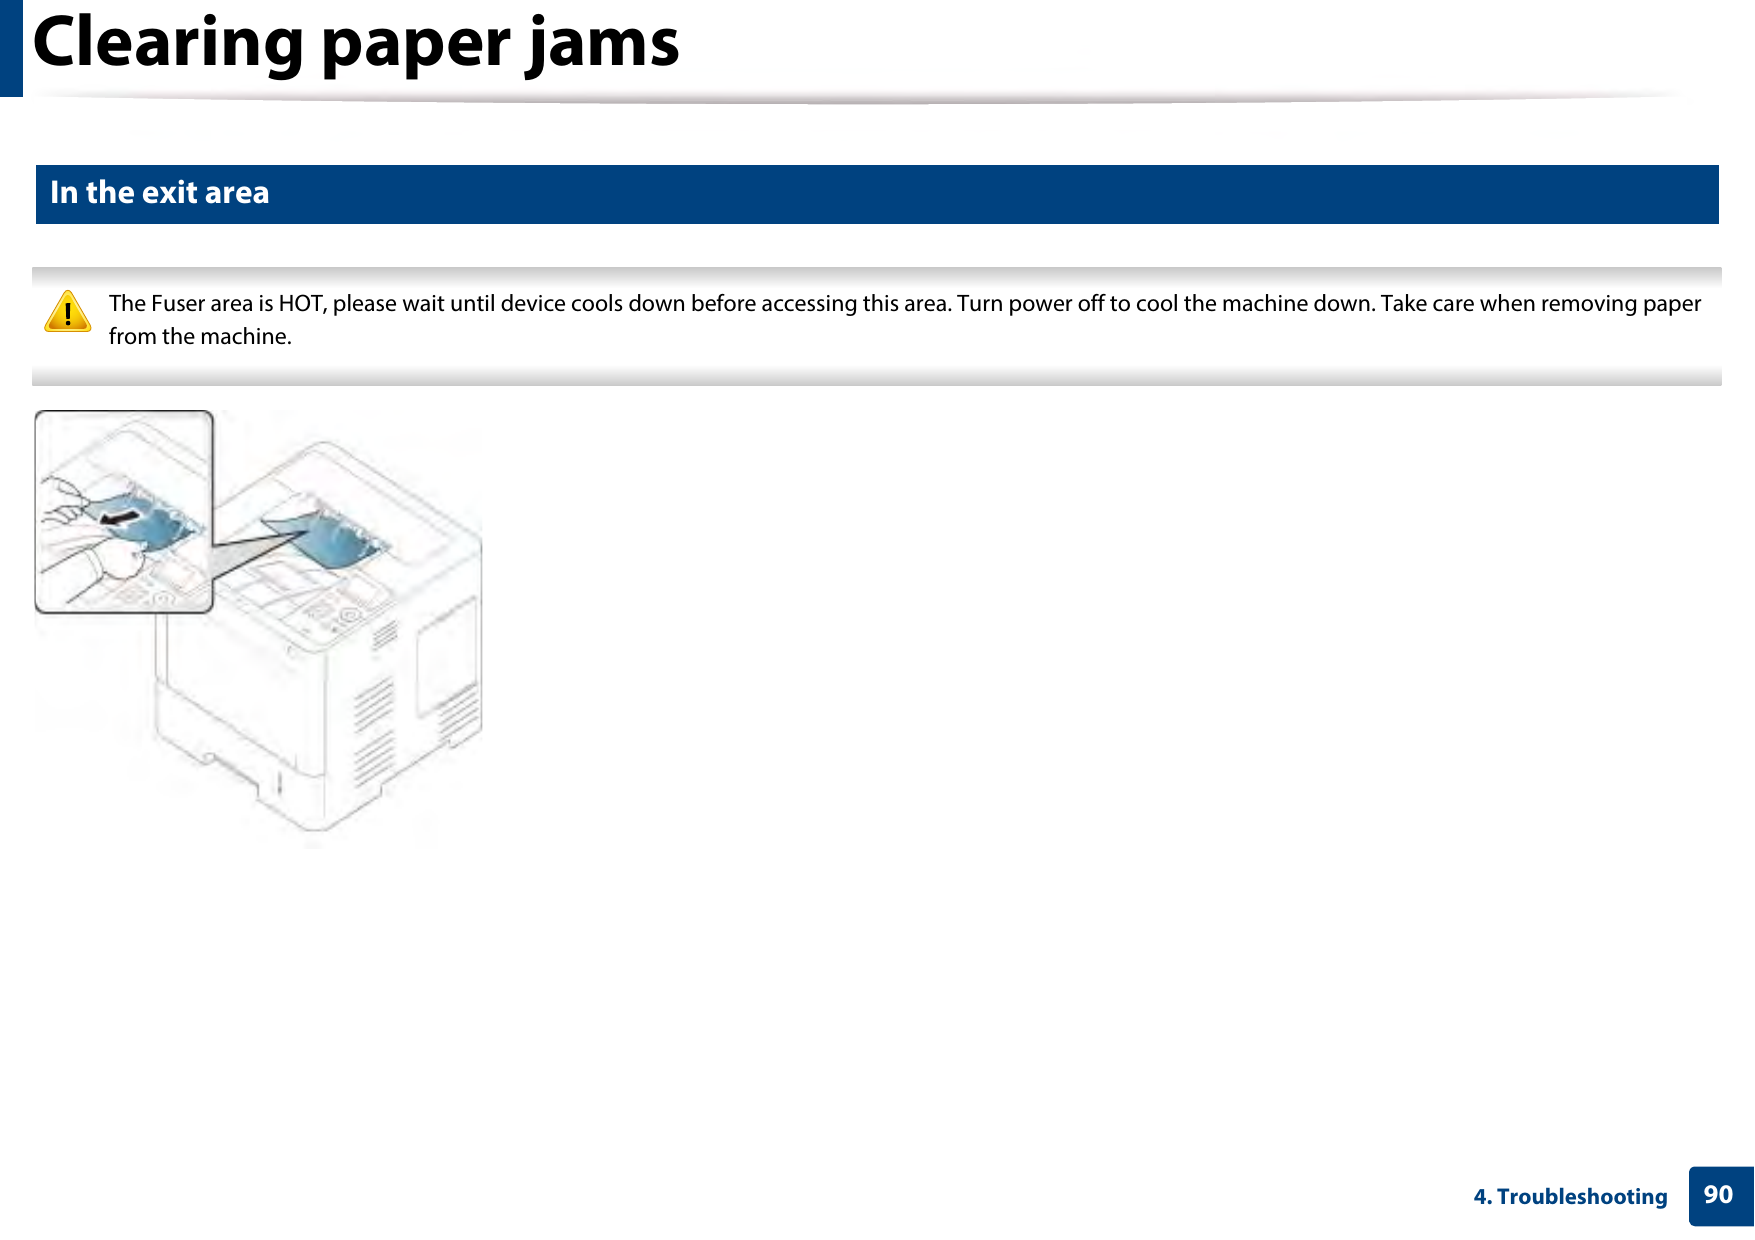
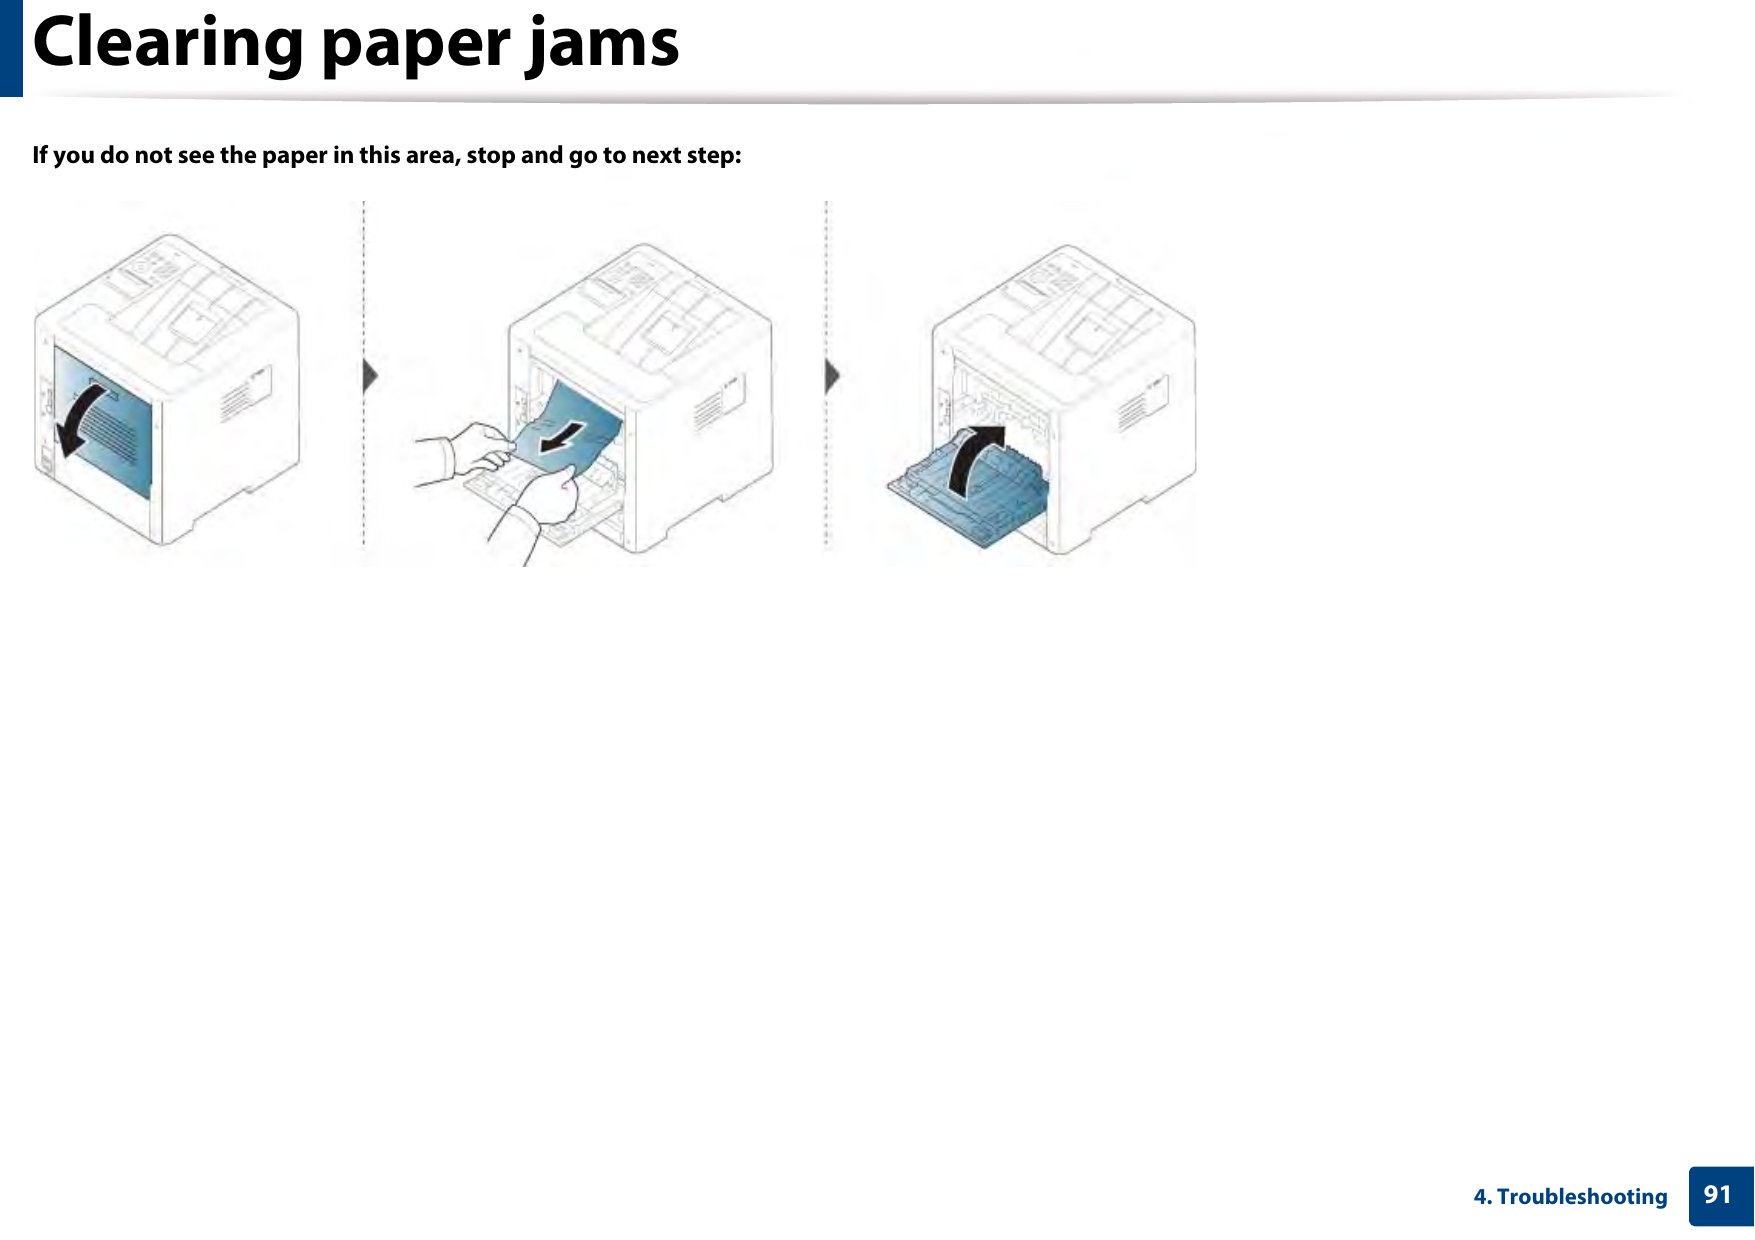
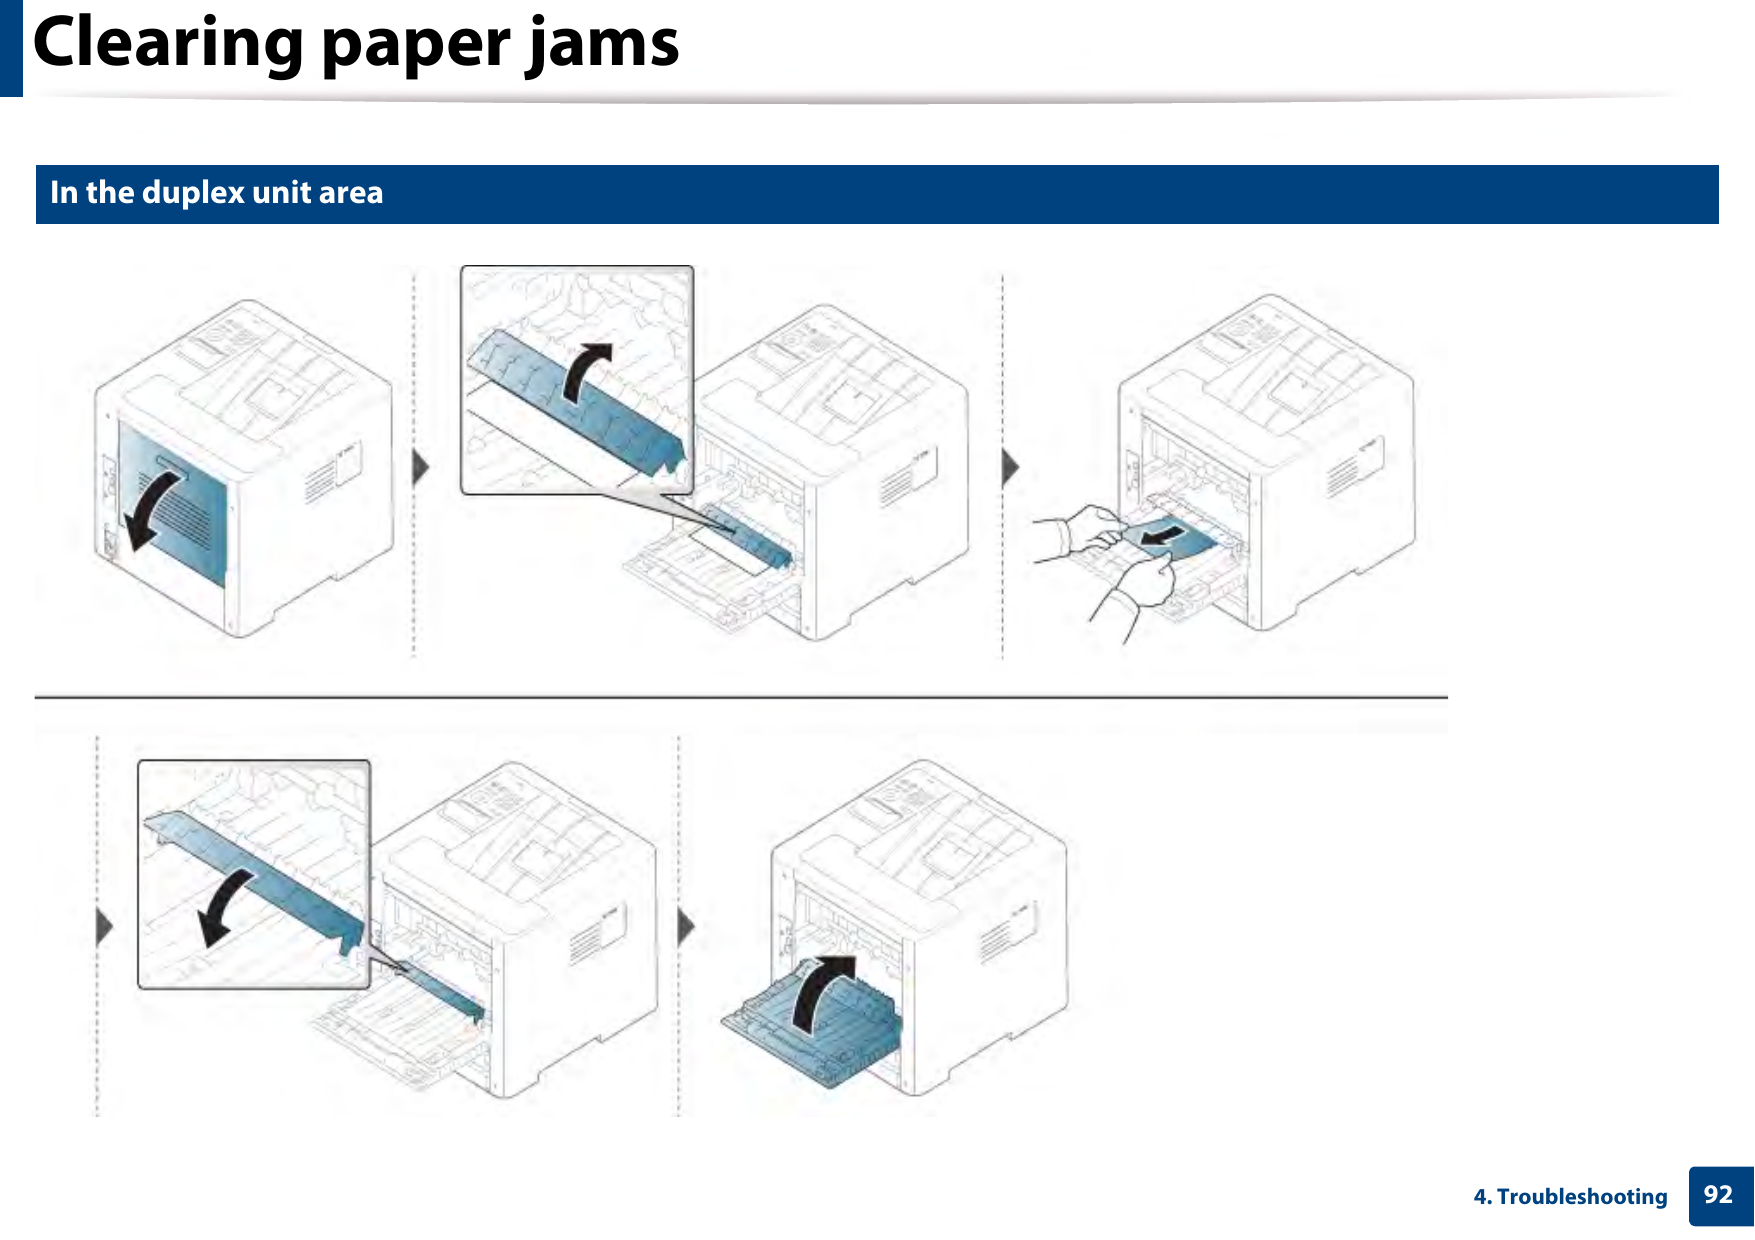
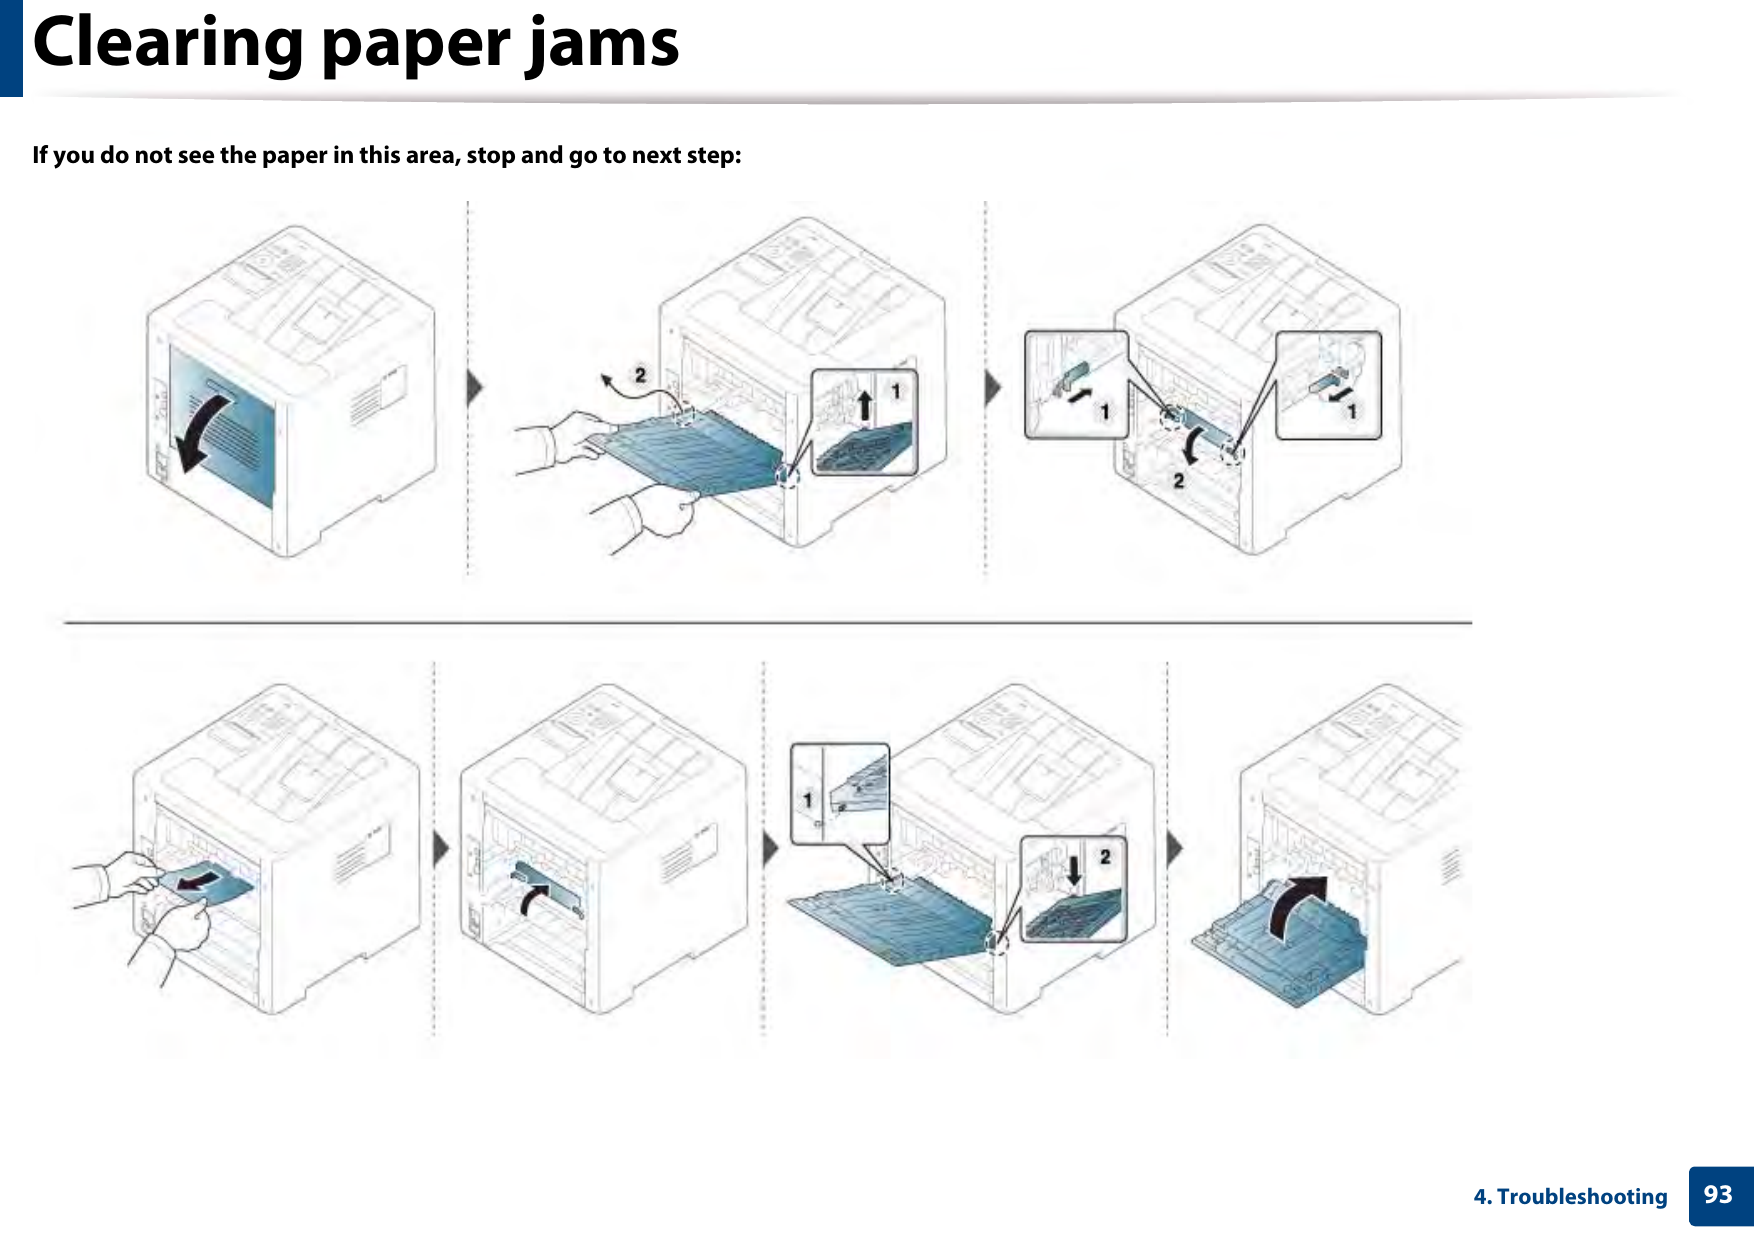

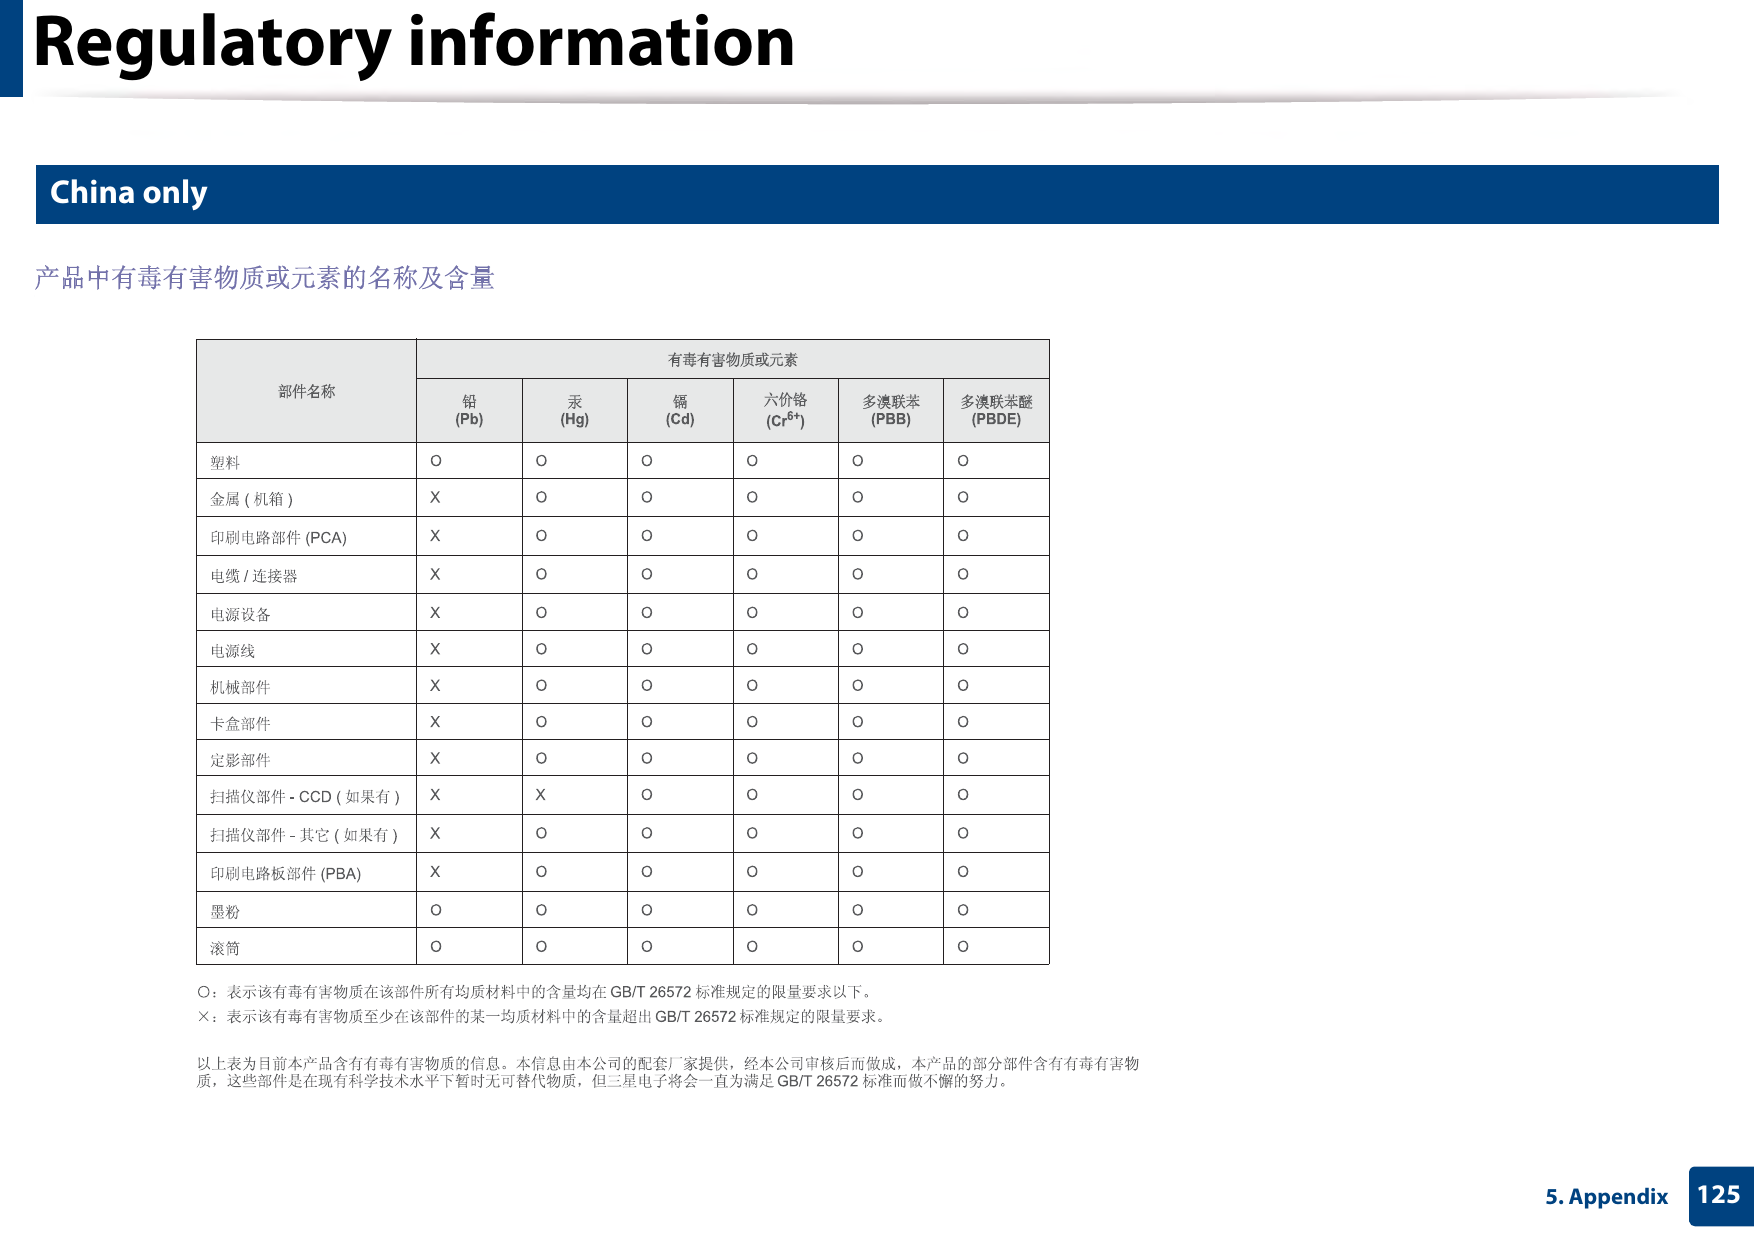
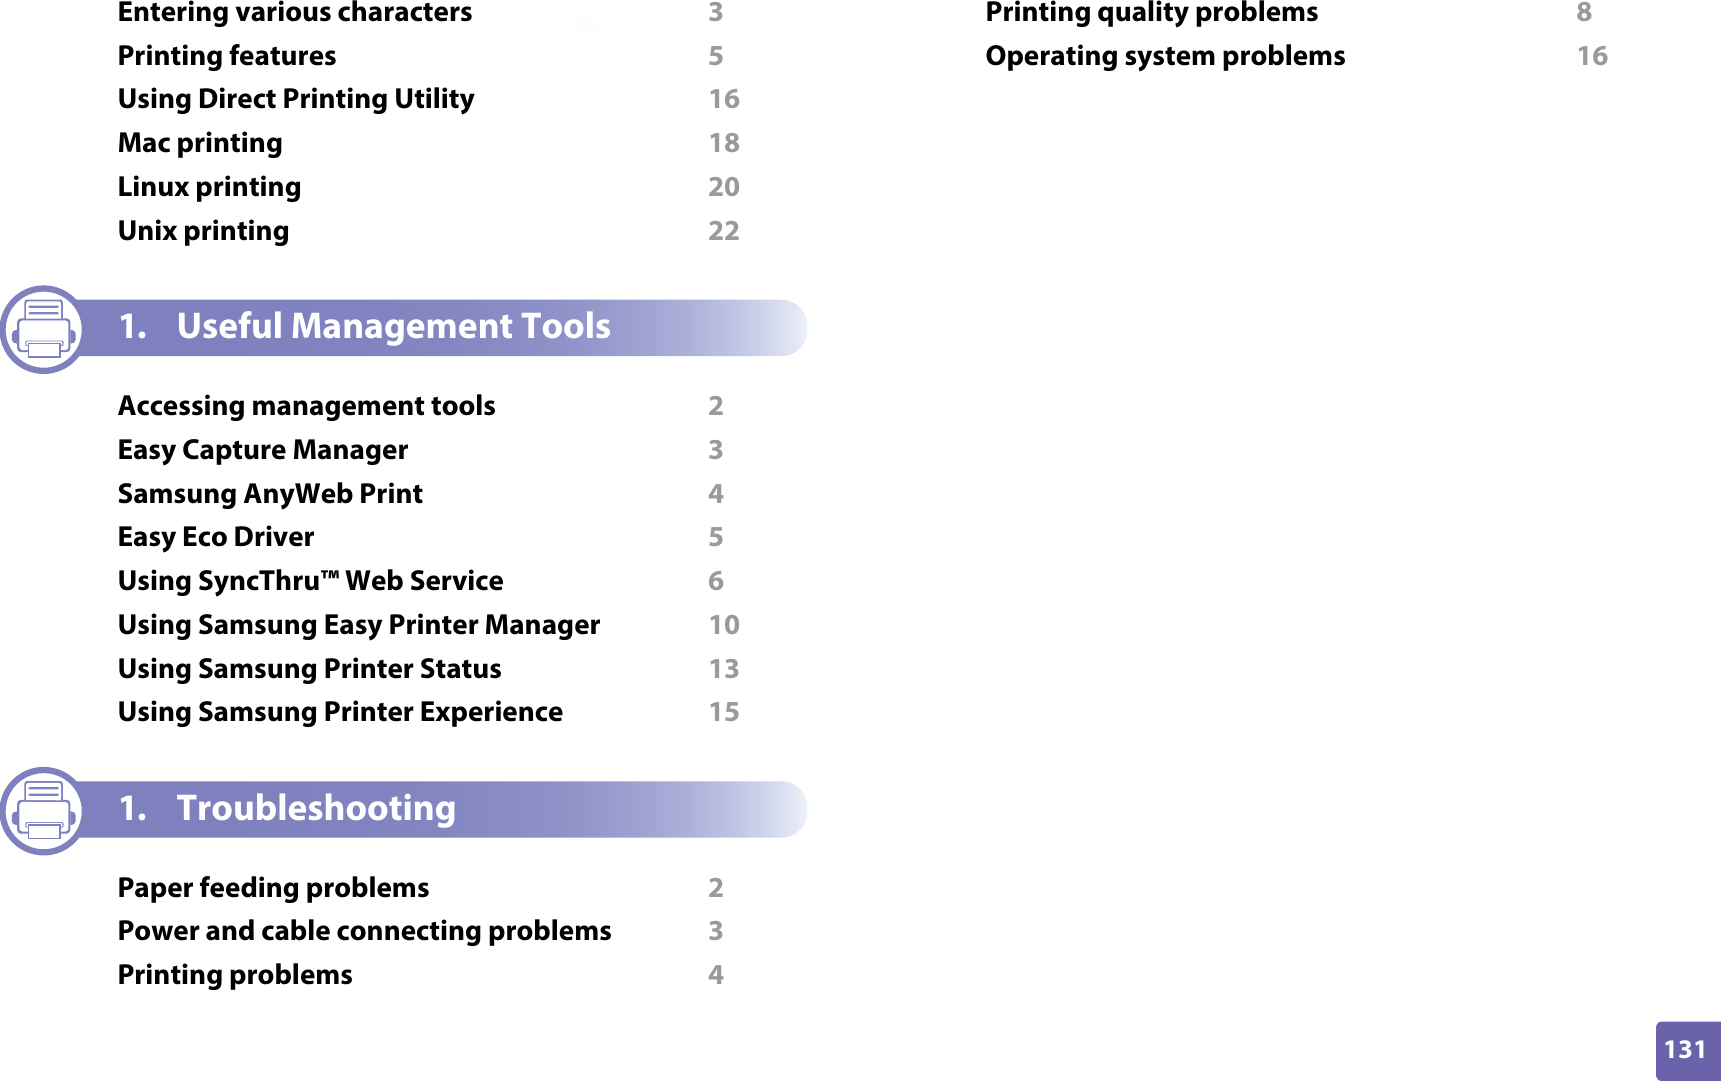
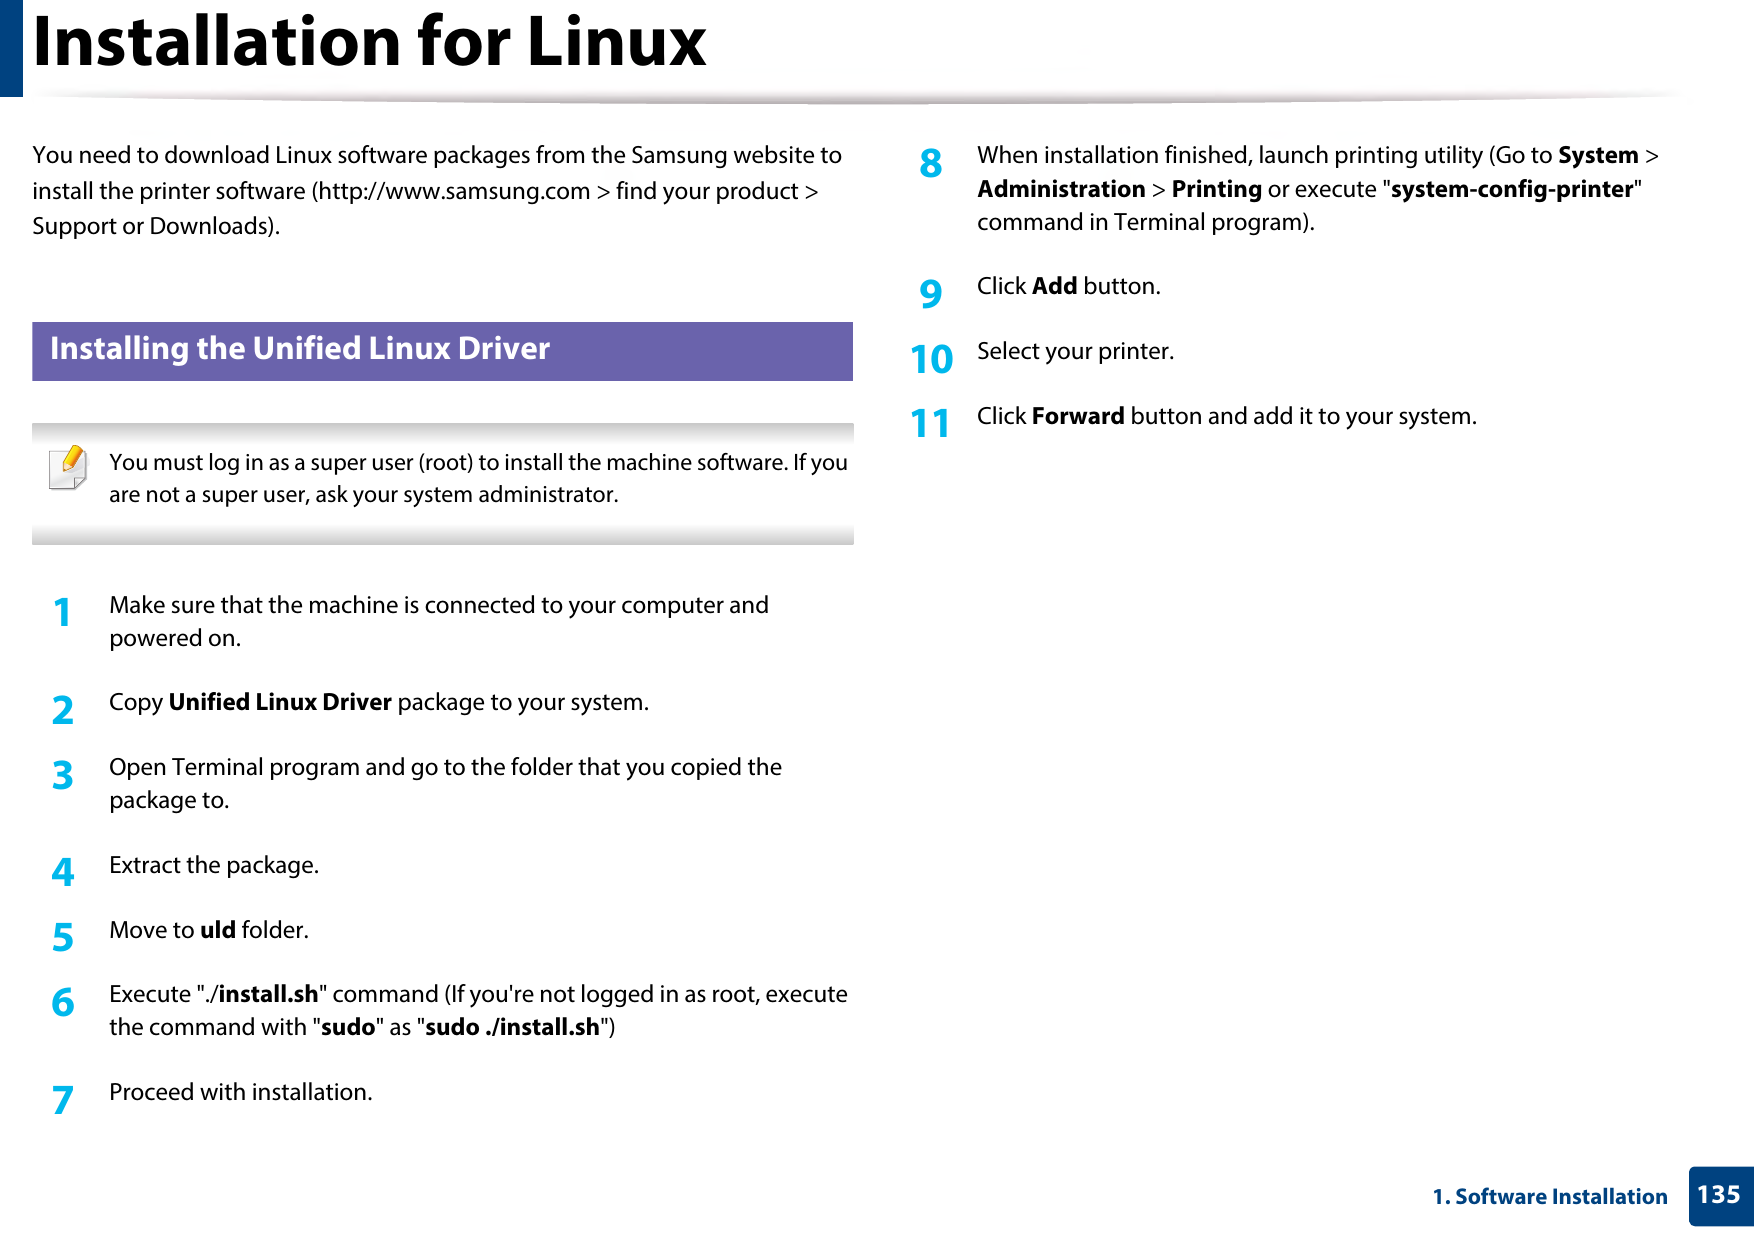
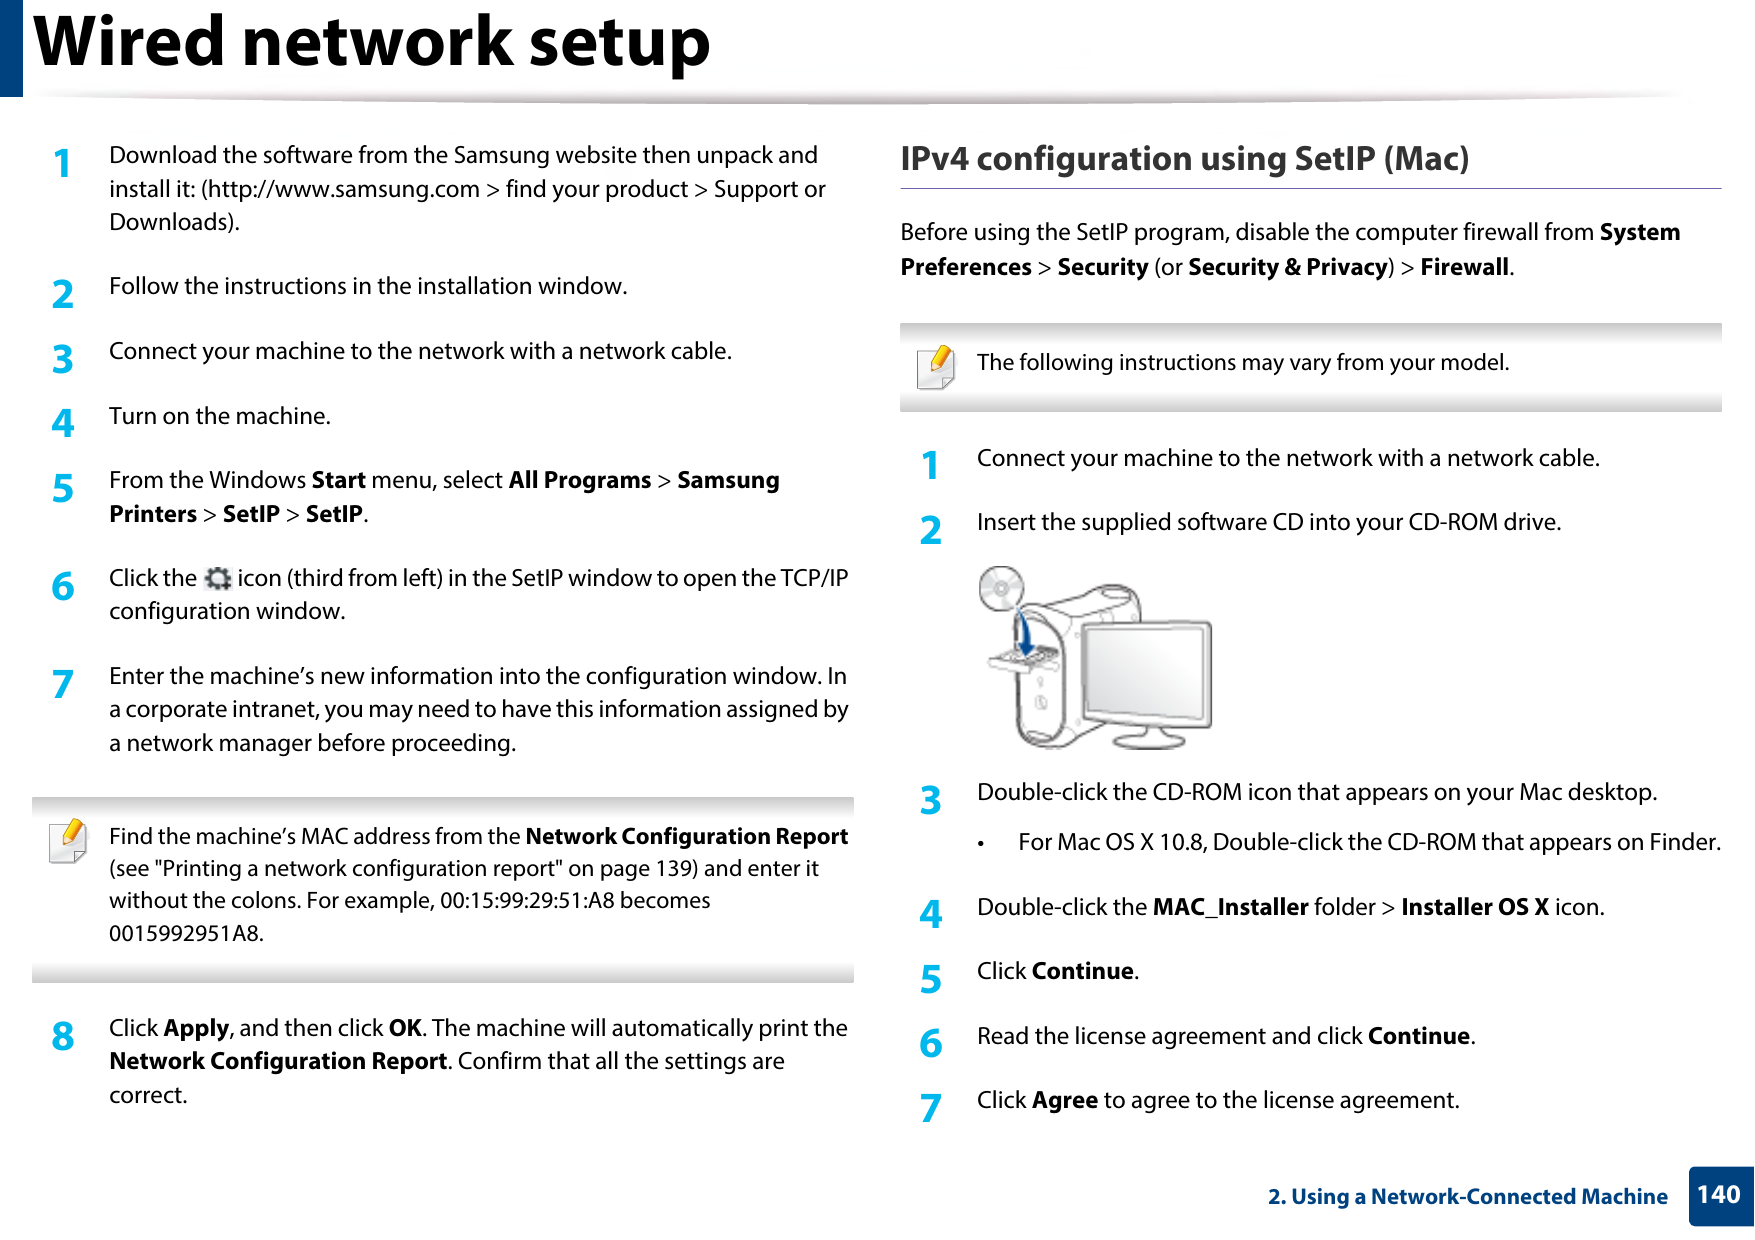
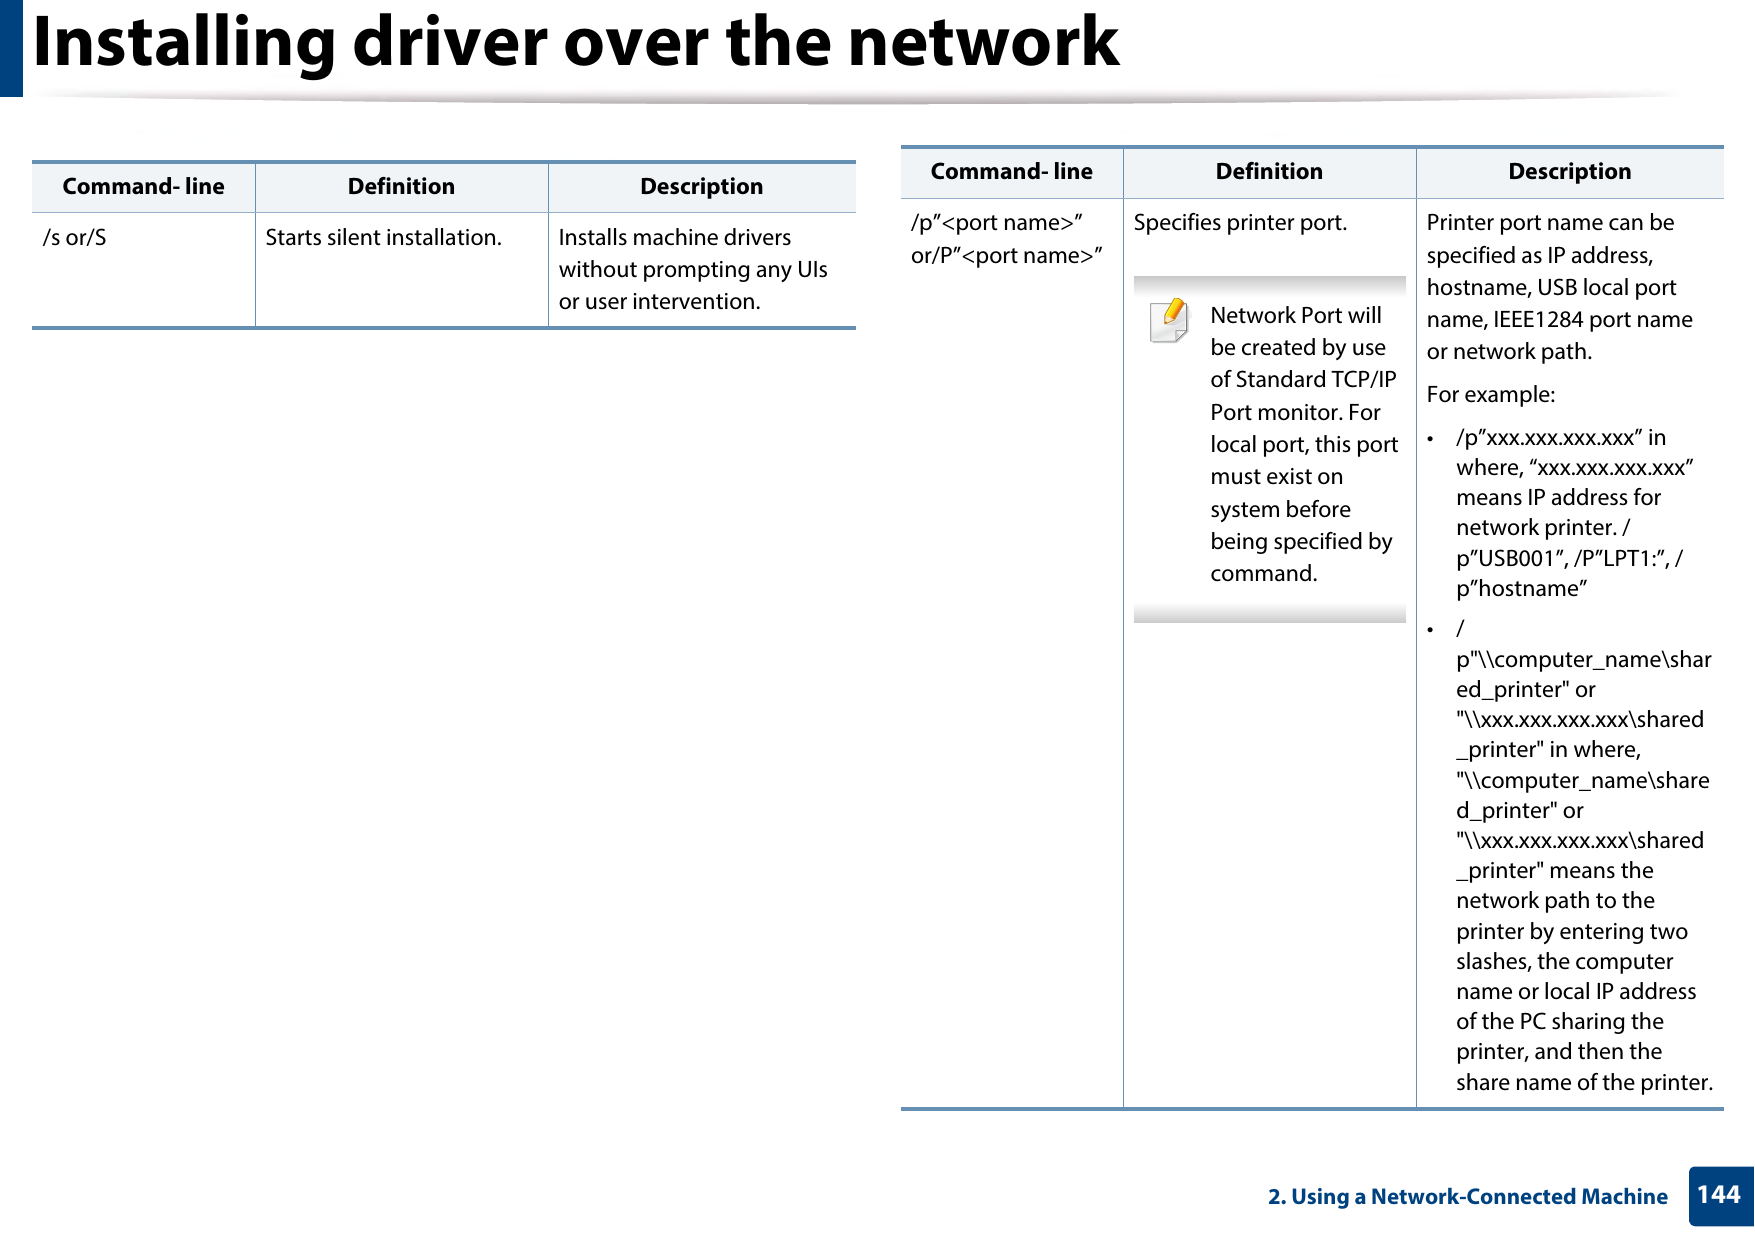
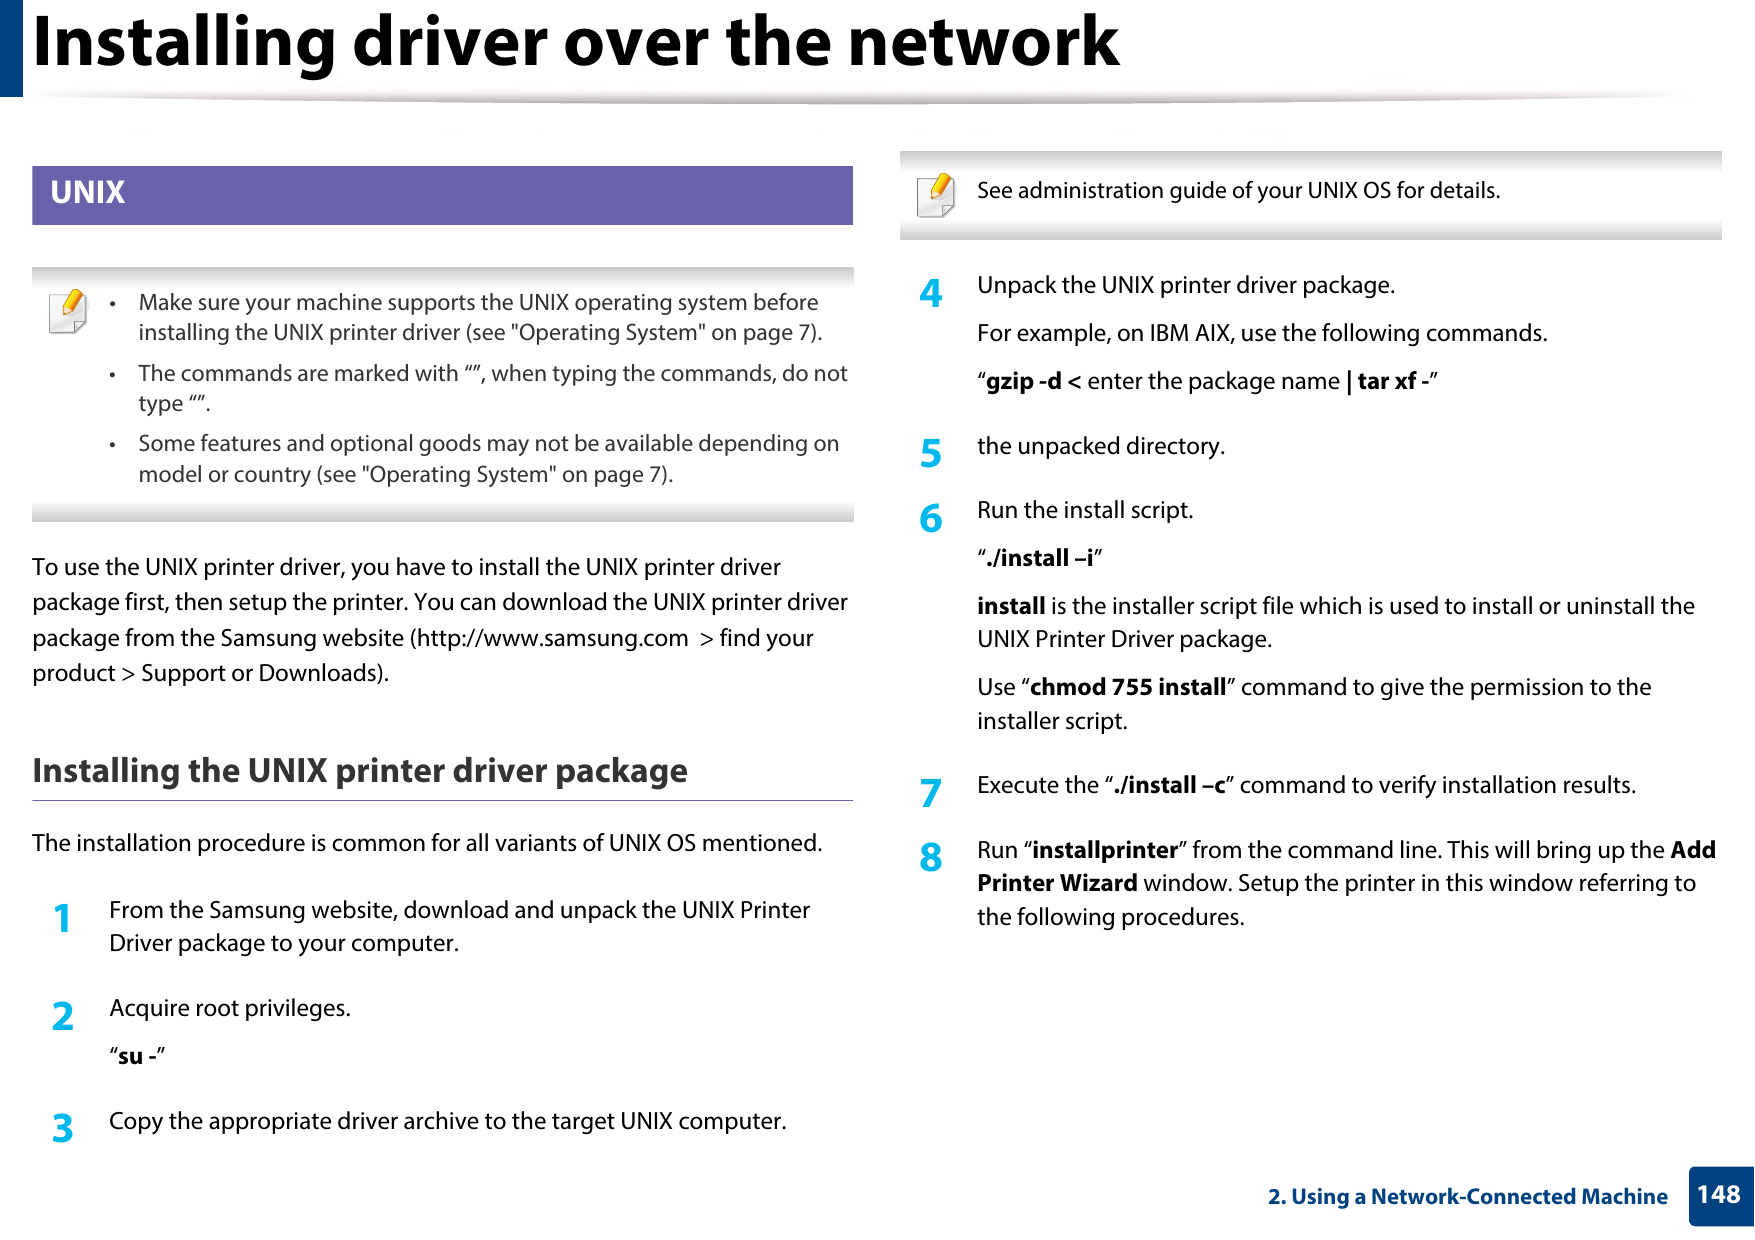
![964. TroubleshootingUnderstanding display messagesMessages appear on the control panel display to indicate the machine’s status or errors. Refer to the tables below to understand the messages’ and their meaning, and correct the problem, if necessary. • You can resolve the error with the guideline from the computer’s Printing Status program window (see "Using Samsung Printer Status" on page 247).• If a message is not in the table, reboot the power and try the printing job again. If the problem persists, call a service representative.• When you call for service, provide the service representative with the contents of display message.• Some messages may not appear on the display depending on the options or models.• [error number] indicates the error number. • [tray type] indicates the tray number. • [color] indicates the color of toner. 7 Paper Jam-related messagesMessage Meaning Suggested solutions•Jam inside of duplex Paper has jammed during duplex printing. This is applicable only to machines with this feature. Clear the jam (see "In the duplex unit area" on page 92).•Jam bottom of duplex•Jam in exit area Paper has jammed in the exit area.Clear the jam (see "In the exit area" on page 90).•Jam inside of machinePaper has jammed in the inside machine.Clear the jam (see "Inside the machine" on page 87).Paper jam in tray Paper has jammed in the tray.Clear the jam (see "In tray1" on page 83).•Paper jam in tray 2•Paper jam in tray 3•Paper jam in tray 4•Paper jam in tray 5Paper has jammed in the optional tray.Clear the jam (see "In optional tray" on page 84).Paper jam in MP tray Paper has jammed in the multi-purpose tray.Clear the jam (see "In the multi-purpose tray" on page 86).Message Meaning Suggested solutions](https://usermanual.wiki/Samsung-Electronics-Co/SLM4530NX.User-Manual-Part-2/User-Guide-2436783-Page-21.png)
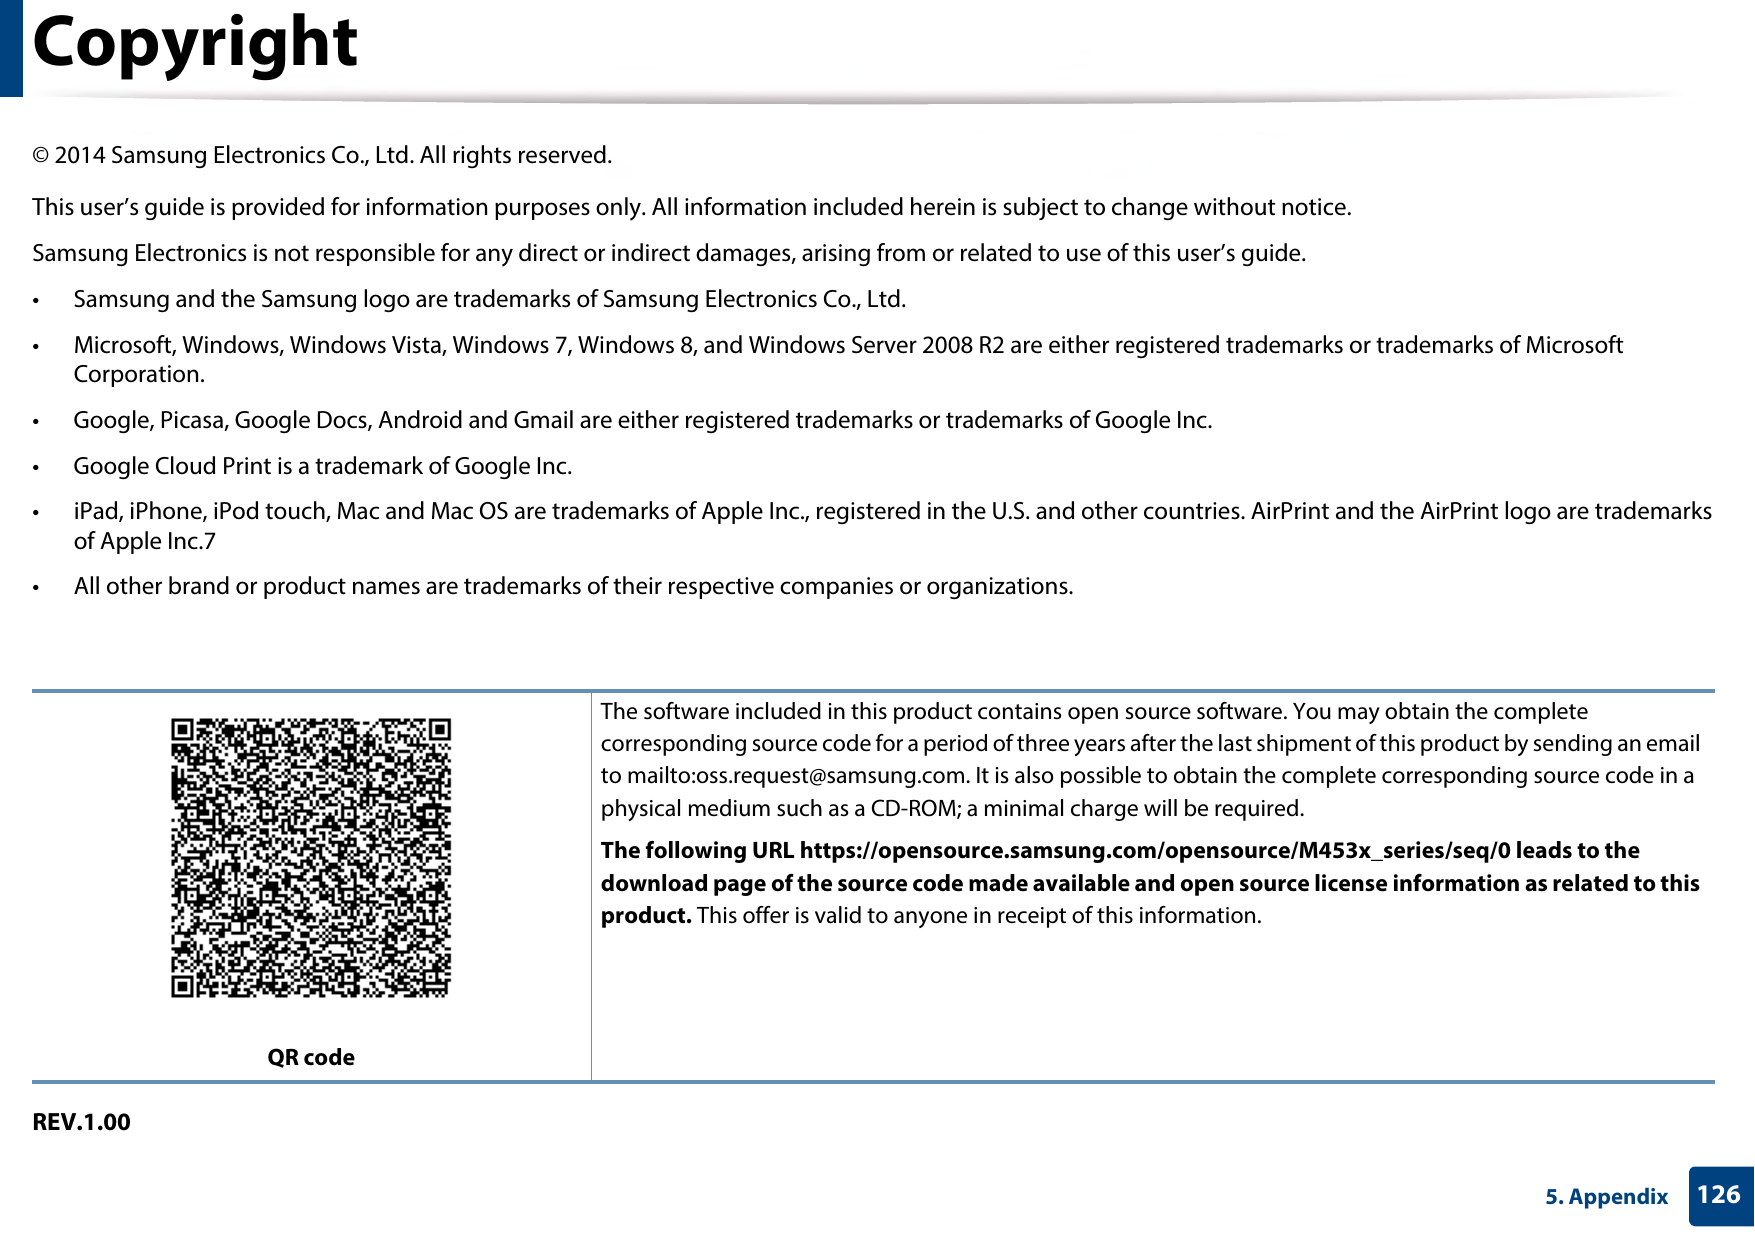
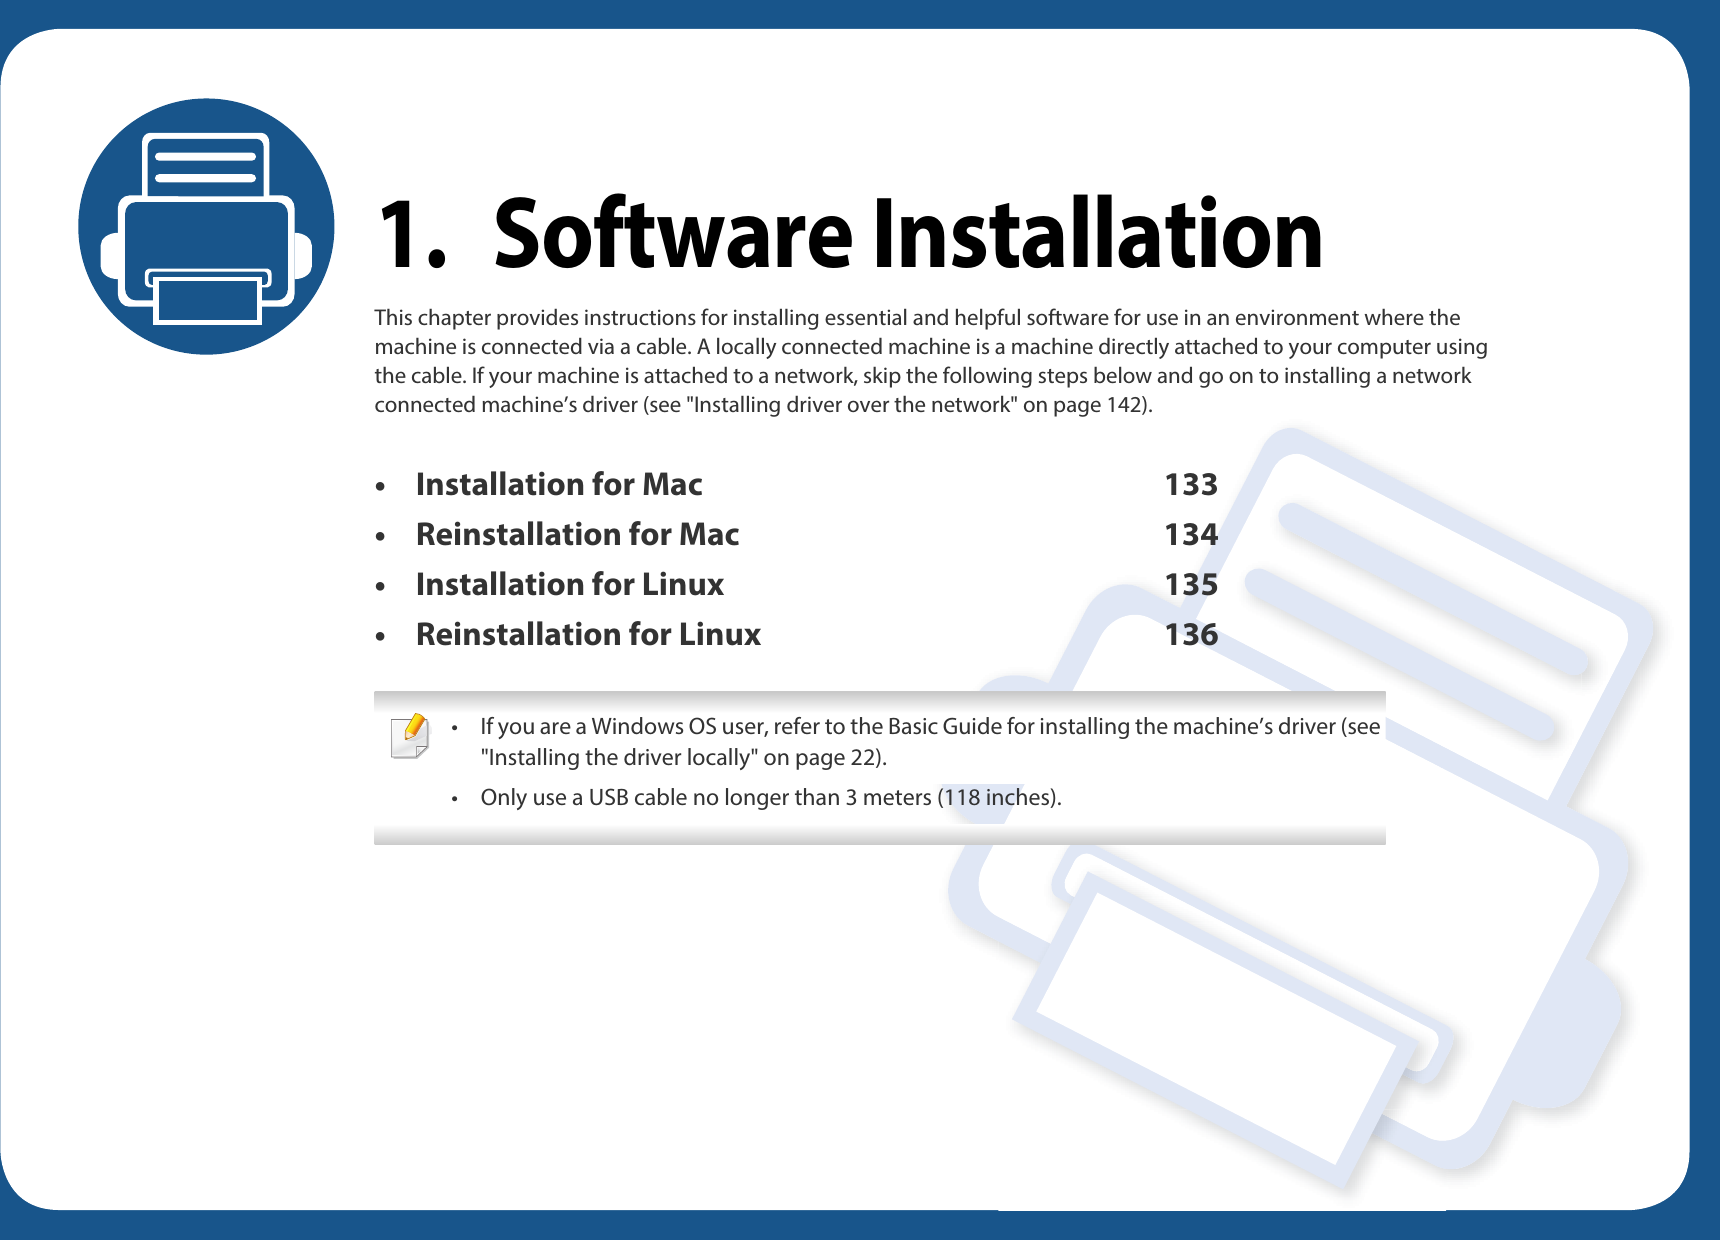
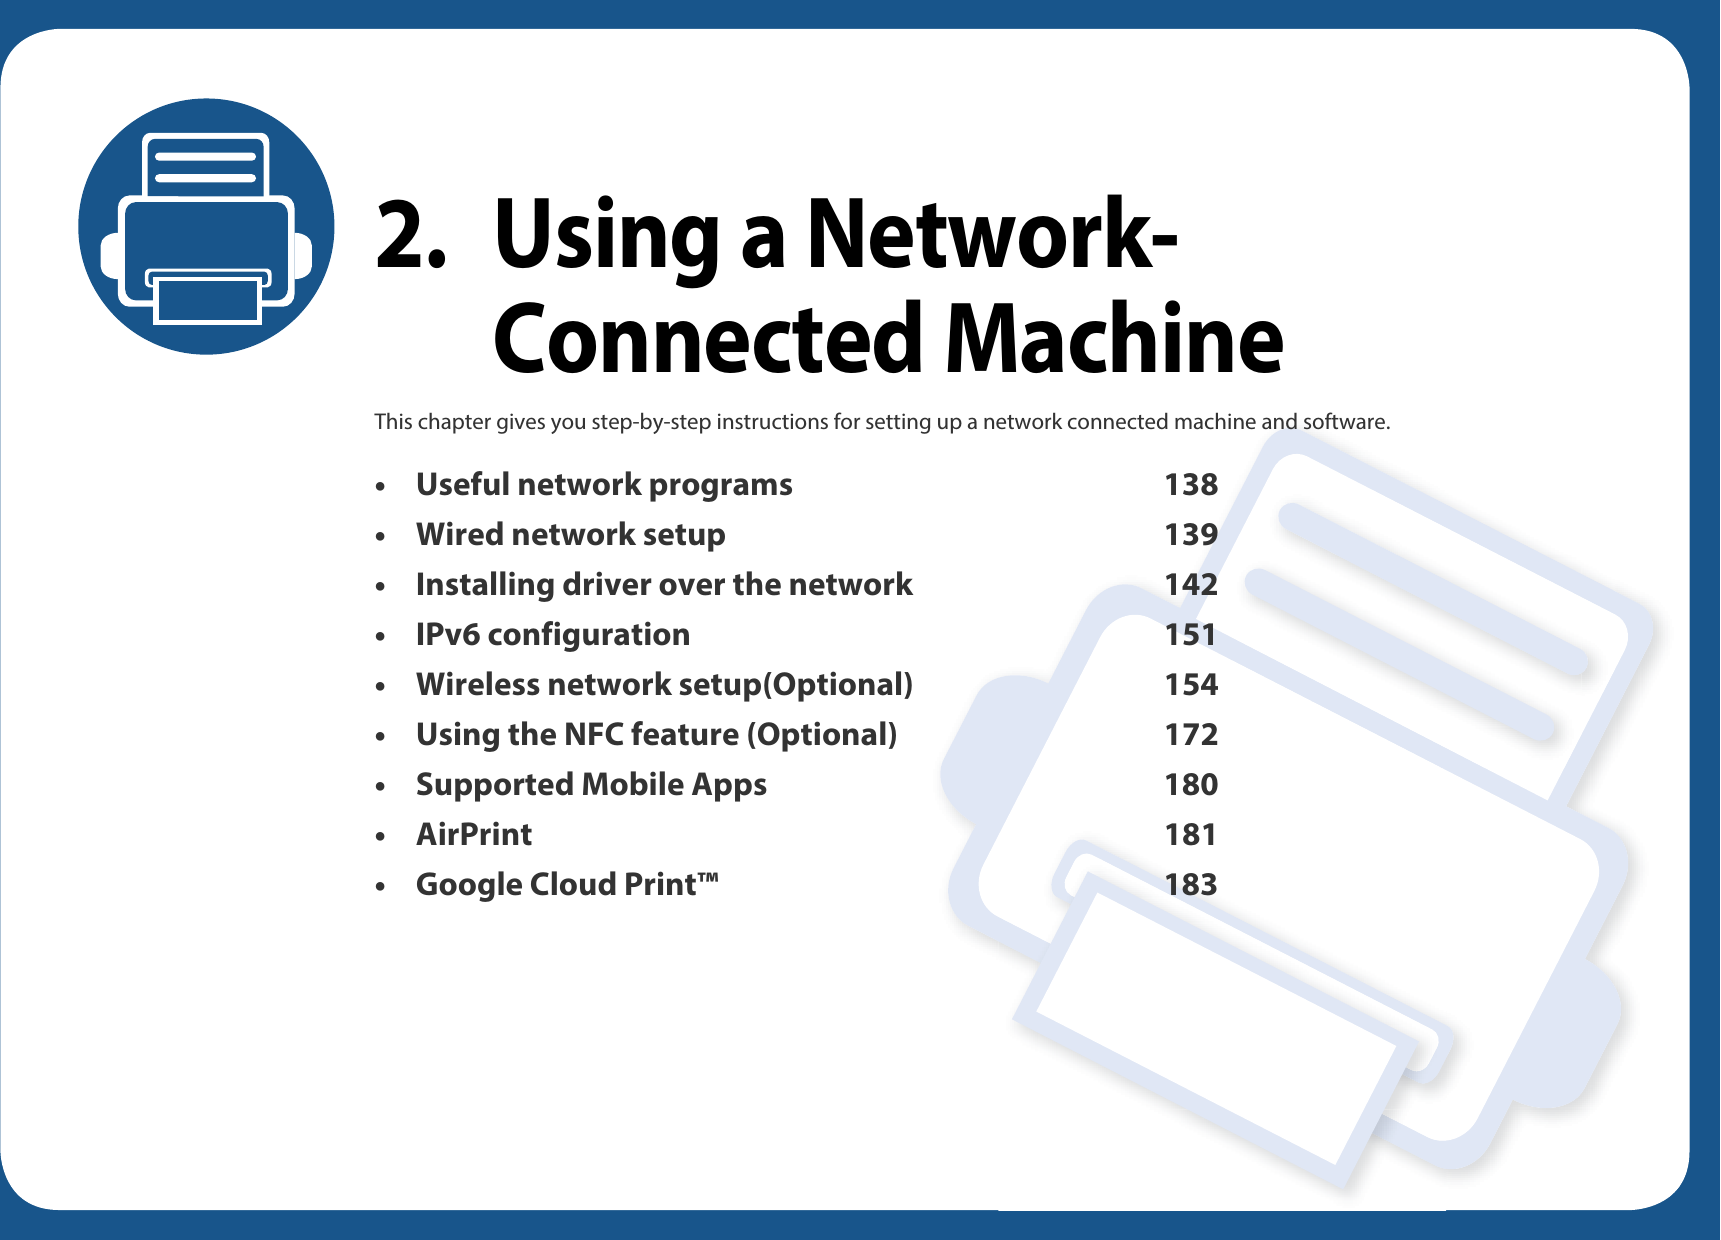
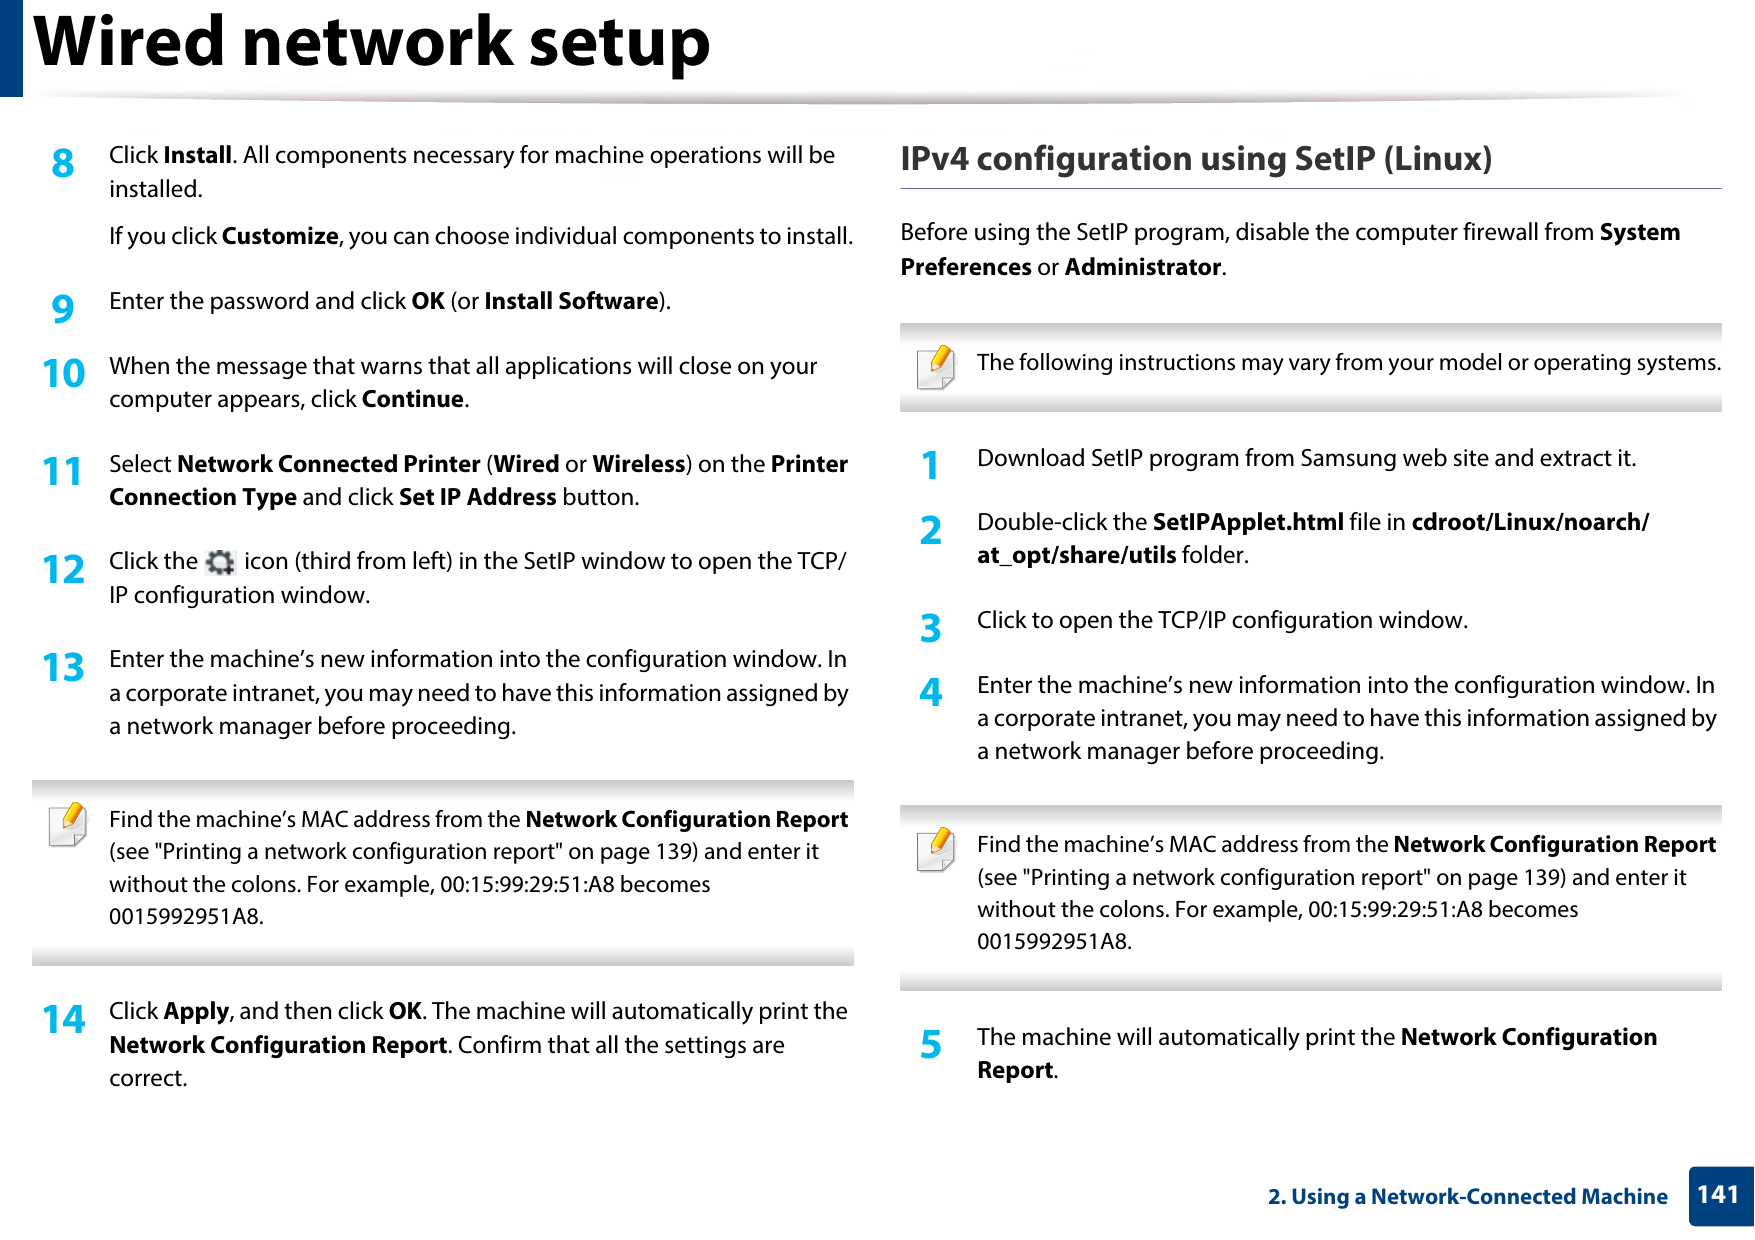
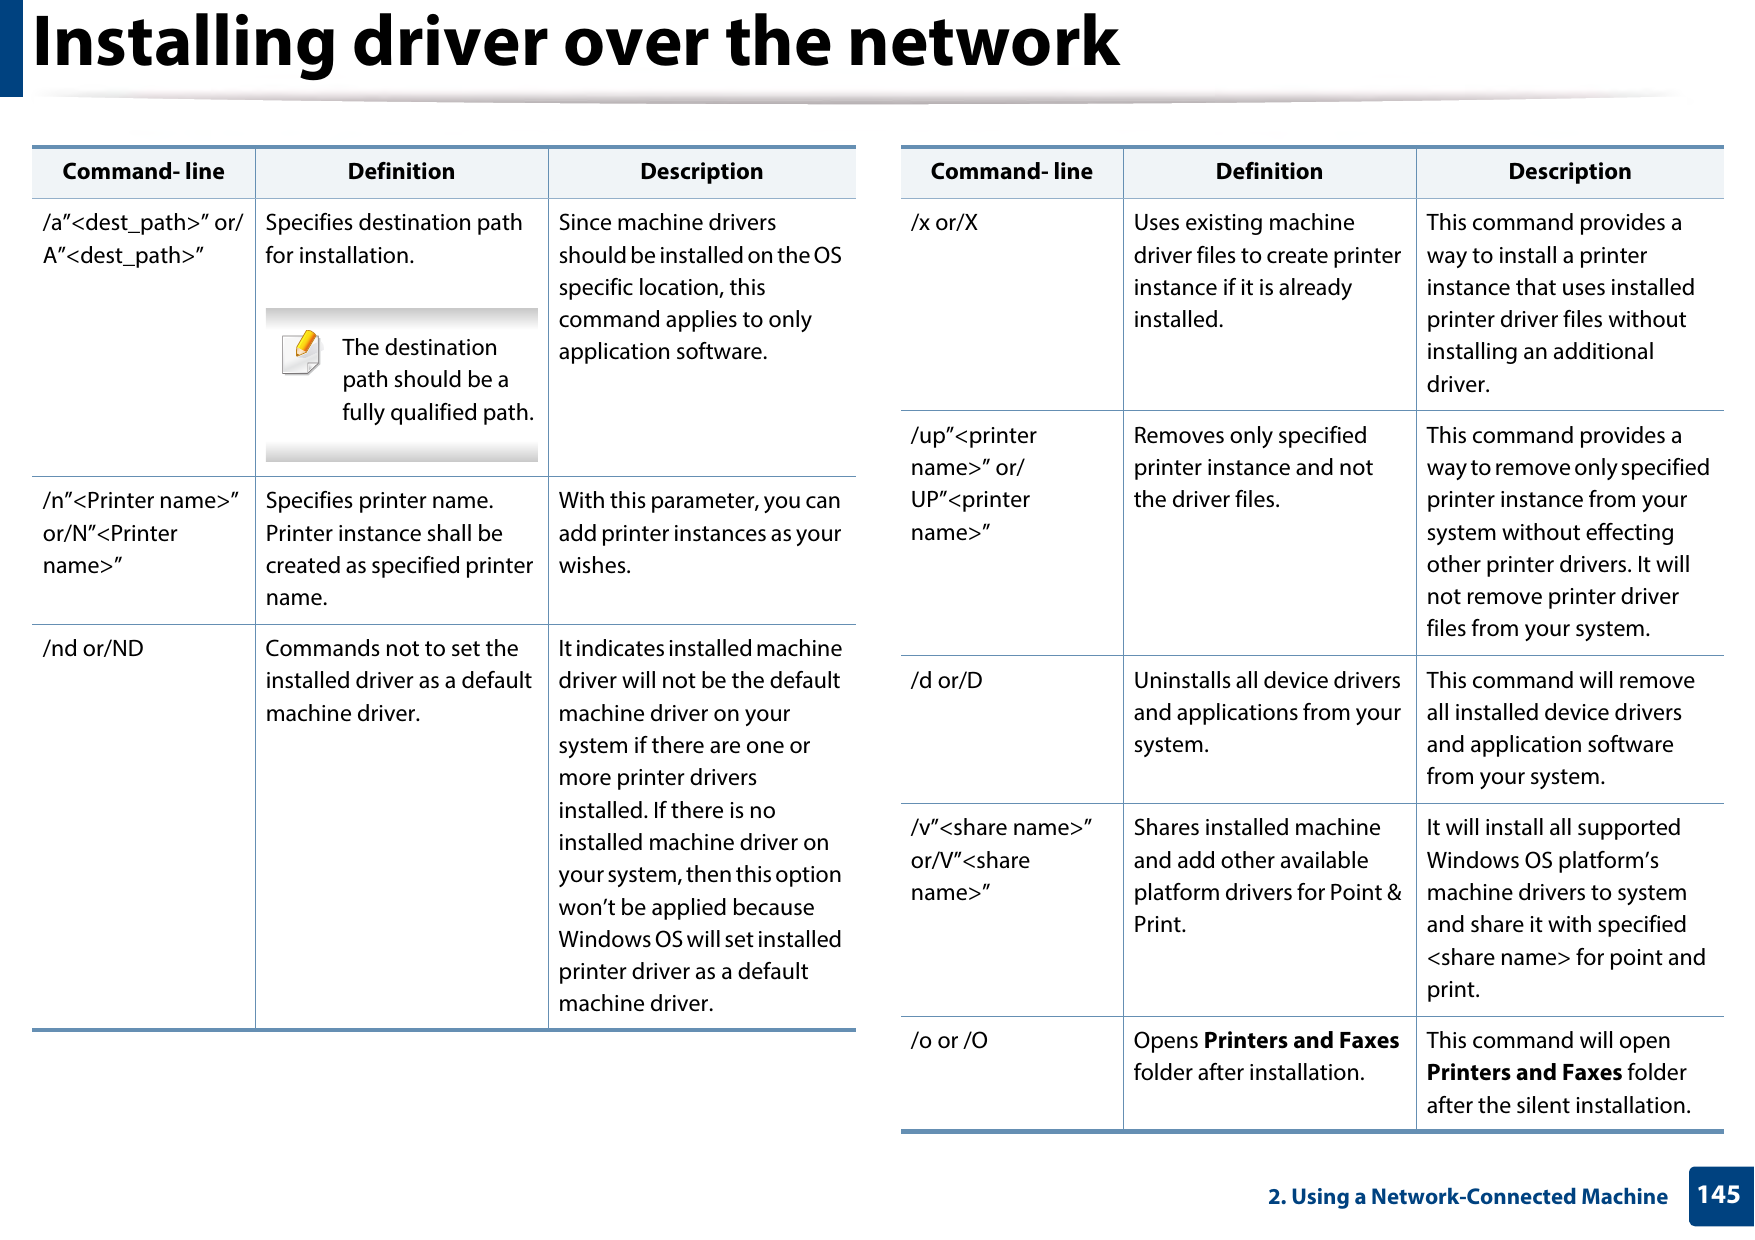
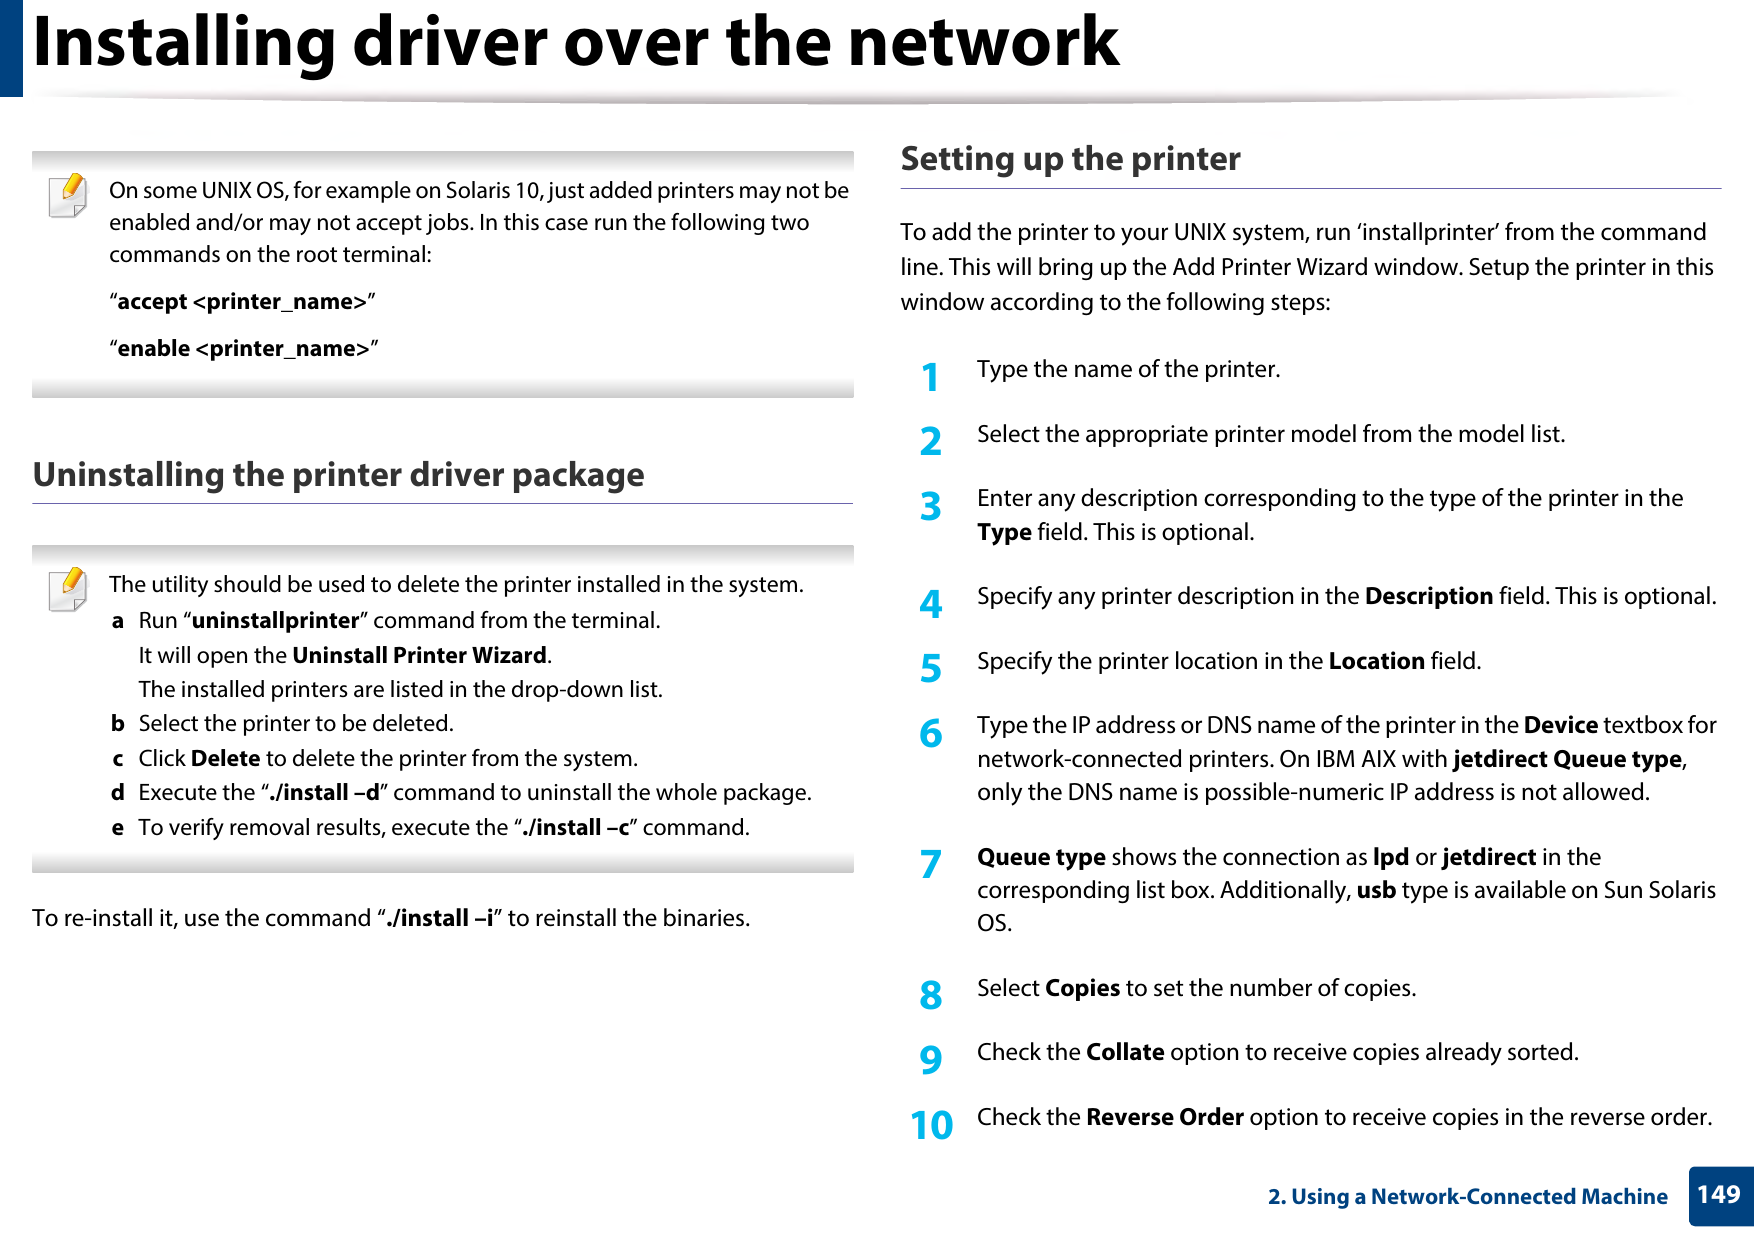
![Understanding display messages974. Troubleshooting8 Toner-related messagesMessage Meaning Suggested solutions•Replace new toner•End of life, Replace with new toner cartridgeThe indicated toner cartridge has reached its estimated cartridge lifeb.Replace the toner cartridge with a Samsung- genuine toner cartridgea (see "Replacing the toner cartridge" on page 67).•Replace IMG. unit•End of life, Replace with new imaging unitThe indicated imaging unit has reached its estimated imaging unit lifeb.Replace the imaging unit with a Samsung-genuine imaging unit (see "Replacing the imaging unit" on page 69).•Error: [error number]•Imaging Unit Failure: [error number]. Install imaging unit againThe imaging unit is not installed.Install the imaging unit. If it is already installed, try to reinstall the imaging unit. If the problem persists, call for service.•Error: [error number]•Imaging unit Failure: [error number]. Call for serviceThere is a problem in the imaging unit. Turn the machine off and back on again. If the problem persists, call for service.•Prepare new toner•Prepare new toner cartridgeThe estimated cartridge lifeb of toner is close.Prepare a new cartridge for a replacement. You may temporarily increase the printing quality by redistributing the toner (see "Redistributing toner" on page 65).•Prepare IMG. unit•Prepare new imaging unitThe estimated imaging unit life of toner is close.Prepare a new imaging unit for a replacement (see "Replacing the imaging unit" on page 69).•Shake toner cart.•Shake toner cartridge and then install. Replace toner cartridge if the problem persistsSmall amount of toner is left in the indicated cartridge.You may temporarily increase the printing quality by redistributing the toner (see "Redistributing toner" on page 65).•Error: [error number]•Toner Cartridge Failure: [error number]. Install toner cartridge againThe toner cartridge is not installed.Install the toner cartridge. If it is already installed, try to reinstall the toner cartridge. If the problem persists, call for service.Message Meaning Suggested solutions](https://usermanual.wiki/Samsung-Electronics-Co/SLM4530NX.User-Manual-Part-2/User-Guide-2436783-Page-22.png)
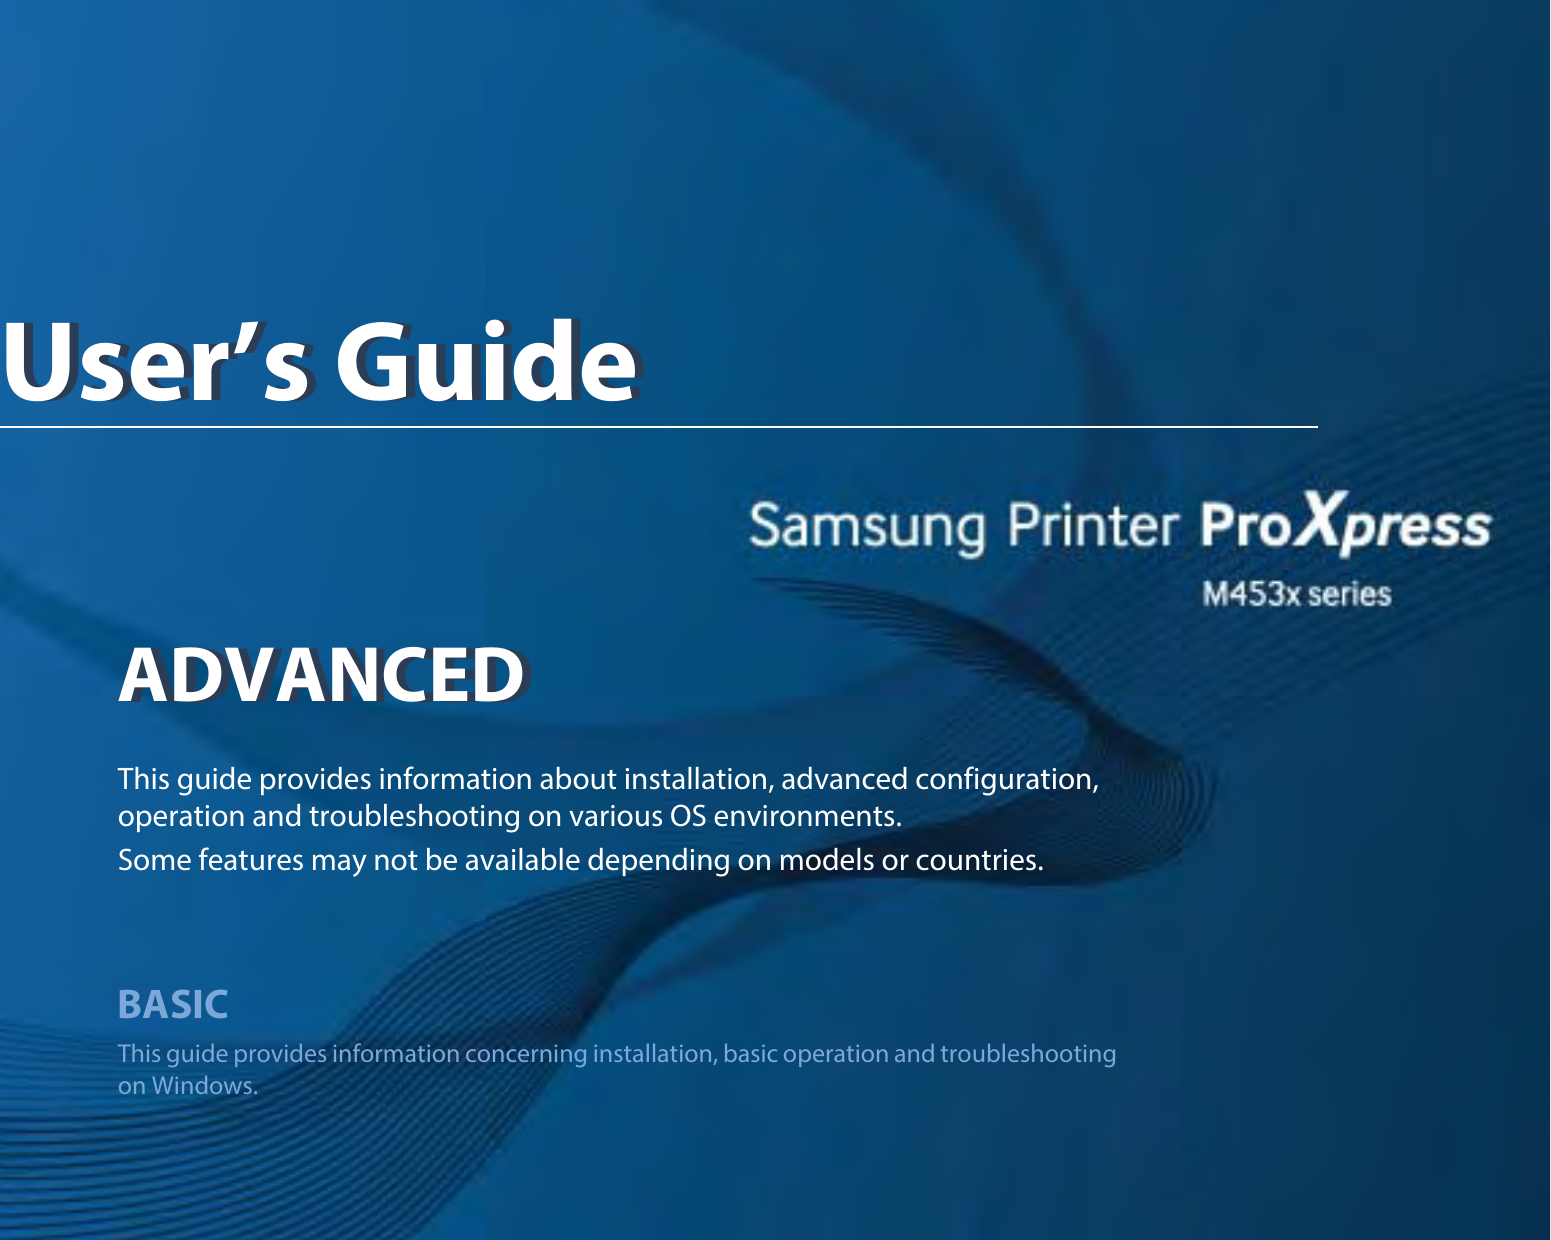
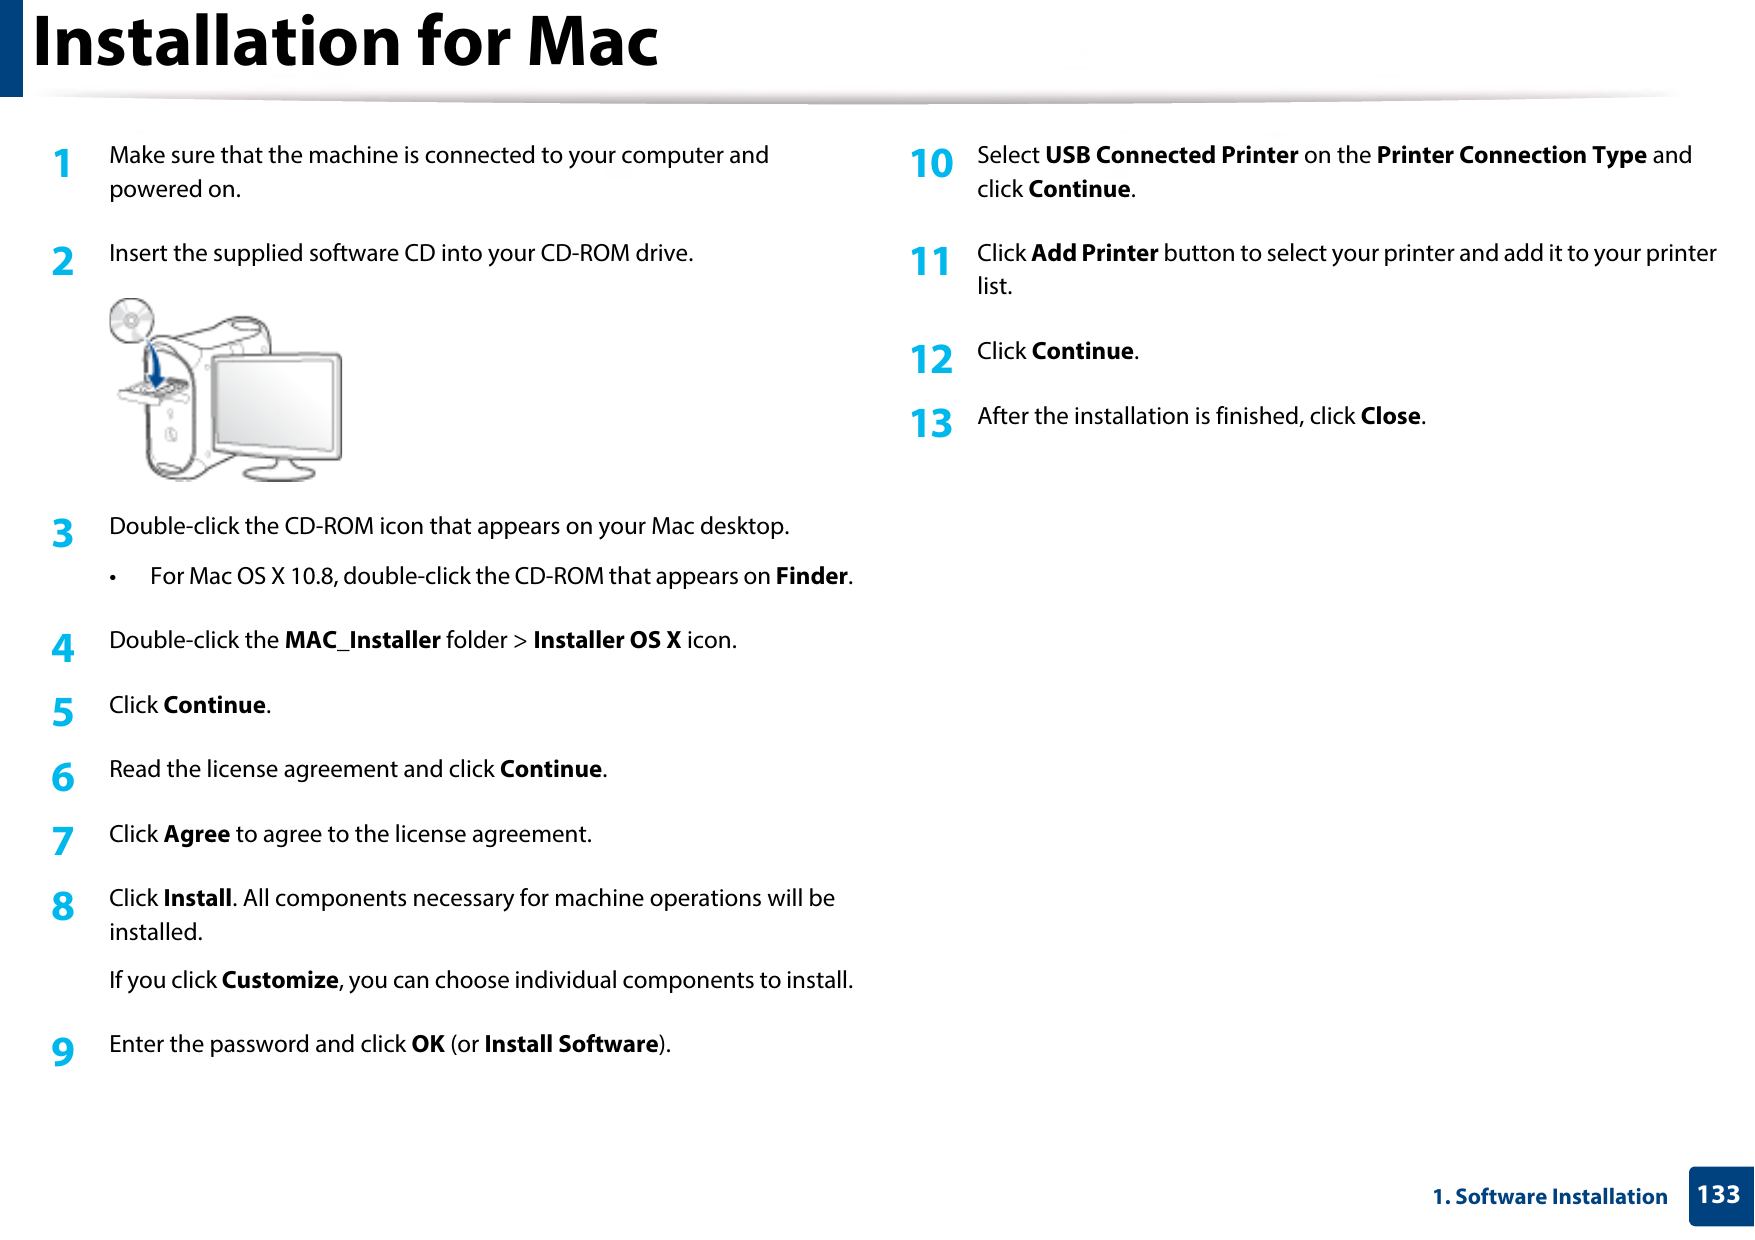
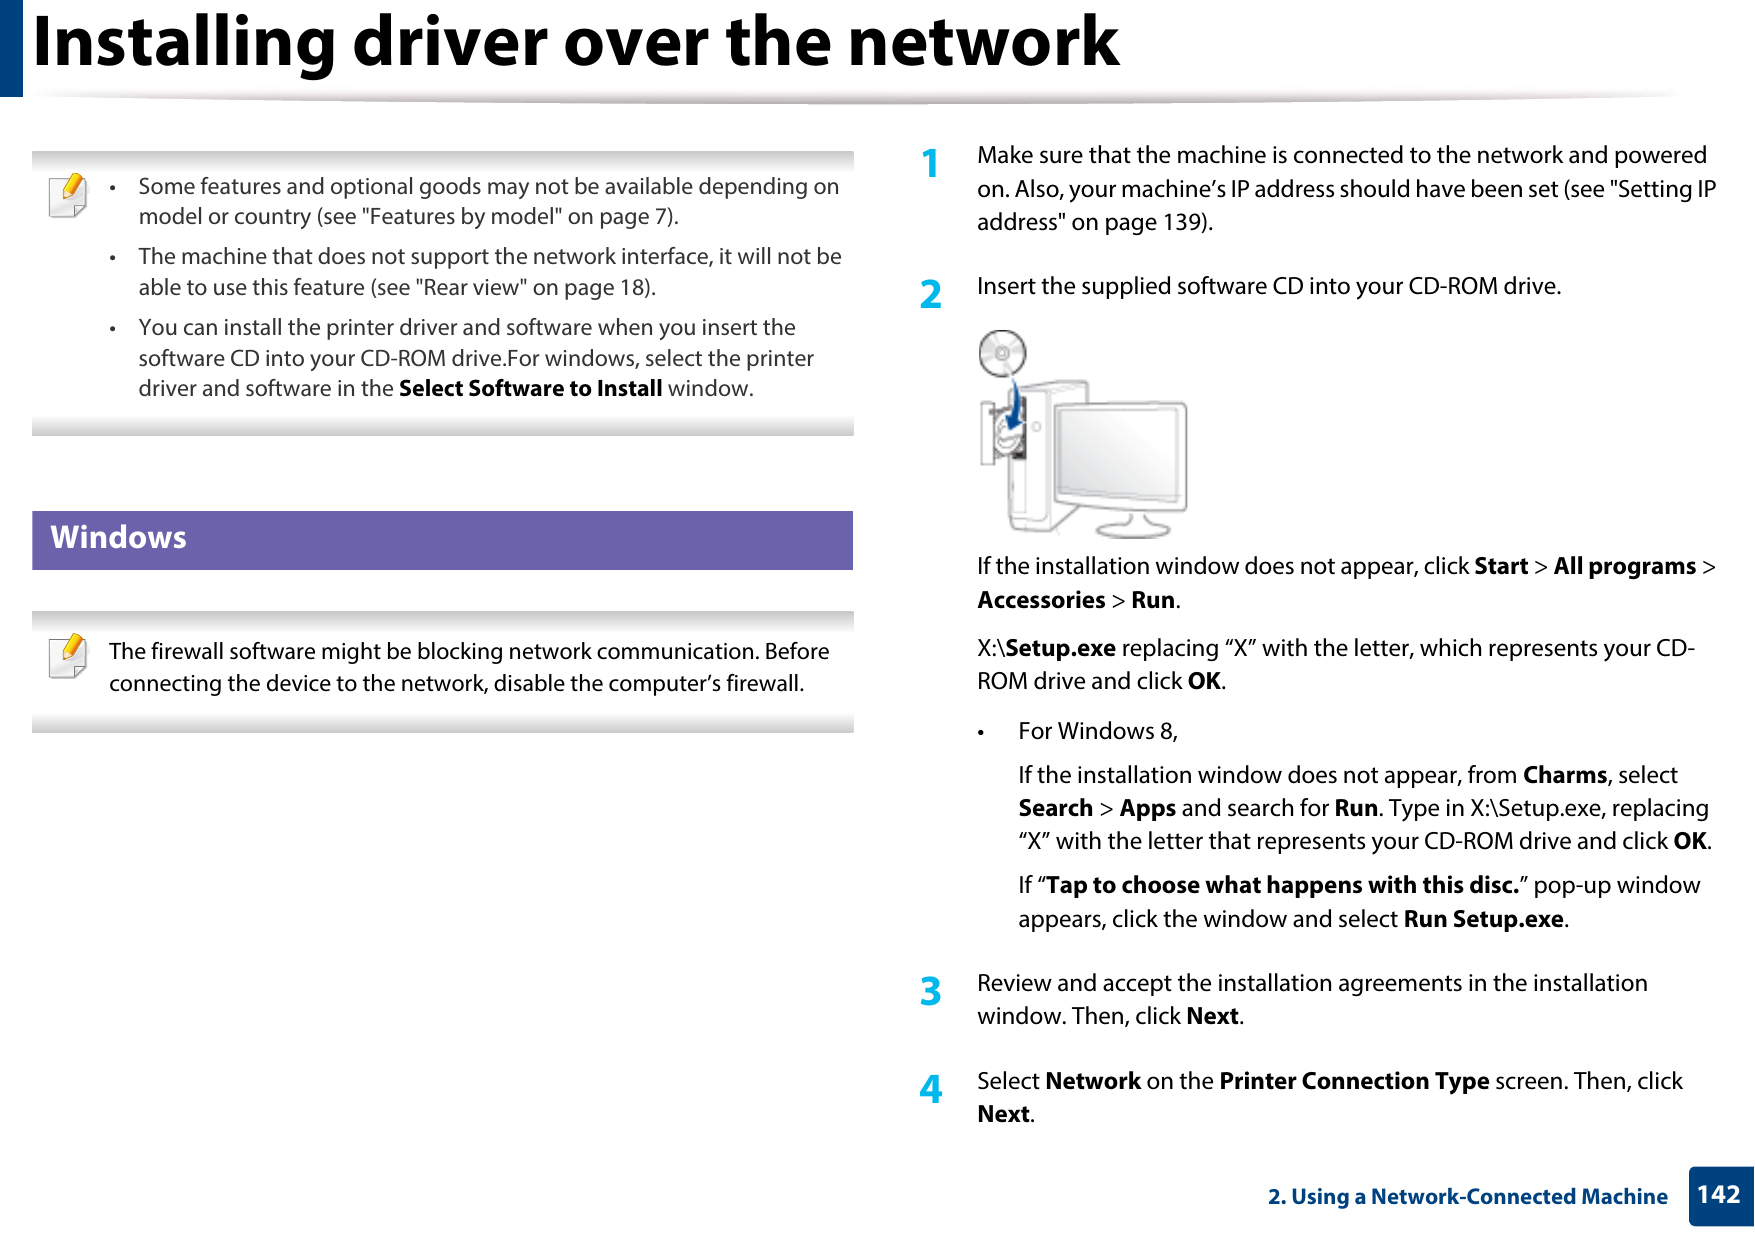
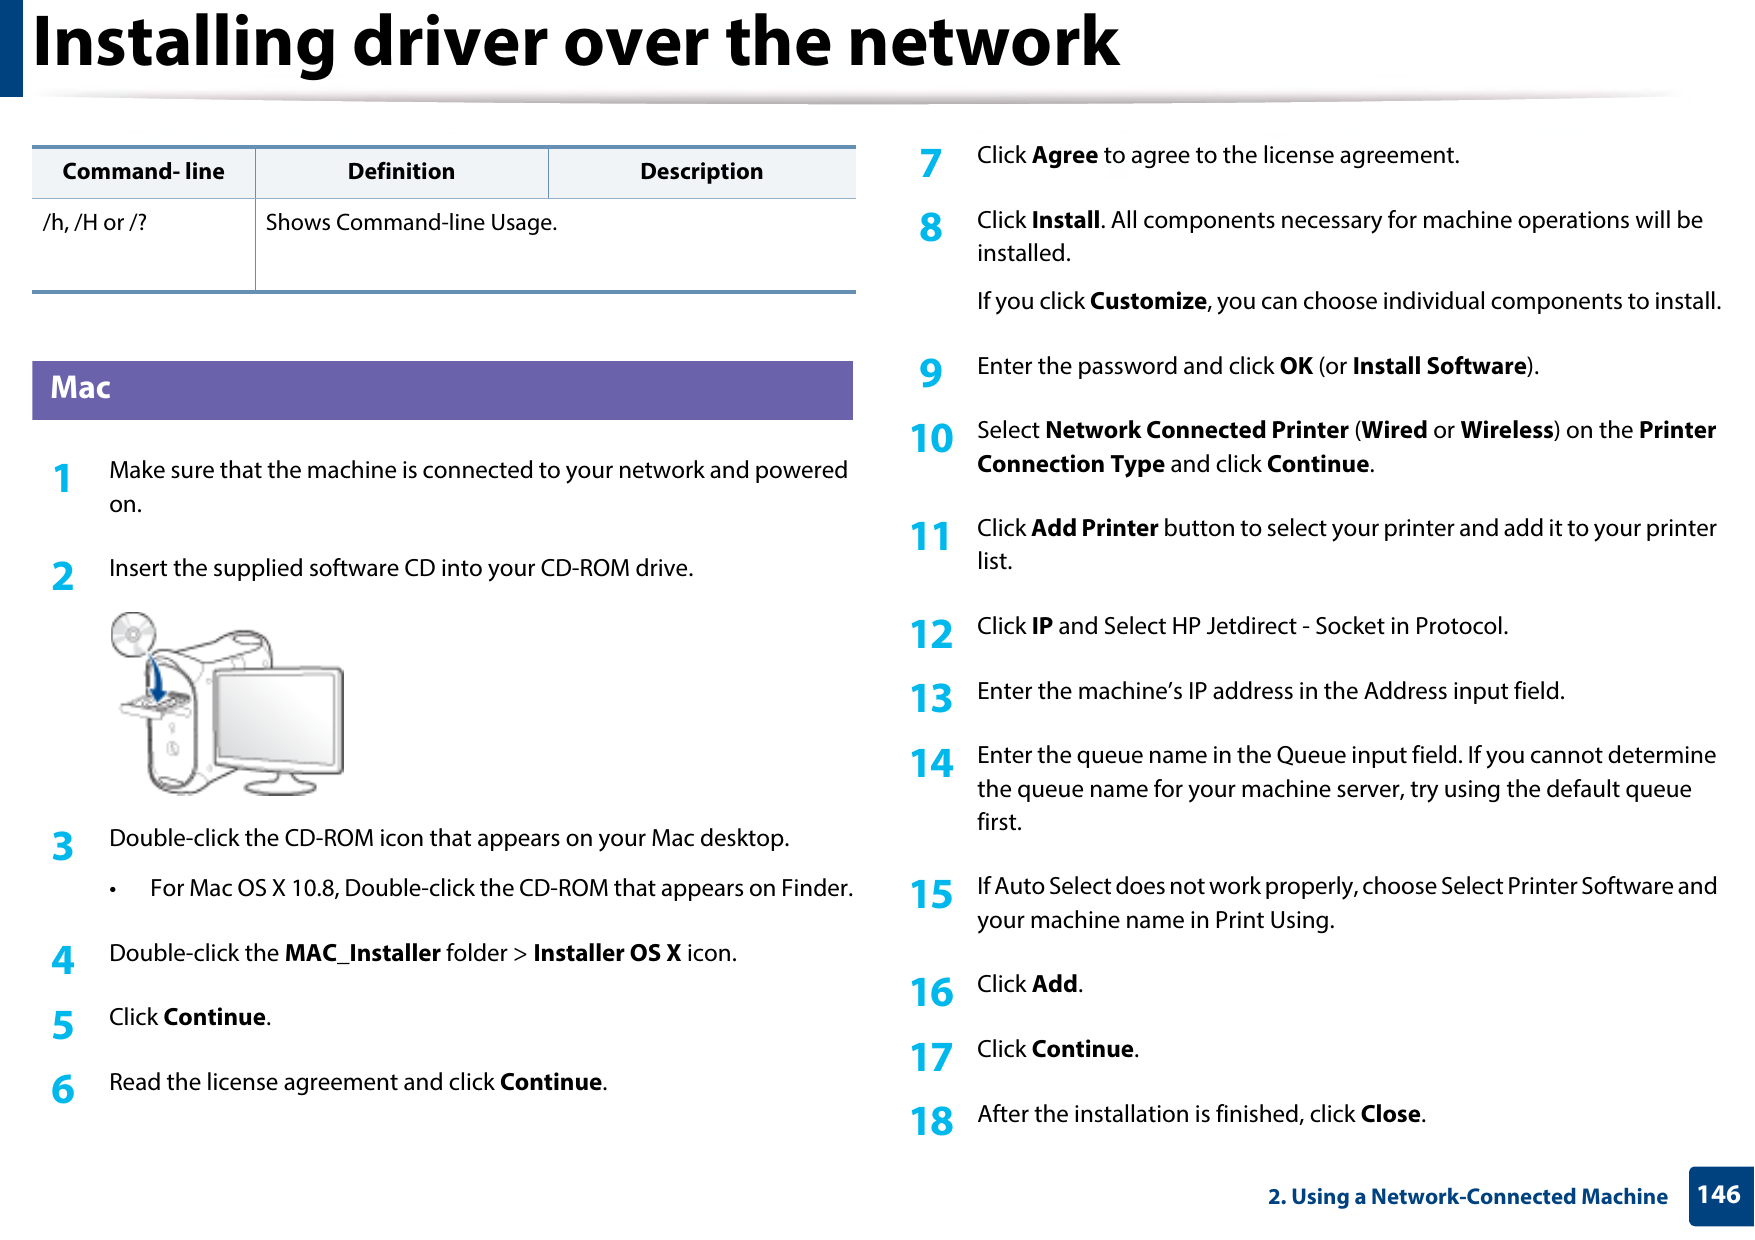
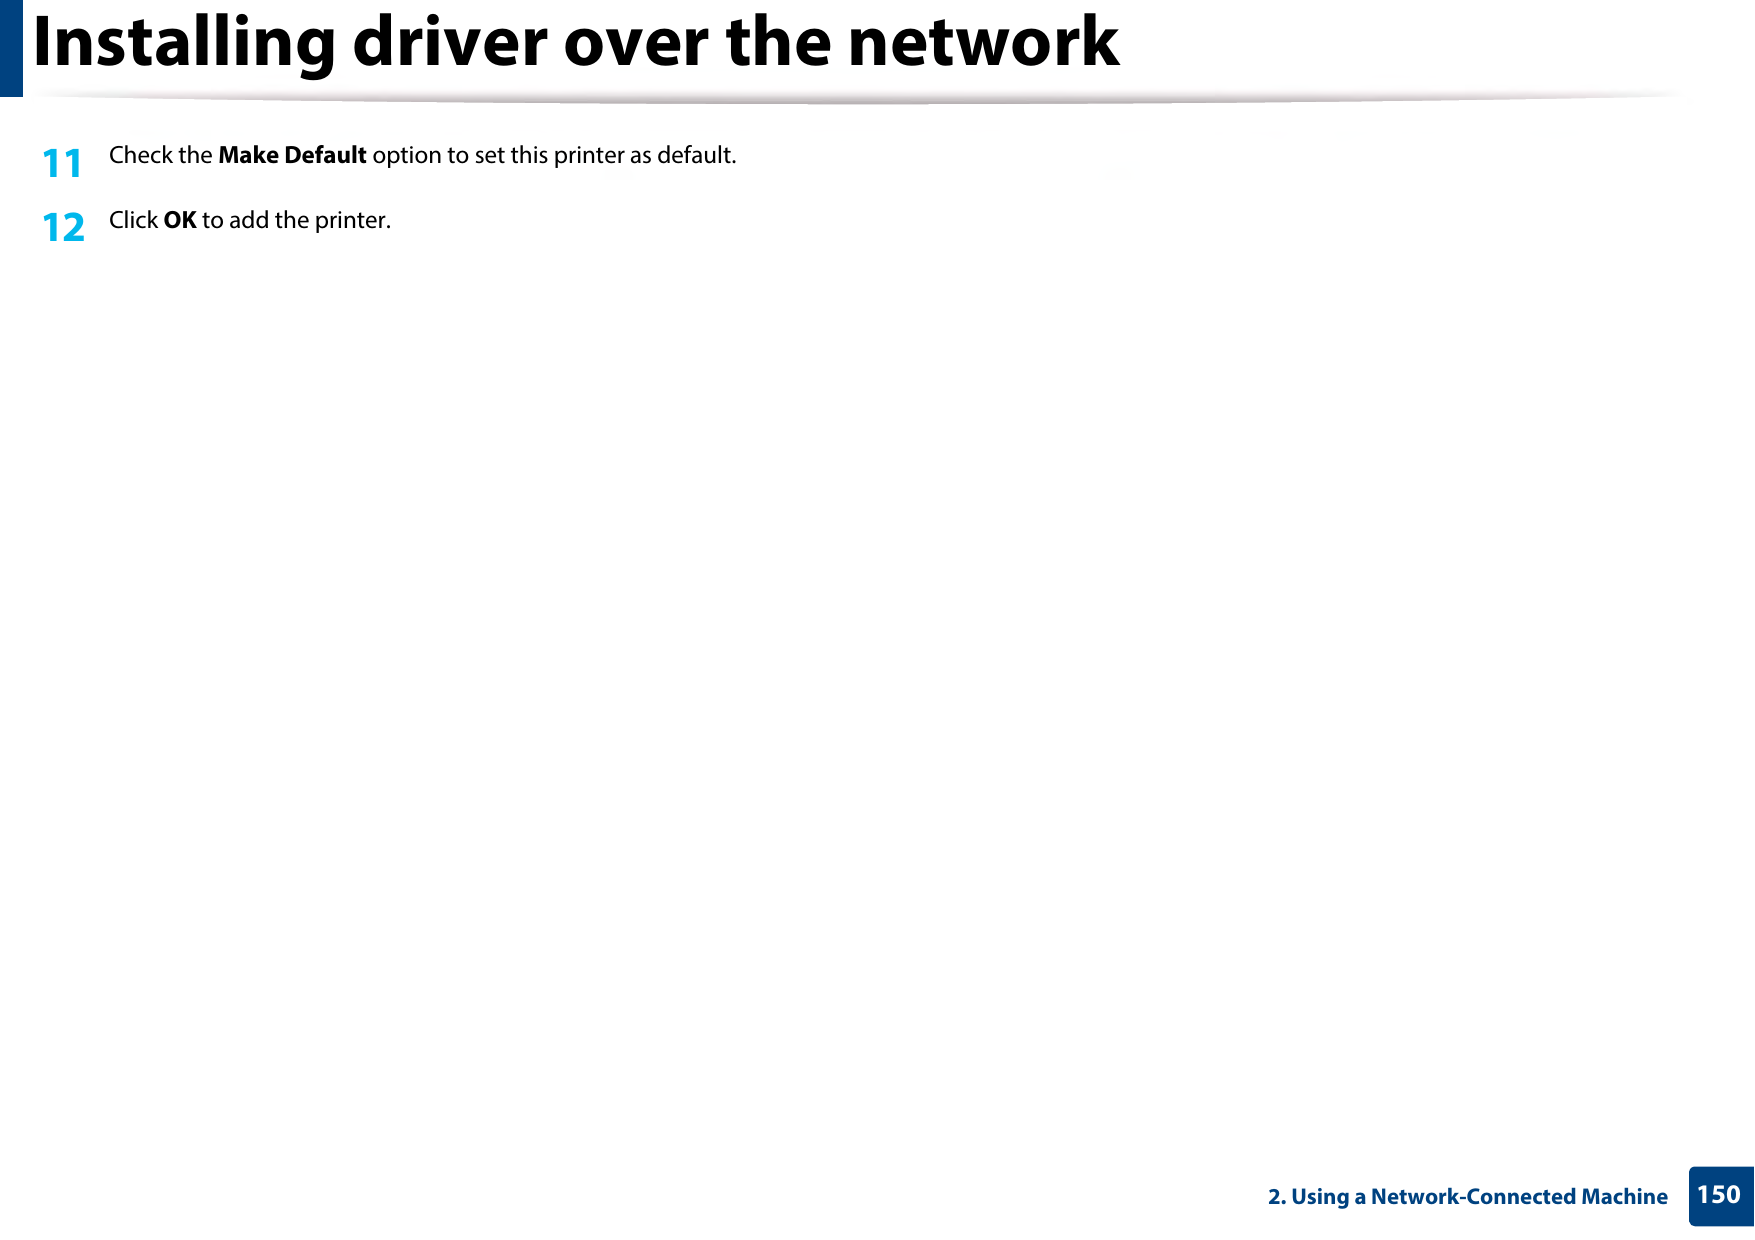
![Understanding display messages984. Troubleshooting•Toner Not Installed•Toner cartridge is not installed. Install the cartridgeThe toner cartridge is not installed.Reinstall the toner cartridge.•IMG. Not Installed•Imaging unit is not installed. Install the unitThe imaging unit is not installed.Reinstall the imaging unit two or three times. If the problem persists, call for service.•Error: [error number]•Toner Cartridge Failure: [error number]. Call for serviceThere is a problem in the toner cartridge. Turn the machine off and back on again. If the problem persists, call for service.•Toner Not Compatible•Toner cartridge is not compatible. Check users guideThe toner cartridge you have installed is not for your machine.Install a Samsung-genuine toner cartridge, designed for your machine (see "Available consumables" on page 60).•IMG. Not Compatible•Imaging unit is not compatible. Check guideThe imaging unit you have installed is not for your machine.Install a Samsung-genuine imaging unit, designed for your machine (see "Available consumables" on page 60).Message Meaning Suggested solutions•Replace new toner•Replace with new toner cartridgeThe indicated toner cartridge has almost reached its estimated cartridge lifeb.Replace the toner cartridge for the best print quality when this message appears. Using a cartridge beyond this stage can result in printing quality issues (see "Replacing the toner cartridge" on page 67).If the machine stops printing, replace the toner cartridge (see "Replacing the toner cartridge" on page 67).•Replace IMG. unit •Replace with new imaging unitThe indicated imaging unit has almost reached its estimated imaging unit lifeb.Replace the imaging unit for the best print quality when this message appears. Using a imaging unit beyond this stage can resultin printing quality issues (see "Replacing the imaging unit" on page 69).•Remove seal tape•Did not supply enough toner. Remove seal tape of toner cartridge or shake it. Call for service if the problem persistsThe seal tape of the toner cartridge is not removedRemove the seal tape of the toner cartridge (see "Replacing the toner cartridge" on page 67).Message Meaning Suggested solutions](https://usermanual.wiki/Samsung-Electronics-Co/SLM4530NX.User-Manual-Part-2/User-Guide-2436783-Page-23.png)
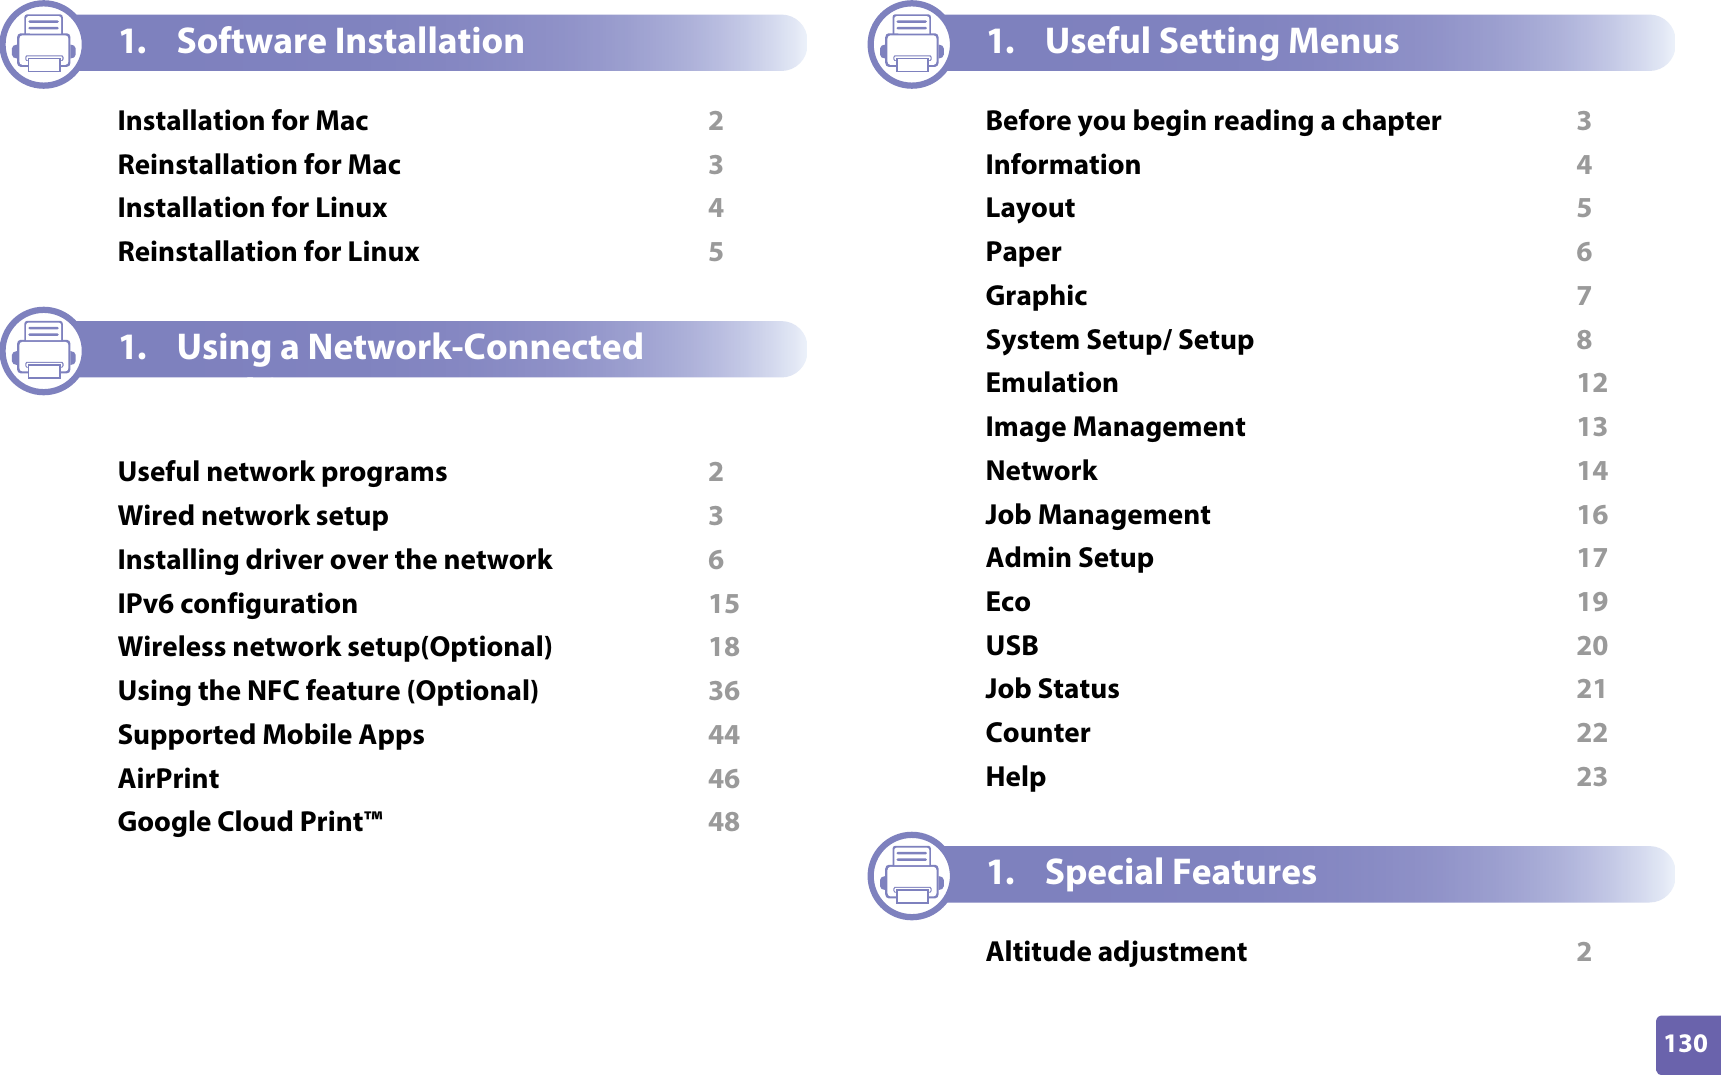
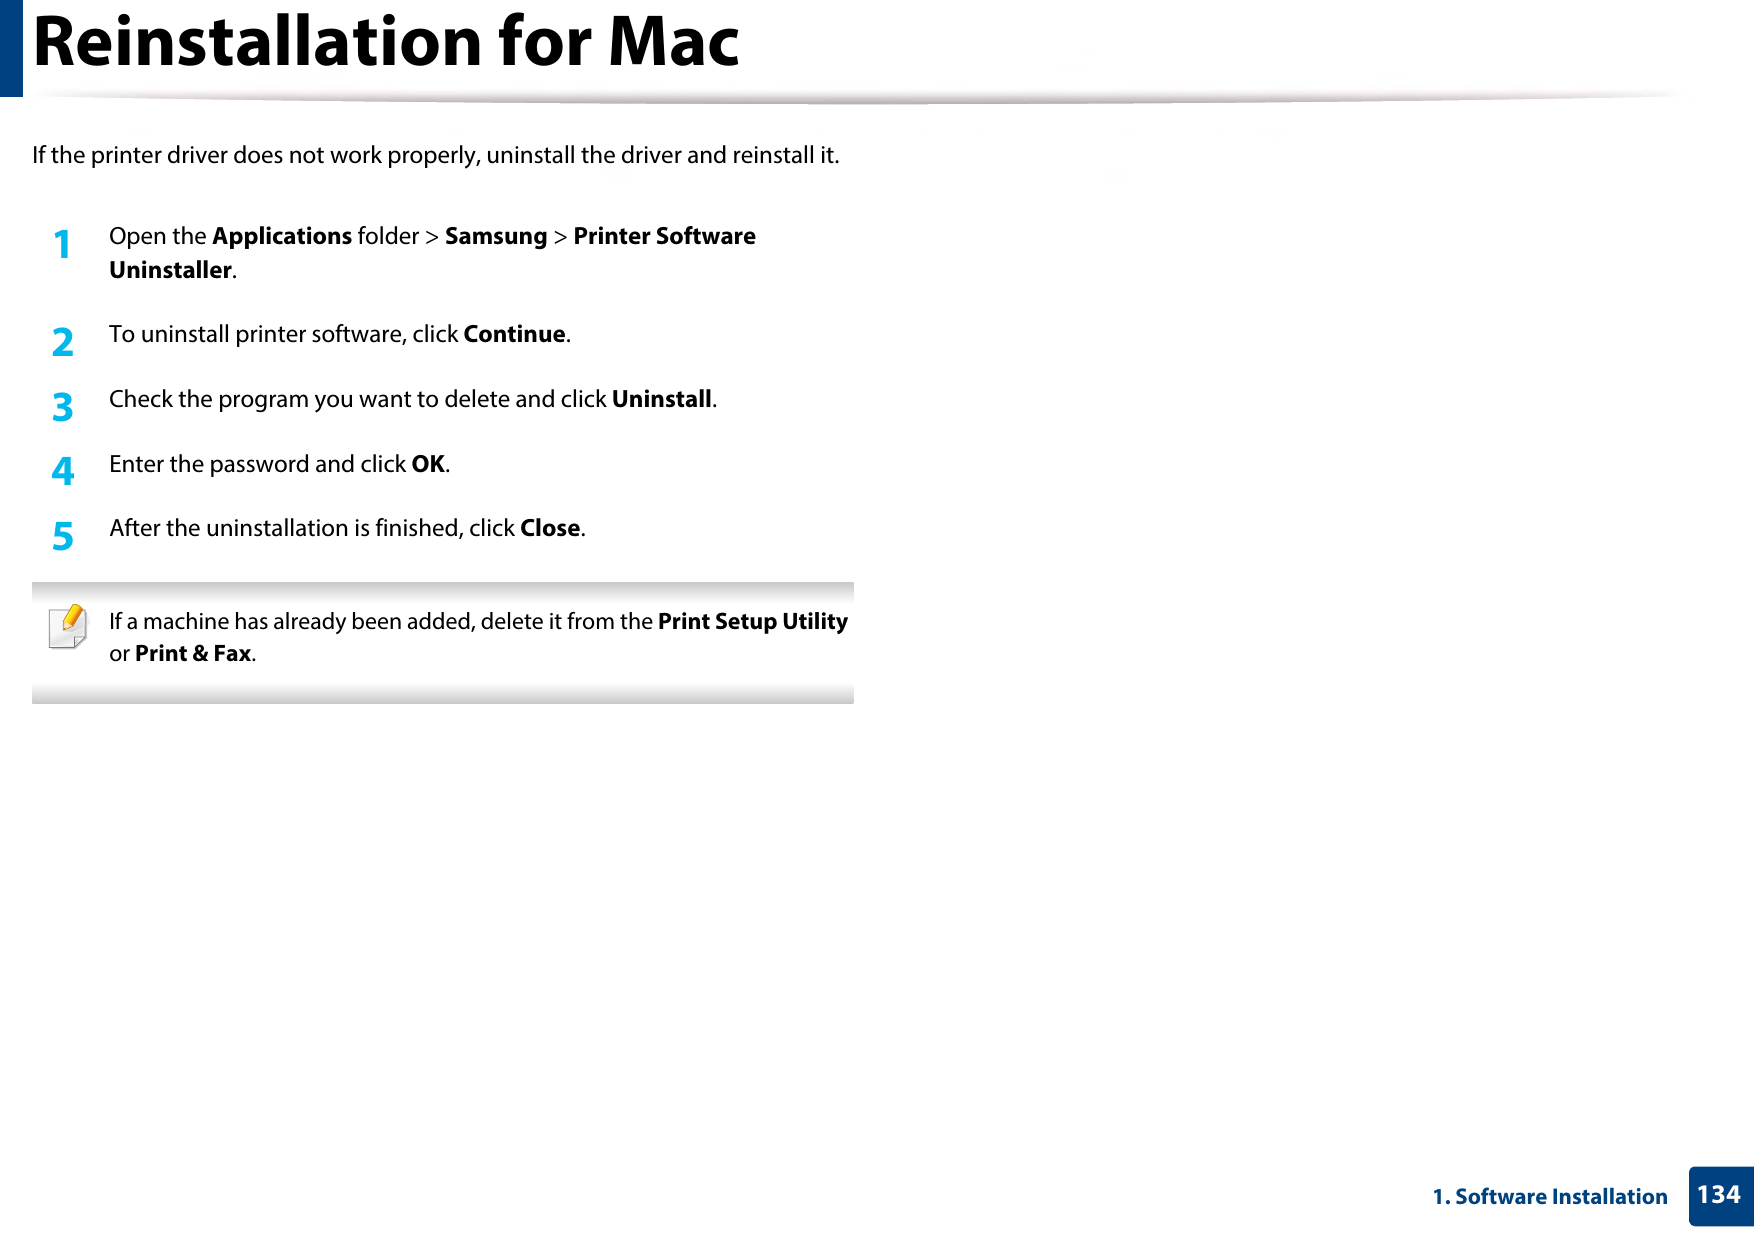
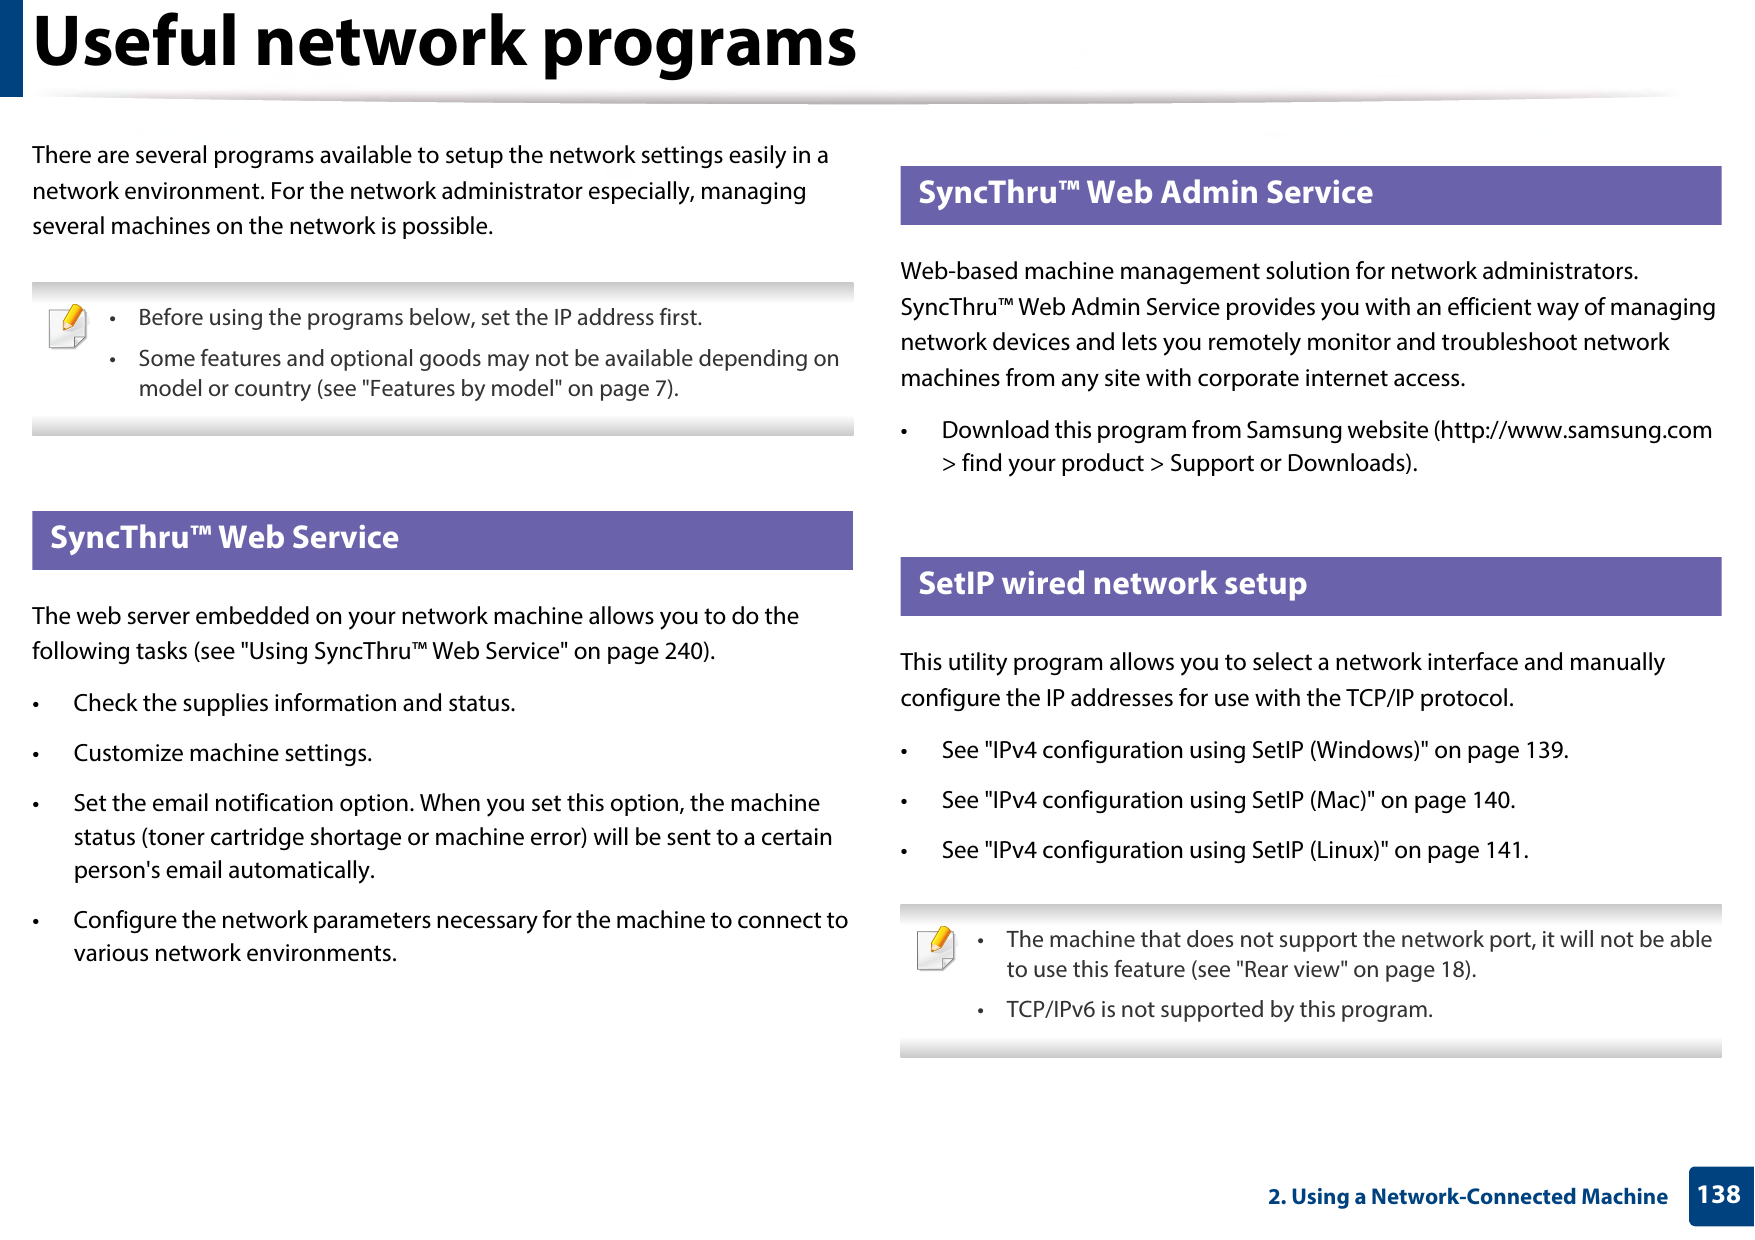
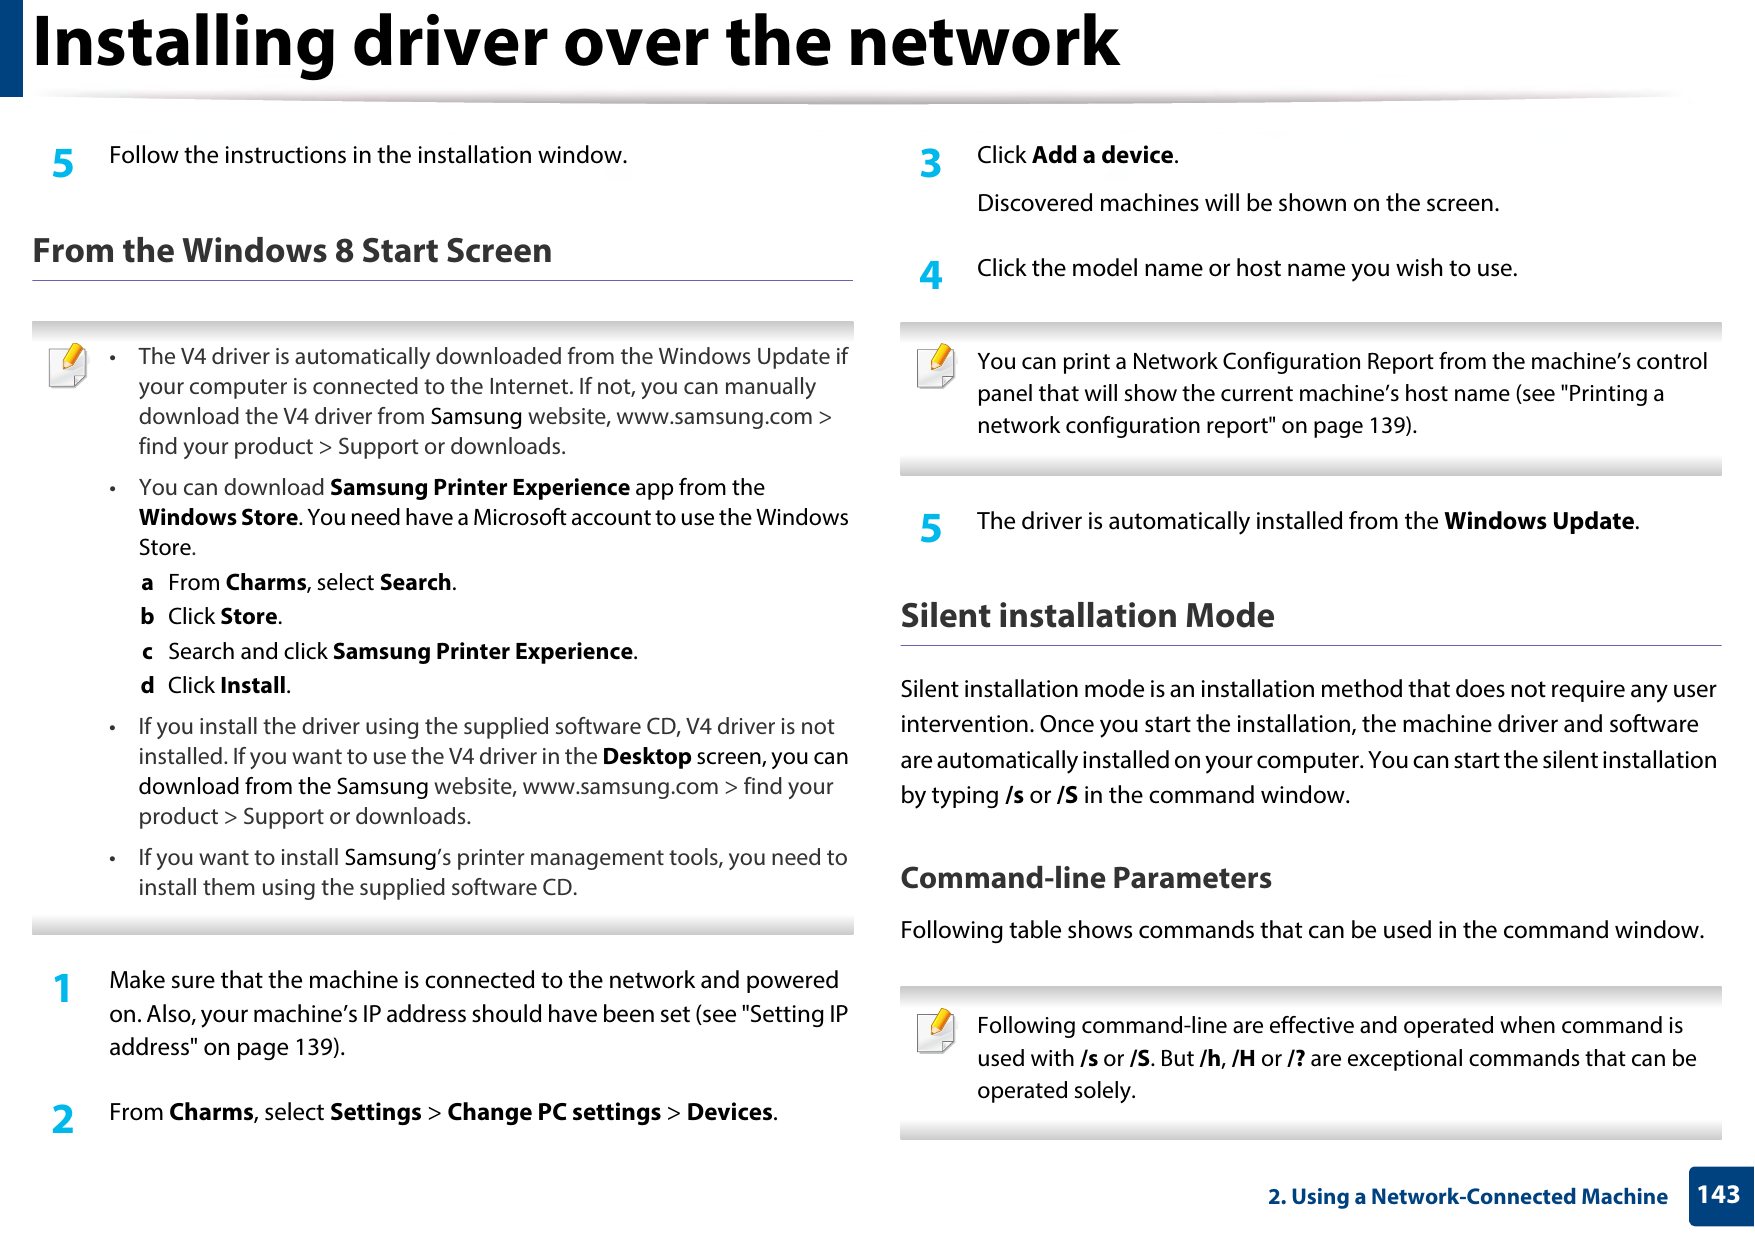
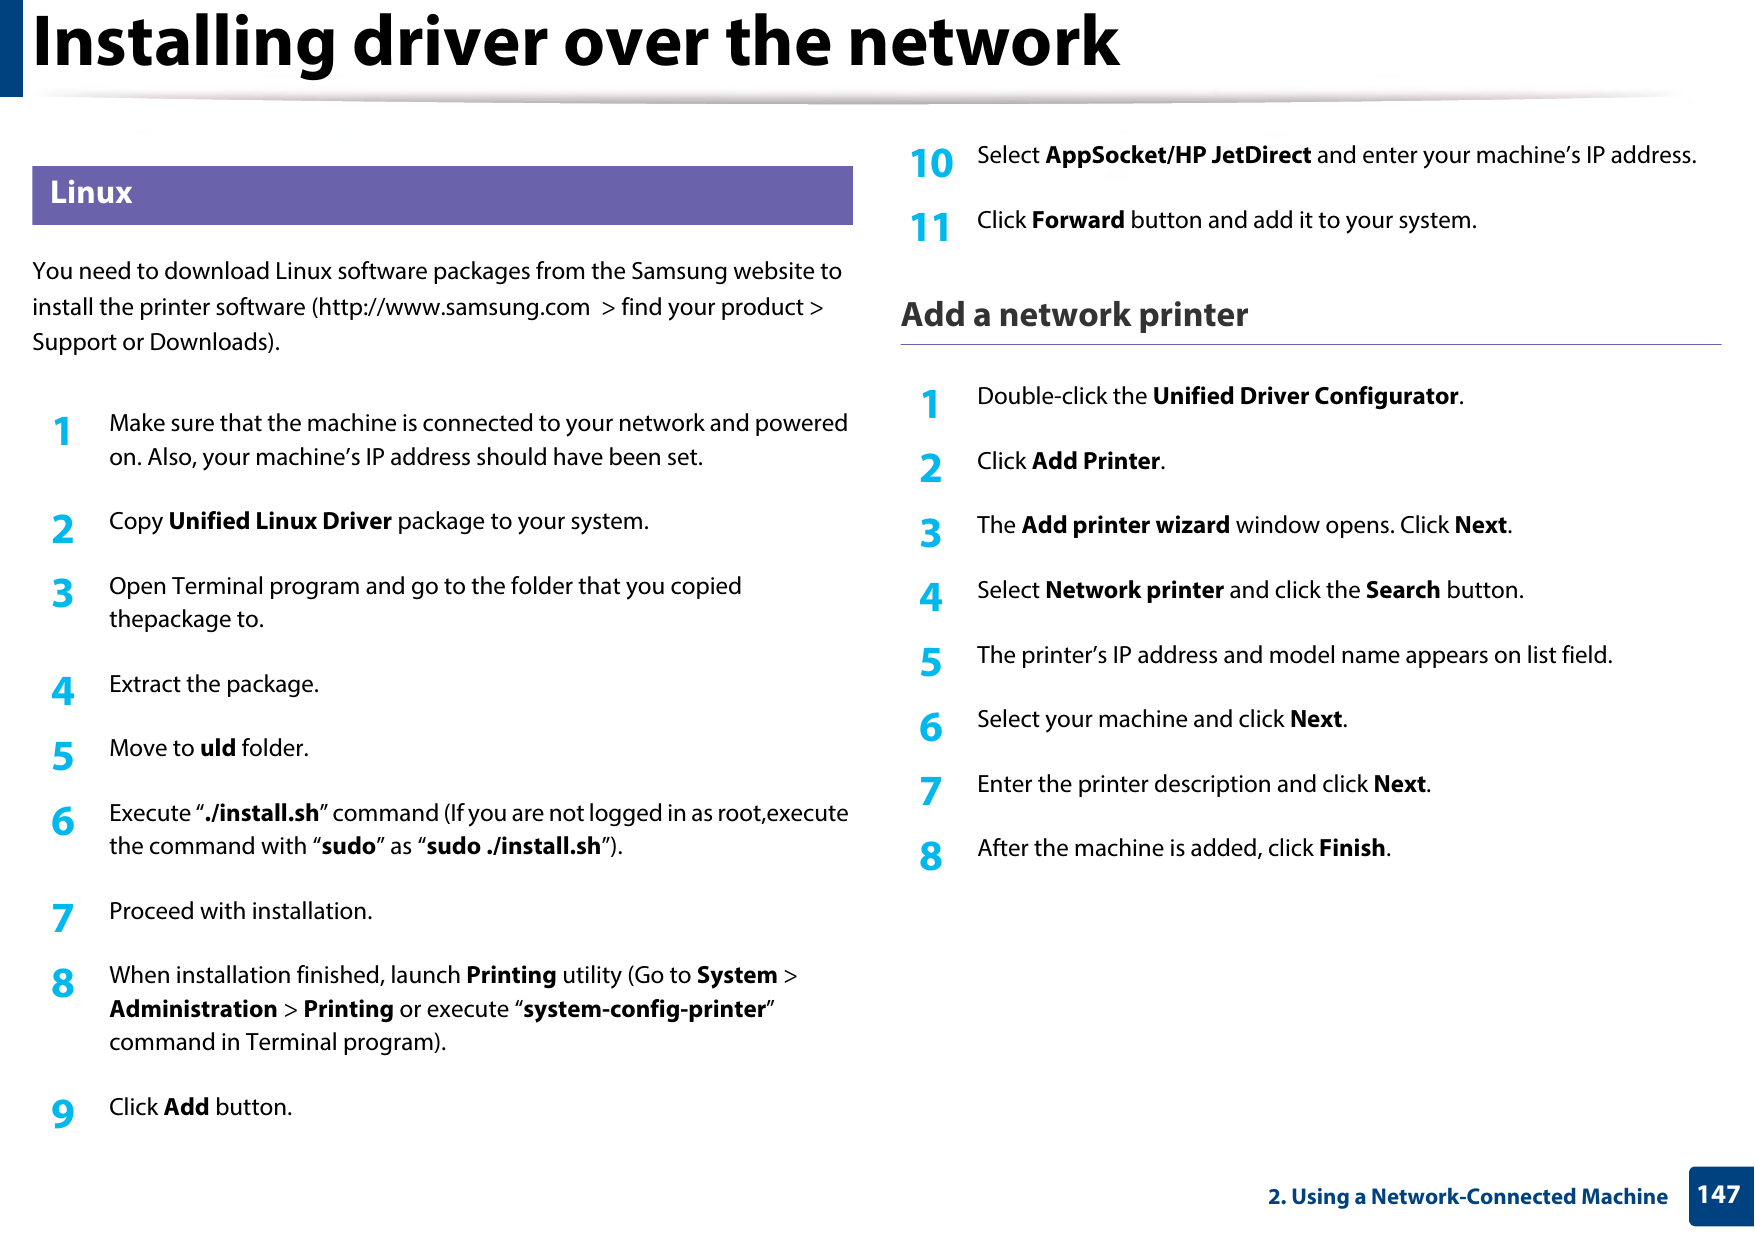
![Understanding display messages994. Troubleshooting Samsung does not recommend using a non-genuine Samsung toner cartridge such as refilled or remanufactured. Samsung cannot guarantee a non-genuine Samsung toner cartridge's quality. Service or repair required as a result of using non-genuine Samsung toner cartridges will not be covered under the machine warranty. 9 Tray-related messagesa. When the toner cartridge has reached its end of life, the machine will stop printing. In this case, you can choose to stop or continue printing from the SyncThru™Web Service. (Settings > Machine Settings > System > Setup > Supplies Management > Toner Cartridge Stop) or Samsung Easy Printer Manager (Device Settings > System > Supplies Management > Toner Cartridge Stop). Turning off this option and continuing to print may damage the device's system.b. Estimated cartridge life means the expected or estimated cartridge, which indicates the average capacity of print-outs and is designed pursuant to ISO/IEC 19752. The number of pages may be affected by the percentage of image area, operating environment, printing interval, media type and media size.Message Meaning Suggested solutions•Output bin is full•Paper in output bin is full. Remove printed paperThe output tray is full. Remove papers from the output tray, the machine resumes printing. If the problem persists, call for service.•Paper Empty in all trays•Paper is empty in all tray. Load paperThere is no paper in all tray.Load paper in the tray (see "Loading paper in the tray" on page 38).•Paper Empty in MP tray•Paper is empty in MP tray. Load paperThere is no paper in the multi-purpose tray. Load paper in the multi-purpose tray (see "Multi-purpose tray" on page 41).•Paper mismatch [tray type]•[tray type] paper mismatchThe paper sizespecified in the printerproperties does notmatch the paper youare loading.You can select the option between Continue or Cancel. If you select Cancel , the printing job will stop. Load the correct paper in the tray. If you select Continue, printing job will continue.•[tray type] cassette Out•[tray type] cassette is pulled out. Insert it properlyThe tray is not securely latchedClose the tray until it locks into place. If the problem persists, call for service. Message Meaning Suggested solutions](https://usermanual.wiki/Samsung-Electronics-Co/SLM4530NX.User-Manual-Part-2/User-Guide-2436783-Page-24.png)
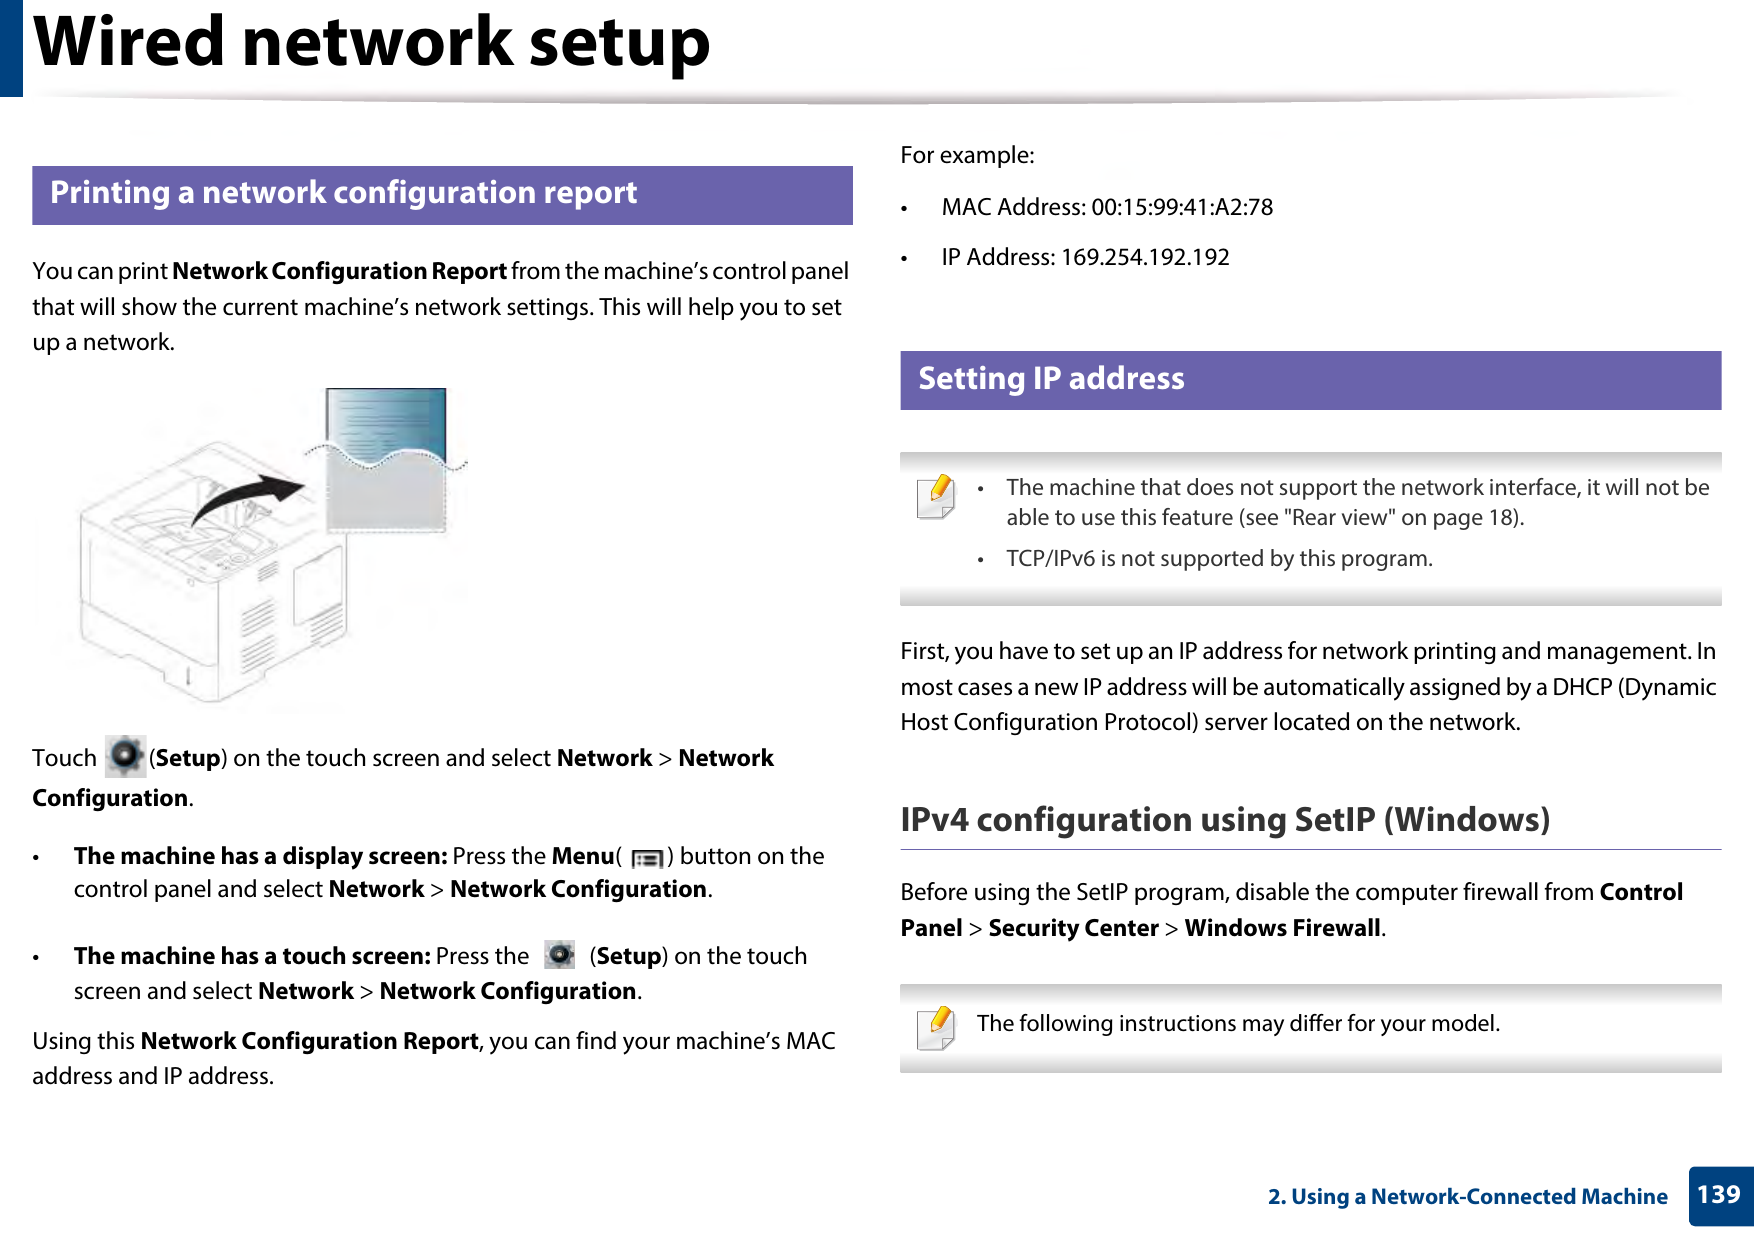
![Understanding display messages1004. Troubleshooting10 Network-related messages11 Misc. messages•Error: [error number]•Input System Failure [error number]. Check [tray type] connectionThere is a problem in the tray.Check the tray connection. If the problem persists, call for service.•Error: [error number]•Input System Failure [error number] : Pull [tray type] out and insert itThere is a problem in the tray.Open and close the tray. If the problem persists, call for service•Paper Low in [tray type]•Paper is low in [tray type]. Load paperRunning out of paper in the tray.Load paper in the tray.•Paper Empty in [tray type]•Paper is empty in [tray type]. Load paperThere is no paper in the tray.Load paper in the tray.Message Meaning Suggested solutionsMessage Meaning Suggested solutions•IP Conflict•This IP address conflicts with that of other system. Check itThe IP address is used elsewhere. Check the IP address or obtain a new IP address.•802.1x Network Error•802.1x authentication failed. Please contact the system administratorFail to authenticate. Check the network authentication protocol. If the problem persists, contact your network administrator.Message Meaning Suggested solutions•Front door is open. Close it•Rear door is open. Close itThe cover is not securely latched.Close the cover until it locks into place.](https://usermanual.wiki/Samsung-Electronics-Co/SLM4530NX.User-Manual-Part-2/User-Guide-2436783-Page-25.png)
![Understanding display messages1014. Troubleshooting•Error: [error number]•Engine System Failure: [error number]. Call for service if the problem persistsThere is a problem in the engine system.Unplug the power cord and plug it back in. If the problem persists, call for service.•Error: [error number]•Fuser Failure: [error number]. Turn off then on. Call for service if the problem persistsThere is a problem in the fuser unit.Reboot the power. If the problem persists, please call for service.•Error: [error number]•Motor Failure: [error number]. Turn off then on. Call for service if the problem persistsThere is a problem in the motor system.Reboot the power. If the problem persists, please call for service.•Error: [error number]•MSOK System Failure: [error number]. Call for serviceThere is a problem in the HDD system.Reboot the power. If the problem persists, please call for service.Message Meaning Suggested solutions•Error: [error number]•HDD System Failure: [error number]. Turn off then on. Call for service if the problem persistsThere is a problem in the HDD system.Reboot the power. If the problem persists, please call for service.•Error: [error number]•LSU Failure: [error number]. Turn off then on. Call for service if the problem persistsThere is a problem in the LSU.Reboot the power. If the problem persists, please call for service.•Error: [error number]•Fan Failure: [error number]. Turn off then on. Call for service if the problem persistsThere is a problem in the fan system.Reboot the power. If the problem persists, please call for service.•Error: [error number]•Sensor Failure: [error number]. Turn off then on. Call for service if the problem persistsThere is a problem in the sensor.Reboot the power. If the problem persists, please call for service.Message Meaning Suggested solutions](https://usermanual.wiki/Samsung-Electronics-Co/SLM4530NX.User-Manual-Part-2/User-Guide-2436783-Page-26.png)
![Understanding display messages1024. Troubleshooting•Error: [error number]•Lamp Failure: [error number]. Turn off then on. Call for service if the problem persistsThere is a problem in the lamp.Reboot the power. If the problem persists, please call for service.•Not proper Room Temp •The room temperature is not suitable for this set use. Please adjust room temperature The machine is in a room with improper room temperature.Move the machine to a room with proper room temperature (see "Specifications" on page 105).•Replace fuser unit•Replace with new fuser unitThe life of the fuser unit has expired.Replace the fuser unit with a new one. If the problem persists, please call for service.Message Meaning Suggested solutions](https://usermanual.wiki/Samsung-Electronics-Co/SLM4530NX.User-Manual-Part-2/User-Guide-2436783-Page-27.png)


![Regulatory information1215. AppendixImportant warning: If the wires in the mains lead do not match the colors marked in your plug, do the following:You must connect the green and yellow wire to the pin marked by the letter “E” or by the safety ‘Earth symbol’ or colored green and yellow or green.You must connect the blue wire to the pin which is marked with the letter “N” or colored black.You must connect the brown wire to the pin which is marked with the letter “L” or colored red.You must have a 13 amp fuse in the plug, adaptor, or at the distribution board.19 Declaration of conformity (European countries)Approvals and CertificationsJanuary 1, 1995: Council Directive 2006/95/EC Approximation of the laws of the member states related to low voltage equipment.January 1, 1996: Council Directive 2004/108/EC, approximation of the laws of the Member States related to electromagnetic compatibility.March 9, 1999: Council Directive 1999/5/EC on radio equipment and telecommunications terminal equipment and the mutual recognition of their conformity. A full declaration, defining the relevant Directives and referenced standards can be obtained from your Samsung Electronics Co., Ltd. representative.You must earth this machine.The wires in the mains lead have the following color code:•Green and Yellow: Earth•Blue: Neutral•Brown: Live Hereby, Samsung Electronics, declares that this [C2620x series] is in compliance with the essential requirements and other relevant provisions of R&TTE Directive 1999/5/EC.The declaration of conformity may be consulted at www.samsung.com, go to Support > Download center and enter your printer (MFP) name to browse the EuDoC.](https://usermanual.wiki/Samsung-Electronics-Co/SLM4530NX.User-Manual-Part-2/User-Guide-2436783-Page-45.png)

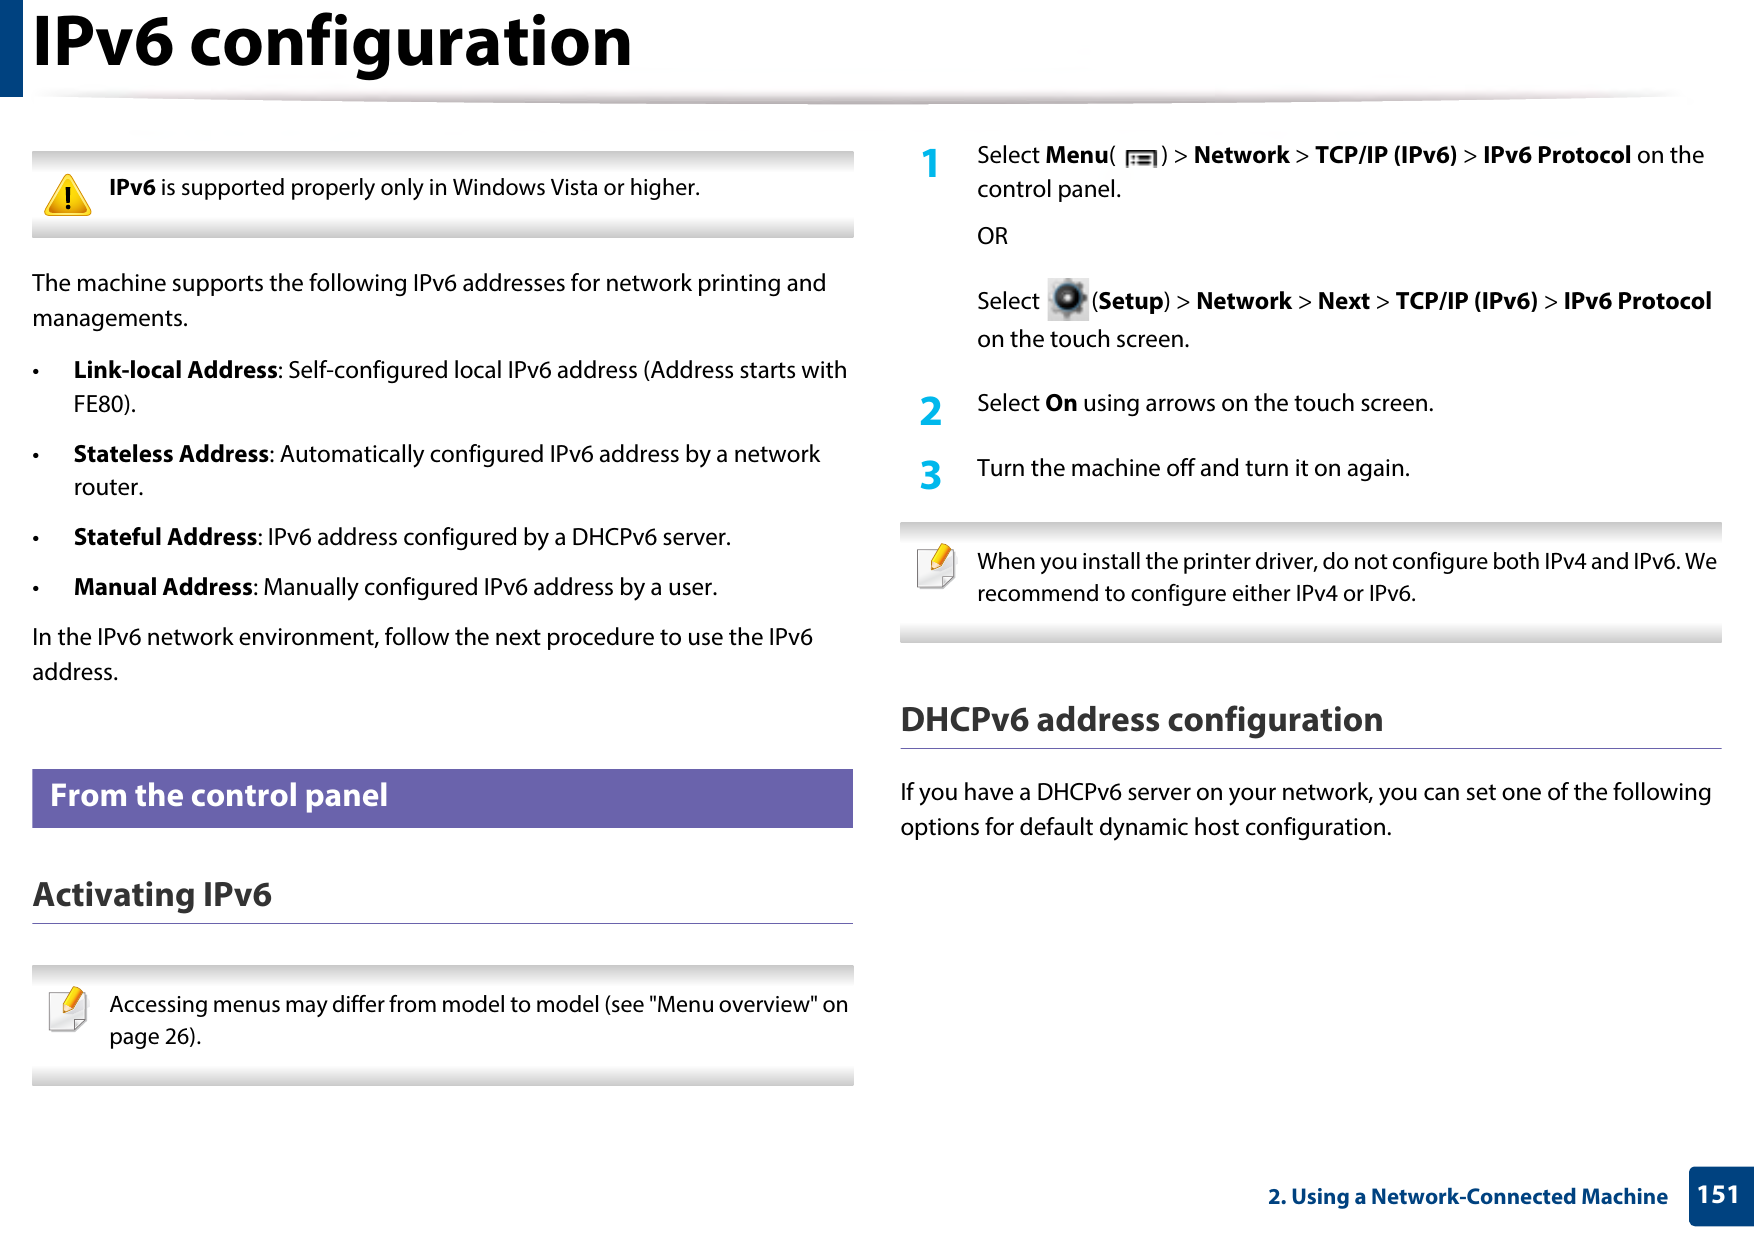
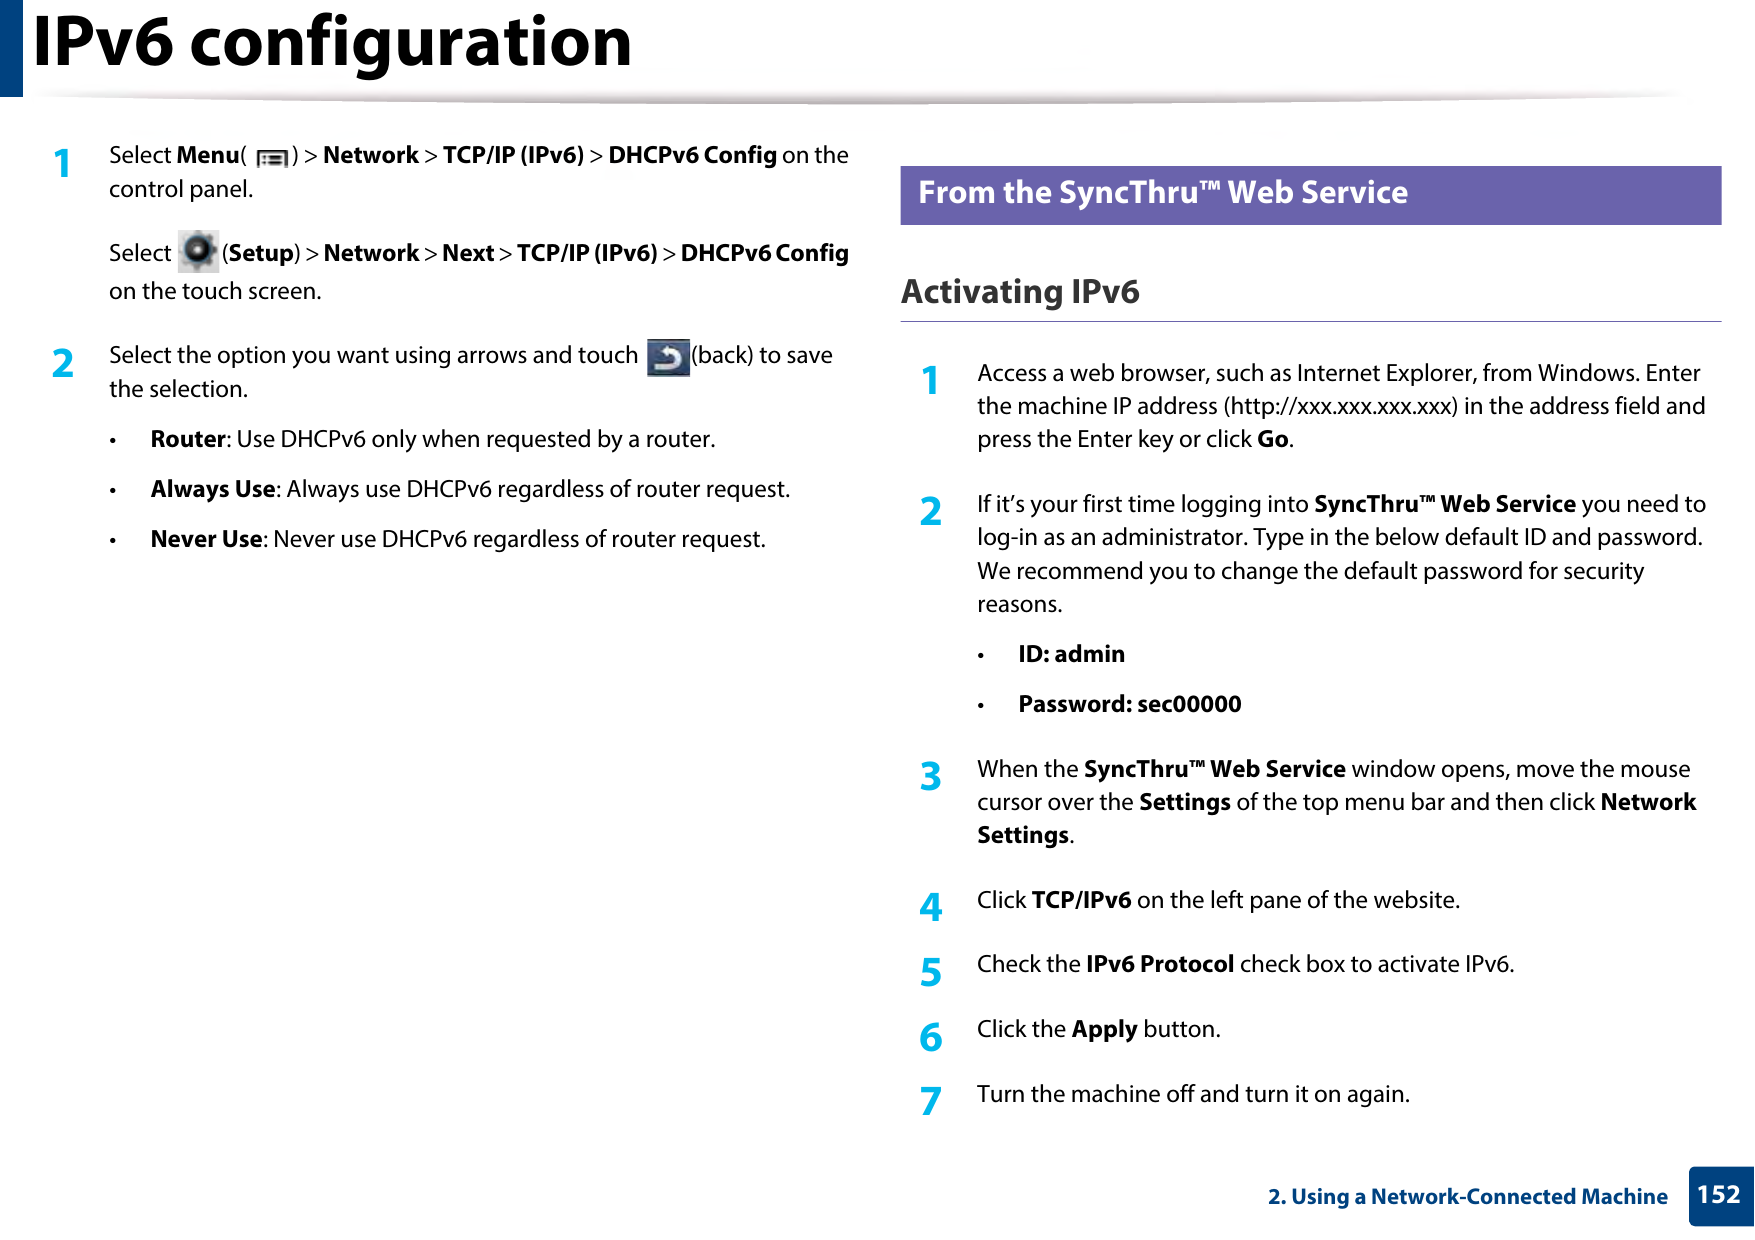
![IPv6 configuration1532. Using a Network-Connected Machine • You can also set the DHCPv6.• To manually set the IPv6 address:Check the Manual Address check box. Then, the Address/Prefix text box is activated. Enter the rest of the address (e.g.,:3FFE:10:88:194::AAAA. “A” is the hexadecimal 0 through 9, A through F). IPv6 address configuration1Start a web browser, such as Internet Explorer, that supports IPv6 addressing as a URL.2 Select one of the IPv6 addresses (Link-local Address, Stateless Address, Stateful Address, Manual Address) from Network Configuration Report (see "Printing a network configuration report" on page 139).•Link-local Address: Self-configured local IPv6 address (Address starts with FE80).•Stateless Address: Automatically configured IPv6 address by a network router.•Stateful Address: IPv6 address configured by a DHCPv6 server.•Manual Address: Manually configured IPv6 address by a user.3 Enter the IPv6 addresses (e.g.,: http://[FE80::215:99FF:FE66:7701]). Address must be enclosed in '[ ]' brackets.](https://usermanual.wiki/Samsung-Electronics-Co/SLM4530NX.User-Manual-Part-2/User-Guide-2436783-Page-75.png)