Samsung Electronics Co SP10WL User Manual Taurus Windows XP English
Samsung Electronics Co Ltd Taurus Windows XP English
Contents
Users Manual part 4 per CRN 23252
8 Users Manual
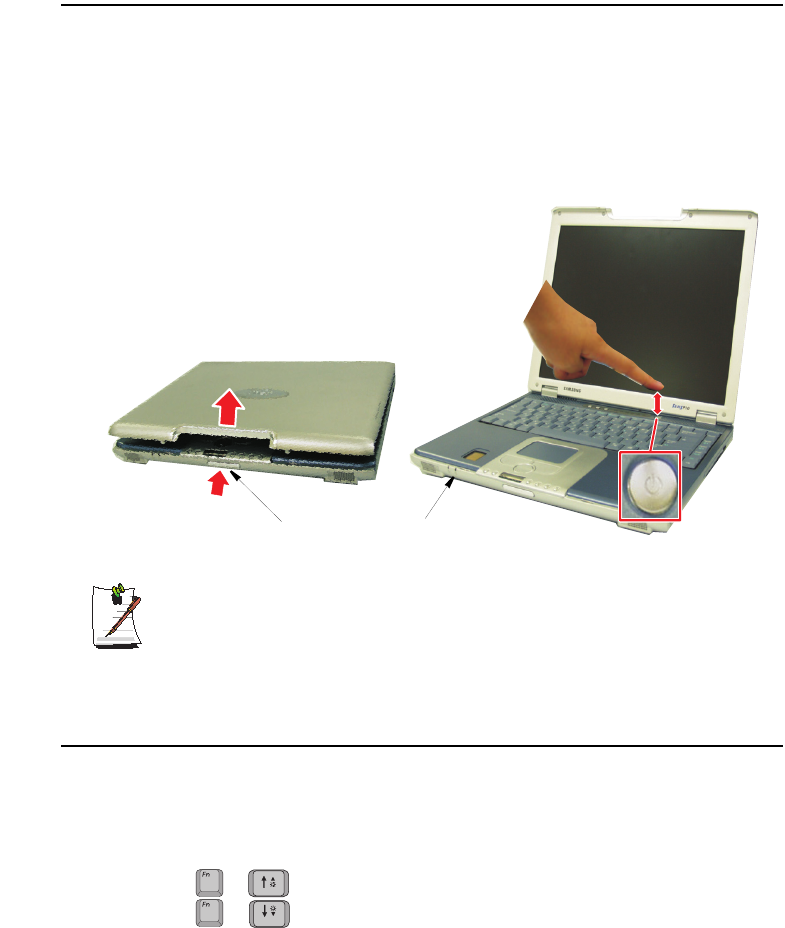
Turning On the Computer
To turn on the computer’s power for the first time:
1. Push the LCD cover button, located on the front of the computer below the MP3/
CD Player.
2. Lift up the cover.
3. Press and then release the power button.
The power light is on when the computer’s power is on.
Initial Computer Startup:
The first time you start your computer you will see the operating system
registration screens. Simply read each screen and follow the simple directions.
You must complete this process in order to use your computer. A tutorial is
provided if you require it.
Adjusting the LCD Display
You may wish to adjust the LCD (Liquid-Crystal Display) when you begin using your
computer. A TFT (Thin-Film Transistor) LCD does not require adjustment for contrast
because the contrast is set to remain at maximum.
To adjust the LCD:
•Press <Fn+Up Arrow> to increase the display brightness.
•Press <Fn+Down Arrow> to decrease the display brightness.
Power Button
Cover Latch Button Power Light
+
+
Taurus (Windows XP) - English.fm Page 8 Tuesday, April 2, 2002 4:13 PM
Using Your Computer for the First Time 9
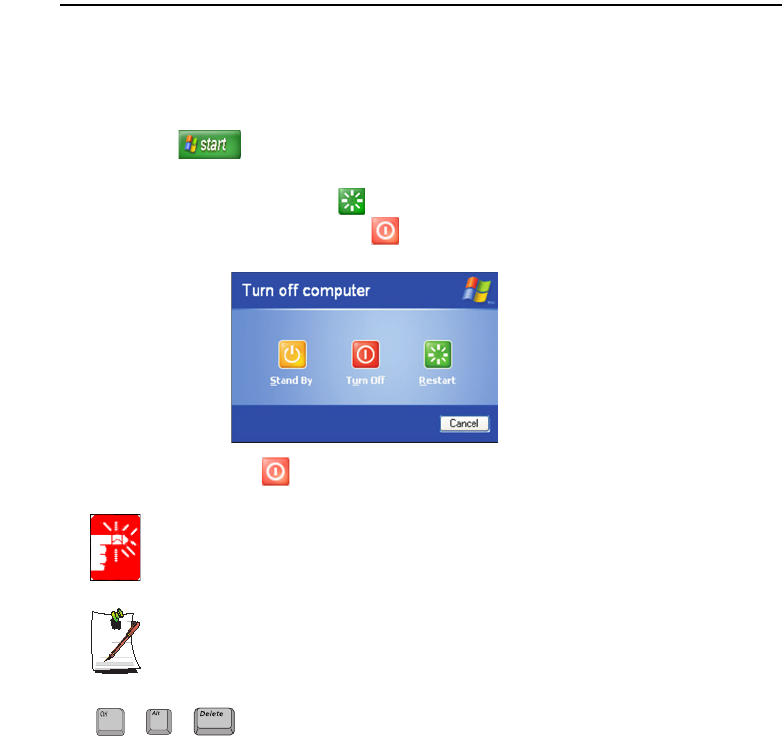
Turning Off Your Computer
Prior to shutting down your computer ensure all of your data and current work are
saved. The system will ask if you wish to save any unsaved work, saving your work
first will speed the shutdown process.
To turn off the computer, complete the following steps:
1. Click on the taskbar.
If you need to restart your computer after software (re)installation or because it is not
responding select the Restart option in step 3 below.
2. Click Shut Down Computer to display the shutdown popup window shown
below.
3. Click Turn Off to complete the shutdown sequence.
Power Off:
If the system does not power off, then press and hold the power button for over
5 seconds. See ”Using Power Management Options” on page 52.
Power Button Functions:
The power button has several functions other than just turning on and off your
computer, see “Using Power Management Options” on page 52.
You can also perform a soft boot by saving your files and pressing
<Ctrl+Alt+Del> to pop-up the “Windows Task Manager” window.
Click Shut Down > Restart.
You can perform a cold boot by pressing the power button for more than 4 seconds to
turn the computer off, waiting more than five seconds, and then pressing the power
button to turn the computer on. The system may perform some extra checks during the
restart.
+ +
Taurus (Windows XP) - English.fm Page 9 Tuesday, April 2, 2002 4:13 PM

10 Users Manual
Tips for Using Your Computer
The following information helps you avoid potential problems as you use your
computer:
Do not try to disassemble your computer. Opening the system chassis voids
your warranty. Only an authorised manufacturer service center can replace or
add any parts inside the chassis.
•Follow all the instructions and cautions in your computer user documentation.
•The LCD has a polarized surface and can be damaged easily. To prevent
damage, avoid touching the screen.
•Use only approved AC adapters, auto adapters, memory modules and other
options.
•Because a notebook computer is small and has restricted air flow around
components, it is more likely to overheat than a desktop computer. A fan inside
your computer runs when needed to help eliminate heat. Make sure the fan vent
on the left side of your computer is not blocked when you use the computer.
Occasionally check the vents and remove any accumulated dust on the outside.
•Avoid using or storing the computer in extremely hot or cold areas, such as a
car on a hot day. Keep the computer away from heaters and out of direct
sunlight. Exposure to excessive heat may damage computer components. If you
have left your computer in a hot place, let it cool down slowly to room
temperature (with the LCD panel open) before using it.
•Do not remove the memory-module compartment door, or try to install a
memory module when the computer is on. (For information on installing
memory modules, see “Installing a Memory Module” on page 65.)
•Set up your computer work area to avoid physical strain. Sit with your back
straight and supported by your chair. Adjust your chair or work table so that
your arms and wrists can remain in a relaxed position, parallel with the floor.
Avoid bending or twisting your wrists as you work. Your hands should “float”
slightly above the keyboard. Refer to a book on office ergonomics for more
information on setting up your work area.
•Take frequent breaks from working at the computer to rest your eyes and
stretch your muscles.
•Remember to save your data files frequently and to make backup copies of your
files.
Taurus (Windows XP) - English.fm Page 10 Tuesday, April 2, 2002 4:13 PM
Using Your Computer for the First Time 11
Travelling with Your Computer
Air Travel
If you are travelling by air, follow these tips:
•Take the computer with you as carry-on luggage. Do not check the computer
with your baggage.
•Allow the computer and disks to go through the X-ray security devices. Do not
hand-carry disks through the walk-through metal detectors, which can cause
loss of data.
•Make sure that the battery is charged or the power cord is easily accessible.
You may be required to turn on the computer for airport security personnel.
•Be prepared to turn off the computer during take off and landing.
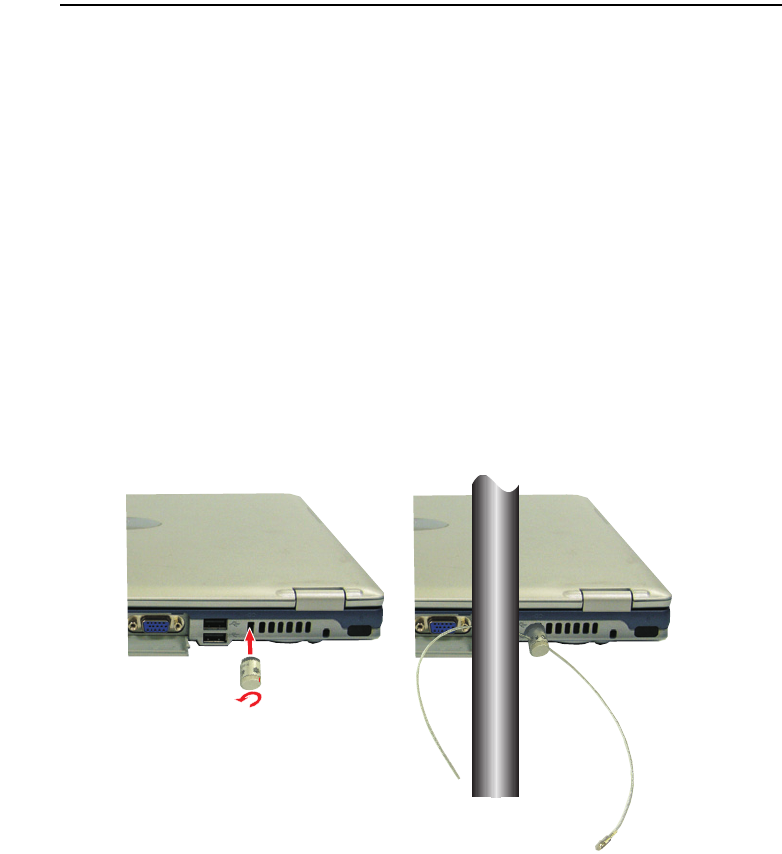
Locking your Computer
As a precaution when you are travelling or using your computer in an unsecured area,
you should keep your computer as safe as possible. An option to do this is the Security
Lock System. Follow the Security Lock System manufacturers instructions for specific
installation and use. The following figure shows generally how to use the lock.
To Lock
From Lock
Taurus (Windows XP) - English.fm Page 11 Tuesday, April 2, 2002 4:13 PM

12 Users Manual
Handling Spills
Do not spill anything on your computer. The best way to avoid spills is to avoid eating
and drinking around your computer. If you do spill something on your computer, turn
off your computer, unplug it immediately, and do the following:
•If you spill liquid on the keyboard, drain as much of the liquid from the
keyboard as possible. Be careful not to let the liquid drip onto the LCD panel.
Allow the system to dry for several days before trying to use it.
•If you spill liquid on an external keyboard or keypad, unplug it and drain as
much of the liquid as possible. Allow the keyboard to sit at room temperature
for a full day before trying to use it.
Sweet liquids leave a sticky residue that may jam the keyboard despite your
efforts to dry it.
•If you spill liquid on the LCD panel, clean it immediately with a soft cloth and
denatured alcohol or a proprietary LCD screen cleaner. Do not use water,
window cleaner, acetone, aromatic solvent, or dry, rough towels to clean it.
Some liquids damage the polarized LCD screen. If your screen is damaged,
contact your authorized manufacturer’s service center for a replacement.
Storing the Computer for Long Periods
If possible, leave the power cord connected to the computer and an electrical outlet
when the computer is not in use. This extends the life of the battery and keeps the
battery fully charged.
If you will not be using the computer for a long period of time (a month or more), you
should charge the battery until it is completely full. After you have done so, remove the
battery from the unit.
Taurus (Windows XP) - English.fm Page 12 Tuesday, April 2, 2002 4:13 PM
14 Users Manual
To clean the computer keyboard, use slightly damp cotton swabs. Scrub the keys and
the surface around the keys.
Do not allow liquid to drip into the keyboard or you may damage the keyboard.
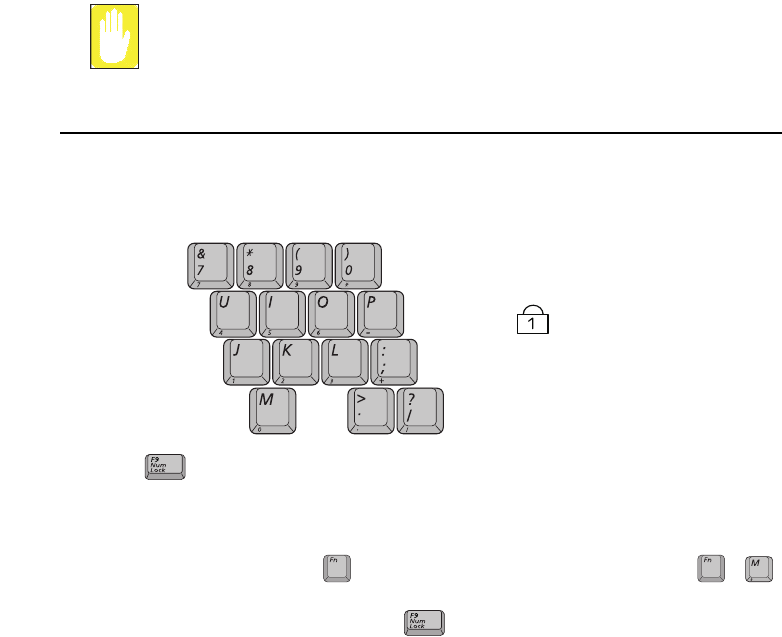
Using the Numeric Keypad
Your keyboard includes a numeric keypad, which is a group of keys that you can set to
type numbers and mathematical symbols, such as the plus sign. A number or symbol
on the right corner of each keypad key shows its numeric function.
Press to turn on the embedded numeric keypad. The numeric functions of the
keypad are enabled and the Num Lock LED turns on. (See ”Reading the System Status
Lights” on page 20 for the location of the Num Lock LED.)
While the numeric functions are enabled, you can temporarily return a key to its normal
function by pressing and the key. For example to type the letter m, press + ,
this operation displays the letter m.
To turn the numeric keypad off, press again. The Num Lock LED turns off.
Num Lock LED
Taurus (Windows XP) - English.fm Page 14 Tuesday, April 2, 2002 4:13 PM
Using the Keyboard 15
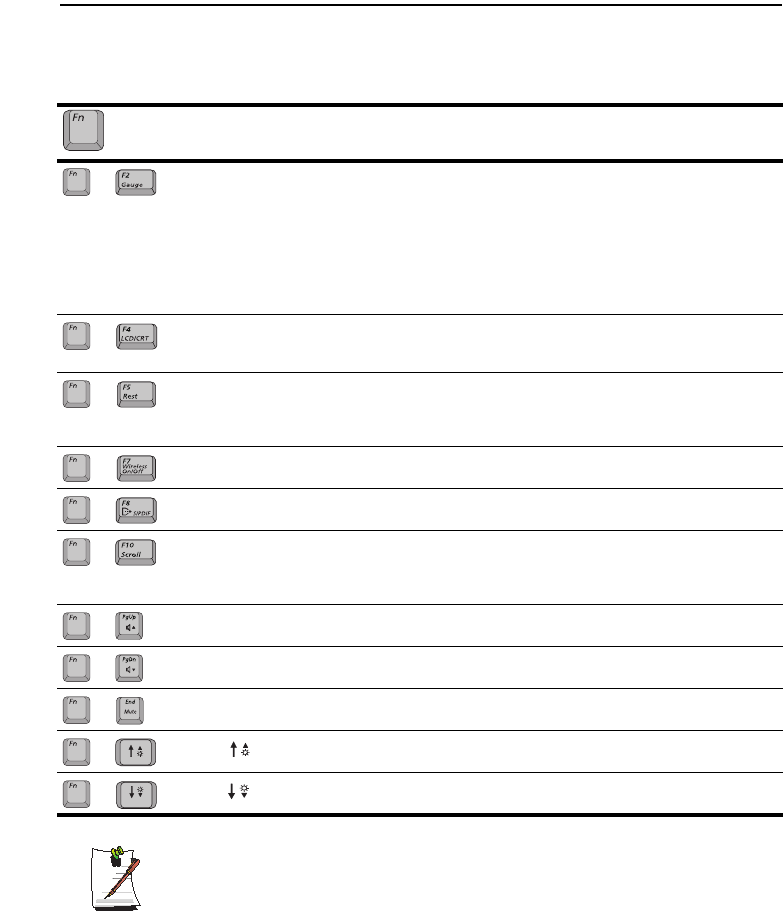
Using Special Function Keys
The function key activates special functions when it is pressed in combination with
another keys. Table 2 shows the special key combinations.
Table 2. Description of Special Function Key Combinations
When you press a function key combination, the system sound may be
temporarily muted.
Key
Combinations Key Name Key Function
F2
Gauge
Gauge Displays the battery gauge in the upper-right corner
of your screen.
The gauge closes in a few seconds, or you can press
<Esc> to close the gauge. (See ”Monitoring the
Battery Charge” on page 43 for more information on
the battery gauge.)
This function will also display status of Wireless LAN
and
S/PDIF functions.
F4
CRT/LCD
CRT/LCD: Switches the display between the LCD, the external
monitor, and simultaneous display on both the LCD
and the external monitor.
F5
Rest:
Rest: Puts the computer into Suspend mode. To resume
normal operation from rest, press the power button.
(See ”Using Power Management Options” on page
52 for more information about the rest mode.)
F7
WLAN
WLAN: Toggles the Wireless LAN function On/Off
F8
S/PDIF
S/PDIF: Toggles the S/PDIF function On/Off
F10
Scroll
Scroll: In some applications, sets the cursor-control keys to
scroll the page up or down while the cursor position
does not change. Pressing key combination again
turns off the scrolling function.
PgUp: Volume up: Increases the audio volume.
PgDn Volume
down:
Decreases the audio volume.
End
Mute:
Mute: Mutes the audio.
Brightness
Up:
Increases the LCD brightness.
Brightness
Down:
Decreases the LCD brightness.
+
+
+
+
+
+
+
+
+
+
+
Taurus (Windows XP) - English.fm Page 15 Tuesday, April 2, 2002 4:13 PM
16 Users Manual
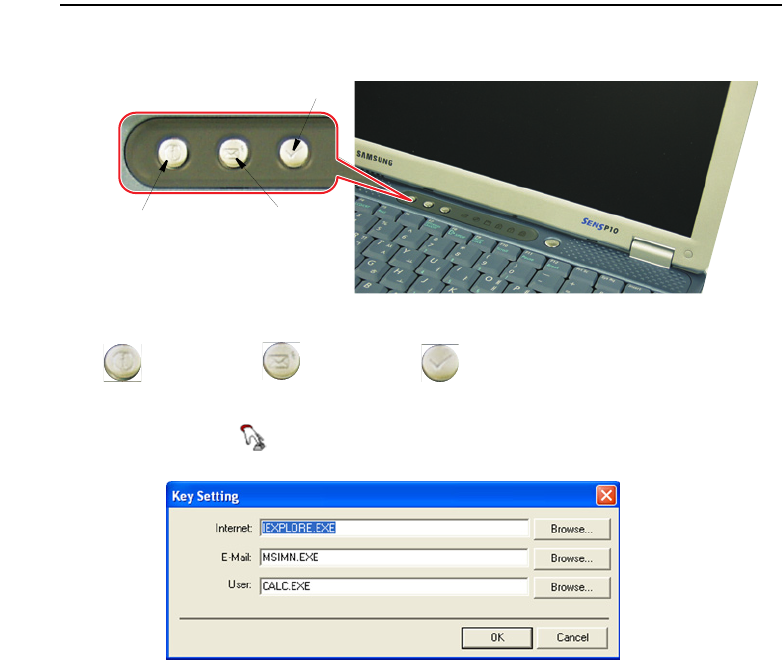
User Defined Buttons (SENS Keyboard)
You may program the three buttons to the left of the power button to start any program
you have installed on your computer.
The default settings for these buttons are:
To reprogram the Sens Keyboard, follow the steps below:
1. Double-click icon on the Windows taskbar, the Key Setting window is
displayed.
2. Select Button you wish to reprogram from the drop down menus in the Key
Setting window.
3. Use the Browse button to locate the program you wish to assign to the SENS
Keyboard button selected.
4. Click on your program choice to select it.
5. Click Open.
6. Click OK to close window and complete programming the Sens Keyboard.
Internet E-Mail - Outlook Windows Calculator
Internet Explorer Outlook Express
User defined program
Taurus (Windows XP) - English.fm Page 16 Tuesday, April 2, 2002 4:13 PM
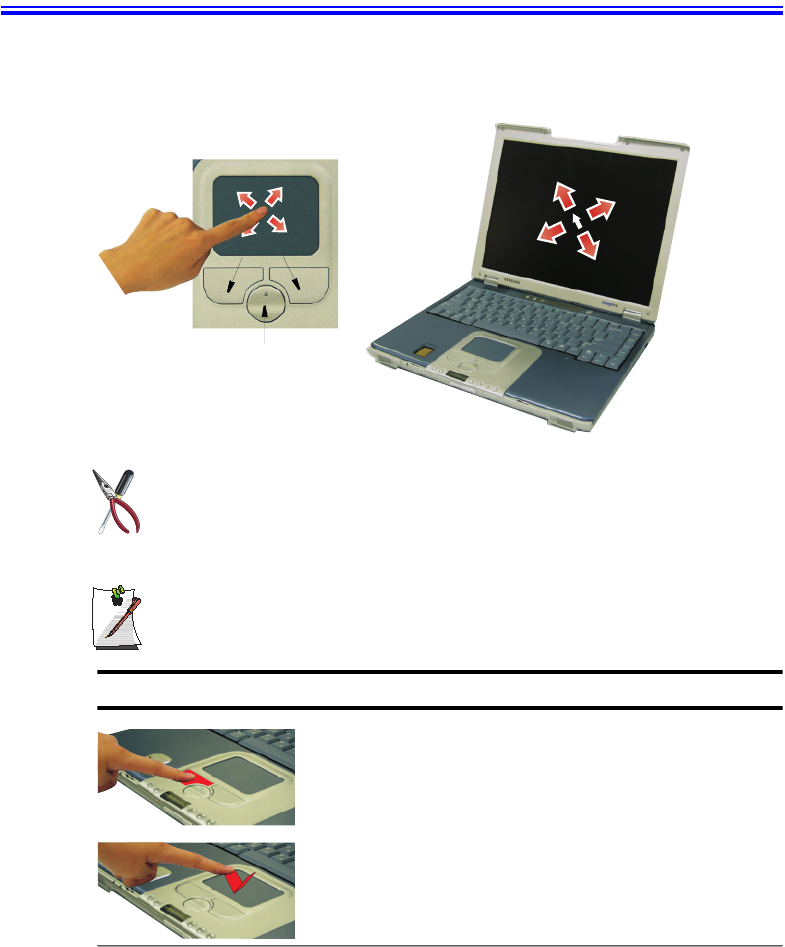
Using the Touchpad 17
Using the Touchpad
Your computer is equipped with a touchpad, which is an integrated-pointing device
that is used to perform standard mouse functions. The touchpad is an advanced and
reliable pointing device that works with a touch of your finger.
Scroll Button Use
The scroll button driver is not installed as part of the original program/driver
installation. If you wish to use the scroll button you must install the scroll button
driver located on the Software CD that comes with your computer.
Press on the touchpad gently. The touchpad responds to light pressure.
d
Action Process and Comment
Click/Tap
Process
Depress the touchpad left button and release or position the pointer
over the object and Quickly tap the touchpad once with your finger.
This action is called clicking.
Comment
This will cause a process to begin or select an object on the screen.
Touchpad
Mouse Buttons
Scroll Button
Taurus (Windows XP) - English.fm Page 17 Tuesday, April 2, 2002 4:43 PM
18 Users Manual
PS/2 Mouse Menu:
You may change the setup in Setup > Advanced Menu
Disabled : Prevents any installed PS/2 mouse from functioning, but frees
up IRQ12.
Enabled : Forces the PS/2 mouse port to be enabled regardless if there is
a mouse present.
Auto Detect : Enables the PS/2 mouse only if present.
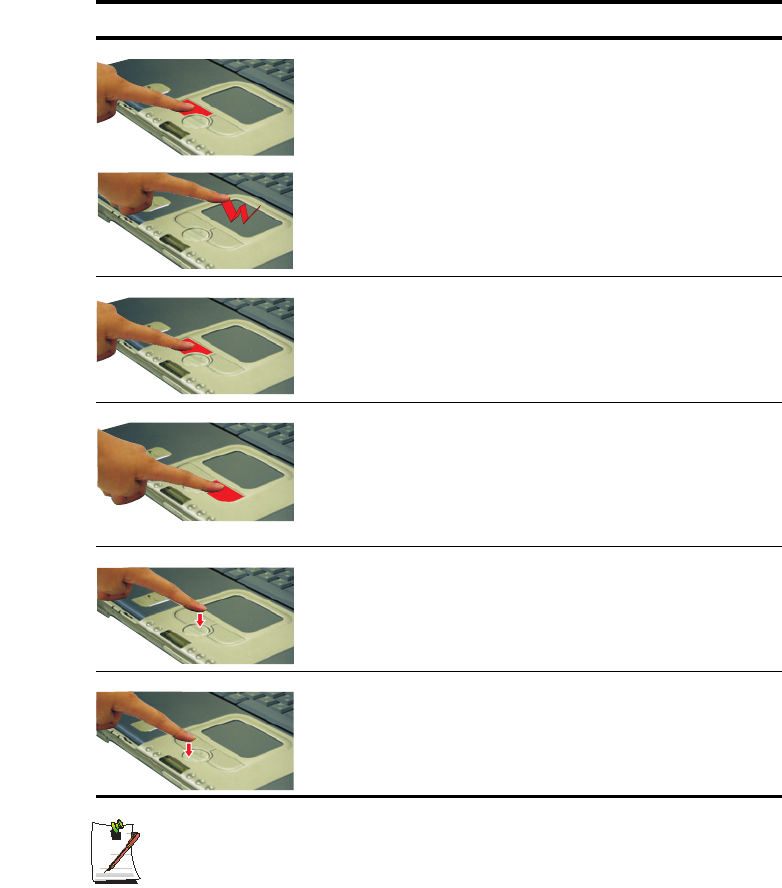
Double-click/Tap
Process
Quickly click the left touchpad button two times or position the pointer
over the object and Quickly tap the touchpad twice with your finger.
This action is called Double-clicking.
Comment
This will cause a process to begin or open a file folder.
Click-Hold
Process
Depress the left touchpad button and do not release.
Comment
This is used to move/drag objects to new locations. See ”Drag (Move)”
on page 19.
Right-click Process
Position the pointer over the object. Quickly press and release the right
button once.
This action is called Right-clicking.
Comment
This is usually used to obtain information about an object or
access a short cut menu.
Scroll Up
Process
Place your finger on the top half of the button to scroll up the current
window.
Comment
Moves the current window down.
Scroll Down
Process
Place your finger on the bottom half of the button to scroll up the current
window.
Comment
Moves the current window up.
Action Process and Comment
Taurus (Windows XP) - English.fm Page 18 Tuesday, April 2, 2002 4:13 PM
Using the Touchpad 19
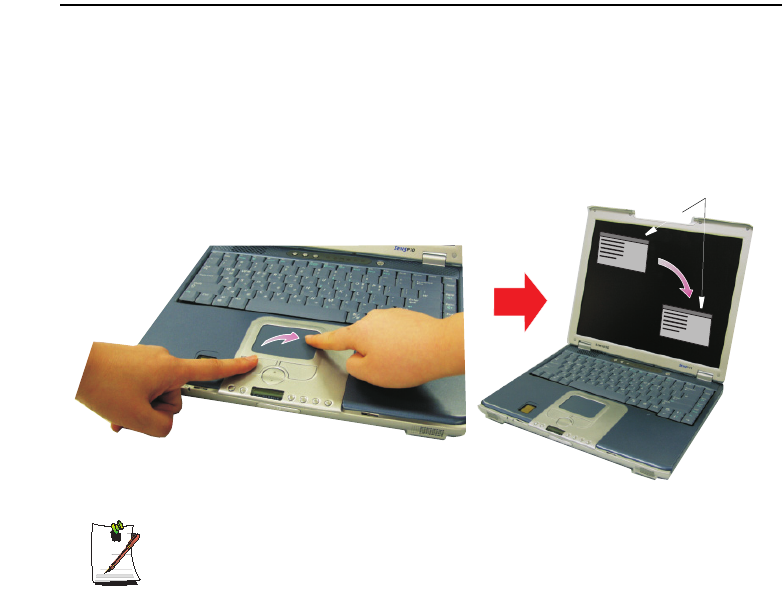
Drag (Move)
To move a window on the desktop, complete the following:
1. Click the window title bar or icon in the bottom of the window which you want
to drag using the touchpad.
2. Press the left touchpad button and hold it.
3. Drag the window using the touchpad.
Area or Multiple item selection:
The drag function may be used to select an area or multiple items in an area
by clicking in one area and then dragging to create a selection window. The
items inside the window will be selected.
Cursor in Windows
Title Bar
1 Click the Window
Title Bar and Hold
1
2 Drag your finger to
move the window
2
Taurus (Windows XP) - English.fm Page 19 Tuesday, April 2, 2002 4:44 PM
20 Users Manual
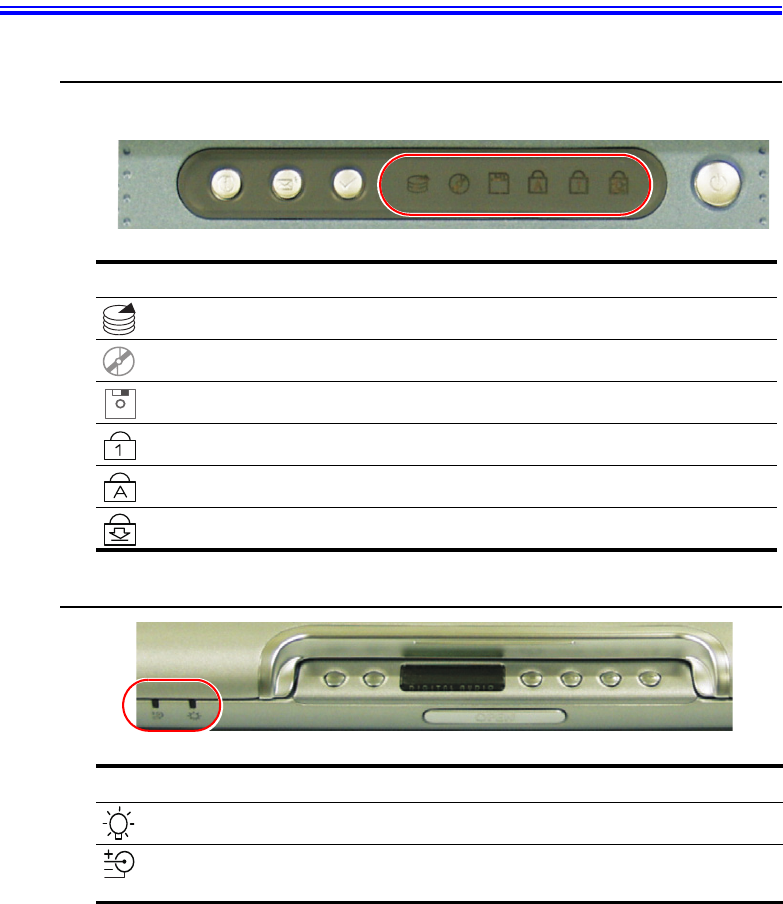
Reading the System Status Lights
System Top
System Status lights show the status of computer functions.
System Bottom
LED Name Function
HDD Access Blinking Green - HDD is being accessed.
CD Access Blinking Green - CD is being accessed.
FDD Access Blinking Green - FDD is being accessed.
Num Lock Changes a portion of the keyboard to a numeric keypad.
See ”Using the Numeric Keypad” on page 14.
Caps Lock Changes all alpha or letter input into capital letters.
No changes occur to numeric and special keys.
Scroll Lock Scroll lock in certain software.
LED Name Function
Power Green - System power on.
Blinking - Standby mode.
Battery Status Green - No battery pack installed/battery fully charged.
Amber - Charging.
Blinking - Bad Battery
Taurus (Windows XP) - English.fm Page 20 Tuesday, April 2, 2002 4:13 PM
Connecting to the Internet 21
Connecting to the Internet
This section explains how to connect you to the internet. For details on how to establish
the connection contact the Internet Service Provider [ISP] or system administrator
[SysAdmin].
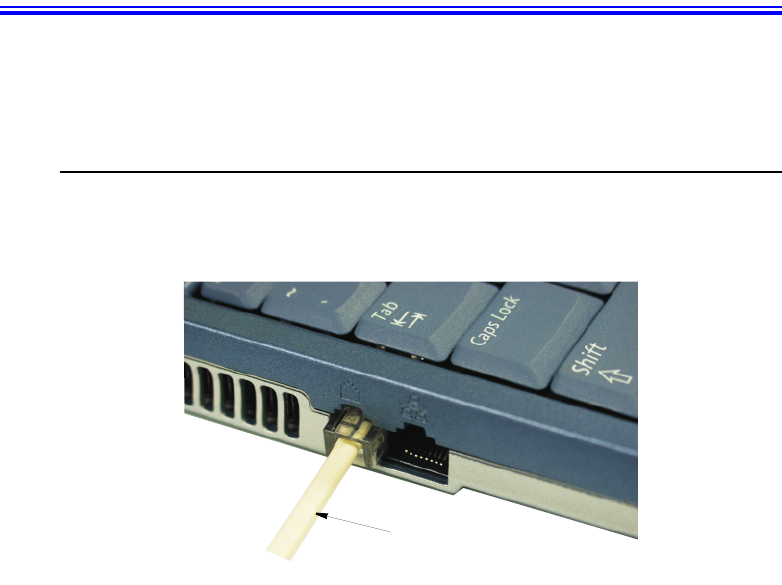
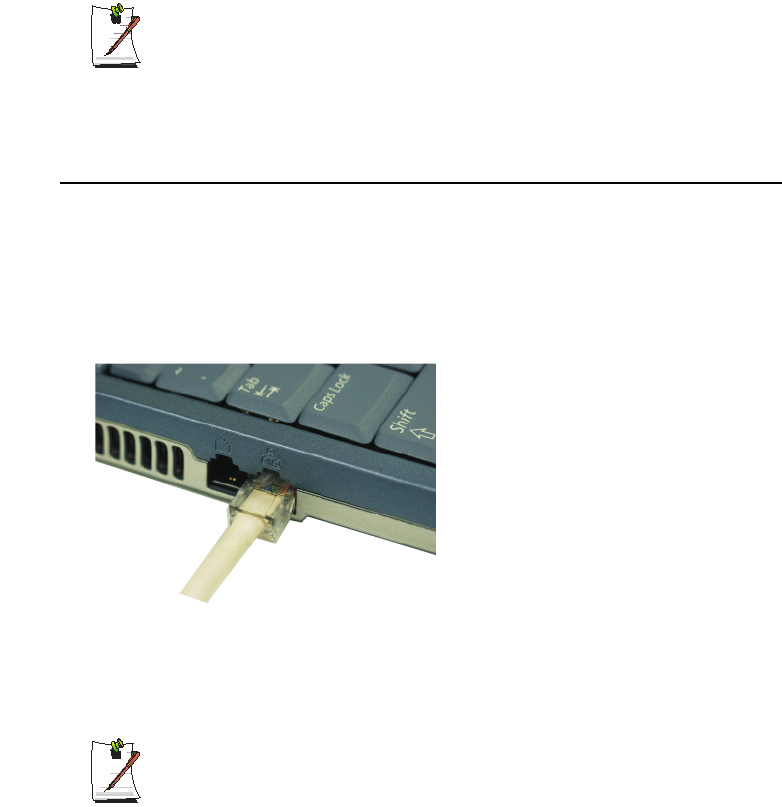
Using the Modem
Install the Modem cable by simply plugging the cable into the modem slot as shown in
the figure below.
Your Notebook computer will have a Modem/LAN installed.
1. Contact your Internet Service Provider to obtain information or CD required to
make the connection in your area.
2. After the cable is connected create a “Dialup” connection by clicking
Start > Control Panel > Network and Internet Connections.
3. Click Set up or change your Internet connection > Setup to start the connection
wizard.
4. Follow the instructions in provided in the Make New Connection wizard.
Modem Cable
(Minimum 26 AWG)
Taurus (Windows XP) - English.fm Page 21 Tuesday, April 2, 2002 4:13 PM
22 Users Manual
Precautions Before Use
Country Selection
Country Selection:
Because your computer is very mobile you must ensure you select the
country you are calling from is selected correctly, otherwise you may
experience connection problems.
To change the country selection proceed as follows:
1. Click Start > Control Panel > Network and Internet Connections.
2. Click Phone and Modem Options.
3. Click on the connection you wish to edit in the Locations: box.
4. Click Edit in the Dialing Rules Tab
5. Select the Country/region you are calling from in the General tab.
6. Click OK to close the “Edit Locations” box.
7. Click OK to close “Phone and Modem Options” box.
Digital Phone Lines:
If you connect the modem to a digital phone line (such as a company
4-wire system), the modem may be damaged.
DOS support
•Windows XP: Does not support pure DOS mode and the modem does not
support a DOS box in Windows. So you cannot use a
communication application which runs under DOS.
Using the Modem on a PBX system
If you use a Windows Communication Program:
1. Click Start > Control Panel > Network and Internet Connections.
2. Click Phone and Modem Options.
3. Click Properties in the Modems tab section.
4. Check off “Wait for dial tone before dialing” check box in the Modem tab section.
5. Click OK to close the dialog box.
6. Click OK to close “Modem Properties” dialog box.
Taurus (Windows XP) - English.fm Page 22 Tuesday, April 2, 2002 4:13 PM
Connecting to the Internet 23
If you use a simple terminal program (i.e. hyper terminal):
Type the “ATX3&W” or “ATX3” command as an initialization command.
MODEM Notes:
1. In order to use the 56K feature, be sure to check if the standards supported
by the on-line service provider and the modem are identical.
2. If you use a PBX phone system, you can not connect using the 56K mode.
3. Internationally connected calls will be limited to 33.6K (Max.)
Using the LAN
You may connect to the network using either a LAN cable or by establishing a wireless
connection if factory option is installed.
Cable Connection
Install the LAN cable by simply plugging the cable into the slot in the left side of the
computer.
Your computer’s LAN adapter is ready to use for most situations, however if your
system does not have a DHCP server or you wish to personally configure your LAN
connection, proceed as outlined in “Configuring Network Environment” below.
Network Protocols:
You may need to consult your SysAdmin if their network protocols and settings
are required for your LAN environment.
Taurus (Windows XP) - English.fm Page 23 Tuesday, April 2, 2002 4:13 PM
24 Users Manual
Configuring Network Environment
Configure the Network Adapter as follows:
1. Click Start > Control Panel > Network and Internet Connections
2. Click icon (Network Connections).
Configure Adapter Only (Not Connected to Network)
If your network is not active or the cable is NOT connected double-click the
icon (Labeled Local Area Network) then follow the instructions starting
with step 4 below.
3. Right-click the icon (Labeled Local Area Network) then click Properties
button.
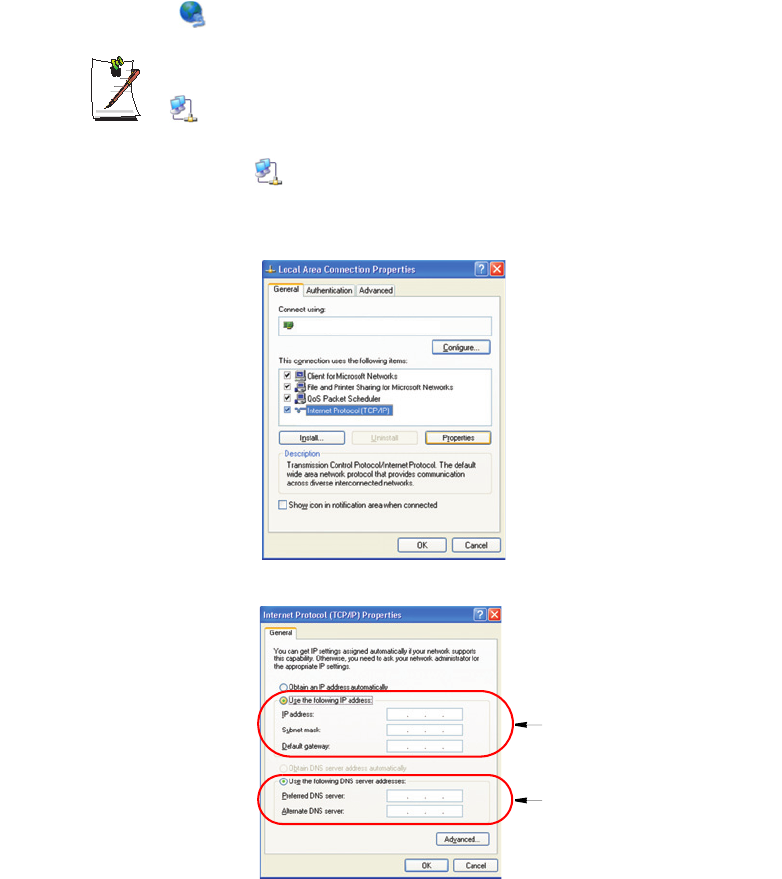
4. Select Internet Protocol (TCP/IP) in the “This connection uses the following
items:” box.
5. Click Properties. The TCP/IP Properties window opens.
Intel(R) Pro/100 VE Network Connection
Step 7
Step 8
Taurus (Windows XP) - English.fm Page 24 Tuesday, April 2, 2002 4:13 PM

Connecting to the Internet 25
6. Click “Use the following IP address” in the General tab
7. In the “Use the following IP address” box, enter your IP address:, subnet mask:
and Default Gateway:.
8. In the “Use the following DNS server addresses” box, Enter your Preferred DNS
server: and Alternate DNS server:.
9. Click OK when you finish the TCP/IP set-up.
Wireless Connection (Factory Option)
Your computer’s wireless LAN adapter is ready to use for most situations, however if
your system does not have a DHCP server or you wish to personally configure your
wireless LAN connection, proceed as outlined in “Configuring Network Environment”
below.
Regulatory Notice for Channel Use in France
The number of channels that can be used for wireless LAN differs from country
to country.
In France however, use only 4 channels (2446.5~2483.5MHz) when using
wireless networks.
•Channel Allocation: Channel 10, 11, 12, 13.
The table below shows the Windows taskbar icons for the wireless LAN.
To display relative Signal Strength:
1. Double-click the icon in the taskbar to display the Wireless Network
Connection Status window. This window also displays connection Status, Speed,
Duration and Activity.
Network Protocols:
You may need to consult your System Administrator if their network protocols
and settings are required for your wireless LAN environment.
Icon Name Description
Connection
Established
Displays if connection is available.
Connection
Unavailable
Displays if connection is unavailable.
Taurus (Windows XP) - English.fm Page 25 Tuesday, April 2, 2002 4:13 PM
26 Users Manual
Configuring Network Environment
Configure the Wireless Network Adapter as follows:
1. Click Start > Control Panel > Network and Internet Connections
2. Click icon (Network Connections)
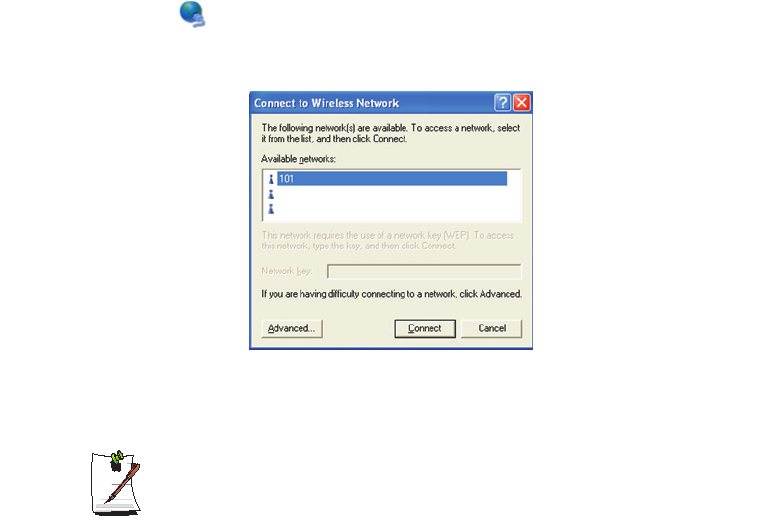
3. Double-click the Wireless Network Connection icon. The Connect to Wireless
Network window pops up.
4. Select one of the available networks in the Available networks section, if
displayed.
No networks are displayed
Office - Consult your system administrator.
Home - Verify your access point is working properly.
5. Click the Connect button. The Wireless Network Connection icon in the control
panel will show your connection is Enabled. You may proceed using the network
as normal wired LAN connections.
Change Wireless Network Access Point as follows:
1. Right-click the Wireless Network Connection icon.
2. Click View Available Wireless Networks. The Connect to Wireless Network
window pops up.
3. Select the new network from the available networks in the Available networks
section, if displayed.
4. Click Connect button. The Wireless Network Connection icon in the control panel
will show your connection is Enabled. You may proceed using the network as
normal wired LAN connections
General Office Net
Supervisor Office Net
Taurus (Windows XP) - English.fm Page 26 Tuesday, April 2, 2002 4:13 PM
Using the Flex-Bay 27
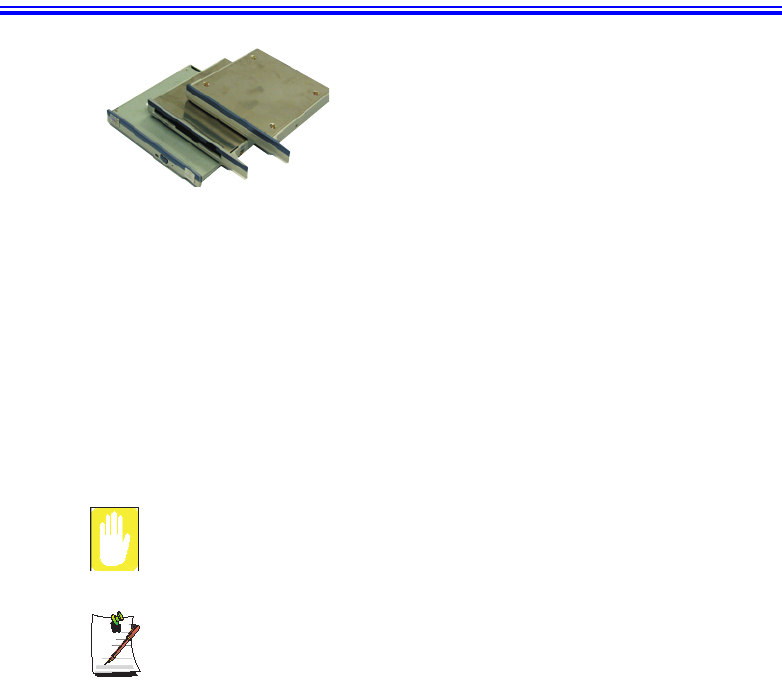
Using the Flex-Bay
If your operating system is Windows, you must install the Softex Bay Manager
software on the software CD in order to use the Bay Manager Utility to hot-
swap the devices.
If you do not use Windows, make sure that the computer’s power is off before
you remove or install any devices.
The Flex-Bay provides an impressive array of
secondary storage devices listed below:
CD-ROM drive:
Shipped with some computers is also an available option.
CD-ROM R/W drive:
Shipped with some computers is also an available option.
DVD-ROM drive:
Shipped with some computers is also an available option.
DVD/CD-RW Combo drive:
Shipped with some computers is also an available option.
Optional secondary hard drive:
Available as an option for your computer.
Taurus (Windows XP) - English.fm Page 27 Tuesday, April 2, 2002 4:13 PM