Samsung Electronics Co SP10WL User Manual Taurus Windows XP English
Samsung Electronics Co Ltd Taurus Windows XP English
Contents
Users Manual part 5 per CRN 23252

Using the Flex-Bay 29
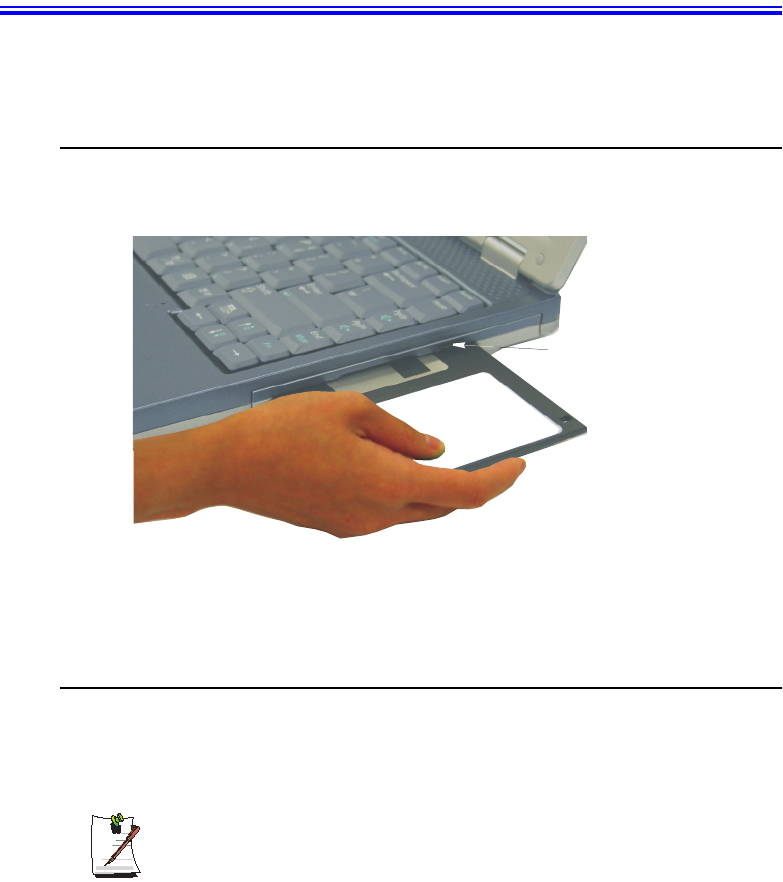
5. Slide the device out.
6. Slide the new device in
7. Click OK. The message “Please wait until the system processes the device
change” appears again.
8. Click OK to close the Softex Bay Manager Utility.
Swap a Flex-Bay Device - Power Off
Device Swap
To remove a device with the power off proceed as follows:
1. Turn the computer’s power off.
2. Tilt the computer up & locate the smart bay latch.
3. Slide and hold the device latch toward the rear of the computer.
4. Slide the device out.
5. Carefully slide the new device into the bay.
6. Push the device in until it is flush with the chassis and the Flex-Bay latch snaps
into place. Your computer’s operating system automatically recognizes the device
in the Flex-Bay and configures your computer accordingly when power is restored.
Taurus (Windows XP) - English.fm Page 29 Tuesday, April 2, 2002 4:13 PM
30 Users Manual
Using the Disk Drives
To use the Floppy drive or the CD-ROM drive you must verify it is installed in the
flexbay slot. To swap devices see “Using the Flex-Bay” on page 27.
Using the Floppy Disk Drive
Your computer comes with a 1.44 MB, 3.5-inch, floppy drive.
To use a floppy disk in your computer, insert it into the floppy drive.
To remove a floppy disk, press the floppy disk eject button on the front of the floppy
drive.
To protect the data on your floppy disks, follow the manufacturers guidelines.
Using the CD/DVD-ROM Drive
Compact discs are designed so that you can easily insert one into the computer when
you need it, and then remove it. See ”Using the Flex-Bay” on page 27 for information
on installing the DVD-ROM drive into the computer.
DVD Notes:
A DVD player is a factory option and if you ordered this option you will have to
install the provided DVD software to view the DVD Title.
Floppy Disk Eject Button
Taurus (Windows XP) - English.fm Page 30 Tuesday, April 2, 2002 4:13 PM
Using the Disk Drives 31
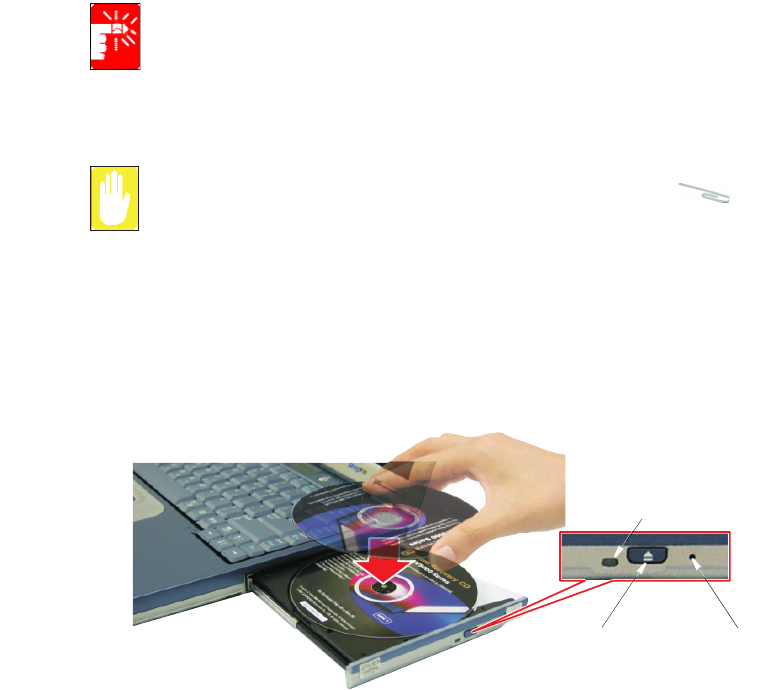
1. Press the button on the CD-ROM or DVD-ROM drive, and the tray slides out.
(Do not lean on the tray; because it will not support much weight.)
CD/DVD Drive Warnings:
Do not place reflective objects other than the CD/DVD disks in the disk slot
because of possible hazardous laser emissions. The laser beam used in this
CD/DVD-ROM drive is harmful to the eyes. Do not attempt to disassemble the
CD/DVD-ROM drive. Refer servicing to your authorized service center.
Do not touch the CD/DVD lens, doing so may damage the device.
CD/DVD Precautions:
The tray may be stuck, in which case straighten out a paper clip, insert
it into the Emergency Eject hole in the front of the CD/DVD-ROM and push it
until the tray ejects.
A LED on the drive tray is on when the computer is reading from a CD. Do not
remove a disc when this LED is on.
To clean a CD/DVD, wipe from the center outwards with clean and dry cloth.
Remove the CD/DVD when the drive activity LED is off.
2. Insert a CD/DVD, label side up (or remove a disc, if you have finished using it).
3. Push the tray in gently to close the drive tray.
Install and/or start a CD-based program as you would run a program on a floppy disk.
Eject Button
CD-ROM Light
Emergency
Eject Button
Taurus (Windows XP) - English.fm Page 31 Tuesday, April 2, 2002 4:13 PM
32 Users Manual
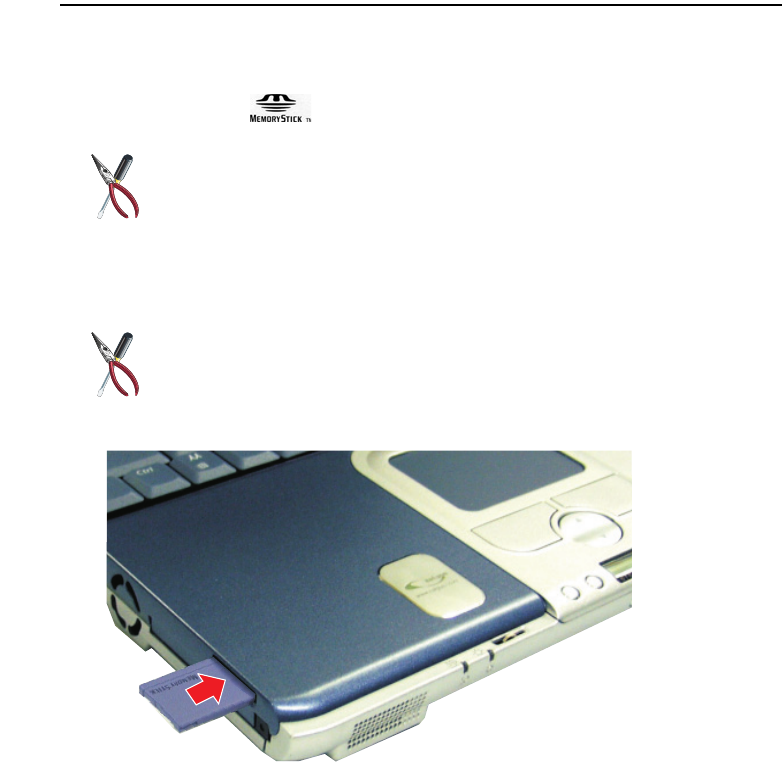
Using the Memory Stick (Factory Option)
The Memory Stick is a factory option that will increase your computer storage capacity as well
as increase data portability. The Memory Stick may used in many types of equipment such as
digital cameras and PDAs for example.
Memory Stick and are a trademarks of the Sony Corporation.
Memory Stick Support
The Magic Gate model is not currently supported.
Inserting the Memory Stick
To insert the memory stick proceed as follows:
Ensure you Insert the Memory Stick into the slot with the correct orientation
(Name Up) so that the Memory Stick will operate properly and be recognized
by the computer.
1. Slide the Memory stick into the slot until you feel the first latch catch.
2. Then push the Memory stick in until it clicks into place.
Taurus (Windows XP) - English.fm Page 32 Tuesday, April 2, 2002 4:13 PM
Using the Disk Drives 33
Using the Memory Stick
The Memory Stick is used the same as the FDD drive on your computer but with much
larger capacity, currently up to 128MB.
Formatting the Memory Stick
The Memory Stick may need to be formatted before use, if so insert it into the
slot and format it the same as the FDD Drive.
Protecting Data on the Memory Stick
To prevent overwriting/deleting your data in the Memory Stick, move the slide
lock to the “Lock” position.
to see the contents of the Memory Stick:
1. Double-click “My Computer” on the desktop, the My Computer window opens.
2. Double-click the icon in the Devices with Removable Storage section of the
window.
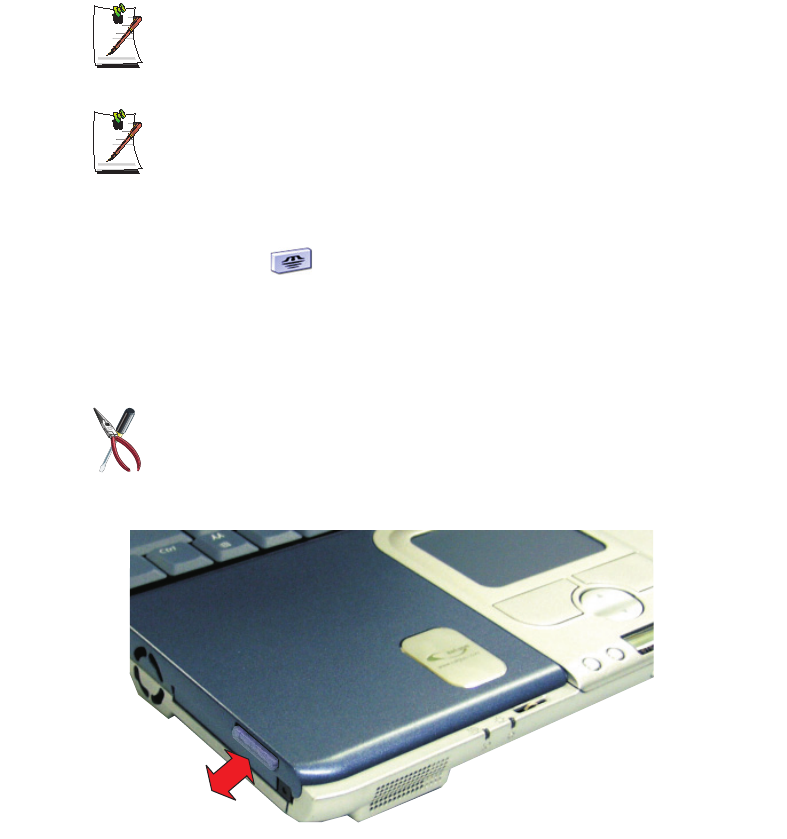
Removing the Memory Stick
To use the Memory Stick proceed as follows:
Ensure any operations using the Memory stick have completed before you
remove it. Otherwise you will corrupt your data.
1. Push the Memory Stick in until it clicks and release.
2. The Memory Stick will pop out ~ 1 cm and then you can slide it out.
Taurus (Windows XP) - English.fm Page 33 Tuesday, April 2, 2002 4:13 PM

34 Users Manual
Working with PC Cards
By installing PC Cards, you can add functions to your notebook computer similar to
those found on add-in boards for desktop computers. Available PC Cards include:
•Input/output, such as modem, network, video capture, and SCSI cards.
•Storage, such as hard drive and flash memory cards.
Your computer includes the following PC Card support:
•One PC-Card slot: You can install Type I or II cards in the slot.
•CardBus hardware and software: CardBus enables the computer to use 32-bit
PCMCIA Cards. Windows supports 32-bit and 16-bit PC Cards.
Maintaining PC Cards
To maintain your PC Cards, follow these guidelines:
•Keep cards away from excessive heat, direct sunlight, and liquids.
•Do not drop, bend, flex, or crush cards when handling.
•Keep dust, magnets, and static electricity away from PC Cards.
•When a card is not in use, carry it in its protective carrying case.
•Some PC Cards include cables that extend from the back of the cards. Be
careful not to bend or put excessive strain on these cables.
Taurus (Windows XP) - English.fm Page 34 Tuesday, April 2, 2002 4:13 PM
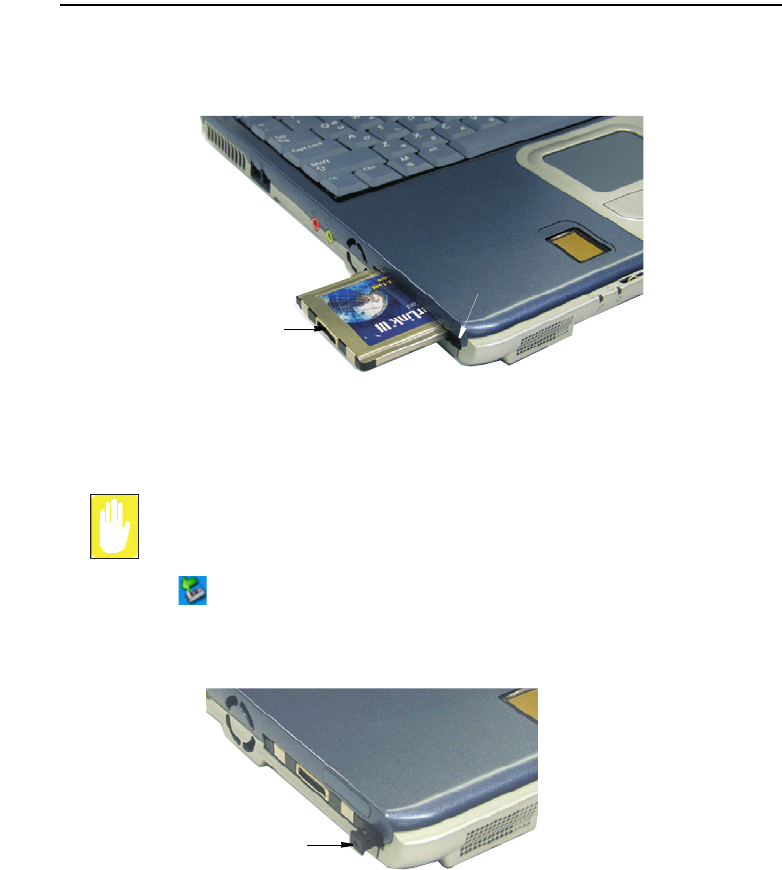
Working with PC Cards 35
Using PC Cards
To insert a PC Card into a slot:
1. Push the slot door in with the PC Card.
2. Align the card with a slot and insert the card into the slot until it locks in place.
Windows automatically assigns computer resources (such as communication ports and
memory addresses) to a PC Card installed in your computer.
To remove a PC Card from your computer:
Use the following procedures to remove PC Cards, or you may lose data that
is being stored to a card.
1. Click icon on the taskbar.
2. Select the card currently in use, and click the Stop button.
The eject button for the card slot operates in two steps, therefore to remove a PC
Card:
3. Push the eject button once to pop it outward then push the eject button again to
eject the card.
4. Pull the card out of the PC Card slot.
PC Card :
Insert PC card with product
information facing up
PCMCIA Card
Eject button
PCMCIA Card
Eject button
Taurus (Windows XP) - English.fm Page 35 Tuesday, April 2, 2002 4:13 PM
36 Users Manual
Multi Media Functions/Equipment
Media Player
The Windows Media player is used to play audio files while the computer is on. You
can play audio/video CD files using the Windows Media Player, as well as watching
TV, video and listening to the radio through internet. The instructions to play a video
CD-ROM are the same as the instructions for the audio CD below.
Playing a Audio/Multimedia CD
To play an CD follow the instructions below:
1. Insert a compact disc into your CD-ROM drive.
2. Press the eject button on the CD-ROM drive to open the CD-ROM device.
3. Insert a CD, label side up.
4. Carefully push the tray in to close the drive tray. The Windows Media Player
button appears on the taskbar if not already there, and the music begins to play. If
the disk does not play click Start > All Programs > Accessories >
Entertainment > Windows Media Player.
CD LED On:
A LED on the drive tray is on when the computer is reading from a CD. Do not
remove a disc when this LED is on.
Removing the Audio/Multimedia CD
To remove the CD follow the instructions below:
1. Click Start > All Programs > Accessories > Entertainment > Windows Media
Player to open the Windows Media Player window, if not already open.
2. Click Stop in the Windows Media Player window or simply close the Windows
media player.
3. Press the button on your CD-ROM drive. The drive tray opens and you can remove
the CD from the CD-ROM drive.
4. For more information on playing compact discs, see the Help menu in the
Windows Media Player window.
Taurus (Windows XP) - English.fm Page 36 Tuesday, April 2, 2002 4:13 PM

Multi Media Functions/Equipment 37
MP3/CD Player
The MP3/CD Player can play music CDs and MP3 files while the computer is off. It
will not, however play video CDs.
Button Operation
The buttons & display for the MP3/CD Player operate as follows:
Button Name Function
Volume Down Decreases speaker volume when MP3/CD Player is on.
Volume Up Increases speaker volume when MP3/CD Player is on.
MUTE Press the <Volume Down + Volume Up> buttons simultaneously
for ~ 1 sec. to mute the sound.
Track Display Indicates power on => and total tracks available on CD and
track playing => .
The blinks when the music file is paused.
Stop/Eject Stops & Ejects the Audio CD.
Press the button ~ 3 seconds to turn off power.
MP3/CD Player Power
CD Play/Pause
Starts/Pauses the Audio CD and MP3 Files.
Previous Track/Song
Fast Search Reverse
Changes the Audio CD to the previous track/song.
Next
Track/Song
Fast Search Forward
Changes the Audio CD to the next track/song.
Lock Press the <Stop/Eject + Volume Down> buttons simultaneously
for ~ 3 sec. to lock the MP3/CD Player buttons.
Unlock Press the <MP3/CD Player Power CD Play/Pause + Volume
Down> buttons simultaneously for ~ 3 sec. to unlock the MP3/CD
Player buttons and energize the MP3/CD Player.
+
+
+
Taurus (Windows XP) - English.fm Page 37 Tuesday, April 2, 2002 4:13 PM
38 Users Manual
Using the MP3/CD Player
Play an Audio CD
1. Verify the computer is off and that a CD-ROM device is in the flex-bay.
MP3/CD Player Power Buttons:
If a CD-ROM device is not in the flex-bay, the MP3/CD Player power button
will not energize the MP3/CD Player player.
Computer Button Operation:
All computer and SENS keyboard buttons are non functional while MP3/CD
Player is operating except the Computer Power Button.
2. Press the MP3/CD Player power button until the icon is displayed in the track
display window [Labeled: DIGITAL AUDIO].
3. Press the eject button on the CD-ROM drive or the button on the MP3/CD
Player button bar.
4. Insert a Audio CD into your CD-ROM drive label side up.
5. Press the button on the MP3/CD Player.
Pause/Resume an Audio CD
1. Press the CD button to pause the CD.
2. Press the button again to restart the CD.
Stop an Audio CD
1. Press the button to stop and eject the CD.
2. Remove the Audio CD, then close the tray.
3. Press the MP3/CD Player power button for ~ 3 seconds to turn off the MP3/
CD Player player.
Fast Search an Audio CD
1. Press the or buttons for ~1 second while the music is playing to start Fast
Search.
2. Press the button and or buttons to stop the Fast Search.
Taurus (Windows XP) - English.fm Page 38 Tuesday, April 2, 2002 4:13 PM
Multi Media Functions/Equipment 39
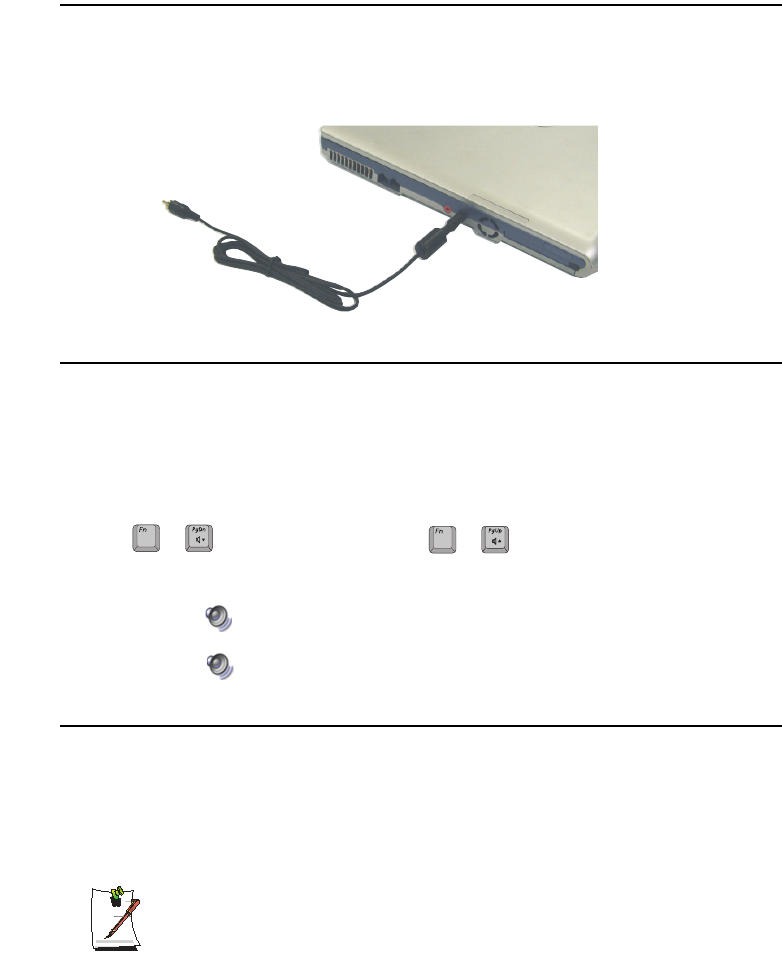
Dolby Digital & Dolby Theater System
Your computer supports Dolby Digital & Dolby Theater System through a shared
Headphone-S/PDIF jack, located on the left side of the computer. You must use a
3.5-mm (mono)- to RCA cable to use the S/PDIF function as shown in the figure
below.
Volume Control
The instructions below are for controlling speaker volume when the computer is on. To
control speaker volume when the MP3/CD Player only is on see “MP3/CD Player” on
page 37.
Using the Keyboard
Changing the volume with your keyboard.
Use to decrease the volume or to increase the volume.
Using the Volume Control Icon
Double-click icon in the active program tray. The Volume Control window pops
up. Use this window to adjust the volume. You can pop up a simple volume slider by
a single click icon.
Movie Maker
You can edit audio and video data using this Movie Maker included with Windows XP.
It is also possible to make a slide show with each frame or picture.
To start the program:
Click Start > All Programs > Accessories > Windows Movie Maker.
Please refer to the on-line help manual to operate the Windows Movie Maker.
++
Taurus (Windows XP) - English.fm Page 39 Tuesday, April 2, 2002 4:13 PM

40 Users Manual
Using the Battery
Your computer uses a smart rechargeable Lithium-ion (Li-ion) battery pack for power
when the AC adapter is not attached to an electrical outlet. The smart battery gives a
accurate measurement of the current battery capacity which helps extend operating
time by enabling effective power management in operating systems that take
advantage of the accurate information supplied by the battery.
Charging the Battery
Your computer’s battery starts charging automatically when you connect the power to
the computer and to an electrical outlet. If the computer is off, the battery charges faster
than if the computer’s power is on.
Approximate charging times for the Li-Ion battery are
•3 hours with the computer off.
•6 hours with the computer on.
While the battery is charging normally, the battery charge light on the computer is red.
When the battery is fully charged, the light changes to green.
When you use a new battery pack for the first time or use a battery after a long period
of storage, the initial battery life is shorter than normal. Normal battery life resumes
after a few discharge-recharge cycles.
Follow these rules for charging your battery:
•A battery normally discharges power when not used for long periods of time.
Be sure to recharge the battery every two months when it is not in use.
•Make it a practice to discharge your battery fully before recharging the battery.
This can help extend the life of the battery.
•Do not attempt to charge the battery in temperatures of under 5oC or over 45oC
All batteries eventually wear out and lose the ability to hold a charge. You may
need to replace your battery pack after a year of average usage.
Taurus (Windows XP) - English.fm Page 40 Tuesday, April 2, 2002 4:13 PM

Using the Battery 41
Safely Using the Battery
Follow these guidelines to safely use the battery:
•Turn off your computer and unplug it if you accidentally:
– Expose the equipment to liquid.
– Drop, jar, or damage the computer.
•Use only approved battery chargers.
•Do not disassemble the battery, heat it above 100°C, or burn it. The battery
used in this computer may cause a fire or chemical burn if mistreated.
•Your computer's rechargeable battery may be considered hazardous waste. If
you replace your battery with a new one:
– Keep the old battery out of the reach of children.
– Dispose of the old battery promptly.
– Make sure that you follow all local requirements when you dispose of the
old battery.
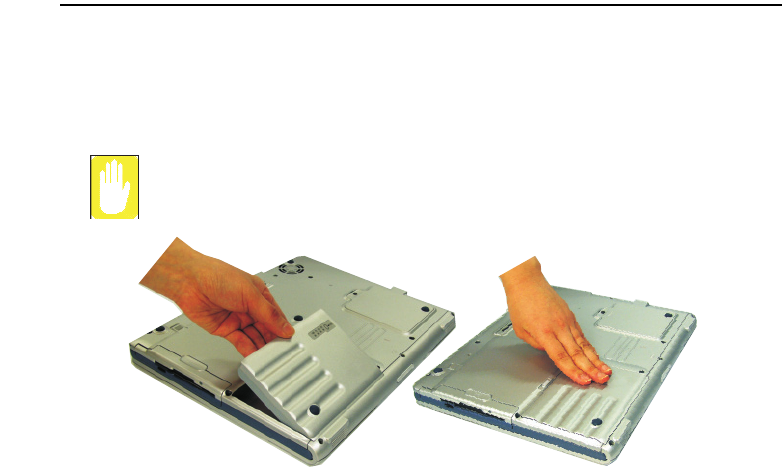
Removing the Battery
Your computer comes with the battery pack inserted in the computer.
To remove the battery from the computer:
1. Turn the computer’s power off.
2. Close the LCD panel, and turn the computer over so that the bottom of the unit
faces up.
3. Slide the battery compartment latch toward the left side of the computer and hold,
this raises the battery slightly.
4. Slip your fingernail under the edge of the battery and pull it up and then grab the
battery and remove it from the compartment.
Taurus (Windows XP) - English.fm Page 41 Tuesday, April 2, 2002 4:13 PM
42 Users Manual
Installing the Battery
To install the battery pack:
1. With the computer’s power off, close the LCD panel and turn the computer over
so the bottom of the unit faces up.
Insert the battery into the battery compartment, ensuring the correct
orientation so that the battery fits in its slot properly.
2. Place the battery inside and against right side of the computer battery compartment
at an angle of approximately 30 degrees.
3. Push the battery down until the latch snaps into place, securing the battery.
Taurus (Windows XP) - English.fm Page 42 Tuesday, April 2, 2002 4:13 PM
Using the Battery 43
Monitoring the Battery Charge
Battery life is affected by factors such as the power-management settings in System
Setup, the applications you use, and the brightness settings of the LCD. Under normal
usage, the battery charge lasts approximately 2.5 hours.
Battery life estimates are subject to variation. The actual life of your battery
may be less than the estimates given in the manual.
You can monitor the charge of the battery pack installed in your computer by using the
Power Meter or Battery Gauge.
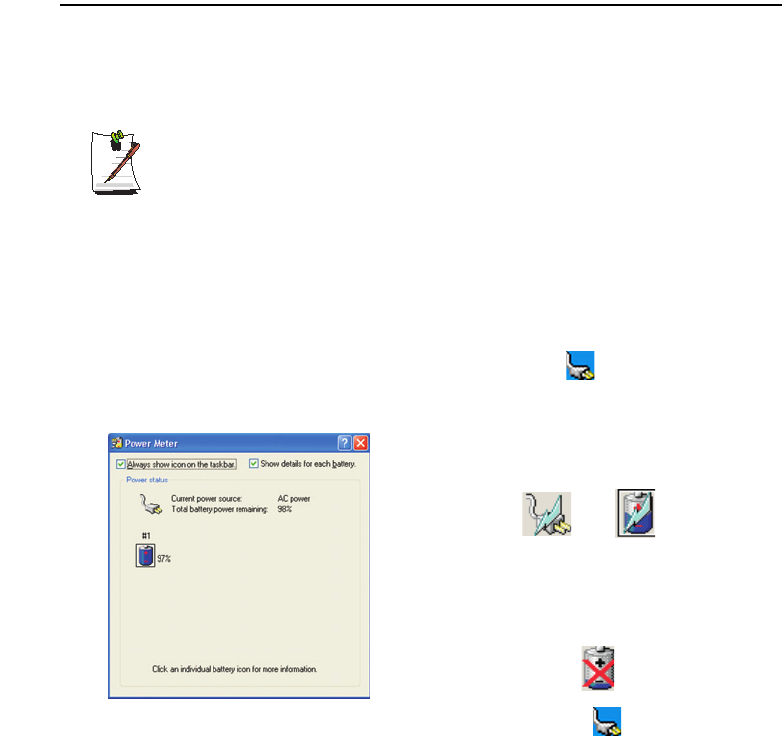
Power Meter
The Power Meter displays the charge of the batteries and the current source of
computer power, AC or batteries. You may monitor the battery charge or usage by
using the “Power Meter”. To access the power meter click icon on the task bar or
click Start > Control Panel > Performance and Maintenance > Power Options >
Power Meter Tab.
You may also check battery charge by moving the cursor to the icon, a small dialog
box will display the % of charge.
The Power Status icons shown below are displayed
during Battery Charging Operations
At ~15% and 10% remaining battery power the
current power source and the battery Icons
respectively change to the icon shown below and
you should follow the instructions in “Battery
Warnings” section below
Taurus (Windows XP) - English.fm Page 43 Tuesday, April 2, 2002 4:13 PM
44 Users Manual
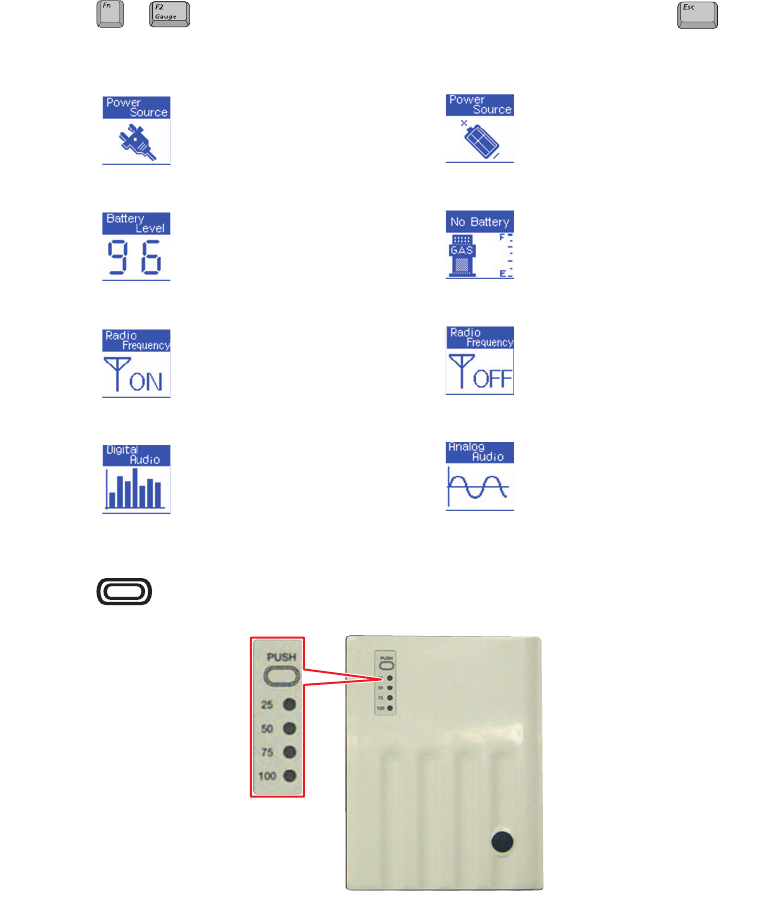
Battery Gauge
You may display the battery gauge while you are in any program by pressing
. While the battery gauge is being displayed, all keys except are
disabled. The battery gauge is only displayed for a few seconds.
You may also determine the charge of your battery by simply pushing the symbol
below the word PUSH located on the bottom of the battery. The green LEDs
will illuminate to show you the percentage of charge remaining in the battery.
Power Source: (Top Right)
Indicates that the computer is
powered by the AC adapter.
Indicates that the computer is
powered by the battery.
Battery Level: (Lower Right)
Indicates the approximate
amount of the primary battery
charge remaining.
Indicates the computer is on
AC power only.
(No Battery Present).
Radio Frequency: (Top Left)
Wireless LAN On Wireless LAN Off
Digital/Analog Audio: (Lower Left)
Digital Audio On: Indicates the
S/PDIF / Headphone jack is set
for digital output.
Digital Audio Off: Indicates the
S/PDIF / Headphone jack is set
for analog output.
+
Taurus (Windows XP) - English.fm Page 44 Tuesday, April 2, 2002 4:13 PM

Using the Battery 45
Battery Warnings
If the battery charge is low (about 10%) you have ~ 5–10 minutes of battery life left.
You should:
•Save your work and,
•Connect the power cord to the computer or turn off the computer and install a
fully charged battery.
You can adjust the battery alarm features by using the operating systems power
management program (Start > Control Panel > Power Options in Windows).
If you cannot run your computer from the battery and the battery will not charge when
you attach the power cord, the problem may be that:
•The battery temperature is below 0°C or over 45°C. If you think the battery
temperature is too hot or too cold, turn off the computer, remove the battery,
and let the battery reach room temperature. Then try charging the battery again.
•The battery is defective. Replace the battery with a new battery.
Battery Calibration
Calibrating your battery once a month is one of the recommended methods of
increasing your computer’s battery life. To calibrate the battery complete the following
steps:
Calibration Notes:
You should start the battery calibration process with a fully charged battery,
battery status LED is green. The power meter may not show 100%.
Before you commence the battery calibration process you should fully charge,
then fully discharge and finally fully recharge the battery again.
1. Disconnect the AC power adapter after turning off the system.
2. Restart your computer and press <F2> to enter BIOS setup.
3. Using the arrow keys, highlight Smart Battery Calibration in the Power menu.
4. Press Enter to start calibration process. The calibration usually takes 2 to 3 hours
depending on the current battery charge.
5. When the calibration process is complete, recharge the battery fully.
Taurus (Windows XP) - English.fm Page 45 Tuesday, April 2, 2002 4:13 PM
46 Users Manual
Using System Setup
The System Setup (BIOS) program enables you to configure your computer hardware
and set security and power-savings options. The settings you choose are stored in
battery-maintained CMOS memory that saves the information even when the
computer’s power is turned off. When your computer is turned back on, it is configured
with the values found in this memory.
Run System Setup if you get a message prompting you to run the program. You may
also want to run System Setup, particularly the first time you use your computer, to set
the time and date, use security or power-management features, or alter the settings of
other features.
BIOS Caution:
If you are not familiar with BIOS setup and what the parameters mean, seek
help from a person who is knowledgeable. Incorrect settings may cause your
system to “Crash”.
Your computer’s version of System Setup may not include all the fields listed
here or may include additional fields. Field names and order of appearance
can vary according to the version of the BIOS (basic input/output system) on
your computer.
Starting System Setup
To start System Setup, turn on your computer and then press and hold until the
System Setup screen appears.
Table 3. System Setup Menus
To open the menu you need to use, use the left or right arrow keys to select the menu
name.
Menu Function
Main Changes the basic system.
Advanced Configures advanced features on your computer.
Security Enables security features, including passwords and backup
and virus-check reminders.
Power Configures power-management features.
Boot Specifies the order of boot devices and configures boot
features.
Exit Specifies how to exit System Setup.
Taurus (Windows XP) - English.fm Page 46 Tuesday, April 2, 2002 4:13 PM
Using System Setup 47
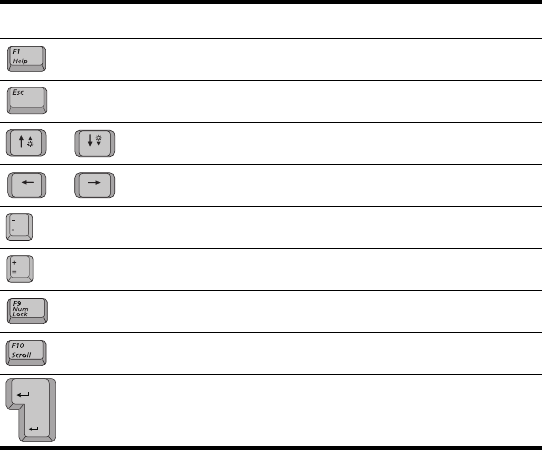
Table 4. System Setup Navigation Keys
Navigation Key Function
Displays the General Help window.
Exits the current menu.
Moves the cursor up and down between fields.
Selects different menus. Pressing the ESC key at the Main
menu brings you to the Exit menu.
Scrolls backwards through the options for the highlighted field.
Scrolls forward through the options for the highlighted field.
Sets the parameters for the current menu to their default
values.
Sets the parameters for the current menu to their previous
values.
Executes commands or opens a submenu.
or
or
Taurus (Windows XP) - English.fm Page 47 Tuesday, April 2, 2002 4:13 PM
48 Users Manual
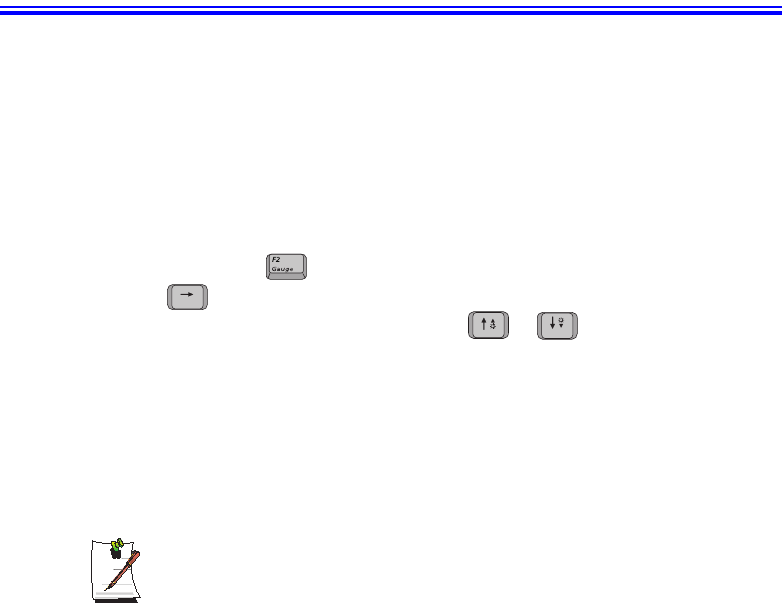
Changing Booting Priority
The Boot menu in System Setup enables you to select the booting device and to set
booting options.
Boot Device Priority field enables:
You to select the order in which the computer attempts to boot from different devices.
The field has four (4) options: CD-ROM Drive, Removable Devices, Hard Drive
and Network Boot.
To change the booting device priority, choose the device positions by completing
the following:
1. At startup, press to open System Setup.
2. Use to select the Advanced CMOS Setup menu.
3. Highlight the 1st Boot Device option with keys.
4. Press <Shift+Plus> keys until the option moves up in the list to the desired
position or press <Minus> key until the option moves down in the list to the
desired position.
5. Press <Esc> to return to the Exit menu.
6. Press <Enter> or <F10> to exit and save your changes.
7. Press <Enter> again to restart the computer.
If you want to start the system using a bootable CD, change the CD-ROM
Drive to be the 1st Boot Device.
or
Taurus (Windows XP) - English.fm Page 48 Tuesday, April 2, 2002 4:13 PM