Samsung Electronics Co SP10WL User Manual Taurus Windows XP English
Samsung Electronics Co Ltd Taurus Windows XP English
Contents
Users Manual part 6 per CRN 23252
48 Users Manual
Changing Booting Priority
The Boot menu in System Setup enables you to select the booting device and to set
booting options.
Boot Device Priority field enables:
You to select the order in which the computer attempts to boot from different devices.
The field has four (4) options: CD-ROM Drive, Removable Devices, Hard Drive
and Network Boot.
To change the booting device priority, choose the device positions by completing
the following:
1. At startup, press to open System Setup.
2. Use to select the Advanced CMOS Setup menu.
3. Highlight the 1st Boot Device option with keys.
4. Press <Shift+Plus> keys until the option moves up in the list to the desired
position or press <Minus> key until the option moves down in the list to the
desired position.
5. Press <Esc> to return to the Exit menu.
6. Press <Enter> or <F10> to exit and save your changes.
7. Press <Enter> again to restart the computer.
If you want to start the system using a bootable CD, change the CD-ROM
Drive to be the 1st Boot Device.
or
Taurus (Windows XP) - English.fm Page 48 Tuesday, April 2, 2002 4:13 PM

Using System Security 49
Using System Security
This section describes your computer security programs. The first is the standard BIOS
security which is standard on almost all computers. The second is a advanced factory
option Biometric security system that uses your fingerprint(s) to control access to your
computer and individual files if necessary. You no longer have to worry about
passwords being lost, stolen or forgotten.
BIOS Security
The BIOS security operations are explained below:
System Passwords
The computer provides (4) levels of password security: administrative-level
(supervisor), user-level (user), HDD access and Password on Boot. These passwords
prevent unauthorized access to the computer. The supervisor password enables full
access to all System Setup fields. The user password enables full access to only the Set
User Password and Password on boot security fields and read access to all other
System Setup fields. The HDD Password controls access to the hard drive.
You may also enable the biometric security at boot.
The (3) security boot time options are:
The Biometric Security software MUST be installed prior to setting the security
options to any of the fingerprint options.
•Disabled
•Text password
•Finger Print
If multiple users have access to the computer (such as in a network environment), a
supervisor password can prevent unauthorized access to certain security options.
Choose the type of password security that is appropriate for your work.
If You Forget Your Password
It is very important that you do not forget your password. If you do, you cannot access
your system. Write your password down and keep it in a safe place. If you do forget
and cannot find the written note, please contact the Samsung Helpline. Please have
your receipts available to verify the type and model of your computer. You may be
charged for password removal.
Taurus (Windows XP) - English.fm Page 49 Tuesday, April 2, 2002 4:13 PM
50 Users Manual
Creating a Password
To create a password follow the instructions below:
1. At startup, press to open System Setup.
2. Use to select the Security menu.
Precautions for Password Entry:
You can enter letters or numbers, but you cannot use the function keys, such
as the Shift key. Your computer does not distinguish between capitalized and
lowercase letters in your password. As you type the password, the cursor
moves but your password does not appear on the screen. Choose the type of
password security that is appropriate for your work. If you want to set a user
password, you must set a supervisor password first.
3. Use to select Set Supervisor Password or Set User Password.
4. Press <Enter>. The Set Password dialog box appears.
5. Press <Enter> after you have typed your password. The computer prompts you to
reenter your password for verification.
6. Type your password again and press <Enter>. A message appears telling you that
the changes have been saved.
The “Password on boot” password MUST also be set in order for your machine
to boot properly.
7. Use to select Password on boot.
8. Press <Enter>. The Set Password dialog box appears.
9. Select the “Text Password” option.
10. Press <Enter> again to return to the Security menu.
11. Press to go to the Exit menu.
12. Press <Enter> or <F10> to exit and save your changes.
13. Press <Enter> again to restart the computer.
If password use is not desired:
Follow the creating a password procedure above except leave the password field empty in
step 5.
Taurus (Windows XP) - English.fm Page 50 Tuesday, April 2, 2002 4:13 PM

Using System Security 51
Biometric Security (Factory Option)
Advantages of Biometric Security are:
•Very high level of security
•No password to remember, lose or have stolen.
•Streamlined logon process.
•Single fingerprint will access many programs, eliminating passwords.
If you purchased the Biometric Security option, please refer to the manual provided for
installation and use.
The factory optional fingerprint sensor provides unique
security access to your computer. You will no longer have to
worry about losing or forgetting your password. Since every
person has a unique set of fingerprints, only a biometrically
enrolled person may have access to your computer.
Taurus (Windows XP) - English.fm Page 51 Tuesday, April 2, 2002 4:13 PM

52 Users Manual
Using Power Management Options
Your computer includes Power Management options that can help the battery charge
last longer and extend the life of the battery. Power-management options will slow
down or shut off system components when the components are not being used.
Power management may slow down system performance. Your computer runs fastest
with the power cord attached, when power management is disabled.
In the next sections, basic and advanced methods of power management will be
discussed.
Basic Power Management Schemes
This section discusses the basic schemes of power management when the computer is
operating on battery power or using AC power.
Standby vs. Hibernation
Standby unlike hibernation mode does not store unsaved information on your
hard disk; it's stored only in the computer memory. If there is an interruption in
power, the information is lost. So before putting your computer on standby,
you should save your files.
Changing Devices:
Do not change PC Cards while in standby or hibernate modes.
To enter the power management window complete the following:
1. Click Start > Control Panel > Performance and Maintenance.
2. Click icon to display the Power Options Properties window.
Taurus (Windows XP) - English.fm Page 52 Tuesday, April 2, 2002 4:13 PM
Using Power Management Options 53
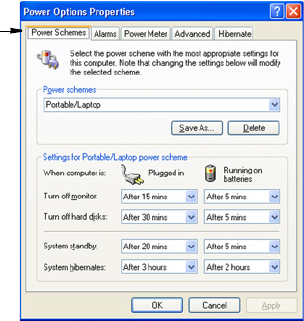
3. Click the Power Schemes tab to display the basic power management options.
4. Select the time that you wish each of the following actions to occur in Battery and
AC power mode.
•Turn off monitor:
•Turn off hard disks:
•System standby:
•System hibernates:
Turning off the monitor and HDDs will save a substantial battery power, therefore
when in battery only mode select the shortest time practical.
a Hibernate Mode (Power Management or Manual Method)
When hibernation is used, your computer turns off and when you power up again,
everything is restored exactly as you left it—including programs and documents
you may not have saved or closed. Everything in memory gets saved to the HDD,
and the monitor and hard disk get turned off.
Power Schemes Tab
Taurus (Windows XP) - English.fm Page 53 Tuesday, April 2, 2002 4:13 PM
54 Users Manual
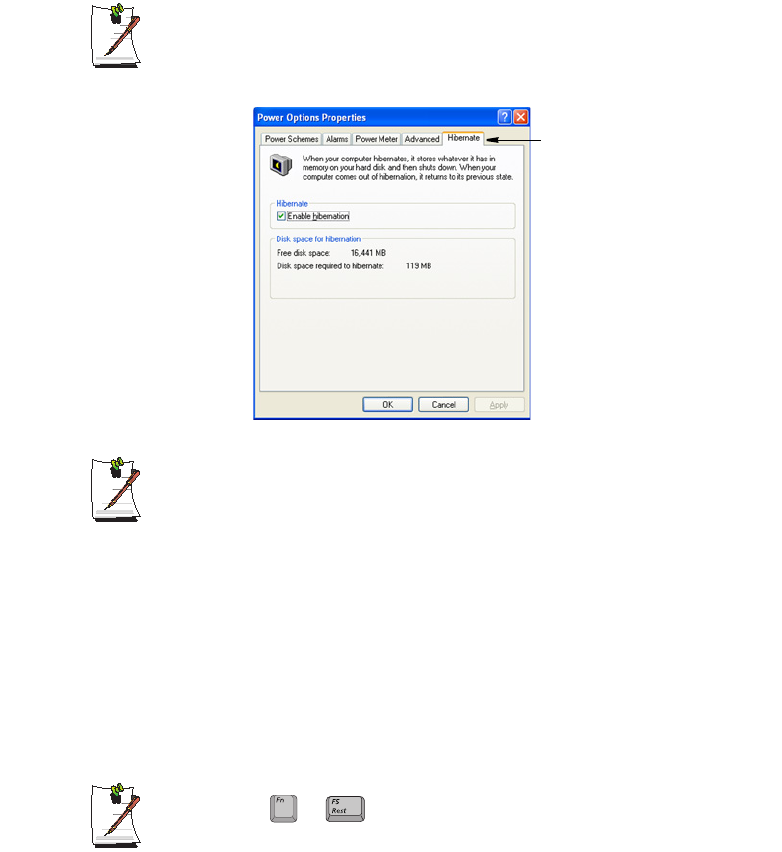
If You Reinstall Windows:
You should re-establish hibernate in power options by opening Power
Options Properties window and click on the Hibernate tab then click
“Enable Hibernation”.
Frequent Interruptions:
If you experience frequent interruptions, you might also consider putting your
computer into automatic hibernation after a specified number of minutes using
the power management options.
a Standby Mode (Power Management or Manual Method)
Standby is used mainly for conserving battery power in your notebook computer. It
also gives you the benefit of getting right back to your work without waiting for the
computer to restart. Standby turns off your monitor and hard disks, placing your entire
system in a low-power state. When you return to your computer, restores your desktop
exactly as you left it. It is recommended that you do not enter standby mode with less
than 20% battery power.
5. Click OK to set your power management options and close the window.
Rest Key:
The manual <Fn+F5> key combination will not activate Standby
or Hibernate modes whilst you are playing a multimedia program or have an
active USB device connected.
Hibernate Tab
+
Taurus (Windows XP) - English.fm Page 54 Tuesday, April 2, 2002 4:13 PM
Using Power Management Options 55
Advanced Power Management Schemes
This section discusses the advanced power management schemes. There are two
buttons that you can use to manually conserve power.
To enter the power management window complete the following:
1. Click Start > Control Panel > Performance and Maintenance.
2. Click icon to display the Power Options Properties window.
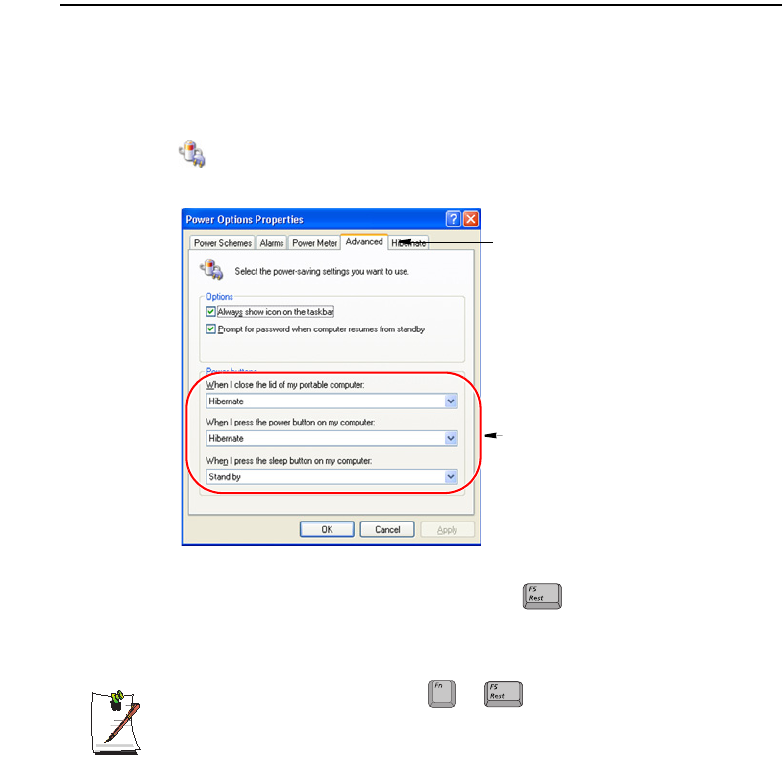
3. Click the Advanced tab to display the advanced power management options.
4. Select the mode (Do nothing/Ask me what to do/Standby/Hibernate/Shut
down) assigned to the Power button and/or Rest <F5> key. Also select the
action (Do nothing/Standby/Hibernate) associated with closing the computer
lid.
The “Rest” key is assigned to the <Fn+F5> key combination. See
”Basic Power Management Schemes” on page 52 for a better understanding
of Standby and Hibernate modes.
5. Click OK to set your power management options and close the window.
You can return to normal operation after you have used one of the “Power
Management” buttons by quickly pushing and releasing the Power button.
Advanced Tab
Power & Sleep Button
Programming Windows
+
Taurus (Windows XP) - English.fm Page 55 Tuesday, April 2, 2002 4:13 PM

56 Users Manual
Using the Hard Drive
Your computer includes a removable IDE (integrated drive electronics) hard drive. The
IDE hard drive can store the data and programs your computer uses. The drive plugs
into a connector on the system board.
The hard drive that comes with your computer has already been formatted. Do
not format the hard drive. Doing so destroys all data contained on the drive. If
you need to format a new drive, or want to erase all data on your existing hard
drive, refer to the manual for your operating system.
Installing/Reinstalling a HDD
To install a new HDD you must contact your local service representative. He will do
the physical change of the drive. You should complete the instructions below before
you go to the service center.
See the information below before you install your HDD:
•Back up data files of your old hard drive.
•For system boot with CD-ROM, under the Boot menu in System setup, set
Bootable CD Check to Enabled and set Boot Device Priority is ordered starting
from the [DVD/CD-ROM].
When you are ready to install the new HDD use the Recovery CD-ROM to install the
device driver.
(Re)Installing Windows and Device Drivers
Use System Recovery CD to (re)install OS and System Software CD to (re)install
device' drivers.
The System Recovery CD is used to (re)install the OS and System Software
to a new HDD or recover from a system crash.
Notebook computers that ship from the factory include System Recover CD-
ROM and System Software CD-ROM, which contains a copy of the
applications and drivers needed for computer's operating system.
In the unlikely event that programs on the computer hard drive become
corrupted or are erased, you can use the System Recovery CD-ROM to
reinstall your operating system and then System Software CD-ROM to
reinstall your original applications and drivers.
Taurus (Windows XP) - English.fm Page 56 Tuesday, April 2, 2002 4:13 PM

Video Features and Configuration 57
Video Features and Configuration
All these video modes can be displayed on an external monitor. However, if you
disconnect an external monitor that was attached to your computer and then start the
computer, the LCD may revert to a different resolution than the one you chose for the
external monitor.
Resolution and Colour Depth
The resolution of the LCD is the sharpness of the image it can display. Resolution is
measured by the number of pixels (individual dots) displayed on the entire screen. In
general, the more pixels the LCD can display, the better the image.
The number of colours the LCD can display is measured by how many bits the LCD
uses to represent each pixel:
•16-bit colour can support 64 K (65,536) colours.
•32-bit colour can support 16 M (16.8 million) colours.
All these video modes can be displayed on an external monitor. However, if you
disconnect an external monitor that was attached to your computer and then start the
computer, the LCD may revert to a different resolution than the one you chose for the
external monitor.
Adjusting the LCD Display
You may wish to adjust the LCD (Liquid-Crystal Display) when you begin using your
computer. A TFT (Thin-Film Transistor) LCD does not require adjustment for contrast
because the contrast is set to remain at maximum.
To adjust the LCD:
•Press <Fn+Up Arrow> to increase the display brightness.
•Press <Fn+Down Arrow> to decrease the display brightness.
+
+
Taurus (Windows XP) - English.fm Page 57 Tuesday, April 2, 2002 4:13 PM

58 Users Manual
Configuring Display Features
The following sections describe how to configure the display settings on your
computer.
Display Resolution Notes:
When Windows XP is initially installed it will automatically adjust the resolution
to maximum available.
Changing Colour Depth and Resolution
To change the colour depth and resolution of your LCD:
1. Click Start > Control Panel > Appearance and Themes.
2. Click icon. The Display Properties window appears.
3. Click the Settings tab. The Settings screen appears.
4. To change the colour depth, click the arrow next to the Colour quality palette and
select the available colour depth you want.
5. To change the resolution, click and drag the slider under the Screen resolution
until you select the available resolution you want.
6. Click OK.
7. Follow the prompts that appear on the screen.
Taurus (Windows XP) - English.fm Page 58 Tuesday, April 2, 2002 4:13 PM
Using Dual View Mode 59
Using Dual View Mode
Single View mode is the basic display mode which displays same view on all the
display devices connected to a system.
Dual View mode is the “Extended screen mode” supported in Windows, which
displays separate views on each display devices connected to a system.
<Fn+F4 LCD/CRT> Key Combination
The Key Combination will not operate while you are playing a
MPEG file or a Video CD.
Occasionally the video output in dual view mode becomes erratic.
The default setting on your system is Single View mode.
Setting Dual View Mode
To set Dual View mode on your system:
1. Connect peripheral display device such as monitor, television or digital flat panel
(DFP) to your system and start the system.
2. Select Start > Control Panel > Appearance and Themes.
3. Click icon. The Display Properties window appears.
4. Click the Settings tab. The Settings window appears.
5. Check Extend my Windows desktop onto this monitor.
6. You can drag the second monitor image to position where you want your extended
screen space with respect to the primary monitor (usually the LCD).
To confirm whether the system is set properly with Dual View mode:
1. Open Display properties and click Settings tab.
2. Place the cursor on the first monitor picture and click and hold over a second, a
number 1 will be shown on the first actual monitor screen. And place the cursor on
the second monitor picture and click and hold over a second, then digit number 2
will be shown on the second actual monitor screen.
+
Taurus (Windows XP) - English.fm Page 59 Tuesday, April 2, 2002 4:13 PM

60 Users Manual
3. The monitor displays digit number 1 is the primary monitor and number 2 is the
secondary monitor.
In Windows explorer, the program is displayed on the primary monitor, if you can
drag it to the secondary monitor, then Duo View mode is now working properly.
The secondary monitor has a display of 256 colours (colour depth) and 640x480 pixels
(resolution) at first. The colour depth and resolution of primary/secondary monitors are
separately changeable.
Changing Colour Depth and Resolution of 2nd Monitor
To change the colour depth and resolution of 2nd Monitor, TV or DFP):
1. Click Start > Control Panel > Appearance and Themes.
2. Click icon. The Display Properties window appears.
3. Click the Settings tab. The Settings screen appears.
4. Click on the display number of the monitor you wish to change.
TV/DFP Display Resolution Limitations
You can change the Colour Depth and Resolution within the limitations
of the TV/DFP. Adjust as necessary to get a good display.
5. To change the colour depth, click the arrow next to the Colour quality palette and
select the available colour depth you want.
6. To change the resolution, click and drag the slider under the Screen resolution
until you select the available resolution you want.
7. Click OK.
8. Follow the prompts that appear on the screen.
Taurus (Windows XP) - English.fm Page 60 Tuesday, April 2, 2002 4:13 PM

Using Dual View Mode 61
To reset the system to Single View mode:
1. Start Display properties.
2. Click Settings tab.
3. Click the second monitor among two monitor pictures.
4. Uncheck Extend my Windows desktop onto this monitor.
5. Click OK.
Using Multimonitor Mode
You may duplicate your LCD screen on an external monitor, television or digital flat
panel.
TV Connection Restrictions:
You should only connect/disconnect cables and wires to your computer and
TV when the power is off.
TV/DFP Support Limitations:
The computer will only support televisions with S-VHS input capability. The
standard composite video in port is not supported.
You can not use TV-out port to connect to your television or digital flat panel
in DOS mode.
When TV-Out is activated, your computer screen will not be active.
To start using multimonitor mode proceed as follows:
1. Connect the external monitor to the connection on the back of your computer.
2. Press the <Fn + F4> key combination, the LCD will be duplicated on the monitor,
television or digital flat panel.
<Fn + F4> key combinations
Each time you use the key combination the LCD/Monitor
combination changes as follows:
•Both displays are displaying the computer output (LCD & Monitor).
•Monitor, television or digital flat panel only is displayed the computer
output.
•LCD only is displaying the computer output.
+
Taurus (Windows XP) - English.fm Page 61 Tuesday, April 2, 2002 4:13 PM

62 Users Manual
To stop using multimonitor mode proceed as follows:
1. Press the <Fn + F4> key combination until only the LCD is displaying the
computer output.
2. Disconnect the external monitor or television from the connection on the back of
your computer.
Using Powerplay
The Powerplay technology supplied with your graphics adapter to extend battery life.
POWERPLAY Use Limitations
Activating POWERPLAY will reduce your graphic card performance.
To activate POWERPLAY proceed as follows:
1. Click Start > Control Panel > Appearance and Themes.
2. Click icon. The Display Properties window appears.
3. Click the Settings tab. The Settings screen appears.
4. Click the Advanced button. The (Multiple Monitors) and M7 Properties
window appears.
5. Click the POWERPLAY tab
6. Click the POWERPLAY button in the POWERPLAY Settings section. The
button will change to a button and activate the other options available.
Taurus (Windows XP) - English.fm Page 62 Tuesday, April 2, 2002 4:13 PM

Using Options 63
Using Options
You can order the following options for your Notebook computer from your authorised
reseller:
•An extra AC adapter.
•An auto adapter that enables you to charge the computer’s battery and operate
the computer while in an automobile.
•An extra battery pack.
•128, 256 and 512 MB DDR SDRAM memory modules that enable you to
upgrade your computer’s memory to a maximum of 1 GB.
•A CD-ROM drive module (CD Only or CD R/W).
•DVD/CD-RW Combo drive:
•A DVD-ROM drive module.
•Bluetooth/Wireless
•FIR (Fast Infrared) Connection
•2nd HDD
•Port Replicator
•Biometric Security
•Memory Stick
The options that are available may change periodically. Contact your reseller for
updated information on current and new options.
Taurus (Windows XP) - English.fm Page 63 Tuesday, April 2, 2002 4:13 PM

64 Users Manual
Memory Modules
You can increase system memory by installing optional memory modules. You can
install a 128 256 or 512 MB modules.
To avoid possible system problems, use only approved memory modules in
your computer.
Before You Install Memory
To prevent personal injury and damage to the equipment, follow the
precautions listed here before installing a memory module.
Take the following precautions when installing a memory module:
•Before you remove the memory module compartment door, turn off the
computer, unplug the power cord, and remove the battery. Also, disconnect any
peripheral devices.
•Before handling a memory module, discharge any static electricity by touching
a grounded surface or using a grounding wrist strap.
•Do not insert objects with conductive material, such as metal screwdrivers or
graphite pencils, into the memory-module compartment.
•Be careful in handling the metal plate of the memory door.
Taurus (Windows XP) - English.fm Page 64 Tuesday, April 2, 2002 4:13 PM
Using Options 65
Installing a Memory Module
Handle a memory module carefully. Hold them only by the edges.
To install a memory module:
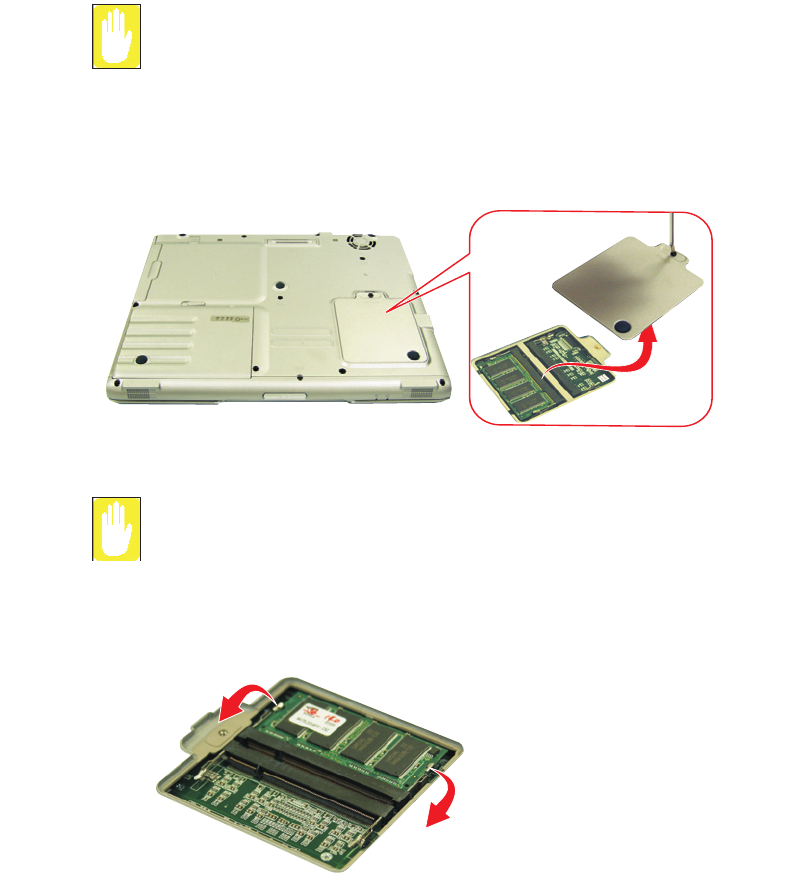
1. Turn the computer over so that the bottom faces up.
2. Using a screwdriver, remove the screw that holds the memory-module
compartment door in place.
3. Grasp the edge of the door and pull the door off the chassis.
Memory Module Precautions:
When removing the module, pull on the plastic portion of the connector slots
tabs only. Do not pull on the metal part of the tabs, this may damage the tabs.
4. Remove the installed module if necessary.
a. Pull the tabs on the connector slot outward slightly, until the edge of the
memory module pops up.
b. Hold the memory module by the edges and pull it forward out of the
compartment.
Taurus (Windows XP) - English.fm Page 65 Tuesday, April 2, 2002 4:13 PM

66 Users Manual
5. Align the connector on the memory module with the connector of the slot.
6. Push the memory module into the slot at a slight angle (~45o) until the connectors
are fully engaged.
7. Push down on the edge of the memory module until the module snaps into place.
8. Align the memory module compartment door with the compartment and push the
door down until it snaps into place.
9. Reinstall the screw you removed in step 2.
10. Turn on the computer and perform a complete POST to check the memory
integrity.
Bluetooth/Wireless
Bluetooth/Wireless technology allows wireless communication between bluetooth
communication devices, such as cellular phones, desktop and other notebook
computers.
To setup and use the Wireless LAN, Please refer to the user manual provided with the
option at the time of purchase.
Wireless LAN
The wireless LAN option allows easy connection to large or small office networks
while also providing freedom from the constraints of cables and sockets.
To setup and use the Wireless LAN, Please refer to the user manual provided with the
option at the time of purchase.
Port Replicator
Contact your reseller for a list of port replicator options available for your Notebook
computer. User’s manuals are included with the port replicator options.
45o
Taurus (Windows XP) - English.fm Page 66 Tuesday, April 2, 2002 4:13 PM
Using Options 67
FIR (Fast Infrared) Connection
FIR Technology Limitation
The transmitter and the receiver should be no more than 50cm apart.
BIOS Setup
The BIOS setup must be completed first in order for the option to operate
properly.
1. At startup, press to open System Setup.
2. Use to select the Advanced CMOS Setup menu.
3. Highlight the I/O Device Configuration option with keys and press
<Enter>.
4. Highlight the FIR port with
5. Press <Shift+Plus> keys until the option changes to Enabled.
6. Press <Esc> to return to the Exit menu.
7. Press <Enter> or <F10> to exit and save your changes.
Windows Setup
1. Right-click My Computer.
2. Click Properties, the System properties window pops up.
3. Click the hardware tab then click the device manager button in the device manager
section.
4. Double-click the Infrared devices
5. Double-click the IrDA Fast Infrared Port, the IrDA Fast Infrared Port properties
window pops up.
6. Click on the Advanced tab and set the device as follows.
•Select the “Infrared Transceiver A” in the properties section.
•Select the “Vishay TFDS-6500” in the value section.
7. Click OK
or
or
Taurus (Windows XP) - English.fm Page 67 Tuesday, April 2, 2002 4:13 PM