Samsung Electronics Co XE300TZC Tablet PC with 802.11 abgn + BT, GPS User Manual Part 2
Samsung Electronics Co Ltd Tablet PC with 802.11 abgn + BT, GPS Part 2
Contents
- 1. User Manual Part 1
- 2. User Manual Part 2
- 3. User Manual Part 3
- 4. User Manual Part 4
- 5. User Manual Part 5
User Manual Part 2
26
27
Chapter 1
Getting Started
Overview
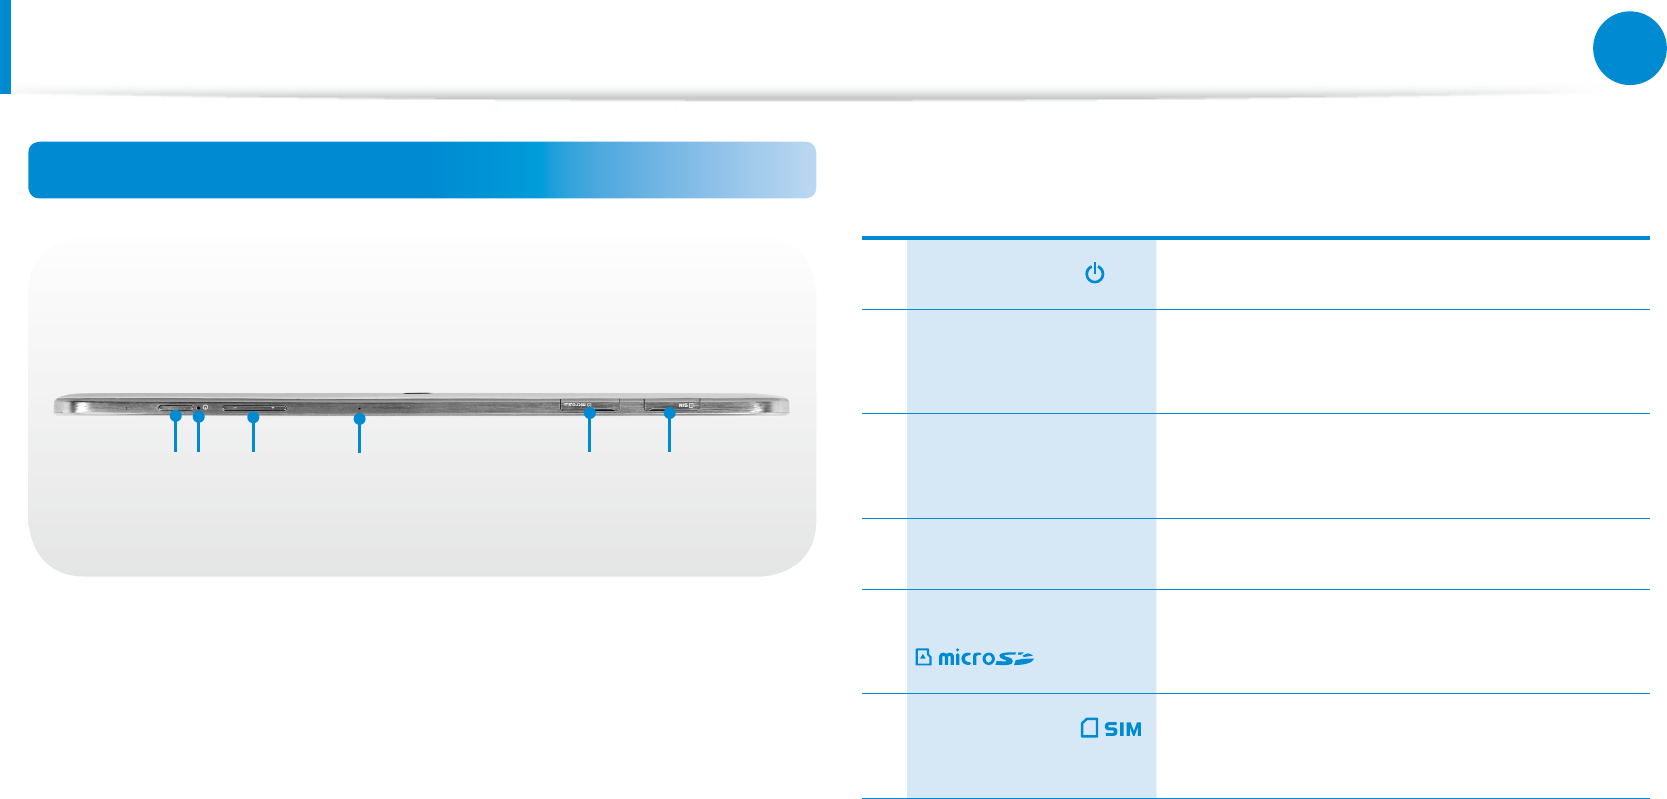
Top View
1 3 4 5 62
1Power Button Turns the computer on and o.
2Power Button LED When the computer is on, the power
button LED is lit.
3Volume Control
Button Controls the volume.
4Microphone You can use the built-in microphone.
5Micro SD Card Slot This slot is for micro SD cards.
6SIM Card Slot
(Optional) This slot is for SIM cards.
28
Chapter 1
Getting Started
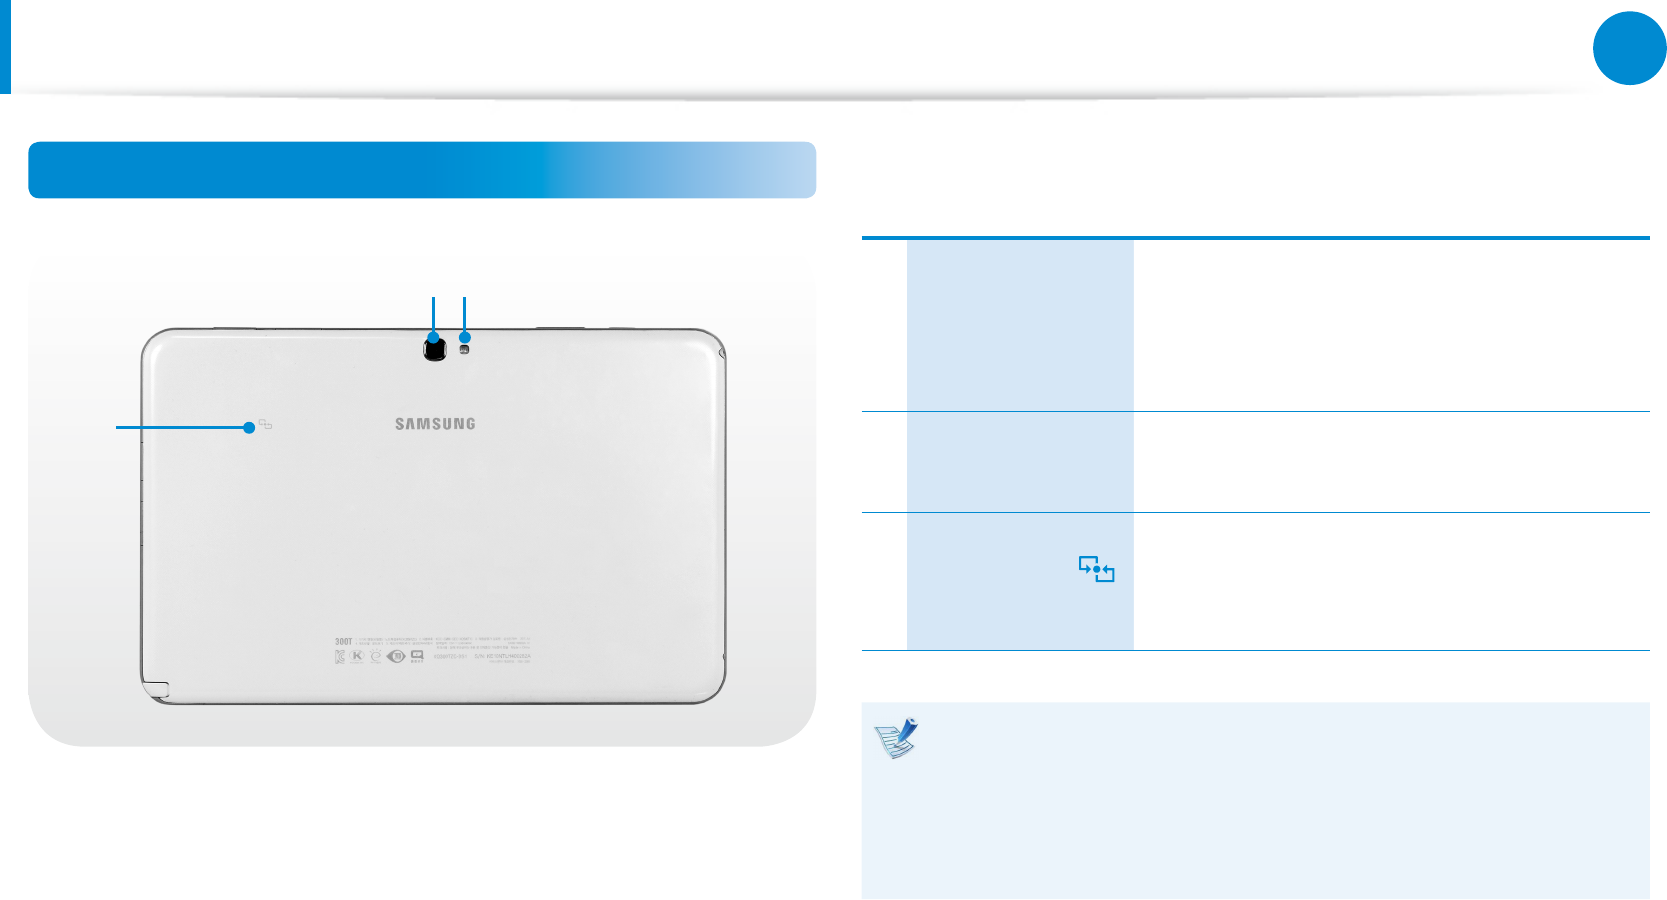
Rear View
21
3
1Camera
Using this camera, you can take still pictures
and record video.
You can take a picture or make a movie
using the Charms > Start > Camera.
2Camera Flash Used when taking photos.
3NFC Antenna
(Optional)
Provides NFC features for near eld
communication for various application
services.
To replace the rear case, contact the local service center. Note
that the replacement rear case does not have the model
name/logo/part number on the surface.
For more information, please ask for assistance from the
service center.
Overview
28
29
Chapter 1
Getting Started
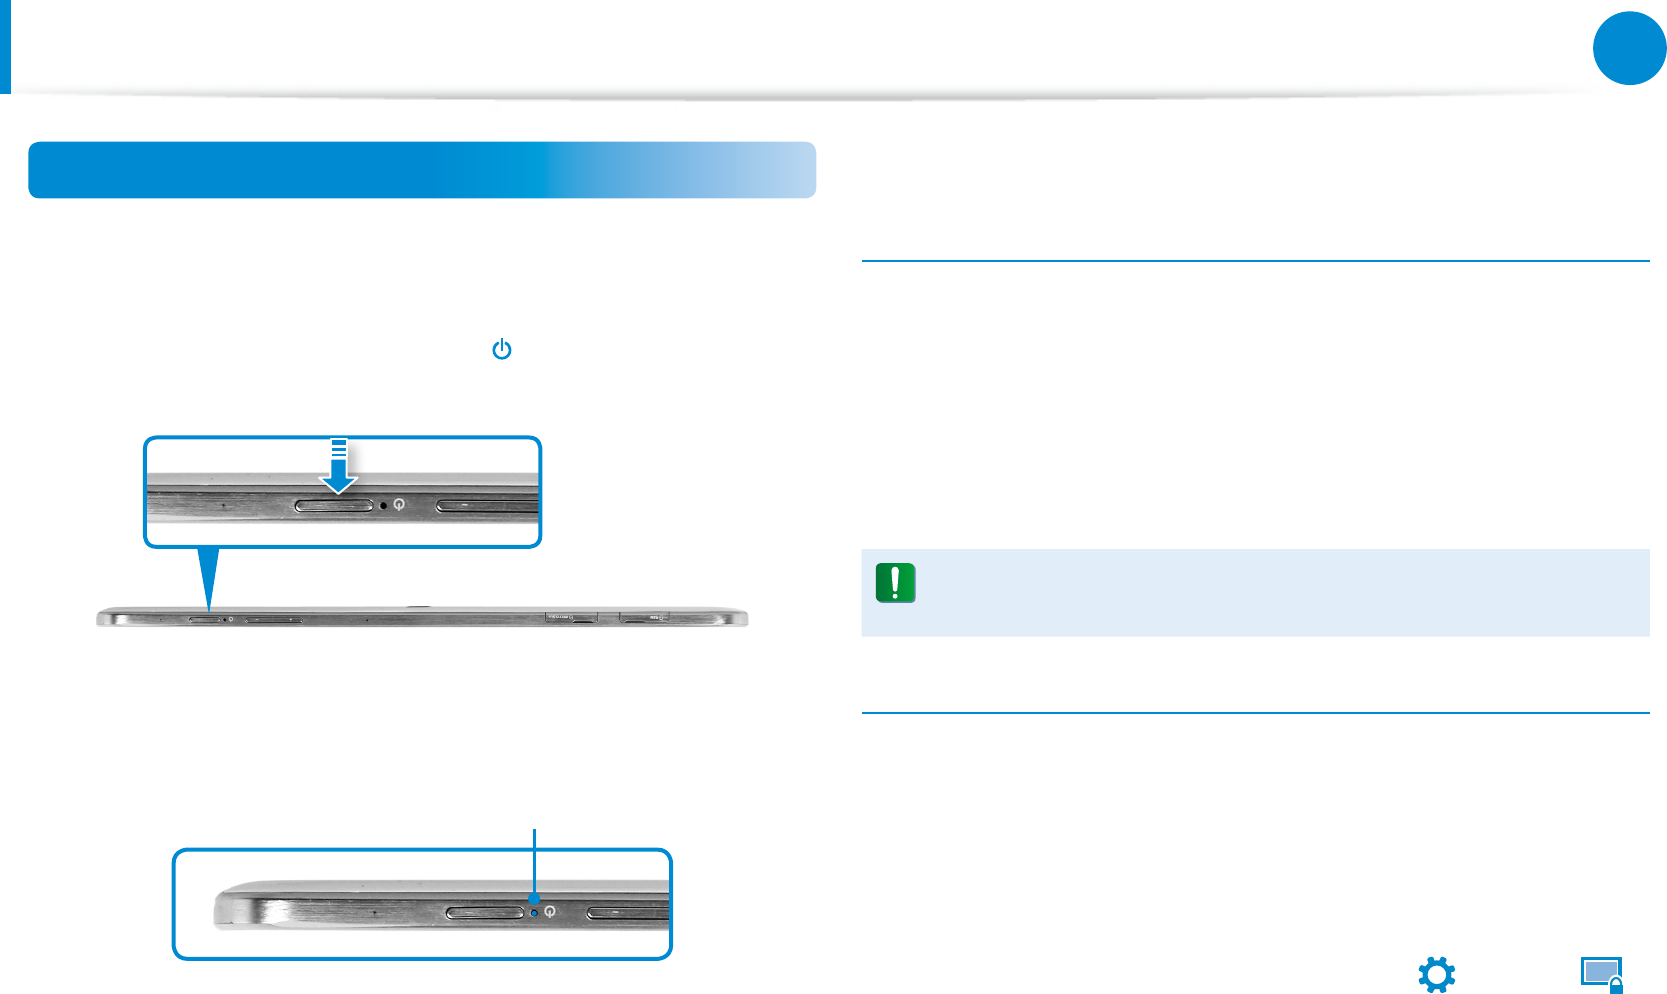
Turning the Computer On and O
Turning the computer on
1 Connect the AC adapter.
2 Press and hold the Power button for a moment to turn the
computer on.
3 Power button LED is lit while the computer is turned on.
LED
About Windows Activation
When you turn the computer on for the rst time, the Windows
activation screen appears.
Follow the activation procedures according to the instructions on
the screen to use the computer.
When you turn on the computer for the rst time, the factory date
settings are displayed. Set your local time and date.
This model returns to the factory date settings if the battery
is completely discharged.
Adjusting the screen brightness
When the computer runs on battery power, the LCD brightness is
automatically set to low.
1 Slightly drag from the right edge of the screen toward the
center to display the Charms menu.
2 Increase the bar by pressing the Settings
áᔪ
Ŗᮁ
᯲
ᰆ⊹
ᖅᱶ
> Screen .

30
Chapter 1
Getting Started
Turning the computer o
Since the procedures to turn the computer o may dier •
depending on the installed operating system, please turn
the computer o according to the procedures for the
purchased operating system.
Save all your data before clicking on • Shut down.
1 Slightly drag from the right edge of the screen toward the
center to display the Charms menu.
2 Click Settings
áᔪ
Ŗᮁ
᯲
ᰆ⊹
ᖅᱶ
> Power
⦽
> Shut down.
If you want to power o your computer when you are logged
out, unlock the screen and click Power
⦽
> Shut down.
Turning the Computer On and O
Chapter 2.
Using Windows 8
What is Microsoft Windows 8? 32
Screen At a Glance 33
Using the Charms 35
Using Apps 37
Windows Hot Key Function 41
32
Chapter 2
Using Windows 8
What is Microsoft Windows 8?
Microsoft Windows 8 (hereafter referred to as Windows) is an
operating system that is required for operating a computer.
To use your computer optimally, you need to know how to use it
properly. Therefore, It is better to learn how to use Windows by
utilizing Windows Help and Support.
The screen may appear somewhat dierent depending on •
the model and the operating system.
Since this guide has been prepared based on Windows •
8, some of the instructions may dier depending on the
version. It may also be modied without prior notice.
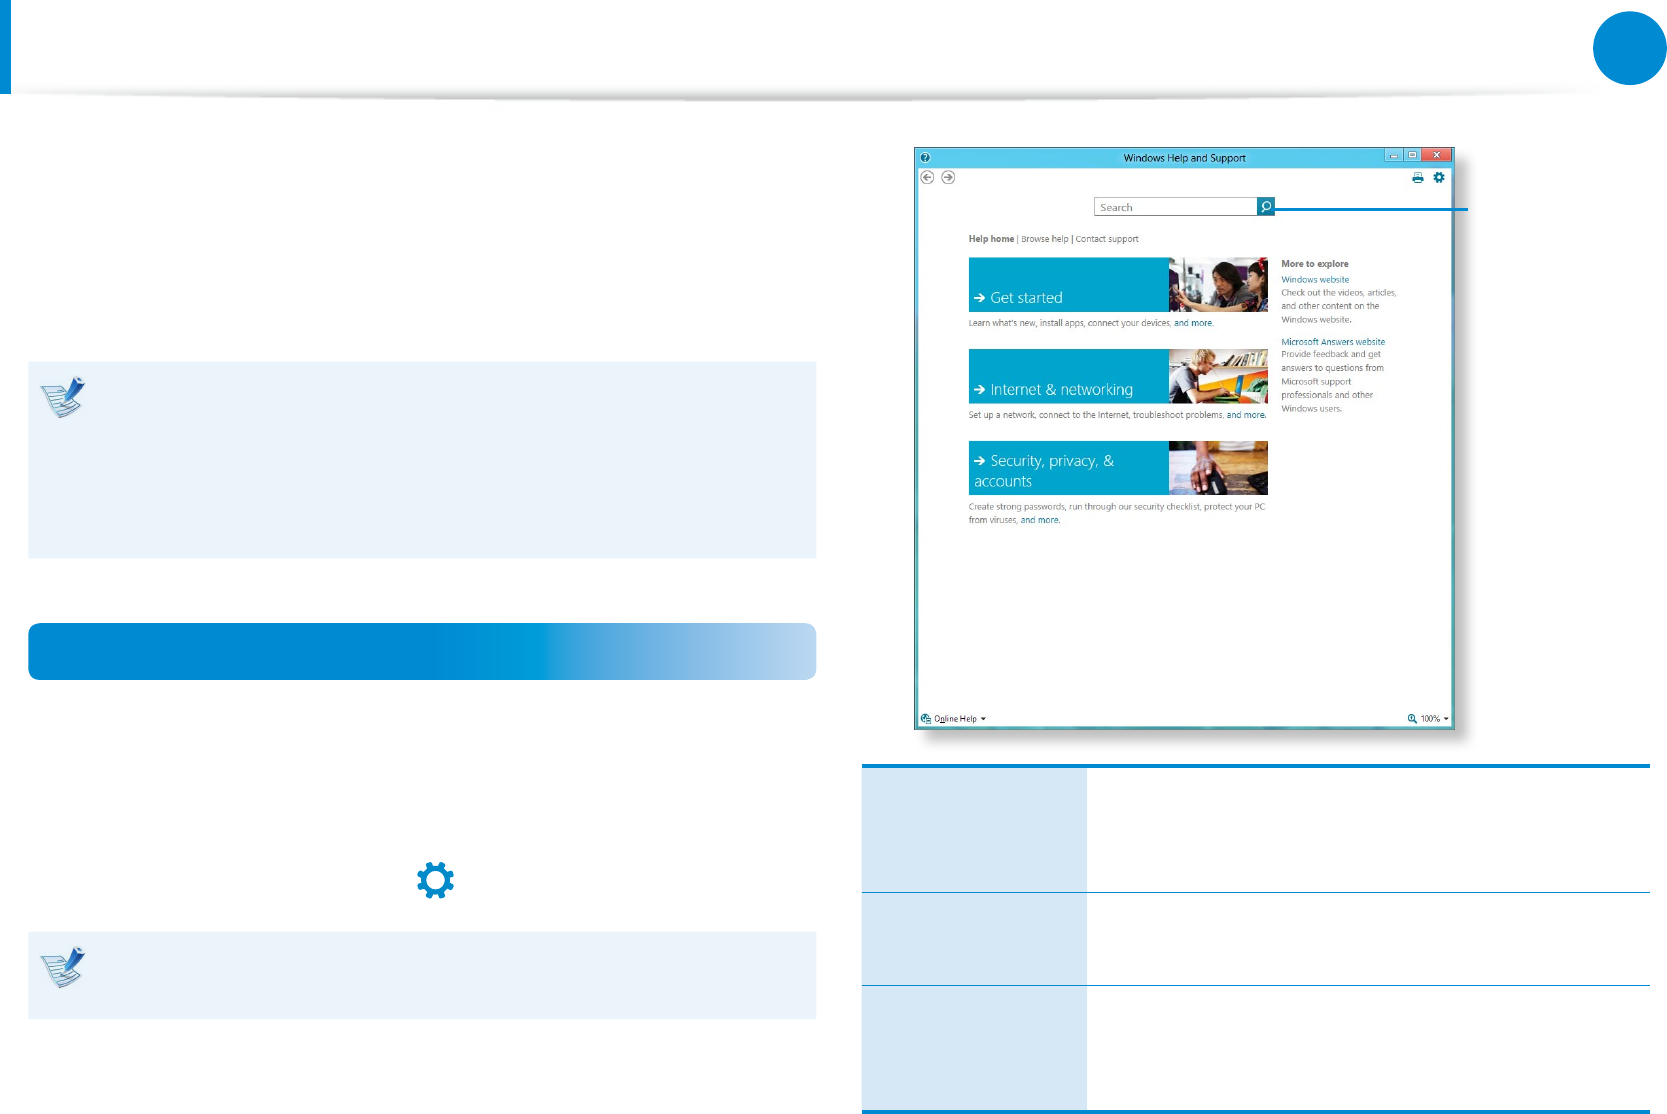
Displaying Help
Move the pointer on the screen to the top or bottom right edge of
the screen to view the Charm menu.
Alternatively, slightly drag the right edge inward with your nger
to view the Charm menu.
Select Charm menu > Settings
áᔪ
Ŗᮁ
᯲
ᰆ⊹
ᖅᱶ
> Help.
If you are connected to the internet, you can access the most
recent online Help.
Searching
for Help
Get Started
You can view basic instructions on how to use
your computer including new function(s) for the
Windows OS.
Internet &
networking
After connecting to the network, you can check
the Help section required to use the internet.
Security, privacy,
& accounts
You can check the Help information required
to protect your computer and personal
information.
32
33
Chapter 2
Using Windows 8
Screen At a Glance
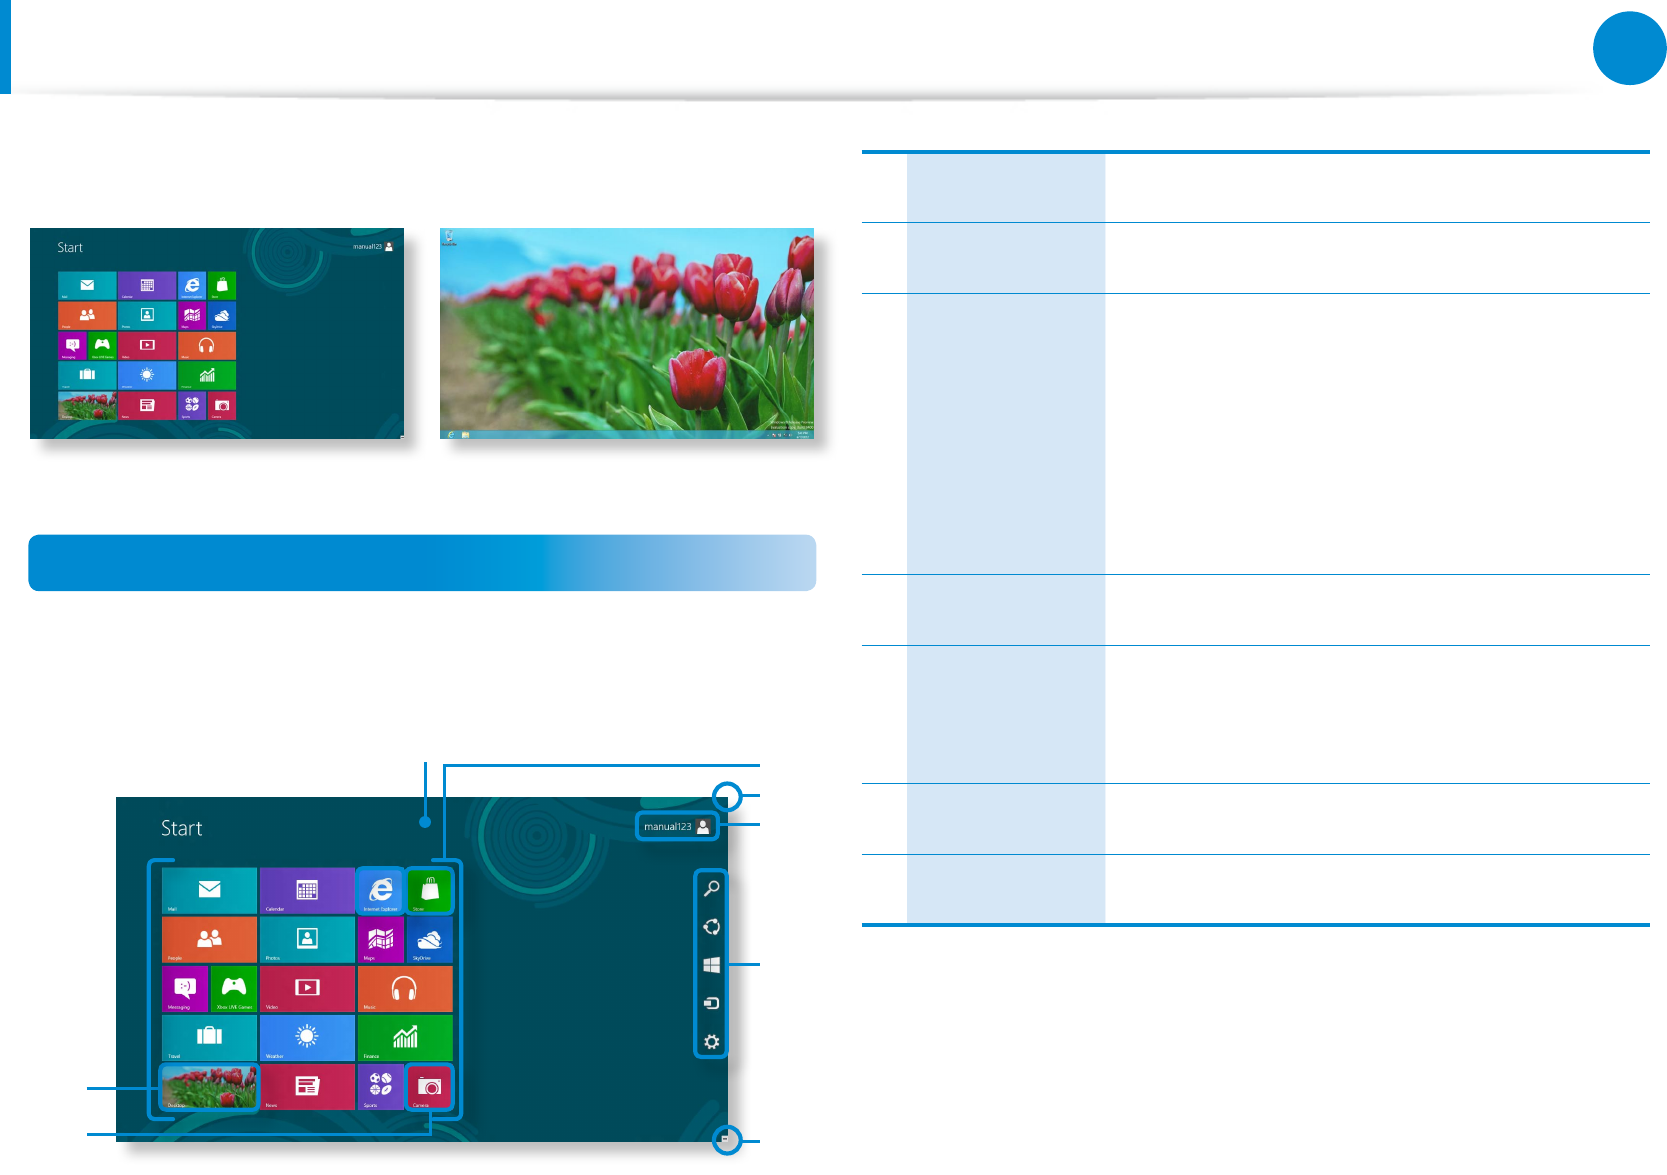
Windows 8 provides both the new Start screen mode and the
Desktop mode of the existing OS.
Start Screen Desktop
Start Screen
When you turn on the computer, the Start screen is displayed,
which allows you to use the applications (Application, App,
hereafter referred to as an App) at the same location.
5
6
7
4
3
3
2
1
1 Start Screen Refers to the default Start screen of Windows 8.
2 App Refers to the apps that are currently installed.
3Displaying the
Charms
The Charms is hidden at the right of the
screen. Place your mouse pointer at the edge
of the top or bottom right of the screen to
display the Charms.
Alternatively, slightly drag the right edge
inward with your nger to view the Charm
menu.
4 User Account This refers to the currently used user account.
5Charms
This refers to the menu that allows you to use
functions such as Search, Share, Start, Device
and Settings.
6Desktop Switches to Desktop mode.
7Camera Allows you to take pictures or make a movie.
34
Chapter 2
Using Windows 8
Screen At a Glance
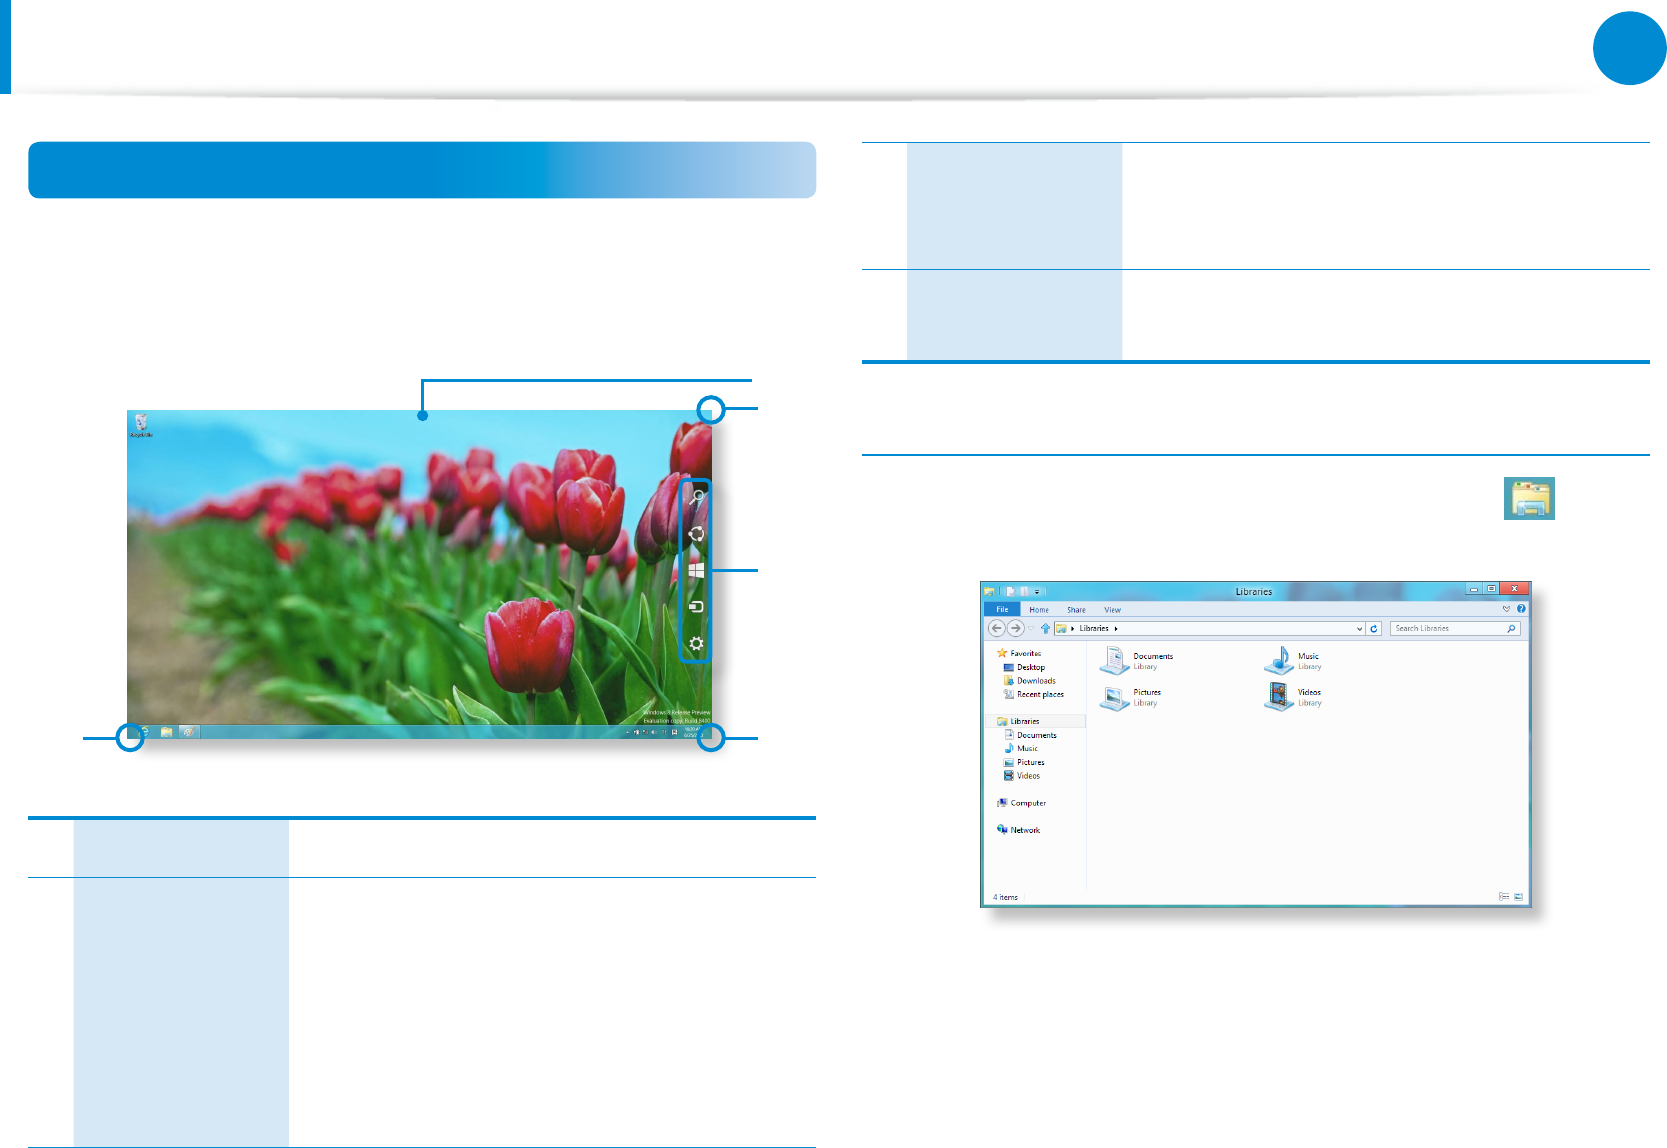
Desktop
This provides similar functions to those provided by the Desktop
in prior Windows versions.
3
4
2
2
1
1Desktop Refers to the Desktop.
2Displaying the
Charms
The Charms is hidden at the right of the
screen. Place your mouse pointer at the edge
of the top or bottom right of the screen to
display the Charms.
Alternatively, slightly drag the right edge
inward with your nger to view the Charm
menu.
3Charms
This refers to the menu that allows you to use
functions such as Search, Share, Start, Device
and Settings.
4Switching to the
Start Screen
Click the corner of the bottom left of the
screen to switch to the Start screen.
Displaying Documents and Files
Click Windows Explorer in the taskbar on the Desktop to
search for documents and les.
34
35
Chapter 2
Using Windows 8
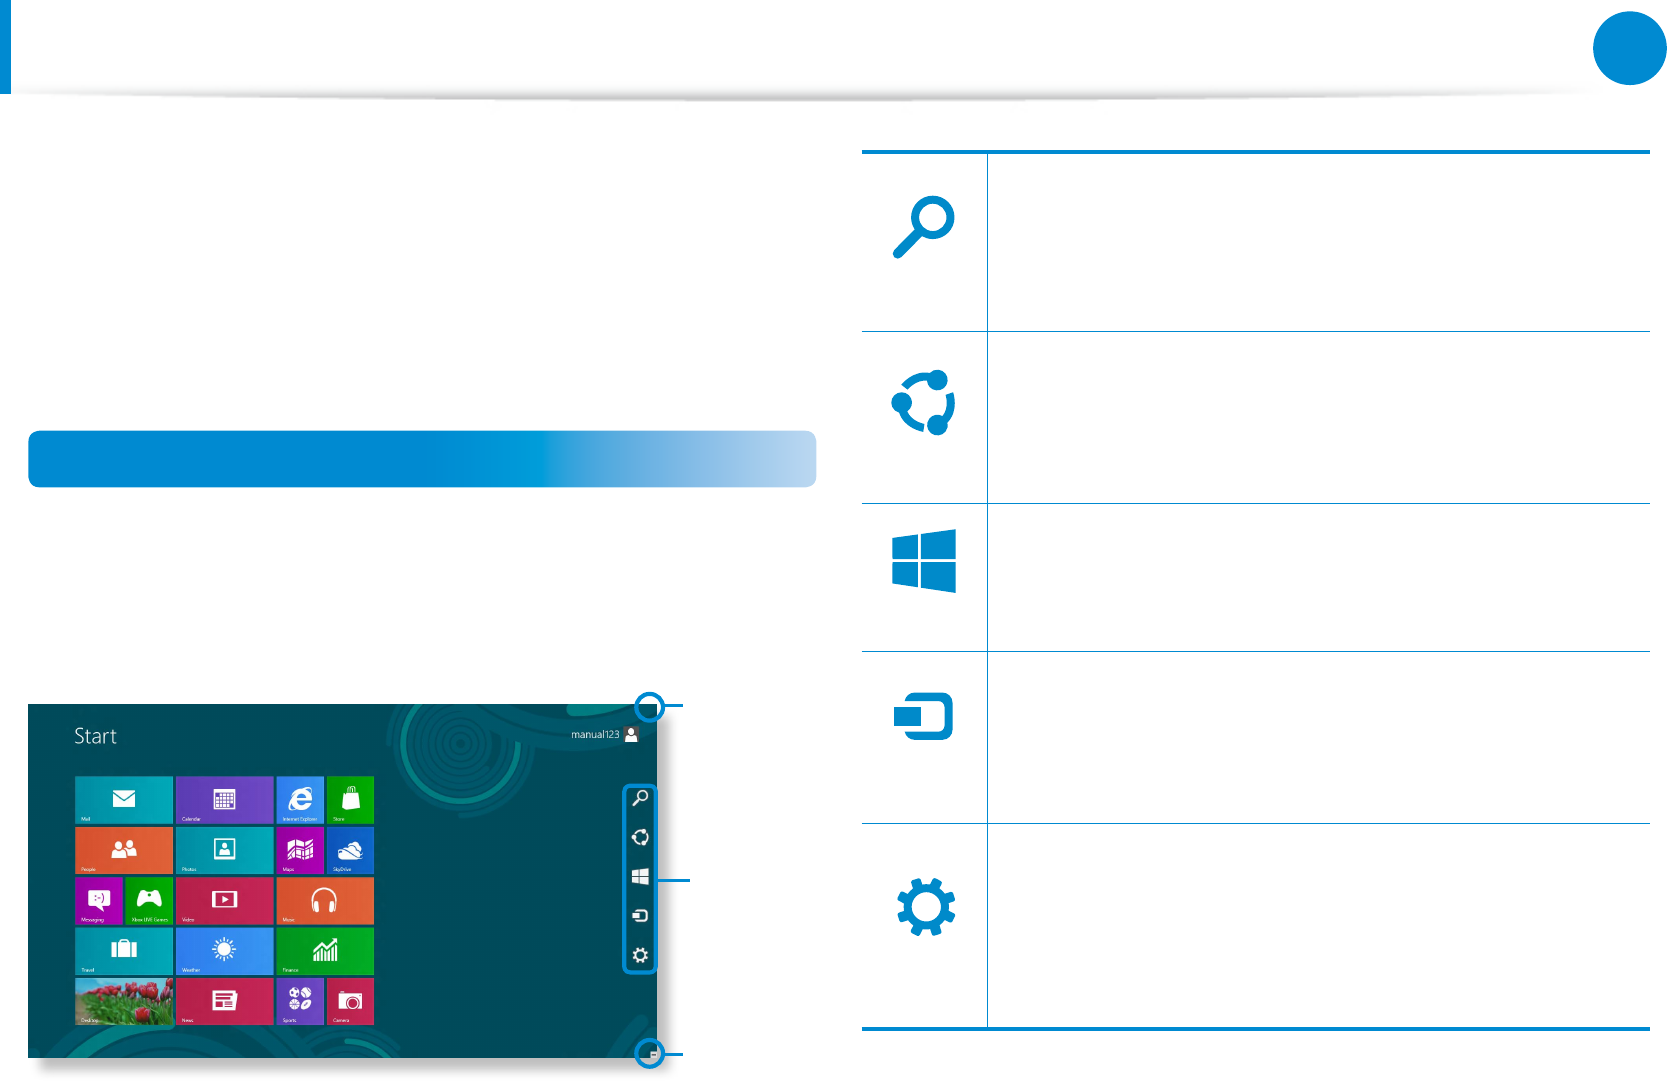
The Charms is a new type of menu that combines the Start menu
with the Control Panel of existing Windows.
The Charms allows you to quickly congure the device(s)
connected to your computer, search for App(s)/le(s), and use the
sharing function, etc.
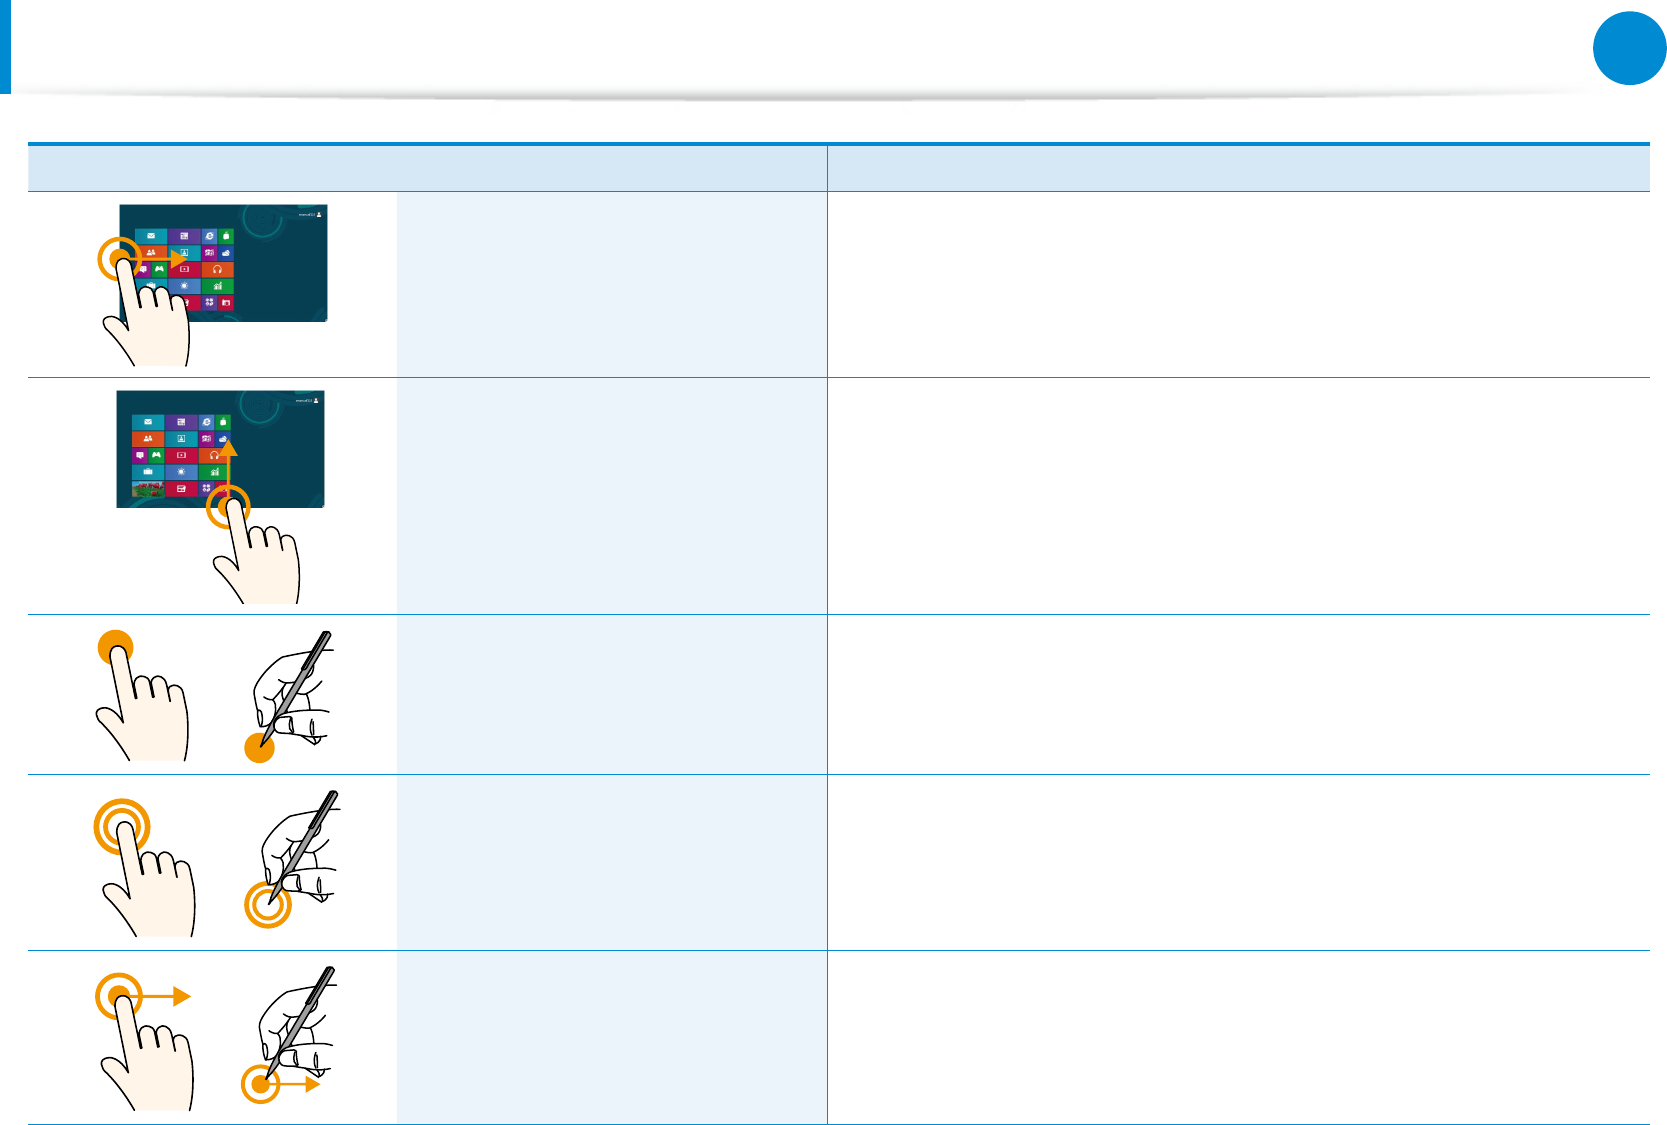
Activating the Charms
Slightly drag the right edge inward with your nger to view the
Charm menu.
Alternatively, tap the top or bottom right edge of the screen to
view the Charm menu.
Charms
Displaying
the Charms
Menu
Displaying
the Charms
Menu
Search
Share
Start
Device
Settings
If you want to search for a program or le in the App(s)/
Settings/File(s), simply enter a keyword in the Search
charm and start Search.
You can also search within an App or on the Web.
Search
Share
Start
Device
Settings
You can use this menu to transfer a picture or le to
another user. You can easily share pictures or les with
other users simply by associating multiple Apps with the
Share charm.
Search
Share
Start
Device
Settings
You can move to the Start screen.
Search
Share
Start
Device
Settings
As this allows you to move directly to a desired device,
you can handle tasks such as importing pictures from
a digital camera, streaming a video to your TV or
transferring les to a device on the current screen.
Search
Share
Start
Device
Settings
The Settings charm allows you to perform basic tasks
such as adjusting the volume, turning o the PC, etc.
If you select the Settings charm while a specic App is
running, the settings for the currently running App are
displayed.
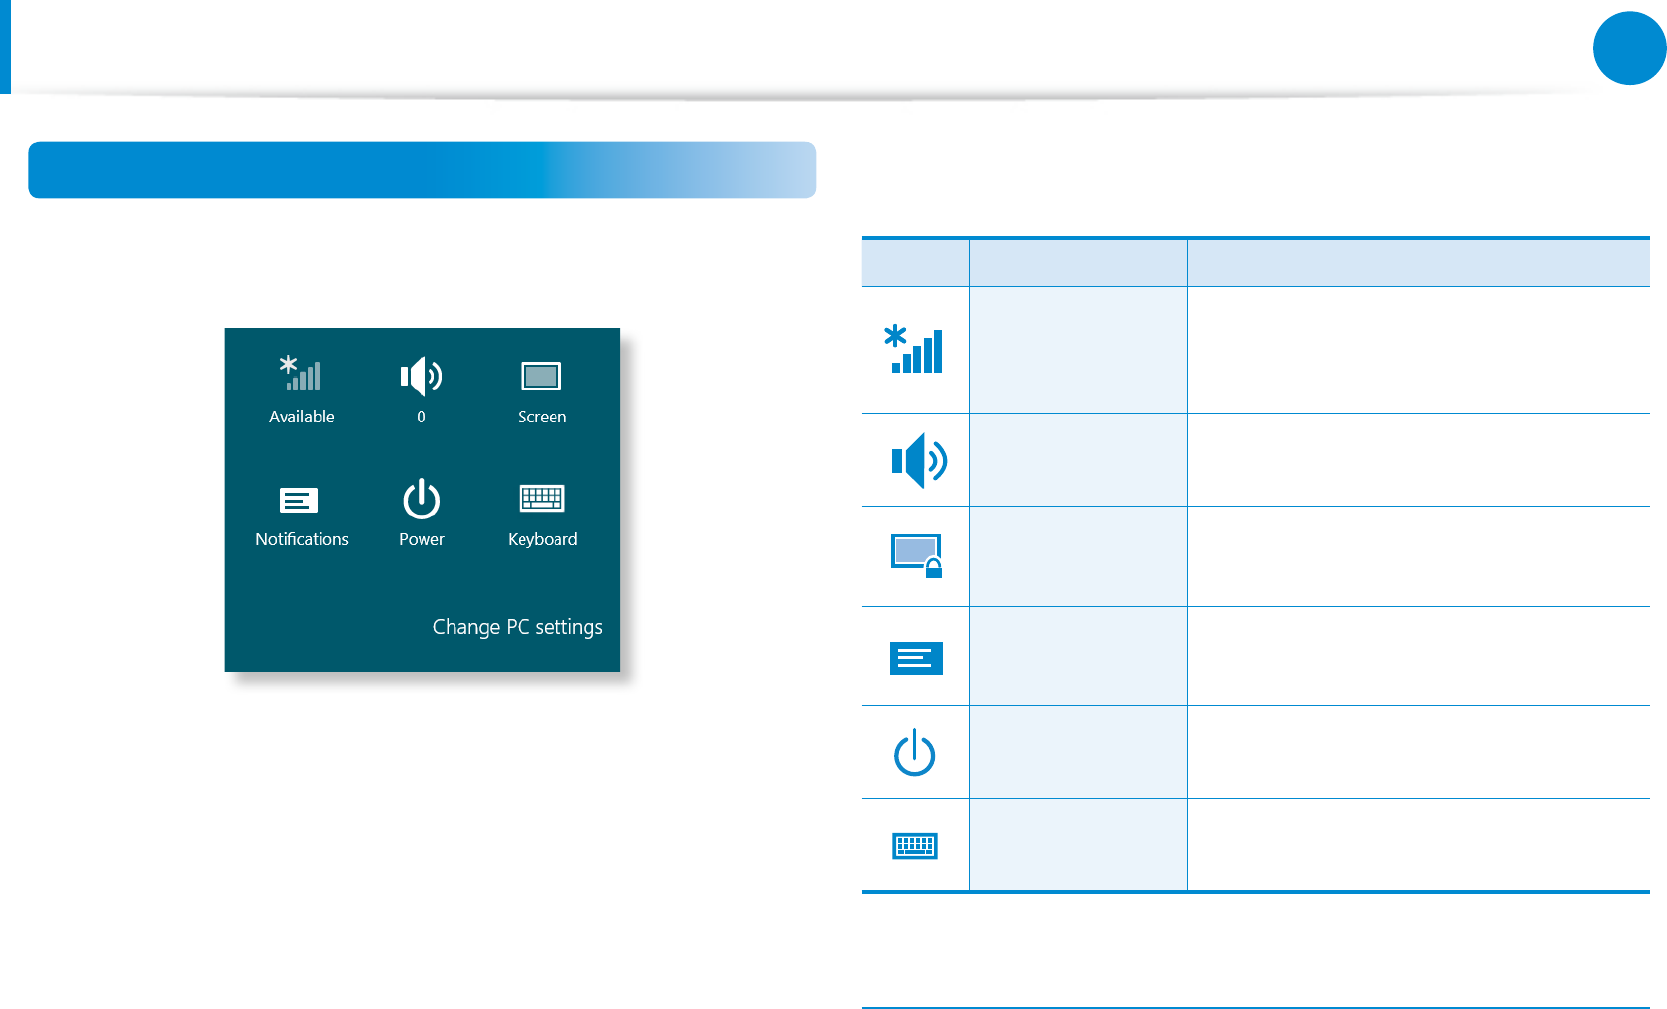
Using the Charms
36
Chapter 2
Using Windows 8
Using the Charms
Changing the Settings
Frequently used Windows menus are collected.
Click the Charms > Settings.Icon Name Function Description
⦽
Wireless
Network
You can connect to a wireless network.
Select a wireless network to connect
to.
⦽
Adjusting the
Volume
You can adjust the volume or mute the
sound.
한
Screen You can adjust the screen brightness.
⦽
Notice You can set the interval at which an
App sends notices.
⦽
Power You can turn o your computer or
select the Power Options.
⦽
Keyboard You can set the Language or launch
Touch keyboard.
Change PC settings
You can change more settings.
36
37
Chapter 2
Using Windows 8
Using Apps
An App refers to an application program (hereafter referred to as
an App). In a larger sense, it refers to all the software programs
installed on the operating system.
Windows 8 provides basic Apps for frequently performed tasks.
Starting/Exiting an App
Click on an App in the Start screen to activate it.
To exit the App
1 Move your mouse pointer to the top of the screen.
Your mouse pointer changes to a hand shape.
2 Click and hold your mouse button and then drag it to the
bottom of the screen. The App moves downward and
disappears and exits.
1
2
Using Apps
You can use the following function with the mouse.
Displaying Currently Running App(s)
1 Move your mouse pointer to the top left corner of the screen
to display the last run App.
2 Then, move your mouse pointer down to display a list of the
currently running Apps in order.

38
Chapter 2
Using Windows 8
Using Apps
3 Click on an App in that list or drag it to the center of the
screen. Now, you can check the selected App which is
currently running.
Right-click over the App in the list and click Close to exit the
App.
1
2
Running Two Apps at the Same Time
1 Select the Apps in the Start screen.
2 Move your mouse pointer to the top of the screen. Your
mouse pointer changes to a hand shape.
3 If you click and hold your mouse button and move left or
right, you can split the screen to display multiple Apps.
4
Move the Screen Split Bar to change the screen split ratio.
Supported screen split ratios are 3:7 or 7:3.
Ex) If you run the Weather App and Store App at the same time
Screen
Split Bar
Weather
App Store App
38
39
Chapter 2
Using Windows 8
Adding/Removing an App to/from the Start Screen
In the Start screen, slightly drag the top edge of the screen
inward.
Click All Apps at the bottom of the screen to display all the
Apps that are currently installed.
1 If you right-click over the App to be added, the relevant menu
is activated at the bottom of your screen.
2
Click Pin to start or Unpin from Start .
Ex) When removing an App in the Start screen
1
2
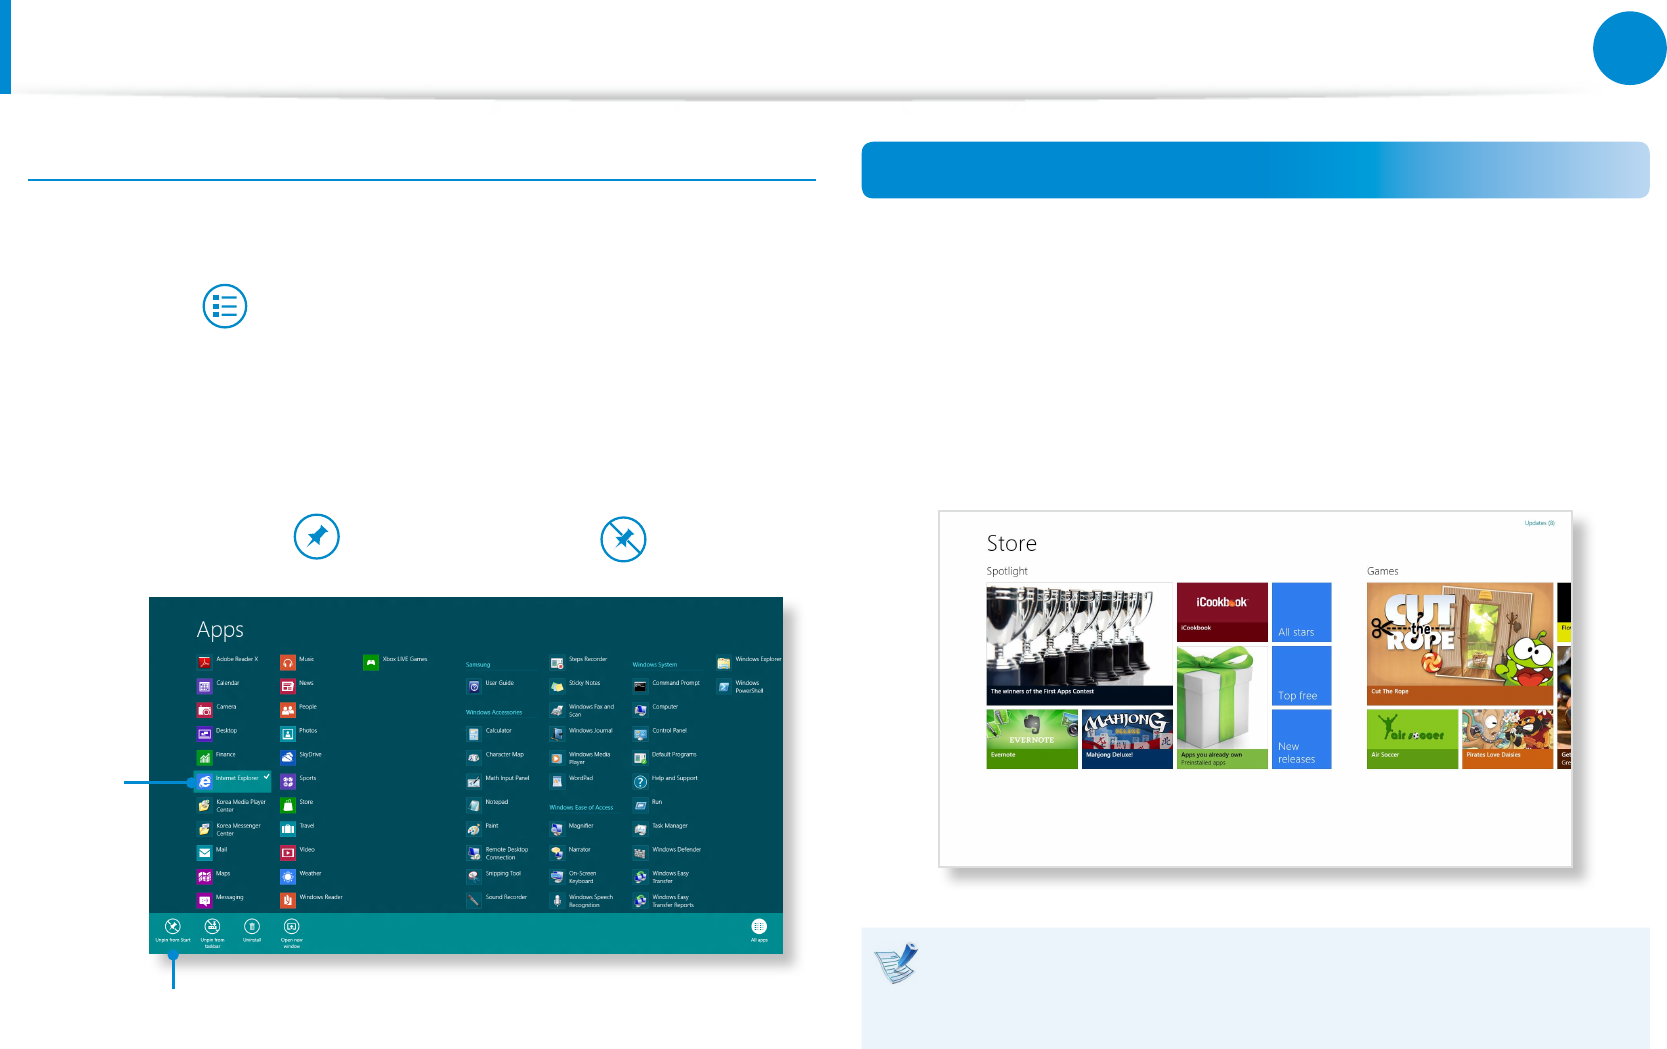
Using the Windows Store
If you run the App Store in the Start screen, the Apps in the
Windows Store are displayed.
However, a Microsoft account is required to purchase App(s) in the
Windows Store.
Continue after registering your Microsoft Account in the
Charms.
Samsung cannot solve errors occuring with other apps
installed from the Windows Store. Contact customer support
for the app directly.
Using Apps
40
Chapter 2
Using Windows 8
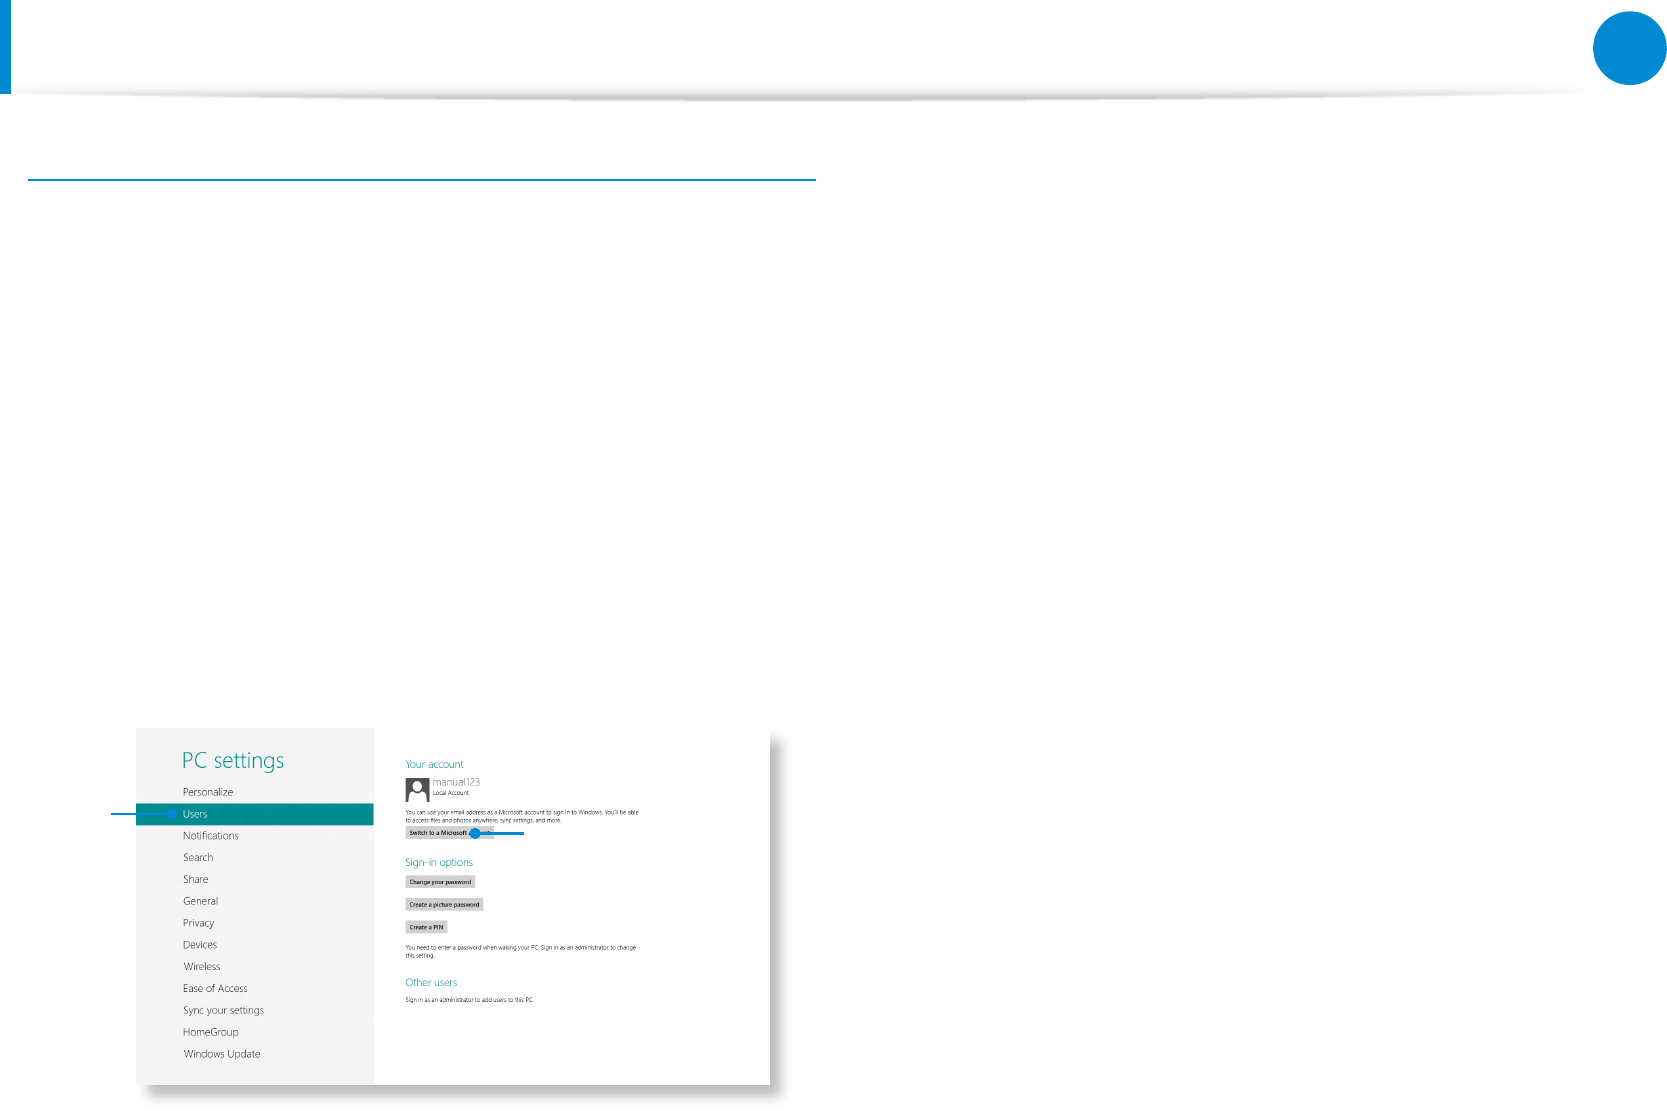
Conguring your Microsoft Account
A Microsoft Account allows you to synchronize your settings with
other device(s) running Windows 8 online allowing you to share
le(s) or settings.
You should register a Microsoft Account to download or purchase
App(s) from the Store.
1 Run the Charms and click Settings > Change PC Settings.
2
Click Users > Your account > Switch to a Microsoft
account.
3
Register your account through the following relevant
procedures.
12
Using Apps
40
41
Chapter 2
Using Windows 8
Windows Hot Key Function
You can use the following convenient hot keys in Windows 8.
You can use the following function when an external-type
keyboard is connected.
Function Hot Keys Function Description
Displaying the Start
Screen Windows Key Switches to Start mode.
Displaying the
Desktop Windows Key + D Switches to Desktop
mode.
Running the
Charms Windows Key + C Activates the Charms.
Locking the Screen Windows Key + L Locks the screen.
Opening the Ease
of Access Center Windows Key + U Opens the Ease of Access
Center conguration.
Opening the
Second Screen
Settings
Windows Key + P Opens the External
Monitor Settings menu.
Function Hot Keys Function Description
Opening the
Advanced
Management Tool
Windows Key + X Opens the Advanced
Management Tool.
Exit App Alt + F4 Exits the currently
running App.

Using the Touch Screen 43
Multi Card Slot (Optional) 51
Connecting an External Display Device 53
Adjusting the Volume 56
LCD Brightness Control 58
Wireless Network (Optional) 60
Mobile broadband (Wireless WAN, Optional) 62
NFC (Near Field Communication) (Optional) 63
Book Cover Keyboard (Optional) 65
Using the S Note app (S Note, Optional) 70
Using the Multimedia App (Optional) 74
Using Apps a Samsung Smartphone (Optional) 78
Samsung Software Update 79
Diagnosing the Computer Status and Troubleshooting 80
Battery 81
BIOS Setup 84
Setting a Boot Password 86
Chapter 3.
Using the computer
43
Chapter 3.
Using the computer
You can use the computer using the touch screen only, without using the keyboard and mouse.
The touch screen function is only supported for models which have the function installed at the factory.
Operate the touch screen using your nger or the S Pen. Other tools such as a ballpoint pen are not recognized and using sharp •
objects may damage or scratch the surface of the LCD.
If a S Pen (optional) is provided, you can use the S Pen instead.•
Since touching the touch screen with a conductive material such as a metallic object may cause a malfunction, take care not to •
touch the screen with this kind of object.
Using the Touch Screen
This function is provided by touch screen models running Windows 8 and will only work for some applications.•
In addition, note that the supported functions are dependant on the application.•
You can use the S Pen (optional) as you use your ngers. The descriptions here are for using your ngers.•
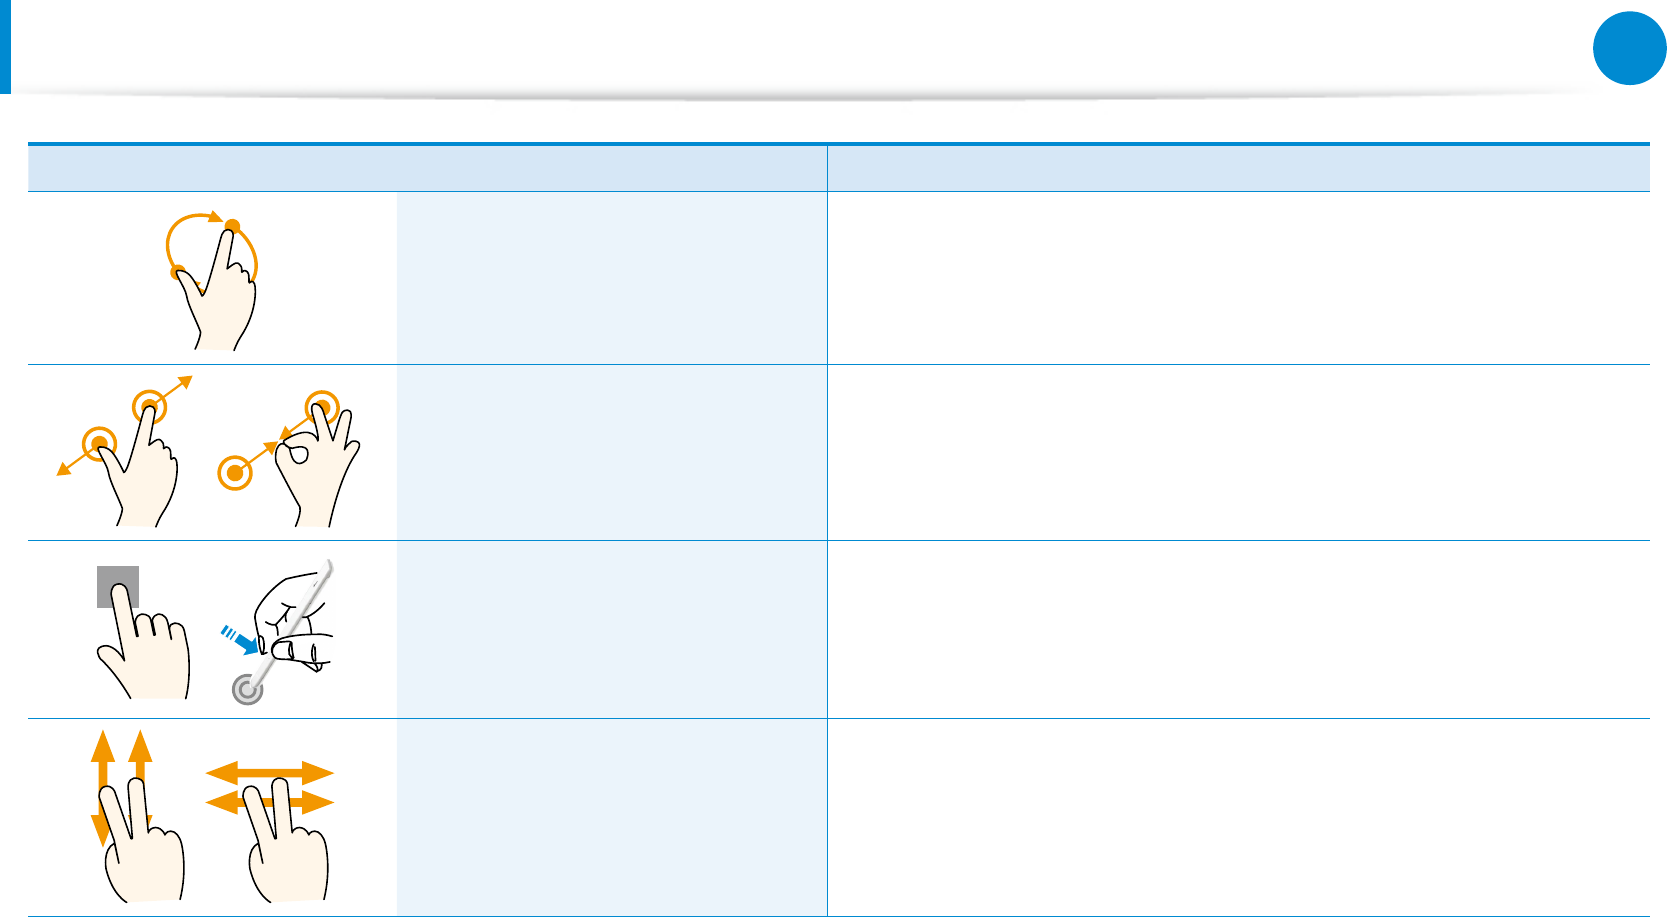
Learning basic touch screen operations
You can easily learn how to use the touch screen conveniently.
Touch Operation Function Description
Dragging from the right edge
toward the center Displays the Charms menu which is hidden at the right of the screen.
Using the Touch Screen
44
Chapter 3.
Using the computer
Using the Touch Screen
Touch Operation Function Description
Dragging from the left edge
toward the center Displays the last run App.
Dragging from the bottom edge
upward
or
from the top edge downward
Displays the options for the currently running application.
Touching slightly
(Clicking)
Slightly press with your nger to select an item.
(If you slightly touch a specic menu, option, application icon, etc. on
the screen, the corresponding capability is activated.)
Touching twice
(Double-clicking) Slightly press twice with your nger to select an item.
Touching and dragging Moves the selected target or moves to the next page.
You can draw a picture or write some letters with this operation.
44
45
Chapter 3.
Using the computer
Touch Operation Function Description
Rotating with more than 2 ngers Rotates the selected target.
Spreading 2 ngers widely
or
bringing them towards each other
Zooms in or out of the target.
Touching and holding for a while
(Right-clicking your mouse)
Provides the same function as right-clicking your mouse button.
Displays the additional options which can be set for the selected
target or more detailed information.
Touching and dragging 2 ngers
up/down, left/right
(Scrolling)
Moves up/down, left/right. Provides the same function as scrolling
your mouse.
Using the Touch Screen

46
Chapter 3.
Using the computer
Using the S Pen (optional)
If a S Pen is supplied with the product, you can operate the
computer with the pen instead of your ngers.
You can use the S Pen as you would use your ngers.
Taking Out the S Pen
Take out your S Pen toward the right.
After using the S Pen, keep it in the S Pen slot.
S Pen structure and functions
Pen button
Pen tip Pen tip
Ring
Pen tip
(Use this to perform the role
of the left mouse button)
This performs the function of your
nger tip when you touch the screen.
Pen button
(Use this to perform the role
of the right mouse button.) If you press the pen button when the S
Pen tip is on the screen, circles appear
around the pointer on the screen.
Touch the screen with the S Pen while
holding down the pen button.
This performs the right-click function.
Using the Touch Screen

46
47
Chapter 3.
Using the computer
Using the Touch Screen
Replacing the pen tip
If the pen tip is damaged, you can replace the pen tip as follows:
1 Hold the pen tip by inserting it into the hole of the ring and
remove the tip by pulling it out.
2 Insert the new pen tip into the S Pen.
Take care so that the pen tip does not spring out when taking
it out.
Screen Calibration
When the pointer on the screen does not precisely match the
points you touch, calibrate the touch screen using the Tablet PC
Settings menu.
The calibration process for the touch screen may dier depending
on the operating system and may not be available in some
operating systems. The following descriptions assume the
Windows 8 operating system.
1 Click Charms menu on the Desktop > Settings
áᔪ
Ŗᮁ
᯲
ᰆ⊹
ᖅᱶ
>
Control Panel > Hardware and Sound > Tablet PC
Settings > Calibrate.
48
Chapter 3.
Using the computer
Using the Touch Screen
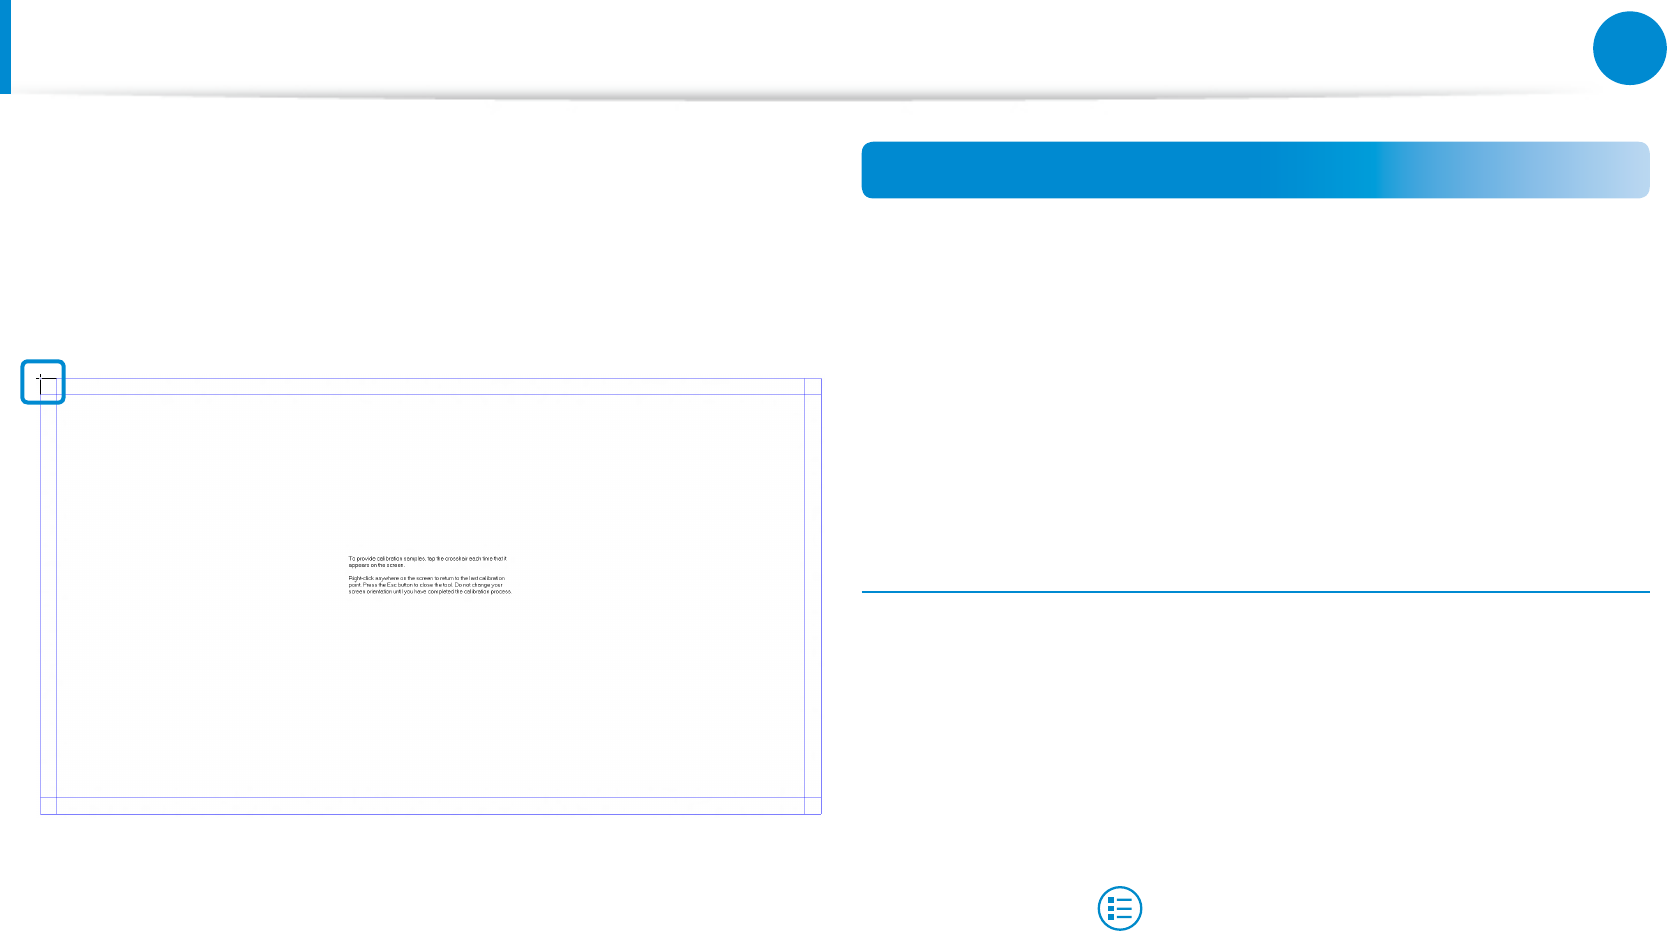
2 Select the screen type to calibrate. If the Calibration screen
appears, touch the point represented by the “+” mark and
then remove your nger.
The “+” mark appears sequentially from the top left to the
bottom right of the screen.
3 When the Do you want to save the calibration data?
window appears, click Yes.
The touch screen input points are calibrated.
Entering Characters
You can enter characters using the keyboard and the Tablet PC
Input Panel.
Entering characters may dier depending on the operating system
and is not supported by some operating systems.
If you are using your computer for a long period of time, it is
recommended using the keyboard.
Entering characters is explained using an example with notepad.
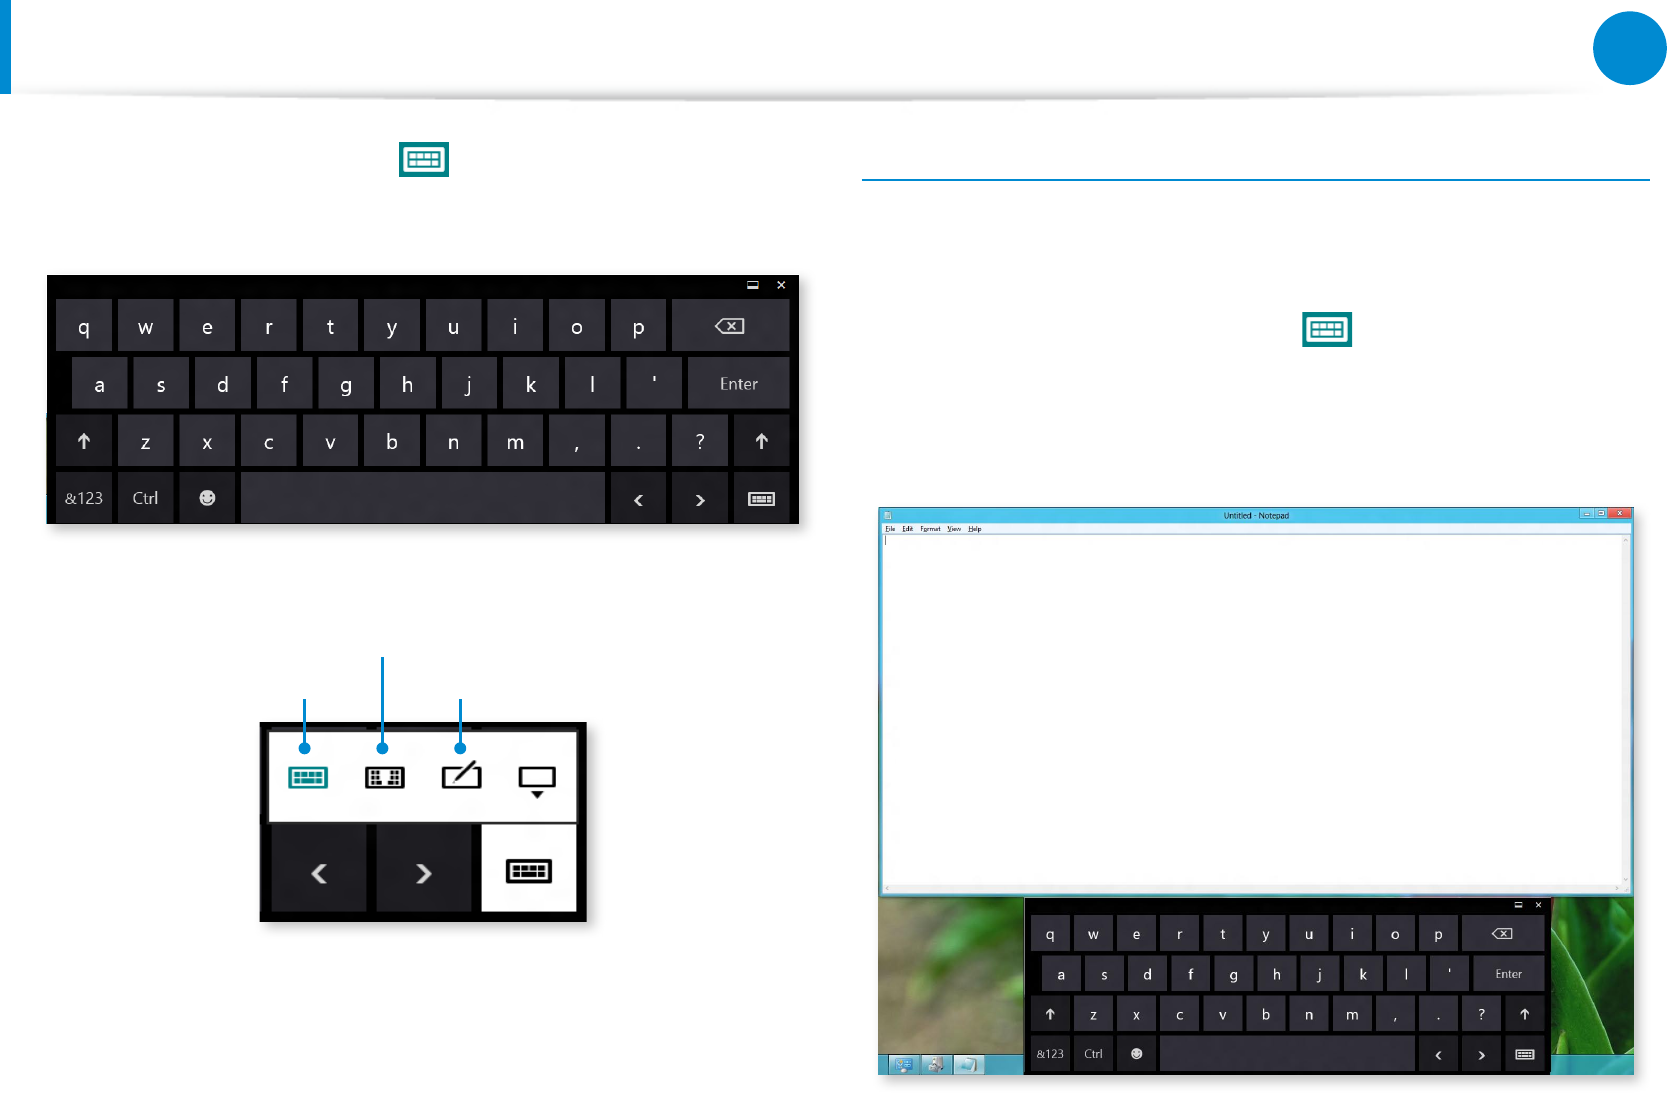
Using the Tablet PC Input Panel
The Tablet PC Input Panel is an onscreen keyboard provided by
Windows.
Follow the descriptions and illustrations on how to use the touch
keyboard and handwriting mode.
1 In the Start screen, slightly drag the top edge of the screen
toward the center.
Press All Apps > Notepad.
2 Put your hand on the Notepad screen to display the cursor.
48
49
Chapter 3.
Using the computer
Using the Touch Screen
3 On the Desktop, press the at the right of the taskbar to
display the Tablet PC Input Panel.
Touch Keyboard
Touch Keyboard
(displays the Numeric Key Pad in the middle.)
Handwriting Mode
[Input Mode]
Entering characters using the Touch Keyboard
The Touch keyboard has the standard keyboard layout which
allows you to select keys to enter characters.
1 Press the Touch Keyboard icon in the Tablet PC Input
Panel.
2 Press the keys to enter your characters.
50
Chapter 3.
Using the computer
Using the Touch Screen
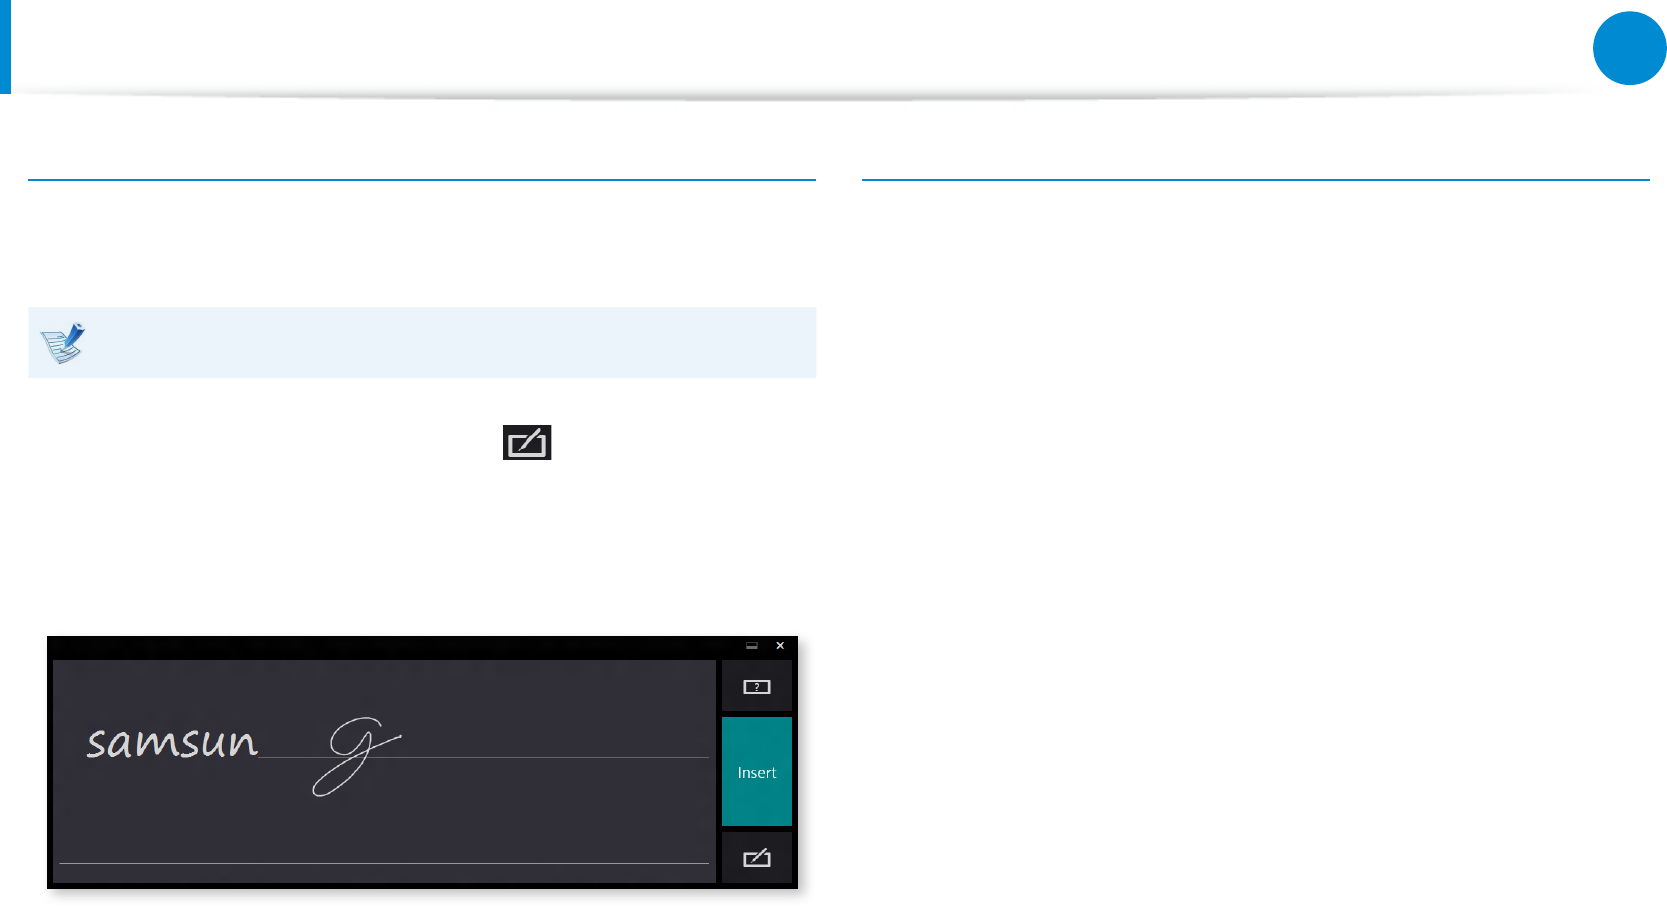
Entering characters in Handwriting Mode
You can enter characters by writing them in the Handwriting
Mode Input Panel on the touch screen.
Handwriting Mode may not be available in some languages.
1 Press the Handwriting Mode icon in Tablet PC Input
Panel.
2 Write characters in the input area of the Handwriting Mode
Input Panel on the touch screen.
3 Press the Insert button to enter characters.
Touch screen use precautions
Use the touch screen with clean and dry hands. In a humid •
environment, remove the moisture from your hands and the
touch screen surface before use.
Avoid directly spraying liquid cleansing solution onto the touch •
screen. The liquid solution may enter the touch screen through
the bottom edge.
When using a liquid cleansing solution, dampen a cloth in
the solution and clean the screen with the cloth (a cleansing
solution or cloth containing abrasives may damage the touch
screen.)
Do not apply a severe impact to the touch screen or press the •
screen with a sharp object such as a ball-point pen.
This may damage the touch screen.
If your nger only touches the touch screen slightly, your touch •
may not be recognized.
If you wish to use a pen, please use the provided S Pen •
(optional). Otherwise, the computer may not work properly.
Take care that you do not drop the S Pen as this may damage •
the pen tip.
When pressing the touch screen, press over an item precisely •
taking care not to press other items.
If the touch screen is contaminated by a foreign substance •
such as a bug or water, the touch screen will not work properly.
50
51
Chapter 3.
Using the computer
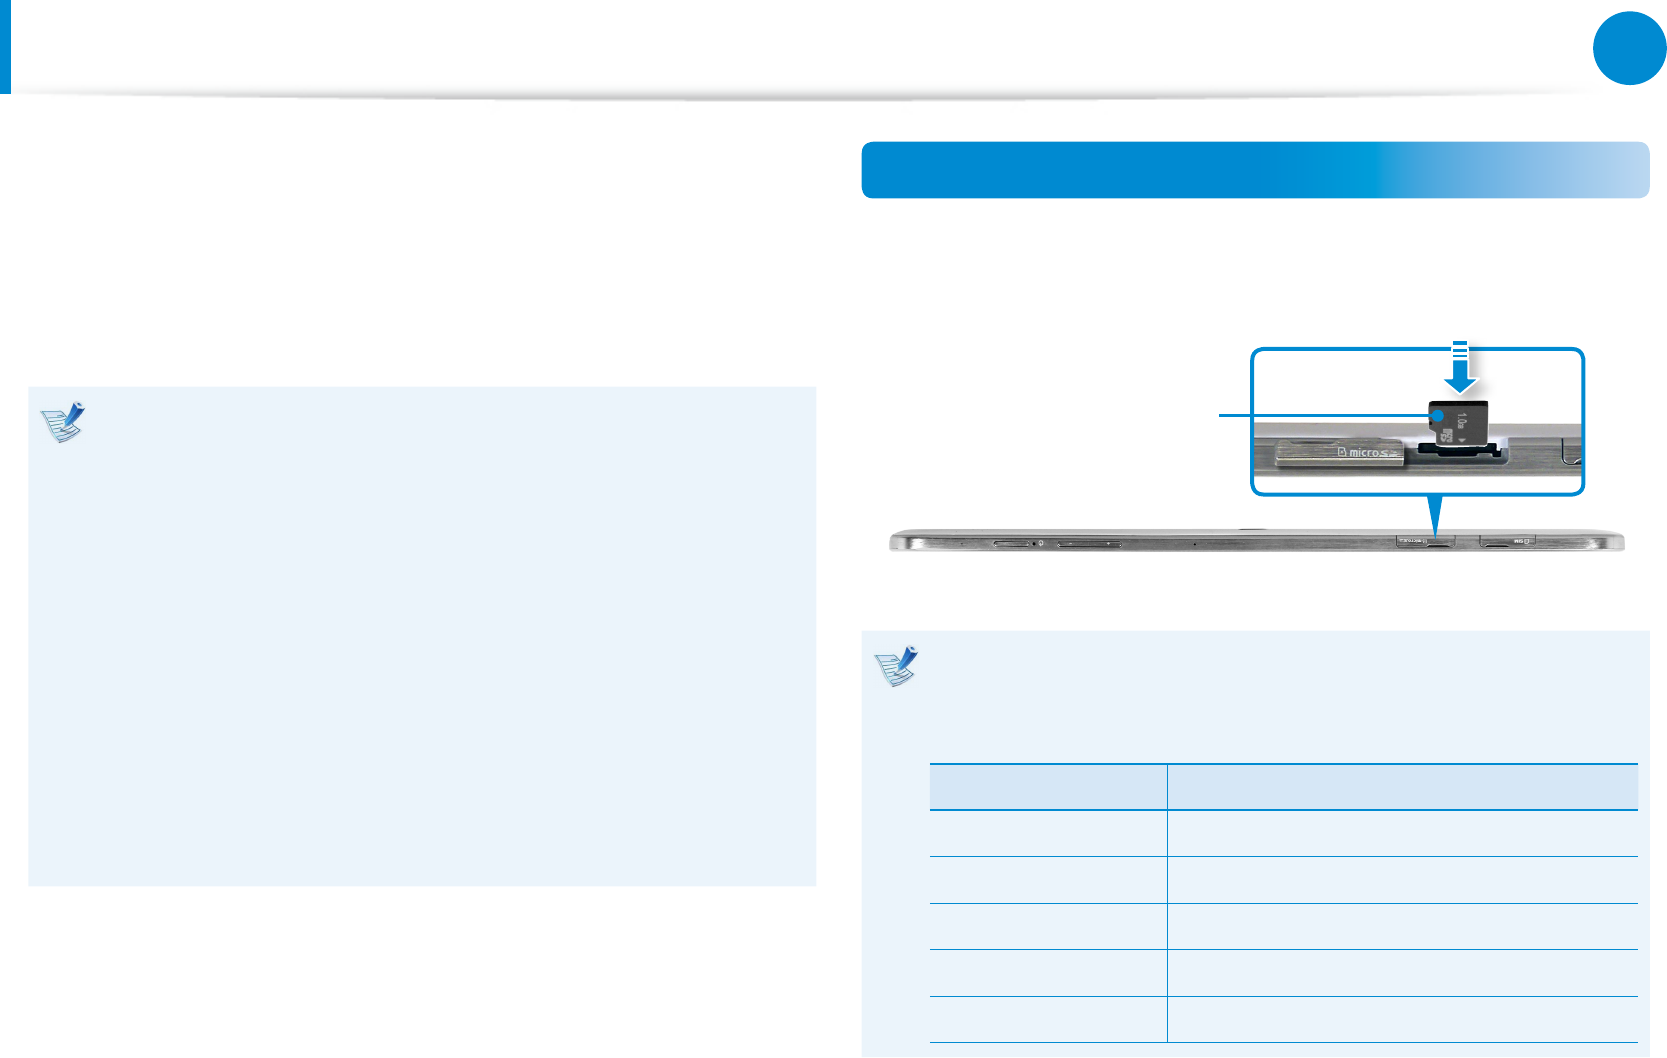
Multi Card Slot (Optional)
Using the multi-card slot, you can read and write data on various
types of memory cards.
When you insert a memory card, make sure to insert the memory
card in the correct direction. Pushing an incorrectly inserted
memory card may damage the card itself or the slot.
You can use memory cards as a removable disk and •
conveniently exchange data with digital devices such as a
digital camera, etc.
Separately purchase memory cards of your desired •
capacity.
The color of the multi-card slot may dier from the picture •
in this manual.
Before using the slot, remove the dummy card from inside •
the slot. (Only for models providing dummy cards.)
Insert the memory card into the multi-card slot in the •
direction printed on the slot.
The data transfer rate may dier depending on the •
specication of the memory card.
Using the card
1 Insert a memory card into the multi-card slot in the correct
direction.
Example) micro SD
Memory Card Naming
The following table shows the full names of memory cards
for each abbreviation.
Abbreviation Memory Card’s Name
micro SD micro Secure Digital
mini SD mini Secure Digital
micro SDHC micro Secure Digital High Capacity
micro SDXC micro Secure Digital eXtended Capacity
mini SDHC mini Secure Digital High Capacity
52
Chapter 3.
Using the computer
Multi Card Slot (Optional)
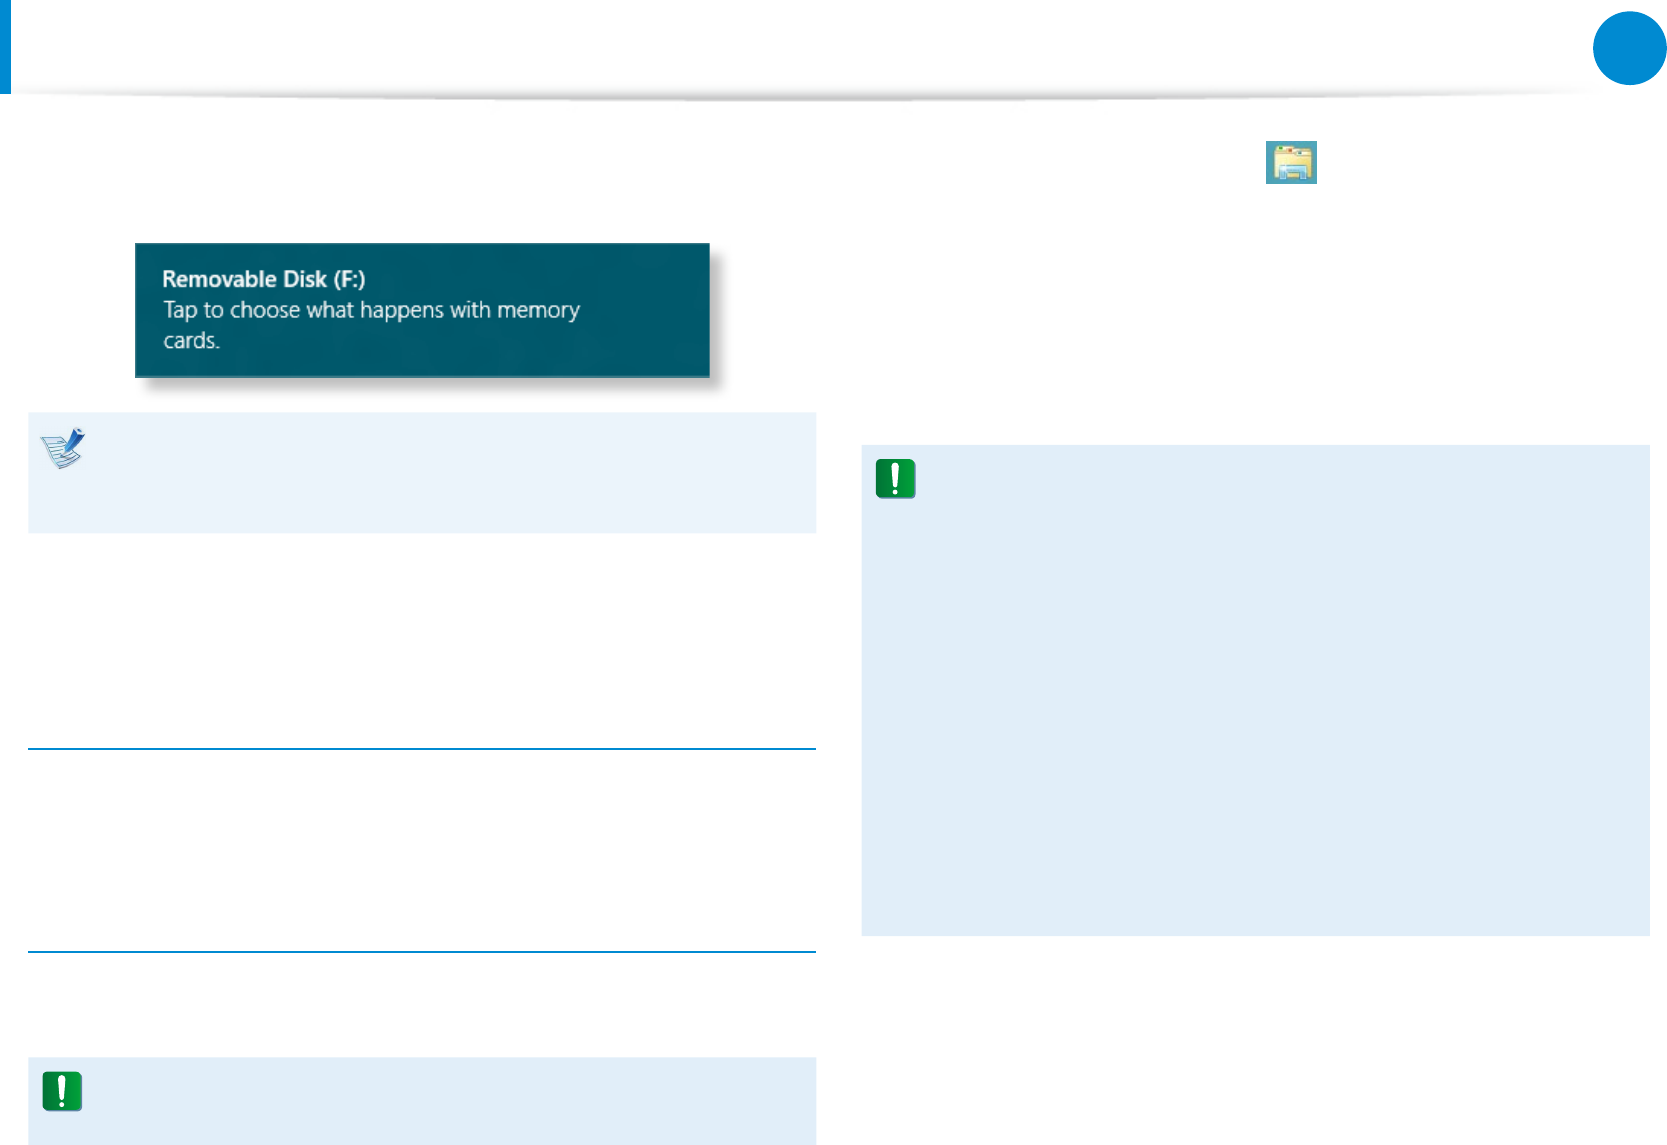
2 The following message appears on the top right. Click to
open the folder and click View Files.
If a message appears to notify you of any problem, click the
corresponding window > Continue without Scanning. You
can perform the following process described in No. 3.
3 Windows Explorer runs on the Desktop. You can save, move
and delete data on the corresponding drive.
To remove a memory card
Push the card to eject it. Then, hold the tip of the card and pull it.
Alternatively, just hold the end of the card and remove it.
To format a memory card
When using the memory card for the rst time, you must format
the card before using it.
Formatting a card deletes all data saved on the card. If the
card includes data, backup the data before formatting it.
1 Click the Windows Explorer icon in the taskbar on the
Desktop.
2 Right-click over a card drive with the touchpad and select
Format.
3 Click Start to the formatting.
To share a memory card with a digital device such as digital •
camera, it is recommended to format the memory card
in the digital device before use. If you format a memory
card on the computer and then insert the memory into the
digital device, you may need to format the memory card
again in the digital device.
If there is a write-protection device in the memory card •
and the device is set to the lock position, you cannot
format, write data, nor erase data from the card.
Repeatedly inserting and removing a memory card may •
damage the memory card.
SDIO (Secure Digital Input Output) is not supported.•
You cannot read or write copyright-protected data.•
52
53
Chapter 3.
Using the computer
Connecting an External Display Device
If you connect an external display device such as a monitor, TV,
projector, etc., you can view the picture on the wider screen of the
external device when you give a presentation or watch a video or
movie.
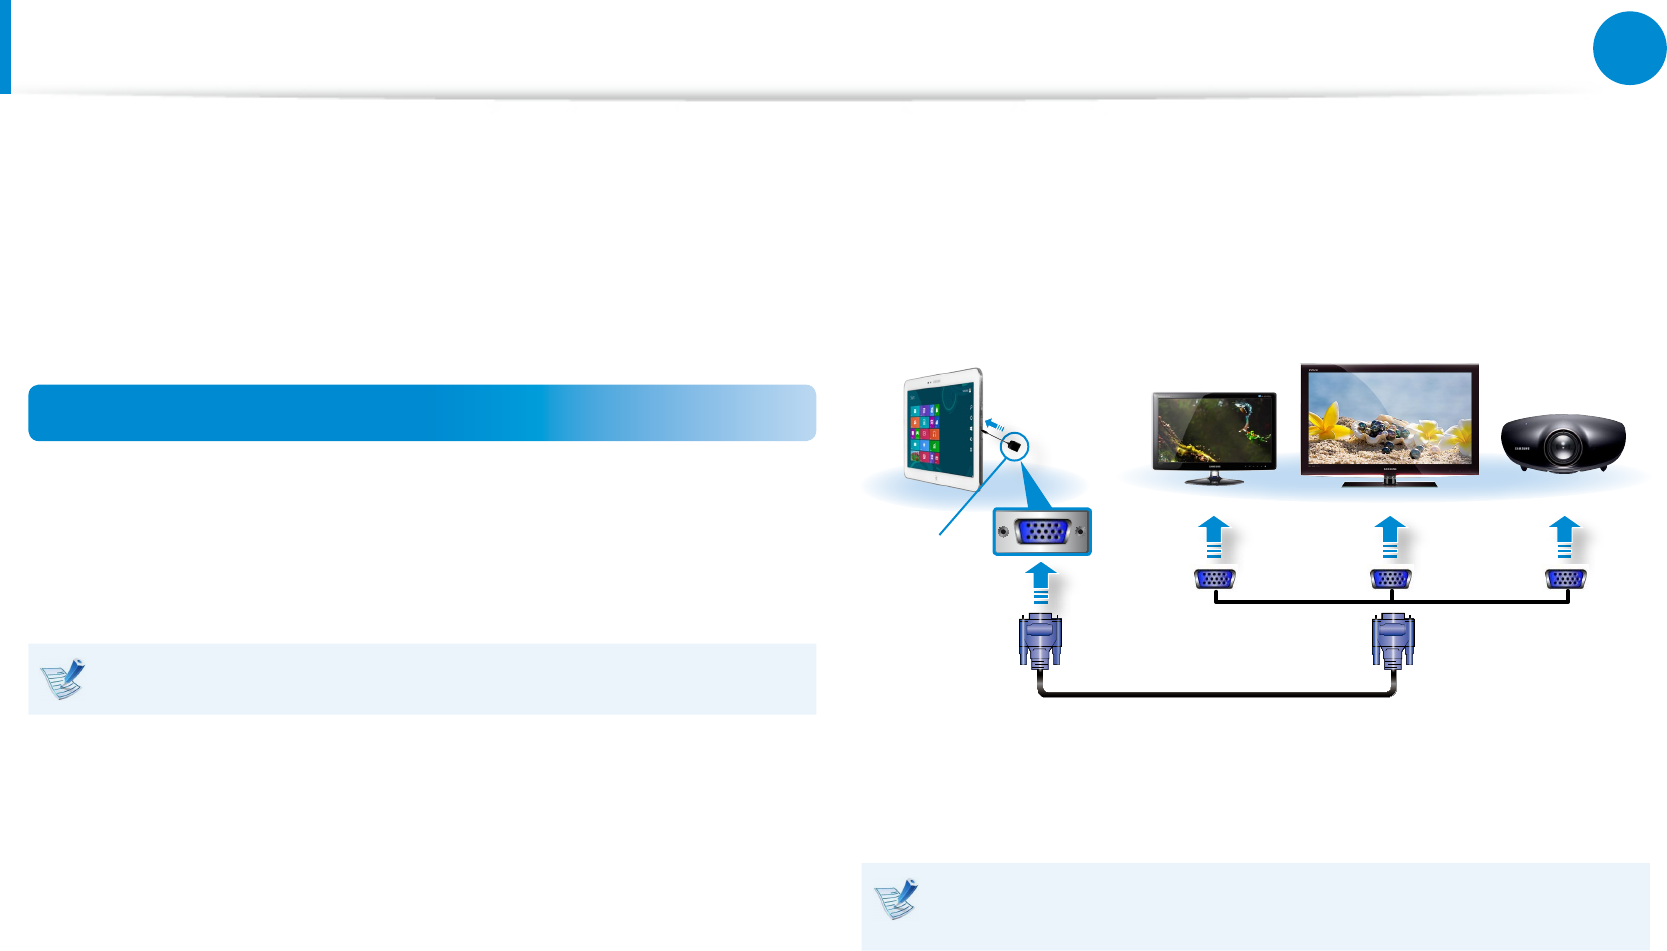
Connecting to the monitor port (Optional)
Connect an external monitor, TV, or projector that supports the
D-SUB interface to display the image on a wider screen.
You can give better presentations by connecting the computer to
a projector.
The VGA adapter is optional and to be be purchased.
1 Open the micro HDMI port, and connect the VGA adapter.
Connect the VGA cable (15-pin) to the connected VGA
adapter and then connect the other end of the VGA cable to
the D-SUB port of the monitor or the TV.
x
External
Monitor TV
Projector
z
VGA
Adapter
2 Connect the power cord of the connected monitor, TV or
projector and turn the power on.
Change your TV to external device mode when connecting to
the TV.