Samsung Electronics Co XE300TZC Tablet PC with 802.11 abgn + BT, GPS User Manual Part 3
Samsung Electronics Co Ltd Tablet PC with 802.11 abgn + BT, GPS Part 3
Contents
- 1. User Manual Part 1
- 2. User Manual Part 2
- 3. User Manual Part 3
- 4. User Manual Part 4
- 5. User Manual Part 5
User Manual Part 3
54
Chapter 3.
Using the computer
3 Select Charms menu > Devices
áᔪ
Ŗᮁ
᯲
ᰆ⊹
ᖅᱶ
> Second Screen.
Select a desired monitor mode.
3&ִփ
ـࢿ
ࢠ
ѿءधִփ
PC screen only
The contents are only displayed on the PC
monitor (current device).
3&ִփ
ـࢿ
ࢠ
ѿءधִփ
Duplicate
The contents of the current device are displayed
on the external device as well.
3&ִփ
ـࢿ
ࢠ
ѿءधִփ
Extend
The screen of the current device is expanded to
the external device.
3&ִփ
ـࢿ
ࢠ
ѿءधִփ
Second screen only
The contents are displayed only on the screen of
the external device.
Alternatively, to set up dual view:
Open the Display Settings window in the Control Panel,
select Monitor 2 and select the Expand to t to this
monitor checkbox to set dual view. For more detailed
information, refer to the Windows online help.
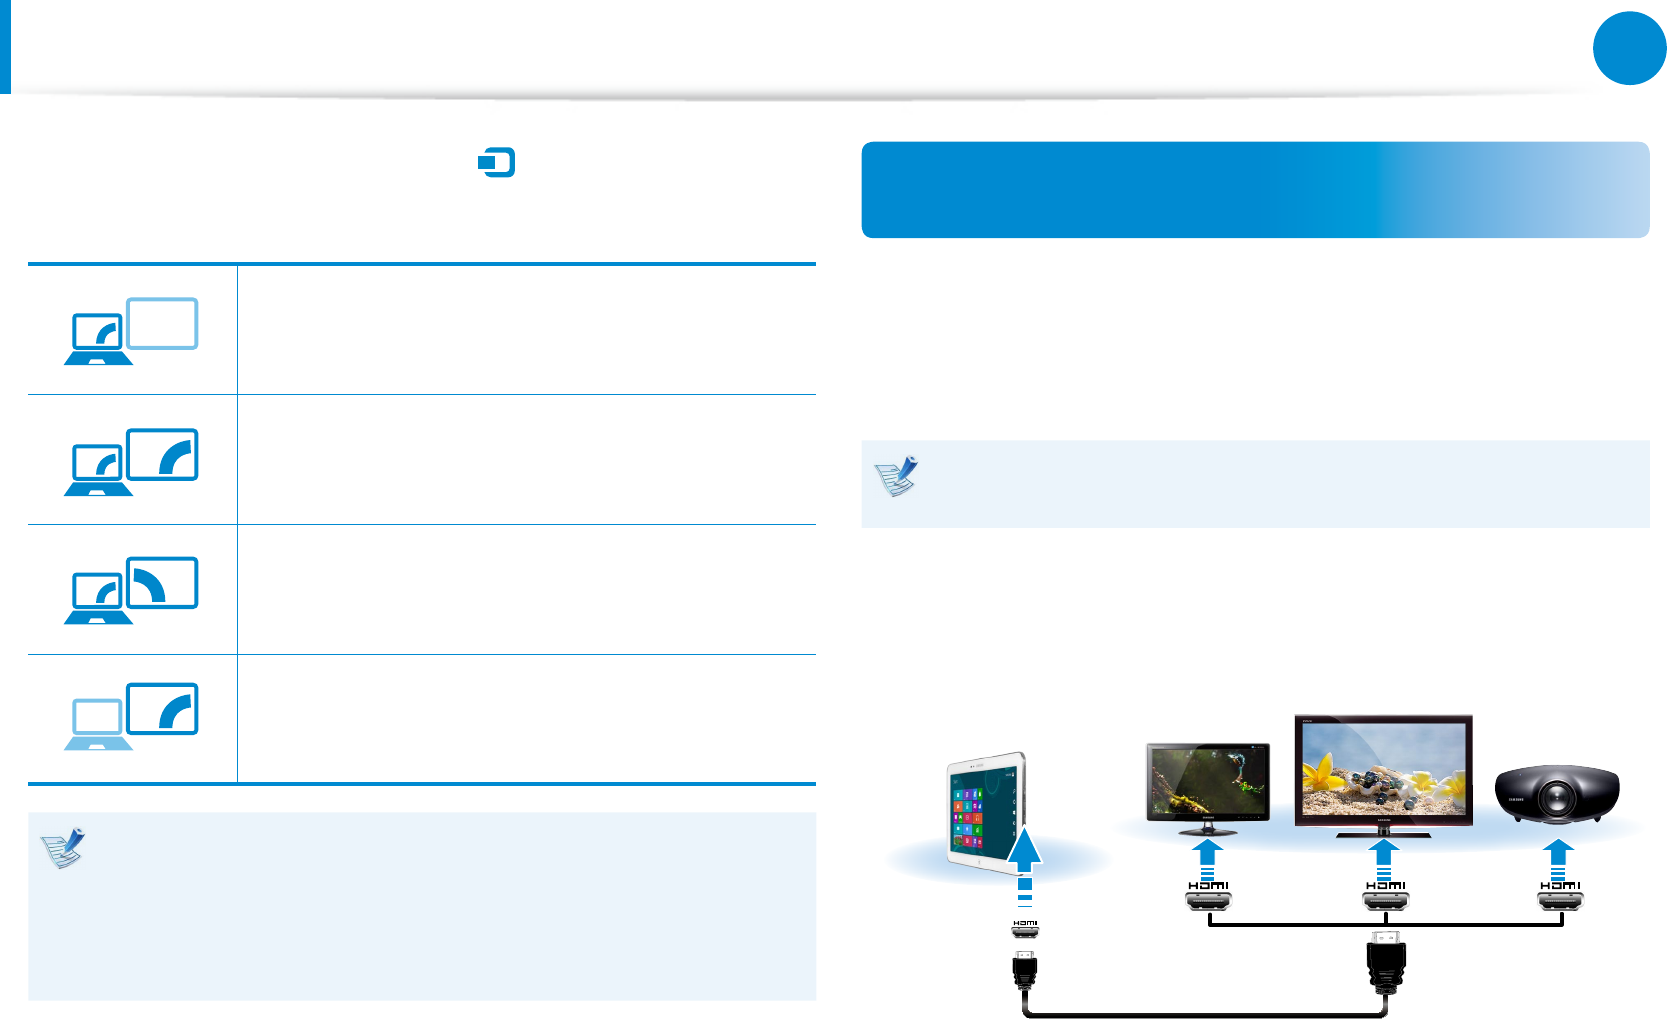
Connecting through the Micro HDMI port
(Optional)
By connecting the computer to a TV with a HDMI port, you can
enjoy both a high visual quality and a high sound quality.
After connecting a TV through HDMI, you have to congure the
screen and sound.
You have to additionally purchase the HDMI to micro HDMI
cable.
1 Connect the HDMI to micro HDMI cable to the HDMI port of
the TV.
External
Monitor TV
Projector
HDMI to
micro HDMI
Connecting an External Display Device
54
55
Chapter 3.
Using the computer
This is only supported for models that support a TV output •
port (HDMI).
When a TV provides more than one HDMI port, connect •
the computer to the DVI IN port.
When connecting the computer to a TV, switch the •
external input mode of the TV to HDMI.
2 Select Charms menu > Devices
áᔪ
Ŗᮁ
᯲
ᰆ⊹
ᖅᱶ
> Second Screen.
Select a desired monitor mode.
3&ִփ
ـࢿ
ࢠ
ѿءधִփ
PC screen only
The contents are only displayed on the PC
monitor (current device).
3&ִփ
ـࢿ
ࢠ
ѿءधִփ
Duplicate
The contents of the current device are displayed
on the external device as well.
3&ִփ
ـࢿ
ࢠ
ѿءधִփ
Extend
The screen of the current device is expanded to
the external device.
3&ִփ
ـࢿ
ࢠ
ѿءधִփ
Second screen only
The contents are displayed only on the screen of
the external device.
External Monitor / TV is not supported in the DOS Command
Prompt window.
Using the Micro USB Port (optional)
You can use the Micro USB adapter to connect a USB device to the
computer.
The Micro USB adapter is optional and is sold separately.
1 Connect the Micro USB adapter to the Micro USB port of
the computer.
2 Connect a USB device to the Micro USB port.
The Micro USB port does not support the USB 3.0 protocols.
Connecting an External Display Device
56
Chapter 3.
Using the computer
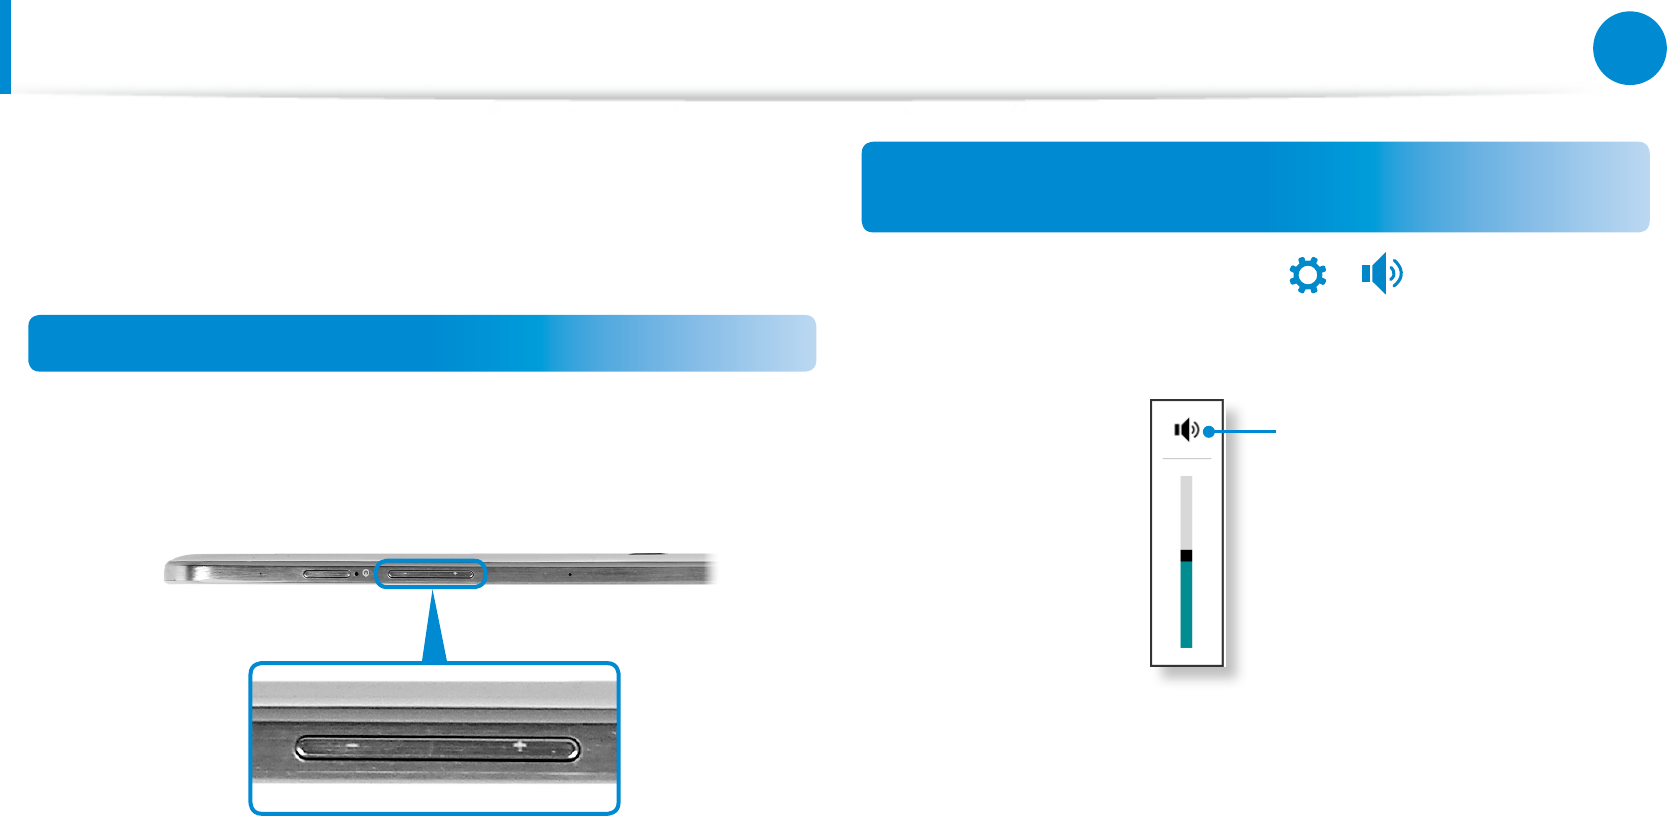
Adjusting the Volume
You can adjust the volume using the volume control button and
the volume control program.
Adjusting the volume with the buttons
You can adjust the volume by using the volume buttons on the
top bezel of the computer.
+
-
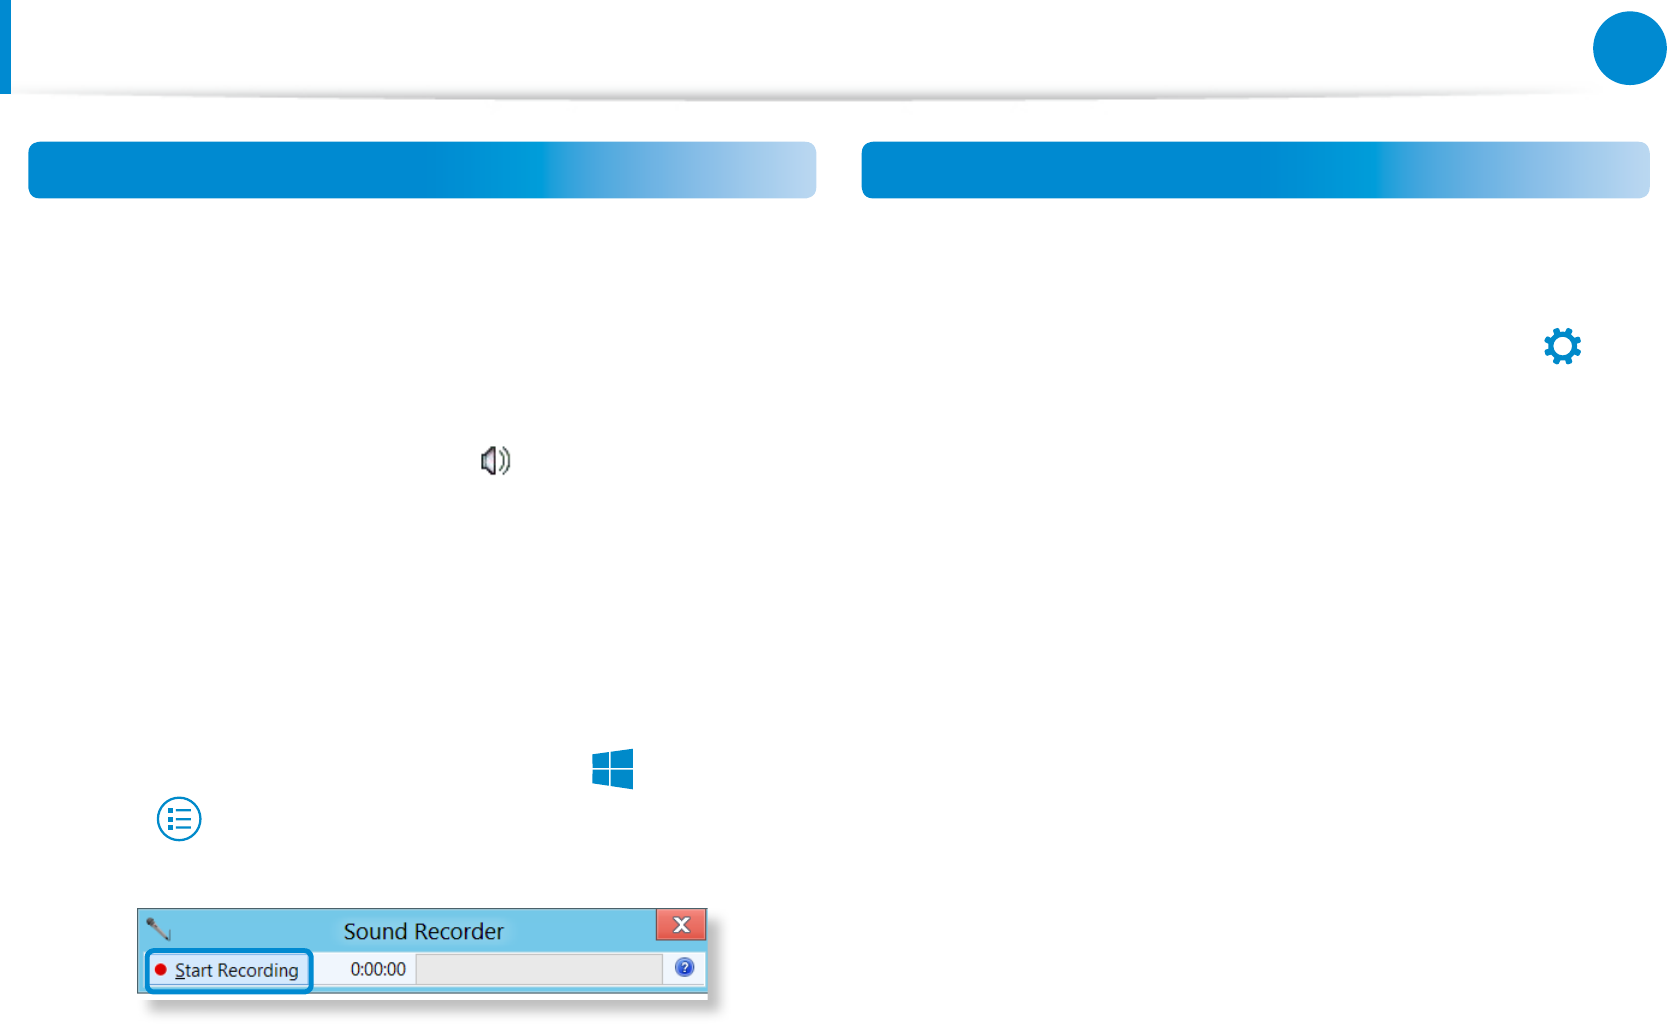
Adjusting the Volume using the Volume
Adjustment Program
Click the Charms menu > Settings
áᔪ
Ŗᮁ
᯲
ᰆ⊹
ᖅᱶ
>
⦽
to adjust the control
bar.
Mute
56
57
Chapter 3.
Using the computer
Using the Sound Recorder
The procedures to record sound using the Windows Recorder are
described below.
1 Connect a microphone to the microphone jack.
Or use built-in microphone.
2 Right-click over the Volume icon on the taskbar and select
Recording Device.
3 Check if the microphone is set as the default recording
device.
If this is the case, it is already set as the default device. If not,
right-click over the microphone and select Set default.
4 Right-click over the Charms menu > Start
áᔪ
Ŗᮁ
᯲
ᰆ⊹
ᖅᱶ
to click All
Apps > Sound Recorder. Then press Start Recording to
record.
Connecting and using a Ear-set / headset Jack
When there is no sound after connecting an earset or headset,
congure the settings as follows.
1 On the Desktop, click the Charms menu > Settings
áᔪ
Ŗᮁ
᯲
ᰆ⊹
ᖅᱶ
>
Control Panel > Hardware and Sound > Sound > Play tab.
2 Select the Speakers (Intel SST Audio Device (WDM)), click
Set Default and click OK.
Adjusting the Volume
58
Chapter 3.
Using the computer
LCD Brightness Control
The screen brightness is automatically set to the brightest
level when AC power is connected and the brightness is
automatically set dimmer when the computer runs on battery
power to extend the battery use time.
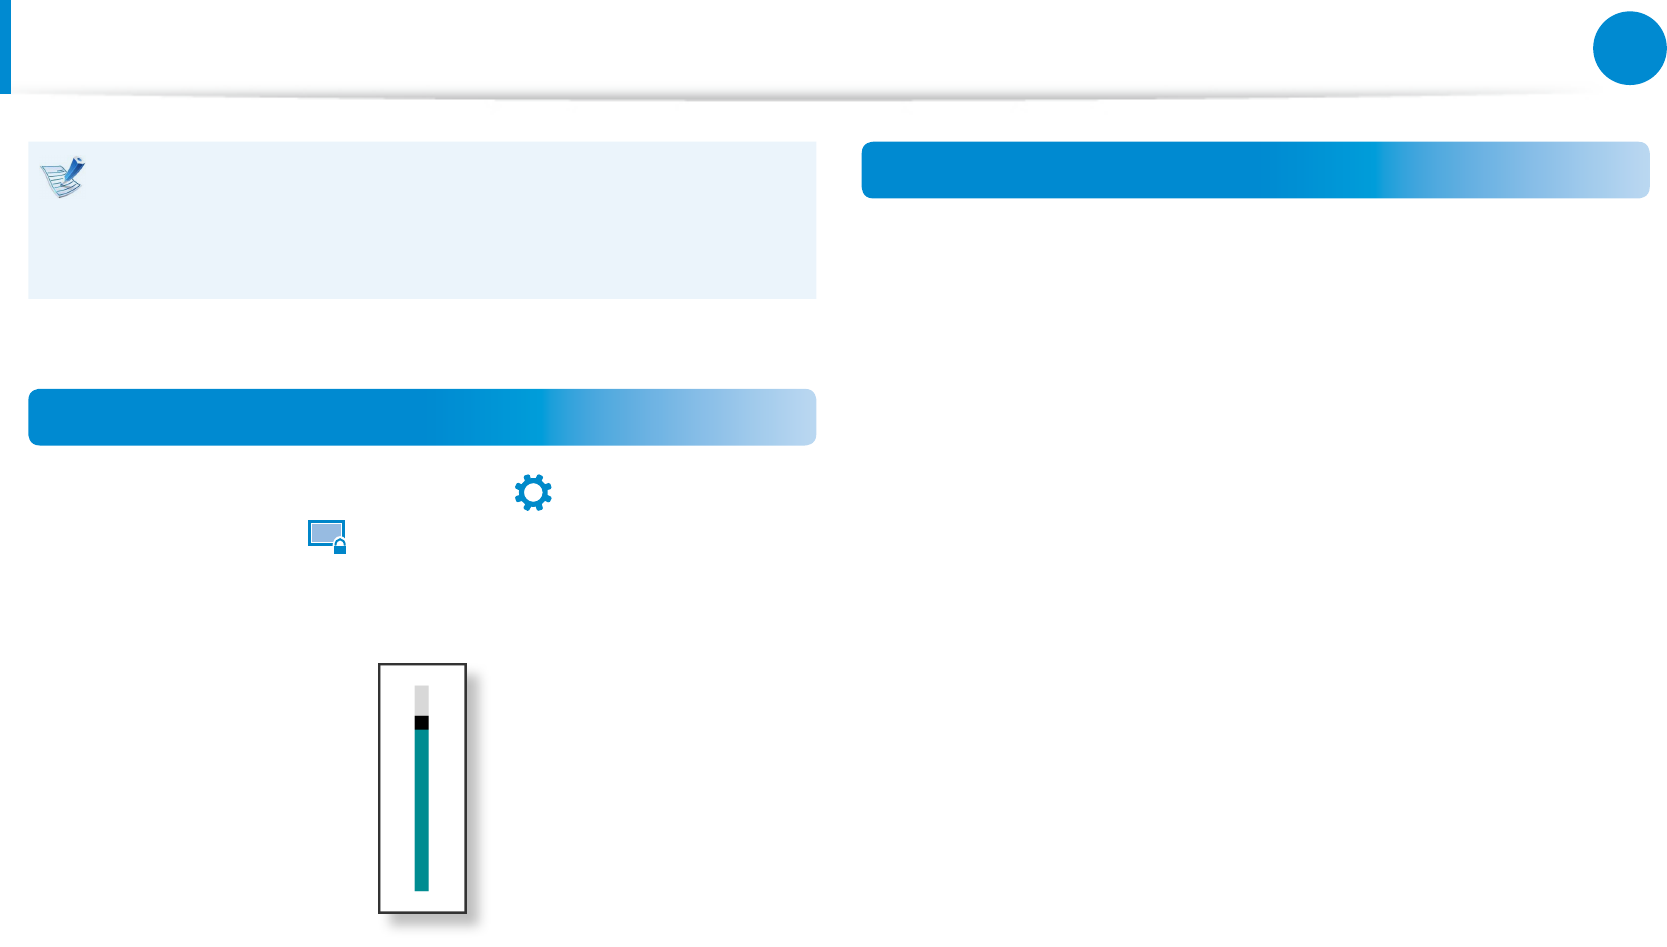
Controlling the Brightness Using the Keyboard
1 Click the Charms menu > Settings
áᔪ
Ŗᮁ
᯲
ᰆ⊹
ᖅᱶ
> Screen
Adjustment icon
한
.
2 Adjust the brightness with the screen brightness control bar.
Switching the picture mode
You can switch the picture mode to your preferred viewing
pleasure, such as optimizing the display for movies or electronic
books.
On the desktop, right-click an empty area and click All apps >
Settings > Display > Picture Tones.
Standard: Standard picture mode.•
Movie: Switch to this mode when the ambient lighting is dark •
or when watching movies.
Low-contrast scene: This will make a darker scene brighter for •
distinction.
Sharp: This will make the picture clear and sharp.•
Read: Suitable for reading electronic books.•
No eect: This is the default picture mode.•

58
59
Chapter 3.
Using the computer
LCD Brightness Control
Saving battery power consumption•
Decreases the LCD brightness when the computer
is running on battery power to save battery power
consumption.
LCD bad pixels principle of computer•
Samsung observes the specications regarding strict
quality and reliability of LCD. But in spite of that, it is
inevitable that there might be a small number of bad
pixels. A large number of bad pixels can cause problems in
appearance, but a small number of pixels doesn’t aect the
computer performance.
Therefore Samsung observes and manages the following
dot principles:
- Bright dot : 2 or less
- Black dot : 4 or less
- Combination of Bright and Dark : 4 or less
Instructions for Cleaning the LCD
Clean the LCD panel with a soft cloth lightly moistened with
computer cleansing detergent moving in one direction.
Cleaning the LCD panel with excessive force can damage the
LCD.
60
Chapter 3.
Using the computer
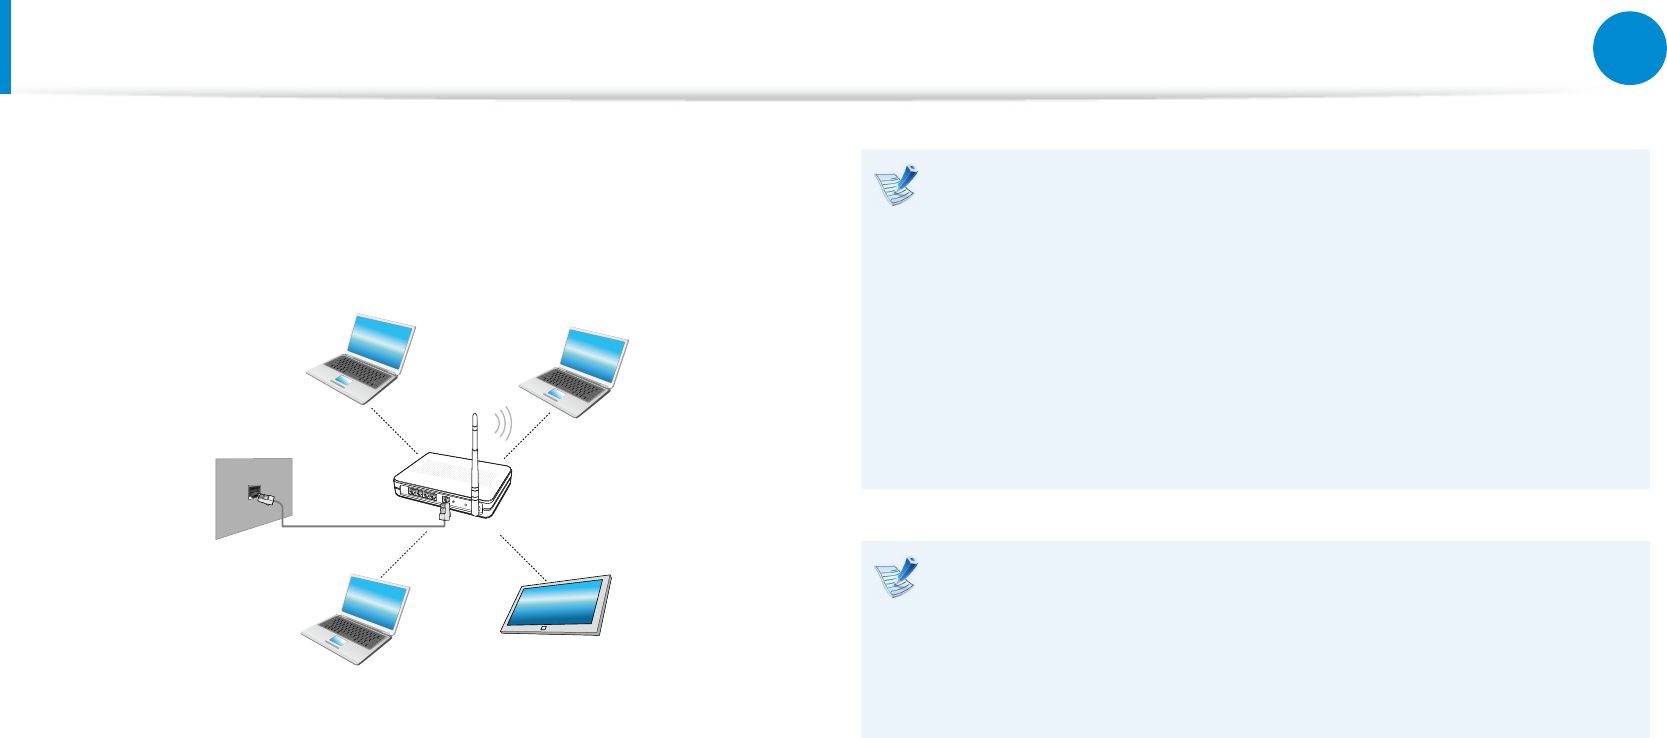
A wireless network (Wireless LAN) environment is a network
environment that enables communication between multiple
computers at home or a small-size oce through wireless LAN
devices.
The screen gures and terms may dier depending on the •
model.
The descriptions below are for computer models with •
a Wireless LAN card or device. A Wireless LAN device is
optional.
The pictures in this manual may dier from the actual
product depending on your wireless LAN device model.
If the wireless LAN is turned o, select • Settings > Wireless
Network and set it to ON.
What is an Access Point (AP)?
An AP is a network device that bridges wired and wireless
LANs, and corresponds to a wireless hub in a wired network.
You can connect multiple wireless LAN installed computers
to an AP.
Wireless Network (Optional)
60
61
Chapter 3.
Using the computer
Wireless Network (Optional)
Connecting to a Wireless LAN
If there is an AP, you can connect to the Internet via the AP using
the Wireless LAN connection method provided by Windows.
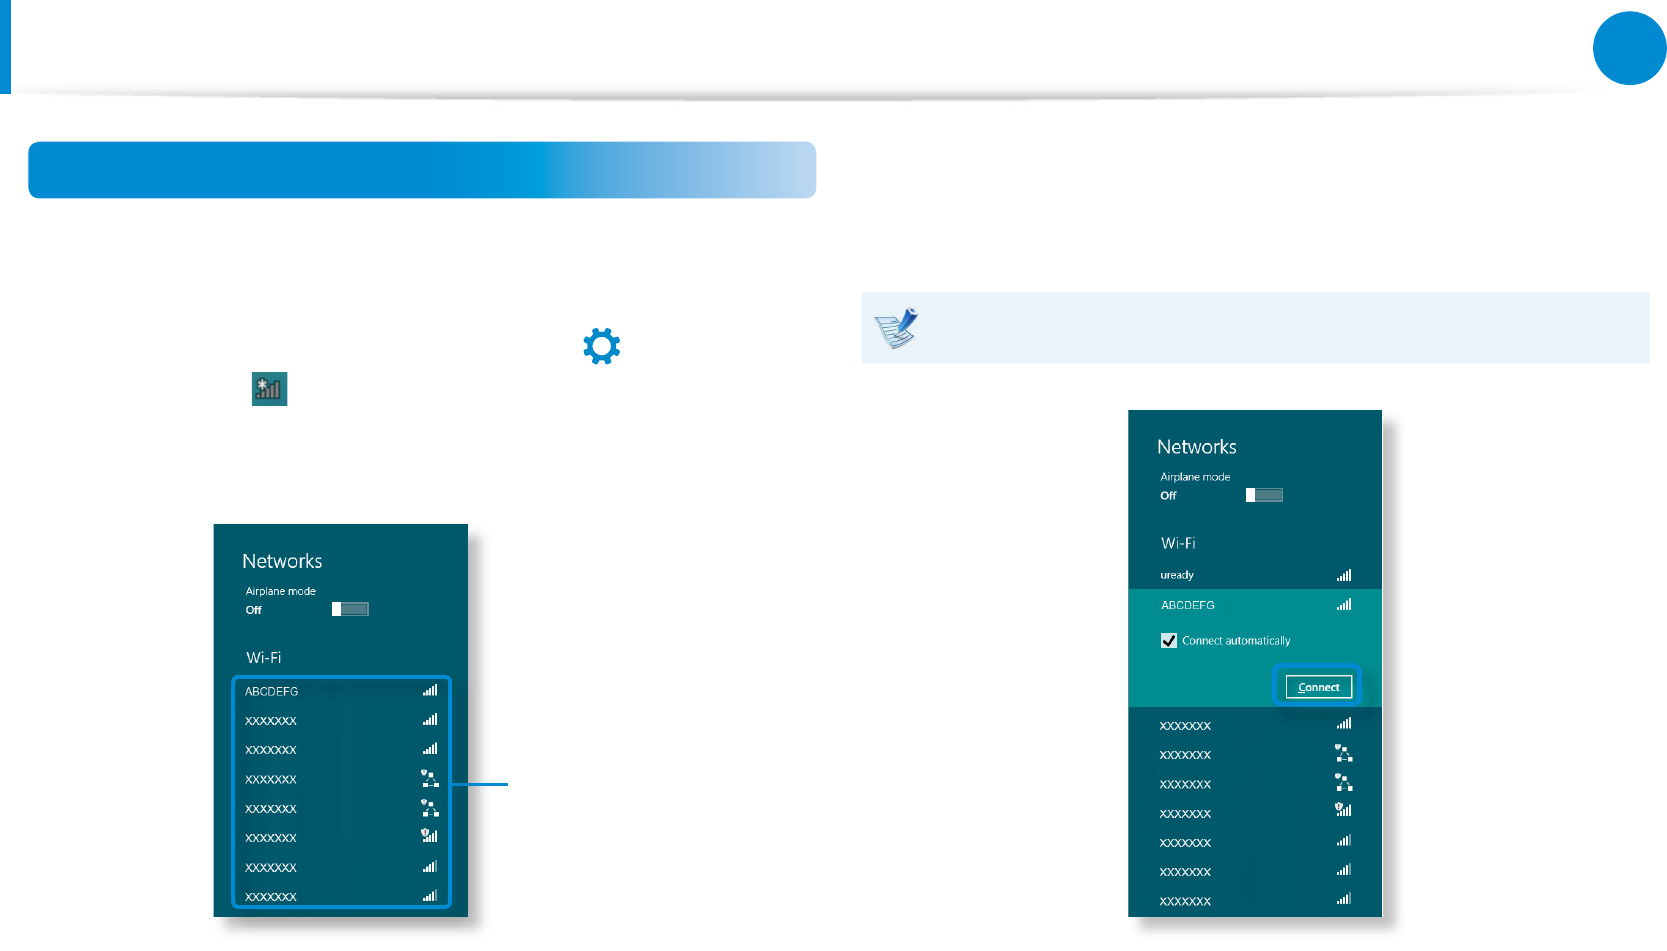
1 If you click the Charms menu > Settings
áᔪ
Ŗᮁ
᯲
ᰆ⊹
ᖅᱶ
> Network
Connections icon, a list of available APs appears.
If you select an AP to connect to, the Connect button
appears.
AP List
2 Click Connect.
If a network key is set for the AP, enter the network key and
then click OK.
For the network key, please ask your network administrator.
3 When the AP connection is completed, Connected is
displayed next to the corresponding AP. You can now use the
wireless network.
62
Chapter 3.
Using the computer
Mobile broadband (Wireless WAN, Optional)
A wireless wide area network (WWAN) is a mobile broadband
network that is available in mobile phone service areas.
The descriptions below are for computer models with •
mobile broadband devices. A mobile broadband device is
optional.
Depending on the version of the operating system, some •
functions may not be provided or dierent functions may
be provided.
The pictures in this manual may dier from the actual •
product depending on your WWAN device model.
For more information on the mobile broadband network, •
contact the network provider.
You must activate the SIM before you connect to the •
mobile broadband.
To nd the hardware information for the SIM activation,
open the Charms and click Settings
áᔪ
Ŗᮁ
᯲
ᰆ⊹
ᖅᱶ
> Change PC
settings > Wireless > View mobile broadband hardware
information. You can check IMEI, phone number, and SIM
ICC ID information.
To set a SIM card’s PIN for security, open the • Charms and
click Settings
áᔪ
Ŗᮁ
᯲
ᰆ⊹
ᖅᱶ
> Network. Press and hold the carrier
name and click View link properties > Secure.
1 Click Charms > Settings
áᔪ
Ŗᮁ
᯲
ᰆ⊹
ᖅᱶ
> Network to display available
mobile broadband networks as shown below.
If there are no available network service providers listed
under Mobile broadband, turn o the computer, and insert
the SIM card correctly, and then turn on the computer.
2 Select a carrier, and then click Connect.
Clicking Connect in a foreign country activates automatic
data roaming. Therefore, you may be charged for the data
usage.
3 If the Prole settings screen appears, follow the onscreen
instructions to enter the required information.
4 The network connection is established and Internet access is
available.
62
63
Chapter 3.
Using the computer
NFC (Near Field Communication) (Optional)
About NFC (Near Field Communication)
This is a set of standards to establish radio communications •
within a short distance (usually no more than 10 centimeters).
You can share the contents safely and conveniently without
any cumbersome setup process.
Various features such as video/photo transfers, P2P games, •
mobile payments, reading/writing tags, NFC device
communications and so on can be utilized depending on the
NFC device.
You can use the NFC function on devices that have the NFC •
mark.
For more information on how to use the device, refer to the
user manual of the device.
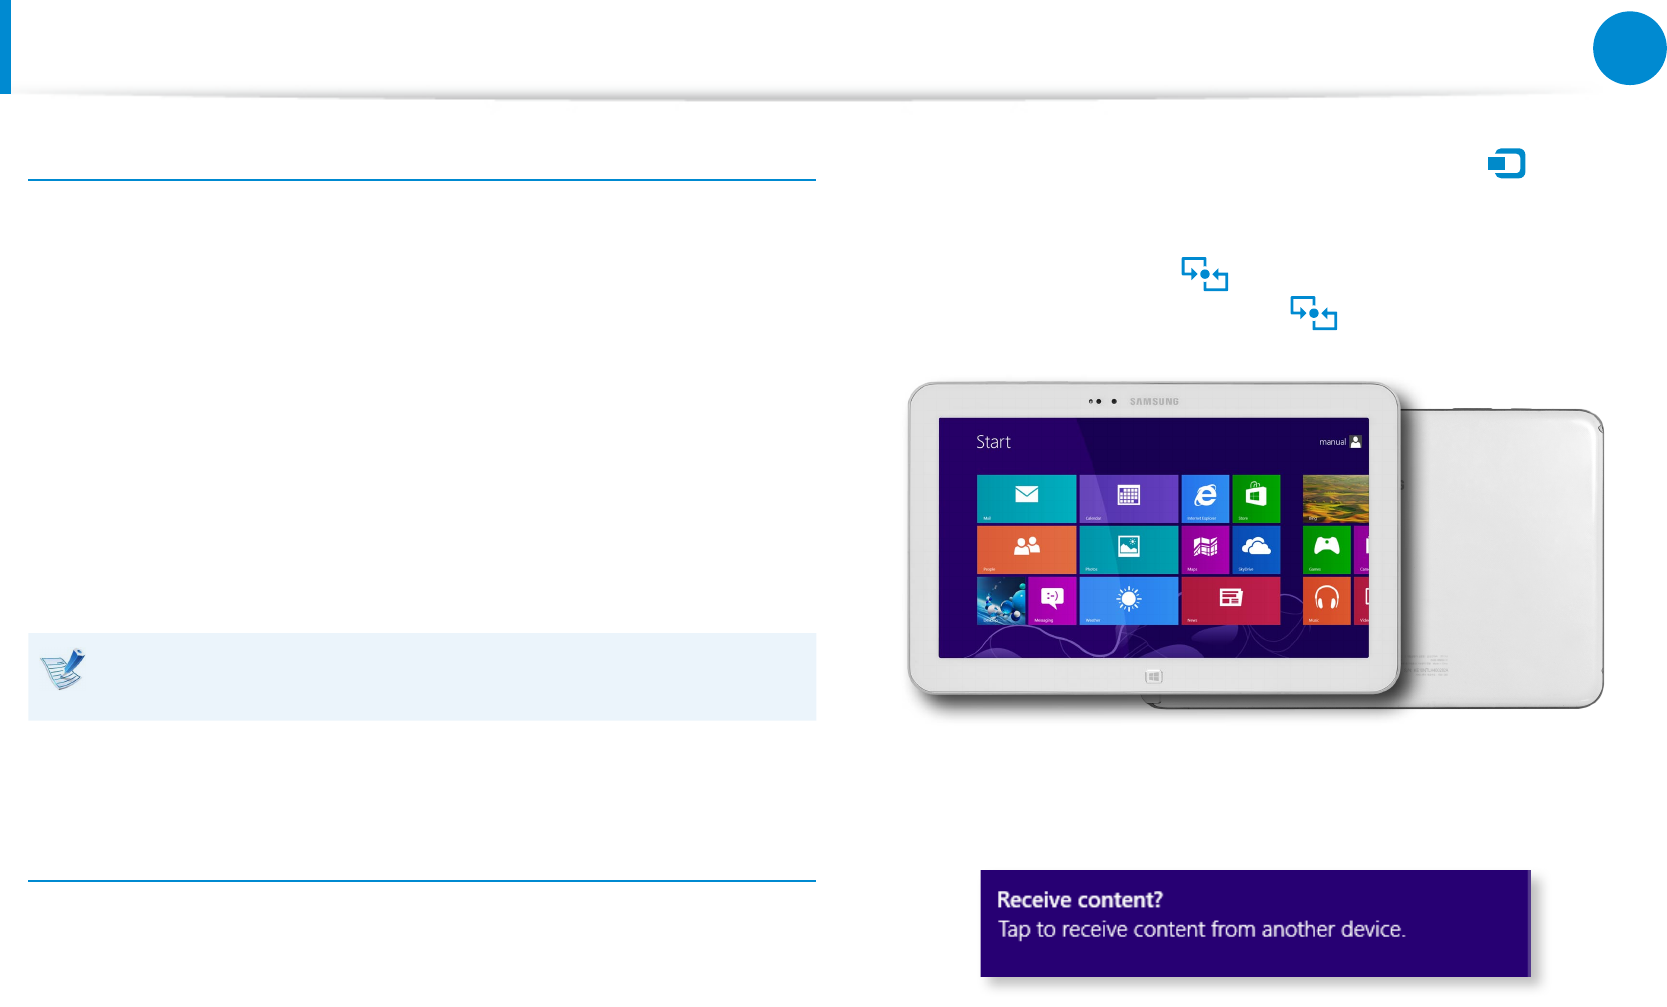
Simultaneously sharing a website between two
computers
This section describes how to connect two NFC computers.
You can connect a website displayed on computer A with
computer B at the same time.
1 Open a website on computer A using Internet Explorer.
2 On computer A, select Charm menu > Device
áᔪ
Ŗᮁ
᯲
ᰆ⊹
ᖅᱶ
> Sent
by Tap.
3 Put the NFC antenna of the NFC computer B into
contact with the NFC antenna of computer A.
4 If the following message appears on the B computer, tap on
the screen.
5 Now, the website contents in computer A are delivered to
computer B.
You can see the computer A’s website on the computer B’s
Internet Explorer.
64
Chapter 3.
Using the computer
NFC (Near Field Communication) (Optional)
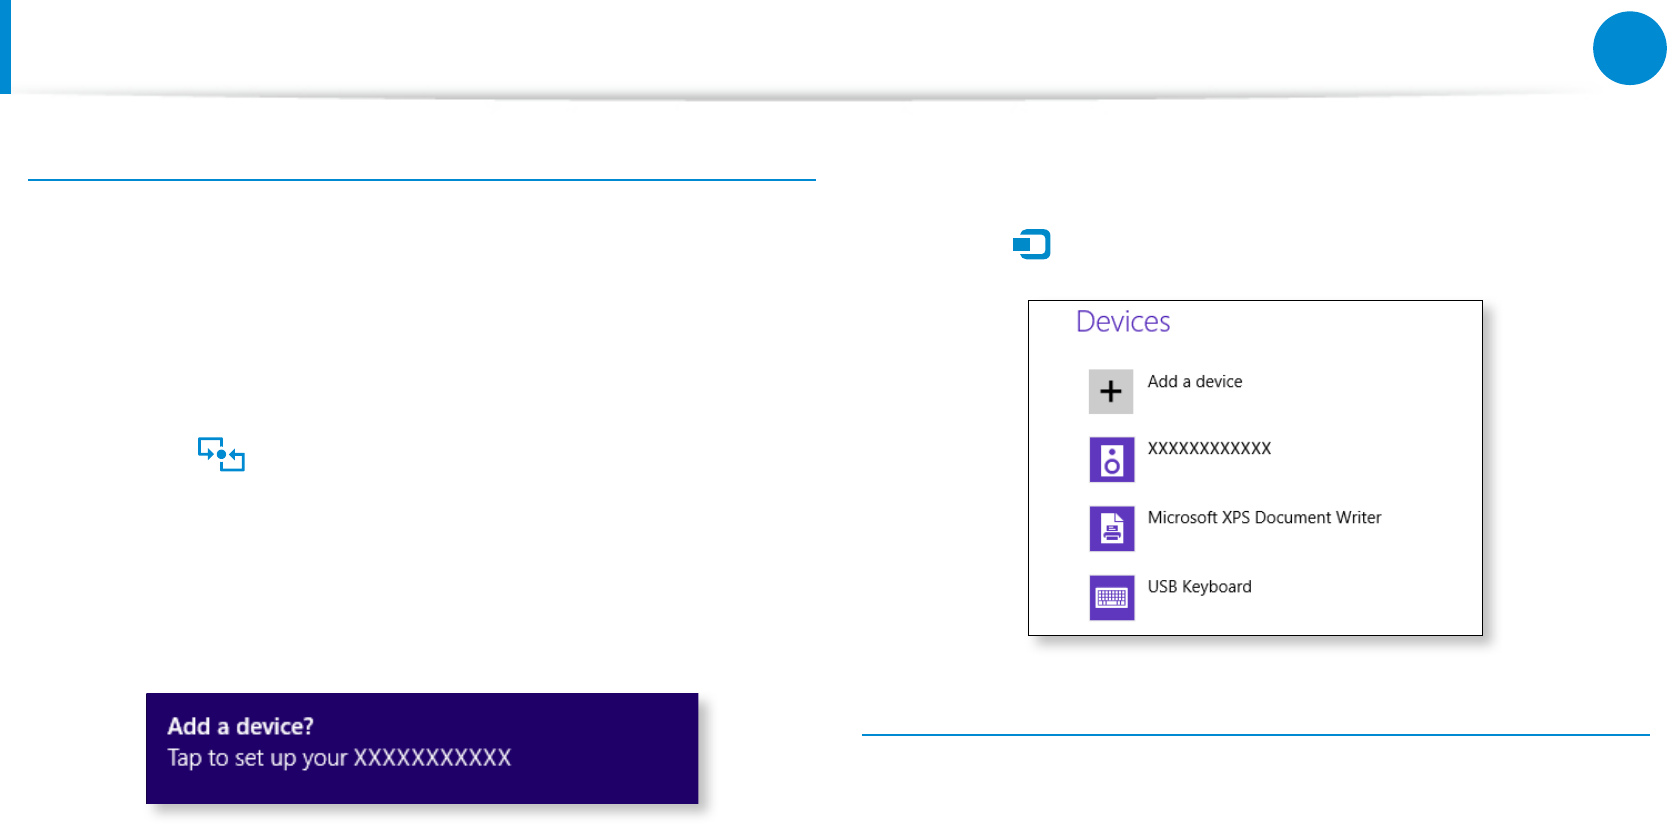
Connecting a device
This section describes how to connect an NFC-supported
Bluetooth speaker.
1 Turn the computer on. Turn the Bluetooth speaker on.
2 Put the NFC mark of the speaker into contact with the NFC
antenna at the back of the computer.
3 The device connection conrmation message appears at the
top right of the screen. Tap on the message.
Connect the device according to the instructions on the
screen.
4 The device is connected. You can now use the speaker.
Select Charm menu > Settings > Change PC Settings >
Device
áᔪ
Ŗᮁ
᯲
ᰆ⊹
ᖅᱶ
to view the connected device.
Restrictions
You can make only one-to-one connection between NFC •
devices at a time.
Because the NFC function is not compatible between Windows •
and Android operating systems, only the URL of the NFC
function is transferred to an Android-based mobile device that
is connected to the computer.
64
65
Chapter 3.
Using the computer
Make sure the following items are included in the device •
package: book cover keyboard, charging adapter, and user
manual.
The layout and appearance of the keyboard may dier •
from the actual model.
This keyboard is designed for the Windows 8 operating •
system, and it may not fully work on other operating
systems.
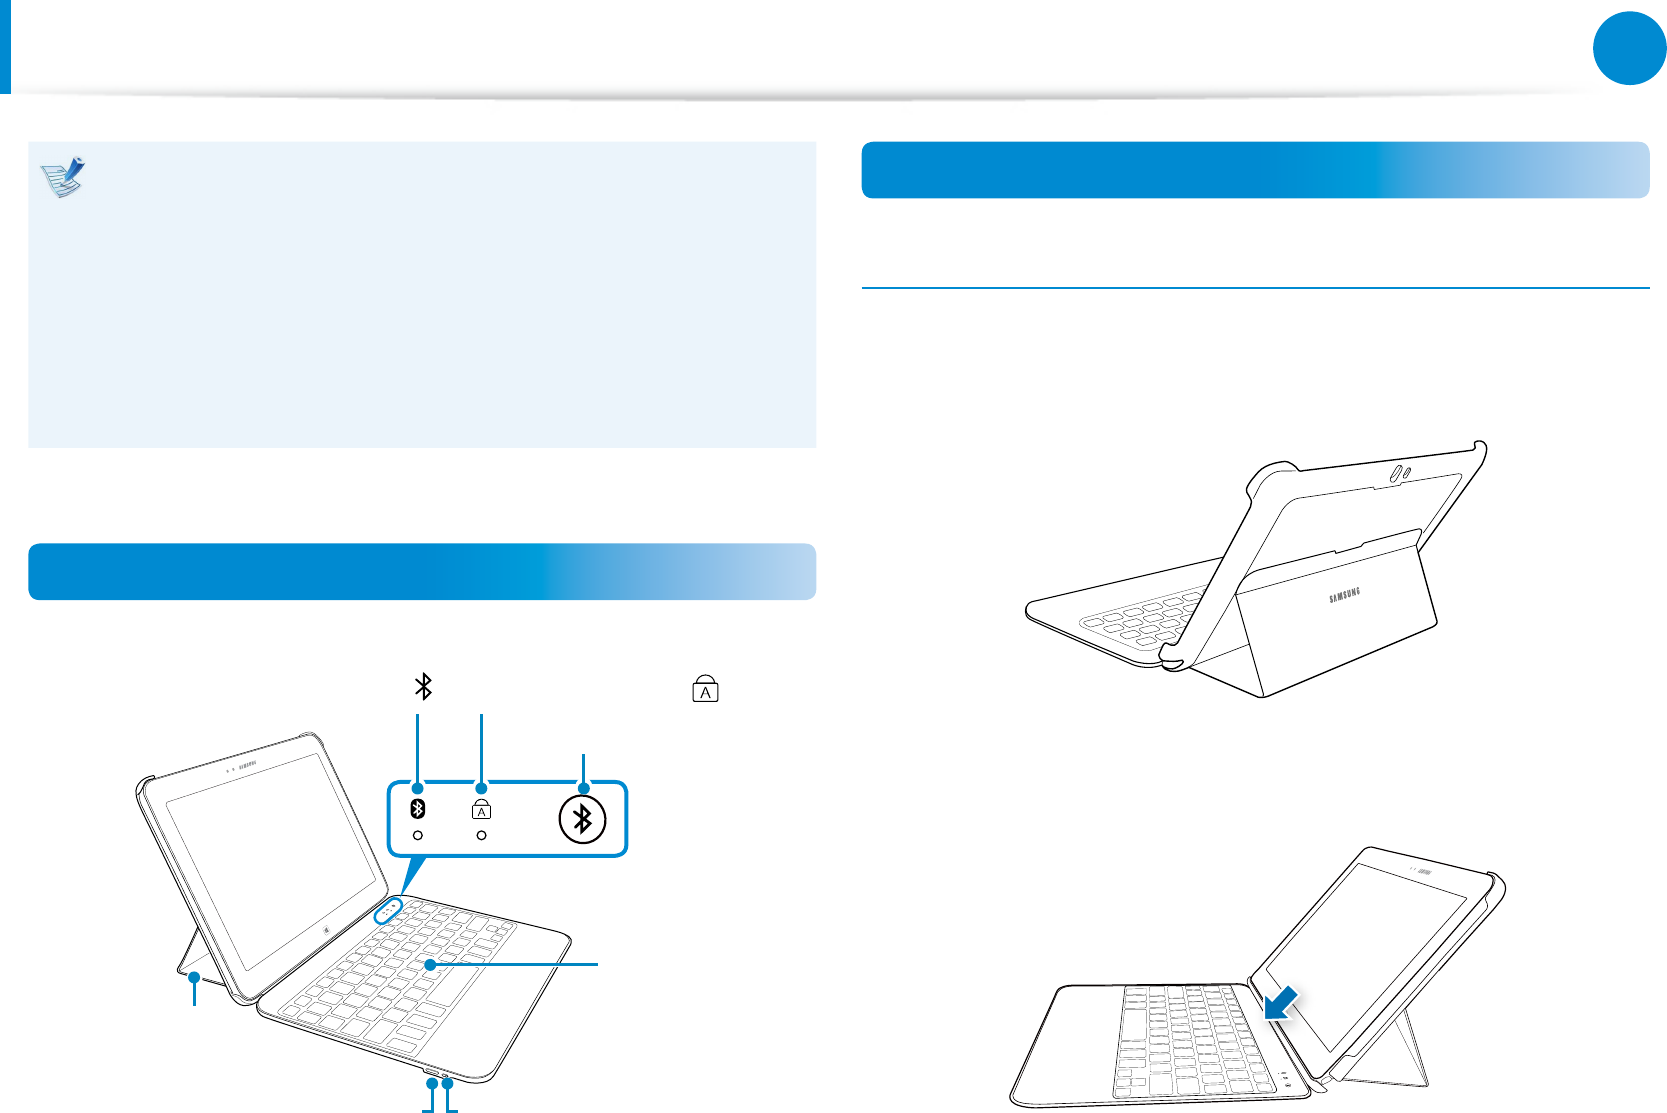
Layout
Charger port
Caps Lock indicator
Stand
Power indicator/
Bluetooth indicator
Keyboard
Connect button
Power switch
Attaching/detaching the computer
Attaching the computer
1 Fold the stand and position it as shown.
2 Attach the computer to the keyboard.
Book Cover Keyboard (Optional)
66
Chapter 3.
Using the computer
Book Cover Keyboard (Optional)
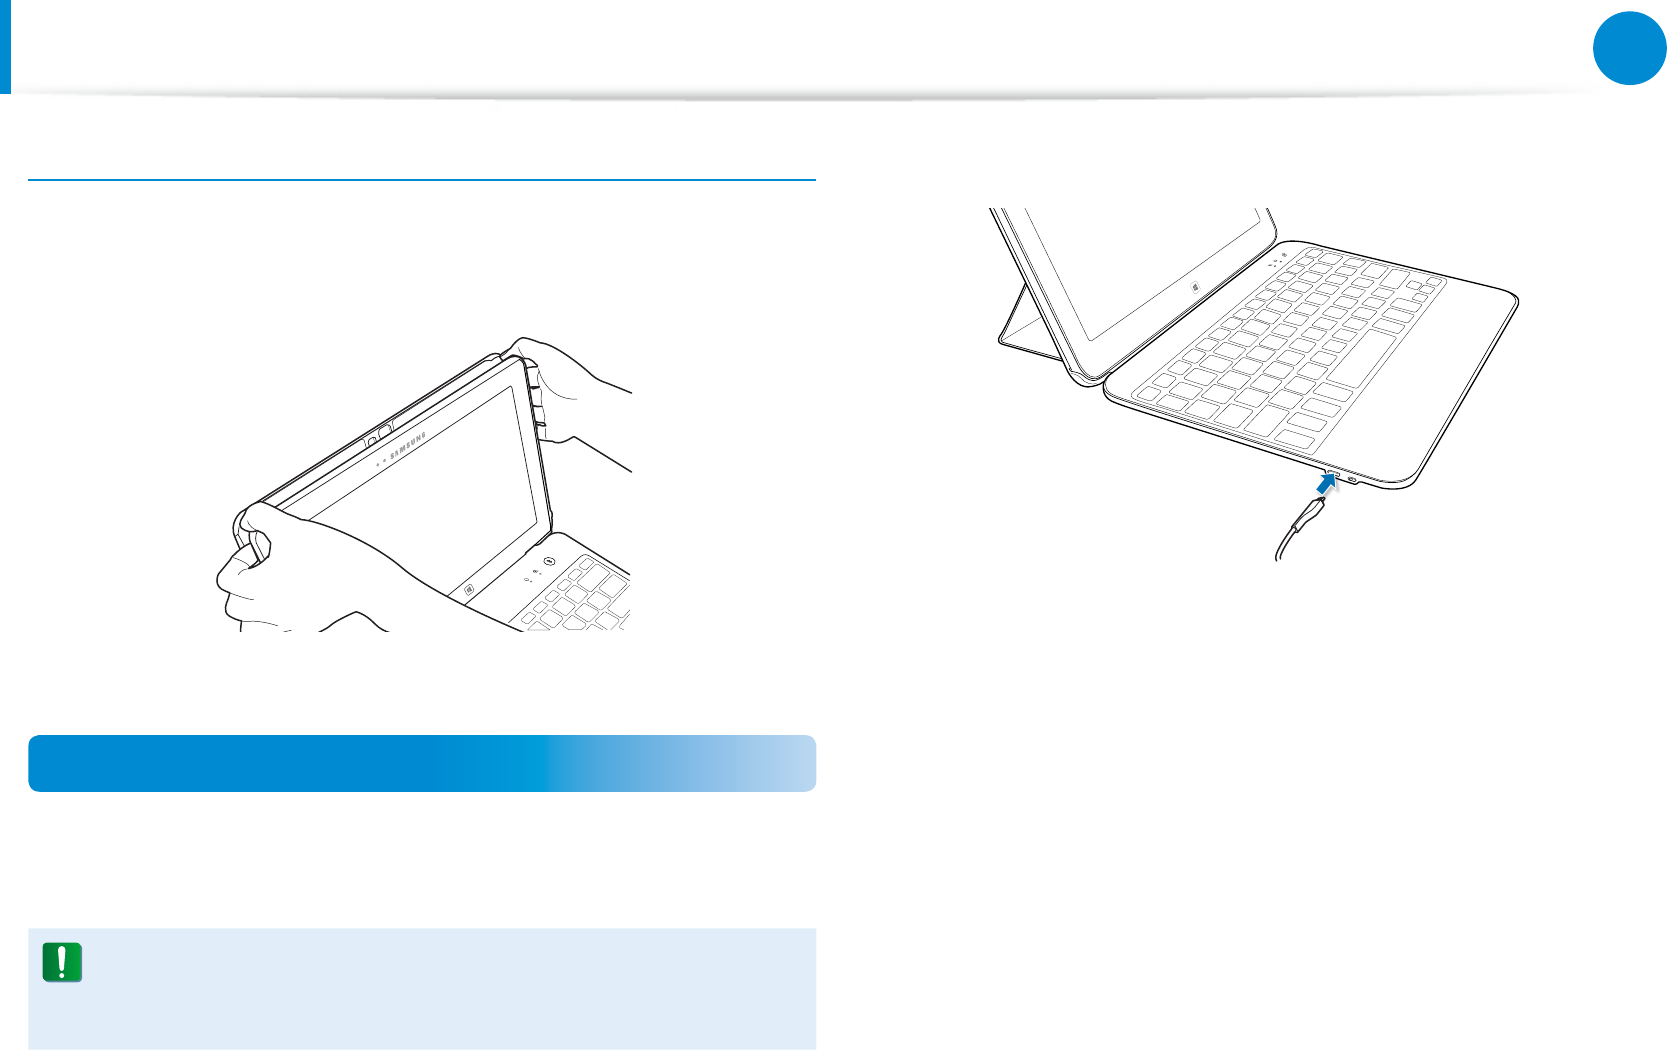
Detaching the computer
Hold the computer on both sides, and use both thumbs to pull it
out from the keyboard. The computer detaches.
Charging the keyboard
This keyboard has a built-in battery. Before using the keyboard for
the rst time, fully charge the battery.
Use only the provided or Samsung-approved charger. Use of
unauthorized chargers may damage the keyboard or cause
the keyboard to malfunction.
1 Connect the charger to the keyboard’s charger port.
2 Connect the charger to an electric socket. The Power
indicator turns red while the keyboard is charging.
If charging fails, reconnect the charger and try again.
3 When charging is complete, the Power indicator turns blue.
Disconnect the charger from the keyboard.
66
67
Chapter 3.
Using the computer
Book Cover Keyboard (Optional)
Standard usable time according to the charging time
Charging time Standard usable time
Approx. 2 hours
Normal usage Standby
Approx. 100 hours Approx. 1 month
The charging time and the keyboard’s usable time may •
dier depending on the usage conditions.
The built-in battery is consumable, of which the usable •
time decreases naturally over time.
Checking the remaining battery capacity
To check the keyboard’s remaining capacity, press and hold the
left [Ctrl] key for 3 seconds. The Bluetooth indicator blinks 5 times
in the following colours:
Remaining capacity Indicator colour
Above 80% Blue
20% - 80% Violet
Below 20% Red

68
Chapter 3.
Using the computer
Book Cover Keyboard (Optional)
Turning the keyboard on or o
Turning on the keyboard
Move the power switch to the ON position. The blue Bluetooth
indicator blinks 4 times.
Turning o the keyboard
Move the power switch to the OFF position.
Pairing the keyboard
To pair two Bluetooth devices for the rst time, it is required to
register a password for the pairing between them.
1 Turn on the computer.
2 Turn on the keyboard.
3 Press and hold the Connect button on the keyboard for 3
seconds to enter the pairing mode.
• When the keyboard turns on for the rst time, it enters the
pairing mode automatically.
It stays in the pairing mode for 3 minutes.
4 In the bottom-right notication area at the desktop, right-
click the Bluetooth icon, and then click Add Bluetooth
device. The computer starts scanning for the available
Bluetooth devices.
5 Select the Bluetooth keyboard from the results list.
6 Type in the numbers on screen, and then press Enter.
Number information may not be displayed depending on the
computer mode. In this case, use the onscreen keyboard to
enter a password for the pairing, and then press Next. Now
type in the same password using the keyboard, and then
press Enter.
7 When two Bluetooth devices are paired, the keyboard’s
Bluetooth indicator blinks blue 3 times. If no user input is
made for about 1 minute, the Bluetooth indicator turns o. To
reactivate the keyboard, press any key.
68
69
Chapter 3.
Using the computer
Book Cover Keyboard (Optional)
If the keyboard stops operating, check the connection and
pairing status between the two devices and try again. To
regain the pairing, follow the instructions below:
Check the pairing status from the computer’s Bluetooth •
Setup menu.
Press any key on the keyboard, or turn o the keyboard, •
and then turn it back on. The keyboard tries to set the
pairing for 10 seconds.
Indicator status
When the keyboard
turns on
The blue Bluetooth indicator
rapidly blinks 4 times.
When the keyboard
enters the pairing mode
The blue Bluetooth indicator
stays solid for about 3 minutes.
When the keyboard fails
to enter the pairing mode
The blue Bluetooth indicator
blinks once every 6 seconds for 3
minutes, and then it turns o.
If the Bluetooth keyboard
runs out of battery The red Bluetooth indicator blinks.
Device specications
Item Specications and description
Frequency range 2402 - 2480MHz
Input AC 100 - 240V, 50/60Hz
Output 0.25 - 2.5 mW
Eective wireless range Max. 10m
70
Chapter 3.
Using the computer
Using the S Note app (S Note, Optional, for corresponding models only)
You can design your note using various formats such as idea
writing, recipe, diary, travel sketch and so on.
Depending on the version of the program, some functions
may not be provided or dierent functions may be provided.
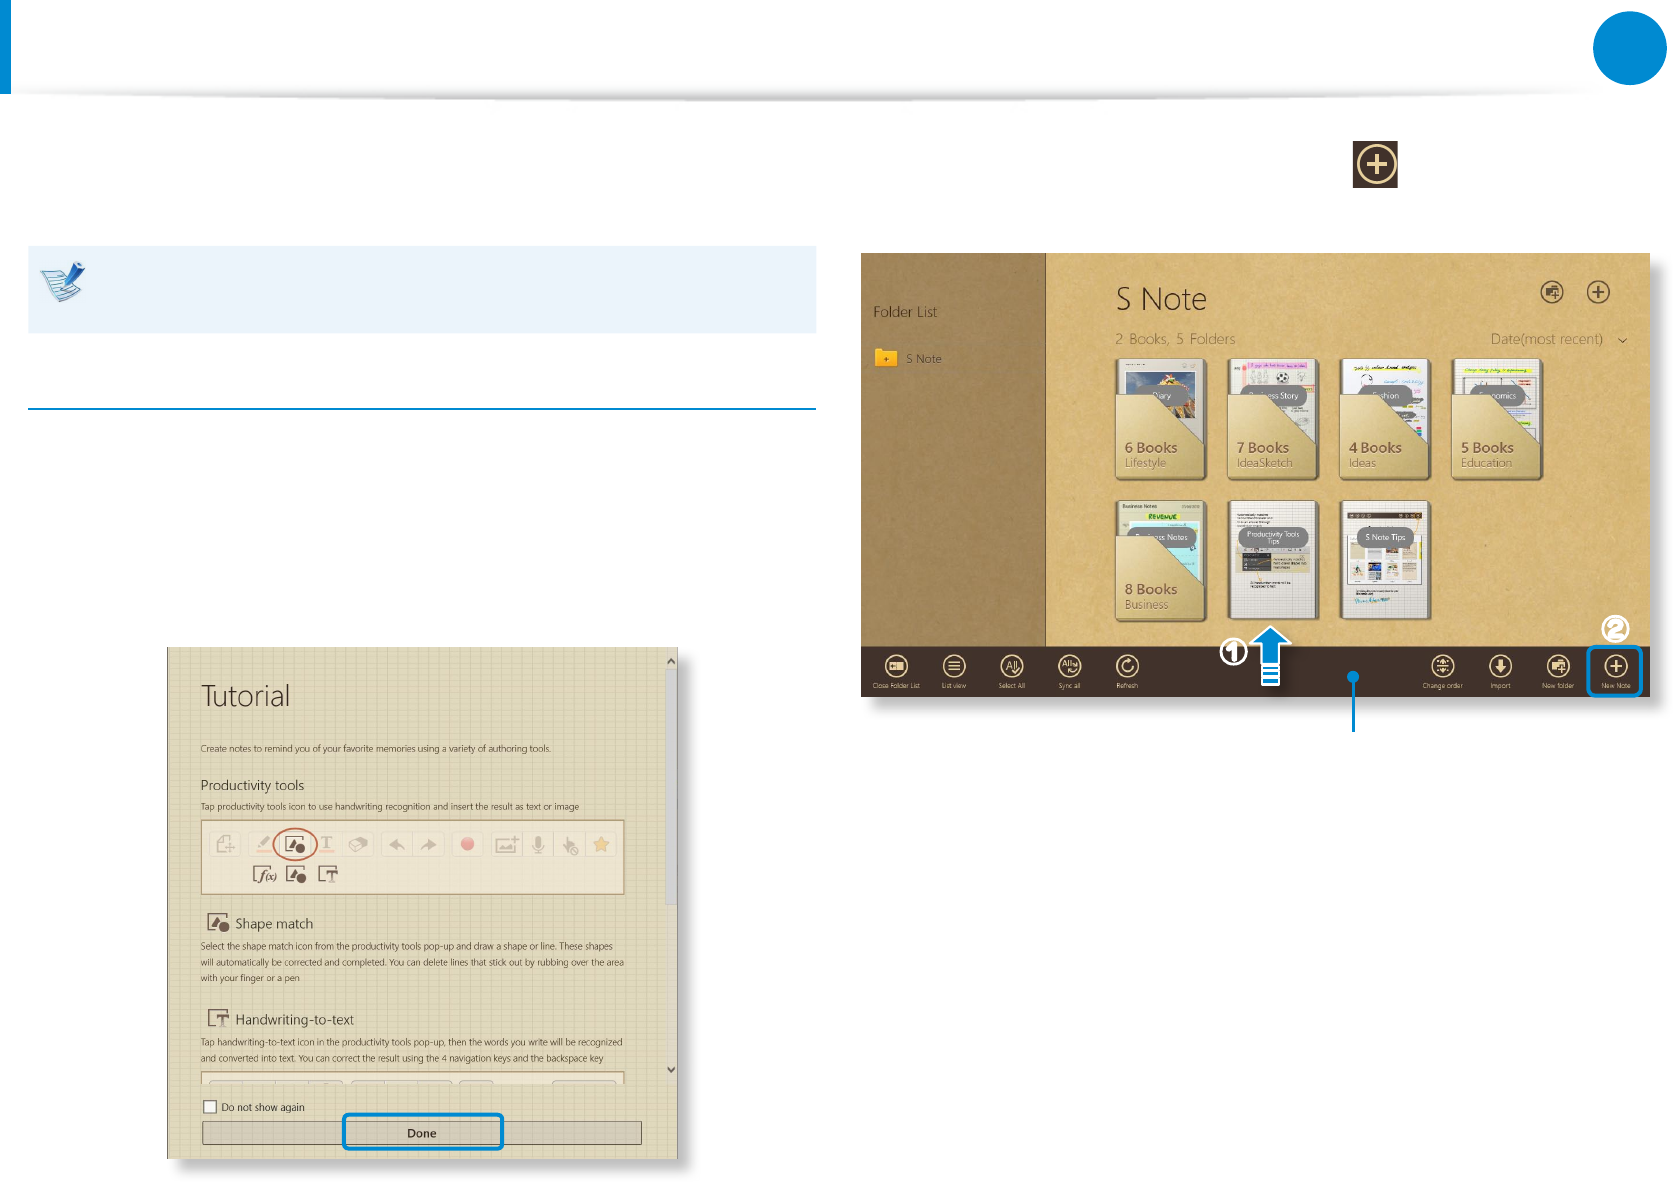
Creating a note
1 Select S Note in the Start screen.
2 The S Note app is launched and the S Note guide appears.
Tap Finish.
3 From the Appbar, tap the New note .
Appbar
zx
70
71
Chapter 3.
Using the computer
Using the S Note app (S Note, Optional, for corresponding models only)
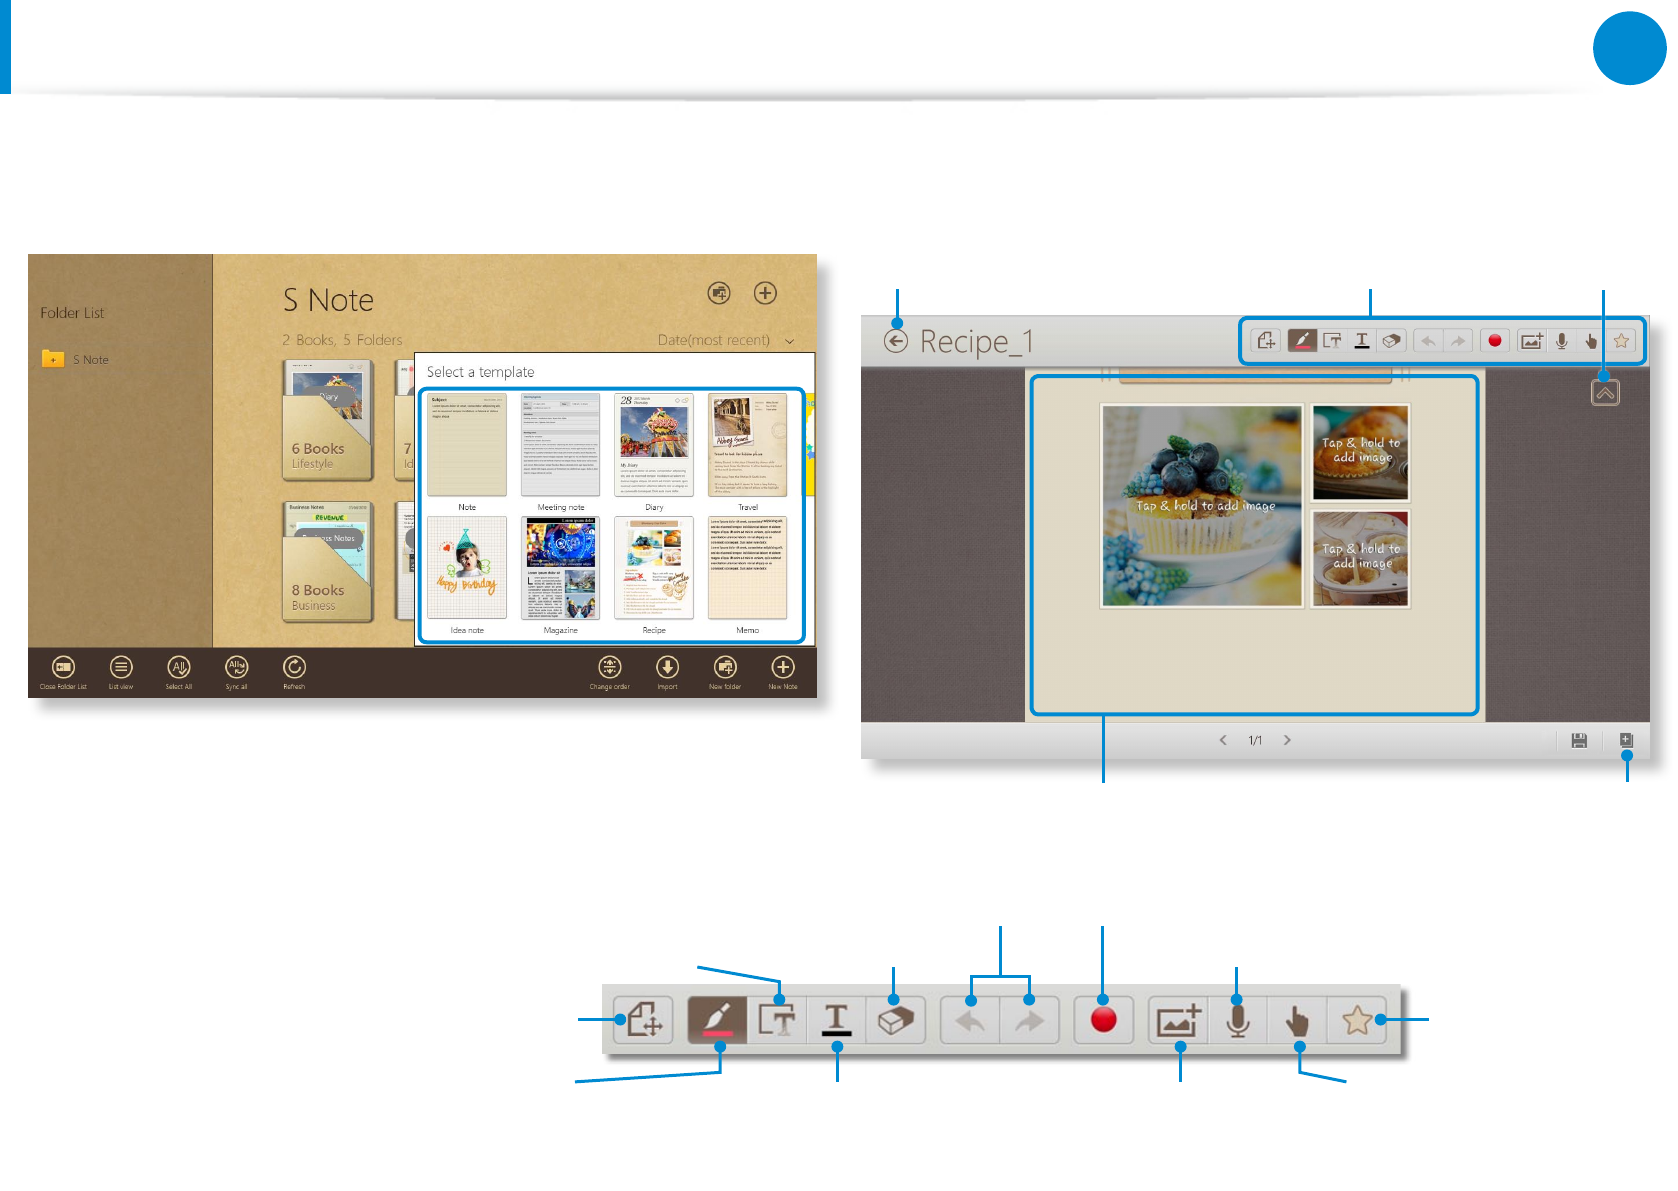
4 Various note format options will appear.
Select a format. 5 Create a note using the Menu.
E.g. When you selected Recipe
Exit S Note
Tap and hold to change
the photos or contents.
Menu Hide menu
Add a page
Text, diagrams, and formulas Eraser Voice memo
Undo / Redo Record sketch
Preview / edit Favorites
Using pens and conguring the
pen tools
Entering text through the Keypad
and style settings
Insert a gure Turn the S Pen on or o
You can design your note using various formats such as idea
writing, recipe, diary, travel sketch and so on.
Depending on the version of the program, some functions
may not be provided or dierent functions may be provided.
Creating a note
1 Select S Note in the Start screen.
2 The S Note app is launched and the S Note guide appears.
Tap Finish.
3 From the Appbar, tap the New note .
Appbar
zx
72
Chapter 3.
Using the computer
Using the S Note app (S Note, Optional, for corresponding models only)
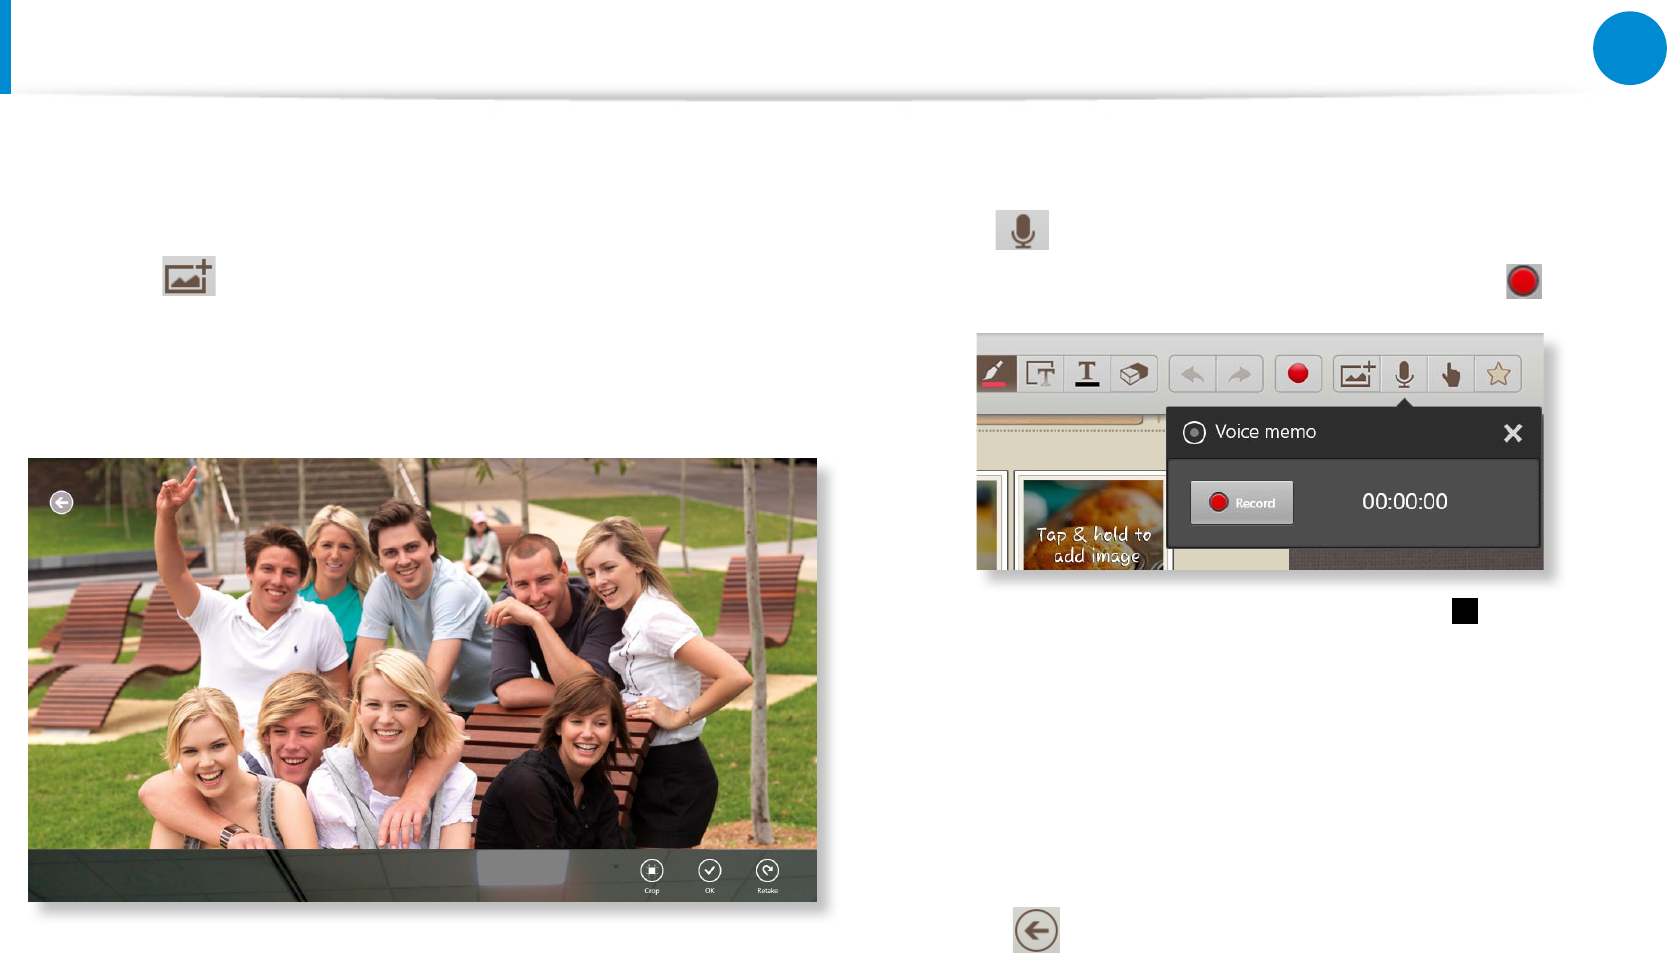
► Inserting a gure (photo)
We will describe inserting a photo as an example.
z Tap the icon.
x Select the gure insertion method.
c If you tap on Take a picture, the picture taking screen appears.
Tap on the screen to take a picture.
v If the photo has been taken, tap OK.
b The photo is inserted into the recipe screen. Adjust the size
and location of the photo.
n Inserting a gure is completed.
You can also insert various items such as text boxes, clipart, etc.
► Recording a voice memo
z Tap the icon.
x The voice memo window appears. Tap the Record button.
c When the recording is complete, tap the Stop button.
v The recording is complete. To make a new recording, tap
Replace.
6 When creating a note is completed, drag the bottom center
upward.
Tap Save to nish creating the note.
7 Tap the icon to exit the note app. Then you can view the
newly created note icon.
72
73
Chapter 3.
Using the computer
Using the S Note app (S Note, Optional, for corresponding models only)
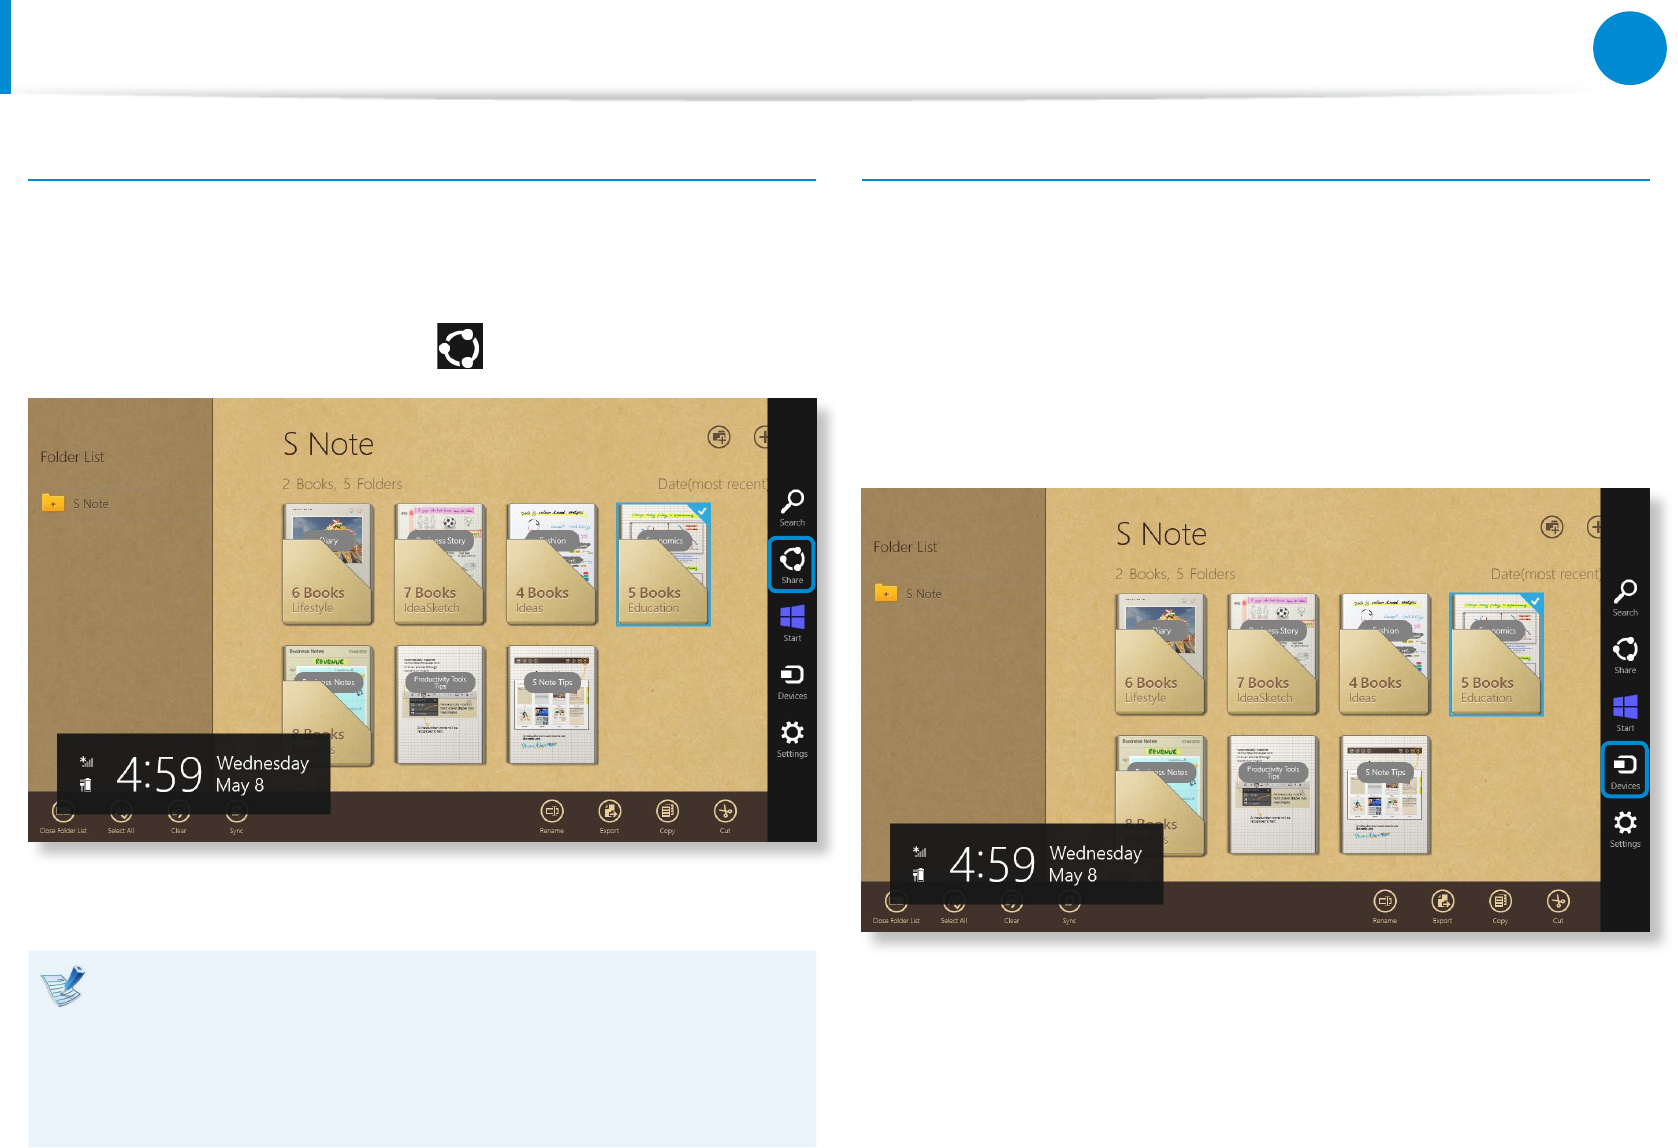
Sending a note via email
1 Slightly drag the note to be sent via email downward in the
folder. The note is selected.
2 Select Charm menu > Share > Email.
3 Send an email according to the instructions below.
You need a Microsoft account to use the email app.•
To register a note to an app other than the email app, •
select Charm menu > Settings > Change PC Settings >
Sharing and set the App to be used for sharing option to
On.
Printing a note
1 Slightly drag the note to be printed downward in the folder.
The note is selected.
2 Select Appbar > More > Print.
Alternatively, select Charm menu > Device and select a
printing device.
3 Print the note according to the instructions.

74
Chapter 3.
Using the computer
Using the Multimedia App (Optional)
You can enjoy photo, video and music les with the S Camera+, S
PhotoStudio and S Player+ apps.
S Camera+ You can take photos and record videos with the S
Camera+ app, and view them directly in this app.
S PhotoStudio You can edit photos/videos recorded with S
Camera+.
S Player+ You can view the photo, video and music les
saved on the computer.
Depending on the version of the program, some functions
may not be provided or dierent functions may be provided.
Third-party software related services
For descriptions about and service requests for third-party •
software, please contact the relevant manufacturer.
Some troubleshooting actions in response to service •
requests may not work depending on the software
manufacturer.
74
75
Chapter 3.
Using the computer
Using the Multimedia App (Optional)
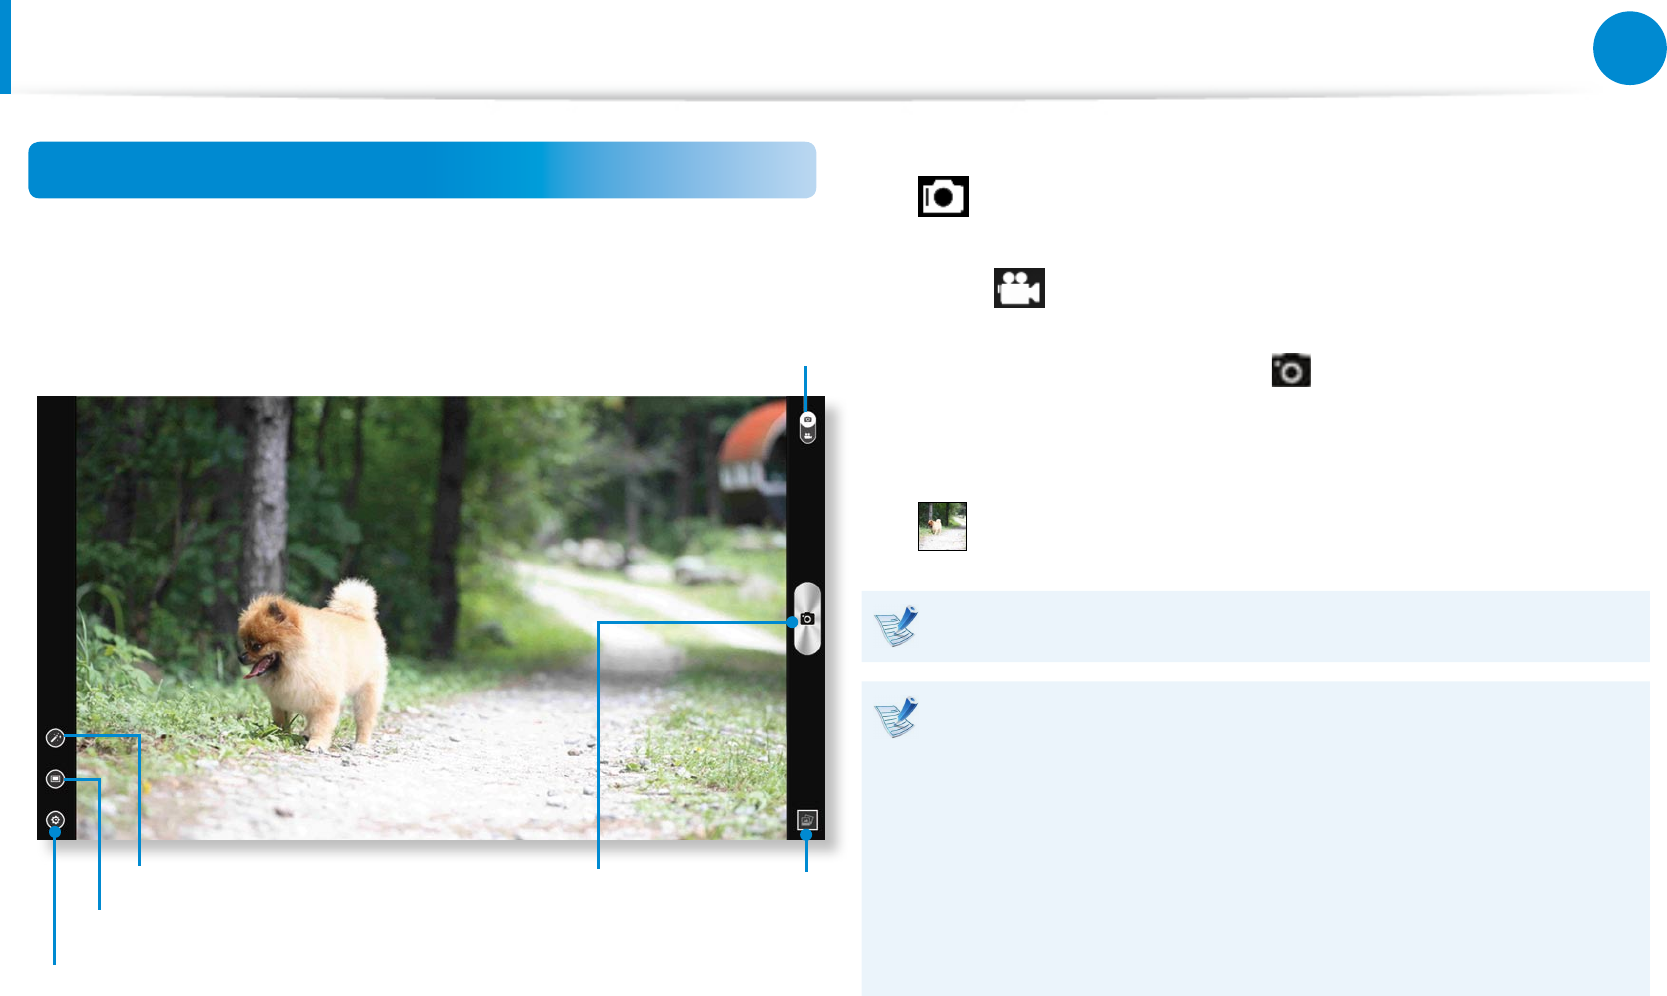
Using the S Camera+ app
1 On the Start screen, select S Camera+.
Switch the recording mode
Apply frame and ltering eects
Switch between Photo and Video mode
Start
recording
Advanced settings
Picture
preview
2 To take a picture, slide the camera mode bar into the Photo
position.
To make a video recording, slide the camera mode bar to the
Video position.
3 Focus on the target, and click to start recording.
4 You can view the picture or video using the Picture preview
or Gallery app.
The S Camera+ app is not available in Desktop mode.
Precautions while taking a picture or video
Do not take a picture or video of others without their •
consent.
Do not take a picture or video in locations where this is not •
allowed.
Do not take picture or videos in locations where you may •
infringe on others’ privacy or condential information may
be exposed.
76
Chapter 3.
Using the computer
Using the Multimedia App (Optional)
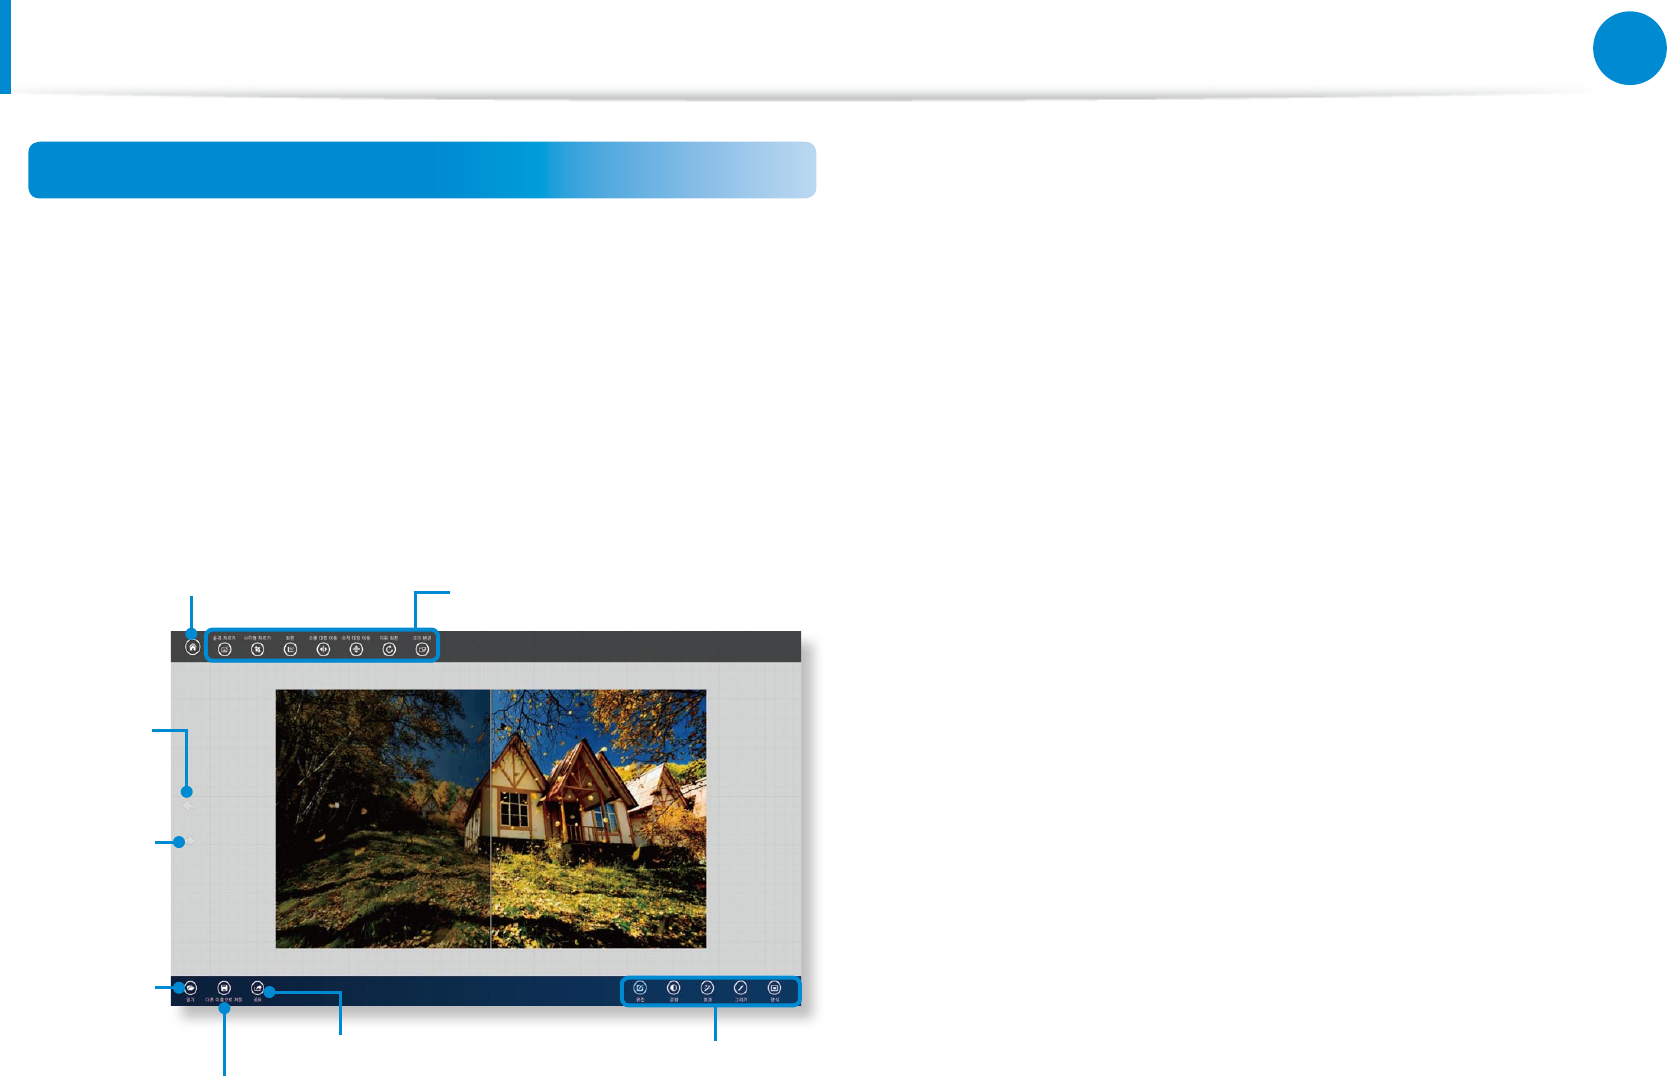
Using the PhotoStudio app
1 On the Start screen, select S PhotoStudio.
2 Select a photo to edit.
3 Select an editing mode from the lower-right bar. The content
of the top-left bar diers depending on the selected editing
mode.
Back to Home Apply eects to the
current photo
Editing mode
Open a
new le
Undo
changes
Redo
changes
Share to SNS
Save as
4 When done, save the image as a dierent name.
76
77
Chapter 3.
Using the computer
Using the Multimedia App (Optional)
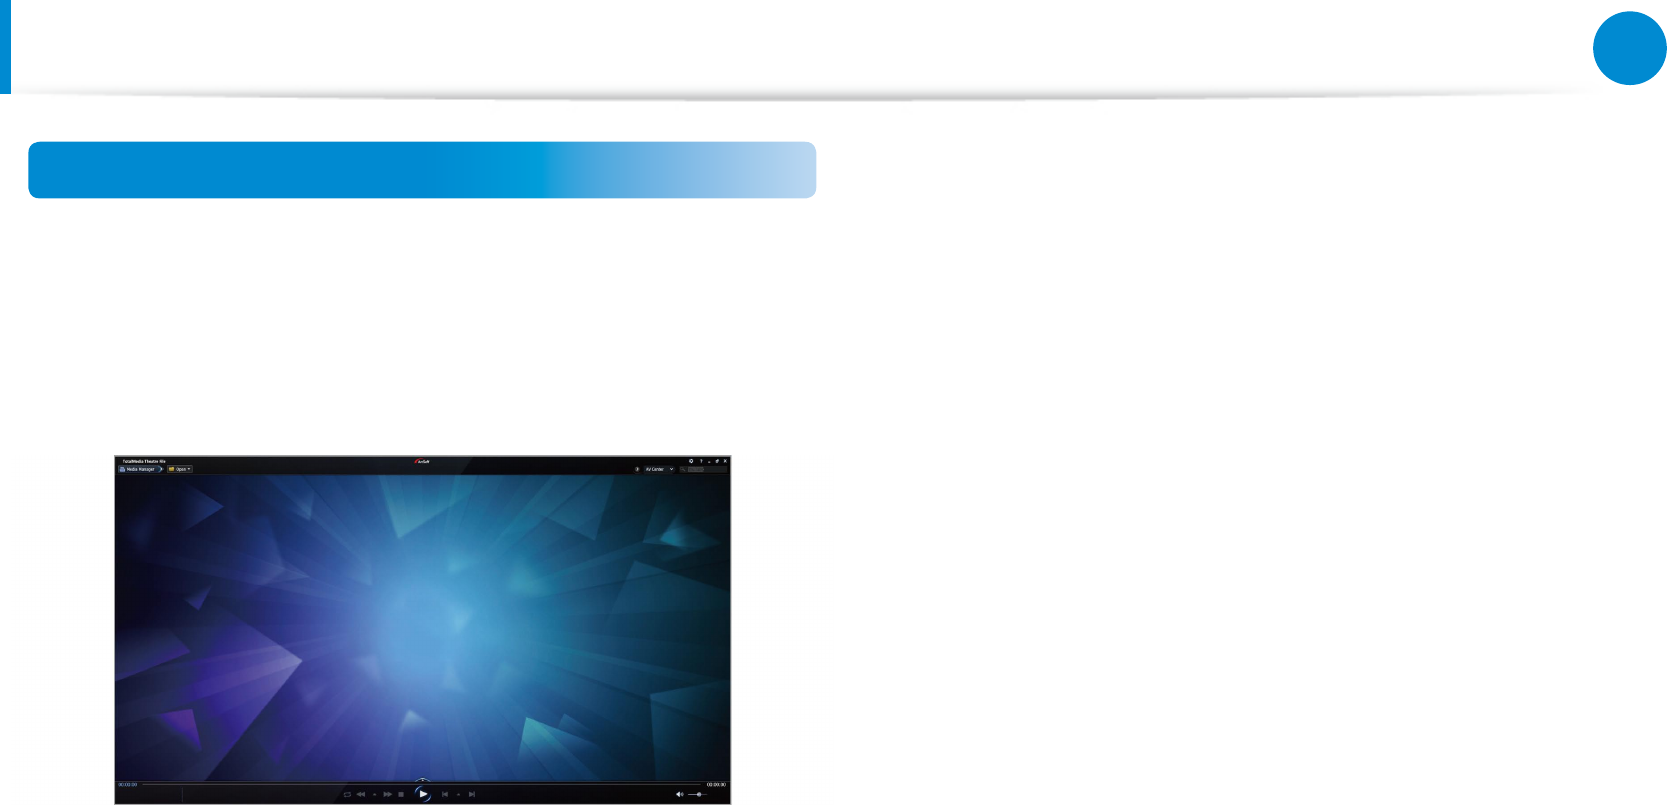
Using the S Player+ app
1 On the Start screen, select S Player+.
2 From the menu bar, click Open > Open File..., and then
select a le to play.
78
Chapter 3.
Using the computer
Using Apps a Samsung Smartphone (Optional)
Samsung Kies
You can use Samsung Kies to sync multimedia les and documents
between the computer and mobile devices, or upgrade the
rmware of the connected mobile device to the latest version.
For more information, refer to the Help section of this
application.
HomeSync
You can use the computer as Cloud storage to save the uploaded
les from Samsung mobile devices. Specify a shared folder and
get instant access to the content of the folder on the move.
For more information, refer to the Help section of this
application.
SideSync
You can use SideSync to share and control the display between
the computer and Samsung mobile devices, or share les between
them. Select one from the following two options:
Keyboard/Mouse Sharing : You can use the computer’s •
keyboard or mouse on mobile devices.
Phone Screen Sharing : You can view the mobile device’s •
screen on the computer.
For more information, refer to the Help section of this
application.
78
79
Chapter 3.
Using the computer
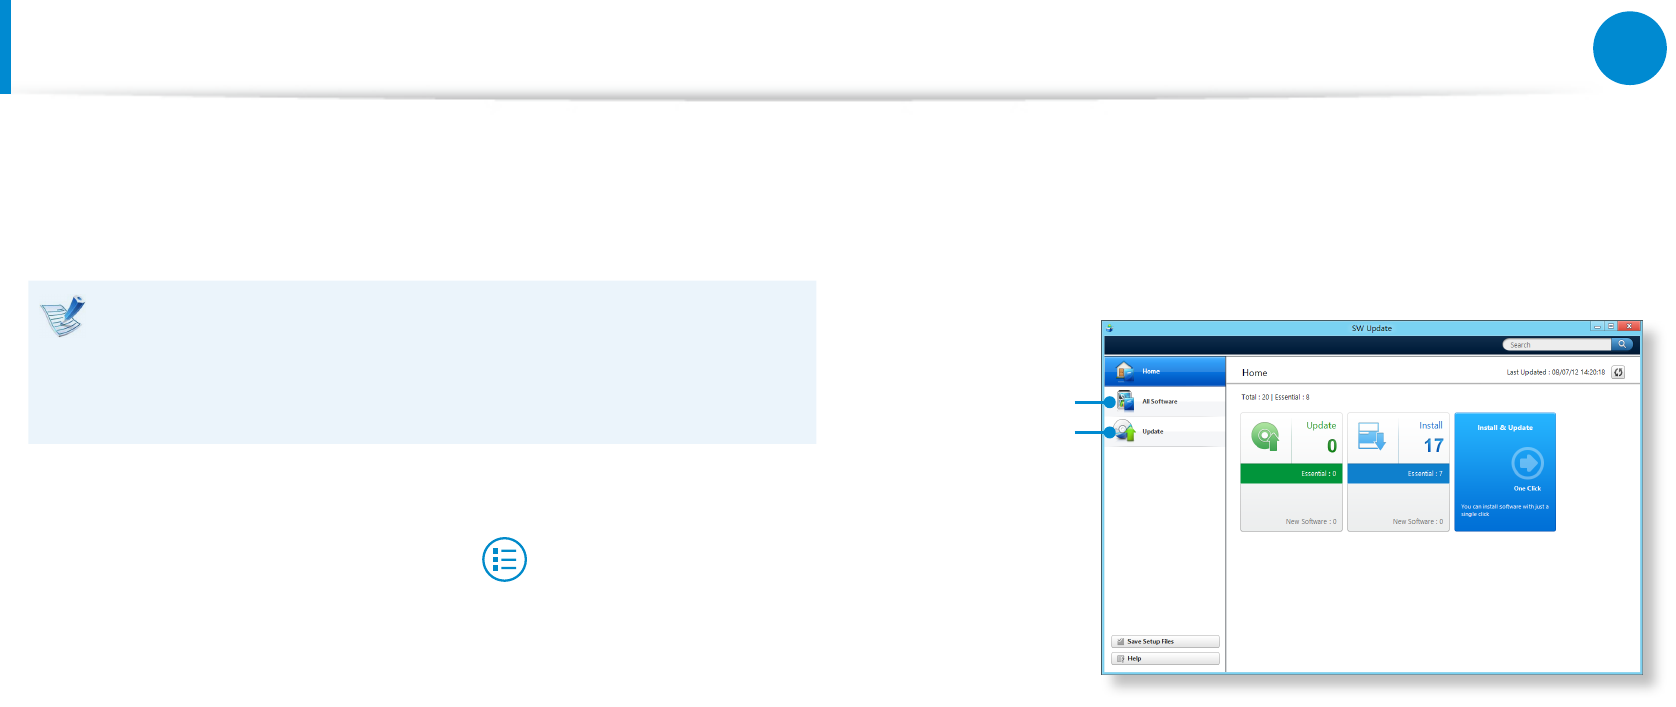
Samsung Software Update
SW Update is a software program that searches for Samsung
software programs and drivers installed when you purchased the
computer and helps you update any drivers or programs.
You can check updatable les before performing the •
update only when you are connected to the internet.
SW Update does not provide any updates for device drivers •
or software programs installed separately by the user.
1 Right-click over the Start screen.
Click SW Update in the All Apps menu item.
2 If the program is running for the rst time, the User
Agreement for personal information use appears.
Click Agree.
3 The SW Update program runs.
Select the items that you want to update before proceeding
with the update process.
Software
Update
Software List
80
Chapter 3.
Using the computer
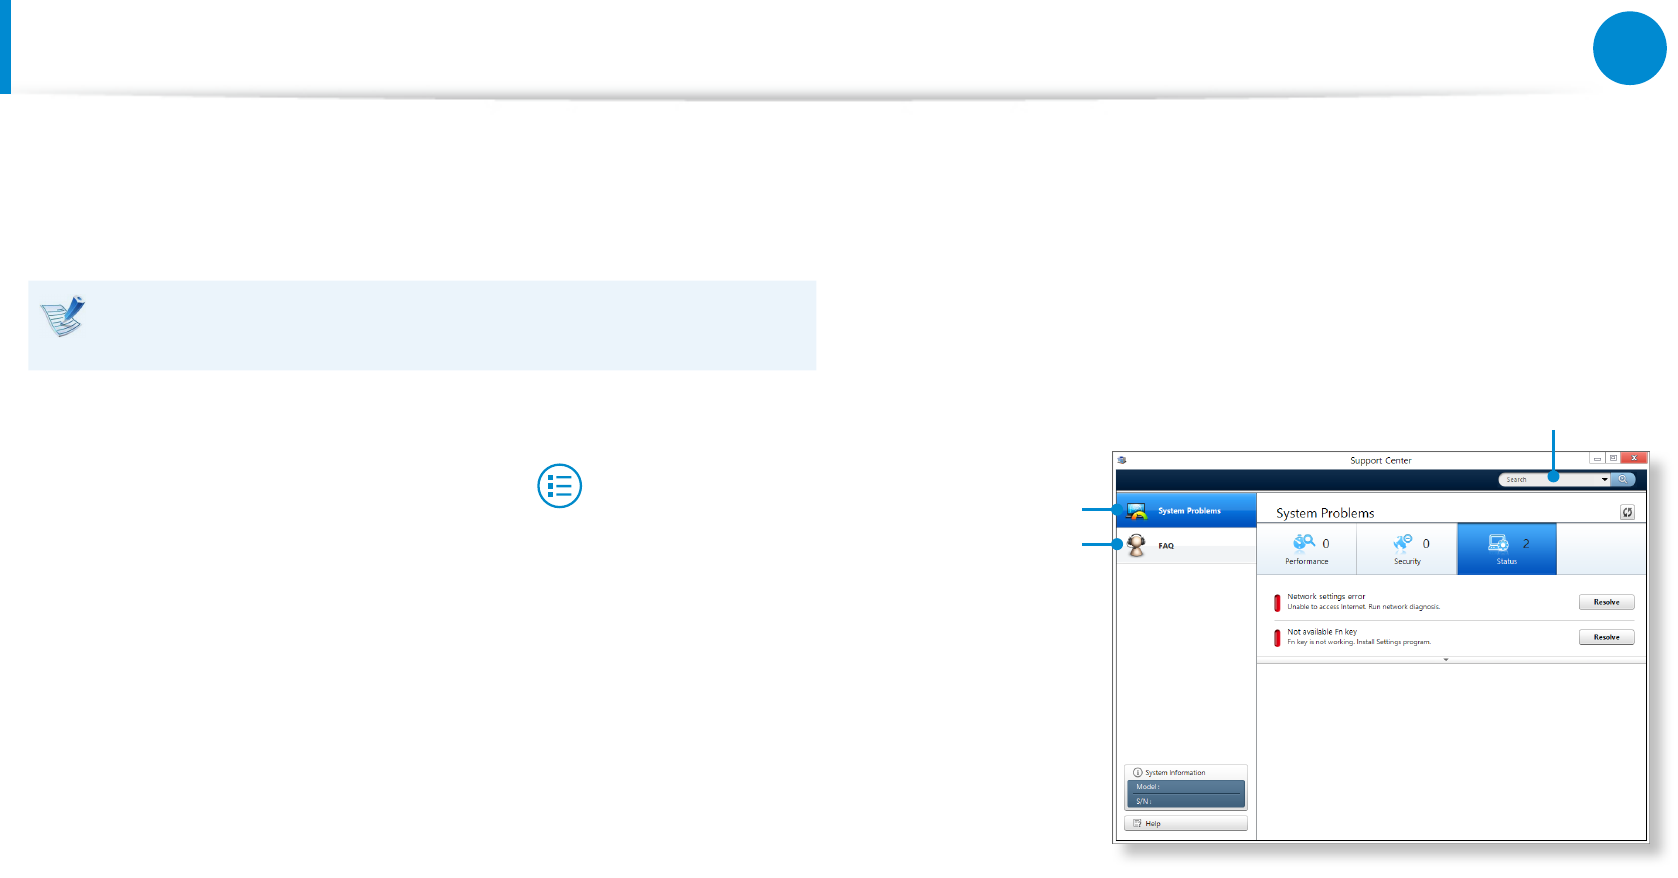
Diagnosing the Computer Status and Troubleshooting
The Support Center program, which is Samsung’s computer’s
troubleshooting guide, supports diagnosing the system and has a
FAQ for frequently occurring problem(s).
Support Center may not be provided or may be a dierent
version depending on the model.
1 Right-click over the Start screen.
Click Support Center in the All Apps menu item.
2 Support Center is activated and starts diagnosing your
computer.
After the diagnosing process is nished, the System Status
menu displays a list of the current problems to be solved as
shown.
FAQ for
computer’s
major problems
Diagnosing
Computer and
Troubleshooting
Searching for
computer’s problems
3 You can solve a problem by clicking the Troubleshoot button
for the problem.