Contents
- 1. Users Manual 1
- 2. Users Manual 2
- 3. Users Manual 3
- 4. Part 24 Setup Photos
Users Manual 2

39
e02_dv67_7e.fm
[39/50]
Before Using the Handset
When [Submenu] appears in the operation guidance,
press C to display functions (Submenu) that can be
used in the screen. Select the displayed Submenu
with w or the Optical TOUCH CRUISER.
If there are multiple pages in the Submenu, change
pages with w or the Optical TOUCH CRUISER.
Alternatively, press the dial key corresponding to the
menu item number (U, V, W, etc.) to select a
function. However, some Submenus do not have item
numbers.
■Target data when operating functions from Submenu
When operating functions from Submenu of data list screen, some
functions target at selected data only while other functions target at all
data in the list screen. When attempting to operate selected data only,
select the data to operate in advance.
Function targeting at selected data only
Example: Edit title, Edit file name, Delete one, etc.
Function targeting at all data in the list screen
Example: Delete all, Copy all in folder, Move all in folder, etc.
Use this function for unsure operations. After
the Support Book appears, check the
explanation and operation procedures of each
function. In addition, directly start functions
that were looked up in the Support Book.
1In stand-by, press $/[Support Book].
2Select a menu or item/t.
:To start functions directly: Select the function to start/t/[Yes].
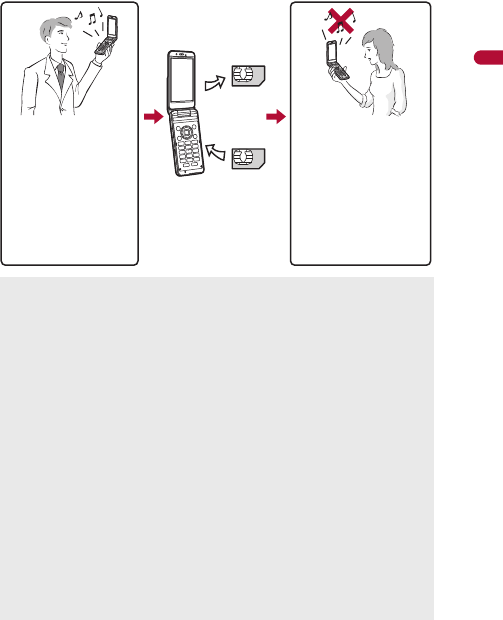
A FOMA card is an IC card that records personal information,
such as phone numbers. A FOMA card can store phonebook data
and SMS. By switching FOMA cards, multiple FOMA terminals
can be used for different purposes as needed.
If a FOMA card is not inserted, transmission functions such as voice/
Videophone calls, i-mode, mail transmission and packet transmission are
not available on the FOMA terminal.
Before inserting or removing the FOMA card, turn off the power, position
the back facing upwards and remove the battery pack. Close and hold
the FOMA terminal securely with your both hands.
Selecting a function from Submenu
Submenu screen
Support Book
Displaying Support Book
FOMA card
Using FOMA card
Inserting/Removing FOMA card
dv67_E.book 39 ページ 2009年4月22日 水曜日 午後5時33分
40
e02_dv67_7e.fm
[40/50]
Before Using the Handset
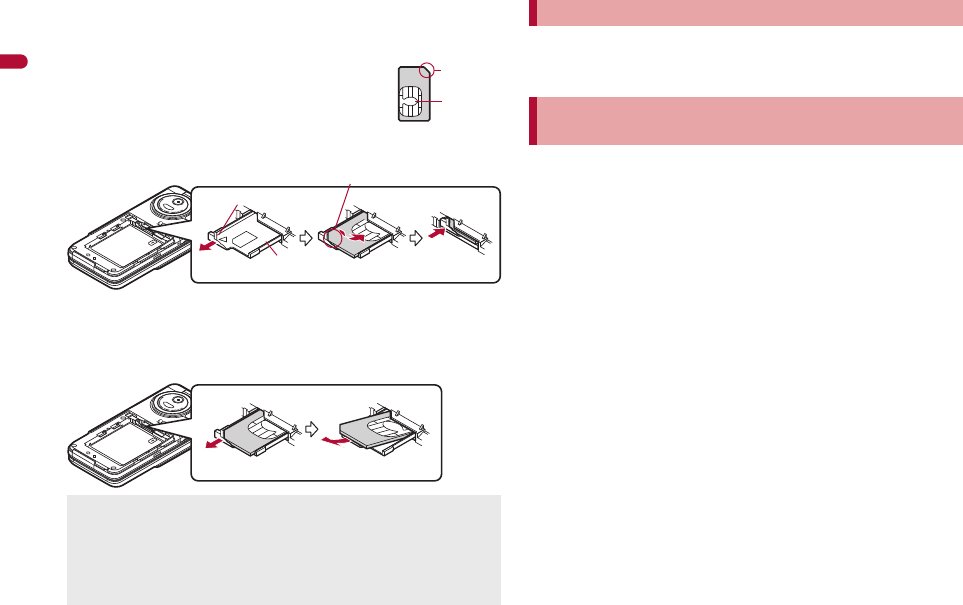
■Inserting FOMA card
1Hook a finger on the tab and pull the tray out (1).
:Pull out the tray straight until it stops.
2Hold the FOMA card with the IC
facing up and set on the tray (2).
3Push the tray all the way in (3).
■Removing FOMA card
1Hook a finger on the tab, pull the tray out (1) and
remove the FOMA card (2).
:Do not allow the FOMA card to fall when removing it.
The FOMA card has a “PIN1 code” and a “PIN2 code”.
Both are set to [0000] by default but can be changed to a four- to eight-digit
number by the user (nP. 110).
The FOMA terminal has built-in FOMA card security functions (FOMA card
restriction functions) as functions for protecting personal data and files.
When data or files are retrieved using any of the following methods or
i-appli is running with the FOMA card inserted into the FOMA terminal,
FOMA card security functions are automatically set in the retrieved data
or files.
When a file such as an image, melody or PDF is downloaded from a
site or Internet web page
When a site or Internet web page is added in screen memo
When i-mode mail with a file attached is received
When i-appli is running
Data, files or software with FOMA card security functions run only when
in use with the FOMA card inserted at time of acquisition. Display, play,
attach to i-mode mail, run software, send data using Ir communication
function and iC communication function, and copy to microSD Card can
be executed. These operations cannot be performed if a different FOMA
card is inserted.
Inserting or removing the FOMA card forcibly may damage the card or
deform the tray. Use caution.
Refer to the FOMA card user’s guide for more information on the FOMA
card.
Do not misplace the FOMA card once it is taken out.
When the tray falls off, slide the tray in straight along the guide rail.
Notch
IC (gold)
2
Tray
3
Fit the notch of the FOMA card to
that of the tray.
1Tab
12
Security codes
FOMA card security functions
<FOMA card security functions>
dv67_E.book 40 ページ 2009年4月22日 水曜日 午後5時33分
e02_dv67_7e.fm
[41/50]
41
Continued on next page
Before Using the Handset
The following indicates the data for which FOMA card security is set.
Melody
Image (including animation and Flash movie)
Screen memo Chaku-uta®/Chaku-uta full®
Chara-den File attached to Message R/F
i-motion ToruCa (details) image
PDF data Image inserted to Deco-mail or signature
Kisekae Tool Videophone picture memo
Machi-chara i-appli (including i-appli stand-by)
Download dictionary
Download font Contents transfer compatible data
Image in Message R/F
Music&Video Channel program
Deco-mail template with data which FOMA card security functions are
set
Decome-Anime Template
e-book/e-dictionary/e-comic saved in the [Comic] folder
File attached to i-mode mail other than the following
• ToruCa • Phonebook • Schedule
• Bookmark • Documents
※“Chaku-uta” is a registered trademark of the Sony Music
Entertainment (Japan) Inc.
The following indicates the settings saved in the FOMA card.
Own number PIN setting
Select language SSL/TLS certificates
SMS center SMS expiry
SMS input character
The following explanation refers to the FOMA card inserted at time of
data/files retrieval as “one’s own FOMA card” and other FOMA cards as
“another’s FOMA card”.
When one’s own FOMA card is replaced with another’s FOMA card, the
data or files for which FOMA card security functions are set cannot be
set as stand-by displays or ring tones.
When a FOMA card is replaced with another’s FOMA card, FOMA card
security functions are activated and if data or file retrieved from a site is
set as the stand-by display or ring tone, the setting is reset to the
default. When one’s own FOMA card is re-inserted, the setting returns.
Example: When setting [Melody A], for which FOMA card
security functions are set, as a ring tone
When one’s own FOMA card is taken out or is replaced with another’s
FOMA card, ring tone returns to default setting. When one’s own FOMA
card is put back, the ring tone returns to [Melody A].
FOMA card security functions cannot be set for data received using Ir
communication or data transmission functions, and still/moving
pictures, etc. shot with the FOMA terminal.
It is possible to move or delete data or files for which FOMA card
security functions are set even when another’s FOMA card is inserted.
Running i-appli by selecting highlighted text in i-mode mail details
screen cannot be performed or retrieved when FOMA card security
functions are set.
One’s own FOMA
card security functions
are set for
downloaded data, files
attached to received
mail and i-appli that
have been run,
allowing viewing and
playback of data.
When another’s
FOMA card is
inserted, data with
one’s own FOMA
card security
functions set cannot
be viewed or played.
One’s own
FOMA card
Another’s
FOMA card
Different FOMA card
inserted
dv67_E.book 41 ページ 2009年4月22日 水曜日 午後5時33分
42
e02_dv67_7e.fm
[42/50]
Before Using the Handset
Note the following differences between “FOMA card (blue)” and “FOMA
card (green/white)” used on the FOMA terminal.
Use the Battery Pack SH22 exclusive to the FOMA terminal.
Turn off the power, close the FOMA terminal, and hold it in your both
hands before attaching or removing the battery pack.
■Attaching battery pack
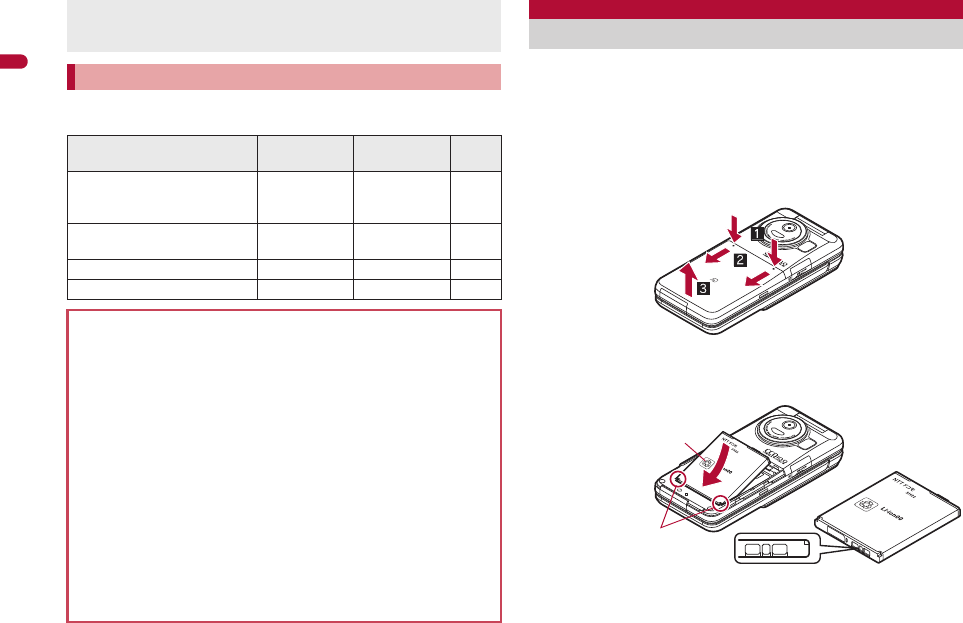
1Push the back cover in the direction of the arrow (1),
slide approximately 2 mm (2) and remove the back
cover (3).
2Attach the battery pack (4).
:The FOMA terminal has tabs that make it easy to attach. Attach the
battery pack with a recycle mark side faced up.
If the FOMA card is replaced with another’s FOMA card after i-appli
stand-by is set, the set i-appli cannot be activated in stand-by, and the
image set in Stand-by display appears.
FOMA card type
Function FOMA card
(blue) FOMA card
(green/white) Page
Number of phone number digits
available in the FOMA card
phonebook
Up to 20 digits Up to 26 digits P. 79
Client certificate operations for
FirstPass Not available Available P. 183
Use of WORLD WING Not available Available P. 428
Service Numbers Not available Available P. 418
About WORLD WING
WORLD WING is a DOCOMO’s FOMA international roaming service that
makes it possible to use the mobile phone number registered in Japan to
make and receive calls even overseas by the FOMA card (green/white)
and supported FOMA terminal.
If subscribed to the FOMA service after September 1, 2005,
subscription for “WORLD WING” is not required. However, if
subscription for “WORLD WING” is canceled at or after subscription for
the FOMA service, subscription for “WORLD WING” is required again.
If subscribed to the FOMA service before August 31, 2005 but not
subscribed to “WORLD WING”, subscription for “WORLD WING” is
required.
Some payment plans are not available.
When the FOMA card (green/white) is lost or stolen overseas, promptly
contact DOCOMO and conduct a procedure for canceling the use of
service. Refer to General Inquiries on the back of this manual for
inquiries. Note that transmission/calling charges after the FOMA card
is lost or stolen are incurred to the subscriber.
Attaching/Removing battery pack
Face the side with a
recycle mark up
4
Tabs
Battery pack
Battery pack connector terminal side
dv67_E.book 42 ページ 2009年4月22日 水曜日 午後5時33分
e02_dv67_7e.fm
[43/50]
43
Continued on next page
Before Using the Handset
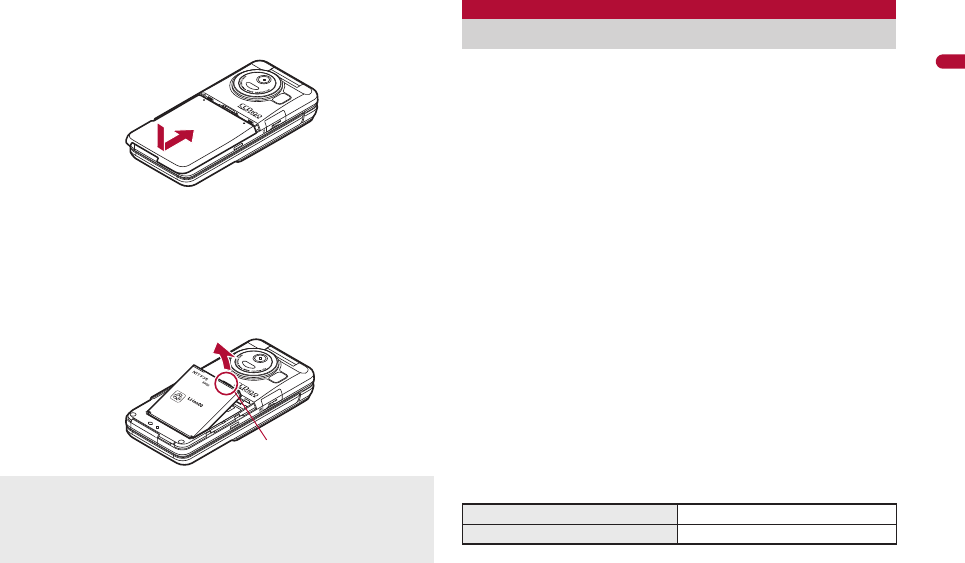
3Attach the back cover (5).
:Place the back cover as shown in the illustration and then push the
back cover and slide.
■Removing battery pack
1Follow step 1 of “Attaching battery pack” to remove
the back cover.
2Remove the battery pack.
:The battery pack has a tab that makes it easy to remove. Hook a
finger on the tab to prevent excessive force on it and remove the
battery pack upward.
The battery pack is not fully charged at the time of purchase. Be
sure to charge the battery using the exclusive AC or DC adapter
(sold separately) before use.
■Cautions while charging
Do not charge for long periods of time with the power left on. If the FOMA
terminal is left on after charging is complete, the battery pack charge
decreases.
In such cases, the AC or DC adapter charges the battery again.
However, depending on when the FOMA terminal is disconnected from
the AC or DC adapter, the battery charge level may be low, the battery
alert tone may sound, or the battery may only be usable for a short time.
When the battery is empty and terminal is recharging, charging LED may
not illuminate immediately.
If the battery empty alert is displayed, the alert tone sounds and the
power cannot be turned on, charge the battery for a while.
If the battery empty alert is displayed and charging begins within 60
seconds of the alert tone, the status returns to normal.
While charging, terminal may not turn on even when charging LED is
illuminated in red. Charge longer and try turning power on again.
Frequently recharging the battery when its power is still remaining
enough may shorten the life of the battery pack. It is recommended to
use the battery to a certain level before recharging.
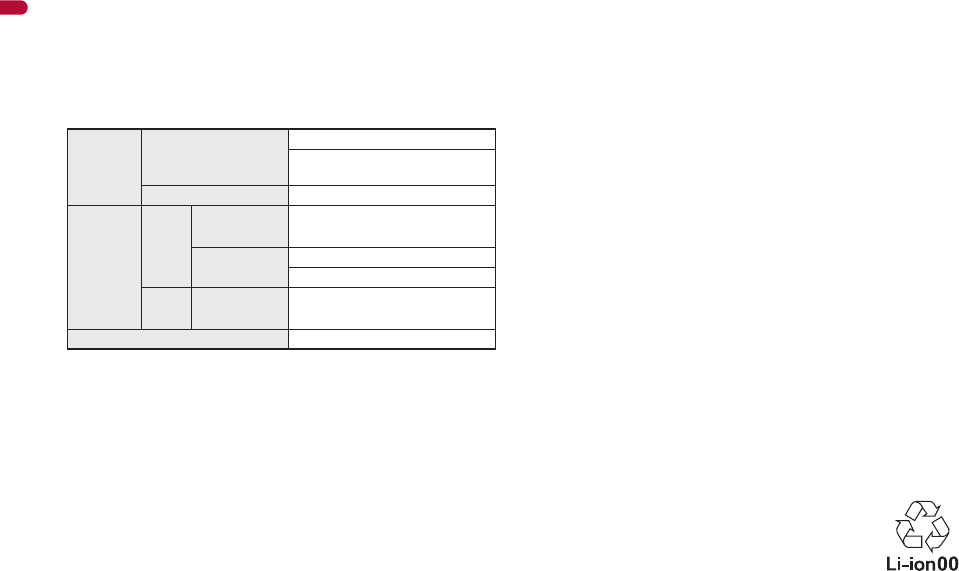
■Estimated charge times and LED display
The following figures are estimated times for charging an empty battery
pack with the FOMA terminal turned off.
Charging LED illuminates in red while charging, and it turns off when
charging is completed.
Using unnecessary force when attaching or removing the battery pack
may damage the connector terminal for the battery pack (charger
terminal) on the FOMA terminal.
Securely close the back cover. If not closed securely, the back cover
may come off and the battery pack may fall out due to vibration.
5
Tab
Charging
FOMA AC Adapter 01/02 Approx. $$ min
FOMA DC Adapter 01/02 Approx. $$ min
dv67_E.book 43 ページ 2009年4月22日 水曜日 午後5時33分
44
e02_dv67_7e.fm
[44/50]
Before Using the Handset
Check that the battery pack has been properly attached when charging
LED flashes red. The LED also flashes red when the battery pack has
reached the end of its service life.
The battery pack can also be charged with the FOMA terminal turned on
(Battery icon flashes during charging).
When the battery becomes warm, charging may automatically stop even
if the battery has not been fully charged. Charging resumes after the
temperature lowers to an appropriate temperature. While charging is
stopped, charging LED turns off (Battery icon flashes while stopped).
■Estimated times of use when fully charged
Continuous talk time is estimated as the usage time at normal
transmission signal strength, and continuous stand-by time is estimated
as the usage time while moving with the FOMA terminal folded at normal
signal strength. Using i-mode reduces talk (transmission)/stand-by time.
When i-Channel is subscribed, information is automatically received and
updated, so talk (transmission)/stand-by time will be reduced. In addition,
when shooting or editing an image, watching 1Seg, composing i-mode
mail, activating the downloaded i-appli or the i-appli stand-by, or using
MUSIC Player, i-motion player, Bluetooth function or data
communication, the talk (transmission)/stand-by time will be reduced
even if calls or i-mode transmission are not made. Some i-appli software
may continue transmission even after downloading. To avoid this, set not
to connect in advance.
The actual usage time is a combination of stand-by time and talk time,
and the longer the talk time, the shorter the stand-by time becomes.
1Seg watching time is estimated as the watching time at normal
transmission signal strength with the Stereo Earphone Set 01 (sold
separately) used.
Talk (transmission)/stand-by time may be reduced by about half or 1Seg
watching time may be shortened depending on battery pack status,
function used, temperature and other environmental conditions, or signal
strength (no signal or weak signal).
■Battery pack service life
Battery pack is a consumable product. Service time per charge is
gradually reduced every time the battery is charged.
When service time per charge is reduced to about half of the default time,
this means that the battery pack is approaching the end of its service life.
In such a case, it is recommended to replace the battery pack as soon as
possible. Depending on usage, the battery pack may swell as it
approaches the end of its service life but this will not cause problems.
If i-appli, Videophone, or 1Seg is used while charging for a long time, the
service life of the battery pack may become shorter than estimated.
To prevent damage to the environment, bring used battery
packs to a docomo service counter, a docomo agent or a
recycle center.
Continuous
talk time
FOMA/3G Voice call: Approx. $$ min
Videophone call: Approx. $$ min
(Substitute image: Approx. $$ min)
GSM Voice call: Approx. $$ min
Continuous
stand-by
time
FOMA/
3G
3G/GSM
setting: 3G
When mobile: Approx. $$ hr
3G/GSM
setting: AUTO
When mobile: Approx. $$ hr
At rest: Approx. $$ hr
GSM 3G/GSM
setting: AUTO
At rest: Approx. $$ hr
1Seg watching time Approx. $$ min
dv67_E.book 44 ページ 2009年4月22日 水曜日 午後5時33分
e02_dv67_7e.fm
[45/50]
45
Continued on next page
Before Using the Handset
■About charging batteries
Refer to user’s guide of FOMA AC Adapter 01/02 (sold separately),
FOMA AC Adapter 01 for Global use (sold separately), or FOMA DC
Adapter 01/02 (sold separately).
FOMA AC Adapter 01 covers only 100V AC. FOMA AC Adapter 02/
FOMA AC Adapter 01 for Global use covers from 100 to 240V AC.
The shape of the plug for the AC adapter is for 100V AC (for domestic
use). To use the AC adapter of 100 to 240V AC overseas, a conversion
plug adapter that is compatible with the voltage of your country of stay is
required. Do not use a transformer for use overseas to charge the
battery.
[Read “FOMA AC Adapter 01/02 (sold separately) and FOMA DC
Adapter 01/02 (sold separately) user’s guide” carefully.]
Battery pack can be charged even with the FOMA terminal opened or in
the Cycloid position.
1Open the external connector terminal cover and insert
the AC or DC adapter connector horizontally into the
external connector terminal (1).
:Check the direction (See diagram) of
the connector, keep it parallel with
the FOMA terminal and securely
push all the way in until it clicks.
2When inserting the AC adapter power plug into an
outlet or inserting the DC adapter power plug into a
car cigarette lighter socket, Charge start sound is
heard, charging LED illuminates, and charging starts.
3When Charge end sound is heard and charging LED
turns off, charging is complete.
:When removing the connector, always hold the release buttons on
both sides (1) and unplug it horizontally (2).
Charging by using AC adapter/DC adapter
Connector (Face the side with the arrows up)
1
External connector terminal cover
External connector
terminal
Charging LED
100V AC
outlet
For AC adapter For DC adapter
Cigarette
lighter socket
1
2
1
Release buttons
dv67_E.book 45 ページ 2009年4月22日 水曜日 午後5時33分
46
e02_dv67_7e.fm
[46/50]
Before Using the Handset
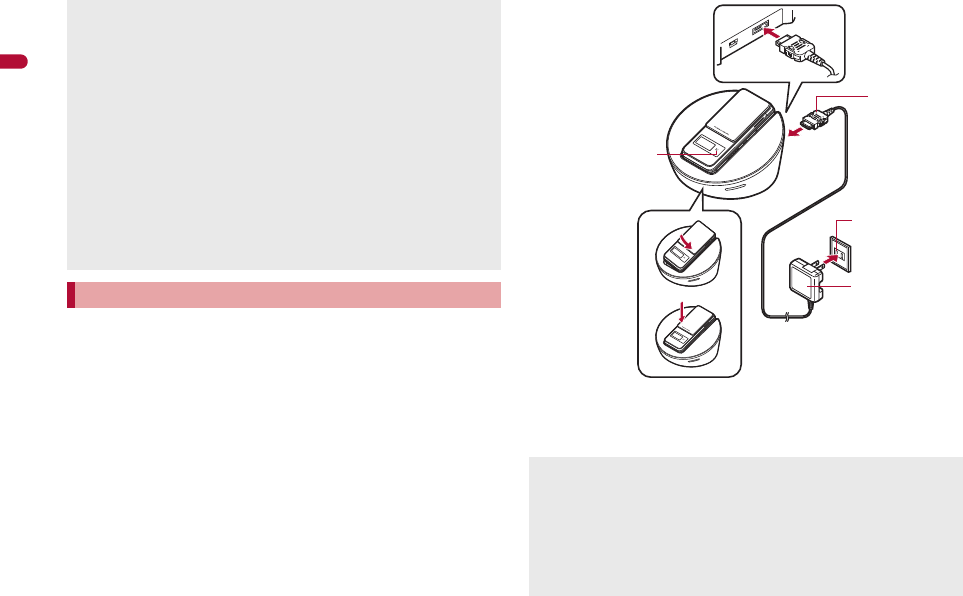
Battery pack can be charged even with the FOMA terminal opened or in
the Cycloid position.
1Face the side with the arrows of the AC adapter
connector up and insert it into the connector terminal
of the desktop holder (1).
:Keeping the connector parallel with the desktop holder, securely
push it all the way in until it clicks.
2Insert the AC adapter power plug into an outlet (2).
3When placing the FOMA terminal in the desktop
holder, Charge start sound is heard, charging LED
illuminates, and charging starts.
:Place the FOMA terminal as the figure shows (3), and push it in the
direction of the arrow (4) until it clicks.
4When Charge end sound is heard and charging LED
turns off, charging is complete.
:Hold the desktop holder and lift the FOMA terminal out.
Do not forcibly insert or remove. May cause damage to the external
connector terminal and the connector.
Pull the adapter out of the outlet or cigarette lighter socket if it will not be
used for a long time.
Do not forcefully pull the external connector terminal cover. May
damage the cover.
Do not place objects near the FOMA terminal when charging. May
damage the FOMA terminal.
When using a DC adapter
The DC adapter should only be used in negative grounded vehicles (12
and 24V DC).
Do not use with the car engine shut off. May drain the car battery.
The DC adapter fuse (2A) is a consumable. For replacement, purchase
a new fuse at a local automobile supply shop.
Refer to the FOMA DC Adapter 01/02 user’s guide for details.
Charging by using desktop holder
Pull the AC adapter out of the outlet when left unused for a long period
of time.
When Charge start sound is not heard or when charging LED does not
illuminate, check that the FOMA terminal is placed securely in the
desktop holder (except when terminal is turned off, Manner mode is set
or Charge start sound is Silent).
When placing the FOMA terminal in the desktop holder, be careful that
the strap is not caught in between the handset and the desktop holder.
Connector
(Face the side
with the arrows
up)
FOMA AC
Adapter 01/02
100V AC
outlet
3
1
2
Charging LED
4
dv67_E.book 46 ページ 2009年4月22日 水曜日 午後5時33分
47
e02_dv67_7e.fm
[47/50]
Before Using the Handset
If the battery icon is changed to [電池残量$$], battery level is displayed in
percentage. However, [&] appears when battery level is 100% while
[(] appears when battery level is 4% or less.
The battery icon and Percentage are rough indications.
If the FOMA terminal is left for a long time or the power remains on, the
battery level may reduce even after charging is complete.
■Changing design of battery icon <Battery icon>
1In the Custom menu, select [Settings]/[Battery]/
[Battery icon]/i.
2Select an image/i.
1In the Custom menu, select [Settings]/[Battery]/
[Battery level].
:Battery level is displayed in percentage and graphic. In addition, it is
notified by the number of the battery level sound according to its
remaining amount.
:Wait approximately 5 seconds and the display disappears.
:The battery level sound is heard at the volume set in Key sound
(nP. 90).
:If the Manner mode is set, the battery level sound follows the setting
of the Manner mode.
[Battery empty. Unsaved data will be lost. Ending current
operation] appears if battery starts to run out (Press t to
clear the message). After a while, an alert tone sounds.
The warning screen stating that the battery runs out
appears, handset operations are disabled and power turns off after
approximately 60 seconds.
During a voice/Videophone call, the alert tone sounds and [Battery
empty. Unsaved data will be lost. Ending current operation] appears. The
call is disconnected after approximately 20 seconds. At the same time,
the screen above appears and after approximately 60 seconds, the
power turns off.
Alert tone does not sound when Manner mode or Public mode (Drive
mode) is set (Alert tone sounds during a call).
When the FOMA terminal placed in the desktop holder is set to the
Cycloid position, operate while holding it so as not to come off from the
desktop holder.
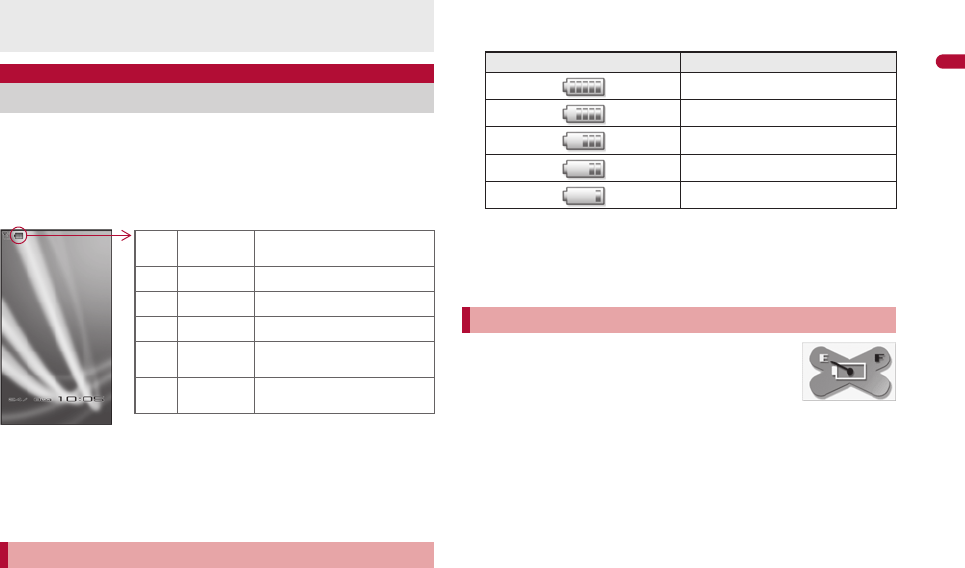
Battery level
Checking battery level
Checking battery level with sound and display
"81 to 100% Battery is sufficiently
remaining.
061 to 80% Battery is remaining.
!41 to 60% Battery level is low.
#21 to 40% Battery level is very low.
$1 to 20% Battery is almost empty.
Charge the battery.
%0% Battery is empty (Power will
turn off soon).
Graphic Number of beep sound
Five times
Four times
Three times
Twice
Once
If battery runs out
dv67_E.book 47 ページ 2009年4月22日 水曜日 午後5時33分

48
e02_dv67_7e.fm
[48/50]
Before Using the Handset
1Press H (for 2+ seconds).
:It may take some time for the wakeup screen to appear.
:The wakeup screen appears followed by the initial settings screen.
Proceed to Initial setting (nP. 48).
:If initial settings have been completed, the
screen shown on the right appears when
power is turned on. This screen is called the
“stand-by display”.
Welcome mail
:“Welcome-ドコモ動画#”
(Welcome-docomo-doga#) and “緊急速報
「エリアメール」のご案内” (Information of Early
Warning “Area Mail”) are saved by default.
:To check a welcome mail: In stand-by, press
t/select the stock icon [C] (mail
message)/t.
• For details on the following operations
nP. 138
1Press H (for 2+ seconds).
:It may take some time for the power to be turned off (The end screen
appears on the display until the power is turned off).
1In the Custom menu, select [設定]/[一般設定]/
[Bilingual]/[English].
:To switch the display language from English to Japanese: In the
Custom menu, select [Settings]/[General settings]/[Select
language]/[日本語].
The initial settings screen appears automatically when the power
is turned on for the first time. Each setting item can also be set
from Menu (When the initial settings are complete, the stand-by
display appears).
Date and time settings Change terminal security code
Key sound Location request menu
Set all font size
When items that have not been set remain, the setting screen appears
every time the power is turned on.
Alternatively, select [Settings]/[Initial setting] in the Custom menu to
display the setting screen.
1Set the date and time (nP. 49).
2Register a terminal security code (nP. 109).
Power ON/OFF
Turning power ON/OFF
Turning power ON
If initial settings are not yet completed, the setting screen appears every
time the power is turned on.
If the FOMA card is not inserted, [Insert UIM] and a FOMA card error
appear (nP. 31).
When [Enter PIN1 code] appears, enter the PIN1 code (nP. 109).
When a FOMA card is replaced with a new card, the terminal security
code (four to eight digits) must be entered after turning on the terminal.
If a correct terminal security code is entered, stand-by display appears.
When a wrong terminal security code is entered five times, the power is
turned off. However, turning on the power again is possible.
When [A] appears, the handset is outside the service area or in a
place with no signal. Move to a place where the icon disappears.
Stand-by display
Turning power OFF
Select language
Changing screen display to English
If a FOMA card is inserted, settings are saved to the FOMA card as
well. When the setting of the FOMA terminal handset and the setting of
the inserted FOMA card are different, the setting in the FOMA card is
prioritized.
Initial setting
Making initial setting
dv67_E.book 48 ページ 2009年4月22日 水曜日 午後5時33分
e02_dv67_7e.fm
[49/50]
49
Continued on next page
Before Using the Handset
3Set the Key sound (nP. 90).
4Set GPS Location provision ON/OFF (nP. 304).
5Set the font size collectively (nP. 105).
:When the initial settings are complete, the software update function
confirmation screen appears. Read the description and select
[Agree] (When the initial settings are made from the menu or the
software update is set to other than [auto-update], the confirmation
screen does not appear).
Set the date and time on the FOMA terminal.
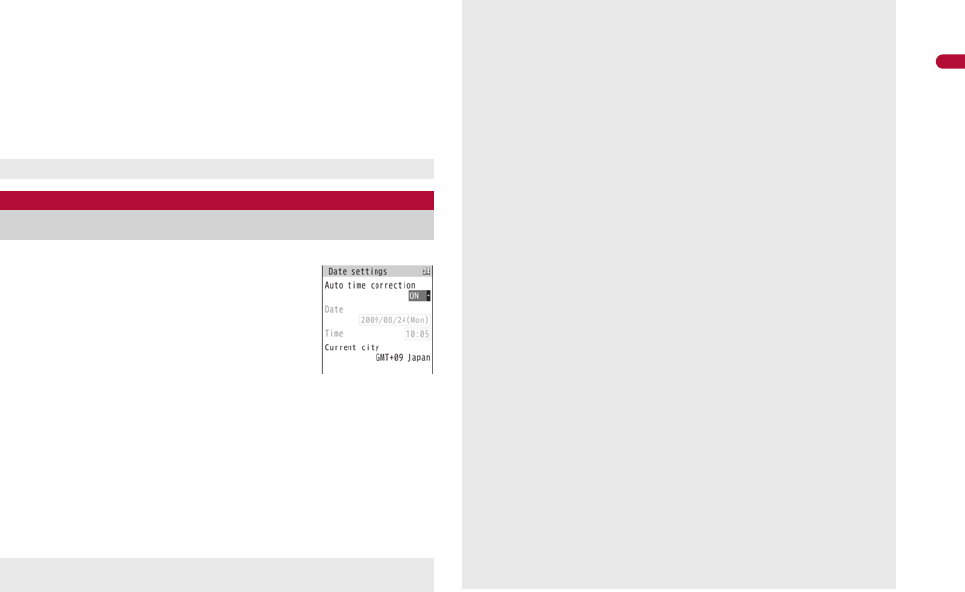
1In the Custom menu, select
[Settings]/[General settings]/[Date
settings].
2Select the [Auto time correction] field/t/select the
setting.
;Select [ON]/i.
;Select [OFF]/select the [Date] field/t/enter the date/t/
select the [Time] field/t/enter the time (24-hour format)/
t/i.
• When entering month, day and time, add 0 before numbers one
through nine (example: 01, 02, 03, etc.).
• Set the date and time from 00:00 January 1, 2001 to 23:59
December 31, 2050.
Press H to cancel the initial settings.
Date settings
Setting date and time
When Limit settings is set to [Enable], the terminal security code must
be entered in the Date settings.
The date and time that are set are saved even if the battery pack is
removed, but if the battery pack remains removed for approximately 30
seconds or more, the settings are reset. Also, if the battery remains
empty, the settings may be reset. When this happens, set again after
charging the battery.
If the date and time are not set correctly, the following functions cannot
be used properly.
Redial, Received calls Auto power ON/OFF
Alarm Schedule
SSL/TLS (authentication) i-appli Auto start
Starting i-appliDX Reception, Recording
Machi-chara Software update
Pattern definitions update
Record message (voice), Record message (Videophone calls)
Camera image titles/shooting date
Playback of i-motion or music data with expiration date/period for
replay
View of e-books/e-dictionaries/e-comics with expiration date/period
for browse
When [Auto time correction] is set to [ON]
When the power is turned on, the FOMA terminal adjusts the time by
connecting to the network’s time information.
If the FOMA terminal does not adjust the time even when the power is
turned on, turn off the power and restart.
Time may not be adjusted depending on the signal status.
Time may be off by a few seconds.
When time difference is adjusted overseas, the local time and date and
[!] appear in Redial, Received calls, Received/Sent messages history
(SMS only), received/sent mails list and location history list. The
received/sent mails are not displayed in order of the displayed time and
date but the mail reception/send.
[!] does not appear in the Unsent messages for mail messages. If the
date order display is set for the Unsent messages, unsent mails are
displayed in the order of the displayed time and date.
Time correction may not be performed depending on the overseas
telecommunications carriers. Change the time zone manually.
dv67_E.book 49 ページ 2009年4月22日 水曜日 午後5時33分

50
e02_dv67_7e.fm
[50/50]
Before Using the Handset
■Changing time zone manually <City>
1In the Date settings screen, select the [Auto time
correction] field/t/[OFF]/C.
2Select a time zone/t.
3Select a city/t/i.
Display your number (caller ID) on the other party’s phone
(display) when making a voice/Videophone call.
Handset number (caller ID) is important personal information. Be very
careful about your caller ID setting.
The Notify caller ID function is available only on compatible phone
devices.
1In the Custom menu, select [Settings]/[NW
Services]/[Notify caller ID].
2Select [Activate/Deactivate].
:To check the setting: Select [Check setting].
3Select the setting.
:To notify caller ID: Select [Yes].
:To not notify caller ID: Select [No].
When checking your own phone number during a call nP. 54
1In the Custom menu, press 0.
:Alternatively, select [Phone]/[Own number] (or [Settings]/
[General settings]/[Check status]/[Own number]).
:To switch between Number A and Number B (when 2in1 [Dual mode]
is used): Press i.
During overseas use, Japan time and local time (or time set in City)
appear in the dual display except for the following cases.
When Auto time correction is set to [ON] and time correction
information is not being received from an overseas network
When Auto time correction is set to [OFF] and City is set to the city in
the same time zone as Japan
Notify caller ID
Notifying the other party of your phone
number
Setting Notify caller ID/No caller ID in advance
Notify caller ID setting cannot be set from outside the service area.
Own number
Checking your own phone number
When changing the Number B of 2in1, use any of the following methods
to obtain the correct Number B.
Set 2in1 function OFF and then perform 2in1 setting again to set
2in1 function ON
Check the 2in1 subscription
When a FOMA card exchange (2in1 subscriber b 2in1 nonsubscriber)
is performed, set 2in1 function OFF.
When a FOMA card exchange (2in1 subscriber b 2in1 subscriber) is
performed, check the 2in1 subscription.
For details on Owner information nP. 384
dv67_E.book 50 ページ 2009年4月22日 水曜日 午後5時33分

e15_dv67_7e.fm
[299/310]
299
Map/GPS Function
Using Map/GPS function. . . . . . . . . . . . . . . . . . . . . . . . . . . . . . . . . . . . .300
Checking your location . . . . . . . . . . . . . . . . . . . . . . <Position location>301
Setting position location . . . . . . . . . . . . . . . . . . . . . . <Set position loc.>302
Viewing Map . . . . . . . . . . . . . . . . . . . . . . . . . . . . . . . . . . . . . . . . <Map>302
Using GPS compatible i-appli. . . . . . . . . . . . . . . . . . . . . . . . . . . . . . . . .302
Providing location information on request. . . . . . .<Loc. request menu>304
Notifying present location information. . . . . . . . .<Location notification>307
Displaying history of checked location information
. . . . . . . . . . . . . . . . . . . . . . . . . . . . . . . . . . . . . . . . <Location history>308
Using location information from each function . . . . . . . . . . . . . . . . . . . .309
dv67_E.book 299 ページ 2009年4月22日 水曜日 午後5時33分

300
e15_dv67_7e.fm
[300/310]
Map/GPS Function
Note that DOCOMO shall not be liable for the pure economic loss if you
cannot confirm the positioning (communication) result with FOMA
terminal failure, malfunction, error or external factors such as power
failure (including battery exhaustion).
FOMA terminals cannot be used as navigation system for professional
use of aircrafts, vehicles, person, etc. Therefore, note that DOCOMO
shall not be liable for the loss caused by the navigation system to use
location information.
FOMA terminals cannot be used as surveying GPS of high accuracy.
Therefore, note that DOCOMO shall not be liable for the loss caused by
the error of location information.
GPS is the service in charge of Department of Defense of USA,
therefore, GPS radio wave condition may be controlled (accuracy
degradation, radio wave abort, etc.) for the US national security reason.
For the use of Location provision or Location notification, check the
information of an information provider and DOCOMO website. Charges
may be incurred for these functions.
Position location and Location notification are not available when
Function lock is applied to GPS.
Location provision, Position location and Location notification are not
available in the following cases.
When a FOMA card is not inserted
During the Self mode During software update
Note that GPS is using the radio wave from satellites, and following
conditions may cause the radio wave abort or difficulty to receive.
In or under buildings In basement, tunnel, ground or water
In bags or boxes
In density area with buildings or residence
In or under densely trees Near high-tension line
Inside cars or trains In bad weather with heavy rain/snow
When people or objects are blocking mobile phones
When hands are covering screen/keypad/microphone/speaker of
mobile phones
In these cases, the error of retrieved location information may be 300 m
or more.
GPS function of the FOMA terminal is not available outside the service
area.
Note the following when using a map and GPS function overseas.
• Location notification and Location provision function are not available.
• When attempting to connect to the GPS service setting site from
[Service settings] in [Loc. request menu], an error message appears
and the functions cannot be used. However, packet transmission
charges are incurred in such cases.
• The displayed map based on the acquired location information (latitude
and longitude information) may not be accurate because of the legal
system in each country and the area.
Note the following when using each function.
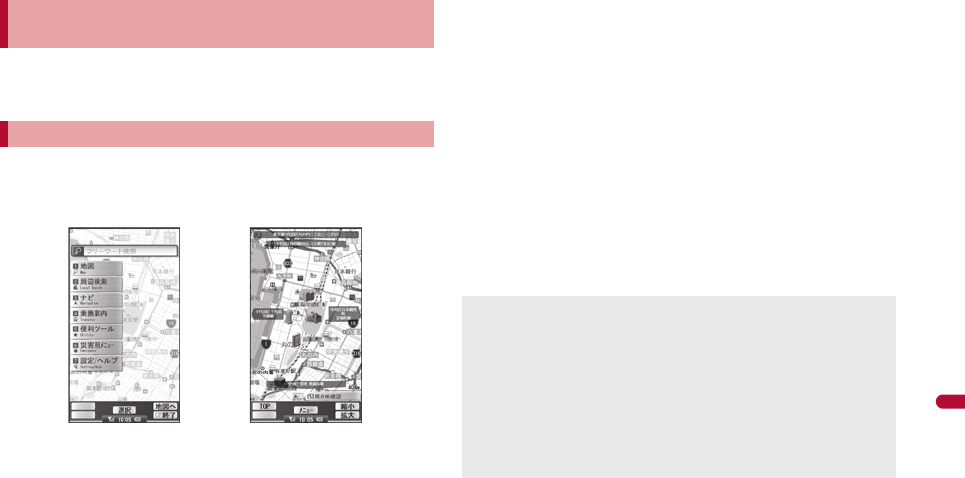
■Viewing map
The selection screen for viewing a map either on the i-mode site or
i-appli appears when selecting Map in the Map/GPS menu or selecting
[Read Map] after checking the present location, etc. Select the view
mode.
Even if a map is displayed on the i-mode site or i-appli, the map may not
be provided or the present location may not appear properly. In those
cases, packet transmission charges apply.
■Position location
Set the correct date and time in advance.
GPS positioning is available in the 3G network and GPRS network
service areas.
When GPS positioning is failed due to signal status, etc., the message
asking whether to select a city name may appear. If [Select city name] is
selected, the list of world cities appears. GPS positioning may succeed if
the city around the present location is selected.
Positioning is activated with [Quality mode] regardless of the Positioning
mode settings.
Using Map/GPS function Using map and GPS function overseas
dv67_E.book 300 ページ 2009年4月22日 水曜日 午後5時33分
301
e15_dv67_7e.fm
[301/310]
Map/GPS Function
■Using GPS compatible i-appli
Even if GPS compatible i-appli is set for Select Map, a map may not
appear properly when location information that GPS compatible i-appli
does not support is provided. In this case, packet transmission charges
apply.
■Location history
[_], the icon indicating that location is positioned overseas, appears for
positioned location history in the location history list screen/location
history screen. [.] appears in the location history list screen when the
time difference is adjusted.
If [Read Map] is selected from the location history positioned overseas,
the selection screen for viewing a map either on the i-mode site or i-appli
appears. Select the view mode.
Check the present location and check your place. Use this
function for more convenient use such as showing a map from
positioning location information, changing the location
information to a URL, sending mail with the URL pasted, etc.
Transmission charges are not incurred when the present location is
positioned. However, packet transmission charges are applied when a
map is displayed based on the location information.
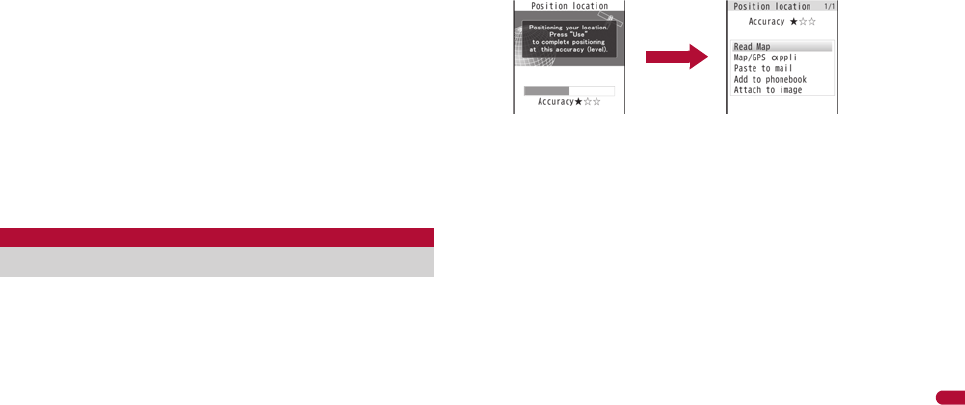
Change sound/volume/LED color for Position location (nP. 89, P. 103).
1In the Custom menu, select [LifeKit]/[Map/GPS]/
[Position location].
:In stand-by: Press y (for 1+ seconds).
• It is activated following the GPS button setting after positioning.
:[B] flashes while GPS positioning is being performed.
Accuracy level ★★★ : Almost accurate location information
Error is less than 50 m
Accuracy level ★★☆ : Relatively accurate location information
Error is less than 300 m
Accuracy level ★☆☆ : Rough location information
Error is 300 m or more
:Accuracy level is a rough indication. It may differ depending on the
radio wave condition of the surroundings.
:To use the location information as a result of location positioning at
the displayed accuracy level while the present location is being
positioned: Press C.
:To cancel position location: Press i/t.
2Select a usage.
;Select [Read Map].
• GPS compatible i-appli set in Map setting is activated.
;Select [Map/GPS appli]/select i-appli/t.
;Select [Paste to mail]/[OK]/compose and send a mail.
• The Location URL to be sent appears only on the i-mode
supported terminal.
;Select [Add to phonebook]/add to the phonebook.
;Select [Attach to image]/select an image/t/C/select the
saving method/t.
:To check the location information: Press i.
:To retry position location: Press C.
Position location
Checking your location
dv67_E.book 301 ページ 2009年4月22日 水曜日 午後5時33分

302
e15_dv67_7e.fm
[302/310]
Map/GPS Function
Set the operation that is automatically launched after positioning the present
location by pressing y for 1+ seconds.
1In the Custom menu, select [LifeKit]/[Map/GPS]/
[Set position loc.]/[GPS button setting].
2Select the action/t/[OK].
This setting is valid only when the positioning is performed in Japan.
1In the Custom menu, select [LifeKit]/[Map/GPS]/
[Set position loc.]/[Positioning mode].
2Select the Positioning mode/t/[OK].
:When [Quality mode] is selected, the positioning is performed with
longer time. As a result, more accurate positioning is performed than
in the Standard mode.
Activate GPS compatible i-appli and view the present location or
specified location.
Make the Map setting in advance, and set GPS compatible i-appli to
activate.
By default, the FOMA terminal is set to activate “Map Application”. For
details on operating “Map Application” nP. 303
1In the Custom menu, select [LifeKit]/[Map/GPS]/
[Map].
:GPS compatible i-appli is activated after positioning the present
location.
■Setting i-appli to activate as a map <Select Map>
Set GPS compatible i-appli to activate when selecting Map in the Map/GPS
menu or [Read Map] from the location information of each function.
1In the Custom menu, select [LifeKit]/[Map/GPS]/
[Map setting]/[Select Map].
2Select the GPS compatible i-appli/t.
■Setting whether to position present location when
activating a map <Map activate setting>
Set whether to position the present location when Map in the Map/GPS
menu is selected and GPS compatible i-appli is activated.
1In the Custom menu, select [LifeKit]/[Map/GPS]/
[Map]/[Map activate setting].
2Select the setting/t.
Start i-appli compatible with Map/GPS function.
When GPS compatible i-appli is used, location information is sent to the
information provider of the software used.
When GPS function is used on GPS compatible i-appli, set Location
usage setting of the software used to [Send].
1In the Custom menu, select [LifeKit]/[Map/GPS]/
[Map/GPS appli].
2Select software/t.
Set position loc.
Setting position location
Setting GPS button <GPS button setting>
Setting Positioning mode for positioning
location <Positioning mode>
Map
Viewing Map
Setting map <Map setting>
Using GPS compatible i-appli
dv67_E.book 302 ページ 2009年4月22日 水曜日 午後5時33分
303
e15_dv67_7e.fm
[303/310]
Map/GPS Function
1In stand-by, press y.
:GPS compatible i-appli is started according to Select Map. By
default, the FOMA terminal is set to activate “Map Application”.
“Map Application” is a convenient i-appli for viewing the map of the present
location or specified location, searching the peripheral area information or
navigating to a destination. Search helpful facilities in case of disaster. With
Chizu Talk function, exchange a message with the other party on the map.
Service charge
The appli services are divided into the following.
Free functions
View the map and search the peripheral area information. Also, search
the food coupon.
Display the location, which was positioned using GPS in the past, in the
unit of municipality or prefecture with color on a map. This is the function
that allows you to recognize the visited town at a glance.
Change the mode to various maps such as a 3D map, a map with
emphasized railways, a map in the day and night mode, including a
normal map.
Paid functions
Use all services excluding the traffic information for free until the 60th day
from the first-time use of this software.
After the free period, the My menu registration (fees apply) for “ゼンリンL
地図+ナビ” provided by ZENRIN DataCom CO., LTD. is required.
Totally navigate to the destination including the means of driving, using
train and walking. Search a route considering the traffic information.
Display train transfer information and timetable.
Exchange a message while displaying the other party’s position on a
map.
Search helpful facilities in case of disaster. Use the i-appli without
communication called Map Application for disaster. If a map for disaster
of the area around the home is downloaded, it will be useful in case of an
emergency.
Starting GPS compatible i-appli by one-touch
operation
Using “地図アプリ” (Map Application)
©2009 ZENRIN DataCom CO., LTD.
Packet transmission charges apply when using this service. It is
recommended to use this software with Pake-hodai/Pake-hodai full/
Pake-hodai double.
When this software is deleted, download it from “iエリア-周辺情報-”.
Note that there is no guarantee for the accuracy and immediacy of the
information such as a map and route.
Make sure that a person other than the driver operates this software
while driving.
This appli supports the Motion tracking.
Screenshots are examples and may differ from actual screens.
dv67_E.book 303 ページ 2009年4月22日 水曜日 午後5時33分

304
e15_dv67_7e.fm
[304/310]
Map/GPS Function
Set whether to provide the present location on the request from
the other party.
Location provision may require the subscription to an information
provider supporting the service and the service usage fee.
To use a service supporting location provision, set Location provision
ON/OFF to [Loc. provision:ON] or [Reject No. unset]. In addition, usage
settings for each service (GPS Service settings) may be required. To use
“imadoco-search”, settings accessed by [iMenu]/[お客様サポート]/[各
種設定(確 認・変 更・利 用 )]/[その他サービス設定・確認]/[位置情報利用
設定]/[イマドコサーチ設定] is required.
Sent location information may not reach an information provider
depending on the signal strength.
Location information may be sent to an information provider without any
operation when Location provision ON/OFF is set to [Loc. provision:ON]
or [Reject No. unset]. Under [Loc. provision:OFF], even if the location
information from the other party is received, it is automatically rejected,
and the history of location provision does not remain.
[A] (blue) appears when Location provision ON/OFF is set to [Loc.
provision:ON] or [Reject No. unset]. Until a location provision permission
schedule ends if it is set, [A] (blue) is displayed while permitted and [A]
(gray) while rejected.
If Location provision ON/OFF is set to [Reject No. unset], calls are
automatically rejected when the location information from callers not
saved in the phonebook are received. However, a request for Location
provision may be received depending on the operating condition of other
functions.
Change sound/volume/LED color for Location provision (
n
P. 89, P. 103).
Location information is provided free of charge.
For the use of location information, check the information of an
information provider and DOCOMO website. Charges may apply for
these functions.
1In the Custom menu, select [LifeKit]/[Map/GPS]/
[Loc. request menu]/[Loc. prov. ON/OFF].
2Enter the terminal security code/t.
3Select the setting/t.
■Setting permission schedule onto Location provision
1In the Location provision ON/OFF setting screen,
select [Permission sched.].
2Select [Start]/enter the start time (24-hour format)/
t.
3Select [End]/enter the end time
(24-hour format)
/t.
4Select [Repeat]/select the repeat method.
;Select [Daily].
;Select [Set day of week]/select a day of the week/t/C.
;Select [Not set]/proceed to step 6.
5Select [From]/[Start date setting]/enter the start
date/t/[End date setting]/enter the end date/
t.
:To not set valid period: Select [End date]/[Not set].
6Press i/select the setting of Reject No. unset/t.
■Setting Positioning mode of Location provision
<Positioning mode>
1In the Custom menu, select [LifeKit]/[Map/GPS]/
[Loc. request menu]/[Positioning mode].
2Select the Positioning mode/t/[OK].
Loc. request menu
Providing location information on
request
Location provision can also be set from initial settings (nP. 48).
If an end time is set to the time before the scheduled time, location
information is not provided for the day.
dv67_E.book 304 ページ 2009年4月22日 水曜日 午後5時33分
e15_dv67_7e.fm
[305/310]
305
Continued on next page
Map/GPS Function
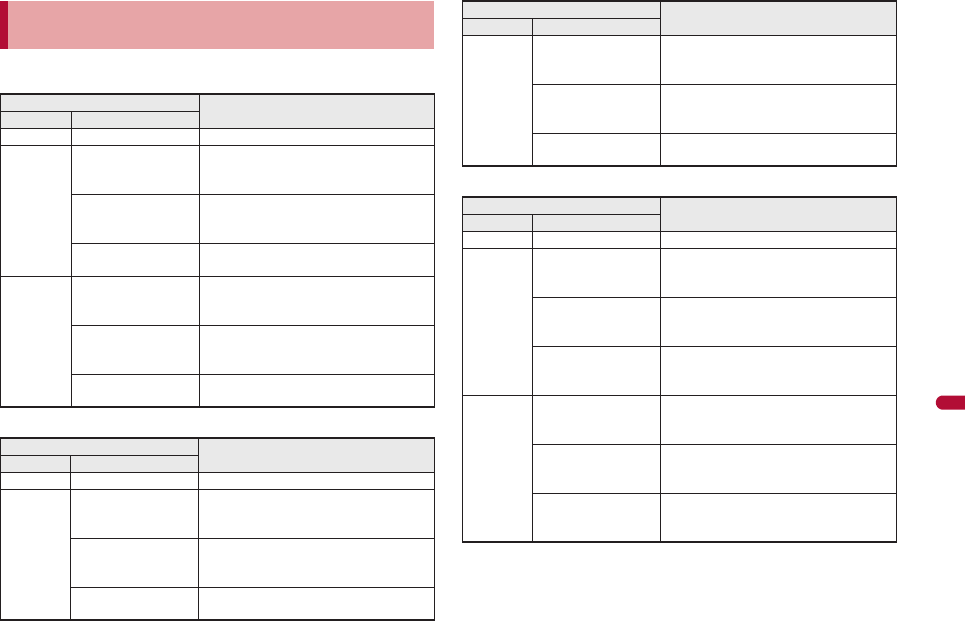
Example: When the current date is “August 24, 2009, 14:00”
Start: 15:00 End: 22:00
Start: 09:00 End: 22:00
Start: 15:00 End: 10:00
Operation when permission schedule is set onto
location provision
Setting details Schedule when location provision is
performed
Repeat Valid period
Not set – 08/24/2009, 15:00 to 08/24/2009, 22:00
Everyday From 08/29/2009
End date 09/29/2009
Everyday from 08/29/2009, 15:00 to 09/
29/2009, 22:00 (between 15:00 and
22:00)
From 08/19/2009
End date 09/29/2009
Everyday from 08/24/2009, 15:00 to 09/
29/2009, 22:00 (between 15:00 and
22:00)
Not set Everyday after 08/24/2009, 15:00
(between 15:00 and 22:00)
Set day of
week
From 08/29/2009
End date 09/29/2009
Set day of week from 08/29/2009,
15:00 to 09/29/2009, 22:00 (between
15:00 and 22:00)
From 08/19/2009
End date 09/29/2009
Set day of week from 08/24/2009,
15:00 to 09/29/2009, 22:00 (between
15:00 and 22:00)
Not set Set day of week after 08/24/2009,
15:00 (between 15:00 and 22:00)
Setting details Schedule when location provision is
performed
Repeat Valid period
Not set – 08/24/2009, 14:00 to 08/24/2009, 22:00
Everyday From 08/29/2009
End date 09/29/2009
Everyday from 08/29/2009, 09:00 to 09/
29/2009, 22:00 (between 09:00 and
22:00)
From 08/19/2009
End date 09/29/2009
Everyday from 08/24/2009, 14:00 to 09/
29/2009, 22:00 (between 09:00 and
22:00)
Not set Everyday after 08/24/2009, 14:00
(between 09:00 and 22:00)
Set day of
week
From 08/29/2009
End date 09/29/2009
Set day of week from 08/29/2009, 09:00
to 09/29/2009, 22:00 (between 09:00
and 22:00)
From 08/19/2009
End date 09/29/2009
Set day of week from 08/24/2009, 14:00
to 09/29/2009, 22:00 (between 09:00
and 22:00)
Not set Set day of week after 08/24/2009, 14:00
(between 09:00 and 22:00)
Setting details Schedule when location provision is
performed
Repeat Valid period
Not set – 08/24/2009, 15:00 to 08/25/2009, 10:00
Everyday From 08/29/2009
End date 09/29/2009
Everyday from 08/29/2009, 15:00 to 09/
30/2009, 10:00 (between 15:00 and
10:00 on the next day)
From 08/19/2009
End date 09/29/2009
Everyday from 08/24/2009, 15:00 to 09/
30/2009, 10:00 (between 15:00 and
10:00 on the next day)
Not set Everyday after 08/24/2009, 15:00
(between 15:00 and 10:00 on the next
day)
Set day of
week
From 08/29/2009
End date 09/29/2009
Set day of week from 08/29/2009, 15:00
to 09/30/2009, 10:00 (between 15:00
and 10:00 on the next day)
From 08/19/2009
End date 09/29/2009
Set day of week from 08/24/2009, 15:00
to 09/30/2009, 10:00 (between 15:00
and 10:00 on the next day)
Not set Set day of week after 08/24/2009, 15:00
(between 15:00 and 10:00 on the next
day)
Setting details Schedule when location provision is
performed
Repeat Valid period
dv67_E.book 305 ページ 2009年4月22日 水曜日 午後5時33分

306
e15_dv67_7e.fm
[306/310]
Map/GPS Function
Start: 09:00 End: 09:00
Set the host for the GPS service setting site.
※Setting does not normally need to be changed.
1In the Custom menu, select [LifeKit]/[Map/GPS]/
[Loc. request menu]/[Host setting].
2Enter the terminal security code/t.
3Select [User specified host]/C.
:To return to the default host: Select [Default].
:To change to the preset user-defined host: Select [User specified
host].
:To delete the set user-defined host: Select [User specified host]/
C/C/[Yes].
4Select [Host name]/enter the host name/t.
:Enter up to 99 single-byte alphanumeric characters and symbols.
5Select [Host URL]/enter the host URL/t.
:Enter up to 100 single-byte alphanumeric characters and symbols.
6Press i.
Configure the setting required for Location provision.
1In the Custom menu, select [LifeKit]/[Map/GPS]/
[Loc. request menu]/[Service settings].
:Connected to the GPS service setting site.
2Configure the settings.
:Please contact GPS information providers for the setting details.
Location provision starts when the request to provide the location
information is received.
When each service usage setting is set to [許可], the location information
is automatically provided upon request.
When each service usage setting is set to [毎回確認], a confirmation
screen asking whether to provide appears at every request. Select [Yes]
to start providing the location information.
If no operation is performed when the location is requested, return to
stand-by display after providing location information is end, and the stock
icon [@] (Send loc - Resp/Send loc - No resp/Send loc - Failed) appears.
Select the stock icon and location histories appear.
To cancel Location provision, press i and press t. However, the
location information may be sent depending on timing.
Sent location information may not reach a requestor of the location
information depending on the signal strength.
Host ID for Location provision may not be displayed on the screen.
Setting details Schedule when location provision is
performed
Repeat Valid period
Not set – 08/24/2009, 14:00 to 08/25/2009, 09:00
Everyday From 08/29/2009
End date 09/29/2009
Everyday from 08/29/2009, 09:00 to 09/
30/2009, 09:00 (between 09:00 and
09:00 on the next day)
From 08/19/2009
End date 09/29/2009
Everyday from 08/24/2009, 14:00 to 09/
30/2009, 09:00 (between 09:00 and
09:00 on the next day)
Not set Everyday after 08/24/2009, 14:00
(between 09:00 and 09:00 on the next
day)
Set day of
week
From 08/29/2009
End date 09/29/2009
Set day of week from 08/29/2009, 09:00
to 09/30/2009, 09:00 (between 09:00
and 09:00 on the next day)
From 08/19/2009
End date 09/29/2009
Set day of week from 08/24/2009, 14:00
to 09/30/2009, 09:00 (between 09:00
and 09:00 on the next day)
Not set Set day of week after 08/24/2009, 14:00
(between 09:00 and 09:00 on the next
day)
Setting host <Host setting>
GPS service settings <Service settings>
When location information is requested
dv67_E.book 306 ページ 2009年4月22日 水曜日 午後5時33分

e15_dv67_7e.fm
[307/310]
307
Continued on next page
Map/GPS Function
Notify the positioned Location information of the present location
to specified service clients (information provider supporting
Location notification).
For Location notification function, subscription to an information provider
supporting Location notification and a service usage fee may be
required.
Sent location information may not reach an information provider
depending on the signal strength.
Using Location notification is charged.
1In the Custom menu, select [LifeKit]/[Map/GPS]/
[Loc.notification/set]/[Location notification].
2Select the service client.
;Select [Select from list]/select a service client/t.
;Select [Direct input]/enter the service client ID/t.
:To cancel positioning location: Press i/t.
• Positioning may not be canceled or the location information may be
sent depending on timing.
■Setting Positioning mode of Location notification
<Positioning mode>
1In the Custom menu, select [LifeKit]/[Map/GPS]/
[Loc.notification/set]/[Positioning mode].
2Select the Positioning mode/t/[OK].
Save up to five service clients to notify the present location.
1In the Custom menu, select [LifeKit]/[Map/GPS]/
[Loc.notification/set]/[Notification clients].
2Press C/[Save new].
:Alternatively, press i.
3Select [Name]/enter a service client name/t.
:Enter up to 32 single-byte (16 double-byte) characters.
4Select [ID]/enter the service client ID/t.
:Enter ID specified by a GPS information provider.
:Enter up to 12 single-byte numeric characters. [b] and [#] are also
available to enter.
When the 2in1 service is used, only Number A is available regardless of
the mode. If the location information provision is requested with
Number B, the location information is not provided, and the failure of
search is notified to the other party.
When the location information is requested from the other party
who used imadocokantan search
A confirmation screen for location provision appears at every request.
Select [Yes] to immediately notify to a rough positioning result to the
other party.
After [Yes] is selected, the GPS positioning screen appears, and a
high-accuracy positioning result is notified.
If the location provision is canceled after [Yes] is selected on a
confirmation screen for location provision, a rough positioning result is
notified to the other party. In this case, the location history is recorded,
but the location information does not appear.
When the location information is requested while in Public
mode (Drive mode)
If Location provision is set to [許可] for usage settings of each service, a
confirmation screen for location provision is displayed, the GPS
positioning screen appears, and the location is provided after GPS
positioning. However, Location provision/accept, Location provision/
notify, vibrator or called LED does not operate.
When Location provision is set to [毎回確認] for usage settings of each
service, location information is not provided.
Location notification
Notifying present location information
Change sound/volume/LED color for Location notification (nP. 89,
P. 103).
When the 2in1 service is used, the location information is notified with
Number A regardless of the mode.
Saving service clients <Notification clients>
dv67_E.book 307 ページ 2009年4月22日 水曜日 午後5時33分
308
e15_dv67_7e.fm
[308/310]
Map/GPS Function
5Select [Phone number]/enter a phone number.
;Select [Search phonebook]/select a recipient/t.
;Select [Direct input]/enter a phone number/t.
:The phone number already saved as location service client cannot
be added.
6Select [Auto]/select the setting/t.
:If automatic notice is set to [Yes], automatically notifies the present
location to the recipient when a voice/Videophone call is made to a
saved phone number.
7Press i.
■Submenu operations for notification clients screen
[Save new] nP. 307
[Copy to microSD] nP. 343
[Send data]
/[Send Ir data] nP. 357
/[iC transmission] nP. 359
/[Send via Bluetooth] nP. 399
[Add to phonebook]/add to the phonebook
[Delete]
/[Delete one]/[Yes]
/[Delete selected]/select a service client/t/C/[Yes]
/[Delete all]/enter the terminal security code/t/[Yes]
■Editing saved contents of location service clients
1In the notification clients screen, select a location
service client/t.
2Select an item/t.
3Edit/i.
Up to 50 entries of location information positioned by GPS
function are saved in Location history. Use location information
on the history to display a map or for other operations.
When 50 entries are exceeded, entries are overwritten starting with the oldest.
Even if latitude and longitude are indicated on the Location history
screen, sent location information may not reach the service clients or
provider.
1In the Custom menu, select
[LifeKit]/[Map/GPS]/[Location
history].
:Location history types and dates are listed
starting with the most recent.
Location history type
:[j] appears when the location history contains location information.
:To show a map: Select a location history/i.
2Select the location history/t.
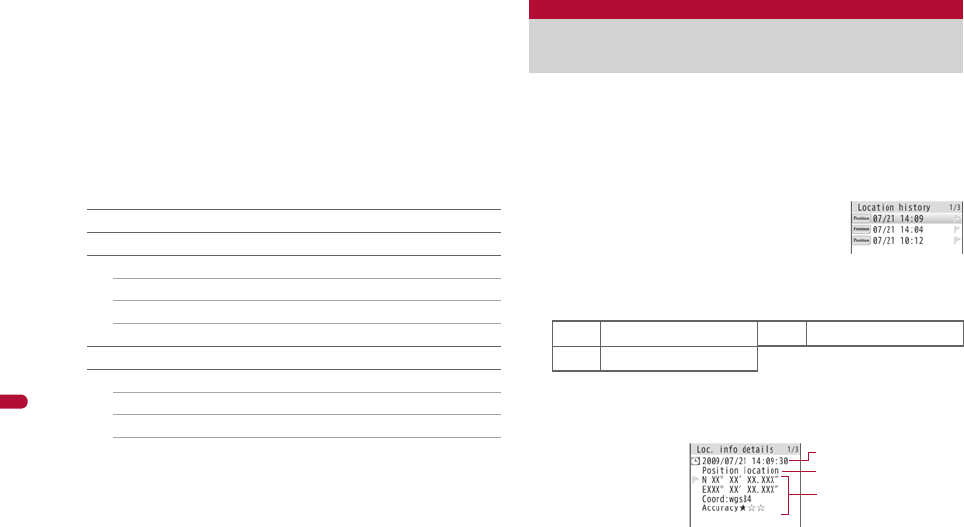
Location history
Displaying history of checked location
information
VPosition location TLocation notification
ULocation provision
1Positioning date
Location history list
Location history details screen
2
3
1
dv67_E.book 308 ページ 2009年4月22日 水曜日 午後5時33分
e15_dv67_7e.fm
[309/310]
309
Continued on next page
Map/GPS Function
For Location notification
For Location provision
※When the requestor ID for Location provision is a phone number
or mail address, Phone To (AV Phone To) (nP. 173) and Mail
To (nP. 173) can be used.
Latitude : Degrees, Minutes, Seconds
Longitude : Degrees, Minutes, Seconds
Datum*: wgs84 (World Datum), tokyo (Tokyo Datum)
Accuracy : Error range of accuracy (nP. 301)
* Datum is a standard for expressing the position on the earth as
latitude and longitude.
■Submenu operations for location history list screen
[Read Map]
[Map/GPS appli]/select i-appli/t
[Paste to mail]/[OK]/compose and send a mail
[Add to phonebook]/add to the phonebook
[Attach to image]/select an image/t/C/select the saving
method/t
[Send location info] nP. 398
[Delete]
/[Delete one]/[Yes]
/[Delete selected]/select a location history/t/C/[Yes]
/[Delete all]/enter the terminal security code/t/[Yes]
■Submenu operations for location history details screen
Refer to submenu operations for location history list screen (nP. 309)
for the following functions.
Read Map Map/GPS appli Paste to mail
Add to phonebook Attach to image Send location info
[Delete one]/[Yes]
Use location information with each function by adding location
information to data such as phonebook and still pictures or
displaying a map based on the added location information.
Example: Phonebook
1In the phonebook entry screen, select [j].
2History type
[Position location]/[Location notification]/[Location provision]
appears. For [Location notification]/[Location provision], the icon and
the information of the service client or service client for provision
appear.
GService client name HService client ID
GService client name for Location provision
HService client ID for Location provision
IRequestor name for Location provision
JRequestor ID for Location provision
3Location information
Accuracy is a rough indication. It may differ depending on the radio
wave condition of the surroundings.
The entry that has failed or interrupted to position for Position location is
not saved as Location history.
If the location information is provided when the 2in1 service is used, the
requestor name for Location provision appears in each 2in1 mode
according to the Phonebook 2in1 setting.
The location information and accuracy recorded in Location history may
differ from those sent to a location provider and a location service client
due to the signal strength, etc.
Using location information from each
function
Adding location information
dv67_E.book 309 ページ 2009年4月22日 水曜日 午後5時33分

310
e15_dv67_7e.fm
[310/310]
Map/GPS Function
2Select a location information to add.
;Select [From position loc.]/t/[Yes].
• The present location is positioned by GPS function.
;Select [From loc. history]/select a location history/i/
[Yes].
;Select [From image]/select an image/i.
;Select [Loc. info details].
;Select [Del. location info].
:For images saved in My picture of Data box or i-mode mail, location
information added to the phonebook can be selected. The location
information added to an image cannot be selected.
:For My picture of Data box, when the operation is made from the
image list screen, multiple images to which location information is
added can be selected.
■Using location information in the FOMA terminal handset
phonebook or in images saved in My picture of Data box
Example: Phonebook
1In the phonebook entry details screen, select [j].
:To show a map based on the address saved in the phonebook: In the
phonebook entry details screen, select [O]/t/[OK].
2Select a usage.
;Select [Read Map].
;Select [Map/GPS appli]/select i-appli/t.
;Select [Paste to mail]/[OK]/compose and send a mail.
;Select [Attach to image]/select an image/t/C/select the
saving method/t.
;Select [Loc. info details].
■Using location information of sites, data broadcasting,
ToruCa or Message R/F
Example: Sites
1While viewing sites, select location information/t.
2Select a usage.
;Select [Read Map].
;Select [Map/GPS appli]/[Yes]/select i-appli/t.
;Select [Paste to mail]/[Yes]/compose and send a mail.
:To check the location information: Select a usage/t/C.
Using added location information
dv67_E.book 310 ページ 2009年4月22日 水曜日 午後5時33分
358
e16_dv67_7e.fm
[358/368]
Data Management
Use the Ir communication function from running i-appli.
Activating i-appli from Ir communication is also possible.
For details on activating Ir communication from i-appli nP. 284
During Ir communication, if a signal to activate i-appli is received from
devices supporting Ir communication, software can be activated.
1In the Custom menu, select [LifeKit]/[Receive Ir
data]/[Receive]/[Yes].
:The FOMA terminal waits to receive data. Software is activated when
signal to activate i-appli is received from the sender’s FOMA
terminal.
Use the FOMA terminal’s Infrared port from i-appli software to
operate equipment supporting the infrared remote control such
as TVs and VCRs.
To use the infrared remote control function, download compatible i-appli
software.
Start i-appli software that supports Ir remote control functions, point the
FOMA terminal’s Ir port to the front of the remote control sensor on the TV,
VCR or other device to operate, and perform remote control operations.
Actual operational methods will differ with each i-appli software
application.
Control devices from a distance of up to approximately 4 m (Distance will
vary depending on the device, the ambient brightness and other factors).
Use iC communication to send and receive data to and from other
FOMA terminals which also support iC communication function.
During iC communication, the FOMA terminal status is the same as
when outside the service area, such that making/receiving calls, i-mode,
and data communications are not possible.
iC communication is not available while a call is in progress or the IC
card is locked.
Using Ir communication with i-appli
Activating i-appli from Ir communication
When i-appli To is set to [No], i-appli is not activated from Ir
communication.
Cannot be activated as i-appli stand-by.
Infrared remote control
Using infrared remote control function
Remote control operation
When in the Self mode, the Ir remote control function cannot be used.
Depending on the device, operation may not run properly.
Remote control operation may not run properly directly under
fluorescent lights, near other equipment using infrared signals, or in
areas of direct sunlight.
iC communication
15°
15°
Approx. 4 m Infrared port
dv67_E.book 358 ページ 2009年4月22日 水曜日 午後5時33分

e16_dv67_7e.fm
[359/368]
359
Continued on next page
Data Management
For an image, i-motion, Melody, PDF, or Decome-Anime Template in the
Data box, Sending and receiving all data items is not available. For other
than those above, data that can be sent and received or operations when
various lock functions are set are same as for Ir communication
(nP. 354).
For details on starting iC communication from i-appli nP. 284
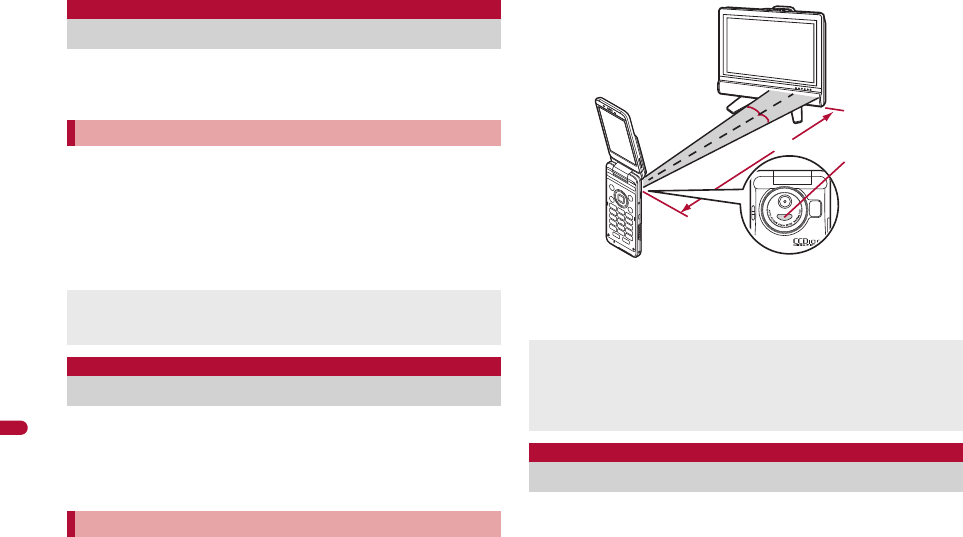
Use while placing the b mark of receiver’s FOMA terminal on that of
sender’s FOMA terminal as shown.
Do not move the FOMA terminal until all data are sent and received.
Sending and receiving data may be difficult depending on the other
party’s FOMA terminal. In such case, make the clearance between the
b mark closer or farther, or move them up/down/left/right alternately.
During iC communication, FOMA terminal called LED flashes
(nP. 103).
Data communication via iC communication is not available while
charging.
Terminal security code and authentication password entry are required
for sending or receiving all data items. The authentication password is a
password exclusively for iC communication. Before starting data transfer,
the sender and receiver must enter the same user-specified four-digit
password.
Example: Phonebook
1In stand-by, press a.
2Select a name/C/[Send data]/[iC transmission].
3Select the sending method.
;Select [Send].
;Select [Send all]/enter the terminal security code/t/enter
the authentication password/t.
4Select [Yes].
5Place the b mark on that of the other party’s FOMA
terminal.
1In stand-by, place the b mark on that of the other
party’s FOMA terminal.
2Select [Yes].
:When receiving all data items: Select [Yes]/enter the terminal
security code/t/enter the same authentication password
entered on the sender’s FOMA terminal/t/[Yes].
• To cancel Receive: While receiving data, press C.
Precautions for using iC communication function
b mark
Sending and receiving data
Sending data <Send/Send all>
Receiving data <Receive/Receive all>
dv67_E.book 359 ページ 2009年4月22日 水曜日 午後5時33分

390
e17_dv67_7e.fm
[390/400]
Convenient Functions
■Making a call after entering a phone number
1In stand-by, enter a phone number/press the switch
for 2+ seconds.
:Call can also be made from phonebook and Redials/Received calls.
2Press the switch for 2+ seconds to finish call.
Receive voice/Videophone calls.
1Connect the Stereo Earphone Set.
2When a call is received, press the switch for 2+
seconds.
:Set the location to which the ring tone is output (nP. 92).
3Press the switch for 2+ seconds to finish call.
Automatically answer voice/Videophone calls received while the
Stereo Earphone Set 01 (sold separately), etc. is connected.
When the Stereo Earphone Set is not connected, Auto answer setting is
not available even if set to [ON].
1In the Custom menu, select [Settings]/[Phone
settings]/[Incoming settings]/[Auto answer
setting].
2Select [ON]/enter a ring time/t.
Connect the FOMA terminal to Bluetooth devices wirelessly.
Wireless communications with all the Bluetooth devices are not
completely guaranteed.
If multiple phone numbers are saved to memory numbers set in
Headset switch to call, the first phone number saved is called.
When a memory number set for Headset switch to call is set as Secret,
set Secret mode to [ON] before using switch to call.
Calls may be made accidentally if the FOMA terminal is carried in a bag
with the Stereo Earphone Set connected. Disconnect when not in use.
Calls may be made if an earphone/microphone without switch is rapidly
inserted and removed.
Receiving calls with switch
Calls may be answered accidentally if the earphone/microphone with
switch is connected while the ring tone sounds. Disconnect when not in
use.
Auto answer setting
Receiving a call automatically when an
earphone is connected
Calls are answered without ringing or vibrating when the ring time is set
to “0 seconds”.
Calls from other parties set for Reject calls are not answered.
Set different Auto answer setting and Record message ring times.
If both Voice Mail Service and Auto answer setting are enabled, and the
same number of seconds is set for both services, then Voice Mail
Service may take priority. To prioritize Auto answer setting, set a
shorter ring time than that set for the Voice Mail Service (This also
applies to the Call Forwarding Service).
Bluetooth
Using Bluetooth function
dv67_E.book 390 ページ 2009年4月22日 水曜日 午後5時33分

391
e17_dv67_7e.fm
[391/400]
Convenient Functions
Supported version
Bluetooth specification Ver. 2.0+EDR*1
Supported profiles*2 (Supported services)
HSP (Headset Profile)
HFP (Hands Free Profile)
A2DP (Advanced Audio Distribution Profile)
AVRCP (Audio/Video Remote Control Profile)
HID (Human Interface Device Profile)
DUN (Dial-up Networking Profile)
OPP (Object Push Profile)
SPP (Serial Port Profile)
*1 The FOMA terminal and all Bluetooth function-installed devices have
ensured that they conform to the Bluetooth specification according to
the rules that the Bluetooth SIG defines, and are all authenticated.
However, operating methods might differ, or data might not be
exchanged even when they are connected wirelessly, depending on the
features or specifications of connecting devices.
*2 Standardizes the communication procedures of Bluetooth device per
feature of a device.
If the FOMA terminal is already connected to Bluetooth devices,
searching the Bluetooth device may not be available depending on the
status of the FOMA terminal.
■Talking with Headset/Hands-free (HSP/HFP)
Connect commercially available Bluetooth compatible Headset to the FOMA
terminal to talk wirelessly.
Connect a commercially available Bluetooth compatible hands-free device
such as a car navigation system to the FOMA terminal to talk during
hands-free operation using the car navigation system.
■Playing on Audio device (A2DP/AVRCP)
Connect Wireless Earphone Set 02 (sold separately) or commercially
available Bluetooth compatible audio device to the FOMA terminal to play
music or sound of 1Seg wirelessly. Also, remote control operation may be
available from Bluetooth devices. However, some devices do not support
sounds of 1Seg, videos, or moving pictures in the [Link with recorder] folder
in i-motion/Movie of Data box.
■Using Bluetooth compatible keyboard or PC (HID)
Connect commercially available Bluetooth compatible keyboard to the
FOMA terminal to enter text in the keyboard. Usual screen operations are
available using Cursor key/Enter key/Esc key/Function key/Numeric key. In
addition, operate commercially available Bluetooth compatible PC using
presentation assist.
■Making Dial-up connection wirelessly (DUN)
Connect a Bluetooth compatible PC to the FOMA terminal to make packet
transmission or 64K data communication using the FOMA terminal as a
modem.
Refer to “Manual for PC Connection” in the accompanying CD-ROM for
details.
■Sending/Receiving data (File transfer) (OPP)
Send or receive phonebook entries, schedule, mails, text memos,
bookmarks, location service clients, or ToruCa with the Bluetooth device.
■Using Bluetooth communication from i-appli (SPP)
Connect with another mobile phone or Bluetooth device to play a match
game and manage data.
Supported version and supported profiles What can be performed using Bluetooth
connection
dv67_E.book 391 ページ 2009年4月22日 水曜日 午後5時33分
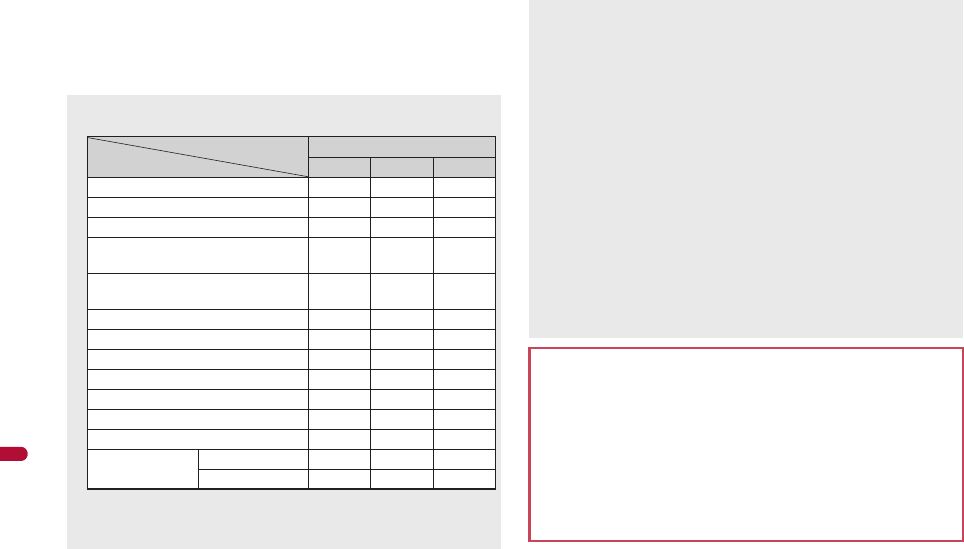
392
e17_dv67_7e.fm
[392/400]
Convenient Functions
■Cooperating with Bluetooth compatible car navigation
system (SPP)
Connect with a car navigation system complying with Photoremo@Navi
standard to transmit location information to a car navigation system or send
a mail transferred from a car navigation system with the FOMA terminal.
The following sounds are output from the Bluetooth device or the FOMA
terminal depending on the connected service.
A: Output from the Bluetooth device.
B: Sounds from the FOMA terminal instead of outputting from the
Bluetooth device.
Connected services
HSP HFP A2DP
Voice call dial tone A A B
Voice/Videophone call ring tone A*1, 2 A*2 B
Calling tone at voice/Videophone call A A B
The other party’s voice at voice/
Videophone call A A B
Caller’s voice from Record message
at voice call A A B
Sounds of 1Seg programs B B A*3
i-motion playback tone B B A*4, 5
Video playback tone B B A*3
Movie playback tone B B A*5
MUSIC Player playback tone B B A*5
Music&Video Channel playback tone B B A
Alarm tone BBB
Mail ring tone Notice first BBB
Operation first B*6 B*6 B*6
*1 The ring tone sounds from both the Bluetooth device and the FOMA
terminal when Headset setting is set to [Headset + speaker].
*2 The ring tone sounds from the FOMA terminal when Forward Ring
Tone is set to [OFF].
*3 Play only on an A2DP compatible Bluetooth device protected by
copyright in the SCMS-T.
*4 Play moving pictures in the [Link with recorder] folder in i-motion/
Movie of Data box, only on an A2DP compatible Bluetooth device
protected by copyright in the SCMS-T.
*5 The tone does not sound for activating the player from sites or Ring
tone.
*6 The mail ring tone does not sound when a screen other than
stand-by is shown.
Some Bluetooth devices may not work as those specified above.
The ring tone sounds from the Bluetooth device even while the Manner
mode is set.
Some commercially available Bluetooth compatible earphones or
headphones may not conform to the Bluetooth specification. In this
case, the audio noise may affect earphones or headphones.
Refer to the manual for the Bluetooth device as well.
Precautions for handling the Bluetooth device
Note the following when using the Bluetooth device.
Note the following to make good connection.
The distance between the FOMA terminal and another Bluetooth
device keep within approximately 10 m with no obstructions in sight.
The distance that can make connection may be shorter when there
are obstructions between them or depending on the conditions of
the surroundings (such as walls or furniture) and the structure of a
building. Especially when there is a wall or floor of reinforced
concrete between them, they may be unable to connect with each
other. Note the above mentioned distance is not guaranteed.
dv67_E.book 392 ページ 2009年4月22日 水曜日 午後5時33分
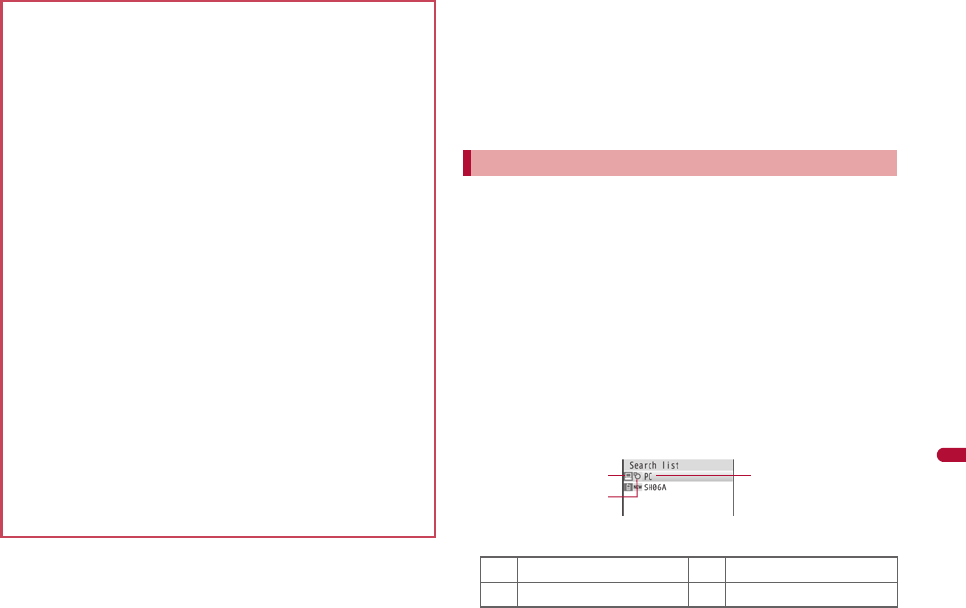
393
e17_dv67_7e.fm
[393/400]
Convenient Functions
■Using Bluetooth devices simultaneously
Connect Bluetooth simultaneously, for example, listening to the music on
the Bluetooth device while composing mail with a Bluetooth compatible
keyboard. For details on the combinations of functions that can be used
simultaneously nP. 471
For Hands-free and Headset services, the profile connected first takes
priority. However, they can be simultaneously switched to connection
stand-by.
Search for the Bluetooth device to connect and register the device to the
FOMA terminal. Register up to ten Bluetooth devices.
To register a Bluetooth device, the Bluetooth passkey must be entered.
Before starting the registration, enter the same user-specified 4- to
16-digit number on the FOMA terminal and the other party’s Bluetooth
device.
Switch the other party’s Bluetooth device to the registration stand-by
status in advance.
1In the Custom menu, select [LifeKit]/[Bluetooth]/
[List/cnnct/discnnct].
:When any Bluetooth devices have already been registered, the
device list screen appears. Press i and proceed to step 3.
2Select [Yes].
:Search the Bluetooth device around the FOMA terminal. Searched
devices are displayed on the list.
1Device category icon
Move the FOMA terminal and another Bluetooth device as far away
as possible from home electric appliances, AV devices, OA
devices, etc. before connection. The Bluetooth device is liable to be
adversely affected by a microwave oven so move as far away as
possible from the microwave oven while using it. Otherwise, normal
connection cannot be performed when electric devices are
powered on or Bluetooth devices may cause noises or reception
failure on a TV or radio set (TV images may degrade for specific
channels of UHF or satellite broadcasting).
Move the Bluetooth device to a place that connection is possible
when there is a broadcast station or radio near a Bluetooth device,
and the FOMA terminal cannot be connected to the device. Strong
radio waves may prevent connection between Bluetooth devices.
Wireless connection is available with Bluetooth device put in a bag
or pocket. However, lowering of communication speed or noise
may result when the Bluetooth device and the FOMA terminal are
separated by your body.
The Bluetooth device use the same frequency band (2.4 GHz) as
wireless LANs (IEEE802.11 b/g). Therefore, using the Bluetooth
device near a wireless LAN device may cause the radio interference,
lowering of communication speed, noise, or connection fail. In this
case, turn off the wireless LAN device or keep the FOMA terminal and
the Bluetooth device at least approximately 10 m away from the
wireless LAN.
Electromagnetic signals from the Bluetooth device may affect the
operation of electronic medical equipment. As some cases may result
in accident, turn off the FOMA terminal and another Bluetooth device
in the following place.
On trains On airplanes In hospitals
Nearby automatic doors or fire alarms
In places such as gas stations where flammable gas is generated
Registering Bluetooth device
/Computer :Peripheral
*Phone +Imaging device
3
1
2
Search list
dv67_E.book 393 ページ 2009年4月22日 水曜日 午後5時33分
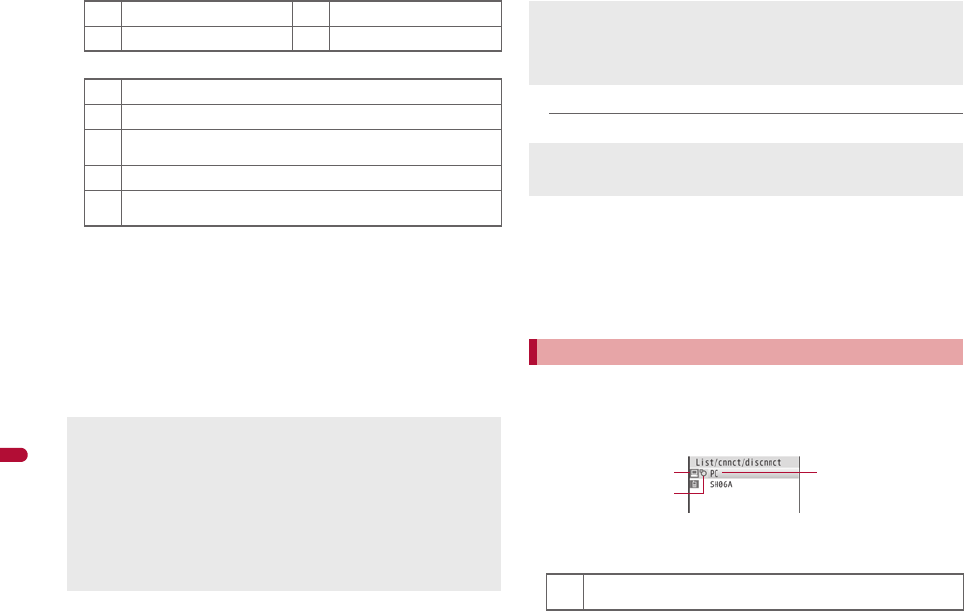
394
e17_dv67_7e.fm
[394/400]
Convenient Functions
2Classification icon
3Device name
3Select a Bluetooth device to register/C/[Register
Devices].
:Alternatively, select a Bluetooth device to register and press t.
:To search again: Press i.
4Enter the Bluetooth passkey/t.
:If a device is the one supported by Audio service, the default
connection device setting screen appears. When [Yes] is selected,
the device is set to default connection device.
■Submenu operations for search list screen
[Register Devices] nP. 393
■Searching only unregistered devices to register
1In the Custom menu, select [LifeKit]/[Bluetooth]/
[Register new device].
2Register.
:For details on registering nstep 3 of “Registering Bluetooth device”
on P. 393
Connect to registered Bluetooth devices.
1In the Custom menu, select [LifeKit]/[Bluetooth]/
[List/cnnct/discnnct].
:To update the information: Press a.
1Device category icon (nP. 393)
2Classification icon
,LAN -Wearable terminal
;Audio device _Other
(Unregistered device that has been newly found
)Already registered device that has been found
$Already registered device that has been found and is set to
default connection device
&Already registered and connected device that has been found
%Already registered and connected device that is set to default
connection device
Entering the Bluetooth passkey may not be required depending on the
operations of the other party’s Bluetooth device.
When ten Bluetooth devices are already registered, the confirmation
screen for overwriting appears. When [Yes] is selected, the Bluetooth
devices are overwritten starting with the oldest communication date and
time.
When the already registered Bluetooth device is selected to register
again, it cannot be registered again during the connection.
For details on the operations of the other party’s Bluetooth device, refer
to the manuals of the Bluetooth device to be used.
Searching is not available in the following cases.
While 1Seg or MUSIC Player is activated with connection made
using Audio service
While receiving a call or during a voice/Videophone call with
connection made using Headset service or Hands-free service
[Connection info]
Enter up to 32 single-byte (16 double-byte) characters for a device
name.
Connecting to Bluetooth devices
$Already registered and unconnected device that is set to default
connection device
3
1
2
Device list
dv67_E.book 394 ページ 2009年4月22日 水曜日 午後5時33分
e17_dv67_7e.fm
[395/400]
395
Continued on next page
Convenient Functions
3Device name
2Select a Bluetooth device to connect to/t.
:Select a service and connect: Select a Bluetooth device to connect
to/m/select a service/t/C.
:[H] flashes at approximately 0.5-second intervals when the
connection is completed.
:To disconnect the Bluetooth device: Select a Bluetooth device to
disconnect/t/[Yes].
■Submenu operations for device list screen
[Delete]/[Yes]
[Def cnnctn dev]/[Yes]
Set a device that is automatically connected when a Bluetooth
compatible function is activated.
[Connection info]
To edit the device name: Press C/edit the device name/t.
Switch to receive a registration request/connection request from other
Bluetooth devices in stand-by display.
1In the Custom menu, select [LifeKit]/[Bluetooth]/
[Accept Registered].
:[H] flashes at approximately 1-second intervals.
:Register devices within approximately 5 minutes after switching the
FOMA terminal to connection stand-by. After approximately 5
minutes, [H] becomes illuminating.
:To select the service to switch to the connection stand-by: Select
[Accept Registered]/i/select a service/t/C.
:Turn off the Bluetooth power when disabling the stand-by status.
■When accepting a registration request from Bluetooth
device or connection request from unregistered Bluetooth
device
1Registration request/Connection request from the
other party in stand-by/[Yes]/register.
:For details on registering nstep 4 of “Registering Bluetooth device”
on P. 394
&Already registered device that is being connected
%Already registered and connected device that is set to default
connection device
If a Bluetooth device is turned off during the connection or
disconnection processing or there is no response from the Bluetooth
device, it takes up to approximately 20 seconds for the processing.
If the FOMA terminal is disconnected from a Bluetooth device while
being connected, the connected service is switched to connection
stand-by. Also, if the FOMA terminal is turned off while being connected
or in connection stand-by, the connection or connected service will be
switched to connection stand-by when the power is turned on next time.
When connection to the registered Bluetooth device is failed, delete the
registration once and register the device again. It may be able to
connect.
Entering the Bluetooth passkey may be required depending on the
other party’s Bluetooth device when connecting, updating information,
or sending via Bluetooth communication.
Switching to registration stand-by/connection
stand-by <Accept Registered>
Connection does not start when the other party’s Bluetooth device is
already in connection stand-by after the connection is ended. In this
case, connect from the FOMA terminal.
If connection stand-by is set when multiple Bluetooth devices are
registered, the FOMA terminal may be connected to a Bluetooth device
other than the one to be connected.
While in connection stand-by, even if a connection request from a
Bluetooth device is received, connection may not be made depending
on the signal strength, etc.
dv67_E.book 395 ページ 2009年4月22日 水曜日 午後5時33分

396
e17_dv67_7e.fm
[396/400]
Convenient Functions
■When accepting a connection request from registered
Bluetooth device
Automatically connect and [L] becomes flashing at approximately
0.5-second intervals.
Turn on/off the Bluetooth power of the FOMA terminal.
If the Bluetooth power is turned off, all services that are connecting or in
connection stand-by are stopped. If the Bluetooth power is turned on,
services that are previously connecting or in connection stand-by are
switched to connection stand-by.
1In the Custom menu, select [LifeKit]/[Bluetooth]/
[Bluetooth Power ON]/[Bluetooth Power OFF]/[Yes].
1Connect a Bluetooth device using Headset service or
Hands-free service.
2Make/Receive a call via the Bluetooth device.
:[M] appears during a call via the Bluetooth device.
:To switch between call on the Bluetooth device and FOMA terminal:
Press t (for 1+ seconds) during a call.
• When a connection is being made using the Headset service and
the call is being made with the FOMA terminal, the connection can
be switched only from the Bluetooth device.
• Alternatively, press t for 1+ seconds to switch while calling,
receiving a call, holding a call, responding to a recorded message/
recording message or on hold.
1Connect a Bluetooth device using Audio service.
2Activate and watch/play 1Seg, MUSIC Player, etc.
When accepting a connection request from already connected service,
or when there are two connecting Bluetooth devices, connection is not
available.
Turning on/off Bluetooth power on the FOMA
terminal <Bluetooth Power ON/Bluetooth Power OFF>
With the following operations, Bluetooth is automatically turned on.
Connection/connection stand-by Search
Bluetooth reception/send
Bluetooth output from Bluetooth compatible functions (1Seg,
i-motion, Video player, Music&Video Channel, MUSIC Player,
Internet movie player)
Activating Bluetooth functions from i-appli
Device registration/Connection from presentation assist
Also, Bluetooth remains on after the completion of the above
processing. However, for Bluetooth communication from i-appli, if there
is no Bluetooth function being used when i-appli ends, Bluetooth is
turned off.
While the FOMA terminal is turned off or in the Self mode, Bluetooth
power is forcibly turned off. However, when the FOMA terminal is
turned on or the Self mode is disabled, the original status (connection
stand-by) is recovered.
Making a call using Bluetooth devices
During a call on the Bluetooth device, adjust the volume on the
Bluetooth device.
During a call on the Bluetooth device, the call continues when the
FOMA terminal is closed regardless of Set when closed.
If the FOMA terminal is disconnected from a Bluetooth device during a
call, the call is finished.
Playing audio and music of 1Seg and MUSIC
Player using Bluetooth devices
During a Bluetooth outputting, adjust the volume on the Bluetooth
device.
Remote control operations are available even while playing MUSIC
Player or Music&Video Channel player (program with voice only) in the
background. However, remote control operations are not available
when Submenu, etc. is displayed even in the player screen.
Depending on the conditions of Bluetooth device or operations from the
FOMA terminal, playing sound or music may be interrupted.
dv67_E.book 396 ページ 2009年4月22日 水曜日 午後5時33分

e17_dv67_7e.fm
[397/400]
397
Continued on next page
Convenient Functions
1In the Custom menu, select [LifeKit]/[Bluetooth]/
[Bluetooth setting]/[Music auto start].
2Select the setting/t.
Connect to the Bluetooth device that is set to the default connection
device setting.
1While 1Seg, video player, etc. is being activated, press
C/[Bluetooth output]/[ON].
1While 1Seg, video player, etc. is being activated, press
C/[Bluetooth output]/[Startup auto cnnct].
2Select the setting/t.
1Connect a Bluetooth compatible keyboard using
Presentation/Keyboard service.
2In the text input screen, input text from keyboard.
:Input method is automatically set to [Romaji method] and Quick
conversion and Direct conversion are set to [OFF].
If a voice or music is stopped from a Bluetooth device during the
playback, the FOMA terminal may be outside the Bluetooth area or the
Bluetooth device is turned off. Check the FOMA terminal and Bluetooth
device. In this case, the Audio service may be disconnected depending
on the Bluetooth device. To play the voice or music from the Bluetooth
device again, reconnect the Audio service.
When connecting the Wireless Earphone Set 02 (sold separately),
connect it from the FOMA terminal.
Some music data in AMR format may not be played depending on the
car navigation.
Setting Auto start of MUSIC Player
<Music auto start>
When Music auto start is [ON], if an Audio service is connected from a
Bluetooth device with the Audio service in connection stand-by, MUSIC
Player is automatically activated. However, it is not activated while a
screen other than stand-by appears.
Outputting with voice from a Bluetooth device
after each function is activated <Bluetooth output>
Connecting automatically to a Bluetooth device
when each function is activated <Startup auto cnnct>
When Startup auto connection is [ON] and there are some Bluetooth
devices that are set to the default connection device setting, just
activate 1Seg or MUSIC Player to automatically make it connect to the
Bluetooth devices without connecting to the Audio service in advance.
Connection is not available when 1Seg is activated by the time for
starting or recording and Wakeup TV.
When there is no Bluetooth device that is set to the default connection
device setting, Startup auto connection cannot be set to [ON].
The setting becomes valid from next start.
Using Bluetooth compatible keyboard
dv67_E.book 397 ページ 2009年4月22日 水曜日 午後5時33分
398
e17_dv67_7e.fm
[398/400]
Convenient Functions
■Bluetooth compatible keyboard
Convenient operations in the text input screen are shown below.
Keys of the Bluetooth compatible keyboard correspond to the operation
keys of the FOMA terminal as below. Corresponding keys can be
operated same as the FOMA terminal.
*1 Press in the compose message screen to send.
*2 Press in the text input screen to insert [K] (line breaks).
In addition to Hands-free service, etc., Serial port service is available for
connecting the FOMA terminal with a Bluetooth compatible car navigation
system to use various functions.
Refer to the following website for compatible models.
http://k-tai.sharp.co.jp/peripherals/bluetooth/sh-07a.html
1Connect with a Bluetooth compatible car navigation
system using Serial port service.
2Send and receive data with car navigation system.
■Sending location information to Bluetooth compatible car
navigation system
Send location information to a cooperated Bluetooth compatible car
navigation system from still pictures with location information or location
history.
Example: Still picture
1In the Custom menu, select [Data box]/[My picture].
2Select an image/C/[Send data]/[Send location
info].
3Select the sending method/t.
To select text Shift+Cursor key
To copy the selection Ctrl+C
To cut the selection Ctrl+X
To paste Ctrl+V
To cancel operations (UNDO function) Ctrl+Z
To change the range of characters to be converted Shift+c, Shift+b
FOMA terminal Bluetooth compatible keyboard
cBS or DEL
HEsc
sCtrl+Esc
iF1*1
CF2
mF3
aF4
1 to 9, 01 to 9, 0
** “Shift+: (colon)”
## “Shift+3”
o, p, q, rd, e, c, b
tEnter*2 (Text input screen: Ctrl+Enter)
$/
Some keys, such as numeric keypad, cannot be inputted.
Text input is not available with the FOMA terminal during the operation
with Bluetooth compatible keyboard. Switch the Input method to
[5-touch]/[2-touch] for inputting the text with FOMA terminal
(nP. 409). In this case, the operation with Bluetooth compatible
keyboard is not available.
The terminal security code cannot be entered using a Bluetooth
compatible keyboard.
If the text box is selected during i-mode/Full Browser, the text input
screen appears and text can be entered.
Connecting with a Bluetooth compatible car
navigation system using Serial port service
dv67_E.book 398 ページ 2009年4月22日 水曜日 午後5時33分

399
e17_dv67_7e.fm
[399/400]
Convenient Functions
:When Bluetooth compatible car navigation system is not cooperated,
location information is saved as send reservation data in the FOMA
terminal. When the send reservation data is already saved, the
confirmation screen asking whether to overwrite appears. The saved
send reservation data is sent when Bluetooth compatible car
navigation system is cooperated. Send reservation data is sent
regardless of Function lock settings.
■Deleting send reservation data <Del send res data>
1In the Custom menu, select [LifeKit]/[Bluetooth]/
[Del send res data]/[Yes].
■Checking missed calls or mail reception of the FOMA
terminal with Bluetooth compatible car navigation system
Check missed calls or mail reception of the FOMA terminal with Bluetooth
compatible car navigation system.
■Sending a mail transferred from a Bluetooth compatible
car navigation system with the FOMA terminal
If a phonebook in which other party’s mail address is saved is transferred to
a Bluetooth compatible car navigation system, a mail transferred from a
Bluetooth compatible car navigation system can be sent with the FOMA
terminal.
Connect a Bluetooth device to the FOMA terminal with the File transfer
service to send and receive data.
While sending and receiving data through Bluetooth communication, the
FOMA terminal status is the same as when outside the service area,
such that making/receiving calls, i-mode, and data communications are
not available.
Sending and receiving data via Bluetooth communication is not available
during a call.
Images, i-motion, Melody and PDF of Data box or Decome-Anime
Template cannot be sent or received. Other data that can be sent and
received or operations for when various lock functions are set are same
as for Ir communication (nP. 354).
If Session number setting is set to [ON], the terminal security code and
authentication password entry are required to send all data.
Authentication password is a password exclusively for Bluetooth. Before
starting to send, the sender and receiver must enter the same
user-specified four-digit password.
■Sending data items <Send/Send all>
Example: Phonebook
1In stand-by, press a.
2Select a name/C/[Send data]/[Send via
Bluetooth].
3Select the send method.
;Select [Send].
;Select [Send all]/enter the terminal security code/t.
:Set the receiving Bluetooth device to receive data.
4Select [Yes].
5Select a Bluetooth device to connect to/t.
■Receiving data items <Receive Bluetooth>
1In the Custom menu, select [LifeKit]/[Bluetooth]/
[Receive Bluetooth]/[Yes].
:The FOMA terminal waits to receive data. Data is automatically
received when data is sent from sender’s Bluetooth device.
2Select [Yes].
:To receive all data items: Select [Yes]/enter the terminal security
code/t/[Yes].
• To cancel Receive: While receiving data, press C.
■Checking Bluetooth information <Bluetooth info>
1In the Custom menu, select [LifeKit]/[Bluetooth]/
[Bluetooth setting]/[Bluetooth info].
:To edit the device name: Press C/edit the device name/t.
Sending and receiving data
Setting Bluetooth function <Bluetooth setting>
dv67_E.book 399 ページ 2009年4月22日 水曜日 午後5時33分

400
e17_dv67_7e.fm
[400/400]
Convenient Functions
• Enter up to 32 single-byte (16 double-byte) characters for a device
name.
■Setting time to search Bluetooth device
<Time-out To Search>
1In the Custom menu, select [LifeKit]/[Bluetooth]/
[Bluetooth setting]/[Time-out To Search].
2Enter the search time/t.
■Setting whether to perform Bluetooth authentication
<Set Authentications>
1In the Custom menu, select [LifeKit]/[Bluetooth]/
[Bluetooth setting]/[Set Authentications].
2Select the setting/t.
■Setting whether to perform Encryptions <Set Encryptions>
1In the Custom menu, select [LifeKit]/[Bluetooth]/
[Bluetooth setting]/[Set Encryptions].
2Select the setting/t.
■Setting whether to forward ring tone to Bluetooth devices
<Forward Ring Tone>
1In the Custom menu, select [LifeKit]/[Bluetooth]/
[Bluetooth setting]/[Forward Ring Tone].
2Select the setting/t.
■Setting whether to enter authentication password
<Session no. setting>
When sending all data via Bluetooth communication, set whether to enter
the authentication password.
1In the Custom menu, select [LifeKit]/[Bluetooth]/
[Bluetooth setting]/[Session no. setting].
2Select the setting/t.
Pictograms in the device name may not appear correctly for the other
party’s Bluetooth device.
The setting cannot be made when [H] appears.
The setting cannot be made when Set Authentications is set to [No].
The setting cannot be made when [H] appears.
The setting cannot be made while connecting Hands-free or Headset
services.
dv67_E.book 400 ページ 2009年4月22日 水曜日 午後5時33分

e20_dv67_7e.fm
[427/438]
427
Overseas Use
Outline of international roaming (WORLD WING) . . . . . . . . . . . . . . . . .428
Available services overseas . . . . . . . . . . . . . . . . . . . . . . . . . . . . . . . . . .429
Before use overseas. . . . . . . . . . . . . . . . . . . . . . . . . . . . . . . . . . . . . . . .430
Making a call at your country of stay. . . . . . . . . . . . . . . . . . . . . . . . . . . .432
Receiving a call overseas . . . . . . . . . . . . . . . . . . . . . . . . . . . . . . . . . . . .433
Setting network communication system . . . . . . . . . .<3G/GSM setting>434
Setting a search method of telecommunications carrier
. . . . . . . . . . . . . . . . . . . . . . . . . . . . . . . . . . . <Network search mode>434
Setting a telecommunications carrier to preferentially connect to
. . . . . . . . . . . . . . . . . . . . . . . . . . . . . . . . . . . . . . . . . . <PLMN setting>434
Displaying a telecommunications carrier during roaming
. . . . . . . . . . . . . . . . . . . . . . . . . . . . . . . . . . . . .<Operator name disp>435
Activating roaming guidance. . . . . . . . . . . . . . . . .<Roaming guidance>435
Setting incoming call to reject during roaming . . . . . . . . <Call barring>435
Using Missed Call Notice function during roaming
. . . . . . . . . . . . . . . . . . . . . . . . . . . . . . . . . . . . . .<Missed Call Notice>436
Using network services during roaming . . . . . . . . . . . . .<Int’l services>436
dv67_E.book 427 ページ 2009年4月22日 水曜日 午後5時33分

428
e20_dv67_7e.fm
[428/438]
Overseas Use
~~~~~ ~~~~~ ~~~~~ ~~~
International roaming (WORLD WING) is a service that enables
you, using overseas telecommunications carrier’s networks, to
make calls and use i-mode.
Use this FOMA terminal for voice/Videophone calls, i-mode and
SMS with the phone number and mail address used in Japan.
Network services such as Voice Mail and Call Forwarding
Services can also be used.
This service is available in the 3G network and GSM/GPRS network
service areas. In addition, this service is available in countries and
regions supporting 3G 850 MHz.
By default, the FOMA terminal is set to automatically switch networks
(nP. 434).
Refer to the following before using the FOMA terminal overseas.
“Mobile Phone User’s Guide [International Services]”
“Mobile Phone User’s Guide [Network Services]”
PDF file “海外ご利用ガイド” pre-installed in [My Documents] of Data
box
DOCOMO “International Services website”
Country codes of major countries
The following shows “Country code” used when making international calls
(nP. 61) or setting International dial assist (nP. 62).
For other country codes and details, some services are not available
depending on the telecommunications carrier or network. Refer to the
DOCOMO “International Services website” for information on available
countries and regions, and telecommunications carriers.
Outline of international roaming
(WORLD WING)
Country/Region Code Country/Region Code
Australia 61 Maldives 960
Austria 43 Netherlands 31
Belgium 32 New Caledonia 687
Brazil 55 New Zealand 64
Canada 1 Norway 47
China 86 Peru 51
Czech 420 Philippines 63
Egypt 20 Russia 7
Fiji 679 Singapore 65
Finland 358 South Korea 82
France 33 Spain 34
Germany 49 Sweden 46
Greece 30 Switzerland 41
Hong Kong 852 Tahiti
(French Polynesia)
689
Hungary 36
India 91 Taiwan 886
Indonesia 62 Thailand 66
Italy 39 Turkey 90
Japan 81 U.K. 44
Macau 853 U.S.A. 1
Malaysia 60 Vietnam 84
dv67_E.book 428 ページ 2009年4月22日 水曜日 午後5時33分
429
e20_dv67_7e.fm
[429/438]
Overseas Use
The available communication services overseas are as follows.
*1 When the 2in1 is used, calling from Number B is not available overseas.
*2 When Multi Number is used, calling from Additional Number is not
available overseas.
*3 Overseas use settings for i-mode is required (nP. 430).
*4 i-Channel setting is required. Packet transmission charges are incurred
for each i-Channel reception (including Basic channel).
*5 Overseas use settings for i-concier is required. Packet transmission
charges are incurred for each information reception.
Overseas use settings for i-concier can be changed in the following
way.
In the Custom menu, select [i-concier]/i/[設定]/[その他共通設
定]/[海外利用設定].
*6 Setting for i-Widget roaming is required (nP. 285). Multiple Widget
appli may attempt transmission when i-Widget screen appears. In such
case, packet transmission charges are incurred for each transmission.
*7 Unable to use 64K data communication by connecting a PC, etc.
Available services overseas
Communication
service Explanation 3G GSM GPRS
Voice call*1, 2 Make or receive calls in your
country of stay or make
international calls to Japan or
to other countries with the
same phone number as used
in Japan while abroad.
AAA
Videophone*1, 2 Make international Videophone
calls to users of the specified
3G telecommunications
carriers overseas and FOMA
users in Japan.
ABB
i-mode mail Send or receive i-mode mail
overseas with the same
address as used in Japan.
ABA
i-mode*3 Use i-mode overseas. ABA
i-Channel*3, 4 Use i-Channel overseas. ABA
i-concier*5 Use i-concier overseas. ABA
i-Widget*6 Use i-Widget overseas. ABA
SMS Send or receive SMS overseas
with the same phone number
as used in Japan.
AAA
GPS position
location –ABA
Packet
transmission by
connecting a PC,
etc.*7
Use packet transmission
overseas. ABA
Some services are not available depending on the telecommunications
carrier or network. Refer to “Mobile Phone User’s Guide [International
Services]” or the DOCOMO “International Services website” for
information on available countries and regions, and
telecommunications carriers.
Overseas packet transmission charges differ from those in Japan.
日英版しゃべって翻訳 for SH (J-E Speech Translation for SH) is
available overseas (nP. 269).
dv67_E.book 429 ページ 2009年4月22日 水曜日 午後5時33分