Shin Chuan Computer SC620PDT-BW Portable Data Terminal User Manual SC600 SC620 En 060921 rev by Joy
Shin Chuan Computer Co., Ltd. Portable Data Terminal SC600 SC620 En 060921 rev by Joy
Contents
User manual 1 8 rev2
3-30
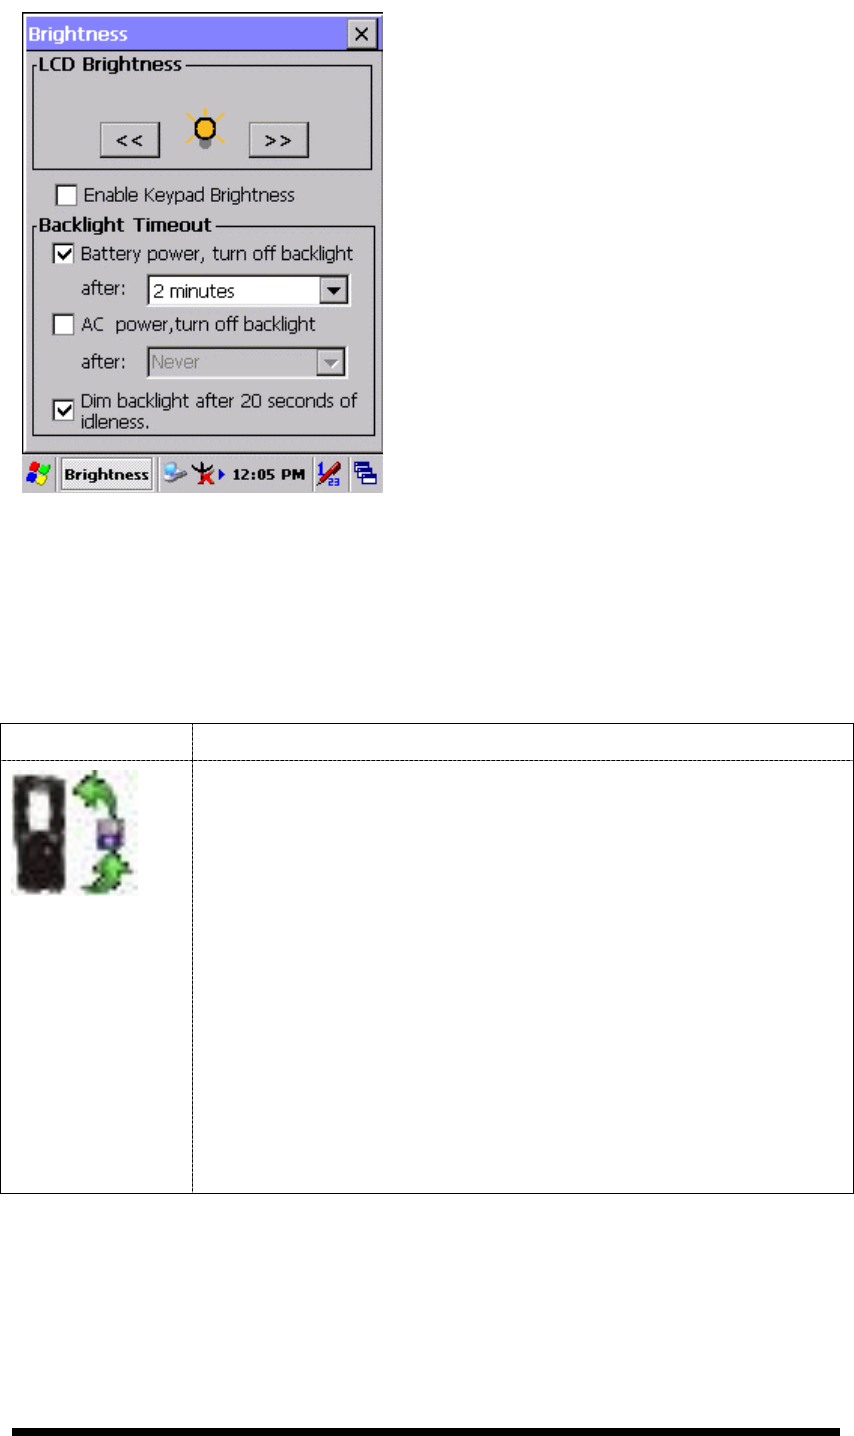
Figure 3-37 Brightness
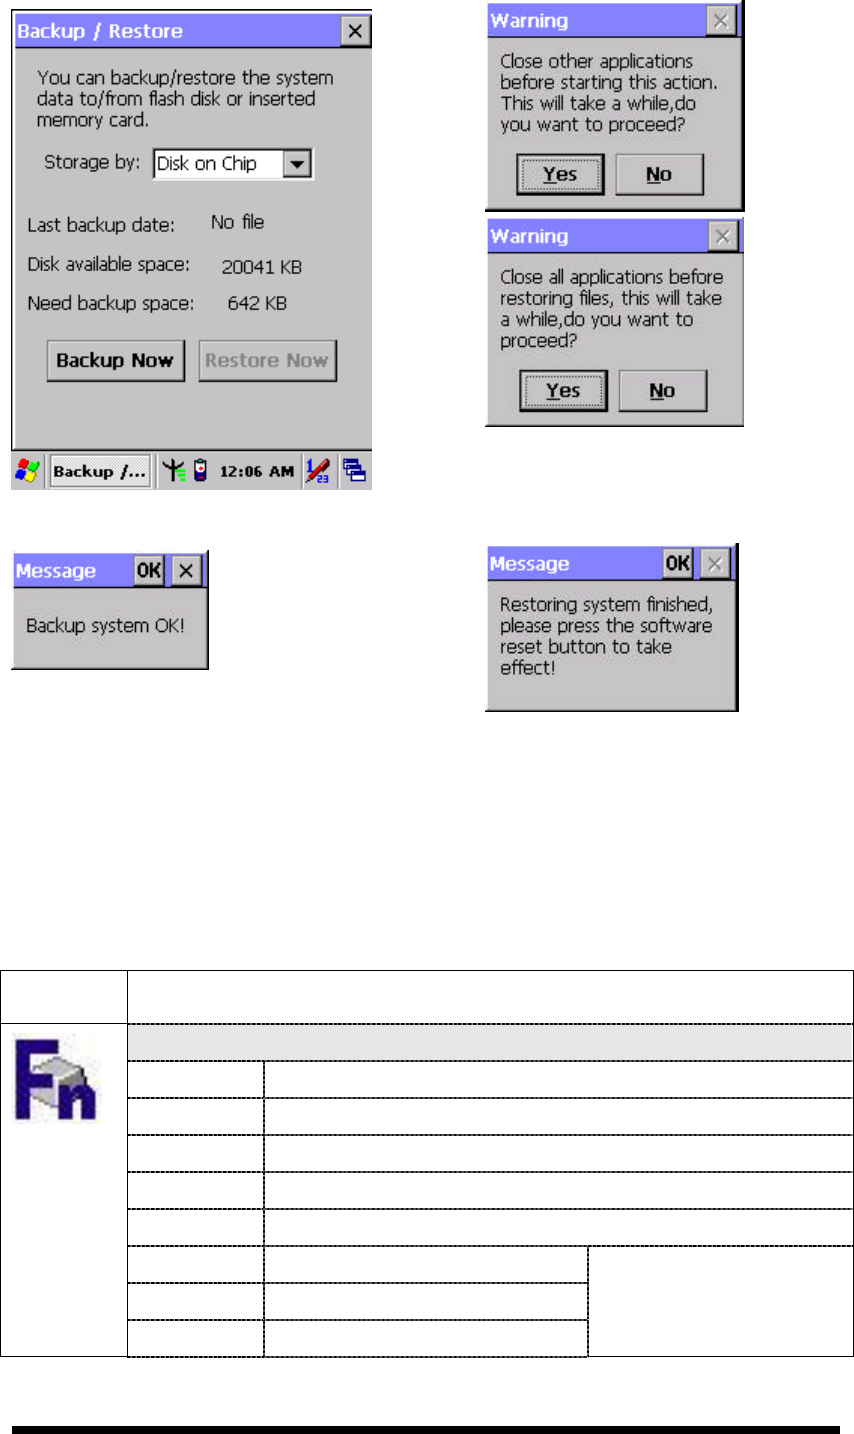
3.2.5.3 Backup Restore
Table 3-25 Backup Restore
ICON ITEM & FUNCTION
1. You can backup/restore system to/from flash disk or inserted
memory card. (A. Disk on Chip, B. CF Card, C. SD Card)
( Figure 3-38)
2. When you launch this AP, it must check backup file in DOC
first. And if you select other storage, it will check again.
3. Then if it has the file, appeared its date behind “Last backup
date:”; if not, disable “Restore Now” Button.
4. When you press the Backup/Restore Button will be a warning
dialog pop up. ( Figure 3-39)
5. When system backup/restoring finished will be a message
dialog will pop up. (A. Backup: Figure 3-40, B. Restore: Figure
3-41)
3-31
Figure 3-38 Backup Restore Figure 3-39 Backup & Restore Start
Figure 3-40 Backup OK Figure 3-41 Restore OK
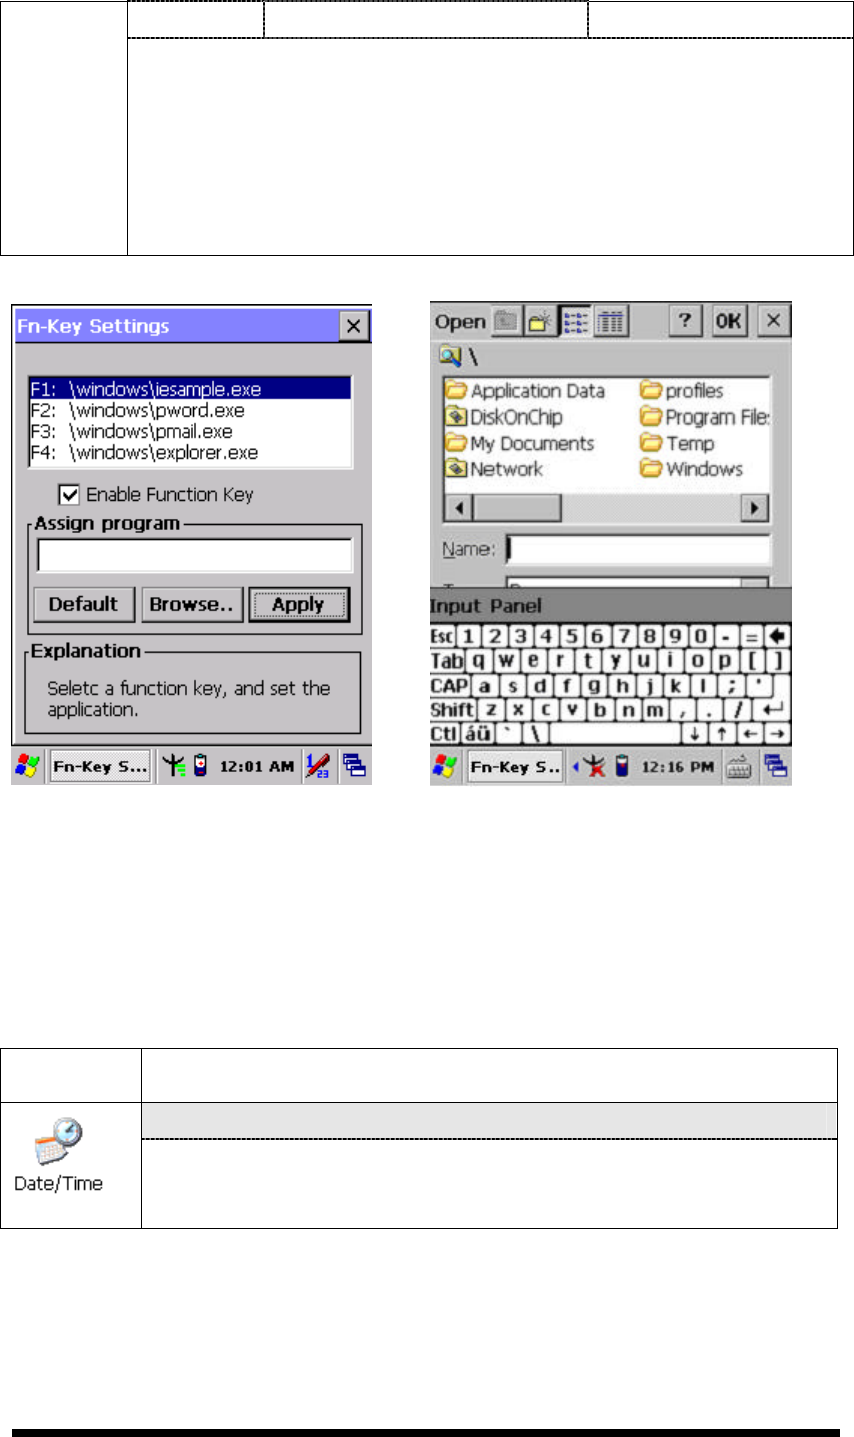
3.2.5.4 Fn-key Settings
Table 3-26 Fn-Key
ICON ITEM & FUNCTION
l Fn-Key Setting (Figure 3-42)
Fn Key The Application Program of default setting
F1 Internet Explorer
F2 Microsoft WordPad
F3 Inbox
F4 My Computer
F5 Barcode Settings
F6 Media Player
F7 Calculator
Only for SC620
3-32
F8 Information
ü To assign your favorite application program to Hot Keys.
ü Choose one of Hot Keys from pull-down list.(Figure 3-43)
ü To tap “Browse…” inside “Assign program” applet.
ü Select one application program you want from program list, then,
choose “OK”. (Figure 3-43)
ü To tap “Default” to return back to default setting. (Figure 3-42)
Figure 3-42 Fn-Key Settings Figure 3-43 Fn-Key Settings
3.2.6 Date/Time
Table 3-27 Date/Time
ICON ITEM & FUNCTION
l “Date/Time” Tab :( Figure 2-14)
ü Please see the detail information of 2.5.1 Setting Time and
Date on P.2-21

3-33
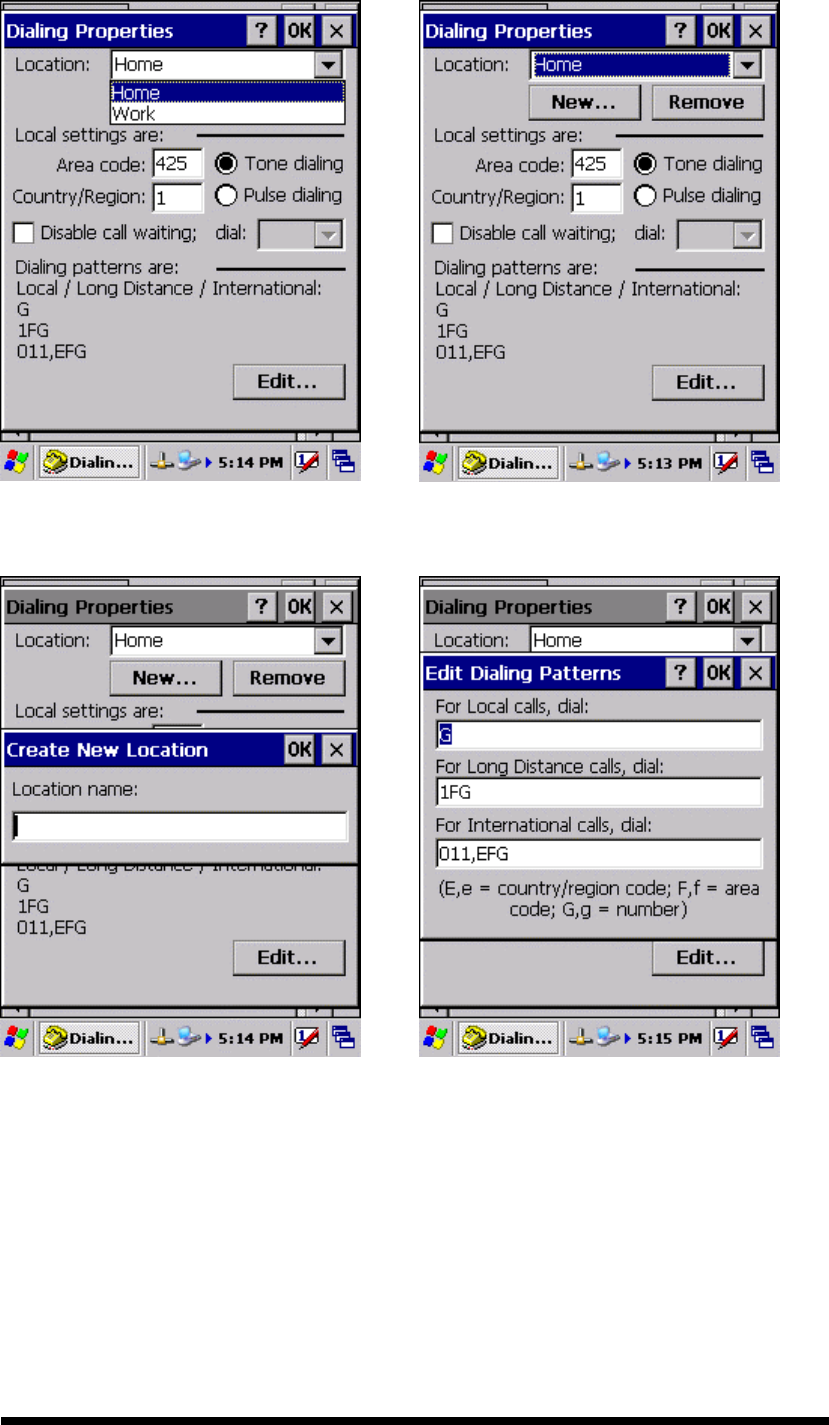
3.2.7 Dialing Properties
Table 3-28 Dialing properties
ICON ITEM & FUNCTION
l “Dialing Properties” Tab :( Figure 3-44)
ü In the When dialing from list, select the “Location” where you
want to change settings.(Figure 3-45)
ü To create a new location, select “New”. Enter the name of the
location, and then select “OK”.(Figure 3-46)
ü Enter or edit the area code and local country code as needed.
ü In Dial using, select “Tone dialing” or “Pulse dialing”. Most
phone lines are tone.
ü To automatically disable call waiting, select “□ Disable call
waiting by dialing”, select the appropriate number sequence in
the list, or enter a new sequence.
l Editing dialing patterns (Figure 3-47)
ü Using the codes listed in the topic; revise the dialing patterns as
needed.
Notes:
n If you need to use character other than the ones listed here,
use manual dialing.
n Hyphens and spaces in dialing strings are ignored.
n Some modems may not respond to the following characters,
even though your device lets you add them to the dial
string.
3-34
Figure 3-44 Dialing Properties Figure 3-45 Dialing Properties
Figure 3-46 Dialing Properties Figure 3-47 Dialing Properties

3-35
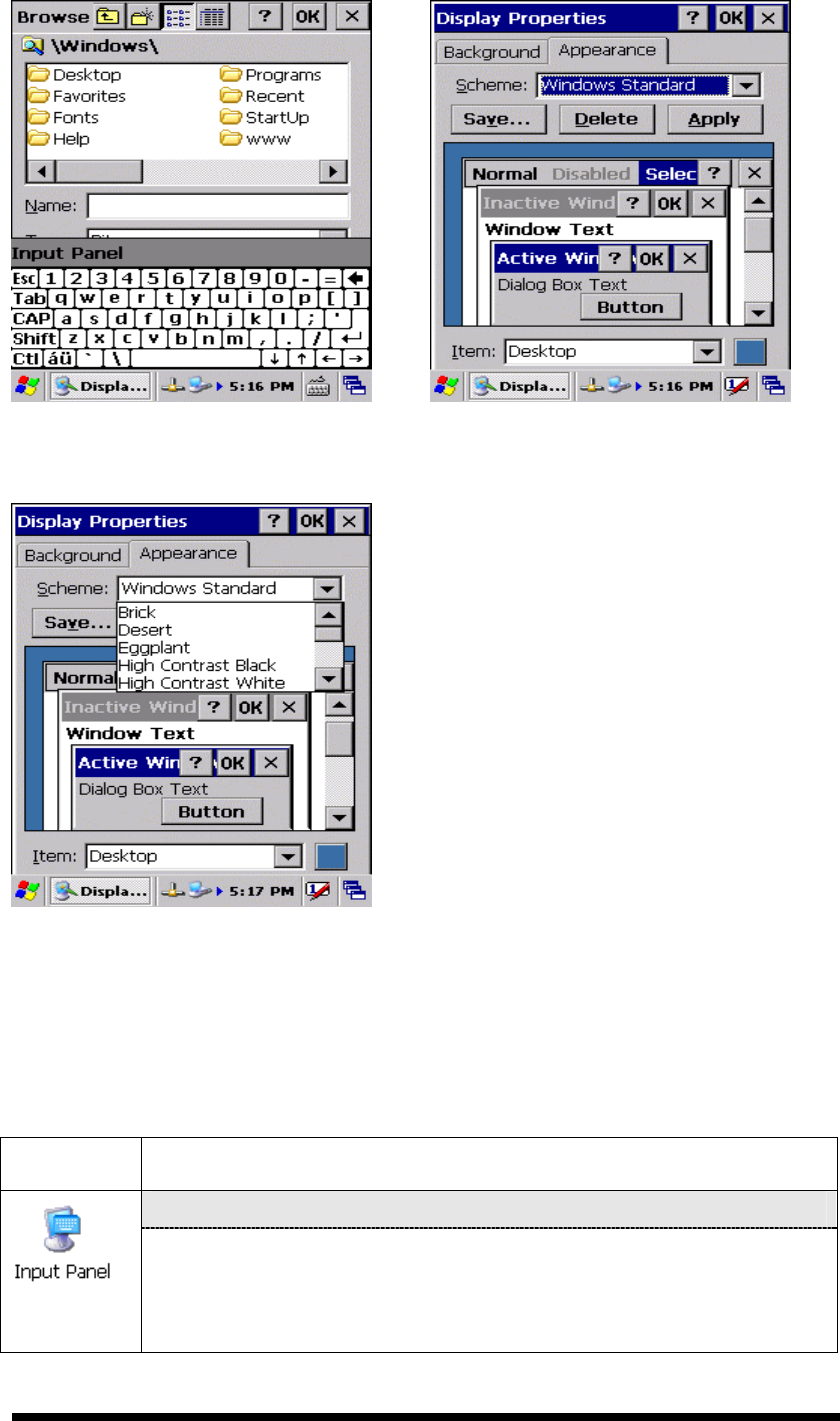
3.2.8 Display Properties
Table 3-29 Display properties
ICON ITEM & FUNCTION
l “Background” Tab :( Figure 3-48)
ü From the “Image” list, select an image you want as the
background of the desktop.(Figure 3-49)
ü To locate an image in another folder, select “Browse”.(Figure
3-50)
ü To have the image cover the entire background, select “ □Tile
image on background”
l “Appearance” Tab(Figure 3-51)
ü Change the color scheme :( Figure 3-52)
Ø From the” Scheme” list, select a scheme.
Ø View your choice in the preview box. If you like the scheme,
select “Apply”.
ü Create a custom color scheme:
Ø From the “Item” list, select a display item.
Ø From the “Basic colors” list, select a color, and select “OK”.
Ø View your color selection(s) in the Preview box.
Ø To save the scheme, select “Save”.
Ø In the “Save this color scheme as” box, enter a name for the
scheme, and select “OK”.
Ø Select “Apply”.
Figure 3-48 Display properties Figure 3-49 Display properties
3-36
Figure 3-50 Display properties Figure 3-51 Display properties
Figure 3-52 Display properties
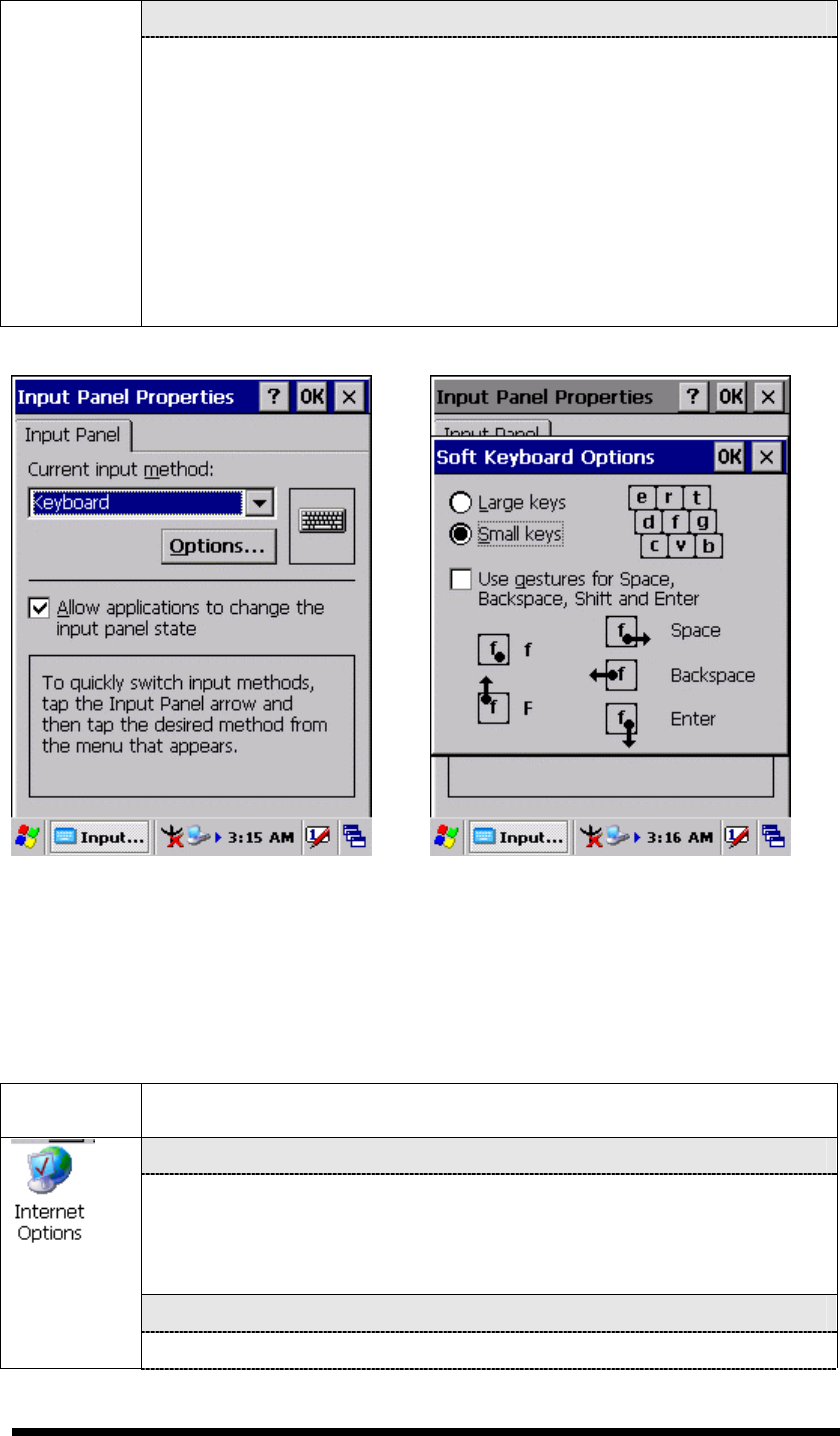
3.2.9 Input Panel
Table 3-30 Display properties
ICON ITEM & FUNCTION
l “Input panel” Tab :( Figure 3-53)
ü Select the input method you want to change.
ü To change the Soft Keyboard Options , tap “Option” (Figure
3-54) .
3-37
l “Options” Tab :
ü Change the soft keyboard options as desired, selecting from:
Ø Large or small keys
Ø Using gestures for space, black-space shift, and enter.
ü To exit the soft keyboard Options, press “OK” on the control
bar, or press the <Enter> key on the keypad.
ü To exit the Input Panel, press “OK” on the control bar, or press
the <Enter> key on the keypad.
.
Figure 3-53 Input Panel Properties Figure 3-54 Input Panel Properties
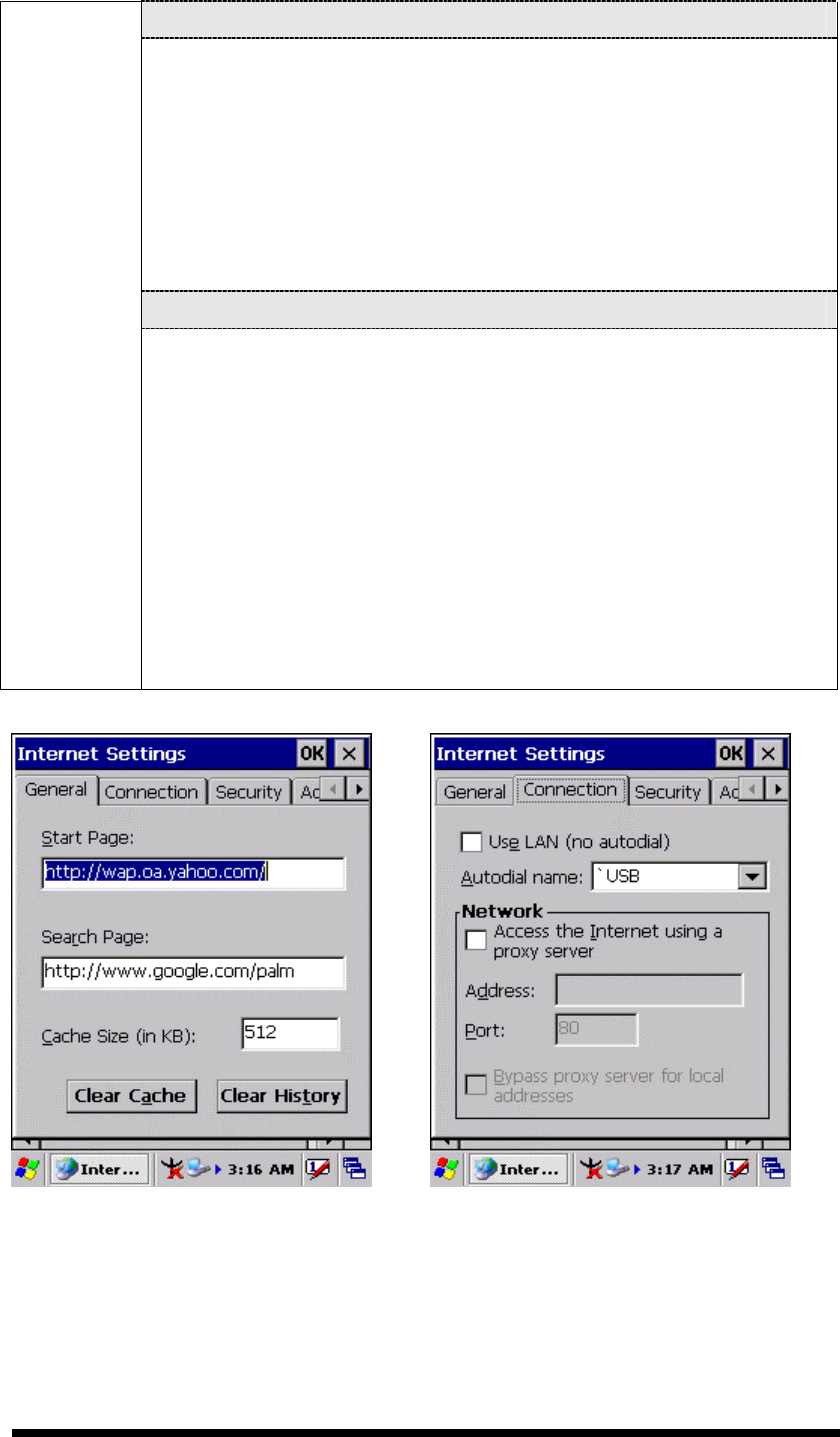
3.2.10 Internet Options
Table 3-31 Internet Options
ICON ITEM & FUNCTION
l “General” Tab :( Figure 3-55)
ü Type in the URL of desired start page and the desired search
engine. You also change the Cache Size, clear the Cache and
Clear the History..
l “Connection” Tab :( Figure 3-56)
ü Modify the network access setting as desired.
3-38
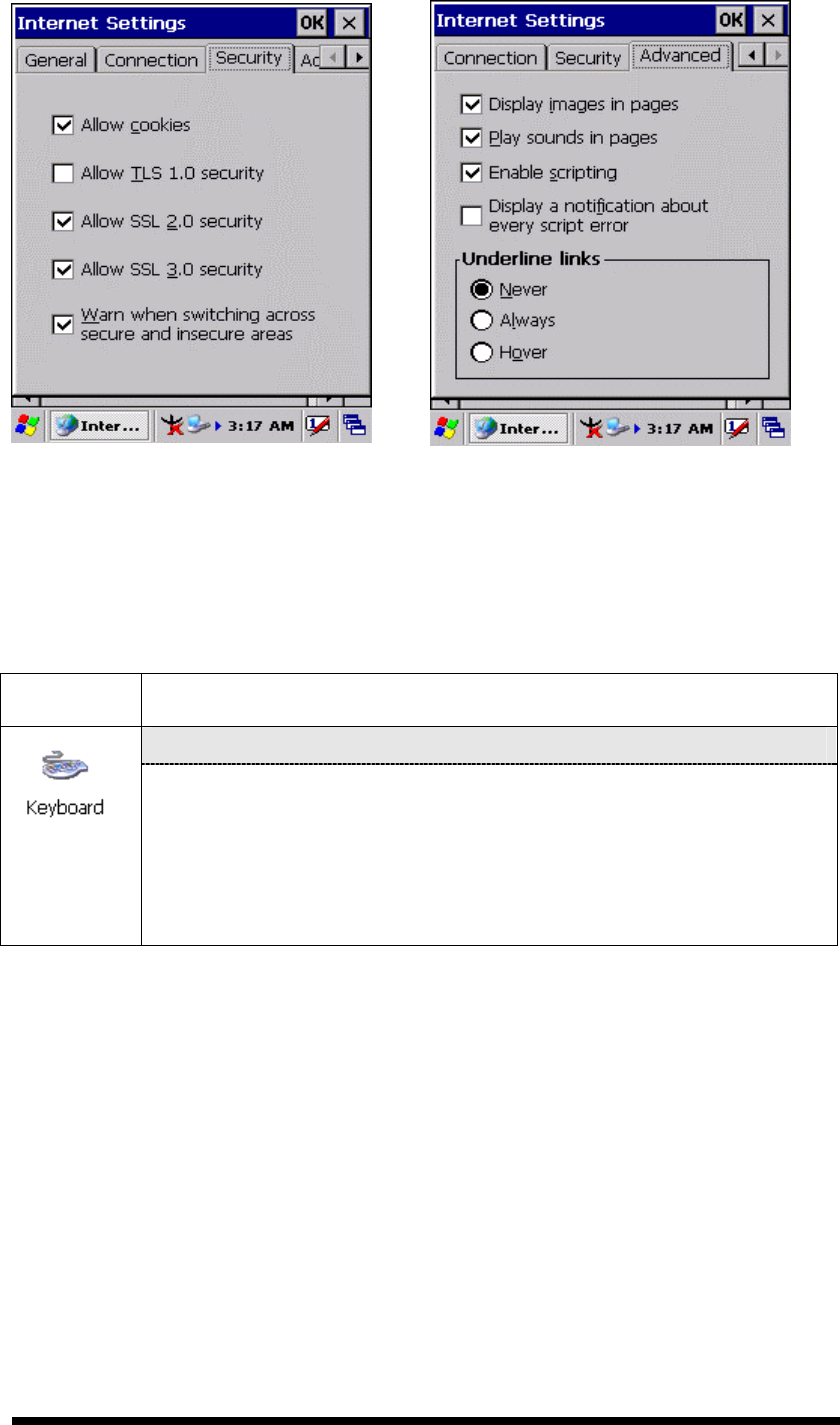
l “Security” Tab (Figure 3-57)
ü Modify the security settings as desired. You can enable any of
the following by tapping the checkbox:
Ø Allow cookies
Ø Allow TLS 1.0 security
Ø Allow SSL 2.0 security
Ø Allow SSL 3.0 security
Ø Warm when switching across secure and insecure areas.
l “Advanced” Tab (Figure 3-58)
ü Modify the security settings as desired. You can enable any of
the following by tapping the checkbox:
Ø Display Image in pages
Ø Play sounds in pages
Ø Enable scripting
Ø Display a notification about every script error
Ø Underline links-
○ Never
○ Always
○ Hover
Figure 3-55 Internet Settings Figure 3-56 Internet Settings
3-39
Figure 3-57 Internet Settings Figure 3-58 Internet Settings
3.2.11 Keyboard
Table 3-32 Keyboard
ICON ITEM & FUNCTION
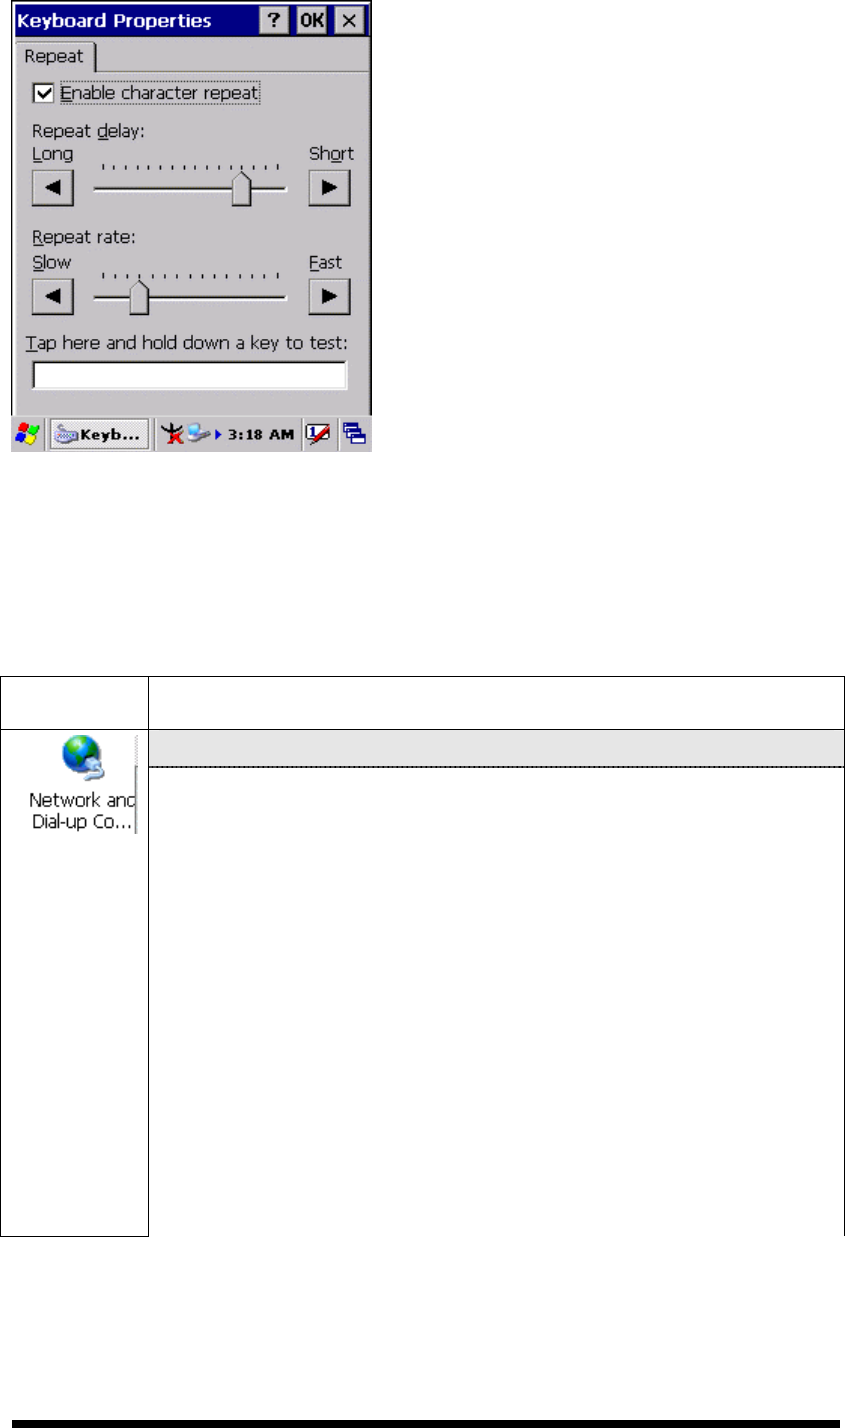
l “Repeat” Tab :( Figure 3-59)
ü To change the amount of time between depressions before
repetition starts, adjust the Repeat delay slider
ü To change the repeat rate, adjust the Repeat rate slider.
ü Test your new setting.
ü Tap “ OK” to exit the “Keyboard” Tab.
3-40
Figure 3-59 Keyboard Properties
3.2.12 Network and Dial-up Connections
Table 3-33 Network and Dial-up Connections
ICON ITEM & FUNCTION
l “Connection” Tab :
ü To create a “Dial-up Connection”:
Ø Double-tap the “Make New connection”.
Ø In the “Make New Connection” dialog box, enter a name for
the connection.
Ø Select “Dial-Up Connection”.
Ø Select the “Next” button.
Ø Select the modem you want use.
Ø Select “Configure”
Ø Under “Connection Reference”, use the default settings
provided. If you can’t connect using these settings, see your
ISP or network administrator for specific information. If you
want to always enter a phone number before connecting,
Select “Manual Dial”. Select “OK”.

3-41
Ø Select “TCP/IP Settings”. In the “General” tab, ensure “Use
Server-assigned IP address” is selected. In the “Name
Servers” tab, ensure “Use Server-assigned addresses” is
selected, and select “OK”. If you are unable to connect with
these default settings, see your ISP or network administrator
for specific TCP/IP information.
Ø Select the “Next” button and type the telephone number.
Ø Select the “Finish” button.
The connection you just created appears as an icon in the “Network
and Dial-up Connections” folder.
ü Set up a point-to-Point Protocol(PPP) account with an ISP and
obtain the following information:
Ø Access telephone number
Ø User name
Ø Password
Once you have established an account, create a new connection on
your device. When creating this connection, you should be able to use
all of the default TCP/IP settings provided in the Make New
Connection Wizard. If you can’t connect using the default settings,
contact your ISP or access your ISP’s Web site for specific TCP/IP
information as well as primary and secondary DNS address.
ü Modify connection setting
Ø Select Start > Settings > Network and Dialup Connections
Ø Select the icon for connection settings you want to modify.
Ø Select File > Properties, or double- tap the appropriate icon.
Ø Select desired options. There may be additional settings that
depend on the connection. To modify, select the icon and
select the icon and select Advanced Settings… from the
menu.