Shintom Co M5016 PCS handset User Manual manual 7
Shintom Co Ltd PCS handset manual 7
Contents
manual 7
46
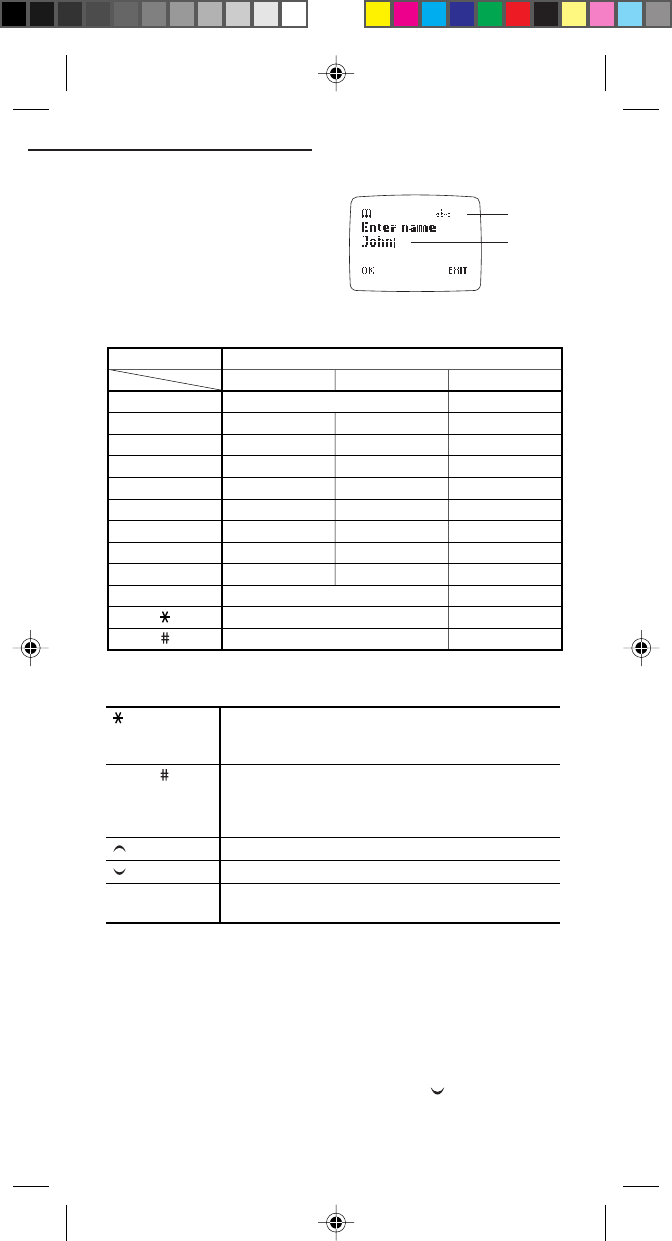
Keys
When you press the following keys
repeatedly in the name entry mode,
the displayed letter will change in
accordance with the number of key
presses:
ALPHANUMERIC KEYS
KEY FUNCTION
Tip:
- A maximum of 30 letters (depending on the SIM) can be
shown on the display.
- When you press the same key more than twice to select a
letter, press the key within an interval of 1 second. Other-
wise, the cursor will move to the right of your last entry.
However, if you wait for 1 second, the cursor will move to
the right and you will not need to press to enter the next
letter.
Displayed letter by number of presses
1
2
3
4
5
6
7
8
9
0
123
1
2
3
4
5
6
7
8
9
0
-
-
Key Mode
(Space)
(Change the case)
# . , : ; / – _ @ & ? ¿ ! ¡
abc
a b c à ä å æ ß
d e f è é
g h i ì
j k l
m n o ñ ò ö ø
p q r s
t u v ù ü
w x y z
ABC
A B C Ä ÅÆ Ç Γ
D E F ∆ É Φ
G H I Θ
J K L Ξ Λ
M N O Ñ Ö Ø
P Q R S Π Σ
T U V Ü
W X Y Z Ψ Ω
* + - / = < > % ( ) £ ¥ ¤ §
Toggles among upper case, lower case, and numerals.
(On the top right of the screen, "ABC", "abc", and
"123" are displayed, respectively.)
Enters a letter behind it or numeral (for 0 to 9). During
the process of entering a letter, one second after
releasing it, the cursor will move to the right for the
next letter entry.
Shifts the cursor to the left.
Clears the last letter. Pressing and holding clears it all
letters.
Shifts the cursor to the right.
:
:
:
0 to 9, :
CLEAR:
Mode
Cursor
10. Clock
CEL GDU325 (p.41-59) Eng.pm6 8/2/01, 10:20 AM46

47
11. Audio Settings
11. Audio Settings (MENU 6)
Within the Audio menu you can adjust the phone’s tones.
Press MENU and select Audio, and press .
See page 21 for general information on the menu functions.
Ringing Tone Selection (MENU 6-1)
You can select a ringing tone from several types. Also, you can
select silent mode. (Set to “off”)
NOTE:
- When you choose “Off”, it becomes silent alert. Then an
icon is displayed at the idle screen.
Ringing Volume Setting (MENU 6-2)
Select your desired volume level, and press .
The new setting will be displayed.
Earpiece Volume Setting (MENU 6-3)
Select your desired volume level, and press .
The new setting will be displayed.
Key Tone Volume Setting (MENU 6-4)
Select your desired volume level, and press .
The new setting will be displayed.
Warning Tones Selection (MENU 6-5)
You can enable or disable the Warning tones.
You can select desired setting from On and Off.
The new setting will be displayed. To activate the Warning tones,
select On.
DTMF Tones Selection (MENU 6-6)
You can enable or disable the DTMF tones.
You can select desired setting from On and Off.
The new setting will be displayed. To activate the DTMF tones,
select On.
NOTE:
- Please refer to page 17.
␣
CEL GDU325 (p.41-59) Eng.pm6 8/2/01, 10:20 AM47

48
Vibrating Alert Setting (MENU 6-7)
If the optional vibrating battery is installed, you can switch the
vibrating alert on/off. This sub-item is not displayed if the regular
battery is installed.
If the vibrating alert is turned on then the alert for incoming calls
works as follows:
• If no ring tone is selected or the volume is turned off, the phone
will vibrate and pause in a continuous cycle.
Tip:
- When Vibrating alert is On, when the power is switched on,
the phone vibrates.
Quiet Mode
Your phone’s quiet mode is toggled on or off by pressing and
holding down CLEAR at the standby mode. An icon is shown in the
screen when quiet mode is enabled.
When switching to quiet mode the vibrator (if fitted) will give a
short burst to indicate this. When exiting quiet mode the phone will
emit a short beep.
When running in quiet mode all audio actions are silenced, except
for DTMF tones and call progress tones when in call. If your phone
has a vibration motor then this is used when alerting to incoming
calls, temporarily overriding any audio/vibrator alert settings.
11. Audio Settings
CEL GDU325 (p.41-59) Eng.pm6 8/2/01, 10:20 AM48

49
12. Settings
12. Settings (MENU 7)
You can select various settings to set up your phone in accordance
with your preferences. To select settings, the menu operation is
used.
Press MENU and select Settings, and press .
See page 18 for general information on the menu functions.
Phone Settings (MENU 7-1)
Display Language Selection (MENU 7-1-1)
Your phone is capable of displaying text in one of several
languages.
Own Number Review/Edit (MENU 7-1-2)
You can store your own phone number for your later reference.
Greeting Message Display (MENU 7-1-3)
You can program a Greeting Message to be displayed upon power-up.
Edit it or enter your new Greeting Message, or choose animation
and press .
NOTE:
- To restore the message to the original one in your phone,
clear the current greeting message, and press .
Backlight Adjustment (MENU 7-1-4)
You can adjust the backlight level of the display.
You can select desired setting from following and press .
Off, 1, 2, 3 and Maximum. The new setting will be displayed.
NOTE:
- A brighter backlight will consume more power.
Contrast Adjustment (MENU 7-1-5)
You can adjust the contrast of the display.
You can select desired setting from following and press .
1, 2 and 3. The new setting will be displayed.
Menu Number Code System Selection
(MENU 7-1-6)
You can select desired setting from On and Off.
The new setting will be displayed. To enable the system, select On.
CEL GDU325 (p.41-59) Eng.pm6 8/2/01, 10:20 AM49

50
12. Settings
Auto Shutdown Selection (MENU 7-1-7)
You can set your phone to automatically turn itself off 5 minutes
after it enters standby mode.
You can select desired setting from following and press .
On and Off. The new setting will be displayed. To enable the
feature, select On.
Call Settings (MENU 7-2)
Any Key Answering (MENU 7-2-1)
You can answer incoming calls by pressing any key except .
You can select desired setting from On and Off.
The new setting will be displayed. To enable the feature, select On.
Call Waiting (MENU 7-2-2)
During a call, your phone will advise you that a new call is waiting
where such service is available. This is indicated by an alert tone and
“waiting”.
You can activate or cancel the Call Waiting function.
You can also check the current status.
Select On, Off, or Status, and press .
On: Select to enable this feature.
Off: Select to disable this feature.
Status: Select to review the current setting.
Call Waiting Feature
When a new incoming call is received during a call, you can
respond to it as follows:
• To answer a new incoming call:
Press , or MENU and select Multiparty/Hold answer. (The
first call will be put on hold.)
• To end the first call and answer a new incoming call:
Press MENU, select End & next, and press .
• To reject a new incoming call without answering it:
Press MENU, select Multiparty/Reject, and press .
• To notify a party that you are busy with another call:
Press MENU, select Multiparty/I am busy, then press .
CEL GDU325 (p.41-59) Eng.pm6 8/2/01, 10:20 AM50
51
International Roaming Service
If your service provider has International Roaming agreements with
overseas network operators, you can enjoy International Roaming
Service. For the details, please contact your service provider.
NOTE:
- During roaming, ( ) indicator lights up.
Caller Number Status (MENU 7-2-3)
When your phone receives an incoming call, the phone number of
the caller will be displayed where this feature is in service.
In addition, if the phone number of the caller is stored in your
Phone Book with the name, the caller’s name will be displayed. You
can check the current status of call line identification options.
Select the following:
Select one of the following items, and press .
Show caller no. : Shows the phone number making the
incoming call
Hide your no. : Hide your phone number when
dialling out
Show called no. : Displays the number of the phone you are
connected to on your screen, even if your
call is diverted to another number
Hide if called : This function overrides “show called
number” and hides your phone number
from any callers.
NOTE:
- When the service contents can not be changed, ask your
network service provider.
Minute Minder (MENU 7-2-4)
Your phone will issue a tone every minute you are in an out-going
call for your reference. You can disable or enable this feature.
You can select desired setting from On and Off.
The new setting will be displayed. To disable the feature, select Off.
NOTE:
- Minute Minder only operates while you are in a call.
12. Settings
CEL GDU325 (p.41-59) Eng.pm6 8/2/01, 10:20 AM51

52
12. Settings
Network Settings (MENU 7-3)
Network options (MENU 7-3-1)
Select the network to use.
Normally, you can use the service provider that the phone
automatically receives, but you can also use this menu item to set
the service provider you want yourself.
Automatic (MENU 7-3-1-1)
When there is no particular need for you to make the selection
yourself, select this item.
1 Press .
2 The search screen is displayed for finding the service providers
that your phone can currently receive.
3 When receiving is complete, “Done” is displayed.
4Press .
NOTE:
- If “Network list” is executed, it may become impossible to
send or receive calls. In this case, execute “Automatic”.
Manual (MENU 7-3-1-2)
If it is necessary for you to select the service provider yourself, select
one of the service providers received by your phone.
1 Press .
2 The search screen is displayed for finding the service providers
that your phone can currently receive.
3 After the search is completed, the network(s) that can be
connected to will be displayed. Select the network of your choice
with / .
NOTE:
- Your phone can not display “Add” when the list is full.
Changing your Network password (MENU 7-3-2)
You can change your 4-digit Password available from the network
provider.
1Press . “Network password” will be displayed.
2Enter your current 4-digit Password and press .
“New password” will be displayed.
3Enter your new 4-digit Password and press .
“Repeat new password” will be displayed.
CEL GDU325 (p.41-59) Eng.pm6 8/2/01, 10:20 AM52

53
4Enter your new 4-digit Password again and press .
After a temporary display of “Working”, “Done” or “Please try
again” will be displayed.
CAUTION
• Keep a record of your new Password in a safe place!
Selecting a mode (MENU 7-3-3)
See page 14.
Restoring to Original Settings
(MENU 7-4)
This feature resets all settings made by you to the original settings
(factory settings), including the Language display.
After restoring, the screen will return to the standby screen.
12. Settings
CEL GDU325 (p.41-59) Eng.pm6 8/2/01, 10:20 AM53
54
13. Security Settings
13. Security Settings
(MENU 8)
Your phone is equipped with a versatile security system to prevent
unauthorised use of the phone or the SIM card.
CAUTION
• Once you change the password or lock code, keep a
record of it in a safe place! Also, immediately after
changing it, turn off your phone before leaving it
anywhere.
Press MENU and select Security, and press .
Enter the Handset lock code, and .
See page 18 for general information on the menu functions.
SIM Card Lock Settings (MENU 8-1)
To prevent fraudulent usage of your SIM card, you can select a PIN1
(Personal Identification Number 1) code to be entered each time
your phone is powered up. Your PIN code is usually supplied when
you receive your SIM card.
1Select SIM password.
The current setting (On or Off) will be displayed.
2
Press .
Then, On, Off, and Change PIN will be displayed.
• To enable SIM card lock:
1) Select On, and press . “Enter PIN1” will be displayed.
2) Enter the PIN1 code, and press .
“PIN enabled” will be displayed.
• To change the PIN1 code:
1) Select Change PIN, and press . “Enter old PIN1” will
be displayed.
2) Enter the current PIN1 code, and press .
“Enter new PIN1” will be displayed.
3) Enter new PIN1 code, and press .
Then, the screen will ask you to enter the same code
again. “PIN changed” will be displayed.
• To release SIM card lock:
1) Select Off, and press . “Enter PIN1” will be displayed.
2) Enter the PIN1 code, and press .
“PIN disabled” will be displayed.
CEL GDU325 (p.41-59) Eng.pm6 8/2/01, 10:20 AM54

55
NOTE:
- “Change PIN” does not appear when OFF is selected.
To unlock your SIM card at powering on
“Enter PIN1” will be displayed at powering on.
Enter correct PIN1 code and press to unlock the SIM card.
NOTES:
-
The key entry for the code will be displayed by the letter “x”.
- If you enter the wrong code, “PIN state unchanged” will
be displayed.
- You can still make emergency calls on the phone even if
the SIM card is locked.
Handset Lock Settings (MENU 8-2)
To prevent fraudulent usage of your phone, you can lock your phone
using the lock code. Once you lock your phone, you will need to unlock
your phone each time it is powered up. You can change the lock code as
required. The default handset lock code is 1234.
1Select Handset lock.
2Press . On, Off, and Change code will be displayed.
• To enable handset lock:
Select On, and press .
• To change the lock code:
1) Select Change code, and press . “Enter old code” will
be displayed.
2) Enter the current lock code, and press .
“Enter new code” will be displayed.
3) Enter new lock code, and press .
Then, the screen will ask you to enter the same code
again.
• To release the handset lock:
Select Off, and press .
To unlock your phone at powering on
“UNLOCK” will be displayed at the bottom right of the screen at
powering on.
Press , enter the correct lock code, and press .
13. Security Settings
CEL GDU325 (p.41-59) Eng.pm6 8/2/01, 10:20 AM55

56
13. Security Settings
NOTES:
- The key entry for the code will be displayed by the letter
“x”.
- If you fail to enter the correct lock code, the screen will
return to the original screen.
- You can still make emergency calls on the phone even if
your phone is locked.
Handset Call Barring (MENU 8-3)
You can restrict outgoing calls and incoming calls of your phone.
This is not controlled by the network service.
Incoming Calls Barring (MENU 8-3-1)
1The current setting (On or Off) will be displayed, and press .
2Select another item, and press .
To restrict incoming calls, select On.
Outgoing Calls Barring (MENU 8-3-2)
1The current setting will be displayed.
2Select one of the following items, and press .
All: Bars all outgoing calls.
List: The current prefixes entered by you are listed. If nothing is
listed, “List empty” will be displayed. If the prefix is
“nnn”, for example, then the calls that
begin with “nnn” will be barred. If it is “00”, then
international calls will be barred.
1) Select one of the prefixes on the list, and press .
2) Select one of the following items, and press .
Add: You can add a new prefix.
Edit: You can edit the selected prefix.
Delete: You can delete the selected prefix.
Clear all: You can clear all the prefixes.
Off: Cancels outgoing call barring.
Network Call Barring (MENU 8-4)
You can restrict outgoing calls or incoming calls where such services
are available.
1Select Network call barring, and press .
2You can restrict the calls as follows:
• To bar outgoing calls, select one of the following items, and
press .
CEL GDU325 (p.41-59) Eng.pm6 8/2/01, 10:20 AM56

57
Bar foreign calls (MENU 8-4-1), Only local and home
country (MENU 8-4-2), and Bar outgoing calls (for all
outgoing calls) (MENU 8-4-5).
• To bar incoming calls, select one of the following items, and
press .
Bar incoming calls (for all incoming calls) (MENU 8-4-3) and
Bar incoming if abroad (restricted if your phone is used
abroad) (MENU 8-4-4).
3Select your desired item from the following, and press .
All services, Voice calls, Data, Fax, Messages, and All
except msg(messages).
4Select one of the following items to choose the setting, and
press .
On: Select to enable this feature. You will need to enter
the Network password, and press .
Off: Select to disable this feature. You will need to enter
the Network password and press .
Status: Select to review the current status without entering
the code.
NOTE:
- To check the contents of the service, press / .
To cancel all barring (MENU 8-4-6)
1Select Clear all (MENU 8-4-6), and press .
2Enter the Network password and press .
NOTES:
- Your initial Network password will be provided by your
service provider.
-
The key entry for the code will be displayed by the letter “x”.
- If you enter the wrong Network password, the screen will
return to the original screen.
13. Security Settings
CEL GDU325 (p.41-59) Eng.pm6 8/2/01, 10:20 AM57

58
Fixed Dialling (MENU 8-5)
Your outgoing calls can be restricted to the phone numbers in the
Fixed Dialling list, if supported by your SIM card. The maximum
number of Fixed Dialling entries depends on your SIM card. You can
add phone numbers to the Fixed Dialling list. Also, you can enable
or disable the Fixed Dialling feature.
Setting (MENU 8-5-1)
To enable the Fixed Dialling feature, select On.
To disenable the Fixed Dialling feature, select Off.
List (MENU 8-5-2)
1To edit the Fixed Dialling list, select Fixed dial list (MENU 8-5-2).
The Fixed Dialling list will be displayed.
2Select the name you wish to edit, and press .
3Select one of the following items, and press .
Add: Enter a name and then the phone number you
wish to add to the Fixed Dialling list.
View number
: You can review the contents of the Fixed Dialling
list.
Edit: Edits the name and then the phone number.
Delete: The selected item will be deleted.
4If you are asked to “ENTER PIN2”, enter your PIN2 code.
NOTES:
- When you need to enter PIN2, you should ask the PIN2 of
your service Centre.
- For details on entering names into lists, see “Keys” on
page 46.
13. Security Settings
CEL GDU325 (p.41-59) Eng.pm6 8/2/01, 10:20 AM58

59
14. SIM Services
14. SIM Services
(MENU 9)
In addition to the functions available in the phone, your SIM card
may provide additional services that you can access in this menu.
This menu is shown only if it is supported by your SIM card.
The name and contents of this menu depended entirely on the
services vailable.
CEL GDU325 (p.41-59) Eng.pm6 8/2/01, 10:20 AM59

60
15. General Specifications
Frequency Band: 900MHz and 1900MHz
Operating Temperature:
Main Unit: –10°C to + 55°C
Supply Voltage: Standard Li-ion battery
3.8 V 700mAh
Optional NiMH battery
3.6V 720mAh
RF Power Output: Class 4 (GSM-900/2W)
Class 1 (PCS-1900/1W)
Dimensions:
With standard Li-ion battery (BTL325):
4.4” × 1.89” × 0.9”
(112mm × 48mm × 23.5mm)
With optional Li-ion battery (with vibrator) (VTL325):
4.4” × 1.89” × 0.9”
(112mm × 48mm × 23.5mm)
With optional NiMH battery (BTR325):
4.4” × 1.89” × 1.06”
(112mm × 48mm × 27mm)
With optional NiMH battery (with vibrator) (VTR325):
4.4” × 1.89” × 1.06”
(112mm × 48mm × 27mm)
Weight:
With standard Li-ion battery: 3.45oz (98g)
With optional Li-ion battery (with vibrator): 3.5oz (100g)
With optional NiMH battery: 3.9oz (113g)
With optional NiMH battery (with vibrator): 4.1oz (115g)
Talk Time:
With standard Li-ion battery: 90-300 minutes
With optional Li-ion battery (with vibrator): 90-300 minutes
With optional NiMH battery: 90-300 minutes
With optional NiMH battery (with vibrator): 90-300 minutes
Standby Time:
With standard Li-ion battery: 60-110 hours
With optional Li-ion battery (with vibrator): 60-110 hours
With optional NiMH battery: 60-110 hours
With optional NiMH battery (with vibrator): 60-110 hours
* Subject to change without notice.
* Times may vary depending on system.
15. General Specifications
CEL GDU325 (p.41-59) Eng.pm6 8/2/01, 10:20 AM60