Sierra Wireless SB3000P PCS CDMA Voice/Data Modem for Handspring PDAs User Manual SB3000
Sierra Wireless, Inc PCS CDMA Voice/Data Modem for Handspring PDAs SB3000
Contents
Users Manual Part 3 of 6
Getting To Know Your Sprint PCS Phone 19
Getting Started 2Getting to Know
Your Communicator2Understanding
Roaming 2Getting Started 2Getting Started 2
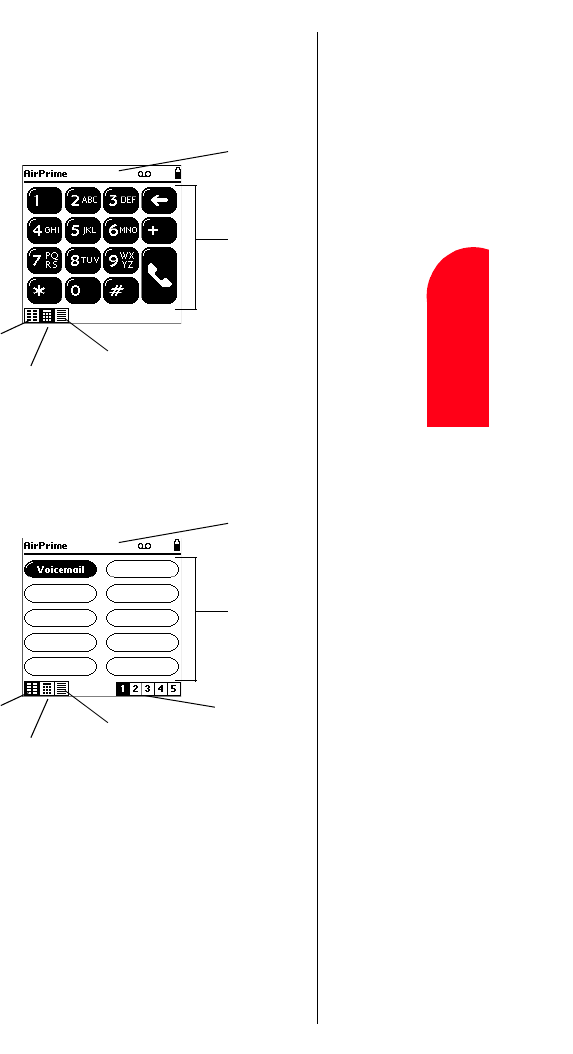
Phone Application Display Screens
The Phone application has three main screens:
Dialpad Screen
<Insert updated screen grab here (time/date, no VM
icon).>
Speed Dial Screen
<Insert better screen grab here.>
Status bar/
Dial box
Digits and
other keys
Speed Dial icon
Dialpad icon Call History icon
Status bar
Speed Dial
entries
Speed Dial icon
Dialpad icon Call History icon
Page icons
Section 2
20 Getting To Know Your Sprint PCS Phone
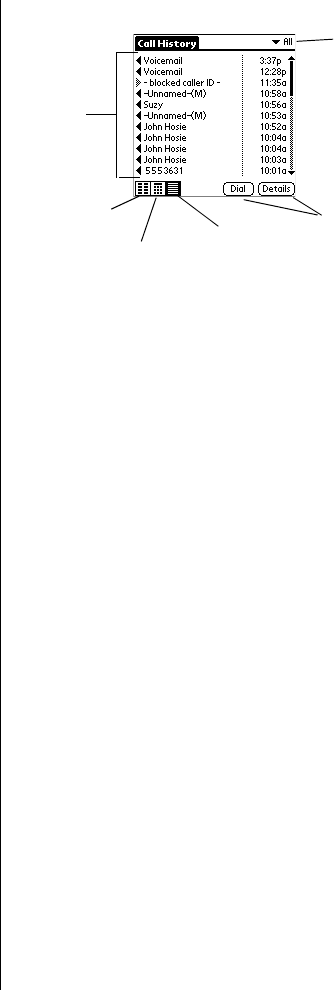
Call History Screen
<Insert updated screen grab here.>
Listing of
your calls
Drop-down
menu where
you can choose
to view All,
Missed,
Outgoing,
Incoming, or
Data calls.
S
peed Dial icon
Dialpad icon Call History icon Action buttons

Getting To Know Your Sprint PCS Phone 21
Getting Started 2Getting to Know
Your Communicator2Understanding
Roaming 2Getting Started 2Getting Started 2
Data Applications Display Screens
You can use your Sprint PCS Communicator to access a
variety of data applications, including SMS Text Messages
and third-party applications. The display screen varies with
the application you are using.
SMS Text Messages Screen
<Insert screen grab of SMS Text Messages inbox here.>
Note:
In order to use some
t
hird-party data
applications, you must
subscribe to their
services.
L
isting of your
SMS Text
Messages
Drop-down
menu where
you can choose
to view your
Inbox or your
Filed messages.
Tap to change the
display settings

Section 2
22 Getting To Know Your Sprint PCS Phone
Turning Your Module ON and OFF
Turning your Module ON
To turn your module on, press the Power button on
your SB3000 for approximately one second. The module
beeps and the screen displays Please wait while the
module is turning on.
<Need Sprint banner or terminology for powering up.>
Once your module is on, it displays Network Search while
your module looks for a signal. When your module finds a
signal, it automatically takes you to the Phone application.
At this point, you're ready to begin making and receiving
calls.
If your module is unable to find a signal after 15 minutes of
searching, a Power Save feature is automatically activated.
The message Power Save appears.
Your module searches for a signal periodically without your
intervention. You can also initiate a search for Sprint PCS
Service by tapping OK on the Power Save dialog.
Turning your Module OFF
Press for two seconds. The module beeps and the
message Power Down. Goodbye. appears while the
module is turning off. The message Phone is off appears
when the module is off.
Tip:
If you try to place
an outgoing call
when your module
is off, you will be
asked if you want to
t
urn the module on.
Tip:
The Power Save
feature helps to
conserve your
battery power
when you are in an
area where there is
no signal.

Getting To Know Your Sprint PCS Phone 23
Getting Started 2Getting to Know
Your Communicator2Understanding
Roaming 2Getting Started 2Getting Started 2
Using the KeyGuard
<This feature is not applicable. Confirmed by AirPrime. OK
to remove?>
The KeyGuard feature helps avoid accidental key presses
without blocking incoming calls or messages. KeyGuard is
disabled when you receive an incoming call and is
reactivated when the call is complete.
1. To activate the KeyGuard, highlight KeyGuard in the
main menu and press .
2. To disable the KeyGuard, press and hold .
Using the Battery
Battery Capacity
Your Sprint PCS Communicator is equipped with a Lithium
Ion (LiIon) battery. This allows you to recharge your battery
before it is fully drained. The battery provides
approximately 6 hours of continuous talk time or
approximately 10-28 days of continuous standby time,
depending on network configurations.
When the battery reaches 5% of its capacity, the battery icon
blinks and the message Phone battery is low appears.
When the battery reaches 3% of its capacity, the battery icon
blinks, the message Phone battery is critically low
appears, and the module sounds an audible alert. When the
battery is empty, the module powers down and the message
Please recharge your phone battery appears.
Note:
Searching for
service and using
t
he vibrate mode
affect the battery’s
t
alk and standby
t
imes.
Tip:
Be sure to charge your
module’s battery and
watch your Battery icon
t
o ensure the battery
level is OK.
Section 2
24 Getting To Know Your Sprint PCS Phone
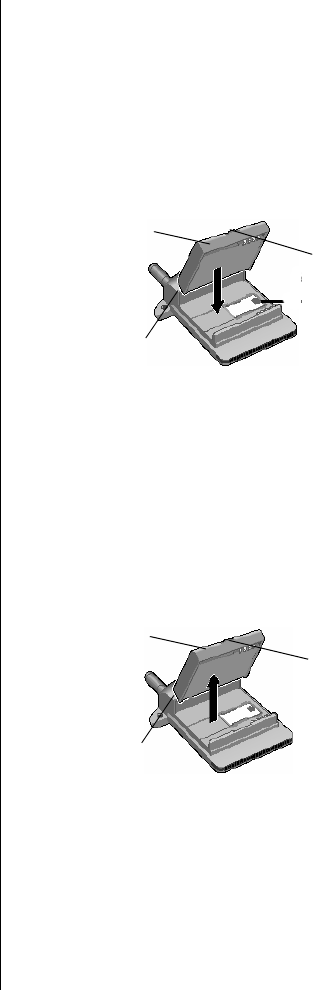
Installing the Battery
Your Sprint PCS Communicator comes with a LiIon battery.
Follow these easy steps to install it:
1. Insert the top edge of the battery into the battery
compartment on the back of the SB3000 Module. The
label on the battery faces in (toward the SB3000).
2. Push the bottom edge of the battery down until the
latch clicks.
<Need better graphic.>
Removing the Battery
To remove your battery, follow these easy steps:
1. Remove the SB3000 Module from your Visor handheld.
2. Press the latch and lift the bottom edge of the battery
out of the SB3000.
3. Slide the top edge of the battery out of the
compartment.
<Need better graphic.>
latch
bottom edge
top edge
latch
bottom edge
top edge

Getting To Know Your Sprint PCS Phone 25
Getting Started 2Getting to Know
Your Communicator2Understanding
Roaming 2Getting Started 2Getting Started 2
Charging the Battery
Your Sprint PCS Communicator comes with a rechargeable
battery. You should charge the battery as soon as possible so
you can begin using your module.
Keeping track of your battery’s charge is important. If your
battery level becomes too low, your module automatically
turns off and you may lose some data. For a quick check of
your module’s battery level, glance at the Battery icon
located in the upper-right corner of the Phone application
screen. When the battery charge gets too low, the Battery
icon appears empty and starts to flash.
When you’re ready to charge your battery, it is vital that you
use only a Sprint PCS-approved charger, such as the travel
charger that came with your module (see page 5).
It generally takes about 4 to 5 hours to fully recharge a
completely rundown battery. With the Sprint PCS-approved
Lilon battery, it is okay to recharge the battery before it
becomes completely run down.
Using the Handspring Charging Cradle
If you are using your SB3000 with a rechargeable Visor
(such as the Visor Prism or Visor Edge), you can use the
charging cradle that came with your handheld to charge
your SB3000. Simply place your handheld into the
charging cradle while the SB3000 is installed to charge
both your handheld and the SB3000.
While the SB3000 is charging, the Battery LED is red. The
Batter LED turns green when the SB3000 is fully charged. It
takes about 4 to 5 hours to fully charge the battery.
Using the Desktop Charger
<This section is not applicable. OK to discard?>
When you’re ready to charge your battery, it is vital that you
use only Sprint PCS-approved desktop chargers and AC
W
arning!
Using the wrong battery
charger could cause
damage to your module
and void the warranty.
Tip:
For more information on
using the handheld’s
charging cradle, see the
“Visor Handheld User
Guide” that came with
your handheld, or go to
www.handspring.com.

Section 2
26 Getting To Know Your Sprint PCS Phone
adapter chargers. To use the desktop charger provided with
your module:
1. Plug the round end of the AC adapter into the charger
holder and the other end into the electrical outlet.
2. Insert the the module (with the battery installed) into
the slot.
䊳A red light on the charger lets you know the battery is
charging.
䊳A green light lets you know that the battery is at least
90 percent charged.
It generally takes about 4 to 5 hours to fully recharge a
completely rundown battery. With the Sprint PCS-approved
Lilon battery, it is okay to recharge the battery before it
becomes completely run down.

Getting To Know Your Sprint PCS Phone 27
Getting Started 2Getting to Know
Your Communicator2Understanding
Roaming 2Getting Started 2Getting Started 2
Future Capabilities
Your new module uses existing CDMA technology to provide
clear digital voice and data calling across the all-digital
Sprint PCS Nationwide Network.
Your module is also designed to support future cdma2000
1x data and voice enhancements to the Sprint PCS
Nationwide Network. These new enhancements promise to
deliver much faster data rates and a standby time of up to
28 days. As these new high-speed data and improved battery
capabilities are introduced, you will be given the
opportunity to upgrade the software in your module to
support these new services.

28

Understanding Roaming 29
Understanding
Roaming 3 3 Understanding
Roaming 333
3
Understanding Roaming
In this Section
䊳Understanding How Roaming Works
䊳Setting Your Module’s Roam Mode
䊳Setting and Using Alerts and Call Guard
oaming is the ability to make or receive calls while you’re off the
Sprint PCS Nationwide Network. Your new digital Sprint PCS
Communicator™ works anywhere on the Sprint PCS Nationwide Network
and allows you to roam on other digital networks virtually anywhere in the
U.S. where competitive wireless service is available.
This section explains how roaming works and explains special features that
let you manage your roaming experience.
R

Section 3
30 Understanding Roaming
Understanding How Roaming Works
Recognizing When You’re Roaming
When you are roaming off the Sprint PCS Network,
appears in the status bar of your display screen.
<Need “R”icon.>
Roaming on Other PCS CDMA Networks
When you’re roaming on other PCS CDMA networks, your
call quality will be similar to the quality you receive when
making calls while on the Sprint PCS Network. You may not
be able to access certain calling features, such as SMS Text
Messages, however, all of your calls are still private and
secure.
Roaming on Analog Cellular Networks
<Not applicable. Confirmed by AirPrime. OK to remove?>
When you roam on analog cellular networks, you will
experience the same quality provided by analog cellular
carriers today. Although some calling features, such as
Sprint PCS Wireless Web, may be unavailable, you can still
make and receive calls. You will experience a few
differences including:
䊳You are more likely to experience static, cross-talk,
fade-out and dropped calls.
䊳Some calling features that are standard on the
SprintPCS Network are unavailable.
䊳There are security and privacy risks (eavesdropping and
cloning) that exist with conventional analog cellular
services today.
䊳Your battery needs recharging sooner when you use
your phone for analog cellular roaming.
Setting Your Module’s Roam Mode
Your Sprint PCS Communicator allows you to control your
ability to roam. By using the Roam Preferences menu
option, you determine whether your module allows digital
Tip:
Remember, when you
are using your module
off the Sprint PCS
Network, always dial
numbers using 11 digits
(1 + area code +
number).
Note:
You will pay a
higher per-minute
rate for roaming
calls.
Tip:
If you’re on a call when
you leave the
Sprint PCS Network and
enter an area where
CDMA roaming is
available, your call is
dropped. If your call is
dropped in an area
where you think
Sprint PCS Service is
available, turn your
module off and on again
t
o reconnect to the
Sprint PCS Nationwide
Network.

Understanding Roaming 31
3 3 Understanding
Roaming 333
roaming. You can also choose options to help you control
your roaming.
To choose your roaming preferences:
1. Make sure your module is on.
2. Press the Phone Application button or tap the
Phone icon in the Applications Launcher to start the
Phone application.
3. Tap the Menu icon on your Visor™ handheld to
view the menus.
<Need icon.>
4. From the Options menu, tap Roam Preferences.
<Insert graphic of Roam Prefs screen.>
5. The Roam Preferences screen gives you the following
options. To change or select an option, tap it.
䊳Allow digital roaming: This option determines
whether you can roam off the Sprint PCS
Nationwide Network.
䊳Call Guard: This feature causes a warning dialog
to appear when you try to place a call while you are
roaming off the Sprint PCS Network.
䊳Roam Ringer: This feature allows you to pick a
special ringer to alert you to incoming calls while
you are roaming.
6. Tap OK to save your changes, or tap Cancel to return
to the Phone application without saving your changes.
Tip:
For more information
about using the menus,
see page 52. Also, refer
t
o the “Visor Handheld
User Guide” that came
with your handheld.
Tip:
You can always
place an
emergency call,
even if Allow digital
roaming is disabled.
Note:
Call Guard and Roam
Ringer are only
applicable if Allow
digital roaming is
enabled.

Section 3
32 Understanding Roaming
Setting Alerts to Warn You When
Roam Charges Apply
<These two options have not been implemented on my
prototype. The info here is from UI doc v.6. Need to test.>
Your Sprint PCS Communicator features two options you
can set to alert you when roam charges will apply.
Call Guard
Call Guard alerts you when roaming charges apply to
outgoing calls. This feature makes it easy to manage your
roaming charges by requiring you to take an additional
step before placing a roaming call. This additional step is
not required when you make or receive calls while on the
Sprint PCS Nationwide Network.
To turn Call Guard off:
1. From the Options menu, tap Roaming Preferences.
2. Tap the checkbox next to Call Guard to deselect it.
To place roaming calls with Call Guard on:
1. On the Dialpad screen, enter 1 + area code + the
seven-digit number, then tap . (You can also
initiate a call from the Address Book, Call History, SMS
Text Messages, or Speed Dial.) The Call Guard
Reminder appears.
<Insert graphic of Call Guard Reminder dialog.>
2. Tap OK.
Roam Ringer
Roam Ringer alerts you when roaming charges apply to
incoming calls. By setting a special ring for incoming
Tip:
If you enable Allow
digital roaming, an alert
message will remind
you when roaming rates
apply.
Note:
Call Guard is only
applicable if Allow
digital roaming is
enabled.
Tip:
You can get more
information by tapping
t
he Information
icon on the dialog.
<Insert info
icon.>

Understanding Roaming 33
3 3 Understanding
Roaming 333
roaming calls, you can choose whether to answer a
roaming call.
To turn Roam Ringer on:
1. From the Options menu, tap Roaming Preferences.
2. Tap the checkbox next to Roam ringer to select it.
3. Tap the arrow next to Roam ringer and choose a ring
from the pop-up list.
To answer an incoming roaming call:
▲Tap Answer.
Setting the Time and Date in Analog Mode
<Not applicable. Confirmed by AirPrime. OK to remove?>
If the time has not been set since the battery was installed
and you turn your phone on outside a Sprint PCS Service
Area, you are prompted to enter the current time and date.
To enter the time and date when the Set Time and Date
menu displays, press the appropriate keys on your keypad.
Fields must be two digits, for example “05:07a 01/01/99.”
Note:
Roam Ringer is only
applicable if Allow
digital roaming is
enabled.
Note:
If you do not enter
t
he time and date
when prompted in
Analog mode, you
are not notified of
scheduled events
or call alarms.

34

Making and Answering Calls 35
Understanding
Roaming 4 4 Understanding
Roaming 4Making and
Answering Calls 4 4
4
Making and Answering Calls
In this Section
䊳Making Calls
䊳Answering Calls
䊳Using the Speakerphone
<Not applicable. Confirmed by AirPrime. OK to remove?>
䊳Using Sprint PCS Voice Command
䊳In-Call Options
䊳End-of-Call Options
䊳Dialing Options
<Not applicable. Confirmed by AirPrime. OK to remove?>
䊳Saving a Phone Number
䊳Dialing Phone Numbers with Pauses
䊳Calling Emergency Numbers
䊳Displaying your Phone Number
our Sprint PCS Communicator™ gives you different options for
making calls so you can use the method that works best for you. Once
you learn the basics here, the possibilities are endless.
Y

Section 4
36 Making and Answering Calls
Making Calls
Your Sprint PCS Communicator offers many different ways
to make calls, including dialing from the Dialpad (see
below), using Speed Dial (page 37), using the Call History
(page 38), using Sprint PCS Voice Command (page 42),
and dialing from your Address Book (page page 96).
Using the Dialpad to Make Calls
The Dialpad screen looks and functions like a regular
telephone keypad.
To make a call using the Dialpad:
1. Make sure your module is on.
2. Press the Phone Application button or tap the
Phone icon in the Applications Launcher to start the
Phone application.
3. Tap the Dialpad icon or press the Phone
Application button repeatedly until the Dialpad
screen appears.
Tip:
To redial your last
outgoing phone number,
press and hold the
Phone Application
button for 2 seconds.
Tip:
When making calls off
t
he Sprint PCS Network,
always dial using
11 digits (1 + area code
+ phone number).
Tip:
If your module is off
when you try to place a
call, you will be
prompted to turn your
module on.
Tip:
To display the last
number dialed, tap
without entering a
phone number. To
display the last ten
numbers dialed, use the
Scroll buttons on the
front of your handheld.
Making and Answering Calls 37
4 4 Understanding
Roaming 4Making and
Answering Calls 4 4
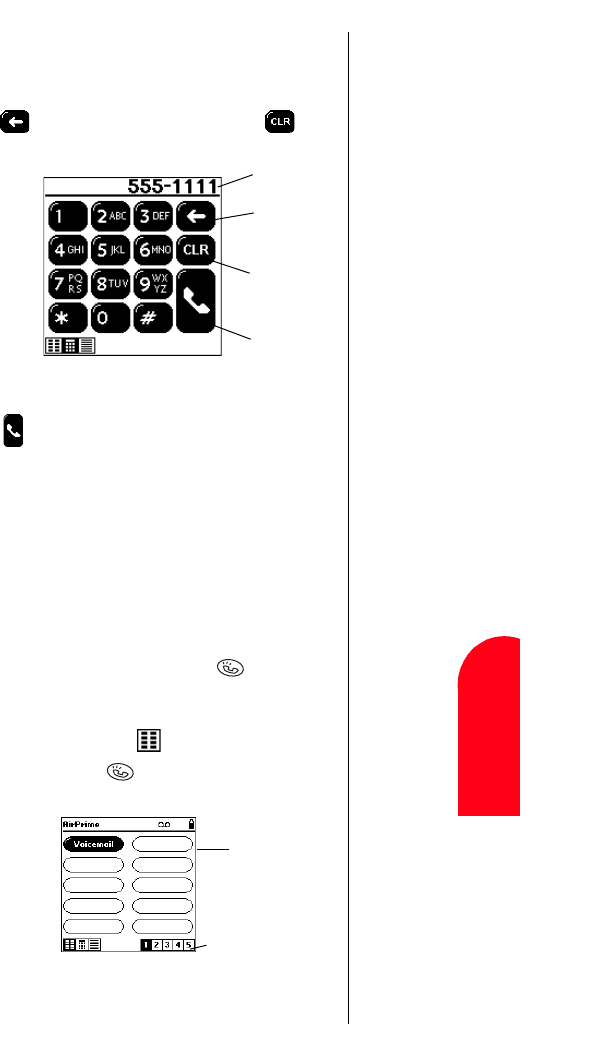
4. Enter a phone number by tapping the digits or by using
Graffiti® writing. The number appears in the Dial box
as you enter it. (If you make a mistake while dialing,
tap to erase one digit at a time or tap to
erase the entire number.)
<Need updated screen grab.>
5. Tap to dial the number. (To make calls when you
are roaming and Call Guard is enabled, tap OK on the
Call Guard Reminder dialog. See page 32.)
6. To end the call, tap Hang Up on the Active Call screen.
Using Speed Dial to Make Calls
Speed Dial allows you to place a call to a number you have
stored without entering the phone number.
To place a call using Speed Dial:
1. Press the Phone Application button or tap the
Phone icon in the Applications Launcher to start the
Phone application.
2. Tap the Speed Dial icon or press the Phone
Application button repeatedly until the Speed
Dial screen appears.
Tip:
You can also paste a
number that you have
copied from another
application into the Dial
box. Phone numbers
can be any combination
of alpha-numeric
characters.
Tip:
To edit the phone
number, tap the Dial
box, then correct the
entry.
Dial box
Tap to erase
one digit
Tap to erase
entire number
Tap to send
the call
Tip:
If the other party hangs
up first, you do not need
t
o tap Hang Up.
Note:
Before you can use
Speed Dial to place
a call, you need to
create a Speed Dial
list by programming
Speed Dial entries
(see page 127).
Tip:
To view additional
Speed Dial entries, tap
t
he Page Number icon
at the bottom of the
screen, or use the Scroll
buttons on the front of
your handheld.
Speed Dial
entries
Page Number icons

Section 4
38 Making and Answering Calls
<Need better graphic (one with more speed dial entries).>
3. Tap the entry’s button to dial the number.
Using the Call History to Make Calls
The Call History screen contains a log of the last 1000
phone numbers or Address Book entries for calls you placed,
accepted, and missed.
To place a call using the Call History:
1. Press the Phone Application button or tap the
Phone icon in the Applications Launcher to start the
Phone application.
2. Tap the Call History icon or press the Phone
Application button repeatedly until the Call
History screen appears.
<Need better graphic here. This graphic should have No ID
and Blocked entries as well as entries with phone
numbers.>
3. Tap the entry you want to call.
4. Tap Dial.
4-Digit Dialing
4-Digit Dialing lets you dial by simply entering the last four
digits of a phone number. Your module searches your
Address Book for a matching entry.
In order to use 4-Digit Dialing, you need to enable it on
your module.
To enable 4-Digit Dialing:
1. Press the Phone Application button or tap the
Tip:
You can also Speed Dial
a number from the
Dialpad screen. Simply
t
ap the digit(s) that
correspond to the
button number for your
Speed Dial entry, then
t
ap . See page 137
for more information.
Tip:
You can also make a call
from the Call Details
screen. See "Call History
Options" on page 89 for
more information.
Call History
entries
Note:
You cannot make calls
from the Call History
screen to entries
identified as No ID or
Blocked Caller ID. Calls
labeled Data can only
be dialed through a
personal computer.

Making and Answering Calls 39
4 4 Understanding
Roaming 4Making and
Answering Calls 4 4
Phone icon in the Applications Launcher to start the
Phone application.
2. Tap the Dialpad icon or press the Phone
Application button repeatedly until the Dialpad
screen appears.
3. Tap the Menu icon on your Visor™ handheld to
view the Dialpad menus.
<Need icon.>
4. From the Edit menu, tap Enable 4-digit dialing.
To make a call using 4-Digit Dialing:
1. On the Dialpad screen, tap the last four digits of a
phone number stored in your Address Book.
2. Tap .
䊳If one matching entry is found, your module dials
the number automatically.
䊳If more than one matching entry is found, the
Phone Number Lookup screen displays. Tap the
entry you want, then tap Dial.
<Insert graphic of Phone Number Lookup screen.>
Tip:
For more information
about using the menus,
see page 52. Also, refer
t
o the “Visor Handheld
User Guide” that came
with your handheld.
Tip:
To disable 4-Digit
Dialing, tap Disable 4-
digit dialing on the Eidt
menu.
Tip:
You can also use
Graffitti writing to enter
t
he last four digits.

Section 4
40 Making and Answering Calls
Answering Calls
1. Make sure your module is on. If your module is off,
incoming calls go to voicemail.
2. When your module rings, tap Answer, or press the
Phone Application button .
<Need new graphic here. I can’t get screen shots of alert
messages.>
3. To disconnect the call, tap Hang Up on the Active Call
screen.
Incoming Call Notification
Depending on your settings, your Sprint PCS
Communicator notifies you of incoming calls in the
following ways:
䊳The module rings and/or vibrates.
䊳The green LED blinks rapidly.
䊳The screen displays an incoming call message.
䊳If the phone number is available, the phone number of
the caller is displayed.
䊳If the phone number is in your handheld’s Address
Book, the name is also displayed.
The following options are also displayed. To select an
option, tap it.
䊳Answer to answer the call.
䊳Silence to mute the ringer.
Tip:
Your handheld does not
need to be on to receive
a call. Incoming calls
automatically turn on
your handheld.
Caller’s
name and
phone
number, if
available
Tap to answer
the call Tap to
silence the
ringer
Tip:
If the other party hangs
up first, you do not need
t
o tap Hang Up.
Tip:
You can also mute the
ringer by briefly
pressing the Power
button.

Making and Answering Calls 41
4 4 Understanding
Roaming 4Making and
Answering Calls 4 4
Missed Call Notification
When an incoming call is not answered, the Missed Call
alert displays on your screen.
<Need screen grab of Missed Call alert - single call.>
To dial the Missed Call:
▲Tap Call Back.
If you miss more than one call, the Missed Call alert
displays the following:
<Need screen grab of Missed Call alert - multiple calls.>
To view a list of the calls you missed:
1. Tap View List. The Call History screen displays the
missed call log. See page 87 for more information
about using the Call History.
2. Tap the entry, then tap Dial to return the call, or tap
Details to get more information about the call.
Using the Speakerphone
<This feature is not applicable. Confirmed by AirPrime. OK
to remove?>
Tap to dismiss
the alert Tap to return
the call
Caller’s
name and
phone
number, if
available
Time the call
was received
Note:
You cannot return
phone calls identified as
No ID, Blocked Caller
ID, or Data calls.
Tip:
Even after you dismiss
t
he Missed Call alert,
you can see the details
of your missed calls and
return missed calls
using the Call History
screen (see page 87).
Tap to dismiss
the alert
Tap to view a
list of the calls
you missed

Section 4
42 Making and Answering Calls
The speakerphone feature lets you hear audio through the
speaker and talk without holding the phone. When the
speakerphone is activated, use the volume control keys on
the side of the phone to adjust the volume.
To activate the speakerphone during a call:
䊳Highlight Speakerphone On and press .
To turn the speakerphone off:
䊳Highlight Spkrphone Off and press .
Using Sprint PCS Voice Command
With Sprint PCS, the first wireless provider to offer
innovative Voice Command technology, reaching your
friends, family, coworkers, and teammates has never been
easier – especially when you’re on the go.
With Sprint PCS Voice Command:
䊳You store all your contacts right in your module, so you don’t
need to search through or keep a phone book close by.
䊳There’s no need to punch in a lot of numbers,
memorize voicemail passwords or try to dial while
you’re driving.
䊳You can call anyone at any time – even if you don’t
remember their phone number.
It’s Easy To Start
Just dial from your Sprint PCS
Communicator to activate the service. You can also dial
to go through a Sprint PCS Voice Command
tutorial directly from your module.
You can choose Sprint PCS Voice Command as your free
option when you sign up for the Sprint PCS Advantage
AgreementSM or you can add Sprint PCS Voice Command
for $10 per month in addition to your normal monthly
service plan rate.
W
arning!
Due to higher
volume levels, do
not place the phone
near your ear
during
speakerphone use.

Making and Answering Calls 43
4 4 Understanding
Roaming 4Making and
Answering Calls 4 4
Create Your Own Address Book
You can program up to 500 names into your personal
address book, with each name having up to five phone
numbers. That’s 2,500 phone numbers – and with the
advanced technology of Sprint PCS Voice Command – you
can have instant access to all of them.
There are four ways to update your address book:
䊳Choose Sprint PCS Voice Command and receive a fully
functional web-based address book where you can
create and update your contacts for free at
www.talk.sprintpcs.com.
䊳Upload your contacts from Microsoft® Outlook,
Microsoft Excel and other personal information software
into your address book for no additional charge.
䊳If you don’t have a computer or Internet access handy,
you can have Sprint PCS Directory Assistance look up
phone numbers for you and automatically add them to
your address book. Just say, “Call operator,” and we’ll
add two names and numbers to your address book for
our standard $0.99 directory assistance charge. Each
additional update added during the call is $0.50.
䊳Simply dial and say, “Add name.” You will
then be asked to say the name and number you want to
add to your personal address book. Your address book
can store up to 20 voice-entered names at one time.
How It Works
1. Once you’ve signed up for Sprint PCS Voice Command
and created your address book, all you do is dial
. You’ll hear a tone followed by the prompt
“Ready.”
2. After the “Ready” prompt, simply say, in a neutral
voice, the name of the person or the number you’d like
to call. You can say, “Call Jane at work,” “Call John on
his wireless phone,” “Call 555-1234” or “Look up
Bob.”
Tip:
You can also upload
your handheld’s
Address Book to your
Sprint PCS Voice
Command personal
address. Just sync your
Address Book with
Microsoft Outlook on
your PC, then upload
your contacts from
Outlook.

Section 4
44 Making and Answering Calls
3. The number will automatically be dialed. Keep in mind
that Sprint PCS Voice Command recognizes not only
your voice, but any voice, so others can experience the
same convenience if they use your module.
For more helpful hints on Sprint PCS Voice Command, visit
www.talk.sprintpcs.com.
Dialing Options
<This section is not applicable. Confirmed by AirPrime. OK
to remove?>
Dialing options are displayed when you enter numbers in
the main menu.
To select an option, highlight it and press .
䊳Call to dial the phone number. (If you are roaming
and have the Call Guard feature activated, select
Roam Call. See “Call Guard” on page xx.)
䊳Save to save the phone number in your Internal
PhoneBook. (See “Saving a Phone Number” on
page xx.)
䊳Find to display Internal Phone Book entries that
contain the entered numbers. (See “Finding a Phone
Number” on page xx.)
䊳Hard Pause to insert a hard pause. (See “Dialing and
Saving Phone Numbers with Pauses” on page xx.)
䊳2-Second Pause to insert a 2-second pause. (See
“Dialing and Saving Phone Numbers with Pauses” on
page xx.)
Some options are displayed as you enter numbers. To select
an option, highlight it and press .
䊳[An Internal Phone Book Entry] to display the
Internal Phone Book entry. Press again to dial
the entry’s phone number.
䊳4-Digit Dial to dial the phone number in your Internal
Phone Book that ends with the four digits you enter.
(See “4-Digit Dialing” on page xx.)
Tip:
To speed dial a phone
number from the main
menu, press and hold
t
he Internal Phone Book
entry number. If the
entry number is two
digits, enter the first
digit, then press and
hold the second digit.
(This feature will not
work when you are
roaming and Call Guard
is enabled.)

Making and Answering Calls 45
4 4 Understanding
Roaming 4Making and
Answering Calls 4 4
In-Call Options
During a call, your module may display one or more of the
following options. The options that display depend on the
status of your call.
To select an option, tap it.
䊳Hang Up to end the call.
䊳Hold to place the call on hold.
䊳Mute (or Unmute) to mute (or reactivate) your
module’s microphone.
䊳Release Pause to send the next set of numbers after a
hard pause. This option is only available if the call was
placed using Speed Dial and the Speed Dial entry
contains a hard pause. See page 125 for more
information about using Speed Dial.
䊳Key Pad to enter and send audible DTMF tones (for
sending voicemail codes, passwords, credit card
information, etc.). See "Dialing Extra Digits" on page
48 for more information.
䊳Swap to place an active call on hold and answer an
incoming Call Waiting call (see page 64).
䊳Ignore to send an incoming Call Waiting call to
voicemail.
䊳Swap Calls to switch between two calls. This option is
only available if the second call is an incoming Call
Waiting call.
䊳Off Hold to return to a call that you previously placed
on hold.
䊳2nd Call to place a second call. This option is only
available after you’ve placed the first call on hold.
䊳Clear All Calls to end both calls. This option is only
available if the second call is an outgoing call.
䊳3-way Call to speak with both calls at the same time.
This option is only available if the second call is an
outgoing call (see page 67).