Sony Group IJ1001SNBT Energy Storage System User Manual 3
Sony Corporation Energy Storage System 3
Contents
- 1. User Manual 2
- 2. User Manual 1
- 3. User Manual 3
- 4. User Manual 4
User Manual 3
Energy Storage System “IJ1001SNBT”
38
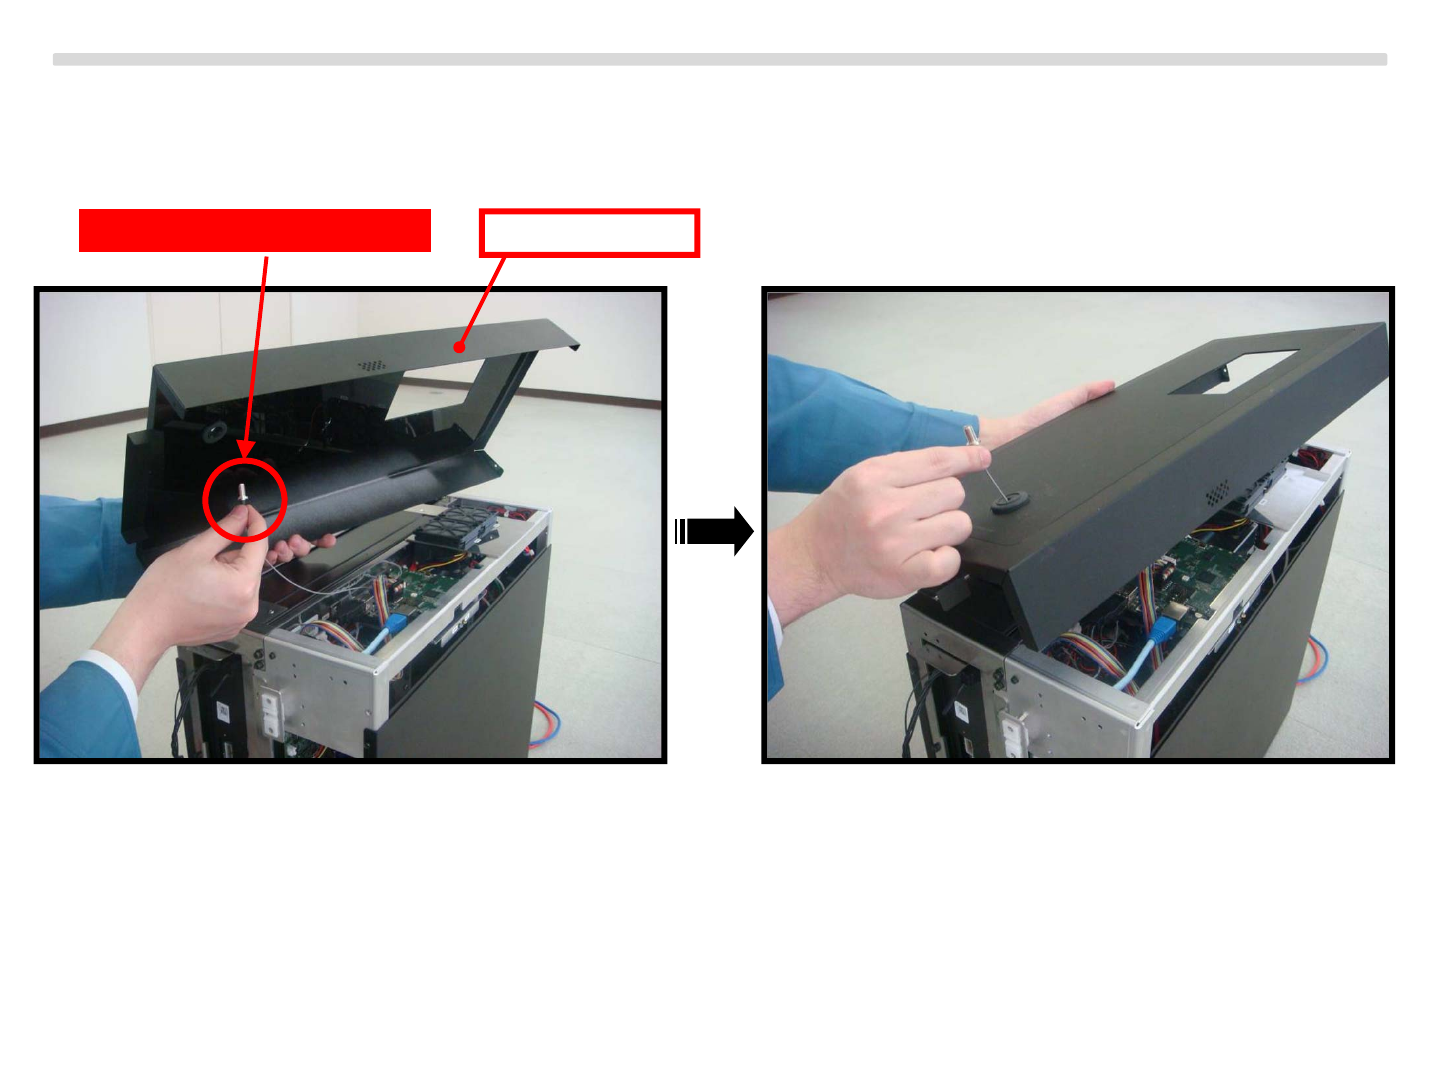
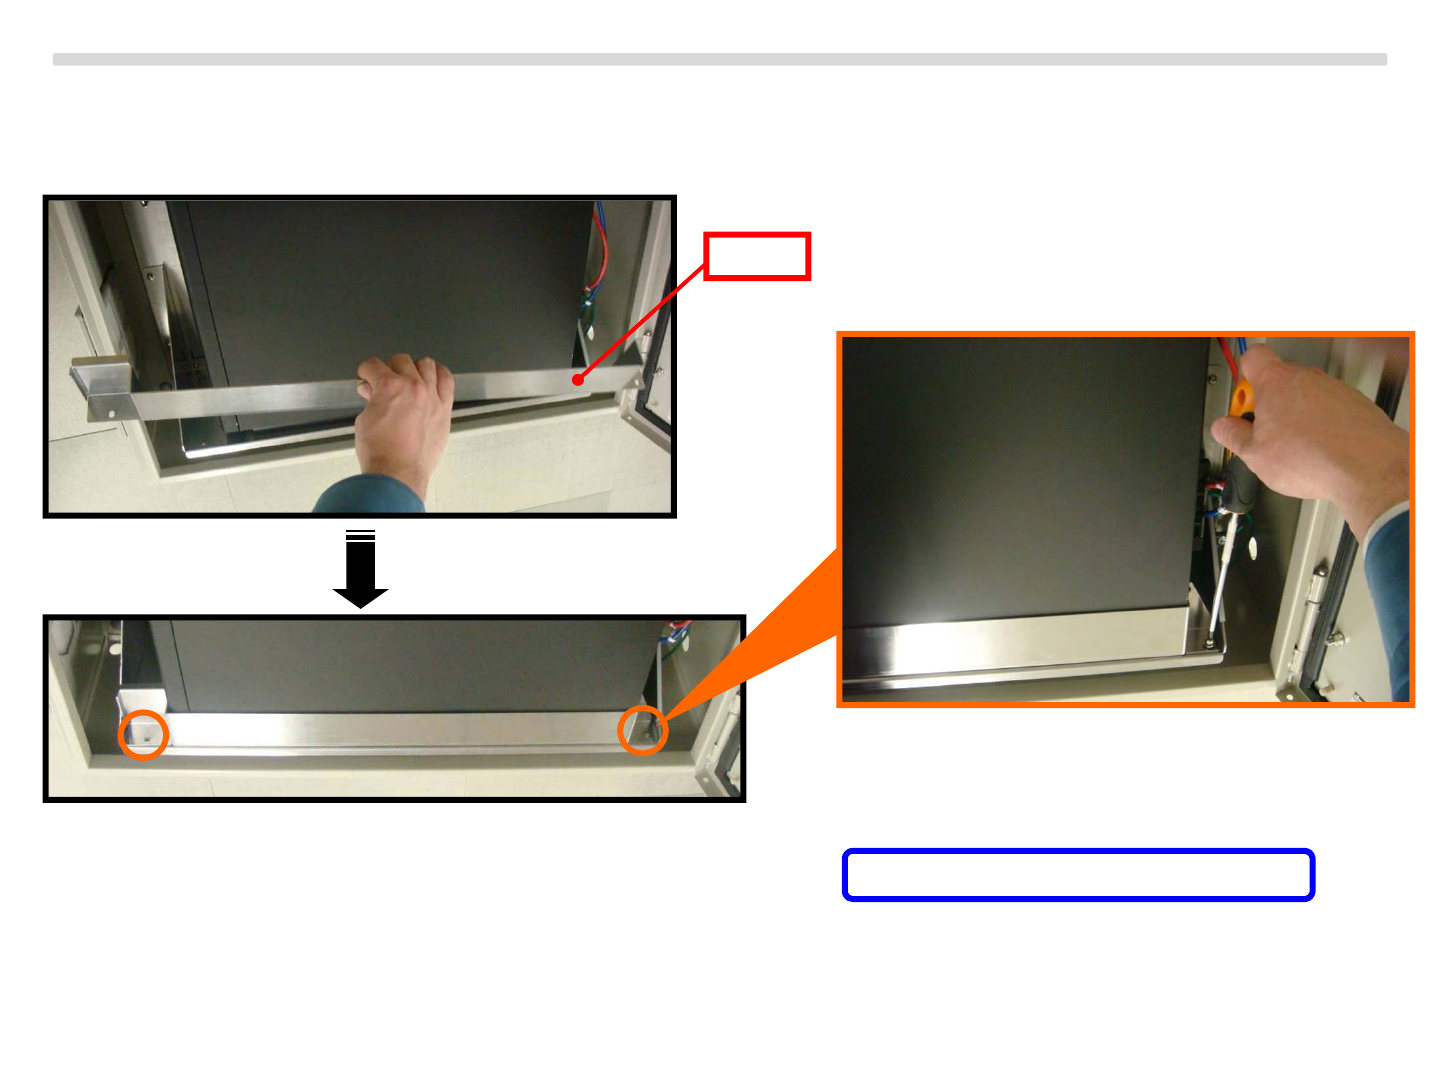
Open the energy storage server using screw driver and install the lithium ion battery module
Fixing the top cover.
Copyright Sony Energy Devices Corporation
Insert the antenna cable Top cover
Front
Energy Storage System “IJ1001SNBT”
39
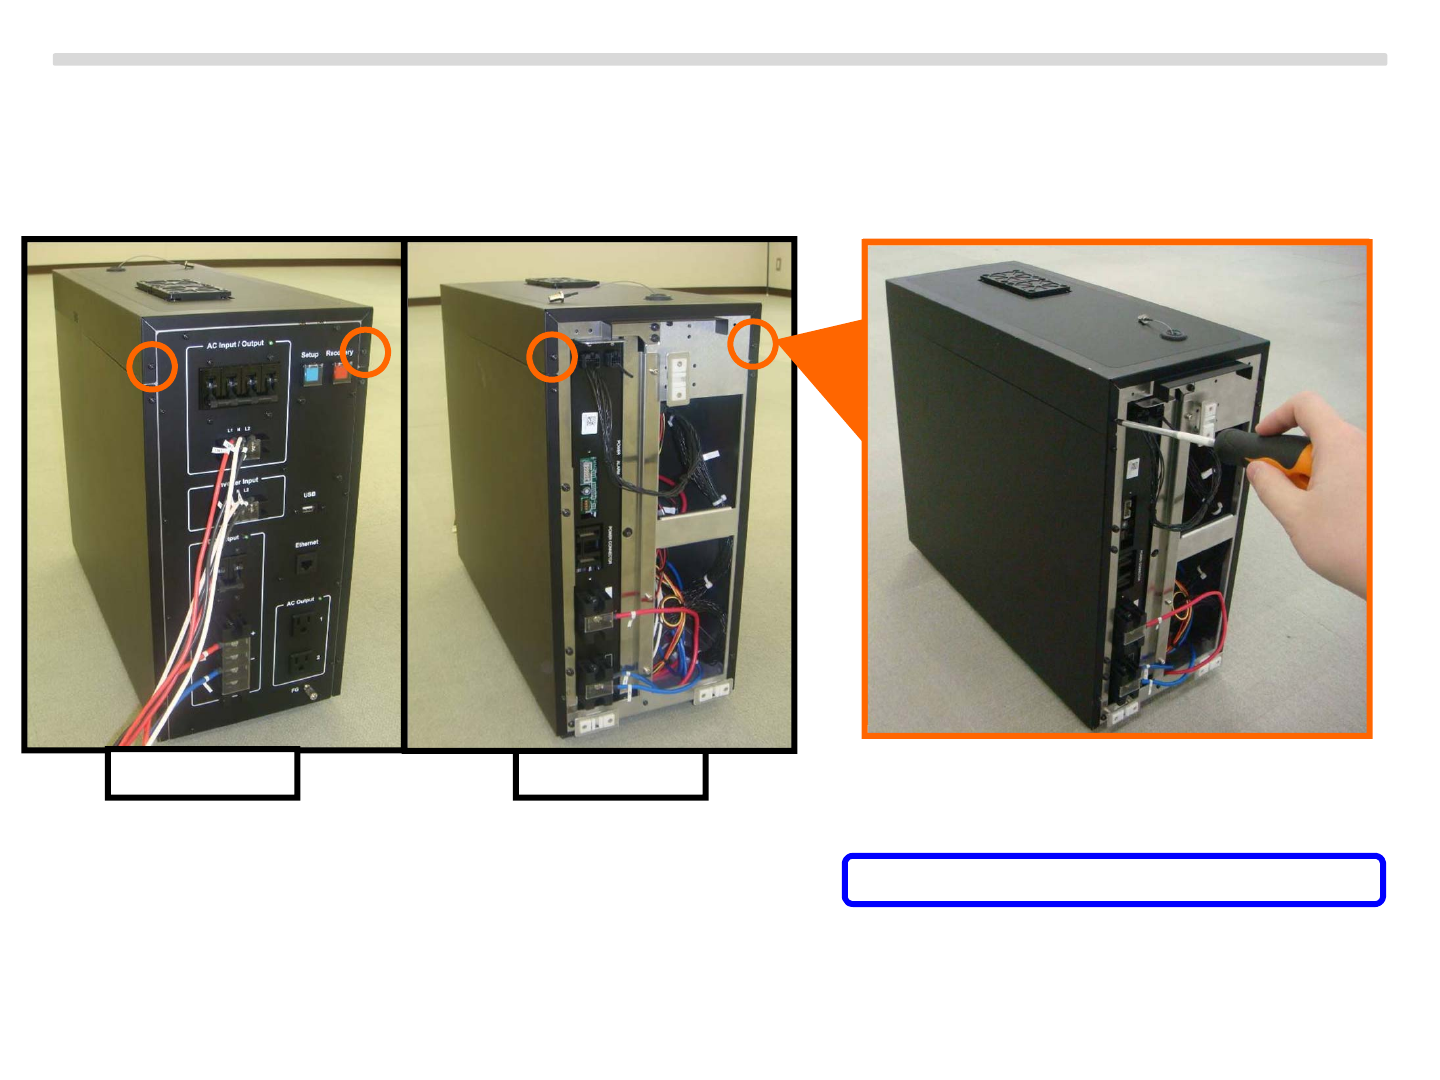
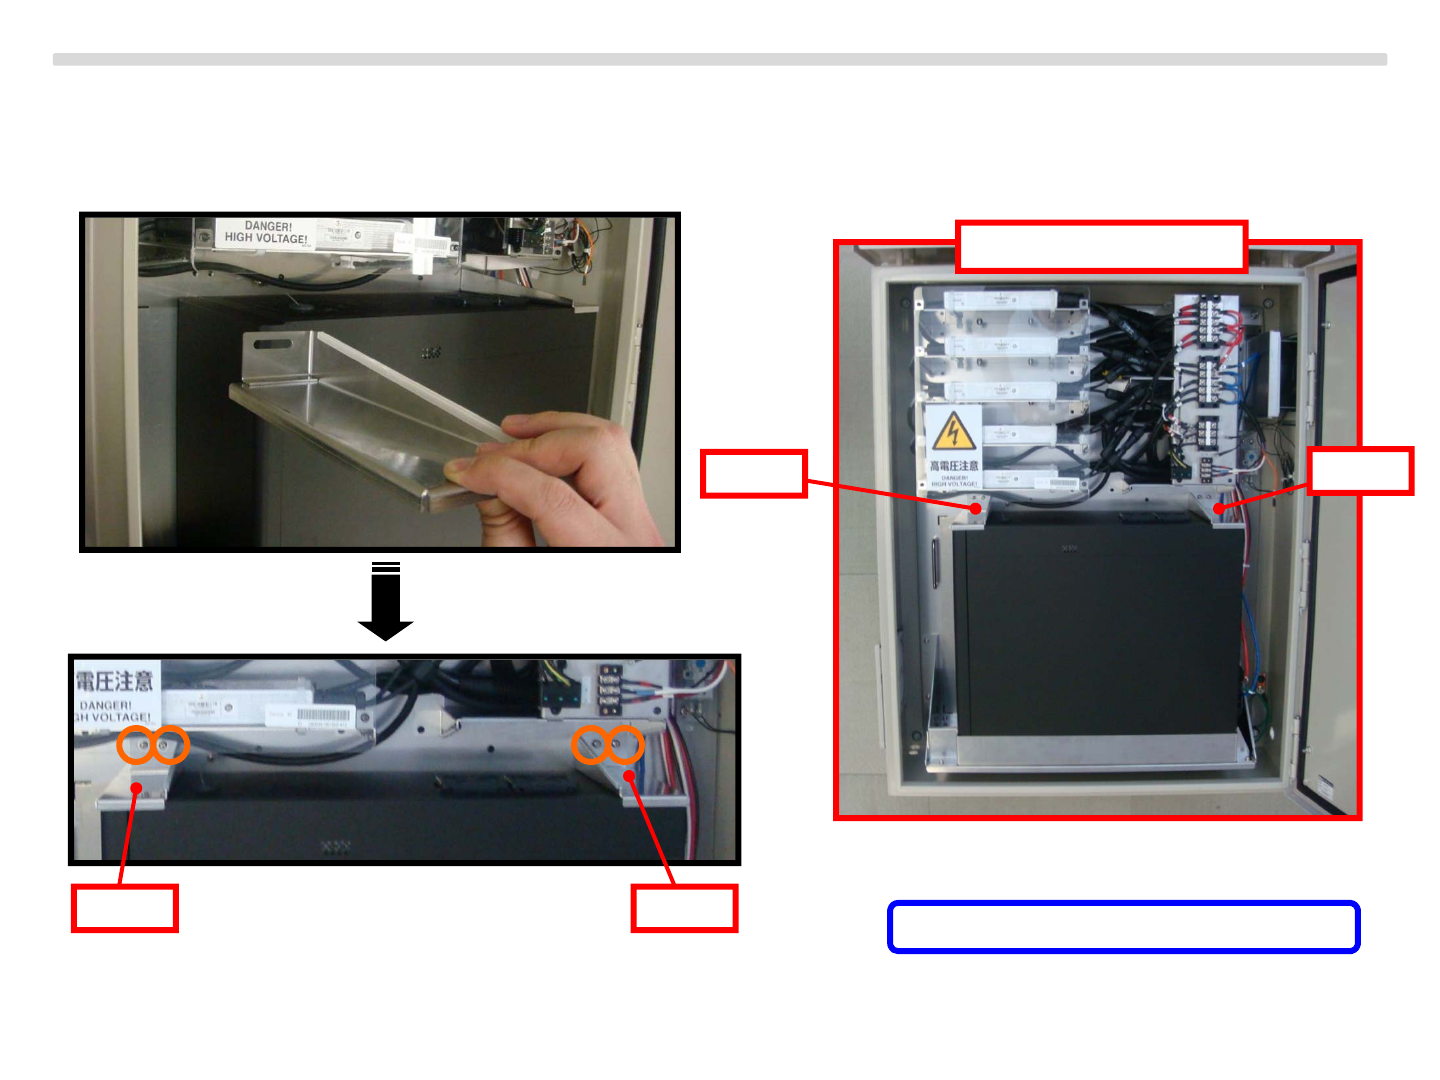
Open the energy storage server using screw driver and install the lithium ion battery module
Fixing the top cover.
Copyright Sony Energy Devices Corporation
Screw:⑥Screw(M4×10㎜Black)×4pcs
Rear
Energy Storage System “IJ1001SNBT”
40
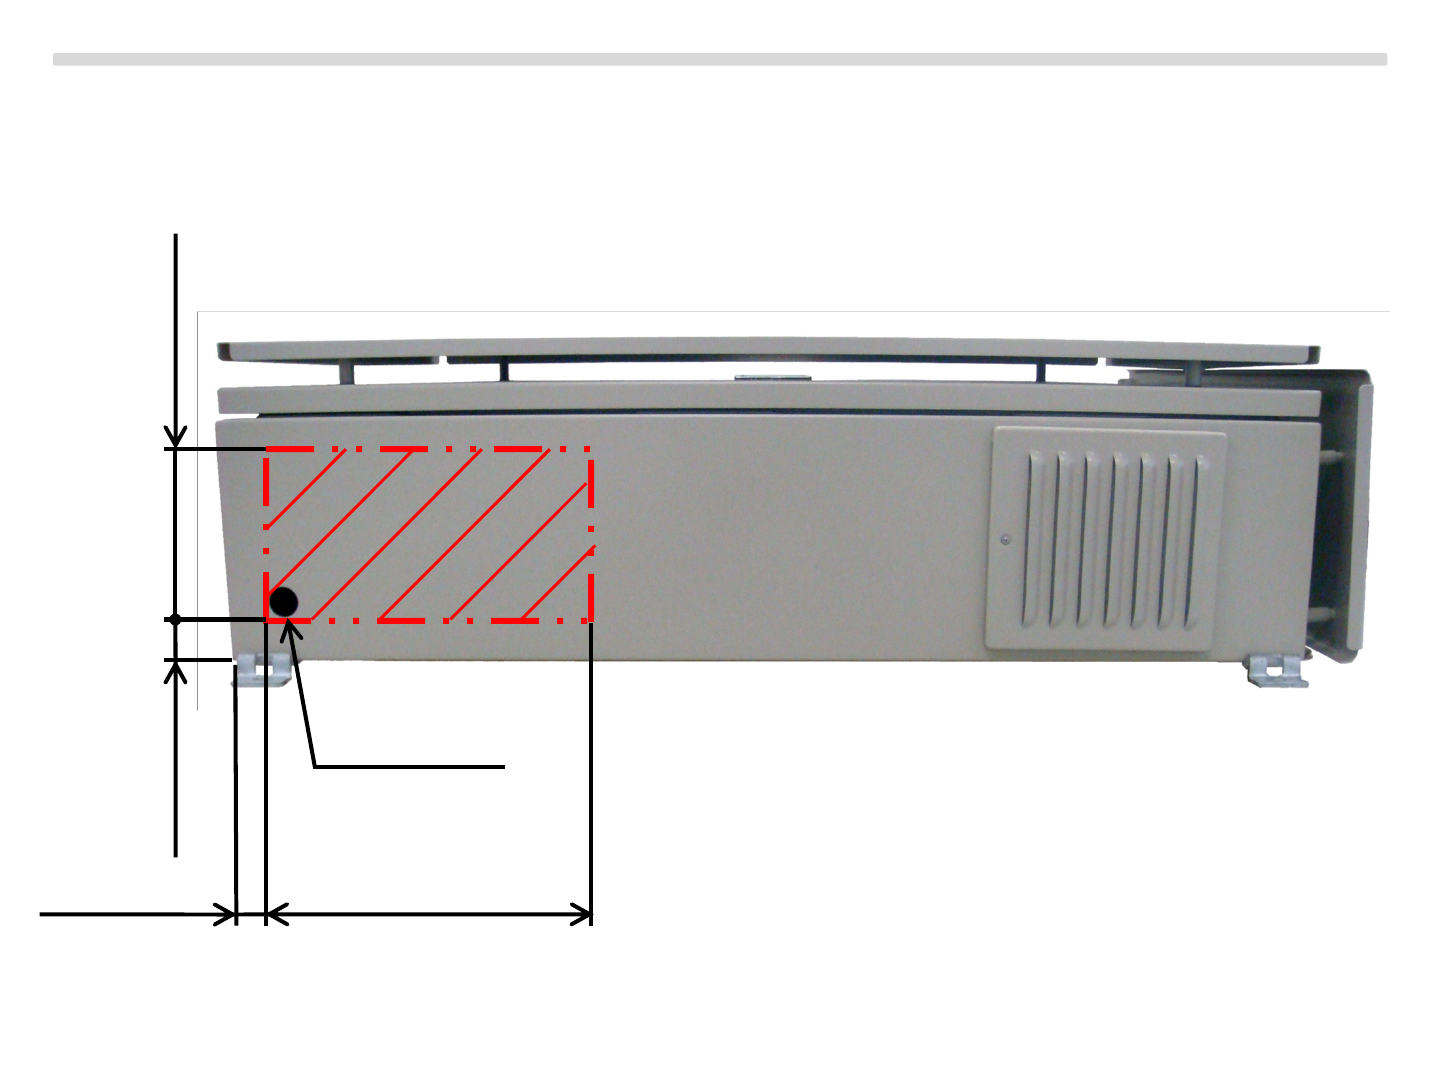
Set the outer enclosure to the wall
Make a hole for conduit inside the bellow area.
Copyright Sony Energy Devices Corporation
177.8㎜(7in)25.4㎜(1in)
25.4㎜(1in) 304.8㎜(12in)
Hole(1.06in)
Energy Storage System “IJ1001SNBT”
41
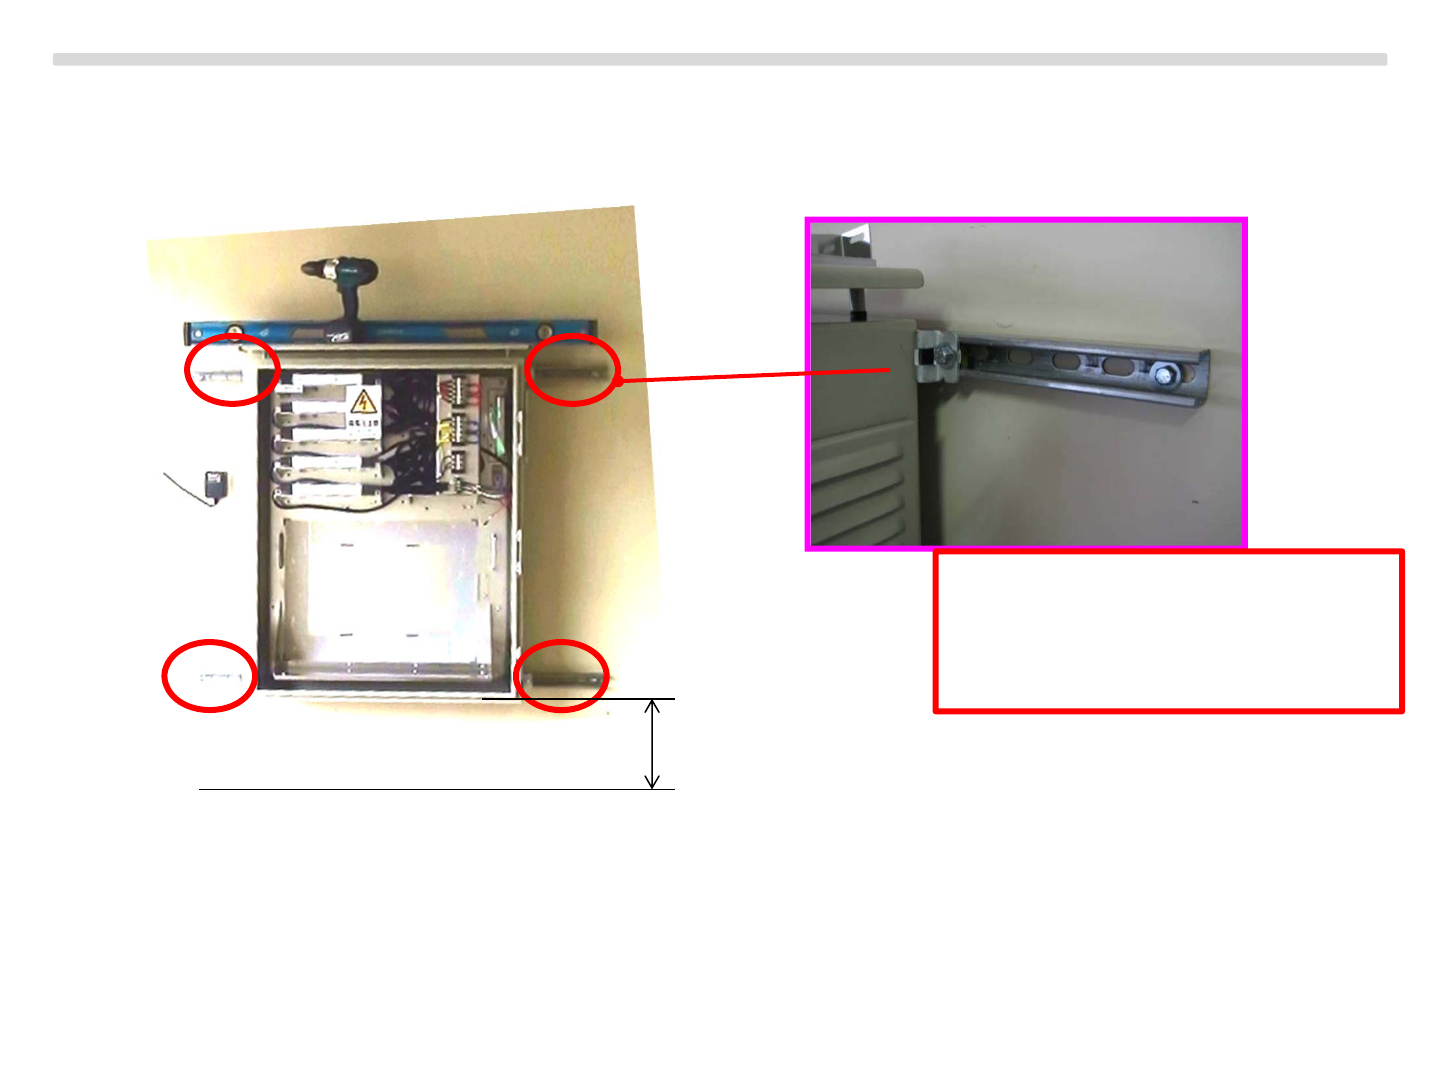
Set the outer enclosure to the wall
Fixing the outer enclosure to the wall 4 bolts.
Copyright Sony Energy Devices Corporation
Ground
Keep the distance 30cm or more
From the ground
Bolt :
For Wood Wall Diameter 3/8 inch
Length : 3-1/4 inch
For Concrete Diameter 3/8 inch
Length 3 inch

Energy Storage System “IJ1001SNBT”
42
Install the energy storage box into the outer enclosure
Install the energy storage server to the outer enclosure.
Copyright Sony Energy Devices Corporation
Install
Energy Storage System “IJ1001SNBT”
43
Install the energy storage box into the outer enclosure
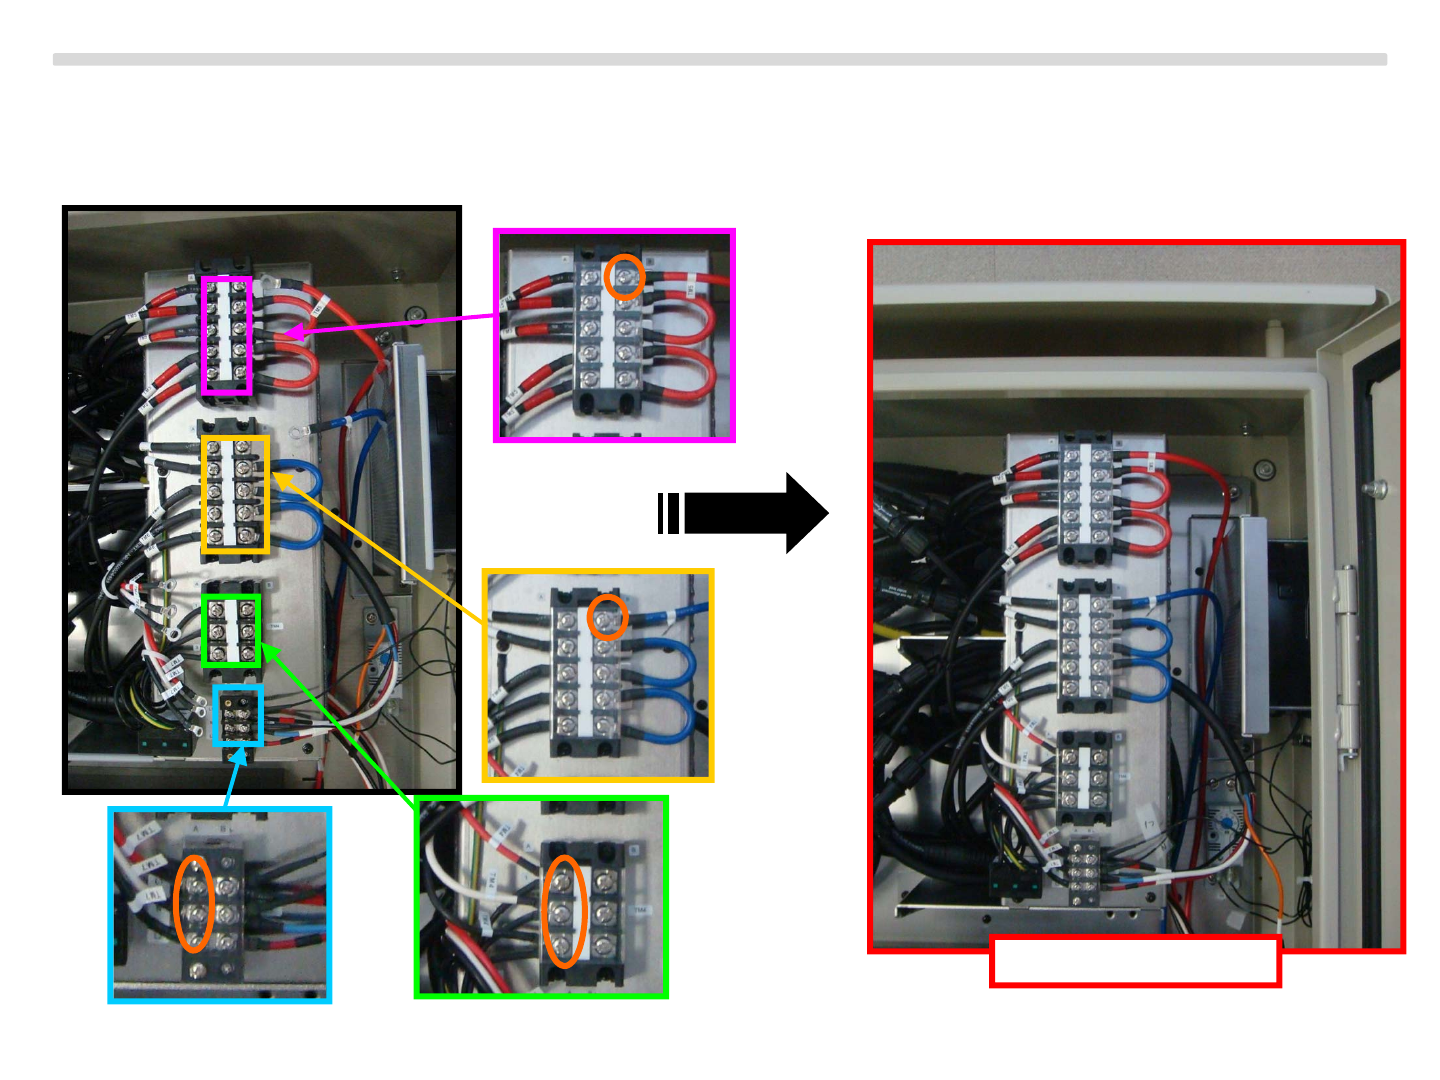
Wiring 8 position bellow.
Copyright Sony Energy Devices Corporation
Completed photo

Energy Storage System “IJ1001SNBT”
44
Install the energy storage box into the outer enclosure
Wiring ground terminal using the grounding cable from outer enclosure to the energy storage server.
Copyright Sony Energy Devices Corporation
Ground terminal
Completed photo
Energy Storage System “IJ1001SNBT”
45
Install the energy storage box into the outer enclosure
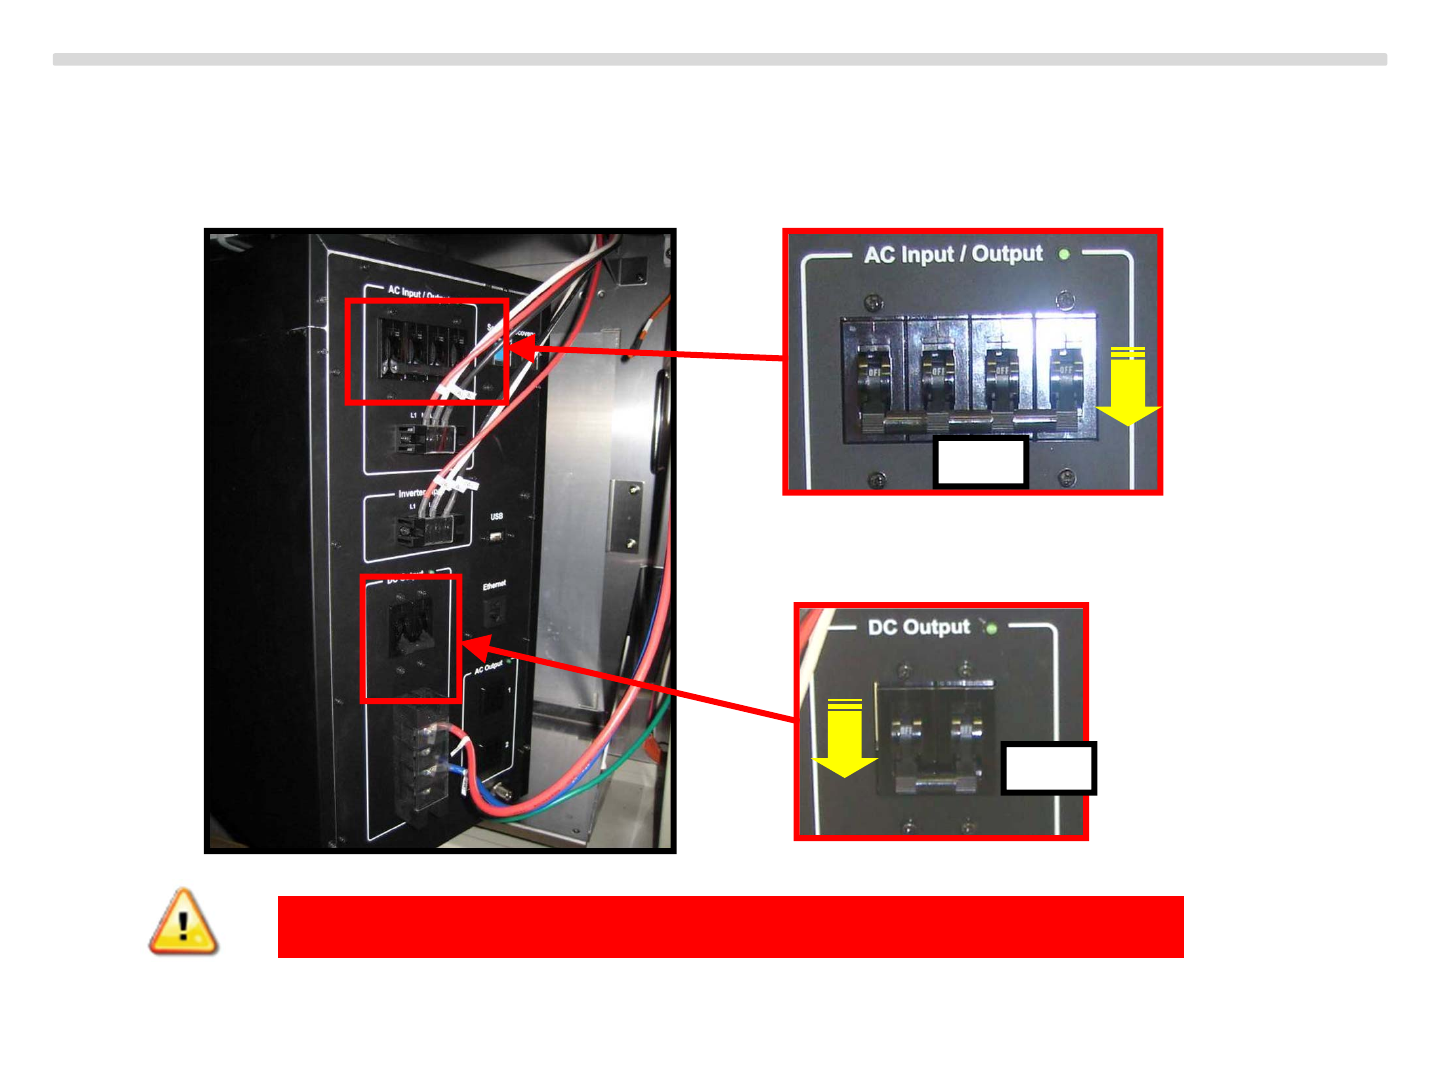
Check the circuit protector.
Copyright Sony Energy Devices Corporation
Confirm the circuit protector is off
OFF
OFF
Energy Storage System “IJ1001SNBT”
46
Install the energy storage box into the outer enclosure
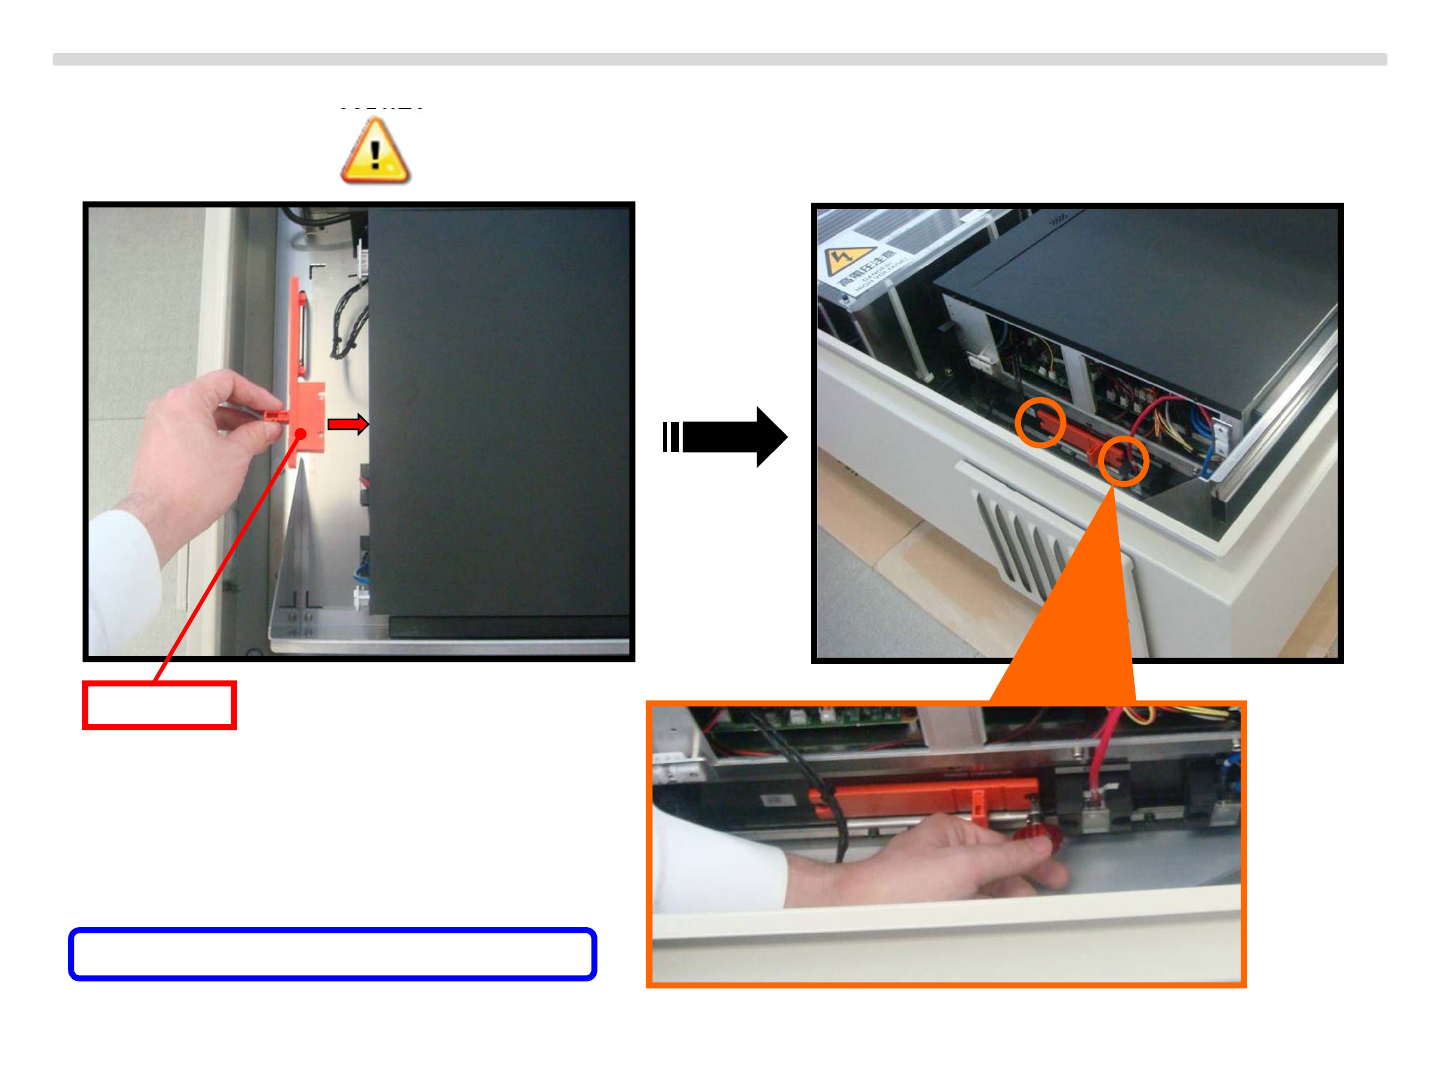
Insert the fuse bar.
Copyright Sony Energy Devices Corporation
Fuse bar
Screw:⑦Screw(M3×8㎜Black)×2pcs
Energy Storage System “IJ1001SNBT”
47
Install the energy storage box into the outer enclosure
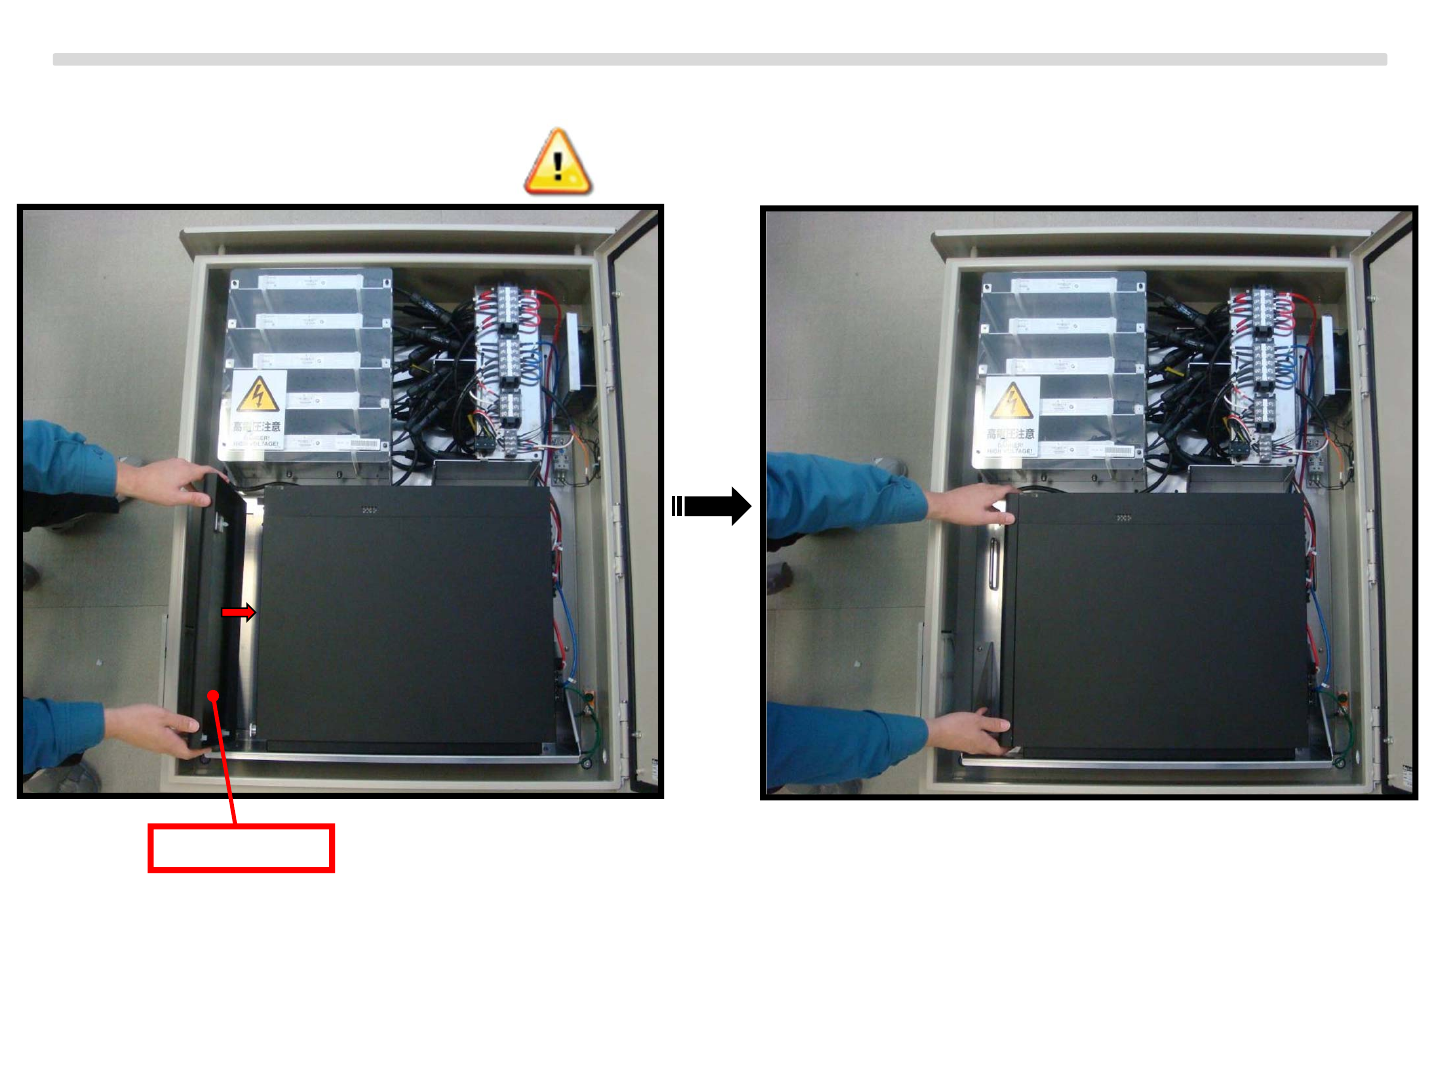
Insert the front panel of the server.
Copyright Sony Energy Devices Corporation
Front panel
Energy Storage System “IJ1001SNBT”
48
Install the energy storage box into the outer enclosure
Fixing the jig-3.
Copyright Sony Energy Devices Corporation
Jig-3
Screw:⑧Screw(M5×10㎜)×2pcs
Energy Storage System “IJ1001SNBT”
49
Install the energy storage box into the outer enclosure
Fixing the jig-4,5.
Copyright Sony Energy Devices Corporation
Jig-4 Jig-5 Screw:⑧Screw(M5×10㎜)×4pcs
Jig-5
Jig-4
Completed photo
Completed
Energy Storage System “IJ1001SNBT”
50
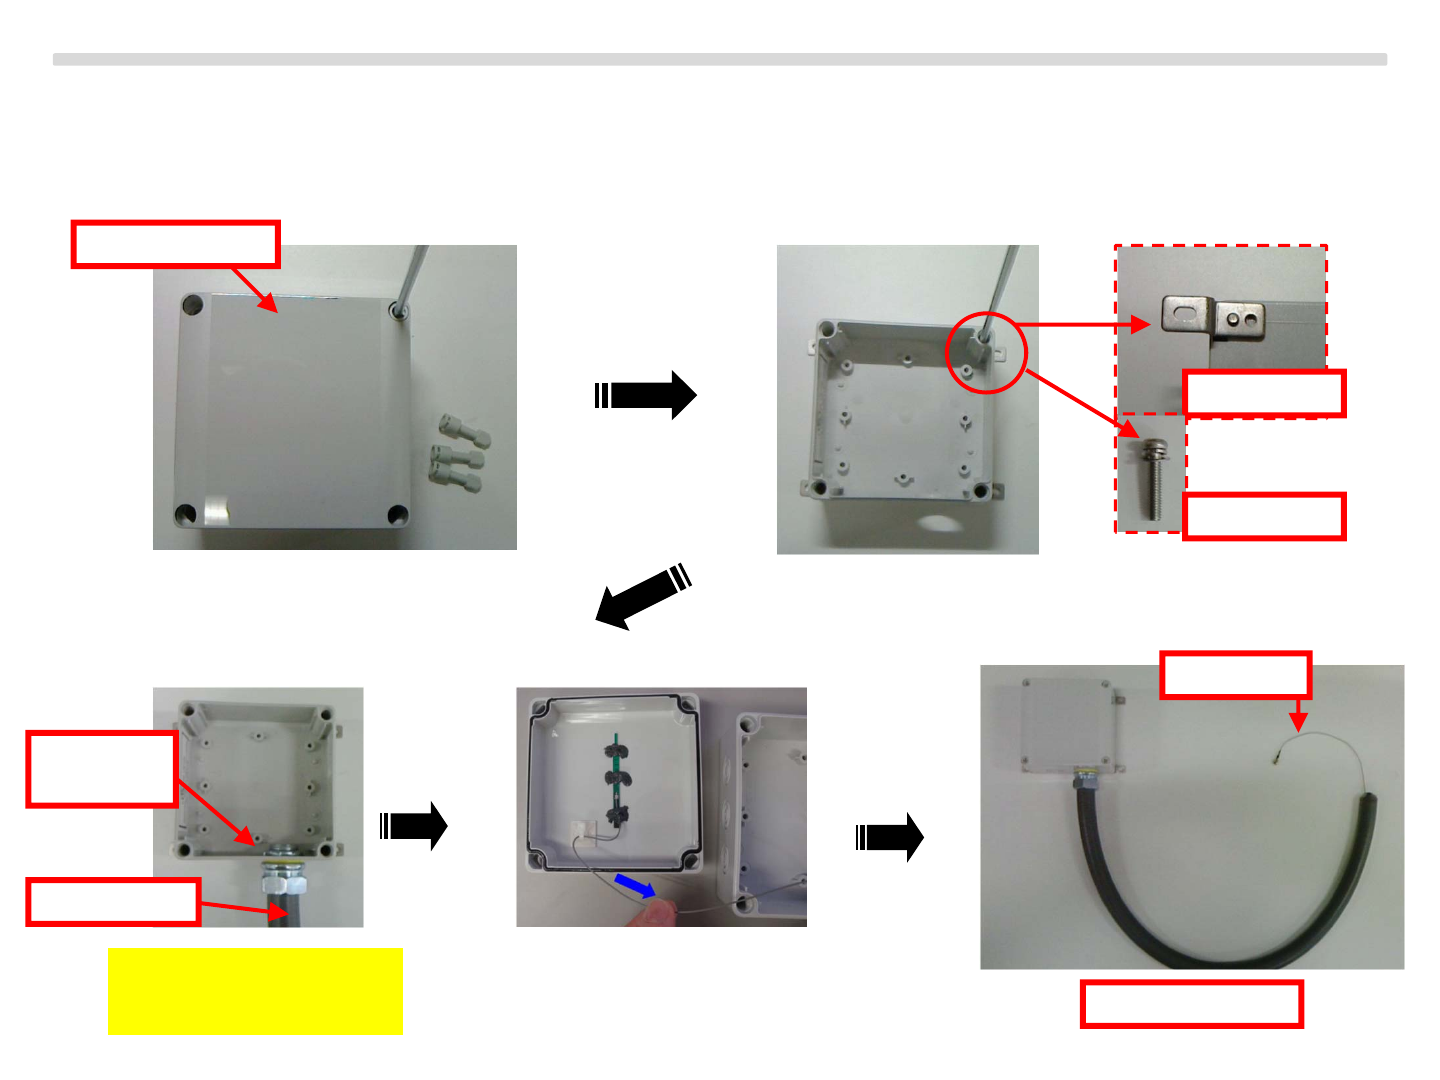
Assemble the WiFi antenna to the outer enclosure
Wear metal parts and fix the metal pipe.
Copyright Sony Energy Devices Corporation
Antenna
※Insert the pipe then
lock the connector
Antenna BOX
Screw out Wear metal parts
CK-34Z
U-0418-S1
Metal
connector
Metal Pipe
Insert antenna cable
Energy Storage System “IJ1001SNBT”
51
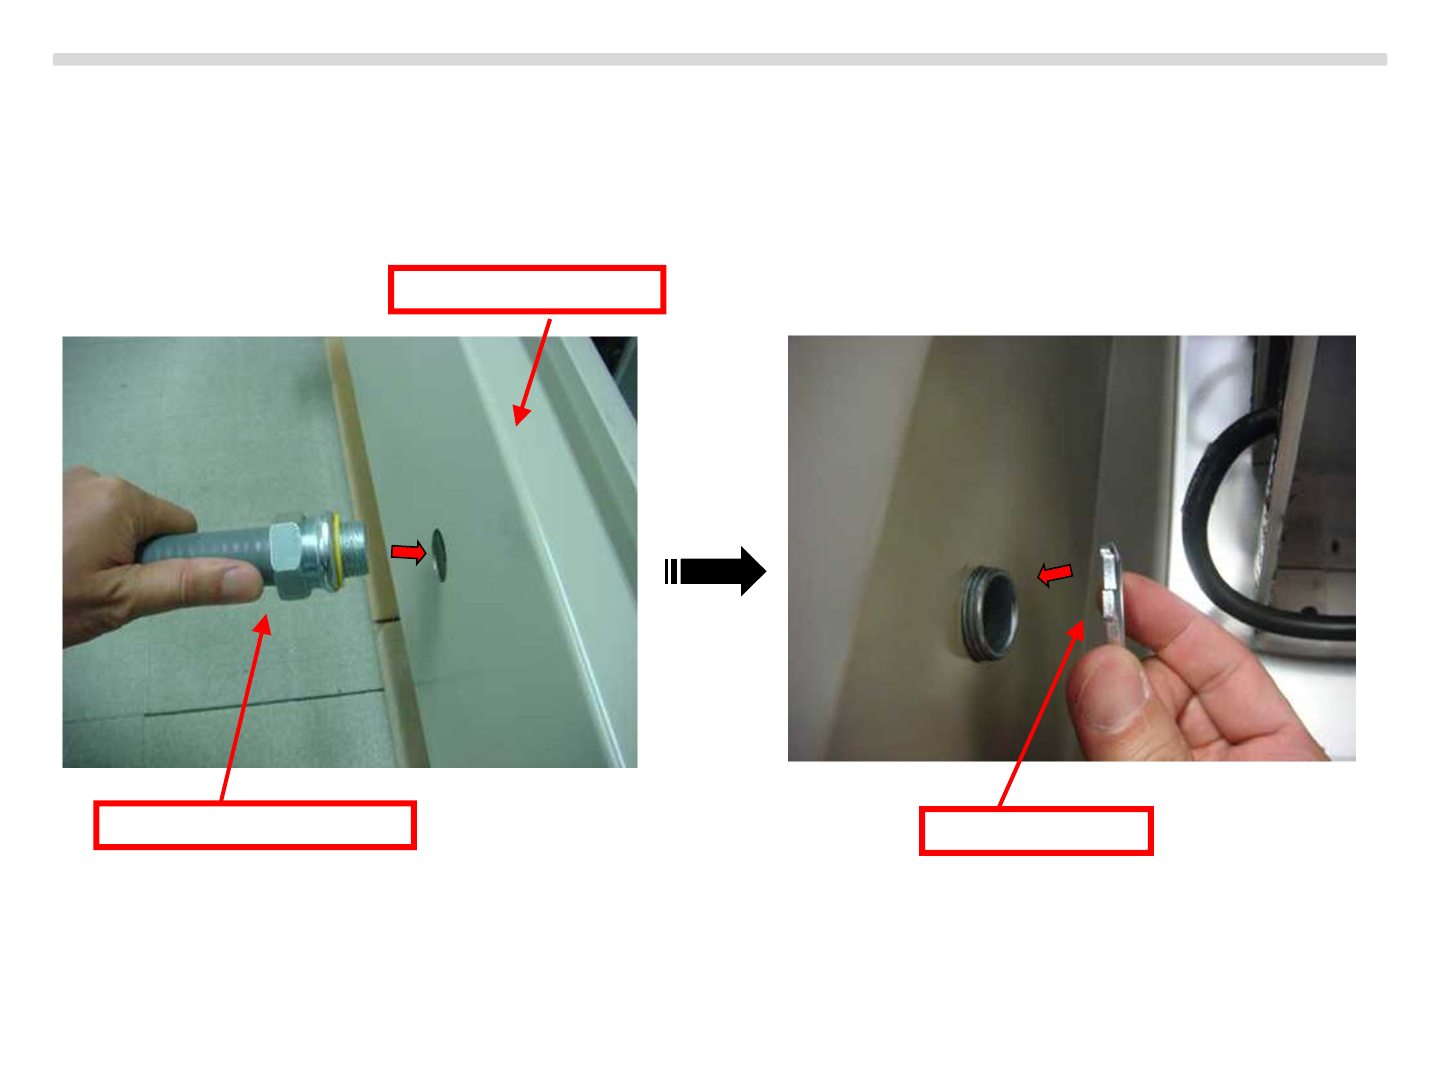
Assemble the WiFi antenna to the outer enclosure
Fix the pipe to the outer enclosure.
Copyright Sony Energy Devices Corporation
Connector and Pipe Connect screw
Outer Enclosure
Straight Liquid tight Connector 3/4" Trade Size
Liquid tight Flexible Steel Conduit 3/4" Trade Size
Energy Storage System “IJ1001SNBT”
52
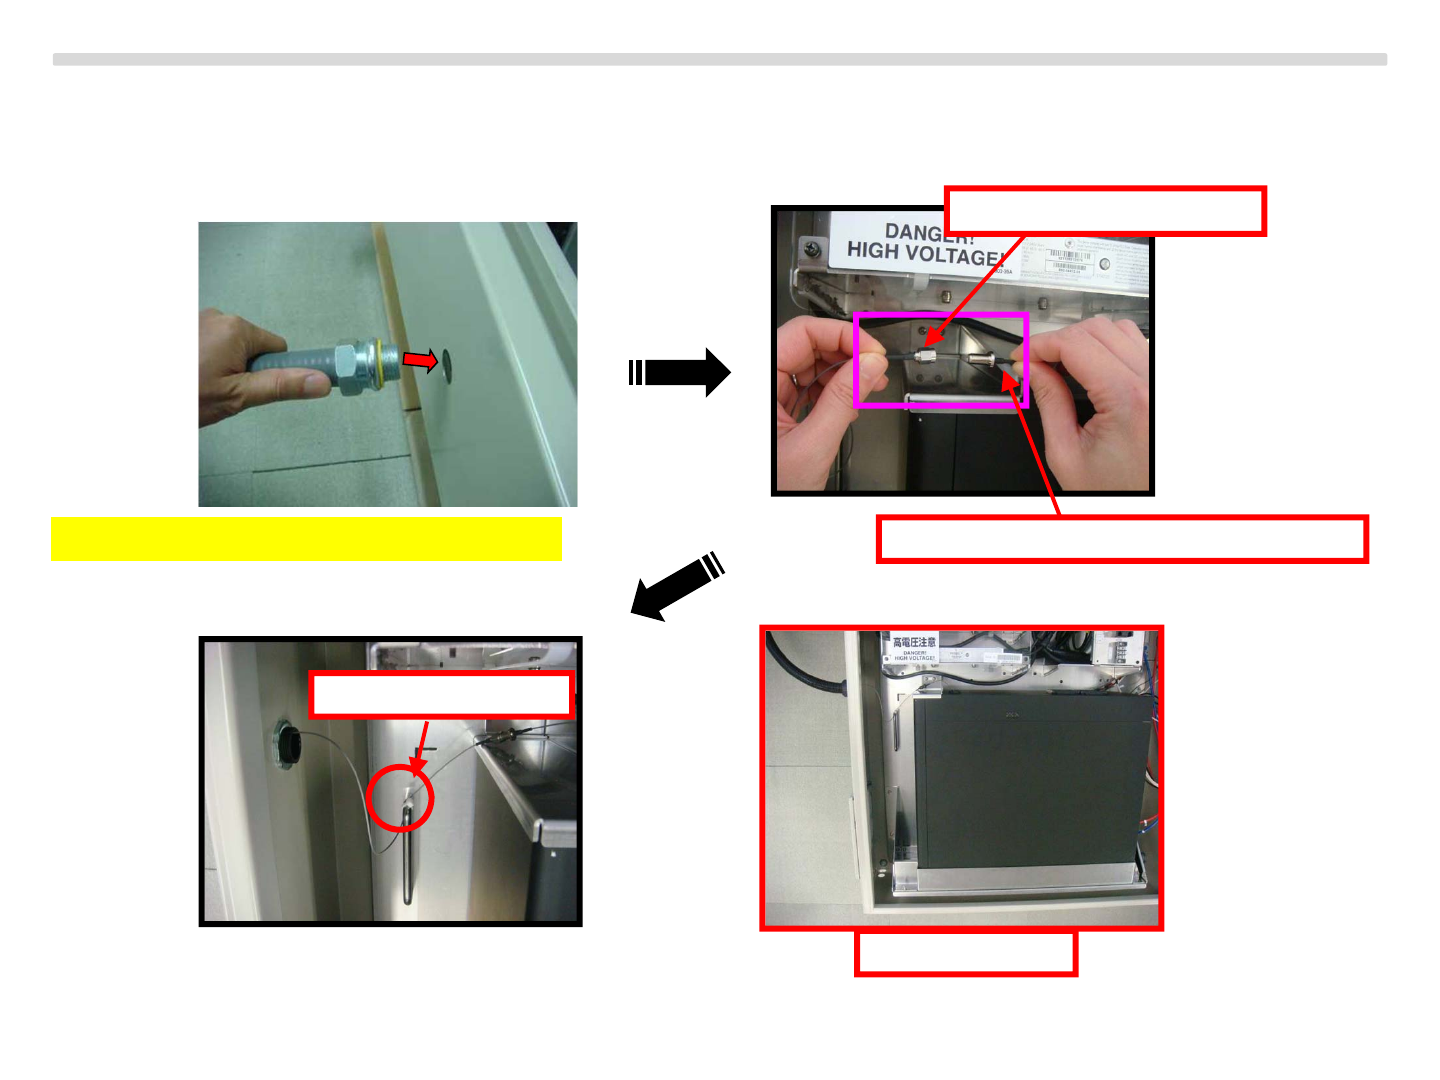
Assemble the WiFi antenna to the outer enclosure
Connect to the antenna cable and fix the cable inside the outer enclosure.
Copyright Sony Energy Devices Corporation
Fixed using tie
Completed
Cable from the energy storage server
Cable from the antenna
※Insert the pipe then lock the connector
Energy Storage System “IJ1001SNBT”
53
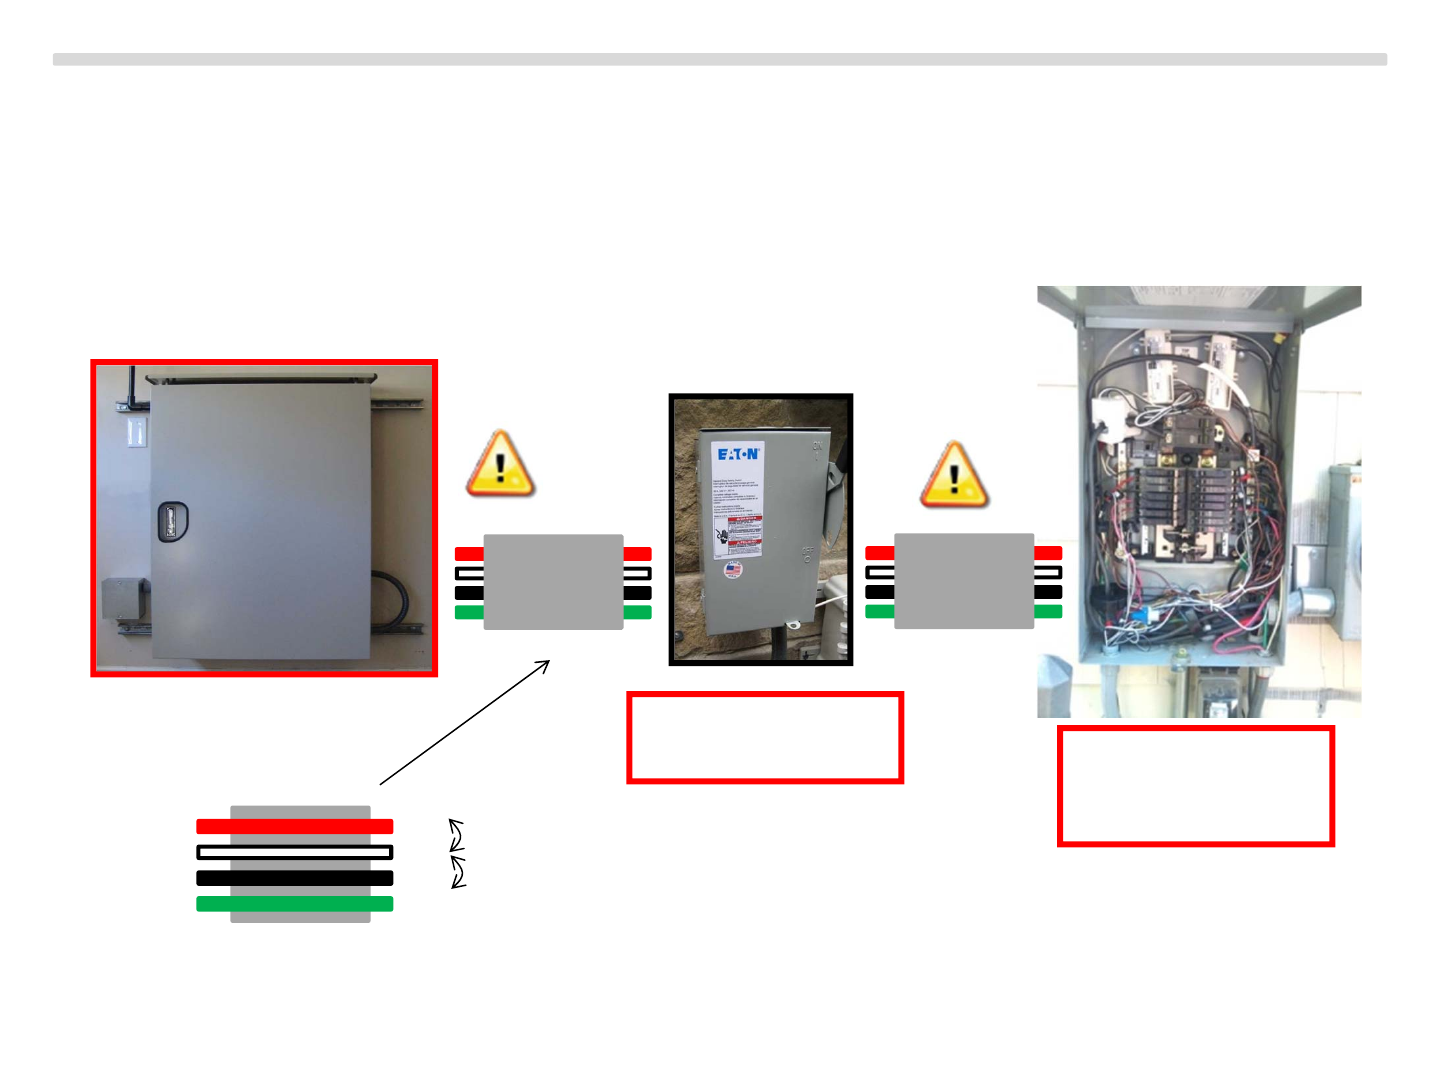
Set the connecting box and conduit
Overview
Set the connecting box to the wall and conduit from the energy storage system and to distribution panel.
Branch circuit inside the distribution panel required UL489 Listed, rated 240Vac, 30A, Time delay.
3 Cables are used, LI(Red) and N(White) connected to 120V, 60Hz.
L2(Black) and N connected to 120V, 60Hz.
Before start the installation, please refer to the next page.
Copyright Sony Energy Devices Corporation
Branch circuit
UL489 Listed, 240V,
30A, Time delay
Connecting Box
UL Listed, 30A
L1
N
L2
GND
AC120V, 60Hz
AC120V, 60Hz

Energy Storage System “IJ1001SNBT”
54
Set the connecting box and conduit
Remarks
The field-wiring terminals shall be connected using the following wire types:
AC connections:
18 in./lbs. - 22 in./lbs. tightening torque
#10 AWG - #14 AWG
wire type – rated 90C
Copper
Equipment Electrode Terminal:
75 in./lbs. – 88 in./lbs. tightening torque
#8 AWG - #10 AWG
wire type – rated 90C
Copper
Limits of accuracy of frequency measurement (+ 0.1 Hz)
Limits of accuracy of Voltage measurement (+ 6 V)
For conduit hubs, use only UL Listed rain tight for entry into the enclosure.
AC output / neutral is not bonded to ground.
The AC input and AC output circuits are isolated from the enclosure and that system grounding,
if required by Section 250 of the National Electrical Code, ANSI/NFPA 70, is the responsibility of the installer.
The National Electrical Code, ANSI/NFPA 70 wiring methods are to be used.
use if needed
The following pressure terminal connectors / component terminal assemblies are allowed / provided for
field installation with this unit.
Manufacturer : OSADA Co., Ltd (E121961)
Model #Type : OK-147-3P Acceptable wire gauges : 16-10 AWG
Copyright Sony Energy Devices Corporation
Energy Storage System “IJ1001SNBT”
55
Set the connecting box and conduit
Remarks
This charge controller / inverter is intended to charge batteries of the following type 51.2V Li-ion type only.
This inverter is intended for operation in an environment having a maximum ambient temperature of
60 degrees C.
CAUTION To reduce the risk of fire, connect only to a circuit provided with 30 amperes maximum
branch-circuit over current protection in accordance with the National Electrical Code,
ANSI/NFPA 70. Units with an integral ground-fault detector/interrupter [JWC1]
CAUTION Risk of electric shock. Normally grounded conductors may be ungrounded and energized
when a ground-fault is indicated.
Copyright Sony Energy Devices Corporation
Energy Storage System “IJ1001SNBT”
56
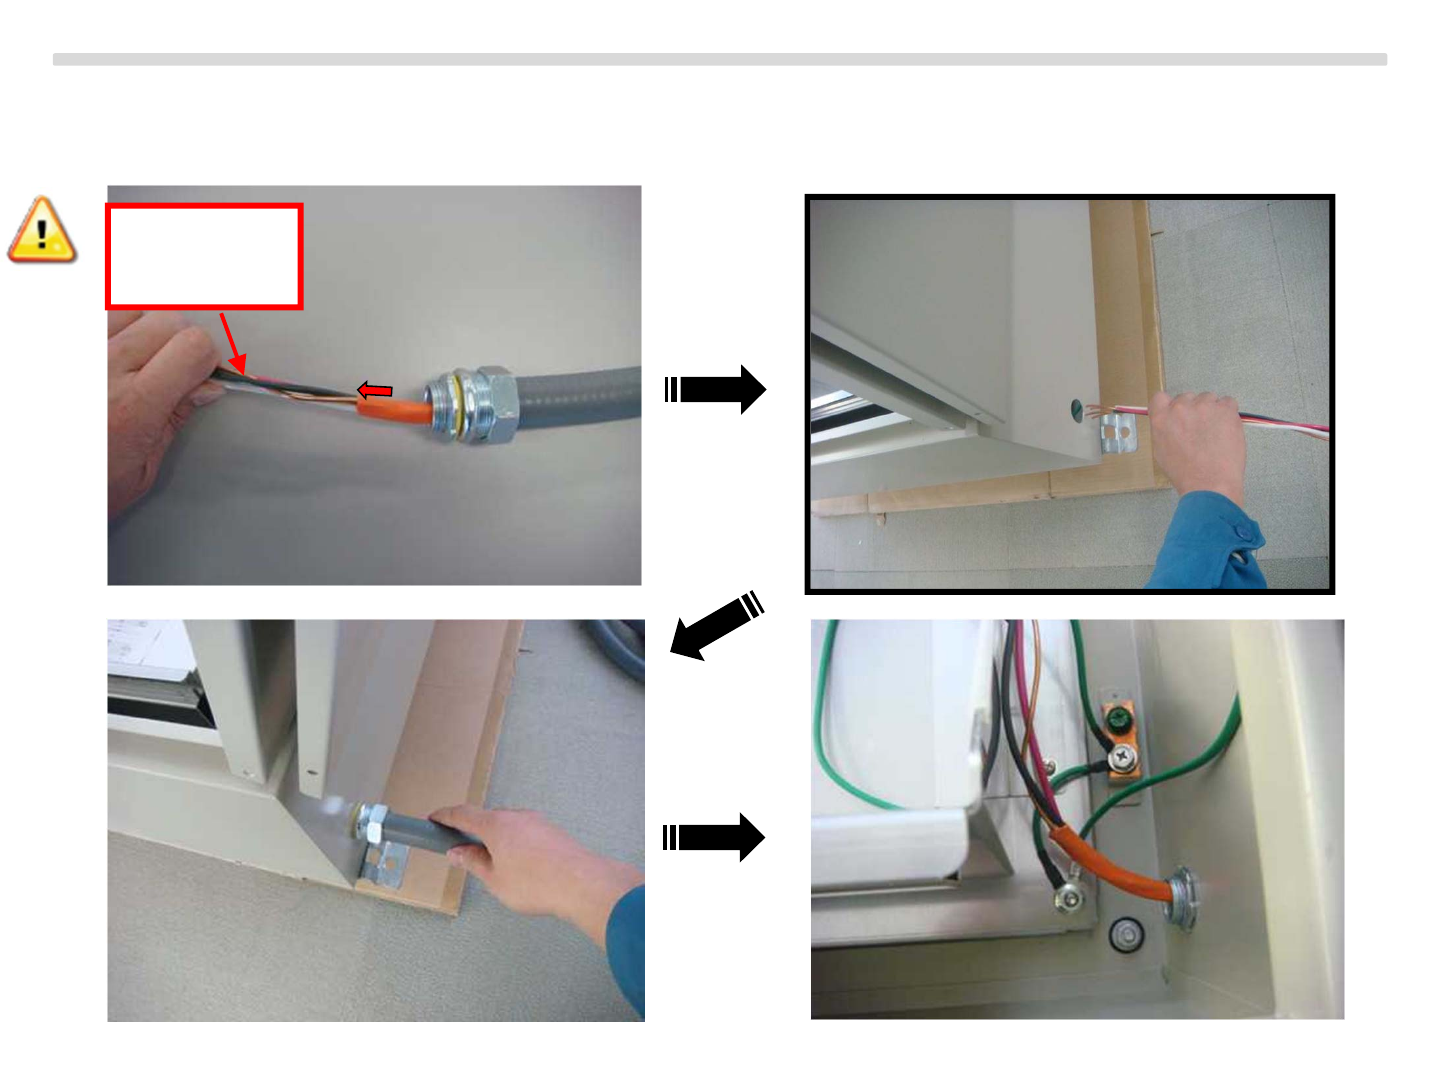
Set the connecting box and conduit
Conduit work.
Copyright Sony Energy Devices Corporation
Wire from
distribution
panel