WIMAN Systems WIMAN2A24 FHSS RF Modem User Manual Introduction to WIMAN technology
WIMAN Systems Inc FHSS RF Modem Introduction to WIMAN technology
Contents
Manual03

2 The WIMAN Command Line Level
21 / 90l
The parameter MaxNodeId determines the maximum number of
devices that are connected to a STAR.
Authorization Level: 2
Preset value: 1
Scope: 1 … 250
The parameter Location can be edited freely to determine the lo-
cation of the IWMAN radio modem, e.g. Water_Tower01 or
rooftop.
Authorization Level: 2
Preset value: default-location
Scope: No value
2.5.2 Parameter for the Serial Configuration Interface
The following parameters serve for the communication with the
serial configuration interface and are important for the correct
communication with the command line level.
The parameter ConBaudrate determines the Baud rate that can
be transferred over the RS-232-interface for configuring the
WIMAN.
Authorization Level: 1
Preset value: 9600
Scope: 300, 1200, 2400, 4800, 9600,
19200, 38400, 57600
The Parameter ConDataBit determines the length of the data bits
when transferring data over the RS 232-interface.
Authorization Level: 2
Preset value: 8
Scope: 7, 8
The parameter ConHandShake determines the handshaking
mode during a transfer on RS-232-interface. It can be selected
between a software-controlled handshaking and no handshaking.
With software-controlled handshaking the control sequences
Xon and Xoff are used.
Authorization Level: 2
Preset value: soft
Scope: soft, none (no handshaking)
ConBaudrate
ConDataBit
ConHandShake
Location
MaxNodeId

2 The WIMAN Command Line Level
22 / 90
The parameter ConPageSize indicates, how many lines in the re-
spective command line window (terminal window over RS-232-
interface) are to be represented, before the continuous output of
the parameters is stopped. The size of an output page is thus fi-
nally determined.
Authorization Level: 2
Preset value: 24
Scope: 10 ... 100
The parameter ConPauseMode determines if the output on the
display shall be stopped after the number of lines given with
ConPageSize or not.
Authorization Level: 2
Preset value: On
Scope: On, Off
The parameter ConParity determines the type of the parity
check on the serial RS-232-interface.
Authorization Level: 2
Preset value: none (no parity check)
Scope: none, odd, even
The parameter ConStopBit determines, how many stop bits are
supposed to follow the data bits on the serial RS-232-interface.
Authorization Level: 2
Preset value: 1
Scope: 1, 2
2.5.3 Parameter for the serial data Interface
The following parameters serve for the configuration of the se-
rial data interface and are important for correct data exchange
between the Router and the WIMAN radio data modem.
The parameter SerBaudrate determines the Baud rate for the
data communication on the X21-interface.
Authorization Level: 1
Preset value: 2048000
SerBaudrate
ConParity
ConStopBit
ConPageSize
ConPauseMode

2 The WIMAN Command Line Level
23 / 90l
Scope: 19200, 48000, 64000, 128000,
256000, 512000, 1024000,
2048000
The parameter SerCRC determines the error correction proce-
dure that can be used (check total of 16 or 32 bits).
Authorization Level: 2
Preset value: 16
Scope: 16, 32
The parameter SerEncode determines the coding procedure on
the X.21-interface. It can be selected between the values NRZ or
NRZI. NRZ is for No Return zero and NRZI for NO Return
zero Inverted.
Authorization Level: 2
Preset value: NRZ
Scope: NRZ, NRZI
Determines whether the external control signal is analyzed
(SerControl normal) on the synchronous serial interface
(e.g. C with X.21) or whether the signal is set internally by the
WIMAN device (SerControl internal). Latter adjust-
ment is particularly necessary with the application of 10paired
(10x2) data cables (between hybrid cables 2 and 3), since the C-
line of the DTE is not been transferred here.
Authorization Level: 2
Preset value: Normal
Scope: Normal, Intern
2.5.4 Network-Parameter
The parameter IPDefaultGW determines, to which IP address IP
packages are to be sent, whose target is not situated in the con-
figured local area network and thus is not known in this network
Authorization Level: 2
Preset value: 0.0.0.0
Scope: valid IP-address
The parameter IPEthAddress determines the IP address, which is
bound to the Ethernet interface (an IP address from the local
area network).
Authorization Level: 2
IPDefaultG
W
IPEthAddress
SerCRC
SerEncode
SerControl

2 The WIMAN Command Line Level
24 / 90
Preset value: 0.0.0.0
Scope: valid IP-address
The parameter IPEthMask determines the subnet-mask for the
IP network bound to the Ethernet interface.
Authorization Level: 2
Preset: 0.0.0.0
Scope: valid IP-subnet-mask
The parameter IPSerAddress determines the IP address, which is
bound to the X.21-interface (an IP address from the local area
network).
Authorization Level: 1
Preset value: 0.0.0.0
Scope: valid IP-address
The parameters IPSerMask determines the subnet-mask for the
IP network bound to the X.21-interface.
Authorization Level: 1
Preset value: 0.0.0.0
Scope: valid IP-subnet-mask
The parameter IPWLAddress determines the IP address, which is
bound to the wireless interface (an IP address from the local area
network). This parameter is not available on STAR devices.
Authorization Level: 1
Preset value: 0.0.0.0
Scope: valid IP-address
The parameter IPWLMask determines the subnet-mask for the
IP network bound to the wireless interface. This parameter is not
available on STAR devices.
Authorization Level: 1
Preset value: 0.0.0.0
Scope: valid IP-subnet-mask
The parameter IPTFTPServer indicates the IP address of a
Server, from which a software download can be executed.
Authorization Level: 2
Preset value: 0.0.0.0
IPEthMask
IPSerAddress
IPSerMask
IPWLAddress
IPWLMask
IPTFTPServer

2 The WIMAN Command Line Level
25 / 90l
Scope: valid IP-address
2.5.5 Other Parameter
The parameter PS1 determines the appearance of the WIMAN
command line prompt. The factory-installed setting is
WIMAN II >. However, the user has the option to edit the
command line prompt (e.g. DEVICE 1:).
Authorization Level: 2
The parameter SyncMode determines whether the WIMAN gen-
erates the Burst-synchronizing signal (master), or if it will re-
ceive an externally generated Burst signal (Slave). Further de-
tails to this parameter can be found in chapter 4.5 on page 53
Authorization Level: 2
Preset value: Off
Scope: Off, Master, Slave
2.6 Instructions
Issuing instructions on the command line level configure the
WIMAN radio modem. The instructions available for use de-
pend on the authorization level and the operating mode.
The instructions can be roughly divided into three categories:
• Instructions for the manipulation of passwords and authori-
zation levels
• Instructions for manipulating and transferring configuration
data
• General instructions
2.6.1 Instructions for the manipulation of Passwords and
Authorization Levels
The following commands are available for the designation and
modification of passwords:
Note
To execute instructions the device must be in configuration
mode (see Chapter 3, page 33)
The instruction Passwd console permits the definition of a
password for access to the first authorization level (console).
Passwd console
SyncMode
PS 1

2 The WIMAN Command Line Level
26 / 90
When selecting a password, be sure to use the designated char-
acters only (see page 14). For instructions on how to set up a
password for authorization level one, see Chapter 3.5.1, page 40.
The instruction del Passwd console deletes the password for au-
thorization level one (console). For mor information see Chap-
ter 3.5.2, page 41.
The instruction passwd enable permits the designation of a
password for access to authorization level two (Enable). When
entering the password, be sure tu use the specified characters
only (see page 14). For instructions on how to set up a password
for authorization level two, please refer to Chapter 3.5.3,
page 40.
The instruction Enable enables you to switch from the instruc-
tion mode of the authorization level one into the command mode
of the authorization level two (see page 25). To enter the au-
thorization level two a password is always required.
2.6.2 Instructions for manipulating and transferring of
Configuration Data
The instruction Checkcfg checks if all the parameters are valid
and entered correctly. This instruction can only be issued in con-
figuration mode.
The instruction Config enables to change from the command
mode of the respective authorization level into the configuration
mode (see page 25). A successful transition into the configura-
tion mode is displayed by the term (config) behind the com-
mand-line prompt and before the indication of the authorization
levels (located in parentheses). The following example shows
the factory-installed command-line prompt for authorization
level two:
WIMAN II (config) #
Del Passwd
console
Enable
Config
Passwd enable
checkcfg

2 The WIMAN Command Line Level
27 / 90l
The command Del Config enables the factory-installed preset
parameter-values to be transferred from the non-volatile con-
figuration to the new configuration. All modifications entered
before will be overwritten. This command can be given in con-
figuration mode only.
The command Del < paraname > enables a transferring of the
factory-installed preset parameter-value for the parameter de-
fined in < parname > from the non-volatile configuration into
the new configuration. All modifications of < parname > are
overwritten with defined parameters. In contrast to the instruc-
tion Del Config, it is possible to overwrite directed parameters
with the factory-installed defaults. This instruction can be issued
in the configuration mode only.
The command exit enables you to leave the configuration mode
or the command mode.
When leaving the config mode after having changed at least one
parameter, you will be asked whether these modifications should
be made the present configuration.
You now have the choice to:
• Make the modifications the present configuration and leave
the config mode by entering ‘y’,
• Discard the modifications to the present configuration and
leave the config-mode by entering ‘n’, or,
• stay in configuration mode and make the modifications only
the new configuration by entering ‘c’.
When leaving the command mode after having changed at least
one parameter (at least one parameter was modified in the con-
figuration mode and the modification was made the present con-
figuration), You will also be asked if these modifications are to
be considered with the next restart (They will be transferred into
the non-volatile configuration).
You now have the choice to:
• transfer the modifications to the non-volatile configuration
and leave the command mode by entering ‘y’,
• discard all modifications made and leave the command
mode by entering ‘n’ or
• stay in the command mode and keep the modification of the
parameters exclusively as present configuration by entering
‘c’.
Exit
Del <paraname>
Del Config
2 The WIMAN Command Line Level
28 / 90
Note
Entering the command exit at the command line level (Shell)
will always allow you to leave the command mode. This proce-
dure ensures that modifications made in a higher authorization
level are saved.
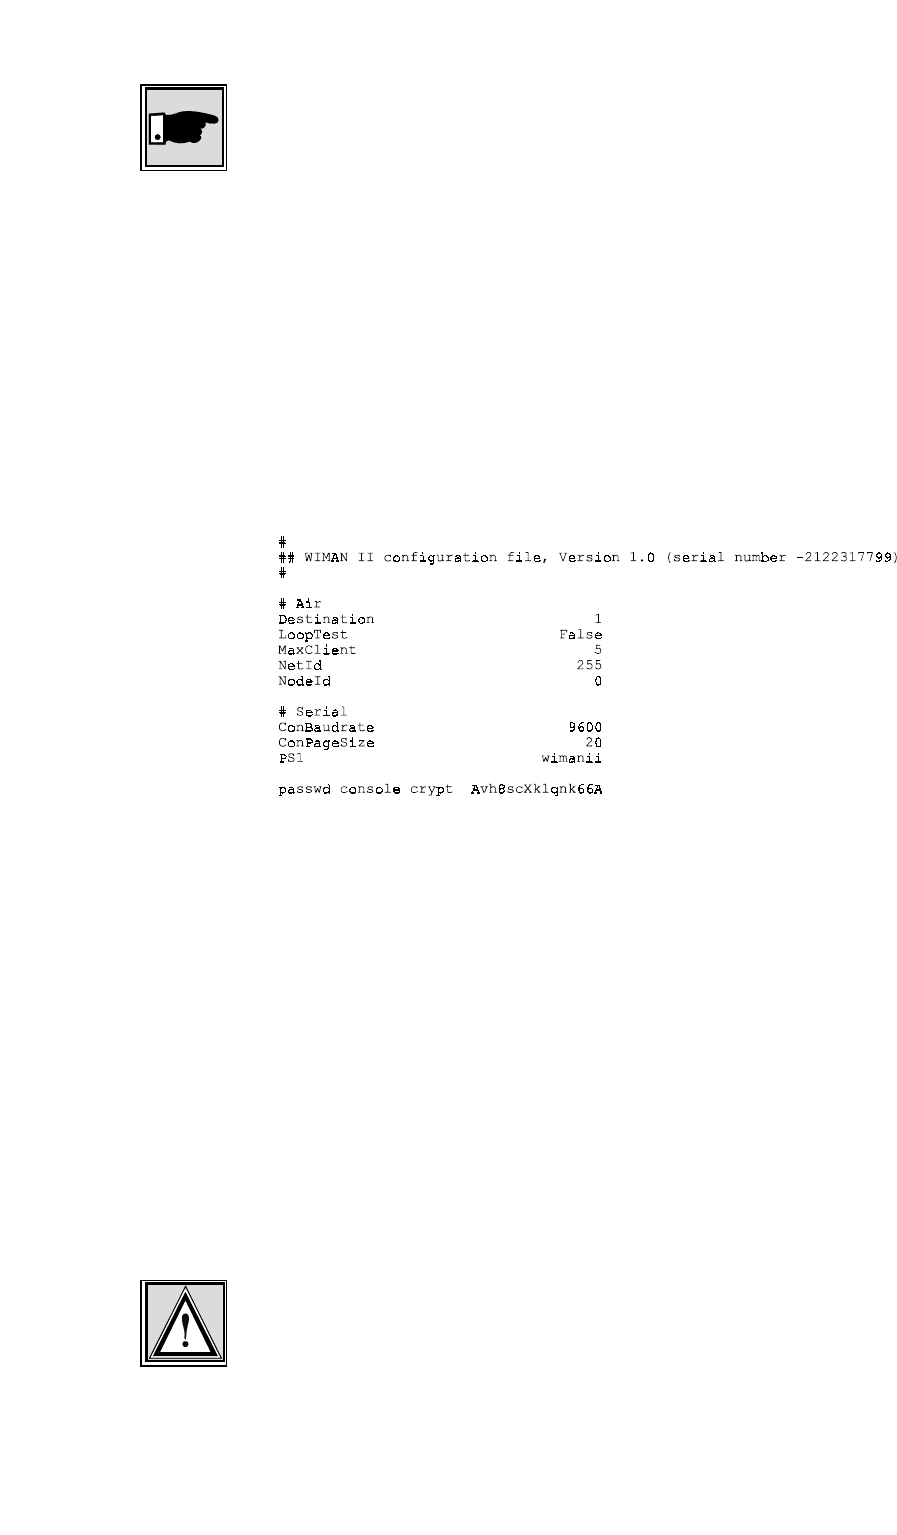
The command Export makes it possible to export the configura-
tion parameter values into an ACSII-file. The Serial number of
the WIMAN as well as the encrypted passwords are put out, too.
The range of the parameter values depends on the authorization
level in which you are when issuing this command. At the end
of the configuration file, the passwords for the individual au-
thorization levels are exported in encoded form, excluding the
passwords for the authorization levels you have no access to.
Figure 6 shows a possible configuration file.
Figure 6 exported configuration file
The instruction <parname> <value> enables you to occupy the
defined parameter <parname> with the defined value <value>.
This is the "classic” command for adapting the WIMAN to your
specific requirements. This instruction can be executed in con-
figuration mode only!
The instruction save transfers the present configuration into the
non-volatile configuration. This instruction can be issued only in
the command mode.
The instruction Restore enables a transferring of the parameter-
values from the non-volatile configuration into the new configu-
ration. All modifications completed before are overwritten. This
instruction can be issued in the configuration mode only.
Attention:
Since the parameter-values of the non-volatile configuration do
not have to correspond with the values of the present configura-
tion, an operational disturbance can occur. This can happen due
Save
Restore
Export
<parname>
<value>

2 The WIMAN Command Line Level
29 / 90l
to a false configuration when leaving the configuration mode
with simultaneous transfer of the data into the present configura-
tion (the query when leaving the config mode was acknowl-
edged with y).
Before storing of the data into the present configuration, be sure
that the parameters are occupied with the values necessary for
your configuration.

2 The WIMAN Command Line Level
30 / 90
2.6.3 General instructions
The instruction Help displays a summarized list of instructions.
The output on the command line level appears as follows:
WIMAN_Star # help
WIMAN II Wireless Data Communication Equipment
(c) 1999-2000 ALTVATER AIRDATA Systems GmbH & Co. KG, Bad Rappenau Germany
Built-In shell commands:
config - enter config mode
clear - clears a VT 100 screen
clear stat <type> - clears the statistic <type>
exit - exit configuration shell
export - export configuration
help - display these few helpful help lines
reset - reset unit
save - save running config to boot config
show - display running config and differences to boot config
show <regex> - display parameter(s) matching <regex>
stat <type> - display statistic information of <type>
swupdate <swlst> - get software update list <swlst> from TFTP Server
How to use command line editing, the shell history function and
the syntax of a valid <regexp>, please see the user's manual.
Figure 7 Help display output
The input of a valid parameter name alone leads to textual in-
formation available for this parameter. The admissible scope for
this parameter is displayed and the factory-installed preset value
are displayed, too.
The command CLEAR deletes the display on the command line
level of the respective terminal program (e.g. Telix or telnet
window).
The instruction reset restarts the WIMAN (Hardware reset).
<parname>
reset
Help
clear

2 The WIMAN Command Line Level
31 / 90l
2.6.4 Statistics Instructions
The WIMAN radio modem collects statistics data and system in-
formation on both software and hardware as. In case of an error,
a very exact search for the cause of the error is possible with the
help of the statistics explained below.
The command Stat displays a list of the available statistics. The
display output appears as follows:
WIMAN_Star # stat
The following statistics are available:
serial - serial interface statistics
eth - ethernet interface statistics
fr - common frame relay information
fr<dlci> - traffic on frame relay <dlci>
frmap - show dlci switching map
wl - common wireless interface information
wl<n> - traffic on wireless interface node <n>
qos<n> - actual quality of services wireless interface <n>
ipif - IP interfaces
iproute - IP routing table
tp - transparent interface statistics
sync - RF and external synchronisation
hw - hardware statistics
sw - software statistics
update - software update statistics
sysmsg - system messages
syserr - system errors
date - actual date and time
Figure 8 the statistics assistance display
The instruction Stat <type> displays the statistics specified with
<type>. The following statistics can be selected:
• serial
supplies statistics of all serial interfaces
• fr
supplies general Frame Relay information
• fr<dlci>
supplies information of a certain Frame Relay channel
(DLCI)
• wl
supplies general information of the wireless interface
• wl<node>
supplies information about the data communication to a
certain WIMAN ACCESS selected with NodeId
• qos<n>
Quality of service. Supplies performance information about
the grade of transmission
Stat <type>
Stat

2 The WIMAN Command Line Level
32 / 90
• sync
supplies information about the synchronization status of the
WIMAN.
• sysmsg
supplies a list with system messages
• syserr
supplies the system error list
• hw
supplies a list with hardware statistics
• sw
supplies a list of software statistics
• tp
supplies traffic information for the wireless hardware driver
• lbt
listen before talking
• con
supplies login-information about the wireless connection
• eth
supplies information about the ethernet connection
• date
supplies information about the time and date
• update
supplies information about the status of a TFTP-update
The parameters serial, fr, wl and qos can supply extended in-
formation by adding the switch <ext> to the instruction, e.g.
stat wl1 ext.
By adding the switch cont=<x> you can achieve continuous
output. The <x> gives the amount in seconds how fast the up-
date-interval of the output shall be. This function is especially
useful when performing a looptest, e.g. stat qos1 cont=2 dis-
plays information about the Quality of Service on the wireless
interface 1 in continuous mode. The display is updated every 2
seconds.
The instruction Clear stat <type> sets the counter statistics-
display of the device specified with <type> back to zero. The
setting of <type> to ALL clears all statistics.
Clear stat <type>

33 / 90l
3 Configuration of the WIMAN radio modem
3 Configuration of the WIMAN radio mo-
dem
To adjust the WIMAN to your specific network needs it is nec-
essary to modify some of the factory-installed preset parameters.
This modification of the WIMAN can be executed via three dif-
ferent types of interfaces:
• the wireless interface
• the RS-232-interface
• the X.21-interface.
Access to the command line level via the serial RS-232-interface
can take place with the help of a terminal program without pre-
vious configuration of the WIMAN. The access to the command
line level via the wireless interface and the X.21-interface re-
quires a previous configuration of the WIMAN.
3.1 Access to the Command Line Level over the
Wireless Interface
To access the command line level over the wireless interface
you have to use a TELNET-Program like NETTERM or the
like. Just enter the correct IP-address of the WIMAN you want
to administer and connect. You will receive the same display as
if connecting via a serial cable.
The big advantage is that you can connect to any WIMAN, no
matter where it is situated, and that you have the same function-
ality as when connecting directly via cable.
Checklist:
To access the WIMAN radio modem via the wireless-interface
you need:
• A Terminal program (Telix, Hyperterm, etc.),
• A PC/Laptop with an online connection
• A properly configured WIMAN unit
34 / 90
3 Configuration of the WIMAN radio modem
3.2 Access to the Command Line Level over the RS-
232 Interface
Checklist:
To access the WIMAN via the serial RS-232-interface you need:
• Terminal program (e.g. ZOC, TELIX),
• PC/Laptop with a free serial interface (e.g.. Com1, Com2)
• Hybrid cable (see chapter 8.3 on page 75)
• RS-232-connection cable with proper 9- or 25-pin plug/
socket, which fit to the plug/socket of the serial interface of
the PC/Laptop as well as to the RS-232-interface of the hy-
brid cable.
• Power supply for the WIMAN (supplied with the WIMAN
hardware)
Follow these steps to access the command line level of the
WIMAN:
1. Connect the hybrid cable with the 37pin D-Sub connector at
the backside of the WIMAN.
2. Connect one side of the RS-232 cable with the serial inter-
face of the PC and the other side with the RS-232 link of
the hybrid cable.
3. Connect the DIN plug of the power supply with the hybrid
cable and the plug of the power supply with an AC socket.
The illuminated power LED on the front of the WIMAN
will indicate that the WIMAN is activated.
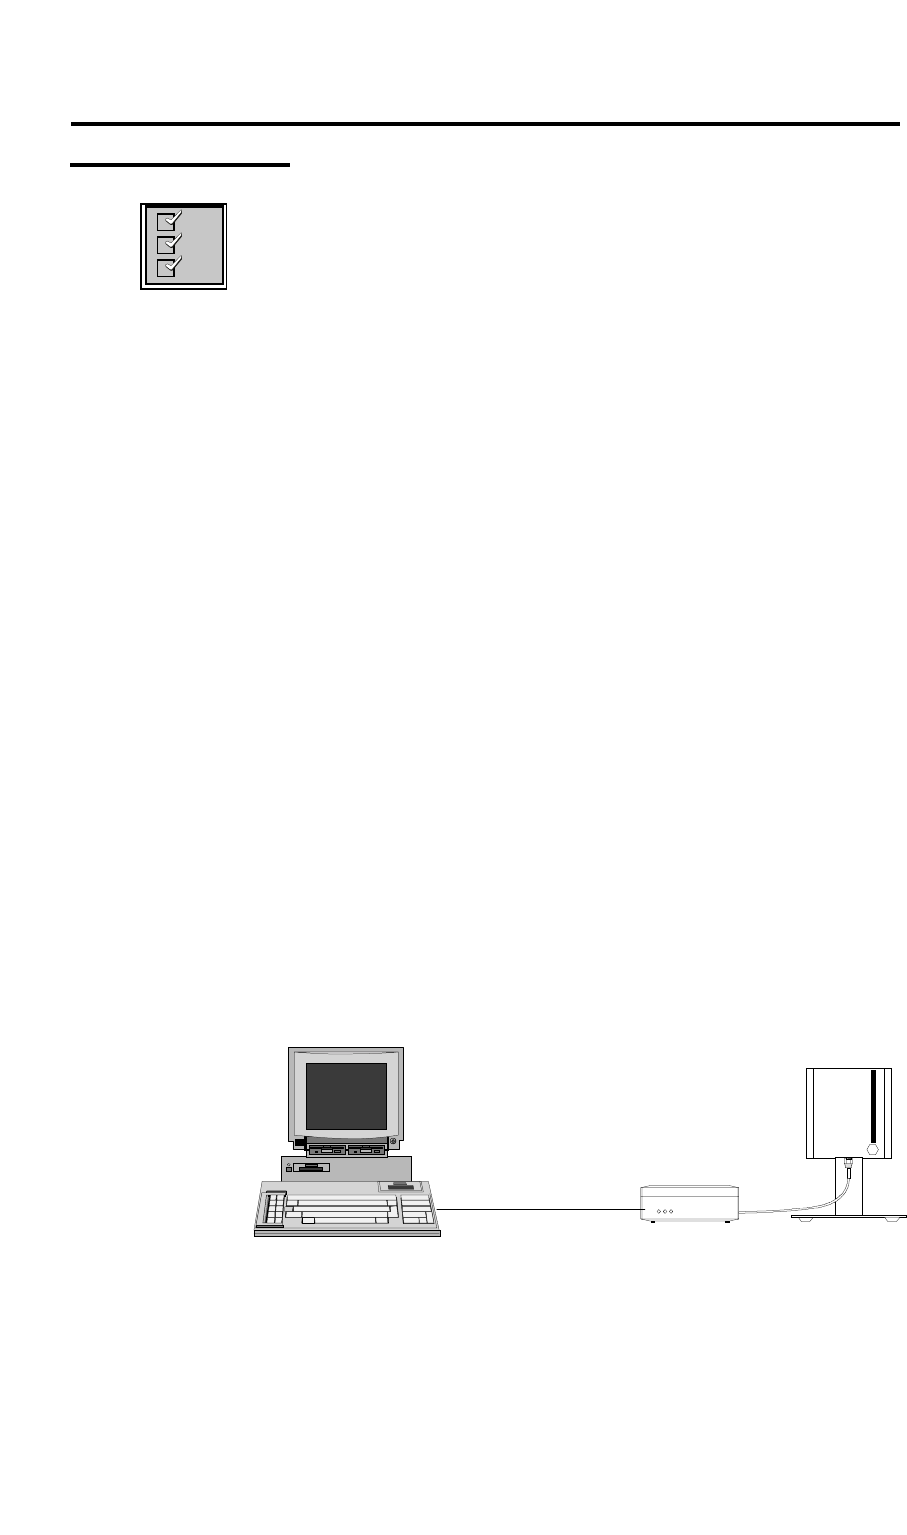
Figure 9 shows the arrangement of equipment for the configura-
tion of the WIMAN radio modem.
RS232-cable
WIMAN-unit
Com
p
uter with VT1xx-emulation
Figure 9 arrangement of equipment for the configuration
of the WIMAN radio modem
4. Start the PC and afterwards the terminal program.
35 / 90l
3 Configuration of the WIMAN radio modem
The operating system of the WIMAN has an integrated com-
mand line interpreter ("Shell") for configuration. Input and out-
put is shown on the input/output window of the PC terminal pro-
gram (e.g. TELIX, ZOC), which must be able to emulate a VT-
terminal (DEC). The communication parameters of the terminal
program and the WIMAN must correspond so that the WIMAN
and the Computer can communicate.
Note:
The default settings of the RS-232-interface of the WIMAN is
adjusted to a data rate of 9600 Bit/s, a data length of 8 data bits,
one stop bit and no parity check (8N1). As handshaking proce-
dure software handshaking is configured.
To ensure that the terminal program uses the same parameters,
set the communication parameters of the terminal program to the
values stated above. If these parameters were not set correctly
communication with the WIMAN radio modem is not possible.
These values can be preset in the terminal program, thus starting
the terminal program immediately with the suitable settings.
After the WIMAN is attached to the operating voltage, it
switches itself into the transparent data-communication operat-
ing mode. Pressing the INPUT key in your terminal program
brings you to the command line level of the WIMAN.
The command line prompt should appear as follows:
WIMAN II Configuration Shell (TTY connection)
WIMAN-II >
If the WIMAN is not configured to the factory-installed de-
faults, another command line prompt may appear. It is also pos-
sible that the first authorization level of the command line level
is protected by a password.
If so, the following message appears:
WIMAN II Configuration Shell (TTY connection)
Enter password:
In this case you need the password of the supplier of the
WIMAN. If the password should not be available, please contact
your WIMAN Distributor.
Note:
If you do not arrive at the command line level of the WIMAN or
if only “confused” characters are shown on the screen after you
have adjusted the above mentioned settings, do not be con-
cerned. It may be that the configuration of the WIMAN has al-

36 / 90
3 Configuration of the WIMAN radio modem
ready been modified. In this case test different adjustments re-
garding the Baud-rate, the Stop-bits, etc.
3.3 Access to the command line prompt via the
X.21-interface
Will be created later
3.4 Setting of the Parameters of the Differnt Inter-
faces
3.4.1 Setting of the Parameters for the Wireless Interface
The settings of the parameters for the wireless interface can be
divided into the following two categories:
• base parameter and
• extended parameters.
The base parameters destination (see page 17), LoopTest (see
page 19), NetId (see to page 19) and NodeId (see page 19) can
be modified already in authorization level one (e.g. by the final
customer).
The extended parameters (all remaining parameters in section 2,
on page 39) can only be modified in authorization level two.
To set the base parameters for the wireless interface:
Checklist:
You need the values of the parameters destination (only LINE),
NetId and NodeId. To obtain these values please check with
your Provider.
1. Access the command line level of the authorization level
one (see chapter 2) and change into the configuration mode
by entering the config -command. You will receive a simi-
lar display output (depending on the prompt configured)
like:
WIMAN-II (config) >

37 / 90l
3 Configuration of the WIMAN radio modem
2. Type in the command show.
You will receive a list of the changeable parameters in au-
thorization level one e.g. in the following display output:
WIMAN_Star (config) > show
Config mode running config ( new config)
# Wireless
NetId 250
NodeId 0
# Serial
SerBaudrate 2048000
# Console
ConBaudrate 9600
# Network
IPSerAddress 192.168.40.2
IPSerMask 255.255.255.224
All changeable parameters for the wireless interface are
listed under the category “#Wireless”.
3. Modify the parameters according to the specifications of
your Provider. Type in the parameter, followed by a blank,
next add the value of the parameter and press ENTER.
NetID 255 ↵
NodeId 2 ↵
4. Check with checkcfg whether all values for the parameters
were input correctly. If the inputs were correct, you will re-
ceive the following display output:
WIMAN-II (config) > checkcfg
parameter check successful
In case of an incorrect input you receive an error message
with output of the accepted parameter e.g.:
wimanii (config) > checkcfg
bad value: NodeId
configuration invalid
5. Type in the instruction show again to compare the input
values with the values given by your Provider. The new
configuration of the parameter is displayed in parentheses.
Access_01 (config) > show
Config mode running config ( new config)
# Wireless
NetId 250 ( 255)
NodeId 1 ( 2)

38 / 90
3 Configuration of the WIMAN radio modem
6. In order to transfer the modifications into the current con-
figuration leave the configuration mode with exit (see
page 27).
The following display output appears::
Configuration changed, do you want to save (y)es
/ (n)o / (c)ancel ?
You now have the choice to do one of the following:
- Transfer the new configuration to the current configuration
and to leave the configuration mode by pressing the key " y,
- Leave the configuration mode without transferring the new
configuration to the current configuration by pressing the
key " n "
- Remain in the configuration mode and repeat the configura-
tion or do another modification of parameters (if necessary)
by pressing the key " c ".
In order to maintain the values after a restart it is necessary to
store them in the non-volatile configuration. This can be done in
two ways:
• With input of the command save (see page 28) in the com-
mand mode.
All modifications made at this configuration are stored in
the non-volatile configuration and are available after a re-
start.
The command-mode will not be left.
• With input of the command exit (see page 17) in the com-
mand mode.
When leaving the command mode the WIMAN radio mo-
dem checks whether the present configuration modifica-
tions are available for non-volatile configuration. Since you
made some modifications the following display output ap-
pears:
Boot config differs from running config, save
(y)es / (n)o / (c)ancel ?
You now have the choice to do one of the following:

39 / 90l
3 Configuration of the WIMAN radio modem
- Transfer the modifications to the non volatile configuration
and to leave the command mode by pressing the key "y",
- Discard the modifications and leave the command mode by
pressing the key “n“ or
- Don’t take over the modifications but stay in command
mode and redo some modifications by pressing the key “c”
To set up the extended parameters for the wireless interface:
Attention:
In order to avoid disturbances in the current line operation, only
qualified personnel in arrangment with the Provider may carry
out these modifications.
Checklist:
You need a list of the parameters configured by your Provider.
1. Access the command line level of the authorization level
two (see chapter 2 on page 13) and change into the configu-
ration mode with the command config.
2. Proceed as shown under point 2. during adjustment of the
base parameters and replace thereby the term " authoriza-
tion level one " with " authorization level two ".
3.4.2 Setup of the Parameter of the serial interfaces
The adjustments of the parameters for the serial interfaces can
basically be divided into the following two categories:
• Basic parameter and
• extended parameter.
The only base parameter that can already be modified in au-
thorization level one (e.g. of the final customer) is ConBaudrate
(see page 21).
All other parameters (see chapter 2 starting from page 13) may
exclusively be modified in authorization level two.
To set the parameters of the serial interfaces:
Proceed as shown in Chapter 3.4.1 on page 36
3.4.3 Setup of the network parameter
The setting of the network parameters can exclusively be exe-
cuted in the authorization level two. You will find the defini-
tions of the individual parameters in chapter 2 starting on
page 23.

40 / 90
3 Configuration of the WIMAN radio modem
To setup the network parameter:
Attention:
In order to avoid disturbances of the current line operation, only
qualified personnel in arrangement with the Provider may exe-
cute these adjustments.
Checklist:
You need a list of the parameters that can be configured of your
Provider.
Proceed as shown in Chapter 3.4.1 on page 36
3.4.4 Setup of the other parameters
The only other parameters are PS1 and SyncMode (see page 25).
Note:
In order to avoid disturbances of the current line operation, only
qualified personnel in arrangement with the Provider may exe-
cute these adjustments.
Proceed as shown in Chapter 3.4.1 on page 36
3.5 Modification of the WIMAN Passwords
This section deals with the configuration of the passwords of the
WIMAN radio modem. Before you alter the factory-installed
preset passwords make sure to jot down the new passwords and
store them in a safe place.
3.5.1 Setting of a Password for the Authorization Level
one (console)
To change/set a password for the authorization level one:
1. Access the command line level one. If the command line
prompt appears (for example: WIMAN II >), proceed to
No.2.
If you are asked for a password, e.g.:
Enter password: ****
Type in the correct password and press the ENTER-
key. Now the command line prompt should appear, for
example:
WIMAN-II > _