Zebra Technologies MC55N0 ENTERPRISE DIGITAL ASSISTANT (EDA) User Manual REVISED 5
Zebra Technologies Corporation ENTERPRISE DIGITAL ASSISTANT (EDA) REVISED 5
Contents
REVISED USER MANUAL 5
5 - 8 MC55A0/MC55N0 Enterprise Digital Assistant User Guide
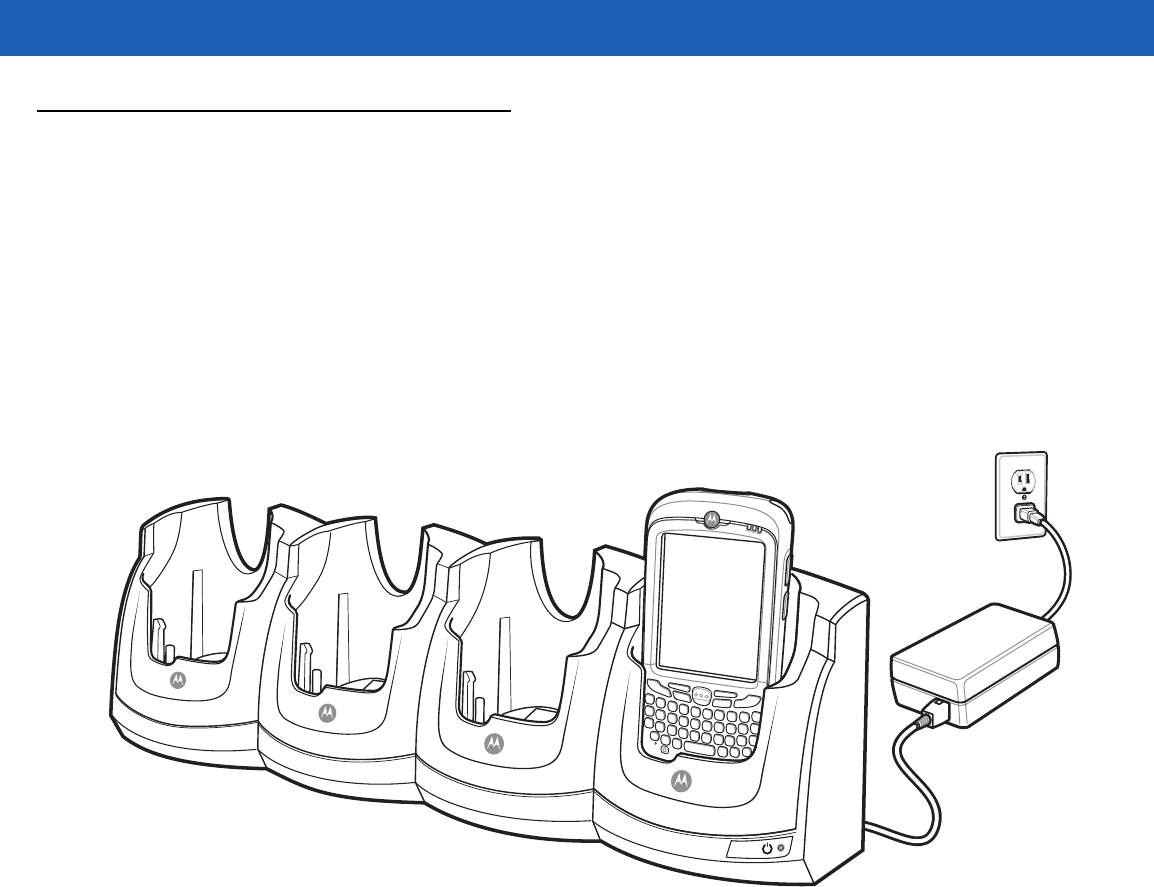
Four-slot Charge Only Cradle
This section describes how to set up and use a Four-slot Charge Only cradle with the MC55.
The Four-slot Charge Only cradle:
•
Provides 5.4 VDC power for operating the MC55.
•
Simultaneously charges up to four MC55 devices.
Charging
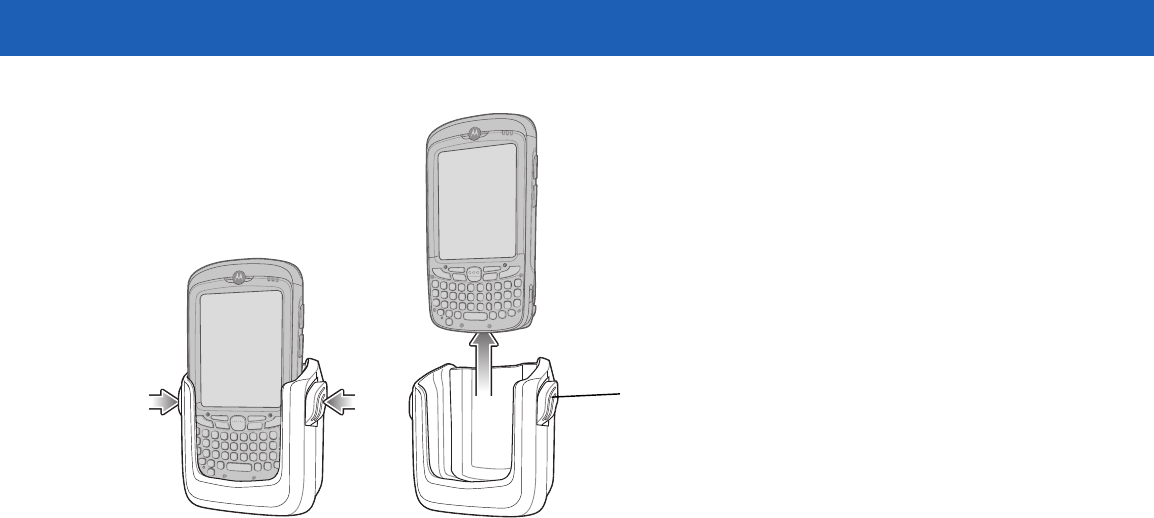
Insert the MC55 into a slot to begin charging.
Figure 5-6
MC55 Battery Charging
Battery Charging Indicators
The MC55’s charge LED shows the status of the battery charging in the MC55. See Table 1-1 on page 1-6 for
charging status indications.
The 2400 mAh battery fully charges in less than four hours and the 3600 mAh battery fully charges in less than
six hours.
Charging Temperature
Charge batteries in temperatures from 0°C to 40°C (32°F to 104°F). Charging is intelligently controlled by the
MC55.
To accomplish this, for small periods of time, the MC55 or accessory alternately enables and disables battery
charging to keep the battery at acceptable temperatures. The MC55 or accessory indicates when charging is
disabled due to abnormal temperatures via its LED. See Table 1-1 on page 1-6.
Accessories 5 - 9
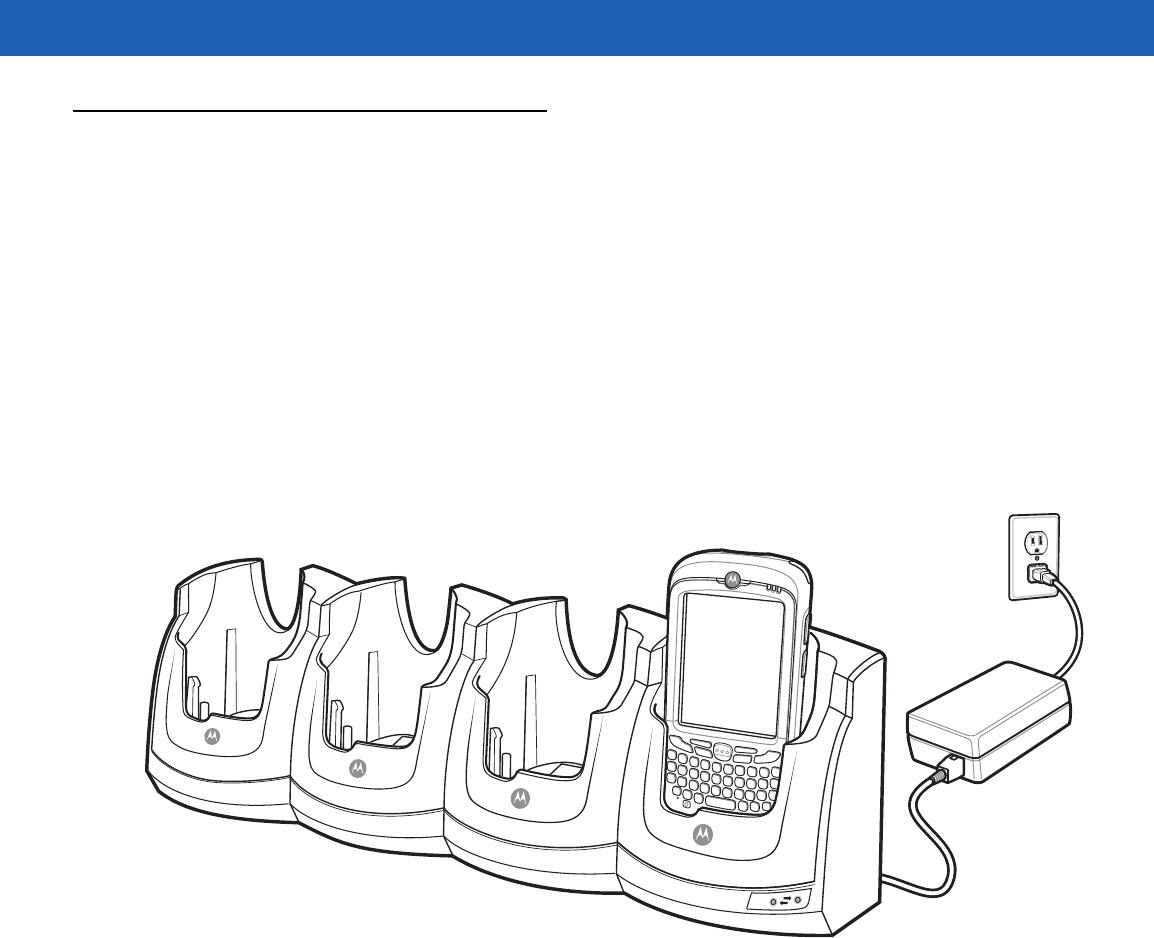
Four-slot Ethernet Cradle
This section describes how to set up and use a Four-slot Ethernet cradle with the MC55. For cradle
communication setup procedures refer to the MC55 Integrator Guide.
The Four-slot Ethernet cradle:
•
Provides 5.4 VDC power for operating the MC55.
•
Connects the MC55 (up to four) to an Ethernet network.
•
Simultaneously charges up to four MC55 devices.
Charging
Insert the MC55 into a slot to begin charging.
Figure 5-7
MC55 Battery Charging
Battery Charging Indicators
The MC55’s charge LED shows the status of the battery charging in the MC55. See Table 1-1 on page 1-6 for
charging status indications.
The2400 mAh battery fully charges in less than four hours and the 3600 mAh battery fully charges in less than
six hours.
Charging Temperature
Charge batteries in temperatures from 0°C to 40°C (32°F to 104°F). Charging is intelligently controlled by the
MC55.
To accomplish this, for small periods of time, the MC55 alternately enables and disables battery charging to
keep the battery at acceptable temperatures. The MC55 indicates when charging is disabled due to abnormal
temperatures via its LED. See Table 1-1 on page 1-6.
100
Mbps

5 - 10 MC55A0/MC55N0 Enterprise Digital Assistant User Guide
VCD5000 Vehicle Cradle
This section describes how to use a VCD5000 vehicle cradle with the MC55. For cradle installation and
communication setup procedures refer to the MC55 Integrator Guide.
Once installed in a vehicle, the cradle:
•
holds the MC55 securely in place
•
provides power for operating the MC55
•
re-charges the battery in the MC55.
Charging the MC55 Battery
Insert the MC55 into the vehicle cradle to begin charging. A click indicates that the MC55 button release
locking mechanism is enabled and the MC55 is locked in place.
Figure 5-8
MC55 Battery Charging
Removing the MC55
To remove the MC55, hold back the release lever on the cradle and pull the MC55 up and out of the cradle.
CAUTION Ensure the MC55 is fully inserted in the cradle. Lack of proper insertion may result in property damage
or personal injury. Motorola is not responsible for any loss resulting from the use of the products while
driving.
Accessories 5 - 11
Figure 5-9
Removing the MC55
Battery Charging Indicators
The MC55’s charge LED indicates the status of the battery charging in the MC55. See Table 1-1 on page 1-6
for charging status indications.
The 2400 mAh battery fully charges in less than four hours and the 3600 mAh battery fully charges in less than
six hours.
Charging Temperature
Charge batteries in temperatures from 0°C to 40°C (32°F to 104°F). Charging is intelligently controlled by the
MC55.
To accomplish this, for small periods of time, the MC55 alternately enables and disables battery charging to
keep the battery at acceptable temperatures. The MC55 indicates when charging is disabled due to abnormal
temperatures via its LED. See Table 1-1 on page 1-6.
Release Lever
5 - 12 MC55A0/MC55N0 Enterprise Digital Assistant User Guide
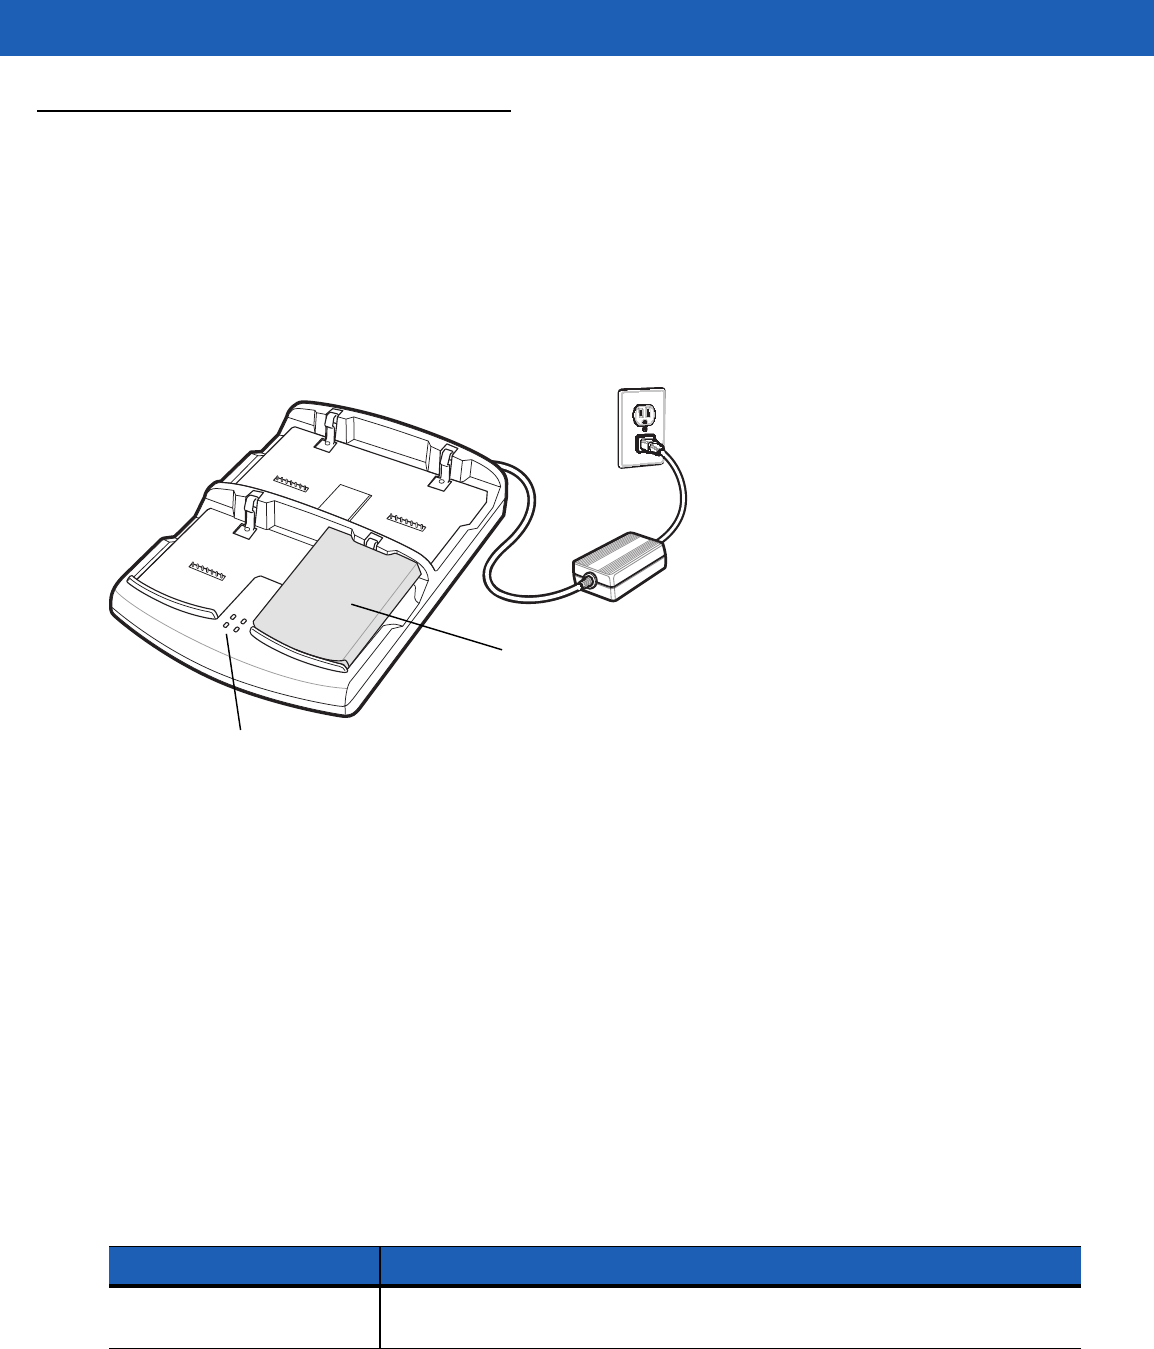
Four-slot Battery Charger
This section describes how to use the Four-slot Battery Charger to charge up to four MC55 batteries.
Battery Charging
1. Connect the charger to a power source.
2. Insert the battery into a battery charging well and gently press down on the battery to ensure proper
contact.
Figure 5-10
Four-slot Battery Charger
Battery Charging Indicators
The charger has an amber LED for each battery charging well. See Table 5-3 for charging status indications.
The 2400 mAh battery fully charges in less than four hours and the 3600 mAh battery fully charges in less than
six hours.
Charging Temperature
Charge batteries in temperatures from 0°C to 40°C (32°F to 104°F). Charging is intelligently controlled by the
MC55.
To accomplish this, for small periods of time, the charger alternately enables and disables battery charging to
keep the battery at acceptable temperatures. The charger indicates when charging is disabled due to abnormal
temperatures via its LED. See Table 5-3.
Battery Charging
LEDs (4)
Battery
Table 5-3
Battery LED Charging Indicators
LED Indication
Off No battery in slot; battery is not charging; battery is not inserted correctly in the
charger; charger is not powered.

Accessories 5 - 13
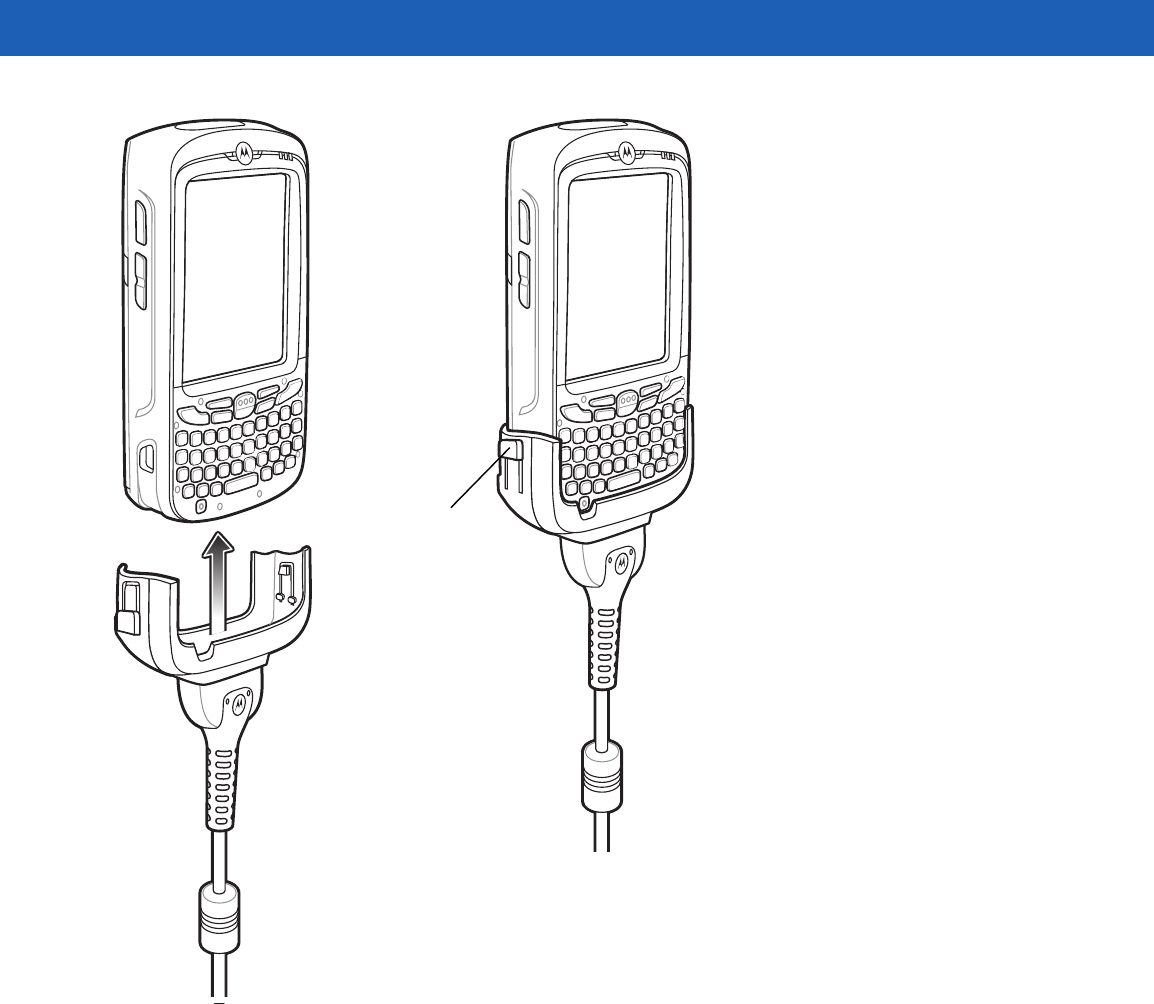
Cables
This section describes how to set up and use the cables. The cables are available with a variety of connection
capabilities.
The following communication/charge cables are available:
•
USB Charging cable
•Provide the MC55 with operating and charging power when used with the Motorola approved power
supply.
•Synchronize information between the MC55 and a host computer. With customized or third party
software, it can also synchronize the MC55 with corporate databases.
•
Charge Only cable
•Provide the MC55 with operating and charging power when used with the Motorola approved power
supply.
•
Auto Charge cable.
•Provide the MC55 with operating and charging power when used with the Motorola approved power
supply.
Battery Charging and Operating Power
The communication/charge cables can charge the MC55 battery and supply operating power.
To charge the MC55 battery:
1. Connect the communication/charge cable power input connector to the Motorola approved power source.
2. Slide the bottom of the MC55 into the connector cup end of the communication/charge cable and gently
press in until it latches into the MC55.
3. Slide the two locking tabs up until they both lock into position.
Slow Blinking Amber Battery is charging.
Solid Amber Charging complete.
Fast Blinking Amber Charging error.
Table 5-3
Battery LED Charging Indicators (Continued)
LED Indication
5 - 14 MC55A0/MC55N0 Enterprise Digital Assistant User Guide
Figure 5-11
Cable Cup Locking Tabs
The MC55 amber Charge LED indicates the MC55 battery charging status. The 2400 mAh standard
battery charges in less than four hours and the 3600 mAh standard battery charges in less than six hours.
See Table 1-1 on page 1-6 for charging status indications.
4. When charging is complete, push the two locking tab down and remove the cable from the MC55.
LED Charge Indications
The amber Charge LED on the MC55 indicates battery charging status. See Table 1-1 on page 1-6 for charging
status indications.
Charging Temperature
Charge batteries in temperatures from 0°C to 40°C (32°F to 104°F). Charging is intelligently controlled by the
MC55.
Locking Tab
Accessories 5 - 15
To accomplish this, for small periods of time, the MC55 or accessory alternately enables and disables battery
charging to keep the battery at acceptable temperatures. The MC55 or accessory indicates when charging is
disabled due to abnormal temperatures via its LED. See Table 1-1 on page 1-6.
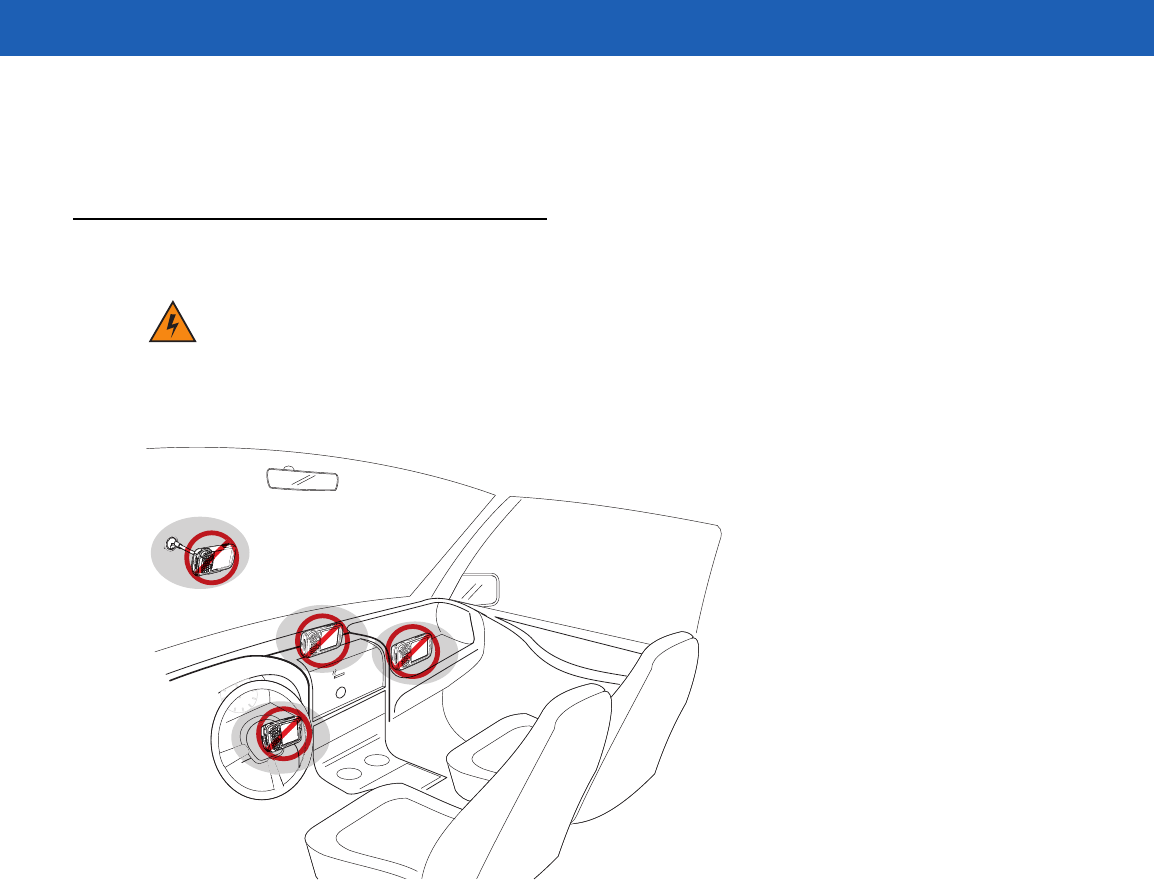
Vehicle Holder
Installation Reminders
Figure 5-12
Vehicle Holder Mounting
•
Do not mount the vehicle holder where it will obscure the driver’s view of the road.
•
Do not mount the vehicle holder near the driver seat air bag deployment area.
•
Do not place the MC55 on top of the dashboard or anywhere without securing it in the vehicle holder.
•
Do not mount the vehicle holder near the passenger seat air bag deployment area.
•
Install the vehicle holder on the surface of your vehicle that is reasonably flat and free of dirt and oil.
Device Mounting Precautions
•
Some countries prohibit the mounting of any electronic device in any location on the vehicle dashboard.
Be sure to check your local laws acceptable mounting areas before installing the vehicle holder.
•
The heating and cooling cycle of a vehicle’s interior will in some cases loosen the adhesion of the suction
cup. Check the vacuum seal of the vehicle mount kit for adequate adhesion each time you use the unit,
and reinstall if necessary.
•
If the vehicle holder has problems staying on, clean the plastic suction cup with alcohol, then reinstall.
WARNING!Some countries prohibit the mounting of any electronic device in any location on the vehicle
dashboard. Be sure to check your local laws acceptable mounting areas before installing the auto
mounting kit.
5 - 16 MC55A0/MC55N0 Enterprise Digital Assistant User Guide
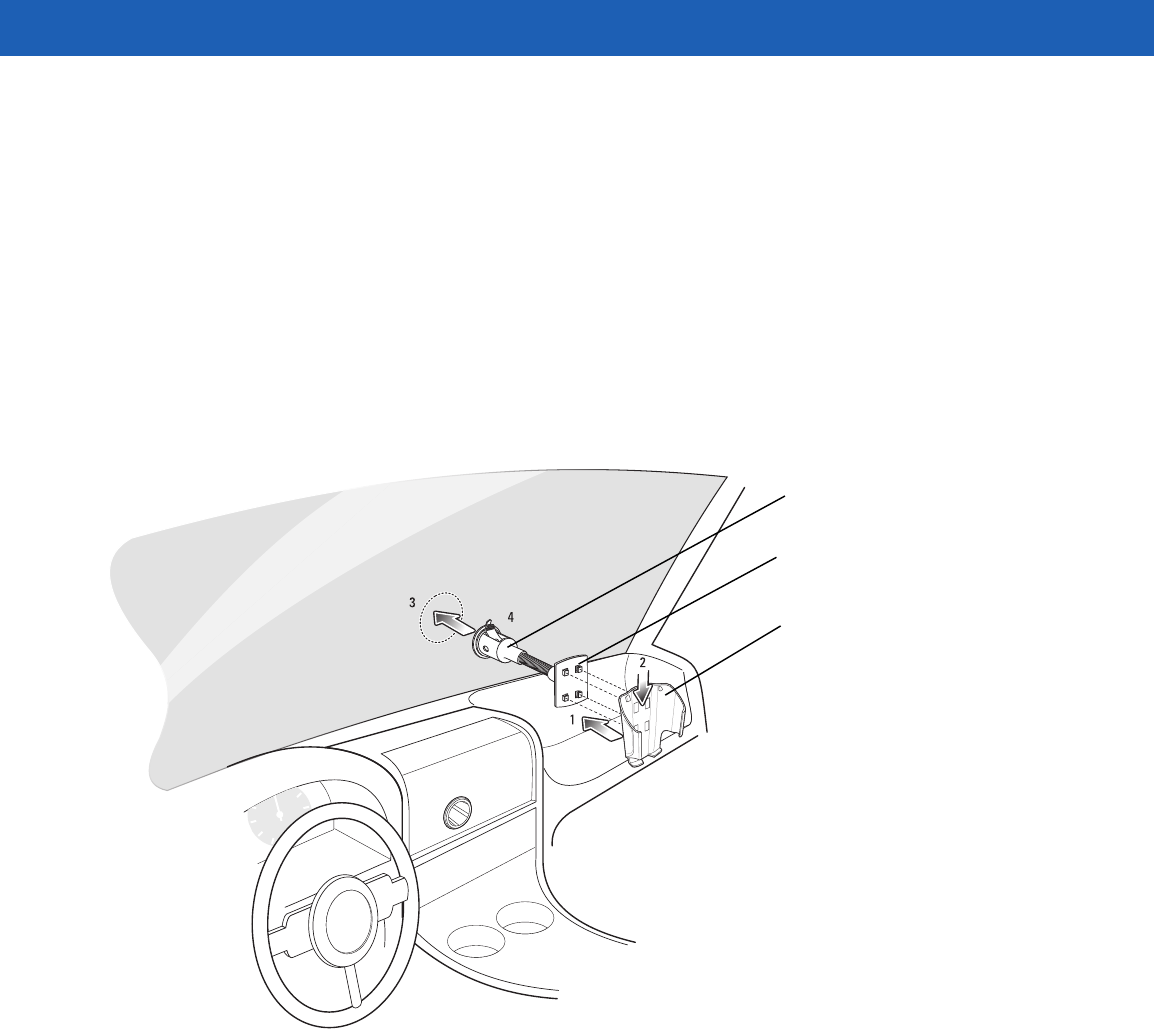
Installation
Install the vehicle mount on the surface of your vehicle that is reasonably flat and free of dirt and oil. Clean the
mounting surface with a glass cleaner and a clean cotton cloth. Install the vehicle mount on the windshield or
other flat car surface using the supplied mounting disc.
Assembly
1. Insert the vehicle holder’s cradle plate to the holes on the back of the cradle.
2. Push the cradle down until both parts are engaged.
Windshield Installation
1. Fix the suction cup mount to the selected area with the suction lever facing up.
Figure 5-13
Windshield Installation
2. Flip the lever down to create a vacuum between the suction cup and the mounting surface.
3. Make sure that the suction bond is strong enough before proceeding to the next step.
4. Slide the MC55 into the cradle.
Cradle Plate
Cradle
Suction Cup Mount
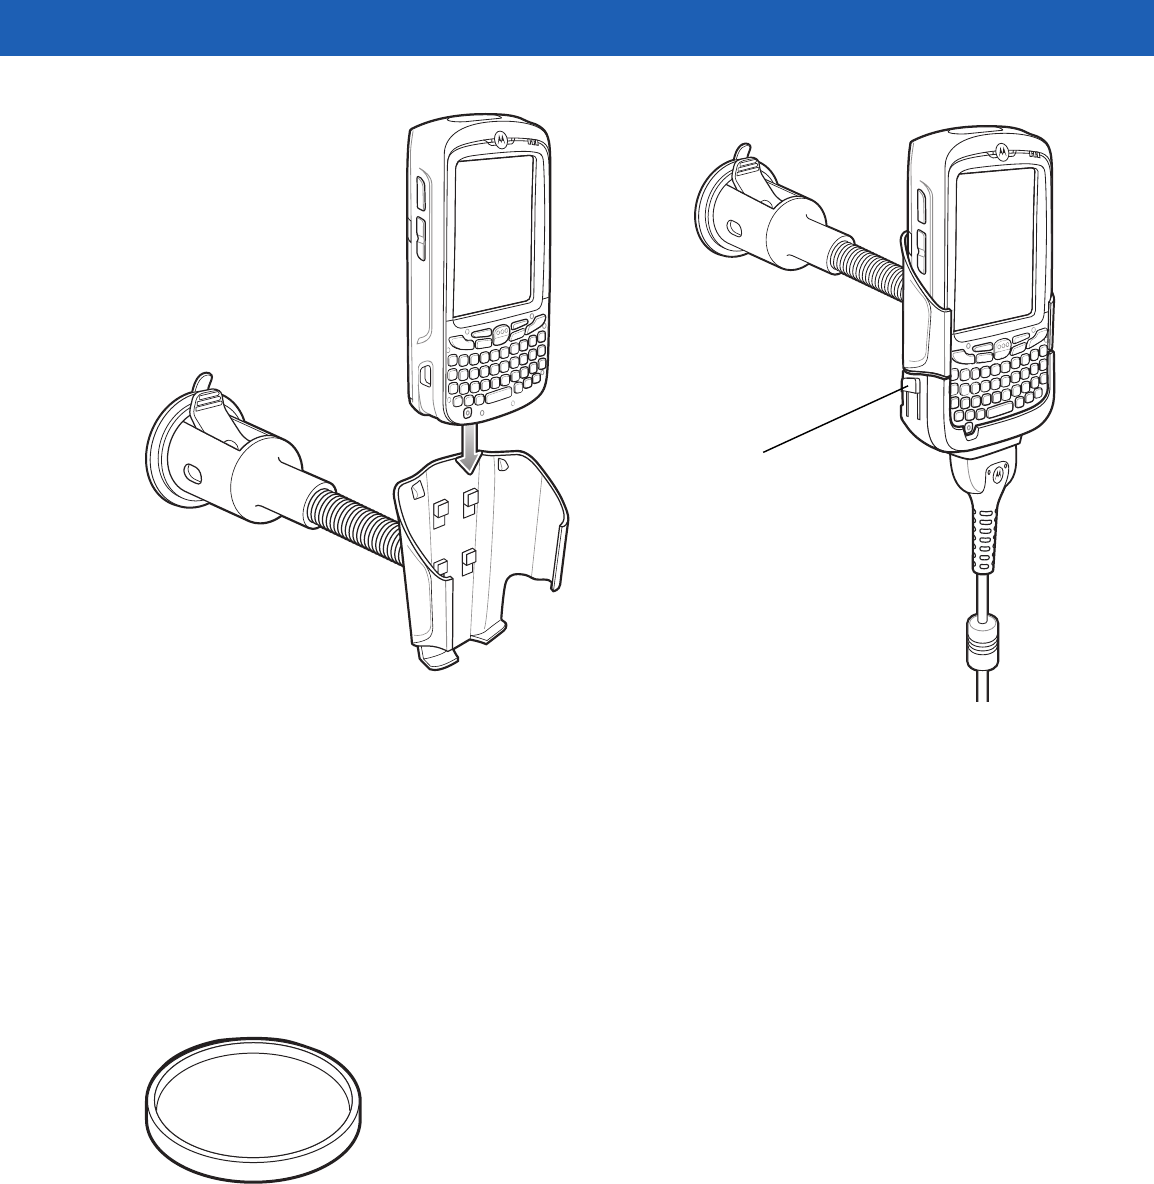
Accessories 5 - 17
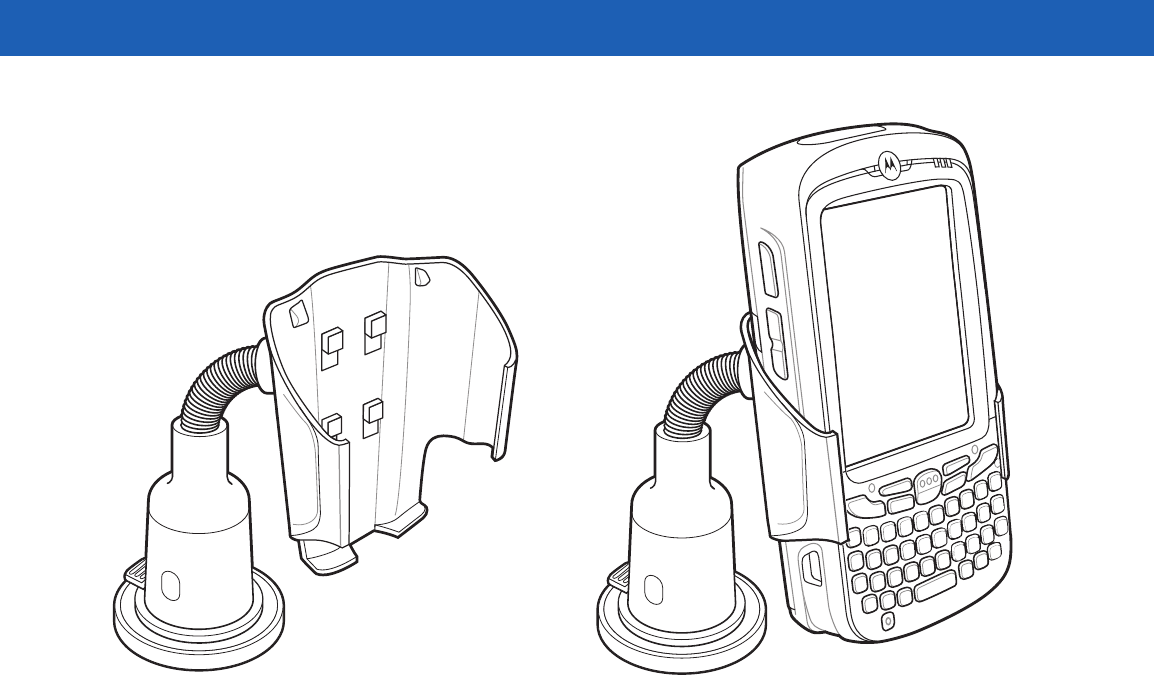
Figure 5-14
Insert MC55 into Vehicle Holder
5. Connect the auto charger cable to the MC55 and slide the two locking tabs up to secure the cable cup to
the MC55.
6. Connect the other end to the cigarette lighter socket.
The LED indicator on the right side of the touch screen lights up orange during charging.
Flat Surface Installation
1. Remove the plastic sheet on the bottom of the mounting disc.
2. Place the disc, sticky side down, on a clean flat surface.
Figure 5-15
Mounting Disc
3. Fix the suction cup mount to the disc with the suction lever facing up.
4. Flip the lever down to create a vacuum between the suction cup and the disc.
5. Make sure that the suction bond is strong enough before proceeding to the next step.
6. Slide the MC55 into the cradle.
Locking Tab
5 - 18 MC55A0/MC55N0 Enterprise Digital Assistant User Guide
Figure 5-16
Vehicle Holder Mounted on Flat Surface
7. Connect the auto charger cable to the MC55 and slide the two locking tabs up to secure the cable cup to
the MC55.
8. Connect the other end to the cigarette lighter socket.
The LED indicator on the right side of the touch screen lights up orange during charging.