Zebra Technologies MC55N0 ENTERPRISE DIGITAL ASSISTANT (EDA) User Manual REVISED 4
Zebra Technologies Corporation ENTERPRISE DIGITAL ASSISTANT (EDA) REVISED 4
Contents
REVISED USER MANUAL 4
Bluetooth 4 - 7
Figure 4-4
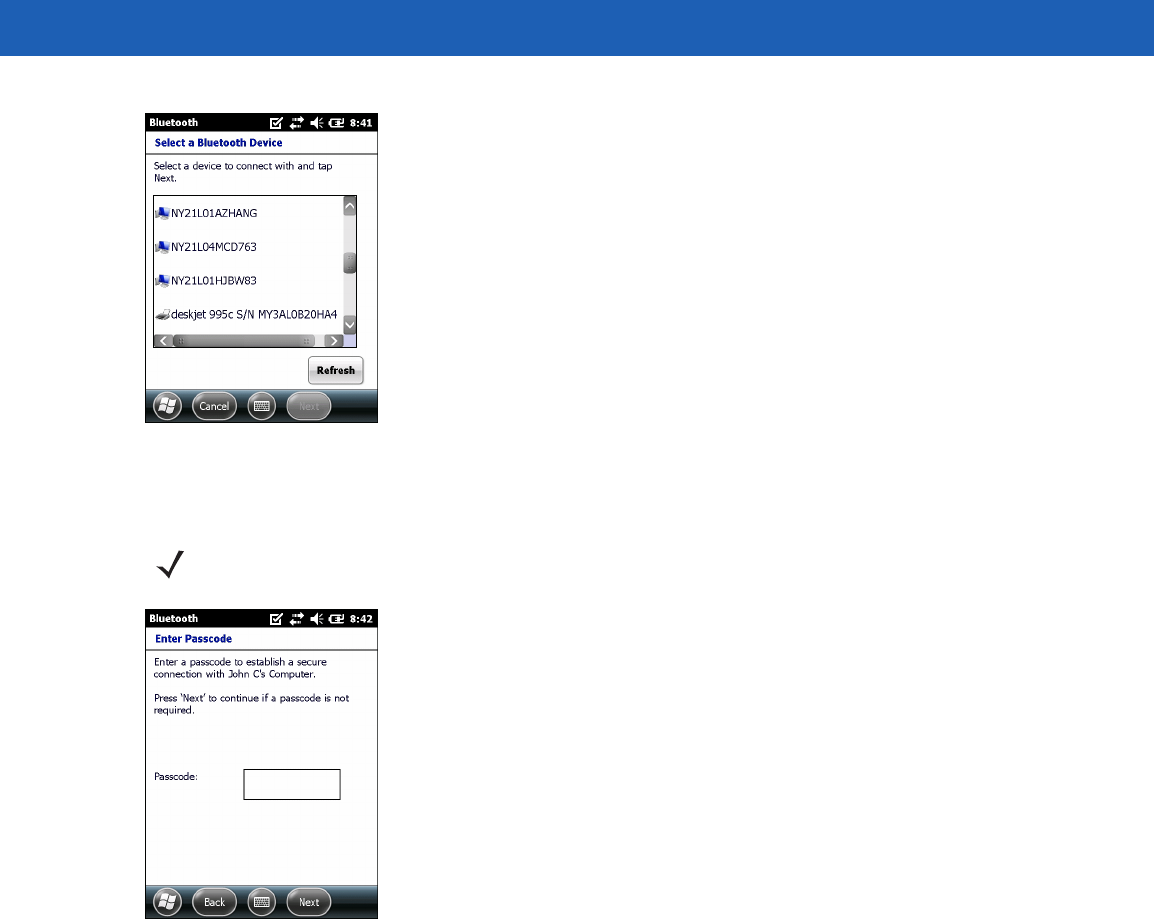
Select a Bluetooth Device
7. Tap Next. The Enter Passcode window appears.
Figure 4-5
Enter Passcode
8. Enter the Passcode on the other device. The device is added to the Bluetooth list.
You are prompted to enter a passcode. If the device has a specific passcode, enter it in the Passcode field
and tap Next. If the device does not have a specific passcode, enter one in the Passcode field and tap
Next. The Bluetooth radio tries to connect with the device.
9. If you created a passcode, you will be prompted by the other device to enter the same passcode. Enter the
created passcode to establish a paired connection. (If you entered a passcode from the device, you
shouldn’t have to do anything on the other device.)
10. When the connection is complete, a list of matching and supported services on the device appears.
11. Select the services you want to use and tap Finish. The services on the new devices have to be selected
or else the pairing won’t include those services, even though the devices are paired. If services are not
selected, you will be continually reprompted for the passcode from the device.
12. The device appears in the list on the main window.
After the passcodes have been accepted on both sides, you have a trusted (“paired”) connection.
NOTE If Smart-pairing is configured and the device is requesting one of the pre-defined PINs, the Enter
Passcode window does not appear.
4 - 8 MC55A0/MC55N0 Enterprise Digital Assistant User Guide
Available Services
The MC55 with Microsoft Bluetooth stack offers the following services:
•
OBEX Object Push Services via Beam
•
Serial Port Services
•
Personal Area Networking Services
•
PBAP Services
•
Dial-up Networking Services
•
A2DP/AVRCP Services.
See the following sections for information on these services.
Object Push Services via Beam
Use the OBEX Push Service to send files and contacts to another Bluetooth device. To transfer files between
the MC55 and another Bluetooth enabled device:
1. Ensure that Bluetooth is enabled and discoverable on both devices.
2. Ensure that the two devices are within 30 feet (10 meters) of one another.
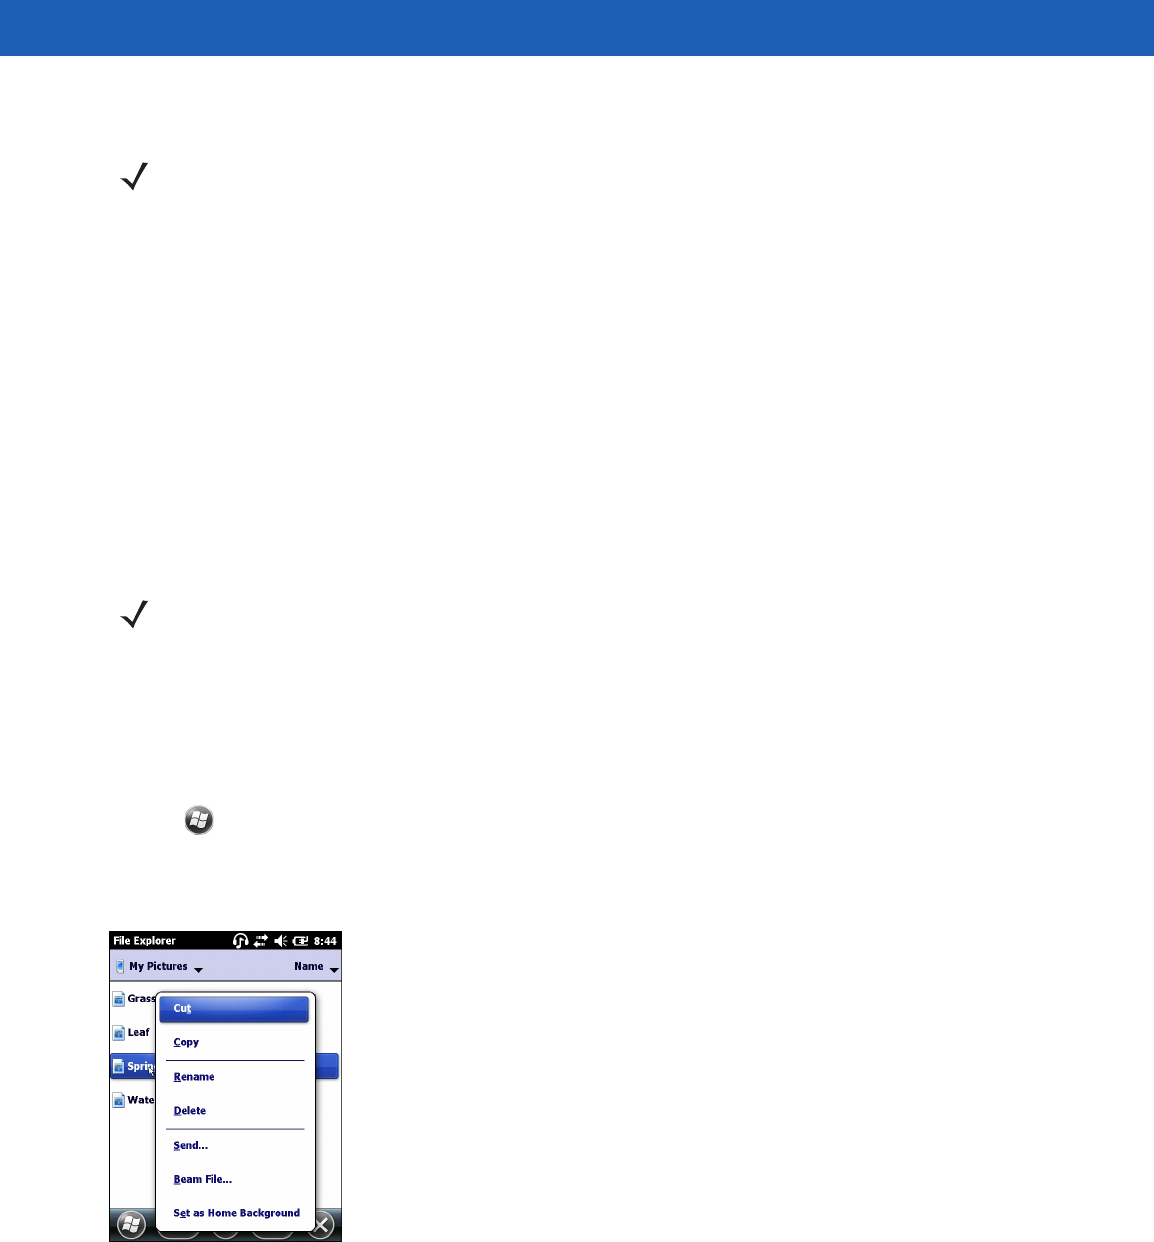
3. Tap > Programs > File Explorer.
4. Navigate to the file to transfer.
5. Tap and hold on the filename until the pop-up menu appears.
Figure 4-6
File Explorer Window
6. Select Beam File. The MC55 searches for Bluetooth devices in the area.
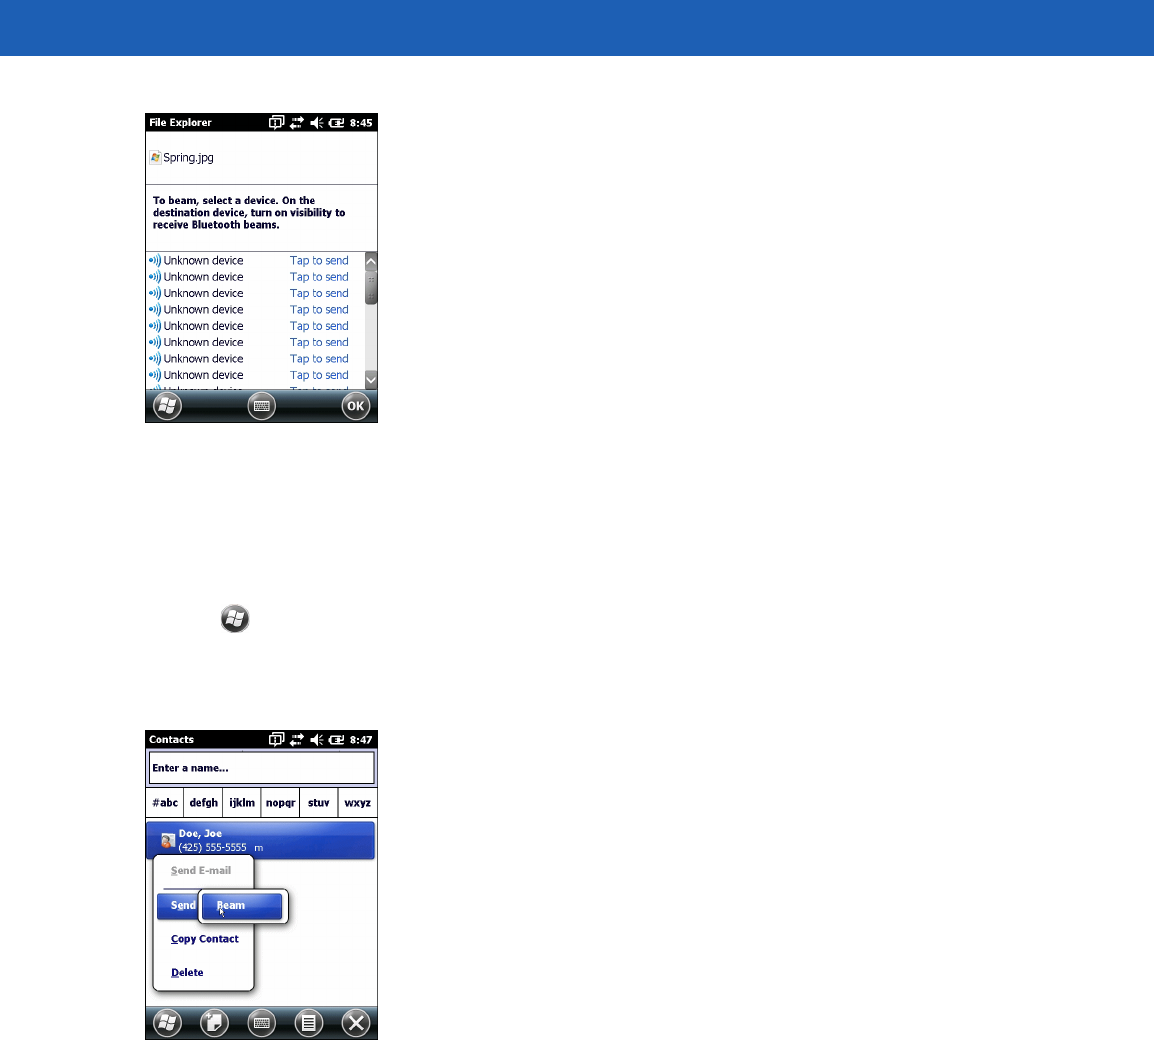
7. Tap Tap to send next to the Bluetooth device to send the file to. The MC55 communicates with the device
and send the file. When completed, Tap to send changes to Done.
NOTE Some devices might not require a PIN. This depends upon the device’s authentication.
NOTE You can only send files to a remote device using the Beam function.
Bluetooth 4 - 9
Figure 4-7
Beam File Window
To transfer a contact between the MC55 and another Bluetooth enabled device:
1. Ensure that Bluetooth is enabled and discoverable on both devices.
2. Ensure that the two devices are within 30 feet (10 meters) of one another.
3. Tap > Contacts.
4. Navigate to the contact to transfer.
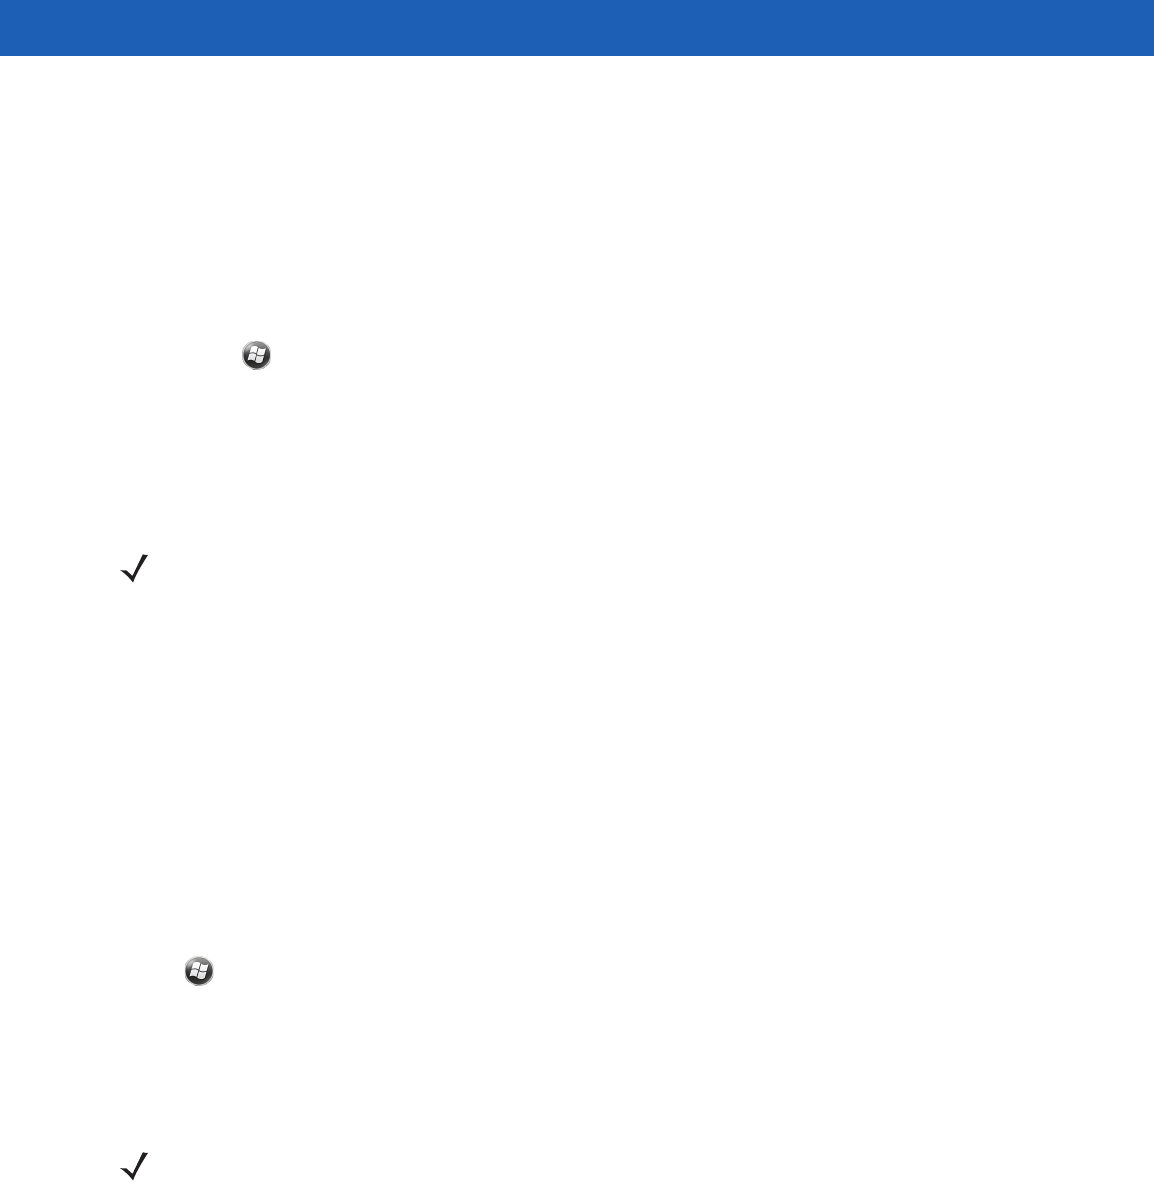
5. Tap and hold on the contact until the pop-up menu appears.
Figure 4-8
Contact Window
6. Select Send Contact > Beam. The MC55 searches for Bluetooth devices in the area.
7. Tap Tap to send next to the Bluetooth device to send the file to. The MC55 communicates with the device
and send the contact. When completed, Tap to send changes to Done.
Internet Sharing
Internet Sharing allows the user to connect a computer or laptop to the MC55 and use the MC55 as a modem
to connect to an office network or ISP.
To use MC55 as a modem using Bluetooth:
1. Ensure that the device is not connected to the computer or laptop.
2. On the MC55, ensure that the Phone is on and a data connection is configured.
4 - 10 MC55A0/MC55N0 Enterprise Digital Assistant User Guide
3. Tap > Programs > Internet Sharing.
4. In the PC Connection list, select Bluetooth PAN.
5. In the Network Connection list, select the connection type.
Select the network connection that the device should use to connect to the Internet.
6. Tap Connect.
7. On the computer or laptop, setup a Bluetooth PAN with your device.
a. Select > Control Panel > Network Connections.
b. Under Personal Area Network, select Bluetooth Network Connection.
c. Right-click on Bluetooth Network Connection and select View Bluetooth network devices.
d. In the Bluetooth Personal Area Network Devices window select your device.
e. Click Connect. The computer connects to the device via Bluetooth.
8. To verify, on the PC or laptop, launch Internet Explorer and open a web site.
9. To end dial-up networking, on the MC55 tap Disconnect.
Serial Port Services
Use the wireless Bluetooth serial port connection as you would a physical serial cable connection. Configure
the application that will use the connection to the correct serial port.
To establish a serial port connection:
1. Ensure that Bluetooth is enabled and discoverable on both devices.
2. Ensure that the two devices are within 30 feet (10 meters) of one another.
3. Tap > Settings > Connections > Bluetooth > Devices.
4. Tap Add new device. The MC55 begins searching for discoverable Bluetooth devices in the area.
5. Select a device from the list.
6. Tap Next. The Enter Passcode window appears.
7. Enter the Passcode and the tap Next. The device is added to the Bluetooth list.
8. In the device list, tap the serial device. The Partnership Settings window displays.
9. Select the Serial Port checkbox.
10. Tap Save.
11. Tap COM Ports.
12. Tap New Outgoing Port. The add device window appears.
NOTE If your computer is Bluetooth-enabled and you select Bluetooth as the PC connection, you must initiate
and complete the Bluetooth PAN partnership before Internet Sharing will work. For more information, refer
to Windows Help and Support.
NOTE If Smart-pairing is configured and the device is requesting one of the pre-defined PINs, the Enter
Passcode window does not appear.

Bluetooth 4 - 11
13. Select the serial device in the list and then tap Next.
14. Select a COM port from the drop-down list.
15. Tap Finish.
ActiveSync Using Serial Port Services
Use the wireless Bluetooth serial port connection for ActiveSync just as you would a physical serial cable
connection. You must configure the application that will use the connection to the correct serial port.
To set up a Bluetooth ActiveSync connection:
Before setting up a Bluetooth ActiveSync connection, configure the Bluetooth function of your device.
1. Ensure that Bluetooth is enabled and discoverable on both devices.
2. Ensure that the two devices are within 30 feet (10 meters) of one another.
3. On the computer, click > Settings > Control Panel.
4. Double-click Bluetooth Devices.
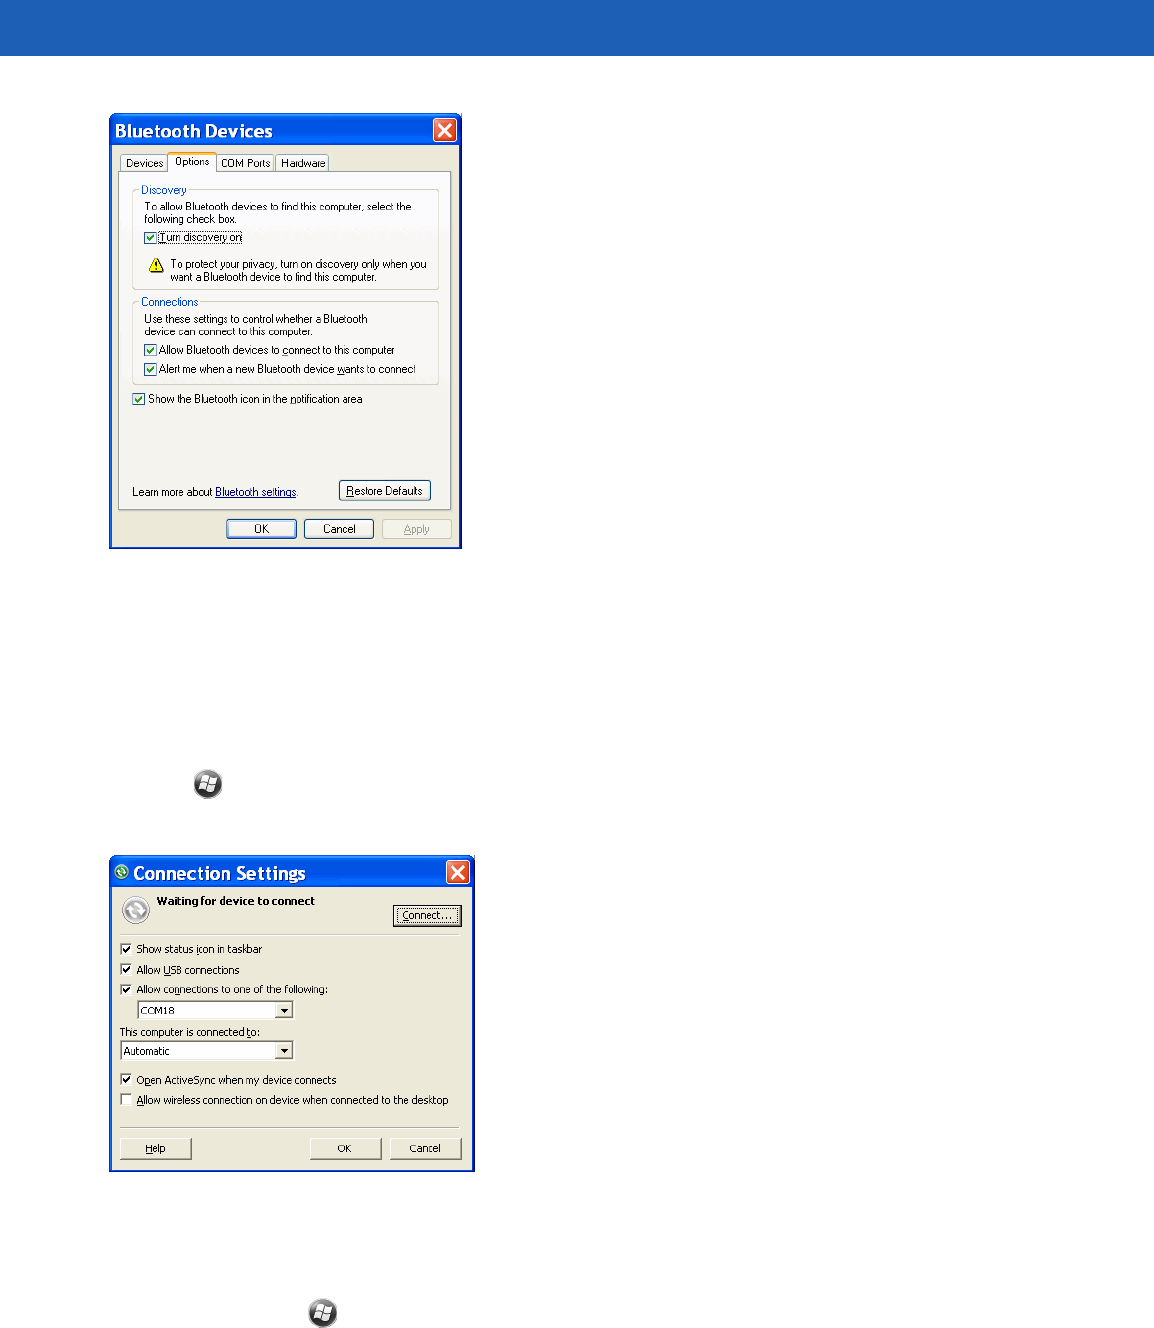
5. On the Options tab, select the Turn discovery on and Allow Bluetooth devices to connect to this
computer checkboxes.
NOTE By default, Secure Connection checkbox is set enabling Security Level 3 (Linked Level Encryption).
NOTE No connection is made at this point. An application must open the selected COM port to trigger Microsoft
Bluetooth stack to open the connection.
NOTE For additional security, disable network bridging on the computer (specifically, bridging to a Remote NDIS
adapter) before connecting to the computer to pass though to the Internet or a network. For more
information on network bridging, see Windows Help on your computer.
The instructions below are for computers that support the Windows XP SP2 or later version operating
system.
4 - 12 MC55A0/MC55N0 Enterprise Digital Assistant User Guide
Figure 4-9
Computer Bluetooth Devices Window
6. On the COM Ports tab, click Add.
7. Select the Incoming (device initiates the connection) option, then click OK.
Note the number of the COM port that was added.
8. Click OK.
9. Click > All Programs > Microsoft ActiveSync.
10. Click File > Connection Settings.
Figure 4-10
ActiveSync Connection Settings
11. On the Allow connections to one of the following drop-down list, select the COM port with the number
you noted earlier.
12. On the MC55, tap > Programs > ActiveSync.
13. Tap Menu > Connect via Bluetooth.
Synchronization is automatically initiated. The ActiveSync icon appears on the lower right corner of the
Today screen.

Bluetooth 4 - 13
If an Authentication is required, the Enter Passcode screen appears, type an alphanumeric passkey (PIN
code), then tap Next; enter the same passkey on the other device.
The passkey is recommended for enhanced security. Your passkey must be between 1 to 16 alphanumeric
characters.
If you do not want to use a passkey, tap Next.
14. To disconnect the ActiveSync connection, tap the ActiveSync icon on the Today screen.
15. Tap Disconnect.
Phone Book Access Profile Services
Phone Book Access profile (PBAP) is used to synchronize contacts between a remote device and the MC55.
To establish an PBAP synchronization:
1. Ensure that Bluetooth is enabled and discoverable on both devices.
2. Ensure that the two devices are within 30 feet (10 meters) of one another.
3. Tap > Settings > Connection > Bluetooth icon > Devices.
4. Tap Add New Device.The MC55 searches for a Bluetooth device, such as a Car Kit.
5. Select a device from the list.
6. Tap Next. The Enter Passcode window appears.
7. Enter the Passcode and the tap Next. The device is added to the Bluetooth list.
8. A dialog box appears requesting if you want to transfer contacts to the car kit.
9. Select Yes or No.
10. If Yes is selected, contacts from the MC55 are transferred to the car kit.
NOTE If Smart-pairing is configured and the device is requesting one of the pre-defined PINs, the Enter
Passcode window does not appear.

4 - 14 MC55A0/MC55N0 Enterprise Digital Assistant User Guide
Using Bluetooth StoneStreet One Bluetooth Stack
The following sections provide information on using the Stone Street One Bluetooth stack.
Turning the Bluetooth Radio Mode On and Off
Turn off the Bluetooth radio to save power or if entering an area with radio restrictions (e.g., an airplane). When
the radio is off, other Bluetooth devices cannot see or connect to the MC55. Turn on the Bluetooth radio to
exchange information with other Bluetooth devices (within range). Communicate only with Bluetooth radios in
close proximity.
Disabling Bluetooth
To disable Bluetooth, tap the Connection icon on the Status bar and select Wireless Manager in the
Connectivity dialog box. Tap the blue Bluetooth bar to turn off the Bluetooth radio.
Enabling Bluetooth
To enable Bluetooth, tap the Connection icon on the Status bar and select Wireless Manager in the
Connectivity dialog box. Tap the blue Bluetooth bar to turn on the Bluetooth radio.
Modes
The BTExplorer application has two modes for managing Bluetooth connections: Wizard Mode and Explorer
Mode. The Wizard Mode is for novice Bluetooth users and the Explorer Mode is for experienced Bluetooth
users. To switch between modes, select View > Wizard Mode or View > Explorer Mode.
Wizard Mode
Wizard Mode provides a simple process for discovering and connecting to Bluetooth devices.
Wizard Mode shows the devices and services in a simple Favorites view created by following the step-by-step
wizard.
Explorer Mode
The Explorer Mode window is easy to navigate and provides greater control to users familiar with Bluetooth.
The menu bar provides quick access to the options and tools used to connect to devices. To access Explorer
Mode, tap View > Explorer Mode.
NOTE To achieve the best battery life turn off radios not in use.
NOTE Switching between Wizard Mode and Explorer Mode closes all active connections.
Bluetooth 4 - 15
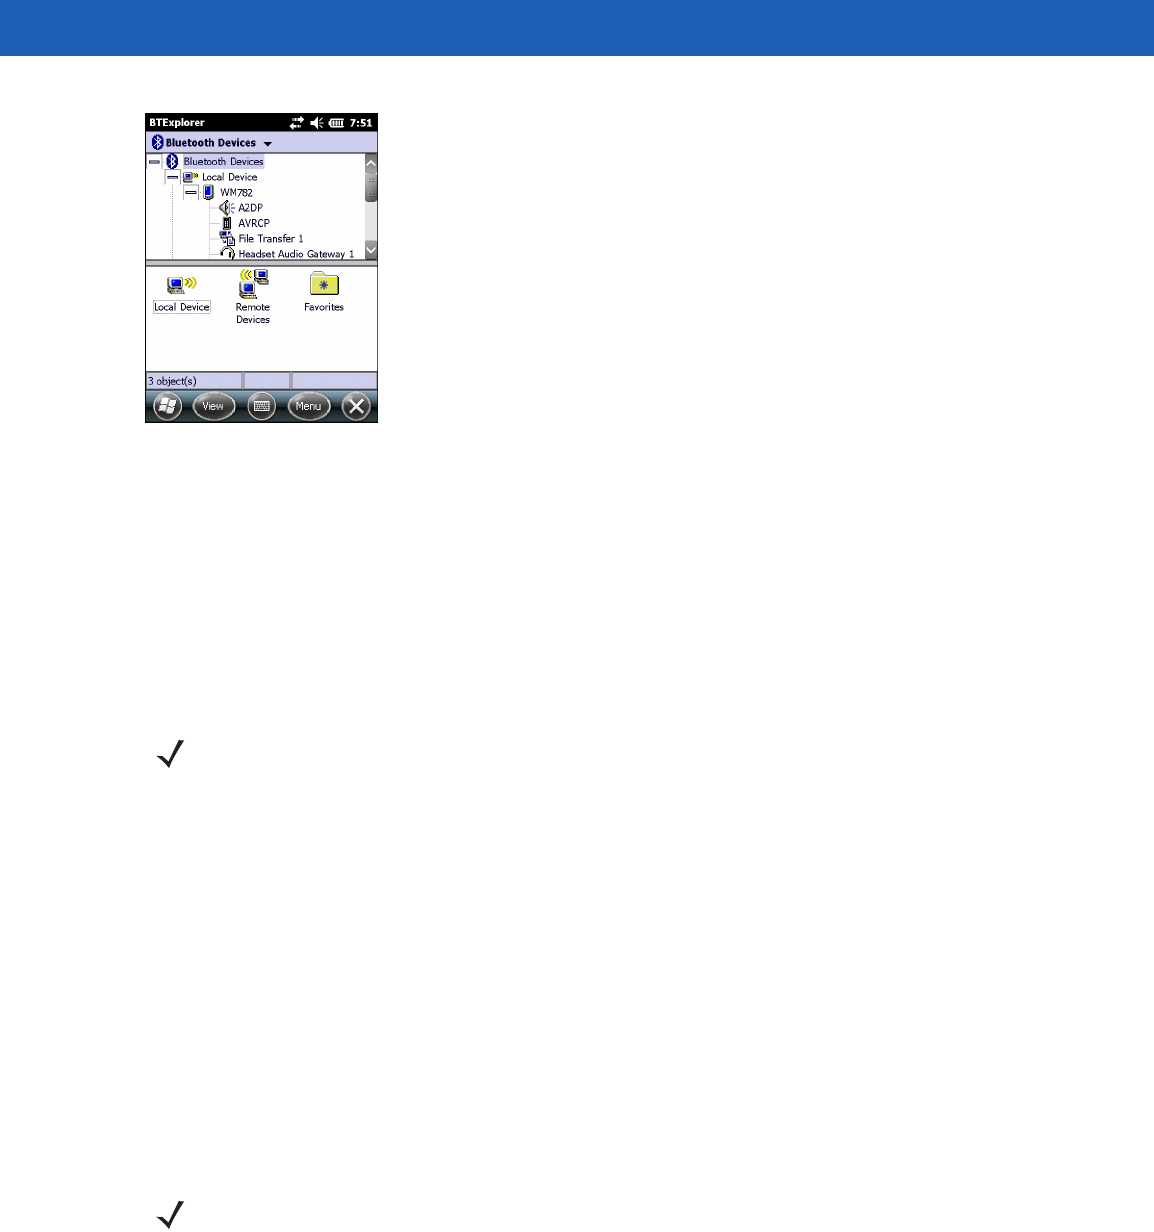
Figure 4-11
Explorer Mode Window
You can also use the “tap and hold” technique to view available options. Scroll bars and view options are
similar to those on the Windows desktop. The tree structure lists the following sub-items:
•
Local Device - This device
•
Remote Device - Other Bluetooth devices
•Trusted Devices - Bonded (paired) Bluetooth devices
•Untrusted Devices - Discovered devices that are not bonded
•
Favorites - Selected services that are set as Favorite for quick access.
Discovering Bluetooth Device(s)
The MC55 can receive information from discovered devices without bonding. However, once bonded, the
MC55 and a bonded device exchange information automatically when you turn the Bluetooth radio on. See
Bonding with Discovered Device(s) on page 4-30 for more information.
To find Bluetooth devices in the area:
1. Ensure that Bluetooth is enabled on both devices.
2. Ensure that the Bluetooth device to discover is in discoverable and connectable modes.
3. Ensure that the require profile is enabled on the MC55. See Profiles on page 4-39 for more information.
4. Ensure that the two devices are within 30 feet (10 meters) of one another.
5. Tap the Bluetooth icon and select Show BTExplorer. The BTExplorer window appears.
6. Tap Menu > New Connection.The New Connection Wizard appears.
NOTE Switching between Wizard Mode and Explorer Mode closes all active connections.
NOTE If favorite connections have already been created, the Favorites screen displays. If no favorite
connections have been created, the New Connection Wizard screen displays.
4 - 16 MC55A0/MC55N0 Enterprise Digital Assistant User Guide
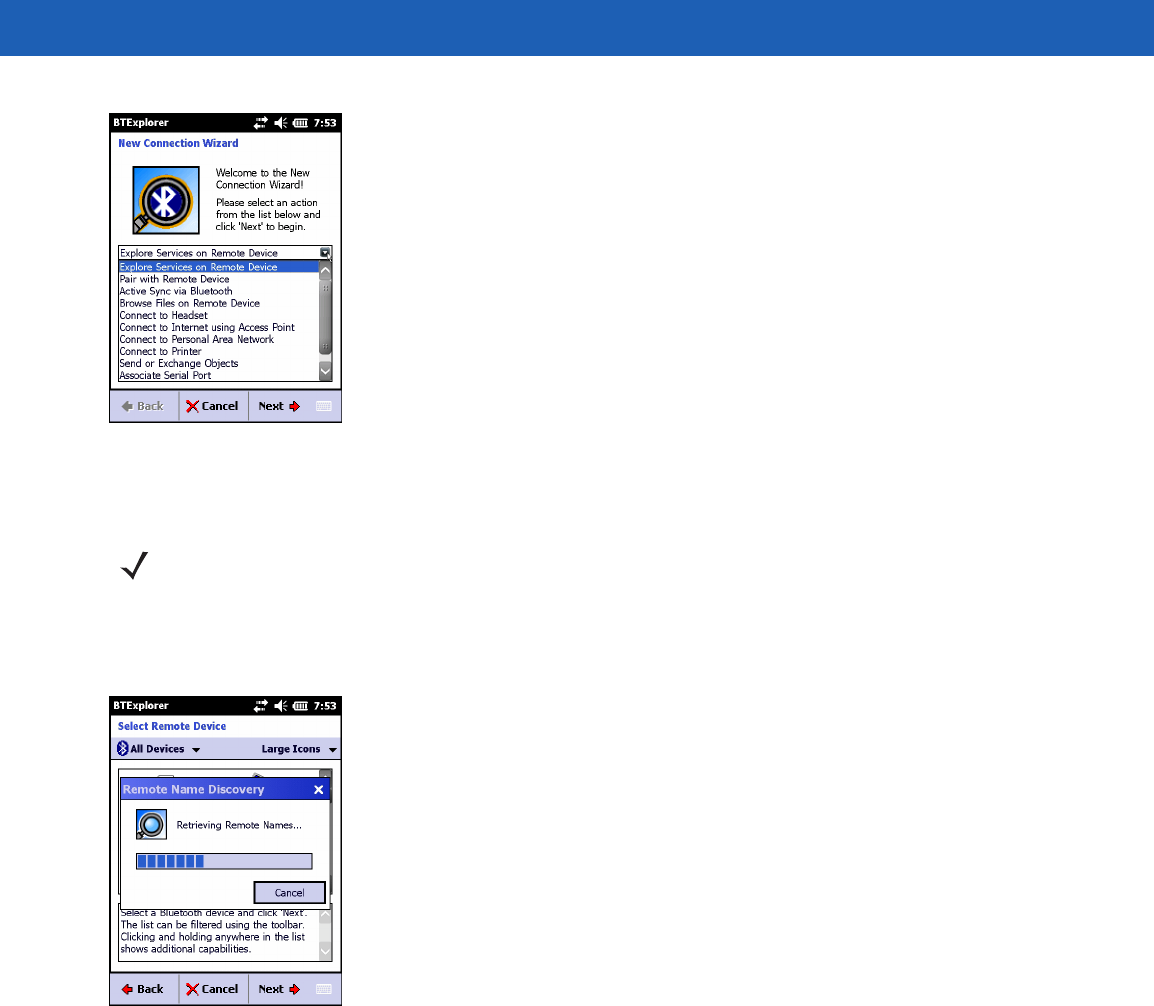
Figure 4-12
BTExplorer Window
7. Select Explore Services on Remote Device or another from the drop-down list and tap Next.
8. BTExplorer searches for Bluetooth devices in the area.
Figure 4-13
Discover Devices Dialog Box
The discovered devices display in the Select Remote Device window.
NOTE If a device discovery action has not been previously performed, a device discovery is automatically
initiated. If a device discovery has previously been performed, the device discovery process is skipped,
and the previously found list of devices displays. To start a new device discovery, tap and hold in the
window and select Discover Devices from the pop-up menu.
Bluetooth 4 - 17
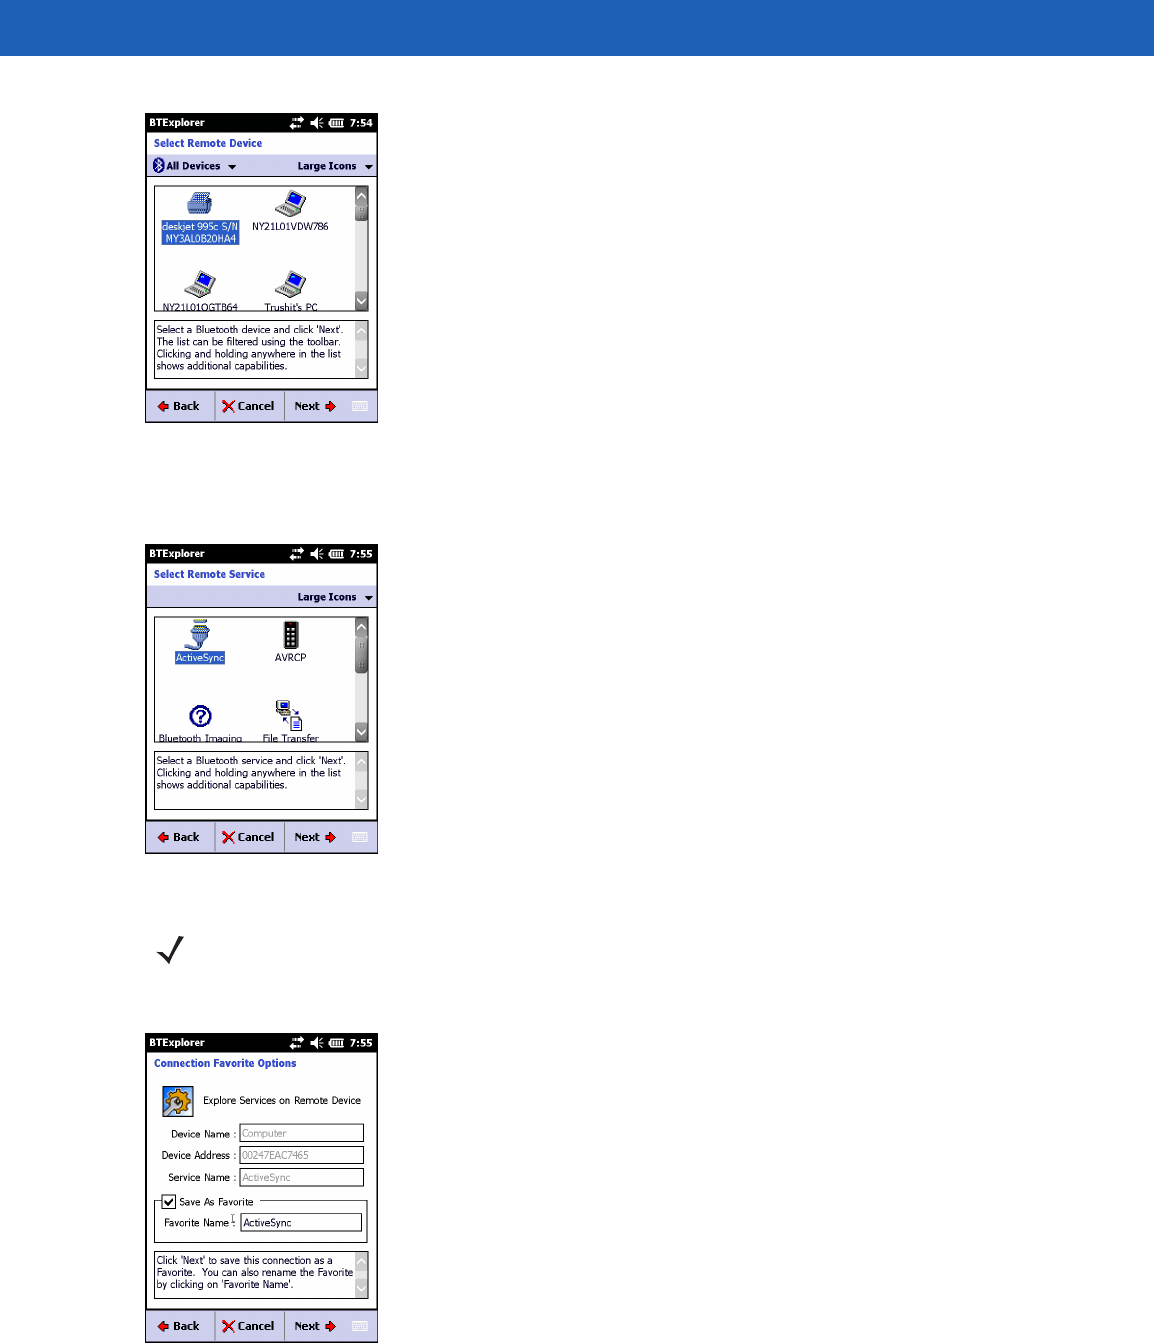
Figure 4-14
Select Remote Device Window
9. Select a device from the list and tap Next. The MC55 searches for services on the selected Bluetooth
device.
Figure 4-15
Device Services
10. Select a service from the list and press Next. The Connection Favorite Options window appears.
Figure 4-16
Connection Favorite Options Window
11. In the Favorite Name text box, enter a name for this service that will appear in the Favorite window.
NOTE If the MC55 discovers a service but the service is not supported, the service icon is grayed-out.
4 - 18 MC55A0/MC55N0 Enterprise Digital Assistant User Guide
12. Tap Next. The Connection Summary window appears.
13. Tap Connect to add the service to the Favorite window and connect to the service.
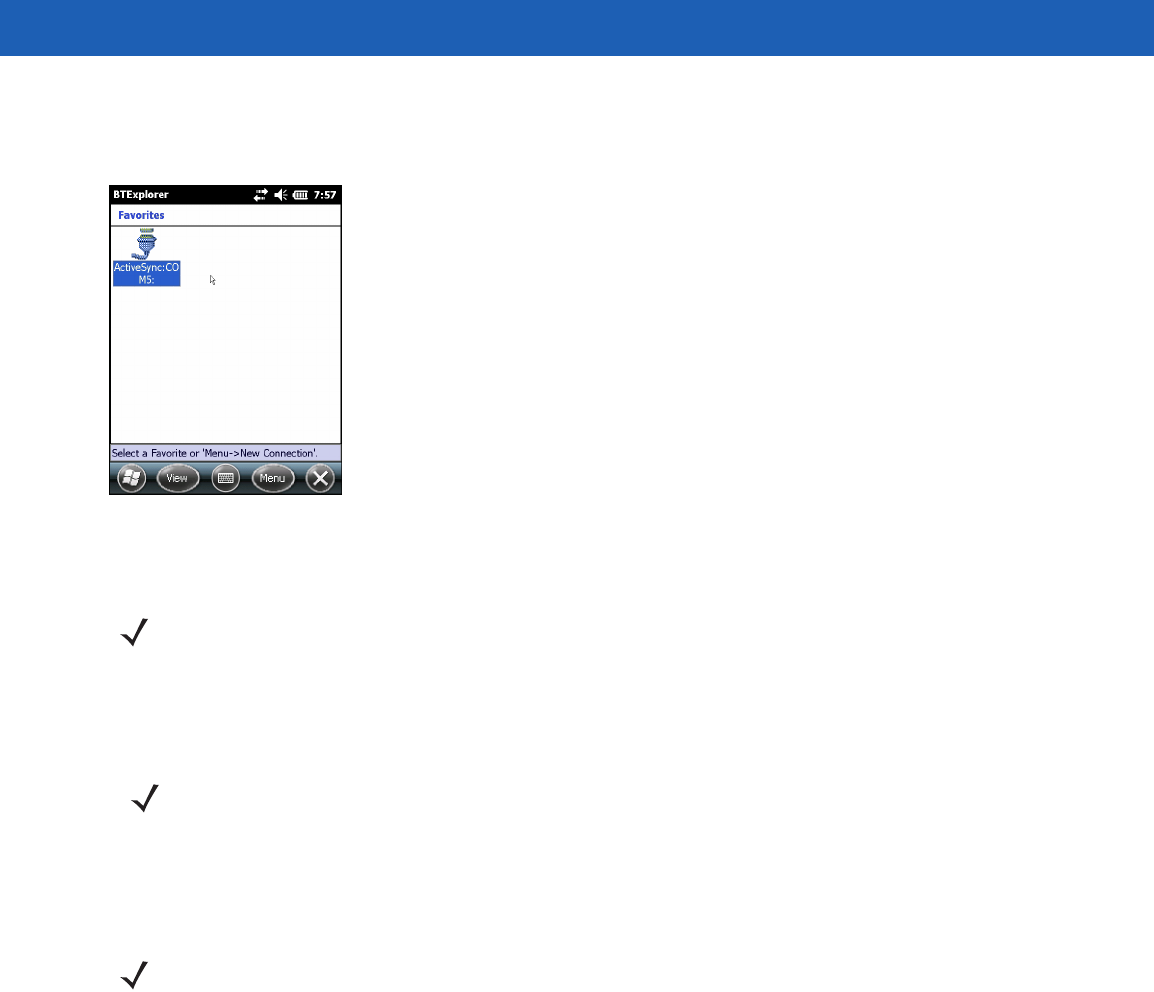
Figure 4-17
Favorites Window
Available Services
See the following sections for information on these services.
File Transfer Services
To transfer files between the MC55 and another Bluetooth enabled device:
1. Ensure that OBEX File Transfer profile is enabled on the MC55. See Profiles on page 4-39 for more
information.
2. Use the Connection Wizard to search for a Bluetooth device.
3. Select the device and tap Next. The Select Remote Service window appears.
4. Select File Transfer and tap Next. The Connection Favorite Options window appears.
5. Tap Next. The Connection Summary window appears.
6. Tap Connect. The remote device’s accessible folders appear.
NOTE Some devices might not require a PIN. This depends upon the device’s authentication.
NOTE Shared folders are a security risk.
NOTE If favorite connections have already been created, the Favorites screen displays. If no favorite
connections have been created, the New Connection Wizard screen displays.
Bluetooth 4 - 19
Figure 4-18
File Transfer Window
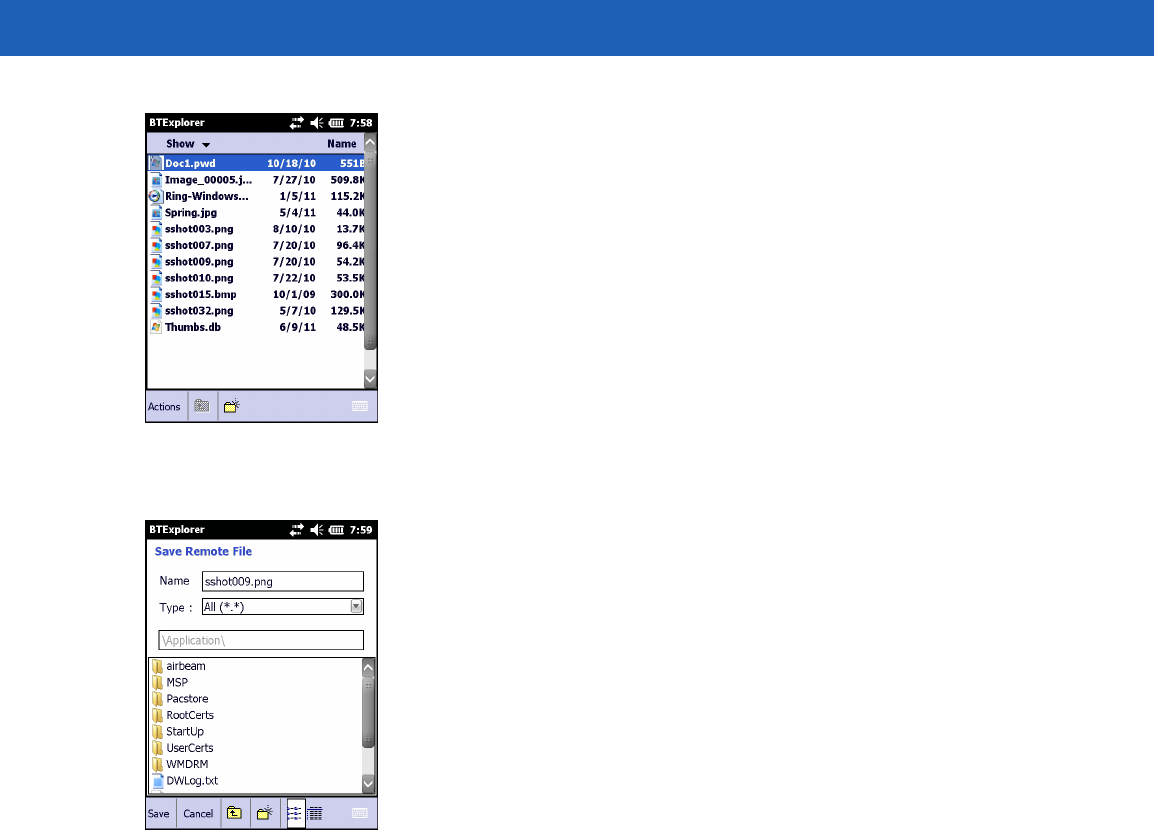
7. Double-tap the file to copy. The Save Remote File window appears.
Figure 4-19
Save Remote File Window
8. Tap and hold on the file. A pop-up menu appears.
9. Select the action to perform:
•
New - create a new file or folder on the remote device
•
Delete - delete the selected file on the remote device.
•
Get File - copy the file from the remote device to the MC55.
•
Put File - copy a file from the MC55 to the remote device.
Creating a New File or Folder
To create a new folder or file on the remote device:
1. Tap and hold on the screen and select New > Folder or New > File. The Create New Folder or Create
New File window appears.
2. Enter the name for the new folder or file.
3. Tap OK to create the new folder or file on the remote device.
Deleting a File
To delete a file from the remote device:

4 - 20 MC55A0/MC55N0 Enterprise Digital Assistant User Guide
1. Tap and hold on the file to delete and select Delete.
2. In the Delete Remote Device File dialog box tap Yes.
Getting a File
To copy a file from a remote device:
1. Double-tap or tap and hold on the file and select Get. The Save Remote File window appears.
2. Navigate to the directory to save the file.
3. Tap Save. The file is transferred from the remote device to the MC55.
Copying a File
To copy a file to a remote device:
1. Tap Action > Put. The Send Local File window appears.
2. Navigate to the directory to save the file and select a file.
3. Tap Open. The file copies from the MC55 to the remote device.
Connecting to the Internet Using an Access Point
This section explains how to access a Bluetooth-enabled LAN access point (AP) for a network connection. Use
Internet Explorer to connect to a server.
1. Ensure the MC55 is discoverable and connectable. See Device Info on page 4-32.
2. Ensure that the Personal Area Networking profile is enabled on the MC55. See Profiles on page 4-39 for
more information.
3. Use the Connection Wizard to search for a Bluetooth AP.
4. Select the Personal Area Network or Network Access service and select Connect from the pop-up
menu. The MC55 connects with the access point.
5. Tap > Internet Explorer. The Internet Explorer window appears.
6. In the address field, enter an internet address and tap the Enter button. The web page loads.
Dial-Up Networking Services
Dial-up networking allows the user to connect the MC55 to a Bluetooth Phone and use the Bluetooth Phone as
a modem to connect to an office network or ISP.
Before setting up dial-up networking, obtain dial-up information and other necessary settings (username,
password and domain name, if required) for the office network or ISP.
To create a new Bluetooth connection:
NOTE If favorite connections have already been created, the Favorites screen displays. If no favorite
connections have been created, the New Connection Wizard screen displays.
NOTE Network Access profile is not supported.

Bluetooth 4 - 21
1. Ensure the Bluetooth Phone is discoverable and connectable.
2. Ensure that the Dial-Up Networking profile is enabled on the MC55. See Profiles on page 4-39 for more
information.
3. Tap Menu > New Connection.
4. Select Explore Services on Remote Device or another from the drop-down list and tap Next.
5. BTExplorer searches for Bluetooth devices in the area.
The discovered devices display in the Select Remote Device window.
6. Select the Bluetooth Phone from the list and tap Next. The MC55 searches for services on the Bluetooth
Phone.
Figure 4-20
Select Remote Service Window
7. Select Dial-up Networking Gateway service from the list and tap Next. The Connection Favorite
Options window appears.
Figure 4-21
Connection Favorite Options Window
8. In the Favorite Name text box, enter a name for this service that will appear in the Favorite window.
9. Tap Next. The Connection Summary window appears.
10. Tap Connect. The Select Dial-up Networking Entry window appears.
4 - 22 MC55A0/MC55N0 Enterprise Digital Assistant User Guide
Figure 4-22
Select Dial-up Networking Entry Window
11. Select the entry and tap OK. The MC55 begins to communicate with the Bluetooth phone. If required, the
phone requests permission to communicate with the MC55.
12. Confirm the connection on the phone. The Network Log On window appears.
13. In the User name text box, enter the user name for this connection.
14. In the Password text box, enter the password for this connection.
15. In the Domain text box, enter the domain name for this connection, if required.
16. Tap Finish or Connect.
17. The phone begins dialing and connects to the network.
18. To end a session, tap the Connection icon and then tap Disconnect in the dialog box.
Add a Dial-up Entry
To add a dial-up entry:
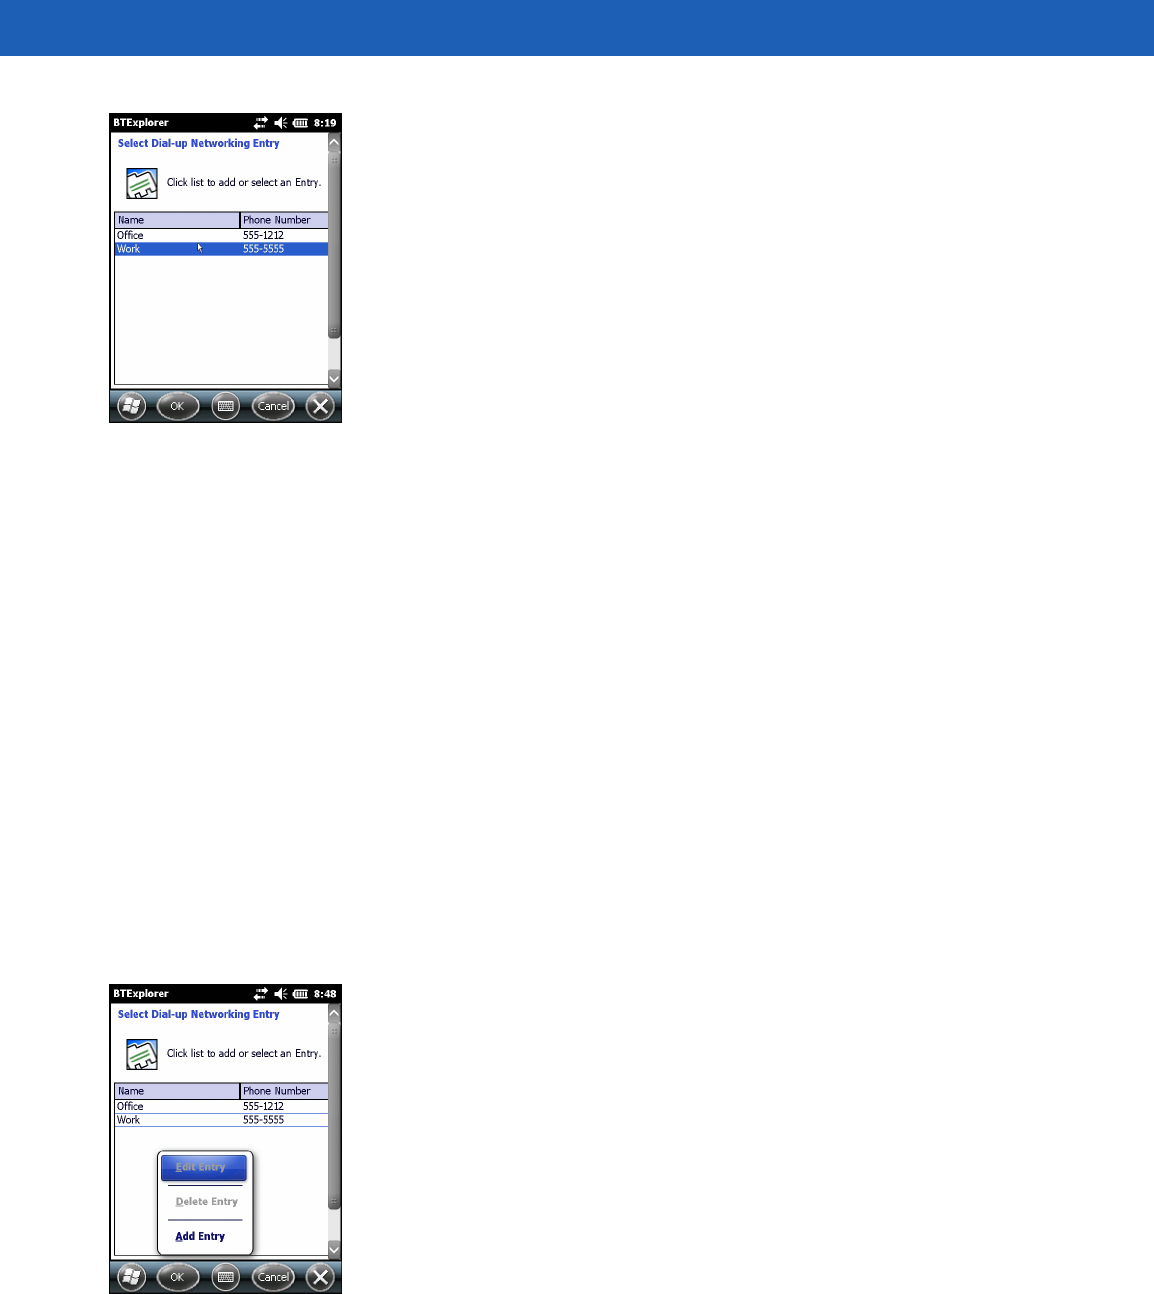
1. In the Select Dial-up Networking Entry window, tap and hold and then select Add Entry from the pop-up
menu.
Figure 4-23
Select Dial-up Networking Entry Window
2. The Add Phone Book Entry window appears.
Bluetooth 4 - 23
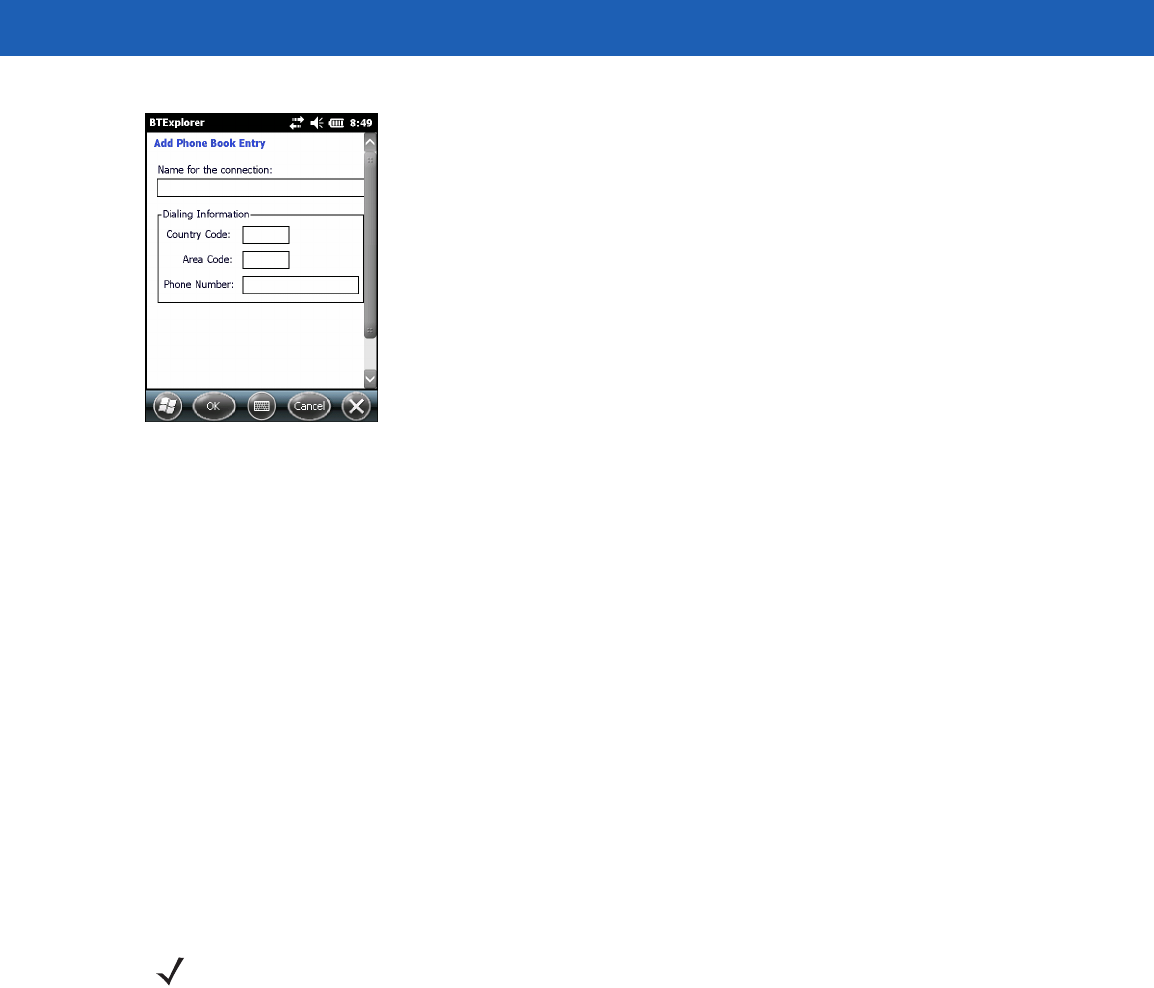
Figure 4-24
Add Phone Book Entry Window
3. In the Name for the connection text box, enter a name for this connection.
4. In the Country Code text box, enter the country code for the country that you are calling.
5. In the Area Code text box, enter the area code.
6. In the Phone Number text box, enter the phone number.
7. Tap OK.
Object Exchange Push Services
Object Exchange (OBEX) is a set of protocols that allows sharing objects such as Contacts or pictures using
Bluetooth.
To exchange contact information with another Bluetooth enabled device:
1. Ensure the MC55 is discoverable and connectable. See Device Info on page 4-32.
2. Ensure that the OBEX Object Push profile is enabled on the MC55. See Profiles on page 4-39 for more
information.
3. Use the Connection Wizard to search for a Bluetooth device.
4. Select the device and tap Next.
5. Select the OBEX Object Push service and tap Next. The Connection Favorite Options window
appears.
6. Tap Next. The Connection Summary window appears.
7. Tap Connect. The OBEX Object Push window appears.
8. In the Action drop-down list, select one of the following options: Send Contact Information, Swap
Contact Information, Fetch Contact Information, or Send a Picture.
NOTE If favorite connections have already been created, the Favorites screen displays. If no favorite
connections have been created, the New Connection Wizard screen displays.

4 - 24 MC55A0/MC55N0 Enterprise Digital Assistant User Guide
Sending a Contact
To send a contact to another device:
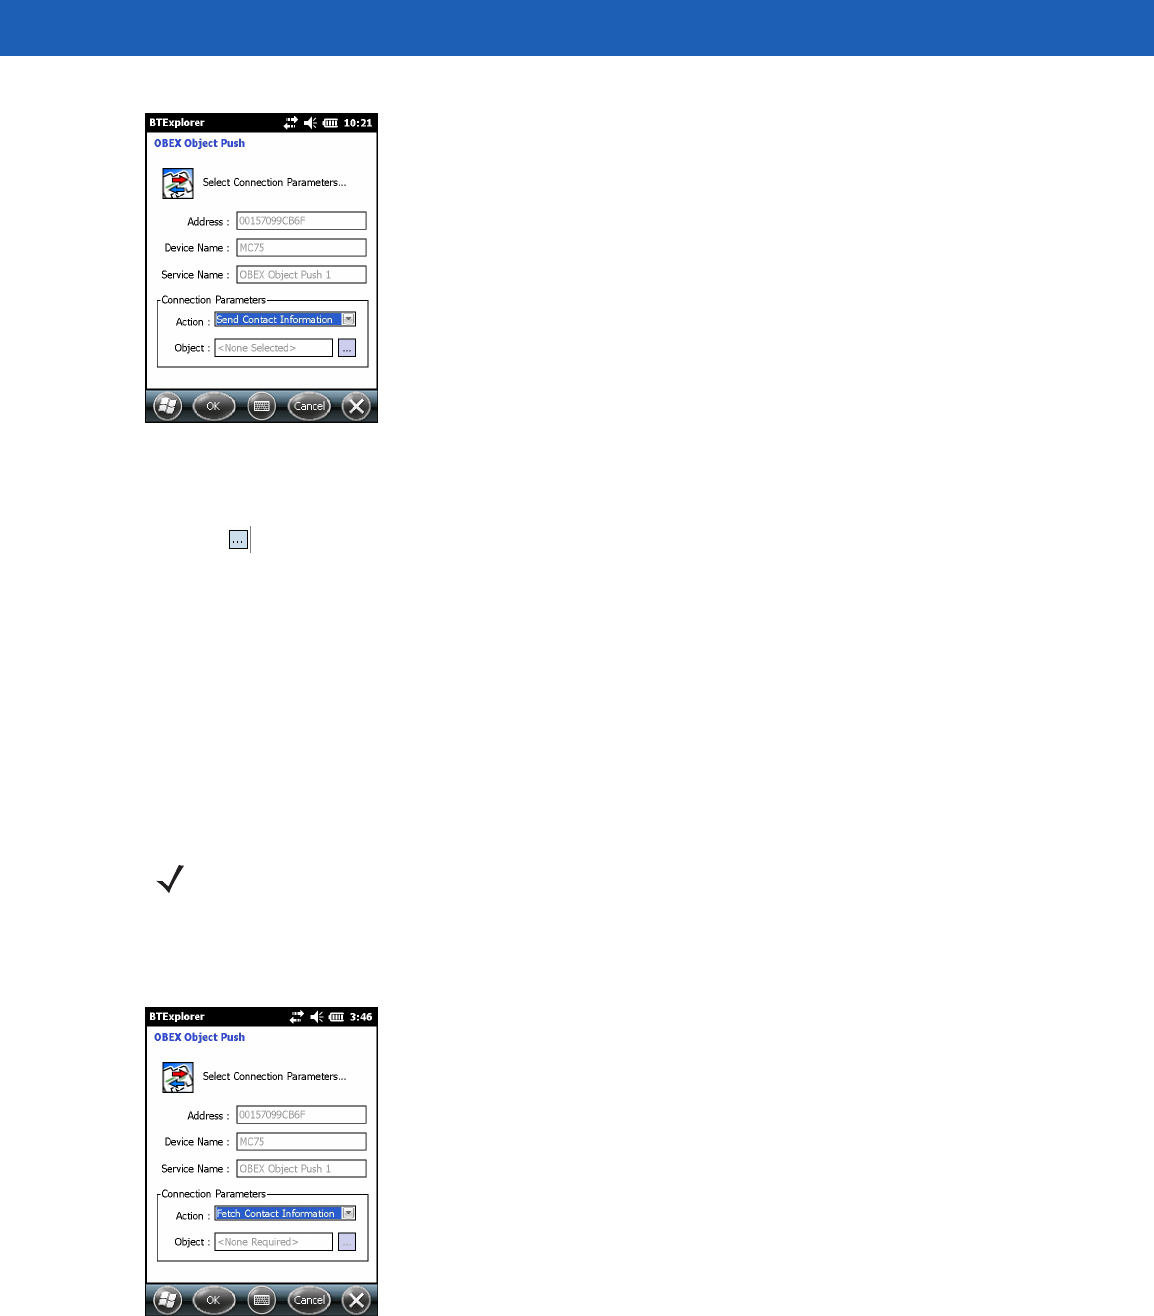
1. Tap and hold on OBEX Object Push and select Connect.
Figure 4-25
OBEX Object Push Window
2. In the Action: drop-down list, select Send Contact Information.
3. Tap .
4. Select a contact to send to the other device.
5. Tap OK.
6. Tap OK to send the contact to the other device and display a confirmation dialog box on the other device to
accept the contact. A Send Contact dialog appears.
7. Tap Ok.
Swapping Contacts
To swap contacts with another device:
1. Tap and hold on OBEX Object Push and select Connect. The OBEX Object Push window appears.
NOTE Prior to sending and receiving contacts, a default contact must be set up before attempting to send a
contact.
NOTE Prior to swapping contacts, a default contact must be set up before attempting to send a contact.
Ensure that the MC55 is connectable.
Bluetooth 4 - 25
Figure 4-26
OBEX Object Push Window
2. In the Action: drop-down list, select Swap Contact Information.
3. Tap . The Select Contact Entry window appears.
4. Select a contact to send to the other device.
5. Tap OK.
6. Tap OK to swap contacts with the other device and display a confirmation dialog box on the other device to
accept the contact.
7. Tap Ok.
Fetching a Contact
To fetch a contact from another device:
1. Tap and hold on OBEX Object Push and select Connect. The OBEX Object Push window appears.
Figure 4-27
OBEX Object Push Window
2. In the Action: drop-down list, select Fetch Contact information.
3. Tap OK. The contact on the other device is copied.
NOTE Prior to sending and receiving contacts, a default contact must be set up before attempting to send a
contact.
Ensure that the MC55 is connectable.
4 - 26 MC55A0/MC55N0 Enterprise Digital Assistant User Guide
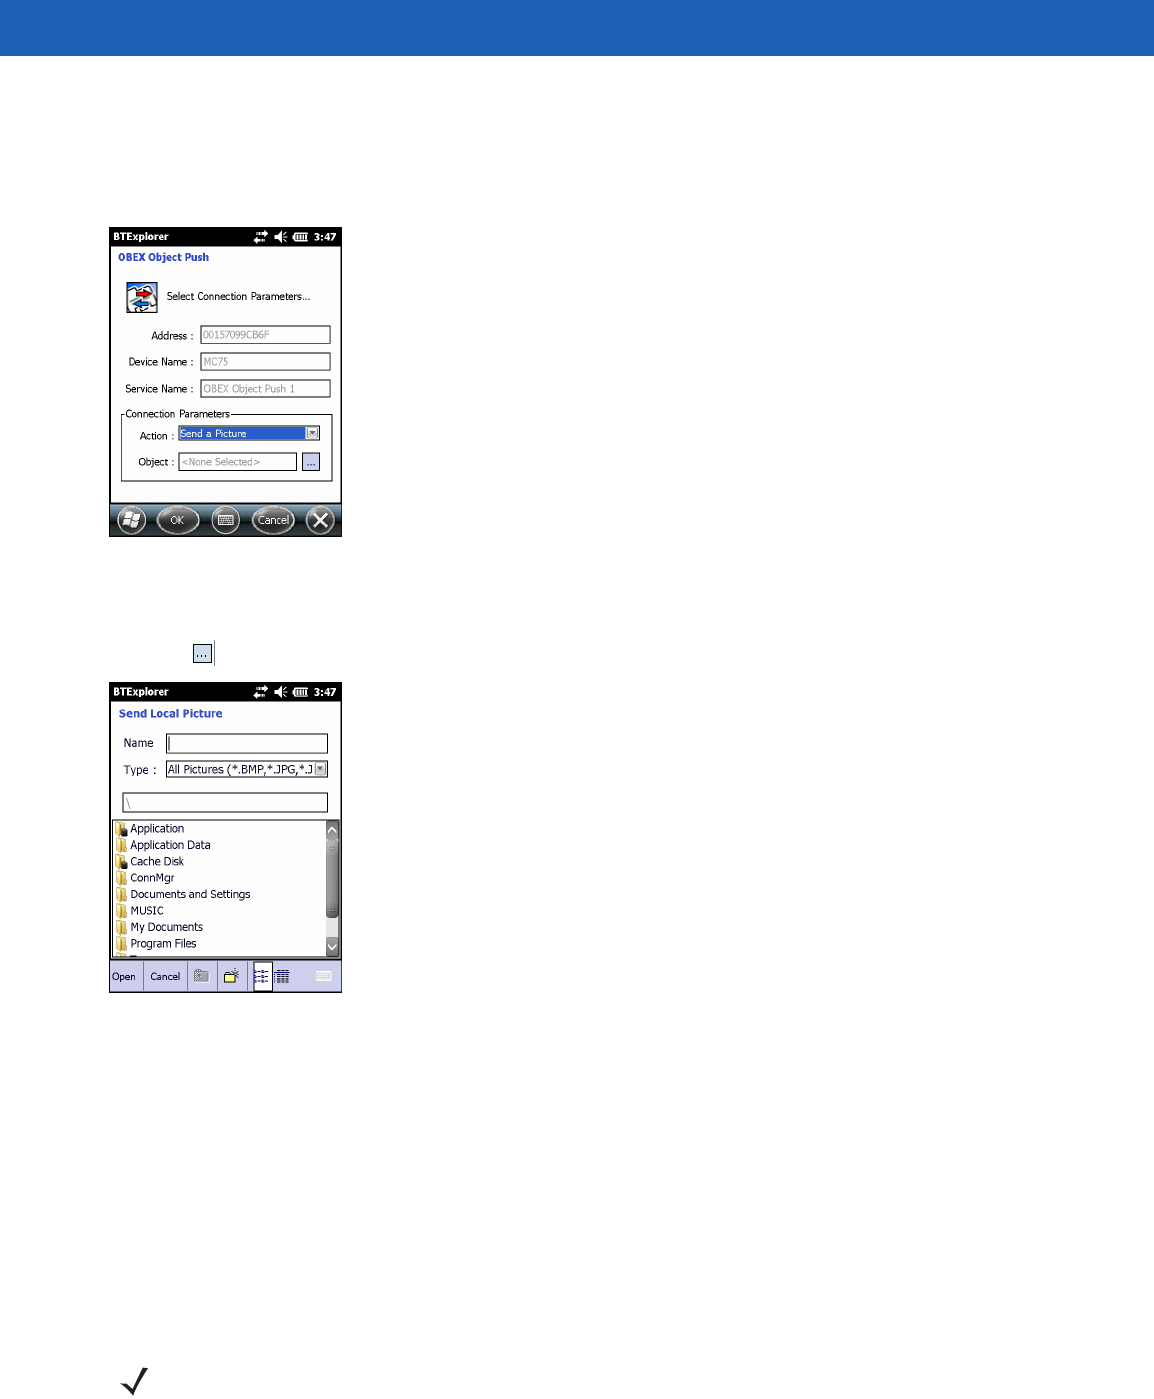
Sending a Picture
To send a picture to another device:
1. Tap and hold on OBEX Object Push and select Connect. The OBEX Object Push window appears.
Figure 4-28
OBEX Object Push Window
2. In the Action: drop-down list, select Send A Picture.
3. Tap . The Send Local Picture window appears.
Figure 4-29
Send Local Picture Window
4. Navigate to the picture to send to the other device.
5. Tap Open.
6. Tap OK to send the picture to the other device and display a confirmation dialog box on the other device to
accept the picture. A Send Picture dialog appears.
7. Tap Ok.
Headset Services
To connect to a Bluetooth headset:
NOTE Newer Bluetooth headsets are device dependant and remember the last device they connected to. If
problems occur while connecting to the headset, place the headset in discovery mode. Refer to the
headset user manual for more information.

Bluetooth 4 - 27
1. Ensure the MC55 is connectable (required when automatic re-connect is initiated). See Device Info on
page 4-32.
2. Ensure that the Headset profile is enabled on the MC55. See Profiles on page 4-39 for more information.
3. Use the Connection Wizard to search for a Bluetooth headset.
4. Select the device and tap Next.
5. Select the Headset service name and select Connect. The MC55 connects to the headset. Refer to the
headset user manual for instructions on communicating with a Bluetooth device.
6. Press the communication button on the headset. This routes both system and WAN call audio to the
headset.
7. When a call is received on the MC55, tap the Accept button to answer the call.
8. Press the communication button on the headset to route the audio back to the MC55.
Serial Port Services
Use the wireless Bluetooth serial port connection as you would a physical serial cable connection. Configure
the application that will use the connection to the correct serial port.
To establish a serial port connection:
1. Use the Connection Wizard to search for a Bluetooth serial device.
2. Select the device and tap Next. The Connection Favorite Options window appears.
3. In the Local COM Port: drop-down list select a COM port.
4. Tap Finish.
ActiveSync Using Serial Port Services
Use the wireless Bluetooth serial port connection for ActiveSync just as you would a physical serial cable
connection. You must configure the application that will use the connection to the correct serial port.
NOTE When using a Bluetooth headset with Headset Services, you cannot accept or end a call from the
headset. You must accept or end a call on the MC55.
NOTE By default, COM ports COM5, COM9, COM11, COM21, COM22 and COM23 are Bluetooth virtual ports.
If an application opens one of these ports, the Bluetooth driver activates and guides you through a
Bluetooth connection.
4 - 28 MC55A0/MC55N0 Enterprise Digital Assistant User Guide
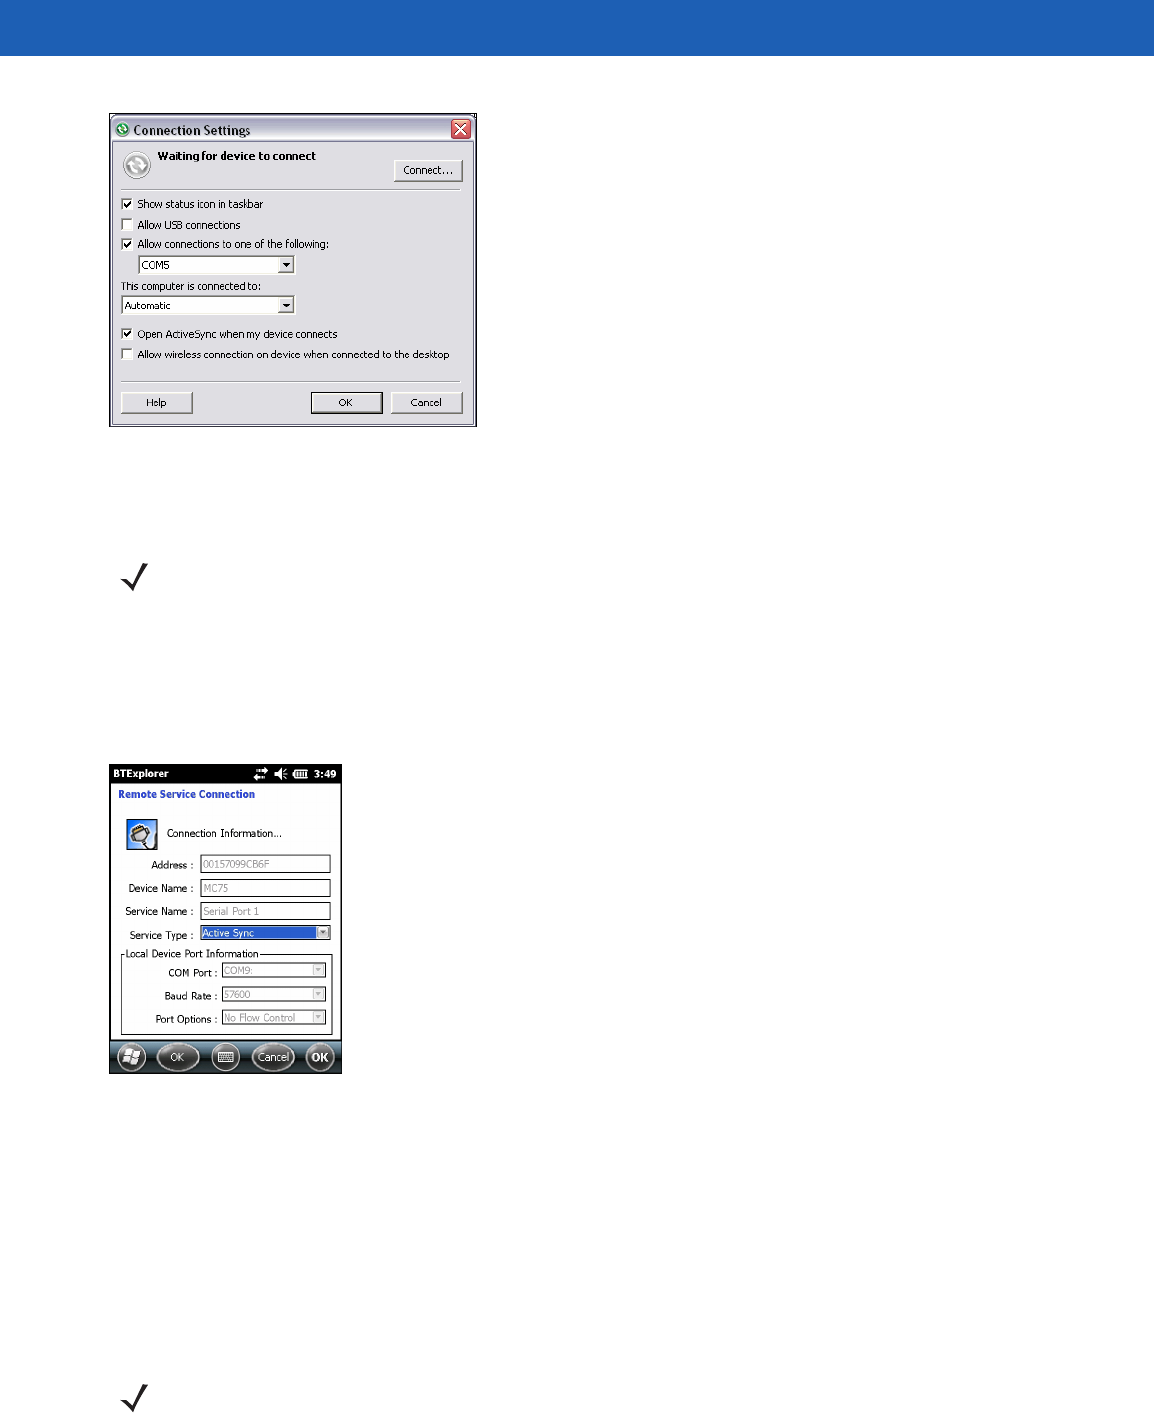
Figure 4-30
ActiveSync Connection Settings Window on PC
To establish an ActiveSync connection:
1. Use the Connection Wizard to search for a Bluetooth device, such as a computer. In the drop-down list
select ActiveSync via Bluetooth.
2. Select the device and tap Next. The Connection Favorite Options window appears.
3. Tap Connect. The Remote Service Connection window appears.
Figure 4-31
Remote Service Connection Window
4. In the Service Type drop-down list, select Active Sync.
5. Tap OK. The MC55 connects the PC and an ActiveSync session begins.
6. Tap Finish. The Connection Favorite Options window appears.
7. To end the session, tap the ActiveSync icon in the Favorite window and select Disconnect from the
pop-up window.
Personal Area Network Services
NOTE When creating an ActiveSync connection, only use StoneStreet One Bluetooth Explorer in Wizard mode.
NOTE This profile supports Ad-hoc and PAN User. Network Access Profile is not supported.

Bluetooth 4 - 29
Connect two or more Bluetooth devices to share files, collaborate, or play multi-player games. To establish a
Personal Area Network connection:
1. Ensure that the Personal Area Networking profile is enabled on the MC55. See Profiles on page 4-39 for
more information.
2. Use the Connection Wizard to search for a Bluetooth device.
3. Select the device and tap Next. The Connection Favorite Options window appears.
4. Tap Next. The Connection Summary window appears.
5. Tap Connect. The MC55 connects to the Bluetooth device.
A2DP/AVRCP Services
A2DP/AVRCP is used to connect to a high-quality stereo headset:
1. Ensure the MC55 is connectable (required when automatic re-connect is initiated). See Device Info on
page 4-32.
2. Ensure that the remote Bluetooth device is in discoverable mode. See the devices user manual for
instructions.
3. Ensure that the A2DP/AVRCP profile is enabled on the MC55. See Profiles on page 4-39 for more
information.
4. Tap Menu > Settings > Services.
5. Tap Add button.
6. Select Advanced Audio Distribution Services.
7. Tap OK. The Edit Local Services window appears.
8. Tap OK twice.
9. Tap Menu > New Connection.
10. Select Connect to High-Quality Audio from the drop-down list.
11. Tap Next.
12. Select the device and tap Next.
13. Enter the PIN Code for the remote device and then tap OK. The Connection Favorite Options window
appears.
14. Tap Next.
15. Tap Connect. The MC55 connects to the high-quality audio headset.
For stereo headsets that can use hands-free services, connect to the hands-free service after connecting to
the A2DP service:
1. Tap Menu > New Connection.
2. Select Connect to Headset from the drop-down list.
3. Tap Next.
4. Select the stereo headset and tap Next.
5. Select the Hands-Free unit service and then tap Next.

4 - 30 MC55A0/MC55N0 Enterprise Digital Assistant User Guide
6. Tap Next.
7. Tap Connect.
Connect to a HID Device
The MC55 can connect to an Human Interface Device (HID) device such as a Bluetooth keyboard:
1. Ensure the MC55 is connectable (required when automatic re-connect is initiated). See Device Info on
page 4-32.
2. Ensure that the remote Bluetooth device is in discoverable mode. See the device user manual for
instructions.
3. Ensure that the HID Client profile is enabled on the MC55. See Profiles on page 4-39 for more information.
4. Tap Menu > New Connection.
5. Select Explore Services on Remote Device from the drop-down list.
6. Tap Next.
7. Select the device and tap Next.
8. Select the service and tap Next.
9. The Connection Favorite Options window appears.
10. Tap Next.
11. Tap Connect. The MC55 connects to the HID device.
Bonding with Discovered Device(s)
A bond is a relationship created between the MC55 and another Bluetooth device in order to exchange
information in a secure manner. Creating a bond involves entering the same PIN on the two devices. After
creating a bond and turning on the Bluetooth radios, the devices recognize the bond and can exchange
information without re-entering a PIN.
To bond with a discovered Bluetooth device:
1. Tap the Bluetooth icon and select Show BTExplorer. The BTExplorer window appears.
2. Tap Menu > New Connection. The New Connection Wizard window appears.
3. In the drop-down list, select Pair with Remote Device.
4. Tap Next. The Select Remote Device window appears.
NOTE If favorite connections have already been created, the Favorites screen displays. If no favorite
connections have been created, the New Connection Wizard screen displays.
NOTE Devices discovered previously are listed to save time. To start a new device discovery, tap and hold on the list
area and select Discover Devices from the pop-up menu.
Bluetooth 4 - 31
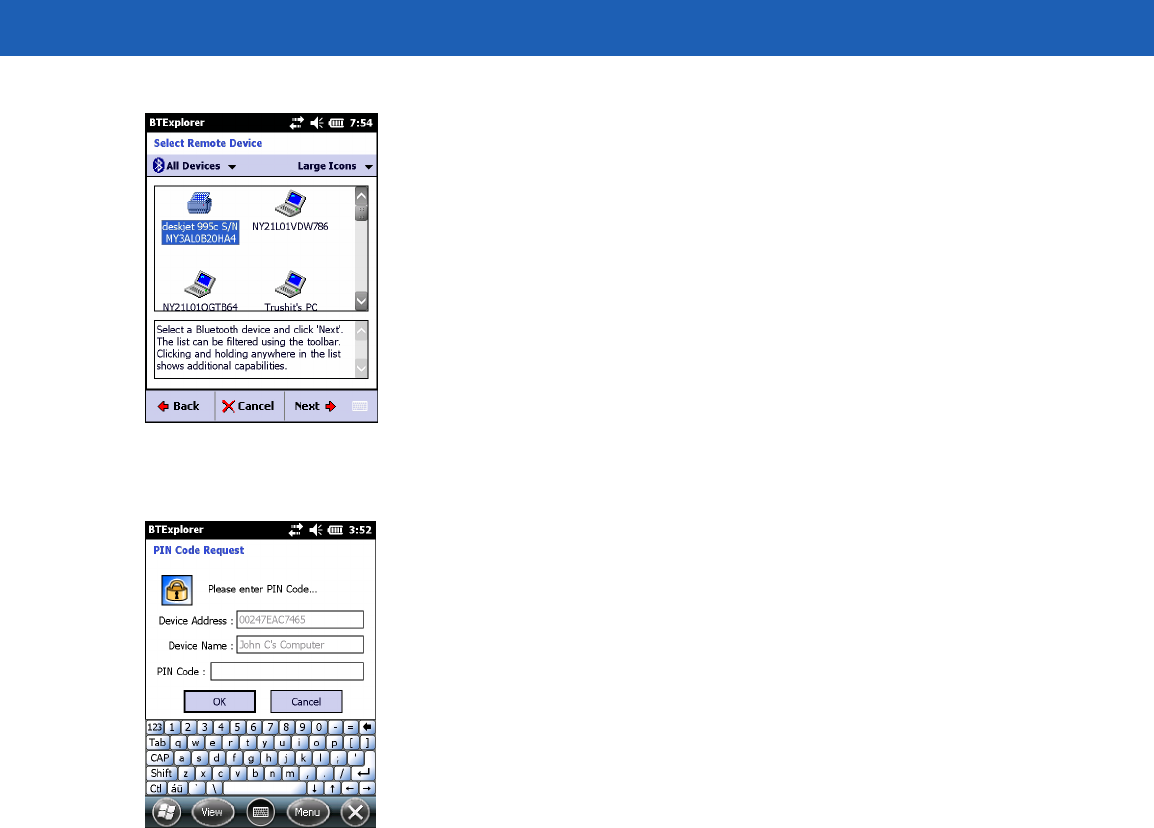
Figure 4-32
Select Remote Device Window
5. Select a device from the list and tap Next. The PIN Code Request window appears.
Figure 4-33
Connection Favorite Options Window
6. In the PIN Code field, enter the PIN code.
7. Tap OK. The Pairing Status window displays.
8. Tap Finish. The devices are successfully paired. The device name moves to the Trusted Devices window.
Deleting a Bonded Device
To delete a device no longer needed:
1. Tap the Bluetooth icon and select Show BTExplorer. The BTExplorer window appears.
2. Tap Menu > Trusted Devices. The Trusted Devices window appears.
3. Tap and hold on the device select Delete Link Key in the pop-up menu.
4. A confirmation dialog appears. Tap Yes.
Accepting a Bond
When a remote device wants to bond with the MC55, enter a PIN when requested to grant permission.
1. Ensure that the MC55 is set to discoverable and connectable. See Bluetooth Settings on page 4-32. When
prompted to bond with the remote device the PIN Code Request window appears.
4 - 32 MC55A0/MC55N0 Enterprise Digital Assistant User Guide
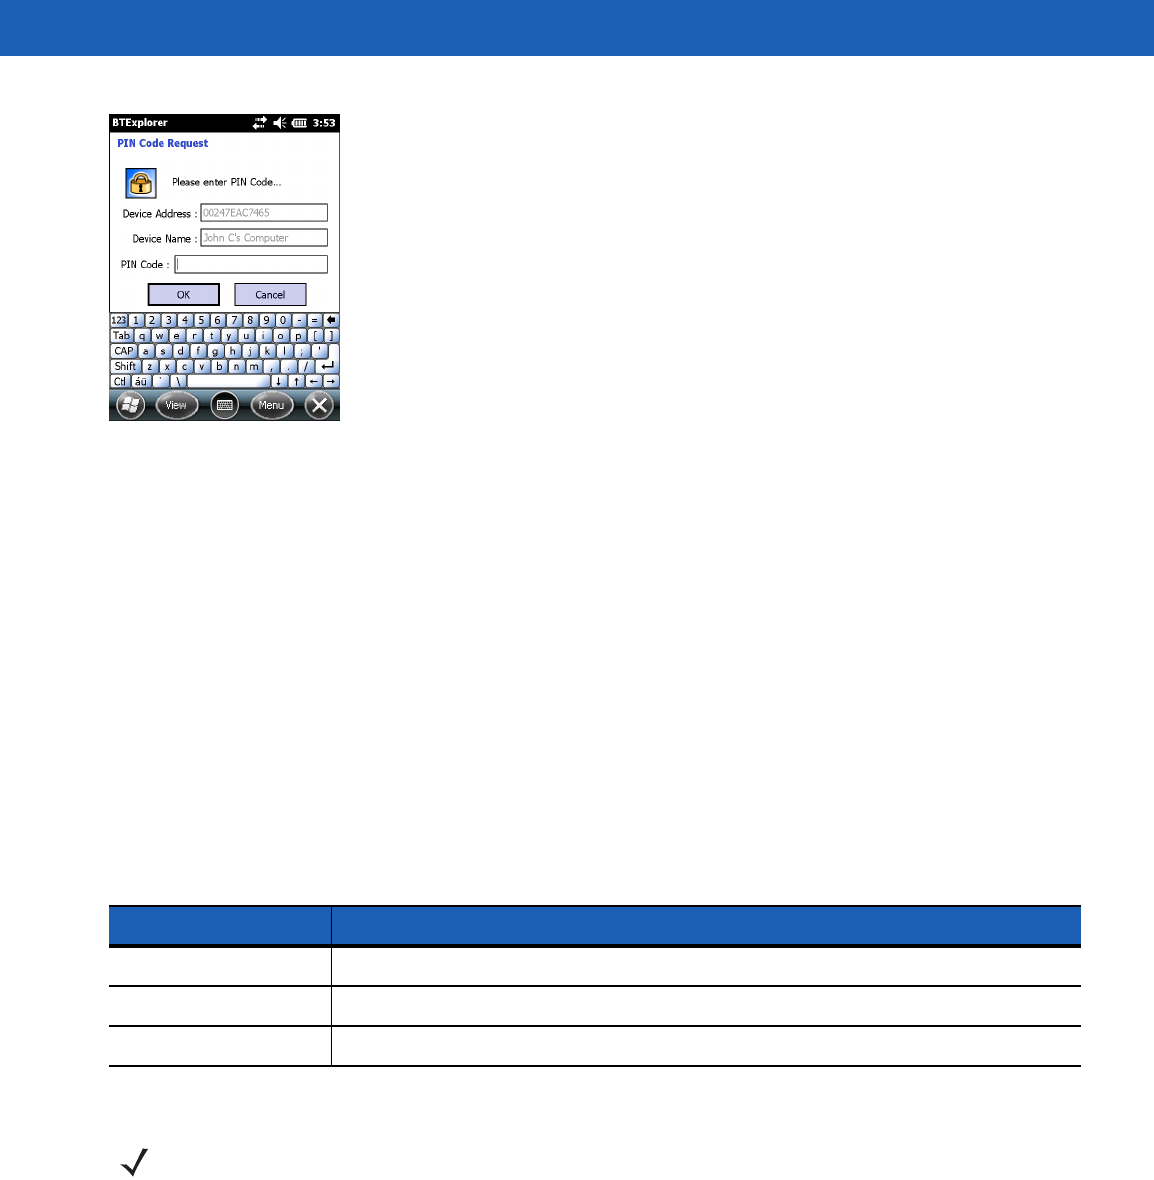
Figure 4-34
PIN Code Request Window
2. In the PIN Code: text box, enter the same PIN entered on the device requesting the bond. The PIN must
be between 1 and 16 characters.
3. In the Device Name: text box, edit the name of the device requesting the bond, if desired.
4. Tap OK to create the bond. The MC55 can now exchange information with the other device.
Bluetooth Settings
Use the BTExplorer Settings window to configure the operation of the BTExplorer application. Tap Menu >
Settings.
Device Info
Use Device Info to configure the MC55’s Bluetooth connection modes.
Services
Use Services to add or delete Bluetooth services.
Table 4-3
Device Info Data
Item Description
Device Name Displays the name of the MC55.
Discoverable Mode Select whether or not the MC55 is discoverable by other Bluetooth devices.
Connectable Mode Select whether or not the MC55 is connectable by other Bluetooth devices.
NOTE Ensure that the MC55 is discoverable and connectable when remote devices use MC55 services.
Bluetooth 4 - 33
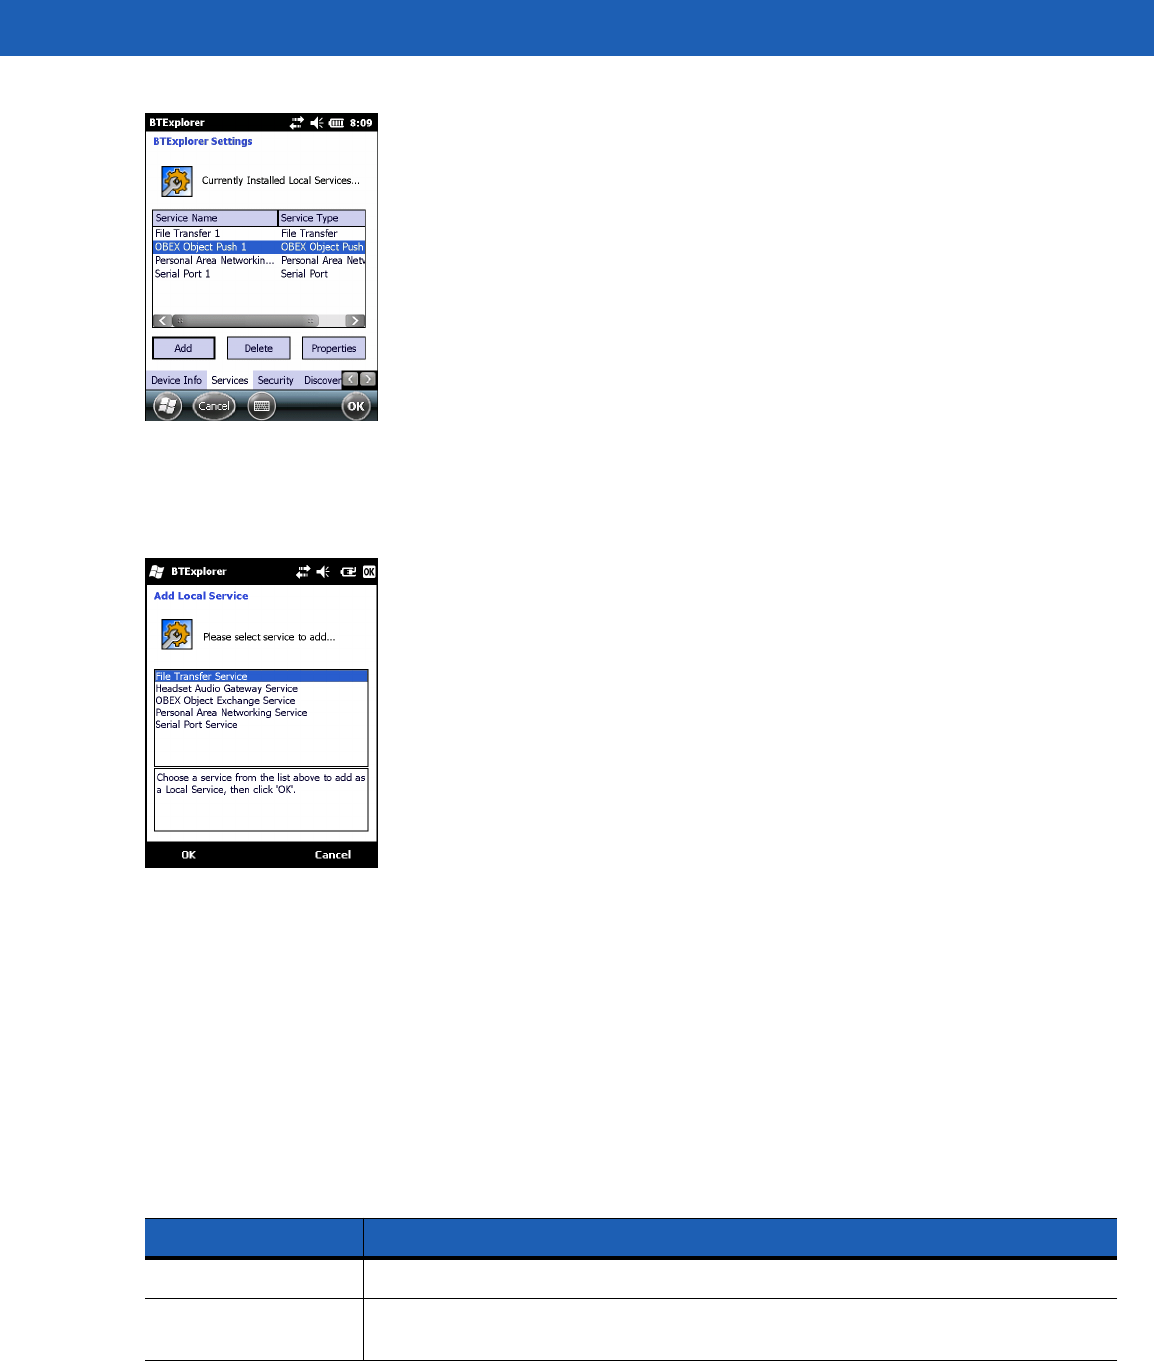
Figure 4-35
BTExplorer Settings - Services
To add a service:
1. Tap Add.
Figure 4-36
Add Local Service Window
2. In the list, select a service to add.
3. Tap OK. The Edit Local Service window displays for the selected service.
4. Select the appropriate information and then tap OK. See the following sections for information on the
available services.
Dial-Up Networking Service
Dial-up Networking allows other Bluetooth devices to access a dial-up modem.
Table 4-4
Dial-up Networking Information Data
Item Description
Service Name Displays the name of the service.
Service Security Select the type of security from the drop-down list. Options are None, Authenticate,
or Authenticate/Encrypt.
4 - 34 MC55A0/MC55N0 Enterprise Digital Assistant User Guide
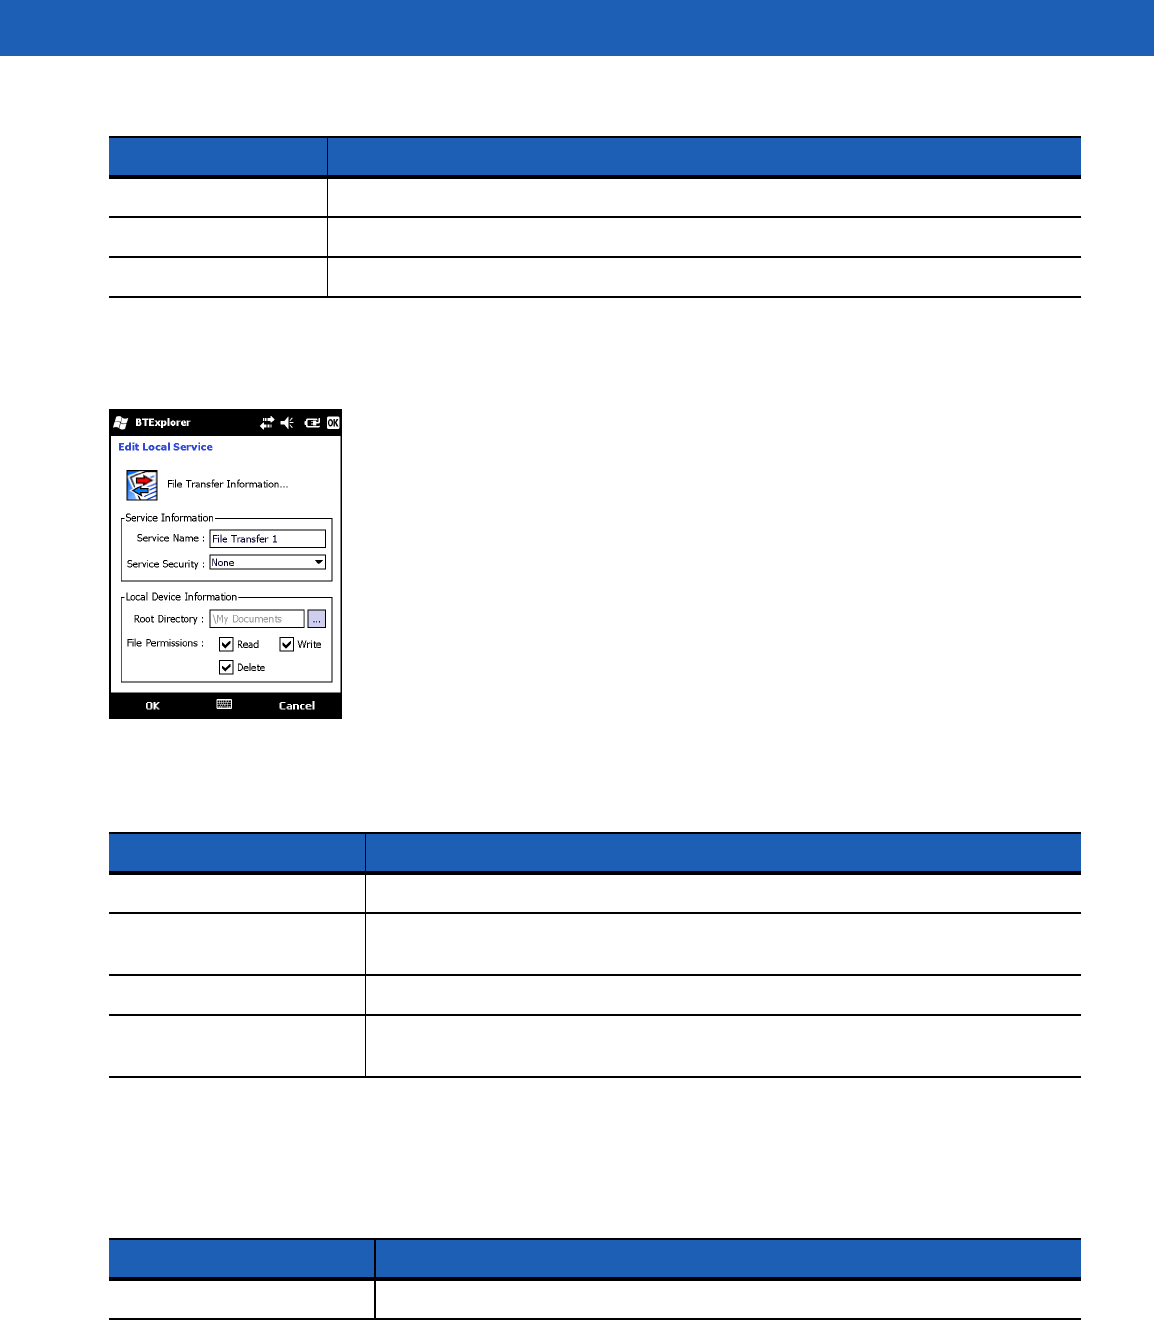
File Transfer Service
File transfer allows other Bluetooth devices to browse files.
Figure 4-37
BTExplorer Settings - File Transfer Information
Hands-Free Audio Gateway Service
Hands-Free Service Audio Gateway allows connection to hands-free devices.
Headset Audio Gateway Service
Headset Service Audio Gateway allows connection to headset devices.
Local COM Port Select the COM port.
Local Baud Rate Select the communication baud rate.
Local Port Options Select the port option.
Table 4-5
File Transfer Information Data
Item Description
Service Name Displays the name of the service.
Service Security Select the type of security from the drop-down list. Options are None,
Authenticate, or Authenticate/Encrypt.
Root Directory Select the directory that other Bluetooth devices can access.
File Permissions Select the file permissions for the selected directory. Check the appropriate box
to grant read access, write access, and delete access.
Table 4-6
Hands-Free Audio Gateway Data
item Description
Service Name Lists the name of the audio service.
Table 4-4
Dial-up Networking Information Data
Item Description

Bluetooth 4 - 35
IrMC Synchronization Service
The IrMC Synchronization service used to synchronize PIM contacts between a remote device and the MC55.
OBEX Object Push Service
OBEX Object Push allows other Bluetooth devices to push contacts, business cards, pictures, appointments,
and tasks to the MC55.
Personal Area Networking Service
Personal Area Networking hosts a Personal Area Network which allows communication with other Bluetooth
devices.
Table 4-7
Headset Audio Gateway Data
Item Description
Service Name Lists the name of the audio service.
Table 4-8
IrMC Synchronization Data
Item Description
Service Name Displays the name of the service.
Service Security Select the type of security from the drop-down list. Options are None, Authenticate,
or Authenticate/Encrypt.
Phonebook Select the Phonebook checkbox to allow synchronization with the MC55’s contacts.
Select Read, Write, Create and/or Delete to allow phonebook permissions.
Table 4-9
OBEX Exchange Information Data
Item Description
Service Name Displays the name of the service.
Service Security Select the type of security from the drop-down list. Options are
None, Authenticate, or Authenticate/Encrypt.
Do not allow clients to push objects Disables clients from pushing objects to the MC55.
Inbox Directory Select a directory where another Bluetooth device can store files.
Table 4-10
Personal Area Networking Data
Item Description
Service Name Displays the name of the service.
Service Security Select the type of security from the drop-down list. Options are None,
Authenticate, or Authenticate/Encrypt.
Support Group Ad-Hoc
Networking Select to enable Ad-Hoc networking.

4 - 36 MC55A0/MC55N0 Enterprise Digital Assistant User Guide
Serial Port Service
Serial port allows other Bluetooth devices to access COM ports.
Advanced Audio Distribution Service
Advanced Audio Distribution hosts connects from Bluetooth devices supporting high-quality stereo audio.
Audio Video Remote Control Service
Audio Video Remote Control hosts connections from Bluetooth devices supporting audio remote-control
functionality.
Security
Security settings allows you to set global security policies for Bluetooth. Note that these settings are only active
on local Services that are set to Authenticate or Authenticate/Encryption. You can set authentication on local
Services under Services.
To adjust the security settings for an individual service, select Services first, then select the individual service,
then Properties.
Table 4-11
Serial Port Services Data
Item Description
Service Name Displays the name of the service.
Service Security Select the type of security from the drop-down list. Options are None, Authenticate,
or Authenticate/Encrypt.
Local COM Port Select the COM port.
Local Baud Rate Select the communication baud rate.
Local Port Options Select the port option.
Table 4-12
Advanced Audio Distribution Data
Item Description
Service Name Lists the name of the audio service.
Table 4-13
Audio Video Remote Control Data
Item Description
Service Name Lists the name of the audio service.
Bluetooth 4 - 37
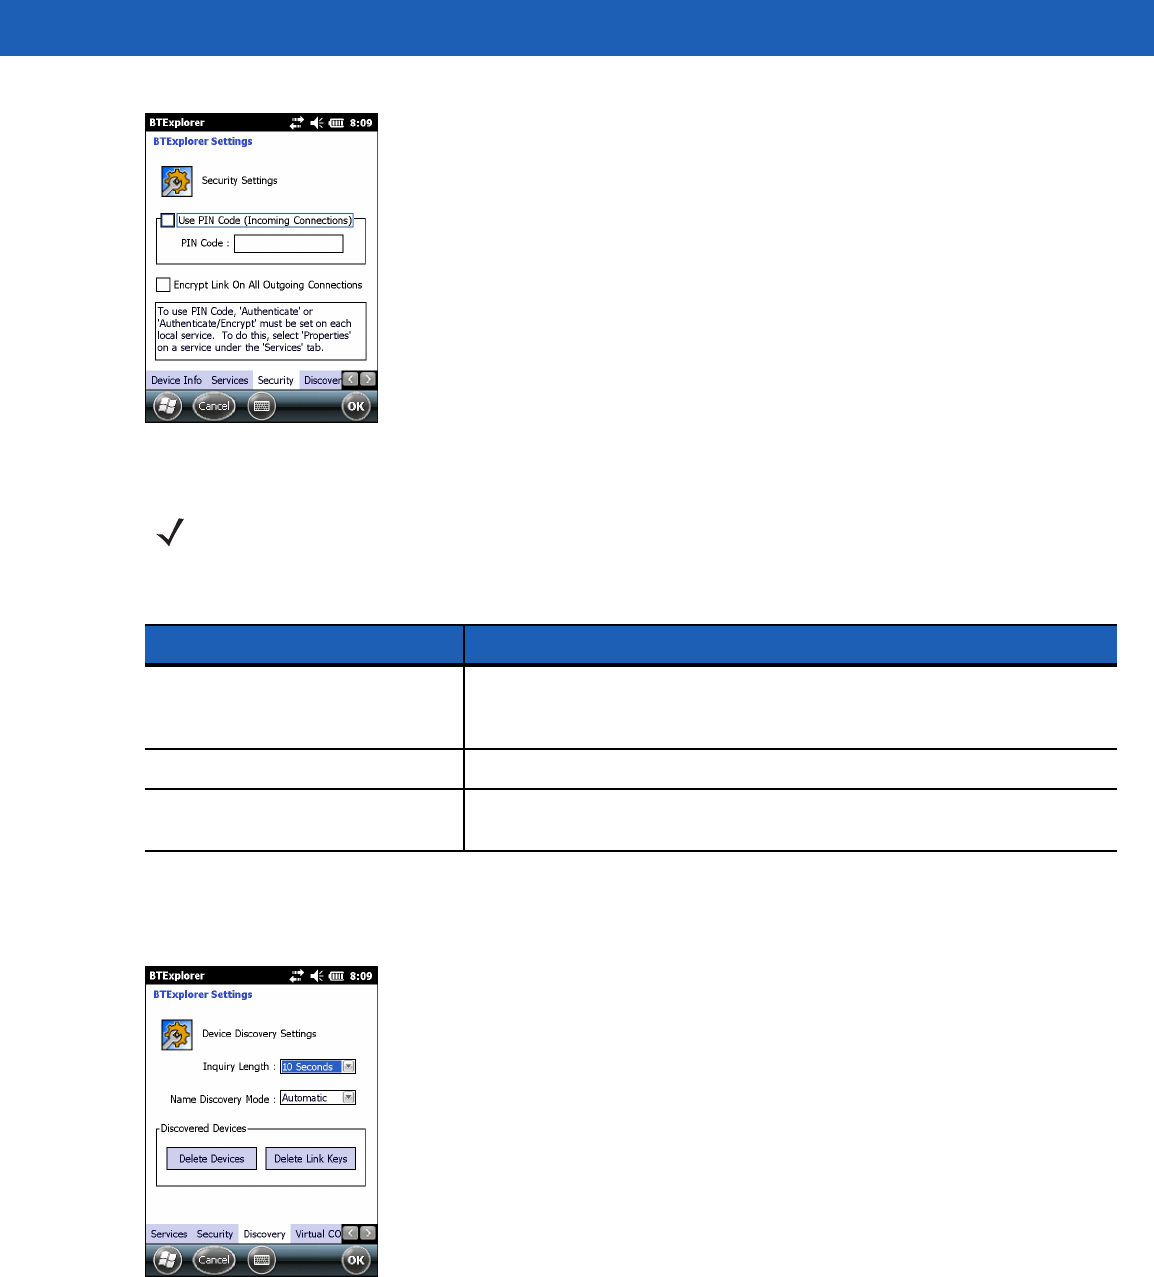
Figure 4-38
BTExplorer Settings - Security
Discovery
Use Discovery to set and modify discovered devices.
Figure 4-39
BTExplorer Settings - Discovery
NOTE To use PIN Code, select Authenticate or Authenticate/Encrypt from the Service Security drop-down
list on each local service.
Table 4-14
Security Data
Item Description
Use PIN Code (Incoming
Connection) Select for automatic use of the PIN code entered in the PIN Code text
box. It is recommended not to use this automatic PIN code feature. See
Security on page 4-2 for more information.
PIN Code Enter the PIN code.
Encrypt Link On All Outgoing
Connections Select to enable or disable encryption on all outgoing connections to
other Bluetooth devices.

4 - 38 MC55A0/MC55N0 Enterprise Digital Assistant User Guide
Virtual COM Port
Virtual COM Port defines which COM ports BTExplorer attempts to use for virtual COM ports. Check the
appropriate checkbox to use the port as a virtual COM port. When finished, choose Apply to enforce changes,
or Revert to restore the original settings.
HID
Use HID to select The Human Interface Device Profile programming interface defines the protocols and
procedures to be used to implement HID capabilities.
Provides support for devices such as mice, joysticks, keyboards.
Table 4-15
Discovery Data
Item Description
Inquiry Length Sets the amount of time the MC55 takes to discover Bluetooth devices in
the area.
Name Discovery Mode Select either Automatic or Manual to automatically attempt to discover
a Bluetooth device's name after finding the device.
Discovered Devices - Delete
Devices Deletes all discovered devices and link keys from memory.
Discovered Devices - Delete
Linked Keys Removes all pairing from remote Bluetooth devices, and makes them all
un-trusted.
Table 4-16
Virtual COM Port Data
Item Description
COM5:Bluetooth Enable or disable COM Port 5.
COM9:Bluetooth Enable or disable COM Port 9.
COM11:Bluetooth Enable or disable COM Port 11.
COM21:Bluetooth Enable or disable COM Port 21.
COM22:Bluetooth Enable or disable COM Port 22.
COM23:Bluetooth Enable or disable COM Port 23.
Table 4-17
HID Data
Item Description
Enable Key Repeat Enables key repeat functionality.
Delay To increase key repeat delay, drag the Delay slider to the right. To
decrease key repeat delay, drag the Delay slider to the left.
Rate To increase key repeat speed, drag the Rate slider to the left. To
decrease key repeat speed, drag the Rate slider to the right.

Bluetooth 4 - 39
Profiles
Use Profile to load or remove Bluetooth services profiles. If a profile is not used, it can be removed to save
memory.
1. Tap a check box next to the profile to load (activate).
The Serial Port profile is always active and cannot be removed.
2. Tap Select All to select all profiles or tap Deselect All to deselect all profiles.
3. Tap Apply to activate the profiles and then Close to exit the application.
System Parameters
Use System Parameters to set device connection settings.
Miscellaneous
Use Miscellaneous to set color and types to better view active connections.
Table 4-18
System Parameters Data
item Description
Page Timeout Sets the amount of time the MC55 searches for a device before moving
on the next device.
Link Supervision Timeout Sets the amount of time that the MC55 will wait for a device to come back
into range after it has gone out of range. If the device does not come back
into range by the set time, the MC55 drops the connection.
Table 4-19
Miscellaneous Data
Item Description
Highlight Connections Select the connection type to highlight when connected. In the Wizard
Mode, the only options are Favorites or None. In the Explorer Mode the
options are None, Tree View Only, List View Only, or Tree and List
View.
Apply Text Style Select the text style to apply to the connection text.
Apply Text Color Select the text color to apply to the connection text.

4 - 40 MC55A0/MC55N0 Enterprise Digital Assistant User Guide

CHAPTER 5 ACCESSORIES
Introduction
Table 5-1 lists the accessories available for the MC55.
Table 5-1
MC55 Accessories
Accessory Part Number Description
Cradles
Single-slot USB Cradle CRD5500-1000UR Charges the MC55 main battery and a spare battery.
Synchronizes the MC55 with a host computer through a USB
connection.
Single-slot
Ethernet/Modem/USB
Cradle
CRD5500-1000XR Charges the MC55 main battery and a spare battery.
Synchronizes the MC55 with a host computer through an
Ethernet, Modem or USB connection.
Four-slot Charge Only Cradle CRD5500-4000CR Charges up to four MC55 devices.
Vehicle Holder VCH5500-1000R Provides an alternative mounting solution for the MC55 in a
vehicle. Requires the Auto Charge cable for charging the
MC55 battery.
Chargers
Four-slot Spare Battery
Charger SAC5500-4000CR Charges up to four MC55 batteries.
USB Charging Cable KT-108022-03R Provides power to the MC55 and USB communication with a
host computer.
Charge Only Cable 25-112560-01R Connects to a power supply to provide power to the MC55.
Auto Charge Cable VCA5500-01R Charges the MC55 using a vehicle’s cigarette lighter.
Miscellaneous
Magnetic Stripe Reader MSR5500-100R Snaps on to the MC55 and adds magnetic stripe reading
capabilities.
Trigger Handle TRG5500-100R Adds a gun-style handle with a scanning trigger to the MC55.
DEX Cable 25-127558-01R Connects the MC55 to a vending machine.

5 - 2 MC55A0/MC55N0 Enterprise Digital Assistant User Guide
Spare 2400 mAh lithium-ion
battery BTRY-MC55EAB00
BTRY-MC55EAB00-10
BTRY-MC55EAB00-50
Replacement 2400 mAh battery (MC55 only).
10-pack.
50-pack.
Spare 3600 mAh lithium-ion
battery BTRY-MC55EAB02
BTRY-MC55EAB02-10
BTRY-MC55EAB02-50
Replacement 3600 mAh battery.
10-pack.
50-pack.
Spare 3600 mAh lithium-ion
battery BTRY-MC55EAB02-H Replacement 3600 mAh battery (MC55-HC only).
Belt Mounted Rigid Holster SG-MC5511110-01R Clips onto belt to hold the MC55 when not in use.
Fabric Holster SG-MC5521110-01R Soft holder for added protection.
Stylus KT-119150-03R
KT-119150-50R Replacement stylus (3-pack).
Replacement stylus (50-pack).
Stylus Stylus-HC005-03R
Stylus-HC005-50R Replacement stylus for MC55-HC (3-pack)
Replacement stylus for MC55-HC (50-pack)
Spring Loaded Stylus STYLUS-00001-03R
STYLUS-00001-10R Optional spring loaded stylus (3-pack).
Optional spring loaded stylus (10-pack).
Tether KT-122621-03R
KT-122621-50R Replacement tether (3-pack)
Replacement tether (50-pack)
Anti-bacterial Handstrap SG-MC5523341-01R Replacement handstrap for MC55-HC only.
Wall Mounting Kit 8710-050006-01R Use for wall mounting the Four-slot cradles.
Screen Protector KT-67525-01R Package of 3 screen protectors.
Software - Enterprise Mobility Developer Kits (EMDKs), available at:
http://supportcentral.motorola.com.
Table 5-1
MC55 Accessories (Continued)
Accessory Part Number Description
Accessories 5 - 3
Single-slot USB Cradle
This section describes how to use a Single-slot USB cradle with the MC55. For USB communication setup
procedures refer to the MC55 Integrator Guide.
The Single-slot USB Cradle:
•
Provides 5.4 VDC power for operating the MC55.
•
Synchronizes information between the MC55 and a host computer. Refer to the MC55 Integrator Guide
for information on setting up a partnership between the MC55 and a host computer.
•
Charges the MC55’s battery.
•
Charges a spare battery.
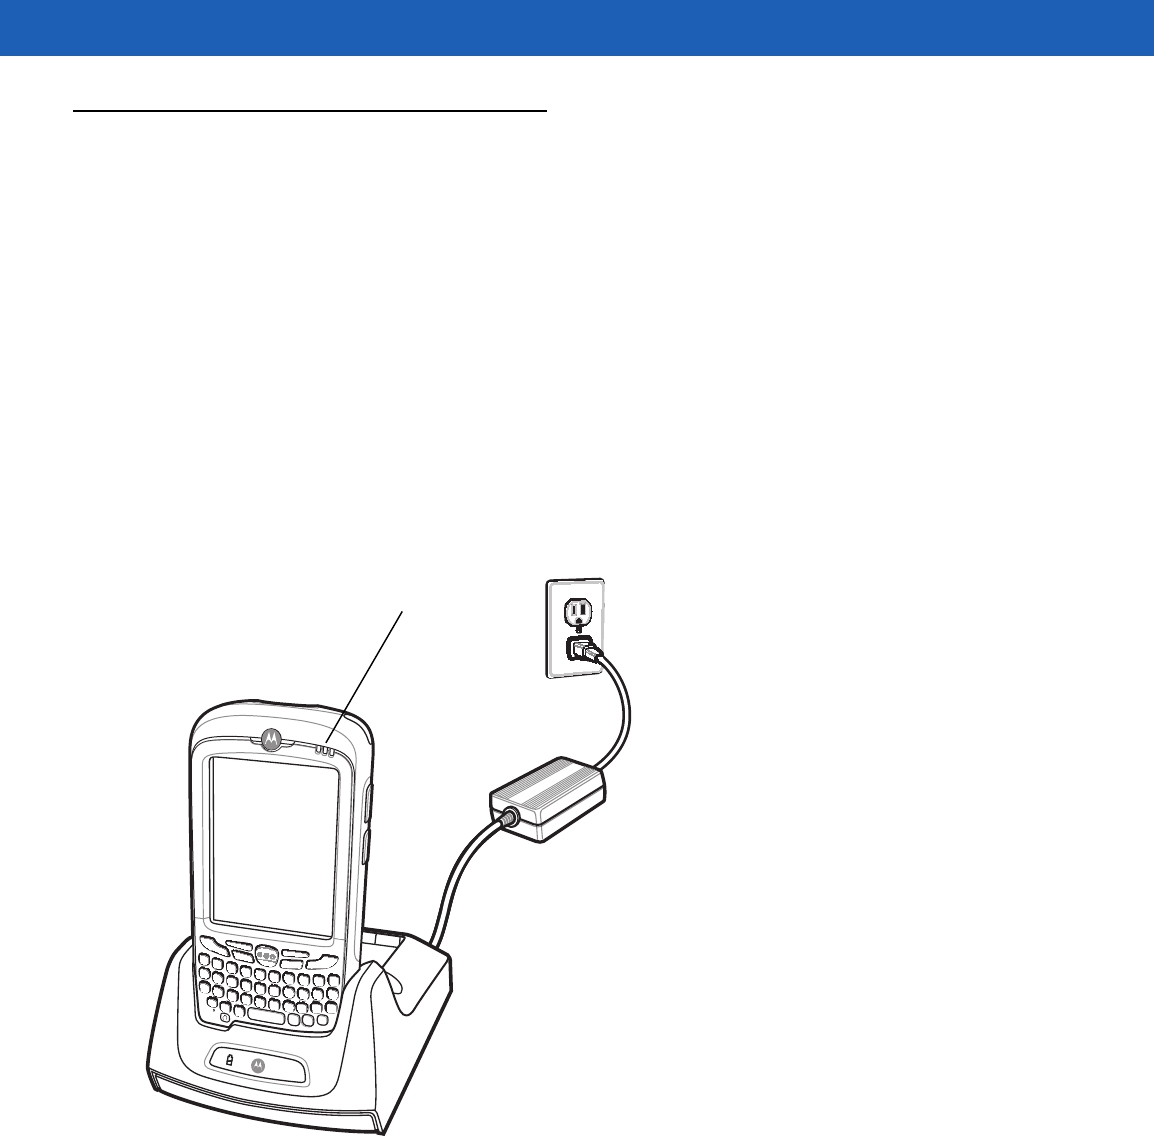
Charging the MC55 Battery
Connect the cradle to power. Insert the MC55 into the slot to begin charging.
Figure 5-1
MC55 Battery Charging
Charging/Battery Status LED
5 - 4 MC55A0/MC55N0 Enterprise Digital Assistant User Guide
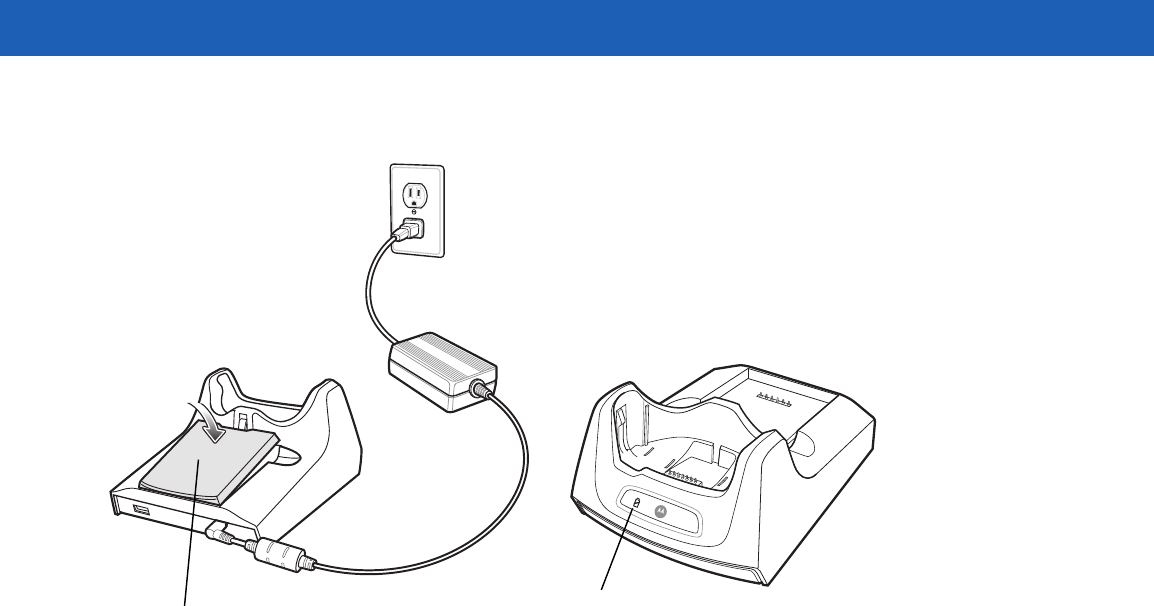
Charging the Spare Battery
Figure 5-2
Spare Battery Charging
Battery Charging Indicators
The Single-slot USB Cradle charges the MC55’s main battery and a spare battery simultaneously.
The MC55’s charge LED indicates the status of the battery charging in the MC55. See Table 1-1 on page 1-6
for charging status indications.
The spare battery charging LED on the cradle indicates the status of the spare battery charging in the cradle.
See Table 5-2 for charging status indications.
The 2400 mAh battery fully charges in less than four hours and the 3600 mAh battery fully charges in less than
six hours.
Charging Temperature
Charge batteries in temperatures from 0°C to 40°C (32°F to 104°F). Charging is intelligently controlled by the
MC55.
To accomplish this, for small periods of time, the MC55 or accessory alternately enables and disables battery
charging to keep the battery at acceptable temperatures. The MC55 or accessory indicates when charging is
disabled due to abnormal temperatures via its LED. See Table 1-1 on page 1-6 and Table 5-2.
Spare Battery Spare Battery
Charging LED

Accessories 5 - 5
Table 5-2
Spare Battery LED Charging Indicators
Spare Battery LED
(on cradle) Indication
Off Battery is not charging; battery is not inserted correctly in the cradle;
cradle is not powered
Slow Blinking Amber Spare battery is charging.
Solid Amber Charging complete.
Fast Blinking Amber Charging error.
5 - 6 MC55A0/MC55N0 Enterprise Digital Assistant User Guide
Single-slot Ethernet/Modem/USB Cradle
The CRD5500-1000XR cradle provides connection to a host computer using USB, a dial-up network using the
modem or an Ethernet network.
Refer to the MC55 Integrator Guide for information on setting up the cradle.
Country Settings
The modem defaults to operation with US telephone networks. To operate the modem with other country
telephone networks, it must be configured using an application on the MC55. Download the Cradle Modem
Country Configurator Application Software for MC55xx package from the Motorola Support Central web site:
http://www.motorola.com/enterprisemobility/support.
Following the instructions with the software package to install the application on the MC55.
The application includes country selections for all supported countries and automatically programs the modem
and adjust its operating parameters to comply with the telephone network in the selected country.
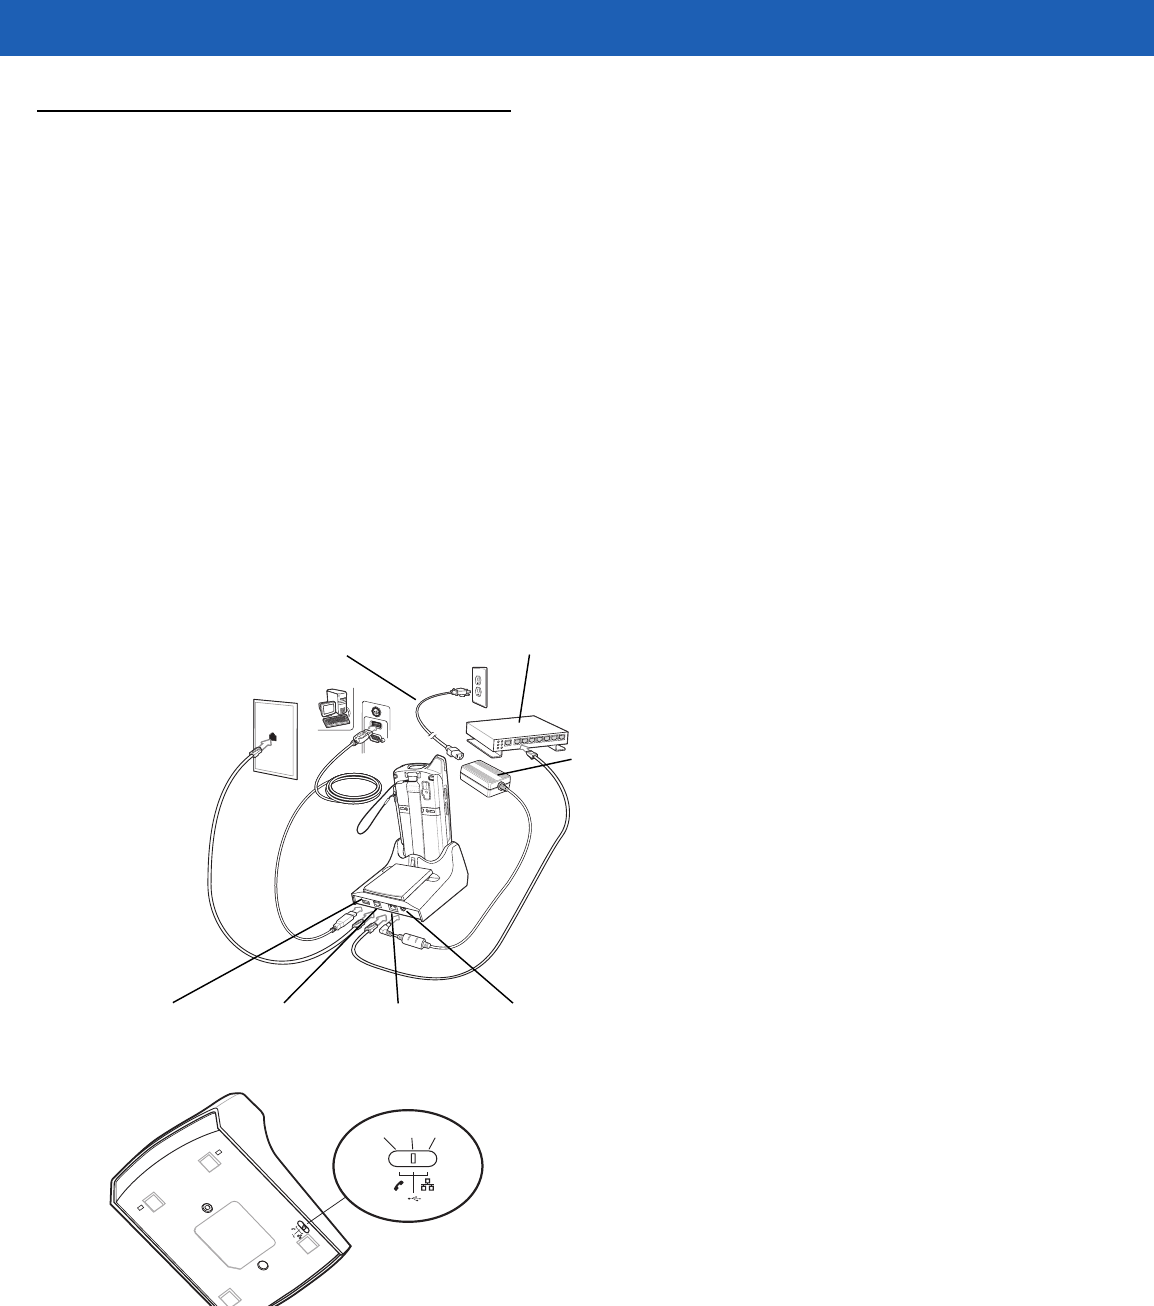
Connection Setup
Figure 5-3
Connection Setup
Figure 5-4
Connection Switch
Power
Supply
Ethernet Power Port
AC Line Cord
USB Port Phone Port
Ethernet Hub
Modem USB Ethernet
Accessories 5 - 7
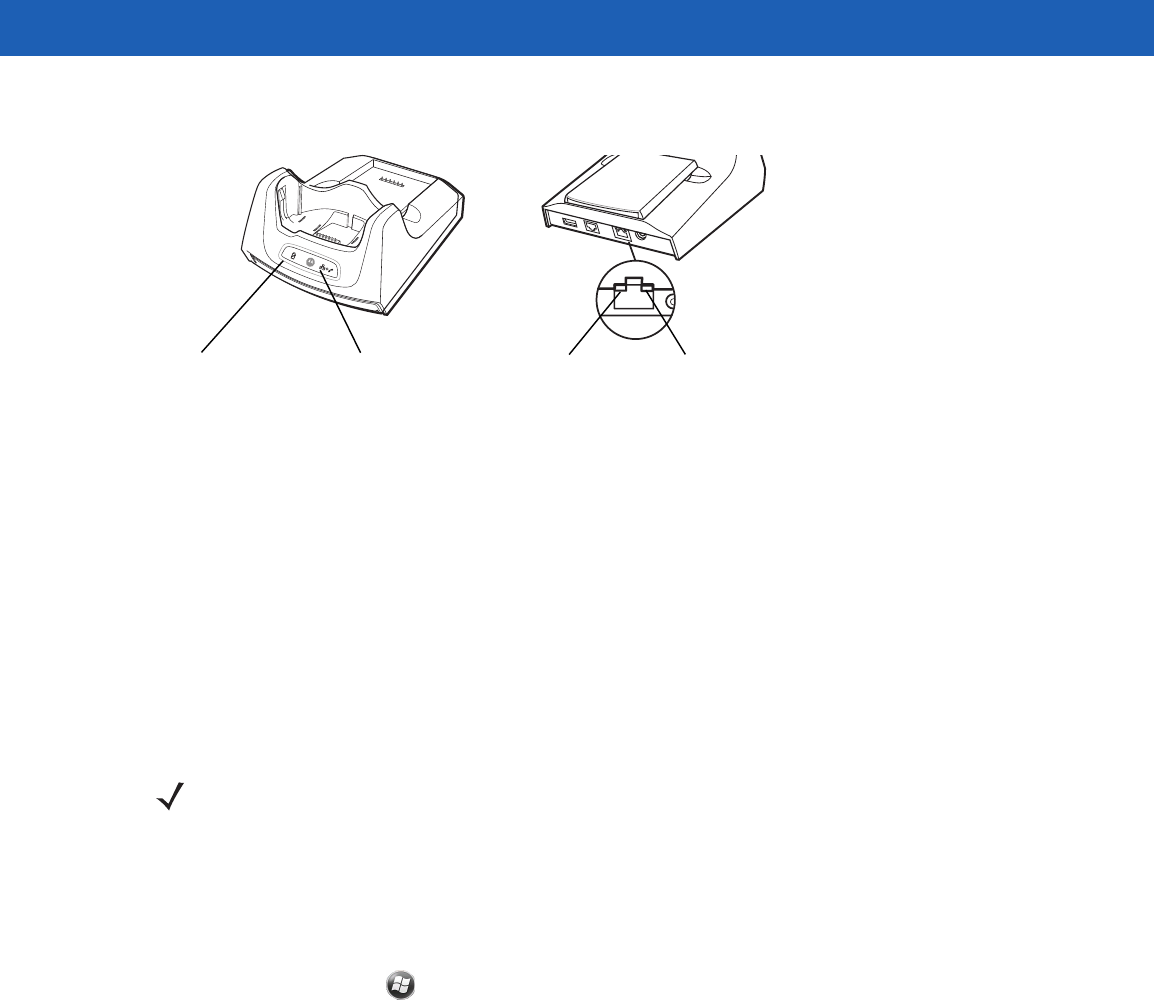
Indicators
Figure 5-5
Indicators
•
Spare Battery Charging LED - Indicates the charging status of the spare battery.
•
Ethernet/Modem LED - Blink whenever Ethernet or modem connectivity is established.
•
Speed LED (green)- Indicates that the transfer rate is 100 Mbps. When it is not lit it indicates that the
transfer rate is 10 Mbps.
•
Link LED (yellow) - Blinks to indicate activity, or stays lit to indicate that a link is established. When it is
not lit it indicates there is no link.
Operation
Ethernet Connection
Place the Connection switch on the bottom of the cradle to the Ethernet position.
Place the MC55 into the cradle.
To test the connection, tap > Programs > Internet Explorer. Enter a web address.
Modem Connection
Place the Connection switch on the bottom of the cradle to the Modem position.
Place the MC55 into the cradle.
The MC55 dials the phone number and connects to the web site.
Ethernet/Modem LEDSpare Battery
Charging
LED
Speed LED Link LED
NOTE The CRD5500-1000XR does not support hot swapping between operational modes. After moving the
switch into a different position, remove the MC55 from the cradle and then re-insert into the cradle.