Zebra Technologies RFID-M4E-01 Multiprotocol RFID Encoder User Manual Technical Writer II

Zebra Technologies Corporation Multiprotocol RFID Encoder Technical Writer II

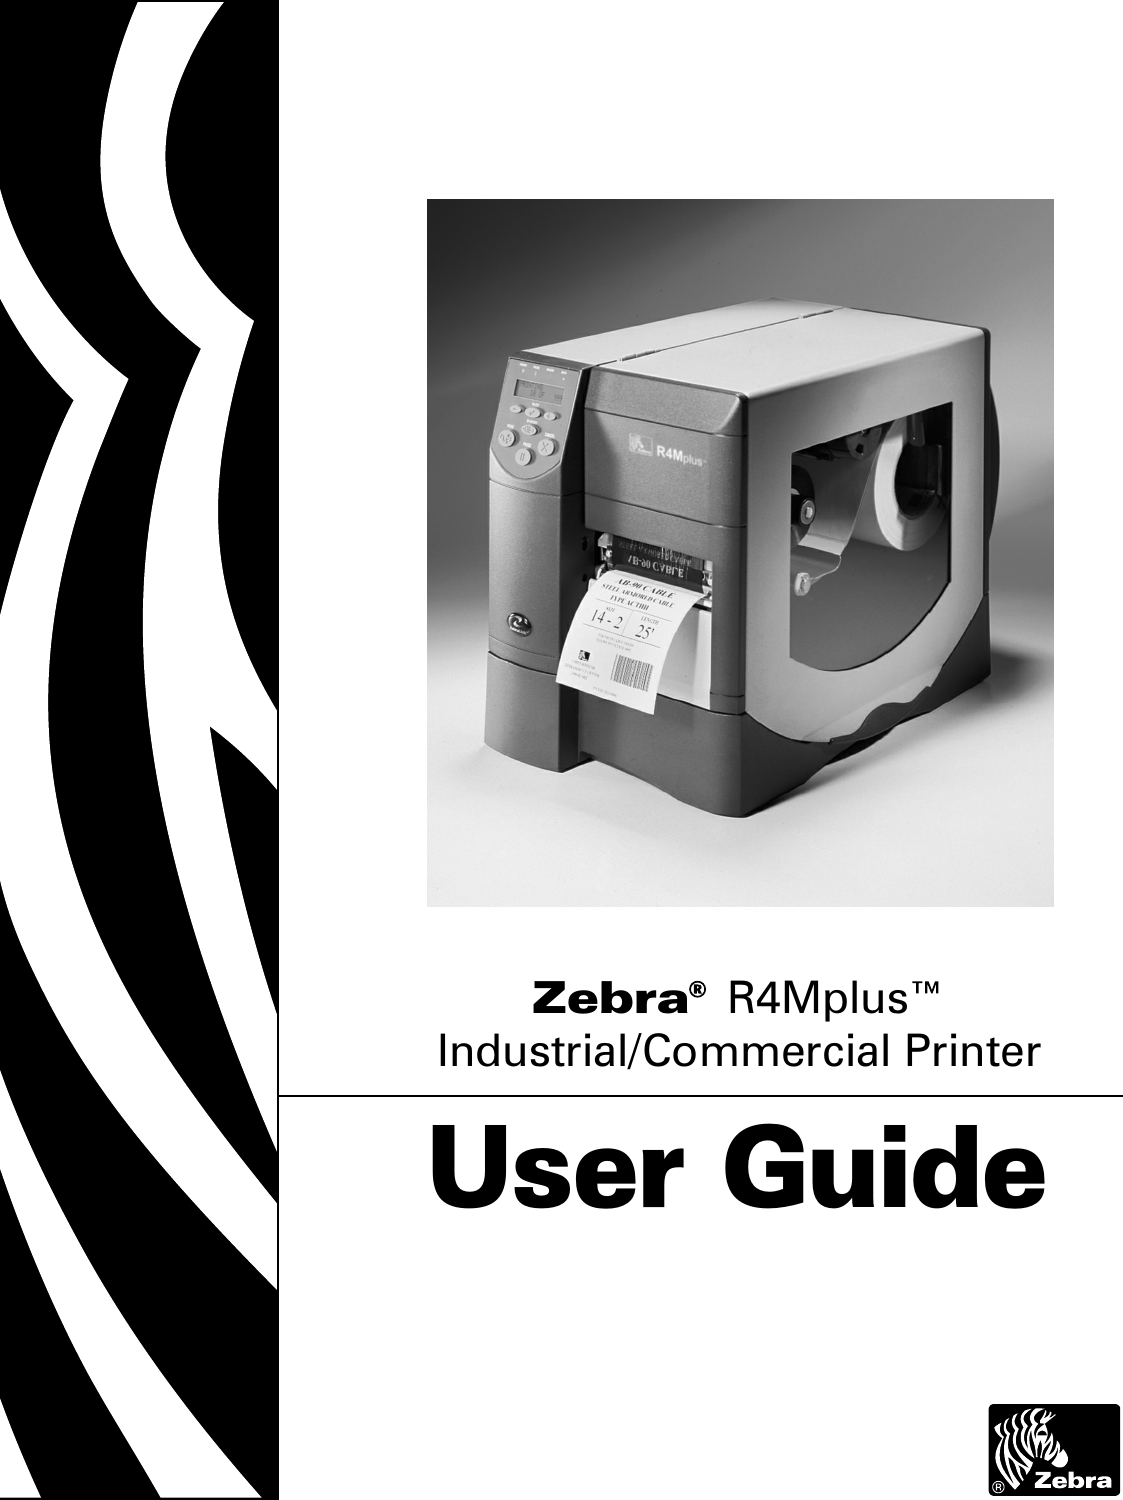
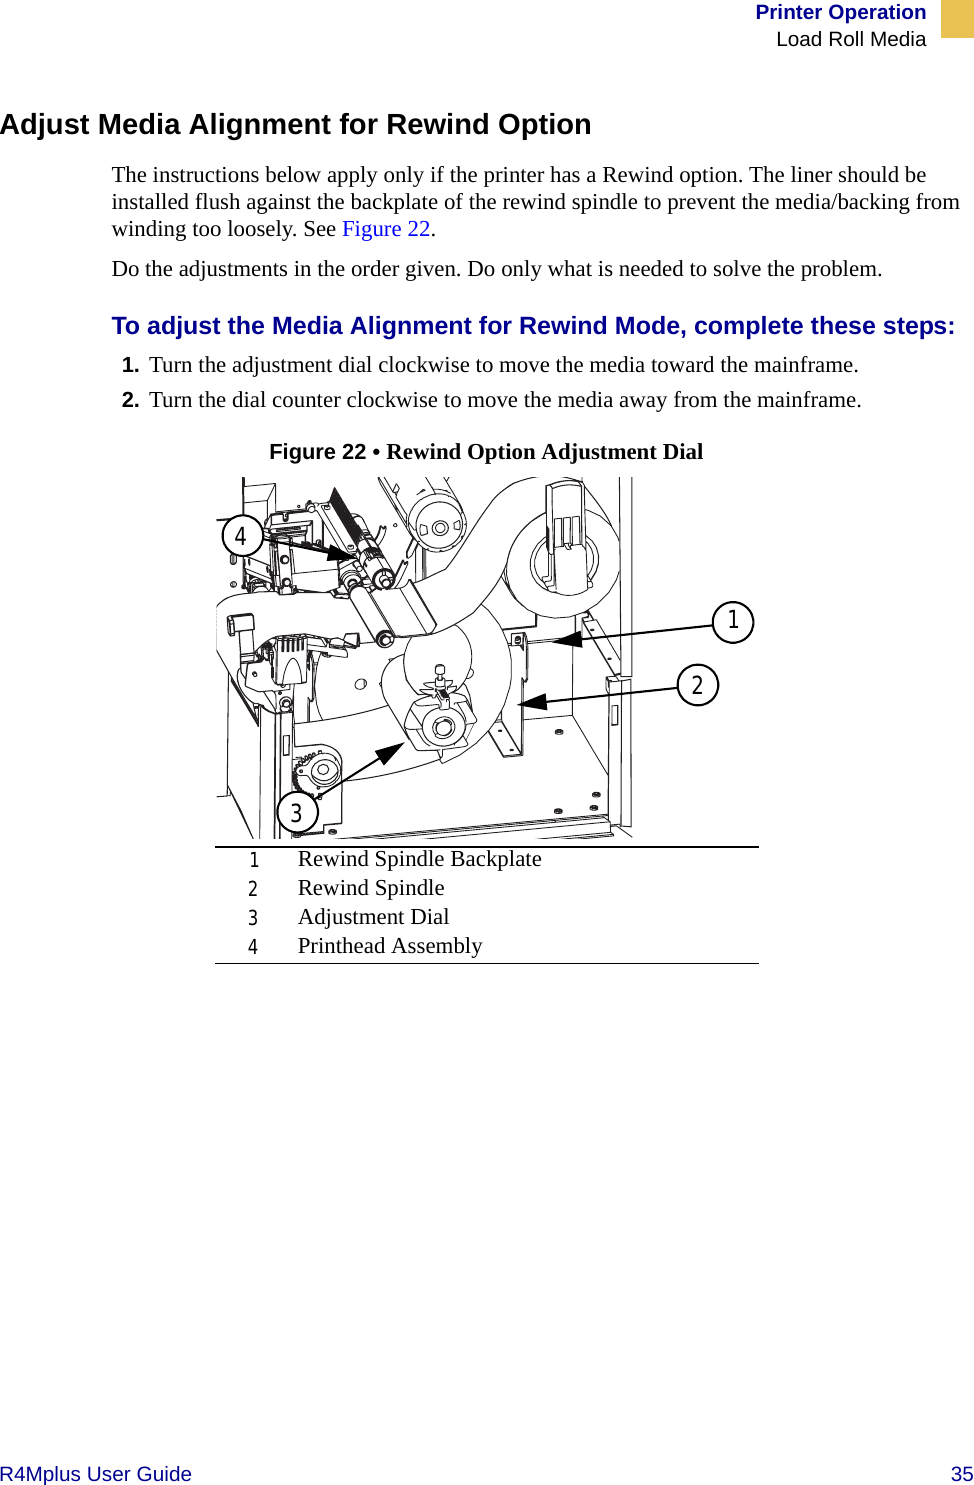
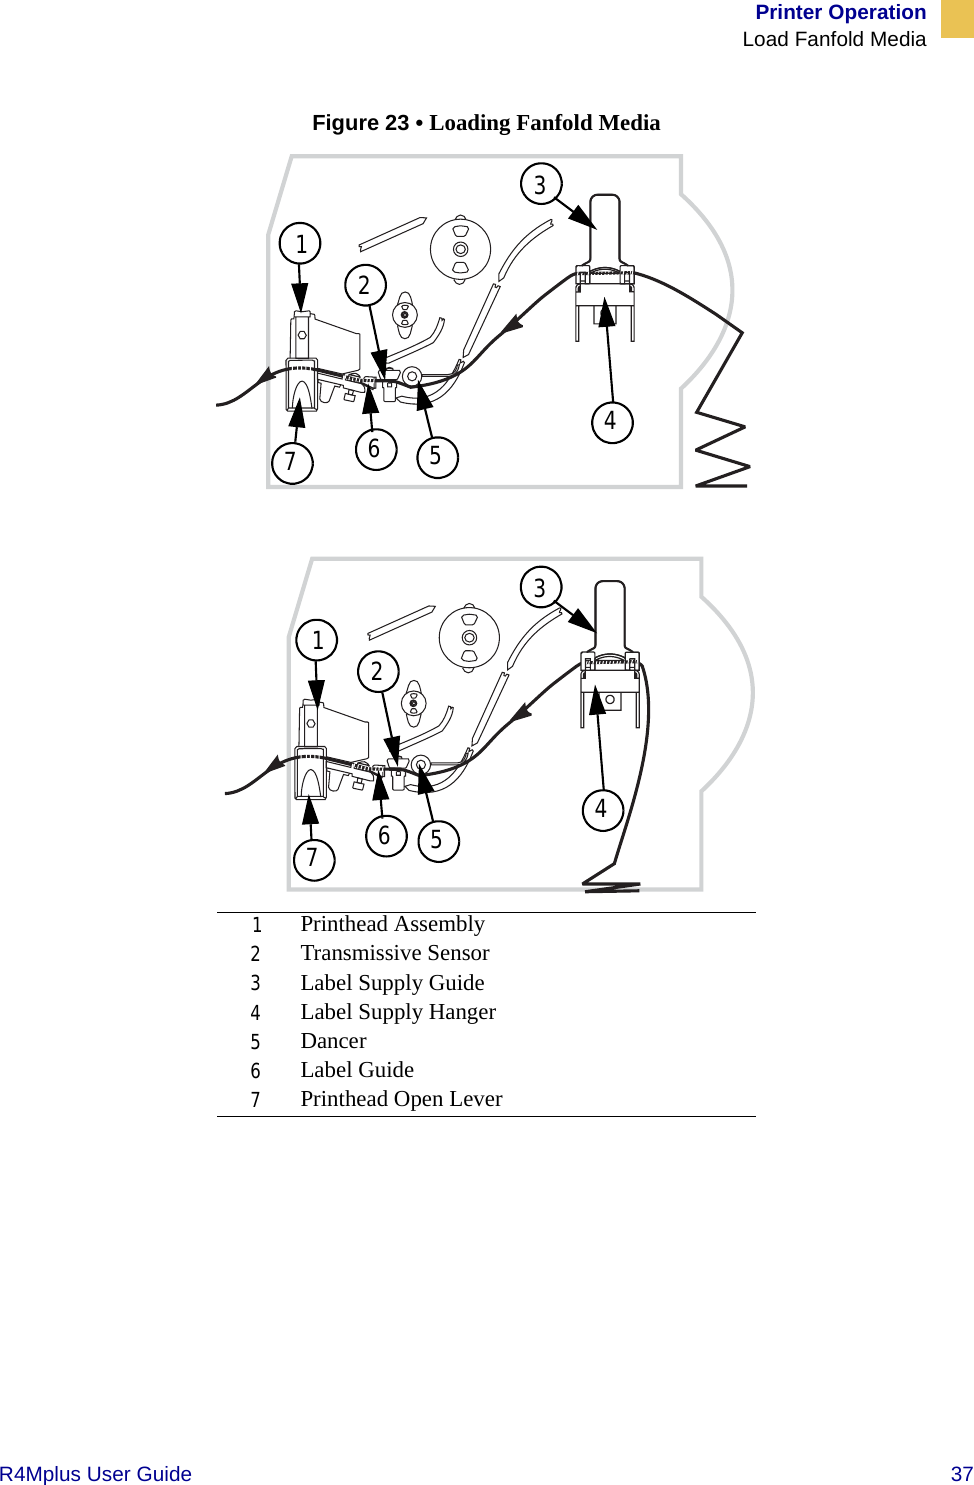
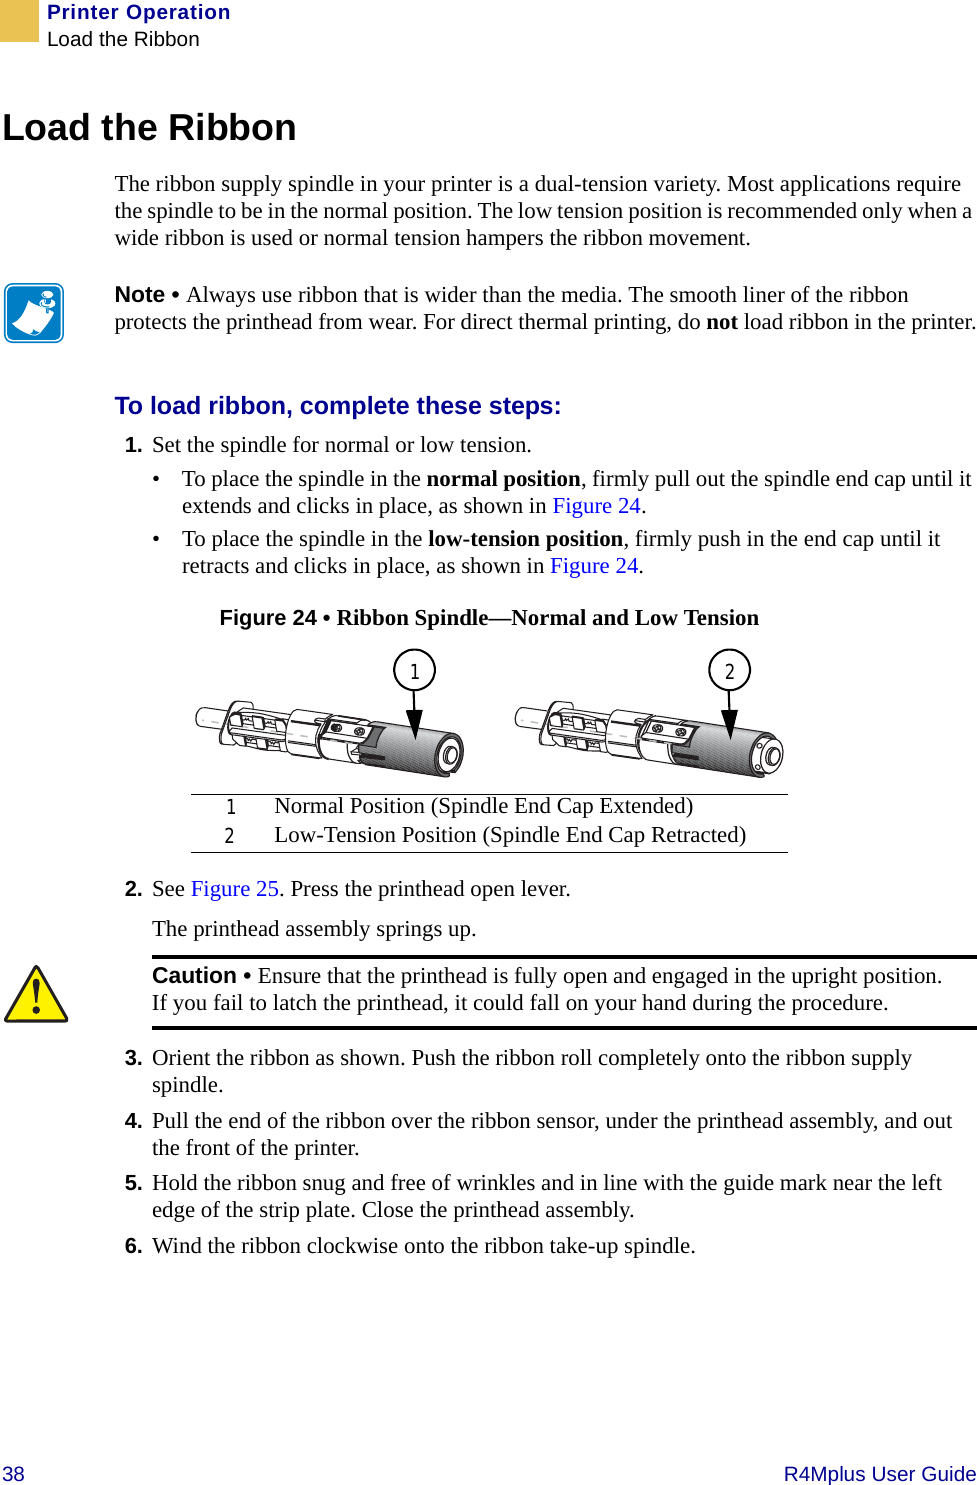
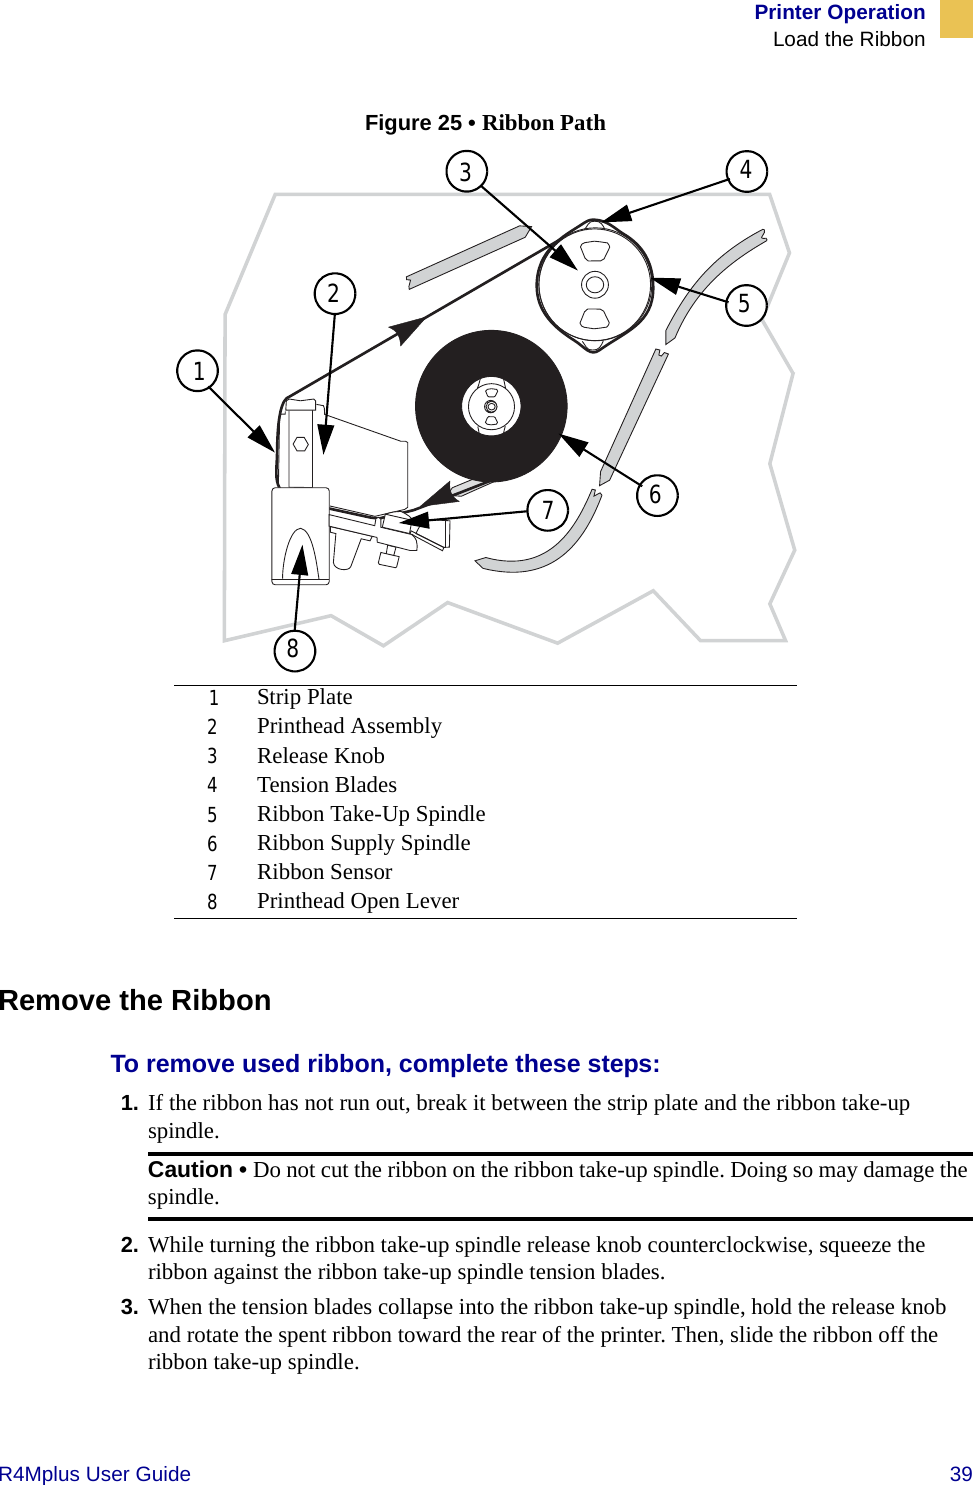
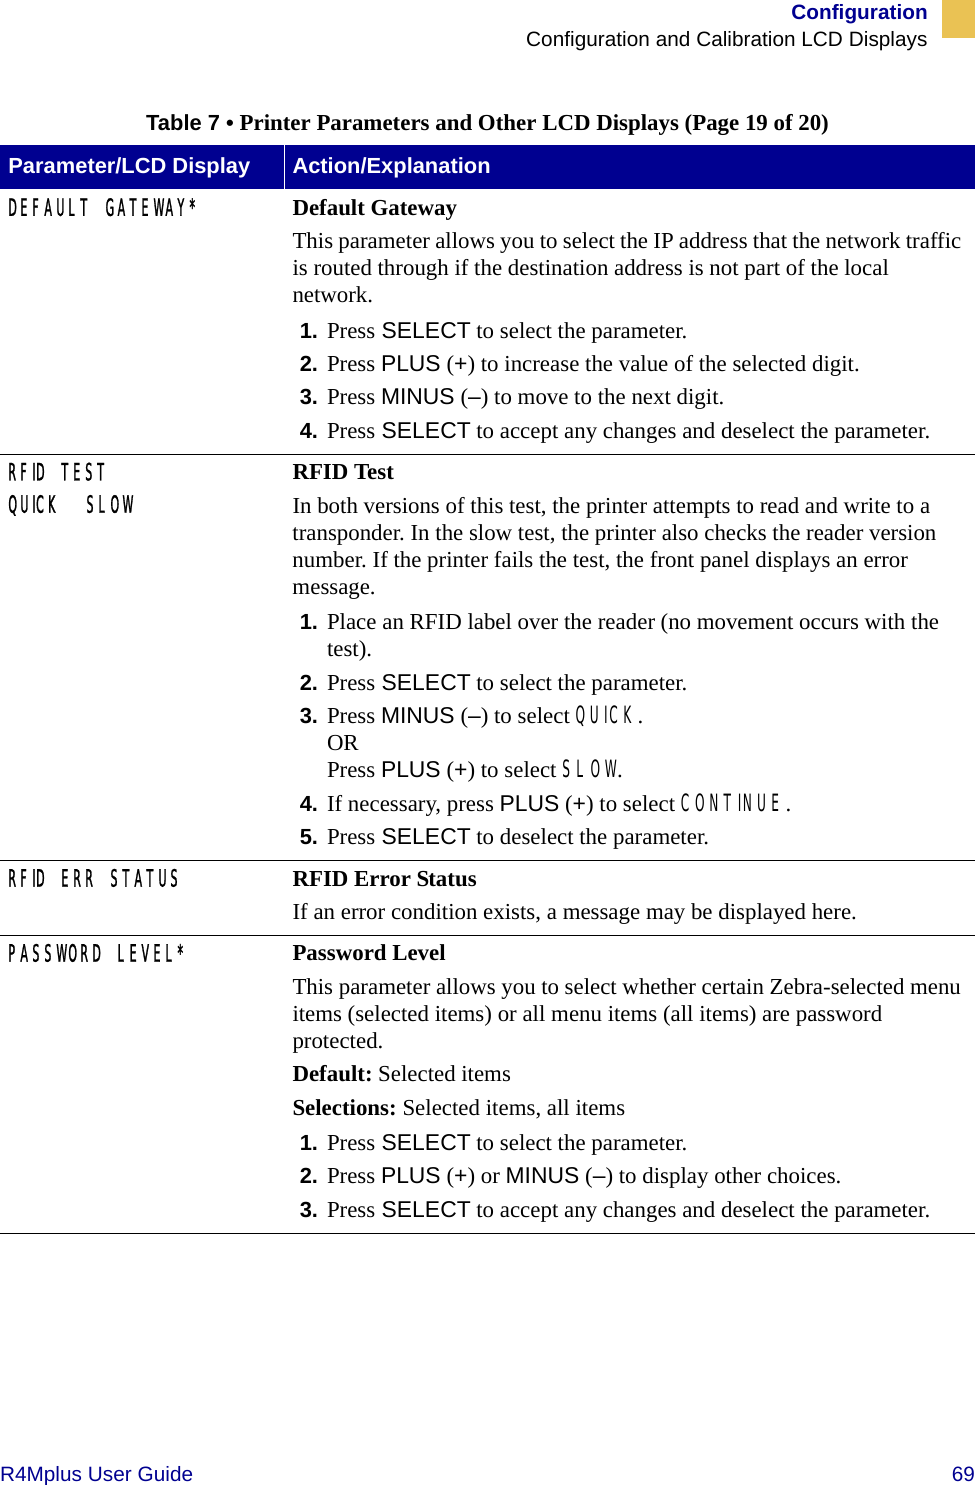
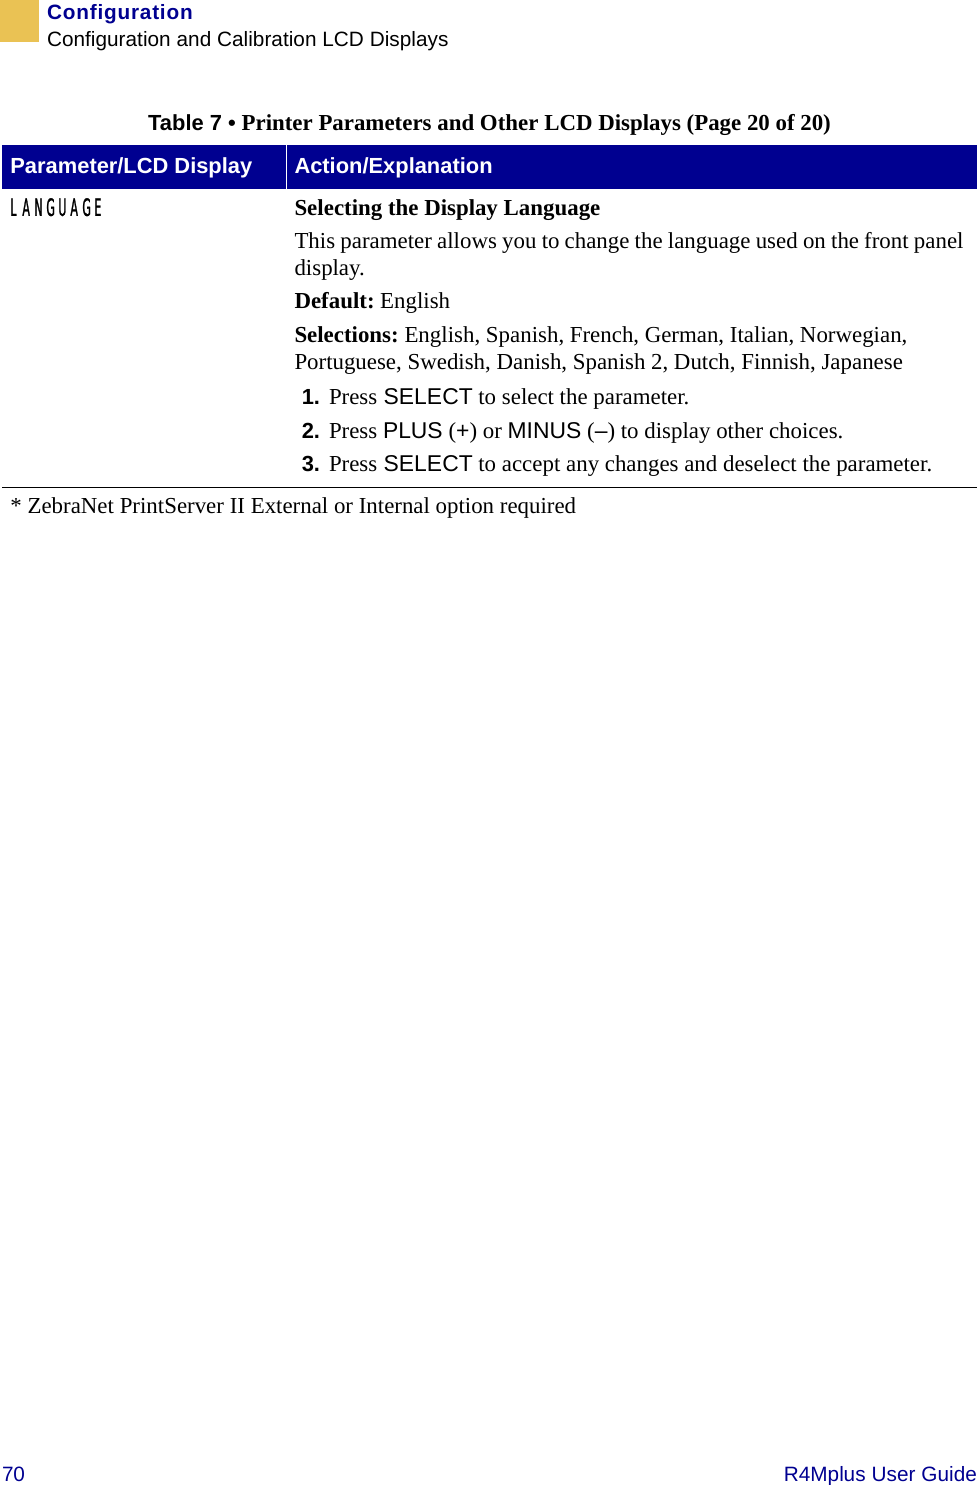
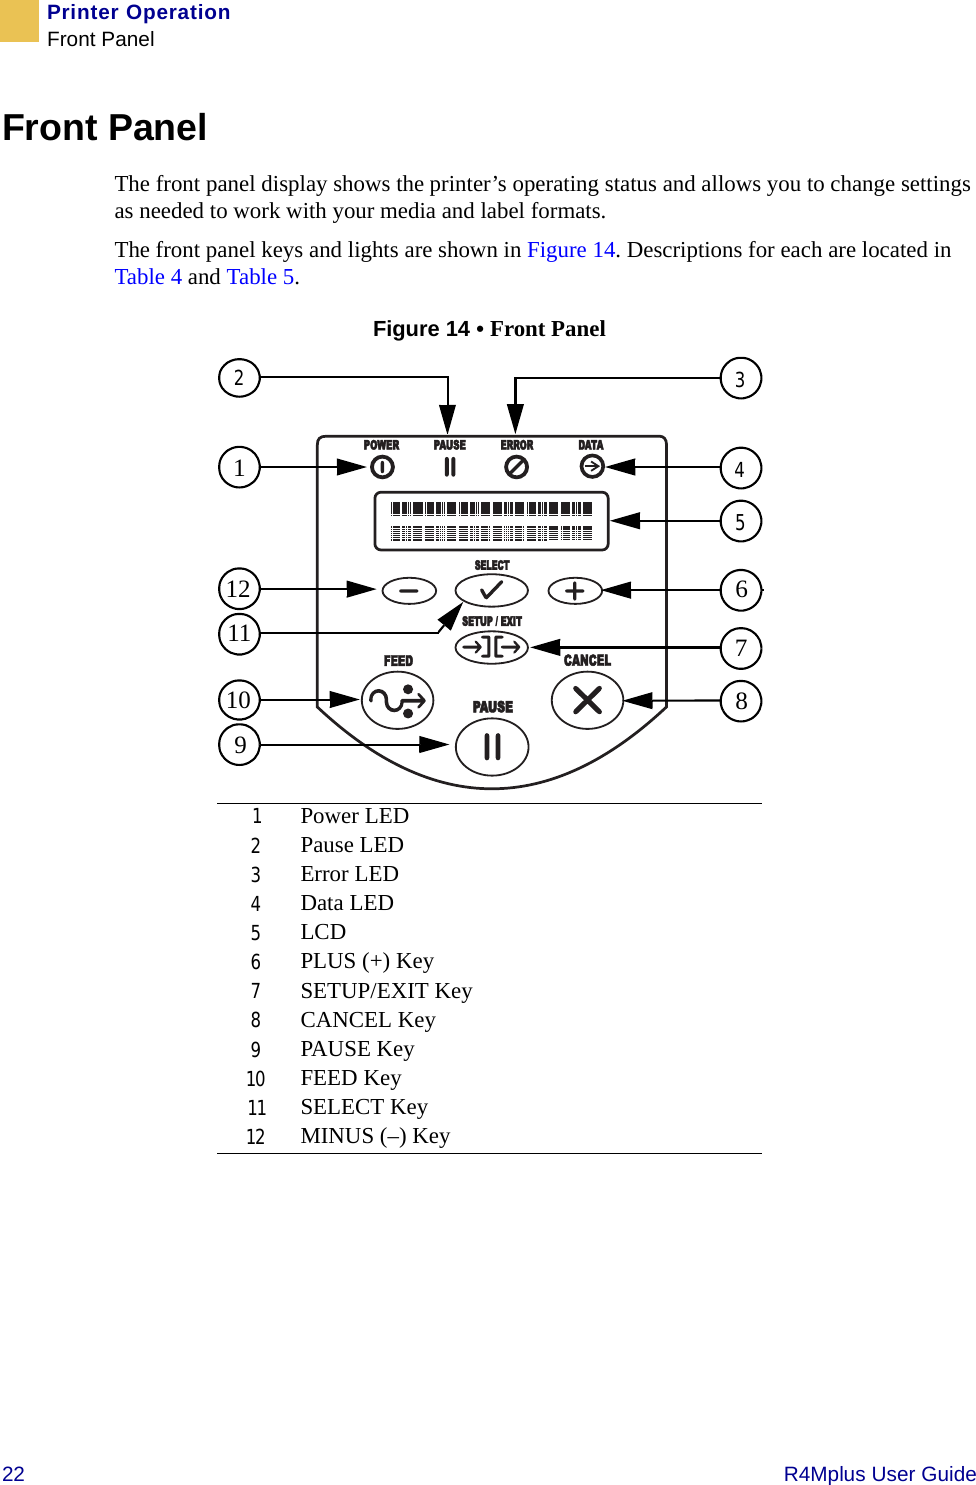
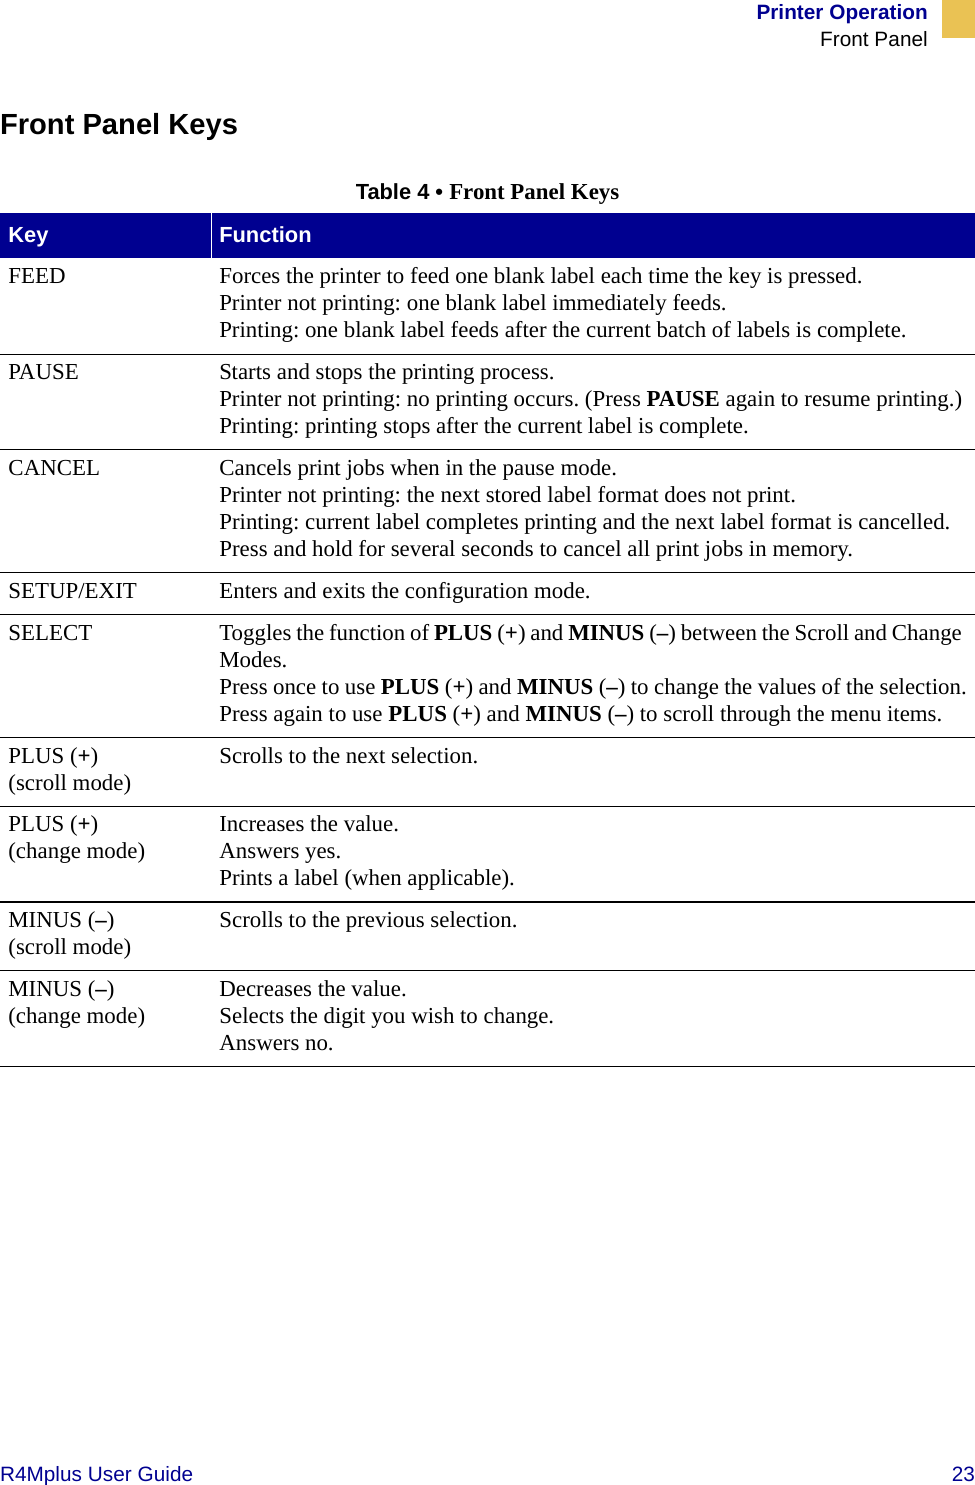
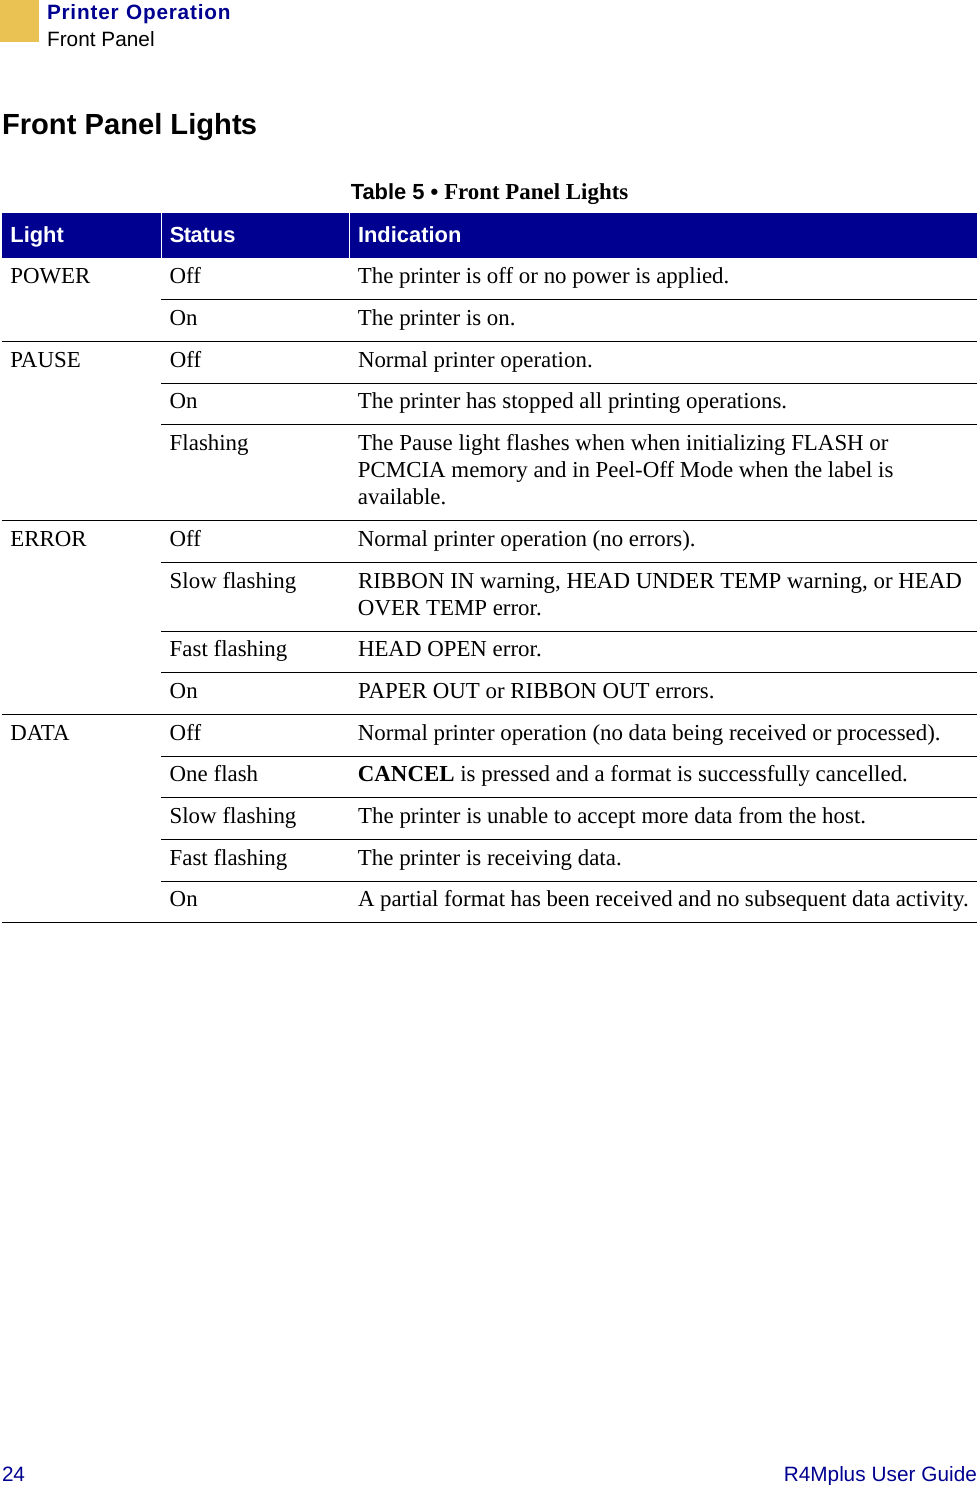
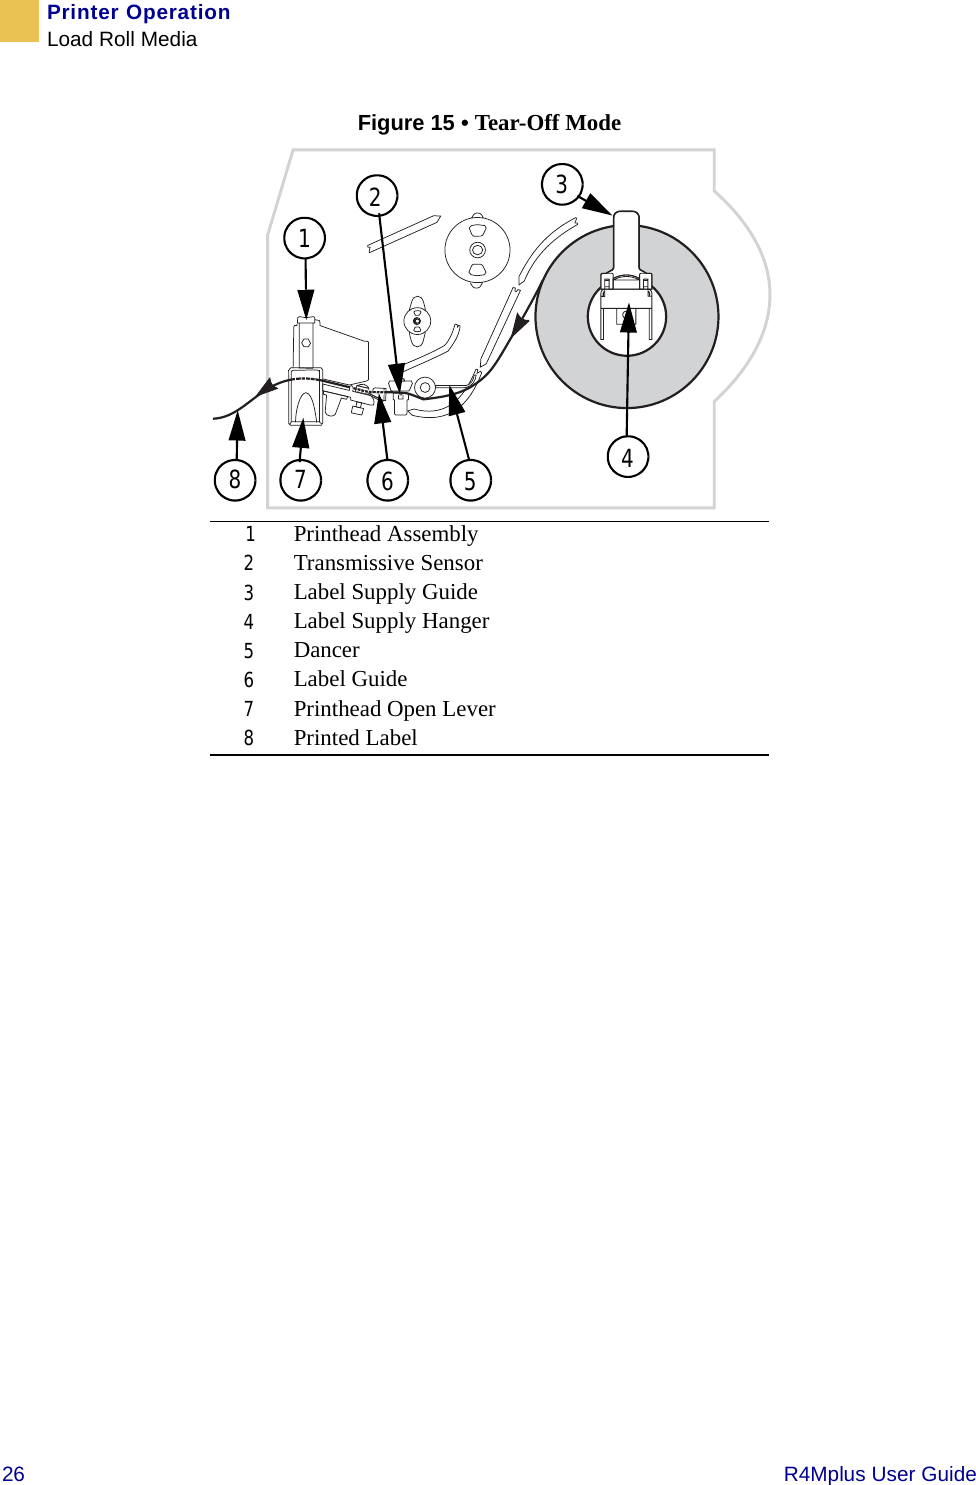
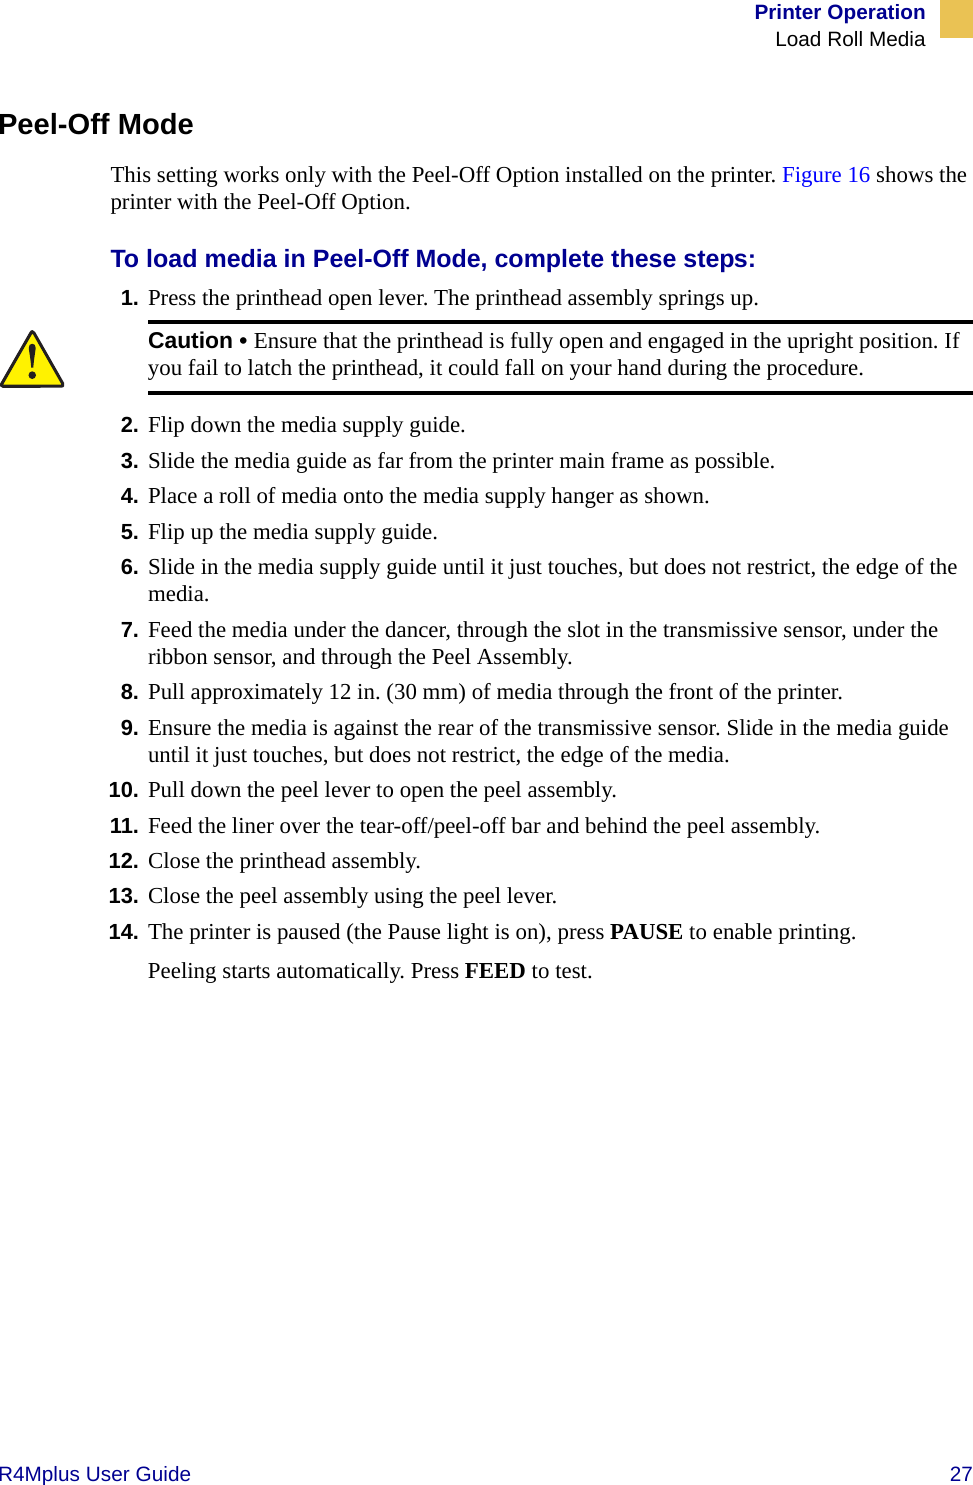
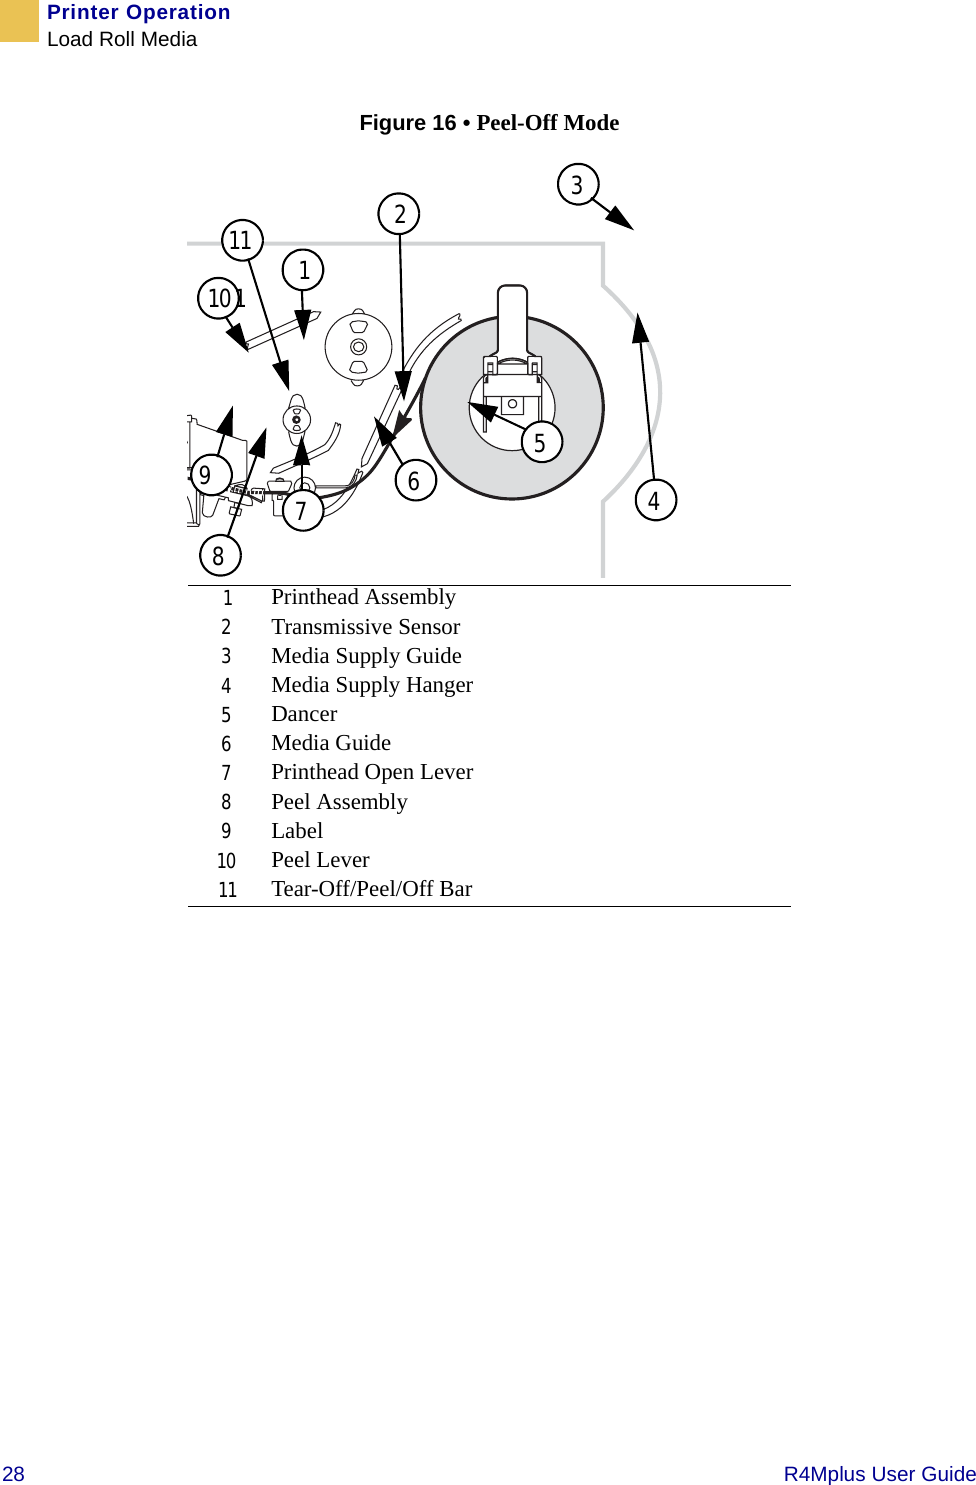
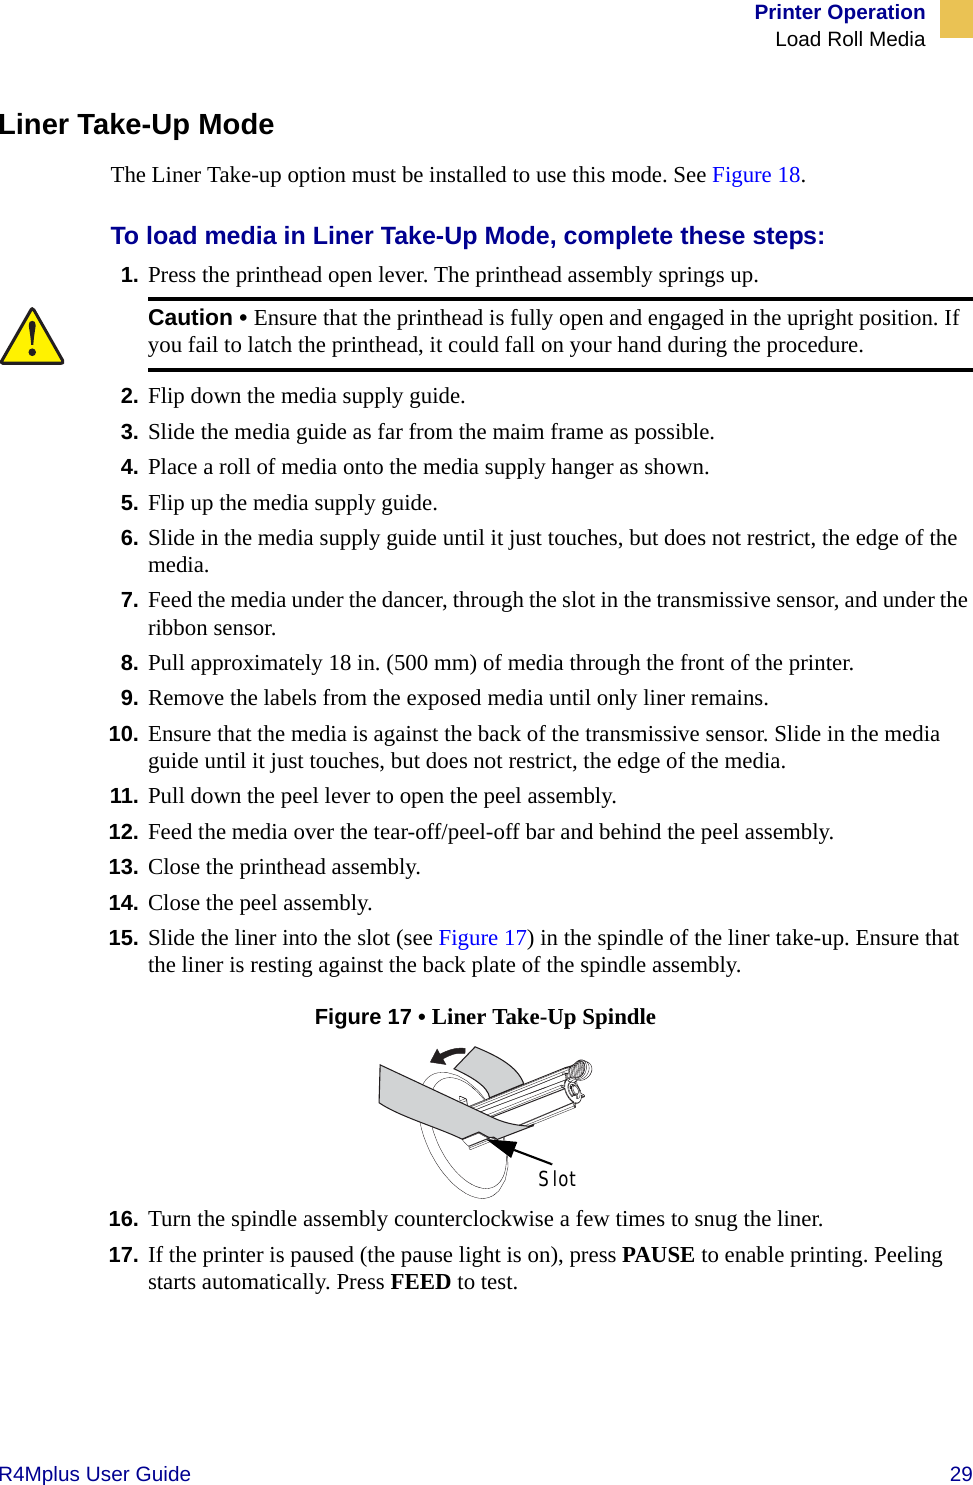
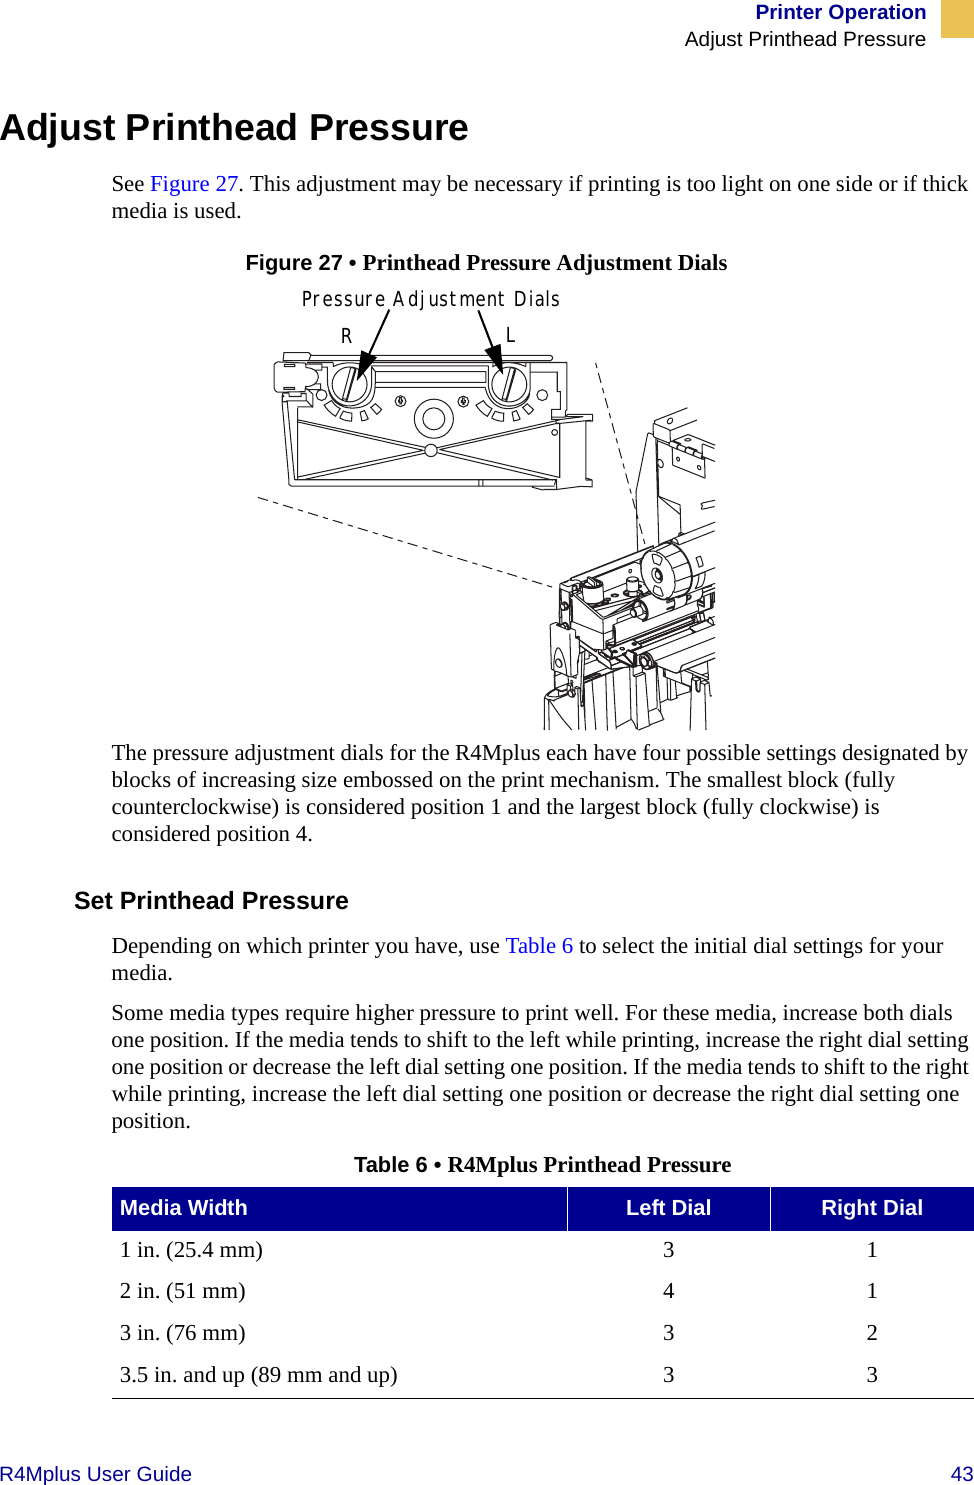
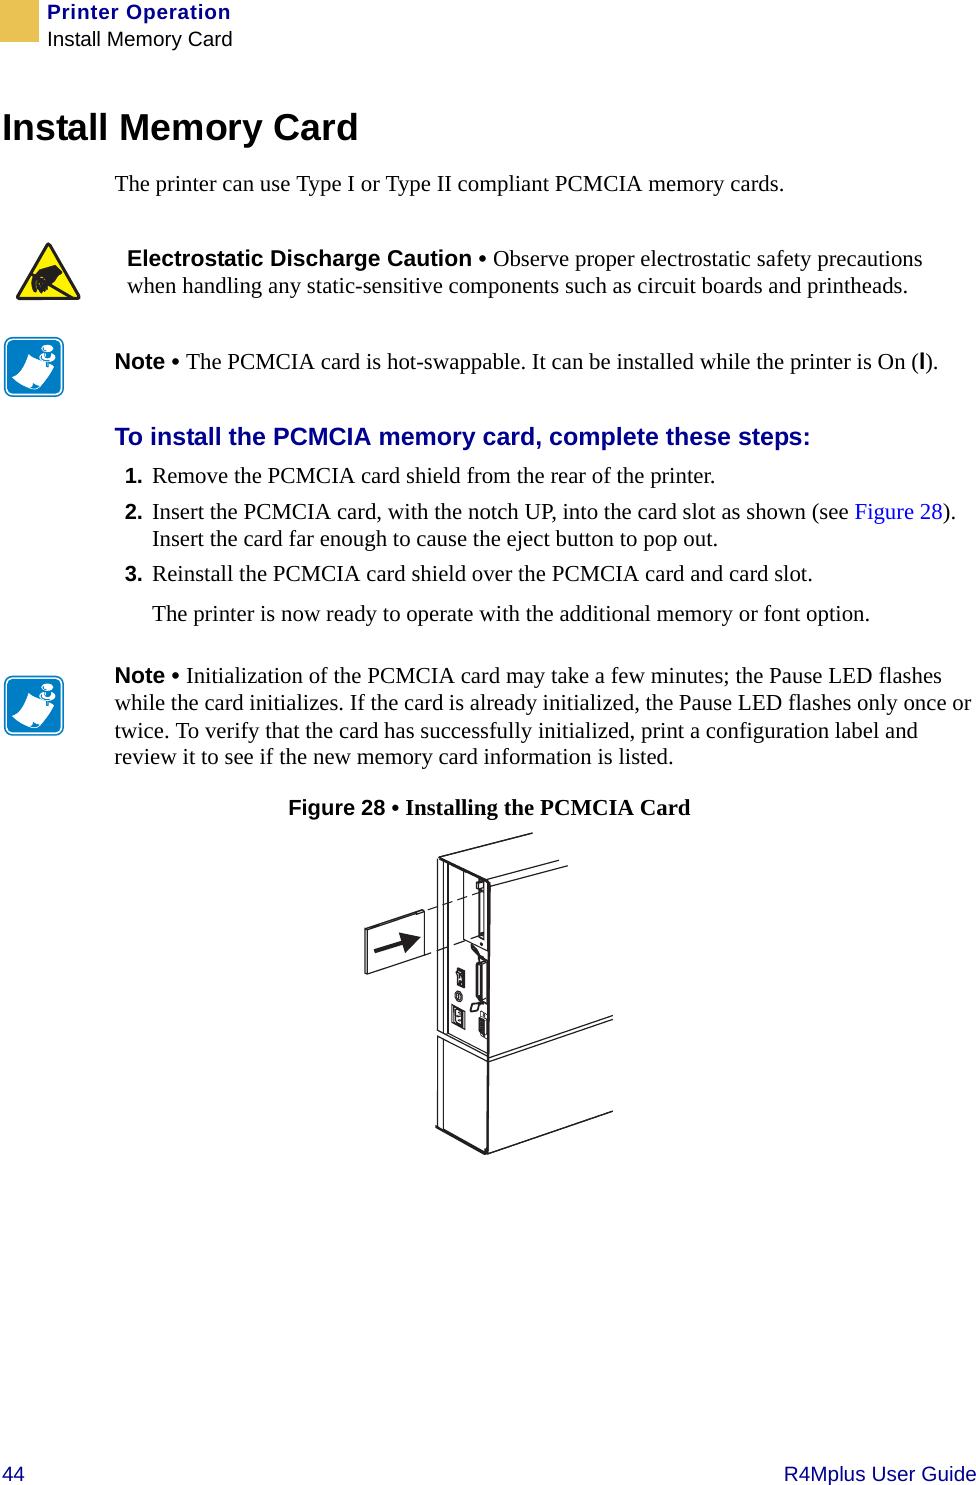
Users Manual R4M Part 1

User GuideZebra R4MplusIndustrial/Commercial Printer
Copyright © ZIH Corp.The copyrights in this manual and the label printer described therein are owned by Zebra Technologies. All rights are reserved. Unauthorized reproduction of this manual or the software in the label printer may result in imprisonment of up to one year and fines of up to $10,000 (17 U.S.C.506). Copyright violators may be subject to civil liability.IBM® is a registered trademark of IBM Corporation. Adobe® and Acrobat® are registered trademarks of Adobe Systems Incorporated.  Zebra®, Stripe®, ZPL®, ZebraNet®, ZebraLink™,  and ZPL II® are registered trademarks of Zebra Technologies.All other brand names, product names, trademarks, and registered trademarks are property of their respective holders.Customer Order # 21067LManufacturer Part # 21067L Rev. A
R4Mplus User Guide  iYour Feedback Is ImportantYour feedback helps us improve our documents to better serve you!Please take a few minutes to evaluate your experience using this document. Product and Personal Information1. What printer are you using? ____________________________2. What document are you using? ___________________________3. Have you ever worked with our product before?   Yes    NoIf Yes, how many ___years? ___months?4. What is your education level?______________ Document UsabilityCheck the rating that applies to your experience using this document: Additional Comments Write any additional comments on the lines provided on the next page.Content Excellent Good PoorThe information I needed was available.The information I needed was easy to find.The information and directions were clear.The illustrations were helpful.The document was arranged logically.The Table of Contents and Index were helpful.The Glossary was helpful.The level of information was appropriate for my technical expertise.
ii   R4Mplus User Guide Thank you for taking the time to provide us with feedback. Fax: 1.847.821.1795       Attention: TechPubs — CTCE-mail: techpubs@zebra.comNote • ___________________________________________________________________________________________________________________________________________________________________________________________________________________________________________________________________________________________________________________________________________________________________________________________________________________________________________________________________________________________________________________________________________________________________________________________________________________________________________________________________________________________________________________________________________________________________________________________________________________________________________________________________________________________________________________________________________________________________________________________________________________________________________________________________________________________________________________________________________________________________________________________________________________________________________________________________________________________________________________________________________________________________________________________________________________________________________________________________________________________________________________________________________________________________________________________________________________________________________________________________________________________________________________________________________________________________________________________________________________________________________________________________________________________________________________________________________________________________________________________________________________________________________________________________________________________________
R4Mplus User Guide  iiiTable of ContentsProprietary Statement . . . . . . . . . . . . . . . . . . . . . . . . . . . . . . . . . . . . . . . . . . . . . . viiProduct Improvements . . . . . . . . . . . . . . . . . . . . . . . . . . . . . . . . . . . . . . . . . . . . . . .viiFCC Compliance Statement . . . . . . . . . . . . . . . . . . . . . . . . . . . . . . . . . . . . . . . . . . .viiFCC Radiation Exposure Statement. . . . . . . . . . . . . . . . . . . . . . . . . . . . . . . . . . . .  viiiCanadian DOC Compliance Statement  . . . . . . . . . . . . . . . . . . . . . . . . . . . . . . . . .  viiiLiability Disclaimer  . . . . . . . . . . . . . . . . . . . . . . . . . . . . . . . . . . . . . . . . . . . . . . . . .  viiiLimitation of Liability . . . . . . . . . . . . . . . . . . . . . . . . . . . . . . . . . . . . . . . . . . . . . . . .  viiiCopyrights. . . . . . . . . . . . . . . . . . . . . . . . . . . . . . . . . . . . . . . . . . . . . . . . . . . . . . . .  viiiDeclaration of Conformity. . . . . . . . . . . . . . . . . . . . . . . . . . . . . . . . . . . . . . . . . . . .ixWarranty Information. . . . . . . . . . . . . . . . . . . . . . . . . . . . . . . . . . . . . . . . . . . . . . . .xiPrinter Products . . . . . . . . . . . . . . . . . . . . . . . . . . . . . . . . . . . . . . . . . . . . . . . . . . . . . . . xiPrinter Software and Firmware License Agreement . . . . . . . . . . . . . . . . . . . . . . . . . . .  xiiiPreface . . . . . . . . . . . . . . . . . . . . . . . . . . . . . . . . . . . . . . . . . . . . . . . . . . . . . . . . . .xixContacts . . . . . . . . . . . . . . . . . . . . . . . . . . . . . . . . . . . . . . . . . . . . . . . . . . . . . . . . . . . . .xxSupport . . . . . . . . . . . . . . . . . . . . . . . . . . . . . . . . . . . . . . . . . . . . . . . . . . . . . . . . . . .xxAbout this Document  . . . . . . . . . . . . . . . . . . . . . . . . . . . . . . . . . . . . . . . . . . . . . . . . . . xxiDocument Conventions  . . . . . . . . . . . . . . . . . . . . . . . . . . . . . . . . . . . . . . . . . . . . . . . . xxiiRelated Documents  . . . . . . . . . . . . . . . . . . . . . . . . . . . . . . . . . . . . . . . . . . . . . . . . . .  xxivChapter 1 • Introduction . . . . . . . . . . . . . . . . . . . . . . . . . . . . . . . . . . . . . . . . . . . . . 1External View . . . . . . . . . . . . . . . . . . . . . . . . . . . . . . . . . . . . . . . . . . . . . . . . . . . . . . . . . 2Front Panel . . . . . . . . . . . . . . . . . . . . . . . . . . . . . . . . . . . . . . . . . . . . . . . . . . . . . . . . . . . 3LCD Display Settings . . . . . . . . . . . . . . . . . . . . . . . . . . . . . . . . . . . . . . . . . . . . . . . .  4Print Modes. . . . . . . . . . . . . . . . . . . . . . . . . . . . . . . . . . . . . . . . . . . . . . . . . . . . . . . .  5Printer Media Compartment . . . . . . . . . . . . . . . . . . . . . . . . . . . . . . . . . . . . . . . . . . . . . .  6
iv   R4Mplus User GuideTable of ContentsChapter 2 • Printer Setup  . . . . . . . . . . . . . . . . . . . . . . . . . . . . . . . . . . . . . . . . . . . . 7Before You Begin . . . . . . . . . . . . . . . . . . . . . . . . . . . . . . . . . . . . . . . . . . . . . . . . . . . . . .  8Unpack and Inspect the Printer. . . . . . . . . . . . . . . . . . . . . . . . . . . . . . . . . . . . . . . . . . . .  9Report Damage. . . . . . . . . . . . . . . . . . . . . . . . . . . . . . . . . . . . . . . . . . . . . . . . . . . . .  9Storage . . . . . . . . . . . . . . . . . . . . . . . . . . . . . . . . . . . . . . . . . . . . . . . . . . . . . . . . . . .  9Select a Site for the Printer. . . . . . . . . . . . . . . . . . . . . . . . . . . . . . . . . . . . . . . . . . . . . .  10Select a Surface . . . . . . . . . . . . . . . . . . . . . . . . . . . . . . . . . . . . . . . . . . . . . . . . . . .  10Provide Proper Operating Conditions . . . . . . . . . . . . . . . . . . . . . . . . . . . . . . . . . . .  10Allow Proper Space. . . . . . . . . . . . . . . . . . . . . . . . . . . . . . . . . . . . . . . . . . . . . . . . .  10Provide a Data Source . . . . . . . . . . . . . . . . . . . . . . . . . . . . . . . . . . . . . . . . . . . . . .  10Connect the Printer to a Power Source  . . . . . . . . . . . . . . . . . . . . . . . . . . . . . . . . . . . . .11Power Cord Specifications . . . . . . . . . . . . . . . . . . . . . . . . . . . . . . . . . . . . . . . . . . . .11Select a Communication Interface . . . . . . . . . . . . . . . . . . . . . . . . . . . . . . . . . . . . . . . .  13Cable Requirements . . . . . . . . . . . . . . . . . . . . . . . . . . . . . . . . . . . . . . . . . . . . . . . .  14Types of Media . . . . . . . . . . . . . . . . . . . . . . . . . . . . . . . . . . . . . . . . . . . . . . . . . . . . . . .  15Non-Continuous Web Media. . . . . . . . . . . . . . . . . . . . . . . . . . . . . . . . . . . . . . . . . .  16Continuous Media. . . . . . . . . . . . . . . . . . . . . . . . . . . . . . . . . . . . . . . . . . . . . . . . . .  16RFID “Smart” Labels. . . . . . . . . . . . . . . . . . . . . . . . . . . . . . . . . . . . . . . . . . . . . . . .  17Ribbon  . . . . . . . . . . . . . . . . . . . . . . . . . . . . . . . . . . . . . . . . . . . . . . . . . . . . . . . . . . . . . 18When to Use Ribbon. . . . . . . . . . . . . . . . . . . . . . . . . . . . . . . . . . . . . . . . . . . . . . . .  18Ribbon Width  . . . . . . . . . . . . . . . . . . . . . . . . . . . . . . . . . . . . . . . . . . . . . . . . . . . . .  18Coated Side of Ribbon . . . . . . . . . . . . . . . . . . . . . . . . . . . . . . . . . . . . . . . . . . . . . .  18Chapter 3 • Printer Operation . . . . . . . . . . . . . . . . . . . . . . . . . . . . . . . . . . . . . . . . 21Front Panel . . . . . . . . . . . . . . . . . . . . . . . . . . . . . . . . . . . . . . . . . . . . . . . . . . . . . . . . . .  22Front Panel Keys  . . . . . . . . . . . . . . . . . . . . . . . . . . . . . . . . . . . . . . . . . . . . . . . . . .  23Front Panel Lights. . . . . . . . . . . . . . . . . . . . . . . . . . . . . . . . . . . . . . . . . . . . . . . . . .  24Load Roll Media . . . . . . . . . . . . . . . . . . . . . . . . . . . . . . . . . . . . . . . . . . . . . . . . . . . . . .  25Tear-Off Mode. . . . . . . . . . . . . . . . . . . . . . . . . . . . . . . . . . . . . . . . . . . . . . . . . . . . .  25Peel-Off Mode. . . . . . . . . . . . . . . . . . . . . . . . . . . . . . . . . . . . . . . . . . . . . . . . . . . . .  27Liner Take-Up Mode . . . . . . . . . . . . . . . . . . . . . . . . . . . . . . . . . . . . . . . . . . . . . . . .  29Rewind/Peel-Off Mode . . . . . . . . . . . . . . . . . . . . . . . . . . . . . . . . . . . . . . . . . . . . . .  31Rewind Mode . . . . . . . . . . . . . . . . . . . . . . . . . . . . . . . . . . . . . . . . . . . . . . . . . . . . .  33Adjust Media Alignment for Rewind Option  . . . . . . . . . . . . . . . . . . . . . . . . . . . . . .  35Load Fanfold Media . . . . . . . . . . . . . . . . . . . . . . . . . . . . . . . . . . . . . . . . . . . . . . . . . . .  36Load the Ribbon . . . . . . . . . . . . . . . . . . . . . . . . . . . . . . . . . . . . . . . . . . . . . . . . . . . . . .  38Remove the Ribbon  . . . . . . . . . . . . . . . . . . . . . . . . . . . . . . . . . . . . . . . . . . . . . . . .  39Calibrate the Printer . . . . . . . . . . . . . . . . . . . . . . . . . . . . . . . . . . . . . . . . . . . . . . . . . . .  40Auto Calibration  . . . . . . . . . . . . . . . . . . . . . . . . . . . . . . . . . . . . . . . . . . . . . . . . . . .  40Manual Calibration . . . . . . . . . . . . . . . . . . . . . . . . . . . . . . . . . . . . . . . . . . . . . . . . .  40Print a Configuration Label . . . . . . . . . . . . . . . . . . . . . . . . . . . . . . . . . . . . . . . . . . . . . .  41Adjust Printhead Pressure  . . . . . . . . . . . . . . . . . . . . . . . . . . . . . . . . . . . . . . . . . . . . . .  43
Table of ContentsR4Mplus User Guide  vInstall Memory Card . . . . . . . . . . . . . . . . . . . . . . . . . . . . . . . . . . . . . . . . . . . . . . . . . . .  44Chapter 4 • Configuration . . . . . . . . . . . . . . . . . . . . . . . . . . . . . . . . . . . . . . . . . . . 45Overview. . . . . . . . . . . . . . . . . . . . . . . . . . . . . . . . . . . . . . . . . . . . . . . . . . . . . . . . . . . . 46Enter Configuration Mode. . . . . . . . . . . . . . . . . . . . . . . . . . . . . . . . . . . . . . . . . . . .  46Exit Configuration Mode . . . . . . . . . . . . . . . . . . . . . . . . . . . . . . . . . . . . . . . . . . . . .  46Change Password-Protected Parameters  . . . . . . . . . . . . . . . . . . . . . . . . . . . . . . .  47Basic Configuration. . . . . . . . . . . . . . . . . . . . . . . . . . . . . . . . . . . . . . . . . . . . . . . . . . . .  48Configuration and Calibration LCD Displays  . . . . . . . . . . . . . . . . . . . . . . . . . . . . . . . .  51Chapter 5 • RFID Guidelines . . . . . . . . . . . . . . . . . . . . . . . . . . . . . . . . . . . . . . . . . 71Overview. . . . . . . . . . . . . . . . . . . . . . . . . . . . . . . . . . . . . . . . . . . . . . . . . . . . . . . . . . . . 72Transponder Placement . . . . . . . . . . . . . . . . . . . . . . . . . . . . . . . . . . . . . . . . . . . . . . . .  72ZPL II Commands for RFID  . . . . . . . . . . . . . . . . . . . . . . . . . . . . . . . . . . . . . . . . . . . . .  73^WT. . . . . . . . . . . . . . . . . . . . . . . . . . . . . . . . . . . . . . . . . . . . . . . . . . . . . . . . . . . . .  74^RT . . . . . . . . . . . . . . . . . . . . . . . . . . . . . . . . . . . . . . . . . . . . . . . . . . . . . . . . . . . . .  76^HV . . . . . . . . . . . . . . . . . . . . . . . . . . . . . . . . . . . . . . . . . . . . . . . . . . . . . . . . . . . . .  78^RS . . . . . . . . . . . . . . . . . . . . . . . . . . . . . . . . . . . . . . . . . . . . . . . . . . . . . . . . . . . . .  79Sample of RFID Programming . . . . . . . . . . . . . . . . . . . . . . . . . . . . . . . . . . . . . . . . . . .  83Chapter 6 • Routine Care and Adjustments. . . . . . . . . . . . . . . . . . . . . . . . . . . . . 85Cleaning Procedures  . . . . . . . . . . . . . . . . . . . . . . . . . . . . . . . . . . . . . . . . . . . . . . . . . .  86Clean the Exterior . . . . . . . . . . . . . . . . . . . . . . . . . . . . . . . . . . . . . . . . . . . . . . . . . .  86Clean the Interior  . . . . . . . . . . . . . . . . . . . . . . . . . . . . . . . . . . . . . . . . . . . . . . . . . .  87Clean the Sensors  . . . . . . . . . . . . . . . . . . . . . . . . . . . . . . . . . . . . . . . . . . . . . . . . .  88Clean the Rewind Option . . . . . . . . . . . . . . . . . . . . . . . . . . . . . . . . . . . . . . . . . . . .  89Clean the Peel-Off Assembly . . . . . . . . . . . . . . . . . . . . . . . . . . . . . . . . . . . . . . . . .  90Lubrication  . . . . . . . . . . . . . . . . . . . . . . . . . . . . . . . . . . . . . . . . . . . . . . . . . . . . . . . . . . 90Fuse Replacement . . . . . . . . . . . . . . . . . . . . . . . . . . . . . . . . . . . . . . . . . . . . . . . . . . . .  91Chapter 7 • Troubleshooting. . . . . . . . . . . . . . . . . . . . . . . . . . . . . . . . . . . . . . . . . 93LCD Error Conditions and Warnings. . . . . . . . . . . . . . . . . . . . . . . . . . . . . . . . . . . . . . .  94Print Quality Problems . . . . . . . . . . . . . . . . . . . . . . . . . . . . . . . . . . . . . . . . . . . . . . . . .  97Calibration Problems  . . . . . . . . . . . . . . . . . . . . . . . . . . . . . . . . . . . . . . . . . . . . . . . . . .  98Communication Problems. . . . . . . . . . . . . . . . . . . . . . . . . . . . . . . . . . . . . . . . . . . . . . .  99Printer Diagnostics . . . . . . . . . . . . . . . . . . . . . . . . . . . . . . . . . . . . . . . . . . . . . . . . . . .  100Power-On Self Test. . . . . . . . . . . . . . . . . . . . . . . . . . . . . . . . . . . . . . . . . . . . . . . .  100CANCEL Self Test. . . . . . . . . . . . . . . . . . . . . . . . . . . . . . . . . . . . . . . . . . . . . . . . .  101PAUSE Self Test . . . . . . . . . . . . . . . . . . . . . . . . . . . . . . . . . . . . . . . . . . . . . . . . . .  102FEED Self Test . . . . . . . . . . . . . . . . . . . . . . . . . . . . . . . . . . . . . . . . . . . . . . . . . . .  103Communication Diagnostics Test . . . . . . . . . . . . . . . . . . . . . . . . . . . . . . . . . . . . .  104RFID Test . . . . . . . . . . . . . . . . . . . . . . . . . . . . . . . . . . . . . . . . . . . . . . . . . . . . . . .  105Loading Factory Defaults . . . . . . . . . . . . . . . . . . . . . . . . . . . . . . . . . . . . . . . . . . . . . .  106
vi   R4Mplus User GuideTable of ContentsAppendix A • Data Connections . . . . . . . . . . . . . . . . . . . . . . . . . . . . . . . . . . . . . 107Serial Data Port. . . . . . . . . . . . . . . . . . . . . . . . . . . . . . . . . . . . . . . . . . . . . . . . . . . . . .  108Hardware Control Signal Descriptions . . . . . . . . . . . . . . . . . . . . . . . . . . . . . . . . .  108RS-232 Serial Data Port . . . . . . . . . . . . . . . . . . . . . . . . . . . . . . . . . . . . . . . . . . . .  108Parallel Data Port . . . . . . . . . . . . . . . . . . . . . . . . . . . . . . . . . . . . . . . . . . . . . . . . . . . . .112Parallel Cabling Requirements . . . . . . . . . . . . . . . . . . . . . . . . . . . . . . . . . . . . . . . .112Parallel Port Interconnections. . . . . . . . . . . . . . . . . . . . . . . . . . . . . . . . . . . . . . . . .112Appendix B • Specifications . . . . . . . . . . . . . . . . . . . . . . . . . . . . . . . . . . . . . . . .  113General Specifications  . . . . . . . . . . . . . . . . . . . . . . . . . . . . . . . . . . . . . . . . . . . . . . . . .114Printing Specifications. . . . . . . . . . . . . . . . . . . . . . . . . . . . . . . . . . . . . . . . . . . . . . . . . .115Media Specifications. . . . . . . . . . . . . . . . . . . . . . . . . . . . . . . . . . . . . . . . . . . . . . . . . . .116Ribbon Specifications . . . . . . . . . . . . . . . . . . . . . . . . . . . . . . . . . . . . . . . . . . . . . . . . . .117Printer Options . . . . . . . . . . . . . . . . . . . . . . . . . . . . . . . . . . . . . . . . . . . . . . . . . . . . . . .118Zebra Programming Language (ZPL II) Features. . . . . . . . . . . . . . . . . . . . . . . . . . . . .119Supported Bar Codes . . . . . . . . . . . . . . . . . . . . . . . . . . . . . . . . . . . . . . . . . . . . . . . . . .119Index . . . . . . . . . . . . . . . . . . . . . . . . . . . . . . . . . . . . . . . . . . . . . . . . . . . . . . . . . . . 121
R4Mplus User Guide  viiProprietary StatementThis manual contains proprietary information of Zebra Technologies Corporation and its subsidiaries (“Zebra Technologies”). It is intended solely for the information and use of parties operating and maintaining the equipment described herein. Such propriety information may not be used, reproduced, or disclosed to any other parties for any other purpose without the expressed written permission of Zebra Technologies Corporation.Product ImprovementsContinuous improvement of products is a policy of Zebra Technologies Corporation. All specifications and designs are subject to change without notice.FCC Compliance Statement FCCID: I28RFID-Z4M-01Manufacturer:Zebra Technologies Corporation333 Corporate Woods ParkwayVernon Hills, Illinois, 60061-3109 U.S.A.This equipment has been tested and found to comply with the limits for a Class B Digital Device, pursuant to Part 15 of the FCC Rules. These limits are designed to provide reasonable protection against harmful interference when the equipment is operated in a residential environment. This equipment generates, uses, and can radiate radio frequency energy and, if not installed and used in accordance with the product manuals, may cause harmful interference to radio communications.In order to ensure compliance, this printer must be used with Shielded Communication Cables.This device complies with Part 15 rules. Operation is subject to the following two conditions:1. This device may not cause harmful interference, and2. This device must accept any interference received, including interference that may cause undesired operation.Caution • The Part 15 radio device operates on a non-interference basis with other devices operating at this frequency when using the Zebra-supplied antenna. Any changes or modifications to the product not expressly approved by Zebra could void the user’s authority to operate this device.
viii   R4Mplus User GuideProprietary StatementFCC Radiation Exposure StatementThis equipment complies with FCC radiation exposure limits set forth for an uncontrolled environment. This equipment should be installed and operated with minimum distance 20cm between the radiator and your body.This transmitter must not be co-located or operating in conjunction with any other antenna or transmitter.Canadian DOC Compliance Statement This Class B digital apparatus complies with Canadian ICES-003.ICID: 3798A-RFIDZ4M1Liability DisclaimerZebra Technologies Corporation takes steps to assure that its published Engineering specifications and manuals are correct; however, errors do occur. Zebra Technologies Corporation reserves the right to correct any such errors and disclaims liability resulting therefrom.Limitation of Liability In no event shall Zebra Technologies Corporation or anyone else involved in the creation, production or delivery of the accompanying product (including hardware and software) be liable for any damages whatsoever (including, without limitation, consequential damages including loss of business profits, business interruption or loss of business information) arising out of the use of or the results of use of or inability to use such product, even if Zebra Technologies Corporation has been advised of the possibility of such damages. Some states do not allow the exclusion or limitation of incidental or consequential damages, so the above limitation or exclusion may not apply to you.CopyrightsThe copyrights in this manual and the label printer described therein are owned by Zebra Technologies Corporation. All rights are reserved. Unauthorized reproduction of this manual or the software in the label printer may result in imprisonment of up to one year and fines of up to $10,000 (17 U.S.C.506). Copyright violators may be subject to civil liability.All trademarks and registered trademarks are property of their respective owners.Copyright ZIH Corp. All rights reserved.
Declaration of ConformityR4Mplus User Guide  ixDECLARATION OF CONFORMITYI have determined that the Zebra printers identified as theZ4Mplus/Z6Mplus™-seriesmanufactured by:Zebra Technologies Corporation333 Corporate Woods ParkwayVernon Hills, Illinois 60061-3109 U.S.A.Have been shown to comply with the applicable technical standards of the FCCFor Home, Office, Commercial, and Industrial useIf no unauthorized change is made in the equipment,and if the equipment is properly maintained and operated.
x  R4Mplus User GuideDeclaration of Conformity
R4Mplus User Guide  xiWarranty InformationEffective November 1, 2001All Zebra Technologies Corporation products are sold with warranties. Following is some general information:Printer ProductsPrinters. All printers (excluding printheads) are warranted against defect in material or workmanship for twelve (12) months from the purchase date.Proof of purchase or shipment date is required to validate the warranty period. The warranty becomes void if the equipment is modified, improperly installed or used, damaged by accident or neglect, or if any parts are improperly installed or replaced by the user.Note: Products returned must be packaged in the original or comparable packing and shipping container. In the event equipment is not so packaged, or if shipping damage is evident, it will not be accepted for service under warranty. Surface transportation charges for return to customers in the continental United States is paid by Zebra. Otherwise, Zebra pays CPT (carriage paid to) nearest airport; customer pays customs, duties, taxes, and freight from airport to destination. If Zebra determines that the product returned for warranty service or replacement is not defective as herein defined, the customer will pay all handling and transportation costs.Printheads. Since printhead wear is part of normal operation, the original printhead is covered by a limited warranty as indicated below. Warranty period begins on purchase date.To qualify for this warranty, the printhead must be returned to the factory or to an authorized service center. Customers are not required to purchase Zebra supplies (media and/or ribbons) for warranty qualification. However, if it is determined that the use of other manufacturer supplies has caused any defect in the printhead for which a warranty claim is made, the user is responsible for Zebra’s labor and material charges required to repair the defect. The warranty becomes void if the printhead is physically worn or damaged; also if it is determined that failure to follow the preventive maintenance schedule listed in the User’s Guide has caused defect in the thermal printhead for which a warranty claim is made.Printhead Warranty PeriodBar code label printer printheads 6 monthsCard printer printheads 12 months
xii   R4Mplus User GuideWarranty InformationPrinter ProductsSoftware. Software is warranted to be free of defects in material and workmanship for 30 days from the date of purchase. In the event of notification within the warranty period of defects, Zebra will replace the defective diskette or documentation. Batteries. Mobile printer batteries are warranted to be free of defects in material and workmanship for 90 days from date of purchase. In the event of notification within the warranty period, Zebra will replace the defective battery provided there has not been damage resulting from user abuse. Parts. All parts, maintenance kits, options kits, and accessories are warranted to be free of defects in material and workmanship for 90 days (except where otherwise noted) from date of purchase. This warranty becomes void if the item is modified, improperly installed or used, or damaged by accident or neglect.Supplies ProductsSupplies are warranted to be free from defect in material and workmanship for a period of six (6) months for media and twelve (12) months for ribbon from the date of shipment by Zebra. This is provided the user has complied with storage guidelines, handling, and usage of the supplies in Zebra printers. Zebra’s sole obligation under these warranties is to furnish parts and labor for the repair or possible replacement of products found to be defective in material or workmanship during the warranty period. Zebra may in its discretion issue a credit for any such defective products in such amount as it deems reasonable.Warranty Exclusions & Conditions StatementThe warranties provided above are the only warranties applicable. No other warranties, expressed or implied, are given. Zebra does not make any IMPLIED WARRANTY OF MERCHANTABILITY OR FITNESS FOR A PARTICULAR PURPOSE in connection with its sale of products or services. While Zebra’s desire is to be responsive to specific needs and questions, Zebra does not assume responsibility for any specific application to which any products are applied including, but not limited to, compatibility with other equipment. All statements, technical information or recommendations relating to Zebra products are based upon tests believed to be reliable yet do not constitute a guaranty or warranty.Zebra’s maximum liability for warranty claims is limited to the invoice price of the product claimed defective. Zebra does not assume responsibility for delays or replacement or repair of products. Zebra shall not under any circumstances whatsoever be liable to any party for loss of profits, lost data, diminution of good will, or any other special or consequential damages whatsoever with respect to any claim made under agreement with Zebra. Specifically for software, Zebra is not liable for any incidental or consequential damages caused by abuse or misapplication of the software or by its use in violation of the U.S. copyright law or international treaty. No salesperson, representative, or agent of Zebra is authorized to make any guaranty, warranty, or representation that contradicts the foregoing. Any waiver, alteration, addition or modification to the foregoing warranties must be in writing and signed by an executive officer of Zebra to be valid.
Warranty InformationPrinter Software and Firmware License AgreementR4Mplus User Guide  xiiiZebra Link License Agreement  Printer Software and Firmware License Agreement YOU SHOULD CAREFULLY READ THE FOLLOWING TERMS AND CONDITIONS OF THIS ZEBRA TECHNOLOGIES CORPORATION PRINTER SOFTWARE AND FIRMWARE LICENSE AGREEMENT (“PSFLA”) BEFORE USING THE PRINTER WHICH IS ENCLOSED OR OTHERWISE ASSOCIATED WITH THIS AGREEMENT. IF YOU DO NOT AGREE WITH THESE TERMS AND CONDITIONS, DO NOT OPERATE THE PRINTER AND PLEASE PROMPTLY RETURN THE PRINTER, ENCLOSURES AND ALL PACKAGING FOR A FULL REFUND.Zebra Technologies Corporation (“ZEBRA”) hereby grants you a non-exclusive, non-transferable license to use the SOFTWARE and FIRMWARE embedded in the printer and the accompanying documentation according to the following terms:1. The printer enclosed with or otherwise associated with this Agreement has or includes certain SOFTWARE and FIRMWARE therein which is protected by copyright laws and international copyright treaties, as well as other intellectual property laws and treaties. The SOFTWARE and FIRMWARE is licensed, not sold. Such SOFTWARE and/or FIRMWARE may include, but is not limited to, SOFTWARE and/or FIRMWARE that is licensed under one or more of the following trademarks: ZPL (Zebra Programming Language), Zebralink, Web View, Web Alert, ZBI (Zebra Basic Interpreter), BAR-ONE, ZTools, Utilities, ZebraNet View for IP, ZebraNet Alert, PC Management Program, ZebraNet View for Networks and ZebraNet Connect. 2. GRANT OF LICENSE. This License grants you the following rights:•SOFTWARE and FIRMWARE. You may use, access, display, run, or otherwise interact with (“RUN”) the SOFTWARE and FIRMWARE in connection with operating the printer which is enclosed with or otherwise associated with this PSFLA (“PRINTER”). The primary user of the PRINTER may make a second copy for his or her exclusive use on a portable computer/printer.•Storage/Network Use. You may also store or install a copy of the SOFTWARE and FIRMWARE on a storage device, such as a network server, used only to RUN the SOFTWARE and FIRMWARE on your other PRINTERS over an internal network; however, you must acquire and dedicate a license for each separate PRINTER on which the SOFTWARE and FIRMWARE is RUN from the storage device. A license for the SOFTWARE and FIRMWARE may not be shared or used concurrently on different PRINTERS.• Reservation of Rights. All rights not expressly granted are reserved by ZEBRA.
xiv   R4Mplus User GuideWarranty InformationPrinter Software and Firmware License Agreement•Accessing Services Using the SOFTWARE and FIRMWARE. Your use of any service accessible using the SOFTWARE and FIRMWARE is not covered by this PSFLA and may be governed by separate terms of use, conditions or notices.3. RESTRICTIONS. •You must maintain all copyright notices on all copies of the SOFTWARE and FIRMWARE.•Limitations on modification. You may not modify, adapt, translate, or create derivative works based on this SOFTWARE OR FIRMWARE or the accompanying documentation.•Limitations of Reverse Engineering, Decompilation and Disassembly. You may not reverse engineer, decompile, or disassemble the SOFTWARE or the FIRMWARE, except and only to the extent that such activity is permitted by applicable law notwithstanding this limitation.•Rental. You may not rent or lease or lend the SOFTWARE or FIRMWARE.•Support Services. ZEBRA may provide you with support services related to the SOFTWARE and/or FIRMWARE (“SUPPORT SERVICES”), in its discretion. Use of SUPPORT SERVICES, if any, is governed by the ZEBRA policies and programs described in the user manual, in “online” documentation, and/or other ZEBRA provided materials. Any supplemental SOFTWARE or FIRMWARE code provided to you as a part of SUPPORT SERVICES shall be considered part of the SOFTWARE and/or FIRMWARE and is subject to the terms of this PSFLA. With respect to technical information you provide to ZEBRA as part of the SUPPORT SERVICES, ZEBRA may use such information for its business purposes, including for product support and development. ZEBRA will not utilize such technical information in a form that personally identifies you except to the extent necessary to provide you with support. •Replacement, Modification and Upgrade of the SOFTWARE and/or FIRMWARE. ZEBRA reserves the right to replace, modify or upgrade the SOFTWARE and/or FIRMWARE at any time by offering you a replacement or modified version of the SOFTWARE and/or FIRMWARE or such upgrade and to charge for such replacement, modification or upgrade. Any such replacement or modified SOFTWARE and/or FIRMWARE code or upgrade to the SOFTWARE and/or FIRMWARE offered to you by ZEBRA shall be considered part of the SOFTWARE and/or FIRMWARE and subject to the terms of this PSFLA (unless this PSFLA is superseded by a further PSFLA accompanying such replacement or modified version of or upgrade to the SOFTWARE and/or FIRMWARE). In the event that ZEBRA offers a replacement or modified version of or any upgrade to the SOFTWARE and/or FIRMWARE, (a) your continued use of the SOFTWARE and/or FIRMWARE is conditioned on your acceptance of such replacement or modified version of or upgrade to the SOFTWARE and/or FIRMWARE and any accompanying superseding PSFLA and (b) in the case of the replacement or modified SOFTWARE and/or FIRMWARE, your use of all prior versions of the SOFTWARE and/or FIRMWARE is terminated.
Warranty InformationPrinter Software and Firmware License AgreementR4Mplus User Guide  xv4. TERMINATION. Without prejudice to any other rights, ZEBRA may terminate this PSFLA if you fail to comply with the terms and conditions of this PSFLA. ZEBRA may terminate this PSFLA by offering you a superseding PSFLA for the SOFTWARE and/or FIRMWARE or any replacement or modified version of or upgrade to the SOFTWARE and/or FIRMWARE and conditioning your continued use of the SOFTWARE and/or FIRMWARE or such replacement, modified or upgraded version on your acceptance of such superseding PSFLA. In addition, ZEBRA may terminate this PSFLA by notifying you that your continued use of the SOFTWARE and/or FIRMWARE is prohibited. In the event that ZEBRA terminates this PSFLA, you must immediately stop using the SOFTWARE and/or FIRMWARE and destroy all copies of the SOFTWARE and/or FIRMWARE and all of its component parts.5. COPYRIGHT. All title and copyrights in and to the SOFTWARE and FIRMWARE, the accompanying printed materials, and any copies of the SOFTWARE and FIRMWARE, are owned by ZEBRA or its suppliers. All title and intellectual property rights in and to the content which may be accessed through use of the SOFTWARE and/or FIRMWARE is the property of the respective content owner and may be protected by applicable copyright or other intellectual property laws and treaties. This PSFLA grants you no rights to use such content. If this SOFTWARE and/or FIRMWARE contains documentation which is provided only in electronic form, you may print one copy of such electronic documentation. You may not copy the printed materials accompanying the SOFTWARE and/or FIRMWARE.6. U.S. GOVERNMENT RESTRICTED RIGHTS. All SOFTWARE and/or FIRMWARE provided to the U.S. Government pursuant to solicitations issued on or after December 1, 1995 is provided with the commercial rights and restrictions described elsewhere herein. All SOFTWARE and/or FIRMWARE provided to the U.S. Government pursuant to solicitations issued prior to December 1, 1995 is provided with RESTRICTED RIGHTS as provided for in FAR, 48 CFR 52.227-14 (JUNE 1987) or DFAR, 48 CFR 252.227-7013 (OCT 1988), as applicable.7. EXPORT RESTRICTIONS. You agree that you will not export or re-export the SOFTWARE and/or FIRMWARE, any part thereof, or any process or service that is the direct product of the SOFTWARE and/or FIRMWARE (the foregoing collectively referred to as the “RESTRICTED COMPONENTS”), to any country, person or entity subject to U.S. export restrictions. You specifically agree not to export or re-export any of the RESTRICTED COMPONENTS (i) to any country to which the U.S. has embargoed or restricted the export of goods or services, which currently include, but are not necessarily limited to Cuba, Iran, Iraq, Libya, North Korea, Sudan and Syria, or to any national of any such country, wherever located, who intends to transmit or transport the RESTRICTED COMPONENTS back to such country; (ii) to any person or entity who you know or have reason to know will utilize the RESTRICTED COMPONENTS in the design, development or production of nuclear, chemical or biological weapons; or (iii) to any person or entity who has been prohibited from participating in U.S. export transactions by any federal agency of the U.S. government. You warrant and represent that neither the U.S. Commerce Department, Bureau of Export Administration nor any other U.S. federal agency has suspended, revoked or denied your export privileges.
xvi   R4Mplus User GuideWarranty InformationPrinter Software and Firmware License Agreement8. DISCLAIMER OF WARRANTIES. ZEBRA AND ITS SUPPLIERS PROVIDE THE SOFTWARE AND/OR FIRMWARE “AS IS” AND WITH ALL FAULTS, AND HEREBY DISCLAIM ALL OTHER WARRANTIES AND CONDITIONS, EITHER EXPRESS, IMPLIED OR STATUTORY, INCLUDING BUT NOT LIMITED TO ANY (IF ANY) IMPLIED WARRANTIES OR CONDITIONS OF MERCHANTABILITY, OF FITNESS FOR A PARTICULAR PURPOSE, OF LACK OF VIRUSES, AND OF LACK OF NEGLIGENCE OR LACK OF WORKMANLIKE EFFORT. ALSO, THERE IS NO WARRANTY OR CONDITION OF TITLE, OF QUIET ENJOYMENT, OR OF NONINFRINGEMENT. THE ENTIRE RISK ARISING OUT OF THE USE OR PERFORMANCE OF THE SOFTWARE AND FIRMWARE IS WITH YOU. ZEBRA DOES NOT WARRANT THAT THE OPERATION OF THE SOFTWARE OR FIRMWARE WILL BE UNINTERRUPTED OR ERROR FREE.9. EXCLUSION OF ALL DAMAGES. TO THE MAXIMUM EXTENT PERMITTED BY APPLICABLE LAW, IN NO EVENT SHALL ZEBRA OR ITS SUPPLIERS BE LIABLE FOR ANY CONSEQUENTIAL, INCIDENTAL, DIRECT, INDIRECT, SPECIAL, PUNITIVE, OR OTHER DAMAGES WHATSOEVER (INCLUDING, WITHOUT LIMITATION, DAMAGES FOR ANY INJURY TO PERSON OR PROPERTY, DAMAGES FOR LOSS OF PROFITS, BUSINESS INTERRUPTION, LOSS OF BUSINESS INFORMATION, FOR LOSS OF PRIVACY FOR FAILURE TO MEET ANY DUTY INCLUDING OF GOOD FAITH OR OF REASONABLE CARE, FOR NEGLIGENCE, AND FOR ANY PECUNIARY OR OTHER LOSS WHATSOEVER) ARISING OUT OF OR IN ANY WAY RELATED TO THE USE OF OR INABILITY TO USE THE SOFTWARE OR FIRMWARE, WHETHER BASED ON CONTRACT, TORT, NEGLIGENCE, STRICT LIABILITY OR OTHERWISE, EVEN IF ZEBRA OR ANY SUPPLIER HAS BEEN ADVISED OF THE POSSIBILITY OF SUCH DAMAGES. THIS EXCLUSION OF DAMAGES SHALL BE EFFECTIVE EVEN IF ANY REMEDY FAILS OF ITS ESSENTIAL PURPOSE.10. LIMITATIONS AND RELEASE OF LIABILITY.•To the extent that the SOFTWARE and/or FIRMWARE covered by this PSFLA includes emulation libraries, emulation libraries are offered “as is”. ZEBRA does not provide any warranty associated with the emulation libraries.•The emulation library does not work 100% correctly or cover 100% of the functionality of the printer language being emulated. Modifications may be required for each target application. If such modification is necessary, prior to making any such modification, you are required to contact ZEBRA to obtain express written consent to make such modification.•If the emulation library is sold separately by an authorized party other than ZEBRA (“RESELLER”—A party other than ZEBRA which is authorized by ZEBRA to distribute the SOFTWARE and/or FIRMWARE with its application so long as the SOFTWARE and/or FIRMWARE is used with a ZEBRA printer) or is sold bundled with a printer to an end-user by a RESELLER, and if claims are made by the RESELLER that the emulation library performs as a 100% emulation solution, ZEBRA is not responsible if the emulation library does not work as advertised by the RESELLER. Furthermore, ZEBRA is not liable for any damages directly or indirectly relating to such emulation library which is sold separately by the RESELLER or which is sold bundled with a printer to an end-user by the RESELLER.
Warranty InformationPrinter Software and Firmware License AgreementR4Mplus User Guide  xvii•The SOFTWARE and FIRMWARE was provided to you at no additional charge and ZEBRA has included in this PSFLA terms that disclaim all warranties and liability for the SOFTWARE and FIRMWARE. To the full extent allowed by law, YOU HEREBY RELEASE ZEBRA AND ITS SUPPLIERS FROM ANY AND ALL LIABILITY ARISING FROM OR RELATED TO ALL CLAIMS CONCERNING THE SOFTWARE AND/OR FIRMWARE OR ITS USE. If you do not wish to accept the SOFTWARE OR FIRMWARE under the terms of this PSFLA, do not use the PRINTER enclosed with or otherwise associated with this PSFLA. 11. GOVERNING LAW. If you acquired the SOFTWARE and/or FIRMWARE in the United States of America, the laws of the State of Illinois, U.S.A. will apply to this contract. If you acquired this SOFTWARE and/or FIRMWARE outside of the United States of America, then local law may apply. If any provision of this PSFLA is held invalid, the remainder of this PSFLA shall continue in full force and effect.12. QUESTIONS. Should you have any questions, or if you desire to contact ZEBRA for any reason, please contact the ZEBRA subsidiary serving your country, or write:Zebra Technologies Corporation333 Corporate Woods ParkwayVernon Hills, IL 60061
xviii   R4Mplus User GuideWarranty InformationPrinter Software and Firmware License Agreement
R4Mplus User Guide  xixPrefaceThe Preface discusses the topics and illustrates standards that are used throughout this guide.ContentsContacts . . . . . . . . . . . . . . . . . . . . . . . . . . . . . . . . . . . . . . . . . . . . . xxSupport . . . . . . . . . . . . . . . . . . . . . . . . . . . . . . . . . . . . . . . . . . . . xxAbout this Document  . . . . . . . . . . . . . . . . . . . . . . . . . . . . . . . . . . .xxiDocument Conventions  . . . . . . . . . . . . . . . . . . . . . . . . . . . . . . . .  xxiiRelated Documents  . . . . . . . . . . . . . . . . . . . . . . . . . . . . . . . . . . . xxiv
xx   R4Mplus User GuidePrefaceContactsContactsYou can contact Zebra Technologies Corporation, USA at any of the following: Visit us at: www.zebra.comOur Mailing Address: Zebra Technologies Corporation333 Corporate Woods ParkwayVernon Hills, Illinois 60061.3109 U.S.ATelephone: +1 847.634.6700Facsimile: +1 847.913.8766Zebra Technologies Europe LimitedZebra HouseThe Valley Centre, Gordon RoadHigh WycombeBuckinghamshire HP13 6EQ, UKTelephone: +44 (0)1494 472872Facsimile: +44 (0)1494 450103SupportYou can contact Zebra support at any of the following:Web address:   www.zebra.com/SS/service_support.htm US Phone Number:   +1 847.913.2259UK/International Phone Number:   +44 (0) 1494 768289Caution • The Web address is case-sensitive. The SS must be all caps.
PrefaceAbout this DocumentR4Mplus User Guide  xxiAbout this DocumentThe User Guide contains the following chapters:Table 1 • User Guide ContentsTitle  Content DescriptionIntroduction This chapter shows the operational controls and location of major components needed in the loading of media and ribbon.Printer Setup The chapter provides the tasks that you must complete and the issues that you must consider before you load and configure your printer.Printer Operation This chapter provides instructions for loading media, loading ribbon, and basic printer operation.Configuration This chapter discusses detailed configuration settings and instructs you how to view or change parameters through the front panel.RFID Guidelines This chapter provides an overview of how RFID works and the ZPL commands used to create RFID labels.Routine Care and Adjustments This chapter discusses printer cleaning and minor adjustments.Troubleshooting This chapter discusses typical problems and their probable solutions.Data Connections This appendix provides details about the serial port and parallel port data connections.Specifications This appendix contains specifications for the R4Mplus printer.
xxii   R4Mplus User GuidePrefaceDocument ConventionsDocument ConventionsThe following conventions are used throughout this document to convey certain information: About this Chapter:   This section lists and describes each main section of the chapter, including the initial page number of that section. These sections primarily serve as hyperlink components for the Adobe Acrobat.pdf version of this guide.Alternate Color (on-line only):   Cross-references contain hot links to other sections in this guide. If you are viewing this guide on-line in.pdf format, you can click a cross-reference (royal blue text) to jump directly to the other location.Command Line Examples:   All command line examples appear in Courier font. For example, you would type the following to get to the Post-Install scripts in the bin directory: ZtoolsFiles and Directories:   All file names and directories appear in Courier New font. For example, the Zebra<version number>.tar file and the /root directory.Caution, Important, Note, and Example:   These types of paragraphs are defined in the following examples:Caution • Advises you that failure to take or avoid a specific action could result in physical harm to you or the hardware.Caution • Advises you that failure to take or avoid a specified action could result in loss of data or hardware damage. !Important • Provides information that is essential to the completion of a task.Note •  Indicates neutral or positive information that emphasizes or supplements important points of the main text.Example • Provides an example, often a scenario, to better clarify a section of text.
PrefaceDocument ConventionsR4Mplus User Guide  xxiiiIllustration Callouts:   Callouts are used when an illustration contains information that needs to be labeled and described. A table that contains the labels and descriptions follows the illustration. See Figure 1.Figure 1 • Example of an Illustration with Callouts1Power LED2Pause LED3Error LED4Data LEDPAUSE2134
xxiv   R4Mplus User GuidePrefaceRelated DocumentsRelated DocumentsIn addition to this user guide, the following documents might be helpful references:•The ZPL II Programming Guide Volume I and Volume II (Zebra part number 45540L) details how to create the perfect label format for your application. The guide explains how the optional ZBI™ extends the power of ZPL II by allowing custom programs to be written that operate within the printer, directly interfacing with bar code scanners, keyboard display devices, etc. The guide also contains information about the enhanced operating system features of your printer. There are three ways to obtain this guide: on the accessory CD-ROM (supplied with the printer), on our web site (www.zebra.com), or by ordering printed manuals from your distributor.•The PrintServer II User and Reference Guide (Zebra part number 45537L) explains how you can quickly set up your printer on an IP network and experience ZebraLink, our revolutionary real-time connectivity and control solution for Zebra printers (optional ZebraNet PrintServer II required).•The Z4Mplus and Z6Mplus Maintenance Manual (Zebra part number 13358L) contains the information you need to maintain your printer.Note • This maintenance manual applies to the R4Mplus, but the RFID components are not included.
R4Mplus User Guide  1CHAPTER 1IntroductionThis chapter shows the operational controls and location of major components needed in the loading of media and ribbon.ContentsExternal View . . . . . . . . . . . . . . . . . . . . . . . . . . . . . . . . . . . . . . . . . . 2Front Panel . . . . . . . . . . . . . . . . . . . . . . . . . . . . . . . . . . . . . . . . . . . . 3LCD Display Settings . . . . . . . . . . . . . . . . . . . . . . . . . . . . . . . . . . 4Print Modes. . . . . . . . . . . . . . . . . . . . . . . . . . . . . . . . . . . . . . . . . . 5Printer Media Compartment . . . . . . . . . . . . . . . . . . . . . . . . . . . . . . . 6
2  R4Mplus User GuideIntroductionExternal ViewExternal ViewFigure 1 shows the outside of the printer.Figure 1 • External View1Electronics cover2Front panel3Media door321
IntroductionFront PanelR4Mplus User Guide  3Front PanelThe front panel keys and lights are shown in Figure 2.Figure 2 • Front Panel Controls and LEDs1Power LED2Pause LED3Error LED4Data LED5LCD6PLUS (+) Key7SETUP/EXIT Key8CANCEL Key9PAUSE Key10 FEED Key11 SELECT Key12 MINUS (–) KeyPAUSE234567819101112
4  R4Mplus User GuideIntroductionFront PanelLCD Display SettingsTable 1 shows front panel LCD display settings that you may wish to adjust and what they mean. Refer to Basic Configuration on page 48 for more detailed information on each setting.Table 1 • Front Panel LCD Display SettingsLCD Display Meaning/Available SettingsPRINTER READYReady to print labels or to configure the printer. All printer self-tests have been performed successfully.DARKNESSThe larger the number, the darker the print. The range is 0 to 30, with a default setting of 10.PRINT SPEEDThe print speed is given in inches per second. The larger the number, the faster the label prints.TEAR OFFEstablishes the position of the media over the tear-off bar after printing.PRINT MODETear-Off (default setting), Peel-Off, Cutter, Rewind. For more details, see Table 2.MEDIA TYPENon-continuous (default setting), ContinuousSENSOR TYPEWeb (default setting), MarkPRINT METHODThermal transfer (default setting using a ribbon), Direct thermal (no ribbon)
IntroductionFront PanelR4Mplus User Guide  5Print ModesYou can view the current print mode on the LCD on the front panel of the printer. Refer to Configuration and Calibration LCD Displays on page 51 for more detailed information. Print modes should match the media and printer options chosen. Print mode choices are listed in Table 2.Table 2• Print Mode OptionsMode Printer Option ActionTear-Off Mode (Default setting) Use for most applications. Each label or strip of labels can be torn off after printing.Peel-Off Mode Use only if printer has the peel option. Liner material is peeled away from the label as it is printed. After the printed label is removed the next label prints.Cutter Mode  Use only if printer has a cutter option. Printer automatically cuts the label after it is printed.Rewind Mode Use only if printer has the rewind option. The media and/or liner are rewound onto a core as they are printed.
6  R4Mplus User GuideIntroductionPrinter Media CompartmentPrinter Media CompartmentFigure 3 shows a simplified view of your printer. Depending on installed options, your printer may look slightly different.Figure 3 • Media Compartment1Printhead Assembly2Transmissive Sensor3Label Supply Guide4Label Supply Hanger5Dancer6Label Guide7Printhead Open Lever1234567
R4Mplus User Guide  7CHAPTER 2Printer SetupThe chapter provides the tasks that you must complete and the issues that you must consider before you load and configure your printer.ContentsBefore You Begin . . . . . . . . . . . . . . . . . . . . . . . . . . . . . . . . . . . . . . . 8Unpack and Inspect the Printer  . . . . . . . . . . . . . . . . . . . . . . . . . . . . 9Report Damage  . . . . . . . . . . . . . . . . . . . . . . . . . . . . . . . . . . . . . . 9Storage . . . . . . . . . . . . . . . . . . . . . . . . . . . . . . . . . . . . . . . . . . . . . 9Select a Site for the Printer. . . . . . . . . . . . . . . . . . . . . . . . . . . . . . . 10Select a Surface . . . . . . . . . . . . . . . . . . . . . . . . . . . . . . . . . . . . . 10Provide Proper Operating Conditions. . . . . . . . . . . . . . . . . . . . . 10Allow Proper Space  . . . . . . . . . . . . . . . . . . . . . . . . . . . . . . . . . . 10Provide a Data Source . . . . . . . . . . . . . . . . . . . . . . . . . . . . . . . . 10Connect the Printer to a Power Source  . . . . . . . . . . . . . . . . . . . . . 11Power Cord Specifications . . . . . . . . . . . . . . . . . . . . . . . . . . . . . 11Select a Communication Interface . . . . . . . . . . . . . . . . . . . . . . . . . 13Types of Media . . . . . . . . . . . . . . . . . . . . . . . . . . . . . . . . . . . . . . . . 15Non-Continuous Web Media. . . . . . . . . . . . . . . . . . . . . . . . . . . . 16Continuous Media. . . . . . . . . . . . . . . . . . . . . . . . . . . . . . . . . . . . 16RFID “Smart” Labels. . . . . . . . . . . . . . . . . . . . . . . . . . . . . . . . . . 17Ribbon  . . . . . . . . . . . . . . . . . . . . . . . . . . . . . . . . . . . . . . . . . . . . . . 18
8  R4Mplus User GuidePrinter SetupBefore You BeginBefore You BeginReview this checklist, and resolve any issues before you begin setting up your printer. When you are ready, continue with Printer Operation on page 21.Unpack and Inspect  Have you unpacked the printer and inspected it for damage? If you have not, see Unpack and Inspect the Printer on page 9.Select a Site  Have you selected an appropriate location for the printer? If you have not, see Select a Site for the Printer on page 10.Attach Power Cord  Do you have the correct power cord for your printer? If you are unsure, see Power Cord Specifications on page 11. To attach the power cord and connect the printer to a power source, see Connect the Printer to a Power Source on page 11. Connect to a Data Source  Have you determined how the printer will be connected to a data source (usually a computer)? For more information, see Select a Communication Interface on page 13.Select Media  Do you have the correct media for your application? If you are unsure, see Types of Media on page 15.Select Ribbon  Do you need to use ribbon, and is the appropriate ribbon available, if needed? If you are unsure, see Ribbon on page 18.
Printer SetupUnpack and Inspect the PrinterR4Mplus User Guide  9Unpack and Inspect the Printer• Check all exterior surfaces.• Raise the media door, and inspect the media compartment.• Save the carton and all packing material in case the printer needs to be shipped. Contact your authorized Zebra reseller for instructions.• Depending on how your printer was ordered, a power cord may or may not be included. If one is not included, or if the one included is not suitable for your requirements, see Connect the Printer to a Power Source on page 11.Report DamageIf you discover shipping damage:• Immediately notify the shipping company and file a damage report.• Keep the carton and all packing material for inspection.• Notify your local Zebra reseller.StorageIf you are not placing the printer into operation immediately, repackage it using the original packing materials. The printer may be stored under the following conditions:• Temperature: –40°F to 140°F (–40°C to 60°C)• Relative humidity: 5% to 85%, non-condensingElectric Shock Caution • For personnel and equipment safety, always use a three-prong plug with an earth-ground connection to the AC power source. !Important • Zebra Technologies Corporation is not responsible for any damage incurred during the shipment of the equipment and will not repair this damage under warranty
10   R4Mplus User GuidePrinter SetupSelect a Site for the PrinterSelect a Site for the PrinterConsider the following when selecting an appropriate location for your printer.Select a SurfaceSelect a solid, level surface of sufficient size and strength to accommodate the printer and other equipment (such as a computer), if necessary. The choices include a table, countertop, desk, or cart.Provide Proper Operating ConditionsBecause the printer was designed and is fabricated as an industrial-type unit, it functions satisfactorily in a location that conforms to specified environmental and electrical conditions, including a warehouse or factory floor. For more information on the required conditions, see General Specifications on page 114.Table 3 shows the temperature and relative humidity requirements for the printer when it is operating.Allow Proper SpaceThe printer should have enough space around it for you to be able to open the media door. To allow for proper ventilation and cooling, leave open space on all sides of the printer.Provide a Data SourceIf the printer will be located away from the data source, the selected site must provide the appropriate connections to that data source. For more information on the types of communication interfaces, see Select a Communication Interface on page 13.Table 3 • Operating Temperature and HumidityMode Temperature Relative HumidityThermal Transfer 41° to 104°F (5° to 40°C) 20 to 85% non-condensingDirect Thermal 32° to 104°F (0° to 40°C) 20 to 85% non-condensingCaution •  Do not place any padding or cushioning material behind or under the printer because this restricts air flow and could cause the printer to overheat.
Printer SetupConnect the Printer to a Power SourceR4Mplus User Guide  11Connect the Printer to a Power SourceTo connect the printer to a power source, complete these steps:1. Turn the printer power switch (located on the rear of the printer) to the Off (O) position.2. Plug the power cord into the mating connector on the rear of the printer.3. Plug the other end of the power cord into the power source.Power Cord SpecificationsDepending on how your printer was ordered, a power cord may or may not be included. The power cord used must meet your local electrical requirements. If a power cord is not included or if the one included is not suitable for your requirements, refer to the following guidelines.Your power cord must meed these standards:• The overall length must be less than 9.8 ft. (3.0 m).• It must be rated for at least 5A, 250 VAC.• The chassis ground (earth) must be connected to ensure safety and reduce electromagnetic interference. The ground connection is handled by the third wire (earth) in the power cord as shown in Figure 4.Figure 4 • Power Cord SpecificationsElectric Shock Caution • For personnel and equipment safety, always use an approved three-conductor power cord specific to the region or country intended for installation. This cord must use an IEC 320 female connector and the appropriate region-specific three-conductor grounded plug configuration.1AC power plug for your country23-conductor HAR cable3IEC 320 connector4Neutral earth live in contact view1 2 3 4
12   R4Mplus User GuidePrinter SetupConnect the Printer to a Power Source• The AC power plug and IEC 320 connector must bear the certification mark of at least one of the known international safety organizations shown in Figure 5.Figure 5 • International Safety Organization Marks+R
Printer SetupSelect a Communication InterfaceR4Mplus User Guide  13Select a Communication InterfaceThe way that you connect your printer to a data source depends on the communication options installed in the printer.Standard interfaces: the RS-232 DB-9 serial data port and the IEEE 1284 compliant bidirectional parallel port. For further information, see Data Connections on page 107.Optional interfaces:• Socket Card for PCMCIA cards. For further information on PCMCIA cards, see Install Memory Card on page 44.Optional Print Servers:• ZebraNet external PrintServer II (PSII)• PSII internal PrintServer (factory installed only)Enables the printer to be connected to 10Base-T Ethernet networks.For further information on PrintServer II, see the PrintServer II User and Reference Guide (Zebra part number 45537L).Serial Port  Communicating using a serial data port (see Figure 6) requires choosing the baud rate, number of data bits, stop bits, parity, and handshake (default settings are 9600 baud, 8 data bits, 1 stop bit, no parity, and XON/XOFF). Parity only applies to data transmitted by the printer since the parity of received data is ignored. See Serial Data Port on page 108 to configure the communication parameters. The values selected must be the same as those used by the host equipment connected to the printer.Figure 6 • Communicating Using a Serial Data PortPrinter ComputerNull modem adaptor(if using a standardmodem cable)Male2599950 ft. (15 mm) maximum
14   R4Mplus User GuidePrinter SetupSelect a Communication InterfaceParallel Port  Communicating using the parallel port (see Figure 7) does not require special settings. The serial settings do not affect the parallel port. Refer to Parallel Data Port on page 112 for further information.Figure 7 • Communicating Using a Parallel PortCable RequirementsData cables must be fully shielded and fitted with metal or metallized connector shells. Shielded cables and connectors are required to prevent radiation and reception of electrical noise. To minimize electrical noise pickup in the cable:• Keep data cables as short as possible.• Do not bundle the data cables tightly with the power cords.• Do not tie the data cables to power wire conduits.Note • Zebra printers comply with FCC Rules and Regulations, Part 15 for Class B Equipment using fully shielded, 6.5 ft (2 m) data cables. Use of unshielded cables may increase radiation above the Class B limits.Note • RS-422 and RS-485 applications should use twisted shielded pairs as recommended in the TIA/EIA-485 Specification.Printer Computer36-pinmale25-pinmalePC25-pinfemale10 ft. (3 mm) maximum
Printer SetupTypes of MediaR4Mplus User Guide  15Types of MediaYour printer is capable of using various types of media. These include continuous roll and fanfold media (Figure 8) that may be labels or card stock and that may have optional perforations or registration holes. The media also may have a radio frequency identification (RFID) chip and antenna inlay embedded in it (sometimes called “smart” labels). The following sections contain descriptions of the various types of media approved for use in your printer.We strongly recommend the use of Zebra-brand supplies for continuous high-quality printing. A wide range of paper, polypropylene, polyester, and vinyl stock has been specifically engineered to enhance the printing capabilities of the printer and to ensure against premature printhead wear.Figure 8 • Roll and Fanfold MediaRoll Media Fanfold MediaNote • Because print quality is affected by media and ribbon, printing speeds, and printer operating modes, it is very important to run tests for your applications.
16   R4Mplus User GuidePrinter SetupTypes of MediaNon-Continuous Web MediaNon-continuous web media refers to individual labels that are separated by a gap, notch, or hole (Figure 9). When you look at the media, you can tell where one label ends and the next one begins.Figure 9 • Non-Continuous Web MediaContinuous MediaContinuous media (Figure 10) is one uninterrupted roll of material without gaps, holes, notches, or black marks. This allows the image to be printed anywhere on the label. The individual labels can be cut apart or stored in a roll for later use.Figure 10 • Continuous Media !Important • Printhead life may be reduced by abrasion from exposed paper fibers when using perforated media.1Hole2Notch3Label Gap13 32
Printer SetupTypes of MediaR4Mplus User Guide  17RFID “Smart” Labels“Smart” labels are usually made from two components: media and an embedded RFID transponder (Figure 11). For more information about reading and encoding RFID tags, see RFID Guidelines on page 71.• The media (usually a label with a UHF transponder embedded between the label and liner) is usually comprised of synthetic- or paper-based material that can be printed upon using direct thermal or thermal transfer printing techniques. The media is typically made from the same materials and adhesives that a non-RFID barcode printer would use.• The UHF transponder, which is sometimes called the RFID tag, is usually comprised of an antenna that is bonded to an integrated circuit (IC) chip. If you hold a “smart” label up to the light, you can see the transponder’s antenna embedded within the label, and you can feel a bump in the label where the IC chip is located.The IC chip contains the RF circuit, coders, decoders, and memory. At a minimum, “smart” labels have memory that can be read, while the vast majority also have memory that can be encoded by the user as well. For more information about encoding “smart” labels, see ZPL II Commands for RFID on page 73.Figure 11 • RFID “Smart” Labels1Liner2Label3Location of embedded transponder4Outline of transponder antenna (shape varies by manufacturer)(label profile)1234
18   R4Mplus User GuidePrinter SetupRibbonRibbonRibbon is a thin film that is coated on one side with wax or wax resin, which is transferred to the media during the thermal transfer process. The media determines whether you need to use ribbon and how wide the ribbon must be.When to Use RibbonThermal transfer media requires ribbon for printing while direct thermal media does not. To determine if ribbon must be used with a particular label, perform a media scratch test.To perform a label scratch test, complete these steps:1. Scratch the print surface of the media with your fingernail.2. Did a black mark appear on the media?Ribbon WidthWhen ribbon is used, it must be as wide as or wider than the media being used. If the ribbon is narrower than the media, areas of the printhead are unprotected and subject to premature wear. Though it is not required, ribbon may be used with direct thermal media to help protect the printhead from abrasion with the media.Coated Side of RibbonRibbon can be wound with the coated side on the inside or outside (see Figure 12 and Figure 13), which affects how it will be loaded in the printer. This printer can only use ribbon that is coated on the outside. If you do not know which side is coated on of a particular roll of ribbon, perform a ribbon scratch test.Figure 12 • Ribbon Coated on OutsideIf a black mark... Then...Does not appear on the media The media is thermal transfer. A ribbon is required with this type of media.Appears on the media  The media is direct thermal. No ribbon is required for this type of media.
Printer SetupRibbonR4Mplus User Guide  19Figure 13 • Ribbon Coated on InsideTo perform a ribbon scratch test, complete these steps:1. Unroll a short length of ribbon.2. Place the unrolled section of ribbon on a piece of paper with the outside surface of the ribbon in contact with the paper.3. Scratch the surface of the unrolled ribbon with your fingernail.4. Lift the ribbon from the paper.5. Did the ribbon leave a mark on the paper?If the ribbon... Then...Left a mark on the paper The ribbon is coated on the side that was in contact with the paper.Did not leave a mark on the paper The ribbon is likely coated on the side that you scratched. a. Flip the ribbon over on the paper.b. Repeat the test by scratching on the side that was previously in contact with the paper.c. Observe the results again. The ribbon should have left a mark on the paper. If not, repeat the test, starting with the first side again. You may need to scratch the surface of the ribbon harder.
20   R4Mplus User GuidePrinter SetupRibbon
R4Mplus User Guide  21CHAPTER 3Printer OperationThis chapter provides instructions for loading media, loading ribbon, and basic printer operation.ContentsFront Panel . . . . . . . . . . . . . . . . . . . . . . . . . . . . . . . . . . . . . . . . . . . 22Front Panel Keys  . . . . . . . . . . . . . . . . . . . . . . . . . . . . . . . . . . . . 23Front Panel Lights. . . . . . . . . . . . . . . . . . . . . . . . . . . . . . . . . . . . 24Load Roll Media . . . . . . . . . . . . . . . . . . . . . . . . . . . . . . . . . . . . . . . 25Tear-Off Mode. . . . . . . . . . . . . . . . . . . . . . . . . . . . . . . . . . . . . . . 25 . . . . . . . . . . . . . . . . . . . . . . . . . . . . . . . . . . . . . . . . . . . . . . . . . . 26Liner Take-Up Mode . . . . . . . . . . . . . . . . . . . . . . . . . . . . . . . . . . 29Rewind/Peel-Off Mode . . . . . . . . . . . . . . . . . . . . . . . . . . . . . . . . 31Rewind Mode . . . . . . . . . . . . . . . . . . . . . . . . . . . . . . . . . . . . . . . 33Adjust Media Alignment for Rewind Option  . . . . . . . . . . . . . . . . 35Load Fanfold Media . . . . . . . . . . . . . . . . . . . . . . . . . . . . . . . . . . . . 36Load the Ribbon . . . . . . . . . . . . . . . . . . . . . . . . . . . . . . . . . . . . . . . 38Remove the Ribbon . . . . . . . . . . . . . . . . . . . . . . . . . . . . . . . . . . 39Calibrate the Printer . . . . . . . . . . . . . . . . . . . . . . . . . . . . . . . . . . . . 40Auto Calibration  . . . . . . . . . . . . . . . . . . . . . . . . . . . . . . . . . . . . . 40Manual Calibration . . . . . . . . . . . . . . . . . . . . . . . . . . . . . . . . . . . 40Print a Configuration Label . . . . . . . . . . . . . . . . . . . . . . . . . . . . . . . 41Adjust Printhead Pressure  . . . . . . . . . . . . . . . . . . . . . . . . . . . . . . . 43Install Memory Card . . . . . . . . . . . . . . . . . . . . . . . . . . . . . . . . . . . . 44
22   R4Mplus User GuidePrinter OperationFront PanelFront PanelThe front panel display shows the printer’s operating status and allows you to change settings as needed to work with your media and label formats.The front panel keys and lights are shown in Figure 14. Descriptions for each are located in Table 4 and Table 5.Figure 14 • Front Panel1Power LED2Pause LED3Error LED4Data LED5LCD6PLUS (+) Key7SETUP/EXIT Key8CANCEL Key9PAUSE Key10 FEED Key11 SELECT Key12 MINUS (–) KeyPAUSE345678219101112
Printer OperationFront PanelR4Mplus User Guide  23Front Panel KeysTable 4 • Front Panel KeysKey FunctionFEED Forces the printer to feed one blank label each time the key is pressed.Printer not printing: one blank label immediately feeds.Printing: one blank label feeds after the current batch of labels is complete.PAUSE Starts and stops the printing process.Printer not printing: no printing occurs. (Press PAUSE again to resume printing.)Printing: printing stops after the current label is complete.CANCEL Cancels print jobs when in the pause mode.Printer not printing: the next stored label format does not print.Printing: current label completes printing and the next label format is cancelled.Press and hold for several seconds to cancel all print jobs in memory.SETUP/EXIT Enters and exits the configuration mode. SELECT Toggles the function of PLUS (+) and MINUS (–) between the Scroll and Change Modes.Press once to use PLUS (+) and MINUS (–) to change the values of the selection.Press again to use PLUS (+) and MINUS (–) to scroll through the menu items.PLUS (+) (scroll mode) Scrolls to the next selection.PLUS (+) (change mode) Increases the value.Answers yes.Prints a label (when applicable).MINUS (–) (scroll mode) Scrolls to the previous selection.MINUS (–) (change mode) Decreases the value.Selects the digit you wish to change.Answers no.
24   R4Mplus User GuidePrinter OperationFront PanelFront Panel LightsTable 5 • Front Panel LightsLight Status IndicationPOWER Off The printer is off or no power is applied.On The printer is on.PAUSE Off Normal printer operation.On The printer has stopped all printing operations.Flashing The Pause light flashes when when initializing FLASH or PCMCIA memory and in Peel-Off Mode when the label is available.ERROR Off Normal printer operation (no errors).Slow flashing RIBBON IN warning, HEAD UNDER TEMP warning, or HEAD OVER TEMP error.Fast flashing HEAD OPEN error.On PAPER OUT or RIBBON OUT errors.DATA Off Normal printer operation (no data being received or processed).One flash CANCEL is pressed and a format is successfully cancelled.Slow flashing The printer is unable to accept more data from the host.Fast flashing The printer is receiving data.On A partial format has been received and no subsequent data activity.
Printer OperationLoad Roll MediaR4Mplus User Guide  25Load Roll MediaTear-Off ModeTear-Off Mode is the default mode. The printer is set to this mode in the factory.To load media in Tear-Off Mode, complete these steps:1. Press the printhead open lever. The printhead assembly springs up.2. Flip down the media supply guide.3. Slide out the media guide as far from the printer frame as possible.4. Place the roll of media on the media supply hanger and orient the media properly.5. Flip up the media supply guide. 6. Slide in the media supply guide until it touches, but does not restrict, the edge of the roll.7. Feed the media under the dancer, through the slot in the transmissive sensor, under the ribbon sensor, and out the front of the printer.8. Ensure the media is against the back of the transmissive sensor. Slide in the media guide until it touches, but does not restrict, the edge of the label.9. Close the printhead assembly.10. The printer is paused (the Pause light is on), press PAUSE to enable printing.Caution • Ensure that the printhead is fully open and engaged in the upright position. If you fail to latch the printhead, it could fall on your hand during the procedure.
26   R4Mplus User GuidePrinter OperationLoad Roll MediaFigure 15 • Tear-Off Mode1Printhead Assembly2Transmissive Sensor3Label Supply Guide4Label Supply Hanger5Dancer6Label Guide7Printhead Open Lever8Printed Label1234786 5
Printer OperationLoad Roll MediaR4Mplus User Guide  27Peel-Off ModeThis setting works only with the Peel-Off Option installed on the printer. Figure 16 shows the printer with the Peel-Off Option.To load media in Peel-Off Mode, complete these steps:1. Press the printhead open lever. The printhead assembly springs up.2. Flip down the media supply guide.3. Slide the media guide as far from the printer main frame as possible.4. Place a roll of media onto the media supply hanger as shown.5. Flip up the media supply guide. 6. Slide in the media supply guide until it just touches, but does not restrict, the edge of the media.7. Feed the media under the dancer, through the slot in the transmissive sensor, under the ribbon sensor, and through the Peel Assembly.8. Pull approximately 12 in. (30 mm) of media through the front of the printer.9. Ensure the media is against the rear of the transmissive sensor. Slide in the media guide until it just touches, but does not restrict, the edge of the media.10. Pull down the peel lever to open the peel assembly.11. Feed the liner over the tear-off/peel-off bar and behind the peel assembly.12. Close the printhead assembly.13. Close the peel assembly using the peel lever.14. The printer is paused (the Pause light is on), press PAUSE to enable printing.Peeling starts automatically. Press FEED to test.Caution • Ensure that the printhead is fully open and engaged in the upright position. If you fail to latch the printhead, it could fall on your hand during the procedure.
28   R4Mplus User GuidePrinter OperationLoad Roll MediaFigure 16 • Peel-Off Mode1Printhead Assembly2Transmissive Sensor3Media Supply Guide4Media Supply Hanger5Dancer6Media Guide7Printhead Open Lever8Peel Assembly9Label10 Peel Lever11 Tear-Off/Peel/Off Bar21345678910111
Printer OperationLoad Roll MediaR4Mplus User Guide  29Liner Take-Up ModeThe Liner Take-up option must be installed to use this mode. See Figure 18.To load media in Liner Take-Up Mode, complete these steps:1. Press the printhead open lever. The printhead assembly springs up.2. Flip down the media supply guide.3. Slide the media guide as far from the maim frame as possible.4. Place a roll of media onto the media supply hanger as shown.5. Flip up the media supply guide. 6. Slide in the media supply guide until it just touches, but does not restrict, the edge of the media.7. Feed the media under the dancer, through the slot in the transmissive sensor, and under the ribbon sensor.8. Pull approximately 18 in. (500 mm) of media through the front of the printer.9. Remove the labels from the exposed media until only liner remains. 10. Ensure that the media is against the back of the transmissive sensor. Slide in the media guide until it just touches, but does not restrict, the edge of the media.11. Pull down the peel lever to open the peel assembly.12. Feed the media over the tear-off/peel-off bar and behind the peel assembly.13. Close the printhead assembly.14. Close the peel assembly.15. Slide the liner into the slot (see Figure 17) in the spindle of the liner take-up. Ensure that the liner is resting against the back plate of the spindle assembly.Figure 17 • Liner Take-Up Spindle 16. Turn the spindle assembly counterclockwise a few times to snug the liner.17. If the printer is paused (the pause light is on), press PAUSE to enable printing. Peeling starts automatically. Press FEED to test.Caution • Ensure that the printhead is fully open and engaged in the upright position. If you fail to latch the printhead, it could fall on your hand during the procedure.Slot
30   R4Mplus User GuidePrinter OperationLoad Roll MediaFigure 18 • Liner Take-Up ModeLiner Removal1. Pull the liner slide toward you (see inset) until it stops (about a third of the way down the liner take-up spindle).Figure 19 • Removing Liner from Liner Take-Up Spindle2. Slide the liner from the take-up spindle.1Printhead Assembly2Transmissive Sensor3Label Supply Guide4Label Supply Hanger5Liner Take-Up 6Dancer7Label Guide8Printhead Open Lever9Peel Assembly10 Label11 Peel Lever12 Tear-Off/Peel-Off BarNote • The liner slide moves back in place once the liner is removed.123456789101112
Printer OperationLoad Roll MediaR4Mplus User Guide  31Rewind/Peel-Off ModeThe Rewind option must be installed to use this mode. The option is shown in Figure 20.To load media in Rewind/Peel-Off Mode, complete these steps:1. Press the printhead open lever. The printhead assembly springs up.2. Flip down the media supply guide.3. Slide the media guide as far from the main frame as possible.4. Place the roll of labels on the media supply hanger as shown.5. Flip up the media supply guide.6. Slide in the media supply guide until it just touches, but does not restrict, the edge of the media.7. Feed the labels under the dancer, through the slot in the transmissive sensor, and under the ribbon sensor.8. Pull approximately 36 in. (900 mm) of label through the front of the printer.9. Remove the labels from the first 18 in. (450 mm) of media.10. Ensure the media is against the back of the transmissive sensor. Slide in the media guide until it touches, but does not restrict, the edge of the media.11. Pull down the peel lever to open the peel assembly.12. Feed the media over the tear-off/peel-off bar, and through the slot in the peel assembly.13. Loosen the thumbscrew and slide out the rewind media guide to the end of the take-up spindle.14. Slide an empty core onto the take-up spindle; wrap the liner around the core and turn the take-up spindle counterclockwise to wind up the excess liner.15. Slide the rewind media guide against the liner and tighten the thumbscrew.16. Close the printhead assembly.17. Close the peel assembly using the peel lever.18. If the printer is paused (the Pause light is on), press PAUSE to enable printing.Peeling starts automatically. Press FEED to test.Caution • Ensure that the printhead is fully open and engaged in the upright position. If you fail to latch the printhead, it could fall on your hand during the procedure.Note • The liner must be attached to the take-up spindle for the printer to operate properly. Ensure the edge of the liner is flush against the backplate of the take-up spindle.
32   R4Mplus User GuidePrinter OperationLoad Roll MediaFigure 20 • Rewind/Peel ModeLiner RemovalTo remove liner from the rewind spindle, complete these steps:1. Cut the liner between the media alignment spindle and the rewind spindle.2. Rotate the take-up spindle counterclockwise until the rewind media guide is in the 12 o’clock position.3. Loosen the thumbscrew and slide the rewind media guide to the end of the take-up spindle.4. Slide the core with the liner from the take-up spindle.1Printhead Assembly2Transmissive Sensor3Label Supply Guide4Label Supply Hanger5Rewind Spindle 6Rewind Label Guide7Thumbscrew8Dancer9Label Guide10 Media Alignment Spindle11 Printhead Open Lever12 Peel Assembly13 Label14 Rewind Base Assembly15 Peel Lever123456789101112131415
Printer OperationLoad Roll MediaR4Mplus User Guide  33Rewind ModeThe Rewind option must be installed to use this mode. The option is shown in Figure 21.To load media in Rewind Mode, complete these steps:1. Press the printhead open lever. The printhead assembly springs up.2. Flip down the media supply guide.3. Slide the media guide as far from the main frame as possible.4. Place a roll of media on the media supply hanger as shown.5. Flip up the media supply guide. 6. Slide in the media supply guide until it just touches, but does not restrict, the edge of the media.7. Feed the media under the dancer, through the slot in the transmissive sensor, and under the ribbon sensor.8. Pull approximately 36 in. (900 mm) of media through the front of the printer.9. Remove the labels from the first 18 in. (450 mm) of media.10. Ensure the media is against the back of the transmissive sensor. Slide in the media guide until it just touches, but does not restrict, the edge of the media.11. Feed the media over the peel assembly and through the rewind base assembly.12. Loosen the thumbscrew and slide out the rewind media guide to the end of the take-up spindle.13. Slide an empty core onto the take-up spindle; wrap the media liner around the core, and turn the take-up spindle counterclockwise to wind up the excess material.14. Slide the rewind media guide against the media, and tighten the thumbscrew.15. Close the printhead assembly.16. If the printer is paused (the Pause light is on), press PAUSE to enable printing.Caution • Ensure that the printhead is fully open and engaged in the upright position. If you fail to latch the printhead, it could fall on your hand during the procedure.Note • The liner must be attached to the take-up spindle for the printer to operate properly. Ensure that the edge of the liner is flush against the backplate of the take-up spindle.
34   R4Mplus User GuidePrinter OperationLoad Roll MediaFigure 21 • Rewind ModeMedia RemovalTo remove printed media from the rewind spindle, complete these steps:1. Cut the media between the media alignment spindle and the rewind spindle.2. Rotate the take-up spindle counterclockwise until the rewind media guide is in the 12 o’clock position.3. Loosen the thumbscrew and slide out the rewind media guide to the end of the take-up spindle.4. Slide the core with the roll of media from the take-up spindle.1Printhead Assembly2Transmissive Sensor3Label Supply Guide4Label Supply Hanger5Rewind Spindle 6Rewind Label Guide7Thumbscrew8Dancer9Label Guide10 Media Alignment Spindle11 Printhead Open Lever12 Rewind Base Assembly13 Peel Assembly14 Peel Lever1234567891011121314
Printer OperationLoad Roll MediaR4Mplus User Guide  35Adjust Media Alignment for Rewind OptionThe instructions below apply only if the printer has a Rewind option. The liner should be installed flush against the backplate of the rewind spindle to prevent the media/backing from winding too loosely. See Figure 22.Do the adjustments in the order given. Do only what is needed to solve the problem.To adjust the Media Alignment for Rewind Mode, complete these steps:1. Turn the adjustment dial clockwise to move the media toward the mainframe. 2. Turn the dial counter clockwise to move the media away from the mainframe.Figure 22 • Rewind Option Adjustment Dial1Rewind Spindle Backplate2Rewind Spindle3Adjustment Dial4Printhead Assembly1243
36   R4Mplus User GuidePrinter OperationLoad Fanfold MediaLoad Fanfold MediaFanfold media feeds through either the bottom or rear access slot. See Figure 23.To load fanfold media, complete these steps:1. Press the printhead open lever. The printhead assembly springs up.2. Flip down the media supply guide.3. Slide the media guide as far from the main frame as possible.4. Pass the fanfold media over the media supply hanger.5. Flip up the media supply guide. Slide in the media supply guide until it just touches, but does not restrict, the edge of the media.6. Thread the media under the dancer, through the slot in the transmissive sensor, under the ribbon sensor, and out the front of the printer.7. Ensure the media is against the back of the transmissive sensor. Then, slide in the media guide until it just touches, but does not restrict, the edge of the media.8. Close the printhead assembly.9. Press PAUSE.Caution • Ensure that the printhead is fully open and engaged in the upright position. If you fail to latch the printhead, it could fall on your hand during the procedure.
Printer OperationLoad Fanfold MediaR4Mplus User Guide  37Figure 23 • Loading Fanfold Media1Printhead Assembly2Transmissive Sensor3Label Supply Guide4Label Supply Hanger5Dancer6Label Guide7Printhead Open Lever32145673214567
38   R4Mplus User GuidePrinter OperationLoad the RibbonLoad the RibbonThe ribbon supply spindle in your printer is a dual-tension variety. Most applications require the spindle to be in the normal position. The low tension position is recommended only when a wide ribbon is used or normal tension hampers the ribbon movement.To load ribbon, complete these steps:1. Set the spindle for normal or low tension.• To place the spindle in the normal position, firmly pull out the spindle end cap until it extends and clicks in place, as shown in Figure 24. • To place the spindle in the low-tension position, firmly push in the end cap until it retracts and clicks in place, as shown in Figure 24.Figure 24 • Ribbon Spindle—Normal and Low Tension2. See Figure 25. Press the printhead open lever. The printhead assembly springs up.3. Orient the ribbon as shown. Push the ribbon roll completely onto the ribbon supply spindle.4. Pull the end of the ribbon over the ribbon sensor, under the printhead assembly, and out the front of the printer.5. Hold the ribbon snug and free of wrinkles and in line with the guide mark near the left edge of the strip plate. Close the printhead assembly.6. Wind the ribbon clockwise onto the ribbon take-up spindle.Note • Always use ribbon that is wider than the media. The smooth liner of the ribbon protects the printhead from wear. For direct thermal printing, do not load ribbon in the printer.1Normal Position (Spindle End Cap Extended)2Low-Tension Position (Spindle End Cap Retracted)Caution • Ensure that the printhead is fully open and engaged in the upright position. If you fail to latch the printhead, it could fall on your hand during the procedure.1 2
Printer OperationLoad the RibbonR4Mplus User Guide  39Figure 25 • Ribbon PathRemove the RibbonTo remove used ribbon, complete these steps:1. If the ribbon has not run out, break it between the strip plate and the ribbon take-up spindle.2. While turning the ribbon take-up spindle release knob counterclockwise, squeeze the ribbon against the ribbon take-up spindle tension blades.3. When the tension blades collapse into the ribbon take-up spindle, hold the release knob and rotate the spent ribbon toward the rear of the printer. Then, slide the ribbon off the ribbon take-up spindle.1Strip Plate2Printhead Assembly3Release Knob4Tension Blades5Ribbon Take-Up Spindle6Ribbon Supply Spindle7Ribbon Sensor8Printhead Open LeverCaution • Do not cut the ribbon on the ribbon take-up spindle. Doing so may damage the spindle.32145678
40   R4Mplus User GuidePrinter OperationCalibrate the PrinterCalibrate the PrinterAuto CalibrationThe R4Mplus automatically calibrates on power up. During auto calibration, the printer determines the label length and sensor settings.Auto calibration occurs when the printer is turned on and each time the printer recovers from an error condition. To clear an error, open and close the printhead assembly and then press PAUSE. The printer begins auto calibration when all errors have been cleared.The results of the auto calibration are stored in the printer’s memory and are retained even if printer power is removed. These parameters remain in effect until the next calibration is performed.Manual CalibrationPerform a media and ribbon sensor calibration to reset the sensitivity of the sensors so the media and ribbon are detected more accurately. If you change the type of ribbon or media, your printer may operate better if this calibration is performed.For instructions, refer to Media and Ribbon Sensor Calibration (Manual Calibration) on page 58.,Note • If the front panel setting for MEDIA POWER UP or HEAD CLOSE are set to LENGTH, NO MOTION, or FEED, the printer starts printing without auto calibrating.
Printer OperationPrint a Configuration LabelR4Mplus User Guide  41Print a Configuration LabelPrint a configuration label to test the printer setup. Do this when the printer is first installed, or when the printer cannot properly detect the top of the label.To print a configuration label, complete these steps:1. Turn the printer power Off (O).2. Press and hold CANCEL while turning the printer On (l). See Figure 2, Front Panel Controls and LEDs, on page 3.3. Release CANCEL after the DATA light turns off (approximately five seconds).A configuration label prints showing the printer’s currently stored parameters (similar to the label shown in Figure 26).4. Did the configuration label print correctly?• If yes, go to Configuration on page 45.• If the configuration label did not print or if the labels are aligned improperly, review the following items in the order shown. Do only as many steps as needed to solve the printing problem.•Review Types of Media on page 15 to make sure that you have the correct type of media for your application.•Review Ribbon on page 18. If you are using direct thermal media, you do not need to use ribbon. If you are using thermal media, ribbon is required for printing.•Review Load Roll Media on page 25 or Load Fanfold Media on page 36.• Configure the printer according to the directions given in Basic Configuration on page 48.
42   R4Mplus User GuidePrinter OperationPrint a Configuration LabelFigure 26 • Sample Configuration Label
Printer OperationAdjust Printhead PressureR4Mplus User Guide  43Adjust Printhead PressureSee Figure 27. This adjustment may be necessary if printing is too light on one side or if thick media is used.Figure 27 • Printhead Pressure Adjustment DialsThe pressure adjustment dials for the R4Mplus each have four possible settings designated by blocks of increasing size embossed on the print mechanism. The smallest block (fully counterclockwise) is considered position 1 and the largest block (fully clockwise) is considered position 4.Set Printhead PressureDepending on which printer you have, use Table 6 to select the initial dial settings for your media.Some media types require higher pressure to print well. For these media, increase both dials one position. If the media tends to shift to the left while printing, increase the right dial setting one position or decrease the left dial setting one position. If the media tends to shift to the right while printing, increase the left dial setting one position or decrease the right dial setting one position.Table 6 • R4Mplus Printhead PressureMedia Width Left Dial Right Dial1 in. (25.4 mm) 3 12 in. (51 mm) 4 13 in. (76 mm) 3 23.5 in. and up (89 mm and up) 3 3Pressure Adjustment DialsRL
44   R4Mplus User GuidePrinter OperationInstall Memory CardInstall Memory CardThe printer can use Type I or Type II compliant PCMCIA memory cards. To install the PCMCIA memory card, complete these steps:1. Remove the PCMCIA card shield from the rear of the printer.2. Insert the PCMCIA card, with the notch UP, into the card slot as shown (see Figure 28). Insert the card far enough to cause the eject button to pop out.3. Reinstall the PCMCIA card shield over the PCMCIA card and card slot.The printer is now ready to operate with the additional memory or font option.Figure 28 • Installing the PCMCIA CardElectrostatic Discharge Caution • Observe proper electrostatic safety precautions when handling any static-sensitive components such as circuit boards and printheads.Note • The PCMCIA card is hot-swappable. It can be installed while the printer is On (l).Note • Initialization of the PCMCIA card may take a few minutes; the Pause LED flashes while the card initializes. If the card is already initialized, the Pause LED flashes only once or twice. To verify that the card has successfully initialized, print a configuration label and review it to see if the new memory card information is listed.FuseFuse
R4Mplus User Guide  45CHAPTER 4ConfigurationThis chapter discusses detailed configuration settings and instructs you how to view or change parameters through the front panel.ContentsOverview. . . . . . . . . . . . . . . . . . . . . . . . . . . . . . . . . . . . . . . . . . . . . 46Enter Configuration Mode. . . . . . . . . . . . . . . . . . . . . . . . . . . . . . 46Exit Configuration Mode . . . . . . . . . . . . . . . . . . . . . . . . . . . . . . . 46Change Password-Protected Parameters  . . . . . . . . . . . . . . . . . 47Basic Configuration. . . . . . . . . . . . . . . . . . . . . . . . . . . . . . . . . . . . . 48Configuration and Calibration LCD Displays  . . . . . . . . . . . . . . . . . 51
46   R4Mplus User GuideConfigurationOverviewOverviewAfter you have installed the media and ribbon and the Power-On Self Test (POST) is complete (see Power-On Self Test on page 100 for more information), the front panel displays PRINTER READY. Use the front panel display and the four keys directly below it to set printer parameters for your application.Enter Configuration ModeTo enter configuration mode, complete these steps:1. From the front panel, press SETUP/EXIT:2. Press PLUS (+) or MINUS (–) to scroll to the setting you wish to change.3. Press SELECT to toggle the functionality of PLUS (+) and MINUS (–) keys.4. Press PLUS (+) or MINUS (–) to increase or decrease the value, answer yes or no, print a label, or select the digit you wish to change.5. Press SELECT again to use PLUS (+) and MINUS (–) to scroll to the desired menu item.Exit Configuration ModeYou can leave configuration mode at any time.To exit configuration mode, complete these steps:1. From the front panel, press SETUP/EXIT. The SAVE CHANGES display appears. Press PLUS (+) or MINUS (–) to display other choices.•PERMANENT — Permanently saves the changes. Values are stored in the printer even when power is turned off. This is the default selection.•TEMPORARY — Saves the changes until you change them again or until power is turned off.•CANCEL — Cancels all changes from the time you pressed SETUP/EXIT, except for darkness and tear-off settings (if they were changed).•LOAD DEFAULTS — Loads factory defaults.•LOAD LAST SAVE — Loads values from the last permanent save.2. Press SELECT to select the displayed choice.3. Press SETUP/EXIT to save your choice.Note • Printers operating on an IP network can be quickly configured using ZebraNet View (optional ZebraNet PrintServer II required). For more information, see the PrintServer II User and Reference Guide.Note • An asterisk (*) in the upper left-hand corner of the display indicates that the value displayed is different than the currently stored value.
ConfigurationOverviewR4Mplus User Guide  47Change Password-Protected ParametersCertain parameters are password-protected by factory default. If you press SELECT when a password-protected parameter is displayed on the front panel, the printer prompts you for a password. If you do not know the password, press SETUP/EXIT to leave the prompt. You will not be allowed to modify the parameter without entering the password.The default password is 1234. You can change the password using the ^KP (Define Password) ZPL II command. Password-Protect All Parameters  You have the option of making all parameters password protected. Refer to Password Level on page 69 for details.Disable Password  You can disable the password protection feature to no longer prompt you for a password by setting the password to ØØØØ via the ^KPØ ZPL/ZPL II command. To reenable the password-protection feature, send the ZPL/ZPL II command ^KPx, where x can be any number that is one to four digits in length, except Ø.To enter a password, complete these steps:1. From the front panel, enter a four-digit password at the ENTER PASSWORD prompt. MINUS (–) changes the selected digit position. PLUS (+) increases value of the selected digit.2. After entering the password, press SELECT. The parameter that you selected is displayed, and the value may be modified if the password was entered correctly.Note • After you enter the password correctly, you do not have to enter it again until you leave and reenter the configuration mode.
48   R4Mplus User GuideConfigurationBasic ConfigurationBasic ConfigurationIf your labels are not printing correctly, the configuration may need to be changed because the printer defaults may not reflect the options that you need. Media, ribbon, darkness, print mode, media type, sensor type, and print method all affect the way the printer is configured. This section covers how to change these basic configuration options for your printer through the printer’s front panel. Review Figure 2 on page 3 to familiarize yourself with the front panel controls. Refer to Configuration and Calibration LCD Displays on page 51 for more detailed information on all of the configuration options available on your printer.Many printer settings may also be controlled by your printer’s driver or label preparation software. See the driver or software documentation for more information.To perform basic a configuration, complete these steps:1. Enter the configuration mode by pressing SETUP/EXIT.DARKNESS displays.Adjust Darkness2. Is the printed image too dark or too light? Or does the ribbon stick to the media?• If no, press PLUS (+) to move to the next option: PRINT SPEED. Continue with Adjust Image Crispness and Print Speed.• If yes, complete the following steps:2.1. Press SELECT.2.2. If the labels moved forward, but the print is light or there is no print, press PLUS (+) to increase the darkness. If the print is too dark, or the ribbon sticks to the media, press MINUS (–) to decrease the darkness.2.3. Press SELECT to accept the change.2.4. Press PLUS (+) to move to the next option.PRINT SPEED displays. Continue with Adjust Image Crispness and Print Speed.Adjust Image Crispness and Print Speed3. Is the printed image crisp?• If yes, press PLUS (+) to move to the next option: TEAR-OFF. Continue with Adjust Tear-Off Position.• If the print is dark enough but the image is not crisp, slow down the print speed by completing the following steps. Print speed is given in inches per second (ips).3.1. Press SELECT.3.2. Press PLUS (+) to increase the speed or MINUS (–) to decrease the speed.3.3. Press SELECT to accept the changes.3.4. Press PLUS (+) to move to the next option.TEAR OFF displays. Continue with Adjust Tear-Off Position.
ConfigurationBasic ConfigurationR4Mplus User Guide  49Adjust Tear-Off PositionThe Tear-Off position defines the position of the label on the tear-off bar. When working with non-continuous labels, the inter-label gap should be on the tear bar. This setting does not apply to continuous media.4. Are you using continuous media?• If yes, press PLUS (+) to move to the next option: PRINT MODE. Continue with Select Print Mode.• If no, continue with Step 5.5. Does the inter-label gap line up on the tear bar?• If yes, press PLUS (+) to move to the next option: PRINT MODE. Continue with Select Print Mode.• If no, complete the following steps:5.1. Press SELECT.5.2. Press PLUS (+) to move the label forward or MINUS (–) to move the label backward. Repeat this until the label lines up correctly.5.3. Press SELECT to accept the changes.5.4. Press PLUS (+) to move to the next option.PRINT MODE displays. Continue with Select Print Mode.Select Print ModeWhen the wrong Print Mode is selected, the top of the label is not found by the printer. Examples of common problems include when the gaps between noncontinuous labels do not line up on the tear bar or when continuous media is not being cut at the right interval.6. Do the labels line up or cut correctly?If yes, press PLUS (+) to move to the next option: MEDIA TYPE. Continue with Select Media Type.If no, review the media and the printer options, then complete the following steps:6.1. Press SELECT.6.2. Press PLUS (+) or MINUS (–) to scroll through the setting options. Stop at the setting that matches your printer options (Tear-Off, Peel-Off, or Rewind).6.3. Press SELECT to accept the change.6.4. Press PLUS (+) to move to the next option.MEDIA TYPE displays. Continue with Select Media Type.Select Media TypeFor examples of non-continuous and continuous media, see Types of Media on page 15.7. Does the media type on the display match the type of media that you are using?• If yes, press PLUS (+) to move to the next option: PRINT METHOD. Continue with Select Print Method.• If your label media does not match the Media Type, complete the following steps:7.1. Press SELECT.
50   R4Mplus User GuideConfigurationBasic Configuration7.2. Press PLUS (+) or MINUS (–) to scroll through the setting options. Stop at the setting that matches your printer options (Continuous or Noncontinuous).7.3. Press SELECT to accept the change.7.4. Press PLUS (+) to move to the next option.PRINT METHOD displays. Continue with Select Print Method.Select Print MethodThe two choices for print method are thermal transfer and direct thermal transfer. You can find out if a label is thermal transfer or direct thermal transfer by scratching it with your fingernail. If your nail leaves a black mark, the media is direct thermal. If it does not leave a mark, the media is thermal transfer.• Use Thermal Transfer if you are using ribbon with your label material. • Use Direct Thermal if you are not using ribbon. Direct thermal label media has ink embedded in the label material that is brought out by the heat of the printhead.8. Does the Print Method setting match your media type?• If yes, continue with Save Changes and Exit.• If no, complete the following steps:8.1. Press SELECT.8.2. Press PLUS (+) or MINUS (–) to scroll through the setting options. Stop at the setting that matches your printer options (Thermal Transfer or Direct Thermal).8.3. Press SELECT to accept the change.Save Changes and Exit9. Press SETUP/EXIT to leave the front panel menu.SAVE CHANGES PERMANENT displays. For other save options, see Exit Configuration Mode on page 46.10. Press SETUP/EXIT again.SAVING PERMANENT displays. One or more labels may feed out, depending on your settings. The LCD displays PRINTER READY.
ConfigurationConfiguration and Calibration LCD DisplaysR4Mplus User Guide  51Configuration and Calibration LCD DisplaysTable 7 covers all of the configuration options for your printer. Parameters are shown in the order in which they are displayed when you press PLUS (+) after entering the setup mode. Throughout this process, press PLUS (+) to continue to the next parameter, or press MINUS (–) to return to the previous parameter in the cycle. Refer to Basic Configuration on page 48 for information on changing just the basic print settings.Table 7 • Printer Parameters and Other LCD Displays (Page 1 of 20)Parameter/LCD Display Action/ExplanationDARKNESS Adjusting Print DarknessSet the darkness to the lowest setting that provides good print quality. Darkness set too high may cause ink to smear or the printer may burn through the ribbon.Darkness settings are dependent upon a variety of factors, including ribbon type, media, and the condition of the printhead. You may adjust the darkness for consistent high-quality printing. Darkness settings also may be changed by the driver or software settings. To determine if your print darkness setting is optimal, perform the FEED Self Test on page 103.You may want to adjust the printer’s darkness while performing the PAUSE Self Test on page 102. Because the darkness setting takes effect immediately, you can see the results on labels that are currently printing during the test.Default: +10Range: 0 to +301. Press SELECT to select the parameter.2. Press PLUS (+) to increase darkness if printing is too light or if there are voids in printed areas.3. Press MINUS (–) to decrease darkness if printing is too dark or if there is spreading or bleeding of printed areas.4. Press SELECT to accept any changes and deselect the parameter.PRINT SPEED Adjusting Print SpeedSpeed is measured in inches per second (ips).Default: 2 ips1. Press SELECT to select the parameter.2. Press PLUS (+) to increase print speed. 3. Press MINUS (–) to decrease print speed. 4. Press SELECT to accept any changes and deselect the parameter.
52   R4Mplus User GuideConfigurationConfiguration and Calibration LCD DisplaysTEAR OFF Adjusting the Tear-Off PositionThis parameter establishes the position of the media over the tear-off/peel-off bar after printing. The label and liner can be torn off or cut between labels.Default: +0Range: –120 to +1201. Press SELECT to select the parameter.2. Press PLUS (+) to increase the value. Each press adjusts the tear-off position by four dot rows.3. Press MINUS (–) to decrease the value. 4. Press SELECT to accept any changes and deselect the parameter.PRINT MODE Selecting Print ModePrint mode settings tell the printer the method of media delivery that you wish to use. Be sure to select a print mode that your hardware configuration supports as some selections displayed are for optional printer features.Default: Tear-offSelections: Tear-off, cutter, peel-off, rewind1. Press SELECT to select the parameter.2. Press PLUS (+) or MINUS (–) to display other choices.3. Press SELECT to accept any changes and deselect the parameter.MEDIA TYPE Setting Media TypeThis parameter tells the printer the type of media you are using. Selecting continuous media requires that you include a label length instruction in your label format (^LLxxxx if you are using ZPL or ZPL II).When non-continuous media is selected, the printer feeds media to calculate label length (the distance between two detections of the inter-label gap, webbing, or alignment notch or hole).Default: Non-ContinuousSelections: Non-Continuous, Continuous 1. Press SELECT to select the parameter.2. Press PLUS (+) or MINUS (–) to display other choices.3. Press SELECT to accept any changes and deselect the parameter.Table 7 • Printer Parameters and Other LCD Displays (Page 2 of 20)Parameter/LCD Display Action/Explanation
ConfigurationConfiguration and Calibration LCD DisplaysR4Mplus User Guide  53PRINT METHOD Selecting Print MethodThe print method parameter tells the printer the method of printing you wish to use: direct thermal (no ribbon) or thermal transfer (using thermal transfer media and ribbon). Selecting direct thermal when using thermal transfer media and ribbon creates a warning condition, but printing continues.Default: Thermal transferSelections: Thermal transfer, direct thermal1. Press SELECT to select the parameter.2. Press PLUS (+) for the next value.3. Press MINUS (–) for the previous value.4. Press SELECT to accept any changes and deselect the parameter.PRINT WIDTH Setting Print WidthPrint width determines the printable area across the width of the label.Default, Range: The default and range of acceptable values may vary depending on what printer you have. See Printing Specifications on page 115 for further information about the ranges available for your model.1. Press SELECT to select the parameter.2. Press PLUS (+) to increase the value of the selected digit.3. Press MINUS (–) to move to the next digit. 4. To change the unit of measurement, press MINUS (–) until the unit of measurement is active, then press PLUS (+) to toggle to a different unit of measure (inches, mm, or dots).5. Press SELECT to accept any changes and deselect the parameter.MAXIMUM LENGTH Setting Maximum LengthAlways set the value to at least 1 in. (25.4 mm) longer than the longest label to be used in the printer. Default: 39 in. (991 mm) for non-continuous material1. Press SELECT to select the parameter.2. Press PLUS (+) to increase the value3. Press MINUS (–) to decrease the value. 4. Press SELECT to accept any changes and deselect the parameter.Table 7 • Printer Parameters and Other LCD Displays (Page 3 of 20)Parameter/LCD Display Action/Explanation
54   R4Mplus User GuideConfigurationConfiguration and Calibration LCD DisplaysLIST FONTS List FontsThis selection is used to print a label that lists all of the fonts currently available in the printer, including standard printer fonts plus any optional fonts. Fonts may be stored in RAM, FLASH memory, font EPROMs, or font cards.1. Press SELECT to select the parameter.2. Press PLUS (+) to print a label listing all of the available fonts.3. Press SELECT to deselect the parameter.LIST BAR CODES List Bar CodesThis selection is used to print a label that lists all of the bar codes currently available in the printer.1. Press SELECT to select the parameter.2. Press PLUS (+) to print a label listing all of the available bar codes.3. Press SELECT to deselect the parameter.LIST IMAGES List ImagesThis selection is used to print a label that lists all of the images currently stored in the printer’s RAM, FLASH memory, optional EPROM, or optional memory card.1. Press SELECT to select the parameter.2. Press PLUS (+) to print a label listing all of the available images.3. Press SELECT to deselect the parameter.LIST FORMATS List FormatsThis selection is used to print a label that lists all of the formats currently stored in the printer’s RAM, FLASH memory, optional EPROM, or optional memory card.1. Press SELECT to select the parameter.2. Press PLUS (+) to print a label listing all of the available formats.3. Press SELECT to deselect the parameter.LIST SETUP List SetupThis selection is used to print a label that lists the current printer configuration information. (Same label as CANCEL Self Test on page 101.)1. Press SELECT to select the parameter.2. Press PLUS (+) to print a label listing the current printer configuration.3. Press SELECT to deselect the parameter.Table 7 • Printer Parameters and Other LCD Displays (Page 4 of 20)Parameter/LCD Display Action/Explanation
ConfigurationConfiguration and Calibration LCD DisplaysR4Mplus User Guide  55LIST ALL List AllThis selection is used to print a label that lists the five previous selections, as described.1. Press SELECT to select the parameter.2. Press PLUS (+) to print a label listing all of the available fonts, bar codes, images, formats, and the current printer configuration.3. Press SELECT to deselect the parameter.FORMAT CARDA B Initialize Memory CardCaution • Perform this operation only when it is necessary to erase all previously stored information from the optional memory card. Press PLUS (+) to bypass this function.1. Press SELECT to select the parameter.If your printer is set to require a password, you are prompted to enter the password. 2. Enter the password, then press SELECT.3. Press the PLUS (+) to select B memory (PCMCIA card) or press MINUS (–) to select the A memory (internal compact flash). The front panel LCD asks ARE YOU SURE?.4. Press MINUS (–) to select No and cancel the request. The INITIALIZE CARD prompt is displayed.orPress PLUS (+) to select YES and begin initialization.FORMATTING CARD displays. Depending on the amount of memory in the memory card, initialization may take up to three minutes to complete. When formatting is complete, FORMAT CARD displays.5. Press SELECT to continue with the next prompt.Table 7 • Printer Parameters and Other LCD Displays (Page 5 of 20)Parameter/LCD Display Action/Explanation
56   R4Mplus User GuideConfigurationConfiguration and Calibration LCD DisplaysINIT FLASH MEM Initialize Flash MemoryCaution • Perform this operation only when it is necessary to erase all previously stored information from the FLASH memory. Press PLUS (+) to bypass this function.1. Press SELECT to select the parameter.If your printer is set to require a password, you are prompted to enter the password. 2. Enter the password, then press SELECT.3. Press PLUS (+) to select YES.The display asks INITIALIZE FLASH?. 4. Press PLUS (+) to select YES.The front panel LCD asks ARE YOU SURE?.5. Press MINUS (–) to select NO and cancel the request. The INITIALIZE FLASH prompt is displayed.orPress PLUS (+) to select YES and begin initialization. Depending on the amount of free FLASH memory, initialization may take up to one minute to complete.6. Press SETUP/EXIT followed by SELECT. If initialization is still in process, the front panel display flashes back and forth between the phrases CHECKING E: MEMORY and PRINTER IDLE.When initialization is complete, the printer automatically exits the configuration mode and the front panel displays PRINTER READY.7. Press SELECT to continue with the next prompt.Table 7 • Printer Parameters and Other LCD Displays (Page 6 of 20)Parameter/LCD Display Action/Explanation
ConfigurationConfiguration and Calibration LCD DisplaysR4Mplus User Guide  57SENSOR PROFILE Sensor ProfileThe media sensor profile may be used to troubleshoot registration problems that may be caused when the media sensor detects preprinted areas on the media or experiences difficulty in determining web location. If the sensitivity of the media and/or ribbon sensors MUST be adjusted, use the manual calibration procedure.Figure 29 • Media Sensor Profile1. Press SELECT to select the parameter.2. Press PLUS (+) to print a media sensor profile.3. Press SELECT to deselect the parameter.Table 7 • Printer Parameters and Other LCD Displays (Page 7 of 20)Parameter/LCD Display Action/Explanation
58   R4Mplus User GuideConfigurationConfiguration and Calibration LCD DisplaysMEDIA AND RIBBON Media and Ribbon Sensor Calibration (Manual Calibration)Performing the manual calibration procedure resets the sensitivity of the sensors to detect the media and ribbon you are using more accurately. With the sensors at their new sensitivity, the printer then performs the manual calibration. Changing the type of ribbon and/or media may require resetting the sensitivity of the media and ribbon sensors.1. Press SELECT to display CALIBRATE.2. Press PLUS (+) to start the calibration procedure.LOAD BACKiNG is displayed.3. Open the printhead.4. Remove approximately 8 in. (200 mm) of labels from the media roll, enough so that only the liner material is threaded between the media sensors when the media is loaded.5. Press PLUS (+) to continue. To cancel the operation, press MINUS (–).REMOVE RiBBON is displayed.6. Remove the ribbon (sliding it as far to the right as possible has the same effect as removing it).7. Close the printhead.8. Press PLUS (+) to continue. To cancel the operation, press MINUS (–).CALIBRATING PLEASE WAIT is displayed.The printer automatically adjusts the scale (gain) of the signals it receives from the media and ribbon sensors based on the specific media and ribbon combination you are using. On the sensor profile, this corresponds to moving the graph up or down to optimize the readings for your application.RELOAD ALL is displayed.9. Open the printhead and pull the media forward until a label is positioned under the media sensor.10. Move the ribbon back to its proper position.11. Close the printhead.MEDIA AND RIBBON is displayed.Now that the scale has changed, the printer performs another calibration. During this process, the printer checks the readings for the media and ribbon based on the new scale that you established, determines the label length, and determines whether you are in Direct Thermal or Thermal Transfer Print Mode. The process is now complete. To see the new readings, print a sensor profile. See Sensor Profile on page 57.12. Press SELECT to deselect the parameter.Table 7 • Printer Parameters and Other LCD Displays (Page 8 of 20)Parameter/LCD Display Action/Explanation
ConfigurationConfiguration and Calibration LCD DisplaysR4Mplus User Guide  59Setting Communication Parameters (next nine parameters)Communication parameters must be set correctly for the printer to communicate with the host computer. These parameters make sure that the printer and host computer are speaking the same language. All communication parameters are password protected.PARALLEL COMM Setting Parallel CommunicationsNote • Unidirectional will not support ZebraNet two-way communications.Default: BidirectionalSelections: Bidirectional, Unidirectional1. Press SELECT to select the parameter.2. Press PLUS (+) or MINUS (–) to display other choices.3. Press SELECT to accept any changes and deselect the parameter.SERIAL COMM Setting Serial CommunicationsSelect the communications port that matches the one being used by the host computer.Default: RS-232Selections: RS-232, RS-422/485, RS-485 multidrop1. Press SELECT to select the parameter.2. Press PLUS (+) or MINUS (–) to display other choices.3. Press SELECT to accept any changes and deselect the parameter.BAUD Setting BaudThe baud setting of the printer must match the baud setting of the host computer for accurate communications to take place. Select the value that matches the one being used by the host computer.Default: 9600Selections: 110, 300, 600, 1200, 2400, 4800, 9600, 14400, 19200, 28800, 38400, 57600, 1152001. Press SELECT to select the parameter.2. Press PLUS (+) or MINUS (–) to display other choices.3. Press SELECT to accept any changes and deselect the parameter.Table 7 • Printer Parameters and Other LCD Displays (Page 9 of 20)Parameter/LCD Display Action/Explanation
60   R4Mplus User GuideConfigurationConfiguration and Calibration LCD DisplaysDATA BITS Setting Data BitsThe data bits of the printer must match the data bits of the host computer for accurate communications to take place. Set the data bits to match the setting being used by the host computer.Note • Must be set to 8 data bits to use Code Page 850.Default: 7-bitsSelections: 7-bits, 8-bits1. Press SELECT to select the parameter.2. Press PLUS (+) or MINUS (–) to display other choices.3. Press SELECT to accept any changes and deselect the parameter.PARITY Setting ParityThe parity of the printer must match the parity of the host computer for accurate communications to take place. Select the parity that matches the one being used by the host computer.Default: NoneSelections: None, even, odd 1. Press SELECT to select the parameter.2. Press PLUS (+) or MINUS (–) to display other choices.3. Press SELECT to accept any changes and deselect the parameter.HOST HANDSHAKE Setting Host HandshakeThe handshake protocol of the printer must match the handshake protocol of the host computer for communications to take place. Select the handshake protocol that matches the one being used by the host computer.Default: XON/XOFF Selections: XON/XOFF, DTR/DSR, RTS/CTS1. Press SELECT to select the parameter.2. Press PLUS (+) or MINUS (–) to display other choices.3. Press SELECT to accept any changes and deselect the parameter.Table 7 • Printer Parameters and Other LCD Displays (Page 10 of 20)Parameter/LCD Display Action/Explanation
ConfigurationConfiguration and Calibration LCD DisplaysR4Mplus User Guide  61PROTOCOL Setting ProtocolProtocol is a type of error checking system. Depending on the selection, an indicator may be sent from the printer to the host computer signifying that data has been received. Select the protocol that is requested by the host computer. Further details on protocol can be found in the ZPL II Programming Guide Volume I.Default: NoneSelections: None, Zebra, ACK_NACKZebra is the same as ACK_NACK except that with Zebra the response messages are sequenced. If Zebra is selected, the printer must use DTR/DSR host handshake protocol.1. Press SELECT to select the parameter.2. Press PLUS (+) or MINUS (–) to display other choices.3. Press SELECT to accept any changes and deselect the parameter.NETWORK ID Setting Network IDNetwork ID is used to assign a unique number to a printer used in an RS-422/RS-485 network. This gives the host computer the means to address a specific printer. If the printer is used in a network, you must select a network ID number. This does not affect TCP/IP or IPX networks.Default: 000Range: 000 to 9991. Press SELECT to select the parameter.2. Press PLUS (+) to increase the value of the selected digit.3. Press MINUS (–) to move to the next digit. 4. Press SELECT to accept any changes and deselect the parameter.Table 7 • Printer Parameters and Other LCD Displays (Page 11 of 20)Parameter/LCD Display Action/Explanation
62   R4Mplus User GuideConfigurationConfiguration and Calibration LCD DisplaysCOMMUNICATIONS Setting Communication Diagnostics ModeThe communication diagnostics mode is a troubleshooting tool for checking the interconnection between the printer and the host computer. When “diagnostics” is selected, all data sent from the host computer to the printer is printed as straight ASCII hex characters. The printer prints all characters received, including control codes, such as CR (carriage return). A sample printout is shown in Figure 30.Figure 30 • Communication Diagnostics Test PrintoutDefault: Normal modeSelections: Normal mode, diagnostics1. Press SELECT to select the parameter.2. Press PLUS (+) or MINUS (–) to display other choices.3. Press SELECT to accept any changes and deselect the parameter.4. Turn the printer Off (O) to exit the communication diagnostics test and return to Normal mode.Notes on diagnostic printouts• FE indicates a framing error• OE indicates an overrun error• PE indicates a parity error• NE indicates noiseFor any errors, check that your communication parameters are correct. Set the print width equal to or less than the label width used for the test. See Setting Print Width on page 53 for more information.Table 7 • Printer Parameters and Other LCD Displays (Page 12 of 20)Parameter/LCD Display Action/Explanation
ConfigurationConfiguration and Calibration LCD DisplaysR4Mplus User Guide  63Selecting Prefix and Delimiter Characters (next three parameters)Prefix and delimiter characters are 2-digit hex values used within the ZPL/ZPL II formats sent to the printer. The printer uses the last prefix and delimiter characters sent to it, whether from a ZPL II instruction or from the front panel.Do not use the same hex value for the control, format, and delimiter characters. The printer must see different characters to function properly.CONTROL PREFIX Control Prefix CharacterThe printer looks for this 2-digit hex character to indicate the start of a ZPL/ZPL II control instruction.Default: 7E (tilde - displayed as a black square)Range: 00 to FF1. Press SELECT to select the parameter.2. Press PLUS (+) to increase the value of the selected digit.3. Press MINUS (–) to move to the next digit. 4. Press SELECT to accept any changes and deselect the parameter.FORMAT PREFIX Format Prefix CharacterThe printer looks for this 2-digit hex character to indicate the start of a ZPL/ZPL II format instruction.Default: 5E (caret)Range: 00 to FF1. Press SELECT to select the parameter.2. Press PLUS (+) to increase the value of the selected digit.3. Press MINUS (–) to move to the next digit. 4. Press SELECT to accept any changes and deselect the parameter.DELIMITER CHAR Delimiter CharacterThe delimiter character is a 2-digit hex value used as a parameter place marker in ZPL/ZPL II format instructions. See the ZPL II Programming Guide Volume I for more information.Default: 2C (comma)Range: 00 to FF1. Press SELECT to select the parameter.2. Press PLUS (+) to increase the value of the selected digit.3. Press MINUS (–) to move to the next digit. 4. Press SELECT to accept any changes and deselect the parameter.Table 7 • Printer Parameters and Other LCD Displays (Page 13 of 20)Parameter/LCD Display Action/Explanation
64   R4Mplus User GuideConfigurationConfiguration and Calibration LCD DisplaysZPL MODE Selecting ZPL ModeThe printer remains in the selected mode until it is changed by this front panel instruction or by using a ZPL/ZPL II command. The printer accepts label formats written in either ZPL or ZPL II. This eliminates the need to rewrite any ZPL formats you already have. See the ZPL II Programming Guide Volume II for more information on the differences between ZPL and ZPL II.Default: ZPL IISelections: ZPL II, ZPL1. Press SELECT to select the parameter.2. Press PLUS (+) or MINUS (–) to display other choices.3. Press SELECT to accept any changes and deselect the parameter.MEDIA POWER UP Media Power UpEstablishes the action of the media when the printer is turned on.Default: CalibrationSelections:•Calibration: Recalibrates the media and ribbon sensors.•Length: Determines the length of the label.•No Motion: Media does not move.•Feed: Feeds the label to the first web.1. Press SELECT to select the parameter.2. Press PLUS (+) or MINUS (–) to display other choices.3. Press SELECT to accept any changes and deselect the parameter.HEAD CLOSE Head CloseDetermines the action of the media after the printhead has been opened and then closed.Default: CalibrationSelections:•Calibration: Recalibrates the media and ribbon sensors.•Length: Determines the length of the label.•No Motion: Media does not move.•Feed: Feeds the label to the first web.1. Press SELECT to select the parameter.2. Press PLUS (+) or MINUS (–) to display other choices.3. Press SELECT to accept any changes and deselect the parameter.Table 7 • Printer Parameters and Other LCD Displays (Page 14 of 20)Parameter/LCD Display Action/Explanation
ConfigurationConfiguration and Calibration LCD DisplaysR4Mplus User Guide  65BACKFEED Backfeed SequenceThis parameter establishes when and how much label backfeed occurs after a label is removed or cut in the peel-off or cutter modes. It has no effect in rewind or tear-off modes. This parameter setting can be superseded by the ~JS instruction when received as part of a label format (see the ZPL II  Programming Guide Volume I).The difference between the value entered and 100% establishes how much backfeed occurs before the next label is printed. For example, a value of 40 means that 40% of the backfeed takes place after the label is removed or cut. The remaining 60% takes place before the next label is printed. A value of “before” means that all backfeed takes place before the next label is printed.Default: Default (90%)Selections: Default, after, before, 10%, 20%, 30%, 40%, 50%, 60%, 70%, 80%, off1. Press SELECT to select the parameter.2. Press PLUS (+) or MINUS (–) to display other choices.3. Press SELECT to accept any changes and deselect the parameter.LABEL TOP Adjusting Label Top PositionThe label top position adjusts the print position vertically on the label. Positive numbers adjust the label top position further down the label (away from the printhead); negative numbers adjust the position up the label (toward the printhead).Default: +0Range: –120 to +120 dot rows1. Press SELECT to select the parameter.2. Press PLUS (+) to increase the value. The displayed value represents dots.3. Press MINUS (–) to decrease the value.4. Press SELECT to accept any changes and deselect the parameter.Table 7 • Printer Parameters and Other LCD Displays (Page 15 of 20)Parameter/LCD Display Action/Explanation
66   R4Mplus User GuideConfigurationConfiguration and Calibration LCD DisplaysLEFT POSITION Adjusting Left PositionThis parameter establishes how far from the left edge of a label the format begins to print by adjusting horizontal positioning on the label. Positive numbers adjust the printing to the left by the number of dots selected; negative numbers shift printing to the right.Default: 0000Range: –9999 to +99991. Press SELECT to select the parameter.2. Press MINUS (–) to move to the next position.3. Press PLUS (+) to change between +/– or to increase the value of the digit. The displayed value represents dots. For a negative value, enter the value before changing to the minus sign.4. Press SELECT to accept any changes and deselect the parameter.WEB S.MEDIA S.RIBBON S.TAKE LABEL S.MEDIA LEDRIBBON LEDThese parameters are automatically set during the calibration procedure. They should be changed only by a qualified service technician. See the Maintenance Manual for more information on these parameters.Press PLUS (+) repeatedly to skip these parameters.LCD ADJUST LCD Display AdjustmentThis parameter allows you to adjust the brightness of your display if your display is difficult to read.Range: 00 to 191. Press SELECT to select the parameter.2. Press MINUS (–) to decrease the value (reduce brightness).3. Press PLUS (+) to increase the value (increase brightness).4. Press SELECT to accept any changes and deselect the parameter.Table 7 • Printer Parameters and Other LCD Displays (Page 16 of 20)Parameter/LCD Display Action/Explanation
ConfigurationConfiguration and Calibration LCD DisplaysR4Mplus User Guide  67FORMAT CONVERT Format ConvertThe Format Convert setting is used when upgrading from a printer of lower resolution to a printer of higher resolution and the user does not wish to modify their formats.Example: If your original formats were written for a 150 dpi printer and your new printer is 300 dpi, you would choose150-300.Default: NoneSelections: None, 150–300, 150–600, 200–600, 300–6001. Press SELECT to select the parameter.2. Press PLUS (+) or MINUS (–) to display other choices.3. Press SELECT to accept any changes and deselect the parameter.IDLE DISPLAY Idle DisplayIf a real-time clock (RTC) is installed, this parameter selects the LCD options for the RTC.Default: FW VersionSelections: FW Version, MM/DD/YY 24HR, MM/DD/YY 12HR, DD/MM/YY 24HR, DD/MM/YY 12HR1. Press SELECT to select the parameter.2. Press PLUS (+) or MINUS (–) to display other choices.3. Press SELECT to accept any changes and deselect the parameter.RTC DATE RTC DateIf the RTC is installed, this parameter allows changing of the date.1. Press SELECT to select the parameter.2. Press PLUS (+) to increase the value of the selected digit.3. Press MINUS (–) to move to the next digit. 4. Press SELECT to accept any changes and deselect the parameter.RTC TIME RTC TimeIf the RTC is installed, this parameter allows changing of time. 1. Press SELECT to select the parameter.2. Press PLUS (+) to increase the value of the selected digit.3. Press MINUS (–) to move to the next digit. 4. Press SELECT to accept any changes and deselect the parameter.Table 7 • Printer Parameters and Other LCD Displays (Page 17 of 20)Parameter/LCD Display Action/Explanation
68   R4Mplus User GuideConfigurationConfiguration and Calibration LCD DisplaysIP RESOLUTION* IP ResolutionDepending on the selection, allows either the user (permanent) or the server (dynamic) to select the IP address. For more information, see ZebraNet Networking: PrintServer II Installation and Users Guide.Default: DynamicSelections: Dynamic, permanent1. Press SELECT to select the parameter.2. Press PLUS (+) or MINUS (–) to display other choices.3. Press SELECT to accept any changes and deselect the parameter.IP PROTOCOLS* IP ProtocolsIf dynamic was chosen in the previous parameter, this selection determines the method(s) by which the PrintServer II receives the IP address from the server. For more information, see ZebraNet Networking: PrintServer II Installation and Users Guide.Default: AllSelections: All, gleaning only, RARP, BOOTP, DHCP, DHCP/BOOTP1. Press SELECT to select the parameter.2. Press PLUS (+) or MINUS (–) to display other choices.3. Press SELECT to accept any changes and deselect the parameter.IP ADDRESS* IP AddressThis parameter allows you to select the IP address if permanent was chosen in IP RESOLUTION. (If dynamic was chosen, the user cannot select the address.) For more information, see ZebraNet Networking: PrintServer II Installation and Users Guide.1. Press SELECT to select the parameter.2. Press PLUS (+) to increase the value of the selected digit.3. Press MINUS (–) to move to the next digit. 4. Press SELECT to accept any changes and deselect the parameter.SUBNET MASK* Subnet MaskThis parameter selects the part of the IP address that is considered to be part of the local network. It can be reached without going through the default gateway.Default: Permanent (user must set)Selections: Dynamic (user may set, but server can assign), permanent1. Press SELECT to select the parameter.2. Press PLUS (+) or MINUS (–) to display other choices.3. Press SELECT to accept any changes and deselect the parameter.Table 7 • Printer Parameters and Other LCD Displays (Page 18 of 20)Parameter/LCD Display Action/Explanation
ConfigurationConfiguration and Calibration LCD DisplaysR4Mplus User Guide  69DEFAULT GATEWAY* Default GatewayThis parameter allows you to select the IP address that the network traffic is routed through if the destination address is not part of the local network.1. Press SELECT to select the parameter.2. Press PLUS (+) to increase the value of the selected digit.3. Press MINUS (–) to move to the next digit. 4. Press SELECT to accept any changes and deselect the parameter.RFID TESTQUICK SLOW RFID TestIn both versions of this test, the printer attempts to read and write to a transponder. In the slow test, the printer also checks the reader version number. If the printer fails the test, the front panel displays an error message.1. Place an RFID label over the reader (no movement occurs with the test).2. Press SELECT to select the parameter.3. Press MINUS (–) to select QUICK.ORPress PLUS (+) to select SLOW.4. If necessary, press PLUS (+) to select CONTINUE.5. Press SELECT to deselect the parameter.RFID ERR STATUS RFID Error StatusIf an error condition exists, a message may be displayed here.PASSWORD LEVEL* Password LevelThis parameter allows you to select whether certain Zebra-selected menu items (selected items) or all menu items (all items) are password protected.Default: Selected itemsSelections: Selected items, all items1. Press SELECT to select the parameter.2. Press PLUS (+) or MINUS (–) to display other choices.3. Press SELECT to accept any changes and deselect the parameter.Table 7 • Printer Parameters and Other LCD Displays (Page 19 of 20)Parameter/LCD Display Action/Explanation
70   R4Mplus User GuideConfigurationConfiguration and Calibration LCD DisplaysLANGUAGE Selecting the Display LanguageThis parameter allows you to change the language used on the front panel display.Default: EnglishSelections: English, Spanish, French, German, Italian, Norwegian, Portuguese, Swedish, Danish, Spanish 2, Dutch, Finnish, Japanese1. Press SELECT to select the parameter.2. Press PLUS (+) or MINUS (–) to display other choices.3. Press SELECT to accept any changes and deselect the parameter.* ZebraNet PrintServer II External or Internal option requiredTable 7 • Printer Parameters and Other LCD Displays (Page 20 of 20)Parameter/LCD Display Action/Explanation

Navigation menu