Zultys Technologies ZIP4X5 Bluetooth FHSS transceiver in VOIP Phone User Manual ZIP 4x4 User s Manual 1 0 2 20 April 2003
Zultys Technologies Bluetooth FHSS transceiver in VOIP Phone ZIP 4x4 User s Manual 1 0 2 20 April 2003
Contents
- 1. Manual 1
- 2. Manual 2
- 3. Manual 3
- 4. Manual 4
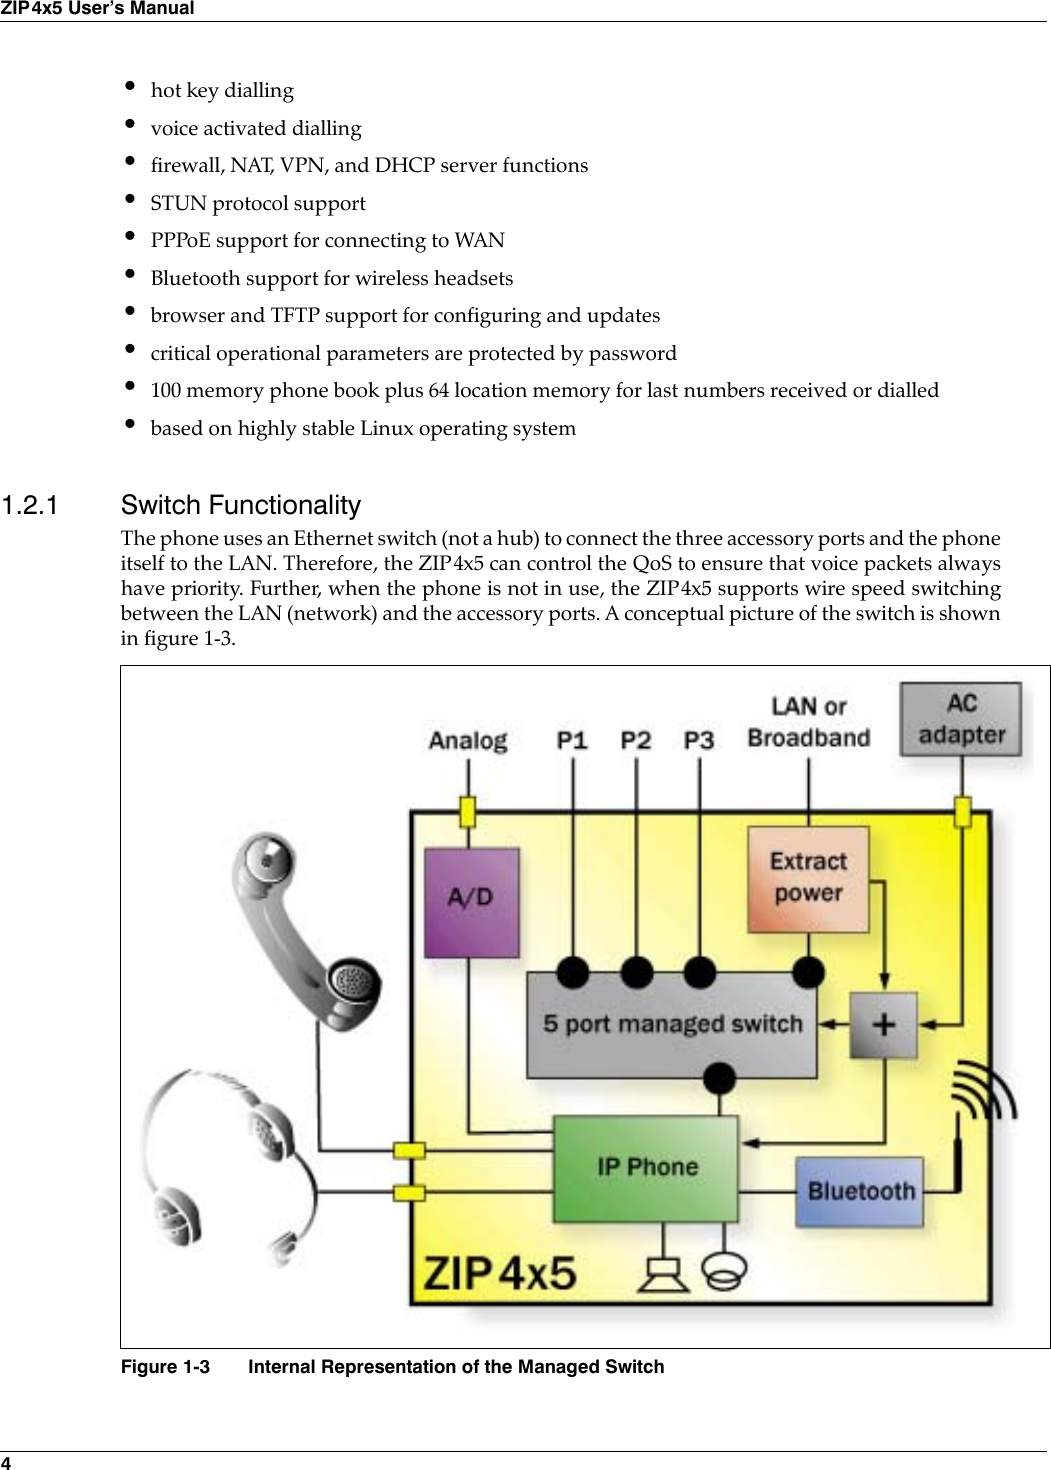
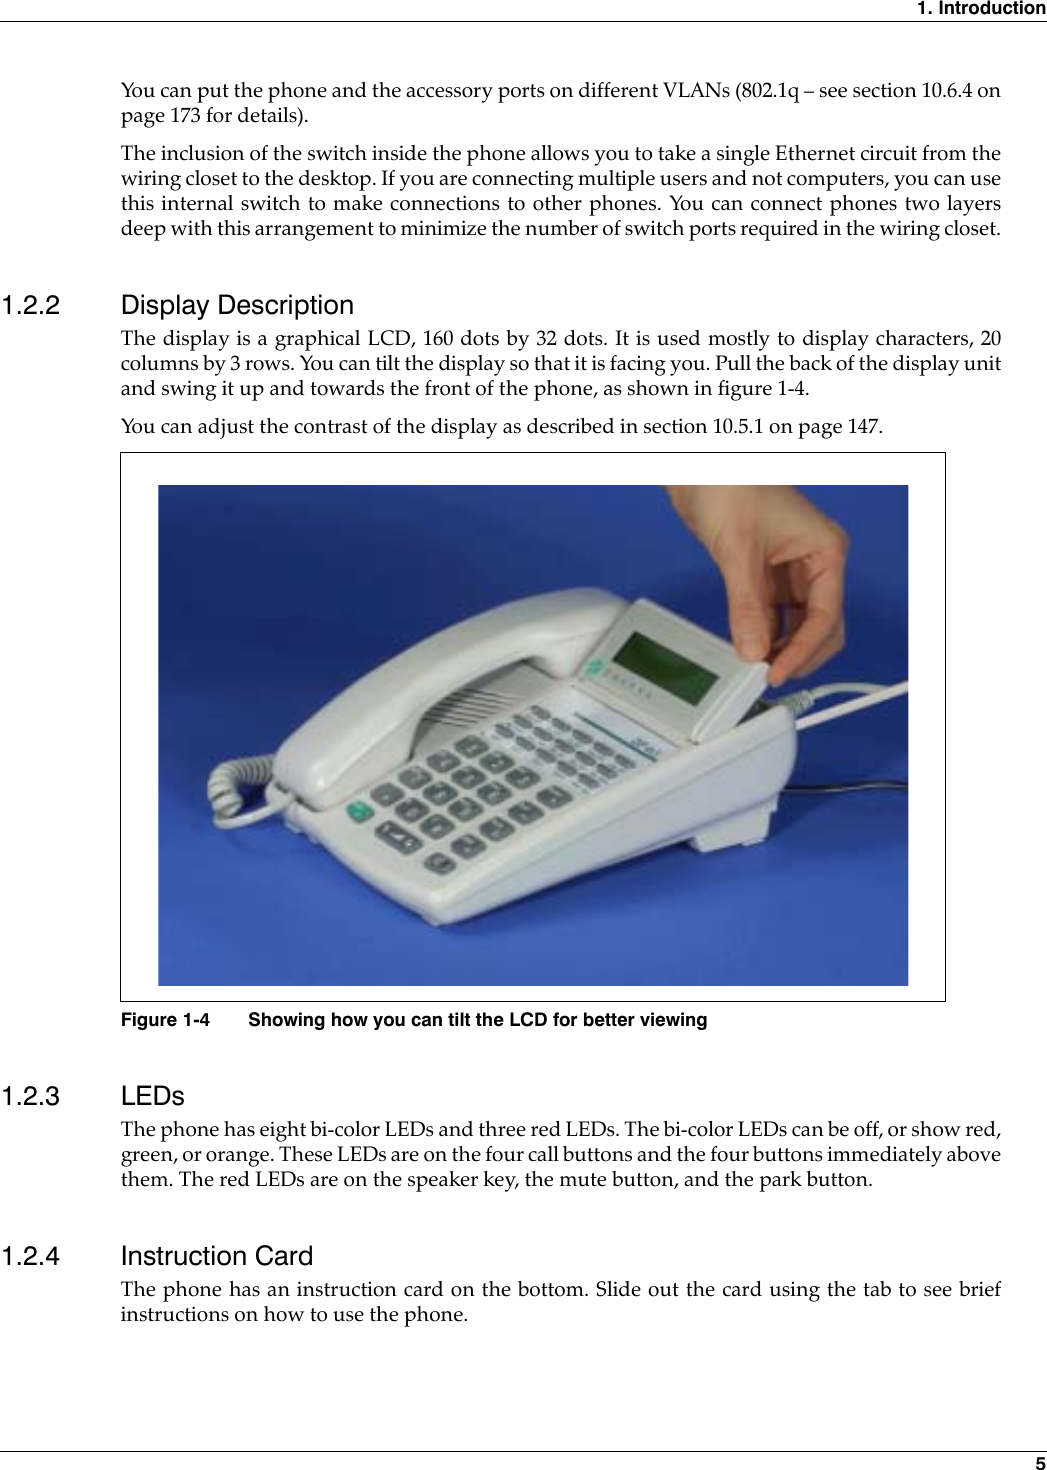
Manual 1
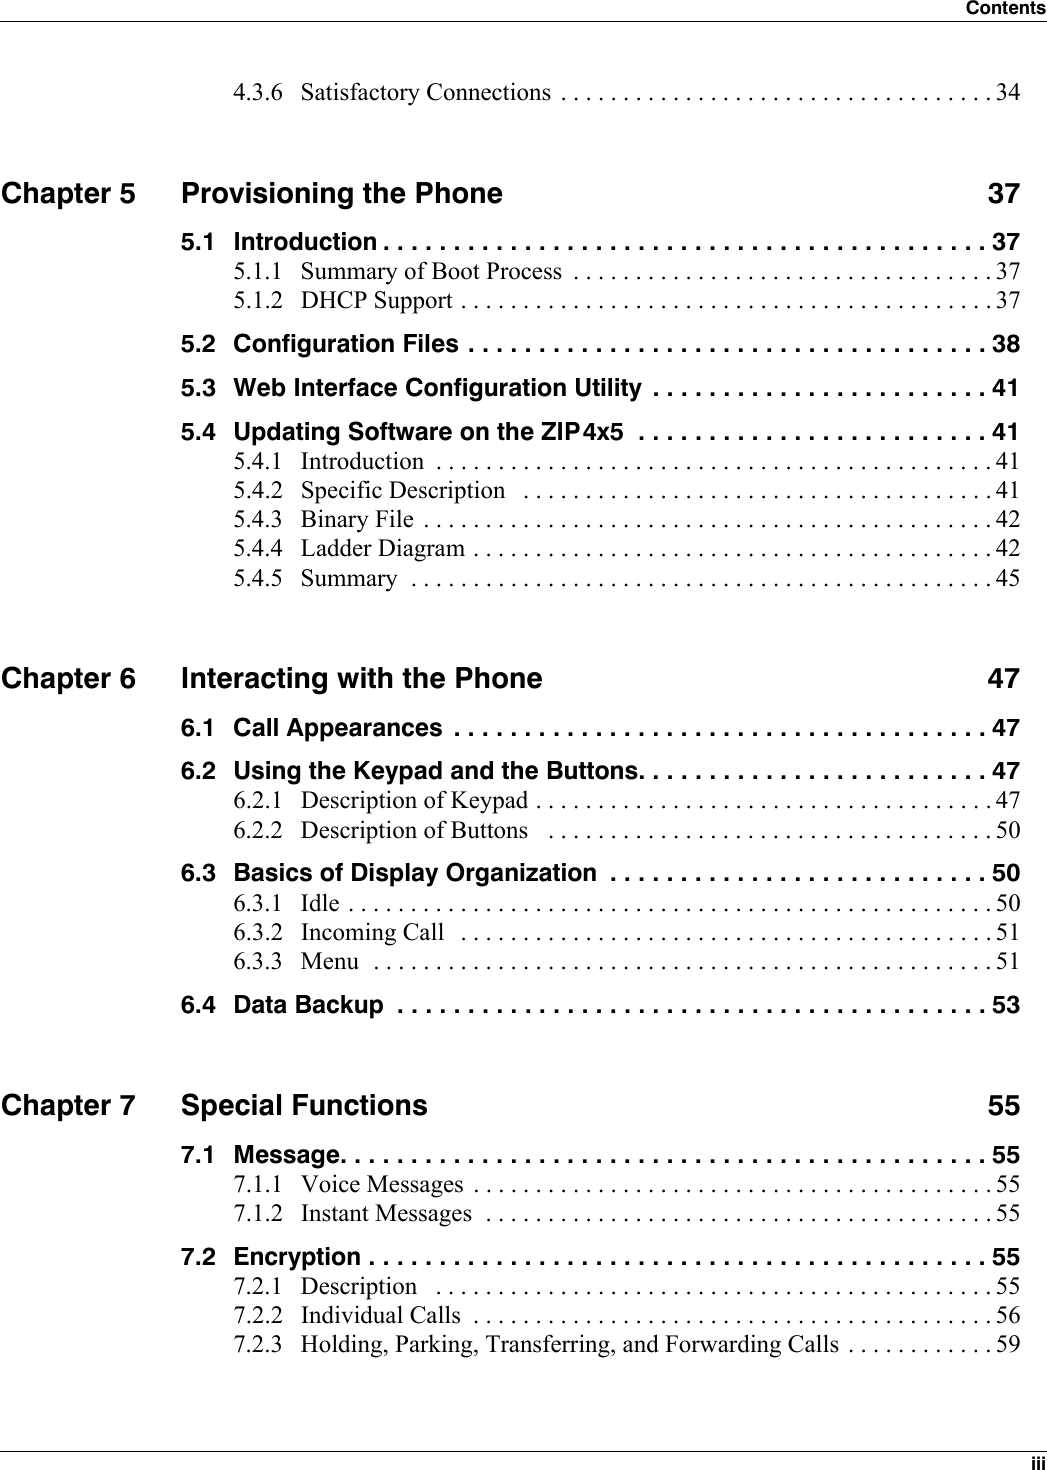


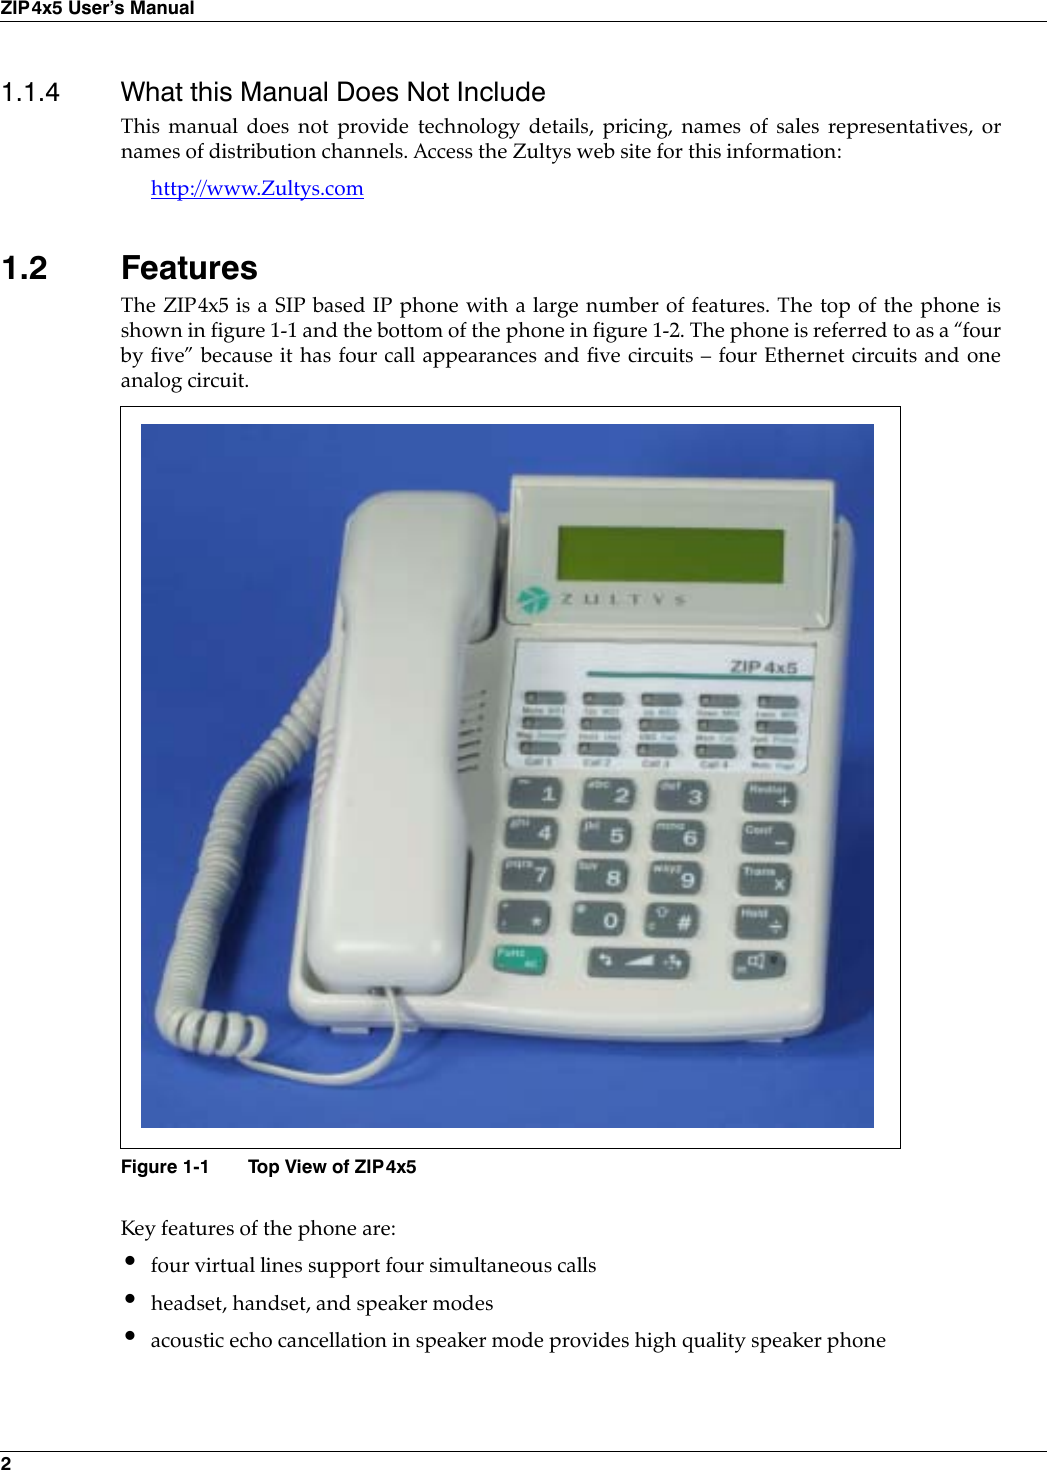

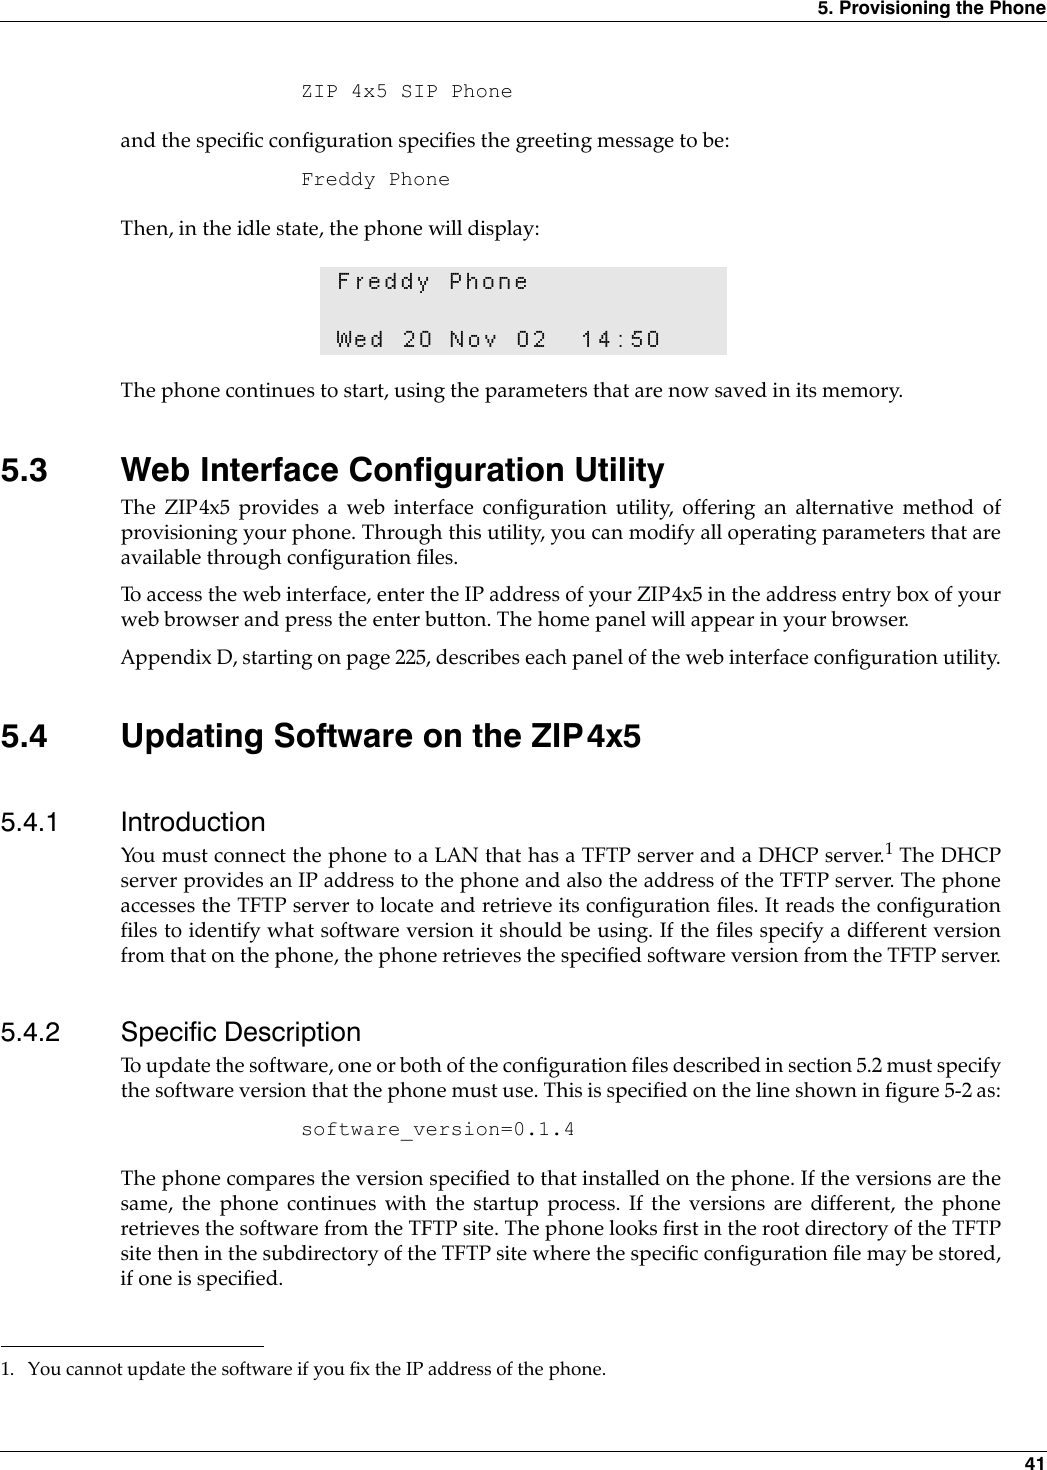
![38ZIP4x5 User’s Manual•domain name (option 15)•NTP servers (option 42)You should consult your system administrator for specific details on configuration of the DHCPserver.5.2 Configuration FilesThere can be three sources of configuration for the phone:•what is saved in a common configuration file•what is saved in a specific configuration file•what is saved in the phone’s memoryThe common configuration file is called:ZIP4x5_common.cfgThis file is stored in the root directory of the TFTP server.The specific configuration file is called:<MAC address>.cfgFor example,0050C2180FD8.cfgThe format for the files is identical, and is shown in figure 5-1. This is an ASCII text file, with thename of the parameter and the value of the parameter listed on the same line. Each parametermust be within the section (denoted by square brackets “[]”). The contents of the file are not casesensitive; you can enter parameter names in upper or lower case. Comment lines are denotedwith a leading semi-colon (;) and have no effect on the operation of the phone.[HW_CONFIG]lcd_contrast=8ring_volume=5speaker_volume=5headset_volume=5handset_volume=5Figure 5-1 Format for Configuration File](https://usermanual.wiki/Zultys-Technologies/ZIP4X5.Manual-1/User-Guide-458733-Page-50.png)
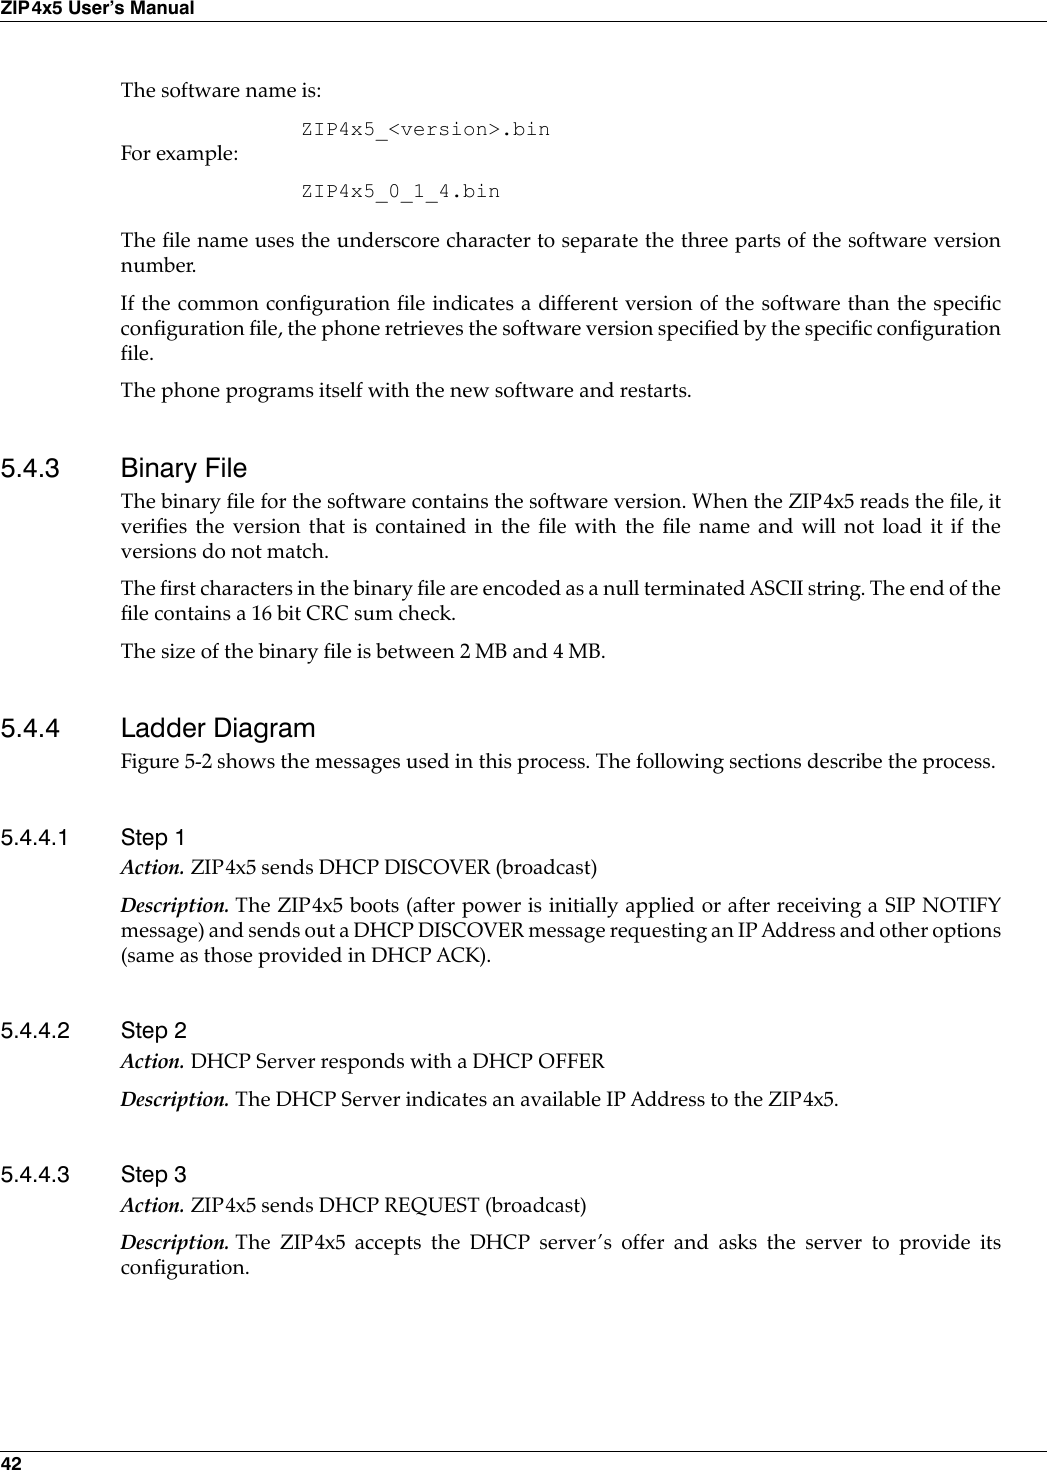
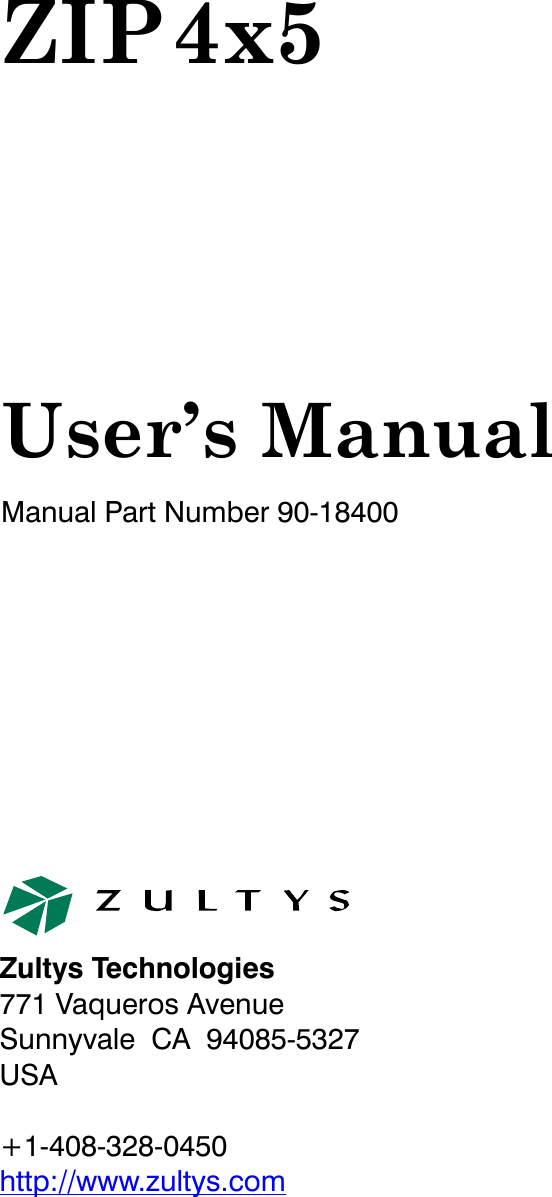
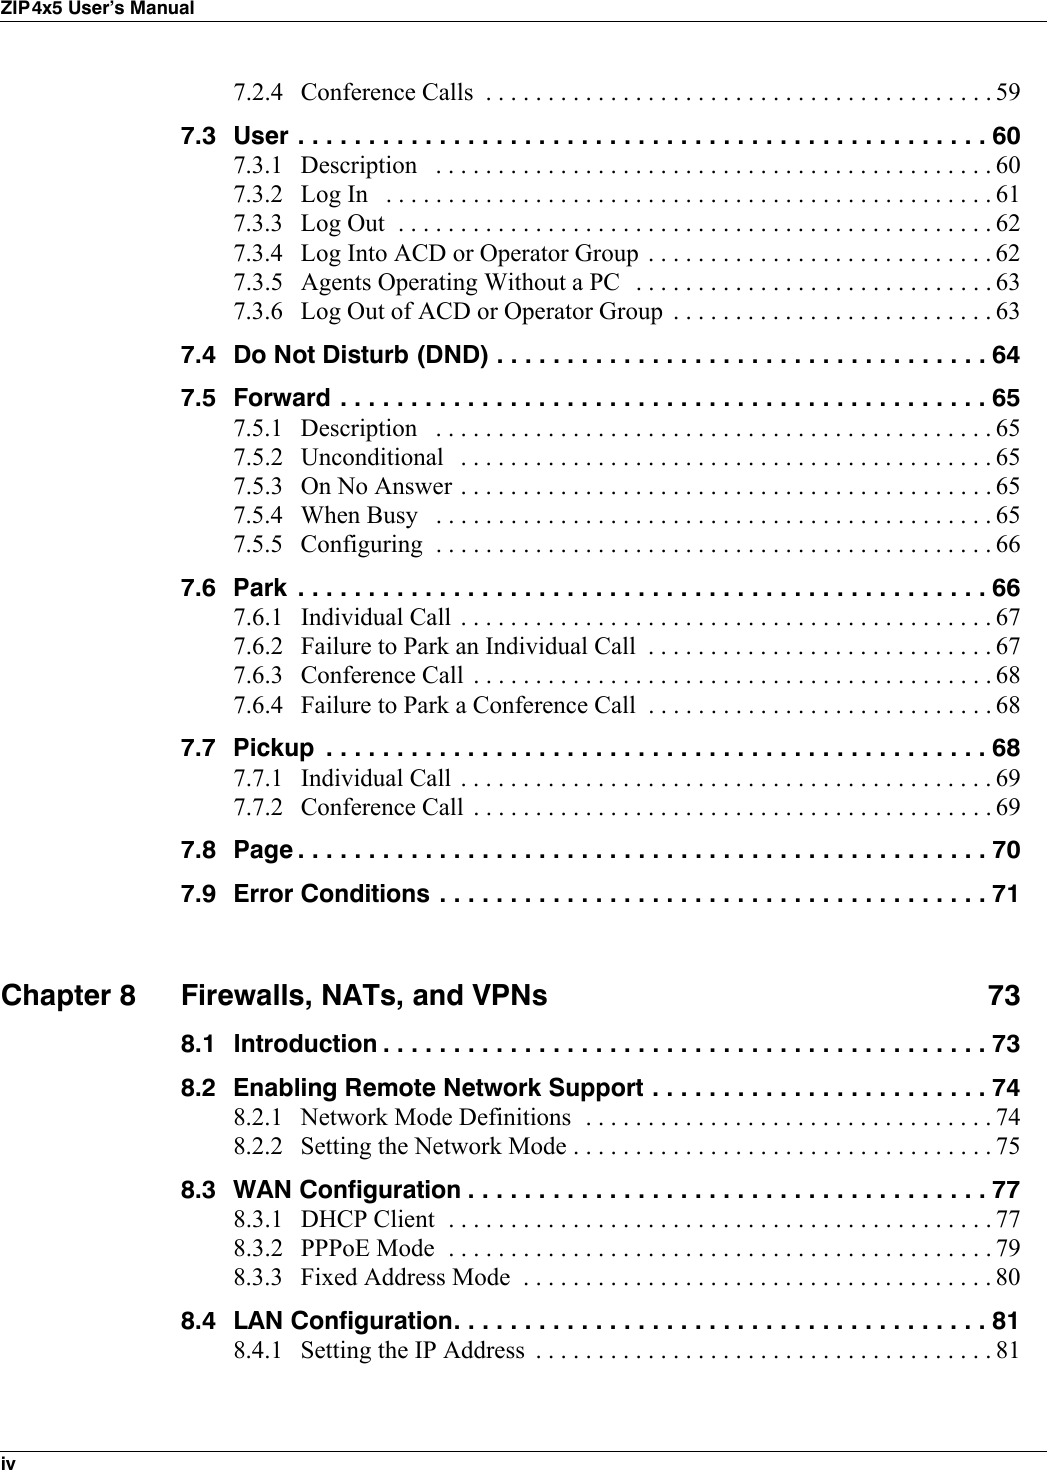
![5. Provisioning the Phone 39[VLAN_CONFIG]mode=1vlan_id_a=1circuits_a=UUUUUvlan_id_b=-1circuits_b=EEEEEvlan_id_c=-1circuits_c=EEEEEvlan_id_d=-1circuits_d=EEEEEvlan_id_e=-1circuits_e=EEEEEvlan_id_f=-1circuits_f=EEEEEvlan_id_g=-1circuits_g=EEEEEvlan_id_h=-1circuits_h=EEEEEcos_setting=5dscp_setting=0[NET_CONFIG]use_dhcp=yesip_addr=subnet_mask=default_gateway=primary_dns=secondary_dns=;host_name is DNS lookup for this phonehost_name=domain=zultys.comntp_server_addr=tftp_server_addr=tftp_cfg_dir=./ZIP4x5[SIP_CONFIG]phone_sip_port=5060rtp_start_port=33000;The Device ID is the user portion of the SIP URIdevice_id=West;The Display Name is sent in SIP messagesdisplay_name=Zultys ZIP4x5;This must always be set to “yes”use_proxy=yesregister_w_proxy=yesproxy_addr=10.1.32.224proxy_port=5060voice_mail_uri=258call_park_extension=259registration_expires=3600session_expires=3600Figure 5-1 Format for Configuration File (Continued)](https://usermanual.wiki/Zultys-Technologies/ZIP4X5.Manual-1/User-Guide-458733-Page-51.png)
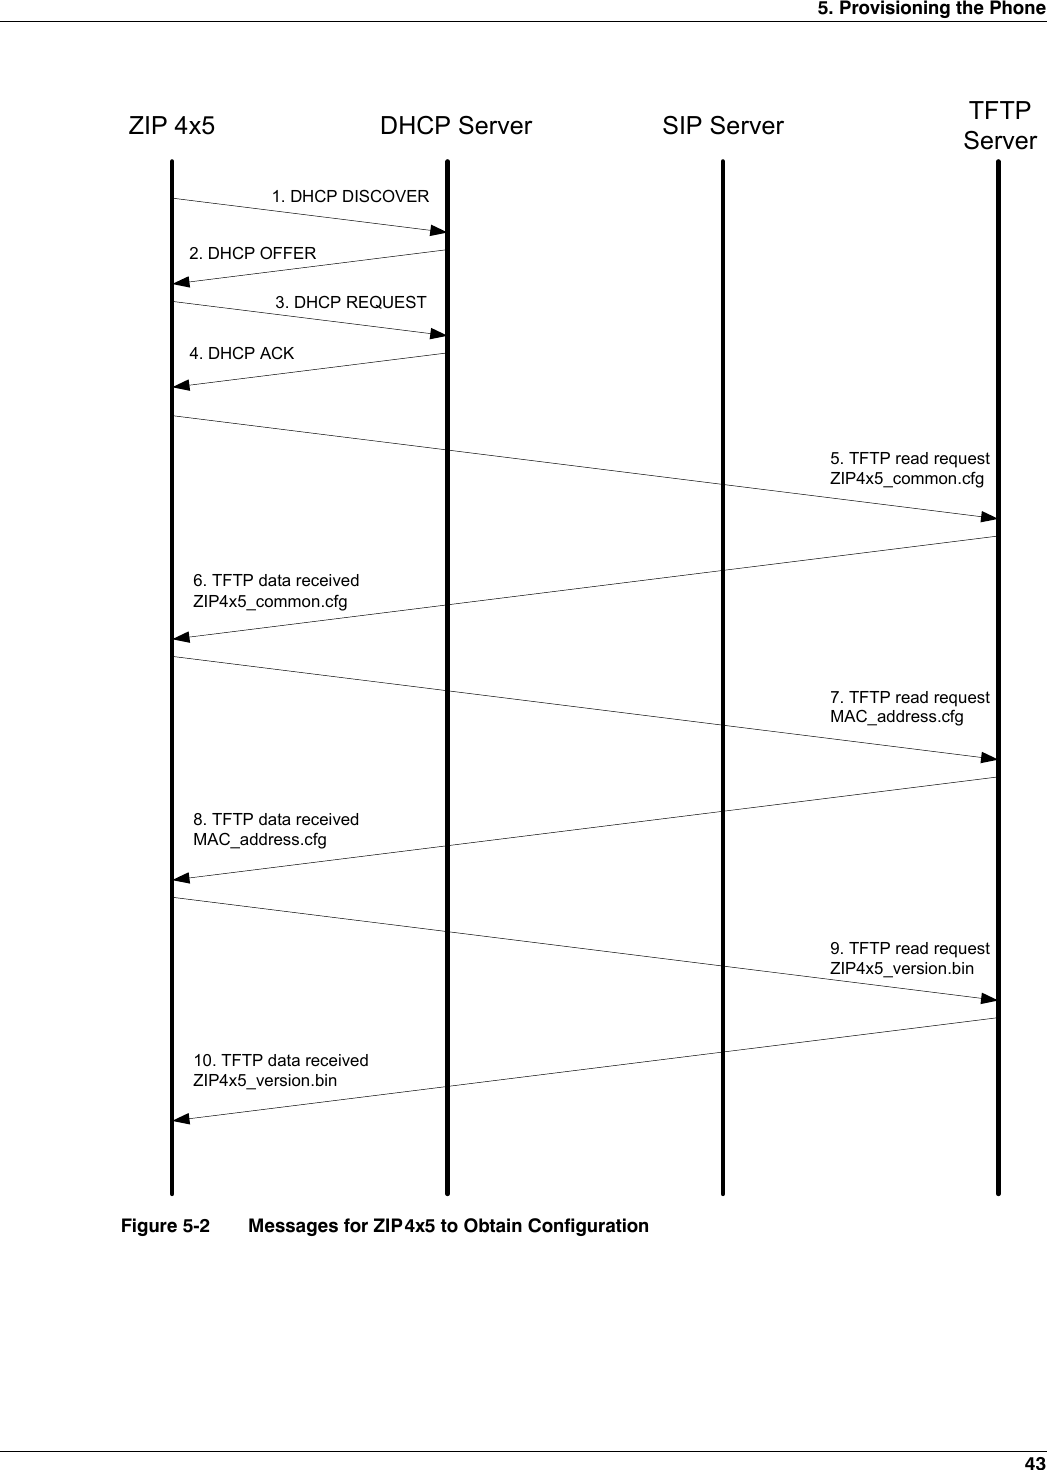
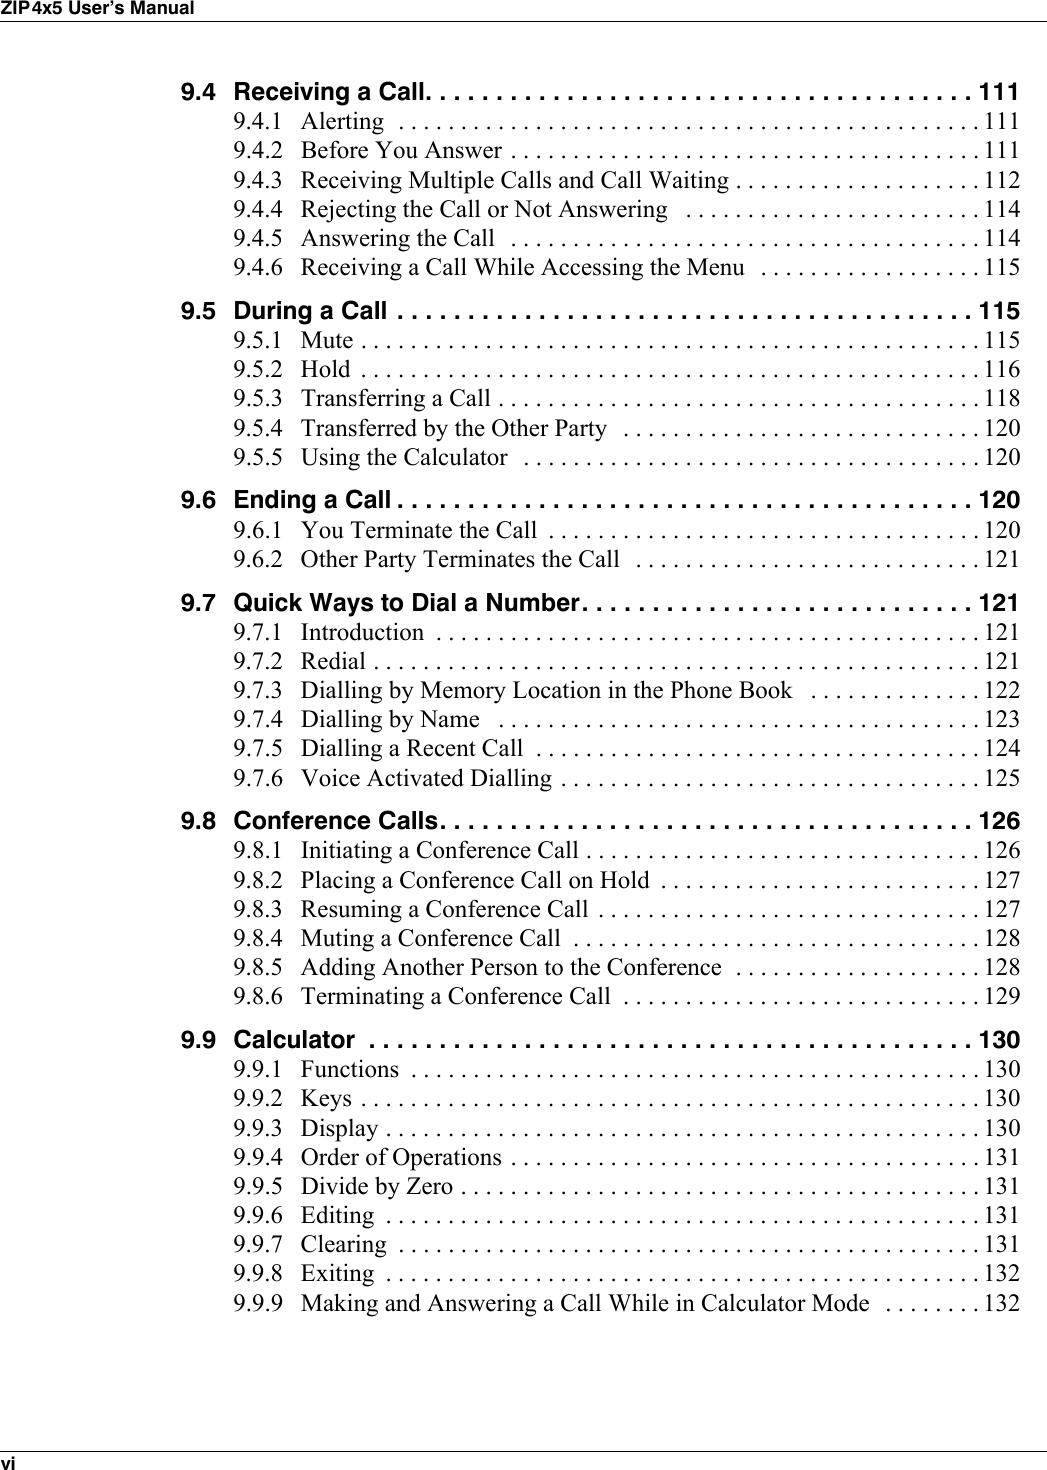
![40ZIP4x5 User’s ManualMany parameters in the configuration files correspond to the parameters that you can configurethrough the menu of the ZIP4x5. Configuration parameters are described in Appendix C, startingon page 197.Every time the phone restarts (either by command or by power on), the phone reads theconfiguration files. It extracts the data in the files and saves it to memory, overwriting allparameters that are saved in memory except that if the user settings are not configured to becleared, it retains the settings in the phone.1The common configuration file specifies a directory, using the parameter:2tftp_cfg_dir= <directory_name>The phone accesses the specified directory (which can be blank, or ‘.’) and reads the specificconfiguration file from the specified directory. It extracts the data in the file and saves it tomemory, overwriting whatever parameters were already saved in memory. The parametersspecified in the specific configuration file take precedence over the same parameters specified inthe common configuration file.For example, suppose the common configuration specifies the greeting message to be:[AUDIO_INFO]ext_ring_tone=0ext_cust_ring=int_ring_tone=0int_cust_ring=ring_tone2=0cust_ring2=key_click=0codec=0distinctive_ring=yesaccept_url=nosound_url=[GENERAL_INFO]software_version=1.0.0;The message displayed on the LCD in idle modegreeting_message=ZIP 4x5 SIP Phonepassword=985897time_fmt=%H:%Mdate_fmt=%a %d %b %ydate_time_order=0;This is the offset from GMT, in minutestimezone=-480country=USAlanguage=ENGLISHdelmtr=._clear_settings=21. You select whether you want the user settings cleared using the menu, as described in section 10.5.3.2. If the specific configuration file contains such a line, the phone ignores it.Figure 5-1 Format for Configuration File (Continued)](https://usermanual.wiki/Zultys-Technologies/ZIP4X5.Manual-1/User-Guide-458733-Page-52.png)