ASUSTeK Computer P505 PDA phone User Manual Appendix 1 P505 UserMan
ASUSTeK Computer Inc PDA phone Appendix 1 P505 UserMan
Contents
Manual 3
Chapter 5: Phone Features
5-41
SIM ManagerSIM Manager
SIM ManagerSIM Manager
SIM Manager
The SIM Manager application allows you to:
• add, edit, or delete a SIM card contact information
• copy phone contact information to the SIM contacts
• manage SMS messages stored in the SIM card
Tap to select a
phone contact
Tap to select a
SIM card contact
Tap to save contact
information to SIM card
Tap to save contact
information to phone
Tap to add a new SIM
phone book entry
Tap to view SMS messages
stored in the PDA or SIM
card memory
Tap to delete contact
information
Tap to view
additional options
NOTENOTE
NOTENOTE
N O T E You can manage the phone contacts using the Pocket PC
ContactsContacts
ContactsContacts
C o n t a c t s menu. See chapter 4 for details.
To launch SIM Manager:To launch SIM Manager:
To launch SIM Manager:To launch SIM Manager:
To launch SIM Manager:
1. Tap > ProgramsPrograms
ProgramsPrograms
Programs > SIM ManagerSIM Manager
SIM ManagerSIM Manager
SIM Manager.
2. The SIM Manager main window appears.
5-42
P505 Pocket PC
Adding a SIM contactAdding a SIM contact
Adding a SIM contactAdding a SIM contact
Adding a SIM contact
There are two ways to add a contact to the SIM memory: (1) copy a
contact from the phone memory, or (2) create a new one.
To copy a phone contact to the SIM:To copy a phone contact to the SIM:
To copy a phone contact to the SIM:To copy a phone contact to the SIM:
To copy a phone contact to the SIM:
1. Tap the box preceding the phone
contact you want to copy.
2. Tap and hold the entry to display a
pop-up menu.
3. Select Copy Selected to SIMCopy Selected to SIM
Copy Selected to SIMCopy Selected to SIM
Copy Selected to SIM
ContactsContacts
ContactsContacts
Contacts.
NOTENOTE
NOTENOTE
N O T E After selecting a contact
information, you can also tap
to save the entry to the
SIM contacts.
4. When prompted, tap CopyCopy
CopyCopy
Co p y to copy
the contact information to the SIM
contacts. Otherwise, tap cancel to
return to the previous window.
The display returns to the SIM
Manager main window.
5. Check if the contact information is
copied to the SIM ContactsSIM Contacts
SIM ContactsSIM Contacts
SIM Contacts list.
IMPORTANTIMPORTANT
IMPORTANTIMPORTANT
I M P O R T A N T • The SIM contacts can only store a contact name of up to
ten characters. A message appears when you attempt to
copy a long contact name to the SIM Contacts.
• The number of contacts that can be stored on a SIM card
varies. Open the SIM Info SIM Info
SIM Info SIM Info
SIM Info from the OptionsOptions
OptionsOptions
O p t i o n s menu to
view the SIM memory and phone book status.
Chapter 5: Phone Features
5-43
To create a new SIM contact:To create a new SIM contact:
To create a new SIM contact:To create a new SIM contact:
To create a new SIM contact:
1. Tap InsertInsert
InsertInsert
Inse r t from the SIM Manager main
window. A Create SIM ContactCreate SIM Contact
Create SIM ContactCreate SIM Contact
Create SIM Contact
window appears.
2. Use the soft keyboard to enter the
name and telephone number of the
new contact, then tap InsertInsert
InsertInsert
Insert.
3. An Entry Added!Entry Added!
Entry Added!Entry Added!
Entry Added! message appears
indicating that you have successfully
created a new SIM contact.
4. Tap to close the window.
The created contact is displayed in
the SIM Contacts list.
5. Follow the same instructions when
creating new SIM contacts.
5-44
P505 Pocket PC
Editing a SIM contactEditing a SIM contact
Editing a SIM contactEditing a SIM contact
Editing a SIM contact
To edit a SIM contact:To edit a SIM contact:
To edit a SIM contact:To edit a SIM contact:
To edit a SIM contact:
1. Tap and hold the SIM contact you
want to edit to display a pop-up
menu.
4. An Entry Edited!Entry Edited!
Entry Edited!Entry Edited!
Entry Edited! message appears
indicating that you have successfully
edited the SIM contact. Tap to
close the window.
2. Select Edit SIM Entry Edit SIM Entry
Edit SIM Entry Edit SIM Entry
Edit SIM Entry from the
menu. An Edit Entry Edit Entry
Edit Entry Edit Entry
Edit Entry window
appears.
3. Use the soft keyboard to edit the SIM
entry, then tap ApplyApply
ApplyApply
Apply.
Chapter 5: Phone Features
5-45
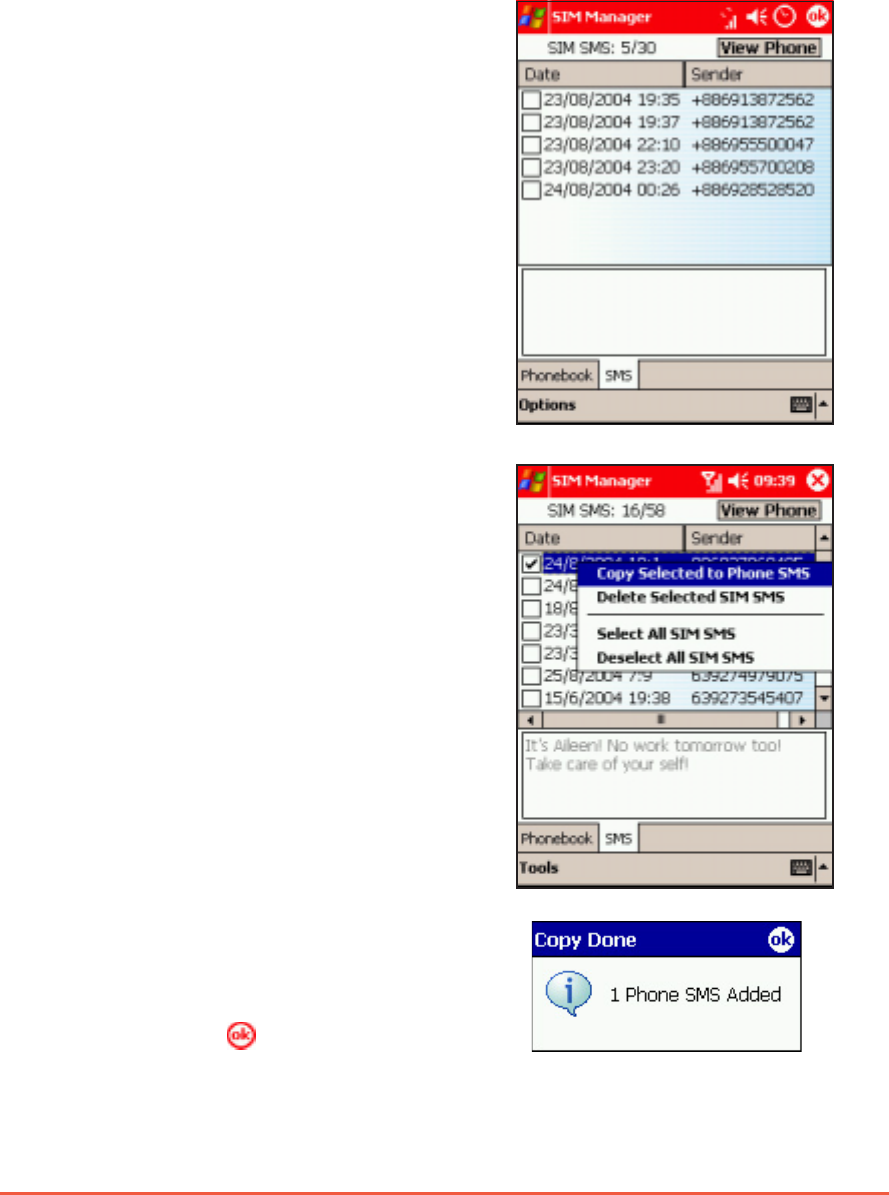
Managing SMS messagesManaging SMS messages
Managing SMS messagesManaging SMS messages
Managing SMS messages
While you can use the Vodafone Menu to view incoming SMS
messages, the SIM Manager application allows you to view, copy, or
delete SMS messages stored in the SIM card memory.
To move an SMS message to the phone SMS inbox:To move an SMS message to the phone SMS inbox:
To move an SMS message to the phone SMS inbox:To move an SMS message to the phone SMS inbox:
To move an SMS message to the phone SMS inbox:
1. From the SIM Manager main window,
tap the SMSSMS
SMSSMS
SM S tab at the bottom of
the display.
A list of received SMS messages are
displayed.
4. A Copy DoneCopy Done
Copy DoneCopy Done
Copy Done window appears
indicating that you have successfully
copied the SMS message to the phone
SMS inbox. Tap to close the
window.
5. Tap the View Phone View Phone
View Phone View Phone
View Phone button to view the copied SMS message.
2. Check the box preceding the
message you want to copy.
3. Tap and hold the message entry,
then select Copy Selected toCopy Selected to
Copy Selected toCopy Selected to
Copy Selected to
Phone SMS Phone SMS
Phone SMS Phone SMS
Phone SMS from the menu.
5-46
P505 Pocket PC
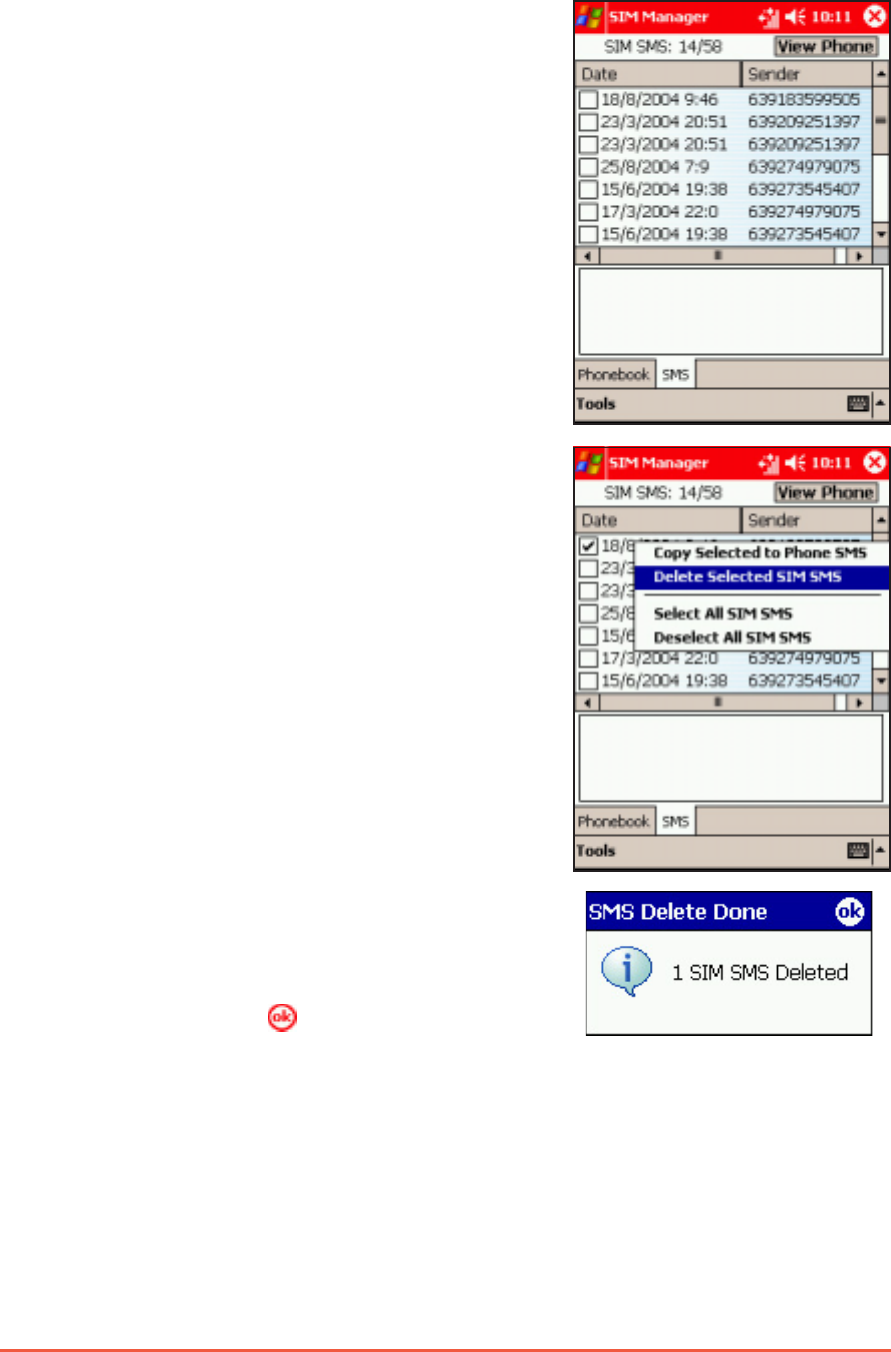
ToTo
ToTo
To deletedelete
deletedelete
delete an SMS message: an SMS message:
an SMS message: an SMS message:
an SMS message:
1. From the SIM Manager main window,
tap the SMSSMS
SMSSMS
SM S tab at the bottom of
the display.
A list of received SMS messages are
displayed.
4. An SMS Delete DoneSMS Delete Done
SMS Delete DoneSMS Delete Done
SMS Delete Done window
appears indicating that you have
successfully deleted the SMS
message. Tap to close the window.
2. Check the box preceding the
message you want to delete.
3. Tap and hold the message entry,
then select Copy Selected toCopy Selected to
Copy Selected toCopy Selected to
Copy Selected to
Phone SMS Phone SMS
Phone SMS Phone SMS
Phone SMS from the menu.
Chapter 5: Phone Features
5-47
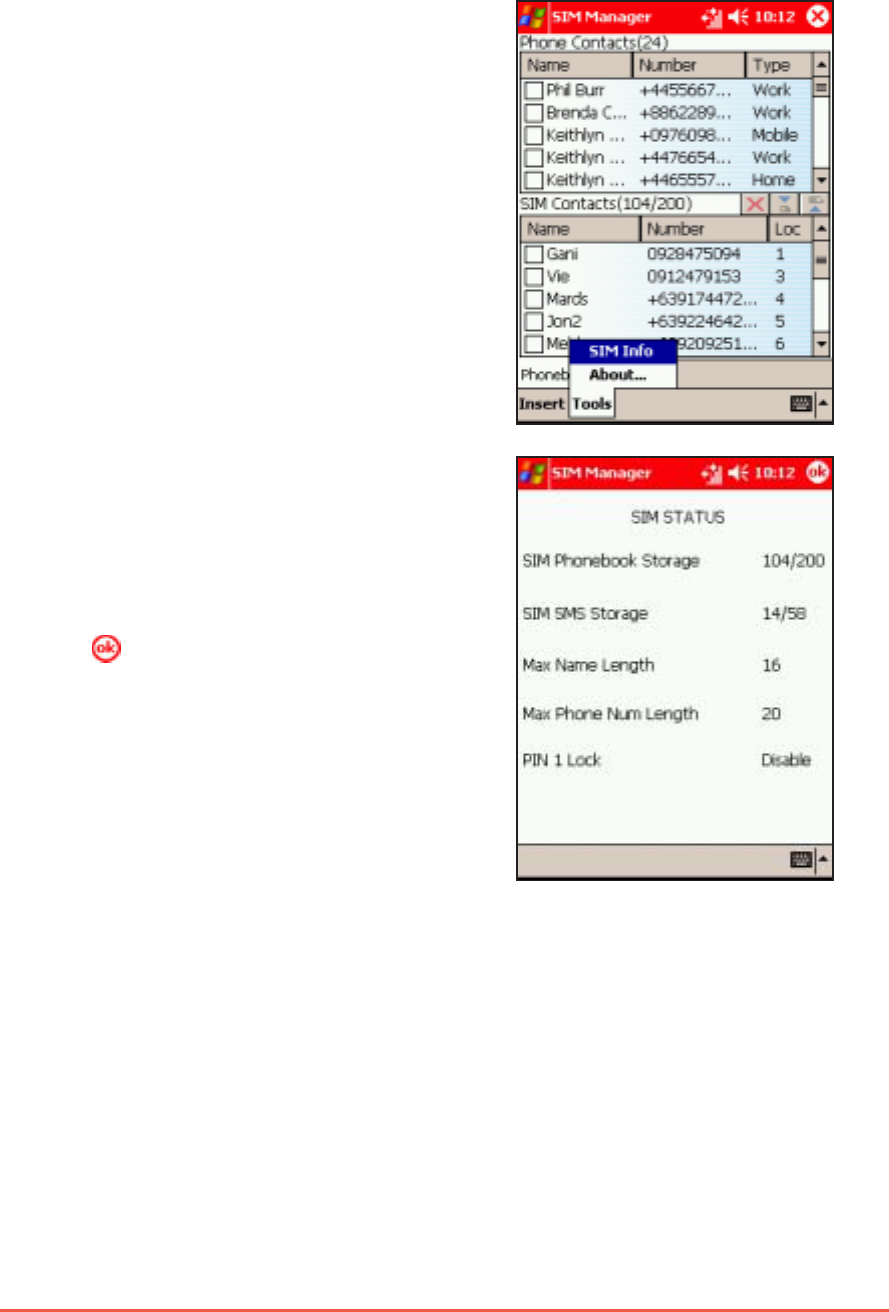
Viewing the SIM statusViewing the SIM status
Viewing the SIM statusViewing the SIM status
Viewing the SIM status
ToTo
ToTo
To view theview the
view theview the
view the SMS SMS
SMS SMS
SMS statusstatus
statusstatus
status::
::
:
1. From the SIM Manager main window,
tap ToolsTools
ToolsTools
Tool s at the bottom of the
display, then select SIM InfoSIM Info
SIM InfoSIM Info
SIM Info.
2. The window shows the available SIM
phone book and SMS storage,
maximum name and phone number
lenght, and the status of the PIN1
lock.
Tap to close and return to the SIM
Manager main window.
5-48
P505 Pocket PC
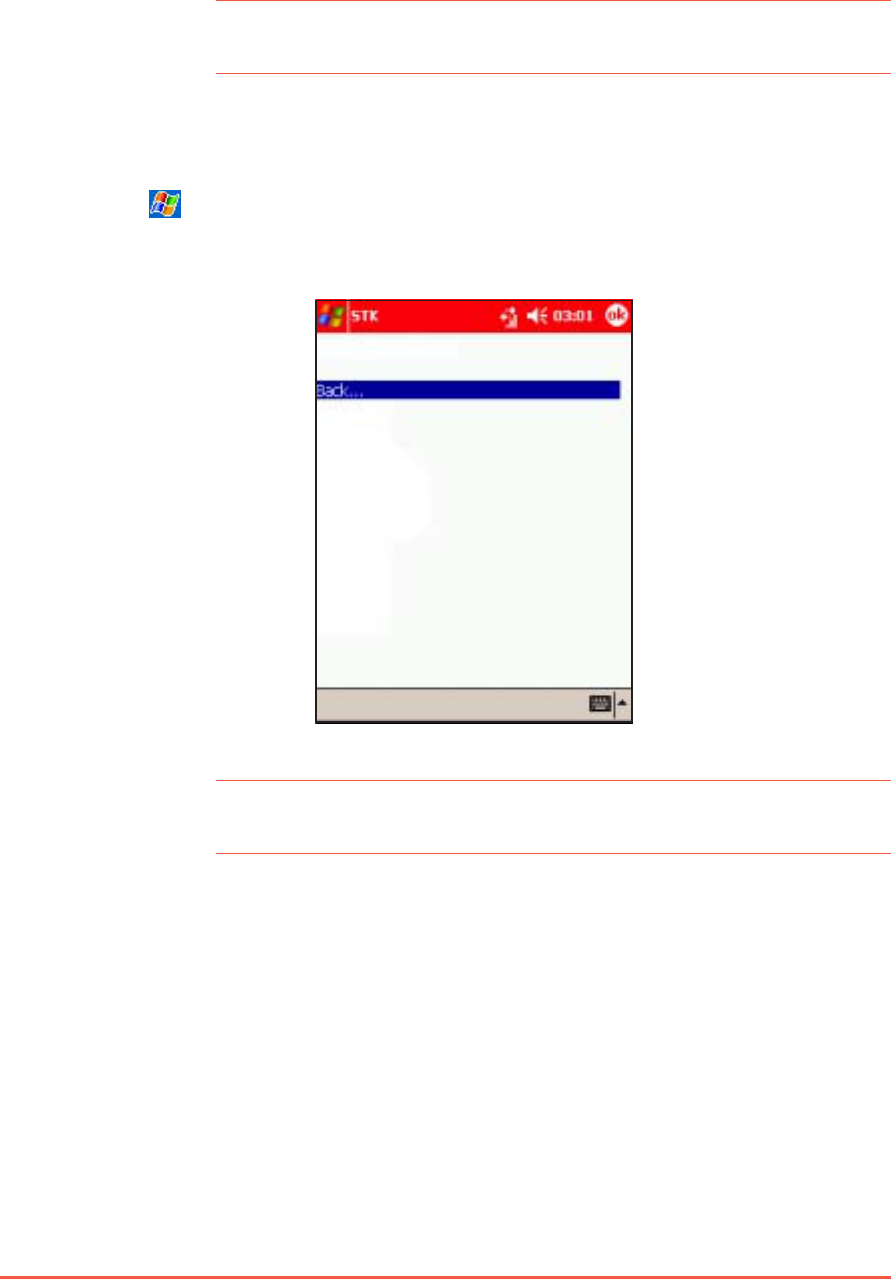
STKSTK
STKSTK
STK
The STK lists value-added services offered by your phone operator.
You can use this application to access or launch these services.
NOTENOTE
NOTENOTE
N O T E The value-added services may vary according to your phone
operator, location, and/or availability.
To launch STK:To launch STK:
To launch STK:To launch STK:
To launch STK:
1. Tap > ProgramsPrograms
ProgramsPrograms
Programs > STKSTK
STKSTK
STK.
2. The STK main window appears.
NOTENOTE
NOTENOTE
N O T E The STK window shows blank when your phone operator has
no value-added services.

Chapter 6
Messaging Features
This chapter teaches you how
to send MMS, SMS, and e-mail
messages using the Pocket PC
phone and WAP features.

6-2
P505 Pocket PC
Chapter summaryChapter summary
Chapter summaryChapter summary
Chapter summary
••
••
•Messaging featuresMessaging features
Messaging featuresMessaging features
Messaging features ............................................................................
............................................................................
...................................... 6-36-3
6-36-3
6-3
Using the Messaging application ...................................... 6-3
Creating message accounts ............................................. 6-9
••
••
•Multimedia Messaging Service (MMS)Multimedia Messaging Service (MMS)
Multimedia Messaging Service (MMS)Multimedia Messaging Service (MMS)
Multimedia Messaging Service (MMS) ..........................
..........................
.............6-126-12
6-126-12
6-12
Composing an MMS message ......................................... 6-12
Previewing the message ................................................ 6-17
Creating and organising slides ........................................ 6-19
Sending the MMS message ............................................. 6-21
••
••
•Short Message Service (SMS)Short Message Service (SMS)
Short Message Service (SMS)Short Message Service (SMS)
Short Message Service (SMS) ..............................................
..............................................
.......................6-246-24
6-246-24
6-24
Opening the Text Messages account ............................. 6-24
Creating text messages ................................................. 6-25
Sending the text message ............................................. 6-29
Changing the text message settings .............................. 6-30
••
••
•E-mailE-mail
E-mailE-mail
E-mail................................................................................................................
................................................................................................................
........................................................6-316-31
6-316-31
6-31
Synchronising e-mail messages ...................................... 6-31
Connecting directly to an e-mail server .......................... 6-31
Using the Inbox .............................................................. 6-33
Creating e-mail messages .............................................. 6-35
Sending the e-mail message .......................................... 6-40
Chapter 6: Messaging Features
6-3
Messaging featuresMessaging features
Messaging featuresMessaging features
Messaging features
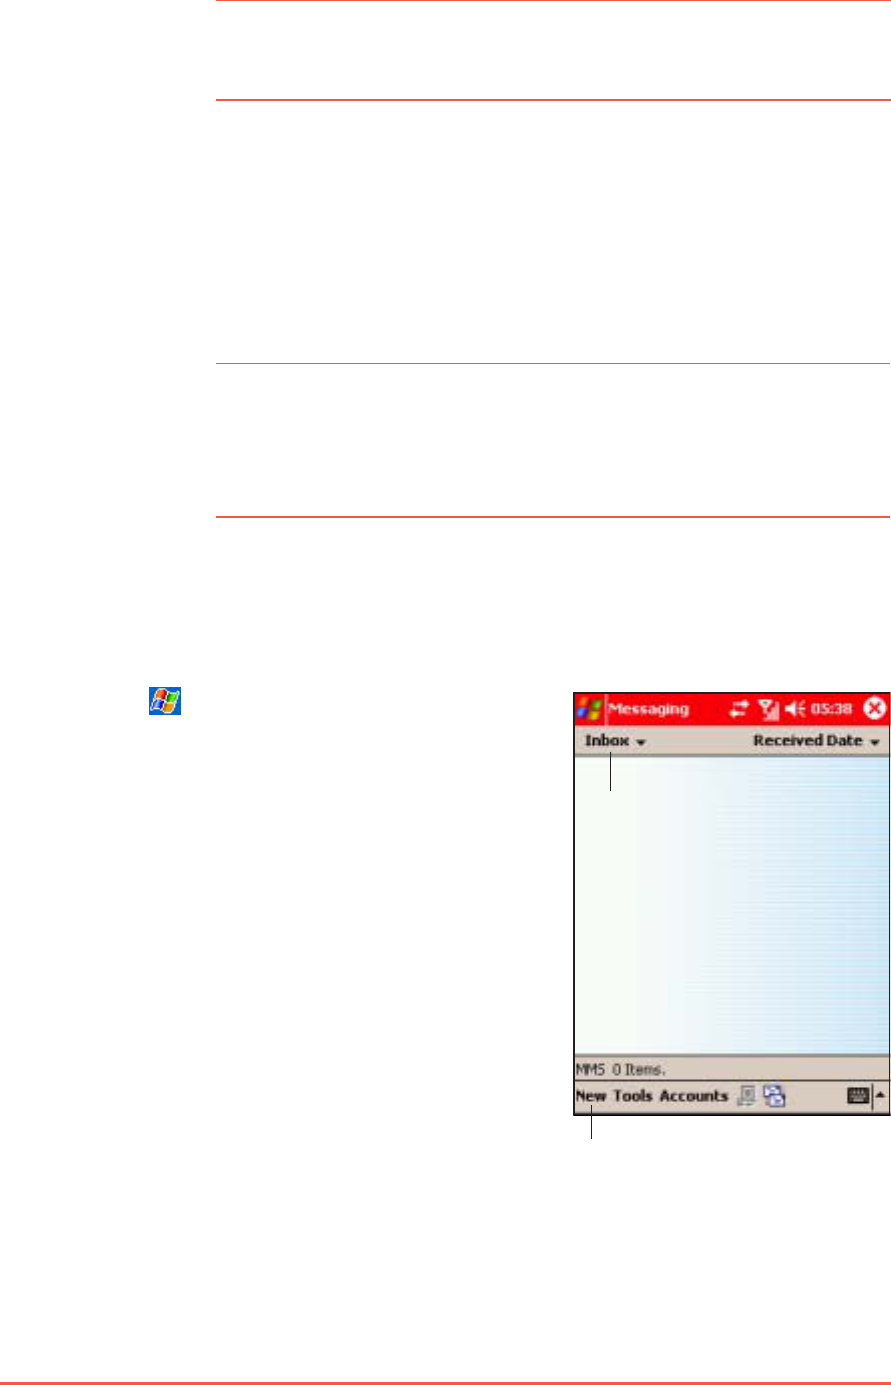
The Pocket PC allows you to send Multimedia Messaging Service
(MMS), Short Message Service (SMS), or e-mail messages to a mobile
phone or computer.
The Pocket PC MessagingMessaging
MessagingMessaging
Messaging application integrates the MMS, SMS, and
e-mail message accounts in one simple interface. From this
application, you can manage, send, store, delete, and share e-mails,
texts, or multimedia messages.
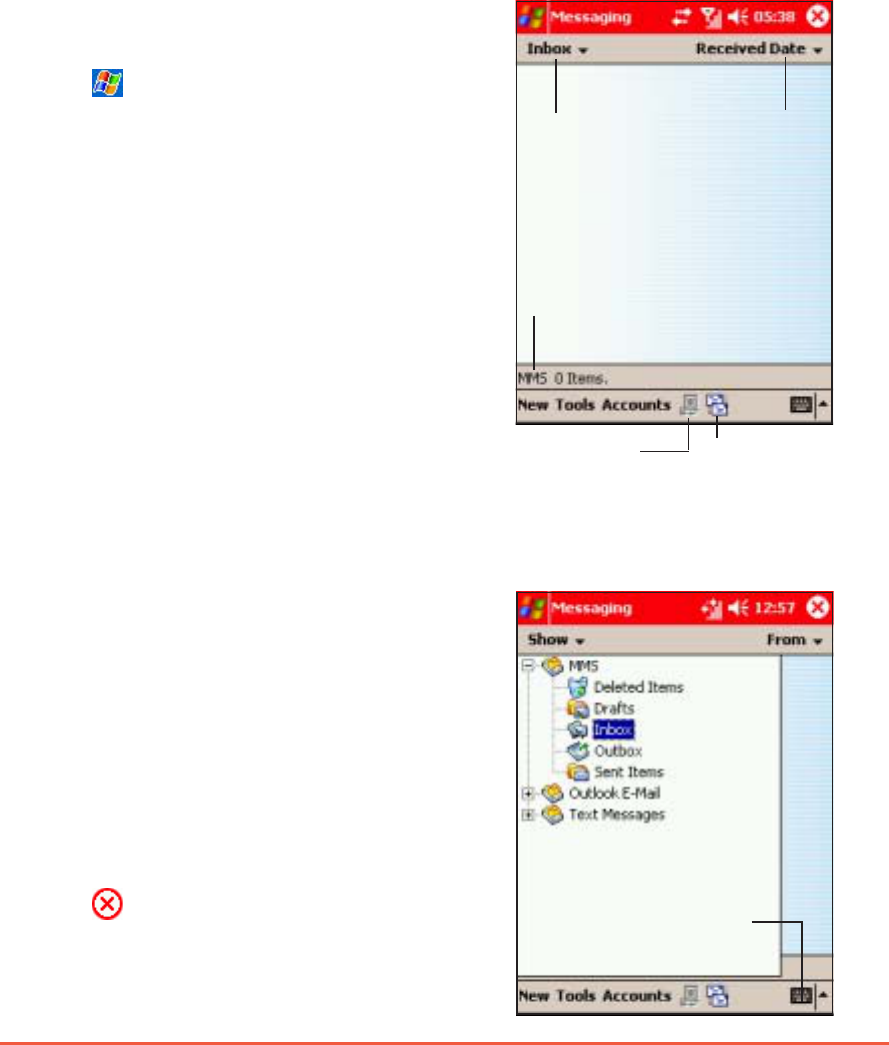
Using the Messaging applicationUsing the Messaging application
Using the Messaging applicationUsing the Messaging application
Using the Messaging application
To launch Messaging:To launch Messaging:
To launch Messaging:To launch Messaging:
To launch Messaging:
1. Tap .
2. Tap MessagingMessaging
MessagingMessaging
Messaging. The screen shows
the Inbox of one of the three
message accounts (MMS, Outlook
E-mail, and Text Messages)
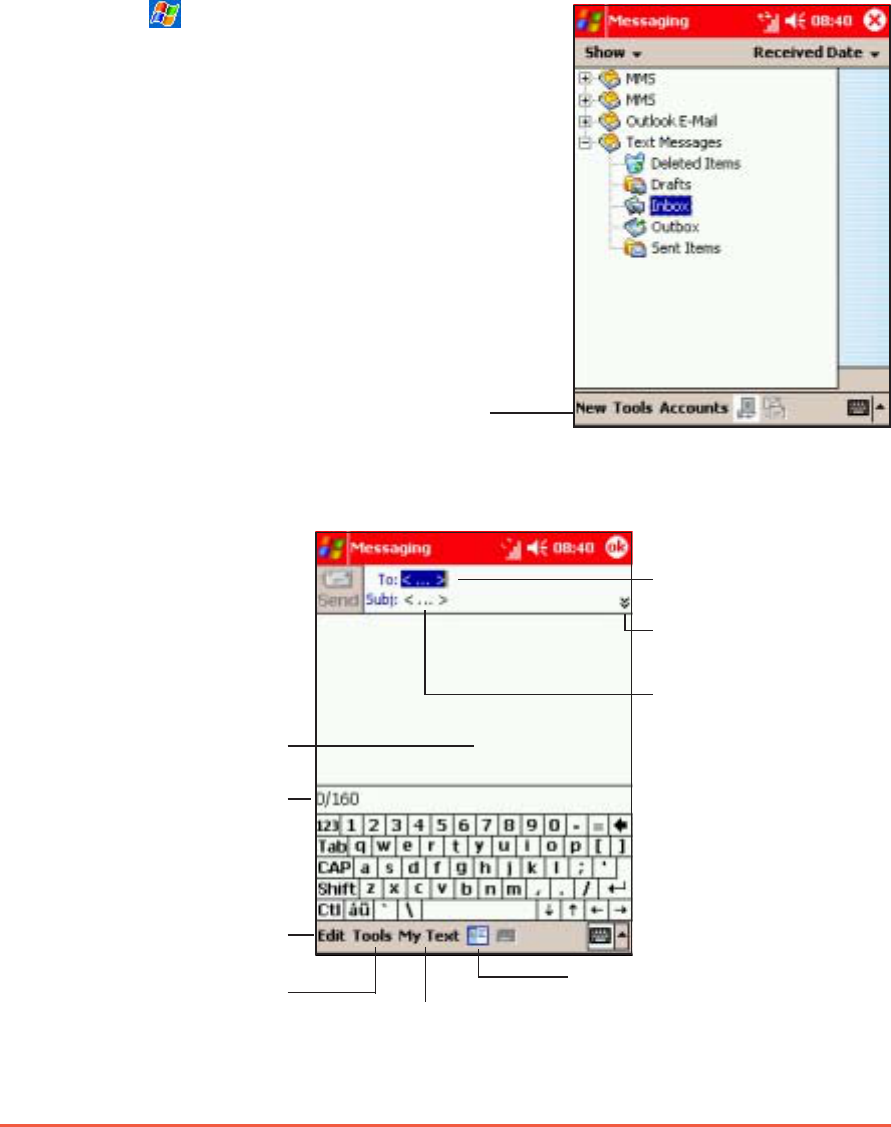
The P505 shows one folder of
messages at a time. This may be the
Inbox, Outbox, Sent, etc. folder of
MMS, Outlook, a private e-mail
account, etc.
To move between folders and message types:To move between folders and message types:
To move between folders and message types:To move between folders and message types:
To move between folders and message types:
Tap to access the
MMS, Outlook E-mail,
or Text Messages
folders.
Tap to send or
receive
messages from
the network.
Tap to connect to
the network.
Tap to sort
messages
Message type
Tap to close the
soft keyboard
1. Tap on the folder name of the
current message(s) displayed (e.g.
Inbox, Sent, Deleted Items).
2. Tap on the name of the account you
want to view.
You may have to expand the folder,
by tapping on + or -, to see the
message types.
3. Tap to close.
6-4
P505 Pocket PC
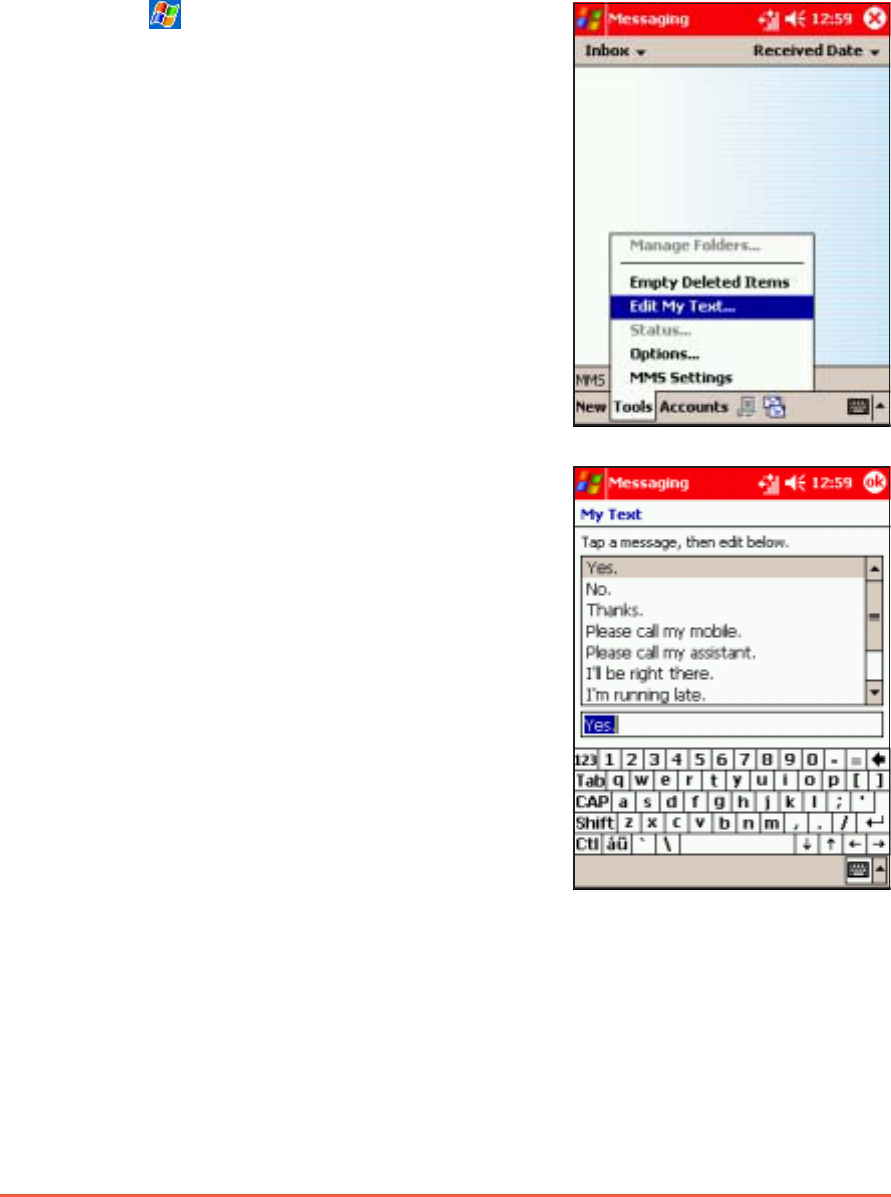
To change the frequently used message text:To change the frequently used message text:
To change the frequently used message text:To change the frequently used message text:
To change the frequently used message text:
You probably use some phrases frequently in messages. Instead of
writing/entering this text each time, you can select the phrase from a
list of ten messages (called My Text). To see/change the default
text:
1. Tap , then tap MessagingMessaging
MessagingMessaging
Messaging.
2. Tap ToolsTools
ToolsTools
To o ls, then select Edit MyEdit My
Edit MyEdit My
Edit My
TextText
TextText
Text.
3. Tap on the text you want to edit or
replace and edit the text displayed.
Chapter 6: Messaging Features
6-5
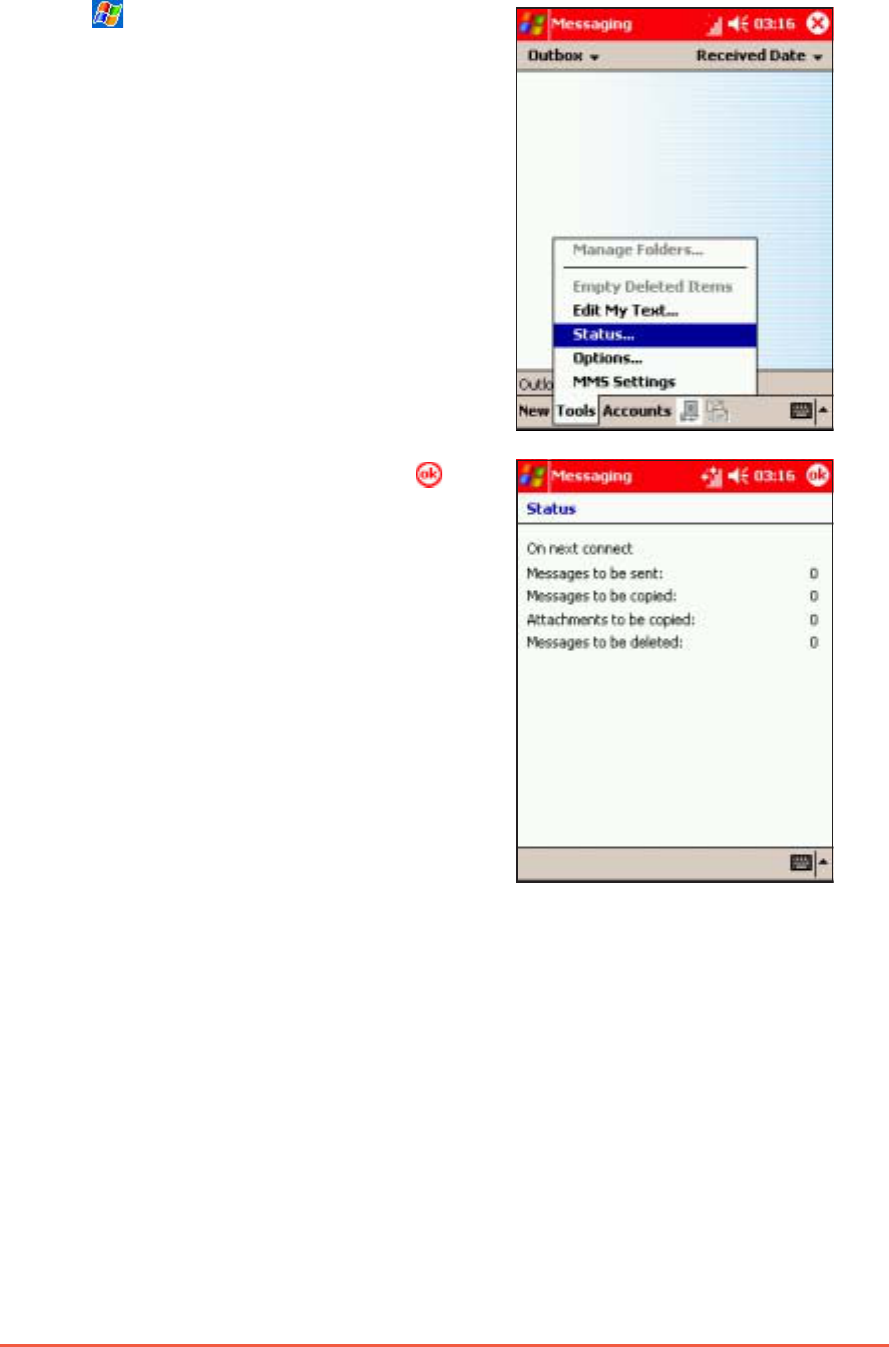
To view e-mail account status:To view e-mail account status:
To view e-mail account status:To view e-mail account status:
To view e-mail account status:
1. Tap , then tap MessagingMessaging
MessagingMessaging
Messaging.
2. Ensure you are in an E-mail folder
(tap top left folder name).
3. Tap ToolsTools
ToolsTools
To o ls, then select StatusStatus
StatusStatus
Status.
4. View the account status. Press to
return to the previous screen.
6-6
P505 Pocket PC
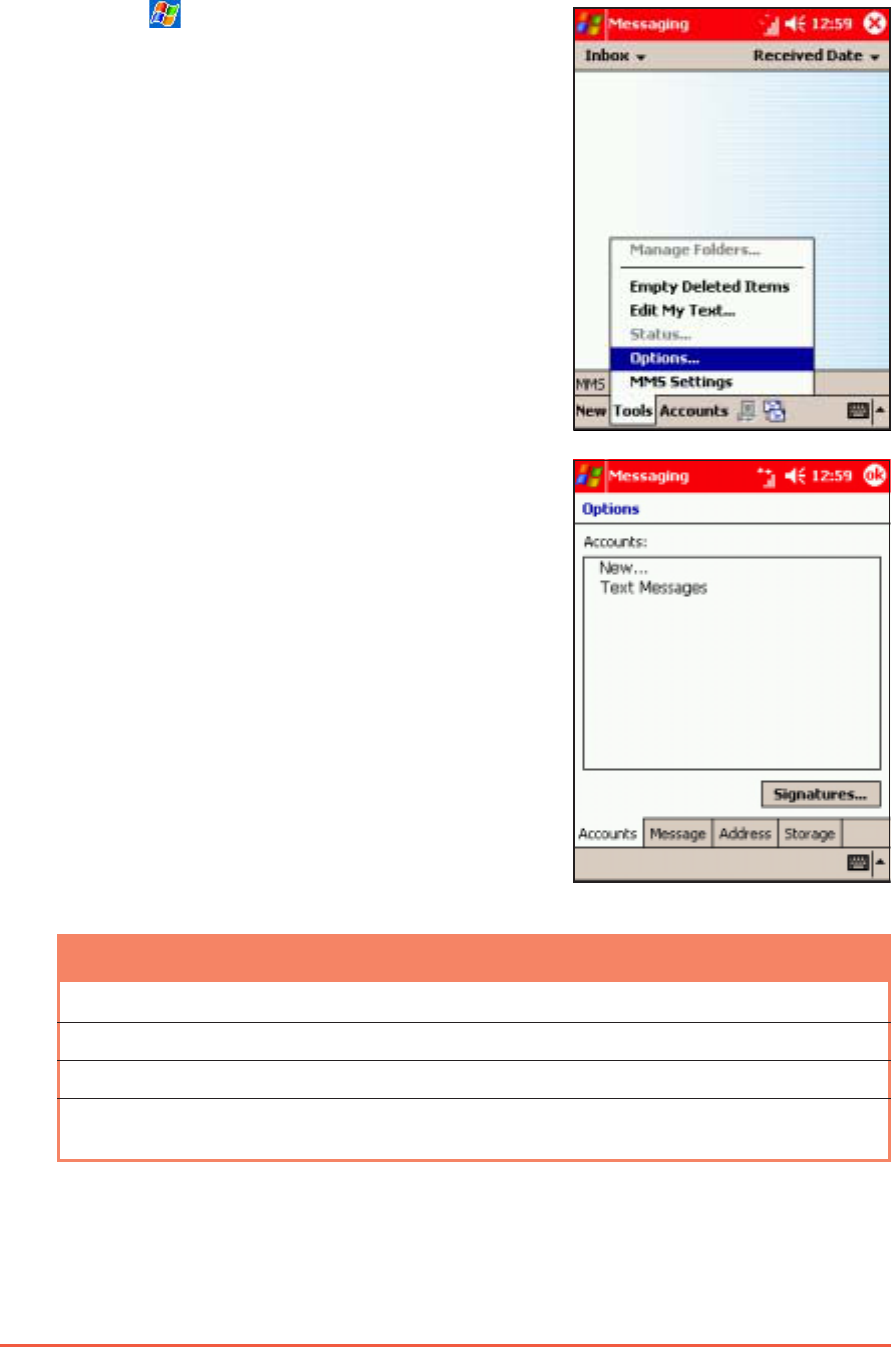
To change the account options:To change the account options:
To change the account options:To change the account options:
To change the account options:
1. Tap , then tap MessagingMessaging
MessagingMessaging
Messaging.
2. Ensure you are in the folder of the
message type you want to manage
(tap top left folder name).
3. Tap ToolsTools
ToolsTools
To o ls, then select OptionsOptions
OptionsOptions
Options.
4. Select from the tabs at the
bottom of the screen to
change the account options.
Refer to the table below for
the tab description.
TabTab
TabTab
Tab Allows you toAllows you to
Allows you toAllows you to
Allows you to
AccountsAccounts
AccountsAccounts
A c c o u n t s Change, delete, view MMS, SMS, or E-mail accounts
MessageMessage
MessageMessage
M e s s a g e Change reply and other message options
AddressAddress
AddressAddress
Address Set the default e-mail address list for the ContactsContacts
ContactsContacts
Contacts menu.
StorageStorage
StorageStorage
S t o r a g e View the main/storage card memory status and empty the
deleted items folder of the selected account
Chapter 6: Messaging Features
6-7
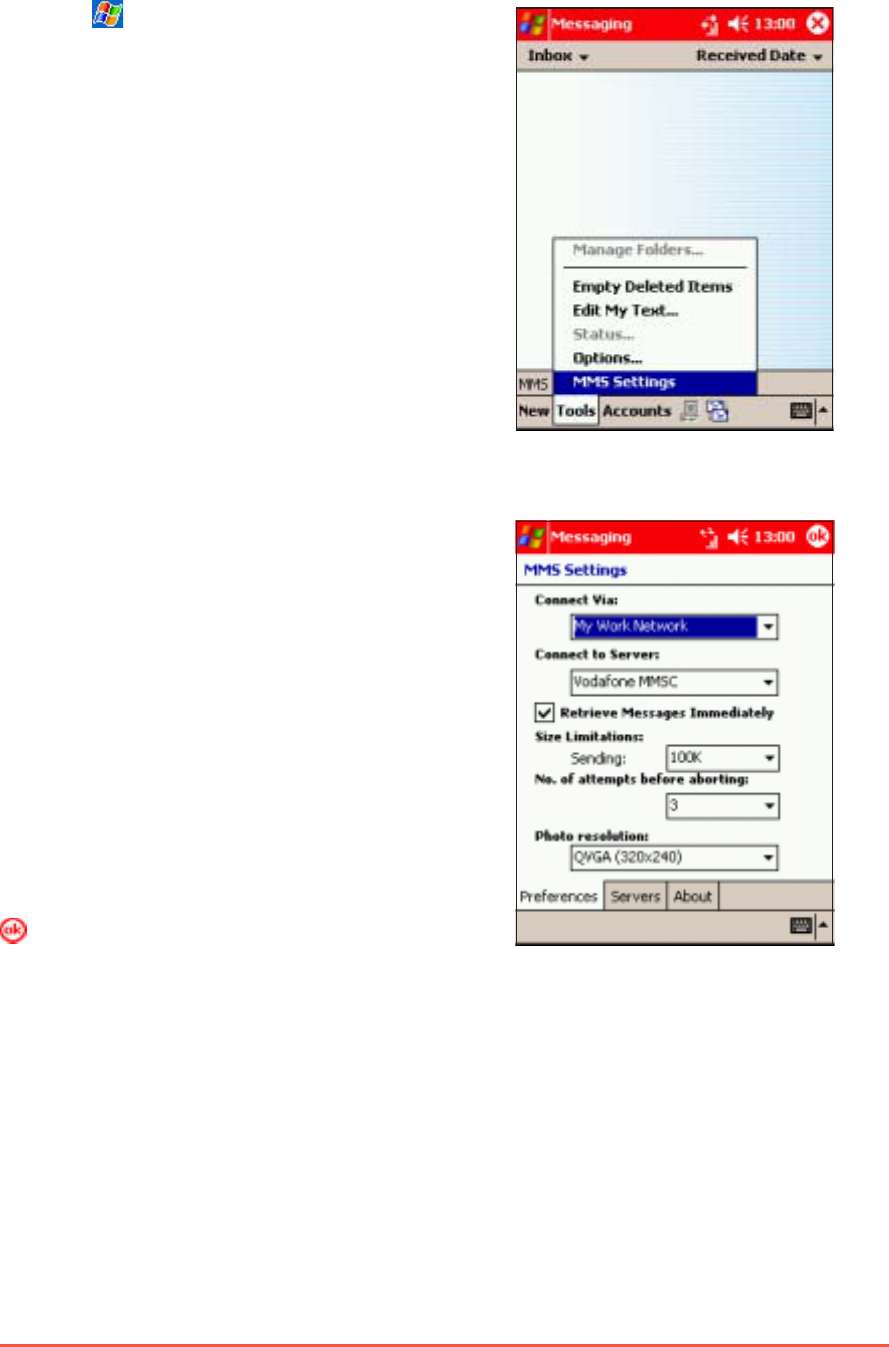
To change the MMS settings:To change the MMS settings:
To change the MMS settings:To change the MMS settings:
To change the MMS settings:
1. Tap , then tap MessagingMessaging
MessagingMessaging
Messaging.
2. Ensure you are in an MMS folder
(tap top left folder name).
3. Tap ToolsTools
ToolsTools
To o ls, then select MMSMMS
MMSMMS
MMS
SettingsSettings
SettingsSettings
Settings.
4. Select a tab to display its contents.
PreferencesPreferences
PreferencesPreferences
Preferences
The PreferencesPreferences
PreferencesPreferences
Preferences tab allows you to:
• specify the MMS connection
• specify the MMS connection server
• limit the size of MMS sending
• set the number of send attempts
before aborting
• set the resolution of the photo
attached to an MMS mesage.
Click the down arrow button after each
item to display additional options. Tap
to effect the changes.
6-8
P505 Pocket PC
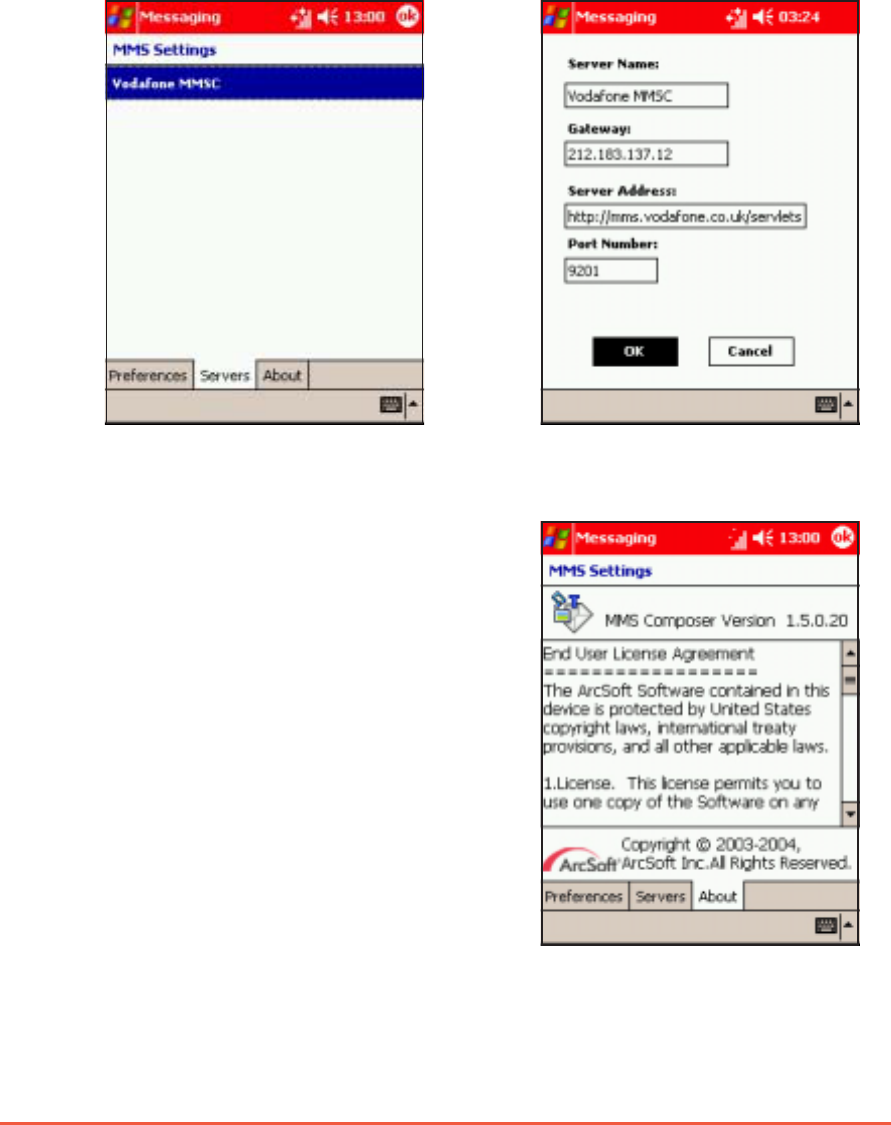
ServersServers
ServersServers
Servers
The ServersServers
ServersServers
Servers tab allows you specify or change the server name,
gateway, server address, and the port number to use in receiving
MMS messages.
You can change these settings by tapping the item, then type the
new values using the soft keyboard. Tap the OKOK
OKOK
O K button to effect the
changes.
AboutAbout
AboutAbout
About
The AboutAbout
AboutAbout
Abou t tab displays the MMS
Composer software infomation and
End User License Agreement.
Chapter 6: Messaging Features
6-9
Creating message accountsCreating message accounts
Creating message accountsCreating message accounts
Creating message accounts
You may want to add further messaging accounts, for example, an
account for private POP3 or IMAP4 e-mail messages. To do this:
1. From the Messaging screen,
tap AccountsAccounts
AccountsAccounts
Accounts, then select
New AccountNew Account
New AccountNew Account
New Account.
2. Enter your e-mail address,
then tap NextNext
NextNext
Next.
3. The P505 tries to
automatically configure the
device. If successful,
CompletedCompleted
CompletedCompleted
Completed appears in the
Status field. Tap NextNext
NextNext
Next to
continue. Otherwise, tap SkipSkip
SkipSkip
Skip
to manually configure the
device.

6-10
P505 Pocket PC
4. When prompted, key-in your
name, user name, and
password in the fields. Tap
NextNext
NextNext
Nex t when finished.
5. Select the account type from
the drop-down menu. Refer to
the accounts description
below.
Accounts descriptionAccounts description
Accounts descriptionAccounts description
Accounts description
• If you select MMSMMS
MMSMMS
M M S, all MMS messages received are automatically
stored in the Inbox folder of the created account.
• If you select POP3POP3
POP3POP3
PO P3 and you move e-mail messages to a folder you
created, the link is broken between the messages on the device
and their copies on the mail server. The next time you connect,
the mail server will see that the messages are missing from the
device Inbox and delete them from the server. This prevents you
from having duplicate copies of a message, but it also means that
you will no longer have access to messages that you move to
folders created from anywhere except the device.
• If you select IMAP4IMAP4
IMAP4IMAP4
IMA P4, the folders you create and the e-mail
messages you move are mirrored on the server. Therefore,
messages are available to you anytime you connect to your mail
server, whether it is from your device or desktop computer. This
synchronisation of folders occurs whenever you connect to your
mail server, create new folders, or rename/delete folders when
connected.
Chapter 6: Messaging Features
6-11
6. Type the account name on
the field, then tap NextNext
NextNext
Next when
finished.
7. Enter the incoming, outgoing
mail, and domain in the fields.
NOTENOTE
NOTENOTE
N O T E If you are unsure on the server information, check with your
system administrator, e-mail and/or telephony provider.
8. Tap the OptionsOptions
OptionsOptions
Options button to adjust the advanced account
settings. Otherwise, tap FinishFinish
FinishFinish
Finish.
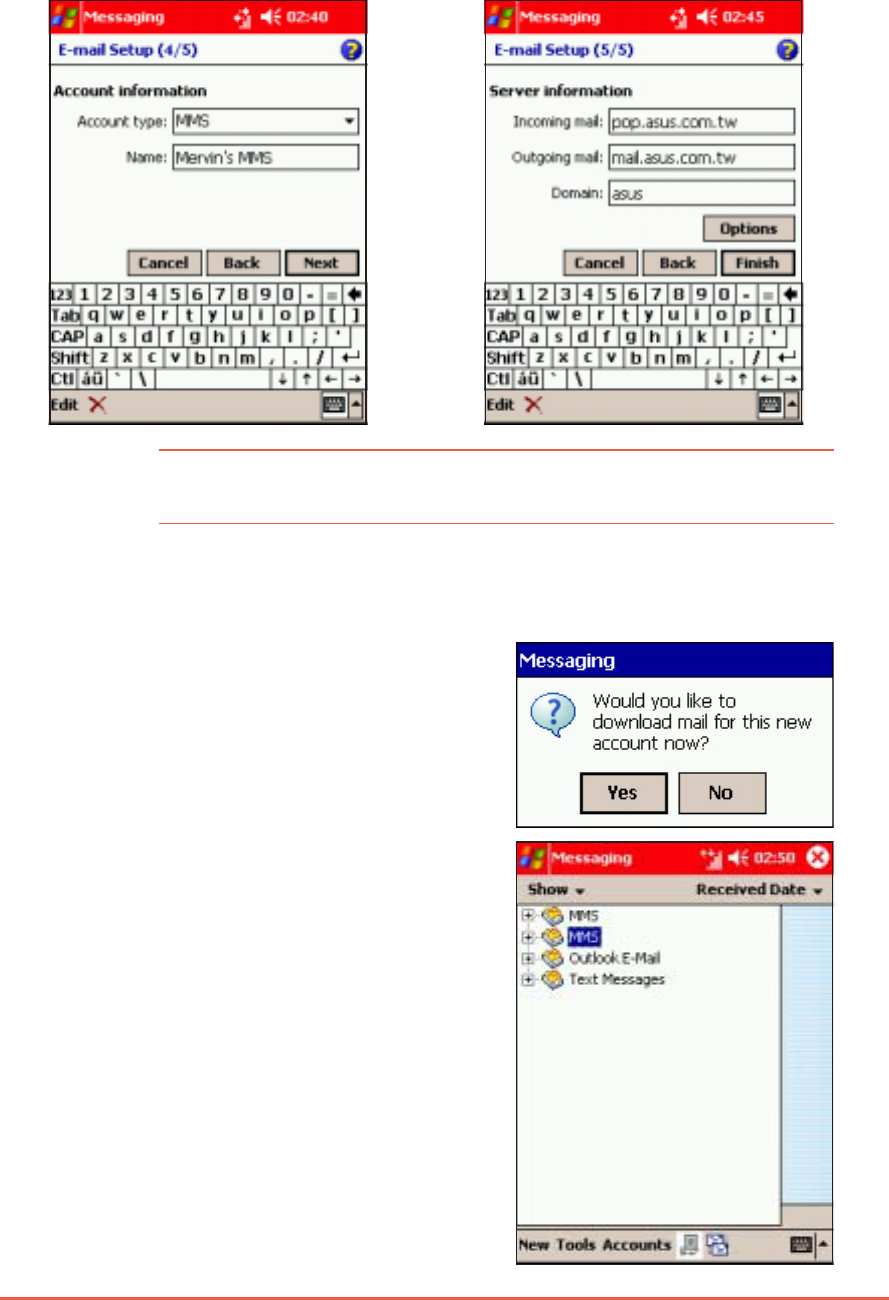
9. A MessagingMessaging
MessagingMessaging
Messaging window appears.
Tap YesYes
YesYes
Ye s to download messages
to the created account.
Otherwise, tap NoNo
NoNo
N o to close the
window.
10.Go to the Messaging main
screen, then tap InboxInbox
InboxInbox
Inbox to
display the created account.
11.Follow the same instructions to
create further accounts.
6-12
P505 Pocket PC
NOTENOTE
NOTENOTE
N O T E To send MMS you may have to subscribe tp your network
operator’s service. The P505 has been configured to the
Vodafone UK MMS settings.
Multimedia Messaging Service or MMS is a messaging feature that
allows you to send messages with text, audio, video, or animation
attachments to an MMS-enabled mobile phone or a computer with
e-mail capability. An MMS message is composed of one or many
slides. Each slide can contain a maximum of three objects (one text,
audio, and video file).
NOTENOTE
NOTENOTE
N O T E The default maximum file size for an MMS message is 10 Kb.
You may change the file size limit in the Preferences tab of
the MMS Settings menu. Your network operator may have a
limitation on the size of the message that can be sent. See
page 6-7 for details.
Composing an MMS messageComposing an MMS message
Composing an MMS messageComposing an MMS message
Composing an MMS message
To compose an MMS message:To compose an MMS message:
To compose an MMS message:To compose an MMS message:
To compose an MMS message:
1. Tap , then tap MessagingMessaging
MessagingMessaging
Messaging.
2. Ensure you are in an MMS
folder (tap top left folder
name).
3. Tap NewNew
NewNew
New.
Multimedia Messaging Service (MMS)Multimedia Messaging Service (MMS)
Multimedia Messaging Service (MMS)Multimedia Messaging Service (MMS)
Multimedia Messaging Service (MMS)
Tap to select
MMS account
Tap to compose new MMS message
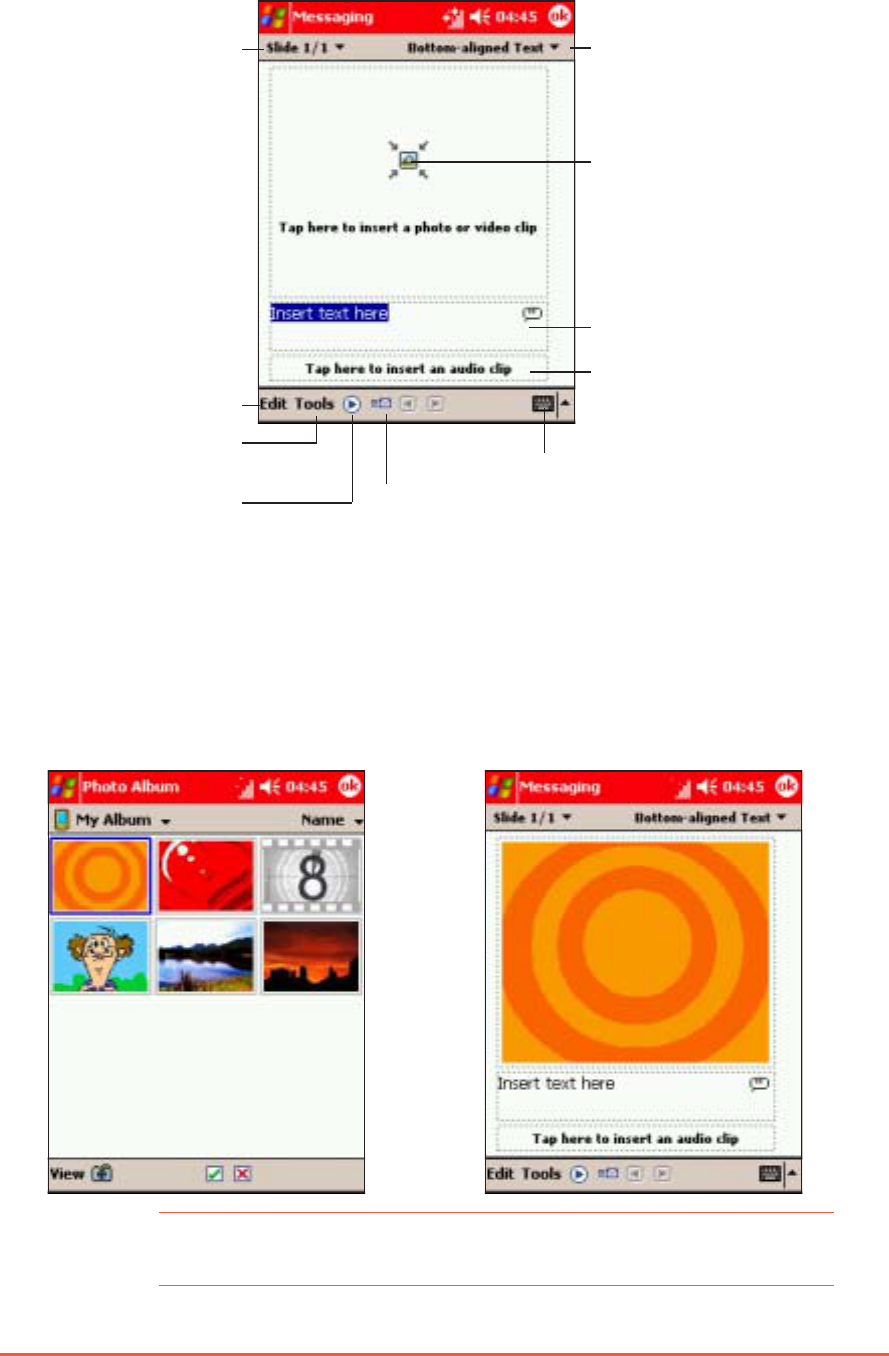
Chapter 6: Messaging Features
6-13
NOTENOTE
NOTENOTE
N O T E To change the picture inserted, tap on it and, from the Photo
Album application, tap on a different picture.
Tap to place the text
above or below the photo
or video file.
Tap to insert photo or
video clip
Tap to insert text
Tap to insert an audio file.
Tap to navigate
through the slides
Tap to edit the message
Tap to open the soft keyboard.
Tap to open the MMS
tools menu.
Tap to preview the
message.
Tap to send MMS message.
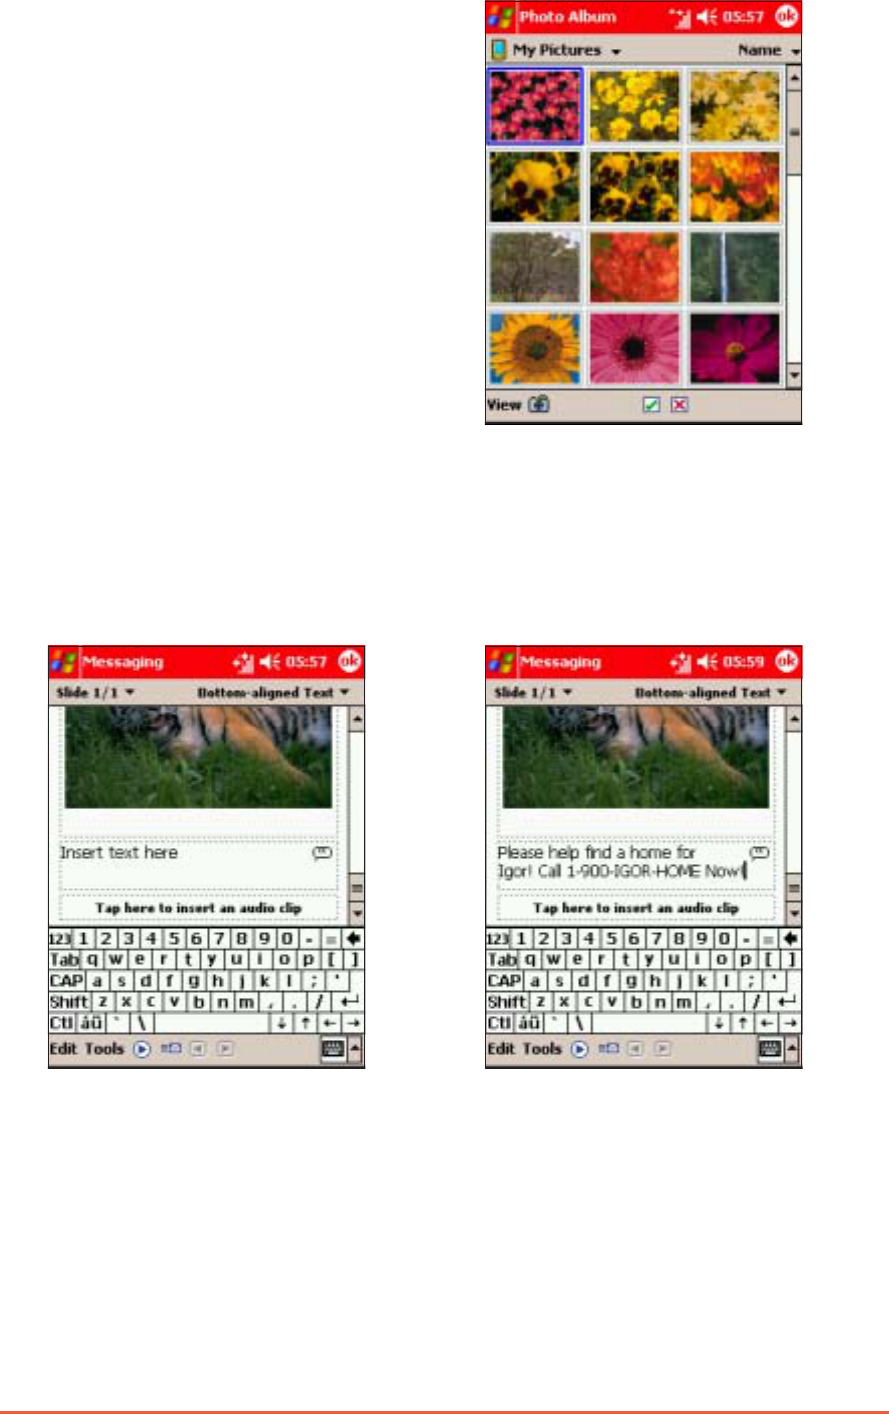
To add a photo or video clip from Photo Album:To add a photo or video clip from Photo Album:
To add a photo or video clip from Photo Album:To add a photo or video clip from Photo Album:
To add a photo or video clip from Photo Album:
1. Tap the photo or video clip
field to open the PhotoPhoto
PhotoPhoto
Photo
AlbumAlbum
AlbumAlbum
Album window.
2. Select and tap a photo or a
video clip to insert.
MMS message screenMMS message screen
MMS message screenMMS message screen
MMS message screen
6-14
P505 Pocket PC
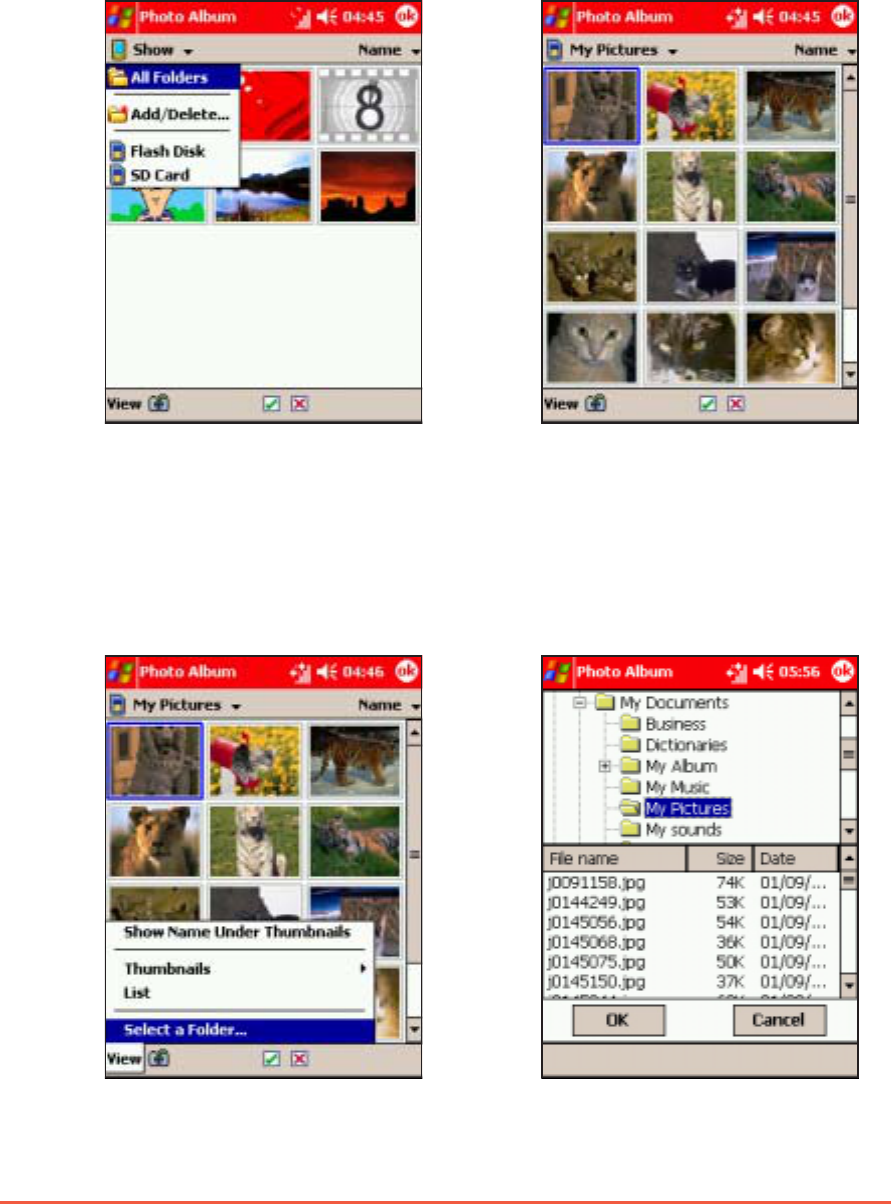
1. From the Photo Album, tap on
ShowShow
ShowShow
Show or the name of the
current folder selected (e.g. My
Album), then select SD CardSD Card
SD CardSD Card
SD Card.
To add a photo or video clip saved in the SD card:To add a photo or video clip saved in the SD card:
To add a photo or video clip saved in the SD card:To add a photo or video clip saved in the SD card:
To add a photo or video clip saved in the SD card:
2. Locate the photo or video
clip, then tap on it to insert.
1. From the Photo Album, tap
ViewView
ViewView
View, then Select aSelect a
Select aSelect a
Select a
FolderFolder
FolderFolder
Folder.
To add a photo or video clip saved elsewhere:To add a photo or video clip saved elsewhere:
To add a photo or video clip saved elsewhere:To add a photo or video clip saved elsewhere:
To add a photo or video clip saved elsewhere:
2. Locate the photo or video clip
folder, then tap OKOK
OKOK
OK.
Chapter 6: Messaging Features
6-15
3. The Photo Album displays the
contents of the selected folder.
Select and tap a photo or video
clip to insert.
To add text to the MMS message:To add text to the MMS message:
To add text to the MMS message:To add text to the MMS message:
To add text to the MMS message:
1. Tap the text field. The soft
keyboard appears.
2. Type the text using the input
panel, then press the input
panel icon when finished.
6-16
P505 Pocket PC
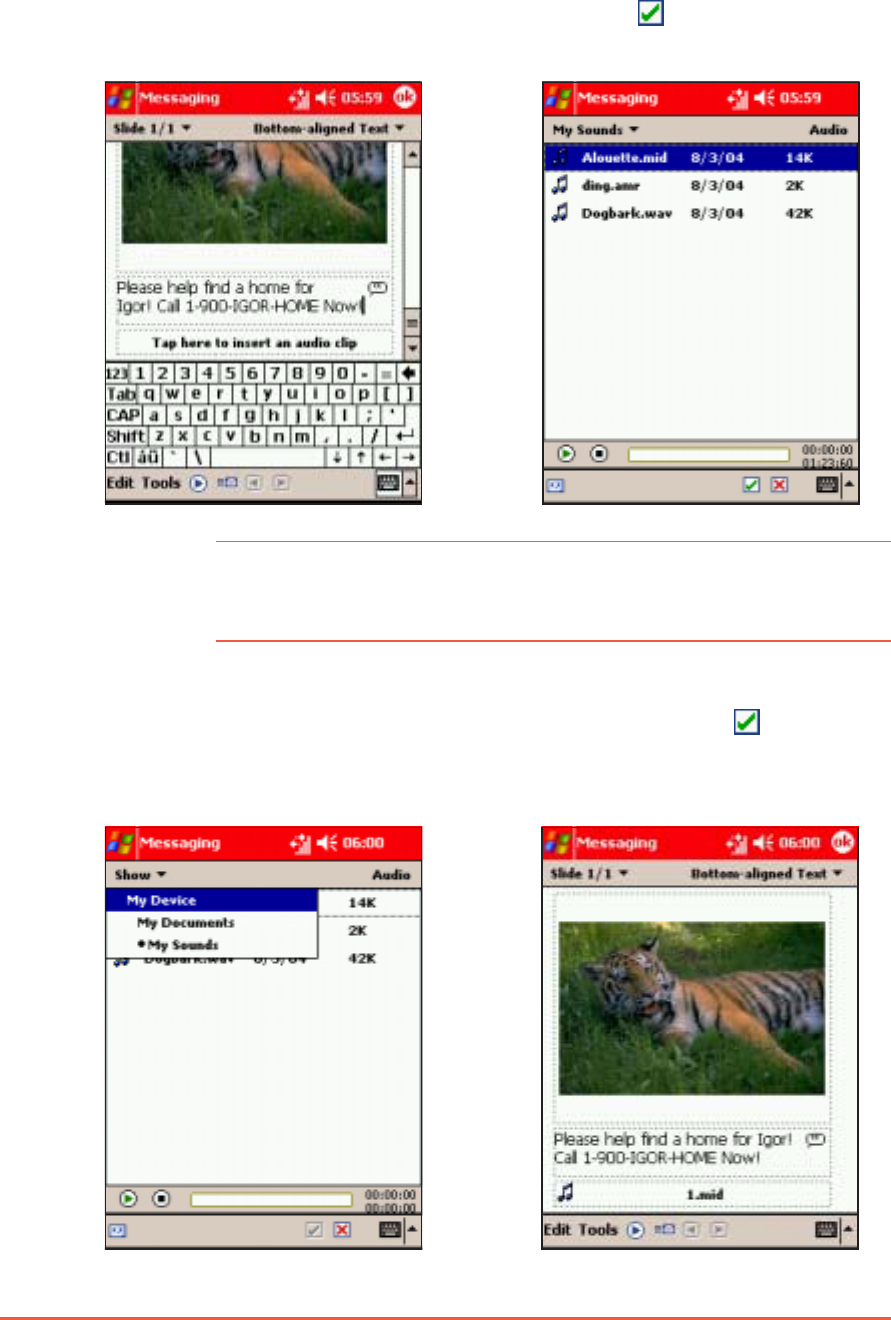
To add an audio clip to the MMS message:To add an audio clip to the MMS message:
To add an audio clip to the MMS message:To add an audio clip to the MMS message:
To add an audio clip to the MMS message:
1. Tap the audio clip field to
open the Pocket PC MyMy
MyMy
My
SoundsSounds
SoundsSounds
Sounds folder.
2. Select the audio clip to insert,
then tap .
3. If the audio clip you want to
insert is in another folder, tap
My SoundsMy Sounds
My SoundsMy Sounds
My Sounds, then select MyMy
MyMy
My
Device.Device.
Device.Device.
Device.
4. Locate the audio clip from the
folders, then tap to insert.
The audio clip is inserted to
the MMS message.
NOTENOTE
NOTENOTE
N O T E The audio clip automatically plays when selected. The
duration of the audio clip and the time elapsed are displayed
on the bottom right corner of the screen.
Chapter 6: Messaging Features
6-17
Previewing the messagePreviewing the message
Previewing the messagePreviewing the message
Previewing the message
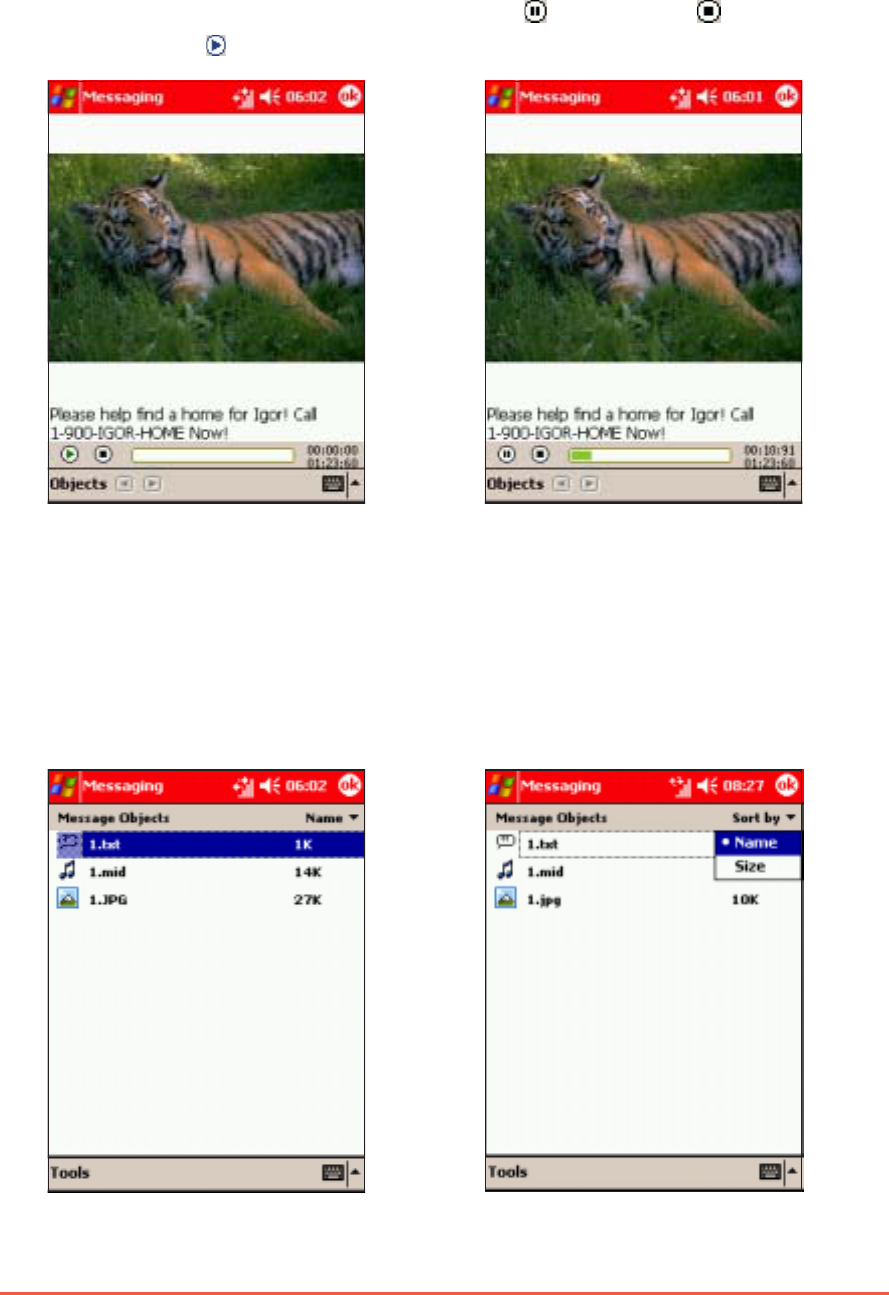
To preview the message:To preview the message:
To preview the message:To preview the message:
To preview the message:
1. After composing the MMS
message, tap to preview.
2. Tap to pause or to stop
the preview.
To preview the message objects individually:To preview the message objects individually:
To preview the message objects individually:To preview the message objects individually:
To preview the message objects individually:
1. Tap ObjectsObjects
ObjectsObjects
Objects from the MMS
preview window to display the
message objects.
2. Tap on an object to display.
You can sort the objects by
name or by file size by
tapping NameName
NameName
Name.
6-18
P505 Pocket PC
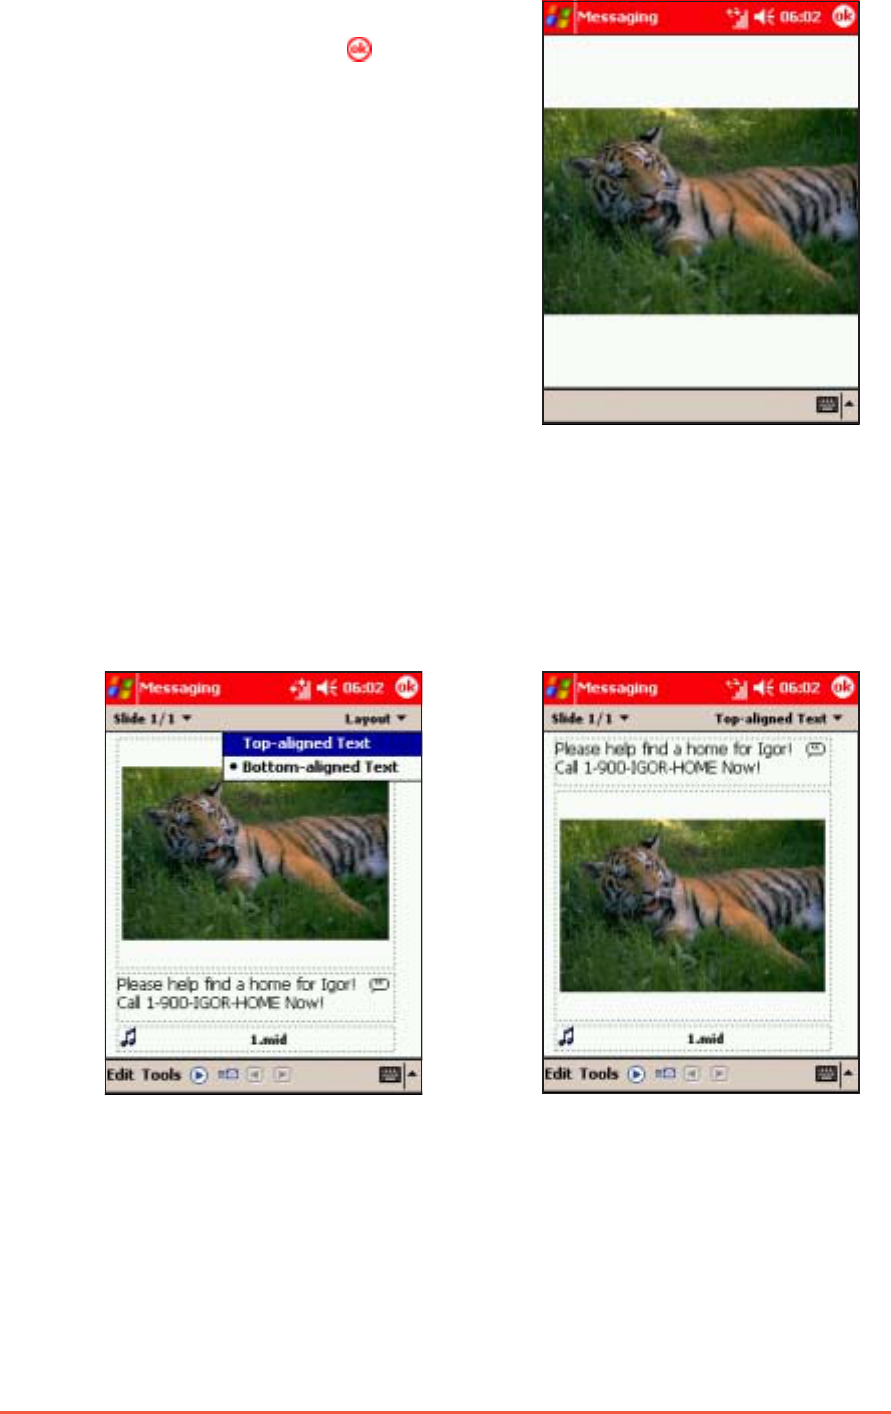
To reposition the text:To reposition the text:
To reposition the text:To reposition the text:
To reposition the text:
Select the position of the text from the top right drop-down
menu. This says Layout for new messages, and wither Top-aligned
Text or Bottom-aligned Text for existing messages
3. The screen displays the
selected object. Tap to
return to the MessageMessage
MessageMessage
Message
ObjectsObjects
ObjectsObjects
Objects window.
4. Do steps 2 to 3 to preview
another message object.
Chapter 6: Messaging Features
6-19
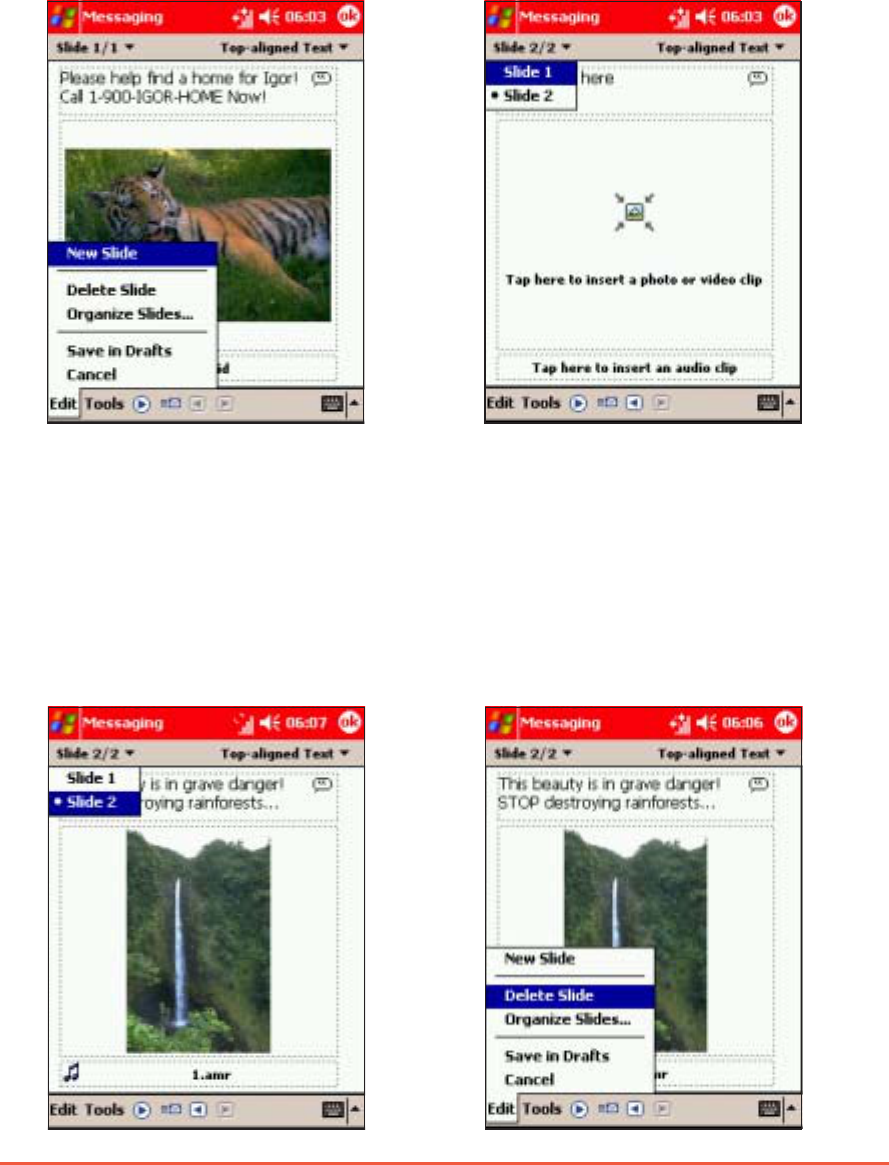
Creating and organising slidesCreating and organising slides
Creating and organising slidesCreating and organising slides
Creating and organising slides
To add another slide:To add another slide:
To add another slide:To add another slide:
To add another slide:
1. Tap EditEdit
EditEdit
Ed i t, then select NewNew
NewNew
New
SlideSlide
SlideSlide
Slid e from the menu. A new
slide window appears.
2. Insert text, photo or video clip,
and audio file to the new slide.
Refer to the “Composing an MMS
message” section for details.
3. To preview the MMS slide, follow the instructions given in the
previous section.
To delete a slide:To delete a slide:
To delete a slide:To delete a slide:
To delete a slide:
1. Select the slide you want to
delete from the top left
drop-down menu.
2. Tap EditEdit
EditEdit
Edit > Delete Slide Delete Slide
Delete Slide Delete Slide
Delete Slide to
delete the slide.
6-20
P505 Pocket PC
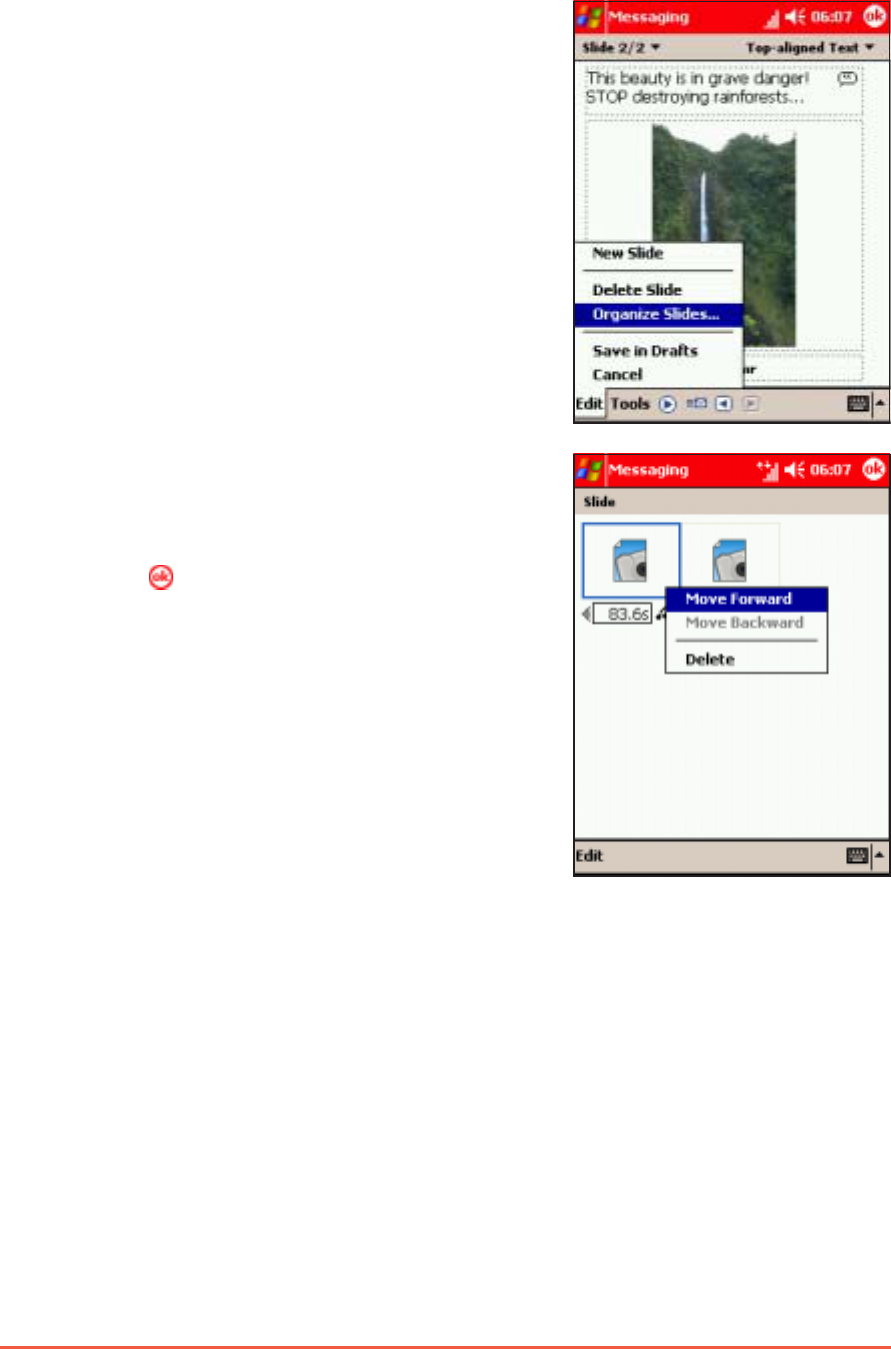
To organise multiple slides:To organise multiple slides:
To organise multiple slides:To organise multiple slides:
To organise multiple slides:
1. Tap Edit > Organize SlidesEdit > Organize Slides
Edit > Organize SlidesEdit > Organize Slides
Edit > Organize Slides. This
displays a thumbnail of each slide.
2. Tap and hold a slide to move it
forward or backward in the slide
sequence, or to delete.
3. Tap .
Chapter 6: Messaging Features
6-21
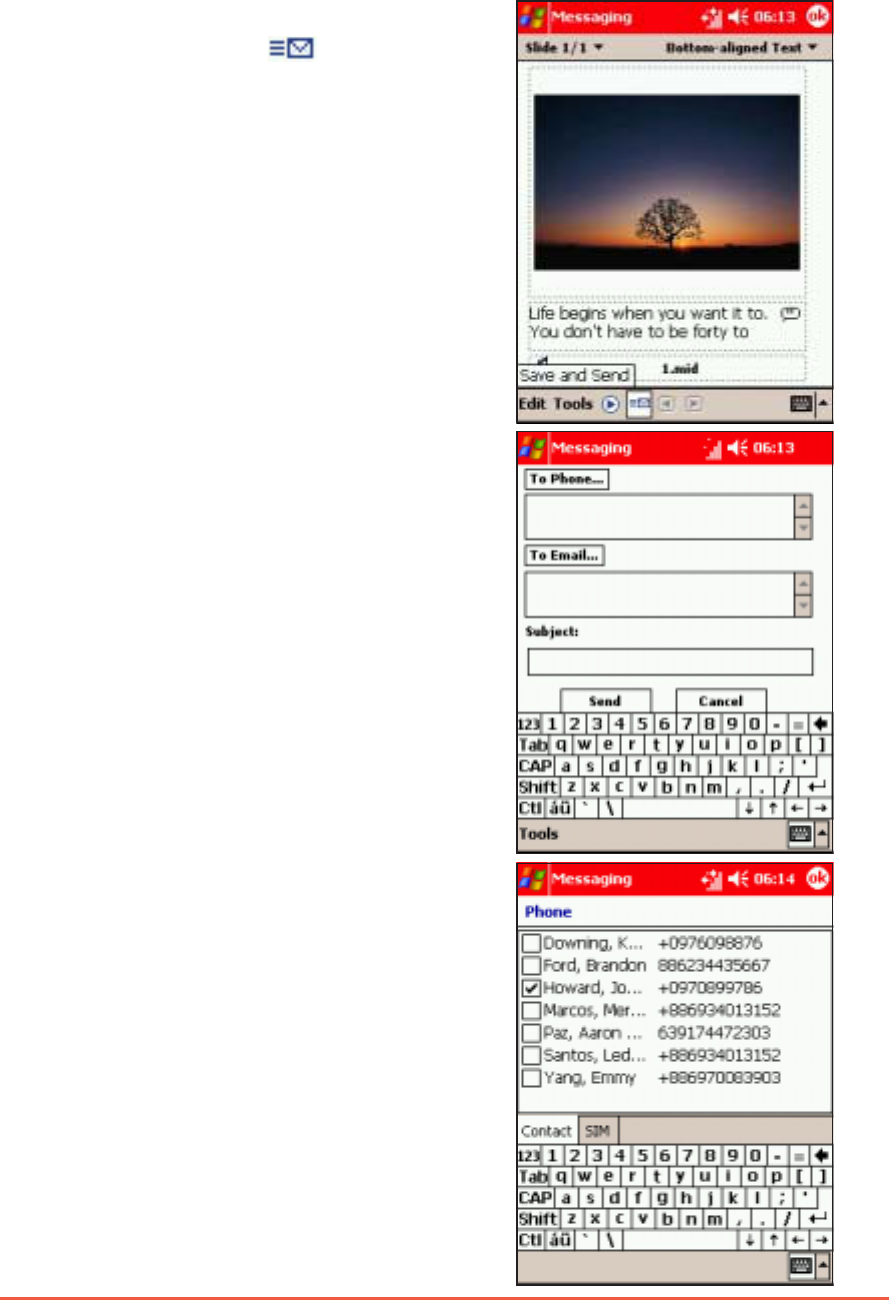
Sending the MMS messageSending the MMS message
Sending the MMS messageSending the MMS message
Sending the MMS message
To send the MMS message to a mobile phone:To send the MMS message to a mobile phone:
To send the MMS message to a mobile phone:To send the MMS message to a mobile phone:
To send the MMS message to a mobile phone:
1. When you are ready to send the
MMS message, tap to save and
send the message.
2. Enter the phone number(s) to which
you want to send the message
(separate each contact numbers
with ;).
OROR
OROR
OR
Tap the To Phone To Phone
To Phone To Phone
To Phone button to see
your contacts, tap on the check box
to select the recipients for your
message.
SIM contacts can be selected by
tapping on the tab.
6-22
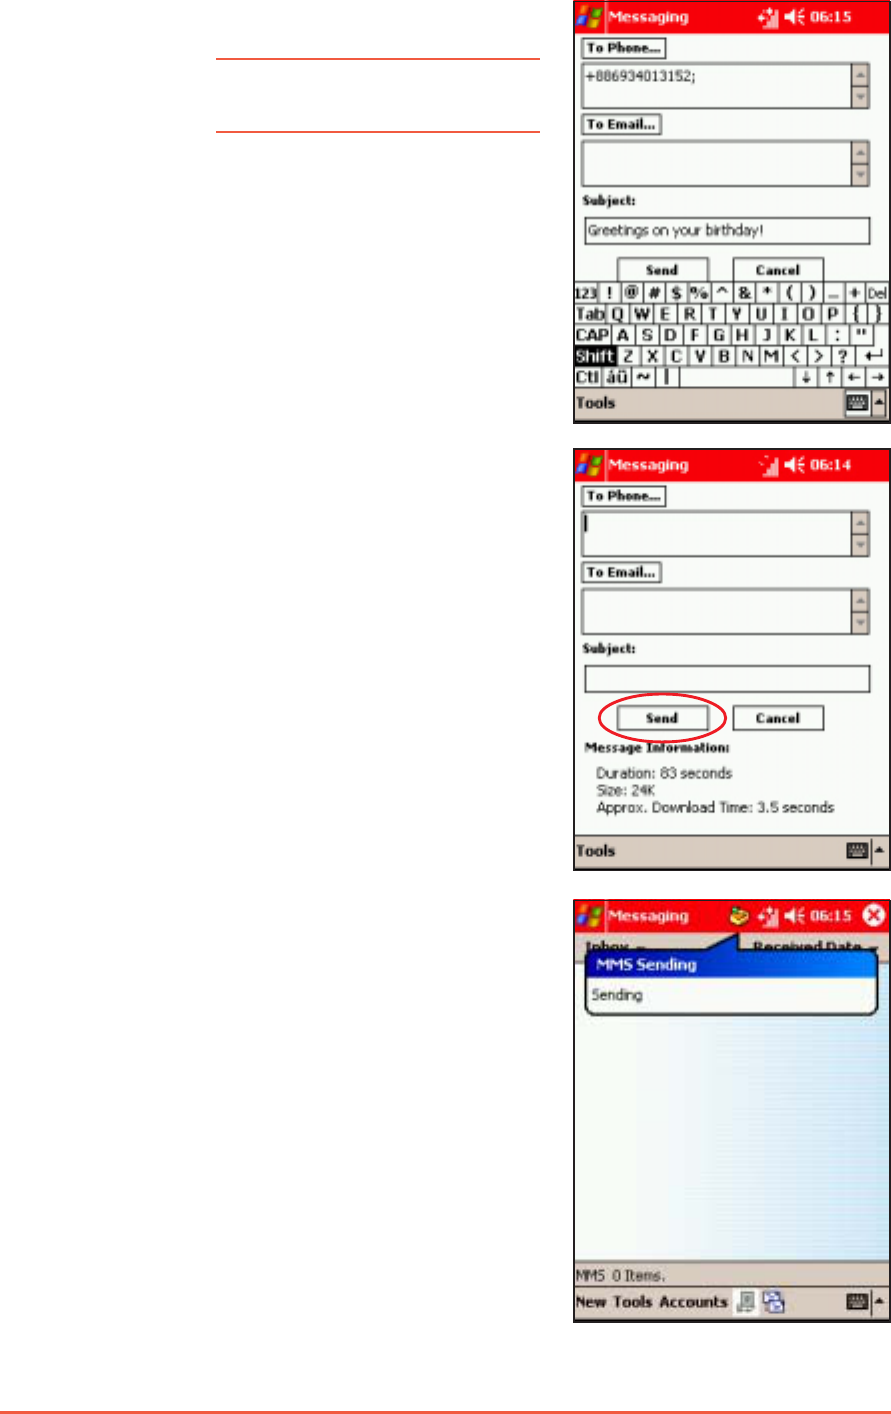
P505 Pocket PC
4. Tap the SendSend
SendSend
Se nd button.
The outbox icon appears to indicate
that the MMS message is being sent
to the recipients.
3. Enter the subject information.
NOTENOTE
NOTENOTE
N O T E Hide the input panel to see
the message information.
Chapter 6: Messaging Features
6-23
3. Enter the subject information.
NOTENOTE
NOTENOTE
N O T E Hide the input panel to
see the message
information.
4. Tap the SendSend
SendSend
Se nd button.
The outbox icon appears to
indicate that the MMS message
is being sent to the recipients.
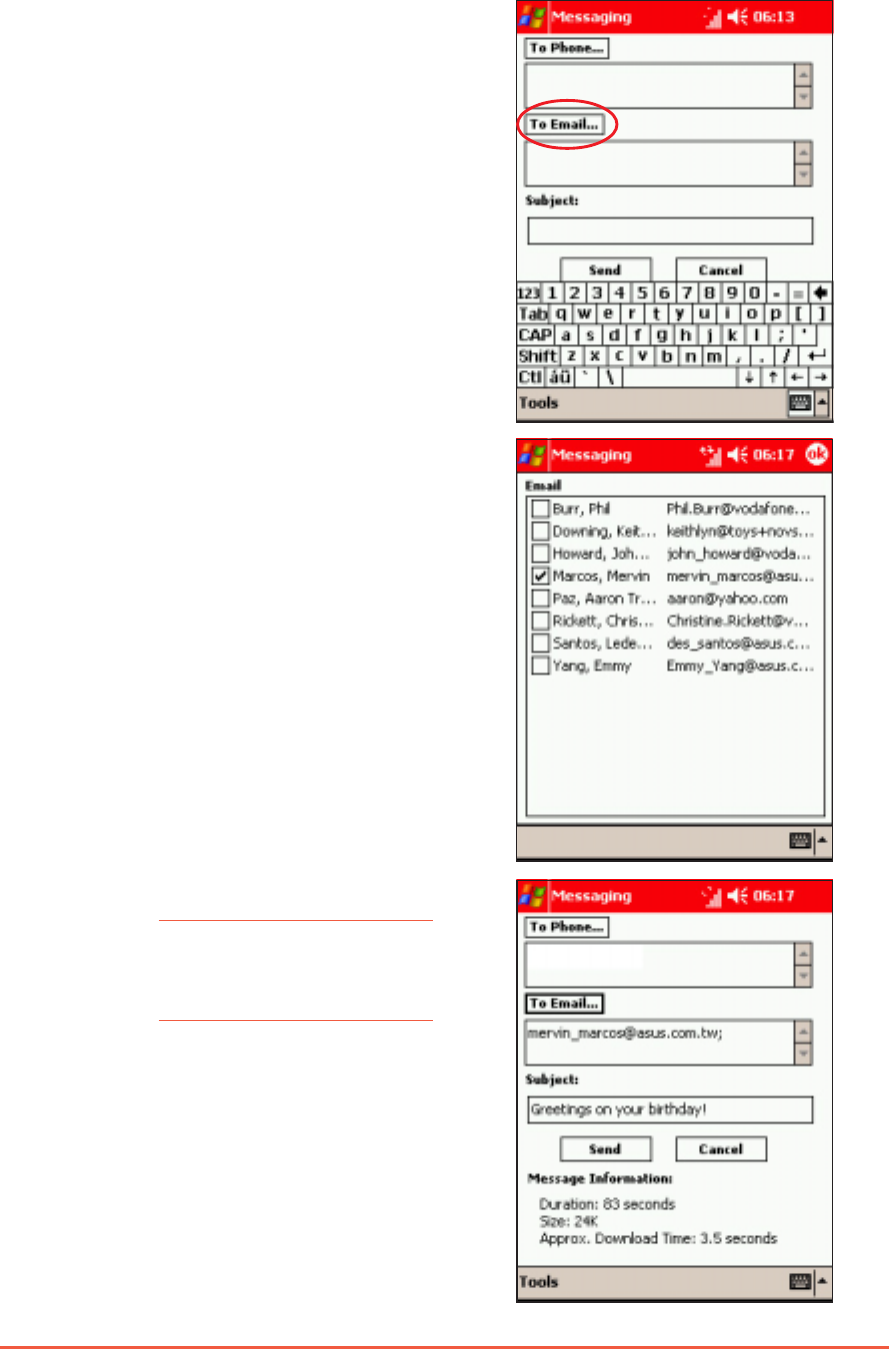
1. Follow step 1 of the previous
section.
2. Enter the e-mail address(es) to
which you want to send the
message (separate each e-mail
address with ;).
OROR
OROR
OR
To send the MMS message to an e-mail address:To send the MMS message to an e-mail address:
To send the MMS message to an e-mail address:To send the MMS message to an e-mail address:
To send the MMS message to an e-mail address:
Tap the To Email To Email
To Email To Email
To Email button to
see your contacts, tap on the
check box to select the
recipients for your message.
6-24
P505 Pocket PC
ShortShort
ShortShort
Short MessagMessag
MessagMessag
Messagee
ee
e Service ( Service (
Service ( Service (
Service (SS
SS
SMS)MS)
MS)MS)
MS)
Short Message Service or SMS allows you to send text messages to
almost any mobile phone, e-mail, or even fax account. In MessagingMessaging
MessagingMessaging
Messaging,
you can manage SMS messages using the Text Messages account.
Opening the Text Messages accountOpening the Text Messages account
Opening the Text Messages accountOpening the Text Messages account
Opening the Text Messages account
To open the Text Messages account:To open the Text Messages account:
To open the Text Messages account:To open the Text Messages account:
To open the Text Messages account:
1. Tap , then tap MessagingMessaging
MessagingMessaging
Messaging.
2. Ensure you are in an SMS folder
(tap top left folder name).
3. Tap NewNew
NewNew
N e w to compose a new SMS
message.
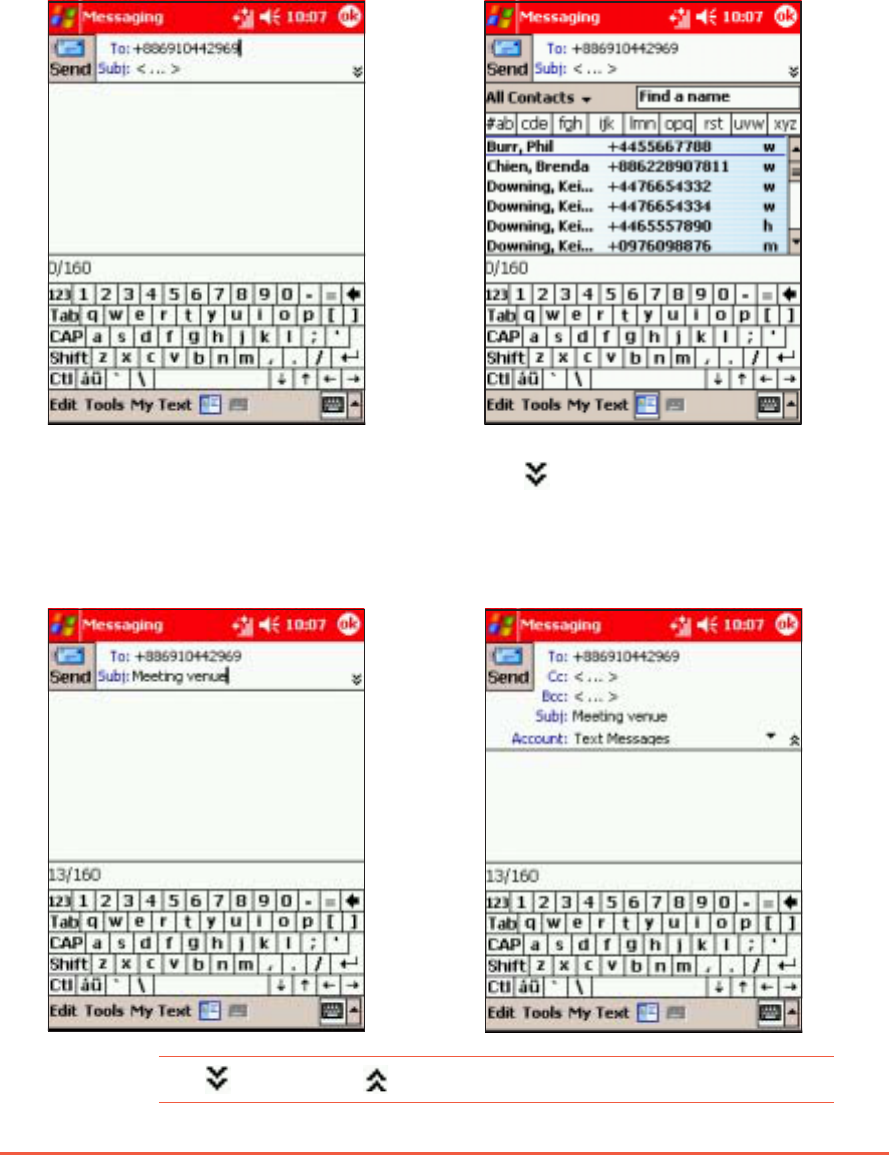
SMS main screenSMS main screen
SMS main screenSMS main screen
SMS main screen
Tap to compose new SMS message
Tap to compose
new SMS message
Tap to open text
message tools Tap to insert preset
text messages
Tap to display the
phone contacts
Tap to select the
message recipient(s)
Tap to enter the
message subject
Tap to display the Cc:
and Bcc: fields
Message section
Character count
Chapter 6: Messaging Features
6-25
4. Tap to display the Cc:Cc:
Cc:Cc:
Cc: and
Bcc:Bcc:
Bcc:Bcc:
Bc c : fields, then select the
recipients you want the
message copied to.
Creating text messagesCreating text messages
Creating text messagesCreating text messages
Creating text messages
To compose a text message:To compose a text message:
To compose a text message:To compose a text message:
To compose a text message:
1. Tap the To:To:
To:To:
To : field to enter the
message recipient(s)
manually, or tap over To:To:
To:To:
To: to
display the contact list.
2. Enter the mobile phone
number or select from the
contact list.
3. Tap Subj:Subj:
Subj:Subj:
Su bj : , then type
message the subject.
NOTENOTE
NOTENOTE
NOTE Tap to open, or to close the Cc: and Bcc: fields.
6-26
P505 Pocket PC
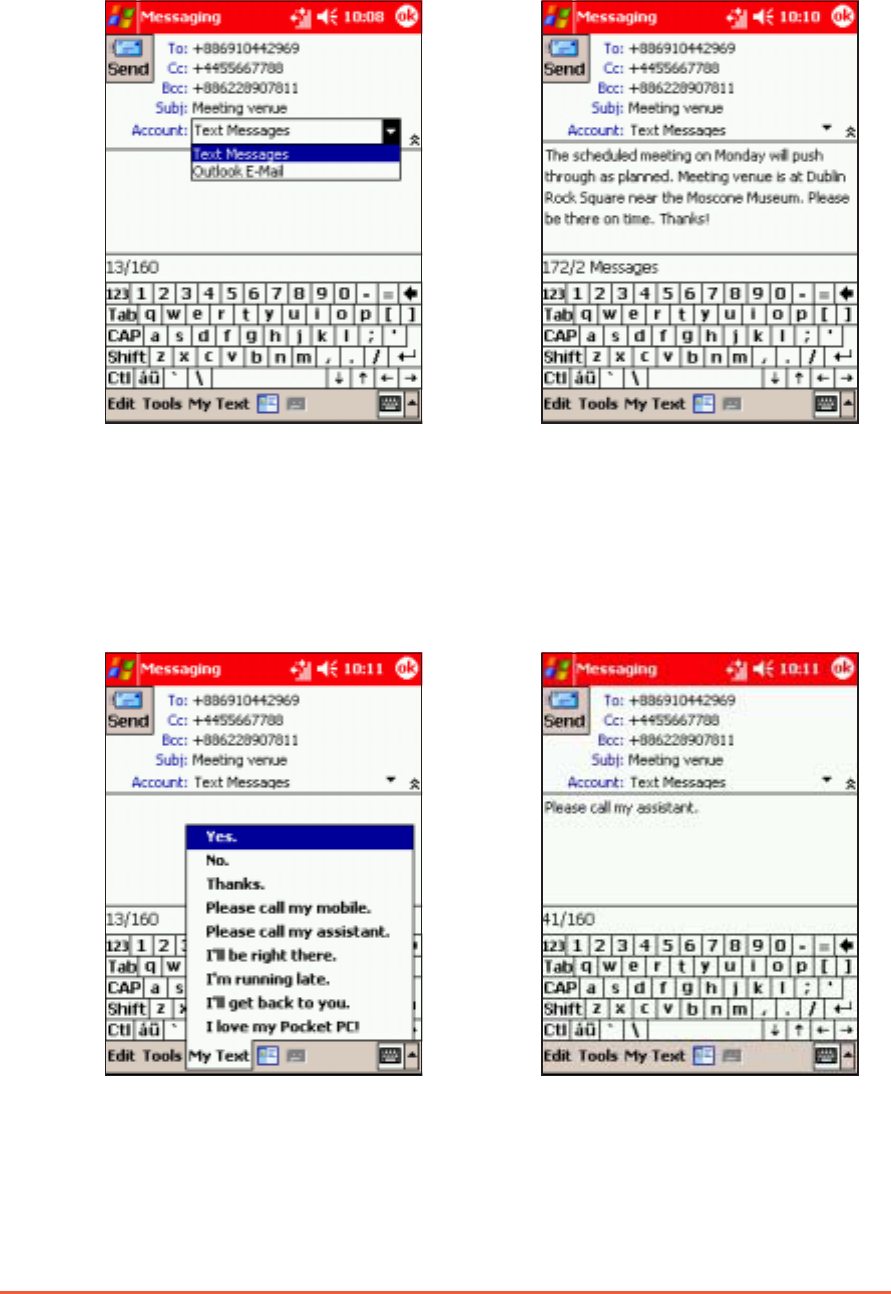
6. Tap the message section,
then type the message.
To insert a preset textTo insert a preset text
To insert a preset textTo insert a preset text
To insert a preset text
1. From the Text Message main
window, tap My TextMy Text
My TextMy Text
My Text.
2. Select a preset message from
the list to insert.
5. Tap the AccountsAccounts
AccountsAccounts
Accounts field
down arrow, then select TextText
TextText
Text
MessagesMessages
MessagesMessages
Messages.
Chapter 6: Messaging Features
6-27
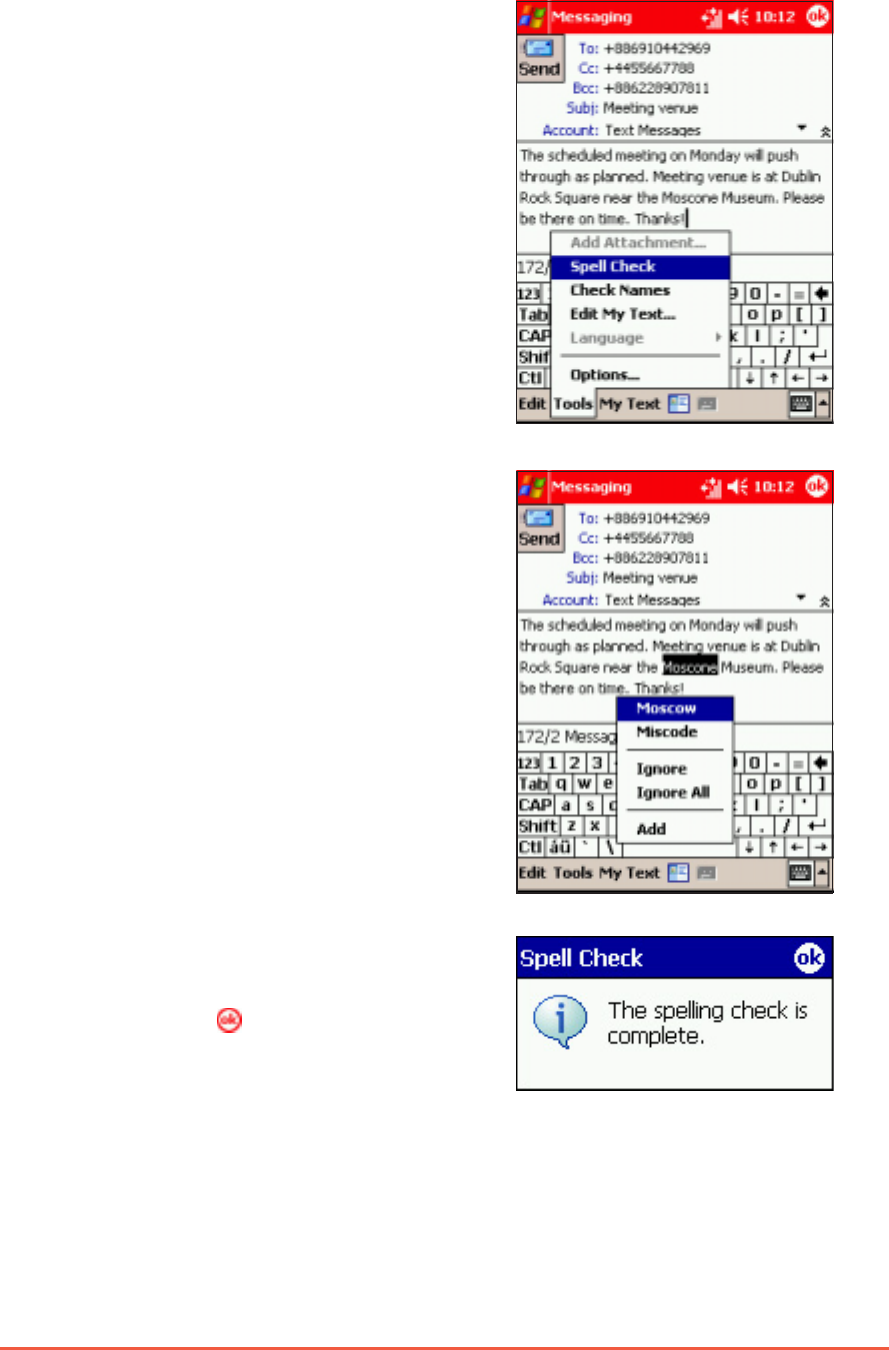
To use the spell check:To use the spell check:
To use the spell check:To use the spell check:
To use the spell check:
1. After composing the text, tap
ToolsTools
ToolsTools
To o ls, then select SpellSpell
SpellSpell
Spell
CheckCheck
CheckCheck
Check.
2. The spell checker searches for
misspelled words, then displays
an alternative word list. Tap the
correct word to replace, or tap
IgnoreIgnore
IgnoreIgnore
Ignore to leave the word
unchanged.
3. A Spell Check Spell Check
Spell Check Spell Check
Spell Check window
appears when spell check is
complete. Tap to close.
6-28
P505 Pocket PC
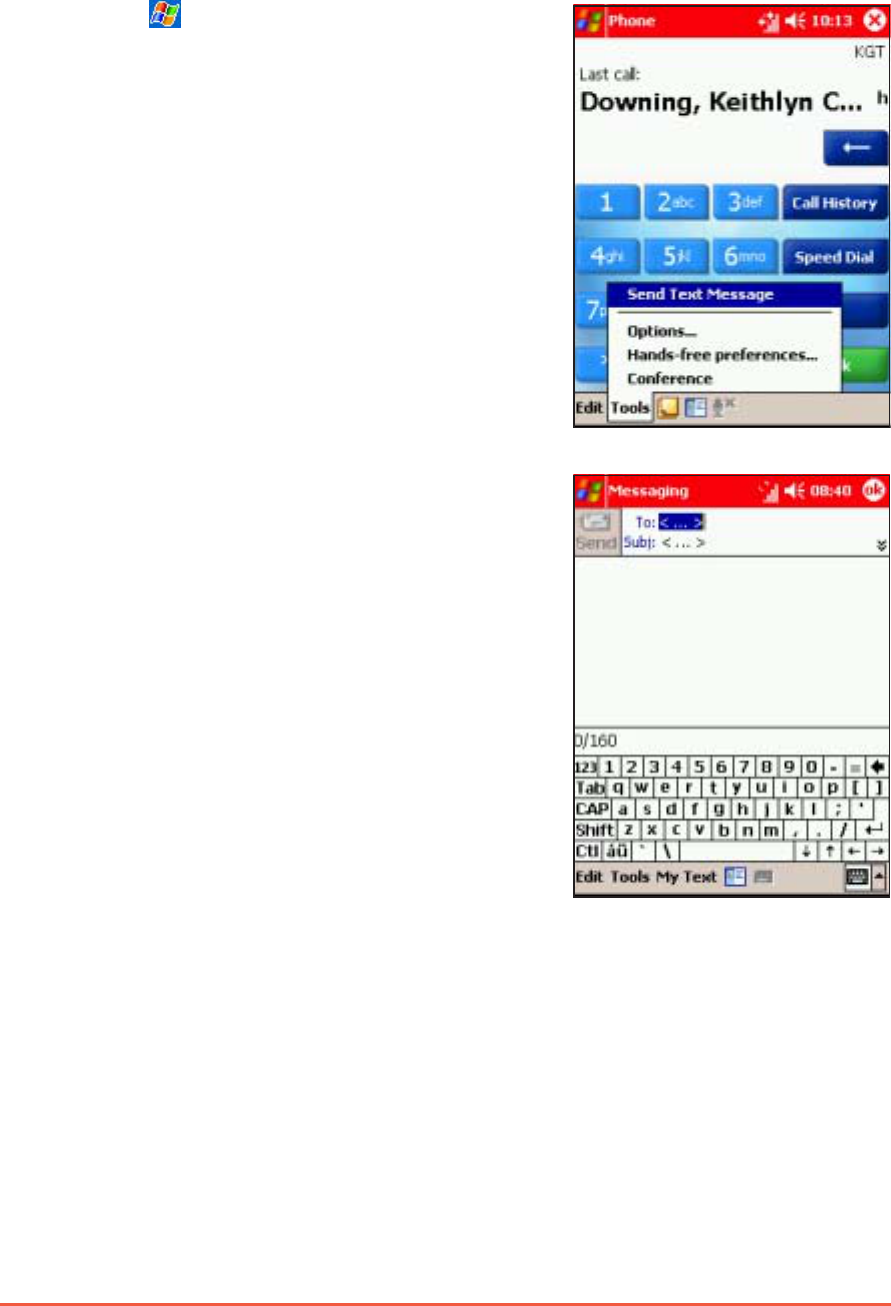
To compose a text message from the PhoneTo compose a text message from the Phone
To compose a text message from the PhoneTo compose a text message from the Phone
To compose a text message from the Phone
application:application:
application:application:
application:
1. Tap , then tap PhonePhone
PhonePhone
Phone.
2. Tap ToolsTools
ToolsTools
To o ls, then select SendSend
SendSend
Send
Text MessageText Message
Text MessageText Message
Text Message.
3. The MessagingMessaging
MessagingMessaging
Messaging window
appears. Follow the instructions
in the previous sections to
compose the message.

Chapter 6: Messaging Features
6-29
Sending the text messageSending the text message
Sending the text messageSending the text message
Sending the text message
To send the text message:To send the text message:
To send the text message:To send the text message:
To send the text message:
1. When finished, tap SendSend
SendSend
Send to
send the text message to the
recipient(s).
The SMS message icon
appears to indicate that the
SMS message is being sent to
the recipients.
6-30
P505 Pocket PC
Changing the text message settingsChanging the text message settings
Changing the text message settingsChanging the text message settings
Changing the text message settings
To change the text message options:To change the text message options:
To change the text message options:To change the text message options:
To change the text message options:
2. Select a tab, then adjust the
settings accordingly. Tap
when finished.
See page 6-7 for details.
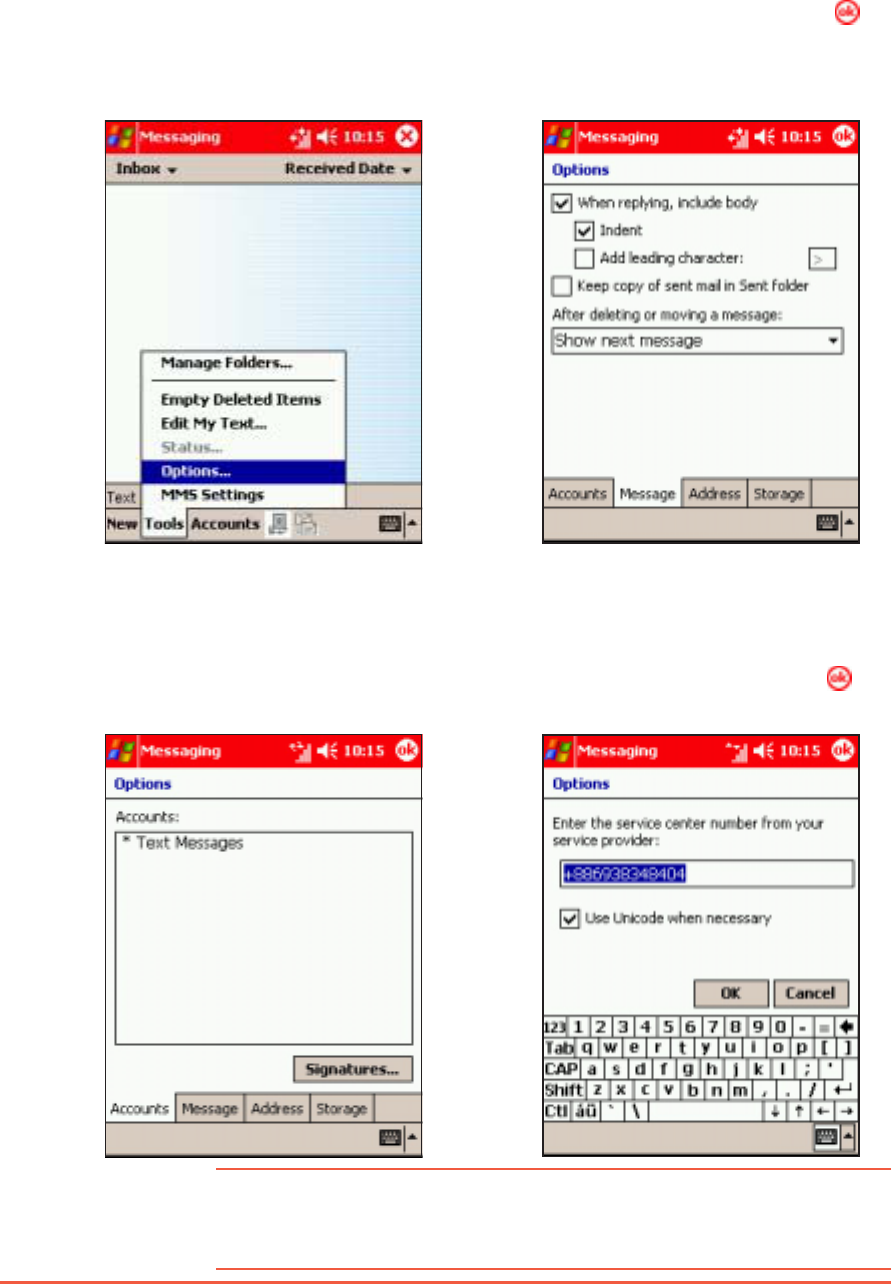
1. In the OptionsOptions
OptionsOptions
Options window, tap
the AccountsAccounts
AccountsAccounts
Accounts tab, then tap
Text MessagesText Messages
Text MessagesText Messages
Text Messages.
2. Tap the new SMS service
center number, then tap .
To change the SMS service center number:To change the SMS service center number:
To change the SMS service center number:To change the SMS service center number:
To change the SMS service center number:
1. In the Messaging main
window, select the TextText
TextText
Text
MessageMessage
MessageMessage
Messag e account, tap
ToolsTools
ToolsTools
To o ls, then select OptionsOptions
OptionsOptions
Options.
CAUTIONCAUTION
CAUTIONCAUTION
C A U T I O N The device is pre-configured with the Vodafone UK service
center number. You should only change this if you change
providers. Contact your provider for more information.

Chapter 6: Messaging Features
6-31
E-mailE-mail
E-mailE-mail
E-mail
Send and receive e-mail messages by:
• synchronising with Microsoft Exchange or Microsoft Outlook on
your desktop computer by cradle, infrared, or Bluetooth™.
• connecting directly with your Microsoft
®
Exchange/Outlook or
POP3/IMAP service using GPRS (contact your system
administrator, service provider, or network provider for more
details).
Synchronising e-mail messagesSynchronising e-mail messages
Synchronising e-mail messagesSynchronising e-mail messages
Synchronising e-mail messages
Once ActiveSync
®
has been installed on your desktop computer you
can link your desktop computer to your P505 using the cradle. You
can also use infrared or Bluetooth™, if your computer has these
capabilities (See chapter 3). Each time you connect, the P505 and
computer compare e-mail content and synchronise, so you have the
information on each device.
During synchronisation:During synchronisation:
During synchronisation:During synchronisation:
During synchronisation:
• Messages are copied from the mail folders of Exchange or Outlook
on your desktop computer to the ActiveSync folder in Inbox on
your device. By default, you will receive messages from the past
five days only, the first 100 lines of each message, and file
attachments of less than 100KB in size.
• E-mail messages in the Outbox folder on your device are
transferred to Exchange or Outlook, then sent by the computer.
• E-mail messages in subfolder must be selected in ActiveSync on
your desktop computer in order to be transferred.
NOTENOTE
NOTENOTE
N O T E You can also synchronise e-mail messages with your desktop
computer from a remote location. See Chapter 3 for details.
You can change how messages are transferred, for example, transfer
all content or download messages from subfolders by changing the
appropriate settings in ActiveSync
®
on your desktop computer.
Connecting directly to an e-mail serverConnecting directly to an e-mail server
Connecting directly to an e-mail serverConnecting directly to an e-mail server
Connecting directly to an e-mail server
To send and receive messages using GPRS, you need to set up a
connection to the network and your e-mail service or your e-mail
provider.

6-32
P505 Pocket PC
When you connect to the e-mail server, new messages are
downloaded to the Outlook E-mail Outlook E-mail
Outlook E-mail Outlook E-mail
Outlook E-mail account’s InboxInbox
InboxInbox
Inbox folder,
messages in the device OutboxOutbox
OutboxOutbox
Outbox folders are sent, and messages that
have been deleted on the e-mail server are removed from the device
InboxInbox
InboxInbox
Inbox folder.
Messages that you receive directly from an e-mail server are linked to
your e-mail server rather than your desktop computer. When you
delete a message on your device, it is also deleted from the e-mail
server the next time you connect based on the settings you selected
in ActiveSync
®
.
You can work online or offline. When working online, you read and
respond to messages while connected to the e-mail server. Messages
are sent as soon as you tap SendSend
SendSend
Se n d, which saves space in your device.
When working offline, once you have downloaded new message
headers or partial messages, you can disconnect from the e-mail
server and decide which messages to download completely. The next
time you connect, Inbox downloads the complete messages you have
marked for retrieval and sends the messages you have composed.
Chapter 6: Messaging Features
6-33
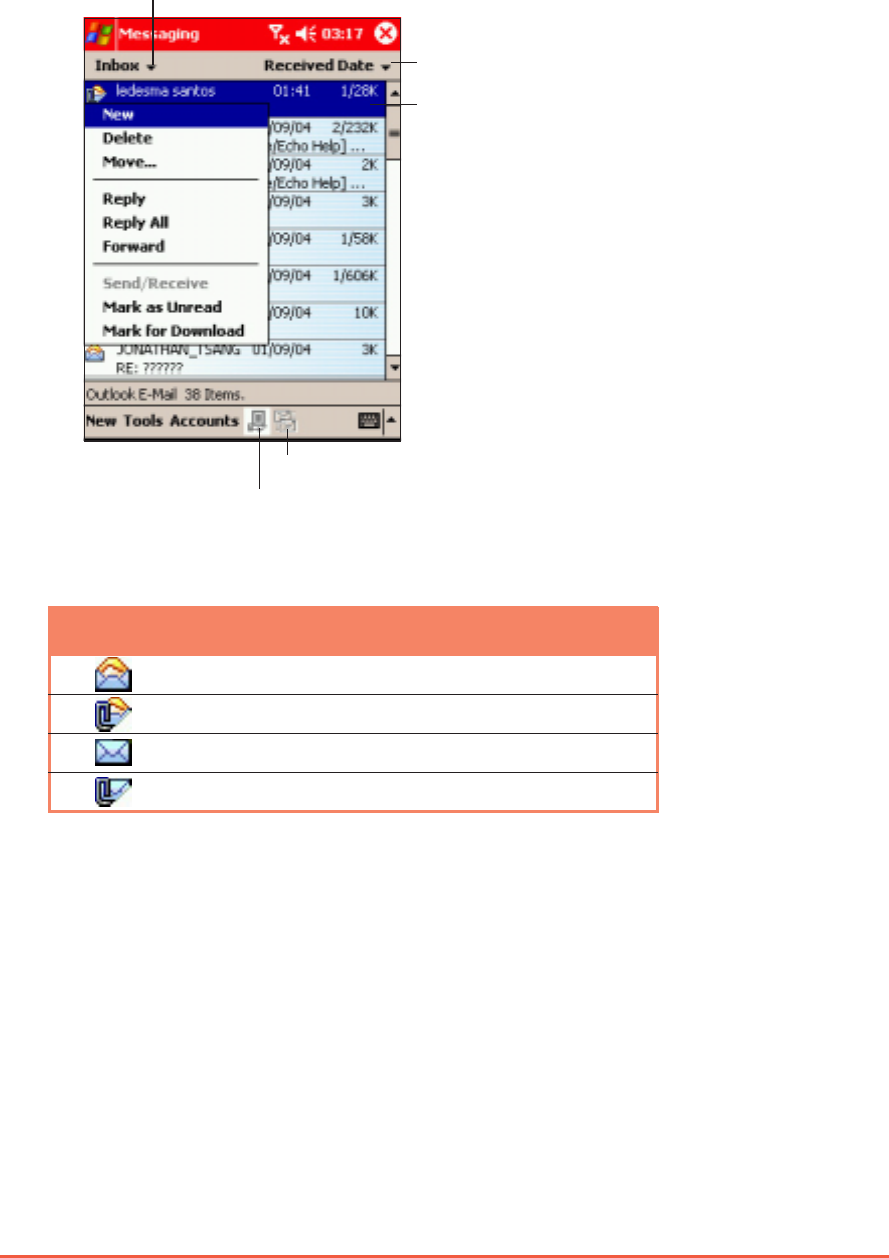
Tap to select the sort
order for the messages
Tap and hold to display a
pop-up menu of actions
Tap to connect, and to send/receive e-mail
Tap to connect to the selected service
Tap to select the folder you wish to display
Using the InboxUsing the Inbox
Using the InboxUsing the Inbox
Using the Inbox
The messages you receive are displayed in the Inbox. By default, the
most recently received messages are displayed first in the list.
Take note of the following icons that appear before each message:
IconIcon
IconIcon
Icon Indicates that the e-mail messageIndicates that the e-mail message
Indicates that the e-mail messageIndicates that the e-mail message
Indicates that the e-mail message
has already been read
with attachment(s) has already been read
has not been read
with attachment(s) has not been read
6-34
P505 Pocket PC
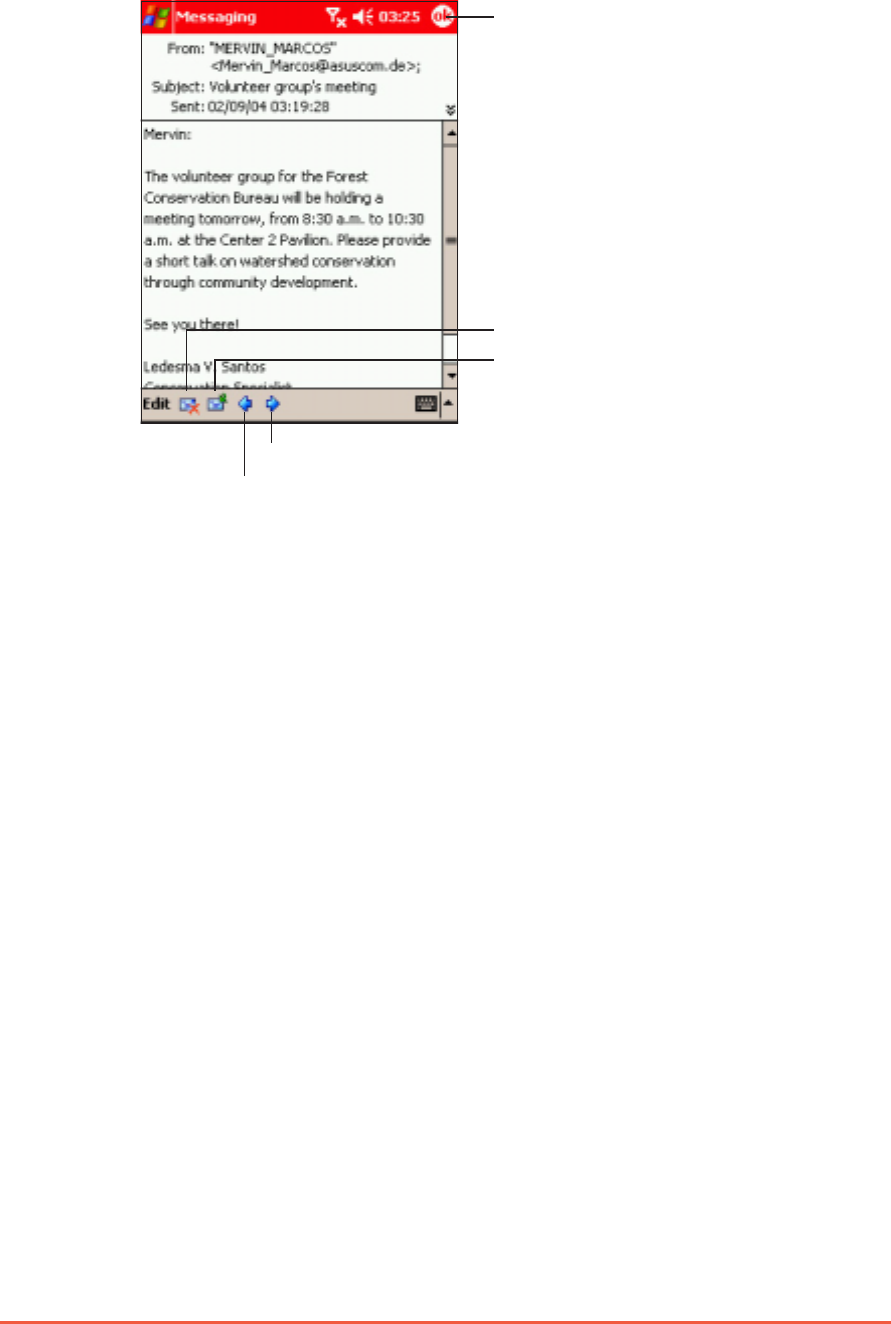
When you receive a message, tap it to open. Unread messages are
displayed boldface.
Tap to return to the message
list
Tap to delete this message
Tap to reply to or forward this message
Tap to view the next message
Tap to view the previous message
When you connect to your e-mail server or synchronise with your
desktop computer, by default, you will receive messages from the
last five days only, the first 100 lines of each new messages, and file
attachments of less than 100KB in size. The original messages
remain on the e-mail server or your desktop computer.
You can mark the messages that you want to retrieve in full during
your next synchronisation or e-mail server connection. In the message
list, tap and hold the message that you want to retrieve. On the
pop-up menu, tap Mark for DownloadMark for Download
Mark for DownloadMark for Download
Mark for Download.
To change the synchronisation options:To change the synchronisation options:
To change the synchronisation options:To change the synchronisation options:
To change the synchronisation options:
• Change the ActiveSync
®
options on your desktop computer for
Inbox synchronisation.
• For direct server synchronisation, change the e-mail server
connections for the Inbox of that service on your device by
tapping Tools,Tools,
Tools,Tools,
Tools, then OptionsOptions
OptionsOptions
Options. On the ServiceService
ServiceService
Service tab, tap the
service that you wish to change. Tap and hold the service and
select DeleteDelete
DeleteDelete
Delete to remove a service.
Chapter 6: Messaging Features
6-35
Tap to compose a new e-mail message
Creating e-mail messagesCreating e-mail messages
Creating e-mail messagesCreating e-mail messages
Creating e-mail messages
To open the e-mail account:To open the e-mail account:
To open the e-mail account:To open the e-mail account:
To open the e-mail account:
1. Tap .
2. Tap MessagingMessaging
MessagingMessaging
Mess aging to open the
MessagingMessaging
MessagingMessaging
Messaging screen.
3. Tap InboxInbox
InboxInbox
Inb ox, then select the OutlookOutlook
OutlookOutlook
Outlook
E-MailE-Mail
E-MailE-Mail
E-Mail account.
4. Tap NewNew
NewNew
N e w to create a new e-mail
message.
E-mail main screenE-mail main screen
E-mail main screenE-mail main screen
E-mail main screen
Tap to edit the
e-mail message
Tap to open e-mail
message tools Tap to insert
standard messages
Tap to display the
phone contacts
Tap to select the
message recipient(s)
Tap to enter the
message subject
Tap to display the Cc:
and Bcc: fields
Message section
6-36
P505 Pocket PC
4. Tap to display the Cc:Cc:
Cc:Cc:
Cc: and
Bcc:Bcc:
Bcc:Bcc:
Bc c : fields, then select the
recipients you want the e-mail
message copied to.
1. Tap the To:To:
To:To:
To : field to enter the
message recipient(s)
manually, or tap over To:To:
To:To:
To: to
display the contact list.
2. Enter the e-mail address of
the recipient(s) using the soft
keyboard or select from the
contact list.
3. Tap Subj:Subj:
Subj:Subj:
Su bj : , then use the
soft keyboard to type
message the subject.
NOTENOTE
NOTENOTE
NOTE Tap to open, or to close the Cc: and Bcc: fields.
To create a new e-mail message:To create a new e-mail message:
To create a new e-mail message:To create a new e-mail message:
To create a new e-mail message:
Chapter 6: Messaging Features
6-37
6. Tap the message section,
then type the message using
the soft keyboard.
To insert a standard messageTo insert a standard message
To insert a standard messageTo insert a standard message
To insert a standard message
1. Tap in the message section at the point you want to insert the
standard message.
2. Tap My TextMy Text
My TextMy Text
My Text.
5. Tap the AccountsAccounts
AccountsAccounts
Accounts field
down arrow, then select
Outlook E-mailOutlook E-mail
Outlook E-mailOutlook E-mail
Outlook E-mail.
3. Select a standard message
from the list to insert.
6-38
P505 Pocket PC
To attach a file or recording to the e-mail message:To attach a file or recording to the e-mail message:
To attach a file or recording to the e-mail message:To attach a file or recording to the e-mail message:
To attach a file or recording to the e-mail message:
2. Locate and tap the file you
want to attach to the
message. Otherwise, tap
CancelCancel
CancelCancel
Canc el to return to the
e-mail message.
1. Tap ToolsTools
ToolsTools
To o ls, then select AddAdd
AddAdd
Add
AttachmentAttachment
AttachmentAttachment
Attachment.
4. Tap the record button ( ) to
start recording. Tap to stop
recording.
3. The selected file is attached
to the message. Tap the
recording icon at the bootom
of the screen to attach a
recording.
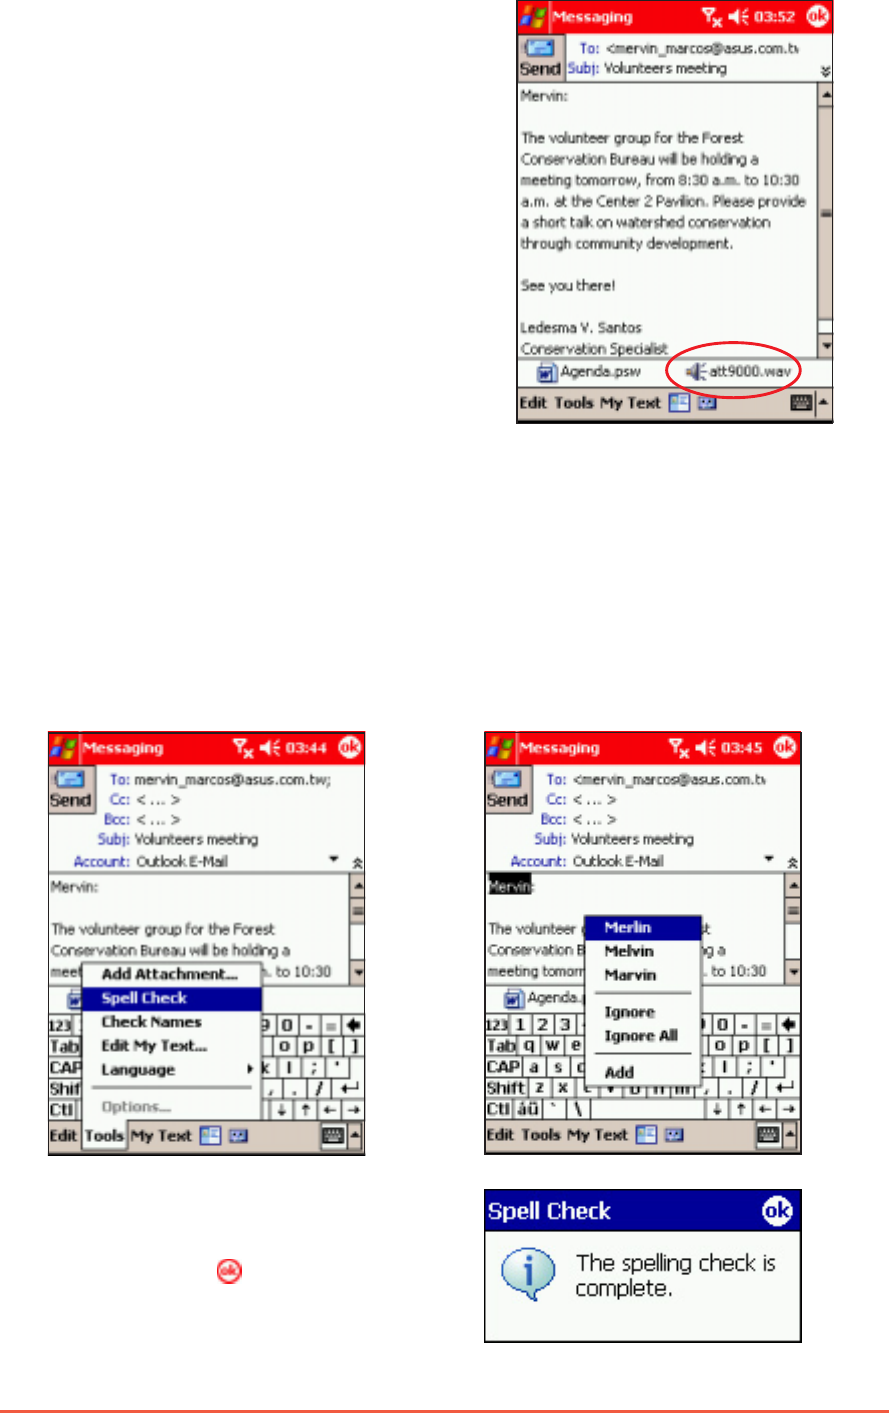
Chapter 6: Messaging Features
6-39
5. The recording is attached to
the message.
To check the spelling in the message:To check the spelling in the message:
To check the spelling in the message:To check the spelling in the message:
To check the spelling in the message:
2. The spell checker searches for
misspelled words, then
displays an alternative word
list. Tap the correct word to
replace, or tap IgnoreIgnore
IgnoreIgnore
Ignore to
leave the word unchanged.
3. A Spell Check Spell Check
Spell Check Spell Check
Spell Check window
appears when spell check is
complete. Tap to close.
1. After composing the text, tap
ToolsTools
ToolsTools
To o ls, then select SpellSpell
SpellSpell
Spell
CheckCheck
CheckCheck
Check.
6-40
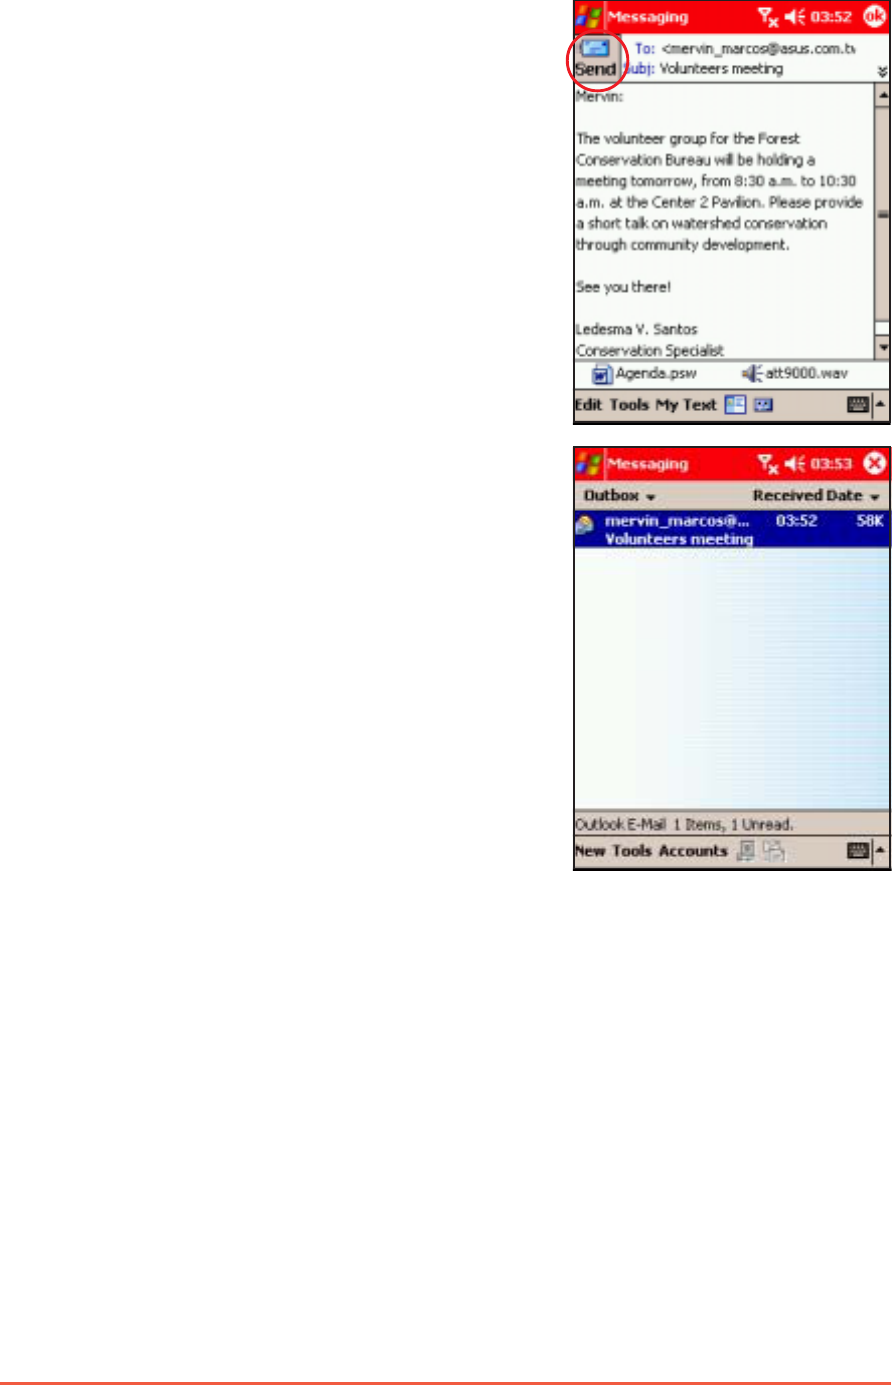
P505 Pocket PC
When finished, tap the SendSend
SendSend
Send
button to send the e-mail
message.
Sending the e-mail messageSending the e-mail message
Sending the e-mail messageSending the e-mail message
Sending the e-mail message
When you are using
ActiveSync
®
to send and
receive e-mail messages, the
message is saved in the
OutboxOutbox
OutboxOutbox
Outbox folder of the
account.
The message is sent to the
recipients when the device
synchronises with your
desktop PC or notebook.

Chapter 7
Multimedia Features
This chapter introduces the
multimedia features of the
Pocket PC including sections on
Camera, Photo Album, and
Pictures applications.

7-2
P505 Pocket PC
Chapter summaryChapter summary
Chapter summaryChapter summary
Chapter summary
••
••
•Multimedia featuresMultimedia features
Multimedia featuresMultimedia features
Multimedia features ..........................................................................
..........................................................................
..................................... 7-37-3
7-37-3
7-3
••
••
•CameraCamera
CameraCamera
Camera..............................................................................................................
..............................................................................................................
....................................................... 7-37-3
7-37-3
7-3
Launching the Camera ..................................................... 7-3
Changing the camera settings ......................................... 7-6
Taking photos ................................................................ 7-11
Capturing video ............................................................. 7-17
Using the Camera in phone mode................................... 7-19
Changing the settings in phone mode ............................ 7-20
Taking photos in phone mode ........................................ 7-20
••
••
•Photo AlbumPhoto Album
Photo AlbumPhoto Album
Photo Album ............................................................................................
............................................................................................
..............................................7-217-21
7-217-21
7-21
Launching the Photo Album ........................................... 7-21
Finding files and customising your view ......................... 7-23
Managing photos and videos .......................................... 7-26
Editing photos ............................................................... 7-30
Saving photos ................................................................ 7-42
Sharing photos .............................................................. 7-43
••
••
•PicturesPictures
PicturesPictures
Pictures..........................................................................................................
..........................................................................................................
.....................................................7-467-46
7-467-46
7-46
Launching the Pictures .................................................. 7-46
Editing photos using Pictures ......................................... 7-47
Starting a photo slide show ........................................... 7-50
Using the Tools menu .................................................... 7-51
Auto-launching Pictures ................................................. 7-52
Chapter 7: Multimedia Features
7-3
Multimedia featuresMultimedia features
Multimedia featuresMultimedia features
Multimedia features
The P505 comes with a rich selection of multimedia applications that
allows you to capture, edit, and share photos and videos with other
PDAs, next generation mobile phones, and computers. The following
sections describe these applications in detail.
CameraCamera
CameraCamera
Camera
Your pocket PC omes with a built-in 1.3 megapixel camera that allows
you to take photos or capture videos when you are in PDA or phone
mode.
Launching the CameraLaunching the Camera
Launching the CameraLaunching the Camera
Launching the Camera
To launch Camera:To launch Camera:
To launch Camera:To launch Camera:
To launch Camera:
1. Tap .
2. Tap ProgramsPrograms
ProgramsPrograms
Programs.
3. Tap the CameraCamera
CameraCamera
Camera icon.
4. The CameraCamera
CameraCamera
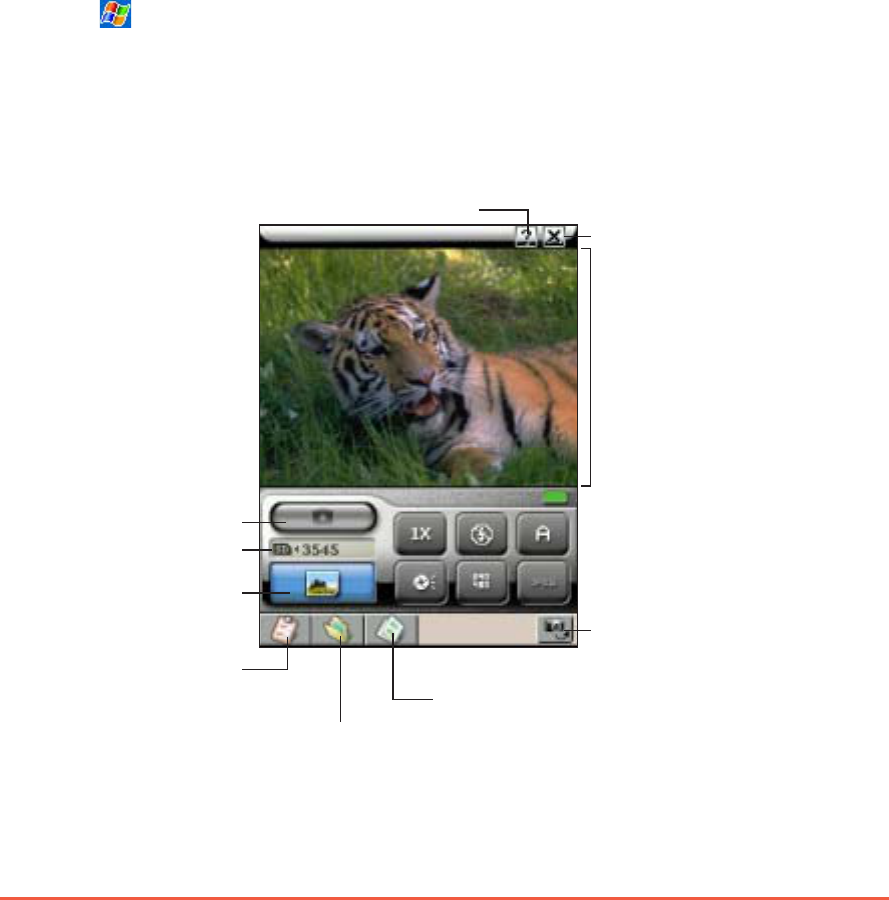
Camera screen appears.
Tap to change the
capture mode
Preview area
Tap to open the Photo Album
Tap to change to preview
area to landscape mode
Tap to change the
advanced camera settings
Tap to close the
application
Tap to display help information
Tap to select or change the folder
where photos or videos are saved
Storage information
Capture button
7-4
P505 Pocket PC
Main panelMain panel
Main panelMain panel
Main panel
The main panel has the information
window and control buttons for
adjusting the camera settings. Refer to
the table below for button functions.
Storage location and indicator buttonStorage location and indicator button
Storage location and indicator buttonStorage location and indicator button
Storage location and indicator button
The information window displays the the shutter sound setting, zoom
level, storage status, and remaining images/video length time.
The indicator button turns green when the camera is in standby
mode. It turns red when the camera is capturing a photo or video, or
when saving the photo or video file to the SD card.
Indicator button
Storage location
NOTENOTE
NOTENOTE
N O T E You can select or change the location where captured photos
or videos are to be saved by tapping . See page 7-16 for
details.
ButtonButton
ButtonButton
Button What it doesWhat it does
What it doesWhat it does
What it does
Changes the capture mode
Captures the photo or video
Zooms the image in the preview area to 1x, 2x, or 4x
Turns the flash on or off
Adjusts the environment settings
Turns the shutter sound on or off
Changes the photo size and resolution
Selects the video capture file type
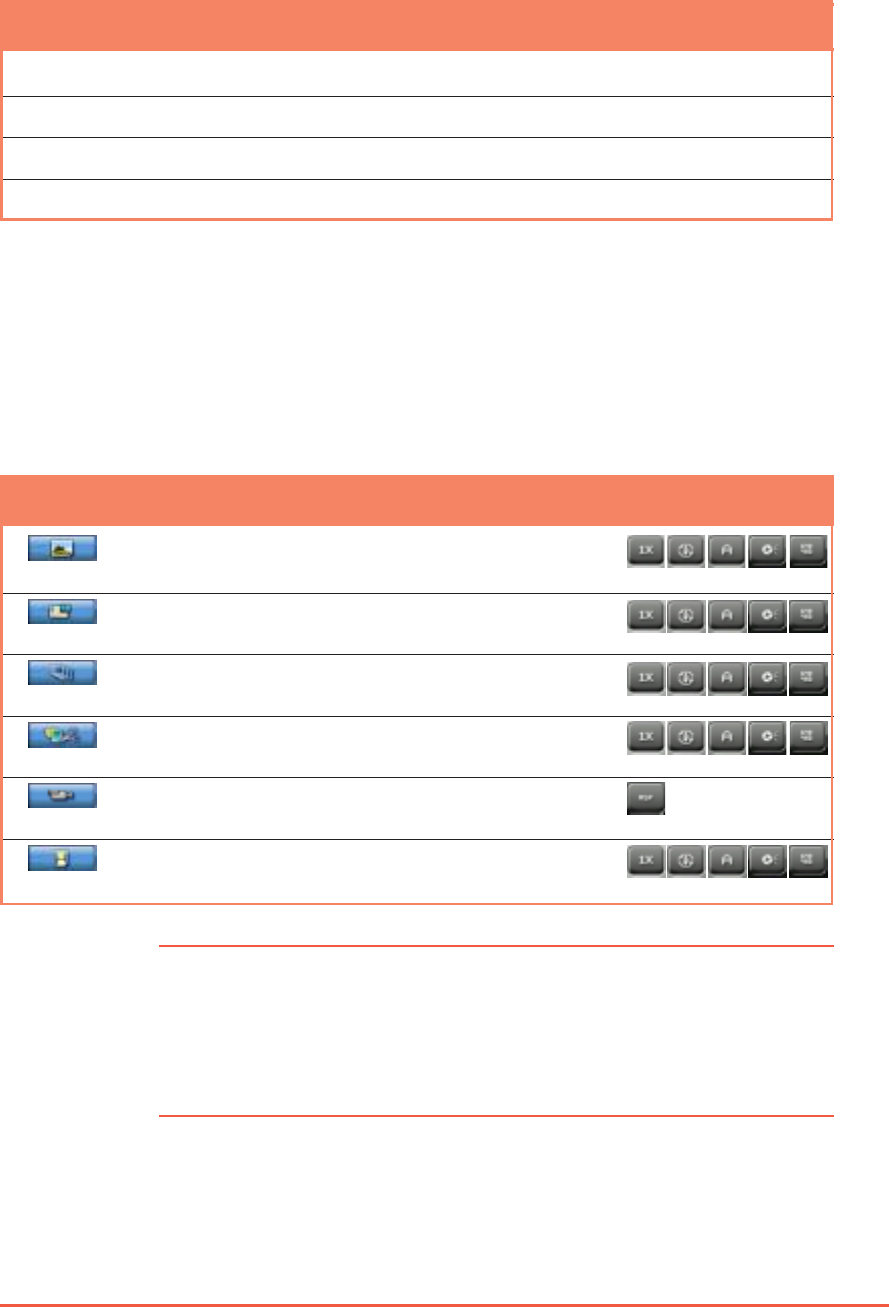
Chapter 7: Multimedia Features
7-5
Button functionsButton functions
Button functionsButton functions
Button functions
The function of the following buttons changes when the PDA is in
camera mode.
ButtonButton
ButtonButton
Button PressPress
PressPress
Press ToTo
ToTo
To
5-way joystick5-way joystick
5-way joystick5-way joystick
5-way joystick DownDown
DownDown
D o w n Zoom out the subject
UpUp
UpUp
U p Zoom in the subject
CenterCenter
CenterCenter
C e n t e r Capture the photo or start video capture
Camera buttonCamera button
Camera buttonCamera button
Camera button OnceOnce
OnceOnce
O n c e Change the capture mode
Capture modesCapture modes
Capture modesCapture modes
Capture modes
The camera has six capture modes: Single Shot, MMS, Burst,
Composition, Video, and Caller ID. Some main panel buttons are
disabled when the camera is in a particular mode. Refer to the table
below for a description of each mode.
NOTENOTE
NOTENOTE
N O T E • The camera uses more battery power than other Pocket
PC operations. Make sure that the battery is fully charged
before using the camera.
• The camera goes into standby mode when not used for
several minutes.
ButtonButton
ButtonButton
Button ModeMode
ModeMode
Mode DescriptionDescription
DescriptionDescription
Description Active buttonsActive buttons
Active buttonsActive buttons
Active buttons
Single ShotSingle Shot
Single ShotSingle Shot
Single Shot Captures a photo, then saves it
to the PDA memory or SD card
MMSMMS
MMSMMS
M M S Captures a photo, then inserts it
to an MMS message
BurstBurst
BurstBurst
B u r s t Captures sequential photos in
fixed time interval
CompositionComposition
CompositionComposition
Composition Puts a frame design around
the photo before capture
VideoVideo
VideoVideo
V i d e o Captures video, then saves the
video file in the memory/SD card
Caller IDCaller ID
Caller IDCaller ID
C a l l e r I D Captures a photo, then attaches
the photo to a contact for caller ID
7-6
P505 Pocket PC
Changing the camera settingsChanging the camera settings
Changing the camera settingsChanging the camera settings
Changing the camera settings
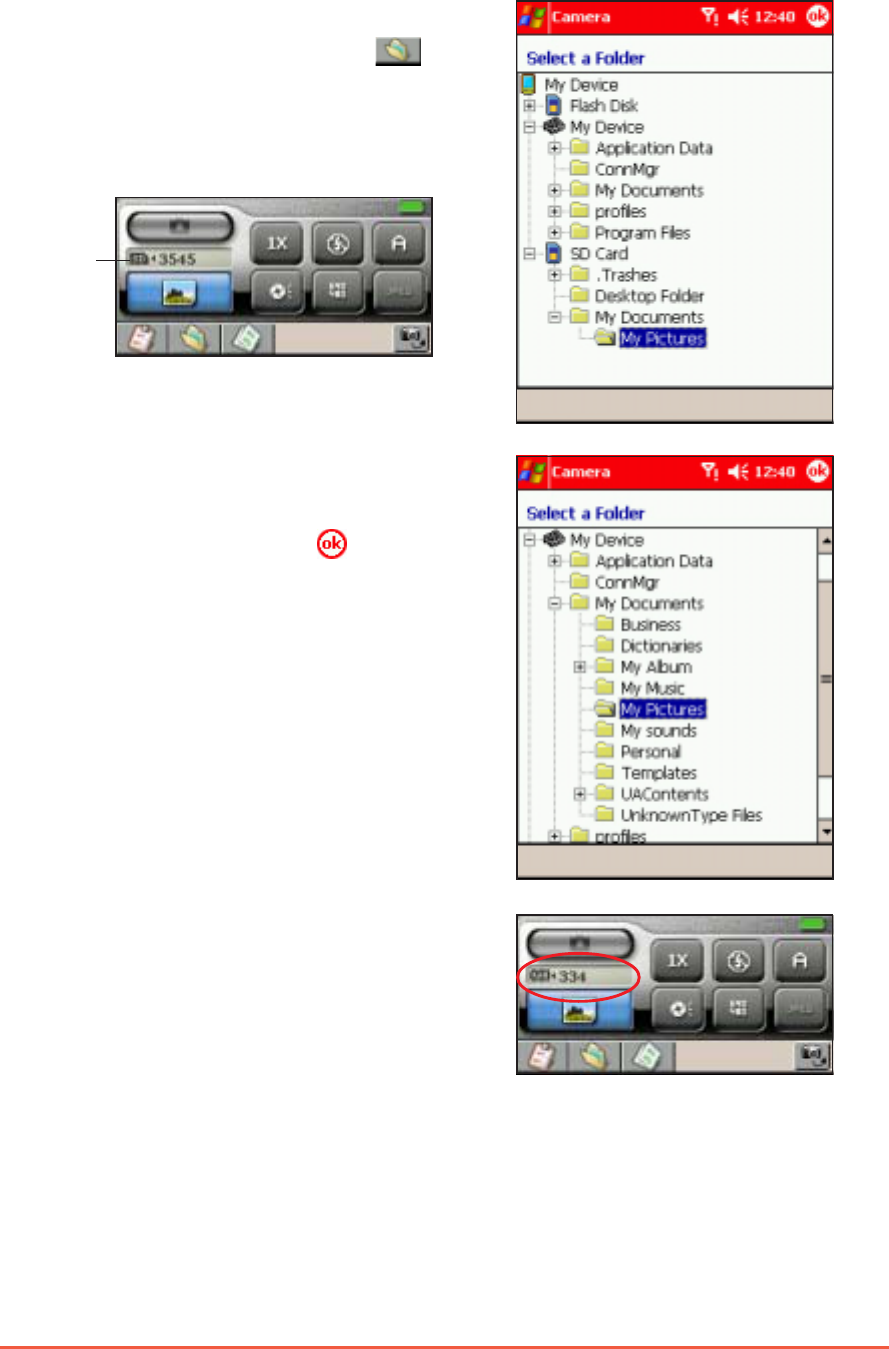
You can change the camera settings to capture sharper and clearer
photos. You can change the zoom levelzoom level
zoom levelzoom level
zoom level, environment settingsenvironment settings
environment settingsenvironment settings
environment settings,
capture sizecapture size
capture sizecapture size
capture size, and resolutionresolution
resolutionresolution
resolution.
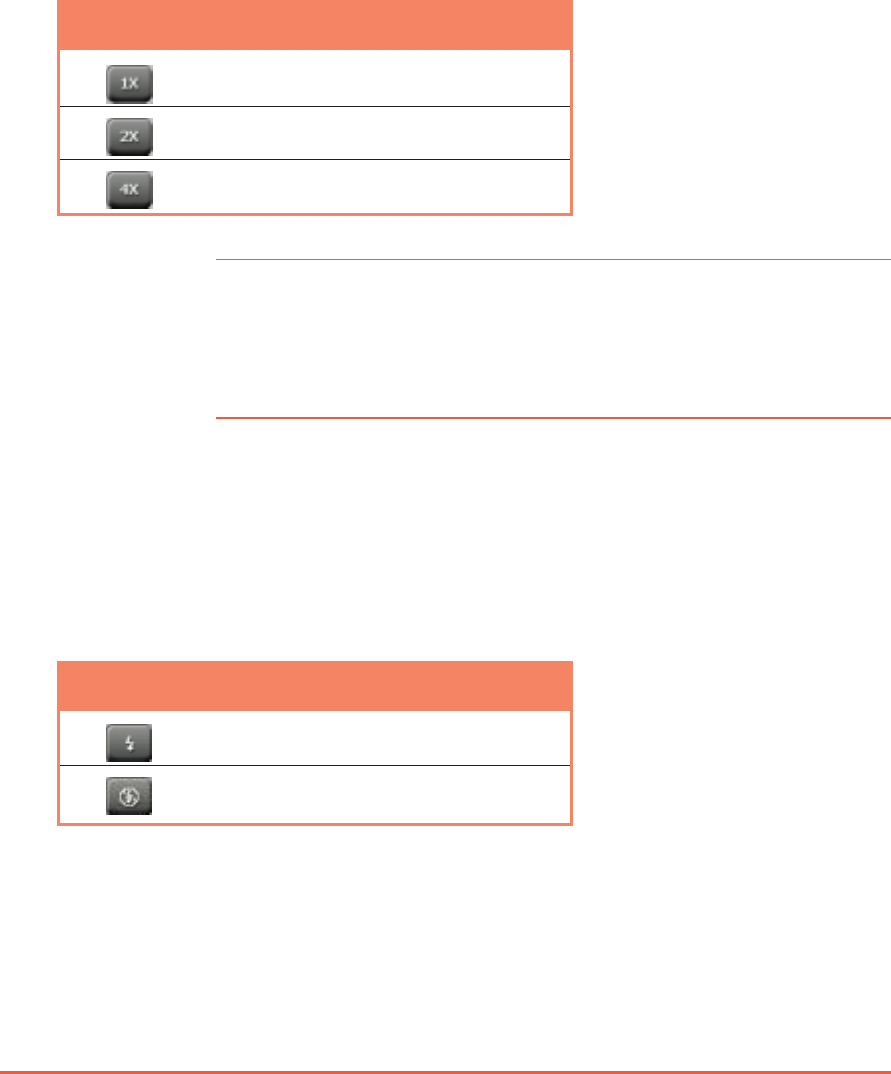
To change the zoom level:To change the zoom level:
To change the zoom level:To change the zoom level:
To change the zoom level:
When in Single Shot, MMS, Burst, Composition, or Caller ID modes, tap
the zoom button to adjust the zoom level. Refer to the table below
for zoom level information.
TIPTIP
TIPTIP
T I P You can also try to:
• move nearer to or further away from your subject if the
zoom level is very near or very far from the subject, or
• increase the capture size and resolution.
LevelLevel
LevelLevel
Level What it doesWhat it does
What it doesWhat it does
What it does
Displays the subject as is (1:1)
Zooms the subject two times
Zooms the subject four times
To turn the flash on or off:To turn the flash on or off:
To turn the flash on or off:To turn the flash on or off:
To turn the flash on or off:
When in Single Shot, MMS, Burst, Composition, or Caller ID modes, tap
the flash button to turn the flash on or off depending on the lighting
condition of your capture environment.
ButtonButton
ButtonButton
Button MeansMeans
MeansMeans
Means
The flash is on
The flash is off
Chapter 7: Multimedia Features
7-7
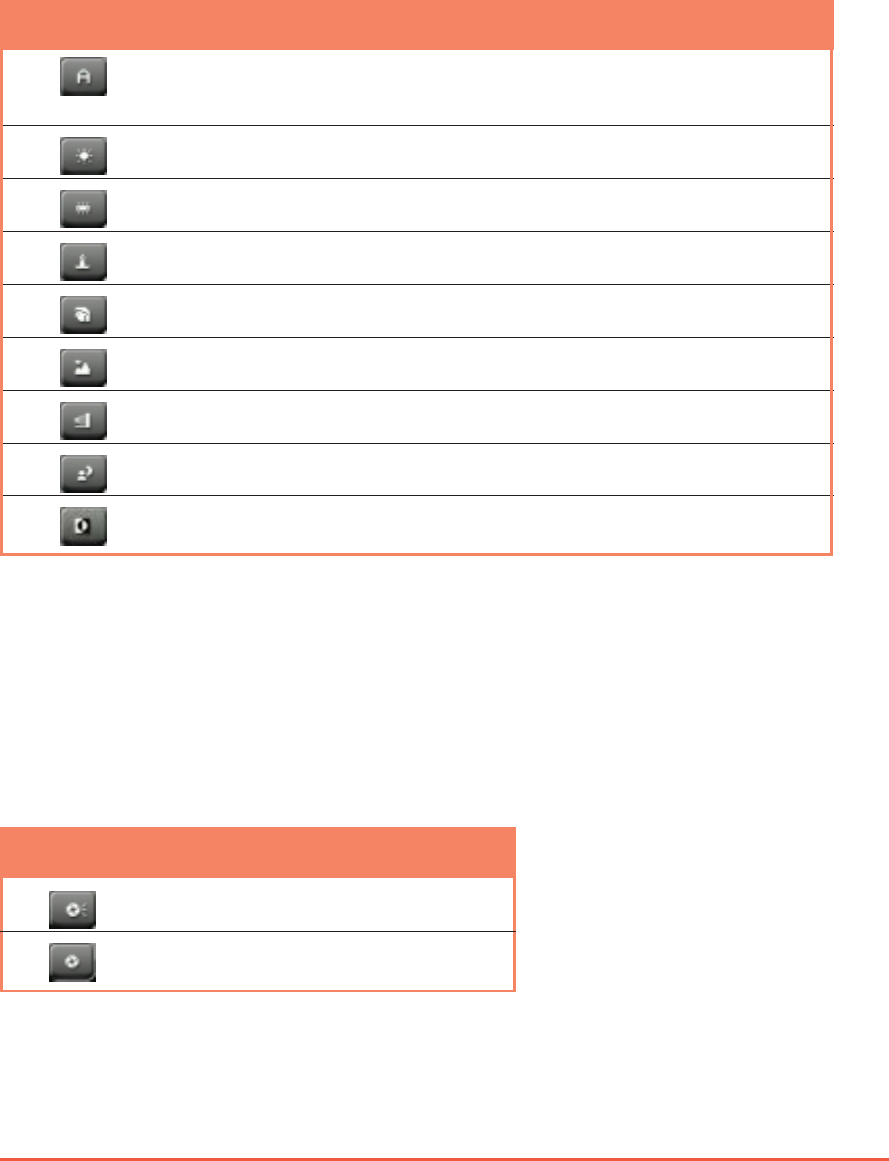
To change the environment settings:To change the environment settings:
To change the environment settings:To change the environment settings:
To change the environment settings:
When in Single Shot, MMS, Burst, Composition, or Caller ID modes, tap
the environment settings button to choose from nine preset settings
and effects. These settings enhance your photo by auto-detecting
the lighting condition, time, and place of capture. Refer to the table
below for the settings description.
To turn the shutter sound on or off:To turn the shutter sound on or off:
To turn the shutter sound on or off:To turn the shutter sound on or off:
To turn the shutter sound on or off:
When in Single Shot, MMS, Burst, Composition, or Caller ID modes, tap
the shutter sound button to turn the shutter sound on or off. When
on, the camera makes a shutter sound everytime you capture a
photo.
ButtonButton
ButtonButton
Button MeansMeans
MeansMeans
Means
The shutter sound is on
The shutter sound is off
ButtonButton
ButtonButton
Button SettingSetting
SettingSetting
Setting Use this settingUse this setting
Use this settingUse this setting
Use this setting
Auto if you want the camera to automatically adjusts to the
current lighting conditions
Outdoor when taking outdoor photos
Flourescent when your subject is under artificial lighting
Candle when the environment has poor lighting visibility
Portrait when taking close-up photos of human subjects
Landscape when taking landscape, mountains, scenic photos
Sepia to transform your photos to vintage sepia finish
Night time when taking night time photos
B/W to capture black and white photos
7-8
P505 Pocket PC
To change the photo size and resolution:To change the photo size and resolution:
To change the photo size and resolution:To change the photo size and resolution:
To change the photo size and resolution:
When in Single Shot, MMS, Burst, Composition, or Caller ID modes, tap
the photo resolution button to change the photo size and resolution.
Refer to the table below for photo size and resolution supported by
the capture modes.
Capture Supported resolution (pixels)Capture Supported resolution (pixels)
Capture Supported resolution (pixels)Capture Supported resolution (pixels)
Capture Supported resolution (pixels)
ModeMode
ModeMode
Mode
960x1280960x1280
960x1280960x1280
960x1280 480x640480x640
480x640480x640
480x640 240x320240x320
240x320240x320
240x320 120x160120x160
120x160120x160
120x160 60x8060x80
60x8060x80
60x80
Single ShotSingle Shot
Single ShotSingle Shot
Single Shot
MMSMMS
MMSMMS
MMS
BurstBurst
BurstBurst
Burst
CompositionComposition
CompositionComposition
Composition
Caller IDCaller ID
Caller IDCaller ID
Caller ID
VideoVideo
VideoVideo
Video
To change preview orientation:To change preview orientation:
To change preview orientation:To change preview orientation:
To change preview orientation:
When in any capture mode, tap the orientation button to toggle
between portrait and landscape mode.
Portrait Landscape
Chapter 7: Multimedia Features
7-9
To change the storage location:To change the storage location:
To change the storage location:To change the storage location:
To change the storage location:
1. When in any capture mode, tap
the storage location button
to locate the folder where
captured photos and videos are
saved.
The information window displays the
selected storage location including
the number of captures you can
store using the current capture
mode.
2. Select and tap the folder you
want the captured photos and
videos saved, then tap .
Current
storage
7-10
P505 Pocket PC
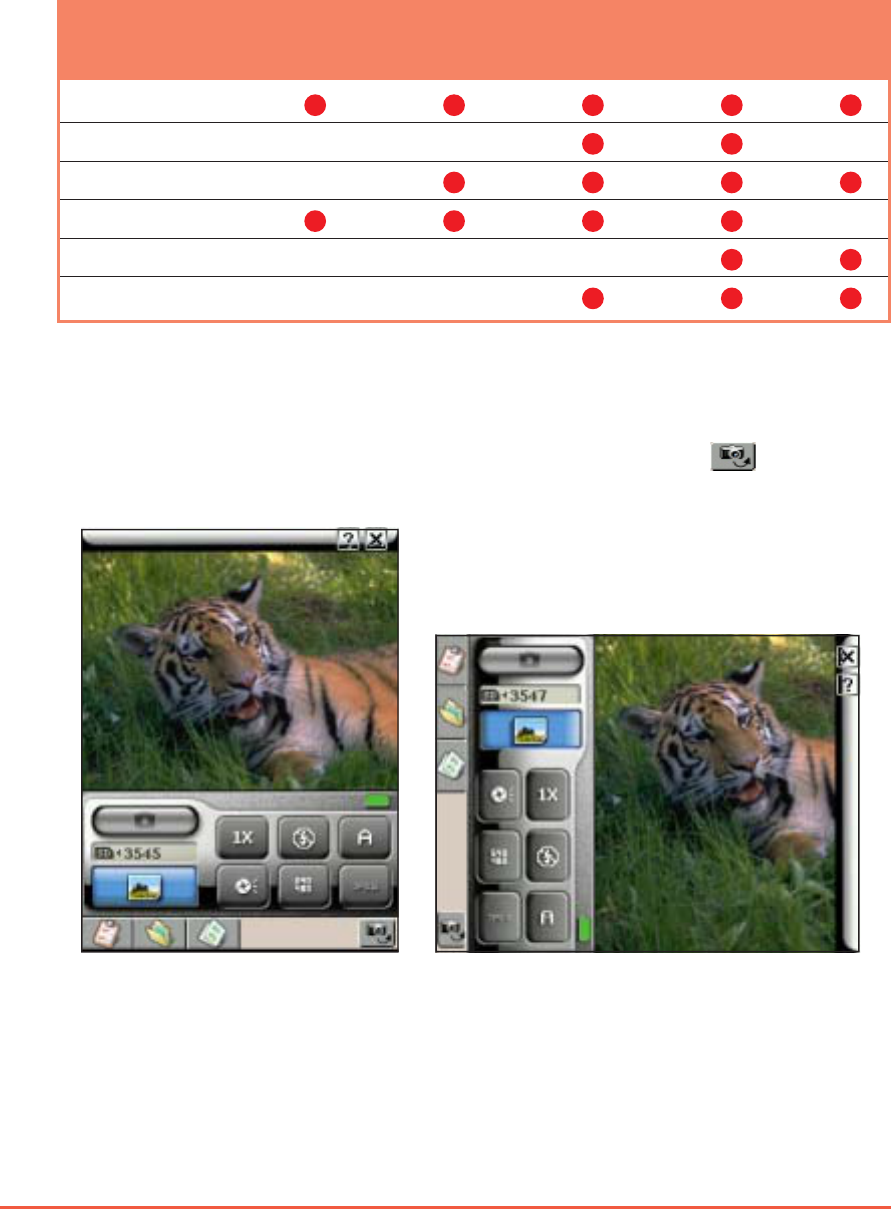
To change the advanced camera settings:To change the advanced camera settings:
To change the advanced camera settings:To change the advanced camera settings:
To change the advanced camera settings:
1. When in any capture mode, tap the settings button to open
the camera’s advanced settings window.
2. Adjust the contract, brightness, white balance, exposure, and
color tone from this window. Preview the changes through the
thumbnail displayed at the bottom left of the screen.
3. Tap OK when finished.
NOTENOTE
NOTENOTE
N O T E Tap the DefaultDefault
DefaultDefault
D e f a u l t button to revert to the default settings.
Slide to adjust the
capture contrast
Slide to adjust the
capture brightness
Tap to select a white
balance setting
Slide to adjust the
capture exposure
Tap a color tone
Tap to revert to the
default settings.
Sample preview
Chapter 7: Multimedia Features
7-11
Taking photosTaking photos
Taking photosTaking photos
Taking photos
After learning the camera basics, you are now ready to capture
photos or videos using the Pocket PC.
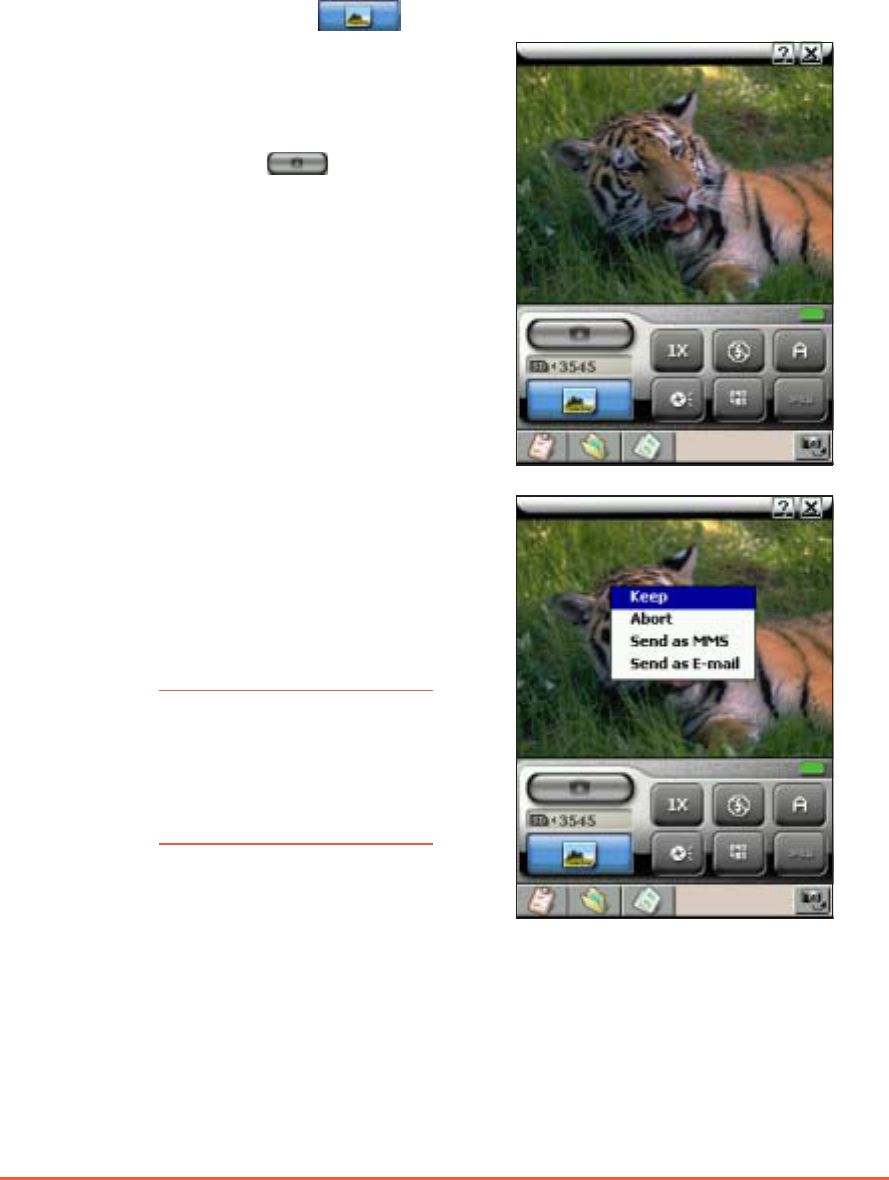
To capture a single shot photo:To capture a single shot photo:
To capture a single shot photo:To capture a single shot photo:
To capture a single shot photo:
1. Put the Pocket PC in camera mode, then set the camera capture
mode to Single Shot Single Shot
Single Shot Single Shot
Single Shot .
2. Point the camera to your
subject, then adjust the camera
settings, if necessary.
3. When finished, tap or press
the joystick to capture the
image.
NOTENOTE
NOTENOTE
N O T E The camera automatically
saves the image to the
specified location when
no option is selected
from the menu.
4. A pop-up menu appears. Tap an
option to save, cancel, or send
the image via MMS or e-mail.
Refer to the table on the next
page for details.

7-12
P505 Pocket PC
5. When you select KeepKeep
KeepKeep
Ke e p, a progress bar appears indicating that the
capture is being saved.
NOTENOTE
NOTENOTE
N O T E You can view the saved photo by tapping the Photo AlbumPhoto Album
Photo AlbumPhoto Album
Photo Album
button . See page 7-21 for details.
OptionOption
OptionOption
Option ActionAction
ActionAction
Action
KeepKeep
KeepKeep
K e e p Saves the photo in JPG format (DSC_xxxx.jpg) to your
specified location, then returns the camera to active mode
AbortAbort
AbortAbort
A b o r t Ignores the photo, then returns the camera to active mode
Send by MMSSend by MMS
Send by MMSSend by MMS
S e n d b y M M S Saves the photo as an MMS message object, exits the
Camera application, then opens the Messaging application
Send by E-mailSend by E-mail
Send by E-mailSend by E-mail
S e n d b y E - m a i l Saves the captured photo as an e-mail attachment, exits the
Camera application, then opens the Messaging application
6. The camera returns to active mode when you choose KeepKeep
KeepKeep
Keep or
IgnoreIgnore
IgnoreIgnore
Igno re. The Pocket PC launches the MessagingMessaging
MessagingMessaging
Messaging application if
you selected Send by MMS/E-mailSend by MMS/E-mail
Send by MMS/E-mailSend by MMS/E-mail
Send by MMS/E-mail. Refer to the previous
chapter for more information on sending MMS and e-mail
messages.