ASUSTeK Computer P505 PDA phone User Manual Appendix 1 P505 UserMan
ASUSTeK Computer Inc PDA phone Appendix 1 P505 UserMan
Contents
Manual 5
Chapter 8: Using Companion Applications
8-21
Windows Media Player for Pocket PCWindows Media Player for Pocket PC
Windows Media Player for Pocket PCWindows Media Player for Pocket PC
Windows Media Player for Pocket PC
Use Microsoft
®
Windows Media Player for Pocket PC to play digital
audio and video files that are stored on your device or on a network.
You can use Microsoft
®
Windows Media Player on your desktop
computer to copy digital audio and video to your Pocket PC. You can
play Windows
®
Media and MP3 files on your Pocket PC.
To launch the WindowsTo launch the Windows
To launch the WindowsTo launch the Windows
To launch the Windows®®
®®
® Media Player for Pocket PC: Media Player for Pocket PC:
Media Player for Pocket PC: Media Player for Pocket PC:
Media Player for Pocket PC:
1. Tap .
2. Tap Programs.Programs.
Programs.Programs.
Programs.
3. Tap the Windows MediaWindows Media
Windows MediaWindows Media
Windows Media
icon.
NOTENOTE
NOTENOTE
N O T E For more information
on using Windows
Media Player for Pocket
PC, tap , then tap
HelpHelp
HelpHelp
Help.
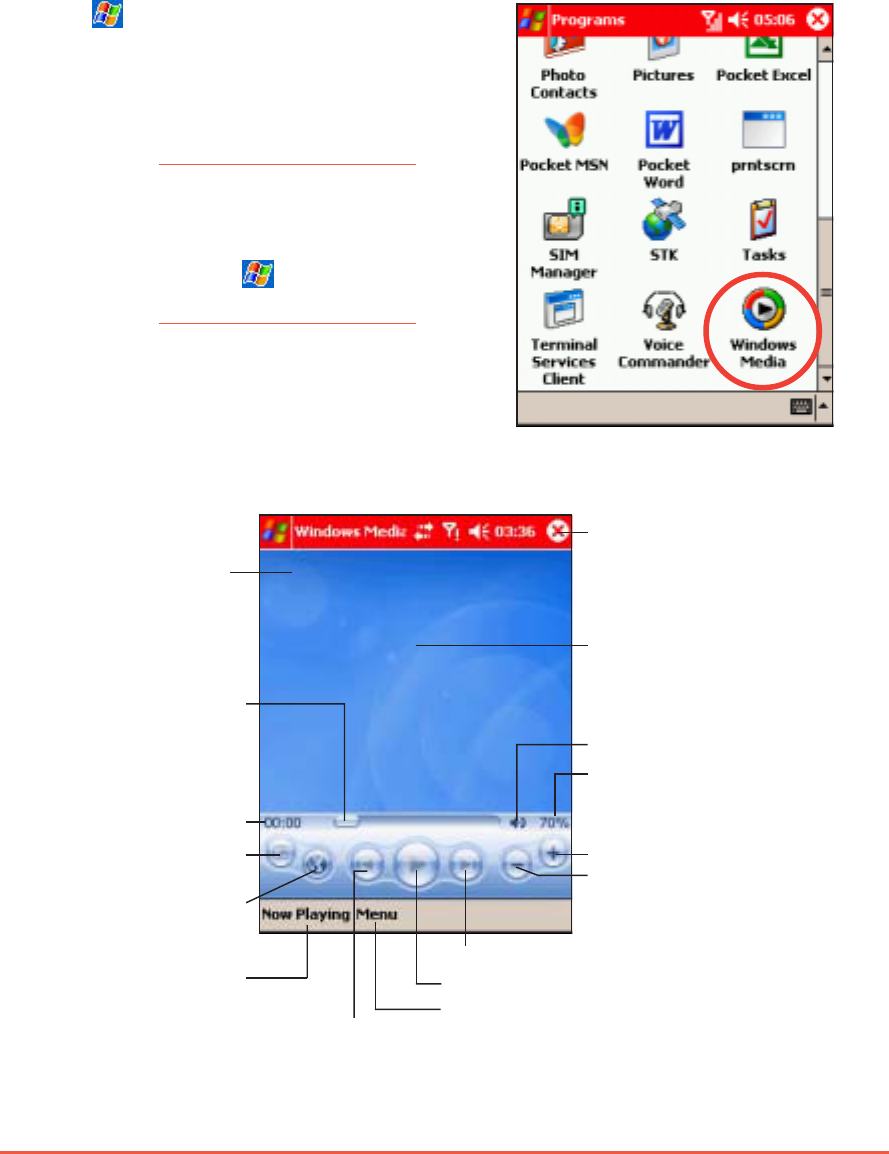
Windows Media Player main screenWindows Media Player main screen
Windows Media Player main screenWindows Media Player main screen
Windows Media Player main screen
Indicates the volume level
Tap to play the
previous track/file
in the playlist
Tap to increase volume
Tap to play the next track/file in the playlist
Tap to play or pause track/file
Tap to display track options
Tap to close the application
Displays the first track or
file in the selected playlist
Tap to open the
WindowsMedia.com website
Preview window
Track/file number
Slide to fast forward or
rewind the track/file
Tap to open a video file
in full screen mode Tap to decrease volume
Tap to mute sound
Tap to open the
playlist window
8-22
P505 Pocket PC
Using the WindowsUsing the Windows
Using the WindowsUsing the Windows
Using the Windows
®®
®®
®
Media Player library Media Player library
Media Player library Media Player library
Media Player library
The Windows
®
Media Player library stores the links to audio and video
files saved in your device, whether these are saved in the device
memory or SD card. The library allows you to sort your audio or video
files according to criteria such as artist’s name, album title, genre, or
actor.
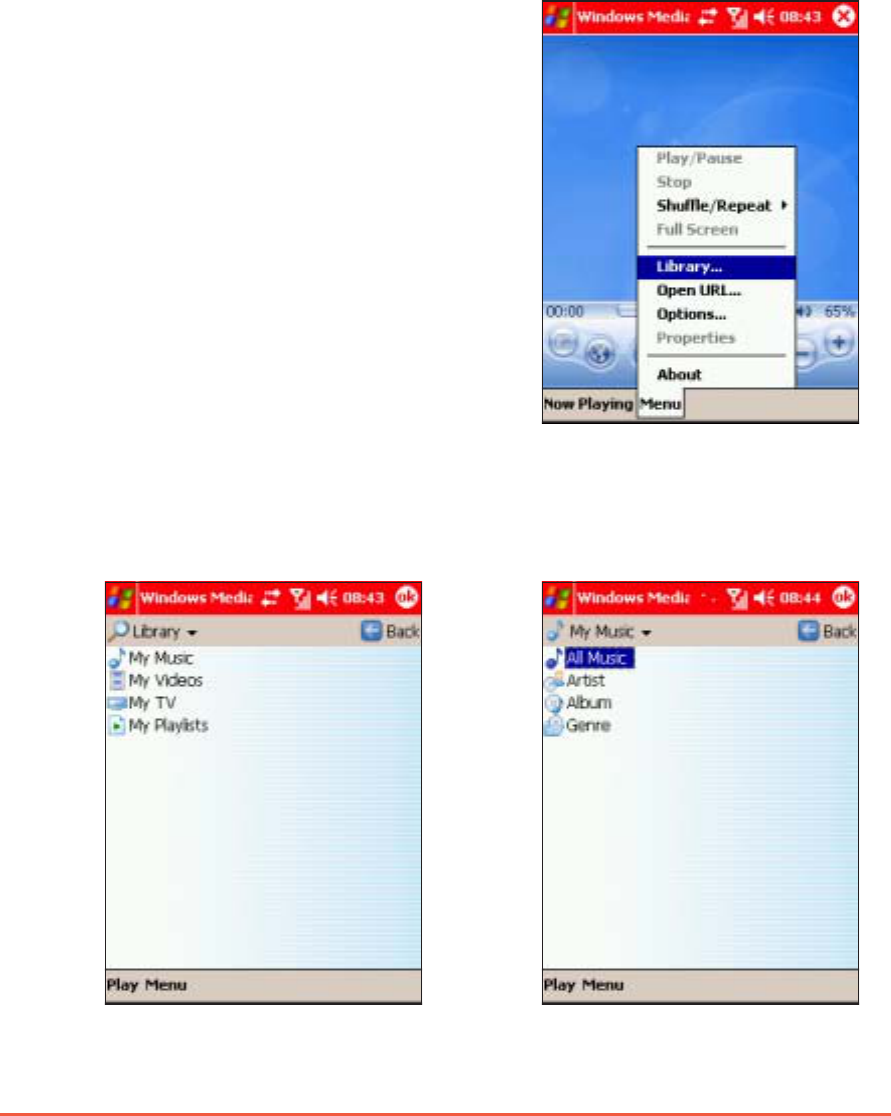
To open an audio/video file from the library:To open an audio/video file from the library:
To open an audio/video file from the library:To open an audio/video file from the library:
To open an audio/video file from the library:
1. From the Windows
®
Media Player
playback screen, tap MenuMenu
MenuMenu
Menu, then
select Library...Library...
Library...Library...
Library...
The LibraryLibrary
LibraryLibrary
Library screen appears.
2. Tap on a library (i.e. My Music)
to display the library criterion.
3. Tap on a library criteria to
display the audio/video file(s)
in that criteria, if any.
Chapter 8: Using Companion Applications
8-23
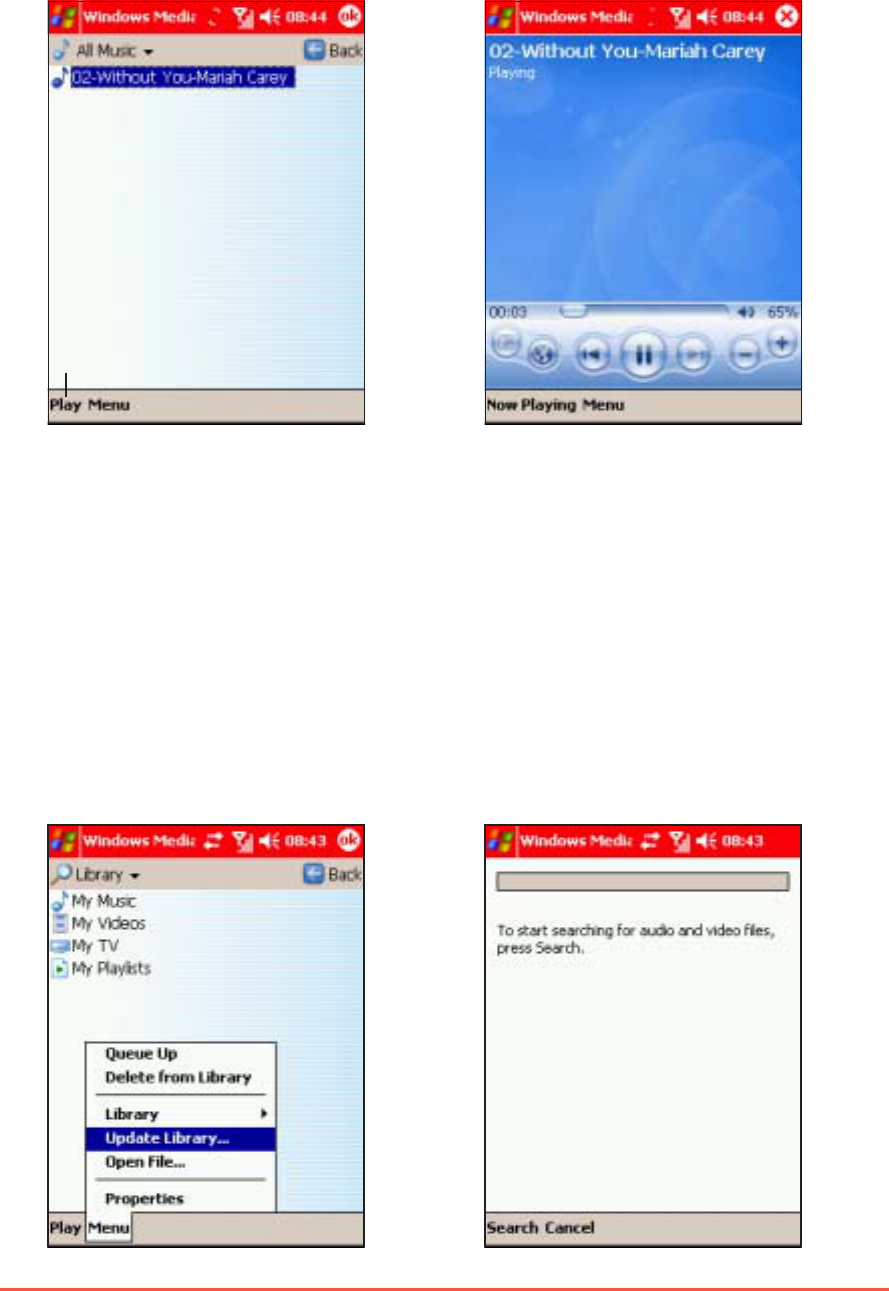
4. Tap on an audio or video file
from the list, then tap the
PlayPlay
PlayPlay
Play button.
The selected file is played on
the playback screen.
Tap to play the file
To update the library:To update the library:
To update the library:To update the library:
To update the library:
Everytime you copy, save, or add an audio or video file to your device
memory or SD card, Windows
®
Media Player automatically updates
the library. However, you may need to update the library to make
sure that recently added audio/video files are properly linked in the
library. To do this:
1. From the LibraryLibrary
LibraryLibrary
Library screen, tap
MenuMenu
MenuMenu
M en u, then select,
2. Tap SearchSearch
SearchSearch
Search to begin
searching newly-added
audio/video files.
8-24
P505 Pocket PC
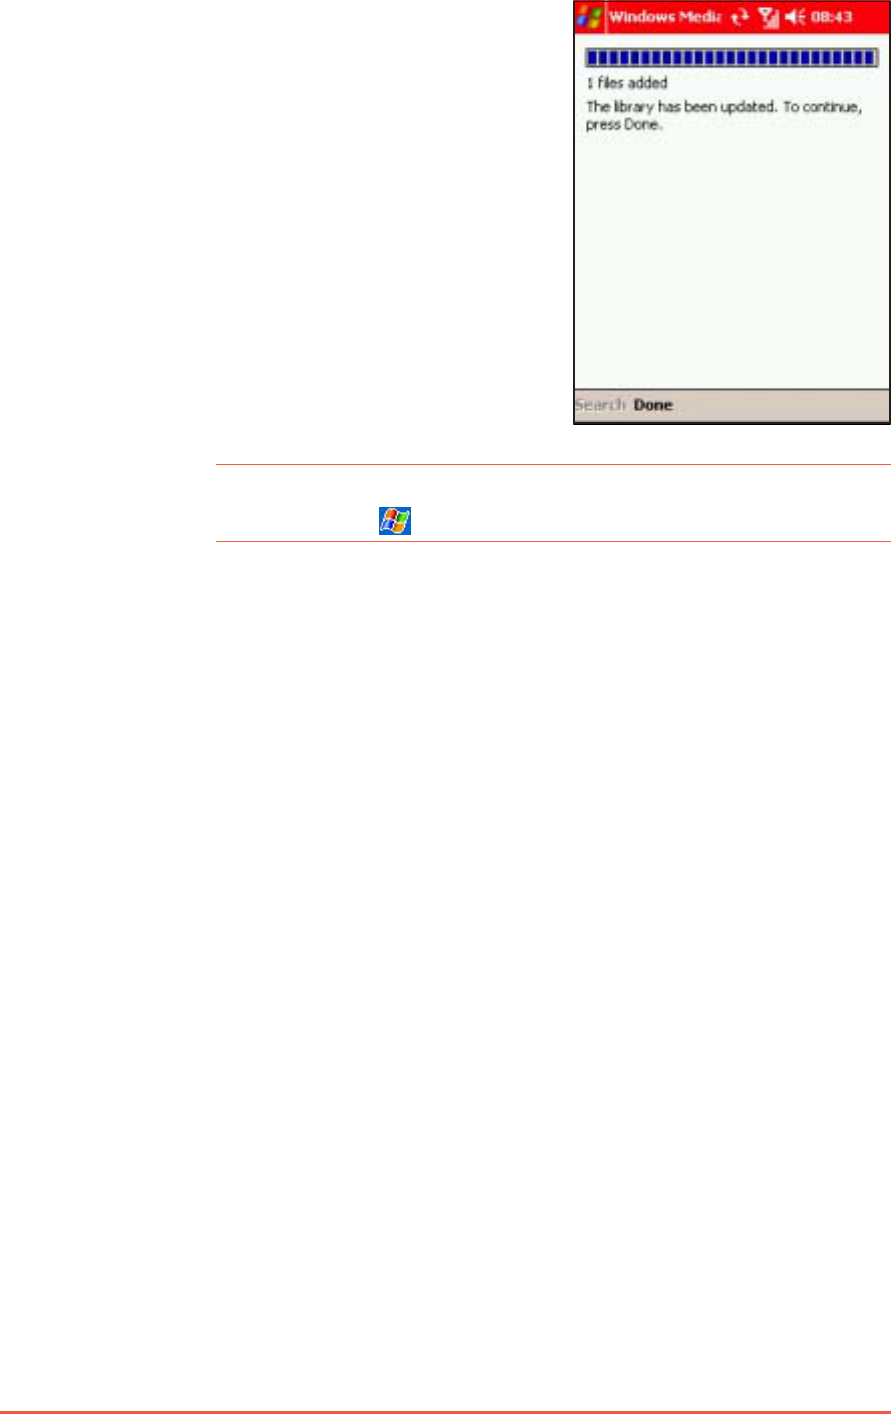
3. The audio/video files are
automatically added to the library.
When all files are added, tap DoneDone
DoneDone
Done
to close the window.
NOTENOTE
NOTENOTE
N O T E For more information on using Windows Media Player for
Pocket PC, tap , then tap HelpHelp
HelpHelp
Help.
Chapter 8: Using Companion Applications
8-25
Voice CommanderVoice Commander
Voice CommanderVoice Commander
Voice Commander
Voice Commander is a speech recognition technology that allows the
Pocket PC to launch applications and dial contact numbers via voice
commands. Voice Commander is speaker-independent because it
automatically creates a default voice tag for each of your contacts and
installed applications. You can, however, customise these voice tags
using the Voice Commander Settings menu. Press the voice command
button at the right side of the Pocket PC to launch the application.
The Voice Commander interprets your voice commands or you can
teach it your own voice commands, for example to call “Mum” who has
been saved as a contact Anne Smith.
Changing the Voice Commander settingsChanging the Voice Commander settings
Changing the Voice Commander settingsChanging the Voice Commander settings
Changing the Voice Commander settings
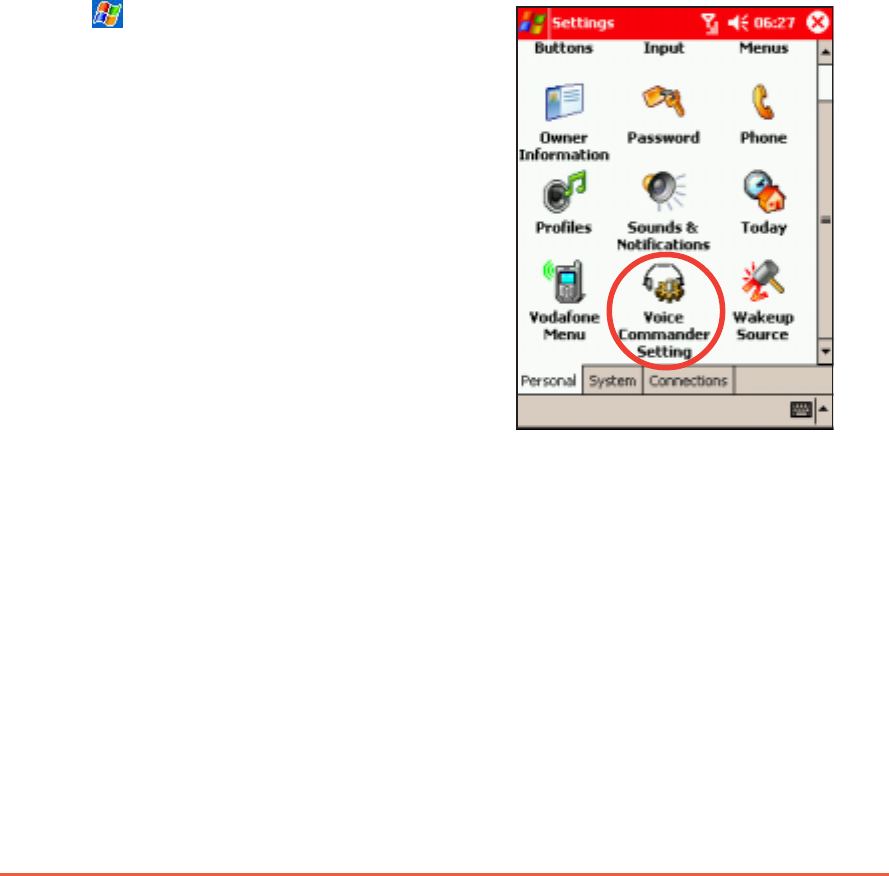
To launch the Voice Commander settings:To launch the Voice Commander settings:
To launch the Voice Commander settings:To launch the Voice Commander settings:
To launch the Voice Commander settings:
1. Tap .
2. Tap Settings.Settings.
Settings.Settings.
Settings.
3. Tap the Voice CommanderVoice Commander
Voice CommanderVoice Commander
Voice Commander
SettingSetting
SettingSetting
Setting icon.
8-26
P505 Pocket PC
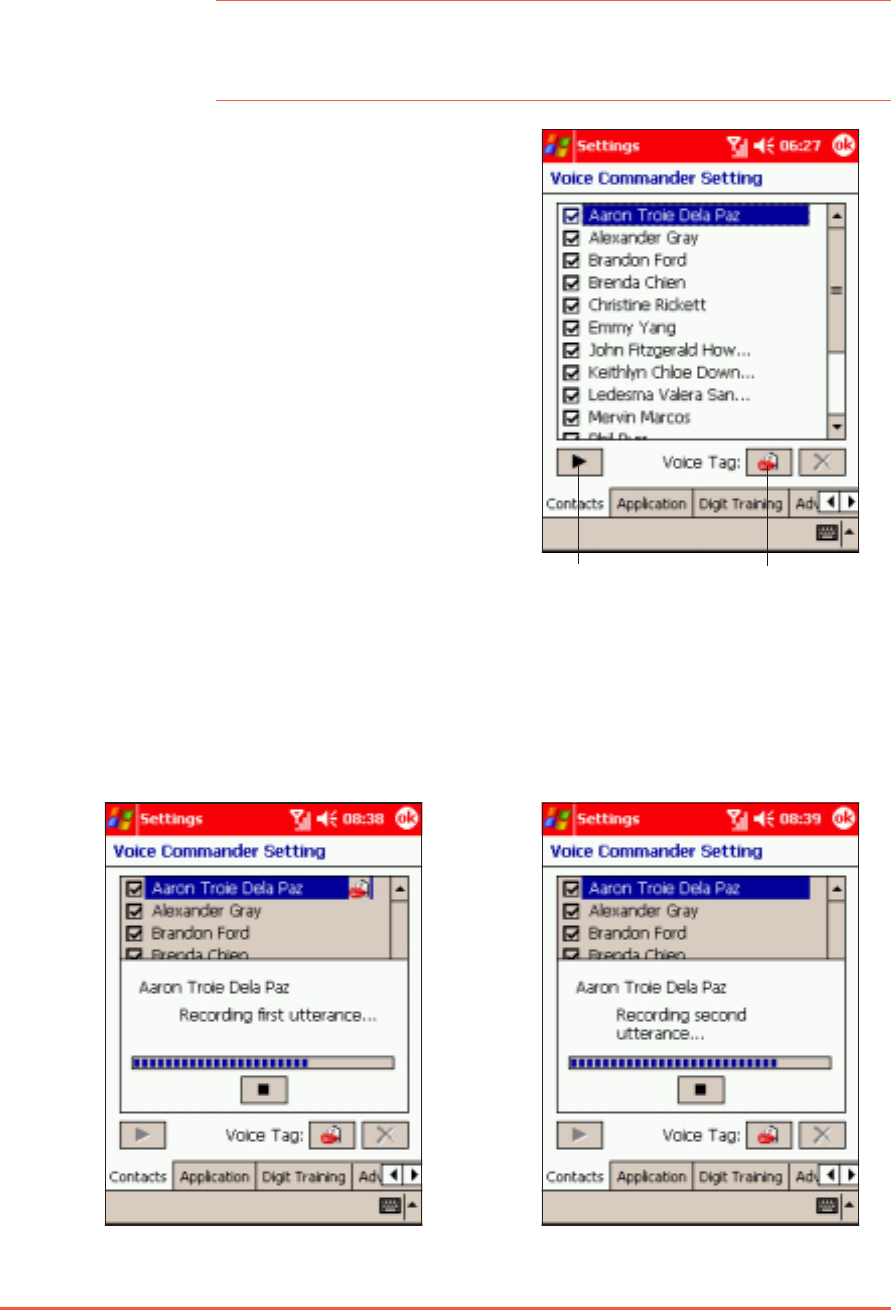
4. When prompted, repeat the
voice tag.
3. Use the headphone or the
device microphone to record a
voice tag for the selected
contact.
NOTENOTE
NOTENOTE
N O T E An automatic (hidden) voice tag is attached to all contacts
and applications. You can listen to these tags by tapping the
play button.
1. Select a contact using the
stylus.
2. Tap the Voice Tag Voice Tag
Voice Tag Voice Tag
Voice Tag button to
start recording.
Creating voice tagsCreating voice tags
Creating voice tagsCreating voice tags
Creating voice tags
To create a voice tag for a contact:To create a voice tag for a contact:
To create a voice tag for a contact:To create a voice tag for a contact:
To create a voice tag for a contact:
Voice tag
record button
Play button
Chapter 8: Using Companion Applications
8-27
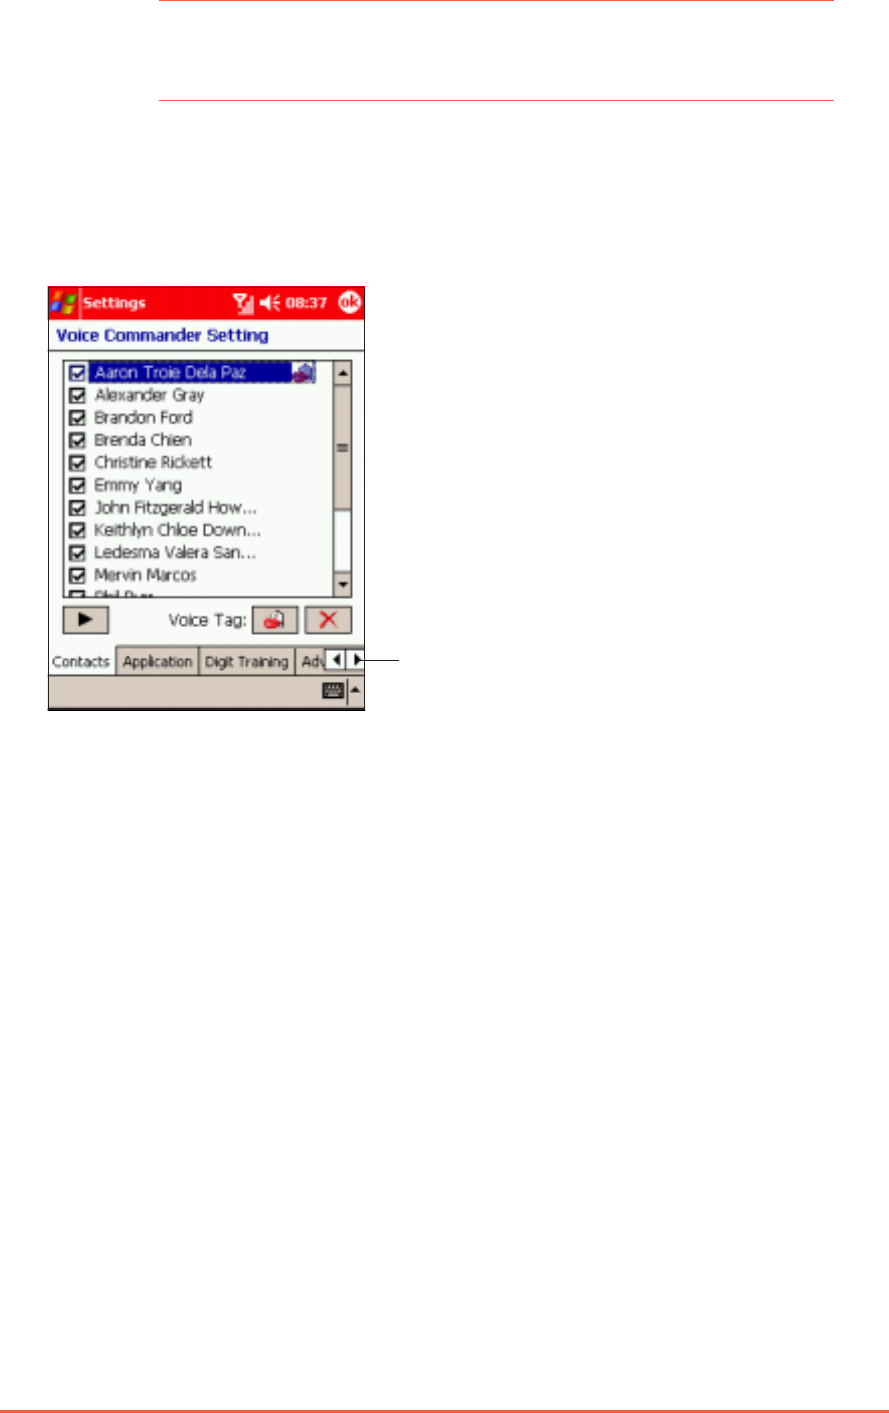
NOTENOTE
NOTENOTE
N O T E A message appears if the device fails to recognise the voice
tag. Try speaking more loudly or move to a quieter location
for making the recording.
6. Follow the same instructions
when creating voice tags for
other contacts.
5. A voice tag icon appears after
the contact to indicate that
the voice tag has been saved.
Tap to display
other tabs
8-28
P505 Pocket PC
NOTENOTE
NOTENOTE
N O T E An automatic (hidden)
voice tag is attached to
all contacts and
applications. You can
listen to these tags by
tapping the play button.
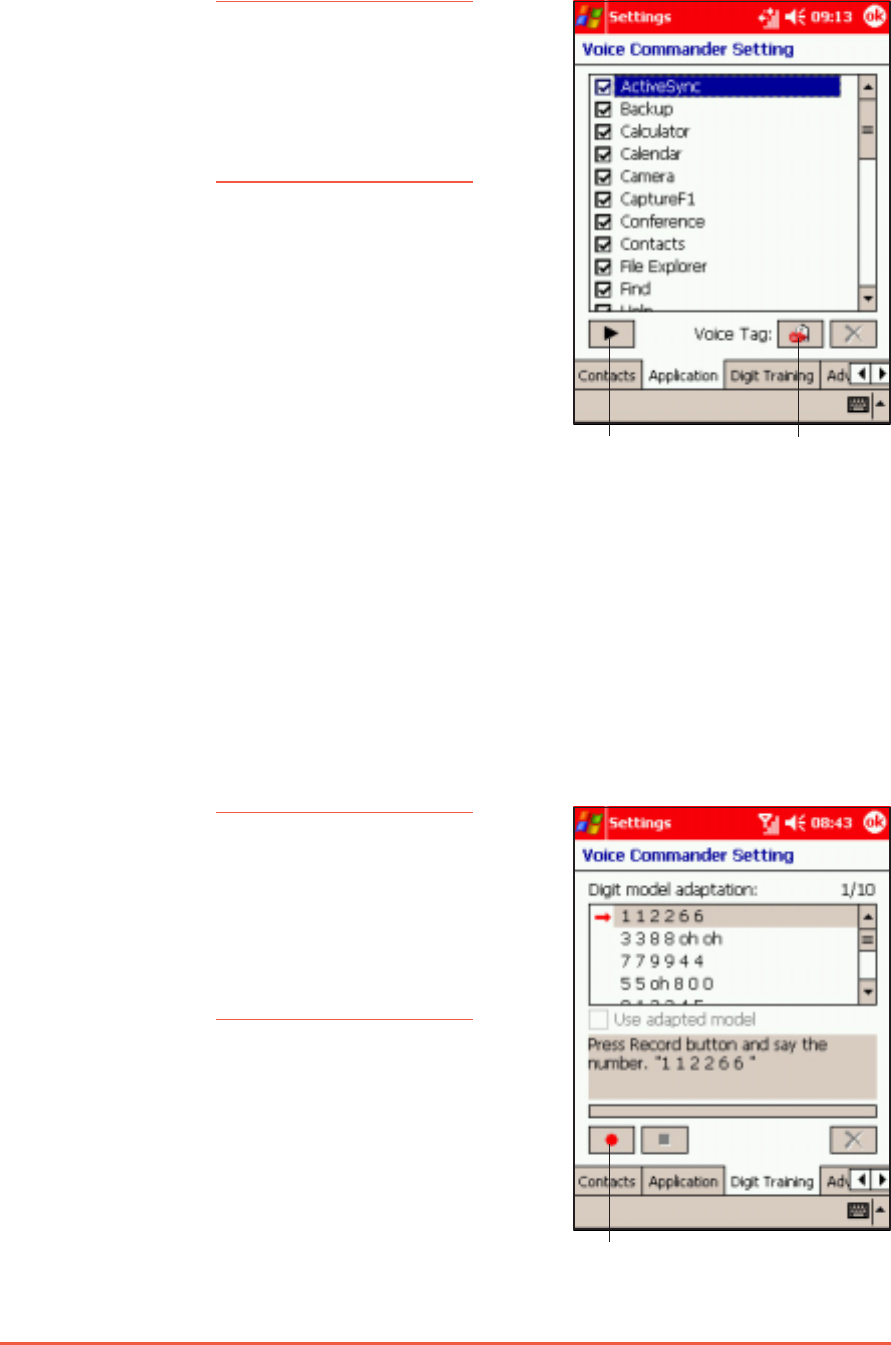
1. Tap the ApplicationApplication
ApplicationApplication
Application tab to
display all applications.
2. Select an applicaton using the
stylus, then check the box
preceding the application to
activate voice command.
3. Follow the instructions in the
previous section to create a
voice tag for an application.
To create a voice tag for an application:To create a voice tag for an application:
To create a voice tag for an application:To create a voice tag for an application:
To create a voice tag for an application:
Voice tag
record button
Play button
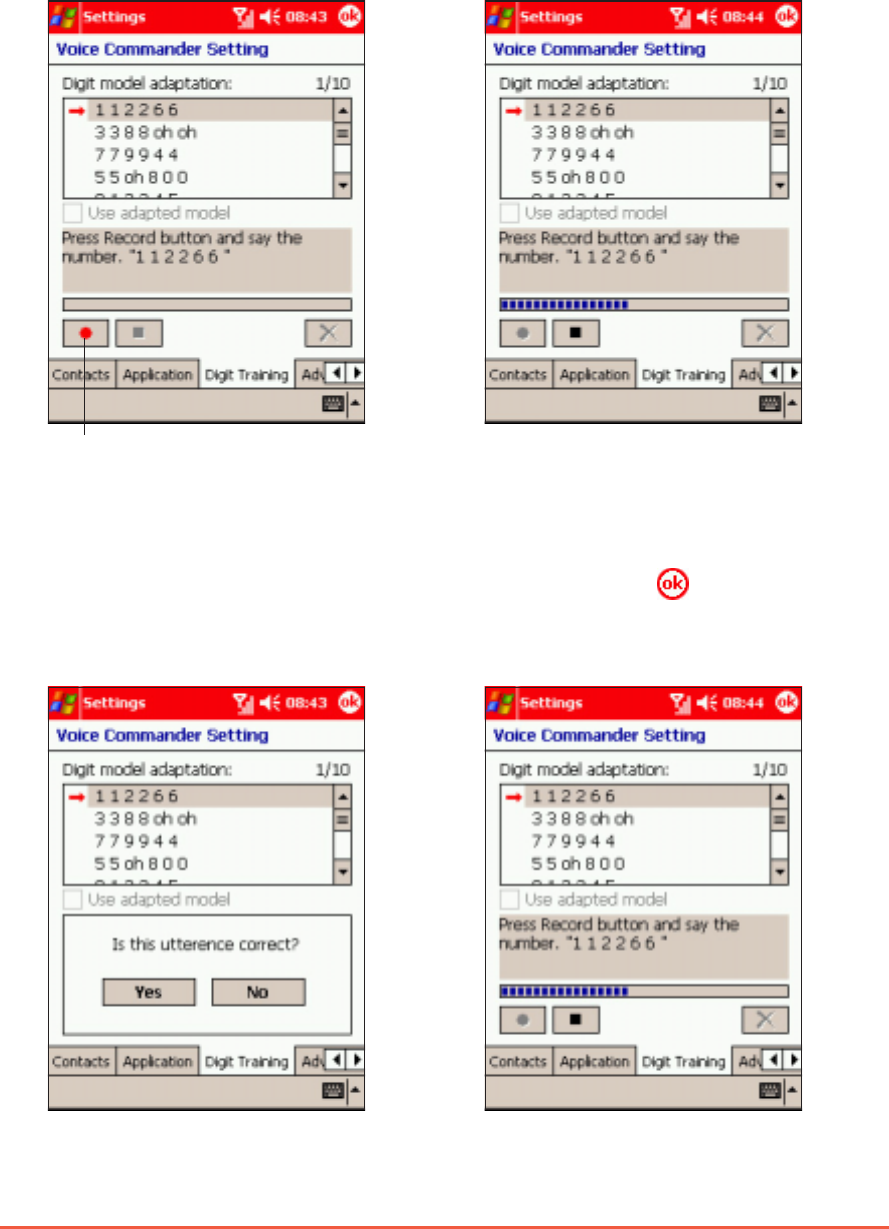
Digit trainingDigit training
Digit trainingDigit training
Digit training
The Digit Training Digit Training
Digit Training Digit Training
Digit Training tab trains you on pronouncing digits when using
the Digit Dial feature of the Voice Commander. The device uses the
digit model adaptation recording to recognise your voice tone and
pronunciation speed.
NOTENOTE
NOTENOTE
N O T E Since Digit Training
serves as the Voice
Commander calibration,
it is recommended that
you record in a quiet
environment for
accurate recognition.
Record button
Chapter 8: Using Companion Applications
8-29
ToTo
ToTo
To teach the device to recognise teach the device to recognise
teach the device to recognise teach the device to recognise
teach the device to recognise digitdigit
digitdigit
digitss
ss
s::
::
:
Record button
2. Say the first number
sequence on the DigitDigit
DigitDigit
Digit
model adaptation model adaptation
model adaptation model adaptation
model adaptation field.
1. Tap the Digit Training Digit Training
Digit Training Digit Training
Digit Training tab,
then tap the record button
to start.
3. The device plays back the
recording, then confirms if
the recording is correct. Tap
YesYes
YesYes
Y es to record, or NoNo
NoNo
No to
repeat recording.
4. Record the next digit model
adaptation until all 10 are
recorded. Tap when done.
8-30
P505 Pocket PC
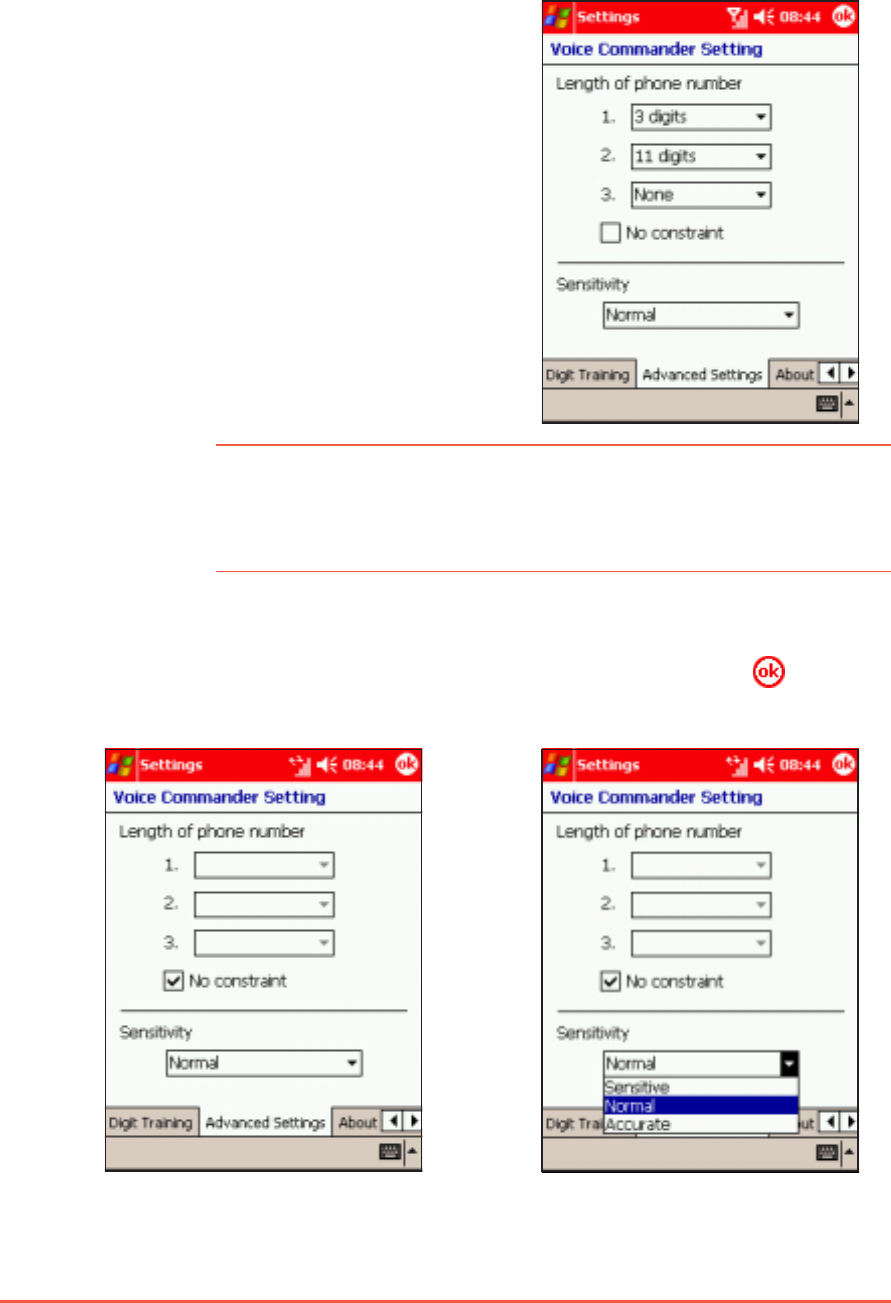
Adjusting the advanced settingsAdjusting the advanced settings
Adjusting the advanced settingsAdjusting the advanced settings
Adjusting the advanced settings
To adjust the advanced settings:To adjust the advanced settings:
To adjust the advanced settings:To adjust the advanced settings:
To adjust the advanced settings:
1. Tap the AdvancedAdvanced
AdvancedAdvanced
Advanced
SettingsSettings
SettingsSettings
Settings to display the
options.
2. Assign the length of the
phone number in the first
three fields.
NOTENOTE
NOTENOTE
N O T E By default, the Voice Commander application recognises three
phone number lengths based on your settings. Tap the NoNo
NoNo
No
constraintconstraint
constraintconstraint
c o n s tra i n t option to support unlimited number of phone
number digits.
3. Select the voice command
sensivity, then tap to save
your changes.
Chapter 8: Using Companion Applications
8-31
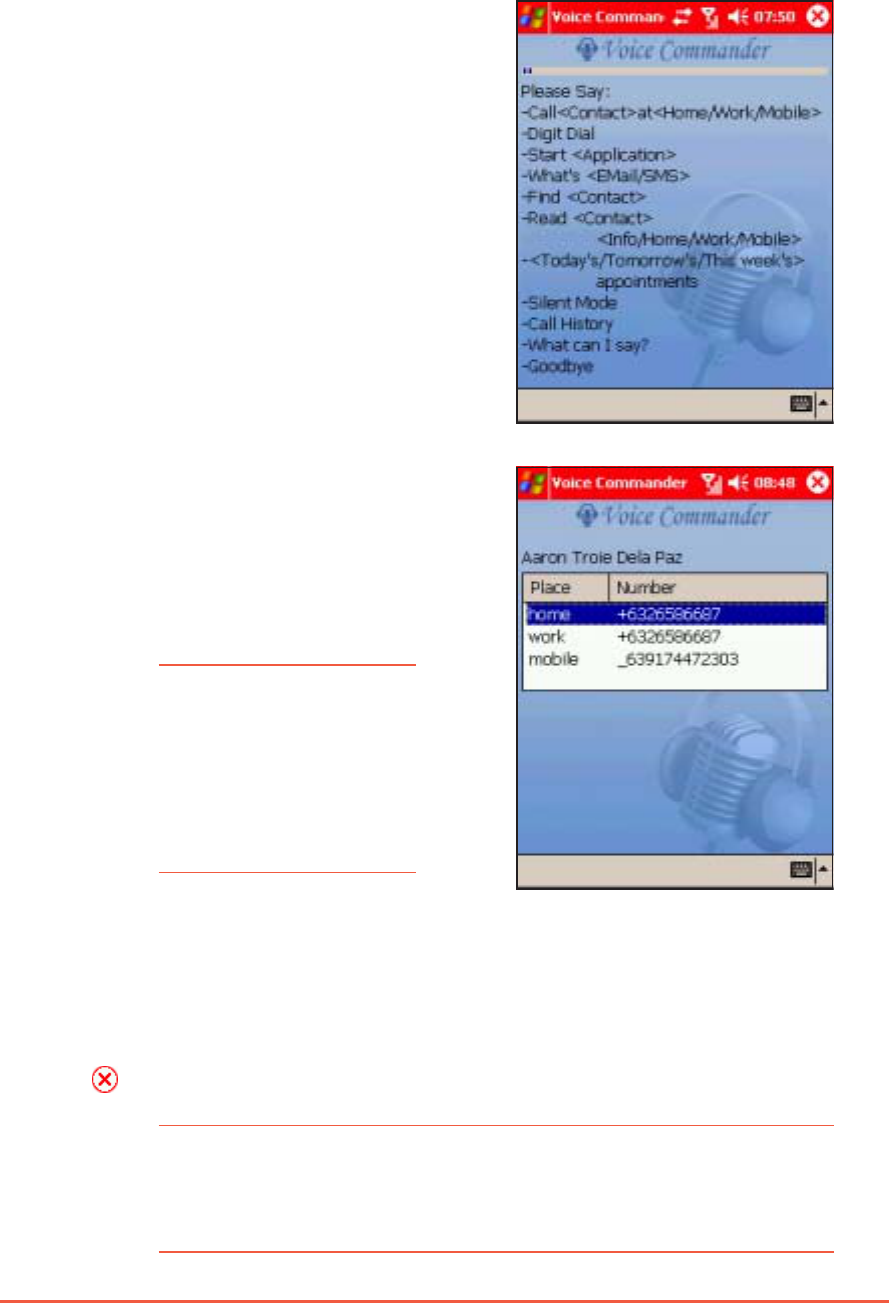
Using the Voice CommanderUsing the Voice Commander
Using the Voice CommanderUsing the Voice Commander
Using the Voice Commander
To launch and use the Voice Commander:To launch and use the Voice Commander:
To launch and use the Voice Commander:To launch and use the Voice Commander:
To launch and use the Voice Commander:
1. Press the Voice Commander
button on the right side of the
device to launch the
application.
2. Say a voice command providing
the relevant details as
prompted for between the < >.
For example, say “CallCall
CallCall
Call
AmandaAmanda
AmandaAmanda
Amanda”, “Start ExplorerStart Explorer
Start ExplorerStart Explorer
Start Explorer”.
IMPORTANTIMPORTANT
IMPORTANTIMPORTANT
I M P O R T A N T For details on each voice command function and other
application features, launch the Voice Commander application,
then say “What can I say?” to display the Voice Commander
help menu.
3. When multiple numbers are detected, the application will ask you
which number to call. Say “mobilemobile
mobilemobile
mobile” to call the mobile number.
4. The application associated with the command will open. Follow
screen instructions to continue.
5. Tap to close.
NOTENOTE
NOTENOTE
N O T E If you use your voice
tags, make sure you
use the same phrase as
recorded. “Call Mandy”
would not be
recognised if you
recorded “Amanda”.

8-32
P505 Pocket PC

Chapter 9
Using Pocket Internet Explore
r
This chapter gives
information on using
Pocket Internet Explorer
and the Mobile Favorites
folder.

9-2
P505 Pocket PC
Chapter summaryChapter summary
Chapter summaryChapter summary
Chapter summary
IntroductionIntroduction
IntroductionIntroduction
Introduction ............................................................................................................
............................................................................................................
...................................................... 9-39-3
9-39-3
9-3
Pocket Internet ExplorerPocket Internet Explorer
Pocket Internet ExplorerPocket Internet Explorer
Pocket Internet Explorer ..........................................................................
..........................................................................
..................................... 9-39-3
9-39-3
9-3
Using Pocket Internet Explorer ......................................... 9-3
Changing View settings ................................................... 9-4
Browsing the Internet ...................................................... 9-5
Mobile Favorites folderMobile Favorites folder
Mobile Favorites folderMobile Favorites folder
Mobile Favorites folder ..............................................................................
..............................................................................
....................................... 9-69-6
9-69-6
9-6
Favorite links ................................................................... 9-6
Mobile Favorites ............................................................... 9-6
Viewing mobile favourites and channels ........................... 9-8
Adding/Deleting mobile favourites and folders ................ 9-8
Chapter 9: Using Pocket Internet Explorer
9-3
IntroductionIntroduction
IntroductionIntroduction
Introduction
You can view web or WAP pages by connecting to the Internet via
GPRS or your local area network. See Chapter 10 for information on
creating a connection.
When connected to an ISP or network, you can also download files
and programs from the Internet or intranet.
NOTENOTE
NOTENOTE
N O T E Your mobile phone operator may charge for Internet/WAP
access. Contact them for details.
Pocket Internet ExplorerPocket Internet Explorer
Pocket Internet ExplorerPocket Internet Explorer
Pocket Internet Explorer
You can use Pocket Internet Explorer to browse mobile favourites and
channels that have been downloaded to your device without
connecting to the Internet. You can also connect to the Internet
through an ISP or a network connection to surf the Web.
Using Pocket Internet ExplorerUsing Pocket Internet Explorer
Using Pocket Internet ExplorerUsing Pocket Internet Explorer
Using Pocket Internet Explorer
To launch Pocket Internet Explorer:To launch Pocket Internet Explorer:
To launch Pocket Internet Explorer:To launch Pocket Internet Explorer:
To launch Pocket Internet Explorer:
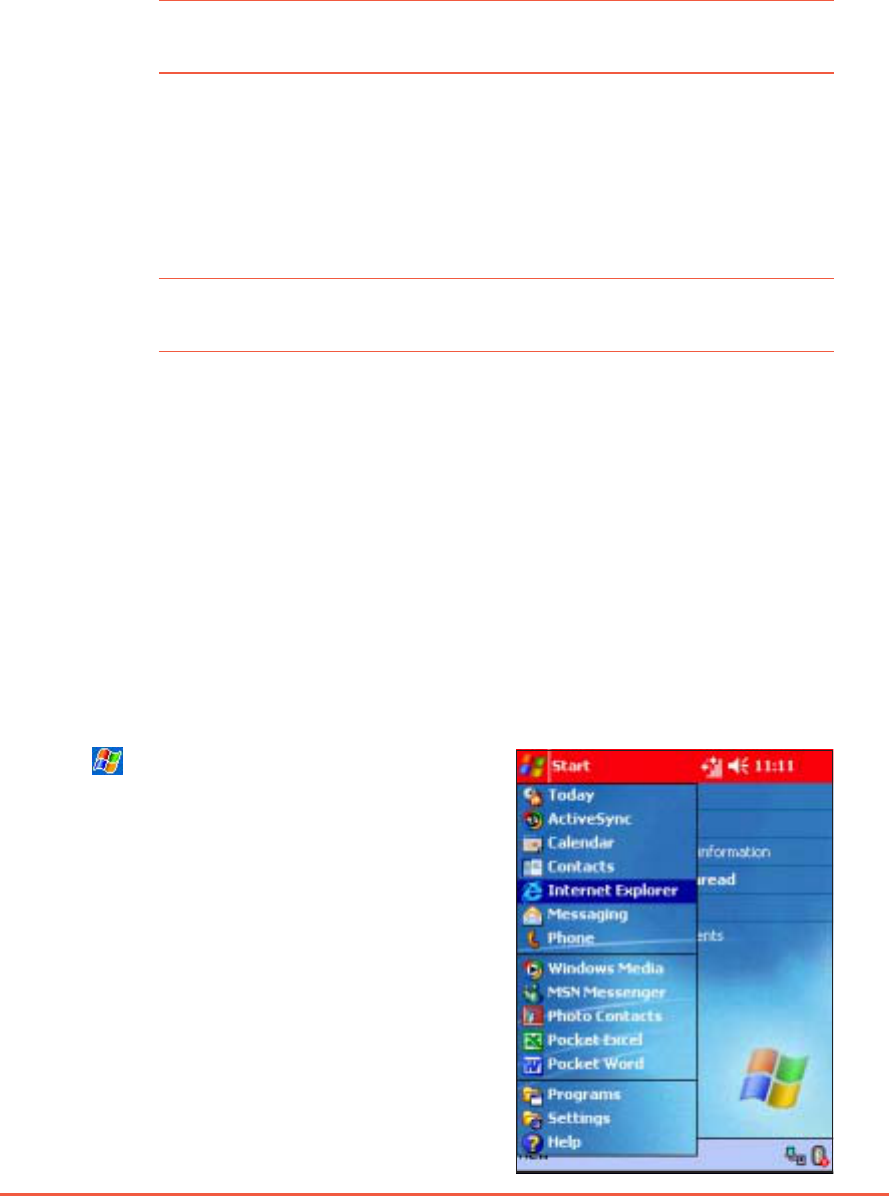
1. Tap , then InternetInternet
InternetInternet
Internet
ExplorerExplorer
ExplorerExplorer
Explorer to display the Pocket
Internet Explorer home page.
NOTENOTE
NOTENOTE
N O T E Internet surfing through WAP or GPRS may incur charges.
Inquire the applicable rate(s) with your phone operator.
You can copy the links to your favourite pages from your desktop
computer to the P505 or vice versa using ActiveSync. In Internet
Explorer, copy those links you wish to use on the P505 into the
Mobile Favourites sub-folder. These links are listed the next time you
synchronise the device with the desktop computer.
9-4
P505 Pocket PC
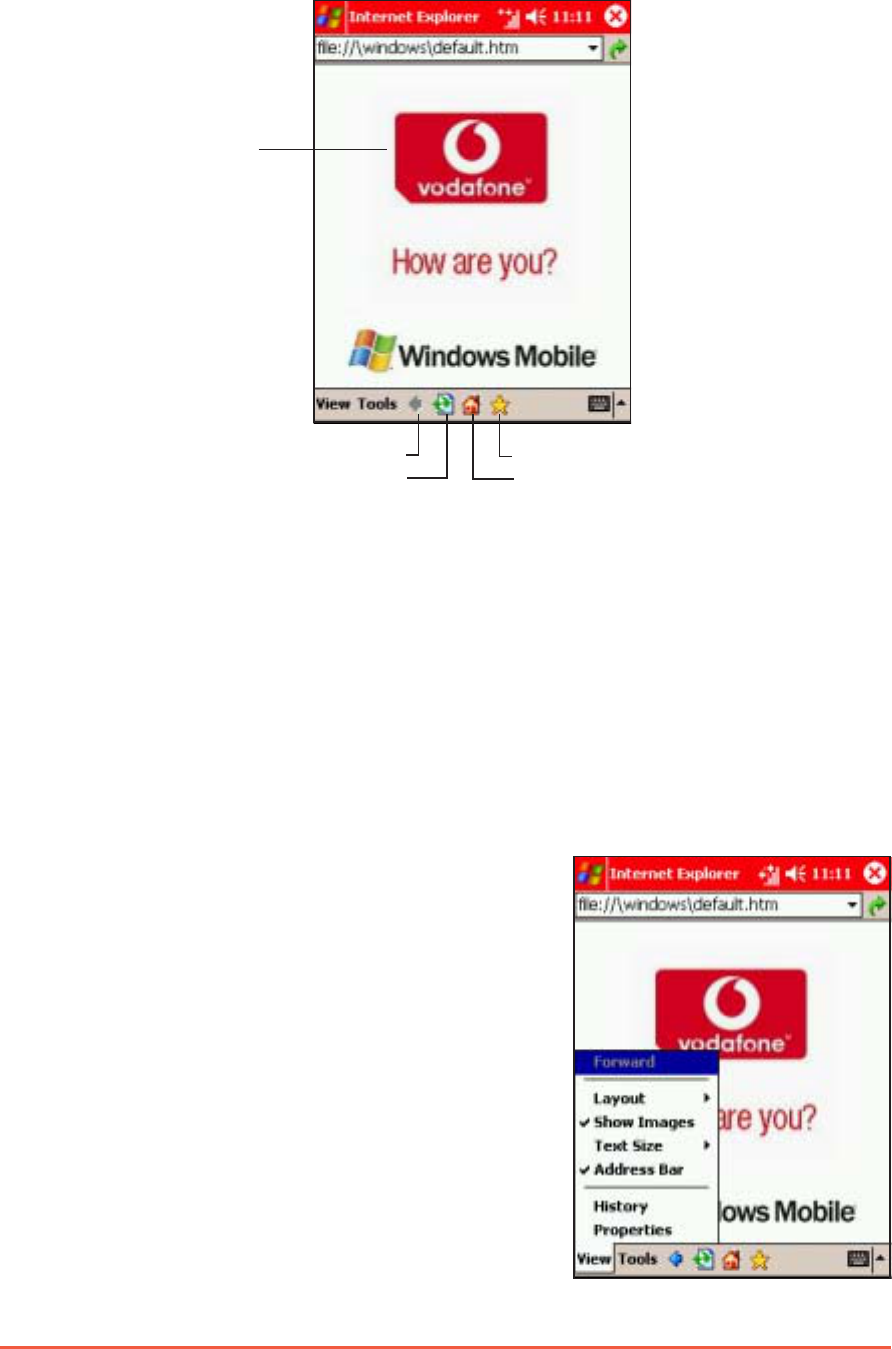
2. Tap the HomeHome
HomeHome
Ho me button to display the Pocket Internet Explorer
welcome screen with links to some useful Web sites.
3. Tap any of the Web site buttons to go to a specific site.
Changing View settingsChanging View settings
Changing View settingsChanging View settings
Changing View settings
To change View settings:To change View settings:
To change View settings:To change View settings:
To change View settings:
1. Tap ViewView
ViewView
Vi ew to display a pop-up
menu.
2. Tap Address BarAddress Bar
Address BarAddress Bar
Address Bar to display the
Web site address bar.
4. Tap and hold Text SizeText Size
Text SizeText Size
Text Size to display
another pop-up menu with a text
size selection. Select your desired
text size for the screen.
Tap to launch Favorites
Tap to go to the homepage
Tap to go back to previous page
Tap to stop/refresh
Tap to open the
Vodafone homepage
Pocket Internet Explorer home pagePocket Internet Explorer home page
Pocket Internet Explorer home pagePocket Internet Explorer home page
Pocket Internet Explorer home page
Chapter 9: Using Pocket Internet Explorer
9-5
Browsing the InternetBrowsing the Internet
Browsing the InternetBrowsing the Internet
Browsing the Internet
To browse the Internet:To browse the Internet:
To browse the Internet:To browse the Internet:
To browse the Internet:
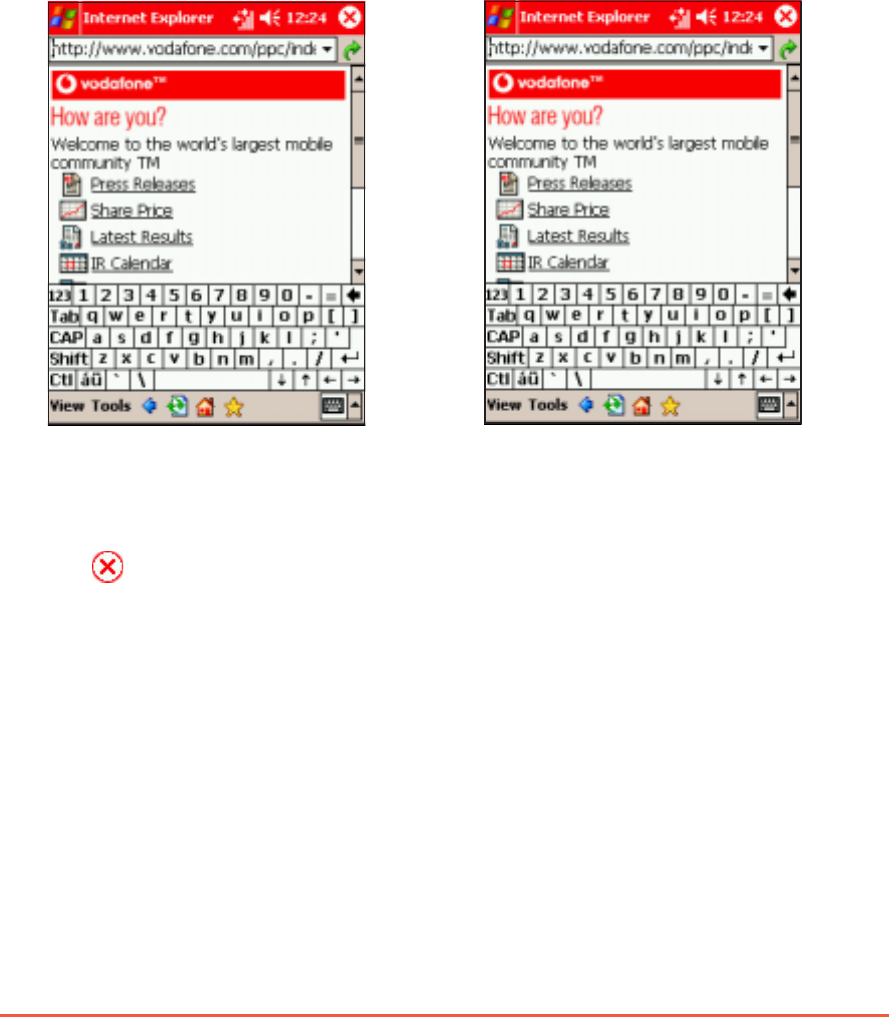
1. To browse pages you must have a valid connection established. This
may be automatic or require configuration. See Chapter 10 for details.
2. Do one of the following to connect and start browsing:
•Tap
ViewView
ViewView
View > AddressAddress
AddressAddress
Address
BarBar
BarBar
B a r. Enter the address of
the website that you want
to visit using the soft
keyboard, then tap GoGo
GoGo
Go.
•Tap the FavoritesFavorites
FavoritesFavorites
Favorites
button, then tap the
favourite that you wish to
view.
3. Use the stylus to move the browser slides up/down or left/right
to browse the web page.
4. Tap to close the browser.

9-6
P505 Pocket PC
Mobile Favorites folderMobile Favorites folder
Mobile Favorites folderMobile Favorites folder
Mobile Favorites folder
Only items stored in the Mobile Favorites sub-folder in the Favorites
folder in the desktop PC Internet Explorer will be synchronised with
your device. The Mobile Favorites folder is automatically created
when you installed ActiveSync
®
.
Favorite linksFavorite links
Favorite linksFavorite links
Favorite links
During synchronisation, any links in your computer’s Mobile Favorites
folder will be synchronised with Pocket Internet Explorer on your
device. Both computers are updated with changes made to either list
each time you synchronise. Unless you mark the favourite link as a
mobile favourite, only the link will be downloaded to your device, and
you will need to connect to your ISP or network to view the content.
For more information on synchronisation, see ActiveSync
®
Help on
the desktop computer.
Mobile FavoritesMobile Favorites
Mobile FavoritesMobile Favorites
Mobile Favorites
If you are using Microsoft
®
Internet Explorer 5.0 or later on your
desktop computer, you can download mobile favourites to your
device. Synchronising mobile favourites downloads Web content to
your device so that you can view pages while you are disconnected
from your ISP and desktop computer.
Use the Internet Explorer plug-in installed with ActiveSync
®
to quickly
create mobile favourites.
To create a mobile favourite:To create a mobile favourite:
To create a mobile favourite:To create a mobile favourite:
To create a mobile favourite:
1. In Internet Explorer on your
desktop computer, click ToolsTools
ToolsTools
Tools
then Create Mobile FavoriteCreate Mobile Favorite
Create Mobile FavoriteCreate Mobile Favorite
Create Mobile Favorite.
2. To change the link name, enter a
new name in the NameName
NameName
Name box.
3. Select your desired update
schedule in UpdateUpdate
UpdateUpdate
Upd ate. This is
optional.
4. Click OKOK
OKOK
O K. Internet Explorer downloads the latest version of the
page to your desktop computer.

Chapter 9: Using Pocket Internet Explorer
9-7
5. If you want to download the pages
that are linked to the mobile
favourite you just created, in
Internet Explorer on the desktop
computer, right-click the mobile
favourite, then click PropertiesProperties
PropertiesProperties
Properties. In
the DownloadDownload
DownloadDownload
Download tab, specify the
number of links deep you want to
download. To conserve device
memory, go only one level deep.
6. Synchronise your device and your
desktop computer. Mobile
favourites that are stored in the
Mobile Favorites in Internet Explorer
are downloaded to your device.
NOTENOTE
NOTENOTE
N O T E • If you did not specify an update schedule in step 3, you
will need to manually download content to keep the
information updated on your desktop computer and
device. Before synchronising with your device, in Internet
Explorer on your desktop computer, click ToolsTools
ToolsTools
Tools then
SynchronizeSynchronize
SynchronizeSynchronize
S y n c h ron i z e. You will see the last time content was
downloaded to the desktop computer, and you can
manually download content if needed.
• You can add a button to the Internet Explorer toolbar for
creating mobile favourites. In Internet Explorer on your
desktop computer, click ViewView
ViewView
View,
ToolbarsToolbars
ToolbarsToolbars
T o o l b a r s, and
CustomizeCustomize
CustomizeCustomize
Customize.
Saving device memorySaving device memory
Saving device memorySaving device memory
Saving device memory
Mobile favourites take up storage memory on your device. To
minimise the amount of memory used:
• In the settings for the Favorites information type in ActiveSync
®
options, turn off pictures and sounds, or stop some mobile
favourites from being downloaded to the device. For more
information, see ActiveSync
®
Help.
• Limit the number of downloaded linked pages. In Interner Explorer
on your desktop computer, right-click the mobile favourite you
want to change, then click PropertiesProperties
PropertiesProperties
Properties. In the DownloadDownload
DownloadDownload
Download tab,
specify 0 or 1 for the number of linked pages you want to
download.
9-8
P505 Pocket PC
Viewing mobile favourites and channelsViewing mobile favourites and channels
Viewing mobile favourites and channelsViewing mobile favourites and channels
Viewing mobile favourites and channels
To view mobile favourites and channels:To view mobile favourites and channels:
To view mobile favourites and channels:To view mobile favourites and channels:
To view mobile favourites and channels:
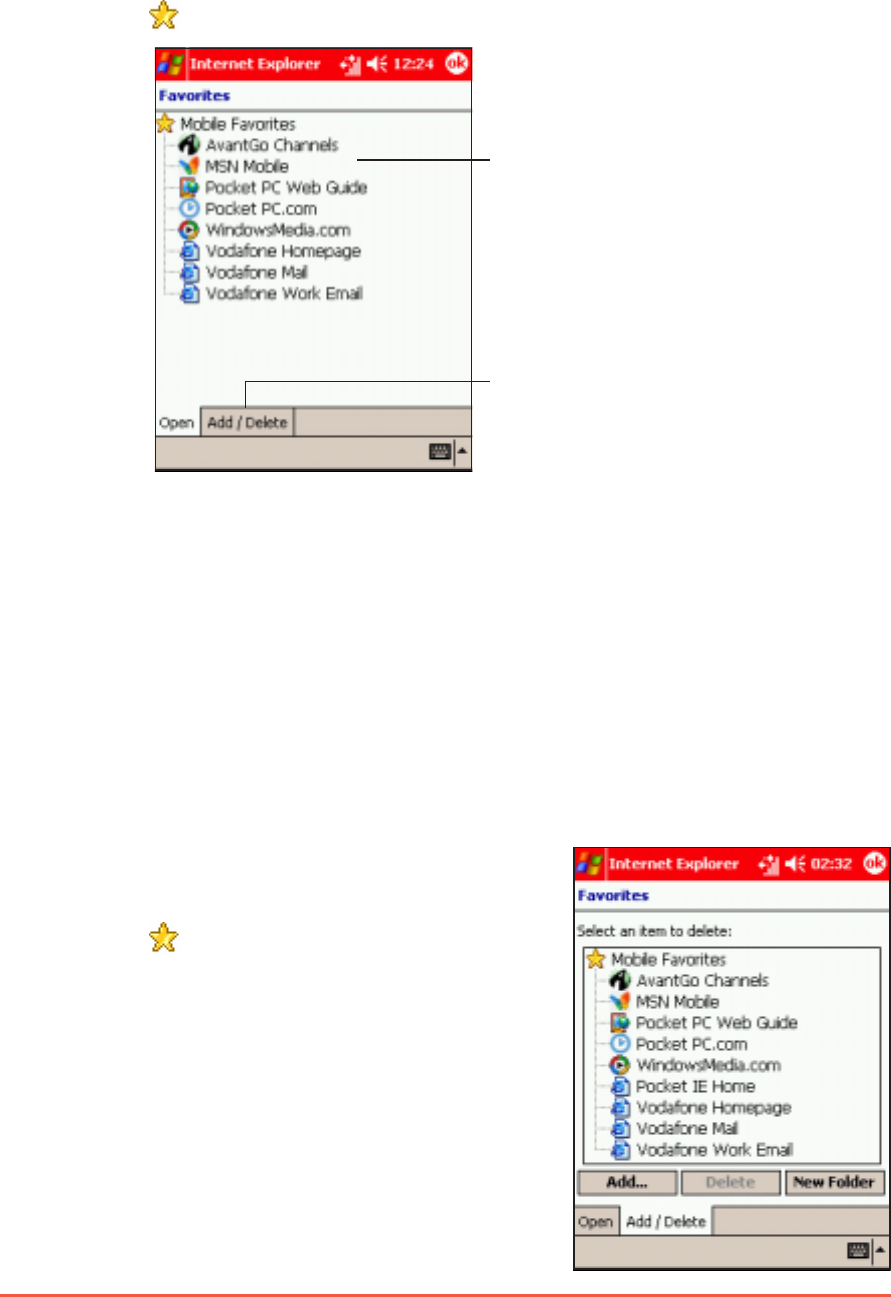
1. Tap to display your list of favourites.
2. Tap a Favorites page that you wish to view.
You will see the page that was downloaded the last time you
synchronised with your desktop computer. If the page is not on
your device, the favourite is dimmed. You need to synchronise
with your desktop computer again to download the page to your
device, or connect to the Internet to view the page.
Adding/Deleting mobile favourites andAdding/Deleting mobile favourites and
Adding/Deleting mobile favourites andAdding/Deleting mobile favourites and
Adding/Deleting mobile favourites and
foldersfolders
foldersfolders
folders
To add a favourite:To add a favourite:
To add a favourite:To add a favourite:
To add a favourite:
1. Tap to display your list of
favourites.
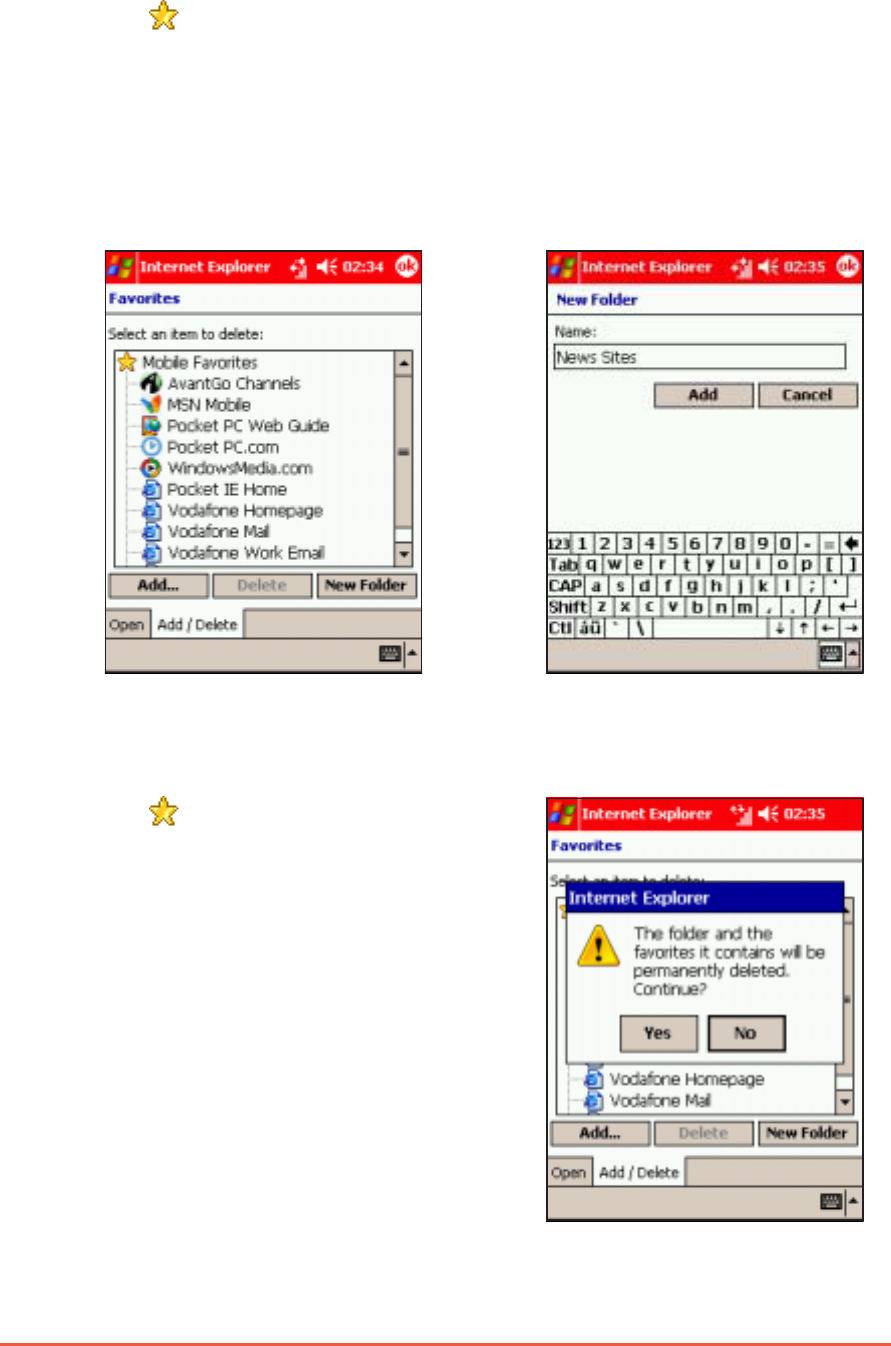
2. Tap the Add/DeleteAdd/Delete
Add/DeleteAdd/Delete
Add/Delete button
to display the FavoritesFavorites
FavoritesFavorites
Favorites
screen.
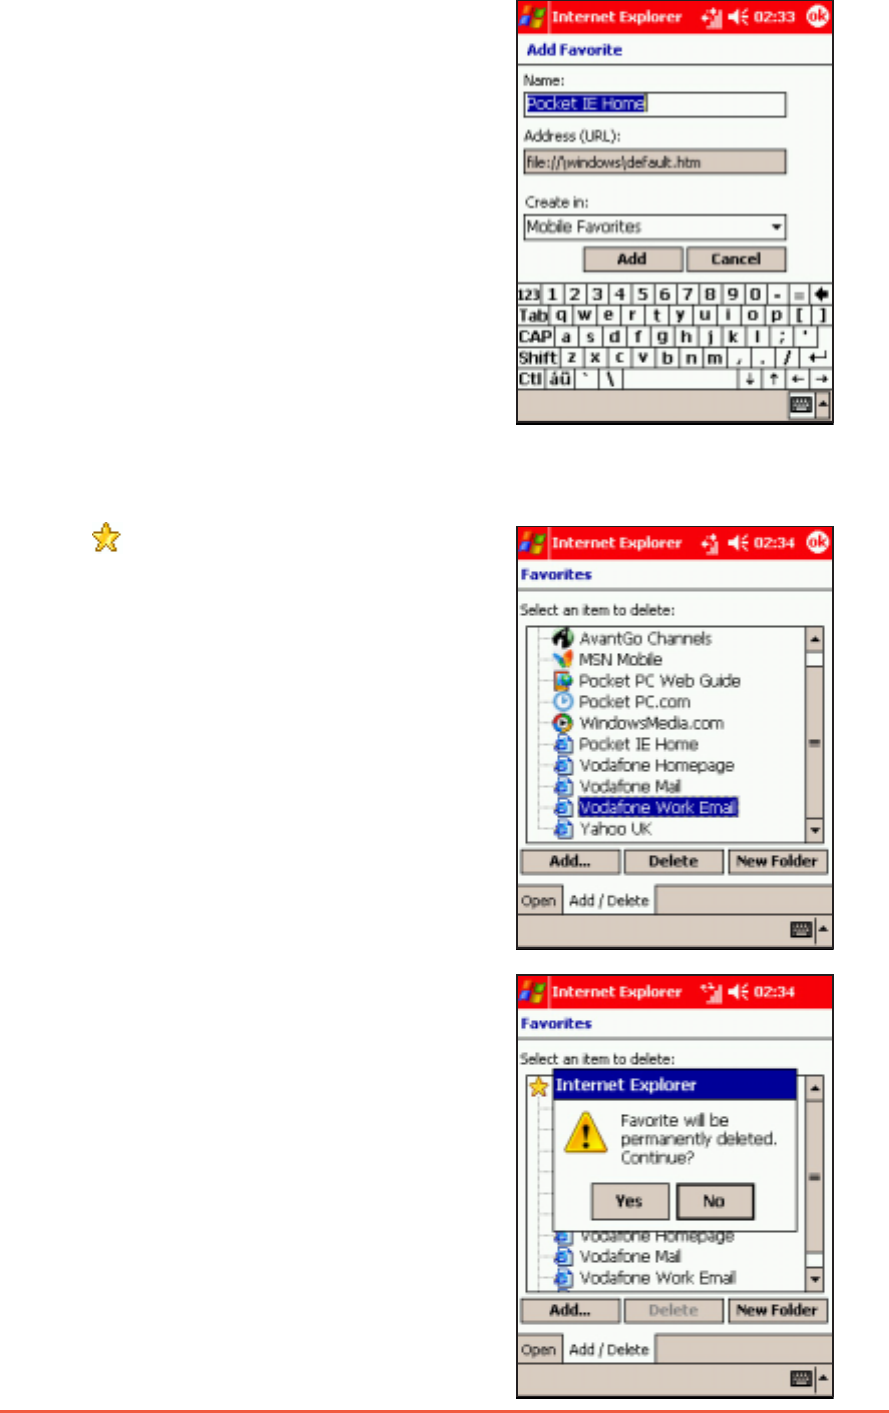
3. Tap the Add...Add...
Add...Add...
Add ... button to
show the Add FavoriteAdd Favorite
Add FavoriteAdd Favorite
Add Favorite
screen.
Tap the favourite that
you wish to view
Tap to add or delete a
folder or favourite link
Chapter 9: Using Pocket Internet Explorer
9-9
4. Type a name for the favourite that
you wish to add in the NameName
NameName
Name field.
5. Type in the URL address in the
Address (URL)Address (URL)
Address (URL)Address (URL)
Address (URL) field.
6. Select a folder to place the favourite
from the Create in:Create in:
Create in:Create in:
Create in: box.
7. Tap AddAdd
AddAdd
Add to return to the Favorites
screen, which now shows the
favourite that you added.
To delete a favourite:To delete a favourite:
To delete a favourite:To delete a favourite:
To delete a favourite:
1. Tap to display your list of
favourites.
2. Tap the Add/DeleteAdd/Delete
Add/DeleteAdd/Delete
Add/Delete button to
display the FavoritesFavorites
FavoritesFavorites
Favorites screen.
3. Select the favourite that you wish to
delete, then tap DeleteDelete
DeleteDelete
Delete.
4. When prompted to permanently
delete the favourite, tap YesYes
YesYes
Yes.
9-10
P505 Pocket PC
To add a folder:To add a folder:
To add a folder:To add a folder:
To add a folder:
1. Tap to display your list of favourites.
2. Tap the Add/DeleteAdd/Delete
Add/DeleteAdd/Delete
Add/Delete button to display the FavoritesFavorites
FavoritesFavorites
Favorites screen.
3. Tap the New FolderNew Folder
New FolderNew Folder
New Folder button.
4. Type a name for the folder that you wish to create.
5. Tap AddAdd
AddAdd
Add to return to the Favorites screen, which now shows the
folder that you added.
To delete a folder:To delete a folder:
To delete a folder:To delete a folder:
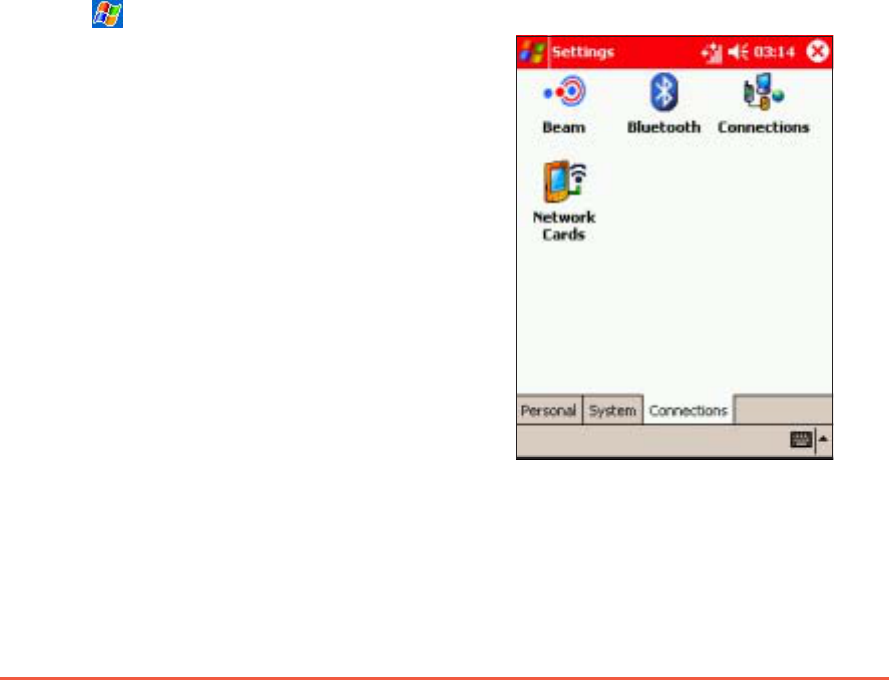
To delete a folder:
1. Tap to display your list of
favourites.
2. Tap the Add/DeleteAdd/Delete
Add/DeleteAdd/Delete
Add/Delete button
to display the FavoritesFavorites
FavoritesFavorites
Favorites
screen.
3. Select the folder that you wish
to delete, then tap DeleteDelete
DeleteDelete
Delete.
4. When prompted to permanently
delete the folder, tap YesYes
YesYes
Yes.

Chapter 10
Getting Connected
This chapter provides the
procedures for connecting to
the Internet, intranet, and for
transferring data using infrared
(IR).

10-2
P505 Pocket PC
Chapter summaryChapter summary
Chapter summaryChapter summary
Chapter summary
••
••
•IntroductionIntroduction
IntroductionIntroduction
Introduction ..............................................................................................
..............................................................................................
...............................................10-310-3
10-310-3
10-3
••
••
•My ISP connectionsMy ISP connections
My ISP connectionsMy ISP connections
My ISP connections ..........................................................................
..........................................................................
.....................................10-410-4
10-410-4
10-4
Creating an Internet connection ..................................... 10-4
••
••
•My Work connectionsMy Work connections
My Work connectionsMy Work connections
My Work connections ....................................................................
....................................................................
..................................10-910-9
10-910-9
10-9
Creating a VPN connection .......................................... 10-10
Adjusting the proxy server settings ............................. 10-12
Network card connections ........................................... 10-13
••
••
•Set up a WAP gatewaySet up a WAP gateway
Set up a WAP gatewaySet up a WAP gateway
Set up a WAP gateway ............................................................
............................................................
..............................10-1510-15
10-1510-15
10-15
••
••
•Using dialing rulesUsing dialing rules
Using dialing rulesUsing dialing rules
Using dialing rules ........................................................................
........................................................................
....................................10-1710-17
10-1710-17
10-17
••
••
•Ending a connectionEnding a connection
Ending a connectionEnding a connection
Ending a connection ....................................................................
....................................................................
..................................10-1810-18
10-1810-18
10-18
••
••
•Infrared (IR) connectionInfrared (IR) connection
Infrared (IR) connectionInfrared (IR) connection
Infrared (IR) connection ........................................................
........................................................
............................10-1810-18
10-1810-18
10-18
Sending information ..................................................... 10-19
Receiving information .................................................. 10-20
Chapter 10: Getting Connected
10-3
IntroductionIntroduction
IntroductionIntroduction
Introduction
The connection settings tell the device how you want it to connect to
service/network to browse the Internet, send and receive e-mail,
SMS, MMS, etc.
Connections can be made using a modemmodem
modemmodem
modem, wireless networkwireless network
wireless networkwireless network
wireless network, or
network (Ethernet) cardsnetwork (Ethernet) cards
network (Ethernet) cardsnetwork (Ethernet) cards
network (Ethernet) cards. A modem connection can be used to
set up connections with an external modem, or with the mobile phone
network using a cellular line (WAP or GPRS).
Your device has two groups of connection settings: My ISPMy ISP
My ISPMy ISP
My ISP and MyMy
MyMy
My
Work NetworkWork Network
Work NetworkWork Network
Work Network. My ISP settings are used to connect to the Internet,
and My Work Network settings can be used to connect to any private
network, such as a corporate network you use at work. Simply fill in
the settings and get ready to start connecting. For more information,
see the sections “Connect to the Internet” or “Connect to Work.”
You may also establish connection to the Internet wirelessly through
another device with infrared (IR) or Bluetooth
®
features. For more
information, see sections “Infrared (IR) connection” or “Bluetooth
®
connection.”
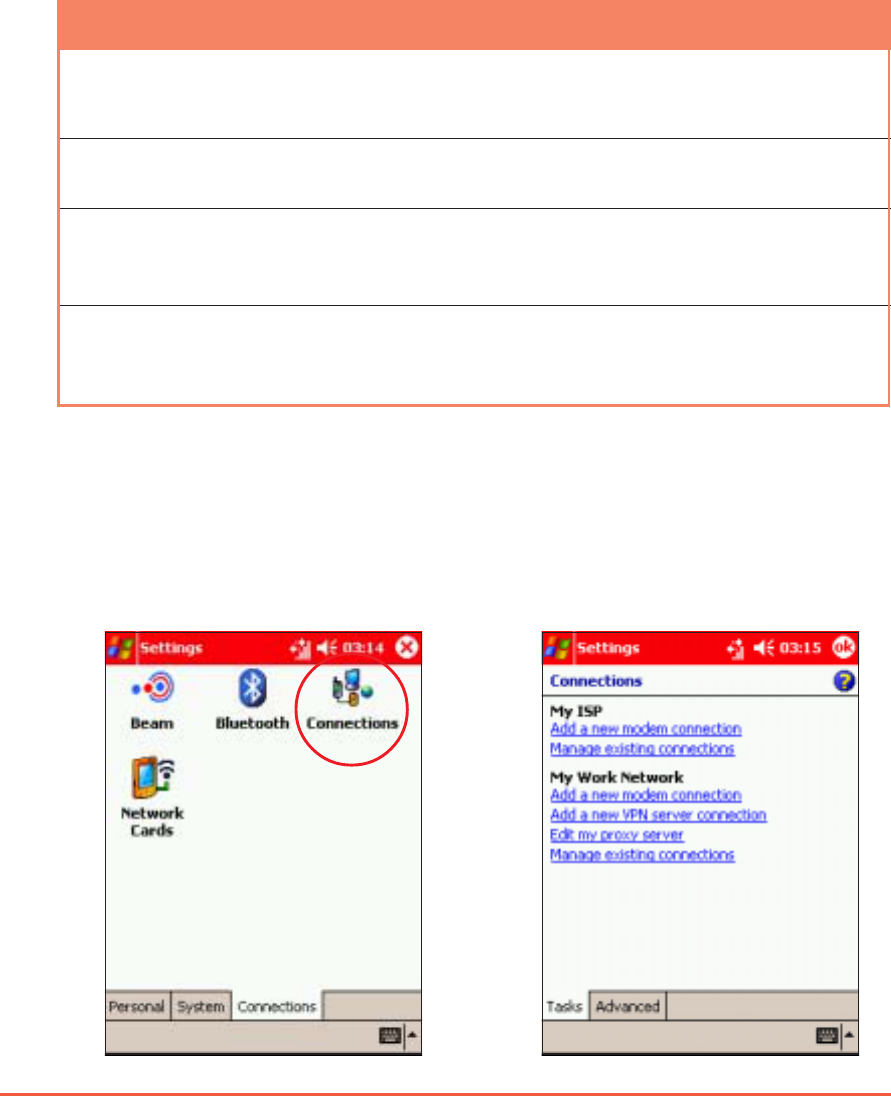
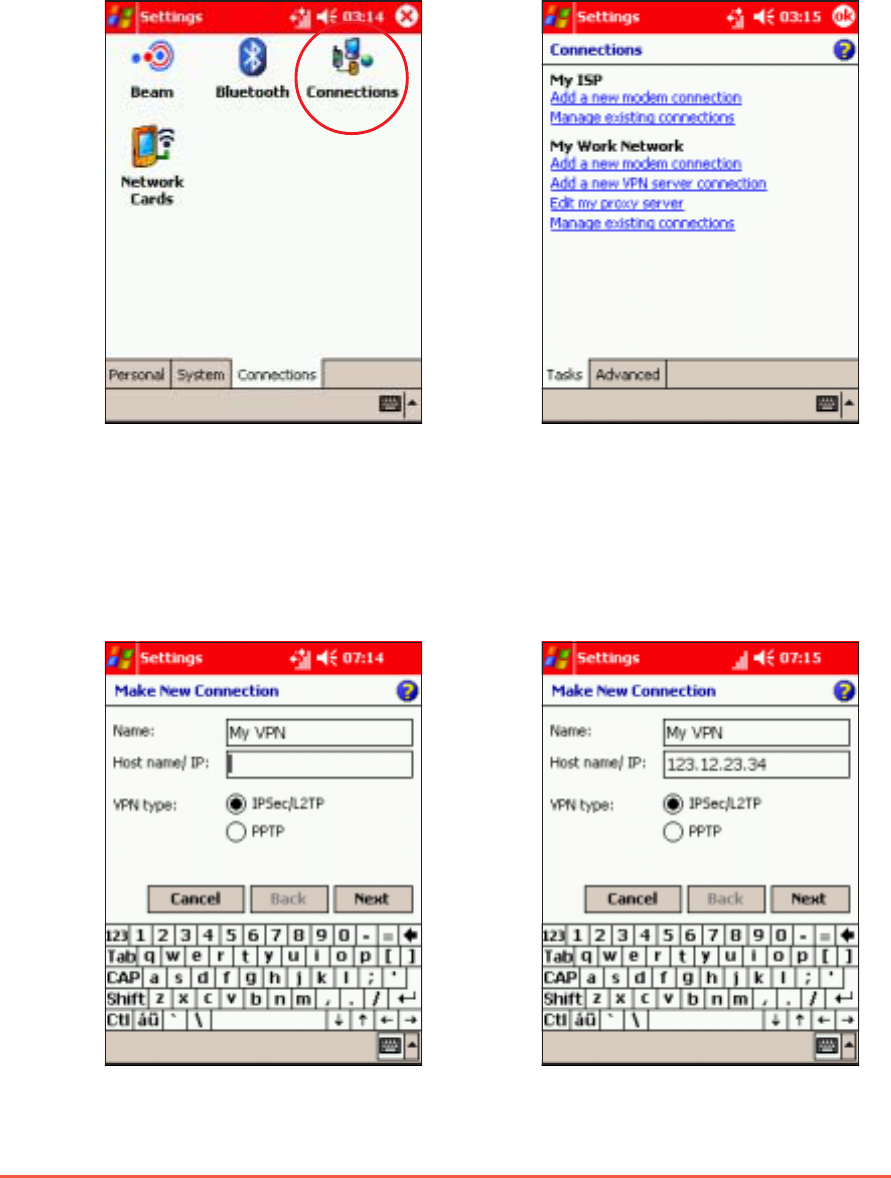
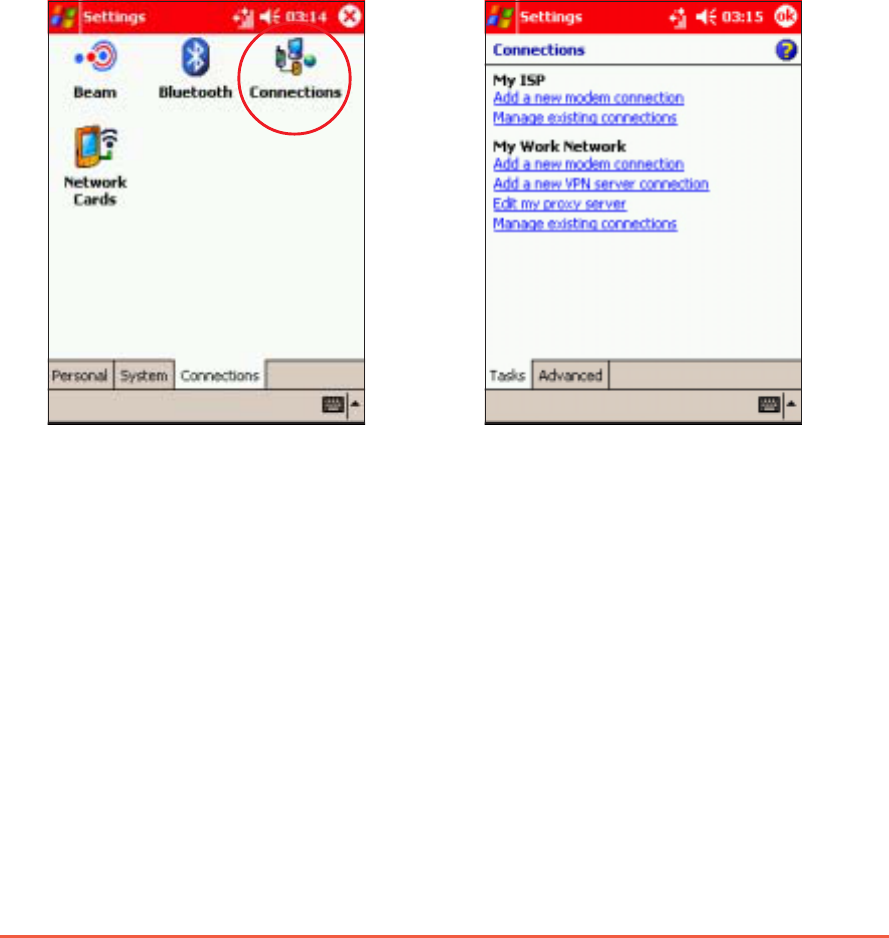
To view the Connections window:To view the Connections window:
To view the Connections window:To view the Connections window:
To view the Connections window:
1. Tap .
2. Tap SettingsSettings
SettingsSettings
Settings.
3. Tap the ConnectionsConnections
ConnectionsConnections
Connections tab.
4. Tap a connection to use or
configure.
10-4
P505 Pocket PC
ConnectionConnection
ConnectionConnection
Connection Information requiredInformation required
Information requiredInformation required
Information required
Cellular Line (WAP)Cellular Line (WAP)
Cellular Line (WAP)Cellular Line (WAP)
C el l u l ar L i ne ( W A P) server phone number, user name, password,
domain, port settings, TCP/IP settings, specific
server addresses
Cellular Line (GPRS)Cellular Line (GPRS)
Cellular Line (GPRS)Cellular Line (GPRS)
C el l u l ar L i n e ( G P RS) access point name, user name, password, domain,
TCP/IP settings, specific server addresses
Generic IrDAGeneric IrDA
Generic IrDAGeneric IrDA
G e n e r i c I r D A server phone number, user name, password,
domain, Baud rate, port settings, TCP/IP settings,
specific server addresses
Hayes-compatible modemHayes-compatible modem
Hayes-compatible modemHayes-compatible modem
Hayes-compatible modem server phone number, user name, password,
domain, Baud rate, port settings, TCP/IP settings,
specific server addresses
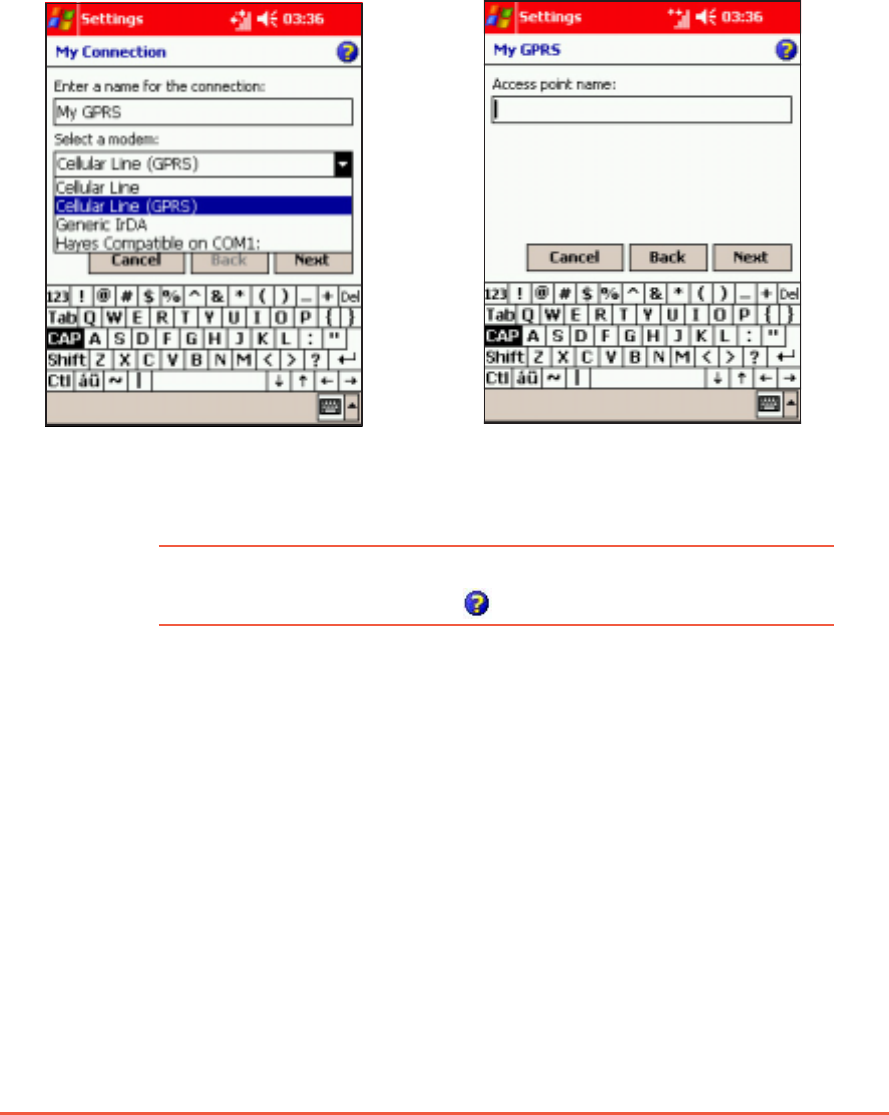
Creating an Internet connectionCreating an Internet connection
Creating an Internet connectionCreating an Internet connection
Creating an Internet connection
To create a Cellular Line (WAP) connection:To create a Cellular Line (WAP) connection:
To create a Cellular Line (WAP) connection:To create a Cellular Line (WAP) connection:
To create a Cellular Line (WAP) connection:
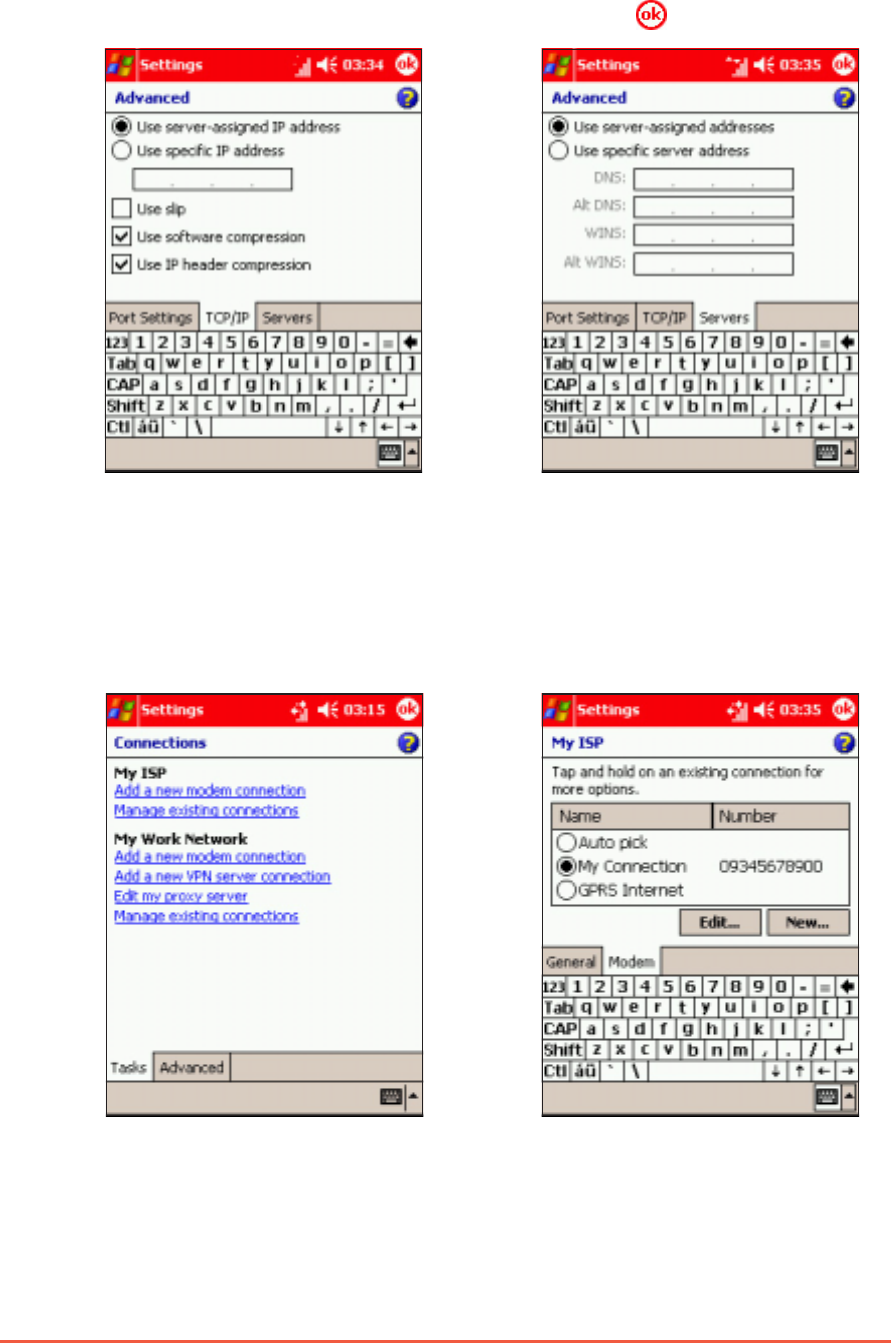
1. From the ConnectionsConnections
ConnectionsConnections
Connections tab,
tap ConnectionsConnections
ConnectionsConnections
Connections.
2. In My ISP, tap Add a newAdd a new
Add a newAdd a new
Add a new
modem connectionmodem connection
modem connectionmodem connection
modem connection.
My ISP connectionsMy ISP connections
My ISP connectionsMy ISP connections
My ISP connections
You can connect to the Internet using your Pocket PC cellular line
(WAP), GPRS, generic IrDA, or Hayes-compatible modem. Refer to the
following sections on how to set up your Internet connection.
Your device is pre-configured to automatically connect to Vodafone’s
services, provided you have subscription. Contact the operator for
details of specific charges and services.
To create a different connection, you need the following information
to set up the device.
Chapter 10: Getting Connected
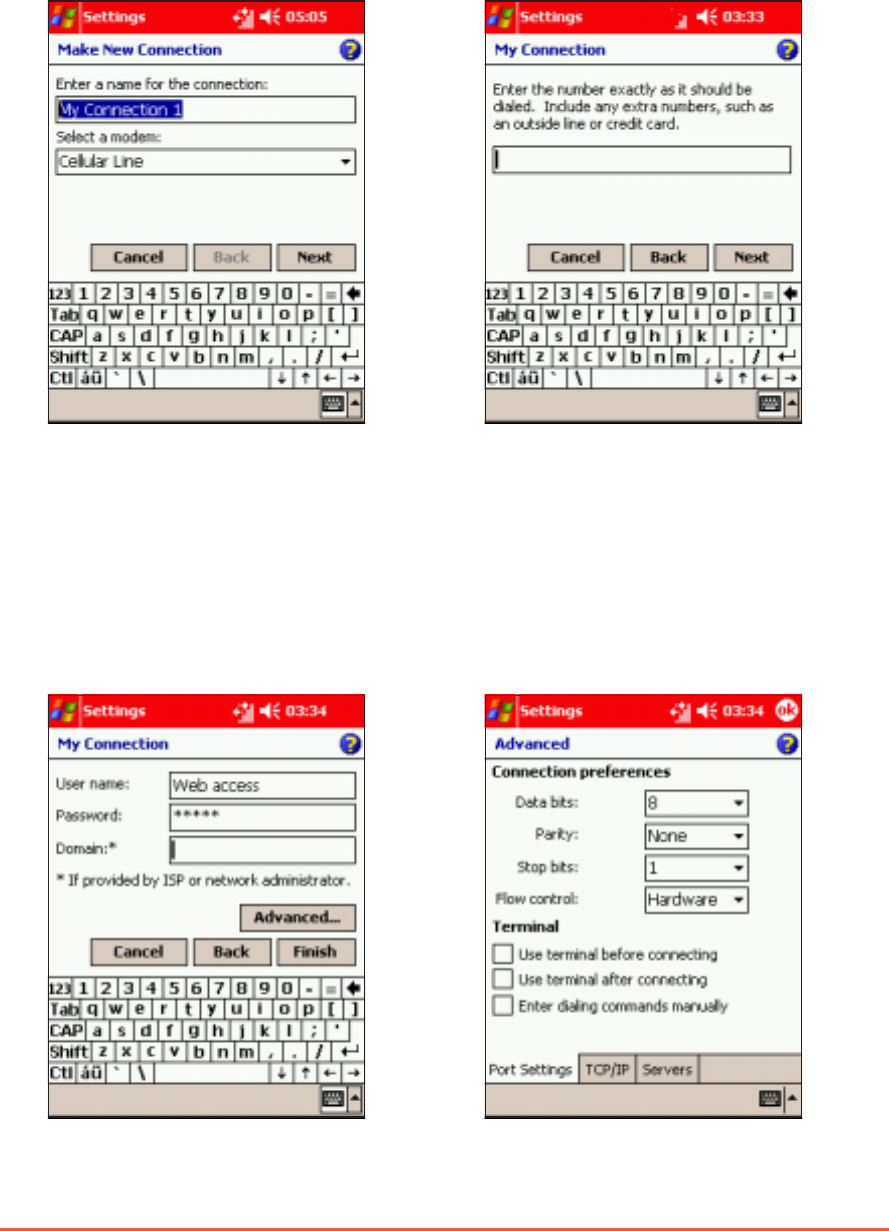
10-5
3. Type a name for the
connection, then select
Cellular Line Cellular Line
Cellular Line Cellular Line
Cellular Line from the
modem list. Tap NextNext
NextNext
Next when
finished.
4. Use the soft keyboard to type
the number of the phone
network server, then tap
NextNext
NextNext
Next.
5. Type the user name,
password, and domain for the
connection, then tap
AdvancedAdvanced
AdvancedAdvanced
Advanced. Otherwise, tap
FinishFinish
FinishFinish
Fin ish to create the
connection.
6. Adjust the ConnectionConnection
ConnectionConnection
Connection
PreferencesPreferences
PreferencesPreferences
Preferences and TerminalTerminal
TerminalTerminal
Terminal
settings from this tab, then
tap the TCP/IPTCP/IP
TCP/IPTCP/IP
TCP/IP tab.
10-6
P505 Pocket PC
7. Adjust the TCP/IP settings
from this window, then tap
the ServersServers
ServersServers
Servers tab.
8. Adjust the specific server
address from this window,
then tap .
9. The device creates the
connection. To verify, return
to the ConnectionsConnections
ConnectionsConnections
Connections main
window, then tap ManageManage
ManageManage
Manage
existing connectionsexisting connections
existing connectionsexisting connections
existing connections.
10.The connection appears in
the list of network
connections. Launch Internet
Explorer to test the
connection.
Chapter 10: Getting Connected
10-7
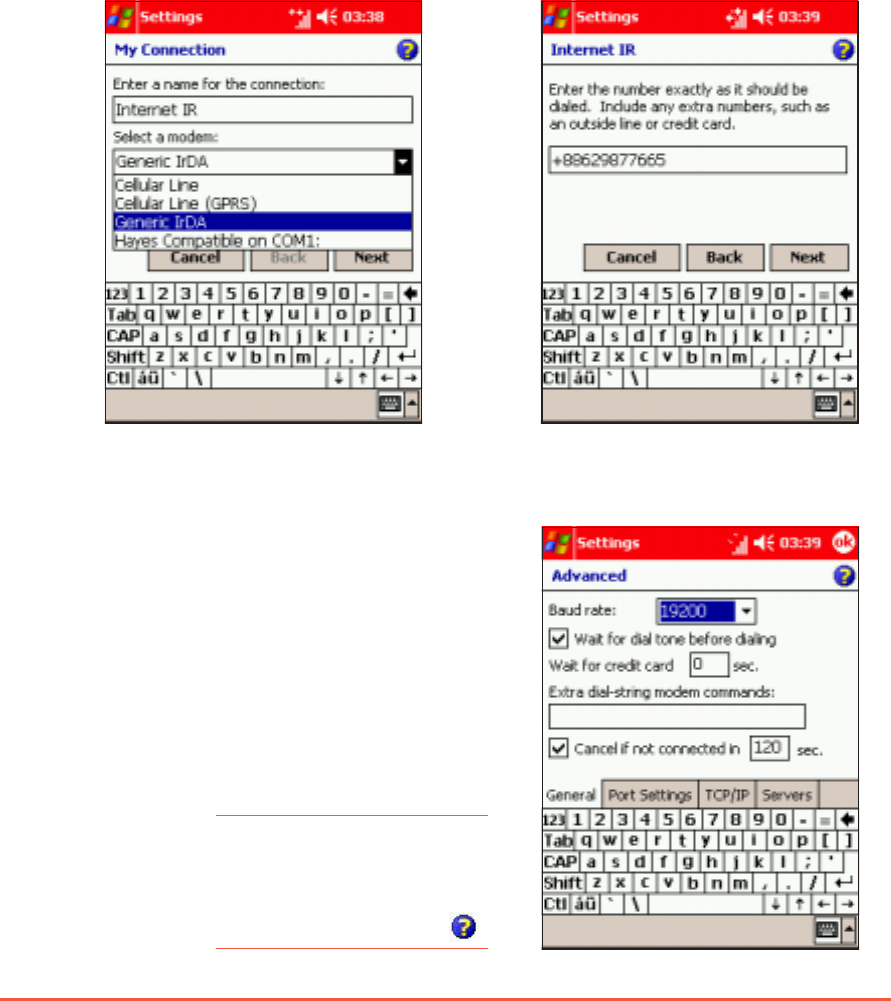
To create a Cellular Line (GPRS) connection:To create a Cellular Line (GPRS) connection:
To create a Cellular Line (GPRS) connection:To create a Cellular Line (GPRS) connection:
To create a Cellular Line (GPRS) connection:
1. Follow steps 1 to 2 of the previous section.
2. Type a name for the
connection, then select
Cellular Line (GPRS) Cellular Line (GPRS)
Cellular Line (GPRS) Cellular Line (GPRS)
Cellular Line (GPRS) from
the modem list. Tap NextNext
NextNext
Next.
3. Use the soft keyboard to type
the GPRS access point name
of the phone network server,
then tap NextNext
NextNext
Next.
4. Follow steps 5, 7 to 10 of the previous section to create the
GPRS connection.
NOTENOTE
NOTENOTE
N O T E To view additional information for any screen in the wizard or
while changing settings, tap .
10-8
P505 Pocket PC
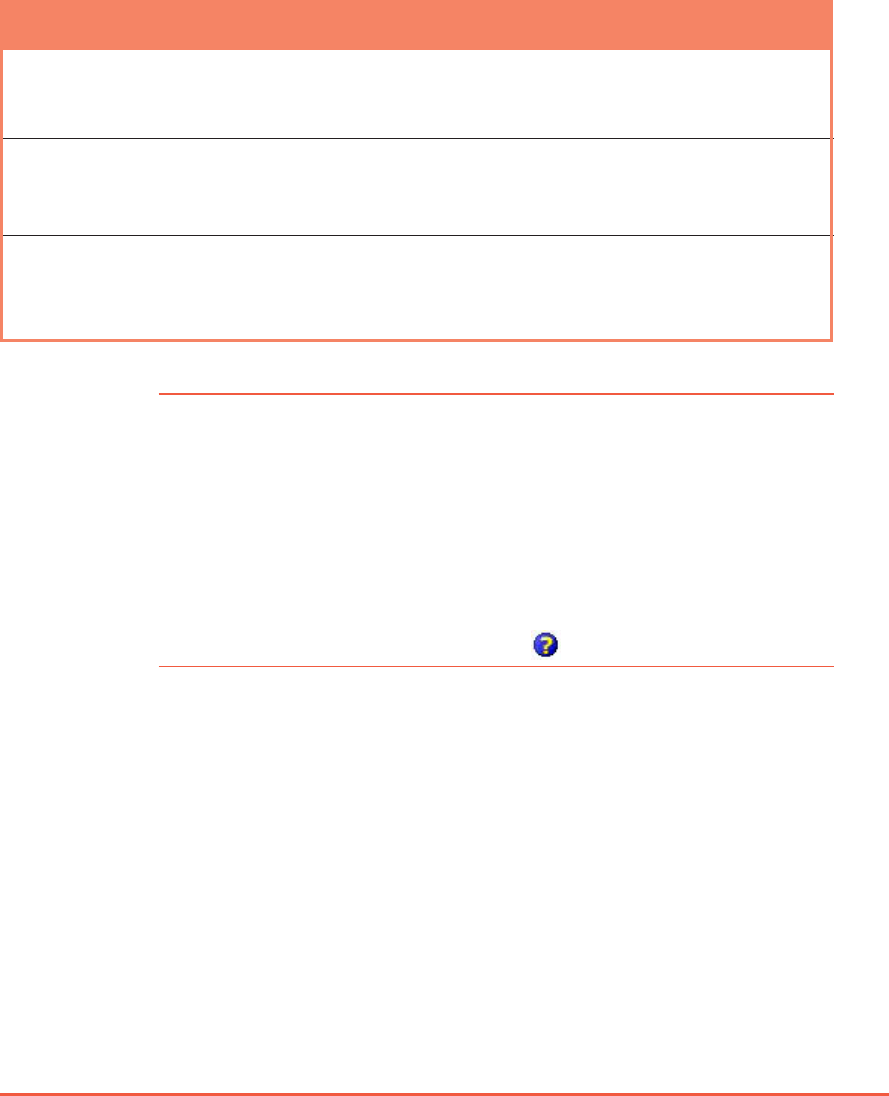
To create an IR or Hayes-compatible modemTo create an IR or Hayes-compatible modem
To create an IR or Hayes-compatible modemTo create an IR or Hayes-compatible modem
To create an IR or Hayes-compatible modem
connection:connection:
connection:connection:
connection:
1. Follow steps 1 to 2 of the section on creating a cellular line (WAP)
connection on page 10-4.
2. Type a name for the
connection, then select
Generic IrDA Generic IrDA
Generic IrDA Generic IrDA
Generic IrDA or
Hayes-compatible onHayes-compatible on
Hayes-compatible onHayes-compatible on
Hayes-compatible on
COM1:COM1:
COM1:COM1:
COM 1: from the modem list.
Tap NextNext
NextNext
Next.
3. Use the soft keyboard to type
the number of phone network
server, then tap NextNext
NextNext
Next.
4. Follow step 5 of the section on creating a cellular line (WAP)
connection on page 10-5.
5. Set the Baud Rate Baud Rate
Baud Rate Baud Rate
Baud Rate for the
connection using the GeneralGeneral
GeneralGeneral
General
tab.
6. Follow steps 6 to 10 of the
section on creating a cellular line
(WAP) connection on page 10-5
to 10-6 to create the
connection.
NOTENOTE
NOTENOTE
N O T E To view additional
information for any screen
in the wizard or while
changing settings, tap .
Chapter 10: Getting Connected
10-9
My Work connectionsMy Work connections
My Work connectionsMy Work connections
My Work connections
Use My Work connections to connect to a Local Area Network (LAN),
virtual private network (VPN), and edit the firewall proxy settings.
using the device or a network card (Ethernet card). Refer to the
following sections on how to set up your work connections.
Before you proceedBefore you proceed
Before you proceedBefore you proceed
Before you proceed
Before setting up your Internet connection in the My Work group,
obtain the following information from your network administrator.
ConnectionConnection
ConnectionConnection
Connection Information requiredInformation required
Information requiredInformation required
Information required
Generic IrDAGeneric IrDA
Generic IrDAGeneric IrDA
G e n e r i c I r D A server phone number, user name, password,
domain, Baud rate, port settings, TCP/IP settings,
specific server addresses
Hayes-compatible modemHayes-compatible modem
Hayes-compatible modemHayes-compatible modem
Hayes-compatible modem server phone number, user name, password,
domain, Baud rate, port settings, TCP/IP settings,
specific server addresses
Virtual Private NetworkVirtual Private Network
Virtual Private NetworkVirtual Private Network
Virtual Private Network host name/IP, VPN type, VPN authentication or
certificate, user name, password, domain, TCP/IP
settings, specific server addresses
NOTESNOTES
NOTESNOTES
N O T E S • Refer to the previous sections when setting up modem
connections in My Work.
• To change modem connection settings in either My ISPMy ISP
My ISPMy ISP
My ISP
or My Work NetworkMy Work Network
My Work NetworkMy Work Network
My Work Network, tap Manage existingManage existing
Manage existingManage existing
Manage existing
connectionsconnections
connectionsconnections
c o n n e c tio n s. Select the desired modem connection,
tap SettingsSettings
SettingsSettings
S e t t i n g s, and follow the instructions on the screen.
• To view additional information for any screen in the wizard
or while changing settings, tap .
10-10
P505 Pocket PC
Creating a VPN connectionCreating a VPN connection
Creating a VPN connectionCreating a VPN connection
Creating a VPN connection
To create a Virtual Private Network (VPN) connection:To create a Virtual Private Network (VPN) connection:
To create a Virtual Private Network (VPN) connection:To create a Virtual Private Network (VPN) connection:
To create a Virtual Private Network (VPN) connection:
1. From the ConnectionsConnections
ConnectionsConnections
Connections tab,
tap ConnectionsConnections
ConnectionsConnections
Connections.
2. In My Work Network, tap AddAdd
AddAdd
Add
a new VPN servera new VPN server
a new VPN servera new VPN server
a new VPN server
connectionconnection
connectionconnection
connection.
3. Type the VPN name using the
soft keyboard.
4. Enter the host name/IP
address, then select the VPN
type. Tap NextNext
NextNext
Next when
finished.
Chapter 10: Getting Connected
10-11
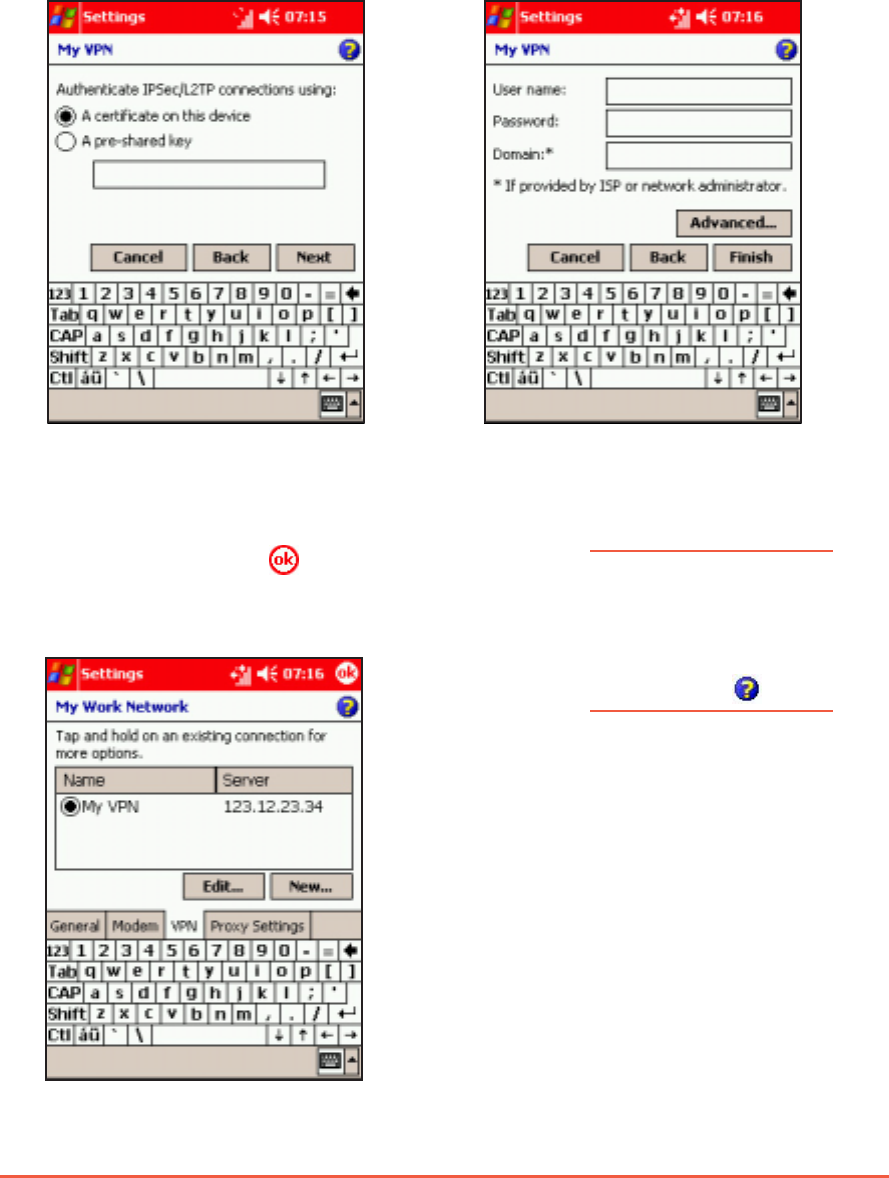
5. Select the VPN
authentication, then tap
NextNext
NextNext
Ne xt to continue.
6. Type the user name,
password, and domain for the
connection, then tap
AdvancedAdvanced
AdvancedAdvanced
Advanced. Otherwise, tap
FinishFinish
FinishFinish
Fin ish to create the
connection.
7. The created VPN network is
displayed in the My WorkMy Work
My WorkMy Work
My Work
NetworkNetwork
NetworkNetwork
Network list. Tap to
close the window.
8. Launch Internet Explorer to
test the connection.
NOTENOTE
NOTENOTE
N O T E To view additional
information for any
screen in the wizard
or while changing
settings, tap .
10-12
P505 Pocket PC
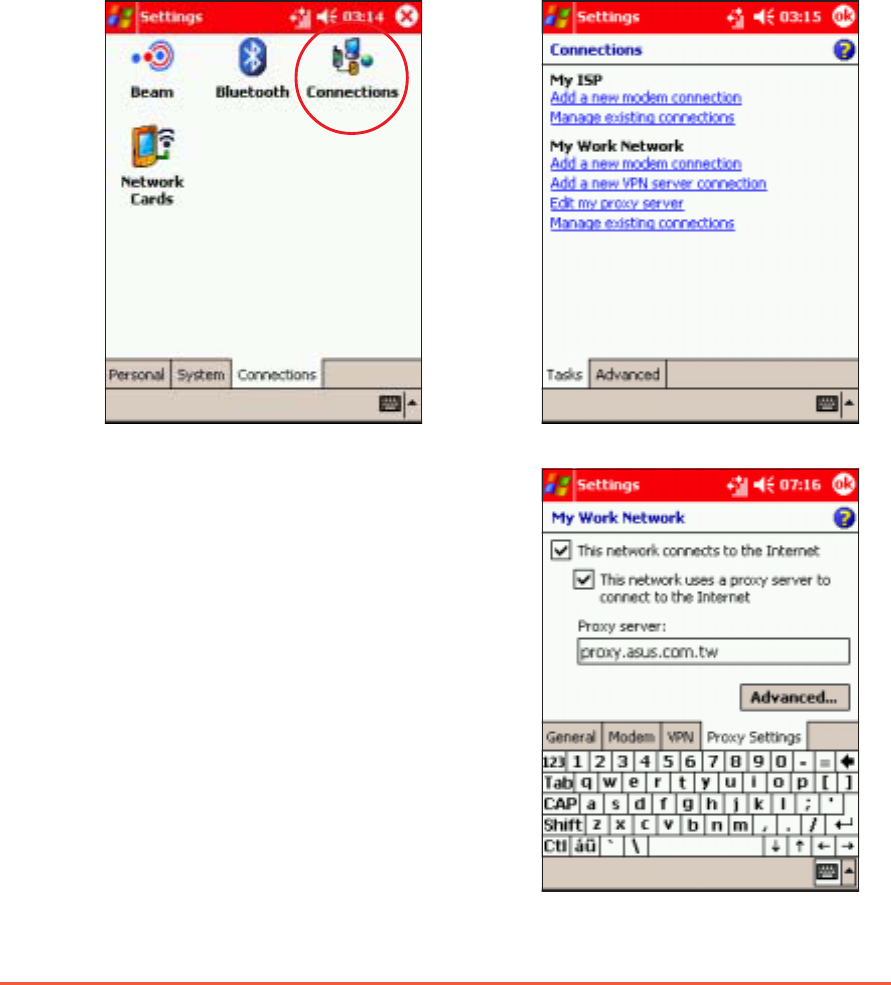
Adjusting the proxy server settingsAdjusting the proxy server settings
Adjusting the proxy server settingsAdjusting the proxy server settings
Adjusting the proxy server settings
If you are connected to your ISP or private network during
synchronization, your mobile device should download the proper
proxy settings from your PC. If these settings are not on your PC or
need to be changed, ask your ISP or network administrator for the
proxy server name, server type, port, type of Socks protocol used,
and your user name and password.
To change proxy server settings:To change proxy server settings:
To change proxy server settings:To change proxy server settings:
To change proxy server settings:
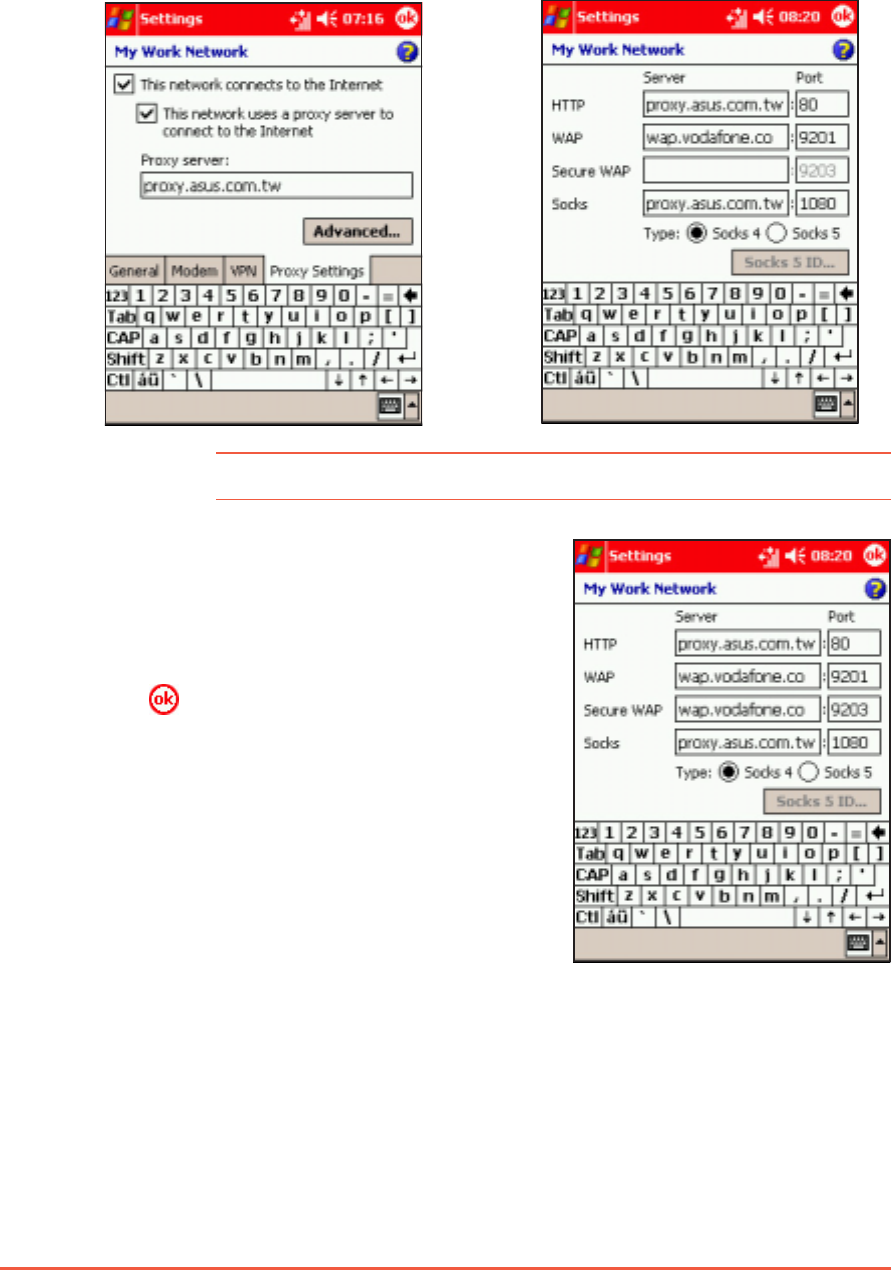
3. Select This networkThis network
This networkThis network
This network
connects to the Internetconnects to the Internet
connects to the Internetconnects to the Internet
connects to the Internet
and This network uses aThis network uses a
This network uses aThis network uses a
This network uses a
proxy server to connectproxy server to connect
proxy server to connectproxy server to connect
proxy server to connect
to the Internetto the Internet
to the Internetto the Internet
to the Internet.
4. In the Proxy serverProxy server
Proxy serverProxy server
Proxy server box,
enter the proxy server name.
2. Tap Edit my proxy serverEdit my proxy server
Edit my proxy serverEdit my proxy server
Edit my proxy server.1. From the ConnectionsConnections
ConnectionsConnections
Connections tab,
tap ConnectionsConnections
ConnectionsConnections
Connections.
Chapter 10: Getting Connected
10-13
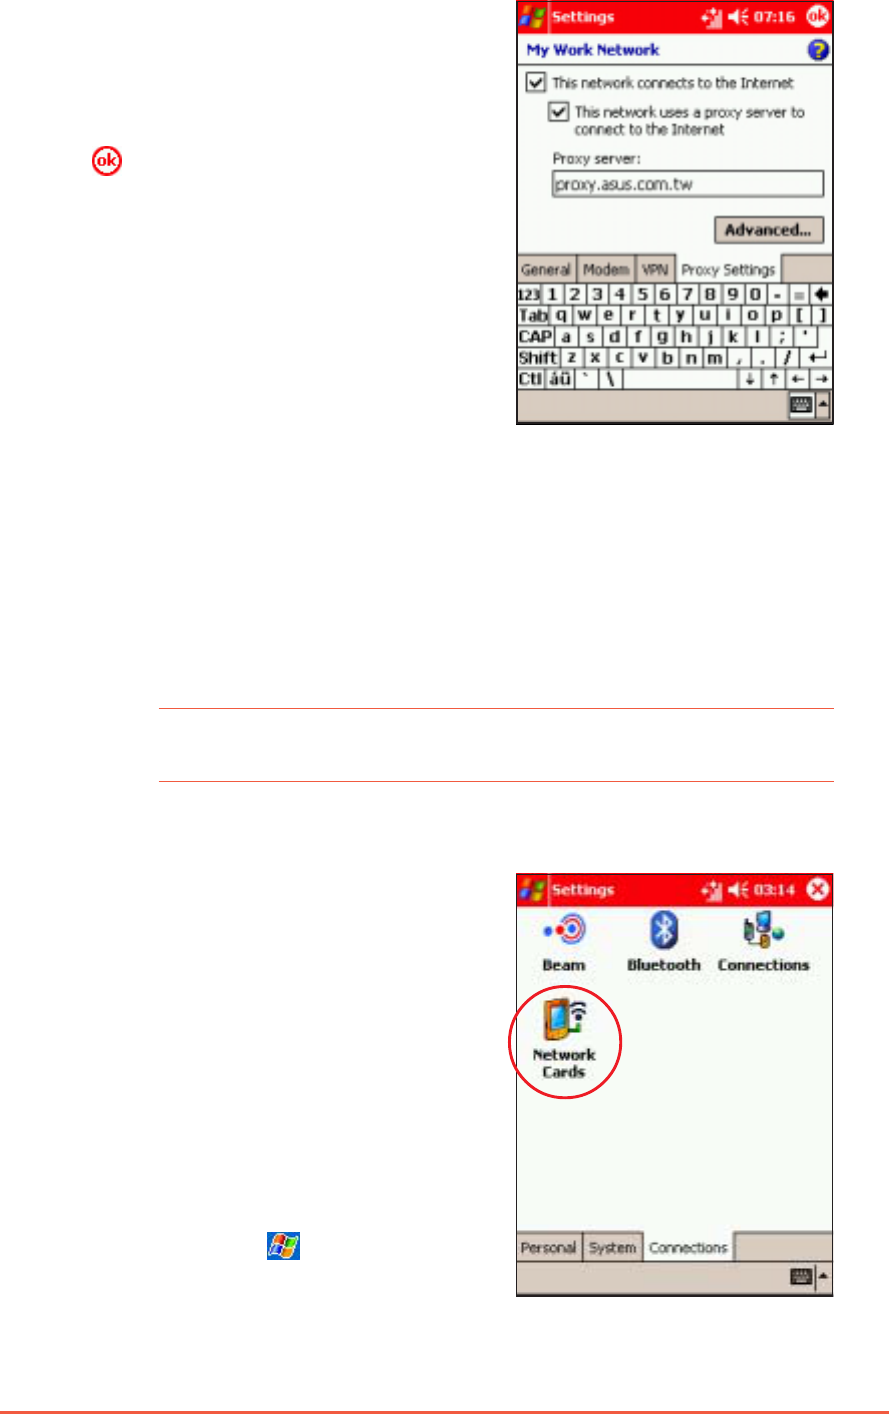
5. Tap the AdvancedAdvanced
AdvancedAdvanced
Advanced button to
change the port number, proxy
server type, and other advanced
proxy settings.
6. Tap to save your changes.
Network card connectionsNetwork card connections
Network card connectionsNetwork card connections
Network card connections
Use a network (Ethernet) card to connect directly to a network. Once
connected, you can view the Internet or intranet, download e-mail or
send and receive MMS messages. You do not need to create a new
connection on your device. Your network administrator can provide
details of the network settings.
IMPORTANTIMPORTANT
IMPORTANTIMPORTANT
I M P O R T A N T Make sure to purchase and configure a network card that is
compatible with your device.
To set up a network card:To set up a network card:
To set up a network card:To set up a network card:
To set up a network card:
1. Obtain the network settings
from your network
administrator.
2. Insert the network card into
your device.
3. The Network Settings window
appears the time you insert the
card so you can configure it
immediately. If it does not
appear, or to change the
settings later, tap >
SettingsSettings
SettingsSettings
Settings > Connections tabConnections tab
Connections tabConnections tab
Connections tab
>Connections > NetworkConnections > Network
Connections > NetworkConnections > Network
Connections > Network
CardsCards
CardsCards
Cards.
10-14
P505 Pocket PC
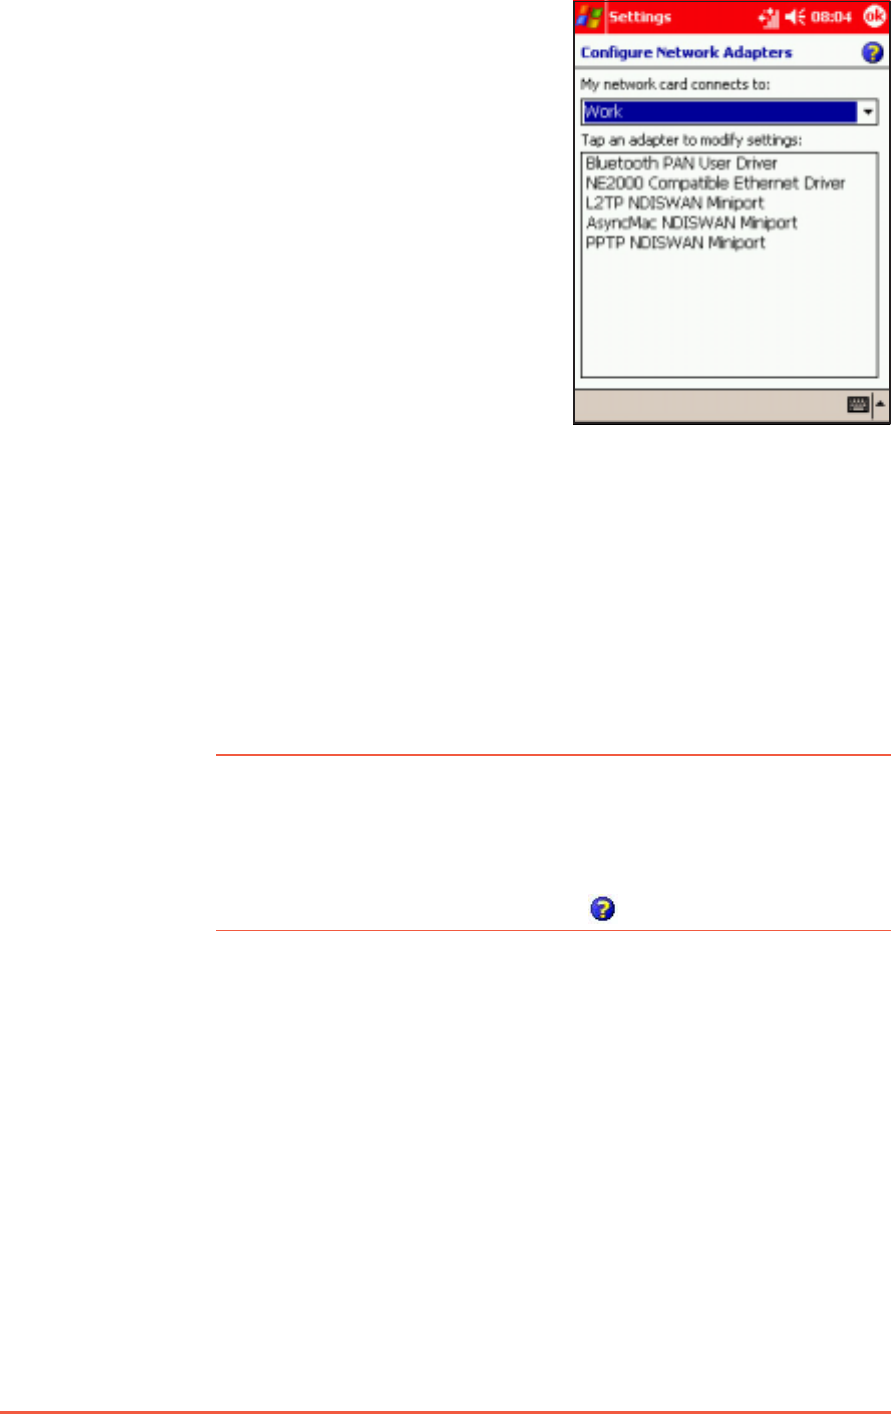
4. If you need to enter specific
server information, tap the
appropriate adapter. Most
networks use DHCP, so you
should not have to change these
settings unless your network
administrator instructs you
otherwise.
5. If necessary, connect the
network card to the network by
using a network cable. For
information, refer to the
documentation that came with
your network card.
6. To start a connection, insert the network card, and begin using a
desired program. For example, switch to Pocket InternetPocket Internet
Pocket InternetPocket Internet
Pocket Internet
ExplorerExplorer
ExplorerExplorer
Explorer and browse a Web pageWeb page
Web pageWeb page
Web pag e. Your device automatically
starts connecting.
If you use your network card with two networks, such as a private
network at work and one at home for the Internet, you need to
change the network to which the network card connects.
NOTENOTE
NOTENOTE
N O T E • You may need proxy server and VPN connection settings.
Inquire the network settings with your network
administrator.
• To view additional information for any screen in the wizard
or while changing settings, tap .
Chapter 10: Getting Connected
10-15
Set up a WAP gatewaySet up a WAP gateway
Set up a WAP gatewaySet up a WAP gateway
Set up a WAP gateway
Your device is pre-configured to automatically connect to Vodafone’s
services, provided you have subscription. Contact the operator for
details of specific charges and services.
If you lose these automatic settings, and do not want to reset your device
completely, then you need the following information to set up the device:
ISP server phone number, user name password, WAP gateway server
name, and port number.
To access WAP sites through Pocket InternetTo access WAP sites through Pocket Internet
To access WAP sites through Pocket InternetTo access WAP sites through Pocket Internet
To access WAP sites through Pocket Internet
Explorer:Explorer:
Explorer:Explorer:
Explorer:
2. Tap Edit my proxy serverEdit my proxy server
Edit my proxy serverEdit my proxy server
Edit my proxy server.1. From the ConnectionsConnections
ConnectionsConnections
Connections tab,
tap ConnectionsConnections
ConnectionsConnections
Connections.
10-16
P505 Pocket PC
6. In the Secure WAP Secure WAP
Secure WAP Secure WAP
Secure WAP box,
enter the Secure WAPSecure WAP
Secure WAPSecure WAP
Secure WAP
gateway server namegateway server name
gateway server namegateway server name
gateway server name,
then specify the port number.
7. Tap to save your changes.
4. Tap the AdvancedAdvanced
AdvancedAdvanced
Advanced button
to access the WAP gateway
settings.
5. In the WAPWAP
WAPWAP
W AP box, enter the
WAP gateway serverWAP gateway server
WAP gateway serverWAP gateway server
WAP gateway server
namename
namename
na m e, then specify the port
number.
NOTENOTE
NOTENOTE
N O T E The most common WAP port number is 9201.
Chapter 10: Getting Connected
10-17
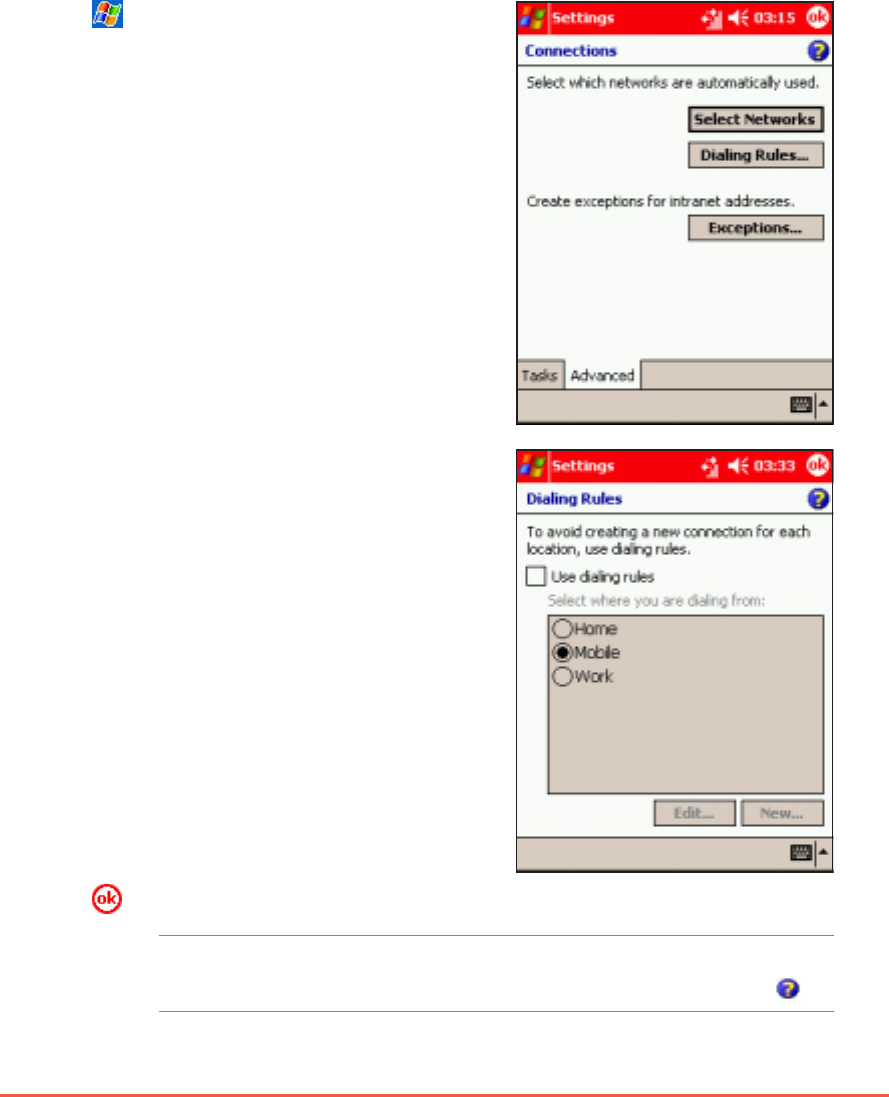
Using dialing rulesUsing dialing rules
Using dialing rulesUsing dialing rules
Using dialing rules
Depending upon where you use the P505, you may have to dial
additional numbers, for example 0 or 9 to dial out of an exchange, or
a particular prefix. The device automatically uses these numbers
when the dialing rule is selected. You can create as many dialing
locations as you require. Three are already created: Home, Mobile,
and Work, edit these to your requirements.
To change the dialing rules:To change the dialing rules:
To change the dialing rules:To change the dialing rules:
To change the dialing rules:
1. Tap > SettingsSettings
SettingsSettings
Settings >
Connections tabConnections tab
Connections tabConnections tab
Connections tab >
ConnectionsConnections
ConnectionsConnections
Connections > AdvancedAdvanced
AdvancedAdvanced
Advanced
tab.
2. Tap the Dialing Rules Dialing Rules
Dialing Rules Dialing Rules
Dialing Rules button.
3. Tap Use dialing rulesUse dialing rules
Use dialing rulesUse dialing rules
Use dialing rules.
4. Select a location.
•HomeHome
HomeHome
Ho m e - Dials the number as
a local call without a number
prefix.
•MobileMobile
MobileMobile
Mobile - Dials the number
with the mobile phone
operator designated prefix.
•WorkWork
WorkWork
W or k - Dials the number as
local call with a number
prefix.
5. Tap to save your changes.
NOTENOTE
NOTENOTE
N O T E To create a new location, tap New and follow the directions on
the screen. To view additional information at any time, tap .
10-18
P505 Pocket PC
Infrared (IR) connectionInfrared (IR) connection
Infrared (IR) connectionInfrared (IR) connection
Infrared (IR) connection
By default, your device detects incoming infrared (IR) beams and
prompts you to accept them. If you do not want your device to
detect or receive beams, clear the Receive all incoming beamsReceive all incoming beams
Receive all incoming beamsReceive all incoming beams
Receive all incoming beams
check box.
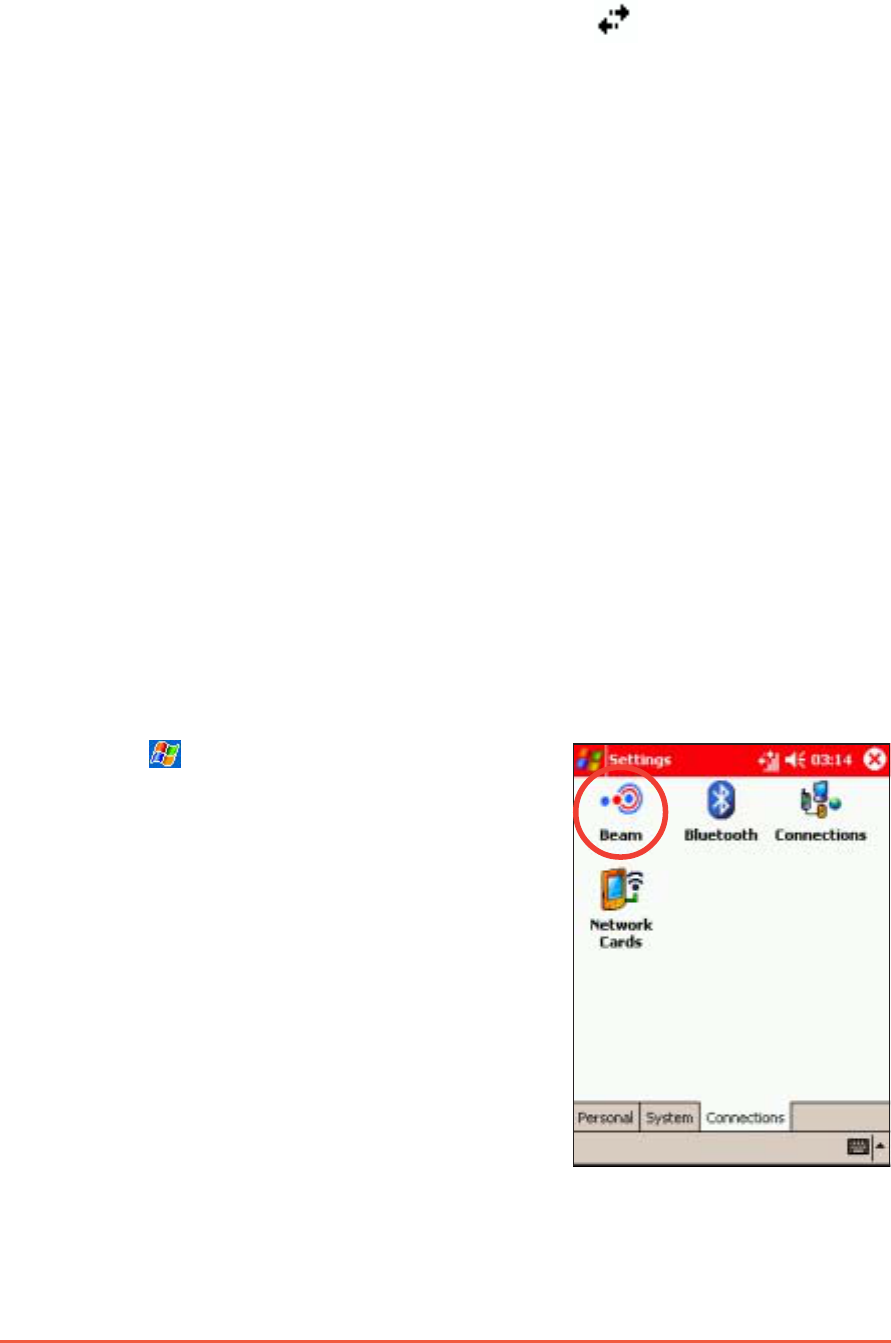
To set the Beam options:To set the Beam options:
To set the Beam options:To set the Beam options:
To set the Beam options:
1. Tap , then SettingsSettings
SettingsSettings
Settings.
2. Tap the ConnectionsConnections
ConnectionsConnections
Connections tab.
3. Tap the BeamBeam
BeamBeam
Beam icon to display
the Settings screen.
Ending a connectionEnding a connection
Ending a connectionEnding a connection
Ending a connection
Use the following methods to end a network connection.
• When connected via modem or VPN, tap on the navigation
bar, then tap DisconnectDisconnect
DisconnectDisconnect
Disconnect.
• When connected via cable or cradle, detach your device from the
cable or cradle.
• When connected via Infrared, move the device away from the
other computer or device.
• When connected via a network (Ethernet) card, remove the card
from your device.
• When connected via a wireless network, switch off the
connection.
Chapter 10: Getting Connected
10-19
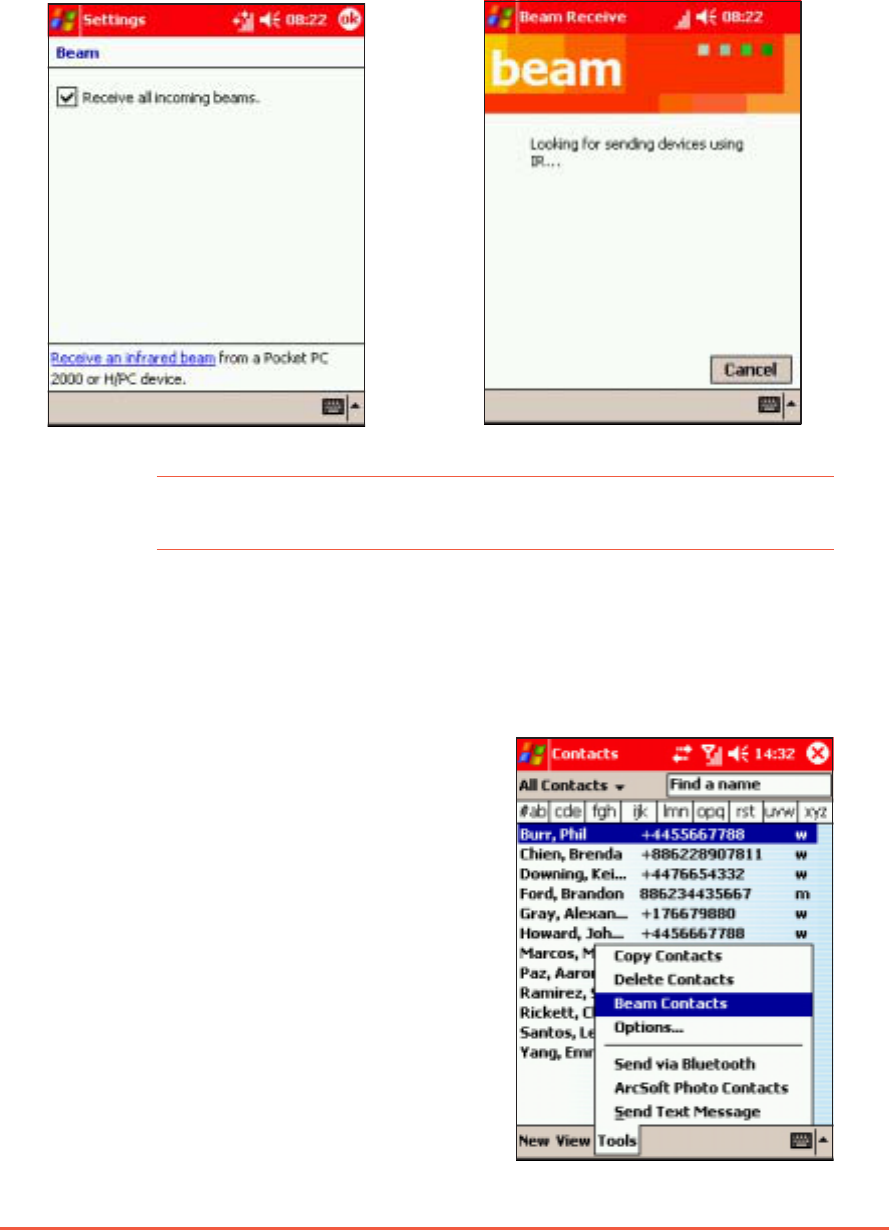
4. Tap the option Receive allReceive all
Receive allReceive all
Receive all
incoming beamsincoming beams
incoming beamsincoming beams
incoming beams, then tap
the Receive an infraredReceive an infrared
Receive an infraredReceive an infrared
Receive an infrared
beambeam
beambeam
be am link to receive beams
from this screen.
The device automatically
looks for another device using
infrared.
NOTENOTE
NOTENOTE
N O T E Turning off the Receive all incoming beam Receive all incoming beam
Receive all incoming beam Receive all incoming beam
Receive all incoming beam options
saves battery power.
Sending informationSending information
Sending informationSending information
Sending information
To beam a contact:To beam a contact:
To beam a contact:To beam a contact:
To beam a contact:
1. In ContactsContacts
ContactsContacts
Contacts, highlight the contact
name to beam.
2. Select Tools > Beam Contacts.
3. Align the IR ports of the P505 and
the device to which you are beaming
(the devices should be in close range
of each other and have clear
line-of-sight).

10-20
P505 Pocket PC
NOTENOTE
NOTENOTE
N O T E You can also send items, but not folders, from File Explorer.
Tap and hold the item that you want to send, then tap BeamBeam
BeamBeam
Beam
FileFile
FileFile
F i l e on the pop-up menu.
To beam a file:To beam a file:
To beam a file:To beam a file:
To beam a file:
1. Go to the program associated with
the file you want to transfer, and
select it from the list.
2. Align the IR ports of the P505 and
the device to which you are beaming
(the devices should be in close range
of each other and have clear line-of-
sight).
3. Tap and hold the item, then tap
Beam File... Beam File...
Beam File... Beam File...
Beam File... on the pop-up menu.
Receiving informationReceiving information
Receiving informationReceiving information
Receiving information
To receive information:To receive information:
To receive information:To receive information:
To receive information:
1. Align the IR ports of the devices (the devices should be in close
range of each other and have clear line-of-sight).
2. Have the owner of the other device send the information to you.
Your device automatically receives the information, provided the
beaming option is set to receive incoming beams. See previous
page for details.

Chapter 11
Using Bluetooth
This chapter provides
information on how to use the
Pocket PC Bluetooth
®
feature.

11-2
P505 Pocket PC
Chapter summaryChapter summary
Chapter summaryChapter summary
Chapter summary
••
••
•Introducing BluetoothIntroducing Bluetooth
Introducing BluetoothIntroducing Bluetooth
Introducing Bluetooth
®
........................................... 11-311-3
11-311-3
11-3
Bluetooth icon ............................................................... 11-3
••
••
•Bluetooth settingsBluetooth settings
Bluetooth settingsBluetooth settings
Bluetooth settings ............................................................................
............................................................................
......................................11-411-4
11-411-4
11-4
••
••
•Bluetooth ManagerBluetooth Manager
Bluetooth ManagerBluetooth Manager
Bluetooth Manager ............................................................................
............................................................................
......................................11-611-6
11-611-6
11-6
Bluetooth connection wizard ......................................... 11-7
••
••
•BluetoothBluetooth
BluetoothBluetooth
Bluetooth
®®
®®
®
services services
services services
services ........................................................................
........................................................................
....................................11-811-8
11-811-8
11-8
Wireless serial port ........................................................ 11-8
Dial-up networking ......................................................... 11-9
Send via Bluetooth....................................................... 11-10
Bluetooth Personal Area Network ................................ 11-12
Chapter 11: Using Bluetooth
®®
®®
®
11-3
Introducing BluetoothIntroducing Bluetooth
Introducing BluetoothIntroducing Bluetooth
Introducing Bluetooth®®
®®
®
Bluetooth
®
is a short-range wireless communications technology.
Devices with Bluetooth
®
capabilities can exchange information over a
distance of about 10 meters (30 feet) without requiring a physical
connection.
Unlike infrared, you do not need to line up the devices to exchange
information via Bluetooth
®
. The devices only need to be within a
range of about 10 meters. You can even exchange information to a
device in a different room, as long as it is within the specified range.
The Bluetooth
®
technology allows your Pocket PC to:
• Locate other Bluetooth devices within the vicinity
• Discover the services that those devices offer
• Connect to, use, and disconnect from those services
• Enable or disable individual services
• Use security features including authentication, authorisation, and
encryption
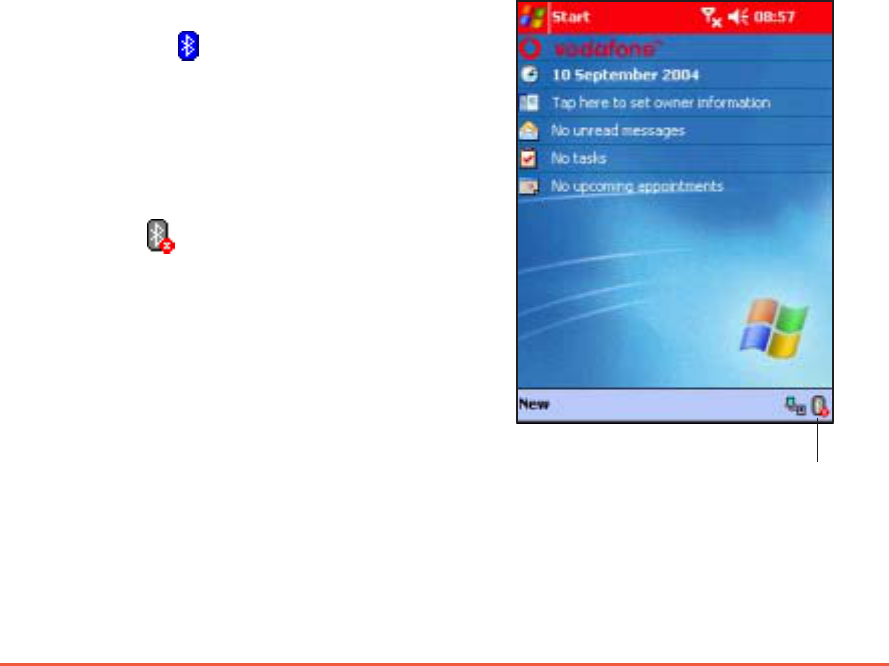
Bluetooth iconBluetooth icon
Bluetooth iconBluetooth icon
Bluetooth icon
The Bluetooth icon is located on the lower right corner of the Today
screen.
When Bluetooth is enabled (turned ON),
the icon is blue , and the Bluetooth LED
on the upper left side of the device blinks
blue.
When Bluetooth is disabled (turned
OFF), the icon has a red X on its lower
right corner .
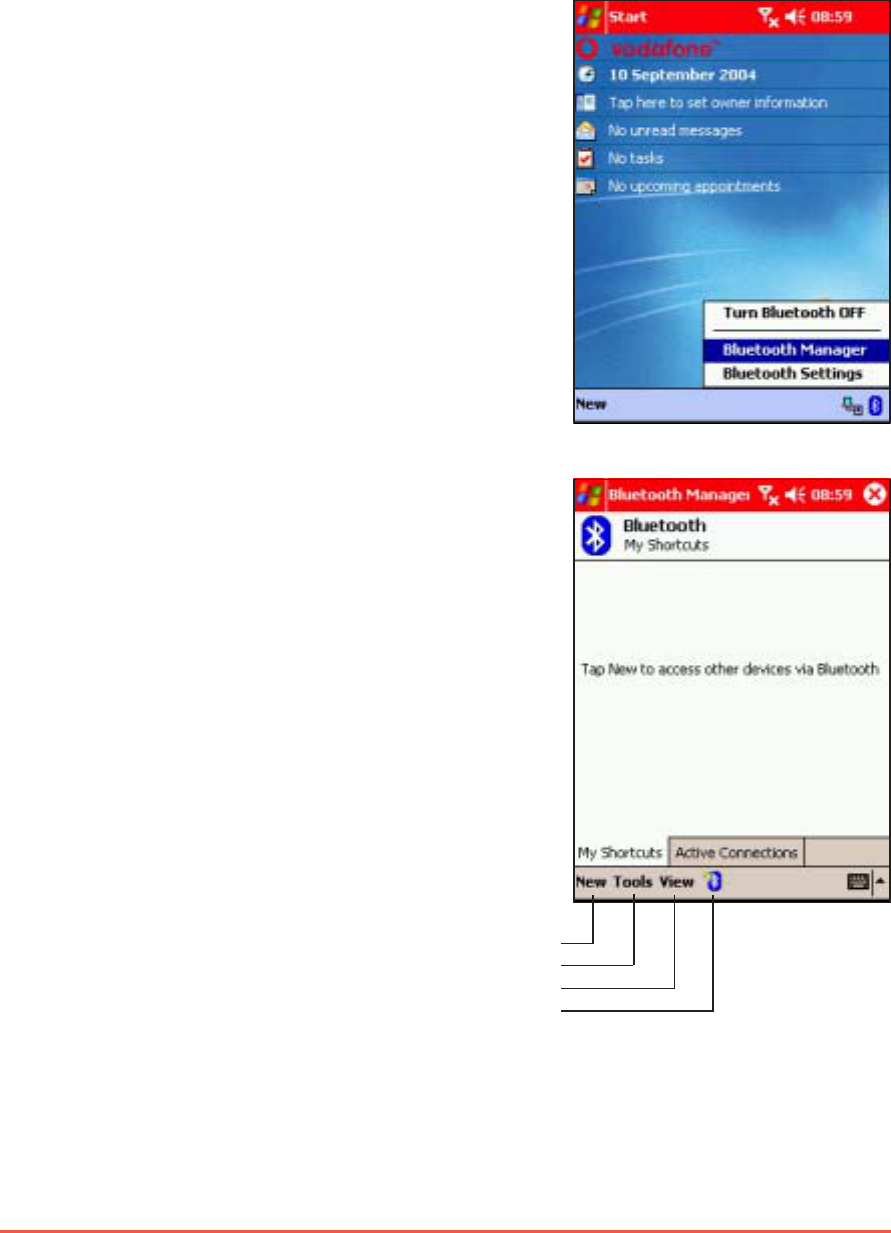
Tapping the icon displays a menu that
allows you to:
• turn Bluetooth on or off
• launch the Bluetooth Manager
• change the Bluetooth Settings
Bluetooth icon
11-4
P505 Pocket PC
Bluetooth settingsBluetooth settings
Bluetooth settingsBluetooth settings
Bluetooth settings
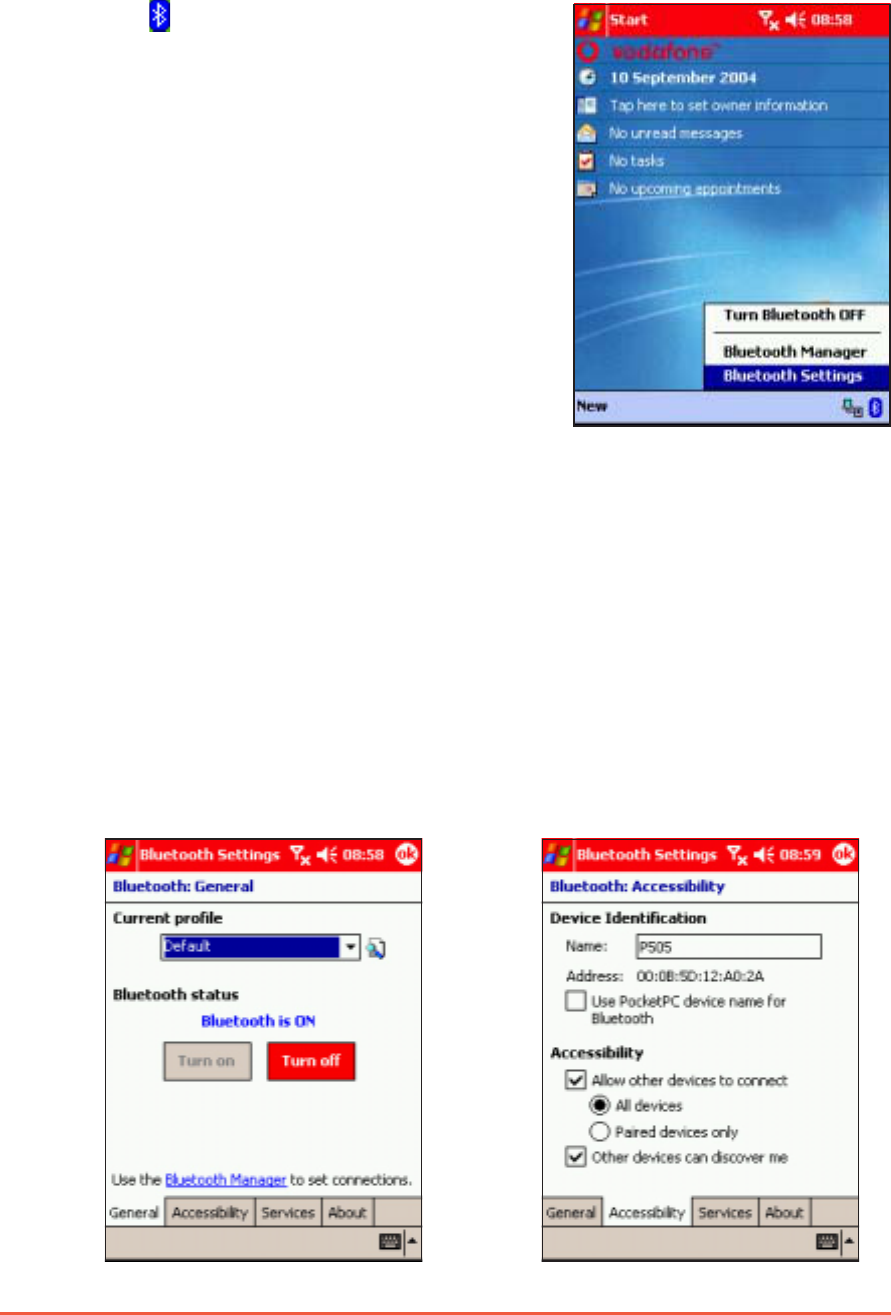
To configure the Bluetooth settings:To configure the Bluetooth settings:
To configure the Bluetooth settings:To configure the Bluetooth settings:
To configure the Bluetooth settings:
1. Tap from the lower right
corner of the Today screen to
display the Bluetooth menu.
2. Tap Bluetooth SettingsBluetooth Settings
Bluetooth SettingsBluetooth Settings
Bluetooth Settings.
3. Tap one of the tabs at the
bottom of the BluetoothBluetooth
BluetoothBluetooth
Bluetooth
SettingsSettings
SettingsSettings
Settings window to make
your desired changes.
GeneralGeneral
GeneralGeneral
General
Allows you to:
• select the user profile
• see the Bluetooth status
(ON/OFF)
• turn Bluetooth ON or OFF
• tap a link to the Bluetooth
Manager
AccessibilityAccessibility
AccessibilityAccessibility
Accessibility
Allows you to:
• set the device name
• see the Bluetooth Device
Address (BDA)
• select the remote devices you
wish to connect
• set whether to allow remote
devices to see your device
Chapter 11: Using Bluetooth
®®
®®
®
11-5
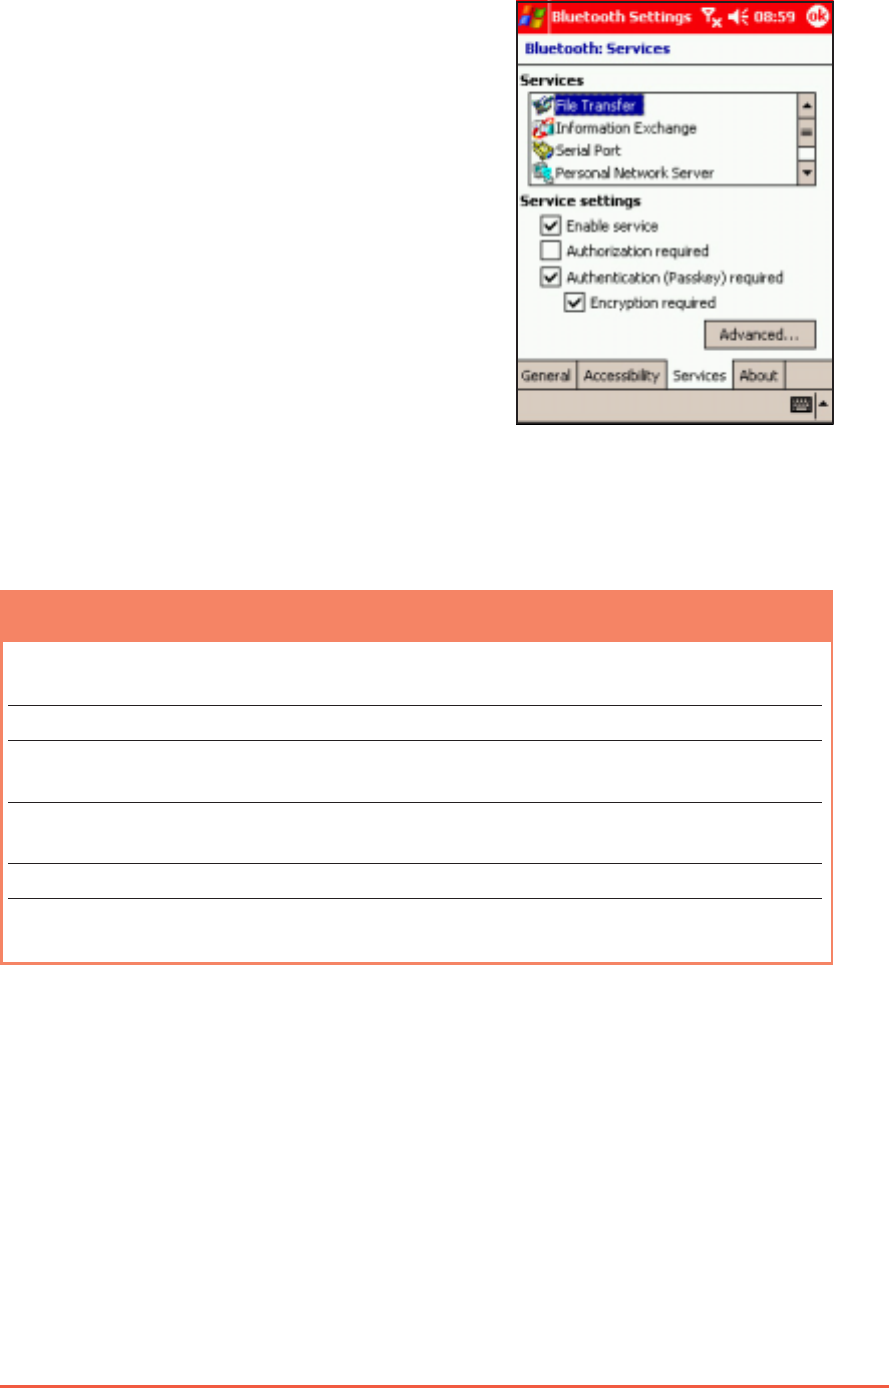
ServicesServices
ServicesServices
Services
Allows you to:
• enable/disable available
Bluetooth services
• change the advanced settings
of Bluetooth services
• set authentication and specify
encryption settings for
Bluetooth services
The available service settings are
enabled when you select a
Bluetooth service.
Select a service from the list to
establish its settings (enabled, authorisation and authentication).
Other options can be accessed by tapping on AdvancedAdvanced
AdvancedAdvanced
Advanced and are
described below:
Bluetooth ServiceBluetooth Service
Bluetooth ServiceBluetooth Service
Bluetooth Service DescriptionDescription
DescriptionDescription
Description
File TransferFile Transfer
File TransferFile Transfer
F i l e Tr a n s f e r Set the highest level directory on your device that
remote devices can access.
Information ExchangeInformation Exchange
Information ExchangeInformation Exchange
I nf o r m ati o n Ex c h a ng e Set the default business card.
Serial PortSerial Port
Serial PortSerial Port
S e r i a l P o r t Displays the port addresses. This cannot be
changed.
Personal Network ServerPersonal Network Server
Personal Network ServerPersonal Network Server
Personal Network Server Allows you to customise the service settings for
your personal network server.
Hands FreeHands Free
Hands FreeHands Free
H a n d s F r e e Enable telephone and/or audio profile.
Dial-up Networking ServerDial-up Networking Server
Dial-up Networking ServerDial-up Networking Server
Dial-up Networking Server Allows you to enable and/or authenticate
connection to the dial-up network server.
11-6
P505 Pocket PC
Bluetooth ManagerBluetooth Manager
Bluetooth ManagerBluetooth Manager
Bluetooth Manager
The Bluetooth Manager allows you to create, manage, and use
Bluetooth
®
to connect to remote devices.
To launch the Bluetooth Manager:To launch the Bluetooth Manager:
To launch the Bluetooth Manager:To launch the Bluetooth Manager:
To launch the Bluetooth Manager:
1. Tap and hold the Bluetooth
icon in the Today screen.
2. Tap Bluetooth ManagerBluetooth Manager
Bluetooth ManagerBluetooth Manager
Bluetooth Manager.
3. The My ShortcutsMy Shortcuts
My ShortcutsMy Shortcuts
My Shortcuts screen
displays a list of pre-configured
connections, if any.
Tap to make a new connection
Tap to add or remove paired devices
Tap to set view options
Tap to launch the Bluetooth connection wizard
Chapter 11: Using Bluetooth
®®
®®
®
11-7
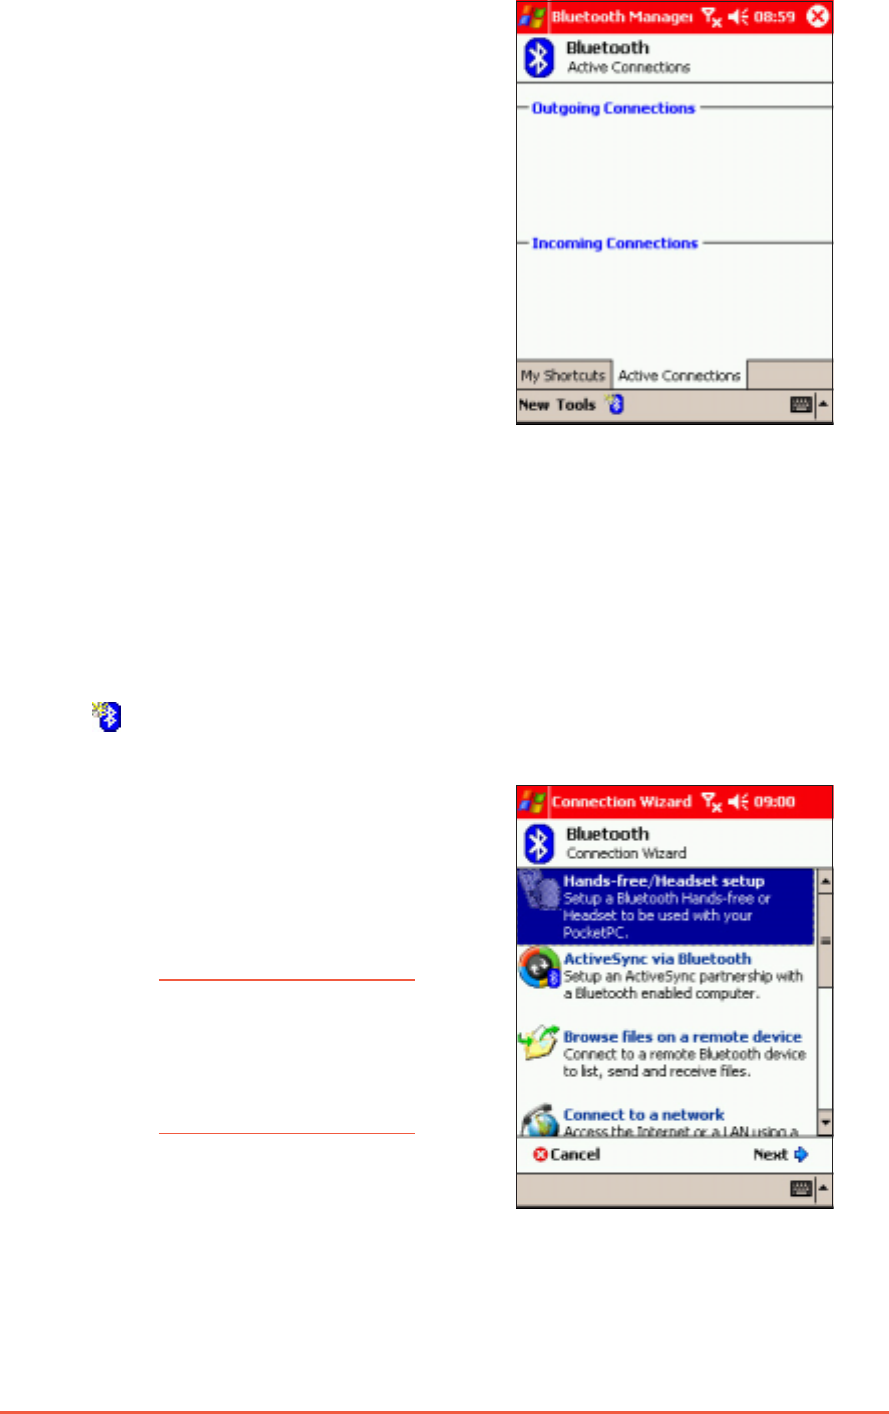
Bluetooth connection wizardBluetooth connection wizard
Bluetooth connection wizardBluetooth connection wizard
Bluetooth connection wizard
The Bluetooth connection wizard helps you set up connections with
remote Bluetooth
®
devices.
To launch the Bluetooth connection wizard:To launch the Bluetooth connection wizard:
To launch the Bluetooth connection wizard:To launch the Bluetooth connection wizard:
To launch the Bluetooth connection wizard:
1. Tap from the Bluetooth Manager command bar. The Bluetooth
Connection Wizard screen appears.
2. Select a type of connection
that you wish set up, then tap
NextNext
NextNext
Next.
Tap CancelCancel
CancelCancel
Cancel to terminate the
connection process.
NOTENOTE
NOTENOTE
N O T E Refer to the device
online help for other
information on
Bluetooth®
connections.
4. Tap the Active ConnectionsActive Connections
Active ConnectionsActive Connections
Active Connections
tab to display the active
incoming and outgoing
connections.
11-8
P505 Pocket PC
BluetoothBluetooth
BluetoothBluetooth
Bluetooth®®
®®
® services services
services services
services
Wireless serial portWireless serial port
Wireless serial portWireless serial port
Wireless serial port
Using a Bluetooth
®
serial port is equivalent to using a physical cable
serial port connection between two devices. As with a physical
connection, you have to configure the application that will use the
serial port.
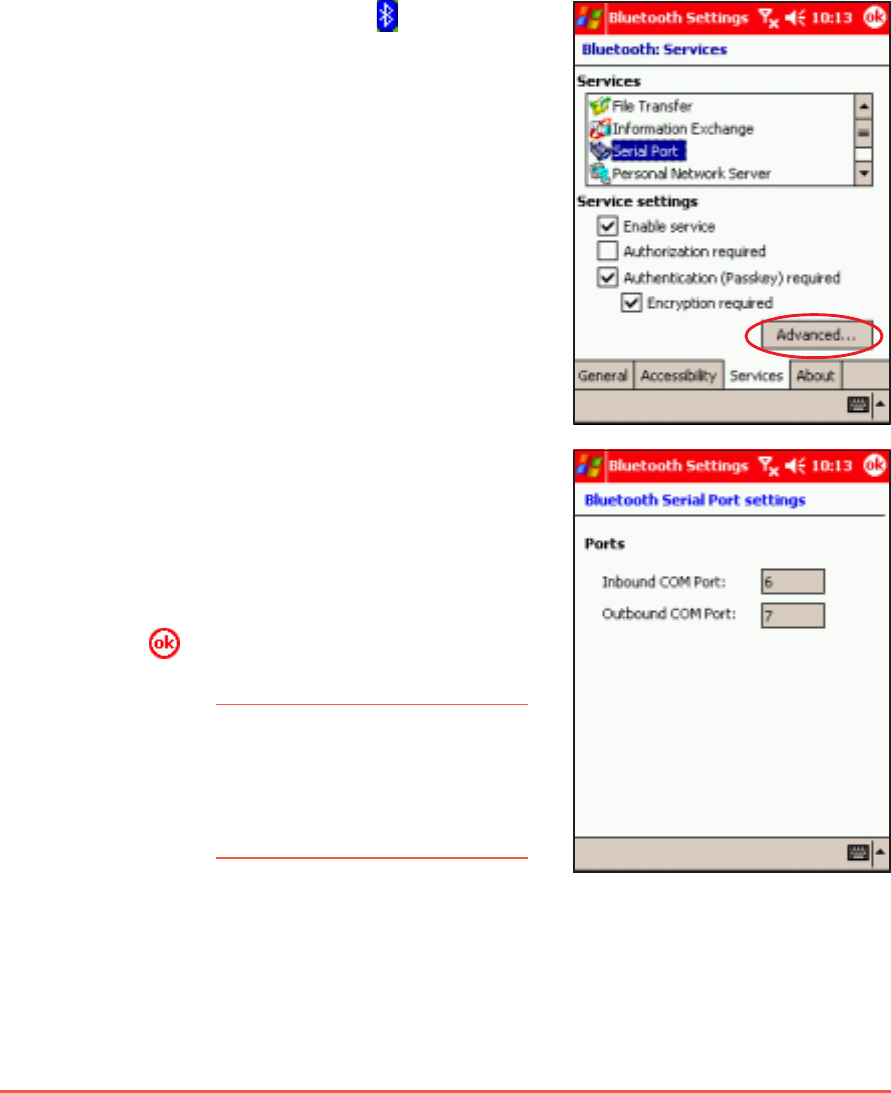
To configure the Bluetooth Serial Port:To configure the Bluetooth Serial Port:
To configure the Bluetooth Serial Port:To configure the Bluetooth Serial Port:
To configure the Bluetooth Serial Port:
1. Tap the Bluetooth icon from
the Today screen to display
the Bluetooth menu.
2. Tap Bluetooth SettingsBluetooth Settings
Bluetooth SettingsBluetooth Settings
Bluetooth Settings,
then tap the ServicesServices
ServicesServices
Services tab.
3. Select Serial PortSerial Port
Serial PortSerial Port
Serial Port from the
available services, then tap the
AdvancedAdvanced
AdvancedAdvanced
Advanced button.
NOTENOTE
NOTENOTE
N O T E Refer to the application’s
documentation for more
information about
configuring your application’s
Outbound COM port.
4. Note the assigned Outbound COM
Port 6, then assign the same
Outbound COM port to the
application that will use the
Bluetooth serial port.
5. Tap to close the screen.

Chapter 11: Using Bluetooth
®®
®®
®
11-9
To use the wireless serial port:To use the wireless serial port:
To use the wireless serial port:To use the wireless serial port:
To use the wireless serial port:
1. Create a connection to the device that uses the wireless serial port
(i.e. Bluetooth GPS). See the section “Bluetooth connection wizard”
on page 11-7.
2. Tap and hold the Bluetooth icon on the Today screen, then tap
Bluetooth ManagerBluetooth Manager
Bluetooth ManagerBluetooth Manager
Bluetooth Manager.
3. In My Shortcuts screen, tap and hold the device connection
shortcut, then select ConnectConnect
ConnectConnect
Connect from the pop-up menu.
4. Enter the required information on the succeeding screens to
complete the connection process.
5. When the connection is active, you can exchange, share, and
browse data and files or launch applications from the remote
Bluetooth device.

11-10
P505 Pocket PC
Dial-up networkingDial-up networking
Dial-up networkingDial-up networking
Dial-up networking
The Dial-up Networking feature allows you to connect to a remote
computer through a phone line. Once connected, you can browse the
Internet, check or read emails, etc.
NOTENOTE
NOTENOTE
N O T E The remote Bluetooth device that will provide the Dial-up
Networking service should have access to a telephone
system, either a hard-wired or a cellular connection, and
capable of answering a call.
Devices that may provide a Dial-up Networking service:
• Bluetooth-enabled cellular telephones
• Bluetooth-enabled desktop computers attached to a telephone system
• Bluetooth modems
To use Dial-up Networking:To use Dial-up Networking:
To use Dial-up Networking:To use Dial-up Networking:
To use Dial-up Networking:
1. Create a connection to the device that will provide telephone access.
See the section “Bluetooth connection wizard” on page 11-7.
2. Tap and hold the Bluetooth icon on the Today screen, then tap
Bluetooth ManagerBluetooth Manager
Bluetooth ManagerBluetooth Manager
Bluetooth Manager.
3. In My Shortcuts screen, tap and hold the Dial-up NetworkingDial-up Networking
Dial-up NetworkingDial-up Networking
Dial-up Networking
ConnectionConnection
ConnectionConnection
Connection shortcut, then select ConnectConnect
ConnectConnect
Connect from the pop-up
menu.
4. On the first Bluetooth: Dial-up Connection screen, double-tap NewNew
NewNew
New
Connection...Connection...
Connection...Connection...
Connection... OR select New ConnectionNew Connection
New ConnectionNew Connection
New Connection, then tap OKOK
OKOK
OK.
5. Key-in the following information on the second Bluetooth: Dial-up
Connection screen:
• Name for a connection
• Country code (if dialing outside the default country setting)
• Area code (if dialing outside the default area code setting)
• Phone number to be dialed
6. Tap .
7. Enter the required information on the succeeding screens to
complete the connection process.
8. When the connection is active, open a web browser from the
device.
Chapter 11: Using Bluetooth
®®
®®
®
11-11
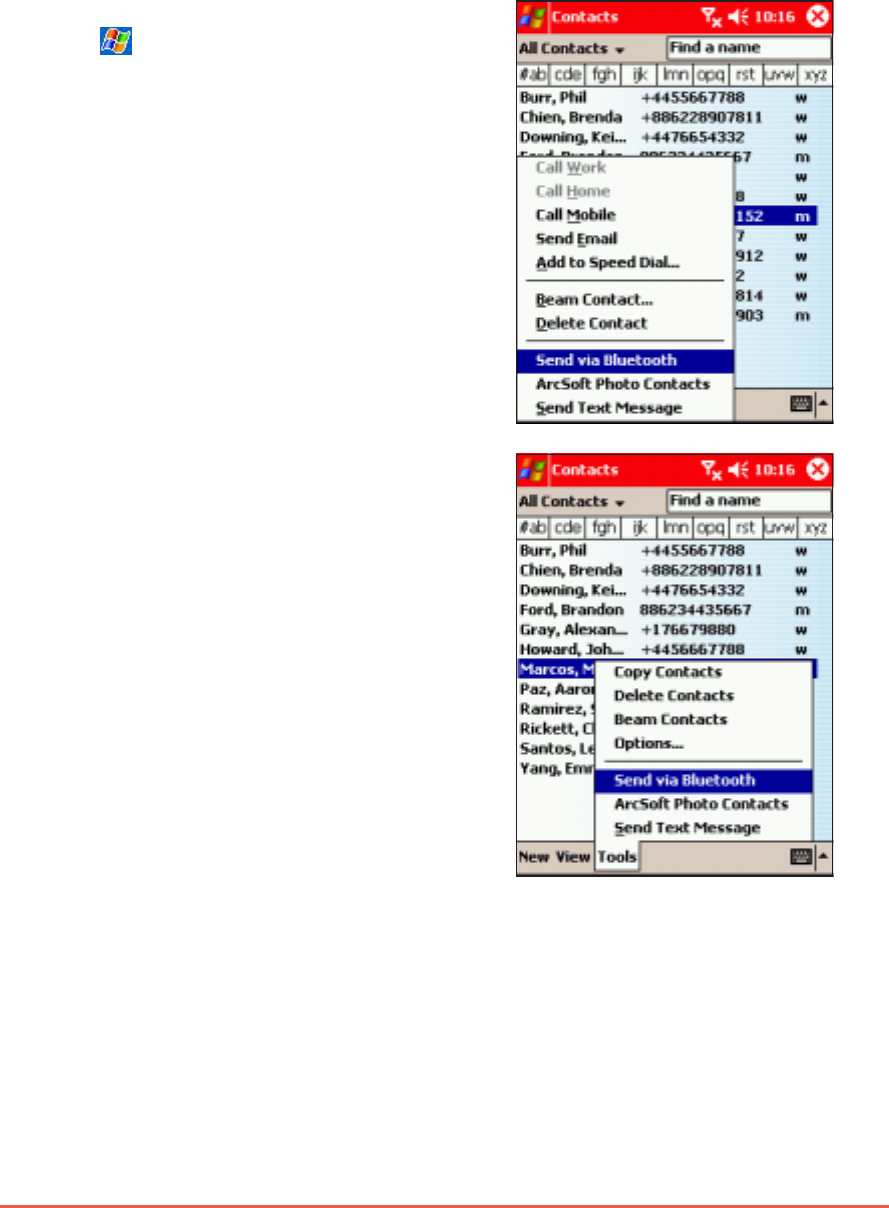
Send via BluetoothSend via Bluetooth
Send via BluetoothSend via Bluetooth
Send via Bluetooth
You can conveniently send your Pocket Outlook contacts, calendar
items, and tasks individually or collectively to the remote device via
Bluetooth.
To send data via Bluetooth:To send data via Bluetooth:
To send data via Bluetooth:To send data via Bluetooth:
To send data via Bluetooth:
1. Tap , then open either
ContactsContacts
ContactsContacts
Contacts, CalendarCalendar
CalendarCalendar
Calendar, or TasksTasks
TasksTasks
Tasks.
2. Highlight an item that you wish to
send to the remote device.
3. Tap and hold the item, then tap
Send via BluetoothSend via Bluetooth
Send via BluetoothSend via Bluetooth
Send via Bluetooth from the
pop-up menu.
OROR
OROR
OR
Tap ToolsTools
ToolsTools
Too ls from the command bar,
then select Send via BluetoothSend via Bluetooth
Send via BluetoothSend via Bluetooth
Send via Bluetooth.

11-12
P505 Pocket PC
The device searches and displays
remote Bluetooth
®
device(s) in your
location.
4. Tap the destination of the file, then
tap to send.
Chapter 11: Using Bluetooth
®®
®®
®
11-13
BluetoothBluetooth
BluetoothBluetooth
Bluetooth
®®
®®
®
Personal Area Network Personal Area Network
Personal Area Network Personal Area Network
Personal Area Network
A Bluetooth
®
personal area network is a private, temporary, ad-hoc
network of up to eight (8) devices. A Bluetooth
®
personal area
network allows you to easily exchange information that normally
requires a TCP/IP network. Most chat utilities, multi-player games,
etc. are fully functional in a Bluetooth
®
personal area network
environment.
Bluetooth
®
private area networks are subject to the same security
settings (service availability, authorisation, authentication, and
encryption) that govern other Bluetooth
®
communications.
One Bluetooth
®
device must be the host of the personal area
network. Other Bluetooth
®
devices join the network as clients. The
host can accept and reject clients on an individual basis.
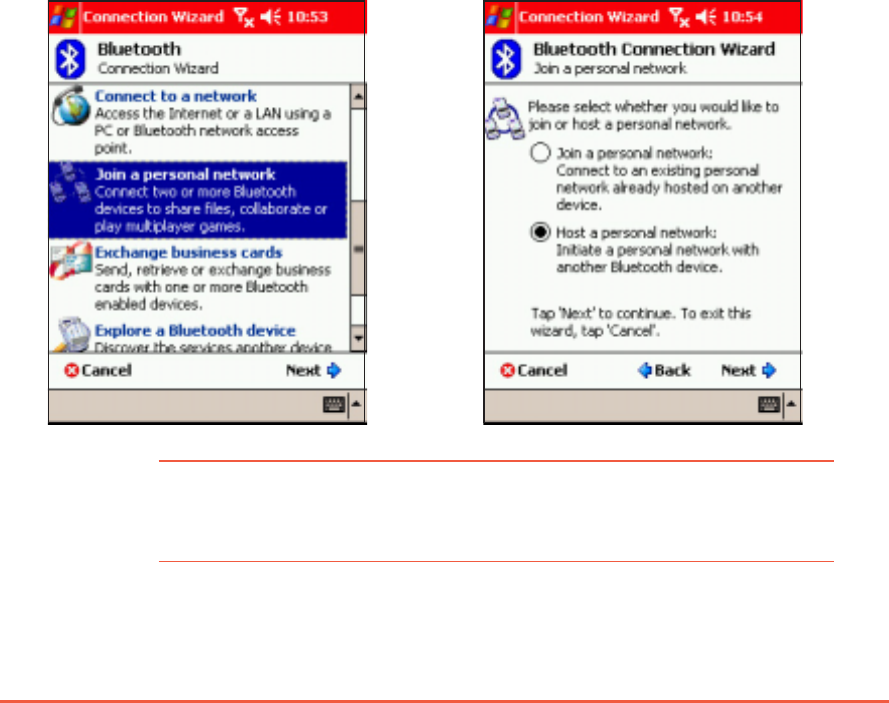
To set up a Bluetooth personal area network:To set up a Bluetooth personal area network:
To set up a Bluetooth personal area network:To set up a Bluetooth personal area network:
To set up a Bluetooth personal area network:
NOTENOTE
NOTENOTE
N O T E Adding devices is optional. You do not have to add devices to
the personal network while configuring the host. You can let
other devices join the personal network later.
2. On the wizard screen, select
Host a personal networkHost a personal network
Host a personal networkHost a personal network
Host a personal network,
then tap NextNext
NextNext
Nex t. The device
scans for Bluetooth
®
devices.
1. From the BluetoothBluetooth
BluetoothBluetooth
Bluetooth
ManagerManager
ManagerManager
Manager, tap NewNew
NewNew
New > Join Join
Join Join
Join
a personal networka personal network
a personal networka personal network
a personal network. Tap
NextNext
NextNext
Next.
11-14
P505 Pocket PC
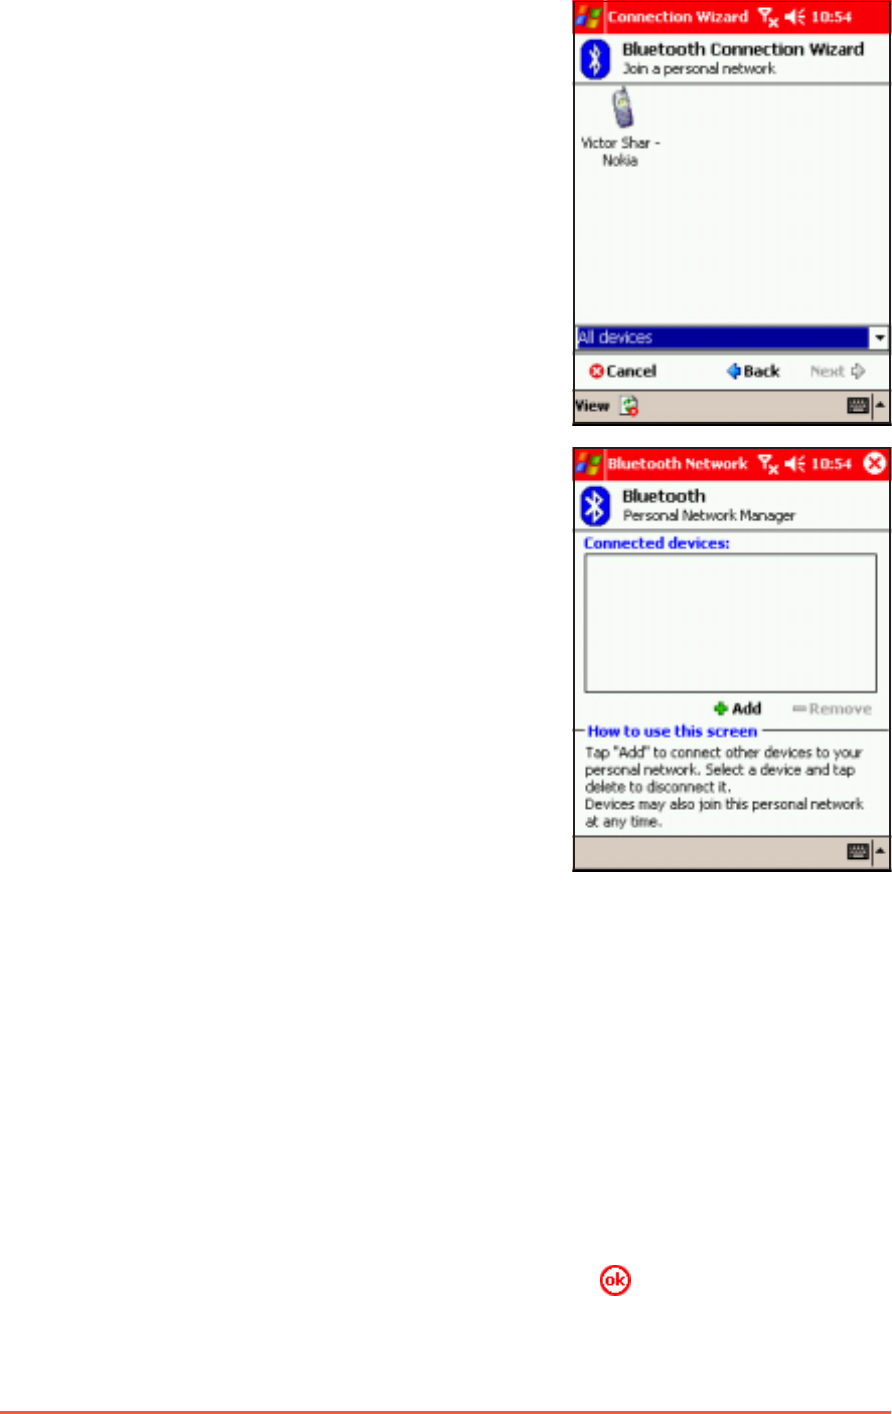
3. Tap the remote devices you want
to add to the personal network,
then tap NextNext
NextNext
Next.
To join a personal network:To join a personal network:
To join a personal network:To join a personal network:
To join a personal network:
1. From the Bluetooth ManagerBluetooth Manager
Bluetooth ManagerBluetooth Manager
Bluetooth Manager, tap NewNew
NewNew
New > Join a personal Join a personal
Join a personal Join a personal
Join a personal
networknetwork
networknetwork
network. Tap NextNext
NextNext
Next.
2. On the wizard screen, select Join a personal networkJoin a personal network
Join a personal networkJoin a personal network
Join a personal network, then
tap NextNext
NextNext
Nex t. The Bluetooth browser appears.
3. Select the host of the personal network, then tap NextNext
NextNext
Next to
establish a connection to the personal area network.
If you are asked to enter the IP network settings, select UseUse
UseUse
Use
server-assigned IP addressserver-assigned IP address
server-assigned IP addressserver-assigned IP address
server-assigned IP address, then tap .
4. Add remote devices to the
Bluetooth personal network, if
desired.
a. Tap the AddAdd
AddAdd
Add button, then
select the device that you want
to add.
b. Add other devices, if desired.
You can add up to eight
devices, including the host.
5. After adding devices, tap OKOK
OKOK
OK to
complete the setup and close the
wizard.

Notices

A-2
P505 Pocket PC
Chapter summaryChapter summary
Chapter summaryChapter summary
Chapter summary
••
••
•Federal Communications CommissionFederal Communications Commission
Federal Communications CommissionFederal Communications Commission
Federal Communications Commission
StatementStatement
StatementStatement
Statement ..................................................................................................................
..................................................................................................................
.........................................................A-3A-3
A-3A-3
A-3
••
••
•Canadian Department ofCanadian Department of
Canadian Department ofCanadian Department of
Canadian Department of
Communications StatementCommunications Statement
Communications StatementCommunications Statement
Communications Statement ..................................................................
..................................................................
.................................A-3A-3
A-3A-3
A-3
••
••
•UL Safety NoticesUL Safety Notices
UL Safety NoticesUL Safety Notices
UL Safety Notices ............................................................................................
............................................................................................
..............................................A-4A-4
A-4A-4
A-4

Notices
A-3
Federal Communications CommissionFederal Communications Commission
Federal Communications CommissionFederal Communications Commission
Federal Communications Commission
StatementStatement
StatementStatement
Statement
This device complies with Part 15 of the FCC Rules. Operation is subject to
the following two conditions:
1) This device may not cause harmful interference, and
2) This device must accept any interference received, including interference
that may cause undesired operation.
This device and its antenna must not be co-located or operating in
conjunction with any other antenna or transmitter.
This equipment has been tested and found to comply with the limits for a
Class B digital device, pursuant to Part 15 of the FCC Rules. These limits are
designed to provide reasonable protection against harmful interference in a
residential installation. This equipment generates, uses and can radiate radio
frequency energy and, if not installed and used in accordance with
manufacturer’s instructions, may cause harmful interference to radio
communications. However, there is no guarantee that interference will not
occur in a particular installation. If this equipment does cause harmful
interference to radio or television reception, which can be determined by
turning the equipment off and on, the user is encouraged to try to correct
the interference by one or more of the following measures:
• Reorient or relocate the receiving antenna.
• Increase the separation between the equipment and receiver.
• Connect the equipment to an outlet on a circuit different from that to
which the receiver is connected.
• Consult the dealer or an experienced radio/TV technician for help.
WARNING!WARNING!
WARNING!WARNING!
W A R N I N G ! The use of shielded cables for connection of the monitor to
the graphics card is required to assure compliance with FCC
regulations. Changes or modifications to this unit not
expressly approved by the party responsible for compliance
could void the user’s authority to operate this equipment.
Canadian Department of CommunicationsCanadian Department of Communications
Canadian Department of CommunicationsCanadian Department of Communications
Canadian Department of Communications
StatementStatement
StatementStatement
Statement
This digital apparatus does not exceed the Class B limits for radio noise
emissions from digital apparatus set out in the Radio Interference
Regulations of the Canadian Department of Communications.
This class B digital apparatus complies with Canadian ICES-003.

A-4
P505 Pocket PC
UL Safety NoticesUL Safety Notices
UL Safety NoticesUL Safety Notices
UL Safety Notices
Required for UL 1459 covering telecommunications (telephone) equipment
intended to be electrically connected to a telecommunication network that
has an operating voltage to ground that does not exceed 200V peak, 300V
peak-to-peak, and 105V rms, and installed or used in accordance with the
National Electrical Code (NFPA 70).
When using the Pocket PC, basic safety precautions should always be
followed to reduce the risk of fire, electric shock, and injury to persons,
including the following:
•Do not useDo not use
Do not useDo not use
Do not u s e the Pocket PC near water, for example, near a bath tub,
wash bowl, kitchen sink or laundry tub, in a wet basement or near a
swimming pool.
•Do not useDo not use
Do not useDo not use
Do not u s e the Pocket PC during an electrical storm. There may be a
remote risk of electric shock from lightning.
•Do not useDo not use
Do not useDo not use
Do not use the Pocket PC in the vicinity of a gas leak.
Required for UL 1642 covering primary (non-rechargeable) and secondary
(rechargeable) lithium batteries for use as power sources in products. These
batteries contain metallic lithium, or a lithium alloy, or a lithium ion, and may
consist of a single electrochemical cell or two or more cells connected in
series, parallel, or both, that convert chemical energy into electrical energy
by an irreversible or reversible chemical reaction.
•Do not Do not
Do not Do not
Do n ot dispose the Pocket PC battery pack in a fire, as they may
explode. Check with local codes for possible special disposal instructions
to reduce the risk of injury to persons due to fire or explosion.
•Do not Do not
Do not Do not
Do not use power adapters or batteries from other devices to reduce
the risk of injury to persons due to fire or explosion. Use only UL certified
power adapters or batteries supplied by the manufacturer or authorized
retailers.

Notices
A-5
Replaceable batteriesReplaceable batteries
Replaceable batteriesReplaceable batteries
Replaceable batteries
If an equipment is provided with a replaceable battery and if replacement by
an incorrect type could result in an explosion (e.g. with some lithium
batteries), the following applies:
– if the battery is placed in an OPERATOR ACCESS AREA, there shall be a
marking close to the battery or a statement in both the operating and
the servicing instructions;
– if the battery is placed elsewhere in the equipment, there shall be a
marking close to the battery or a statement in the servicing instructions.
The marking or statement shall include the following or similar text:
CAUTIONCAUTION
CAUTIONCAUTION
CAUTION
RISK OF EXPLOSION IF BATTERY IS REPLACED
BY AN INCORRECT TYPE.
DISPOSE OF USED BATTERIES ACCORDING
THE INSTRUCTIONS
Compliance is checked by inspection.
CAUTIONCAUTION
CAUTIONCAUTION
C A U T I O N Use only with the battery listed in the user manual.
Operator access with a toolOperator access with a tool
Operator access with a toolOperator access with a tool
Operator access with a tool
If a TOOL is necessary to gain access to an OPERATOR ACCESS AREA, either
all other compartments within that area containing a hazard shall be
inaccessible to the OPERATOR by the use of the same TOOL, or such
compartments shall be marked to discourage OPERATOR access.
An acceptable marking for an electric shock hazard is (ISO 3864, No. 5036).
Equipment for restricted access locationsEquipment for restricted access locations
Equipment for restricted access locationsEquipment for restricted access locations
Equipment for restricted access locations
For equipment intended only for installation in a RESTRICTED ACCESS
LOCATION, the installation instructions shall contain a statement to this
effect.

4RF Exposure Information (SAR)
This model phone meets the government’s requirements for exposure to radio
waves.
This phone is designed and manufactured not to exceed the emission limits for
exposure to radio frequency (RF) energy set by the Federal Communications
Commission of the U.S. Government.
The exposure standard for wireless mobile phones employs a unit of
measurement known as the Specific Absorption Rate, or SAR. The SAR limit
set by the FCC is 1.6W/kg. *Tests for SAR are conducted using standard
operating positions accepted by the FCC with the phone transmitting at its
highest certified power level in all tested frequency bands. Although the SAR
is determined at the highest certified power level, the actual SAR level of the
phone while operating can be well below the maximum value. This is because
the phone is designed to operate at multiple power levels so as to use only the
poser required to reach the network. In general, the closer you are to a
wireless base station antenna, the lower the power output.
The highest SAR value for the model phone as reported to the FCC when tested
for use at the ear is 0.633 W/kg and when worn on the body, as described in this
user guide, is 0.703 W/kg. (Body-worn measurements differ among phone
models, depending upon available enhancements and FCC requirements.)
While there may be differences between the SAR levels of various phones and
at various positions, they all meet the government requirement.
The FCC has granted an Equipment Authorization for this model phone with all
reported SAR levels evaluated as in compliance with the FCC RF exposure
guidelines. SAR information on this model phone is on file with the FCC and
can be found under the Display Grant section of http://www.fcc.gov/oet/fccid
after searching on FCC ID: MSQ-P505.
For body worn operation, this phone has been tested and meets the FCC RF
exposure guidelines for use with an accessory that contains no metal and the
positions the handset a minimum of 1.5 cm from the body. Use of other
enhancements may not ensure compliance with FCC RF exposure guidelines.
If you do no t use a body-worn accessory and are not holding the phone at the
ear, position the handset a minimum of 1.5 cm from your body when the phone
is switched on.