Alcatel Canada 39T28A03A22A Alcatel 7390 LMDS Multiservice Broadband Wireless User Manual 3cc12426aaaaTQbja01
Alcatel Canada Inc Alcatel 7390 LMDS Multiservice Broadband Wireless 3cc12426aaaaTQbja01
Contents
- 1. Base Station User Manual 1 of 14
- 2. Base Station User Manual 2 of 14
- 3. Base Station User Manual 3 of 14
- 4. Base Station User Manual 4 of 14
- 5. Base Station User Manual 5 of 14
- 6. Base Station User Manual 6 of 14
- 7. Base Station User Manual 7 of 14
- 8. Base Station User Manual 8 of 14
- 9. Base Station User Manual 9 of 14
- 10. Base Station User Manual 10 of 14
- 11. Base Sation User Manual 11 of 14
- 12. Base Sation User Manual 12 of 14
- 13. Base Sation User Manual 13 of 14
- 14. Base Sation User Manual 14 of 14
Base Station User Manual 3 of 14
3CC12426AAAA TQ BJA 01 Issue 01 - April 2001 - Draft 04 81/346
104
9. Set the DMC crimping tool to position 4 (for 24 AWG wire), and give the positioner a clockwise twist
to ensure that it is set properly and will crimp the contact pins on four sides.
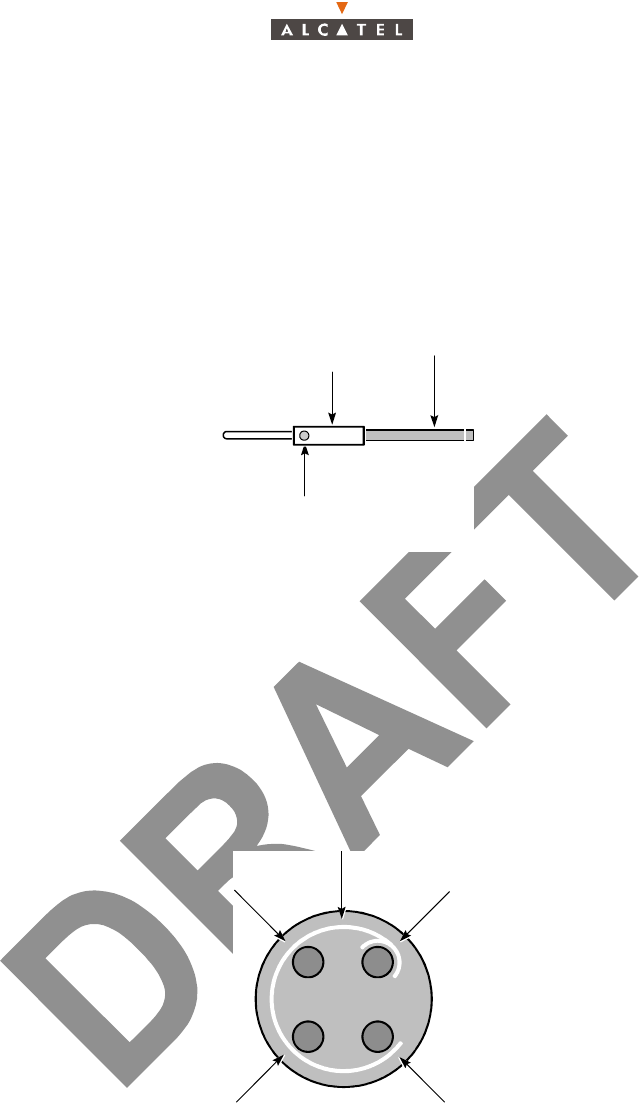
10. Place a contact pin on a lead and check that the lead is inserted completely by looking in the hole in
the contact pin; see Figure 51. There should be no more than 1 mm (0.04 in.) of exposed conductor
protruding from the pin.
Insert the pin into the DMC tool as far as it can go, and crimp the pin. The DMC tool has a ratchet
mechanism that does not release until the pin has been crimped properly.
Repeat this step for each lead.
Figure 51 – Attaching a contact pin
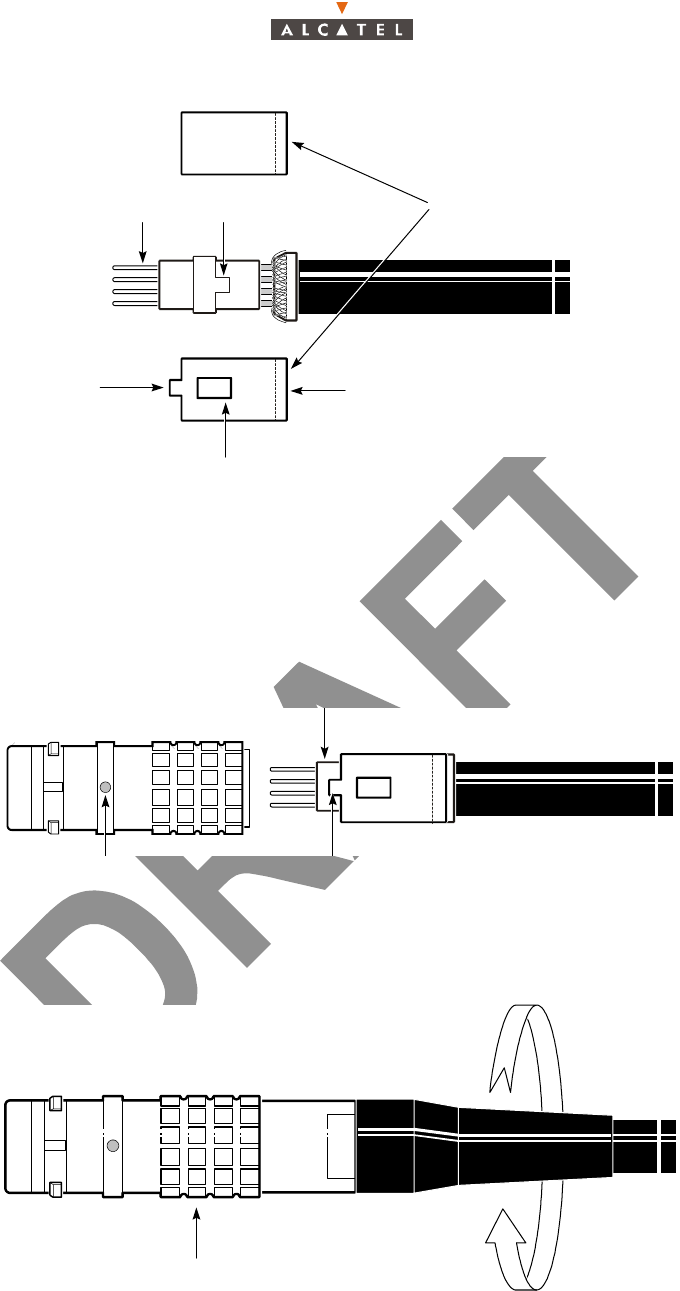
11. Arrange the four pins as indicated in Figure 52, and insert them simultaneously into the insert; the
pins enter the side of the insert that has the white marking. The pins must be inserted simultaneously
because the conductors are not long enough to be inserted one at a time. Push each pin until it clicks
into position, then confirm that contact is secure by gently pulling on the conductor.
The white marking on the insert identifies the pins. The white circle identifies pin 1, and pins 2, 3 and
4 follow counterclockwise.
Use the removal tool if the pins are in the wrong holes.
Figure 52 – Inserting the contact pins
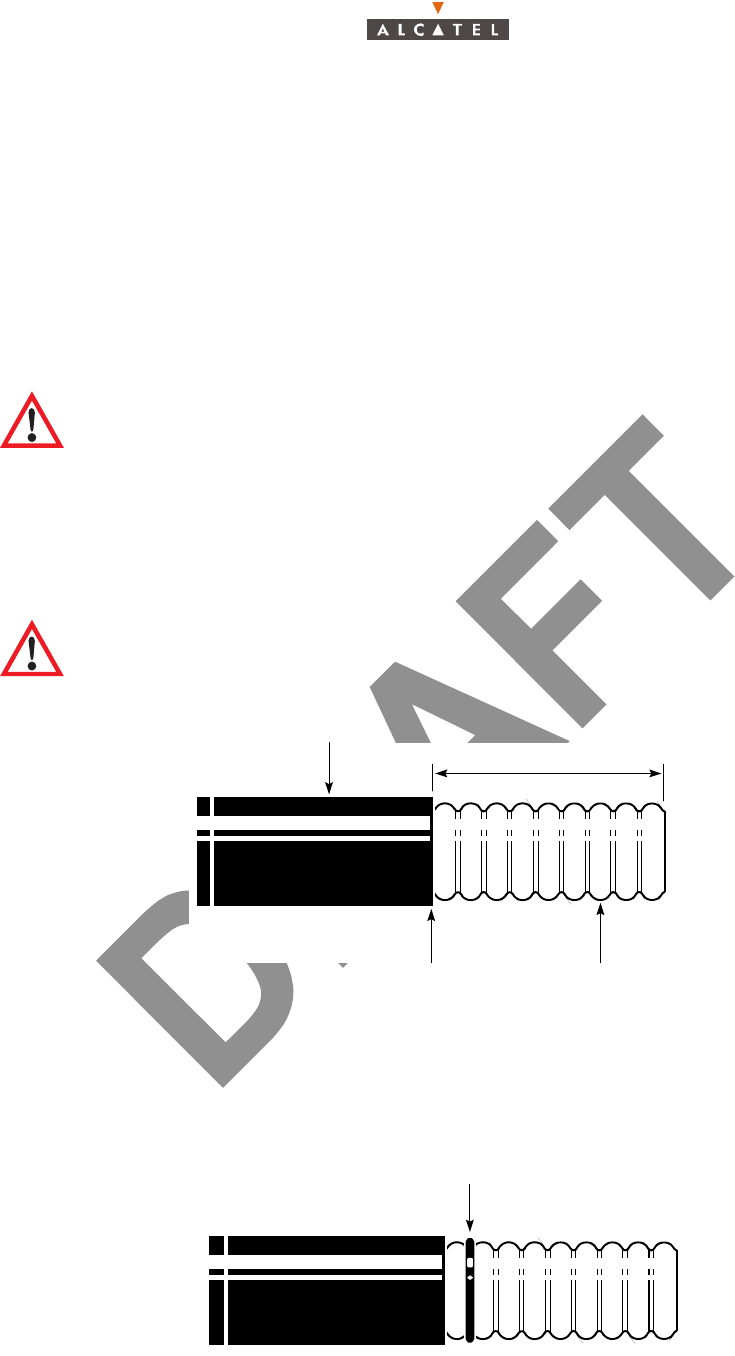
12. Put the insert into the insert carrier; see Figure 53.
When assembled properly, the tab on the carrier faces towards the pins, the tab on the insert fits in
the cutout in the carrier, and the bevel in the carrier fits on the bevel on the cone washer. The mat-
ching bevels pinch the braided shielding when the connector is completely assembled.
Contact
pin
Conductor
Inspection
hole
White
marking
Pin 1
Tx+ White (Blue)
Pin 4
Rx- White (Orange)
Pin 2
Rx+ Orange
Pin 3
Tx- Blue
82/346 Issue 01 - April 2001 - Draft 04 3CC12426AAAA TQ BJA 01
104
Figure 53 – .Putting the insert into the insert carrier
13. Put the insert carrier into the connector body; see Figure 54.
The red dot on the outer shell aligns with the tab on the insert carrier. You should feel a slight click
when the carrier locks into place. It may be necessary to gently push the cable while carefully rotating
the connector body until the click is felt.
Figure 54 – Inserting the insert carrier into the outer shell
14. Tighten the connector by turning the collet nut to 6.9 Nm (5 ft-lb) of torque; see Figure 55. Do not
rotate the connector body.
Figure 55 – Tightening the connector
15. Push the bend relief on to the collet nut.
Insert
carrier
Bevel
Cutout in carrier
Pins Tab on
insert
Tab on
carrier
Insert
Tab on insert carrier
Red dot
Do not turn
3CC12426AAAA TQ BJA 01 Issue 01 - April 2001 - Draft 04 83/346
104
2.9 – Installing an L4PNM Heliax connector
2.9.1 – Overview
The following parts are required:
– Heliax LDF4 cable.
– Heliax L4PNM connector (solder-connect or ring-flare variant).
All tools and hardware required for this procedure except wrenches and soldering tools should be
ordered from Heliax. See Appendix A for details.
2.9.2 – To add a solder-connect L4PNM connector
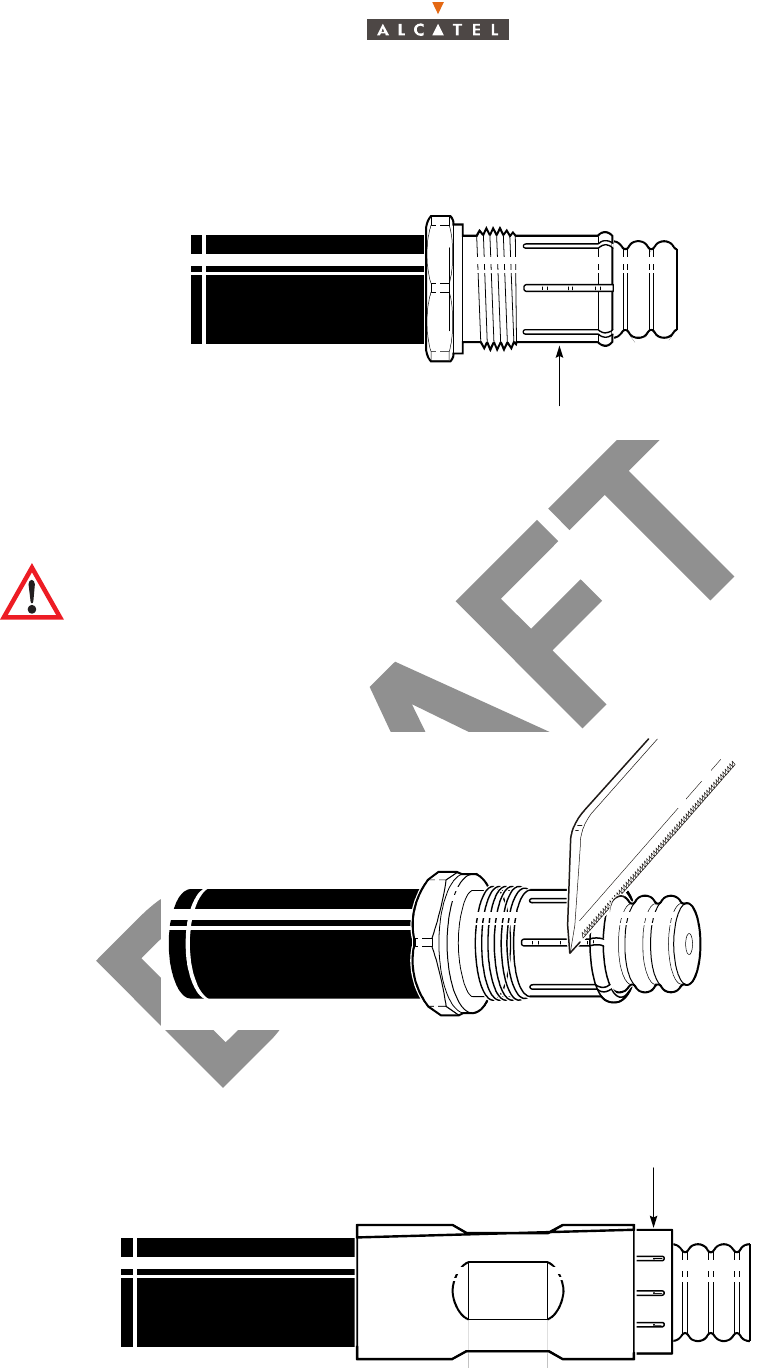
1. Strip 51 mm (2 in.) or more of the cable jacket from the IF cable, ending at the lowest point of a valley
between two corrugations, as shown in Figure 56.
Figure 56 – Removing the insulation
2. Install the O-ring on the first corrugation valley as shown in Figure 57.
Figure 57 – Installing the small O-ring
Note - Newbridge Broadband Wireless equipment should only be installed by qualified
individuals who are trained and certified for the type of installation task assigned to them.
Note - This step can be done more accurately and quickly if Heliax cable tool 207886 is used
to score the cable jacket and cut the outer conductor.
51 mm (2 in.) or greater
Outer
conductor
Lowest point
between corrugations
O-ring
Cable
jacket
84/346 Issue 01 - April 2001 - Draft 04 3CC12426AAAA TQ BJA 01
104
3. Use a small grease brush to lubricate the O-ring with the silicone grease shipped with the connector.
4. Install the clamping nut on the cable by sliding it over the cable end until it is stopped by the O-ring.
The fingers of the clamping nut should stop exactly half-way through a corrugation peak, as shown
in Figure 58.
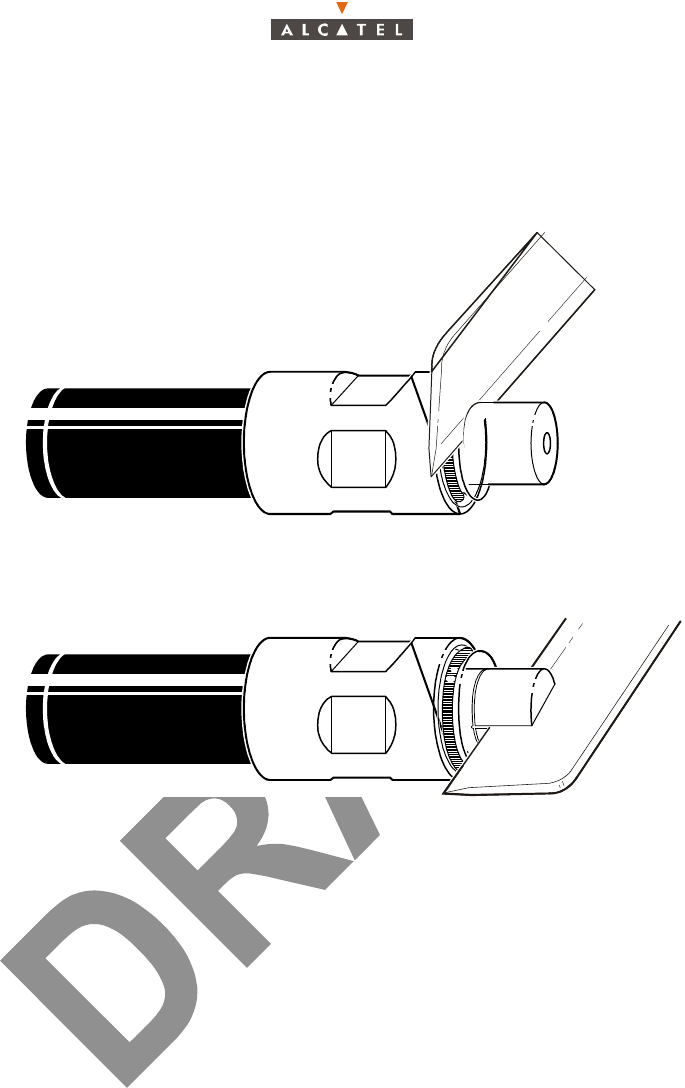
Figure 58 – Installing the clamping nut
5. Remove the portion of outer conductor that is not covered by the clamping nut.
1. Use a fine-tooth saw to cut through the outer conductor flush with the clamping nut fingers. Do
not cut deeper than the outer conductor, and make sure that the cut is made along the entire
circumference where the clamping nut fingers meet the outer conductor; see Figure 59.
Figure 59 – Cutting the outer conductor
2. Grasp the outer conductor with pliers, and carefully pull it off. When removed, the foam dielectric
is exposed, as seen in Figure 60.
Figure 60 – Foam dielectric
Note - Substep i is unnecessary if Heliax cable tool 207886 was used in step 1 to score the
cable jacket, and cut the outer conductor. If the Heliax cable tool was used, proceed to
substep 2.
Clamping nut
Foam dielectric
3CC12426AAAA TQ BJA 01 Issue 01 - April 2001 - Draft 04 85/346
104
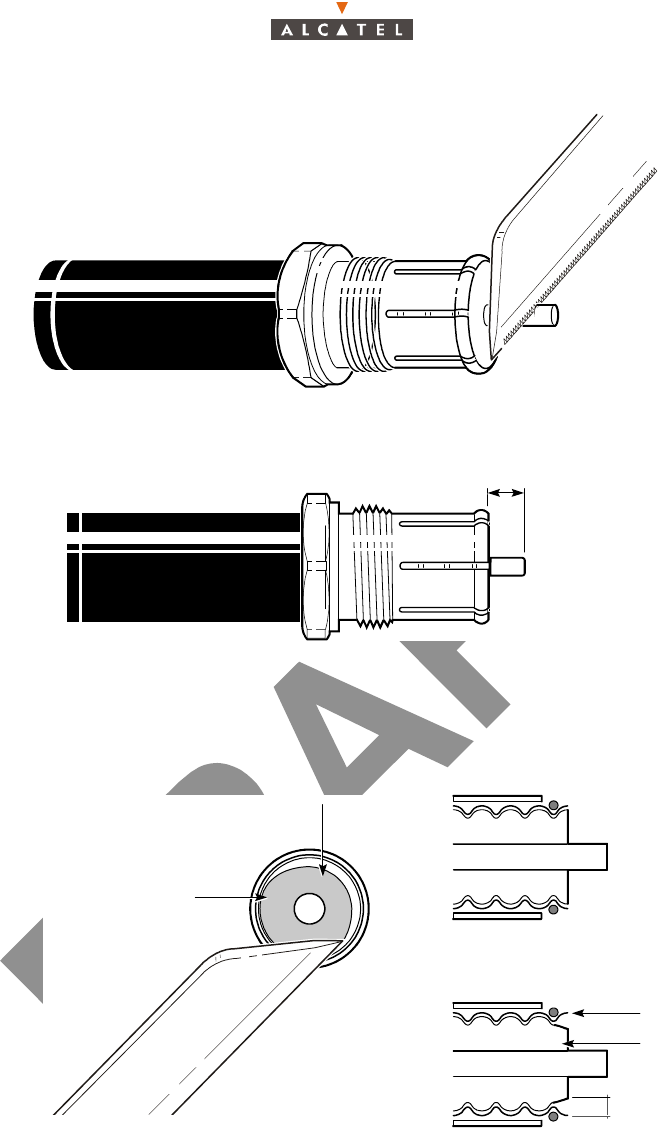
6. Remove the foam dielectric from the inner conductor.
1. Use a knife to cut the foam dielectric flush with the outer conductor, to the depth of the inner
conductor, then cut along the length of the inner conductor several times until all the foam
dielectric is removed from the inner conductor; see Figure 61.
Figure 61 – Removing the foam dielectric
2. Use a knife to carefully scrape any remaining dielectric foam adhesive from the inner conductor.
Be careful not to damage the inner conductor.
7. Trim the inner conductor.
1. Use a fine-tooth saw to trim the inner conductor to 5 mm (7/32 in.) from the outer conductor and
clamping nut fingers, as shown in Figure 62.
2. Use a small file to remove any burrs on the end of the inner conductor.
3. Use a clean wire brush to remove any debris from the foam dielectric.
86/346 Issue 01 - April 2001 - Draft 04 3CC12426AAAA TQ BJA 01
104
Figure 62 – Trimming the inner conductor
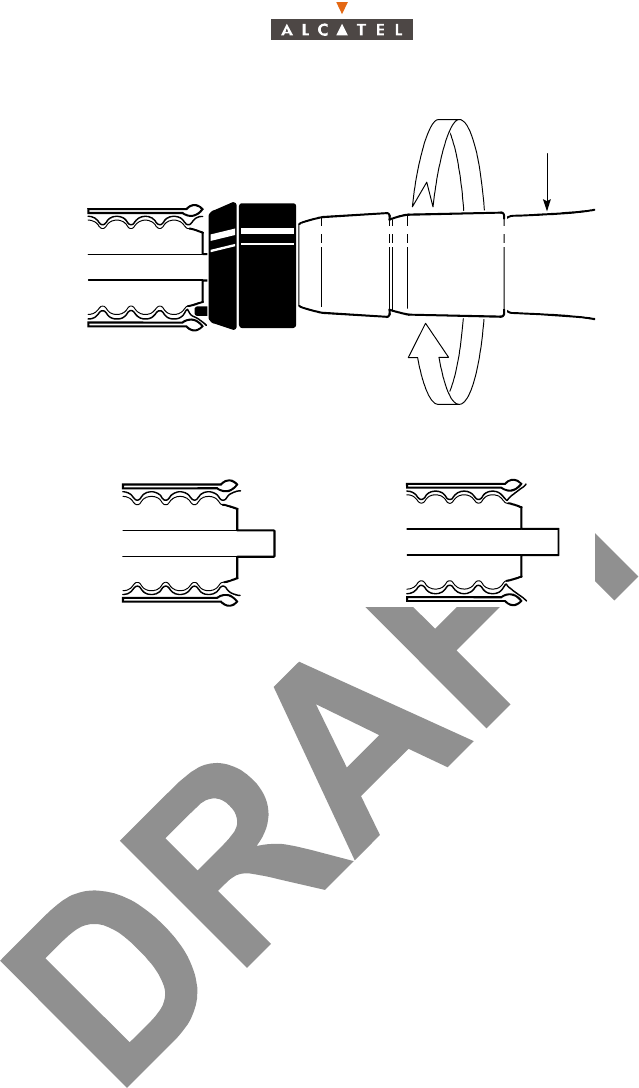
8. Use a knife to compress the foam dielectric away from the outer conductor as shown in Figure 63.
Figure 63 – Compressing the foam dielectric
9. Flare the outer conductor:
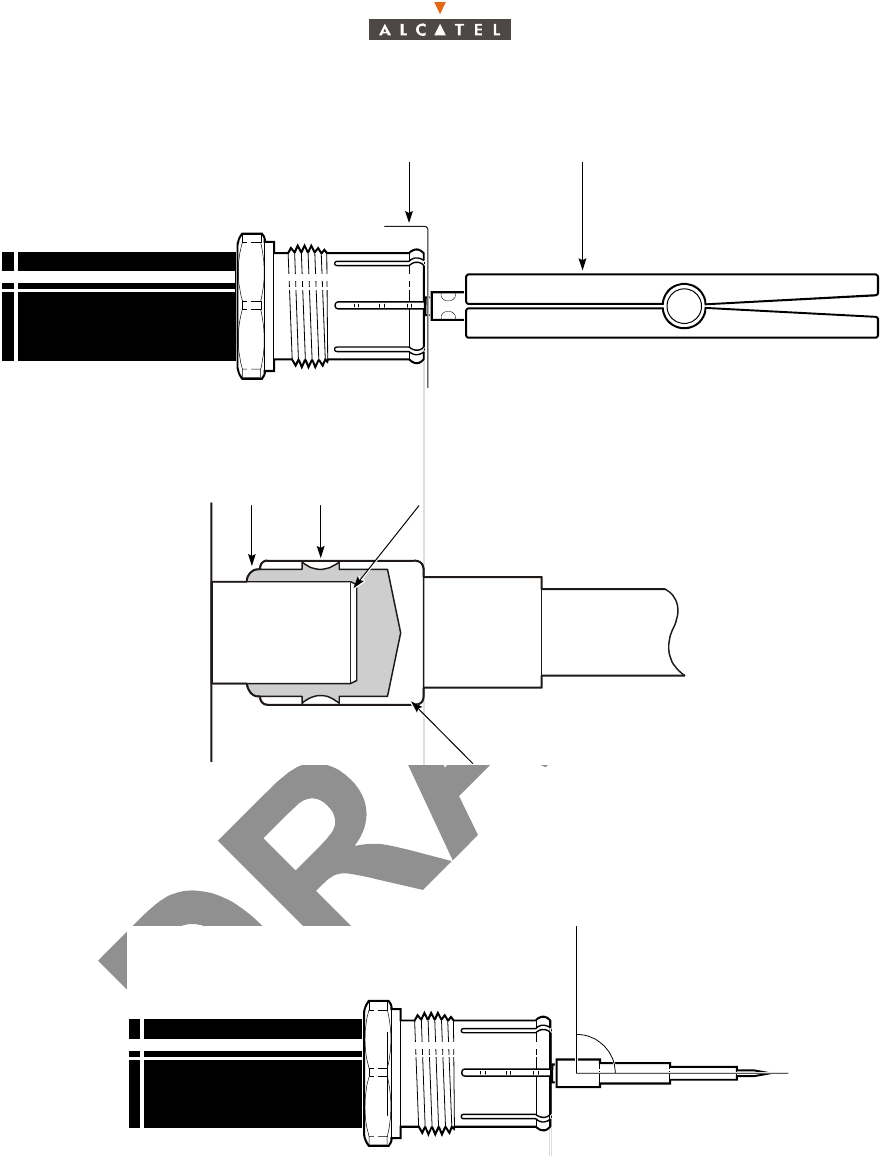
1. Use a flaring tool to flare the outer conductor, as shown in Figure 64. The flared outer conductor
should not extend past the clamping nut fingers.
2. Use a small file to remove any burrs or irregularities on the end of the inner conductor.
3. Use a clean wire brush to remove any debris from the foam dielectric.
5 mm
(7/32 in.)
Compressed
foam
Before foam compression
Uncompressed
foam
After foam compression
Outer conductor
Foam dielectric
2 mm
(3/32 in.)
3CC12426AAAA TQ BJA 01 Issue 01 - April 2001 - Draft 04 87/346
104
Figure 64 – Flaring the outer conductor
10. Solder the pin to the inner conductor:
1. Cut 1 mm (0.040 in.) diameter solder to a length equal to the depth of the pin cup, roll the length
into a ball, and insert it into the pin cup. When the pin cup is heated by the soldering iron, this
solder will melt and provide a even solder bond on the inside of the pin cup.
2. Use the heat shield, soldering pliers and soldering iron to solder the pin to the inner conductor,
as shown in Figure 65. Apply extra solder to the holes in the pin cup if required.
3. Remove excess solder from the solder holes using wire cutters and/or emery paper.
Flaring tool
Before flaring After flaring
88/346 Issue 01 - April 2001 - Draft 04 3CC12426AAAA TQ BJA 01
104
Figure 65 – Soldering the pin
11. Verify that the pin is installed at a 90° angle with respect to the clamping nut, as shown in Figure 66.
If the pin is not straight, and cannot be corrected, remove it, and start the procedure again.
Figure 66 – Checking the pin
12. Add the large O-ring to the clamping nut, as shown in Figure 67.
Pin cup
Deburred inner
conductor
Solder
hole
Solder
bead
Soldering
pliers
Heat
shield
90°
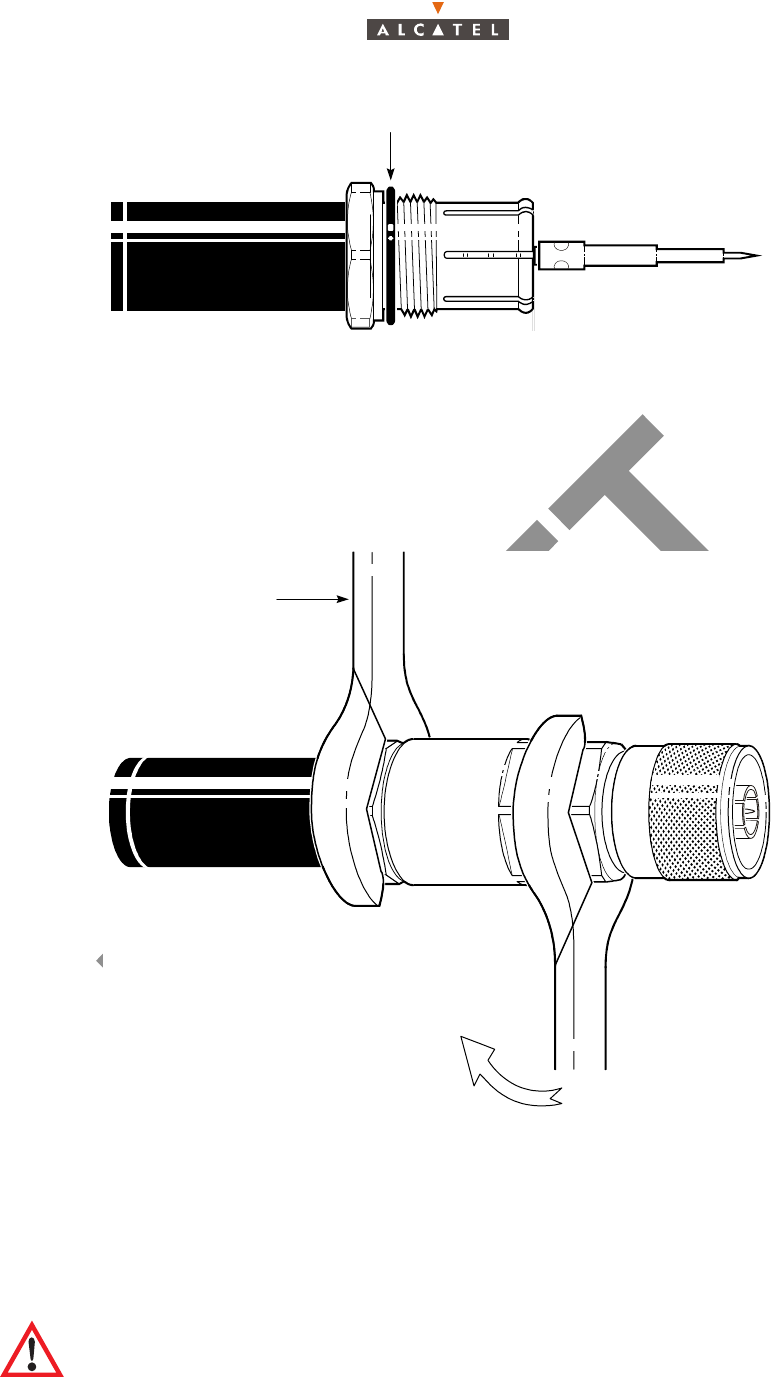
3CC12426AAAA TQ BJA 01 Issue 01 - April 2001 - Draft 04 89/346
104
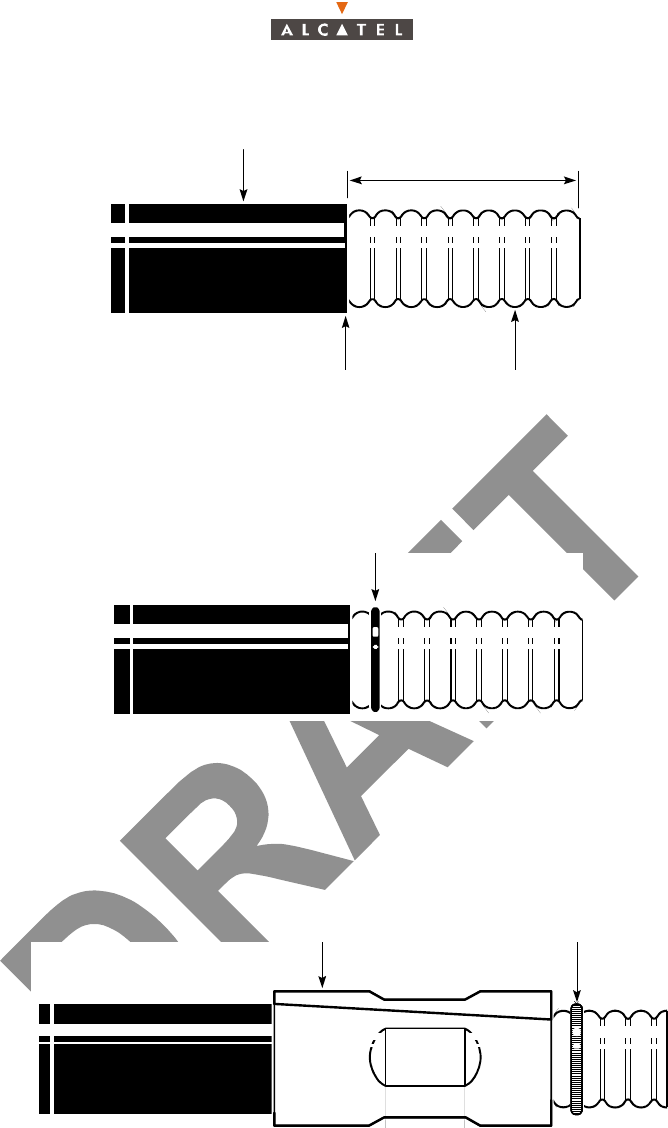
Figure 67 – Adding the large O-ring
13. Use a small grease brush to lubricate the O-ring with the silicone grease included with the connector.
14. Add the outer connector body to the clamping nut and pin. Hold the clamping nut stationary with one
wrench, and thread the connector body onto the clamping nut with another wrench; see Figure 68.
Do not turn the clamping nut, only turn the connector body. Tighten to 1.9 to 2.4 Nm (16.8 to 20.8 in.-
lb) of torque.
Figure 68 – Assembling the connector
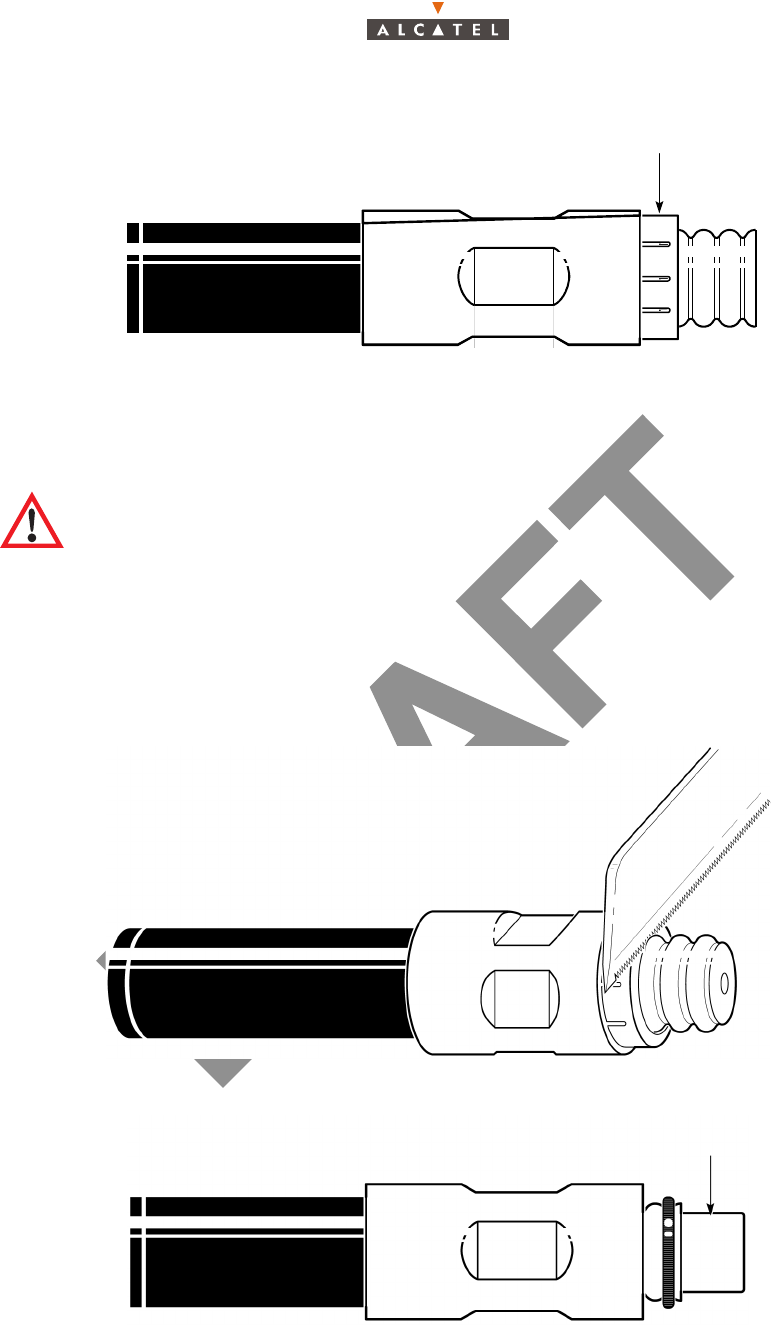
2.9.3 – To add a ring-flare L4PNM connector
1. Strip 51 mm (2 in.) or more of the cable jacket from the IF cable, ending at the lowest point of a valley
between two corrugations, as shown in Figure 69.
Note - This step can be done more accurately and quickly if Heliax cable tool 207886 is used
to score the cable jacket and cut the outer conductor.
O-ring
Stationary wrench
90/346 Issue 01 - April 2001 - Draft 04 3CC12426AAAA TQ BJA 01
104
Figure 69 – Removing the cable jacket
2. Install the O-ring on the first corrugation valley as shown in Figure 70.
Figure 70 – Installing the small O-ring
3. Use the small brush to lubricate the O-ring with the silicone grease included with the connector.
4. Install the connector body on the cable by sliding it over the cable end until it is stopped by the O-
ring, as shown in Figure 71. Install the spring ring on the first corrugation valley after the cable body,
as shown in Figure 71.
Figure 71 – Installing the connector body and spring ring
5. Slip the outer conductor cutting guide over the cable and onto the spring ring, as shown in Figure 72.
51 mm (2 in.) or greater
Outer
conductor
Lowest point
between corrugations
Cable
jacket
O-ring
Connector body Spring ring
3CC12426AAAA TQ BJA 01 Issue 01 - April 2001 - Draft 04 91/346
104
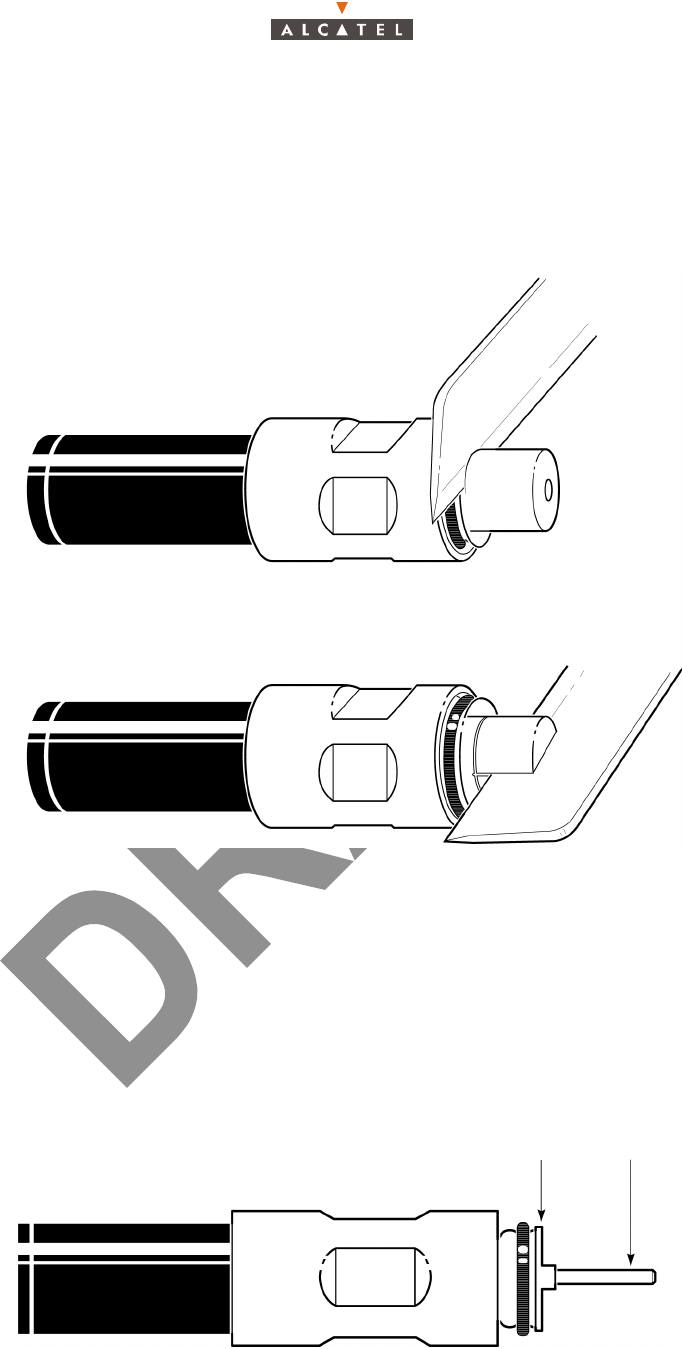
Figure 72 – Adding the cutting guide
6. Remove the outer conductor:
1. Use a fine-tooth saw to cut through the outer conductor flush with the cutting guide. Do not cut
deeper than the outer conductor, and make sure that the cut is made along the entire
circumference where the cutting guide meets the outer conductor corrugation peak; see Figure
73. Remove the cutting guide when the cut is complete.
2. Grasp the outer conductor with pliers and carefully pull it off, exposing the foam dielectric, as
shown in Figure 74.
Figure 73 – Cutting the outer conductor
Figure 74 – Foam dielectric
Note - Substep 2 is unnecessary if Heliax cable tool 207886 was used in step 1 to score the
cable jacket, and cut the outer conductor. If the Heliax cable tool was used, proceed to
substep 2.
Cutting guide
Foam dielectric
92/346 Issue 01 - April 2001 - Draft 04 3CC12426AAAA TQ BJA 01
104
7. Remove the foam dielectric from the inner conductor:
1. Use a knife to cut the foam dielectric flush with the outer conductor, to the depth of the inner
conductor, then cut along the length of the inner conductor several times, until all the foam
dielectric is removed; see Figure 75.
2. Use a knife to carefully scrape any remaining dielectric foam adhesive from the inner conductor.
Be careful not to damage the copper coating on the inner conductor.
Figure 75 – Removing the foam dielectric
8. Trim the inner conductor:
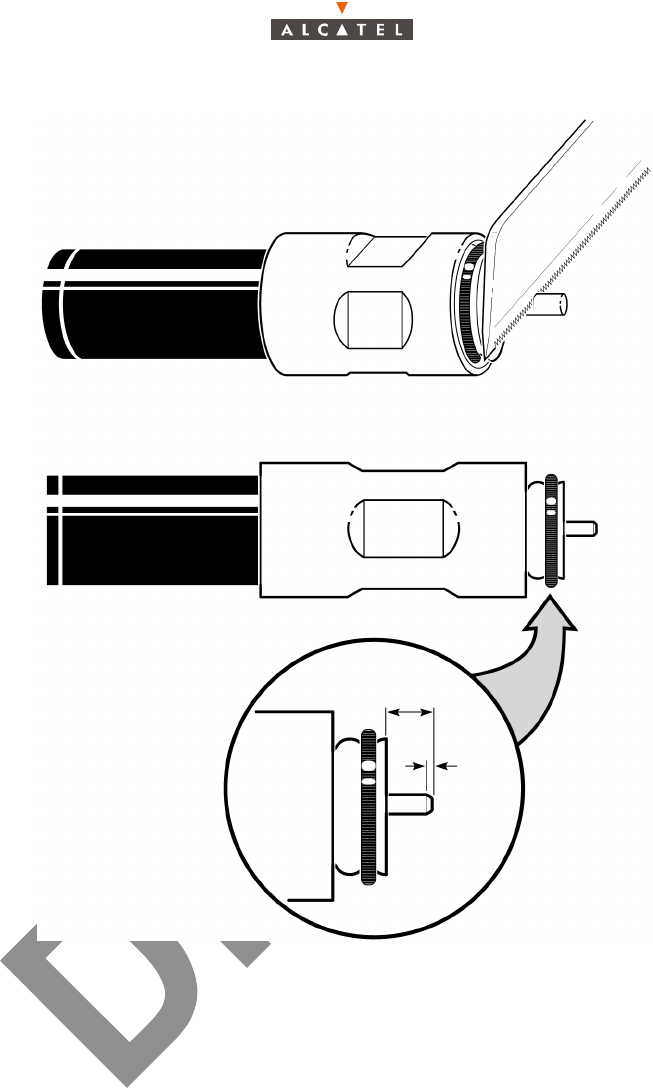
1. Add the inner conductor cutting guide, as shown in Figure 76.
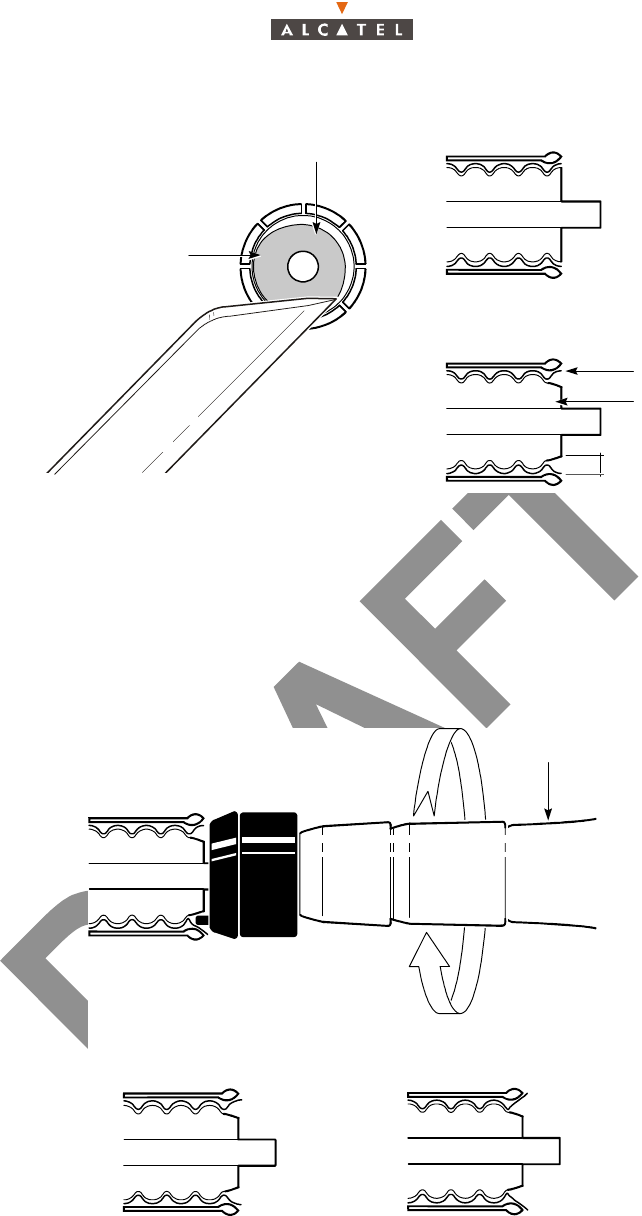
2. Use a fine-tooth saw to trim the inner conductor flush with the cutting guide, as shown in Figure
77.
3. File the outer conductor to the specifications shown in Figure 77.
4. Use a clean wire brush to remove any debris from the foam dielectric.
Figure 76 – Adding the inner conductor cutting guide
Cutting
guide
Inner
conductor
3CC12426AAAA TQ BJA 01 Issue 01 - April 2001 - Draft 04 93/346
104
Figure 77 – Trimming the inner conductor
9. Use a knife to compress the foam dielectric away from the outer conductor as shown in Figure 78.
6-8 mm
(1/4’’-5/16’’)
1 mm
(1/32’’)
94/346 Issue 01 - April 2001 - Draft 04 3CC12426AAAA TQ BJA 01
104
Figure 78 – Compressing the foam dielectric
10. Flare the outer conductor:
1. Use a flaring tool to flare the outer conductor, as shown in Figure 79.
2. Examine the flare, and use the small file to remove any burrs or irregularities from the flared outer
conductor.
3. Use a clean wire brush to remove any debris from the foam dielectric.
Figure 79 – Flaring the outer conductor
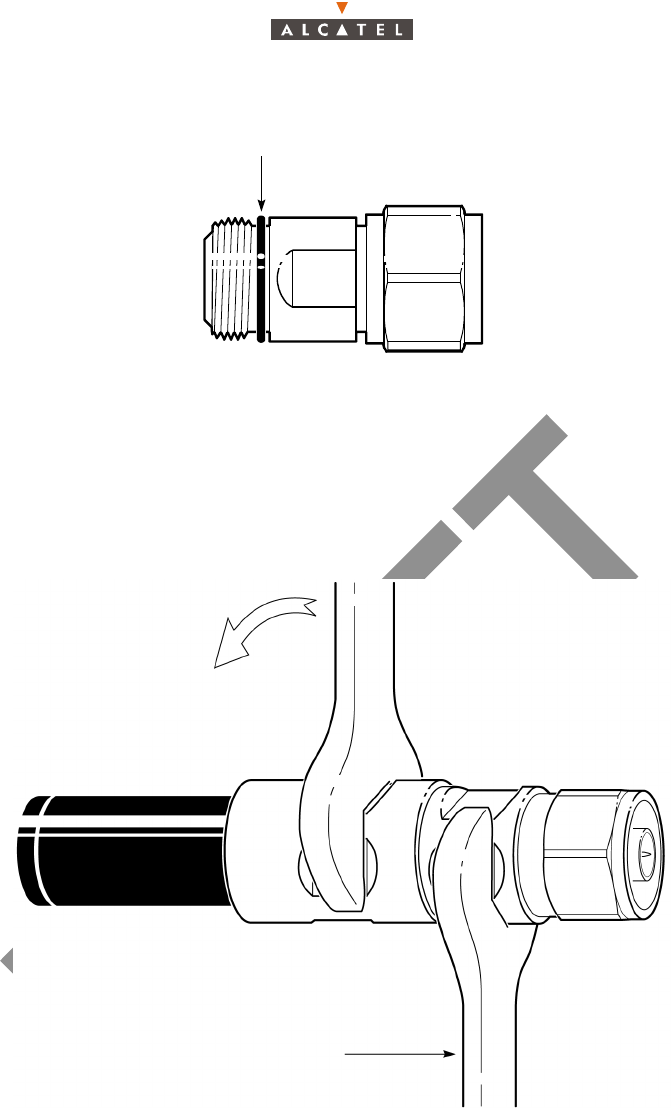
11. Add the large O-ring to the end of the connector, as shown in Figure 80.
Compressed
foam
Uncompressed
foam
Before foam compression
After foam compression
Outer conductor
Foam dielectric
2 mm
(3/32 in.)
Flaring tool
Before flaring After flaring
3CC12426AAAA TQ BJA 01 Issue 01 - April 2001 - Draft 04 95/346
104
Figure 80 – Adding the large O-ring
12. Use the small grease brush to lubricate the O-ring with the silicone grease shipped with the
connector.
13. Add the end of the connector to the connector body. Hold the end of the connector stationary with
one wrench, and thread the connector body onto the connector end by turning it with another wrench;
see Figure 81. Do not turn the connector end, only turn the connector body. Tighten to 1.9 to 2.4 Nm
(16.8 to 20.8 in.-lb) of torque.
Figure 81 – Assembling the connector
2.10– BT system loss calibration
2.10.1– Overview
This chapter demonstrates how to measure and calibrate the system according to the required upstream
and downstream losses.
In both upstream and downstream loss calculations, losses due to connectors and connections, cable
runs, and passive devices, such as the Bias-T or 12:2 Combiner/Splitter, are part of the measured loss.
O-ring
Stationary wrench
96/346 Issue 01 - April 2001 - Draft 04 3CC12426AAAA TQ BJA 01
104
The downstream path loss is measured from the IBS-TLX card Tx SMA cable to the end of the IF cable
that connects to the X-Pol RBS Tx. The upstream path is measured from the IBS-TLX card Rx SMA
cable to the end of the IF cable that connects to the X-Pol RBS Rx. If the measured upstream or
downstream loss is less than the value required, an attenuator is installed between the 12:2 Combiner/
Splitter and the Bias-T.
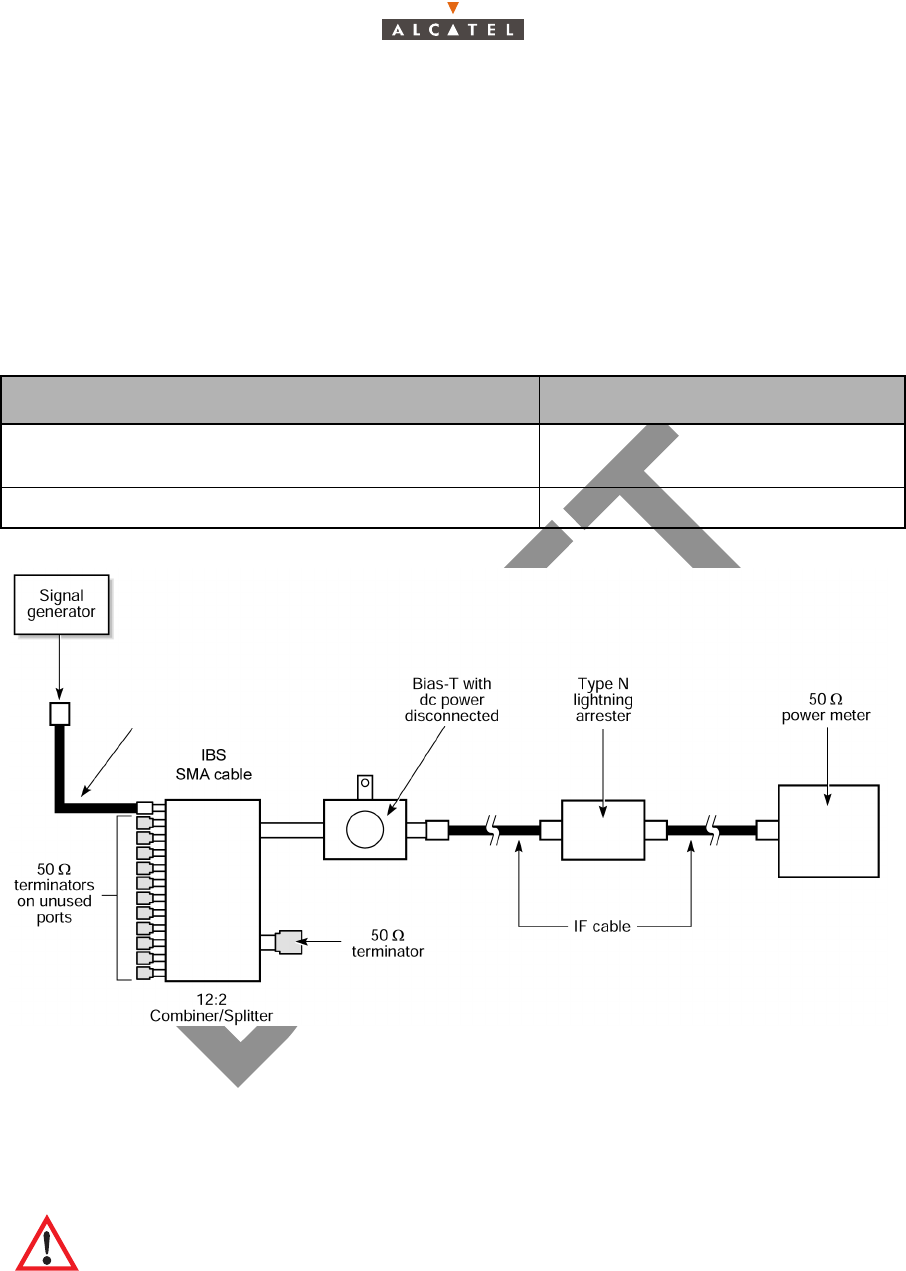
Table 27 lists the equipment required to calibrate the upstream and downstream IF cable losses.
Figure 82 shows the equipment setup used to measure upstream or downstream cable loss.
Measurements should be made at the lowest and highest frequencies of the upstream and downstream
IF bands for your system. The average of the pair of measurements is used to determine the nominal
amount of attenuation needed in the upstream and downstream paths.
Table 27: Test equipment required for BS IF system loss calibration
Figure 82 – BS IF cable calibration equipment setup
2.10.2– To calibrating the upstream and downstream cable runs
Perform the following procedure for the downstream and upstream cable runs.
1. Ensure the dc power to the surge protector is disconnected.
2. Disconnect the dc power cables from the Bias-Ts.
3. Disconnect the SMA cables from the IBS card.
4. Disconnect the IF cables from the X-Pol RBS Tx and X-Pol RBS Rx.
Equipment Supplier
Signal generator capable of generating a sine wave at
2050 MHz Hewlett Packard: Model ESG-4000A
50 W power meter Hewlett Packard: Model E4419A
If dc power is not disconnected from the IF cables, the test equipment will be damaged. To
remove dc power, switch off the appropriate circuit breaker on the power distribution system
to isolate the individual IF channel.

3CC12426AAAA TQ BJA 01 Issue 01 - April 2001 - Draft 04 97/346
104
5. Measure the losses at the lowest and highest frequencies in the frequency band used by the system.
1. Set the signal generator frequency to the Llow frequency and the RF output power level to
0dBm.
2. Connect the signal generator to the appropriate SMA cable (IBS-TLX). Connect the power meter
to the X-Pol RBS Tx/X-Pol RBS Rx IF cable. Figure 82 shows the test setup.
3. Measure the RF power level with the power meter. Record this value as the upstream or
downstream Llow value.
4. Repeat this step at the Lhi frequency.
6. Use the equation below to calculate the mean attenuation. Record the result as the downstream or
upstream LA nom value.
LA nom= ((Llow + Lhi)/2)
where
LA nom represents the required attenuation value (nominal)
Llow represents the loss measurement at the lowest frequency
Lhi represents the loss measurement at the highest frequency
LR represents the required loss value (27 dB ±1 dB for the downstream path, 24 ±1 dB for the ups-
tream path)
7. Enter in 7390LT radiolink intallation screen recorded attenuation value for downstream and
upstream cables.
8. Reconnect the SMA and IF cables.
9. Reconnect the Bias-T power cables.
10. Reapply the dc power.
98/346 Issue 01 - April 2001 - Draft 04 3CC12426AAAA TQ BJA 01
104
2.11– Simplified description of the Base Station (7390BS)
The A7390 system Base Station (7390BS) consists of the following main elements:
– one or more (up to eight) external transceivers, comprising the radio and the antenna part and
designated "X-Pol RBS" (Radio Base Station);
– one modem rack, including the power supply unit and interfaces; this is the "indoor" part and de-
signated DBS (Digital Base Station);
–a cables linking the X-Pol RBS and the DBS ("X-Pol RBS/DBS link");
– a network management and configuration station (7390LT), based on the use of a PC with appro-
priate software.
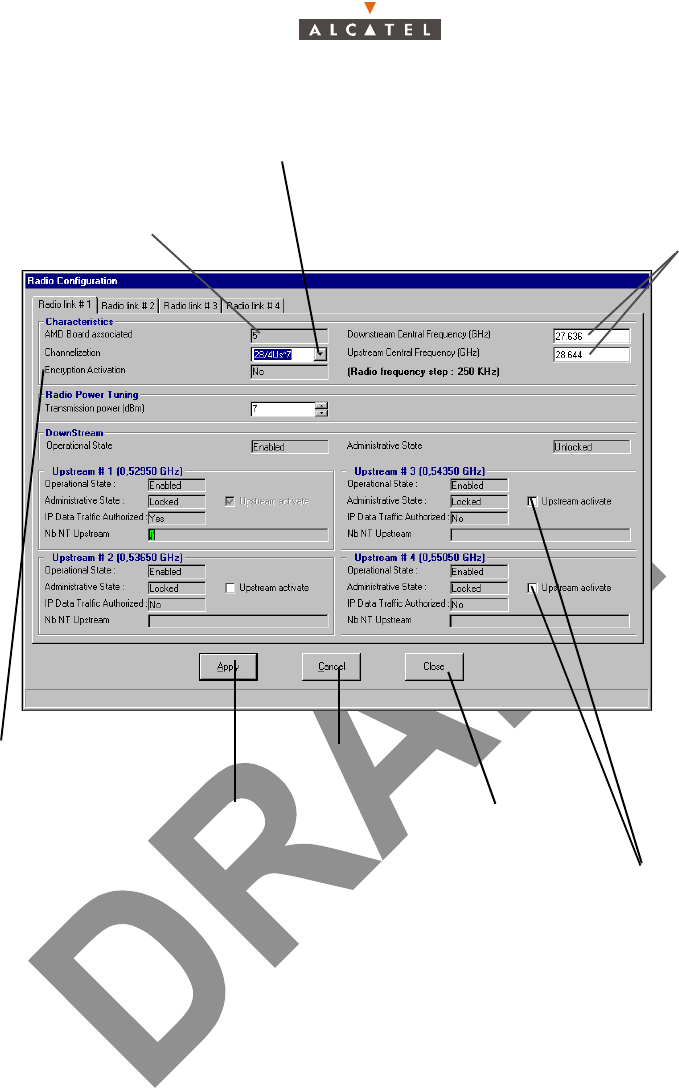
Click on the arrow to select the bandwidth: 14/4 Us*3.5,
28/4 Us*7 MHz (by default: not configured)
No. of the AMD board
associated with the sector
Click here to cancel
the modifications
Click here to activate the
upstream.
Click here to return to
the BS details screen
Click here to enter the central trequencies
of the upstream (reception) and downstream
(emission) channels (see radio scheduler)
Click here to apply
the modifications
Encryption activation:
No
3CC12426AAAA TQ BJA 01 Issue 01 - April 2001 - Draft 04 99/346
104
2.12– Technical specifications of the Base Station (7390BS)
2.12.1– X-Pol RBS specifications
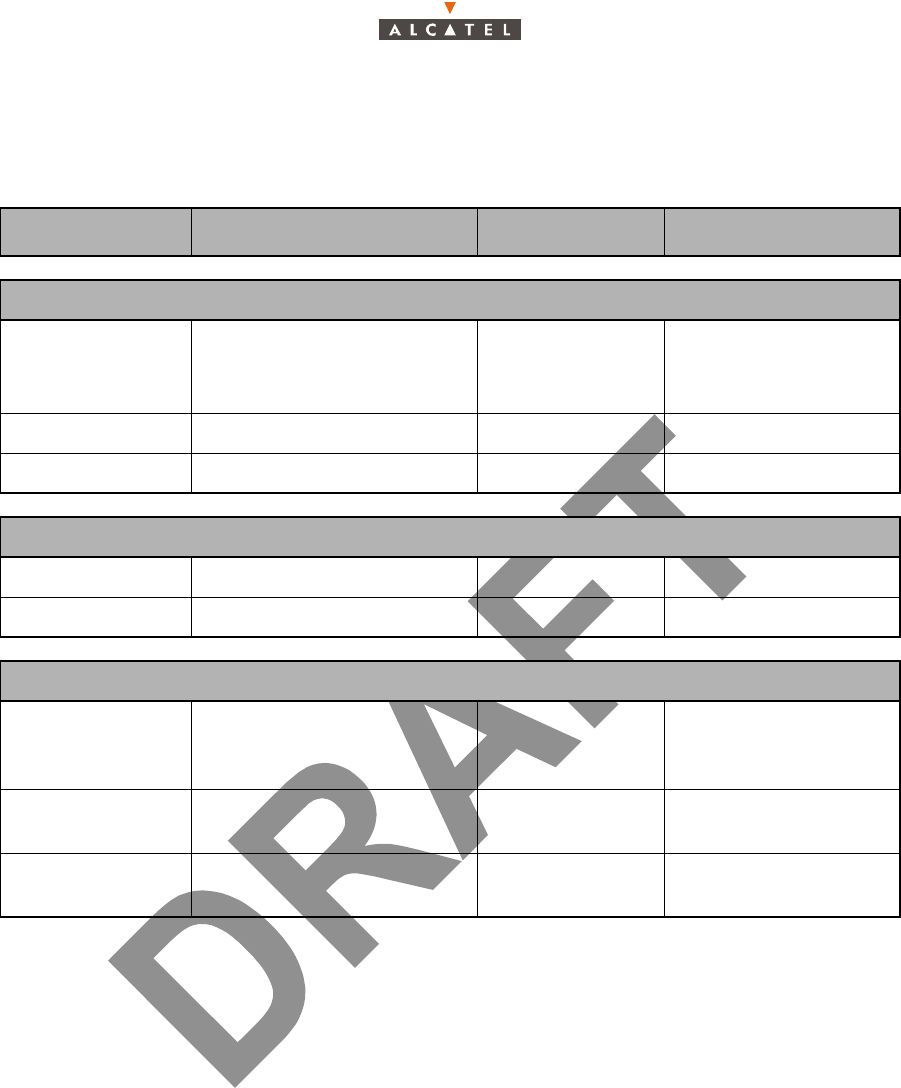
Designation Description Standards Observations
Mechanical specifications of the X-Pol RBS assembly (antenna + pole mounting)
HxLxD 644(mm)x221(mm)x720(mm)
D taken from axial tube
11,43 to 7,3cm
(4 1/2 into 2 1/2 in)
Weight 15 kg -
Physical interfaces: X-Pol RBS/DBS indoor-outdoor cable
Connector type N/female weatherproof
Medium 50W coaxial cable -
Environmental specifications
X-Pol RBS Classi-
fication -
equipment for premi-
ses not sheltered from
the weather
Operating
temperature -33°C to + 55°C -
Relative humidity
at 30°C 100% -
100/346 Issue 01 - April 2001 - Draft 04 3CC12426AAAA TQ BJA 01
104
2.12.2– DBS specifications
Note: Power supplies are floating level voltages; the ground cable can be connected to + 48V or - 48V
according to the country standards.
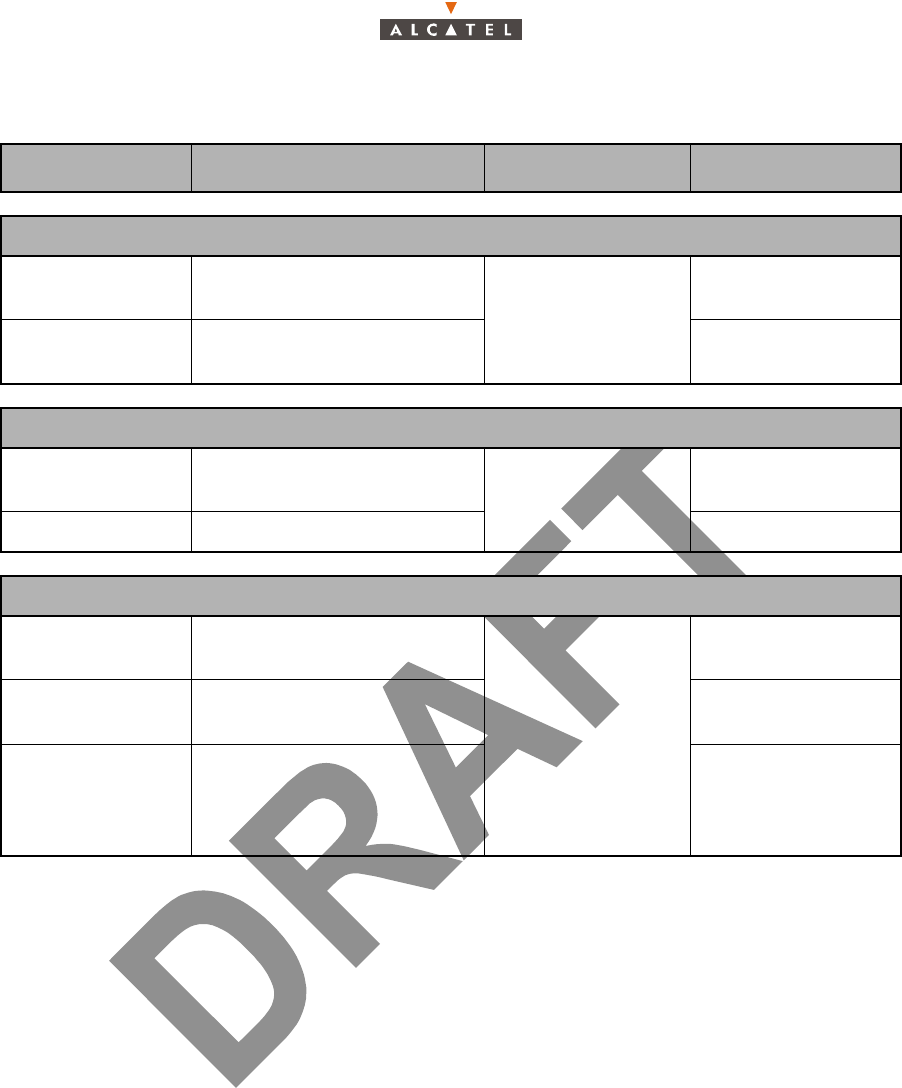
Designation Description Standards Observations
Mechanical specifications: Rack-mounted DBS assembly standard 19"
HxLxD 1250(mm)x600(mm)x600(mm) cf. diagram in
§ 3 Installation
Weight <135 kg (including 85 kg for
empty rack) -
Mechanical specifications: DBS shelf without rack
HxLxD 844.55(mm)x482.6(mm)x540(mm) 19-inch cf. diagram
in § 3 Installation
Weight < 50 kg -
Power supply and consumption
Primary voltage
range 36 V to 60 V 48 V rated voltage
Maximum con-
sumption 750W including 8 X-Pol
RBS
Protection overvoltage, short-circuit
(40 A fuse), polarity inversion,
thermal protection
(ventilation failure)
-