Alcatel Canada 39T28A03A22A Alcatel 7390 LMDS Multiservice Broadband Wireless User Manual 3cc12426aaaaTQbja01
Alcatel Canada Inc Alcatel 7390 LMDS Multiservice Broadband Wireless 3cc12426aaaaTQbja01
Contents
- 1. Base Station User Manual 1 of 14
- 2. Base Station User Manual 2 of 14
- 3. Base Station User Manual 3 of 14
- 4. Base Station User Manual 4 of 14
- 5. Base Station User Manual 5 of 14
- 6. Base Station User Manual 6 of 14
- 7. Base Station User Manual 7 of 14
- 8. Base Station User Manual 8 of 14
- 9. Base Station User Manual 9 of 14
- 10. Base Station User Manual 10 of 14
- 11. Base Sation User Manual 11 of 14
- 12. Base Sation User Manual 12 of 14
- 13. Base Sation User Manual 13 of 14
- 14. Base Sation User Manual 14 of 14
Base Station User Manual 8 of 14
3CC12426AAAA TQ BJA 01 Issue 01 - April 2001 - Draft 04 171/346
234
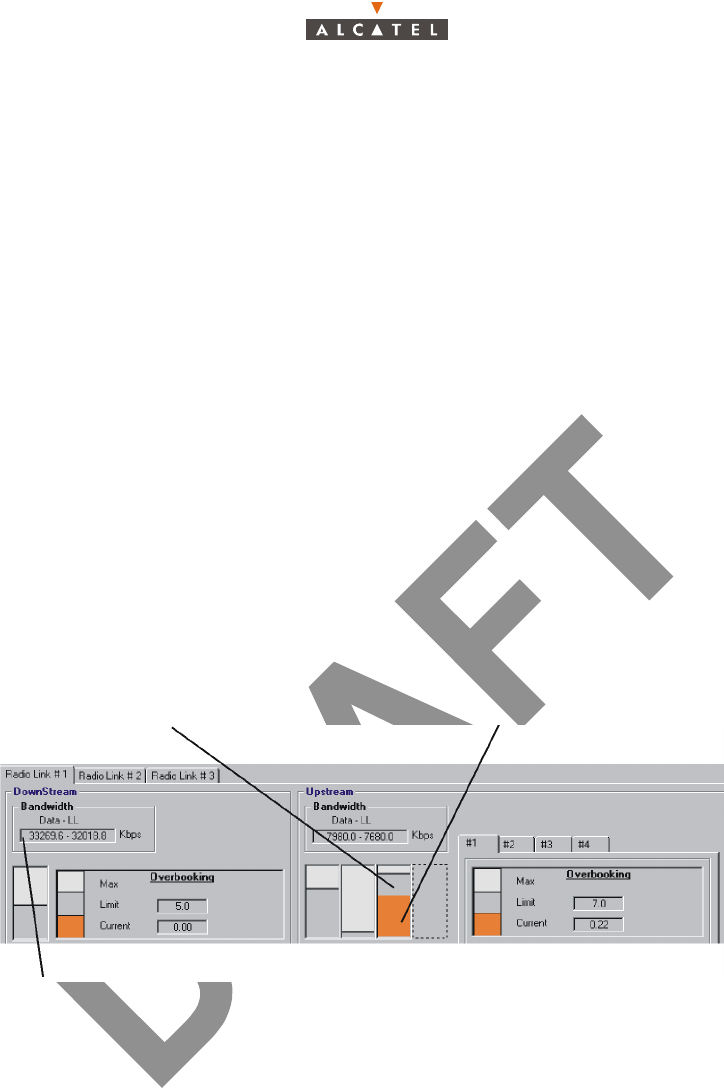
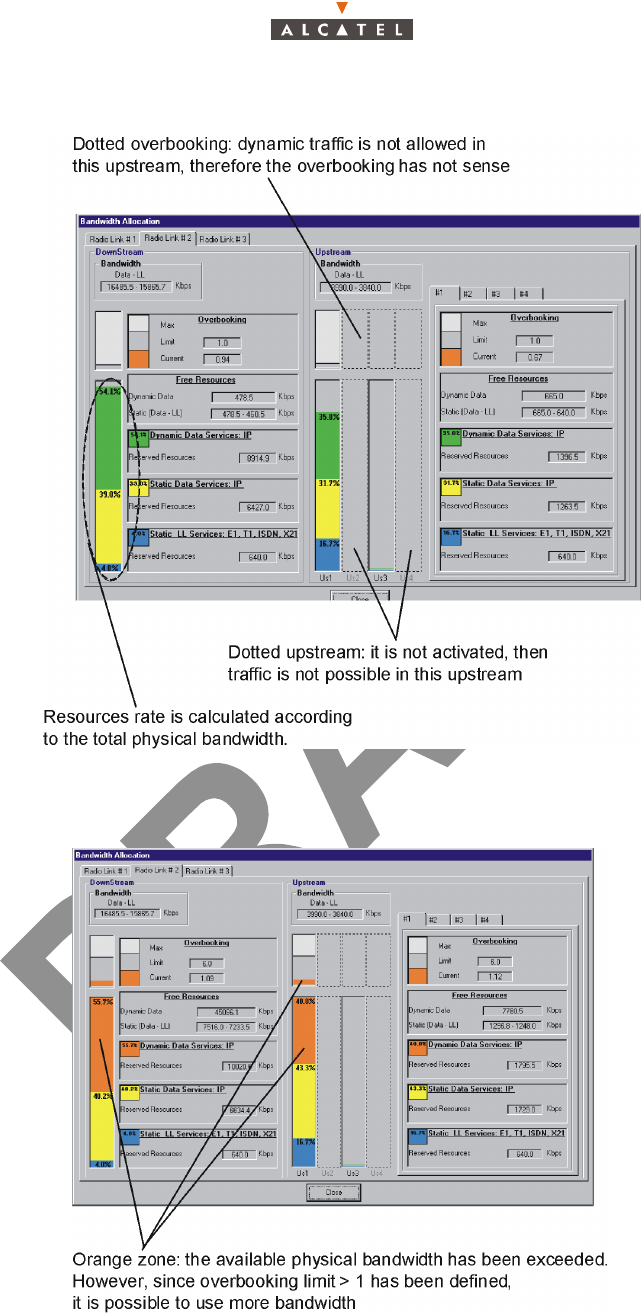
The static zone represents the portion of the bandwith allocated to static services, with display of both
bit rate types: leased line (LL) and static IP (ATM) bit rate.
The dynamic zone represents the portion of the bandwidth allocated to the dynamic services: the
dynamic IP services.
Note : The available bit rate depends on the traffic type allocated: leased lines, static or dynamic IP.
Note : The dynamic zone is the zone remaining available, corresponding to the total bandwidth minus
the static zone; the static zone corresponds to the static IP service bit rate.
The overbooking factor limit (OFL) is a value defined by the operator (until 10 as maximum) and can
be modified at any time depending on radio resource requirements: if the operator wishes to offer more
services than the system can physically provide simultaneously on the available bandwidth, he defines
this value which will represent a risk level of dynamic degraded service.
Note : When OFL = 1 (default value), it corresponds to the system physical limit assigned to the dyna-
mic zone (= width of bandwidth).
If OFL = 2, double the dynamic zone physical bandwidth can be used for dynamic IP services.
IP traffic is measured according to «ATM» Rate = 66.5 Kbps,
whereas LL is measured with rate = 64 Kbps
Overbooking limit
Current overbooking (orange zone): < 1
means that there is no overbooking
172/346 Issue 01 - April 2001 - Draft 04 3CC12426AAAA TQ BJA 01
234
When the dynamic traffic (green color) is overbooked, green is changed to orange (see next screen).

3CC12426AAAA TQ BJA 01 Issue 01 - April 2001 - Draft 04 173/346
234
4.8 – NE management
As soon as the 7390LT is connected to the NE, it keeps a log of all the events taking place between the
Agent (NE) and the Manager (7390 LT) for the corresponding part of the supervised NE. This supervision
tool is mainly used as a log file to be used for maintenance purpose (see Chapter 6 – Operation and
maintenance).
4.8.1 – NE Supervision
To Start or Stop the supervision of the NE:
NE supervised means that the agent sends to the manager all the events related to the network element.
When the NE is supervised, the "Start NE Supervision" button is disabled.
When the NE is not supervised, the "Stop NE Supervision" button is disabled. The manager has lost
its synchronization with the agent. BS and NT are not supervised and events are not received.
Starting the NE supervision implies a total NE upload, because it is the only way to align again the LT
and the MIB agent.
To Allow or Inhibit the alarms of the NE:
NE Alarms allowed means that all the alarms present in the NE equipment will be reported to the LT
manager.
When the NE alarms are allowed, the "Allow Alarms NE" button is disabled.
When the NE alarms are inhibited, the "Inhibit Alarms NE" button is disabled. Moreover, neither alarm
window is present in the 7390LT nor alarm code colour is showed in the main window.
Click on the icon to start the supervision of the NE.
Click on the icon to stop the supervision of the NE.
Or else, open the NE Supervision pull-down menu and choose the item
Start NE Supervision or Stop NE Supervision.
Click on the icon to allow receiving the alarms of the NE.
Click on the icon to inhibit receiving the alarms of the NE.
Or else, open the NE Supervision pull-down menu and choose the item
Allow Alarms NE or Inhibit Alarms NE.
174/346 Issue 01 - April 2001 - Draft 04 3CC12426AAAA TQ BJA 01
234
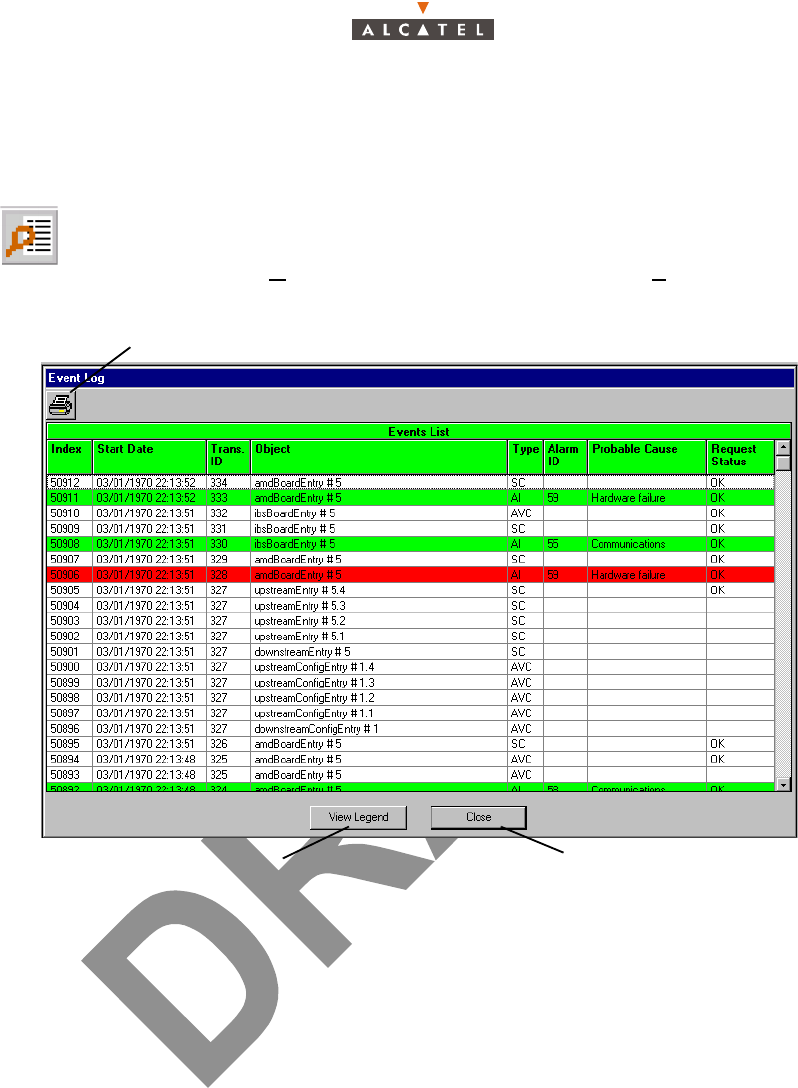
4.8.2 – Events log
Note: the events log (in read only) is presented in reverse chronological order. The most recent event
is at the top of the list. The circular list can contain up to 5000 events.
Index: this is the event number: an incremental cyclic counter is activated each time an event takes
place.
Start date: time-stamping of the event (format: day/month/year, hour/minute/second).
Trans ID: transaction number allowing the action which occurred on the system and the different events
resulting from it, to be linked; in the example above, the action corresponding to event number 294
corresponds to 5 events (see groups ID Trans. 165).
Object: indicates the part of the system affected by the event (format: designation#equipment ID
followed by port number).
Type: abbreviation (which key is permanently displayed at the bottom of the window) of the event type:
alarm, deletion, creation, etc.
Alarm ID (if the event type is an alarm): alarm identifier corresponding to its coming out number
(chronological).
The line is displayed in the color related to the alarm: when the alarm ends, the same line will be
displayed (with an incrementing Index) in green to symbolize the end of alarm.
Probable cause (field associated with the alarm): description of the cause of the problem from the ASAP
(giving the severity for a given probable cause).
Request status: request status in the form of abbreviation whose legend is displayed at the bottom of
the screen. This is to identify the way a group of events has been terminated (same lD Trans.); the
transaction status of the last event of a same group is therefore ok if the action succeeded.
Note: ends of alarm are displayed in green.
To access the events log:
– click on the button shown here (on the 7390 LT main screen),
– or, open the Management pull-down menu and choose View Event Log.
Click here to print the events log on the default printer (see § 4.1.4 – Printing)
Click here to quit the events list
Key of the differents event types
(see § 4.8.4 – Event log legend)
3CC12426AAAA TQ BJA 01 Issue 01 - April 2001 - Draft 04 175/346
234
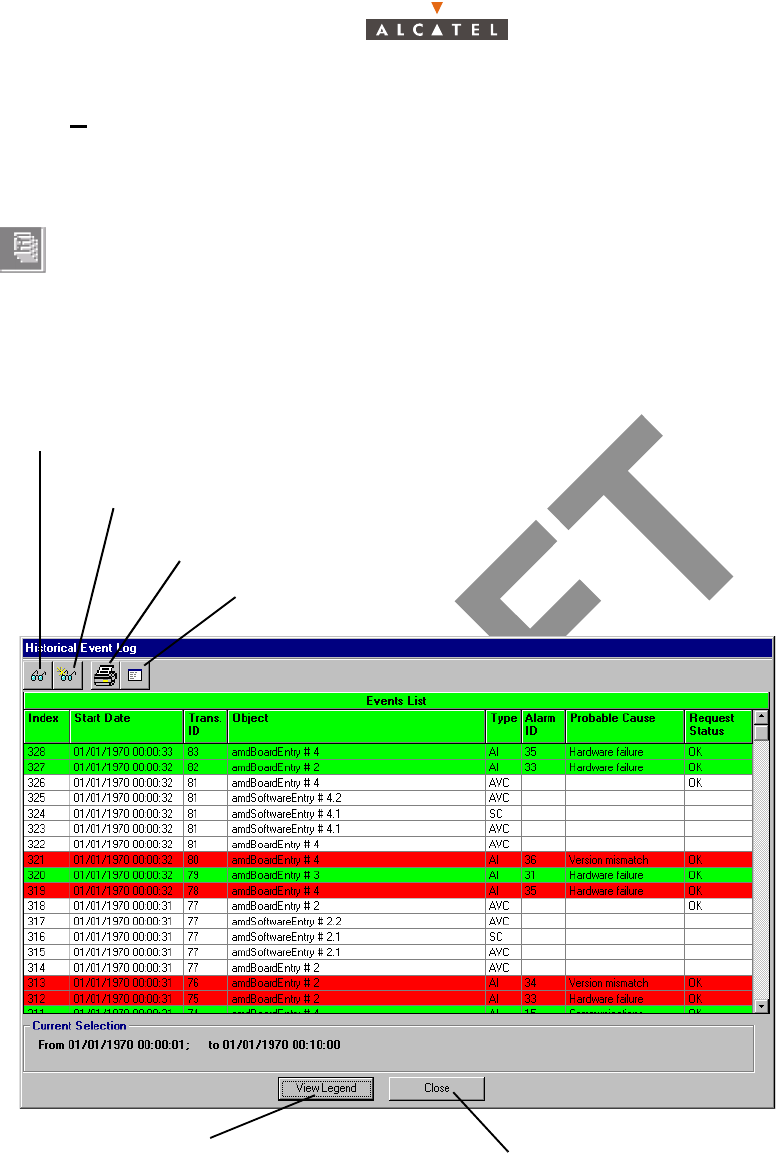
4.8.3 – Historical Event log
This function allows all or certain events, listed in the events log since the last connection, to be retrieved.
4.8.3.1 – Accessing the historical event log
The screen below is displayed:
To access the historical event log:
– click on the button shown here (in the 7390 LT main screen),
– or, open the Management pull-down menu and select the Historical Event Display
section.
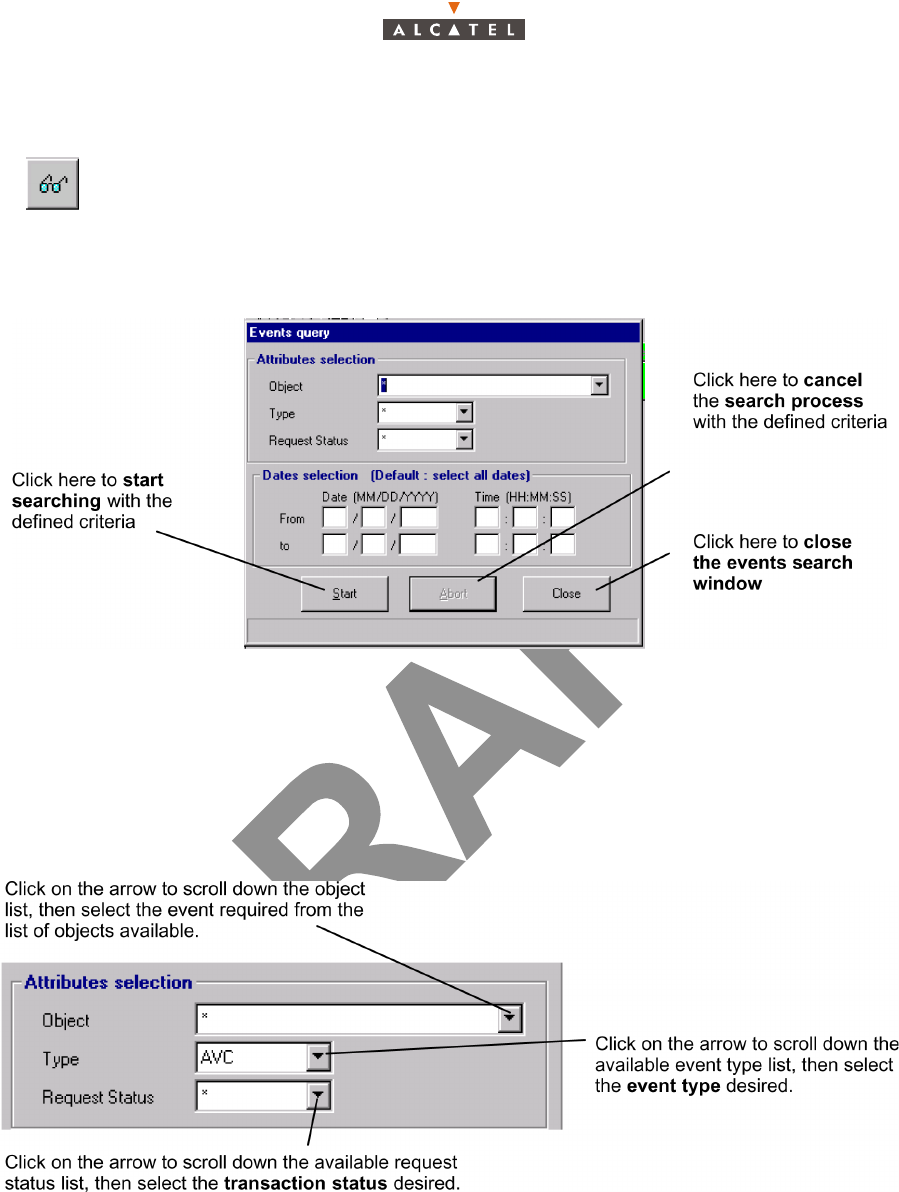
Click here to access search of items to be retrieved from the historical event log (cf:§ 4.8.3.2 –)
Click here to refresh the historical display of the event log according to the
selection criteria displayed at the bottom of the screen
Click here to print the event list on the default printer (cf: § 4.1.4 –)
Key of the different possible
types of event (cf: § 4.8.4 – Click here to quit the Historical Event Log screen
Click here to save the historical event log file (cf: § 4.8.3.3 –
176/346 Issue 01 - April 2001 - Draft 04 3CC12426AAAA TQ BJA 01
234
4.8.3.2 – Searching for items in the historical event log
The following screen is displayed:
Note: The search process can take several minutes to start after launch depending on the number of
events listed.
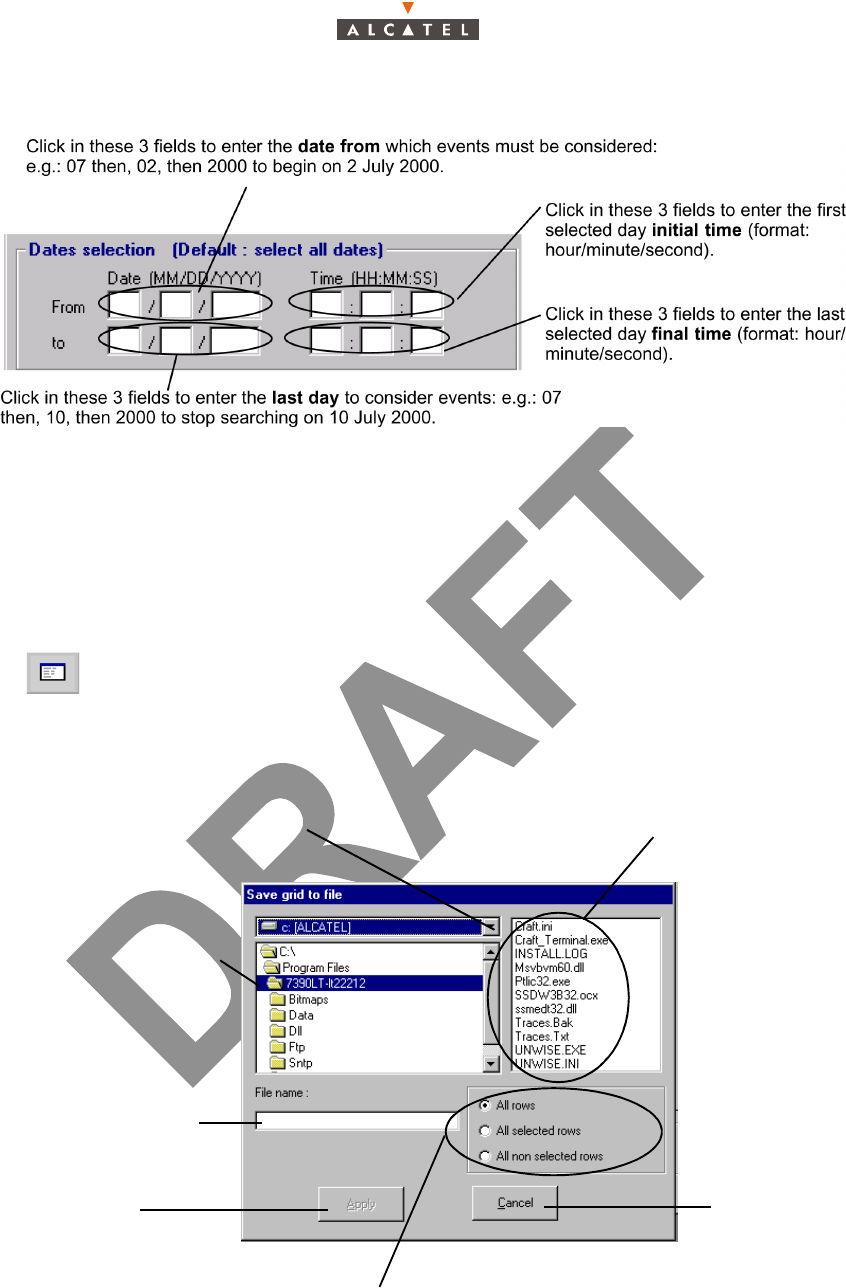
Two types of search criteria are available to retrieve the events in question from the entire historical
event log since the last connection:
– event attributes: object, event type and transaction status linked with the event.
Note: The selection of a star in the "attribute selection" fields allows all the items of the list for the sec-
tion concerned to be taken into account (no defined criteria).
To access the events search, click on the button shown here (in the Historical event log
screen).
3CC12426AAAA TQ BJA 01 Issue 01 - April 2001 - Draft 04 177/346
234
–Time periods.
Note: By default, no date is selected: all dates are taken into account.
The tabulation key also allows you to move from one field to another.
Note: The chosen selection criteria are permanently displayed at the bottom of the Historical Event
Log screen.
4.8.3.3 – Historical event log item backup
The following screen is displayed:
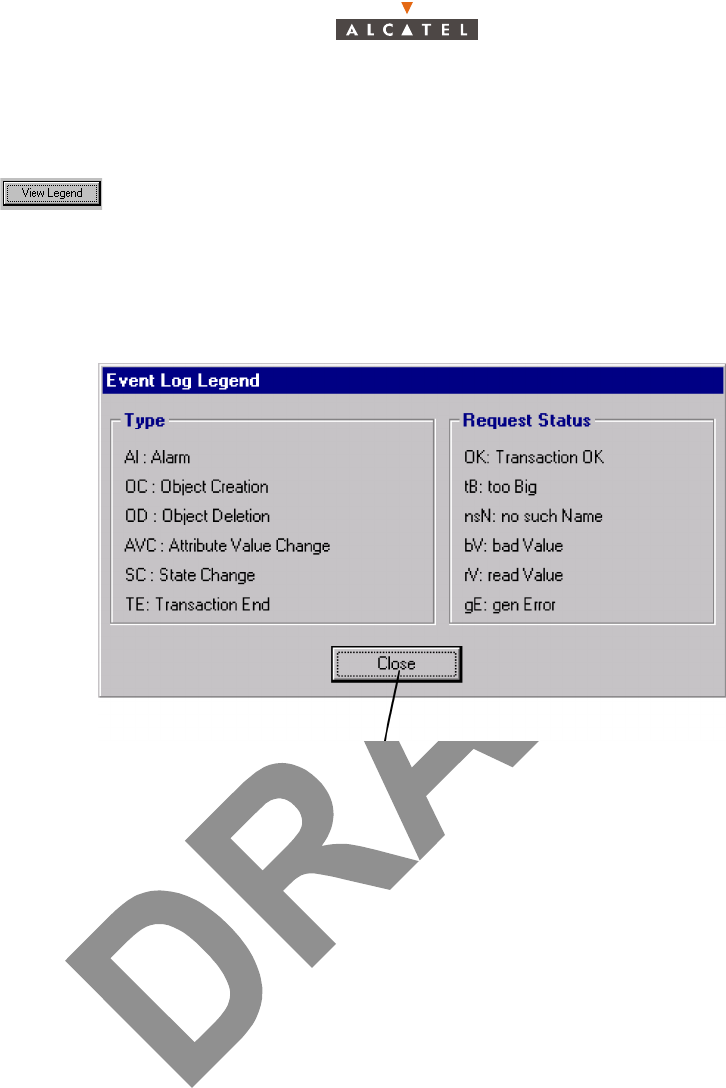
To perform backup of events corresponding to the defined search criteria (see
§ 4.8.3.2 – Searching for items in the historical event log), click on the button
shown here (in the Historical Event Log screen).
1- Click on the arrow to select the disk
on which the event file is to be saved
2- Select the directory where
the event file is to be saved
Display of file names already present
in the selected directory
3- Click in this field to enter
the backup file name
Click here to start
the back up
Click here to
cancel the
backup
Check one of the 3 sections to define the backup content with regard to the history
displayed in the Historical Event Log screen (cf: § 4.8.3.1 –). This filter is added
to the previously defined criteria (cf: § 4.8.3.2 –)
178/346 Issue 01 - April 2001 - Draft 04 3CC12426AAAA TQ BJA 01
234
4.8.4 – Event log legend
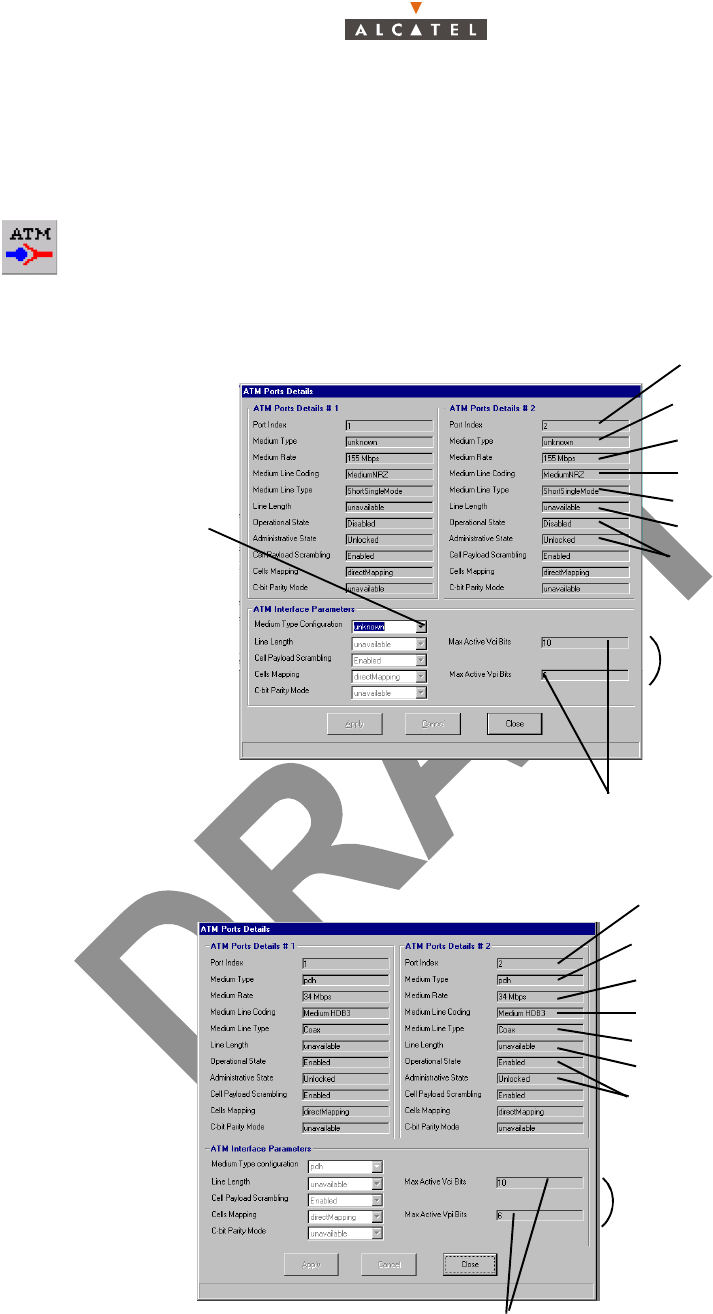
The following legend is displayed:
To access the legend of events listed in the Event Log screen, click on the
button shown here (at the bottom of the Event Log and Historical Event Log
screens).
Click here to quit the Event Log Legend screen
3CC12426AAAA TQ BJA 01 Issue 01 - April 2001 - Draft 04 179/346
234
4.9 – Interface parameters
4.9.1 – ATM
For the 155 Mbit/s version:
For the 34 MBit/s version:
Note: For the 34Mbit/s version, the Medium Type configuration cannot be modified.
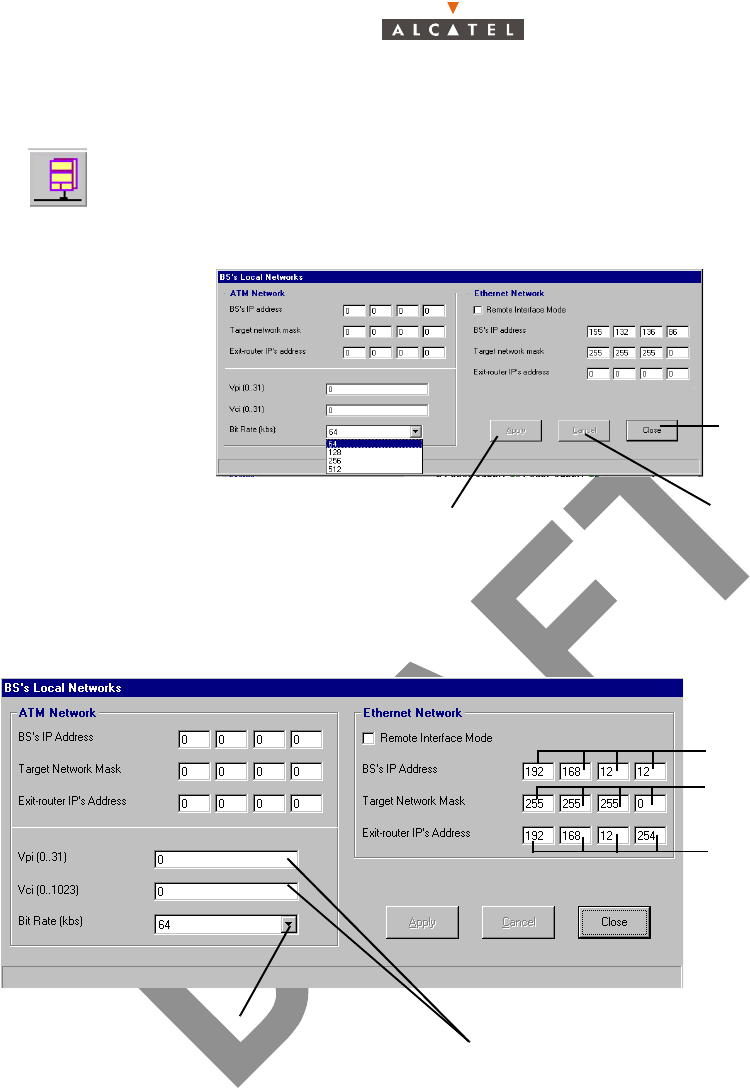
To access the parameters of the ATM link, click on the button shown here (in the BS
details screen toolbar).
The following screen is displayed:
To make the ATM
operational, click on the
arrow to scroll down the list
and select the medium type
used for the ATM link: sdh or
sonet (by default unknown)
The numbers of bytes respectivelly allow the Vci and the Vpi
to be encoded (Vci bytes fixed to 10 and vpi bytes fixed to 6)
ATM port number
ATM transport
medium type
Line coding
Line type
ATM port states
ATM cell
coordinates
medium bit rate
unused parameter
ATM
por
t
num
b
er
ATM transport
medium type
Line coding
Line type
ATM port states
ATM cell coordinates
medium bit rate
unused parameter
The numbers of bytes respectivelly allow the Vci and the Vpi
to be encoded (Vci bytes fixed to 10 and vpi bytes fixed to 6)
180/346 Issue 01 - April 2001 - Draft 04 3CC12426AAAA TQ BJA 01
234
4.9.2 – IP addresses
Note: To configure IP addressing on all the interfaces for connection to the manager (OS or LT), the
BS has two physical interfaces to choose from: the ATM port (fiber optic) and Ethernet port
(10bT: J102).
Note: The router is the first equipment to be connected to the BS, at the external network side.
Note: The encapsulation type for the management link is IP over ATM. The IP cross-connection ser-
vice uses a different type of encapsulation.
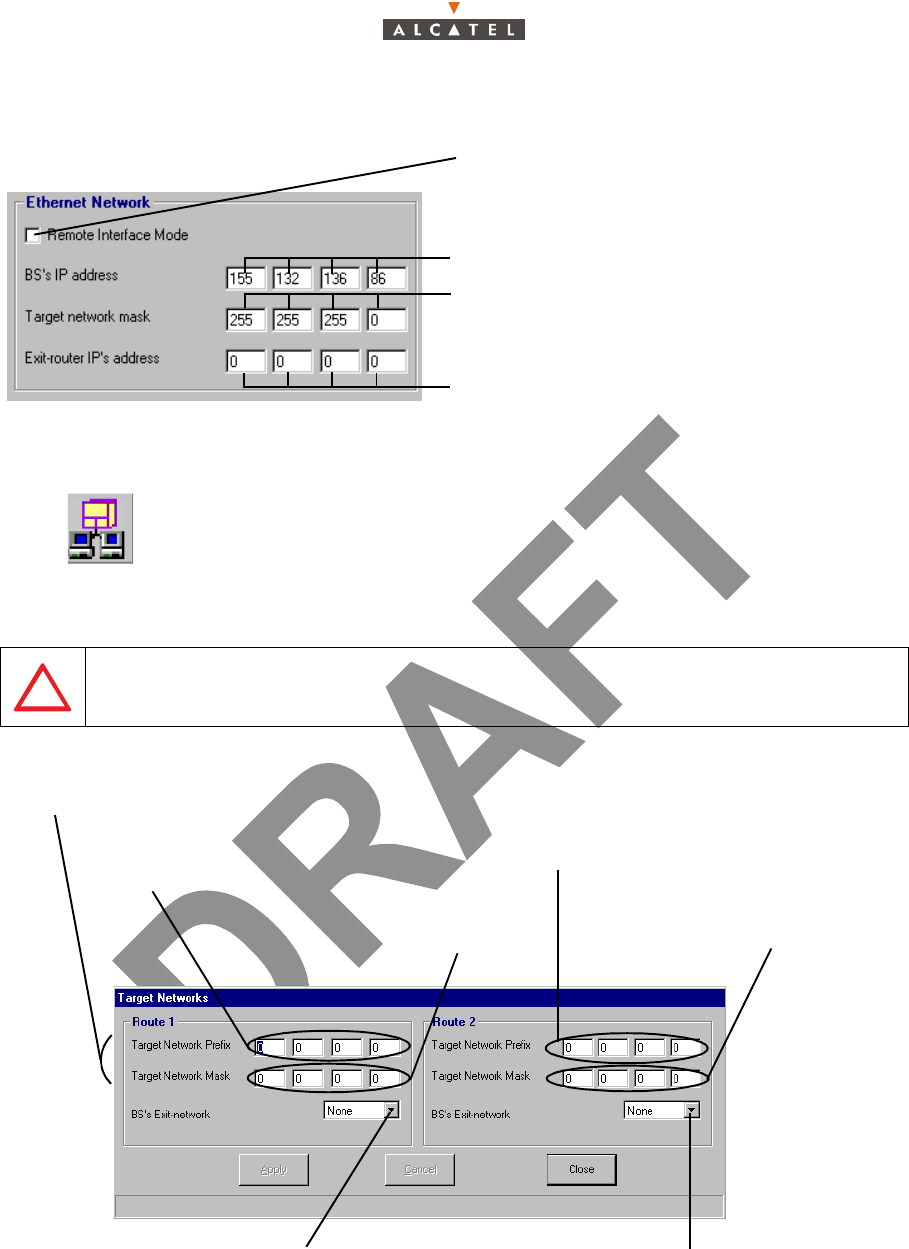
To access the parameters of the IP addresses of the BS, click on the button shown here
(in the BS Details screen toolbar).
The following configuration screen is displayed, then its two main parts detailed below:
Click here to cancel
the modifications
Click here to return
to the BS details
screen
Click here to apply
the modifications
Click here to enter the 4 bytes
of the IP address of the BS at
the ATM interface
Click here to enter the 4
bytes of the BS Interface IP
Mask at the ATM interface
Click here to enter the 4 bytes o
f
the address of the router of the
BS at the ATM interface
Click here to enter the VCL coordinates (supplied by the provider)
for the management link between a manager and the BS
The Vpi and Vci values must be respectively selected in
ranges 0-30 and 0-1023 (except 1 to 4 values for Vpi)
Click here to select the VCL Bit Rate (64, 128,256,
512 kbps)
3CC12426AAAA TQ BJA 01 Issue 01 - April 2001 - Draft 04 181/346
234
4.9.3 – Network addresses
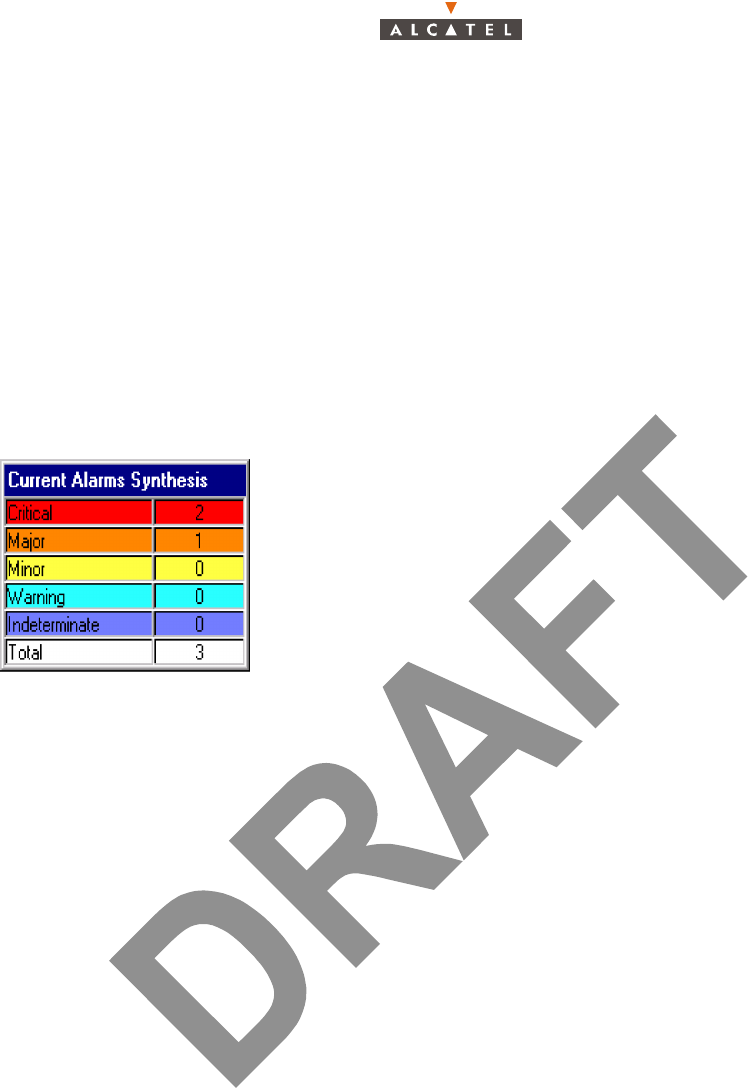
Note: In order to allow modifications in this Network address screen the "Remote Interface Mode" box
of the IP addresses screen (see § 4.9.2 – IP addresses) must not be selected.
To access the settings for configuring the interfaces, click on the button in the
BS Details screen toolbar, shown here.
This involves informing the system of the interfaces used by the managers.
The manager is the network supervision software (7390 LT or NSM).
FOR REMOTE LT: INTERFACE ROUTE MUST BE DEFINED IN "IP ADDRESS" DIALOG
BOX (§ 4.9.2 –) BEFORE ENTERING THE MANAGER IP ADDRESS INSIDE THE
"NETWORK ADDRESS" WINDOW
Click here if the system is in WAN network type to
lock the IP address modification
Click here to enter the 4 bytes of the BS interface
IP mask at the Ethernet Interface
Click here to enter the 4 bytes of the IP address of
the router of the BS at the Ethernet Interface
Click here to enter the 4 bytes of the IP
address of the BS at the Ethernet Interface
Both addresses together define the subnetwork the
manager connected to route 1 belongs to
Target Network
mask used on route
IP address of manager
connected to route 1
Click here to scroll down the list and select the
type of interface used on the BS to connect
the local manager (ETH) (no by default)
Click here to scroll down the list and select the
type of interface used on the BS to connect
the remote manager (ATM)
IP address of manager
connected to route 2
Target Net w o r k ma s k
used on route 2
182/346 Issue 01 - April 2001 - Draft 04 3CC12426AAAA TQ BJA 01
234
4.10– Environment and equipment incident management
4.10.1– Alarms
Alarms allow incidents occuring on the equipment managed by the 7390 LT to be reported to the
supervisor.
For complete alarm management and, in particular, the corrective actions to be performed, refer to § 6.4
– Corrective maintenance of this manual.
4.10.1.1– Current alarms synthesis
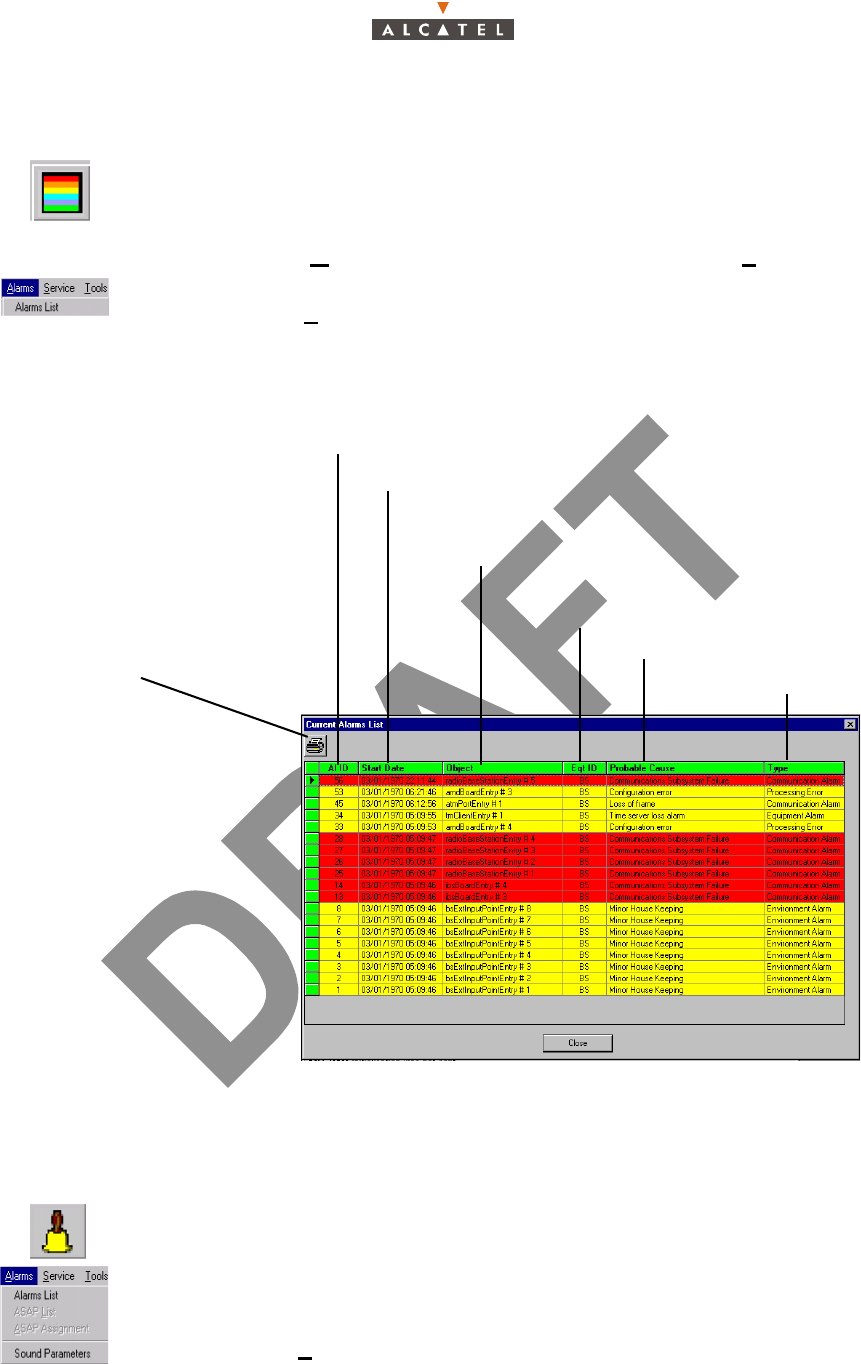
The current alarms synthesis window is opened automatically for the first connection and remains active
as long as the connection to the NE is supervised.
4.10.1.2– Alarms color code
A color code has been adopted to symbolize the five critical levels:
–red: critical alarm;
–orange: major alarm;
–yellow: minor alarm;
–light blue: warning alarm;
–mauve: indeterminate alarm.
Note: Green is used to symbolize no alarm or end of alarm in several screens: BS representation,
Alarms list and Event log.
Note: There is one color per line in accordance with the ASAP data table (see § 4.10.2 – Alarms cor-
respondence tables (ASAP)).
This window offers a view of the number of active alarms in the system
in terms of critical levels. There are five levels: Critical / Major / Minor
/ Warning / Indeterminate.
Note: the highest level of criticality is displayed at the bottom right of the
general status bar (see § 4.2.2 – Accessing and running 7390 LT).
The final line, "Total", totalizes the number of active alarms.
By double-clicking on one of the levels, the list of same level alarms is
displayed; by double-clicking on the last line, the list of all the alarms is
displayed (see § 4.10.1.3 – Alarms list).
3CC12426AAAA TQ BJA 01 Issue 01 - April 2001 - Draft 04 183/346
234
4.10.1.3– Alarms list
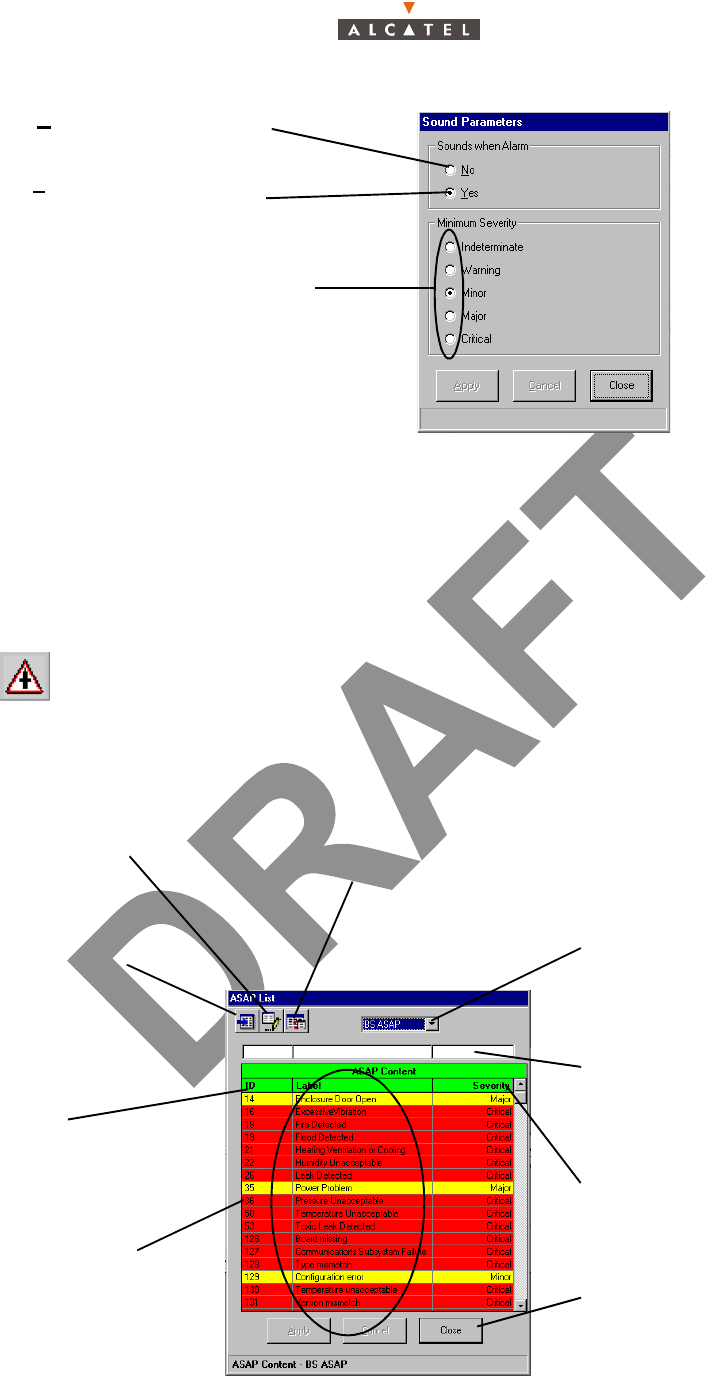
4.10.1.4– Sound adjustment of alarms
It is possible to associate or disassociate the emission of a sound warning for alarms corresponding to
a certain critical level:
To display the alarms list at any time:
– click on the button shown here (in the 7390 LTmain screen),
– or, open the Windows pull-down menu and choose the line Current alarms
synthesis,
– or, open the Alarms pull-down menu and choose the item Alarms List.
To access the alarm sound parameters:
– click on the button shown here (on the 7390 LT main screen),
– or, open the Alarms pull-down menu and choose the item Sound Parameters.
Alarm number: number increases
incrementally in order of appearance
Time-stamping of the alarm (format: day /
month/year/hours/minutes/seconds)
The part of the system affected by
the alarm (format: name and number)
Probable cause of the alarm
Number of the equipment to
which the alarm is assigned
Alarm type
Click here to print the list of
alarms on the default printer
(cf: § 4.1.4 –)
184/346 Issue 01 - April 2001 - Draft 04 3CC12426AAAA TQ BJA 01
234
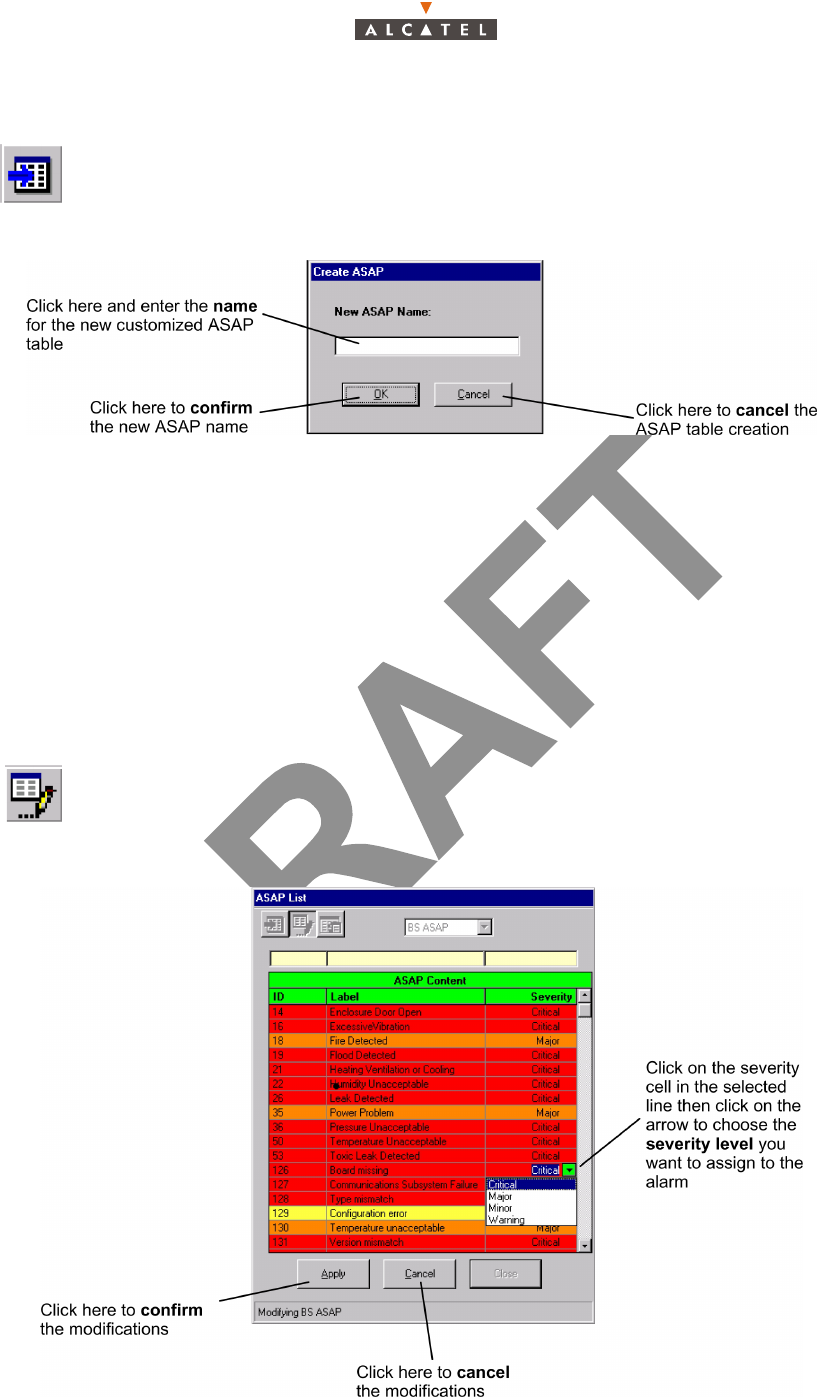
4.10.2– Alarms correspondence tables (ASAP)
The correspondence between the alarms and the severity levels is managed by an ASAP table. There
are two types of correspondence tables:
– one table for alarms relating to the BS ("BS ASAP"),
– one or several tables for alarms of the NTs ("NT Default" and customized tables).
To view the correspondence tables:
- click on the button shown here, in the 7390 LT main screen,
or
- open the Alarms pull-down menu and choose the item Alarm list,
The following screen appears:
Check No to deactivate the sounds
associated with the alarms
Check Yes to activate the sounds
associated with the alarms
Choose the critical level starting from which
the sound warning should be emitted
Click here to modify
an ASAP table
Quick search possibility
(cf: § 4.1.2.4 – )
Click here to create
a customized NT
ASAP table
Click on the arrow to select
the ASAP table to be
displayed: «BS ASAP», NT
Default or the table created
by the operator
ID number
of alarms
Click here to delete
an ASAP table
Alarm severity assigned to
each probable alarm cause
Click here to quit the
correspondence tables
display window
A
larm designation
c
orresponding to the
«
Probable cause»
c
olumn of the alarms list
(
cf:§ 4.10.1.3 –) and the
l
ist of events (cf:§ 4.8 –)
3CC12426AAAA TQ BJA 01 Issue 01 - April 2001 - Draft 04 185/346
234
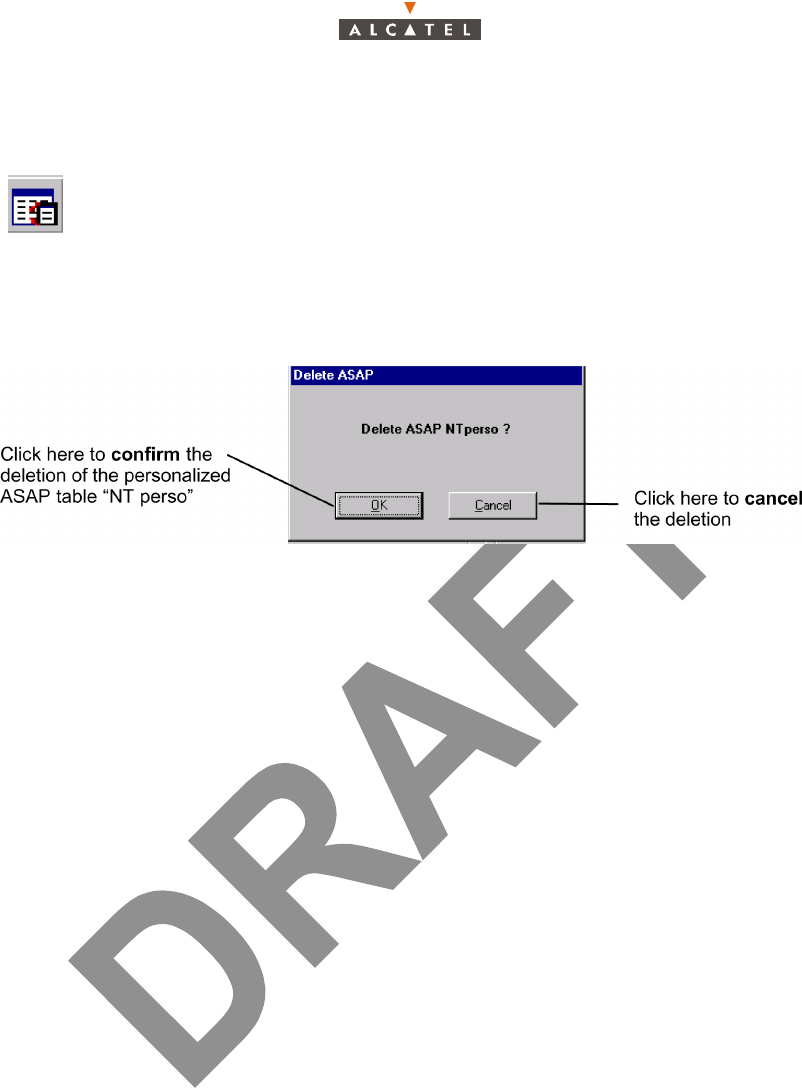
4.10.2.1– Creation of ASAP table for NT
By default, the new table has the same characteristics as the "NT Default" table. To modify the severity
levels, (see § 4.10.2.2 –4.10.2.2 – Modification of alarm severity profile).
Note: You can only create ASAP tables for alarms of the NTs. The maximum number of ASAP NT
tables is 10 including "ASAP NT Default".
Note: You can assign a customized ASAP table to NTs (see § 4.6.2 – Declaring a new NT or § 4.6.3 –
NT Details)
Note: The name of the new asap table must be shorter than 36 characters
4.10.2.2– Modification of alarm severity profile
To create a personalized ASAP table for alarms of the NTs, click on the button shown
here (on the ASAP List screen).
The following screen appears:
To modify the severity levels of a customized ASAP table, click on the button shown
here (on the ASAP List screen).
The following screen appears:
186/346 Issue 01 - April 2001 - Draft 04 3CC12426AAAA TQ BJA 01
234
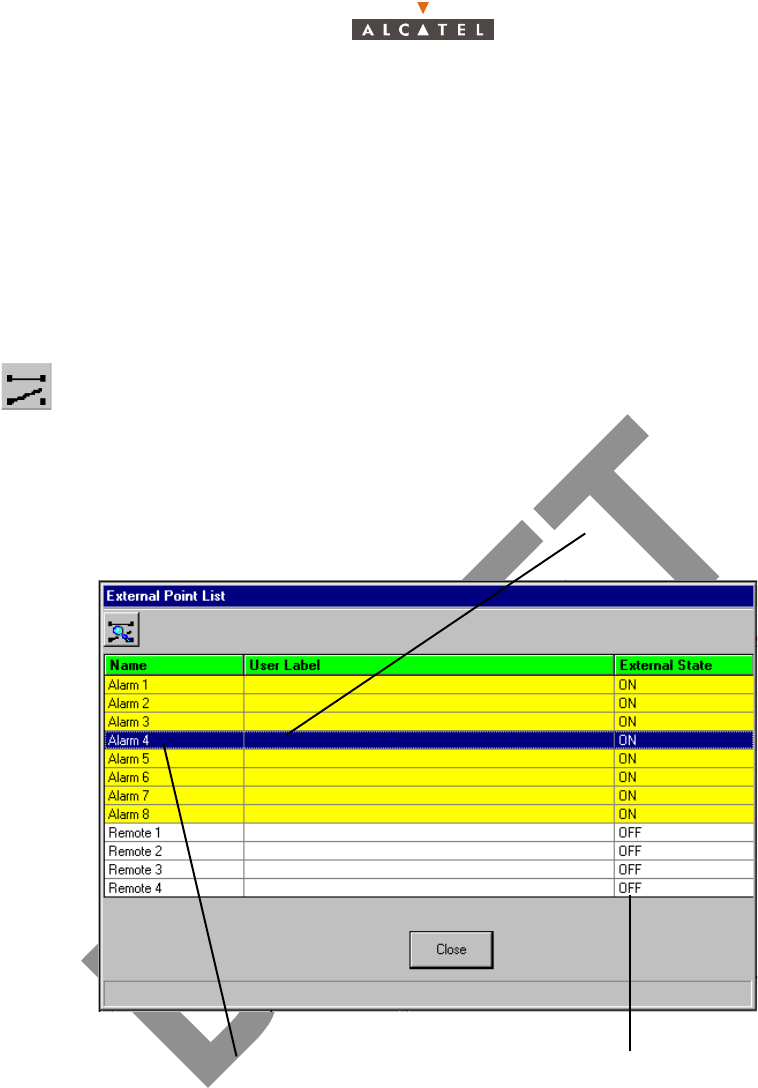
4.10.2.3– Deletion of ASAP table for NT
The following screen appears:
Note: You can only delete customized ASAP tables (you cannot delete the "BS ASAP" or the "ASAP
NT default" tables).
Note: You cannot delete a table assigned to at least one NT. You have to assign another table to this
NT before (see § 4.6.3 – NT Details).
To delete a customized ASAP table, click on the button shown here (on the ASAP
List screen).
3CC12426AAAA TQ BJA 01 Issue 01 - April 2001 - Draft 04 187/346
234
4.10.3– Alarms and remotes
In addition to alarms reporting problems for the system and occuring on the equipment (see § 4.10.1 –
Alarms), two configurable types of device are available to the operator for notification and remote
solving of problems linked to the cabinet environment (DBS).
These devices are: sensors (fire detection, etc.) and remote controls (extinguisher, etc.) present in the
vicinity of the cabinet.
Sensors are used for problem detection (see alarms § 4.10.1 – Alarms), and remote controls for
problem correction.
– alarms: see § 4.10.3.1 – Alarm characteristics
– remotes: see § 4.10.3.2 – Remote characteristics
Note: Default external state is ON for alarms and OFF for remotes.
To access the alarms (sensors) and remotes list, click on the button shown here (BS
Details screen toolbar) (see § 4.5 – Base Station Supervision).
Select a line and click on this button (remote details)
or double click on a line to display the details of the
selected equipment.
Alarms and remotes
external state
Designation of alarms
and remotes
188/346 Issue 01 - April 2001 - Draft 04 3CC12426AAAA TQ BJA 01
234
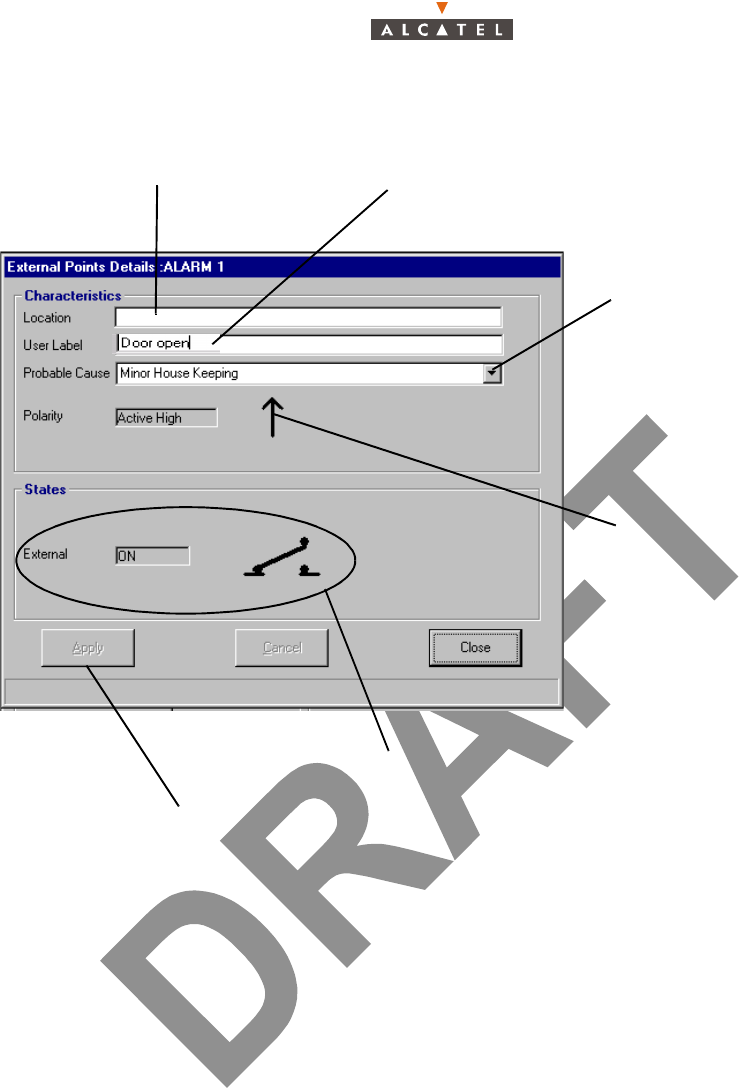
4.10.3.1– Alarm characteristics
Note: The operator must choose the probable cause from the list of alarms relevant to the BS.
This list includes three types of alarm:
• X721 standard environment alarms,
• A7390 system specific alarms,
• environment generic alarms:
• Environment: critical,
• Environment: urgent,
• Environment: not urgent.
The operator will therefore choose from the first group of alarms and, if necessary, from the last
group of alarms.
Click here to modify the
alarm designation
Click here to indicate
alarm location
Click here to apply changes to sensor characteristics
Alarm external state reminder: ON /OFF
Click here to choose the
probable cause which will
be affected to this alarm
when its state is set on ON
(see External state section):
(see Note below)
Sensor polarity: active if the
signal front is hight or low
(not subject to change from
the 7390LT)
3CC12426AAAA TQ BJA 01 Issue 01 - April 2001 - Draft 04 189/346
234
4.10.3.2– Remote characteristics
4.11– Performance
4.11.1– Radio Performance
The Radio Performance feature gives the quality of the internal radio transport.
To access the radio performance:
– click on the button shown here (in the main screen toolbar),
– or else, open the Performance pull-down-menu and choose the first item:
Radio Performance
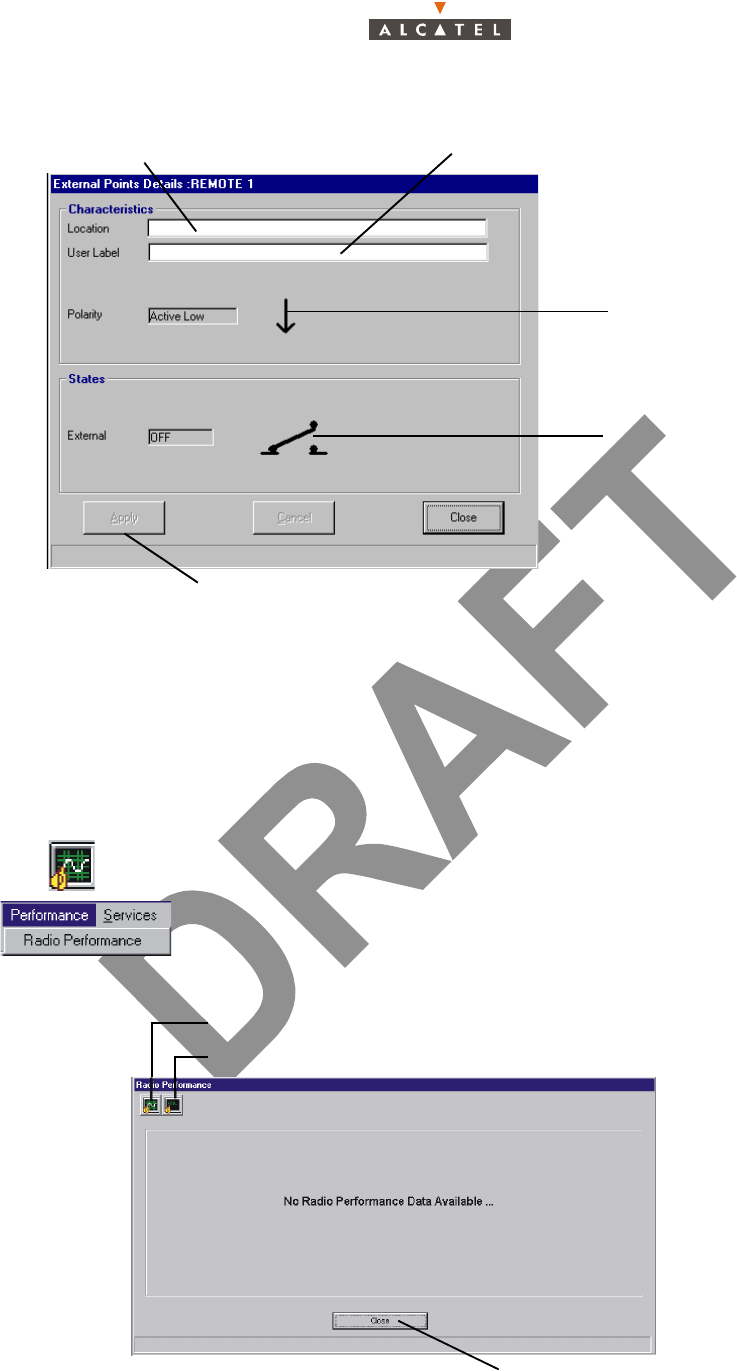
Click here to modify the remote designationClick here to indicate remote location
Click here to apply changes to remote characteristics
Sensor polarity: active if the
signal front is hight or low
(not subject to change from
the 7390LT)
Remote control external state
reminder: ON /OFF can be
changed in the External
Points List screen
(cf: § 4.10.3 – )
Click here to monitor the NT and Radio Link
Click here to stop the monitoring over the NT and Radio Link
Click here to return to the BS Details screen
190/346 Issue 01 - April 2001 - Draft 04 3CC12426AAAA TQ BJA 01
234
4.11.1.1– Start Radio Performance
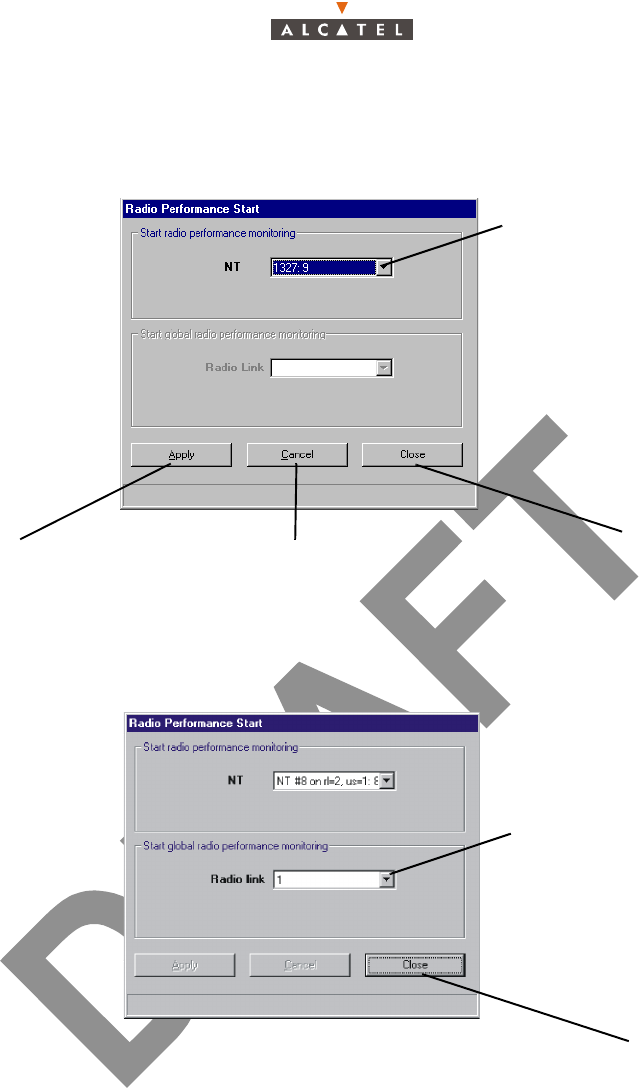
Start Radio Performance for a NT
Once you have applied monitoring on one NT, you can close the screen.
Start radio performance for a radio link
Once you have applied monitoring on one radio link, you can close the screen.
Click here to scroll down
the list and select the NT
Click here to apply
the modifications
Click here to cancel
the selections
Click here to quit the Radio
Performance Start screen
Click here to quit the Radio
Performance Start screen
Click here to scroll down the
list and select the Radio Link
3CC12426AAAA TQ BJA 01 Issue 01 - April 2001 - Draft 04 191/346
234
4.11.1.2– Monitoring the Radio Performances
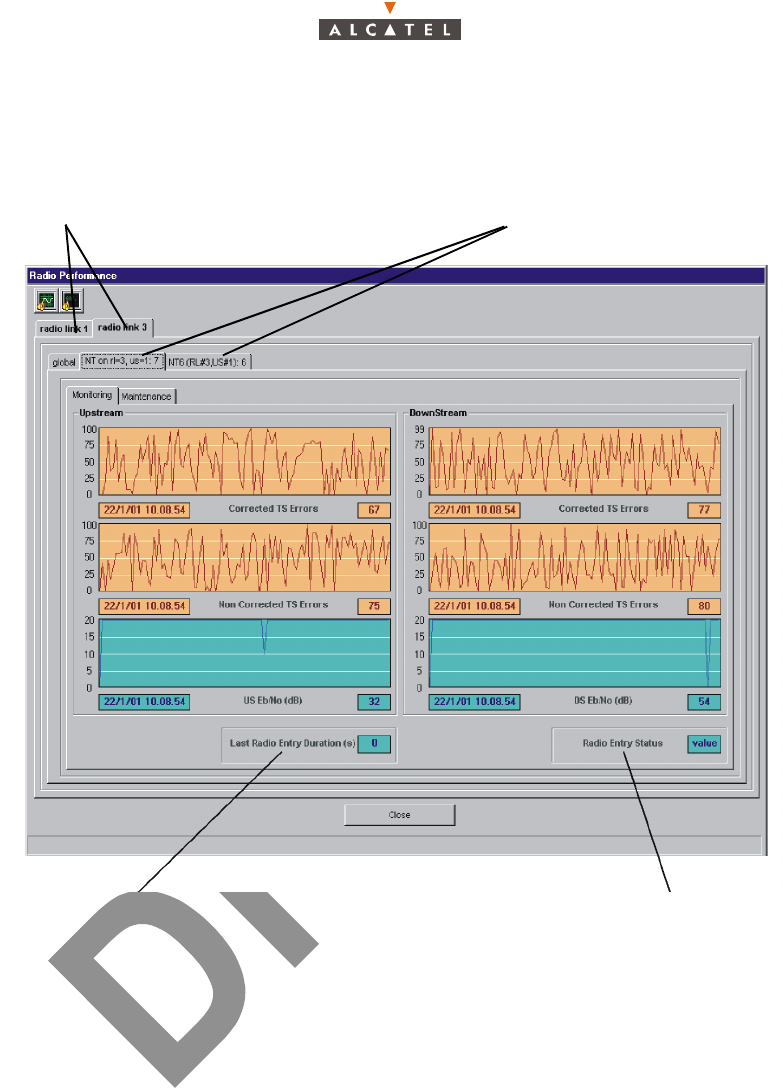
Monitoring the Radio Performance for a NT
This screen is read only.
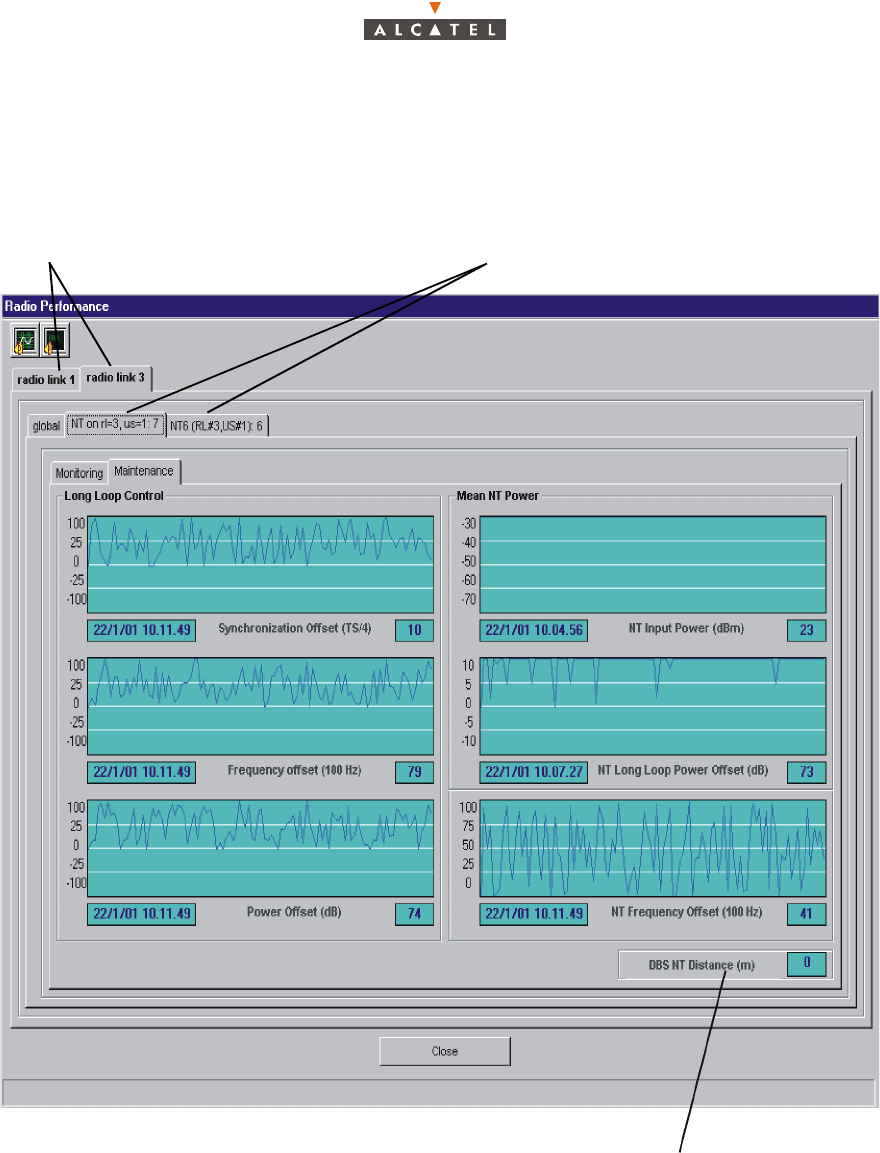
The Radio Performance counters are sent by the agent to the LT each 5 seconds. When the data are
not received, the counter are colored in white.
When the mouse is positioned over, the graphical boxes indicate the hour and value for this time. In
any case the edit-boxes indicate the hour and value of the last data received.
The graphic scales are dynamic (they change depending on the coming values), but they are symme-
trical (they always show the same value, positive or negative).
Last radio entry duration is the number of
seconds the NT takes to become operational
Radio Entry Status can have two values:
Tracking (when the NT is active and enabled)
or Acquisition (when the NT is out of service)
Click on these tabs to display
the chosen Radio Link
Click on these tabs to
display the chosen NT
192/346 Issue 01 - April 2001 - Draft 04 3CC12426AAAA TQ BJA 01
234
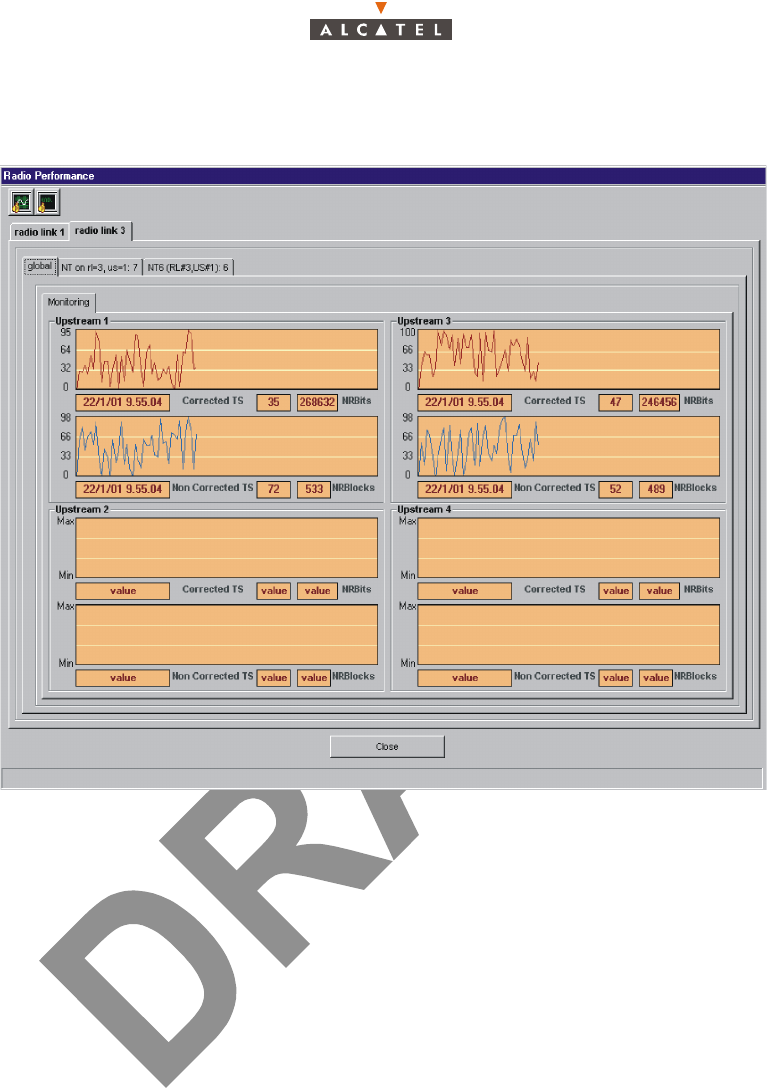
DBS distance NT indicates the distance
between the DBS and the NT, in meters
Click on these tabs to display
the chosen Radio Link
Click on these tabs to
display the chosen NT
3CC12426AAAA TQ BJA 01 Issue 01 - April 2001 - Draft 04 193/346
234
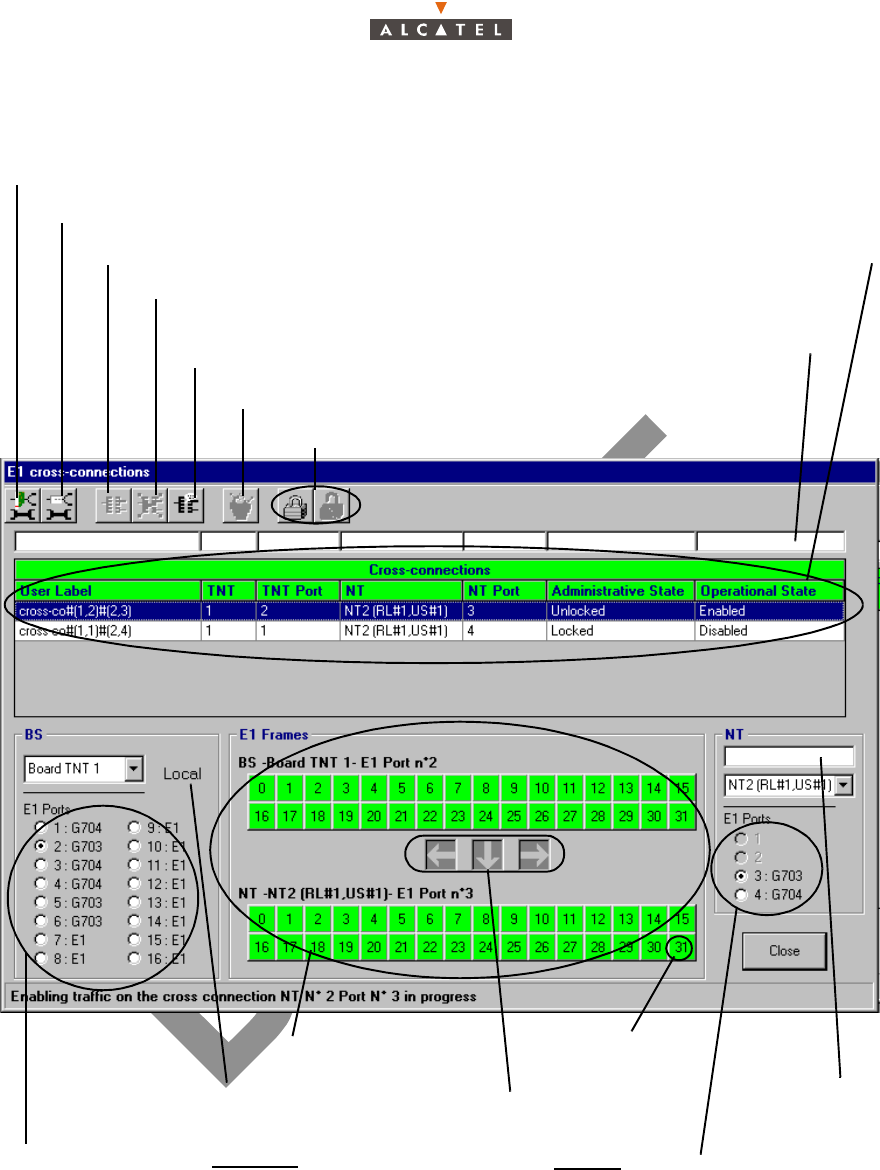
Monitoring the Radio Performance for a Radio Link
This screen is read only.

194/346 Issue 01 - April 2001 - Draft 04 3CC12426AAAA TQ BJA 01
234
4.12– Client services: leased lines
There are three types of service: Leased Lines (LL), IP lines (see § 4.13 – Client services: IP links) and
Circuit Emulation Services (CES): see § 4.12.6 – Circuit emulation (CES).
For service traffic supervision, refer to § 4.7 – Radio supervision and parameters. For
synchronization, refer to § 4.5.4 – Clock synchronization parameters.
The leased lines cross-connections managed by the 7390 LT are declined in 4 types: E1 traffic (see §
4.12.1 – Leased lines E1), X21 (see § 4.12.2.2 – Access to the X21 link management), T1 (see § 4.12.3
– Leased lines T1) and ISDN (see § 4.12.4.2 – Presentation of the ISDN link management screen).
4.12.1– Leased lines E1
A E1 cross-connection is a link between a TNT board of the BS linked to the TDM network (or ATM if
the CES is used: see § 4.12.6 – Circuit emulation (CES)) and the NT terminal (E1 port) linked to the user
peripheral devices.
The maximum flow offered on a E1 link is a symetrical 2.048 Mbit/s.
4.12.1.1– Procedure of creation of an E1 link (E1 cross-connection)
The implementation steps for an E1 cross-connection are as follows:
1. Selection and configuration of the ports for cross-connect: BS side (TNT board) (see § 4.12.1.4 –
Ports configuration of TNT board (BS));
2. Selection and configuration of the ports for cross-connect: NT side (see § 4.12.1.5 – Configuration
of NT ports);
3. Cross-connect between time-slots of selected ports: (see § 4.12.1.6 – Cross-connect);
4. Creation of an E1 link: (see § 4.12.5 – Principles of management common to all types of leased
lines);
4.12.1.2– Access to the E1 link management
To access E1 lines management:
– click on the button shown here (in the main screen toolbar),
or else,
– open the Service pull-down menu and choose the first item: E1.
3CC12426AAAA TQ BJA 01 Issue 01 - April 2001 - Draft 04 195/346
234
4.12.1.3– Presentation of the E1 link management screen
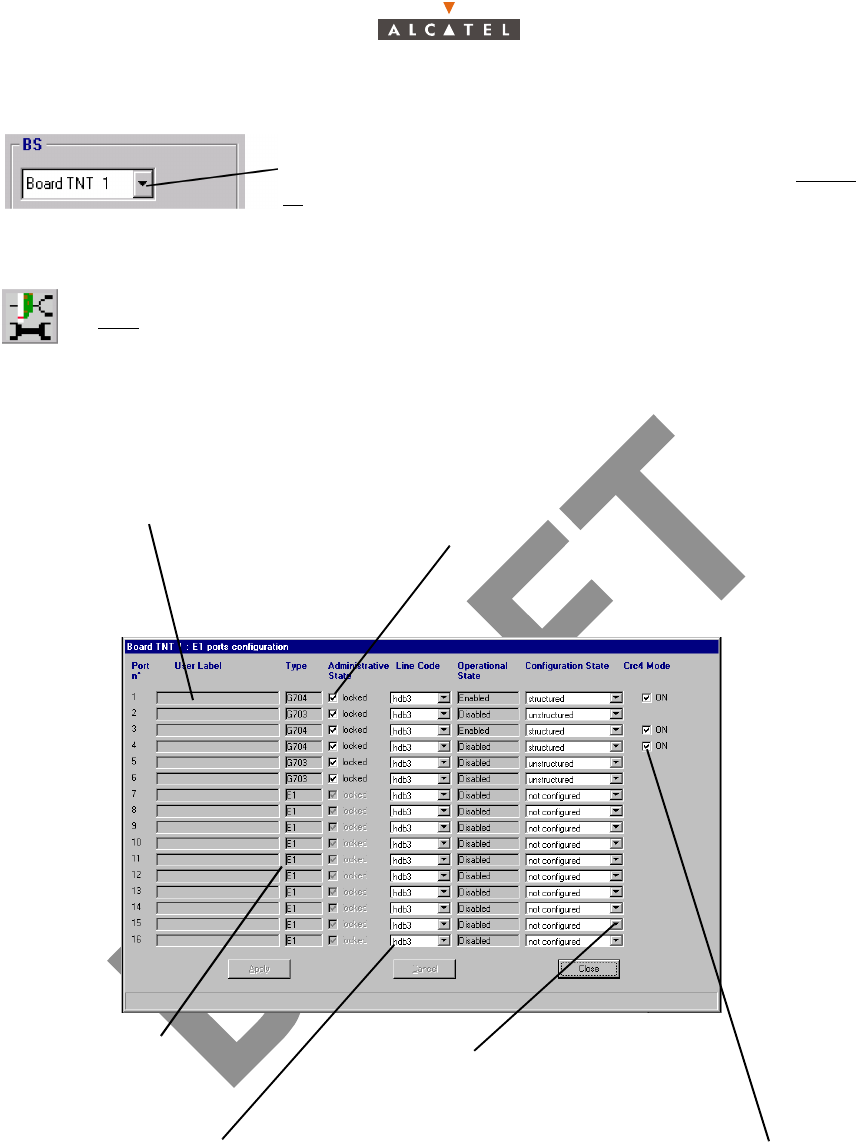
Click here to access the TNT ports configuration of the selected equipment
Click here to access the NT ports configuration
E1 cross-connection creation
Delete the chosen link
Allow to modify the name of the
selected cross-connetion (cf: § 4.12.5.4 –
)Cancel the current cross-connect
Locking / unlocking the administrative state (cf: § 4.12.5.5 –
List of E1 links (cf: § 4.12.5.1 –)
Quick search
(cf: § 4.1.2.4
Display of the 16 E1
ports of the chosen TNT:
Input / output
characteristics of the
selected TNT board
Cross-connect zone
Indicator of cross-connect
position
1 IT = 64 kbps
Quick search
(cf: § 4.1.2.4 –)
Display of the 2 E1 ports of
the chosen NT (the grayed
out ports are not accessible
to the leased lines)
- «E1» port: not configured
- «G703» port: unstructured
- «G704» port: structured
(cf § 4.12.4.3 – and § 4.12.3.5
196/346 Issue 01 - April 2001 - Draft 04 3CC12426AAAA TQ BJA 01
234
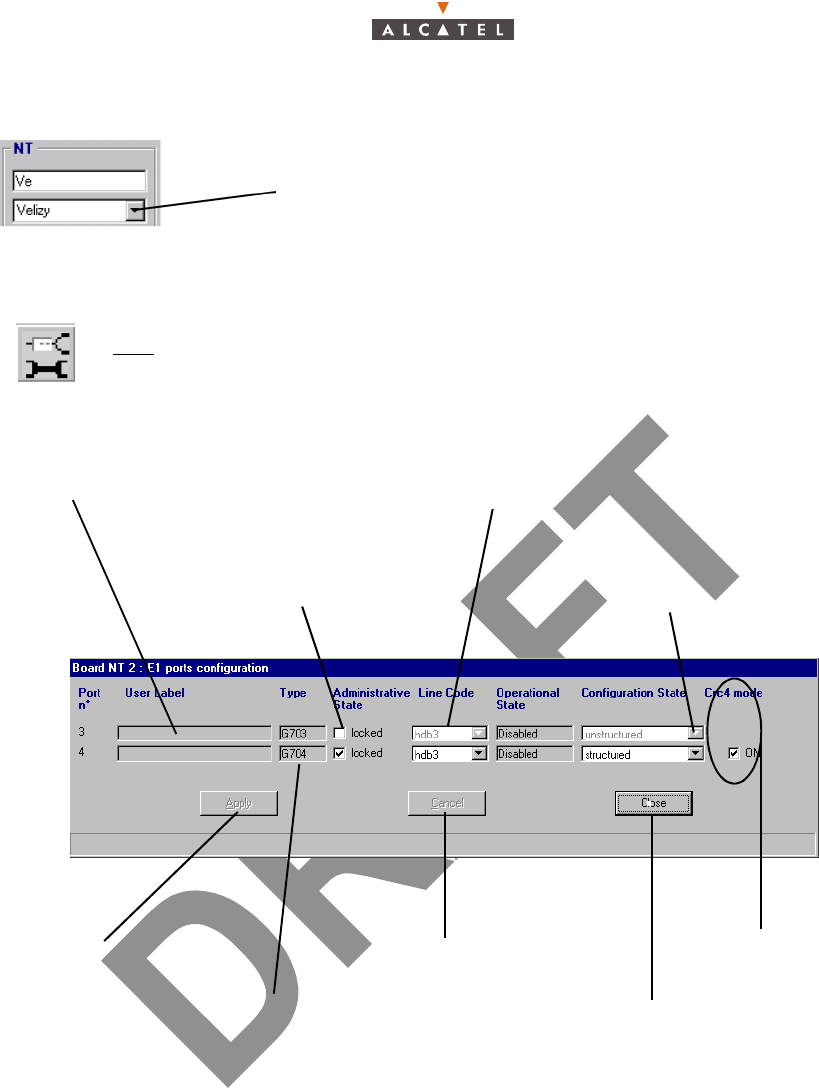
4.12.1.4– Ports configuration of TNT board (BS)
The screen listing the E1 ports of the TNT is displayed:
Note: The modification of the port configuration is possible if the port state is locked.
Note: Unlocking a TNT port state is only possible when you have configured it.
Next, access the ports configuration of the TNT board selected by clicking on the first
button, shown here (on the toolbar of the E1 cross-connections screen).
On the E1 cross-connection screen (see § 4.12.1.3 –
Presentation of the E1 link management screen ), select first of
all, the TNT board concerned by the cross-connect by scrolling
The port labels are to be
entered in the TNT Ports
Configuration screen:
(cf: § 4.5.3.2 –)
Port type: G703, G704
(initially E1)
Type of line code: hdb3
(one choice)
Check box to lock / unlock the port’s
administrative state. By default, the port is locked.
Port configuration modification is only possible
when the port is locked
Scroll down the list to configure
the port: structure or unstructured
(initially: not configured)
Appears if the configuration state is
structured; to be checked if the
corresponding hardware uses CR4
3CC12426AAAA TQ BJA 01 Issue 01 - April 2001 - Draft 04 197/346
234
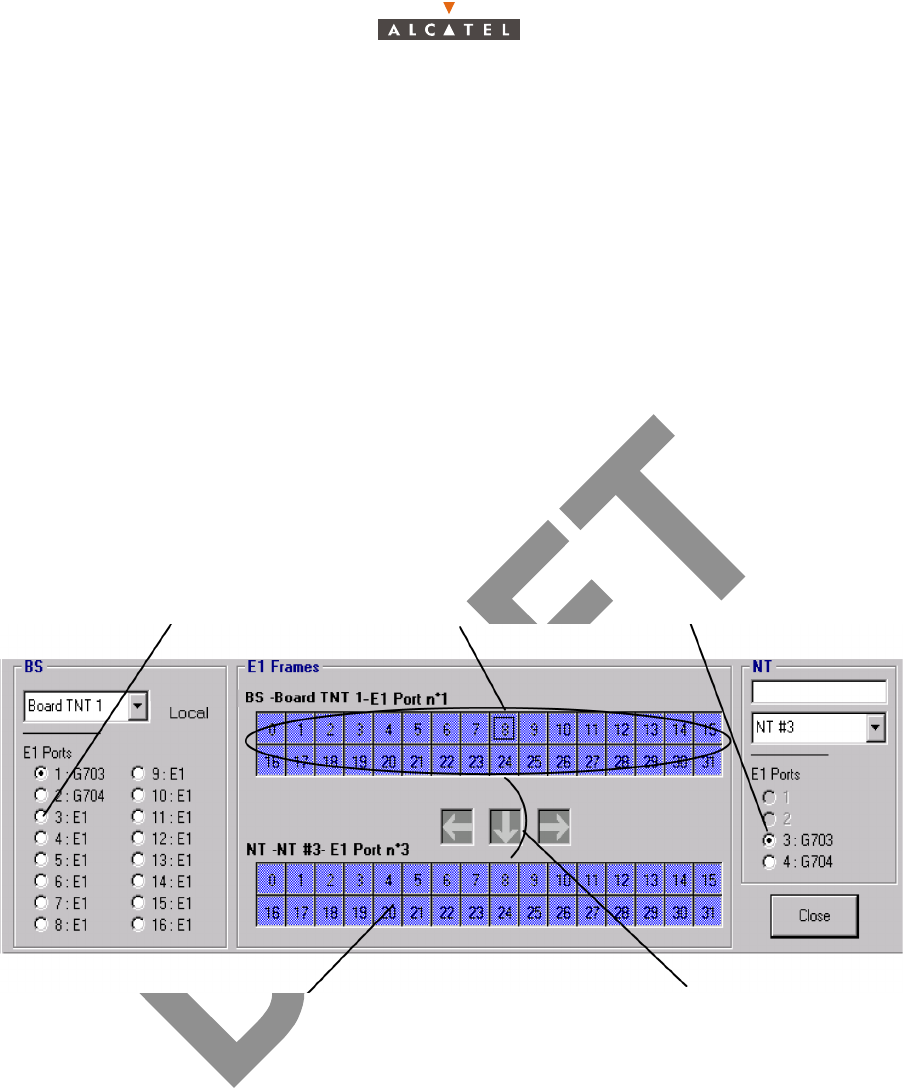
4.12.1.5– Configuration of NT ports
Note: The modification of the port configuration is possible if the port state is locked.
Note: Unlocking a NT port state is only possible when you have configured it.
Next, access the ports configuration of the chosen NT by clicking on the second button,
shown here (on the toolbar of the E1 cross-connections screen).
On the E1 cross-connection screen (see § 4.12.1.3 – Presentation
of the E1 link management screen),
Click on the arrow to scroll down the NT list declared, then select
the NT concerned by the cross-connect.
The ports label is to be entered in
the NT Details screen (see § 4.6.2
Check box to lock / unlock
the port’s administrative state;
by default, the port is locked
Type of line code: hdb3
Scroll down the list to
configure the port:
structured or unstructured
See § 4.11.1 –
Click here to confirm
a modification
Click here to cancel
modifications
Click here to return to the
cross-connections screen
Port type: G703, G704
198/346 Issue 01 - April 2001 - Draft 04 3CC12426AAAA TQ BJA 01
234
4.12.1.6– Cross-connect
Cross connection consists in matching the time-slots (TSs) of a configured port of the TNT board with
those of a configured port of the NT.
Note: To make an E1 "cross-connection", E1 type TNT ports can be cross connected with E1 or X21
type NT ports.
There are two types of cross-connect: between structured ports and between unstructured ports.
If the operator wants to offer a 2 Mbps contract, the cross connnection must be unstructured: using a
G703 TNT port (32 available TSs, global selection of TSs).
If the operator wants to offer a less than 2 Mbps contract, the cross connection must be structured:
using a G704 TNT port (31 available TSs, individual selection of TSs).
– Unstructured case:
In this case, the maximum bit rate is supplied because all the selected TNT port time-slots are connected
to the NT port time-slots.
– Structured case:
To implement the cross-connect in structured case, proceed in the same way as for non-structured ports,
but this time select the time-slots individually.
Thirty one time-slots can be brought into play in a E1 cross-connection (the first time-slot (grayed out) is
not accessible because reserved for synchronization). The maximum bit rate is 31*64 kbps.
The cross-connect arrows offer you guidance for dragging the TNT slots to the available NT slots; if the
current cross-connect corresponds to "unauthorized" ones, an error message is displayed at the bottom
of the window and the cross-connect arrows indicate the NT time-slots to which the cross-connect is
directed.
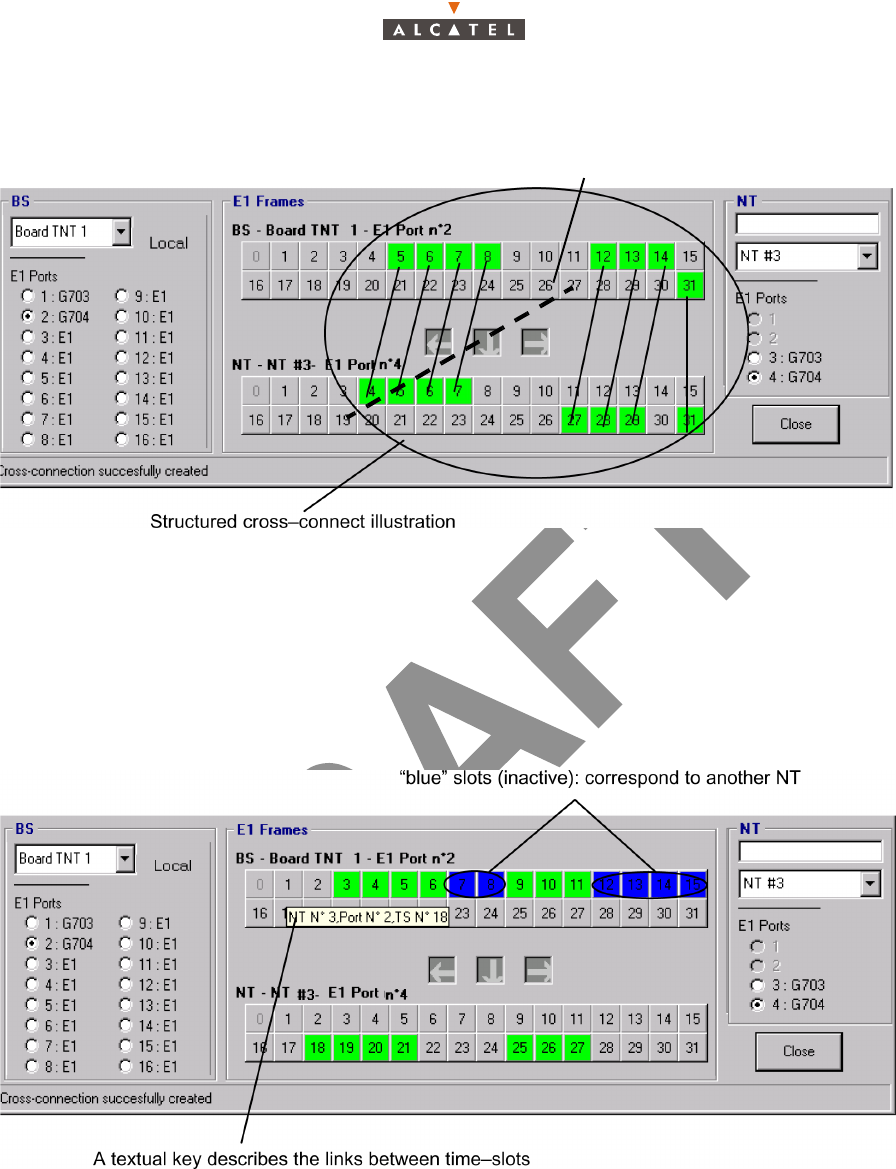
1 Select the unstructured ports that you wish to connect
2- Select the block of time slots at the TNT by pressing
a time slot of the of the time slot block at the TNT
4- Release the buttons: all
the slots are selected
5- Confirm the cross-connect by creating
the cross-conection (see § 4.12.1.3 –)
3- Press the CTRL
key while clicking on the left
button of the mouse on a
TNT time slot and slide the
mouse pointer towards NT
3CC12426AAAA TQ BJA 01 Issue 01 - April 2001 - Draft 04 199/346
234
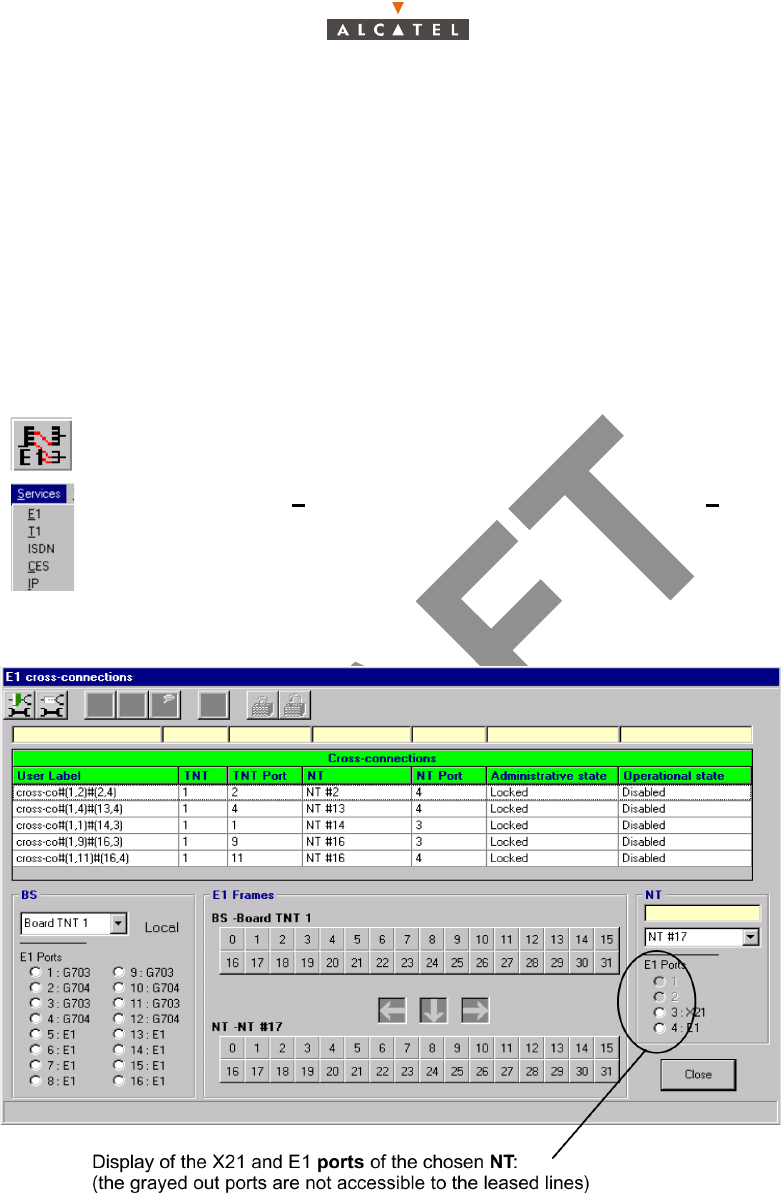
The slots of a real cross-connection (following the creation phase: see § 4.12.5.3 – Creation of a cross-
connection) are colored in green.
Note: It is not mandatory to create cross-connections with consecutive time slots. In that case, you
must match the first group of TNT time slot with a group of NT time slot, and then match the
second group and so on.
Note: It is not possible to «cross» the links between TNT and NT time slots. Example on the above con-
figuration link between TNT-TS 10 and TNT-TS 3 not authirized.
4.12.1.7– Grooming
Several NTs can be fed from a single TNT board and a single E1 port. This is known as "grooming".
4.12.2– Leased lines X21
A X21 cross-connection is a link between a TNT board of the BS linked to the TDM network (or ATM if
the CES is used: see § 4.12.6 – Circuit emulation (CES)) and the NT terminal (X21 port) linked to the
user peripheral devices.
The maximum flow offered on an X21 link is 2 Mbps.
no
t
au
th
or
i
ze
d
200/346 Issue 01 - April 2001 - Draft 04 3CC12426AAAA TQ BJA 01
234
4.12.2.1– Creation procedure of an X21 link
The implementation stages for an X21 cross-connection are as follows:
1. Selection and configuration of the ports for cross-connect: BS side (TNT board): see § 4.12.2.4 –
Ports configuration of TNT board (BS);
2. Selection of NT ports for cross-connect: see § 4.12.2.5 – Port selection on the NT side;
3. Cross-connect between time-slots of selected ports: see § 4.12.2.6 – Cross-connect;
4. Creation of an X21 link: see § 4.12.5.3 – Creation of a cross-connection;
4.12.2.2– Access to the X21 link management
To access X21 line management:
4.12.2.3– Presentation of the X21 link management screen
As the other sections are the same as that of the E1 leased lines screen, refer to § 4.12.1.3 –
Presentation of the E1 link management screen.
4.12.2.4– Ports configuration of TNT board (BS)
As the TNT board port configuration principle is the same as that of E1 leased lines, refer to § 4.12.1.4
– Ports configuration of TNT board (BS).
In case of 32 TS transmission, the TNT port has to be unstructured.
– click on the button shown here (in the main screen button bar),
or else,
– open the Service pull-down menu and choose the item: E1.