Alcatel Lucent USA ONEBTS-11 UMTS-CDMA Transceiver System (850) User Manual 401703454i1
Alcatel-Lucent USA Inc. UMTS-CDMA Transceiver System (850) 401703454i1
Contents
users manual l
A- 133
Lucent Technologies – Proprietary
See notice on first page
401-703-454
FOA Draft Issue 1
January, 2006
............................................................................................................................................................................................................................................................
................................................................................................................................
............................................
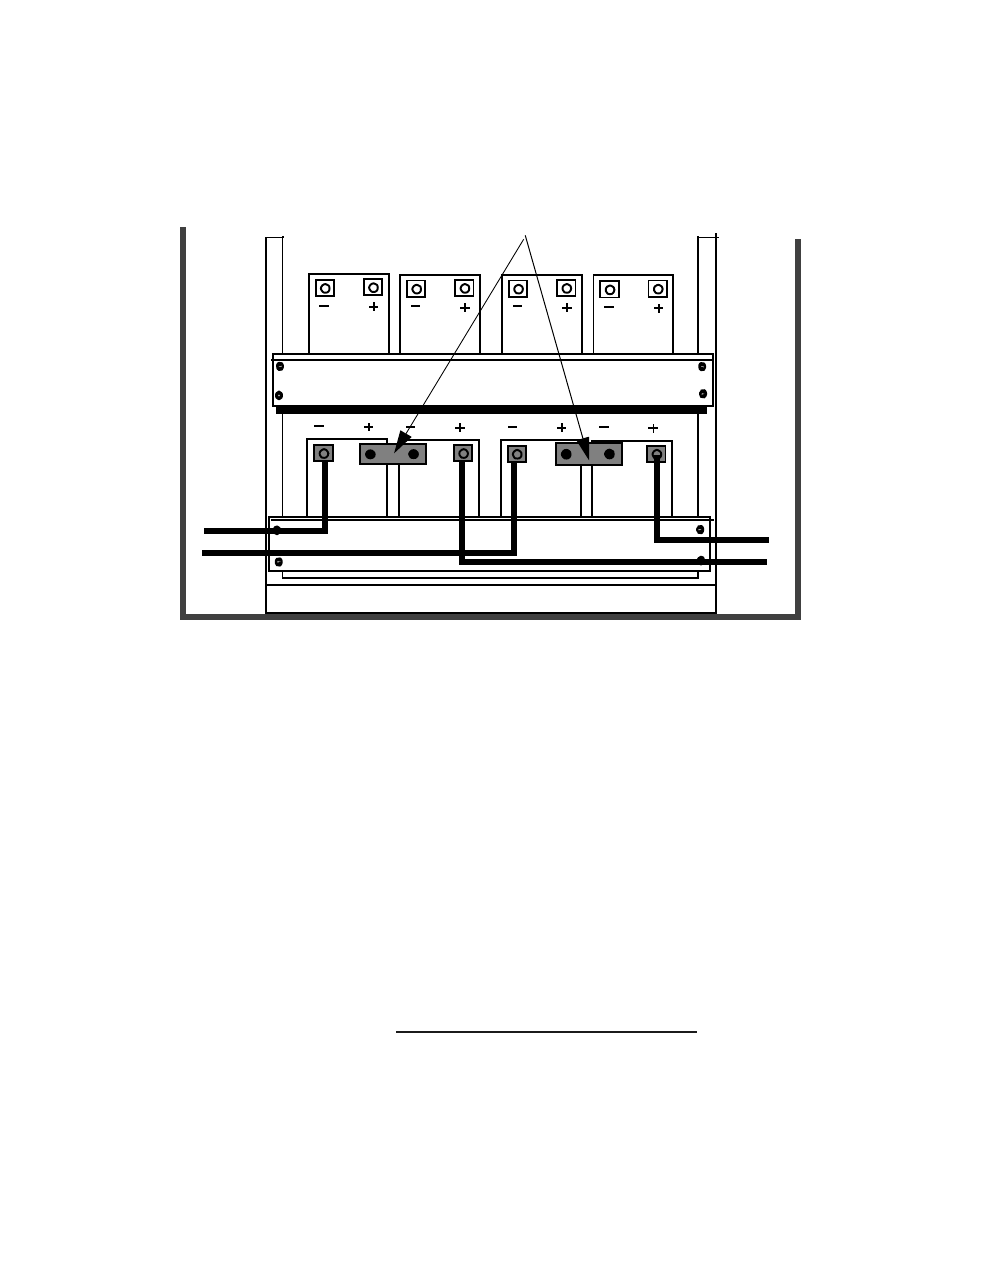
6Connect the interconnecting bus bar using the previously removed
attaching hardware. Refer to the figure below.
................................................................................................................................
............................................
7Torque the two bus bar connections using the torque value provided on
the battery label. Do not use the torque specifications provided in
Chapter 1.
................................................................................................................................
............................................
8Repeat Steps 1 through 7 for the remaining battery strings.
................................................................................................................................
............................................
9Skip to How to make final DC connections on Page A - 140 to continue the
installation
122
1
11234
1234
2
3
4
Interconnecting bus bars
UPPER
SHELF
LOWER
SHELF
A- 134 Lucent Technologies – Proprietary
See notice on first page 401-703-454
FOA Draft Issue 1
January, 2006
...........................................................................................................................................................................................................................................................
.............................................................................................................................................................................................................................................................
How to install 12IR25 batteries in the EZBFo battery modules
Overview This procedure module provides instructions for the installation of
12IR125 batteries.
Important! The battery cables will be connected to the batteries and
the batteries will be installed on the shelves in this section. The battery
cables must not be connected to the bus bars until later. Refer to How to
make final DC connections on Page A - 140.
Step-by-step instructions are provided for the following tasks:
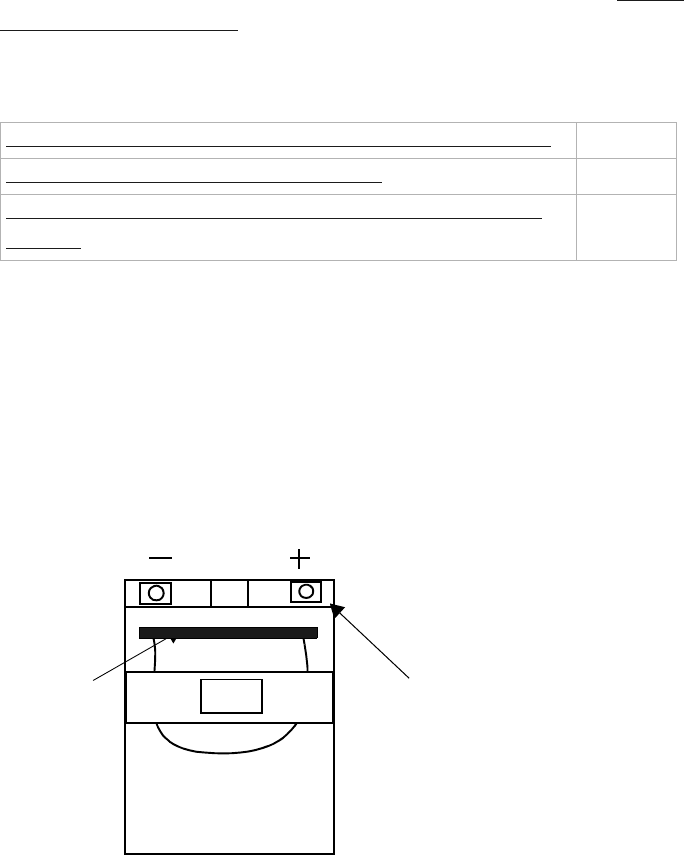
Description of typical batteries
The 12IR125 battery terminals are located on the front end of the
battery, as well as on the side. The front terminals will be used for
EZBFo installation. Positive and negative terminals are clearly labeled
"+" and "-". Dual strap handles are permanently attached to the battery
along its top. An example 12IR125 battery is shown in the figure
below.
Separate and remove the two piece battery retaining brackets A - 135
Connect the battery cables to the batteries A - 136
Place the batteries on the shelves, and replace the retaining
brackets
A - 138
BATTERY
STRAP
BATTERY
CABLE
ATTACHMENT
A- 135
Lucent Technologies – Proprietary
See notice on first page
401-703-454
FOA Draft Issue 1
January, 2006
............................................................................................................................................................................................................................................................
Separate and remove the
two piece battery retaining
brackets
If they have not been previously removed, use the following procedure
to separate and remove the two piece battery retaining brackets.
................................................................................................................................
............................................
1Check and record battery initial voltages and all battery date codes.
Important! The next step is not required if the top panel has
been removed from the module, since the batteries may be
installed on the top shelf through the top
................................................................................................................................
............................................
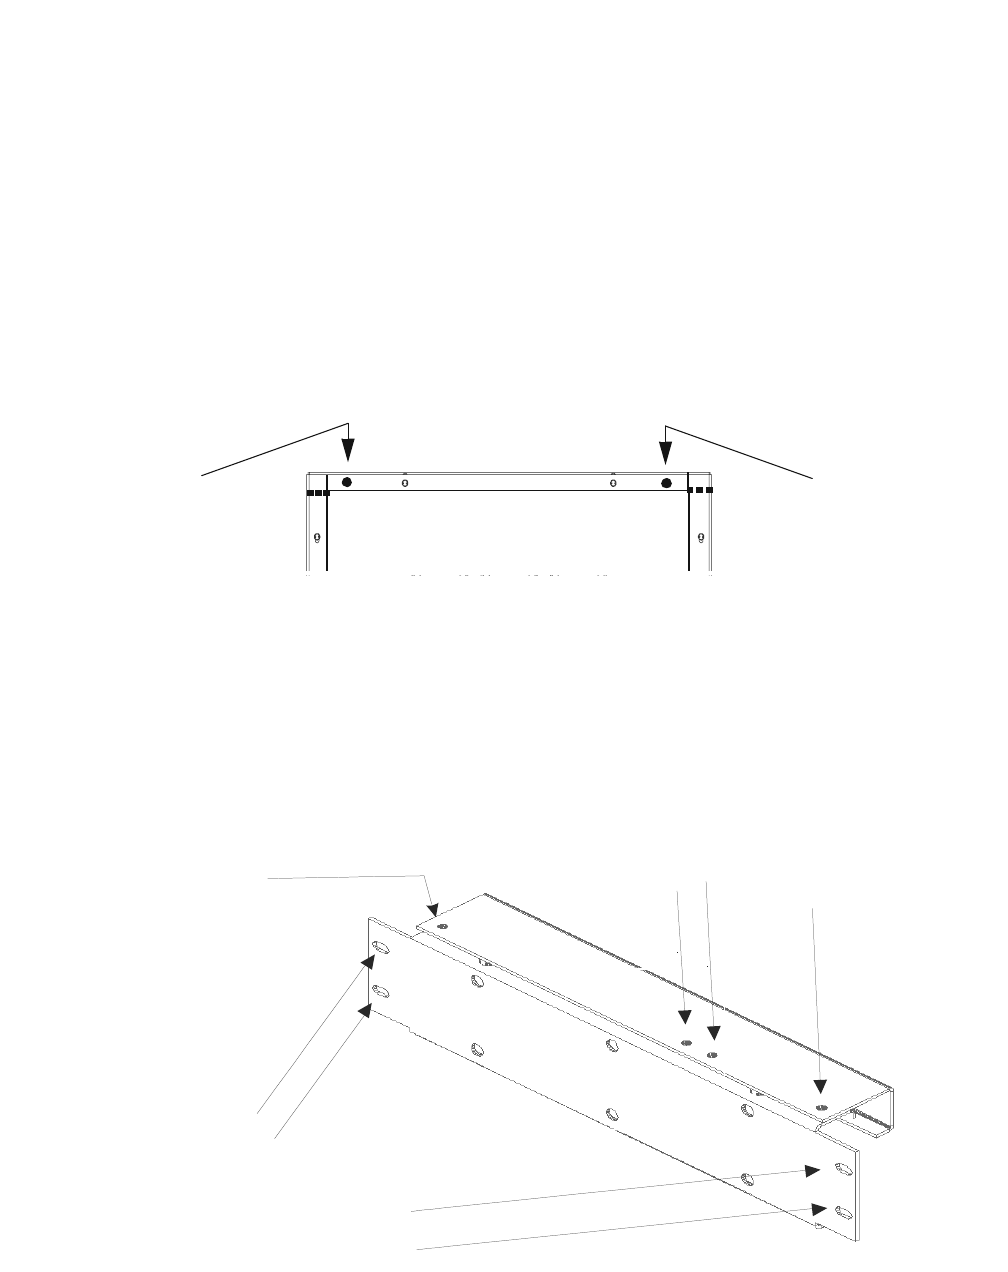
2Remove the two nuts and remove the top flange from the front of the
battery module. Refer to the figure below.
................................................................................................................................
............................................
3Remove the four bolts that attach the top portion of the battery retaining
bracket and remove the top portion. Repeat for both shelves They will
not be replaced but will be used as a battery spacers in a later procedure.
Refer to the figure below.
................................................................................................................................
............................................
4Remove the battery retaining bracket from both shelves.
BATTERY BASE MODULE
R
EMOVE NUT
I
NSIDE LEFT
F
LANGE
TOP FLANGE
REMOVE NU
T
INSIDE RIGH
T
FLANGE
R
emove
thi
s
b
o
lt
(1 of 4) and the
top portion of the
retaining bracket
Remove these four
bolts and the battery
retaining bracket
BATTERY RETAINING
BRACKET
(FRONT VIEW)
A- 136 Lucent Technologies – Proprietary
See notice on first page 401-703-454
FOA Draft Issue 1
January, 2006
...........................................................................................................................................................................................................................................................
Connect the battery cables
to the batteries Perform the following steps to connect the battery cables to the
batteries.
Important! The battery cables will be connected to the batteries
and the batteries in this procedure. The battery cables must not be
connected to the bus bars.
................................................................................................................................
............................................
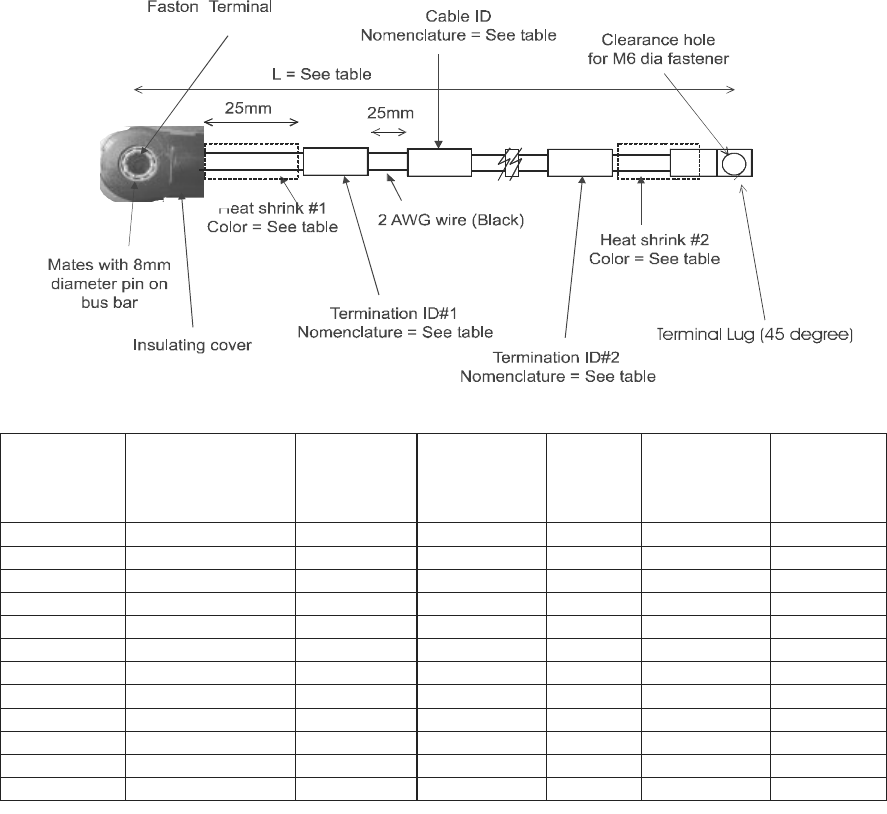
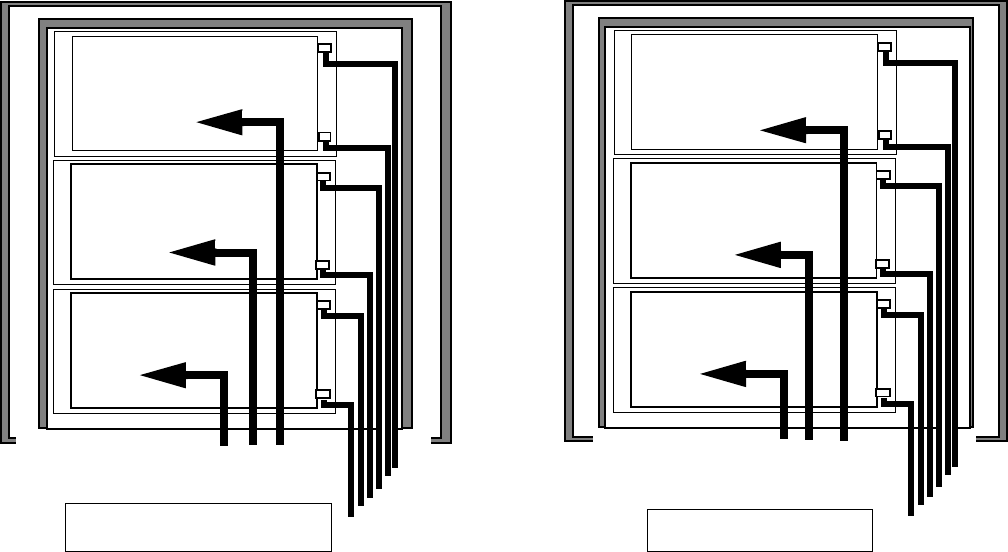
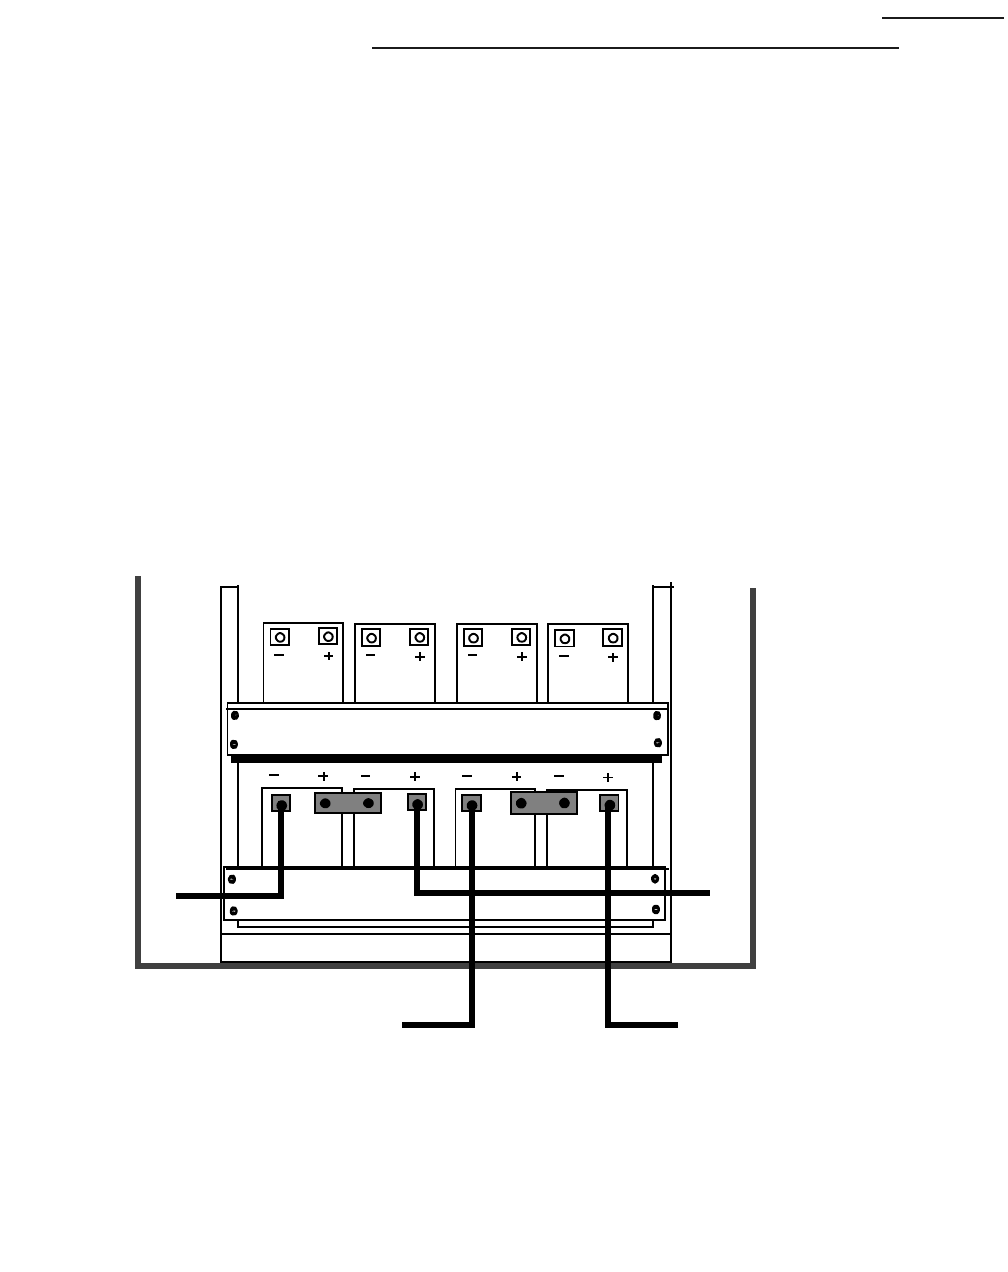
1Refer to the figure below for an illustration of the battery cables and a
table showing the different cables required.
Dash no. Cable ID Heat
shrink #1
color
Termination
ID#1 Length
(mm)
+/-
10mm
Termination
ID#2 Heat
shrink #2
color
1 BAT 4(-) - RTN
Black
RTN BUS
1168 BAT4( -) Black
2
BAT5(
-) - RTN
Black
RTN BUS
1066 BAT5( -) Black
3
BAT6(
-) - RTN
Black
RTN BUS
964 BAT6( -) Black
4
BAT1(
-) - 12V Blue
12V BUS
812 BAT1( -) Black
5
BAT2(
-) - 12V Blue
12V BUS
660 BAT2( -) Black
6
BAT3(
-) -12V Blue
12V BUS
517 BAT3( -) Black
7 BAT4(+) - 12V Blue 12V BUS 785 BAT4(+) Red
8 BAT5(+) - 12V Blue 12V BUS 625 BAT5(+) Red
9 BAT6(+) - 12V Blue 12V BUS 475 BAT6(+) Red
10 BAT1(+) - 24V Red 24V BUS 710 BAT1(+) Red
11 BAT2(+) - 24V Red 24V BUS 558 BAT2(+) Red
12 BAT3(+) - 24V Red 24V BUS 406 BAT3(+) Red

A- 137
Lucent Technologies – Proprietary
See notice on first page
401-703-454
FOA Draft Issue 1
January, 2006
............................................................................................................................................................................................................................................................
................................................................................................................................
............................................
2With a magic marker mark the six batteries number 1 through 6 on the
top of the battery. Remove the attaching hardware from the two battery
terminals on all batteries.
Important! A battery wiring diagram is shipped with the cables
................................................................................................................................
............................................
3Using the previously removed attaching hardware (and antioxidant
compound), connect the one-hole lug end of the following cables to the
positive (+) and negative (-) terminals of the specified battery. Torque
the connections to 60 in.-lb. (6.8 Nm). Refer to the table below and the
figure on Page A - 136.
Battery cable table
BATTERY
NUMBER / SHELF CABLE
NUMBER CABLE
BATTERY END
ID / COLOR
CABLE ID BUS END
ID / COLOR
1
BOTTOM SHELF
(REAR)
10
BAT1(+) / RED BAT1(+)-24V 24V BUS / RED
4
BAT1(-)/BLACK BAT1(-)-12V 12V BUS / BLUE
2
BOTTOM SHELF
(MIDDLE)
11
BAT2(+) / RED BAT2(+)-24V 24V BUS / RED
5
BAT2(-)/BLACK BAT2(-)-12V 12V BUS / BLUE
3
BOTTOM SHELF
(FRONT)
12
BAT3(+) / RED BAT3(+)-24V 24V BUS / RED
6
BAT3(-)/BLACK BAT3(-)-12V 12V BUS / BLUE
4
TOP SHELF (REAR)
7
BAT4(+) / RED BAT4(+)-12V 12V BUS / BLUE
BAT4(-)/BLACK BAT4(-)-RTN RTN BUS / BLACK
5
TOP SHELF
(MIDDLE)
8
BAT5(+) / RED BAT5(+)-12V 12V BUS / BLUE
2
BAT5(-)/BLACK BAT5(-)-RTN RTN BUS / BLACK
6
TOP SHELF
(FRONT)
9
BAT6(+) / RED BAT6(+)-12V 12V BUS / BLUE
3
BAT6(-)/BLACK BAT6(-)-RTN RTN BUS / BLACK
A- 138 Lucent Technologies – Proprietary
See notice on first page 401-703-454
FOA Draft Issue 1
January, 2006
...........................................................................................................................................................................................................................................................
Place the batteries on the
shelves, and replace the
retaining brackets
Perform the following steps to place the batteries on the shelves, and
replace the retaining brackets.
Important! The batteries will be installed on the shelves in this
procedure. The battery cables must not be connected to the bus
bars.
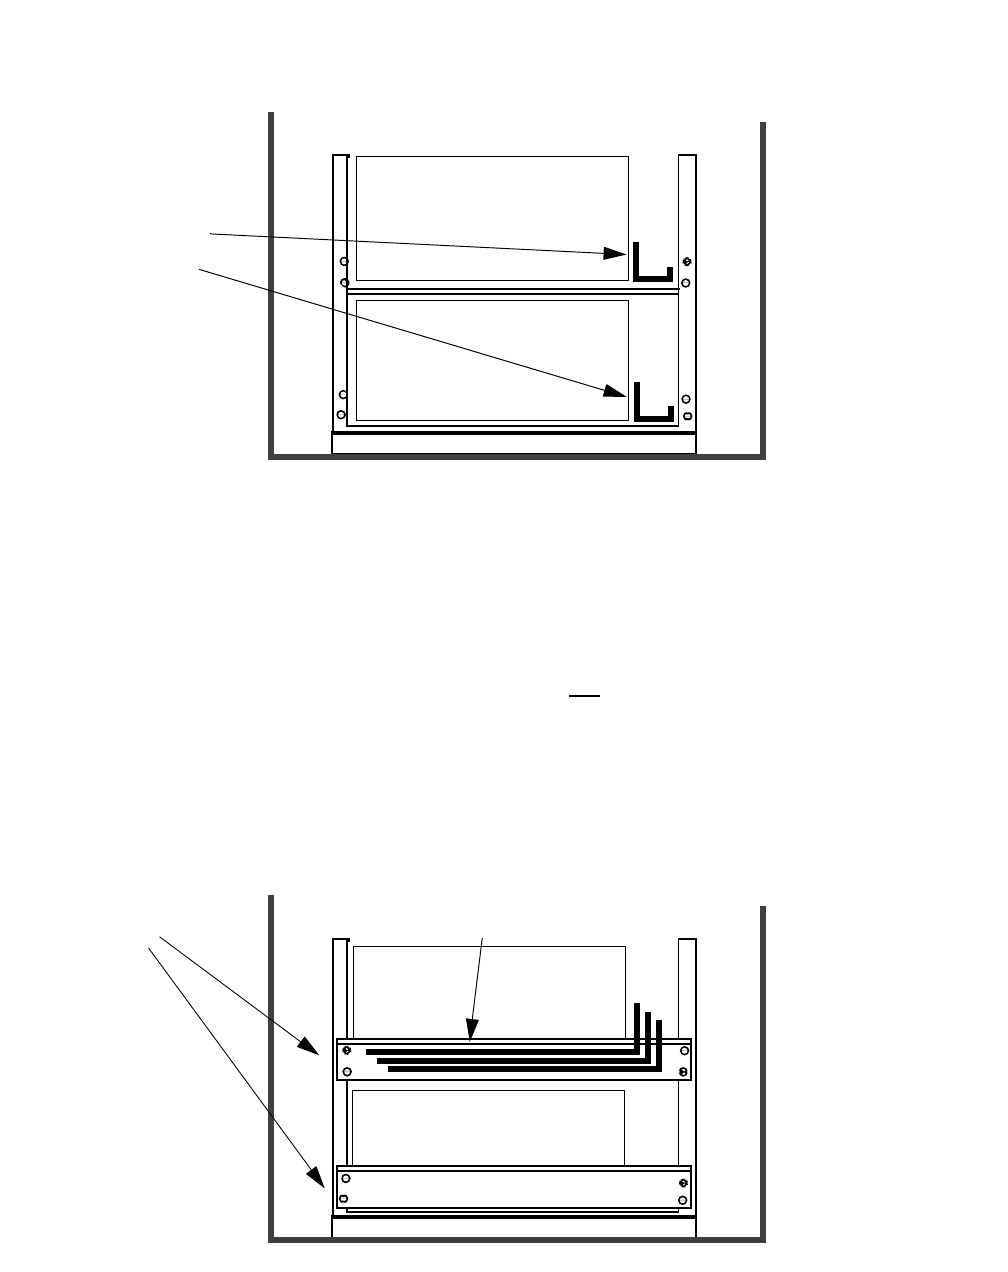
1Place the batteries onto the shelves in numerical order
• 1 - 3 on the bottom shelf, back to front
• 4 - 6 on the top shelf, back to front
• Route the cables forwards on the right with the batteries to the rear
and to the left as far as possible, and the battery terminals facing to
the right. Refer to the figure below.
#1
#10
+
#4
_
+
_
#2
#11
#5
+
_
#3
#12
#6
BOTTOM SHELF
TOP
VIEWS
FRONT
#4
#7
+
#1
_
+
_
#5
#8
#2
+
_
#6
#9
#1
TOP SHELF
FRONT
A- 139
Lucent Technologies – Proprietary
See notice on first page
401-703-454
FOA Draft Issue 1
January, 2006
............................................................................................................................................................................................................................................................
................................................................................................................................
............................................
2Insert the previously removed top portion of the battery retaining
brackets as a spacer on the right side of the batteries as shown below.
................................................................................................................................
............................................
3Replace the battery retaining brackets. Torque the bolts according to the
table in Chapter 1. Refer to the figure below.
................................................................................................................................
............................................
4Route the following three top battery shelf "RTN BUS" cables to the
left across the front of the top retaining bracket. Tie to the bracket. Refer
to the figure below.
• Cable #1 (Cable ID "BAT4 (-) -RTN")
• Cable #2 (Cable ID "BAT5 (-) -RTN")
• Cable #3 (Cable ID "BAT6 (-) -RTN")
PREVIOUSLY REMOVED
TOP PORTION OD THE
BATTERY RETAINING
BRACKETS INSERTED AS
BATTERY SPACER
TOP
SHELF
BOTTOM
SHELF
FRONT VIEW
BATTERY RETAINING
BRACKETS
TOP
SHELF
ROUTE "RTN BUS" CABLES #1, #2, and #3 TO LEFT
SIDE AND TIE TO TOP RETAINING BRACKET
BOTTOM
SHELF
FRONT VIEW

A- 140 Lucent Technologies – Proprietary
See notice on first page 401-703-454
FOA Draft Issue 1
January, 2006
...........................................................................................................................................................................................................................................................
How to make final DC connections
.............................................................................................................................................................................................................................................................
Overview
Purpose This section provides the procedures for the final DC connections (or
reconnections) in the Modular Cell 4.0B cabinet and subsequently in
the battery modules. The cables were previously routed into the 4.0B
cabinet.
This section contains the following procedures.
Safety A - 141
How to make the DC connections in the Modular Cell 4.0B
cabinet
A - 142
How to make the final L1 battery connections in the battery
modules
A - 148
How to make the final 12IR125 battery connections in the
battery modules
A - 156
A- 141
Lucent Technologies – Proprietary
See notice on first page
401-703-454
FOA Draft Issue 1
January, 2006
............................................................................................................................................................................................................................................................
.............................................................................................................................................................................................................................................................
Safety
Safety and precautions Your understanding of the following information is important to ensure
a proper and safe connection of the DC cables in the Modular Cell
cabinet and installation of the EZBFo batteries.
WARNING
Injury to Personnel and High Energy Hazard
The following procedures are the safest method to install and
connect the batteries. If these procedures are not followed in the
exact sequence listed, a serious high electrical energy hazard
will result. Ensure that loose cables cannot cause a short circuit.
Since the batteries are charged, do not touch battery terminals or
cross terminals with metal objects.
WARNING
Electrical Energy Hazard
Failure to follow the order of the installation procedure (as
written) can result in an energized DC circuit, which creates
an electrical energy hazard. Follow these rules:
1. Perform installation steps exactly as written and in the
order provided.
2. Do not connect battery cables to the bus bars until
instructed to do so.
3. Observe and follow all safety precautions.
4. When completing electrical connections, always use
tools that are properly insulated.

A- 142 Lucent Technologies – Proprietary
See notice on first page 401-703-454
FOA Draft Issue 1
January, 2006
...........................................................................................................................................................................................................................................................
.............................................................................................................................................................................................................................................................
How to make the DC connections in the Modular Cell 4.0B cabinet
Overview This procedure module provides instructions for the final DC
connections in the Modular Cell 4.0B cabinet.
Important! The DC cables will be connected to the applicable bus in
the Modular Cell cabinet in this module. The battery cables will not be
connected to the bus bars in the EZBFo battery base module until How
to make the final L1 battery connections in the battery modules on Page A -
142 or How to make the final 12IR125 battery connections in the battery
modules on Page A - 156, as applicable
Step-by-step instructions are provided for the following tasks:
Connect the battery base module +24-VDC cables to the HPDA
in the Modular Cell 4.0B cabinet
A - 143
Connect (or reconnect) the 24V Return cables from the first
battery base module to the return bus in the Modular Cell 4.0B
cabinet
A - 146
A- 143
Lucent Technologies – Proprietary
See notice on first page
401-703-454
FOA Draft Issue 1
January, 2006
............................................................................................................................................................................................................................................................
Connect the battery base
module +24-VDC cables to
the HPDA in the Modular
Cell 4.0B cabinet
Important! If installing a second battery base module only, skip
to Connect (or reconnect) the 24V Return cables from the first battery
base module to the return bus in the Modular Cell 4.0B cabinet on Page
A - 146 to continue the installation.
Perform the following steps to connect the four +24-VDC cables (from
the first battery base module) in the Modular Cell 4.0B cabinet.
................................................................................................................................
............................................
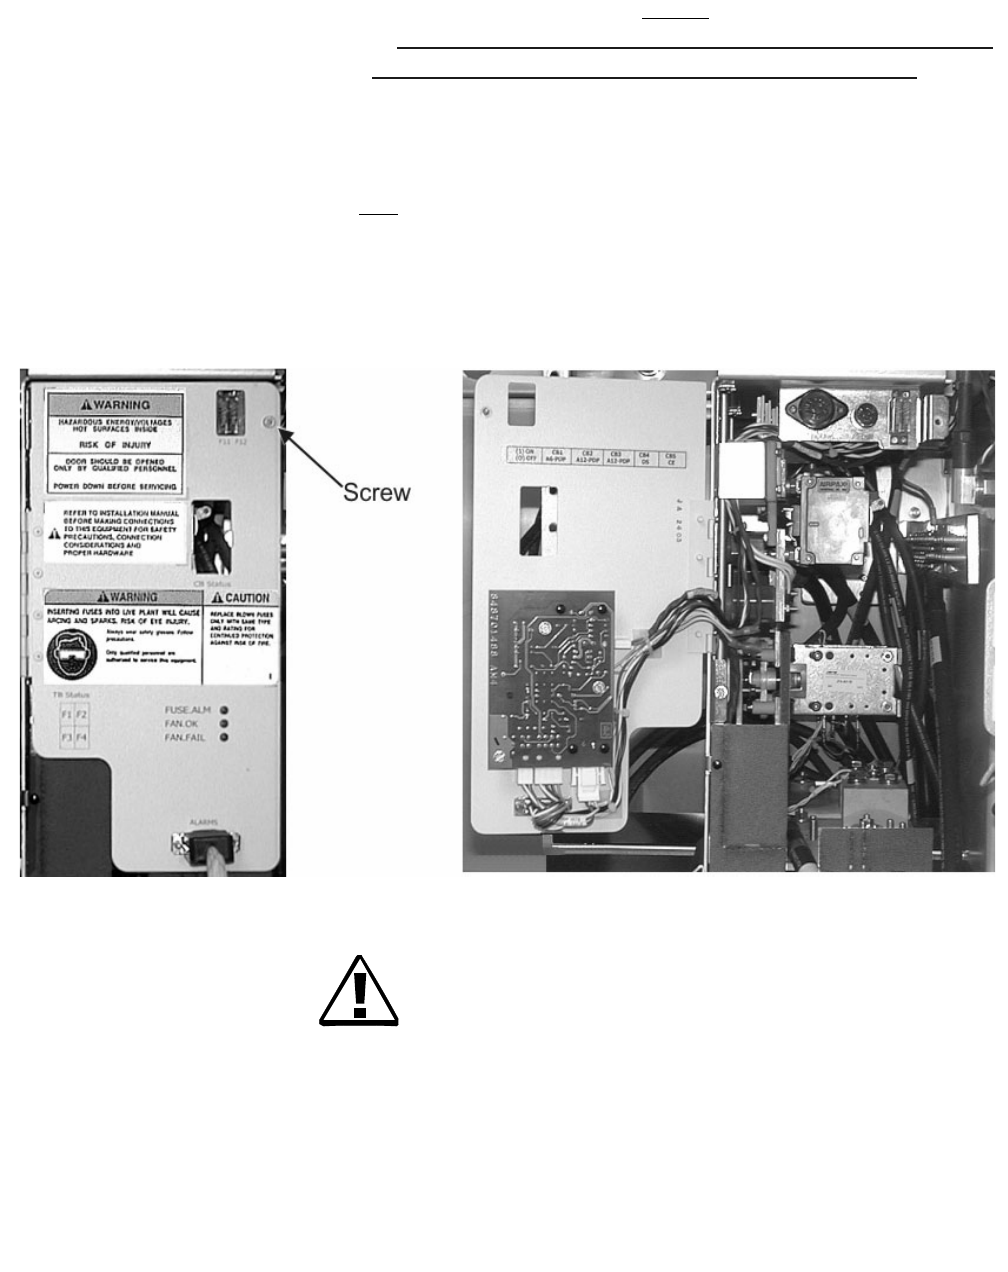
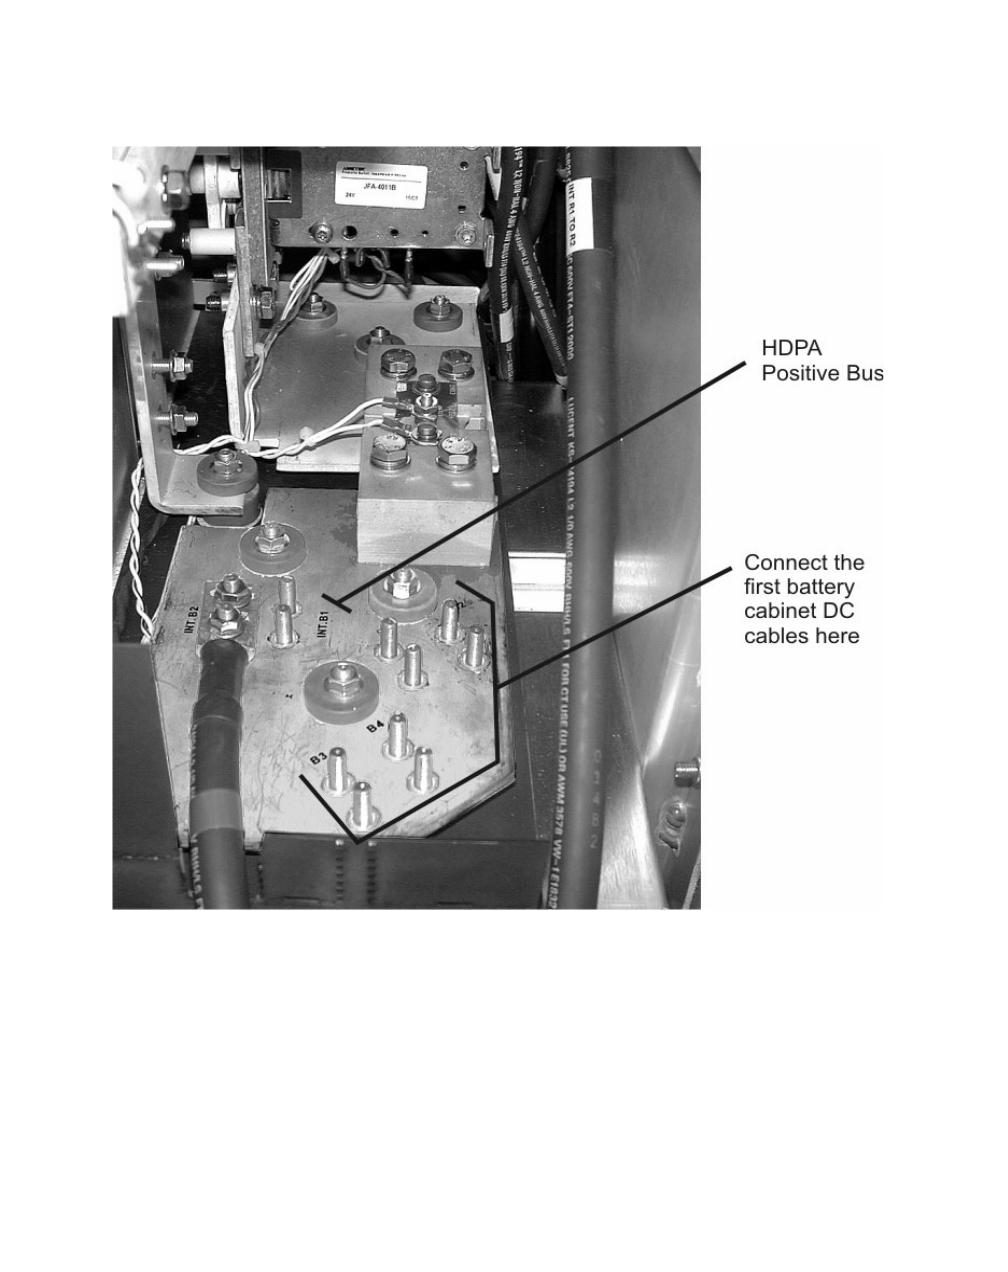
1Loosen the screw and open the HPDA door. Refer to the figure below.
DANGER
Electrical Shock Hazard
When completing electrical connections, always use tools
that are properly insulated.
2Remove the knockout shown in the figure above.

A- 144 Lucent Technologies – Proprietary
See notice on first page 401-703-454
FOA Draft Issue 1
January, 2006
...........................................................................................................................................................................................................................................................
................................................................................................................................
............................................
3Untape one of the four +24V DC load cables and to cut it to the proper
length to reach the load bus in the HPDA. Refer to the figure on Page A
- 145.
Important! When cutting the cable to the proper length the
cable identification marker may be cut off. If so, remark it with red
tape immediately.
................................................................................................................................
............................................
4Strip the insulation at the end of the cable.
................................................................................................................................
............................................
5Slip a section of the supplied heat shrink tubing onto each cable.
................................................................................................................................
............................................
6Crimp a supplied two-hole terminal lug onto the end of the cable.
................................................................................................................................
............................................
7Shrink the tubing with a heat gun.
................................................................................................................................
............................................
8Connect this +24V DC load cable (from the first battery base module)
in the Modular Cell 4.0B cabinet. Refer to the figure on Page A - 145.
................................................................................................................................
............................................
9Torque the nuts to according to the torque table in Chapter 1.
A- 145
Lucent Technologies – Proprietary
See notice on first page
401-703-454
FOA Draft Issue 1
January, 2006
............................................................................................................................................................................................................................................................
................................................................................................................................
............................................
10 Repeat Steps 3 through 9 for the three remaining +24-VDC cables.

A- 146 Lucent Technologies – Proprietary
See notice on first page 401-703-454
FOA Draft Issue 1
January, 2006
...........................................................................................................................................................................................................................................................
Connect (or reconnect) the
24V Return cables from the
first battery base module to
the return bus in the
Modular Cell 4.0B cabinet
Perform the following steps to connect (or reconnect) the four 24V
Return cables from the first battery base module to the return bus in the
Modular Cell 4.0B cabinet
Important! If installing a first battery base module, skip the
first step and proceed to step 2.
................................................................................................................................
............................................
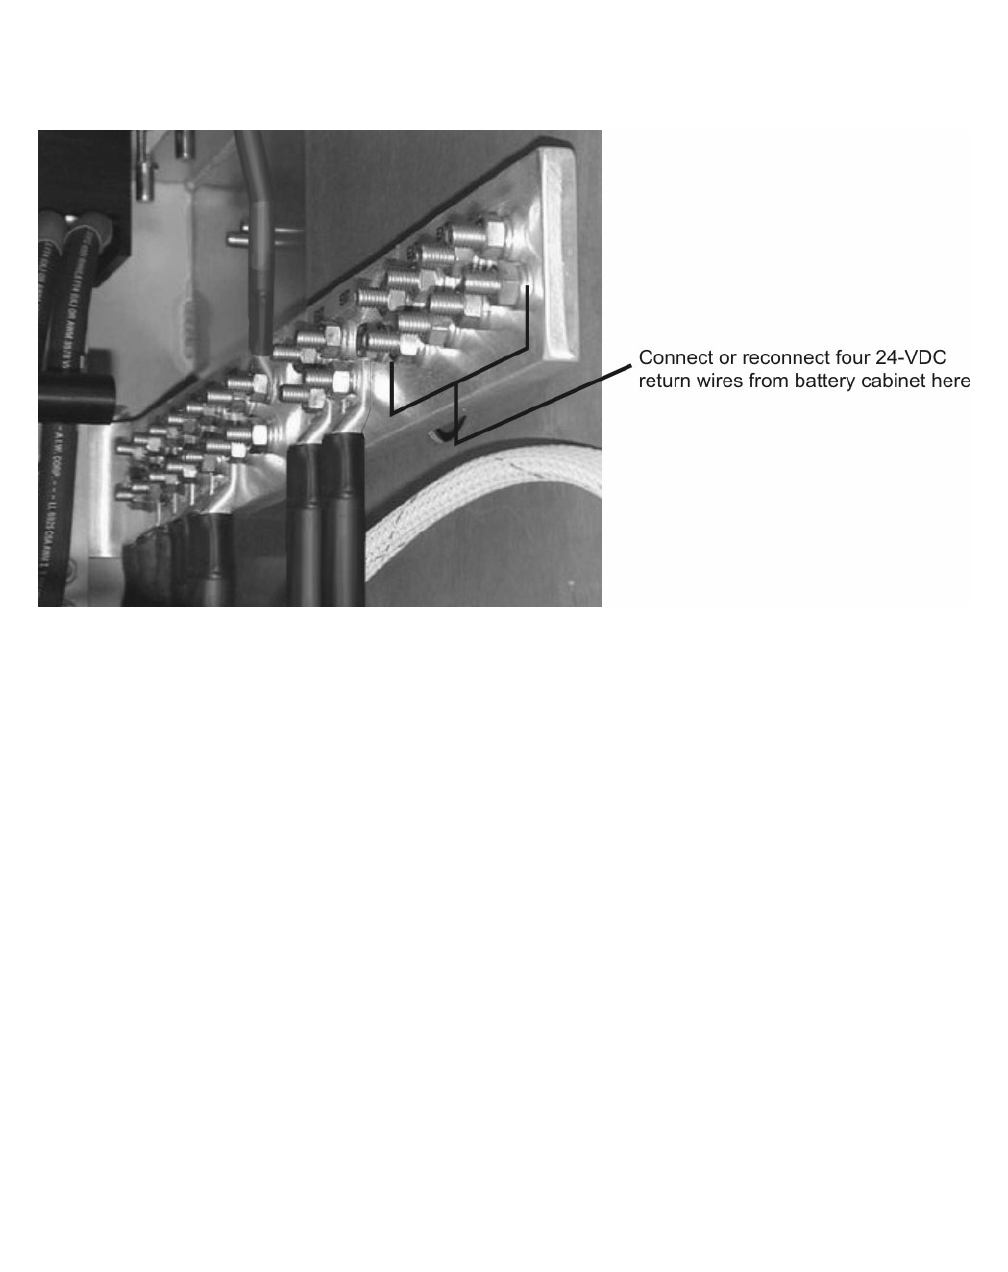
1Individually untape and reconnect to the return bus the four 24V Return
cables (from the first battery base module) that were disconnected for
safety reasons. Refer to the figure on Page A - 147.
................................................................................................................................
............................................
2Untape one of the four 24V Return cables and to cut it to the proper
length to reach the Return bus in the HPDA. Refer to the figure on Page
A - 147.
................................................................................................................................
............................................
3Strip the insulation at the end of the cable.
................................................................................................................................
............................................
4Slip a section of the supplied heat shrink tubing onto each cable.
................................................................................................................................
............................................
5Crimp a supplied two-hole terminal lug onto the end of the cable.
................................................................................................................................
............................................
6Shrink the tubing with a heat gun.
................................................................................................................................
............................................
7Connect this 24V Return cable (from the first battery base module) at
the return bus bar in the Modular Cell 4.0B cabinet. Refer to the figure
on Page A - 147.
................................................................................................................................
............................................
8Torque the nuts to according to the torque table in Chapter 1.
A- 147
Lucent Technologies – Proprietary
See notice on first page
401-703-454
FOA Draft Issue 1
January, 2006
............................................................................................................................................................................................................................................................
................................................................................................................................
............................................
9Repeat Steps 2 through 8 for the remaining three 24V Return cables.

A- 148 Lucent Technologies – Proprietary
See notice on first page 401-703-454
FOA Draft Issue 1
January, 2006
...........................................................................................................................................................................................................................................................
.............................................................................................................................................................................................................................................................
How to make the final L1 battery connections in the battery modules
Overview This procedure module provides instructions for the final L1 battery
connections in the battery modules.
Important! The battery cables will be connected to the bus bars in this
module.
Step-by-step instructions are provided for the following tasks:
Test and connect the L1 battery cables to the bus bars in the
battery modules
A - 149
Complete the installation of batteries A - 153
A- 149
Lucent Technologies – Proprietary
See notice on first page
401-703-454
FOA Draft Issue 1
January, 2006
............................................................................................................................................................................................................................................................
Test and connect the L1
battery cables to the bus
bars in the battery modules
Important! If installing 12IR125 batteries, skip to How to make
the final 12IR125 battery connections in the battery modules on Page D
-156 to continue the installation.
Perform the following steps to test and connect the battery cables to the
bus bars in the battery base modules, as applicable.
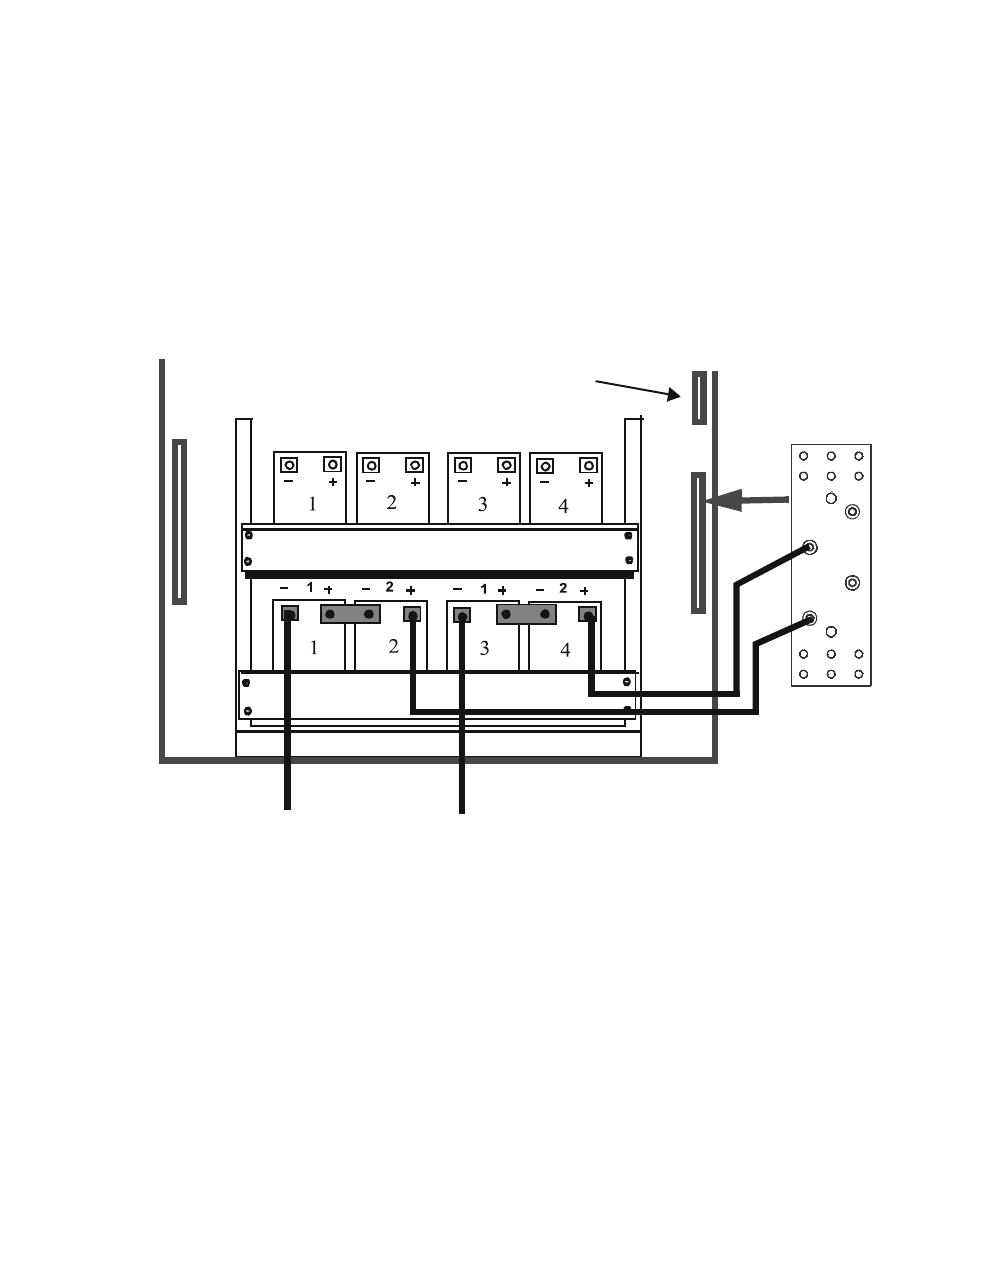
1To determine if you have correctly connected the battery cables to the
batteries, measure the voltage and polarity between the positive and
negative cables from each battery string (identified in the figure below)
prior to connecting the two cables to the applicable buses. Start with the
lowest shelf of the first battery frame.
• Place the negative probe of the meter on "RTN" cable #1 (marked
black)
• Place the positive probe of the meter on " 24V" cable #4 (marked
red)
122
1
1
1234
1234
2
3
4
UPPER
SHELF
LOWER
SHELF
A- 150 Lucent Technologies – Proprietary
See notice on first page 401-703-454
FOA Draft Issue 1
January, 2006
...........................................................................................................................................................................................................................................................
................................................................................................................................
............................................
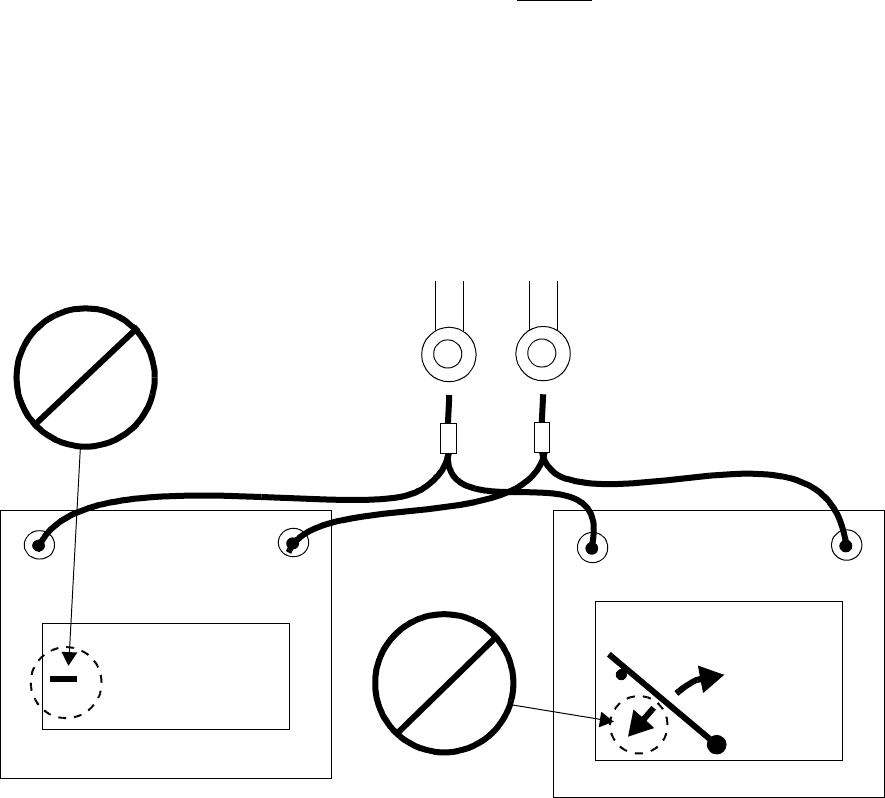
2 To determine that the polarity is correct, refer to the figure below.
• Digital meter - no symbol or positive symbol = correct
connection.
• Digital meter - negative symbol = incorrect connection.
• Analog meter - positive deflection = correct connection.
• Analog meter - negative deflection = incorrect connection.
All of the above assume correct meter lead connection.
................................................................................................................................
............................................
3Repeat the previous two steps for the other battery string on the shelf:
• Place the negative probe of the meter on "RTN" cable #3 (marked
black)
• Place the positive probe of the meter on " 24V" cable #2 (marked
red)
................................................................................................................................
............................................
4Repeat the previous three steps for all populated battery shelves.
+
_
+
_
26.25*
+
NEGATIVE
SYMBOL
POSITIVE
DEFLECTION
NEGATIVE
DEFLECTION
ANALOG
DIGITAL
BATTERY
CABLES *EXAMPLE VOLTAGE ONLY
_
A- 151
Lucent Technologies – Proprietary
See notice on first page
401-703-454
FOA Draft Issue 1
January, 2006
............................................................................................................................................................................................................................................................
................................................................................................................................
............................................
5If necessary, rewire the battery cables found to be incorrectly wired.
Important! A battery wiring diagram is shipped with the cables
................................................................................................................................
............................................
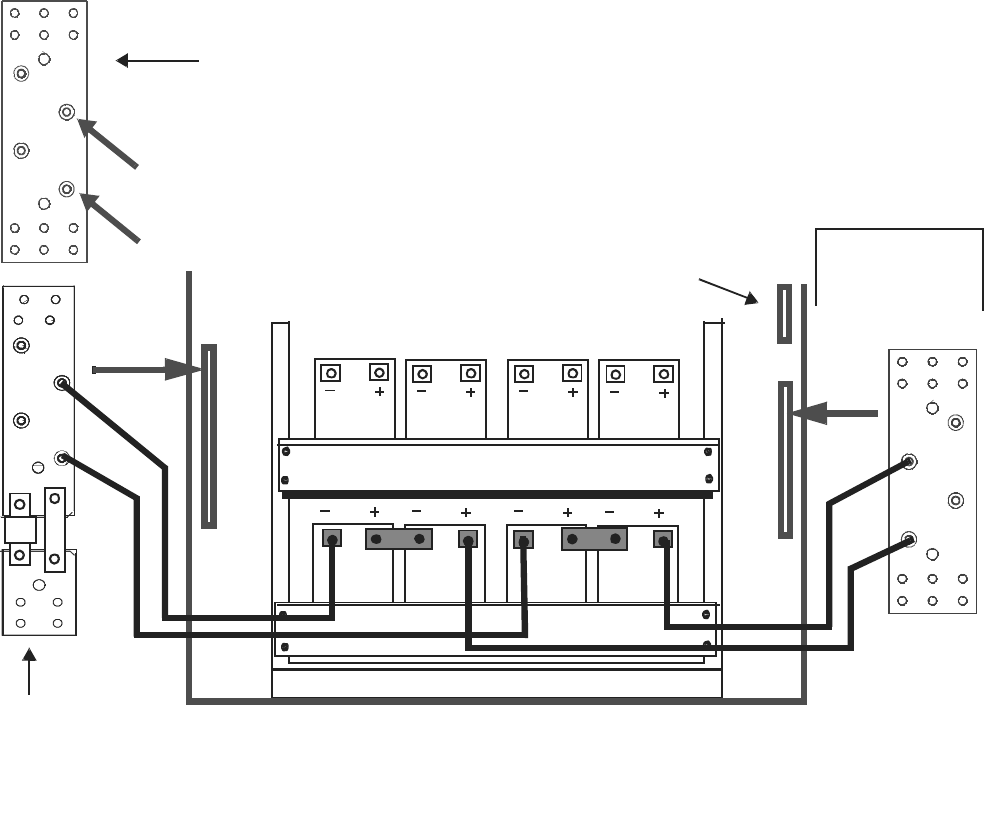
6Connect the following two positive (24V) battery cables starting on the
lowest shelf of the first battery frame to the positive (24V) bus.
• Attach cable #4 (marked red) to the positive (24V) bus
• Attach cable #2 (marked red) to the positive (24V) bus
................................................................................................................................
............................................
7Repeat the previous step for the positive (24V) cables only on all
populated battery shelves.
................................................................................................................................
............................................
8Tie the two positive (24V) cables to the front of the battery retaining
bracket.
1
2
3
4
POSITIVE
BUS
12V BUS NOT USED
WITH L1 BATTERIES
+24
V
A- 152 Lucent Technologies – Proprietary
See notice on first page 401-703-454
FOA Draft Issue 1
January, 2006
...........................................................................................................................................................................................................................................................
................................................................................................................................
............................................
9Connect the following two negative (RTN) battery cables starting on the
lowest shelf of the first battery frame to the negative (RTN) bus.
• Attach cable #3 (marked black) to the negative (RTN) bus
• Attach cable #1 (marked black) to the negative (RTN) bus
................................................................................................................................
............................................
10 Repeat the previous step for all populated battery shelves.
122
1
1
1
2
3
4
1
2
3
4
2
3
4
POSITIVE
BUS
RETURN
BUS:
BATTERY
BASE
MODULE*
1
3
RETURN
BUS:
ADD-
ON
MODULES
PREVIOUSLY
CONNECTED
* THE FUSE AND FUSE ACTUATOR/SWITCH ARE REPLACED
BY A STRAP IN THE SECOND BATTERY BASE MODULE
12V BUS NOT USED
WITH L1 BATTERIES
+
24V
RTN
12V
A- 153
Lucent Technologies – Proprietary
See notice on first page
401-703-454
FOA Draft Issue 1
January, 2006
............................................................................................................................................................................................................................................................
Complete the installation of
batteries Use the following procedure to complete the installation of batteries.
................................................................................................................................
............................................
1Dress and tie-wrap any remaining loose cables.
................................................................................................................................
............................................
2Replace the plastic cover that shields the 12V and 24V bus bars in all
modules. Refer to the Step 2 figure on Page A - 58.
................................................................................................................................
............................................
3Check the completed installation against the wiring diagram shipped
with the cables or the wiring diagram below.
................................................................................................................................
............................................
4Attach the wiring diagram shipped with the cables to the inside of the
front panel or door.
Replace the battery module
panels and close/secure
the front door(s) (if
applicable)
Perform the following steps to replace the battery module front panel
on all battery modules, and the filter panel and top panel on the top
battery module. Close and secure the front door(s), if applicable.
................................................................................................................................
............................................
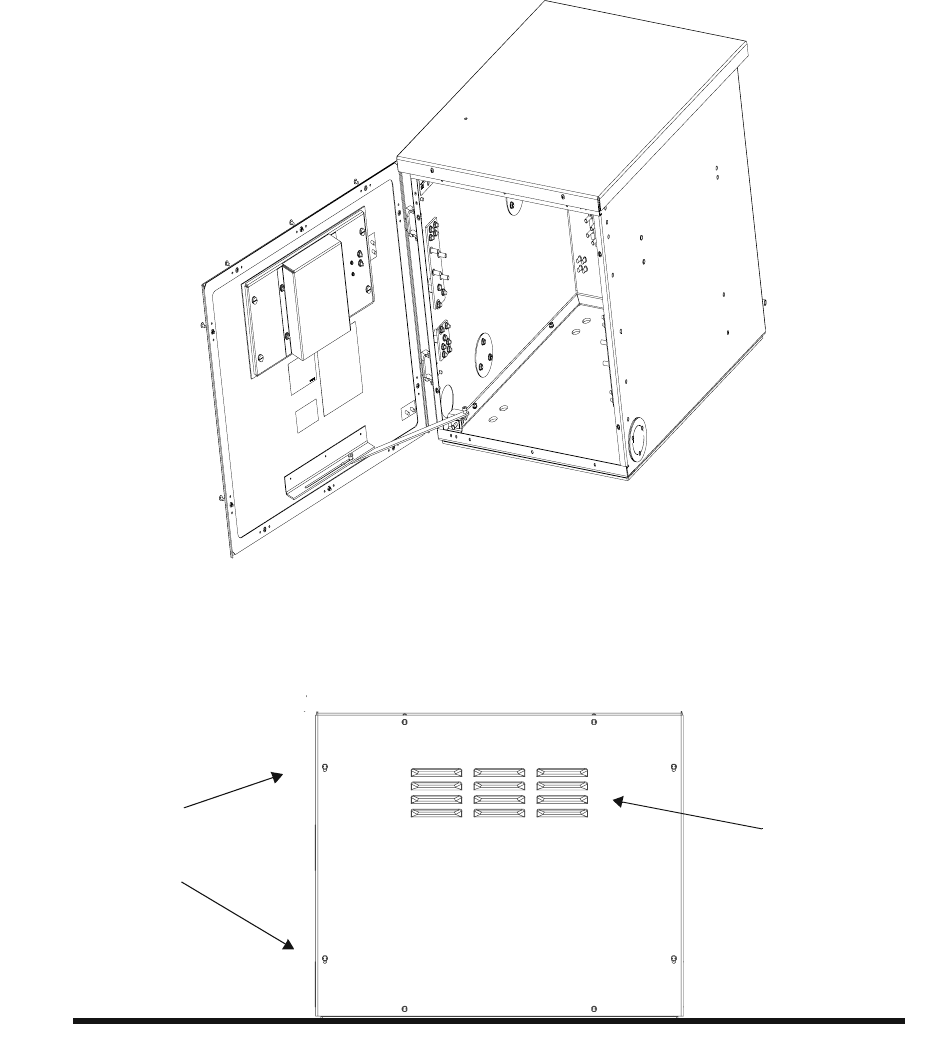
1Attach the front panel lanyard cable (and the fan power and alarm cable
if it is a base module) if either has been disconnected. Refer to the figure
below.
A- 154 Lucent Technologies – Proprietary
See notice on first page 401-703-454
FOA Draft Issue 1
January, 2006
...........................................................................................................................................................................................................................................................
................................................................................................................................
............................................
2Close the front door, if applicable, or replace the front panel. Use the
eight TR 25 Keytorx screws provided, to secure both the panel. Use the
1/4 turn fasteners for the door. Refer to the applicable figure below.
................................................................................................................................
............................................
3Repeat the previous steps for all front doors or panels.
B
OLT LOCATIONS
(2 of 8)
LOUVERS NOT
PRESENT ON
ADD-ON MODUL
E
FRONT PANELS
FRONT VIEW
A- 155
Lucent Technologies – Proprietary
See notice on first page
401-703-454
FOA Draft Issue 1
January, 2006
............................................................................................................................................................................................................................................................
................................................................................................................................
............................................
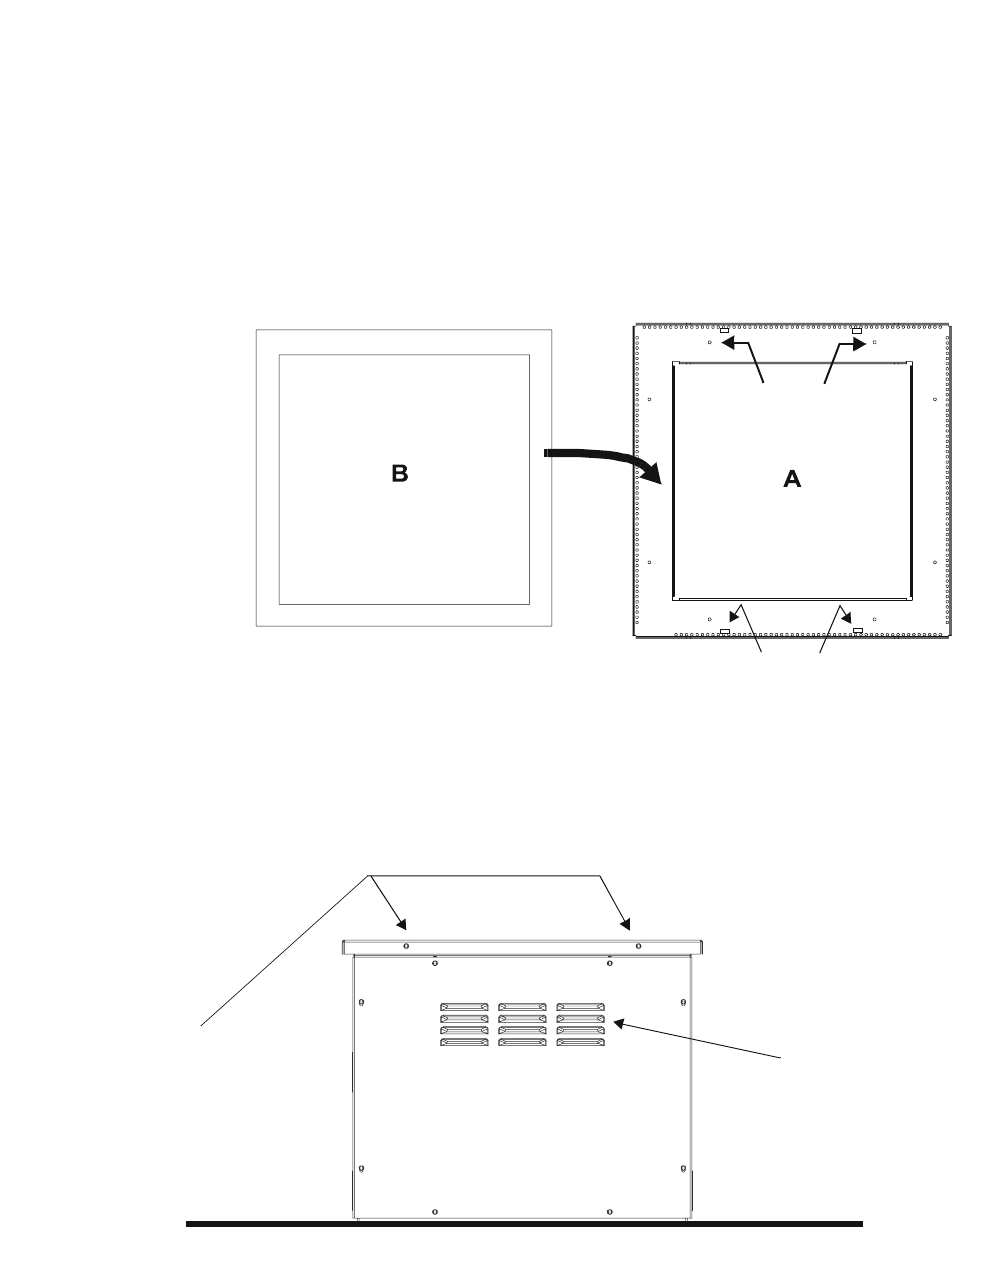
4Position the filter panel with the captive nuts (for front panel mounting)
forward as shown in the "A" figure below. Attach the filter panel to the
outer frame using the eight bolts that were previously removed. Torque
according to the table in Chapter 1.
................................................................................................................................
............................................
5Replace the filter material. Refer to "B" in the figure below.
................................................................................................................................
............................................
6Reattach the lanyard cable and replace the top panel using the two TR
25 Keytorx screws previously removed. Torque according to the table in
Chapter 1. Refer to the figure below.
FILTER MATERIAL
FILTER PANEL
FRONT
BOLT LOCATIONS (2 of
8)
CAPTIVE NUT LOCATIONS*
FOR MOUNTING TOP PANEL
TOP VIEW
*
The captive
n
ut locations
a
re also present
o
n the rear of
t
he panel,
a
llowing it to
b
e mounted 180
d
egrees from
t
he position
s
hown
B
OLT LOCATIONS
LOUVERS NOT
PRESENT ON
ADD-ON MODUL
E
FRONT PANEL
FRONT VIEW

A- 156 Lucent Technologies – Proprietary
See notice on first page 401-703-454
FOA Draft Issue 1
January, 2006
...........................................................................................................................................................................................................................................................
How to make the final 12IR125 battery connections in the battery
.............................................................................................................................................................................................................................................................
modules
Overview This procedure module provides instructions for the final 12IR125
battery connections in the battery modules.
Important! The battery cables will be connected to the bus bars in this
module.
Step-by-step instructions are provided for the following tasks:
This procedure module provides instructions for the final 12IR125
battery connections in the battery modules.
Important! All six 12IR125 batteries must be installed in the battery
module.
Test and connect the 12IR125 battery cables to the bus bars in
the battery modules
A - 157
Complete the installation of 12IR125 batteries A - 160
Replace the battery module panels and close/secure the front
door(s), if applicable (Reference)
A - 162
A- 157
Lucent Technologies – Proprietary
See notice on first page
401-703-454
FOA Draft Issue 1
January, 2006
............................................................................................................................................................................................................................................................
Test and connect the
12IR125 battery cables to
the bus bars in the battery
modules
Perform the following steps to test and connect the battery cables to the
bus bars in the battery base modules, as applicable.
................................................................................................................................
............................................
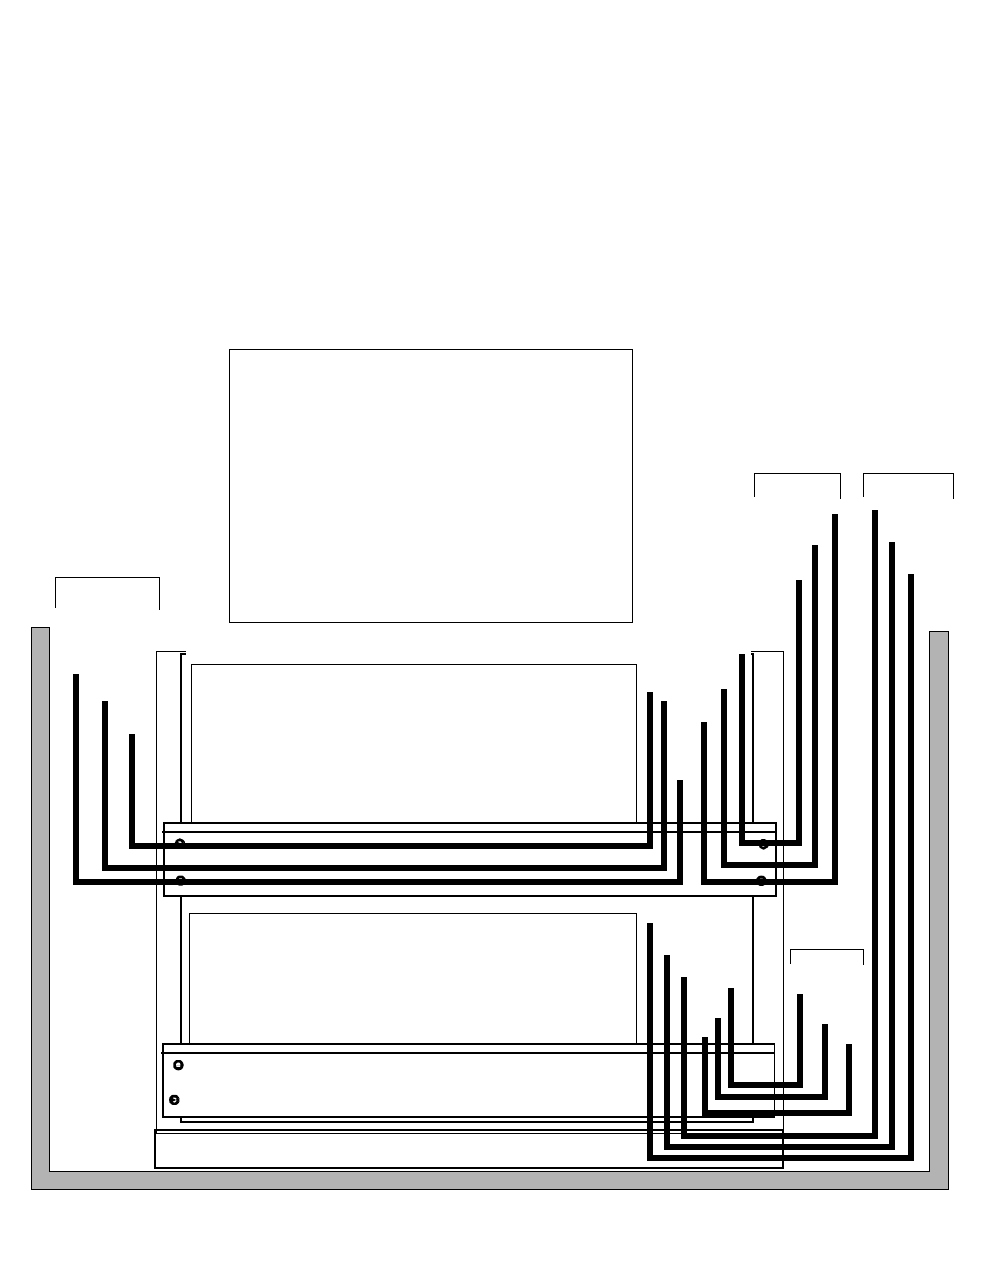
1Prior to connecting the cables to the applicable buses, determine if you
have correctly connected the battery cables to the batteries by measuring
the voltage and polarity between the positive and negative cables from
each battery. Use the figure below for measuring points.
UPPER
SHELF
LOWER
SHELF
FRONT VIEW
B1
B2
B3
B4
B5
B6
B4
B5
B6
BLACK
BLUE BLUE
B1
B2B3
RED
Measure:
• B1 Red (+) to B1 Blue (-)
• B2 Red (+) to B2 Blue (-)
• B3 Red (+) to B3 Blue (-)
• B4 Blue (+) to B4 Black (-)
• B5 Blue (+) to B5 Black (-)
• B6 Blue (+) to B6 Black (-)
A- 158 Lucent Technologies – Proprietary
See notice on first page 401-703-454
FOA Draft Issue 1
January, 2006
...........................................................................................................................................................................................................................................................
................................................................................................................................
............................................
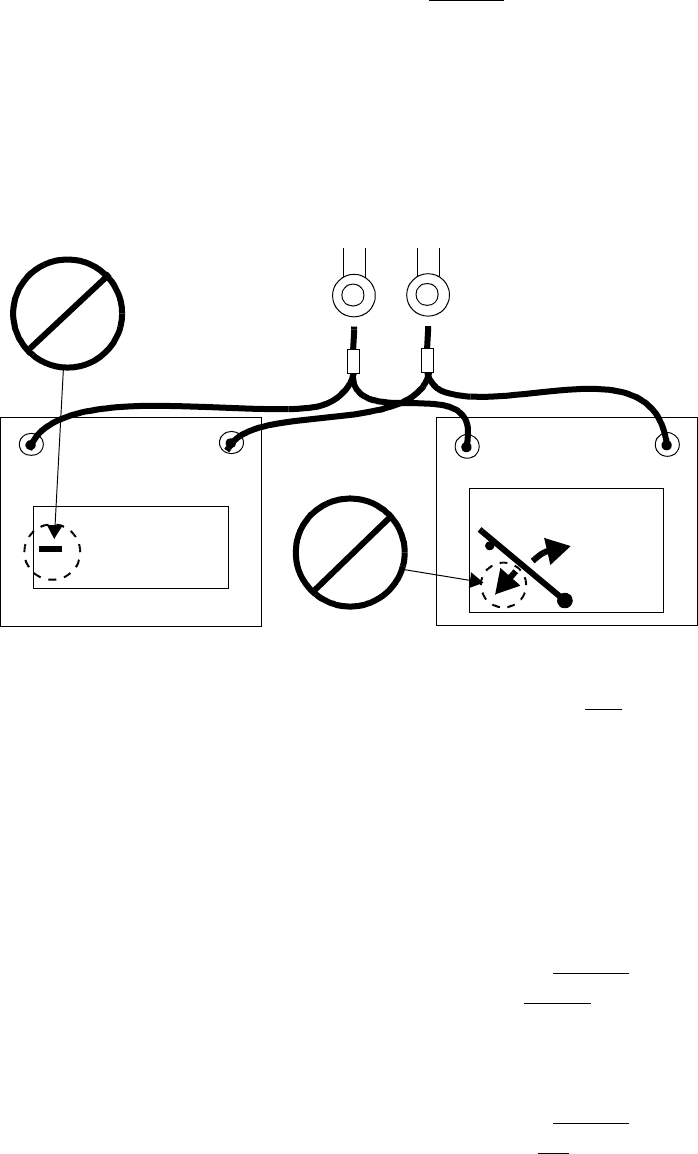
2 To determine that the polarity is correct, refer to the figure below.
• Digital meter - no symbol or positive symbol = correct
connection.
• Digital meter - negative symbol = incorrect connection.
• Analog meter - positive deflection = correct connection.
• Analog meter - negative deflection = incorrect connection.
All of the above assume correct meter lead connection.
................................................................................................................................
............................................
3Repeat the previous two steps on every pair of battery shelves populated
with 12IR125 batteries.
................................................................................................................................
............................................
4If necessary, rewire the battery cables found to be incorrectly wired.
Important! A battery wiring diagram is shipped with the cables
................................................................................................................................
............................................
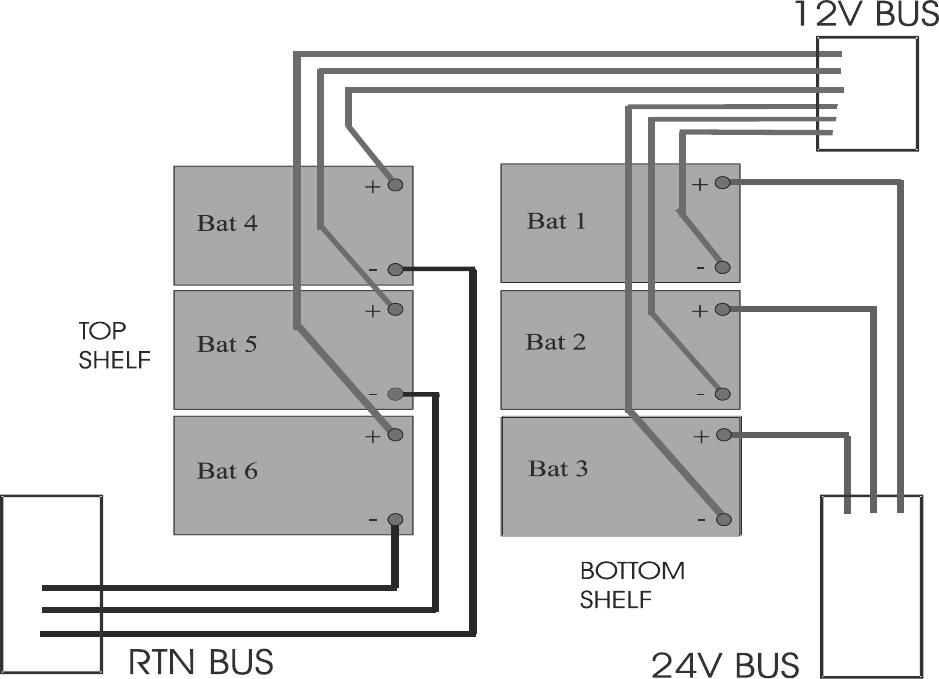
5Connect the three battery 1, 2, and 3 positive cables (labeled “24V BUS”
with RED heat shrink) from the bottom battery shelf to the positive
(24V) bus. Refer to the figure on Page A - 159.
................................................................................................................................
............................................
6Connect the three battery 4, 5, and 6 positive cables (labeled “12V BUS”
with BLUE heat shrink) from the top battery shelf to the rear most
portion of the 12V bus. Refer to the figure on Page A - 159.
+
_
+
_
12.25
+
NEGATIVE
SYMBOL
POSITIVE
DEFLECTION
NEGATIVE
DEFLECTION
ANALOG
DIGITAL
BATTERY
CABLES *EXAMPLE VOLTAGE ONLY
_
A- 159
Lucent Technologies – Proprietary
See notice on first page
401-703-454
FOA Draft Issue 1
January, 2006
............................................................................................................................................................................................................................................................
................................................................................................................................
............................................
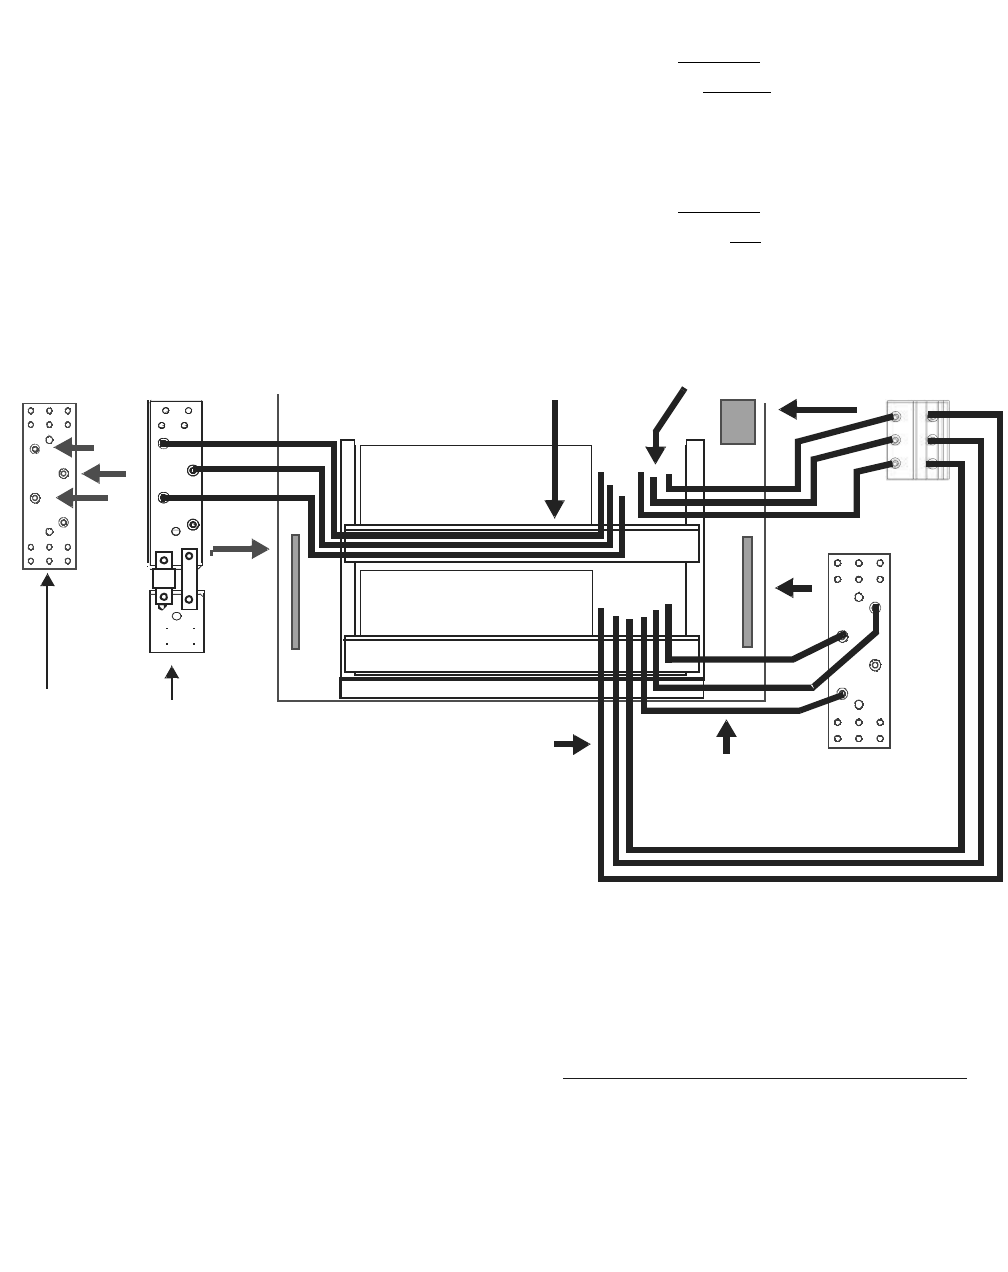
7Connect the three battery 1, 2, and 3 negative cables (labeled "12V
BUS" with BLUE heat shrink) from the bottom battery shelf to the front
most portion of the 12V bus. Refer to the figure below.
................................................................................................................................
............................................
8Connect the three battery 4, 5, and 6 negative cables (labeled "RTN
BUS" with BLACK heat shrink) from the top battery shelf to the RTN
bus. Refer to the figure below.
................................................................................................................................
............................................
9Repeat the steps 1 through 8 for all populated battery modules.
Important! When you have finished connecting the batteries to
the bus bars skip to Complete the installation of 12IR125 batteries on
Page A - 160. Continue to the next step only if you have not
marked the battery cables B1-B6 and have not yet connect the
battery cables to the bus bars.
RTN BUS:
IN
BATTERY
BASE
MODULE*
RTN BUS:
IN
ADD-ON
MODULES
*
THE FUSE AND FUSE ACTUATOR/SWITCH ARE REPLACED
BY A STRAP IN THE SECOND BATTERY BASE MODULE
THREE TOP SHELF
BLACK CABLES
(Batteries 4-6) TO
RTN BUS
12V BUS
THREE TOP SHELF
BLUE CABLES
(Batteries 4-6) TO
12V BUS
THREE BOTTOM SHELF
BLUE CABLES (Batteries
1-3) TO
12V BUS
24V
BUS
THREE BOTTOM
SHELF RED CABLES
(Batteries 1-3) TO 24V BUS
TOP SHELF
12IR125
BATTERIES (4-6)
BOTTOM SHELF
12IR125
BATTERIES (1-3)
A- 160 Lucent Technologies – Proprietary
See notice on first page 401-703-454
FOA Draft Issue 1
January, 2006
...........................................................................................................................................................................................................................................................
Complete the installation of
12IR125 batteries Use the following procedure to complete the installation of the
12IR125 batteries.
................................................................................................................................
............................................
1Dress and tie-wrap any remaining loose cables.
................................................................................................................................
............................................
2Replace the plastic cover that shields the 12V and 24V bus bars in all
modules. Refer to the Step 2 figure on Page A - 58.
................................................................................................................................
............................................
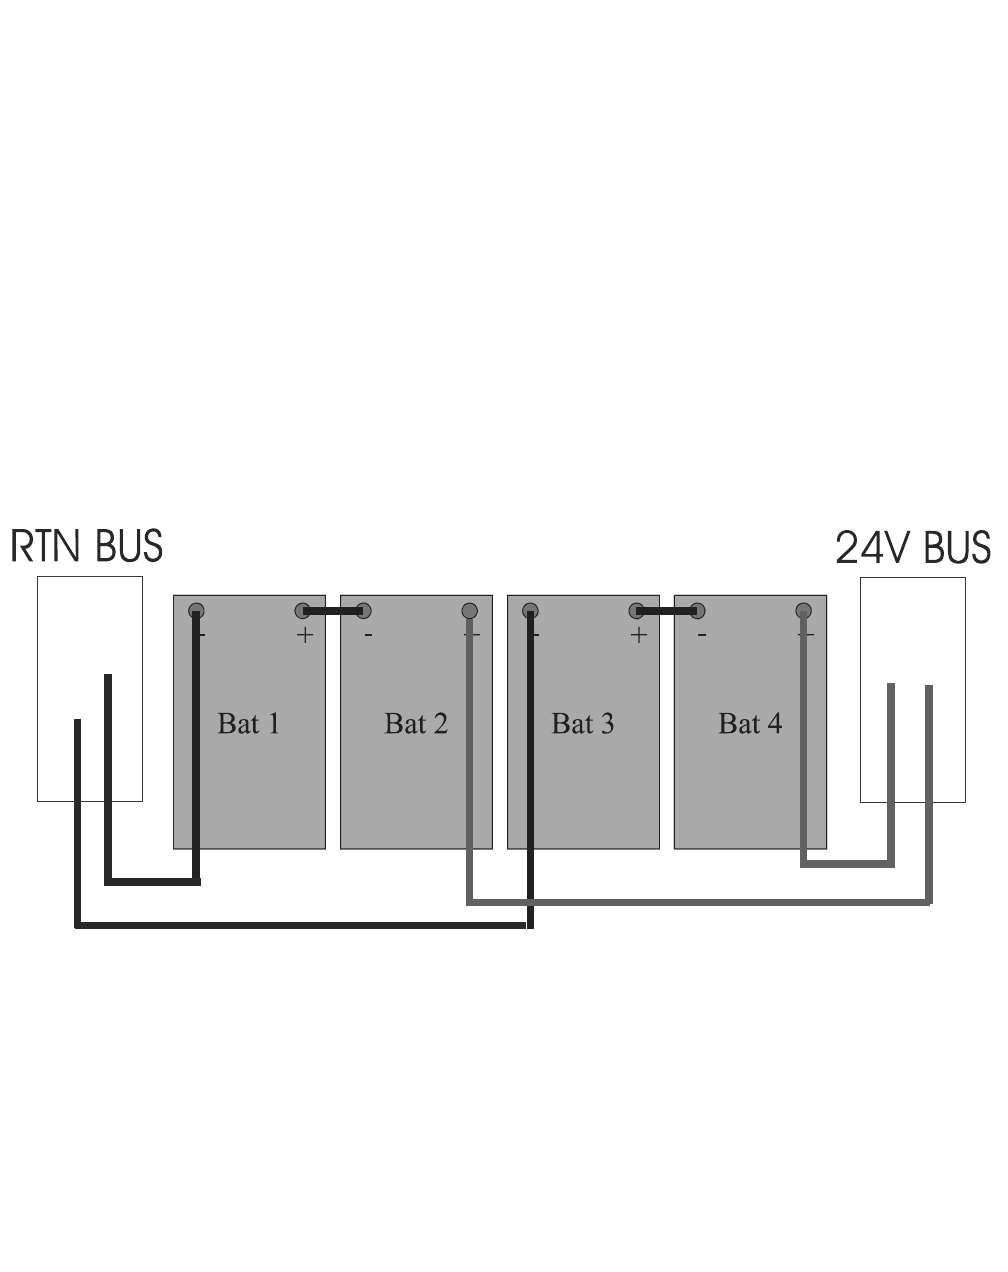
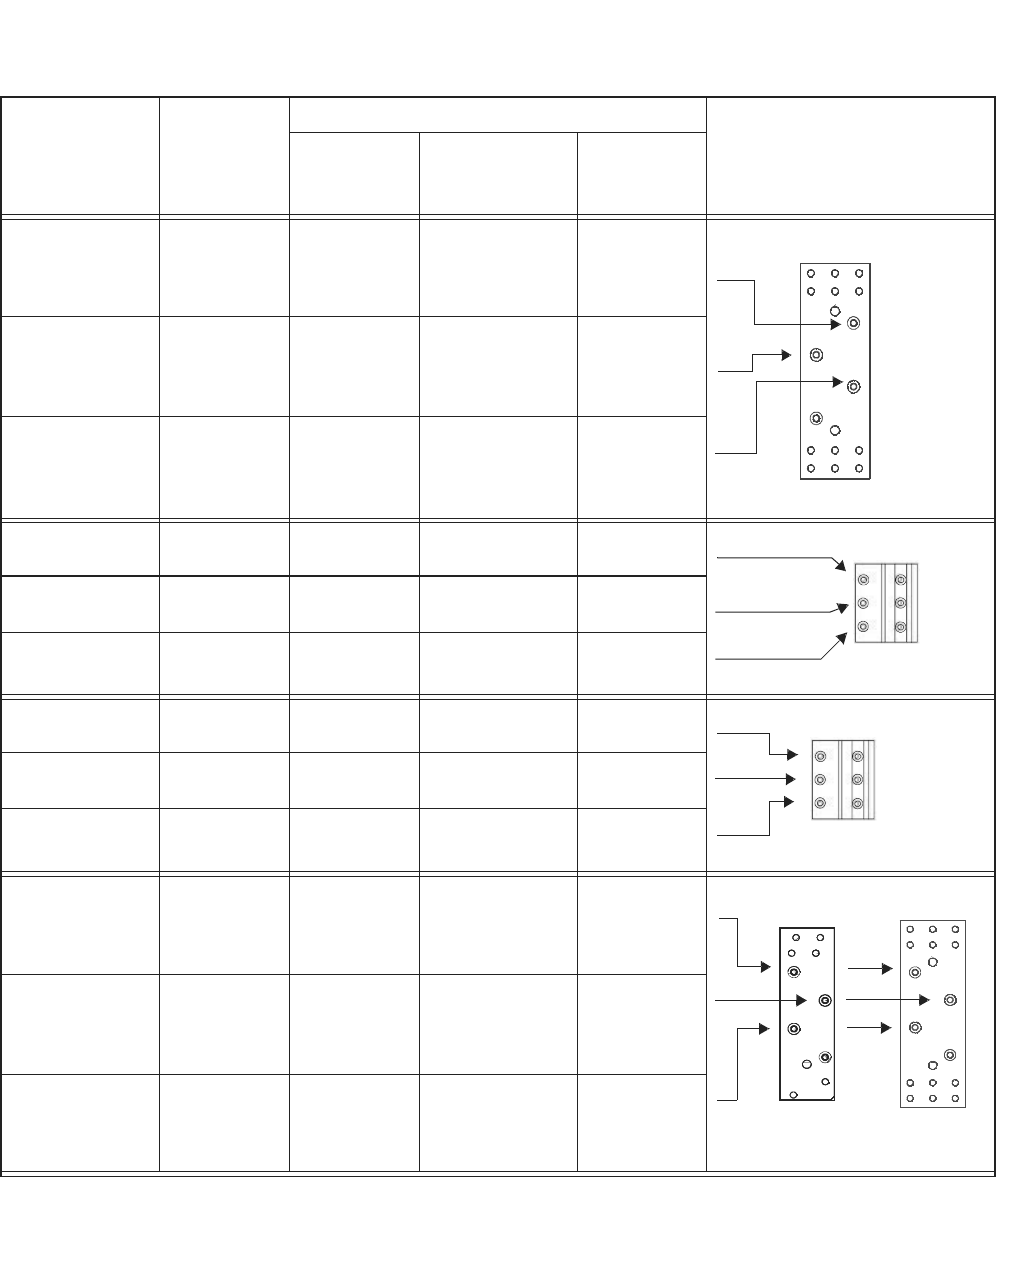
3Check the completed installation against the wiring diagram shipped
with the cables or the wiring diagram below.
................................................................................................................................
............................................
4Attach the wiring diagram shipped with the cables to the inside of the
front panel or door.
A- 161
Lucent Technologies – Proprietary
See notice on first page
401-703-454
FOA Draft Issue 1
January, 2006
............................................................................................................................................................................................................................................................
................................................................................................................................
............................................
5Refer to the table below for specific battery cable connections.
BATTERY
NUMBER/
SHELF
LOCATION
CABLE
NUMBER CABLE BUS CONNECTION
BATTERY
END ID/
COLOR
CABLE ID BUS
END ID/
COLOR
BATTERY 1
LOWER SHELF
10 BAT1(+)/
RED
BAT1(+)-24V 24V BUS/
RED
BATTERY 2
LOWER SHELF
11 BAT2(+)/
RED
BAT2(+)-24V 24V BUS/
RED
BATTERY 3
LOWER SHELF 12 BAT3(+)/
RED BAT3(+)-24V 24V BUS/
RED
BATTERY 1
LOWER SHELF
4 BAT1(-)/
BLACK
BAT1(-)-12V 12V BUS/
BLUE
BATTERY 2
LOWER SHELF 5 BAT2(-)/
BLACK BAT2(-)-12V 12V BUS/
BLUE
BATTERY 3
LOWER SHELF
6 BAT3(-)/
BLACK
BAT3(-)-12V 12V BUS/
BLUE
BATTERY 4
UPPER SHELF
7BAT4(+)/
RED
BAT4(+)-12V 12V BUS/
BLUE
BATTERY 5
UPPER SHELF
8BAT5(+)/
RED
BAT5(+)-12V 12V BUS/
BLUE
BATTERY 6
UPPER SHELF
9BAT6(+)/
RED
BAT6(+)-12V 12V BUS/
BLUE
BATTERY 4
UPPER SHELF
1 BAT4(-)/
BLACK
BAT4(-)-RTN RTN BUS/
BLACK
BATTERY 5
UPPER SHELF 2 BAT5(-)/
BLACK BAT5(-)-RTN RTN BUS/
BLACK
BATTERY 6
UPPER SHELF
3 BAT6(-)/
BLACK
BAT6(-)-RTN RTN BUS/
BLACK
24V BUS
12V BUS
12V BUS
RTN BUS
ADD-ON
BASE

A- 162 Lucent Technologies – Proprietary
See notice on first page 401-703-454
FOA Draft Issue 1
January, 2006
...........................................................................................................................................................................................................................................................
Replace the battery module
panels and close/secure
the front door(s), if
applicable (Reference)
Refer to Replace the battery module panels and close/secure the front
door(s) (if applicable) on Page A - 153 to replace the battery module
front panels and top cover, and close the door(s), if applicable.

B- 1
Lucent Technologies – Proprietary
See notice on first page
401-703-454
FOA Draft Issue 1
January, 2006
............................................................................................................................................................................................................................................................
Appendix B: Non-Lucent power
ancillary hardware installation, cable
routing and connection
.............................................................................................................................................................................................................................................................
Overview
Purpose This appendix provides the following instructions that are required
when a customer supplied non-Lucent power source is being utilized to
power a line-up configuration consisting of a Cell 4.0B primary cabinet
and a Modular Cell 4.0B dual band cabinet:
• Installation the ancillary hardware required for routing of DC, AC,
and power alarm cables from the power source to the outdoor
Modular Cell 4.0B cabinets.
• Direct (or remote connection using conduits) connection of the
power source to the outdoor Modular Cell 4.0B primary cabinet.
• Routing and connection of DC, AC and power alarm cables from
the power source to the outdoor Modular Cell 4.0B primary
cabinet, as well as DC and AC cable routing and connection to the
Modular Cell 4.0B dual band cabinet.
Contents This appendix contains the following sections.
Installation of ancillary hardware B - 2
Procedures to route and connect all non-Lucent power
cables in the Modular Cell 4.0B cabinets
B - 16
Finishing the installation B - 74

B- 2 Lucent Technologies – Proprietary
See notice on first page 401-703-454
FOA Draft Issue 1
January, 2006
...........................................................................................................................................................................................................................................................
Installation of ancillary hardware
.............................................................................................................................................................................................................................................................
Overview of this section
Purpose This section describes the procedures required for the installation the
ancillary hardware required for routing of DC, AC, and power alarm
cables from the power source to the outdoor Modular Cell 4.0B
cabinets.
Contents This section covers the following procedures.
.............................................................................................................................................................................................................................................................
How to install the cable duct assembly
Description of cable duct
assembly and AC conduit
kit
The cable duct assembly and AC conduit kit provides a weatherproof
duct to route DC and AC power cables, as well as the power user alarm
cable. The kit consists of the following components:
• Vertical Duct Cable Assembly (quantity: 1)
• Rectangular spacer with gasket foam on both sides (quantity. 1)
• Conduit nipple, threaded alum., 2-in. dia. X 2-in. long (quantity:
1)
• Conduit, flexible, 2-in. dia. X. 2-in. long (quantity: 1)
• Conduit, fitting, 2-in. dia. (quantity: 2)
• Conduit body, LL69 (quantity: 1)
• Conduit body, cover 690 (quantity: 1)
• Conduit body gasket, gasket 1946 (quantity: 1)
•Chase nipple (quantity: 2)
• Locknut, 2-in. dia. (quantity: 6)
• Sealing washer (quantity: 2)
How to install the cable duct assembly B - 2
How to install the AC conduit B - 6
How to attach the non-Lucent power source to the cable duct assembly B - 10
B- 3
Lucent Technologies – Proprietary
See notice on first page
401-703-454
FOA Draft Issue 1
January, 2006
............................................................................................................................................................................................................................................................
• Bushing, insulating, 2-in. dia. (quantity: 3)
• Grommet, caterpillar, 20-in. long (quantity: 2)
• Plug 2-1/2 in. (quantity: 1 - used when there is no dual band
cabinet)
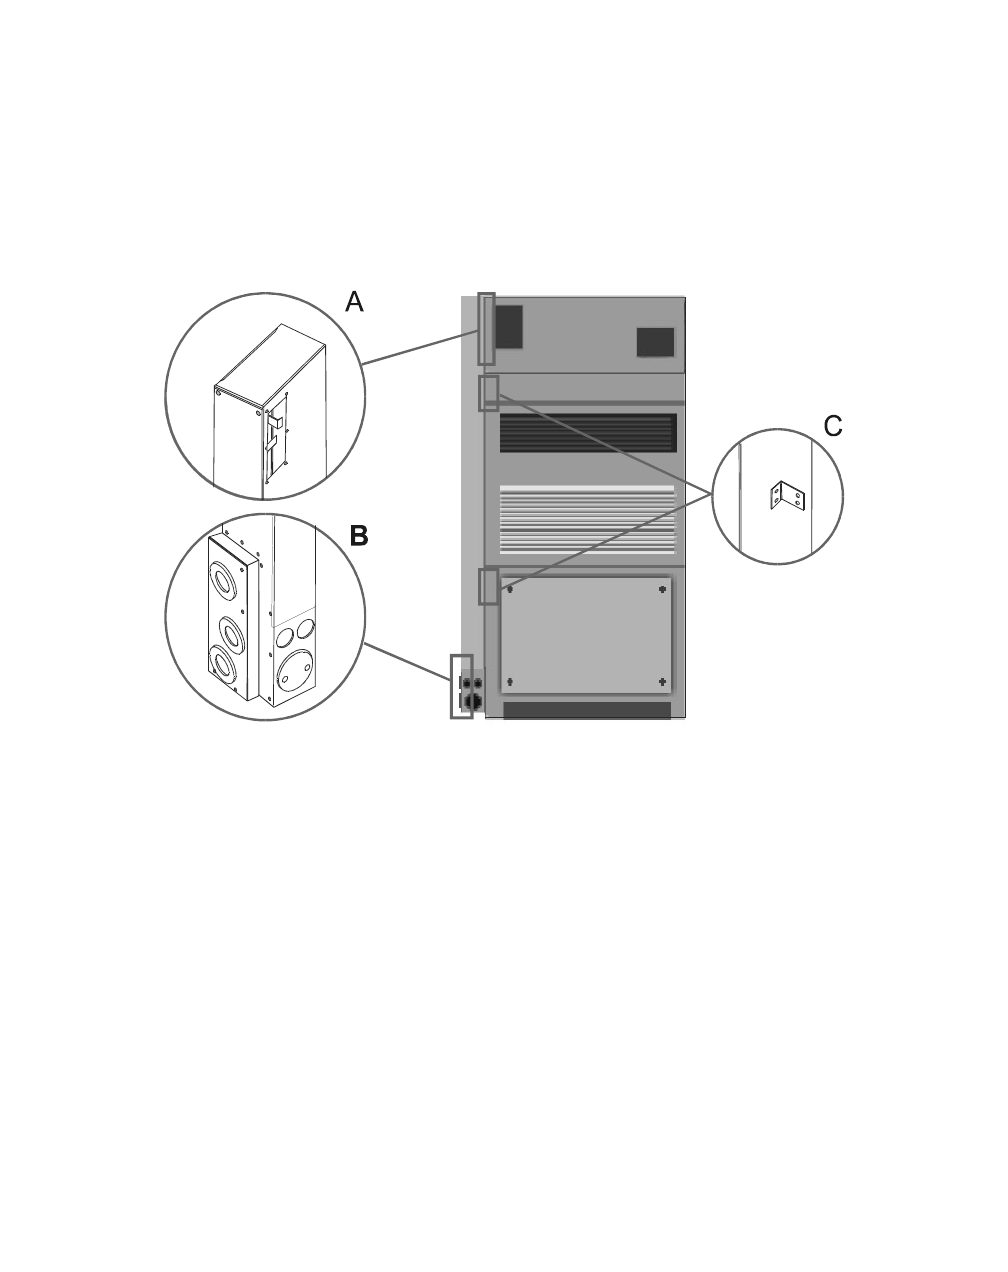
The figure below illustrates the cable duct assembly viewed from the
rear, and identifies the connections to the primary cabinet.
Detail A: Connections for six hex-head screws
Detail B: Location for conduit connections (on left) for routing of DC,
AC, and power alarm cables from the non-Lucent power source. For
the conduit connections on the right (rear) of the cable duct, refer to
Chapter 3 for T1/E1 and external user alarm routing and connection.
Detail C: Connections for four tamper-proof screws (requires #14
drilled spanner driver)
The right side of the cable duct assembly (as viewed from the rear) is
attached to the Modular Cell 4.0B primary cabinet at two locations: On
the right side using tamper-proof screws, and at the top using hex-head
screws. The mounting locations are shown in the figure above (details
A and C). Refer to the figure on Page B - 5, which shows a different
view.
B- 4 Lucent Technologies – Proprietary
See notice on first page 401-703-454
FOA Draft Issue 1
January, 2006
...........................................................................................................................................................................................................................................................
Important! If the interface hardware is not going to be installed
at this time and the Modular Cell 4.0B cabinet is to be left
unattended, provisions must be made to cover the opening on the
left side of the antenna cable cover in the event of inclement
weather.
Install the cable duct
assembly This instruction describes the procedures for installing the cable duct
assembly (required for non- Lucent power connection) on the Modular
Cell 4.0B primary cabinet. Use the following procedure to install the
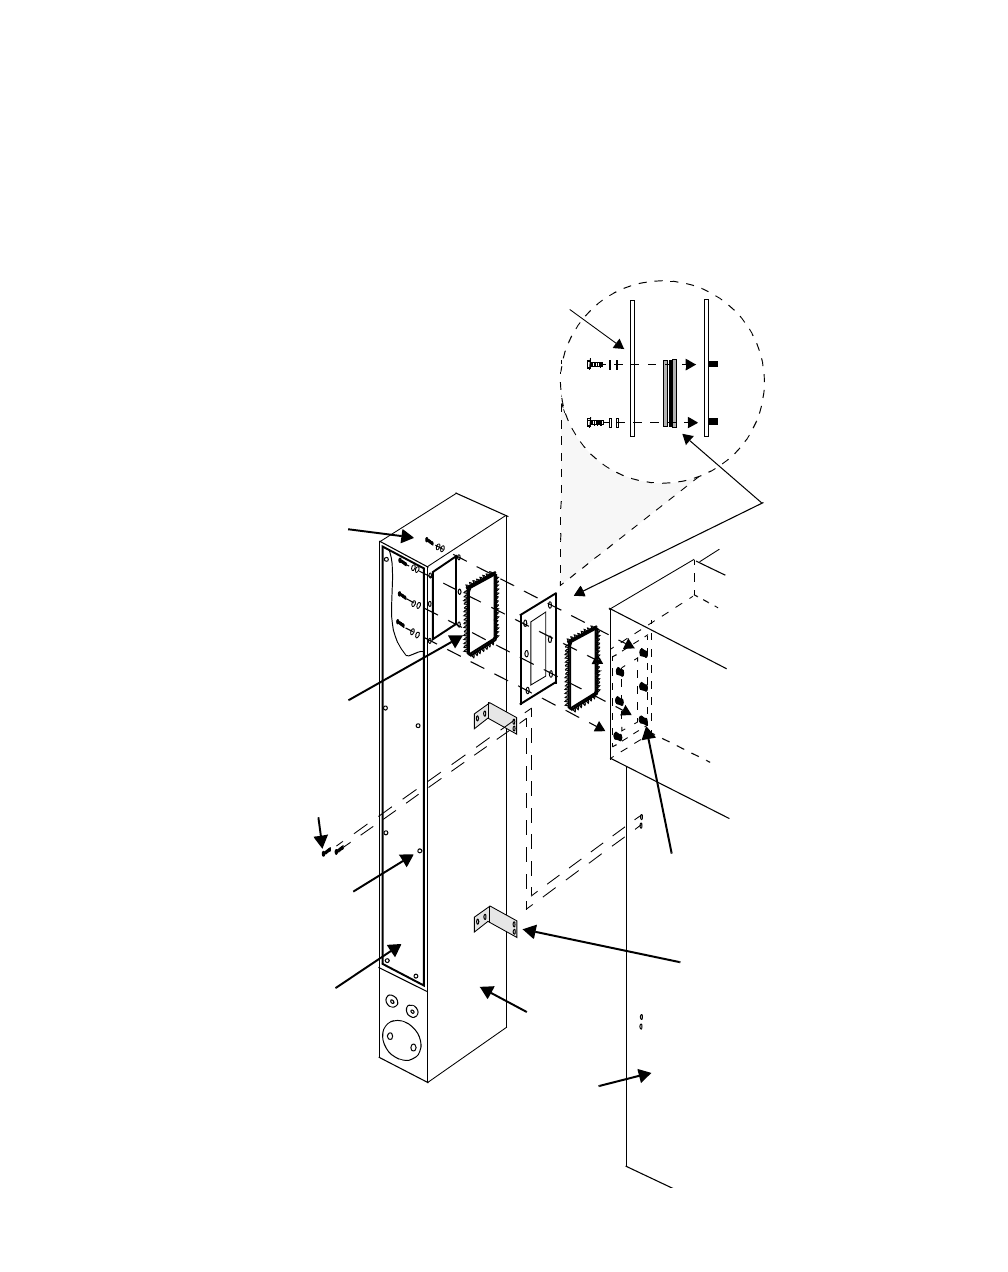
cable duct assembly. Refer to the figure on Page B - 5.
................................................................................................................................
............................................
1Obtain the DC interface kit. Inventory the kit to ensure all required items
are available. Remove the duct cover if not already separated.
................................................................................................................................
............................................
2Insert the caterpillar grommet provided with the kit around the top
opening of the duct and the cabinet’s antenna cable cover.
................................................................................................................................
............................................
3Remove the four tamper-proof screws from the rear of the cabinet.
................................................................................................................................
............................................
4Partially attach the cable duct assembly to the Modular Cell 4.0B
primary cabinet using one tamper-proof screw at the bottom-most
position of the duct’s bottom mounting bracket. Refer to the figure on
Page B - 5
................................................................................................................................
............................................
5Align the top of the duct with gaskets to the end of the Modular Cell
4.0B primary cabinet antenna cover. Use the hex-head screw sets
(quantity: 6). Do not tighten the hardware.
................................................................................................................................
............................................
6Loosely install the remaining three tamper-proof screws.
................................................................................................................................
............................................
7Tighten the four tamper-proof screws and the six hex-head screws.
B- 5
Lucent Technologies – Proprietary
See notice on first page
401-703-454
FOA Draft Issue 1
January, 2006
............................................................................................................................................................................................................................................................
................................................................................................................................
............................................
8Set aside the two sets of 2-inch chase nipples lock nuts, and insulating
bushings. This hardware will be used later to connect the bottom of the
duct to the non-Lucent power cabinet if it is to be placed flush against
the cable duct. Refer to the figure on Page B - 13. These parts will not
be used if the non-Lucent power cabinet is positioned away from the
cable duct and connected via conduits. Refer to the figure on Page B - 15
cable
T1 cable
Power System Alarm cable
DUCT COVER
TAMPER PROOF
SCREW (1 of 8)
TAMPER
PROOFSCREW
(1 of 4)
CATERPILLAR
GROMMET
(1 of 2)
MODULAR CELL
4.0B PRIMARY
CABINET
HEX HEAD
SCREW,
LOCKWASHER,
(1 of 6 sets)
SPACER WITH
GASKETS
ANTENNA
CABLE COVER
THREADED
CAPTIVE
RECEPTACLE
(1 of 6)
BOTTOM
MOUNTING
BRACKET
CABLE DUCT
ASSEMBLY
CABLE
DUCT
TOP
VIEW
B- 6 Lucent Technologies – Proprietary
See notice on first page 401-703-454
FOA Draft Issue 1
January, 2006
...........................................................................................................................................................................................................................................................
.............................................................................................................................................................................................................................................................
How to install the AC conduit
Install the AC conduit Important! The AC interface conduit must pre-assembled to
accurately measure the required length of the liquid tight flexible
conduit.
This instruction describes the procedure for installing the AC interface
conduit. The AC interface conduit connects to the bottom front of the
cable duct assembly at one end, and to the bottom right AC port on the
Modular Cell 4.0B primary cabinet at the other end. Refer to the figures
on Page B - 7 and B - 9.
................................................................................................................................
............................................
1Screw a conduit fitting into the end of the 90 degree conduit body that
is in line with the long axis of the 90 degree conduit body. Refer to the
figure on Page B - 7.
................................................................................................................................
............................................
2Screw the 3-inch conduit nipple into the other end of the 90 degree
conduit body, making sure it seats fully.
................................................................................................................................
............................................
3Assemble a sealing washer, two lock nuts, and another sealing washer
(in that order) on the 3-inch long conduit nipple.
................................................................................................................................
............................................
4Insert the end of the 3-inch long conduit nipple into the AC port (bottom
right side of Modular Cell 4.0B primary cabinet). Refer to the figures on
Page B - 7 and B - 9.
................................................................................................................................
............................................
5Install a lock nut on the conduit nipple from inside the Modular Cell
4.0B primary cabinet.
................................................................................................................................
............................................
6Insert the second conduit fitting into the 2-inch diameter hole at the
bottom front of the cable duct assembly. Have a second technician
install a lock nut on the conduit fitting from inside the cable duct
assembly. Refer to the figures on Page B - 7 and B - 9.
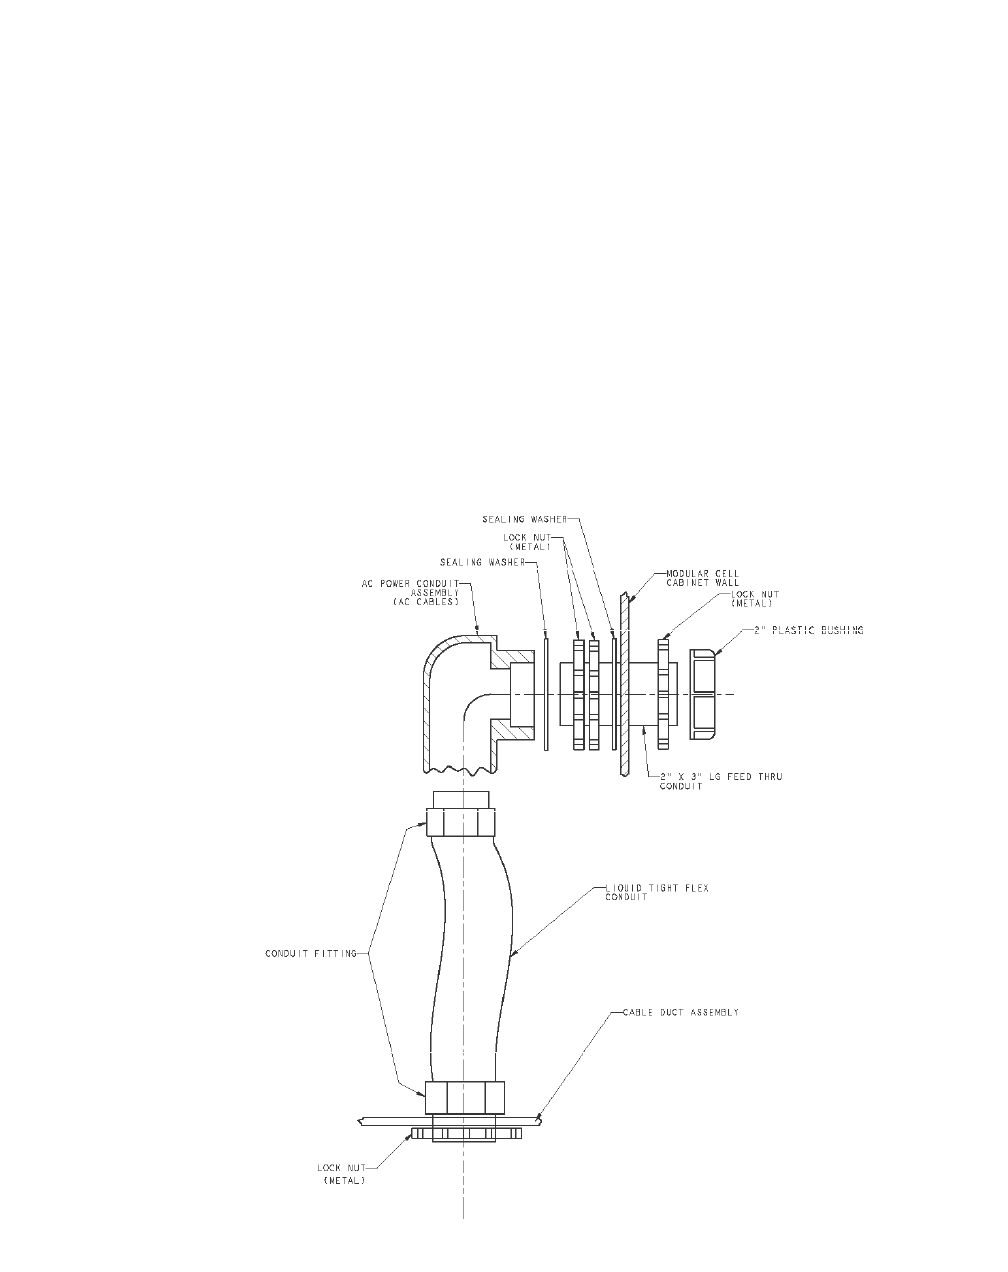
B- 7
Lucent Technologies – Proprietary
See notice on first page
401-703-454
FOA Draft Issue 1
January, 2006
............................................................................................................................................................................................................................................................
................................................................................................................................
............................................
7Line up the conduit fitting on the end of the 90 degree conduit body with
the conduit fitting on the cable duct assembly.
................................................................................................................................
............................................
8Using a tape measure, measure the distance between conduit fittings.
Add to this distance the length of liquid tight flexible conduit that goes
into each conduit fitting. The provided piece of liquid tight flexible
conduit must be cut to this length. This should be approximately 9 1/2".
................................................................................................................................
............................................
9Using a hacksaw, cut the 2-inch diameter liquid tight flexible conduit to
the calculated length.
................................................................................................................................
............................................
10 Deburr both ends of the liquid tight flexible conduit.
FRONT
REAR
THIS IS A TOP
VIEW OF THE AC
FLEXIBLE CONDUIT
CONNECTION
B- 8 Lucent Technologies – Proprietary
See notice on first page 401-703-454
FOA Draft Issue 1
January, 2006
...........................................................................................................................................................................................................................................................
................................................................................................................................
............................................
11 Unscrew the lock nut on the conduit nipple at the AC port inside the
bottom right side of Modular Cell 4.0B primary cabinet. Refer to the
figures on Page B - 7 and B - 9.
................................................................................................................................
............................................
12 Then remove the 90 degree conduit body and the attached 3-inch
conduit nipple from the AC port.
................................................................................................................................
............................................
13 Unscrew the liquid tight conduit fitting from the 90 degree conduit
body. Refer to the figure on Page B - 7
................................................................................................................................
............................................
14 Unscrew the lock nut inside the cable duct and remove the liquid tight
conduit fitting from the cable duct assembly.
................................................................................................................................
............................................
15 Assemble a liquid tight flexible conduit fitting at each end of the 2-inch
liquid tight flexible conduit.
................................................................................................................................
............................................
16 Screw one liquid tight flexible fitting into the end of the 90 degree
conduit body that is in line with the long axis of the 90 degree conduit
body and tighten with channel lock pliers.
................................................................................................................................
............................................
17 Insert the other conduit fitting into the 2-inch diameter hole at the
bottom front of the cable duct assembly. (Have a second technician
reinstall a lock nut on the conduit fitting from inside the cable duct
assembly.) Refer to the figure on Page B - 9
................................................................................................................................
............................................
18 Insert the 3-inch long conduit nipple into the AC port (bottom right side
of Modular Cell 4.0B primary cabinet).
................................................................................................................................
............................................
19 Install a lock nut and insulating bushing on the conduit nipple from
inside the Modular Cell 4.0B primary cabinet.
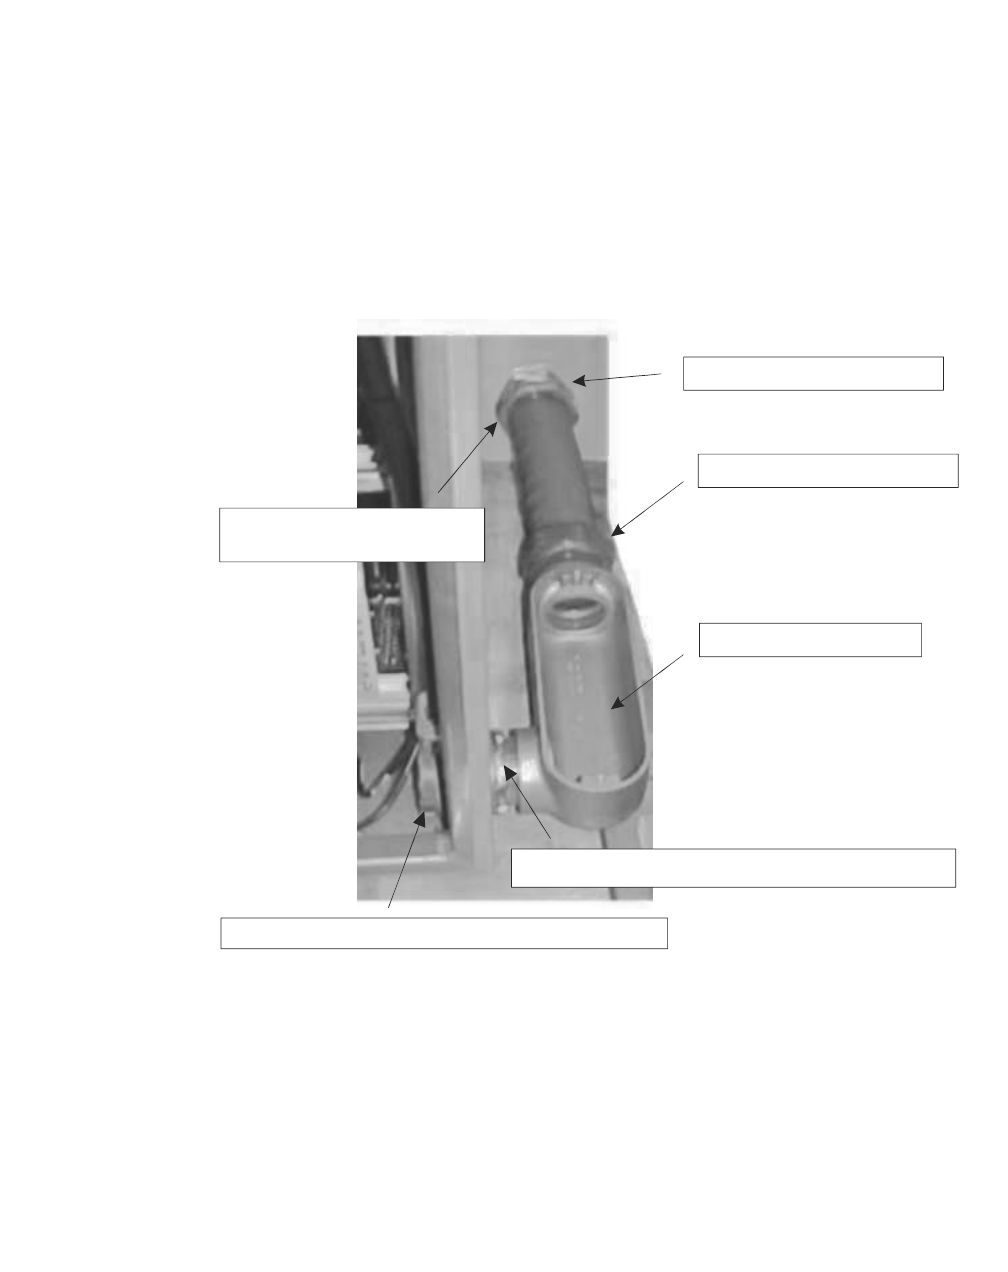
B- 9
Lucent Technologies – Proprietary
See notice on first page
401-703-454
FOA Draft Issue 1
January, 2006
............................................................................................................................................................................................................................................................
................................................................................................................................
............................................
20 Using a screwdriver and hammer, tighten all lock nuts and the insulating
bushing.
................................................................................................................................
............................................
21 Do not place the cover and gasket on the 90 degree conduit body at this
time
One conduit fitting used here
One conduit fitting used here
One lock nut and one insulating bushing used here
One lock nut used inside the
vertical duct assembly
Two lock nuts and two sealing washers used here
90 degree conduit body

B- 10 Lucent Technologies – Proprietary
See notice on first page 401-703-454
FOA Draft Issue 1
January, 2006
...........................................................................................................................................................................................................................................................
How to attach the non-Lucent power source to the cable duct
.............................................................................................................................................................................................................................................................
assembly
Overview The non-Lucent power source may be connected directly to the cable
duct assembly, or alternately, located away from the primary cabinet
with conduits utilized for cable routing to the cable duct assembly.
Perform one of the following procedures to connect the non-Lucent
power source to the bottom of the cable duct assembly.
This section covers the following procedures, as applicable.
Attach the non-Lucent power source directly to the cable duct
(zero spacing), if applicable
B - 11
Attach the non-Lucent power source to the cable duct assembly
using conduits.
B - 14
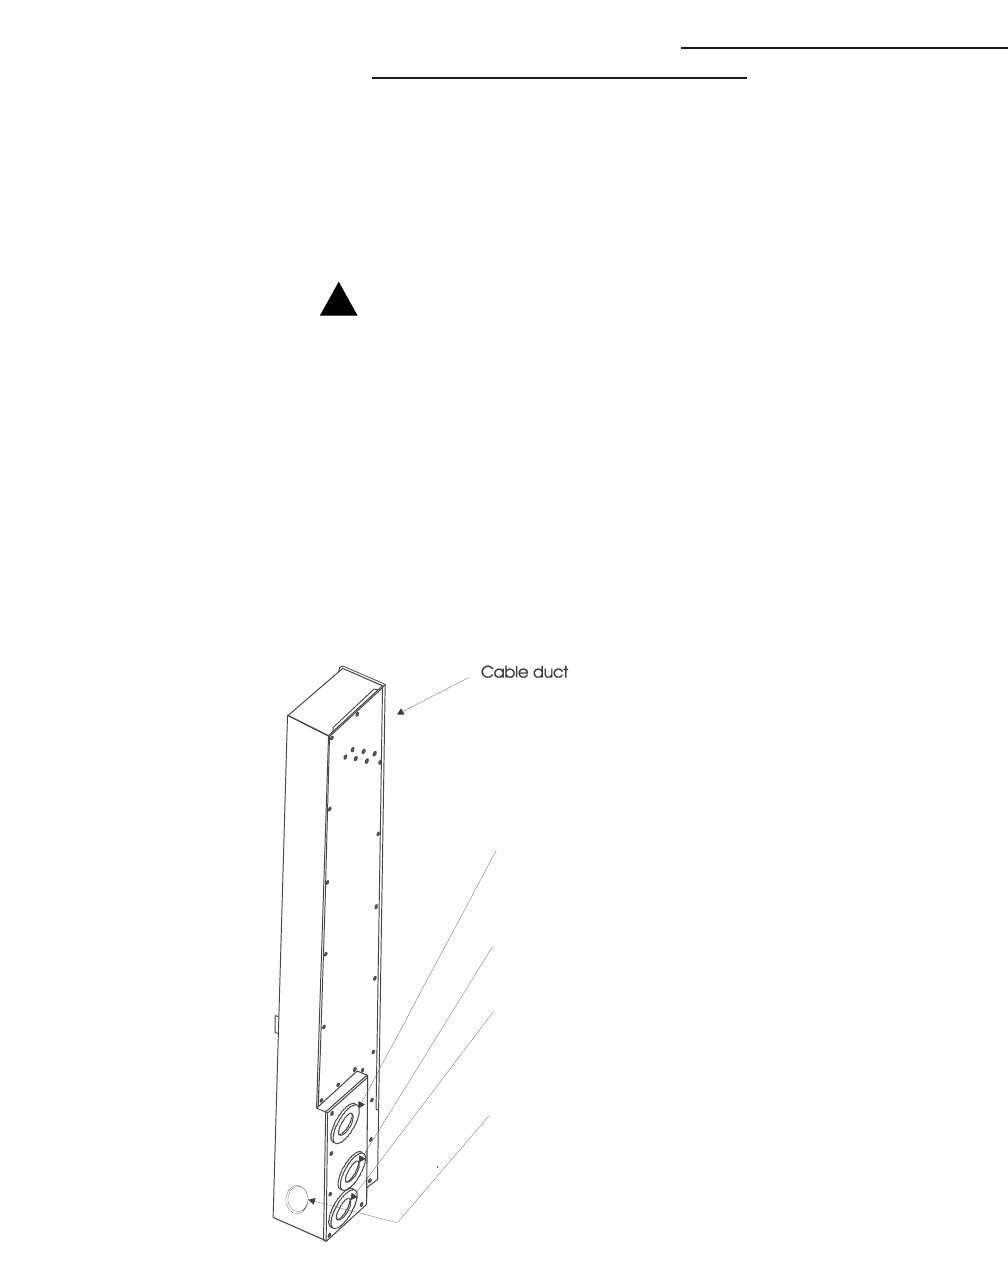
B- 11
Lucent Technologies – Proprietary
See notice on first page
401-703-454
FOA Draft Issue 1
January, 2006
............................................................................................................................................................................................................................................................
Attach the non-Lucent
power source directly to
the cable duct (zero
spacing), if applicable
Important! If using conduits to attach the non-Lucent power
source to the cable duct, skip to Attach the non-Lucent power source
to the cable duct assembly using conduits. on Page B - 14
Use the following steps to connect the non-Lucent power source
directly to the bottom of the cable duct assembly (zero spacing). This is
only possible if openings that are adaptable to the cable duct openings
are available on the non-Lucent power source.
WARNING
!
................................................................................................................................
.............................................
Equipment damage
When performing the next step, the correct method to align
the non-Lucent power source to the three openings in the
cable duct is to re-level the non-Lucent power source and/or
the Modular Cell 4.0B primary cabinet.
1Align the openings at the bottom of the cable duct assembly to the
opposite openings on the non-Lucent power source. Refer to the figure
below.
Opening for 2-inch flexible condui
t
for AC power cable routing to the
primary and dual band cabinets
(Previously installed)
Opening for 2-1/2 inch conduit
from non-Lucent power source,
for dual band DC power cables
(Shown with foam gasket)
Opening for 2-inch conduit
for primary cabinet DC power
and power alarms
(Shown with foam gasket)
from non-Lucent power source,
Opening for 2-inch conduit
for AC power cable
(Shown with foam gasket)
from non-Lucent power source,
B- 12 Lucent Technologies – Proprietary
See notice on first page 401-703-454
FOA Draft Issue 1
January, 2006
...........................................................................................................................................................................................................................................................
................................................................................................................................
............................................
2Install the bottom 2- inch chase nipple, lock nuts, and insulating bushing
into the correct opening, and hand-tighten. Refer to the figure on Page
B - 13.
................................................................................................................................
............................................
3Repeat the previous step for middle (2-inch) chase nipple.
Important! The top chase nipple (2-1/2 inch) is only needed for
the dual band cabinet. The 2-1/2 inch chase nipple, lock nuts, and
insulating bushing are not supplied with the cable duct kit. They
are supplied if a dual band cabinet is being installed.
................................................................................................................................
............................................
4Adjust the position of the Modular Cell 4.0B primary cabinet and the
non-Lucent power source to achieve correct alignment of the chase
nipple connections.
Important! The sides must be parallel with each other.
................................................................................................................................
............................................
5Hold the lock nut inside of the non-Lucent power source with a wrench,
and tighten the lock nut inside of the cable duct with a hammer and a
screwdriver (two technicians needed). Refer to the figure on Page B - 13
................................................................................................................................
............................................
6Repeat the previous step for the remaining locknuts inside the cable
duct.
................................................................................................................................
............................................
7Tighten the cable duct assembly hardware on the primary cabinet.
................................................................................................................................
............................................
8Tighten the anchor bolts or nuts on the primary cabinet (and non-Lucent
power source, if applicable) as follows. The anchors were installed in
Chapter 2, "Modular Cell cabinet handling, placement, anchoring and
grounding".
• Seismic zones 0, 1, and 2: Torque the bolts to 18 ft.-lb (24 Nm).
• Seismic zones 3 and 4: Torque the nuts to 58 ft.-lb (79 Nm).
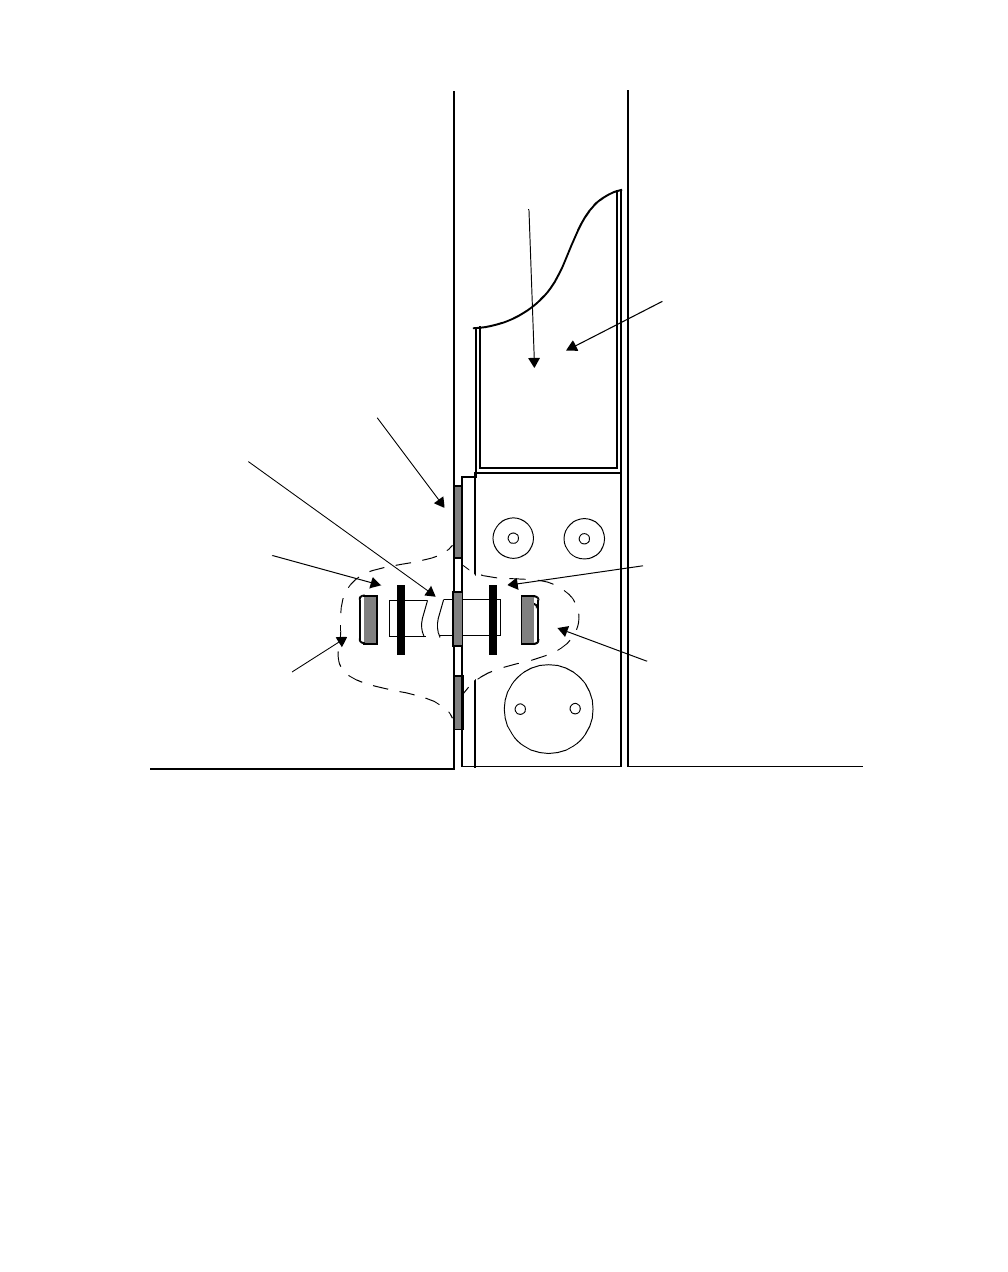
B- 13
Lucent Technologies – Proprietary
See notice on first page
401-703-454
FOA Draft Issue 1
January, 2006
............................................................................................................................................................................................................................................................
ZERO SPACING
CABLE
DUCT
ASSEMBLY
CABLE
DUCT
COVER
MODULAR
CELL 4.0B
PRIMARY
CABINET
INSULATING
BUSHING
LOCKNUT
FOAM
GASKETS
NON-LUCENT
POWER
SOURCE
LOCKNUT
INSULATING
BUSHING
CHASE
NIPPLE

B- 14 Lucent Technologies – Proprietary
See notice on first page 401-703-454
FOA Draft Issue 1
January, 2006
...........................................................................................................................................................................................................................................................
Attach the non-Lucent
power source to the cable
duct assembly using
conduits.
Important! If the non-Lucent power source is attached directly
to the cable duct, skip to Procedures to route and connect all non-
Lucent power cables in the Modular Cell 4.0B cabinets on Page B - 16.
1Remove the three foam gaskets from the cable duct.
Important! The top (2-1/2- inch) opening must be sealed with a
hole plug, if not used at this time. If installing a 2-1/2 inch conduit,
remove that foam gasket, as well.
................................................................................................................................
............................................
2Install a 2-inch conduit (from the power source) and conduit fitting at
the bottom 2-inch opening in the cable duct. Refer to the figure on Page
B - 15.
................................................................................................................................
............................................
3Thread a locknut and insulating bushing onto the end of the conduit
fitting inside of the cable duct., and hand-tighten Refer to the figure on
Page B - 15
................................................................................................................................
............................................
4Repeat the two previous steps for the middle (2-inch) conduit.
Important! The top chase nipple (2-1/2 inch) is only needed for
the DC cables for a dual band cabinet. Note that the 2-1/2 inch
chase nipple, lock nuts, and insulating bushing are not supplied
with the cable duct kit. Note that in this application, the 2-1/2
opening in the cable duct must be sealed with the supplied cover if
a dual band cabinet is not being installed.
................................................................................................................................
............................................
5Hold the fitting with a wrench, and tighten the locknut inside of the
cable duct with a hammer and a screwdriver (two technicians needed).
Refer to the figure on Page B - 15
................................................................................................................................
............................................
6Repeat the previous step for the remaining fittings.
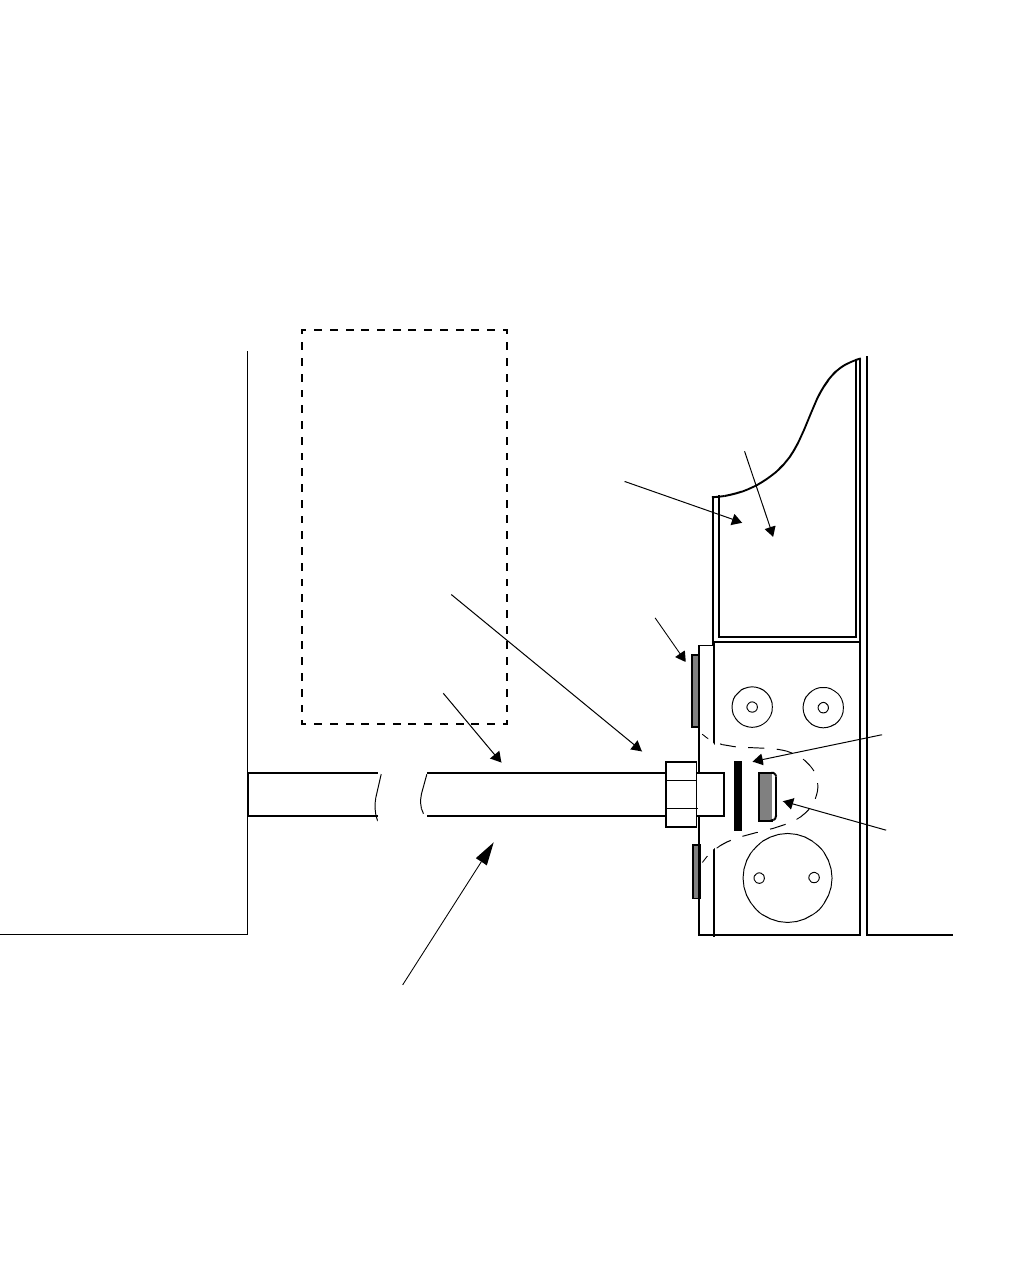
B- 15
Lucent Technologies – Proprietary
See notice on first page
401-703-454
FOA Draft Issue 1
January, 2006
............................................................................................................................................................................................................................................................
................................................................................................................................
............................................
7Tighten the anchor bolts or nuts on the primary cabinet (and non-Lucent
power source, if applicable) as follows. The anchors were installed in
Chapter 2, "Modular Cell cabinet handling, placement, anchoring and
grounding".
• Seismic zones 0, 1, and 2: Torque the bolts to 18 ft.-lb (24 Nm).
• Seismic zones 3 and 4: Torque the nuts to 58 ft.-lb (79 Nm).
CABLE
DUCT
ASSEMBLY
CABLE
DUCT
COVER
REMOVE
ALL THREE
FOAM
GASKETS MODULAR
CELL 4.oB
PRIMARY
CABINET
INSULATING
BUSHING
LOCKNUT
2-inch conduit
(example)
NON-LUCENT
POWER
SOURCE
If flush mounting is not possible, conduit (example) should be used for
routing of cables from the non-Lucent power source to the cable duct.
LIQUID TIGHT
CONDUIT FITTING
NEEDED IF NON -
LUCENT POWER
CABINET IS NOT
IMMEDIATELY
ADJACENT TO
THE CABLE DUCT
(including locknut
and insulating bush-
ing)

B- 16 Lucent Technologies – Proprietary
See notice on first page 401-703-454
FOA Draft Issue 1
January, 2006
...........................................................................................................................................................................................................................................................
Procedures to route and connect all
non-Lucent power cables in the
Modular Cell 4.0B cabinets
.............................................................................................................................................................................................................................................................
Overview of this section
Purpose This section describes the procedures for routing and connecting all
cables from the non-Lucent power source to the Modular Cell 4.0B
cabinets
Cable pre-installation instructions for the primary
cabinet
B - 17
How to route and connect DC power cables to the
Modular Cell 4.0B primary cabinet
B - 18
How to route the power cabinet alarm cable to the
Modular Cell 4.0B primary cabinet
B - 26
How to route and connect the power cabinet alarm
cable at the Modular Cell 4.0B primary cabinet
B - 30
How to route the AC power cables to the Modular Cell
4.0B primary cabinet
B - 40
How to route and connect the AC power cables at the
Modular Cell 4.0B primary cabinet
B - 44
Cable pre-installation instructions for the dual band
cabinet
B - 50
How to install ancillary hardware for the dual band
cabinet DC cables
B - 51
How to route and connect DC power cables to a
Modular Cell 4.0B dual band cabinet
B - 54
How to route and connect AC power cables for a 4.0B
dual band Modular Cell cabinet
B - 64
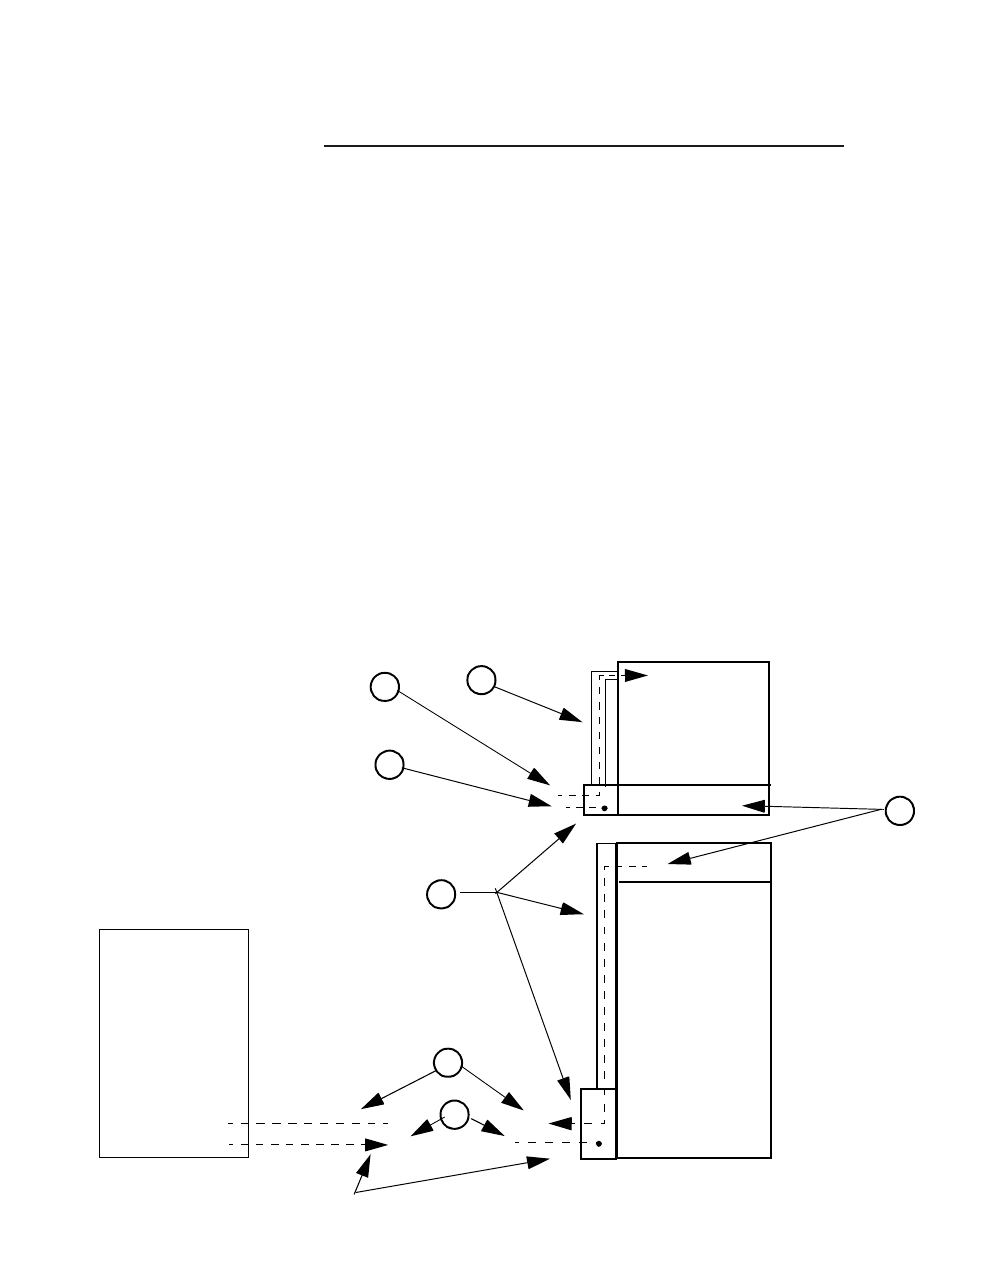
B- 17
Lucent Technologies – Proprietary
See notice on first page
401-703-454
FOA Draft Issue 1
January, 2006
............................................................................................................................................................................................................................................................
.............................................................................................................................................................................................................................................................
Cable pre-installation instructions for the primary cabinet
Wiring overview Important! If installing a Modular Cell 4.0B dual band cabinet, skip to
Cable pre-installation instructions for the dual band cabinet on Page B - 50
to continue the installation.
The following is the wiring overview, item number coded to the figure
below.
a. DC load and return wiring, as well as the alarm cable (see
item 1), are routed from the antenna cable cover (see item 2).
on the Modular Cell primary cabinet, and follow a vertical
route down through the cable duct assembly (see item 3),
through the upper 2-inch opening at the bottom of the cable
duct. They are then routed through the top 2-inch conduit to
the non-Lucent power source.
b. AC wiring from the non-Lucent power source (see item 4) is
routed through the bottom 2-inch conduit to and through the
bottom 2-inch opening in the cable duct (see item 3) and then
is routed forward through the AC conduit (see item 5) and
through the opening at the bottom front of the cabinet.
3
2
5
1
NON-LUCENT
POWER
SOURCE
MODULAR
CELL 4.0B
PRIMARY
CABINET
REAR
VIEW
TOP VIEW
1
4
4
If the power source is not flush mounted with zero spacing to the cable duct, a 2-inch conduit
is used for routing of cables between the cable duct. and the non-Lucent power source

B- 18 Lucent Technologies – Proprietary
See notice on first page 401-703-454
FOA Draft Issue 1
January, 2006
...........................................................................................................................................................................................................................................................
How to route and connect DC power cables to the Modular Cell 4.0B
.............................................................................................................................................................................................................................................................
primary cabinet
Overview Important! If installing a Modular Cell 4.0B dual band cabinet, skip to
Cable pre-installation instructions for the dual band cabinet on Page B - 50
to continue the installation.
These procedure provide instructions for the installation of the DC
power cables from non-Lucent power source to the primary cabinet.
Step-by-step instructions are provided for the following tasks.
For DC power requirements, refer to Appendix E of the following
document.
Flexent Modular Cell 4.0/4.0B Outdoor Site Preparation Guidelines,
401-703-413
If the requirements listed in the applicable document have been
met, refer to the applicable vendor documentation and use this
document for the DC power connections.
Label primary cabinet +24VDC cables B - 21
Label primary cabinet 24VDC return cables B - 21
Route the DC cables from the Modular Cell 4.0B primary
cabinet to the non-Lucent power source
B - 22
Connect the DC cables at the Modular Cell 4.0B primary
cabinet
B - 24

B- 19
Lucent Technologies – Proprietary
See notice on first page
401-703-454
FOA Draft Issue 1
January, 2006
............................................................................................................................................................................................................................................................
Description of the DC
power cables Modular Cell cabinets without integrated power require DC power
cables, red feed cables (+) and black return cables (-) for attachment
from a separate power source. Note that the terminal lugs for
attachment at the Modular Cell 4.0B primary cabinet are supplied with
the primary cabinet.
DC feeders and connection
interface Each Modular Cell outdoor cabinet requires three DC feeds as shown in
the table on the next page. One additional DC feed is required if the
Modular Cell is equipped with an A6 amplifier shelf. Alternate wire
gauges may be used for the DC feeders, but shall be sized to limit the
round trip voltage drop between the power system output terminals and
the Modular Cell input terminals to less than one volt (for +24 VDC
systems). A current level equal to 80% of the circuit breaker current
rating specified shall be used for this calculation. The wire used for the
DC feeders shall be rated for the environmental condition in which it is
used and shall be rated and sized according to the applicable section in
the National Electrical Code or Canadian Electrical Code, Part I (NAR
markets) and IEC 60364, or the local electrical code in effect
(international markets). The circuit breaker shall be type 51 with DC
trip-delay curve characteristics.
The DC power terminal block is located at the top rear of a Modular Cell
4.0B outdoor cabinet. The table on Page B - 20 provides the circuit
breaker sizes, wire gauges, maximum wire lengths and lug dimensions
for DC feeders #1, #2, #3, and #4 for 4.0B Modular Cells.

B- 20 Lucent Technologies – Proprietary
See notice on first page 401-703-454
FOA Draft Issue 1
January, 2006
...........................................................................................................................................................................................................................................................
DC cable specifications The following table provides the DC cable specifications for 4.0B
cabinets. The fourth feed is required for the A6 amplifier shelf only.
NOTES
Note 1: The fourth feed is required only if the Modular Cell 4.0B cabi-
net is equipped with an A6 amplifier shelf
Note 2: DC wires and lugs must be rated for 90 degrees C. For longer
wire runs, calculate wire size and circuit breaker rating according to the
National Electric Code or canadian Electrical Code, Part I (NAR
markets) and IEC 60364, or local electrical code in effect (International
markets).
DC feeders and connection interface: Modular Cell 4.0B
Modular
Cell 4.0B Feeder 1#, #2, #3, #4 (Note 1) Dimensions for lug on
DC terminal block
Circuit breaker
(AMPS) Wire size (AWG) Max. Length (Feet)
+24 VDC 150 1 (Note 2) 40 5/16 (threaded stud)
11/16 (max. width)

B- 21
Lucent Technologies – Proprietary
See notice on first page
401-703-454
FOA Draft Issue 1
January, 2006
............................................................................................................................................................................................................................................................
Label primary cabinet
+24VDC cables Label both ends of each +24VDC primary cabinet cable with a
permanent marker or a wire tag, as shown in the table below. The
(number) in parentheses indicates the DC terminal block position for
connection of each cable. The primary cabinet has DC terminal block
positions numbered 1 through 4 from right to left. Refer to the figure on
Page B - 25.
Label primary cabinet
24VDC return cables Label both ends of each 24VDC return primary cabinet cable with a
permanent marker or a wire tag, as shown in the table below. The
(number) in parentheses indicates the DC terminal block position for
connection of each cable. The primary cabinet has DC terminal block
positions numbered 1 through 4 from right to left. Refer to the figure on
Page B - 25.
If installing: Then label +24VDC cables:
4.0B Primary Cabinet
(L3A required for primary cabinets with A6
shelf)
•#1 AWG: Label L1 (1)
•#1AWG: Label L2 (2)
•#1 AWG: Label L3 (3)
•#1 AWG: Label L3A (4)
(for A6 shelf only)
If installing: Then label 24VDC Return cables:
4.0B Primary Cabinet
(L3A required for primary cabinets with A6
shelf)
•#1 AWG: Label L1 (1)
•#1AWG: Label L2 (2)
•#1 AWG: Label L3 (3)
•#1 AWG: Label L3A (4)
(for A6 shelf only)
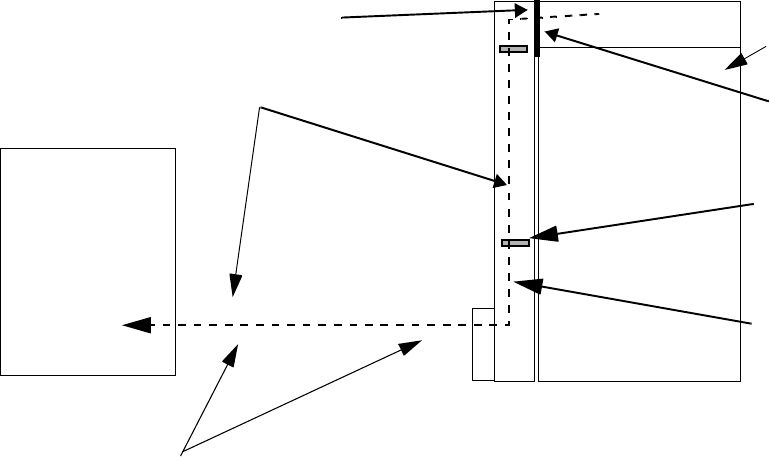
B- 22 Lucent Technologies – Proprietary
See notice on first page 401-703-454
FOA Draft Issue 1
January, 2006
...........................................................................................................................................................................................................................................................
Route the DC cables from
the Modular Cell 4.0B
primary cabinet to the non-
Lucent power source
Important! In order to make the routing of the DC cables as
easy as possible, it is recommended that they be routed in a
direction from the primary cabinet to the non-Lucent power
source, prior to connection at either end.
Use the following procedure to route the DC cables from the Modular
Cell 4.0B primary cabinet to the non-Lucent power source.
................................................................................................................................
............................................
1Thoroughly tape over the ends of all DC cables, and start the routing of
the cables from the area of the DC terminal block at the top of the
primary cabinet.
................................................................................................................................
............................................
2Route two cables at a time through the top section of the opening
between the antenna cable cover and the cable duct and into the cable
duct. Refer to the figure below.
MODULAR CELL
4.0B PRIMARY
CABINET
CABLE
BRACKET (1
of 2)
DC and
ALARM
CABLES
DC CABLES
ROUTE DC CABLES THROUGH TOP
SECTION OF DC CABLE SUPPORT
DC CABLE
SUPPORT
NON-LUCENT
POWER
SOURCE
If the power source is not flush mounted to the cable duct, conduits are used for
routing of cables from the non-Lucent power source to the cable duct.
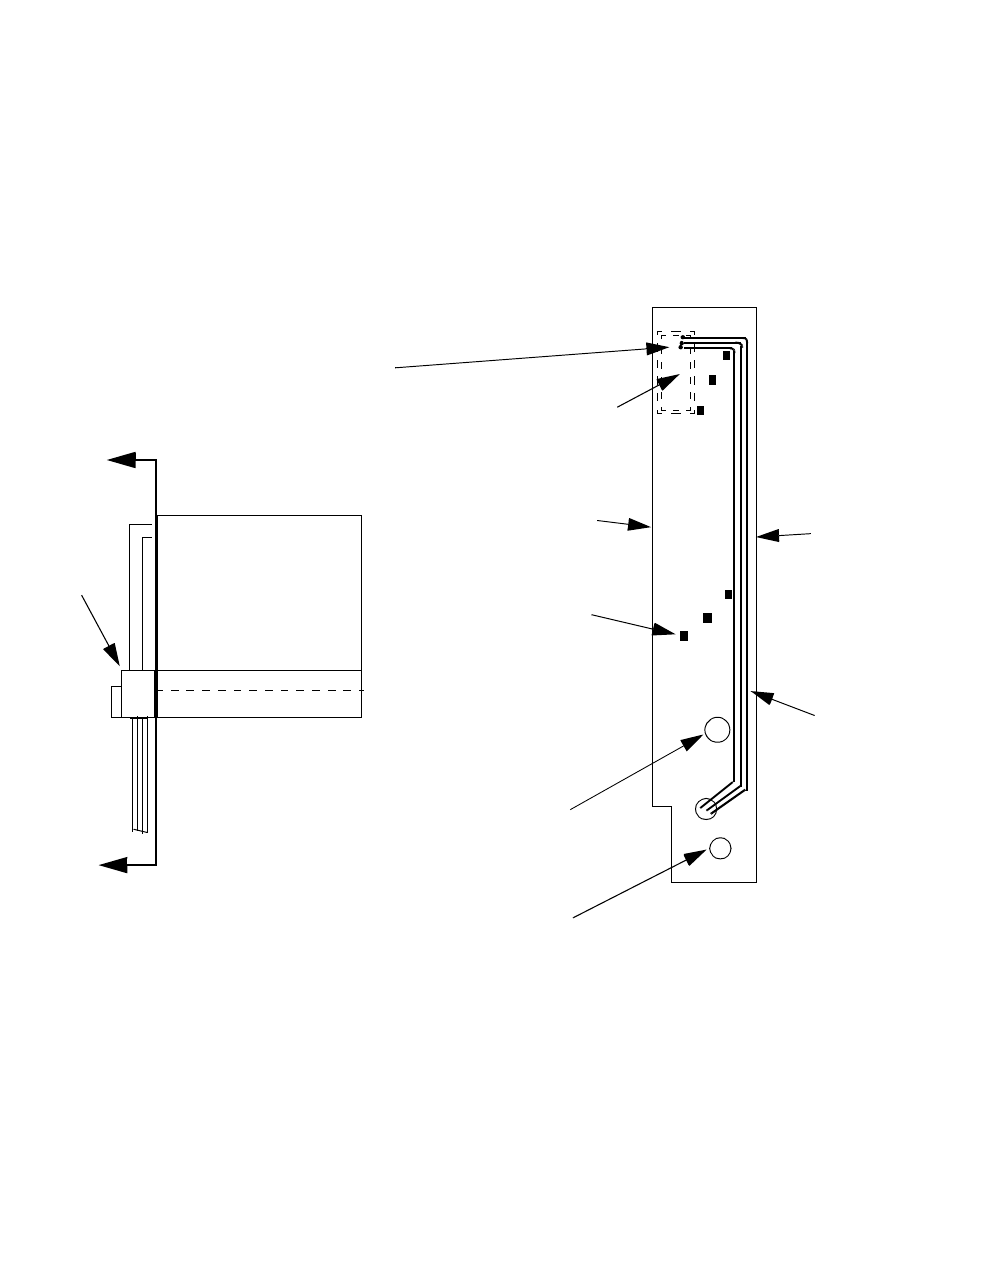
B- 23
Lucent Technologies – Proprietary
See notice on first page
401-703-454
FOA Draft Issue 1
January, 2006
............................................................................................................................................................................................................................................................
................................................................................................................................
............................................
3Within the cable duct assembly, route the cables downward behind the
deepest (inner-most) cable guides. Attach later with wire ties. Refer to
the figure below. Attach later with wire ties.
................................................................................................................................
............................................
4Route the cables into the non-Lucent power source through the middle
(2- inch) port (and conduit, if applicable). Refer to the figure below.
................................................................................................................................
............................................
5If the DC cables need to be shortened before they are attached in the
non-Lucent power source, the labels may be cut off. Remember to re-
label each cable immediately after it is cut.
Important! The installer may wish to wait until after the DC
cables are connected in the non-Lucent power source before
performing the next procedure
A
A
ROUTE CABLES
INTO CABLE DUCT IN
THE TOP-MOST
SECTION OPENING TO
MODULAR CELL
4.0B PRIMARY
CABINET
CABLE DUCT
ASSEMBLY
CABLE BRACKET
(1 of 6)
DC PWR/RTN
CABLES TO
MODULAR
CELL 4.0B
PRIMARY
CABINET
2-1/2 INCH PORT FROM
POWER SOURCE (USED
FOR DC CABLES TO A
DUAL BAND CABINET).
CABLES MUST
BE ROUTED IN
THIS LOCATION
(BEHIND INNER
MOST CABLE
BRACKET)
Modular Cell
4.0B Primary
Cabinet (Top
View)
VIEW A -A
2-INCH PORT
USED FOR AC
CABLE
DUCT
ASSEMBLY
B- 24 Lucent Technologies – Proprietary
See notice on first page 401-703-454
FOA Draft Issue 1
January, 2006
...........................................................................................................................................................................................................................................................
Connect the DC cables at
the Modular Cell 4.0B
primary cabinet
Refer to the figure on Page B - 25 and perform the following steps to
connect the DC cables at the Modular Cell 4.0B primary cabinet.
................................................................................................................................
............................................
1At the top of the primary cabinet, remove the terminal block cover, if
provided, from the terminal block.
................................................................................................................................
............................................
2Remove the straight single-hole terminal lugs from the DC power
terminal block (or from the loose parts bag shipped with the Modular
Cell 4.0B primary cabinet).
Important! When performing the next step, keep all of the DC
cables at the top of the opening between the cable duct assembly
and the antenna cable cover.
................................................................................................................................
............................................
3At the top of the cable duct assembly, cut each cable to the correct length
(allow adequate slack).
Important! The cable markings/tags may be cut off when the
excess cable is removed. Re-mark or tag each cable after cutting.
................................................................................................................................
............................................
4Strip the insulation at the end of each cable.
................................................................................................................................
............................................
5Slide a section of the supplied heat shrink onto the end of each cable.
................................................................................................................................
............................................
6Crimp a terminal lug onto the end of each cable, and then slide the heat
shrink over the terminal lug and shrink with a heat gun.
................................................................................................................................
............................................
7Connect the 24-VDC return cables (black) to the cabinet DC power
terminal block.
Important! Use the four lower terminals labeled RETURN, and
connect the cables by label number in order from right to left. Use
the terminals listed in the applicable table on Page B - 21. Refer to
the figure on Page B - 25
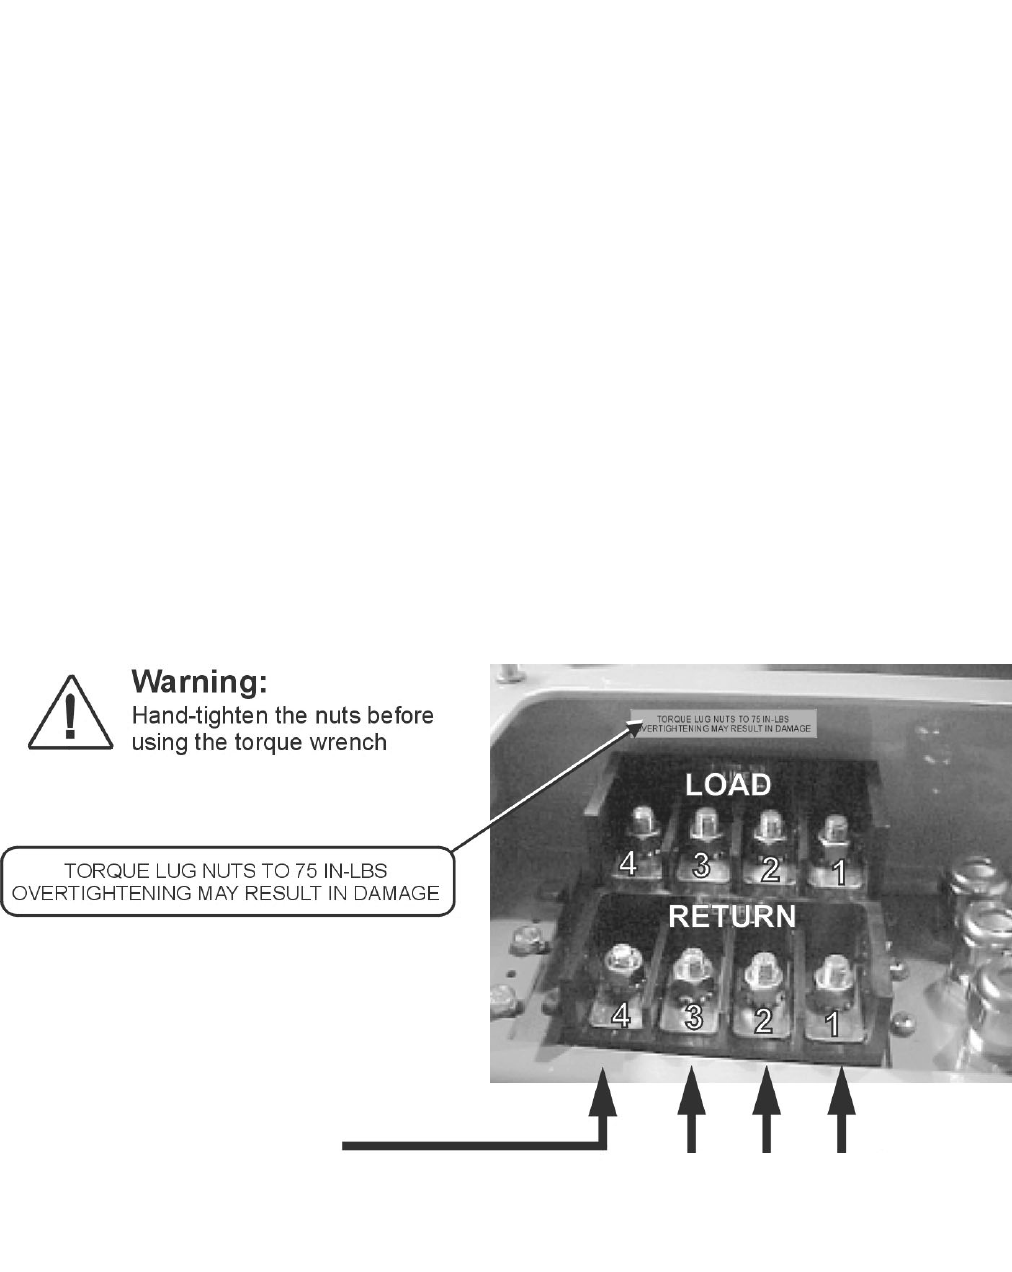
B- 25
Lucent Technologies – Proprietary
See notice on first page
401-703-454
FOA Draft Issue 1
January, 2006
............................................................................................................................................................................................................................................................
................................................................................................................................
............................................
8Hand-tighten the nuts to guard against cross-threading, and then torque
the 5/16-inch, 24-VDC return cable connections to 75 in.-lb. (8 Nm). Do
not use the torque specifications provided in Chapter 1.
................................................................................................................................
............................................
9Connect the +24-VDC cables (red) to the cabinet DC power terminal
block.
Important! Use the upper terminals labeled LINE (+24 VDC),
and connect the cables by label number in order from right to left.
Use the terminals listed in the applicable table on Page B - 21.
Refer to the figure below.
................................................................................................................................
............................................
10 Hand-tighten the nuts to guard against cross-threading, and then torque
the four 5/16-inch, +24-VDC cable connections to 75 in.-lb. (8 Nm). Do
not use the torque specifications provided in Chapter 1.
................................................................................................................................
............................................
11 Replace the terminal block cover.
1 AWG
CONNECT 1 AWG HERE
IF PRIMARY CABINET HAS
AN A6 AMPLIFIER SHELF

B- 26 Lucent Technologies – Proprietary
See notice on first page 401-703-454
FOA Draft Issue 1
January, 2006
...........................................................................................................................................................................................................................................................
How to route the power cabinet alarm cable to the Modular Cell 4.0B
.............................................................................................................................................................................................................................................................
primary cabinet
Overview Important! If installing a 4.0B dual band cabinet, skip to How to route
and connect AC power cables for a 4.0B dual band Modular Cell cabinet on
Page B - 64 to continue the installation.
This procedure provides instructions for the routing of one power alarm
cable from the non-Lucent power source to the primary cabinet.
The following description and step-by-step instructions are provided:
For power system alarm requirements, refer to Appendix E of the
following document.
•Flexent Modular Cell 4.0/4.0B Outdoor Site Preparation
Guidelines, 401-703-413
If the requirements listed in the applicable document have been met,
refer to the applicable vendor documentation and use this document for
power connections.
Description of power
source alarm cable routing
and connection
The primary cabinet provides connections for one power source alarm
cable.
The power source alarm cable will be routed via the same route as the
DC power cables that were previously installed, but in the reverse
direction (from the power source to the Modular Cell primary cabinet).
Description of power source alarm cable routing and connection B - 26
Route the power source alarm cable to the Modular Cell 4.0B
primary cabinet
B - 27
B- 27
Lucent Technologies – Proprietary
See notice on first page
401-703-454
FOA Draft Issue 1
January, 2006
............................................................................................................................................................................................................................................................
Route the power source
alarm cable to the Modular
Cell 4.0B primary cabinet
Use the following procedure to route the power source alarm cable.
................................................................................................................................
............................................
1Locate the power source alarm cable at the non-Lucent power cabinet.
Refer to the figure below.
................................................................................................................................
............................................
2Route the alarm cable through the conduit (if applicable) and into the
cable duct as illustrated in the figure below.
Important! When performing the next step, route the cable
behind the deepest (front-most) cable guides within the cable duct
assembly and attach with wire ties. Refer to the figure on Page B -
28.
................................................................................................................................
............................................
3Route the alarm cable up to the top the cable duct as illustrated in the
figure below, and the figure on Page E - 28
MODULAR CELL
4.0B PRIMARY
CABINET
CABLE
BRACKET (1
of 2)
ALARM
CABLE
ALARM
CABLE
ROUTE ALARM CABLE
THROUGH TOP SECTION OF
THE CABLE SUPPORT
CABLE
SUPPORT
NON-LUCENT
POWER
SOURCE
If flush mounting is not possible, two 2-inch conduit s are used for routing of cables from
the non-Lucent power source to the cable duct. The middle (upper 2-inch) conduit is used
to route the power alarm cable
B- 28 Lucent Technologies – Proprietary
See notice on first page 401-703-454
FOA Draft Issue 1
January, 2006
...........................................................................................................................................................................................................................................................
Important! When performing the next step, keep the alarm
cable in the top section of the opening in the cable duct.
................................................................................................................................
............................................
4Route the cable out the top of the duct and into the antenna cable cover
on the top rear of Modular Cell 4.0B. Refer to the figure below.
A
A
ROUTE CABLE INTO
CABLE DUCT IN THE
TOP-MOST SECTION OPENING TO
MODULAR CELL
4.0B PRIMARY
CABINET
CABLE DUCT
ASSEMBLY
CABLE BRACKET
(1 of 6)
PREVIOUSLY
INSTALLED DC
PWR/RTN CABLES
TO MODULAR
CELL 4.0B
PRIMARY CABINET
ALARM CABLE
MUST BE
ROUTED IN
THIS LOCATION
(BEHIND
INNERMOST
CABLE
BRACKET)
ALARM CABLE
TO MODULAR
CELL 4.0B
PRIMARY
CABINET
Modular
Cell 4.0B
Primary
Cabinet
VIEW A -A
2-INCH PORT
USED FOR AC
CABLE DUCT
ASSEMBLY
2-1/2 INCH PORT FROM POWER
SOURCE (USED FOR DC CABLES TO
A DUAL BAND CABINET).
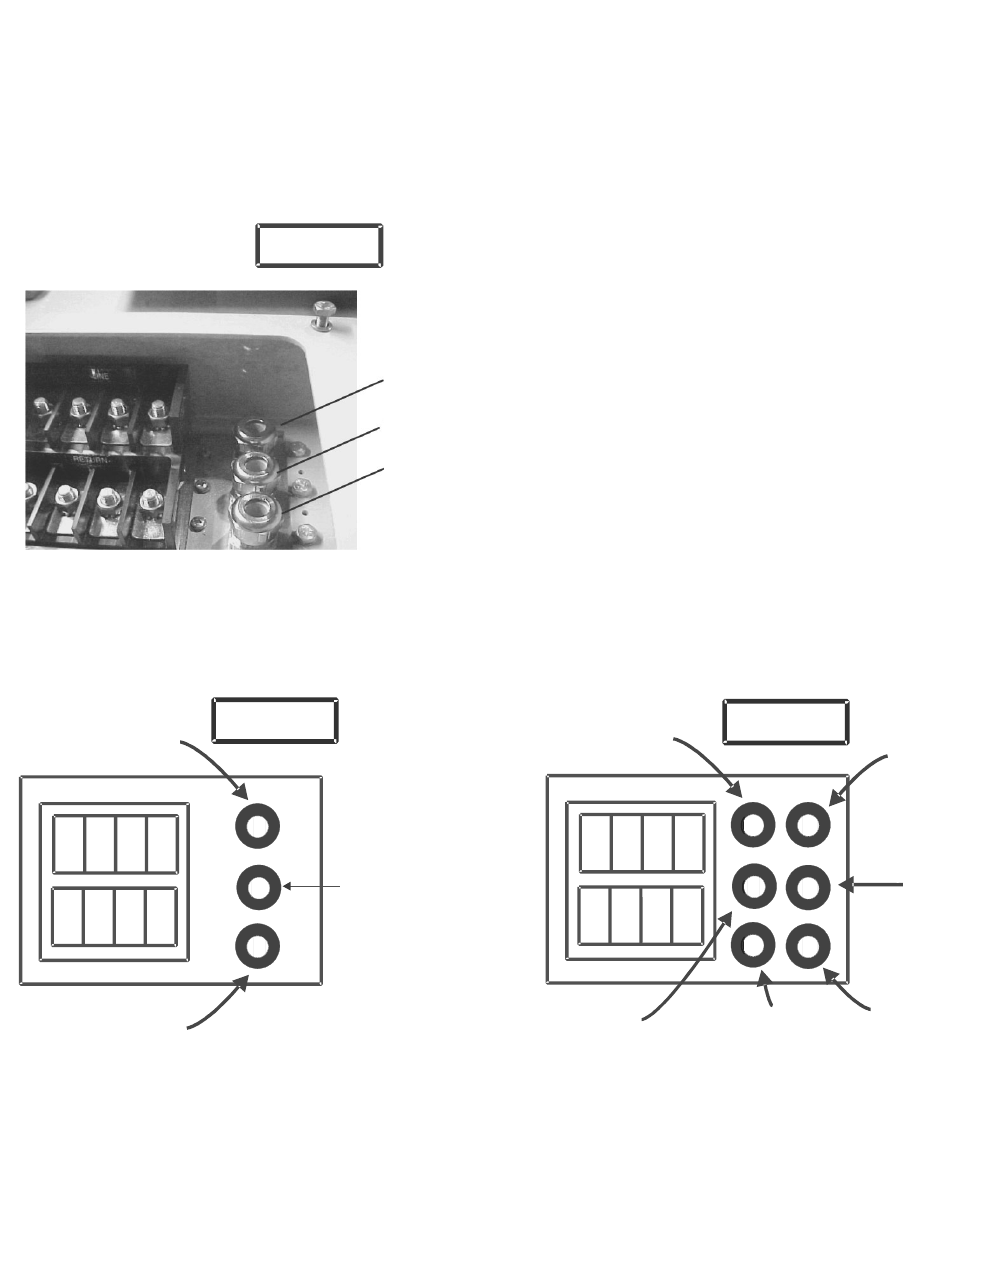
B- 29
Lucent Technologies – Proprietary
See notice on first page
401-703-454
FOA Draft Issue 1
January, 2006
............................................................................................................................................................................................................................................................
................................................................................................................................
............................................
5Route the cable out the top of the duct and to the alarm cable entry point
on the top rear of Modular Cell 4.0B. Refer to the figure below for the
location of the alarm cable entry point in the two types of feed-through
configurations that may be encountered
................................................................................................................................
............................................
6Allow a minimum of 2 meters (6.5 feet) of the alarm cable for routing
inside of the Modular Cell 4.0B primary cabinet and cut off the
remainder.
POWER ALARMS
OR
EXTERNAL DC
(OPTION)
USER ALARMS
T1/E1 CABLE
TYPE 1
T1/E1 CABLE
T1/E1 CABLE #1 T1/E1 CABLE #2
SPARE
USER ALARMS
POWER ALARMS
OR
EXTERNAL DC
(OPTION)
USER ALARMS
POWER ALARMS
OR
EXTERNAL DC
(OPTION)
TYPE 1
SPARE
TYPE 2

B- 30 Lucent Technologies – Proprietary
See notice on first page 401-703-454
FOA Draft Issue 1
January, 2006
...........................................................................................................................................................................................................................................................
How to route and connect the power cabinet alarm cable at the
.............................................................................................................................................................................................................................................................
Modular Cell 4.0B primary cabinet
Overview This procedure module provides instructions for the installation of one
non-Lucent power alarm cable from the power source to the primary
cabinet.
Step-by-step instructions are provided for the following tasks.
Description of power
source alarm cable routing
and connection
The alarm cable is routed into the Modular Cell 4.0B primary cabinet
through a cord grip seal. This seal provides sealing and strain relief.
Inside of the Modular Cell 4.0B primary cabinet, the power source
alarm cable will be connected to a punch-down terminal block. The
terminal block is easily accessible from the front of the cabinet, behind
a slide-out module, the "facilities interface panel".
Description of power alarm
cable The Modular Cell 4.0B primary cabinet requires one power alarm
cable. The recommended cable is specified in Flexent Modular Cell
4.0/4.0B Site Preparation Guidelines, 401-703-413.
Install the EMI / RFI cord grip seal with the alarm cable B - 32
Prepare the alarm cable for punchdown and ground connection
at the facilities interface panel
B - 35
Connect alarm cable to the EFIM punchdowns in Modular Cell
4.0B cabinet
B - 37

B- 31
Lucent Technologies – Proprietary
See notice on first page
401-703-454
FOA Draft Issue 1
January, 2006
............................................................................................................................................................................................................................................................
Important! Installation procedures contained in this document
are based on the recommended 24-pair cable. Refer to the table
below. If a different wire is used, the wire colors may vary.
Important! The outside diameter of the twisted-pair cable must
be within the range of 6 mm (0.24 inches) to 12 mm (0.47 inches),
in order to fit through the connector supplied on the Modular Cell
4.0B cabinet.
Color Code for specified cable
PAIR NO COLORS
1 White-Blue Blue-White
2 White-Orange Orange-White
3 White-Green Green-White
4 White-Brown Brown-White
5 White-Slate Slate-White
6 Red-Blue Blue-Red
7 Red-Orange Orange-Red
8 Red-Green Green-Red
9 Red-Brown Brown-Red
10 Red-Slate Slate-Red
11 Black-Blue Blue-Black
12 Black-Orange Orange-Black
13 Black-Green Green-Black
14 Black-Brown Brown-Black
15 Black-Slate Slate-Black
16 Yellow-Blue Blue-Yellow
17 Yellow-Orange Orange-Yellow
18 Yellow-Green Green-Yellow
19 Yellow-Brown Brown-Yellow
20 Yellow-Slate Slate-Yellow
21 Violet-Blue Blue-Violet
22 Violet-Orange Orange-Violet
23 Violet-Green Green-Violet
24 Violet-Brown Brown-Violet
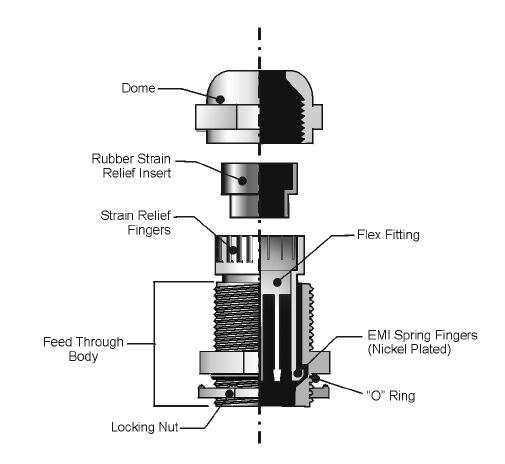
B- 32 Lucent Technologies – Proprietary
See notice on first page 401-703-454
FOA Draft Issue 1
January, 2006
...........................................................................................................................................................................................................................................................
Install the EMI / RFI cord
grip seal with the alarm
cable
The power alarm cable enters the cabinet through an EMI / RFI
cord grip seal. This seal grounds the cable shield to the cabinet. Use
the following procedure to install the EMI / RFI cord grip seal on
the power alarm cable.
The figure below shows the various parts of the cord grip seal. Note
that the cord grip seal should not be disassembled.
Refer to the figure on Page B - 34 for the completed installation.
1From the front of the cabinet, loosen the thumb screws on the facilities
interface panel, and open the panel. Refer to the figure on Page B - 37.
................................................................................................................................
............................................
2Loosen the dome.
Important! When performing the next two steps, it is necessary
to have a second person help by pulling the cable through the
facilities interface panel from the front of the cabinet.
................................................................................................................................
............................................
3Insert the end of the cable into the top of the cord grip seal assembly (on
the top of the cabinet).
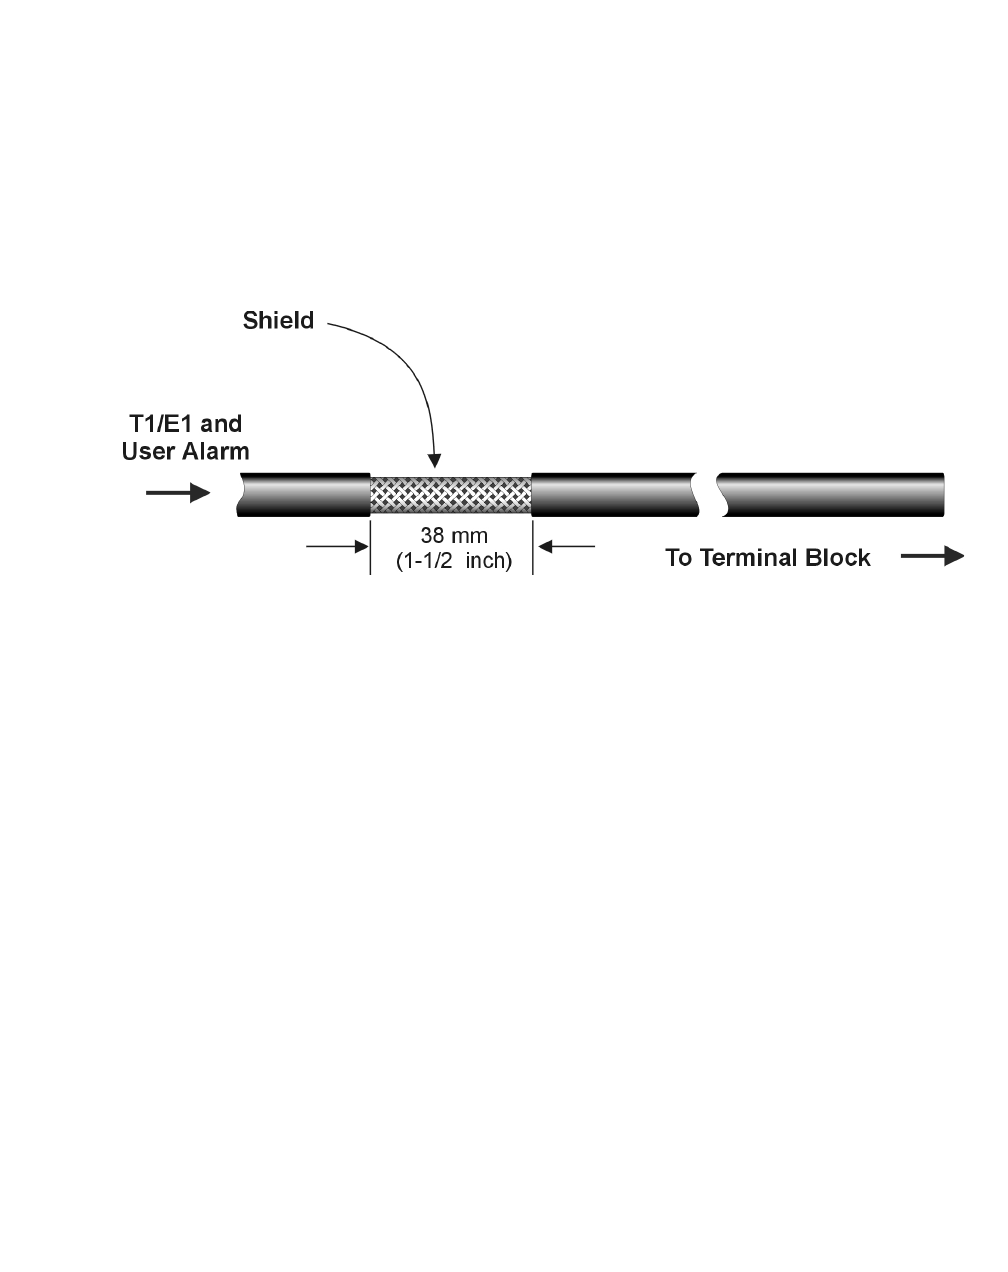
B- 33
Lucent Technologies – Proprietary
See notice on first page
401-703-454
FOA Draft Issue 1
January, 2006
............................................................................................................................................................................................................................................................
................................................................................................................................
............................................
4Slowly push the cable through the cord grip seal assembly until the cable
is fully into the cabinet.
................................................................................................................................
............................................
5Pull the cable back a few inches, and strip the outer insulation from the
cable to expose approximately 38 mm (1.5 inch) of the shield, as shown
in the figure below. Do not cut the cable shield.
Important! When performing the next step, take care not to
insert the cable insulation (above the stripped area) more than
3/8-inch into the rubber strain relief insert.
................................................................................................................................
............................................
6Insert the cable back into the seal. Refer to the figure on Page B - 34.
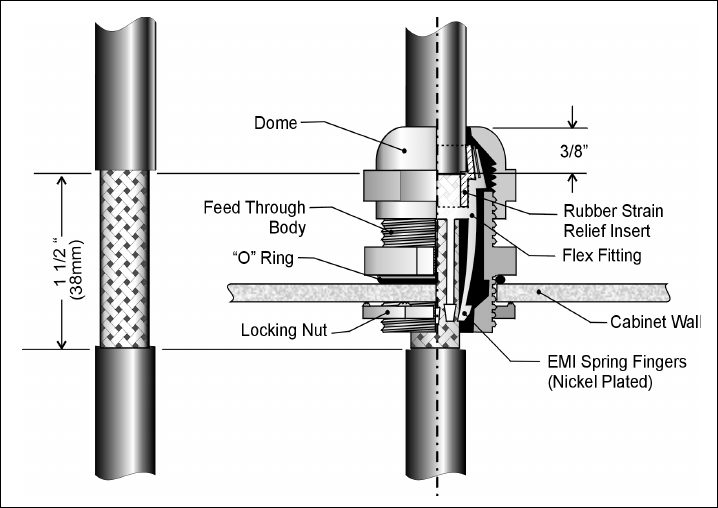
B- 34 Lucent Technologies – Proprietary
See notice on first page 401-703-454
FOA Draft Issue 1
January, 2006
...........................................................................................................................................................................................................................................................
Important! The figure below is not drawn to scale.
................................................................................................................................
............................................
7Tighten the dome.
As the dome is tightened, the fingers at the top of the flex fitting are
compressed against the rubber strain relief insert, which is, in turn,
compressed against the cable insulation. Simultaneously, the
nickel-plated EMI spring fingers at the bottom of the flex fitting are
compressed against the exposed cable shield. The EMI spring
fingers are grounded to the feed-through body, which, in turn, is
bonded to the cabinet enclosure. This effectively grounds the cable
shield.
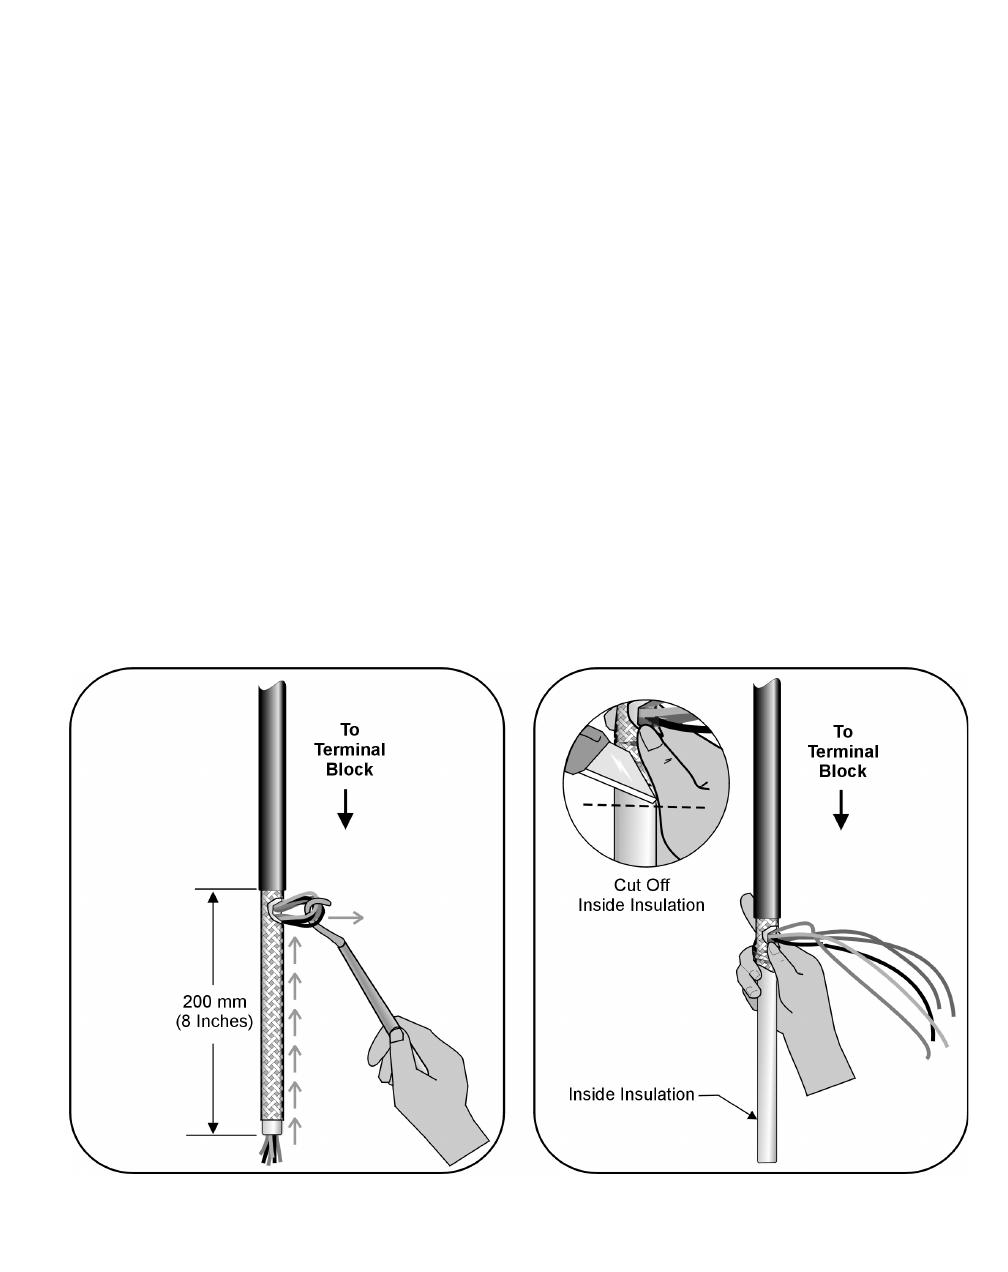
B- 35
Lucent Technologies – Proprietary
See notice on first page
401-703-454
FOA Draft Issue 1
January, 2006
............................................................................................................................................................................................................................................................
Prepare the alarm cable for
punchdown and ground
connection at the facilities
interface panel
Prepare the alarm cable for punchdown at the facilities interface panel.
................................................................................................................................
............................................
1Allow adequate slack and cut the alarm cable to the correct length.
................................................................................................................................
............................................
2Strip the outer cable insulation to expose 200 mm (8 inches) of the
braided shield. Refer to the figure below.
Important! Be careful not to cut into the cable shield.
................................................................................................................................
............................................
3At the end of the outer insulation, cut an opening in the braided shield,
and the insulation inside it, to expose the individual wires.
................................................................................................................................
............................................
4Using a hook or equivalent tool, pull the wires out through the opening
made in the previous step, as shown in the figure below.
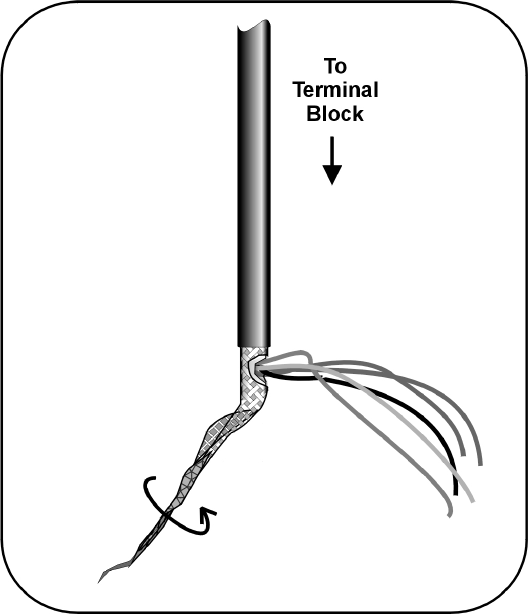
B- 36 Lucent Technologies – Proprietary
See notice on first page 401-703-454
FOA Draft Issue 1
January, 2006
...........................................................................................................................................................................................................................................................
................................................................................................................................
............................................
5Push the braided shield back on the inside insulation as shown.
................................................................................................................................
............................................
6Cut off the exposed inside insulation.
................................................................................................................................
............................................
7Twist the alarm cable shield at the end of the cables in preparation for
their attachment to a grounding clamp located on the facilities interface
panel. Refer to the figure below.
................................................................................................................................
............................................
8Quality Check - Verify the following.
1. Check that the cable is firmly held by the seal and is not loose.
2. Using an ohmmeter, check continuity between the frame and the
cable shield at the end of the cable to ensure that it is bonded in the
cord grip seal.
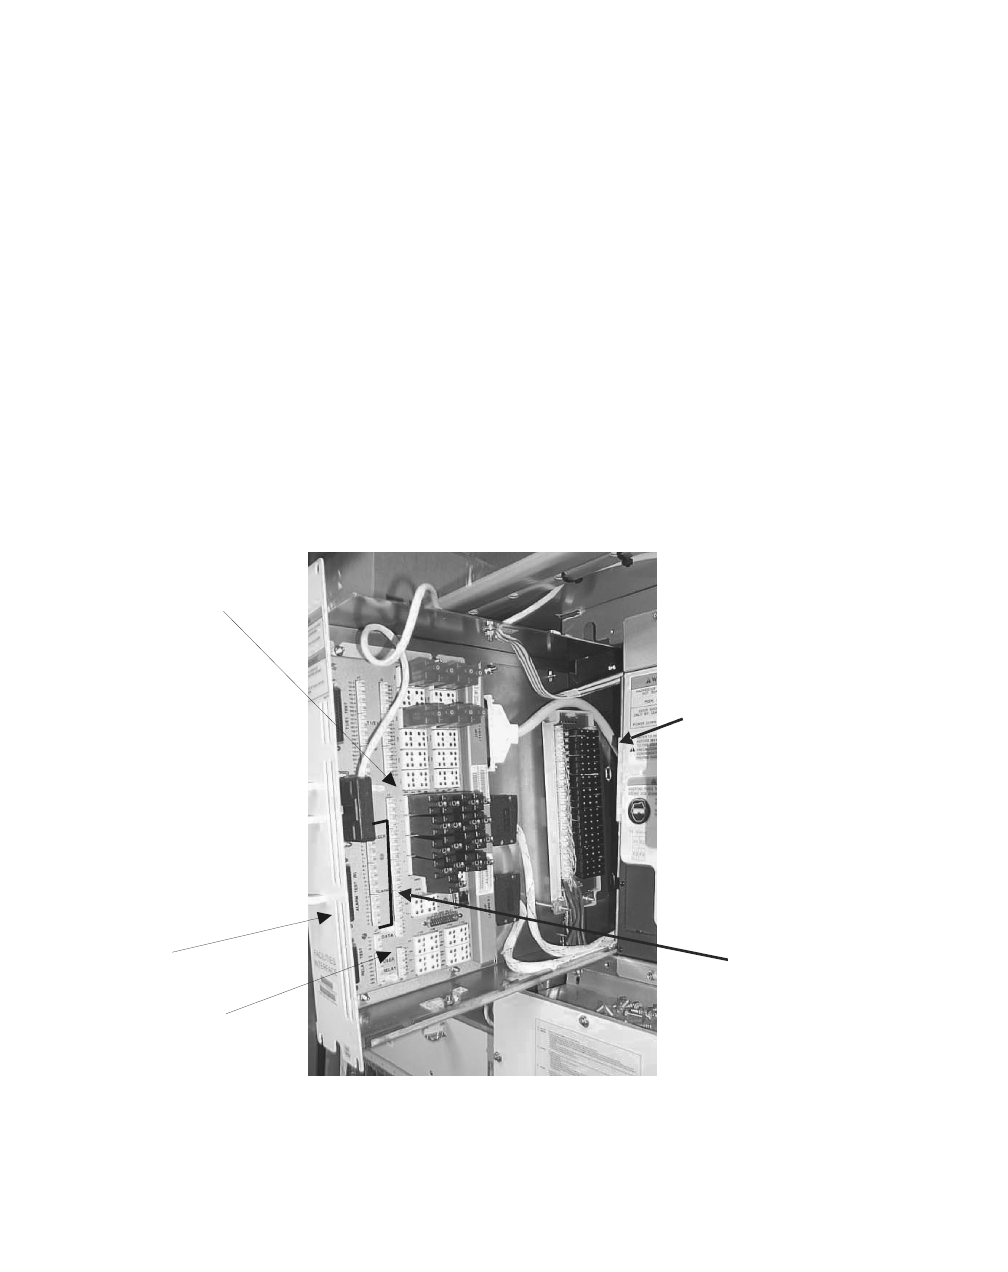
B- 37
Lucent Technologies – Proprietary
See notice on first page
401-703-454
FOA Draft Issue 1
January, 2006
............................................................................................................................................................................................................................................................
Connect alarm cable to the
EFIM punchdowns in
Modular Cell 4.0B cabinet
The wires of the alarm cable will be connected to the punchdown
terminals on the EFIM inside of the Modular Cell 4.0B primary
cabinet. The EFIM is accessible from the front of the cabinet, behind a
slide-out panel (EFIT- facilities interface tray). See the figure below.
Use the following procedure to connect the wires of the alarm cable to
the punchdowns on the EFIM in the Modular Cell 4.0B primary
cabinet.
................................................................................................................................
............................................
1Open the EFIT. Refer to the figure below.
................................................................................................................................
............................................
2Connect the twisted end of the alarm cable shield to the grounding
clamp located on the EFIT. There are two possible grounding locations
depending upon the presence of POD B. Refer to the figure on Page B -
38 for details.
................................................................................................................................
............................................
3Connect the alarm wire pairs. Refer to the figure on Page B - 38 and the
table on Page B - 39. Start at pair 0 (zero).
POD B (4.0B With URCIIs
Only)
EFIM
EFIT
USER AND POWER
A
LARM PUNCHDOWNS
USER AND POWER
A
LARM PROTECTORS
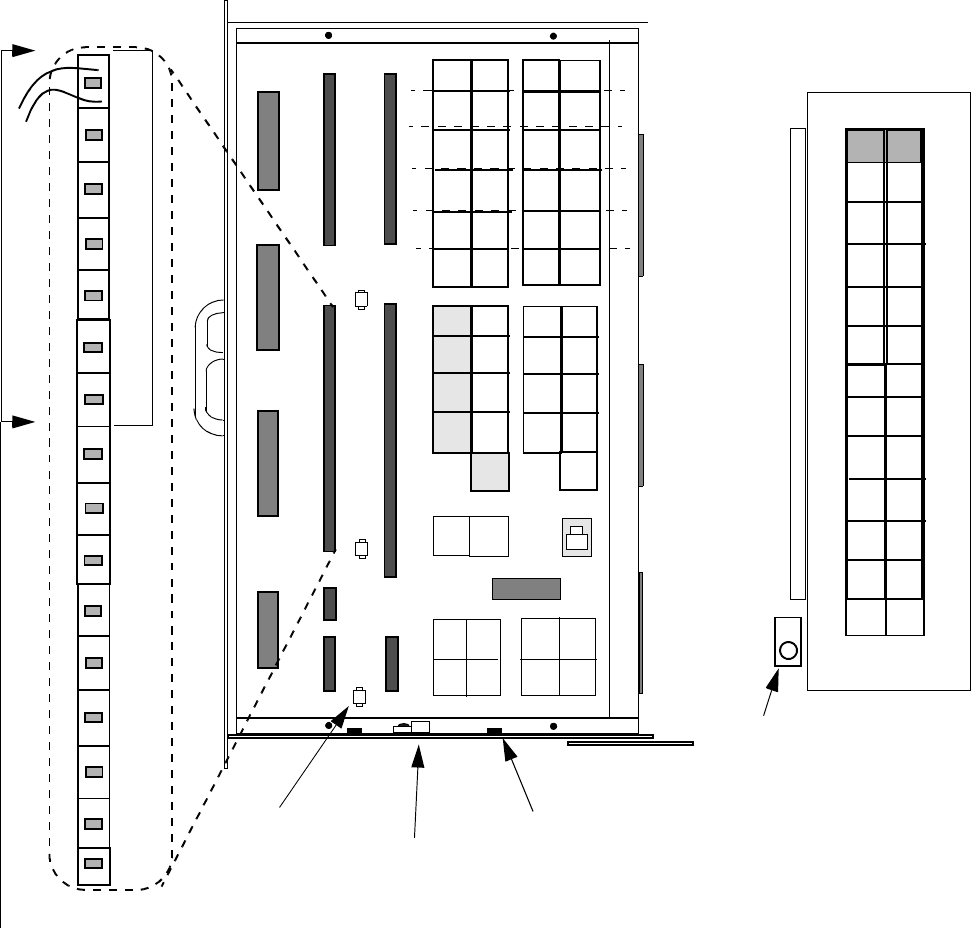
B- 38 Lucent Technologies – Proprietary
See notice on first page 401-703-454
FOA Draft Issue 1
January, 2006
...........................................................................................................................................................................................................................................................
................................................................................................................................
............................................
4Check that the protectors are installed in the correct protector locations
for each installed alarm. The protector location marked "0-33" must also
be populated. Refer to the figure below.
................................................................................................................................
............................................
5Close and secure the EFIT with the four thumb screws.
J1
J4
J3
J5
GROUND
CLAMP
•All punchdown
connections will
accept 24 AWG
solid wires.
J6
J7
J2
CABLE
TIE_DOWN
POINT
(1 of 3)
TX7
TX12
TX1
TX6
0+
15-
33-
16+
J8A J8B J8C J8D
J9A J9B J9C J9D
J10A J10B J10C J10D
TX1
TX7
TX3
TX9
TX5
TX11
TX2
TX8
TX4
TX10
TX6
TX12
RX2
RX7 RX8
RX3 RX4
RX9 RX10
RX5 RX6
RX11 RX12
0+
0-
1+
1-
2+
2-
3+
3-
4+
4-
5+
5-
6-
6+
7+
7-
8+
8-
9+
9-
10+
10-
11+
11-
12+
12-
13+
13-
14+
14-
15+
15-
0+
2+
4+
6+
8+
10+
12+
14+
16+
18+
20+
22+
24+
26+
28+
30+
32+
C1
C2
C3
N/U
UR1
UR2
UR3
UR4
UR5
UR0 UR6
UR7
CABLE
TIE-DOWN
POINT
(1 of 2)
START AT PUNCHDOWN PAIR 0 ON J3, AND CONTINUE THROUGH PAIR 6, AS APPLICAB
LE
1+
3+
5+
7+
9+
11+
13+
17+
19+
21+
23+
25+
27+
29+
31+
33+
0-
to
33-
15+
N/U
N/U
J3
RX1
JXA JXB
TX13
TX14
TX15
TX16
TX17
TX18
RX13
RX14
RX15
RX16
RX17
RX18
TX19
TX20
TX21
TX22
TX23
TX24
RX19
RX20
RX21
RX22
RX23
RX24
GROUND CLAMP
(4.0B with PODB)
POD B (4.0B With
URCIIs Only)

B- 39
Lucent Technologies – Proprietary
See notice on first page
401-703-454
FOA Draft Issue 1
January, 2006
............................................................................................................................................................................................................................................................
POWER ALARM TABLE
* User (power) alarm 6 shares the protector
P9A (6 / 7) with user (external) alarm 7.
** Shown is the wire color code of the recommended cable. The cus-
tomer’s wire color code may differ.
Alarm Wire Color
**
EFIM "J"
Connector
Terminal
Block
Pair
Block
Color
Code
Protector Function
User 0
Alarm
White-Blue J3 + 0 (Top) Blue J9A (0 / 1) Power Major
(PMJ)
Blue-White - 0 (Bottom)
User 1
Alarm
White-Orange J3 + 1 (Top) Orange Power Minor
(PMN)
Orange-White - 1 (Bottom)
User 2
Alarm
White-Slate J3 + 2 (Top) Green J9A (2 / 3) AC Fail (ACF)
Slate-White - 2 (Bottom)
User 3
Alarm
Red-Blue J3 + 3 (Top) Brown Power Cabinet
Intrusion (INTR)
Blue-Red - 3 (Bottom)
User 4
Alarm
White-Green J3 + 4 (Top) Blue J9A (4 / 5) Batteries on
Discharge (BD)
Green-White - 4 (Bottom)
User 5
Alarm
White-Brown J3 + 5 (Top) Orange Fuse Alarm
Brown-White - 5 (Bottom)
User 6
Alarm
J3 + 6 (Top) Green J9A (6 /7) * Reserved
- 6 (Bottom)

B- 40 Lucent Technologies – Proprietary
See notice on first page 401-703-454
FOA Draft Issue 1
January, 2006
...........................................................................................................................................................................................................................................................
How to route the AC power cables to the Modular Cell 4.0B primary
.............................................................................................................................................................................................................................................................
cabinet
Overview This procedure provides instructions for the routing and connection of
the AC power cable or cables in the primary cabinet.
The following description and step-by-step instructions are provided:
Description of the AC power cables B - 41
Route the AC power cables to the Modular Cell 4.0B primary
cabinet
B - 42