Alvarion Technologies MICRO-25 Microbase station transceiver User Manual 4Motion System Manual
Alvarion Technologies Ltd. Microbase station transceiver 4Motion System Manual
Contents
- 1. Manual p1
- 2. Manual p2
- 3. Manual p3
- 4. Manual p4
- 5. Manual p5
Manual p3

Chapter 3 - Operation and Administration of the Macro BTS NPU Configuration
4Motion 250 System Manual
3.4.12.7.3 Restoring the Default Configuration Parameters for the Bearer Plane
QoS Output Marking Rules
Run the following command to restore the default configuration for this bearer
plane QoS marking rule:
npu(config-bqos)# no {outer-dscp | vlan-priority | qos enable}
When you execute this command, it automatically disables this QoS marking rule.
[vlan-priority
<integer(0-7>]
Denotes the VLAN priority to
be assigned to the packets if
the packet meets the
requirements of the marking
rules specified in
Section 3.4.12.7.1.
Optional 0 0-7, where 7 is
the highest
[qos enable] Indicates whether this QoS
marking rule should be
enabled. The absence of this
flag indicates that this QoS
flag is disabled. By default, a
bearer plane QoS marking
rule is disabled.
If you enable this QoS
marking rule, packets on
bearer plane that were
created using the parameters
in Section 3.4.12.7.1, the
Outer DSCP and VLAN
Priority fields in the IP header
and Ethernet header,
respectively are populated
with the values you specify for
the outer-dscp and
vlan-priority
parameters.
Optional By
default,
the QoS
marking
rule is
disabled.
The
presence/abse
nce of this flag
indicates that
this QoS flag is
enabled/disabl
ed.
Command
Modes
Bearer plane QoS marking rules configuration mode
NOTE
Refer to Section 3.4.12.7.2 for a description and default values of these parameters.
Chapter 3 - Operation and Administration of the Macro BTS NPU Configuration
4Motion 251 System Manual
3.4.12.7.4 Terminating the QoS Marking Rules Configuration Mode
Run the following command to terminate the marking rules configuration mode:
npu(config-bqos)# exit
3.4.12.7.5 Deleting Bearer Plane QoS Marking Rules
Run the following command to delete the a QoS marking rule:
npu(config)# no bearerqos [<qos-alias>]
Command
Syntax
npu(config-bqos)# no {outer-dscp | vlan-priority | qos enable}
Privilege
Level
10
Command
Modes
Bearer plane QoS marking rules configuration mode
Command
Syntax
npu(config-bqos)# exit
Privilege
Level
10
Command
Modes
Bearer plane QoS marking rules configuration mode
CAUTION
Specify the QoS alias if you want to delete a specific bearer plane qoS marking rule. Otherwise all
the configured bearer plane QoS marking rules are deleted except "int_default" and "ext_default"
which cannot be deleted.
Command
Syntax
npu(config)# no bearerqos [<qos-alias>]
Privilege
Level
10

Chapter 3 - Operation and Administration of the Macro BTS NPU Configuration
4Motion 252 System Manual
3.4.12.7.6 Displaying Configuration Information for the Bearer Plane QoS
Marking Rules
To display configuration information for specific or all bearer plane QoS marking
rules, run the following command:
npu# show bearerqos [<qos-alias>]
Specify the QoS alias if you want to display configuration information for a
particular bearer plane QoS marking rule. Do not specify a value for this
parameter if you want to view configuration information for all bearer plane QoS
marking rules.
Syntax
Description Parameter Description Presence Default
Value
Possible
Values
[<qos-alias>] Denotes the QoS alias of the
bearer QoS marking rule that
you want to delete. Specify a
value for this parameter if you
want to delete a specific
bearer QoS marking rule.
Do not specify a value for this
parameter if you want to
delete all bearer QoS marking
rules except "int_default" and
"ext_default".
Optional N/A String
Command
Modes
Global configuration mode
Command
Syntax
npu# show bearerqos [<qos-alias>]
Privilege
Level
1

Chapter 3 - Operation and Administration of the Macro BTS NPU Configuration
4Motion 253 System Manual
3.4.12.8 Managing Service Interfaces
A Service Interface defines the parameters of the interface used by the ASN-GW on
the network side for services specified in the applicable Service Group.
The following types of Service Interface are available:
IP-IP: The Service Interface defines the parameters on the ASN-GW side of a
point-to-point tunnel to be used for the applicable traffic.
VLAN: The Service Interface defines the VLAN ID to be added/removed by the
ASN-GW to/from the applicable traffic.
QinQ: Applicable only for special applications requiring local support of
unauthenticated mode. The QinQ Service Interface is applicable only for
supporting VLAN CS Service Flows associated with a QinQ Service Group.
Up to 10 Service Interfaces may be defined.
Syntax
Description Parameter Description Presence Default
Value
Possible
Values
[<qos-alias>] Denotes the QoS alias of the
bearer QoS marking rule that
you want to display.
Specify a value for this
parameter if you want to
display a specific bearer QoS
marking rule. Do not specify a
value for this parameter if you
want to display all bearer QoS
marking rules.
Optional N/A String
Display
Format
Bearer QoS Configuration :
qos-alias intf-type srvc-type trfc-priority media-type inner-dscp outer-dscp vlan-priority status
voip <value> <value> <value> <value> <value> <value> enabled
Command
Modes
Global command mode

Chapter 3 - Operation and Administration of the Macro BTS NPU Configuration
4Motion 254 System Manual
1Enable the Service Interface configuration mode for the selected Service
Interface (refer to Section 3.4.12.8.1)
2You can now execute any of the following tasks:
»Configure one or more of the parameters of the Service Interface (refer to
Section 3.4.12.8.2)
»Restore the default values of the Service Interface parameters (refer to
Section 3.4.12.8.3)
» Terminate the Service Interface configuration mode (refer to
Section 3.4.12.8.4)
In addition, you can, at any time, display configuration information for one or all
existing Service Interfaces (refer to Section 3.4.12.8.6) or delete an existing Service
Interface (refer to Section 3.4.12.8.5).
3.4.12.8.1 Enabling the Service Interface Configuration Mode\Creating a Service
Interface
To configure the parameters of a Service Interface, first enable the Service
Interface configuration mode for the specific Service Interface. Run the following
command to enable the Service Interface configuration mode. You can also use
this command to create a new Service Interface.
npu(config)# srvc-intf [<string>] [{IP-IP|VLAN|QinQ}]
For example, to define a new IP-IP Service Interface named SI1, run the following
command:
npu(config)# srvc-intf SI1 IP-IP
To enable the configuration mode for an existing Service Interface named SI1, run
the following command:
npu(config)# srvc-intf SI1
If you use this command to create a new Service Interface, the configuration mode
for this Service Interface is automatically enabled.
To configure a Service Interface:
Chapter 3 - Operation and Administration of the Macro BTS NPU Configuration
4Motion 255 System Manual
After enabling the configuration mode for a Service Interface you can execute any
of the following tasks:
Configure one or more of the Service Interface parameters (refer to
Section 3.4.12.8.2)
Restore the default values of non-mandatory parameters of the Service
Interface (refer to Section 3.4.12.8.3)
After executing the above tasks, you can terminate the Service Interface
configuration mode (refer to Section 3.4.12.8.4) and return to the global
configuration mode.
NOTE
The Bearer IP Interface (refer to “Configuring IP interfaces” on page 143) must be
configured prior to creating IP-IP or VLAN service interfaces.
Command
Syntax
npu(config)# srvc-intf [<string>] [{IP-IP|VLAN|QinQ}]
Privilege
Level
10
Syntax
Description Parameter Description Presence Default
Value
Possible
Values
[<string>] The Service Interface alias of
the Service Interface for
which you want to enable the
configuration mode. If you
want to create a new Service
Interface, specify a new alias
and define the type of service
interface (see below).
Mandatory N/A String (1 to 30
characters)
[{IP-IP|VLAN
|QinQ}]
The Service Interface’s type. Optional IP-IP IP-IP
VLAN
QinQ

Chapter 3 - Operation and Administration of the Macro BTS NPU Configuration
4Motion 256 System Manual
3.4.12.8.2 Configuring Service Interface Parameters
This section describes the commands for:
“Configuring Parameters for IP-IP Service Interface” on page 256
“Configuring Parameters for VLAN Service Interface” on page 257
3.4.12.8.2.1 Configuring Parameters for IP-IP Service Interface
After enabling the IP-IP Service Interface configuration mode, run the following
command to configure the IP-IP service interface parameters:
This command shall configure one or more parameters of the IP-IP Service
Interface.
npu(config-srvcif-ipip)# config tunnel ([descr <string>] [srcaddr <ip4addr>]
{dstaddr <ipv4addr>} [chksm])
Command
Modes
Global configuration mode
IMPORTANT
An error may occur if you provide an invalid value for any of these parameters. Refer to the syntax
description for more information about the appropriate values and format for configuring these
parameters.
At least one parameter must be specified (the value is optional): The command
npu(config-srvcif-ip-ip)# config tunnel will return an Incomplete Command error.
Command
Syntax
npu(config-srvcif-ip-ip)# config tunnel ([descr <string>] [srcaddr <ip4addr>]
{dstaddr <ipv4addr>} [chksm])
Privilege
Level
10
Syntax
Description Parameter Description Presence Default
Value
Possible
Values
[descr <string>] A description of the Service
Interface.
Optional null String (up to 70
characters)

Chapter 3 - Operation and Administration of the Macro BTS NPU Configuration
4Motion 257 System Manual
3.4.12.8.2.2 Configuring Parameters for VLAN Service Interface
After enabling the VLAN Service Interface configuration mode, run the following
command to configure the VLAN service interface parameters:
This command shall configure one or more parameters of the VLAN Service
Interface.
npu(config-srvcif-vlan)# config ([descr <string>] [vlan-id <size(1-9|11-4094>]
[dflt-gw-ip <ipaddress> <mask>]
[srcaddr
<ip4addr>]
The source IP address that
indicates the point of
origination of the tunnel for
the service interface.
Must be set to the same
address as the NPU Bearer
IP Address.
Optional 0.0.0.0 IP Address of
Bearer
Interface.
{dstaddr
<ipv4addr>}
The destination IP address
that indicates the point of
termination of the tunnel for
the service interface.
Must be set to a valid IP
address. The destination IP
address of an existing
Service Interface (if already
configured to a valid value)
cannot be changed.
Optional 0.0.0.0 Valid IP
Address.
[chksm] Indicates that end-to-end
checksumming mechanism
on ServiceTunnel Interface is
enabled.
Optional By
default,
this
feature
is
disabled.
The
presence/abse
nce of this flag
indicates that
this feature is
enabled/
disabled.
Command
Modes
IP-IP Service Interface configuration mode

Chapter 3 - Operation and Administration of the Macro BTS NPU Configuration
4Motion 258 System Manual
IMPORTANT
An error may occur if you provide an invalid value for any of these parameters. Refer to the syntax
description for more information about the appropriate values and format for configuring these
parameters.
At least one parameter must be specified (the value is optional): The command
npu(config-srvcif-vlan)# config will return an Incomplete Command error.
Command
Syntax
npu(config-srvcif-vlan)# config ([descr <string>] [vlan-id <size(1-9|11-4094>]
[dflt-gw-ip <ip address> <mask>]
Privilege
Level
10
Syntax
Description Parameter Description Presence Default
Value
Possible
Values
descr <string> Aa description of the service
interface.
Optional null String (up to 70
characters)
vlan-id
<size(1-9|11-4094
>]
A Service Interface VLAN ID
shall not conflict with other
instances of Service Interface
VLAN ID and VLAN IDs of
Bearer, Local-Management,
External-Management and
AU Maintenance interfaces.
Shall also not conflict with
CVID of any transparent MS
with L2 service.
Must be set to a valid value
other than the default (0). The
VLAN ID of an existing
Service Interface cannot be
changed.
Optional 0 1-9, 11-4094

Chapter 3 - Operation and Administration of the Macro BTS NPU Configuration
4Motion 259 System Manual
3.4.12.8.2.3 Configuring Parameter for QinQ Service Interface
After enabling the QinQ Service Interface configuration mode, run the following
command to configure the QinQ service interface parameters:
This command shall configure one or more parameters of the QinQ Service
Interface.
[dflt-gw-ip <ip
address> <mask>]
The IP Address and subnet
mask of the Default Gateway.
The IP address shall be
unique among all the Host
Interfaces IP's (Bearer,
Local-Management,
Internal-Management,
External-Management) and
existing instances of Service
Interface’s Tunnel Destination
IP Address and Default
Gateway IP Address.
Interface mask should be
configured in such a way that
the resulting subnet should
not overlap with an existing
Interface subnet (host
interfaces, other service
interfaces).
Should be in the same
subnet.with the IP Address of
the DHCP server/proxy/relay
to be assigned to a service
group using this service
interface.
Must be changed from the
default value. The Default
Gateway IP Address of an
existing service interface
cannot be changed. The
Subnet Mask of a service
interface associated to a
service group cannot be
changed.
Optional 0.0.0.0
255.255.
255.0
valid IP
address and
mask
Command
Modes
VLAN Service Interface configuration mode

Chapter 3 - Operation and Administration of the Macro BTS NPU Configuration
4Motion 260 System Manual
npu(config-srvcif-QinQ)# config ([descr <string>] [vlan-id <size(1-4094>])
3.4.12.8.3 Restoring the Default Configuration Parameters for an IP-IP Service
Interface
Run the following command to restore the default configuration for IP-IP service
interface chksm parameter:
npu(config-srvcif-ipip)# no tunnel [chksm]
IMPORTANT
An error may occur if you provide an invalid value for any of these parameters. Refer to the syntax
description for more information about the appropriate values and format for configuring these
parameters.
At least one parameter must be specified (the value is optional): The command
npu(config-srvcif-QinQ)# config will return an Incomplete Command error.
Command
Syntax
npu(config-srvcif-QinQ)# config ([descr <string>] [vlan-id <size(1-4094>]])
Privilege
Level
10
Syntax
Description Parameter Description Presence Default
Value
Possible
Values
descr <string> A description of the service
interface.
Optional null String (up to 70
characters)
vlan-id
<size(1-4094>]
A Service Interface VLAN ID
shall not conflict with other
instances of Service Interface
VLAN ID and VLAN IDs of
Bearer, Local-Management
and External-Management
interfaces. Shall also not
conflict with CVID of any
transparent MS.
Note that the default (0) is not
a valid value.
Optional 0 1-9, 11-4094
Command
Modes
QinQ Service Interface configuration mode
Chapter 3 - Operation and Administration of the Macro BTS NPU Configuration
4Motion 261 System Manual
3.4.12.8.4 Terminating a Service Interface Configuration Mode
This section describes the commands for:
“Terminating the IP-IP Service Interface Configuration Mode” on page 261
“Terminating the VLAN Service Interface Configuration Mode” on page 262
“Terminating the QinQ Service Interface Configuration Mode” on page 262
3.4.12.8.4.1 Terminating the IP-IP Service Interface Configuration Mode
Run the following command to terminate the IP-IP service interface configuration
mode:
npu(config-srvcif-ipip)# exit
NOTE
Refer to Section 3.4.12.8.2.1 for a description and default value of this parameter.
Command
Syntax
npu(config-srvcif-ipip)# no tunnel [chksm]
Privilege
Level
10
Command
Modes
IP-IP Service Interface configuration mode
Command
Syntax
npu(config-srvcif-ipip)# exit
Privilege
Level
10
Command
Modes
IP-IP Service interface configuration mode
Chapter 3 - Operation and Administration of the Macro BTS NPU Configuration
4Motion 262 System Manual
3.4.12.8.4.2 Terminating the VLAN Service Interface Configuration Mode
Run the following command to terminate the vlan service interface configuration
mode:
npu(config-srvcif-vlan)# exit
3.4.12.8.4.3 Terminating the QinQ Service Interface Configuration Mode
Run the following command to terminate the QinQ service interface configuration
mode:
npu(config-srvcif-QinQ)# exit
3.4.12.8.5 Deleting a Service Interface
You can, at any time, run the following command to delete service interface:
npu(config)# no srvc-intf [<intf-alias>]
Command
Syntax
npu(config-srvcif-vlan)# exit
Privilege
Level
10
Command
Modes
VLAN Service interface configuration mode
Command
Syntax
npu(config-srvcif-QinQ)# exit
Privilege
Level
10
Command
Modes
QinQ Service interface configuration mode
NOTE
A Service Interface cannot be deleted if it is assigned to any Service Group.
A QinQ Service Interface cannot be deleted if it is assigned to a Service Flow (with a VPWS-QinQ
Service Group). For details refer to “Configuring Service Flows” on page 314.

Chapter 3 - Operation and Administration of the Macro BTS NPU Configuration
4Motion 263 System Manual
3.4.12.8.6 Displaying Configuration Information for the Service Interface
To display configuration information for one or all service interfaces, run the
following command:
npu# show srvc-intf <intf-alias>
Specify a value for the intf-alias parameter if you want to display configuration
information for a particular service interface. Do not specify a value for this
parameter if you want to view configuration information for all service interfaces.
Command
Syntax
npu(config)# no srvc-intf [<intf-alias>]
Privilege
Level
10
Syntax
Description Parameter Description Presence Default
Value
Possible
Values
[<intf-alias>] The alias of the Service
interface which needs to be
deleted
Mandatory N/A String
Command
Modes
Global configuration mode
Command
Syntax
npu# show srvc-intf <intf-alias>
Privilege
Level
1

Chapter 3 - Operation and Administration of the Macro BTS NPU Configuration
4Motion 264 System Manual
Syntax
Description Parameter Description Presence Default
Value
Possible
Values
<intf-alias> The alias of the service
interface that you want to
display. If you do not specify a
value for this parameter, all
the services interfaces that
are configured, are displayed.
Optional N/A String
Display
Format
IP-IP
Service
Interface
if-alias <string>
if-descr <string>
intf-type IP-IP
tun-src-ip <IP address>
tun-dst-ip <IP address>
tun-chksum <Enable/Disable>tun-mtu <value>
Display
Format
VLAN
Service
Interface
% Asn-gateway Srvc Intf config
if-alias <string>
if-descr <string>
intf-type VLAN
if-vlan-id <value>
if-dflt-gw-ip <value>
if-dflt-gw-netmask <value>
vlan-mtu <value>
Display
Format
QinQ
Service
Interface
% Asn-gateway Srvc Intf config
if-alias <value>
if-descr <value>
intf-type QinQ
if-vlan-id <value>
Command
Modes
Global command mode

Chapter 3 - Operation and Administration of the Macro BTS NPU Configuration
4Motion 265 System Manual
3.4.12.9 Configuring the AAA Client Functionality
The AAA client functionality enables configuration of one RADIUS client. The
RADIUS client encapsulates the messages destined for the AAA server in RADIUS
messages or decapsulates messages sent by the AAA server for the MS.
In addition, you can also configure certain RADIUS parameters such as the NAS
ID and the time zone offset that are applicable for all AAA clients. In the current
release a single AAA client is supported.
This section describes the commands for:
“Managing AAA Client Configuration” on page 265
“Managing Global RADIUS Configuration Parameters” on page 271
3.4.12.9.1 Managing AAA Client Configuration
1Enable the AAA client configuration mode (refer to Section 3.4.12.9.1.1)
2You can now execute any of the following tasks:
»Configure the AAA client parameters (refer to Section 3.4.12.9.1.2)
»Restore the default configuration of the Alternate Server (refer to
Section 3.4.12.9.1.3)
»Switch between the Primary and Alternate Servers (refer to
Section 3.4.12.9.1.4)
»Terminate the AAA client configuration mode (refer to Section 3.4.12.9.1.5)
In addition, you can, at any time, display the AAA client configuration information
(refer to Section 3.4.12.9.1.6). The AAA client cannot be deleted.
3.4.12.9.1.1 Enabling the AAA Client Configuration Mode
To configure the AAA client parameters, first enable the AAA client configuration
mode. Run the following command to enable the AAA client configuration mode.
npu(config)# aaa-client <client-alias>
The system is supplied with a pre-configured AAA client with the following
properties that cannot be modified:
To configure the AAA client:

Chapter 3 - Operation and Administration of the Macro BTS NPU Configuration
4Motion 266 System Manual
client-alias: default
src-intf: Bearer
After enabling the AAA client configuration mode you can execute any of the
following tasks:
Configure the AAA client parameters (refer to Section 3.4.12.9.1.2)
Restore the default configuration of the Alternate Server (refer to
Section 3.4.12.9.1.3)
Switch between the Primary and Alternate Servers (refer to
Section 3.4.12.9.1.4)
Terminate the AAA client configuration mode and return to the global
configuration mode (refer to Section 3.4.12.9.1.5).
3.4.12.9.1.2 Configuring Parameters for the AAA Client
After enabling the AAA client configuration mode, run the following command to
configure the parameters for the AAA client:
Command
Syntax
npu(config)# aaa-client <client-alias>
Privilege
Level
10
Syntax
Description Parameter Description Presence Default
Value
Possible
Values
<client-alias> Denotes the client-alias of the
AAA client for which the
configuration mode is to be
enabled.
In the current release a single
AAA client is supported, with
client-alias “default”.
Mandatory N/A default
Command
Modes
Global configuration mode

Chapter 3 - Operation and Administration of the Macro BTS NPU Configuration
4Motion 267 System Manual
npu(config-aaa)# config ([src-intf <ip-intf>] [primary-serveraddr
<ipv4addr>] [alternate-serveraddr <ipv4addr>] [rad-sharedsecret
<string>] [aaaRedundancy {Enable|Disable}] [rad-CallingStationId
{Binary | UTF-8}])
IMPORTANT
An error may occur if you provide an invalid value for any of these parameters. Refer the syntax
description for more information about the appropriate values and format for configuring these
parameters.
IMPORTANT
If the bearer interface IP address is being modified after aaa-client configuration, you must
re-configure the src-intf parameter to "bearer" so that the aaa-client will attach itself to the new
bearer interface IP address.
Command
Syntax
npu(config-aaa)# config ([src-intf <ip-intf>] [primary-serveraddr <ipv4addr>]
[alternate-serveraddr <ipv4addr>] [rad-sharedsecret <string>] [aaaRedundancy
{Enable|Disable}] [rad-CallingStationId {Binary | UTF-8}])
Privilege
Level
10
Syntax
Description Parameter Description Presence Default
Value
Possible
Values
[src-intf <ip-intf>] Indicates the interface
providing RADIUS client
functionality. Must be either
the bearer interface or the
external-management
interface.
Optional bearer bearer
external-man
agement
[primary-serveradd
r <ipv4addr>]
Denotes IPv4 address of
the primary AAA server.
primary-serveraddr and
alternate-serveraddr cannot
be the same.
primary-serveraddr and
alternate-serveraddr cannot
have IP address assigned
to NPU IP interfaces.
Mandatory 172.16.0.10 Valid IP
Address

Chapter 3 - Operation and Administration of the Macro BTS NPU Configuration
4Motion 268 System Manual
3.4.12.9.1.3 Restoring the Default Value of the Alternate Server
Run the following command to restore the default value (0.0.0.0) 0f the alternate
server:
npu(config-aaa)# no alternate-serveraddr
[alternate-serverad
dr <ipv4addr>]
Denotes IPv4 address of
the alternate (secondary)
AAA server.
0.0.0.0 means no alternate
server.
Must be set to a valid IP
address if aaaRedundancy
is enabled.
Optional 0.0.0.0 Valid IP
Address
[rad-sharedsecret
<string>]
Denotes the shared secret
between the AAA client and
the AAA server(s).
Optional default String (1 to 49
characters)
[aaaRedundancy
{Enable|Disable}]
Indicates whether AAA
server redundancy is
supported.
If enabled, the ASN-GW will
try switching to the alternate
server if the primary server
does not respond, and vise
versa.
If enabled - the ip-address
of the active server (primary
or alternate) cannot be
modified.
Optional Disable Enable
Disable
[rad-CallingStationI
d {Binary | UTF-8}]
The format of the MAC
address used to define the
Calling Station ID
Optional UTF-8 Binary
UTF-8
Command
Modes
AAA client configuration mode
IMPORTANT
The alternate server cannot be cleared (restored to the default value) id aaaRedundancy is
enabled.

Chapter 3 - Operation and Administration of the Macro BTS NPU Configuration
4Motion 269 System Manual
3.4.12.9.1.4 Switching between the Primary and Alternate Servers
Run the following command to switch between servers:
npu(config-aaa)# aaaSwitchOver
This command is applicable only when aaa redundancy is enabled.
If you execute this command when the active server is the primary server, the unit
will attempt connecting to the alternate server, and vice versa.
3.4.12.9.1.5 Terminating the AAA Client Configuration Mode
Run the following command to terminate the AAA client configuration mode:
npu(config-aaa)# exit
Command
Syntax
npu(config-aaa)# no alternate-serveraddr
Privilege
Level
10
Command
Modes
AAA client configuration mode
Command
Syntax
npu(config-aaa)# aaaSwitchOver
Privilege
Level
10
Command
Modes
AAA client configuration mode
Command
Syntax
npu(config-aaa)# exit
Privilege
Level
10

Chapter 3 - Operation and Administration of the Macro BTS NPU Configuration
4Motion 270 System Manual
3.4.12.9.1.6 Displaying Configuration and Status Information for the AAA Client
To display one or all AAA clients, run the following command:
npu# show aaa-client <client-alias>
In the current release a single AAA client is supported. The client-alias is default.
Command
Modes
AAA client configuration mode
Command
Syntax
npu# show aaa-client <client-alias>
Privilege
Level
1
Syntax
Description Parameter Description Presence Default
Value
Possible
Values
[<client-alias>] Denotes the client-alias for
which the associated AAA
client information is to be
displayed. In the current
release the client-alias of the
supported client is default.
Optional N/A default or null
Display
Format
AAA-client :
Src-intf(IP) :
Primary-ServerAddr :
Alternate ServerAddr :
Radius Shared Secret : <not available for display>
Active AAA server :
AAA Redundancy :
Station ID Format :
Chapter 3 - Operation and Administration of the Macro BTS NPU Configuration
4Motion 271 System Manual
In addition to configurable parameters, the currently Active AAA server
(Primary/Alternate) is also displayed.
3.4.12.9.2 Managing Global RADIUS Configuration Parameters
Global RADIUS configuration parameters for AAA clients determine how AAA
clients should send access requests. This section describes the commands to be
used for:
“Configuring Global RADIUS Parameters” on page 271
“Restoring the Default Global RADIUS Configuration Parameters” on page 273
“Displaying Global RADIUS Configuration Parameters” on page 274
3.4.12.9.2.1 Configuring Global RADIUS Parameters
To configure the global RADIUS configuration parameters to be used for all AAA
clients, run the following command:
npu(config)# radius <[accessreq-retries <retransmissions>]
[accessreq-interval <timeout>] [nasid <nas-identifier>]
[timezone-offset <time-offset(0-86400)>] [mtu <framed mtu
size(1020-2000)>][RadiusAtrbtTypeServiceProfileName
<AtrbtTypeId(1-255)>] [vlan-classf-bit-align
{msbShift|lsb}][alrmAaaSwitchoverRetryFailThrshld(1-250)>]>
Command
Modes
Global command mode
NOTE
You can display configuration information for global RADIUS parameters. For details, refer to
Section 3.4.12.9.2.3
IMPORTANT
An error may occur if you provide an invalid value for any of these parameters. Refer the syntax
description for more information about the appropriate values and format for configuring these
parameters.
Command
Syntax
npu(config)# radius <[accessreq-retries <retransmissions>] [accessreq-interval <timeout>]
[nasid <nas-identifier>] [timezone-offset <time-offset(0-86400)>] [mtu <framed mtu
size(1020-2000)>] [RadiusAtrbtTypeServiceProfileName <AtrbtTypeId(1-255)>]
[alrmAaaSwitchoverRetryFailThrshld(1-250)>] [vlan-classf-bit-align {msbShift|lsb}]>

Chapter 3 - Operation and Administration of the Macro BTS NPU Configuration
4Motion 272 System Manual
Privilege
Level
10
Syntax
Description Parameter Description Presence Default
Value
Possible
Values
[accessreq-retries
<retransmissions>]
Denotes the maximum
number of times the AAA
client can resend the access
request.
Optional 3 0-5
[accessreq-interval
<timeout>]
Denotes the interval, in
seconds, after which the AAA
client can resend the access
request.
Optional 500 10-100000
[nasid
<nas-identifier>]
Denotes the unique identifier
of the ASNGW NAS. Sent in
Access Request message
only if configured. Should be
in FQDN format.
Optional null String (up to 64
characters)
[timezone-offset
<time-offset(0-864
00)>]
Denotes the time zone offset,
in seconds, from GMT at the
NAS.
Optional 0 0-86400
[mtu <framed mtu
size(1020-2000)>]
Denotes the MTU to be used
for the AAA client
functionality.
Optional 2000 1020-2000
[RadiusAtrbtTypeS
erviceProfileName
<AtrbtTypeId(1-25
5)>]
Denotes the RADIUS
attribute in which the
ASN-GW shall expect to get
the service profile name. For
example, configure 11 if AAA
uses Filter ID as the container
of service profile name,
Use only unassigned
freetext-type RADIUS
attributes.
Optional 11 1-255

Chapter 3 - Operation and Administration of the Macro BTS NPU Configuration
4Motion 273 System Manual
3.4.12.9.2.2 Restoring the Default Global RADIUS Configuration Parameters
To restore the default global RADIUS configuration used for AAA clients, run the
following command:
npu(config)# no radius [accessreq-retries] [accessreq-interval]
[nasid] [timezone-offset] [mtu]
[alrmAaaSwitchov
erRetryFailThrshld
(1-250)>]
Threshold to set alarm when
the number of AAA
switchover "unsuccessful
access to primary +
secondary" failed events for a
measured period (PM interval
of 15 minutes) exceeds the
provisioned number.
Optional 250 1 - 250
[vlan-classf-bit-alig
n {msbShift | lsb}]
Defines how to transfer VLAN
ID between R3 and R6:
If msbShift is selected:
a. When transferring classifier
VID value from R3 side to R6
side, the binary value of the
12 least significant bits in R3
TLV will be copied and pasted
as most significant bits in R6
TLV.
b. When transferring classifier
VID value from R6 to R3, the
binary value of the 12 the
most significant bits in R6
TLV will be copied and pasted
as the 12 least significant bits
in R3 TLV.
if lsb is selected: The whole
16 bit value of the relevant
TLV will be transferred
without any change when
transferring classifier VID
value from R3 side to R6 side
and from R6 to R3.
Optional msbShift msbShift
lsb
Command
Modes
Global configuration mode
Chapter 3 - Operation and Administration of the Macro BTS NPU Configuration
4Motion 274 System Manual
3.4.12.9.2.3 Displaying Global RADIUS Configuration Parameters
To display global RADIUS configuration parameters used for all AAA clients, run
the following command:
npu# show radius
NOTE
Refer Section 3.4.12.9.2.1 for a description and default values of these parameters.
Command
Syntax
npu(config)# no radius [accessreq-retries] [accessreq-interval] [nasid] [timezone-offset] [mtu]
Privilege
Level
10
Command
Modes
Global configuration mode
Command
Syntax
npu# show radius
Privilege
Level
1
Display
Format
TimeOut <value>
accessReq-retries <value>
NAS-ID <value>
TimeZone Offset <value>
framed MtuSize <value>
Profile AtrbtType <value>
alrmAaaSwitchoverRetryFailThrshld <value>
VLAN Bit Alignment <value>
Command
Modes
Global command mode

Chapter 3 - Operation and Administration of the Macro BTS NPU Configuration
4Motion 275 System Manual
3.4.12.10 Managing Service Groups
A service group is a group of MSs that are served by the same service provider or
service flows that belong to the same service class.
The following service group types are supported:
IP: This type of service group is used only for IP CS flows. Once service group
is configured as type IP, additional IP allocation configuration is also required
(such as DHCP mode, IP pool, IP Subnet, etc). This type of service group must
be associated with either IP-IP (encapsulated IP packets) or VLAN type of R3
service interface. An IP service group can be configured to support time based
or volume and time based accounting. In addition, an IP service group can be
configured to support direct communication between MSs belonging to the
service group.
VPWS-Transparent: This type of service group is used only for VLAN CS flows.
Once service group is configured as VPWS-Transparent type, IP allocation
configuration is not required. This type of service group is not associated with
any R3 service interface as vlan-tagged MS traffic is transferred transparently
on the on the R3 interface. A VPWS-Transparent service group can be
configured to support time based accounting.
VPWS-QinQ: This type of service group is used only for VLAN CS flows. Once
service group is configured as type VPWS-QinQ type, IP allocation
configuration is not required. This type of service group is not associated with
any R3 service interface as double-tagged MS traffic is transferred
transparently on the on the R3 interface. The QinQ VLAN used by the MS
should be received from the AAA server in Access-Accept messages. A
VPWS-QinQ service group can be configured to support time based
accounting.
VPWS-Mapped: This type of service interface is intended for special needs
were VLAN CS service flows from multiple MSs use the same VLAN ID. Once
service group is configured as VPWS- Mapped type, IP allocation configuration
is not required. This type of service group makes the mapping between a
unique MS flow VLAN ID used on R3 interface and a CVID. The CVID can be
missing. For this service group type a VLAN pool need to configured. The
ASNGW will uniquely allocate a VLAN from the configured pool to each MS
flow to be used on R3 interface. A VPWS-Mapped service group can be
configured to support time based accounting.
You can configure up to 10 service groups, where each of the IP Service Groups is:
Chapter 3 - Operation and Administration of the Macro BTS NPU Configuration
4Motion 276 System Manual
Associated with a separate service IP or VLAN service interface.
Configured as any one of the following:
»DHCP server that allocates an IP address to the MS from the local pool (in
the non-HA mode).
»DHCP relay that obtains the IP address using an external DHCP server (in
the non-HA mode).
»DHCP proxy for either of the following boot modes:
◊Non-HA mode: The DHCP proxy assigns the MS the IP address that was
received from AAA in the MS profile (in FRAMED-IP attribute or R3
Descriptors) or
◊HA mode: The DHCP proxy assigns the MS, the IP address received in
the MS profile or obtains the IP address from HA using the mobile IP.
1Enable the service group configuration mode (refer to Section 3.4.12.10.1)
2You can now execute any of the following tasks:
»Configure the common parameters of an IP service group (refer to
Section 3.4.12.10.2)
»Enable/Disable the VLAN Interface of an IP Service Group (refer to
Section 3.4.12.10.3)
»Enable the service group DHCP operation mode and configure the DHCP
server/proxy/relay-specific parameters (refer to Section 3.4.12.10.4)
»Configure the parameters of a VPWS-Transparent Service Group (refer to
Section 3.4.12.10.5)
»Configure the parameters of a VPWS-QinQ Service Group (refer to
Section 3.4.12.10.6)
»Configure the parameters of a VPWS-Mapped Service Group (refer to
Section 3.4.12.10.7)
To configure a service group:

Chapter 3 - Operation and Administration of the Macro BTS NPU Configuration
4Motion 277 System Manual
»Terminate the service group configuration mode (refer to
Section 3.4.12.10.8)
In addition, you can, at any time, display configuration information (refer to
Section 3.4.12.10.10) or delete an existing service group (refer to
Section 3.4.12.10.9).
3.4.12.10.1 Enabling the Service Group Configuration Mode\ Creating a New
Service Group
To configure the parameters for the service group, first enable the service group
configuration mode. Run the following command to enable the service group
configuration mode or create the service group.
npu(config)# srvc-grp <grp-alias> [ServiceGrpType {IP | VPWS-QinQ |
VPWS-Transparent | VPWS-Mapped}]
If you use this command to create a new service group, the configuration mode for
this group is automatically enabled after which you can configure or restore the
default parameters for this service group.
After enabling the service group configuration mode, you can execute any of the
following tasks:
Configure the common parameters for an IP service group (refer to
Section 3.4.12.10.2)
Enable/Disable the VLAN Interface of an IP Service Group (refer to
Section 3.4.12.10.3)
Enable the service group operation mode and configure the DHCP
server/proxy/relay-specific parameters (refer to Section 3.4.12.10.4)
Configure the parameters of a VPWS-Transparent Service Group (refer to
Section 3.4.12.10.5)
Configure the parameters of a VPWS-Transparent Service Group (refer to
Section 3.4.12.10.6)
Configure the parameters of a VPWS-Transparent Service Group (refer to
Section 3.4.12.10.7)
After executing these tasks, you can terminate the service group configuration
mode (refer to Section 3.4.12.10.8).

Chapter 3 - Operation and Administration of the Macro BTS NPU Configuration
4Motion 278 System Manual
3.4.12.10.2 Configuring Common Parameters of an IP Service Group
After enabling the service group configuration mode for an IP service group, run
the following command to configure common parameters for the service group:
npu(config-srvcgrp)# config {{[srvcif-alias <service interface>]
[waitdhcp-holdtime <timeout>] [dhcp-ownaddr <ipv4addr>]} |
NOTE
You can display configuration information for specific or all service groups. For details, refer to
Section 3.4.12.11.2.
Command
Syntax
npu(config)# srvc-grp <grp-alias> [ServiceGrpType {IP | VPWS-QinQ | VPWS-Transparent |
VPWS-Mapped}]
Privilege
Level
10
Syntax
Description Parameter Description Presence Default
Value
Possible
Values
srvc-grp
<grp-alias>
Denotes the group-alias of
the service group for which
the service group
configuration mode is to be
enabled. If you want to create
a new service group, specify
the group alias to be assigned
to the service group.
Mandatory N/A String (1 to 30
characters)
[ServiceGrpT
ype {IP |
VPWS-QinQ |
VPWS-Transpa
rent |
VPWS-Mapped}
]
The Service group’s type. Optional IP IP
VPWS-QinQ
VPWS-Trans
parent
VPWS-Mapp
ed
Command
Modes
Global configuration mode
Chapter 3 - Operation and Administration of the Macro BTS NPU Configuration
4Motion 279 System Manual
{server|proxy|relay} |{[<acct (none|time|volumeTime)>]}|{[<ms-loop
(enable|disable)>] | [acctInterimTmr <integer(0|5-1600)>]}
This commands comprises 5 sub-commands:
1npu(config-srvcgrp)# config {[srvcif-alias <service interface>]
[waitdhcp-holdtime <timeout>] [dhcp-ownaddr <ipv4addr>]}
2npu(config-srvcgrp)# config {server|proxy|relay}
3npu(config-srvcgrp)# config {[<acct (none|time|volumeTime)>]}
4npu(config-srvcgrp)# config {[<ms-loop (enable|disable)>]}
5npu(config-srvcgrp)# config {[acctInterimTmr <integer(0|5-1600)>]}
NOTE
You can display configuration information for the service group. For details, refer to
Section 3.4.12.11.2.
IMPORTANT
An error may occur if you provide an invalid value for any of these parameters. Refer the syntax
description for more information about the appropriate values and format for configuring these
parameters.
Command
Syntax
npu(config-srvcgrp)# config {{[srvcif-alias <service interface>] [waitdhcp-holdtime <timeout>]
[dhcp-ownaddr <ipv4addr>]} | {server|proxy|relay} |{[<acct (none|time|volumeTime)>]}|{[<ms-loop
(enable|disable)>] | [acctInterimTmr <integer(0|5-1600)>]}
Privilege
Level
10
Syntax
Description Parameter Description Presence Default
Value
Possible
Values
[srvcif-alias
<service
interface>]
Denotes the pre-defined IP or
VLAN service interface alias
to be used as the data path
for traffic towards the core
network.
Note that a Service Interface
alias can be associated only
to a single Service Group.
Mandatory N/A String

Chapter 3 - Operation and Administration of the Macro BTS NPU Configuration
4Motion 280 System Manual
[waitdhcp-holdtime
<timeout>]
Denotes the period, in
seconds, for which the NPU
waits for an IP address
allocation trigger (MIP
registration request / DHCP
discover) from the MS.
If you specify the value of this
parameter as 0, no timer is
started and the NPU will wait
infinitely for the IP address
allocation trigger.
Optional 0 0-86400
[dhcp-ownaddr
<ipv4addr>]
Denotes the IPv4 address of
the DHCP server/ relay/
proxy.
Must be unique in the
network.
For a service group using a
VLAN service interface,
should be in same subnet
with the Default Gateway
configured for the service
interface associated with the
service group. Subnet mask
is taken as the default subnet
mask i.e 255.255.255.0.
Note: In DHCP Server mode,
the DHCP server IP address
must be in the same subnet
but outside the range
allocated for users address
pool as provisioned in the
DHCP Server.
Mandatory N/A Valid IP
Address
{server|proxy|relay
}
Mode of IP address allocation
used for subscribers: DHCP
Server/ Proxy/ Relay.
Mandatory N/A dhcp-server
dhcp-proxy
dhcp-relay

Chapter 3 - Operation and Administration of the Macro BTS NPU Configuration
4Motion 281 System Manual
{acct
{none|time|volume
Time}}
The Accounting mode for the
service interface:
none: No accounting support.
time: The ASN-GW send
RADIUS Accounting
Start/Stop Requests. The
ASN-GW shall also send
Interim Accounting requests
to AAA server using RADIUS
Accounting Interim messages
on a preconfigured or
negotiated interval. AAA
server can send negotiated
time interval in
Access-Accept message. If
ASN GW defined value (see
acctInterimTmr below) is zero
and there is no
Acct-Interim-Interval in
Access Accept, interim
updates should be
deactivated.
volumeTime: Same as for
time option above. In
addition, this mode supports
postpaid accounting by
supporting IP Session
Volume Based Accounting.
The ASN-GW will report the
cumulative volume counters
for each MS IP Session. The
counters will be collected per
MS Service Flow and will be
cumulated in order to get the
MS IP Session counters.
Optional time none
time
volumeTime
{ms-loop {enable|
disable}}
Denotes whether MS
loopback (direct
communication between two
MSs belonging to the same
service group) is enabled or
disabled for the service
interface
Optional Disable Enable
Disable
Chapter 3 - Operation and Administration of the Macro BTS NPU Configuration
4Motion 282 System Manual
3.4.12.10.3 Enabling/Disabling VLAN Service Interface for an IP Service Group
This command is applicable only for an IP service group associated with a VLAN
service interface.
Run the following commands to enable/disable the creation of a data-path for a
VLAN Service:
To enable: npu(config-srvcgrp)# set vlan-enable
To disable: npu(config-srvcgrp)# no vlan-enable
[acctInterimTmr
<integer(0|5-1600)
>]
Applicable only if acct (see
above) mode is set to either
time or volumeTime. The
default interval in minutes for
Accounting Interim reports to
be used if
Acct-Interim-Interval is not
received from the AAA server.
Value “0” means interim
reports are deactivated
unless Acct-Interim-Interval is
sent by the AAA server in
Access Accept messages.
Optional 5 0
5-1600
Command
Modes
IP Service group configuration mode
IMPORTANT
The default is disabled
Command
Syntax
npu(config-srvcgrp)# set vlan-enable
npu(config-srvcgrp)# no vlan-enable
Privilege
Level
10
Command
Modes
IP Service group configuration mode
Chapter 3 - Operation and Administration of the Macro BTS NPU Configuration
4Motion 283 System Manual
3.4.12.10.4 Configuring the DHCP Server/Proxy/Relay
1Enable the service group operation mode for DHCP server/relay/proxy (refer to
Section 3.4.12.10.4.1)
2You can now execute one of the following tasks according to the selected DHCP
mode:
»Configure the DHCP server (refer to Section 3.4.12.10.4.2)
»Configure the DHCP proxy (refer to Section 3.4.12.10.4.3)
»Configure the DHCP relay (refer to Section 3.4.12.10.4.4)
3.4.12.10.4.1 Enabling the Service Group Operation Mode for DHCP Server//Proxy/Relay
Run the following command enable the DHCP (server/relay/proxy) configuration
mode.
npu(config-srvcgrp)# config {server|proxy|relay}
When you run this command, the DHCP server/proxy/relay configuration mode is
enabled, after which you can execute the following tasks:
Configure the DHCP server (refer to Section 3.4.12.10.4.2)
Configure the DHCP proxy (refer to Section 3.4.12.10.4.3)
Configure the DHCP relay (refer to Section 3.4.12.10.4.4)
To configure the DHCP server/proxy/relay:
NOTE
You cannot modify the configured DHCP mode. To change the DHCP mode you should first delete
the Service Group and configure it again.
Command
Syntax
npu(config-srvcgrp)# config {server|proxy|relay}
Privilege
Level
10
Chapter 3 - Operation and Administration of the Macro BTS NPU Configuration
4Motion 284 System Manual
3.4.12.10.4.2 Configuring the DHCP Server
After enabling the service group operation mode for the DHCP server, you can
execute any of the following tasks:
“Configuring DHCP Server Parameters” on page 284
“Restoring Configuration Parameters for the DHCP Server” on page 288
“Configuring Exclude IP Addresses for the DHCP Server” on page 288
“Deleting Exclude IP Addresses for the DHCP Server” on page 289
3.4.12.10.4.2.1Configuring DHCP Server Parameters
Run the following command to configure the DHCP server:
npu(config-srvcgrp-dhcpserver)# config ([pool-minaddr <string>]
[pool-maxaddr <string>] [pool-subnet <string>] [dflt-gwaddr
<string>] [lease-interval <integer(24-4294967295)>]
[renew-interval <integer>] [rebind-interval <integer>]
[dnssrvr-addr <string>] [offerreuse-holdtime <integer>] [opt60
<string(30)>] [opt43 {[Name <string(64)>] [Value <string(64)>]}]
[Sname <string(64)>] [File <string(128)>] [dnssrvr-addr2 <string>])
Syntax
Description Parameter Description Presence Default
Value
Possible
Values
{server|proxy|relay
}
Indicates whether the service
group operation mode is to be
enabled for the DHCP server,
proxy or relay.
Mandatory N/A server
proxy
relay
Command
Modes
Service group configuration mode
NOTE
Before executing these tasks, ensure that you have enabled the DHCP server configuration mode.
For details, refer to “Enabling the Service Group Operation Mode for DHCP
Server//Proxy/Relay” on page 283.

Chapter 3 - Operation and Administration of the Macro BTS NPU Configuration
4Motion 285 System Manual
IMPORTANT
An error may occur if you provide an invalid value for any of these parameters. Refer the syntax
description for more information about the appropriate values and format for configuring these
parameters.
Command
Syntax
npu(config-srvcgrp-dhcpserver)# config ([pool-minaddr <string>] [pool-maxaddr <string>]
[pool-subnet <string>] [dflt-gwaddr <string>] [lease-interval <integer(24-4294967295)>]
[renew-interval <integer>] [rebind-interval <integer>] [dnssrvr-addr <string>] [offerreuse-holdtime
<integer>] [opt60 <string(30)>] [opt43 {[Name <string(64)>] [Value <string(64)>]}] [Sname
<string(64)>] [File <string(128)>] [dnssrvr-addr2 <string>])
Privilege
Level
10
Syntax
Description Parameter Description Presence Default
Value
Possible Values
[pool-minaddr
<string>]
Denotes the minimum
(lowest) IP address of
the address pool to be
used for address
allocation for MSs from
this Service Group.
DHCP address in the
pool shall not overlap
with the DHCP address
pool defined in an
existing service group
and with ip addresses of
host interfaces (Bearer,
External mgmt, Internal
mgmt and Local mgmt).
Optional 0.0.0.0 Valid IP Address

Chapter 3 - Operation and Administration of the Macro BTS NPU Configuration
4Motion 286 System Manual
[[pool-maxaddr
<string>]
Denotes the maximum
(highest) IP address of
the address pool
configuration.
DHCP address in the
pool shall not overlap
with the DHCP address
pool defined in an
existing service group
and with ip addresses of
host interfaces (Bearer,
External mgmt, Internal
mgmt and Local mgmt).
Optional 255.255.
255.255
Valid IP Address
[pool-subnet <string>] The IP subnet mask to
be provided by local
DHCP Service with IP
address for MSs from
this Service Group.
Optional 255.255.
255.255
IP subnet
[dflt-gwaddr <string>] IP address of Default
Gateway to be provided
by local DHCP Service
with IP address for MS
from this Service Group.
Optional 0.0.0.0
(none)
Valid IP Address
[lease-interval
<integer(24-4294967
295)>]
Lease time in seconds of
IP address allocated for
MS from this Service
Group.
Optional 86400 24-4294967295
[renew-interval
<integer>]
Denotes the period, after
which, the MS can
request for renewal of
the lease which has
expired. Specify the
value of this parameter
as a percentage of the
lease-interval
parameter.
The renew-interval must
be lower than
rebind-interval.
Optional 50 1-100
[rebind-interval
<integer>]
Denotes the rebind
interval maintained as a
percentage of the lease
interval. This is passed
to the MS (DHCP client).
Optional 75 1-99

Chapter 3 - Operation and Administration of the Macro BTS NPU Configuration
4Motion 287 System Manual
[dnssrvr-addr
<string>]
IP Address of the first
DNS Server to be
provisioned to MS from
this Group.
Optional 0.0.0.0
(none)
Valid IP Address
[offerreuse-holdtime
<integer>]
Denotes the Offer Reuse
time in seconds of IP
address offered to MS
from this Service Group.
Optional 5 1-120
[opt60 <string(30)>] Configures option 60.
An empty string (null)
means that DHCP
Option 60 is disabled.
Optional null String (up to 30
characters).
Null (empty string)
disables Option 60.
[opt43 {[Name
<string(64)>]
Configures option 43
Name
Optional Internet
Gatewa
yDevice.
Manage
mentSer
ver.URL
String (up to 64
characters)
[Value <string(64)>] Configures option 43
Value
Optional empty
string
String (up to 64
characters)
[Sname <string(64)>] Configures the server
host name. This
parameter is sent in
dhcp-offer / dhcp-ack
messages and may be
used by certain CPEs.
Optional empty
string
String (up to 64
characters)
[File <string(128)>] Configures the boot file
name. This parameter is
sent in dhcp-offer /
dhcp-ack messages and
may be used by certain
CPEs.
Optional empty
string
String (up to 128
characters)
[dnssrvr-addr2
<string>]
IP Address of the second
DNS Server to be
provisioned to MS from
this Group.
Optional 0.0.0.0
(none)
Valid IP address
Command
Modes
Service Group-DCHP server configuration mode
Chapter 3 - Operation and Administration of the Macro BTS NPU Configuration
4Motion 288 System Manual
3.4.12.10.4.2.2Restoring Configuration Parameters for the DHCP Server
Run the following command to restore the default values of one or several DHCP
server parameters. This command can be used to delete the DNS server address
configuration (if specified).
npu(config-srvcgrp-dhcpserver)# no [lease-interval]
[renew-interval] [rebind-interval] [dnssrvr-addr]
[offerreuse-holdtime] [dnssrvr-addr2]
Specify one or several parameters to restore the specified parameters to their
default values. Do not specify any parameter to restore all of these parameters to
their default values.
3.4.12.10.4.2.3Configuring Exclude IP Addresses for the DHCP Server
Run the following command to configure exclude IP addresses for the DHCP
server:
npu(config-srvcgrp-dhcpserver)# exclude-addr <no. of Addrs (1-9)>
<ipv4addr> [<ipv4addr>] ….
In each command you may add up to 9 IP addresses to be excluded. The total
number of excluded IP addresses is up to a maximum of 16384.
NOTE
Refer to Section 3.4.12.10.4.2.1 for a description and default values of these parameters.
Command
Syntax
npu(config-srvcgrp-dhcpserver)# no [lease-interval] [renew-interval] [rebind-interval] [dnssrvr-addr]
[offerreuse-holdtime] [dnssrvr-addr2]
Privilege
Level
10
Command
Modes
Service group-DHCP server configuration mode
IMPORTANT
An error may occur if you provide an invalid IP address. Refer the syntax description for more
information about the appropriate values and format for configuring this parameters.

Chapter 3 - Operation and Administration of the Macro BTS NPU Configuration
4Motion 289 System Manual
3.4.12.10.4.2.4Deleting Exclude IP Addresses for the DHCP Server
Run the following command to delete one or several excluded IP addresses for the
DHCP server:
npu(config-srvcgrp-dhcpserver)# no exclude-addr <no. of Addrs
(1-9)> <ipv4addr> [<ipv4addr>] …
Run the following command (without specifying the parameters) to delete all
excluded IP addresses for the DHCP server:
npu(config-srvcgrp-dhcpserver)# no exclude-addr
The deleted exclude IP addresses are no longer excluded when the DHCP server
allocates the IP addresses. That is, the server may allocate these IP addresses to
the MS.
Command
Syntax
npu(config-srvcgrp-dhcpserver)# exclude-addr <no. of Addrs (1-9)> <ipv4addr> [<ipv4addr>]
….
Privilege
Level
10
Syntax
Description Parameter Description Presence Default
Value
Possible
Values
<no. of Addrs
(1-9)>
The number of IP addresses
to be excluded
Mandatory N/A 1-9
<ipv4addr> Denotes the exclude IP
address that will not be
assigned to an MS by the
DHCP server.
The number of IP address
entries must match the value
defined by the no. of Addrs
parameter.
Mandatory N/A Valid IP
address
Command
Modes
Service group-DCHP server configuration mode
Command
Syntax
npu(config-srvcgrp-dhcpserver)# no exclude-addr no. of Addrs (1-9)> <ipv4addr>
[<ipv4addr>] …

Chapter 3 - Operation and Administration of the Macro BTS NPU Configuration
4Motion 290 System Manual
3.4.12.10.4.2.5Terminating the DHCP Server Configuration Mode
Run the following command to terminate the DHCP server configuration mode:
npu(config-srvcgrp-dhcpserver)# exit
Privilege
Level
10
Syntax
Description Parameter Description Presence Default
Value
Possible
Values
<no. of Addrs
(1-9)>
The number of excluded IP
addresses to be deleted.
Do not specify any value if
you want to remove all the
exclude IP addresses
specified for that DHCP
server.
Optional N/A 1-9
<ipv4addr> Denotes an IP address that
you want to remove from the
list of exclude IP addresses.
The number of IP address
entries must match the value
defined by the no. of Addrs
parameter.
Do not specify any value if
you want to remove all the
exclude IP addresses
specified for that DHCP
server.
Optional N/A Valid IP
address
Command
Modes
Service group-DHCP server configuration mode
Command
Syntax
npu(config-srvcgrp-dhcpserver)# exit
Privilege
Level
10

Chapter 3 - Operation and Administration of the Macro BTS NPU Configuration
4Motion 291 System Manual
3.4.12.10.4.3 Configuring the DHCP Proxy
After enabling the service group operation mode for the DHCP proxy, you can
execute the following tasks:
“Specifying DHCP Proxy Configuration Parameters” on page 291
“Restoring the Default Configuration Parameters for the DHCP Proxy” on
page 294
“Terminating the DHCP Proxy Configuration Mode” on page 295
3.4.12.10.4.3.1Specifying DHCP Proxy Configuration Parameters
Run the following command to configure the DHCP proxy:
npu(config-srvcgrp-dhcpproxy)# config ([offerreuse-holdtime
<integer>] [lease-interval <integer>] [dnssrvr-addr <string>]
[pool-subnet <string>] [dflt-gwaddr <string>] [renew-interval
<integer>] [rebind-interval <integer>] [opt60 <string(30)>] [opt43
{[Name <string(64)>] [Value <string(64)>]}] [Sname <string(64)>]
[File <string(128)>]) [dnssrvr-addr2 <string>]
Command
Modes
Service group-DHCP server configuration mode
IMPORTANT
An error may occur if you provide an invalid value for any of these parameters. Refer the syntax
description for more information about the appropriate values and format for configuring these
parameters.
Command
Syntax
npu(config-srvcgrp-dhcpproxy)# config ([offerreuse-holdtime <integer>] [lease-interval <integer>]
[dnssrvr-addr <string>] [pool-subnet <string>] [dflt-gwaddr <string>] [renew-interval <integer>]
[rebind-interval <integer>] [opt60 <string(30)>] [opt43 {[Name <string(64)>] [Value <string(64)>]}]
[Sname <string(64)>] [File <string(128)>] [dnssrvr-addr2 <string>])
Privilege
Level
10

Chapter 3 - Operation and Administration of the Macro BTS NPU Configuration
4Motion 292 System Manual
Syntax
Description Parameter Description Presence Default
Value
Possible
Values
[offerreuse-holdtim
e <integer>]
Denotes the duration in
seconds within which the
MS should send a DHCP
request to accept the
address sent by the NPU.
If the MS does not accept
the address within this
period, the MS is
deregistered.
Optional 5 0-120
[lease-interval
<integer>]
Lease time in seconds of
IP address allocated for
MS from this Service
Group.
In the Proxy mode, this
value is used if appropriate
parameter is not received
in RADIUS
Access-Accept.
Optional 86400 24 -
4294967295
[dnssrvr-addr <string>] IP Address of the first DNS
Server to be provisioned to
MS from this Group.
In the Proxy mode, this
value is used if appropriate
parameter is not received
in RADIUS
Access-Accept.
Optional 0.0.0.0
(none)
Valid IP
Address
[pool-subnet <string>] The IP subnet mask to be
provided by local DHCP
Service with IP address for
MSs from this Service
Group. In the Proxy mode,
this value is used if
appropriate parameter is
not received in RADIUS
Access-Accept.
Optional 255.255.
255.255
IP subnet

Chapter 3 - Operation and Administration of the Macro BTS NPU Configuration
4Motion 293 System Manual
[dflt-gwaddr <string>] IP address of Default
Gateway to be provided by
local DHCP Service with
IP address for MS from
this Service Group.
In the Proxy mode, this
value is used if appropriate
parameter is not received
in RADIUS
Access-Accept.
Optional 0.0.0.0
(none)
Valid IP
Address
[renew-interval
<integer>]
Denotes the period, after
which, the MS can request
for renewal of the lease
which has expired. Specify
the value of this parameter
as a percentage of the
lease-interval
parameter.
This value is used if
appropriate parameter is
not received in RADIUS
Access-Accept.
Optional 50 1-100
[rebind-interval
<integer>]
Denotes the rebind interval
maintained as a
percentage of the lease
interval. This is passed to
the MS (DHCP client).
This value is used if
appropriate parameter is
not received in RADIUS
Access-Accept.
Optional 75 1-99
[opt60 <string(30)>] Configures option 60. Optional null String (up to 30
characters)
[opt43 {[Name
<string(64)>]
Configures option 43
Name
Optional Internet
Gateway
Device.
Manage
mentSer
ver.URL
String (up to 64
characters)
[Value <string(64)>] Configures option 43
Value
Optional empty
string
String (up to 64
characters)

Chapter 3 - Operation and Administration of the Macro BTS NPU Configuration
4Motion 294 System Manual
3.4.12.10.4.3.2Restoring the Default Configuration Parameters for the DHCP Proxy
Run the following command to restore the default values of one or several DHCP
proxy parameters. This command can also be used to delete the configured DNS
server address (if specified).
npu(config-srvcgrp-dhcpproxy)# no [offerreuse-holdtime]
[lease-interval] [dnssrvr-addr][renew-interval] [rebind-interval]
[dnssrvr-addr2]
Specify one or several parameters to restore the specified parameters to their
default values. Do not specify any parameter to restore all of these parameters to
their default values.
[Sname <string(64)>] Configures the proxy host
name. This parameter is
sent in dhcp-offer /
dhcp-ack messages and
may be used by certain
CPEs.
Optional empty
string
String (up to 64
characters)
[File <string(128)>] Configures the boot file
name. This parameter is
sent in dhcp-offer /
dhcp-ack messages and
may be used by certain
CPEs.
Optional empty
string
String (up to
128 characters)
[dnssrvr-addr2
<string>]
IP Address of the second
DNS Server to be
provisioned to MS from
this Group.
In the Proxy mode, this
value is used if appropriate
parameter is not received
in RADIUS
Access-Accept.
Optional 0.0.0.0
(none)
Valid IP
address
Command
Modes
Service group-DHCP proxy configuration mode
NOTE
Refer Section 3.4.12.10.4.3.1 for a description and default values of these parameters.

Chapter 3 - Operation and Administration of the Macro BTS NPU Configuration
4Motion 295 System Manual
3.4.12.10.4.3.3Terminating the DHCP Proxy Configuration Mode
Run the following command to terminate the DHCP proxy configuration mode:
npu(config-srvcgrp-dhcpproxy)# exit
3.4.12.10.4.4 Configuring the DHCP Relay
After enabling the service group operation mode for the DHCP relay, you can
execute any of the following tasks:
“Configuring the DHCP Relay Parameters” on page 295
“Terminating the DHCP Relay Configuration Mode” on page 301
3.4.12.10.4.4.1Configuring the DHCP Relay Parameters
Run the following command to configure the DHCP server address for the DHCP
relay:
npu(config-srvcgrp-dhcprelay)# config ([server-addr <ipV4Addr>]
[{EnableOpt82|DisableOpt82}])
Command
Syntax
npu(config-srvcgrp-dhcpproxy)# no [offerreuse-holdtime] [lease-interval]
[dnssrvr-addr][renew-interval] [rebind-interval] [dnssrvr-addr2]
Privilege
Level
10
Command
Modes
Service group-DHCP proxy configuration mode
Command
Syntax
npu(config-srvcgrp-dhcpproxy)# exit
Privilege
Level
10
Command
Modes
Service group-DHCP proxy configuration mode

Chapter 3 - Operation and Administration of the Macro BTS NPU Configuration
4Motion 296 System Manual
3.4.12.10.4.4.2Configuring the DHCP Relay Option 82 Parameters
If Option 82 for the DHCP Relay is enabled, run the following command to
configure suboptions of option 82 of DHCP messages:
npu(config-srvcgrp-dhcprelay-Opt82)# config ([Subopt1value
{Default|MSID|BSID|NASID|NASIP|Full-NAI|Domain|asciiMsID|asciiBsID|asc
iiBsMac|AsciiFrStrng <string(32)>|BinFrStrng <string(32)>}] [Subopt2value
{Default|MSID|BSID|NASID|NASIP|Full-NAI|Domain|asciiMsID|asciiBsID|asc
iiBsMac|AsciiFrStrng <string(32)>|BinFrStrng <string(32)>}] [Subopt6value
{Default|MSID|BSID|NASID|NASIP|Full-NAI|Domain|AsciiFrStrng
<string(32)>|BinFrStrng <string(32)>}] [{Subopt7value [service-type]
[vendor-specific] [session-timeout]}] [{EnableUnicast|DisableUnicast}])
IMPORTANT
An error may occur if you provide an invalid value for the DHCP server address. Refer to the syntax
description for more information about the appropriate values and format for configuring this
parameters.
Command
Syntax
npu(config-srvcgrp-dhcprelay)# config ([server-addr <ipV4Addr>]
[{EnableOpt82|DisableOpt82}])
Privilege
Level
10
Syntax
Description Parameter Description Presence Default
Value
Possible
Values
[server-addr
<ipv4addr>]
Denotes the IP address of the
external DHCP server. Must
be configured to a valid IP
address.
Optional 0.0.0.0 Valid IP
Address
[{EnableOpt82|Dis
ableOpt82}]
Denotes whether DHCP
option 82 is enabled or
disabled.
Optional Disable
Opt82
EnableOpt82
DisableOpt8
2
Command
Modes
Service group-DHCP relay configuration mode

Chapter 3 - Operation and Administration of the Macro BTS NPU Configuration
4Motion 297 System Manual
IMPORTANT
For DhcpRlOpt82SubOpt1BinFrstrng value, enter hex string without spaces.
If Opt82Unicast is enabled then DHCP relay agent appends option 82 to all DHCP messages
(unicast and broadcast).
If Opt82Unicast is disabled (default) then DHCP relay agent appends option 82 only to
broadcast DHCP request messages.
Command
Syntax
npu(config-srvcgrp-dhcprelay-Opt82)# config ([Subopt1value
{Default|MSID|BSID|NASID|NASIP|Full-NAI|Domain|asciiMsID|asciiBsID|asciiBsMac|AsciiFrStrng
<string(32)>|BinFrStrng <string(32)>}] [Subopt2value
{Default|MSID|BSID|NASID|NASIP|Full-NAI|Domain|asciiMsID|asciiBsID|asciiBsMac|AsciiFrStrng
<string(32)>|BinFrStrng <string(32)>}] [Subopt6value
{Default|MSID|BSID|NASID|NASIP|Full-NAI|Domain|AsciiFrStrng <string(32)>|BinFrStrng
<string(32)>}] [{Subopt7value [service-type] [vendor-specific] [session-timeout]}]
[{EnableUnicast|DisableUnicast}])
Privilege
Level
10

Chapter 3 - Operation and Administration of the Macro BTS NPU Configuration
4Motion 298 System Manual
Syntax
Description Parameter Description Presence Default
Value
Possible Values
[Subopt1value
{Default|MSID|BSI
D|NASID|NASIP|F
ull-NAI|Domain|asc
iiMsID|asciiBsID|as
ciiBsMac|AsciiFrSt
rng
<string(32)>|BinFr
Strng
<string(32)>}]
Configures the suboption 1
(Agent Circuit ID) of DHCP
option 82.
For AsciiFrStrng (string enter
up to 32 characters,
For BinFrStrng (string enter a
string of up to 32 hexadecimal
digits (no spaces).
Optional Not Set Default
MSID
BSID
NASID
NASIP
Full-NAI
Domain
asciiMsID
asciiBsID
asciiBsMac
AsciiFrStrng
(string32)
BinFrStrng
(string32)

Chapter 3 - Operation and Administration of the Macro BTS NPU Configuration
4Motion 299 System Manual
[Subopt2value
{Default|MSID|BSI
D|NASID|NASIP|F
ull-NAI|Domain|asc
iiMsID|asciiBsID|as
ciiBsMac|AsciiFrSt
rng
<string(32)>|BinFr
Strng <string(32)>}
Configures the suboption 2
(Agent Remote ID) of DHCP
option 82.
For AsciiFrStrng (string enter
up to 32 characters,
For BinFrStrng (string enter a
string of up to 32 hexadecimal
digits (no spaces).
Optional Not Set Default
MSID
BSID
NASID
NASIP
Full-NAI
Domain
asciiMsID
asciiBsID
asciiBsMac
AsciiFrStrng
(string32)
BinFrStrng
(string32)
[Subopt6value
{Default|MSID|BSI
D|NASID|NASIP|F
ull-NAI|Domain|As
ciiFrStrng
<string(32)>|BinFr
Strng
<string(32)>}]
Configures the suboption 6
(Agent Subscriber ID)of
DHCP option 82.
For AsciiFrStrng (string enter
up to 32 characters,
For BinFrStrng (string enter a
string of up to 32 hexadecimal
digits (no spaces).
Optional Not Set Default
MSID
BSID
NASID
NASIP
Full-NAI
Domain
AsciiFrStrng
(string32)
BinFrStrng
(string32)

Chapter 3 - Operation and Administration of the Macro BTS NPU Configuration
4Motion 300 System Manual
3.4.12.10.4.4.3Removing the DHCP Relay suboption values
Run the following command to remove one, several or all of the Suboption values
configured by the user for DHCP Option 82.
npu(config-srvcgrp-dhcprelay-opt82)# no [Subopt1value] [Subopt2value]
[Subopt6value] [Subopt7value]
[{Subopt7value
[service-type]
[vendor-specific]
[session-timeout]}]
Configures the suboption 7 of
DHCP option 82.
Allows enabling/disabling the
use of suboption 7 by
specifying it. In addition,
allows enabling/disabling the
following attributes (by
specifying attributes to be
enabled) if suboption 7 is
enabled:
service-type (attribute 6)
vendor-specific (attribute
26)
session-timeout (attribute
27)
Optional
[{EnableUnicast|Di
sableUnicast}])
Indicates whether the
Unicast parameter is
enabled or disabled.
Optional Disable Enable
Disable
Command
Mode
Service group-DHCP relay-option 82 configuration mode
Command
Syntax
npu(config-srvcgrp-dhcprelay-opt82)# no [Subopt1value] [Subopt2value] [Subopt6value]
[Subopt7value]
Privilege
Level
10

Chapter 3 - Operation and Administration of the Macro BTS NPU Configuration
4Motion 301 System Manual
3.4.12.10.4.4.4Terminating the DHCP Relay Configuration Mode
Run the following command to terminate the DHCP relay configuration mode for
this service group:
npu(config-srvcgrp-dhcprelay)# exit
3.4.12.10.5 Configuring the Parameters of a VPWS-Transparent Service Group
After enabling the service group configuration mode for a VPWS-Transparent
service group, run the following command to configure the accounting parameters
for the service group:
npu(config-srvcgrp-VPWS)# config {acct {none|time} | acctInterimTmr
<integer(0|5-1600)>}
Syntax
Description Parameter Description Presence Default
Value
Possible
Values
no [Subopt1value]
[Subopt2value]
[Subopt6value]
[Subopt7value]
Indicates the removal status
of DHCP Option 82
suboptions.
If no suboption is specified,
the values of all suboptions
will be removed.
Optional N/A N/A
Command
Mode
Service group-DHCP relay-Option 82 configuration mode
Command
Syntax
npu(config-srvcgrp-dhcprelay)# exit
Privilege
Level
10
Command
Modes
Service group-DHCP relay configuration mode
NOTE
You can display configuration information for the service group. For details, refer to
Section 3.4.12.11.2.

Chapter 3 - Operation and Administration of the Macro BTS NPU Configuration
4Motion 302 System Manual
Command
Syntax
npu(config-srvcgrp)# config {acct {none|time} | acctInterimTmr <integer(0|5-1600)>}
Privilege
Level
10
Syntax
Description
Parameter Description Presence Default
Value
Possible
Values
{acct {none|time}} The Accounting mode for the
service interface:
none: No accounting support.
time: The ASN-GW send
RADIUS Accounting
Start/Stop Requests. The
ASN-GW shall also send
Interim Accounting requests
to AAA server using RADIUS
Accounting Interim messages
on a preconfigured or
negotiated interval. AAA
server can send negotiated
time interval in
Access-Accept message. If
ASN GW defined value (see
acctInterimTmr below) is zero
and there is no
Acct-Interim-Interval in
Access Accept, interim
updates should be
deactivated.
Optional time none
time
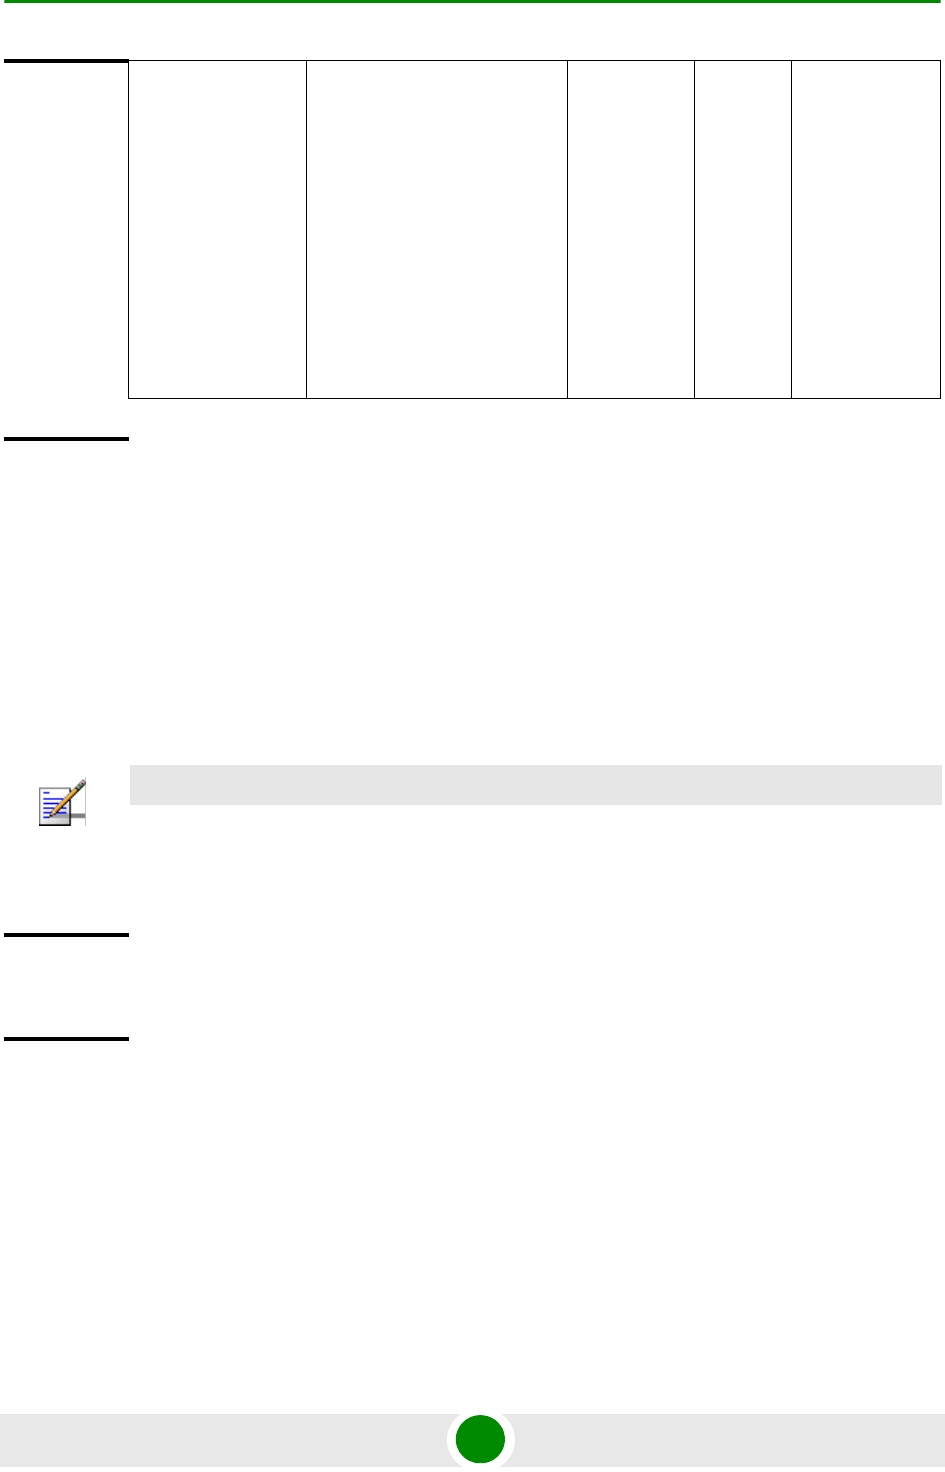
Chapter 3 - Operation and Administration of the Macro BTS NPU Configuration
4Motion 303 System Manual
3.4.12.10.6 Configuring the Parameters of a VPWS-QinQ Service Group
After enabling the service group configuration mode for a VPWS-QinQ service
group, run the following command to configure the accounting parameters for the
service group:
npu(config-srvcgrp-VPWS)# config {acct {none|time} | acctInterimTmr
<integer(0|5-1600)>}
[acctInterimTmr
<integer(0|5-1600)
>]
Applicable only if acct (see
above) mode is set to time.
The default interval in
minutes for Accounting
Interim reports to be used if
Acct-Interim-Interval is not
received from the AAA server.
Value “0” means interim
reports are deactivated
unless Acct-Interim-Interval is
sent by the AAA server in
Access Accept messages.
Optional 5 0
5-1600
Command
Modes
VPWS-Transparent Service group configuration mode
NOTE
You can display configuration information for the service group. For details, refer to
Section 3.4.12.11.2.
Command
Syntax
npu(config-srvcgrp)# config {acct {none|time} | acctInterimTmr <integer(0|5-1600)>}
Privilege
Level
10

Chapter 3 - Operation and Administration of the Macro BTS NPU Configuration
4Motion 304 System Manual
Syntax
Description
Parameter Description Presence Default
Value
Possible
Values
{acct {none|time}} The Accounting mode for the
service interface:
none: No accounting support.
time: The ASN-GW send
RADIUS Accounting
Start/Stop Requests. The
ASN-GW shall also send
Interim Accounting requests
to AAA server using RADIUS
Accounting Interim messages
on a preconfigured or
negotiated interval. AAA
server can send negotiated
time interval in
Access-Accept message. If
ASN GW defined value (see
acctInterimTmr below) is zero
and there is no
Acct-Interim-Interval in
Access Accept, interim
updates should be
deactivated.
Optional time none
time
[acctInterimTmr
<integer(0|5-1600)
>]
Applicable only if acct (see
above) mode is set to time.
The default interval in
minutes for Accounting
Interim reports to be used if
Acct-Interim-Interval is not
received from the AAA server.
Value “0” means interim
reports are deactivated
unless Acct-Interim-Interval is
sent by the AAA server in
Access Accept messages.
Optional 5 0
5-1600
Command
Modes
VPWS-QinQ Service group configuration mode
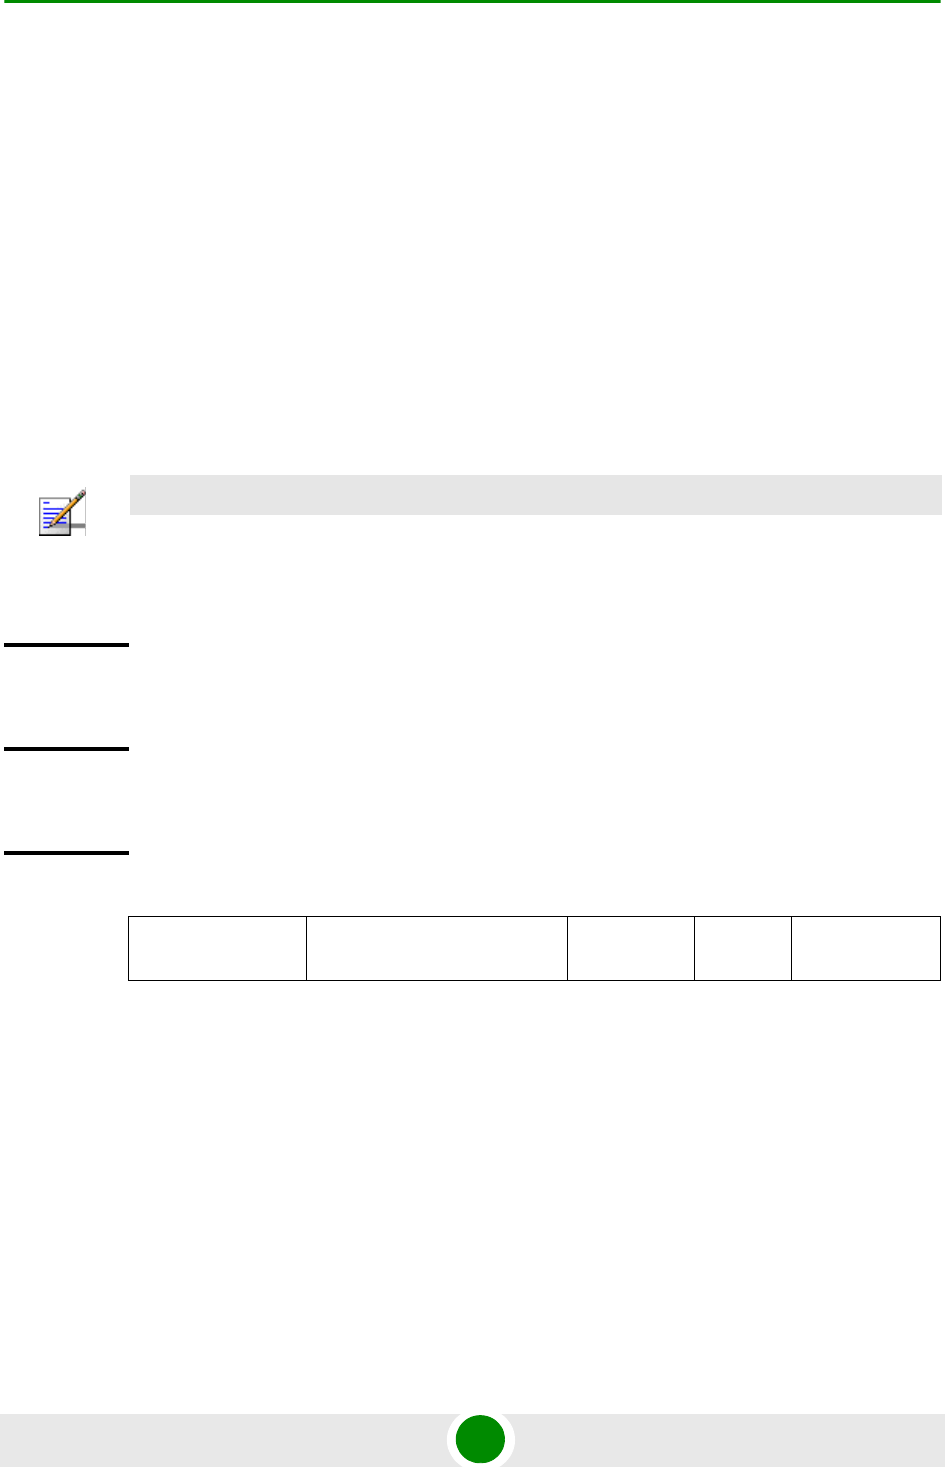
Chapter 3 - Operation and Administration of the Macro BTS NPU Configuration
4Motion 305 System Manual
3.4.12.10.7 Configuring the Parameters of a VPWS-Mapped Service Group
After enabling the service group configuration mode for a VPWS-Mapped service
group, you can configure the following parameters for the service group:
Accounting parameters (see Section 3.4.12.10.7.1)
VID Map Range parameters (see Section 3.4.12.10.7.2)
3.4.12.10.7.1 Configuring the Accounting Parameters of a VPWS-Mapped Service Group
run the following command to configure the accounting parameters for the service
group:
npu(config-srvcgrp-VPWS-Mapped)# config {acct {none|time} |
acctInterimTmr <integer(0|5-1600)>}
NOTE
You can display configuration information for the service group. For details, refer to
Section 3.4.12.11.2.
Command
Syntax
npu(config-srvcgrp-VPWS-Mapped)# config {acct {none|time} | acctInterimTmr
<integer(0|5-1600)>}
Privilege
Level
10
Syntax
Description
Parameter Description Presence Default
Value
Possible
Values

Chapter 3 - Operation and Administration of the Macro BTS NPU Configuration
4Motion 306 System Manual
3.4.12.10.7.2 Configuring the VID Map Range Parameters of a VPWS-Mapped Service
Group
run the following commands to configure the vid-map-range parameters for the
service group:
{acct {none|time}} The Accounting mode for the
service interface:
none: No accounting support.
time: The ASN-GW sends
RADIUS Accounting
Start/Stop Requests. The
ASN-GW also sends Interim
Accounting requests to AAA
server using RADIUS
Accounting Interim messages
on a preconfigured or
negotiated interval. AAA
server can send negotiated
time interval in
Access-Accept message. If
ASN GW defined value (see
acctInterimTmr below) is zero
and there is no
Acct-Interim-Interval in
Access Accept, interim
updates should be
deactivated.
Optional time none
time
[acctInterimTmr
<integer(0|5-1600)
>]
Applicable only if acct (see
above) mode is set to time.
The default interval in
minutes for Accounting
Interim reports to be used if
Acct-Interim-Interval is not
received from the AAA server.
Value “0” means interim
reports are deactivated
unless Acct-Interim-Interval is
sent by the AAA server in
Access Accept messages.
Optional 5 0
5-1600
Command
Modes
VPWS-Mapped Service group configuration mode
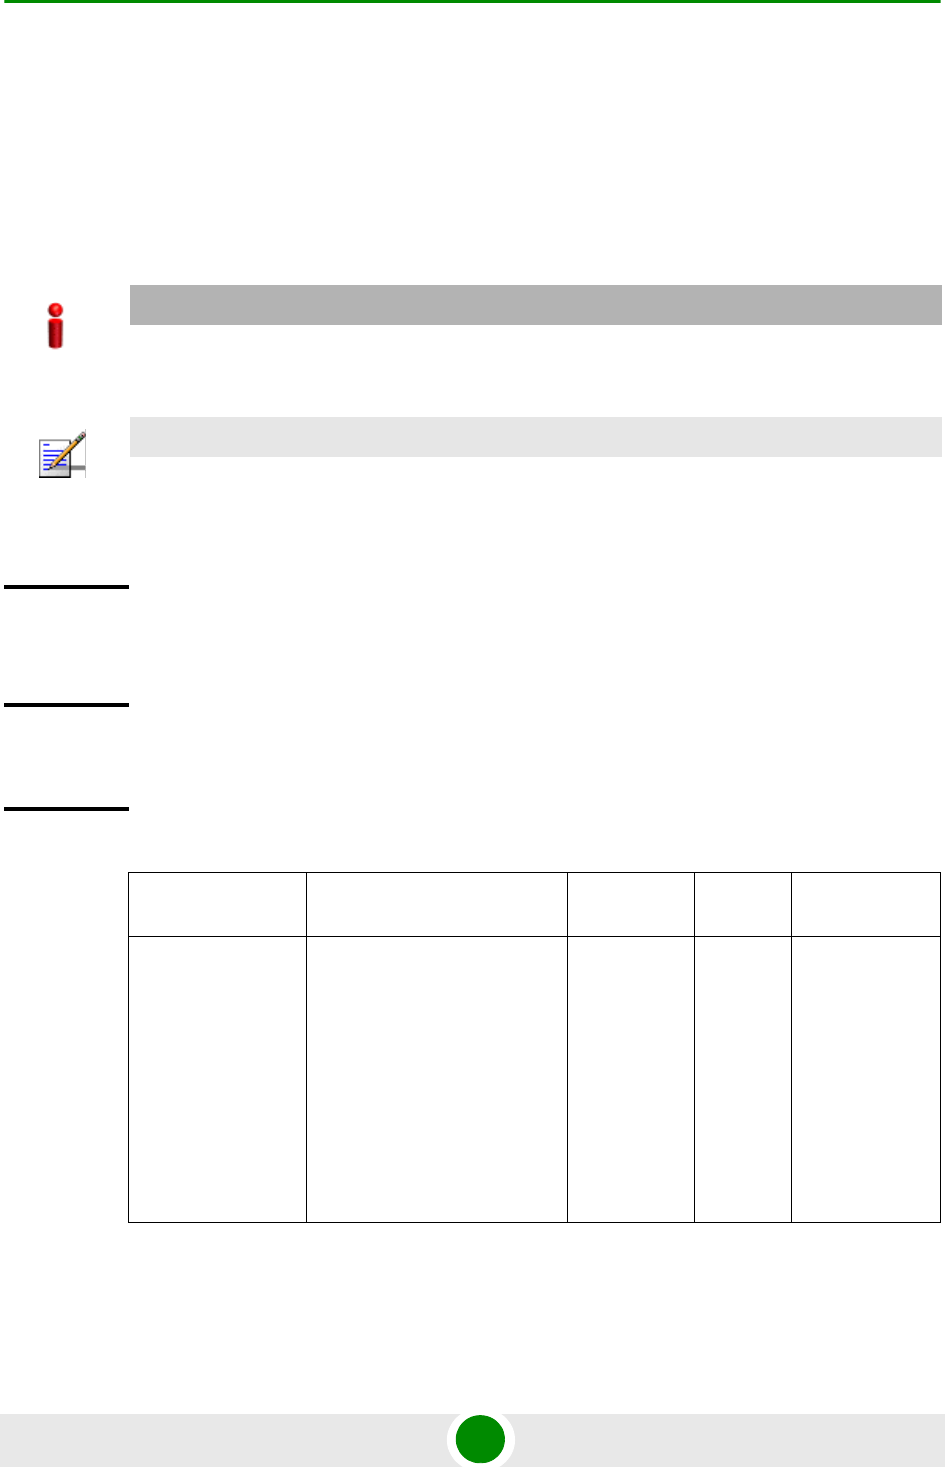
Chapter 3 - Operation and Administration of the Macro BTS NPU Configuration
4Motion 307 System Manual
To configure the start vlan id run the command:
npu(config-srvcgrp-VPWS-Mapped)# config vid-map-range-start vlan-id
<size(1-4094)>.
To configure the end vlan id run the command:
npu(config-srvcgrp-VPWS-Mapped)# config vid-map-range-end vlan-id
<size(1-4094)>.
IMPORTANT
When creating a new VPWS-Mapped service group, both start vlan-id and end vlan-id must be
defined.
NOTE
You can display configuration information for the service group. For details, refer to
Section 3.4.12.11.2.
Command
Syntax
npu(config-srvcgrp-VPWS-Mapped)# config vid-map-range-start vlan-id <size(1-4094)>
npu(config-srvcgrp-VPWS-Mapped)# config vid-map-range-end vlan-id <size(1-4094)>
Privilege
Level
10
Syntax
Description
Parameter Description Presence Default
Value
Possible
Values
vid-map-range-star
t vlan-id
<size(1-4094)>
The start value of the range of
VLAN IDs for mapping.
None of the value within the
range shall overlap with any
existing infrastructure (host
interfaces) VLAN IDs. None
of the value within the range
shall overlap with VID
mapping ranges of other
existing Service Groups
Mandatory N/A 1-4094

Chapter 3 - Operation and Administration of the Macro BTS NPU Configuration
4Motion 308 System Manual
3.4.12.10.8 Terminating the Service Group Configuration Mode
Run the following command to terminate the service group configuration mode:
npu(config-srvcgrp)# exit
npu(config-srvcgrp-VPWS)# exit
npu(config-srvcgrp-VPWS-Mapped)# exit
3.4.12.10.9 Deleting a Service Group
You can, at any time, run the following command to delete a service group:
npu(config)# no srvc-grp <grp-alias>
vid-map-range-end
vlan-id
<size(1-4094)>
The start value of the range of
VLAN IDs for mapping.
Cannot be lower than
vid-map-range-start vlan-id
None of the value within the
range shall overlap with any
existing infrastructure (host
interfaces) VLAN IDs. None
of the value within the range
shall overlap with VID
mapping ranges of other
existing Service Groups
Mandatory N/A 1-4094
Command
Modes
VPWS-Mapped Service group configuration mode
Command
Syntax
npu(config-srvcgrp)# exit
npu(config-srvcgrp-VPWS)# exit
npu(config-srvcgrp-VPWS-Mapped)# exit
Privilege
Level
10
Command
Modes
IP/VPWS-Transparent/VPWS-QinQ/VPWS-Mapped Service group configuration mode
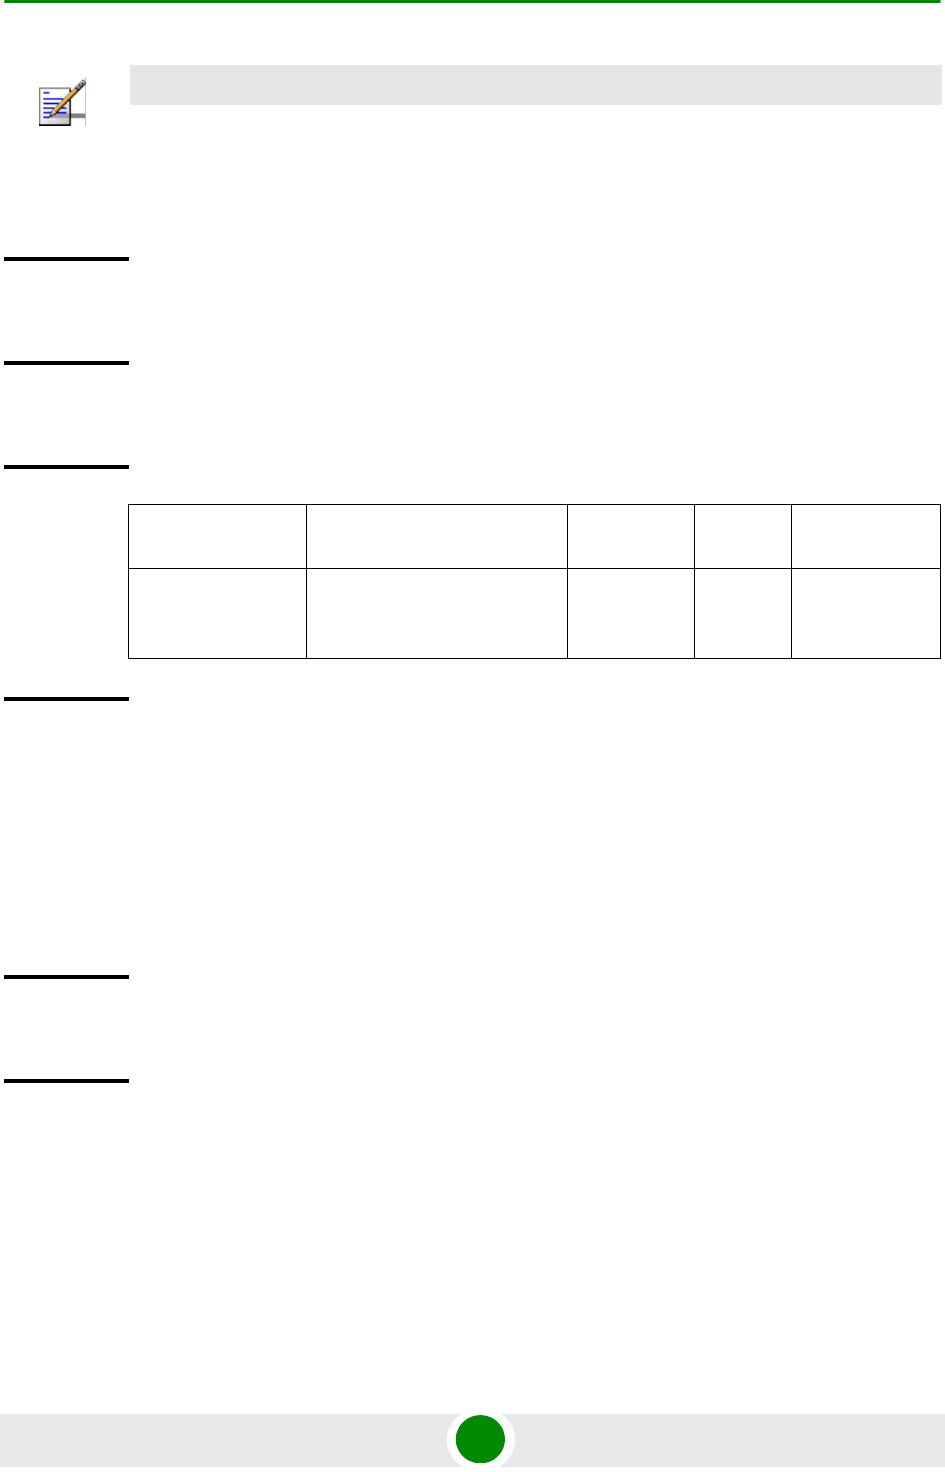
Chapter 3 - Operation and Administration of the Macro BTS NPU Configuration
4Motion 309 System Manual
3.4.12.10.10Displaying Configuration Information for the Service Group
To display configuration information for one service group or for all service
groups, run the following command:
npu# show srvc-grp [<grp-alias>]
NOTE
A Service Group cannot be deleted if it is assigned to a Service Flow. For details refer to
“Configuring Service Flows” on page 314.
To delete a VLAN service group (associated with a VLAN service interface), first execute the "no
vlan-enable" command (refer to Section 3.4.12.10.3).
Command
Syntax
npu(config)# no srvc-grp <grp-alias>
Privilege
Level
10
Syntax
Description Parameter Description Presence Default
Value
Possible
Values
<grp-alias> Denotes the group-alias for
which the service group to be
deleted.
Mandatory N/A String
Command
Modes
Global configuration mode
Command
Syntax
npu# show srvc-grp [<grp-alias>]
Privilege
Level
1

Chapter 3 - Operation and Administration of the Macro BTS NPU Configuration
4Motion 310 System Manual
3.4.12.11 Configuring the Service Flow Authorization Functionality
The Service Flow Authorization (SFA) functionality handles creation/
maintenance of pre-provisioned service flows for MS. It maps the AAA parameters
(service profile name) received from the AAA server to pre-configured
WiMAX-specific QoS parameters in the NPU. The SFA functionality enables you to
configure multiple service profiles with multiple service flows and classification
rules.
This section describes the commands to be used for:
“Configuring the SFA PHS Functionality” on page 310
“Displaying Configuration Information for the SFA PHS Functionality” on
page 311
“Configuring Service Profiles” on page 311
“Configuring Classification Rules” on page 330
3.4.12.11.1 Configuring the SFA PHS Functionality
To configure the SFA functionality with respect to PHS Rules, run the following
command:
To enable PHS: npu(config)# sfa phs-enable
To disable PHS: npu(config)# no sfa phs-enable
The default configuration is PHS Disable.
Syntax
Description Parameter Description Presence Default
Value
Possible
Values
[<grp-alias>] Denotes the group-alias for
which the service group to be
displayed.
If no grp-alias is specified, the
parameters of all service
groups will be displayed.
Optional N/A String
Display
Format
According to Service Group type and (for IP Service Group) the configured DHCP mode.
Chapter 3 - Operation and Administration of the Macro BTS NPU Configuration
4Motion 311 System Manual
3.4.12.11.2 Displaying Configuration Information for the SFA PHS Functionality
To display the current configuration information for the SFA PHS functionality,
run the following command:
npu# show sfa
3.4.12.11.3 Configuring Service Profiles
The NPU allows for guaranteed end-to-end QoS for user traffic across the ASN.
The QoS approach is connection-oriented, whereby user traffic is classified into
"service flows." A service flow is a unidirectional stream of packets, either in the
NOTE
You can display configuration information for the SFA functionality. For details, refer
Section 3.4.12.11.2.
For details on PHS Rules, refer to “Configuring PHS Rules” on page 362.
Command
Syntax
npu(config)# sfa phs-enable
npu(config)# no sfa phs-enable
Privilege
Level
10
Command
Modes
Global configuration mode
Command
Syntax
npu# show sfa
Privilege
Level
1
Display
Format
SFA Configuration :
PHS <Enable/Disable>
Command
Modes
Global command mode

Chapter 3 - Operation and Administration of the Macro BTS NPU Configuration
4Motion 312 System Manual
downlink or uplink direction, associated with a certain set of QoS requirements
such as maximum latency. The QoS requirements for service flows are derived
from "service profiles" defined by the operator. A service profile is a set of
attributes shared by a set of service flows. For instance, an operator might define
a service profile called "Internet Gold" that will include QoS and other definitions
to be applied to service flows associated with users subscribed to the operator's
"Internet Gold" service package.
The factory default configuration includes an ‘empty” (no defined Service Flows)
Service Profile with the name Default. If enabled, it will be used if profile
descriptor is missing in service provisioning or if received profile descriptor is
disabled (unauthenticated mode). Up to 63 additional Service Profiles may be
created.
1Enable the service profile configuration mode (refer to Section 3.4.12.11.3.1)
2You can now execute any of the following tasks:
»Configure the parameters for this service profile (refer to
Section 3.4.12.11.3.2)
»Manage service flow configuration for this service profile (refer to
Section 3.4.12.11.3.3)
»Delete service flows (refer to Section 3.4.12.11.3.3.7)
3Terminate the service profile configuration mode (refer to
Section 3.4.12.11.3.4)
You can, at any time, display configuration information (refer to
Section 3.4.12.11.3.5) or delete an existing service profile (refer to
Section 3.4.12.11.3.6).
3.4.12.11.3.1 Enabling the Service Profile Configuration Mode\Creating a New Service
Profile
To configure the parameters for a service profile, first enable the service profile
configuration mode. Run the following command to enable the service profile
configuration mode. You can also use this command to create a new service
profile.
npu(config)# srvc-profile <profile-name> [dgwPrfl]
To configure one or more service profiles:
Chapter 3 - Operation and Administration of the Macro BTS NPU Configuration
4Motion 313 System Manual
If you use this command to create a new service profile, the configuration mode
for this rule is automatically enabled, after which you can execute any of the
following tasks:
Configure the parameters for this service profile (refer to Section 3.4.12.11.3.2)
Manage service flow configuration for this service profile (refer to
Section 3.4.12.11.3.3)
Delete service flows (refer to Section 3.4.12.11.3.3.7)
After you have executed these tasks, terminate the service profile configuration
mode (refer to Section 3.4.12.11.3.4) to return to the service group configuration
mode.
NOTE
The dgwPrfl option is for future use. Do not use this option. In the rest of this section this option will
be ignored.
Command
Syntax
npu(config)# srvc-profile <profile-name>
Privilege
Level
10
Syntax
Description Parameter Description Presence Default
Value
Possible
Values
<profile-name> Denotes the name of the
service profile for which the
configuration mode is to be
enabled.
If you are creating a new
service profile, specify the
name of the new service
profile. The configuration
mode is automatically
enabled for the new service
profile.
Mandatory N/A String (1 to 30
characters)
Chapter 3 - Operation and Administration of the Macro BTS NPU Configuration
4Motion 314 System Manual
3.4.12.11.3.2 Enabling/Disabling the Service Profile
After enabling the service profile configuration mode, run the following command
to enable this service profile:
npu(config-srvcprfl)# config profile-enable
A service profile can be enabled only if at least one service flow is configured.
To disable this service profile, run the following command:
npu(config-srvcprfl)# no profile-enable
The default mode is Disabled.
3.4.12.11.3.3 Configuring Service Flows
Service flows are unidirectional stream of packets, either in the downlink or
uplink direction, associated with a certain set of QoS requirements such as
maximum latency and minimum rate. Based on certain classification rules,
service flows are transported over the R1 air interface in 802.16e connections,
identified by connection IDs, and identified by GRE keys over the R6 interface in
GRE tunnels. In addition, the ASN-GW can mark outgoing traffic in the R3
interface for further QoS processing within the CSN.
Command
Modes
Global configuration mode
NOTE
You can display configuration information for specific or all service profiles. For details, refer to
Section 3.4.12.11.3.5.
Command
Syntax
npu(config-srvcprfl)# config profile enable
npu(config-srvcprfl)# no profile enable
Privilege
Level
10
Command
Modes
Service profile configuration mode

Chapter 3 - Operation and Administration of the Macro BTS NPU Configuration
4Motion 315 System Manual
The system supports two types of service flows according to the convergence
sublayer (CS) type: IP CS and VLAN CS. An IP CS service flow can be associated
only with an IP service group. A VLAN CS service flow can be associated only with
a VPWS (Transparent/QinQ/Mapped) service group. Typically VLAN CS service
flows should be managed (created/modified/deleted) only by the AAA server.
However, to support special needs, it is possible to define VLAN CS service flows
for the Default Service Profile.
Up to 12 Service Flows can be defined for each Service Profile.
1Enable the service flow configuration mode (refer to Section 3.4.12.11.3.3.1)
2You can now execute any of the following tasks:
»Configure the parameters for this service flow (refer to
Section 3.4.12.11.3.3.2)
»Restore the default parameters for this service flow (refer to
Section 3.4.12.11.3.3.3)
»Configure uplink/downlink classification rule names (refer to
Section 3.4.12.11.3.3.4)
3Terminate the service flow configuration mode (refer to
Section 3.4.12.11.3.3.6)
You can, at any time delete an existing service flow (refer to
Section 3.4.12.11.3.3.7).
3.4.12.11.3.3.1Enabling the Service Flow Configuration Mode\ Creating a New Service
Flow
To configure the parameters for a service flow, first enable the service flow
configuration mode. Run the following command to enable the service flow
configuration mode. You can also use this command to create a new service flow.
npu(config-srvcprfl)# flow [<flow-id (1-255)] [grp-alias
<srvc-grp-alias>] [if-alias <string>] [mcast-sfid <integer(0-65535)>
{[mcastipv4add <string(15)>]}] [<string>]
After enabling the service profile configuration mode, execute the following tasks to
configure service flows within this service profile:
Chapter 3 - Operation and Administration of the Macro BTS NPU Configuration
4Motion 316 System Manual
If you use this command to create a new service flow, the configuration mode for
this service flow is automatically enabled, after which you can execute any of the
following tasks:
Configure the parameters for this service flow (refer to Section 3.4.12.11.3.3.2)
Restore the default parameters for this service flow (refer to
Section 3.4.12.11.3.3.3)
Configure uplink/downlink classification rule names (refer to
Section 3.4.12.11.3.3.4)
After you have executed these tasks, you can terminate the service flow
configuration mode, and return to the service profile configuration mode (refer to
Section 3.4.12.11.3.3.6).
NOTE
The mcast-sfid and mcastipv4add parameter are for future use with a DGW profile (not supported in
the current release). Do not use these parameters. In the following sections these parameters will
be ignored.
Command
Syntax
npu(config-srvcprfl)#flow [<flow-id (1-255)] [grp-alias <srvc-grp-alias>] [if-alias <string>]
Privilege
Level
10
Syntax
Description Parameter Description Presence Default
Value
Possible
Values
flow [<flow-id
(1-255)]
Denotes the flow ID of the
service flow for which the
service flow configuration
mode is to be enabled. If you
are creating a new service
flow, specify the service flow
ID of the new service flow.
The configuration mode is
automatically enabled for the
new service flow.
Mandatory N/A 1-255

Chapter 3 - Operation and Administration of the Macro BTS NPU Configuration
4Motion 317 System Manual
3.4.12.11.3.3.2Specifying Service Flow Configuration Parameters
After enabling the service flow configuration mode, run the following command to
configure the parameters for this service flow:
npu(config-srvcprfl-flow)# config ([flow-type <type (1)>] [cs-type
<type (1 | 4)>] [media-type <string>] [uldatadlvry-type
<type(0<UGS> | 1<RTVR> | 2<NRTVR> | 3<BE> | 4<ERTVR> | 255<ANY>)>]
[ulqos-maxsustainedrate <value(10000-40000000)>]
[ulqos-trafficpriority <value(0-7)>] [dldatadlvry-type
<type(0<UGS> | 1<RTVR> | 2<NRTVR> | 3<BE> | 4<ERTVR> | 255<ANY>)>]
[dlqos-maxsustainedrate <value(10000-40000000)>]
[dlqos-trafficpriority <value(0-7)>] [ul-rsrv-rate-min
<integer(0-40000000)>] [ul-latency-max <integer>]
[ul-tolerated-jitter <integer)>] [ul-unsol-intrvl
<integer(0-65535)>] [dl-rsrv-rate-min <integer(0-40000000)>]
[dl-latency-max <integer>] [dl-tolerated-jitter <integer>])
[grp-alias
<srvc-grp-alias>]
Indicates the Reference
Name for an existing service
group to be used by the
service flow.
VPWS Service Groups are
applicable only for VLAN CS
Service Flows of the Default
Service Profile.
Mandatory
when
creating a
new flow
N/A An existing
Service Group
Alias.
[if-alias <string>] Indicates the Reference
Name for an existing QinQ
service interface.
Applicable only if the
assigned Service Group is of
type VPWS-QinQ (in a
VLANCS Service Flow of the
Default Service Profile).
Mandatory
when
creating a
new flow,
only if the
type of the
specified
grp-alias is
VPWS-QinQ.
N/A An existing
QinQ Service
Interface.
Command
Modes
Service profile configuration mode
IMPORTANT
An error may occur if you provide an invalid value for any of these parameters. Refer the syntax
description for more information about the appropriate values and format for configuring these
parameters.

Chapter 3 - Operation and Administration of the Macro BTS NPU Configuration
4Motion 318 System Manual
Command
Syntax
npu(config-srvcprfl-flow)# config ([flow-type <type (1)>] [cs-type <type (1 | 4)>] [media-type
<string>] [uldatadlvry-type <type(0<UGS> | 1<RTVR> | 2<NRTVR> | 3<BE> | 4<ERTVR> |
255<ANY>)>] [ulqos-maxsustainedrate <value(10000-40000000)>] [ulqos-trafficpriority
<value(0-7)>] [dldatadlvry-type <type(0<UGS> | 1<RTVR> | 2<NRTVR> | 3<BE> | 4<ERTVR> |
255<ANY>)>] [dlqos-maxsustainedrate <value(10000-40000000)>] [dlqos-trafficpriority
<value(0-7)>] [ul-rsrv-rate-min <integer(0-40000000)>] [ul-latency-max <integer>] [ul-tolerated-jitter
<integer)>] [ul-unsol-intrvl <integer(0-65535)>] [dl-rsrv-rate-min <integer(0-40000000)>]
[dl-latency-max <integer>] [dl-tolerated-jitter <integer>])
Privilege
Level
10
Syntax
Description Parameter Description Presence Default
Value
Possible
Values
[flow-type <type
(1)>]
Denotes the type of flow, that
is, bi-directional (1) or
multicast (2).
multicast (2) is not supported
in current release.
Optional 1 1: Indicates
bi-direction
al
[cs-type <type (1 |
4)>]
Convergence Sublayer Type.
This parameter is applied to
both UL and DL Service
Flows.
Must match the type of
service group referenced by
ServiceGrpAlias during
creation of the flow: IPv4CS
should be selected if the
assigned Service Group is of
type IP. VLANCS should be
selected if the assigned
Service Group is of type
VPWS.
Optional 1
(IPv4CS)
1: IPv4CS
4: VLANCS
[media-type
<string>]
Describes the type of media
carried by the service flow.
Optional Null String, up to 32
characters

Chapter 3 - Operation and Administration of the Macro BTS NPU Configuration
4Motion 319 System Manual
[uldatadlvry-type
<type(0<UGS> |
1<RTVR> |
2<NRTVR> |
3<BE> |
4<ERTVR> |
255<ANY>)>]
Denotes the data delivery
type for uplink traffic carried
by the service flow.
Optional 3 (BE) 0-4 or 255 for
ANY.
[ulqos-maxsustain
edrate
<value(10000-400
00000)>]
Denotes the maximum
sustained traffic rate, in bps,
for uplink traffic carried by the
service flow.
Although available for all
service flows, applicable only
for service flows with the
appropriate uplink data
delivery type (NRTVR, RTVR,
BE, ERTVR, ANY)
Optional 250000 10000-400000
00 bps
[ulqos-trafficpriority
<value(0-7)>]
Denotes the traffic priority to
be applied to the uplink traffic
carried by the service flow.
Although available for all
service flows, not applicable
for service flows with UGS
uplink data delivery type.
Optional 0 0-7, where 0 is
lowest and 7 is
highest
[dldatadlvry-type
<type(0<UGS> |
1<RTVR> |
2<NRTVR> |
3<BE> |
4<ERTVR> |
255<ANY>)>]
Denotes the data delivery
type for the downlink traffic
carried by the service flow.
Optional 3 (BE) 0 (UGS)
1 (RTVR)
2 (NRTVR)
3 (BE)
4 (ERTVR)
255 (ANY)
[dlqos-maxsustain
edrate
<value(10000-400
00000)>]
Denotes the maximum
sustained traffic rate, in bps,
for the downlink traffic carried
by the service flow.
Although available for all
service flows, applicable only
for service flows with the
appropriate downlink data
delivery type (NRTVR, RTVR,
BE, ERTVR, ANY)
Optional 250000 10000-400000
00 bps

Chapter 3 - Operation and Administration of the Macro BTS NPU Configuration
4Motion 320 System Manual
[dlqos-trafficpriority
<value(0-7)>]
Denotes the traffic priority to
be applied to the downlink
traffic carried by the service
flow.
Although available for all
service flows, not applicable
for service flows with UGS
uplink data delivery type.
Optional 0 0-7, where 7 is
highest
[ul-rsrv-rate-min
<integer(0-400000
00)>]
the minimum rate in bps
reserved for this uplink
service flow.
Although available for all
service flows, applicable only
for service flows with the
appropriate uplink data
delivery type (UGS, NRTVR,
RTVR, ERTVR).
For NRTVER, RTVR and
ERTVR-cannot be higher
than ulqos-maxsustainedrate.
Optional 250000 0- 40000000
[ul-latency-max
<integer>]
The maximum latency in ms
allowed in the uplink.
Although available for all
service flows, applicable only
for service flows with the
appropriate uplink data
delivery type (UGS, RTVR,
ERTVR).
If uplink data delivery type is
ERTVR or UGS, the default
value should be 90ms.
Optional 500 0- 4294967295
[ul-tolerated-jitter
<integer)>]
the maximum delay variation
(jitter) in milliseconds for this
uplink service flow.
Although available for all
service flows, applicable only
for service flows with the
appropriate uplink data
delivery type (UGS, ERTVR)
Optional 0 0- 4294967295

Chapter 3 - Operation and Administration of the Macro BTS NPU Configuration
4Motion 321 System Manual
[ul-unsol-intrvl
<integer(0-65535)
>]
The nominal interval in ms
between successive data
grant opportunities for this
uplink service flow.
Although available for all
service flows, applicable only
for service flows with the
appropriate uplink data
delivery type (UGS, ERTVR).
Must be lower than
ul-latency-max.
Optional 20 0-65535
[dl-rsrv-rate-min
<integer(0-400000
00)>]
the minimum rate in bps
reserved for this downlink
service flow.
Although available for all
service flows, applicable only
for service flows with the
appropriate downlink data
delivery type (UGS, NRTVR,
RTVR, ERTVR)
For NRTVER, RTVR and
ERTVR-cannot be higher
than dlqos-maxsustainedrate.
Optional 250000 0- 40000000
[dl-latency-max
<integer>]
The maximum latency in ms
allowed in the downlink.
Although available for all
service flows, applicable only
for service flows with the
appropriate downlink data
delivery type (UGS, RTVR,
ERTVR).
If uplink data delivery type is
ERTVR or UGS, the default
value should be 90ms.
Optional 500 0- 4294967295
[dl-tolerated-jitter
<integer)>]
the maximum delay variation
(jitter) in milliseconds for this
downlink service flow.
Although available for all
service flows, applicable only
for service flows with the
appropriate downlink data
delivery type (UGS, ERTVR)
Optional 0 0- 4294967295
Chapter 3 - Operation and Administration of the Macro BTS NPU Configuration
4Motion 322 System Manual
3.4.12.11.3.3.3Restoring the Default Service Flow Configuration Parameters
Run the following command to restore the default values of one or several
parameters for this service flow:
npu(config-srvcprfl-flow)# no [cs-type] [media-type]
[uldatadlvry-type] [ulqos-maxsustainedrate]
[ulqos-trafficpriority] [dldatadlvry-type]
[dlqos-maxsustainedrate] [dlqos-trafficpriority][ul-rsrv-rate-min]
[ul-latency-max] [ul-tolerated-jitter] [ul-unsol-intrvl]
[dl-rsrv-rate-min] [dl-latency-max] [dl-tolerated-jitter]
Do not specify any parameter to restore all parameters to their default values.
3.4.12.11.3.3.4Configuring Uplink/Downlink Classification Rule Names
After enabling the service flow configuration mode, run the following commands to
configure up to a maximum of 6 uplink and 6 downlink classification rules:
npu(config-srvcprfl-flow)# ulclsf-rulename <num_of_rule_names
(1-6)> <rulename> [<rulename>] [...]
npu(config-srvcprfl-flow)# dlclsf-rulename <num_of_rule_names
(1-6)> <rulename> [<rulename>] [...]
Command
Modes
Service profile-service flow configuration mode
NOTE
Refer to Section 3.4.12.11.3.3.2 for a description and default values of these parameters.
Command
Syntax
npu(config-srvcprfl-flow)# no [cs-type] [media-type] [uldatadlvry-type]
[ulqos-maxsustainedrate] [ulqos-trafficpriority] [dldatadlvry-type] [dlqos-maxsustainedrate]
[dlqos-trafficpriority][ul-rsrv-rate-min] [ul-latency-max] [ul-tolerated-jitter] [ul-unsol-intrvl]
[dl-rsrv-rate-min] [dl-latency-max] [dl-tolerated-jitter]
Privilege
Level
10
Command
Modes
Service profile-service flow configuration mode

Chapter 3 - Operation and Administration of the Macro BTS NPU Configuration
4Motion 323 System Manual
After you have executed these tasks, you can terminate the service flow
configuration mode, and return to the service profile configuration mode
(Section 3.4.12.11.3.3.6). For more information about configuring classification
rules, refer “Configuring Classification Rules” on page 330.
IMPORTANT
.If no classifier is associated with the service flow for one or both directions, it means any traffic.
Command
Syntax
npu(config-srvcprfl-flow)# ulclsf-rulename <num_of_rule_names (1-6)> <rulename>
[<rulename>] [...]
npu(config-srvcprfl-flow)# dlclsf-rulename <num_of_rule_names (1-6)> <rulename>
[<rulename>] [...]
Privilege
Level
10
Syntax
Description Parameter Description Presence Default
Value
Possible
Values
<num_of_rule_na
mes (1-6)>
Indicates the number of
uplink/downlink classification
rules to be created
Mandatory N/A 1-6

Chapter 3 - Operation and Administration of the Macro BTS NPU Configuration
4Motion 324 System Manual
3.4.12.11.3.3.5Deleting Uplink/Downlink Classification Rule Names
After enabling the service flow configuration mode, run the following commands to
delete uplink/downlink classification rules:
npu(config-srvcprfl-flow)# no ulclsf-rulename [<num_of_rulenames
(1-6)> <rulename> [<rulename>] ...]
npu(config-srvcprfl-flow)# no dlclsf-rulename [<num_of_rulenames
(1-6)> <rulename> [<rulename>] ...]
After you have executed these commands, you can terminate the service flow
configuration mode, and return to the service profile configuration mode (refer to
Section 3.4.12.11.3.3.6)
<rulename> Indicates the name of the
uplink/downlink classification
rule to be linked to this
service flow. Use the
classification rule name to
reference the appropriate
classification rule.
For VLANCS service flows
the linked uplink and downlink
classification rules should be
the same. This is because the
VLANCS classification rules
define the CVID (Customer
VLAN ID), that should be the
same for uplink and downlink
flows.
The number of rule name
entries must match the
number defined in
num_of_rule_names.
For more information about
creating classification rules,
refer to
Section 3.4.12.11.4.1.
Mandatory N/A Valid
classification
rule name
Command
Modes
Service profile-service flow configuration mode

Chapter 3 - Operation and Administration of the Macro BTS NPU Configuration
4Motion 325 System Manual
3.4.12.11.3.3.6Terminating the Service Flow Configuration Mode
Run the following command to terminate the service flow configuration mode:
npu(config-srvcprfl-flow)# exit
Command
Syntax
npu(config-srvcprfl-flow)# no ulclsf-rulename [<num_of_rulenames (1-6)> <rulename>
[<rulename>] ...]
npu(config-srvcprfl-flow)# no dlclsf-rulename [<num_of_rulenames (1-6)> <rulename>
[<rulename>] ...]
Privilege
Level
10
Syntax
Description Parameter Description Presence Default
Value
Possible
Values
[<num_of_rulenam
es (1-6)>
Indicates the number of
uplink/downlink classification
rules to be deleted.
Mandatory N/A 1-6
<rulename> Indicates the name of the
uplink/downlink classification
rule to be deleted from to this
service flow. Use the
classification rule name to
reference the appropriate
classification rule.
The number of rule name
entries must match the
number defined in
num_of_rule_names.
Mandatory N/A Valid
classification
rule name
Command
Modes
Service profile-service flow configuration mode
Command
Syntax
npu(config-srvcprfl-flow)# exit
Chapter 3 - Operation and Administration of the Macro BTS NPU Configuration
4Motion 326 System Manual
3.4.12.11.3.3.7Deleting Service Flows
You can, at any time, run the following command to delete one or all service flows:
npu(config-srvcprfl)# no flow [<flow-id>]
3.4.12.11.3.4 Terminating the Service Profile Configuration Mode
Run the following command to terminate the service profile configuration mode:
Privilege
Level
10
Command
Modes
Service profile-service flow configuration mode
CAUTION
Specify the flow ID if you want to delete a specific service flow. Otherwise all the configured service
flows are deleted.
Command
Syntax
npu(config-srvcprfl)# no flow [<flow-id>]
Privilege
Level
10
Command
Syntax
npu(config-srvcprfl)# no flow [<flow-id>]
Syntax
Description Parameter Description Presence Default
Value
Possible
Values
[<flow-id>] Denotes the flow ID of the
service flow to be deleted.
If you do not specify a value
for this parameter, all the
service flows are deleted.
Optional N/A 0-255
Command
Modes
Service profile configuration mode
Chapter 3 - Operation and Administration of the Macro BTS NPU Configuration
4Motion 327 System Manual
npu(config-srvcprfl)# exit
3.4.12.11.3.5 Displaying Configuration Information for Service Profiles
To display all or specific service profiles, run the following command:
npu# show srvc-profile [<profile-name>]
Specify the profile name if you want to display configuration information for a
particular service profile. Do not specify a value for this parameter if you want to
view configuration information for all service profile.
Command
Syntax
npu(config-srvcprfl)# exit
Privilege
Level
10
Command
Modes
Service profile configuration mode
IMPORTANT
An error may occur if you provide an invalid service profile name. Refer the syntax description for
more information about the appropriate values and format for configuring this parameter.
Command
Syntax
npu# show srvc-profile [<profile-name>]
Privilege
Level
1

Chapter 3 - Operation and Administration of the Macro BTS NPU Configuration
4Motion 328 System Manual
Syntax
Description Parameter Description Presence Default
Value
Possible
Values
[<profile-name>] Indicates the name of the
service profile for which
configuration information is to
be displayed.
If you do not specify a value
for this parameter,
configuration information is
displayed for all service
profiles.
Optional N/A String

Chapter 3 - Operation and Administration of the Macro BTS NPU Configuration
4Motion 329 System Manual
3.4.12.11.3.6 Deleting Service Profiles
Run the following command to delete one or all service profiles:
npu(config)# no srvc-profile [<profile-name>]
Display
Format
Srvc Profile <value>
status <value>
flow-id <value>
flow-type <value>
srvc-grp <value>
Service-If <value or null>
CS-type <value>
Media-Type <value>
UL-flowDataDeliveryType <value>
UL-flowQosMaxSustainedRate <value>
UL-flowQosTrafficPrority <value>
DL-flowDataDeliveryType <value>
DL-flowQosMaxSustainedRate <value>
DL-flowQosTrafficPrority <value>
UL-MinReservedTrafficRate <value>
UL-MaxLatencey <value>
UL-ToleratedJitter <value>
UL-UnsolicitedGrantInterval <value>
DL-MinReservedTrafficRate <value>
DL-MaxLatencey <value>
DL-ToleratedJitter <value>
UL-Rulenames :<value>, <value>.....
DL-Rulenames :<value>, <value>....
flow-id <value>............
Command
Modes
Global configuration mode
Chapter 3 - Operation and Administration of the Macro BTS NPU Configuration
4Motion 330 System Manual
3.4.12.11.4 Configuring Classification Rules
Classification rules are user-configurable rules that are used to classify packets
transmitted on the bearer plane. You can associate one or more classification
rules with a particular service profile (For details, refer to Section 3.4.12.11.3.3.4).
You can define an L3 classification rule with respect to the following criteria:
IP ToS/DSCP
IP protocol (such as UDP or TCP)
IP source address (an address mask can be used to define a range of addresses
or subnet)
NOTE
The Default Service Profile cannot be deleted.
CAUTION
Specify the profile name if you want to delete a specific service profile. Otherwise all the configured
service profiles (excluding the Default Service Profile) are deleted.
Command
Syntax
npu(config)# no srvc-profile [<profile-name>]
Privilege
Level
10
Syntax
Description Parameter Description Presence Default
Value
Possible
Values
[<profile-name>] Denotes the name of the
service profile you want to
delete. Specify this parameter
only if you want to delete a
specific service profile.
Optional N/A String
Command
Modes
Global configuration mode

Chapter 3 - Operation and Administration of the Macro BTS NPU Configuration
4Motion 331 System Manual
IP destination address (an address mask can be used to define a range of
addresses or subnet)
Source port range
Destination port range
You can define an L2 classification rule based on the Customer VLAN ID (CVID).
Classification rules can be specified for:
Downlink data is classified by the ASN-GW into GRE tunnels, which, in turn,
are mapped into 802.16e connections in the air interface
Uplink data is classified by the MS into 802.16e connections, and with respect
to classification rules defined in the service profile provisioned in the ASN-GW
and downloaded to the MS when establishing a connection.
For instance, you can define an L3 downlink classification rule that will classify
traffic to a certain MS with a DSCP value of 46 into a UGS connection, and all
other traffic to the MS into a best effort connection. In addition, an uplink L3
classification rule can be defined that will classify traffic from this MS with a UDP
destination port higher than 5000 into a UGS connection, and all other traffic
from the MS into a best effort connection.
Up to a maximum of 100 classification rules can be created.
1Enable the L3 classification rules configuration mode (refer to
Section 3.4.12.11.4.1)
To configure one or more L3 classification rules:

Chapter 3 - Operation and Administration of the Macro BTS NPU Configuration
4Motion 332 System Manual
2You can now execute any of the following tasks:
»Configure the parameters for this classification rule (refer to
Section 3.4.12.11.4.2)
»Restore the default parameters for this classification rule (refer to
Section 3.4.12.11.4.3)
»Manage protocol configuration (refer to Section 3.4.12.11.4.4)
»Manage source address configuration (seeSection 3.4.12.11.4.5)
»Manage destination address configuration (refer to Section 3.4.12.11.4.6)
»Manage source port configuration (refer to Section 3.4.12.11.4.7)
»Manage destination port configuration (refer to Section 3.4.12.11.4.8)
3Terminate the L3 classification rules configuration mode (refer to
Section 3.4.12.11.4.9)
You can, at any time, display configuration information (refer to
Section 3.4.12.11.4.13) or delete an existing classification rule (refer to
Section 3.4.12.11.4.14), protocol lists (refer to Section 3.4.12.11.4.4.5), source
addresses (refer to Section 3.4.12.11.4.5.5), destination addresses (refer to
Section 3.4.12.11.4.6.5), source ports (refer to Section 3.4.12.11.4.7.5), or
destination ports (refer to Section 3.4.12.11.4.8.5) configured for this
classification rule.
1Enable the L2 classification rules configuration mode (refer to
Section 3.4.12.11.4.1)
2You can now execute any of the following tasks:
»Configure the parameters for this classification rule (refer to
Section 3.4.12.11.4.10)
»Clear the configuration of this classification rule (refer to
Section 3.4.12.11.4.11)
»Terminate the L2 classification rules configuration mode (refer to
Section 3.4.12.11.4.12)
To configure one or more L2 classification rules:

Chapter 3 - Operation and Administration of the Macro BTS NPU Configuration
4Motion 333 System Manual
You can, at any time, display configuration information (refer to
Section 3.4.12.11.4.13) or delete an existing classification rule (refer to
Section 3.4.12.11.4.14).
3.4.12.11.4.1 Enabling the Classification Rule Configuration Mode\ Creating a New
Classification Rule
To configure the parameters for a classification rule, first enable the classification
rule configuration mode. Run the following command to enable the classification
rule configuration mode. You can also use this command to create a new
classification rule.
npu(config)# clsf-rule <rulename> [clsfRuleType {L2 | L3}]
If you use this command to create a new classification rule, the configuration
mode for this rule is automatically enabled.
After enabling the classification rule configuration mode for an L3 rule you can
execute any of the following tasks:
Configure the parameters for this classification rule (refer to
Section 3.4.12.11.4.2).
Restore the default parameters for this classification rule (refer to
Section 3.4.12.11.4.3)
Manage protocol configuration (refer to Section 3.4.12.11.4.4)
Manage source address configuration (refer to Section 3.4.12.11.4.5)
Manage destination address configuration (refer to Section 3.4.12.11.4.6)
Manage source port configuration (refer to Section 3.4.12.11.4.7)
Manage destination port configuration (refer to Section 3.4.12.11.4.8)
After you have executed these tasks, you can terminate the classification rules
configuration mode (refer to Section 3.4.12.11.4.9).
After enabling the classification rule configuration mode for an L2 rule you can
execute any of the following tasks:
Configure the parameters for this classification rule (refer to
Section 3.4.12.11.4.10).

Chapter 3 - Operation and Administration of the Macro BTS NPU Configuration
4Motion 334 System Manual
Clear the current configuration of this classification rule (refer to
Section 3.4.12.11.4.11)
After you have executed these tasks, you can terminate the classification rules
configuration mode (refer to Section 3.4.12.11.4.12).
3.4.12.11.4.2 Specifying Configuration Parameters for the L3 Classification Rule
After enabling the classification rules configuration mode for an L3 classification
rule, run the following command to configure the parameters for this
classification rule:
npu(config-clsfrule)# config [priority <priority(0-255)>]
[phs-rulename <rulename>] [iptos-low <value(0-63)>] [iptos-high
<value(0-63)>] [iptos-mask <value(0-63)>] [iptos-enable]
Command
Syntax
npu(config)# clsf-rule <rulename> [clsfRuleType {L2 | L3}]
Privilege
Level
10
Syntax
Description Parameter Description Presence Default
Value
Possible
Values
<rulename> Denotes the name of the
classification rule.
Mandatory N/A String (1 to 30
characters)
[clsfRuleType {L2 |
L3}]
The type of classifier: L2 or
L3.
Optional
when
creating a
new rule.
L3 L2
L3
Command
Modes
Global configuration mode
NOTE
You can display configuration information for specific or all classification rules. For details, refer to
Section 3.4.12.11.4.13.

Chapter 3 - Operation and Administration of the Macro BTS NPU Configuration
4Motion 335 System Manual
Command
Syntax
npu(config-clsfrule)# config [priority <priority(0-255)>] [phs-rulename <rulename>] [iptos-low
<value(0-63)>] [iptos-high <value(0-63)>] [iptos-mask <value(0-63)>] [iptos-enable]
Privilege
Level
10
Syntax
Description Parameter Description Presence Default
Value
Possible
Values
[priority
<priority(0-255)>]
Denotes the priority level to
be assigned to the
classification rule.
Optional 0 0-255
[phs-rulename
<rulename>]
Indicates the Packet Header
Suppression (PHS) rule name
to be associated with the
classification rule. Specify the
PHS rulename if you want to
perform PHS for this flow. For
more information about
configuring PHS rules, refer
Section 3.4.12.12.
Optional None String
An existing
PHS rule
name.
[iptos-low
<value(0-63)>]
Denotes the value of the
lowest IP TOS field to define
the lowest value where the
range can begin.
Cannot be higher than
iptos-high.
Can be modified only when IP
TOS classification is disabled
(see iptos-enable below). If
set to a value higher than
iptos-high, IP TOS
classification cannot be
enabled.
Optional 0 0-63

Chapter 3 - Operation and Administration of the Macro BTS NPU Configuration
4Motion 336 System Manual
3.4.12.11.4.3 Restoring the Default Parameters for the L3 Classification Rule
Run the following command to restore the default configuration for this
classification rule.
npu(config-clsfrule)# no [priority] [iptos-low] [iptos-high]
[iptos-mask] [iptos-enable][phs-rulename]
[iptos-high
<value(0-63)>]
Denotes the value of highest
IP TOS field to define the
highest value where the
range can end.
Cannot be lower than
iptos-low.
Can be modified only when IP
TOS classification is disabled
(see iptos-enable below). If
set to a value lower than
iptos-low, IP TOS
classification cannot be
enabled.
Optional 0 0-63
[iptos-mask
<value(0-63)>]
Denotes the mask for IP TOS
value.This mask is applied to
the TOS field received in the
IP header to be matched
within the TOS range
configured.
Optional 0 0-63
[iptos-enable] Indicates whether the use of
TOS-based classification is to
be enabled.
Optional By
default,
the use
of
TOS-bas
ed
classifica
tion is
disabled.
The
presence/abse
nce of this flag
indicates that
the use of
TOS-based
classification
should be
enabled/disabl
ed.
Command
Modes
L3 Classification rules configuration mode
NOTE
Refer to Section 3.4.12.11.4.3 for a description and default values of these parameters.
Chapter 3 - Operation and Administration of the Macro BTS NPU Configuration
4Motion 337 System Manual
3.4.12.11.4.4 Managing IP Protocol Configuration for the L3 Classification Rule
L3 classification rules can classify the packet, based on the value of IP protocol
field. You can configure the value of IP protocol for a given classification rule.
1Enable the IP protocol configuration mode (refer to Section 3.4.12.11.4.4.1)
2Enable/disable IP protocol classification (refer to Section 3.4.12.11.4.4.2
anReclassifiedSection 3.4.12.11.4.4.3)
3Terminate the protocol configuration mode (refer to Section 3.4.12.11.4.4.4)
In addition, you can, at any time, delete an existing IP protocol classifier (refer to
Section 3.4.12.11.4.4.5).
The following example illustrates the sequence of commands for enabling the IP
protocol configuration mode, enabling IP protocol 100, and then terminating the
protocol lists configuration mode:
npu(config-clsfrule)# ip-protocol
npu(config-clsfrule-protocol)# protocol-enable 1 100
npu(config-clsfrule-protocol)# exit
3.4.12.11.4.4.1Enabling the IP Protocol Configuration Mode
Run the following command to enable the IP protocol configuration mode.
npu(config-clsfrule)# ip-protocol
You can now enable or disable the IP protocol (refer to Section 3.4.12.11.4.4.2 and
Section 3.4.12.11.4.4.3).
Command
Syntax
npu(config-clsfrule)# no [priority] [iptos-low] [iptos-high] [iptos-mask] [iptos-enable]
[phs-rulename]
Privilege
Level
10
Command
Modes
L3 Classification rules configuration mode
To configure IP protocol classifier:
Chapter 3 - Operation and Administration of the Macro BTS NPU Configuration
4Motion 338 System Manual
3.4.12.11.4.4.2Enabling IP Protocol Classifier
After enabling the IP protocol configuration mode, run the following command to
enable the IP protocol classifier and define the Protocol number:
npu(config-clsfrule-protocol)# protocol-enable <number of
protocols(1)> <protocol>
Command
Syntax
npu(config-clsfrule)# ip-protocol
Privilege
Level
10
Command
Modes
L3 Classification rules configuration mode
IMPORTANT
If source port range (see Section 3.4.12.11.4.7.2) or destination port range (see
Section 3.4.12.11.4.8.2) is enabled, then:
IP protocol (protocol-enable) must be set to enabled.
Protocol can be either 6 (TCP) or 17 (UDP).
Command
Syntax
npu(config-clsfrule-protocol)# protocol-enable <number of protocols(1)> <protocol>
Privilege
Level
10
Syntax
Description Parameter Description Presence Default
Value
Possible
Values
<number of
protocols(1)>
Indicates the number of
protocol lists to be enabled. In
the current release, only one
protocol can be enabled per
classification rule.
Mandatory N/A 1

Chapter 3 - Operation and Administration of the Macro BTS NPU Configuration
4Motion 339 System Manual
3.4.12.11.4.4.3Disabling Protocol Lists
After enabling the protocol configuration mode, run the following command to
disable IP protocol classification:
npu(config-clsfrule-protocol)# no protocol-enable <number of
protocols(1)> <protocol>
3.4.12.11.4.4.4Terminating the Protocol Configuration Mode
Run the following command to terminate the IP protocol configuration mode:
<protocol> Indicates the IP protocol to be
enabled. In the current
release, only one protocol
can be enabled per
classification rule.
Mandatory N/A 0-255 (Using
standard IANA
protocol
values)
Command
Modes
L3 Classification rules-IP protocol configuration mode
Command
Syntax
npu(config-clsfrule-protocol)# no protocol-enable <number of protocols(1)> <protocol>
Privilege
Level
10
Syntax
Description Parameter Description Presence Default
Value
Possible
Values
<number of
protocols(1)>
Indicates the number of
protocol lists to be disabled.
In the current release, only
one protocol can be enabled
per classification rule.
Mandatory N/A 1
<protocol> Indicates the protocol to be
disabled.
Mandatory N/A 0-255
Command
Modes
L3 Classification rules-IP protocol configuration mode
Chapter 3 - Operation and Administration of the Macro BTS NPU Configuration
4Motion 340 System Manual
npu(config-clsfrule-protocol)# exit
3.4.12.11.4.4.5Deleting the IP Protocol Classifier
You can, at any time, run the following command to delete the protocol classifier:
npu(config-clsfrule)# no ip-protocol
3.4.12.11.4.5 Managing Source Address Configuration for the L3 Classification Rule
Classification rules can classify the packet, based on the source address of the
packet. You can configure the value of source address for a given classification
rule.
1Enable the source address configuration mode (refer to
Section 3.4.12.11.4.5.1)
Command
Syntax
npu(config-clsfrule-protocol)# exit
Privilege
Level
10
Command
Modes
L3 Classification rule-IP protocol configuration mode
Command
Syntax
npu(config-clsfrule)# no ip-protocol
Privilege
Level
10
Command
Modes
L3 Classification rule-IP protocol configuration mode
To configure a source address classifier:

Chapter 3 - Operation and Administration of the Macro BTS NPU Configuration
4Motion 341 System Manual
2You can now execute any of the following tasks:
»Configure the address mask (refer to Section 3.4.12.11.4.5.2)
»Disable the source address (refer to Section 3.4.12.11.4.5.3)
3Terminate the source address configuration mode (refer to
Section 3.4.12.11.4.5.4)
You can, at any time, delete an existing source address (refer to
Section 3.4.12.11.4.5.5).
The following example illustrates the (sequence of) commands for enabling the
source address configuration mode, enabling the source address classifier,
configuring the address mask, and then terminating the source address
configuration mode:
npu(config-clsfrule)# srcaddr 10.203.155.20
npu(config-clsfrule-srcaddr)# config addr-enable addr-mask
255.255.0.0
npu(config-clsfrule-srcaddr)# exit
3.4.12.11.4.5.1Enabling the Source Address Configuration Mode\ Creating a New
Source Address
To configure the parameters for a source address, first enable the source address
configuration mode. Run the following command to enable the source address
configuration mode. This command also creates the source address classifier.
npu(config-clsfrule)# srcaddr <ipv4addr>
The configuration mode for the newly created source address is automatically
enabled, after which you can execute any of the following tasks:
Configure the address mask (refer to Section 3.4.12.11.4.5.2)
Disable the source address (refer to Section 3.4.12.11.4.5.3)
After you have executed these tasks, terminate the source address configuration
mode to return to the service classification rule configuration mode (refer to
Section 3.4.12.11.4.5.4).
Chapter 3 - Operation and Administration of the Macro BTS NPU Configuration
4Motion 342 System Manual
3.4.12.11.4.5.2Enabling the Source Address and Configuring the Address Mask
After enabling the source address configuration mode, run the following command
to enable the source address and configure the address mask for the source
address.
npu(config-clsfrule-srcaddr)# config [addr-enable] [addr-mask
<value>]
You can also run this command to enable a source address that is currently
disabled. For details, refer to “Disabling the Source Address” on page 343.
IMPORTANT
An error may occur if you provide an invalid source IP address. Refer the syntax description for
more information about the appropriate value and format for configuring this parameter.
Command
Syntax
npu(config-clsfrule)# srcaddr <ipv4addr>
Syntax
Description Parameter Description Presence Default
Value
Possible
Values
<ipv4addr> Denotes the IPv4 address of
the source address for which
the configuration mode is to
be enabled. The source
address configuration mode
is automatically enabled.
Mandatory N/A Valid IP
Address
Privilege
Level
10
Command
Modes
L3 Classification rules configuration mode
IMPORTANT
An error may occur if you provide an invalid address mask for the source address. Refer the syntax
description for more information about the appropriate value and format for this parameter.

Chapter 3 - Operation and Administration of the Macro BTS NPU Configuration
4Motion 343 System Manual
3.4.12.11.4.5.3Disabling the Source Address
You can run the following command to disable the source address that is
currently enabled:
npu(config-clsfrule-srcaddr)# no addr-enable
Command
Syntax
npu(config-clsfrule-srcaddr)# config [addr-enable] [addr-mask <value>]
Privilege
Level
10
Syntax
Description Parameter Description Presence Default Value Possible
Values
[addr-enable] Indicates that the use of
the associated source
address is enabled for
the classification rule
that you are configuring.
If the use of this address
is disabled, the
associated source
address is ignored while
classifying the packet.
Optional By default, the
use of the
associated
source address
is disabled.
The
presence/abse
nce of this flag
indicates that
the use of the
associated
source address
is
enabled/disabl
ed.
[addr-mask
<value>]
Denotes the mask field
that is used to specify a
range of source
addresses.
Optional 255.255.255.25
5
Valid address
mask
Command
Modes
L3 Classification rules-source address configuration mode
IMPORTANT
To enable this source address, run the following command:
npu(config-clsfrule-srcaddr)# config [addr-enable] [addr-mask <value>]
For details, refer to “Enabling the Source Address and Configuring the Address
Mask” on page 342.

Chapter 3 - Operation and Administration of the Macro BTS NPU Configuration
4Motion 344 System Manual
3.4.12.11.4.5.4Terminating the Source Address Configuration Mode
Run the following command to terminate the source address configuration mode:
npu(config-clsfrule-srcaddr)# exit
3.4.12.11.4.5.5Deleting Source Address
You can, at any time, run the following command to delete the source address
classifier:
npu(config-clsfrule)# no srcaddr [<ip-Addr>]
Command
Syntax
npu(config-clsfrule-srcaddr)# no addr-enable
Privilege
Level
10
Command
Modes
L3 Classification rules-source address configuration mode
Command
Syntax
npu(config-clsfrule-srcaddr)# exit
Privilege
Level
10
Command
Modes
L3 Classification rule-source address configuration mode
Command
Syntax
npu(config-clsfrule)# no srcaddr [<ip-Addr>]
Privilege
Level
10
Chapter 3 - Operation and Administration of the Macro BTS NPU Configuration
4Motion 345 System Manual
3.4.12.11.4.6 Managing Destination Address Configuration for the L3 Classification Rule
Classification rules can classify the packet, based on the destination address of
the packet. You can configure the value of destination address for a given
classification rule.
1Enable the destination address configuration mode (refer to
Section 3.4.12.11.4.6.1)
2You can now execute any of the following tasks:
»Configure the address mask (refer to Section 3.4.12.11.4.6.2)
»Disable the destination address (refer to Section 3.4.12.11.4.6.3)
3Terminate the destination address configuration mode (refer to
Section 3.4.12.11.4.6.4)
In addition, you can, at any time, delete an existing destination address (refer to
Section 3.4.12.11.4.6.5).
The following example illustrates the (sequence of) commands for enabling the
destination address configuration mode, enabling the destination address
classifier, configuring the address mask, and then terminating the destination
address configuration mode:
npu(config-clsfrule)# dstaddr 10.203.155.22
Syntax
Description Parameter Description Presence Default
Value
Possible
Values
[<ip-Addr>] Denotes the IPv4 address of
the source address that you
want to delete from a
classification rule.
Optional N/A Valid IP
Address
Command
Modes
L3 Classification rules configuration mode
To configure a destination address classifier:

Chapter 3 - Operation and Administration of the Macro BTS NPU Configuration
4Motion 346 System Manual
npu(config-clsfrule-dstaddr)# config addr-enable addr-mask
0.0.255.255
npu(config-clsfrule-srcaddr)# exit
3.4.12.11.4.6.1Enabling the Destination Address Configuration Mode\ Creating a New
Destination Address
To configure the parameters for a destination address, first enable the destination
address configuration mode. Run the following command to enable the
destination address configuration mode. This command also creates the new
destination address classifier.
npu(config-clsfrule)# dstaddr <ipv4addr>
The configuration mode for the newly created destination address is automatically
enabled, after which you can execute any of the following tasks:
Configure the address mask (refer to Section 3.4.12.11.4.6.2)k
Disable the destination address (refer to Section 3.4.12.11.4.6.3)
After you execute these tasks, you can terminate the destination address
configuration mode (refer to Section 3.4.12.11.4.6.4) and return to the
classification rules configuration mode.
IMPORTANT
An error may occur if you provide an invalid destination IP address. Refer the syntax description for
more information about the appropriate values and format for configuring this parameter.
Command
Syntax
npu(config-clsfrule)# dstaddr <ipv4addr>
Privilege
Level
10
Chapter 3 - Operation and Administration of the Macro BTS NPU Configuration
4Motion 347 System Manual
3.4.12.11.4.6.2Enabling the Destination Address and Configuring the Address Mask
Run the following command to enable the destination address classifier and
configure the address mask for the destination address.
npu(config-clsfrule-dstaddr)# config [addr-enable] [addr-mask
<value>]
You can also run this command to enable a destination address that is currently
disabled. For details, refer to “Disabling the Destination Address” on page 348.
Syntax
Description Parameter Description Presence Default
Value
Possible
Values
<ipv4addr> Denotes the IPv4 address of
the destination address for
which the configuration mode
is to be enabled. The
destination address
configuration mode is
automatically enabled.
Mandatory N/A Valid IP
Address
Command
Modes
L3 Classification rules configuration mode
IMPORTANT
An error may occur if you provide an invalid address mask. Refer the syntax description for more
information about the appropriate values and format for configuring this parameter.
Command
Syntax
npu(config-clsfrule-dstaddr)# config [addr-enable] [addr-mask <value>]
Privilege
Level
10

Chapter 3 - Operation and Administration of the Macro BTS NPU Configuration
4Motion 348 System Manual
3.4.12.11.4.6.3Disabling the Destination Address
Run the following command to disable the destination address that is currently
enabled:
npu(config-clsfrule-dstaddr)# no addr-enable
Syntax
Description Parameter Description Presence Default Value Possible
Values
[addr-enable] Indicates that the use
of the associated
destination address is
enabled for the
classification rule that
you are configuring. If
the use of this address
is disabled, the
associated destination
address is ignored
while classifying the
packet.
Optional By default, the
use of the
associated
destination
address is
disabled.
The
presence/abse
nce of this flag
indicates that
the use of the
associated
destination
address is
enabled/disabl
ed.
[addr-mask
<value>]
Denotes the mask field
that is used to specify a
range of destination
addresses.
Optional 255.255.255.255 Valid address
mask
Command
Modes
L3 Classification rules-destination address configuration mode
Command
Syntax
npu(config-clsfrule-dstaddr)# no addr-enable
Privilege
Level
10
Command
Modes
L3 Classification rules-destination address configuration mode
Chapter 3 - Operation and Administration of the Macro BTS NPU Configuration
4Motion 349 System Manual
3.4.12.11.4.6.4Terminating the Destination Address Configuration Mode
Run the following command to terminate the destination address configuration
mode:
npu(config-clsfrule-dstaddr)# exit
3.4.12.11.4.6.5Deleting Destination Address
You can, at any time, run the following command to delete the destination
address classifier:
npu(config-clsfrule)# no dstaddr [<ip-Addr>]
Command
Syntax
npu(config-clsfrule-dstaddr)# exit
Privilege
Level
10
Command
Modes
L3 Classification rule-destination address configuration mode
IMPORTANT
An error may occur if you provide an invalid IP address. Refer the syntax description for more
information about the appropriate values and format for configuring this parameter.
Command
Syntax
npu(config-clsfrule)# no dstaddr [<ip-Addr>]
Privilege
Level
10
Syntax
Description Parameter Description Presence Default
Value
Possible
Values
[<ip-Addr>] Denotes the IPv4 address of
the destination address that
you want to delete from a
classification rule.
Optional N/A Valid IP
Address

Chapter 3 - Operation and Administration of the Macro BTS NPU Configuration
4Motion 350 System Manual
3.4.12.11.4.7 Managing Source Ports Range Configuration for the L3 Classification Rule
Classification can be based on the source port of the packet. You can configure
the range of source ports for a given classification rule.
1Enable the source port configuration mode (refer to Section 3.4.12.11.4.7.1)
2Enable/disable the source port range (refer to
Section 3.4.12.11.4.7.2/Section 3.4.12.11.4.7.3)
3Terminate the source port configuration mode (refer to
Section 3.4.12.11.4.7.4)
In addition, you can, at any time, delete an existing source port configuration
(refer to Section 3.4.12.11.4.7.5).
The following example illustrates the (sequence of) commands for enabling the
source port configuration mode, enabling the source port range, and then
terminating the source port configuration mode:
npu(config-clsfrule)# srcport 20 50
npu(config-clsfrule-srcport)# port-enable
npu(config-clsfrule-srcport)# exit
3.4.12.11.4.7.1Enabling the Source Port Configuration Mode\ Creating a New Source
Port
To configure the parameters for a source port, first enable the source port
configuration mode. Run the following command to enable the source port
configuration mode. This command also creates the new source ports range
classifier.
npu(config-clsfrule)# srcport <start-port> <end-port>
Command
Modes
L3 Classification rules configuration mode
To configure a source ports range classifier:
IMPORTANT
An error may occur if you provide an invalid value for any of these parameters. Refer the syntax
description for more information about the appropriate values and format for configuring these
parameters.

Chapter 3 - Operation and Administration of the Macro BTS NPU Configuration
4Motion 351 System Manual
The configuration mode for the newly created source port is automatically
enabled, after which you can enable/disable the source port range (refer to
Section 3.4.12.11.4.7.2/Section 3.4.12.11.4.7.3).
You can then terminate the source port configuration mode (refer to
Section 3.4.12.11.4.7.4) and return to the classification rules configuration mode.
3.4.12.11.4.7.2Enabling the Source Port Range
Run the following command to enable the source port range:
npu(config-clsfrule-srcport)# port-enable
You can also run this command to enable a source port range that is currently
disabled. For details, refer to “Disabling the Source Port Range” on page 352.
Command
Syntax
npu(config-clsfrule)# srcport <start-port> <end-port>
Privilege
Level
10
Syntax
Description Parameter Description Presence Default
Value
Possible
Values
<start-port> Denotes the starting value of
port range to be configured.
Cannot be higher than
end-port.
Mandatory N/A 1-65535
<end-port> Denotes the end value of port
range to be configured.
Cannot be lower than
start-port.
Mandatory N/A 1-65535
Command
Modes
L3 Classification rules configuration mode

Chapter 3 - Operation and Administration of the Macro BTS NPU Configuration
4Motion 352 System Manual
3.4.12.11.4.7.3Disabling the Source Port Range
Run the following command to disable the source port range that is currently
enabled:
npu(config-clsfrule-srcport)# no port-enable
3.4.12.11.4.7.4Terminating the Source Port Configuration Mode
Run the following command to terminate the source port configuration mode:
IMPORTANT
If source port range is enabled, then:
IP protocol (protocol-enable) must be set to enabled.
Protocol can be either 6 (TCP) or 17 (UDP).
For details on these parameters refer to Section 3.4.12.11.4.4.2.
Command
Syntax
npu(config-clsfrule-srcport)# port-enable
Privilege
Level
10
Command
Modes
L3 Classification rules-source port configuration mode
IMPORTANT
To enable this source port range, run the following command:
npu(config-clsfrule-srcport)# port-enable
For details, refer to “Enabling the Source Port Range” on page 351.
Command
Syntax
npu(config-clsfrule-srcport)# no port-enable
Privilege
Level
10
Command
Modes
L3 Classification rules-source port configuration mode
Chapter 3 - Operation and Administration of the Macro BTS NPU Configuration
4Motion 353 System Manual
npu(config-clsfrule-srcport)# exit
3.4.12.11.4.7.5Deleting Source Ports Range
Run the following command to delete a source ports range classifier:
npu(config-clsfrule)# no srcport [<start-port> <end-port>]
Command
Syntax
npu(config-clsfrule-srcport)# exit
Privilege
Level
10
Command
Modes
L3 Classification rule-source port configuration mode
IMPORTANT
An error may occur if you provide an invalid value for the start-port and end-port parameters.
Refer the syntax description for more information about the appropriate values and format for
configuring these parameters.
Command
Syntax
npu(config-clsfrule)# no srcport [<start-port> <end-port>]
Privilege
Level
10
Syntax
Description Parameter Description Presence Default
Value
Possible
Values
<start-port> Denotes the starting value of
port range to be deleted.
Optional N/A 1-65535
<end-port> Denotes the end value of port
range to be deleted.
Optional N/A 1-65535
Command
Modes
L3 Classification rules configuration mode

Chapter 3 - Operation and Administration of the Macro BTS NPU Configuration
4Motion 354 System Manual
3.4.12.11.4.8 Managing Destination Ports Range Configuration for the L3 Classification
Rule
Classification can be based on the destination port of the packet. You can
configure the range of destination ports for a given classification rule.
1Enable the destination port configuration mode (refer to
Section 3.4.12.11.4.8.1)
2Enable/disable the destination port range (refer to
Section 3.4.12.11.4.8.2/Section 3.4.12.11.4.8.3)
3Terminate the destination port configuration mode (refer to
Section 3.4.12.11.4.8.4)
In addition, you can, at any time, delete an existing destination port configuration
(refer to Section 3.4.12.11.4.8.5).
The following example illustrates the (sequence of) commands for enabling the
destination port configuration mode, enabling the destination port range, and
then terminating the destination port configuration mode:
npu(config-clsfrule)# dstport 50 400
npu(config-clsfrule-dstport)# port-enable
npu(config-clsfrule-dstport)# exit
3.4.12.11.4.8.1Enabling the Destination Port Configuration Mode\ Creating a New
Destination Port
To configure the parameters for a destination port, first enable the destination
port configuration mode. Run the following command to enable the destination
ports range configuration mode. This command also creates the new destination
ports range.
npu(config-clsfrule)# dstport <start-port> <end-port>
The configuration mode for the newly created destination ports range is
automatically enabled, after which you can enable/disable the destination port
range (refer to Section 3.4.12.11.4.8.2/Section 3.4.12.11.4.8.3). After executing
these tasks, you can terminate the destination port configuration mode (refer to
Section 3.4.12.11.4.8.4).
To configure a destination ports range classifier:

Chapter 3 - Operation and Administration of the Macro BTS NPU Configuration
4Motion 355 System Manual
3.4.12.11.4.8.2Enabling the Destination Port Range
You can run the following command to enable the destination port range:
npu(config-clsfrule-dstport)# port-enable
You can also run this command to enable a destination port range that is
currently disabled. For details, refer to “Disabling the Destination Port Range” on
page 356.
IMPORTANT
An error may occur if you provide an invalid value for the start-port and end-port parameters.
Refer the syntax description for more information about the appropriate values and format for
configuring these parameters.
Command
Syntax
npu(config-clsfrule)# dstport <start-port> <end-port>
Privilege
Level
10
Syntax
Description Parameter Description Presence Default
Value
Possible
Values
<start-port> Denotes the starting value of
port range to be configured.
Cannot be higher than
end-port.
Mandatory N/A 1-65535
<end-port> Denotes the end value of port
range to be configured.
Cannot be lower than
start-port.
Mandatory N/A 1-65535
Command
Modes
L3 Classification rules configuration mode

Chapter 3 - Operation and Administration of the Macro BTS NPU Configuration
4Motion 356 System Manual
3.4.12.11.4.8.3Disabling the Destination Port Range
You can run the following command to disable the destination port range that is
currently enabled:
npu(config-clsfrule-dstport)# no port-enable
3.4.12.11.4.8.4Terminating the Destination Port Configuration Mode
Run the following command to terminate the destination port configuration mode:
IMPORTANT
If destination port range is enabled, then:
IP protocol (protocol-enable) must be set to enabled.
Protocol can be either 6 (TCP) or 17 (UDP).
For details on these parameters refer to Section 3.4.12.11.4.4.2.
Command
Syntax
npu(config-clsfrule-dstport)# port-enable
Privilege
Level
10
Command
Modes
L3 Classification rules-destination port configuration mode
IMPORTANT
To enable this destination port range, run the following command:
npu(config-clsfrule-dstport)# port-enable
For details, refer to “Enabling the Destination Port Range” on page 355.
Command
Syntax
npu(config-clsfrule-srcport)# no port-enable
Privilege
Level
10
Command
Modes
L3 Classification rules-destination port configuration mode
Chapter 3 - Operation and Administration of the Macro BTS NPU Configuration
4Motion 357 System Manual
npu(config-clsfrule-dstport)# exit
3.4.12.11.4.8.5Deleting Destination Ports Range
Run the following command to delete the destination ports range:
npu(config-clsfrule)# no dstport [<start-port> <end-port>]
Command
Syntax
npu(config-clsfrule-dstport)# exit
Privilege
Level
10
Command
Modes
L3 Classification rule-destination port configuration mode
IMPORTANT
An error may occur if you provide an invalid value for the start-port and end-port parameters.
Refer the syntax description for more information about the appropriate values and format for
configuring these parameters.
Command
Syntax
npu(config-clsfrule)# no dstport [<start-port> <end-port>]
Privilege
Level
10
Syntax
Description Parameter Description Presence Default
Value
Possible
Values
<start-port> Denotes the starting value of
port range to be deleted.
Optional N/A 1-65535
<end-port> Denotes the end value of port
range to be deleted.
Optional N/A 1-65535
Command
Modes
L3 Classification rules configuration mode
Chapter 3 - Operation and Administration of the Macro BTS NPU Configuration
4Motion 358 System Manual
3.4.12.11.4.9 Terminating the L3 Classification Rule Configuration Mode
Run the following command to terminate the L3 classification rules configuration
mode:
npu(config-clsfrule)# exit
3.4.12.11.4.10Specifying Configuration Parameters for the L2 Classification Rule
After enabling the classification rules configuration mode for an L2 classification
rule, run the following command to configure the parameters for this
classification rule:
npu(config-clsfrule-L2)# cvid <value(1-4094)>
Command
Syntax
npu(config-clsfrule)# exit
Command
Modes
L3 Classification rules configuration mode
NOTE
You can display configuration information for specific or all classification rules. For details, refer to
Section 3.4.12.11.4.13.
Command
Syntax
npu(config-clsfrule-L2)# cvid <value(1-4094)>
Privilege
Level
10
Syntax
Description Parameter Description Presence Default
Value
Possible
Values
cvid
<value(1-4094)>
Denotes the Customer VLAN
ID value to be assigned to the
classification rule.
Mandatory N/A 1-4094
Command
Modes
L2 Classification rules configuration mode

Chapter 3 - Operation and Administration of the Macro BTS NPU Configuration
4Motion 359 System Manual
3.4.12.11.4.11Clearing the configuration of the L2 Classification Rule
Run the following command to clear the configuration of this classification rule
(removing the configured cvid):
npu(config-clsfrule-L2)# no cvid
After clearing the configuration you can define a new cvid for this classification
rule.
3.4.12.11.4.12Terminating the L2 Classification Rule Configuration Mode
Run the following command to terminate the L2 classification rules configuration
mode:
npu(config-clsfrule-L2)# exit
3.4.12.11.4.13Displaying Configuration Information for Classification Rules
To display all or specific classification rules, run the following command:
npu# show clsf-rule [<rulename>]
Specify the classification rule name if you want to display configuration
information for a particular rule. Do not specify a value for this parameter if you
want to view configuration information for all classification rules.
Command
Syntax
npu(config-clsfrule-L2)# no cvid
Privilege
Level
10
Command
Modes
L2 Classification rules configuration mode
Command
Syntax
npu(config-clsfrule-L2)# exit
Command
Modes
L2 Classification rules configuration mode

Chapter 3 - Operation and Administration of the Macro BTS NPU Configuration
4Motion 360 System Manual
IMPORTANT
An error may occur if you provide an invalid value for the rulename parameter. Refer the syntax
description for more information about the appropriate values and format for configuring this
parameters.
Command
Syntax
npu# show clsf-rule [<rulename>]
Privilege
Level
1
Syntax
Description Parameter Description Presence Default
Value
Possible
Values
[<rulename>] Denotes the name of the
classification rule that you
want to display.
Specify this parameter only if
you want to display a specific
classification rule. If you do
not specify a rule name, it
displays all configured
classification rules.
Optional N/A String
Display
Format for
each L3 rule
Classification Rule Configuration :
ClsfRulename <value>
clsfRuleType: L3
Priority <value>
Phs rulename <value>
IpTosLow <value> IpTosHigh <value> IpTosMask <value> IpTosEnable <0/1>
clsfRuleSrcAddr <value> clsfRuleMask <value> SrcAddrEnable <0/1>
clsfRuleDstAddr <value> clsfRuleAddrMask <value> DstAddrenable <0/1>
clsfRuleSrcPort Start <value> clsfRuleSrcPort End <value> clsfRulePortEnable <0/1>
clsfRuleDstPort Start <value> clsfRuleDstPort End <value> clsfRulePortEnable <0/1>
Chapter 3 - Operation and Administration of the Macro BTS NPU Configuration
4Motion 361 System Manual
3.4.12.11.4.14Deleting Classification Rules
Run the following command to delete one or all classification rules:
npu(config)# no clsf-rule [<rulename>]
Display
Format for
each L2 rule
ClsfRulename <value>
clsfRuleType: L2
Cvid <value>
Command
Modes
Global command mode
CAUTION
Specify the rule name if you want to delete a specific classification. Otherwise all the configured
classification rules are deleted.
Command
Syntax
npu(config)# no clsf-rule [<rulename>]
Privilege
Level
10
Syntax
Description Parameter Description Presence Default
Value
Possible
Values
[<rulename>] Denotes the name of the
classification rule that you
want to delete. Specify this
parameter only if you want to
delete a specific classification
rule, otherwise all configured
classification rules are
deleted.
Optional N/A String
Command
Modes
Global configuration mode
Chapter 3 - Operation and Administration of the Macro BTS NPU Configuration
4Motion 362 System Manual
3.4.12.12 Configuring PHS Rules
Packet Header Suppression (PHS) is a mechanism that conserves air-interface
bandwidth by removing parts of the packet header that remain constant along the
traffic session. PHS operates by allowing the MS and ASN-GW to associate PHS
rules to each service flow.
When PHS is enabled, a repetitive portion of the payload headers of higher layers
is suppressed in the MAC SDU by the sending entity and restored by the receiving
entity. At the uplink, the sending entity is the MS and the receiving entity is the
NPU. At the downlink, the sending entity is the NPU, and the receiving entity is
the MS. If PHS is enabled at the MAC connection, each MAC SDU is prefixed with
a PHSI, which references the Payload Header Suppression Field (PHSF).
For instance, the ASN-GW will associate a PHS rule to each provisioned service
flow intended for VoIP traffic that will suppress the IP address field from the IP
header and other unvarying fields (e.g. protocol version) from the IP and RTP
headers. The PHS rules are provisioned on a per-service profile name basis. (For
details, refer Section 3.4.12.11.4.)
PHS rules define:
Header fields that need to be suppressed
Static values that can be configured for the suppressed header fields
1Enable the PHS rules configuration mode (refer to Section 3.4.12.12.1)
2Configure the parameters for the PHS rule (refer to Section 3.4.12.12.2)
3Terminate the PHS rules configuration mode (refer to Section 3.4.12.12.3)
You can, at any time, display configuration information (refer to
Section 3.4.12.12.5) or delete an existing PHS rules (refer to Section 3.4.12.12.4).
The following example illustrates the (sequence of) commands for enabling the
PHS rules configuration mode, configuring the parameters of a PHS rule, and then
terminating the PHS configuration mode, should be executed as shown in the
example below:
npu(config)# phs-rule phs-rule1
To configure one or more PHS rules:

Chapter 3 - Operation and Administration of the Macro BTS NPU Configuration
4Motion 363 System Manual
npu(config-phsrule)# config field
000000000000000000000000FFFFFFFF00000000 mask 000F00 verify 0 size
20
npu(config-phsrule)# exit
3.4.12.12.1 Enabling the PHS Rules Configuration Mode /Creating a New PHS Rule
To configure the parameters for a PHS rule, first enable the PHS rules
configuration mode. Run the following command to enable the PHS rules
configuration mode. You can also use this command to create a new PHS rule.
npu(config)# phs-rule <rulename>
If you use this command to create a new PHS rule, the configuration mode for this
PHS rule is automatically enabled, after which you can configure the parameters
for the PHS rule (refer to Section 3.4.12.12.2). You can then terminate the PHS
rules configuration mode (refer to Section 3.4.12.12.3) and return to the global
configuration mode.
3.4.12.12.2 Configuring Parameters for the PHS Rule
Run the following command to configure the parameters of the PHS rule:
npu(config-phsrule)# config <[field <value>] [mask <value>] [verify
<value>] [size <value>]>
Command
Syntax
npu(config)# phs-rule <rulename>
Privilege
Level
10
Syntax
Description Parameter Description Presence Default
Value
Possible
Values
<rulename> Denotes the PHS rule for
which the PHS configuration
mode is to be enabled.
Mandatory N/A String (1 to 30
characters)
Command
Modes
Global configuration mode

Chapter 3 - Operation and Administration of the Macro BTS NPU Configuration
4Motion 364 System Manual
NOTE
You can display configuration information for specific or all PHS rules. For details, refer
Section 3.4.12.12.5.
IMPORTANT
An error may occur if you provide an invalid value for any of these parameters. Refer the syntax
description for more information about the appropriate values and format for configuring these
parameters.
Command
Syntax
npu(config-phsrule)# config <[field <value>] [mask <value>] [verify <value>] [size <value>]>
Privilege
Level
10
Syntax
Description Parameter Description Presence Default
Value
Possible
Values
[field <value>] Denotes the PHSF value, that
is, the header string to be
suppressed.
Mandatory N/A String. This
parameter is of
format
"0x000000000
000000000000
000000000000
0000000".
Here Octet(x),
x=20 bytes,
each Byte will
represent two
characters
when used as
string like in
xml file.

Chapter 3 - Operation and Administration of the Macro BTS NPU Configuration
4Motion 365 System Manual
3.4.12.12.3 Terminating the PHS Rules Configuration Mode
Run the following command to terminate the PHS rules configuration mode:
npu(config-phsrule)# exit
[mask <value>] Indicates the PHSM, which
contains the bit-mask of the
PHSF with the bits set that is
to be suppressed.
Mandatory N/A String This
parameter is of
format
"0x000000".
Here Octet(x),
x=3 bytes,
each Byte will
represent two
characters
when used as
string like in
xml file.
[verify <value>] Indicates whether the PHS
header is to be verified.
Optional 0 (No) 0: Indicates
that the
PHS
header
should not
be verified.
1: Indicates
that the
PHS
header
should be
verified.
[size <value>]Indicates the size in bytes of
the header to be suppressed.
Mandatory N/A 0-20
Command
Modes
PHS rules configuration mode
Command
Syntax
npu(config-phsrule)# exit
Privilege
Level
10
Command
Modes
PHS rules configuration mode
Chapter 3 - Operation and Administration of the Macro BTS NPU Configuration
4Motion 366 System Manual
3.4.12.12.4 Deleting PHS Rules
Run the following command to delete one or all PHS rules:
npu(config)# no phs-rule [<rulename>]
3.4.12.12.5 Displaying Configuration Information for PHS Rules
To display all or specific PHS rules, run the following command:
npu# show phs-rule [<rulename>]
Specify the rule name if you want to display configuration information for a
particular PHS rule. Do not specify a value for this parameter if you want to view
configuration information for all PHS rule.
CAUTION
Specify the rule name if you want to delete a specific PHS rule. Otherwise all the configured PHS
rules are deleted.
Command
Syntax
npu(config)# no phs-rule [<rulename>]
Privilege
Level
10
Syntax
Description Parameter Description Presence Default
Value
Possible
Values
[<rulename>] Denotes the rule name of the
PHS rule that you want to
delete.
Specify a value for this
parameter if you want to
delete a specific PHS rule. Do
not specify a value for this
parameter, if you want to
delete all PHS rules.
Optional N/A String
Command
Modes
Global configuration mode

Chapter 3 - Operation and Administration of the Macro BTS NPU Configuration
4Motion 367 System Manual
3.4.12.13 Managing the Hot-Lining Feature
Hot-Lining provides a WiMAX operator with the capability to efficiently address
issues with users that would otherwise be unauthorized to access packet data
services.
When Hot-Lining is enabled, the ASN-GW implements UL/DL traffic filters. These
traffic filters are dynamically applied and removed per MSID. Triggers for filter
IMPORTANT
An error may occur if you provide an invalid value for the rulename parameter. Refer the syntax
description for more information about the appropriate values and format for configuring this
parameter.
Command
Syntax
npu# show phs-rule [<rulename>]
Privilege
Level
1
Syntax
Description Parameter Description Presence Default
Value
Possible
Values
[<rulename>] Denotes the rule name of the
PHS rule that you want to
display.
Specify a value for this
parameter if you want to
display the parameters of a
specific PHS rule. Do not
specify a value for this
parameter, if you want to
display all PHS rules.
Optional N/A String
Display
Format
PHS Configuration :
rulename field mask verify size
<value> <value> <value> <value> <value>
Command
Modes
Global command mode

Chapter 3 - Operation and Administration of the Macro BTS NPU Configuration
4Motion 368 System Manual
application/removal are relevant RADIUS messages from the AAA server. Filter's
action on traffic shall be one of the following: pass, drop, or HTTP-redirect the
traffic. The ASN-GW shall apply the pre-configured profile according to the
Hotline-Profile-ID as delivered from the AAA server.
If filtering is applied, uplink subscriber's packet that does not match any
UL-filter-rule shall be dropped. Downlink subscriber's packet that does not match
any DL-filter-rule shall be dropped.
DHCP traffic in UL and DL direction is always passed.
Anti-spoofing function filtering of UL traffic is performed before the hot-lining
filtering.
Hot-Lining is not applied on an MS with VLAN or Ethernet Services. If the
ASN-GW receives Access-Accept message, which includes any Hot-Lining
attributes, and the subject MS is granted at least one flow with CS-type of VLAN
or Ethernet, the ASN-GW shall initiate De-registration of the MS.
Hot-Lining is supported only for IP-CS services using IP-in-IP tunnel or VLAN
interface connectivity towards the CSN.
When Hot-Lining is disabled in ASN-GW, it shall not include Hot-Lining
Capabilities attributes in any Access-Request messages. If AAA replies with
Access-Accept message which includes any Hot-Lining attributes, ASN-GW shall
initiate De-registration of the MS.
The following sections describe the following tasks:
“Enabling/Disabling the Hot-Lining Feature” on page 368
“Managing Hot-Lining Profiles” on page 369
“Deleting Hot-Lining Profiles” on page 379
“Displaying Configuration Information for Hot-Lining Profiles” on page 380
“Displaying the Status of the Hot-Lining Feature” on page 381
3.4.12.13.1 Enabling/Disabling the Hot-Lining Feature
To enable the hot-lining feature, run the following command:
npu(config)# config hotlining-enable
To disable hot-lining, run the following command:

Chapter 3 - Operation and Administration of the Macro BTS NPU Configuration
4Motion 369 System Manual
npu(config)# no hotlining-enable
3.4.12.13.2 Managing Hot-Lining Profiles
Up to 10 hot-lining profiles can be defined. Each profile can include up to 16 filter
rules and (if applicable) an HTTP-redirect URL. To manage hot-lining profiles, first
enable the configuration mode for the profile (refer to “Enabling the Profile
Configuration Mode\ Creating a New Profile” on page 369). You can then execute
the following:
“Enabling/Disabling the Profile” on page 370
“Configuring the HTTP Redirect URL for the Profile” on page 371
“Configuring Hot-Lining Filter Rules” on page 372
“Deleting Filter Rules” on page 378
“Terminating the Profile Configuration Mode” on page 379
3.4.12.13.2.1 Enabling the Profile Configuration Mode\ Creating a New Profile
To configure the parameters for a hot-lining profile, first enable the hot-lining
profile configuration mode. Run the following command to enable the hot-lining
profile configuration mode. You can also use this command to create a new
profile.
npu(config)# hotlining-profile <profilename>
IMPORTANT
The unit must be reset after enabling/disabling hot-lining.
Command
Syntax
npu(config)# config hotlining-enable
npu(config)# no hotlining-enable
Privilege
Level
10
Command
Modes
Global configuration mode

Chapter 3 - Operation and Administration of the Macro BTS NPU Configuration
4Motion 370 System Manual
If you use this command to specify a new profile, the configuration mode for the
newly created profile is automatically enabled, after which you can configure the
profile’s filtering rules (refer to “Configuring Hot-Lining Filter Rules” on page 372)
or delete filter rules (refer to “Deleting Filter Rules” on page 378.
You can then terminate the hot-lining profile configuration mode (refer to
“Terminating the Profile Configuration Mode” on page 379) and return to the
global configuration mode.
3.4.12.13.2.2 Enabling/Disabling the Profile
After enabling the hot-lining profile configuration mode, run the following
command to enable/disable the profile:
npu(config-hotlining-profile)# set profile { enabled | disabled }
Command
Syntax
npu(config)# hotlining-profile <profilename>
Privilege
Level
10
Syntax
Description Parameter Description Presence Default
Value
Possible
Values
profilename Denotes the name of the
hot-lining profile for which the
configuration mode is to be
enabled. Must be unique per
BTS.
If you are creating a new
hot-lining profile, specify the
name of the new profile. The
configuration mode is
automatically enabled for the
new profile.
Mandatory N/A String (1 to 30
characters)
Command
Modes
Global configuration mode
Command
Syntax
npu(config-hotlining-profile)# set profile { enabled | disabled }

Chapter 3 - Operation and Administration of the Macro BTS NPU Configuration
4Motion 371 System Manual
3.4.12.13.2.3 Configuring the HTTP Redirect URL for the Profile
After enabling the hot-lining profile configuration mode, run the following
command to configure the HTTP redirect address (if required):
npu(config-hotlining-profile)# redirect-address <http-redirect-address>
Privilege
Level
10
Syntax
Description Parameter Description Presence Default
Value
Possible
Values
set profile {
enabled | disabled
}
Defines whether the profile is
enabled or disabled.
Optional disabled enabled
disabled
Command
Modes
hot-lining profile configuration mode
Command
Syntax
npu(config-hotlining-profile)# redirect-address <http-redirect-address>
Privilege
Level
10
Syntax
Description Parameter Description Presence Default
Value
Possible
Values
redirect-address
<http-redirect-addr
ess>
The HTTP redirect URL to be
used by uplink filter rules with
redirect action (see
Section 3.4.12.13.2.4)
Redirection location to be
used in Http-Redirection
message.
Optional N/A URL in ASCII
string format.
Command
Modes
hot-lining profile configuration mode
Chapter 3 - Operation and Administration of the Macro BTS NPU Configuration
4Motion 372 System Manual
3.4.12.13.2.4 Configuring Hot-Lining Filter Rules
Up to 16 filter rules can be defined for each hot-lining profile. To manage a filter
rule, first enable the hot-lining configuration mode for the filter rule (refer to
“Enabling the Filtering Rule Configuration Mode\ Creating a New Filtering Rule”
on page 372). You can then execute the following:
“Configuring IP Address Parameters for the Filter Rule” on page 373
“Configuring Source Port Range Parameters for the Filter Rule” on page 374
“Configuring Destination Port Range Parameters for the Filter Rule” on
page 375
“Configuring DSCP Range Parameters for the Filter Rule” on page 376
“Configuring IP Protocol Parameter for the Filter Rule” on page 377
“Restoring the Default Values of Filter Rule Components” on page 377
You can then terminate the filter configuration mode (refer to “Terminating the
Filter Rule Configuration Mode” on page 378) and return to the hotlining profile
configuration mode.
3.4.12.13.2.4.1Enabling the Filtering Rule Configuration Mode\ Creating a New Filtering
Rule
To configure the parameters for a filter rule, first enable the filter rule
configuration mode. Run the following command to enable the filter rule
configuration mode. You can also use this command to create a new filter rule.
npu(config-hotlining-profile)# filter-rule <string> [ direction { uplink |
downlink } ] [ action { drop | pass | redirect } ]
If you use this command to specify a new filter rule, the configuration mode for
the newly created filter rule is automatically enabled, after which you can
configure the filter rule’s parameters.
You can then terminate the filter rule configuration mode and return to the profile
configuration mode.
NOTE
Filtering Rules can be added/updated only when the Profile is disabled.

Chapter 3 - Operation and Administration of the Macro BTS NPU Configuration
4Motion 373 System Manual
The priority of checking for a match in filter rules is applied with respect to the
sequence in which these filter rules were defined. The first found match is applied.
3.4.12.13.2.4.2Configuring IP Address Parameters for the Filter Rule
After enabling the filter rule configuration mode, run the following command to
configure the IP address parameters of the filter rule:
npu(config-hotlining-filter-rule)# ip-address <ipV4Addr> [<netMask>]
Command
Syntax
npu(config-hotlining-profile)# filter-rule <string> [ direction { uplink | downlink } ] [ action { drop | pass
| redirect } ]
Privilege
Level
10
Syntax
Description Parameter Description Presence Default
Value
Possible
Values
filter-rule <string> Denotes the unique (per BTS)
name of the filter rule for
which the configuration mode
is to be enabled.
If you are creating a new filter
rule, specify the name of the
new rule. The configuration
mode is automatically
enabled for the new filter rule.
Mandatory N/A String (1 to 30
characters)
direction { uplink |
downlink }
The direction for which the
rule should be applied.
Optional uplink uplink
downlink
action { drop | pass
| redirect }
Action to be performed on
packets that match the rule,
redirect is applicable only if
direction is uplink. If set to
redirect then redirect-address
(see
Section 3.4.12.13.2.3)
must be defined.
Optional pass drop
pass
redirect
Command
Modes
hot-lining profile configuration mode

Chapter 3 - Operation and Administration of the Macro BTS NPU Configuration
4Motion 374 System Manual
If you do not configure IP address parameters for the filter rule, the default IP
address (0.0.0.0) and subnet mask (0.0.0.0) will be used, meaning that IP address
is ignored.
3.4.12.13.2.4.3Configuring Source Port Range Parameters for the Filter Rule
After enabling the filter rule configuration mode, run the following command to
configure the source port parameters of the filter rule:
npu(config-hotlining-filter-rule)# source-port start <port-number(0-65535)>
stop <port-number(0-65535)>
If you do not configure source port parameters for the filter rule, the default
values will be used, meaning that source port is ignored.
Command
Syntax
npu(config-hotlining-filter-rule)# ip-address <ipV4Addr> [<netMask>]
Privilege
Level
10
Syntax
Description Parameter Description Presence Default
Value
Possible
Values
<ipV4Addr> If direction is downlink then
this is the downlink Source IP
Address.
If direction is uplink then this
is the uplink Destination IP
Address
255.255.255.255 means not
applicable (ignore this
condition).
Optional 255.255.
255.255
ip address
[<netMask>] Defines Subnet Mask
associated with the
configured IP address.
Optional 255.255.
255.255
subnet mask
Command
Modes
hotlining filter rule configuration mode

Chapter 3 - Operation and Administration of the Macro BTS NPU Configuration
4Motion 375 System Manual
3.4.12.13.2.4.4Configuring Destination Port Range Parameters for the Filter Rule
After enabling the filter rule configuration mode, run the following command to
configure the destination port parameters of the filter rule:
npu(config-hotlining-filter-rule)# destination-port start
<port-number(0-65535)> stop <port-number(0-65535)>
If you do not configure destination port parameters for the filter rule, the default
values will be used, meaning that destination port is ignored.
Command
Syntax
npu(config-hotlining-filter-rule)# source-port start <port-number(0-65535)>
stop <port-number(0-65535)>
Privilege
Level
10
Syntax
Description Parameter Description Presence Default
Value
Possible
Values
start
<port-number(0-65
535)>
The minimum value of source
TCP/UDP port range
Optional 0 0-65535
stop
<port-number(0-65
535)>
The maximum value of
source TCP/UDP port range
Optional 65535 0-65535
Command
Modes
hotlining filter rule configuration mode
Command
Syntax
npu(config-hotlining-filter-rule)# destination-port start
<port-number(0-65535)> stop <port-number(0-65535)>
Privilege
Level
10

Chapter 3 - Operation and Administration of the Macro BTS NPU Configuration
4Motion 376 System Manual
3.4.12.13.2.4.5Configuring DSCP Range Parameters for the Filter Rule
After enabling the filter rule configuration mode, run the following command to
configure the DSCP parameters of the filter rule:
npu(config-hotlining-filter-rule)# dscp start <dscp-value(0-63)> stop
<dscp-value(0-63)>
If you do not configure DSCP parameters for the filter rule, the default values will
be used, meaning that DSCP is ignored.
Syntax
Description Parameter Description Presence Default
Value
Possible
Values
start
<port-number(0-65
535)>
The minimum value of
destination TCP/UDP port
range
Optional 0 0-65535
stop
<port-number(0-65
535)>
The maximum value of
destination TCP/UDP port
range
Optional 65535 0-65535
Command
Modes
hotlining filter rule configuration mode
Command
Syntax
npu(config-hotlining-filter-rule)# dscp start <dscp-value(0-63)> stop
<dscp-value(0-63)>
Privilege
Level
10
Syntax
Description Parameter Description Presence Default
Value
Possible
Values
start
<dscp-value(0-63)
>
The minimum value of DSCP Optional 0 0-63
stop
<dscp-value(0-63)
>
The minimum value of DSCP Optional 63 0-63

Chapter 3 - Operation and Administration of the Macro BTS NPU Configuration
4Motion 377 System Manual
3.4.12.13.2.4.6Configuring IP Protocol Parameter for the Filter Rule
After enabling the filter rule configuration mode, run the following command to
configure the IP protocol parameter of the filter rule:
npu(config-hotlining-filter-rule)# ip-protocol <protocol-number (0-255)>
If you do not configure the IP protocol parameter for the filter rule, the default
value (255) will be used, meaning that IP protocol is ignored.
3.4.12.13.2.4.7Restoring the Default Values of Filter Rule Components
Run the following command to restore the default values of the IP address
parameters: npu(config-hotlining-filter-rule)# no ip-address.
Run the following command to restore the default values of the source port
parameters: npu(config-hotlining-filter-rule)# no source-port.
Run the following command to restore the default values of the destination port
parameters: npu(config-hotlining-filter-rule)# no destination-port.
Run the following command to restore the default values of the DSCP range
parameters: npu(config-hotlining-filter-rule)# no dscp-range.
Command
Modes
hotlining filter rule configuration mode
Command
Syntax
npu(config-hotlining-filter-rule)# ip-protocol <protocol-number (0-255)>
Privilege
Level
10
Syntax
Description Parameter Description Presence Default
Value
Possible
Values
<protocol-number
(0-255)>
The IP protocol number.
255 means “any” (ignore this
condition).
Optional 255 0-255
Command
Modes
hotlining filter rule configuration mode

Chapter 3 - Operation and Administration of the Macro BTS NPU Configuration
4Motion 378 System Manual
Run the following command to restore the default value of the IP protocol
parameters: npu(config-hotlining-filter-rule)# no ip-protocol.
3.4.12.13.2.4.8Terminating the Filter Rule Configuration Mode
Run the following command to terminate the filter rule configuration mode:
npu(config-hotlining-filter-rule)# exit
3.4.12.13.2.5 Deleting Filter Rules
Run the following command to delete a filter rule of the profile:
npu(config-hotlining-profile)# no filter-rule <filter-rule-name>
Command
Syntax
npu(config-hotlining-filter-rule)# no ip-address
npu(config-hotlining-filter-rule)# no source-port
npu(config-hotlining-filter-rule)# no destination-port
npu(config-hotlining-filter-rule)# no dscp-range
npu(config-hotlining-filter-rule)# no ip-protocol
Privilege
Level
10
Command
Modes
hotlining filter rule configuration mode
Command
Syntax
npu(config-hotlining-filter-rule)# exit
Privilege
Level
10
Command
Modes
hotlining filter rule configuration mode
Command
Syntax
npu(config-hotlining-profile)# no no filter-rule <filter-rule-name>

Chapter 3 - Operation and Administration of the Macro BTS NPU Configuration
4Motion 379 System Manual
3.4.12.13.2.6 Terminating the Profile Configuration Mode
Run the following command to terminate the profile configuration mode:
npu(config-hotlining-profile)# exit
3.4.12.13.3 Deleting Hot-Lining Profiles
Run the following command to delete a profile:
npu(config)# no hotlining-profile <profilename>
Privilege
Level
10
Syntax
Description Parameter Description Presence Default
Value
Possible
Values
<filter-rule-name> Denotes the rule name of the
filter rule that you want to
delete.
Mandatory N/A String
Command
Modes
hotlining profile configuration mode
Command
Syntax
npu(config-hotlining-profile)# exit
Privilege
Level
10
Command
Modes
hotlining profile configuration mode
Command
Syntax
npu(config)# no hotlining-profile <profilename>
Privilege
Level
10

Chapter 3 - Operation and Administration of the Macro BTS NPU Configuration
4Motion 380 System Manual
3.4.12.13.4 Displaying Configuration Information for Hot-Lining Profiles
To display all or specific profiles, run the following command:
npu# show hotlining-profile [<profilename>]
Specify the rule name if you want to display configuration information for a
particular profile. Do not specify a value for this parameter if you want to view
configuration information for all profiles.
Syntax
Description Parameter Description Presence Default
Value
Possible
Values
<profilename> Denotes the profile name of
the profile that you want to
delete.
Mandatory N/A String
Command
Modes
hotlining profile configuration mode
Command
Syntax
npu# show hotlining-profile [<profilename>]
Privilege
Level
1
Syntax
Description Parameter Description Presence Default
Value
Possible
Values
[<profilename>] Denotes the profile name of
the profile that you want to
display.
Specify a value for this
parameter if you want to
display the parameters of a
specific profile. Do not specify
a value for this parameter, if
you want to display all
profiles.
Optional null String

Chapter 3 - Operation and Administration of the Macro BTS NPU Configuration
4Motion 381 System Manual
3.4.12.13.5 Displaying the Status of the Hot-Lining Feature
To display the status of the Hot-Lining feature, run the following command:
npu# show hotlining-status
Display
Format
% Asn-gw hotlining profile configuration:
For each displayed profile (specific or all) the following will be displayed:
Hotlining profile: <name>
Redirection address: <address.>
Status: <Disabled/Enabled>
for each displayed profile, all defined filter rules will be displayed. For each rule, the following details
will be displayed:
Filter rule: <name>1
Protocol: <value> (only if defined)
Src Port: <start value-stop value> (only if defined)
Dst Port: <start value-stop value> (only if defined)
Action: <drop/pass/redirect>
Direction: <uplink/downlink>
Priority of looking for a match is according to the order of the displayed rules.
Command
Modes
Global command mode
Command
Syntax
npu# show hotlining-status
Privilege
Level
1
Display
Format
Hotlining status: <Enabled/Disabled>
Command
Modes
Global command mode

Chapter 3 - Operation and Administration of the Macro BTS NPU Configuration
4Motion 382 System Manual
3.4.12.14 Managing the ASN-GW Keep-Alive Functionality
Once an MS enters the network, its context is stored in ASN entities (BS,
ASN-GW). Dynamically, MS context could be transferred/updated (during HO and
re-authentication) to other entities or duplicated to other entities (separation
between anchor functions such as Authenticator, Data Path and Relay Data
Path).
In certain cases, such as entity reset, other entities are not aware of service
termination of an MS in that entity, and keep maintaining the MS context. This
may result in service failure, excessive consumption of memory resources and
accounting mistakes.
The keep-alive mechanism should be used to clear MS context from all network
entities when it is de-attached from the BS, and de-register MS from the network
when its context becomes unavailable in one of its serving function locations.
When the keep-alive mechanism is enabled the ASN-GW periodically polls other
ASN entities-of-interest (BSs) and waits for their responses. In case of no
keep-alive response, the ASN-GW shall make further actions, such as clearing the
applicable MS(s) context.
The ASN-GW builds a list of BS-of-interest which it must poll. The list shall be
dynamically updated; the ASN-GW tracks all BSID(s) in all MS(s) contexts it holds,
and dynamically updates the list of BSs-of-interest. When a new MS is attached to
a BS that does not exist in the list, it will be added it to the list. When the last
MS(s) with specific BSID makes network exit, the ASN-GW shall remove the BS
from the list if there is no other MS attached.
The ASN-GW periodically polls the BS(s) for keep-alive. The polling mechanism is
independent and unrelated for every BS-of-interest the ASN-GW polls.
The keep-alive mechanism uses configurable retry timer and retries counter.
Upon expiration of the retry timer, the ASN-GW resends the ASN Keep-Alive
request message. Upon expiration of the retries counter, the ASN-GW assumes
failure of the polled BS and clears the contexts of all MS(s) served by that BS.
In addition, the ASN-GW verifies that for each polled entity that the
“Last-Reset-Time” UTC value of poll N+1 is equal to the value of poll N. If the
“Last-Reset-Time” UTC value of poll N+1 is higher than the value of poll N, this
mean that the BS went through reset state during the interval between two
consecutive polls. In this case, the ASN-GW shall clear all MS(s) contexts, served
by that specific BS that are “older” than BS life after reset (through calculation of
difference between polled entity “Last-Reset-Time” received on poll N+1 and MS
network entry time stamp on ASNGW).

Chapter 3 - Operation and Administration of the Macro BTS NPU Configuration
4Motion 383 System Manual
If the ASN-GW is the authenticator for the MS(s) the failing BS served, then in
addition to context clearance it also sends R3 Accounting-Request (Stop) message
including a release indication to AAA.
When keep-alive fails, ASN-GW generates an event.
Regardless of the enable/disable status of the keep-alive mechanism in the
ASN-GW, it replies to ASN_Keep_Alive_Req received from other BSs with
ASN_Keep_Alive_Rsp. that includes also its “Last-Reset-Time”. It responds only if
all its functions operate properly. In case one of the functions fails, the ASN-GW
shall not respond to the keep-alive poll.
3.4.12.14.1 Configuring ASN-GW Keep-Alive Parameters
To configure one or several keep-alive parameters, run the following command:
npu(config)# keep-alive ([asn-ka <enable|disable>] [period <integer (10-1000)>]
[rtx-cnt <integer (0-10)>] [rtx-time <integer (5000-10000)>] )
IMPORTANT
An error may occur if you provide an invalid value for any of these parameters. Refer to the syntax
description for more information about the appropriate values and format for configuring these
parameters.
An error may occur if you provide configuration values that do not satisfy following condition:
'period*1000 >= rtx-time * (rtx-cnt + 1)'"
At least one parameter must be specified (the value is optional): The command npu(config)#
keep-alive will return an Incomplete Command error.
Command
Syntax
npu(config)# keep-alive ([asn-ka <enable|disable>] [period <integer (10-1000)>] [rtx-cnt <integer
(0-10)>] [rtx-time <integer (5000-10000)>])
Privilege
Level
10

Chapter 3 - Operation and Administration of the Macro BTS NPU Configuration
4Motion 384 System Manual
3.4.12.14.2 Displaying Configuration Information for ASN-GW Keep-Alive
Parameters
To display the ASN-GW keep-alive parameters, run the following command:
npu# show keep-alive
Syntax
Description Parameter Description Presence Default
Value
Possible
Values
[asn-ka
<enable|disable>]
Enable/Disable the ASN-GW
keep-alive mechanism.
Optional disable enable
disable
[period <integer
(10-1000)>]
The period in seconds
between polling sessions.
period x 1000 (value in
milliseconds) cannot be lower
than rtx-time x (rtx-cnt +1).
Optional 60 10-1000
[rtx-cnt <integer
(0-10)>]
Maximum number of retries if
rtx-time has expired without
getting a response.
Optional 5 1-10
[rtx-time <integer
(5000-10000)>]
Time in milliseconds to wait
for a response before
initiating another polling
attempt or reaching a
decision that the polled entity
has failed (if the maximum
number of retries set by
rtx-cnt has been reached).
Optional 5000 5000-10000
Command
Modes
Global configuration mode
Command
Syntax
npu# show keep-alive
Privilege
Level
1

Chapter 3 - Operation and Administration of the Macro BTS NPU Configuration
4Motion 385 System Manual
3.4 .13 Configuring Logging
Logs can be generated to record events that occur with respect to the following
system modules:
System startup procedures: Refers to all procedures/events that occur during
system startup.
NPU/AU upgrade procedures: Refers to all the procedures executed while
upgrading the NPU/AU.
Fault management procedures: Refers to internal processes that are executed
for monitoring erroneous conditions or fault conditions.
System performance procedures: Refers to internal processes that are
executed for monitoring system performance.
Shelf management procedures: Refers to internal processes that are executed
for monitoring the health and temperature of all hardware components (other
than the NPU) such as the AU, PIU and PSU.
WiMAX signaling protocols: Refers to all the protocols that implement the
ASN-GW functionality.
User interface: Refers to the command line or remote management interface
used for executing all user-initiated events such as system shut down or reset.
AU Manager: Refers to all internal processes used for fault, configuration, and
performance management for AU.
Display
Format
% Asn-gateway Keep Alive Configuration
asn-ka : <enable/disable>
period : <value>
rtx-cnt : <value>
rtx-time : <value>
Command
Modes
Global command mode

Chapter 3 - Operation and Administration of the Macro BTS NPU Configuration
4Motion 386 System Manual
You can specify the severity level for which log messages are to be generated for
each module. Logs are generated for events for which the severity level is equal to
or higher than the configured level. The following are the severity levels that you
can configure for each module:
Alert
Error
Information
By default, system-level logging is enabled. The system stores a maximum of 1000
log and trace messages. The system stores log and trace messages using the cyclic
buffer method. That is, when there are more than 1000 messages, the system
overwrites the oldest log and trace messages.
To configure logging, first specify system-level logging that is applicable across the
entire system. You can then configure logging, individually for each system
module. This section describes the commands to be used for:
“Managing System-level Logging” on page 386
“Configuring Module-level Logging” on page 397
3.4.13.1 Managing System-level Logging
System-level logging refers to all the procedures to be executed for managing
logging for the entire system. To manage system-level logging:
Enable/disable logging across the entire system, and specify the destination (a
file on the local system or on an external server) where logs are to be
maintained.
Make periodic backups of log files.
IMPORTANT
The Syslog utility is used to implement the logging feature for 4Motion.
IMPORTANT
It is recommended that you periodically make backups of log messages before these are
overwritten. For details, refer to “Making a Backup of Log Files on the NPU Flash” on
page 393.

Chapter 3 - Operation and Administration of the Macro BTS NPU Configuration
4Motion 387 System Manual
You can, at any time, view the current log destination or delete log files from the
NPU flash. After you have enabled/disabled system-level logging and specified the
destination for storing log messages, you can configure logging separately for each
module. You can also transfer log files from the NPU file system to an external
TFTP server. To support debugging, you can create a “collect logs” file that
contains the also all status and configuration files. This section describes the
commands to be used for:
“Enabling System-level Logging” on page 387
“Disabling Logging to File or Server” on page 389
“Displaying System-level Logs” on page 391
“Displaying the Current Log Destination” on page 392
“Making a Backup of Log Files on the NPU Flash” on page 393
“Deleting Backup Log Files from the NPU Flash” on page 395
“Creating a Collected System Logs File” on page 396
“Transferring Files from the NPU Flash to a TFTP Server” on page 396
“Displaying Log Files Residing on the NPU Flash” on page 397
3.4.13.1.1 Enabling System-level Logging
You can enable logging for the entire system and specify the destination where
logs should be written. The destination can be either written to:
File
External server (Log files are sent to the external server in the Syslog log
format. The Syslog daemon on the external server can save these log messages
in the appropriate format depending upon the server configuration.)
By default, system-level logging is enabled. To view whether the system-level
logging is enabled/disabled for logging to file or server. For details, refer
Section 3.4.13.1.4.
The system maintains a maximum of 1000 log and trace messages. The system
stores log and trace messages using the cyclic buffer method. That is, when there
Chapter 3 - Operation and Administration of the Macro BTS NPU Configuration
4Motion 388 System Manual
are more than 1000 messages, the system overwrites the oldest log and trace
messages.
To enable system-level logging, run the following command:
npu(config)# log destination {file | server <IP address>}
IMPORTANT
If you have enabled writing of log messages to file, it is recommended that you periodically make a
backup of this log file. This is because log messages that are written to file are deleted after system
reset. For more information about making backups of log files on the NPU flash, refer to
Section 3.4.13.1.5.
NOTE
After you execute this command, logging is enabled for the entire system. You may also configure
logging separately for each system module. For details, refer to Section 3.4.13.2.
IMPORTANT
An error may occur if:
Logging is already enabled for the requested destination (file or server).
Logging is enabled to a server with a different IP address. Because logging can be enabled to
only one external server, you can specify another server IP address after you disable logging to
the existing server IP address. For more information about disabling logging to server, refer
“Disabling Logging to File or Server” on page 389.
An internal error has occurred.
You have specified the IP address in an invalid format. Specify the IP address in the format,
XXX.XXX.XXX.XXX.
Command
Syntax
npu(config)# log destination {file | server <IP address>}
Privilege
Level
10

Chapter 3 - Operation and Administration of the Macro BTS NPU Configuration
4Motion 389 System Manual
3.4.13.1.2 Disabling Logging to File or Server
To disable logging to file or server, run the following command:
npu(config)# no log destination {file | server <IP address>}
Syntax
Description Parameter Description Presence Default
Value
Possible
Values
{file|server <IP
address>}
Indicates whether logs are to
be written to a file or server.
Mandatory N/A file:
Indicates
that logs
are to be
written to a
file. (Logs
written to
file are not
maintained
after
system
reset;
periodically
save the log
file to flash.)
For details,
refer to
Section 3
.4.13.1.5.
server:
Indicates
that logs
are to be
written to
an external
server.
Specify the
server IP
address of
the server
in the
format,
XXX.XXX.X
XX.XXX.
Command
Modes
Global configuration mode

Chapter 3 - Operation and Administration of the Macro BTS NPU Configuration
4Motion 390 System Manual
IMPORTANT
An error may occur if:
Logging is already disabled for the requested destination (file or server).
An internal error has occurred.
The server IP address that you have specified does not exist.
Command
Syntax
npu(config)# no log destination {file | server <IP address>}
Privilege
Level
10

Chapter 3 - Operation and Administration of the Macro BTS NPU Configuration
4Motion 391 System Manual
3.4.13.1.3 Displaying System-level Logs
To display system-level logs, run the following command:
npu# show logs
Syntax
Description Parameter Description Presence Default
Value
Possible
Values
{file|server <IP
address>}
Indicates whether the
system-level logs are to be
disabled for a file or server.
Mandatory N/A file:
Indicates
that
system-leve
l logging to
a file is to
be
disabled.
server<ip
address>:
Indicates
that
system-leve
l logging to
a server is
to be
disabled.
Specify the
IP address
if you want
to disable
logging to a
specific
server.
Otherwise
logging is
disabled for
the server
that was
last
enabled for
logging.
Provide the
IP address
in the
format,
XXX.XXX.X
XX.XXX.
Command
Modes
Global configuration mode

Chapter 3 - Operation and Administration of the Macro BTS NPU Configuration
4Motion 392 System Manual
When you run this command, all the log messages are displayed. (4Motion
maintains a maximum of 1000 log and trace messages.) If you want to filter log
messages to be displayed, run the following command to specify the filter criteria:
npu# show logs [| grep <search string>]
For example, if you want to view log messages pertaining to only Error logs, run
the following command:
npu# show logs |grep ERROR
3.4.13.1.4 Displaying the Current Log Destination
To view the current log destination, that is, whether logs are written to file or an
external server, run the following command:
npu# show log destination
IMPORTANT
An error may occur if:
There are no logs to be displayed.
The log files are inaccessible or an internal error occurred while processing the result.
Command
Syntax
npu# show logs [| grep <search string>]
Privilege
Level
1
Syntax
Description Parameter Description Presence Default
Value
Possible
Values
[ grep <search
string>]
Indicates the criteria for
filtering the log messages to
be displayed.
Optional N/A String
Command
Modes
Global command mode
Chapter 3 - Operation and Administration of the Macro BTS NPU Configuration
4Motion 393 System Manual
3.4.13.1.5 Making a Backup of Log Files on the NPU Flash
The system stores a maximum of 1000 log and trace messages in the log file, after
which the oldest messages are overwritten. This log file resides in the TFTP boot
directory (/tftpboot/management/system_logs/) of the NPU. You can TFTP this
file from the NPU flash. You can display the list of log files residing on the NPU
flash. For details, refer Section 3.4.13.1.9.
In addition, logs written to file are not maintained after system reset. If you have
enabled writing of logs to file, it is recommended that you periodically make a
backup of log messages on the NPU flash.
When you make a backup of log files on the NPU flash, the last 1000 log and trace
messages are stored in a compressed file, which is saved on the NPU flash. There
is no limit on the number of log files that can be saved unless there is inadequate
space on the NPU flash.
IMPORTANT
An error may occur if an internal error occurs when you execute this command.
Command
Syntax
npu# show log destination
Privilege
Level
1
Display
Format Log File : <Enabled/Disabled>
Log Server : <Enabled/Disabled>
(ServerIP - <IP address>)
Command
Modes
Global command mode
IMPORTANT
You can display a list of log files that are currently residing on the NPU flash. For details, refer
Section 3.4.13.1.9.

Chapter 3 - Operation and Administration of the Macro BTS NPU Configuration
4Motion 394 System Manual
Run the following command to make a backup of the log and trace messages
(written to file), on the NPU flash:
npu(config)# save log file <file name.gz>
When you run this command, the last 1000 log and trace messages are stored in
the compressed file, which is saved on the NPU flash.
IMPORTANT
Trace messages are also written to the same file as log messages (provided you have enabled
writing of trace messages to file.) When you make a backup of log files written to file, the backup file
also contains trace messages (provided you have enabled writing of trace messages to file). For
more information about configuring traces, refer to Section 3.12.1.1.
IMPORTANT
An error may occur if:
You have specified the file name in an invalid format. Because the backup log file is a
compressed file, always suffix the file name with .gz.
The length of the file name has exceeded 255 characters.
The system was unable to compress the file or save the compressed file to flash.
A processing error has occurred.
Command
Syntax
npu(config)# save log file <file name>
Privilege
Level
10
Syntax
Description Parameter Description Presence Default
Value
Possible
Values
<file name> Indicates the name of the
compressed file that contains
the last 1000 log and trace
messages. Always suffix the
file name with .gz.
Mandatory N/A <file name>.gz
file name string
can contain 1
to 50 printable
characters.
Chapter 3 - Operation and Administration of the Macro BTS NPU Configuration
4Motion 395 System Manual
3.4.13.1.6 Deleting Backup Log Files from the NPU Flash
You can delete the backup log files from the NPU flash. It is recommended that
you periodically make a backup of these log files, and delete these from the NPU
flash.
To delete log and trace backup files from the NPU flash, run the following
command:
npu(config)# erase log file [<file name>]
Command
Modes
Global configuration mode
IMPORTANT
Trace and log messages are stored in the same backup file on the NPU flash. When you execute
this procedure, trace messages are also deleted from the NPU flash. For details, refer to
“Managing System-level Tracing” on page 671.
CAUTION
Specify the file name if you want to delete a specific backup file. Otherwise all the backup files
residing in the NPU flash are deleted.
IMPORTANT
An error may occur if:
The file name that you have specified does not exist.
A processing error has occurred.
Command
Syntax
npu(config)# erase log file [<file name>]
Privilege
Level
10

Chapter 3 - Operation and Administration of the Macro BTS NPU Configuration
4Motion 396 System Manual
3.4.13.1.7 Creating a Collected System Logs File
To create a collected system log file that contains all current logs, status and
configuration files of the system run the following command:
npu# collect logs
The name of the file is: system_logs_<Date & Time>.tar
3.4.13.1.8 Transferring Files from the NPU Flash to a TFTP Server
To transfer files from the NPU flash to a TFTP server, run the following command:
npu# transfer logs [server-ip <ip-addr>] file {<file name (*.tar)> | All | Latest}
Syntax
Description Parameter Description Presence Default
Value
Possible
Values
[<file name>] Indicates the name of the
compressed log file to be
deleted. If you do not specify
the file name, all the log files
residing in the NPU flash are
deleted.
Always suffix the file name
with .gz.
Optional N/A <file name>.gz
Command
Modes
Global configuration mode
Command
Syntax
npu# collect logs
Privilege
Level
10
Command
Modes
Global command mode
Command
Syntax
npu# transfer logs [server-ip <ip-addr>] file {<file name (*.tar)> | All |
Latest}

Chapter 3 - Operation and Administration of the Macro BTS NPU Configuration
4Motion 397 System Manual
3.4.13.1.9 Displaying Log Files Residing on the NPU Flash
You can display a list of log files that are residing on the NPU flash. For details,
refer Section 3.11.2.
3.4.13.2 Configuring Module-level Logging
You can configure logging (enable/disable) separately for the following modules,
and define the severity level for which logging is required:
System startup procedures
NPU/AU upgrade procedures
Fault management procedures
System performance procedures
Shelf management procedures
WiMAX signaling protocols
User interface
Privilege
Level
10
Syntax
Description Parameter Description Presence Default
Value
Possible
Values
[<ip-addr>] Indicates the IP address of
the destination TFTP server.
Mandatory N/A IP address
{<file name (*.tar)>
| All | Latest}
The file(s) to be transferred:
<file name>.tar: A selected
file that exists in the flash.
All: All files in the flash.
Latest: The latest created file.
Mandatory N/A <file name
(*.tar)>
All
Latest
Command
Modes
Global command mode

Chapter 3 - Operation and Administration of the Macro BTS NPU Configuration
4Motion 398 System Manual
AU management procedures
This section describes the commands to be used for:
“Configuring the Log Severity Level” on page 398
“Displaying Configuration Information for Module-level Logging” on page 400
“Disabling Module-level Logging” on page 401
3.4.13.2.1 Configuring the Log Severity Level
You can configure the severity level for logs to be generated for each module. This
means that if an event occurs for a module for which the severity level is equal to
or higher than the configured level, a log is generated. The following are the
severity levels (highest to lowest) that can be configured for each module:
Alert
Error
Information
To specify the severity level for each module for which logs are to be created, run
the following command:
npu(config)# log level
[{StartupMgr|SWDownload|FaultMgr|PerfMgr|ShelfMgr|SIGASN|UserIF|AU
Mgr}] {ALERT|ERROR|INFO}
The parameters in this command correspond to the system modules/procedures
listed in the following table:
IMPORTANT
By default, logging is enabled for all modules, and the severity level is Error. The severity levels
recorded in 4Motion log messages are defined in RFC 3164.
Table 3-24: Modules for which Logging can be Enabled
Parameter Refers to...
StartupMgr System startup procedures
SWDownload Software upgrade procedures