Broadcom BRCM1017 Broadcom 802.11ag WLAN Mini PCI Card User Manual CV60 Vehicle Mount Computer Quick Start Guide
Broadcom Corporation Broadcom 802.11ag WLAN Mini PCI Card CV60 Vehicle Mount Computer Quick Start Guide
Broadcom >
Contents
- 1. Users Guide
- 2. user guide
- 3. Updated portable user guide
- 4. user guide PP07L
- 5. user guide PPT
- 6. PP02X user guide part 1
- 7. PP02X user guide part 2
- 8. PP05L user guide part 1
- 9. PP05L user guide part 2
- 10. Updated User guide partable platform
- 11. User guide PP02X part 1
- 12. User guide PP02X part 2
- 13. User guide PP05L part 1
- 14. User guide PP05L part 2
- 15. User guide PP07L
- 16. User guide PPT
- 17. users manual
- 18. Host Manual 1
- 19. Host Manual 2
Host Manual 1

CV60 Vehicle
Mount Computer
Quick Start Guide
ii CV60 Vehicle Mount Computer Quick Start Guide
Intermec Technologies Corporation
Worldwide Headquarters Technical Communications
6001 36th Ave.W. 550 Second Street SE
Everett, WA 98203 Cedar Rapids, IA 52401
U.S.A. U.S.A.
www.intermec.com
The information contained herein is provided solely for the purpose of
allowing customers to operate and service Intermec-manufactured
equipment and is not to be released, reproduced, or used for any other
purpose without written permission of Intermec Technologies Corpora-
tion.
Information and specifications contained in this document are subject
to change without prior notice and do not represent a commitment on
the part of Intermec Technologies Corporation.
© 2003-2006 by Intermec Technologies Corporation. All rights
reserved.
The word Intermec, the Intermec logo, Norand, ArciTech, Beverage
Routebook, CrossBar, dcBrowser, Duratherm, EasyADC, EasyCoder,
EasySet, Fingerprint, i-gistics, INCA (under license), Intellitag, Intell-
itag Gen2, JANUS, LabelShop, MobileLAN, Picolink, Ready-to-Work,
RoutePower, Sabre, ScanPlus, ShopScan, Smart Mobile Computing,
TE 2000, Trakker Antares, and Vista Powered are either trademarks or
registered trademarks of Intermec Technologies Corporation.
There are U.S. and foreign patents as well as U.S. and foreign patent
applications pending.
Contents
CV60 Vehicle Mount Computer . . . . . . . . . . . . . .1
Unpacking the CV60 Computer . . . . . . . . . . . . . .1
Locating the CV60 Computer Ports. . . . . . . . . . . .2
Attaching an External Antenna. . . . . . . . . . . . . . . .3
Attaching a Cordless Bluetooth Scanner . . . . . . . . .3
Windows CE .NET . . . . . . . . . . . . . . . . .4
Windows XP/XPE . . . . . . . . . . . . . . . . . .5
Connecting to Other Serial Devices . . . . .6
CV60 Computer Setup . . . . . . . . . . . . . . . . . . . . .6
Device Configuration. . . . . . . . . . . . . . . .7
Connecting to the CV60 (Windows CE) .7
Specifications . . . . . . . . . . . . . . . . . . . . . . . . . . . . .8
CV60 Hardware Features. . . . . . . . . . . . .8
Processor/Memory/Storage . . . . . . . . . . .9
System Software . . . . . . . . . . . . . . . . . . . .9
Power System . . . . . . . . . . . . . . . . . . . . .9
Wired Connectivity . . . . . . . . . . . . . . . . .9
Wireless Connectivity . . . . . . . . . . . . . . .9
Peripherals/Accessories . . . . . . . . . . . . . . .9
Troubleshooting . . . . . . . . . . . . . . . .10
CV60 Vehicle Mount Computer Quick Start Guide 1
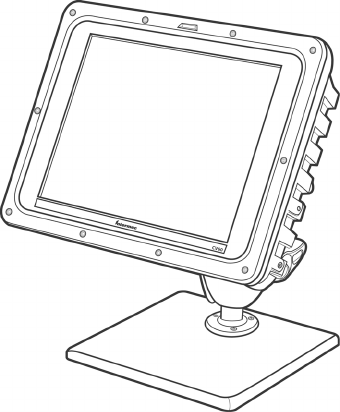
CV60 Vehicle Mount Computer
The CV60 Computer is a rugged PC computing device consist-
ing of a 12.1-inch color, SVGA LCD display with touch screen
for data input and menu navigation.
Communication options include connectivity through two
RS-232 serial ports, two USB ports (host), and Ethernet Wireless
network connectivity is enabled through multiple LAN radio
options.
Peripherals supported include PS/2 keyboard, USB mouse, exter-
nal headset, wired RS-232 scanners, wireless printers, and USB
data recovery drives.
CV60 Vehicle Mount Computer with optional desk mount.
Unpacking the CV60 Computer
When removing the CV60 Computer from its box, save the box
and shipping material in case you need to ship or store it. Check
the contents of the box against the invoice for completeness and
contact your local Intermec representative if there is a problem.
2 CV60 Vehicle Mount Computer Quick Start Guide
The CV60 shipping box contains:
• CV60 Vehicle Mount Computer (P/N: 245-287-10X)
• Documentation (P/N: 930-162-001)
Locating the CV60 Computer Ports
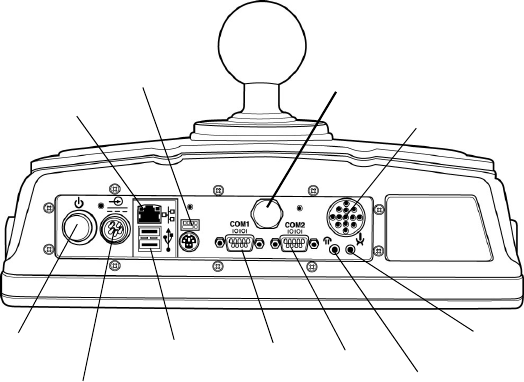
You connect power, a keyboard, scanner, and RS-232 serial
devices to the ports that are located on the bottom panel of the
CV60 Computer.
COM1
Use this port to connect the CV60 Computer to other RS-232
devices, such as PCs, scanners, scales, and printers, using an
RS-232 null-modem adapter cable. The RS-232 null modem
cable is an accessory, which is sold and ordered separately.
COM2
Use this port to connect the CV60 Computer to other RS-232
devices, such as PCs, scales, and printers, using an RS-232 null-
modem adapter cable. The RS-232 null modem cable is an acces-
sory, which is sold and ordered separately.
The CV60 Computer supports these Intermec scanning devices:
• Intermec 1553 Laser Scanners
• Intermec SF51/SX51 Cordless Bluetooth Scanners
Ethernet
Keyboard
Speaker
Power
Switch
Power
Connector
USB COM1 COM2
Headphone
Microphone
Membrane Vent

CV60 Vehicle Mount Computer Quick Start Guide 3
Power Supply Connector
This connector provides power to the CV60 Computer to one of
the DC power supply kits (6-96 VDC) or to connect the AC
power supply when operating the CV60 Computer from the
desktop mounting stand. You must have a power supply con-
nected to operate the CV60 Computer.
Keyboard Connector
Use this connector to connect the CV60 keyboard or a PC-PS/2
keyboard to the CV60 Computer using the CV60 keyboard
adapter cable. The keyboard and keyboard adapter cable are
accessories, which are sold and ordered separately.
USB Connectors
Use these connectors to attach USB serial peripheral devices such
as keyboards, mice, hubs to the CV60 Computer. The CV60
Computer supports USB version 1.1.
Ethernet Connector
Use this connector for connection to a 10baseT/100baseT Ether-
net LAN.
Attaching an External Antenna
You can use an Intermec-approved accessory antenna to improve
RF communications.
Attaching a Cordless Bluetooth Scanner
You can attach a scanner, such as the SF51 or SX51 Scanner, to
scan and input bar code data. Use the accessory scanner cables to
connect a scanning device.
1Insert the scanner cable connector straight into the COM1
port on the CV60 Computer.
2Use a small straight-slot screwdriver to tighten the two screws
in the scanner cable connector and secure the cable to the
CV60 Computer.
3Attach the other end of the scanner cable to your scanner.
Note: See your Intermec representative for information
about the CV60 Computer and a list of Intermec-
approved accessory antennas for the CV60 Computer.

4 CV60 Vehicle Mount Computer Quick Start Guide
4Make sure the cable is not pinched or rubbed by any moving
parts on the vehicle.
Windows CE .NET
1Enable Bluetooth™ settings by selecting Start > Settings >
Control Panel > Local Bluetooth. Tap Tu rn On if you see the
“Bluetooth is off” message, check Connectable, then tap OK.
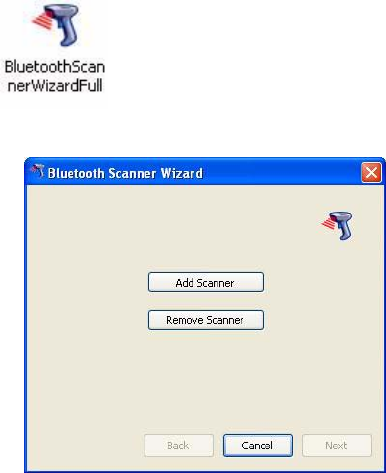
2Select Start > Run, then browse to Program Files > Intermec
> Network >BluetoothScannerWizard.exe to associate your
scanner with the CV60 Computer.
3Tap Add Device, then tap Quick Connect (Incoming) to have
the Connection Wizard find your scanner.
4Scan the bar code, then tap Finish to exit. After association,
enter PIN “0000” in the Authentication dialog box.
Note: If you have any problems scanning the bar code
shown on the display, you can also scan the Bluetooth
association bar code label on the side of the CV60
Computer.
CV60 Vehicle Mount Computer Quick Start Guide 5
Windows XP/XPE
With the Bluetooth Scanner Wizard, you can connect up to
seven scanners using device search, manual entry, Quick Connect
bar code scan, or choose from previously used devices.
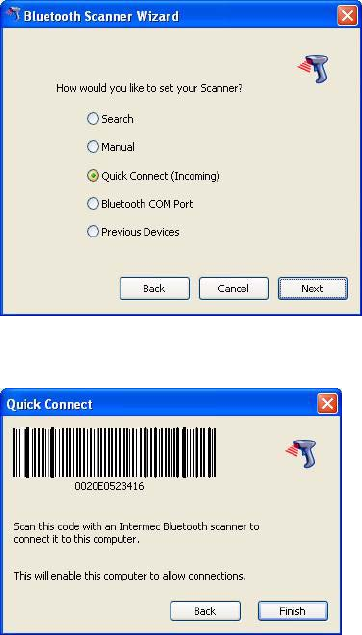
From the CV60 Computer, select Start > My Computer, browse
to the “C:\Program Files\Intermec\Bluetooth Scanner Wizard”
folder, double-click the BluetoothScannerWizardFull icon.
1,From the Bluetooth Scanner Wizard, tap Add Scanner.
6 CV60 Vehicle Mount Computer Quick Start Guide
2Select Quick Connect (Incoming), then tap Next:
3Scan the bar code with your scanner, then tap Finish to close
the wizard.
Connecting to Other Serial Devices
Use the CV60 Serial Port to transfer data between the CV60
Computer and a serial device. There are two serial ports (COM1
and COM2) that support RS-232 communications. Use COM1
and the accessory RS-232 null-modem adapter cable (P/N: 226-
106-00X) to connect to a serial device, such as a printer or scale.
CV60 Computer Setup
Your CV60 Computer may be loaded with one of three operat-
ing systems, installed at the factory: Windows XP Professional,
Windows XP Embedded, or Windows CE. NET.

CV60 Vehicle Mount Computer Quick Start Guide 7
Device Configuration
Configure settings for the CV60 Computer using the Intermec
Settings applet. Tap Start > Settings > Control Panel, then tap
the Intermec Settings icon.
Tap on folders to select and make setting changes. You will be
prompted to save any changes.
Connecting to the CV60 (Windows CE)
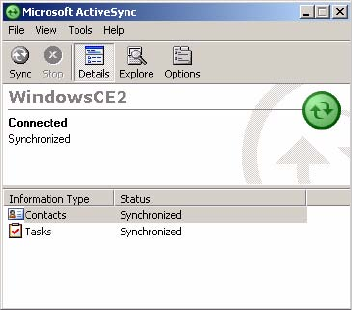
1Connect the CV60 Computer to your desktop PC using an
ActiveSync cable. Install ActiveSync on your desktop PC by
downloading it from the Microsoft web site.
2Tap the ActiveSync desktop icon to start communicating with
your desktop PC. Follow the onscreen instructions for estab-
lishing a partnership.
8 CV60 Vehicle Mount Computer Quick Start Guide
3When the partnership is established, the device name of your
CV60 Computer appears in the ActiveSync window on your
desktop PC.
Specifications
CV60 Hardware Features
Physical
• Weight: 5 kg (11.02 lbs) for base unit
Size
• Height: 26 cm (9.44”)
• Width: 34 cm (13.38”)
• Depth: 9.5 cm (3.74”)
Environmental
•IP65 Compliant
• Recommended Operating Temperature Range (Solid State
Drive): -20° C to 50° C (-4° to 122° F)
• Recommended Operating Temperature Range (Rotating
Drive): 0° C to 50° C (32° to 122° F)
• Recommended Operating Temperature Range (Heater
Option): -30° C to 50° C (-22° to 122° F)
• Recommended Storage Temperature Range: -30° C to 70° C
(-22° to 158° F)
CV60 Vehicle Mount Computer Quick Start Guide 9
Processor/Memory/Storage
• Intel P-III 800Mhz embedded processor
• 256MB base memory with upgrade to 512MB SDRAM
• 512MB FLASH
• Removable IDE rotating media or solid state drive or PC Card
solid state memory
• Resistive touch screen
• 12.1 Inch, Color TFT 800 x 600 SVGA
System Software
• Windows XP Professional
• Windows XP Embedded
• Windows CE .NET
Power System
•6-96 VDC DC/DC converters
• AC/DC adapter supporting international power requirements
• Optional uninterruptible power supply
Wired Connectivity
• Two RS-232 ports, supporting external tethered scanners
•2 USB host ports
• 10BaseT/100BaseT Ethernet
Wireless Connectivity
• 802.11b/g 2.4 GHz (Direct Sequence Spectrum)
• Bluetooth radio for cordless accessories
Peripherals/Accessories
• External alpha/numeric keyboard, PS/2
• Tethered bar code scanners
•Mounting brackets to meet a wide range of vehicles
Intermec External Bar Code Scanners
• Sabre (1553)
• SF51/SX51/SR61/other similar Bluetooth Interface Scanners
10 CV60 Vehicle Mount Computer Quick Start Guide
External Keyboards
• PS/2 interface with locking connector
External Mouse
• Off-the-shelf USB mouse
Audio
• Internal Speaker (mono)
• Stereo Line out/Headset Jack
• External microphone jack allows voice recording. (Mutes
internal speaker when connected.)
Troubleshooting
CV60 Computer does not respond to applying power.
Check to ensure that your CV60 Computer is connected to the
correct power source.
CV60 will not turn on when the On/Off button is pressed.
• Check the power supply connectors and cabling from the
CV60 Computer.
• Check the connections from the dc power supply and verify
that the green LED is lit.
CV60 shuts down during operation.
• Check the power supply cable(s) for intermittent operation by
moving or jiggling it.
• Check to see if the green LED on the back of the power supply
is flickering or blinking at the moment the CV60 Computer
shuts down.
• Check your installation, cables, etc. Flickering LEDs indicate
the power supply has encountered an over-voltage, over-cur-
rent, or over-temperature event. See the Vehicle Power Supply
Installation Guide (P/N: 932-003-001) for more information.
CV60 does not turn off
• May not turn off when it is processing data.
• In the event that your vehicle mount computer locks up, hold
the on/off button down for approximately 4-5 seconds. This
causes an emergency forced shut down of the computer.
• Remove the DC power input and wait 20-30 seconds before
reconnecting.

Worldwide Headquarters
6001 36th Avenue West
Everett, Washington 98203
U.S.A.
tel 425.348.2600
fax 425.355.9551
www.intermec.com
CV60 Vehicle Mount Computer Quick Start Guide
*930-162-001*
P/N 930-162-001