Caretaker Systems 3-204-35 User Manual manual 1of8
Caretaker Systems, Inc. manual 1of8
Contents
manual 1of8

1
10 Jan 99
Copy _____ of 6
2
IMPORTANT SAFETY INSTRUCTIONS
1. There is NO replacement for direct adult supervision of children. The Prevent Laser
Perimeter Alarm was designed as an early warning system in the event a child
should slip away from your supervision or that an unexpected child should gain
access to the protected area.
2. Prevent is not a security system, but an additional layer of protection. When
used in conjunction with other “layers,” Prevent is an early warning system to let
you know that someone or something has entered a restricted or dangerous
area.
3. Prevent is intended for operation by adults only. Do not allow your children to
operate the system.
4. Do not explain the system to children. Do not refer to the system as a “beam to
be avoided” rather a device that watches and tells on them if they get too close
to the water.
5. The Prevent beam can be adjusted to allow for change in elevation and child
height. If you have a crawling toddler, adjust the beam height accordingly. If
older children, adjust beam higher.
Refer to Page 8 for a list of Tools and Materials Required
3
READ THIS NEXT, PLEASE!
We know you are anxious to install your new
Prevent Laser Perimeter Alarm system as soon
as possible, but we strongly urge you to take a
few minutes to become familiar with the various
components of the product, and to take
advantage of the installation hints and
instructions included in this manual.
A good place to start is to unpack the
shipping cartons. Separate all of the parts from
the packing materials and check each item
against the parts list and illustration on the
right.
If parts are missing, or have been damaged
in shipment, do not attempt to complete the
installation until all of the correct parts are on
hand.
Become familiar with the names we call each
item. We will use those same names
throughout this manual, and in any
correspondence or conversations that might be
required in the future.
THE NEXT STEP…
is the planning of your installation. On the
next three pages we have provided you with
information that will make the installation of
your system go more smoothly. A few minutes
spent in planning can save hours later on.
Pay particular attention to the Typical
Installation diagrams on pages 4 and 5. Find a
diagram that comes close to depicting your yard
and use it as a guide for placing the various
system components.
WHEN ALL ELSE FAILS…
get in touch with someone that can help.
You may contact us directly at 1-800-***
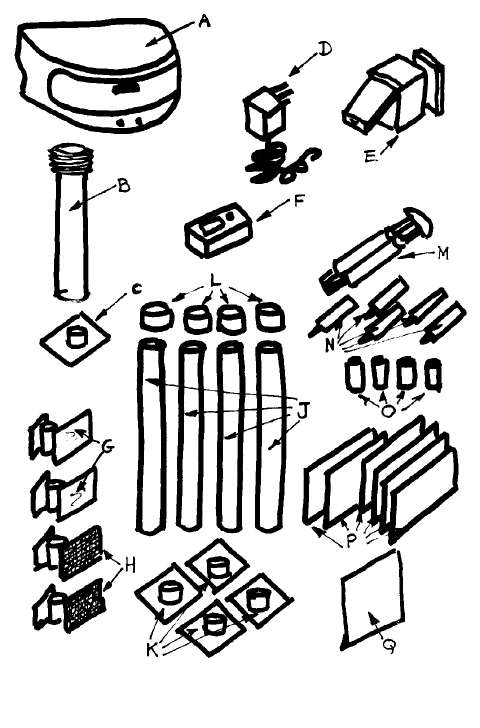
Parts Included
Your prevent system includes everything you
need for a variety of installation methods.
Included in your system are the following parts:
Item Name Qty.
A Prevent Transceiver 1
B Mounting Post - Transceiver 1
C Mounting Base -Transceiver 1
D Power cable assembly – 50’ 1
E Swivel Mount 4
F Remote Controller 1
GMirrors 4”x6” 2
H Reflectors 4”x4” 2
J Mounting Post – Mirror/Reflector 4
K Mounting Base –Mirror/Reflector 4
L Mounting Post Cap 4
M Epoxy Adhesive Tube 1
N Mixing Nozzles 5
? Thum Plunger 1
? Cable Ties – 4” 2
O Batteries - “AAA” 4
P Neighbor Alert Card 6
Q Warranty Card 1
4