D Link TW1130 Wireless VPN Router User Manual di714P manual 1 31
D Link Corporation Wireless VPN Router di714P manual 1 31
D Link >
Contents
User Manual Part 5
92
Networking Basics
Sharing a network printer
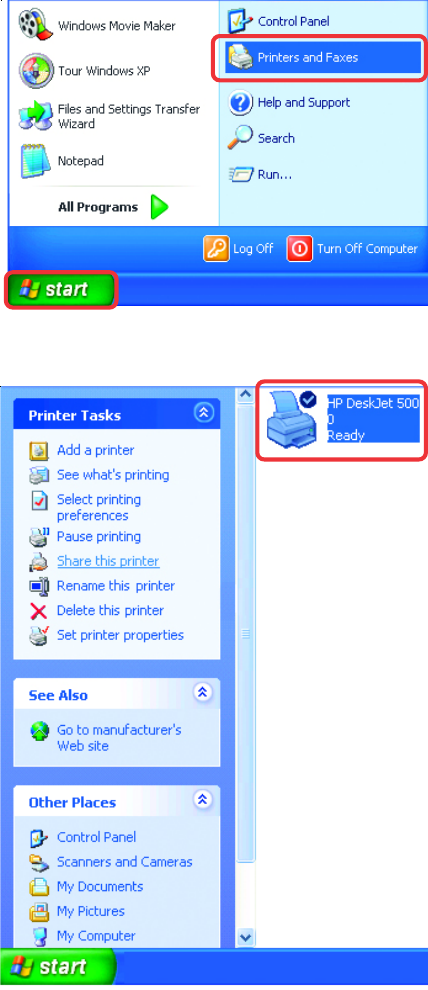
To check for proper
installation:
Go to Start > Printers
and Faxes.
The printer icon will appear at right,
indicating proper installation.
You have completed adding the
printer.
To share this printer
on your network:
Remember the printer
name.
Run the Add Printer
Wizard on all the
computers on your
network.
Make sure you have
already run the
Network Setup
Wizard on all the
network computers.
After you run the Add Printer
Wizard on all the computers in the
network, you can share the printer.
93
Networking Basics
Sharing an LPR printer
To share an LPR printer (using a print server,) you will need a Print Server such as
the DP-101P+. Please make sure that you have run the Network Setup Wizard on
all the computers on your network. To share an LPR printer, please follow these
directions:
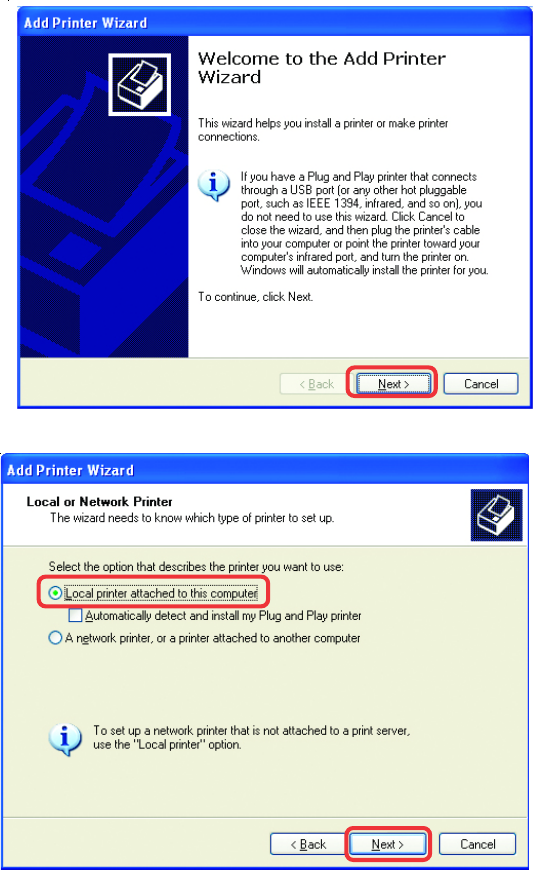
Go to Start >
Printers and
Faxes.
Click on Add
a Printer.
The screen to the
right will appear.
Click Next.
Select
Local
Printer.
Click Next.
94
Networking Basics
Sharing an LPR printer
Select Create a new port.
From the pull-down menu,
select Standard TCP/IP
Port, as shown.
Click Next.
Please read the
instructions on this
screen.
Click Next.
Enter the Printer IP
Address and the Port
Name, as shown.
Click Next.
95
Networking Basics
Sharing an LPR printer
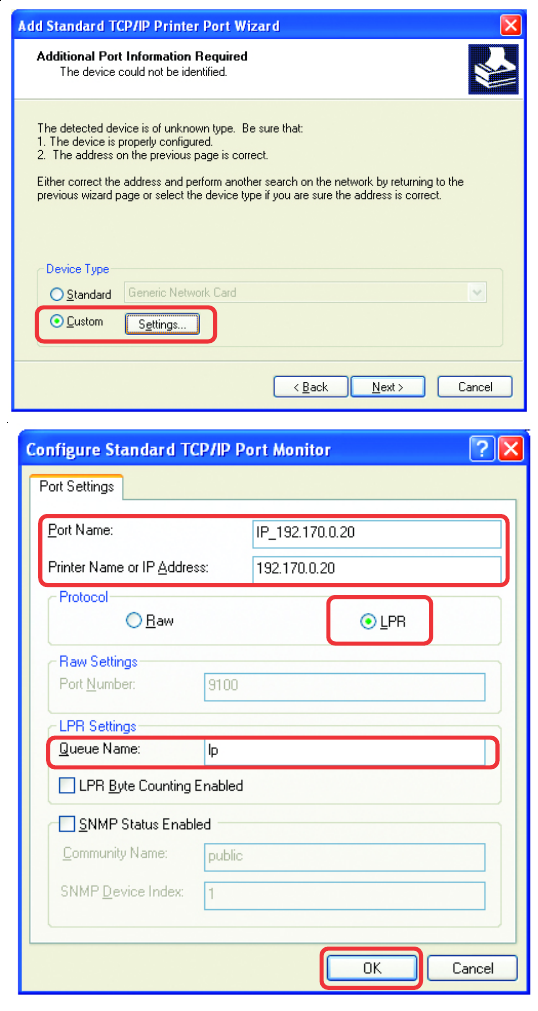
In this
screen,
select
Custom.
Click
Settings.
Enter the Port
Name and the
Printer Name
or
IP Address.
Select LPR.
Enter a
Queue
Name (if your
Print-Server/
Gateway has
more than
one port, you
will need a
Queue
name).
Click OK.
96
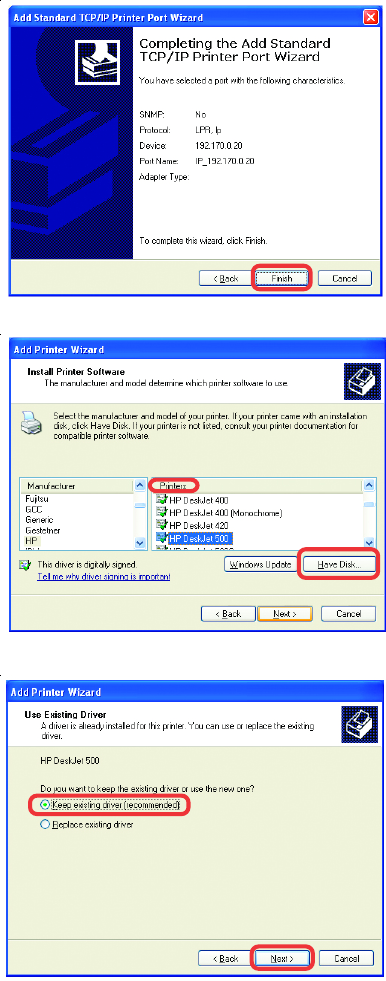
Networking Basics
Sharing an LPR printer
Click Next.
Select Keep existing
driver.
If the printer driver is already installed, do
the following:
Click Have Disk.
Insert the printer driver disk
that came with your printer.
Select the printer you
are adding from the list
of Printers.
Click Finish.
This screen will show you
information about your
printer.

97
Networking Basics
Sharing an LPR printer
Note: You must run the Network Setup Wizard on all the computers on your network before
you run the Add Printer Wizard.
Please run the Add Printer
Wizard on all the computers
on your network in order to
share the printer.
Click Finish to complete the
addition of the printer.
This screen will display information
about your printer.
Click Next
Select Yes, to print a test page.
Click Next
Please remember the name of
your printer. You will need this
information when you use the
Add Printer Wizard on the
other computers on your
network.
You can rename your printer if
you choose. It is optional.
.
.
98
After you have tried other methods for troubleshooting your network, you
may choose to Reset the DI-824VUP to the factory default settings.
To hard-reset the D-Link DI-824VUP to the Factory Default Settings, please
do the following:
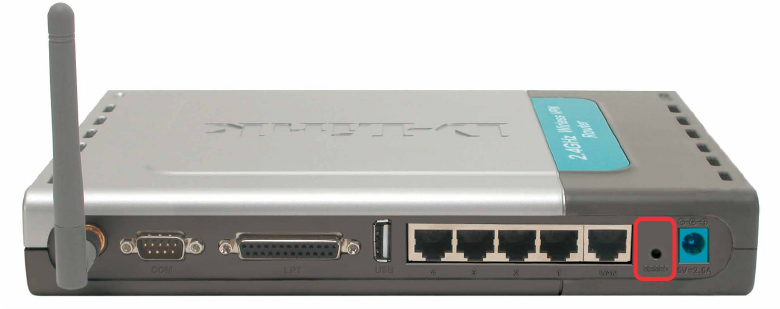
Resetting the DI-824VUP to the
Factory Default Settings
Use a paper clip to press the Reset button and
power on.
Locate the Reset button on the back of the DI-824VUP.
After you have completed the above steps, the DI-
824VUP will be reset to the factory default settings.
Hold for about 5 seconds (do not hold for too long)
and then release. (Or, release when the status
LEDflashes.)
99
Technical Specifications
VPN Pass Through Function
PPTP
L2TP
IPSec
Standards
IEEE 802.11b
IEEE 802.3
LEDs
Power
WAN
LAN
WLAN
Status
COM
USB
Operating Temperature
32°F to 131°F ( 0°C to 55°C)
Humidity
10-90%
Power
5V DC / 2.5A
IEEE 802.3u 100BASE-TX Fast Ethernet
USB 1.1
IEEE 802.11g
L = 9.25 inches (233mm)
W = 6.5 inches (165mm)
H = 1.375 inches (35mm)
Dimensions
~2.0oz. (907g)
Weight
4 x 10/100 LAN Ports (MDI/MDIX)
1 x 10/100 WAN Port (MDI/MDIX
1 COM Port (Dial-up Modem)
1 Parallel Port (DB25)
1 USB Port
Ports
LPT
100
Frequently Asked Questions
When entering the IP Address of the DI-824VUP (192.168.0.1), you are not
connecting to the Internet or have to be connected to the Internet. The device has the
utility built-in to a ROM chip in the device itself. Your computer must be on the same
IP subnet to connect to the web-based utility.
To resolve difficulties accessing a Web utility, please follow the steps below.
Step 1
Verify physical connectivity by checking for solid link lights on the device. If
you do not get a solid link light, try using a different cable or connect to a different
port on the device, if possible. If the computer is turned off, the link light may not be
on.
The following connections require a Crossover Cable:
Computer to Computer
Computer to Uplink Port
Computer to Access Point
Computer to Print Server
Computer/XBOX/PS2 to DWL-810
Computer/XBOX/PS2 to DWL-900AP+
Uplink Port to Uplink Port (hub/switch)
Normal Port to Normal Port (hub/switch)
The following connections require a Straight-through Cable:
Computer to Residential Gateway/Router
Computer to Normal Port (hub/switch)
Access Point to Normal Port (hub/switch)
Print Server to Normal Port (hub/switch)
Uplink Port to Normal Port (hub/switch)
Rule of Thumb:
”If there is a link light, the cable is right.”
What type of cable should I be using?
Why can´t I access the Web-based configuration?
101
Frequently Asked Questions (continued)
What type of cable should I be using? (continued)
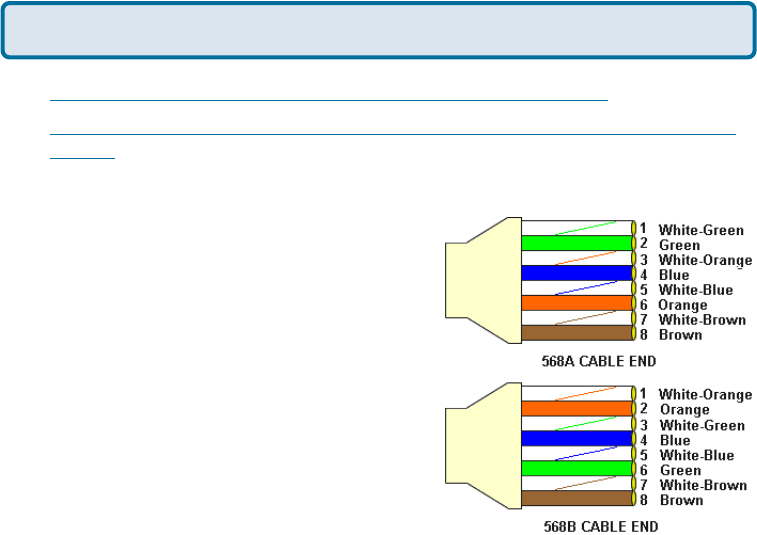
What´s the difference between a crossover cable and a straight-through
cable?
The wiring in crossover and straight-through cables are different. The two types
of cable have different purposes for different
LAN configurations. EIA/TIA 568A/568B
define the wiring standards and allow for
two different wiring color codes as
illustrated in the following diagram.
*The wires with colored backgrounds may
have white stripes and may be denoted
that way in diagrams found elsewhere.
How to tell straight-through cable from
a crossover cable:
The main way to tell the difference
between the two cable types is to compare
the wiring order on the ends of the cable. If
the wiring is the same on both sides, it is
straight-through cable. If one side has opposite wiring, it is a crossover cable.
All you need to remember to properly configure the cables is the pinout order of
the two cable ends and the following rules:
A straight-through cable has identical ends
A crossover cable has different ends
It makes no functional difference which standard you follow for straight-through
cable ends, as long as both ends are the same. You can start a crossover cable
with either standard as long as the other end is the other standard. It makes no
functional difference which end is which. The order in which you pin the cable is
important. Using a pattern other than what is specified in the above diagram
could cause connection problems.
When to use a crossover cable and when to use a straight-through cable:
Computer to Computer – Crossover
Computer to an normal port on a Hub/Switch – Straight-through
Computer to an uplink port on a Hub/Switch – Crossover
Hub/Switch uplink port to another Hub/Switch uplink port – Crossover
Hub/Switch uplink port to another Hub/Switch normal port – Straight-through
Why can´t I access the Web-based configuration? (continued)

102
Step 3 Configure your Internet settings.
Step 2 Disable any Internet security software running on the computer. Software
firewalls like Zone Alarm, Black Ice, Sygate, Norton Personal Firewall, etc. might
block access to the configuration pages. Check the help files included with your
firewall software for more information on disabling or configuring it.
Frequently Asked Questions (continued)
Click to the Connection tab and set the dial-
up option to Never Dial a Connection. Click
the LAN Settings button.
Nothing should be checked. Click OK.
Go to the Advanced tab and click the
Restore Defaults button to restore
these settings to their facotry defaults.
Click OK. Go to the desktop and close any open
windows.
Go to Start > Settings > Control Panel. Double
click the Internet Options Icon. From the Security
tab, click the Default Level button to restore the
settings to their defaults.
Why can´t I access the Web-based configuration? (continued)
103
Frequently Asked Questions (continued)
Step 4 Check your IP address. Your computer must have an IP address in the same
range of the device you are attempting to configure. Most D-Link devices use the
192.168.0.X range.
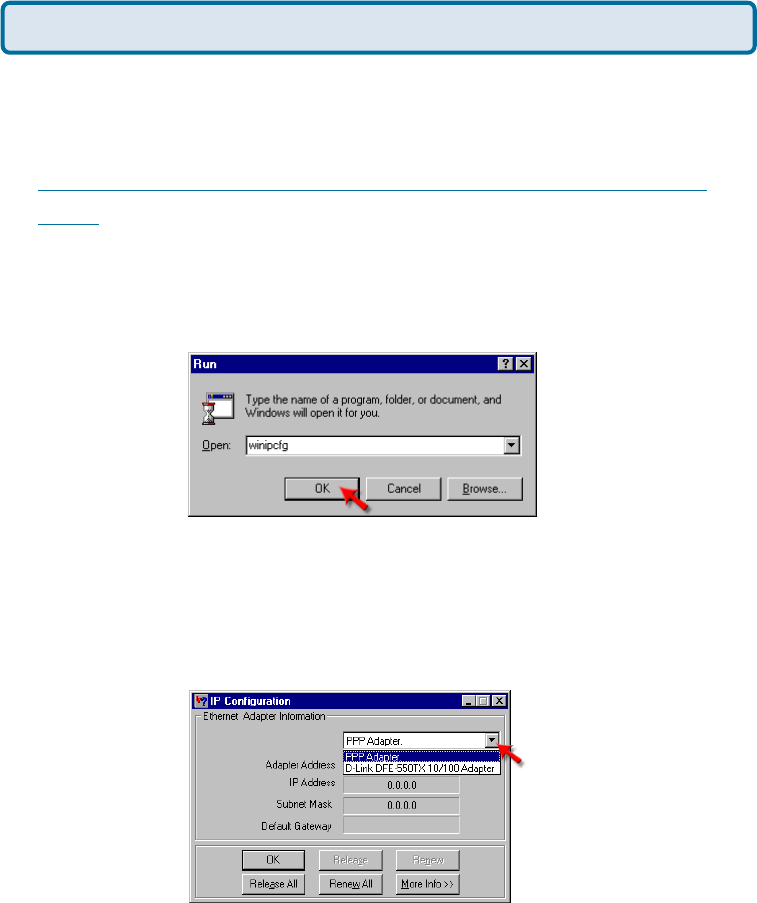
How can I find my IP Address in Windows 95, 98, or
ME?
Step 1 Click on Start, then click on Run.
Step 2 The Run Dialogue Box will appear. Type winipcfg in the text field and
click OK.
Step 3 The IP Configuration window will appear, displaying your Ethernet
Adapter Information.
Select your adapter from the drop down menu.
If you do not see your adapter in the drop down menu, your adapter is
not properly installed.
Step 4 After selecting your adapter, it will display your IP Address, subnet
mask, and default gateway.
Step 5 Click OK to close the IP Configuration window
Why can´t I access the Web-based configuration? (continued)

104
Frequently Asked Questions (continued)
Step 4 (continued) Check your IP address. Your computer must have an IP Address
in the same range of the device you are attempting to configure. Most D-Link devices
use the 192.168.0.X range.
How can I find my IP Address in Windows 2000/XP?
Step 1 Click on Start and select Run.
Step 2 Type cmd then click OK.
Step 3 From the Command Prompt, enter ipconfig. It will return your IP
Address, subnet mask, and default gateway
Step 4 Type exit to close the command prompt.
Why can´t I access the Web-based configuration? (continued)
105
Frequently Asked Questions (continued)
Step 4 (continued) Check your IP address. Your computer must have an IP address
in the same range of the device you are attempting to configure. Most D-Link devices
use the 192.168.0.X range.
Make sure you take note of your computer´s Default Gateway IP Address. The Default
Gateway is the IP Address of the D-Link Router. By default, it should be 192.168.0.1.
How can I assign a Static IP Address in Windows XP?
Step 1
Click on Start > Control Panel > Network and Internet Connections >
Network connections.
Step 2 See Step 2 for Windows 2000 and continue from there.
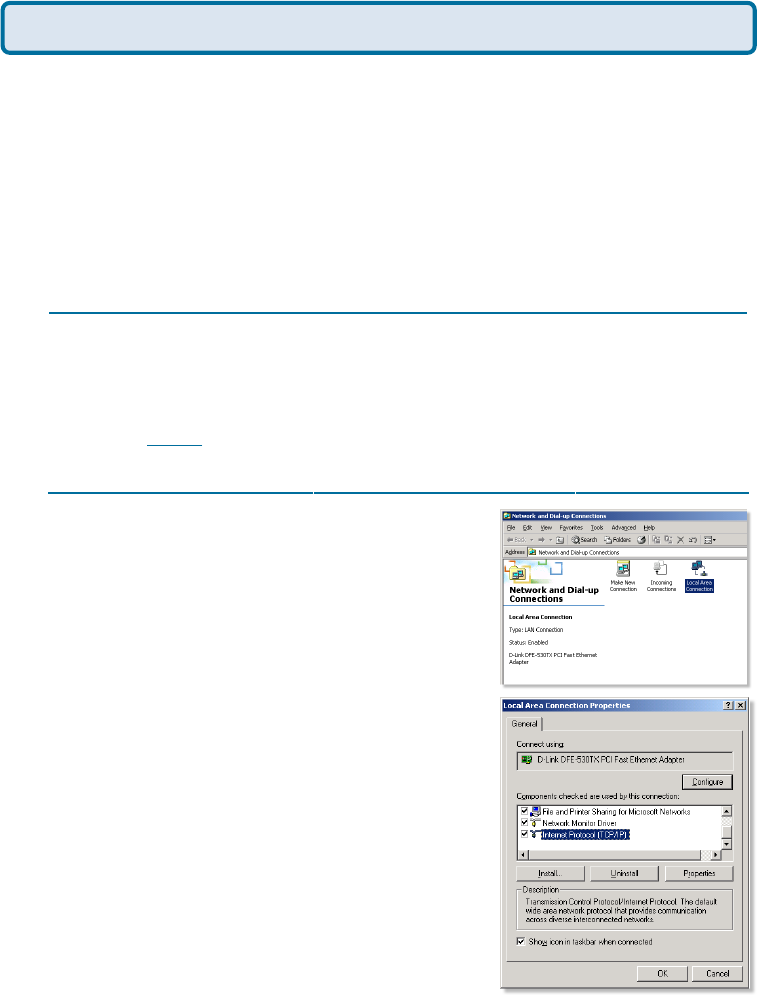
How can I assign a Static IP Address in Windows 2000?
Step 1 Right-click on My Network
Places and select Properties.
Step 2 Right-click on the Local
Area Connection which represents
your network card and select
Properties.
Highlight Internet Protocol (TCP/
IP) and click Properties.
Why can´t I access the Web-based configuration? (continued)
106
Frequently Asked Questions (continued)
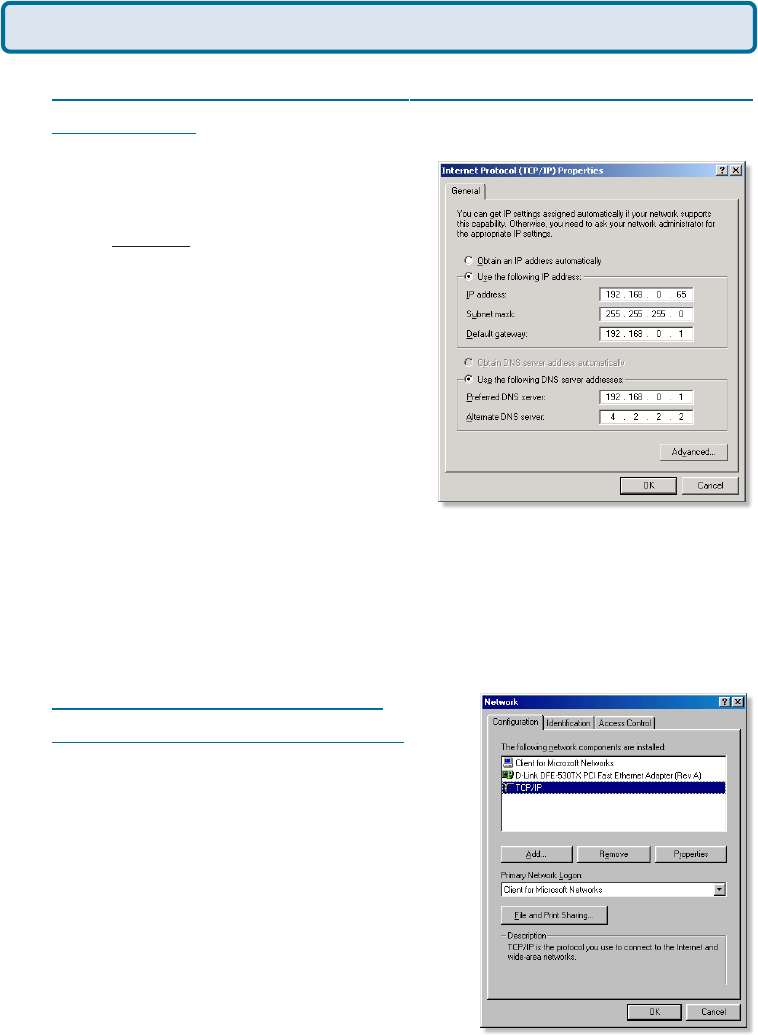
How can I assign a Static IP Address in Windows 2000?
(continued)
Click Use the following IP Address and
enter an IP Address that is on the same
subnet as the LAN IP address on your
router. Example: If the router´s LAN IP
address is 192.168.0.1, make your IP
address 192.168.0.X where X = 2-99.
Make sure that the number you choose is
not in use on the network.
Set the Default Gateway to be the
same as the LAN IP address of your
router (192.168.0.1).
Set the Preferred DNS server to be the
same as the LAN IP address of your
router (192.168.0.1).
The Alternate DNS server is not needed or enter a DNS server from your ISP.
Click OK twice. You may be asked if you want to reboot your computer. Click
Yes.
How can I assign a Static IP
Address in Windows 98/Me?
Step 1 From the desktop, right-click on the
Network Neigborhood icon (Win ME - My
Network Places) and select Properties
Highlight TCP/IP and click the Properties
button. If you have more than one adapter,
then there will be a TCP/IP “Binding” for
each adapter. Highlight TCP/IP > (your
network adapter) and then click
Properties.
Why can´t I access the Web-based configuration? (continued)
107
Frequently Asked Questions (continued)
How can I assign a Static IP Address in Windows
98/Me? (continued)
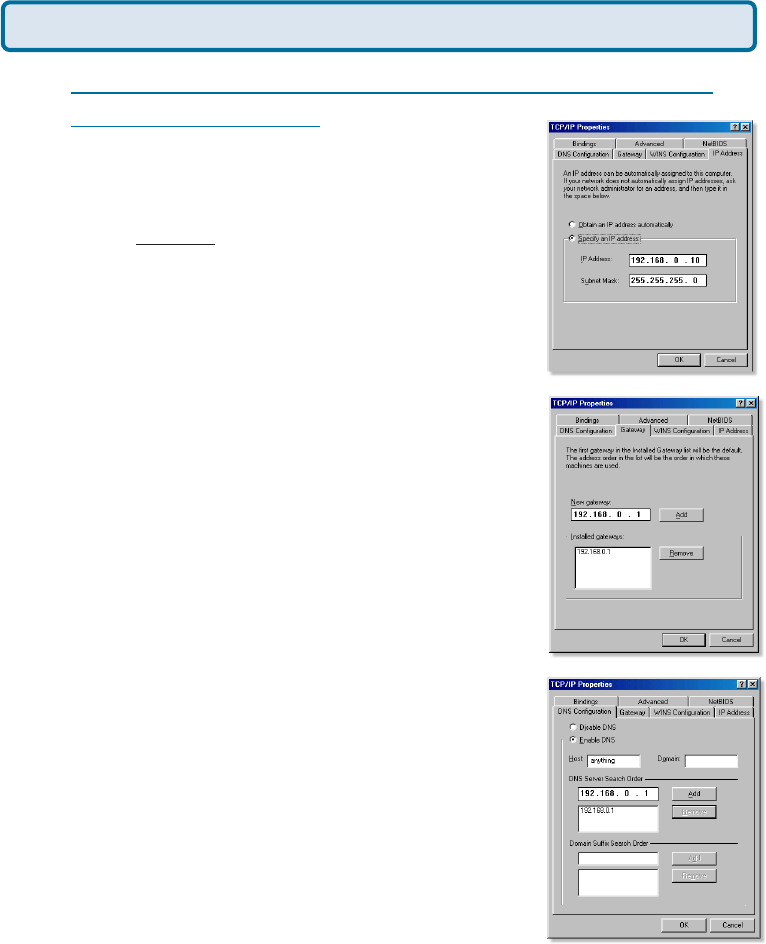
Step 2 Click Specify an IP Address.
Step 3 Click on the Gateway tab.
Enter the LAN IP Address of your router
here (192.168.0.1).
Click Add when finished.
Step 4 Click on the DNS Configuration tab.
Enter in an IP Address that is on the same
subnet as the LAN IP Address on your router.
Example: If the router´s LAN IP Address is
192.168.0.1, make your IP Address
192.168.0.X where X is between 2-99. Make
sure that the number you choose is not in
use on the network.
Step 5 Click OK twice.
Click Enable DNS. Type in a Host (can be
any word). Under DNS server search order,
enter the LAN IP Address of your router
(192.168.0.1). Click Add.
When prompted to reboot your computer,
click Yes.
After you reboot, the computer will now have
a static, private IP Address.
Why can´t I access the Web-based configuration? (continued)
Step 5 Access the Web management. Open your Web
browser and enter the IP Address of your D-Link device in
the address bar. This should open the log-in page for the
web management. Follow instructions to log in and complete the configuration.
108
Frequently Asked Questions (continued)
How can I setup my DI-824VUP to work with a cable modem
connection?
Dynamic Cable connection
(i.e. Cox, Adelphia, Rogers, Roadrunner, Charter, and Comcast).
Note: Please configure the router with the computer that was last connected directly
to the cable modem.
Step 1 Log into the Web based configuration by typing in the IP Address of the
router (default:192.168.0.1) in your web browser. The username is admin (all
lowercase) and the password is blank (nothing).
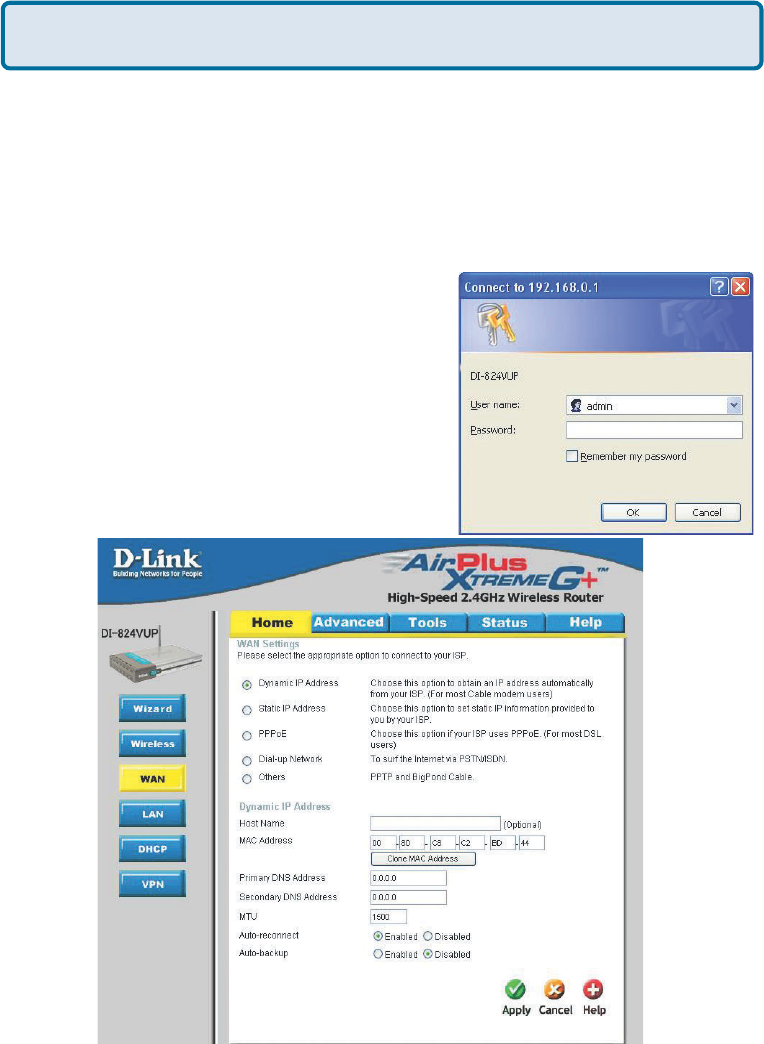
Step 2 Click the Home tab and click the
WAN button. Dynamic IP address is the
default value, however, if Dynamic IP address
is not selected as the WAN type, select
Dynamic IP address by clicking on the radio
button. Click Clone Mac address. Click on
Apply and then Continue to save the
changes.
109
Frequently Asked Questions (continued)
How can I setup my DI-824VUP to work with a cable modem
connection? (continued)
Step 3 Power cycle the cable modem and router:
First turn the cable modem off. Then turn the router off Leave them off for 2 minutes.**
Next turn the cable modem on. Wait until you get a solid cable light on the cable
modem, and then turn the router on. Wait 30 seconds.
** If you have a DCM-201modem, leave off for at least 5 minutes.
Step 4 Follow step 1 again and log back into the web configuration. Click the Status
tab and click the Device Info button. If you do not already have a public IP Address
under the WAN heading, click on the DHCP Renew and Continue buttons.
Static Cable Connection
Step 1 Log into the Web-based configuration by typing in the IP address of the
router (default:192.168.0.1) in your Web browser. The username is admin (all
lowercase) and the password is blank (empty).
Step 2 Click the Home tab and click the WAN
button. Select Static IP Address and enter your
static settings obtained from the ISP in the fields
provided.
If you do not know your settings, you must
contact your ISP.
Step 3 Click on Apply and then
click Continue to save the changes.
Step 4 Click the Status tab and
click the Device Info button. Your
IP Address information will be
displayed under the WAN heading.

110
Frequently Asked Questions (continued)
How can I setup my DI-824VUP to work with Earthlink DSL or any
PPPoE connection?
Make sure you disable or uninstall any PPPoE software such as WinPoet or Enternet
300 from your computer or you will not be able to connect to the Internet.
Step 1 Upgrade Firmware if needed.
(Please visit the D-Link tech support website at: http://support.dlink.com for the latest
firmware upgrade information.)
Step 2 Take a paperclip and perform a hard reset. With the unit on, use a paperclip
and hold down the reset button on the back of the unit for 10 seconds. Release it and
the router will recycle, the lights will blink, and then stabilize.
Step 3 After the Router stabilizes, open your browser and enter 192.168.0.1 into the
address window and hit the Enter key. When the password dialog box appears, enter
the username admin and leave the password blank. Click OK.
If the password dialog box does not come up repeat Step 2.
Note: Do not run Wizard.
Step 4 Click on the WAN tab on left-hand side of the screen. Select PPPoE.
Step 5 Select Dynamic PPPoE (unless your ISP supplied you with a static IP
Address).
Step 6 In the username field enter ELN/username@earthlink.net and your
password, where username is your own username.
For SBC Global users, enter username@sbcglobal.net.
For Ameritech users, enter username@ameritech.net.
For BellSouth users, enter username@bellsouth.net.
For Mindspring users, enter username@mindspring.com.
For most other ISPs, enter username.
Step 7 Maximum Idle Time should be set to zero. Set MTU to 1492, unless
specified by your ISP, and set Autoreconnect to Enabled.
Note: If you experience problems accessing certain websites and/or email issues,
please set the MTU to a lower number such as 1472, 1452, etc. Contact your ISP for
more information and the proper MTU setting for your connection.
111
Step 8 Click Apply. When prompted, click Continue. Once the screen refreshes,
unplug the power to the D-Link Router.
Step 9 Turn off your DSL modem for 2-3 minutes. Turn back on. Once the modem
has established a link to your ISP, plug the power back into the D-Link Router. Wait
about 30 seconds and log back into the router.
Step 10 Click on the Status tab in the web configuration where you can view the
device info. Under WAN, click Connect. Click Continue when prompted. You should
now see that the device info will show an IP Address, verifying that the device has
connected to a server and has been assigned an IP Address.
How can I setup my DI-824VUP to work with Earthlink DSL or any
PPPoE connection? (continued)
Frequently Asked Questions (continued)
Can I use my DI-824VUP to share my Internet connection provided by
AOL DSL Plus?
In most cases yes. AOL DSL Plus may use PPPoE for authentication bypassing the
client software. If this is the case, then our routers will work with this service. Please
contact AOL if you are not sure.
To set up your router:
Step 1 Log into the Web-based configuration (192.168.0.1) and configure the WAN
side to use PPPoE.
Step 2 Enter your screen name followed by @aol.com for the user name. Enter your
AOL password in the password box.
Step 3 You will have to set the MTU to 1400. AOL DSL does not allow for anything
higher than 1400.
Step 4 Apply settings.
Step 5 Recycle the power to the modem for 1 minute and then recycle power to the
router. Allow 1 to 2 minutes to connect.
If you connect to the Internet with a different Internet Service Provider and want to use
the AOL software, you can do that without configuring the router’s firewall settings.
You need to configure the AOL software to connect using TCP/IP.
Go to http://www.aol.com for more specific configuration information of their software.
112
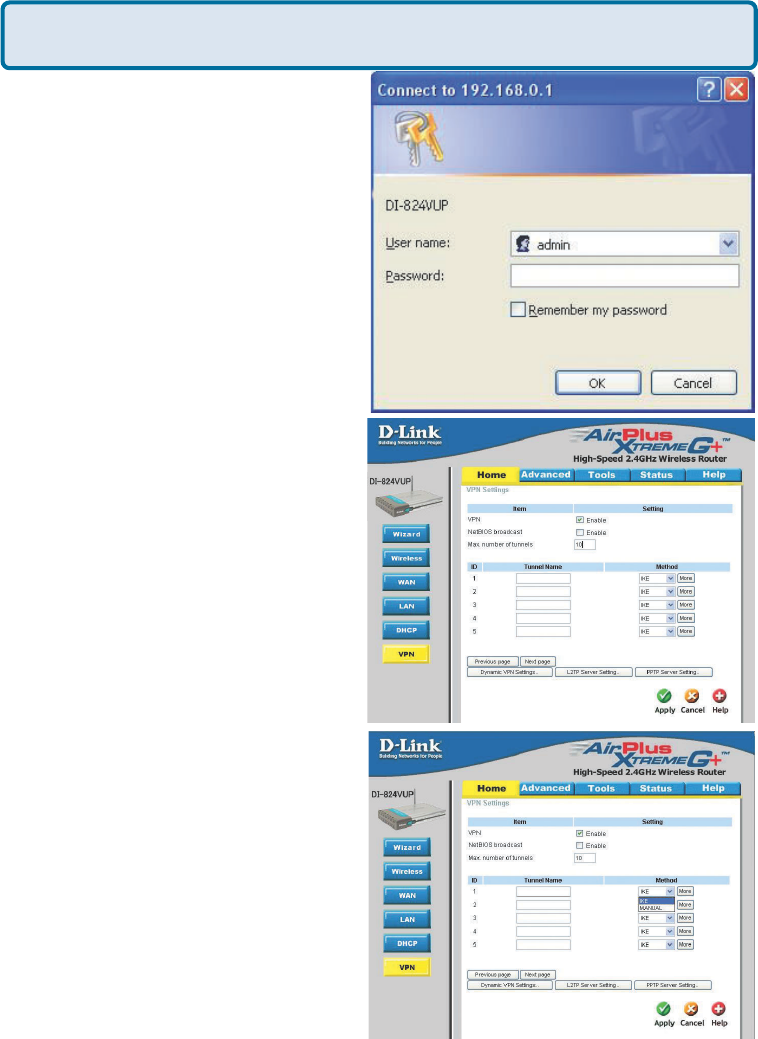
Step 1 Log into the web based
configuration of the router by typing in
the IP address of the router (default:
192.168.0.1) in your web browser. By
default the username is admin and there
is no password.
I have two DI-824VUP Routers, how can I set them up to work with
each other?
Frequently Asked Questions (continued)
Step 2 Click the VPN button on the left
column, select the checkbox to Enable
the VPN, and then in the box next to Max.
number of tunnels, enter the maximum
numbers of VPN tunnels that you would
like to have connected.
Step 3 In the space provided, enter the
Tunnel Name for ID number 1, select IKE,
and then click More.
113
I have two DI-824VUP Routers, how can I set them up to work with
each other?(continued)
Frequently Asked Questions (continued)
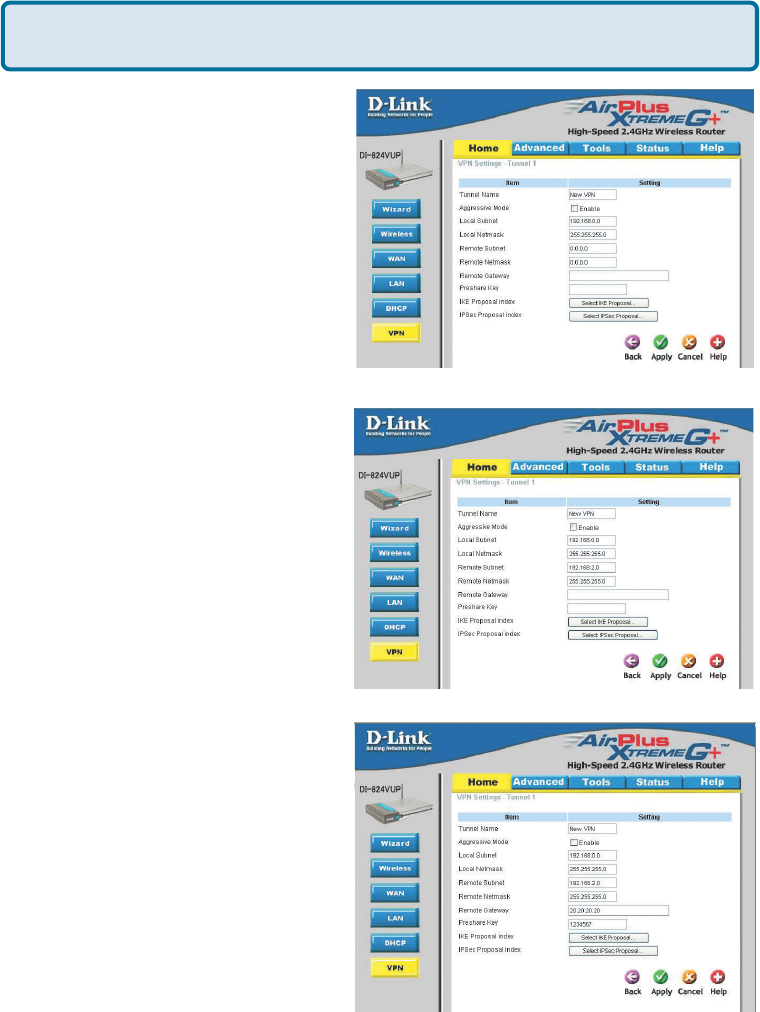
Step 4 In the Local Subnet and Local
Netmask fields enter the network
identifier for the local DI-824VUP´s LAN
and the corresponding subnet mask.
Step 5 In the Remote Subnet and
Remote Netmask fields enter the
network identifier for the remote DI-
824VUP´s LAN and the corresponding
subnet mask.
Step 6 In the Remote Gateway field
enter the WAN IP address of the remote
DI-824VUP and in the Preshare Key
field, enter a key which must be exactly
the same as the Preshare Key that is
configured on the remote DI-824VUP.
Step 7 Click Apply.