D Link TW1130 Wireless VPN Router User Manual di714P manual 1 31
D Link Corporation Wireless VPN Router di714P manual 1 31
D Link >
Contents
User Manual Part 6
114
I have two DI-824VUP Routers, how can I set them up to work with
each other? (continued)
Frequently Asked Questions (continued)
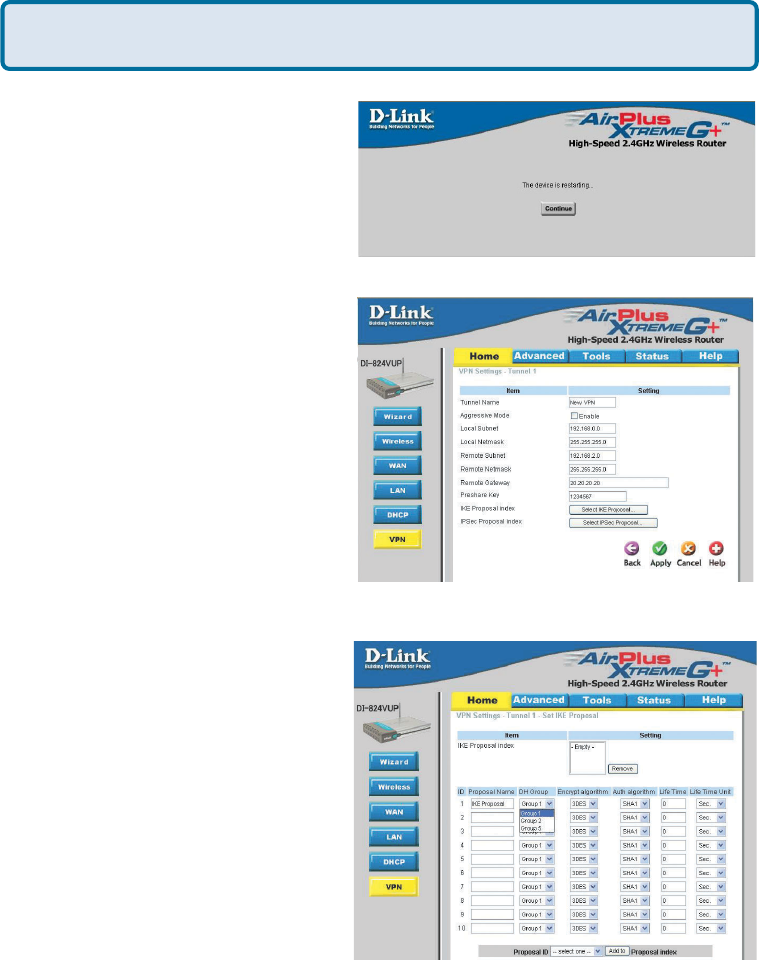
Step 8 The device will restart. Click on
the Continue button.
Step 9 Click on Select IKE Proposal.
Step 10 Enter a name for proposal ID
number 1 and select Group 1, 2, or 5
from the DH Group dropdown menu.
115
I have two DI-824VUP Routers, how can I set them up to work with
each other? (continued)
Frequently Asked Questions (continued)
Step 11 Select DES or 3DES as the
Encryption Algorithm.
Step 12 Select SHA-1 or MD5 as the
Authentication Algorithm.
Step 13 Enter a Lifetime value of 2800
and then either select Sec. or KByte as
the unit for the lifetime value.
116
I have two DI-808HV Routers, how can I set them up to work with
each other? (continued)
Frequently Asked Questions (continued)
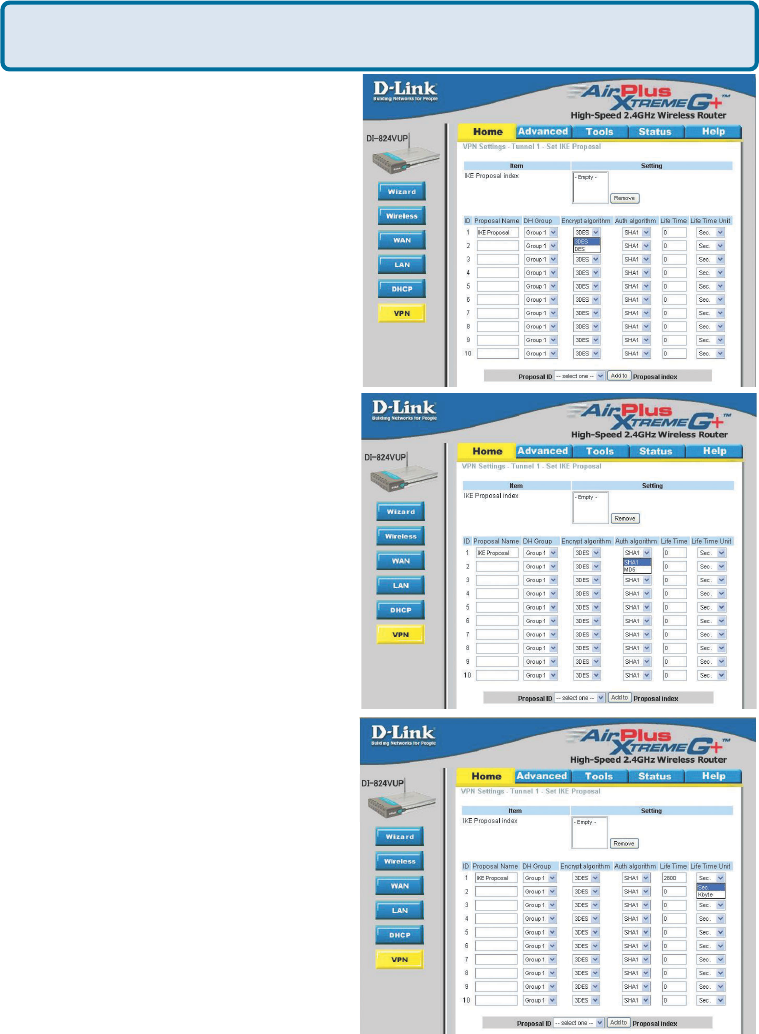
Step 15 The device will restart. Click
on the Continue button.Then click Back.
Step 14 Select 1 out of the Proposal
ID dropdown menu and click Add To,
which will add the proposal that was just
configured to the IKE Proposal Index.
Click Apply.
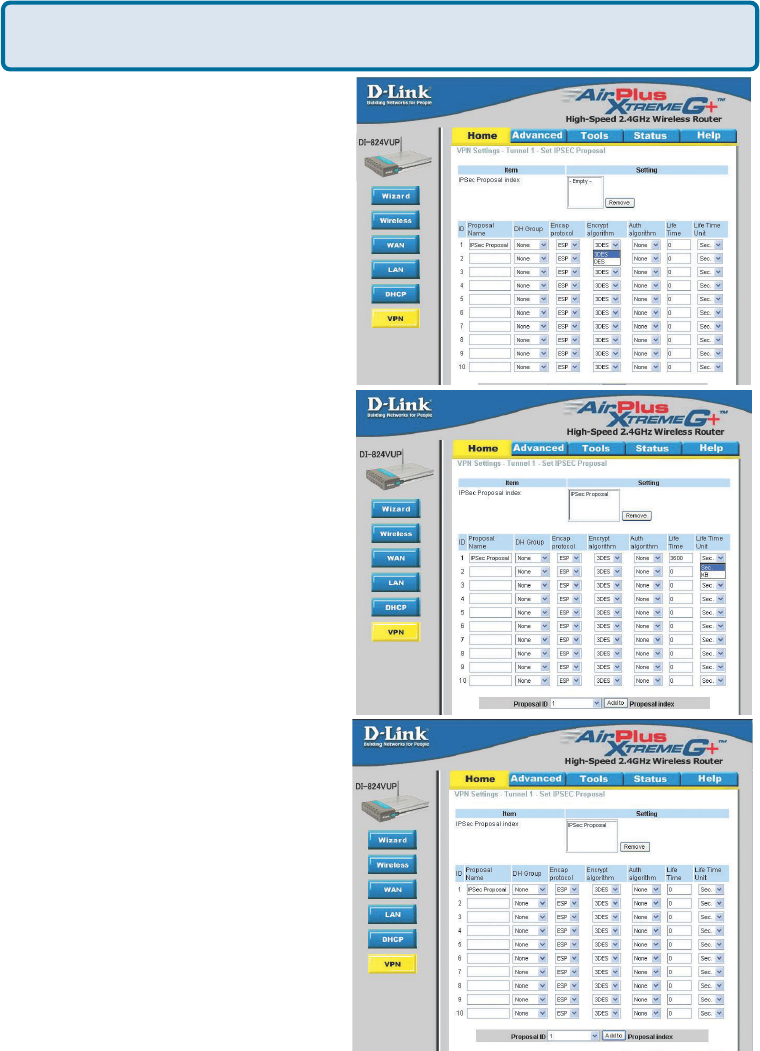
Step 16 Click on Select IPSec
Proposal.
117
I have two DI-824VUP Routers, how can I set them up to work with
each other?(continued)
Frequently Asked Questions (continued)
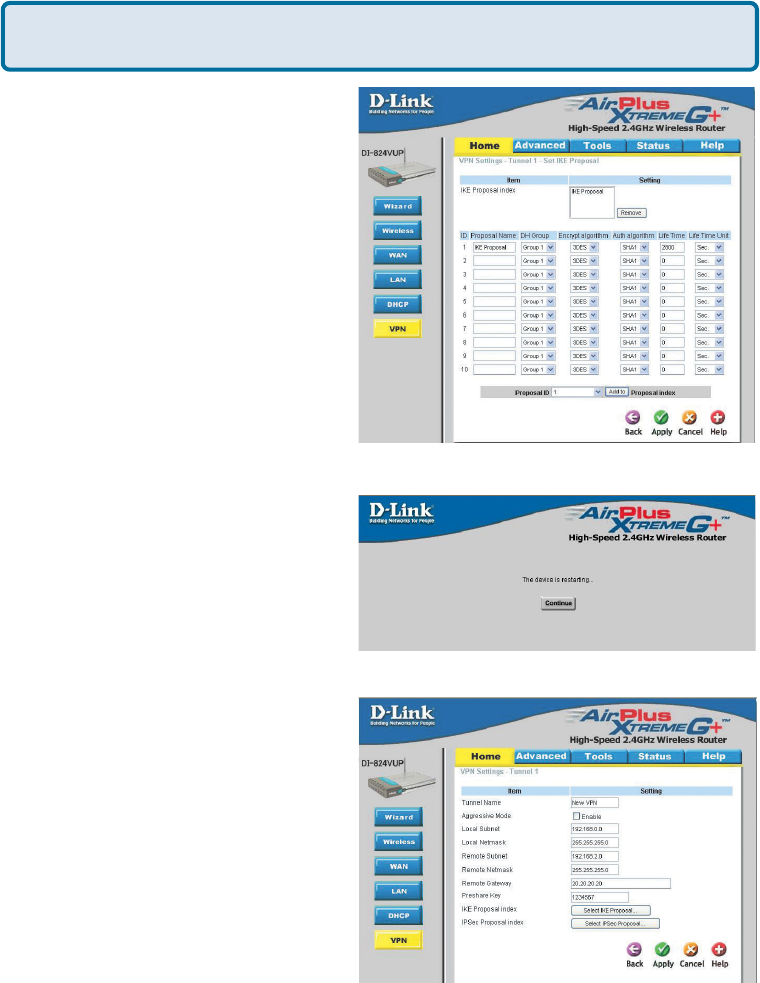
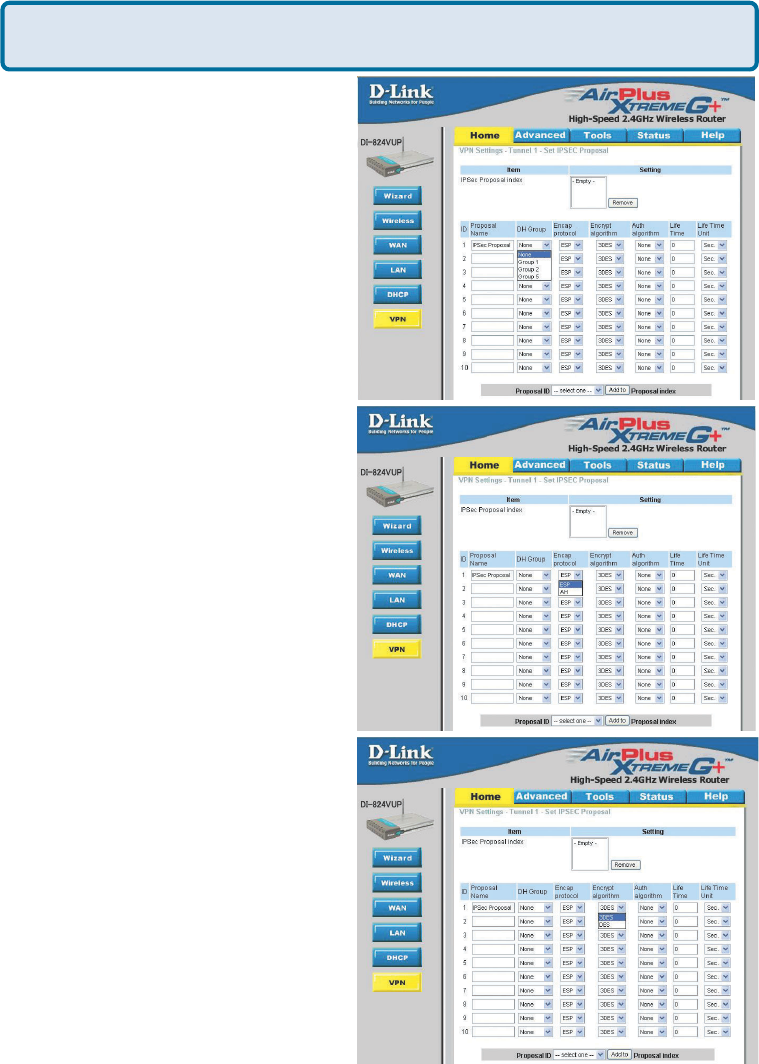
Step 17 Enter a name for proposal ID
number 1 and select Group 1, 2, 5, or
None from the DH Group dropdown
menu.
Step 18 Select ESP or AH as the
Encapsulation Protocol.
Step 19 Select DES or 3DES as the
Encryption Algorithm.

118
Step 20 Select SHA-1, MD5, or None
as the Authentication Algorithm.
I have two DI-824VUP Routers, how can I set them up to work with
each other? (continued)
Frequently Asked Questions (continued)
Step 21 Enter a Lifetime value and then
either select Sec. or KB as the unit for
the lifetime value.
Step 22 Select 1 out of the Proposal
ID dropdown menu and click Add To,
which will add the proposal that was just
configured to the IPSec Proposal Index.
Click Apply and the device will restart.
119
Step 23 Follow these instructions to configure your other DI-824VUP using the
exact same settings for the IKE Proposal and the IPSec Proposal. Also make sure
that Step 4 is configured to reflect the LAN settings for what is now the Local DI-
824VUP and that Steps 5 & 6 are configured to reflect the Subnet and WAN IP of
what is now the remote DI-824VUP.
Step 24 To establish the connection, open a command prompt and ping an IP
address of a computer on the remote LAN. Once you receive replies the tunnel has
been established.
I have two DI-824VUP Routers, how can I set them up to work with
each other? (continued)
Frequently Asked Questions (continued)
You need to first configure your DI-824VUP router.
How can I set up my DI-824VUP to work with a DI-804V or DI-804HV
Router?
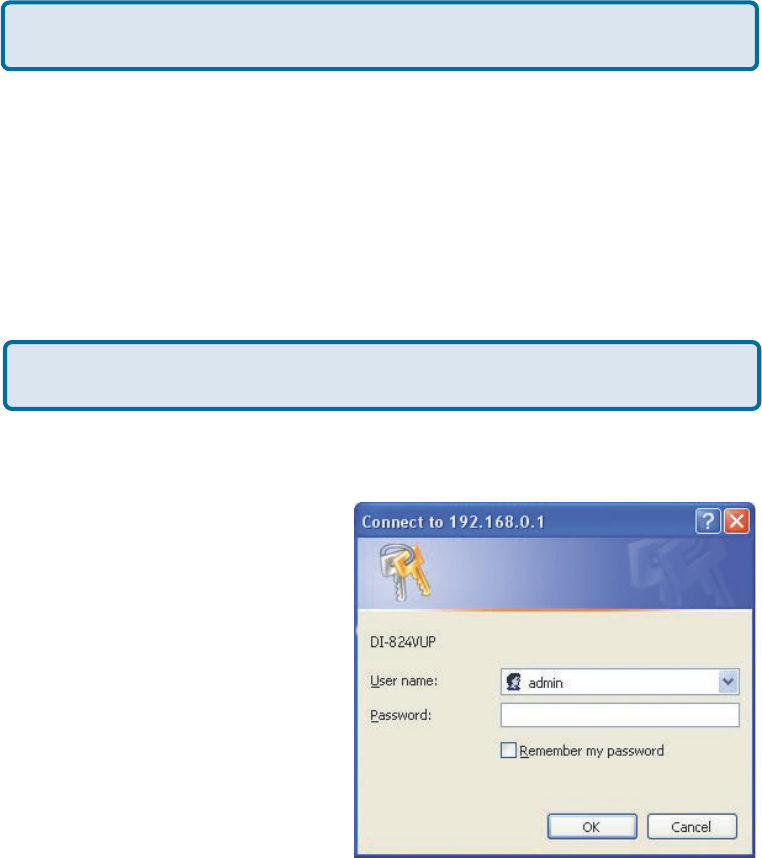
Step 1 Log into the Web-based
configuration of the router by typing in
the IP address of the router (default:
192.168.0.1) in your web browser. By
default the username is “admin” and there
is no password.
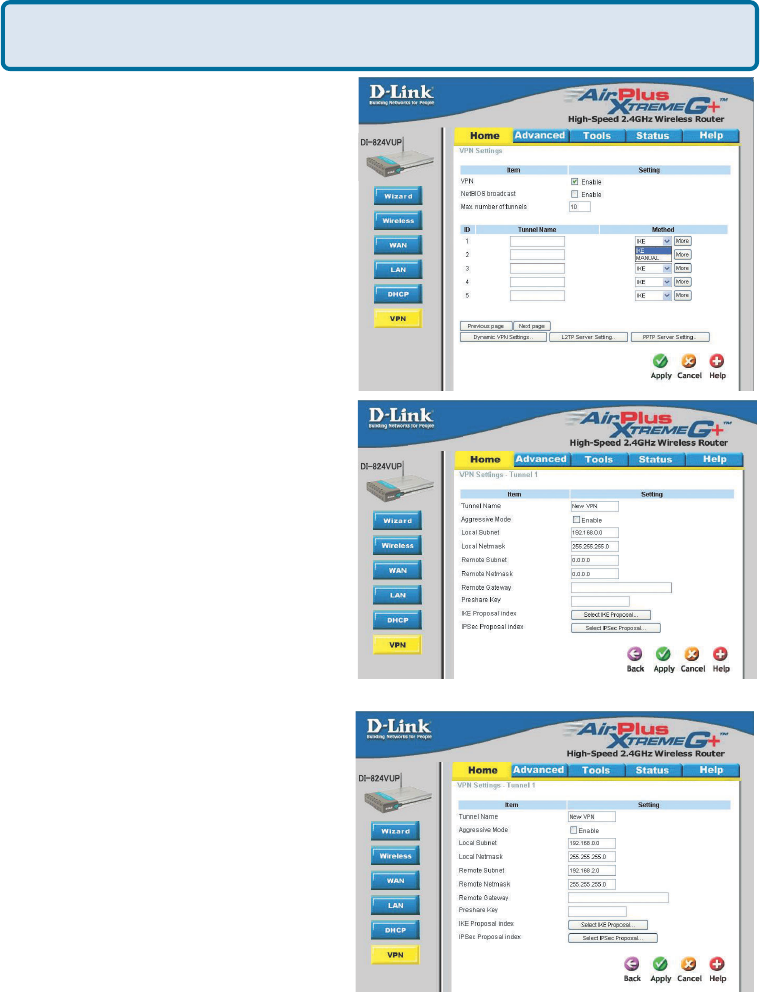
Step 2 Click the VPN button on the left
column, select the checkbox to Enable
the VPN, and then in the box next to
Max. number of tunnels, enter the
maximum numbers of VPN tunnels that
you would like to have connected.
120
Step 3 In the space provided, enter the
Tunnel Name for ID number 1, select IKE,
and then click More.
Frequently Asked Questions (continued)
Step 4 In the Local Subnet and Local
Netmask fields enter the network
identifier for DI-824VUP´s LAN and the
corresponding subnet mask.
Step 5 In the Remote Subnet and
Remote Netmask fields enter the
network identifier for the DI-804V or DI-
804HV’s LAN and the corresponding
subnet mask. Click Apply.
How can I set up my DI-824VUP to work with a DI-804V or DI-804HV
Router? (continued)
121
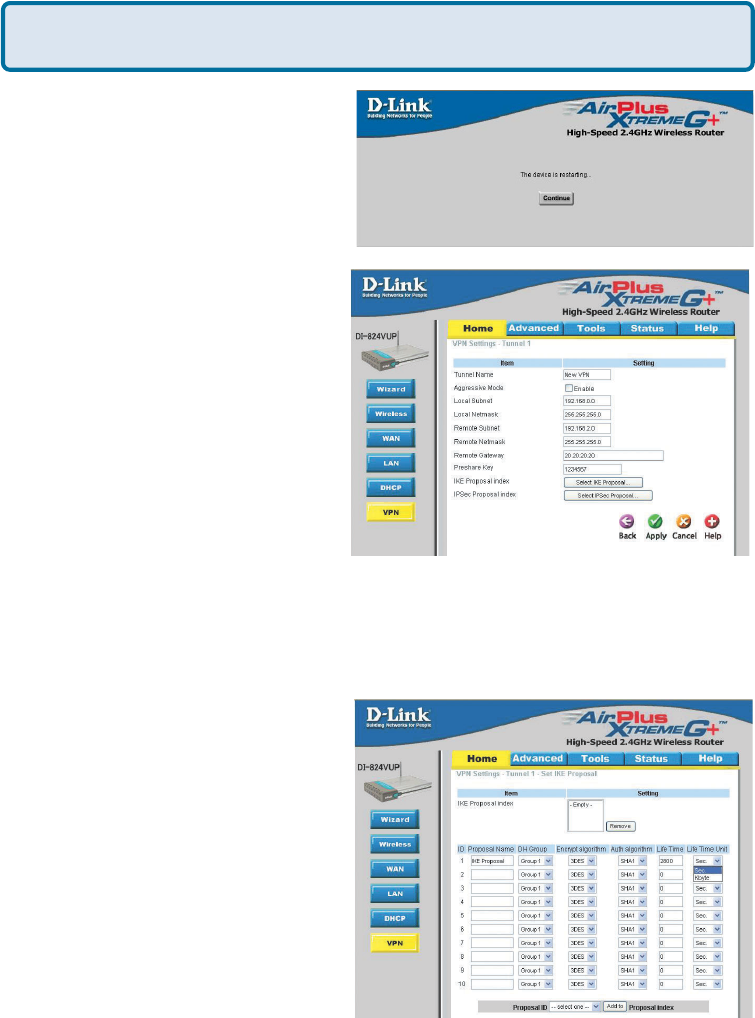
Step 7 In the Remote Gateway field
enter the WAN IP address of the remote
DI-804V or DI-804HV and in the
Preshare Key field, enter a key which
must be exactly the same as the
Preshare Key that is configured on the
DI-804V or DI-804HV.
Frequently Asked Questions (continued)
Step 10 Select 3DES as the
Encryption Algorithm and SHA-1 as the
Authentication Algorithm.
Step 8 Click Apply and then click on
Select IKE Proposal.
Step 9 Enter a name for proposal ID
number 1 and select Group 2 from the
DH Group drop down menu.
Step 11 Enter a Lifetime value of 28800
and then select Sec. as the unit for the
lifetime value.
How can I set up my DI-824VUP to work with a DI-804V or DI-804HV
Router? (continued)
Step 6 The device will restart. Click on
the Continue button.
122
Frequently Asked Questions (continued)
How can I set up my DI-824VUP to work with a DI-804V or DI-804HV
Router? (continued)
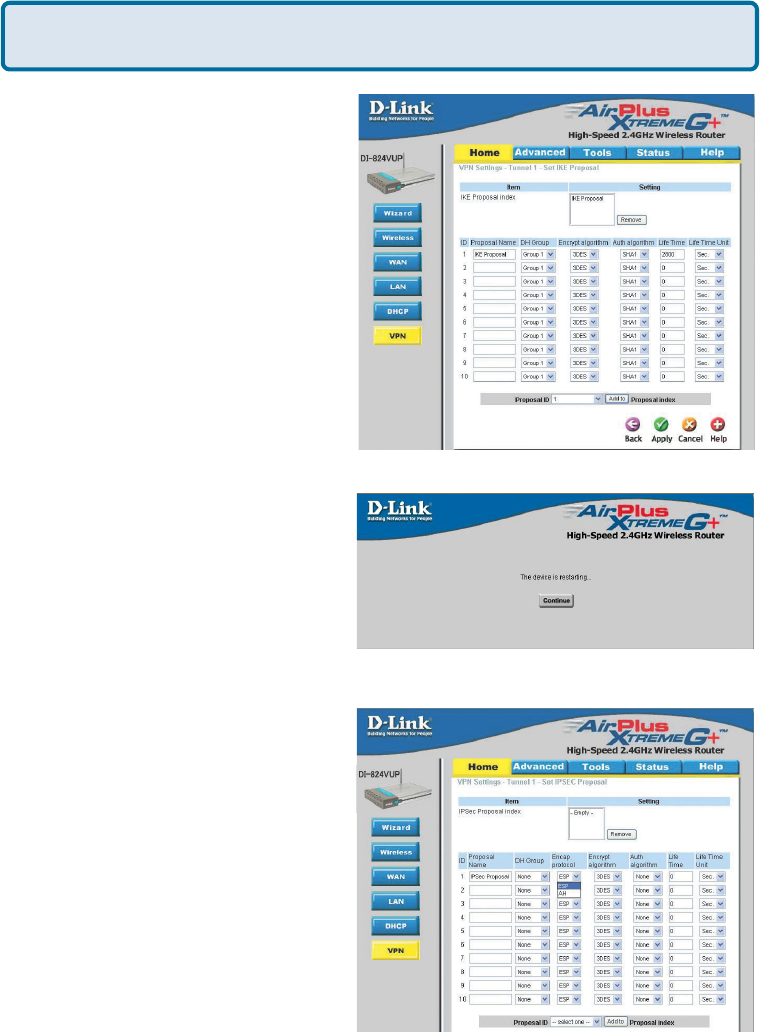
Step 12 Select 1 out of the Proposal ID
dropdown menu and click Add To, which
will add the proposal that was just
configured to the IKE Proposal Index.
Click Apply.
Step 13 The device will restart. Click
on the Continue button.
Step 14 Click Back and click on
Select IPSec Proposal.
Step 15 Enter a name for proposal ID
number 1 and select None from the DH
Group drop-down menu.
Step 16 Select ESP as the
Encapsulation Protocol.
123
Frequently Asked Questions (continued)
Step 17 Select 3DES as the
Encryption Algorithm and MD5 as the
Authentication Algorithm. Click Apply.
Step 18 Enter a Lifetime value of 3600
and then select Sec. as the unit for the
lifetime value.
How can I set up my DI-824VUP to work with a DI-804V or DI-804HV
Router? (continued)
Step 19 Select 1 out of the Proposal
ID dropdown menu and click Add To,
which will add the proposal that was
just configured to the IPSec Proposal
Index. Click Apply. The device will
restart. Click on the Continue button.
124
Frequently Asked Questions (continued)
Next you need to configure the DI-804V or DI-804HV Router.
Step 1 Access the router’s web configuration by entering the router’s IP address in
your web browser. The default IP address is 192.168.0.1. Login using your password.
The default username is “admin” and the password is blank.
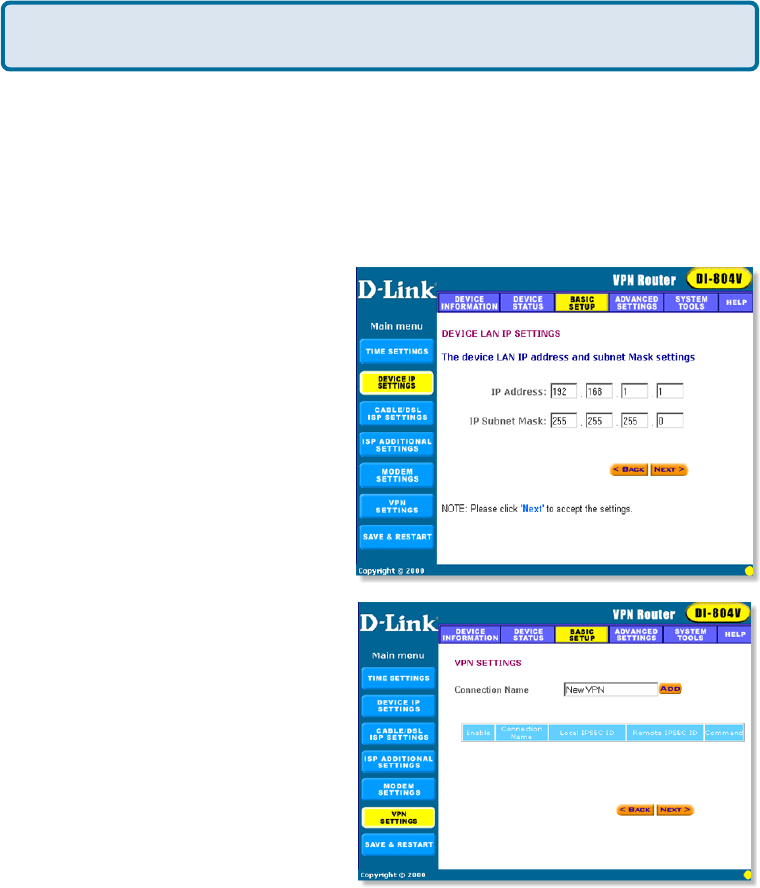
Step 2 Click on Basic Setup and then select Device IP Settings on the left.
Step 3 Change the LAN IP address so
that it is on a different subnet than the
LAN of the DI-824VUP.
Step 4 Click Next until you reach the
Save & Restart screen. Click Save &
restart and then click Basic Setup once
until the unit has rebooted.
Step 5 Click on VPN Settings.
How can I set up my DI-824VUP to work with a DI-804V or DI-804HV
Router? (continued)
Step 6 Name your VPN connection and
click ADD.
Step 7 In Remote IP Network and
Remote IP Netmask fields enter the
network identifier and corresponding
subnet mask of the DI-824VUP´s LAN.
Step 8 In the Remote Gateway IP field
enter the WAN IP address of the DI-
824VUP and make sure that the
Network Interface is set to WAN
Ethernet.
Step 9 Verify that Secure Association is set to IKE and that Perfect Forward Secure is
Disabled.

125
Frequently Asked Questions (continued)
Step 10 Verify the Encryption Protocol
is set to 3DES and enter in your
Preshared Key.
Note: The Preshared Key needs to be
identical to the one configured on the
DI-824VUP.
Step 11 Leave the Key Life and IKE Life
Time values at their default levels and click
SAVE.
Step 12 Click Next and then click on
Save & Restart.
How can I set up my DI-824VUP to work with a DI-804V or DI-804HV
Router? (continued)
After you have configured both routers, you need to establish a connection.
Step 1 Open a command prompt and
from a computer on the internal LAN of
the DI-824VUP and ping the IP address
of a computer that is on the internal LAN
of the DI-804V or DI-804HV, or vice
versa.
Step 2 Once you begin to receive
replies, the VPN connection has been
established.
126
Frequently Asked Questions (continued)
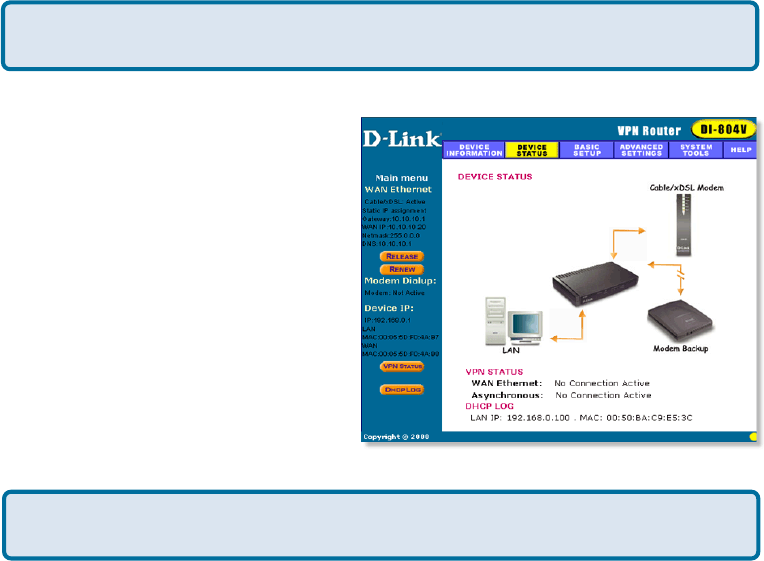
Step 5 When the VPN has been
established the Status will be Active.
Step 3 To view the Status of the VPN
on the DI-804V or DI-804HV, click on
Device Status.
Step 4 From the Device Status screen
click on VPN Status.
How can I set up my DI-824VUP to work with a DFL-300 Firewall?
You need to first configure your DI-824VUP router.
Step 1 Log into the web based configuration of the router by typing in the IP address of
the router (default: 192.168.0.1) in your web browser. By default the username is “admin”
and there is no password.
Step 2 Click the VPN button on the left column, select the checkbox to Enable the
VPN, and then in the box next to Max. number of tunnels, enter the maximum numbers
of VPN tunnels that you would like to have connected.
How can I set up my DI-824VUP to work with a DI-804V or DI-804HV
router? (continued)